HYUNDAI MOBIS AN340EPAN CAR AVN User Manual 1
HYUNDAI MOBIS CO., LTD. CAR AVN 1
Users Manual

iPod®
iPod®is a registered trademark of Apple Inc.
Bluetooth®
The Bluetooth®word mark and logos are registered trademarks owned
by Bluetooth SIG, Inc. and any use of such marks by Hyundai is under
license.
A Bluetooth®enabled cell phone is required to use Bluetooth®wireless
technology.
A Bluetooth®enabled cell phone is required to use Bluetooth®wireless
technology. Bluetooth® phone compatibility can be checked by visiting
www.hyundaiusa.com and under the SERVICE & PARTS –
BLUETOOTH COMPATIBILITY menu.
HD RadioTM Technology
HD RadioTM Technology manufactured under license from iBiquity
Digital Corp. U.S. and Foreign Patents. HD RadioTM and the HD and
HD Radio logos are proprietary trademarks of iBiquity.
Gracenote®
Gracenote®, Gracenote logo and logotype, and the “Powered by
Gracenote” logo are either a registered trademark or a trademark of
Gracenote, Inc. in the United States and/or other countries.
Music recognition technology and related data are provided by
Gracenote®̭Portions of the content is copyright © Gracenote or
its providers̮

U.S.FEDERAL COMMUNICATIONS COMMISSION RADIO
FREQUENCY INTERFERENCE STATEMENT
INFORMATION TO THE USER
NOTE : This equipment has been tested and founded to
comply with the limits for a Class B digital device pursuant to
Part 15 of the FCC Rules.
These limits are designed to provide reasonable protection
against harmful interference in a residential installation.
This equipment generates, uses, and can radiate radio
frequency energy and, if not installed and used in accordance
with the instructions, may cause harmful interference to radio
communications.
However, there is no guarantee that interference will not
occur in a particular Installation.
If this equipment dose cause harmful interference to radio or
television reception, which can be determined by turning the
equipment off and on, the user is encourage to try to correct
the interference by one or more of the following measures:
• Reorient or relocate the receiving antenna.
• Increase the separation between the equipment and receiver.
• Connect the equipment into an outlet of a circuit different
from that to which the receiver is connected.
• Consult the dealer or an experienced radio/TV technician for
assistance.
Changes or modification not expressly approved by the party
responsible for compliance could void the user’s authority to
operate the equipment.
Connecting of peripherals requires the use of grounded
shielded signal cables.
IC Warning
This device complies with Industry Canada licence-exempt
RSS standard(s).
Operation is subject to the following two conditions:
(1) this device may not cause interference, and
(2) this device must accept any interference, including
interference that may cause undesired operation of the
device.

zWarnings and Cautions
zKey Product Features
zComponent Names and Functions
1Basic

Warnings and Cautions
Even when receiving route guidance from the Navigation
system, please abide by actual traffic and road regulations.
Following only the Navigation route guidance may lead to
violations of actual traffic and road regulations and lead to
traffic accidents.
Do not stare at the screen while driving. Staring at the
screen for prolonged periods of time could lead to traffic
accidents.
Do not operate the Navigation system while driving, such
as entering POIs or conducting route searches. Such acts
could lead to accidents, fire, or electric shock. Park the
vehicle before operating the device.
Do not disassemble, assemble, or modify the AVN system.
Such acts could result in accidents, fire, or electric shock.
Heed caution not to spill water or introduce foreign objects
into the device. Such acts could lead to smoke, fire, or
product malfunction.
Please refrain from use if the screen is blank or no sound
can be heard as these signs may indicate product malfunction.
Continued use in such conditions could lead to accidents
(fires, electric shock) or product malfunctions.
Safety Warnings
Do not touch the antenna during thunder or lightening as
such acts may lead to lightning induced electric shock.
Do not stop or park in parking-restricted areas to operate
the product. Such acts could lead to traffic accidents..
For most AV and multimedia modes, the display will not
operate when the vehicle is in motion. For your safety, first
park the vehicle to watch or view the screen.
Driving while distracted can result in a loss of vehicle control,
that may lead to an accident, severe personal injury,
and death. The driver’s primary responsibility is in the safe
and legal operation of a vehicle, and use of any handheld
devices, other equipment, or vehicle systems which take the
driver’s eyes, attention and focus away from the safe operation
of a vehicle or which are not permissible by law should
never be used during operation of the vehicle.
Part 1. Basic

Pay attention to traffic conditions while driving.
In some instances, the navigation may provide guidance
through restricted areas.
Operating the device while driving could lead to accidents
due to a lack of attention to external surroundings. First
park the vehicle before operating the device. In addition,
the touch screen may not work for some functions when
the vehicle is in motion. The touch screen feature will be
supported once the vehicle has stopped.
Adjust the volume to levels that allow the driver to hear
sounds from outside of the vehicle. Driving in a state
where external sounds cannot be heard may lead to accidents.
Pay attention to the volume setting when turning the
device on. A sudden output of extreme volume upon
turning the device on could lead to hearing impairment.
(Adjust the volume to a suitable levels before turning off
the device.)
If you want to change the position of device installation,
please inquire with your place of purchase or service
maintenance center.
Safety Cautions
Technical expertise is required to install or disassemble
the device.
Turn on the car ignition before using this device. Do not
operate the Audio Video Navigation
system for long periods of time with the ignition turned off
as such operations may lead to battery discharge.
Upon using the Audio Video Navigation
system for more than 10 minutes with the car engine
turned off, the following warning will be displayed. After
10 minutes, the warning will be displayed for 5 seconds
every 1 minute.
Do not subject the device to severe shock or impact
Direct pressure onto the front side of the monitor may
cause damage to the LCD or touch screen.
When cleaning the device, make sure to turn off the
device and use a dry and smooth cloth.
Never use tough materials, chemical cloths, or solvents
(alcohol, benzene, thinners, etc.) as such materials may
damage the device panel or cause color/quality deterioration.
When experiencing product malfunctions, inquire with
your place of purchase or service maintenance center.
Warnings and Cautions
Part 1. Basic

Display
Wide TFT-LCD Display
• Provides high quality video and music through a Wide TFT-LCD Display using an LED Back
Light
• Touch screen for maximum user convenience
Radio
Digital Tuner Feature
• Digital Tuner using PPL method that supports memory of 6 broadcast stations for each AM,
FM1, and FM2 modes
Integrated Antenna (RADIO+NAVI)
• Outstanding reception via integrated antenna with high sensitivity Radio broadcast station name
• Displays broadcast station names for key locations
DVD/VCD/CD Player
Auto Play Feature
• Auto play feature upon inserting Audio CD, MP3, VCD or DVD discs
• Supports PBC (Playback Control)
• Information included within video CDs can be enjoyed by using the interactive menu encoded in MPEG1 version 2.0
VCD discs.
Miscellaneous
Digital Screen Control
• Easy control of screen brightness, contrast, color and saturation
Equipped with Central Controller
• Possible to use all system features with one central controller
Gracenote®, Gracenote logo and logotype, and the “Powered by Gracenote” logo are either a registered trademark or a trademark of
Gracenote, Inc. in the United States and/or other countries. Music recognition technology and related data are provided by Gracenote®
Portions of the content is copyright © Gracenote or its providers
Key Product Features
This device is an Audio Video Navigation system equipped with a multifunctional disc player that supports Radio (FM1, FM2, AM), Audio
CD, MP3, DVD, USB, iPod, and Audio/Video AUX features. The WIDE VGA LCD provides a high quality resolution to both driver and
passengers while the powerful and rich sound system adds to driving enjoyment.
Part 1. Basic

Head Unit
1. CD-IN LED DISC LED
2. DISC IN/OUT DISC insert/eject key
3. DISC Insert Slot DISC insert/eject slot
4. DISP Displays current date and time
5. Power/Volume knob
• Used to turn device power ON/OFF and control volume
• When power is off, press to turn power on
• When power is on, press and hold (over 0.8 seconds) to turn power off
• When power is on, press shortly (under 0.8 seconds) to turn AV off
• Turn left/right to adjust volume
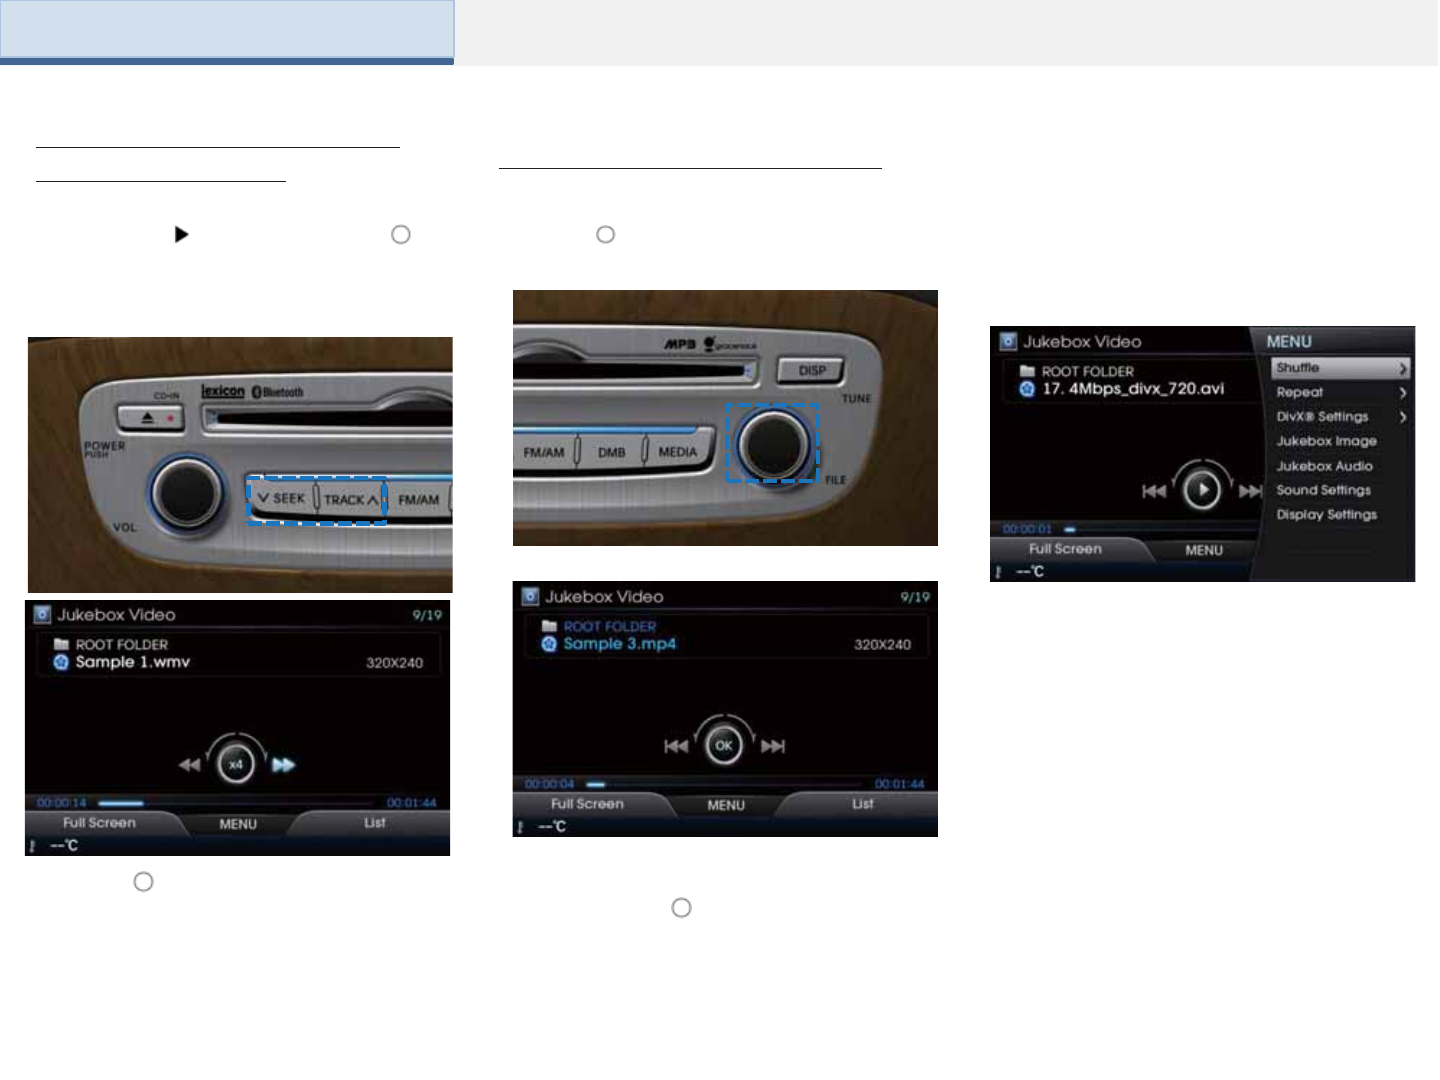
6, 7. SEEK/ TRACK
When the [ SEEK] [TRACK ] keys are pressed shortly (under 0.8 seconds)
• In FM/AM mode, searches broadcast frequencies saved to presets
• In DVDP CD/MP3/DVD and USB/iPod modes, changes the track, file or chapter
When the [ SEEK] [TRACK ] keys are pressed and held (over 0.8 seconds)
• In FM/AM mode, automatically searches broadcast frequencies and channels
• In DVDP CD/MP3/DVD and USB/iPod modes, rewinds or fast forwards the track or file
8. FM/AM • Operates FM/AM mode
• Each time the key is pressed, mode is changed in order of FM1→FM2→AM
9. SAT • Operates XM mode
10. MEDIA • Operates CD, MP3, DVD, VCD, USB, iPod, AU, Bluetooth Streaming Audio modes
• If the media is not connected or a disc is not inserted, corresponding modes will be disabled
11. TUNE/FILE knob
• In FM/AM mode, turn to change broadcast frequencies
• In CD, MP3, USB, and iPod modes, turn to search tracks/channels/files. When the desired channel or file
name is displayed, press to operate the corresponding track/channel/file
Component Names and Functions
Part 1. Basic
SAT
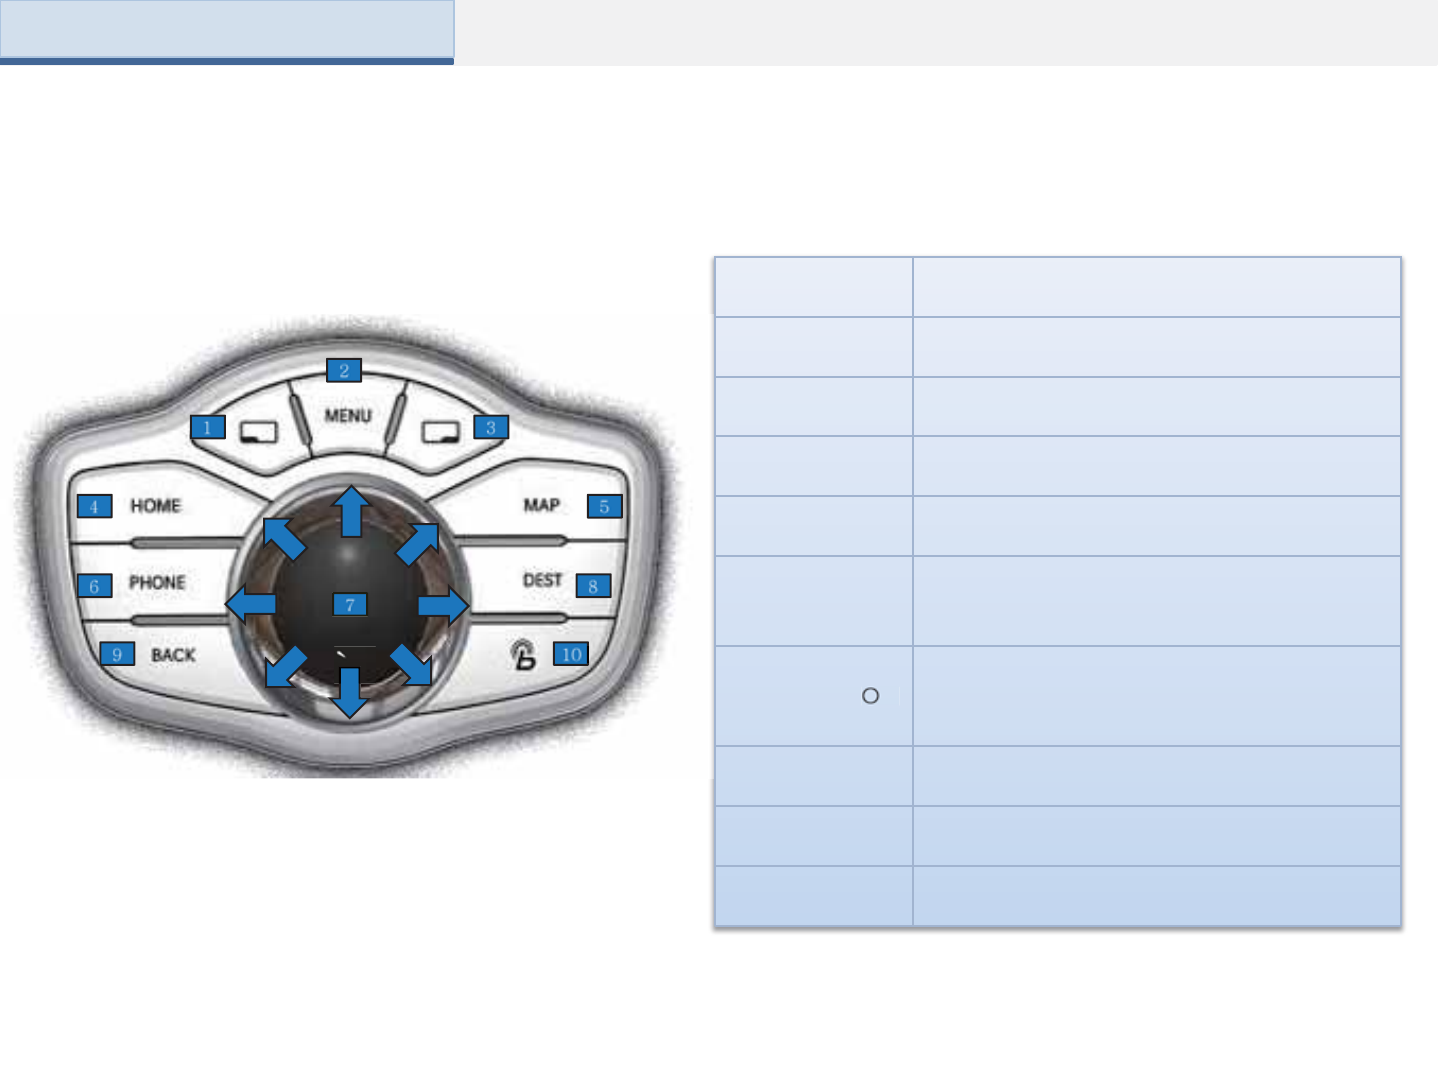
1. LFT Left Soft Key
2. MENU Displays MENU popup screen
3. RHT Right Soft Key
4. HOME Displays HOME screen
5. MAP Displays the map for the current position
6. PHONE Converts to Bluetooth®Handsfree mode
7. Controller ( )All desired functions can be operated by turning,
8-directional pushing and pressing the controller.
8. DEST Displays the Destination setup menu
9. Back Displays the previous screen
10. Blue Link Displays Blue Link mode
Component Names and Functions
Front Central Controller
Part 1. Basic

zFM/AM
zXM
zPandora
zCD
zMP3
zDVD
zVCD
zJUKEBOX
zUSB
ziPod
zAUX
zBluetooth Audio
2AV
Part 2. AV (FM/AM)
4
10
1
5
14
2
6
3
11
7
8
9
15
12
13
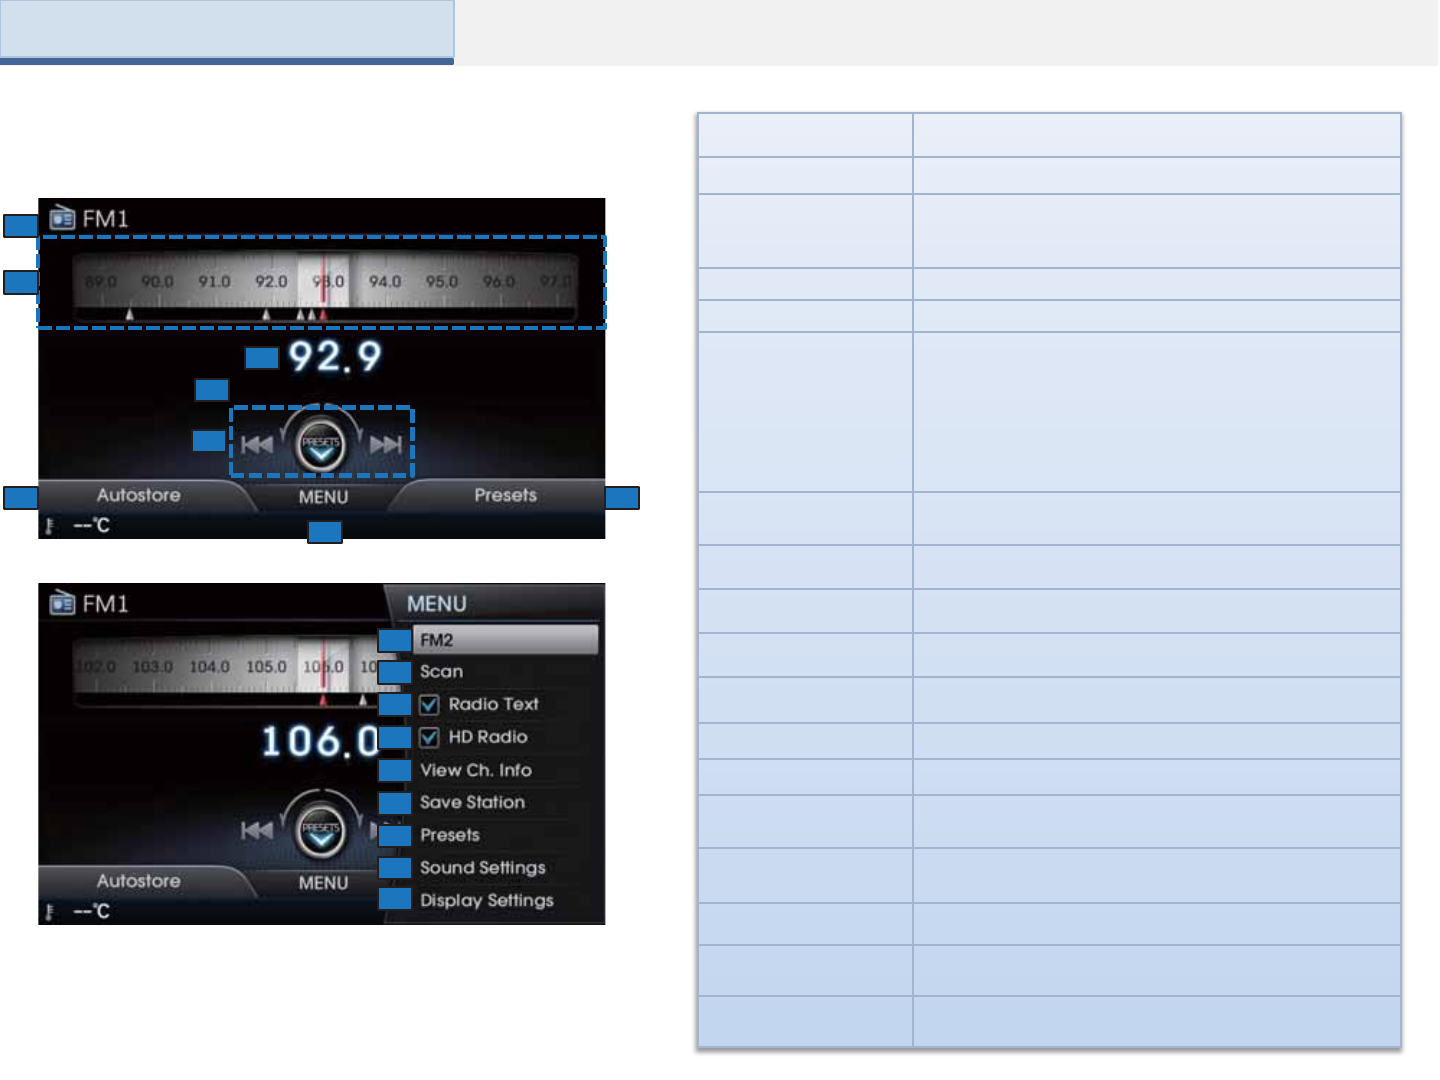
Name Description
1. Mode Display Displays currently operating mode
2. Frequency Range
and Presets Display the frequency range and saved presets
3. Frequency Currently playing frequency
4. Station Name Name of current broadcast station
5. Control Panel
Converts to frequency search function, and preset
mode
When turned in Ω directions: moves to previous/next
preset station
When pushed in ← or →directions: moves to
previous/next frequency
When pushed in ↑ or ↓directions: converts to TUNE or
PRESET mode
6. Auto Store Saves frequencies with superior reception to Preset
buttons
7. MENU Displays Scan/Save Preset/Auto Store/Sound
Settings/Display Settings related menu screens
8. Presets Moves to saved preset list
9. FM1/FM2 Converts to FM1 or FM2 mode
10. Scan Plays frequencies with superior reception for 5 seconds
each
11. Radio Text Sets radio text function On/Off
12. HD Radio Sets HD radio On/Off
13. View Ch. Info Displays information of current frequency
11. Save Frequency Saves current frequency
15. Presets Moves to saved preset list
12. Sound Settings Displays sound setup menu
13. Screen Settings Displays display setup menu
16
17
Basic Mode Screen
Part 2. AV (FM/AM)
Using the Mode
Press the [HOME] key Select the
desired FM or AM mode
Press the [FM/AM] key on the head unit to
change the mode in order of FM1-> FM2-
> AM.
Information
•Pressing the [FM/AM] key while the power
is off will automatically turn the device on
and start radio mode.
Using Autostore
Push the [ ] in ↓ direction to enter
Preset mode.
-When turning the controller in Ω direction:
receives previous/next preset station
When pushed in ← or →directions: :
Changes the frequency while pressed and
receives the next frequency upon release.
-If the [SEEK/TRACK] keys are shortly
pressed (under 0.8 seconds): Plays
previous/next frequency
-If the [SEEK/TRACK] keys are pressed
and held (over 0.8 seconds): changes the
frequency while pressed and receives the
next frequency upon release.
Using TUNE
Push the [ ] in ↑ direction to enter Tune
mode.
Push the [ ] or turn the [TUNE/FILE]
knob in Ω direction to select the desired
frequency.
• FM1 / FM2: Increases/decreased by
100kHz
• AM: Increases/decreased by 9kHz
Saving Radio Frequencies
Saving Automatically (Autostore)
Press the [Soft1] and select the Autostore
feature to automatically save receivable
frequencies with superior reception to
preset buttons
• A total of 36 frequencies with 12 preset
frequencies each for FM1/FM2/AM modes
can be saved.
Information
While Autostore is operating, pressing the
[ ] will cancel the function and return to
the previous frequency.
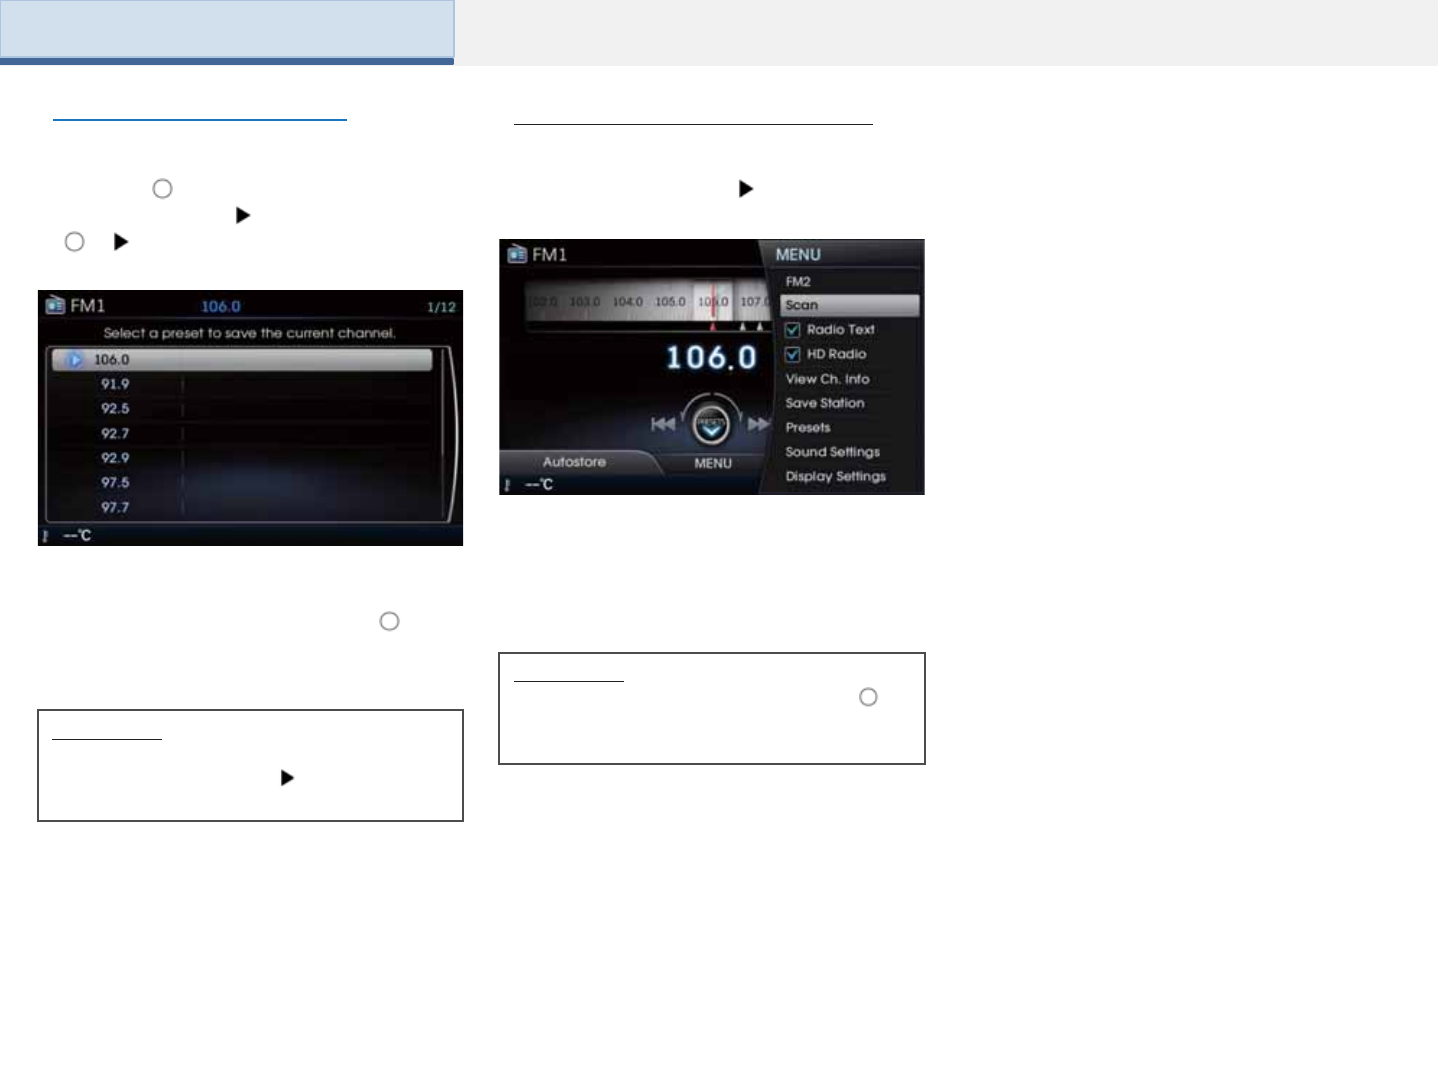
Selecting Stations Manually
Turn the [ ] in Ω direction and select the
desired frequency Press and hold the
[ ] Select position to save preset
After selecting the desired preset, press
and hold (over 0.8 seconds) the [ ]. A
‘beep’ will sound and the frequency is
saved to the selected preset button.
Information
Stations can also be saved manually by
pressing the [MENU] key Pressing [Save
Preset].
Scanning Radio Frequencies
Press the [MENU] key Press [Scan]
Starting from the current frequency,
frequencies with superior reception are
scanned for 5 seconds and the previous
frequency is restored.
Information
While Scan is operating, pressing the [ ]
will cancel the function and return to the
previous frequency.
Part 2. AV (FM/AM)
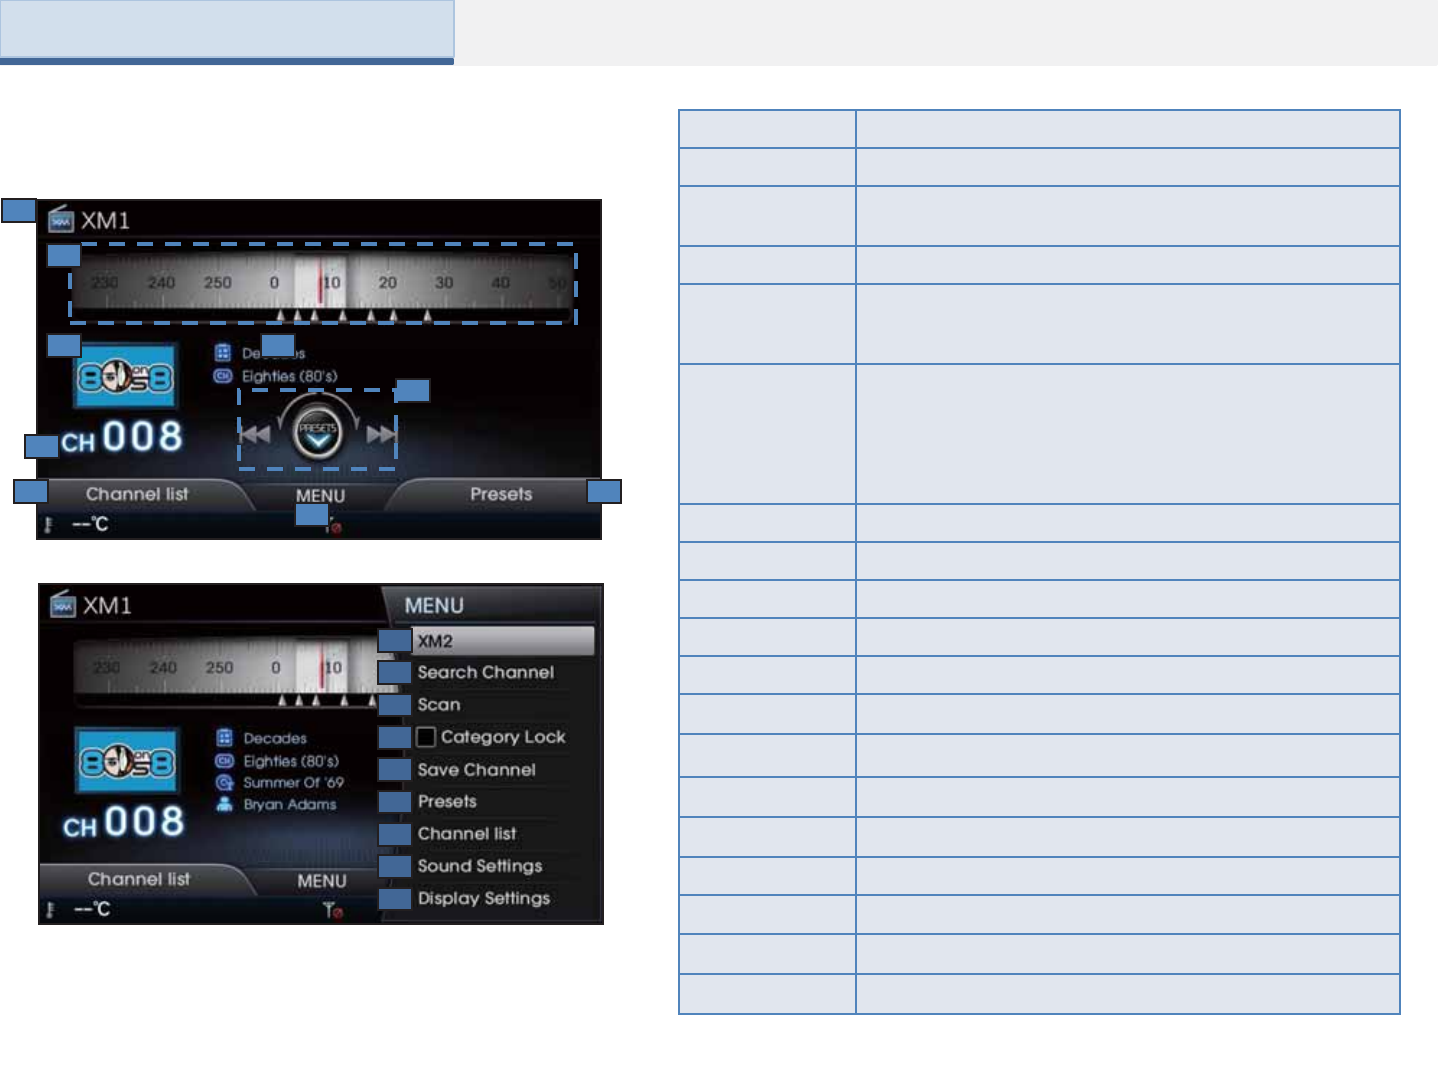
Name Description
1. Mode Display Displays currently operating mode
2. Channel
Range and
Presets
Display the frequency range and saved presets
3. XM Image XM channel image
4. Category,
Channel, Title,
Artist
Information
Shows category, channel, title, and artist information
5. Control Panel
Converts to Channel search function, and preset mode
When turned in Ω directions: moves to previous/next preset
station
When pushed in ← or →directions: : moves to previous/next
Channel
When pushed in ↑ or ↓directions: converts to TUNE or PRESET
mode
6. Preset List Moves to saved preset list
7. Channel list Channel list screen by category
8. MENU Displays the menu screens
9. Preset List Moves to saved preset list
10. XM1/XM2 Converts to FM1 or FM2 mode
11. Search
Channel Searches XM channels..
12. Scan •Plays channel with superior reception for 5 seconds each.
•Within preset mode, scans previously saved presets.
13. Category
Lock
When searching for channels with the category lock set, only the
channels within the fixed category can be searched.
14. Save
Channel Saves current frequency
15. Preset List Moves to saved preset list
16. Channel list Channel list screen by category
17. Sound
Settings Displays sound setup menu
18. Screen
Settings Displays display setup menu
Basic Mode Screen
1
Part 2. AV (XM)
2
3
6
4
5
7
8
9
10
11
12
13
14
15
16
17
18
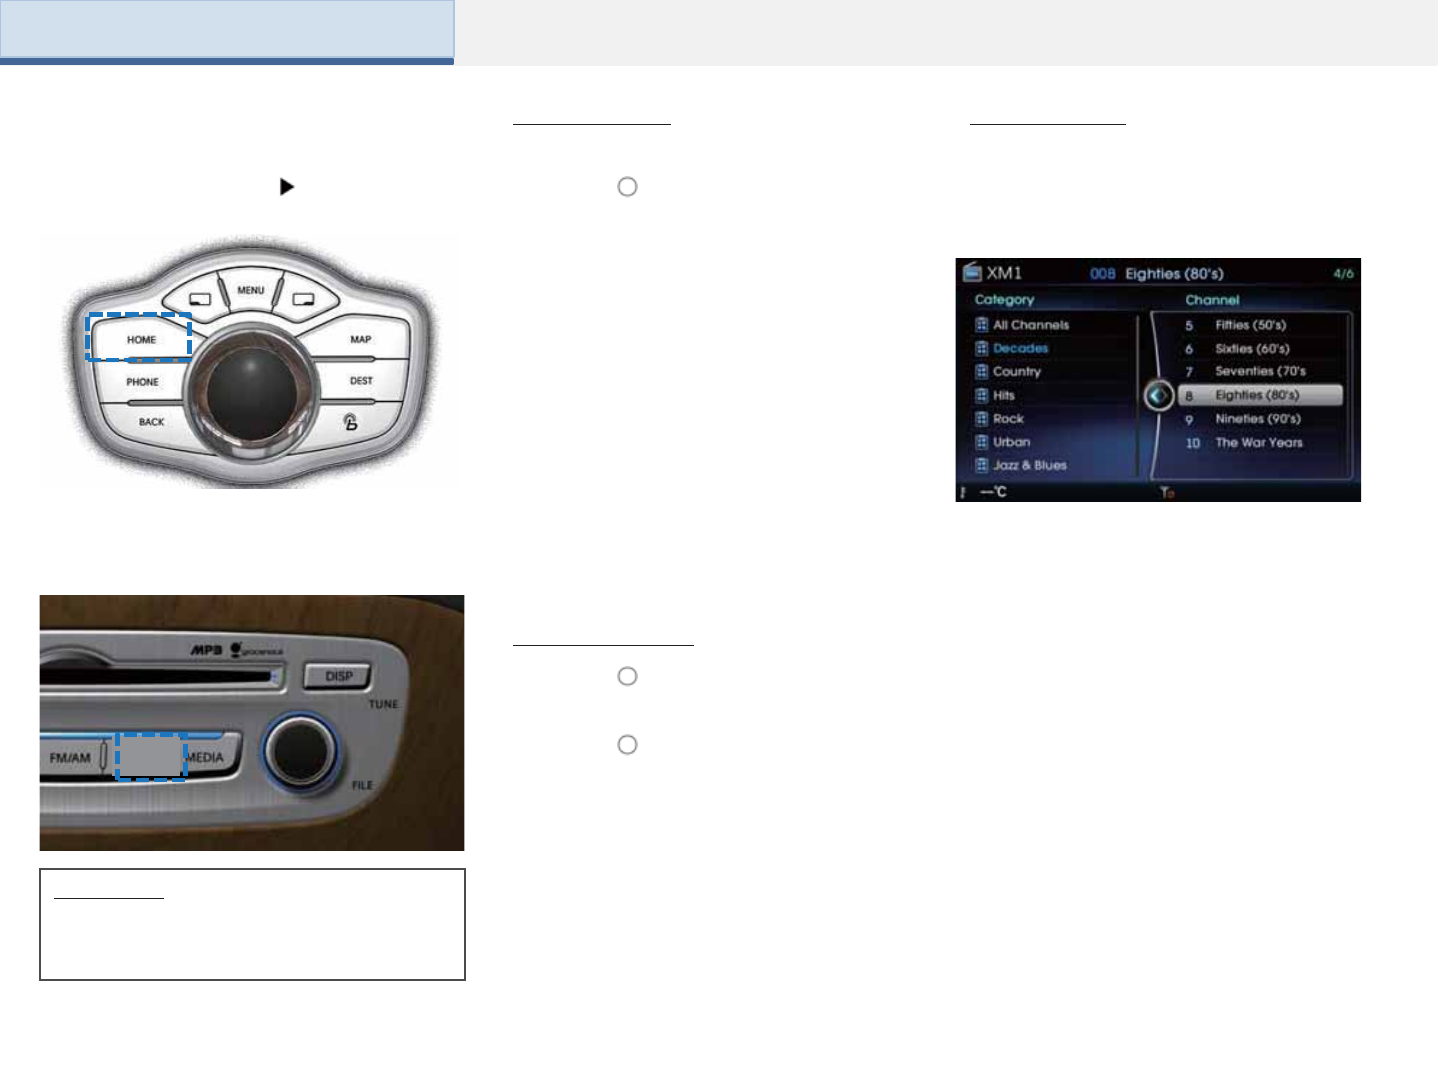
Using the Mode
Press the [HOME] key Select the XM
mode
Press the [SAT] key on the head unit to
change the mode in order of XM1-> XM2
Information
•Pressing the [XM] key while the power is
off will automatically turn the device on and
start radio mode.
Push the [ ] in ↓ direction to enter
Preset mode.
-If the [SEEK/TRACK] keys are shortly
pressed (under 0.8 seconds): Plays
previous/next channel.
-If the [SEEK/TRACK] keys are pressed
and held (over 0.8 seconds): changes the
channel while pressed and receives the
next frequency upon release.
-When turning the controller in Ω direction:
receives previous/next preset channel
When pushed in ← or →directions:
Changes the channel while pressed and
receives the next channel upon release.
Push the [ ] in ↑ direction to enter
channel mode.
Push the [ ] in ↑ direction or turn the
[TUNE/FILE] knob in Ω direction to select
the desired channel.
Preset Mode
Channel Mode
Press the [Soft1] key on the main screen
or [Channel List] from the MENU.
-Once you select a category shown on the
left column, lists of channels included
within the selected category are displayed
on the right column.
- Select the desired channel from the right
column.
Channel List
SAT
Part 2. AV (XM)
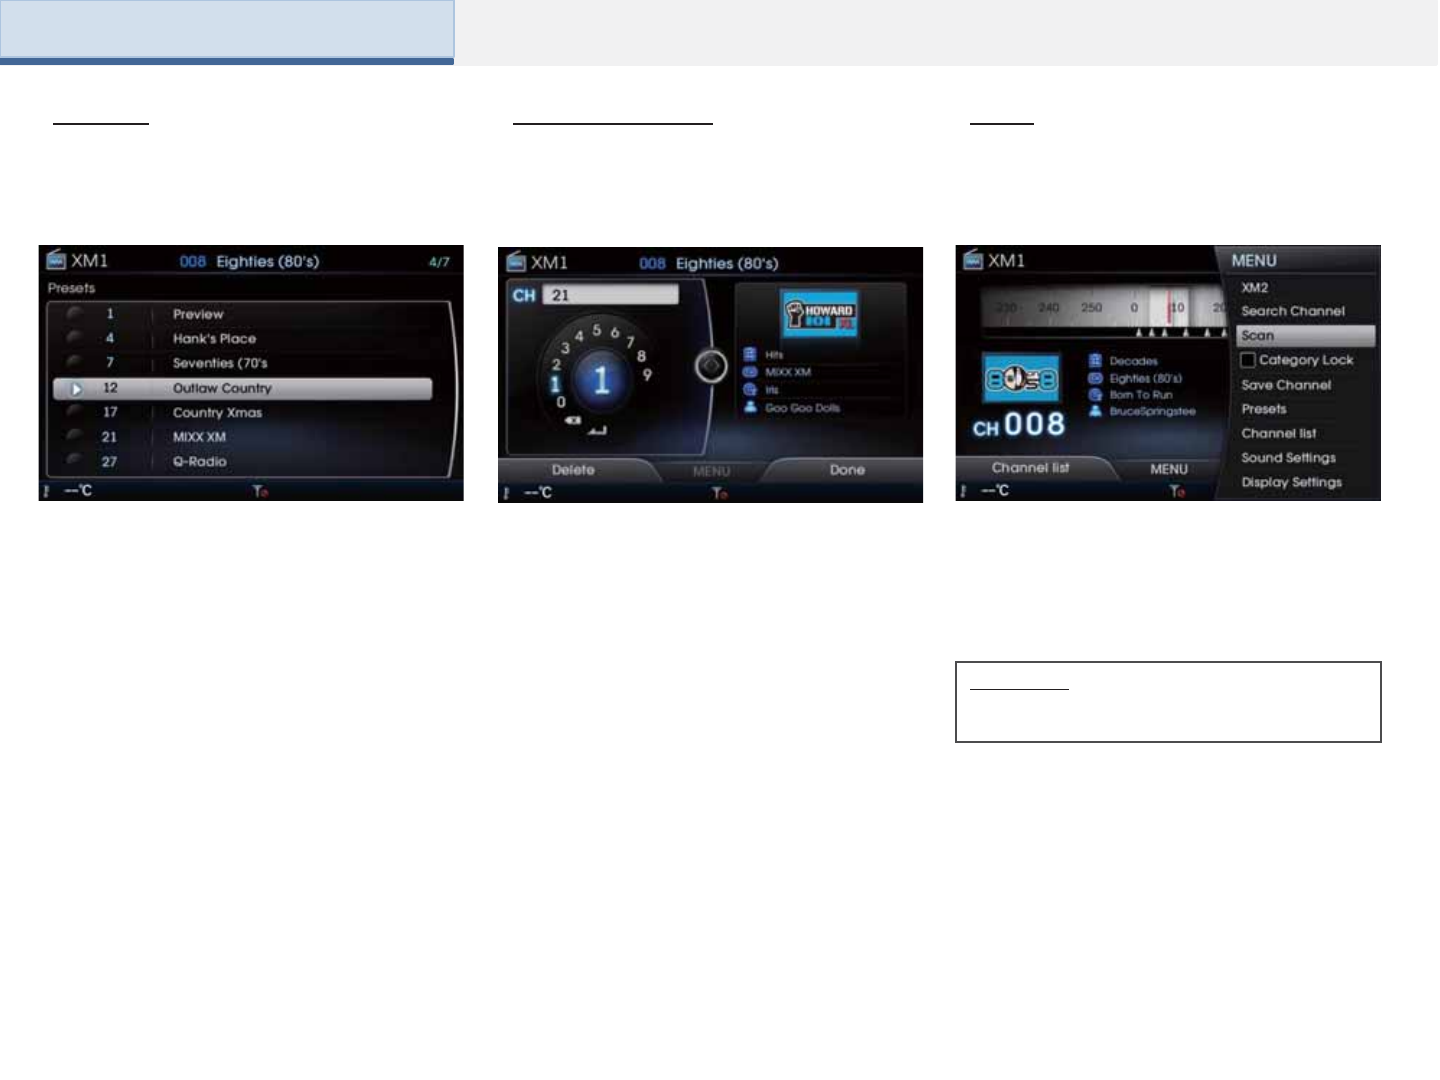
From the presets, select the desired
channel.
from the MENU, press [Search Channel]..
- Turn the controller to enter the desired
channel number.
- Press the [Soft2] or the [Back] key to
return to the main screen.
Information
Pressing the controller during Scan will stop the
scanning feature.
Search Channel
from the MENU, press scan.
Channel Mode: Receives channels with
good reception for 5 seconds each.
Preset Mode : Receives channels saved
as presets for 5 seconds each.
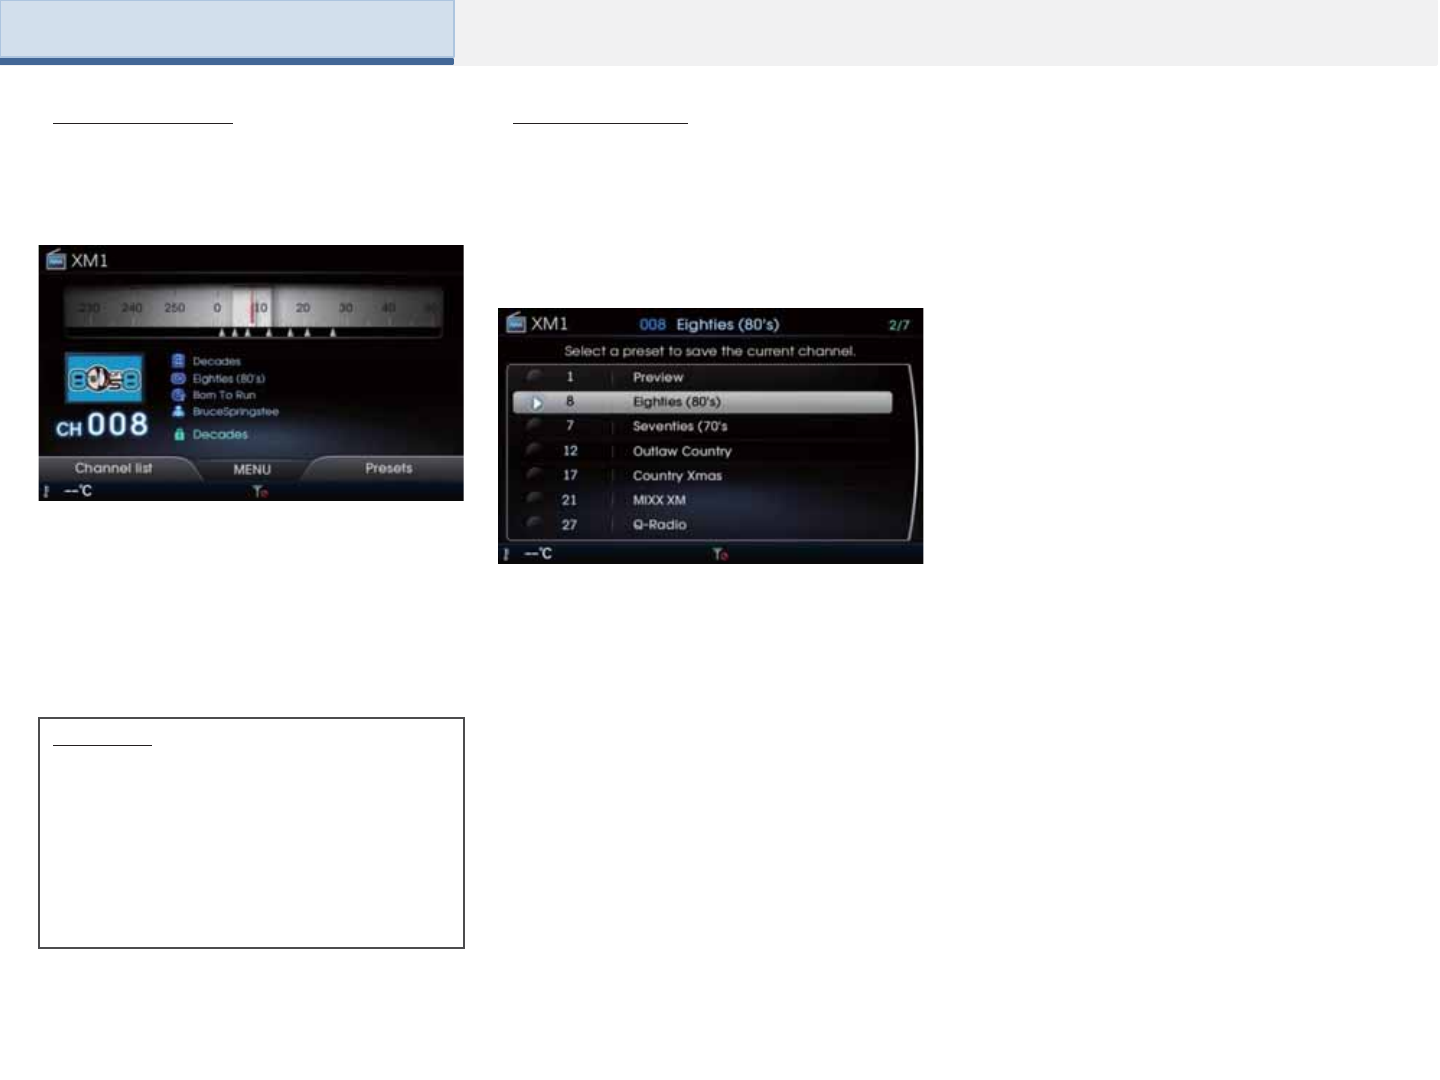
ScanPresets
Press the [Soft2] key on the main screen
or [Presets] from the MENU.
Part 2. AV (XM)
Press [Category Lock] from the MENU.
Once Category Lock is turned on, the
Category Lock icon is displayed on the
main screen. Upon operating seek with
the Lock on, only channels within the
category are searched.
Press [CCP] or [Save Channel] from the
MENU.
From the Preset list, select the position
where you want to save.
- Upon saving a channel, the Preset list
screen is displayed. Select the channel
you want to delete from the Preset list.
- Delete a previously saved channel to
save the current channel.
Save ChannelCategory Lock
Information
The Category Lock feature is turned off upon
conducting the following operations.
- Selecting Category Lock from the Menu
- Selecting a Preset channel
- Manually changing channels
- Operating Scan
-Changing XM1,2
-Changing the AV mode
Part 2. AV (XM)
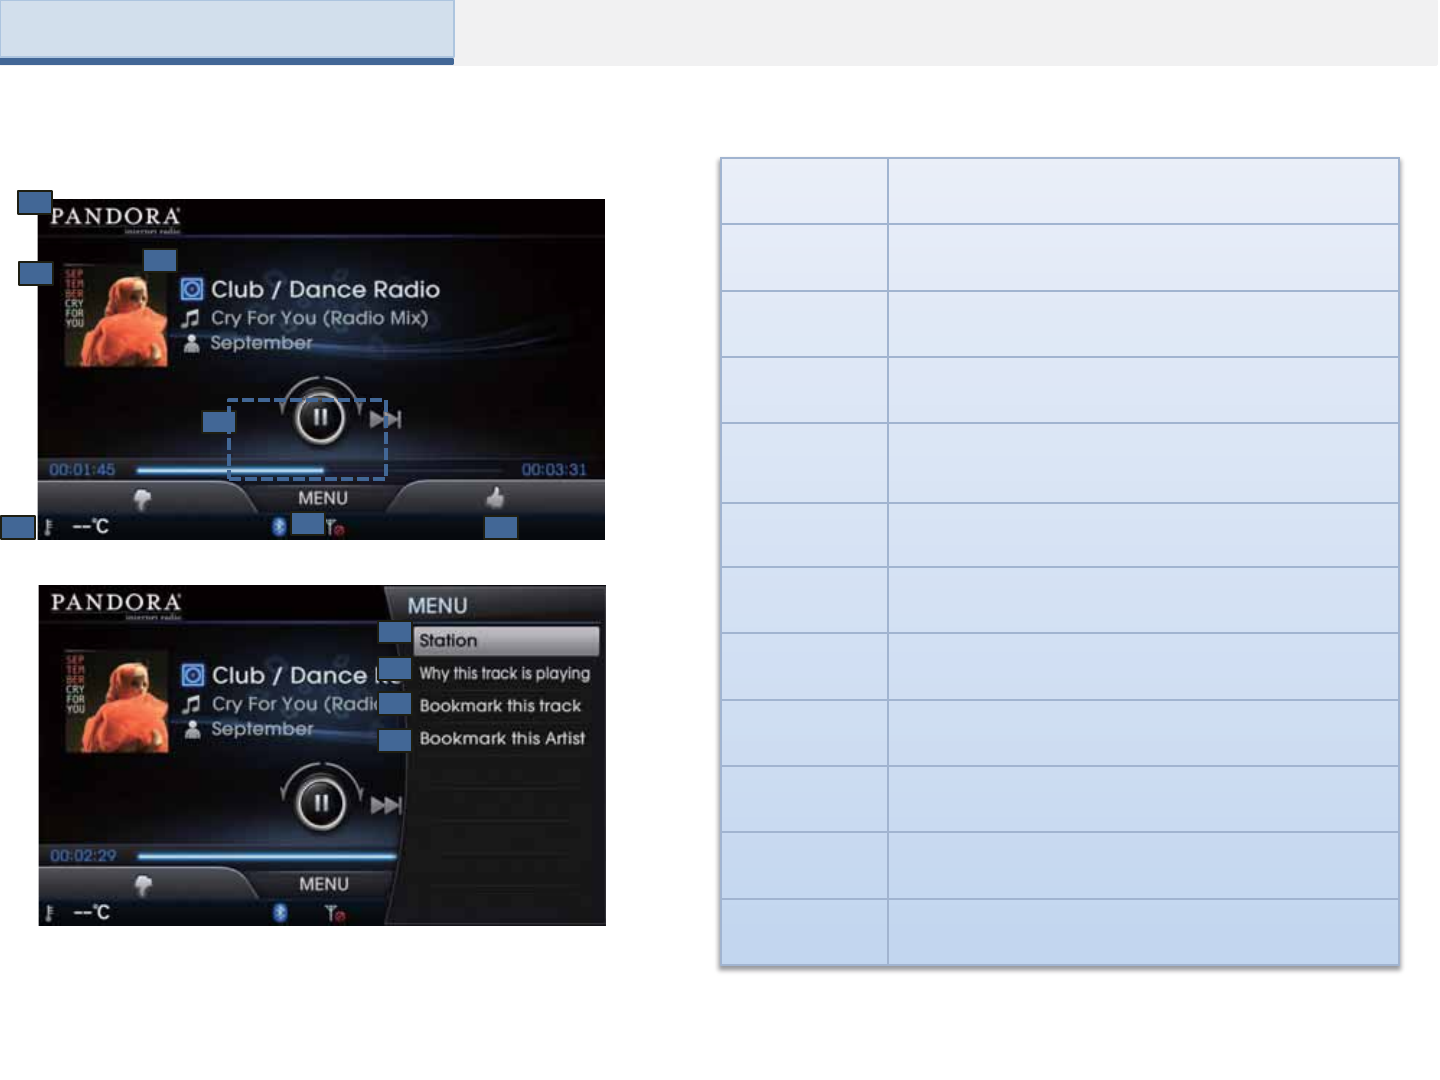
Name Description
1. Mode
Display Displays currently operating mode
2. Album
Image Displays title album image
3. Station, Title,
Artist
Information
Station, Title, Artist
4. Control
Panel
When turned in Ω directions: moves to previous/next
station
When pushed in →directions: Skip the now playing
song
5. Thumb
Down Thumbs down the current song.
6. Menu Displays the menu screens
7. Thumb Up Thumbs up the current song.
8. Station Enters the station list screen.
9. Why this
track is playing Enters the “Why this track is playing” screen.
10. Bookmark
this track Bookmarks the track.
11. Bookmark
this Artist Bookmarks the artist.
Basic Mode Screen
1
Part 2. AV (Pandora)
23
4
567
8
9
10
11
Using the Mode
Press the [HOME] key Select the
Pandora mode
-If the [SEEK/TRACK X] keys are shortly
pressed (under 0.8 seconds): Skip the
now playing song
-When turning the controller in Ω direction:
Searches stations, press to listen to
selected station.
When pushed in →directions: Skip the
now playing song
Main Controller
Press the [Soft1] key.
• You can thumb down the currently
playing song to play the next song.
Thumb Down
Part 2. AV (Pandora)
Information
-In order to operate Pandora Radio, the system
must be connected to the related device through
Bluetooth and Pandora Radio must be operating
within the connected device.
- Features available within Pandora Radio Mode
may differ depending on the Pandora Radio
specification within the connected device.
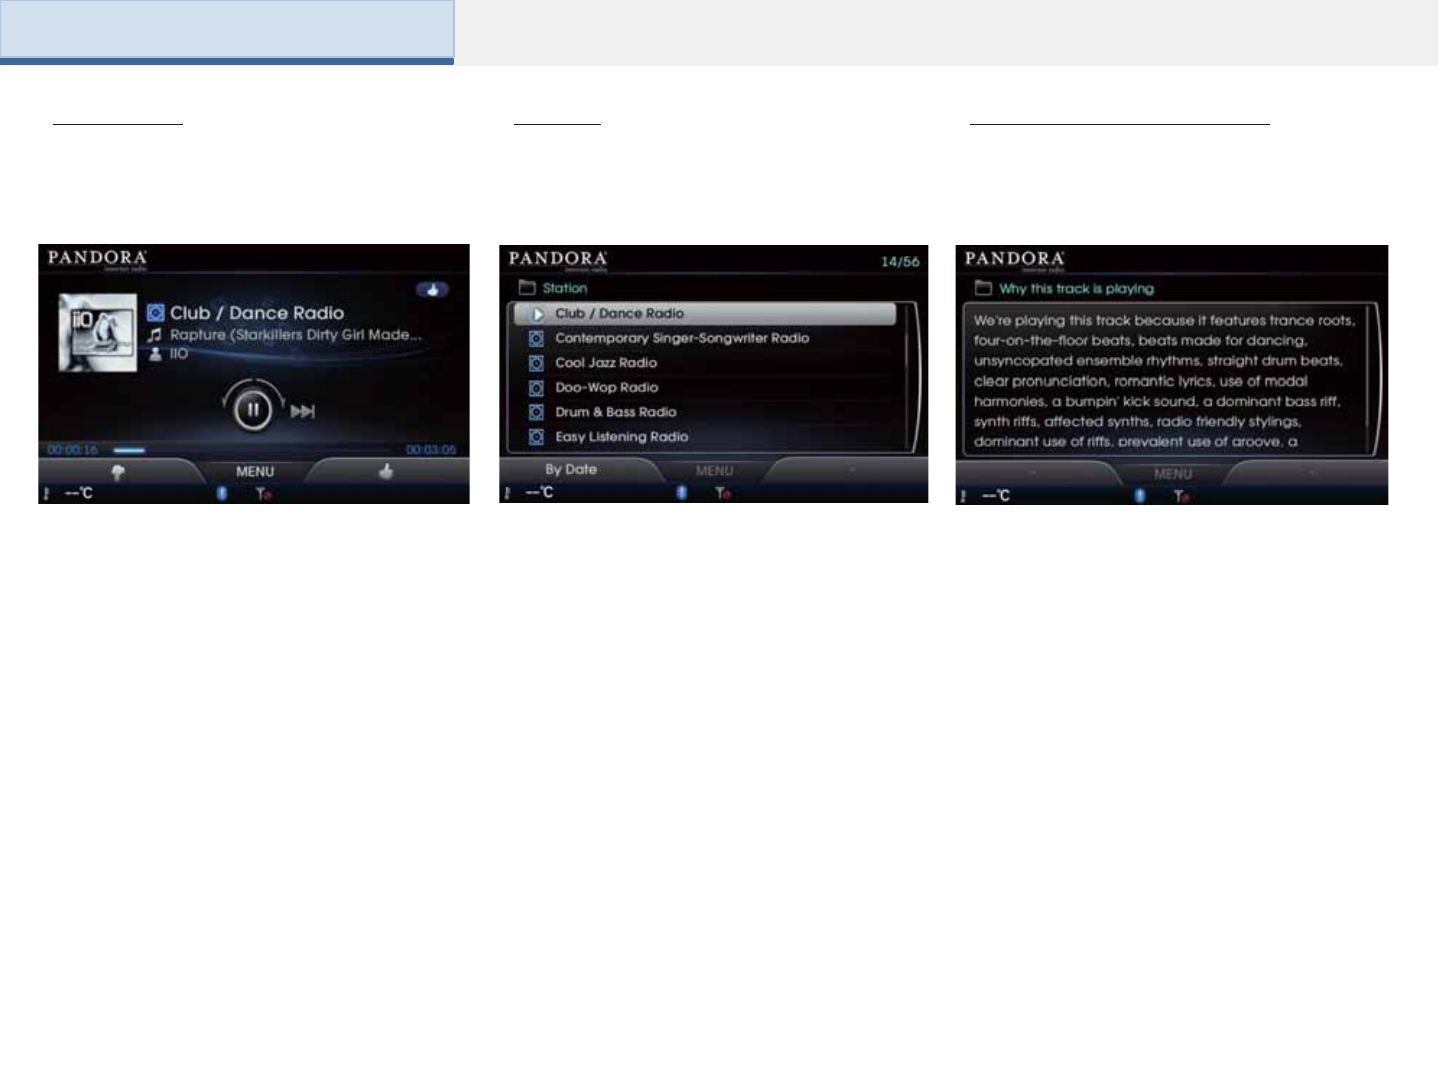
Press [Why this track is playing] from the
MENU.
This option is used to display information
about the currently playing song.
Press [Station] from the MENU.
- Use the controller to select the desired
station.
- Use the [Soft1] key to sort station lists
by date or name.
Station
Press the [Soft2] key.
• Thumb up the currently playing song.
Thumb Up Why this track is playing
Part 2. AV (Pandora)
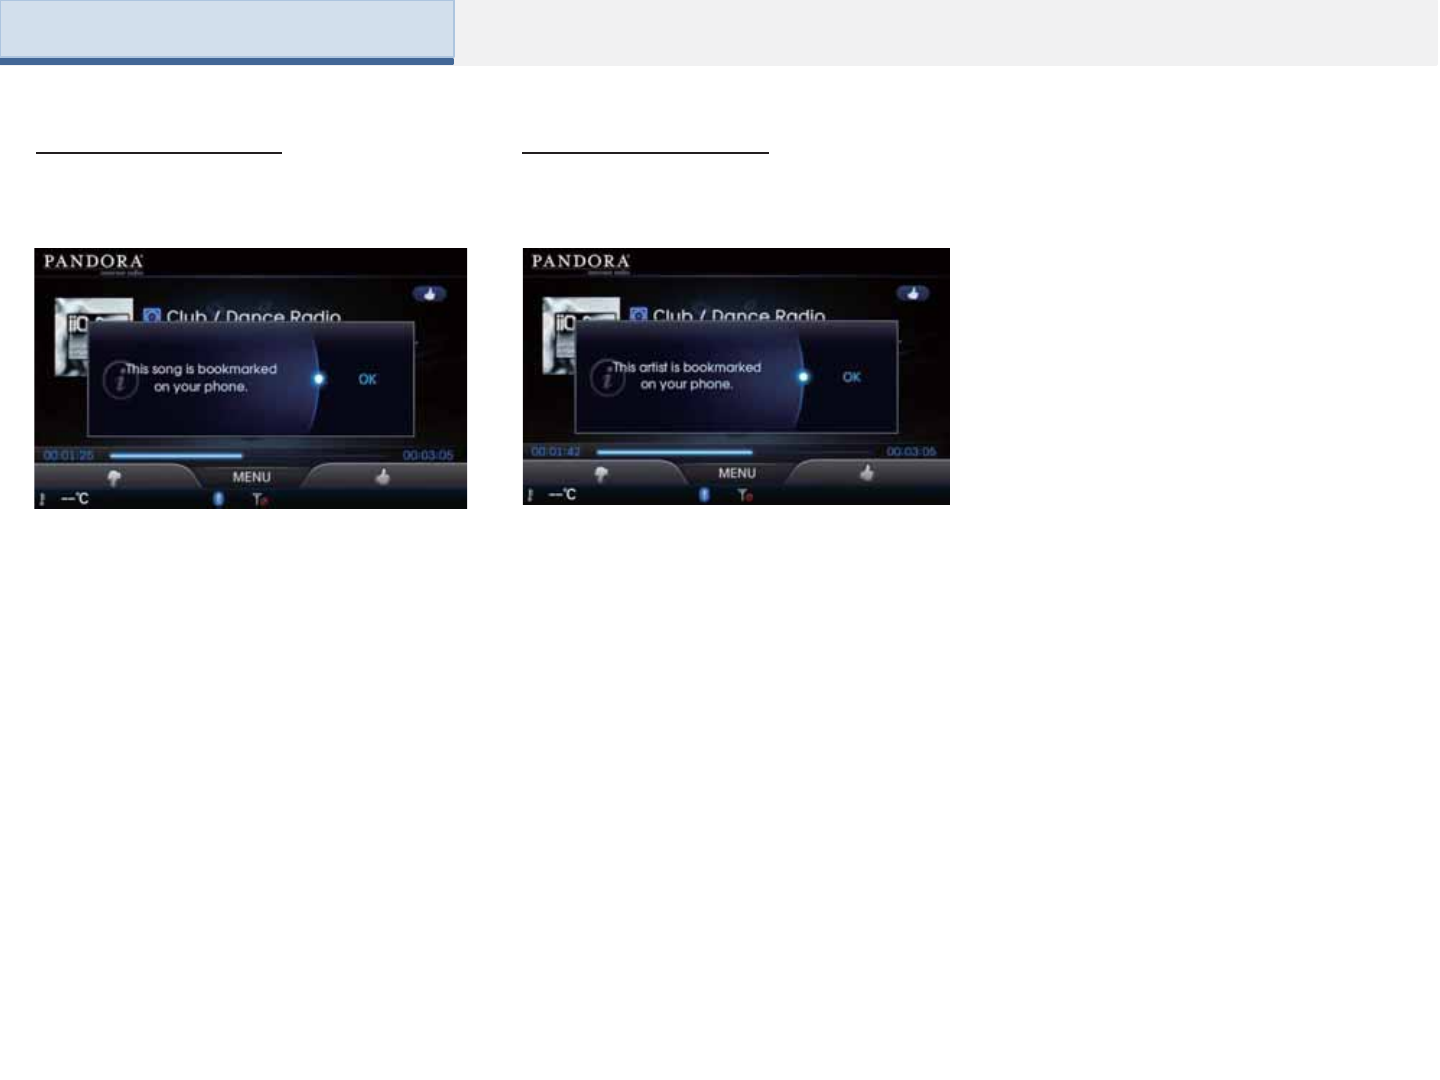
Press [Bookmark this track] from the MENU.
• This option is used to bookmark the current
track.
Bookmark this track
Press [Bookmark this Artist] from the MENU.
Bookmark this Artist
• This option is used to bookmark the artist of the
current song.
Part 2. AV (Pandora)

Part 2. AV (DISC)
About Discs
Precautions upon handling
discs
•After using a disc, put the disc back in
its original case to prevent disc scratches.
•Do not use abnormally shaped discs
(8cm, heart-shaped, octagon-shaped) as
such discs could lead to malfunctions.
•Do not clean discs with chemical
solutions, such as record sprays,
antistatic sprays, antistatic liquids,
benzene, or thinners.
•Do not expose the disc to direct
sunlight or high temperatures for
prolonged periods of time. Such
exposure may lead to disc deformation.
•Upon playing a disc contaminated by
dirt or other substances, the sound and
video quality may deteriorate and result
in skipping sounds. Writing on either side
of the disc could result in damage to disc
surfaces.
•Clean fingerprints and dust off the disc
surface (coated side) with a soft cloth.
•Copy-protected CDs, such as S-type
CDs, may not properly operate in the
device.
•DATA CDs cannot be played. (However,
such discs may still abnormally operate.)
•Do not disassemble the device. Contact
a designated service center in case of
malfunction. (Complete after service
assistance will not be provided if the user
disassembles the device.)
•Do not use water to clean the device.
Exposure to water could lead to product
malfunction.
•Do not to introduce foreign substances
into the disc insert/eject slot. Introducing
foreign substances could damage the
device interior.
•The device may fail to properly operate
in extremely hot or cold temperatures.
(The operating temperature range is: -
10 ~ 65 )
•Steam can become condensed on the
fiber optic lens due to rain, wet
conditions, or upon operating the heating
system. In such cases, discs may not be
properly recognized could be the cause
of product malfunction. Remove the disc
and wait until the moisture dries.
•Skipping may occur to the audio and
video when driving on bumpy roads for
prolonged periods of time or upon severe
shock to the vehicle. In case of severe
shock, video and audio may not properly
play.
•Do not attach stickers or labels on to
discs. Stickers or labels could cause
damage to the system.
Do not insert more than one disc at
once. Such acts could lead to product
damage or malfunctions.
Do not forcefully eject or pull on discs
when a disc is being loaded into the disc
player. Such acts could lead to product
damage or malfunctions.

Supported Disc Formatst
When playing a dual-layer disc, video/
sound lags may occur for up to several
seconds. Such phenomena are not
unusual when using a dual-layer disc
and
do not signal a product malfunction.
CD-R or CD-RW DISC without quality
guarantees or discs over 650mb may not
be properly recognized by the device.
Inserting an abnormal disc may result in
faulty operation/recognition.
Disc Type
Disc Type Disc Format Device Support
CD
3”(8cm)
5”(12cm)
CD
CD-R
CD-RW
Multisession-
CD
O
O
O
O (Read Only)
O (Read Only)
O (Read Only)
DVD
DVD
DVD R
DVD RW
DVD-RAM
O
O (Read Only)
O (Read Only)
X
SACD
SACD (Single,
SACD layer)
SACD (Hybrid)
X
O (Only CD layer)
Disc Formats
Disc Type Disc Format Device
Support
CD
3CD-DA
MP3
WMA
MPEG4 AAC
VIDE-CD
DTS-CD
CD-RM
CD-G
CD-EXTRA
CD-TEXT
O
O
O
X
O
O
O
O
O
O
DVD
MPEG4(VIDEO)
DivX® (VIDEO)
DVD DVD-VIDEO
DVD-AUDI
DVD-RM
DVD-VR
CPRM
X
X
O
O
O
O
O
Disc/Content Format
Compatibility
Disc Type Disc Format Device Support
DVD
LPCM
Dolby Digital
DTS
MPEG
O
O
O
O
CD LPCM O
MP3
MPEG1,
Layer3
MPEG2,
Layer3
MPEG2.5
O
O
O
WMA Ver9 O
Dual-Layer DVD Video Discs
This device supports the following disc
formats.
Part 2. AV (DISC)
By Format according to Disc Type

· In the case of MP3/WMA, write using
only Korean or English. (Other
languages are not supported)
· Unauthorized use of copy-protected
music files is prohibited by law.
· Prolonged use of CD-R/CD-RW
products that do not satisfy related
specifications may result in product
malfunction.
· When writing CDs, low-speed writing is
recommended.
The DVD Player and DVD discs are
assigned region codes. The region code
of this device is <3>.
Discs that have region codes besides
<3> or <ALL> cannot be played.
DVD Region Code
· This device supports CD-R, CD-RW,
and MP3 discs burned in Audio CD,
Video CD formats.
· The recording of CD-R and CD-RW
discs with this device is not supported.
· CD-R/RW discs recorded as audio CDs
that were not finalized are not supported
by this device.
CD-R/RW Compatibility
When a multi-session disc is being
recorded, make sure to close the session
before recording.
· If mp3/wma file extensions are changed,
such could result in malfunctions.
Cautions upon writing CDs
This device supports PBC-compatible
Video CDs.
PBC (Play-Back Control)-Compatible
Video CD
This device has been
designed/manufactured to be compatible
with software bearing the following logo
marks.
· This device supports the IEO Super
VCD standard. Super VCD supports
outstanding quality and supports 2 sound
tracks upon recording.
· CD-R/RW discs (Audio CD) created
with CD recording devices or PCs may
not properly operate in the device. This is
a result of various causes, including disc
format, recording method, and
contamination to the disc or lens.
Ordinary Disc Compatibility
· Physical formats of CD: Model 1, Model
2 XA format 1.
· This device supports audio file
compressed through MPEG-1 audio
stream layer 3 (MP3) using 8kbps ~
320kbps (CBR), VBR. For stable
operation, the use of files in
95kbps~192kbps bit rate range and
44.1kHz SAMPLING frequency is
recommended.
· This device supports WMA audio files
using 20kbps ~ 320kbps(CBR), VBR.
· Variable bit rate files may operate, but
the play time information may not be
properly displayed.
· This device only supports tracks with
file extension of ".mp3" or".wma".
Compressed Audio Compatibility
· When burning a disc on the PC, the
disc may not operate in this device
depending on the software settings. In
such cases, inquire with the software
manufacturer.
· Additional information regarding
compatibility is displayed on the CD-
R/RW software disc box.
· DVD-R/W discs are not compatible with
this device.
PC-created Disc Compatibility
Part 2. AV (DISC)

· This device does not support
multisession discs.
· This device supports only 8 layer folders.
· This device supports MP3 ID3 tag
versions of Ver. 1.0, Ver. 1.1, Ver. 2.2, Ver.
2.3, Ver. 2.4. When using discs with other
versions, the ID3 info will not be displayed.
· Although this device has been
designated to be compatible with various
bit rates, playing low bit rate MP3 tracks
may result in low quality sound.
Before playing a MP3 Disc
Supported MP3 File Specification
· Acceptable standard: MPEG1 AUDIO
LAYER 33
· Acceptable sampling frequency: 8,
11.025, 12, 16, 22.05, 24, 32, 44.1, 48
(kHz)
· Acceptable bit rate: 8 ~ 320 (Kbps)
Recommended bit rates and frequency
· Sampling frequency: 96 ~ 192 Kbps fixed
bit rate /44.1kHz
Notice
· Supported ID3 tags : ID3v1 0, ID3v1 1, ID3v2
2, ID3v2 3, ID3v2 4
· Supported MP3 Media: CD-ROM
· Supported media formats: ISO9660 LEVEL1
and LEVEL2
Detailed Specification
Precautions upon burning MP3 files
· Maximum directory layers: 8 layers
· Maximum folder length: 64 bytes, file
name length: 64 bytes
· Supported characters for folder name/file
name: Alphanumeric characters, Korean
standard character set 2350 characters,
Simplified Chinese 4888 characters
· Maximum number of folders per disc:
256 folders (including ROOT)
· Maximum number of files per disc: 512
files
· The use of ISO 9660 LEVEL 2 JOLIET
format is recommended.
· Up to 32 characters in Korean/Chinese
are supported for file names and up to 20
characters in Korean/Chinese are
supported for folder names.
· The use of CDs exceeding 700M may
result in faulty disc recognition or errors
upon play.
Part 2. AV (DISC)

MP3 File Structure
Folder structure as saved in CD-ROM Folder structure recognized by the DVDP
Part 2. AV (DISC)
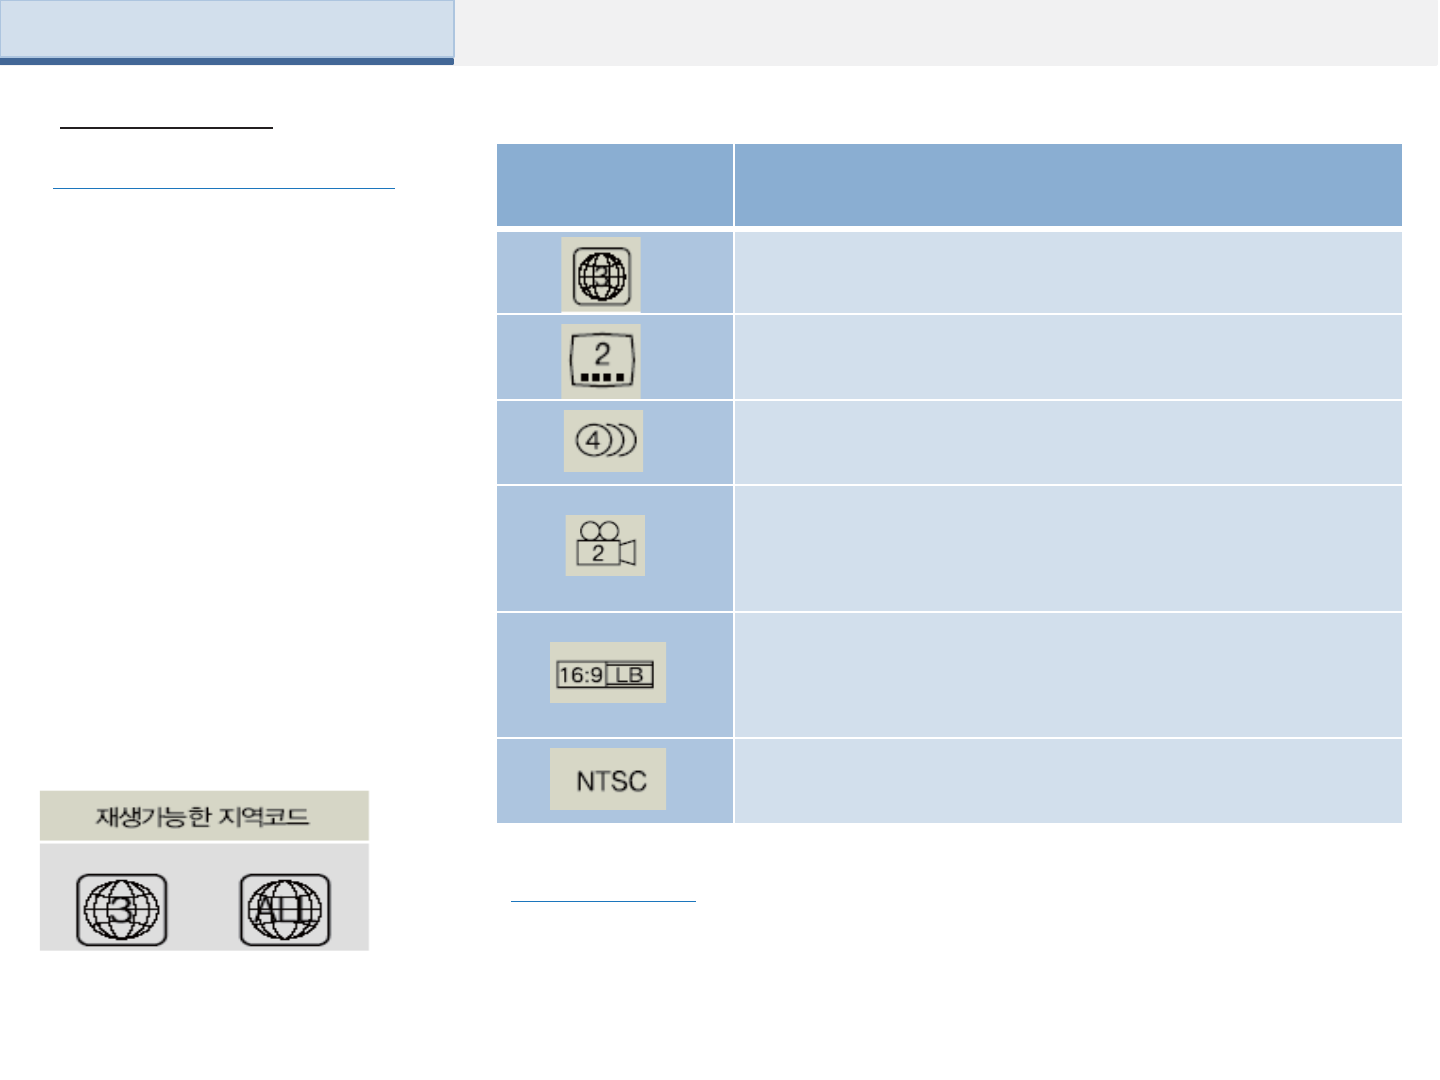
Icon Description
Shows the supported region codes.
Up to 32 subtitles can be recorded within a DVD. The number within the
icon indicates the number of subtitle languages recorded within the DVD.
Up to 8 voice languages can be recorded within a DVD. The number
within the icon indicates the number of voices languages recorded within
the DVD.
DVD allows viewing of filmed footage from up to 9 angles (multi-angle).
The number within the icon indicates the number of screen angles.
This icon the screen ratio and display method. “16:9" or “4:3” indicates
the screen proportion (ratio) while “LB”, “PS” and “WIDE” indicates the
screen display method and stands for “Letter Box”, “Pan-Scan” and
“Wide Screen”, respectively.
NTSC: This is the color method as used in Korea, Japan and the United
States.
.
About DVD Titles
Understanding of the DVD Titles
•Contents of DVD Titles
The video and sound recorded on a DVD
are divided into titles and can be
recognized by their title numbers. Each
title is sub-divided into smaller units
called chapters and each chapter can be
recognized by the chapter number. The
title number and chapter number of the
currently playing DVD title is displayed
on the upper side of the DVD operation
menu screen.
•DVD Region Code
The DVD player and DVD discs are set
with region codes and can be played in
accordance to the sales region. If a disc
besides "Region Code 3(Korea)" or "All
region disc” is inserted, then a “Region
Code Error” screen will be displayed and
the disc will not normally play.
Color TV Support
This device supports NTSC color encoding methods. Other methods besides NTSC may
not be supported.
Part 2. AV (DISC)
4
10
1
5
12
2
6
3
11
7
8
9
13
14
Name Description
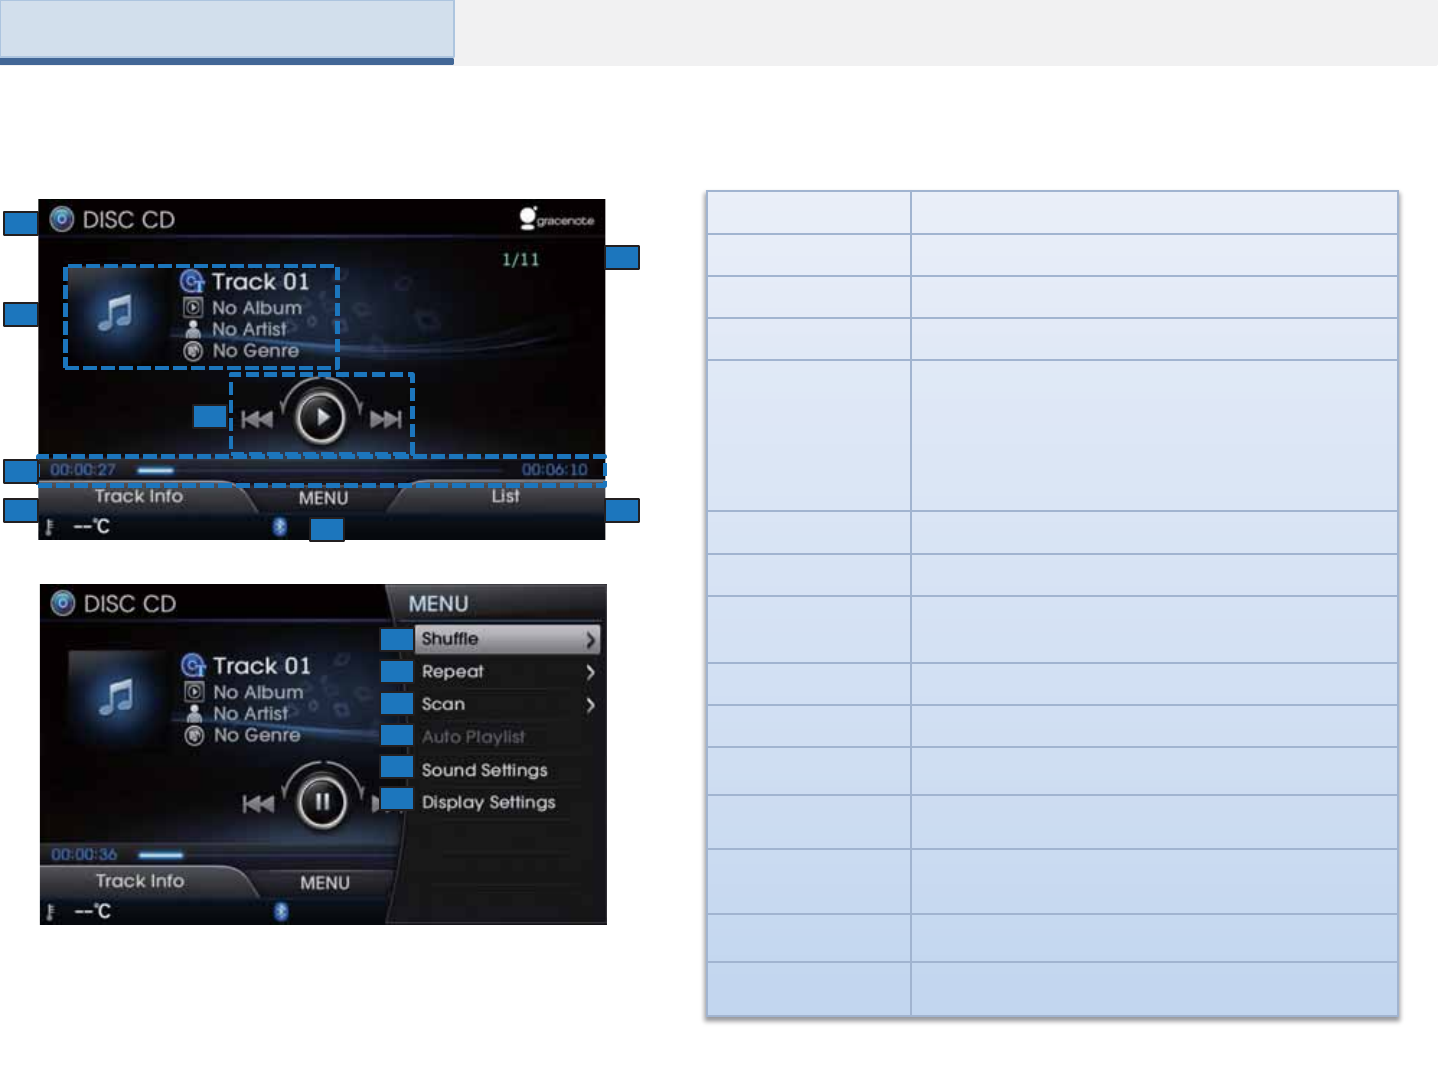
1. Mode Displays currently operating mode
2. Track Index Shows the current track/total tracks
3. Play File Info Shows track number/album/artist/genre info
4. Control Panel
Enables use of play/pause/select/search features
When turned in Ω directions : Moves to previous/next
track
When pushed in ← or → directions: : Plays
previous/next song
When pressed :Plays or pauses
5. Play Time Displays the current play time and total play time
6. Track Info Shows track info
7. MENU Displays Shuffle/Repeat/Scan/Auto Playlist/ Sound
Setting/Display Setting
8. List Moves to the track list screen
9. Shuffle Plays disc tracks in random order
10. Repeat Repeats the current track or entire tracks
11. Scan Scans the beginning parts of disc tracks (approx 10
seconds per track)
12. Auto Playlist Moves to list screen showing current song and similar
songs
13. Sound Settings Displays sound settings screen
14. Display
Settings Displays display settings screen
Basic Mode Screen
Part 2. AV (CD)
Part 2. AV (CD)
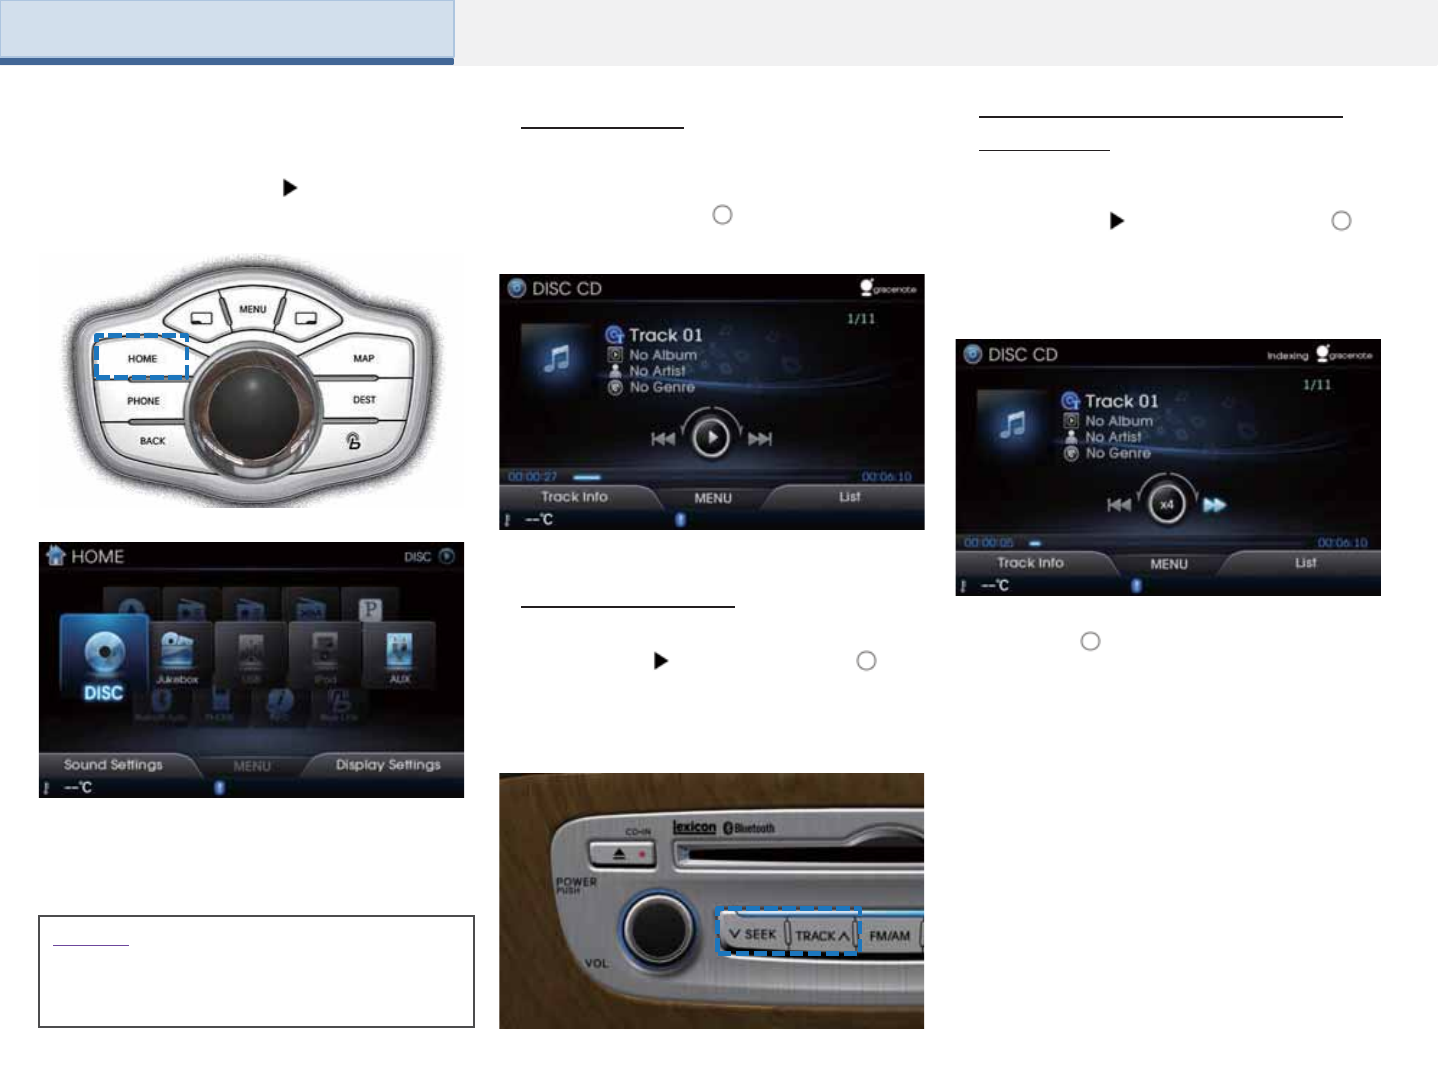
Starting Mode
Press the [HOME] Key Select [Disc]
Menu
CD mode will automatically start once a
CD is inserted
NOTICE
•Only genuine audio CDs are supported.
Other discs may result in recognition failure
(e.g. copy CD-R, CDs with labels
CD will automatically play once a CD is
inserted, press the [ ] button to pause
the track.
Playing a CD
Selecting a Track
While playing Shortly push the [ ] in
← or → direction (under 0.8 seconds) or
shortly press the [SEEK]TRACK] key to
select the previous/next track.
Fast-forwarding or Rewinding
CD Tracks
While playing Push and hold the [ ]
in ← or → direction (under 0.8 seconds)
or press and hold the [SEEK]TRACK]
key to fast-forward/rewind the track.
While the [ ] or [SEEK] [TRACK] key is
being operated, the track will rewind or
fast-forward at 20x speed. Once
released, the track will begin playing at
normal speed.
Searching CD Tracks
Turn the [ ] or [TUNE/FILE] knob to
search tracks
From the searched tracks, once the
desired track name is displayed, press
the [ ] or [TUNE/FILE] knob to play the
corresponding track.
Information
•When searching, the track info is displayed
in blue.
•Pressing the [ ] or [TUNE/FILE] knob will
play the selected track and display the basic
display specification.
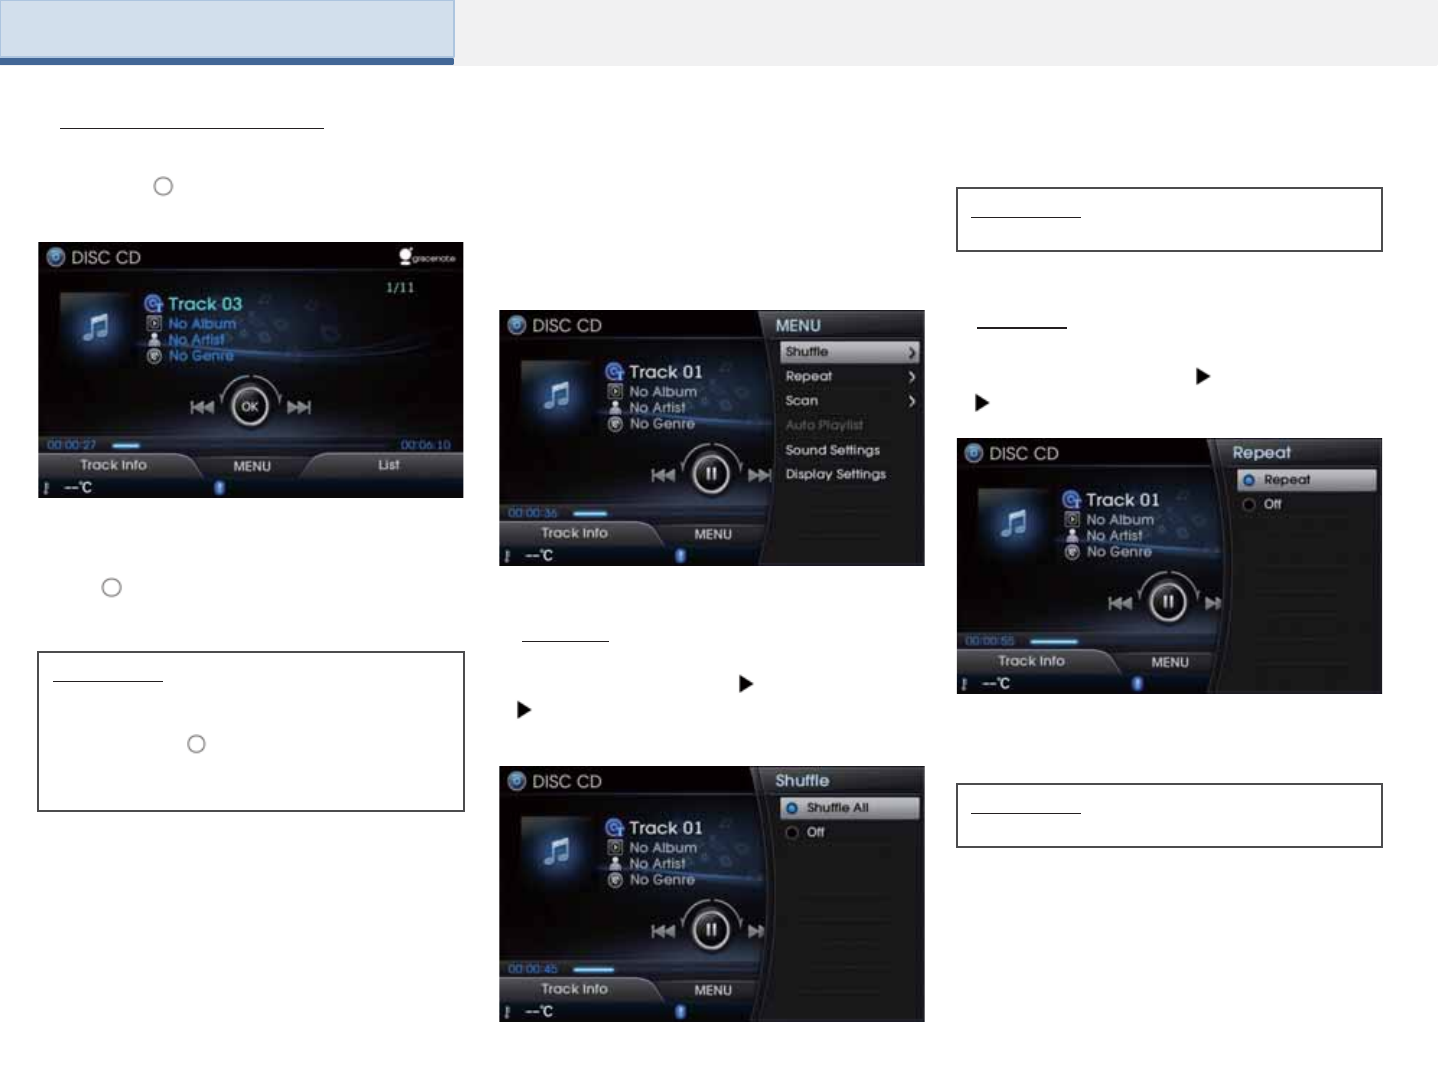
Press the [Menu] button to set the
Shuffle, Repeat, Scan, Auto Playlist
options as well as Sound Settings and
Display Settings.
Using the Menu Buttonst
Shuffle
Press the [MENU] key Select [Shuffle]
Set Shuffle All to On.
Repeat
Press the [MENU] key Select [Repeat]
Set Repeat to On.
The current track is repeated.
Information
Select the [Off] button to turn off repeat.
Information
Select the [Off] to turn the shuffle option off.
Songs within the current playlist are
played
in random order.
Part 2. AV (CD)
The beginning (approx 10 seconds) of all
tracks within the CD are scanned.
Scan
Press the [MENU] key Press [Auto
Playlist]
Auto Playlist
Press the [MENU] key Press [Scan]
Press [Scan All]
Information
•Press the [Off] button again to turn the
scan option off.
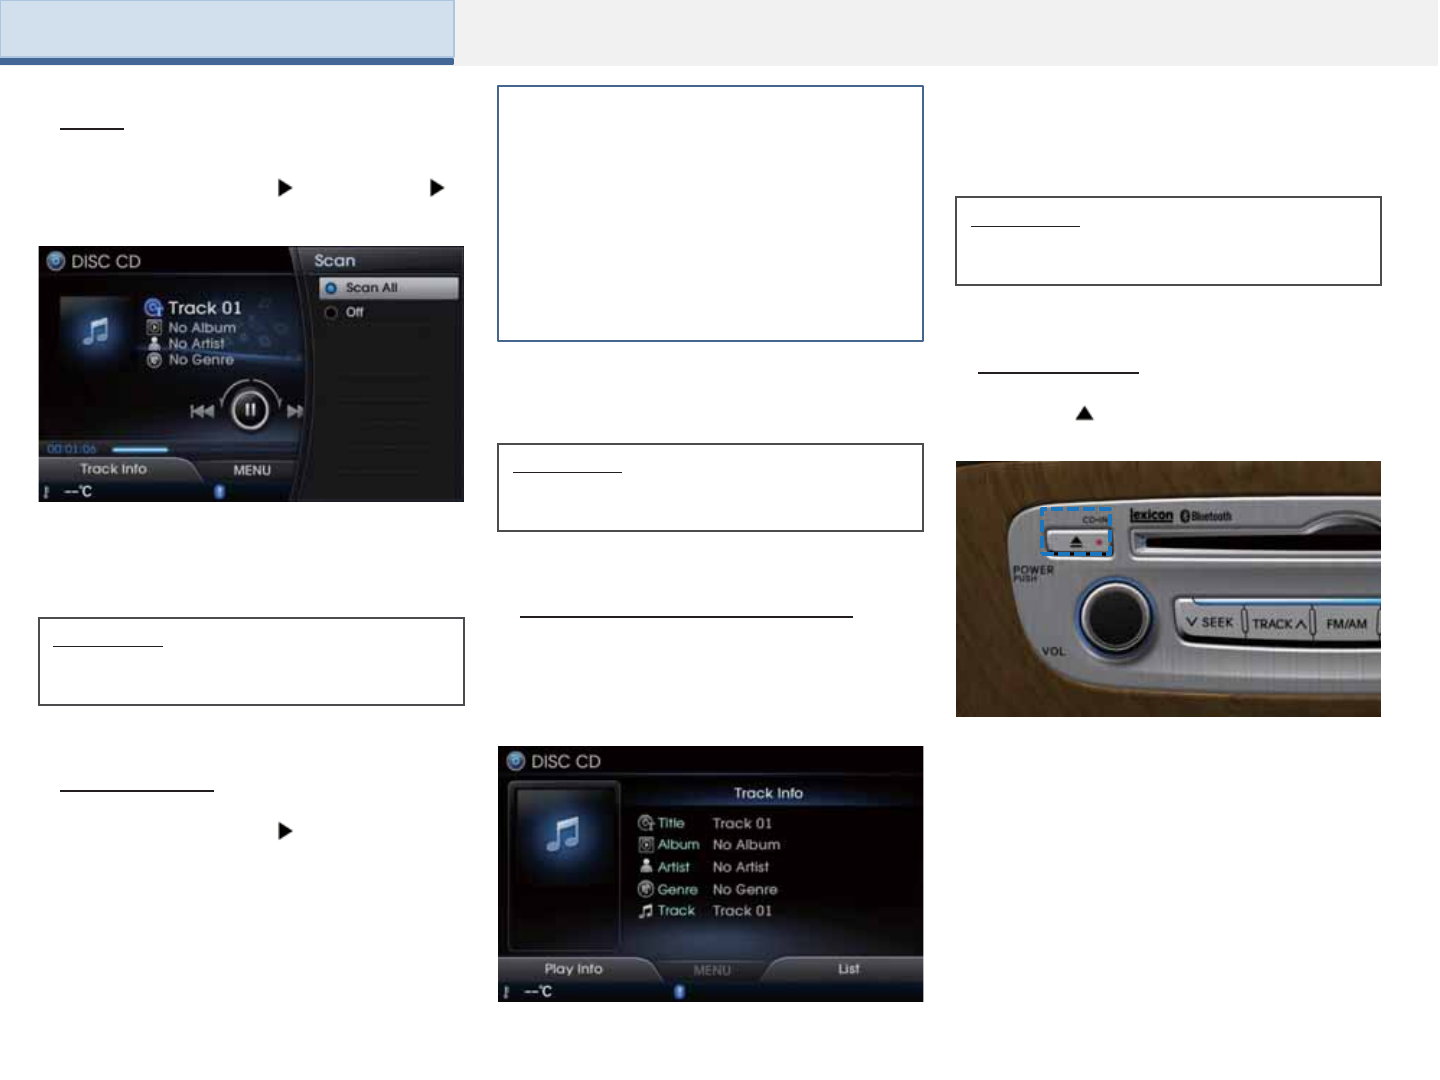
Track Info/Play Information
Press the [LHT] to select Track Info to
view track information, such as title,
album, artist, genre, and track number.
List of songs within the CD similar with
the current song is displayed.
Information
•For more information on Sound and Display
settings, refer to the Info/Setup section.
Press [Play Info] to restore the previous
display
Ejecting Disc
Press the [ ] key to eject the disc.
Information
•Artist/album info are supported within Text
CDs.
Part 2. AV (CD)
4
10
1
5
12
2
6
3
11
7
8
9
13
Name Description
1. Mode Displays currently operating mode
2. Track Index Shows the current MP3 file/total number of MP3 files
3. Play File Info Shows track number/album/artist/genre info
4. Control Panel
Enables use of play/pause/select/search features
When turned in Ω directions : Moves to previous/next
track
When pushed in ← or → directions: : Plays
previous/next song
When pressed :Plays or pauses
5. Play Time Displays the current play time
6. Track Info. Shows track info
7. MENU Displays Shuffle/Repeat/Scan/Sound Settings/Display
Settings menus
8. List Moves to the track list screen
9. Shuffle Plays disc tracks in random order
10. Repeat Repeats the current track or entire tracks
11. Scan Scans the beginning parts of disc tracks (approx 10
seconds per track)
12. Sound Setting Moves to the sound setting screen
13. Display Setting Moves to the display setting screen
Basic Mode Screen
Part 2. AV (DISC MP3)
Starting Mode
MP3 mode automatically starts when an
MP3 disc is inserted.
Press the [HOME] Key Select [Disc]
Menu
Information
• If there are numerous songs and folders
within the disc, reading time could take more
than 10 seconds and the list may not be
displayed or song searches may not operate.
Once loading is complete, try again.
• Only genuine audio CDs are supported.
Other discs may result in recognition failure
(e.g. copy CD-R, CDs with labels)
While playing Push and hold the [ ]
in ← or → direction (under 0.8 seconds)
or press and hold the [SEEK]TRACK]
key to fast-forward/rewind the file.
Playing DISC MP3
Selecting DISC MP3 files
While playing Shortly push the [ ] in
← or → direction (under 0.8 seconds) or
shortly press the [SEEK]TRACK] key to
select the previous/next file.
Once a CD is inserted, the DISC MP3
will automatically being playing. Pressing
the [ ]again will pause the current
song.
Fast-forwarding or Rewinding
DISC mp3 Tracks
Part 2. AV (DISC MP3)
Turn the [ ] or [TUNE/FILE] knob in Ω
directions to search for files.
During search, the file name is displayed
in blue. Press the [ ] or [TUNE/FILE]
knob to play the selected file and display
the basic display info.
Press the [MENU] key to use the Shuffle,
Repeat, Scan, Sound Settings and
Display Settings.
Searching DISC MP3
Using the Menu Buttons
While the [ ] or [SEEK] [TRACK] key is
being operated, the file will rewind or
fast-forward at 20x speed. Once
released, the track will begin playing at
normal speed.
Press the [Soft2] to select the list and
check the playlist.
Searching DISC MP3 List
Turn the [ ] in Ω direction to select and
play the desired file.
From the searched files, once the
desired file name is displayed, press the
[ ] or [TUNE/FILE] knob to play the
corresponding file.
Part 2. AV (DISC MP3)
Name Description
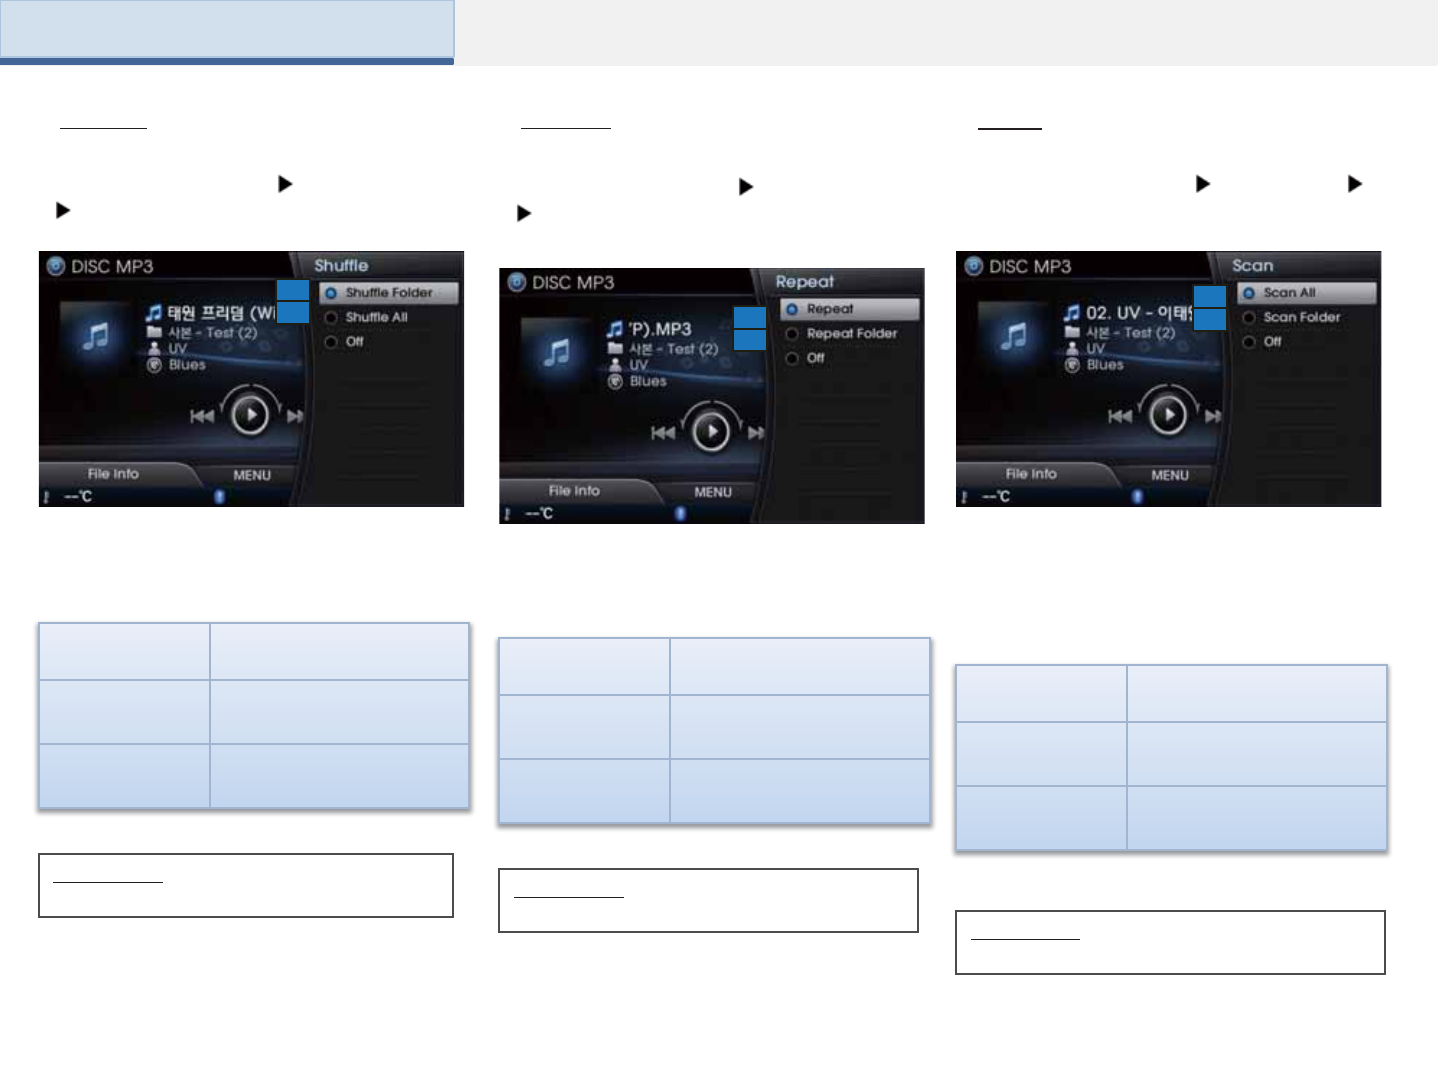
1. Shuffle Folder Plays current folder in
random order
2. Shuffle All Plays all files in random
order
1
21
2
1
2
Name Description
1. Repeat Song Repeat current song
2. Repeat Folder Repeat current folder
Name Description
1. Scan All
Scans the beginning parts
(approx 10 seconds) of all
files
2. Folder Scan
Scans the beginning parts
(approx 10 seconds) of all
files within the current folder
Information
•Press [Off] to turn the Shuffle feature off. Information
•Press [Off] to turn the Repeat feature off. Information
•Press [Off] to turn the Scan feature off.
Press the [MENU] key Select [Repeat]
Press [Repeat Song] or [Repeat
Folder]
Press the [MENU] key Press [Scan]
[Scan All] or [Folder Scan]
Press the [MENU] key select [Shuffle]
Select [Shuffle Folder] or [Shuffle All]
The current song or the all files within the
folder can be repeated.
The beginning part (approximately first
10 seconds) of all files within the current
folder or the entire DISC MP3 are
scanned.
All songs or songs within the current
folder can be played in random order.
Repeat Scan
Shuffle
Part 2. AV (DISC MP3)

File Info/Play Info
Press the [Soft1] to select File Info to
display file information, such as the title,
album, artist, genre, file name, and folder
location.
To return to the previous screen, press
the [Soft1] to select Play Info.
Information
• No information are shown for MP3 files
without file information.
• For more information on Sound and
Display settings, refer to the Info/Setup
section.
Part 2. AV (DISC MP3)
4
10
1
5
12
2
6
3
11
7
8
9
13
15
14
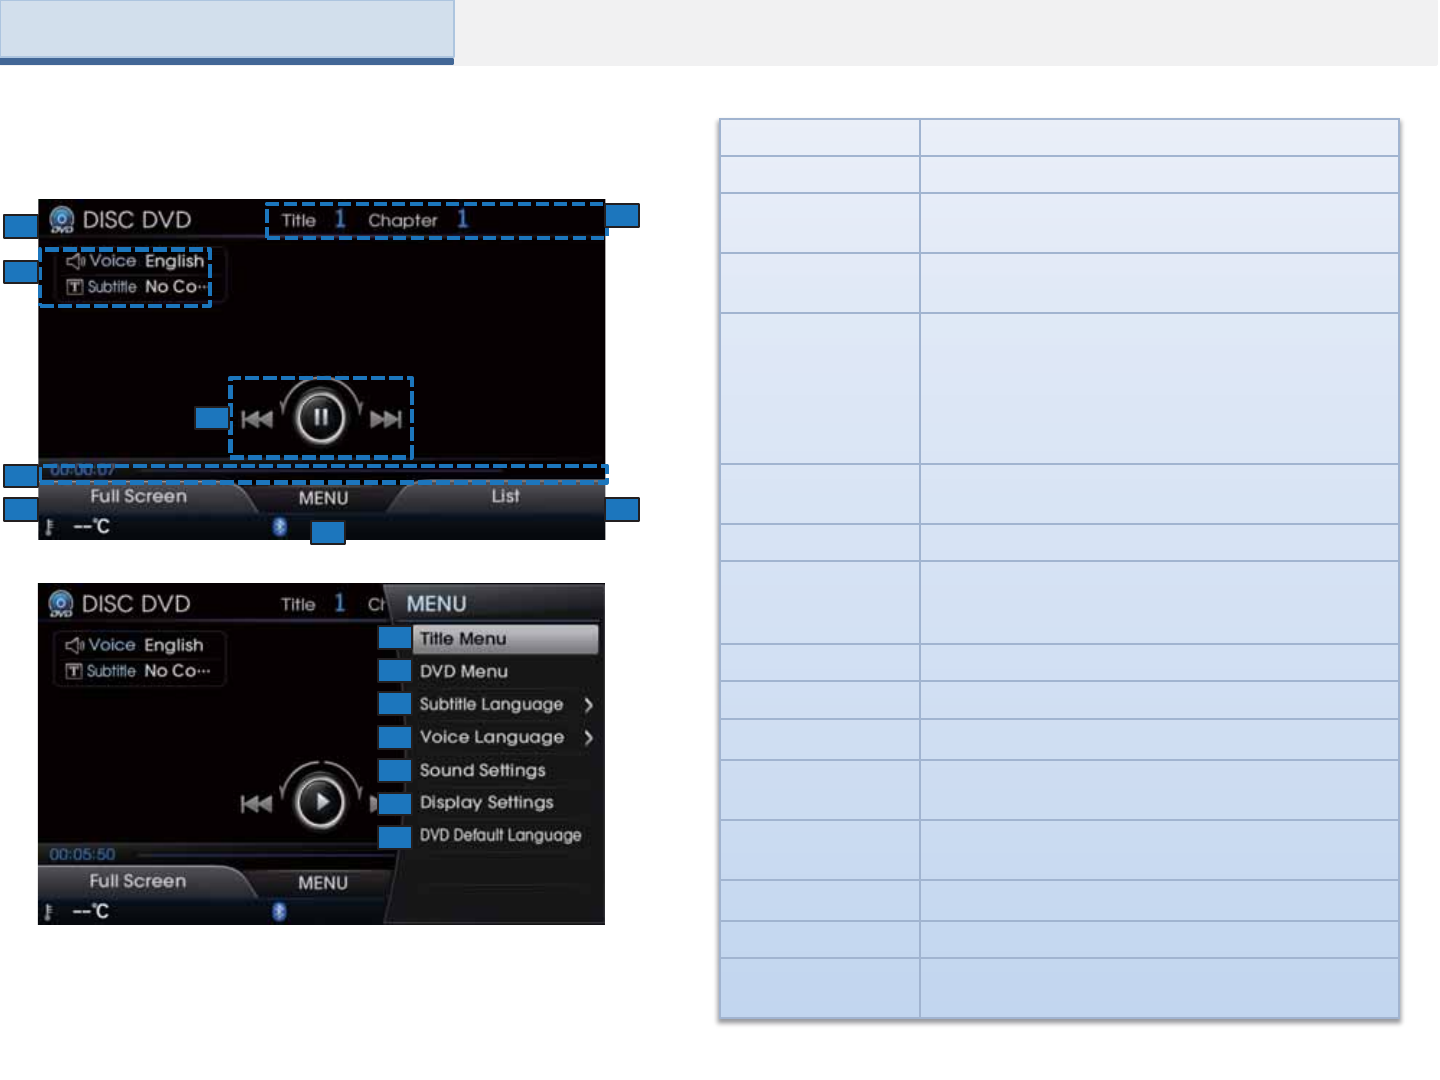
Name Description
1. Mode Displays currently operating mode
2. Title/Chapter
Index
Shows the current DVD title/chapter number of the
DVD
3. Code
Information Shows information on voice and subtitle codes
4. Control Panel
Enables use of play/pause/search features
When turned in Ω directions: Searches
previous/next chapter
When pushed in ← or → directions: Plays
previous/next chapter
When pressed :Plays or pauses
5. Play Time Shows the current and total play time of current
chapter
6. Full screen Converts DVD into full screen
7. MENU
Displays Title Menu/DVD Menu/Subtitle
Language/Voice Language/Sound Settings/Display
Settings/DVD Default Language menus
8. List Displays the List Screen
9. Title Menu Moves to the title menu screen
10. DVD Menu Moves to the DVD menu screen
11. Subtitle
Language Set Subtitle Language
12. Voice
Language Set Voice Language
13. Sound Setting Moves to the sound setting screen
14. Display Setting Moves to the display setting screen
15. DVD Default
Language Moves to the DVD default language setting screen
Basic Mode Screen
Part 2. AV (DVD)
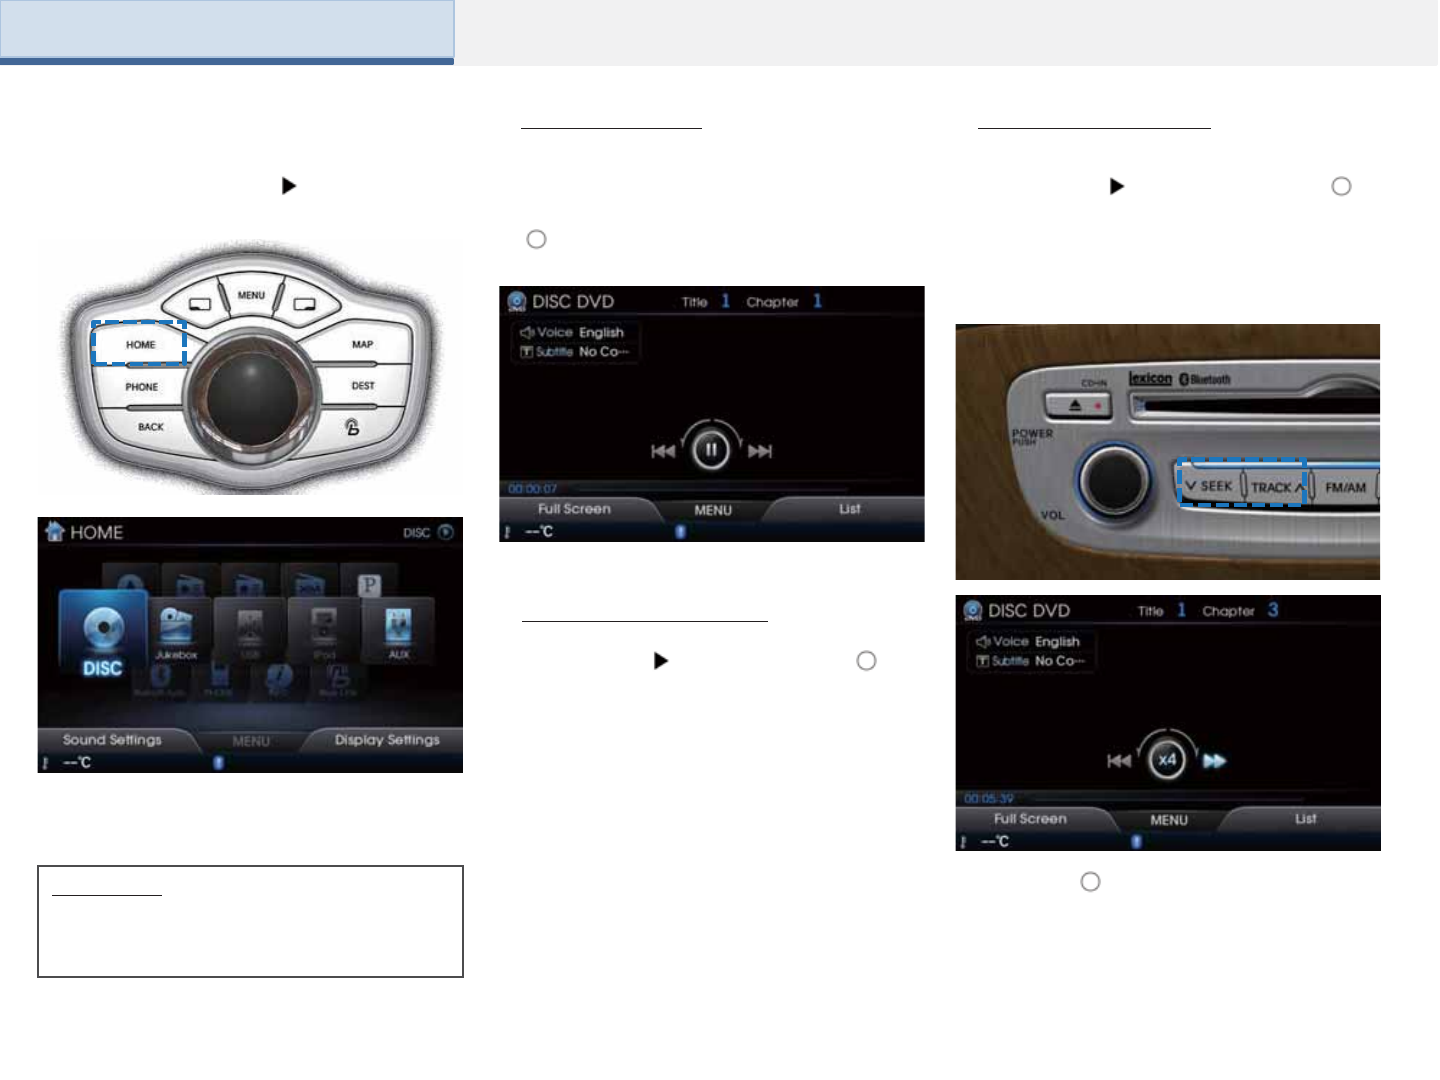
Starting Mode
While playing Push and hold the [ ]
in ← or → direction (under 0.8 seconds)
or press and hold the [SEEK]TRACK]
key to fast-forward/rewind the current
DVD.
Once a DVD is inserted, the DVD will
automatically begin playing. Pressing the
[ ] again will pause the DVD.
Playing a DVD Searching Chapter
Selecting a Chapter
While playing Shortly push the [ ] in
← or → direction (under 0.8 seconds) or
shortly press the [SEEK]TRACK] key to
select the previous/next chapter.
While the [ ] or [SEEK] [TRACK] key is
being operated, the DVD will rewind or
fast-forward at 20x speed. Once
released, the DVD will begin playing at
normal speed.
The mode will be disabled when a DVD
disc has not been inserted.
Information
•Only genuine DVDs are supported. Other
discs may result in recognition failure (e.g.
copy DVD-R, DVDs with labels)
Press the [HOME] Key Select [Disc]
Menu
Part 2. AV (DVD)
1
2
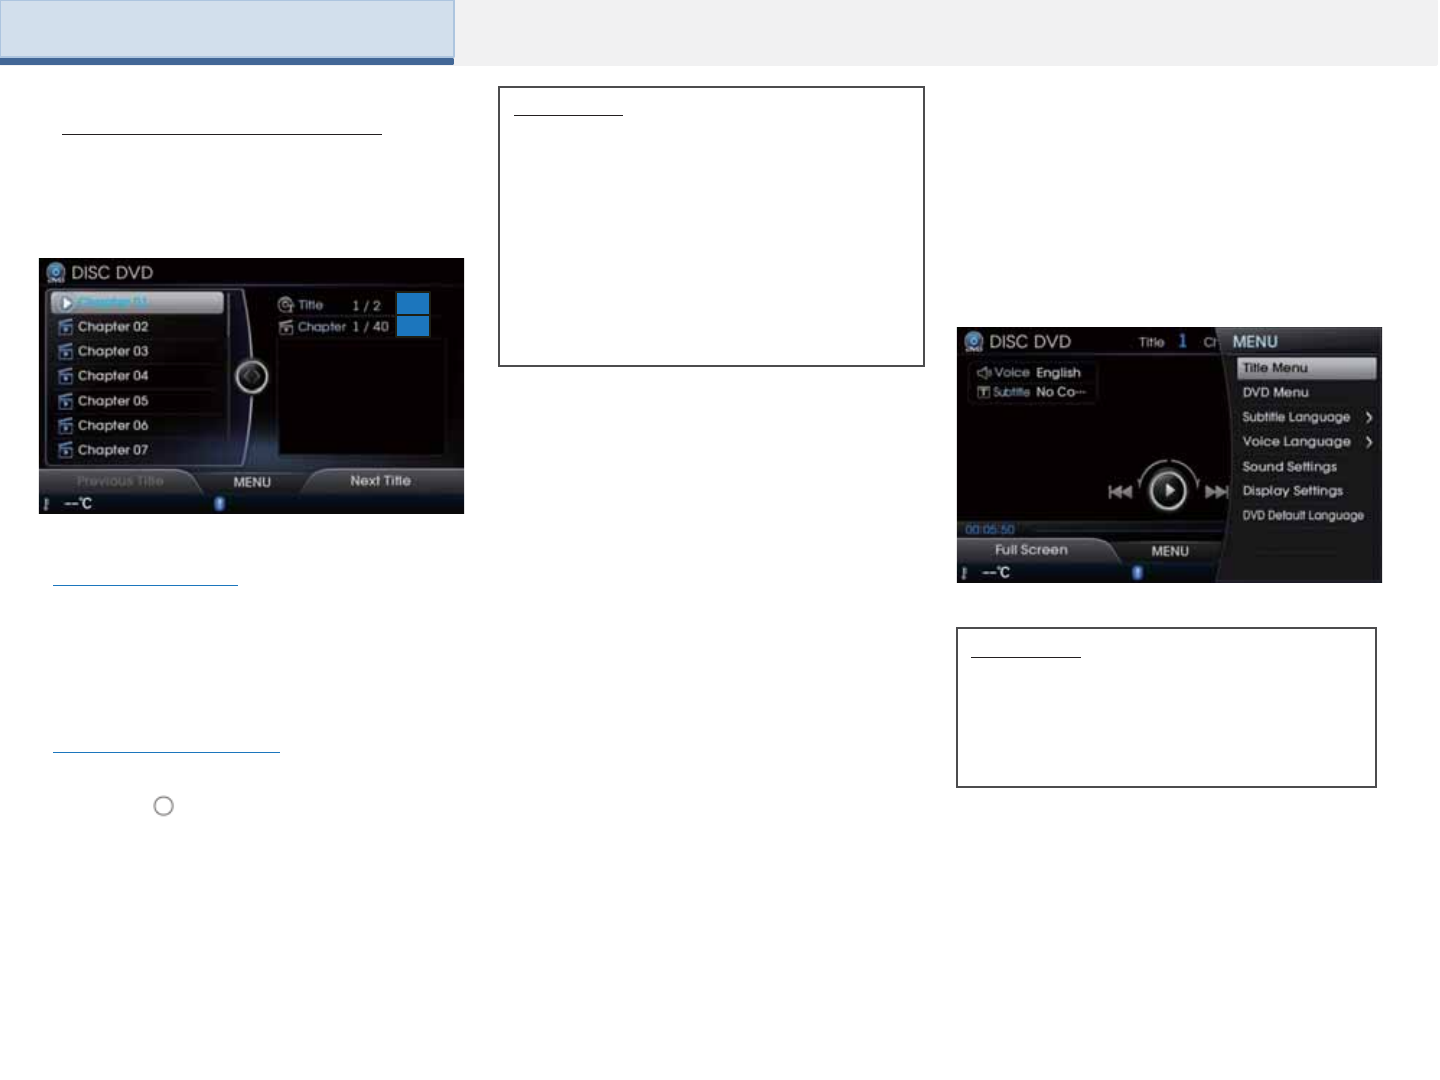
Searching Titles
Searching Titles/Chapters
Press the [List] button to search DVD
titles and chapters.
Press the [Soft1] and [Soft2] to change to
the previous or next title.
Searching Chapters
Turn the [ ] in Ω direction or shortly
press the [SEEK]TRACK] key (under 0.8
seconds) to select the previous/next
chapter.
Press the [MENU] key to use the Title
Menu, DVD Menu, Subtitle Language,
Voice Language, Sound Settings,
Display Settings and DVD Default
Language.
Using the Menu Buttons
Information
• The 1 displays the total number of titles
within the current DVD disc.
• The 2 displays the total number of chapters
within the title.
• The title/chapter search feature can only be
used while the DVD is playing. The feature
will not operate during the initial DVD screen
or when menus are being displayed.
Information
•The DVD Menu and DVD Title options can
only be used within DVDs that support
these features. For DVD Menus, different
DVD titles may have different menu
organizations.
Part 2. AV (DVD)
Push the [ ] in up/down/left/right
directions to select the desired menu and
press the
[OK] button.
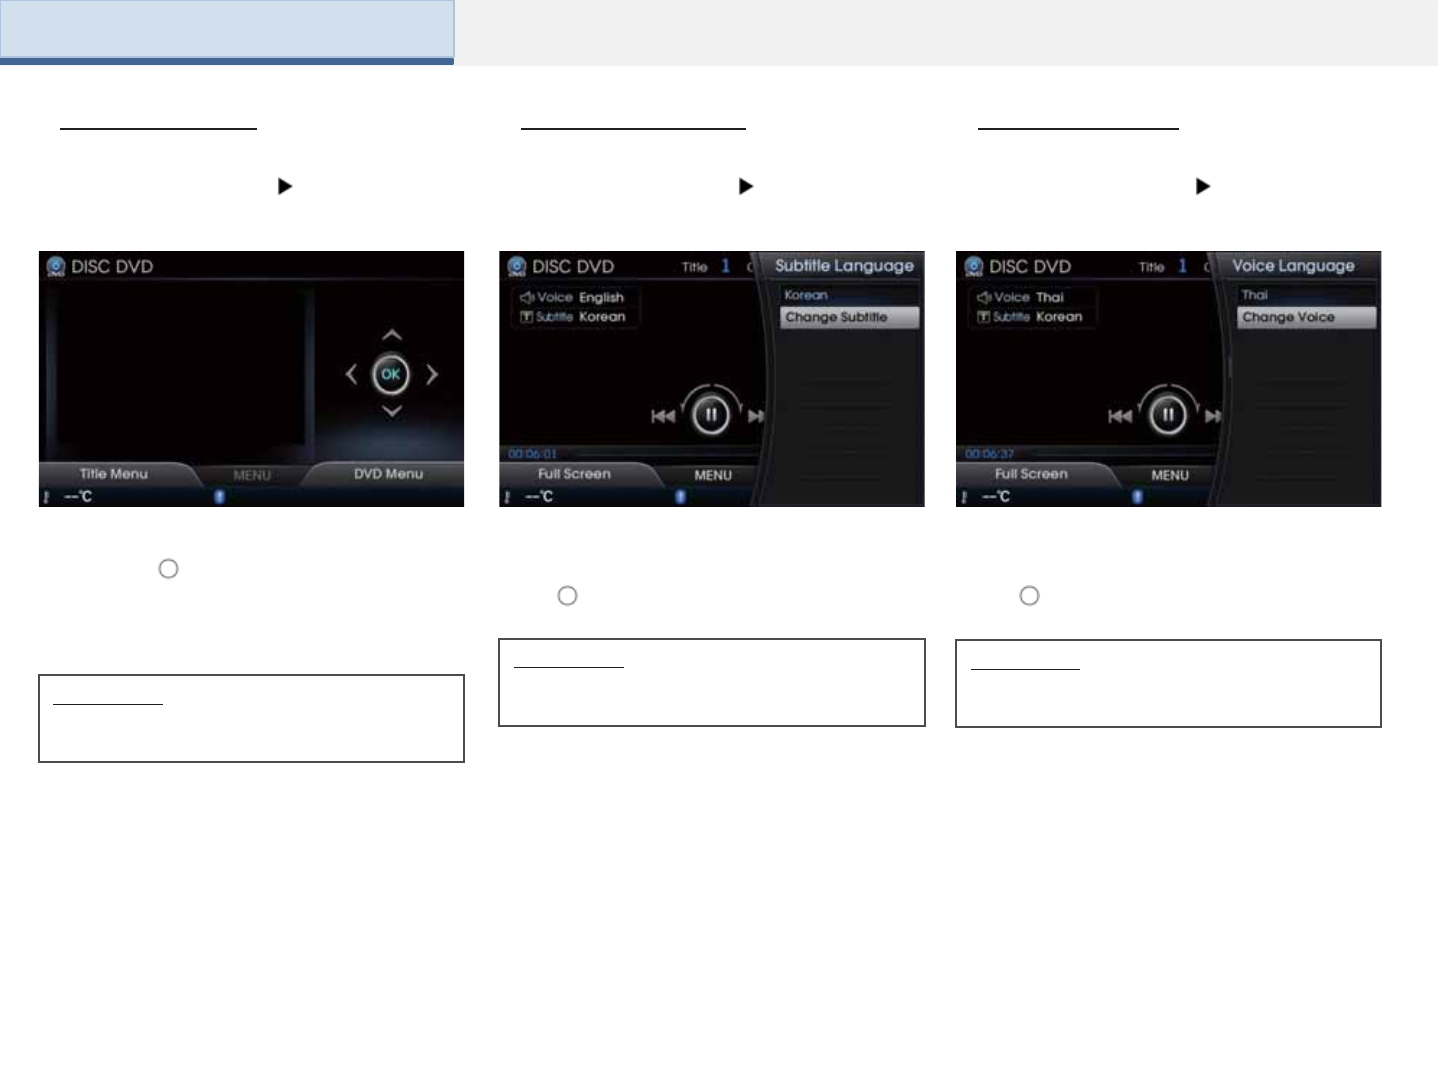
Title/DVD Menu
Press the [MENU] key Select [Title
Menu] or [DVD Menu]
Select the desired language and press
the [ ] to change the subtitle language.
Subtitle Language
Press the [MENU] key Select [Subtitle
Language]
Voice Language
Press the [MENU] key Select [Voice
Language]
Select the desired language and press
the [ ] to change the voice language.
Information
•This is supported only for DVD titles that
support this feature.
Information
•Supported languages may differ according
to DVD title.
Information
•Supported languages may differ according
to DVD title.
Part 2. AV (DVD)
Part 2. AV (DVD)
Viewing in Full Screen
Press the [Soft1] and select [Full Screen]
to view the DVD in full screen.
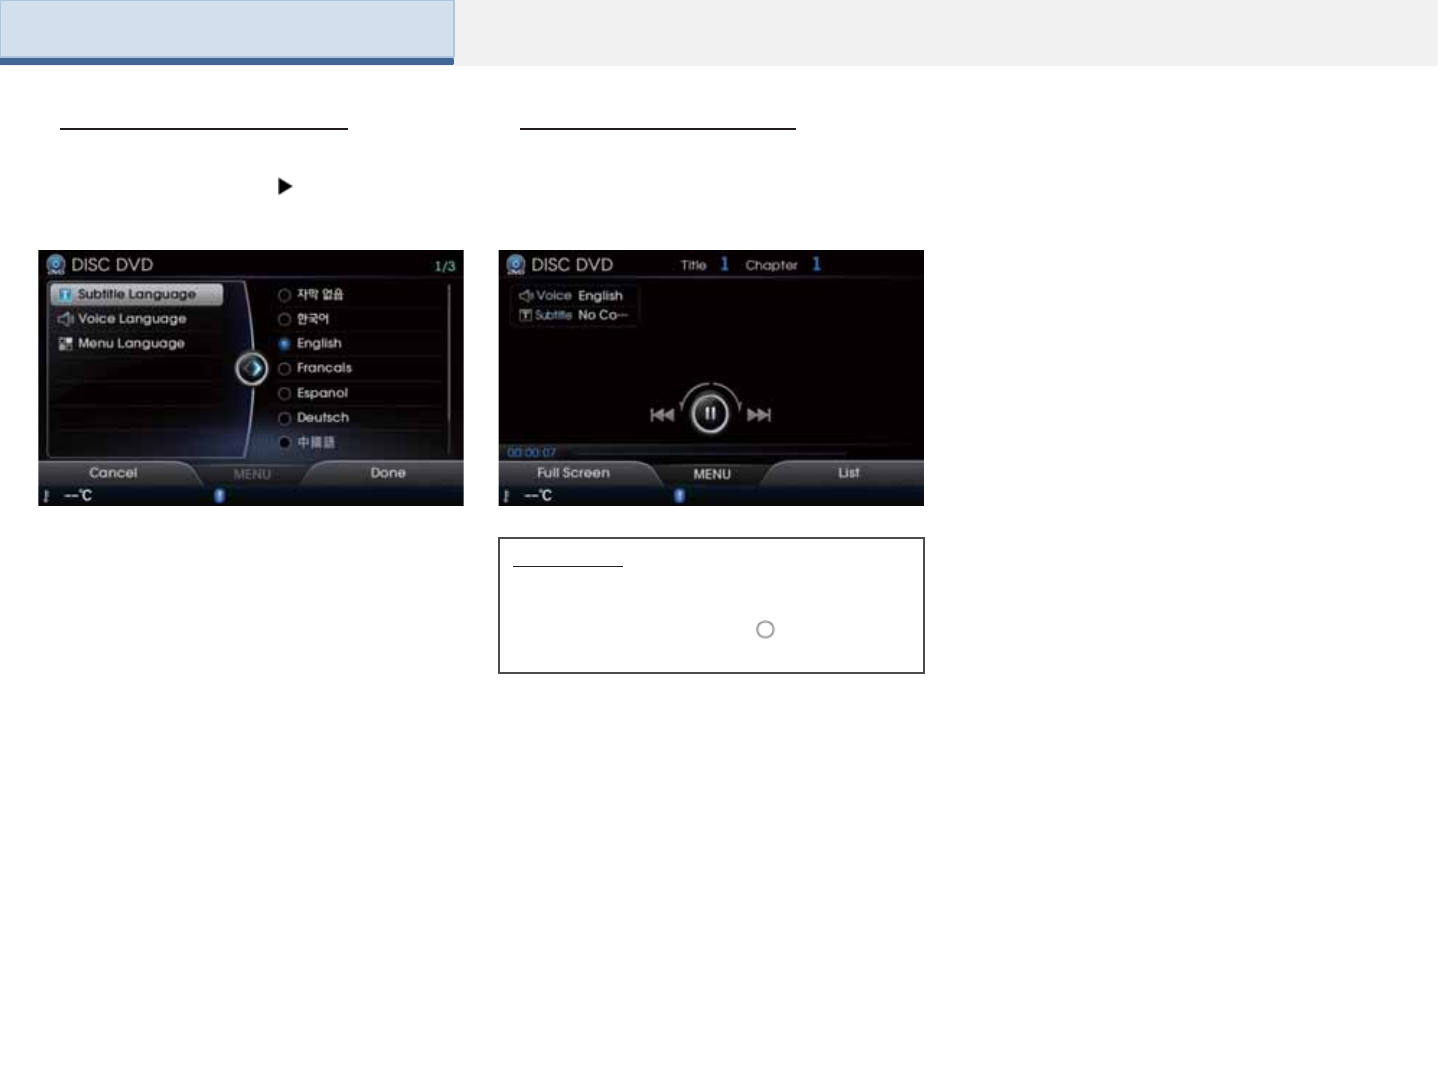
DVD Default Language
Press the [MENU] key Select [DVD
Default Language]
Information
•If there are no operations for 10 seconds,
the DVD menu will automatically disappear.
•Press the [MENU] key or [ ] to display the
menu again.
4
10
1
5
12
2
6
3
11
7
8
9
13
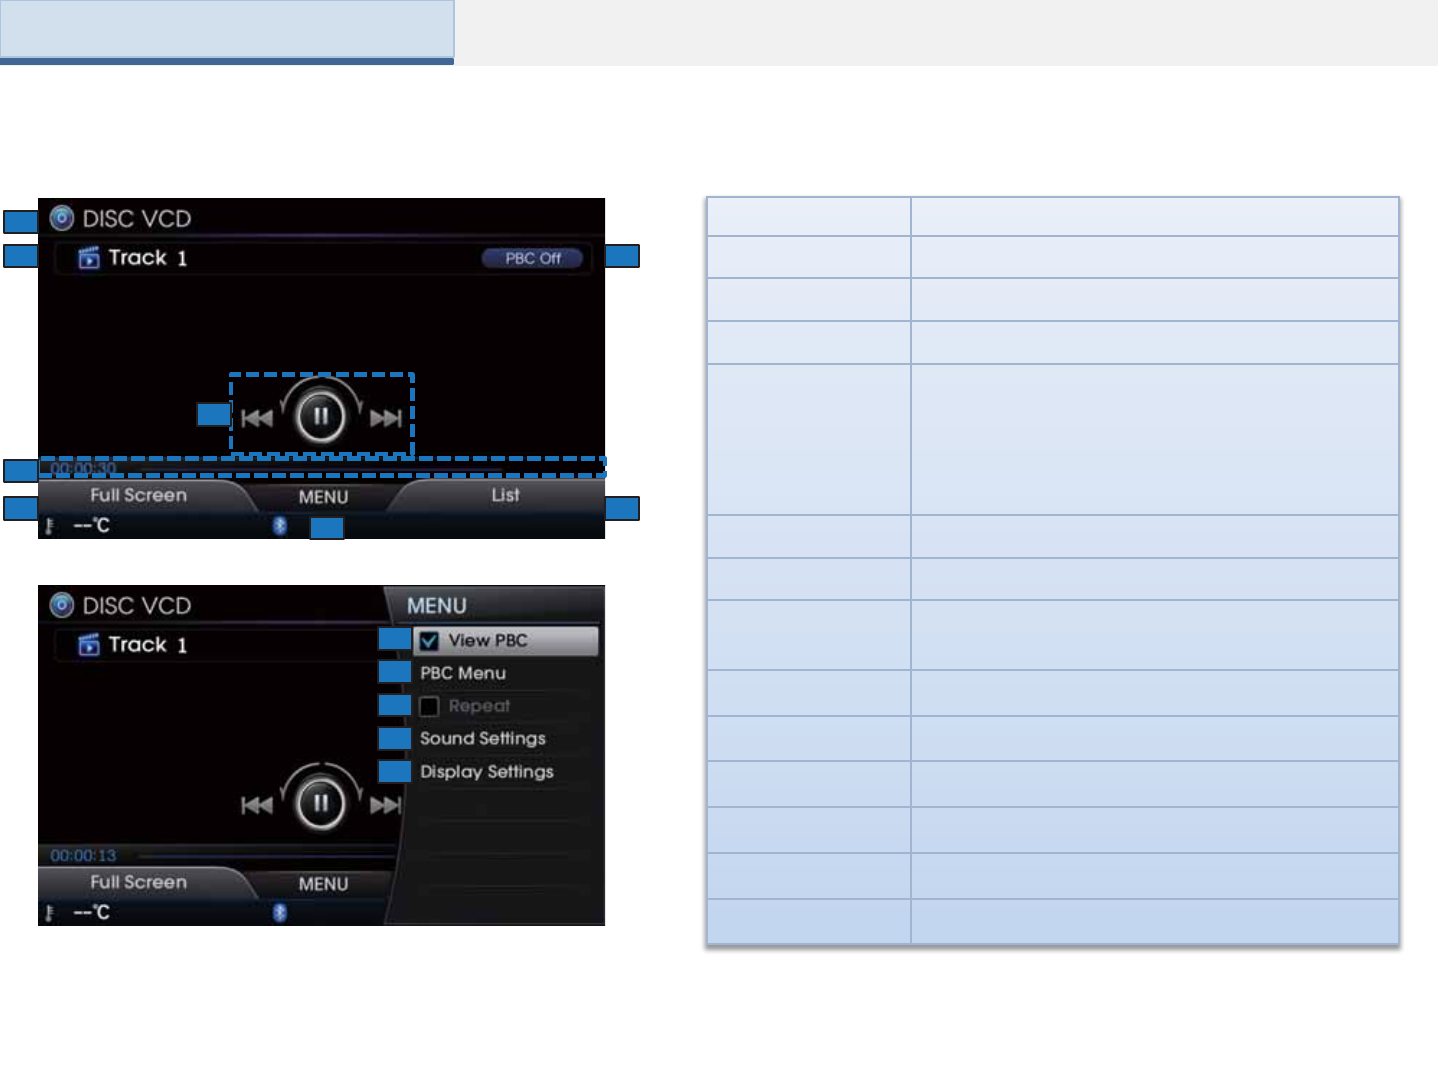
Name Description
1. Mode Displays currently operating mode
2. Track Index Shows the current track number
3. PBC Displays PBC On/Off status
4. Control Panel
Enables use of play/pause/search features
When turned in Ω directions : Searches previous/next
file
When pushed in ← or → directions: : Plays
previous/next file
When pressed :Plays or pauses
5. Play Time Displays the current play time/total play time
6. Full Screen Converts VCD into full screen
7. MENU Displays View PBC/PBC Menu/Repeat/Sound
Settings/Display Settings menus
8. List Moves to the list screen
9. View PBC Turns PBC On/Off
10. PBC Menu Moves to the PBC Menu screen
11. Repeat Repeats the current VCD
12. Sound Setting Moves to the sound setting screen
13. Display Setting Moves to the display setting screen
Basic Mode Screen
Part 2. AV (VCD)
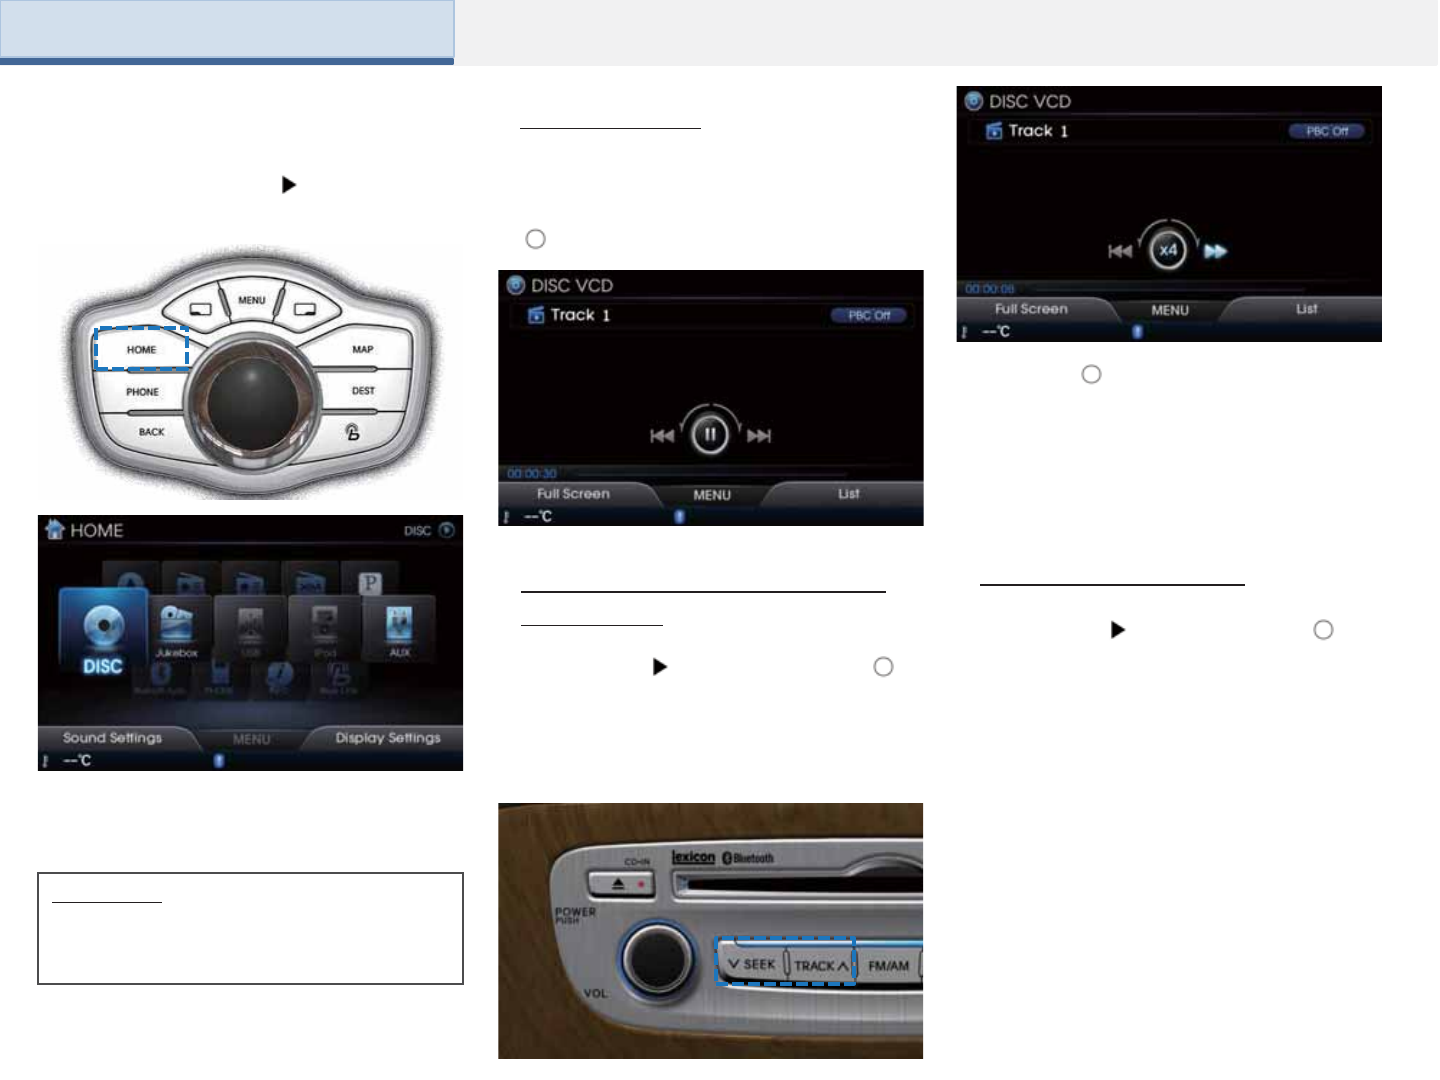
Starting Mode
Press the [HOME] Key Select [Disc]
Menu
The mode will be disabled when a VCD
disc has not been inserted.
While playing Push and hold the [ ]
in ← or → direction (under 0.8 seconds)
or press and hold the [SEEK]TRACK]
key to fast-forward/rewind the current
VCD.
Once a VCD is inserted, the VCD will
automatically begin playing. Pressing the
[ ] again will pause the VCD.
Playing a VCD
Fast-forwarding or Rewinding
VCD tracks
Selecting VCD tracks
While playing Shortly push the [ ] in
← or → direction (under 0.8 seconds) or
shortly press the [SEEK]TRACK] key to
select the previous/next track.
While the [ ] or [SEEK] [TRACK] key is
being operated, the VCD will rewind or
fast-forward at 20x speed. Once
released, the VCD will begin playing at
normal speed.
Information
•Only genuine VCDs are supported. Other
discs may result in recognition failure . (e.g.
Copied CD-R, CDs with labels)
Part 2. AV (VCD)

Turn the [ ] or [TUNE/FILE] knob in Ω
directions to search for tracks. From the
searched tracks, once the desired file
name is displayed, press the [ ] or
[TUNE/FILE] knob to play the
corresponding track.
During search, the track name is
displayed in blue. Press the [ ] or
[TUNE/FILE] knob to play the selected
track and display the basic display info.
Press the [MENU] key to use the View
PBC, PBC Menu, Repeat, Sound
Settings and Display Settings.
Searching VCD tracks Using the Menu Buttons
PBC
Press the [MENU] key Press [View
PBC] Press the [0]~[9] buttons Set
and press [Done]
Press the [List] button to view the play
list.
Searching VCD List
Select track you want to play.
Part 2. AV (VCD)
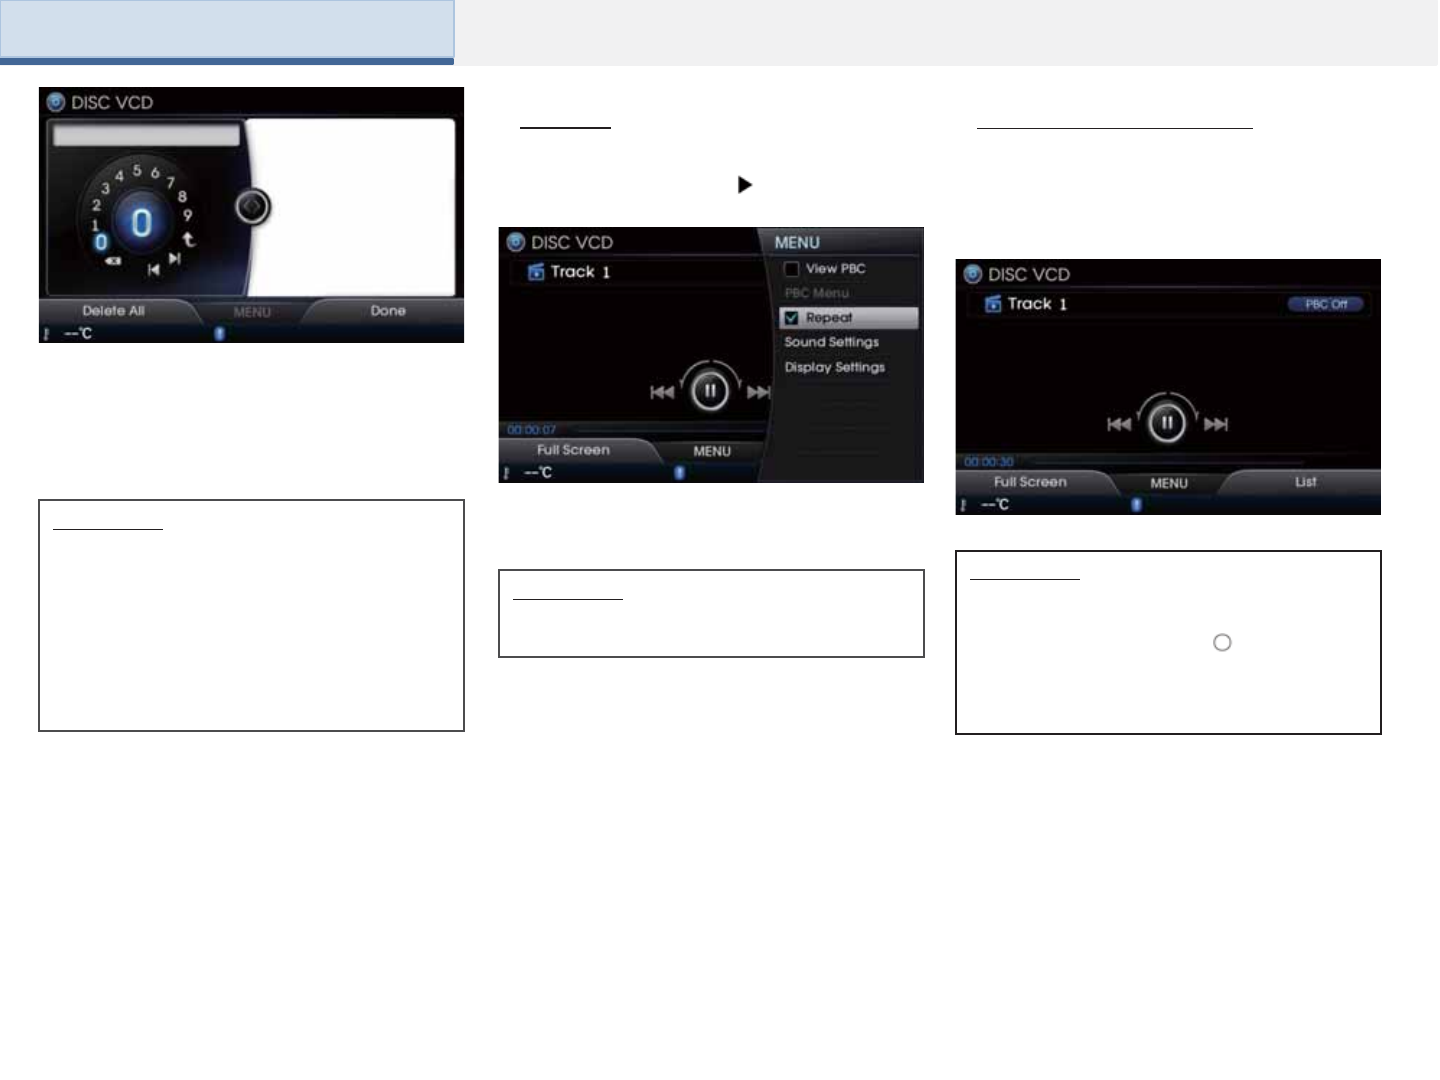
Part 2. AV (VCD)
Within PBC ON state, press the [PBC
MENU] button to display the PBC menu
screen.
Viewing in Full Screen
Press the [Soft1] and select [Full Screen]
to view the VCD in full screen.
Repeat
Press the [MENU] key Press [Repeat]
The current track is repeated.
Information
• Press the [PBC OFF] button to turn the
PBC setting OFF. The play screen will be
displayed and the first track is displayed.
• Press the [<<] [>>] buttons to move to the
previous/next list menu page.
• While in PBC ON mode state, turning the
power or ignition ON/OFF will return the
VCD to PBC OFF state.
Information
•Press the [Repeat] button again to turn off
shuffle.
Information
•If there are no operations for 10 seconds,
the VCD menu will automatically disappear.
•Press the [MENU] key or [ ] to display the
menu again.
•For more information on Sound and Display
settings, refer to the Info/Setup section.
Basic Mode Screen (Audio)
4
10
1
5
12
2
6
3
11
7
8
9
13
15
14
16
Name Description
1. Mode Displays currently operating mode
2. File Index Shows the current files/total number of files
3. Play File Info Shows file number/album/artist/genre information
4. Control Panel
Enables use of play/pause/select/search features
When turned in Ω directions : Searches previous/next
file
When pushed in ← or → directions: : Plays
previous/next file
When pressed :Plays or pauses
5. Play Time Displays the current play time and total time
6. File Info Shows file information
7. MENU
Moves to Shuffle/Repeat/Scan/Auto Playlist/Jukebox
Video/Jukebox Image/Sound Settings/Display Settings
and other modes
8. List Moves to the file list screen
9. Shuffle Plays files in random order
10. Repeat Repeats the current file or all files
11. Scan Scans the beginning parts of files (approx 10 seconds
per file)
12. Auto Playlist Moves to list screen showing current song and similar
songs
13. Jukebox Video Moves to Jukebox video menu
14. Jukebox Image Moves to Jukebox image menu
15. Sound
Settings Moves to the sound setting screen
16. Display
Settings Moves to the display setting screen
Part 2. AV (JUKEBOX)
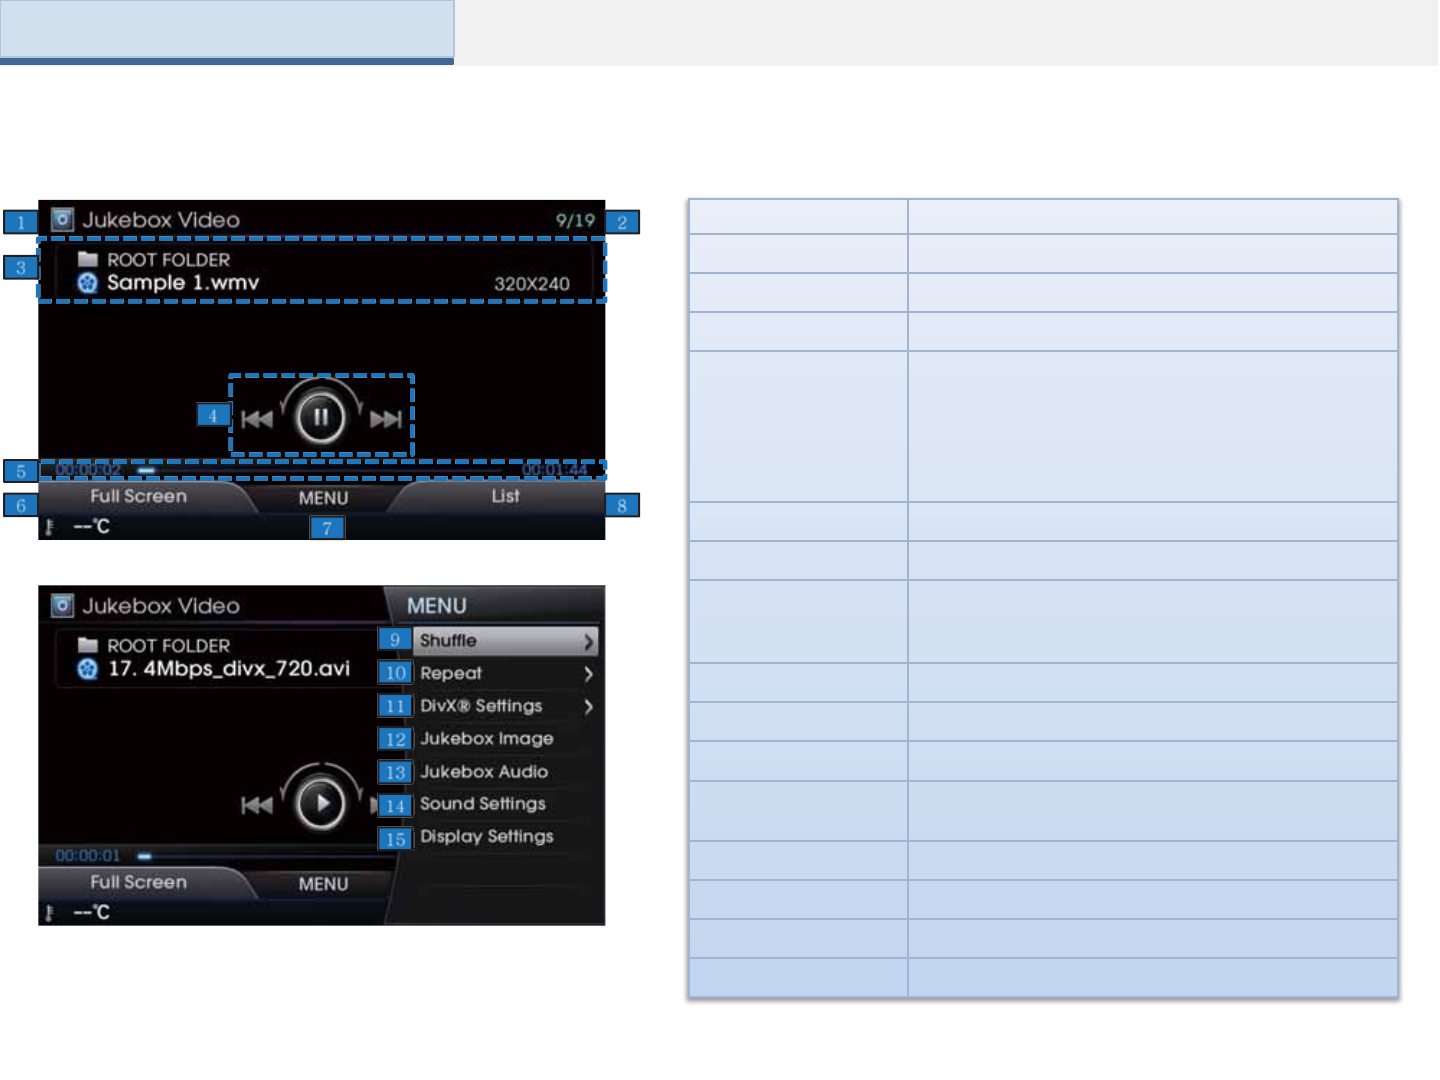
Basic Mode Screen (Video)
Name Description
1. Mode Displays currently operating mode
2. File Index Shows the current files/total number of files
3. Play File Info Shows the file name/folder path/resolution information
4. Control Panel
Enables use of play/pause/select/search features
When turned in Ω directions : Searches previous/next
file
When pushed in ← or → directions: : Plays
previous/next file
When pressed :Plays or pauses
5. Play Time Displays the current play time and total time
6. Full screen Displays the video in full screen
7. MENU
Moves to Shuffle/Repeat/DivX Settings/Jukebox
Image/Jukebox Audio/Sound Settings/Display
Settings and other modes
8. List Moves to the list screen
9. Shuffle Plays files in random order
10. Repeat Repeats the current file or all files
11. DivX Settings Used to set DivX VOD related settings/subtitles and
voice language settings
12. Jukebox Image Moves to Jukebox image menu
13. Jukebox Audio Moves to Jukebox audio menu
14. Sound Settings Moves to the sound setting screen
15. Display Settings Moves to the display setting screen
Part 2. AV (JUKEBOX)
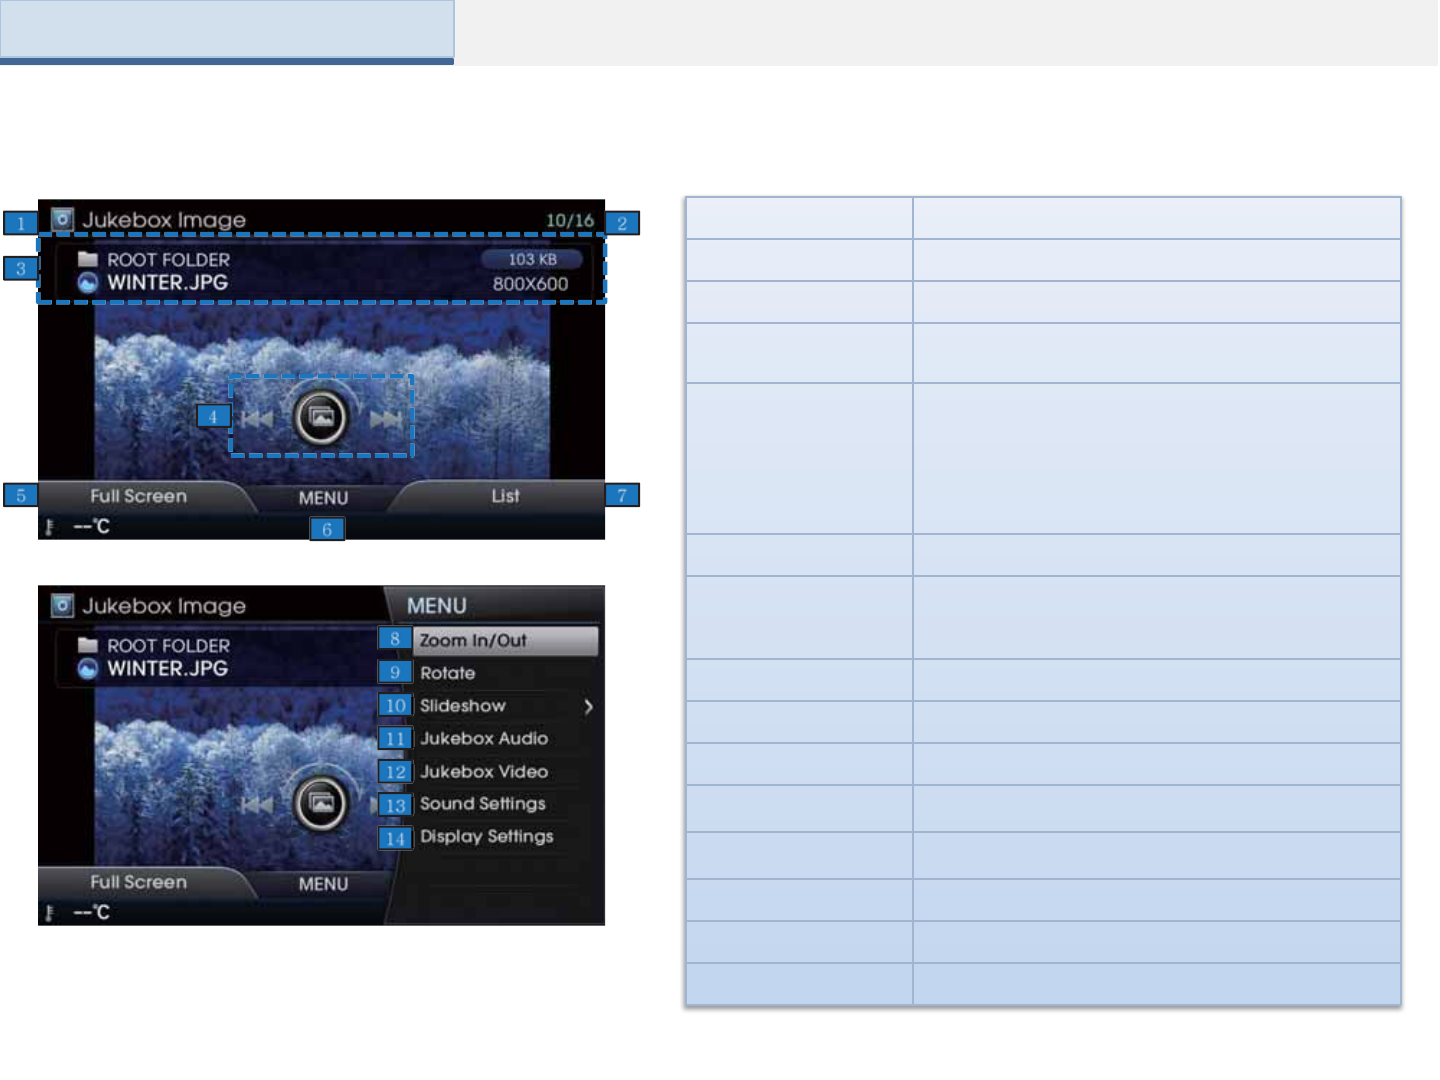
Basic Mode Screen (Image)
Name Description
1. Mode Displays currently operating mode
2. File Index Shows the current file/total files
3. Play File Info Shows the file name/folder path/size/resolution
information
4. Control Panel
Enables search/selection of previous/next files
When turned in Ωdirections : Searches previous/next
file
When pushed in ←or →directions: : Shows
previous/next file
When pressed :Start/stops slideshow
5. Full Screen Displays the image in full screen
6. MENU
Moves to Zoom in/Zoom out/Slideshow
settings/Jukebox Audio/Jukebox Video/ Sound
Settings/Display Settings and other modes
7. List Moves to the list screen
8. Zoom In/Out Enlarges/reduces image (zoom in/out)
9. Rotate Rotates image
10. Slideshow View images as slideshow
11. Jukebox Audio Moves to Jukebox audio menu
12. Jukebox Video Moves to Jukebox video menu
13. Sound Settings Moves to the sound setting screen
14. Display Settings Moves to the display setting screen
Part 2. AV (JUKEBOX)
Starting Mode (Audio)
Once Jukebox mode is selected, the Jukebox
audio will automatically begin playing. Pressing
the [ ] again will pause the current file.
Playing Jukebox Audio
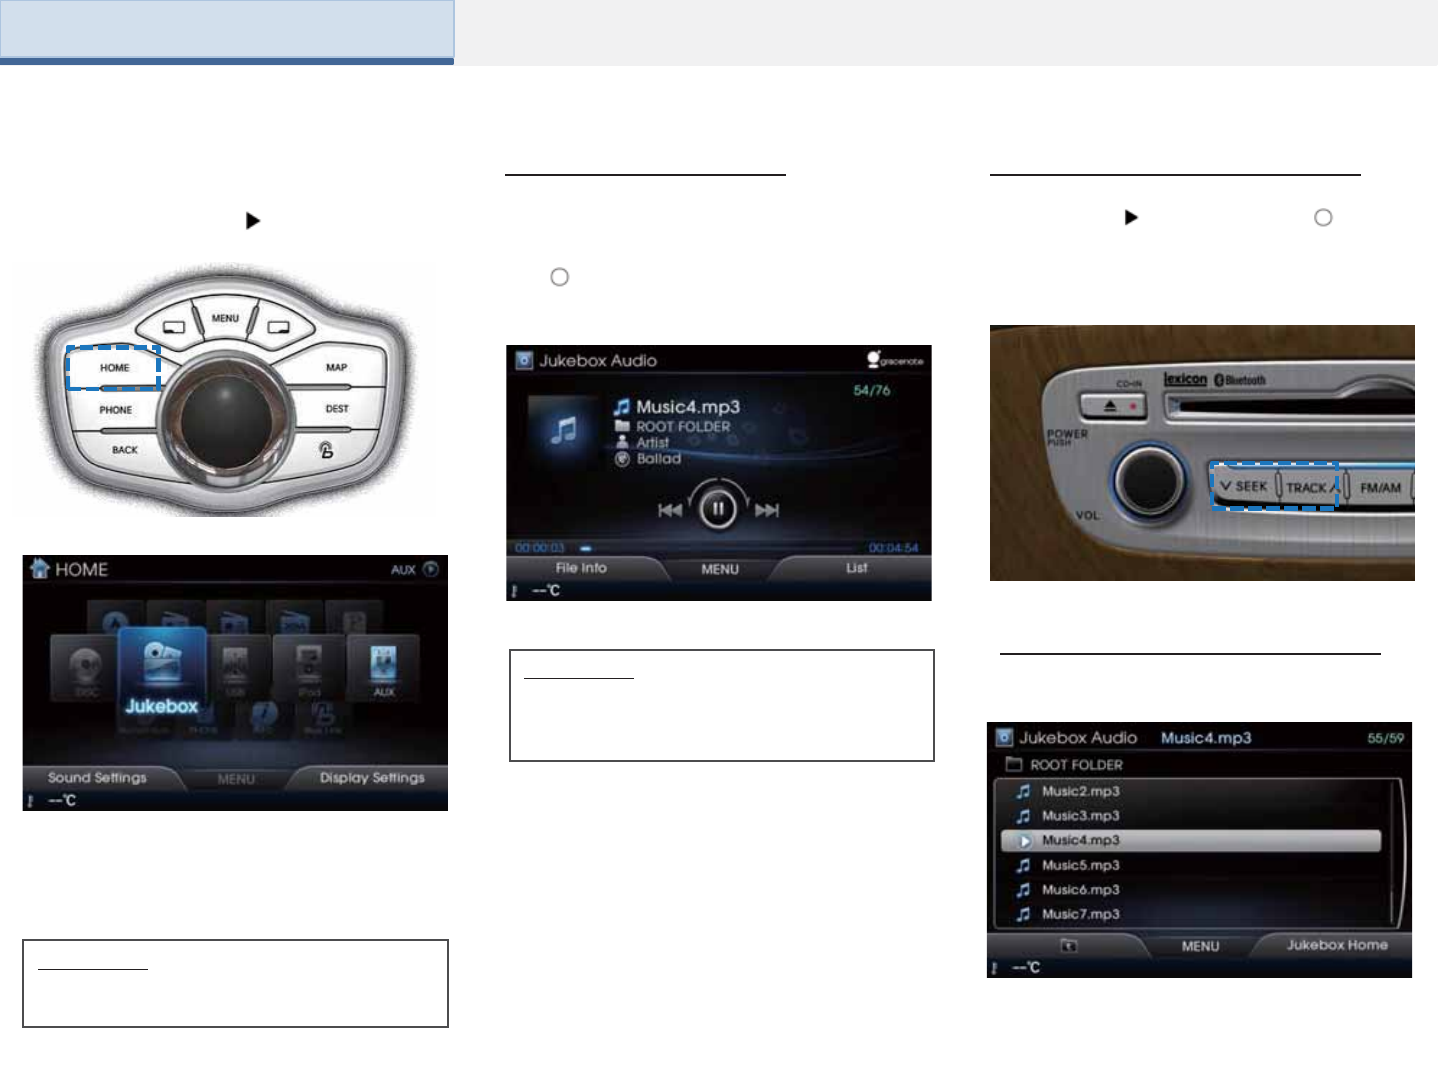
Press the [HOME] key Select [Jukebox]
Selecting Jukebox Audio Files
Once [Jukebox] is selected, the most
recently operated mode (Audio, Image, and
Video) will operate.
Information
• If there are no files saved in the Jukebox,
then the Jukebox button will be disabled.
Information
• If the most recently operated mode was
video or image mode, press [MENU] >
[Jukebox Audio] to operate Audio mode.
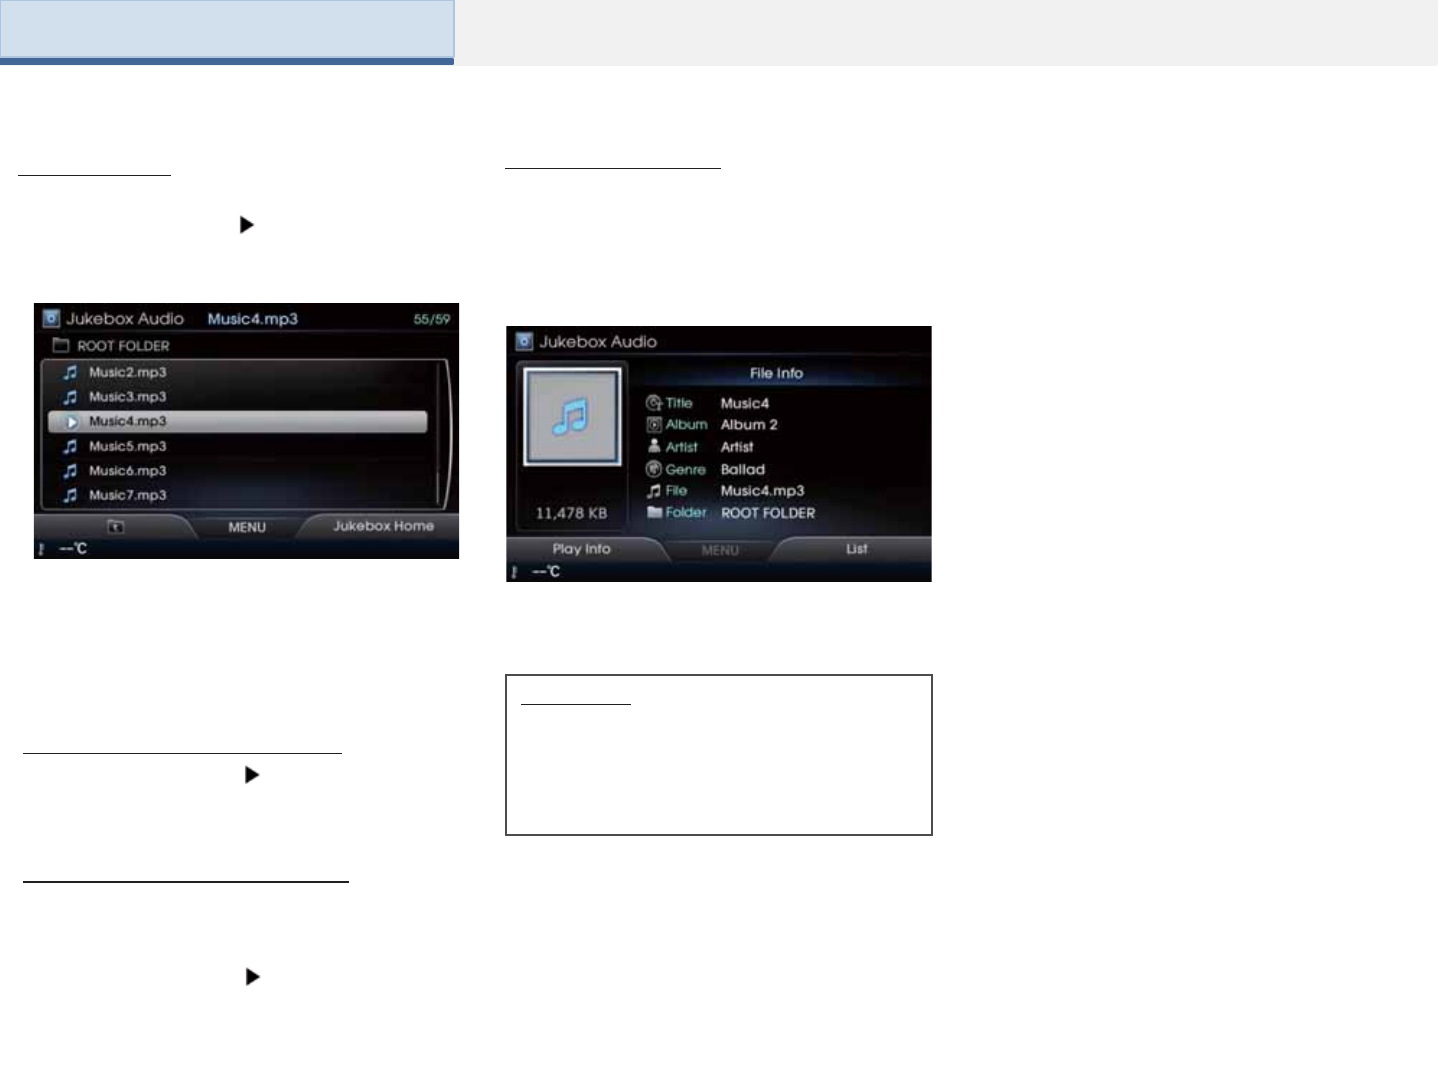
Press the [List] button to check the play list.
Searching Jukebox Audio Lists
Select the desired file you want to play.
Part 2. AV (JUKEBOX)
While playing Shortly press the [ ] in ←
or → direction (under 0.8 seconds) or shortly
press the [SEEK/TRACK] key to select the
previous/next file.
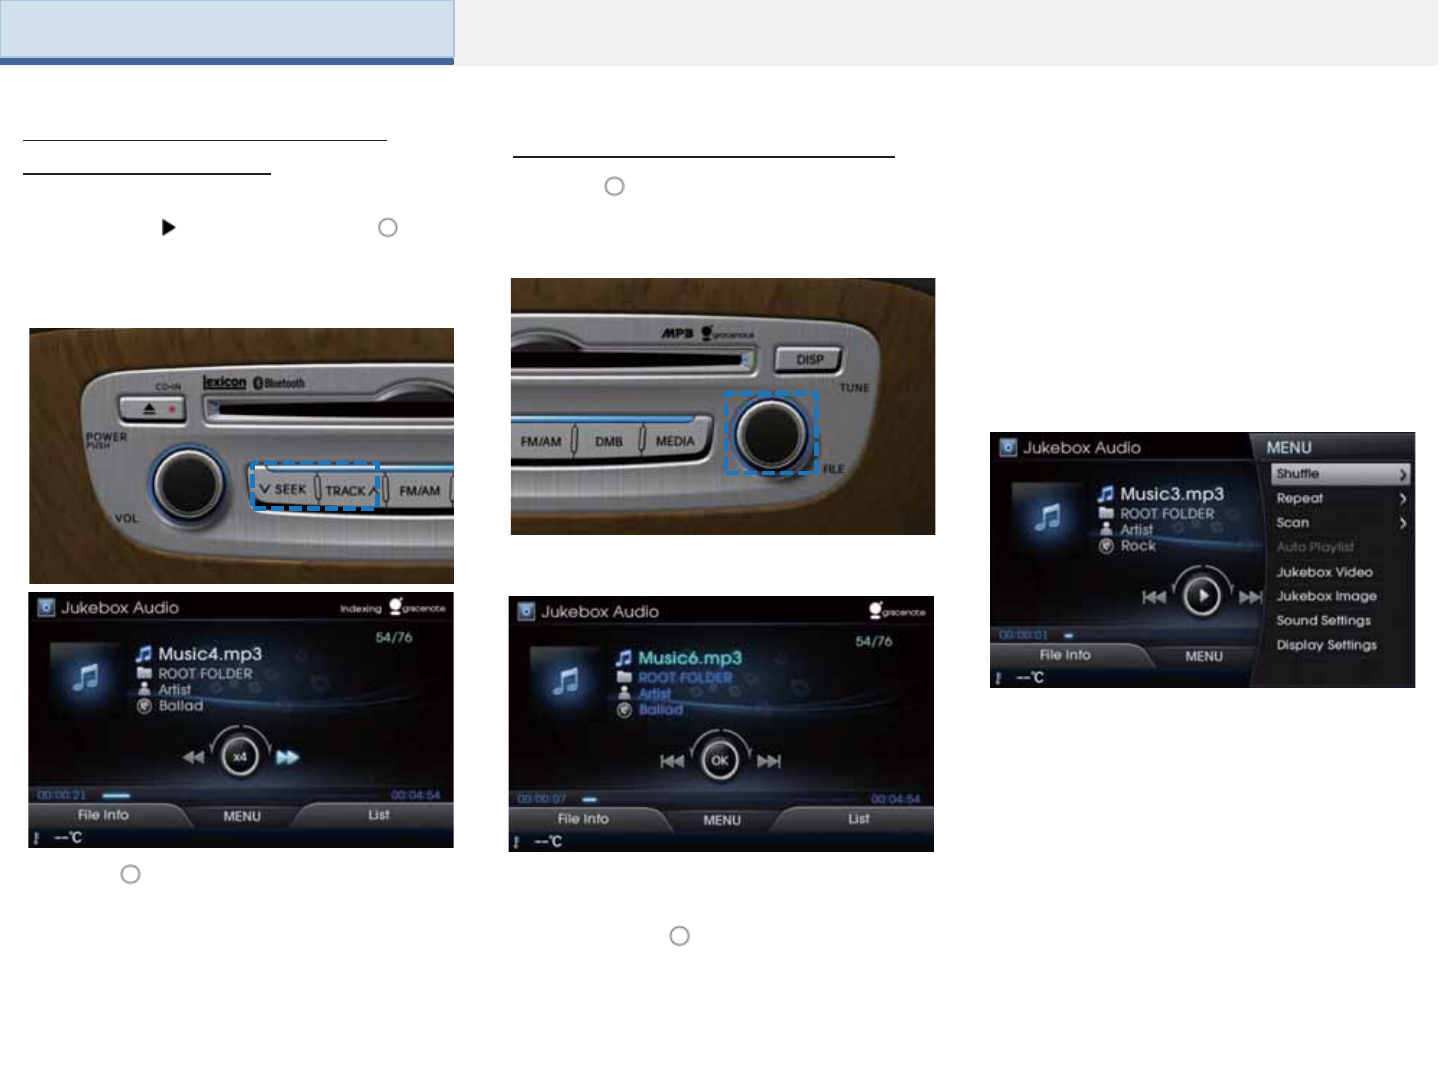
Fast-forwarding or Rewinding
Jukebox Audio Files Searching Jukebox Audio Files
Press the [MENU] key to use the Repeat,
Shuffle, Scan, Auto Playlist, Sound
Settings and Display Settings. This menu
is also used to move to other Jukebox
modes.
Using the Menu Buttons
While playing Press and hold the [ ] in
← or → direction (over 0.8 seconds) or
press and hold the [SEEK/TRACK] key to
fast-forward/rewind the current file.
Part 2. AV (JUKEBOX)
While the [ ] or [SEEK] [TRACK] key is
being operated, the file will rewind or fast-
forward at a high speed. Once released,
the file will begin playing at normal speed.
During search, the file name is displayed in
blue. Press the [ ] or [TUNE/FILE] knob to
play the selected file and display the basic
display info.
Turn the [ ] or [TUNE/FILE] knob in Ω
directions to search for files.
Part 2. AV (JUKEBOX)
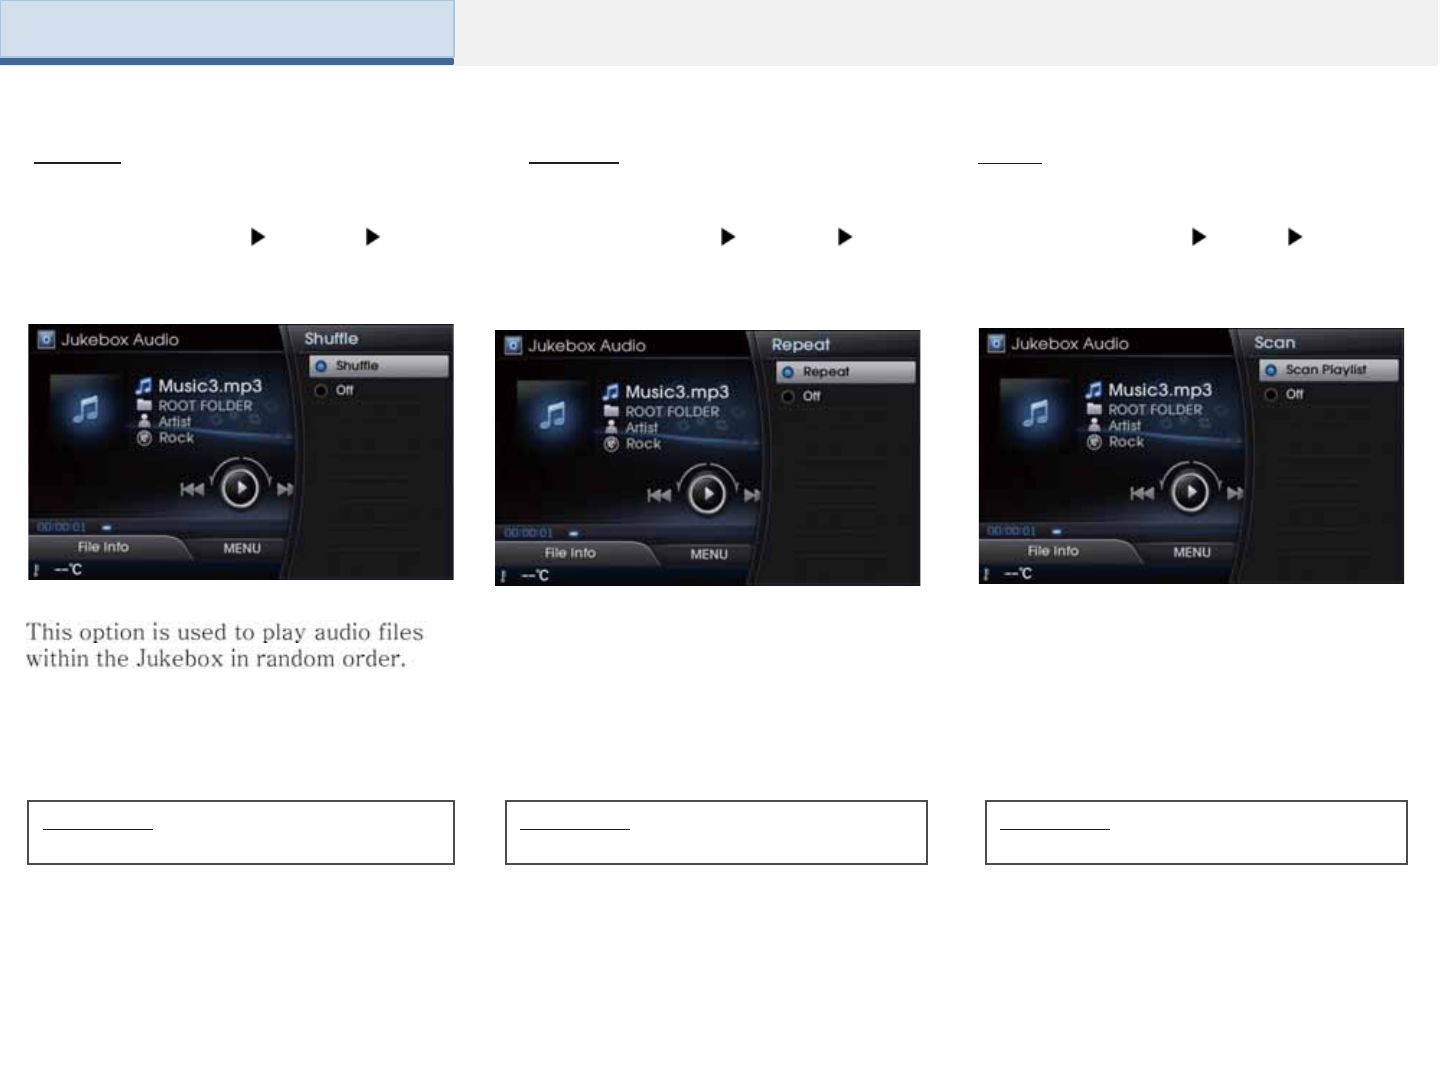
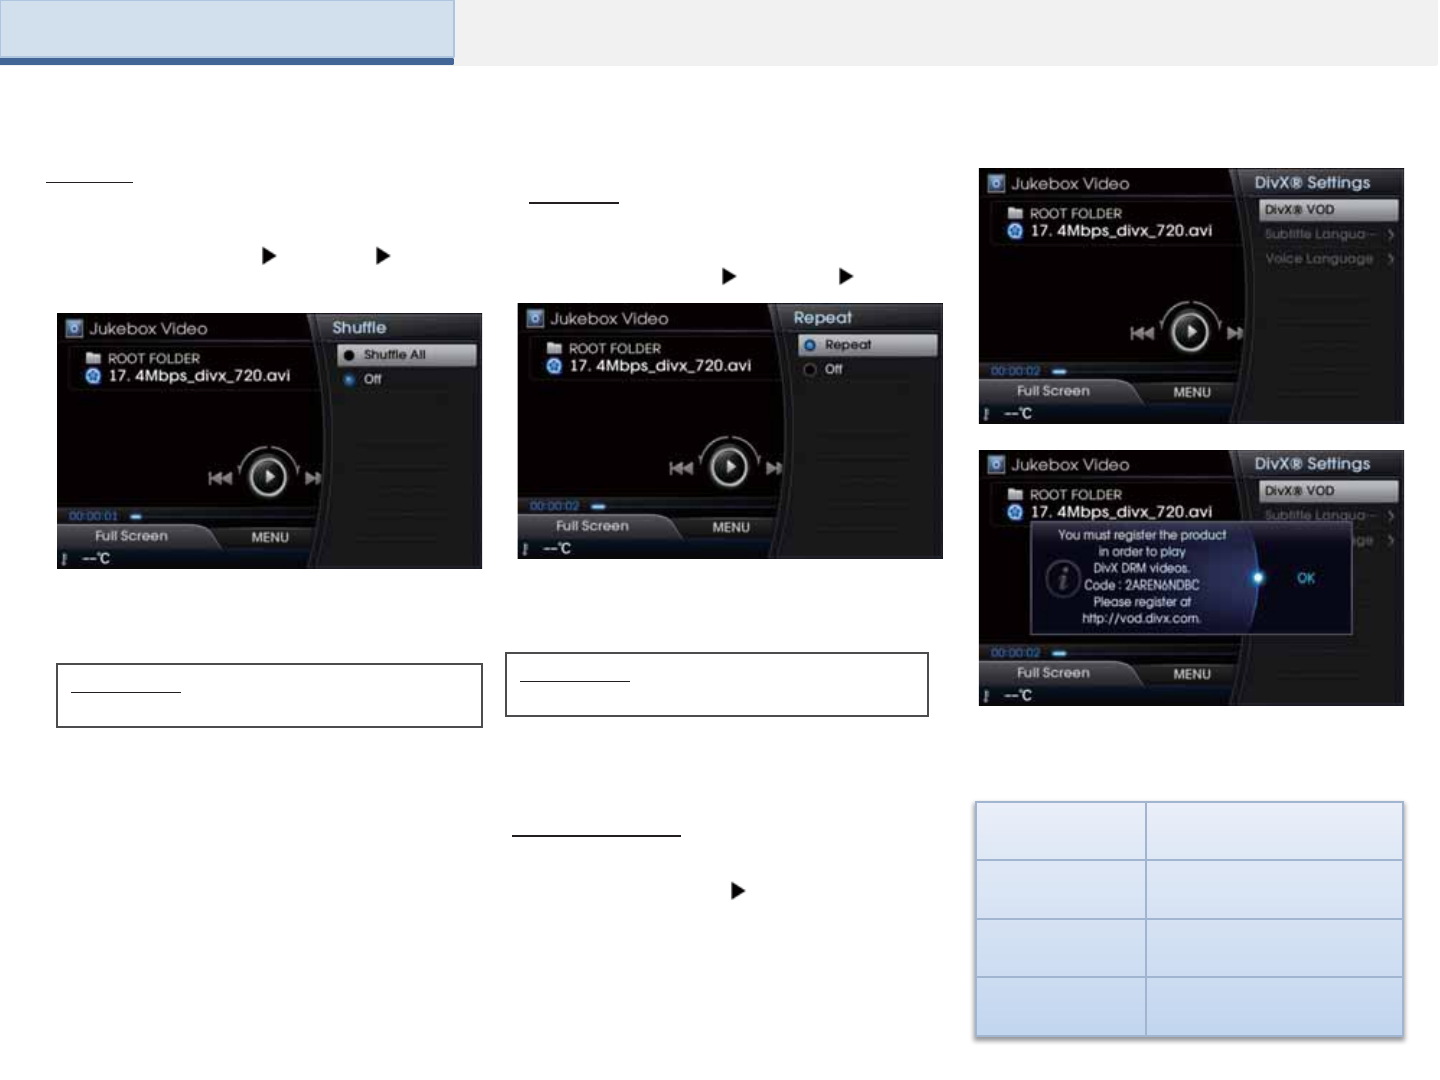
Shuffle
Press the [MENU] key [Shuffle] [Shuffle]
Information
•Press [Off] to turn the Shuffle feature off.
Information
•Press [Off] to turn the Repeat feature off.
Information
•Press [Off] to turn the Scan feature off.
The beginning part (approximately first 10
seconds) of all files within the current folder
or all Jukebox files are scanned.
Scan
Press the [MENU] key [Scan] Select
[Scan Playlist]
Repeat
Press the [MENU] key [Repeat]
[Repeat]
The current song or the all files within the
folder can be repeated.
Press the [MENU] key [Jukebox Video]
Press the [MENU] key [Jukebox Image]
File Info/Play Info
To return to the previous screen, press the
[Play Info] button.
Information
•Information will not be displayed for MP3
files without file information.
• For more information on Sound and
Display settings, refer to the Info/Setup
section.
Part 2. AV (JUKEBOX)
List of songs similar with the current song
is displayed. The list can be used to select
desired songs.
Auto Playlist
Press the [MENU] key Select [Auto
Playlist]
Moving to Jukebox Video
Moving to Jukebox Image
Press the [Soft1] key to select File Info to
view file information, such as title, album,
artist, genre, fie name, and folder location.

Starting Mode (Video)
Press the [HOME] key [Jukebox]
Part 2. AV (JUKEBOX)
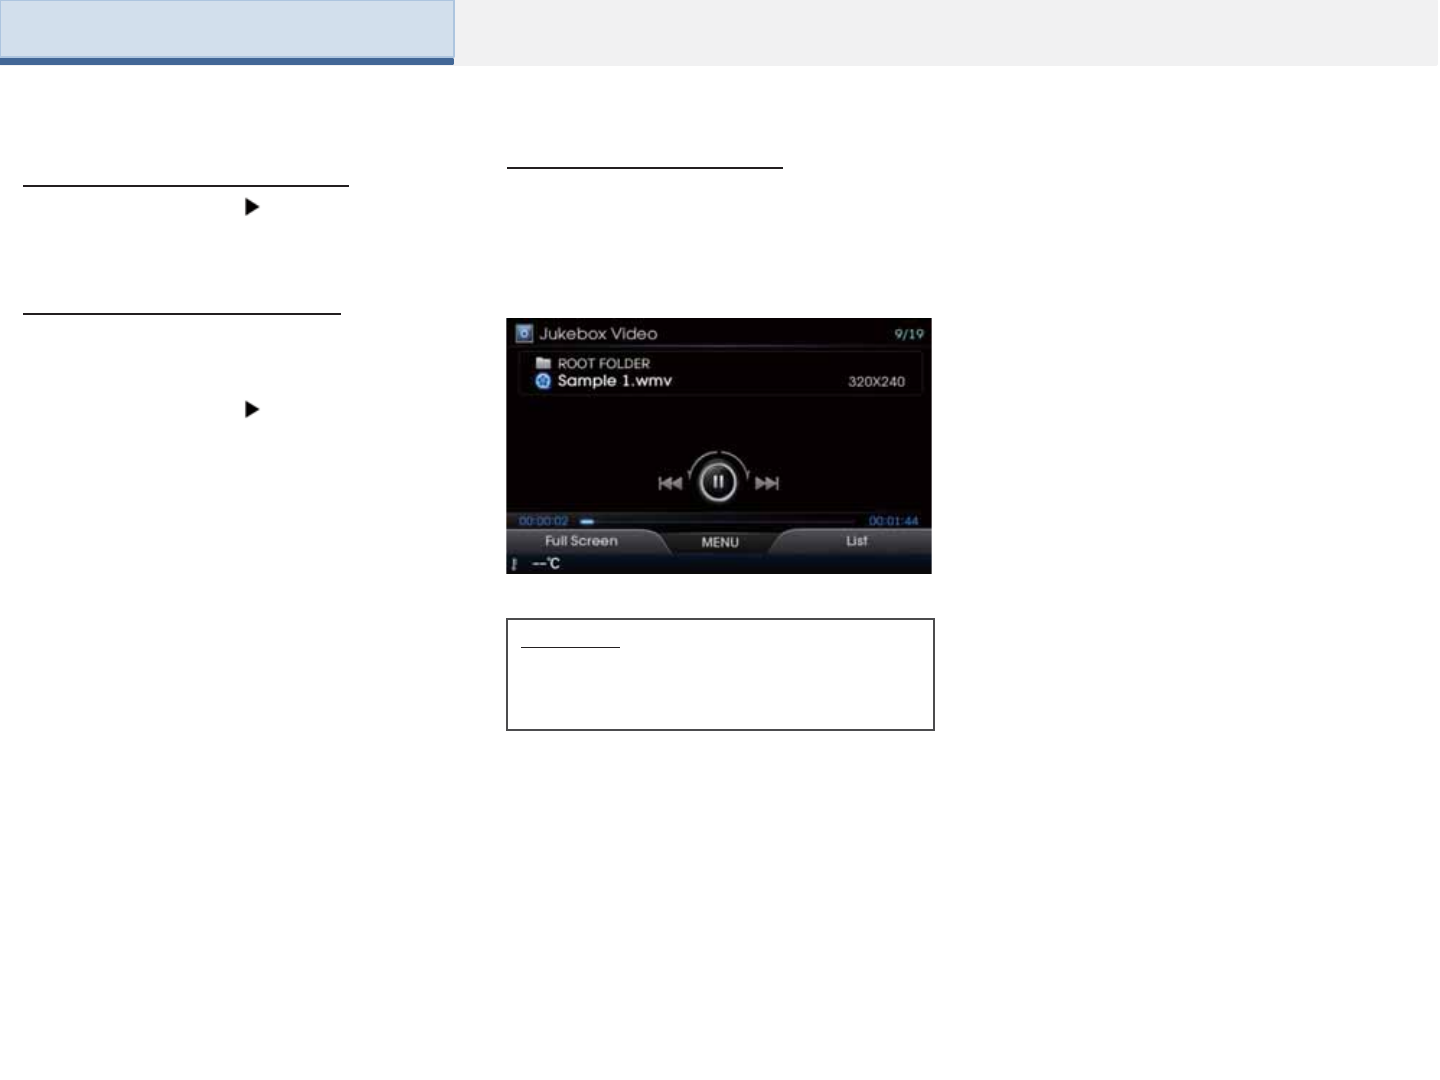
Once Jukebox mode is selected, the Jukebox
video will automatically begin playing. Pressing
the [ ] again will pause the current file.
Playing Jukebox Video Selecting Jukebox Video Files
Once [Jukebox] is selected, the most
recently operated mode (Audio, Image, and
Video) will operate.
Information
• If there are no files saved in the Jukebox,
then the Jukebox button will be disabled.
Information
• If the most recently operated mode was
audio or image mode, press [MENU] >
[Jukebox Video] to operate Video mode.
Press the [List] button to check the play list.
Searching Jukebox Video Lists
Select the desired file you want to play.
While playing Shortly press the [ ] in ←
or → direction (under 0.8 seconds) or shortly
press the [SEEK/TRACK] key to select the
previous/next file.
Part 2. AV (JUKEBOX)
Fast-forwarding or Rewinding
Jukebox Video Files Searching Jukebox Video Files
Press the [MENU] key to use the Shuffle,
Repeat, Shuffle, DivX Settings, Sound
Settings and Display Settings. This menu
is also used to move to other Jukebox
modes.
Using the Menu Buttons
While playing Press and hold the [ ] in
← or → direction (over 0.8 seconds) or
press and hold the [SEEK/TRACK] key to
fast-forward/rewind the current file.
While the [ ] or [SEEK] [TRACK] key is
being operated, the file will rewind or fast-
forward at a high speed. Once released,
the file will begin playing at normal speed.
During search, the file name is displayed in
blue. Press the [ ] or [TUNE/FILE] knob to
play the selected file and display the basic
display info.
Turn the [ ] or [TUNE/FILE] knob in Ω directions
to search for files.
DivX Settings
Press the [MENU] key [DivX Settings]
Upon first use of this feature, you must register
your product through the DivX website.
Name Description
1. DivX VOD Set DivX VOD related
options
2. Subtitle
Language Set Subtitle language
3. Voice
Language Set Voice language
This option is used to play video files within
the Jukebox in random order.
Part 2. AV (JUKEBOX)
Shuffle
Press the [MENU] key [Shuffle] [Shuffle
All]
Information
•Press [Off] to turn the Shuffle feature off.
Information
•Press [Off] to turn the Repeat feature off.
Repeat
Press the [MENU] key [Repeat]
[Repeat]
The current song or the all files within the
folder can be repeated.
Viewing in Full Screen
Information
•For more information on Sound and Display
settings, refer to the Info/Setup section.
Press the [Soft1] key and press [Full Screen]
to view the USB in full screen.
Part 2. AV (JUKEBOX)
Press the [MENU] key [Jukebox Image]
Press the [MENU] key [Jukebox Audio]
Moving to Jukebox Image
Moving to Jukebox Audio
Starting Mode (Image)
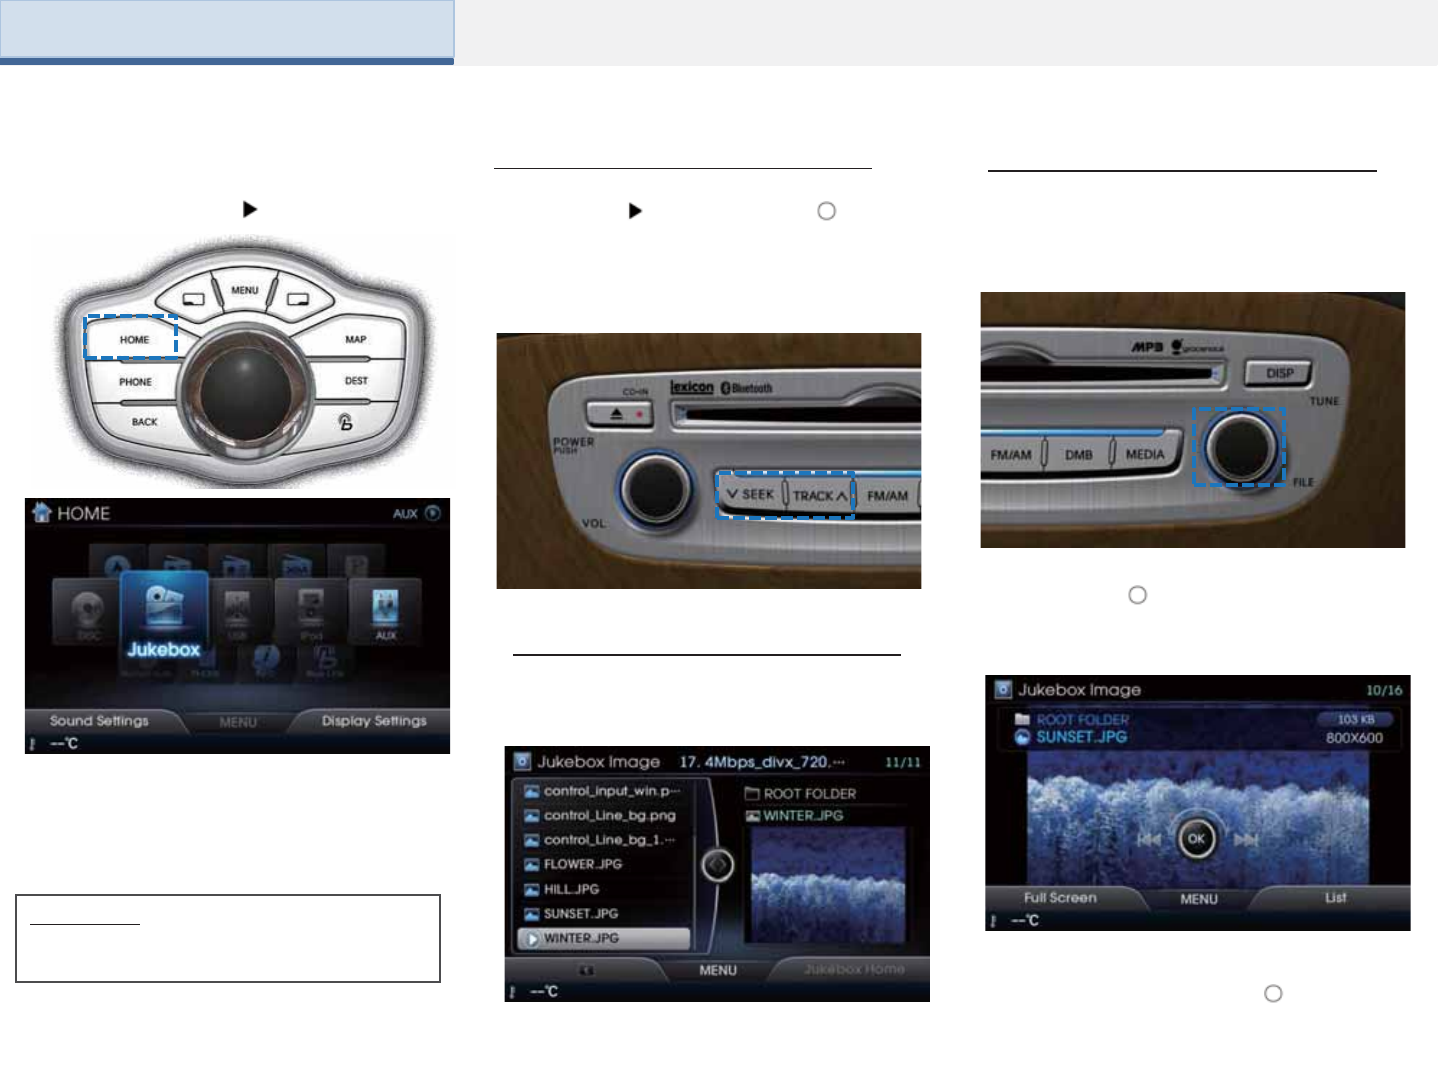
Press the [HOME] key [Jukebox]
Part 2. AV (JUKEBOX)
Selecting Jukebox Image Files
Once [Jukebox] is selected, the most
recently operated mode (Audio, Image, and
Video) will operate.
Information
• If there are no files saved in the Jukebox,
then the Jukebox button will be disabled.
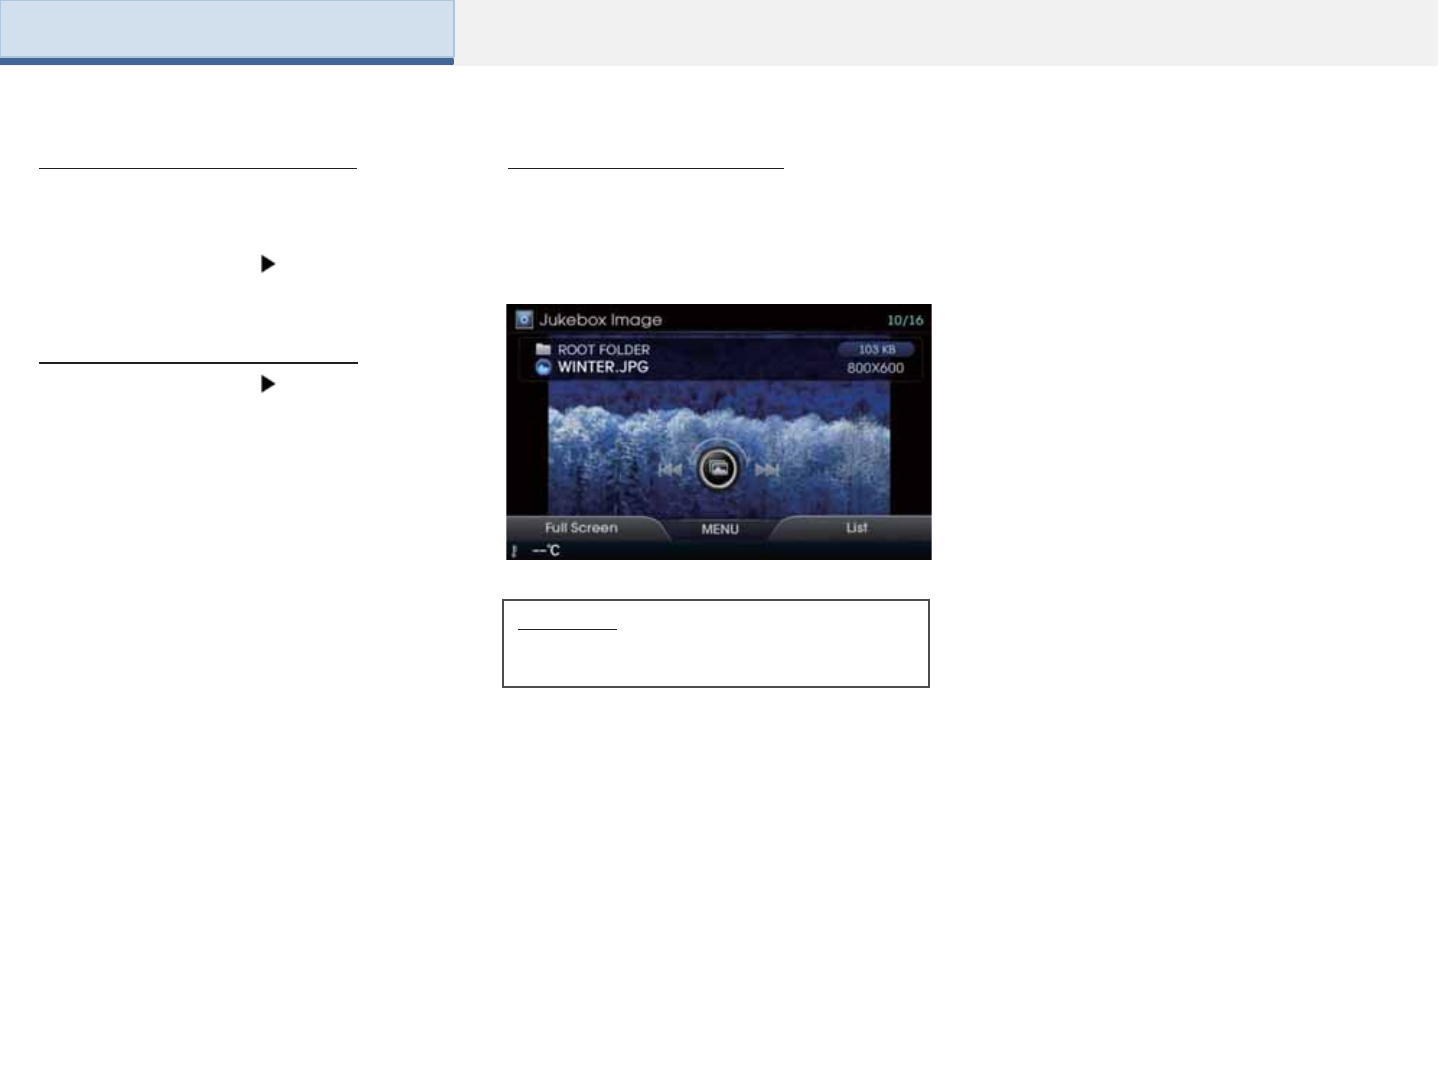
Press the [List] button to check the image list.
Searching Jukebox Image Lists
Select the desired file you want to view.
While playing Shortly press the [ ] in ←
or → direction (under 0.8 seconds) or shortly
press the [SEEK/TRACK] key to select the
previous/next file.
Searching Jukebox Image Files
During search, the image name is displayed in
blue. Press the [ ] or [TUNE/FILE] knob to play
the selected image and display the basic display
info.
From the searched files, once the desired file
name is displayed, press the [ ] or
[TUNE/FILE] knob to play the corresponding
image.
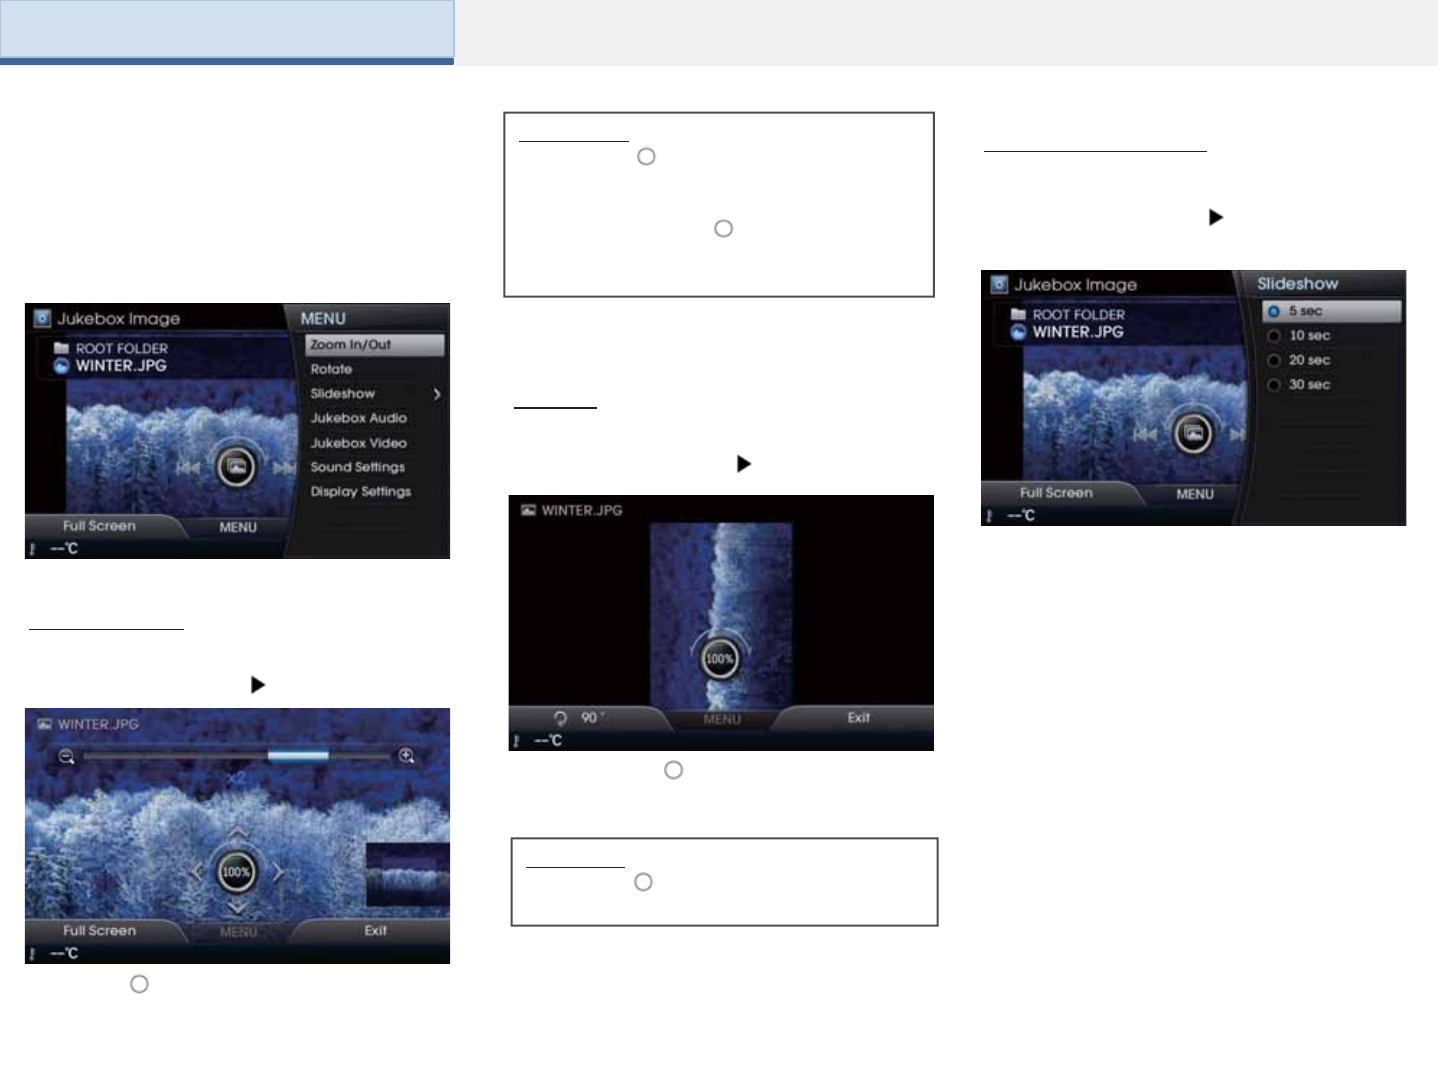
Zoom In/Out
Press the [MENU] key [Zoom In/Out]
Information
•Press the [ ] to restore the original image
size.
Rotate
Press the [MENU] key [Rotate]
Information
• Press the [ ] to restore the original
image size.
• When images are not all displayed on the
screen, pushing the [ ] in
up/down/left/right directions will display
other images.
Slideshow Setting
Press the [MENU] key [Slideshow]
Image slideshow intervals can be set at [5secs],
[10secs], [20secs], [30secs] intervals.
Part 2. AV (JUKEBOX)
Press the [MENU] key to use the Zoom
In/Out, Rotate, Slideshow, Copy, Sound
Settings and Display Settings options.
This menu is also used to move to other
Jukebox modes.
Turn the [ ] in Ω direction to enlarge or
reduce the image size. The scale can be
changed to 1/4, 1/2, 1x, 2x, and 4x.
Each time the [ ] is turned, the image is
rotated from 0 → 90 → 180 → 270 degrees.
Part 2. AV (JUKEBOX)
Press the [MENU] key [Jukebox Audio]
Moving to Jukebox Audio
Press the [MENU] key [Jukebox Video]
Moving to Jukebox Video
Press the [Soft1] key and select [Full Screen]
to view the USB in full screen.
Information
•For more information on Sound and Display
settings, refer to the Info/Setup section.
Viewing in Full Screen

Before playing a USB MP3
•Connect the USB device after turning on the engine. The USB
device may become damaged if it is already connected when
the ignition is turned on.
•Files that are not standard format music/video/image files will
not be played.
•For MP3/WMA files, only music files with compression rates
between 8Kbps ~ 320Kbps can be played.
•Heed caution to static electricity when
connecting/disconnecting external USB devices.
•Encoded MP3 Players will not be recognized when connected
as an external device.
•When connecting an external USB device, the device may not
properly recognize the USB is in some states.
•Only products formatted with byte/sectors under 64Kbyte will
be recognized.
•This device recognizes USB devices formatted in FAT
12/16/32 as well as NTFS file systems.
•Some USB devices may not be supported due to compatibility
issues.
About USB •Avoid contact between the USB connector with bodily
parts/foreign objects.
•Repeated connecting/disconnecting of USB devices within
short periods of time may result in product malfunction.
•Make sure to connect/disconnect external USB devices with
the audio power turned off.
•The amount of time required to recognize the external USB
device may differ depending on the type, size, or file formats
stored on the USB. Such differences in required time are not
indications of malfunction.
•Please wait until the device fully recognizes the USB devices.
The device supports only USB devices used to play
music/video/image files.
•Do not use the USB I/F to charge batteries or USB
accessories that generate heat. Such acts may lead to
worsened performance or damage to the device.
•The device may not recognize the USB device if separately
purchased USB hubs and extension cables are being used.
Connect the USB directly with the multimedia terminal of the
vehicle.
•When using mass storage USB devices with separate logical
drives, only files saved to the root drive can be played.
•When application programs are installed to specific USBs,
files may not properly play.
Part 2. AV (USB)
Product Name Manufacturer
XTICK LG
BMK BMK Technology
SKY-DRV Skydigital
TRANSCEND JetFlash Transcend
Sandisk Cruzer SanDisk
Micro ZyRUS ZyRUS
NEXTIK Digiworks
•The device may not operate normally if MP3 Players, cellular
phones, digital cameras, or other electronic devices (USB
devices not recognized as portable disk drives) are connected
with the device.
•Charging through the USB may not work for some mobile
devices.
•The device may not support normal operation when using a
USB memory type besides Metal Cover Type USB Memory.
•The device may not support normal operation when using
formats such as HDD Type, CF, or SD Memory.
•Upon playing iPods, please use a dedicated iPod car cable.
Normal operations cannot be guaranteed when other cables are
being used.
•The device will not support files locked by DRM (Digital Rights
Management.)
•USB memory sticks used by connecting an Adaptor (SD Type
or CF Type) may not be properly recognized.
•Only use Plug type connector products, as shown in the figure
below.
* Problems that occur through use of USB devices not listed
within the above table are not covered by the product warranty.
• ABOUT DivX VIDEO:
• DivX is a digital video format created by DivX, LLC,
a subsidiary of RoviCorporation. This is an official
DivX Certified device that plays DivX video.
Visit divx.com for moreinformation and software tools to convert your fil
es into DivX videos.
• ABOUT DivX VIDEO-ON-DEMAND:
• This DivX Certified device must be registered in order to play purchas
ed DivX Video-on-Demand (VOD) movies. To obtain your registration c
ode, locate the DivX VOD section in your device setup menu. Go to vod
.divx.com for more information on how to complete your registration.
• DivX Certified to play DivX video, including premium content.
• DivX , DivX Certified and associated logos are trademarks of Rovi Cor
poration or its subsidiaries and are used under license.
• Covered by one or more of the following U.S. patents: 7,295,673; 7,46
0,668; 7,515,710; 7,519,274
Part 2. AV (USB)
Information
•DivX Certified to play DivX video, including premium content.
• DivX , DivX Certified and associated logos are trademarks of Rovi
Corporation or its subsidiaries and are used under license.
• Covered by one or more of the following U.S. patents: :
7,295,673; 7,460,668; 7,515,710; 7,519,274
Caution
•In cases that are not fixed bit rates, the play time may not be properly
displayed.
Information
•If a problem occurs while playing or when playing an unsupported
video format file, use an up-to-date encoding software to change the
format for use.
Information Description
MP3 file
Specification
Specification: MPEG1 AUDIO LAYER3
Recommended
bit rates and
sampling
frequency
Acceptable sampling frequency:: 32, 44.1, 48 (KHz)
Acceptable frequency: 32, 40, 48, 56, 64, 80, 96, 112,
128, 160, 192, 224, 256, 320 (Kbps)
96, 128, 192 Kbps fixed bit rate / 44.1KHz
ID3 Tag Supports ID3v1.0 and ID3v1.1, ID3v2.2, ID3v2.3,
ID3v2.4 ID3 tags
Detailed
Specifications
Maximum directory layers: 20 layers
Maximum length of folder name/file name: 255Bytes
Supported characters for folder name/file name:
Alphanumeric characters, Korean standard character
set 2350 characters, Simplified Chinese 4888
characters
Maximum number of folders which can be stored onto
one USB: 2000 folders (including ROOT)
Maximum number of files which can be stored onto one
USB: 8000
USB MP3 Information and Precautions
Part 2. AV (USB)
4
10
1
5
12
2
6
3
11
7
8
9
13
15
14
16
17
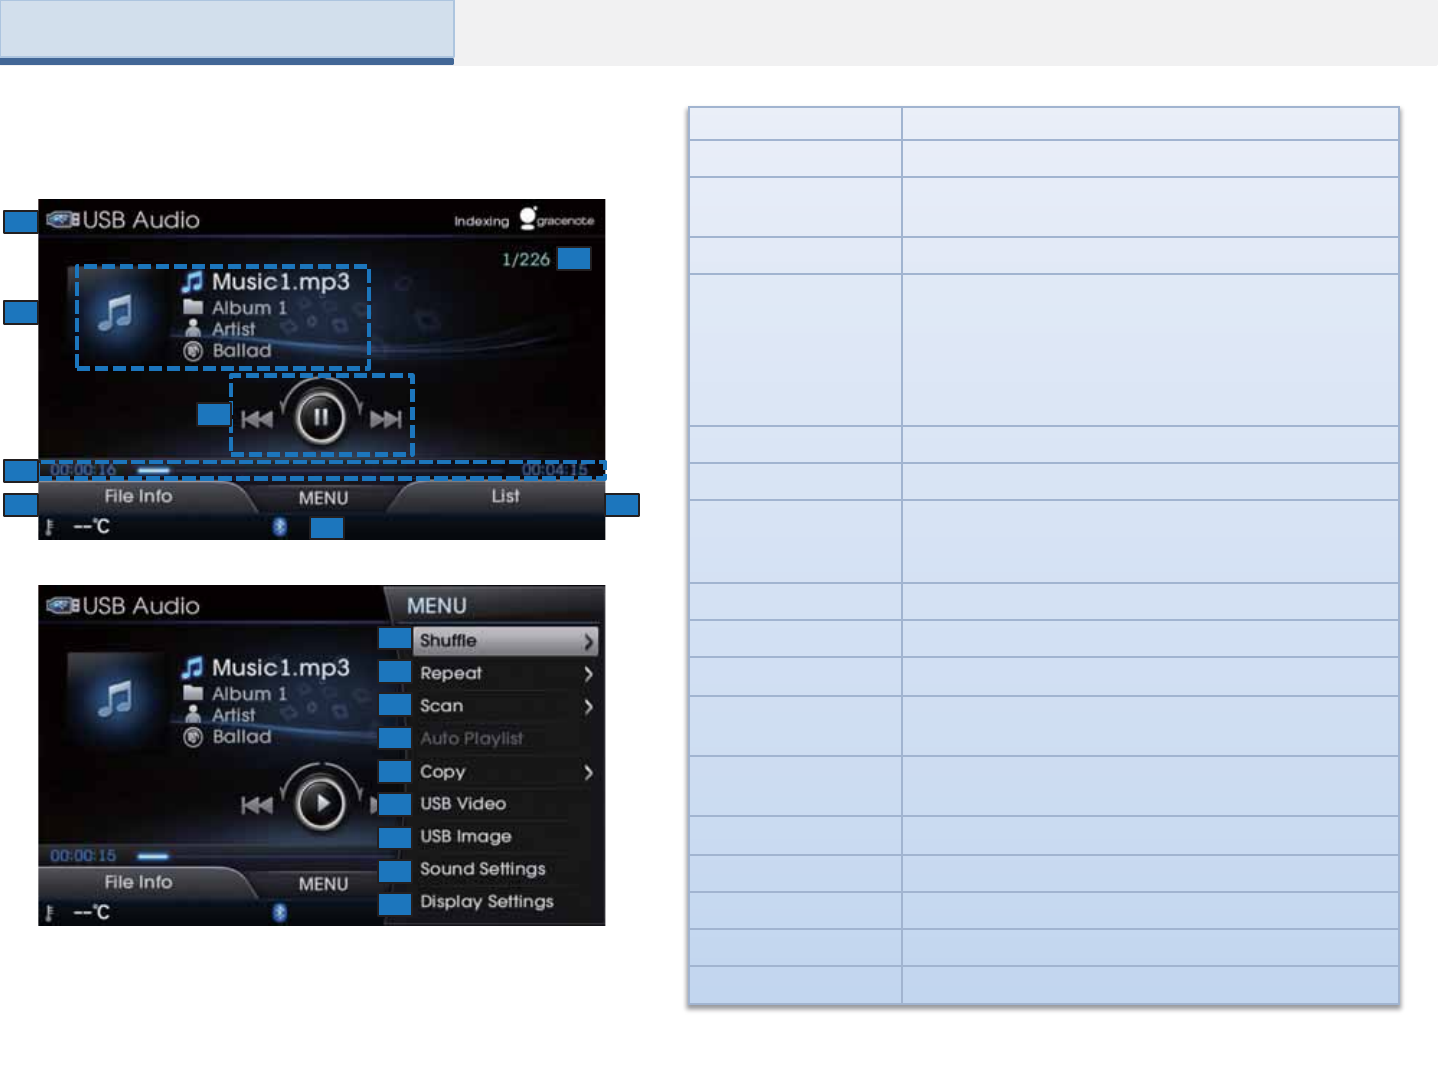
Name Description
1. Mode Displays currently operating mode
2. Track Index Shows the current MP3 file/total number of MP3 files
within the USB
3. Play File Info Displays Track number/Album/Artist/Genre information
4. Control Panel
Enables use of play/pause/select/search features
When turned in Ω directions : Searches previous/next
file
When pushed in ← or → directions: : Plays
previous/next file
When pressed :Plays or pauses
5. Play Time Displays the current play time and total time
6. File Info Shows file information
7. MENU
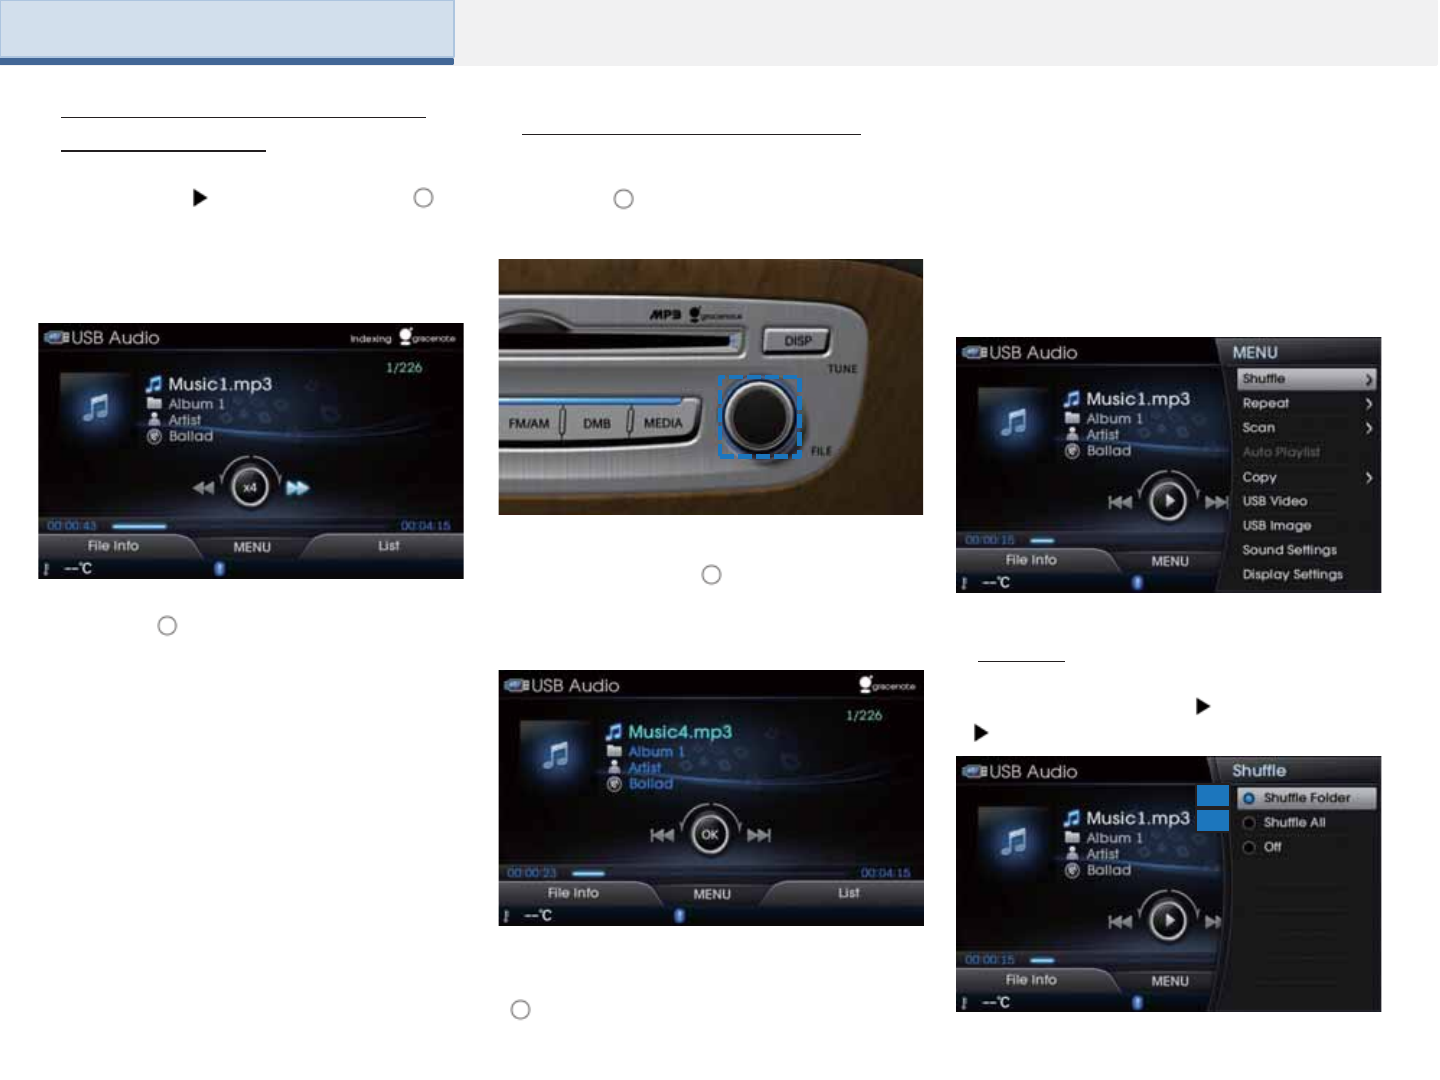
Moves to Shuffle/Repeat/Scan/Auto Playlist/Copy to
Jukebox/Sound Setting/Display Setting and other
modes
8. List Moves to the track list screen
9. Shuffle Plays disc tracks in random order
10. Repeat Repeats the current track or entire tracks
11. Scan Scans the beginning parts of disc tracks (approx 10
seconds per file)
12. Auto Playlist Moves to list screen showing current song and similar
songs
13. Copy Copy USB MP3 file to Jukebox
14. USB Video Moves to the USB Video
15. USB Image Moves to the USB Image
16. Sound Settings Moves to the sound setting screen
17. Display Settings Moves to the display setting screen
Basic Mode Screen (Music)
Part 2. AV (USB)
4
10
1
5
12
2
6
3
11
78
9
13
15
14
16
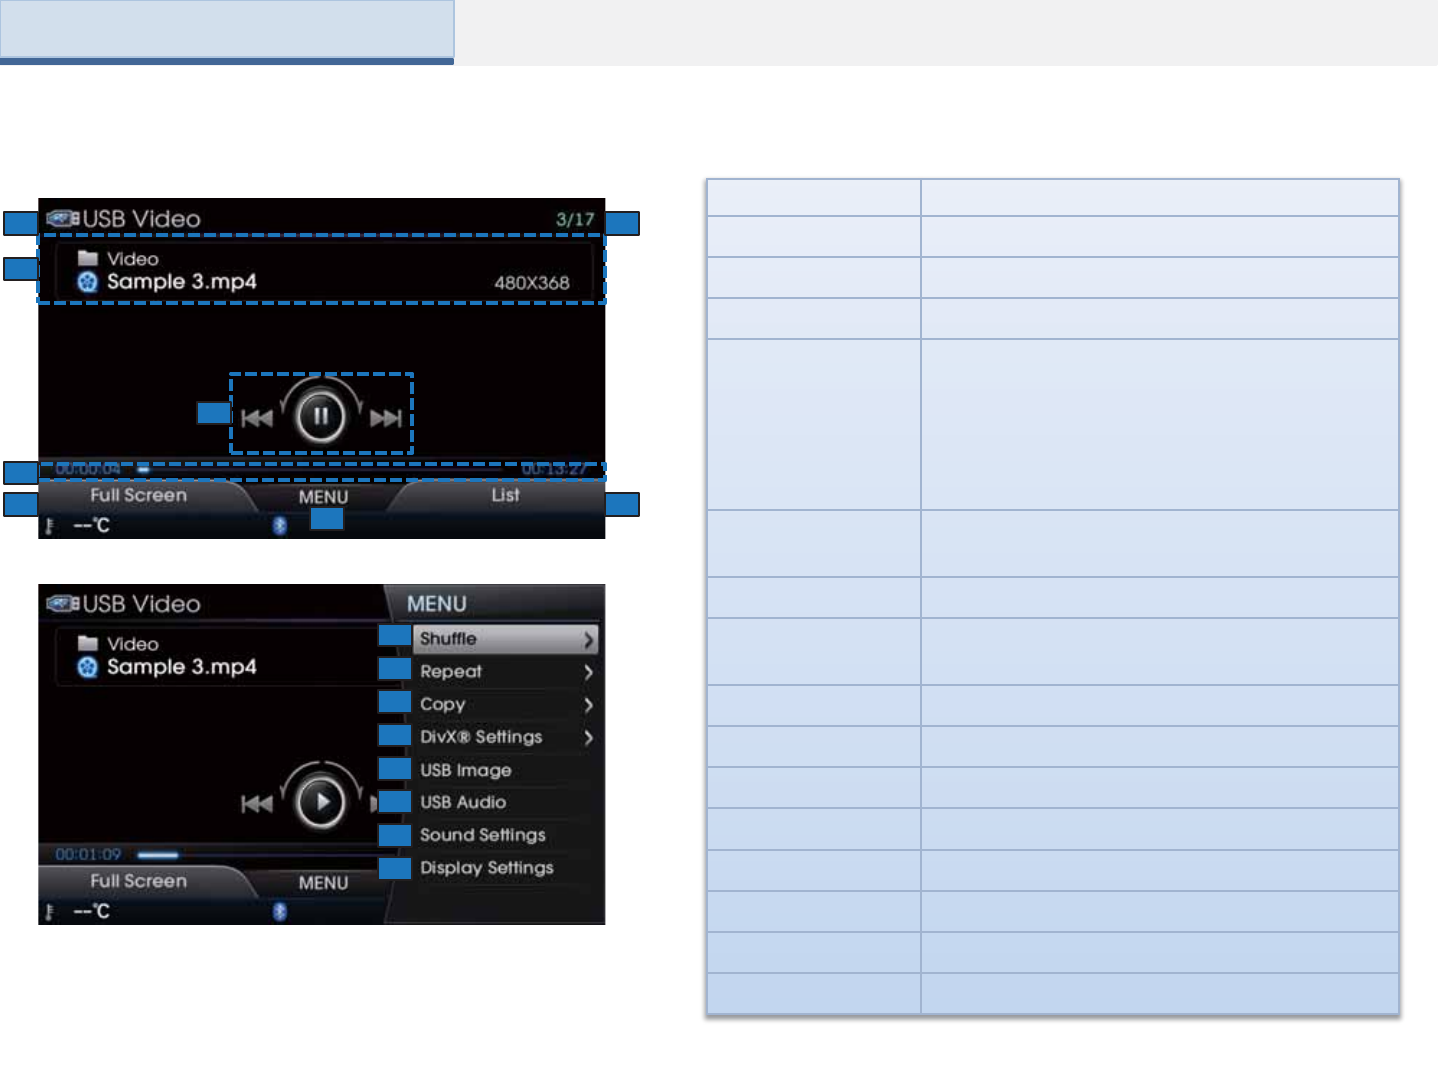
Basic Mode Screen (Video)
Name Description
1. Mode Displays currently operating mode
2. File Index Shows the current file/total number of files
3. Play File Info Displays File name/Folder/Resolution information
4. Control Panel
Enables use of play/pause/select/search features
When turned in Ω directions : Searches previous/next
file
When pushed in ← or → directions: : Plays
previous/next file
When pressed :Plays or pauses
5. Play Time Displays the current play time/total play time of
current USB video
6. File info Shows file information
7. MENU Moves to Shuffle/Repeat/Copy/DivX Setting/Sound
Setting/Display Setting and other mode
8. List Moves to the USB video list screen
9. Shuffle Plays disc files in random order
10. Repeat Repeats the current file or entire files
11. Copy Copy USB Video file to Jukebox
12. USB Image Moves to the USB image
13. USB Audio Moves to the USB audio
14. Sound Settings Moves to the sound setting screen
15. Display Settings Moves to the display setting screen
Part 2. AV (USB)
4
10
1
5
12
2
6
3
11
7
8
9
13
15
14
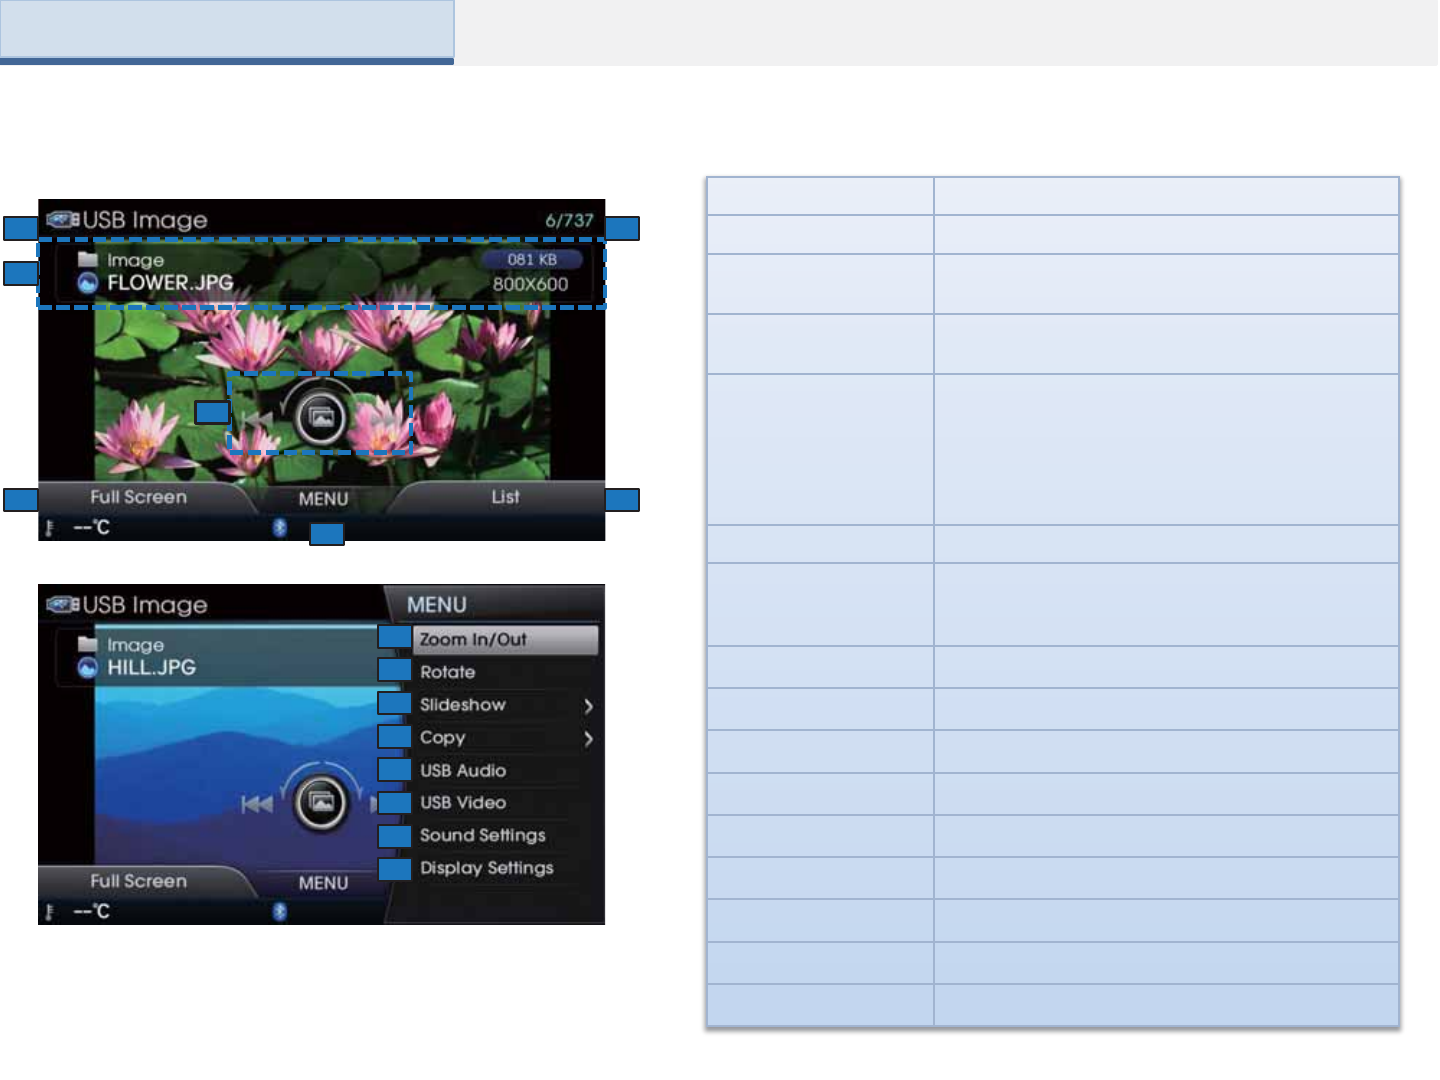
Name Description
1. Mode Displays currently operating mode
2. File Index Shows the current image file/total image files within
the USB
3. Play File Info Displays File name/Folder/Size/Resolution
information
4. Control Panel
Enables search/selection of previous/next files
When turned in Ωdirections : Searches
previous/next file
When pushed in ←or →directions: : Shows
previous/next file
When pressed :Start/stops slideshow
5. Full Screen Viewing image in full screen
6. MENU
Moves to Zoom in/Zoom out/Slide show
setting/Copy to Jukebox/Sound setting/Display
Setting and other mode.
7. List Moves to the USB image list screen
8. Zoom In/Out Enlarges/reduces image (zoom in/out)
9. Rotate Rotate image
10. Slideshow Setting View images as slideshow
11. Copy Copy USB image file to Jukebox
12. USB Audio Moves to the USB Video
13. USB Video Moves to the USB image
14. Sound Settings Moves to the sound setting screen
15. Display Settings Moves to the display setting screen
Basic Mode Screen(Image)
Part 2. AV (USB)
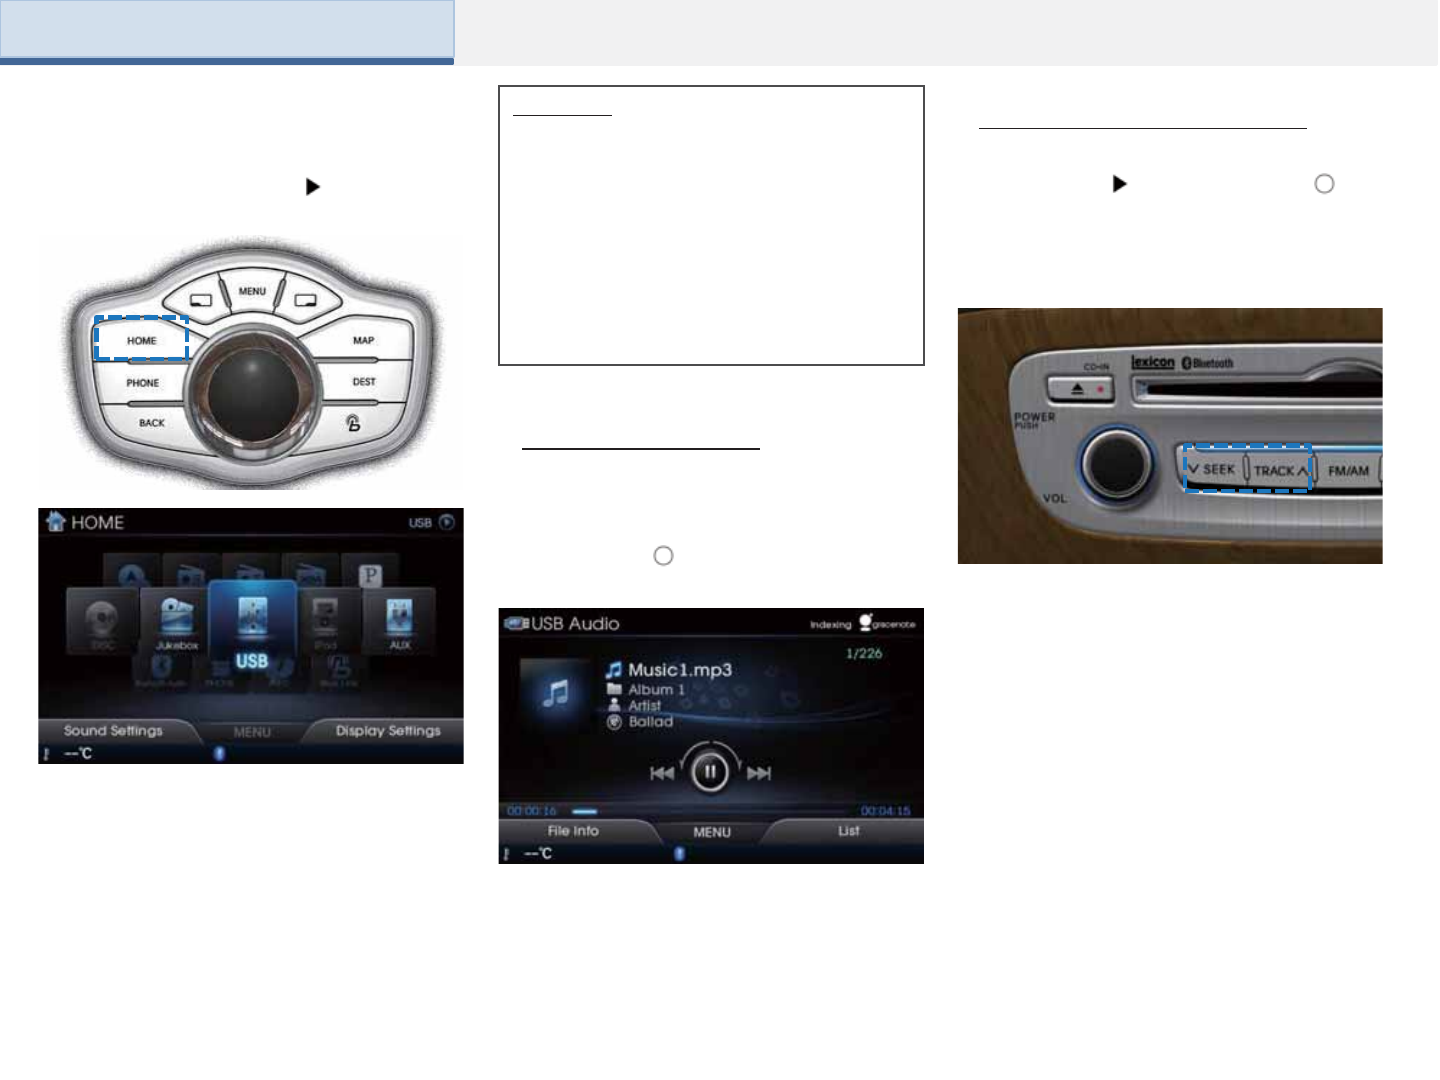
Starting Mode (Music Mode)
Once a USB is connected, the USB
Music will automatically begin playing.
Pressing the [ ] again will pause USB
Music.
Playing USB Music
Press the [HOME] button Select [USB]
Selecting USB Music Files
While playing Shortly push the [ ] in
← or → direction (under 0.8 seconds) or
shortly press the [SEEK]TRACK] key to
select the previous/next track.
Information
• If the USB is not connected, then the USB
button will be disabled.
• If a previously played USB is reconnected,
then the song after the most recently played
song is played. However, if a different USB
is connected or the file information within the
USB was changed, then the USB file order
information is deleted and will start playing
from the first song within the USB.
Once a USB is connected, USB Music
mode will operate automatically.
Part 2. AV (USB)
1
2
While playing Push and hold the [ ]
in ← or → direction (under 0.8 seconds)
or press and hold the [SEEK]TRACK]
key to fast-forward/rewind the current file.
While the [ ] or [SEEK] [TRACK] key is
being operated, the file will rewind or
fast-forward at 20x speed. Once
released, the file will begin playing at
normal speed.
Fast-forwarding or Rewinding
USB Music Files
Shuffle
Press the [MENU] key Select [Shuffle]
[Shuffle Folder] or [Shuffle All]
Press the [MENU] key to use the Shuffle,
Repeat, Scan, Auto Playlist, Copy,
Sound Settings and Display Settings.
This menu is also used to move to other
USB play modes.
Using the Menu Buttons
During search, the file name is displayed
in blue. Press the [ ] or [TUNE/FILE]
knob to play the selected file and display
the basic display info.
From the searched files, once the
desired file name is displayed, press the
[ ] or [TUNE/FILE] knob to play the
corresponding file.
Turn the [ ] or [TUNE/FILE] knob in Ω
directions to search for tracks.
Searching USB Music Files
Part 2. AV (USB)
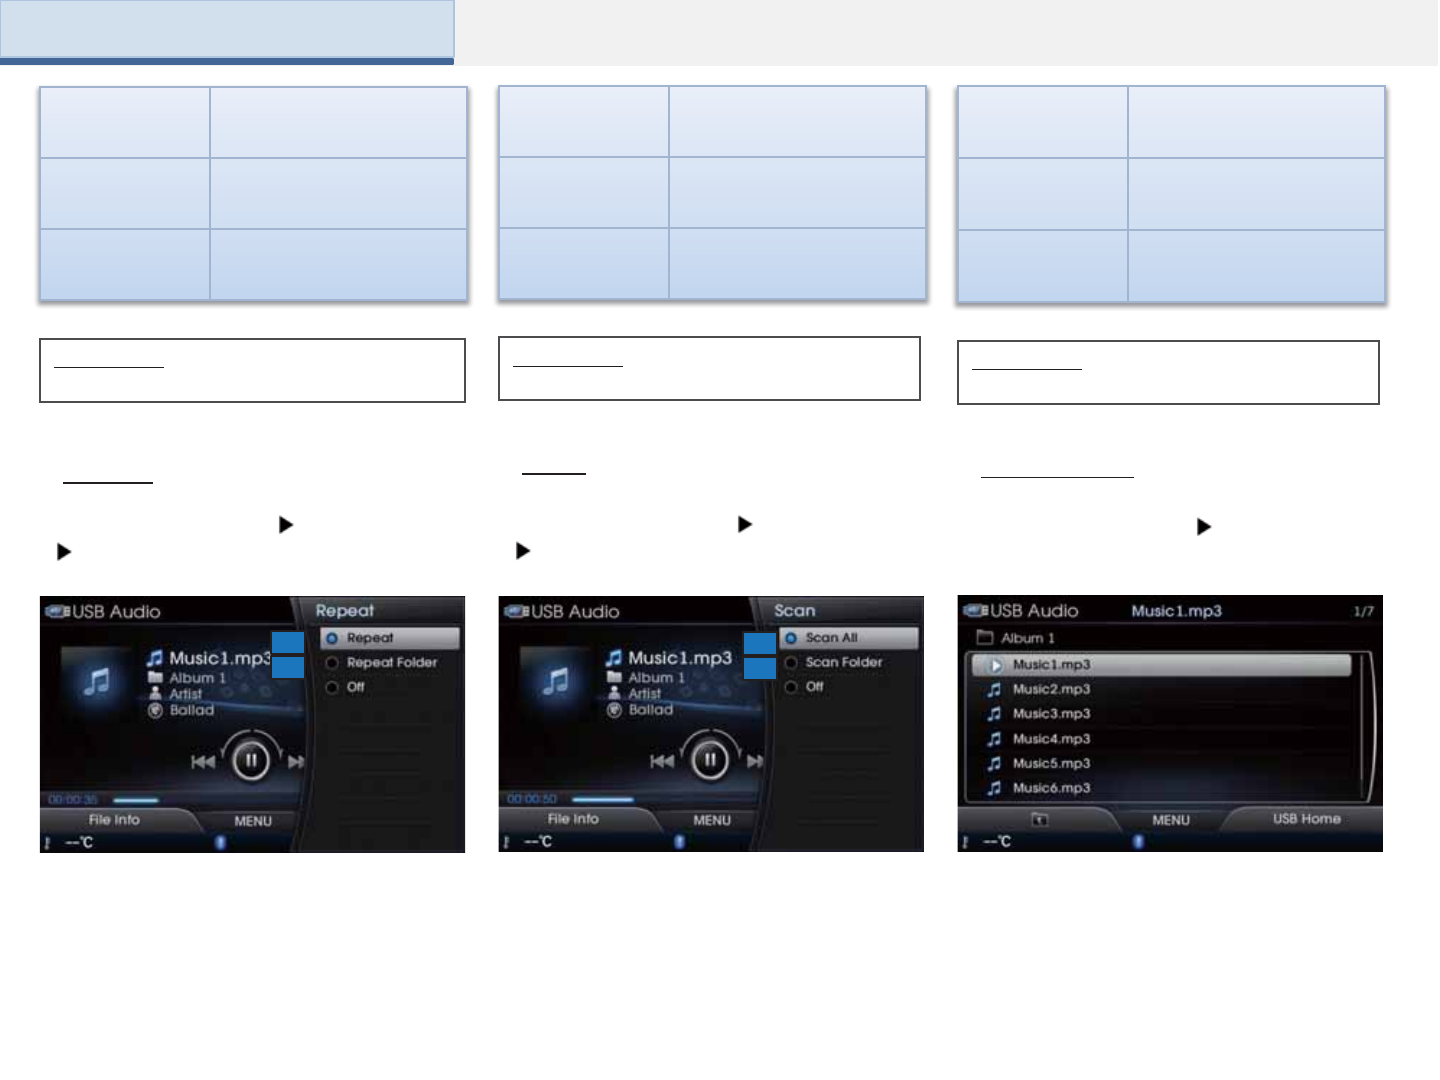
Name Description
1. Shuffle Folder Plays files within the current
folder in random order.
2. Shuffle All Plays files within the USB in
random order.
Name Description
1. Repeat Once Repeats play of currently
playing file.
2. Repeat Folder Repeats the files in the
current folder.
Name Description
1. Scan All Scans files within the USB
in random order.
2. Folder Scan Searches files within the
current folder.
1
2
1
2
Information
•Press [Off] to turn the Shuffle feature off.
Information
•Press [Off] to turn the Repeat feature off.
Information
•Press [Off] to turn the Repeat feature off.
The beginning part (approximately first
10 seconds) of all files within the current
folder or the entire USB are scanned.
Scan
Press the [MENU] key Select [Scan]
Select [Scan All] or [Scan Folder]
Repeat
Press the [MENU] key Select [Repeat]
Select [Repeat] or [Repeat Folder]
The current song or the all files within the
folder can be repeated.
List of songs similar with the current
song is displayed. The list can be used to
select desired songs.
Auto Playlist
Press the [MENU] key Select [Auto
Playlist]
Part 2. AV (USB)
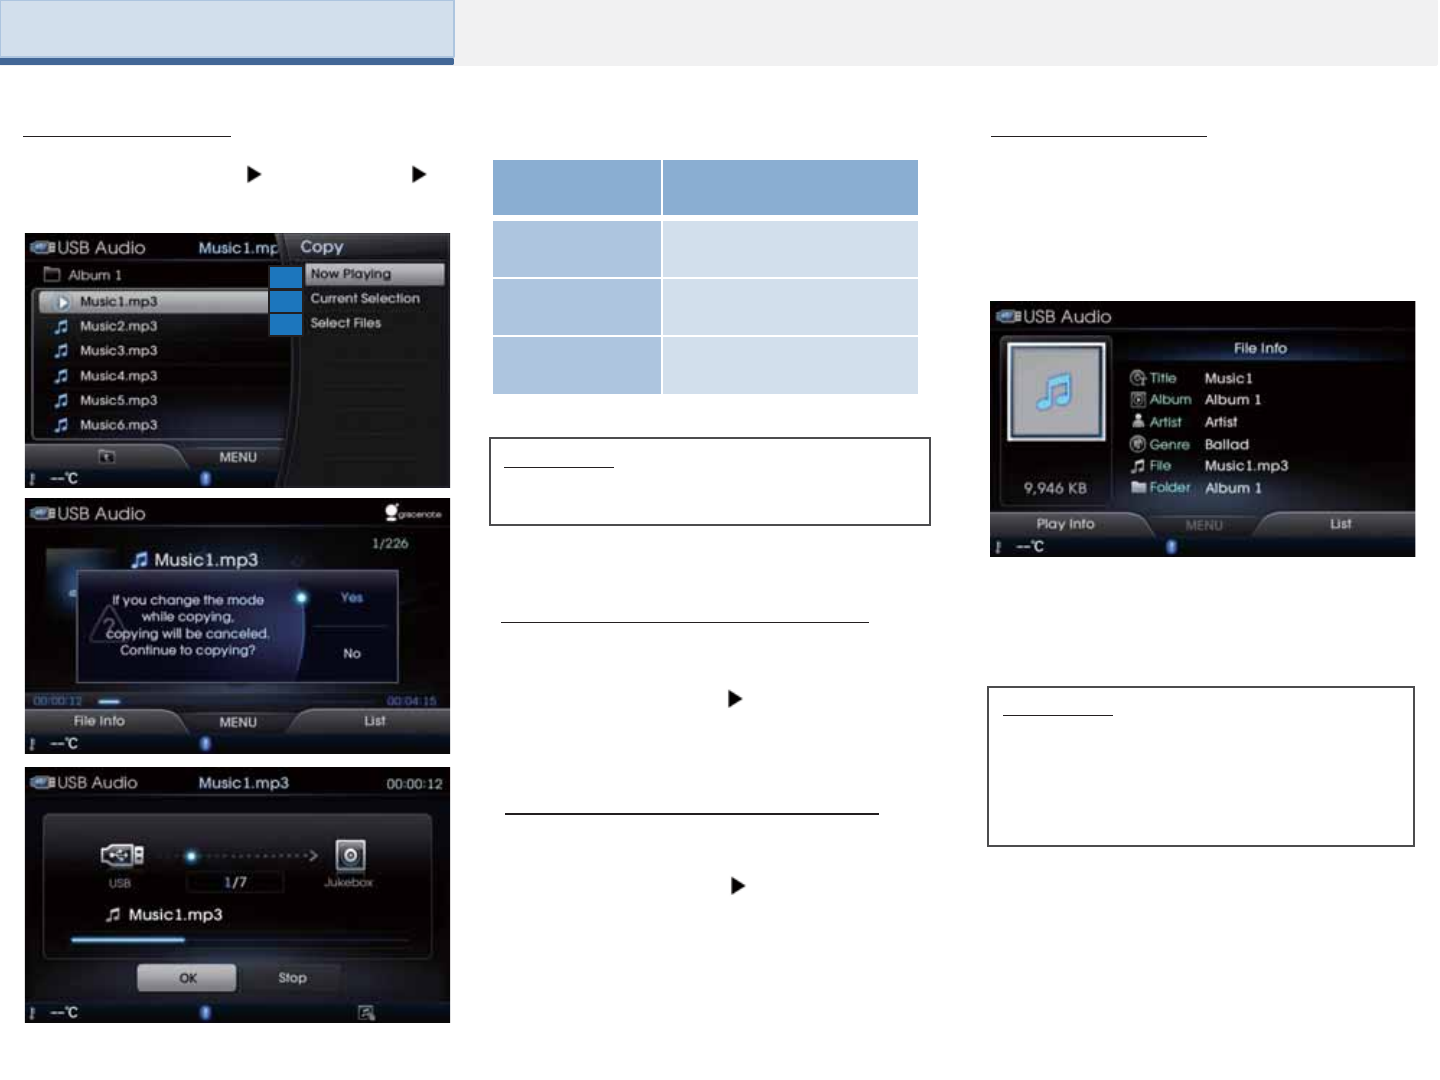
Part 2. AV (USB)
Name Description
1. Now Playing Copy currently playing file
into the Jukebox
2. Current
Selection
Copy currently selected
file into the Jukebox
3. Select Files Select files you want to
copy
1
3
2
Copy to Jukebox
Press the [MENU] key Select [Copy]
Set copy options
This feature is used to copy songs within the
USB into the JUKEBOX.
Information
•Copying will be canceled if you move to a
different mode while copying is in progress.
Move to the USB Video Mode
Press the [MENU] key Select [USB Video]
Move to the USB Image Mode
Press the [MENU] key Select [USB Image]
File Info/Play Info
Press the [LHT] to select File Info to view
file information, such as title, album, artist,
genre, fie name, and folder location.
To return to the previous screen, press the
[Soft1] to select Play Info.
Information
•The title, artist and album info are
displayed only when such information is
recorded within the MP3 file ID3 tag.
•For more information on Sound and Display
settings, refer to the Info/Setup section.
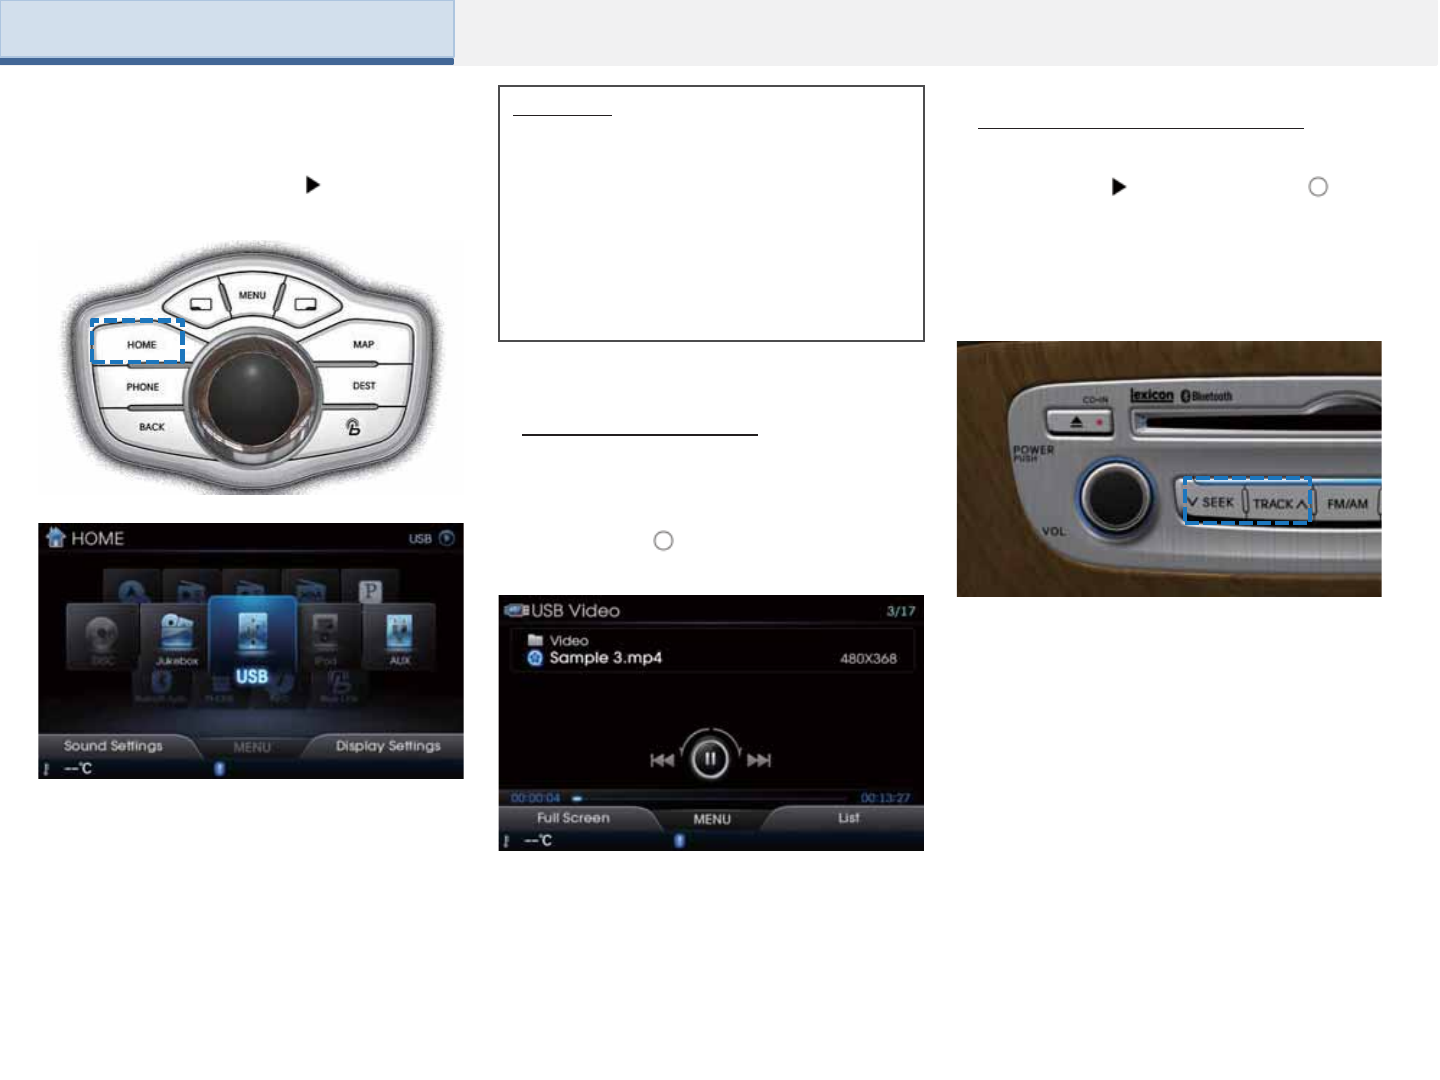
Starting Mode(Video Mode)
Once a USB is connected, the USB
Video will automatically begin playing.
Pressing the [ ] again will pause USB
Video.
Playing USB Video
Selecting USB Video Files
While playing Shortly push the [ ] in
← or → direction (under 0.8 seconds) or
shortly press the [SEEK]TRACK] key to
select the previous/next file.
Press the [HOME] button Select [USB]
Once a USB is connected, USB Video
mode will operate automatically.
Information
• If the USB is not connected, then the USB
button will be disabled.
• If a previously played USB is reconnected,
then the video after the most recently played
video is played. However, if a different USB
is connected or the file information within the
USB was changed, then the USB file order
information is deleted and will start playing
from the first video within the USB.
Part 2. AV (USB)
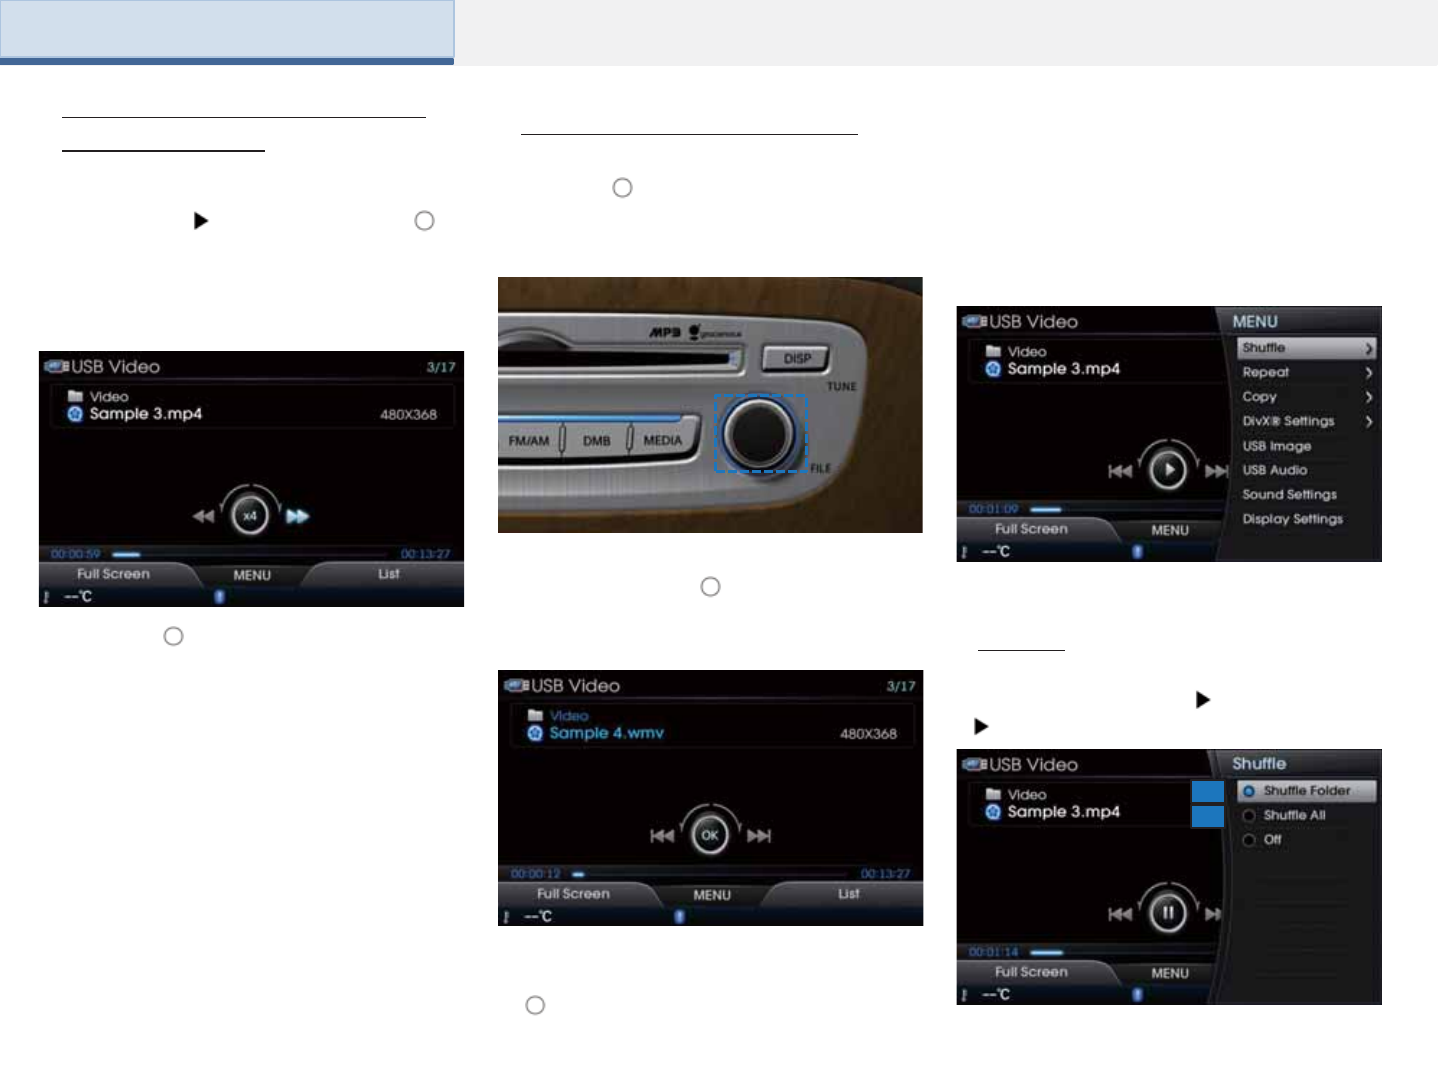
1
2
While playing Push and hold the [ ]
in ← or → direction (under 0.8 seconds)
or press and hold the [SEEK]TRACK]
key to fast-forward/rewind the current file.
While the [ ] or [SEEK] [TRACK] key is
being operated, the file will rewind or
fast-forward at 20x speed. Once
released, the file will begin playing at
normal speed.
Turn the [ ] or [TUNE/FILE] knob in Ω
directions to search for files.
Searching USB Video Files
From the searched files, once the
desired file name is displayed, press the
[ ] or [TUNE/FILE] knob to play the
corresponding file.
Press the [MENU] key to use the Shuffle,
Repeat, Copy, DivX, Sound Settings and
Display Settings. This menu is also used
to move to other USB play modes.
Shuffle
Press the [MENU] key Select [Shuffle]
[Shuffle Folder] or [Shuffle All]
During search, the file name is displayed
in blue. Press the [ ] or [TUNE/FILE]
knob to play the selected file and display
the basic display info.
Fast-forwarding or Rewinding
USB Video Files Using the Menu Buttons
Part 2. AV (USB)
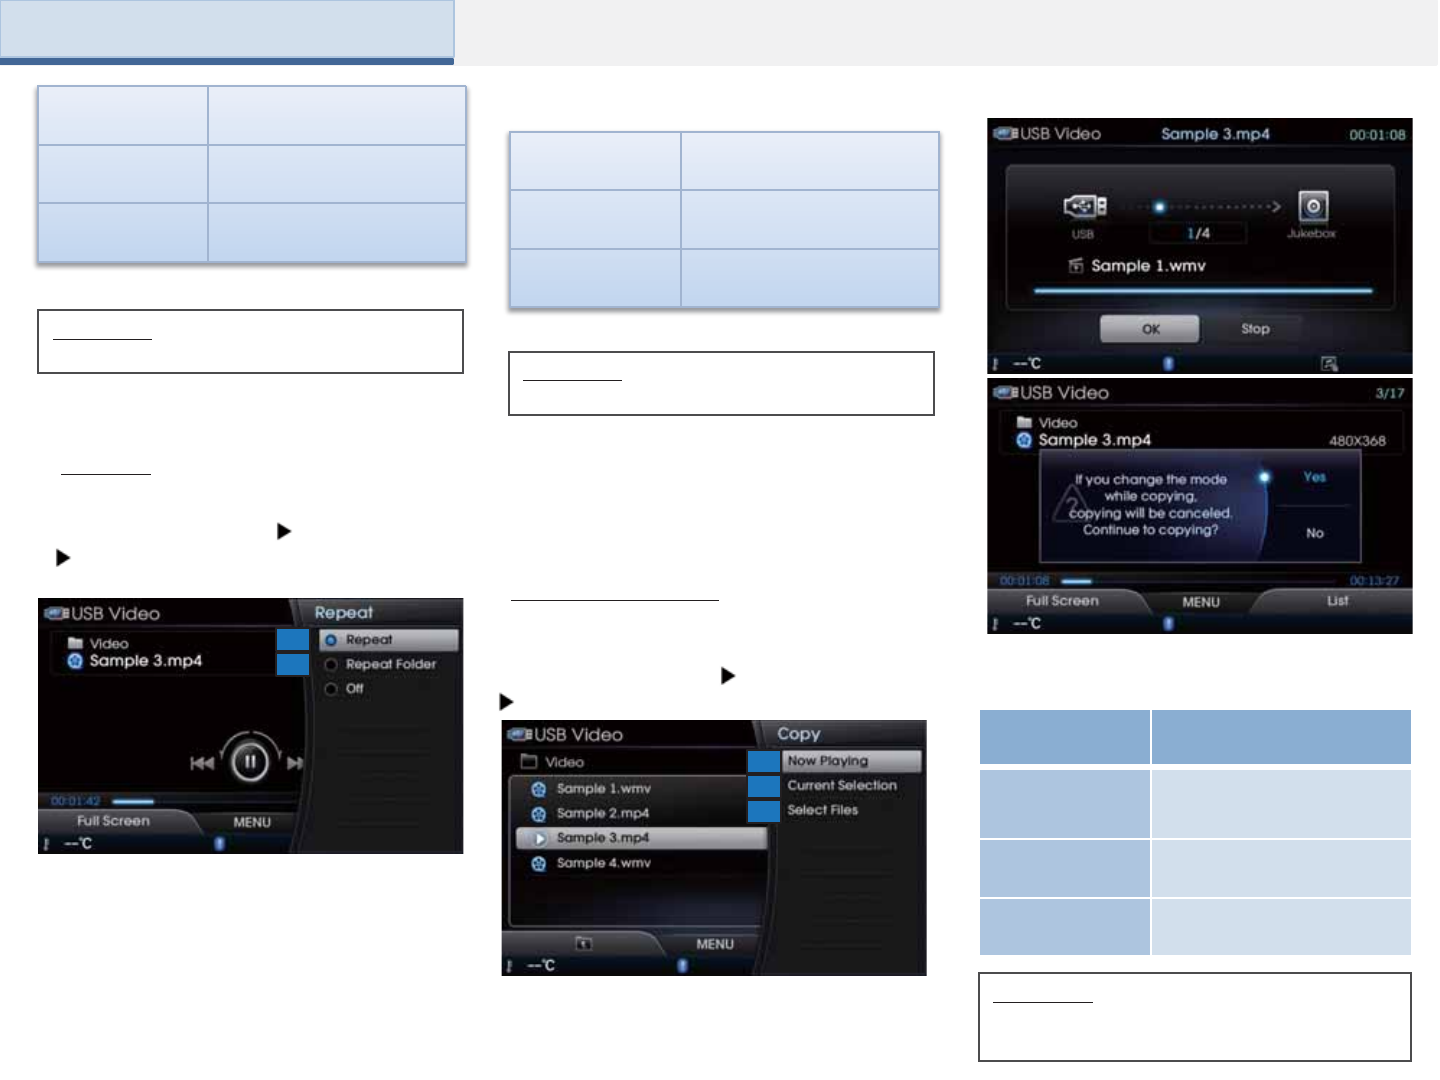
Name Description
1. Shuffle Folder Plays files within the current
folder in random order.
2. Shuffle All Plays files within the USB in
random order.
Name Description
1. Repeat Once Repeats play of currently
playing file.
2. Repeat Folder Repeats the files in the
current folder.
Name Description
1. Now Playing Copy currently playing file
into the Jukebox
2. Current
Selection
Copy currently selected file
into the Jukebox
3. Select Files Select files to
1
2
1
3
2
Information
•Press [Off] to turn the Shuffle feature off. Information
•Press [Off] to turn the Repeat feature off.
Repeat
Press the [MENU] key Select [Repeat]
Select [Repeat] or [Repeat Folder]
The current song or the all files within the
folder can be repeated.
Copy to Jukebox
Press the [MENU] key Select [Copy]
Set copy options
This option is used to copy video files
within the USB to the JUKEBOX
Information
•Copying will be canceled if you move to a
different mode while copying is in progress.
Part 2. AV (USB)
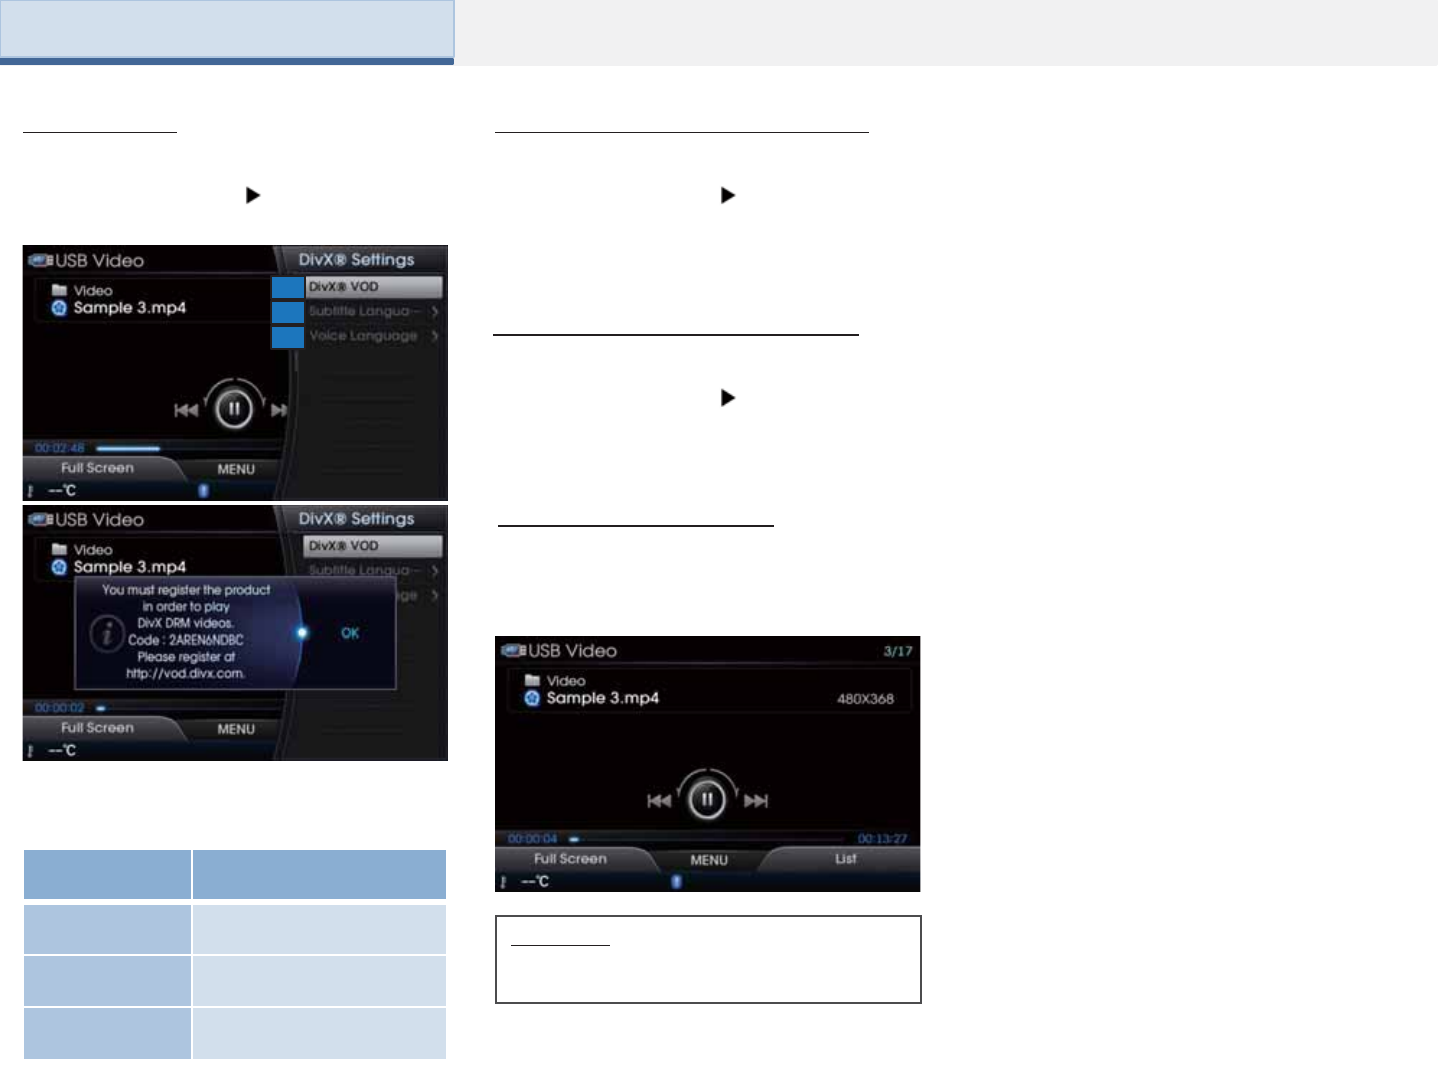
Name Description
1. DivX VOD Set DivX VOD features
2.Subtitle
Language Set subtitle language
3.Voice
Language Set Voice language
1
3
2
Press the [MENU] key Select [USB Image]
Press the [MENU] key Select [USB Audio]
Press the [Soft1] and select [Full Screen] to
view the USB in full screen.
DivX Setting
Press the [MENU] key Select [DivX
Setting]
When using DivX for the first time, you
must register the product through the DivX
website.
Information
•For more information on Sound and Display
settings, refer to the Info/Setup section.
Move to the USB Image Mode
Move to the USB Audio Mode
Viewing in Full Screen
Part 2. AV (USB)
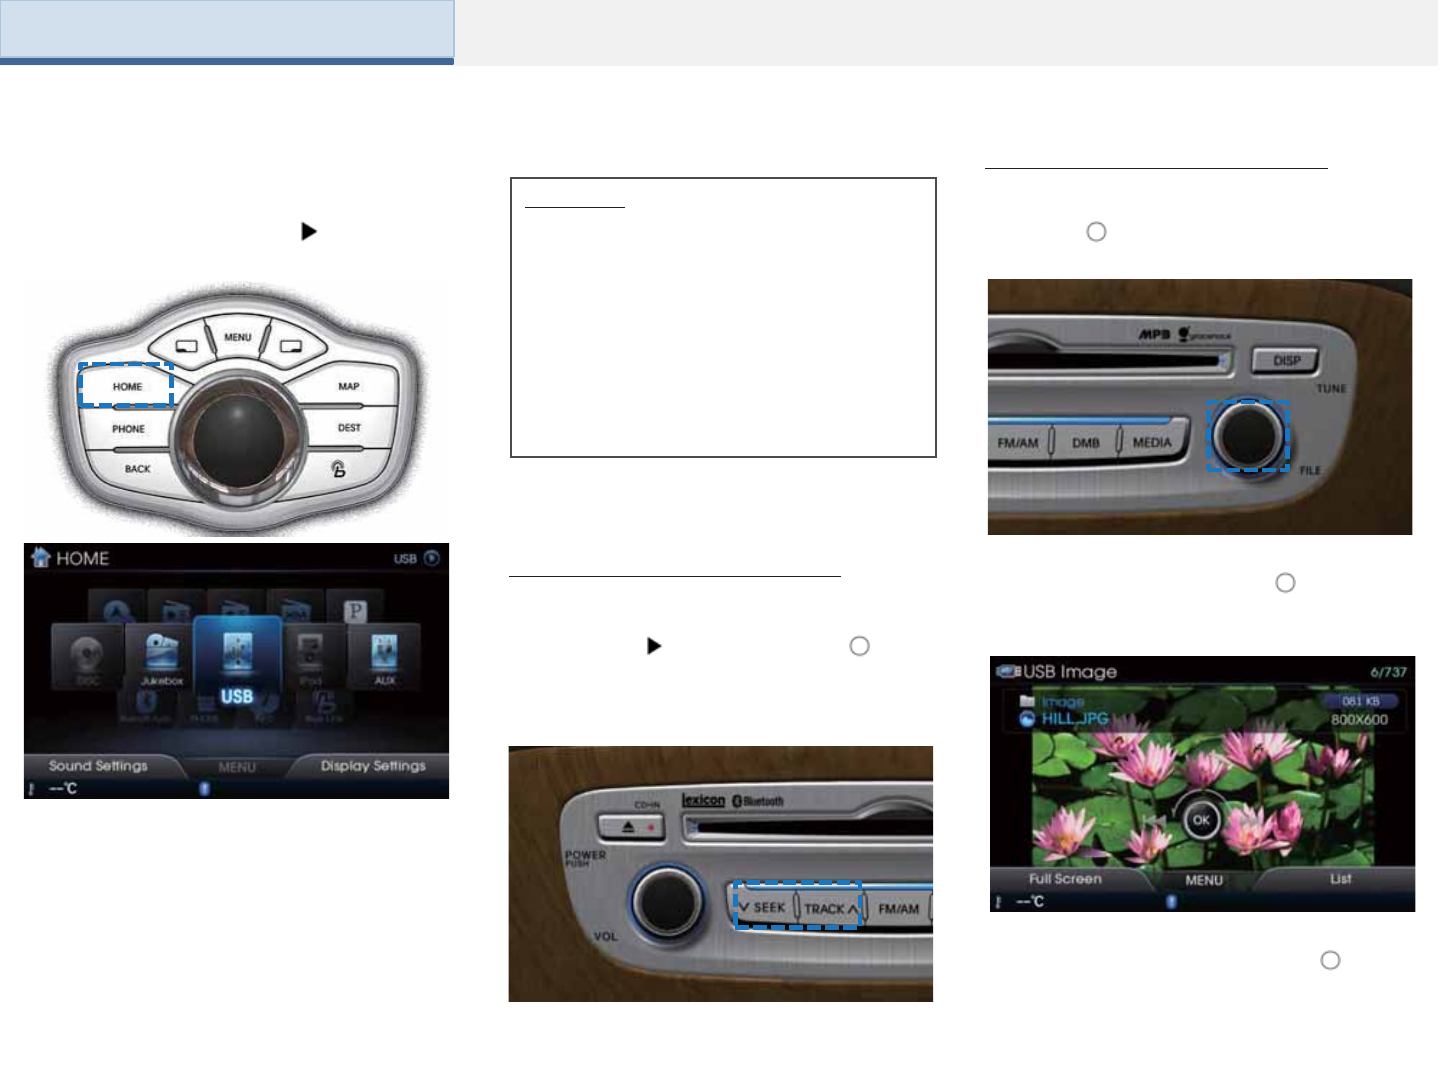
Starting Mode (Image Mode)
Selecting USB Image Files
While playing Shortly push the [ ] in ←
or → direction (under 0.8 seconds) or shortly
press the [SEEK]TRACK] key to select the
previous/next file.
Turn the [ ] or [TUNE/FILE] knob in Ω
directions to search for files.
Searching USB Image Files
During search, the image name is
displayed in blue. Press the [ ] or
[TUNE/FILE] knob to play the selected
image and display the basic display info.
From the searched files, once the desired
file name is displayed, press the [ ] or
[TUNE/FILE] knob to play the
corresponding image.
Press the [HOME] button Select [USB]
Once a USB is connected, USB Image
mode will operate automatically.
Information
• If the USB is not connected, then the USB
button will be disabled.
• If a previously played USB is reconnected,
then the image after the most recently
played image is played. However, if a
different USB is connected or the file
information within the USB was changed,
then the USB file order information is deleted
and will start playing from the first image
within the USB.
Part 2. AV (USB)
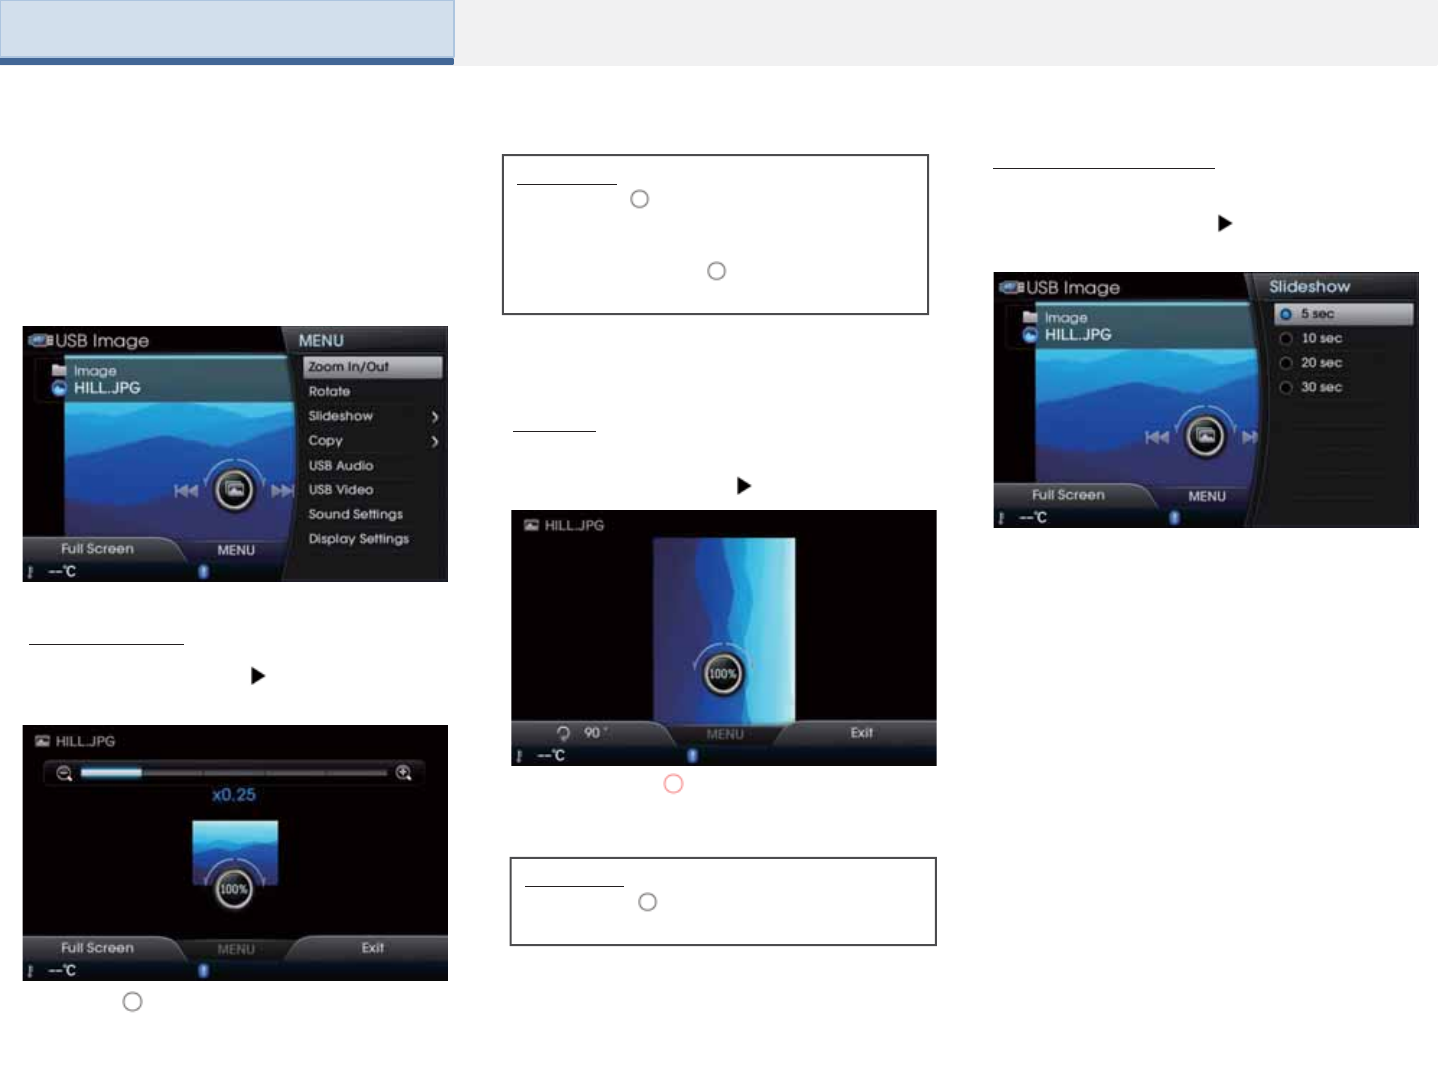
Press the [MENU] key to use the Zoom
In/Out, Rotate, Slideshow, Copy, Sound
Settings and Display Settings options. This
menu is also used to move to other USB play
modes.
Zoom In/Out
Press the [MENU] key Select [Zoom
In/Out]
Turn the [ ] in Ω direction to enlarge or
reduce the image size. The scale can be
changed to 1/4, 1/2, 1x, 2x, and 4x.
Rotate
Press the [MENU] key Select [Rotate]
Each time the [ ] is rotated, the image is
rotated from 0 → 90 → 180 → 270 degrees.
Slideshow Setting
Press the [MENU] key Select [Slideshow]
Image slideshow intervals can be set at
[5secs], [10secs], [20secs], [30secs]
intervals.
Information
• Press the [ ] to restore the original image
size.
• When images are not all displayed on the
screen, pushing the [ ] in
up/down/left/right directions will display other
images.
Information
• Press the [ ] to restore the original image
size.
Using the Menu Buttons
Part 2. AV (USB)
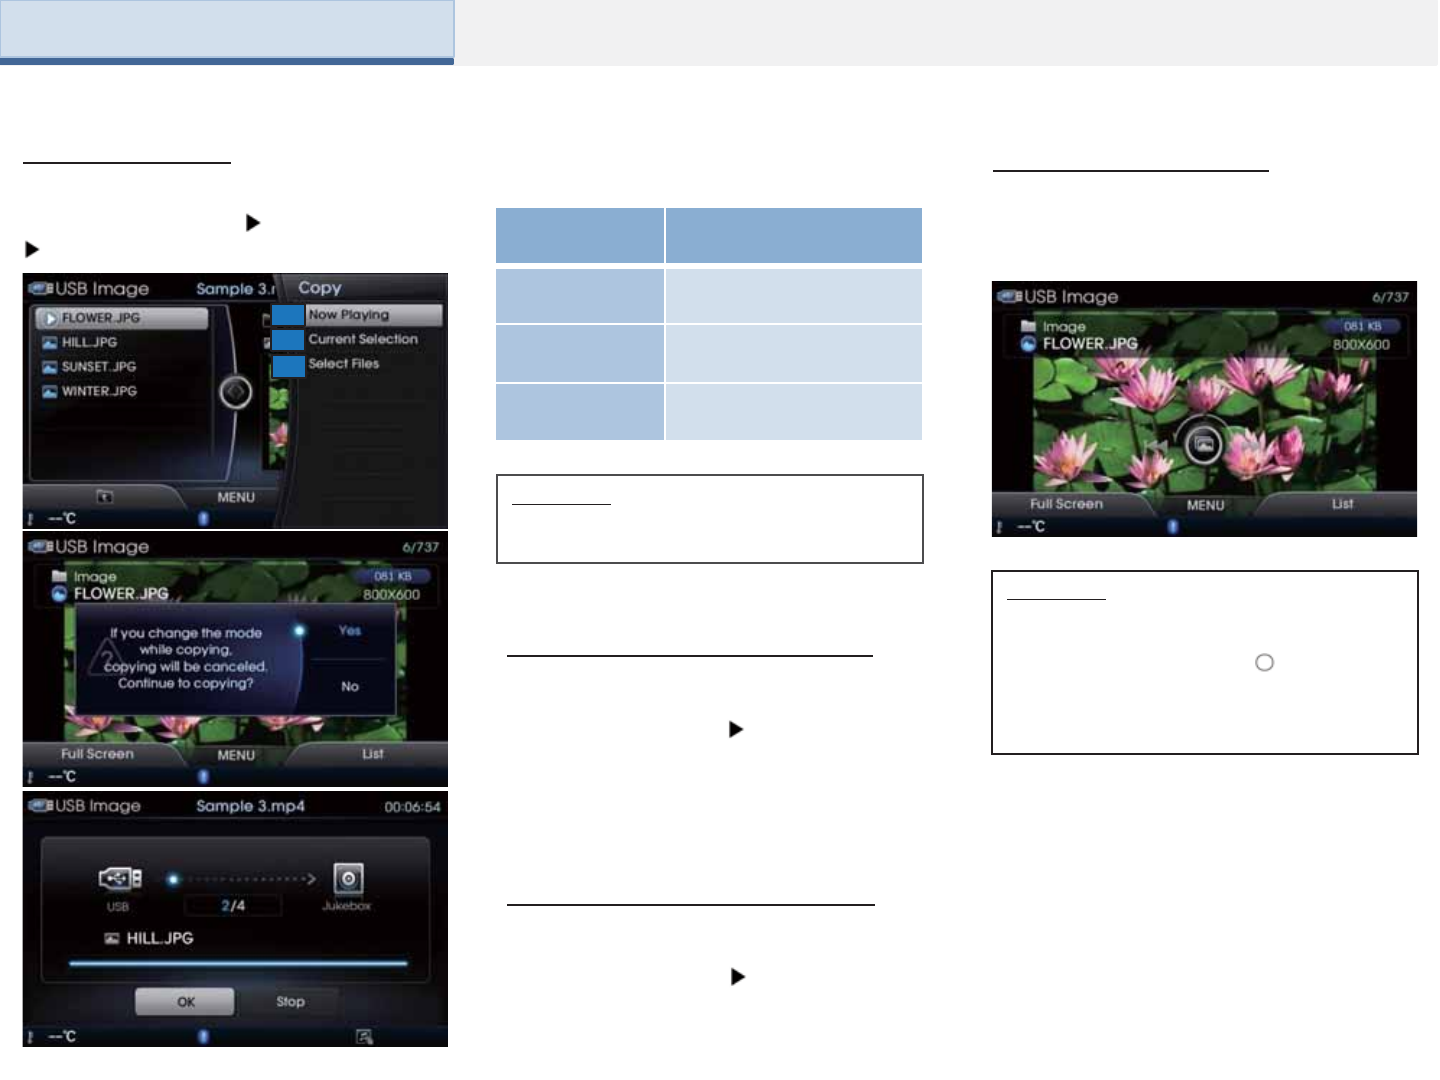
Part 2. AV (USB)
Name Description
1. Now Playing Copy currently playing file
2. Current
Selection
Copy by selecting desired
files from list
3. Select Files Select files you want to
copy
1
2
3
Move to the USB Audio Mode
Press the [MENU] key Select [USB Image]
Move to the USB Video Mode
Press the [MENU] key Select [USB Audio]
Viewing in Full Screen
Press the [Soft1] and select [Full Screen]
to view the file in full screen.
Copy to Jukebox
Press the [MENU] key Select [Copy]
Set copy options
This option is used to copy image files within
the USB to the JUKEBOX
Information
•Copying will be canceled if you move to a
different mode while copying is in progress.
Information
•If there are no operations for 10 seconds,
the menu will automatically disappear.
•Press the [MENU] key or [ ] to display
the menus again.
•For more information on Sound and Display
settings, refer to the Info/Setup section.
Information
• Some iPods with unsupported communication
protocols may not properly operate in the Audio
Video Navigation system.
• For fifth generation iPod Nano devices, the iPod
may not be recognized when the battery level is
low. Please charge the iPod for use.
• Search/play orders shown within the iPod device
may differ with the orders shown within the Audio
Video Navigation system.
• If the iPod malfunctions due to an iPod device
defect, reset the iPod and try again. (To learn
more, refer to your iPod manual)
• For some iPod Touch and iPhone devices,
connecting Bluetooth® while the iPod is operating
may result in discontinued iPod sound. When
such devices with Bluetooth® support is
connected, this problem occurs as the sound
source is changed from the Dock Connector (USB
connector cable) to Bluebird (Audio Video
Navigation Bluetooth® Module).
• To listen to the iPod sound, re-connect the USB
cable or exit then re-enter iPod mode.
Information
• In order to use the iPod while operating the keys,
you must use a dedicated iPod cable. (the cable
that is supplied when purchasing iPod/iPhone
products)
During ACC ON state, connecting the iPod
through the iPod cable (the cable that is supplied
when purchasing iPod/iPhone products), will
charge the iPod through the head unit.
• When connecting with the iPod cable, make
sure to fully insert the jack to prevent
communication interference. If the iPod is
connected to the vehicle while it is playing, a high
pitch tone may sound for about 1~2 seconds
immediately after connection. If possible, connect
the iPod to the vehicle with the iPod
stopped/paused.
• Within iPhones, streaming audio and iPod
control may occasionally conflict. If problems
persist, remove the iPhone and connect again.
• Some iPod versions may not sync with the
system. then the system may not properly restore
the previously operated mode. (For iPads, battery
charging is not supported.)
Device /
Generation
Fir
st
Se
co
nd
Th
ird
Fo
urt
h
Fif
th
Si
xt
h
iPod
classic O O Not Released
iPod
nano OOOOOO
iPod
mini Not Supported
iPod
shuffle Not Supported
iPod
touch OOOO
Not
Release
d
iPhone
Not
Release
d
OO
Not
Release
d
iPad O O Not Released
iPod is a registered trademark of Apple Inc.
iPod mode will not operate if the connected
iPod cannot be recognized due to operation
of unsupported versions that do not support
related protocols, iPod abnormalities, or iPod
device defects.
Supported iPod devices
Using iPod Devices
Part 2. AV (iPod)

1 Step 2 Step 3 Step 4 Step 5 Step
Playlist Playlist Play List name (category is same as iPod)
Artist Artist Artist
Name
Album
Name
Song
Name
Album Album Album
Name
Song
Name
Genre Genre Genre
Name
Artist
Name
Album
Name
Song
Name
Song Song Song Name
Compose
r
Compose
r
Compose
r Name
Album
Name
Song
Name
Search Steps
(may differ depending on the type of iPod device.)
Part 2. AV (iPod)
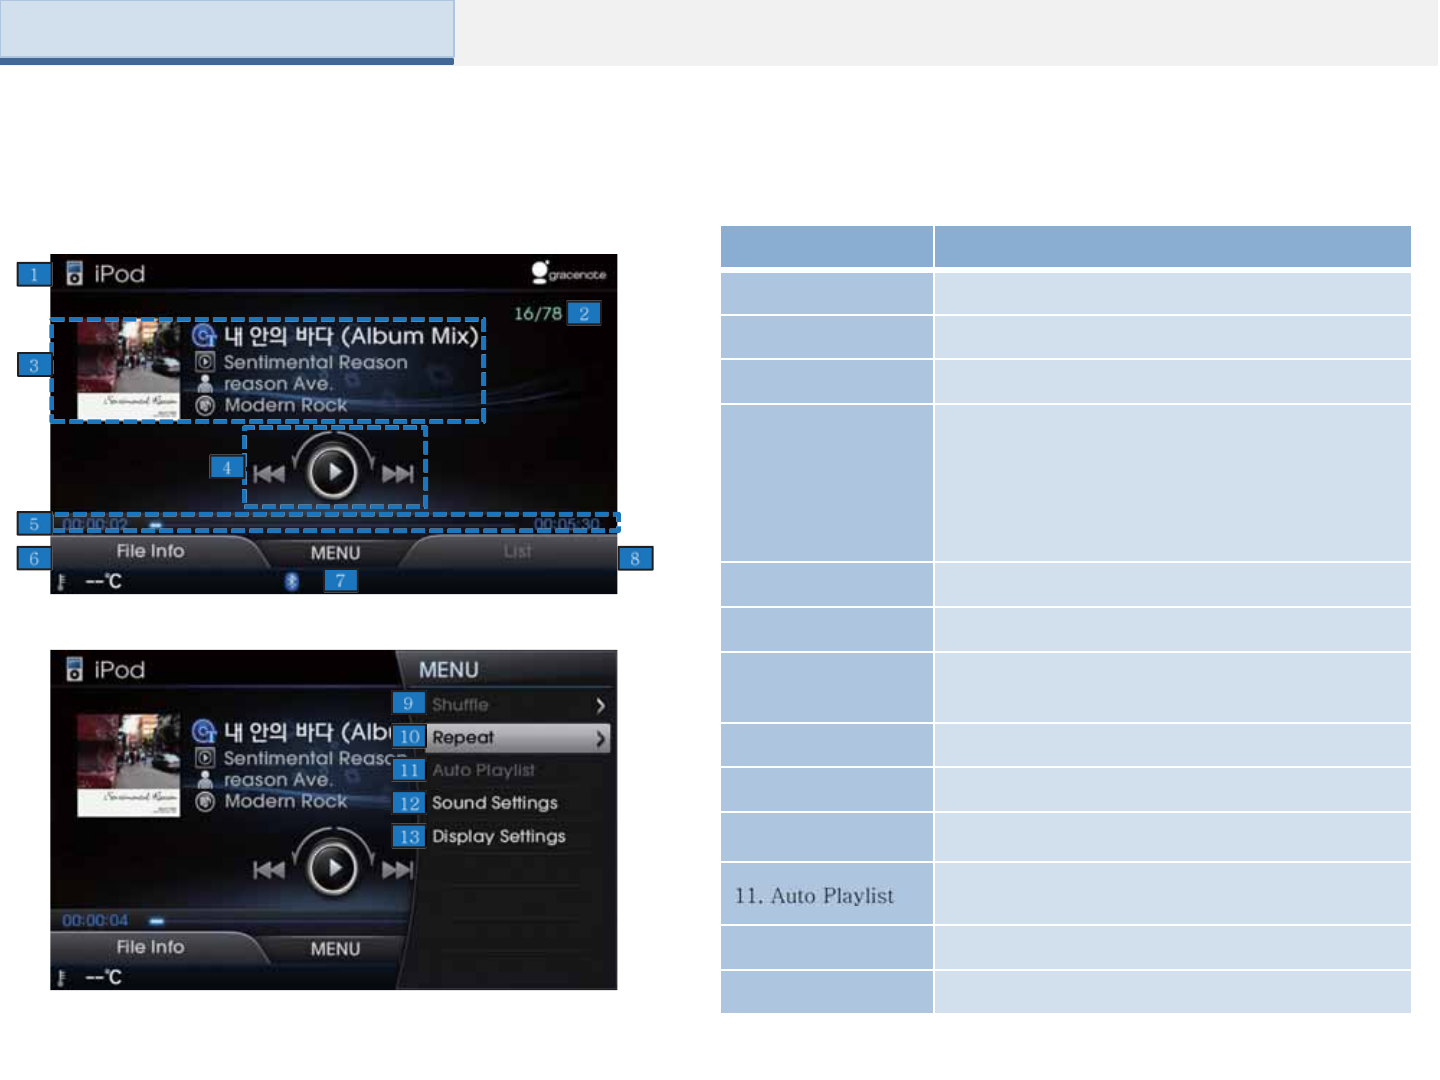
Name Description
1. Mode Displays currently operating mode
2. Track Index Shows the current file/total files within the iPod
3. Play File Info Displays File Name/Album/Artist/Genre
4. Control Panel
Enables use of play/pause/select/search features
When turned in Ωdirections : Moves to
previous/next files
When pushed in ←or →directions: : Plays
previous/next file
When pressed :Plays or pauses
5. Play Time Displays the current play time and total play time
6. File Info Shows file information
7. MENU Moves to Shuffle/Repeat/Auto Playlist/Sound
Setting/Display Setting and other modes
8. List Moves to the track list screen
9. Shuffle Plays iPod tracks in random order
10. Repeat Repeats the current track or entire tracks
Moves to list screen showing current song and
similar songs
12. Sound Settings Moves to the sound setting screen
13. Display Settings Moves to the display setting screen
Basic Mode Screen
Part 2. AV (iPod)
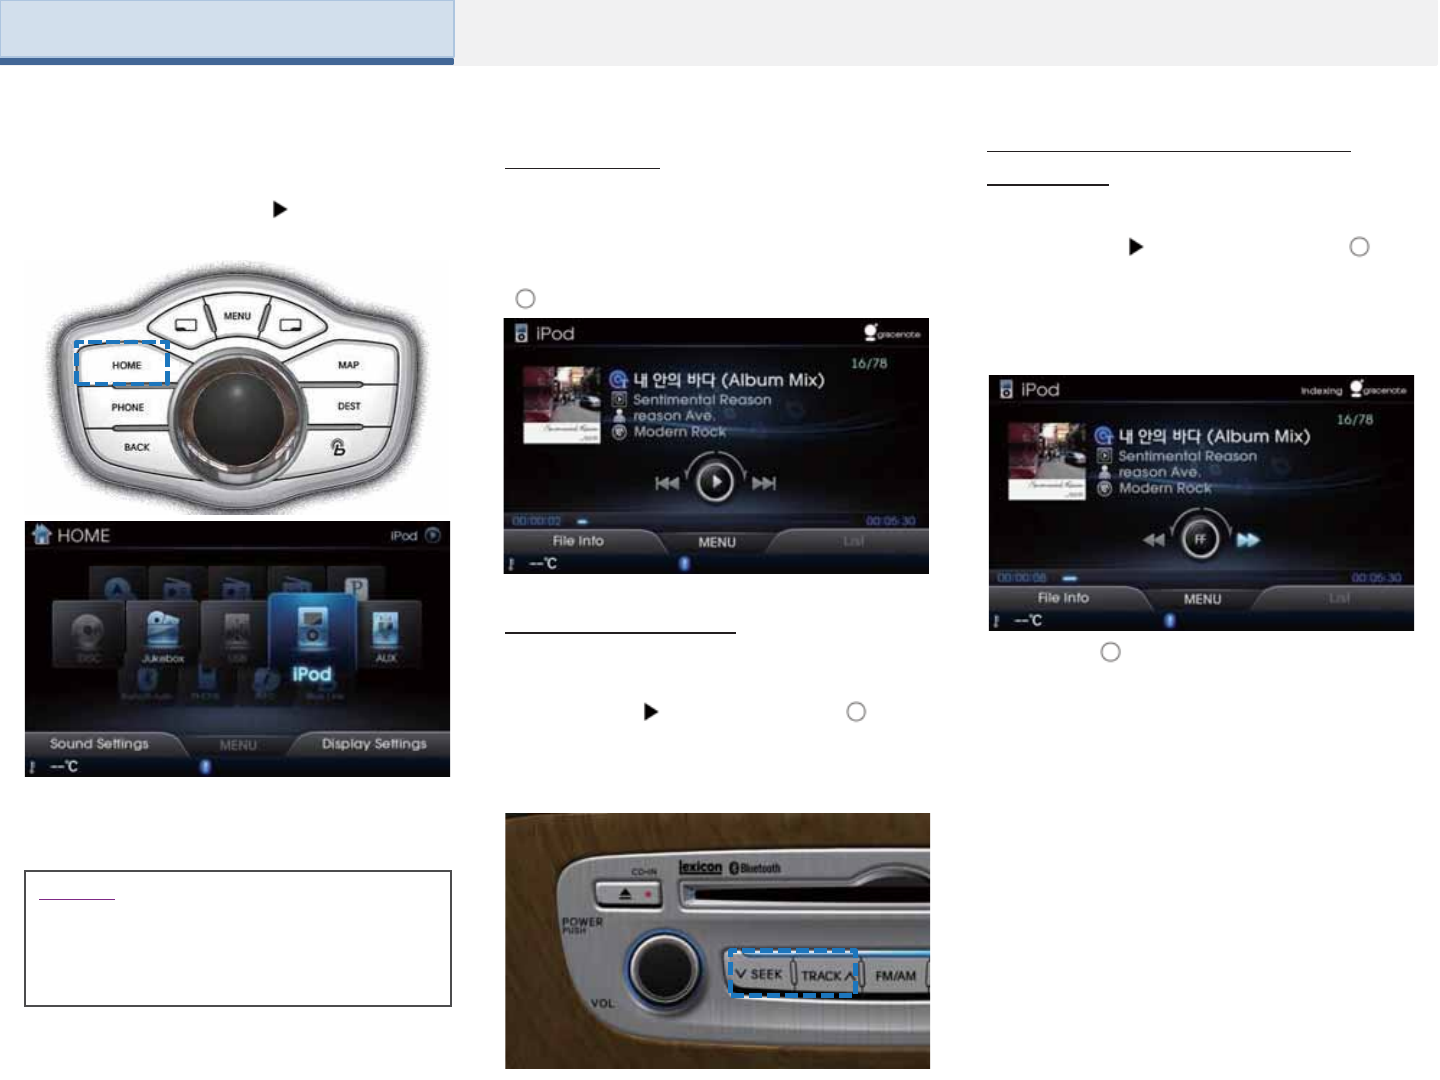
1 3 4
2
Once an iPod is connected, iPod mode will
operate automatically.
While playing Push and hold the [ ] in
← or → direction (under 0.8 seconds) or
press and hold the [SEEK]TRACK] key to
fast-forward/rewind the current song.
Once an iPod is connected, the iPod will
automatically begin playing. Pressing the
[ ] again will pause the iPod.
Playing iPod Fast-forwarding or Rewinding
iPod Files
While the [ ] or [SEEK] [TRACK] key is
being operated, the songs will rewind or
fast-forward at 20x speed. Once released,
the song will begin playing at normal speed.
Selecting iPod File
While playing Shortly push the [ ] in ←
or → direction (under 0.8 seconds) or shortly
press the [SEEK]TRACK] key to select the
previous/next song.
NOTICE
•Some iPods with unsupported
communication protocols may not properly
operate in the Audio Video Navigation
system.
Starting Mode
Press the [HOME] button Select [iPod]
Part 2. AV (iPod)
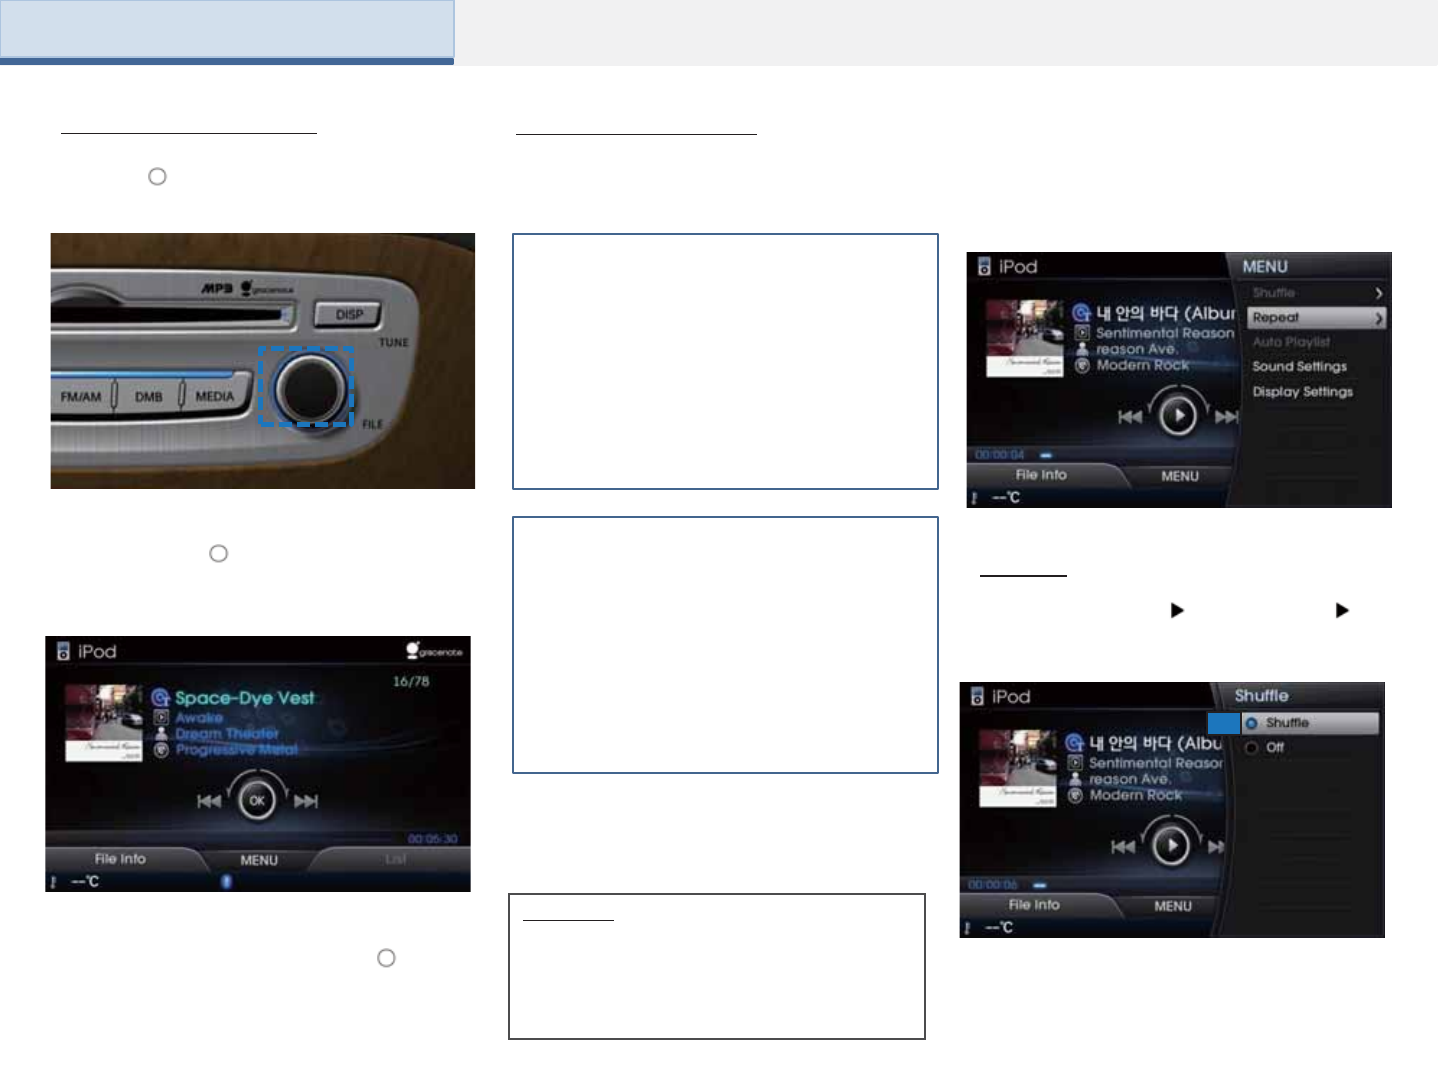
1
Press the [List] button to display the initial iPod
menu screen.
When searching iPod, it is possible to search
by Play list, artist, album, song, genre,
composer, audiobook, and Podcast.
Press the [MENU] key to use the Shuffle,
Repeat, Auto Playlist, Sound Settings and
Display Settings.
Searching iPod List Using the Menu Buttons
Shuffle
Press the [MENU] key Select [Shuffle]
Select [Shuffle] or [Shuffle Album]
Turn the [ ] or [TUNE/FILE] knob in Ω
directions to search for songs.
During search, the song name is displayed in
blue. Press the [ ] or [TUNE/FILE] knob to
play the selected song and display the basic
display info.
Searching iPod Files
From the searched songs, once the desired
song name is displayed, press the [ ] or
[TUNE/FILE] knob to play the corresponding
song.
Information
• If the search mode is accessed while playing a
song, the most recently searched step will
become displayed.
• Upon initial connection, the search steps may
differ depending on the type of iPod device.
Part 2. AV (iPod)
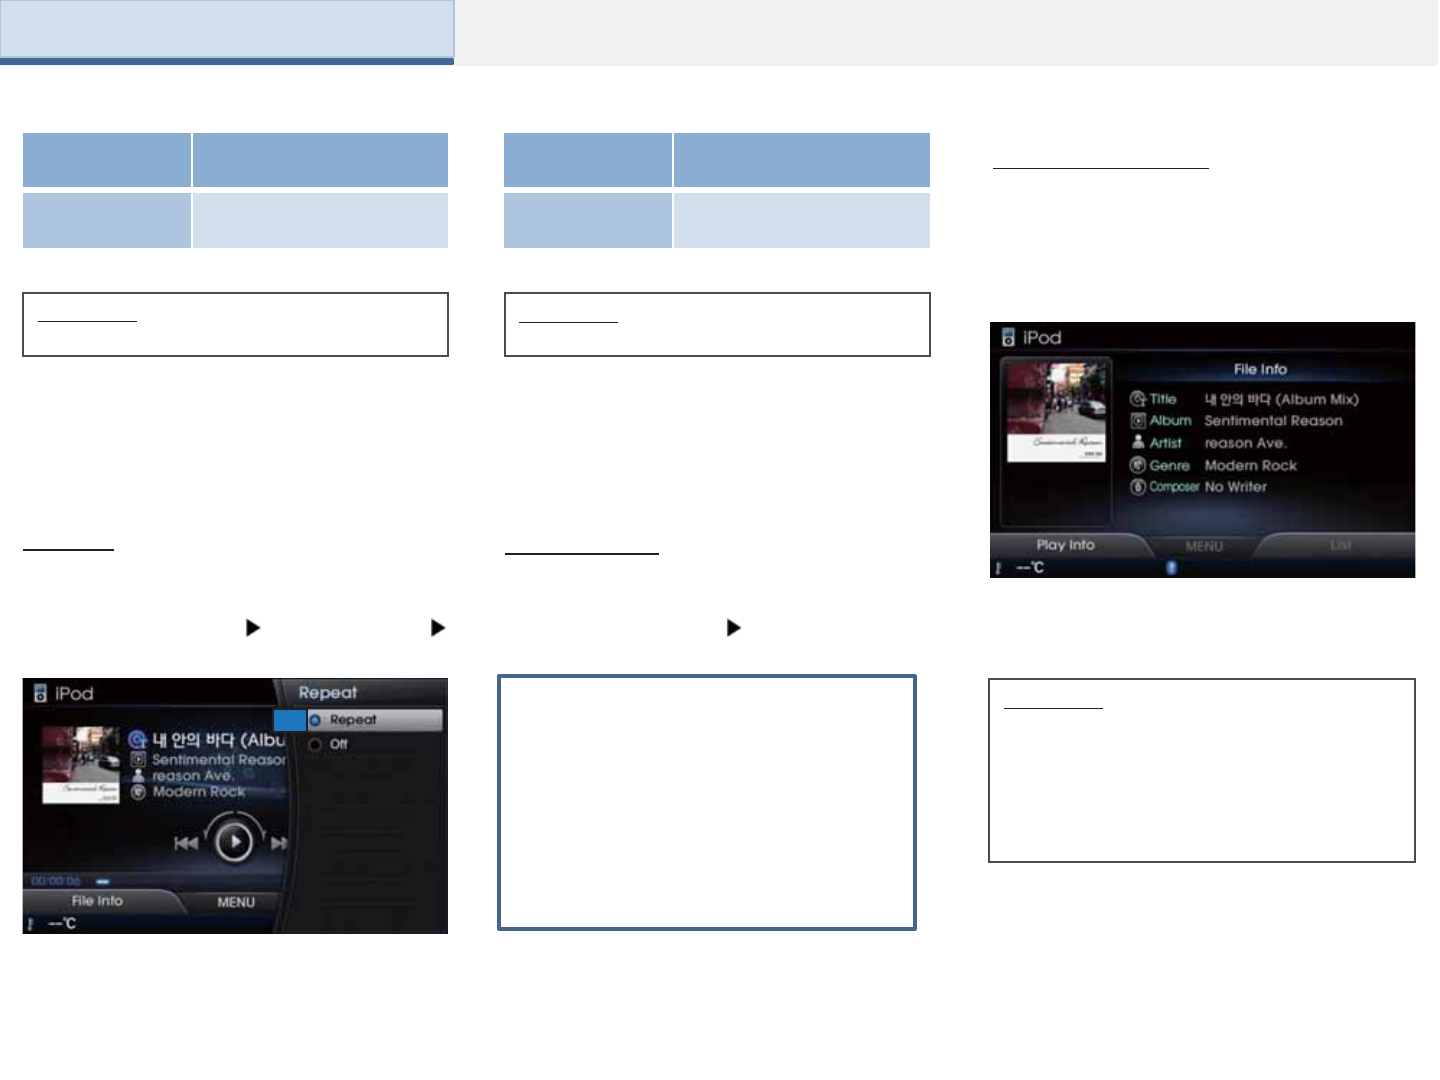
Part 2. AV (iPod)
Name Description
1. Shuffle Plays songs within play list
in random order
Name Description
1. Repeat Repeats play of currently
playing file.
1
Information
•Press [Off] to turn the Shuffle feature off.
Information
•Press [Off] to turn the Repeat feature off.
Repeat
Press the [MENU] key Select [Repeat]
Select [Repeat]
The current song or the all files within the
folder can be repeated.
Auto Playlist
List of songs similar with the current song
is displayed. The list can be used to select
desired songs.
Press the [MENU] key Select [Auto
Playlist]
File Info/Play Info
Press the [LHT] to select Play Info to view
file information, such as title, album, artist,
genre, and composer.
To return to the previous screen, select
[Play Info].
Information
• No information are shown for MP3 files
without file information.
• For more information on Sound and
Display settings, refer to the Info/Setup
section.
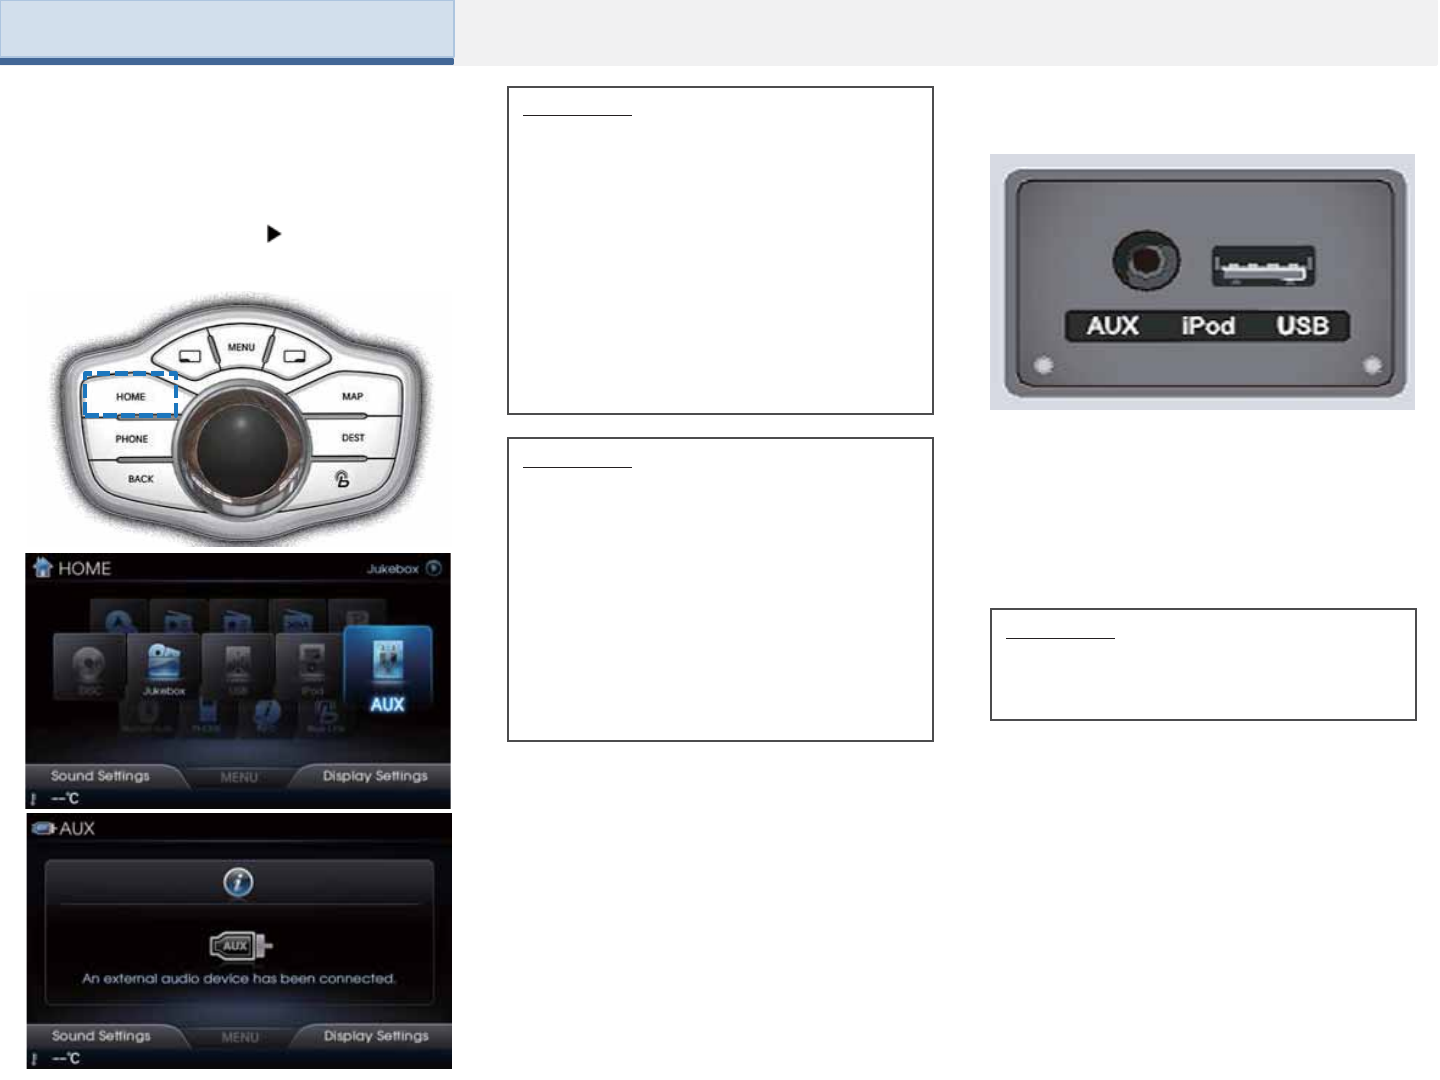
Part 2. AV (AUX)
Starting Mode
Press the [HOME] button Select [AUX]
External AUDIO and VIDEO players
(Camcorders, car VCR, etc.) can be
played through a dedicated cable. The
position of the AUX jack is at the top of
the gear box located between the driver
and passenger seats.
Information
• If an external device connector is
connected with the AUX terminal, then AUX
mode will automatically operate. Once the
connector is disconnected, the previous
mode will be restored.
• AUX mode can be used only when an
external audio/video player (camcorder, car
VCR, etc.) has been connected.
• The AUX volume can be controlled
separately from other AV modes.
Information
• Connecting a connector jack to the AUX
terminal without an external device will
convert the system to AUX mode, but only
output noise. When an external device is not
being used, also remove the connector jack.
• When the external device power is
connected to the power jack, playing the
external device may output noise. In such
cases, disconnect the power connection
before use.
Information
•The color saturation option is not supported
when using the PAL color system within this
device.

About Using Bluetooth® Audio
•Bluetooth® Audio Mode can be used only when a Bluetooth®
phone has been connected.
•While Bluetooth® Audio is playing, if the Bluetooth® phone is
connected, then the music will also stop.
•Bluetooth® streaming audio may not be supported in some
mobile phones.
•If you switch to the Bluetooth mode screen while playing
streaming audio, then the streaming audio will stop and the
previous AV mode will be restored.
Part 2. AV (Bluetooth Audio)
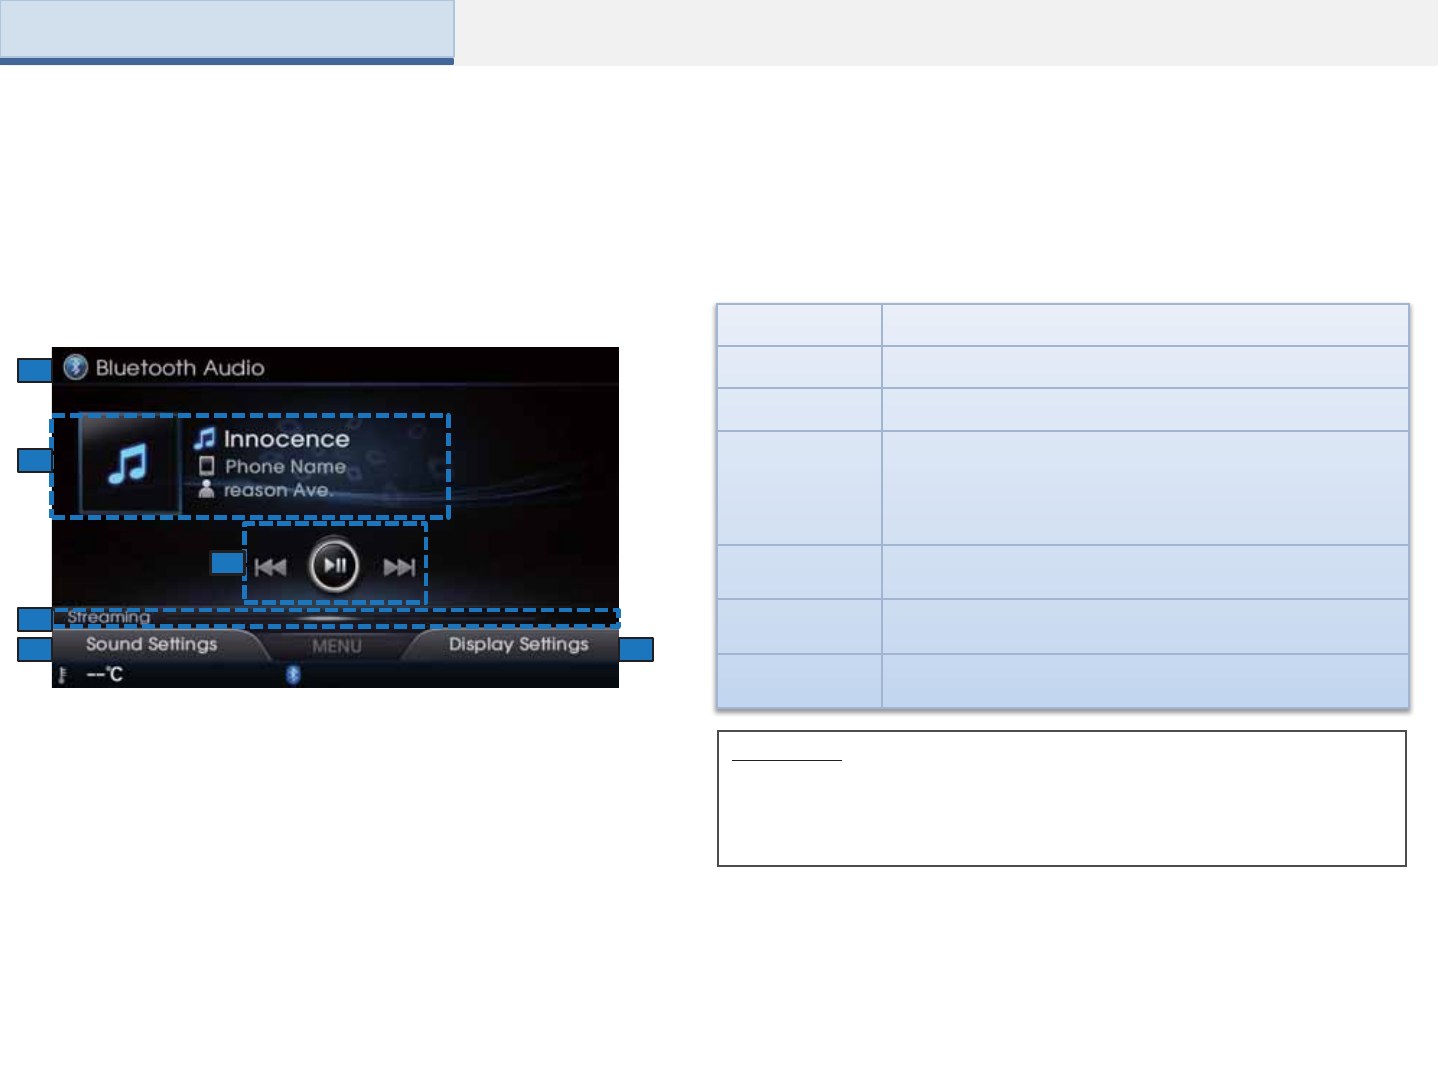
4
1
5
2
6
3
Name Description
1. Mode Displays currently playing mode
2. Play Info Displays mobile phone name/title/artist
3. Control
Panel
Enables use of Bluetooth audio play, pause, select and
search features
When pushed in ← or → directions: : Plays
previous/next song
When pressed :Plays or pauses
4.
Connections Displays the Connections screen
5. Sound
Settings Displays the sound setting screen
6. Display
Settings Displays the display setting screen
Basic Mode Screen
Information
• The title/artist info may not be supported in some mobile phones. When
not supported, “No Title/No Artist” will be displayed.
• The play/pause feature may operate differently depending on the mobile
phone.
Part 2. AV (Bluetooth Audio)
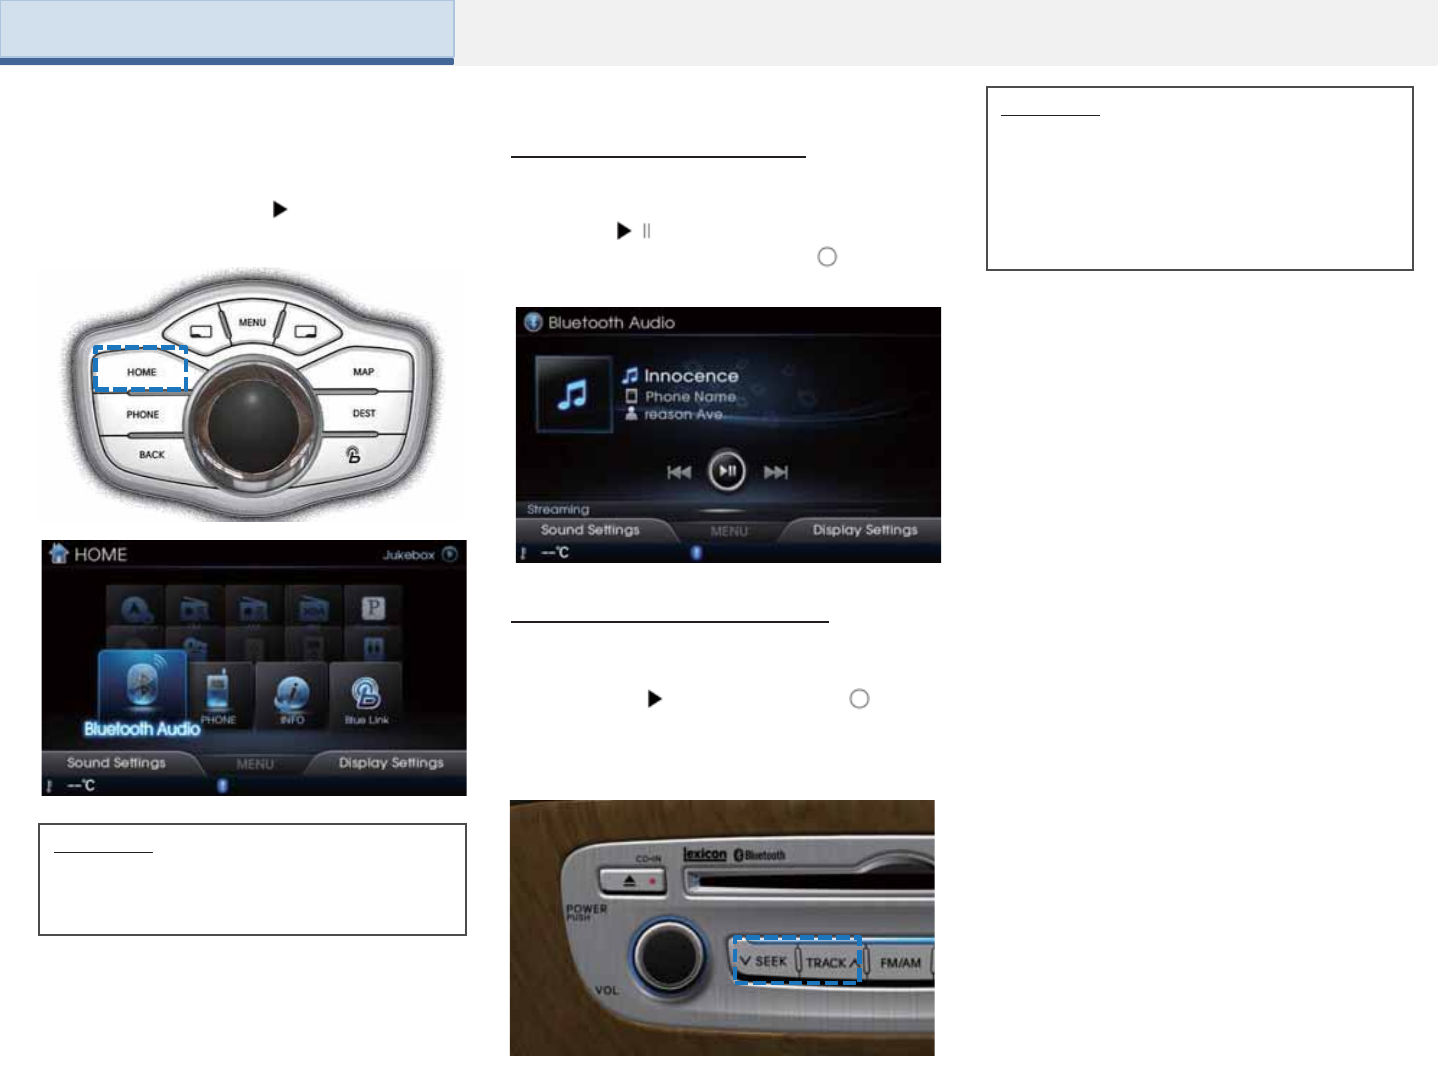
Part 2. AV (Bluetooth Audio)
Starting Mode
Press the [HOME] button Select [Bluetooth
Audio] Press the [ ] button to begin playing
Bluetooth Audio. Pressing the [ ] again will
pause the Bluetooth Audio.
Playing Bluetooth Audio
Selecting Bluetooth Audio
While playing Shortly push the [ ] in ←
or → direction (under 0.8 seconds) or shortly
press the [SEEK]TRACK] key to select the
previous/next song.
Information
• The title/artist info may not be supported in
some mobile phones.
• For more information on Sound and Display
settings, refer to the Info/Setup section.
Information
•If the Bluetooth® device is not connected,
then the [Bluetooth Audio] button will be
disabled.

zBefore Use
zStarting Navigation
zDestination Search
zRoute Menu
zNAVI Setup
zGPS Information
3Navigation

Safety Cautions
•For safety, some functions will be inactive while the vehicle is in
motion. Buttons that cannot be operated will be inactive.
Roads names and POI information may not always be completely
updated. Some places may not include up-to-date information.
The route displayed for destination guidance is a reference that will
take you to the vicinity of your destination.
The navigation system uses GPS information, various sensors, road
map data, and other related information to display the current
position. Errors may occur if the satellite is transmitting inaccurate
signals or if which can only two or less satellite signals can be
received. Errors which occur in such conditions cannot be corrected.
The current position may become displayed on at a place somewhat
different from your actual location. The car position mark may differ
from the actual location due to the state of the GPS satellites or the
vehicle (driving location and conditions). In addition, the car position
mark can become deleted from the actual position when driving on
roads different from the map data, such as newly constructed roads. •
Even if the car position mark on the map is different, map matching or
GPS info are used to automatically update the current position.
(In such cases, up to several minutes may be required.)
Before Use
•When a button function is operating, the color of the selected
button will be displayed differently.
•To return to the previous screen, press the [Back] button.
•Press the [Back] button to cancel the functions that can be
operated on the current screen.
(Some functions may not be canceled.)
Operating the Navigation
Information
•Buttons that cannot be operated will be inactive.
Part 3. Navigation
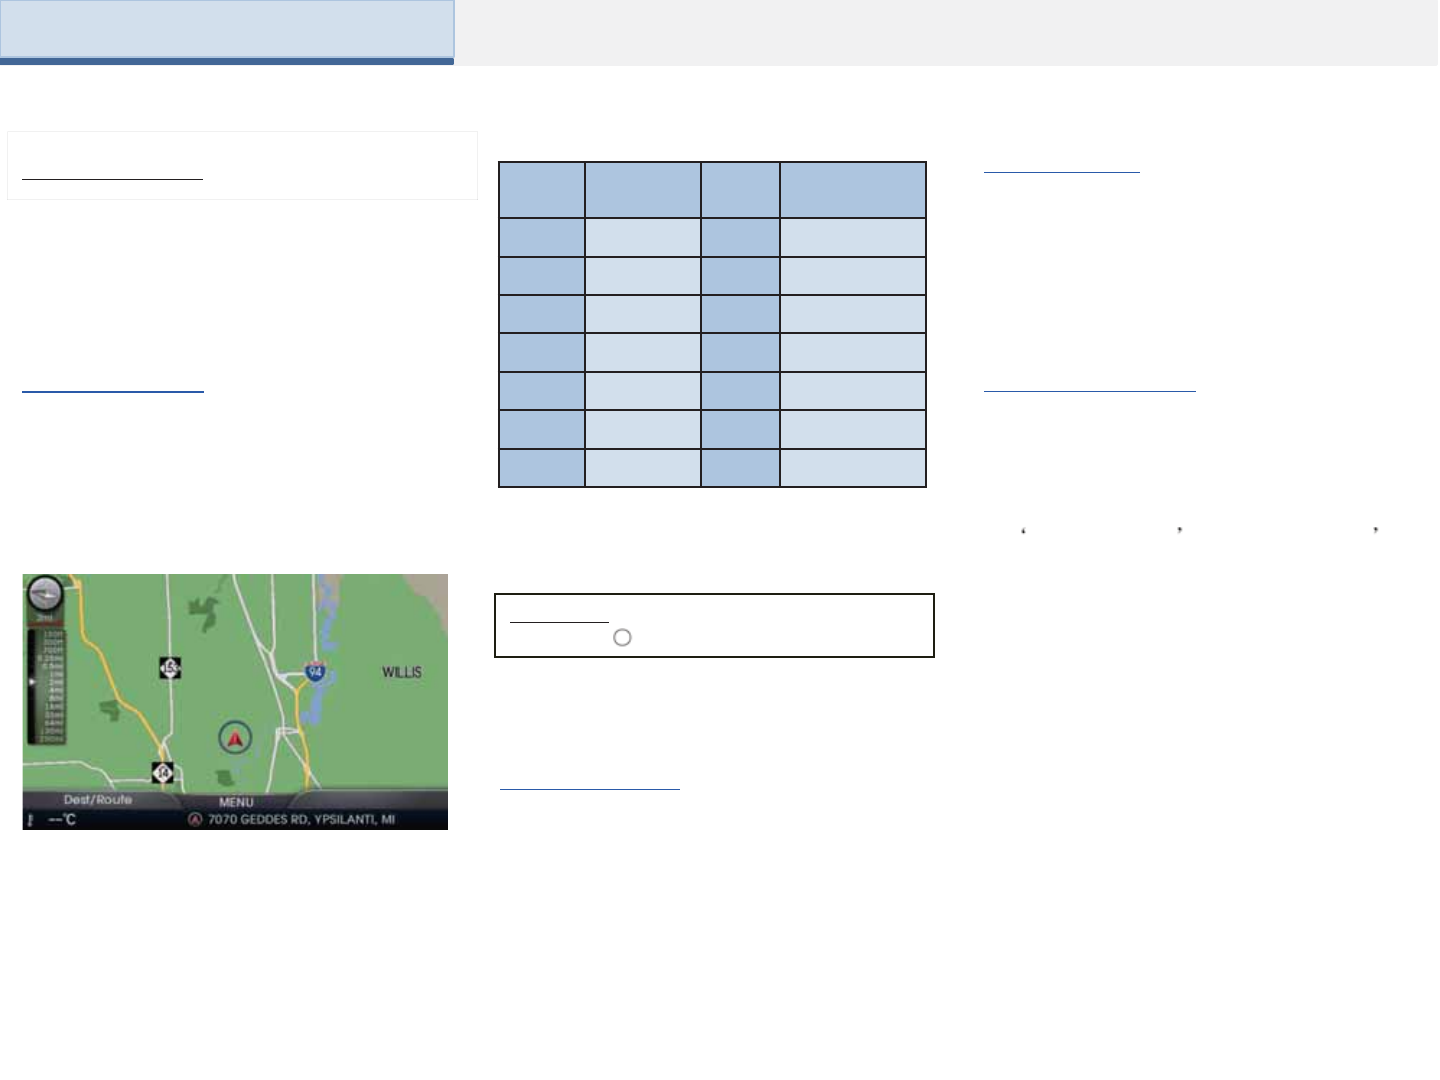
About Map Icons
Some roads, site names, facility information
and fare rates may have changed after map
data development and may differ with actual
road conditions.
About the Map
About Map Scale
If [100m] is displayed on the left side of the
map, this represents a map scale of
1/10,000.
Icons displayed on the map may be different
with actual conditions. Also, display of
multiple icons may be displayed under one
mark.
About Map DB
Unlicensed copying of the map in any form,
in full or in part, is strictly prohibited.
About Map Updates
For up-to-date maps and software, visit the
site (blu.hyundai.com) and download related
files to an SD card. To learn more, refer to
the System Update section of this user
r
s
manual.
Information
• Turn the [ ] left/right to change the scale.
Displa
yScale Displ
ay Scale
150m 1 /15,000 4ml 1 /4ml
300m 1 /30,000 8ml 1 /8ml
700m 1 /70,000 16ml 1 /16ml
0.25ml 1 /0.25ml 32ml 1 /32ml
0.5ml 1 /0.5ml 64ml 1 /64ml
1ml 1 /1ml 130ml 1 /130ml
2ml 1 /2ml 250ml 1 /250ml
Part 3. Navigation
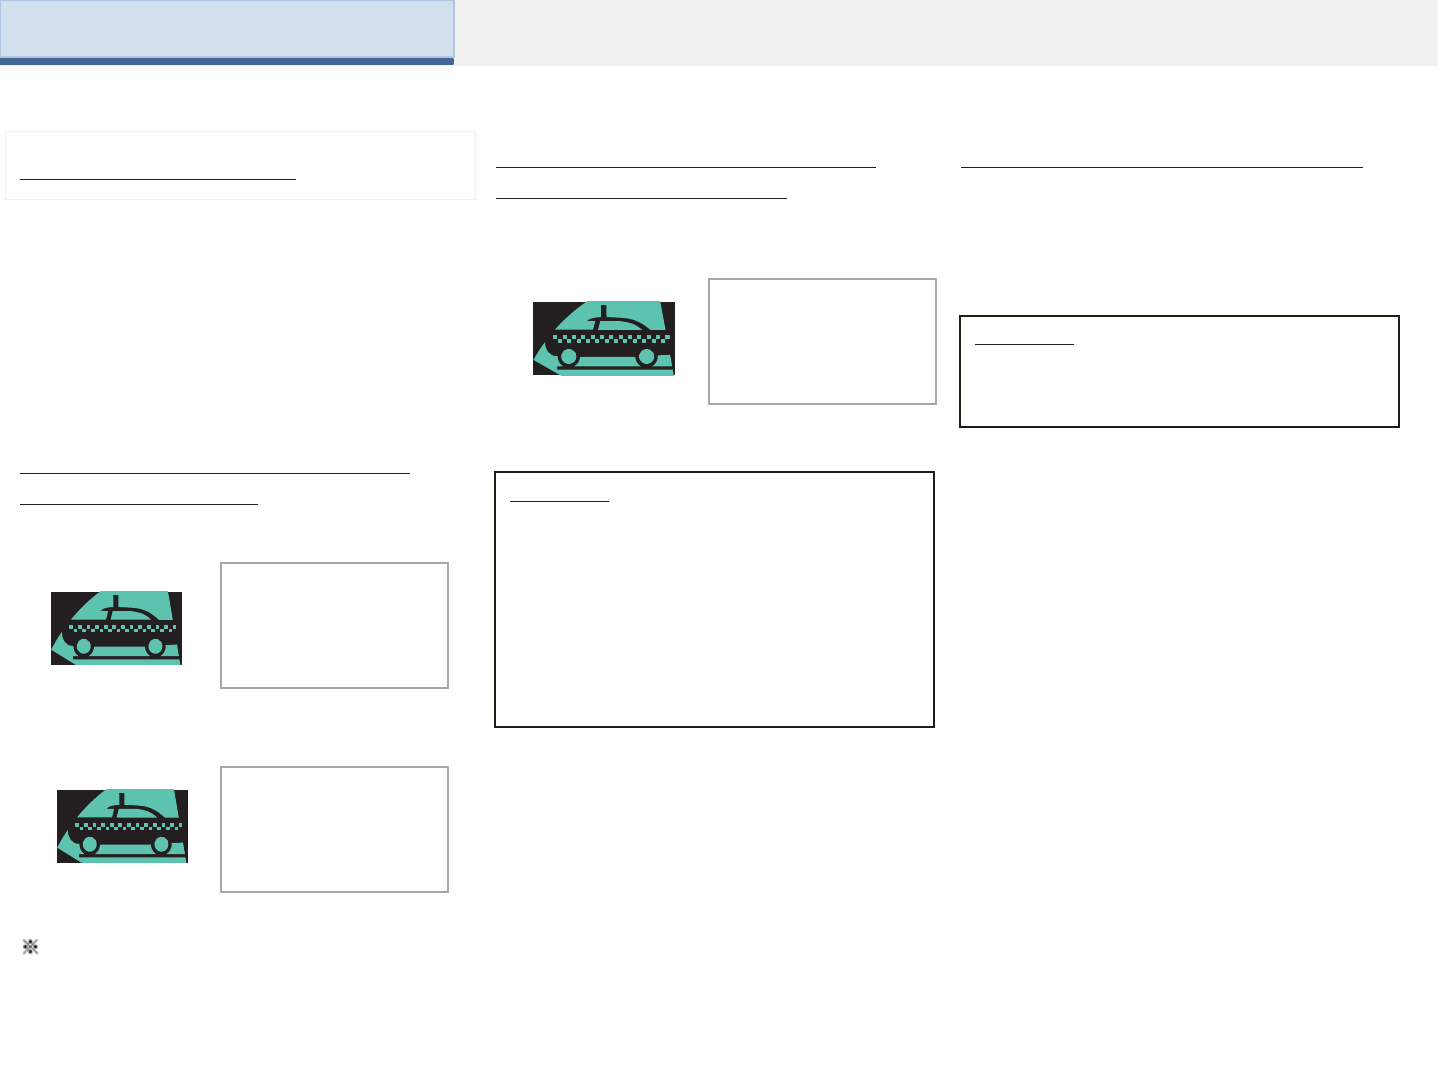
During destination guidance, voice guidance will
be provided when reaching an intersection or you
are nearby the destination.
About Voice Guidance
Example of voice guidance during
destination guidance
Voice guidance is provided in the following
situations.
Example of voice guidance when
arriving at the destination
-In front of an intersection
-Upon entering a toll road
-In front of the destination
Please use voice guidance only as a
reference to assist in your driving.
Information
•The above voice guidance examples are
normal cases. However, the actual voice
guidance may differ depending on the road
type.
•If the car position is not accurately
measured, then voice guidance may not be
given, or may be given later or improperly.
•It is possible to adjust the Navigation
guidance volume.
Guidance when using other modes
Voice guidance will continue even when
converting from the navigation screen to a
different mode screen.
Information
Even when voice guidance has been muted,
destination guidance will continued to be
provided.
You are near your
destination. Voice
guidance will end.
Turn right in about
700m. Right turn ahead.
Right turn ahead.
You are entering a
motorway. Toll gate
ahead.
Part 3. Navigation
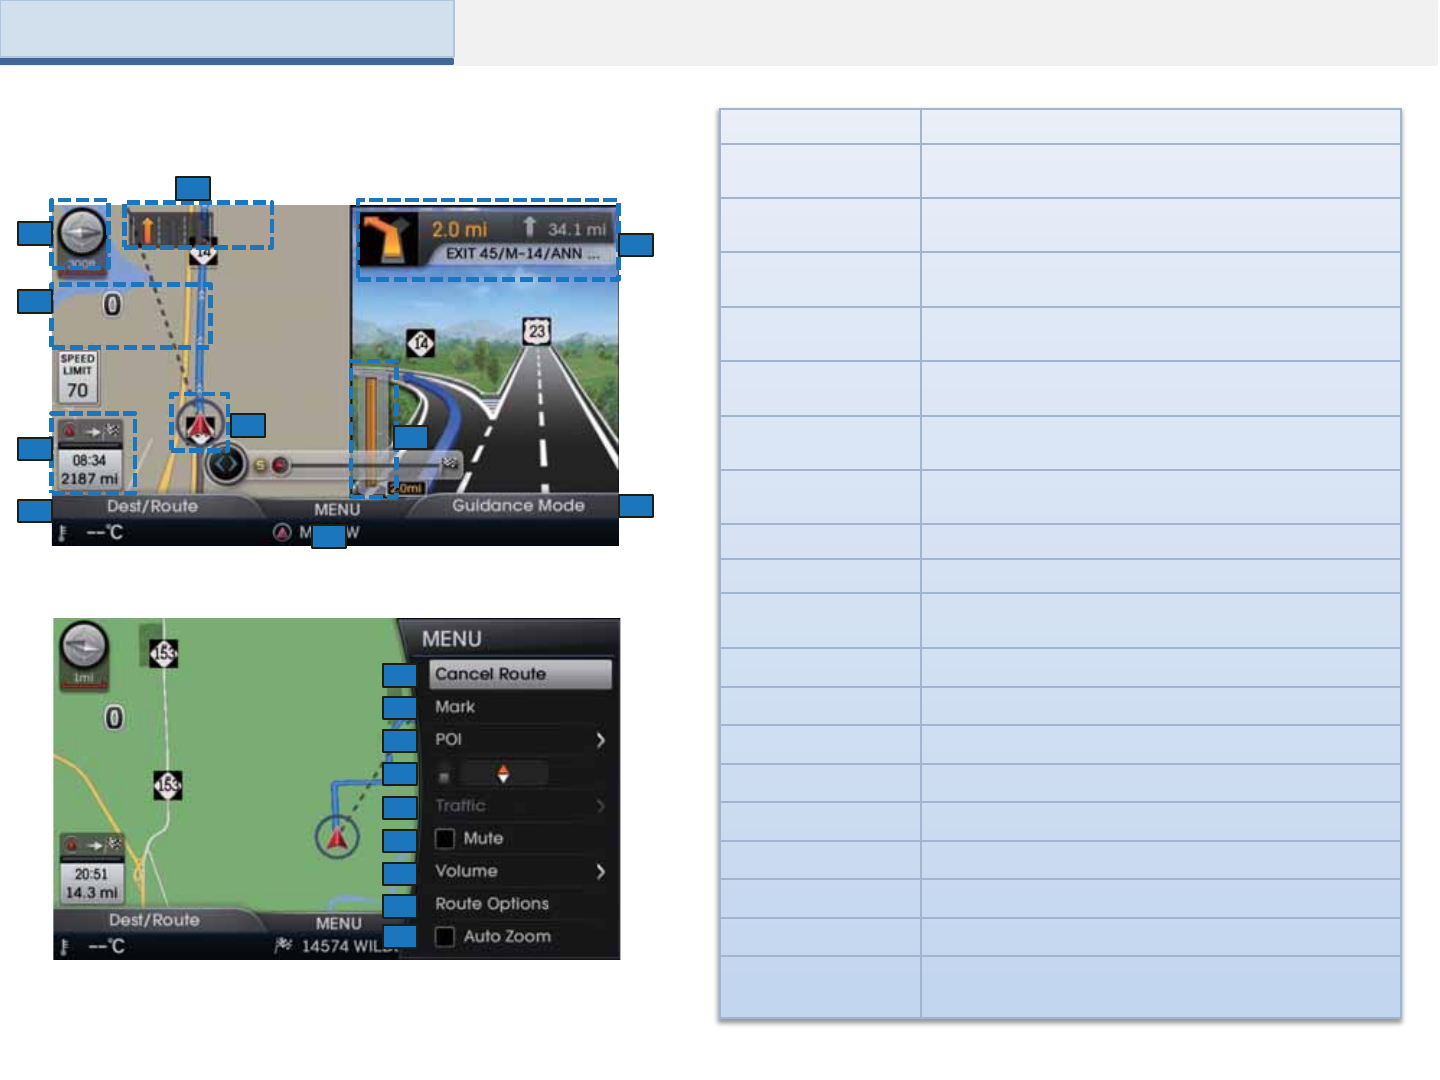
Starting Navigation
1
2
3
4
5
67
8
9
10
11
12
13
14
15
16
17
18
Name Details
1. Car direction and
Scale
Map direction and GPS reception state and scale
display
2. Lane Info Recommended lanes taking the following intersection
and expected route into consideration
3. Preliminary
Guidance
Displays direction, ETA, remaining time and distance
from current position to the destination
4. Current speed
and camera info Displays current vehicle speed and camera information
5. ETA and
Remaining distance
Displays the estimated arrival time and remaining
distance to the destination
6. Car Position
Mark Displays the current vehicle position and direction
7. Remaining
Distance Remaining distance until next turn
8. Navi Menu Displays the Navi menu screen
9. MENU Displays the MENU list
10. Right screen
mode Changes the right Navi screen mode
11. Cancel Route Cancels the currently set route
12. Mark Add my places and user cameras to the current position
13. POI Displays POI list
14. Map Mode Sets map display mode
15. Traffic Displays traffic information on map
16. Mute Mute navi voice guidance
17. Volume Controls navi voice guidance volume
18. Route Options Used to recalculate route to the destination
19. Auto Zoom Sets whether to use the Auto Zoom feature while
the vehicle is in motion
19
Part 3. Navigation
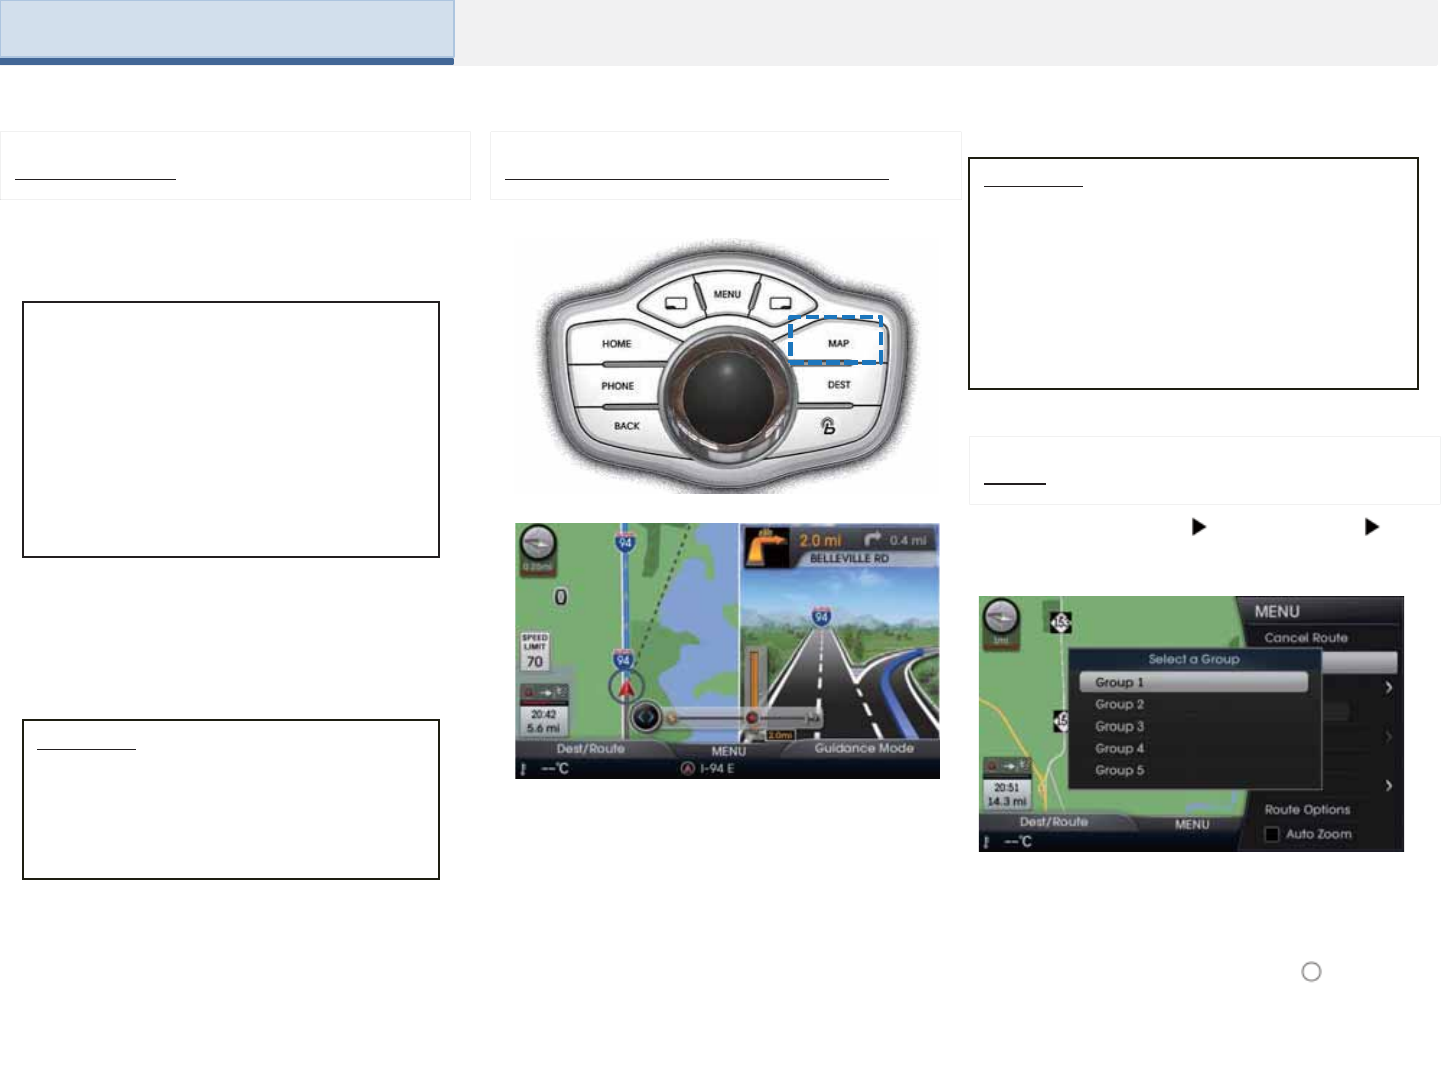
Initial Screen
Press the [Agree] button to display the most
recently used mode
Press the [MAP] key to display the map of
the current position and the neighboring
area.
Information
• When riding in a new car or after replacing the
battery terminal, the car position mark may
appear at a location different from your actual
current position.
• Even if the car position mark on the map is
different, map matching or GPS info are used
to automatically update the current position.
Information
• If you turn the vehicle ignition is turned on,
the User Warning screen will always be
displayed. Make sure to carefully read the
page as it contains important information
related to system operations while driving.
Displaying the Current Position
If AV mode is used with the navigation
turned on, navigation guidance will be
provided in the background. If you turn the
ignition on, then the most recently played
mode will restart.
.
Mark
Press the [MAP] key Press [MENU]
[Mark]
This feature is used to save the current
position or the scrolled position as a My
Place.
To save the position, press the [ ] after
selecting the desired group.
Part 3. Navigation
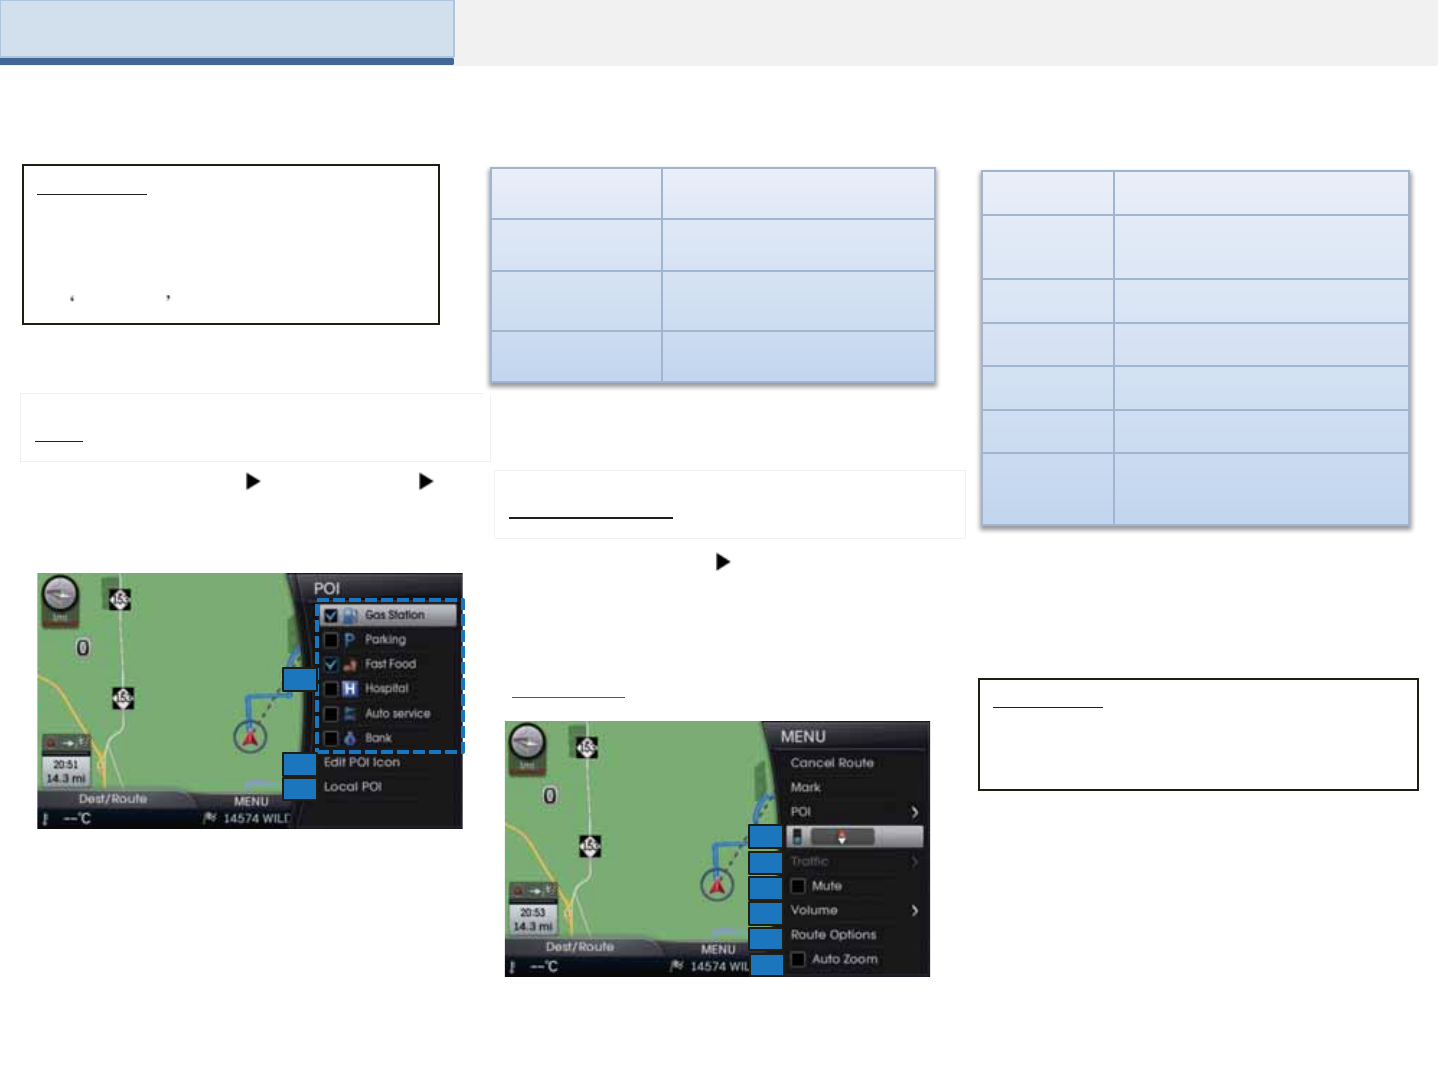
Information
• My Places are saved without distinction
for the driving state or the scrolled state.
• To edit or delete registered mark, refer to
the My places section.
POI
Press the [MAP] key Press [MENU]
Press [POI]
Within the screen when the POI menus
are displayed, pressing one of the 6
facility icon buttons will display the
corresponding facilities.
Name Details
1. POI Icons Sets POI facilities
2. Edit POI Icon
Sets the 6 POI icons to the
desired genre through user
editing
3. Local POI Moves to Search by POI
screen
1
2
3
Map Settings
Press the [MAP] key Press [MENU]
Map Mode
Sets map related options, such as map
direction, traffic information and
sound/volume adjustment.
1
2
3
4
5
Information
• If the map scale is above 16mi, the map
display mode will be changed automatically to
2D North-Up.
Name Details
1. Heading
Up/North Up
Displays map in Vehicle Traveling
Direction(Heading Up) or the
North-Up direction
2. Traffic Provides traffic information on the
screen or by voice
3. Mute Mute route guidance sound
4. Volume Adjust outgoing volume of route
guidance
5 . Route
Option
Displays a menu to change route
settings and conditions
6. Auto
Zoom
Sets whether to automatically
adjust the map scale when the
vehicle is in motion
6
Part 3. Navigation
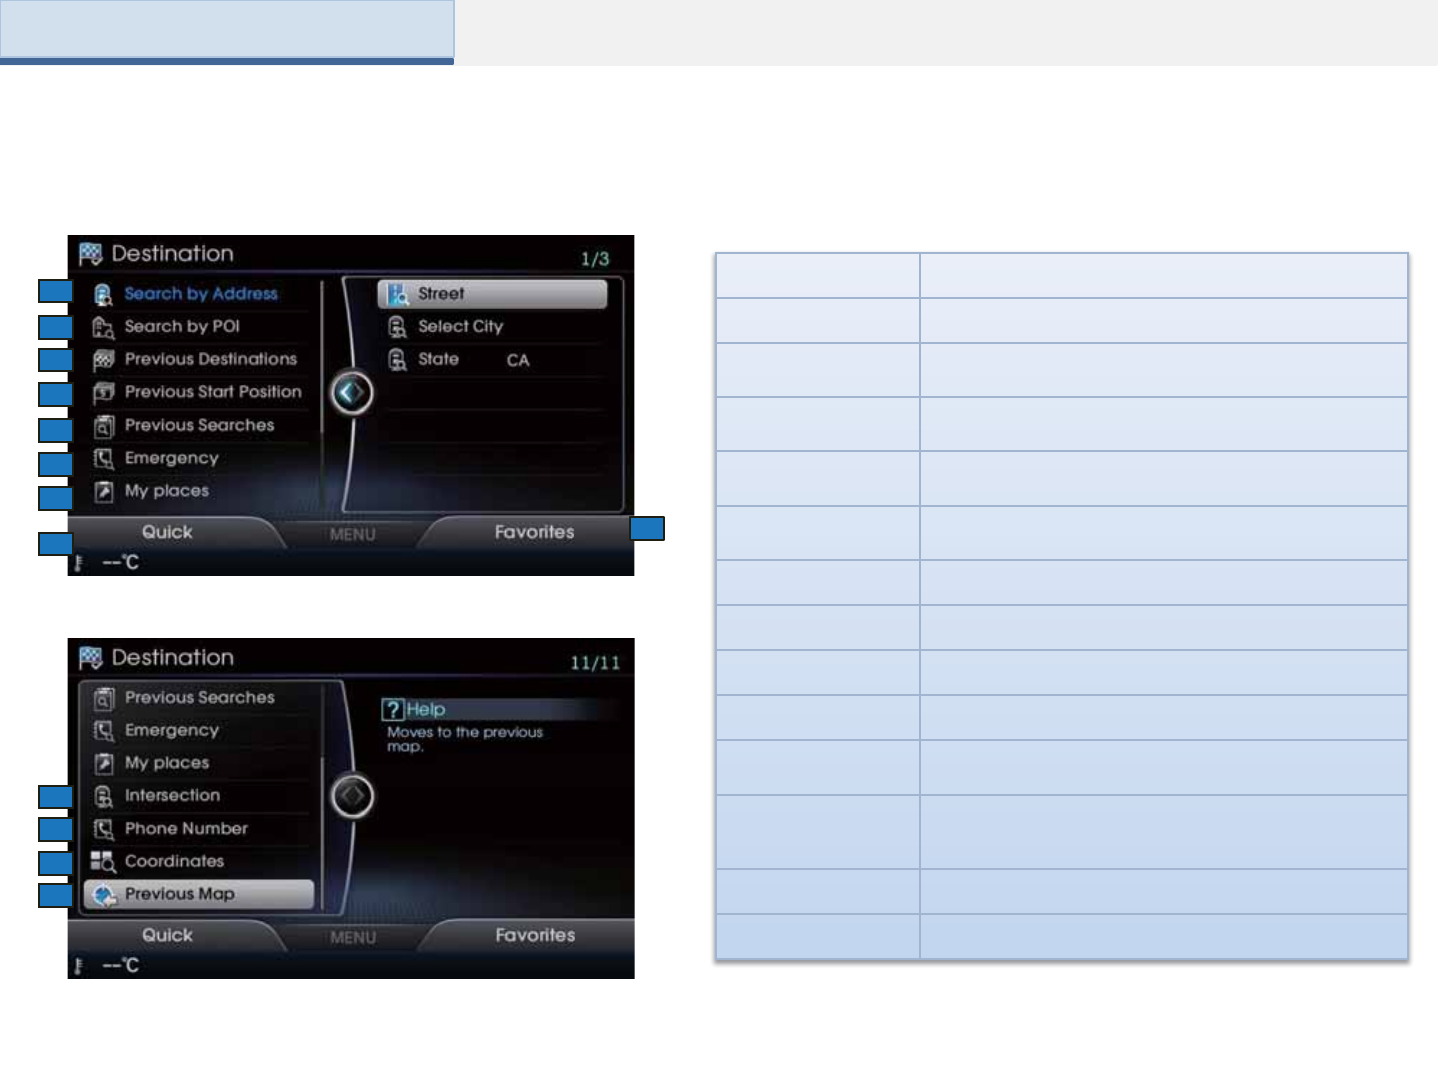
Destination Search
2
3
4
5
6
7
8
1
9
11
12
13
10
Name Details
1. Address Search Searches by address
2. Search by POI POI searches for current position/scroll
position/destination/region
3. Previous
Destinations
Destination guidance for recently set locations
4. Previous Start
Position
Destination guidance for recently set start position
5. Previous
Searches Destination guidance for recently searched locations
6. Emergency Used to make emergency related searches
7. My Places Destination guidance for recently added My Places
8. Quick Used to edit Quick menu
9. Favorites Displays Home/Office/Favorites list
10. Intersection Used to search destinations by entering the intersection
name
11. Phone Number
• Destination search by entering the phone number
• POI search by entering the phone number
12. Coordinates Destination search by entering latitude and longitude
13. Previous Map Moves to previous map screen
Part 3. Navigation
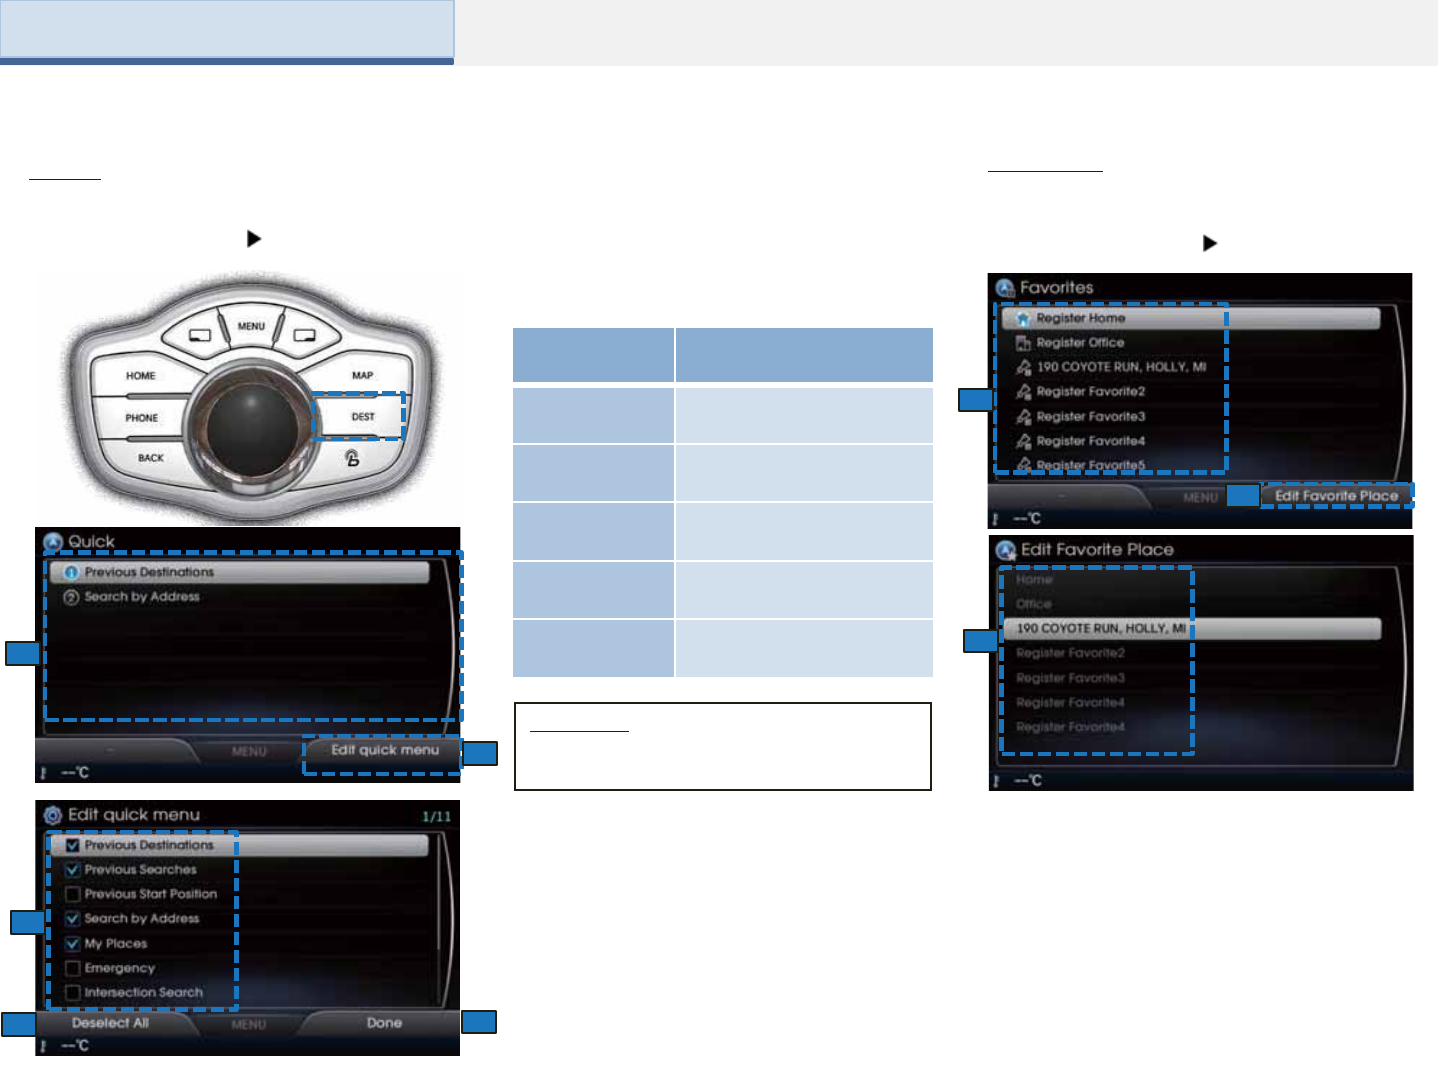
Quick
Press the [DEST] key Press [Quick]
Name Details
1. Quick Lists Registered Quick menu
lists
2. Edit Quick
Menu
Add and delete Quick
menu lists
3. Menu Lists Editable Quick menu lists
4. Deselect All Unmark all selected Quick
menu
5. Done Finishes editing Quick
menu
Information
• Among 11 quick menus, Up to 7 quick
menu can be added to Quick menu.
Favorites
2
3
4
1
2
3
5
1
These menus allow you to set frequently used
menu to Quick List.
To add or delete Quick list, press the [Edit
Quick Menu] button.
Press the [DEST] key Press [Favorites]
This feature is used to register frequently
visited positions to favorites.
Press the [Edit Favorite Place] to add or
delete favorites.
Part 3. Navigation
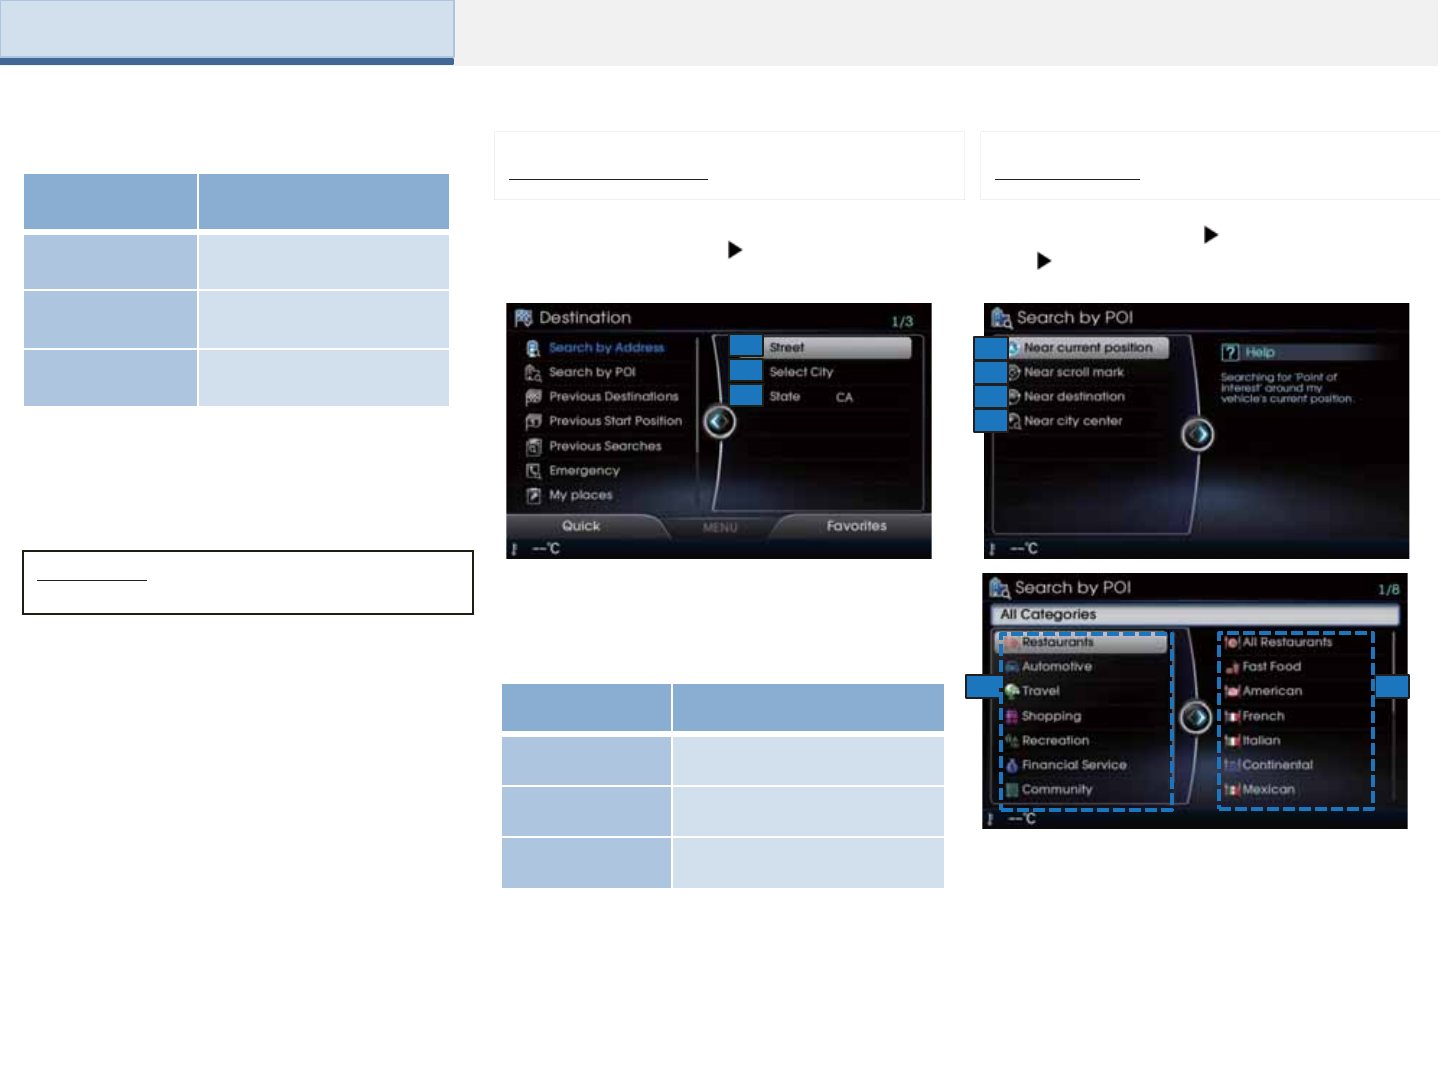
Address Search
Press the [DEST] key Press [Search by
Address]
1
2
3
This search feature is used to search
destinations by addresses through street/
tower/city/country names..
Name Details
1. Street Destination search by
entering the street address
2. Select City Destination search by
entering the city name
3. State Selects state
POI Search
Press the [DEST] key Press [Search by
POI] Select the desired Category
1
2
3
4
This search feature is used to search
destinations by criteria (Near current
position, Near scroll mark, Near destination)
56
Name Details
1. Favorites lists Registered Favorites lists
2. Edit Favorites Adds edit, and deletes
Favorites
3. Menu Lists Editable Quick Menu lists
Information
• Up to 7 positions can be added to Favorites.
Part 3. Navigation
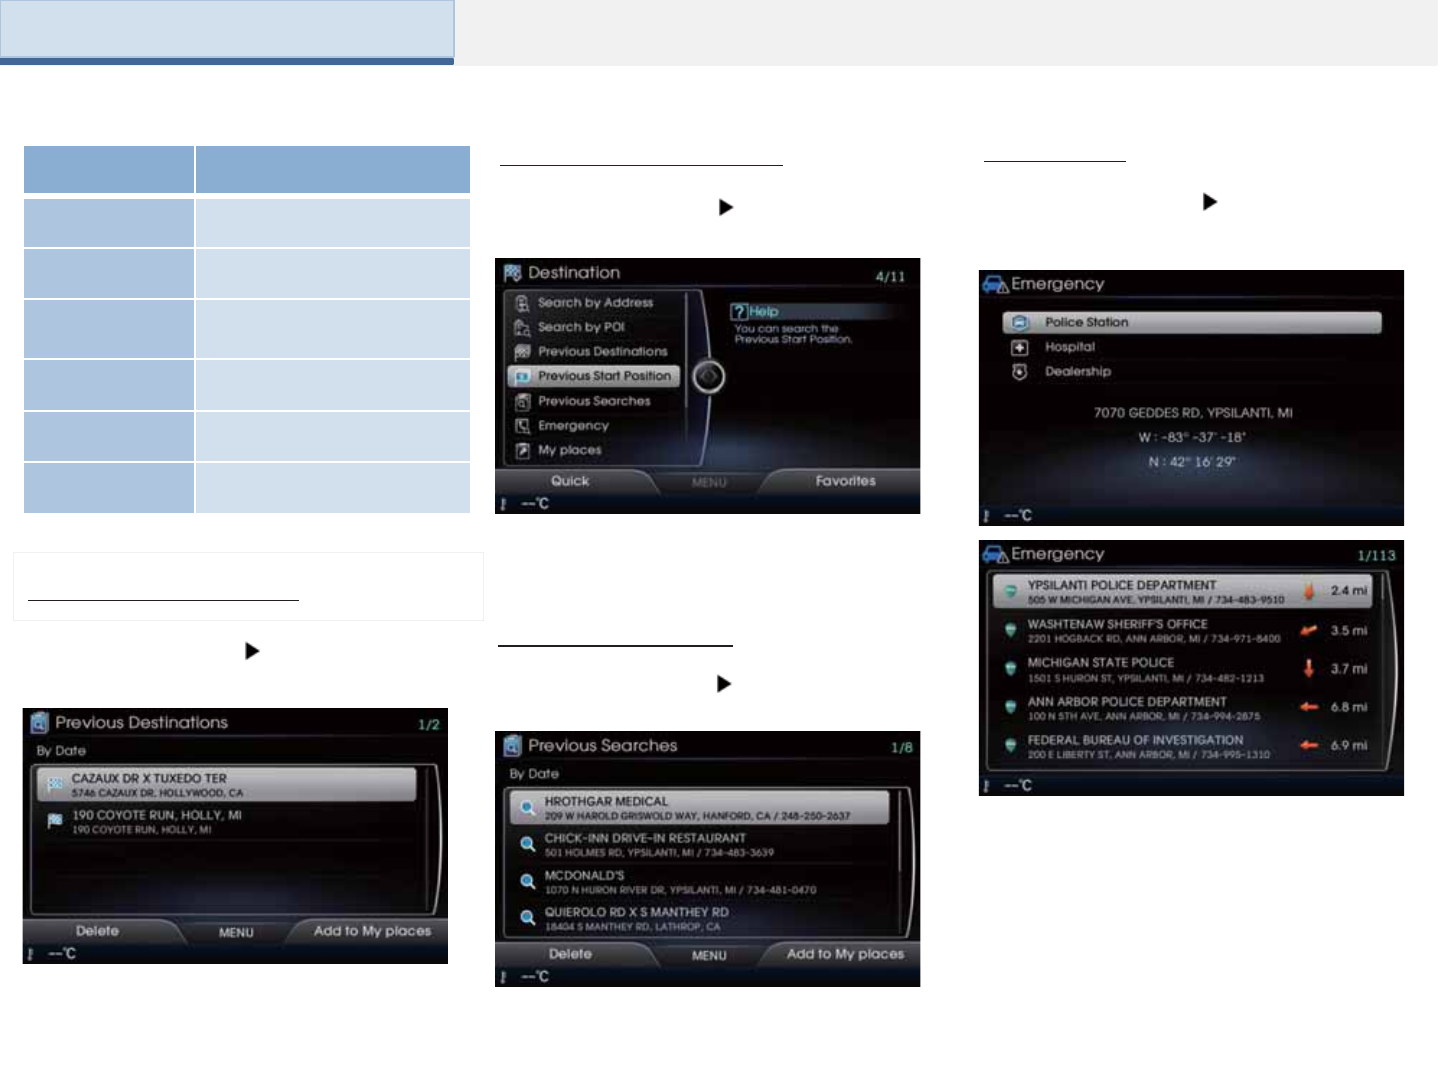
These search features allow you to search
previous routes and set as destinations or
waypoint.
Previous Destinations
Press the [DEST] key Press [Previous
Destinations]
These search features allow you to search
previous start points and set as destinations
or waypoint..
These search features allow you to search
previous searches and set as destinations or
waypoint.
Previous Start Position
Press the [DEST] key Press [Previous
Start Position]
Previous Searches
Press the [DEST] key Press [Previous
Searches]
Emergency
Press the [DEST] key Press [Emergency]
This menu is used to search nearby police
stations, hospitals, dealer shops.
Name Details
1. Near Current
Position
Searches POI around the
vehicle's current position
2. Near Scroll
Mark
searches facilities based on
the current scrolled position
3. Near
Destination
searches facilities based on
the location of the
destination
4. Near city
centre
searches facilities based on
the selected location
5. Category Selects POI categories
6. POI Mark Selects POI marks
Part 3. Navigation
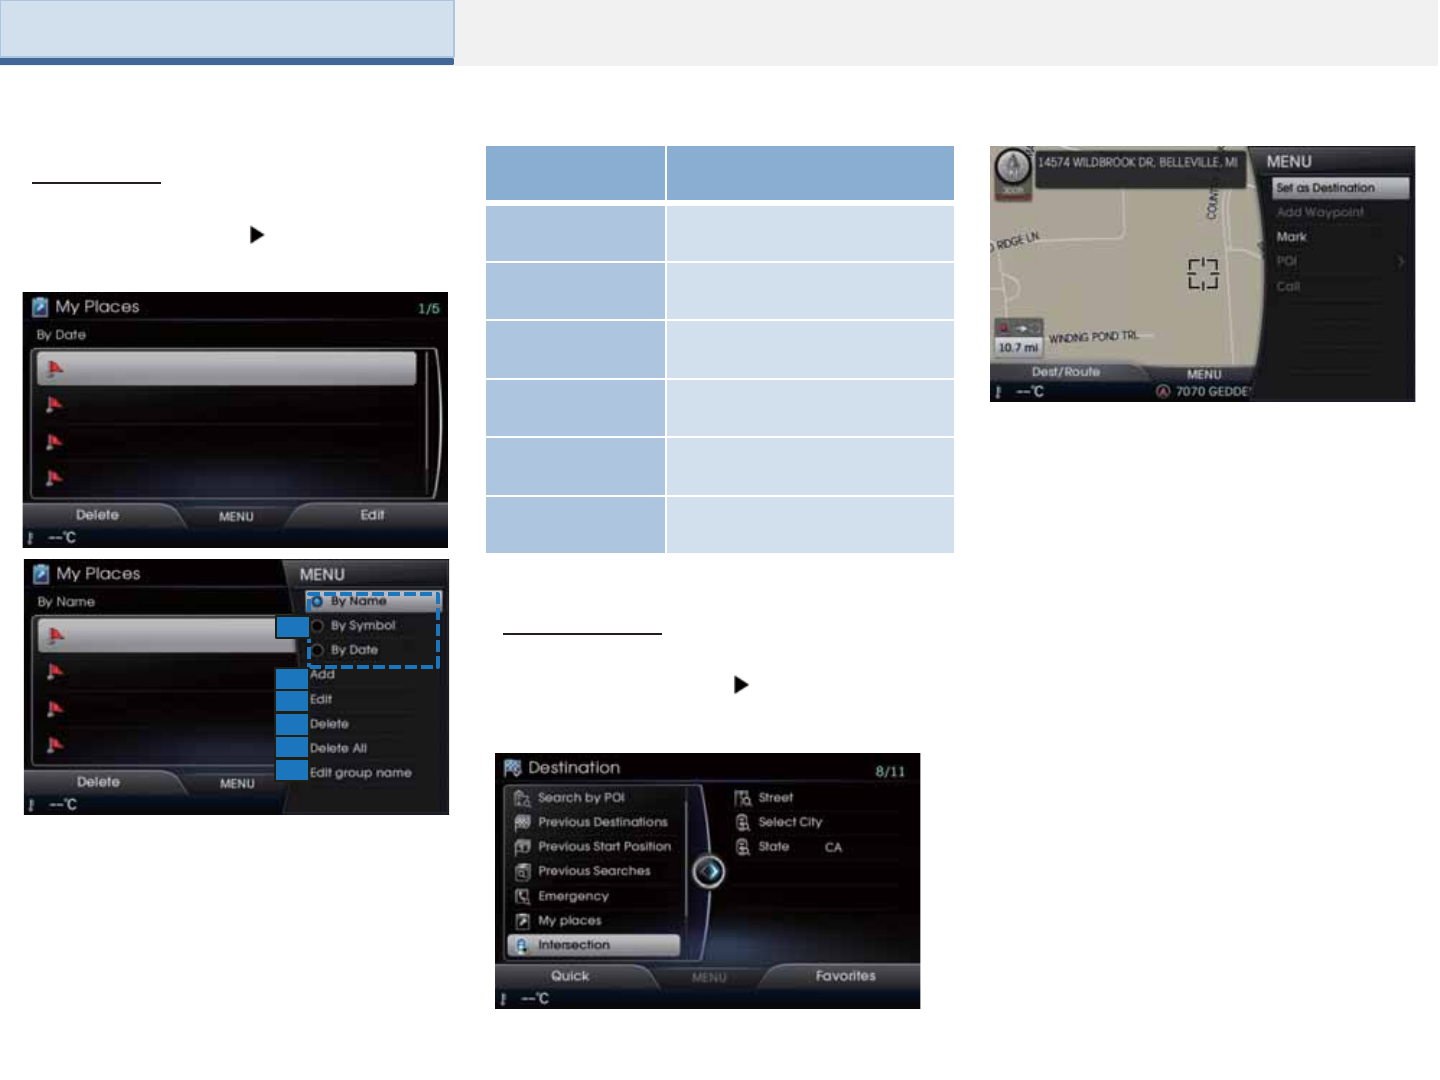
My Places
Press the [DEST] key Press [My Places]
This search feature is used to search
destinations by selecting previously saved
My Places from the list to set as
Destinations.
Name Details
1. Sort Sort POIs and locations by
name/symbol/date
2. Add Adds a new place to My Place
group
3. Edit Edits selected place
4. Delete Deletes selected place
5. Delete All Deletes all registered places
6. Edit group
name Edits My Places group name
1
2
Intersection
Press the [DEST] key Press
[Intersection]
3
4
5
6
This search feature is used to search
destinations by streets and intersections
through road/city/country.
Part 3. Navigation
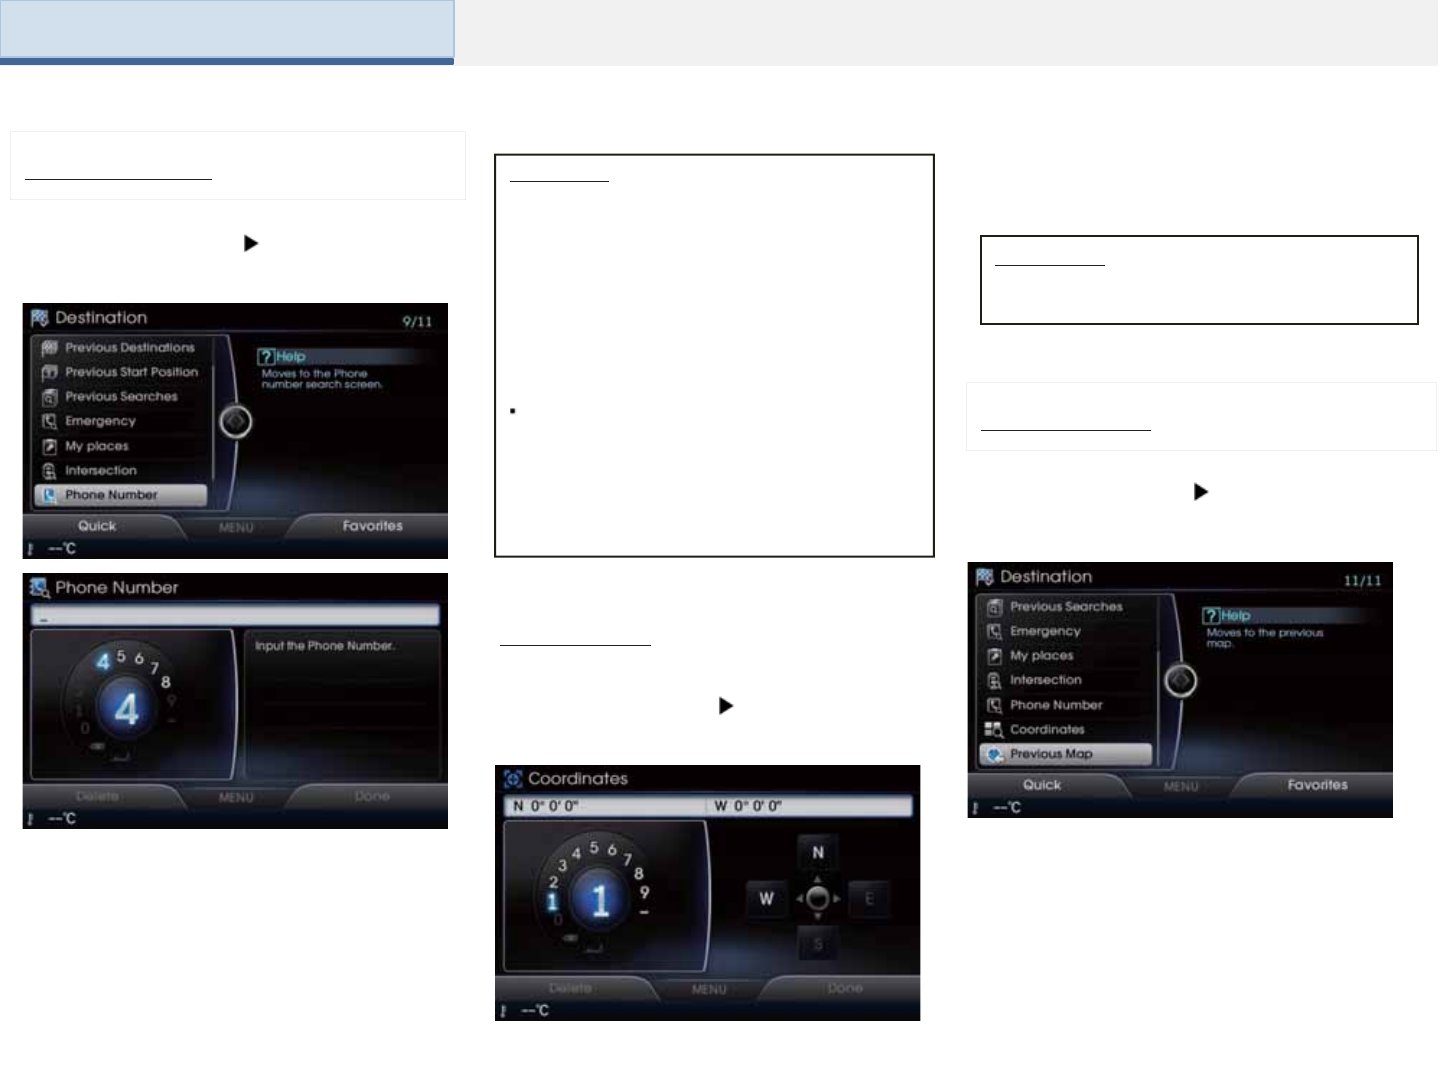
This feature is used to search the locations
of POIs by entering the phone number of
the facility you wish to search.
When entering the phone number, the area
code must be included.
Phone Number
Press the [DEST] key Press [Phone
Number]
Information
• The telephone number and location may not the
same for some POIs. In addition, the following
types of facilities may be more frequently located in
other locations.
•Locations of department stores, museums, and
amusement parks may somewhat differ from the
set destination. Check the exact address when
trying to reach such destinations.
Within general information newspapers, there are
cases when phone numbers of concert halls list the
numbers of managing companies. In such cases,
searches will be to the managing company.
• The telephone number and addresses may
change at any time.
Coordinates
Press the [DEST] key Press [Coordinates]
This feature is used to search the locations
by entering longitude and latitude.
Previous Map
Press the [DEST] key Press [Previous
Map]
Information
• When entering one digit number, 0(zero)
should be entered first.
Part 3. Navigation
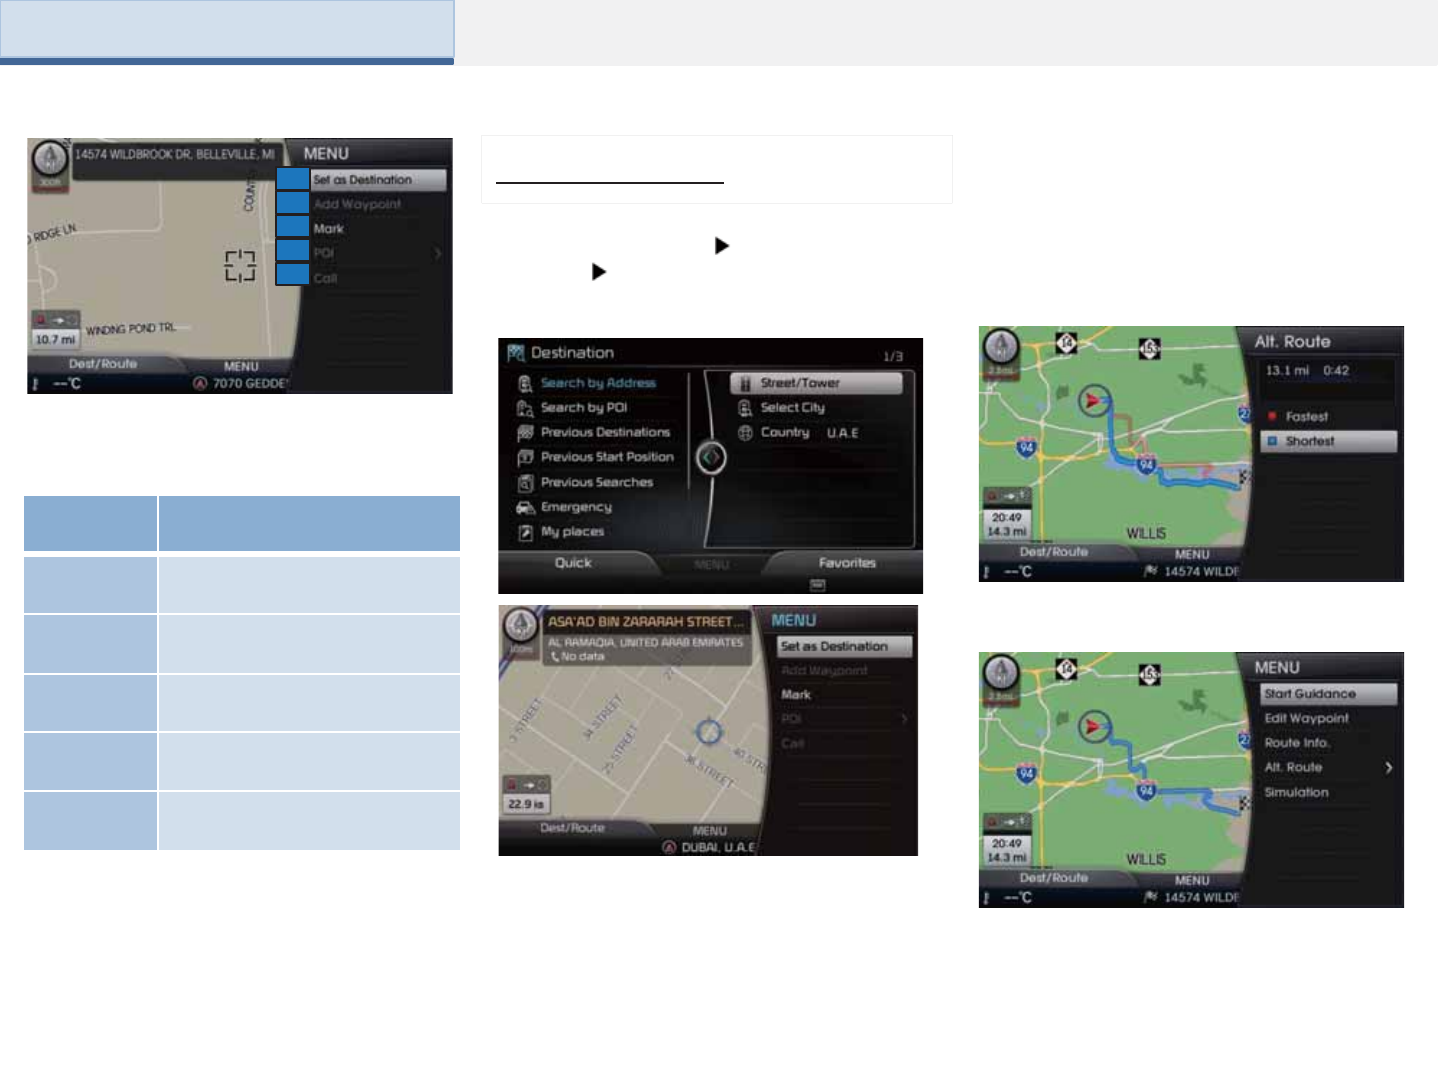
After searching for the destination according
to the map search method, select the desired
destination from the list.
(For more information on destination search
methods, refer to the Destination Search
section.)
Name Details
1. Set as
Destination
Sets the facility or position where
the cursor is positioned as the new
destination
2. Add
Waypoint
Sets the facility or position where
the cursor is positioned as a
waypoint
3. Mark Marks the facility or position where
the cursor is positioned
4. POI Sets destination by searching POI
5. Call
Makeing a phone call to the facility
or position where the cursor is
positioned
The previously displayed position is
displayed by scrolling the map.
2
3
4
5
1Set as Destination
<Alternative Route>
<Route Overview>
After verifying the location of the searched
position, select the [Set as Destination]
button to calculate the route. The Route
Overview or Multipath screen will be the
displayed.
Within the Route Overview or Alternative
Route screen, press the [Map] key or the
[Start Guidance] button to begin guidance.
To add a destination, press the [Add
Waypoint] button.
Press the [DEST] key Press [Search by
Address] Search destination and press
[Set as Destination]
Part 3. Navigation
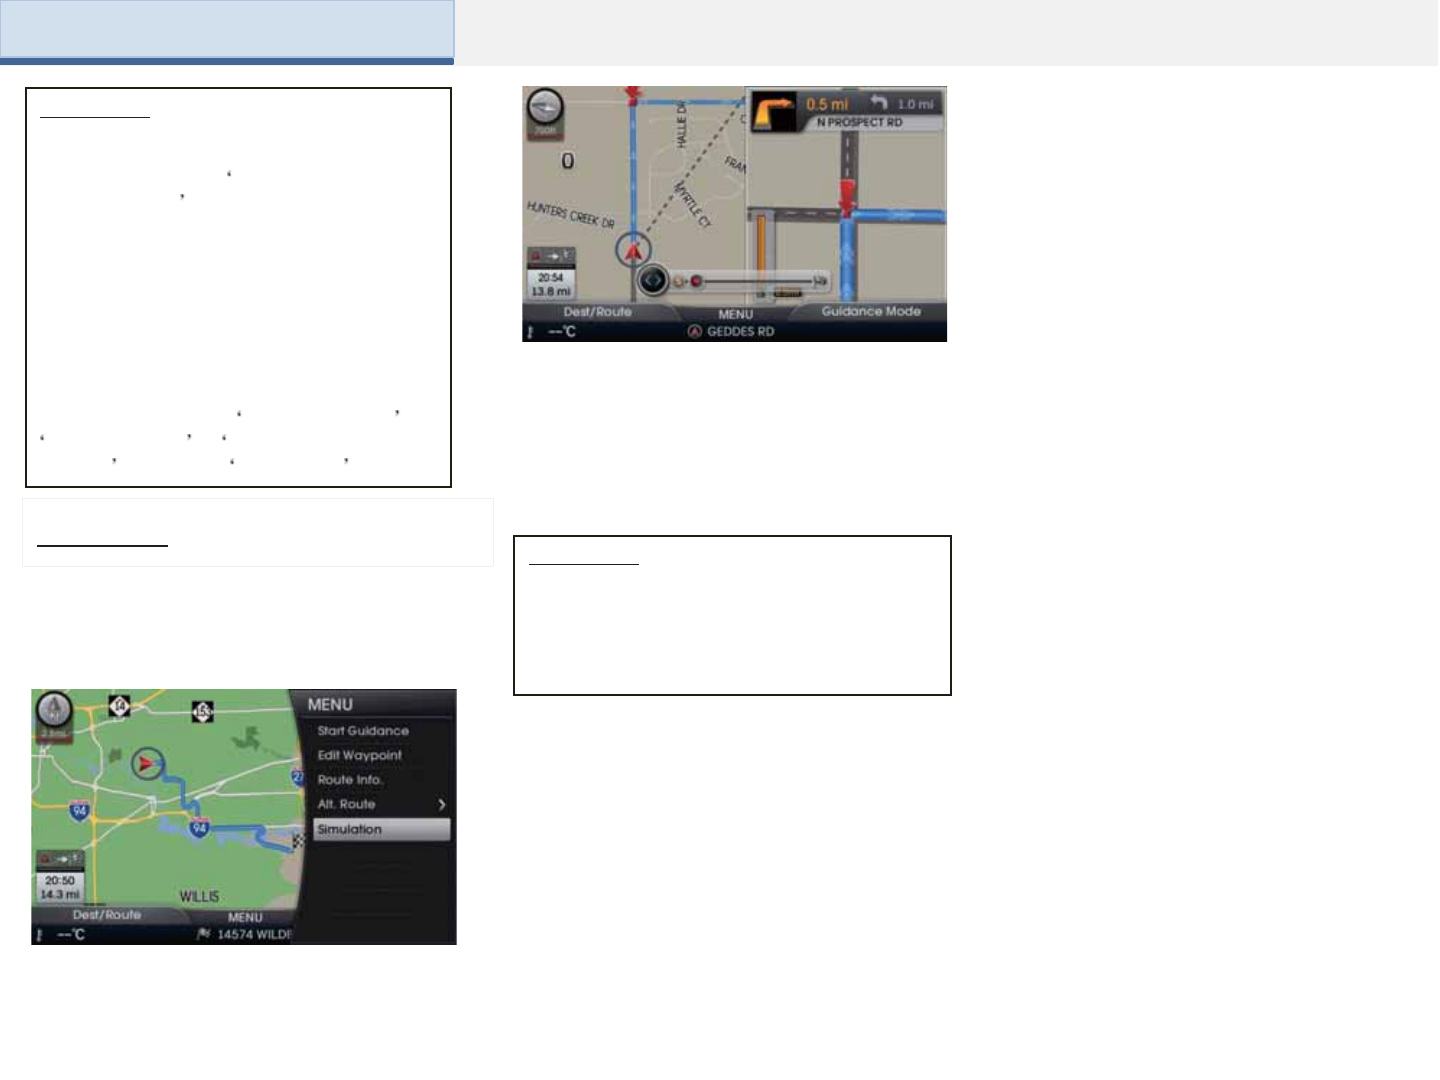
Information
• If you select the [Set as Destination] button
while a previous destination has already
been set, the pop-up Do you want to change
the destination? is displayed.
• If you select [Yes], then the previous
destination is deleted and the new
destination will be set.
• If you select [Add Waypoint], then a new
waypoint is added.
• To learn more about Alternative Route ,
Route Overview
w
or Detailed Route
Settings , refer to the Route Menu section.
Simulation
Once route calculation is complete, Press the
[Simulation] button to view a demo of the
route guidance.
During Simulation, pressing the [Map] key
will end the Simulation and display the
current map position. If you start driving the
vehicle while viewing the route Simulation,
demo will end and route guidance will start.
Information
• Simulation will not operate after route
guidance has begun. When wishing to use the
Demo feature, please use after route
calculation but prior to receiving route
guidance.
Part 3. Navigation
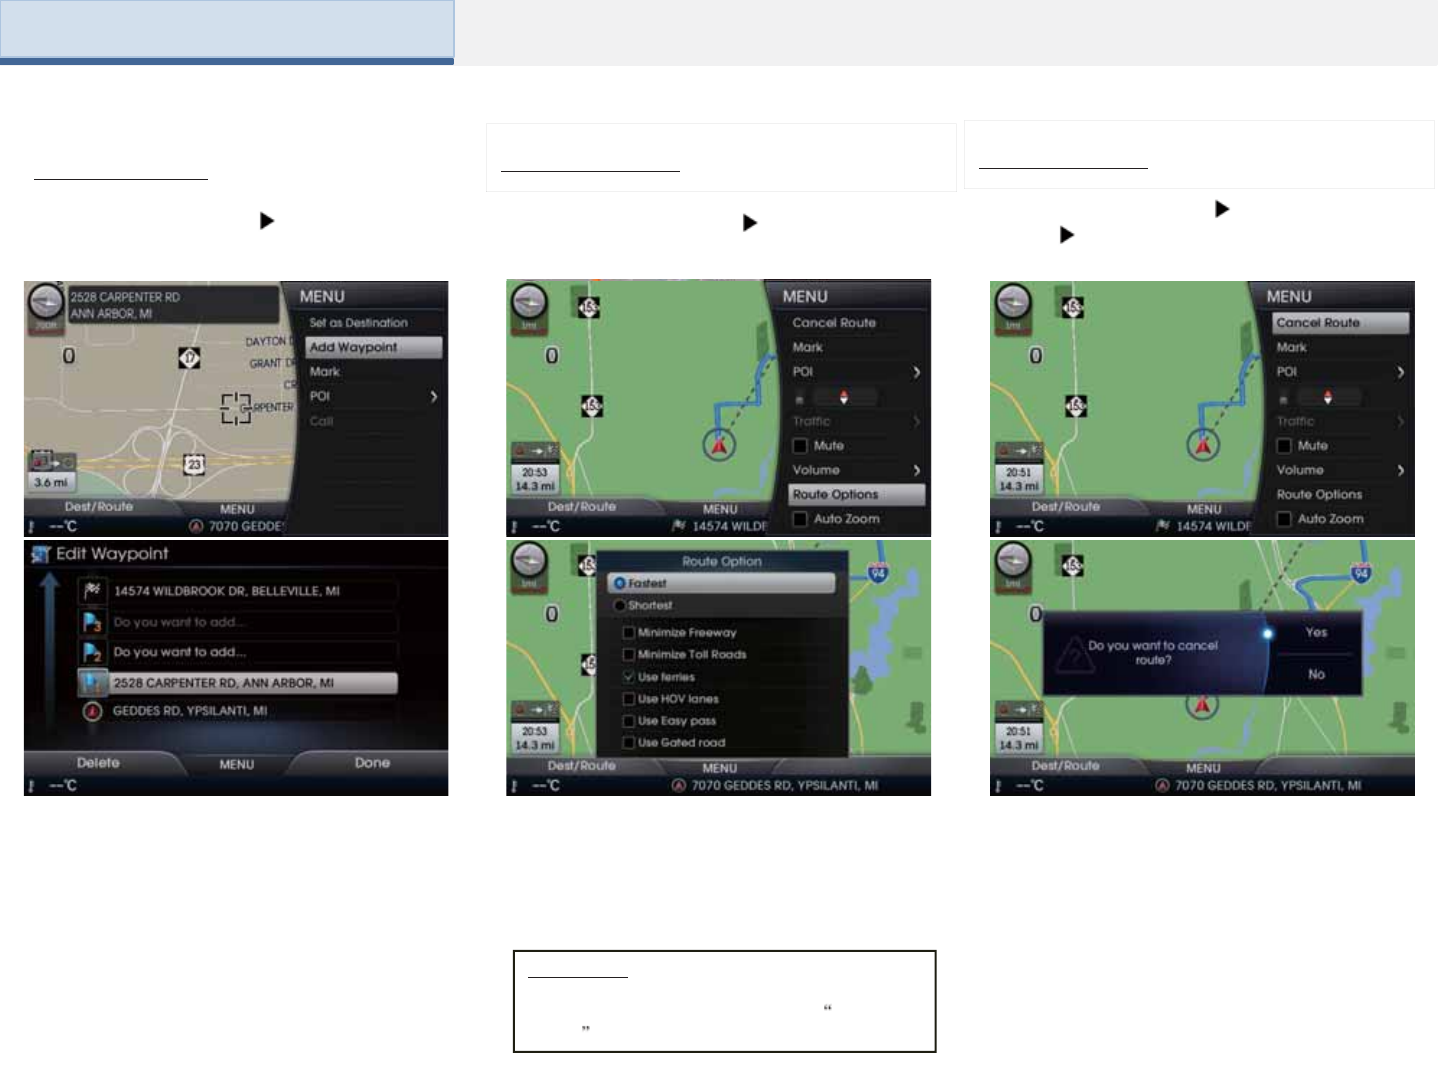
Add Waypoint
Press the [MENU] Key Press [Add
Waypoint]
Searching for the destination according
to the map search method after
searching for waypoints within the map
screen, press the [Add Waypoint] key to
add the waypoint to the current route.
Route Options
Press the [MENU] Key Press [Route
Options]
Information
• For more information on Fastest, Shortest, and
other calculating options, refer to the Route
Option section.
Selecting the [Route Options] will display a pop
up that allows you to change route settings and
conditions. Once the settings are changed, the
route will be recalculated by reflecting the
changes.
Cancel Route
Press the [MENU] Key Press [Cancel
Route] Press [Yes]
Cancels and deletes the currently
designated destination.
Part 3. Navigation

Within the destination guidance map
screen, if the current position is on route,
then intersection guidance will be provided
when nearby an intersection. In addition,
when nearby an intersection, the
intersection zoom screen is displayed.
Route Guidance
The preliminary guidance, intersection
guidance, turn list guidance, motorway
mode screen are displayed depending on
the current road condition.
Information
• Within all guidance mode screens, selecting
the button at the bottom right side of the
screen will change the route guidance mode.
• Each time the button is selected, the
guidance mode will change in order of single
screen → motorway guidance → turn list
mode.
• Motorway and intersection zoom guidance
are displayed on when receiving guidance at
corresponding roads.
At the top right side of the screen, the first
and second turn info, remaining distance,
direction and other information are displayed.
Preliminary Guidance Mode
This mode provides detailed guidance
nearby intersections before an expected
turn. This mode will start displaying before
the intersection.
Intersection Zoom Mode
This mode shows turn information on the
route.
Turn List Mode
Part 3. Navigation
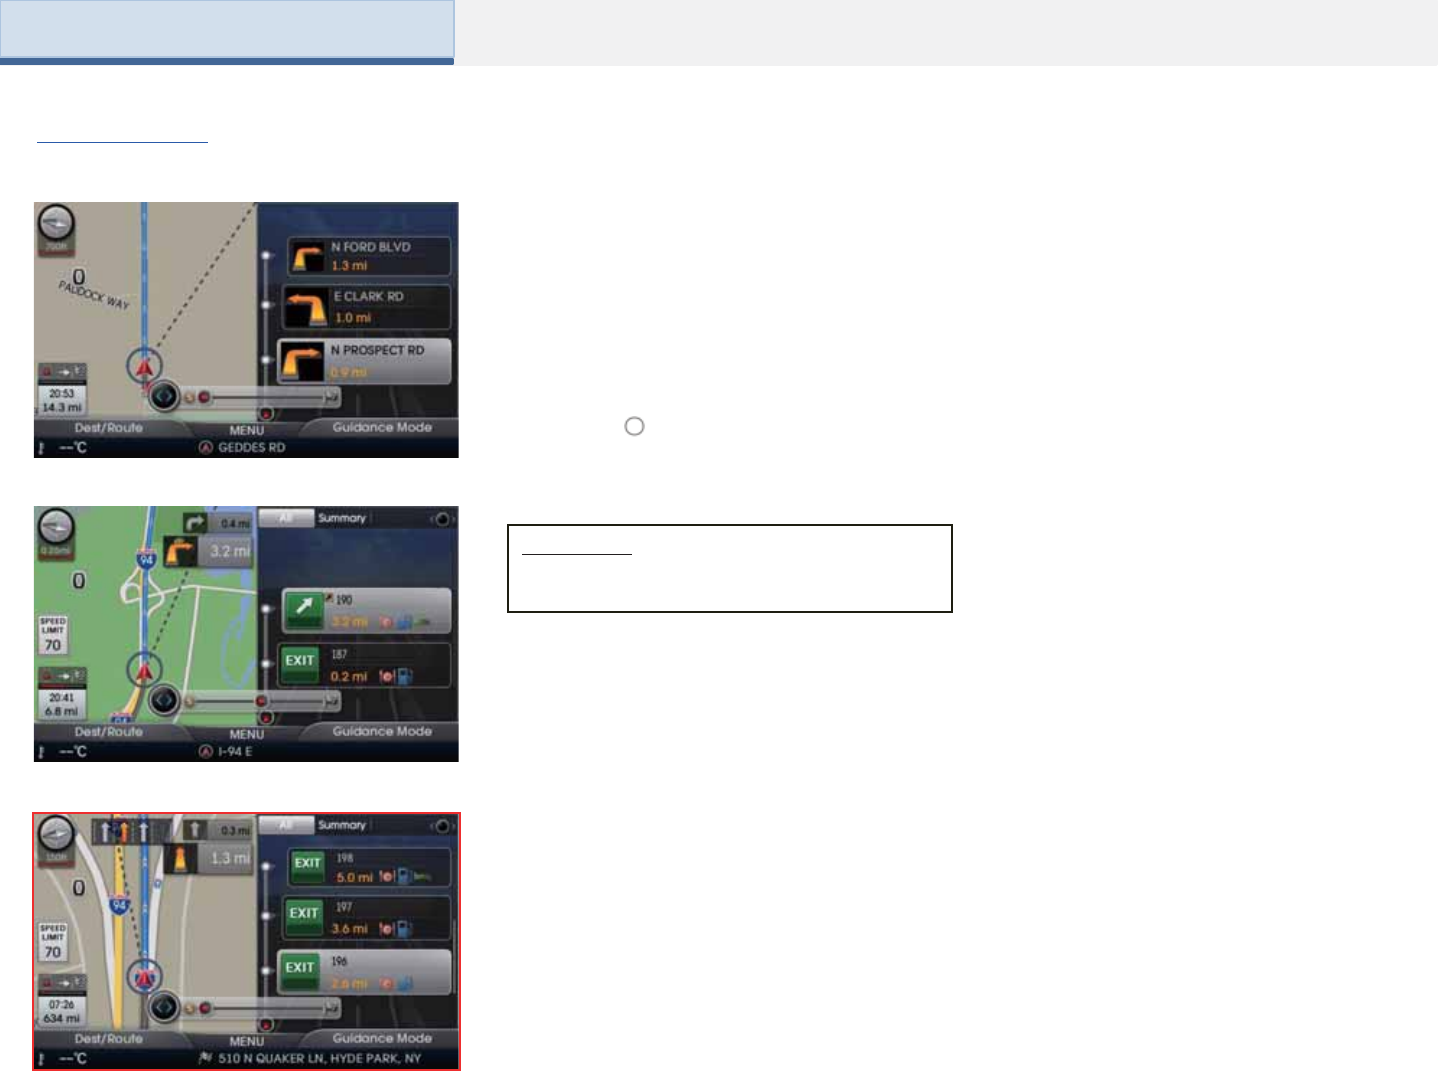
Motorway Mode
<All>
<Summary>
<Rest Area>
Upon entering a motorway during route
guidance, the motorway mode will
automatically be displayed. This mode is
displayed when driving on an expected route
and display mainly motorway related POIs.
Information
• Some POIs may not be displayed if seven(7)
or more POIs exist within the position.
Selecting [All], [Summary], [Rest Area] at the
bottom right side of the screen will change
the route guidance mode.
Press the [ ] left/right to switch display
mode and check POI info list.
Part 3. Navigation
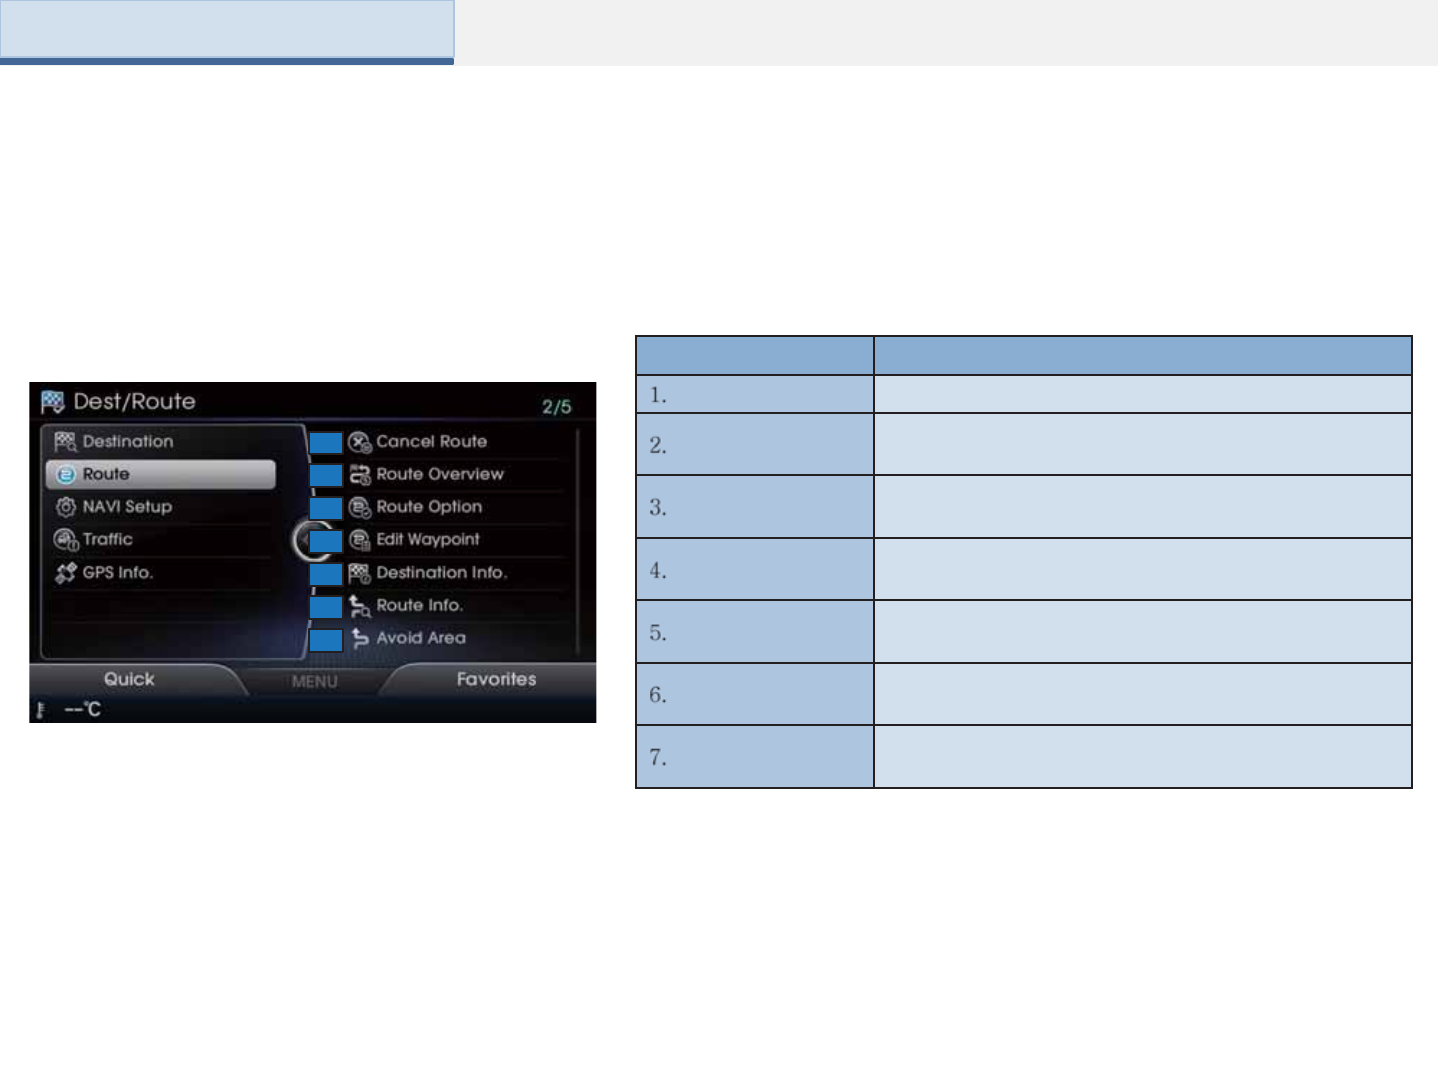
Route Menu
1
2
3
4
5
6
7
Name Details
Cancel Route Cancels the currently set route
Route Overview View route overview for the route to the current
destination
Route Option Route calculation features that include various route
calculation options and settings
Edit Waypoint Add/delete/change order of destinations/waypoints
Destination Info Shows the estimated arrival time and remaining distance
to the destination
Route Info Detailed info on the route to the current destination and
provides detour routing options
Avoid Area Edit route by adding Avoid Areas/Editing Avoid Areas and
Deleting Avoid Areas
Part 3. Navigation
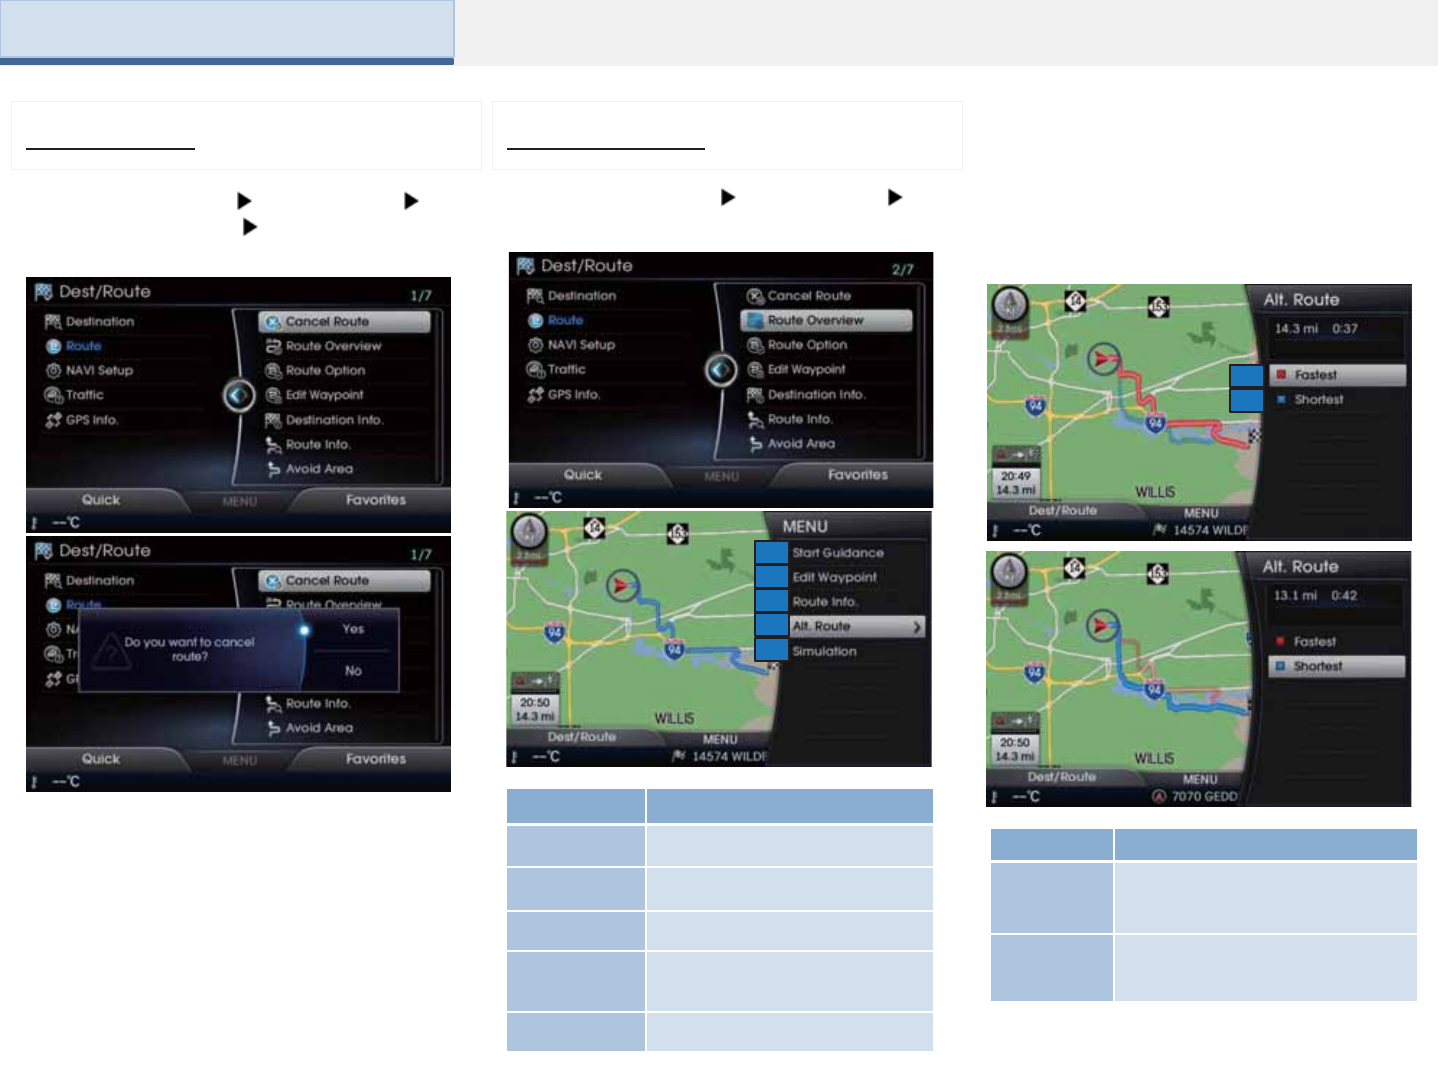
1
2
3
4
5
1
2
3
4
Guidance to the current route is canceled.
Press the [NAVI] key Press [Route]
Press [Cancel Route] Press [Yes]
Cancel Route Route Overview
[Press the [NAVI] key Press [Route]
Press [Route Overview]
Name Details
1. Start
Guidance Starts route guidance to the destination
2. Edit Waypoint Add/delete/change order of
destinations/waypoints
3. Route
Info/Detour
Route guidance information to the set
destination and calculate detours
4. Alternative
Route
Displays various alternative route
options to select the desired route
calculation method
5. Simulation Route simulation to the set destination
Within the Route Overview screen,
pressing the [Alt. Route] button or setting
‘Calculate Alternative Routes upon
Calculation’ within Navigation Setup will
display alternative routes on the screen.
Name Details
1. Fastest Recommended route that reflects
distance and traffic conditions
2. Shortest The shortest distance from start point
to destination
1
2
Part 3. Navigation
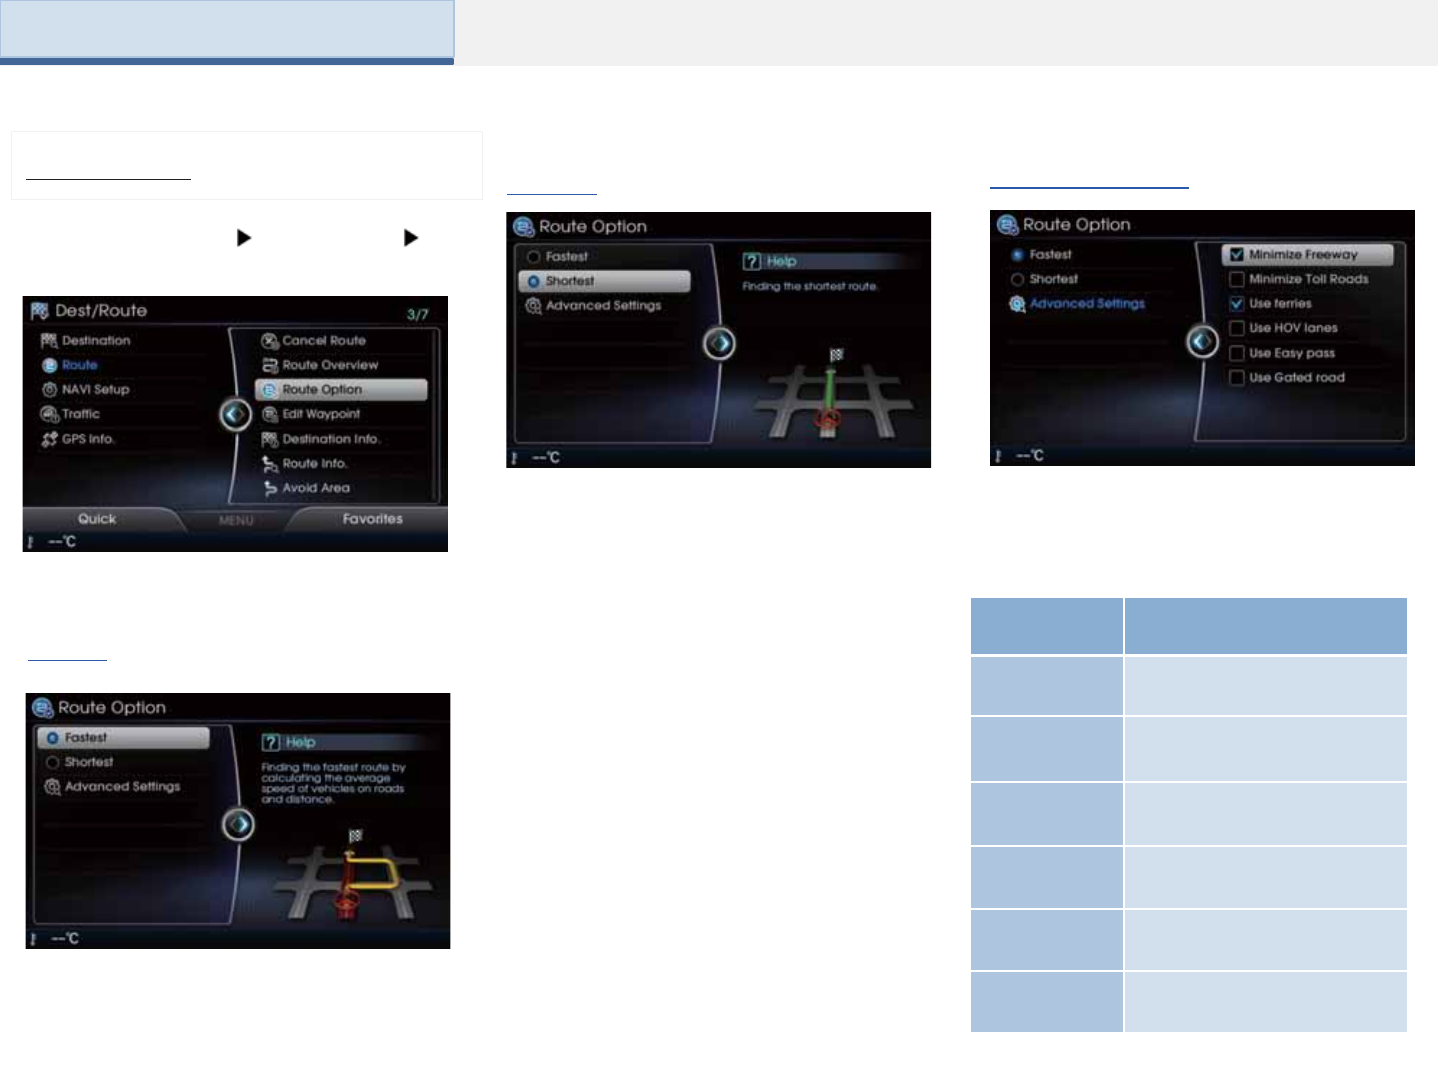
This option provides calculates routes by
reflecting the average speed of streets and
roads to the destination.
Press the [NAVI] key Press [Route]
Press [Route Options]
Route Option
Fastest
Shortest
This option provides guidance by calculating
the shortest distance route to the destination.
Advanced Settings
Advanced settings allow you to set
whether to include motorways, toll roads or
ferries within route calculation.
Name Details
1. Minimise
Motorway
Route calculation with minimal
use of motorways
2. Minimise Toll
Roads
Route calculation with minimal
use of toll roads
3. Use Ferries Route calculation by
including/not including ferries
4. Use HOV
lanes
Route calculation by including
use of HOV lanes
5. Use Easy
pass
Route calculation by including
use of Easy pass
6. Use Gated
Roads
Route calculation by including
use of Gated roads
Part 3. Navigation
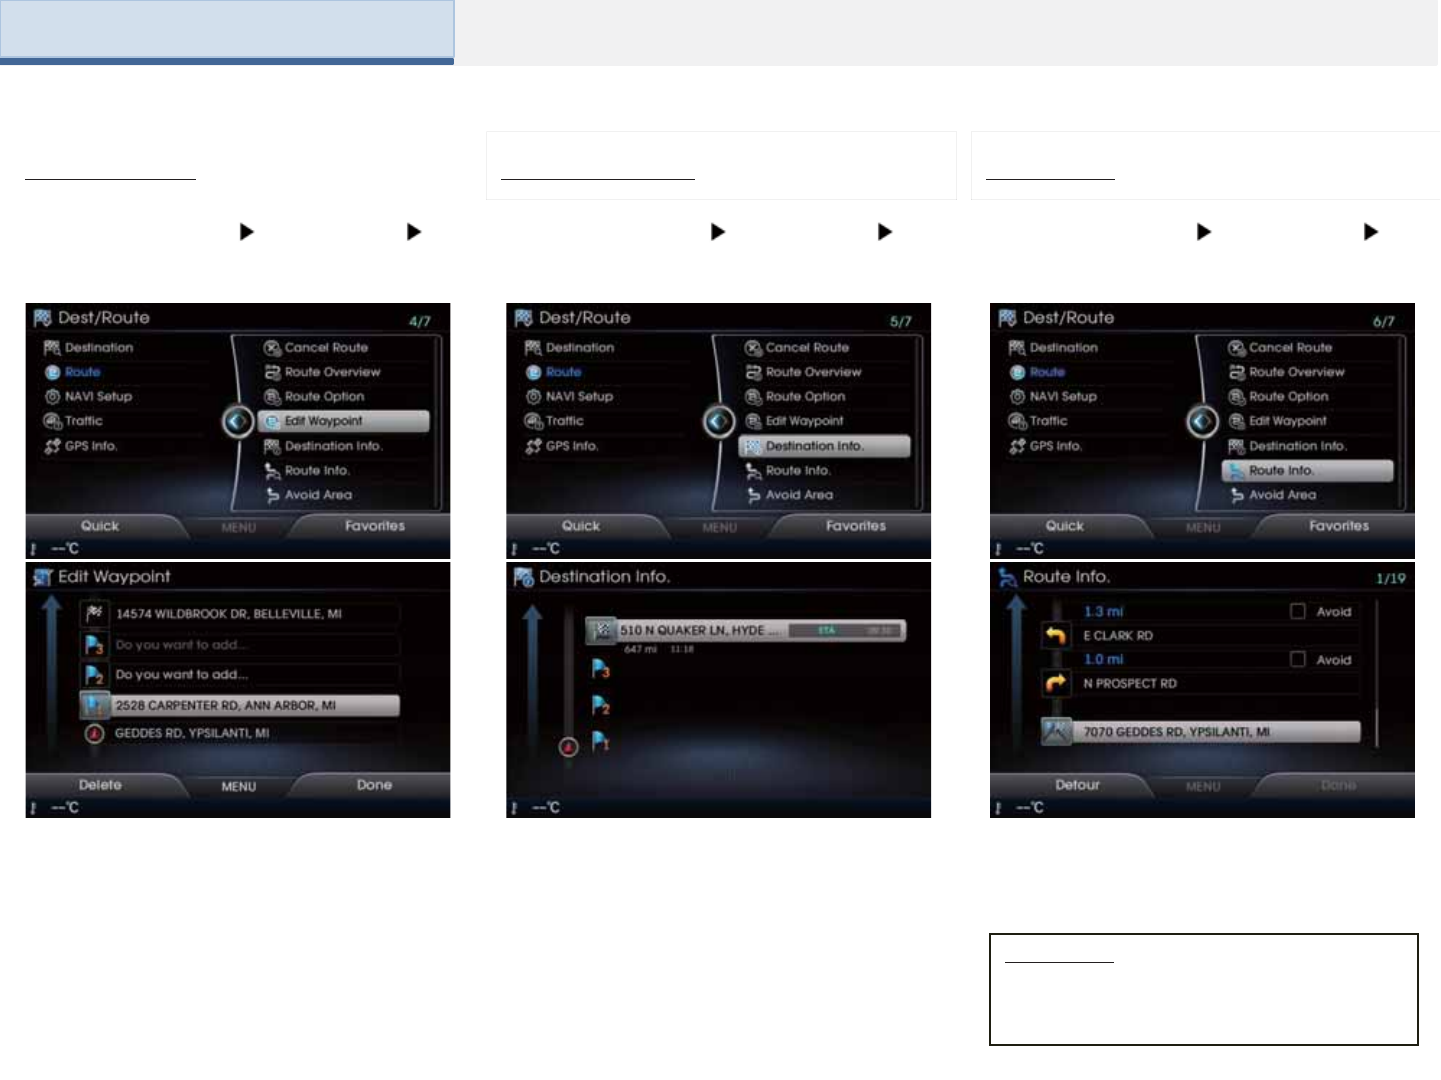
Edit Waypoint
Press the [NAVI] key Press [Route]
Press [Edit Waypoint]
This feature displays the start point,
waypoints and thee destination in list
format and is used to edit corresponding
positions or edit the order of the
destinations included within the route.
Press the [NAVI] key Press [Route]
Press [Destination Info]
Shows the estimated arrival time, remaining
distance, waypoint information, and map of
the destination.
Destination Info
Information
• If you press the [Detour] button, you can set
an area to detour in 1/2/5/10km units for
route calculation.
Route Info
Press the [NAVI] key Press [Route]
Press [Route Info]
This feature is used to check the key routes
and re-set the route by setting detours for a
fixed distance from the current position
Part 3. Navigation
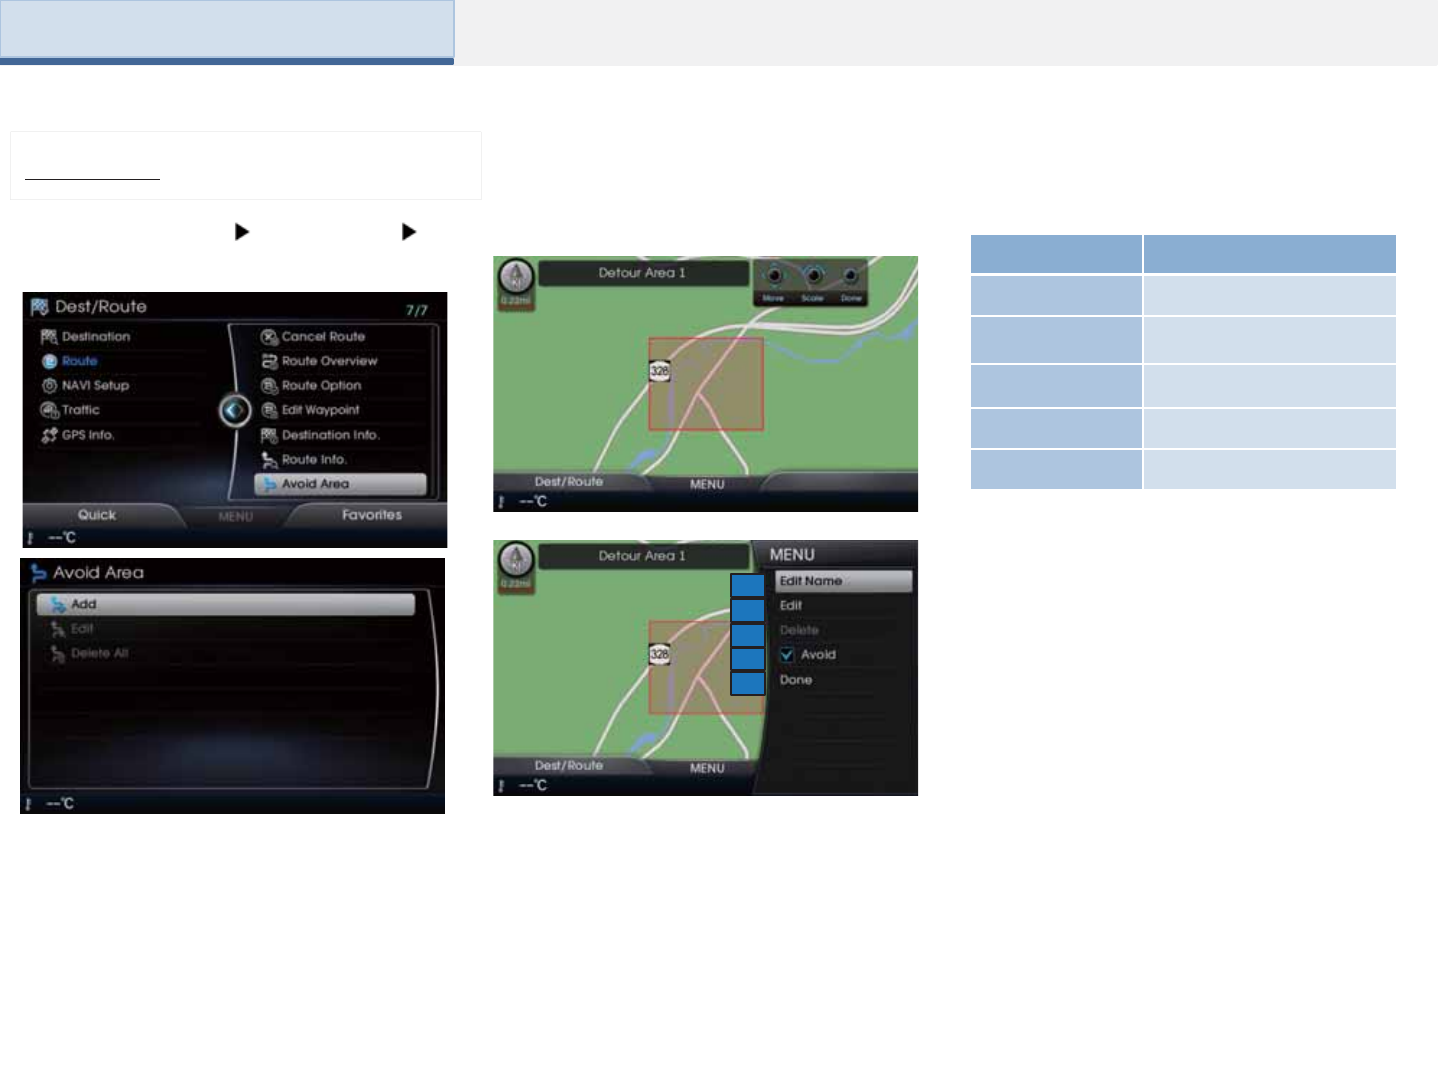
1
2
3
4
5
Press the [NAVI] key Press [Route]
Press [Avoid Area]
Avoid Area
It is possible to add/edit/delete avoid areas.
Use the [controller] to set the range of the
area you wish to avoid.
Name Details
1. Edit Name Edit name of Avoid Area
2. Edit Edit size and area of Avoid
Area
3. Delete Delete set Avoid Area
4. Avoid Avoid the set area
5. Done Finalize setting
Part 3. Navigation
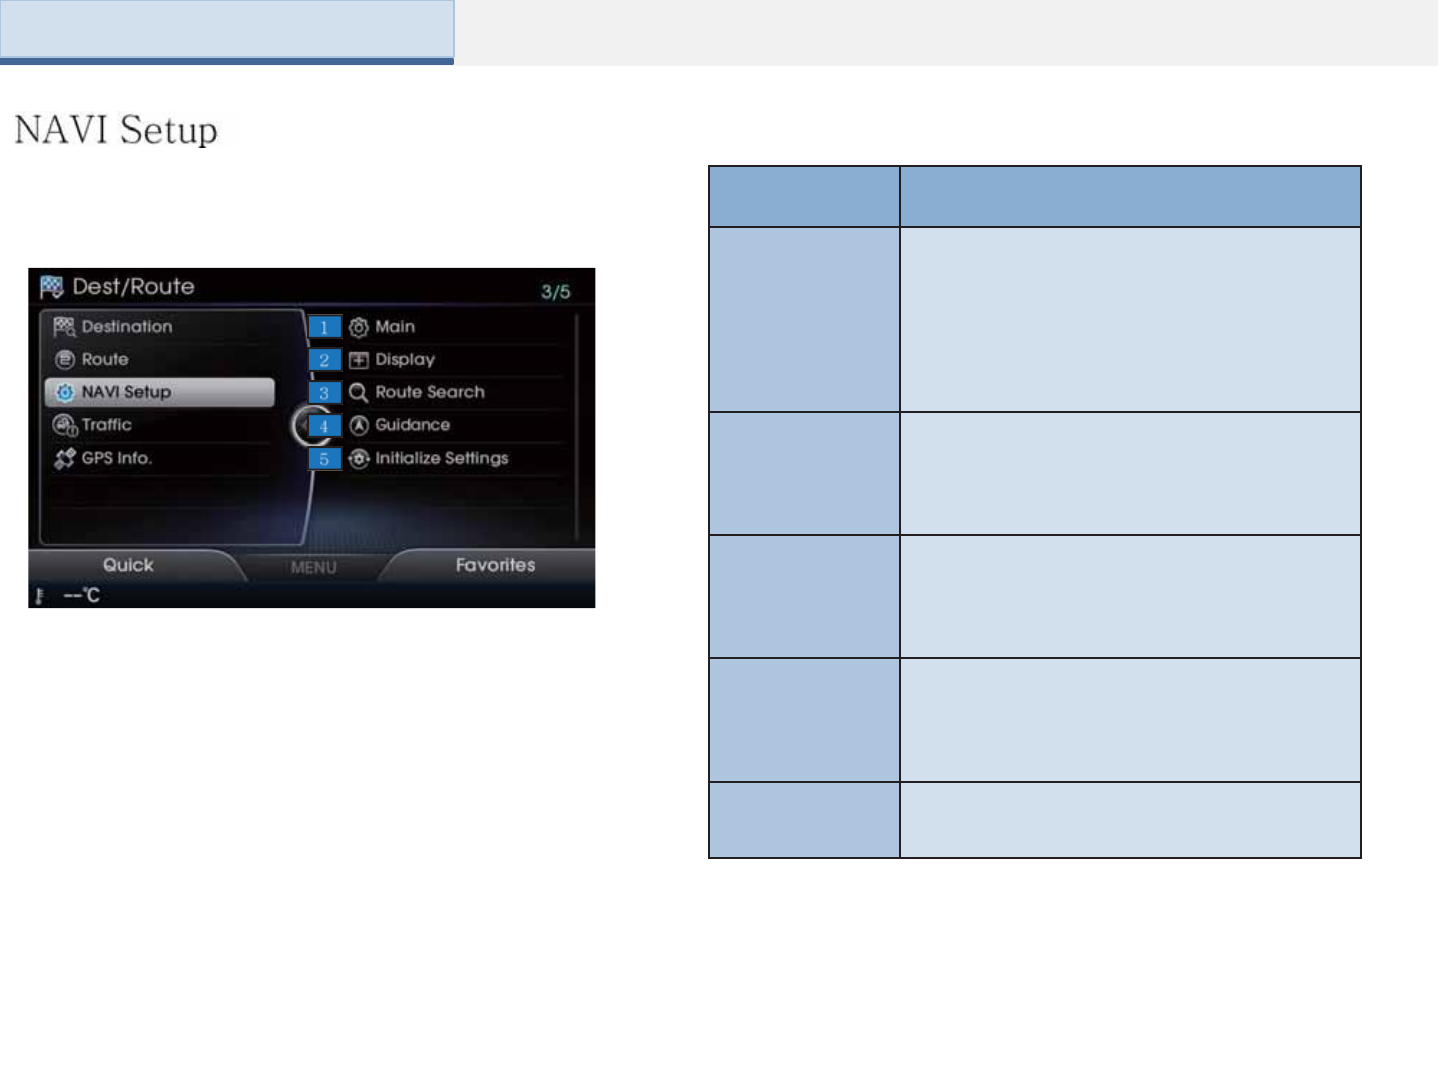
Name Details
1. Main
Displays options related to Units
display/Estimated time of/Distance and Time
to/Fuel Type/Select Voice/Driving Speed/Previous
Destination Display/Auto Zoom
2. Display Displays options related to route indicator line
color/map font size/map color and trace features
3. Route Search
Displays route calculation options related to
calculating alternative routes and upon route
recalculation
4. Guidance Displays options related to camera alert
guidance/driver alert guidance
5. Initialize Settings Displays options used to initialize settings/initialize
saved information
Part 3. Navigation
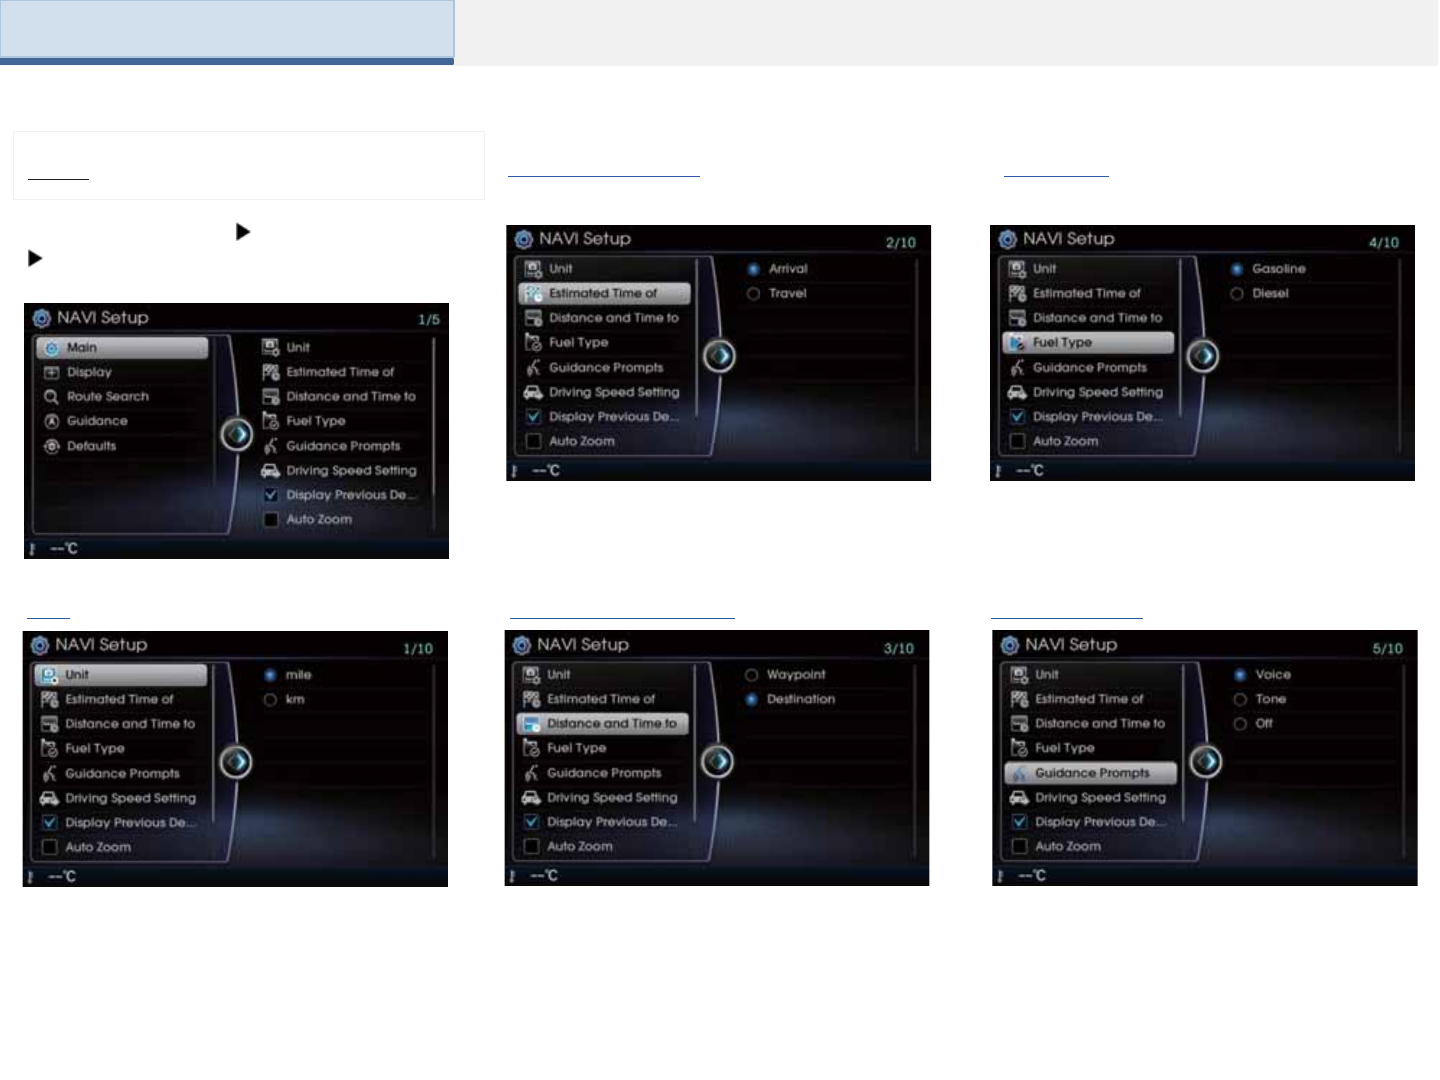
Press the [NAVI] key Press [NAVI Setup]
Press [Main]
Main
This option is used to set the unit when
displaying the vehicle speed
Unit
Estimated Time of
This option is used to set the estimated
arrival time or the remaining time to the
destination.
Distance and Time to
This option is used to set the distance and
time to the destination or waypoint
Fuel Type
This option is used to set the fuel type.
Select a Voice
This option is used to set the navigation
voice.
Part 3. Navigation
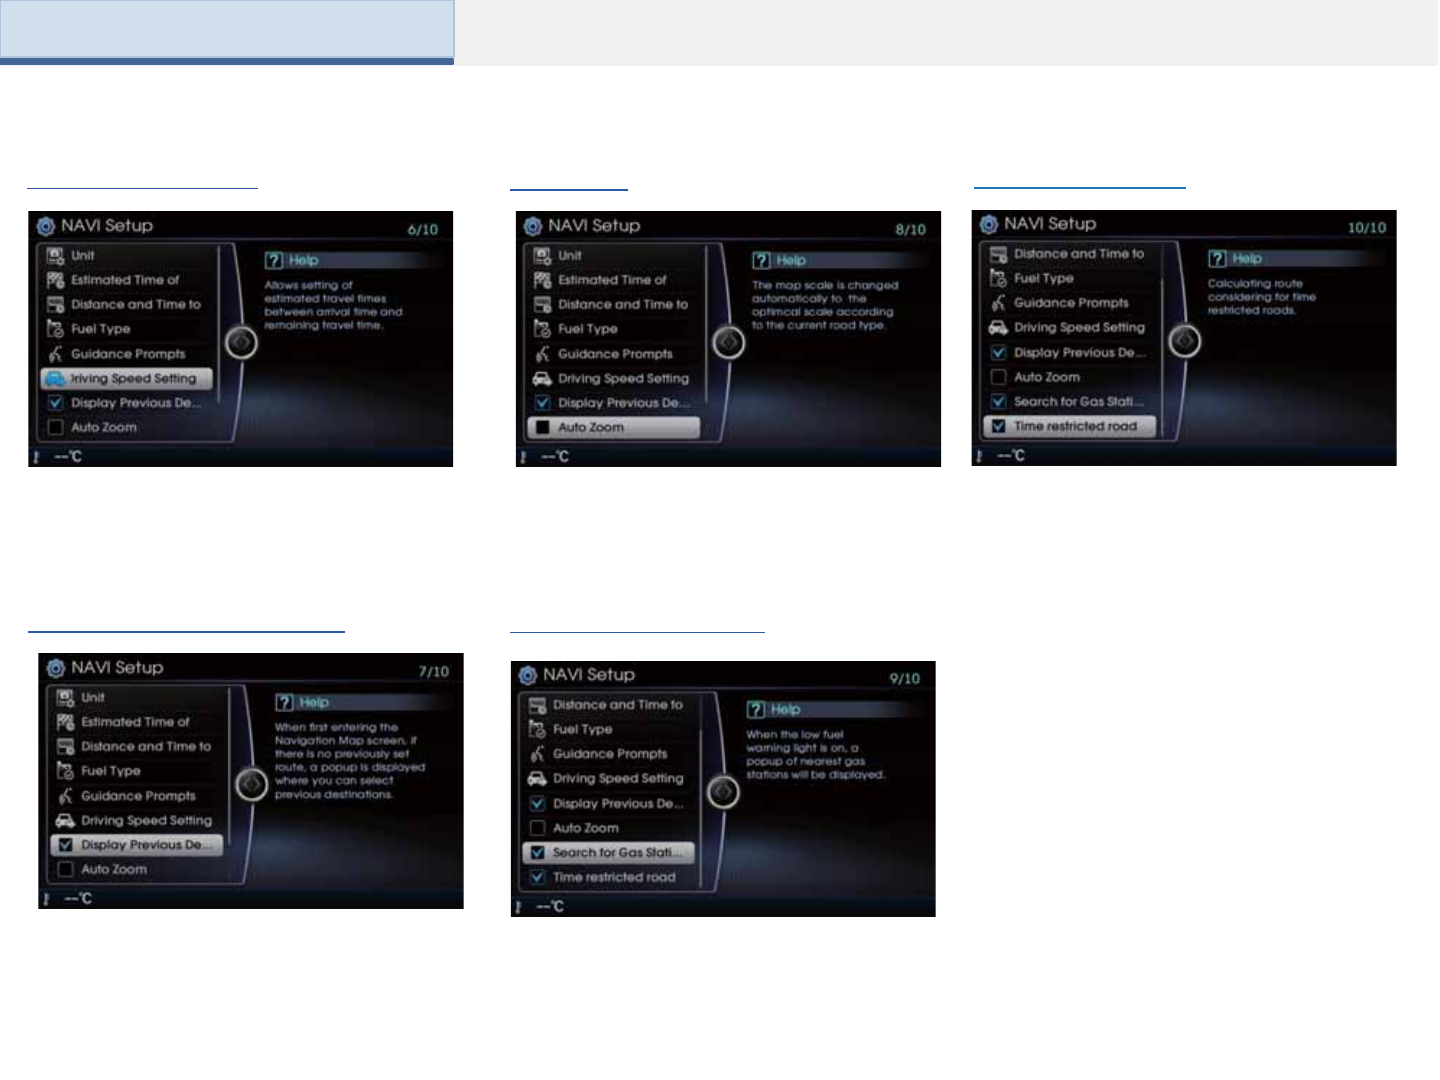
Time restricted road
This option is used to calculate routes by
considering for times of restricted roads.
This option is used to set whether to display
previous destinations upon starting the
Navigation
Display Previous Destinations
Auto Zoom
This option is used to set whether to
automatically scale the map while driving.
Search for Gas Stations
This option is used to set whether to
automatically search for gas stations when
fuel is low.
This option is used to set the estimated
travel speeds within normal roads and
motorways.
Driving Speed Setting
Part 3. Navigation
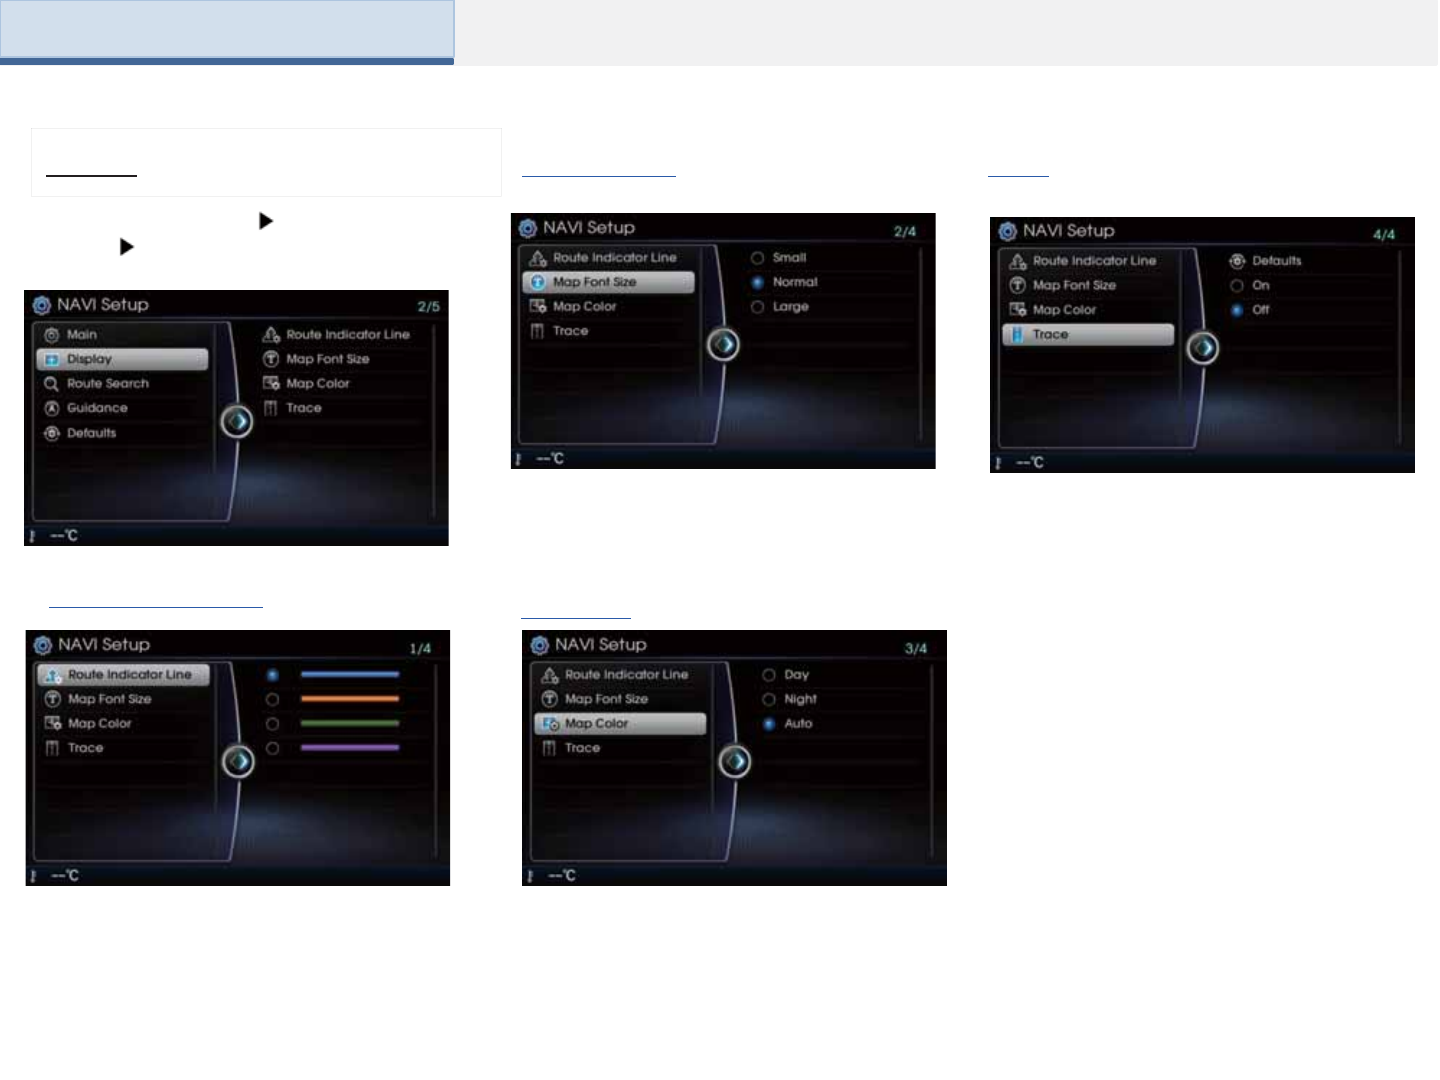
This feature is used to set the color of the
route indicator line.
Press the [NAVI] key Press [NAVI
Setup] Press [Display]
Display
Route Indicator Line
Map Font Size
This option is used to set the size of the font
shown in the map between 3 levels.
Map Color
The map color can be set according to
Day/Night/Auto modes.
Trace
This option is used to set whether to display
the trace on the map
Part 3. Navigation
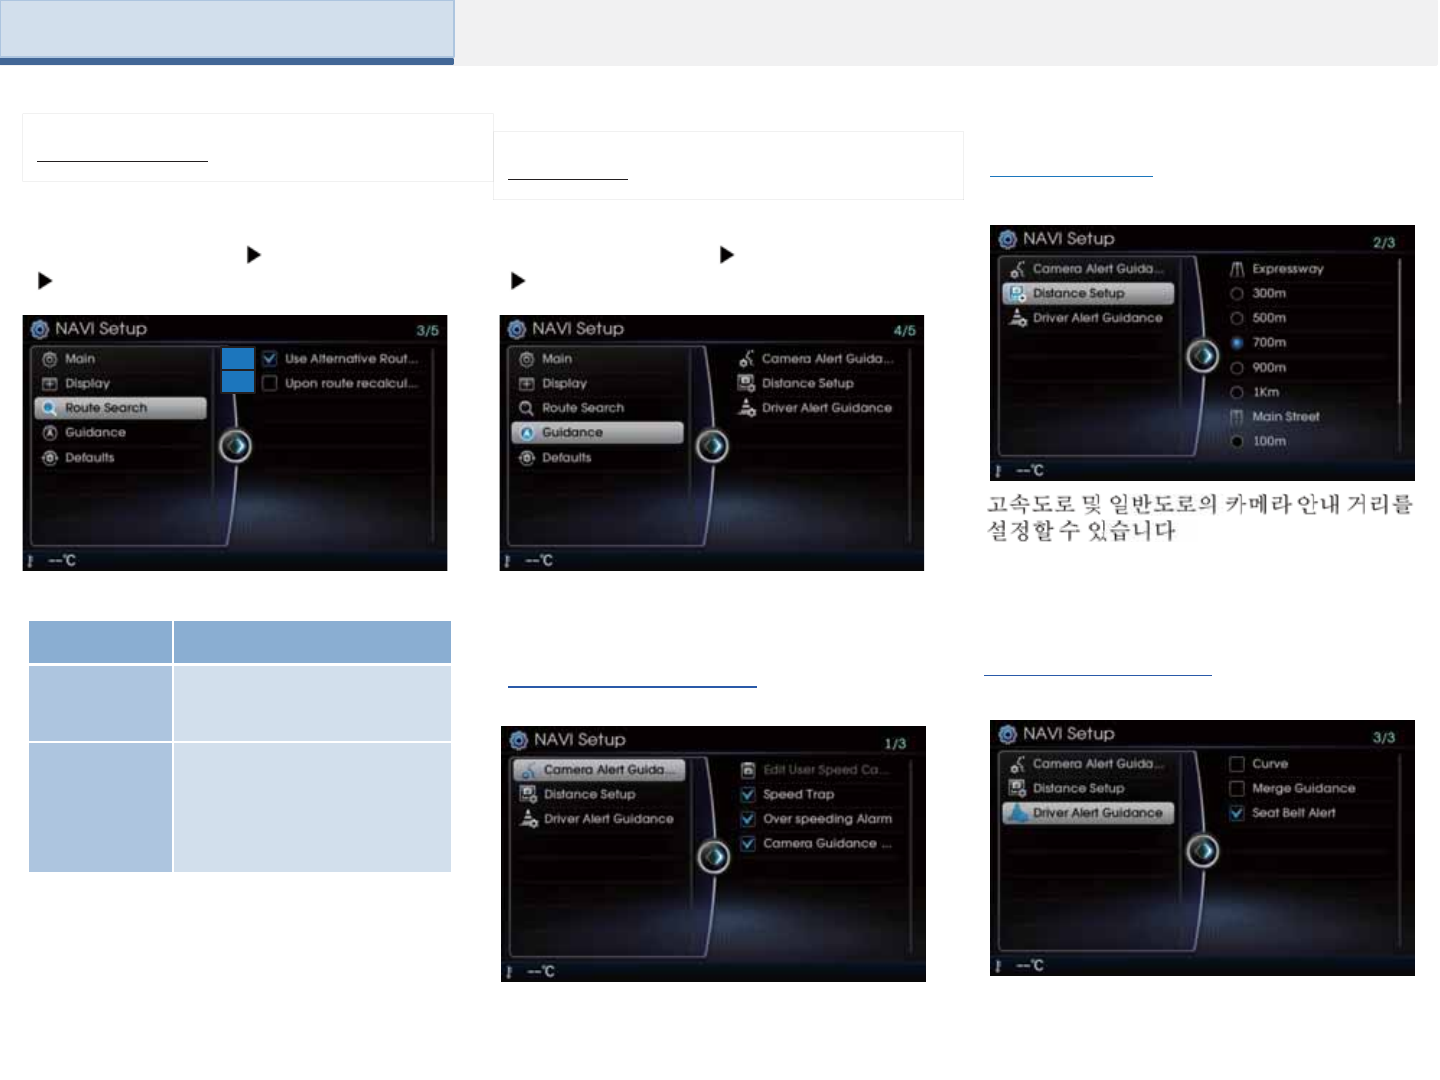
Distance Setup
.
1
2
3
4
Press the [NAVI] key Press [NAVI Setup]
Press [Route Search]
Route Search
1
2
Name Details
1. Use
Alternative
Route Search
Search for alternative routes
when calculating routes
2. Upon
recalculation,
display
routing options
Sets whether to display routing
options upon recalculating
routes
Press the [NAVI] key Press [NAVI Setup]
Press [Guidance]
Guidance
Driver Alert Guidance
This option is used to set whether provide
guidance in various driving conditions.
Camera Alert Guidance
This option is used to set whether provide
guidance in various conditions.
Part 3. Navigation

Name Details
1. Initialize
Settings
used to initialize previous set
navigation settings back to
the default state
2. Memory
Points
used to initialize all searched
lists, memory points and
saved navigation information
Press the [NAVI] key Press [NAVI Setup]
Press [Default]
Default
Initialize Settings
This option is used to initialize previous set
navigation settings back to the default state.
1
2
.
Press the [NAVI] key Press [NAVI Setup]
Press [Traffic]
Traffic
Part 3. Navigation
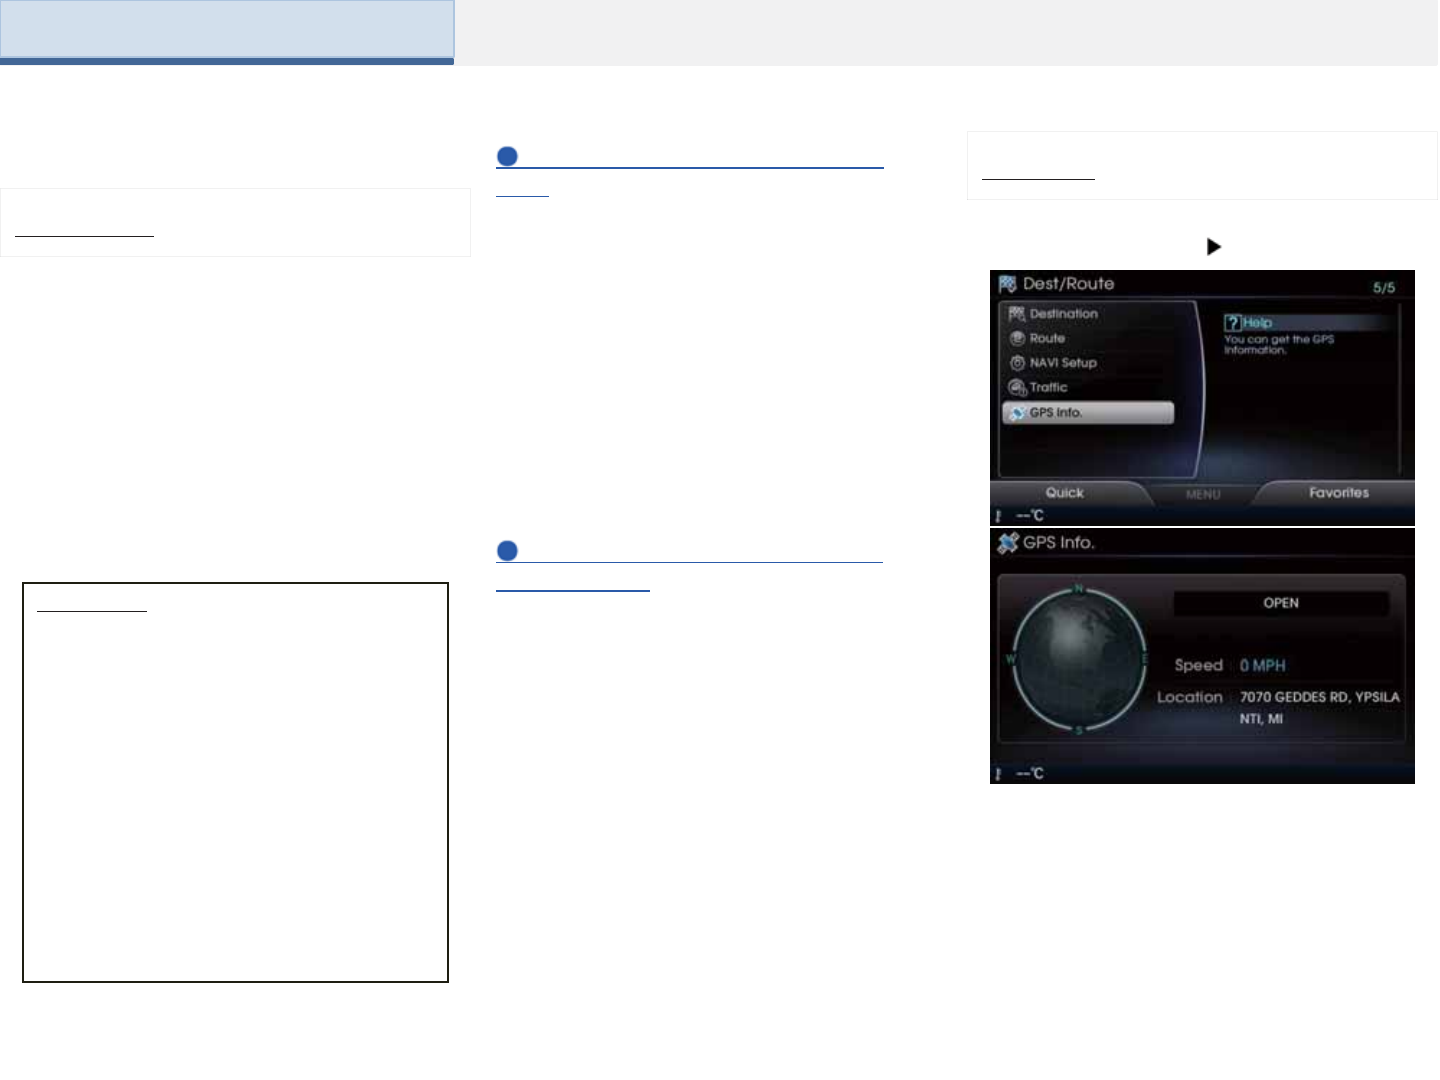
GPS Info When GPS information cannot be
used
GPS information may not operate under the
following conditions.
- When buildings, tunnels, or other
obstructions block satellite signals
- When materials are placed above the GPS
antenna and block satellite signals
- When the satellite is not transmitting
- When a digital cellular phone (1.5GHz) is
placed near the GPS antenna
Errors unavoidable due to system
characteristics
The navigation system uses GPS information,
various sensors, road map data, and other
related information to display the current
position.
Errors may occur if the satellite is
transmitting inaccurate signals or if which
can only two or less satellite signals can be
received.
Errors which occur in such conditions cannot
be corrected.
GPS (Global Positioning System) is a system
developed and operated by the United States
which determines the current location of the
user (longitude · latitude, etc) by generally
using 3 or more satellites.
This system is used with related GPS
information, various sensors, road map data,
and other related information for the
purposes of navigation
About GPS
Information
• For continued map updates, information
collection and surveys are continuously
being conducted to check for changes to
roads and new road construction.
Nonetheless, roads, facilities, and fares are
under constant change. Consequently, it is
impossible to completely delete any errors,
including road updates, names, facilities,
and fares. Keep such matters in mind when
using GPS.
• In principle, roads with widths less than 3m
are not included within the map data. Roads
including sections with widths less than 3m
may be deleted upon updating the map data
GPS Info
Press the [MENU] key Select [GPS Info]
This option is used to display the GPS
satellite reception state, car speed and
position.
Part 3. Navigation

zBefore Use
zPairing and Connecting a Phone
zStarting Mode
4Bluetooth

PART 4. BLUETOOTH
Before using the Bluetooth Handsfree
•Bluetooth refers to a short-distance wireless networking
technology which uses a 2.45GHz frequency to connect various
devices within a certain distance.
•Supported within PCs, external devices, Bluetooth phones,
PDAs, various electronic devices, and automotive
environments, Bluetooth allows data to be transmitted at high
speeds without having to use a connector cable.
•Bluetooth Handsfree refers to a device which allows the user
to conveniently make phone calls with Bluetooth mobile phones
through the AV/Navigation system.
•Bluetooth Hands-free may not be supported in some mobile
phones. Supported mobile phones can be checked at
blu.hyundai.com.
Before Use
•Bluetooth Handsfree is a feature that enables drivers to
practice safe driving. Connecting the head unit with a Bluetooth
phone allows the user to conveniently make calls, receive calls,
and manage the phone book. Before
•using the Bluetooth, carefully read the contents of this user s
manual.
•Excessive use or operations while driving may lead to
negligent driving practices and be the cause of accidents. Do
not operate the device excessively while driving.
•Viewing the screen for prolonged periods of time is dangerous
and may lead to accidents. When driving, view the screen only
for short periods of time.
Precautions for safe driving
What is Bluetooth?
PART 4. BLUETOOTH
Cautions upon connecting Bluetooth phone
Before connecting the head unit with the mobile phone, check
to see that the mobile phone supports Bluetooth features.
Even if the phone supports Bluetooth, the phone will not be
found during device searches if the phone has been set to
hidden state or the Bluetooth power is turned off. Disable the
hidden state or turn on the Bluetooth power prior to
searching/connecting with the Head unit.
If Auto Connection is used, the Bluetooth phone is
automatically connected when the ignition is turned on, making
it unnecessary to have to connect the phone with the head unit
every time.
If you do not want automatic connection with your Bluetooth
device, turn the Bluetooth power off.
The handsfree call volume and quality may differ depending on
the mobile phone.
To set Auto Connection, go to PHONE Settings Auto
Connection.
The car name can be set at PHONE Settings Device
Information.
The passkey needed to connect the mobile phone can be
verified/changed at PHONE Settings Change Passkey.
If the Bluetooth audio does not play, go to PHONE Settings
Bluetooth Audio. If the feature is set to Off , turn On and try
again.
Park the vehicle when connecting the head unit with the mobile
phone.
Bluetooth connection may become intermittently disconnected
in some mobile phones. Follow these steps to try again.
1. Turn the Bluetooth function within the mobile phone off/on
and try again.
2. Turn the mobile phone power Off/On and try again.
3. Completely remove the mobile phone battery, reboot, and
then again.
4. Reboot the Audio Video Navigation System and try again.
5. Delete all paired devices, pair and try again.
Some Bluetooth features may occasionally not operate properly
depending on the firmware version of your mobile phone. If
such features can be operated after receiving a S/W upgrade
from your mobile phone manufacturer, unpair all devices and
pair again before use.
Bluetooth devices cannot be paired when the vehicle is in
motion. For your safety, first park the vehicle to pair a Bluetooth
device.
PART 4. BLUETOOTH
When no phones have been
paired
Information
• Press the [Help] button within the pop-up
to view the help section with information
related to pairing and connecting Bluetooth
devices, and using Handsfree related
features.
• To learn more about searching from
Bluetooth devices and pairing, refer to
the user's manual for your Bluetooth device.
If the system becomes unstable or the
authentication popup is not displayed due to
some communication error, please wait or
reset the Bluetooth device and try again.
Pairing and Connecting a
Phone
Press the [PHONE] button Select
[Connections] Select [Add New] Enter
passkey from the Bluetooth device
When a phone is already paired
Press the [PHONE] button Select
[Connections] Select the device from the
device list Select Connect
Select the device you want to connect and
press the [Connect] button.
If the phone you want to connect does not
exist, press the [Add New] button to pair a
new Bluetooth device.
When the Waiting to Pair
r
screen is
displayed, search for your mobile device
and enter the passkey. The default
passkey is set to 0000 .

PART 4. BLUETOOTH
Pairing Additional Devices
Information
• When a Bluetooth device is connected, a
new device cannot be paired. If you want to
pair a new phone, first disconnect the
connected Bluetooth device.
Press the [Add New] button to pair a new
Bluetooth device.
For more information on pairing, refer to the
When no phones have been paired
section.
Information
• Bluetooth features supported within the
vehicle are as follows. Some features may
not be supported depending on your
Bluetooth device.
- Answering and making Bluetooth
Handsfree calls
- Menu operation during a call (Switch to
Private, Switch to call waiting, Outgoing
volume)
- Download Call History
- Download Mobile Contacts
- Download USIM Contacts
- Download contacts to vehicle
- Contacts/ Call History Auto Download
- Bluetooth device auto connection
Bluetooth Audio Streaming
• It is possible to pair up to five Bluetooth
devices to the car system.
• Only one Bluetooth device can be
connected at a time.
• Other devices cannot be paired while a
Bluetooth device is connected.
• While connecting a Bluetooth device, the
cancel operation is not supported.
• Only Bluetooth Handsfree and Bluetooth
audio related features are supported.
Information
• Normal operation is possible only within
devices that support Handsfree or audio
features, such as a Bluetooth mobile phone
or a Bluetooth audio device.
• Only one function can be used at a time
between the Bluetooth Handsfree and
Bluetooth audio. (While playing Bluetooth
audio, streaming will end upon entering the
Bluetooth phone screen.)
• If a connected Bluetooth device becomes
disconnected due to being out of
communication range, turning the device
OFF, or a Bluetooth communication error,
corresponding Bluetooth devices are
automatically searched and connected.
• If the system becomes unstable due to
communication errors between the vehicle
and the Bluetooth device, reset the Bluetooth
and try again. Upon resetting Bluetooth, the
system is restored to its factory release
state.
PART 4. BLUETOOTH
Information
•If a paired phone is deleted, the call history
and phone book lists will also be deleted.
Disconnecting a Device
A device cannot be deleted when it is
connected.
To delete a paired device, first disconnect the
Bluetooth connection.
Press [Delete All] to delete all paired Bluetooth
devices.
Select the device you want to disconnect
Press [Disconnect] Press [Yes]
Deleting Device
Press the [MENU] key Press [Delete]
Press [Yes]
Information
• The mobile phone battery and signal strength icons may not be supported
in some mobile phones.
• The remaining battery level displayed on your mobile phone battery icon
may slightly differ with the device display.
• The speed dial feature may not be supported in some mobile phones.
• The name of the other party is displayed if the other party
y
s number is
saved within your contacts. If not, only the phone number is displayed..
PART 4. BLUETOOTH
Name Description
1. Number Window Shows entered numbers
2. Send Calls the number
3. End Ends the current call
4. Contacts Displays contacts list screen
5. Dial Pad Used to enter/delete numbers
6. MENU Displays menu screen
7. Call Connection Info Displays the other party s name/number, call time,
battery strength/reception level
8. Private
During a handsfree call, this functions is used to switch
the call to the mobile phone
Upon switching the call to Private, the vehicle mic and
speaker will turn off to allow a private conversation
through the mobile phone
9. MIC Off
Adjusts outgoing volume during calls
Sets call volume as heard by the other party (Levels
0~5)
The outgoing volume may be heard differently
depending on the connected Bluetooth?device0
3
12
3
4
5
2
6
7
8
9
Basic Mode Screen
<Not on a call>
<During a call>
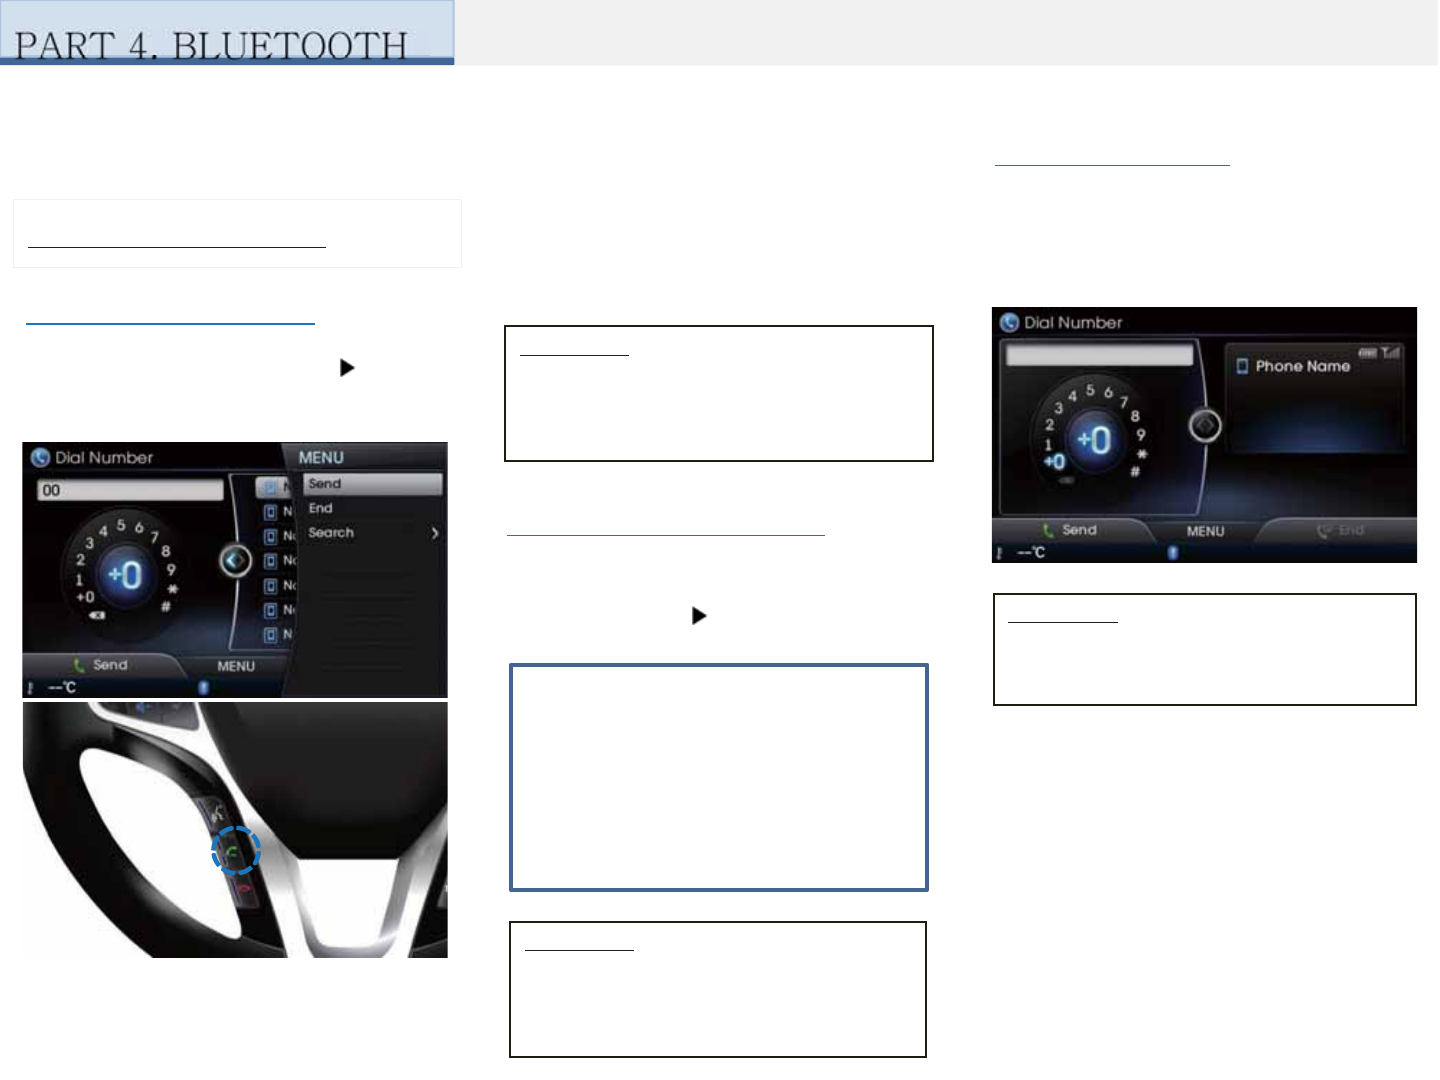
Making/Answering Calls
Information
Most functions within AV mode and INFO will
not operate during a Bluetooth Handsfree
call. Only the call volume and Navigation
screens can be operated.
Starting Mode
Enter number on the dial pad Press
the [Send] button or the [ ] key on the
steering remote controller.
Calling by dialing a number
If you press the Send button without entering
a number, the Call History screen is
displayed.
Press and hold the dial pad 0 + (over 0.8
seconds) to enter a "+".
Making a call from Speed Dial
Enter the 1 or 2 digit speed dial number
with the Dial Pad Press and hold the
last number.
Information
• For speed dials saved within mobile
phones, up to 2 digits are supported.
• Saving or changing speed dial numbers
through the head unit.
Calling through Redial
Press the hold (over 0.8 seconds) the
[Send] button or the key on the steering
remote controller.
Information
Redialing is not possible when there is no
call history or the Bluetooth phone has not
been connected.
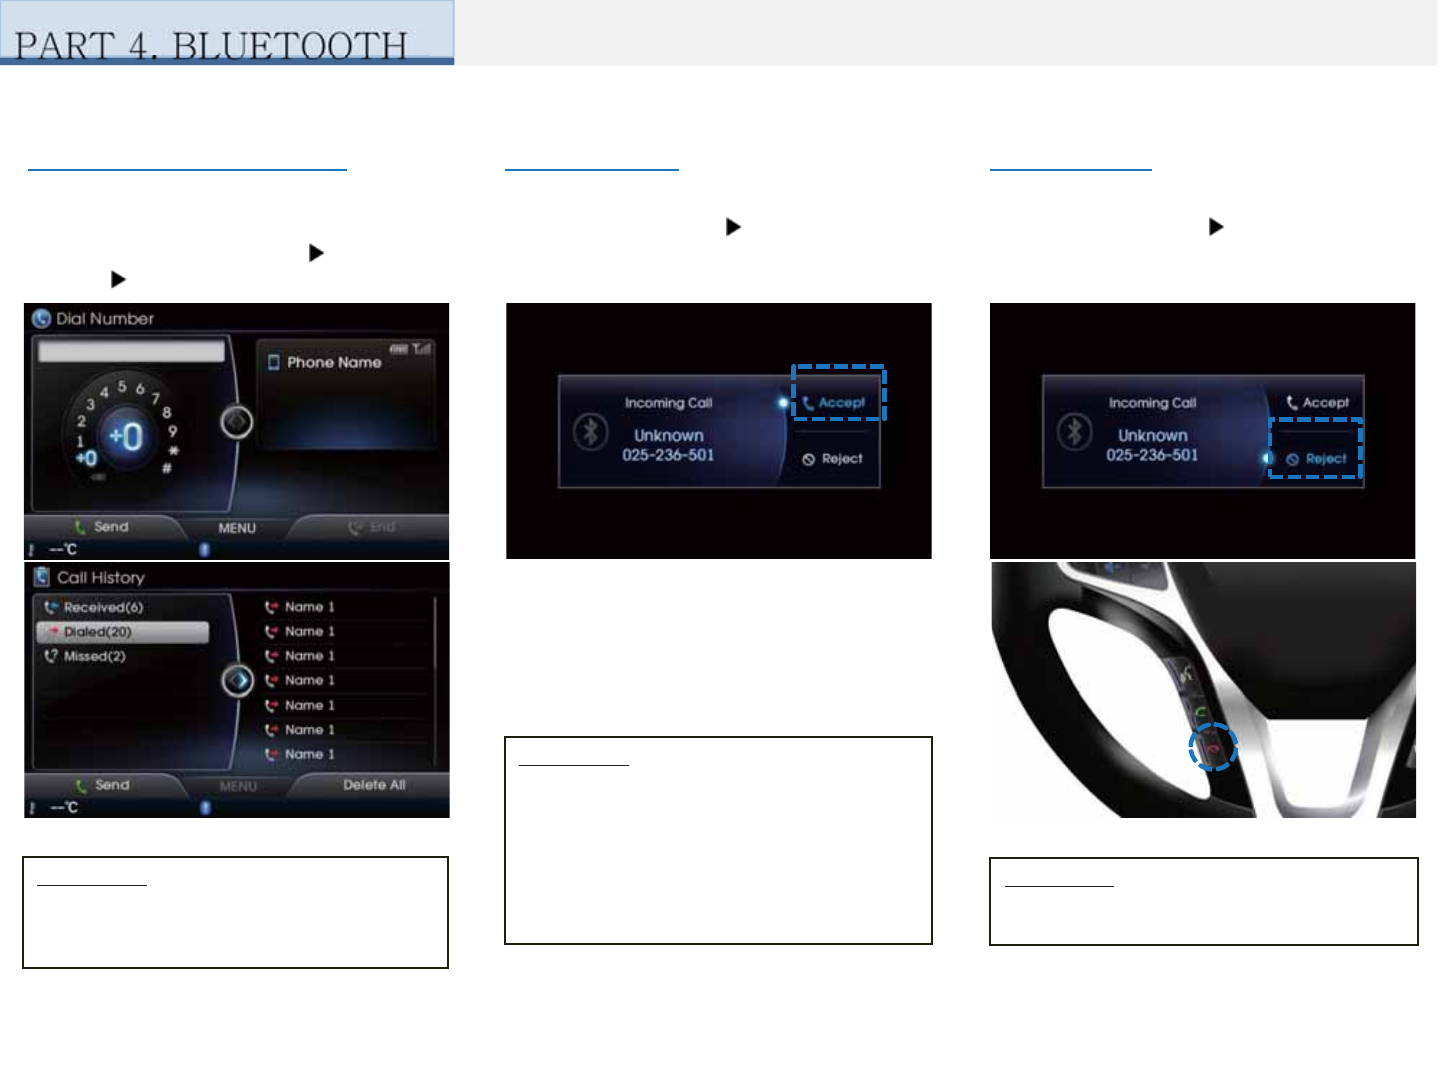
Information
• Calling through the call history is not
possible when there is no call history or the
Bluetooth phone has not been connected.
Making a call from Call history Answering a call
When a call is received on the connected
phone, the bell will sound and the phone
number of the other party will be displayed
on the incoming call pop-up, as shown
here.
Information
• When the incoming call pop-up is
displayed, most functions within AV mode
and SETUP will not operate. Only the call
volume and Navigation screens can be
operated.
• The telephone number may not be
displayed in some mobile phones.
Rejecting a call
Press the [Send] button or the Key on the
steering remote controller Select the
call list Press [Call]
Information
• The reject call function may not be
supported in some mobile phones.
Incoming call notice Press the [Accept]
button or the [ ] key on the steering
remote controller.
Incoming call notice Press the [Reject]
button or the [ ] key on the steering
remote controller.
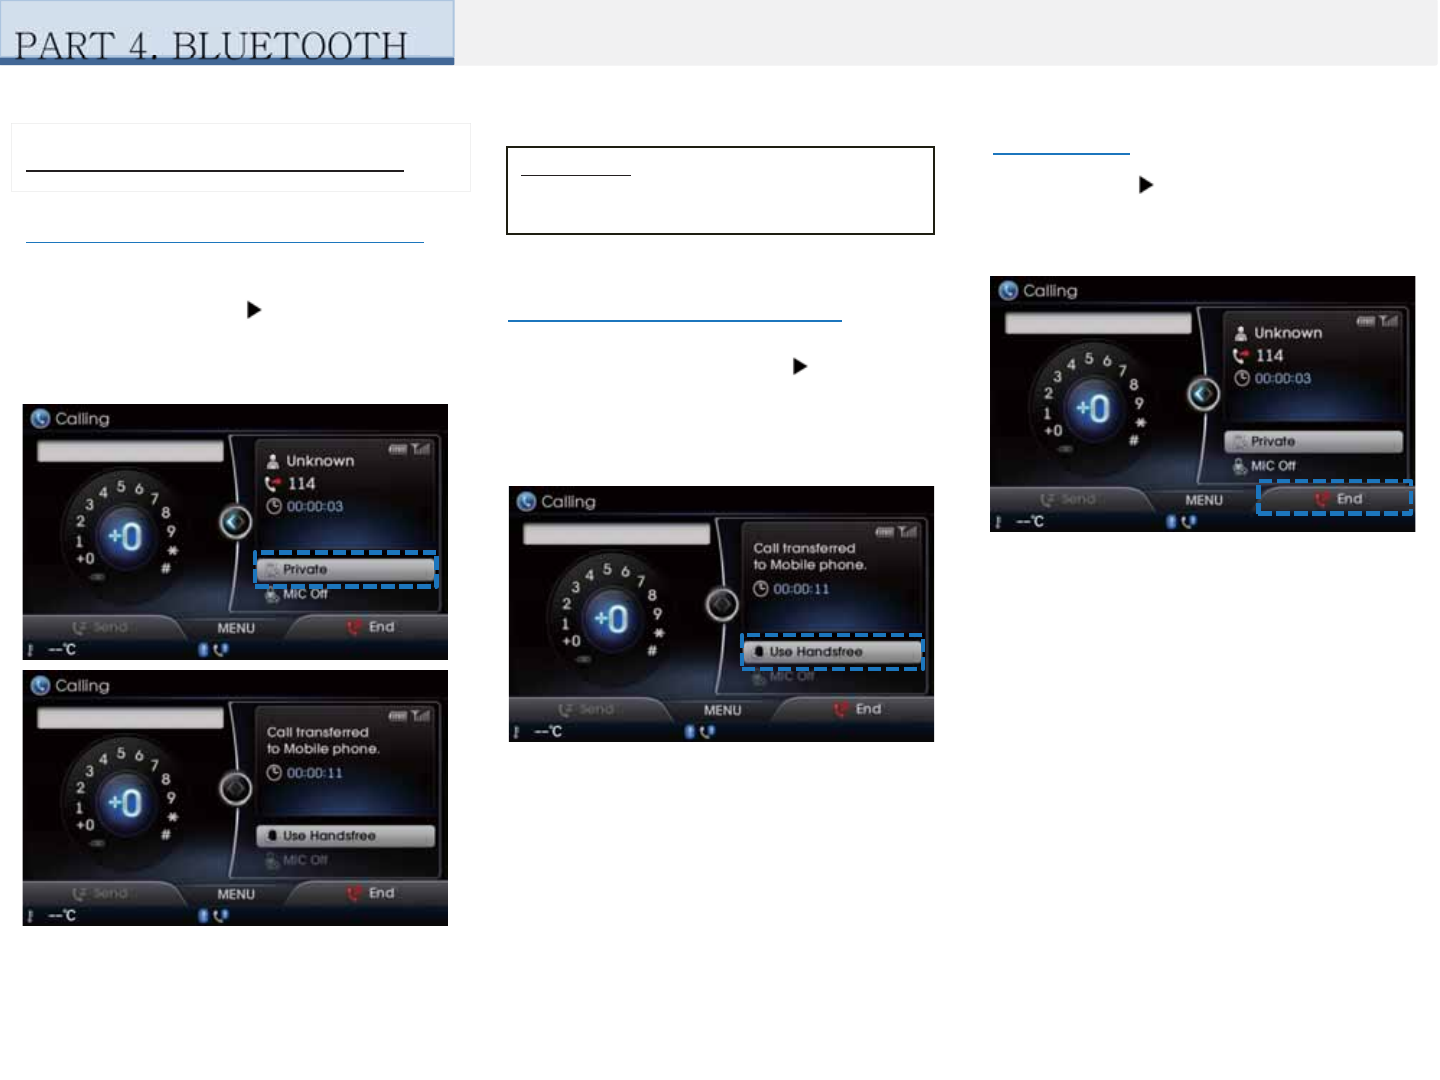
Operating Menus during a Call Information
The Private function may not be supported in
some mobile phones.
During Handsfree call Press the [Private]
button or press and hold the [ ] key (over 0.8
seconds) on the steering remote controller.
The call will be switched from the Handsfree
to the Bluetooth mobile phone.
Switching Call to the Bluetooth phone
Switching Call to the Handsfree
During call on mobile phone Press the
[Use Handsfree] button or press and hold
the [ ] key (over 0.8 seconds) on the
steering remote controller.
The call will be switched from the Bluetooth
mobile phone to the car handsfree.
Ending a call
While on a call Press the [End] button or
the [ ] Key on the steering remote
controller.
The Bluetooth handsfree call will end.
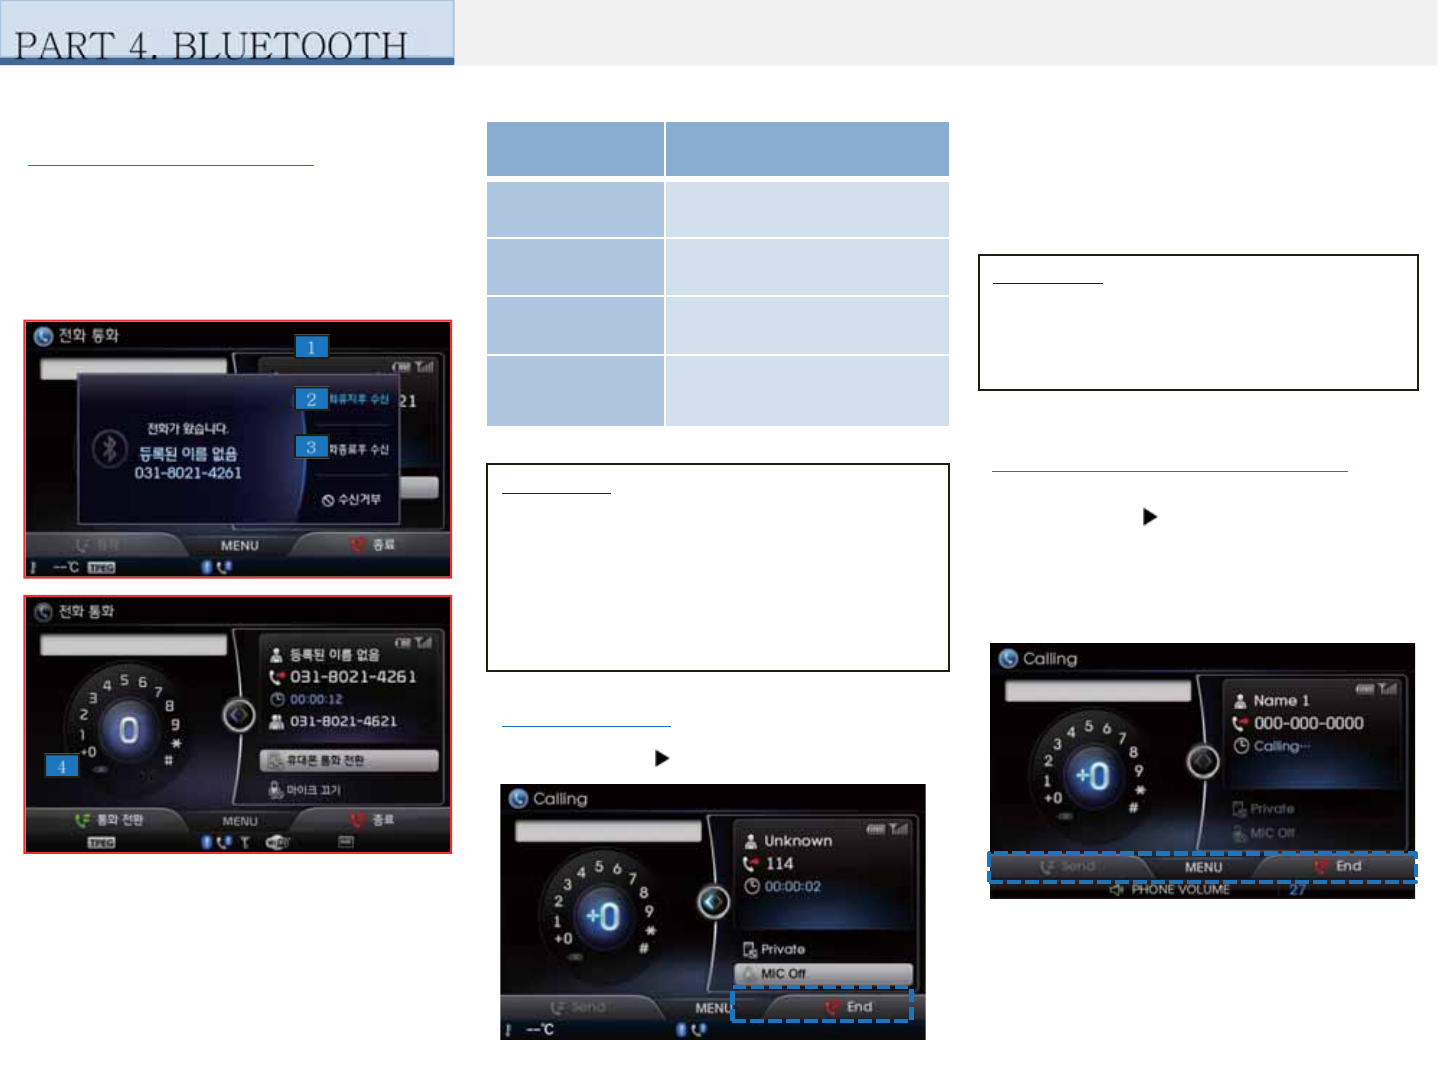
Information
• Call waiting is a feature that allows the caller to
answer a second call while already on a call.
When call waiting is used, the first call is placed
on waiting mode.
• The Private function may not be supported in
some mobile phones.
If another person calls while you are already
on a call, the current call must be placed on
hold or ended to answer the new call.
If there is waiting call, press the [ ] key on
the steering remote controller (under 0.8
seconds) or press the [Switch] button on
the Phone screen.
While on a call Select [Mute]
Switching to Call Waiting
While on a call Use the [VOL] knob on the
head unit or the [+], [-] keys on the steering
remote controller to adjust the ring/call
volume.
Setting Mic Off
If you press the [Mute] button, The outgoing
volume is muted and blocked to the other
party.
Information
The volume heard by the other party may
differ depending on the mobile phone. If call
volume heard by the other party is too low or
too high, first adjust the volume setting.
Adjusting the Ring/Call Volume
Name Description
1. Hold 1st call Places current call on call
waiting and answer new call
2. End 1st call Ends current call and answer
new call
3. Reject Rejects new call and
maintains current call
4. Switch
If there is a call waiting,
switches to the waiting call
waiting call
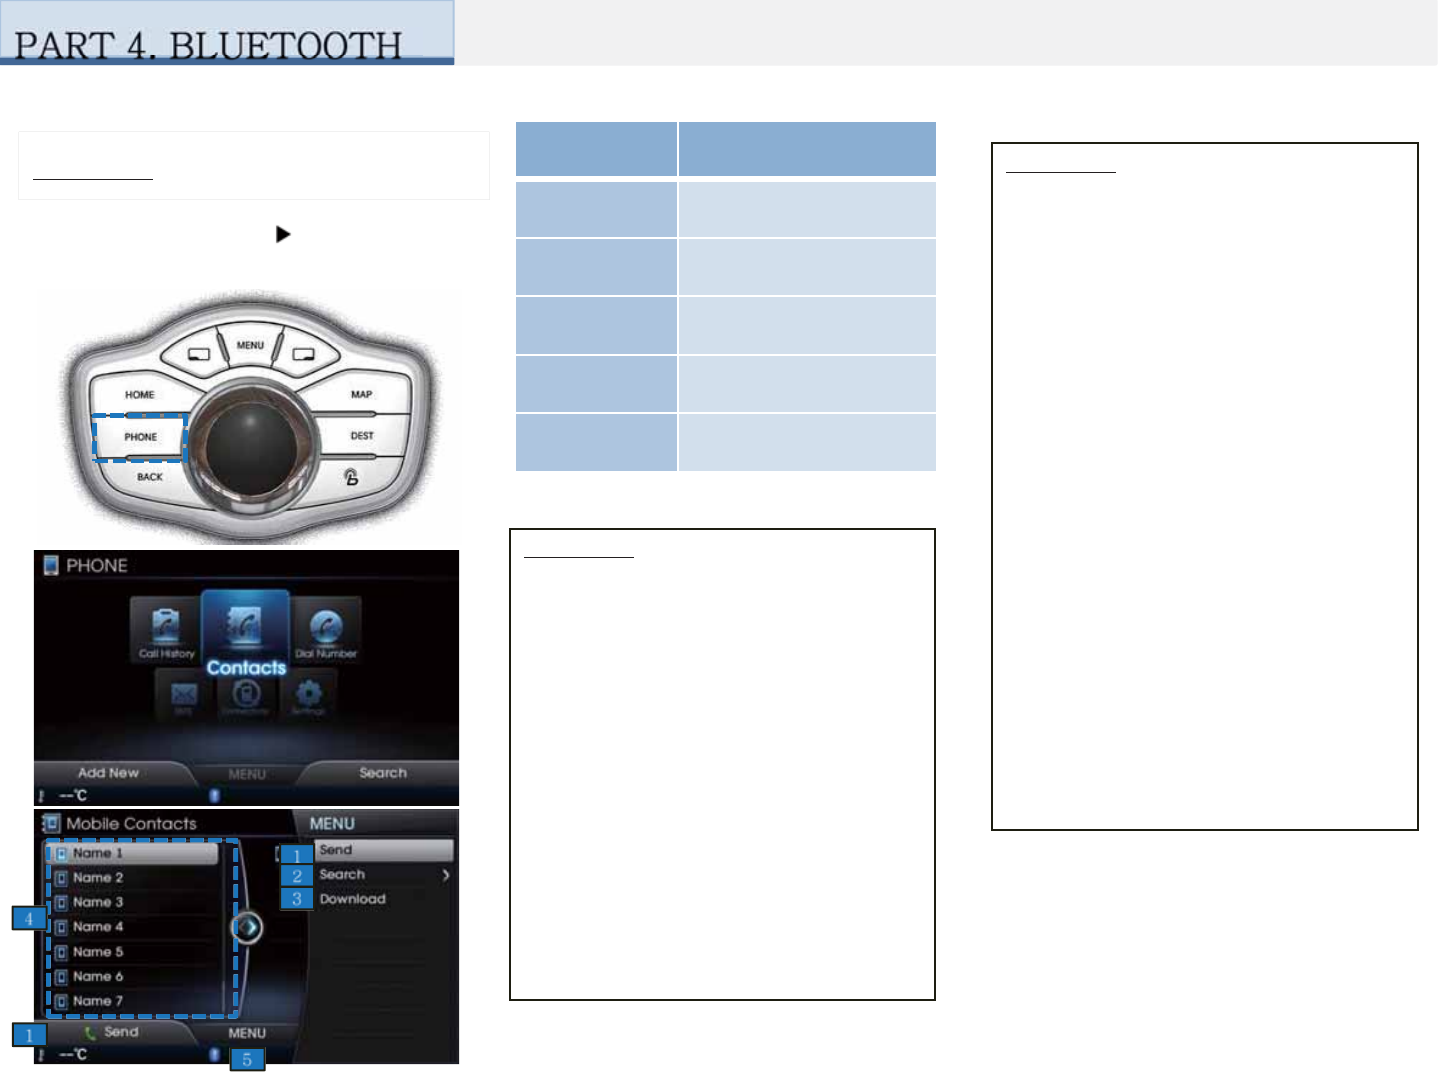
Name Description
1. Send Calls the corresponding
number
2. Search Search contacts by name
or number
3. Download Download contacts from
Bluetooth device
4. Contacts List Downloaded Contacts
5. MENU Displays menu screen
Information
• If there are numerous list entries, selecting
the list page area will move to the
corresponding list page.
• It is possible to download contacts even
during a call or during Bluetooth streaming
audio.
• When downloading call histories, the icon
will be displayed within the status bar.
• It is not possible to commence download
when the contacts download feature has
been turned of within the Bluetooth device.
In addition, some devices may require
device authorization upon attempting to
download contacts. If downloading does not
normally occur, check the Bluetooth device
settings or the screen state.
• The download feature may not be
supported in some mobile phones. Check to
see that the Bluetooth device supports the
download feature. For more information of
supported Bluetooth devices and
function support, visit the BLUmembers
website (blu.hyundai.com)
• Mobile and car contacts data could be lost
depending on the state of the head unit.
Please back up important data within a safe
location.
Information
• Mobile phone contacts can only be
searched when a Bluetooth device is
connected.
• Up to 5,000 contacts saved in your
Bluetooth phone or USIM can be
downloaded into the car contacts. Contacts
that have been downloaded to the car cannot
be edited or deleted.
• Mobile phone contacts are managed
separately for each paired Bluetooth device
(max 5 devices x 5,000 contacts each).
Previously downloaded data is maintained
even if the Bluetooth device has been
disconnected. (However, the contacts and
call history saved to the phone will be
deleted if a paired phone is deleted.)
Contacts
Press [PHONE] button Select
[Contacts]
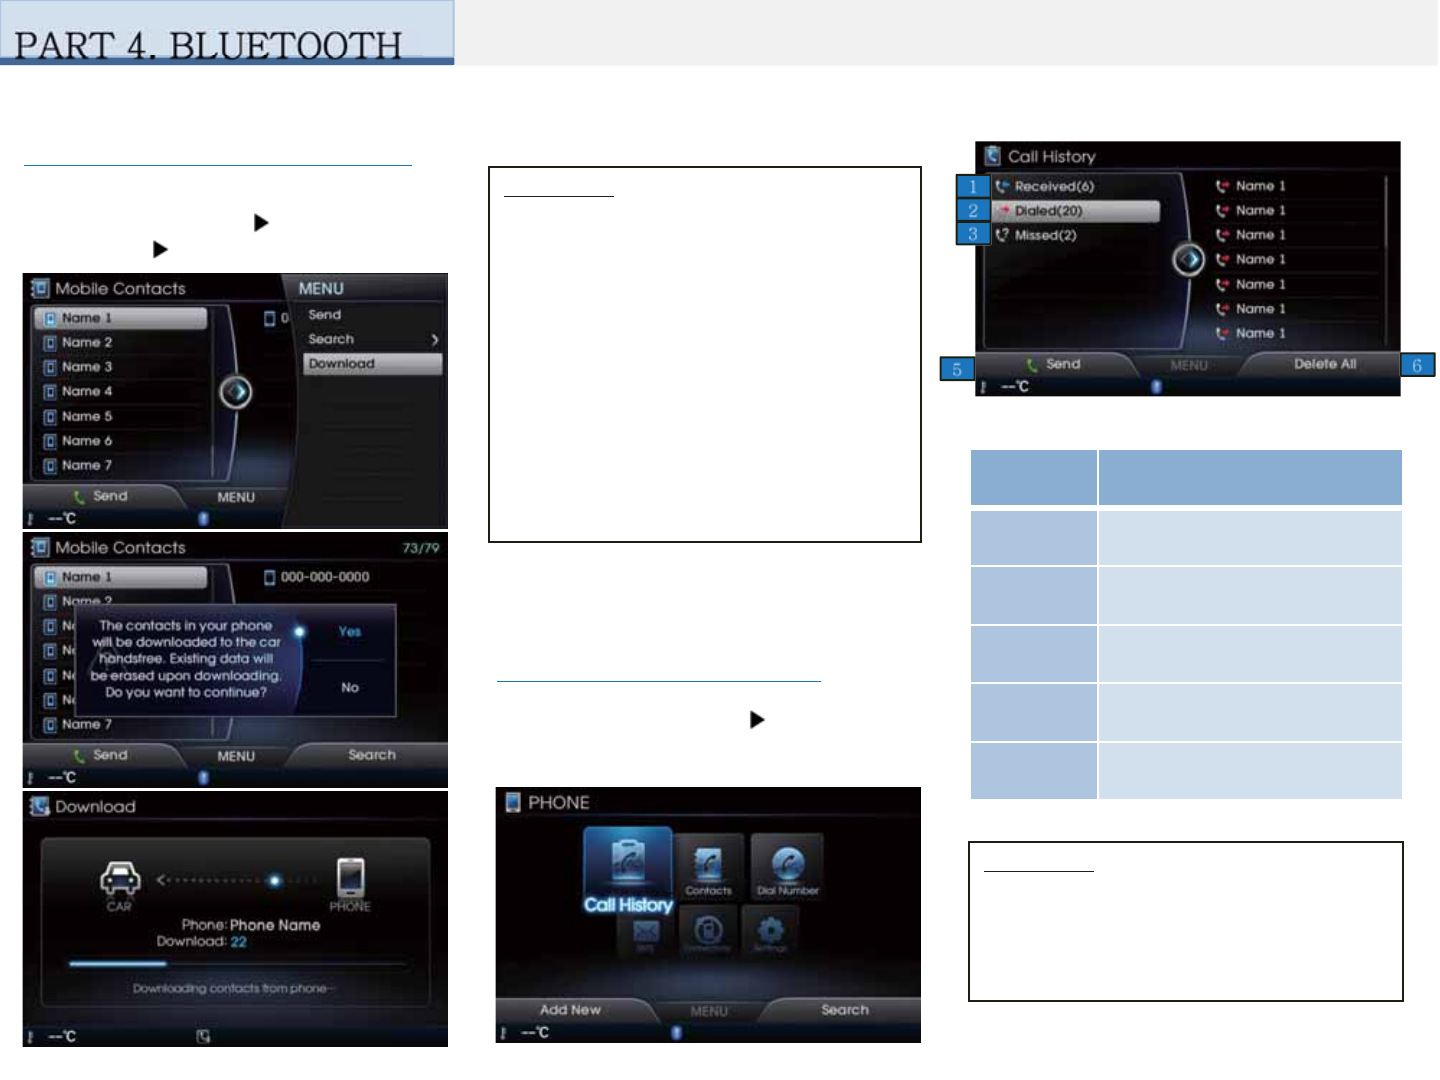
Information
• Upon downloading mobile phone contacts,
the previous corresponding data
is deleted.
• This feature may not be supported in
some mobile phones.
• Upon downloading, contacts saved in
your USIM and mobile phone are
simultaneously downloaded.
• When using Contacts Sync, the contacts
and call histories within your mobile phone
are automatically downloaded upon
connecting Bluetooth. If you do not wish to
use this feature, turn Contacts Sync Setting
off.
Press the [MENU] key
y
Press
[Download] Press [Yes]
Download Mobile Phone Contacts
Name Description
1. Received Displays the incoming call
history list
2. Dialed Displays the outgoing call
history list
3. Missed Displays the missed call history
list
4. Send Dial to selected number
5. Delete
All Delete entire call history
Entering Call History Screen
Press the [PHONE] Key Select [Call
History]
Information
• The call history may not become saved in
the call history list in some mobile phones.
• Calls received with hidden caller ID will not
become saved in the call history list.
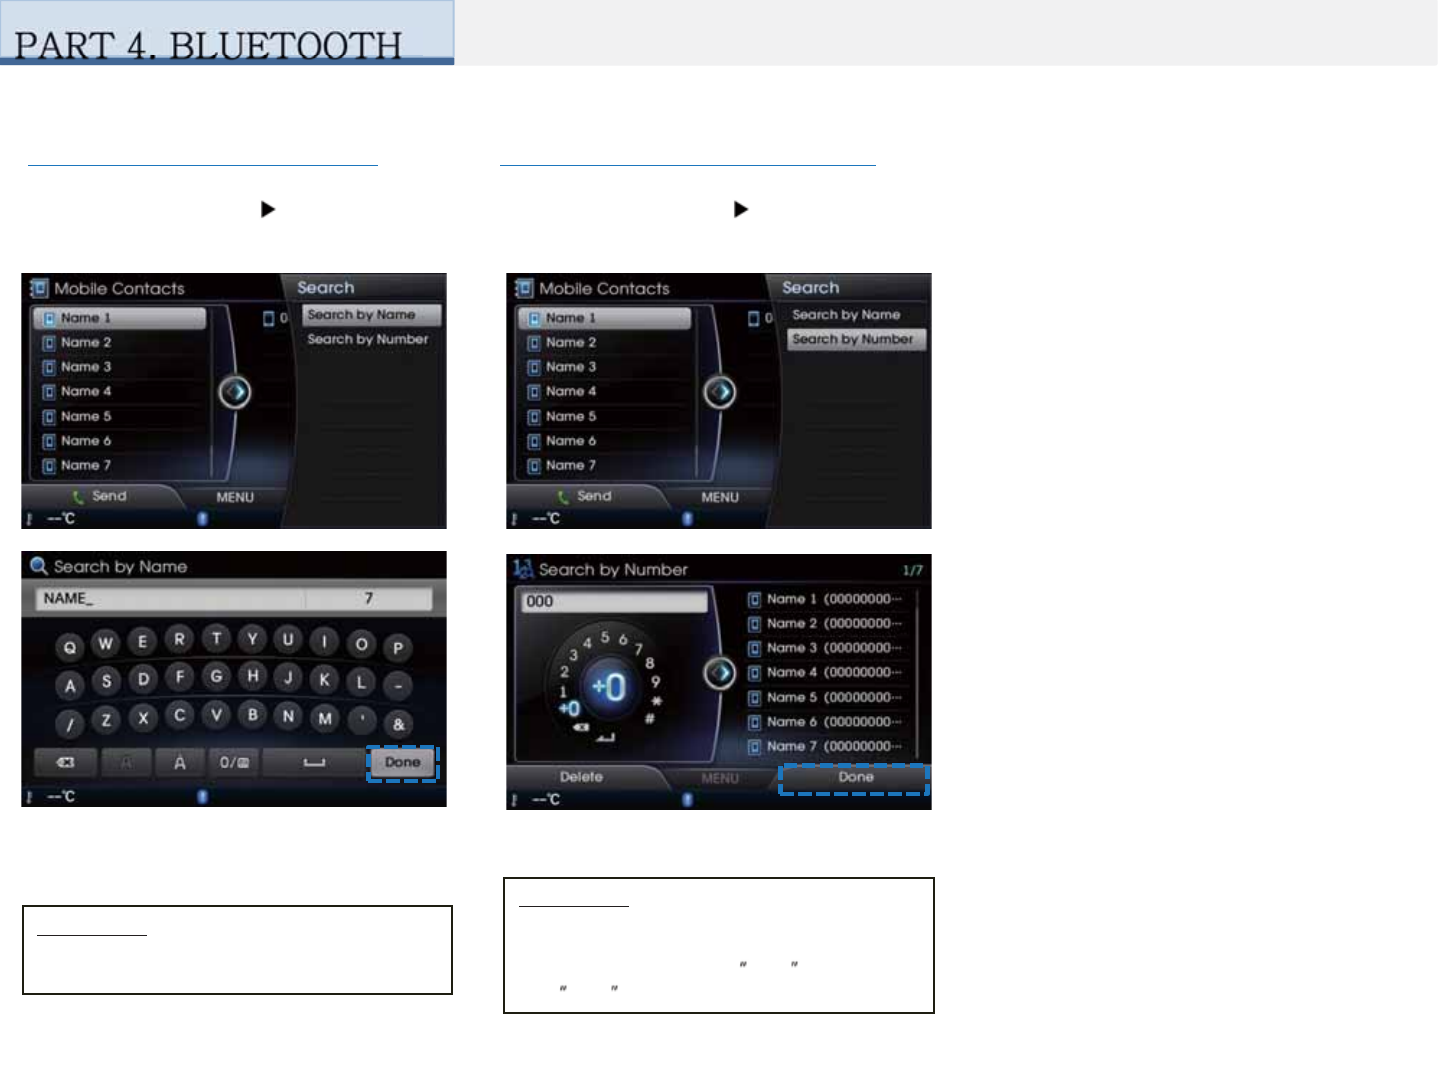
Press the [Search] Key Select [Search by
Name]
Searching Contacts (By Name)
Information
When searching a number, it is possible to
search by entering a part of the entire
number. (ex: if you enter 1544 , all numbers
with 1544 will be searched.
After inputting is complete, press the [Done]
button to save.
Information
Upon search, initial search and intermedial
search is supported.
Searching Contacts (By Number)
Press the [Search] Key Select [Search by
Number]
After inputting is complete, press the [Done]
button to save to search saved numbers.
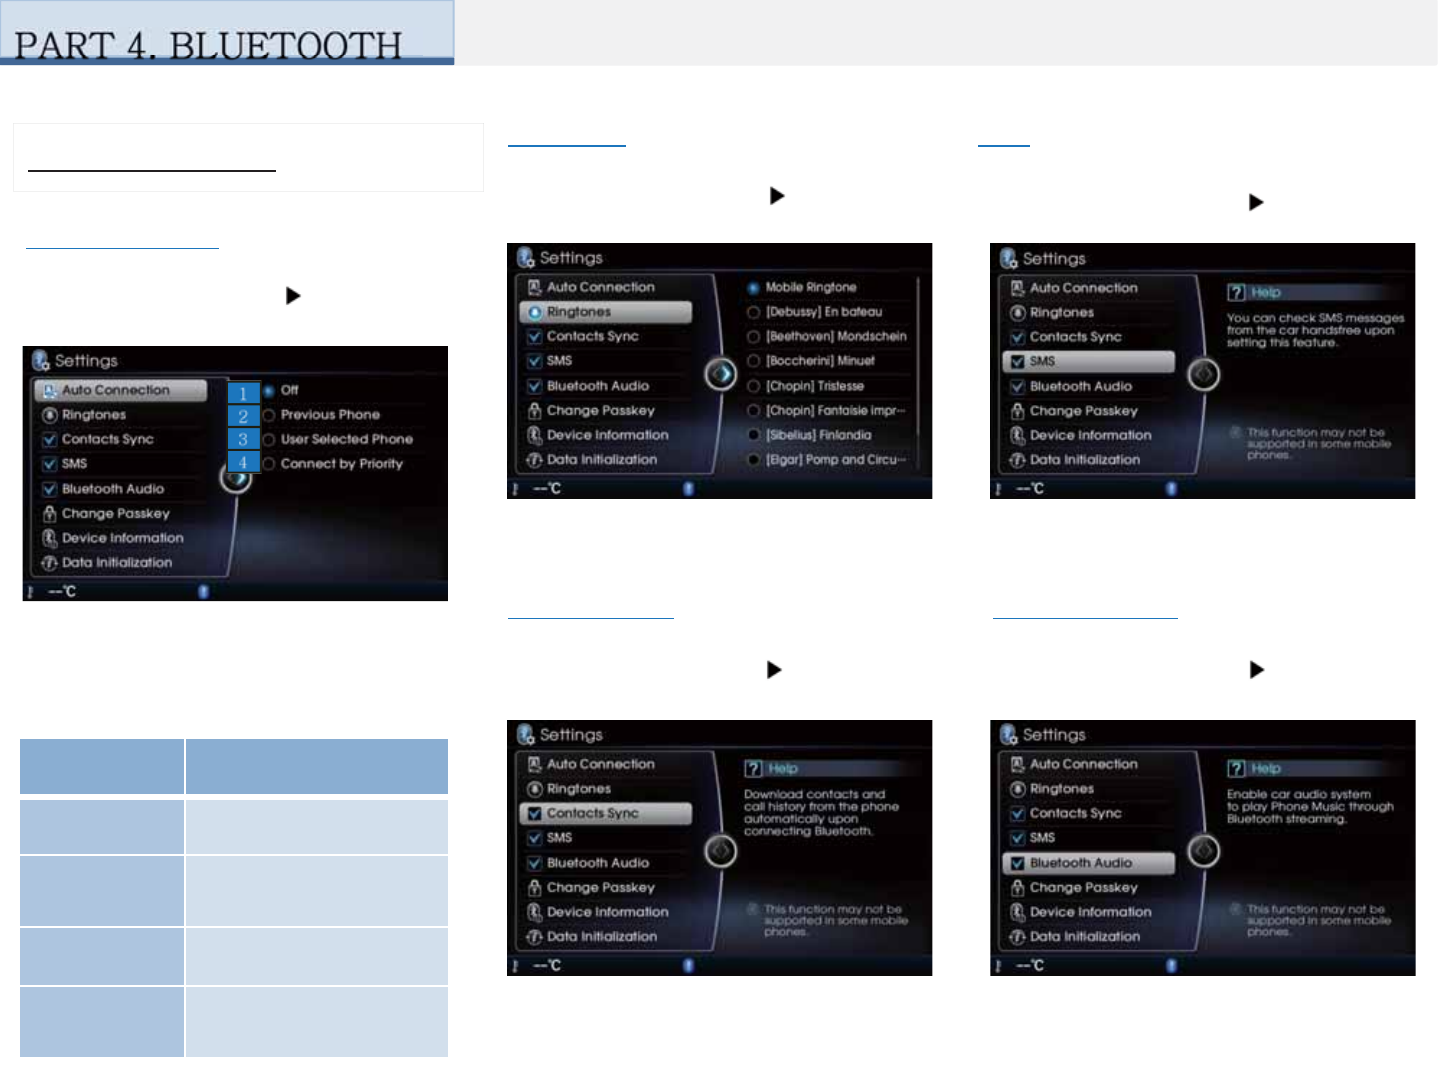
Name Description
1. Off Disables auto connection
2. Previous
Phone
Auto connection with the
previously connected
Bluetooth phone
3. User
Selected Phone
Displays the outgoing call
history list
4. Connect by
Priority
Automatically connects
according to the set
Bluetooth phone priority
Bluetooth Settings
This option is used to select ringtones for
the connected phone.
Auto Connection
Press the [Settings] key Select [Auto
Connection]
If auto connection is turned on, a Bluetooth
device will automatically be connected
according to the option setting when the
car ignition is turned on.
Ringtones
Press the [Settings] Key Select
[Ringtones]
Contacts Sync
Press the [Settings] key Select
[Contacts Sync]
When connecting a Bluetooth device, it is
possible to automatically download new
contacts.
This option is used to check messages
(SMS) through the vehicle handsfree.
SMS
Press the [Settings] Key Select [SMS]
Bluetooth Audio
Press the [Settings] key Select
[Bluetooth Audio]
You can play music files saved in your
Bluetooth device from the car.

Name Description
1. Delete all call
history
Delete all dialed / received
/ missed call lists
2. Delete All
Messages
Delete all received
messages
3. Delete All
Phones
Delete all registered
phones
4. Factory
Defaults
Reset Bluetooth settings
and data to factory state
This option is used to check information
about the connected device, such as device
name, address, and type.
Device Information
Press the [Settings] Key Select [Device
Information]
Data Initialization
Press the [Settings] Key Select [Data
Initialization]
When connecting a Bluetooth device, it is
possible to automatically download new
contacts.
This option is used to change the passkey
needed upon connecting a Bluetooth
phone.
Change Passkey
Press the [Settings] key Select
[Change Passkey]
Information
The default pin code is 0000 .

zXM Data
zCar Settings
zSystem Settings
zSound Settings
zDisplay Settings
6INFO
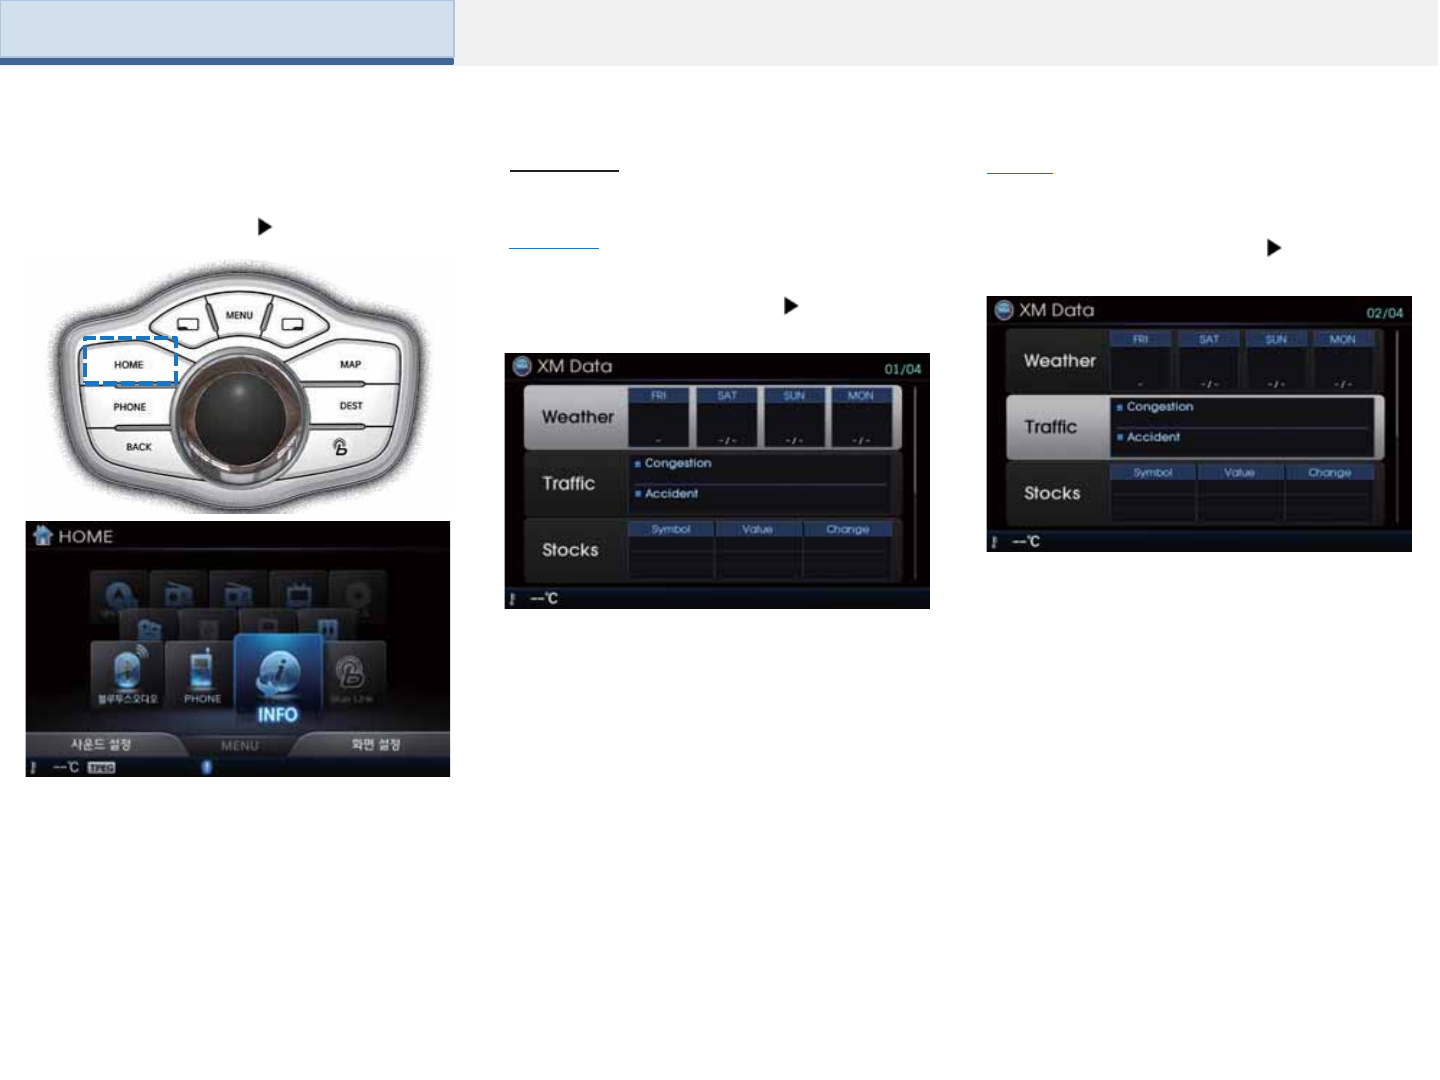
XM Data
Part 6. INFO
Weather
Press the [XM Data] button Press
[Weather]
1
2
Traffic
Press the [XM Data] button Press [Traffic]
1
2
3
Starting Mode
Press the [HOME] Key Press [INFO]
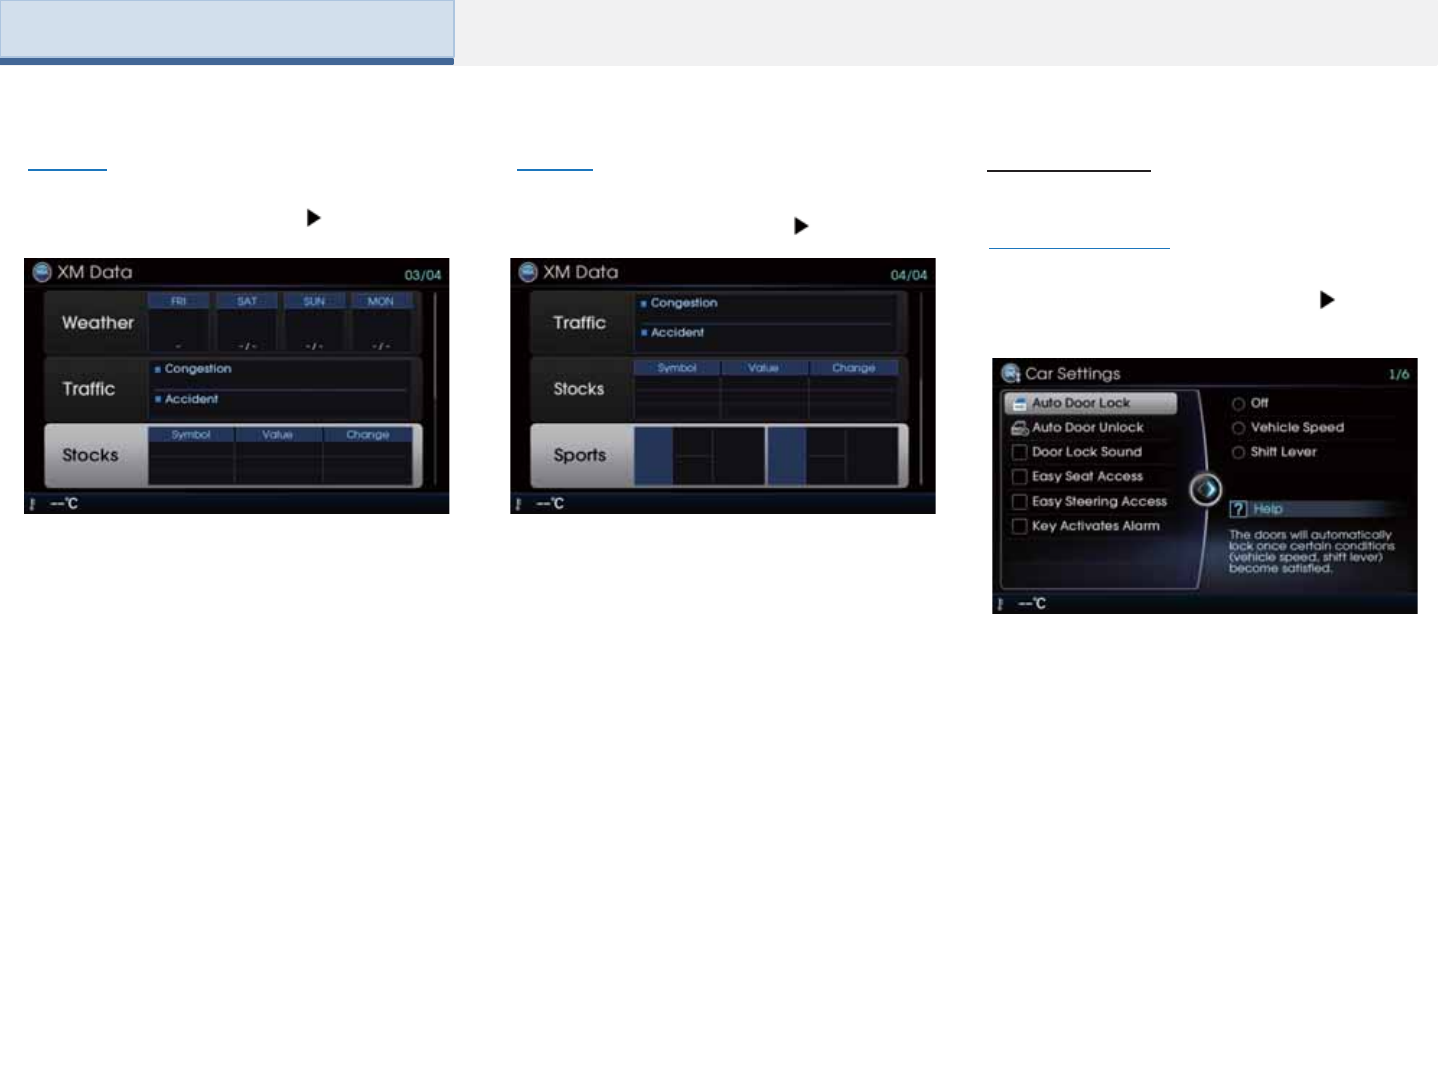
Part 6. INFO
Sports
Press the [XM Data] button Press [Sports]
Stocks
Press the [XM Data] button Press [Stocks]
1
2
Auto Door Lock
Press the [Car Settings] button Press
[Auto Door Lock]
This option enables doors to be
automatically locked in certain conditions
(vehicle speed, shift lever).
Car Settings
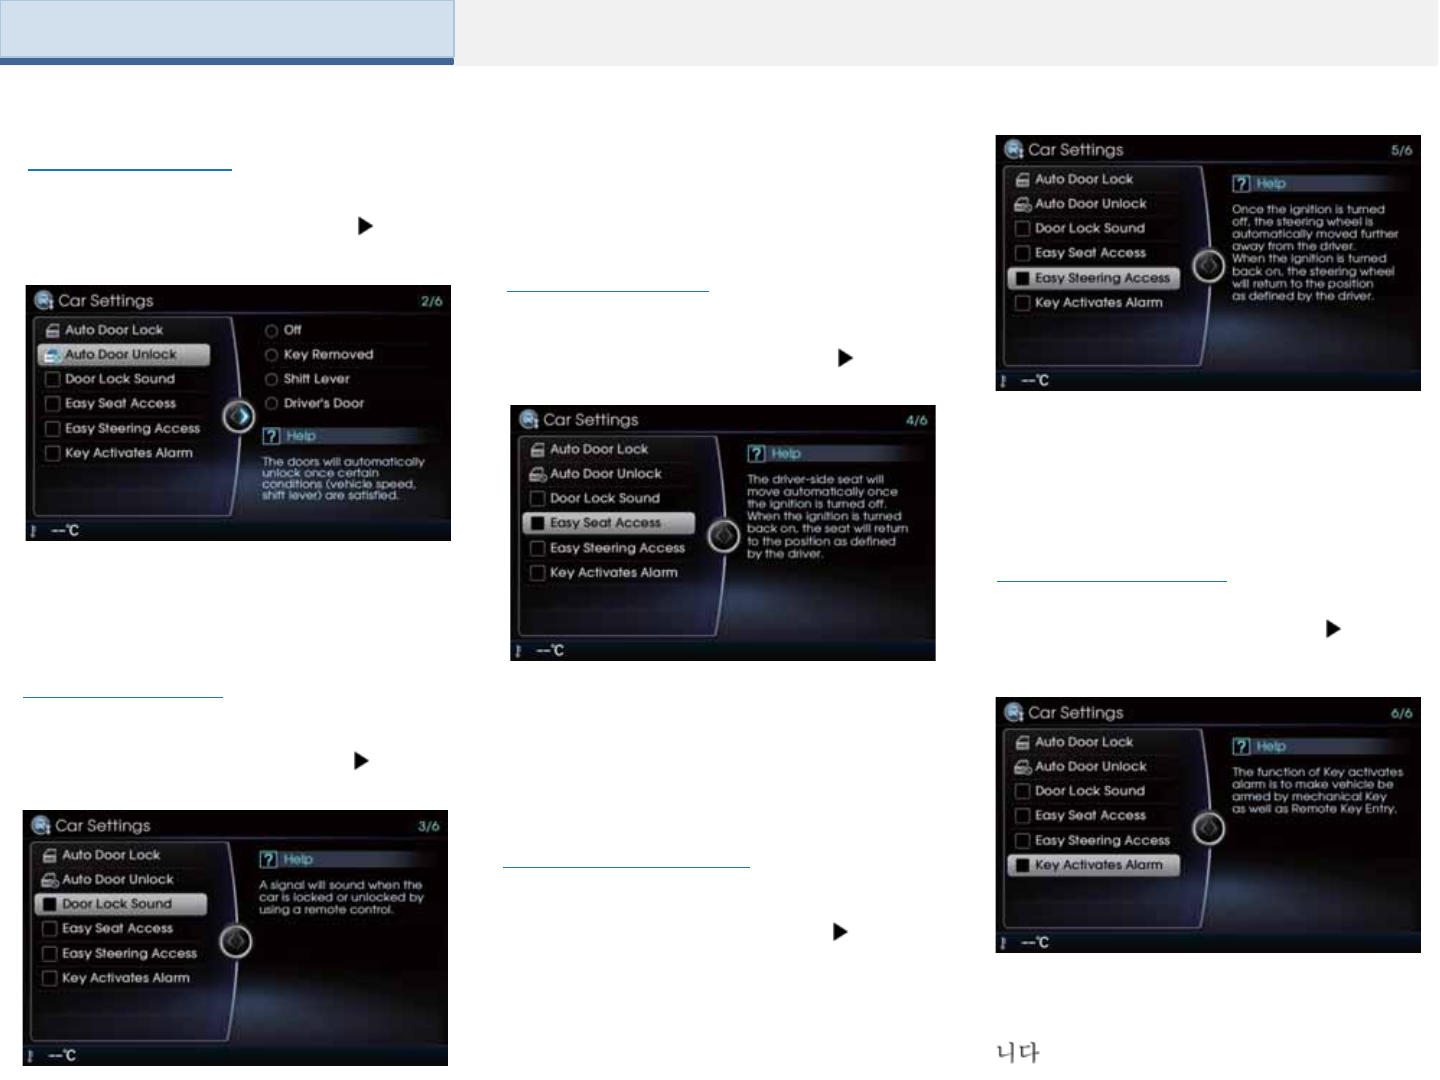
Part 6. INFO
Turning on this option enables doors to
be automatically unlocked in certain
conditions (vehicle speed, shift lever).
Auto Door Unlock
Press the [Car Settings] button Press
[Auto Door Unlock]
Easy Steering Access
Press the [Car Settings] button Press
[Easy Steering Access]
Turning on this option will automatically
move the steering wheel when the
ignition is turned off and re-position it
when the ignition is turned on again.
Turning on this option will sound a signal
when the car is locked/unlocked when using
a remote control.
Door Lock Sound
Press the [Car Settings] button Press
[Door Lock Sound]
Easy Seat Access
Press the [Car Settings] button Press
[Easy Seat Access]
Turning on this option will automatically
move the driver-side seat when the
ignition is turned off and re-position it
when the ignition is turned on again.
Key Activated Alarm
Press the [Car Settings] button
Press [Key Activated Alarm]
Turning on this option will activate the
car alarm when the vehicle is locked by
either the remote key or the actual key.
.
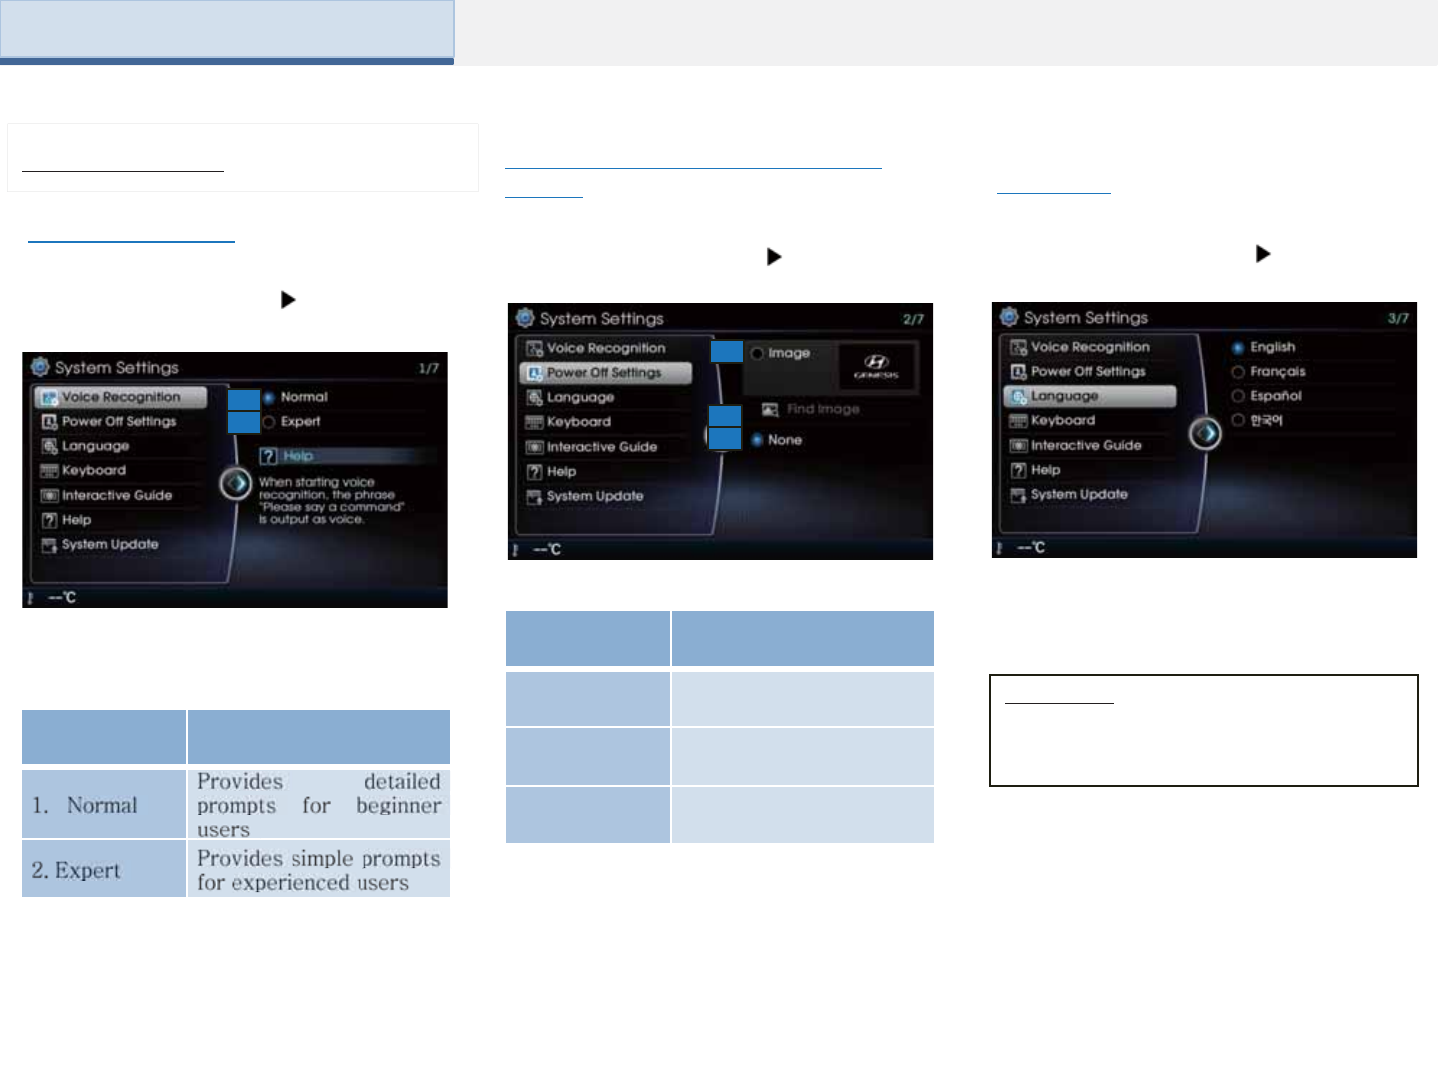
Part 6. INFO
Voice Recognition
Press [System Settings Press [Voice
Recognition]
This option enables you to set Voice
Recognition mode to either Normal or
Expert mode.
Name Description
1
2
1
2
3
Name Description
1. Image Display screen as image
2. Find Image Used to select a different
image
3. None Turns Frame off
Information
• If the language is set to English or
another language, then voice recognition
may not be supported.
This option is used to change the language
of the system display. It is possible to set to
Korean, English, and other languages.
Language
Press [System Settings] Press
[Language]
Setting Power Off Setting (Frame
Image)
Press [System Settings] Press
[Power Off Settings]
System Setting
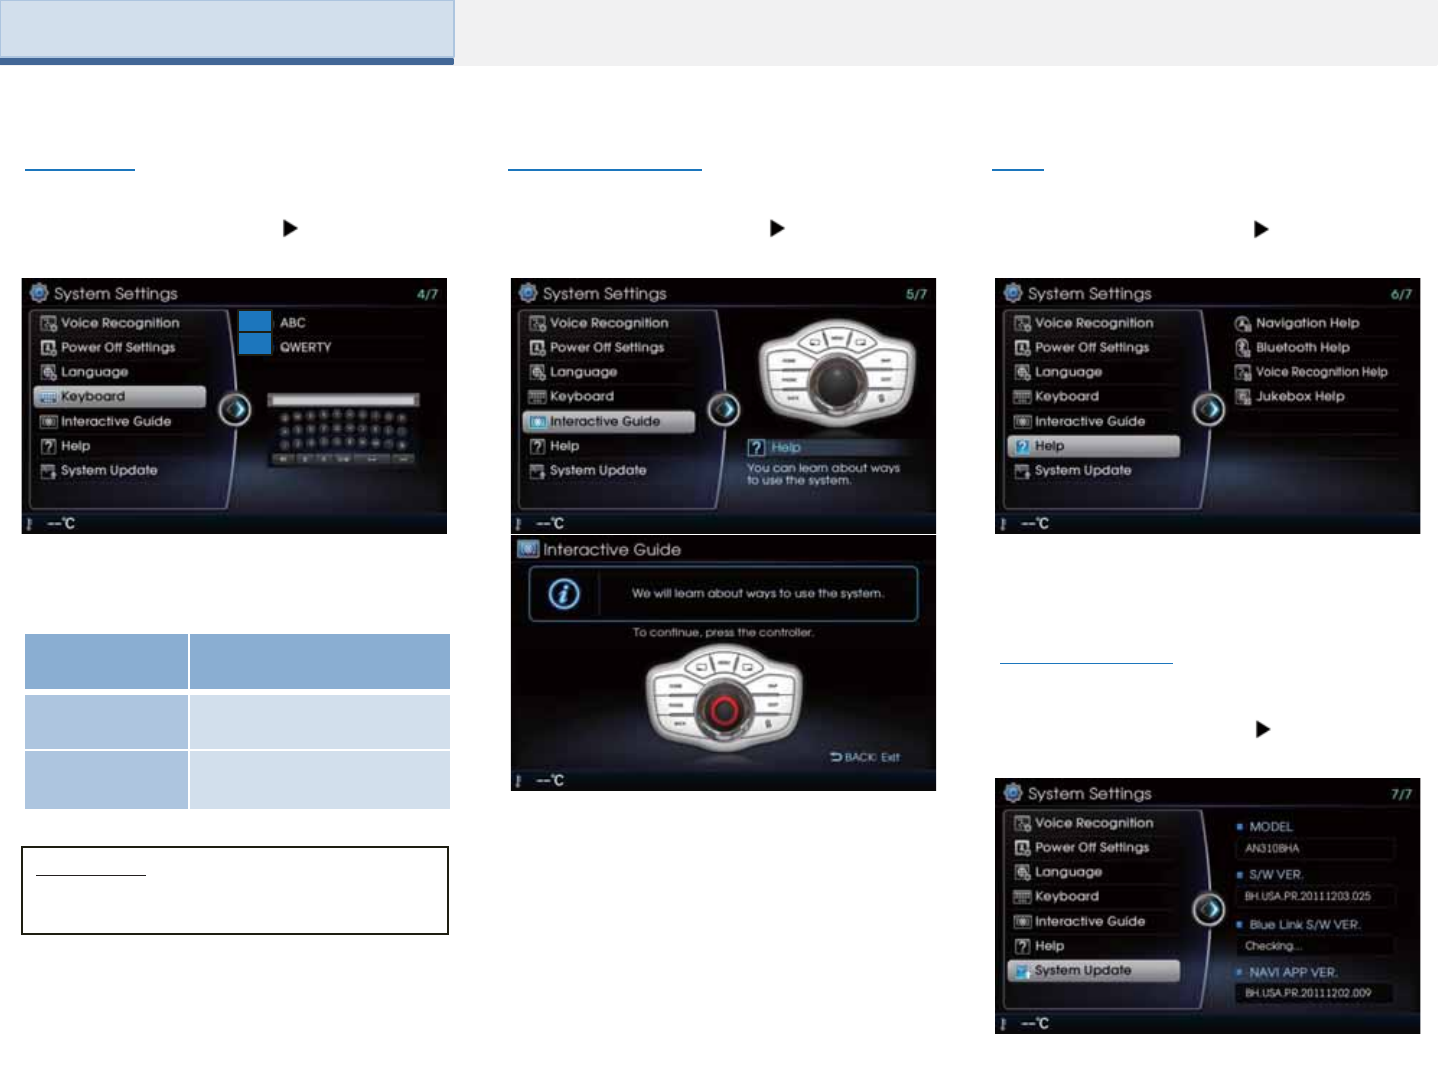
Part 6. INFO
Name Description
1. ABC Keyboard with characters
arranged in order
2. QWERTY
Keyboard similar to the
one used within a
computer
1
2
System Update
Press [System Settings] Press
[System Update]
This option provides Help sections for key
features found within the system.
Help
Press [System Settings] Press [Help]
Interactive Guide
Press [System Settings] Press
[Interactive Guide]
This option is used to turn on the Interactive
Guide that provides explanations and
simple examples of ways to use the
Controller.
Keyboard
Press [System Settings] Press
[Keyboard]
This option allows you to change the type
of keyboard used within the system.
Information
The set keyboard will be applied to all
input modes across the entire system.
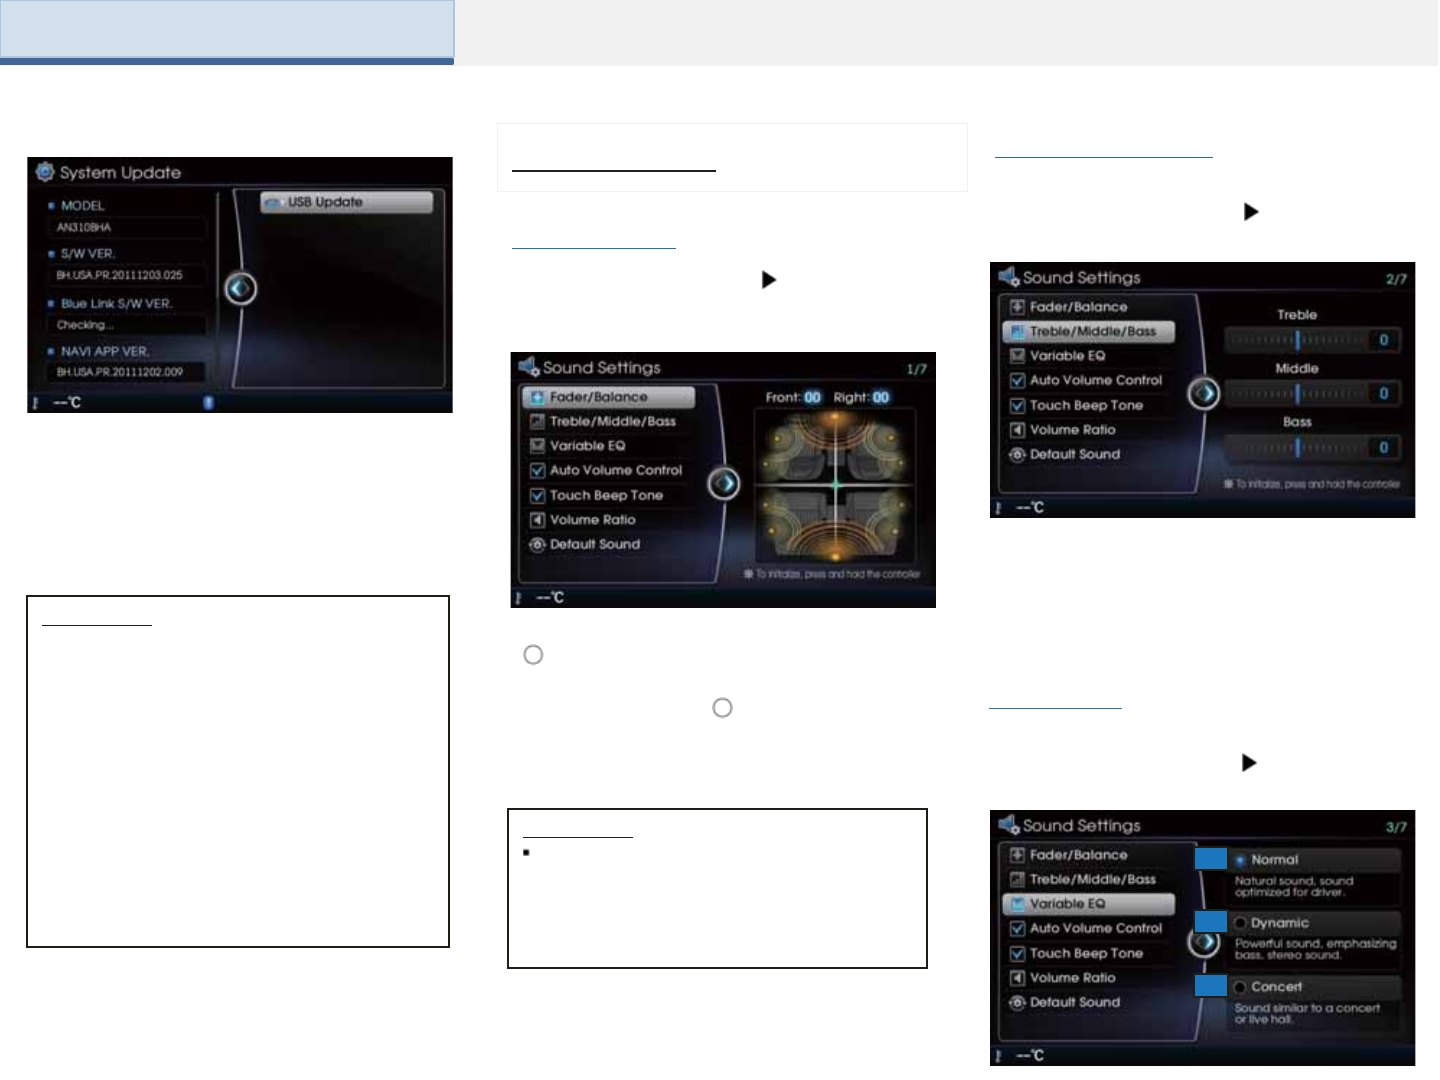
Part 6. INFO
1
2
3
Fader/Balance
Press [Sound Settings] Press
[Fader/Balance]
Use the top/down/left/right buttons on the
[ ] to move the cursor on the control
screen to the desired position.
Press and hold the [ ] for approx 3
seconds to restore sound to the center
position.
Sound Settings
Information
The Balance/Fader settings allow the
position of the sound to be set. For example,
the sound can be set towards the driver
seat so that the volume relatively lower in
the passenger seat or back seats.
Use the [<] or [>] cursors to adjust the
bass/mid/treble settings.
Press and hold the controller for approx 3
seconds to restore all settings back to 0.
Treble/Middle/Bass
Press [Sound Settings] Press
[Treble/Middle/Bass]
Variable EQ
Press [Sound Settings] Press [Variable
EQ]
Information
• This product requires regular updates
for software corrections, new functions
and map updates. Updating may
require up to 1 hour depending on the
data size.
• Turning off the power or ejecting the SD
card during the update process may
result in data loss. Make sure to keep
the ignition on and wait until updating is
complete.
• For up-to-date maps and software, visit the
site (blu.hyundai.com) and download
related files to an SD card.
After inserting the SD card where the
updated file is downloaded, press [USB
Update] to start the update. Once updating
is complete, the system will automatically
restart.
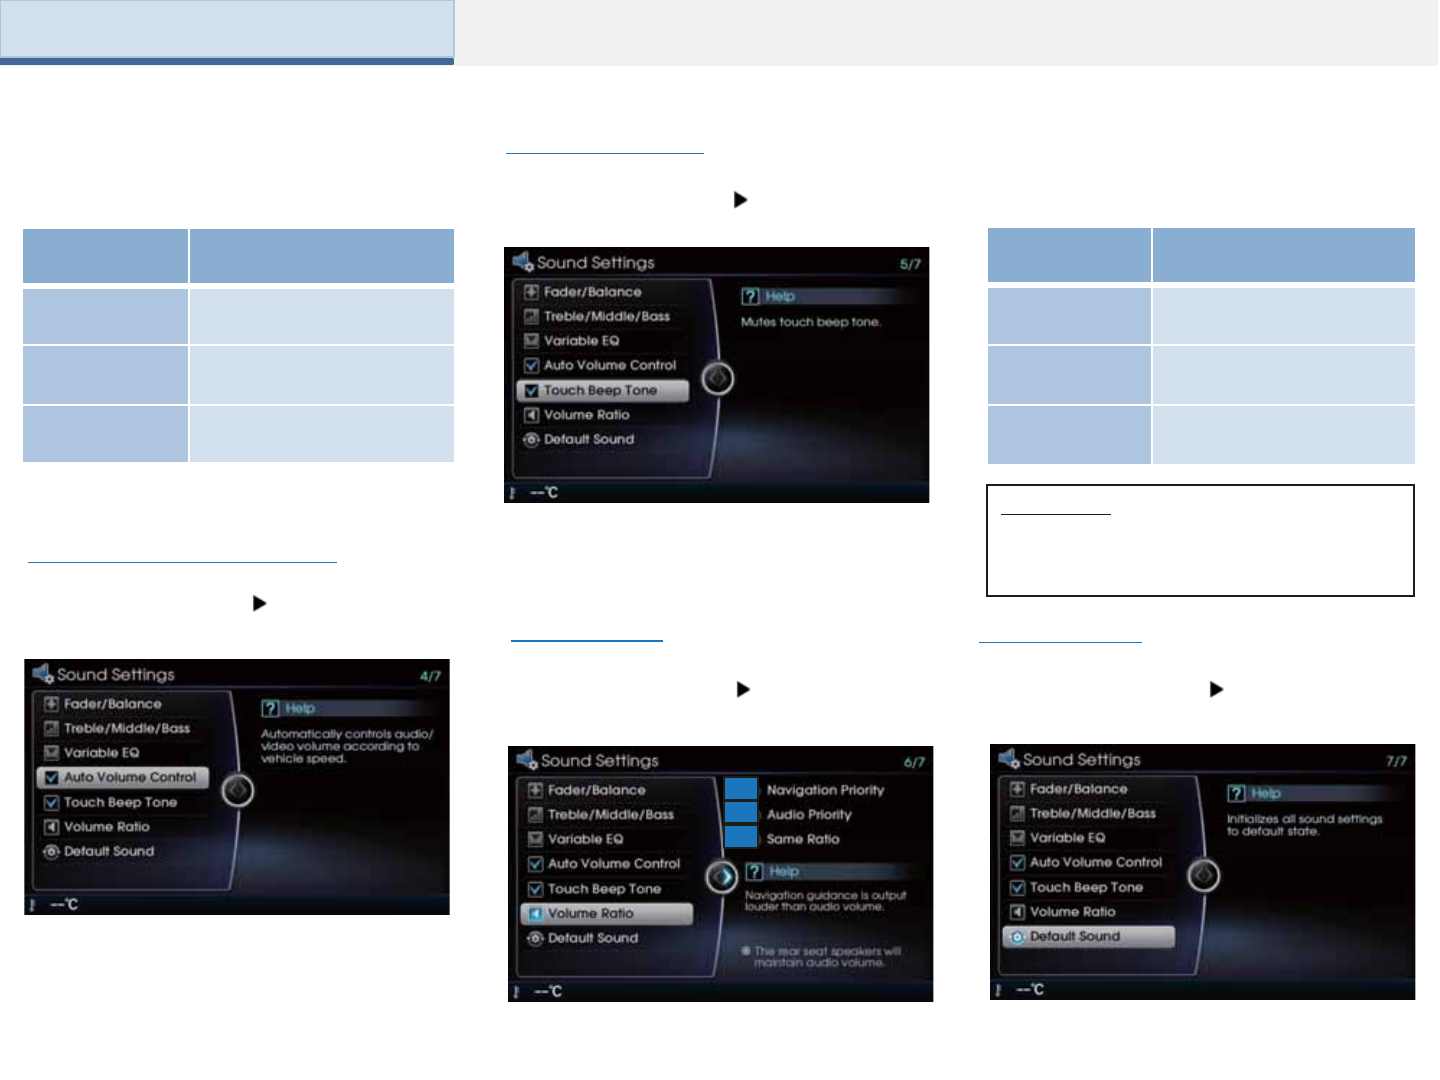
Part 6. INFO
This option allows users to set the sound mode
according to one’s preferences.
Name Description
1. Normal Natural sound, sound
optimized for driver
2. Dynamic
Powerful sound,
emphasizing bass, stereo
sound
3. Concert Sound similar to a concert
or live hall
1
2
3
Name Description
1.Navigation
Priority
Navigation guidance is
output louder than audio
volume
2. Audio Priority
Audio volume is output
louder than the navigation
guidance
3. Same Ratio
Audio volume and
navigation guidance are
output in identical volume
The volume level is automatically controlled
according to the vehicle speed.
Auto Volume Control (AVC)
Press [Sound Settings] Press [Auto Volume
Control]
Each press of this setting with turn the BEEP
tone ON/OFF.
Touch Beep Tone
Press [Sound Settings] Press [Touch Beep
Tone]
Volume Ratio
Press [Sound Settings] Press [Volume Ratio]
These options are used to set the volume ratio
by selecting from Navigation Priority/ Audio
Priority/Same Ratio.
Information
The rear seat speaker will maintain its
audio volume regardless of which volume
ratio is selected.
This option is used to restore all Sound settings
back to the default state.
Default Sound
Press [Sound Settings] Press [Default
Sound]
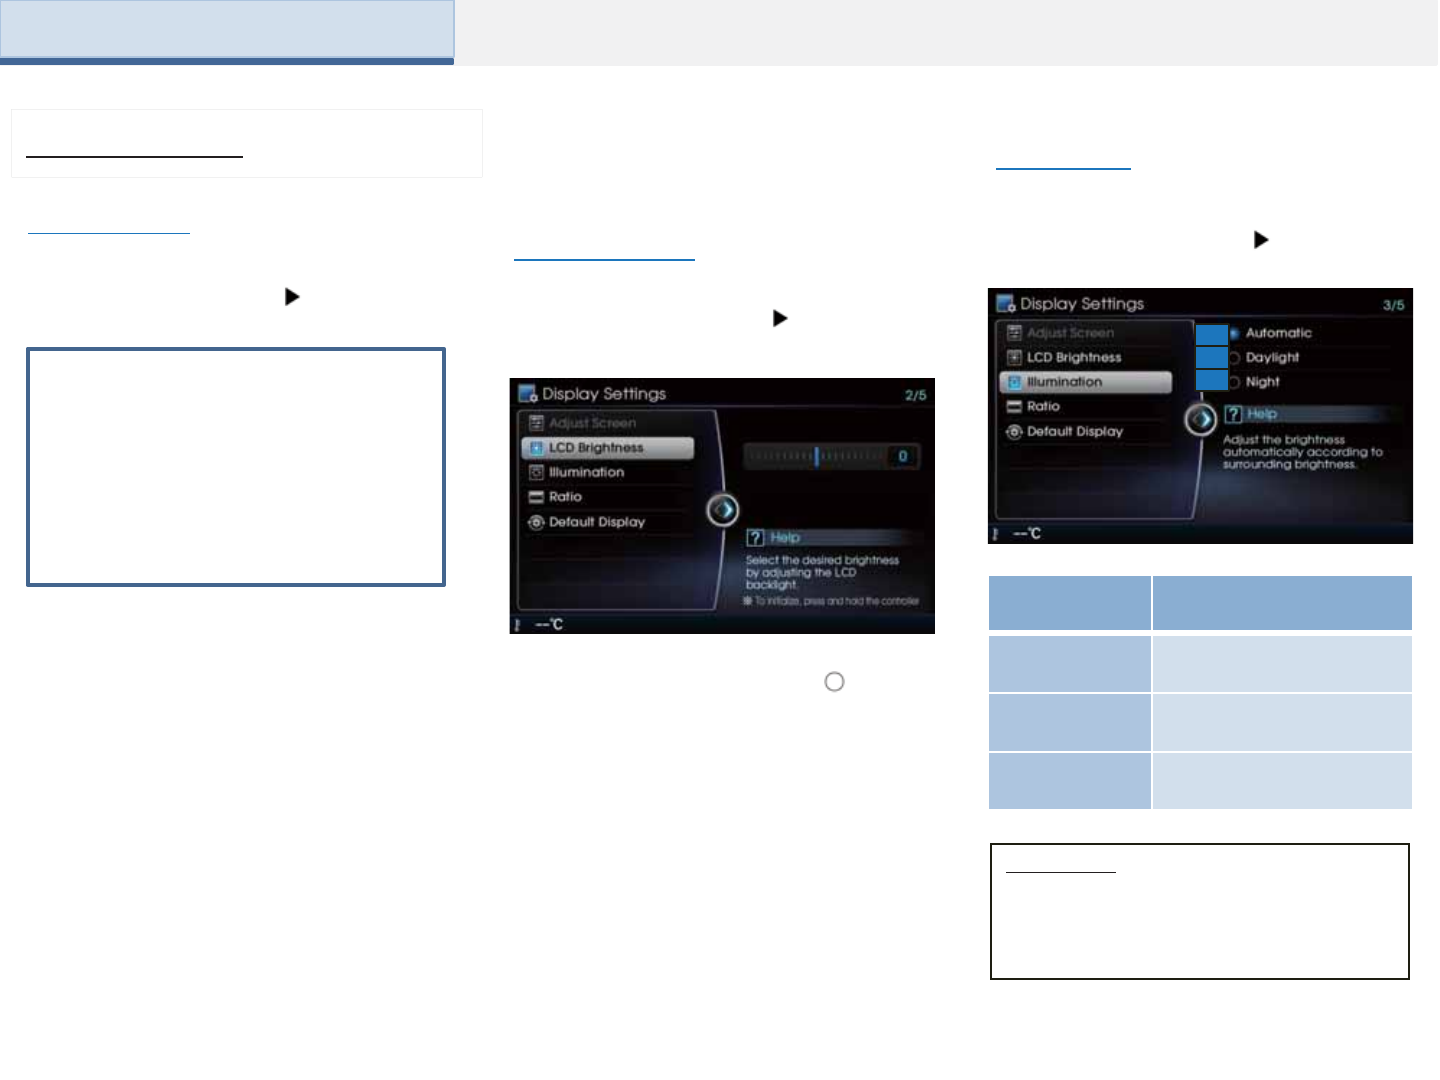
Part 6. INFO
Adjust Screen
Press [Display Settings] Press
[Brightness/Saturation/Contrast/Color]
This option is used to set the screen
brightness and color.
Name Description
1. Automatic
Adjusts the brightness
automatically according to
surrounding brightness
2. Daylight Always maintains the
brightness on high
3. Night Always maintains the
brightness on low
1
2
3
LCD Brightness
Press [Display Settings] Press [LCD
Brightness]
This option is used to change the LCD
brightness. Press and hold the [ ] for
approx 3 seconds to restore brightness to
the default setting
Display Settings Illumination
Press [Display Settings] Press
[Illumination]
Information
When set to Automatic, the screen
brightness and color will automatically be
adjusted according to the surrounding
brightness.
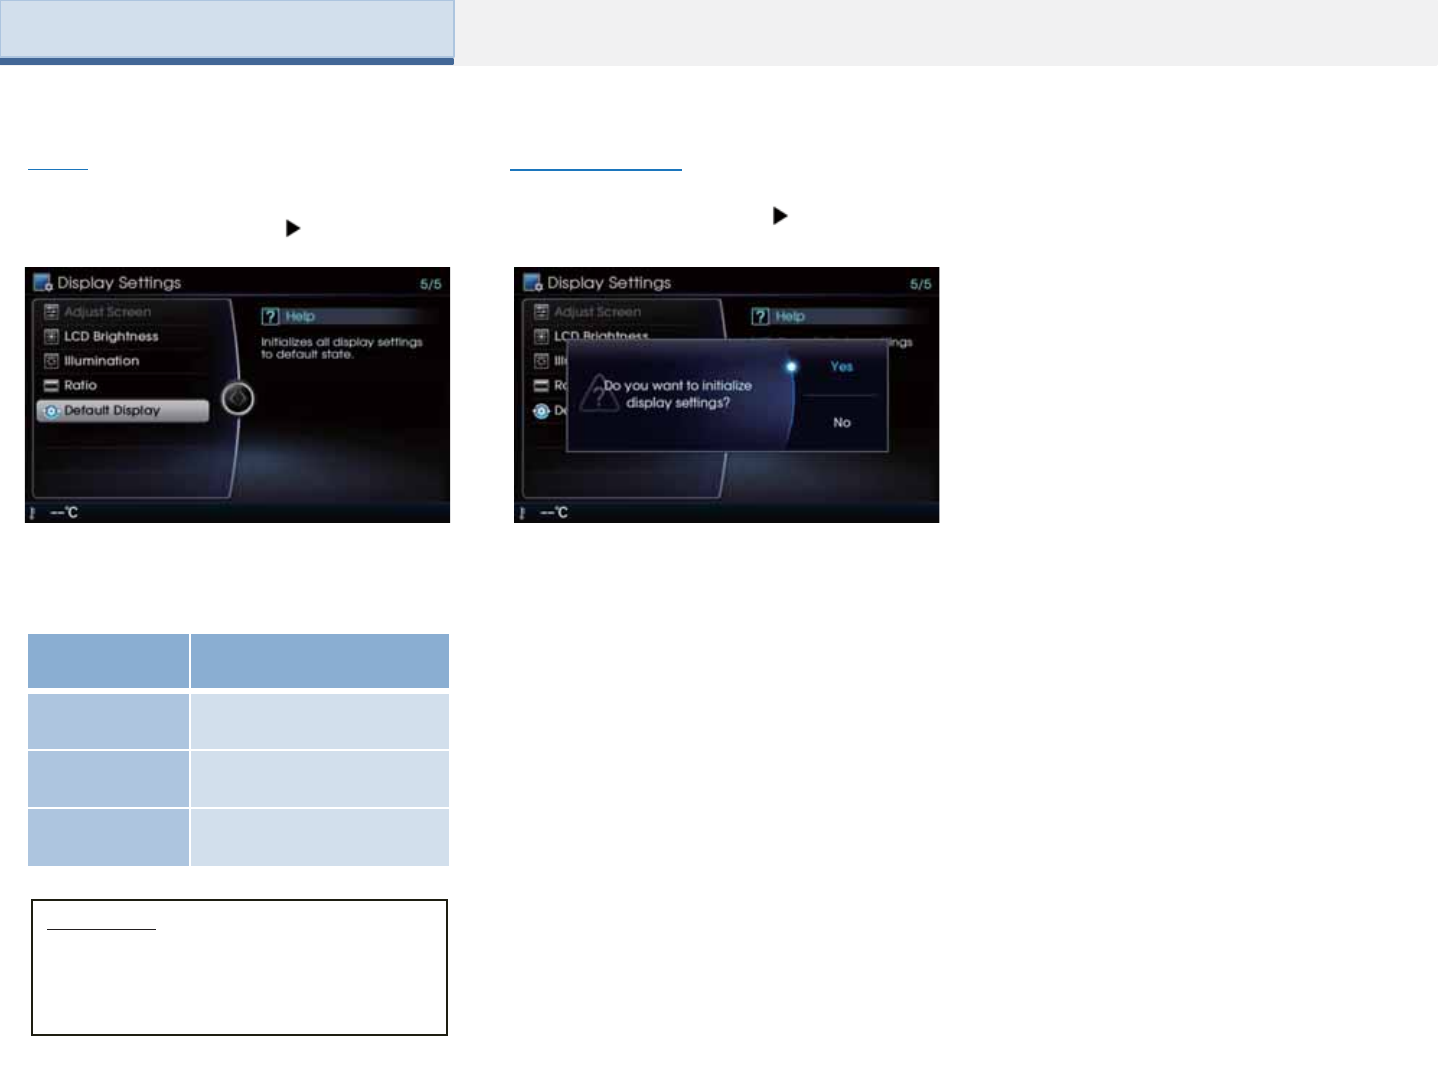
Part 6. INFO
Name Description
1. Normal (4:3) 4:3 screen display
2. Wide (16:9) 16:9 wide screen display
3. Full Screen Full screen display
This option is used to set the screen ratio in
video modes, such as VCD/DVD/USB
Video/AUX.
Ratio
Press [Display Settings] Press [Ratio]
Information
If a DVD is created with a defined ratio
(example: 16:9), the screen will not
change even if a different screen ratio
(example: Normal) is selected.
This option is used to restore all Display
settings back to the default state.
Default Display
Press [Display Settings] Press [Default
Display]

9-17
APPENDIX
M & SOFT AMERICA MAP CENTER
TEL : 888-757-0010
WEBSITE : www.mapnsoft.com
MAP DATABASE HOTLINE
This equipment has been tested and found to comply with the limits for a Class A digital device, pursuant to part 15 of the FCC Rules.
These limits are designed to provide reasonable protection against harmful interference in a residential installation. This equipment
generates, uses and can radiate radio frequency energy and, if not installed and used in accordance with the instructions, may cause
harmful interference to radio communications. However, there is no guarantee that interference will not occur in a particular
installation. If this equipment does cause harmful interference to radio or television reception, which can be determined by turning the
equipment off and on, the user is encouraged to try to correct the interference by one or more of the following measures:
ˍ Reorient or relocate the receiving antenna.
ˍ Increase the separation between the equipment and receiver.
ˍ Connect the equipment into an outlet on a circuit different from that to which the receiver is connected.
ˍ Consult the dealer or an experienced radio/TV technician for help.
Caution: Any changes or modifications to this device not explicitly approved by manufacturer could void your authority to operate this
equipment.
This device complies with part 15 of the FCC Rules. Operation is subject to the following two conditions: (1) This device may not
cause harmful interference, and (2) this device must accept any interference received, including interference that may cause undesired
operation.
,&:DUQLQJ
7KLVGHYLFHFRPSOLHVZLWK,QGXVWU\&DQDGDOLFHQFHH[HPSW566VWDQGDUGV
2SHUDWLRQLVVXEMHFWWRWKHIROORZLQJWZRFRQGLWLRQVWKLVGHYLFHPD\QRWFDXVHLQWHUIHUHQFHDQG
WKLVGHYLFHPXVWDFFHSWDQ\LQWHUIHUHQFHLQFOXGLQJLQWHUIHUHQFHWKDWPD\FDXVHXQGHVLUHGRSHUDWLRQRIWKHGHYLFH
/HSUpVHQWDSSDUHLOHVWFRQIRUPHDX[&15G,QGXVWULH&DQDGDDSSOLFDEOHVDX[DSSDUHLOVUDGLRH[HPSWVGHOLFHQFH
/H[SORLWDWLRQHVWDXWRULVpHDX[GHX[FRQGLWLRQVVXLYDQWHVODSSDUHLOQHGRLWSDVSURGXLUHGHEURXLOODJHHW
OXWLOLVDWHXUGHODSSDUHLOGRLWDFFHSWHUWRXWEURXLOODJHUDGLRpOHFWULTXHVXEL
PrPHVLOHEURXLOODJHHVWVXVFHSWLEOHGHQFRPSURPHWWUHOHIRQFWLRQQHPHQW
7KLVHTXLSPHQWFRPSOLHVZLWK)&&UDGLDWLRQH[SRVXUHOLPLWVVHWIRUWKIRUDQXQFRQWUROOHGHQYLURQPHQW
7KLVHTXLSPHQWVKRXOGEHLQVWDOOHGDQGRSHUDWHGZLWKPLQLPXPFPEHWZHHQWKHUDGLDWRUDQG\RXUERG\
7KLVWUDQVPLWWHUPXVWQRWEHFROORFDWHGRURSHUDWLQJLQFRQMXQFWLRQZLWKDQ\RWKHUDQWHQQDRUWUDQVPLWWHUXQOHVVDXWKRUL]HGWRGRVRE\WKH)&&