HYUNDAI MOBIS AT240C2AN DIGITAL CAR AVN SYSTEM User Manual
HYUNDAI MOBIS CO., LTD. DIGITAL CAR AVN SYSTEM
UserManual.wiki
>
HYUNDAI MOBIS
>
AT240C2AN User Manual
User Manual
Navigation menu
Upload a User Manual
Namespaces
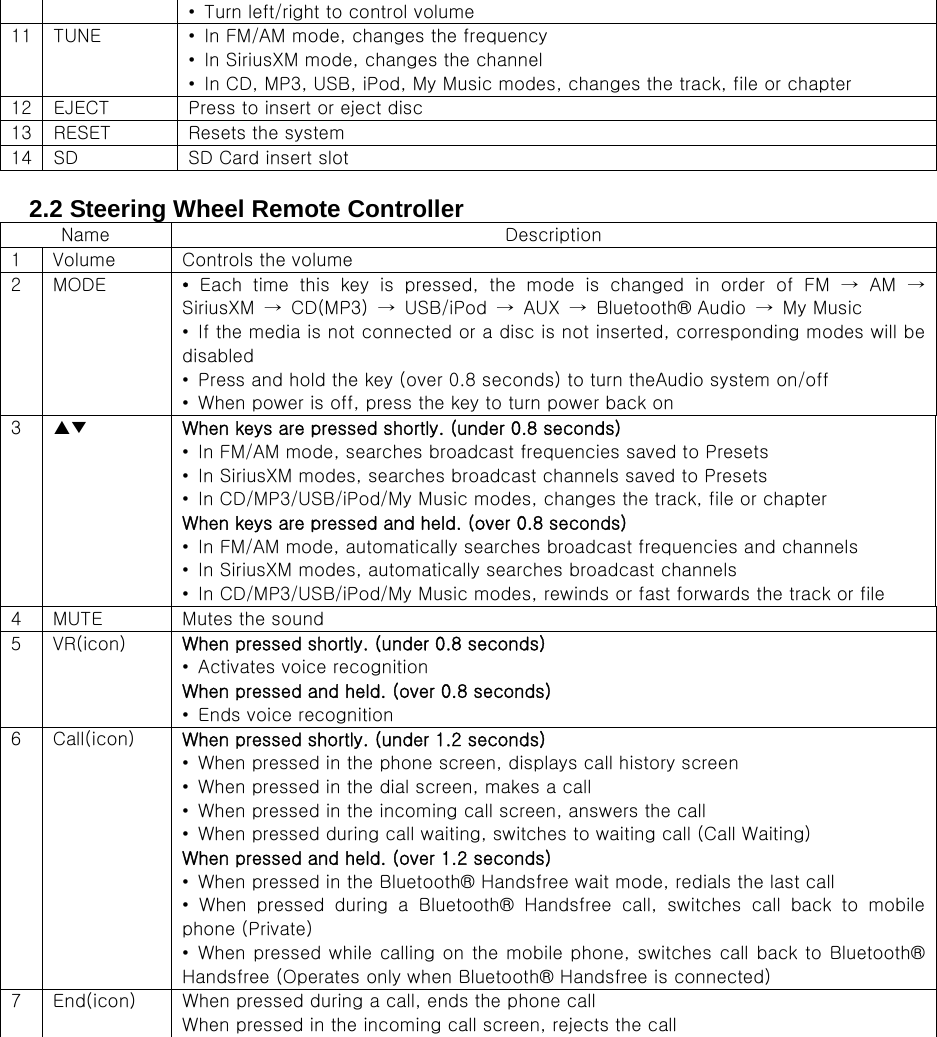
Wiki Guide
HTML
PDF
Info
Views
User Manual
Discussion / Help
Navigation

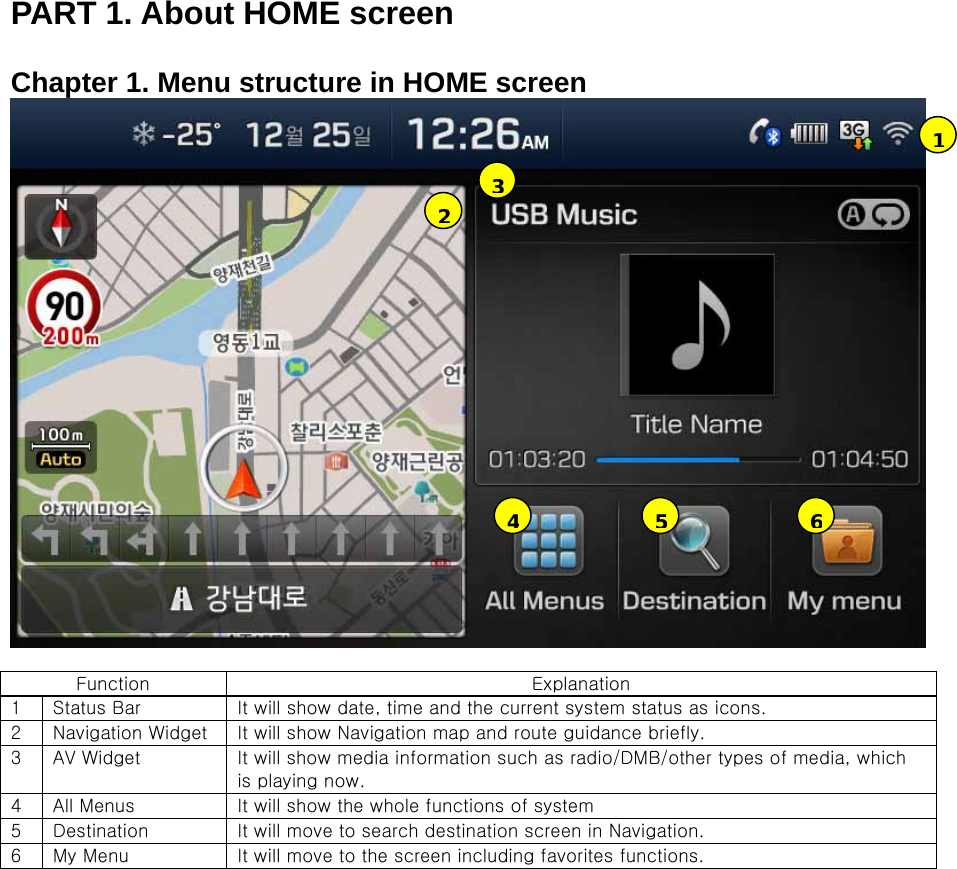
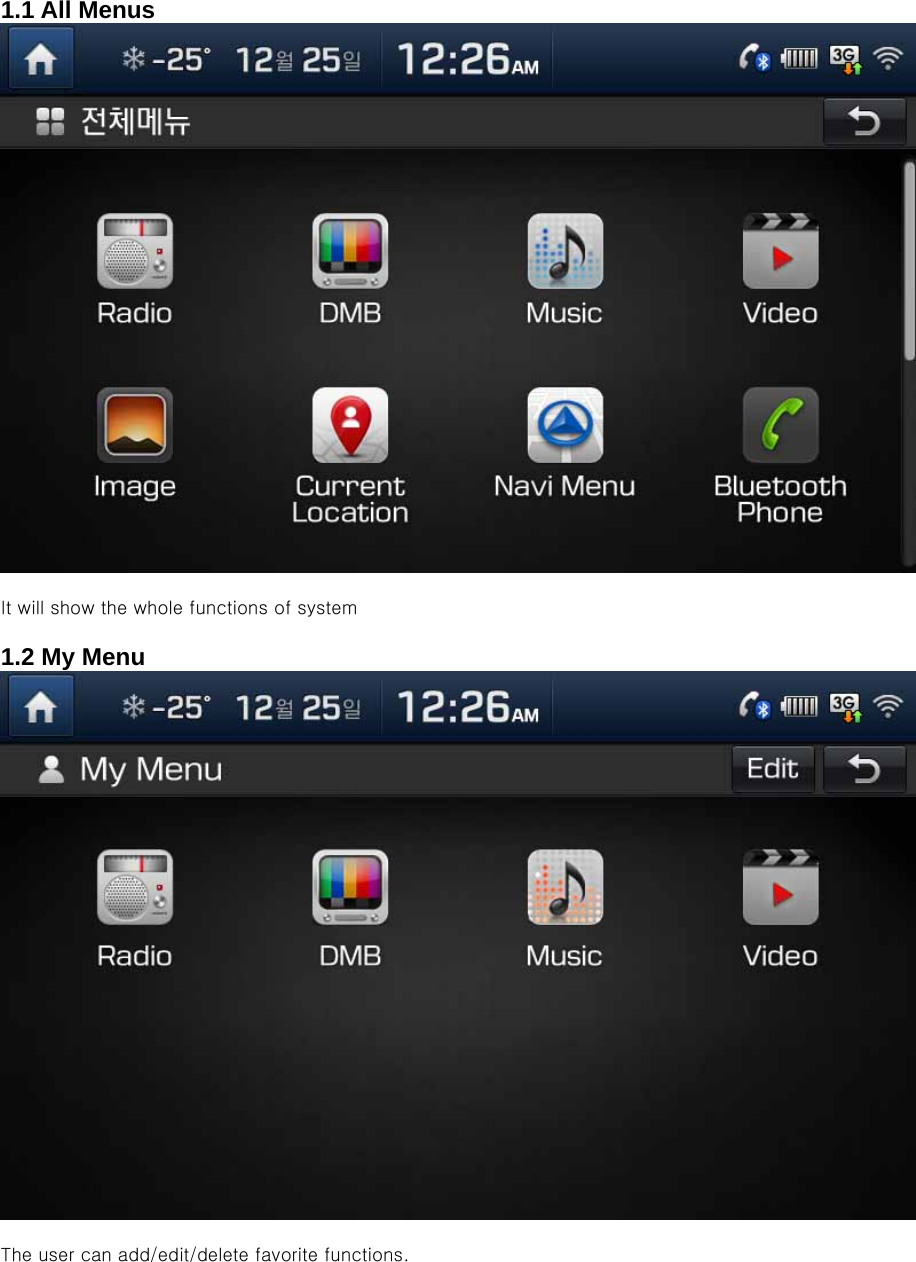
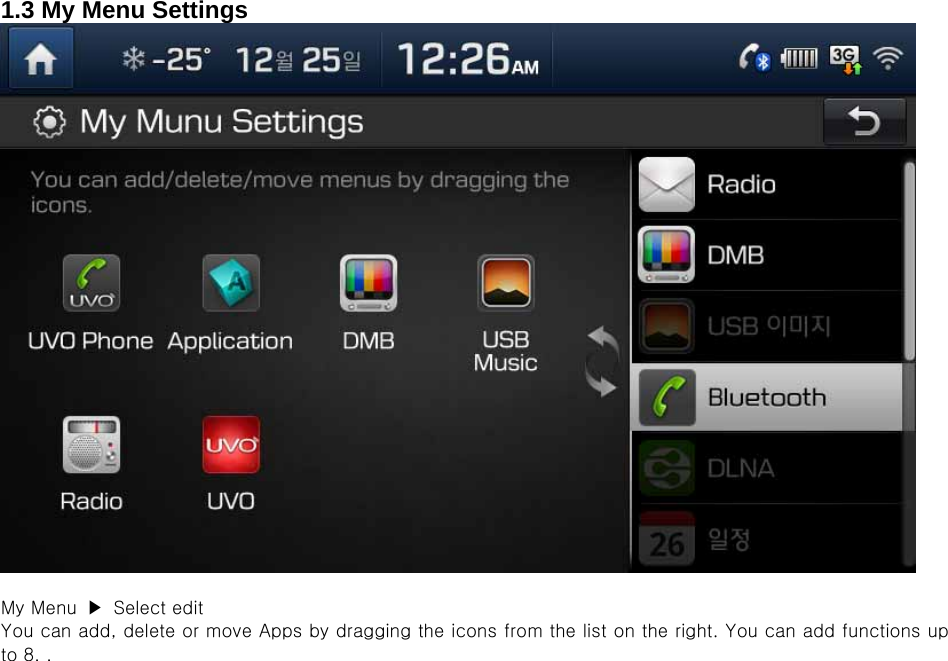
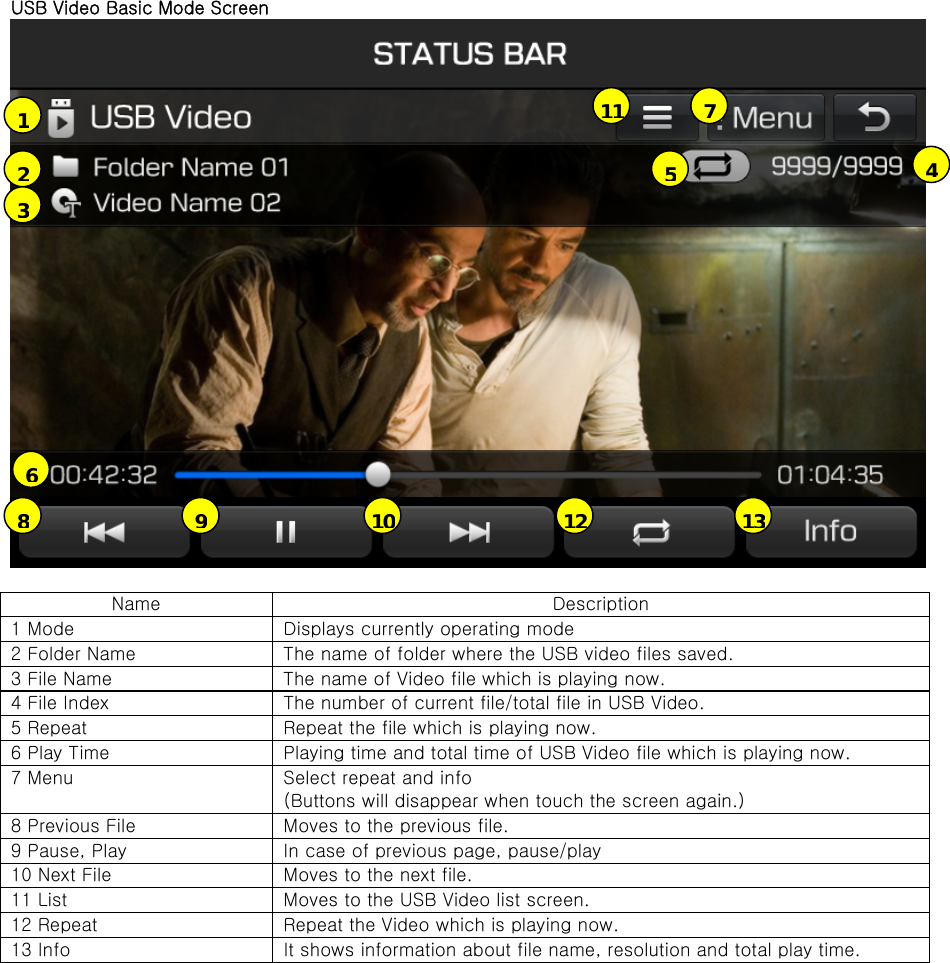
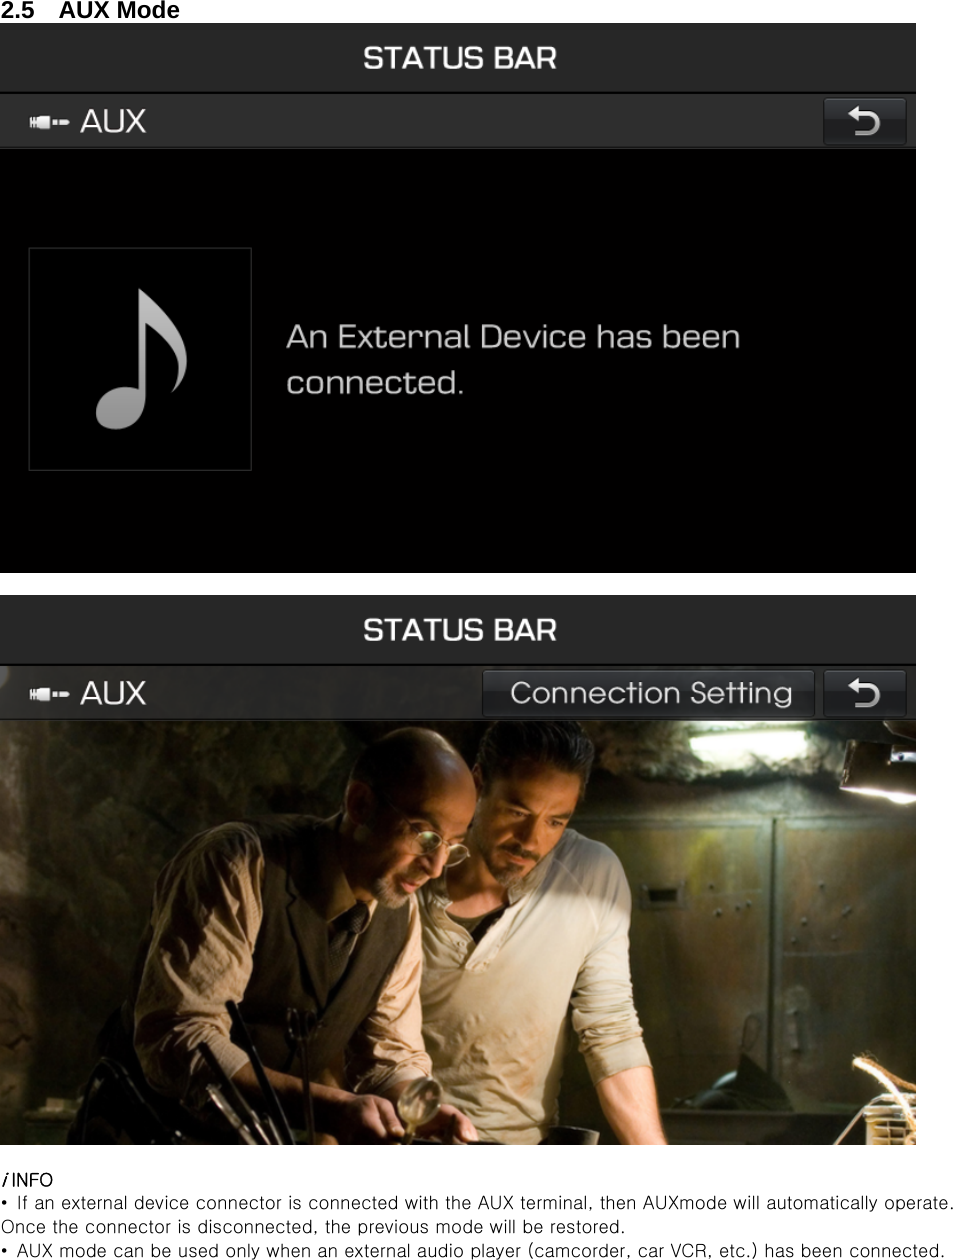
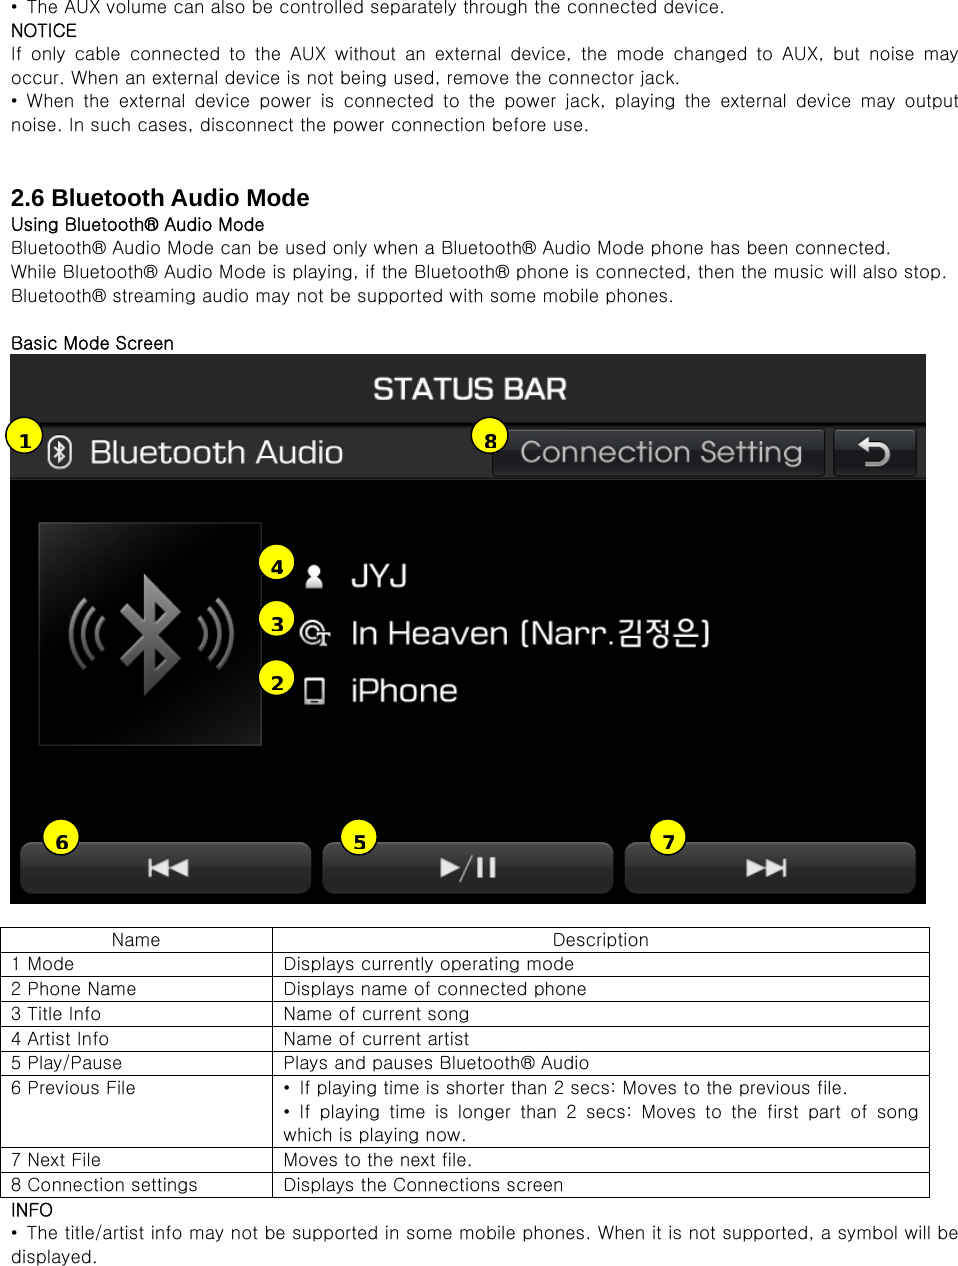
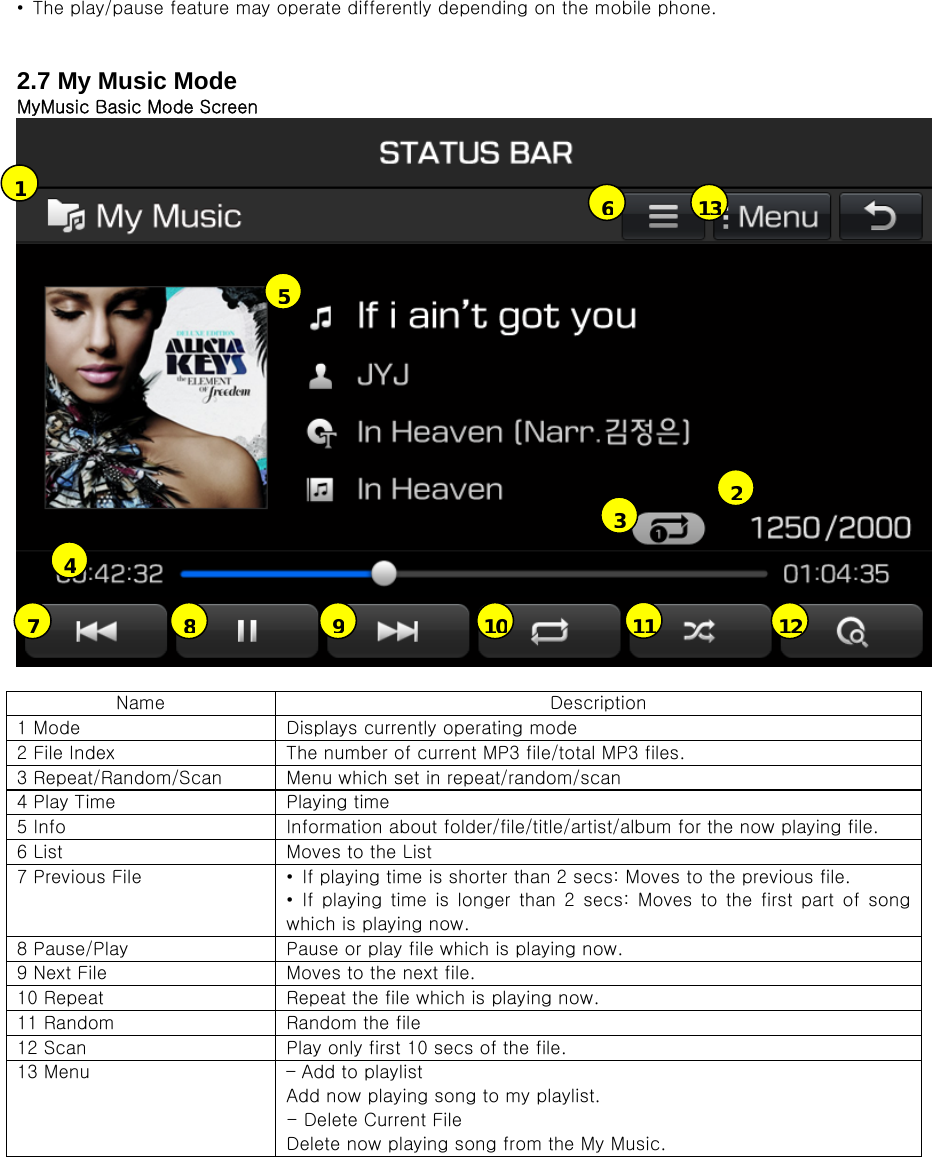
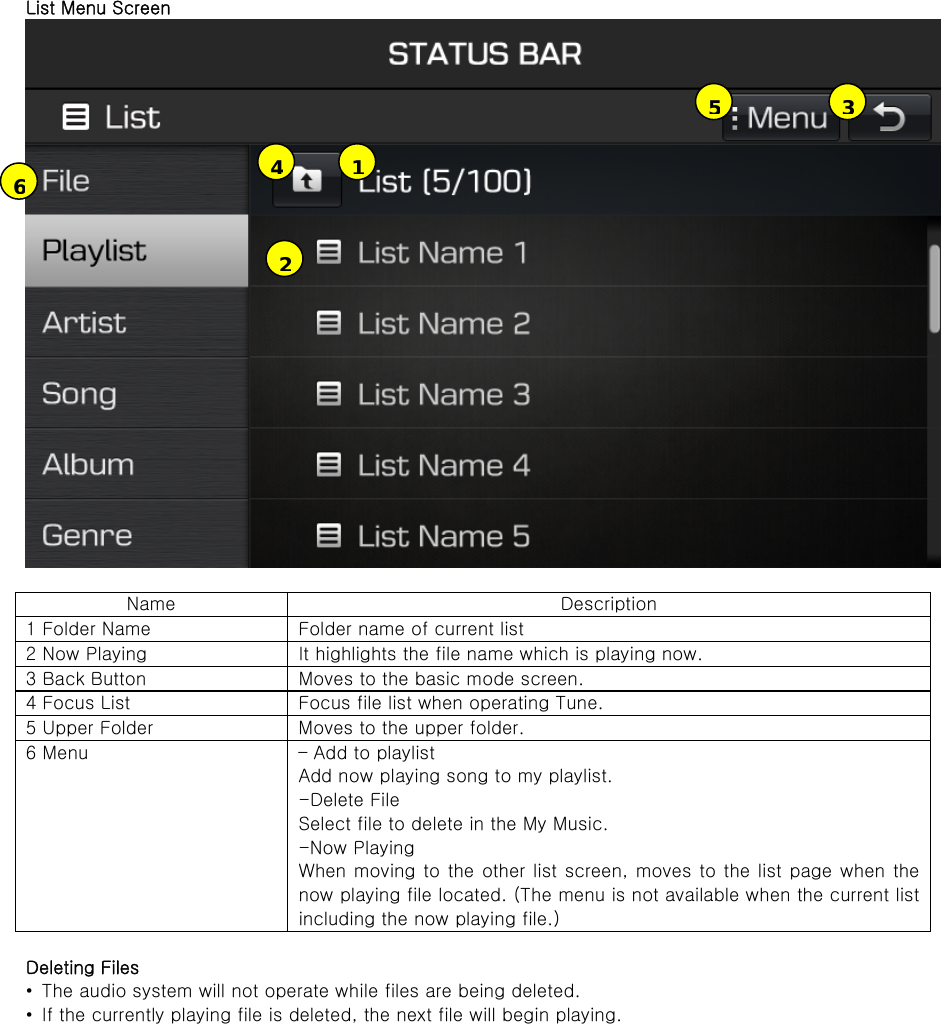
![Contents Before using ....................................................................................................... 4 1 Precaution for safe usage ............................................................................. 4 2 Component Names and Functions .................................................................. 4 2.1 Head Unit ............................................................................................ 4 2.2 Steering Wheel Remote Controller ......................................................... 5 First starting ....................................................................................................... 6 1 Turning the System On/Off ............................................................................ 6 1.1 Turning the System On ......................................................................... 6 1.2 Turning the System Off ......................................................................... 6 2 Resetting the System ................................................................................... 6 3 Battery Warning Message ............................................................................. 7 4 Auto Video Lock(Driving Regulations) ........................................................... 8 PART 1. About HOME screen ................................................................................. 9 Chapter 1. Menu structure in HOME screen ........................................................ 9 1.1 All Menus .......................................................................................... 10 1.2 My Menu ........................................................................................... 10 1.3 My Menu Settings .............................................................................. 11 PART 2. AV ....................................................................................................... 12 Chapter 1. Radio Mode .................................................................................. 12 Chapter 2. Media .......................................................................................... 14 2.1 CD Mode ........................................................................................... 15 2.2 MP3 CD Mode .................................................................................... 16 2.3. USB Mode ........................................................................................ 18 2.4 iPod Mode ......................................................................................... 22 2.5 AUX Mode ....................................................................................... 24 2.6 Bluetooth Audio Mode ........................................................................ 25 2.7 My Music Mode .................................................................................. 26 PART 3. Phone .................................................................................................. 28 Chapter 1. Before using Bluetooth.................................................................. 28 1.1 Guidance for how to use Bluetooth Handsfree ....................................... 28 1.2 Caution for Safety .............................................................................. 28 1.3 Caution for connecting Bluetooth Phone .............................................. 28 Chapter 2. Bluetooth Connection ................................................................... 29 2.1 Add a new device ............................................................................... 29 ▶2.1.1 Add a new device through selecting PHONE Key/CALL Key .......... 29 ▶2.1.2 Add a new device through Phone Settings .................................. 29 2.2 Connect a Bluetooth Device ................................................................ 29 2.2.1 Connect a device through selecting [PHONE]/[CALL] Key .............. 29 2.2.2 Connect a device through Phone Settings ..................................... 29 2.3 Disconnect Bluetooth device .............................................................. 30 2.4 Delete Bluetooth device ..................................................................... 30 Chapter 3. Bluetooth Phone ........................................................................... 30 3.1 Bluetooth Status Icon ......................................................................... 30 3.2 Make a call ........................................................................................ 31 3.3 Accept/Reject a call ........................................................................... 32 3.4 Controlling menu while calling ............................................................ 32](https://usermanual.wiki/HYUNDAI-MOBIS/AT240C2AN/User-Guide-2197874-Page-2.png)


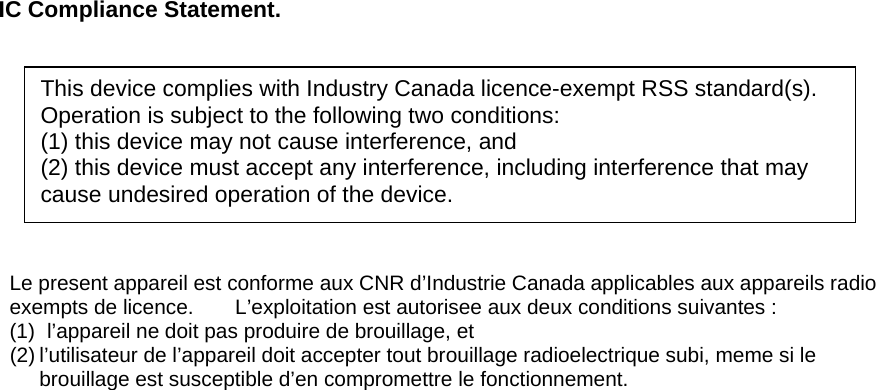
![Chapter 2. Bluetooth Connection 2.1 Add a new device ▶2.1.1 Add a new device through selecting PHONE Key/CALL Key Select [PHONE] key in the Headunit or [CALL] Key on the steering wheel. Select [Yes] Search Bluetooth device in the mobile phone and then pair it. Input the passkey or confirm pop-up. Connect Bluetooth ▶2.1.2 Add a new device through Phone Settings Select [SETUP] Key in the Headunit Select [Phone] Select [Bluetooth Connection] Select [Add New Device] Search Bluetooth device in the mobile phone and then pair it. Input the passkey or confirm pop-up. Connect Bluetooth Initial car name is XXXX, passkey is 0000. 2.2 Connect a Bluetooth Device 2.2.1 Connect a device through selecting [PHONE]/[CALL] Key Select [Phone] Select [Yes] Select the name of device you want to connect Connect Bluetooth 2.2.2 Connect a device through Phone Settings Select [SETUP] Key in the Headunit Select [Phone] Select [Bluetooth Connection] Select the name of device you want to connect Connect Bluetooth](https://usermanual.wiki/HYUNDAI-MOBIS/AT240C2AN/User-Guide-2197874-Page-29.png)
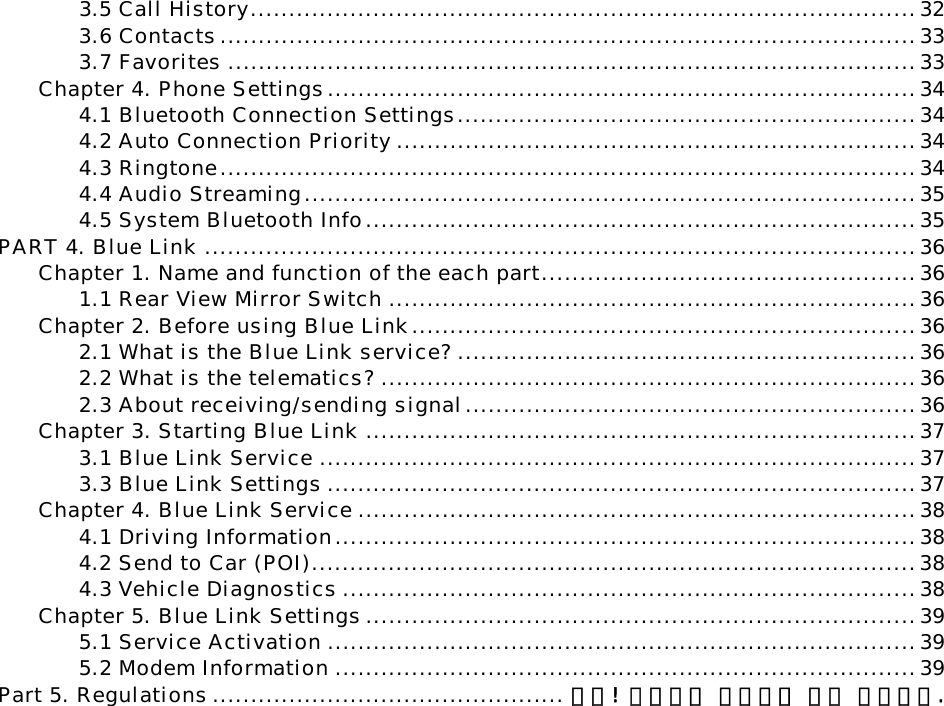
![2.3 Disconnect Bluetooth device Select [SETUP] Key in the Headunit Select [Phone] Select [Bluetooth Connection] Select the name of device you want to disconnect Disconnect Bluetooth 2.4 Delete Bluetooth device 헤드유닛 [SETUP]키 선택 [전화] 선택 [블루투스 연결 설정] 선택 [선택 삭제] 선택 삭제할 기기 이름 선택 [삭제] 선택 Chapter 3. Bluetooth Phone 3.1 Bluetooth Status Icon : Connection status with Bluetooth Handsfree : Connection status with Bluetooth Audio](https://usermanual.wiki/HYUNDAI-MOBIS/AT240C2AN/User-Guide-2197874-Page-30.png)
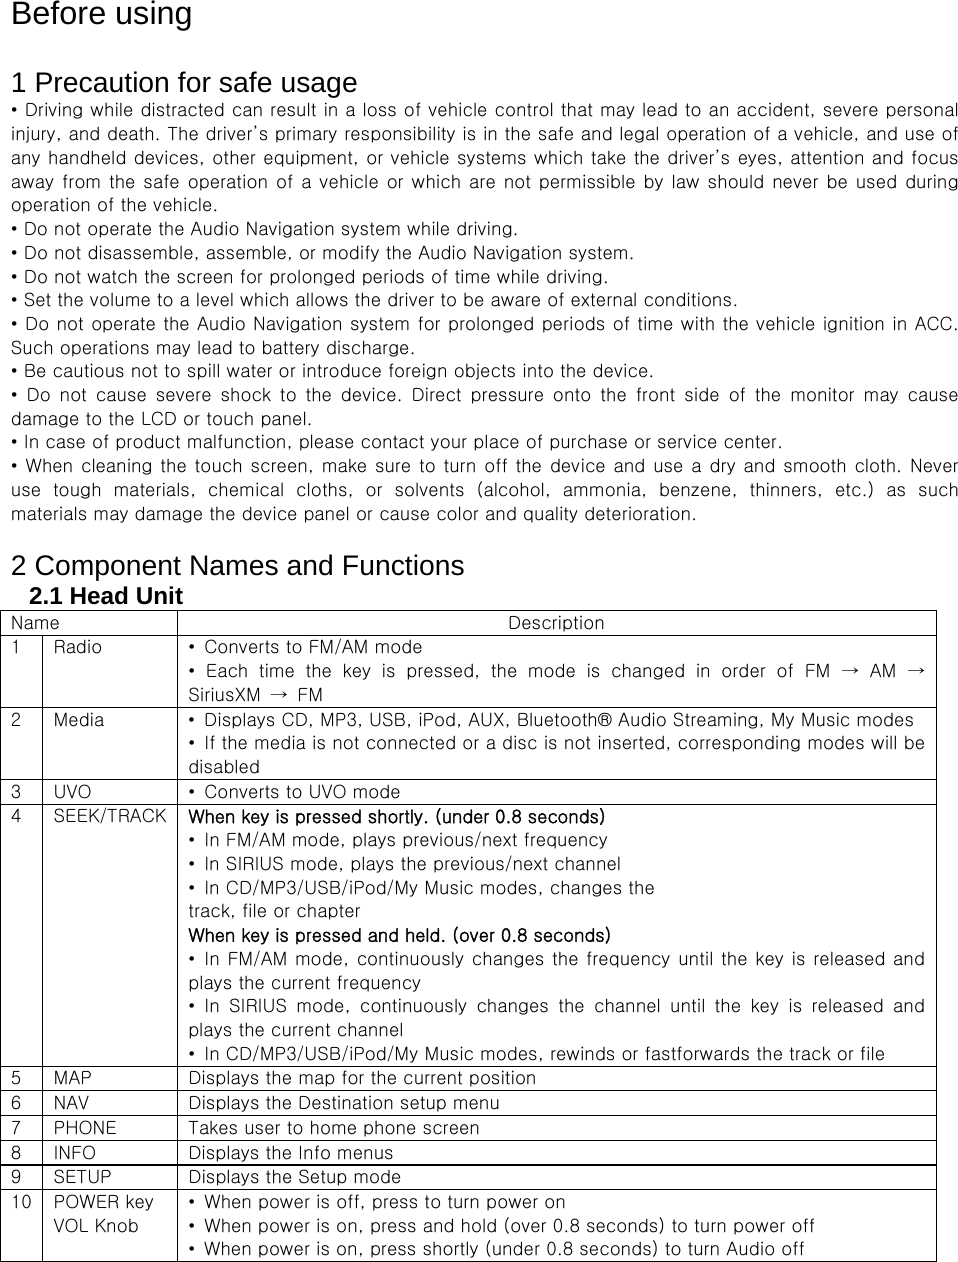
![: Connection status with both Bluetooth Handsfree and Audio : Calling signal sensitivity antenna : Remaining battery of the connected Bluetooth : Downloading status of call history : Downloading status of contacts : Calling status of Bluetooth Phone : Mute status of MIC 3.2 Make a call ▶ Connect with Bluetooth device Select [PHONE] key in the Headunit or[CALL] Key on the steering wheel. ▶ Connect with Bluetooth device Select [All Menus] in Home screen Select [Bluetooth Phone] 1. Keypad: Input numbers you want to call. After input speed number and then long press the last digit, you can call the number saved in the mobile phone as speed dial. 2. Delete: Delete numbers you did input. 3. Connection Settings: Moves to Bluetooth Connection Settings screen. 4. Call: If you select [Call] after inputting numbers, you can call. If there is call history, you can call to the recent number with selecting [Call] without inputting numbers.](https://usermanual.wiki/HYUNDAI-MOBIS/AT240C2AN/User-Guide-2197874-Page-31.png)
![3.3 Accept/Reject a call If you receive a call after Bluetooth Connection, the alert pop-up will be shown up. 1. Accept: Accept the call. 2. Reject: Reject the call. 3.4 Controlling menu while calling You can control below menus while calling. 1. Use Private: Switch call to mobile phone. 2. End: Calling will be terminated. 3. Contacts: Moves to contacts screen. 4. Outgoing Volume: Moves to Mic Volume Settings. 5. Keypad: Moves to screen for inputting ARS numbers. 6. Switch: Switch calling if there is a holding call. A call will also be switched with selecting number in the information screen. 3.5 Call History Connect a Bluetooth Device Select [PHONE] key in the Headunit Select [Call History] 1. Received Calls: List for received calls. 2. Dialed Calls: List for dialed calls. 3. Missed Calls: List for missed calls. 4. Call History List: It shows call history information. If select the list, call to selected number.](https://usermanual.wiki/HYUNDAI-MOBIS/AT240C2AN/User-Guide-2197874-Page-32.png)
![5. Information: It shows the call history information in detail. 6. Download: Download call history from the mobile phone. 7. Delete Items: Delete selected items from the call history. 8. Delete All: Delete all the call history. 9. Call: Call to the recent call. 10. Contact Info: If the number saved in the system, moves to detail information. 11. Delete: Delete the recent call information 3.6 Contacts Connect with Bluetooth device Select [PHONE] key in the Headunit Select [Contacts] 1. Contact List: It shows the information of contact. If it is selected, call to the selected number. 2. Information: It shows detail information of contact. 3. Download: Download contacts from the mobile phone. 4. Search by Name: Search the contact by Name. 5. Search by Number: Search the contact by Number. 6. Add to Favorites: Add the contact to the favorites. 3.7 Favorites Connect with Bluetooth device Select [PHONE] key in the Headunit Select [Favorites] 1. Favorites List: It shows the information for the contact added to the favorites. If it is selected, call to the selected number. 2. Add New: Add new number to the favorites. 3. Delete Selected Items: Delete selected items in Favorites. 4. Delete All: Delete all favorites.](https://usermanual.wiki/HYUNDAI-MOBIS/AT240C2AN/User-Guide-2197874-Page-33.png)
![Chapter 4. Phone Settings 4.1 Bluetooth Connection Settings ▶ Select [PHONE] key in the Headunit Select [Phone] Select [Bluetooth Connection] ▶ Connect with Bluetooth device Select [PHONE] key in the Headunit Select [Bluetooth Connection] ▶ Connect with Bluetooth device Select [All Menus] in Home screen Select [Bluetooth Phone] Select [Bluetooth Connection] 1. Paired Devices List: It shows Bluetooth Devices paired. You can connect or disconnect selected device. 2. Bluetooth Audio connection status: If Bluetooth Audio is connected, the icon is activated. 3. Bluetooth Handsfree connection status: If Bluetooth Handsfree connected, the icon is activated. 4. Add New: Add a new Bluetooth device. 5. Delete Items: Select the devices and delete. 6. Delete All: Delete all paired devices. 7. Help: Moves to help screen showing how to pair a Bluetooth device. 4.2 Auto Connection Priority Select [Setup] key in the Headunit Select [PHONE] Select [Auto Connection Priority] When ignition on, connect to the Bluetooth device automatically. If connection to the selected device failed, it will connect previous connected device. If also failed to connect to the previous device, it will connect to registered devices automatically. 4.3 Ringtone Select [Setup] key in the Headunit Select [PHONE] Select [Ringtone]](https://usermanual.wiki/HYUNDAI-MOBIS/AT240C2AN/User-Guide-2197874-Page-34.png)
![1. Use Mobile Ringtones: When receive a call, the ringtone being set in the mobile phone will output through car’s speakers. If the mobile phone does not support, the basic ringtone in the system will output. 2. Use System Ringtones: The ringtone being set in the system will output. 3. Settings: Change the ringtone. 4. Ringtone Name: Choose the ringtone you want. 5. Song Previews: If select it, song preview is available. 4.4 Audio Streaming Select [Setup] key in the Headunit Select [PHONE] Select [Audio Streaming] If you set Audio Streaming on, you can listen to the music from the mobile phone. If you set Audio Streaming Off, you can not use this function. This function may not be supported, it depends on mobile phone 4.5 System Bluetooth Info Select [Setup] key in the Headunit Select [PHONE] Select [System Bluetooth Info] 1. Device Name: You can change the name of car. 2. Passkey: You can change passkey which is used when pair a new device. The initial passkey is 0000. 3. Default Settings: Delete All Paired Devices, Default Bluetooth Settings can be available. If default Bluetooth, delete all paired devices and reset to the factory settings.](https://usermanual.wiki/HYUNDAI-MOBIS/AT240C2AN/User-Guide-2197874-Page-35.png)
![PART 4. Blue Link Chapter 1. Name and function of the each part 1.1 Rear View Mirror Switch Items Contents [Blue Link] Blue Link Center • Call to the Center agents • If re-select it while calling to the center agents, the call will be terminated. Google Search (Voice Recognition) Search Points of Interest in Google map by voice recognition SOS(Emergency Rescue Center) • In case of car accident, injury, car broken, you can ask emergency rescue. • If select SOS Key, connect to the Blue Link Emergency Rescue Center • If re-select SOS Key, connection will be terminated. Chapter 2. Before using Blue Link 2.1 What is the Blue Link service? The Blue Link service is telematics service provided by KIA. Not only It based on high-technology IT system, but also it provides safety, security, diagnostics, remote control and connection with smart phone so that you can enjoy and feel convenient while you driving. You will enjoy smart driving life with Blue Link eServices. 2.2 What is the telematics? The telematics combines Telecommunication and informatics. Through system built in the car, it analyzes various symptoms and driving status, so it can provide variety information to the driver. Therefore the drivers can drive safely and conveniently. 2.3 About receiving/sending signal Blue Link phone, Connect to the Blue Link Center and wireless data transfer might be influenced in below areas. You can check receiving/sending signal status as referring to the status is shown in the Blue Link phone screen.](https://usermanual.wiki/HYUNDAI-MOBIS/AT240C2AN/User-Guide-2197874-Page-36.png)
![We recommend you use Blue Link system when the antenna signal ( ) is higher than 4. Some areas might be influenced by receiving/sending signal so that the use of Blue Link eServices is limited. • Tunnel • Mountain or forest • Road closed to cliff • Buildings concentrated in areas • Highway or under the bridge • Inside building Chapter 3. Starting Blue Link In general, Blue Link menu consists of Blue Link Service, Blue Link Call, Blue Link Settings and each menu is described in below. 3.1 Blue Link Service Select [Blue Link] key in the Headunit 1. Driving Information: Driving Time/Idle Time, Acceleration/Deceleration Distribution, Speed Distribution and Mileage information can be checked. 2. Send to Car(POI): You can check POI information which is sent from Center agent, Webpage and Smart Phone. 3. Vehicle Diagnostics: Diagnose the car and then you can receive the result of the diagnosis. 4. Blue Link Settings: You can activate the service and check the modem information. 3.3 Blue Link Settings ▶ Select [Blue Link] key in the Headunit ▶ Select [All Menus] in Home screen Select [Setup] Select [Blue Link]](https://usermanual.wiki/HYUNDAI-MOBIS/AT240C2AN/User-Guide-2197874-Page-37.png)
![1. Service Activation: You can activate the service via accessing Center. 2. Modem Information: You can check phone number, USIM and IMEI information. Chapter 4. Blue Link Service 4.1 Driving Information Select [Blue Link] key in the Headunit Select [Blue Link] [Driving Information] You can use it when ignition on after parking. [Update] If select it, driving information can be updated. 4.2 Send to Car (POI) Select [Blue Link] key in the Headunit Select [My Destination] 1. Point of Interest: It shows received POI list. 2. Delete Selected Items: Select POI and delete it. 3. Delete All: Delete all POI list. 4. Call: Call to POI. 5. Show Map: POI will be shown on the map. 6. Previous/Nest: It shows previous or next POI information. You can check POI information which received from Google, Bing, Smart Phone, Blue Link Website and Blue Link Center agent. POI can be saved maximum 50 lists, if the storage is full, it delete the recently saved POI automatically. Registering Blue Link service is required to use My Destination. 4.3 Vehicle Diagnostics Select [Blue Link] key in the Headunit Select [Vehicle Diagnostics]](https://usermanual.wiki/HYUNDAI-MOBIS/AT240C2AN/User-Guide-2197874-Page-38.png)
![1. Blue Link Center: You can call to Center agent then you can check which part is malfunction. You can have diagnosis service in only parking since some functions not be controlled in driving. If try to change screen while diagnosis, the diagnosis will be canceled. You need to register Blue Link service for receiving malfunction information in detail. You can ask questions or apply repair service via Blue Link Center agent. Chapter 5. Blue Link Settings 5.1 Service Activation ▶ Select [SETUP] Select [Blue Link] Select [Service Activation] ▶ Select [Blue Link] key in the Headunit Select [Blue Link Settings] Select [Service Activation] 5.2 Modem Information ▶ Select [SETUP] Key in the Headunit Select [Blue Link] Select [Modem Information] ▶ Select [Blue Link] key in the Headunit Select [Blue Link Settings] Select [Modem Information] 1. IMEI: It shows identity number of the mobile phone.](https://usermanual.wiki/HYUNDAI-MOBIS/AT240C2AN/User-Guide-2197874-Page-39.png)