HYUNDAI MOBIS AV140A5AN CAR AVN User Manual
HYUNDAI MOBIS CO., LTD. CAR AVN
Users Manual

DIGITAL NAVIGATION SYSTEM
User
'
s Manual
DIGITAL NAVIGATION SYSTEM
User's Manual
Thank you for purchasing this Audio
Navigation System.
This user's manual explains how to use
the Hyundai Motor Audio Navigation
System.
Before using the product, read the
contents of this user's manual carefully
and use this product safely.
● The screens shown in this manual
may differ with the actual screens of
the product.
●
#
The design and specification of this
product may change without prior
notification for product improvement.
● When transferring the vehicle to
another individual, include this user's
manual so that the next driver can
continue its use.
iPod®
iPod® is a registered trademark of Apple
Inc.
Bluetooth®
The Bluetooth® word mark and logos are
registered trademarks owned by
Bluetooth SIG, Inc. and any use of such
marks by Hyundai is under license.
A Bluetooth® enabled cell phone is requi-
red to use Bluetooth® wireless technology.
Bluetooth® phone compatibility can be
checked by visiting www.hyundaiusa.com
and under the SERVICE & PARTS –
BLUETOOTH COMPATIBILITY menu.
●
Areas that can be checked – 9 areas,
such as Pairing, Connection, Handsfree
Calling, Streaming, etc.
HD Radio™ Technology (if equipped)
HD Radio Technology manufactured
under license from iBiquity Digital
Corporation. U.S. and Foreign Patents.
HD Radio™ and the HD, HD Radio, and
“Arc” logos are proprietary trademarks
of iBiquity Digital Corp.
Preface
All Map Database cannot be copied without permission.
This is protected by U.S. copyright laws. All rights not expressly granted are reserved.
You may not otherwise reproduce, modify, and distribute the content without M&Soft, Inc's prior written consent.

PRE-OVERVIEW
1-1
PRE-OVERVIEW
PART 1
PRE-OVERVIEW
Introduction ……………………… 1-2
Important information about this manual 1-2
Precaution for safe usage ………………1-2
Controller and functions ……… 1-3
Control panel ……………………………1-3
Steering wheel remote controller ………1-5
HVAC System ……………………………1-6
Room Mirror ……………………………1-7
Basic operation and setting …… 1-9
System Power ON ……………………1-9
Turning the Power ON …………………1-9
Turning the Power OFF …………………1-9
Turning the Audio ON/OFF ……………1-9
Adjusting audio volume ……………… 1-10
How to operate the screen menu …… 1-10
Operating typical screen menu …… 1-10
Inputting letter by using screen
keyboard …………………………… 1-10
Displaying the list ………………… 1-10
Selecting an item in a list ………… 1-11
Sorting items from list …………… 1-11
Conditions for voice recognition
system ……………………………… 1-11
How to operate menu by voice
command …………………………… 1-11
Sound setting ………………………… 1-12
Giving voice command …………… 1-12
FAD/BAL …………………………… 1-12
BASS/MID/TREB …………………… 1-13
Auto volume control ON/OFF …… 1-13
Touch screen beep ON/OFF ……… 1-13
Operating Variable EQ …………… 1-13
Variable EQ Setup (Optional) ………… 1-13
Display mode ……………………… 1-14
Brightness ………………………… 1-14
Display OFF ……………………… 1-14
Display ON ………………………… 1-14
Display setting ……………………… 1-14
Viewing Current Time ………………… 1-14
Display Photo Frame ……………… 1-15
Setting the Clock …………………… 1-15
Setting Display OFF ………………… 1-15
PART 1 PRE-OVERVIEW
1-2 PRE-OVERVIEW
Introduction
Important information about this
manual
This user manual contains instructions related
to safety. Closely observe and comply with all
of the safety instructions found within this
manual.
WARNING !
Disobeying the warnings listed within this
user's manual may cause fatal or serious inju-
ries. Warnings indicate matters which may
directly lead to accidents.
CAUTION!
Disobeying the cautions listed within this user
manual may lead to accidents or cause injury.
Cautions indicate matters which may lead to
vehicle damage or malfunction.
INFORMATION
Information which the user must be aware or
allows for more convenient use of the device.
Precaution for safe usage
WARNING !
●
Driving while distracted can result in a loss of
vehicle control, that may lead to an accident,
severe personal injury, and death. The driver’s
primary responsibility is in the safe and legal
operation of a vehicle, and use of any handheld
devices, other equipment, or vehicle systems
which take the driver’s eyes, attention and
focus away from the safe operation of a vehicle
or which are not permissible by law should
never be used during operation of the vehicle.
●
Do not operate the Audio Navigation system
while driving.
●
Do not disassemble, assemble, or modify the
Audio Navigation system.
●
Do not watch the screen for prolonged peri-
ods of time while driving.
●
Set the volume to a level which allows the
driver to be aware of external conditions.
CAUTION!
●
Do not operate the Audio Navigation system
for prolonged periods of time with the vehi-
cle ignition in ACC. Such operations may
lead to battery discharge.
●
Be cautious not to spill water or introduce
foreign objects into the device.
●
Do not cause severe shock to the device.
Direct pressure onto the front side of the
monitor may cause damage to the LCD or
touch panel.
●
In case of product malfunction, please con-
tact your place of purchase or service center.
●
When cleaning the touch screen, make sure to
turn off the device and use a dry and smooth
cloth. Never use tough materials, chemical
cloths, or solvents (alcohol, ammonia, ben-
zene, thinners, etc.) as such materials may
damage the device panel or cause color and
quality deterioration.
Reference Page
This indicates the title and page that you
should refer to.
This indicates a key on the control panel.
Voice Command
This indicates an operation by voice command.
PRE-OVERVIEW
1-3
PRE-OVERVIEW
SEEK/TRACK Up/Down
●SHORT KEY(less than 0.8 second)
• FM/AM Mode : automatically searches for
the previous or next broadcast frequency
and starts playing.
• XM Mode : receives the previous or next
channel.
• CD Mode : plays the previous or next track.
• MP3, USB Mode : Plays the previous or
next file.
• iPod Mode : plays the previous or next song.
●
LONG KEY(over 0.8 second)
• FM/AM Mode : quickly moves through the
frequencies while the button is pressed.
Once released, automatically searches for
broadcasts which can be received.
• XM Mode : quickly moves to the previous
or next channel.
• CD Mode : REW/FF the current playing
track.
MEDIA
Each press will change the bands in the fol-
lowing order: DISC(CD, MP3)
ĺ
(USB or iPod)
ĺ
(AUX)
ĺ
(Phone Music)
ĺ
DISC(CD, MP3)...
FM/AM
Each press will change the bands in the fol-
lowing order: FM1
ĺ
FM2
ĺ
AM
ĺ
FM1 ...
XM
Each press will change the bands in the fol-
lowing order: XM1
ĺ
XM2
ĺ
XM3
ĺ
XM1 ...
Power / Volume control knob
●
Push knob (over 0.8 second) : turns the
power off.
●
Push knob (under 0.8 second) : each time the
knob is pressed, the Audio is turned on and off.
●
Tune knob : the range of volume adjustment
is between 0 ~ 35.
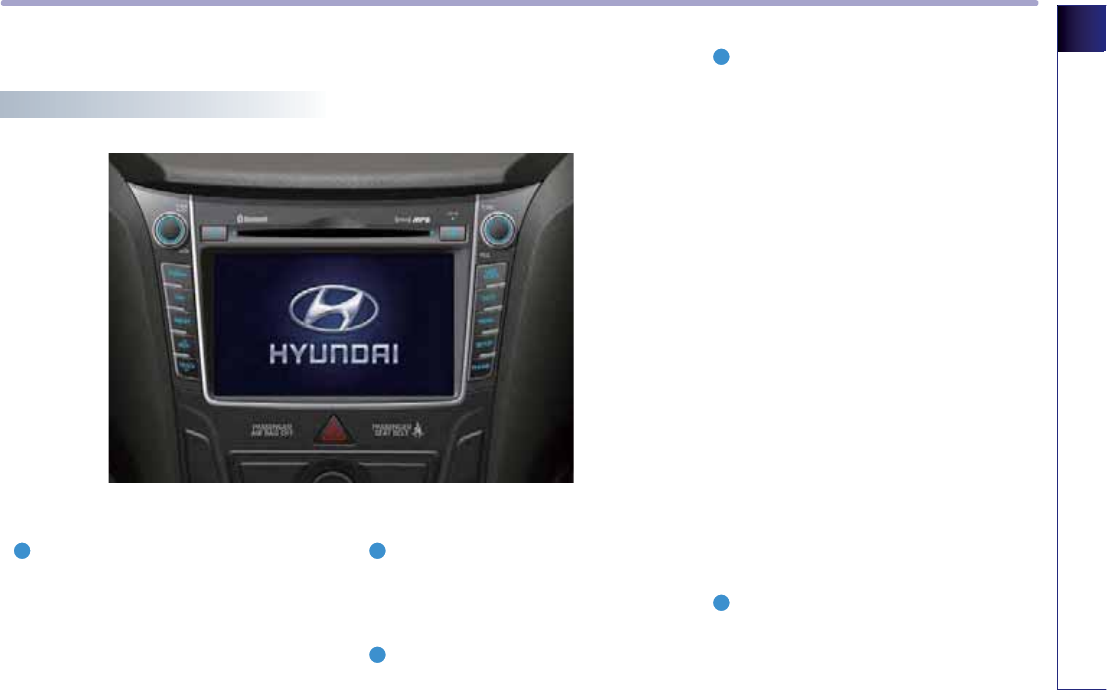
Controller and functions
Control panel

PART 1 PRE-OVERVIEW
1-4 PRE-OVERVIEW
• MP3, USB Mode : REW/FF the current play-
ing file.
• iPod Mode : REW/FF the current playing
song.
PHONE
Displays the Bluetooth® handsfree screen.
INFO
Display the Blue Link® screen.
MAPVOICE
Displays the map screen for the current posi-
tion.
ROUTE
Displays the Route menu screen.
DEST
Displays the displays setting screen.
TUNE
●
FM/AM Mode : push the key to search for
the desired frequency. Press the key to
receive the selected frequency.
●
XM Mode : push the key to search for the
desired channel. After a brief moment, the
selected channel will be displayed.
●
CD Mode : push the key to search for the
desired track. Press the key to play the
selected track.
●
MP3, USB Mode : push the key to search
for the desired file. Press the key to play
the selected file.
●
iPod Mode : push the key to search for the
desired song. Press the key to play the
selected song.
SETUP
Displays the Setup menu screen.
ENTER
Completes the command.
RESET
Resets the system - if software locks-up.
INFORMATION
If pressing the power off knob for over 0.8 sec-
ond and the system does not shut down, and
carefully use and insert a straightened paper
clip at the access hole shown next to the right
DISC indicator LED to reset the software.
The system power will shut-off and restart.
Clock
●Short Key (under 0.8 second)
• When the screen is turned on : displays
the current time in the center of the
screen.
• When the screen is turned off : turns the
full clock screen on and off.
●Long Key (over 0.8 second)
• Displays the clock setting screen.
DISC eject
Ejects the inserted disc.
DISC insert indicator LED
Displays whether a DISC has been inserted.

PRE-OVERVIEW
1-5
PRE-OVERVIEW
Steering wheel remote controller
MODE
Each time the Mode key is pressed, the mode
changes in the following order: FM1
ĺ
FM2
ĺ
AM
ĺ
XM1
ĺ
XM2
ĺ
XM3
ĺ
(DISC)
ĺ
(USB or iPod)
ĺ
(AUX)
ĺ
(Phone Music)
ĺ
FM1 ...
If an unsupported DISC is inserted, if there is
no disc, or if an external device (e.g. iPod, USB
memory stick, etc.) has not been connected,
the mode will not be recognized and auto-
matically switch to the next mode.
●
Press this key for over 0.8 second to turn the
Audio ON and OFF.
●
Press this key when the Power is turned off
to turn the power on.
Volume Up/Down
Increases or decreases the volume within a
range between 0 ~ 35. Volume for navigation
and voice guidance can be adjusted in the
setup mode.
Seek Up/Down
●SHORT KEY(less than 0.8 second)
• FM/AM : receives the previous or next pre-
set frequency.
• XM Mode : receives the previous or next
preset channel.
• CD Mode : plays the previous or next
track.
• MP3, USB Mode : plays the previous or
next file.
• iPod Mode : plays the previous or next
song.
●
LONG KEY(Over 0.8 second)
• FM/AM Mode : quickly moves through the
frequencies while the key is pressed.
Once released, automatically searches for
broadcasts which can be received.
• XM Mode : quickly moves to the previous
or next channel.
• CD Mode : REW/FF the current playing track.
• MP3, USB Mode : REW/FF the current play-
ing file.
• iPod Mode : REW/FF the current playing
song.
Voice Recognition
Starts Voice Recognition.
CALL
Press this key to receive an incoming call. If
pressed while in Audio/Navigation mode, the
Bluetooth® handsfree screen will be displayed.
END
Press this key to reject an incoming call.
If pressed while on a call, then the call will be
terminated.
PART 1 PRE-OVERVIEW
1-6 PRE-OVERVIEW
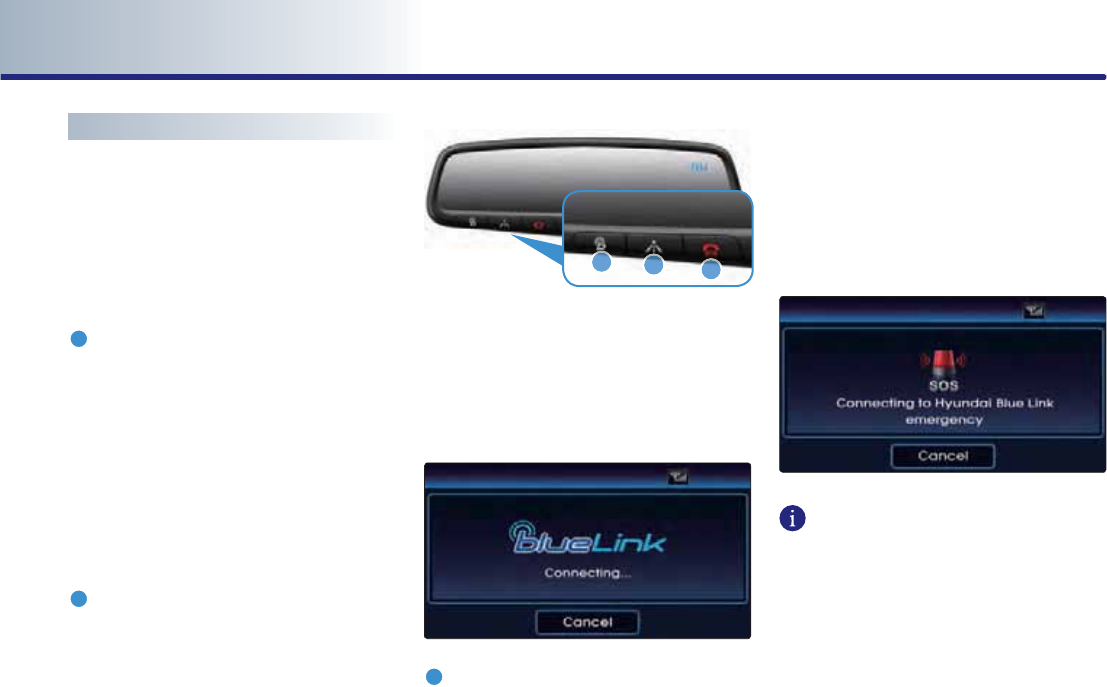
Room Mirror
Selecting the room mirror key allows you to
make service related inquiries, POI info
searches, and manual rescues by connecting
to the Blue Link Center. Such features can be
used only after subscribing to the Blue Link
service.
Blue Link Center
Makes requests for Blue Link service related
inquiries and consultations.
Upon selecting this key, you will be connected
to the Blue Link Center service operator.
Re-pressing the key will end the call.
This feature does not operate when you are
on a Bluetooth phone call or when in the cam-
era screen.
Blue Link for POI
Makes requests for desired POI (point of inter-
est) information, such as Gas Stations,
Restaurants, etc.
Upon selecting this key, you will be connected
to IVR-POI. Re-pressing the key will end the
call.
The incoming POI information can be checked
at INFO>Downloaded POI.
This feature does not operate when you are on a
Bluetooth phone call or when in the camera
screen.
Blue Link for SOS
Places request to Blue Link center for assis-
tance in cases of vehicle abnormality or when
requiring manual rescue.
Upon selecting the key, you will be connected
to the Blue Link Center Emergency Rescue
Center. Re-pressing the key will end the call.
If you are on a Bluetooth phone call, the call
will end and you will be connected to the Blue
Link Emergency Rescue Center.
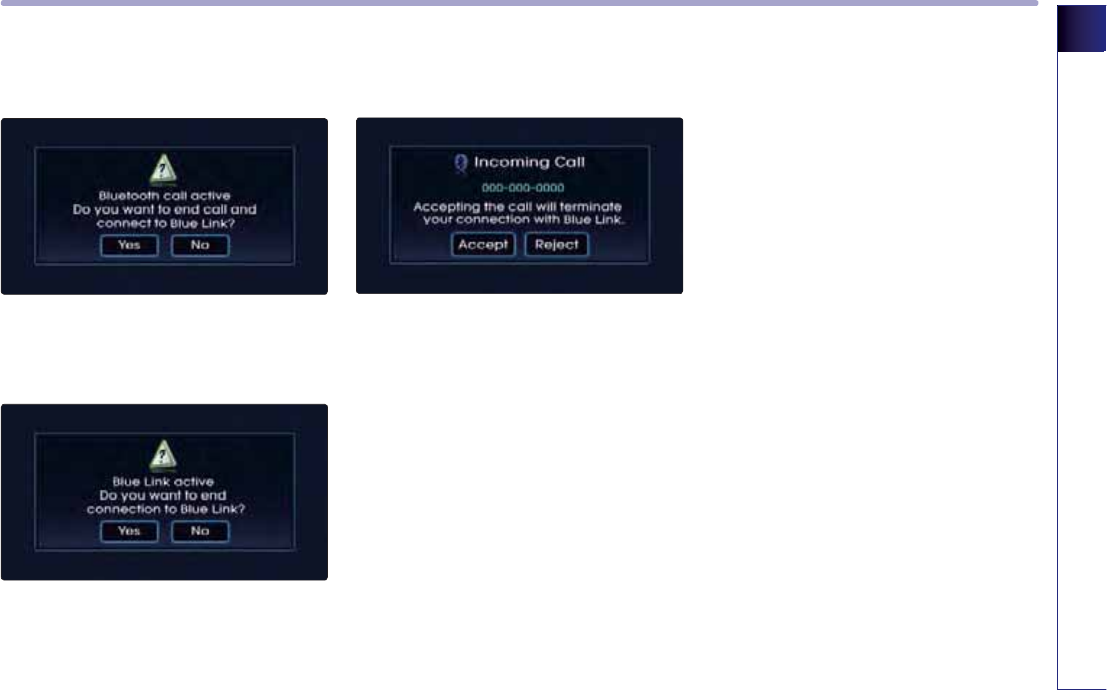
INFORMATION
You cannot talk on the Bluetooth phone and
Blue Link phone simultaneously. When talking
on either the Bluetooth® or Blue Link phone
and you place or receive a call on the other
phone, the following screen is displayed.
PRE-OVERVIEW
1-7
PRE-OVERVIEW
When connecting a Blue Link call while
on a Bluetooth call
When connecting a Bluetooth call while
on a Blue Link call
When receiving a Bluetooth call while on
a Blue Link call
PART 1 PRE-OVERVIEW
1-8 PRE-OVERVIEW
Basic operation and setting
Turning the Power ON
1.
Turn the ignition key onto ACC or ON. If the
system power had been on when the igni-
tion was turned off, the system will turn
back on automatically.
2.
If the system power had been off when the
ignition was turned off, the system will
remain off. In this case, press the
32:(5
knob to turn on the system power.
System Power ON
INFORMATION
As system booting starts from the point the
door lock is unlocked, the device may com-
plete booting before the ACC is turned on or
the
32:(5
knob is pressed.
Consequently, the booting screen may not be
displayed upon initially turning on the system
power.
3.
Once system booting is complete, the most
recent operated mode will be displayed. For
example, turning on the system will display
FM1 radio mode if the last operated mode
prior to turning off the system had been
FM1 radio mode.
Turning the Power OFF
If the
32:(5
knob is pressed for over 0.8
second, a beep will sound and the system
power will be turned off.
Turning the Audio ON/OFF
Press the
32:(5
knob for under 0.8 second
with the system power on to turn the Audio
on and off.
Voice Command
1. Press the key on the steering wheel
remote controller.
2. After the beep sound, say a command.
"Audio On"
"Audio Off"
INFORMATION
Conducting the following operations while
the AUDIO is off will automatically turn on the
Audio system.
●
Pressing the Audio related keys (
)0$0
,
;0
,
0(',$
).
●
Inserting a DISC or connecting an external
device.
PRE-OVERVIEW
1-9
PRE-OVERVIEW
Adjusting audio volume
Turn the
32:(5
knob in clockwise direction
to increase the volume and counter-clockwise
to decrease the volume.
INFORMATION
●
The range of volume adjustment is between
0 ~ 35.
●
Adjustments to the volume cannot be made
while the AUDIO is turned off.
How to operate the screen menu
Operating typical screen menu
●
If a menu button on the screen is pressed,
the corresponding function will begin oper-
ation.
●
The same menu button may perform differ-
ent functions depending on the length of
time the button is pressed (under 0.8 sec-
onds or over 0.8 second). For more informa-
tion, refer to the specific function within this
user manual.
● The current operated button will be high-
lighted upon display.
●
Buttons which cannot be operated under
the current conditions will be displayed in
disabled state. Pressing a disabled button
will not perform any operation.
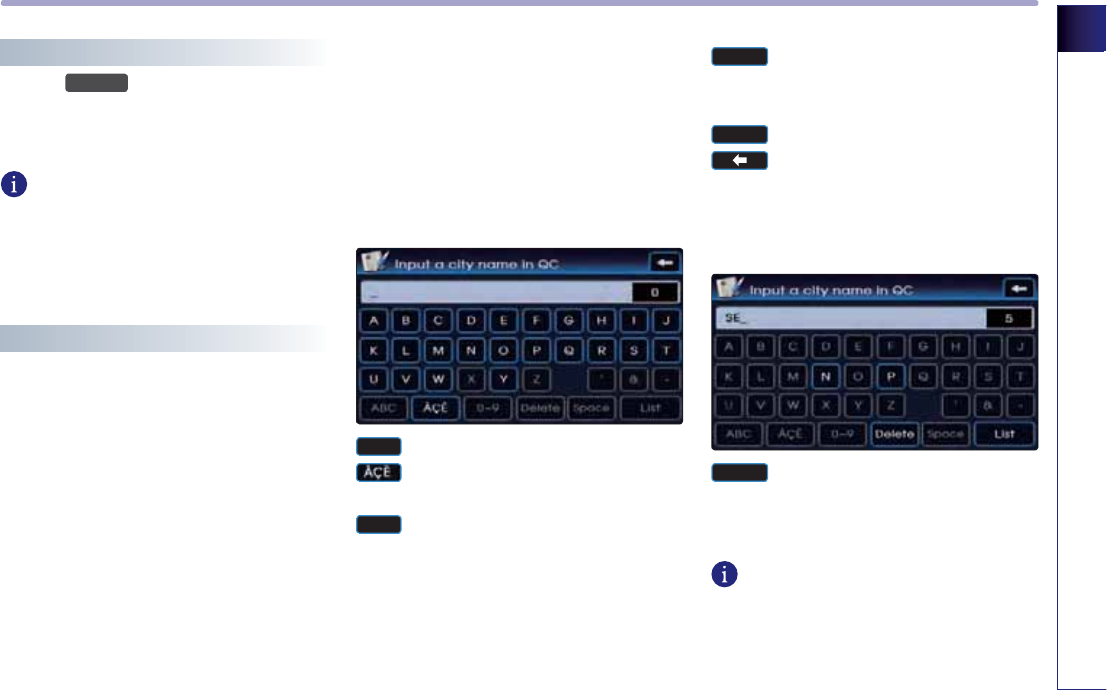
Inputting letter by using screen
keyboard
$%&
: Displays the English alphabet keypad.
: Displays the French alphabet keypad.
(if available)
: Displays the number and symbol key-
pad.
'HOHWH
: Deletes the previously inputted letter.
Pressing for over 0.8 second will delete
all content.
'RQH
: The input is completed.
: Restores to previous screen. The
inputted text will not be saved.
Displaying the list
/LVW
: Even if input is not complete, the cur-
rent matching items from the data-
base will be displayed.
INFORMATION
The number at the upper-right side of the
screen displays the number of current matches.
PART 1 PRE-OVERVIEW
1-10 PRE-OVERVIEW
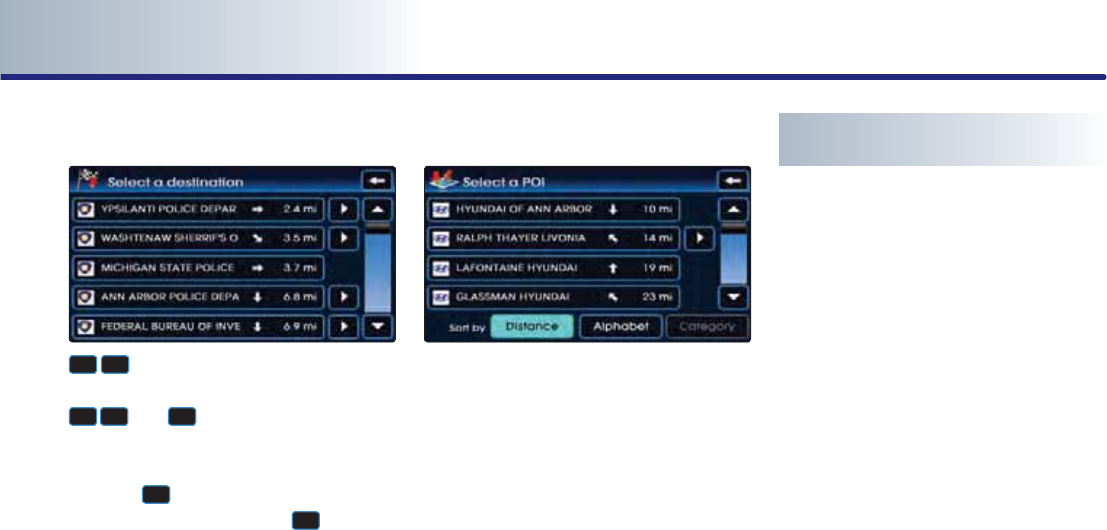
Selecting an item in a list
▲
▼: Moves to the next page or previous
page.
Ԣ
Ԧ
:
The
Ԣ
button will be displayed if
the text is too long to be displayed in
one button.
Press the
Ԣ
button to move the cursor to
the end of the text. Press the
Ԧ
button to
move the cursor to the front of the text.
Sorting items from list
Select the desired sorting method to reorga-
nize the list in accordance to the selected
method.
How to operate menu by voice
command
Conditions for voice recognition system
Most of the functions within the Audio and
Navigation system can be operated by voice.
Please follow the instructions below for opti-
mal voice recognition performance.
●
Close all windows and the sunroof. The
voice recognition can be improved when in
a quiet environment.
●
Press the voice recognition button and say
the desired voice command after the sound
of the beep.
●
The microphone is positioned above the
driver so that voice commands can be said
while maintaining a proper posture.
●
Pronounce the voice commands naturally
and clearly as if in normal conversation.
PRE-OVERVIEW
1-11
PRE-OVERVIEW
Giving voice command
1.
Press the key on the steering wheel
remote controller.
A voice command window will be displayed
on the lower side of the screen followed by
a "Command please" system voice com-
ment.
2.
Once the icon changes into the icon
on the pop-up screen with a beep sound,
say the desired voice command.
[Voice command list], page 5-6.
[ Searching a destination by voice com-
mand], page 5-19.
INFORMATION
Press the key shortly to input the desired
voice command. The system voice instruction
comment will immediately terminate. When
the icon changes into the icon with a
beep sound, it is possible to input voice com-
mands.
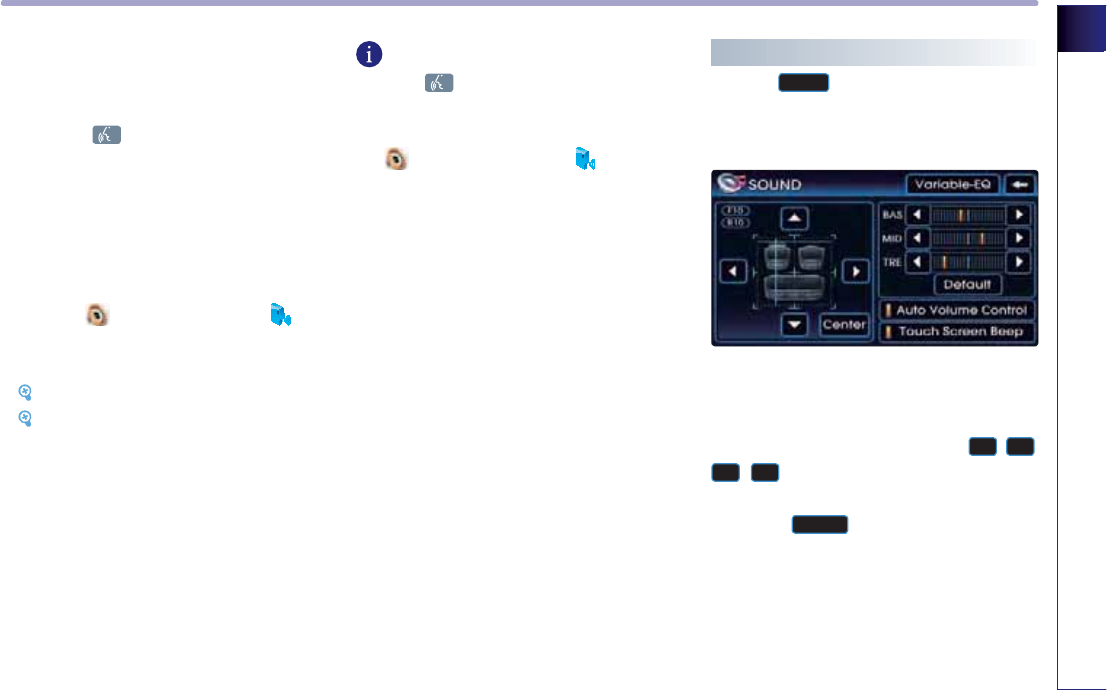
Sound setting
Press the
6RXQG
button on the main screen of
each Audio mode (FM/AM, XM, CD, MP3, USB,
iPod) to display the Sound setting screen.
FAD/BAL
The position of the sound can be adjusted by
using the up-down and left-right (
▲
,
▼
,
▶
,
◀
) buttons on the left side of the
screen.
Press the
&HQWHU
button to position the
sound in the center of the vehicle.
PART 1 PRE-OVERVIEW
1-12 PRE-OVERVIEW
BASS/MID/TREB
The BASS/MID/TREB can be adjusted by using
the left/right buttons (
◀
,
▶
) of each con-
trol.
Auto volume control ON/OFF
Each time the
$XWRYROXPHFRQWURO
button is
pressed, the Auto volume control function is
turned on or off.
INFORMATION
The Auto Volume Control is a function which
automatically adjusts the volume level in
accordance to changes in vehicle speed.
Touch screen beep ON/OFF
Each time the
7RXFKVFUHHQEHHS
button is
pressed, the beeping sound that follows each
press on the screen will turn on or off.
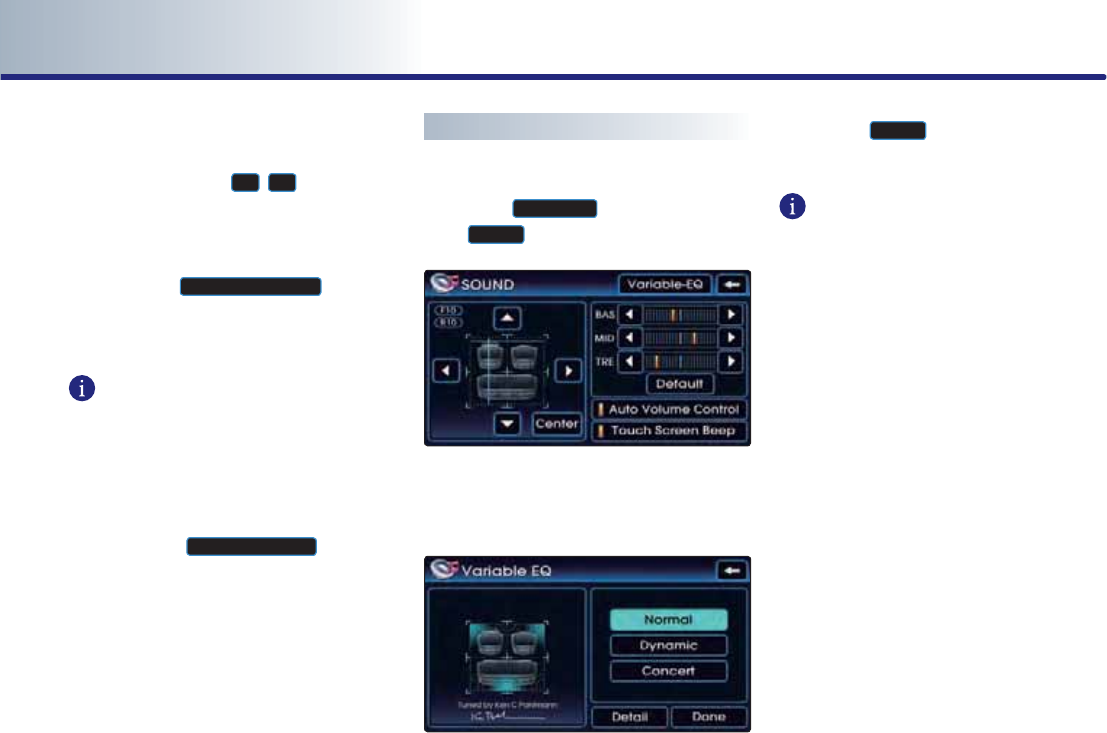
Variable EQ Setup (Optional)
Operating Variable EQ
1.
Press the
9DULDEOH(4
button at the top of
the
6RXQG
screen.
2.
Within the <Variable EQ> screen, three
types of EQ setups such as Normal,
Dynamic, Concert can be selected.
3.
Press the
'HWDLO
button to view specific
information on the three EQ settings.
INFORMATION
The Variable EQ feature may not be supported
in some vehicle models and tuner mode.
PRE-OVERVIEW
1-13
PRE-OVERVIEW
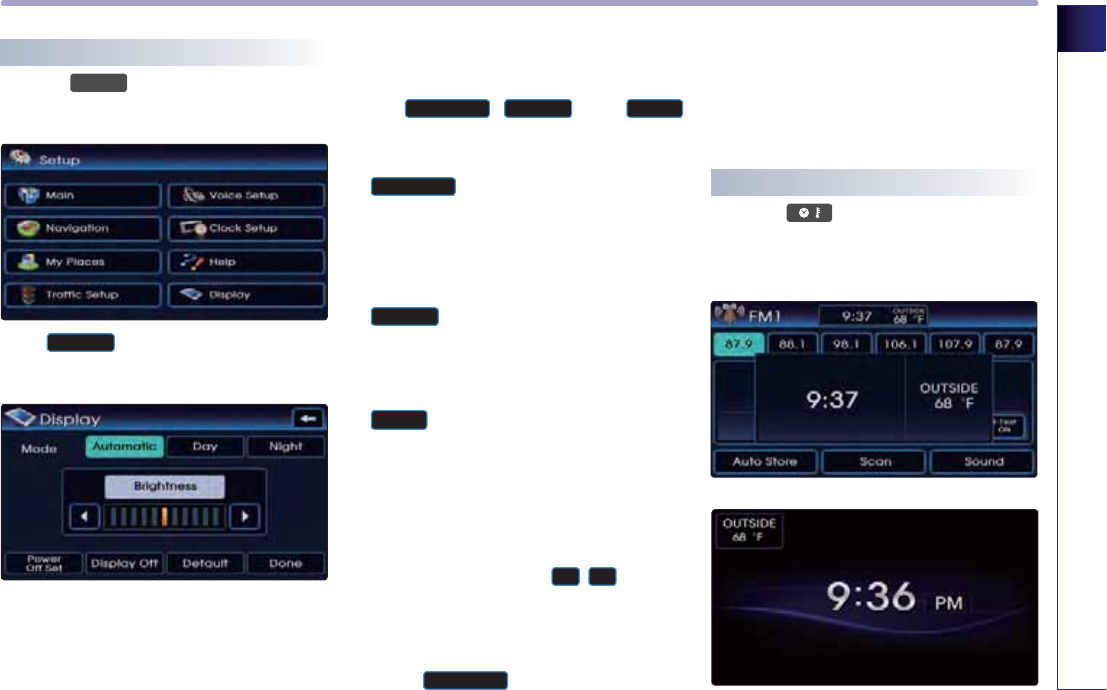
Display setting
Press the
6(783
key on the control panel to
display the Setup menu screen.
Press
'LVSOD\
button to display the Display
Setup screen.
Display mode
Press the button for the desired display mode
from
$XWRPDWLF
,
'D\
, and
1LJKW
modes. The current selected mode is high-
lighted.
●
$XWRPDWLF
The display is automatically converted
between Daylight and Night modes in
accordance to the on/off state of the vehi-
cle taillights.
●
'D\
The bright screen is always maintained
regardless of the on/off state of the vehicle
taillights.
●
1LJKW
The dark screen is always maintained
regardless of the on/off state of the vehicle
taillights.
Brightness
Use the left/right buttons (
◀
,
▶
) for con-
trol to make adjustments.
Display OFF
Press the
'LVSOD\2II
button.
Display ON
Press anywhere on the black screen. The screen
prior to display setting will be displayed.
Viewing Current Time
Press the on the front panel shortly
(under 0.8 second) to display the current time
at the center of the screen.
PART 1 PRE-OVERVIEW
1-14 PRE-OVERVIEW
INFORMATION
If the screen is turned off, selecting the
will display the current time on the entire
screen.
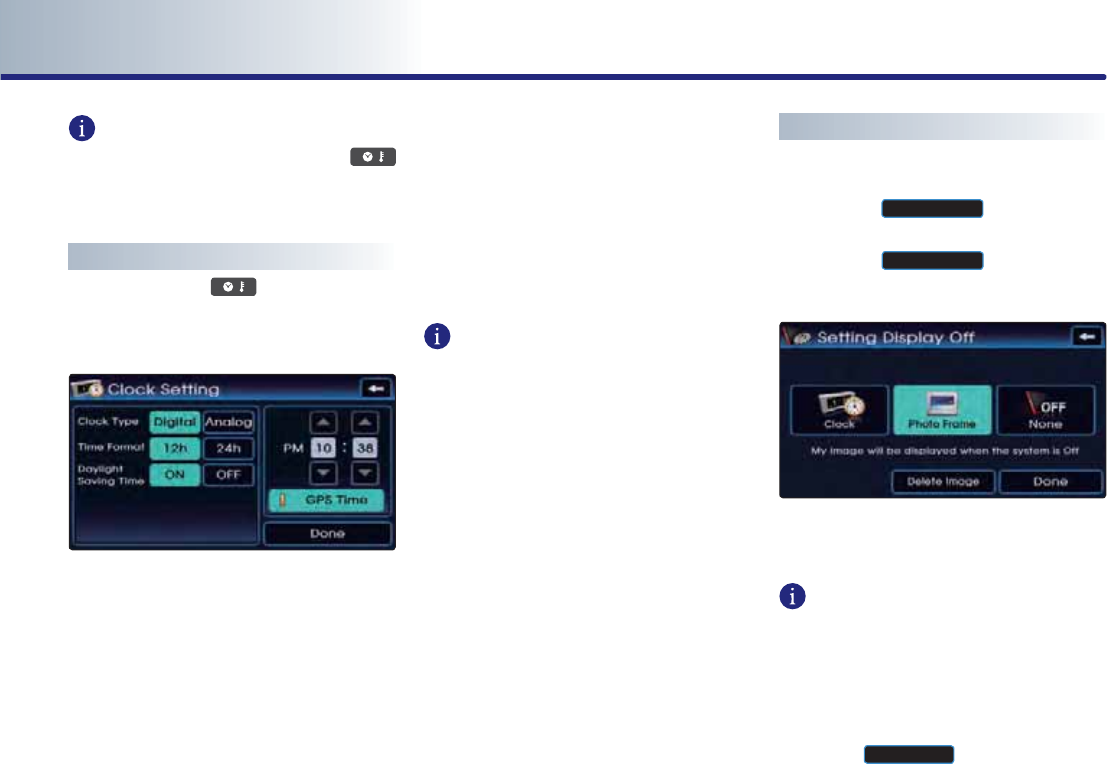
Setting the Clock
Press and hold the on the front panel
(over 0.8 second) to display the Clock setting
screen.
●GPS Time
The time received from the GPS will be dis-
played automatically.
●Clock Type
Selects the clock type shown as the entire
screen when the system power is turned off.
●Time Format
When the clock type is digital, this button is
used to convert the time between 12 hour/ 24
hour systems.
●Daylight Saving Time
Turns the Daylight Saving Time function on or
off.
INFORMATION
Clock setting mode can be displayed while
the clock is displayed on the screen even
when the system is turned off.
Setting Display OFF
Display Photo Frame
1. Press the
3RZHU2II6HW
button in the
DISPLAY setup screen.
2. Press the
3KRWR)UDPH
button in the
<Setting Display Off> setup screen.
3. The registered image will be displayed once
power is turned off.
INFORMATION
For Photo Frame setup, the frame must be set
in USB Image mode. (For details on setting the
Photo Frame, refer to the USB IMAGE page.)
4.
To delete an image registered as a frame,
press the
'HOHWH,PDJH
button.

PRE-OVERVIEW
1-15
PRE-OVERVIEW

PART 1 PRE-OVERVIEW
1-16 PRE-OVERVIEW
PART 2
Audio SYSTEM
PART 2 AUDIO SYSTEM
Operating the radio ……………… 2-2
Listening to the FM/AM radio ………2-2
FM/AM screen and functions …………2-2
FM/AM Radio ……………………………2-2
Selecting FM/AM broadcast frequency 2-3
Storing FM/AM preset ………………2-4
Scanning FM/AM broadcast frequency 2-5
HD Radio Technology(if equipped) ……2-6
Starting HD Radio Mode ……………2-6
HD Radio Mode Screens and
Functions ……………………………2-6
Operating HD Radio Mode ……………2-6
HD Radio digital Broadcast On/Off …2-7
XM radio …………………………………2-9
Listening to the XM radio ……………2-9
XM screen and functions ……………2-9
Switching the XM mode (Channel /
Category) ………………………… 2-10
Selecting XM broadcast channel … 2-10
Storing XM preset ………………… 2-12
Scanning XM broadcast channel … 2-12
Operating the CD Player ………… 2-13
Precautions upon handling discs … 2-13
For safe and efficient operation …… 2-13
About CD Player ……………………… 2-13
Supported disc formats …………… 2-14
Disc/Content format compatibility 2-15
Inserting a Disc …………………… 2-16
Ejecting a Disc …………………… 2-16
Inserting/Ejecting Disc …………… 2-16
CD …………………………………… 2-17
Listening to CD music …………… 2-17
CD screen and functions ………… 2-17
Selecting the CD track …………… 2-17
REW/FF CD track …………………… 2-18
Setting Repeat function for
CD music …………………………… 2-18
Setting Random function for
CD music …………………………… 2-18
Scanning CD track ………………… 2-19
MP3 disc related information and
precaution ………………………… 2-20
Listening to MP3 music …………… 2-21
MP3 screen and functions ………… 2-21
Selecting to MP3 music …………… 2-22
REW/FF MP3 file …………………… 2-23
Viewing detail information for
MP3 file …………………………… 2-23
Setting Repeat function for
MP3 file …………………………… 2-23
Setting Random function for
MP3 file …………………………… 2-23
Scanning MP3 file ………………… 2-24

PREOVERVIEW
2-1
PRE-OVERVIEW
PART 2
Audio SYSTEM
Operating external devices …… 2-25
Connecting iPod devices ………… 2-25
iPod® ……………………………… 2-25
Listening to iPod music …………… 2-26
iPod screen and functions ………… 2-26
Selecting an iPod song …………… 2-27
REW/FF iPod song ………………… 2-28
Setting Repeat function for
iPod song ………………………… 2-28
Setting Random function for
iPod song …………………………… 2-28
USB MP3 related information and
precaution ………………………… 2-29
Precautions upon handling USB … 2-29
Connecting the USB ……………… 2-31
Listening to USB music …………… 2-31
Starting USB IMAGE Mode ………… 2-32
USB IMAGE mode menu screen
configuration ……………………… 2-32
Operating USB IMAGE Mode ……… 2-33
Connecting AUX …………………… 2-33
Playing AUX ……………………… 2-33
AUX screen ………………………… 2-34
AUX …………………………………… 2-34
PART 2 AUDIO SYSTEM
2-2
Operating the radio
FM/AM Radio
Listening to the FM/AM radio
1. Press the
)0$0
key on the control panel.
The FM/AM radio band of the most recent
listened station will be displayed.
2. Press the
)0$0
key to change the
desired radio band. Each press will change
the bands in the following order: FM1
ĺ
FM2
ĺ
AM
ĺ
FM1 ...
3. Select the desired broadcast frequency.
[Selecting FM/AM broadcast frequency],
page 2-3.
Voice Command
1. Press the key on the steering wheel
remote controller.
2. After the beep sound, say a command.
" Radio"
"(Radio) AM"
"(Radio) FM"
"(Radio) FM <1 or 2>"
"AM Frequency <530 to 1710>"
"FM Frequency <87.5 to 107.9>"
"AM Preset <1 to 6>"
"FM <1 or 2> Preset <1 to 6>"
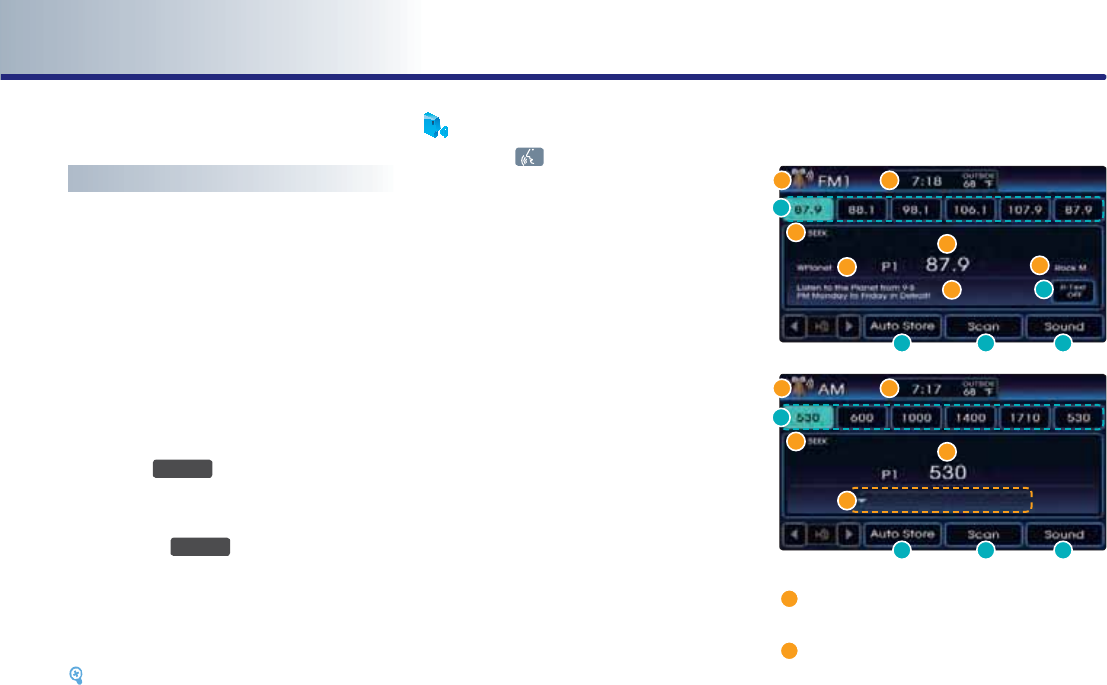
FM/AM screen and functions
Mode display : displays the FM1/FM2/ AM
modes.
SEEK/SCAN/PRESET SCAN/AUTO PRESET
indicator : if SEEK/SCAN/PRESET SCAN /
AUTO PRESET is operating, the switch is
displayed.
E
F
F
G
G
H
H
D
D
PREOVERVIEW
2-3
PRE-OVERVIEW
Program Service name : displays the pro-
gram service name if data is being broad-
cast.
Frequency : displays the current playing
frequency.
Program type name : displays the program
type name if data is being broadcast.
Radio Text : displays the radio text infor-
mation if data is being broadcast.
Frequency Bar : displays the position of
the current frequency within the total fre-
quency range.
Current time : displays the current time
manually automatically according to the
GPS time.
D
3UHVHW
buttons : the desired frequency
can be preset and selected.
[Storing FM/AM preset], page 2-4.
E
57H[W
ON/OFF button : turns the Radio
Text information on and off.
INFORMATION
If the
57H[W
is on OFF state, text will not be
displayed even if there is text being transmit-
ted from the broadcast station.
If the
57H[W
is on ON state, the frequency
bar will not be displayed. Even if the
57H[W
in on ON state, text may not be displayed if
text is not being received from the broadcast
station.
F
$XWR6WRUH
button : searches the 6 fre-
quencies with the most superior reception
and automatically stores as preset buttons
in corresponding order.
[Storing FM/AM preset], page 2-4.
G
6FDQ
button : scans all frequencies or
just the preset frequencies for 5 seconds
each. [Scanning FM/AM broadcast
frequency], page 2-5.
H
6RXQG
button : adjusts the FAD/BAL,
BASS/MID/TREB controls.
[Sound setting], page 1-12.
Selecting FM/AM broadcast frequency
There are 3 ways to select the broadcast fre-
quency - (a) selecting through preset, (b)
selecting through SEEK, (c) selecting through
manual search.
(a) Selecting a frequency through preset
Press the preset button of the desired broad-
cast frequency.
INFORMATION
●
Press the
Ѧ
or
ѧ
key on the steering
wheel remote controller shortly. The preset
frequencies of the current band will be select-
ed in order.
●
There are 6 preset frequencies each for FM1,
FM2, and AM modes.
[Storing FM/AM preset], page 2-4.
Voice Command
1. Press the key on the steering wheel
remote controller.
2. After the beep sound, say a command.
"Preset <1 to 6>"
"Preset Up"
"Preset Down"
PART 2 AUDIO SYSTEM
2-4
(b) Selecting a Broadcast frequency
through SEEK
Press the key on the control panel
for less than 0.8 second.
Once the SEEK function is operating (SEEK
indicator blinking), the next or previous
broadcast frequency with superior reception
will be searched automatically.
INFORMATION
●
Press the key on the control panel
or steering wheel remote controller for
more than 0.8 second to quickly move to
the nearest desired frequency. Once the
button is released, the next frequency with
superior reception will be searched auto-
matically.
●
If the SEEK function is operating, pressing
the key on the control panel
again will terminate SEEK operation and
select the current frequency.
Voice Command
1. Press the key on the steering wheel
remote controller.
2. After the beep sound, say a command.
"Seek Up"
"Seek Down"
(c) Selecting a broadcast frequency through
manual search
Press the
ѧ781(Ѧ
key to search for desired
frequency.
Each click on the
ѧ781(Ѧ
key will increase
or decrease the frequency by 1 step (FM: 0.2
MHz, AM: 10 kHz).
Storing FM/AM preset
There are 2 ways to store preset frequencies -
(a) storing manually and (b) auto store.
(a) Storing manually
1. Select the desired frequency.
[Selecting FM/AM broadcast frequency],
page 2-3.
2. Press the preset button to store for over 0.8
second. The frequency will become stored
along with a beep sound.
INFORMATION
Six preset frequencies each for FM1/ FM2/AM
modes can be stored using the above instruc-
tions.
(b) Auto store
After selecting the desired band, press the
$XWRVWRUH
button. The 6 frequencies with the
most superior reception will be stored as pre-
set buttons in corresponding order.
INFORMATION
If the
$XWRVWRUH
button is pressed again
while operating Auto Store, then the Auto
Store operation will be terminated and the
previously played frequency will be restored.

PREOVERVIEW
2-5
PRE-OVERVIEW
Voice Command
1. Press the
key on the steering wheel
remote controller.
2. After the beep sound, say a command.
"Auto preset"
Scanning FM/AM broadcast frequency
1. Press the
6FDQ
button.
●
SCAN (less than 0.8 second) : scans all fre-
quencies and plays only frequencies with
superior reception for 5 seconds each.
Voice Command
1. Press the key on the steering wheel
remote controller.
2. After the beep sound, say a command.
"Scan"
●
PRESET SCAN (over 0.8 second): scans the
6 frequencies stored as delete this part in
the current band for 5 seconds each.
Voice Command
1. Press the key on the steering wheel
remote controller.
2. After the beep sound, say a command.
"Preset Scan"
2.
Press the
6FDQ
button again to continue
listening to a frequency. The scan will be ter-
minated and the current frequency will con-
tinue to be played.
INFORMATION
When scanning has completed an entire revo-
lution, the scan function will terminate auto-
matically and the previous played frequency
will be restored.
PART 2 AUDIO SYSTEM
2-6
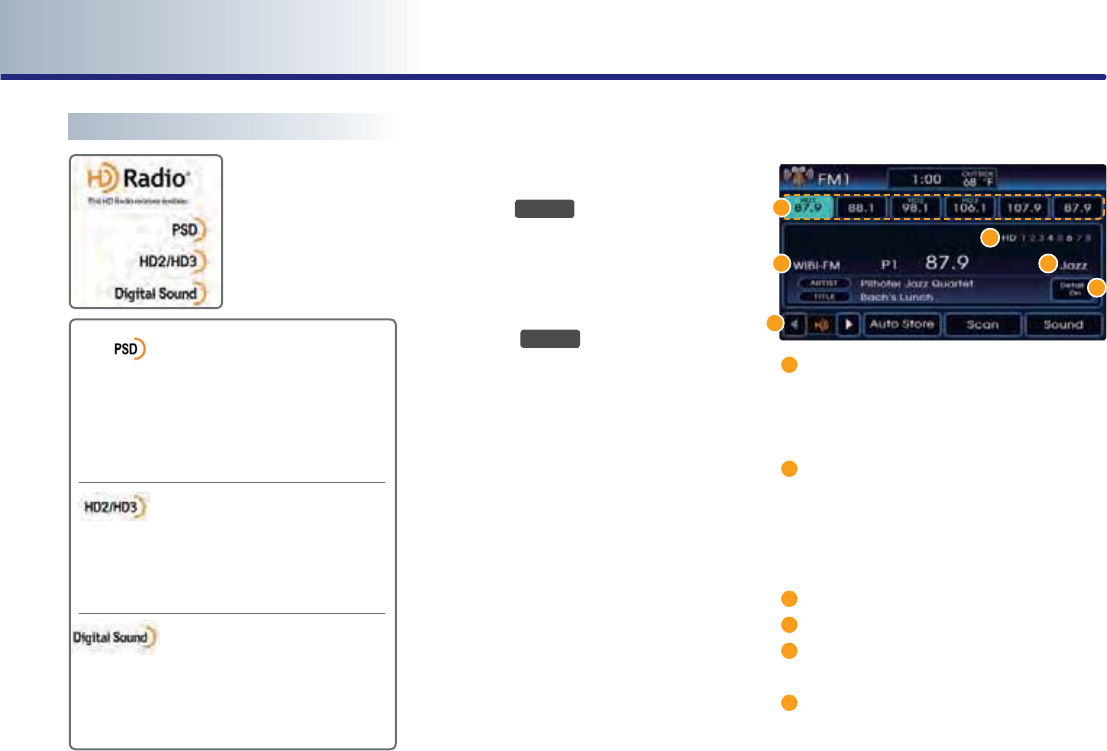
HD Radio™ Technology(if equipped)
Program Service Data:
Contributes to the superior
user experience of HD Radio Technology.
Presents song name, artist, station IDs,
HD2/HD3 Channel Guide, and other rele-
vant data streams.
Adjacent to traditional main
stations are extra local FM
channels. These HD2/HD3 Channels pro-
vide new, original music as well as deep
cuts into traditional genre.
Digital, CD-quality sound. HD
Radio Technology enables local
radio stations to broadcast a clean digital
signal. AM sounds like today’s FM and FM
sounds like a CD.
Starting HD Radio Mode
1. Press the
)0$0
key to turn on FM/AM
mode. If an HD Radio broadcast is received
radio mode will switch from analog broad-
cast to HD Radio broadcast.
2. Press the
)0$0
key will convert the
mode in the order of FM1
ĺ
FM2
ĺ
AM
and convert to HD Radio broadcast once an
HD Radio broadcast becomes received.
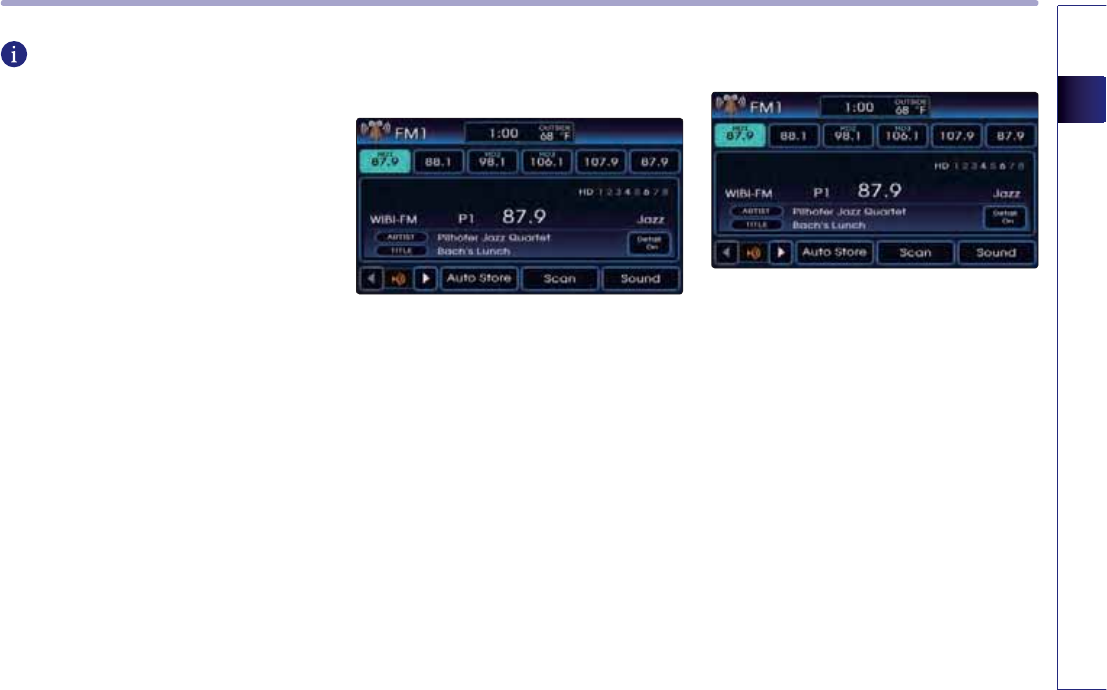
HD Radio Mode Screens and Functions
Preset Button: desired HD Radio frequen-
cies are saved for convenient frequency
selection. Saves up to HD1~HD8 according
to sub broadcasts.
HD Radio Broadcasting reception display:
displays HD Radio main Channel, broad-
cast receiving from sub broadcast 1 ~ 8.
The yellow indicates the currently playing
sub broadcast.
Broadcast station name
Genre Display : displays the current genre.
Detail On: displays detailed information
for current broadcast.
HD
Radio
sub broadcast move button :
moves from HD
Radio
main 1 broadcast to
sub 8 broadcast.
PREOVERVIEW
2-7
PRE-OVERVIEW
INFORMATION
HD Radio broadcasts simultaneously receive
up to 8 different sub broadcasts for each
channel, allowing users to listen to various
broadcasts. Main 1 broadcast is an HD Radio
broadcast for the same broadcast contents as
analog, while sub 2 ~ 8 are broadcasts of dif-
ferent contents.
Operating HD Radio Mode
● Selecting a Frequency
As HD Radio reception is included within
Radio mode, the methods of moving between
channels, saving presets, searching, or meth-
ods of searching frequencies are identical.
However, while the HD Radio reception is
turned on, the HD Radio related icon display
will become active when within regions
where an HD Radio signal can be received.
● Selecting frequency through Preset
This allows you to select previously saved HD
Radio frequencies for broadcast.
1. Press the buttons with HD1~HD8 displayed
above the preset button to listen to the cor-
responding HD Radio channel broadcast.
● Selecting frequency through TUNE
1. Select a channel receiving HD Radio broad-
cast automatically or manually and press the
00 button to move to the corresponding HD
Radio channel sub broadcast.
PART 2 AUDIO SYSTEM
2-8
INFORMATION
For HD Radio broadcast channels without sub
channels, the sub channels of sub numbers
will be skipped to move only to channels
which can be received.
● Storing a frequency to a preset button
● Storing Manually
This function allows you to manually save the
desired sub broadcast frequency within the
currently playing HD Radio broadcast channel.
Method of saving is identical with the method
of saving radio presets. After saving is com-
plete, the HD Radio sub broadcast number
will be displayed on above the frequency.
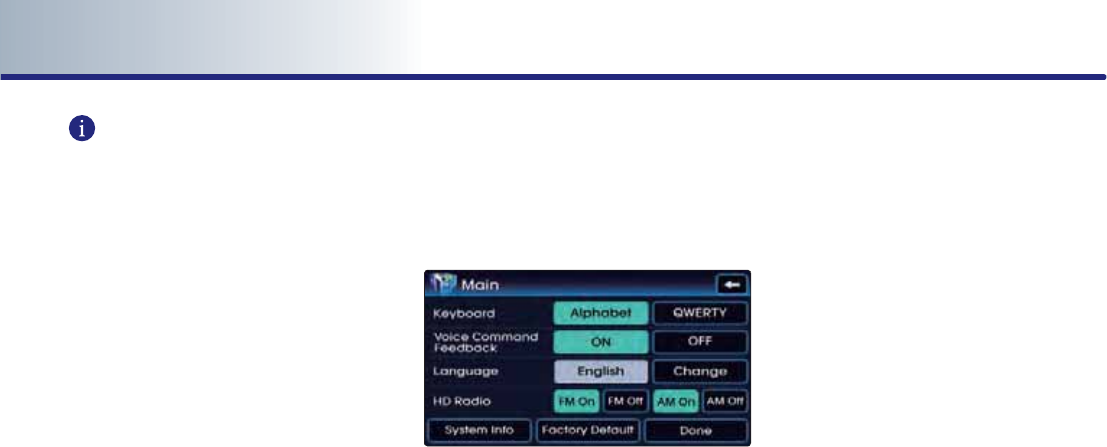
HD Radio Digital Broadcast On/Off
HD Radio Broadcasts can be turned on and off
for HD Radio FM and AM mode.
In Setup > Main setup screen, press the On/
Off setting for the desired HD Radio mode.
PREOVERVIEW
2-9
PRE-OVERVIEW
XM radio
Listening to the XM radio
1. Press the
;0
key on the control panel.
The XM radio band screen of the most
recent listened station will be displayed.
2.
Press the
;0
key to change the desired
radio band. Each press will change the
bands in the following order: XM1
ĺ
XM2
ĺ
XM3
ĺ
XM1 ...
3. Select the desired broadcast channel.
[Selecting XM broadcast channel], page
2-10.
Voice Command
1. Press the key on the steering wheel
remote controller.
2. After the beep sound, say a command.
"XM"
"XM <1 or 2 or 3>"
"XM Channel <0 to 255>"
"XM <1 or 2 or 3> Preset <1 to 6>"
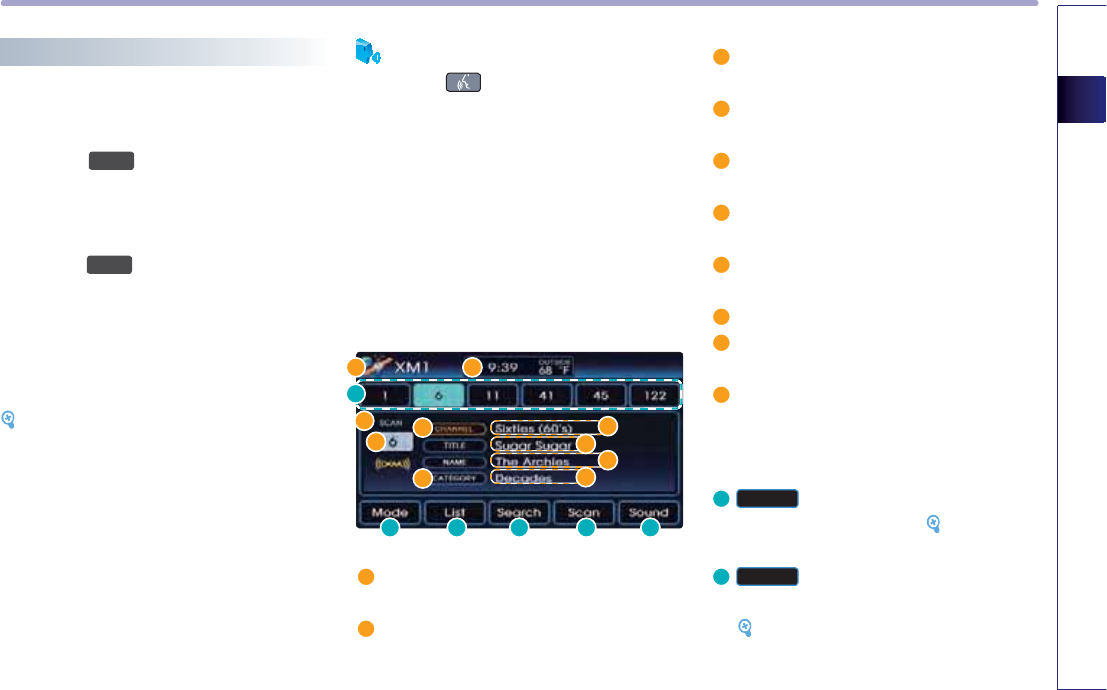
XM screen and functions
Mode display : displays the XM1/XM2/
XM3 modes.
SCAN/PRESET SCAN indicator : if SCAN/
PRESET SCAN is operating, the switch is
displayed.
Channel number : displays the current
playing channel.
Channel mode indicator : displays the
channel mode in orange.
Category mode indicator : displays the cat-
egory mode in orange.
Channel name : displays the channel
name.
NAME : displays the artist and other relat-
ed information.
Title name : displays the title name.
Category name : displays the category
name.
Current time : displays the current time
manually automatically according to the
GPS time.
D
3UHVHW
buttons : the desired channel can
be preset and selected. [Storing XM
preset], page 2-10.
E
0RGH
buttons : switches between
channel mode and category mode.
[Switching the XM mode], page 2-10.
E F G H I
D
PART 2 AUDIO SYSTEM
2-10
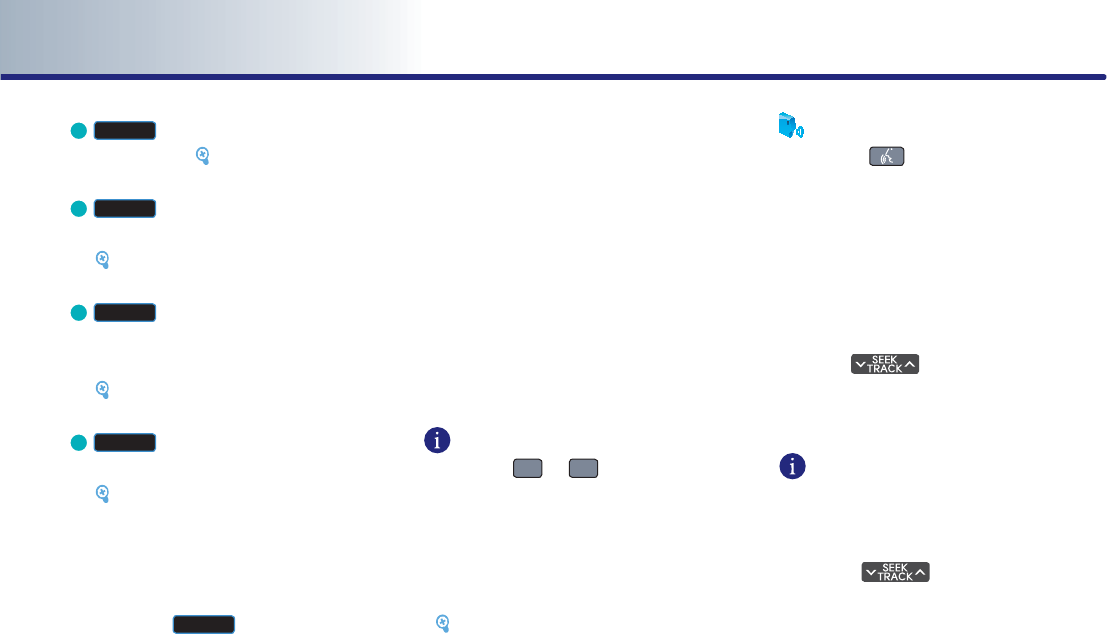
F
/LVW
button : displays the channel or
category list. [Selecting XM broadcast
channel], page 2-10.
G
6HDUFK
button : selects the channel by
directly inputting the channel number.
[Selecting XM broadcast channel], page
2-10.
H
6FDQ
button : scans all frequencies or
just the preset channels for 5 seconds
each.
[Scanning XM broadcast channel], page
2-10.
I
6RXQG
button : adjusts the FAD/BAL,
BASS/MID/TREB controls.
[Sound setting], page 1-12.
Switching the XM mode (Channel /
Category)
Each time the
0RGH
button is pressed, the
mode will switch between channel mode and
category mode.
Use the tune knob to change categories and
press the tune knob change to selected cate-
gory.
Selecting XM broadcast channel
There are 5 ways to select a broadcast channel
- (a) selecting through preset, (b) selecting
with channel Up/Down, (c) Selecting a chan-
nel through manual search, (d) selecting
through channel/ category list, (e) selecting
by directly inputting the channel number.
(a) Selecting a channel through preset
Press the preset button of the desired chan-
nel.
INFORMATION
●
Press the
Ѧ
or
ѧ
key on the steering
wheel remote controller for less than 0.8
second. The preset channels of the current
band will be selected in order.
●
There are 6 preset channels each for XM1,
XM2, and XM3.
[Storing XM preset], page 2-12.
Voice Command
1. Press the key on the steering wheel
remote controller.
2. After the beep sound, say a command.
"Preset <1 to 6>"
"Preset Up"
"Preset Down"
(b) Selecting with Channel Up/Down
Press the key on the control panel
for less than 0.8 second.
The previous or next channel will be selected.
INFORMATION
●
If in Channel mode, the channel is selected
from all channels. If in Category mode, the
first channel of each category is selected.
●
Press the key on the control panel
or steering wheel remote controller for
more than 0.8 second to quickly move to
the nearest desired channel. Once the but-
ton is released, the current channel will be
selected.
PREOVERVIEW
2-11
PRE-OVERVIEW
Voice Command
1. Press the
key on the steering wheel
remote controller.
2. After the beep sound, say a command.
"Channel Up"
"Channel Down"
(c) Selecting a channel through manual
search
Press the
ѧ781(Ѧ
key to display the previ-
ous or next channel information. After a brief
moment, the selected channel will be displayed.
INFORMATION
If in channel mode, the channel is selected
from all channels. If in category mode, the first
channel of each category is selected.
(Category search)
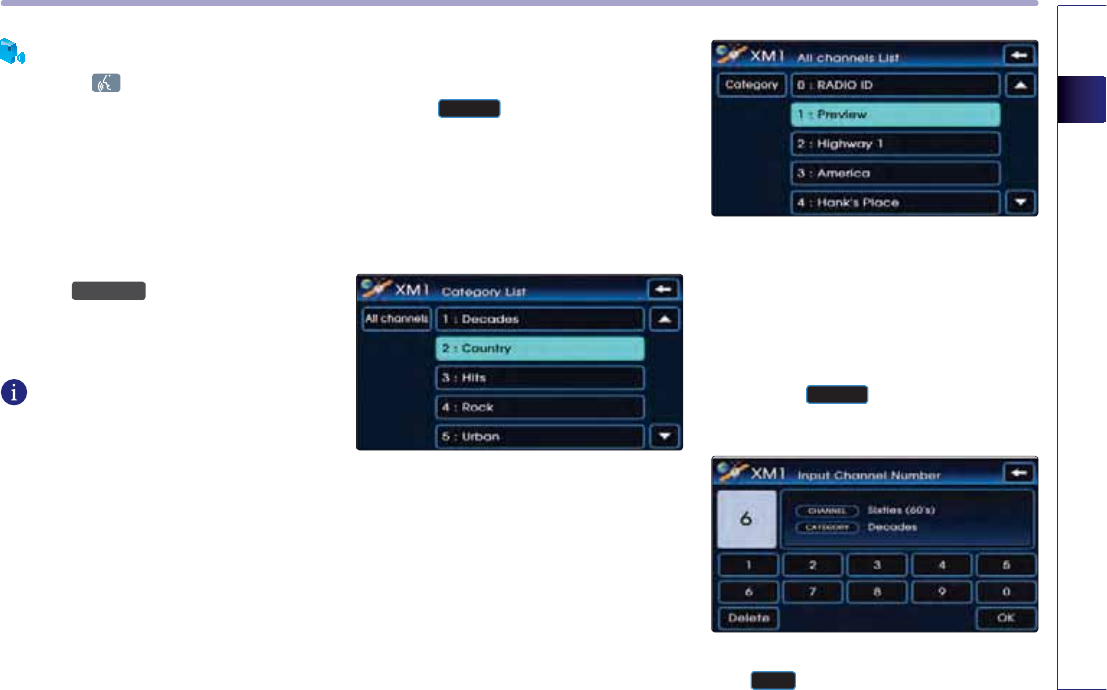
(d) Selecting channel through channel/
category list
1. Press the
/LVW
button.
●
If in category mode, the all category list
screen will be displayed.
Select the desired category button to dis-
play the channel list screen for the corre-
sponding category.
●
If in channel mode, the all channels list
screen will be displayed.
2. Select the desired channel button. The pre-
vious screen will be restored and the select-
ed channel will begin playing.
(e) Selecting channel by directly inputting
the channel number
1. Press the
6HDUFK
button. The channel
input screen will be displayed.
2. Input desired channel number, and press
the
2.
button.
PART 2 AUDIO SYSTEM
2-12
The previous screen will be restored and the
selected channel will begin playing.
INFORMATION
To prevent inputting a channel which exceeds
the channel range, numbers which cannot be
inputted are set to disabled state.
Voice Command
1. Press the key on the steering wheel
remote controller.
2. After the beep sound, say a command.
"Channel<0 to 255>"
Storing XM preset
1. Select the desired channel. [Selecting XM
broadcast channel], page 2-7.
2. Press the preset button for over 0.8 second.
The frequency will be saved along with
beep sound.
INFORMATION
Six preset frequencies each for XM1/ XM2/
XM3 modes can be stored using the above
instructions.
Scanning XM broadcast channel
1. Press the
6FDQ
button.
●
SCAN (under 0.8 second): scans all channels
for 5 seconds each if in channel mode. If in
category mode, scans all channels within
the current category for 5 seconds each.
Voice Command
1. Press the key on the steering wheel
remote controller.
2. After the beep sound, say a command.
"Scan"
● PRESET SCAN (over 0.8 second): scans the 6
preset channels within the current band for
5 seconds each.
Voice Command
1. Press the key on the steering wheel
remote controller.
2. After the beep sound, say a command.
"Preset Scan"
1.
Press the
6FDQ
button again to continue
playing the channel. The scan will be termi-
nated and the current channel will continue
to be played.
INFORMATION
●
When scanning has completed an entire
revolution, the scan function is automatical-
ly terminated and the previous played chan-
nel will be restored.
●
Channel 0 is the radio ID and contains infor-
mation required for XM Activation.

PREOVERVIEW
2-13
PRE-OVERVIEW
Operating the CD Player
About CD Player
Precautions upon handling discs
● After using a disc, keep it in the original case
to prevent it from becoming scratched,
which may cause the CD to make popping
sounds.
● Do not use heart-shaped discs, octagon-
shaped discs, or any other abnormally
shaped disc. Such discs may be the cause of
malfunctions.
● Do not clean discs with chemical solutions
such as record sprays, antistatic sprays, anti-
static liquids, benzene, or thinners. Such
materials may cause the surface of DISC to
be unrecoverable.
● Do not expose the disc to direct sunlight for
prolonged periods of time. Such exposure
may lead to disc deformation.
● Dust, scratch, and other substances may
cause popping sound while playing as well
as sound deterioration.
● Never place paper on either side of the disc
or write on disc surfaces. Sharp writing
utensils and inks used in felt-tip pens may
cause damage to disc surfaces
● Clean fingerprints and dust off the signal
surface (coated side) of the disc with a soft
cloth.
Only soft cloths should be used as there are
no grooves for dust to get in as is the case
with LPs.
● Copy-protected CDs such as S-type CDs
may not function in the device.
● DATA CDs are not supported by the device.
(However, such discs may operate abnor-
mally.)
For safe and efficient operation
● Do not disassemble the CD Player for repair
purposes. Contact your place of purchase in
the case of malfunction. (Complete service
assistance will not be provided if the user
disassembles the device.)
● Do not use water to clean the device.
Exposure to water may cause damage to
the device.
● Be cautious not to introduce foreign sub-
stances into the disc insert slot.
Foreign substances may cause damage to
the interior of the device.
● The device may fail to operate properly in
extremely hot or cold temperatures.
Discontinue the use of the device unless
normal temperature is maintained.
( The operational temperature range is:
-10℃ ~ 65℃).
● Steam can be condensed on the fiberoptic
lens due to rain, wet conditions, or upon
operating the heating system.
● Skipping may occur to the audio when driv-
ing on bumpy roads for prolonged periods
of time or upon severe shock to the vehicle.
● Do not use chemical solvent to clean the
device. Such solvents may cause damage to
the surfaces of the device.
Always use a clean and dry cloth.
PART 2 AUDIO SYSTEM
2-14
WARNING !
Always pay full attention to driving.
Avoid operating your system in such a way
that you are distracted from driving your vehi-
cle.
Supported disc formats
● The disc types supported by this device are
as shown below.
● CD-R or CD-RW DISC burned with a bulk CD
without quality guarantees may not be rec-
ognized by the device.
● Inserting an abnormal disc may result in
faulty operation or recognition.
Disc Size
3-inch (7.6 cm)
5-inch (12.7cm)
Disc format Audio format
CD LPCM
MP3 MPEG1, Layer3
MPEG2, Layer3
MPEG2.5
WMA Ver9
Disc Type Disc Media DIsc Format
CD CD-DA
CD-R MP3
CD-RW WMA
Multisession-CD DTS-CD
CD CD-ROM
CD-G
CD-EXTRA
CD-TEXT

PREOVERVIEW
2-15
PRE-OVERVIEW
Disc/Content format compatibility
● Ordinary disc compatibility
• This device has been designed/ manufac-
tured to be compatible with software bear-
ing the following logo marks.
•
CD-R/RW discs (Audio CD and MP3 CD) cre-
ated with CD-writing devices or personal
computers may not properly function in the
device. This may be caused by damaged
recording method, contamination by dirt
and other foreign substance on the disc sur-
faces or play lens, and various other rea-
sons.
● Special formats or special features regard-
ing software
•CD-R/RW Compatibility.
• This device operates as a CD-ROM including
CD-R and CD-RW DISC written in CD Audio
or MP3 CD Format.
However, other contents may cause abnor-
mal disc operation such as noise.
• The writing of CD-R and CD-RW discs with
this device is not supported.
• Although CD-R/RW discs burned as audio
CDs which have not been finalized are not
supported by the device, some information
such as play time may be displayed.
•PC-created DISC compatibility.
• When recording a disc with a personal com-
puter, even discs recorded in a "format com-
patible" with the formats described above
may not operate on the device caused by
software settings of the recording applica-
tion. In such cases, contact the software
developer.
•
Additional information regarding compati-
bility can be found on the CD-R/ RW soft-
ware disc box.
DVD-R/RW are not supported by the device.
● Compressed audio compatibility
This device plays audio files compressed by
MPEG-1 audio stream layer 3(MP3) using 32,
44.1 and 48kHz fixed bit rates. Incompatible
files are not supported.
•
Variable bit rate files may operate, but the
play time information may not be properly
displayed.
•
Physical formats of CD : Model 1, Model 2
XA format 1.
•
This device only supports tracks with file
extension of ".MP3" or ".WMA".
•
This device does not support multi-session
discs.
•
This device supports a maximum of 256
folders and maximum 512 files.
Folders and files which exceed this limit will
not be supported.
•
There are various bit rates which can be
encoded onto a MP3 file.
This device has been designed to be com-
patible with various bit rates.
Audio which has been encoded at 128kbps
will sound similar to CD audio sound quality.
Audio-CD CD-R CD-RW

PART 2 AUDIO SYSTEM
2-16
Although this device supports low bit rate
MP3 tracks, such tracks may only provide
low quality sound.
•
For stable operation, the use of files in
95kbps ~ 192kbps bit rate range and
44.1kHz SAMPLING frequency is recom-
mended.
Inserting/Ejecting Disc
Inserting a Disc
Insert the disc into the slot.
The disc will begin playing automatically after
it has been inserted.
INFORMATION
If the operation mode had been Audio mode
before inserting the disc, the device will con-
vert to the DISC mode screen and begin play-
ing.
If the operation mode had been Navigation
mode, then Navigation mode screen will
remain and the disc play status will be dis-
played through the Audio bar.
Ejecting a Disc
Press the key.
The disc will immediately be stopped and
ejected.
INFORMATION
● If the operation mode had been in Audio
mode before ejecting the disc, the device
will be converted back to Audio mode.
If the operation mode had been in
Navigation mode, then Navigation mode
screen will remain.
● If the disc is straddled on the slot without
removing for approximately 10 seconds, the
disc will be re-inserted automatically into
the disc player.
In such a case, the disc will not begin play-
ing automatically.
PREOVERVIEW
2-17
PRE-OVERVIEW
CD
Listening to CD music
1. Insert the CD or press the
0(',$
key on the
control panel if the CD is already inserted.
2. Select the desired track. [Selecting the
CD track], page 2-15.
Voice Command
1. Press the key on the steering wheel
remote controller.
2. After the beep sound, say a command.
"DISC"
"CD"
"CD Track <1 to 665>"
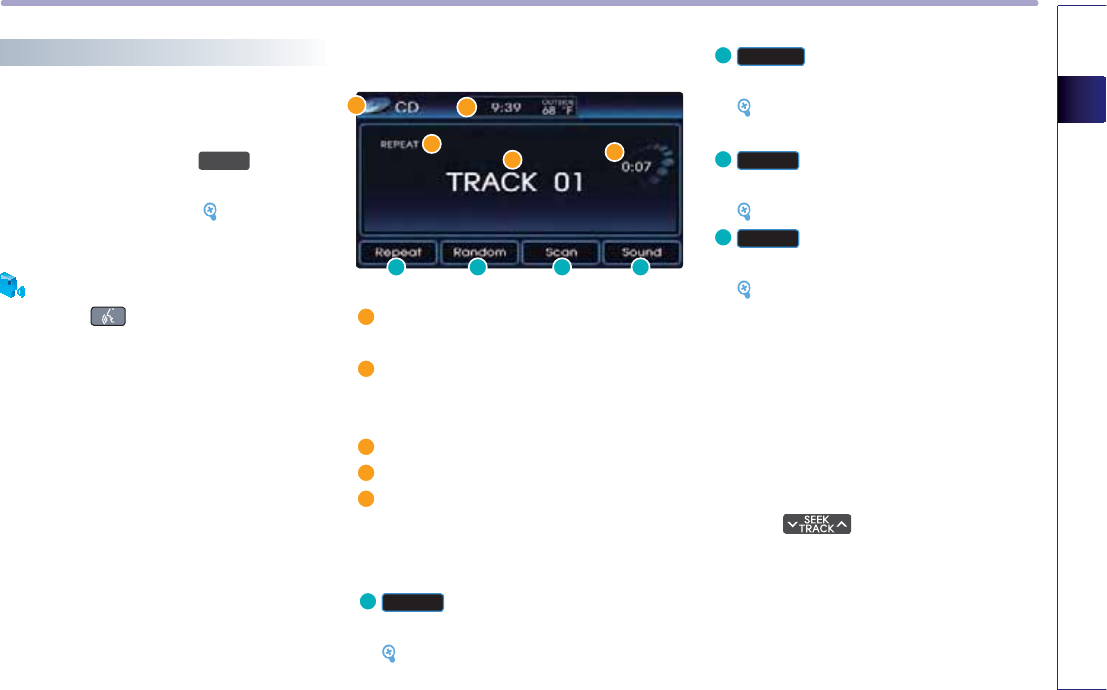
CD screen and functions
Mode display : displays that the current
mode is CD mode.
REPEAT/RANDOM/SCAN indicator : if
REPEAT/RANDOM/SCAN is operating, the
switch is displayed.
Track number : displays the track number.
Play Time : displays the play time.
Current time : displays the current time
manually automatically according to the
GPS time.
D
5HSHDW
buttons : repeat the current play-
ing track.
[Setting Repeat function for CD music],
page 2-18.
E
5DQGRP
button : plays the tracks on the
disc in random order.
[Setting Random function for CD
music], page 2-18.
F
6FDQ
button : scans all tracks on the
disc for 10 seconds each.
[Scanning CD track], page 2-19.
G
6RXQG
button : adjusts the FAD/BAL,
BAS, MID, TRE controls.
[Sound setting], page 1-12.
Selecting the CD track
There are 2 ways to select a CD Track - (a)
selecting through Track Up/Down, (b) select-
ing through searching Track.
(a) Selecting through Track Up / Down
Press the key on the control panel
or steering wheel remote controller for less
than 0.8 second. The next or previous track
will begin playing.
D F
E G
PART 2 AUDIO SYSTEM
2-18
INFORMATION
If the key on the control panel or
steering wheel remote controller is pressed
shortly while the track has played for more
than 3 seconds, the start of the current track
will begin playing. If the track has been play-
ing for less than 2 seconds, the start of the
previous track will begin playing.
Voice Command
1. Press the key on the steering wheel
remote controller.
2. After the beep sound, say a command.
"Next Track"
"Previous Track"
(b) Selecting track through search
1. Press the
ѧ781(Ѧ
key to search for
desired to display track. Each click on the
ѧ781(Ѧ
key will display the information
of the next or previous track. The current
playing track will continue to be played.
2. Press the
(17(5
key at the desired track.
The searched track will begin playing.
REW/FF CD track
Press and hold the key on the con-
trol panel or steering wheel remote controller
for over 0.8 second.
The track will play 20 times faster while hold-
ing the button and return to normal play
when the button is released.
Setting Repeat function for CD music
Press the
5HSHDW
button. Each press will
change the function in the following order:
REPEAT
ĺ
REPEAT OFF
ĺ
REPEAT
●
REPEAT : repeats the current playing track.
Voice Command
1. Press the key on the steering wheel
remote controller.
2. After the beep sound, say a command.
"Repeat Track"
Say "Normal Play" in order to terminate the
set Repeat.
Setting Random function for CD music
Press the
5DQGRP
button. Each press will
change the function in the following order:
RANDOM
ĺ
RANDOM OFF
ĺ
RANDOM...
●
RANDOM : plays all tracks in the disc in ran-
dom order.
Voice Command
1. Press the key on the steering wheel
remote controller.
2. After the beep sound, say a command.
"Random"
Say "Normal Play" in order to terminate the
set Random function.

PREOVERVIEW
2-19
PRE-OVERVIEW
Scanning CD track
1. Press the
6FDQ
button. Each press will
change the function in the following order:
SCAN
ĺ
SCAN OFF
ĺ
SCAN...
●
SCAN : scans all tracks in the disc for 10 sec-
onds each.
Voice Command
1. Press the key on the steering wheel
remote controller.
2. After the beep sound, say a command.
"Scan"
Say "Normal Play" in order to terminate the
set Scan function.
2. Press the
6FDQ
button again to continue
listening to the track. The scan will be termi-
nated and the current track will continue to
be played.
INFORMATION
When scanning has completed an entire revo-
lution, the scan function is automatically ter-
minated and the previous played track will be
restored.

PART 2 AUDIO SYSTEM
2-20
MP3
MP3 disc related information and
precaution
● Information
• The MP3 file standards supported by the
device are as follows.
• Acceptable standard: MPEG1 AUDIO LAYER 3
• Acceptable sampling frequency: 32, 44.1, 48
(KHz)
• Acceptable bit rate: 32, 40, 48, 56, 64, 80, 96,
112, 128, 160, 192, 224, 256, 320 (Kbps)
•
Recommended bit rate & reference sam-
pling frequency: 96,128, 192 Kbps fixed bit
rate /44.1KHz
• ID3 tag
This device supports ID3v1.0, ID3v1.1,
ID3v2.2, ID3v2.3, and ID3v2.4 ID3 tags.
• Supported media
The MP3 media supported by the device are
CD-ROM and USB.
•Supported media formats
This device supports ISO9660 LEVEL1 and
LEVEL2. Detailed specification is as below.
• Maximum directory layers: 8 layers
•
Maximum folder length: 64 Bytes, file name
length: 64 Bytes
•
Supported characters for folder name/ file
name: Alphanumeric characters, Korean
standard character set 2350 characters,
Simplified Chinese 4888 characters
•
Maximum number of folders which can be
stored onto one disc: 256 folders (including
ROOT directory)
• Maximum number of files which can be
stored onto one disc: 512 files
• Precautions upon burning MP3 files
• The use of ISO 9660 LEVEL 2 JOLIET format
is recommended when burning MP3 files.
Burning in other formats may abnormally
display the file names.
• It is possible to display up to 32 characters for
file and folder names in case of UNICODE, and
up to 64 characters in case of ASCII. Although
the full length of the file name can be dis-
played by using the scroll function, the full
length of folder names may not be displayed
as the scroll function does not operate when
displaying folder names.
●Precaution
Please use a MP3 bit rate which is less than
128 kbps. The sound quality cannot be guar-
anteed for MP3s exceeding 128kbps.
PREOVERVIEW
2-21
PRE-OVERVIEW
Listening to MP3 music
1.
Insert the MP3 disc or press the
0(',$
key
on the control panel if the MP3 disc is
already inserted.
2.
Select the desired file. [Selecting the MP3
file], page 2-19.
Voice Command
1. Press the key on the steering wheel
remote controller.
2. After the beep sound, say a command.
"DISC"
"CD"
"MP3"
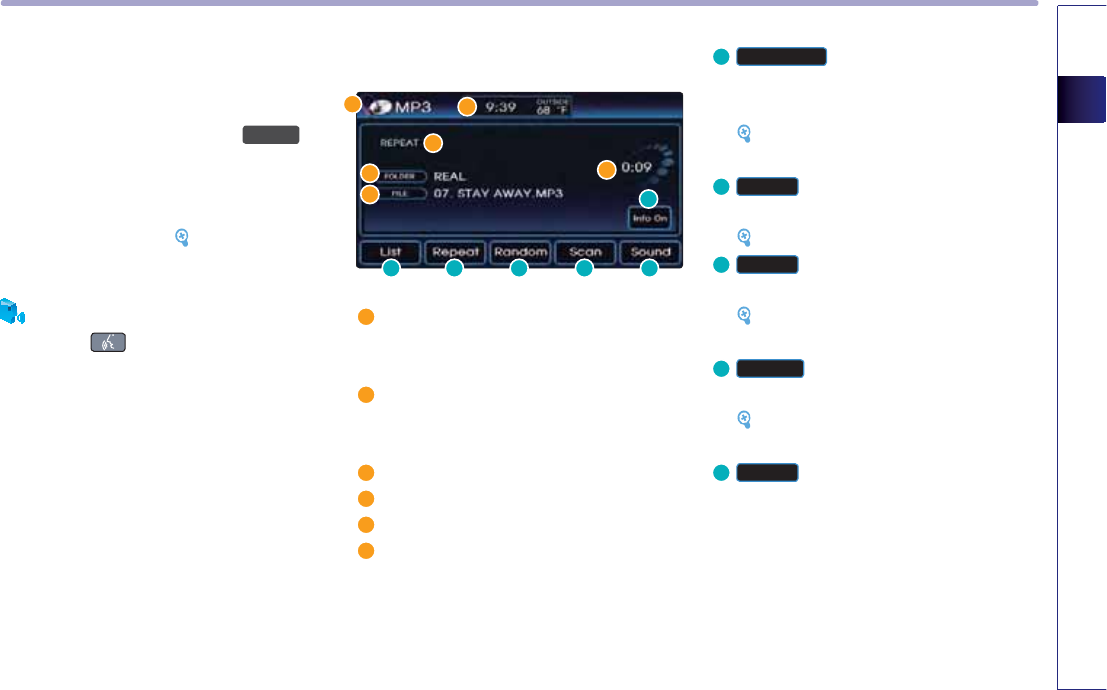
MP3 screen and functions
Mode display : displays that the current
mode is MP3 disc mode. (MP3 files on DVD
discs are not supported.)
REPEAT/RANDOM/SCAN indicator : if
REPEAT/RANDOM/SCAN is operating, the
switch is displayed.
Play Time : displays the play time.
Folder name : displays the folder name.
File name : displays the file name.
Current time : displays the current time
manually automatically according to the
GPS time.
D
,QIR2Q2II
button : displays or hides the
detailed file information for the current
playing file.
[Viewing detail information for MP3
file], page 2-23.
E
/LVW
button : displays the MP3 folders
and file lists for the disc.
[Selecting the MP3 file], page 2-21.
F
5HSHDW
button : repeats the current play-
ing folder or file.
[Setting repeat function for MP3 file],
page 2-23.
G
5DQGRP
button : plays all files on the disc
or folder in random order.
[Setting random function for MP3 file],
page 2-23.
I
6FDQ
button : scans all files on the disc
or folder for 10 seconds each.
D
EFGHI

PART 2 AUDIO SYSTEM
2-22
Selecting to MP3 music
There are 3 ways to select an MP3 file - (a)
selecting through file up/down, (b) selecting
through searching files, (c) selecting through
MP3 list.
(a) Selecting through File Up / Down
Press the key on the control panel
or steering wheel remote controller for less
than 0.8second. The next or previous file will
begin playing.
INFORMATION
If the key on the control panel or
steering wheel remote controller is pressed
shortly while the song has played for more
than 3 seconds, the start of the current song
will begin playing. If the song has been play-
ing for less than 2 seconds, the start of the
previous song will begin playing.
Voice Command
1. Press the key on the steering wheel
remote controller.
2. After the beep sound, say a command.
"Next File"
"Previous File"
"Next Folder"
"Previous Folder"
(b) Selecting through search
1.
Press the
ѧ781(Ѧ
key to search for
desired to display file. Each click on the
ѧ781(Ѧ
key will display the information
of the next or previous file. The current play-
ing file will continue to be played.
INFORMATION
If the operation of the Tune knob is too rapid,
there may be a delay in displaying the file
information.
2. Press the
(17(5
key at the desired file.
The searched file will begin playing.
(c) Selecting through MP3 List
1. Press the
/LVW
button. The file list of the
folder for the current playing file will be dis-
played.
INFORMATION
If many songs and folders are recorded onto a
DISC, file loading time may be longer and
cause the play list to be improperly displayed
or song search through TUNE operation to
operate improperly. In such cases, wait until file
loading is complete and try again.
2. Press the desired menu to return to the
main screen and play the selected file.
PREOVERVIEW
2-23
PRE-OVERVIEW
REW/FF MP3 file
Press and hold the key on the con-
trol panel or steering wheel remote controller
for over 0.8 second.
The file will play 20 times faster while holding
the button and return to normal play when
the button is released.
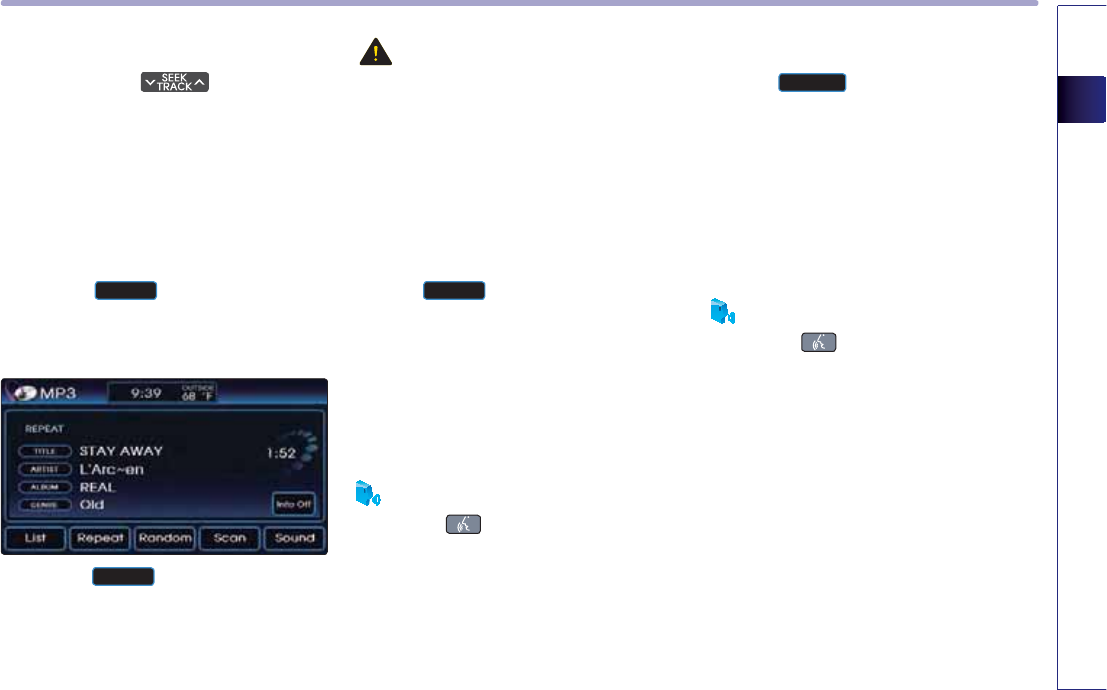
Viewing detail information for MP3 file
1. Press the
,QIR2Q
button. The detailed
information (Title, Artist, Album, Genre) for
the current playing MP3 will be displayed.
2. Press the
,QIR2II
button. The detailed
information will be turned off.
CAUTION!
● If the ID3 TAG info is not included in the
MP3 file, the artist/song title/genre informa-
tion may not be displayed.
● ID3 TAG : Standard format being used to add
various information to the MP3 file, such as
song title, copyrighter, music channel, etc.
Setting Repeat function for MP3 file
Press the
5HSHDW
button.
Each press will change the function in the fol-
lowing order: Repeat
ĺ
Folder Repeat
ĺ
Repeat Off
ĺ
Repeat ...
● Repeat : repeats the current playing file.
● Folder Repeat : repeats the files in the cur-
rent folder.
Voice Command
1. Press the key on the steering wheel
remote controller.
2. After the beep sound, say a command.
"Repeat File"
"Repeat Folder"
Say "Normal Play" in order to terminate the
set Repeat function.
Setting Random function for MP3 file
Press the
5DQGRP
button.
Each press changes the setting as follows :
Random
ĺ
Folder Random
ĺ
Random Off
ĺ
Random ...
●
Folder Random : plays the files in the cur-
rent folder in random order.
●
Random : plays all files in the disc in random
order.
Voice Command
1. Press the key on the steering wheel
remote controller.
2. After the beep sound, say a command.
"Random"
"Random Folder"
Say "Normal Play" in order to terminate the
set Random function.

PART 2 AUDIO SYSTEM
2-24
Scanning MP3 file
1. Press the
6FDQ
button.
Each press will change the function in the fol-
lowing order : Scan
ĺ
Folder Scan
ĺ
Scan Off
ĺ
Scan ...
●
Folder Scan : plays all files in the current
folder for 10 seconds each.
●
Scan: scans all files in the disc for 10 sec-
onds each.
Voice Command
1. Press the key on the steering wheel
remote controller.
2. After the beep sound, say a command.
"Scan"
"Folder Scan"
Say "Normal Play" in order to terminate the
set Scan function.
2. Press the
6FDQ
button again to continue
listening to the file. The scan will be termi-
nated and the current file will continue to be
played.
INFORMATION
When scanning has completed an entire revo-
lution, the scan function is automatically ter-
minated and the previously played file will be
restored.
PART 2 AUDIO SYSTEM

PREOVERVIEW
2-25
PRE-OVERVIEW
Operating external devices
iPod®
iPod® is a registered trademark of Apple Inc.
Connecting iPod devices
Connect the iPod device as shown in the pic-
ture.
The Hyundai iPod Power cable is needed in
order to operate iPod with the audio buttons
on the audio system. The USB cable provided
by Apple may cause malfunction and should
not be used for Hyundai vehicles.
The Hyundai iPod Power cable maybe pur-
chased through your Hyundai dealership.
㿋 Unsupported iPod devices : iPod genera-
tions before iPod 3G, iPod Shuffle, and iPad.
CAUTION!
Some functions may not operate properly
depending on the firmware version in some
iPod or iPhone devices.
INFORMATION
In order to prevent such malfunction, check
the following before connecting your iPod or
iPhone device with the Hyundai iPod Cable.
㿋 If the battery has been completed dis-
charged, charge the device for at least 10
minutes before connecting.
㿋 Turn on the device before connecting.
㿋 If the device is set to lock, release the lock
before connecting.
㿋 For iPhones, audio will not play if the audio
system and BT are paired. Disconnect the
pairing before connecting.
When there are no songs in the iPod or
iPhone or if there is no response from the
device after connecting with the Hyundai
Cable, a “No Media Connected” pop-up mes-
sage will be displayed for 5 seconds and the
previous mode will automatically be restored.
In such cases, disconnect the iPod or iPhone
and try connecting again.
If the message continues even after recon-
necting the iPod, check to see if there are any
problems with the iPod device.
CAUTION!
㿋#
If a playing iPod is connected to the audio
system, a high-pitched tone may occur for
approximately 1-2 seconds.
Please turn the iPod device to pause/stop
prior to connecting it to the vehicle.
㿋#
There are two types of iPod exclusive cables,
the detachable USB/AUX type and the All-
in-one type.
※ Upon connecting or disconnecting the
detachable iPod cable, you must connect or
disconnect both the USB/AUX terminals.
※ The iPod exclusive cable must be connect-
ed to both the USB/AUX terminals for iPod
charging and operations to be supported.
PART 2 AUDIO SYSTEM
2-26
Listening to iPod music
1. Connect the iPod or press the
0(',$
key
on the control panel if the iPod is already
connected.
INFORMATION
Even if the iPod is connected, message may
be displayed if an error has occurred. In such a
case, reconnect the iPod.
2. Select the desired song.
[Selecting an iPod song], page 2-27.
Voice Command
1. Press the key on the steering wheel
remote controller.
2. After the beep sound, say a command.
"iPod"
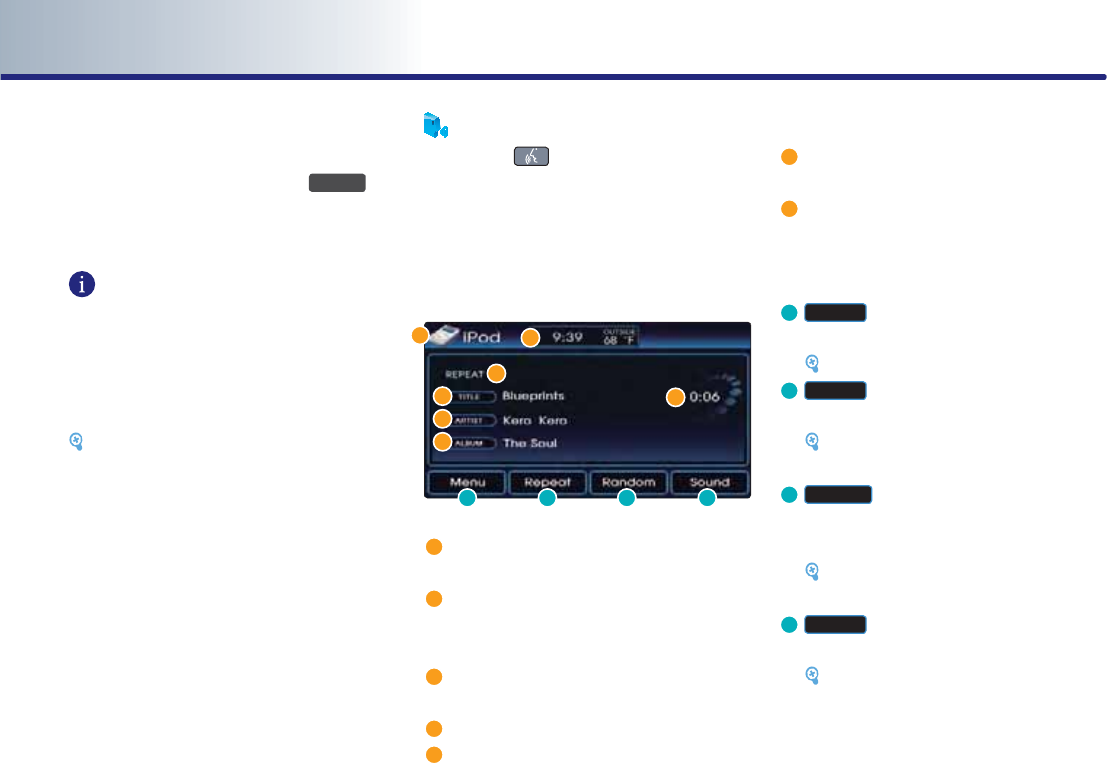
iPod screen and functions
Mode display : displays that the current
mode is iPod mode.
REPEAT/RANDOM indicator : if REPEAT/
RANDOM is operating, the switch is dis-
played.
Title name : displays the title name of the
playing file.
Play Time : displays the play time.
Artist name : displays the artist name of
the playing file.
Album name : displays the album name of
the playing file.
Current time : displays the current time
manually automatically according to the
GPS time.
D
0HQX
button : converts to the search
menu screen.
[Selecting an iPod song], page 2-27.
E
5HSHDW
buttons : repeats the current
playing song.
[Setting repeat function for iPod song],
page 2-28.
F
5DQGRP
button : plays all songs in the
current playing list in random order or ran-
domly in album unit.
[Setting random function for iPod
song], page 2-28.
G
6RXQG
button : adjusts the FAD/BAL,
BASS/MID/TREB controls.
[Sound setting], page 1-12.
PART 2 AUDIO SYSTEM
DEFG
PREOVERVIEW
2-27
PRE-OVERVIEW
Selecting an iPod song
There are 3 ways to select songs from the iPod
device - (a) selecting song through Up/Down,
(b) selecting song through sequential search,
(c) selecting song through menu.
(a) Selecting song through Up / Down
Press the key on the for less than 0.8
second. The next or previous song will begin
playing.
INFORMATION
If the key on the control panel or
steering wheel remote controller is pressed
shortly while the track has played for more
than 3 seconds, the start of the current song
will begin playing. If the track has been
playing for less than 2 seconds, the start of the
previous song will begin playing.
Voice Command
1. Press the key on the steering wheel
remote controller.
2. After the beep sound, say a command.
"Next Song"
"Previous Song"
(b) Selecting song through search
1.
Press the
ѧ781(Ѧ
key to search for desired
to display file. Operate the
ѧ781(Ѧ
key
dial to display the previous or next channel
information. After a brief moment, the select-
ed channel will be displayed.
INFORMATION
If the operation of the
ѧ781(Ѧ
key is too
rapid, there may be a delay in displaying the
song information.
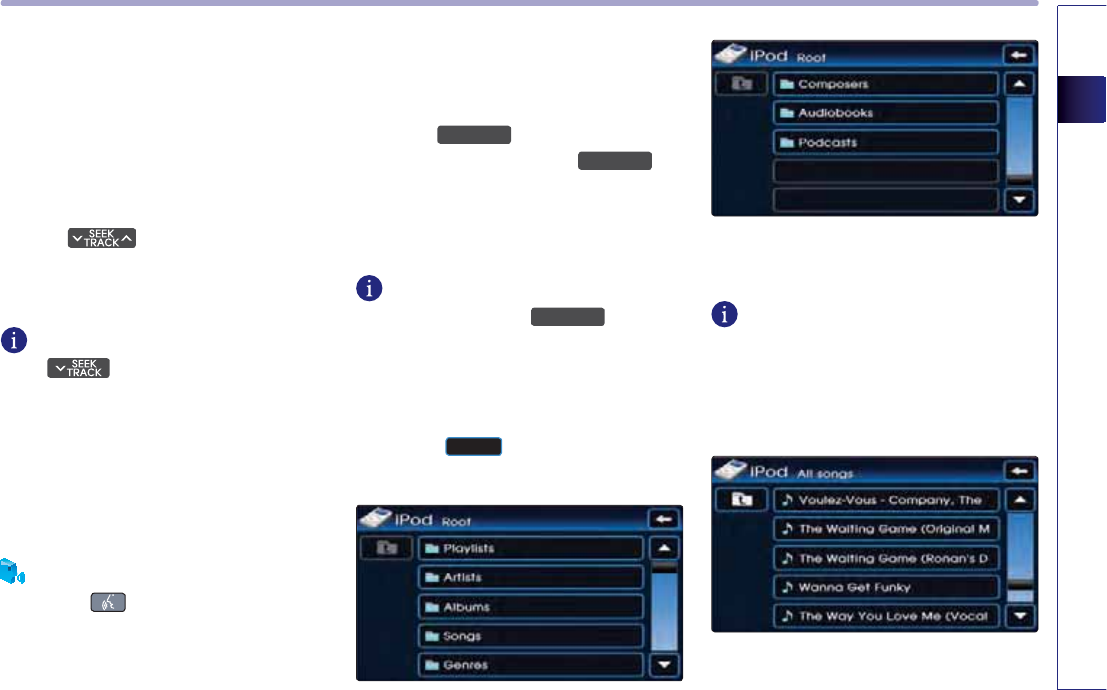
(c) Selecting song through Menu
1. Press the
0HQX
button. The iPod menu
screen will be displayed.
2. Press the button for the desired search
method.
INFORMATION
If the search mode is accessed while playing a
song, the most recent searched step will be
displayed. The search steps upon initial con-
nection are listed below.
3. Press the desired song button to return to
the main screen and play the selected song.
PART 2 AUDIO SYSTEM
2-28
REW/FF iPod song
Press and hold the key on the con-
trol panel or steering wheel remote controller
for over 0.8 second. The song will be play fast-
er while holding the button and return to nor-
mal play when the button is released.
Setting Repeat function for iPod song
Press the
5HSHDW
button. Each press will
change the function in the following order :
Repeat
ĺ
Repeat Off
ĺ
Repeat ...
●
Repeat : repeats the current playing song.
Voice Command
1. Press the key on the steering wheel
remote controller.
2. After the beep sound, say a command.
"Repeat Song"
Say "Normal Play" in order to terminate the
set Repeat function.
Setting Random function for iPod song
Press the
5DQGRP
button. Each press will
change the function in the following order :
Random
ĺ
Album Random
ĺ
Random Off
ĺ
Random ...
●
Album Random : plays the songs in the cur-
rent play list randomly in album units.
However, songs within the same album will
be played sequentially.
e.g.) Album1(Music1
ĺ
Music2
ĺ
Music3
ĺ
...
ĺ
Music10)
ĺ
Album5(Music
ĺ
Music2)
ĺ
Album4(Music1
ĺ
Music2
ĺ
Music3) ...
●
Random : plays all files in the current play
list (All Songs, certain albums, or user desig-
nated iPod Playlists) randomly regardless of
album.
e.g.) Music1
ĺ
Music9
ĺ
Music5
ĺ
Music13 ...
Voice Command
1. Press the key on the steering wheel
remote controller.
2. After the beep sound, say a command.
"Random"
"Random Album"
Say "Normal Play" in order to terminate the
set Random.
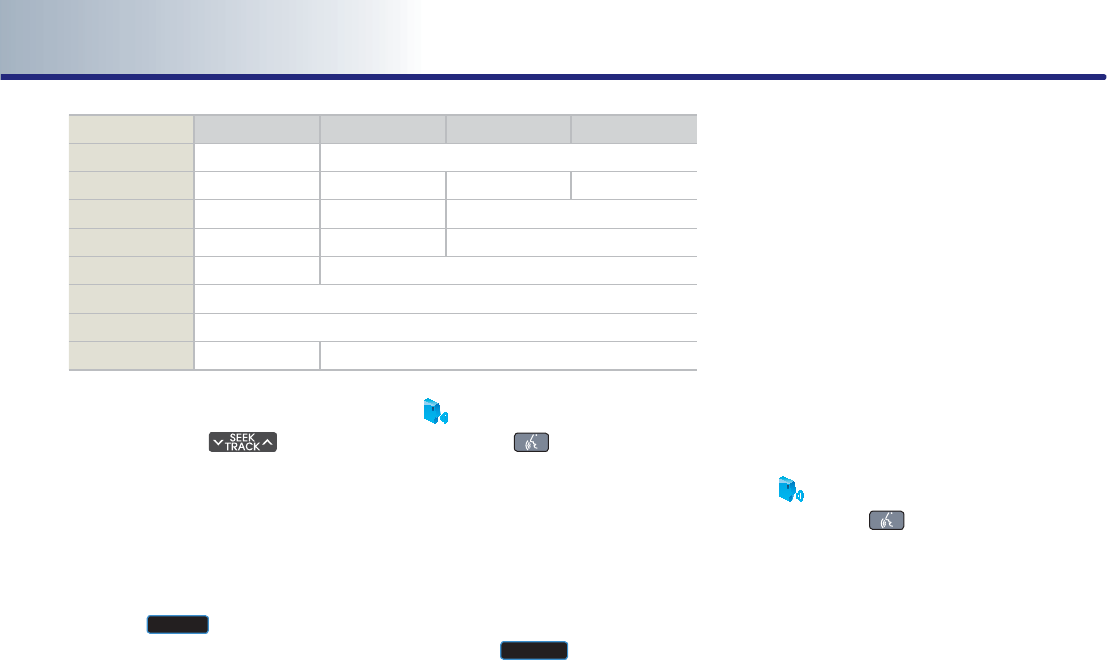
1 Step 2 Step 3 Step 4 Step
Playlist Playlist Song
Genre Genre Artist Album Song
Artist Artist Album Song
Composer composer Album Song
Album Album Song
Audiobooks Song
Songs Song
Podcasts Program Episode

PREOVERVIEW
2-29
PRE-OVERVIEW
USB MP3
USB MP3 related information and
precaution
●Information
• The MP3 file standards supported by the
device are as follows.
•
Acceptable standard: MPEG1 AUDIO LAYER 3
• Acceptable sampling frequency: 32, 44.1, 48
(kHz)
• Acceptable bit rate : 32, 40, 48, 56, 64, 80,
96, 112, 128, 160, 192, 224, 256, 320 (kbps)
• Recommended bit rate & reference sam-
pling frequency: 96,128, 192 kbps fixed bit
rate /44.1kHz
• ID3 tag
This device supports ID3v1.0, ID3v1.1,
ID3v2.2, ID3v2.3, and ID3v2.4 ID3 tags.
• Supported media
The MP3 media supported by the device are
CD-ROM and USB.
•Supported media formats
This device supports ISO9660 LEVEL1 and
LEVEL2. Detailed specification is as below.
•Maximum directory layers: 20 layers
• Maximum length of folder name/file name:
250Bytes
•
Supported characters for folder name/ file
name: Alphanumeric characters, Korean
standard character set 2350 characters,
Simplified Chinese 4888 characters
• Maximum number of folders which can be
stored onto one USB: 2000 folders (includ-
ing ROOT directory)
•
Maximum number of files which can be
stored onto one USB: 6000 files
•
Precautions upon formatting USB & down-
loading MP3 files
•
The device only supports FAT type USB file
system. The device will not play USB media
content if the USB is NTFS type.
●Precaution
Please use an MP3 bit rate which is less than
192Kbps and a fixed bit rate.
The sound quality cannot be guaranteed for
MP3s exceeding 192Kbps and operation of
specific functions (limited to FF/REW func-
tions) may be abnormal with variable bit
rates.
Precautions upon handling USB
● When using the external USB device, make
sure to keep the device disconnected.
Connect the device only after turning on
the vehicle ignition. The USB device may be
damaged if the USB device already connect-
ed when the ignition is turned on. (USB
device is not an electronic automotive com-
ponent)
● The external USB device may not operate if
the USB device already connected when
vehicle ignition is turned on or off.
● The device will not operate when playing a
format which is not MP3 or WMA file for-
mats.

PART 2 AUDIO SYSTEM
2-30
1. Only MP3 files with compression rates
between 8Kbps~320Kbps are supported.
2. Only WMA files with compression rates
between 8Kbps~320Kbps are supported.
● Be cautious of static electricity when con-
necting/disconnecting the external USB
device.
●
Encoded MP3 Players will not be recognized
when connected as the external device.
●
Charging through the USB may not be sup-
ported in some mobile devices.
※
An iPod car cable (Provided or sold sepa-
rately) is required to use the iPod.
•
Detachable USB/AUX •
All-in-one USB/AUX
●
When connecting an external USB device,
the device may not be properly recognize
the USB when the USB is in some states.
●
When formatting the external USB device,
the device may not be properly recognize a
Byte/Sector selection other than 512Byte or
2048Byte.
●
The device will only recognize USB devices
formatted in FAT 12/16/32.
●
Some USB devices may not operate proper-
ly because of compatibility issues. Verify
that the external device is supported by the
device before starting use.
●
Avoid contact between the USB connector
with bodily parts and foreign substances.
●
Repeatedly connecting/disconnecting the
USB in a short period of time may cause
damage to the device.
●
When disconnecting the USB, an abnormal
sound may occur occasionally.
●
Abruptly disconnecting the external USB
device while the USB is operating may
cause the device to be damaged or function
abnormally.
Make sure to disconnect the USB device
only after the audio power is turned off or
when the audio is operating in a different
mode.
●
The amount of time required to recognize
the external USB device may differ depend-
ing on the type, size, or file formats stored
on the USB. Such differences in the required
time are not indications of malfunction.
Please wait the period of time required to
recognize the device.
●
The device supports only USB devices used
to play music files.
●
Do not use the USB I/F to charge batteries
or USB accessories which generate heat.
Such acts may lead to deteriorated perfor-
mance or damage to the device.
●
The device may not recognize the USB
device if separately purchased USB hubs
and extension cables are being used.
Connect the USB directly to the multimedia
terminal of the vehicle.
●
In the case of high capacity USB devices,
there are instances where the logical drives
are partitioned for user convenience. In this
case, only the USB music in the top-level
logical drive will be possible to play.
When using partitioned drives, save the
songs desired to play on the device only in
the top-level logical drive.
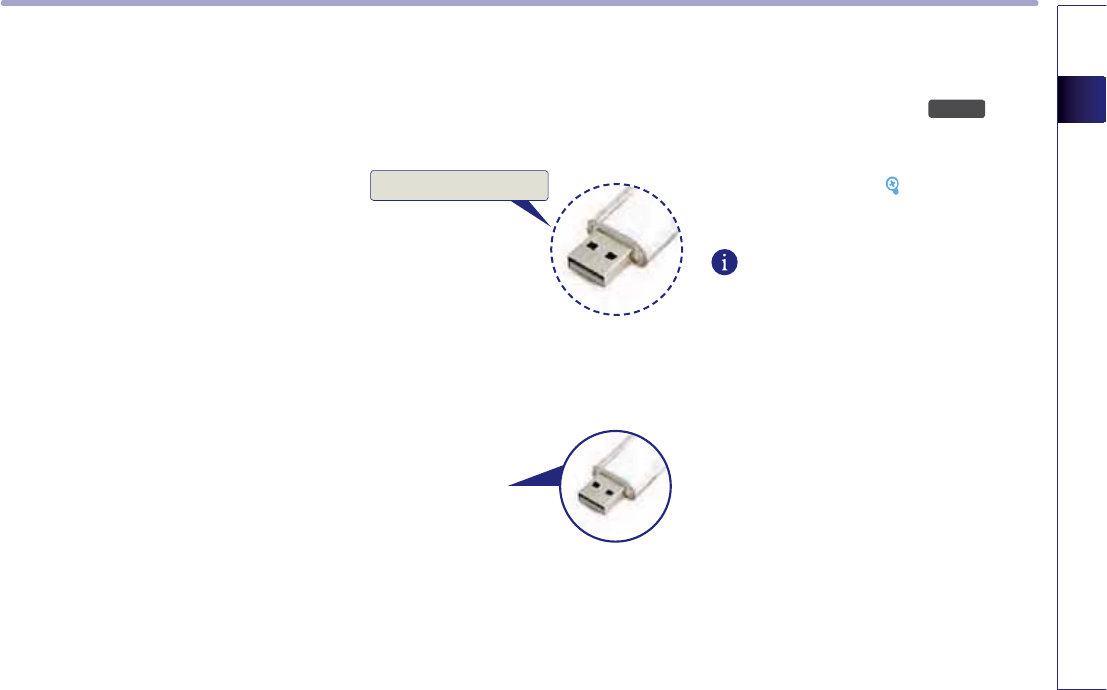
PREOVERVIEW
2-31
PRE-OVERVIEW
In addition, certain USB devices are config-
ured with a separate drive used to install
application programs and songs from such
drives may not be possible to play for the
reasons as described above.
●
The device may not support normal opera-
tion if MP3 Players, cellular phones, digital
cameras, or other electronic devices (USB
devices not recognized as portable disk
drives) are connected to the device.
●
The device may not support normal opera-
tion when using a USB memory type
besides the Metal Cover Type USB Memory.
●
The device may not support normal opera-
tion when using formats such as HDD Type,
CF, or SD Memory.
●
The device will not support files locked by
DRM (Digital Rights Management).
●
The device many not support normal opera-
tion if the proper connection with the USB
memory fails due to vibrations caused by
the vehicle. (i-stick type, etc.)
●
Please avoid using USB memory products
which can be used as key chains or cellular
phone accessories as they could cause dam-
age to the USB jack.
Please make certain only to use plug type
connector products as shown below.
Connecting the USB
Connect the USB as shown in the picture.
Listening to USB music
1. Connect a USB or press the
0(',$
key on
the control panel if the USB is already con-
nected.
2. Select the desired file. [Selecting the MP3
file], page 2-19.
INFORMATION
The USB screen and operation method is the
same with MP3 mode. Please refer to the MP3
mode section for more information.
Plug Type Connector
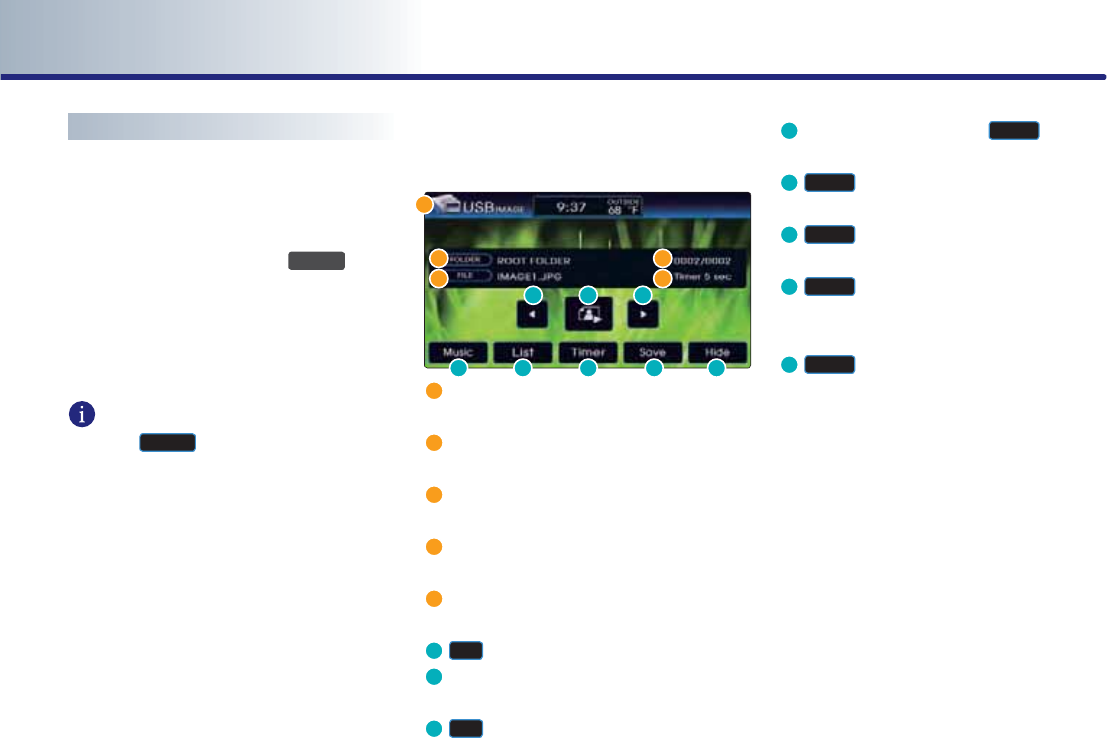
PART 2 AUDIO SYSTEM
2-32
USB IMAGE Mode
Starting USB IMAGE Mode
1. The USB mode will automatically start when
the USB is inserted. When in a different
mode, repeatedly press the
0(',$
key to
convert to USB mode. (Each press will
change in order of AUX
ĺ
DISC
ĺ
USB)
2.
The image will be displayed on the screen.
INFORMATION
Press the
0XVLF
button on the bottom left
side to enter either mode. (Supported only
when compatible files exist within the USB)
USB IMAGE mode menu screen
configuration
Mode display : display that the current
mode is <USB Image> mode.
Folder name : displays the name of the
folder where photo files are located.
File name : displays the file name of the
current photo.
File index : displays the number of Image
files within the USB (current file / all files)
Slide Show Interval : displays intervals of 5,
10, and 20 seconds.
D
Ԧ
button : displays the previous photo.
E
Slide Show View : displays photos in inter-
vals of 5, 10, and 20 seconds.
F
Ԣ
button : displays the next photo.
G
USB music (MP3) Mode
0XVLF
button :
converts to <USB Music> mode.
H
/LVW
button : displays the <Image List>
screen.
I
7LPHU
button : allows changes to slide
show interval.
J
6DYH
button : upon turning off power,
saves the current image as the frame
screen image.
K
+LGH
button : hides the button display.
D
GHIJK
EF

PREOVERVIEW
2-33
PRE-OVERVIEW
Operating USB IMAGE Mode
(a) Moving to next IMAGE
1. Press the screen.
2. Within the Image screen, press the
Ԧ
or
Ԣ
button to flip through each file.
(b) Displaying USB IMAGE Slideshow
Interval
1.
Repeatedly press the
7LPHU
button at the
bottom to change the slideshow interval
(converts in time intervals of 5 seconds
ĺ
10 seconds
ĺ
20 seconds
ĺ
5 seconds).
(c) Registering Frame
1.
Press the
6DYH
button at the bottom of
the <Image> screen. The currently displayed
image will be registered as the frame.
INFORMATION
For details on setting up the frame, refer to
the frame setup page within Screen setup.
Restrictions while driving – Image Play related
buttons cannot be used while the vehicle is in
motion.
There are five buttons such as <
Ԣ
/
Ԧ
/
3OD\,FRQ
/
6DYH
/
+LGH
.
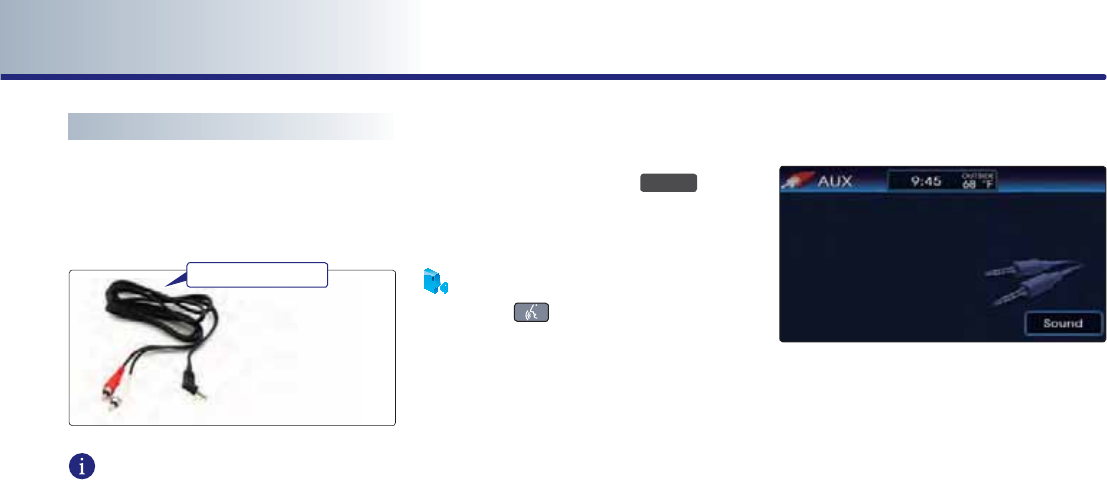
2-34
PART 2 AUDIO SYSTEM
AUX
Connecting AUX
Connect the external Audio player as shown
in the picture.
INFORMATION
Connect only by using AUX terminals.
Playing AUX
Connect an AUX or press the
0(',$
key on
the control panel if the AUX is already con-
nected.
Voice Command
1. Press the key on the steering wheel
remote controller.
2. After the beep sound, say a command.
"Line In"
AUX screen
Audio AUX screen
External Device

PREOVERVIEW
2-35
PRE-OVERVIEW
MEMO

PART 3 NAVIGATION SYSTEM
PART 3 NAVIGATION SYSTEM
PART 3
NAVIGATION SYSTEM
Limitations of the navigation
system ……………………………… 3-2
GPS signal reception state ………………3-2
Vehicle position display …………………3-3
Route Guidance …………………………3-4
Route Re-calculation ……………………3-4
Starting navigation system ……………3-5
Map Functions ……………………… 3-5
Current position map screen
(without route) …………………………3-5
Switching map mode
(North Up / Heading Up) ………………3-6
Viewing GPS signal state ………………3-7
Changing the map scale ………………3-8
Displaying / Hiding POI icons on the map 3-9
Displaying/Hiding Q.POI icons ……… 3-9
Displaying / Hiding icons other than
Q.POI icons …………………………… 3-9
Making a call to POI ………………… 3-10
Scrolling map ………………………… 3-11
Setting a destination ……………… 3-12
Destination menu screen and
functions ……………………………… 3-12
Searching a Destination ……………… 3-13
Searching an Address………………… 3-13
Searching a Previous Destination …… 3-17
Searching an Intersection …………… 3-17
Searching a POI ……………………… 3-20
Searching from Address book ……… 3-24
Searching for Emergency facilities … 3-25
Searching your Home ……………… 3-25
Searching favorite places …………… 3-26
Searching from MAP ………………… 3-26
Searching POI by local POI list ……… 3-26
Operating after searching a destination 3-27
Changing destination position ……… 3-27
Setting as Destination / waypoint …… 3-27
Adding to address book …………… 3-27
Operating after setting a destination … 3-28
Route guidance screen ……………… 3-28
Selecting other route ………………… 3-29
Route guidance ……………………… 3-30
Route menu screen and functions …… 3-30
Finishing route guidance
(Delete Destination) ………………… 3-30
Route overview (View Entire Route) … 3-31
Changing Route option ……………… 3-32
Editing waypoints …………………… 3-32
Deleting waypoints ………………… 3-34
Re-ordering waypoints ……………… 3-34
Setting detour distance ……………… 3-35
Setting avoid streets on route ……… 3-35
Setup and Information …………… 3-36
Setup menu screen and functions …… 3-36
Main setting ………………………… 3-37
Setting keyboard for inputting letter 3-37
Setting voice command feedback
ON/OFF ……………………………… 3-37
Setting Language …………………… 3-37
Initializing system …………………… 3-37
Navigation setting …………………… 3-38
Setting units (mile/ km) ……………… 3-38

NAVIGATION SYSTEM
3-1
NAVIGATION SYSTEM
PART 3
NAVIGATION SYSTEM
Setting arrival time and distance
display ………………………………… 3-38
Registering avoid area ……………… 3-38
Editing avoid area …………………… 3-40
Deleting avoid area ………………… 3-41
Deleting all avoid areas ……………… 3-41
Setting Q.POI icons …………………… 3-42
Setting estimate travel time ………… 3-42
My places setting …………………… 3-43
Registering new address in
address book ………………………… 3-43
Editing an address of address book … 3-45
Deleting an address of address book 3-46
Deleting an address book …………… 3-47
Registering home address …………… 3-48
Deleting home address ……………… 3-48
Registering favorite place …………… 3-49
Deleting favorite place ……………… 3-50
System information and update …… 3-51
Voice guidance volume setting ……… 3-51
Voice guidance volume control ……… 3-51
Adaptive volume control ON/OFF …… 3-52
Traffic Setup ………………………… 3-52
Traffic Information …………………… 3-52
Help …………………………………… 3-54
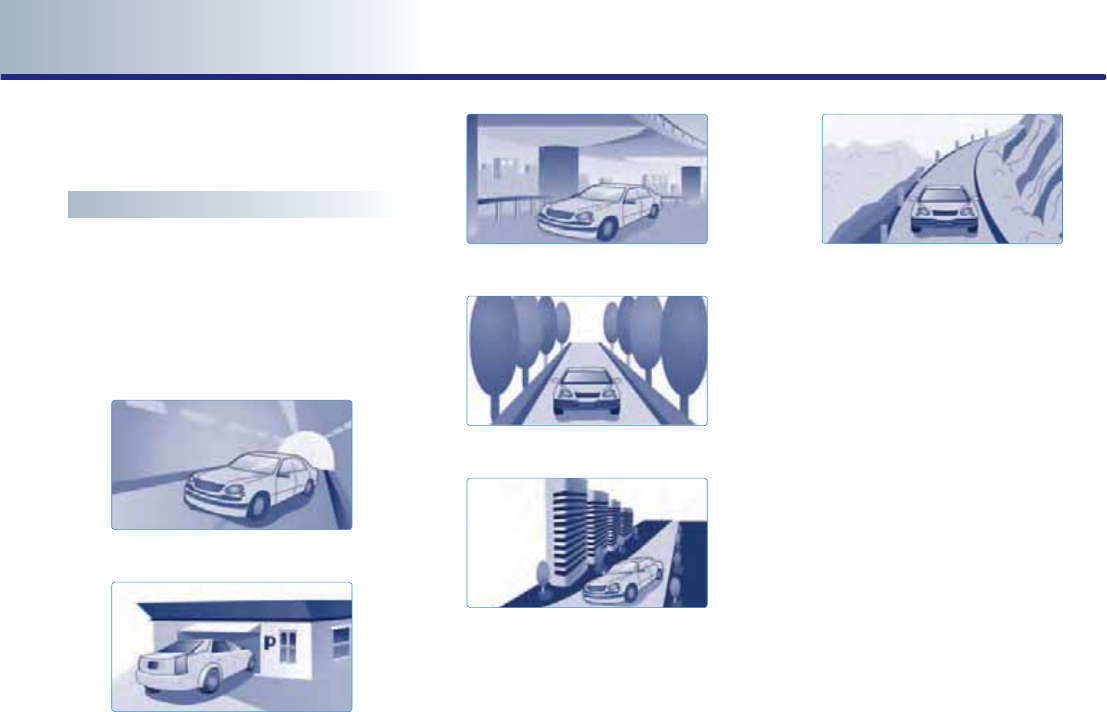
PART 3 NAVIGATION SYSTEM
3-2 NAVIGATION SYSTEM
Limitations of the navigation
system
GPS signal reception state
●
As the GPS satellite frequency is received /
transmitted in straight lines, reception may
not work if devices are placed on or near
the GPS antenna or when traveling through
the following locations.
•Tunnels
•Basement parking structures
•Underneath an overpass
•Roads within forested areas
•Areas near high rise buildings
•Roads within canyons

NAVIGATION SYSTEM
3-3
NAVIGATION SYSTEM
Vehicle position display
●
If multipass errors occur due to reflections
from buildings or related causes, the current
position mark on the navigation may differ
from the actual position of the vehicle.
● The position of the vehicle on the naviga-
tion may be different from the actual posi-
tion if the vehicle is under the following
conditions. If such differences occur, driving
for a short period of time will automatically
correct the position of the vehicle through
map matching or GPS information (several
minutes may be necessary in certain cases).
•
When driving on a Y-shaped road with a
narrow angle, the current position may be
displayed in the opposite direction.
• If the vehicle is loaded onto a ferry or a car
transport vehicle, the current position mark
may be stalled on the last position prior to
loading.
•When driving on a spiral-shaped road.
• When driving in mountain regions with
sharp turns or sudden brakes.
• When entering a road after having been in
an underground parking structure, building
parking structure, or turntable with many
rotations.
• When the tires have recently been replaced
(Especially upon use of spare or studless
tires)
• If the battery terminal is removed.
• When driving in city streets, the current
position may be displayed on the opposite
side or on an off-road position.
• When changing the zoom level from the
maximum zoom in level to a different zoom
level, the current position mark may be dis-
played on a different road.
• When driving in heavy traffic with frequent
go
・
stops in traffic or intersections.
• When driving under slippery conditions,
such as heavy sand, snow, etc.
• When driving with the tire chain in place.
• When using a tire with an incorrect size
specification.
• When the tire pressure for the 4 tires are dif-
ferent.
• When the replacement tire is a worn or
used tire (Especially studless tires having
passed a 2nd seasons, etc.)
• When driving near high-rise buildings
• If a roof carrier has been installed
• When driving under high speeds or having
calculated a long-distance route.

PART 3 NAVIGATION SYSTEM
3-4 NAVIGATION SYSTEM
Route Guidance
●
Suitable route guidance may not occur
caused by search conditions or the driving
position.
•
Guidance to go straight may be given while
driving on a straight road.
•
Guidance may not be given even when hav-
ing turned at an intersection.
•
There are certain intersections in which
guidance may not occur.
•
A route guidance signaling for a U-Turn in a
No U-Turn location may occur.
•
A route guidance signaling entrance into a
no enter zone may occur (No enter zone,
road under construction, etc.).
•
Guidance may be given to a position
removed from the actual destination if
roads to reach the actual destination do not
exist or are too narrow.
•
Faulty voice guidance may be given if the
vehicle breaks from the designated route
(ex: if a turn is made at an intersection while
the navigation provided guidance to go
straight).
•
Map Data may be missing or incorrect caus-
ing route guidance to not be given.
Route Re-calculation
● The following phenomena may occur after
conducting route recalculation.
•
Guidance may be given to a position differ-
ing from the current position when turning
at an intersection.
•
Route Recalculation may take a longer peri-
od of time when driving under high speeds.
•
A route guidance signaling for a U-Turn in a
No U-Turn location may occur.
•
A route guidance signaling entrance into a no
enter zone may occur (No enter zone, road
under construction, etc).
•
Guidance may be given to a position
removed from the actual destination if
roads to reach the actual destination do not
exist or are too narrow.
•
Faulty voice guidance may be given if the
vehicle breaks from the designated route
(ex: if a turn is made at an intersection while
the navigation provided guidance to go
straight)
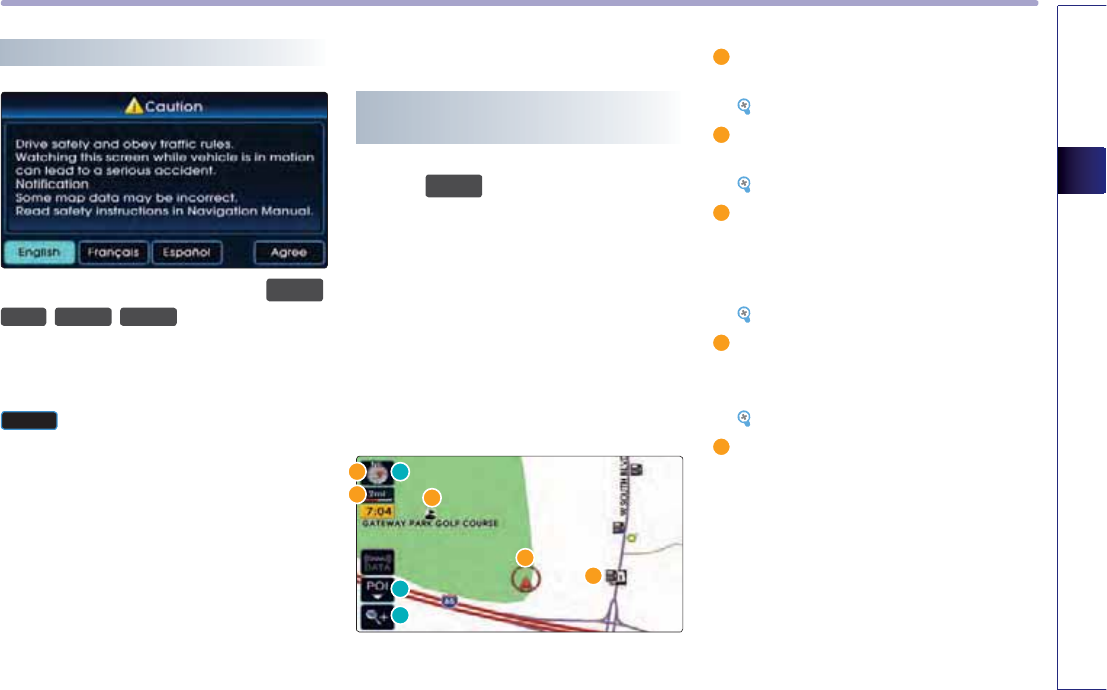
NAVIGATION SYSTEM
3-5
NAVIGATION SYSTEM
Starting navigation system
Press the Navigation mode key (
0$3
92,&(
,
'(67
,
5287(
,
6(783
). The Caution screen
will always be displayed when first entering
into Navigation mode. Read the contents of
the caution screen carefully and press the
$JUHH
button.
Map Functions
Current position map screen
(without route)
Press the
0$3
92,&(
key on the control panel to
display the map of current position and the
neighboring area.
GPS signal state indicator : displays the
state of GPS signal reception.
[Viewing GPS signal state], page 3-7.
Map scale level indicator : displays the cur-
rent map scale.
[Changing the map scale], page 3-8.
Landmark icons : landmark icons are dis-
played on the map when the map scale
level is set to under 300 ft (100m depend-
ing on map data)
[Appendix : landmark icons], page 10-7.
POI icons : POI icons are displayed on the
map when the map scale level is set to
under 0.5 mi (800m).
[Appendix : POI icons], page 10-5.
Current vehicle position icon : displays the
current position of the vehicle.
D
E
F
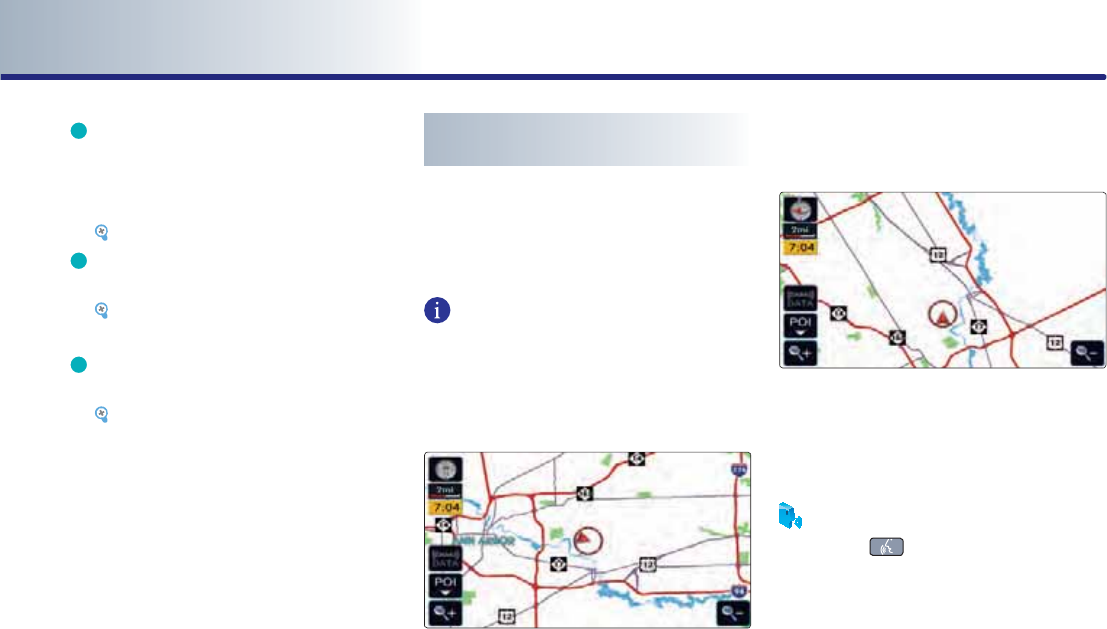
PART 3 NAVIGATION SYSTEM
3-6 NAVIGATION SYSTEM
D
North Up / Heading Up switch : displays
the current map mode and the map mode
can be switched between North Up and
Heading Up.
[Switching map mode], page 3-6.
E
POI : displays or hides the POI icon on the
map.
[Displaying/Hiding POI icons on the
map], page 3-9.
F
Map scale : increases or decreases the map
scale.
[Changing the map scale], page 3-8.
Switching map mode (North Up /
Heading Up)
Each time the compass button is pressed, the
screen will switch in the order shown below.
Heading Up
ĺ
North Up
ĺ
Heading Up ...
INFORMATION
All map screens (map screen after setting des-
tination & whole route display screen) except
the current position screen will always be dis-
played in North Up mode.
● North Up : displays the map always facing
the North direction regardless of the direc-
tion which the vehicle is traveling.
The vehicle icon is displayed in the center
position of the map.
●
Heading Up : displays the map always fac-
ing the direction which the vehicle is travel-
ing. The vehicle icon is displayed in the
lower center position of the map.
Voice Command
1. Press the key on the steering wheel
remote controller.
2. After the beep sound, say a command.
"North Up"
"Heading Up"

NAVIGATION SYSTEM
3-7
NAVIGATION SYSTEM
Viewing GPS signal state
The state of GPS signal reception is displayed
as shown below.
● (active) :
GPS reception is satisfactory.
● (inactive) :
GPS reception is unsatisfactory.
[System information and update], page
3-51.
INFORMATION
●
GPS (Global Position System) : GPS is a sys-
tem developed and operated by the United
States which determines the current loca-
tion of the user (longitude, latitude, etc.) by
generally using 4 or more satellites. This
system is used with related GPS informa-
tion, various sensors, road map data, and
other navigation related information.
●
GPS information may not operate under
thefollowing conditions.
• When buildings, tunnels, or other obstruc-
tions block satellite signals.
• When materials are placed above the GPS
antenna and block satellite signals.
• When the satellite does not transmit sig-
nals (signal transmission is controlled by
the satellite control center in the United
States and may not transmit when under
repair, modification, etc).
• When a digital cellular phone (1.5GHz) is
placed near the GPS antenna.
●
This system uses GPS information, various
sensors, road map data, and other related
information to display the current position.
Errors may occur if the satellite is transmit-
ting inaccurate signals or only two or less
satellite signals can be received.
Errors which occur in such conditions can-
not be corrected.
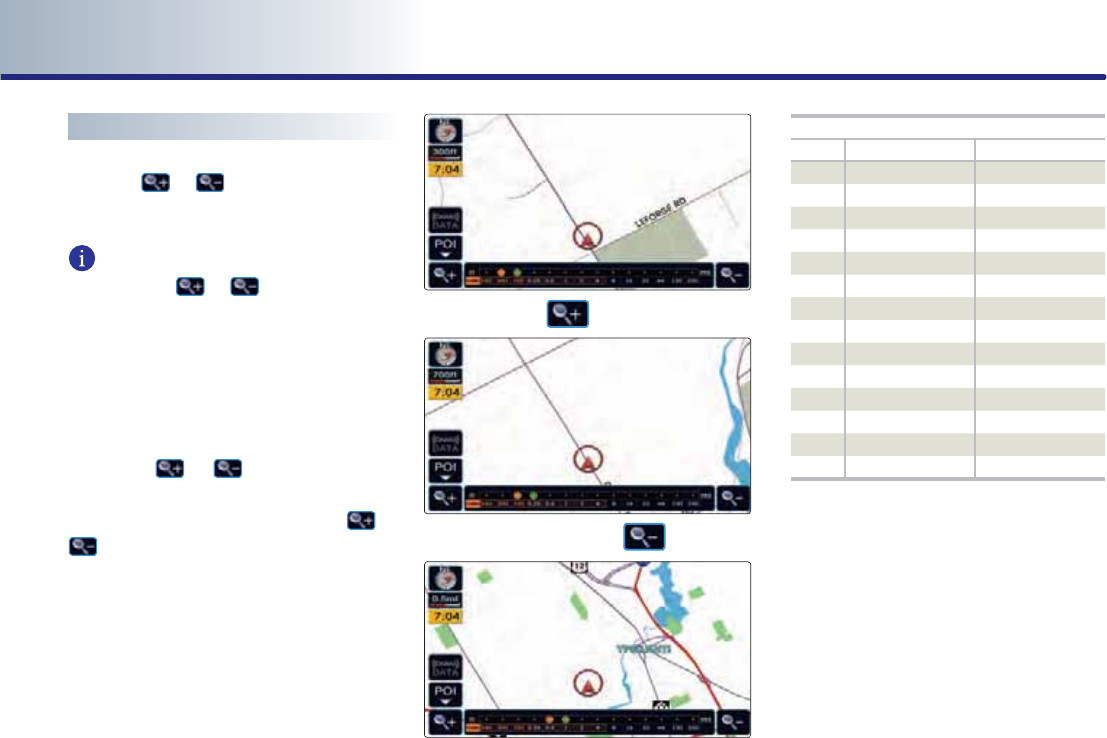
PART 3 NAVIGATION SYSTEM
3-8 NAVIGATION SYSTEM
Changing the map scale
Press the or button. The map scale
will be increased or decreased by one level.
INFORMATION
Each time the or button is pressed,
the scale bar will be displayed.
The scale can be changed by directly pressing
the scale level on the scale bar.
The green color on the scale bar indicates the
current scale level while the orange color indi-
cates the selected scale level.
Ɣ
Press the
or
button for over 0.8
second. The scale will continuously change.
ƔIf the scale range limit is reached, the
or
button will be disabled.
Ɣ The map scale range is between 1 and 14:
10,240,000 ~ 1 : 5,000.
Actual distance
Level
mi / ft km / m
1 150 ft 50 m
2 300 ft 100 m
3 700 ft 200 m
4 0.25 mi 400 m
5 0.5 mi 800 m
6 1 mi 1.6 km
7 2 mi 3.2 km
8 4 mi 6.4 km
9 8 mi 12 km
10 16 mi 25 km
11 32 mi 50 km
12 64 mi 100 km
13 130 mi 200 km
14 250 mi 400 km
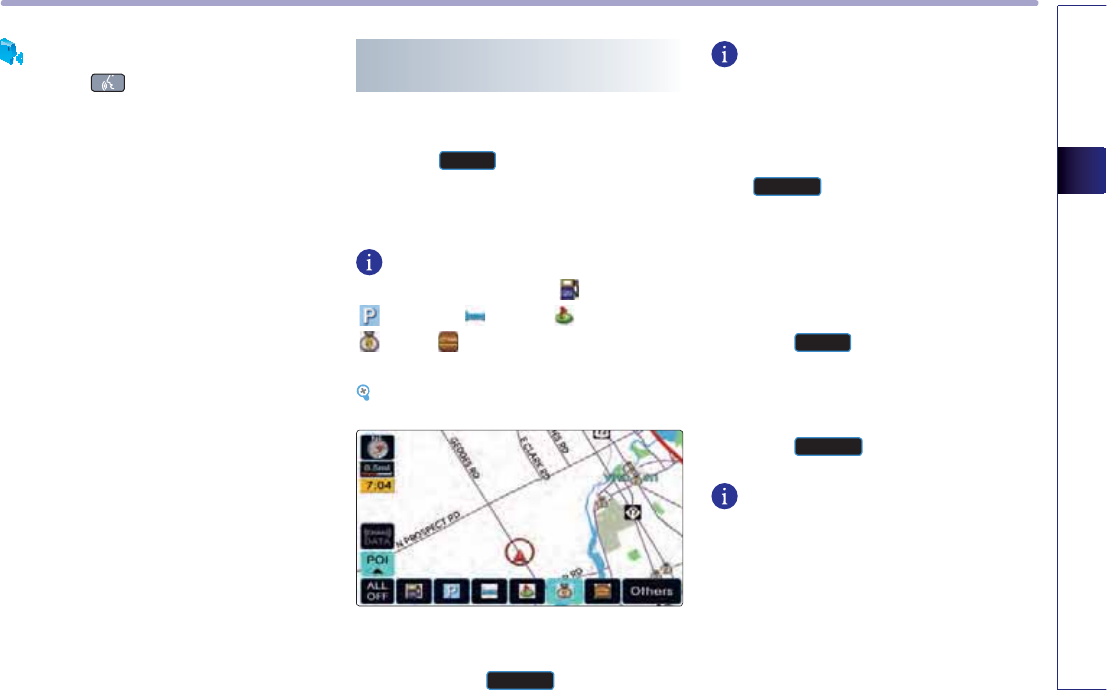
NAVIGATION SYSTEM
3-9
NAVIGATION SYSTEM
Voice Command
1. Press the key on the steering wheel
remote controller.
2. After the beep sound, say a command.
"Zoom In"
"Zoom Out"
"Zoom Maximum"
"Zoom Minimum"
"Zoom level <1 to 14>"
"Zoom <actual distance>"
" (ex. Zoom 700ft)"
Displaying / Hiding POI icons on
the map
Displaying/Hiding Q.POI icons
1
.
Press the
32,Ԥ
button.
Related menu buttons will be displayed at
the bottom of the screen.
INFORMATION
The Q.POI icons are set to - Gas Station,
- Parking, - Hotel, - Golf Course,
- Bank, - Fast Food (6 icons) by default.
This setting can be changed in SETUP.
[Setting Q.POI icons], page 3-42.
2
.
Press the icon buttons to display or hide.
To turn off all POI icons displayed on the
map, press the
$//2))
button.
INFORMATION
●
The current displayed POI icons are high-
lighted while the icons not being displayed
are shown as normal buttons.
●
If there are no POI icons being displayed,
the
$//2))
button will be disabled.
●
POI icons are displayed when the scale is
under 0.5 mi (800m).
Displaying / Hiding icons other than
Q.POI icons
1
.
Press the
32,
▼
button.
Related menu buttons will be displayed at
the bottom of the screen.
2
.
Press the
2WKHUV
button.
INFORMATION
Q.POI stands for Quick POI and refers to the
function which turns POI icon display on or off
on the map.

PART 3 NAVIGATION SYSTEM
3-10 NAVIGATION SYSTEM
(a) by category list
3
.
Press the desired main category button.
4
.
Select the desired sub category menu to
display or hide (Multiple selections are pos-
sible).
Press the selected menu again to cancel the
selection.
5
.
If the
6KRZ,FRQV
button is pressed, the
selected menus will be displayed or hidden
on the map screen.
Voice Command
1. Press the key on the steering wheel
remote controller.
2. After the beep sound, say a command.
"Show <POI name>" (ex. Show ATM)
"Hide <POI name>" (ex. Hide ATM)
"Hide All"
Making a call to POI
After searching a POI, the POI phone number
information can be used to make a call to the
POI facility.
1
.
Use the various search methods, such as the
map scroll function, Q.POI search function,
and destination search function to search
for a POI.
2
.
Press the button.

NAVIGATION SYSTEM
3-11
NAVIGATION SYSTEM
3
.
Bluetooth is used to make a call to the POI
facility.
4
.
Once the call is ended, the map is restored
to the current vehicle location.
INFORMATION
●
Making a call is not possible if there is no
telephone information for a POI or if there is
no mobile phone connected through
Bluetooth.
●
For more information of mobile phone
authentication through Bluetooth or
detailed information on conducting search,
refer to [Pairing and connecting
a Bluetooth phone], page 5-4.
Scrolling map
Press the map area on the map screen.
The selected point will be centered on the
screen and the scroll mark will be displayed.
Information about the marked point and
straight line distance from the current posi-
tion will be displayed at the top of the screen.
INFORMATION
If a map area on the map screen is pressed,
the map will continuously scroll in the corre-
sponding direction until the pressing is
released.
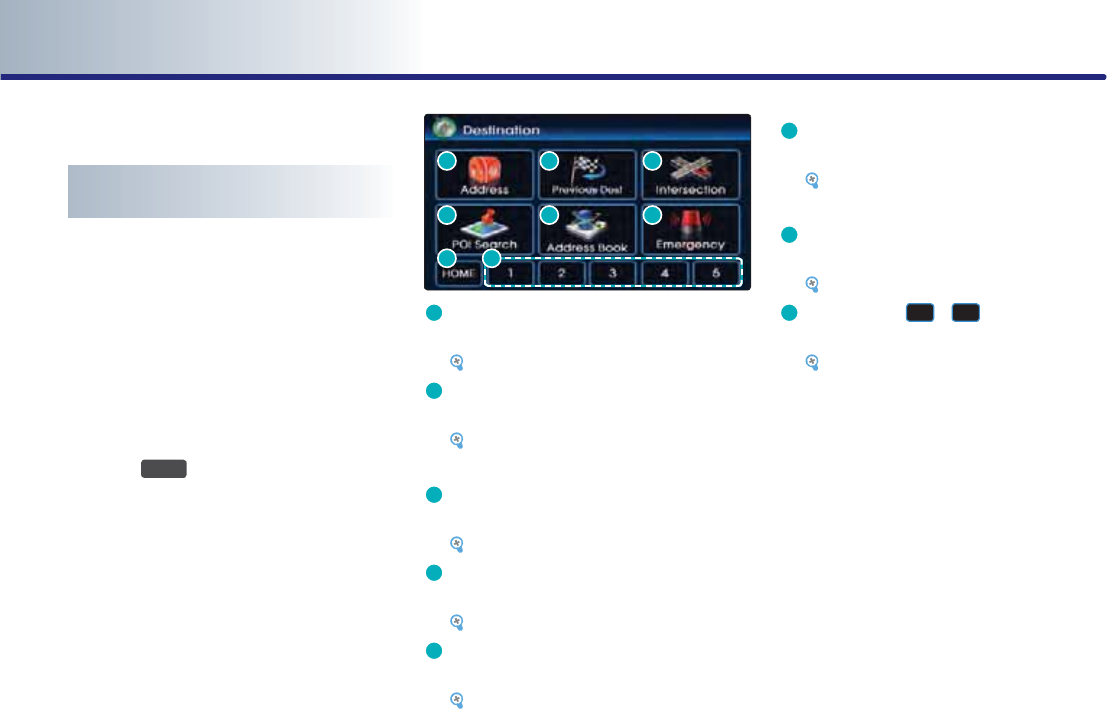
PART 3 NAVIGATION SYSTEM
3-12 NAVIGATION SYSTEM
Setting a destination
Destination menu screen and
functions
Press the
'(67
key on the control panel to
display the destination menu screen.
D
Address : sets the destination through
address search.
[Searching an Address], page 3-13.
E
Previous Dest : sets the destination
through the previous destination list.
[Searching a Previous Destination],
page 3-17 .
F
Intersection : sets the destination through
intersection search.
[Searching an Intersection], page 3-17.
G
POI Search : sets the destination through
POI Category search.
[Searching a POI], page 3-20 .
H
Address Book : sets the destination
through address book search.
[Searching from Address book], page
3-24 .
I
Emergency : sets the destination through
emergency facilities search.
[Searching for Emergency facilities],
page 3-25 .
J
HOME : sets the stored HOME as the desti-
nation.
[Searching your Home], page 3-25 .
K Favorite place
~
: sets the destina-
tion with one of the stored favorite places.
[Searching favorite places], page 3-26 .
D
G
JK
E
H
F
I
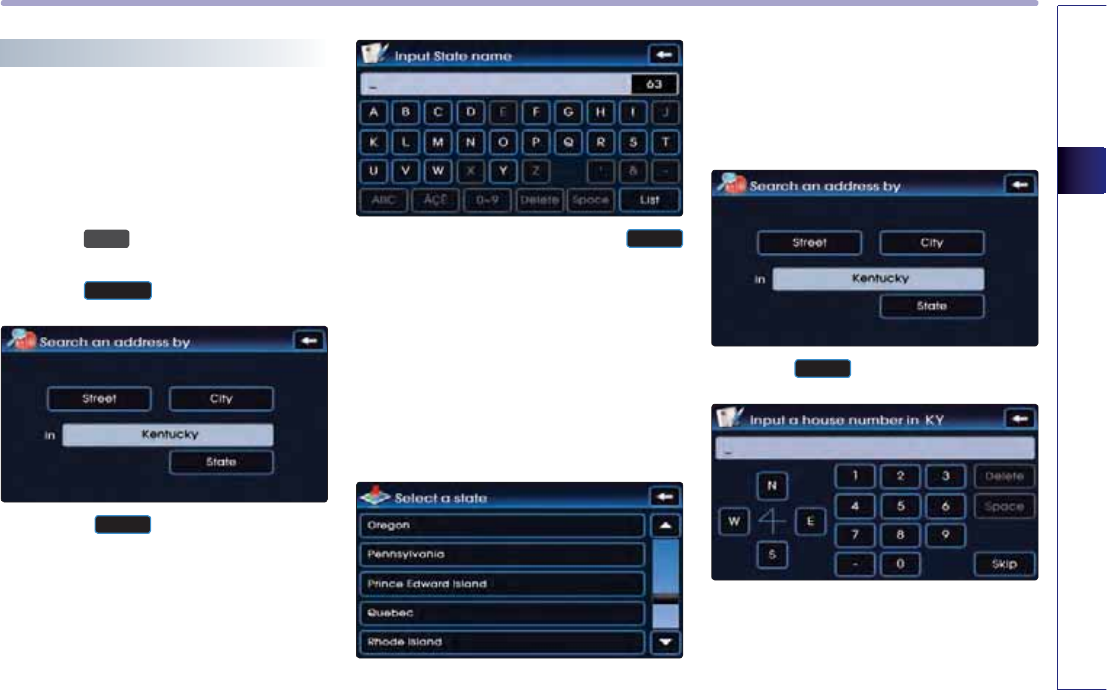
NAVIGATION SYSTEM
3-13
NAVIGATION SYSTEM
Searching a Destination
Searching an Address
There are 2 ways to set the destination
through address search-(a) by street, (b) by
city.
1
.
Press the
'(67
key.
2
.
Press the
$GGUHVV
button.
3
.
Press the
6WDWH
button to change the
state.
4
.
Input the State name and press the
/LVW
button.
If the number of matches with the input is
less than 4 results, then the state list screen
will be displayed automatically.
If the number of matches is only one result,
then the state will automatically be
changed without having to manually select
the state.
5
.
Select the desired state from the list to
change the state.
(a) by street
6
.
Press the
6WUHHW
button.
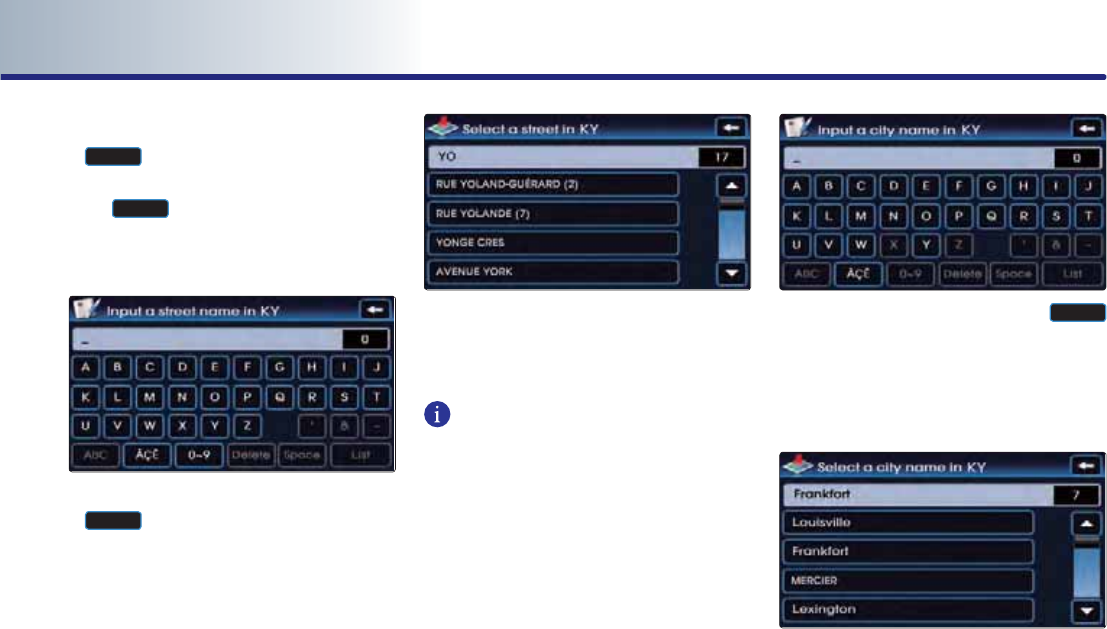
PART 3 NAVIGATION SYSTEM
3-14 NAVIGATION SYSTEM
7
.
Input the House number and Press the
'RQH
button to complete.
If the House number is not recognized, press
the
6NLS
button.
In this case, the range of house numbers
will be displayed during the last step.
8
.
Input the Street name and press the
/LVW
button.
If the number of matches with the input is
less than 4 results, then the street list screen
will be displayed automatically.
9
.
If the desired street from the list is selected,
the corresponding position will be dis-
played on the map.
INFORMATION
If more than 30 cities exist with the selected
street, then the city input screen will be dis-
played. If less than 30 cities exist, then the city
selection screen will be displayed.
10
.
Input the city name and press the
/LVW
button to complete. If the number of
matches with the input is less than 4
results, then the list screen will be dis-
played automatically.
11.Select the desired city from the list.
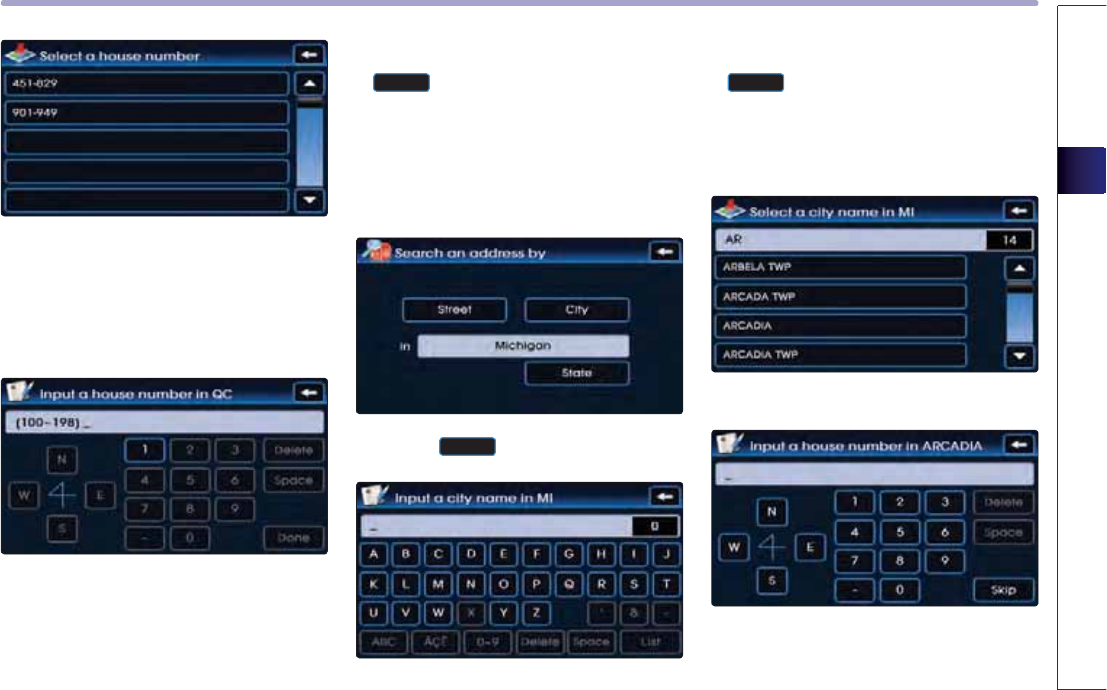
NAVIGATION SYSTEM
3-15
NAVIGATION SYSTEM
12
.
This screen will be displayed if the House
number had not been inputted during
step 6 and more than 2 house numbers
ranges exist.
Select the desired House number range.
13
.
This screen will be displayed if the House
number had not been inputted and only
one house numbers range exists.
Input the House number and press the
'RQH
button to complete.
The corresponding position will be dis-
played on the map.
(b) by city
5
.
Press the
&LW\
button.
6
.
Input the city name and press and press the
/LVW
button.
If the number of matches with the input is
less than 4 results, then the city list screen
will be displayed automatically.
7
.
Select the desired city from the list.
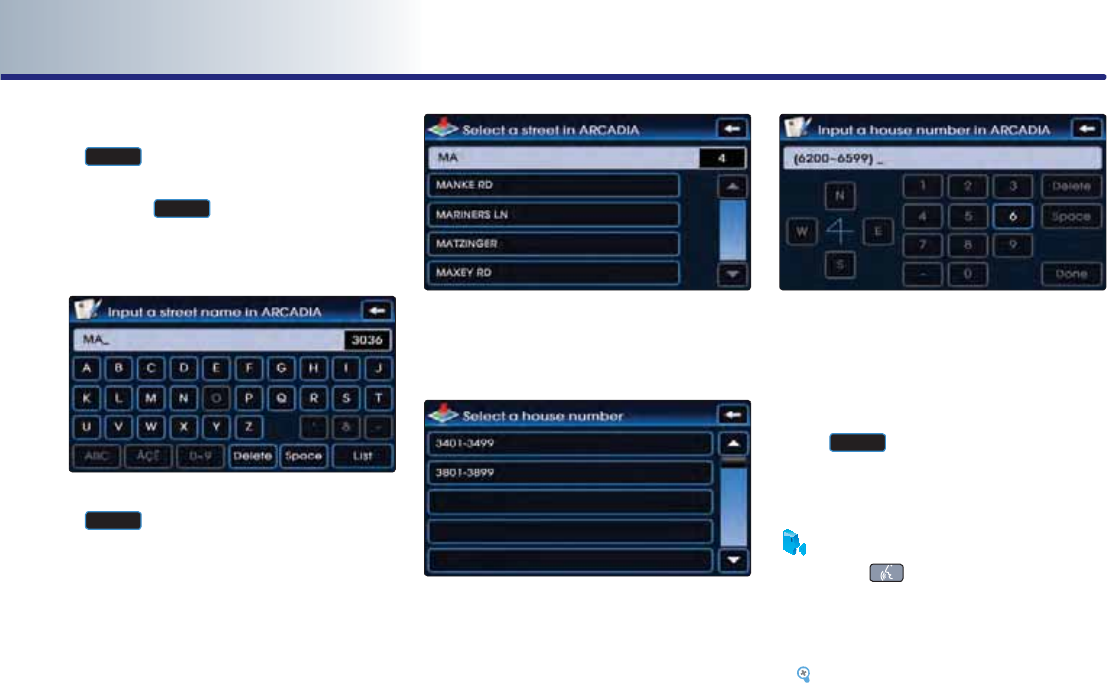
PART 3 NAVIGATION SYSTEM
3-16 NAVIGATION SYSTEM
8
.
Input the house number and press the
'RQH
button to complete.
If the House number is not recognized,
press the
6NLS
button.
In this case, the range of house numbers
will be displayed during the last step.
9
.
Input the Street name and press the
/LVW
button to complete.
If the number of matches with the input is
less than 4 results, then the street list screen
will be displayed automatically.
10
.
Select the desired street from the list and
the corresponding position will be dis-
played on the map.
11
.
This screen will be displayed if the House
number had not been inputted during
step 8 and more than 2 House number
ranges exist.
Select the desired House number range.
12
.
This screen will be displayed if the House
number had not been inputted during
step
H
and only one House number
range exists.
Select the house number range and Press
the
'RQH
button to complete.
The corresponding position will be dis-
played on the map.
Voice Command
1. Press the key on the steering wheel
remote controller.
2. After the beep sound, say a command.
"Find address"
[Find address], page 5-19.
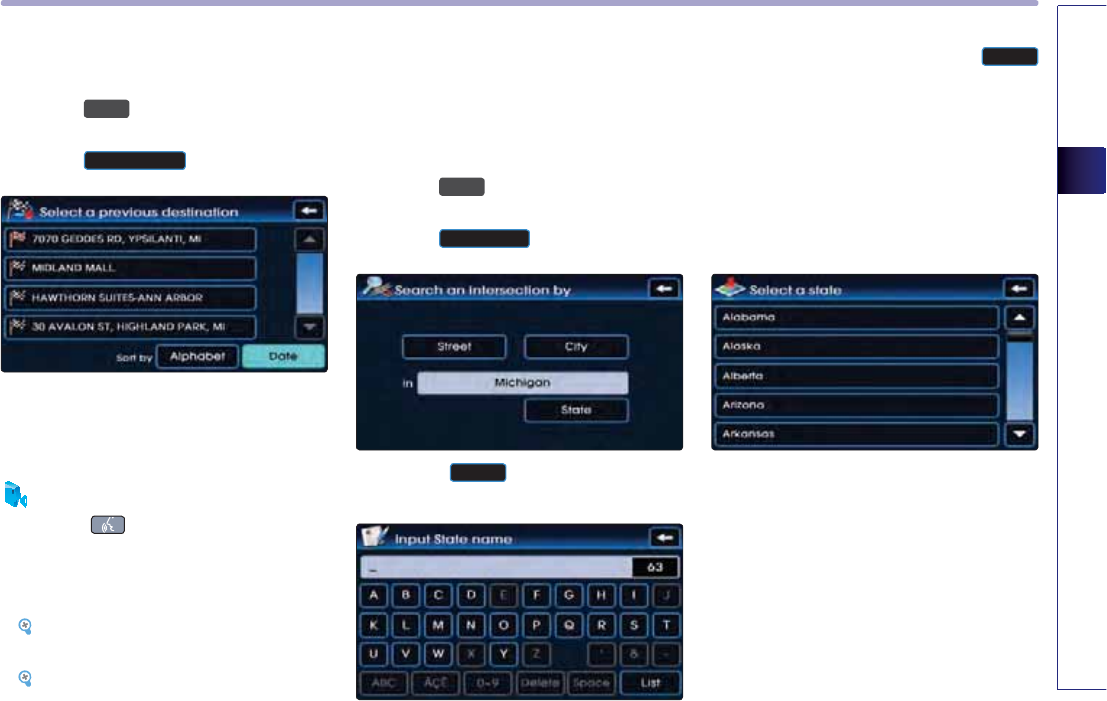
NAVIGATION SYSTEM
3-17
NAVIGATION SYSTEM
Searching a Previous Destination
1
.
Press the
'(67
key.
2
.
Press the
3UHYLRXV'HVW
button.
3
.
Select the desired previous destination. The
corresponding position will be displayed on
the map.
Voice Command
1. Press the key on the steering wheel
remote controller.
2. After the beep sound, say a command.
"Previous destination"
[Previous destination], page 5-24.
"Previous start point"
[Previous start point], page 5-25.
Searching an Intersection
There are two ways to set the destination
through intersection search-(a) by street, (b)
by city.
1
.
Press the
'(67
key.
2
.
Press the
,QWHUVHFWLRQ
button.
3
.
Press the
6WDWH
button to change the
state.
4
.
Input the state name and press the
/LVW
button. If the number of matches with the
input is less than 4 results, then the state
list screen will be displayed automatically.
If the number of matches is only one result,
then the state will automatically be
changed without having to manually select
the state.
5
.
Select the desired state from the list to
change the state.
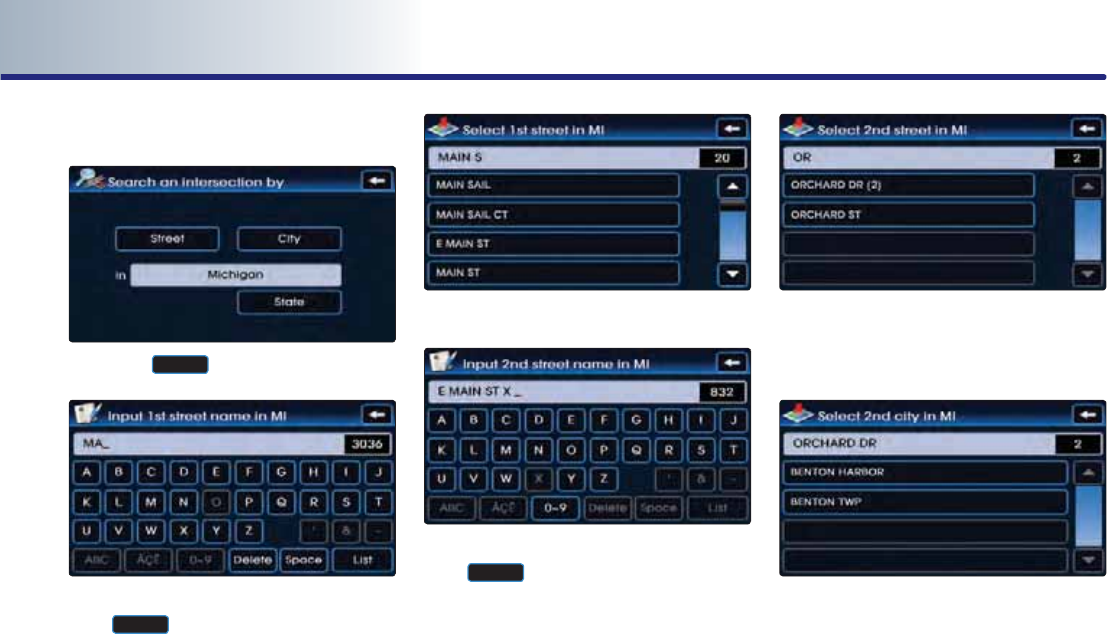
PART 3 NAVIGATION SYSTEM
3-18 NAVIGATION SYSTEM
(a) by street
6
.
Press the
6WUHHW
button.
7
.
Input the name of the 1st street and press
the
/LVW
button.
If the number of matches with the input is
less than 4 results, then the street list screen
will be displayed automatically.
8
.
Select the desired 1st street from the list.
9
.
Input the name of the 2nd street and press
the
/LVW
button.
If the number of matches with the input is
less than 4 results, then the street list screen
will be displayed automatically.
10
.
Select the desired 2nd street menu from
the list. The corresponding position will be
displayed on the map.
11
.
If the selected 2nd street is within more
than 2 cities, then the city list screen will
be displayed.
Select the desired city menu from the list.
The corresponding position will be dis-
played on the map.
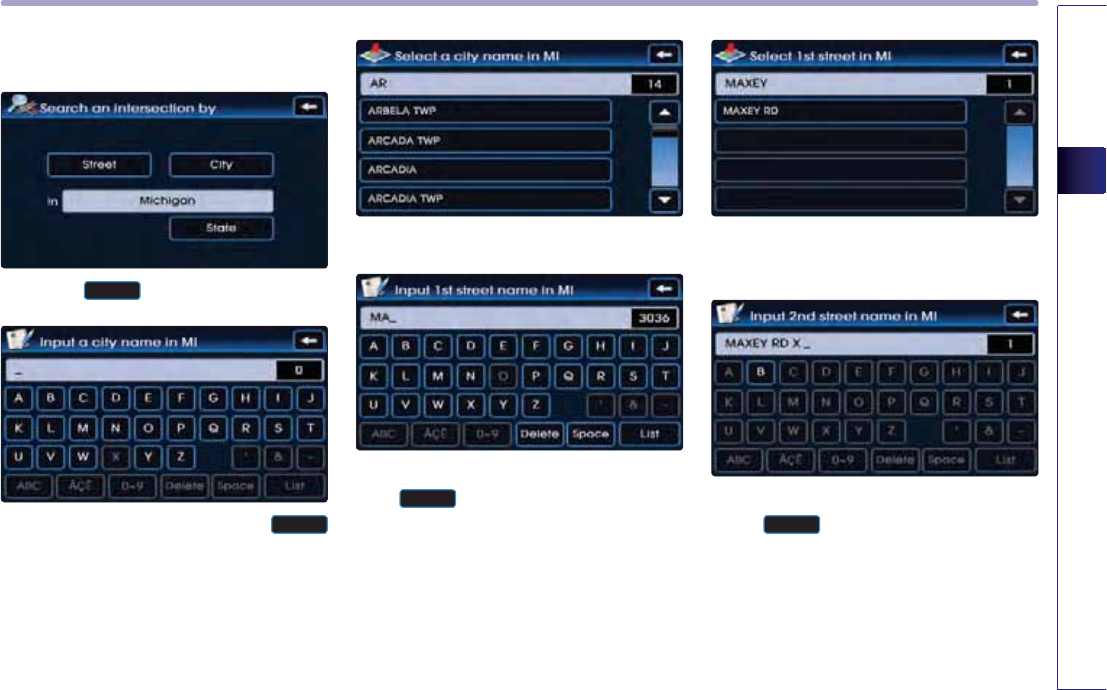
NAVIGATION SYSTEM
3-19
NAVIGATION SYSTEM
(b) by city
6
.
Press the
&LW\
button.
7
.
Input the city name and press the
/LVW
button.
If the number of matches with the input is
less than 4 results, then the city list screen
will be displayed automatically.
8
.
Select the desired city name.
9
.
Input the name of the 1st street and press
the
/LVW
button.
If the number of matches with the input is
less than 4 results, then the street list screen
will be displayed automatically.
10
.
Select the desired 1st street menu from
the list.
11
.
Input the name of the 2nd street and press
the
/LVW
button.
If the number of matches with the input is
less than 4 results, then the street list
screen will be displayed automatically.
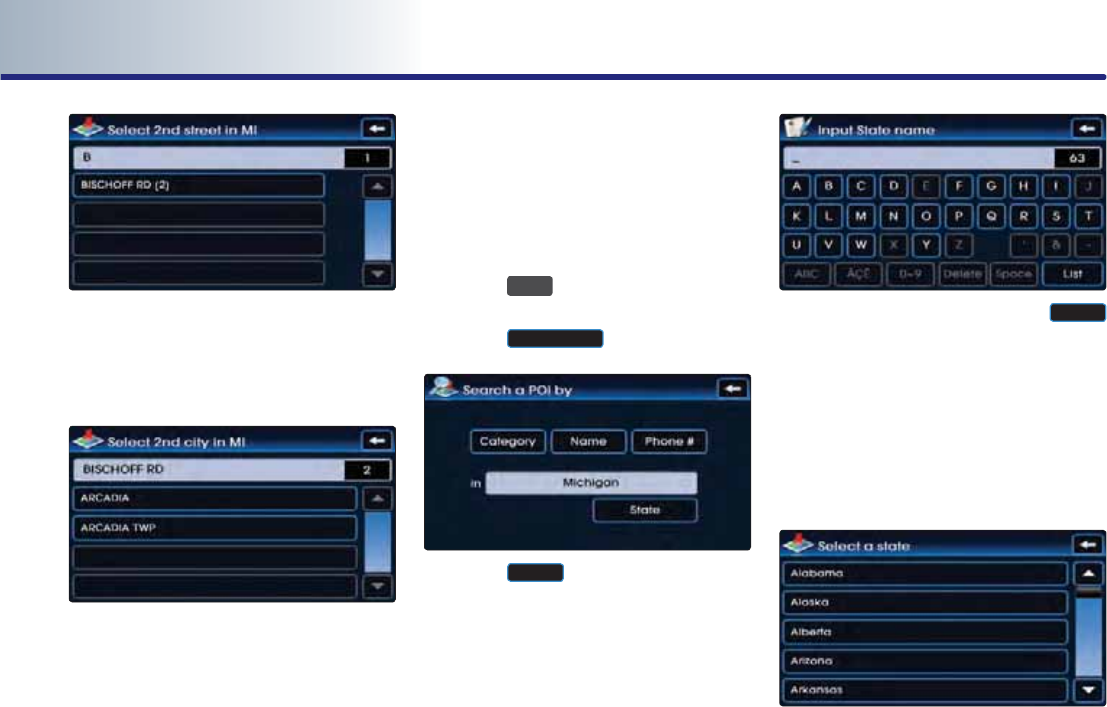
PART 3 NAVIGATION SYSTEM
3-20 NAVIGATION SYSTEM
12
.
Select the desired 2nd street menu from
the list.
The corresponding position will be dis-
played on the map.
13
.
If the selected 2nd street is within more
than 2 cities, then the city list screen will
be displayed. Select the desired city menu
from the list. The corresponding position
will be displayed on the map.
Searching a POI
There are 3 ways to set the destination
through POI search - (a) by category, (b) by
name, (c) by phone number.
1
.
Press the
'(67
key.
2
.
Press the
32,6HDUFK
button.
3
.
Press the
6WDWH
button.
4
.
Input the state name and press the
/LVW
button. If the number of matches with the
input is less than 4 results, then the state list
screen will be displayed automatically.
If there is only one matching result, then
the state will automatically be changed
without having to manually select the state.
5
.
Select the desired state from the list to
change the state.
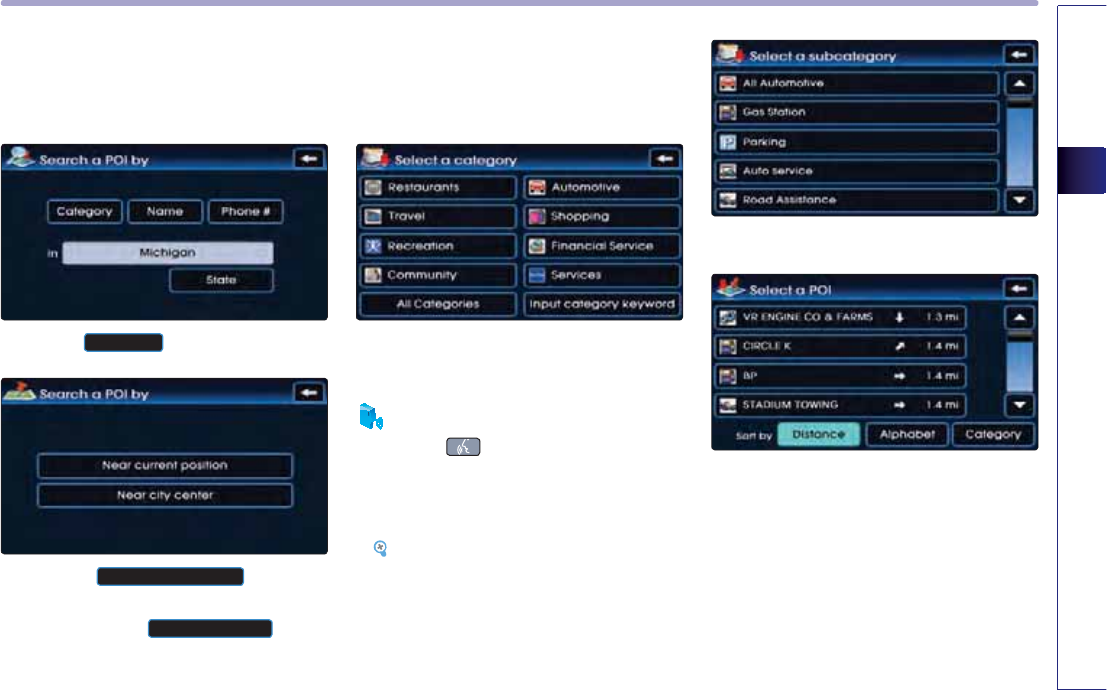
NAVIGATION SYSTEM
3-21
NAVIGATION SYSTEM
(a) By category
Searches for facilities nearby the current posi-
tion or from the city center.
6
.
Press the
&DWHJRU\
button.
7
.
Press the
1HDUFXUUHQWSRVLWLRQ
button to
search for facilities nearby the current posi-
tion, or press the
1HDUFLW\FHQWHU
button
to search for facilities in the near city center.
(a-1) Near current position
Searches for facilities within a 50 mi (80Km)
radius of the current position.
8
.
Press the desired main category menu.
Voice Command
1. Press the key on the steering wheel
remote controller.
2. After the beep sound, say a command.
"Find nearest POI"
[Find nearest POI], page 5-20.
9
.
Press the desired sub category menu.
10
.
Select the desired menu button.
The corresponding position will be dis-
played on the map.
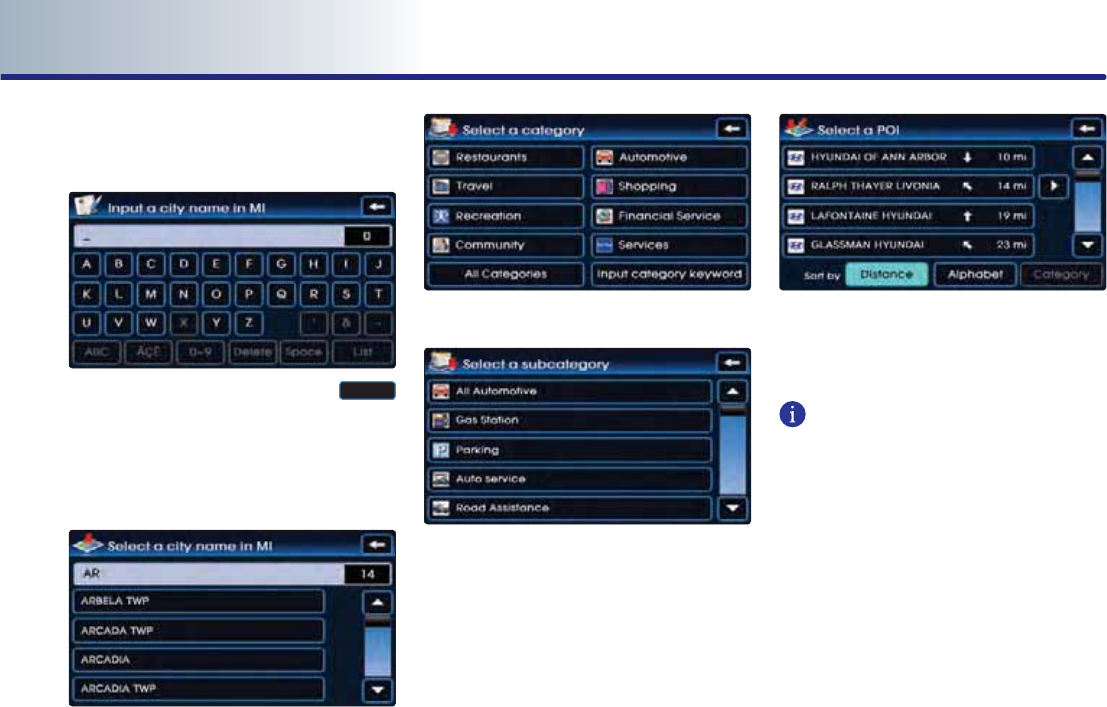
PART 3 NAVIGATION SYSTEM
3-22 NAVIGATION SYSTEM
(a-2) Near city center
Searches for facilities from the city center.
8
.
Input the city name and press the
/LVW
button.
If the number of matches with the input is
less than 4 results, then the city list screen
will be displayed automatically.
9
.
Press the desired city menu.
10
.
Press the desired main category.
11
.
Press the desired sub category.
12
.
Select the desired menu button.
The corresponding position will be dis-
played on the map.
INFORMATION
The distance on each POI item button refers
to the distance from the city center.
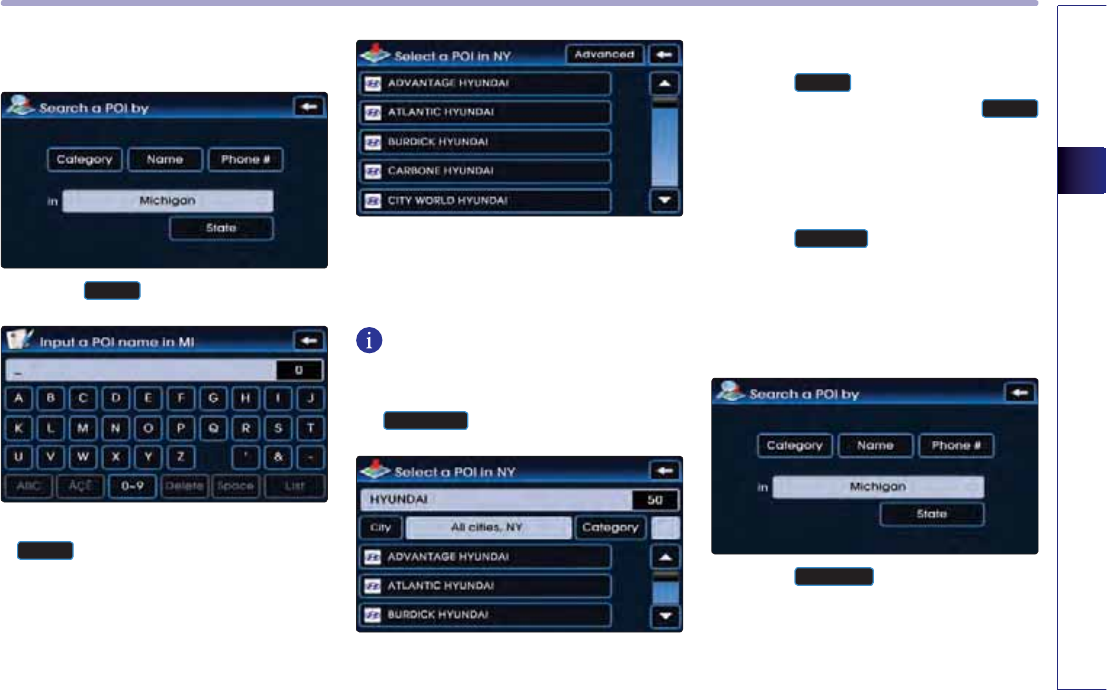
NAVIGATION SYSTEM
3-23
NAVIGATION SYSTEM
(b) By name
6
.
Press the
1DPH
button.
7
.
Input the name of the POI and press the
/LVW
button.
If the number of matches with the input is
less than 4 results, then the facilities list
screen will be displayed automatically.
8
.
Select the desired POI menu.
The corresponding position will be dis-
played on the map.
INFORMATION
When necessary, the search conditions for the
city and category can be changed by pressing
the
$GYDQFHG
button.
●Changing City
1
.
Press the
&LW\
button.
2
.
Input the city name and press the
/LVW
button.
3
.
Select the desired city name.
●Changing Category
1
.
Press the
&DWHJRU\
button.
2
.
Select the desired main category menu.
3
.
Select the desired sub category menu.
(c) By phone number
6
.
Press the
3KRQH
button.
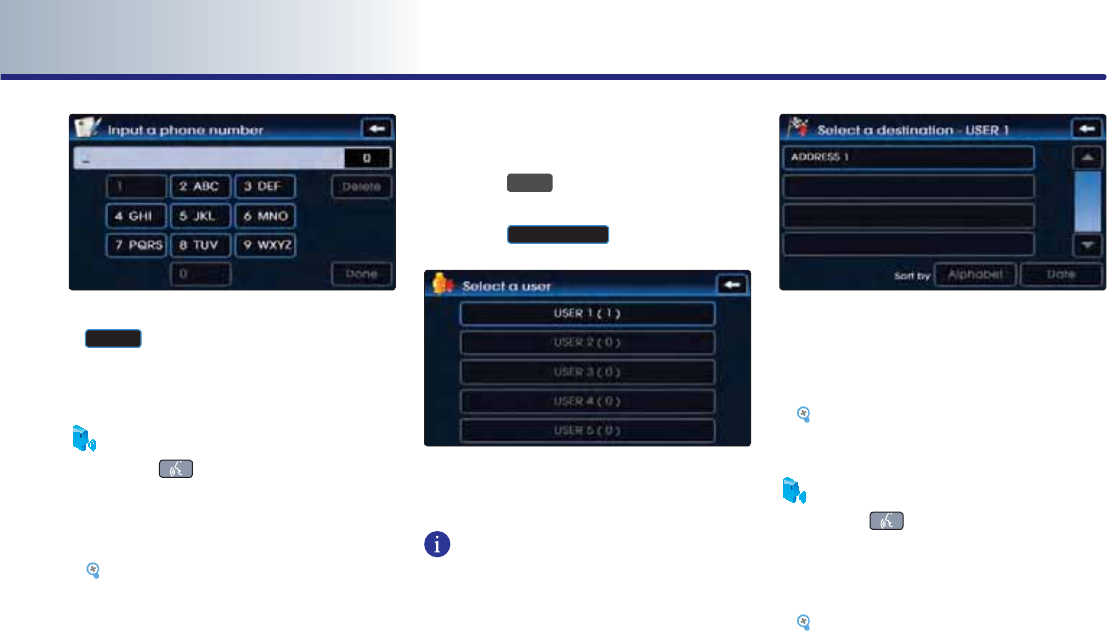
PART 3 NAVIGATION SYSTEM
3-24 NAVIGATION SYSTEM
7
.
Input the phone number and Press the
'RQH
button to complete.
The corresponding position will be dis-
played on the map.
Voice Command
1. Press the key on the steering wheel
remote controller.
2. After the beep sound, say a command.
"Destination POI by Phone Number"
[Destination POI by phone number],
page 5-22.
Searching from Address book
1
.
Press the
'(67
key.
2
.
Press the
$GGUHVVERRN
button.
3
.
Select the desired address book (user)
menu.
INFORMATION
This system provides 5 address books. Each
addresses book can hold up to 200 entries.
4
.
Select the desired address name from the
list.
The corresponding position will be
displayed on the map.
[Registering new address in address
book], page 3-43.
Voice Command
1. Press the key on the steering wheel
remote controller.
2. After the beep sound, say a command.
"Destination by address book"
[Destination by address book], page
5-24.
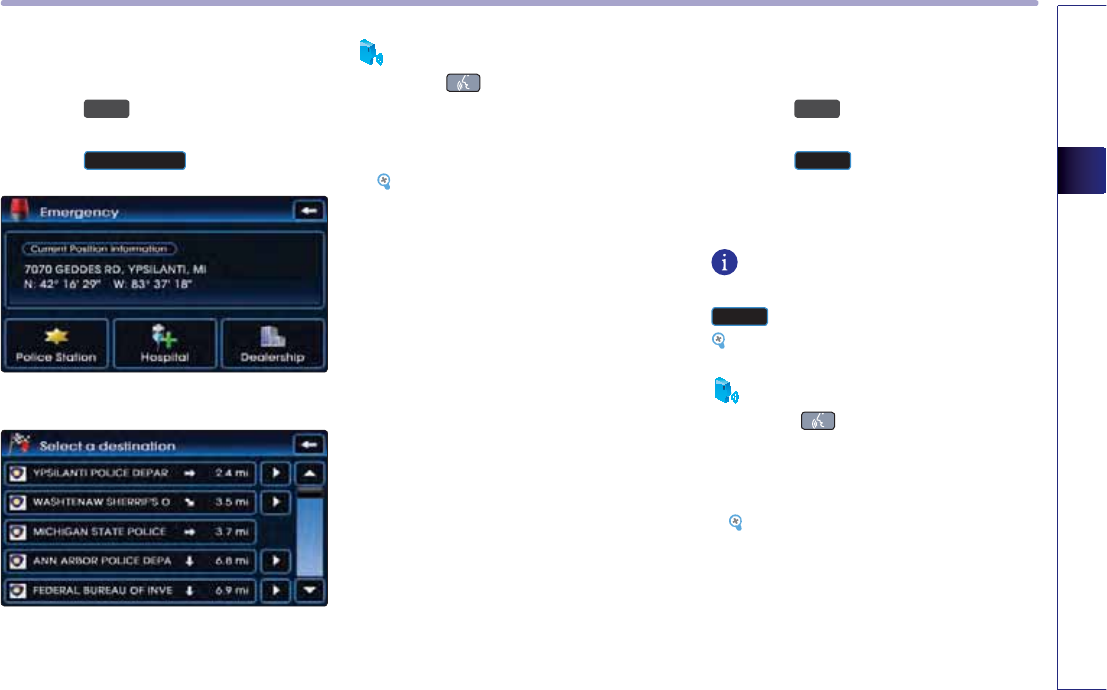
NAVIGATION SYSTEM
3-25
NAVIGATION SYSTEM
Searching for Emergency facilities
1
.
Press the
'(67
key.
2
.
Press the
(PHUJHQF\
button.
3
.
Select the desired facility category.
4
.
Select the desired facility.
The corresponding position will be dis-
played on the map.
Voice Command
1. Press the key on the steering wheel
remote controller.
2. After the beep sound, say a command.
"Find emergency <Category>"
[Find emergency <Category>], page
5-23.
Searching your Home
1
.
Press the
'(67
key.
2
.
Press the
+20(
button.
The Home position will be displayed on
the map.
INFORMATION
If the Home address is not registered, then the
+20(
button will not be displayed.
[Registering home address], page 3-48.
Voice Command
1. Press the key on the steering wheel
remote controller.
2. After the beep sound, say a command.
"Go home"
[Go home], page 5-25.

PART 3 NAVIGATION SYSTEM
3-26 NAVIGATION SYSTEM
Searching favorite places
1
.
Press the
'(67
key.
2.
Select the desired button from
~
.
The corresponding position will be dis-
played on the map.
INFORMATION
If the address of the Favorite place is not regis-
tered, then the
~
buttons without
registered addresses will be disabled.
[Registering favorite place], page 3-49.
Voice Command
1. Press the key on the steering wheel
remote controller.
2. After the beep sound, say a command.
"Destination by memory point <1 to 5>"
[Destination by memory point <1 to 5>],
page 5-25.
Searching from MAP
Position the scroll mark at the destination by
scrolling the map on the map screen.
Searching POI by local POI list
1
.
Press the
32,
▼ button on the map
screen.
2
.
Press the
2WKHUV
button.
3
.
Press the
/RFDO32,OLVWV
button.
4
.
Select the desired POI menu.
The corresponding position will be dis-
played on the map.
Voice Command
1. Press the key on the steering wheel
remote controller.
2. After the beep sound, say a command.
"Find nearest <POI name>"
[Find nearest <POI name>], page 5-21.
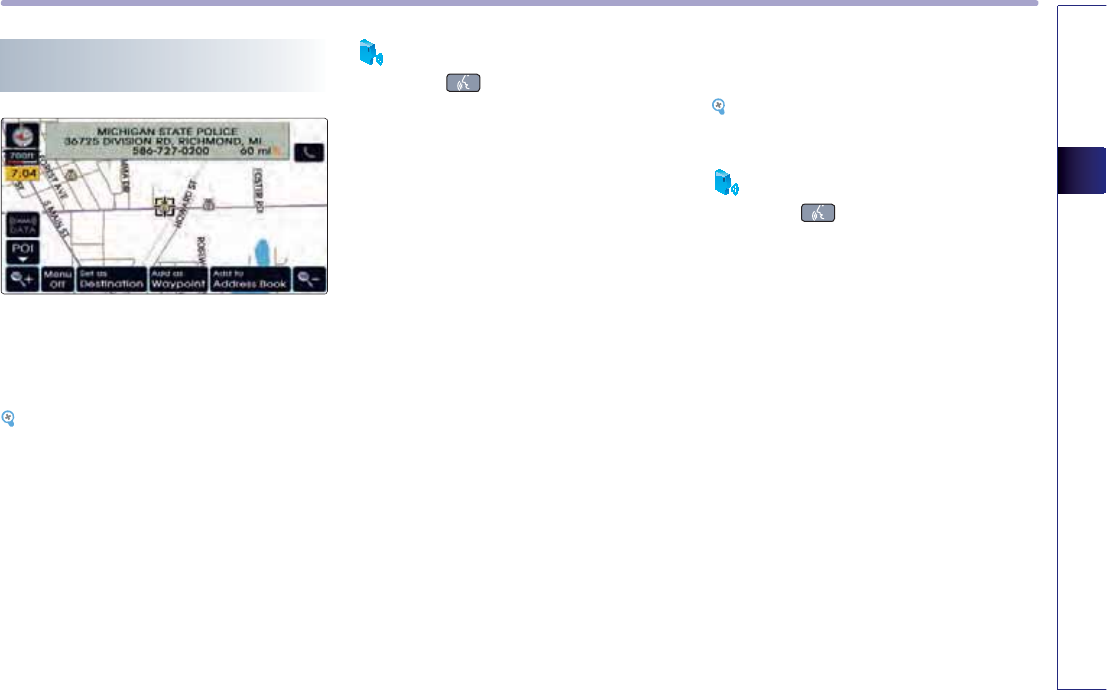
NAVIGATION SYSTEM
3-27
NAVIGATION SYSTEM
Operating after searching a
destination
Changing destination position :
Changes the position of the destination by
scrolling the map.
[Scrolling map], page 3-11.
Setting as Destination / waypoint :
Sets the position as the destination or way-
point.
Voice Command
1. Press the key on the steering wheel
remote controller.
2. After the beep sound, say a command.
"Start guidance"
(Sets the position of the scroll mark as the
destination and begins route guidance.)
Adding to address book :
Saves the position in the address book.
[Registering new address in address book],
page 3-43.
Voice Command
1. Press the key on the steering wheel
remote controller.
2. After the beep sound, say a command.
"Store Marked Location to <text tag>"
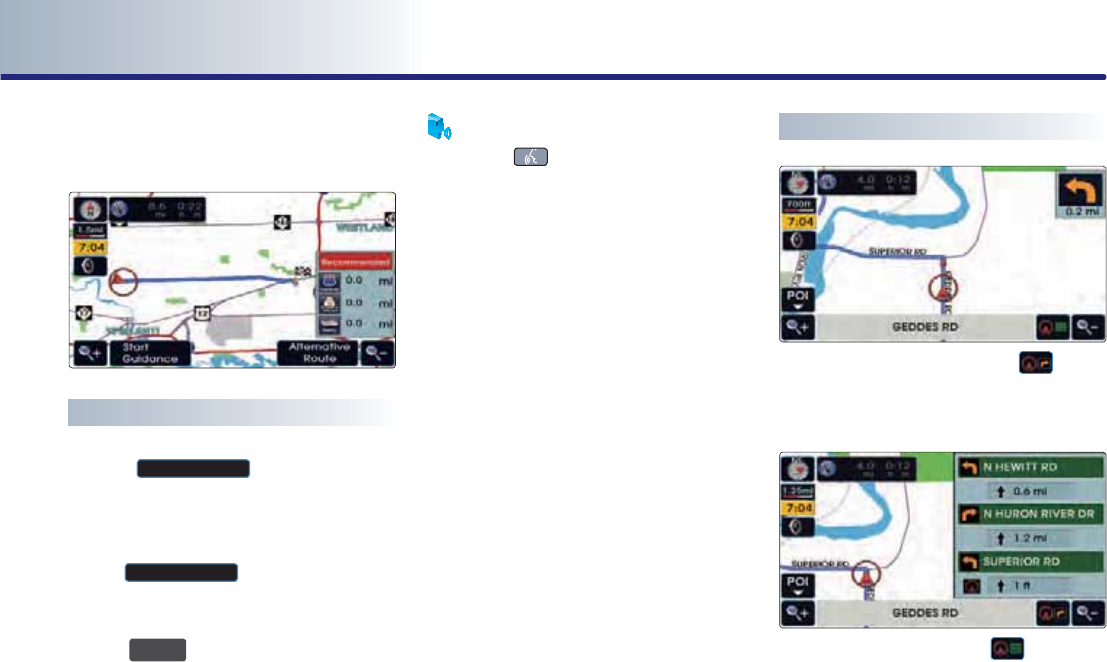
PART 3 NAVIGATION SYSTEM
3-28 NAVIGATION SYSTEM
Operating after setting a
destination
Starting Route Guidance
Press the
6WDUW*XLGDQFH
button. Route Guid-
ance will start.
●Route simulation
• If the
6WDUW*XLGDQFH
button is pressed and
held for over 0.8 second, then the route
simulation will start.
• If the
0$3
92,&(
key on the control panel is
pressed during route simulation, then route
simulation will be terminated.
Voice Command
1. Press the key on the steering wheel
remote controller.
2. After the beep sound, say a command.
"Time to destination"
"Distance to destination"
Route guidance screen
● Symbol guidance mode : if the button
is pressed, then the following route guid-
ance screen will be displayed.
● Turn-List mode : if the button is
pressed, then the following route guidance
screen will be displayed.
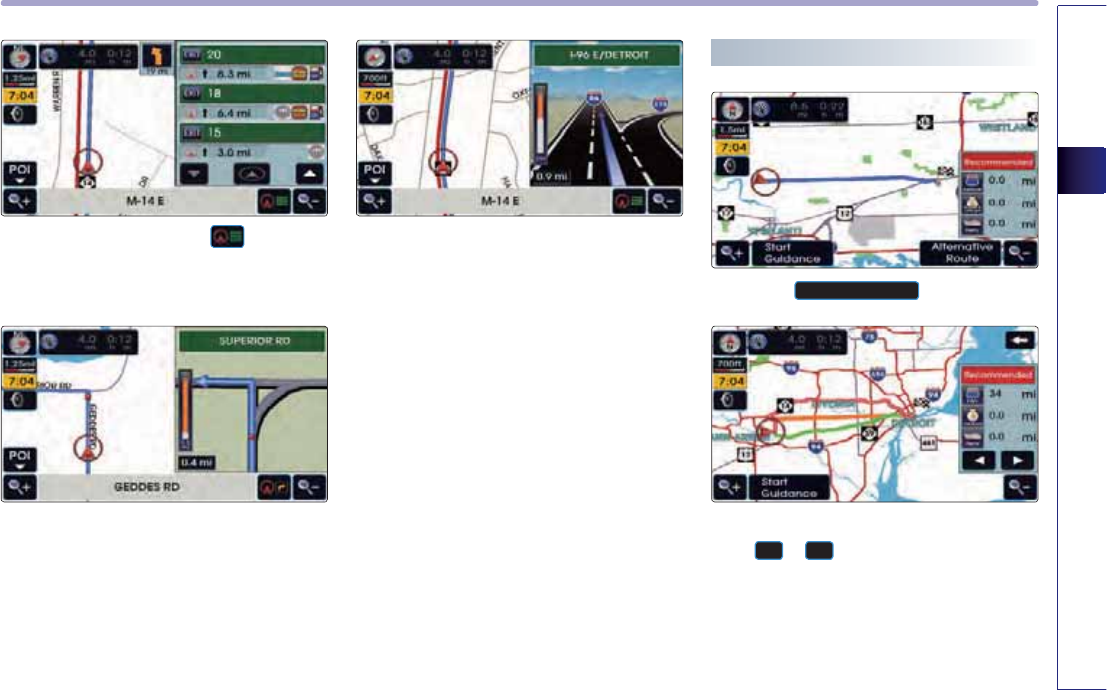
NAVIGATION SYSTEM
3-29
NAVIGATION SYSTEM
● Highway mode : if the button is
pressed, then the following route guidance
screen will be displayed.
● Intersection zoom mode : this route guidance
screen is automatically displayed during
guidance at an intersection.
Once guidance at the intersection is com-
plete, the screen will automatically disappear
and the previous guidance screen will be
restored.
● Highway junction mode : this route guid-
ance screen is automatically displayed dur-
ing guidance at highway junctions.
Once guidance at a highway junction is
complete, this screen will automatically dis-
appear and the previous guidance screen
will be restored.
Selecting other route
1
.
Press the
$OWUHQDWLYH5RXWH
button.
2
.
Other routes can be selected by pressing
the
◀
or
▶
buttons.
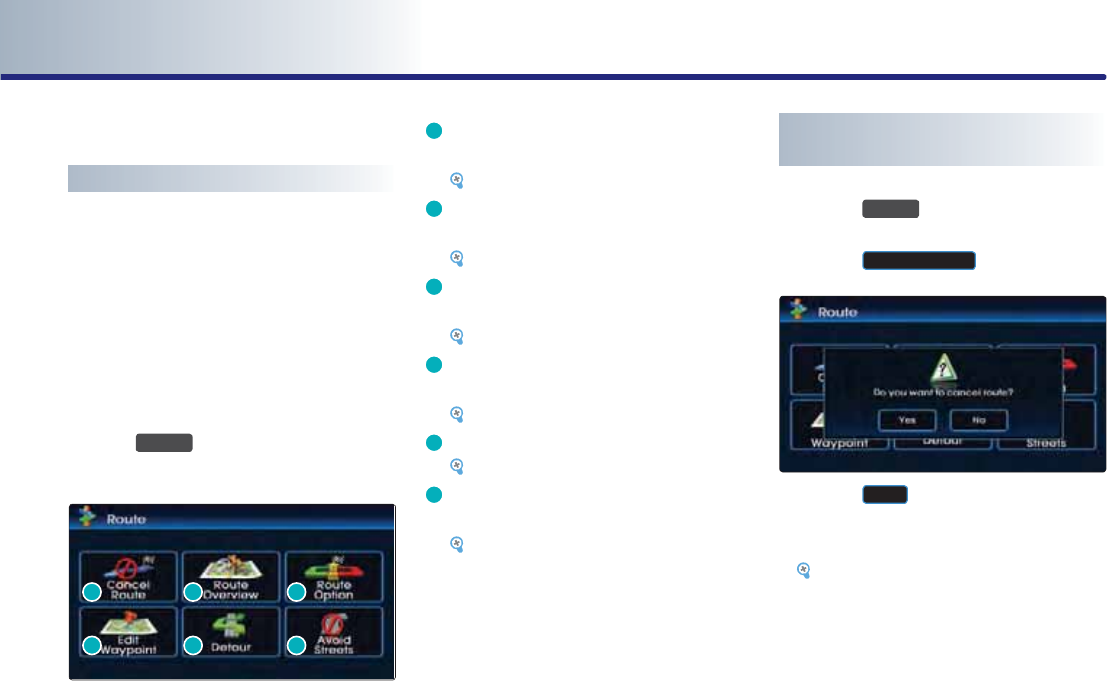
PART 3 NAVIGATION SYSTEM
3-30 NAVIGATION SYSTEM
Route guidance
Route menu screen and functions
Press the
5287(
key on the control panel.
The ROUTE menu screen will be displayed.
D
Cancel Route: deletes destination, way-
points and terminates route guidance.
[Finishing route guidance], page 3-30 .
E
Route Overview: displays the entire route
and route detailed.
[Route overview], page 3-31 .
F
Route Option: the route option can be
changed.
[Changing Route option], page 3-32 .
G
Edit Waypoint: waypoints can be added/
deleted and the order can be changed.
[Editing waypoints], page 3-32 .
H
Detour : searches detour routes.
[Setting detour distance], page 3-35 .
I
Avoid Streets: searches routes which avoid
the selected streets.
[Setting avoid streets on route], page
3-35.
Finishing route guidance (Delete
Destination)
1
.
Press the
5287(
key.
2
.
Press the
&DQFHO5RXWH
button.
3
.
Press the
<HV
button.
The destination and waypoints are deleted
and the route guidance is terminated.
[Finishing route guidance], page 3-30 .
D
G
E
H
F
I
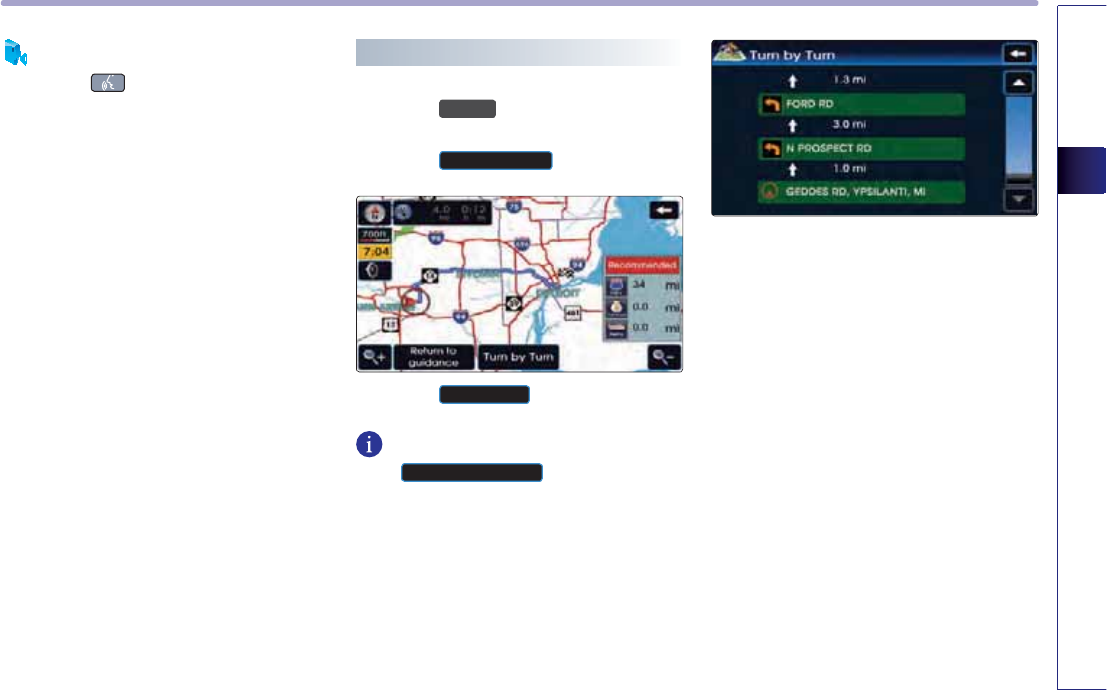
NAVIGATION SYSTEM
3-31
NAVIGATION SYSTEM
Voice Command
1. Press the key on the steering wheel
remote controller.
2. After the beep sound, say a command.
"Cancel route"
(Terminates route guidance and deletes the
set destination and waypoints.)
Route overview (View Entire Route)
1
.
Press the
5287(
key.
2
.
Press the
5RXWH2YHUYLHZ
button.
3
.
Press the
7XUQE\7XUQ
button.
INFORMATION
If the
5HWXUQWRJXLGDQFH
button is pressed,
route guidance screen is displayed.
4
.
The detailed route information can be
viewed
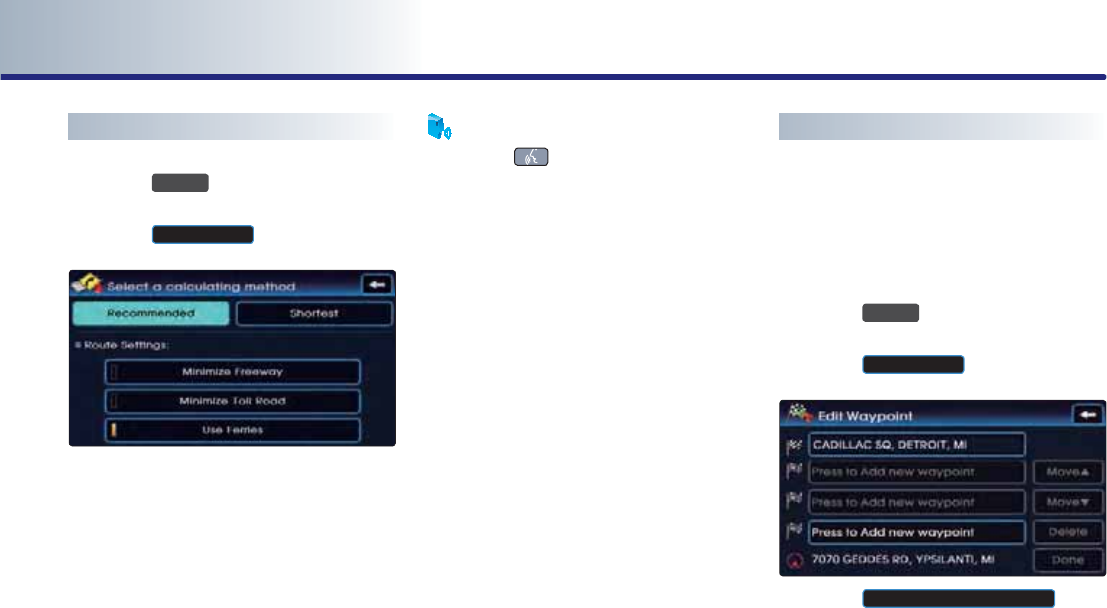
PART 3 NAVIGATION SYSTEM
3-32 NAVIGATION SYSTEM
Changing Route option
1
.
Press the
5287(
key.
2
.
Press the
5RXWH2SWLRQ
button.
3
.
Press the button for the desired route guid-
ance method.
Guidance will be restarted after recalculat-
ing the route with the selected guidance
method.
Voice Command
1. Press the key on the steering wheel
remote controller.
2. After the beep sound, say a command.
"Replan recommended route"
"Replan shortest route"
Editing waypoints
Adding waypoints
There are 2 ways to add waypoints - (a)
searching for POI nearest to the route, (b)
using advanced search.
1
.
Press the
5287(
key.
2
.
Press the
(GLW:D\SRLQW
button.
3
.
Press the
3UHVVWRDGGQHZZD\SRLQW
but-
ton.
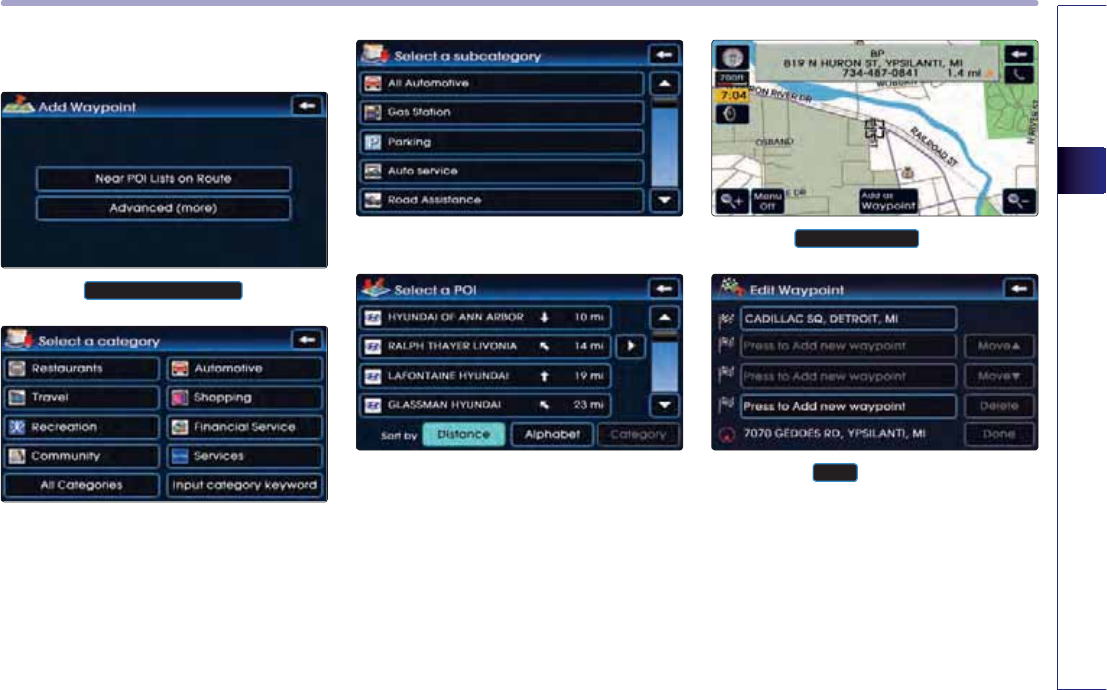
NAVIGATION SYSTEM
3-33
NAVIGATION SYSTEM
(a) Searching POI lists near route
4
.
Press the
1HDU32,/LVWVRQ5RXWH
button.
5
.
Select the desired category.
6
.
Select the desired sub category from list.
7
.
Select the desired POI from the list.
The corresponding position will be dis-
played on the map.
8
.
Press the
$GGDV:D\SRLQW
button.
9
.
Press the
'RQH
button to complete.
Guidance will restart after recalculating the
route.
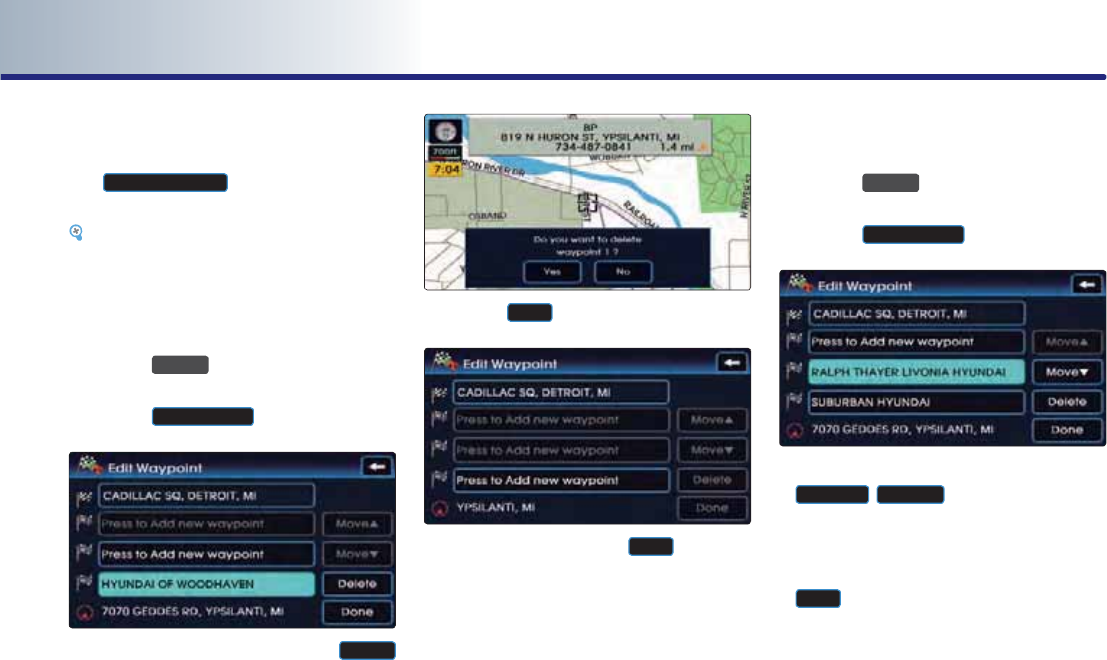
PART 3 NAVIGATION SYSTEM
3-34 NAVIGATION SYSTEM
(b) Using advanced Search
The method for searching waypoints through
the
$GYDQFHGPRUH
button is the same
method as searching destination.
[Searching a Destination], page 3-13.
Deleting waypoints
1
.
Press the
5287(
key.
2
.
Press the
(GLWZD\SRLQW
button.
3
.
Select the waypoint and press the
'HOHWH
button.
4
.
Press the
<HV
button.
5
.
After deleting, press the
'RQH
button to
complete.
Guidance will be restart after recalculating
the route.
Re-ordering waypoints
1
.
Press the
5287(
key.
2
.
Press the
(GLWZD\SRLQW
button.
3
.
Select the desired waypoint and use the
0RYH
▲
,
0RYH
▼
buttons to change the
order.
4
.
Once re-ordering is complete, press the
'RQH
button to complete.
Guidance will restart after recalculating the
route.
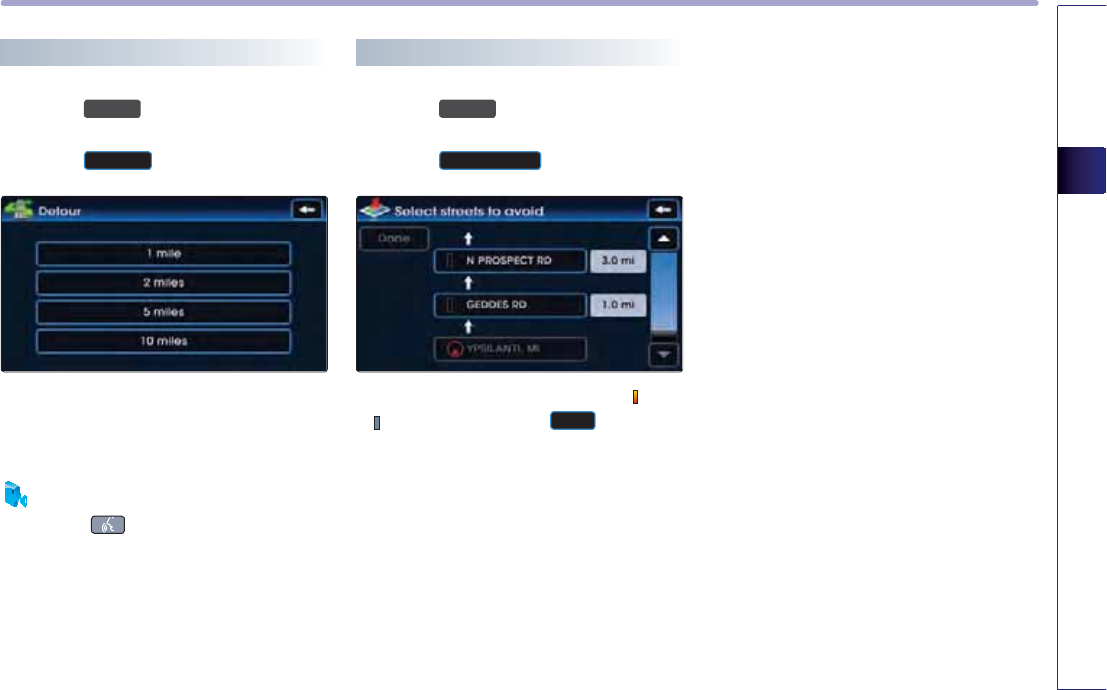
NAVIGATION SYSTEM
3-35
NAVIGATION SYSTEM
Setting detour distance
1
.
Press the
5287(
key.
2
.
Press the
'HWRXU
button.
3
.
Select the desired detour range.
Guidance will restart after recalculating the
detour route.
Voice Command
1. Press the key on the steering wheel
remote controller.
2. After the beep sound, say a command.
"Detour <1 or 2 or 5 or 10> miles"
"Detour <1 or 2 or 5 or 10> kilometers"
Setting avoid streets on route
1
.
Press the
5287(
key.
2
.
Press the
$YRLGVWUHHWV
button.
3
.
Select the desired streets to avoid( avoid,
allow) and press the
'RQH
button to
complete.
Guidance will restarted after recalculating
the route to avoid the selected streets.

PART 3 NAVIGATION SYSTEM
3-36 NAVIGATION SYSTEM
Setup and Information
Setup menu screen and functions
Press the
6(783
key on the control panel to
display the setup menu screen.
D Main button : changes to the input key-
board type, voice command feedback ON/
OFF settings and system initialization can
be made.
[Main setting], page 3-36 .
E Voice Setup button : adjusts the Navigation
guidance volume.
[Voice guidance volume setting], page
3-51.
F Navigation button : navigation related set-
tings can be set.
[Navigation setting], page 3-38 .
G Clock Setup button
H My Places button : the Address book, Home
address, Favorite places, Previous destina-
tion can be edited.
[My places setting], page 3-43 .
I Help button : the help contents can be
viewed.
[Help], page 3-54 .
J Traffic Setup : sets to display traffic informa-
tion on map, or to provide upcoming traffic
information voice guidance, and or to dis-
play the detour route popup showing
upcoming traffic information.
DE
FG
HI
J
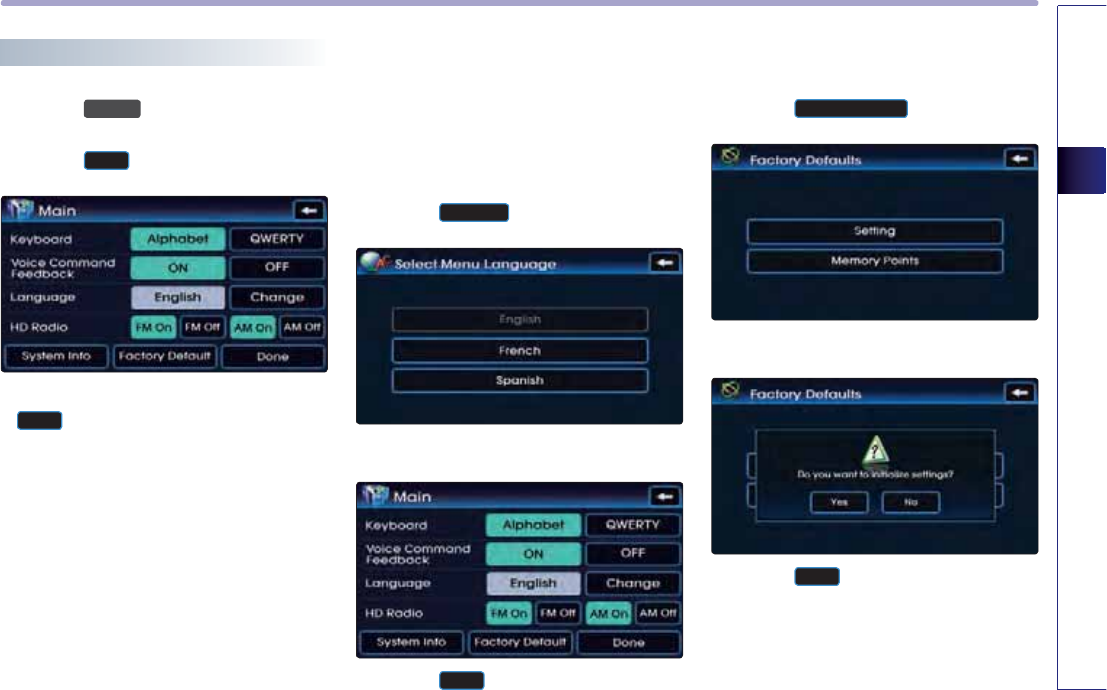
NAVIGATION SYSTEM
3-37
NAVIGATION SYSTEM
Main setting
1
.
Press the
6(783
key.
2
.
Press the
0DLQ
button.
3
.
Select the desired changes and press the
'RQH
button to complete.
Setting keyboard for inputting letter
Press the desired keyboard type button. The
selection will be highlighted.
Setting voice command feedback ON/
OFF
Press the desired setting button.
Setting Language
1
.
Press the
&KDQJH
button.
2
.
Press the desired language.
3
.
Press the
'RQH
button to complete.
Initializing system
1
.
Press the
)DFWRU\'HIDXOW
button.
2
.
Press the menu desired for initialization.
3
.
Press the
<HV
butto
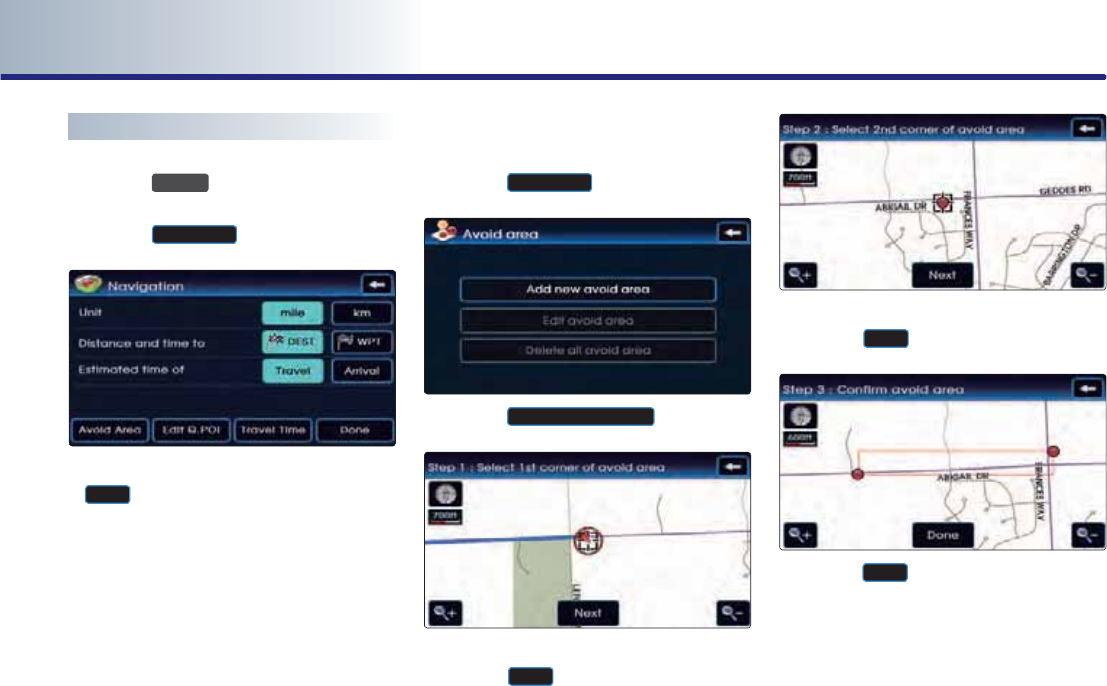
PART 3 NAVIGATION SYSTEM
3-38 NAVIGATION SYSTEM
Navigation setting
1
.
Press the
6(783
key.
2
.
Press the
1DYLJDWLRQ
button.
3
.
Select the desired changes and press the
'RQH
button to complete.
Setting units (mile/ km)
Select the desired distance unit.
Setting arrival time and distance display
Select the desired setting button.
Registering avoid area
1
.
Press the
$YRLG$UHD
button.
2
.
Press the
$GGQHZDYRLGDUHD
button.
3
.
Set the start position of the avoid area and
press the
1H[W
button.
4
.
Set the end position of the avoid area and
press the
1H[W
button.
5
.
Press the
'RQH
button to complete.
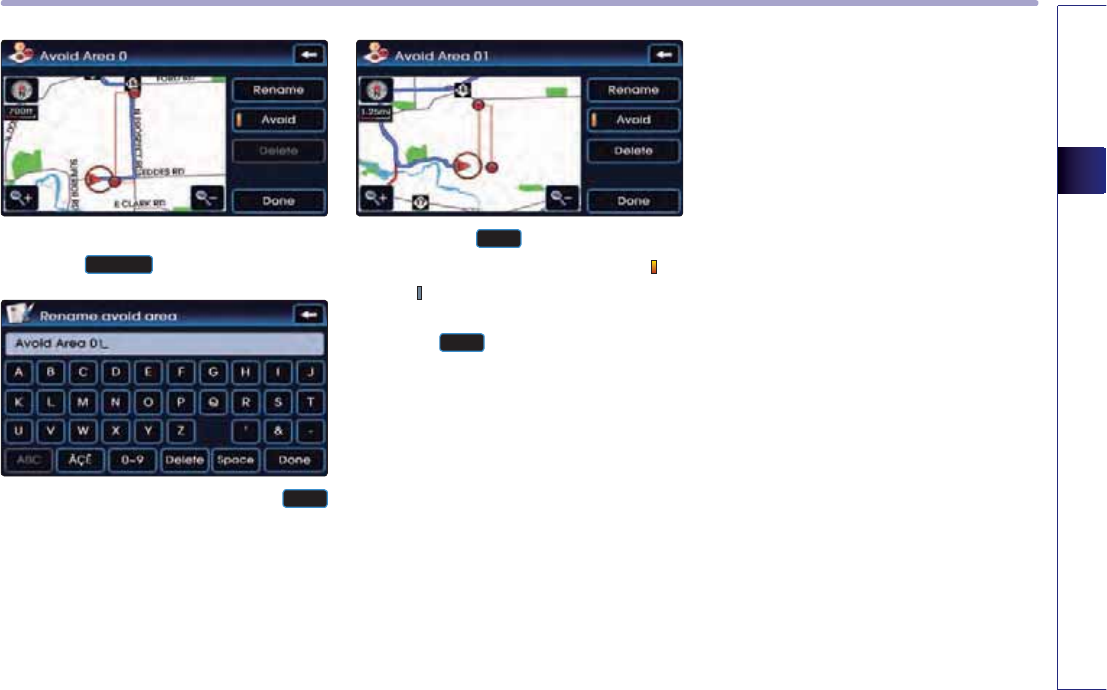
NAVIGATION SYSTEM
3-39
NAVIGATION SYSTEM
6
.
If the Avoid area needs to be renamed,
press the
5HQDPH
button.
7
.
Rename the Avoid area and Press the
'RQH
button to complete.
8
.
Each time the
$YRLG
button is pressed, the
function will switch between avoid ( )or
allow( ).
9
.
Press the
'RQH
button to complete the set-
ting.
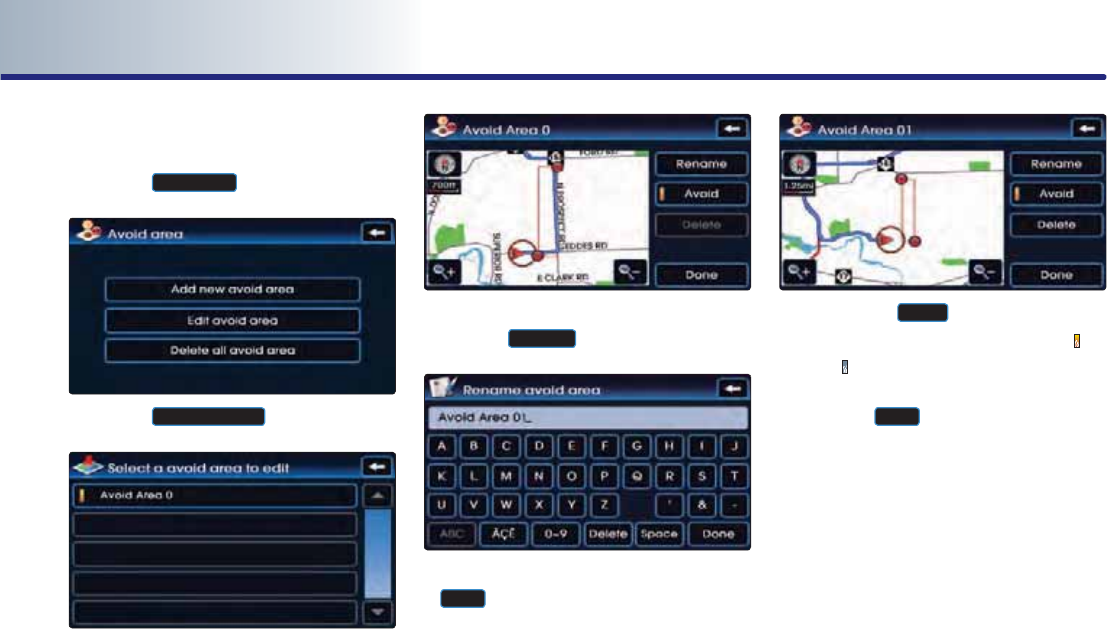
PART 3 NAVIGATION SYSTEM
3-40 NAVIGATION SYSTEM
Editing avoid area
1
.
Press the
$YRLGDUHD
button.
2
.
Press the
(GLWDYRLGDUHD
button.
3
.
Select the Avoid area button to edit.
4
.
If the Avoid area needs to be renamed,
press the
5HQDPH
button.
5
.
Rename the Avoid area and press the
'RQH
button to complete.
6
.
Each time the
$YRLG
button is pressed, the
function will switch between avoid( )or
allow( ).
7
.
Press the
'RQH
button once editing is
complete.
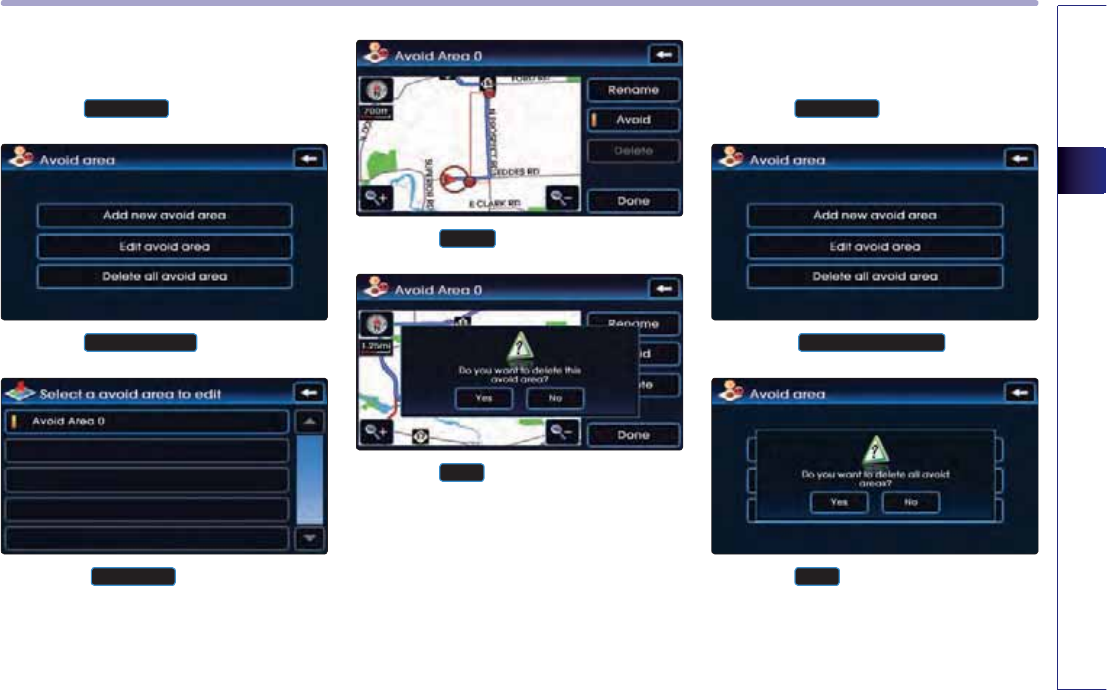
NAVIGATION SYSTEM
3-41
NAVIGATION SYSTEM
Deleting avoid area
1
.
Press the
$YRLGDUHD
button.
2
.
Press the
(GLWDYRLGDUHD
button.
3
.
Select the
$YRLGDUHD
button to delete.
4
.
Press the
'HOHWH
button.
5
.
Press the
<HV
button.
Deleting all avoid areas
1
.
Press the
$YRLGDUHD
button.
2.
Press the
'HOHWHDOODYRLGDUHD
button.
3
.
Press the
<HV
button.

PART 3 NAVIGATION SYSTEM
3-42 NAVIGATION SYSTEM
Setting Q.POI icons
1
.
Press the
(GLW432,
button.
2
.
Select the desired menu.
3
.
Select the desired category.
4
.
Select the desired sub category.
5
.
Press the
'RQH
button to complete.
INFORMATION
Q.POI stands for Quick POI and refers to the
function which turns POI icon display on or off
on the map.
Setting estimate travel time
1
.
Press the
7UDYHO7LPH
button.
2
.
Press the
◀
or
▶
button on the
Residential, Main street, and Freeway con-
trols to adjust the speed.
Press the
'HIDXOW
button to set the
speeds to the default settings.
3
.
Press the
'RQH
button to complete the set-
ting.
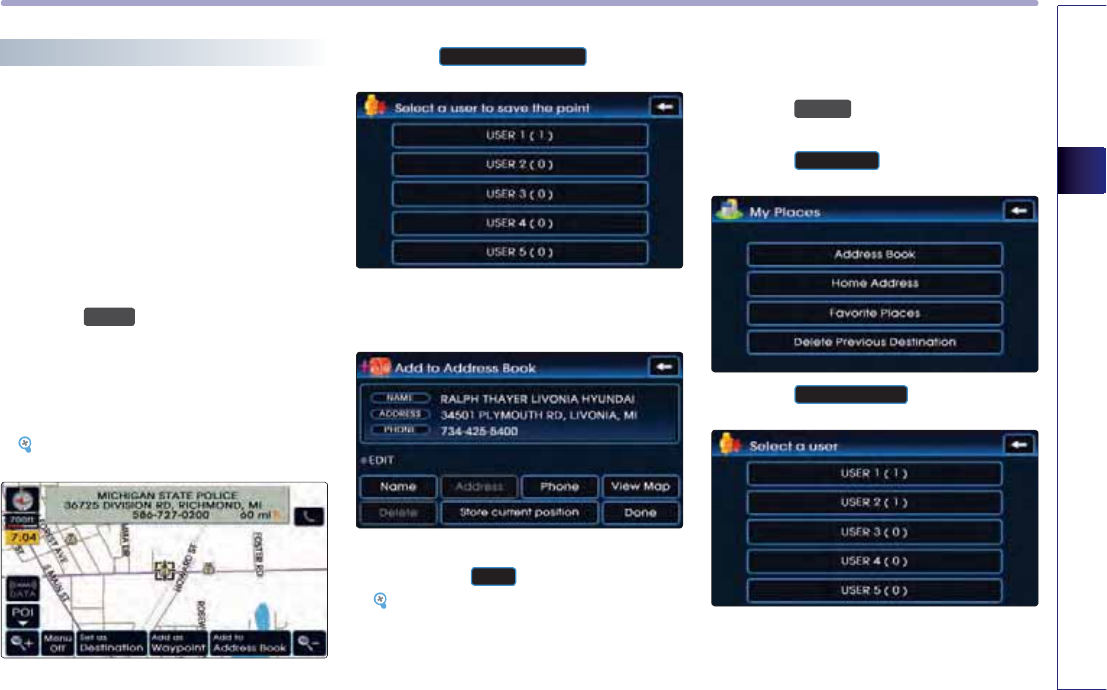
NAVIGATION SYSTEM
3-43
NAVIGATION SYSTEM
My places setting
Registering new address in address book
There are 3 ways to register a new address in
the address book - (a) by DEST menu, (b) by
registering address in address book, (c) from
map scroll.
(a) by DEST menu
1
.
Press the
'(67
key.
2
.
Search through the desired method.
The search process is the same as the meth-
od for destination search.
[Searching a destination], page 3-13.
3
.
Press the
$GGWR$GGUHVV%RRN
button.
4
.
Press the desired address book (user) but-
ton.
5
.
Input the name and telephone information
and press the
'RQH
button to complete.
[Editing an address of address book],
page 3-45.
(b) by registering in the address book
1
.
Press the
6(783
key.
2
.
Press the
0\3ODFHV
button.
3
.
Press the
$GGUHVV%RRN
button.
4
.
Press the desired address book (user) but-
ton.
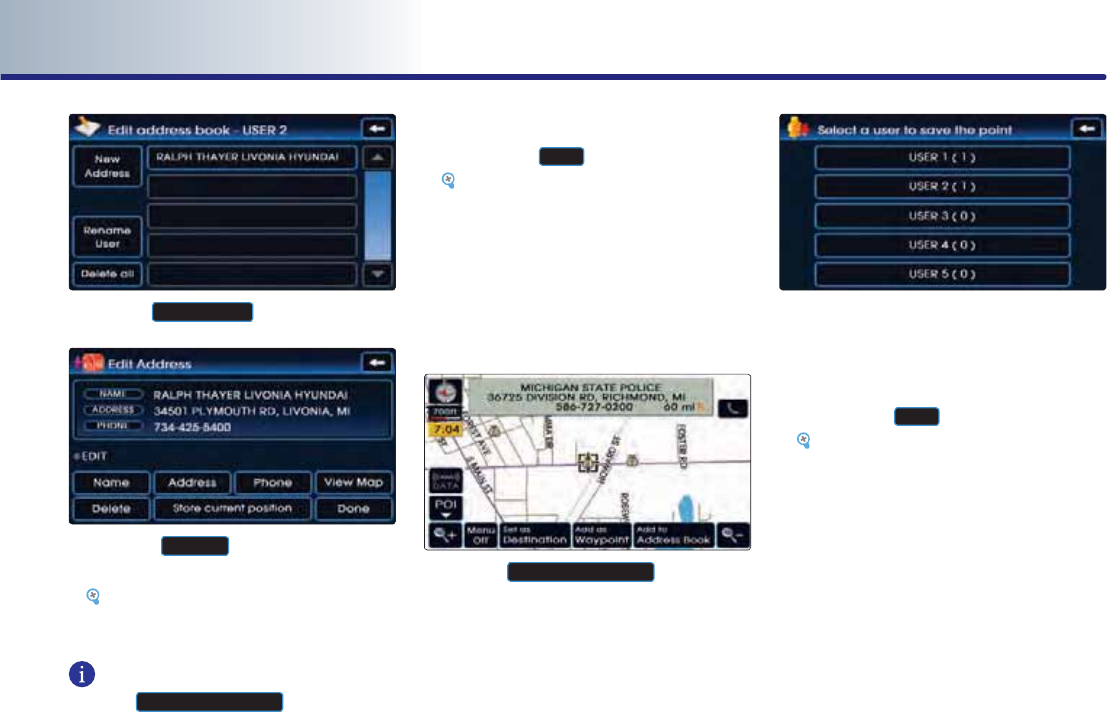
PART 3 NAVIGATION SYSTEM
3-44 NAVIGATION SYSTEM
5
.
Press the
1HZ$GGUHVV
button.
6
.
Press the
$GGUHVV
button to search the
address.
[Searching an address], page 3-13.
INFORMATION
Press the
6WRUHFXUUHQWSRVLWLRQ
button to input
the address of the current position.
7
.
Input the name and telephone information
and press the
'RQH
button to complete.
[Editing an address of address book],
page 3-45.
(c) from map scroll
1
.
In the map screen, scroll the map to the
desired position.
2
.
Press the
$GGWR$GGUHVV%RRN
button.
3
.
Press the desired address book (user) but-
ton.
4
.
Input the name and telephone information
and press the
'RQH
button to complete.
[Editing an address of address book],
page 3-45.
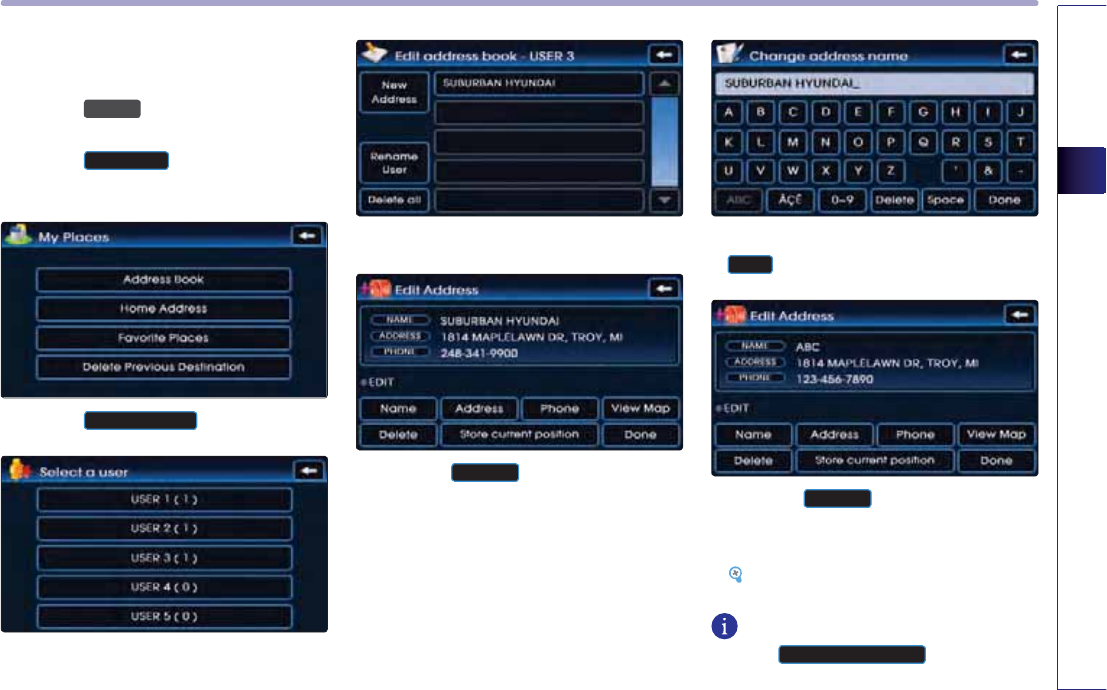
NAVIGATION SYSTEM
3-45
NAVIGATION SYSTEM
Editing an address of address book
1
.
Press the
6(783
key.
2
.
Press the
0\3ODFHV
button.
3
.
Press the
$GGUHVV%RRN
button.
4
.
Select the desired address book (user) but-
ton .
5
.
Select the desired address to edit.
6
.
Press the
1DPH
button to input the
address name.
7
.
Input the address name and press the
'RQH
button to complete.
8
.
Press the
$GGUHVV
button to search the
address. The process is the same as the
method for searching an address.
[Searching an Address] , page 3-13.
INFORMATION
Press the
6WRUHFXUUHQWSRVLWLRQ
button to input
the address of the current position.
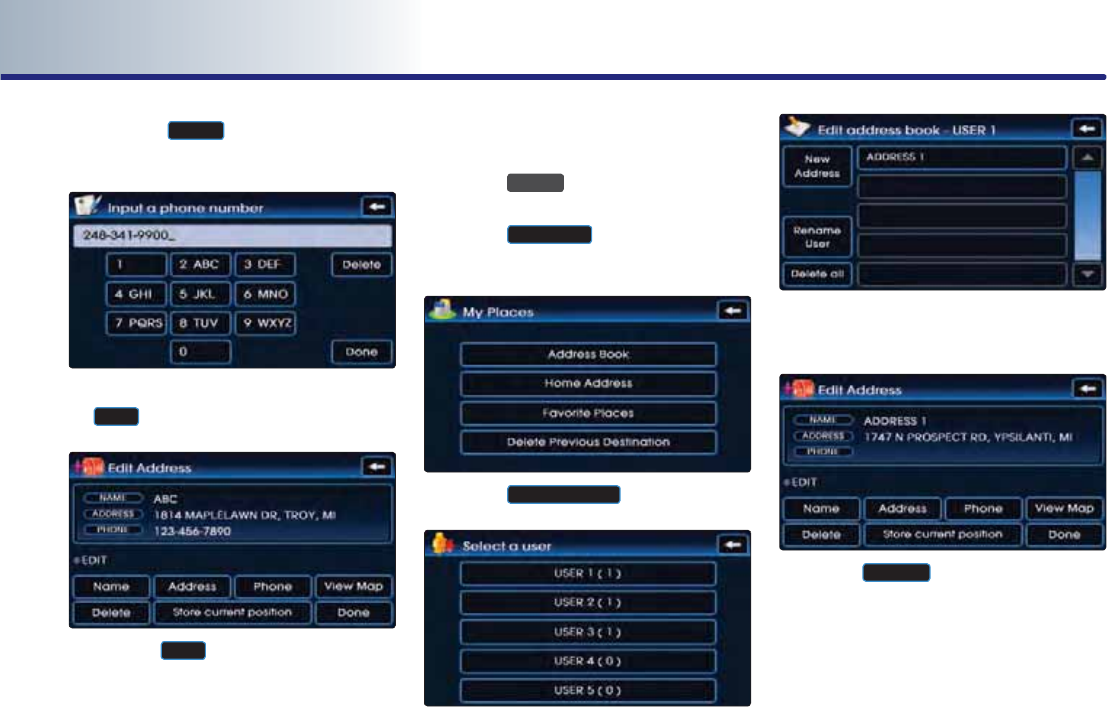
PART 3 NAVIGATION SYSTEM
3-46 NAVIGATION SYSTEM
9
.
Press the
3KRQH
button to input the
phone number.
10
.
Input the phone number and press the
'RQH
button to complete.
11
.
Press the
'RQH
button to complete.
Deleting an address of address book
1
.
Press the
6(783
key.
2
.
Press the
0\3ODFHV
button.
3
.
Press the
$GGUHVV%RRN
button.
4
.
Select the desired address book (user) but-
ton.
5
.
Select the desired address button to
delete.
6
.
Press the
'HOHWH
button.

NAVIGATION SYSTEM
3-47
NAVIGATION SYSTEM
7
.
Press the
<HV
button.
Deleting an address book
1
.
Press the
6(783
key.
2
.
Press the
0\3ODFHV
button.
3
.
Press the
$GGUHVV%RRN
button.
4
.
Press the desired address book (user) but-
ton.
4
.
Press the
'HOHWHDOO
button.
5
.
Press the
<HV
button.
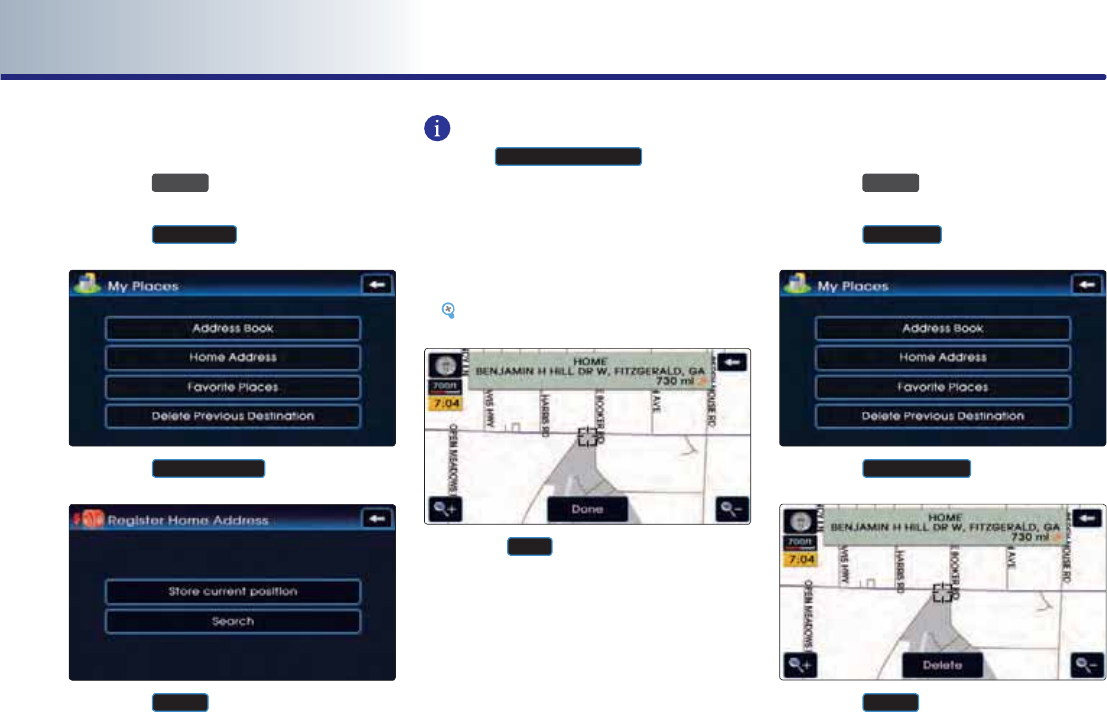
PART 3 NAVIGATION SYSTEM
3-48 NAVIGATION SYSTEM
Registering home address
1
.
Press the
6(783
key.
2
.
Press the
0\3ODFHV
button.
3
.
Press the
+RPH$GGUHVV
button.
4
.
Press the
6HDUFK
button.
INFORMATION
Press the
6WRUHFXUUHQWSRVLWLRQ
button to reg-
ister the current position as Home.
5
.
Search the address.
The process is the same method as search-
ing an address.
[Searching an Address], page 3-13.
6
.
Press the
'RQH
button to complete.
Deleting home address
1
.
Press the
6(783
key.
2
.
Press the
0\3ODFHV
button.
3
.
Press the
+RPH$GGUHVV
button.
4
.
Press the
'HOHWH
button.

NAVIGATION SYSTEM
3-49
NAVIGATION SYSTEM
5
.
Press the
<HV
button.
Registering favorite place
1
.
Press the
6(783
key.
2
.
Press the
0\3ODFHV
button.
3
.
Press the
)DYRULWH3ODFHV
button.
4
.
Press the number of the Favorite Place to
register.
5
.
Press the
6HDUFK
button.
INFORMATION
Press the
6WRUHFXUUHQWSRVLWLRQ
button to reg-
ister the current position as a Favorite place.
6
.
Search the address.
The process is the same as the method for
searching an address.
[Searching an Address], page 3-13.
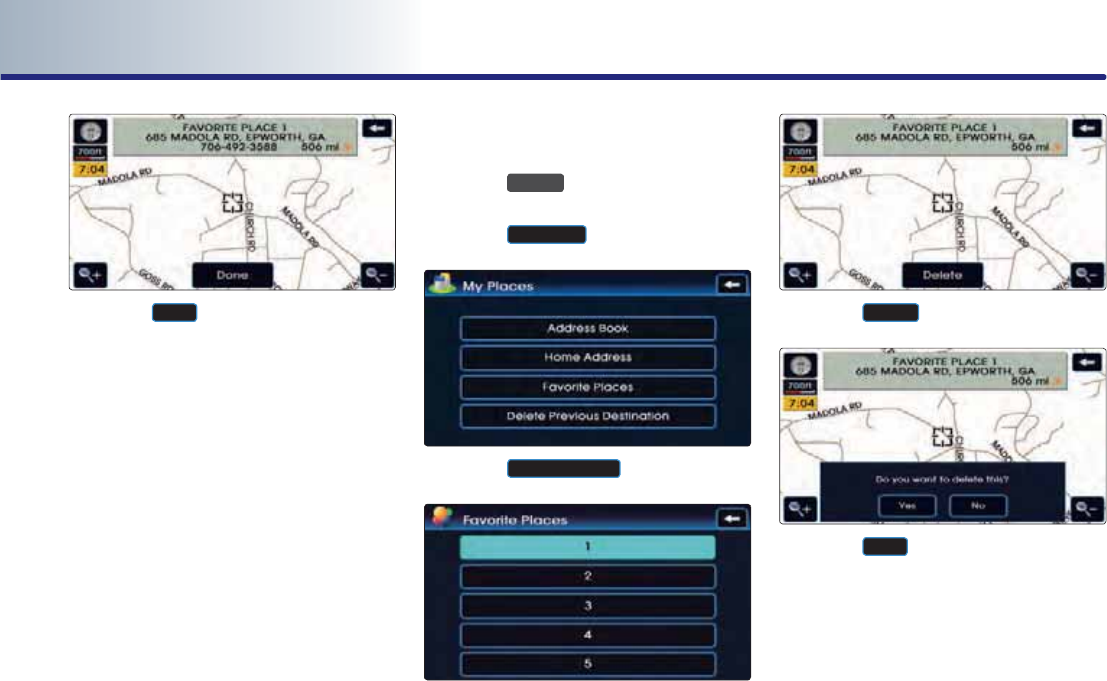
PART 3 NAVIGATION SYSTEM
3-50 NAVIGATION SYSTEM
7
.
Press the
'RQH
button to complete.
Deleting favorite place
1
.
Press the
6(783
key.
2
.
Press the
0\SODFHV
button.
3
.
Press the
)DYRULWH3ODFHV
button.
4
.
Select the desired favorite place button to
delete.
5
.
Press the
'HOHWH
button.
6
.
Press the
<HV
button.
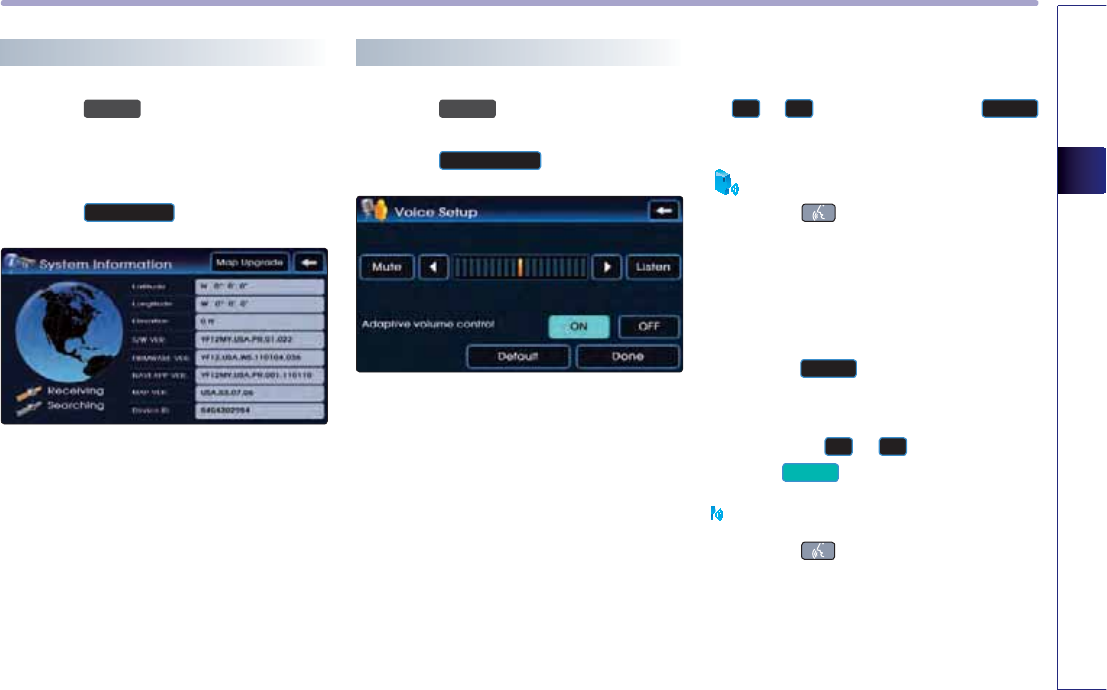
NAVIGATION SYSTEM
3-51
NAVIGATION SYSTEM
System information and update
1
.
Press the
6(783
key.
2
.
Press the main button.
3
.
Press the
6\VWHP,QIR
button.
Voice guidance volume setting
1
.
Press the
6(783
key.
2
.
Press the
9RLFH6HWXS
button.
Voice guidance volume control
● Set the desired volume level by using the
◀
or
▶
buttons and press the
/LVWHQ
button to verify the volume level.
Voice Command
1. Press the key on the steering wheel
remote controller.
2. After the beep sound, say a command.
"Voice Guidance Louder"
"Voice Guidance Softer"
●
Press the
0XWH
button when voice guid-
ance is unnecessary.
Voice guidance can be turned back on by
pressing the
◀
or
▶
buttons or press-
ing the
0XWH
button.
Voice Command
1. Press the key on the steering Wheel
remote controller.
2. After the beep sound, say a command.
"Voice Guidance On"
"Voice Guidance Of"
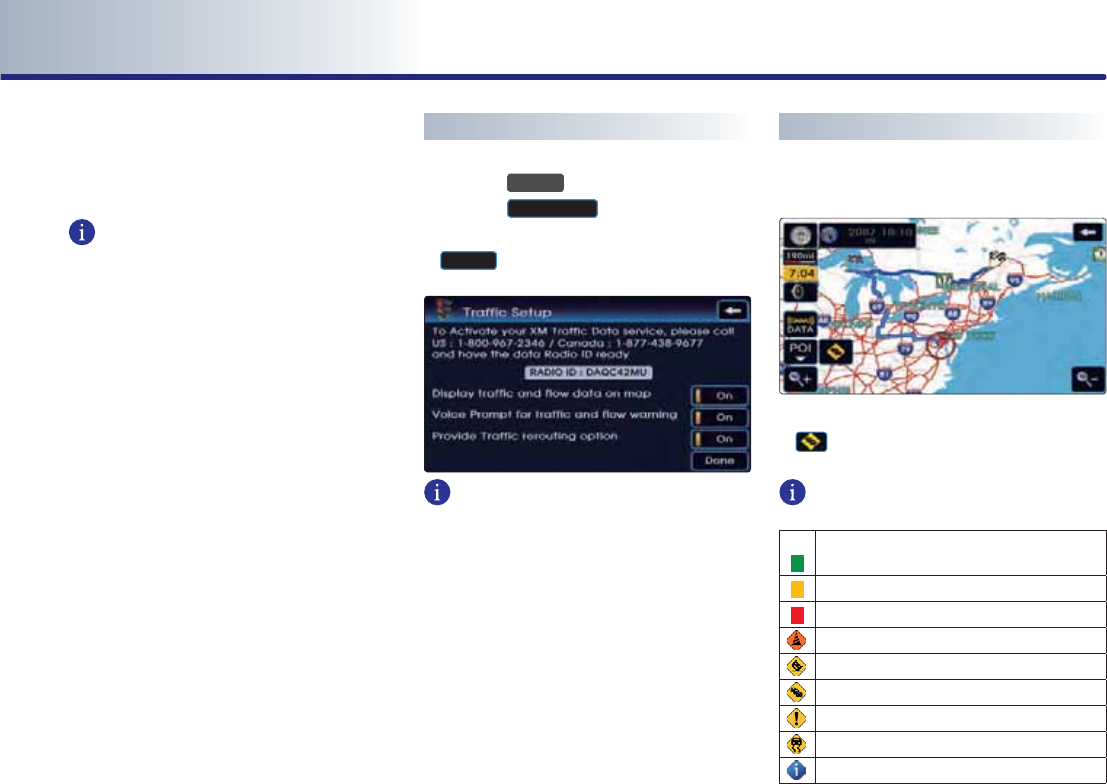
PART 3 NAVIGATION SYSTEM
3-52 NAVIGATION SYSTEM
Adaptive volume control ON/OFF
● Press the desired setting button.
INFORMATION
Adaptive Volume Control
If the speed of the vehicle is over approxi-
mately 60 mi/h (100km/h), the volume level
can be increased one level higher than the
current level. If the speed of the vehicle falls
under 60 mi/h (100km/h), the volume level
will return to its original level.
Traffic Setup
1
.
Press the
6(783
key.
2
.
Press the
7UDIILF6HWXS
button.
3
.
Select the desired changes and press the
'RQH
button.
INFORMATION
●
Display Traffic and Flow data on Map : select
whether to display traffic information on
the map.
●
Voice Prompt for traffic and flow warning :
select whether to provide voice guidance in
front of Traffic Information. (On route -
3mile)
●
Display Detour pop-up message : select
whether to display Detour pop up in front
of Traffic Information. (On route - 3mile)
Traffic Information
(a) Viewing Traffic Information
1
.
When the Traffic option is active, press the
button on the Map screen.
Traffic Flow INFORMATION
Normal, Free Flowing (46 mph ~)
Moderate Congestion (26 ~ 45 mph)
Heavy Traffic, Stop and Go (0 ~ 25 mph)
Road Construction
Accident
Congestion/Slow Traffic
Incient
Hazardous Road Conditions
Travel Information
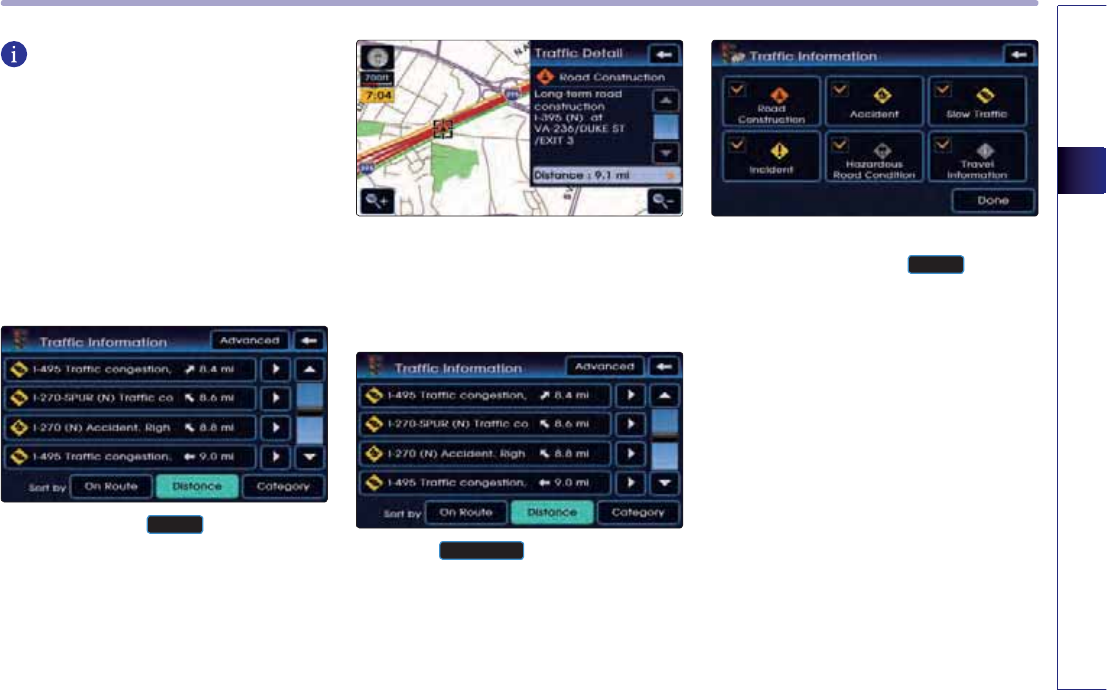
NAVIGATION SYSTEM
3-53
NAVIGATION SYSTEM
INFORMATION
●
Traffic information will be shown on the
map up until the scale is ~4mile.
●
Displays the traffic information around vehi-
cle for up to a radius of 50 miles.
(Information exceeding 50 miles will not be
displayed)
●
The above list can be sorted by either
Distance (Default) or Category.
2
.
Select the desired
/LVW
button.
3
.
The user can check points of accidents and
traffic details.
(b) Changing Traffic Category
1
.
Press the
$GYDQFHG
button at No. 2.
2
.
After selecting the desired menu among
the six menus, press the
'RQH
button to
save. Once returning to the previous List
screen, the corresponding Category list will
be shown and maintained until Category
information is changed.
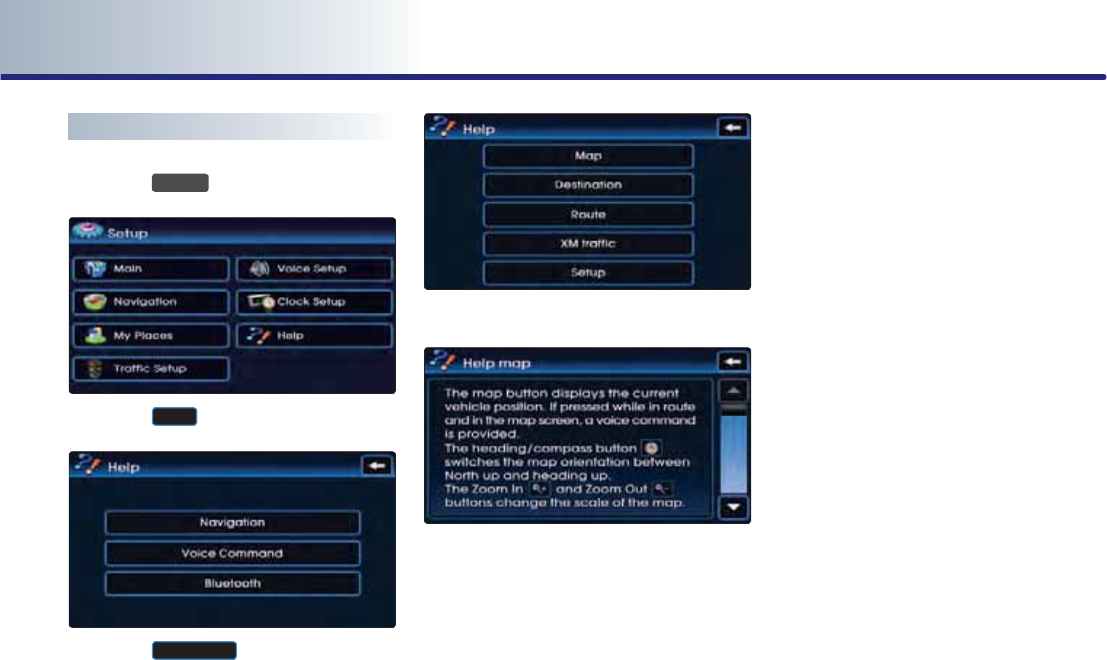
PART 3 NAVIGATION SYSTEM
3-54 NAVIGATION SYSTEM
Help
1
.
Press the
6(783
key.
2
.
Press the
+HOS
button.
3
.
Press the
1DYLJDWLRQ
button.
4
.
Press the desired Help menu button.
5
.
The full content of the help section can be
viewed by using the top-down scroll but-
tons.

XM DATA
4-1
XM DATA
PART 4
XM DATA
XM Data mode ……………………… 4-2
Entering XM Data mode ……………… 4-2
XM Data mode screen and functions … 4-2
Traffic data Service Information …… 4-2
Stock Data Service Information ……… 4-3
Sport Data Service Information ……… 4-3
Weather data Service Information…… 4-4

4-2 XM DATA
PART 4 XM DATA
XM Data mode
The XM Data Service is a paid membership
satellite radio service which provides users
with traffic, stock, sports, and weather infor-
mation. However, weather information is not
supported for vehicles purchased in Canada.
For information on registration or related con-
tent, please visit the XM radio website (www.
xmradio.com).
Entering XM Data mode
1
.
From the current location map screen with-
in the navigation, press the
;0'$7$
button.
2
.
The main XM data service screen will be dis-
played. Within the main screen, there are
four categories of Traffic, Stocks, Sports and
Weather.
XM Data mode screen and
functions
Traffic data Service Information
• Automatic route recalculation (guidance)
according to changes in traffic conditions.
• Provides short-cuts for initially searched
routes.
• Displays increased detour distance and esti-
mated driving times.
• Displays icons by each traffic situation on
the map.
1
.
Route calculation by incorporating actual
road traffic conditions
●
Incorporation of traffic information to route
calculations is a user option which can be
turned on or off by the user.
2
.
Displays Road Traffic situations
●
RTM (Road Traffic Message) is a feature
which displays symbols of icons for each
type of road traffic condition, such as loca-
tions under construction, accidents, basic
weather, and others on map locations based
on Traffic information provided by XM.
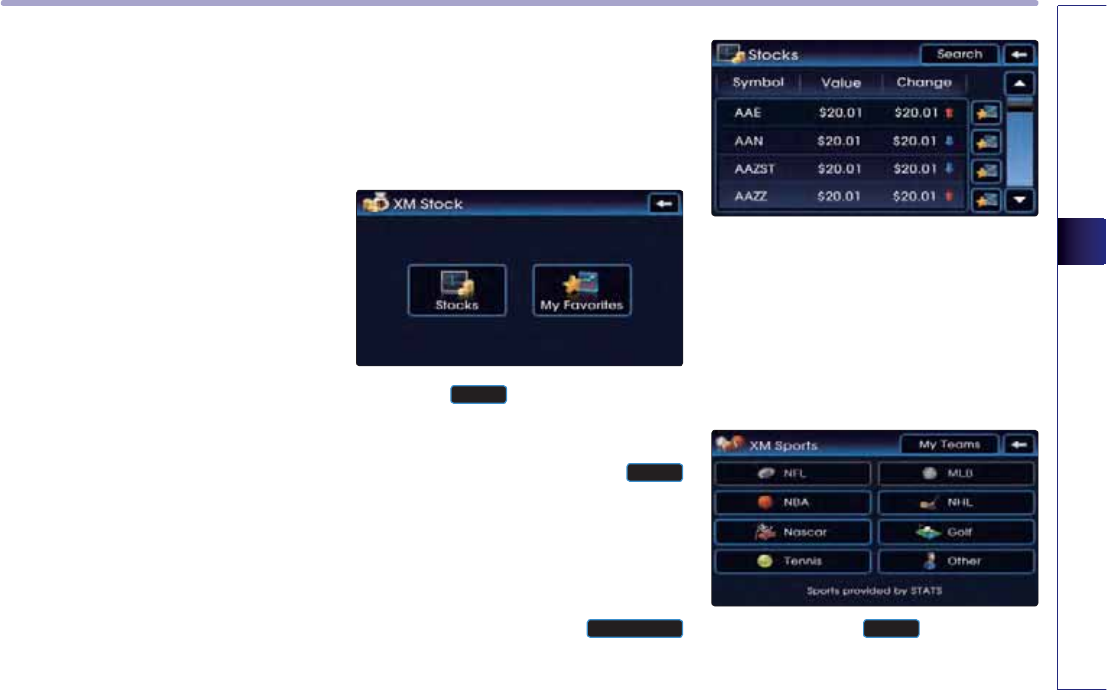
XM DATA
4-3
XM DATA
3
.
Avoidance of locations where traffic situa-
tions have occurred.
●
If a traffic situation occurs somewhere along
the route, the route is recalculated to avoid
such locations and an avoidance recalcula-
tion popup will be displayed.
4
.
Displays Traffic Event List
●
A list providing details on accidents and an
icon which will display the accident location
are displayed. The user can view details by
pressing on the list or move the map to the
accident location by pressing on the acci-
dent icons.
Stock Data Service Information
XM Stock data Service is a service which pro-
vides real-time updated information on the
NYSE, NASDAQ, and AMEX (approximately
11,000 symbols).
1
.
Press the
6WRFNV
button to display the
Search screen where symbols can be
searched. Input the name of the symbol
you wish to search and press the
/LVW
button to show search results.
2
.
For symbols which you are interested in,
press the <Favorites> icon to save the sym-
bol as a part of <My Favorite>. Saved sym-
bols can be viewed from the
0\)DYRULWHV
button on the Stock Main screen.
Sport Data Service Information
This service provides real-time updated infor-
mation on scores and schedules for major
sports, such as NFL, NBA, NCAA Football,
NCAA Basketball, NHL, MLB, NASCAR and
more.
1
.
Press the desired
6SRUWV
button to view
related sports information.
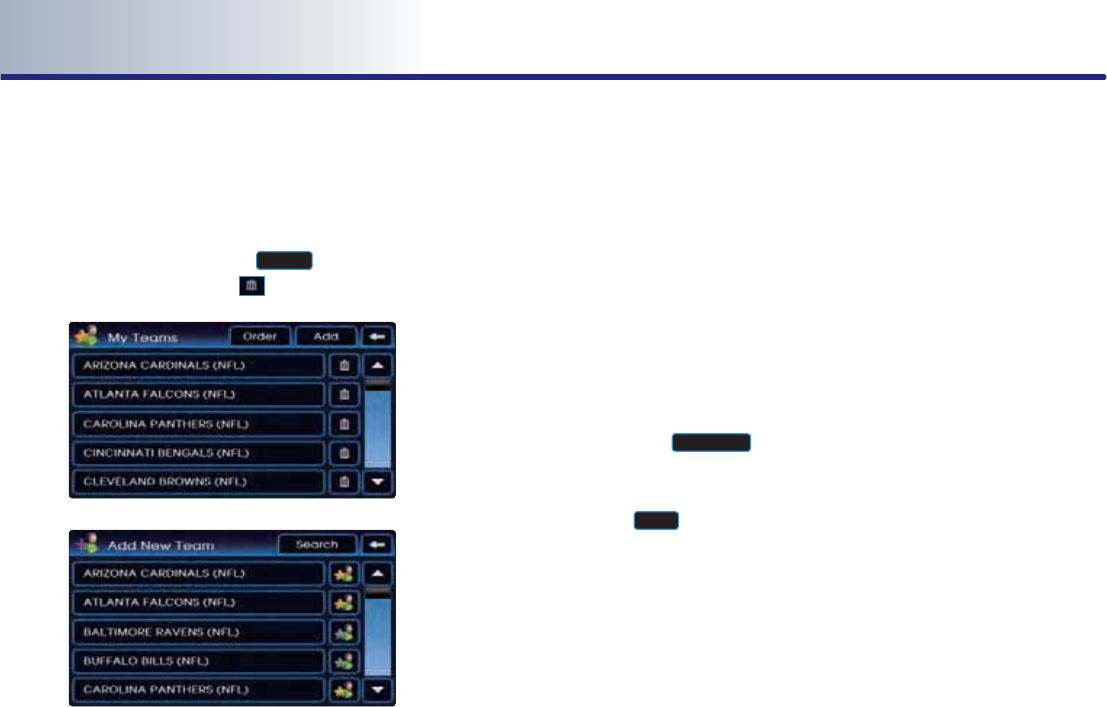
4-4 XM DATA
PART 4 XM DATA
2
.
My teams
You can save teams which you are interested
in as part of <My teams> to easily view related
scores and schedules.
Within the <My teams> screen, teams can be
added by pressing the
$GG
button or
deleted by pressing the button.
Weather data Service Information
The Weather Service is a service which pro-
vides weather information updated every 5
minutes for your region.
The Weather Service includes Tabular Weather,
Graphical Weather, Warnings and Advisories
Services.
1
.
Tabular Weather Service
●
Provides current weather information and
weather information for the coming next
three days for your region.
To change the region, press the
2WKHU&LW\
button and select the desired region.
2
.
Graphical Weather Service (
0DS
button)
●
This service provides weather information,
such as Cloud, Fog, Rain, Snow, and Road
Conditions on the Navigation map as sym-
bols. Details can be viewed on specific
regions by using the zoom in and zoom out
features.
3
.
Warning and Advisories Service
●
This service provides weather warnings and
advisories, such as Tornado, Storm, Flood
etc. as symbols on the Navigation map.
Details can be viewed on specific regions by
using the zoom in and zoom out features.

VOICE COMMAND SYSTEM 5-1
VOICE COMMAND SYSTEM
PART 5
VOICE COMMAND SYSTEM
Operating voice command ………… 5-2
Condition for voice command system …… 5-2
Basic operation for voice
command control ……………………… 5-2
Voice command Help …………………… 5-3
Setting up the voice command system 5-4
Setting voice Prompt ON/OFF ………… 5-4
Speaker adaptation …………………… 5-4
Voice command list ………………… 5-6
Command list of Audio system ………… 5-6
FM/AM Radio ………………………… 5-6
XM Radio …………………………… 5-7
CD …………………………………… 5-8
MP3 …………………………………… 5-9
USB MP3 ……………………………… 5-10
USB IMAGE …………………………… 5-10
iPod …………………………………… 5-11
Others ………………………………… 5-11
Command list of Navigation system ……… 5-12
Map …………………………………… 5-12
Destination …………………………… 5-14
Route ………………………………… 5-15
Others ………………………………… 5-16
Searching destination by voice command 5-19
Find address ………………………… 5-19
Find nearest POI ……………………… 5-20
Find nearest <POI name> …………… 5-21
Destination POI by phone number … 5-22
Find emergency <Category> ……… 5-23
Destination by address book ………… 5-24
Previous destination ………………… 5-24
Previous start point ………………… 5-25
Go home ……………………………… 5-25
Destination by memory
point <1 to 5> ……………………… 5-25
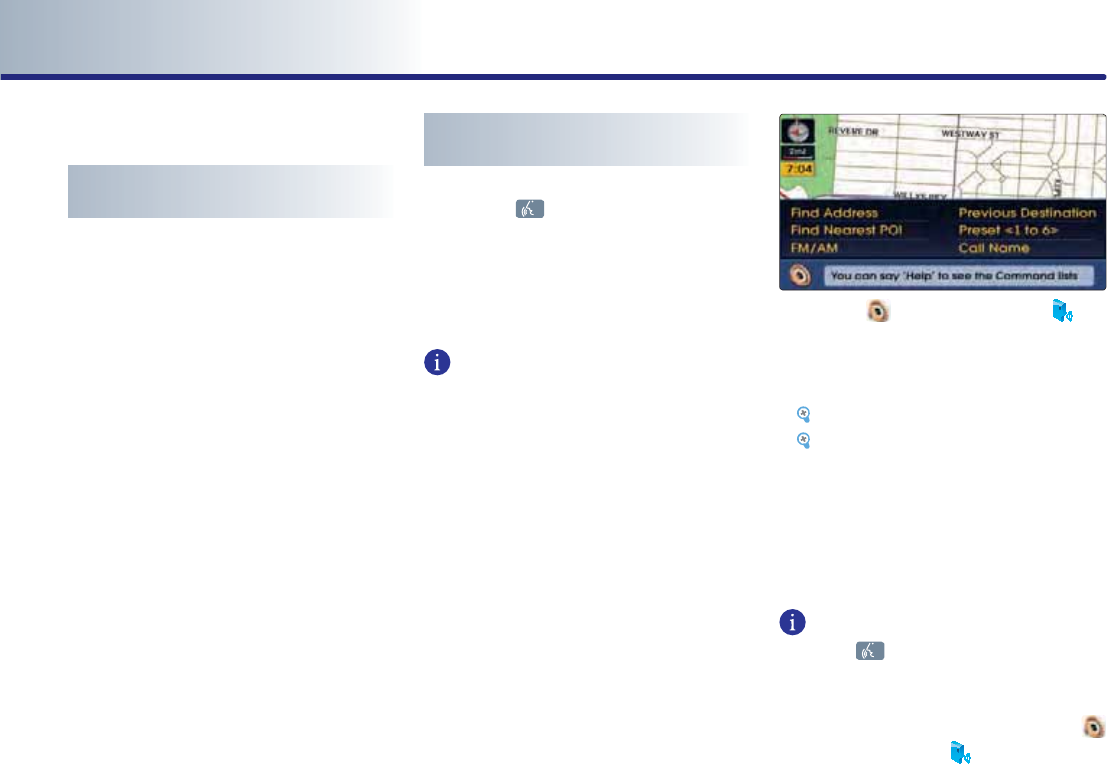
5-2 VOICE COMMAND SYSTEM
PART 5 VOICE COMMAND SYSTEM
Operating voice command
Condition for voice command
system
Most of the functions within the Audio and
Navigation system can be operated by voice.
Please follow the following instructions for
optimal voice recognition performance.
●
Close all windows and the sunroof. The per-
formance of the voice recognition can be
improved if the environment of the car inte-
rior is quiet.
●
Press the voice recognition button and say
the desired voice command after the sound
of the beep.
●
The microphone is positioned above the
driver so that voice commands can be spo-
ken while maintaining a proper posture.
●
Pronounce the voice commands naturally
and clearly as if in a normal conversation.
Basic operation for voice
command control
1. Press the key on the steering wheel
remote controller. A voice command win-
dow will be displayed on the lower side of
the screen followed by a "Command
please" system voice comment.
INFORMATION
The System voice comment "Command
Please" will not be provided when the Voice
prompt is turned OFF.
2. Once the icon changes into the icon
on the pop-up screen with a beep sound,
say the desired voice command (ex : previ-
ous destination)
[Voice command list], page 5-6.
[Searching destination by voice com-
mand], page 5-19.
If the exact command is not known, use the
"Help" command to view the commands list
in detail.
INFORMATION
Press the key shortly to input a voice
command from among the system voice com-
ments. The system voice instruction comment
will immediately terminate. When the
icon changes into the icon with a beep
sound, input the desired voice command.
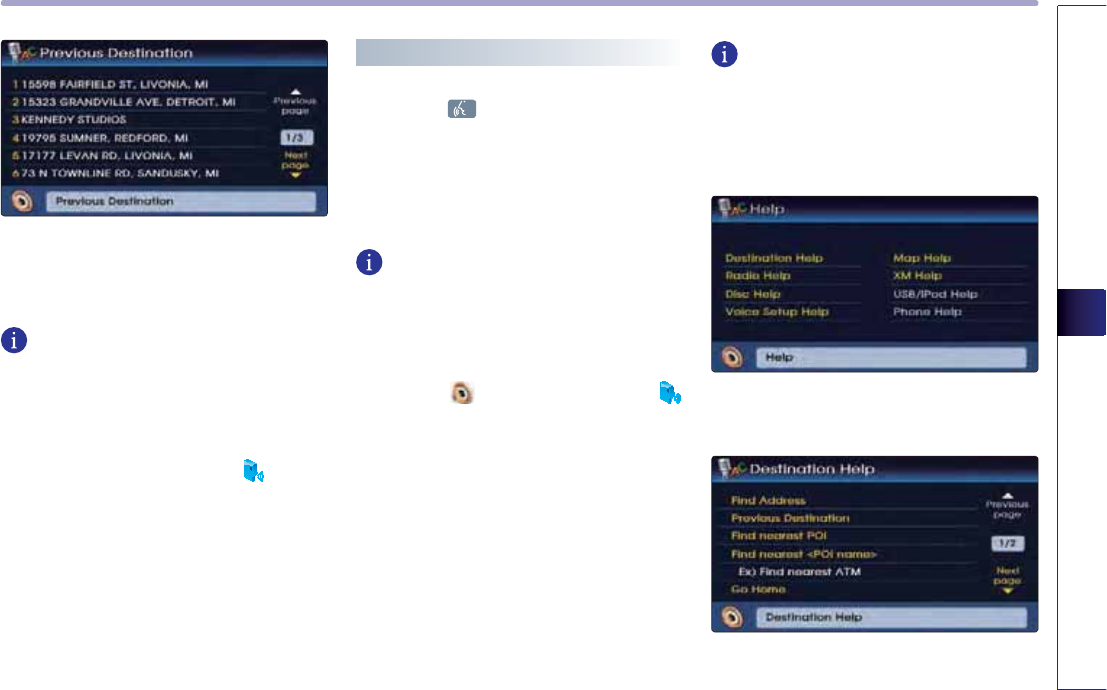
VOICE COMMAND SYSTEM 5-3
VOICE COMMAND SYSTEM
3. The inputted command is fed back to the
screen and voice system. If the command
was not recognized properly, say "Back".
INFORMATION
● The commands which can currently be
inputted are displayed on the screen in yel-
low.
●
To terminate the voice recognition system,
either say "cancel" or press the
for over
0.8 second.
●
Be aware that during the operation of the
voice recognition system, pressing the hard
keys or the screen will terminate the voice
recognition system.
Voice command Help
1. Press the key on the steering wheel
remote controller. A voice command win-
dow will be displayed on the lower side of
the screen followed by a "Command
please" system voice comment.
INFORMATION
The System voice comment "Command
Please" will not be provided when the Voice
prompt is turned OFF.
2. Once the icon changes into the
icon on the pop-up screen with a beep
sound, say "Help". If the proper Help menu
is already known, voice commands, such as
"destination help" can be inputted directly.
INFORMATION
The "help" command can be used even while
voice recognition dialogue is operating. At
such time, help instructions appropriate to
the state of the dialogue will be provided.
3. Say the name of the desired menu.
(ex : "Destination help")
4. Say the desired voice command.
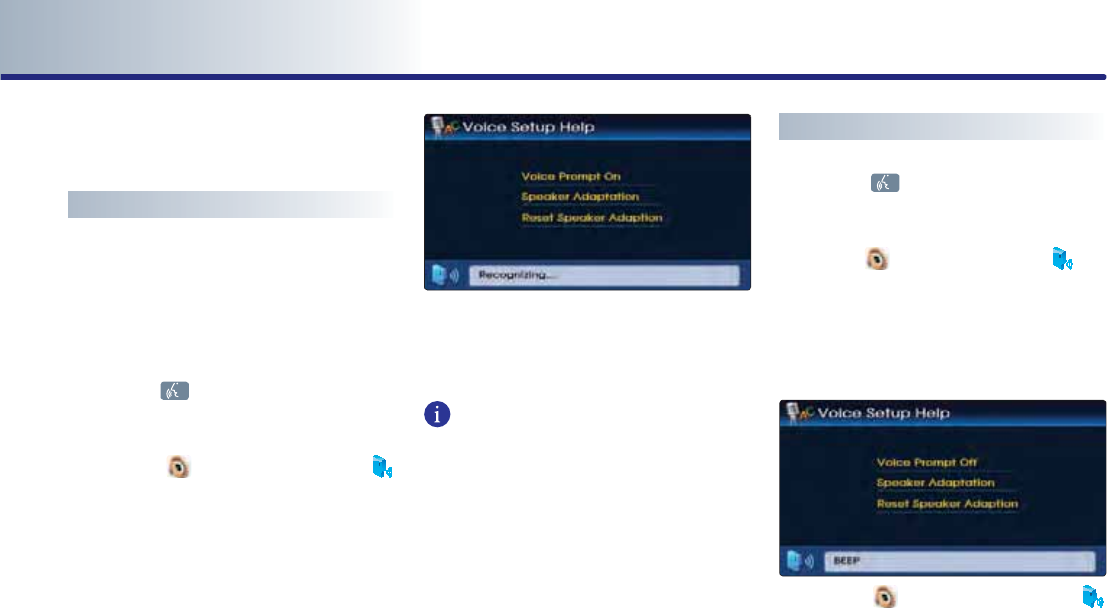
5-4 VOICE COMMAND SYSTEM
PART 5 VOICE COMMAND SYSTEM
Setting up the voice command
system
Setting voice Prompt ON/OFF
●
Voice prompt ON : all system prompts are
provided.
● Voice prompt OFF : most of the system
prompts are not provided.
1. Press the key on the steering wheel
remote controller.
2. Once the icon changes into the
icon on the pop-up screen with a beep
sound, say "Voice setup." The "voice prompt
on" or "voice prompt off" can be directly
inputted if the current state is already
known.
3. Once the icon changes into the icon on the
pop-up screen with a beep sound, say
"Voice Prompt on".
INFORMATION
In the Voice Setup Help screen, the com-
mands possible for input within the current
mode are displayed. For example, if the Voice
prompt is currently in Off state, then the com-
mand Voice prompt ON will be displayed on
the screen.
Speaker adaptation
1. Press the key on the steering wheel
remote controller.
2. Once the icon changes into the icon
on the pop-up screen with a beep sound,
say "Voice setup." Or the "Speaker adapta-
tion" command can be directly inputted.
3. Once the icon changes into the
icon on the pop-up screen with a beep
sound, say "Speaker adaptation".
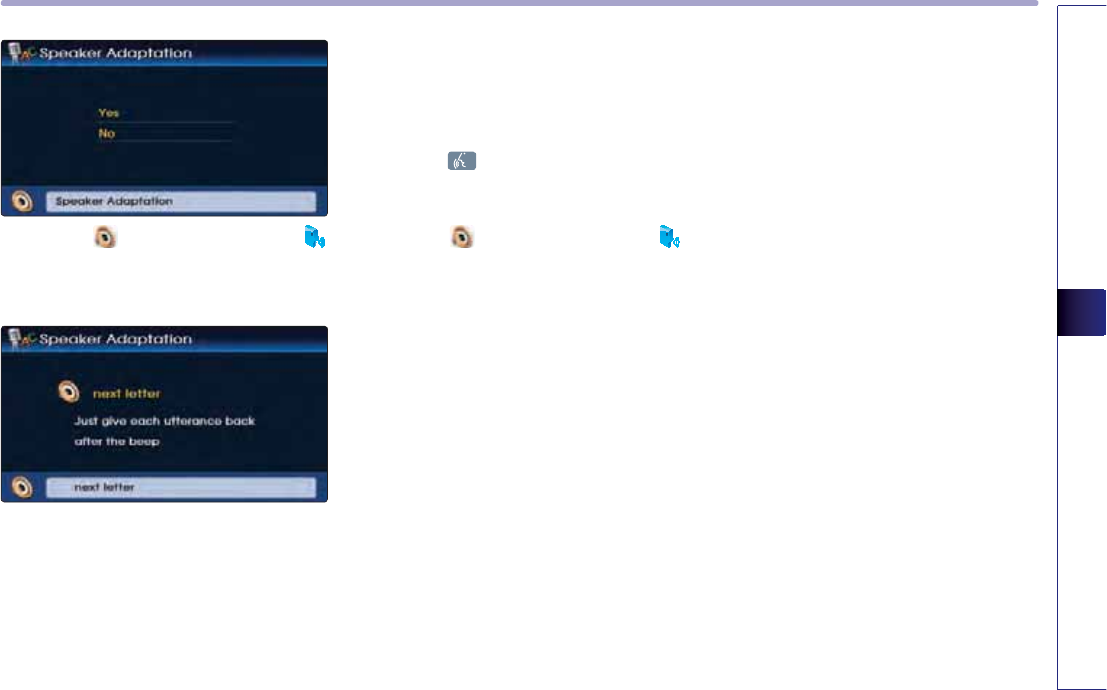
VOICE COMMAND SYSTEM 5-5
VOICE COMMAND SYSTEM
4.
Once the icon changes into the
icon on the pop-up screen with a beep
sound, say "Yes".
5. Listen and repeat the 20 commands
(approximate) as instructed by the device.
● Reset Speaker adaptation: Returns to previ-
ous state prior to applying Speaker adapta-
tion.
1. Press the key on the steering wheel
remote controller.
2. Once the icon changes into the
icon on the pop-up screen with a beep
sound, say "Reset Speaker adaptation".
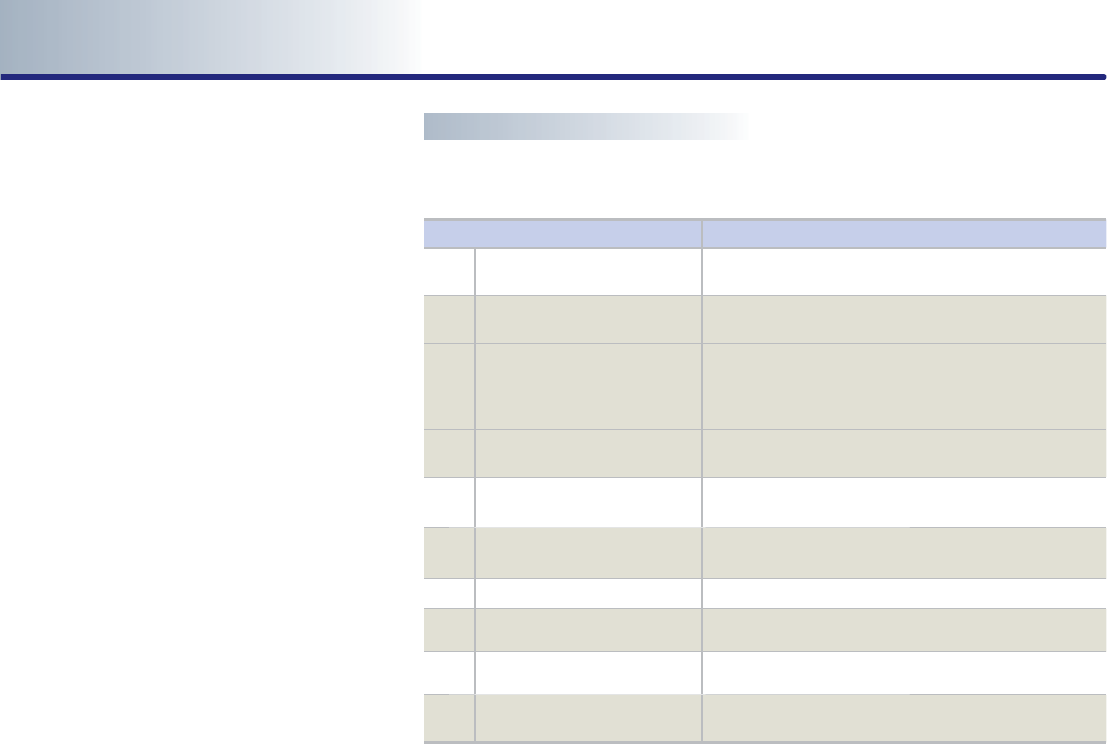
5-6 VOICE COMMAND SYSTEM
PART 5 VOICE COMMAND SYSTEM
Voice command list
The voice commands for this system are divid-
ed into Global commands and Local com-
mands.
● Global command () : Commands which
operate in all operating modes.
● Local command () : Commands which
operate only when the corresponding
mode is operating or when the mode
screen to the corresponding mode is dis-
played.
Command list of Audio system
FM/AM Radio
Command Operation
㿋
Radio Plays the most recent frequency for the most recently
operated band.
㿋
(Radio) AM Plays the most recent frequency for the corresponding
band.
㿋
(Radio) FM
Plays the most recent frequency for the corresponding
band. In the case of FM, the most recent frequency
within the most recently played FM1 or FM2 band is
played.
㿋
FM <1 or 2> Plays the most recent frequency for the corresponding
band.
㿋
AM frequency <530 to 1710>
(ex. AM frequency 1310) Plays the desired AM band frequency.
㿋
FM frequency <87.5 to 107.9>
(ex. FM frequency 99.1) Plays the desired FM band frequency.
㿋
AM Preset <1 to 6> Plays the desired AM band preset frequency.
㿋
FM <1 or 2> Preset <1 to 6> Plays the desired preset frequency of FM1 or FM2
band.
㿊
Preset <1 to 6> Plays the desired preset frequency for the current
band.
㿊
Seek Up Searches and plays the next frequency of the current
band.
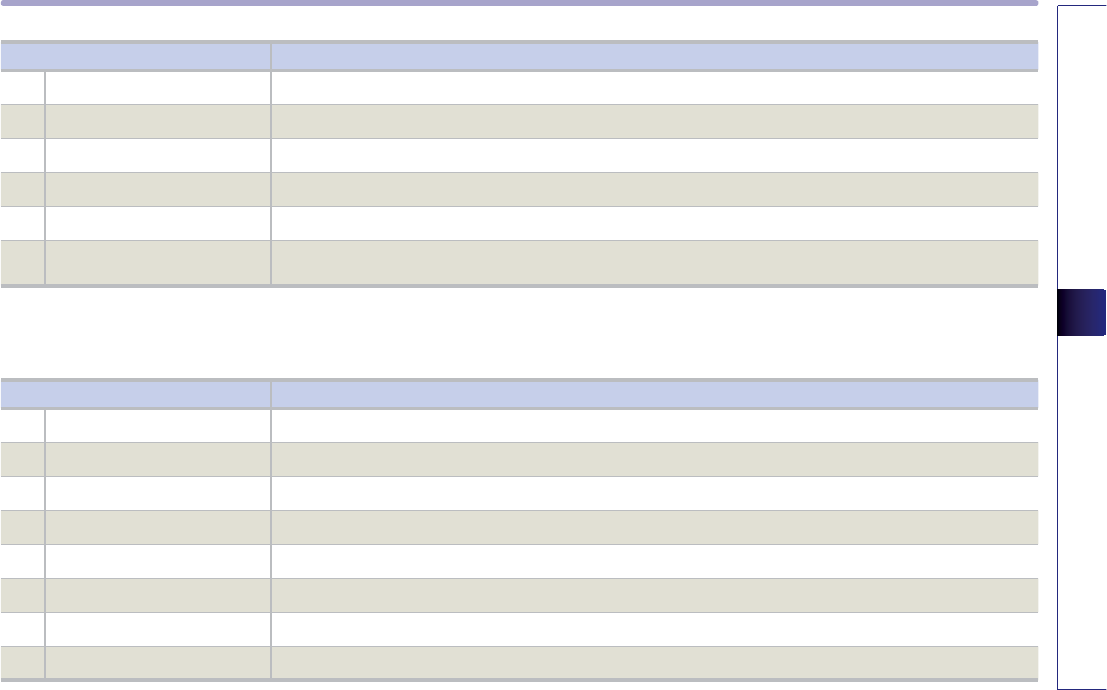
VOICE COMMAND SYSTEM 5-7
VOICE COMMAND SYSTEM
Command Operation
㿊 Seek Down Searches and plays the previous frequency of the current band.
㿊 Preset Up Plays the next preset frequency of the current band.
㿊 Preset Down Plays the previous preset frequency of the current.
㿊 Scan Scans all frequencies within the current band.
㿊 Preset Scan Scans the 6 preset frequencies of the current band.
㿊 Auto Store / Auto Preset Searches all frequencies within the current band and stores the 6 frequencies with the most superior
reception as preset buttons.
Command Operation
㿋# [P Plays the last channel within the last band from XM1, XM2, and XM3.
㿋 XM <1 or 2 or 3> Plays the most recent channel for the corresponding Band.
㿋 XM Channel <0 to 255> Plays the desired XM band channel.
㿋
XM <1 or 2 or 3> Preset <1 to 6>
Plays the desired preset channel for XM1 or XM2 or XM3 band.
㿊 Channel < 0 to 255 > Plays the desired channel of the current band.
㿊 Preset <1 to 6> Plays the desired preset channel of the current band.
㿊 Channel Up Plays the next channel of the current band.
㿊 Channel Down Plays the previous channel of the current band.
XM Radio
5-8 VOICE COMMAND SYSTEM
PART 5 VOICE COMMAND SYSTEM
Command Operation
㿊 Preset Up Plays the next preset channel of the current band.
㿊 Preset Down Plays the previous preset channel of the current band.
㿊 Scan Scans all channels within the current band.
㿊 Preset Scan Scans all preset channels within the current band.
Command Operation
㿋DISC Plays the DISC already inserted in the CD Player.
㿋CD If the DISC inserted in the CD Player is either a CD or MP3 DISC, then the CD or MP3 will be played.
㿋CD track <1 to 665> If the DISC inserted in the CD Player is a CD, then CD Mode will start and plays the desired track.
㿊Track <1 to 665> Plays the desired track.
㿊Next track Plays the next track.
㿊Previous track Plays the previous track.
㿊Scan Scans all tracks on the CD DISC.
㿊Repeat track Repeats the current playing track.
㿊Random Plays the tracks of the CD DISC in random order.
㿊Normal play Turns off the Scan, Repeat, and Random functions.
CD
VOICE COMMAND SYSTEM 5-9
VOICE COMMAND SYSTEM
Command Operation
㿋 DISC Plays the DISC already inserted into the CD Player.
㿋 CD If the DISC inserted in the CD Player is either a CD or MP3 DISC, then the CD or MP3 will be played.
㿋 MP3 If the DISC inserted in the CD Player is an MP3 DISC, then the MP3 will be played.
㿊 Next file Plays the next file.
㿊 Previous file Plays the previous file.
㿊 Next folder Plays the first file in the next folder.
㿊 Previous folder Plays the first file in the previous folder.
㿊 Scan Scans all files within the MP3 DISC.
㿊 Folder Scan Plays all songs in the folder in which the current playing file is located for 10 seconds each.
㿊 Repeat File Repeats the current playing file.
㿊 Repeat Folder Repeats all tracks within the current playing folder.
㿊 Random Plays all files within the MP3 DISC in random order.
㿊 Random Folder Plays all files within the current playing folder in random order.
㿊 Normal play Turns off the Scan, Repeat, and Random functions.
MP3
5-10 VOICE COMMAND SYSTEM
PART 5 VOICE COMMAND SYSTEM
USB MP3
USB IMAGE
Command Operation
㿋 USB If the USB has been connected to the device, plays the MP3 files within the USB.
㿊 Next file Plays the next file.
㿊 Previous file Plays the previous file.
㿊 Next folder Plays the first chapter of the next folder.
㿊 Previous folder Plays the first chapter of the previous folder.
㿊 Scan Scans all files within the USB.
㿊 Folder Scan Plays all songs in the folder in which the current playing file is located for 10 seconds each.
㿊 Repeat File Repeats the current playing file.
㿊 Repeat Folder Repeats all songs within the current playing folder.
㿊 Random Plays all files within the USB in random order.
㿊 Random Folder Plays all files within the current playing folder in random order.
㿊 Normal play Turns off the Scan, Repeat, and Random functions.
Command Operation
㿋 USB If the USB IMAGE has been connected to the device, plays the image files within the USB.
㿊Next image Moves to the next image.
㿊Previous image Moves to the previous image.

VOICE COMMAND SYSTEM 5-11
VOICE COMMAND SYSTEM
iPod
Others
Command Operation
㿋 iPod Plays the songs within the iPod if the iPod has been connected to the device.
㿊 Next song Plays the next song.
㿊 Previous song Plays the previous song.
㿊 Repeat song Repeats the current playing song.
㿊 Random Plays all songs within the iPod in random order.
㿊 Random Album Plays all songs within the current playing album in random order.
㿊 Normal play Turns off the Repeat and Random functions.
Command Operation
㿋 Line in Plays the unit connected with the AUX terminal.
㿋 Audio on Turns on the Audio/Video.
㿋 Audio off Turns off the Audio/Video.
Command Operation
㿊Next folder Moves to the next folder.
㿊Previous folder Moves to the previous folder.
5-12 VOICE COMMAND SYSTEM
PART 5 VOICE COMMAND SYSTEM
Command list of Navigation system
Navigation commands will operate only agreeing to the terms and conditions for the Navigation system.
Map
Command Operation
㿋
Map Current location Displays the current position of the vehicle.
㿋
Zoom In Decreases the map zoom by one level.
㿋
Zoom Out Increases the map zoom by one level.
㿋
Zoom minimum Displays the map screen in the maximum zoom level.
㿋
Zoom maximum Displays the map screen in the minimum zoom level.
㿋
Zoom level <1 to 14> Displays the map in the zoom level selected from the 14 levels.
㿋
Zoom <scale factor> Displays the map in the corresponding zoom.
150 feet / 50 meters
300 feet /100 meters
700 feet / 200 meters
0.25 miles / 400 meters
0.5 miles / 800 meters
1 mile / 1.6 kilometers
2 miles / 3.2 kilometers
4 miles / 6.4 kilometers
8 miles / 12 kilometers

VOICE COMMAND SYSTEM 5-13
VOICE COMMAND SYSTEM
Command Operation
16 miles / 25 kilometers
32 miles / 50 kilometers
64 miles / 100 kilometers
130 miles / 200 kilometers
250 miles / 400 kilometers
(ex.Zoom 0.25 miles, zoom
400 meters)
㿊
North up Displays the map in North Up mode.
㿊
Heading up Displays the map in Heading Up mode.
㿊
Show <POI name>
(ex. Show ATM)
Displays the selected POI categories. [POI Category list], page 5-17.
㿊
Hide <POI name>
(ex. Hide ATM)
Hides the selected POI categories. [POI Category list], page 5-17.
㿊
Hide all Hides all POI categories.
㿊
Daylight mode Converts the map display into daylight mode.
㿊
Night mode Converts the map display into night mode.
㿊
Auto mode Converts the map display is between daylight/night modes automatically.
5-14 VOICE COMMAND SYSTEM
PART 5 VOICE COMMAND SYSTEM
Destination
Command Operation
㿋Find address Sets the destination through address search for route guidance.
㿋Find nearest POI Sets a POI near the current position as the destination for route guidance through POI category search.
㿋Find nearest <POI name> Sets a POI near the current position as the destination by directly inputting the POI name for route
guidance. [POI Category list], page 5-17.
㿋Destination POI by phone
number Sets the destination by searching the phone number of the facility.
㿋Find Emergency <Category>
(ex. Find Emergency Hospital)
Searches for an emergency facility which is nearby the current position and sets it as the destination for
route guidance. Emergency facilities are police stations, hospitals, and dealerships.
㿋Destination by address book Sets one of the list of previously registered addresses in the address book for the user as the destination.
㿋Previous destination Sets one of the previous destination as the current destination.
㿋Previous start point Sets the previous start point as the current destination.
㿋Go home Sets the previously registered home address as the destination for route guidance.
㿋Destination by memory
point <1 to 5> Sets a previously registered memory point as the destination for route guidance
VOICE COMMAND SYSTEM 5-15
VOICE COMMAND SYSTEM
Route
Command Operation
㿋
Cancel route Deletes the designated destination and terminates the route guidance.
㿋
Repeat voice guidance Repeats the route guidance.
㿋
Detour <1 or 2 or 5 or 10>
miles Searches detour routes within a <1|2|5|10> mile radius.
㿋
Detour <1 or 2 or 5 or 10>
kilometers Searches detour routes within a <1|2|5|10> kilometer radius.
㿋
Replan recommended route Recalculates the route with the recommended route.
㿋
Replan shortest route Recalculates the route with the shortest route.
㿋
Distance to destination Reports the remaining distance until destination by voice.
㿋
Time to destination Reports the remaining time until destination by voice.
㿊
View route If the destination has been set, displays the whole route screen until the destination.
㿊Start guidance Sets the scroll mark displayed on the map as the destination and starts route guidance.
5-16 VOICE COMMAND SYSTEM
PART 5 VOICE COMMAND SYSTEM
Others
Command Operation
㿋
Voice guidance on Turns the Voice Guidance On.
㿋
Voice guidance off Turns the Voice Guidance Off.
㿋
Voice guidance louder Increases the Voice Guidance volume by 1 level.
㿋
Voice guidance softer Decrease the Voice Guidance volume by 1 level.
㿋
Store marked location to <text tag>
(ex. Store marked location to user 1) Registers the selected location into the selected Address book.

VOICE COMMAND SYSTEM 5-17
VOICE COMMAND SYSTEM
●POI Category list
All restaurants Car Wash Home Specialty Store Court House
Fast Food restaurant Motorcycle Dealership Clothing shop Fire Department
American restaurant All Travel Shoe Store Convention Center
French restaurant Airport Pharmacy City Hall
Italian restaurant Hotel All Recreation Civic Center
Continental restaurant Tourist Information Amusement Park School
Mexican restaurant Travel Agent Museum Government Offices
Japanese restaurant Tourist Attraction Cinema Waste & Sanitary
Chinese restaurant City Cnter Sports Activities Utilities
Korean restaurant Rental Car Agency Sports Complex All Services
Vegetarian Food restaurant Campground Golf Course Hospital
Seafood restaurant Ferry Terminal Winery Dentist
Latin American restaurant Bus Station Video & Game Rental Photography
Asian restaurant Local Transit Ski Resort Tax Service
African restaurant Train Station Recreation Area Medical Service
Coffee Shop All Shopping Other Recreation Attorney
Other restaurants Department Store All Financial Service Funeral Director
All automotive Convenience Store Bank Hair & Beauty
Hyundai Dealership Shopping Center ATM Cleaning & Laundry
Gas Station Music Store Check Cashing Service Social Service
Parking Grocery Store Money Transfer Physician
Auto service Bookstore Business Facility Communication services
Road Assistance Electronics Store All Community Tailor & Alteration
Automobile Dealership Hardware Store Police Station Mover services
Auto Parts Gifts shop Post Office
Rest Area Sporting Goods store Library
5-18 VOICE COMMAND SYSTEM
PART 5 VOICE COMMAND SYSTEM
Command list of Help
Command list of Phone
Command Operation
㿋
Call Name Makes the call to the name.
㿋
Dial Number makes the callto the number.
㿋
Redial The recently called number is redialed.
㿋
Recent Calls The user can select a number from the outgoing, incoming, and missed calls.
Command Operation
㿋Help Displays the main Help screen.
㿋Destination Help Displays the Destination related command list.
㿋Map Help Displays the Map related command list.
㿋Radio Help Displays the FM/AM radio related command list.
㿋XM Help Displays the XM radio related command list.
㿋Disc Help Displays the DISC mode related command list for the disc inserted in the CD Player.
㿋iPod Help Displays the iPod related Command list.
㿋USB Help Displays the USB related command list.
㿋Phone Help Displays the Phone help screen.
㿋Voice setup Help Displays the Voice prompt settings and speaker-adaptive commands on the screen.
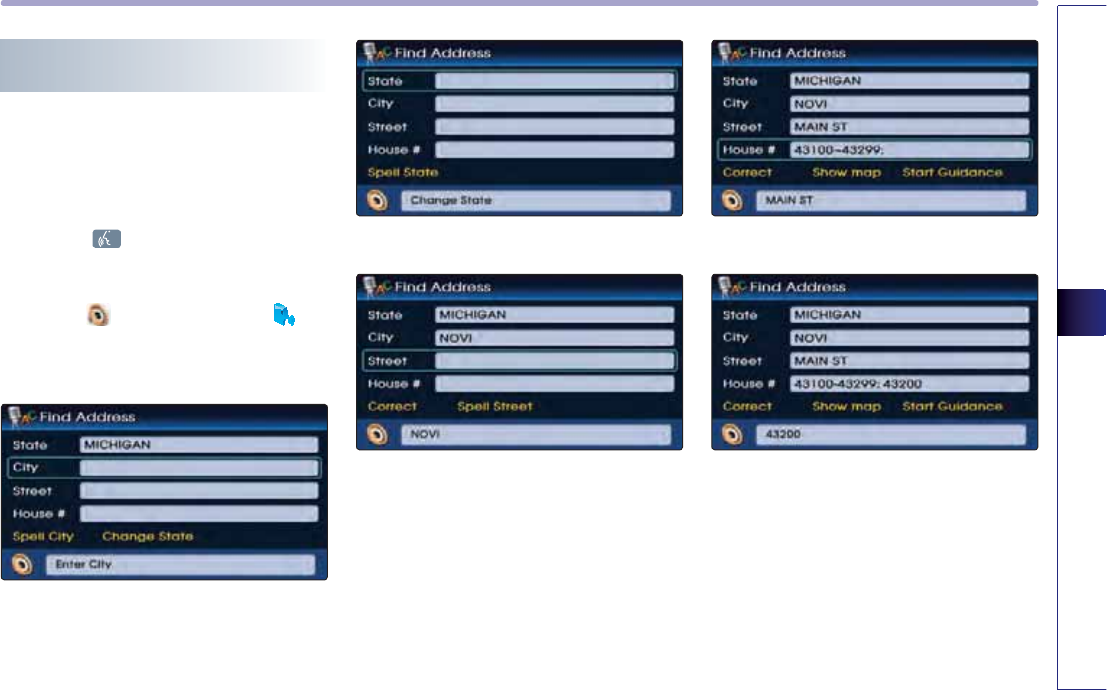
VOICE COMMAND SYSTEM 5-19
VOICE COMMAND SYSTEM
Searching destination by voice
command
Find address
Sets the destination through address search
for route guidance.
1.
Press the key on the steering wheel
remote controller.
2. Once the icon changes into the icon
on the pop-up screen with a beep sound,
say "Find address".
3. Say "Change state" to change the state.
4. Say the state name.
5. Say the city name.
6. Say the street name.
7.
Say the House number. Here, the range
which can be inputted will be displayed.
8.
Say "Start guidance" if guidance to the
selected position is desired, or say "Show
map" to verify the location of the selected
position on the map.
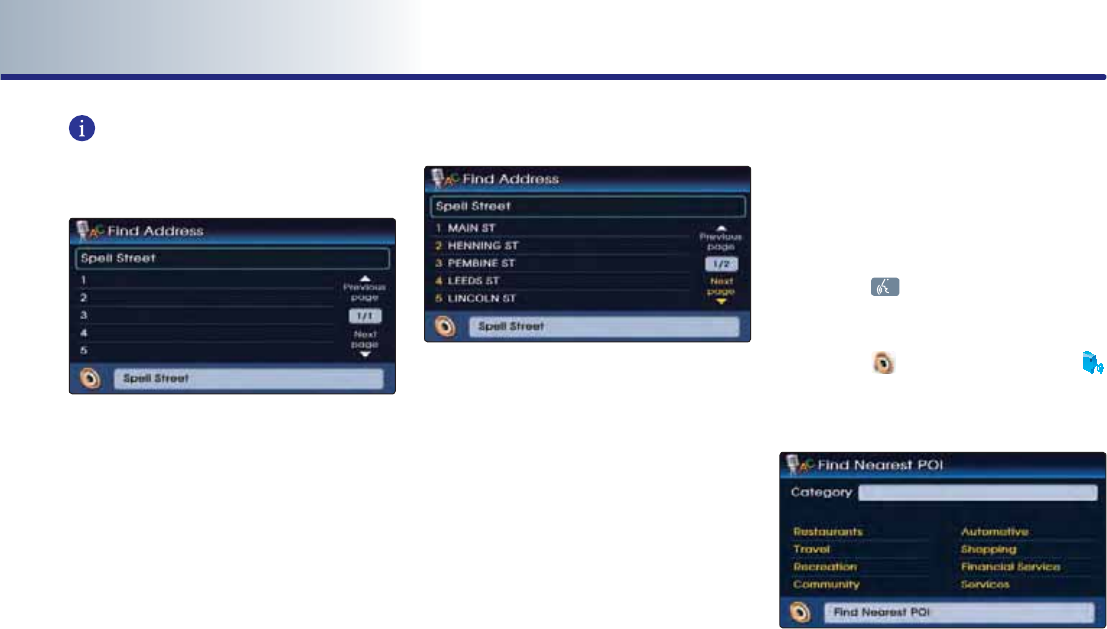
5-20 VOICE COMMAND SYSTEM
PART 5 VOICE COMMAND SYSTEM
INFORMATION
Spell recognition
●
It is possible to search the state, city, street
names through the text line inputted by the
user.
● To enter spell search mode, say the "Spell
state, city, street names" command as dis-
played on the screen.
● Text lines can be inputted continuously.
Pick-List(n-best list)
● If there are more than one voice result, then
a pick-list which can be selected by the user
will be displayed.
● There may be more than one list page. The
desired page can be viewed by using com-
mands such as "next page" or "previous
page".
● Here, the "Line + number" voice command
can be used to select the desired result,
such as "Line one". Pressing the desired
result is not supported.
● Also, selectable areas will be highlighted in
yellow, allowing the user to easily see which
results can be selected.
Find nearest POI
Sets a POI near the current position as the
destination for route guidance through POI
category search.
1.
Press the key on the steering wheel
remote controller.
2. Once the icon changes into the
icon on the pop-up screen with a beep
sound, say "find nearest POI".
3. Select the desired main category.
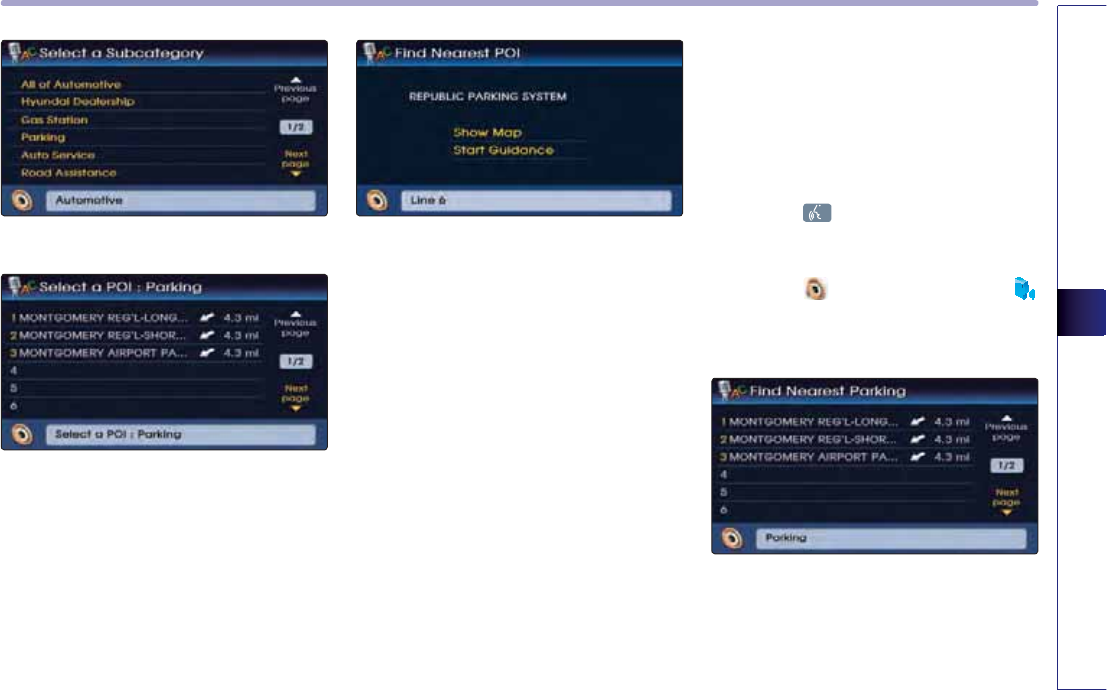
VOICE COMMAND SYSTEM 5-21
VOICE COMMAND SYSTEM
4. Select the desired sub category.
5.
Select the desired POI from the list and say
the line number for the corresponding
menu. Ex) "Line 1".
6.
Say "Start guidance" if guidance to the
selected position is desired, or say "Show
map" to verify the location of the selected
position on the map.
Find nearest <POI name>
Sets a POI near the current position as the
destination by directly inputting the POI
name for route guidance.
1.
Press the key on the steering wheel
remote controller.
2. Once the icon changes into the
icon on the pop-up screen with a beep
sound, say "Find nearest Parking".
3. Select the desired POI from the list and say
the line number for the corresponding
menu. Ex) "Line 1".
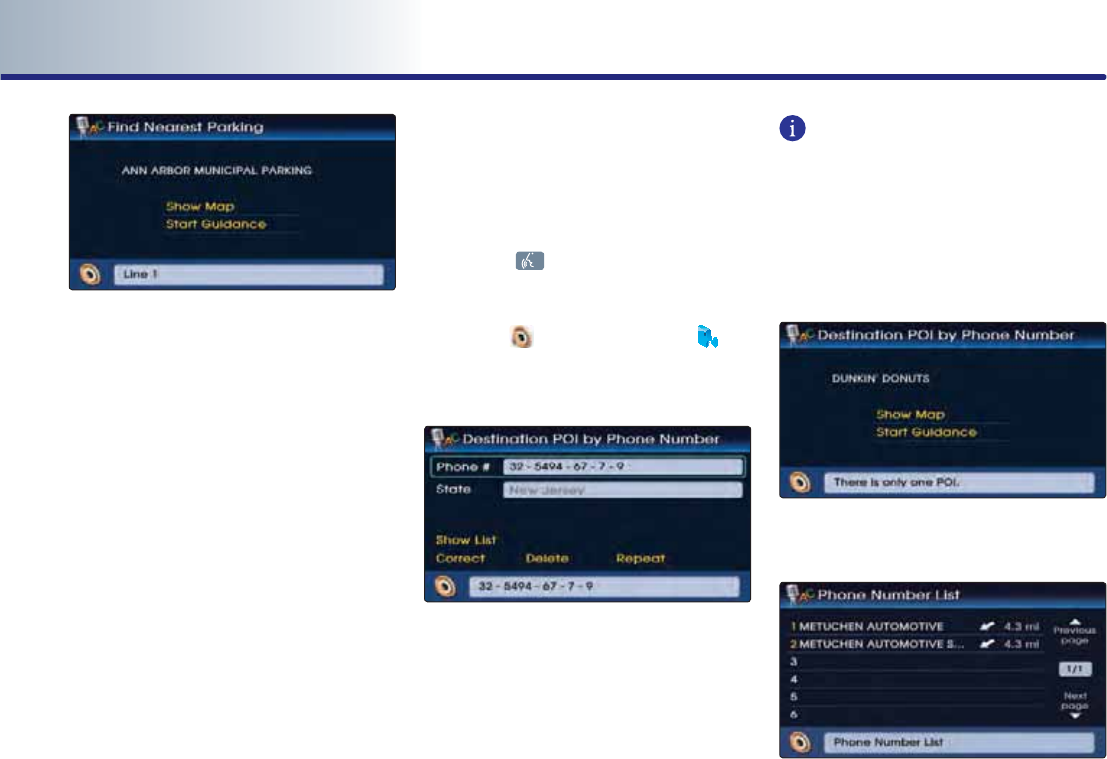
5-22 VOICE COMMAND SYSTEM
PART 5 VOICE COMMAND SYSTEM
4.
Say "Start guidance" if guidance to the
selected position is desired, or say "Show
map" to verify the location of the selected
position on the map.
Destination POI by phone number
Sets the destination by searching the phone
number of the facility.
1. Press the key on the steering wheel
remote controller.
2.
Once the icon changes into the icon
on the pop-up screen with a beep sound,
say "Destination POI by Phone number".
3. Input the 10 numbers for the phone num-
ber.
INFORMATION
Continuous recognition of phone numbers is
possible, and the recognized result will be dis-
played in block units. To correct a block unit,
say "correct". To delete the entire result, say
"delete". To have the input read back, say
"repeat".
4. Say "Show list" to view the resulting search
list.
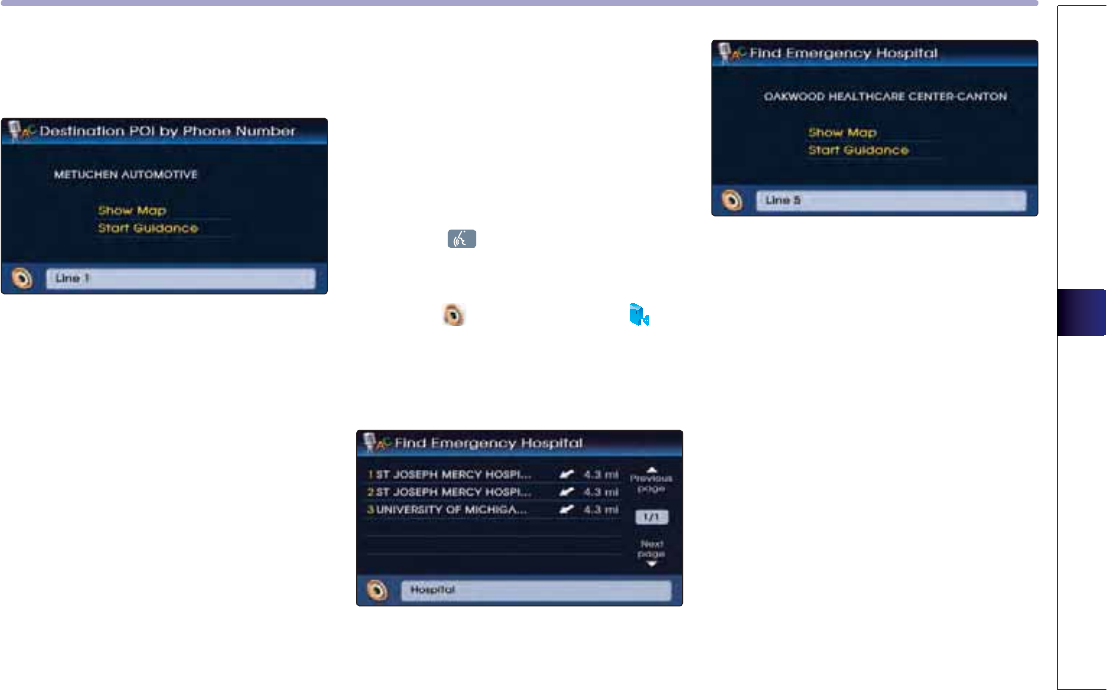
VOICE COMMAND SYSTEM 5-23
VOICE COMMAND SYSTEM
5. Select the desired location from the list and
say the line command.
6. Say "Start guidance" if guidance to the
selected position is desired, or say "Show
map" to verify the location of the selected
position on the map.
Find emergency <Category> :
Searches for an emergency facility which is
nearby the current position and sets it as the
destination for route guidance. Emergency
facilities are police stations, hospitals, and
dealerships.
1. Press the key on the steering wheel
remote controller.
2.
Once the icon changes into the icon
on the pop-up screen with a beep sound,
say the voice command.
ex)“Find emergency hospital”
3. Select the desired location from the list and
say the line command.
4.
Say "Start guidance" if guidance to the
selected position is desired, or say "Show
map" to verify the location of the selected
position on the map.
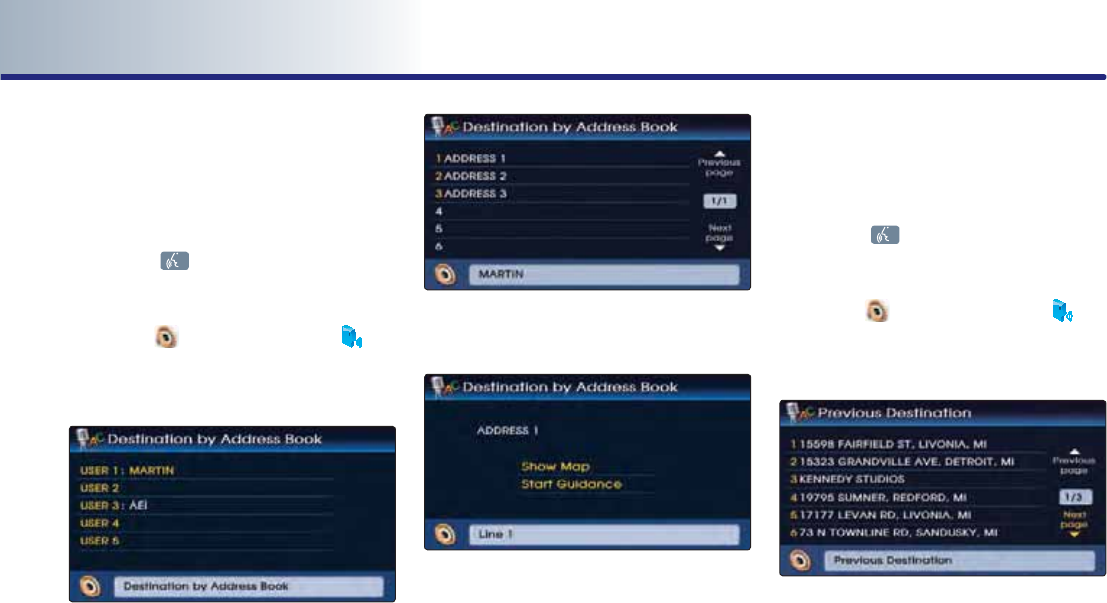
5-24 VOICE COMMAND SYSTEM
PART 5 VOICE COMMAND SYSTEM
Destination by address book
Sets one of the list of previously registered
addresses in the address book for the user as
the destination.
1.
Press the key on the steering wheel
remote controller.
2.
Once the icon changes into the icon
on the pop-up screen with a beep sound,
say "Destination by address book".
3. Select the desired user name(Address book
name).
4. Select the desired location from the list and
say the line command.
5. Say "Start guidance" if guidance to the
selected position is desired, or say "Show
map" to verify the location of the selected
position on the map.
Previous destination
Sets one of the previous destination as the
current destination.
1.
Press the key on the steering wheel
remote controller.
2. Once the icon changes into the icon
on the pop-up screen with a beep sound,
say "Previous destination".
3.
Select the desired location from the list and
say the line command.
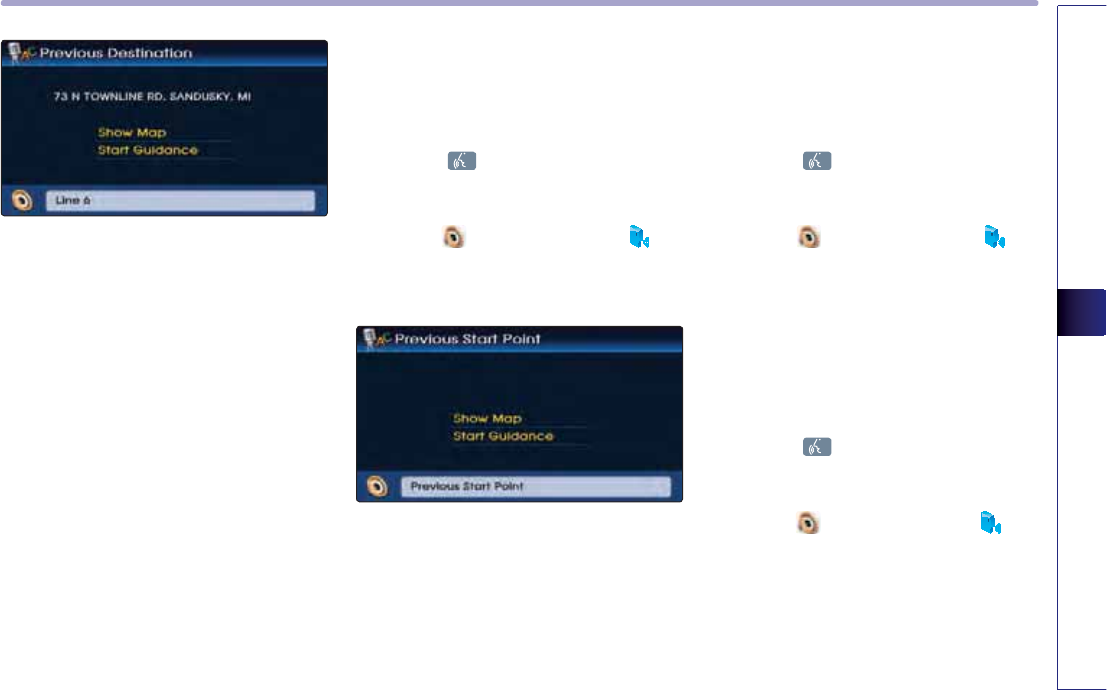
VOICE COMMAND SYSTEM 5-25
VOICE COMMAND SYSTEM
4.
Say "Start guidance" if guidance to the
selected position is desired, or say "Show
map" to verify the location of the selected
position on the map.
Previous start point
Sets the previous start point as the current
destination.
1.
Press the key on the steering wheel
remote controller.
2. Once the icon changes into the icon
on the pop-up screen with a beep sound,
say "Previous start point".
3. Say "Start guidance" if guidance to the
selected position is desired, or say "Show
map" to verify the location of the selected
position on the map.
Go home
Sets the previously registered home address
as the destination for route guidance.
1.
Press the key on the steering wheel
remote controller.
2.
Once the icon changes into the icon
on the pop-up screen with a beep sound,
say "Go home".
Destination by memory point <1 to 5>
Sets a previously registered memory point as
the destination for route guidance.
1.
Press the key on the steering wheel
remote controller.
2.
Once the icon changes into the icon
on the pop-up screen with a beep sound,
say "Destination by memory point 1".

PART 6 Bluetooth® HANDSFREE
PART 6
Bluetooth® HANDSFREE
Before using the Bluetooth
Handsfree …………………………… 6-2
What is Bluetooth? ……………………… 6-2
Functions supported by
Bluetooth Handsfree …………………… 6-2
Converting Bluetooth Handsfree
mode ………………………………… 6-2
Converting from Audio/Navigation mode to
Bluetooth Handsfree mode
……………… 6-2
Converting from Bluetooth Handsfree
mode to Audio/Navigation mode ……… 6-3
Pairing and connecting a Bluetooth
phone ………………………………… 6-4
Pairing a mobile phone ………………… 6-4
Deleting a paired phone ……………… 6-6
Connecting a mobile phone …………… 6-7
Disconnecting a mobile phone ………… 6-8
Bluetooth Handsfree screen layout 6-9
Bluetooth Handsfree screen and
functions ………………………………… 6-9
When there is no mobile phone
connected …………………………… 6-9
When a mobile phone is connected … 6-9
When receiving an incoming call …… 6-10
When already on a call ……………… 6-10
When there is a call waiting ………… 6-10
Making a call ………………………… 6-11
Making a call by dialing a phone
number ………………………………… 6-11
Making a call from Speed Dial ………… 6-11
Making a call by redialing ……………… 6-12
Answering a call …………………… 6-13
Answering an incoming call …………… 6-13
Rejecting an incoming ………………… 6-13
Operating menus during a call …… 6-14
Switching call to the mobile phone …… 6-14
Activating Call waiting ………………… 6-14
Ending a call …………………………… 6-15
Phone Book ………………………… 6-16
Making a call from the Phone book …… 6-16
Searching the Phone Book ……………… 6-17
Searching by name ………………… 6-17
Searching by number ……………… 6-18
Call History List ……………………… 6-19
Making a call from Call history ………… 6-19
Sorting call history ……………………… 6-19
Dialed number ……………………… 6-20
Received number …………………… 6-20
Missed number ……………………… 6-20

Bluetooth® HANDSFREE
6-1
Bluetooth® HANDSFREE
PART 6
BLUETOOTH® HANDSFREE
Phone Music ………………………… 6-21
Before playing Phone music …………… 6-21
Starting Phone Music …………………… 6-21
Phone music screen layout …………… 6-22
Selecting Phone music files …………… 6-23
Bluetooth settings ………………… 6-24
Pairing and connecting a mobile phone … 6-24
Setting mobile phone auto connect
priority ………………………………… 6-24
Setting Handsfree volume ……………… 6-25
Setting Audio streaming ……………… 6-25
Advanced settings ……………………… 6-26
Setting Contacts Auto Download (Sync) …
6-27
Searching and modifying my device
properties …………………………… 6-27
Changing passkey ………………… 6-28
Deleting all paired phones ………… 6-28
Initializing Bluetooth handsfree …… 6-29
Important information …………… 6-30
About pairing mobile phones ………… 6-30
About making/answering phone calls … 6-31
About Bluetooth device environment … 6-31
Mobile Phone Compatibility …………… 6-32

PART 6 Bluetooth® HANDSFREE
6-2 Bluetooth® HANDSFREE
Before using the Bluetooth®
Handsfree
What is Bluetooth®?
●
Bluetooth® allows wireless transmission of
information between PC, mobile phones, head-
sets, PDAs, printers and other devices within
close ranges by using 2.45Ghz frequency short-
distance wireless telecommunication technolo-
gies.
●
Within this vehicle, users can make hands-
free calls, transmit mobile phone data, and
play audio streaming files by connecting a
mobile phone with the system.
Functions supported by
Bluetooth® Handsfree
●
Pairing mobile phones (Up to 5 phones)
●
Connecting/disconnecting mobile phones
●
Making/Answering phone calls
●
Downloading a Phone Book
●Downloading a Call history list
●
Playing music saved in a Bluetooth® phone
in the vehicle
Some functions may not be supported in
some mobile phone.
Converting Bluetooth®
Handsfree mode
Converting from Audio/Navigation
mode to Bluetooth® Handsfree mode
1
.
While in Audio mode or Navigation mode,
press the
3+21(
key or the key on
the steering wheel.
Bluetooth® is a trademark owned by
Bluetooth® SIG, Inc.
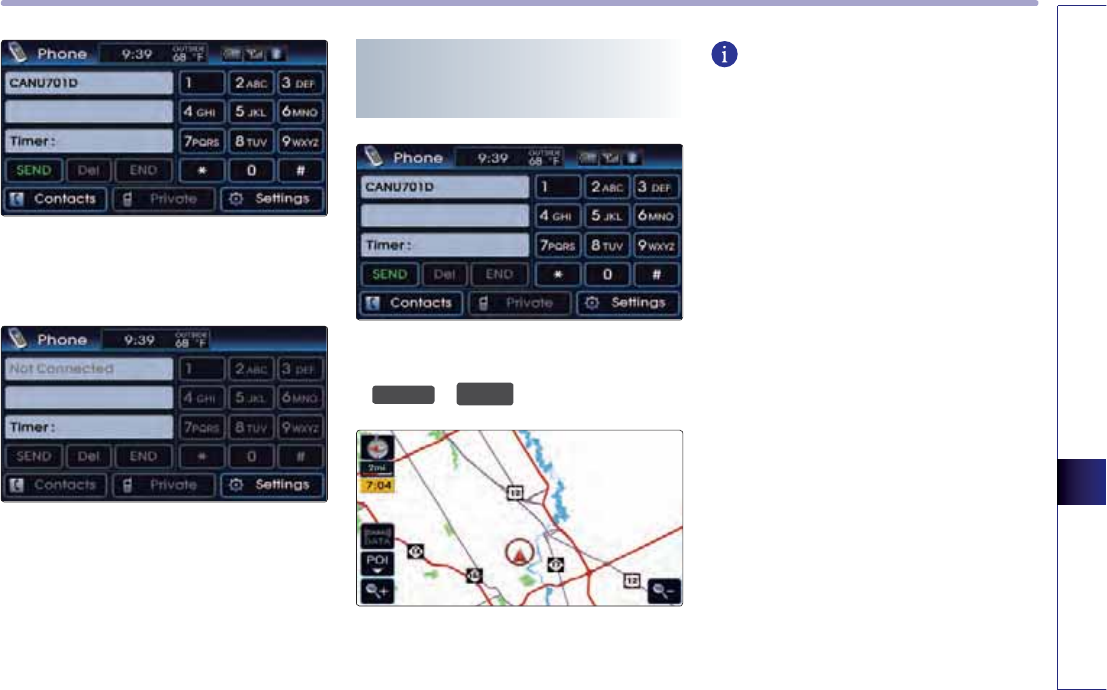
Bluetooth® HANDSFREE
6-3
Bluetooth® HANDSFREE
2
.
The system will change to Bluetooth®
Handsfree mode and display the PHONE
screen.
3
.
The following screen will become displayed
if no mobile phone has been connected.
Converting from Bluetooth
Handsfree mode to Audio/
Navigation mode
1
.
While in Bluetooth® Handsfree mode, press
an Audio/Navigation mode key, such as
)0$0
or
0$3
92,&(
.
2
.
The corresponding mode will be displayed.
INFORMATION
Most of the functions of the Audio or SETUP
modes are not supported while on a
Bluetooth® Handsfree call. The call volume and
Navigation (MAPVOICE, DEST, ROUTE) screens
can be operated.
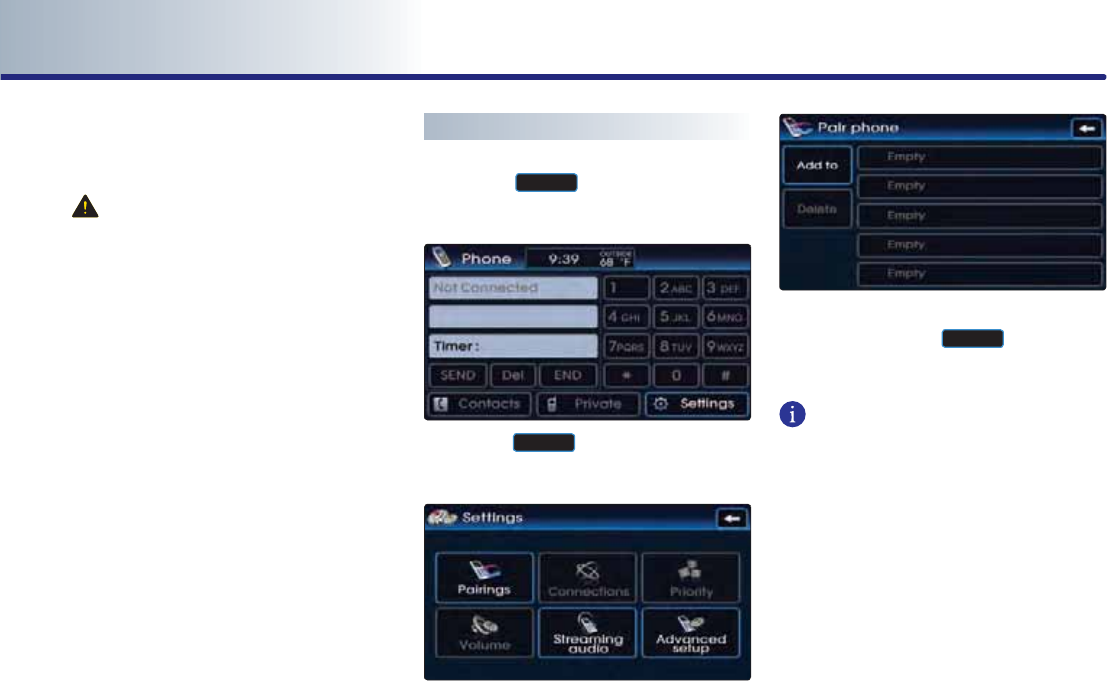
PART 6 Bluetooth® HANDSFREE
6-4 Bluetooth® HANDSFREE
Pairing and connecting a
Bluetooth® phone
CAUTION!
●
Bluetooth® connection may become inter-
mittently disconnected in some mobile
phones. Follow the following steps to try
again.
1. Turn the Bluetooth® function within the
mobile phone ON/OFF and try to connect
again.
2. Turn the mobile phone power ON/OFF
and try to connect again.
3. Completely remove the mobile phone bat-
tery, reboot, and then try to connect again.
4. Reboot the Audio Navigation System and
try to connect again.
5. Delete all paired devices from the mobile
phone and Audio Navigation System and
re-pair for use.
●
The hands-free call volume and quality may
differ depending on the mobile phone.
Pairing a mobile phone
1
.
Press the
6HWWLQJV
button on the PHONE
screen.
2
.
Press the
3DLULQJV
button on the Settings
screen.
3
.
The list of currently paired phones will be
displayed. Press the
$GGWR
button to pair
a new mobile phone.
INFORMATION
For safety reasons, pairing a Bluetooth® phone
is not possible when the vehicle is in motion.
Park the vehicle in a safe location to pair a
new phone. It is possible to pair up to five
mobile phones. In order to pair a new phone
when there are already five mobile phones
paired, you must first delete one of the pre-
viously paired phones.

Bluetooth® HANDSFREE
6-5
Bluetooth® HANDSFREE
4
.
From the Bluetooth® device list within the
mobile phone, add the car handsfree.
The default name of the car system is
(OOO).
For more information on registering
Bluetooth® devices from the mobile phone,
please refer to the mobile phone user's
manual.
INFORMATION
While conducting a Bluetooth® device search
from the mobile phone, operating to another
screen will prevent the car handsfree from
being found in the mobile phone. Always con-
duct searches for Bluetooth® devices with the
Search Bluetooth® device screen displayed.
5
.
When pairing the car handsfree from the
mobile phone, a passkey input window will
become displayed on the mobile phone
screen. Input the passkey set within the car
system into the mobile phone input win-
dow. (The factory state passkey is 0000.) As
shown in the figure, once the passkey beco-
mes successfully inputted, the Bluetooth®
connection between the car system and
mobile phone will start.
6
.
Once Bluetooth® connection is successful,
the name of the connected mobile phone
will become displayed on the PHONE
screen and Bluetooth® handsfree functions
will operate.
INFORMATION
Some functions may not be supported due to
limited Bluetooth® compatibility between the
car system and mobile phone.

PART 6 Bluetooth® HANDSFREE
6-6 Bluetooth® HANDSFREE
Deleting a paired phone
1
.
Press the
6HWWLQJV
button on the PHONE
screen.
2
.
Press the
3DLULQJV
button on the Settings
screen.
3
.
The list of currently paired phones will be
displayed. Select the phone you wish to
delete from the list and press the
'HOHWH
button.
4
.
A pop-up asking whether you wish to dele-
te the paired phone will be displayed.
Press the
<HV
button to delete the paired
phone and the
1R
button to cancel.
CAUTION!
A mobile phone cannot be deleted if it is
currently connected to the car system.
To delete the phone, first disconnect the
mobile phone and try again.
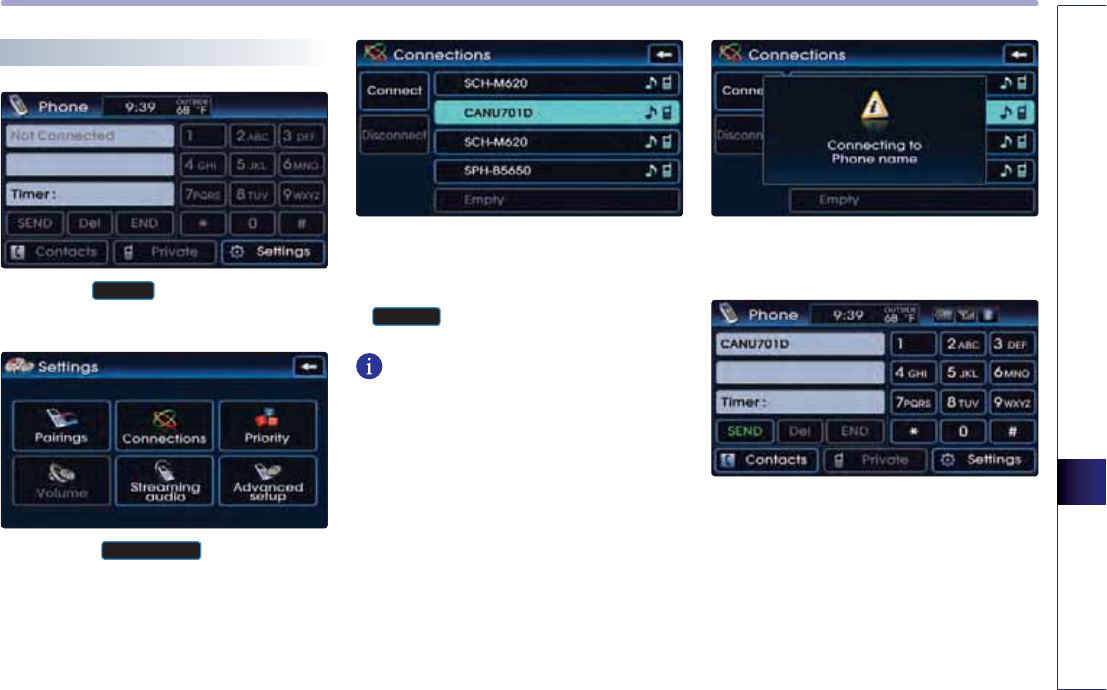
Bluetooth® HANDSFREE
6-7
Bluetooth® HANDSFREE
Connecting a mobile phone
1
.
Press the
6HWWLQJV
button on the PHONE
screen.
2
.
Press the
&RQQHFWLRQV
button on the
Settings screen.
3
.
The list of currently paired phones will be
displayed. Select the phone you wish to
connect from the list and press the
&RQQHFW
button.
INFORMATION
When there are no paired phones, pair the
mobile phone through [Settings>Pairings>
Add to]. For more information on pairing
mobile phones, refer to the user's manual
[Pairing and Connecting a Bluetooth® phone
> Pairing a mobile phone].
4
.
The Bluetooth® connection between the car
system and mobile phone will start.
5
.
Once Bluetooth® connection is successful,
the name of the connected mobile phone
will become displayed on the PHONE
screen and Bluetooth® handsfree functions
will operate.
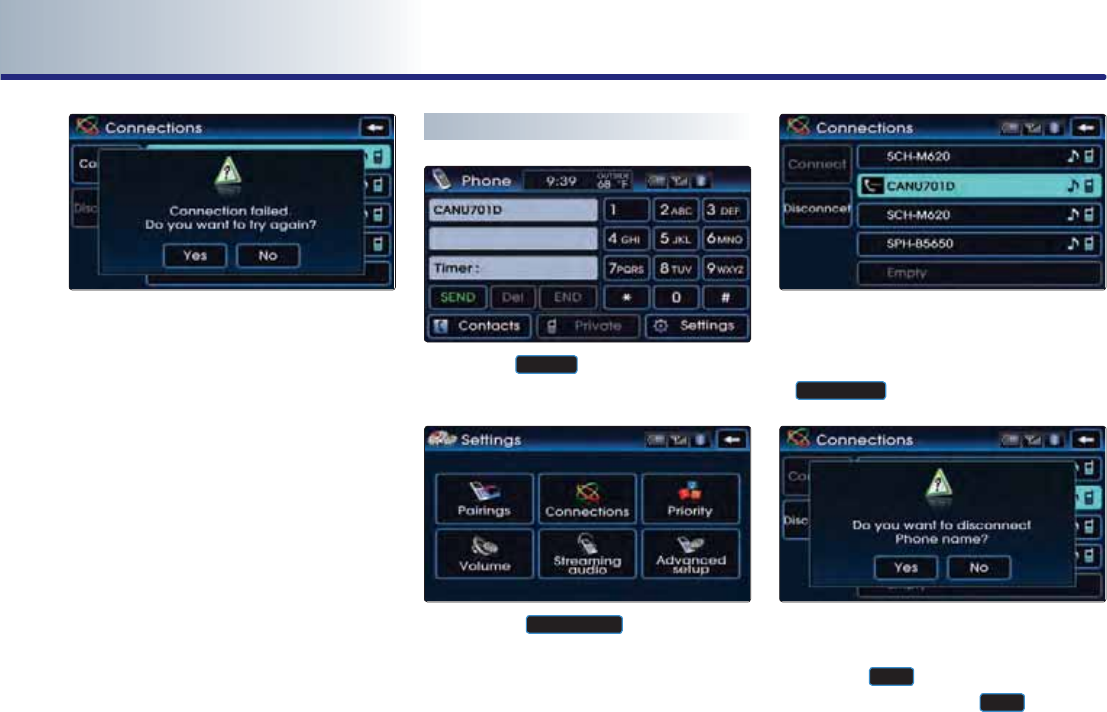
PART 6 Bluetooth® HANDSFREE
6-8 Bluetooth® HANDSFREE
4
.
If the connection between the mobile
phone and Bluetooth® fails, the following
pop-up will be displayed. If problems occur
while connecting Bluetooth®, check for the
following conditions.
●
Whether the mobile phone you wish to con-
nect is in the vicinity of the car system
●
Whether the power of the mobile phone
Bluetooth® has been turned off
●
Whether the mobile phone Bluetooth® has
been set to hidden state
●
Whether there are Bluetooth® compatibility
issues between the car system and another
mobile phone
Disconnecting a mobile phone
1
.
Press the
6HWWLQJV
button on the PHONE
screen.
2
.
Press the
&RQQHFWLRQV
button on the
Settings screen.
3
.
The list of currently paired phones will be
displayed. Select the phone you wish to dis-
connect from the list and press the
'LVFRQQHFW
button.
4
.
pop-up asking whether you wish to discon-
nect the mobile phone will be displayed.
Press the
<HV
button to disconnect the
mobile phone and the
1R
button to
cancel.
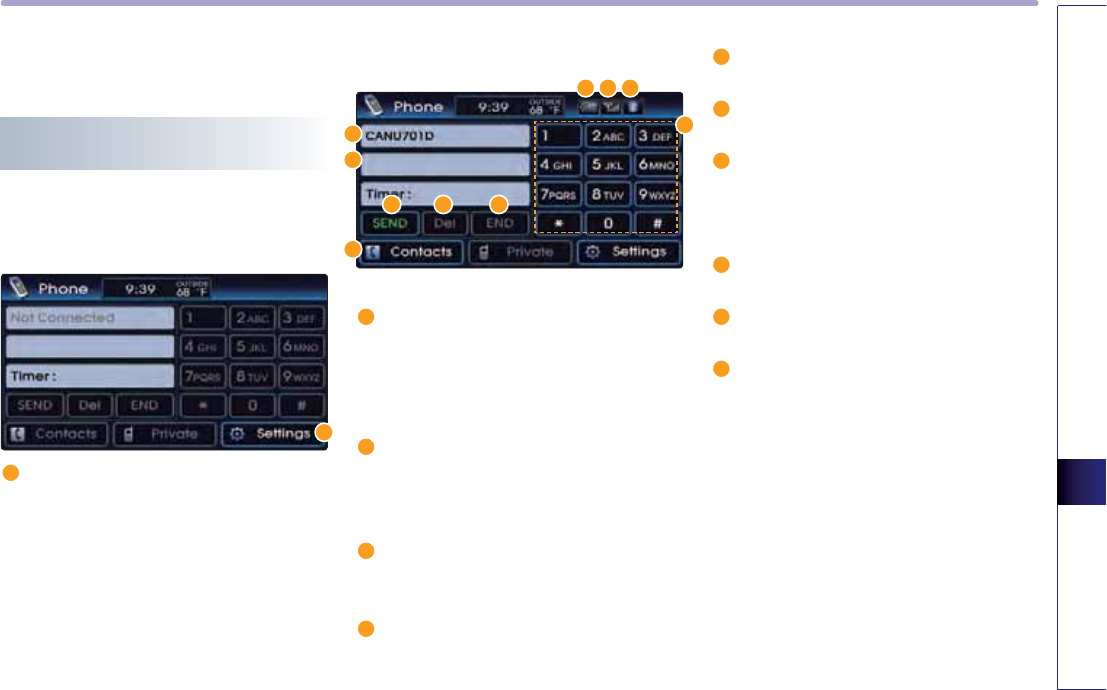
Bluetooth® HANDSFREE
6-9
Bluetooth® HANDSFREE
Bluetooth® Handsfree screen
layout
Bluetooth® Handsfree screen and
functions
When there is no mobile phone
connected
Settings : the user can set desired settings
for the Bluetooth® handsfree, such as pair/
delete mobile phone, connect/ disconnect
mobile phone, set call volume, change
device name and change passkey.
When a mobile phone is connected
Phone battery charge status : displays the
battery charge status of the connected
mobile phone. The battery charge status
may not be displayed in some mobile pho-
nes.
Signal strength : displays the mobile
phone signal strength. The signal strength
may not be displayed in some mobile pho-
nes.
Bluetooth® connection state : becomes
displayed when a Bluetooth® phone has
been connected with the car system.
Name of connected mobile phone : dis-
plays the name of the connected mobile
phone.
Phone number input window : displays
the inputted phone number.
Dial : input the phone number through
the dial pad.
SEND : if a number has not been entered
into the phone number input window,
Pressing the send button displays the call
history list screen.
Del : deletes the inputted number one
digit at a time.
END : if a number has been inputted, then
erases the entire number.
Contacts : displays the phone book screen.
The user can search previously saved
phone numbers. The phone contact list
may not be displayed in some mobile pho-
nes.
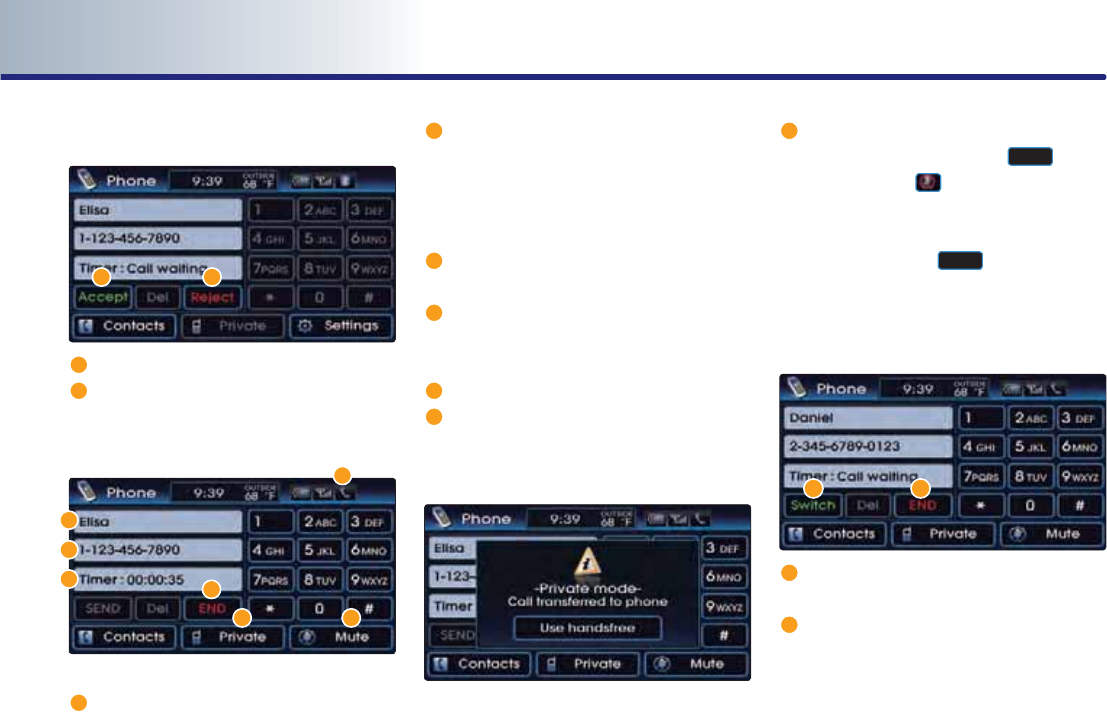
PART 6 Bluetooth® HANDSFREE
6-10 Bluetooth® HANDSFREE
When receiving an incoming call
Accept : accepts the incoming call.
Reject : rejects the incoming call.
When already on a call
Busy icon : when already on a call, displays
an icon shaped like a receiver.
Name of incoming caller : displays the
name of incoming caller. The name of the
incoming caller will not be displayed if the
caller's phone number has not been pre-
viously registered in the phone book.
Number of incoming caller : displays the
number of the incoming caller.
Call state : displays the call state, such as
talk time, phone connection, and end
time.
END : ends the call.
Private : when talking on the car hands-
free, use this function to switch the call to
the mobile phone.
Mute : use this function to mute the out-
going volume. Pressing the
0XWH
button
will display the at the top right side of
the screen and the caller will not be able
to hear the conversation taking place in
the car. Press the
0XWH
button again to
release the Mute function.
When there is a call waiting
Switch : use this button to switch between
callers when there are calls on call waiting.
END : use this button to end the calls with
all callers.
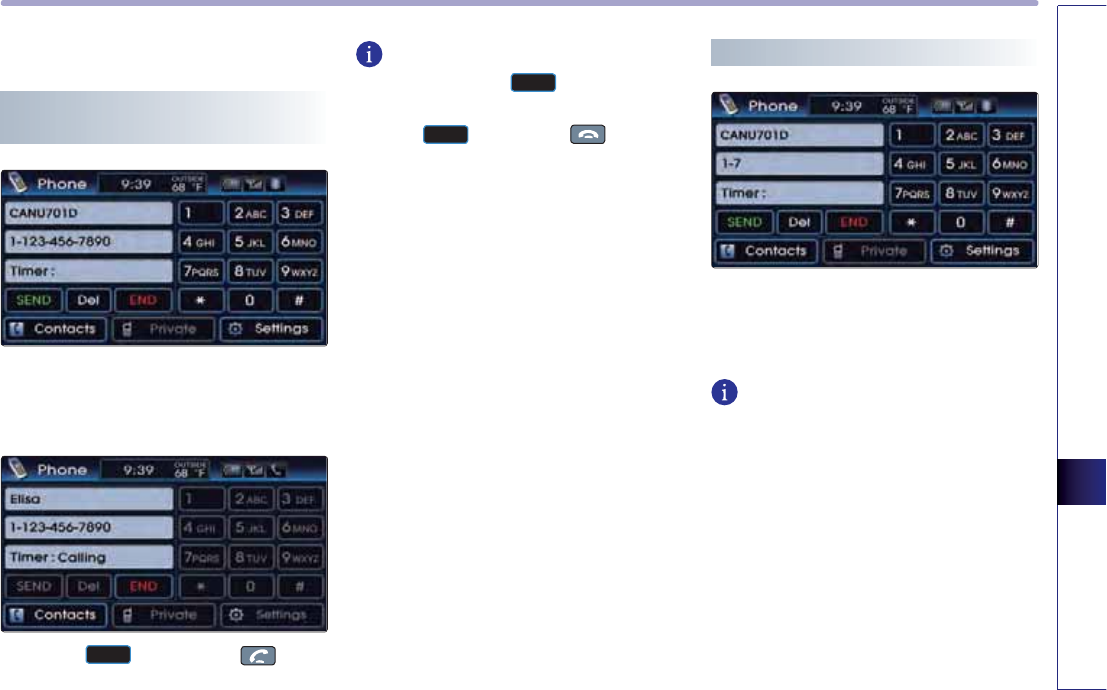
Bluetooth® HANDSFREE
6-11
Bluetooth® HANDSFREE
Making a call
Making a call by dialing a phone
number
1
.
Use the number pad on the right side of the
PHONE screen to input the number you
wish to call.
2
.
Press the
6(1'
button or the key on
the steering wheel to make the call.
INFORMATION
To modify, press the
'HO
button to delete
the inputted number one digit at a time.
Press the
(1'
button or the key on the
steering wheel to cancel the call.
Making a call from Speed Dial
1
.
Use the number pad on the right side of the
PHONE screen to input a speed dial num-
ber.
INFORMATION
Only speed dial numbers already stored on
the mobile phone can be used for speed dial
calls.
Up to 2-digit speed dial numbers are suppor-
ted.
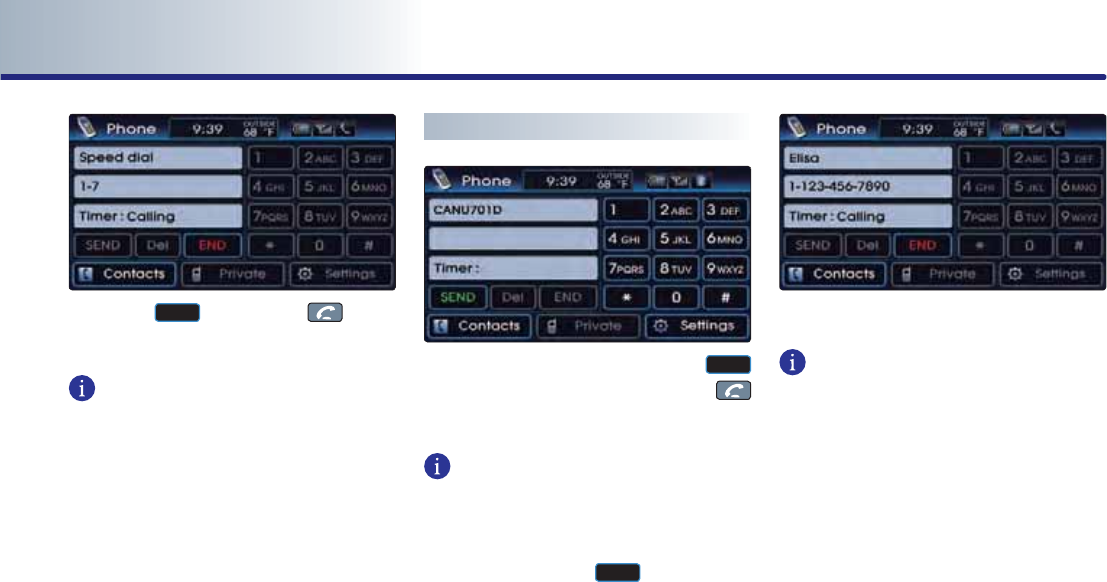
PART 6 Bluetooth® HANDSFREE
6-12 Bluetooth® HANDSFREE
2
.
Press the
6(1'
button or the key on
the steering wheel to make the call.
INFORMATION
For 2-digit speed dial numbers, press and hold
the 2nd digit to make a call to the speed dial
number.
Making a call by redialing
1
.
Press and hold (over 0.8 second) the
6(1'
button on the PHONE screen or the
key on the steering wheel.
INFORMATION
Redialing is not possible when there is no call
history or the call history list is being down-
loaded from the mobile phone. When there is
no call history list, the
6(1'
button will be
inactive.
2
.
The recently called number is redialed.
INFORMATION
It is not possible to display the Audio mode
and Settings screen when on a phone call.
Only the call volume and Navigation
(MAPVOICE, DEST, ROUTE) screens can be
operated.
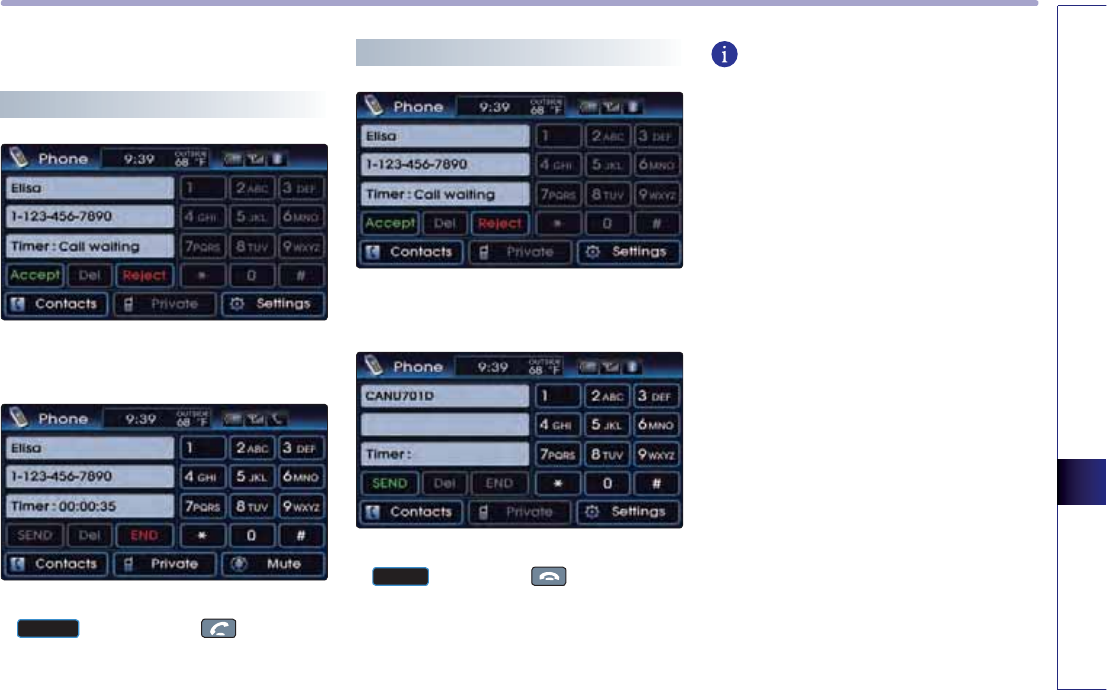
Bluetooth® HANDSFREE
6-13
Bluetooth® HANDSFREE
Answering a call
Answering an incoming call
1
.
The following screen will be displayed
when you receive an incoming call.
2
.
To answer the incoming call, press the
$FFHSW
button or the key on the
steering wheel.
Rejecting an incoming
1
.
The following screen will be displayed
when you receive an incoming call.
2
.
To reject the incoming call, press the
5HMHFW
button or the key on the stee-
ring wheel. The incoming call will be rejec-
ted.
INFORMATION
Upon receiving a call, the [Reject] function
may not be supported in some mobile pho-
nes.
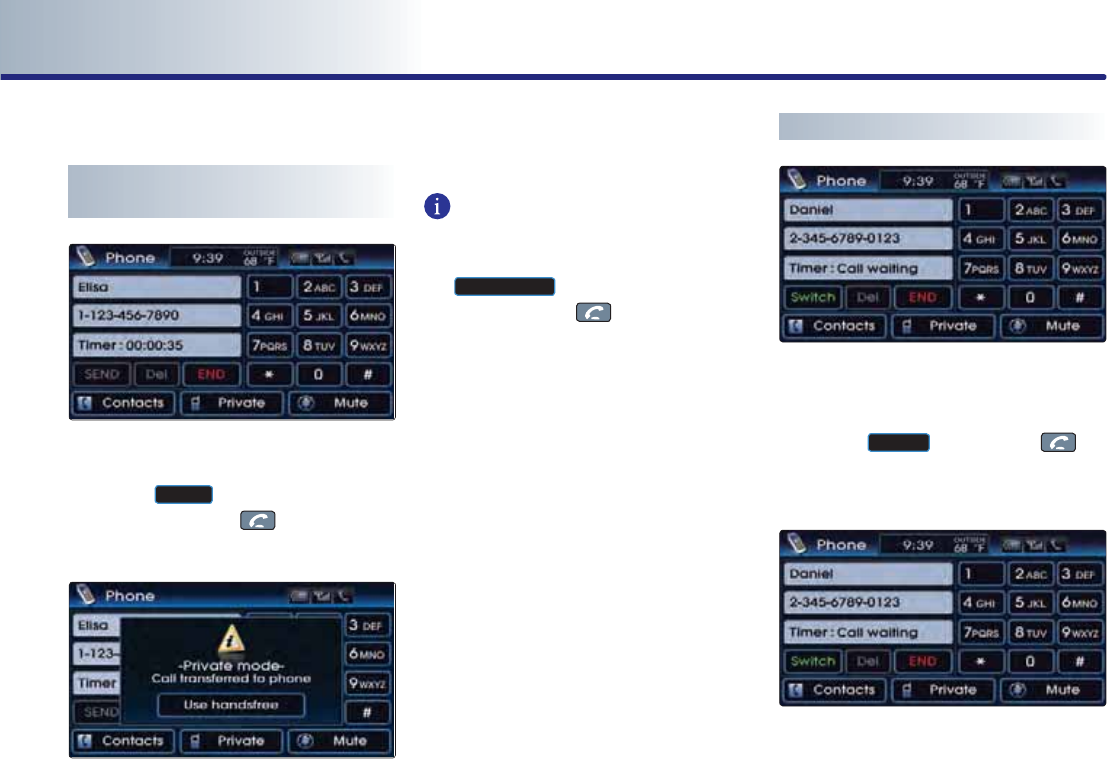
PART 6 Bluetooth® HANDSFREE
6-14 Bluetooth® HANDSFREE
Operating menus during a call
Switching call to the mobile
phone
1
.
If you wish to switch the call to the mobile
phone while talking on the car handsfree,
press the
3ULYDWH
button or press and hold
(over 0.8 second) the key on the stee-
ring wheel.
2
.
As shown, the call will be switched to the
mobile phone.
INFORMATION
If you wish to switch the call to the car hands-
free while talking on the mobile phone, press
the
8VHKDQGVIUHH
button or press and hold
(over 0.8 second) the key on the steering
wheel. The call will be switched to the car
handsfree.
Activating Call waiting
1
.
If another person calls while already on a
call, the following screen will be displayed.
2
.
Press the
$FFHSW
button or the key
on the steering wheel to receive the inco-
ming call by switching to the new caller.
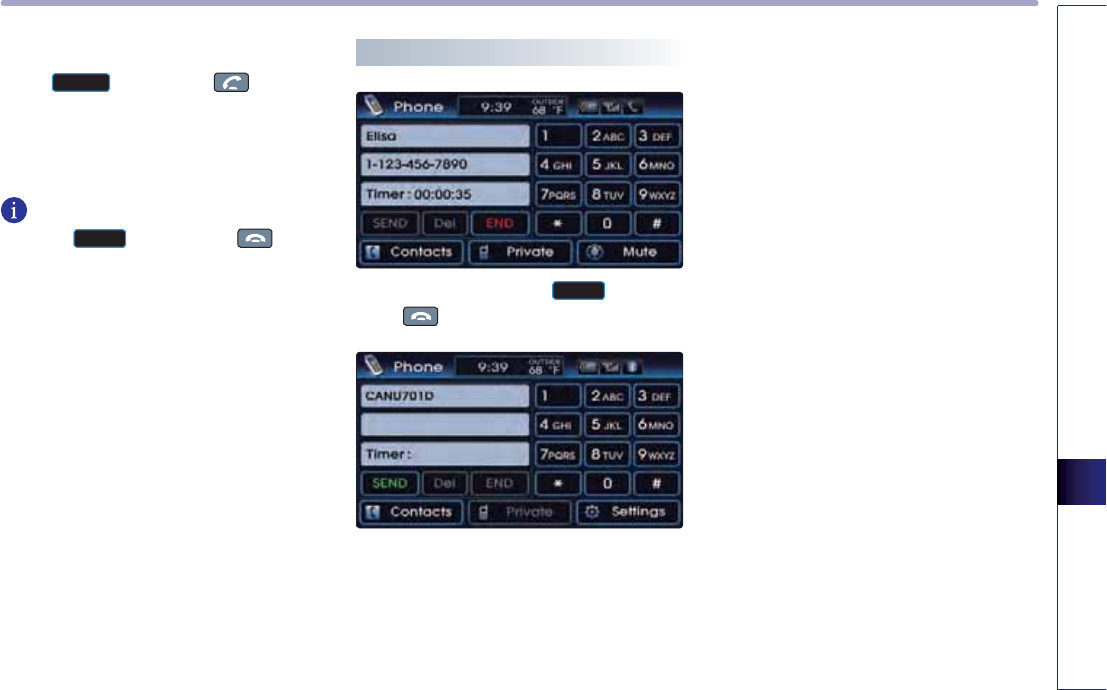
Bluetooth® HANDSFREE
6-15
Bluetooth® HANDSFREE
3
.
To switch again to the other caller, press
the
6ZLWFK
button or the key on the
steering wheel. The other call will be recei-
ved and the previous call will switch back
to call waiting.
INFORMATION
Press the
(QG
button or the
key on
the steering wheel to end the current call and
call waiting.
Ending a call
1
.
To end a call, press the
(QG
button or
the
key on the steering wheel.
2
.
The call will be ended.
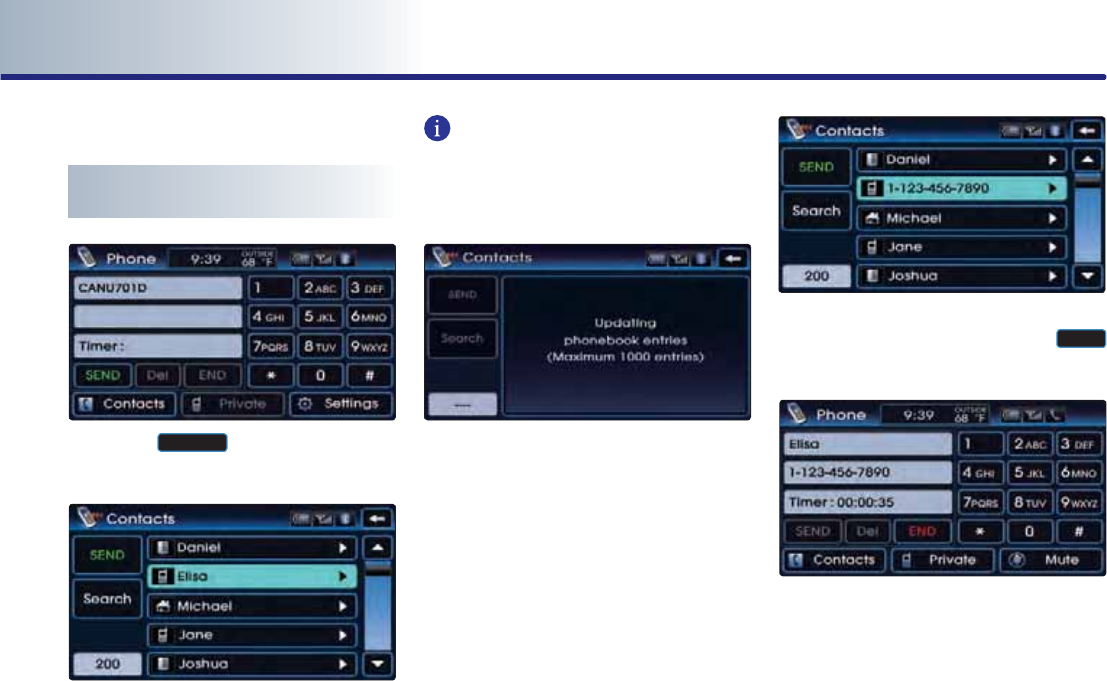
PART 6 Bluetooth® HANDSFREE
6-16 Bluetooth® HANDSFREE
Phone Book
Making a call from the Phone
book
1
.
Press the
&RQWDFWV
button on the PHONE
screen.
2
.
The phone book list will be displayed.
INFORMATION
● The system may begin to slow down when
downloading the phone book in some
mobile phones.
● Upon connecting a mobile phone, the
phone book lists saved in the mobile phone
will automatically be downloaded(Maximum
1000 entries). The phone book download
function may not be supported in some
mobile phones.
●
If you do not wish to automatically down-
load the mobile phone contacts to the vehi-
cle, turn the Contacts Sync setting OFF.
(Phone>Settings>Advanced setup>
Contacts Sync)
3
.
Select the number you wish to call from the
phone book list and press the
6(1'
button.
4
.
The call will be made to the selected num-
ber.
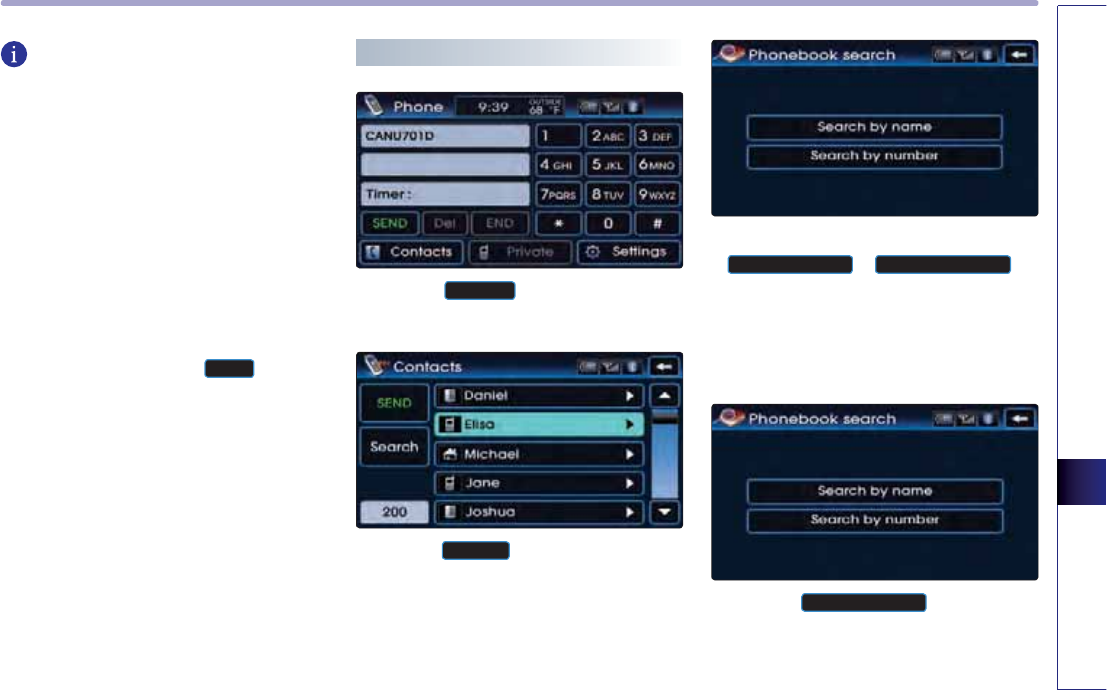
Bluetooth® HANDSFREE
6-17
Bluetooth® HANDSFREE
INFORMATION
●
When there are more than 2 numbers saved
in one phone number list, if the list is repea-
tedly selected, the registered phone num-
bers will be displayed sequentially on the
list.
●
The Mobile Phone/Office/Home categories
received via the mobile phone may differ
from the information actually stored in the
mobile phone.
●
Select the phone number you wish to con-
nect by repeatedly selecting the phone
number list and press the
6(1'
button to
make the call to the selected number.
Searching the Phone Book
1
.
Press the
&RQWDFWV
button on the PHONE
screen.
2
.
Press the
6HDUFK
button on the Contacts
screen.
3
.
Phone numbers can be searched by either
6HDUFKE\QDPH
or
6HDUFKE\QXPEHU
.
From the two methods, select the search
method you wish to use.
Searching by name
1
.
Press the
6HDUFKE\QDPH
button on the
Phonebook search screen.
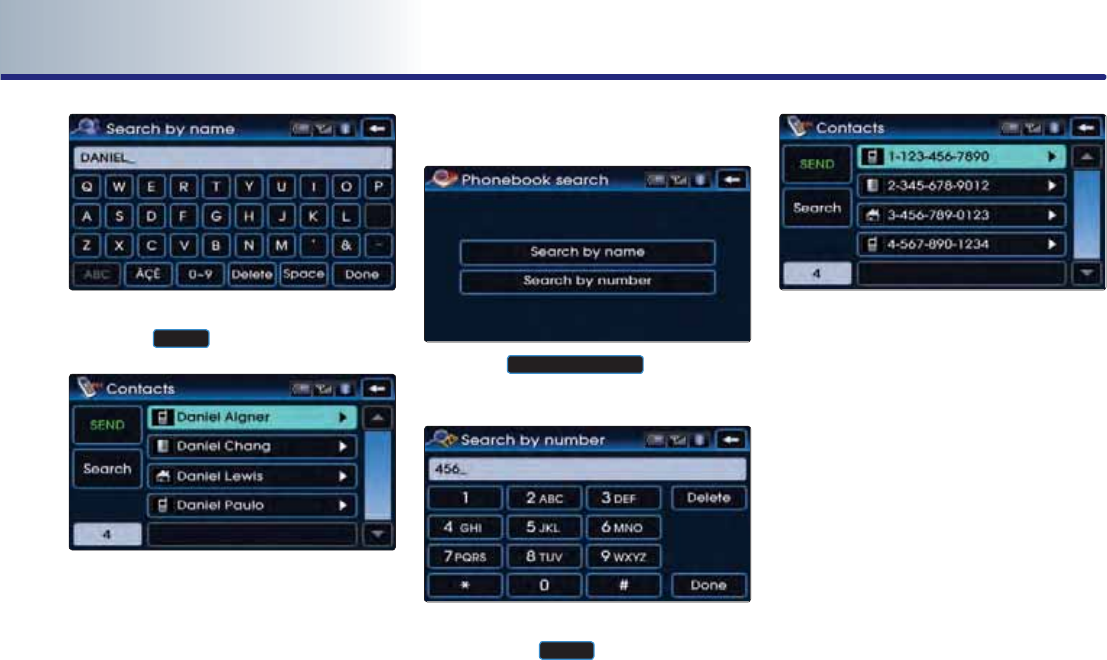
PART 6 Bluetooth® HANDSFREE
6-18 Bluetooth® HANDSFREE
2
.
Input the name you wish to search and
press the
'RQH
button.
3
.
The search results will be displayed on the
screen.
Searching by number
1.
Press the
6HDUFKE\QXPEHU
button on the
Phonebook search screen.
2
.
Input the phone number you wish to search
and press the
'RQH
button.
3
.
The search results will be displayed on the
screen.
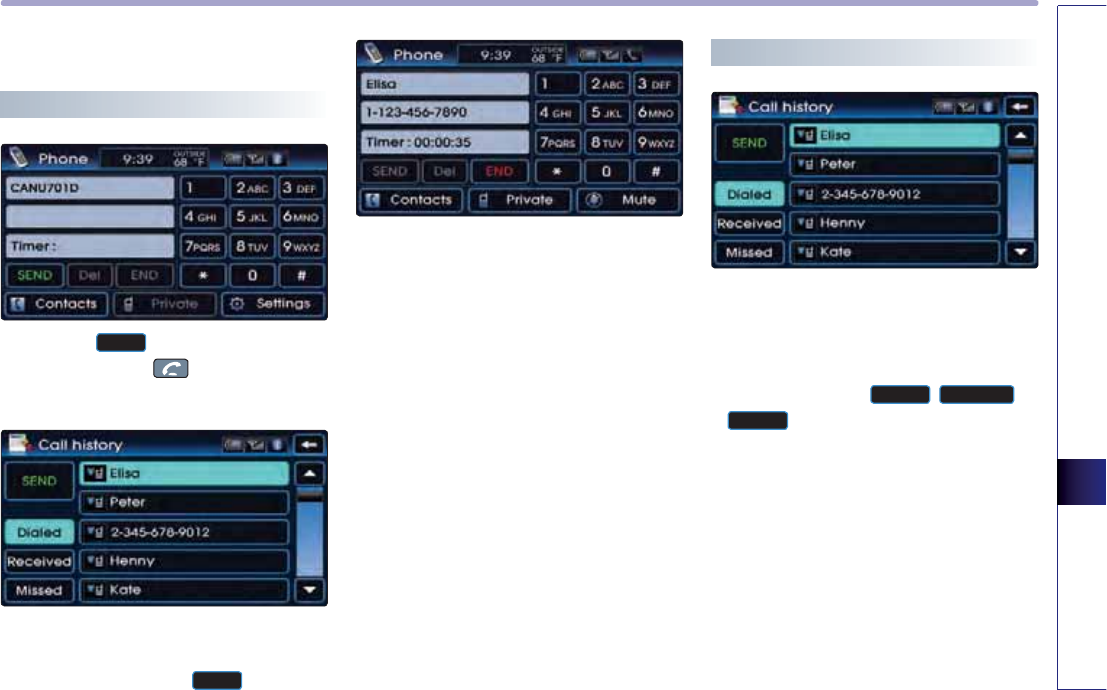
Bluetooth® HANDSFREE
6-19
Bluetooth® HANDSFREE
Call History List
Making a call from Call history
1
.
Press the
6(1'
button on the PHONE
screen or press the key on the steering
wheel.
2
.
The call history list will be displayed. Select
the number you wish to call from the call
history list and press the
6(1'
button.
3
.
The call will be made to the selected num-
ber.
Sorting call history
1
.
The call history can be displayed by sorting
the incoming calls, outgoing calls and mis-
sed calls.
2
.
When pressing the
'LDOHG
,
5HFHLYHG
, or
0LVVHG
button, the corresponding call his-
tory list will be displayed.
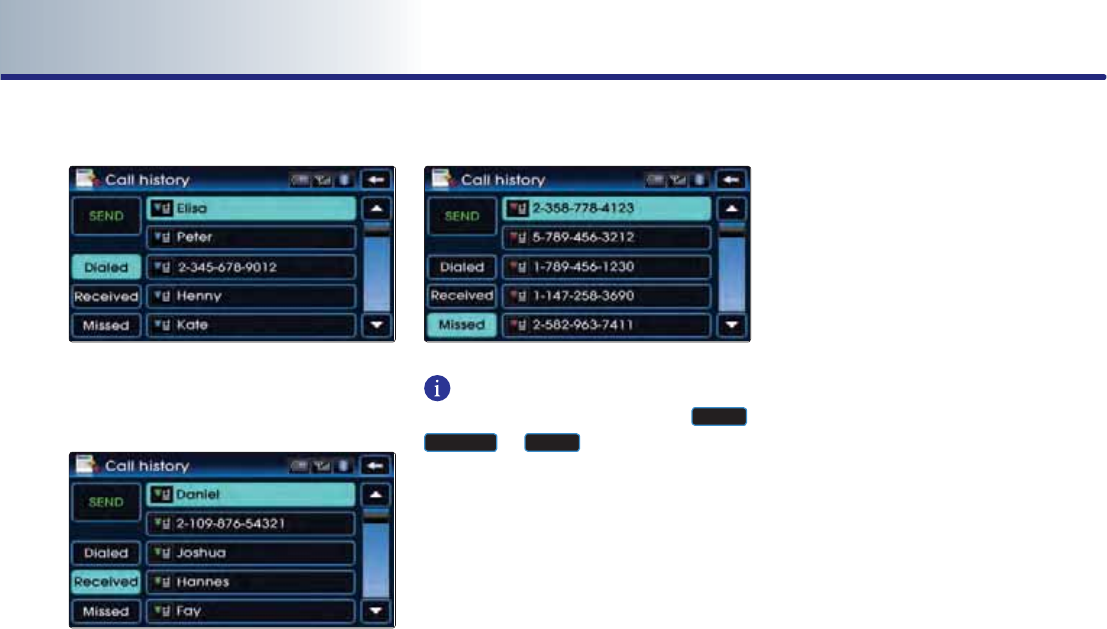
PART 6 Bluetooth® HANDSFREE
6-20 Bluetooth® HANDSFREE
Dialed number
Received number
Missed number
INFORMATION
If there are no entries saved in the
'LDOHG
,
5HFHLYHG
, or
0LVVHG
lists, the corresponding
button will be inactive. Up to 20 entries can
be saved in each list.

Bluetooth® HANDSFREE
6-21
Bluetooth® HANDSFREE
Phone Music
Before playing Phone music
Music saved in the mobile phone can be pla-
yed in the car through Bluetooth® audio strea-
ming.
Phone music can be played only when a
Bluetooth® phone has been connected. To
play phone music, connect the Bluetooth®
phone to the car system. For more informa-
tion on connecting Bluetooth®, please refer to
the user's manual [Pairing and Connecting a
Bluetooth® phone].
If the Bluetooth® is disconnected while pla-
ying phone music, the music will be disconti-
nued.
The audio streaming function may not be
supported in some mobile phones.
Only one function can be used at a time bet-
ween the Bluetooth® handsfree or Phone
music function.
For example, if you convert to the Bluetooth®
handsfree while playing Phone music, the
music will be discontinued.
Playing music from the car is not possible
when there are no music files stored in the
mobile phone.
Starting Phone Music
1
.
Repeatedly press the
0(',$
key on the
front panel or the
02'(
key on the stee-
ring wheel to enter Phone music mode.
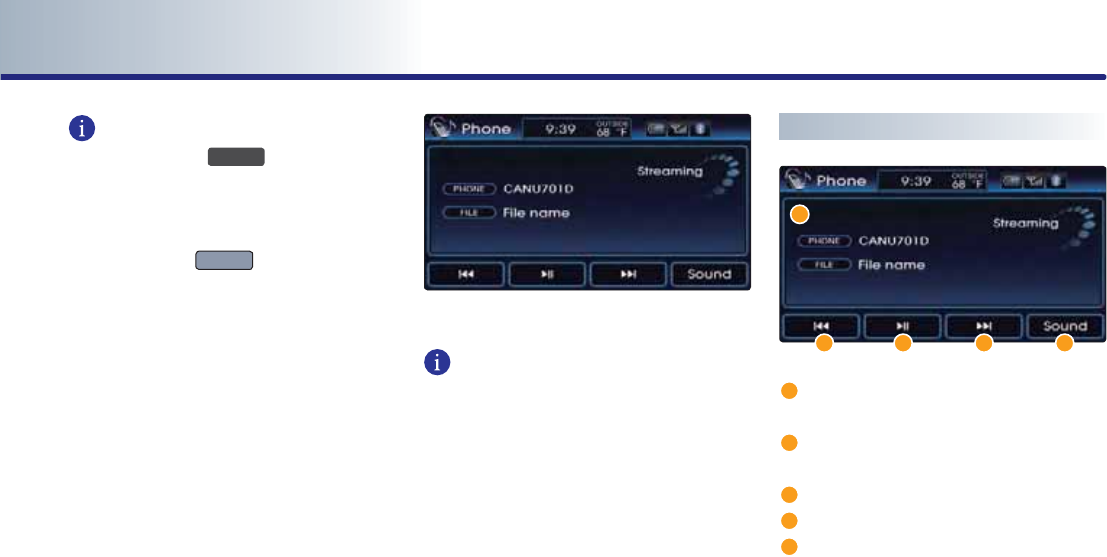
PART 6 Bluetooth® HANDSFREE
6-22 Bluetooth® HANDSFREE
INFORMATION
Each press of the
0(',$
key on the front
panel will change the function in the order of
DISC
ĺ
USB or iPod
ĺ
AUX
ĺ
Phone Music
ĺ
DISC ...
Each press of the
02'(
key on the steering
wheel will change the audio mode in the
order of FM1
ĺ
FM2
ĺ
AM
ĺ
XM1
ĺ
XM2
ĺ
XM3
ĺ
DISC
ĺ
USB or iPod
ĺ
AUX
ĺ
Phone Music
ĺ
FM1...
It is not possible to enter Phone music mode if
the mobile phone is not connected or if the
audio streaming setting within Bluetooth®
handsfree settings has been set to [Disable
streaming audio].
For more information on audio streaming set-
ting, please refer to the user’s manual
[Bluetooth® settings > Setting Audio strea-
ming].
2
.
The Phone music screen is displayed.
INFORMATION
While music saved in the mobile phone will
automatically begin playing after converting
to the Phone music screen, this music player
function may not be supported in some mobi-
le phones.
If music does not begin playing even after
converting to the Phone music screen, try
starting the music directly from the mobile
phone.
Phone music screen layout
Information Bar : displays information for
the currently playing song.
File Down button : plays the previous
song.
Play/Pause button : plays/pauses the song.
File Up button : plays the next song.
Sound button : sets the FAD/BAL and BAS/
MID/TRE.

Bluetooth® HANDSFREE
6-23
Bluetooth® HANDSFREE
Selecting Phone music files
1
.
Press the , buttons on the
Phone music screen or the key on
the system.
The previous or next song will be played
each time the button or key is pressed.
INFORMATION
The file selection function may not be suppor-
ted in some mobile phones.
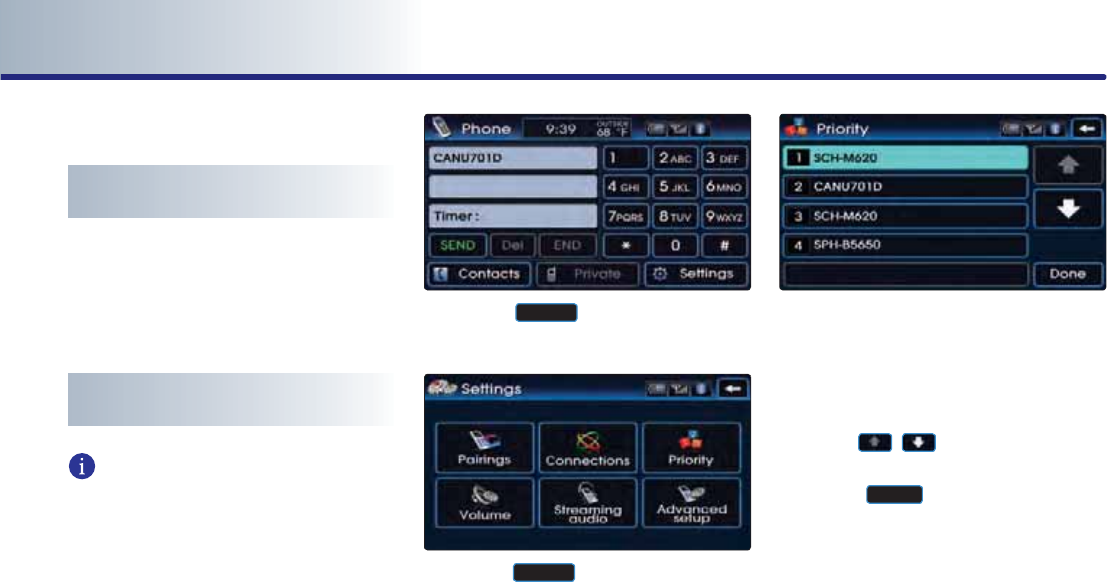
PART 6 Bluetooth® HANDSFREE
6-24 Bluetooth® HANDSFREE
Bluetooth® settings
Pairing and connecting a mobile
phone
For more information on pairing and connec-
ting a mobile phone, please refer to [Pairing
and Connecting a Bluetooth® phone].
Setting mobile phone auto
connect priority
INFORMATION
After turning on the car ignition and the sys-
tem is booted up, the Bluetooth® connection
between the car system and mobile phone is
automatically made.
The Bluetooth® connection will be conducted
in the order of mobile phone priority.
The auto connect priority will be supported
only for previously paired mobile phones.
1
.
Press the
6HWWLQJV
button on the PHONE
screen.
2
.
Press the
3ULRULW\
button on the Settings
screen.
3
.
The paired mobile phone list and the mobi-
le phone connection priority will be displa-
yed.
When wishing to change the priority order,
select the mobile phone from the list and
use the , buttons to change its
priority.
Press the
'RQH
button to save the chan-
ged mobile phone priority.
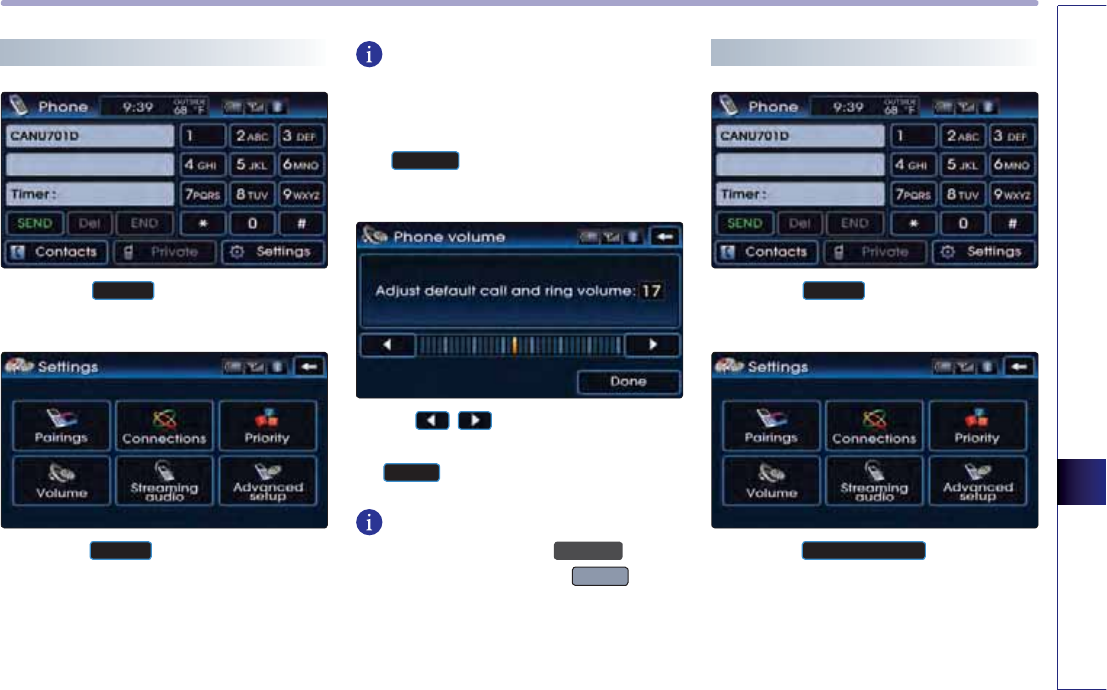
Bluetooth® HANDSFREE
6-25
Bluetooth® HANDSFREE
Setting Handsfree volume
1
.
Press the
6HWWLQJV
button on the PHONE
screen.
2
.
Press the
9ROXPH
button on the Settings
screen.
INFORMATION
The Bluetooth® handsfree volume can be
adjusted only when a mobile phone has been
connected.
The
9ROXPH
cannot be set if no mobile
phone has been connected.
Use the , buttons to set the desired
volume on the Phone volume screen. Press
the
'RQH
button to save.
INFORMATION
While on a call, turning the
32:(5
knob to
the left/right or pressing the
92/
key on
the steering wheel will also adjust the call
volume.
Set the incoming call volume accordingly.
Setting Audio streaming
1
.
Press the
6HWWLQJV
button on the PHONE
screen.
2
.
Press the
6WUHDPLQJDXGLR
button on the
Settings screen.
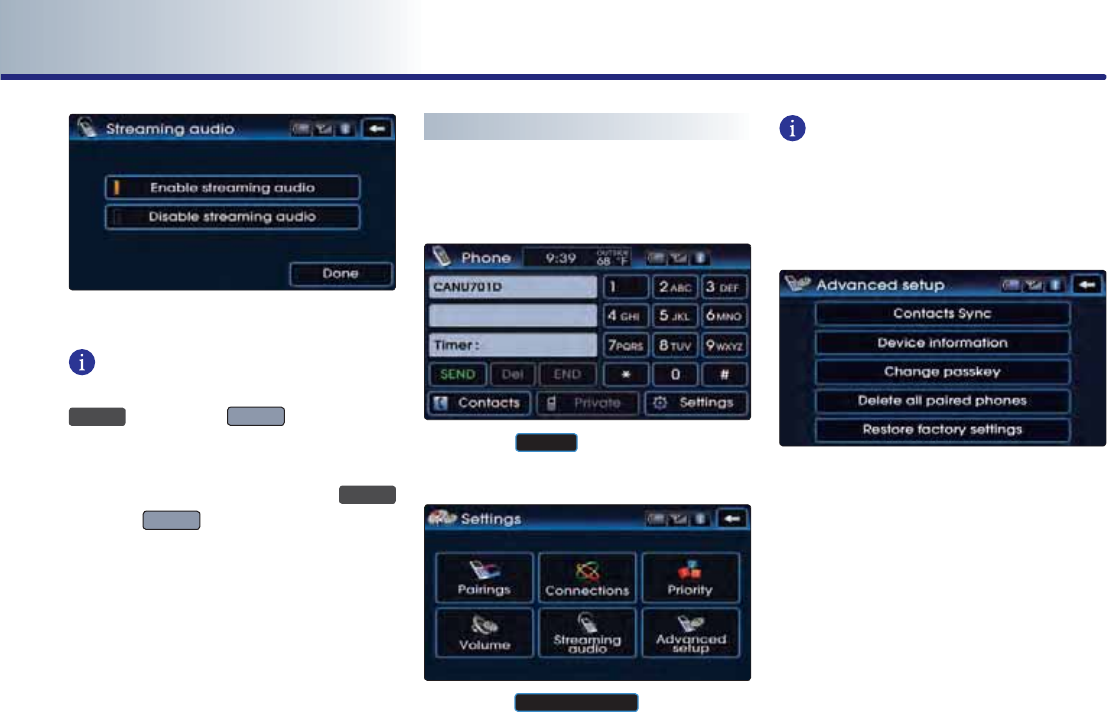
PART 6 Bluetooth® HANDSFREE
6-26 Bluetooth® HANDSFREE
3
.
Streaming audio setting is selected.
INFORMATION
Enable streaming audio: repeatedly press the
0(',$
key or the
02'(
key to enter
Phone music mode. Phone music can be pla-
yed through Bluetooth® audio streaming.
Disable streaming audio: even if the
0(',$
key or the
02'(
key is repeatedly pressed,
will not be available.
Phone music through Bluetooth® audio strea-
ming is not supported.
Advanced settings
Bluetooth® advanced settings can be chan-
ged. Enter advanced settings through the
following way.
1
.
Press the
6HWWLQJV
button on the PHONE
screen.
2
.
Press the
$GYDQFHGVHWXS
button on the
Settings screen.
INFORMATION
For safety reasons, operation of Advance
setup is not possible when the vehicle is in
motion. Please park in a safe place to make
changes to Advanced setup.
3
.
The Advanced setup screen will be displa-
yed. In Advance setup, the following four
settings can be made.
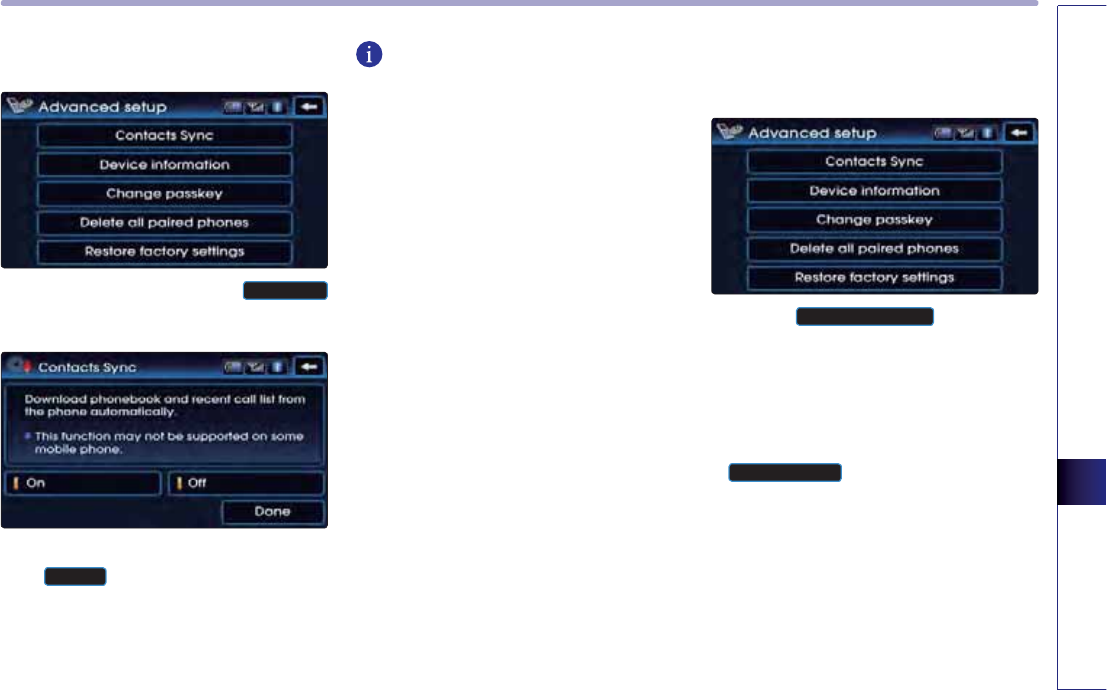
Bluetooth® HANDSFREE
6-27
Bluetooth® HANDSFREE
Setting Contacts Auto Download (Sync)
1. While in Advanced setup press the
&RQWDFWV6\QF
button.
2
.
After turning Contacts Sync ON/OFF, press
the
'RQH
button.
INFORMATION
●
If Contacts Sync is turned ON, the contacts
and call history in your mobile phone will
automatically be downloaded to the vehicle
each time you connect a Bluetooth® device.
Searching and modifying my device
properties
1
.
Press the
'HYLFHLQIRUPDWLRQ
button on the
Advanced setup screen.
2
.
Displays the Device information such as the
name and address of the car system.
To modify the device name, press the
&KDQJHQDPH
button.
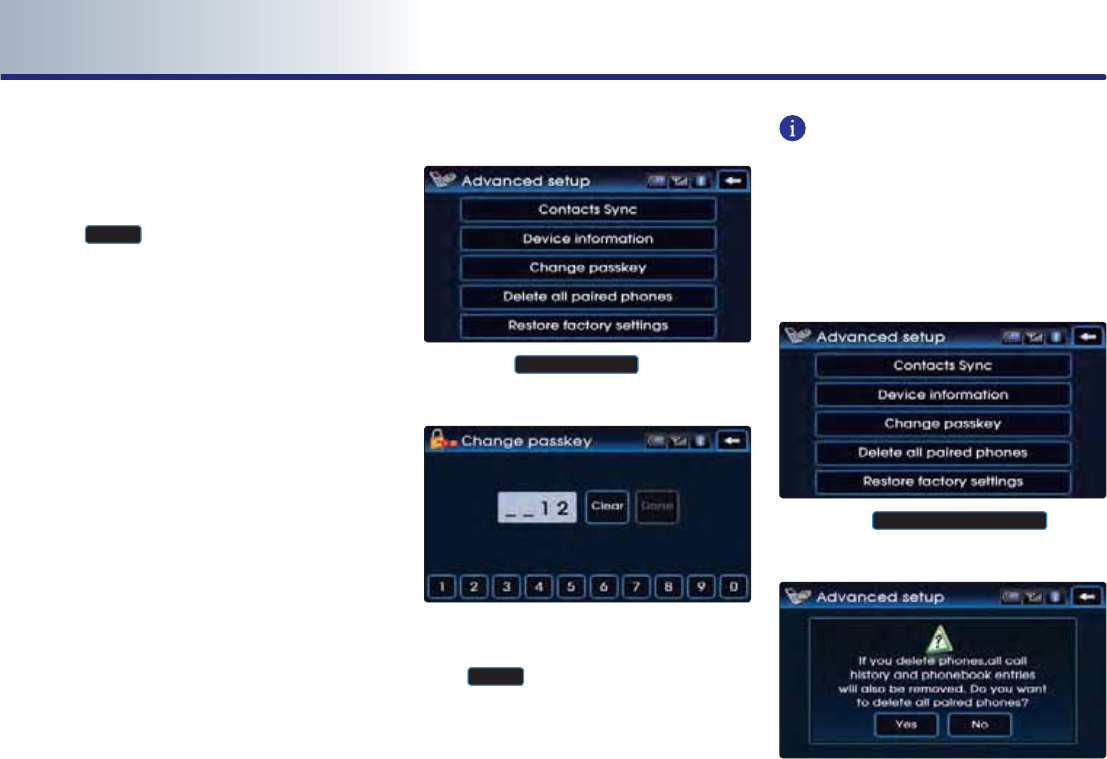
PART 6 Bluetooth® HANDSFREE
6-28 Bluetooth® HANDSFREE
3
.
Use the key pad to input the Device name
you wish to modify.
4
.
After inputting is complete, press the
'RQH
button to save.
Changing passkey
1
.
Press the
&KDQJHSDVVNH\
button on the
Advanced setup screen.
2
.
Once the Change passkey screen is displa-
yed, input the desired passkey and press
the
'RQH
button.
INFORMATION
The passkey is a 4-digit authentication code
used for the Bluetooth® connection between
the mobile phone and car system. The default
passkey is set to 0000.
Deleting all paired phones
1
.
Press the
'HOHWHDOOSDLUHGSKRQHV
button
on the Advanced setup screen.
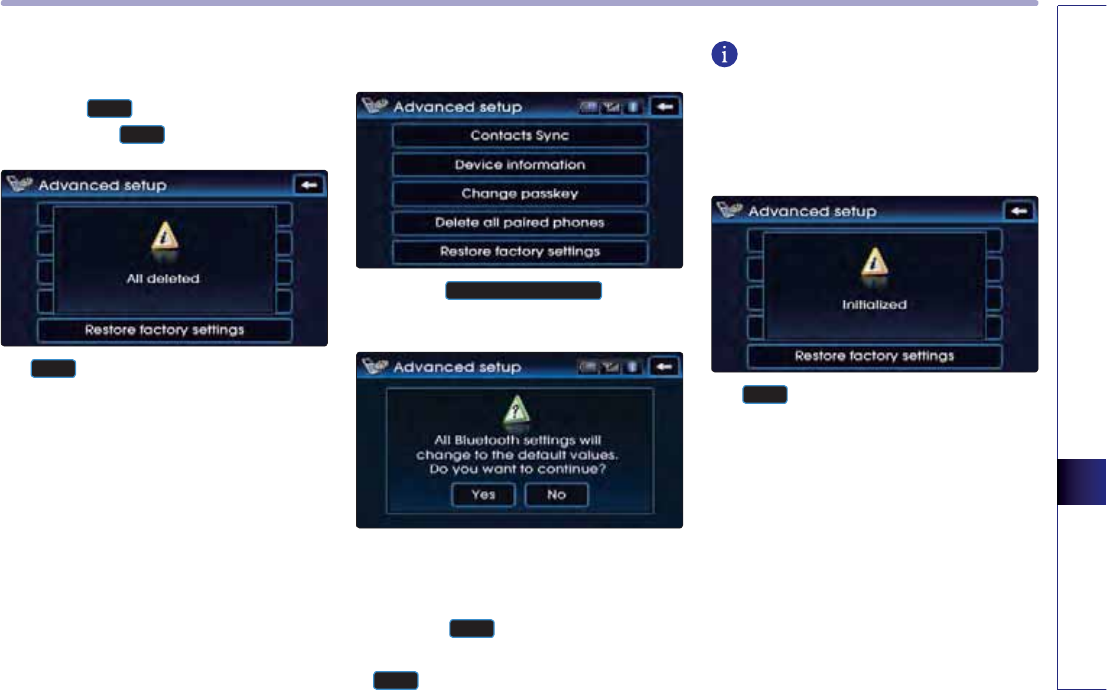
Bluetooth® HANDSFREE
6-29
Bluetooth® HANDSFREE
2
.
A pop-up asking whether you wish to dele-
te all paired phone will be displayed.
Press the
<HV
button to delete all paired
phones or the
1R
button to cancel.
3
.
If
<HV
button is pressed, all currently pai-
red phones will be deleted.
Initializing Bluetooth® handsfree
1
.
Press the
5HVWRUHIDFWRU\VHWWLQJV
button on
the Advanced setup screen.
2
.
A pop-up asking whether you wish to initia-
lize the Bluetooth® handsfree will be displa-
yed.
Press the
<HV
button to initialize the
Bluetooth® handsfree system and the
1R
button to cancel.
INFORMATION
Upon initializing the Bluetooth® handsfree,
the entire paired phone list will be deleted
and all Bluetooth® related settings will be res-
tored to factory state.
3
.
If
<HV
is pressed, the Bluetooth® hands-
free settings will be initialized.

PART 6 Bluetooth® HANDSFREE
6-30 Bluetooth® HANDSFREE
Important information
About pairing mobile phones
I cannot search for mobile phones
through the car system. What is the
cause?
Check to see whether the mobile phone
you wish to connect supports Bluetooth®
function. If your mobile phone supports
Bluetooth®, check to see that whether
the Bluetooth® settings in the mobile
phone have been set to hidden state or if
the Bluetooth® power has been turned
off. If the device has been set to hidden,
release the hidden state and if the
Bluetooth® power has been turned off,
turn the power ON and try searching
again.
What is the difference between pairing a
mobile phone and connecting a mobile
phone?
Paring is the process of creating a secure
communication connection between the
mobile phone and the car Bluetooth® sys-
tem.
Through a two-way passkey between the
car system and mobile phones, up to 5
mobile phones can be paired with the
car system. The paired mobile phone will
remain paired with the car system until
the user deletes it manually.
In addition, the call history lists and
phone number books saved in each
mobile phone will also be maintained
until the paired phone is deleted. For
more information on pairing mobile pho-
nes, please refer to the manual [Pairing
and Connecting a Bluetooth® phone >
Pairing a mobile phone].
Connecting a mobile phone to
Bluetooth® by selecting the desired
mobile phone from the paired phones.
Within the car system, only one Bluetooth®
phone can be connected at one time.
For more information, please refer to the
manual [Pairing and Connecting a
Bluetooth® phone > Pairing a mobile
phone].
What is a Passkey?
A passkey is an authentication code used
for two-way communication of the car
system and the mobile phone.
Only 4-digit numbers can be used as pas-
skeys. Passkeys are registered only once
when pairing the phone number for the
first time. The factory-set passkey is 0000.
Q.
A.
A.
A.
Q.
Q.
Bluetooth® HANDSFREE
6-31
Bluetooth® HANDSFREE
About making/answering phone
calls
How can I answer a call?
When you receive an incoming call, press
the key on the steering wheel or the
$FFHSW
button on the PHONE screen to
answer. To reject the incoming call, press
the key on the steering wheel or the
5HMHFW
button on the PHONE screen.
What should I do if I am talking on the
Handsfree but wish to switch the call to
the mobile phone?
To switch the call to the mobile phone,
press the
3ULYDWH
button on the PHONE
screen or press and hold (over 0.8
second) the key on the steering
wheel. If you wish to switch the call back
to the car handsfree, press the
8VHKDQGVIUHH
button on the PHONE
screen or press and hold (over 0.8
second) the key on the steering
wheel.
About Bluetooth device
environment
What is the range for Bluetooth® wireless
connection?
The wireless connection range is within
Aproximately 30 feet.
How many mobile phones can be paired?
It is possible to pair up to five phones
with the car system.
What is the reason why the call quality
deteriorates?
First, check to see the signal strength of
the mobile phone. The call quality may
deteriorate when the signal strength is
low. Call quality may also deteriorate if
metal objects, such as drink cans, are pla-
ced near the mobile phone.
A.
Q.
A.
Q.
A.
Q.
A.
Q.
A.
Q.

PART 6 Bluetooth® HANDSFREE
6-32 Bluetooth® HANDSFREE
CAUTION!
Mobile Phone Compatibility
Depending on the manufacturer, product and
product specification, some mobile phones
functions may not be supported or may not
operate to specification. Carefully read the
cautions listed below.
●
The occurrence of problems upon using
mobile phones may be caused by the mobi-
le phone and not by the Audio/Navigation
Unit.
●
Even mobile phones which support
Bluetooth function may not operate pro-
perly if the mobile phone connection has
been locked. Release the connection lock
and try connecting the mobile phone with
the system again.
●
The Mobile phone battery icon and signal
strength icon may not be properly displa-
yed depending on the type of mobile
phone.
●
Call waiting is supported only when the
connected mobile phones support this fea-
ture. The call waiting pop-up may not be
displayed in some mobile phones.
●
Audio streaming mode will operate only
when a Bluetooth® phone has been connec-
ted. Connecting or disconnecting a
Bluetooth phone while audio streaming is
operating will stop music play.
●
The audio streaming function may not be
supported in some mobile phones.
●
The phonebook may take a prolonged
period of time to download or may not ope-
rate in some mobile phones.
●
The quality of Bluetooth® handsfree calls
may differ depending on the mobile phone.

7-1
Blue Link
Blue Link®
PART 7
Blue Link®
Starting Blue Link® ………………… 7-2
Safety and Security ………………… 7-3
Auto Crash Notification(ACN) ………… 7-3
Emergency Assistance (SOS) …………… 7-3
Stolen Vehicle Recovery ………………… 7-3
Vehicle Immobilization ………………… 7-4
Vehicle Slowdown ……………………… 7-4
Geographical Position Information 7-5
Downloading POIs from the Blue Link
Center …………………………………… 7-5
Checking POI Lists that have been
downloaded …………………………… 7-6
Sending your car position to a friend … 7-9
Checking incoming friend position
information ……………………………… 7-9
Car Management Information …… 7-11
Eco Driving ……………………………… 7-11
Maintenance Alert Notification ………… 7-12
Automated DTC (Diagnostic Trouble Code)
Notification ……………………………… 7-12
Recall and campaign advisor …………… 7-13
Blue Link System Information …… 7-14
Checking Blue Link System Information
… 7-14
Blue Link Subscription ……………… 7-15
Service Activation ……………………… 7-15
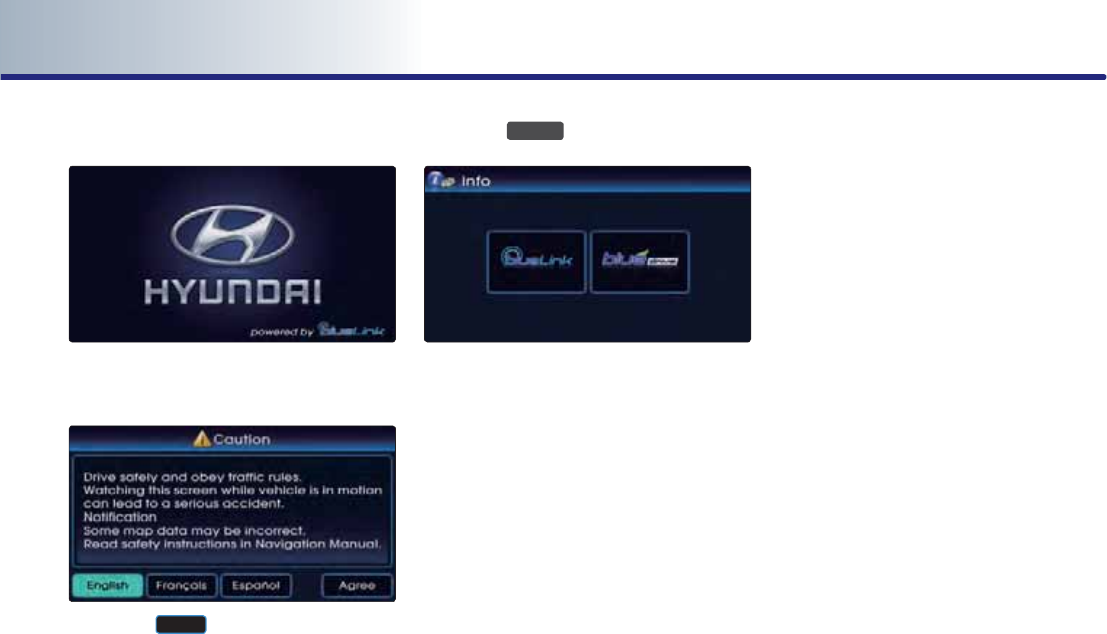
7-2 Blue Link
PART 7 Blue Link®
Starting Blue Link®
1. Turn on the vehicle ignition. The Blue Link
logo is displayed on the screen.
2. Press the
$JUHH
button on the navigation
warning screen and start the Audio
Navigation.
3. Press the
,1)2
key.
4. The Blue Link screen is displayed and the
Blue Link service can be used.
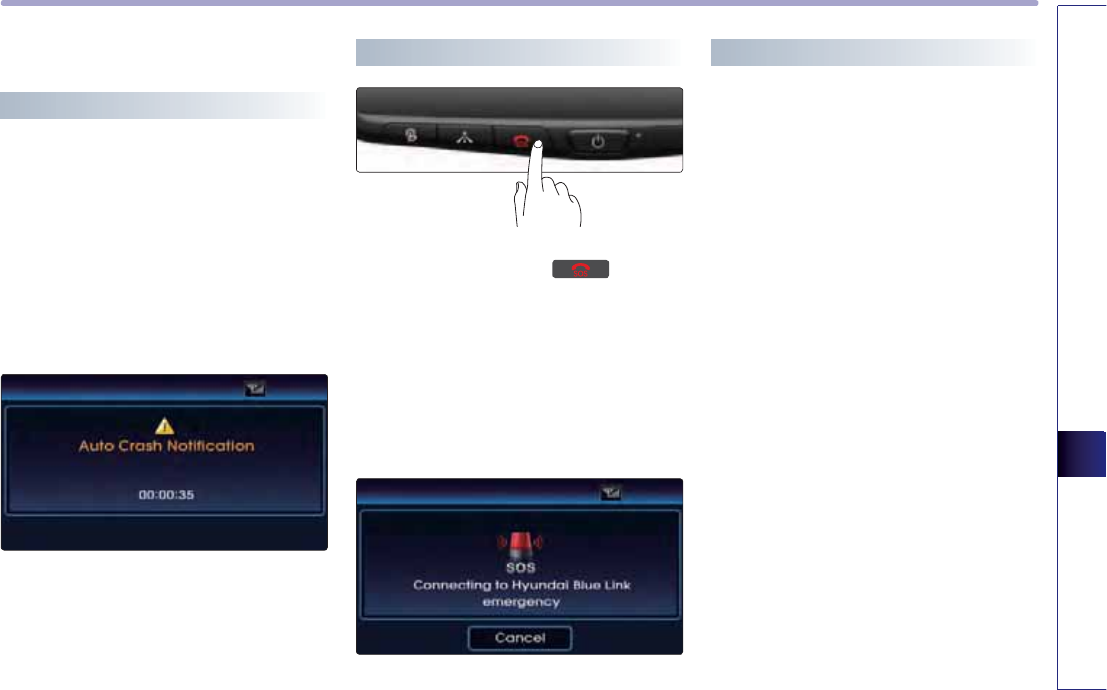
7-3
Blue Link
Blue Link®
Safety and Security
Auto Crash Notification(ACN)
Provides immediate assistance when an acci-
dent occurs and an airbag is deployed. In this
event, an ACN signal, containing customer
and location information, will automatically
be transmitted to the response center. Upon
receipt of the signal, a response specialist will
attempt to establish voice communications
with the vehicle occupants and forward any
pertinent information to emergency services.
Emergency Assistance (SOS)
Customers request emergency 911 assistance
by pressing the dedicated button in
the vehicle. This action transmits vehicle infor-
mation and location to specially trained res-
ponse specialists, who assist in coordinating
the dispatch of appropriate emergency assis-
tance to the customer. The response specialist
remains on the line with the customer until
advised assistance has arrived.
Stolen Vehicle Recovery
In the event a customer’s vehicle is reported
stolen (and a stolen vehicle report has been
filed with the appropriate police department),
the response center can provide assistance to
the police in an attempt to recover the vehi-
cle.
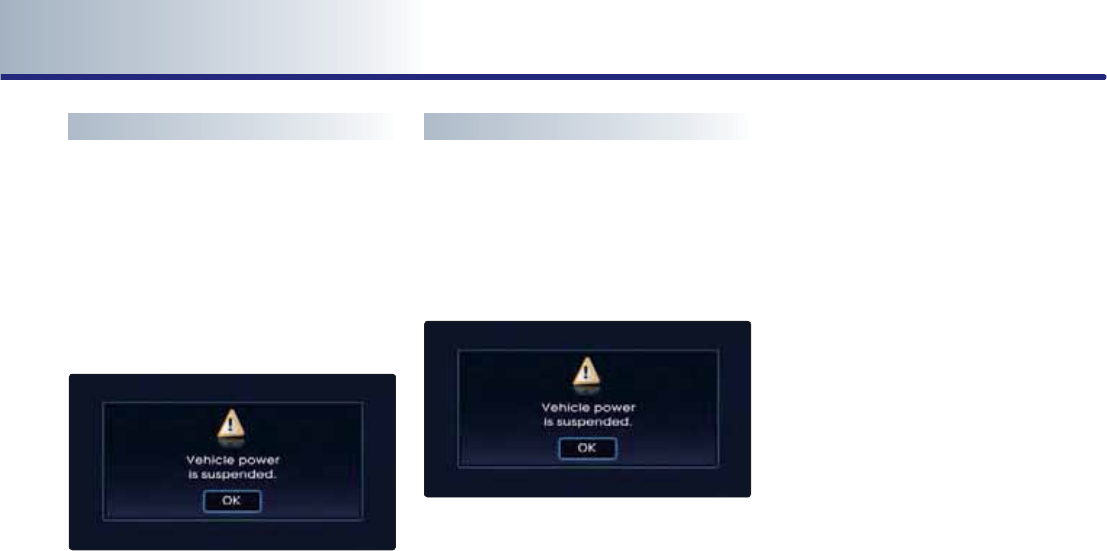
7-4 Blue Link
PART 7 Blue Link®
Vehicle Immobilization
Used with Stolen Vehicle Recovery, this
enables law enforcement to send a signal to
the vehicle which immobilizes the engine
management system, thus preventing startup.
This capability is only valid when the ignition
is off, but can be saved for later immobiliza-
tion if the vehicle is on or in motion at the
time of signal transmission.
Vehicle Slowdown
Used with Stolen Vehicle Recovery, this
enables law enforcement to gradually reduce
the engine power of the vehicle, thus slowing
it down to safe levels. A warning shall be
transmitted to the driver prior to the slow-
down procedure.
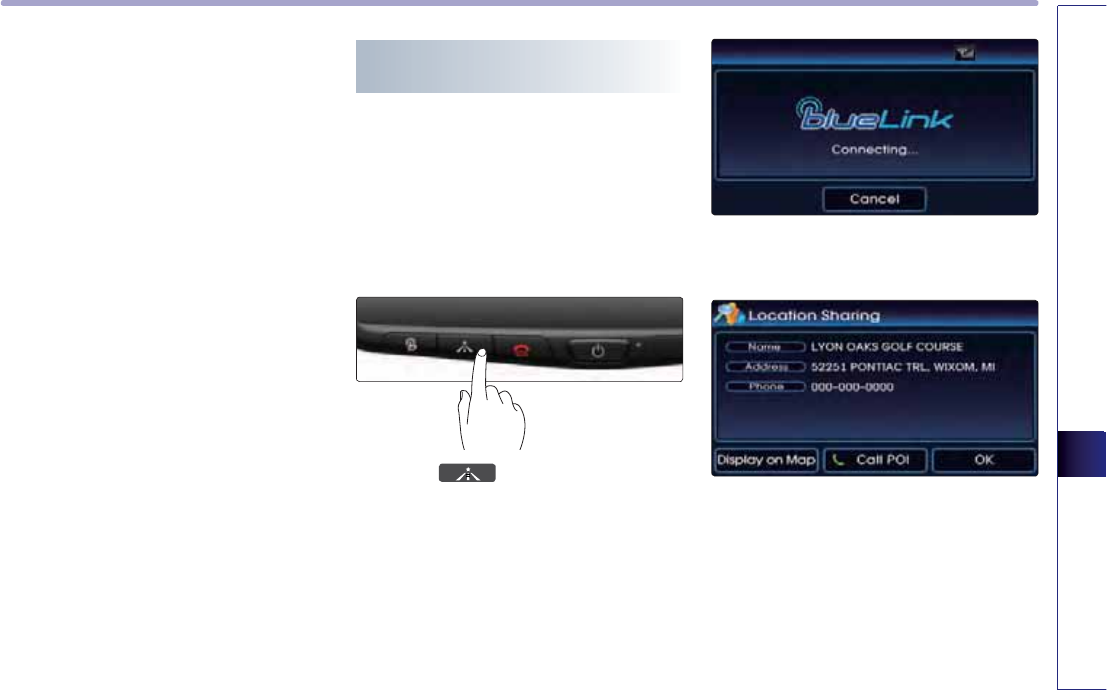
7-5
Blue Link
Blue Link®
Geographical Position
Information
POI information can be downloaded to the
vehicle through the Blue Link center or by
accessing the Owner’s Website.
In the download POI menu, you can check
various information, such as Restaurant
names, addresses, telephone numbers, POI
Rating and Gas Station names, addresses, tele-
phone numbers, fuel type, and price informa-
tion. It is also possible to view the map posi-
tion of the corresponding POI and place a
phone call.
Downloading POIs from the Blue
Link Center
POI Download by IVR
Enables Point of Interest searches using an
automated voice system. Results can be
downloaded to the vehicle navigation system.
Live Operators provide additional support, if
needed.
1. Press the key on the Room Mirror.
2. Connect to IVR_POI menu. Request POI to
IVR.
3. Once the POI is received from the Blue Link
center, the following screen is displayed and
allows you to check POI details.
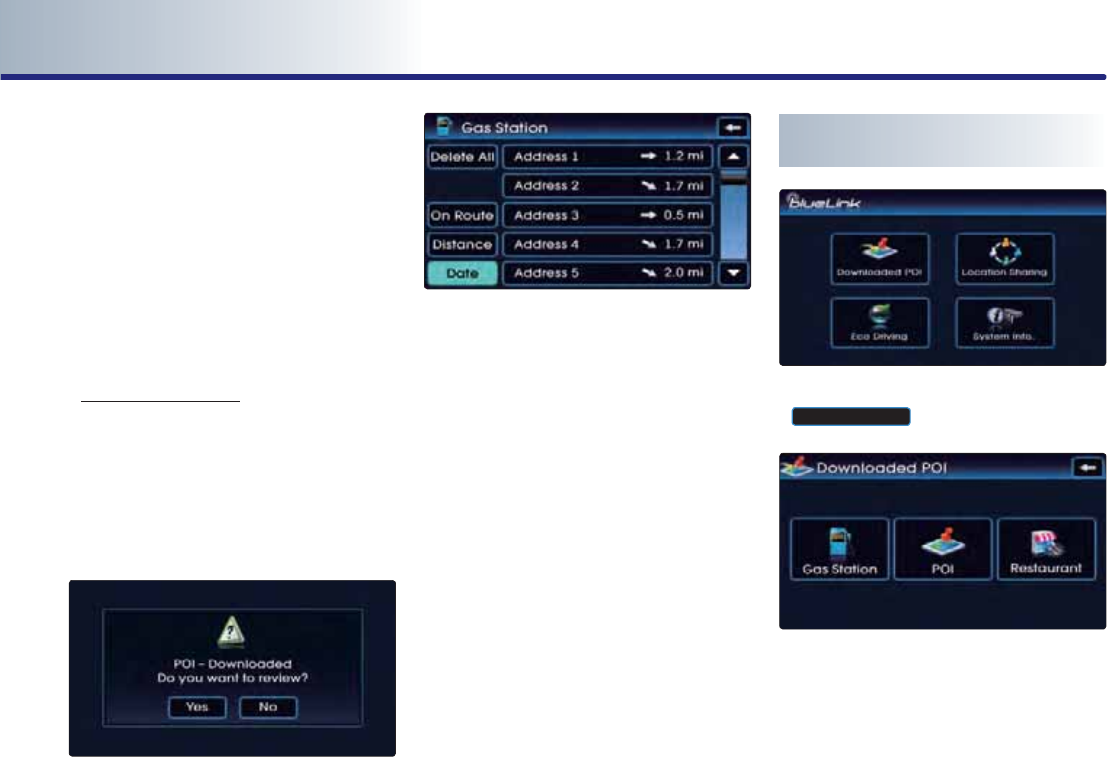
7-6 Blue Link
PART 7 Blue Link®
Downloading POIs through the Owner’s
Website
POI download by Web Portal provides traffic
information surrounding the customer’s vehi-
cle and in the nearby area, based on preferen-
ces established using the Owner’s Website.
1. Select the POI information from the Blue
Link Owner’s Website to transmit to your
vehicle. For the Owner’s Website, go to
www.myhyundai.com.
2. After downloading the POI from the Owner’s
Website, turn on the ignition. The following
POI download pop-up is displayed.
Press the [Yes] button to convert to the
downloaded POI list.
3. Select the desired POI information to check
POI details by category.
Checking POI Lists that have been
downloaded
1. In the Blue Link main screen, press the
'RZQORDGHG32,
button.
2. From Gas Station, POI, and Restaurant,
select the desired POI category menu. You
can check received POI information within
the Blue Link Center or Web Portal.
3. Displays the POI list screen by category.
The screens for each category are as follows.
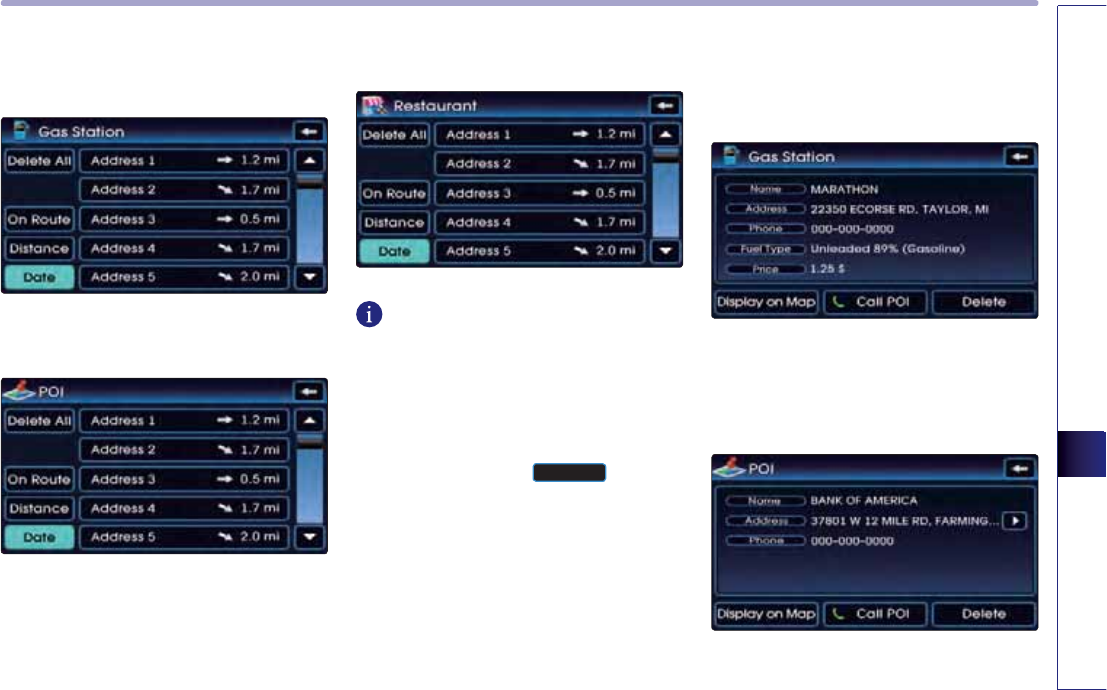
7-7
Blue Link
Blue Link®
When selecting Gas Station
When selecting POI
When selecting Restaurant
INFORMATION
Information displayed in the list includes
names of POIs and the distance from the
current position to the POI destination.
Selecting on Route, Distance, or the Date
button will sort the list according to the selec-
ted category. Press the
'HOHWH$OO
button to
delete the entire POI list.
4. If the desired POI list is selected, then the
detailed info screen is displayed. The details
screens for each category are as follows.
Gas Station details screen
Displays Gas Station name, address, telepho-
ne number, fuel type, and price information.
POI details screen
Displays POI name, address, and telephone
number information.
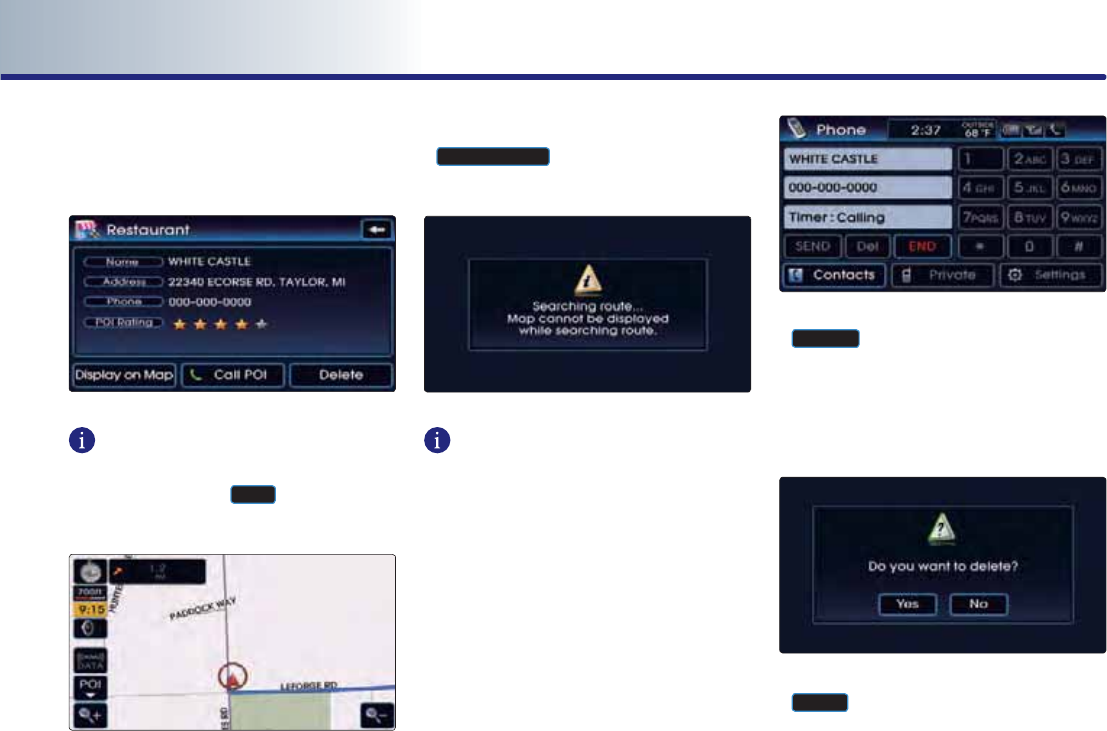
7-8 Blue Link
PART 7 Blue Link®
Restaurant details screen
Displays Restaurant name, address, telephone
number, and POI rating information.
INFORMATION
If the text is too long and cannot all be shown
on the screen, press
Ź
to scroll to the
remaining information.
5. In the Downloaded POI details screen, press
'LVSOD\RQ0DS
to display the POI position
on the map screen.
INFORMATION
During navigation route searches, you cannot
move to the map screen. Convert to the map
screen after completing the navigation route
search.
6. In the Downloaded POI details screen, press
&DOO32,
to connect a call to the correspon-
ding POI telephone number. This feature will
not operate if the Bluetooth phone is not
connected to the vehicle or if already on a
Bluetooth phone call.
7. In the Downloaded POI details screen, press
'HOHWH
to delete the corresponding POI.
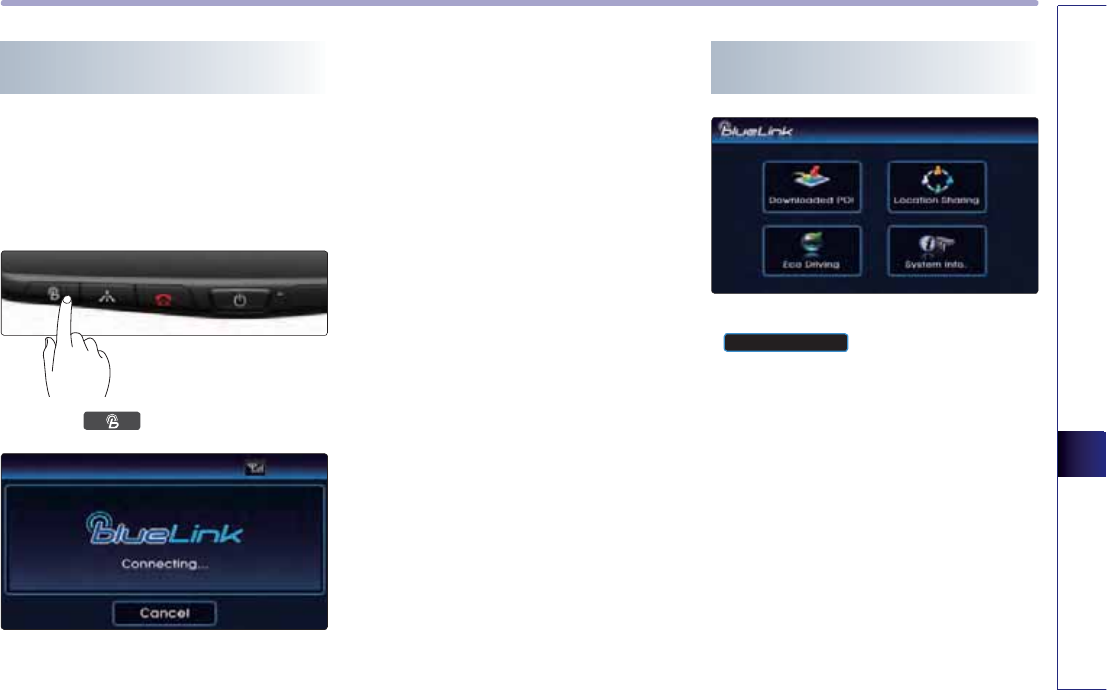
7-9
Blue Link
Blue Link®
Sending your car position to a
friend
Through Blue Link, the locations of your vehi-
cle and friend’s vehicle can be shared. When
sending the location of your vehicle to a
friend, the location is transmitted to a friend
via a Blue Link center call.
1. Press the key on the Room Mirror.
2. Connect to IVR. Following order updates my
location to friend.
3. The location information of your vehicle is
transmitted to your friend’s vehicle.
Checking incoming friend
position information
1. In the Blue Link main screen, press the
/RFDWLRQ6KDULQJ
button.
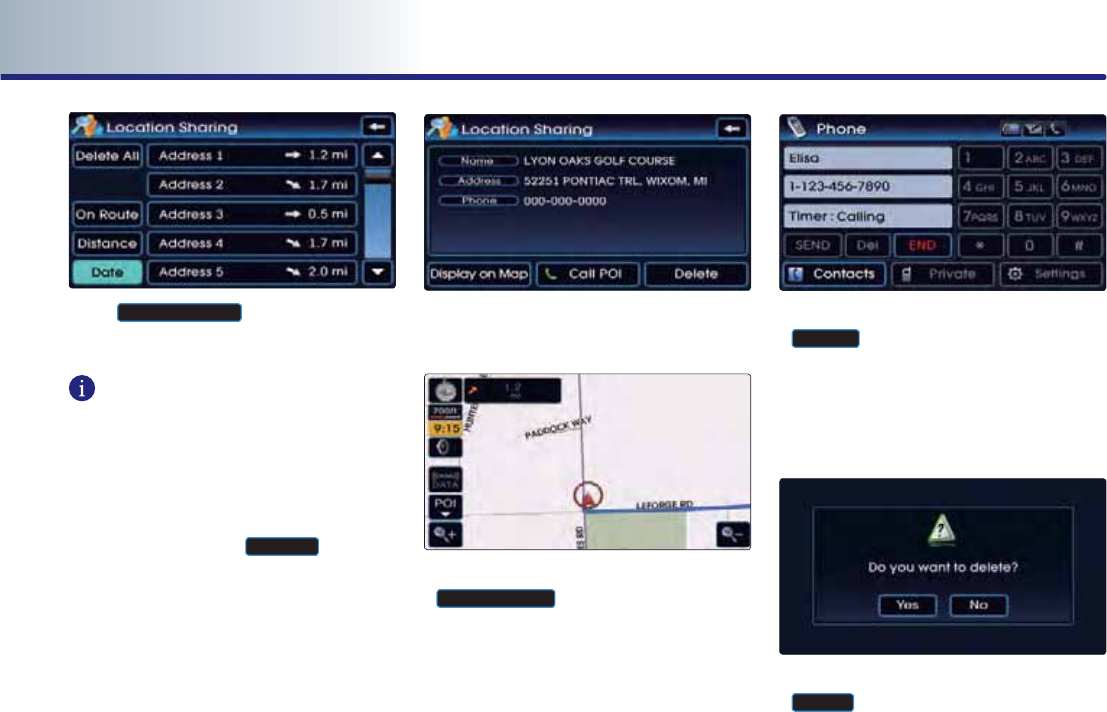
7-10 Blue Link
PART 7 Blue Link®
2. The
/RFDWLRQ6KDULQJ
screen is displayed.
Select the desired list.
INFORMATION
Information displayed in the list include
friend's vehicle location and the distance from
the current position to your friend’s vehicle.
Selecting on Route, Distance, or the Date
button will sort the list according to the selec-
ted category. Press the
'HOHWH$OO
button to
delete the entire POI list.
3. Friend's vehicle location details are displa-
yed.
4. In the Location Sharing details screen, press
'LVSOD\RQ0DS
to display the POI position
on the map screen.
5. In the Location Sharing details screen, press
&DOO32,
to connect a call to the correspon-
ding telephone number. This feature will not
operate if the Bluetooth phone is not con-
nected to the vehicle or if already on a
Bluetooth phone call.
6. In the Location Sharing details screen, press
'HOHWH
to delete the corresponding list.
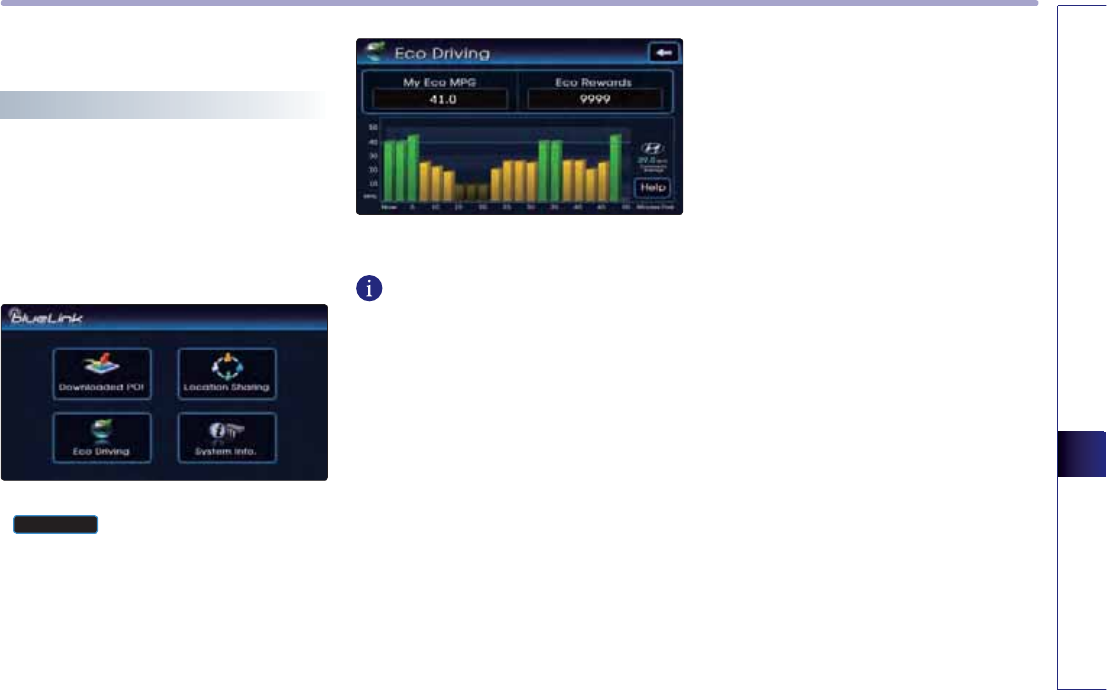
7-11
Blue Link
Blue Link®
Car Management Information
Eco Driving
Tracks the customer’s driving performance
habits (MPG and CO2 emissions) on a conti-
nual and historical basis. Results and environ-
mentally responsible driving recommenda-
tions are provided on the Owner’s Website.
1. In the Blue Link main screen, press the
(FR'ULYLQJ
menu.
2. The Eco Driving screen is displayed.
INFORMATION
What is Eco Coach?
Every 2.5 minutes, Eco Coach compares your
fuel economy against the government tested
average (EPA) or other similar Hyundai models
(community), based on your preference. Each
month, or after every tank fill up, Eco Coach
rates your extended average and gives you a
reward star if you best the average.
See your MyHyundai web page for more infor-
mation.
What does the bar graph and horizontal
line mean?
Green bar means you exceeded the average.
Yellow means you met the average or were
within 20%.
Brown designates fuel economy more than
20% below the average.
The horizontal line is adjusted once per month
or at each tank full, based on your preference;
it represents the EPA combined average or
community average fuel economy target.
What is My Eco MPG?
Your actual fuel economy average over 2.5
minutes.
This value is also shown in bar graph as your
“now” rating.
What are Eco Rewards?
If you beat the average (the EPA or communi-
ty), you will receive an Eco Reward point.
See your MyHyundai web page for more infor-
mation.
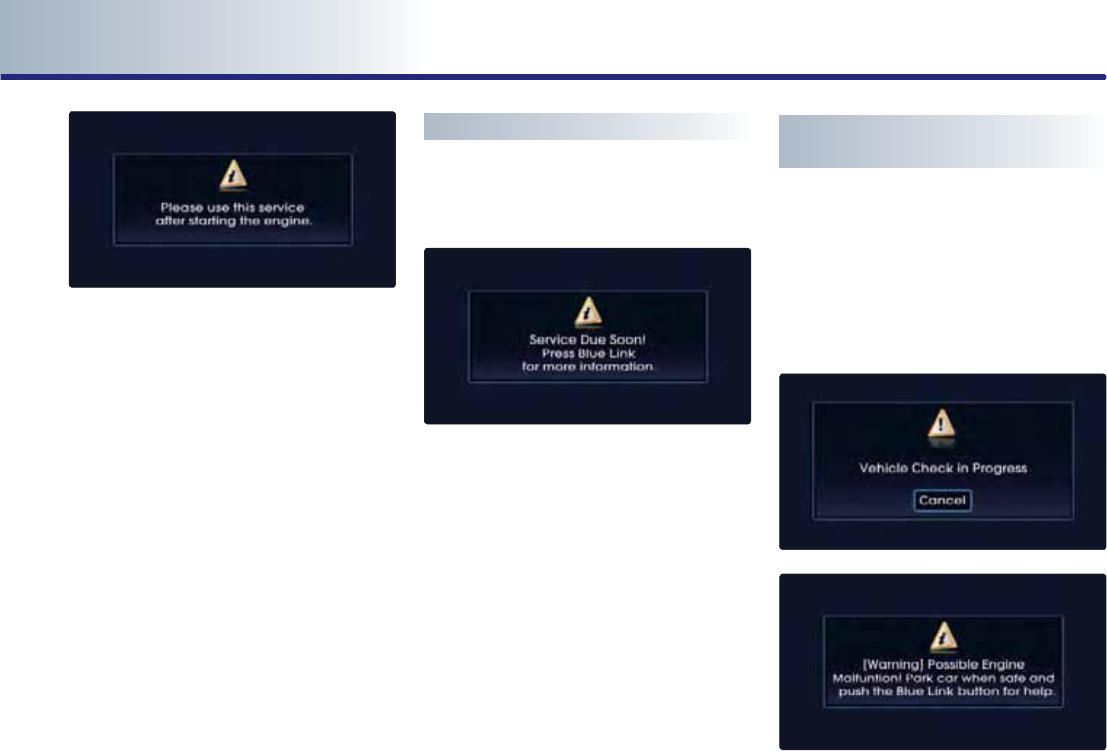
7-12 Blue Link
PART 7 Blue Link®
Eco Driving will not operate if the vehicle igni-
tion is not turned on. Please operate with the
ignition turned on.
Maintenance Alert Notification
Before 250 miles from Service expiration,
message should be shown.
Notifies customers via website, email or SMS
message that an upcoming service is due at
various thresholds leading up to the event.
Configured online, the alerts explain what is
included in particular maintenance intervals.
Automated DTC (Diagnostic
Trouble Code) Notification
Provides explanation and repair assistance
using vehicle data and off-board diagnosis
capabilities to better inform the customer of
vehicle trouble alerts. A combination of inve-
hicle display alerts and what to do next (this
information is also sent to the customer’s pre-
ferred dealer to assist with the repair process).

7-13
Blue Link
Blue Link®
Recall and campaign advisor
Upon receiving a recall or campaign notice,
the following pop-up is displayed.
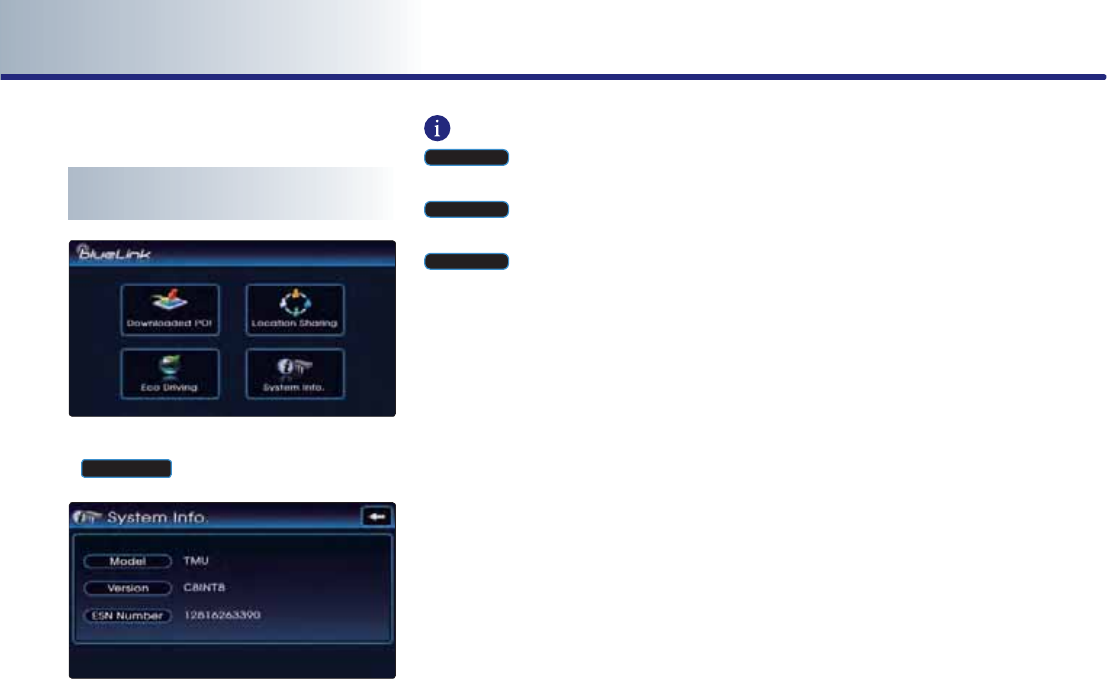
7-14 Blue Link
PART 7 Blue Link®
Blue Link System Information
Checking Blue Link System
Information
1. In the Blue Link main screen, press the
6\VWHP,QIR
menu.
2. The System Information screen is displayed.
INFORMATION
0RGHO
: Displays the vehicle Blue Link
model name.
9HUVLRQ
: Displays the hardware and soft-
ware version.
(611XPEHU
: Displays the Blue Link System
Serial number.

7-15
Blue Link
Blue Link®
Blue Link Subscription
Service Activation
1. If you have not subscribed to the Blue Link
service or Blue Link cannot be connected,
the following pop-up is displayed.
For more information about the Blue Link
service, refer to the Blue Link service
manual.

MEMO

8-1
Rear Camera
Rear Camera
PART 8
REAR CAMERA
About Rear Detection Camera##;-2
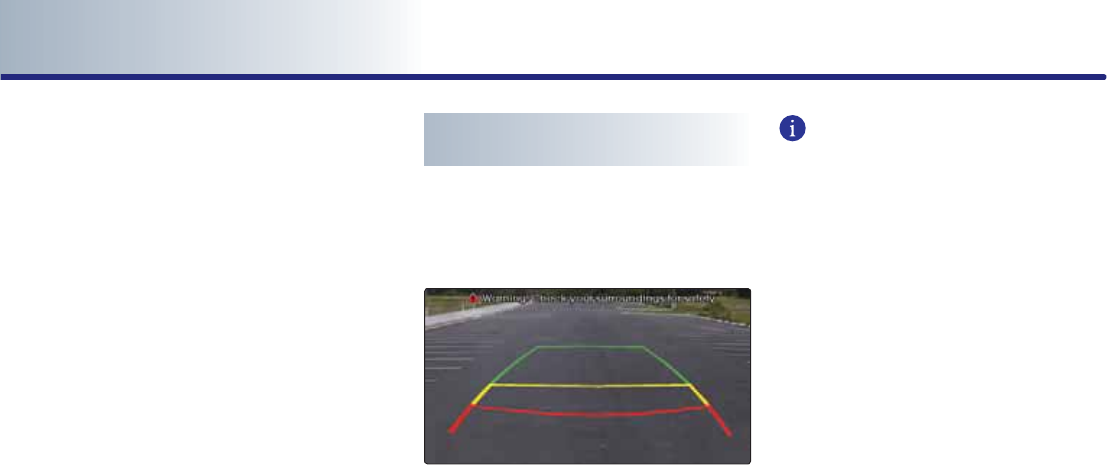
8-2 Rear Camera
PART 8 Rear Camera
About Rear Detection Camera
●
This system has been equipped with a rear
camera for user safety by allowing a wider
rear range of vision.
● The rear camera will operate automatically
when the ignition KEY is turned ON and the
transmission lever is set to R. The rear came-
ra will automatically stop operating when
set to a different lever.
1
.
Position the ignition key onto ACC or ON.
2
.
Position the transmission lever to R.
3
.
The rear camera mode will be displayed on
the screen.
INFORMATION
●
The front/rear camera has been equipped
with an optical lens to provide a wider
range of vision and may appear different
from the actual distance. Check the rear and
left/right firsthand for user safety.
●
The front/rear camera section pertains only
to customers who have purchased this
optional installation.
Operating sequence of the Rear
Camera

APPENDIX
9-1
APPENDIX
PART 9
APPENDIX
Troubleshooting guide …………… 10-2
Before thinking the product has
malfunctioned ………………………… 10-2
Troubleshooting ………………………… 10-3
Map legend ………………………… 10-5
Road color ……………………………… 10-5
POI icons ………………………………… 10-5
Landmark icons ………………………… 10-7
INDEX ………………………………… 10-8

PART 9 APPENDIX
9-2 APPENDIX
Troubleshooting guide
Before thinking the product has malfunctioned
1. Errors which occur during the operation or installation of the device may be mistaken as a malfunction of the actual device.
2. If you are having problems with the device, try the suggestions listed below.
3. If the problems persist, contact your HYUNDAI dealer.
Problem Function
There are small red, blue, or green dots on
the screen
Because the LCD is manufactured with technology requiring high point density, a pixel
deficiency or lighting may occur within 0.01% of total pixels.
The sound or image is not
working ● Has the Switch for the vehicle been turned to [ACC] or [ON]?
●Has the SYSTEM been turned OFF?
The video is being displayed but
sound is not working ●Has the volume been set to a low level?
●Has the volume been set on mute?
When the power is turned on, the corners of
the screen are dark
●
The display looking somewhat darker after prolonged periods of use is a normal
phenomenon with LCD panels. It is not a malfunction.
●
If the screen is very dark, contact your nearest HYUNDAI dealer for assistance.
Sound is working from only one speaker
Is the position of FAL/BAL sound controls or volume adjusted to only one side?
Sound and video does not work in AUX
mode Are the audio and video connector jacks fully inserted into the AUX terminal?
The external device is not working Is the external device connected with a standard connector cable?
The road is missing Some map data may be missing or incorrect.
The road name is spoken incorrectly The TTS(Text To Speech) engine speaks the street name based on the phonetic spelling.
This will continuously be update with the map database.

APPENDIX
9-3
APPENDIX
Problem Possible Cause Solution
The power does not turn
on.
The fuse is blown. Replace with a suitable fuse. If the fuse is blown again, please
contact your nearest HYUNDAI dealer for assistance.
Device is not properly connected. Check to see that the device has been properly connected.
XM only goes through
one category The XM mode is in category. Press the mode button to change to channel mode.
The CD does not play.
The DISC has not been inserted or has been
inserted upside down.
Insert the disc properly so that the sides are facing the correct
direction.
The DISC has been contaminated. Wipe dirt and other foreign substances from the DISC.
The vehicle battery is low. Charge the battery. If the problem persists, please contact your
nearest HYUNDAI dealer for assistance.
A disc which is not supported by the device
has been inserted. Insert a disc which is supported for play by the device.
The video does not work. The brightness level has been set to the
lowest level. Adjust the brightness to a higher level.
The sound does not
work.
The volume level is set the lowest level. Adjust the volume level.
The connector is not properly connected.
Check the connection.
The device is currently fast-forwarding,
rewinding, scanning, or playing in slow mode.
The sound will not work when the device is fast-forwarding,
rewinding, scanning, or playing in slow mode.
Troubleshooting

PART 9 APPENDIX
9-4 APPENDIX
Problem Possible Cause Solution
The sound or video
quality is low.
The DISC is dirty or scratched.
Wipe off water or dirt from the DISC. Do not use a disc which
has been scratched.
Vibration is occurring from the position in
which the conversion switch has been installed.
The sound may be short-circuited and the image distorted if the
device begins to vibrate. The device will return to normal
operation once the vibration has stopped.
The color and tone quality of the image is low.
Aging of the video display and deterioration in performance
may cause certain quality degradations.
The USB does not work.
USB memory is damaged.
Please use after formatting the USB into FAT 12/16/32 format.
USB memory has been contaminated.
Remove any foreign substances on the contact surface of the
USB memory and multimedia terminal.
A separately purchased USB HUB is being used.
Directly connect the USB memory with the multimedia terminal
on the vehicle.
A USB extension cable is being used.
Use standard USB Memory.
A HDD type, CF, SD Memory is being used..
Use standard USB Memory.
There are no music files which can be played.
Only MP3,WMA file formats are supported. Please use only the
supported music file formats.
The iPod is not
recognized even though
it has been connected.
There are no titles which can be played. Use iTunes to download and save MP3 files into the iPod.
The iPod firmware version has not been
properly updated.
Use iTunes to update the firmware version and reconnect the
iPod with the device.
The iPod device does not recognize downloads.
Reset the iPod and reconnect with the device.
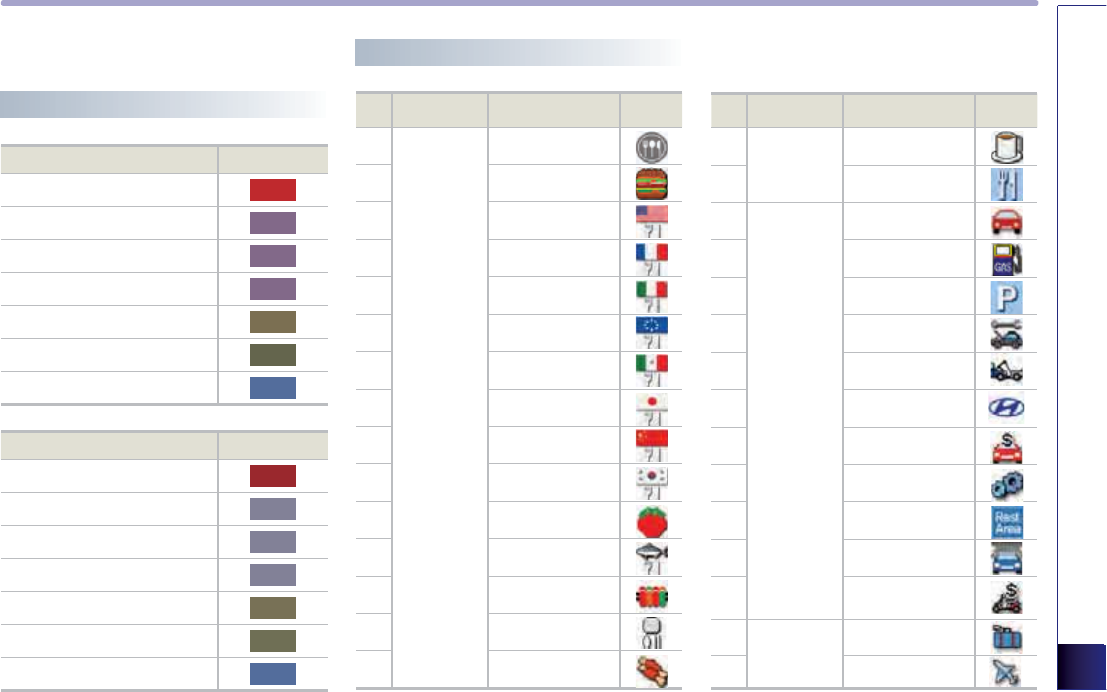
APPENDIX
9-5
APPENDIX
Map legend
Road color
Day Road Type Color
Freeway
Arterial
County
Collector
Local
Unpaved local
Ferry
Night Road Type Color
Freeway
Arterial
County
Collector
Local
Unpaved local
Ferry
No Category Sub Category Icon
1
Restaurants
Representation
2
Fast Food
3
American
4
French
5
Italian
6
Continental
7
Mexican
8
Japanese
9
Chinese
10
Korean
11
Vegetarian Food
12
Seafood
13
Latin American
14
Asian
15
African
No Category Sub Category Icon
16
Restaurants
Coffee Shop
17
Others
18
Automotive
Representation
19
Gas Station
20
Parking
21
Auto service
22
Road Assistance
23
Hyundai Dealership
24
Automobile Dealership
25
Auto Parts
26
Rest Area
27
Car Wash
28
Motorcycle Dealership
29
Travel Representation
30
Airport
POI icons
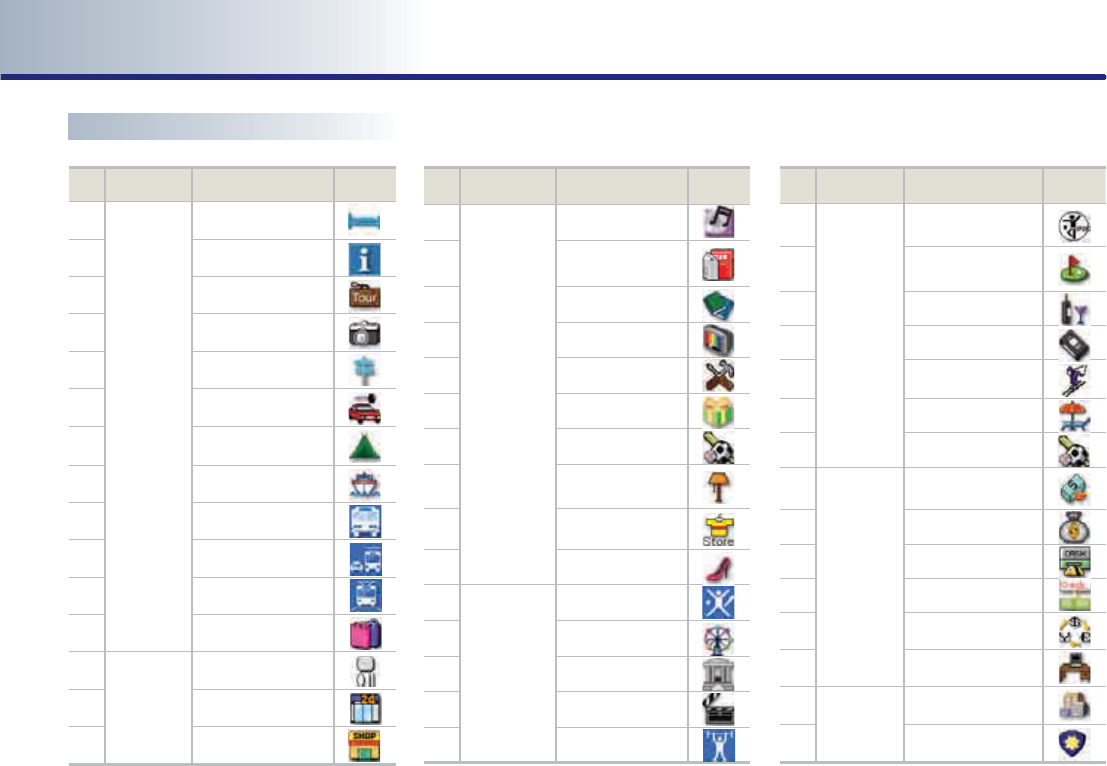
PART 9 APPENDIX
9-6 APPENDIX
POI icons
No Category Sub Category Icon
31
Travel
Hotel
32
Tourist Information
33
Travel Agent
34
Tourist Attraction
35
Popular Spot
36
Rental Car Agency
37
Campground
38
Ferry Terminal
39
Bus Station
40
Local Transit
41
Train Station
42
Shopping
43
Shopping
Department Store
44
Convenience Store
45
Shopping Center
No Category Sub Category Icon
46
Shopping
Music Store
47
Grocery Store
48
Bookstore
49
Electronics
50
Hardware Store
51
Gifts
52
Sporting Goods
53
Home Specialty
Store
54
Clothing
55
Shoe Store
56
Recreation
Representation
57
Amusement Park
58
Museum
59
Cinema
60
Sports Activities
No Category Sub Category Icon
61
Recreation
Sports Complex
62
Golf Course
63
Winery
64
Video & Game Rental
65
Ski Resort
66
Recreation Area
67
Other Recreation
68
Financial
Service
Representation
69
Bank
70
ATM
71
Check Cashing Service
72
Money Transfer
73
Business Facility
74
Community
Representation
75
Police Station
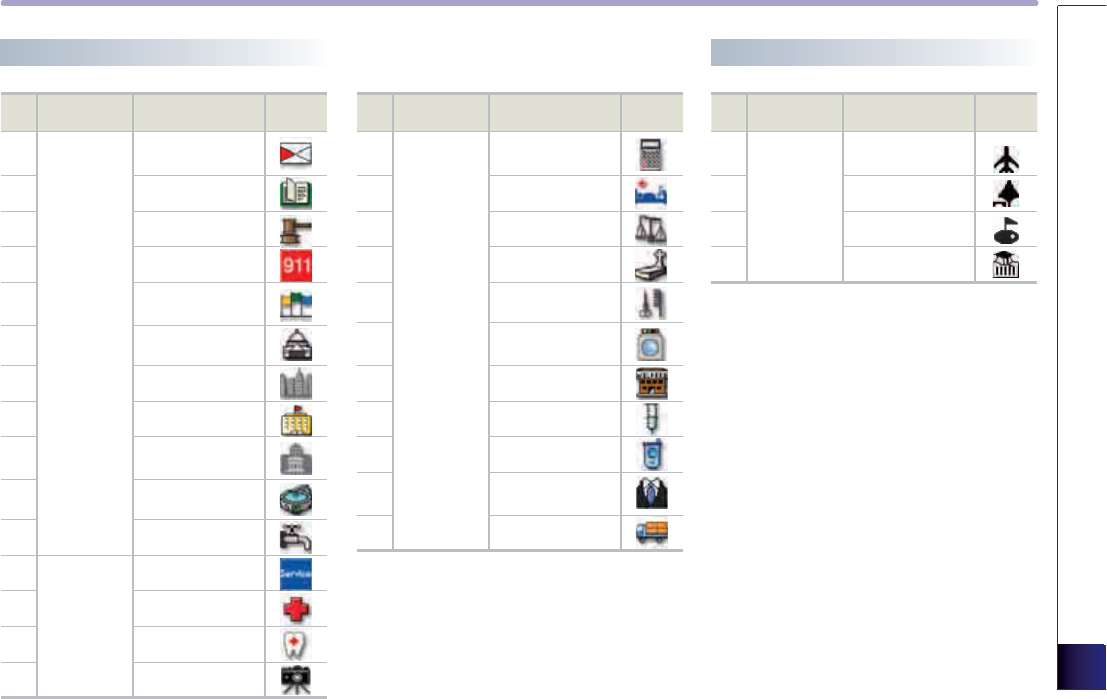
APPENDIX
9-7
APPENDIX
POI icons
No Category Sub Category Icon
76
Community
Post Office
77
Library
78
Court House
79
Fire Department
80
Convention
Center
81
City Hall
82
Civic Center
83
School
84
Government
Offices
85
Waste & Sanitary
86
Utilities
87
Service
Representation
88
Hospital
89
Dentist
90
Photography
No Category Sub Category Icon
91
Service
Tax Service
92
Medical Service
93
Attorney
94
Funeral Director
95
Hair & Beauty
96
Cleaning &
Laundry
97
Social Service
98
Physician
99
Communication
100
Tailor &
Alteration
101
Mudanzas
No Category Sub Category Icon
1
Service
Airport
2Park
3Golf
4University
Landmark icons

9-14 APPENDIX
MS
Microsoft® Windows® Automotive Operating System
Important Safety Information
Read and Follow Instructions
Before using your Windows Automotive-based system, read and follow all instructions and safety information provided in this end user manual
("User's Guide"). Not following precautions found in this User's Guide can lead to an accident or other serious consequences.
Keep User's Guide in Vehicle
When kept in the vehicle, the User's Guide will be a ready reference for you and other users unfamiliar with the Windows Automotive-based sys-
tem. Please make certain that before using the system for the first time, all persons have access to the User's Guide and read its instructions and
safety information carefully.
Warning:
Operating certain parts of this system while driving can distract your attention away from the road, and possibly cause an accident or
other serious consequences. Do not change system settings or enter data non-verbally (using your hands) while driving. Stop the vehicle
in a safe and legal manner before attempting these operations. This is important since while setting up or changing some functions you
might be required to distract your attention away from the road and remove your hands from the wheel.
General Operation
Voice Command Control
Functions within the Windows Automotive-based system may be accomplished using only voice commands. Using voice commands while driving
allows you to operate the system without removing your hands from the wheel.

9-15
APPENDIX
Prolonged Views of Screen
Do not access any function requiring a prolonged view of the screen while you are driving. Pull over in a safe and legal manner before attempting
to access a function of the system requiring prolonged attention. Even occasional short scans to the screen may be hazardous if your attention has
been diverted away from your driving task at a critical time.
Volume Setting
Do not raise the volume excessively. Keep the volume at a level where you can still hear outside traffic and emergency signals while driving.
Driving while unable to hear these sounds could cause an accident.
Navigation Features
Any navigation features included in the system are intended to provide turn by turn instructions to get you to a desired destination. Please make
certain all persons using this system carefully read and follow instructions and safety information fully.
Distraction Hazard
Some navigation features may require manual (non-verbal) setup. Attempting to perform such set-up or insert data while driving can seriously
distract your attention and could cause an accident or other serious consequences. Stop the vehicle in a safe and legal manner before attempting
these operations.
Let Your Judgment Prevail
Any navigation features are provided only as an aid. Make your driving decisions based on your observations of local conditions and existing tra-
ffic regulations. Any such feature is not a substitute for your personal judgment. Any route suggestions made by this system should never replace
any local traffic regulations or your personal judgment or knowledge of safe driving practices.

9-16 APPENDIX
MS
Route Safety
Do not follow the route suggestions if doing so would result in an unsafe or illegal maneuver, if you would be placed in an unsafe situation, or if
you would be directed into an area that you consider unsafe. The driver is ultimately responsible for the safe operation of the vehicle and therefo-
re, must evaluate whether it is safe to follow the suggested directions.
Potential Map Inaccuracy
Maps used by this system may be inaccurate because of changes in roads, traffic controls or driving conditions. Always use good judgment and
common sense when following the suggested routes.
Emergency Services
Do not rely on any navigation features included in the system to route you to emergency services. Ask local authorities or an emergency services
operator for these locations. Not all emergency services such as police, fire stations, hospitals and clinics are contained in the map database for
navigation features.
Use of Speech Recognition Functions
Speech recognition software is inherently a statistical process which is subject to errors. It is your responsibility to monitor any speech
recognition functions included in the system and address any errors.

9-17
APPENDIX
M & SOFT AMERICA MAP CENTER
TEL : 888-757-0010
WEBSITE : www.mapnsoft.com
MAP DATABASE HOTLINE
This equipment has been tested and found to comply with the limits for a Class A digital device, pursuant to part 15 of the FCC Rules.
These limits are designed to provide reasonable protection against harmful interference in a residential installation. This equipment
generates, uses and can radiate radio frequency energy and, if not installed and used in accordance with the instructions, may cause
harmful interference to radio communications. However, there is no guarantee that interference will not occur in a particular
installation. If this equipment does cause harmful interference to radio or television reception, which can be determined by turning the
equipment off and on, the user is encouraged to try to correct the interference by one or more of the following measures:
ˍ Reorient or relocate the receiving antenna.
ˍ Increase the separation between the equipment and receiver.
ˍ Connect the equipment into an outlet on a circuit different from that to which the receiver is connected.
ˍ Consult the dealer or an experienced radio/TV technician for help.
Caution: Any changes or modifications to this device not explicitly approved by manufacturer could void your authority to operate this
equipment.
This device complies with part 15 of the FCC Rules. Operation is subject to the following two conditions: (1) This device may not
cause harmful interference, and (2) this device must accept any interference received, including interference that may cause undesired
operation.
,&:DUQLQJ
7KLVGHYLFHFRPSOLHVZLWK,QGXVWU\&DQDGDOLFHQFHH[HPSW566VWDQGDUGV
2SHUDWLRQLVVXEMHFWWRWKHIROORZLQJWZRFRQGLWLRQVWKLVGHYLFHPD\QRWFDXVHLQWHUIHUHQFHDQG
WKLVGHYLFHPXVWDFFHSWDQ\LQWHUIHUHQFHLQFOXGLQJLQWHUIHUHQFHWKDWPD\FDXVHXQGHVLUHGRSHUDWLRQRIWKHGHYLFH
/HSUpVHQWDSSDUHLOHVWFRQIRUPHDX[&15G,QGXVWULH&DQDGDDSSOLFDEOHVDX[DSSDUHLOVUDGLRH[HPSWVGHOLFHQFH
/H[SORLWDWLRQHVWDXWRULVpHDX[GHX[FRQGLWLRQVVXLYDQWHVODSSDUHLOQHGRLWSDVSURGXLUHGHEURXLOODJHHW
OXWLOLVDWHXUGHODSSDUHLOGRLWDFFHSWHUWRXWEURXLOODJHUDGLRpOHFWULTXHVXEL
PrPHVLOHEURXLOODJHHVWVXVFHSWLEOHGHQFRPSURPHWWUHOHIRQFWLRQQHPHQW