HYUNDAI MOBIS AV1A1IHAN DIGITAL CAR AVN SYSTEM User Manual
HYUNDAI MOBIS CO., LTD. DIGITAL CAR AVN SYSTEM
Users Manual

A7ENE06
CAR MULTIMEDIA SYSTEM l USER'S MANUAL
CAR
MULTIMEDIA
SYSTEM l
USER'S MANUAL

Thank you for purchasing this multimedia
system.
This user's manual explains how to use
the Kia Motor multimedia system.
Before using the product, read the con-
tents of this user's manual carefully and
use this product safely.
Ŗ
The screens shown in this manual may
differ with the actual screens of the
product.
Ŗ
The design and specification of this
product may change without prior notifi-
cation for product improvement.
Ŗ
When transferring the vehicle to another
individual, include this user's manual so
that the next driver can continue its use.
Precaution for safe usage
Ŗ
Driving while distracted can result in a
loss of vehicle control, that may lead to
an accident, severe personal injury, and
death. The driver’s primary responsibil-
ity is in the safe and legal operation of a
vehicle, and use of any handheld devices,
other equipment, or vehicle systems which
take the driver’s eyes, attention and focus
away from the safe operation of a vehicle
or which are not permissible by law should
never be used during operation of the
vehicle.
Ŗ
Do not operate the
multimedia system
while driving.
Ŗ
Do not disassemble, assemble, or modify
the
multimedia system
.
Ŗ
Do not watch the screen for prolonged
periods of time while driving.
Ŗ
Set the volume to a level which allows the
driver to be aware of external conditions.
Ŗ
Do not operate the
multimedia system
for
prolonged periods of time with the vehicle
ignition in ACC. Such operations may lead
to battery discharge.
Ŗ
Be cautious not to spill water or introduce
foreign objects into the device.
Ŗ
Do not cause severe shock to the device.
Direct pressure onto the front side of the
monitor may cause damage to the LCD or
touch panel.
Ŗ
In case of product malfunction, please
contact your place of purchase or service
center.
Ŗ
When cleaning the touch screen, make
sure to turn off the device and use a dry
and smooth cloth. Never use tough mate-
rials, chemical cloths, or solvents (alcohol,
ammonia, benzene, thinners, etc.) as such
materials may damage the device panel
or cause color and quality deterioration.
All Map Database cannot be copied without permission.
Important Notice: This is protected by U.S. copyright laws. All rights not expressly granted are reserved.
You may not otherwise reproduce, modify, and distribute the content without M&Soft, Inc's prior written consent.
Ŗ
SiriusXM service requires a subscrip-
tion, sold separately, after 3-month trial
included with vehicle purchase. If you
decide to continue your SiriusXM ser-
vice at the end of your trial subscription,
the plan you choose will automatically
renew and bill at then-current rates until
you call Sirius XM at 1-866-635-2349 to
cancel. See our Customer Agreement
for complete terms at www.siriusxm.
com. Programming subject to change.
Sirius satellite service is available only
to those at least 18 and older in the 48
contiguous USA, D.C., and PR (with
coverage limitations). Traffic informa-
tion not available in all markets. See
siriusxm.com/traffic for details. Sirius,
XM and all related marks and logos are
trademarks of Sirius XM Radio Inc.
WARNING
Ŗ Driving while distracted can result in a
loss of vehicle control that may lead to
an accident, severe personal injury, and
death. The driver’s primary responsibil-
ity is in the safe and legal operation
of a vehicle, and use of any handheld
devices, other equipment, or vehicle
systems which take the driver’s eyes,
attention and focus away from the safe
operation of a vehicle or which are not
permissible by law should never be used
during operation of the vehicle.
Ŗ
At launch, the Apple iPhone® will be the
only UVO eServices compatible device.
iPhone® is a registered trademark of
Apple Inc.
Ŗ
App Store is a service mark of Apple
Inc. No charge for the UVO eServices
app. App runs on your smartphone cel-
lular data service. Normal data rates will
apply.
Ŗ
HD Radio™ and the HD Radio™ logo
are proprietary trademarks of iBiquity
Digital Corporation.
Ŗ
24-hour Roadside Assistance is a service
plan provided by Kia Motors America,
Inc. Certain limitations apply. Coverage
details are available in the Kia Warranty
and Consumer Information Manual.
For access to Enhanced Roadside
Assistance, a connected mobile phone
via Bluetooth within the cellular service
coverage area is required.
Ŗ
Vehicle Diagnostics do not take the place
of regularly scheduled maintenance.
Feature checks powertrain, chassis, and
airbag systems only. For factory-recom-
mended maintenance schedule, see the
Maintenance Feature of UVO eServices
or the Owner’s Manual.
Ŗ
911 Connect activates after an airbag
deployment. Feature requires a con-
nected mobile phone via Bluetooth.
Dependant on cellular service coverage.
Ŗ
The Rear Camera display is not a sub-
stitute for proper and safe backing-up
procedures. The Rear Camera display
may not display every object behind the
vehicle. Always drive safely and use cau-
tion when backing up.
1RWDWLRQVXVHGZLWKLQWKLV8VHUV
0DQXDO
Safety Warnings
Ŗ (CKNWTGVQQDUGTXGVJGKPUVTWEVKQPUYKVJKPVJKUECVGIQT[EQWNFTGUWNV
KPFCOCIGVQVJGXGJKENG
Safety Cautions
У +PHQTOCVKQPQPOCVVGTUVJCVEQWNFRQVGPVKCNN[NGCFVQKPLWT[QTXGJK-
ENGFCOCIGOCNHWPEVKQP+PHQTOCVKQPVJCVEQWNFNGCFVQJKIJGTWUGT
UCHGV[
i
Information
У
+PHQTOCVKQPCPFVKRUVJCVRTQXKFGCFFKVKQPCNWUGTEQPXGPKGPEGKP
WUKPIVJGRTQFWEV
NOTICE
У
+PHQTOCVKQPQPURGEKHKEHGCVWTGUVJCVHCEKNKVCVGRTQRGTRTQFWEVWUGCPF
HWPEVKQPCNWPFGTUVCPFKPI
У
+PHQTOCVKQPQPVGTOKPQNQI[WUGFYKVJKPVJKUOCPWCN
1RWDWLRQVXVHGZLWKLQWKLV8VHUV
0DQXDO
5HDGWKHIROORZLQJVDIHW\FDXWLRQVIRU
\RXUVDIHW\
Before using the product, read the contents of this user's
manual carefully and use this product safely
ü 6JGFGUKIPCPFURGEKHKECVKQPUQHVJKURTQFWEVOC[EJCPIGYKVJ-
QWVRTKQTPQVKHKECVKQPHQTRTQFWEVCPFUGTXKEGKORTQXGOGPV
6JGCEVWCNHGCVWTGUKPVJGXGJKENGOC[FKHHGTHTQOVJGKNNWUVTC-
VKQPU
(QTOQTGCEEWTCVGKPHQTOCVKQPCDQWVVJGXGJKENGRNGCUGTGHGTVQ
VJGECVCNQIWG

2
%DVLF
:DUQLQJVDQG&DXWLRQV
9CTPKPIU
1-2
%CWVKQPU
1-3
.H\3URGXFW)HDWXUHV
-G[2TQFWEV(GCVWTGU
1-4
&RPSRQHQW1DPHVDQG)XQFWLRQV
*GCF7PKV
1-6
5VGGTKPI9JGGN4GOQVG%QPVTQNNGT
1-8
6WDUWLQJWKH6\VWHPIRUWKH)LUVW7LPH
6WTPKPIVJG5[UVGO1P1HH
1-10
6WTPKPIVJG5[UVGO1P
1-10
6WTPKPIVJG5[UVGO1HH
1-10
4GUGVVKPIVJG5[UVGO
1-11
$CVVGT[9CTPKPI/GUUCIG
1-11
)0$00RGH
$CUKE/QFG5ETGGP
*&4CFKQ6/TGEGRVKQP1((
2-2
$CUKE/QFG5ETGGP
*&4CFKQ6/TGEGRVKQP10
2-3
5VCTVKPI/QFG
2-4
7UKPI5''-
2-4
7UKPI670'
2-4
5GNGEVKPI2TGUGVU
2-4
5CXKPI4CFKQ(TGSWGPE[
2-5
5CXKPI/CPWCNN[
2-5
5CXKPI#WVQOCVKECNN[
2-5
5ECPPKPI4CFKQ(TGSWGPE[
2-5
7UKPIVJG/GPW$WVVQPU
2-6
2TGUGV5ECP
2-6
6GZV1P6GZV1HH
2-6
+'5DGLRЯ0RGH
#DQWV*&4CFKQŠ6GEJPQNQI[
2-7
5VCTVKPI/QFG
2-8
1RGTCVKPI*&4CFKQ6//QFG
2-8
5GNGEVKPIC(TGSWGPE[
2-8
7UKPI670'
2-8
5GNGEVKPIVJTQWIJ2TGUGV
2-9
5QPI6CIIKPI
2-9
*&4CFKQ6/&KIKVCN$TQCFECUV1P1HH
2-9
6,5,860RGH
$CUKE/QFG5ETGGP
2-10
5VCTVKPI/QFG
2-11
7UKPI5''-
2-11
7UKPI670'
2-11
5GNGEVKPI2TGUGVU
2-11
5GNGEVKPIVJTQWIJ%JCPPGN%CVGIQT[.KUV
2-12
5CXKPI5+4+75%JCPPGNU
2-12
5CXKPI/CPWCNN[
2-12
7UKPIVJG/GPW$WVVQPU
2-12
5GCTEJ
2-13
2TGUGV5ECP
2-13
5ECP
2-13
7DEOHRI&RQWHQWV
$XGLR

6CDNGQH%QPVGPVUN
',6&
#DQWV&+5%
2-14
2TGECWVKQPUWRQP*CPFNKPI&KUEU
2-14
5WRRQTVGF&KUE(QTOCVU
2-15
&KUE%QPVGPV(QTOCV%QORCVKDKNKV[
2-15
$GHQTG2NC[KPICP/2&KUE
2-17
&'0RGH
$CUKE/QFG5ETGGP
2-19
5VCTVKPI/QFG
2-20
2NC[KPIC%&
2-20
(CUVHQTYCTFKPIQT4GYKPFKPI%&6TCEMU
2-20
5GCTEJKPI%&6TCEMU
2-21
7UKPIVJG/GPW$WVVQPU
2-21
4GRGCV
2-21
5JWHHNG
2-21
5ECP
2-22
+PHQ1P+PHQ1HH
2-22
03&'0RGH
$CUKE/QFG5ETGGP
2-23
.KUV/GPW5ETGGP
2-25
5VCTVKPI/QFG
2-26
2NC[KPI/2
2-26
5GNGEVKPI/2HKNGU
2-27
7UKPIVJG/GPW$WVVQPU
2-28
%QR[
2-28
4GRGCV
2-28
5JWHHNG
2-28
5ECP
2-28
+PHQ1P+PHQ1HH
2-29
7UKPI/GPWUYKVJKPVJG.KUV5ETGGP
2-29
/QXKPIDGVYGGP.KUVU
2-29
/QXKPIDGVYGGP(QNFGTU
2-30
4GVWTPKPIVQ%WTTGPV.QECVKQP
2-30
86%0RGH
#DQWV75$
2-31
$GHQTG2NC[KPIC75$/2
2-31
75$/2+PHQTOCVKQPCPF2TGECWVKQPU
2-33
$CUKE/QFG5ETGGP
2-34
75$/WUKE/QFG
2-34
75$+OCIG/QFG
2-36
.KUV/GPW5ETGGP
2-37
5VCTVKPI75$/WUKE/QFG
2-38
2NC[KPI75$/WUKE
2-38
5GCTEJKPI75$/WUKE(KNGU
2-39
7UKPIVJG/GPW$WVVQPU
2-39
%QR[
2-39
4GRGCV
2-40
5JWHHNG
2-40
5ECP
2-40
+PHQ1P+PHQ1HH
2-41
5VCTVKPI75$+OCIG/QFG
2-41
5GCTEJKPI75$+OCIG(KNGU
2-41
7UKPIVJG/GPW$WVVQPU
2-42
5NKFGUJQY+PVGTXCN
2-42
4QVCVKPI+OCIG
2-42
#FLWUVKPI+OCIG5K\G
2-43
5CXKPI+OCIG
2-43
8KGYKPI+PHQ
2-43
L3RG0RGH
7UKPIK2QF&GXKEGU
2-44
5VGRUWRQP+PKVKCN%QPPGEVKQP
2-45
5WRRQTVGFK2QF&GXKEGU
2-45
$CUKE/QFG5ETGGP
2-46
5VCTVKPI/QFG
2-47
2NC[KPIK2QF
2-47

4
5GCTEJKPIK2QF
2-47
5GNGEVKPIK2QF(KNGU
2-48
5GCTEJKPIK2QF(KNGU
2-49
7UKPIVJG/GPW$WVVQPU
2-49
4GRGCV
2-49
5JWHHNG
2-49
+PHQ1P+PHQ1HH
2-49
$8;0RGH
5VCTVKPI/QFG
2-50
%QPPGEVKPICP'ZVGTPCN&GXKEG
2-50
%OXHWRRWKp$XGLR0RGH
$CUKE/QFG5ETGGP
2-51
7UKPI
$NWGVQQVJ®#WFKQ/QFG
2-52
5VCTVKPI/QFG
2-52
2NC[KPI$NWGVQQVJ®#WFKQ
2-52
5GNGEVKPI$NWGVQQVJ®#WFKQ(KNGU
2-53
5GVVKPI%QPPGEVKQP
2-53
0\0XVLF0RGH
$CUKE/QFG5ETGGP
2-54
5VCTVKPI/QFG
2-55
2NC[KPI/[/WUKE
2-55
5GNGEVKPI/[/WUKE
2-55
7UKPIVJG/GPW$WVVQPU
2-56
4GRGCV
2-56
5JWHHNG
2-56
5ECP
2-56
+PHQ1P+PHQ1HH
2-57
7UKPI/GPWUYKVJKPVJG.KUV5ETGGP
2-57
/QXKPIDGVYGGP.KUVU
2-57
4GVWTPKPIVQ%WTTGPV.QECVKQP
2-58
&GNGVKPI(KNGU
2-58
1DYLJDWLRQ
%HIRUH8VH
2TGECWVKQPUHQT5CHGFTKXKPI
3-2
1RGTCVKPIVJG0CXKICVKQP
3-3
#DQWVVJG/CR
3-4
#DQWV/CR5ECNG
3-4
#DQWV/CR+EQPU
3-4
#DQWV/CR&CVCDCUG
3-4
#DQWV/CR7RFCVGU
3-4
#DQWV8QKEG)WKFCPEG
3-4
8QKEG)WKFCPEG
3-5
#DQWV)25
3-6
6WDUWLQJ1DYLJDWLRQ
/CR5ETGGP
3-7
+PKVKCN5ETGGP
3-8
%WTTGPV2QUKVKQP
3-8
/CR&KURNC[5GVVKPIU
3-9
%JCPIKPI/CR5ECNG
3-9
/CR/GPW
3-10
#FLWUVKPI0CXKICVKQP8QNWOG
3-10
21+&KURNC[
3-10
'FKVKPI21++EQPU
3-11
5GCTEJKPI21+U
3-12
#FFKPIC/[2NCEG
3-12
8VLQJWKH1DYLJDWLRQ
&GUVKPCVKQP5GCTEJ
3-13
#FFTGUU
3-14
2TGXKQWU&GUVKPCVKQPU
3-14
21+2QKPVQH+PVGTGUV5GCTEJ
3-15
21+0COG5GCTEJ
3-15
)CU5VCVKQP
3-16
4GUVCWTCPVU
3-16
7DEOHRI&RQWHQWV

6CDNGQH%QPVGPVUN
'OGTIGPE[
3-17
/[2NCEGU
3-17
2JQPG0WODGT
3-18
+PVGTUGEVKQP5GCTEJ
3-18
'ZKV'PVTCPEG
3-19
%QQTFKPCVGU
3-19
5GVVKPIC&GUVKPCVKQP
3-19
4QWVG%CNEWNCVKQP
3-21
&GOQ
3-21
#FF9C[RQKPV
3-22
4QWVG4GECNEWNCVKQP
3-22
%CPEGN4QWVG
3-22
4QWVG)WKFCPEG
3-23
2TGNKOKPCT[)WKFCPEG/QFG
3-23
+PVGTUGEVKQP<QQO/QFG
3-24
*KIJYC[/QFG
3-24
6WTP.KUV/QFG
3-24
4QWVG/GPW
3-25
%CPEGN4QWVG
3-26
4QWVG1XGTXKGY
3-26
4QWVG+PHQ
3-27
4QWVG1RVKQP
3-27
&GVQWT
3-28
#XQKF5VTGGVU
3-28
'FKV4QWVG
3-28
#XQKF#TGC
3-29
0DS/RJRVDQG/DQGPDUNV
.QIQ.CPFOCTMU
3-30
.QIQ
3-30
&.CPFOCTMU
3-32
%OXHWRRWKp+DQGVIUHH
%HIRUH8VH
$GHQTG7UKPIVJG$NWGVQQVJ®*CPFUHTGG
4-2
9JCVKU$NWGVQQVJ®9KTGNGUU6GEJPQNQI[!
4-2
%DVLF0RGH6FUHHQ
9JGPPQ2JQPGU*CXG$GGP2CKTGF
4-4
2CKTKPIHTQOVJG$NWGVQQVJ®&GXKEG
4-5
9JGPC2JQPGKU#NTGCF[2CKTGF
4-6
9JGP2CKTKPI#FFKVKQPCN&GXKEG
4-7
8VLQJ%OXHWRRWKp:LUHOHVV7HFKQRORJ\
9JGP6JGTGKUC%QPPGEVGF&GXKEG
4-8
5VCVWU$CT+EQPU
4-8
&WTKPIC%CNN
4-9
5VCVWU$CT+EQPU
4-9
/CMKPI#PUYGTKPI%CNNU
4-10
%CNNKPID[&KCNKPIC0WODGT
4-10
/CMKPIC%CNNHTQO5RGGF&KCN
4-10
%CNNKPIVJTQWIJ4GFKCN
4-11
/CMKPIC%CNNHTQO%CNN*KUVQT[
4-11
#PUYGTKPIC%CNN
4-12
4GLGEVKPIC%CNN
4-12
1RGTCVKPI/GPWUFWTKPIC%CNN
4-13
5YKVEJKPI%CNNVQ$NWGVQQVJ®2JQPG
4-13
5YKVEJKPI%CNNVQ*CPFUHTGG
4-13
'PFKPIC%CNN
4-14
5YKVEJKPIVQ%CNN9CKVKPI
4-14
5GVVKPI/KE8QNWOG
4-15
#FLWUVKPIVJG4KPI%CNN8QNWOG
4-15
%QPVCEVU
4-16
/QDKNG%QPVCEVU5ETGGP%QPHKIWTCVKQP
4-17
&QYPNQCFKPI/QDKNG2JQPG%QPVCEVU
4-18
%JGEMKPI/QDKNG%QPVCEVU&GVCKNU
4-19
#FFKPICUC(CXQTKVG
4-19
(CXQTKVGU
4-20

6
%CNNKPI(CXQTKVGU
4-20
5GNGEVKPI&GNGVKPI(CXQTKVGU
4-20
5GCTEJKPI%QPVCEVU
4-21
%CNN*KUVQT[
4-22
'PVGTKPI%CNN*KUVQT[5ETGGP
4-22
%CNN*KUVQT[5ETGGP%QPHKIWTCVKQP
4-22
&QYPNQCFKPI%CNN*KUVQT[
4-23
8KGYKPI%CNN*KUVQT[+PHQTOCVKQP
4-24
5GVVKPI$NWGVQQVJ®%QPPGEVKQP
4-24
%QPPGEVKQPU/GPW
4-25
%QPPGEVKPIC&GXKEG
4-25
2CKTKPIC0GY&GXKEG
4-26
&KUEQPPGEVKPIC&GXKEG
4-27
&GNGVKPIC&GXKEG
4-27
5GVVKPI#WVQ%QPPGEVKQP
4-28
8VLQJ9RLFH5HFRJQLWLRQ
7UKPI8QKEG4GEQIPKVKQP
5-2
%TGCVKPICUWKVCDNGECDKPGPXKTQPOGPV
5-2
5VCTVKPI8QKEG4GEQIPKVKQP
5-3
5VCTVKPI8QKEG4GEQIPKVKQP
5-3
5MKRRKPI2TQORV/GUUCIGU
5-3
4GUVCTVKPI8QKEG4GEQIPKVKQP
5-4
'PFKPI8QKEG4GEQIPKVKQP
5-4
7UKPI8QKEG4GEQIPKVKQP
5-5
#FLWUVKPI8QKEG4GEQIPKVKQP8QNWOG
5-5
+NNWUVTCVKQPQP7UKPI8QKEG4GEQIPKVKQP
5GVVKPI*QOGCUVJG&GUVKPCVKQP
5-6
9RLFH&RPPDQG/LVWV
8QKEG%QOOCPF.KUV
5-7
*GNR%QOOCPF.KUV
5-7
#WFKQ5[UVGO%QOOCPF.KUV
5-8
(/#/4CFKQ
5-8
5+4+754CFKQ
5-9
%&#WFKQ6[RG
5-9
%&/26[RG
5-10
75$/WUKE
5-10
K2QF
5-11
/[/WUKE
5-11
1VJGTU
5-11
2JQPG%QOOCPF.KUV
5-12
781G5GTXKEGU%QOOCPF.KUV1RVKQPCN
5-12
0CXKICVKQP%QOOCPF.KUV
5-13
&GUVKPCVKQP
5-13
/CR
5-15
21+%CVGIQT[.KUV
5-18
,QIRUPDWLRQ
892H6HUYLFHV2SWLRQDO
6JG%QPPGEVHGCVWTGOC[PQVQRGTCVG
KPVJGHQNNQYKPIUKVWCVKQPU 6-2
7UKPI781G5GTXKEGUCPF%CWVKQPU 6-3
#DQWV781G5GTXKEGU
6-4
$GHQTGWUKPI781G5GTXKEGU
6-5
%QPPGEVKPI$NWGVQQVJ
6-5
2CKTCFGXKEGHTQO$NWGVQQVJGPCDNGF
RJQPG
6-6
#EVKXCVKPI781G5GTXKEGU
6-6
%QPPGEV
6-8
%QPPGEV
6-8
+PKVKCVKPIC%CNN
6-8
4QCFUKFG#UUKUV
6-10
4QCFUKFG#UUKUV
6-10
8GJKENG&KCIPQUVKEU
6-10
%QPFWEVKPI8GJKENG&KCIPQUVKEU
6-10
7DEOHRI&RQWHQWV
9RLFH5HFRJQLWLRQ

6CDNGQH%QPVGPVUN
5EJGFWNG5GTXKEG
6-12
5EJGFWNGF&KCIPQUVKEU
6-13
%QPFWEVKPI#WVQ&KCIPQUVKEU
6-13
2CTMKPI/KPFGT
6-14
5GPFKPI2CTMKPI.QECVKQP
6-14
/[21+U
6-15
5GPFKPI2QKPVUQH+PVGTGUVVQ;QWT 0CXKIC-
VKQP5[UVGO
6-15
/[%CT<QPG
6-16
%WTHGY.KOKV#NGTV
6-17
5RGGF#NGTV
6-18
)GQ(GPEG#NGTV
6-18
G5GTXKEGU)WKFG
6-19
G5GTXKEGU)WKFG
6-19
*36,QIRUPDWLRQ
#DQWV)25)NQDCN2QUKVKQPKPI5[UVGO6-20
9JGP)25+PHQ%CPPQV$G7UGF
6-20
'TTQTU7PCXQKFCDNG&WGVQ5[UVGO%JCTCE-
VGTKUVKEU
6-20
8KGYKPI)25+PHQ
6-21
+HOS
8KGYKPI*GNR
6-22
2WKHU)HDWXUHV
5HDUFDPHUDGLVSOD\
#DQWV4GCT&GVGEVKQP%COGTC
7-2
1RGTCVKPIUGSWGPEGQHVJG4GCT%COGTC 7-2
6HWXS
8VLQJ6HWXS
$CUKE/QFG5ETGGP
8-2
5VCTVKPI/QFG
8-3
5QWPF
8-3
5GVVKPI$CNCPEG(CFGT
8-3
5GVVKPI$CUU/KF6TGDNG
8-3
5GVVKPI8QNWOG4CVKQ
8-4
#FXCPEGF
8-4
5GVVKPI$GGR
8-5
&KURNC[
8-5
#FLWUVKPI$TKIJVPGUU
8-5
5GVVKPI&KURNC[/QFG
8-5
*&4CFKQ6/4GEGRVKQP
8-6
2JQPG
8-6
%QPPGEVKQPU
8-7
%QPVCEVU5[PE5GVVKPI
8-7
#WFKQ5VTGCOKPI5GVVKPI
8-8
0CXKICVKQP
8-9
/CKP
8-10
&KURNC[
8-10
4QWVG5GCTEJ
8-11
)WKFCPEG
8-11
&GHCWNV
8-12
/[2NCEGU
8-13
/[2NCEGU
8-13
(CXQTKVG2NCEGU
8-14
*QOGCPF1HHKEG
8-14
5RGGF#NGTVU
8-15
6TCHHKE5GVWR
8-15
781G5GTXKEGU5GVVKPIU1RVKQPCN
8-16
781G5GTXKEGU5GVVKPIU
8-16
781G5GTXKEGU#EVKXCVKQP
8-17
%QPPGEV5GVVKPI
8-17
/[%CT<QPG
8-18
6TKR+PHQ
8-21

8
5[UVGO+PHQTOCVKQP
8-21
8QKEG4GEQIPKVKQP5GVVKPIU
8-22
%NQEM5GVVKPIU
8-22
2KEVWTG(TCOG
8-23
-G[DQCTF
8-23
.CPIWCIG
8-24
5[UVGO7RFCVG
8-24
&KURNC[1HH
8-25
$SSHQGL[
2TQFWEV5RGEKHKECVKQP
9-2
$GHQTG6JKPMKPI6JGTGKUC2TQFWEV&GHGEV
9-4
$GHQTG6JKPMKPIVJG2TQFWEV*CU
/CNHWPEVKQPGF
9-5
6TQWDNGUJQQVKPI
9-6
(#3
9-8
#DQWV2CKTKPI/QDKNG2JQPGU
9-8
#DQWV/CMKPI#PUYGTKPI2JQPG%CNNU
9-9
#DQWVBluetooth®9KTGNGUU6GEJPQNQI[
*GCF7PKV7UG'PXKTQPOGPV
9-9
7DEOHRI&RQWHQWV
$SSHQGL[

&$87,216XSRQ8VLQJ6'&DUGV
(MHFWLQJDQG,QVHUWLQJ6'&DUGV
У'LGEVKPICPFKPUGTVKPI5&ECTFUYJKNGVJGOWNVKOGFKCU[UVGOKUQRGTCVKPIOC[TGUWNV
KP5&%CTFQT5[UVGOGTTQTU6QGLGEVQTKPUGTVVJG5&ECTFHKTUVVWTPQHHVJGOWNVKOG-
FKCU[UVGOCPFVJGXGJKENGKIPKVKQP
У'LGEVKPUGTV5&ECTFUQPN[VQWRFCVGVJGOWNVKOGFKCU[UVGOYKVJCPGYXGTUKQP
ü9JGPCP5&%CTFYKVJVJGPGYXGTUKQPKUKPUGTVGFVJGPU[UVGOWRFCVGYKNN
QEEWTCWVQOCVKECNN[
8VDJHRI6'&DUGV
У6JG5&%CTFKUHQTOCVVGFVQKPENWFGQPN[/CRCPFPGYU[UVGOWRFCVGHKNGU
У6JG5&%CTFECPPQVDGWUGFVQUCXGCPFRNC[/WUKE
У&QPQVCFFFGNGVGQTHQTOCVHKNGUYKVJKPVJG5&%CTF

iPod®
K2QF®KUCTGIKUVGTGFVTCFGOCTMQH#RRNG+PE
Bluetooth®
Wireless Technology
6JGBluetooth®9KTGNGUU6GEJPQNQI[YQTFOCTMCPFNQIQUCTGTGIKUVGTGF
VTCFGOCTMUQYPGFD[Bluetooth®9KTGNGUU6GEJPQNQI[5+)+PECPFCP[
WUGQHUWEJOCTMUD[-KCKUWPFGTNKEGPUG
#Bluetooth®
9KTGNGUU6GEJPQNQI[GPCDNGFEGNNRJQPGKUTGSWKTGFVQWUG
Bluetooth®9KTGNGUU6GEJPQNQI[Bluetooth®9KTGNGUU6GEJPQNQI[RJQPG
EQORCVKDKNKV[ECPDGEJGEMGFD[XKUKVKPIJVVRYYYMKCEQO
HD Radio™ Technology
*&4CFKQŠ6GEJPQNQI[OCPWHCEVWTGFWPFGTNKEGPUGHTQOK$KSWKV[
&KIKVCN%QTRQTCVKQP75CPF(QTGKIP2CVGPVU
*&4CFKQŠCPFVJG*&*&4CFKQCPF#TENQIQUCTGRTQRTKGVCT[
VTCFGOCTMUQHK$KSWKV[&KIKVCN%QTR

&$508/7,0(',$6<67(0
У
Warnings and Cautions
У
Key Product Features
У
Component Names and Functions
У
Starting the System for the First Time
%DVLF

1-2
:DUQLQJVDQG&DXWLRQV
WARNING
У Even when receiving route guidance from the
multimedia system, please abide by actual
traffic, road regulations, and any road signs.
Following only the Navigation route guidance
may lead to violations of actual traffic and road
regulations and lead to traffic accidents.
У Do not stare at the screen while driving. Staring
at the screen for prolonged periods of time could
lead to traffic accidents, and result in severe per-
sonal injury or damage to the vehicle.
У Do not operate the multimedia system while
driving, such as entering POIs or conducting
route searches. Such acts could lead to acci-
dents, fire, or electric shock. Park the vehicle
before operating the device.
У Do not disassemble, assemble, or modify the
multimedia system. Such acts could result in
accidents, fire, or electric shock.
У Use caution not to spill water or introduce foreign
objects into the device. Such acts could lead to
smoke, fire, or product malfunction.
У
Please refrain from use if the screen is blank
or no sound can be heard as these signs
may indicate product malfunction. Continued
use in such conditions could lead to accidents
(fires, electric shock) or product malfunctions.
У
Do not touch the antenna during thunder or
lightening as such acts may lead to lightning
induced electric shock.
У
Do not stop or park in parking-restricted areas
to operate the product. Such acts could lead
to traffic accidents.
У
For most Audio and multimedia modes, the
display will not operate when the vehicle is in
motion. For your safety, first park the vehicle
to watch or view the screen. (The screen will
operate when the parking brake is set to ON
for manual transmission vehicles and when
set to P or Parking Brake On state for auto
transmission vehicles.)

Warnings and Cautions
Basic O 1-3
CAUTION
Pay attention to traffic conditions while driv-
ing.
У In some instances, the navigation may pro-
vide guidance through restricted areas.
У Operating the device while driving could lead
to accidents due to a lack of attention to exter-
nal surroundings. First park the vehicle before
operating the device. In addition, the touch
screen may not work for some functions when
the vehicle is in motion. The touch screen
feature will be supported once the vehicle has
stopped.
У Adjust the volume to levels that allow the
driver to hear sounds from outside of the vehi-
cle. Driving in a state where external sounds
cannot be heard may lead to accidents.
У Pay attention to the volume setting when turn-
ing the device on. A sudden output of extreme
volume upon turning the device on could lead
to hearing impairment. (Adjust the volume to
a suitable levels before turning off the device.)
У If you want to change the position of
device installation, please inquire with
your place of purchase or service mainte-
nance center.
У Technical expertise is required to install or
disassemble the device.
У Turn on the car ignition before using this
device. Do not operate the
multimedia
system
for long periods of time with the
ignition turned off as such operations may
lead to battery discharge.
У Upon using the
multimedia system
for more
than 10 minutes with the car engine
turned off, a warning will be displayed.
After 10 minutes, the warning will be dis-
played for 3 seconds every 1 minute.
У Do not subject the device to severe shock
or impact. Direct pressure onto the front
side of the monitor may cause damage to
the LCD or touch screen.
У
У When cleaning the device, make sure
to turn off the device and use a dry and
smooth cloth.
У Never use tough materials, chemical
cloths, or solvents(alcohol, benzene, thin-
ners, etc.) as such materials may damage
the device panel or cause color/quality
deterioration.
У When experiencing product malfunctions,
inquire with your place of purchase or ser-
vice maintenance center.
У Prevent caustic solutions such as perfume
and cosmetic oil from contacting the dash-
board because they may cause damage or
discoloration.

1-4
This device is an Multimedia System equipped with a multifunctional disc player that supports Radio (FM1, FM2, AM), HD Radio technology,
SIRIUS, Audio CD, MP3, USB, iPod, Audio AUX, and My Music features. The WIDE VGA LCD provides a high quality resolution while the pow-
erful and rich sound system adds to the driving enjoyment.
Display
TFT
У Provides high quality sound and video through a Wide TFT-LCD Display using an LED Back Light
У Touch screen for maximum user convenience
Radio
Digital Tuner Feature
У Digital Tuner using PPL method that supports memory of 6 broadcast stations for each AM, FM1, and FM2 modes
Integrated Antenna (SIRIUS+NAVI)
У Outstanding reception via integrated antenna with high sensitivity
Radio broadcast station name
У Displays broadcast station names when available
HD Radio/Satellite Radio feature
У Supports HD Radio reception and Satellite Radio (SIRIUS)
Multimedia
Player
Support for various Media Formats
У Support for various media formats, including Radio, audio MP3 CD, USB, iPod and AUX
У Supports USB, iPod, and Bluetooth® Audio Streaming modes
My Music
У Supports copying of music stored within DISC MP3 or USB into My Music (internal memory) mode
USB Image
У Copy to view and save images saved in USB devices
.H\3URGXFW)HDWXUHV

Key Product Features
Basic O 1-5
Navigation
Voice Guidance
У Voice route guidance to conveniently reach set destinations
У Various map scales that enables drivers to accurately view map and surrounding areas
Automatic Correction for Current Location
У Automatically corrects current position using map matching and GPS information
Miscellaneous
Bluetooth®
Wireless Technology
У Convenient use of Bluetooth® Handsfree by using buttons within the steering wheel
Digital Screen Control Features
У Easy control of features through touch screen options
Steering Wheel
У Control over audio features, voice recognition and Bluetooth® through the steering wheel for increased convenience
1-6
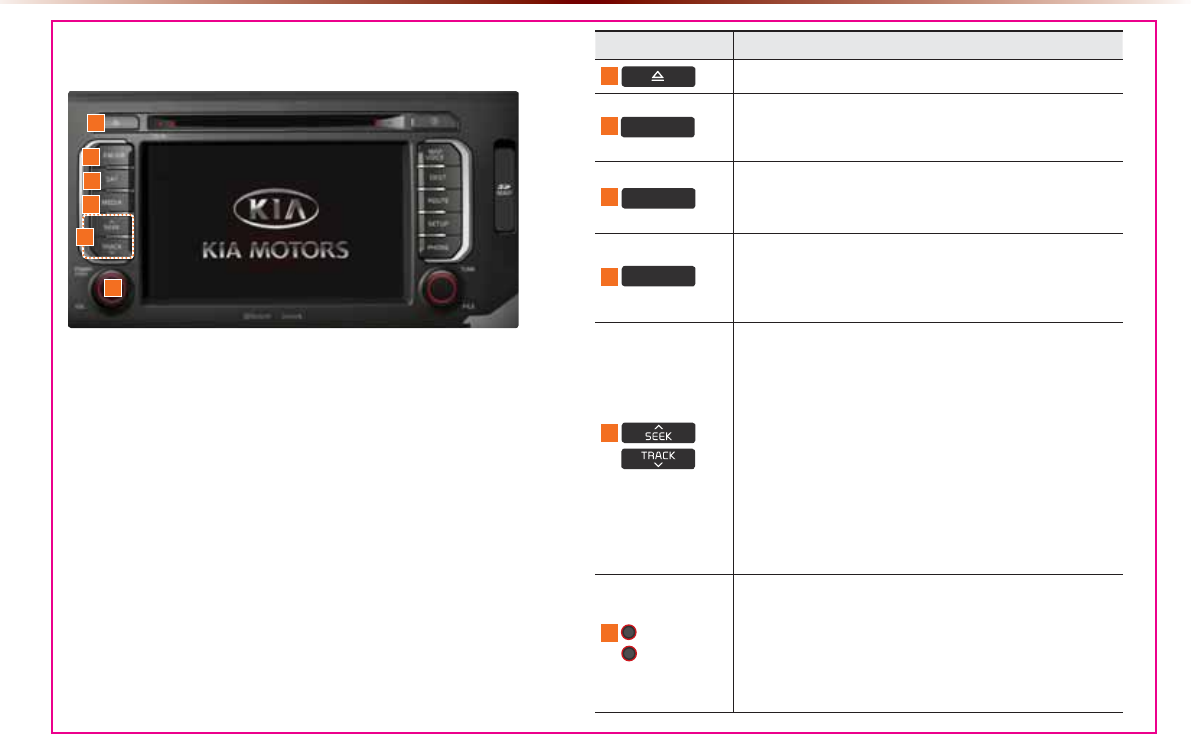
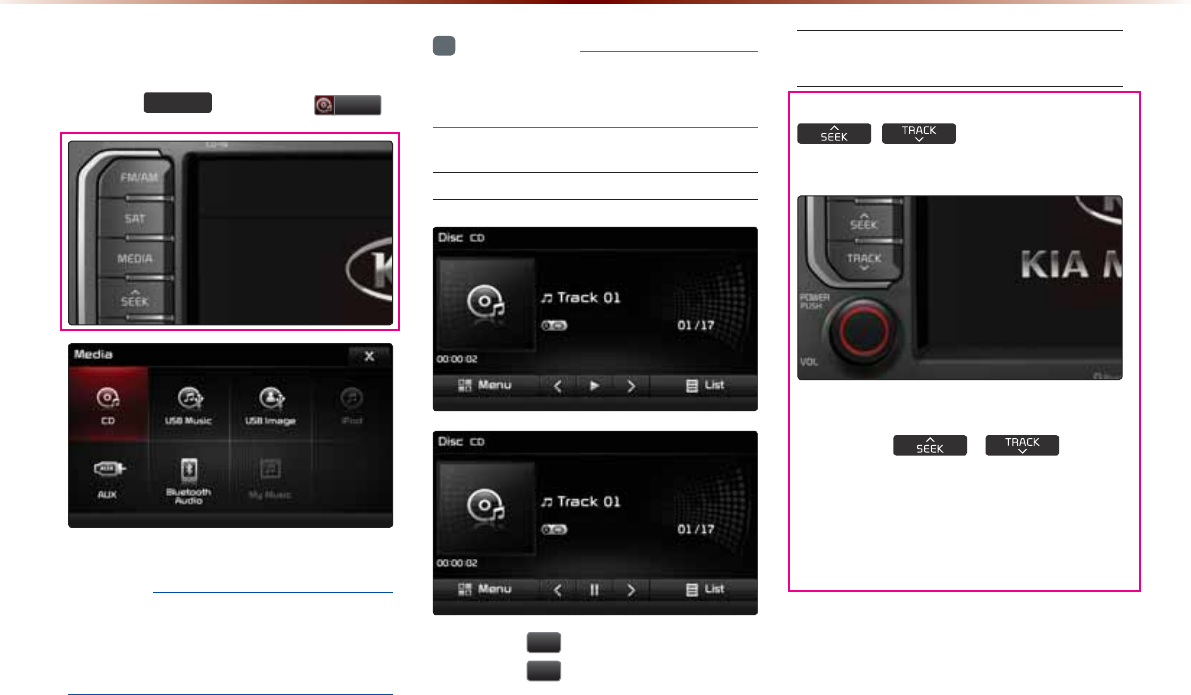
+HDG8QLW
&RPSRQHQW1DPHVDQG)XQFWLRQV
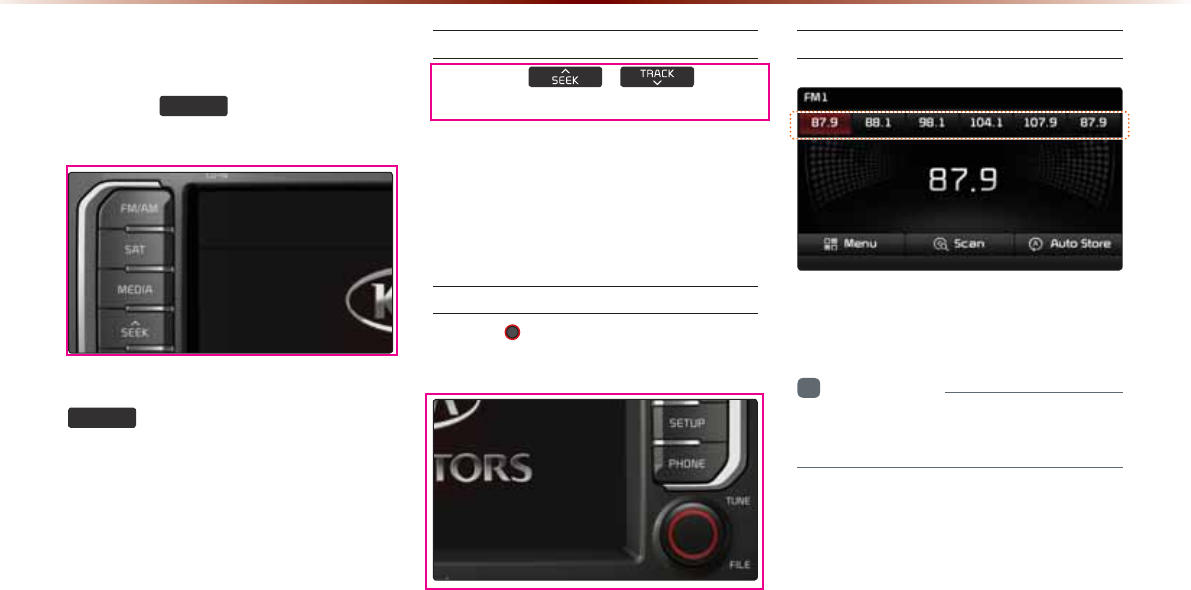
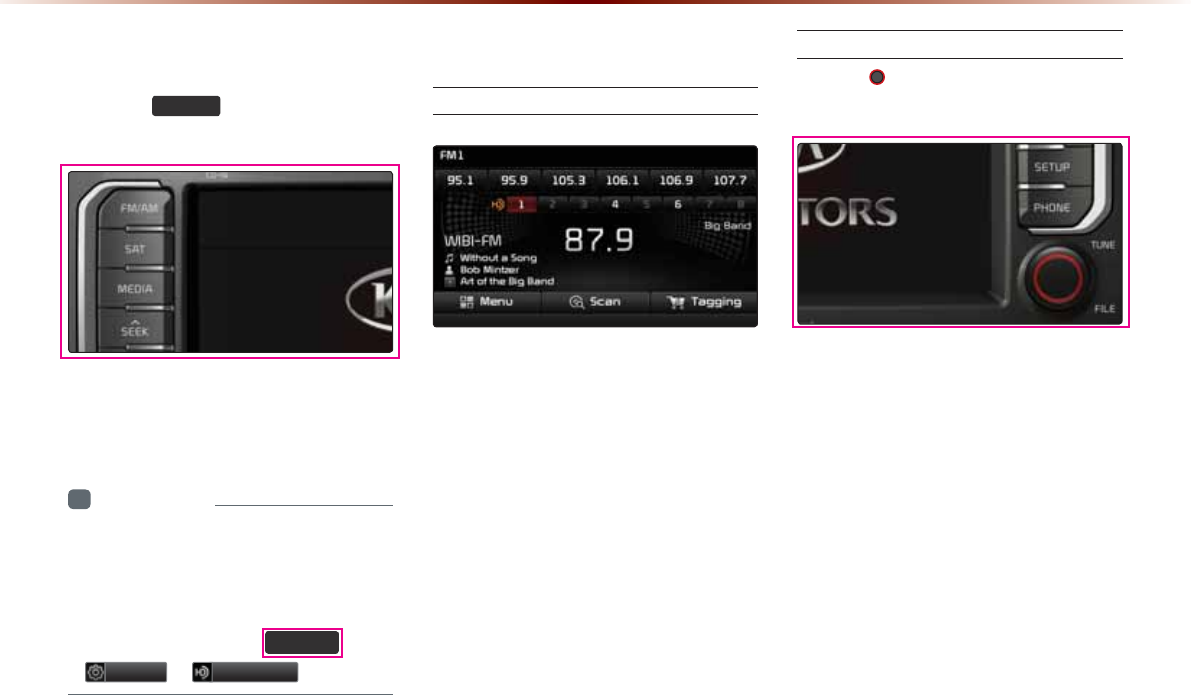
Name Description
1
Press to insert or eject disc
2
)0$0
У Selects FM/AM mode
У Each time the key is pressed, the mode is changed in
order of FM1 Ċ FM2 Ċ AM Ċ FM1
3
6$7
Converts to SIRIUS mode
У Each time the key is pressed, the mode is changed in
order of SIRIUS1 Ċ SIRIUS2 Ċ SIRIUS3 Ċ SIRIUS1
4
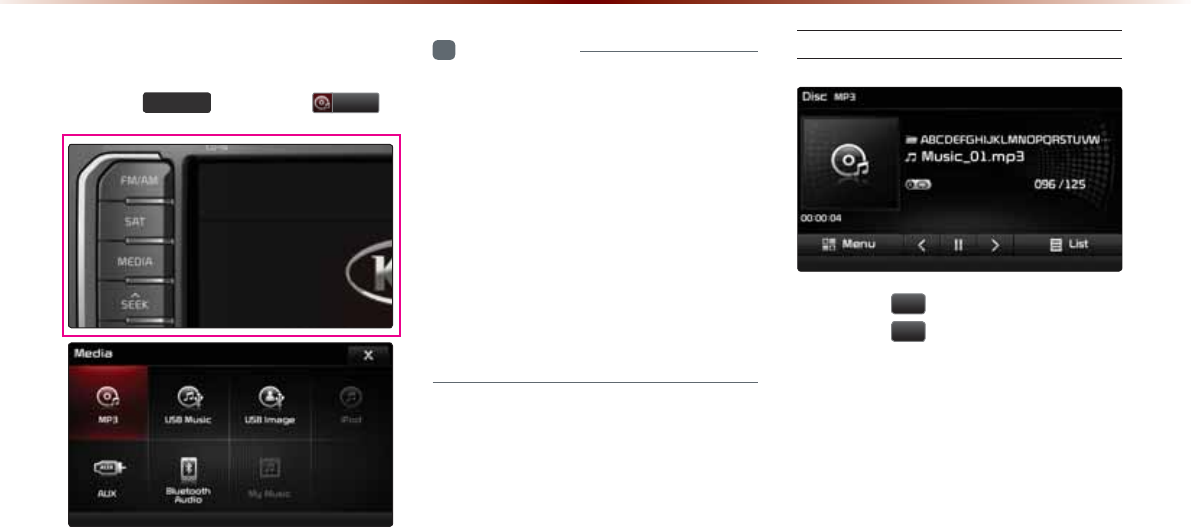
0(',$
У Displays CD, MP3, USB, iPod, AUX, Bluetooth® Audio
Streaming, My Music modes
У If the media is not connected or a disc is not inserted,
corresponding modes will be disabled
5
When key is pressed shortly. (under 0.8 seconds)
У In FM/AM mode, plays previous/next frequency
У In SIRIUS mode, plays the previous/next channel
У In CD/MP3/USB/iPod/My Music modes, changes the
track, file or chapter
When key is pressed and held. (over 0.8 seconds)
У In FM/AM mode, continuously changes the frequency
until the key is released and plays the current frequency
У In SIRIUS mode, continuously changes the channel
until the key is released and plays the current channel
У In CD/MP3/USB/iPod/My Music modes, rewinds or fast-
forwards the track or file
6
32:(5
92/
У When power is off, press to turn power on
У When power is on, press and hold (over 1.2 seconds)
to turn power off
У When power is on, press shortly (under 1.2 seconds)
to turn Audio off
У Turn left/right to control volume
6
2
3
5
4
1
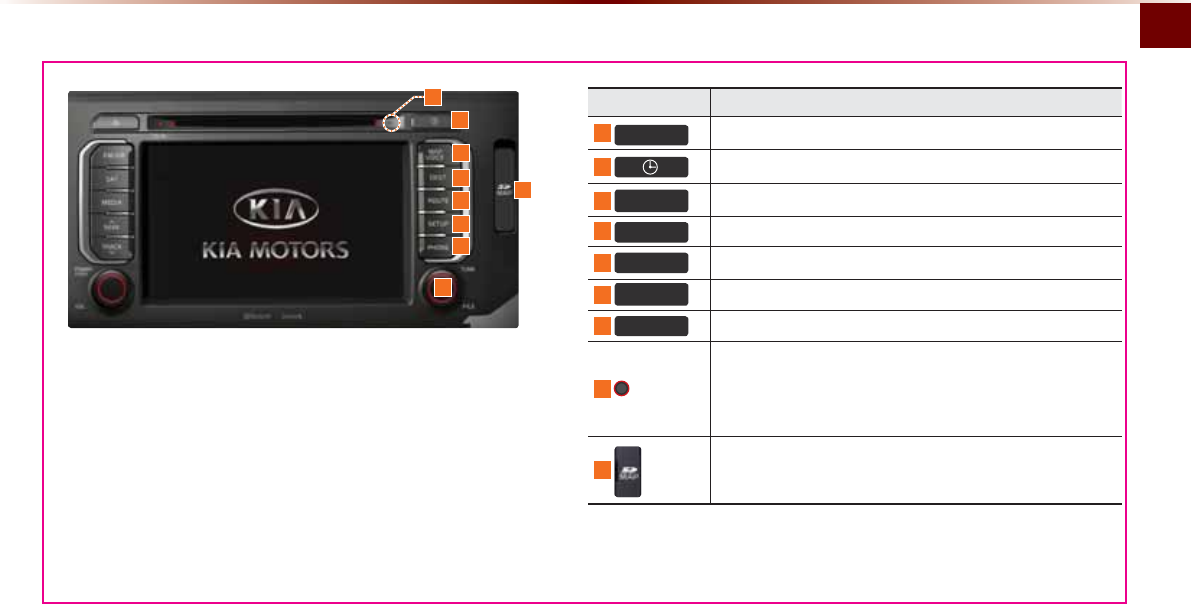
Component Names and Functions
Basic O 1-7
Name Description
7
5(6(7 Resets the system
8
Displays current time and date
9
0$3
92,&( Displays the map for the current position
10
'(67 Displays the Destination setup menu
11
5287( Displays Route menu screen
12
6(783
Displays the Setup mode
13
3+21( Takes user to phone screen
14 781(
У In FM/AM mode, changes the frequency
У In SIRIUS mode, changes the channel
У In CD, MP3, USB, iPod, My Music modes, changes the track,
file or chapter
15
SD Card insert slot
10
11
12
13
14
8
15
7
9

1-8
&RPSRQHQW1DPHVDQG)XQFWLRQV
6WHHULQJ:KHHO5HPRWH&RQWUROOHU
Name Description
1
92/
92/
Controls the volume
2
087( Mutes the sound
3
Ȋ
9
When keys are pressed shortly. (under 0.8 seconds)
У In FM/AM mode, searches broadcast frequencies saved
to Presets
У In SIRIUS modes, searches broadcast channels saved to
Presets
У In CD/MP3/USB/iPod/My Music modes, changes the
track, file or chapter
When keys are pressed and held. (over 0.8 seconds)
У In FM/AM mode, automatically searches broadcast
frequencies and channels
У In
SIRIUS
modes, automatically searches broadcast
channels
У In CD/MP3/USB/iPod/My Music modes, rewinds or fast
forwards the track or file
Name Description
4
02'(
У Each time this key is pressed, the mode is changed in
order of FM1 Ċ FM2 Ċ AM Ċ SIRIUS1 Ċ SIRIUS2 Ċ
SIRIUS3 Ċ CD(MP3) Ċ USB/iPod Ċ AUX Ċ Bluetooth®
Audio Ċ My Music
У If the media is not connected or a disc is not inserted,
corresponding modes will be disabled
У Press and hold the key (over 0.8 seconds) to turn the
Audio system on/off
У When power is off, press the key to turn power back on
5
When pressed shortly. (under 0.8 seconds)
У Activates voice recognition
When pressed and held. (over 0.8 seconds)
У Ends voice recognition
ʭ
ʮ
ʯ
ʰʱ
üThe actual feature in the vehicle may differ from the illustration.
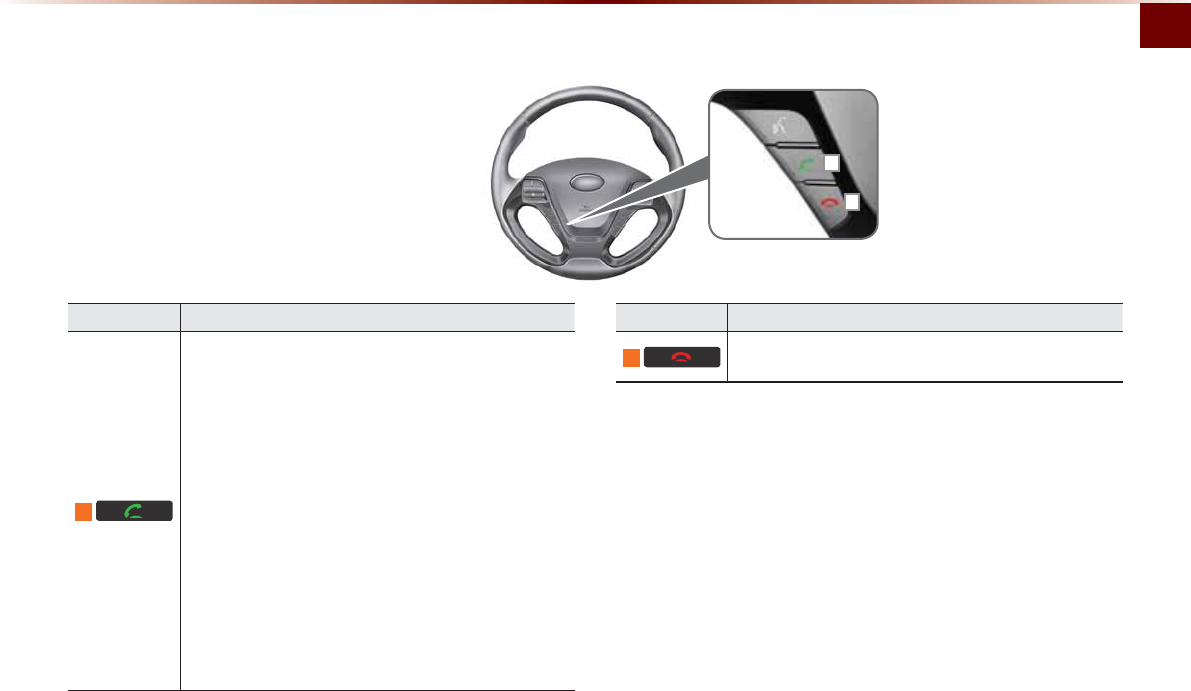
Component Names and Functions
Basic O 1-9
Name Description
6
When pressed shortly. (under 0.8 seconds)
У When pressed in the phone screen, displays call history
screen
У When pressed in the dial screen, makes a call
У When pressed in the incoming call screen, answers the
call
У When pressed during call waiting, switches to waiting
call (Call Waiting)
When pressed and held. (over 0.8 seconds)
У When pressed in the Bluetooth® Handsfree wait mode,
redials the last call
У When pressed during a Bluetooth® Handsfree call,
switches call back to mobile phone (Private)
У When pressed while calling on the mobile phone,
switches call back to Bluetooth® Handsfree (Operates
only when Bluetooth® Handsfree is connected)
Name Description
7
When pressed during a call, ends the phone call
When pressed in the incoming call screen, rejects the call
ʲ
ʳ
ü The actual feature in the vehicle may differ from the illustration.
1-10
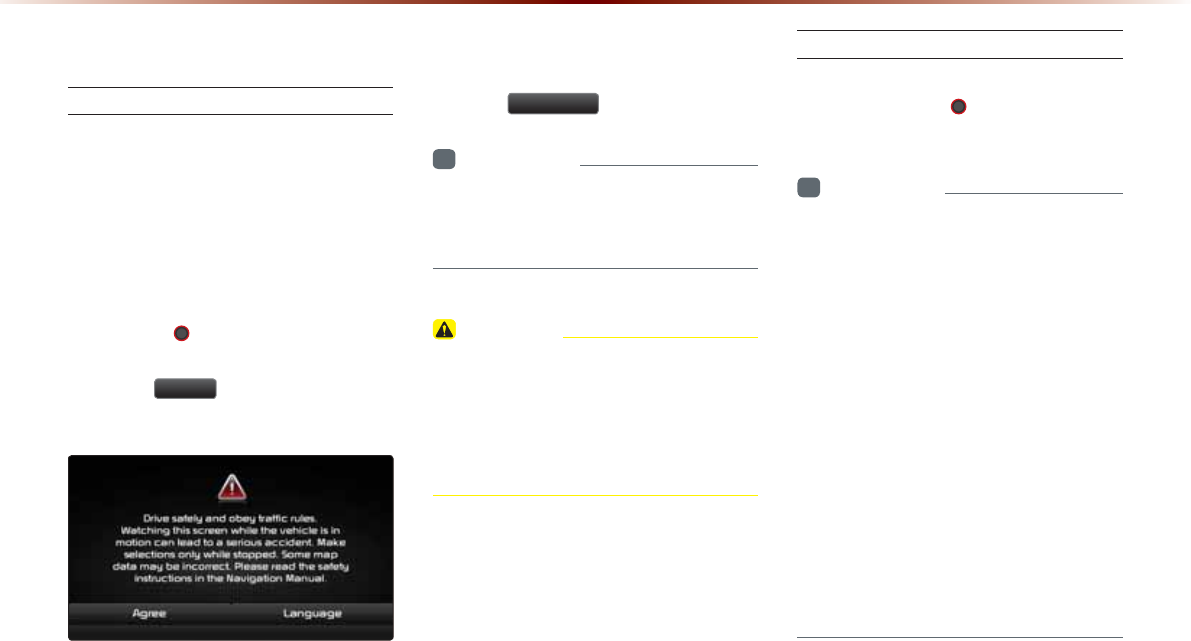
7XUQLQJWKH6\VWHP2Q2II
Turning the System On
If the engine start button is pressed without
pressing the brakes, then the ACC and
system will turn on.
Once the system is turned on, the booting
process will start and the safety warning
page is displayed.
Pressing the 32:(5 key on the head
unit will display the safety warning page.
Press the
$JUHH
button to display the
most recent mode.
To change the system language between
Korean, English, Français, and Español
press the
/DQJXDJH
button.
i
Information
У
No operations are supported while the sys-
tem is booting. Some time may be required
until all features are ready for use.
CAUTION
У This should be a safety warning page is
displayed every time the ignition is turned
on. The displayed warnings are related
to safety, please closely read and comply
with the safety warnings.
Turning the System Off
Press the engine start button again or
press and hold the 32:(5 key on the
system to turn the system off.
i
Information
У
If the system is turned off while the
Handsfree is being used, then the call will
automatically switch back to the mobile
phone.
У
ADM (Accessory Delay Mode) refers to
a state in which the
multimedia system
will
remain turned on for continued use up
to a certain amount of time even if the
vehicle ignition is set to ACC OFF state.
У
The
multimedia system
will automatically
turn off if more than 3 minutes has passed
in ACC OFF state or the driver-side door
is opened.
У
While ADM is operating, it is possible to
manually turn off the system power.
6WDUWLQJWKH6\VWHPIRUWKH)LUVW7LPH
Starting the System for the First Time
Basic O 1-11
CAUTION
У Pay attention to the volume setting when
turning the device on. Adjust the volume
to a suitable levels before turning off the
device.
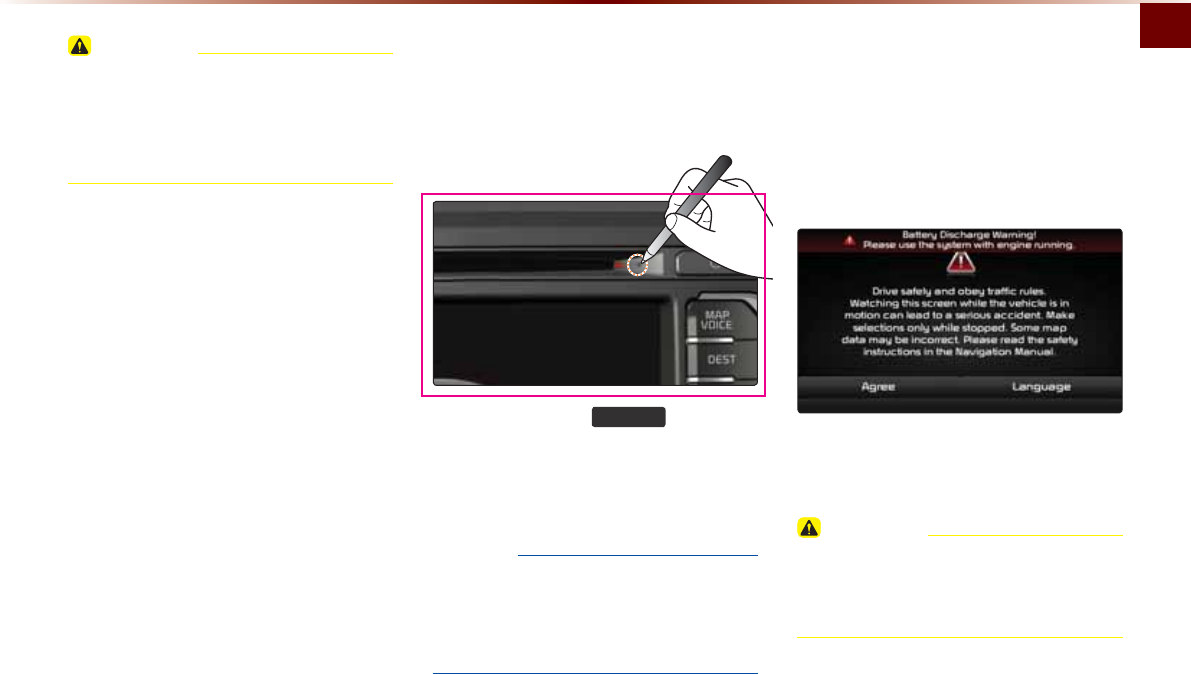
5HVHWWLQJWKH6\VWHP
This feature is used to reset the system in
the occurrence of an unforeseen error or
problem.
Press and hold the
5(6(7
key. (about
0.8 second)
(The use of a clip or pin is recommended
when resetting the system.)
NOTICE
У
Upon resetting the system, saved data
and settings information (volume and dis-
play settings) will be restored back to the
default factory state.
%DWWHU\:DUQLQJ0HVVDJH
Use the system only when the engine is
running. If the system is turned on with the
engine off, then the following warning will
be displayed.
This message will automatically disappear
once the engine is turned on.
CAUTION
У Using the system for prolonged periods
of time without the engine running may
result in battery discharge.

0(02
1-12

&$508/7,0(',$6<67(0
УFM/AM Mode
УHD RadioTM Mode
УSIRIUS Mode
УAbout DISC
УCD Mode
УMP3 CD Mode
УUSB Mode
УiPod Mode
УAUX Mode
УBluetooth® Audio Mode
УMy Music Mode
$XGLR
2-2
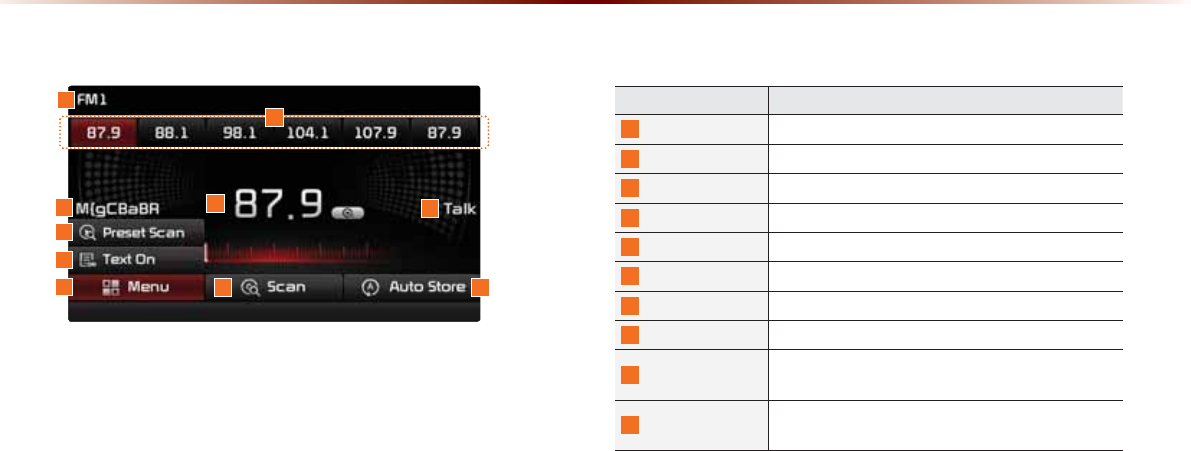
%DVLF0RGH6FUHHQ+'5DGLR70UHFHSWLRQ2))
1
7
6
2
45
109
8
Name Description
1
Mode Display Displays currently operating mode
2
Preset Shows saved presets for user selection
3
Broadcast station Displays the current broadcast station name
4
Frequency Displays the current frequency
5
Genre Display Displays the current genre
6
Preset Scan Plays preset frequencies for 5 seconds each
7
Text On (Text Off) Turns the Radio Text information on and off
8
Menu Displays Preset Scan and Text On (Text Off) menus
9
Scan Plays frequencies with superior reception for 5 sec-
onds each
10
Auto Store Saves frequencies with superior reception to Preset
buttons
)0$00RGH
3
FM/AM Mode
Audio O 2-3
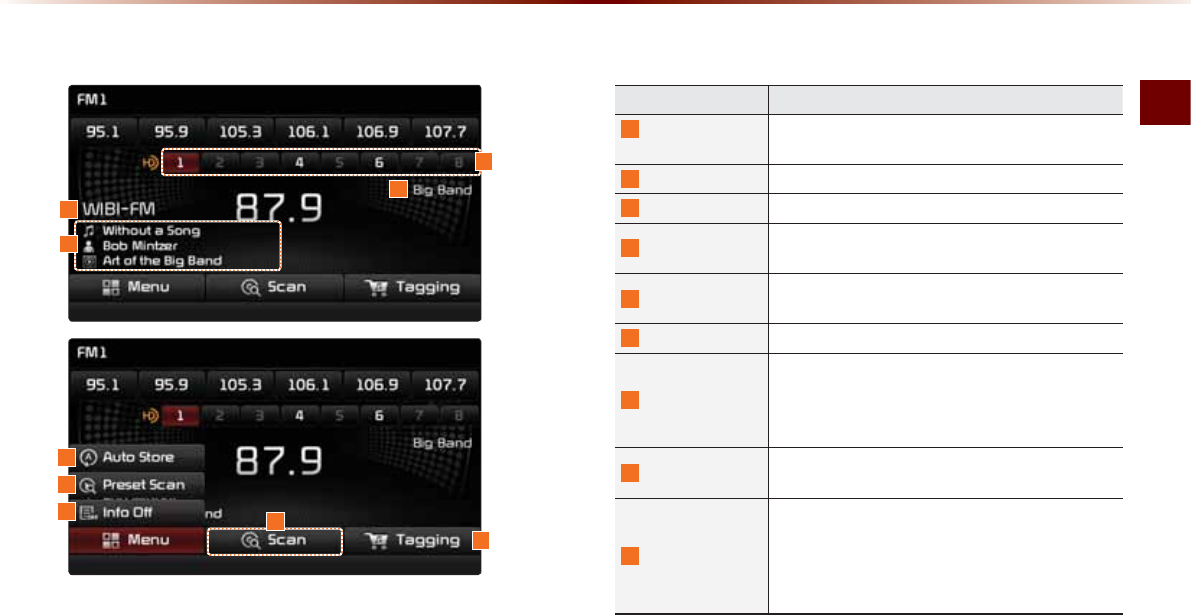
%DVLF0RGH6FUHHQ+'5DGLR70UHFHSWLRQ21
6
7
9
Name Description
1
HD Radio
Reception Displays main HD Radio channels
2
Broadcast Station Displays the current broadcast station
3
Genre Displays the current broadcast genre
4
Broadcast Info Displays detailed information about the current
broadcast
5
Auto Store Saves frequencies with superior reception to Preset
buttons
6
Preset Scan Plays preset frequencies for 5 seconds each
7
Info On (Info Off)
У When pressed, shows detailed information about
the current broadcast
У When pressed again, detailed information is
turned off
8
Scan Plays frequencies with superior reception for 5 sec-
onds each
9
Tagging
У Used to save song information for the currently
playing broadcast
У Upon connecting an iPod, song information is
transferred to the iPod and can be downloaded
through iTunes
2
3
5
1
4
8
2-4
6WDUWLQJ0RGH
Press the
)0$0
key to change the
mode in order of FM1 Ċ FM2 Ċ AM.
When the power is OFF, pressing the
)0$0
key will turn the power on and
play a radio broadcast.
Using SEEK
Press the , key to
automatically search for frequencies.
У Briefly press the key (under 0.8 seconds) :
Plays previous/next frequency.
У Press and hold the key (over 0.8 seconds) :
Changes the frequency while pressed and
receives the next frequency upon release.
Using TUNE
Turn the 781( knob left/right to select
the frequency.
У FM1/FM2 : Increases/decreases by 200kHz
У AM : Increases/decreases by 10kHz
Selecting Presets
From the 6 presets, select the frequency
you want to listen to.
i
Information
У
You can save up to 6 preset channels each
for FM1, FM2 and AM.
)0$00RGH
FM/AM Mode
Audio O 2-5
6DYLQJ5DGLR)UHTXHQF\
Saving Manually
After selecting frequency ƙ Press and
hold (over 0.8 seconds) the preset button.
A 'beep' will sound and the frequency is
saved to the selected preset button.
Saving Automatically
Press the
$XWR6WRUH
to automatically
save receivable frequencies to Preset but-
tons.
A total of 18 frequencies with six preset
frequencies each for FM1/FM2/AM modes
can be saved.
i
Information
У
While Auto Store is operating, pressing
the
$XWR6WRUH
button again will
cancel the function and play the previous
frequency.
6FDQQLQJ5DGLR)UHTXHQF\
Press the
6FDQ
button to scan all radio
frequencies.
Starting from the current frequency, fre-
quencies with superior reception are
scanned for 5 seconds and the previous
frequency is restored.
2-6
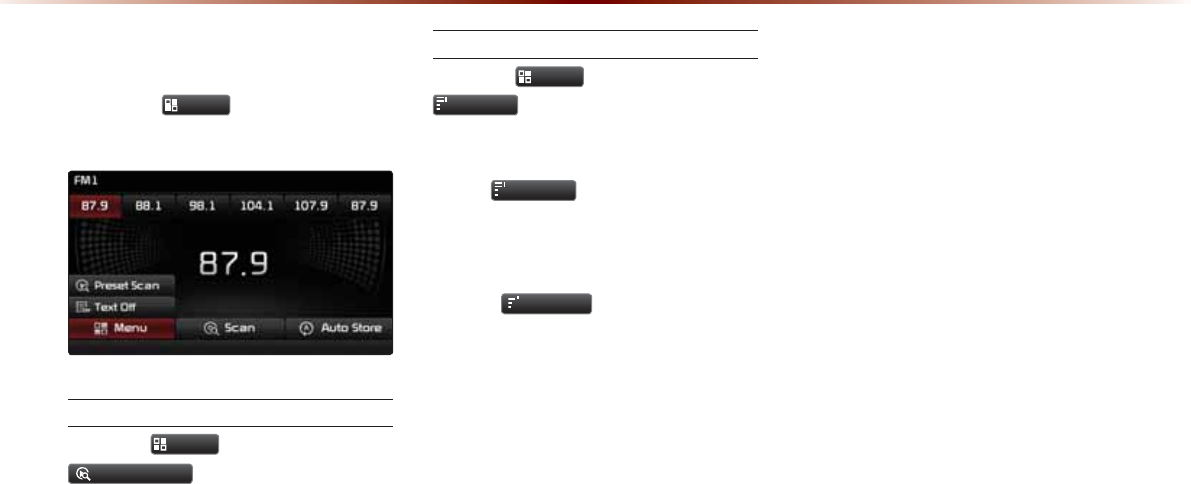
8VLQJWKH0HQX%XWWRQV
Press the
0HQX
button to use the
Preset Scan menu.
Preset Scan
Press the
0HQX
button ƙ Press
3UHVHW6FDQ
.
Frequencies saved to the 6 preset buttons
are each played for 5 seconds and the pre-
vious frequency is restored.
Text On/Text Off
Press the
0HQX
button ƙ Press
ON
7H[W2Q
.
The Text feature is turned on/off.
У If the
ON
7H[W2Q
button is displayed (Text
off state), information will not be dis-
played even if there is information being
transmitted from the broadcast station.
У If the
Off
7H[W2II
button is displayed
(Text on state), then broadcast informa-
tion will be displayed. Information may
not be displayed if there is no information
being transmitted from the broadcast
station.
)0$00RGH
HD RadioTM Mode
Audio O 2-7
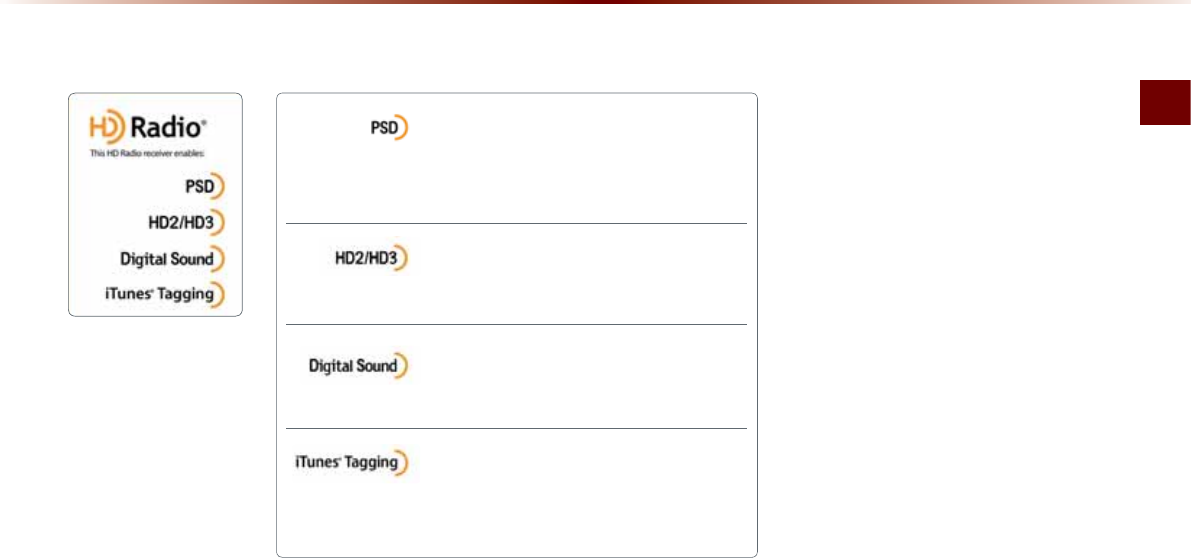
+'5DGLRа0RGH
Program Service Data :
Contributes to the superior user experience of
HD Radio Technology. Presents song name, artist, station IDs, HD2/HD3
Channel Guide, and other relevant data streams.
Adjacent traditional main stations are extra local FM
channels. Theses HD2/HD3 Channels provide new,
original music as well as deep cuts into traditional genre.
Digital, CD-quality sound. HD Radio Technology en-
ables local radio stations to broadcast a clean digital
signal. AM sounds like today’s FM and FM sounds like a CD.
iTunes® Tagging provides you the opportunity to dis-
cover a wide range of content and the means to “tag”
that content for later review and purchase from the iTunes® Store. Also refer to
the Apple Automotive specifications for implementing iTunes® Tagging.
$ERXW+'5DGLRЯ7HFKQRORJ\
2-8
+'5DGLR700RGH
6WDUWLQJ0RGH
Press the
)0$0
key to turn on Radio
mode.
If an HD RadioTM broadcast is received, the
radio mode will switch from analog broad-
cast to HD RadioTM broadcast.
i
Information
У
The HD RadioTM screen is displayed only
when a HD RadioTM broadcast is being
received.
У
To ensure HD RadioTM stations are received,
turn the feature on at 6(783 key ƙ
6HWXS ƙ
+'5DGLR
.
2SHUDWLQJ+'5DGLR700RGH
Selecting a Frequency
As HD RadioTM reception is included within
Radio mode, the methods of moving
between channels, saving presets, search-
ing, or methods of searching frequencies
are identical. However, while the HD RadioTM
related icon display will become active when
within regions where an HD RadioTM signal
can be received.
Using TUNE
Turn the 781( knob left/right to select
the frequency.
HD RadioTM Mode
Audio O 2-9
Selecting through Preset
From the 6 presets, select the HD RadioTM
broadcast you want to listen to.
i
Information
У
For HD RadioTM broadcast channels with-
out sub channels, sub channels will be
skipped and only main channels will be
received.
6RQJ7DJJLQJ
The song tagging feature provides a way to
capture broadcasted song information from
the radio for future purchase in iTunes.
Upon connection of an Apple audio play-
back device , the "tagged songs" will be
transferred to your iTunes account in your
Tagged songs folder.
i
Information
У
Up to 50 songs can be saved if an iPod
device is not connected.
У
Song data can be transferred to an iPod
only if there is available space within the
device.
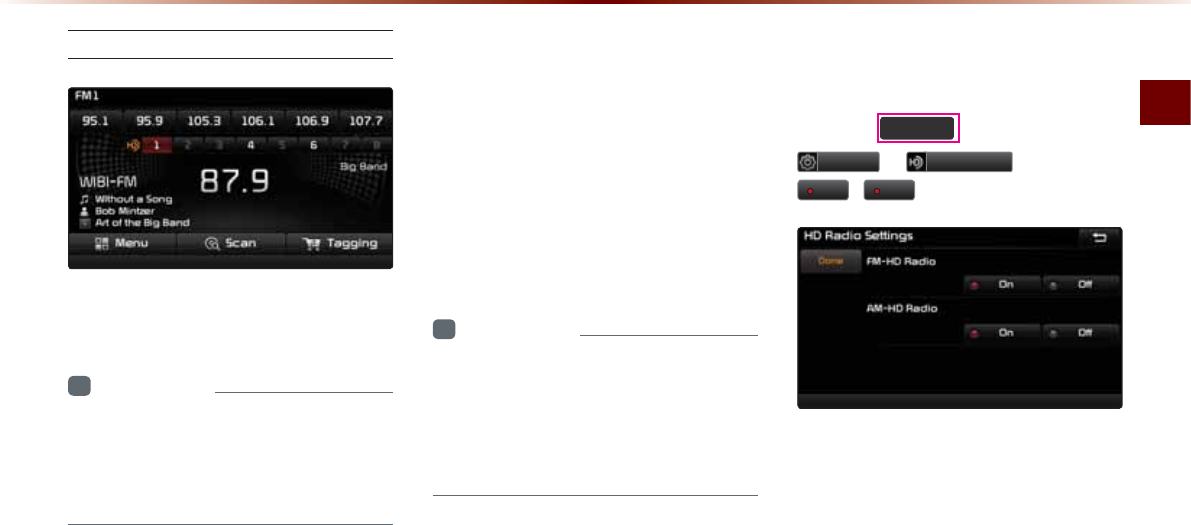
+'5DGLR
70
'LJLWDO
%URDGFDVW2Q2II
Press the
6(783
key ƙ Press
6HWXS
ƙ
+'5DGLR
ƙ Press
2Q
/
2II
.
HD RadioTM Broadcasts can be turned On
and Off for HD RadioTM FM and AM mode.
2-10
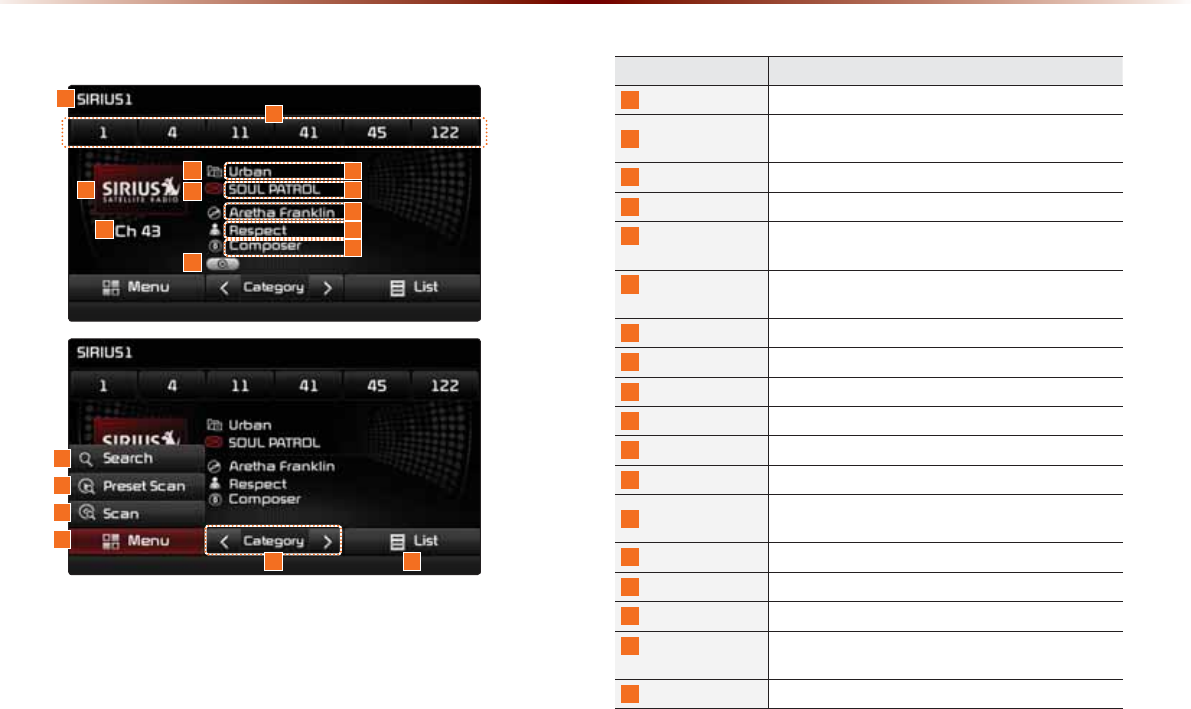
6,5,860RGH
Name Description
1
Mode Display Displays currently operating mode
2
Preset The desired frequency can be saved as a preset
and selected
3
SIRIUS Logo Display the SIRIUS logo
4
Channel Number Displays the current channel number
5
Category mode
indicator
Displays the category mode in orange
6
Channel mode
indicator
Displays the channel mode in orange when chang ing
channel
7
Setting Display
Displays the indicator if Scan/Preset Scan is operating
8
Category name
Displays the category name
9
Channel name
Displays the channel
10
Title name
Displays the title name
11
Artist name
Displays the artist name
12
Composer name Displays the composer name
13
Search Used to search for channels by entering channel
numbers
14
Preset Scan Plays preset frequencies for 10 seconds each
15
Scan Plays all receivable channels for 10 seconds each
16
Menu Displays Search, Preset Scan and Scan menus
17
Category
Selection Buttons Used to select the previous/next category
18
List Displays SIRIUS Radio Categories/Channel Lists
%DVLF0RGH6FUHHQ
16
4
3
12
5
6
7
13
14
15
17 18
8
10
9
11
12
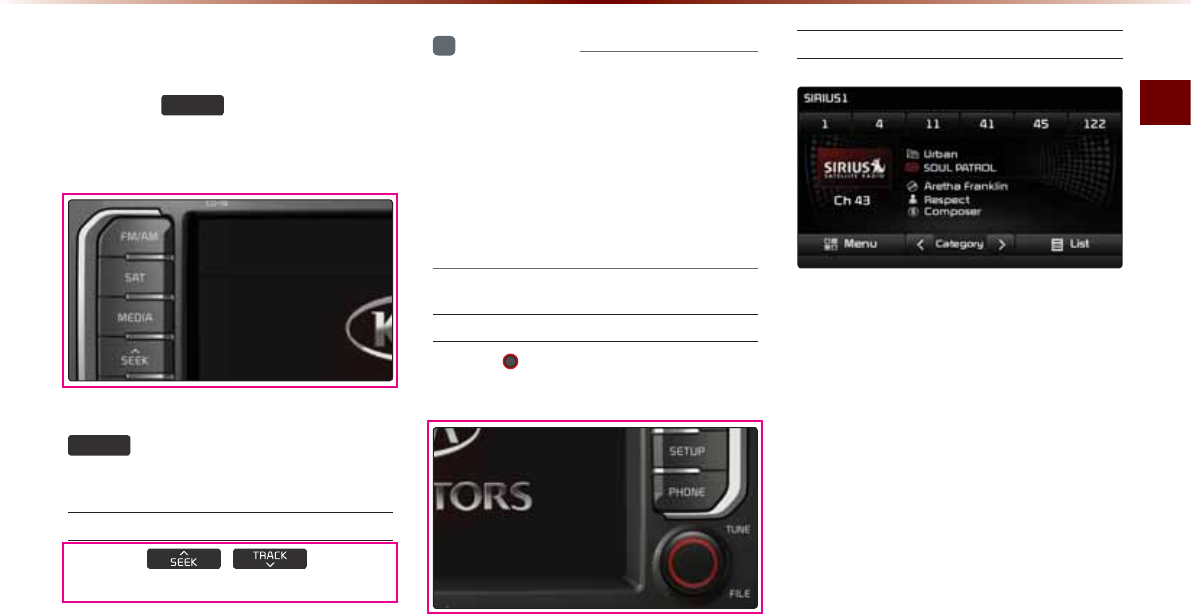
SIRIUS Mode
Audio O 2-11
6WDUWLQJ0RGH
Press the
6$7
key to change the
mode in order of SIRIUS1 Ċ SIRIUS2
Ċ SIRIUS3.
When the power is OFF, pressing the
6$7
key will turn the power on and
play an SIRIUS Radio broadcast.
Using SEEK
Press the ,
key on the
control panel for under 0.8 seconds.
The previous or next channel will be
selected.
i
Information
У
Within category mode, channels within
the current category will be played.
У
Within channel mode, all channels in all
categories will be played.
У
If no operation for 5 seconds during cat-
egory mode, it goes back to the channel
mode automatically.
Using TUNE
Turn the 781( knob left/right to display
the previous or next channel information.
After a brief moment, the selected channel
will be displayed.
Selecting Presets
From the 6 presets, select the channel you
want to listen to.
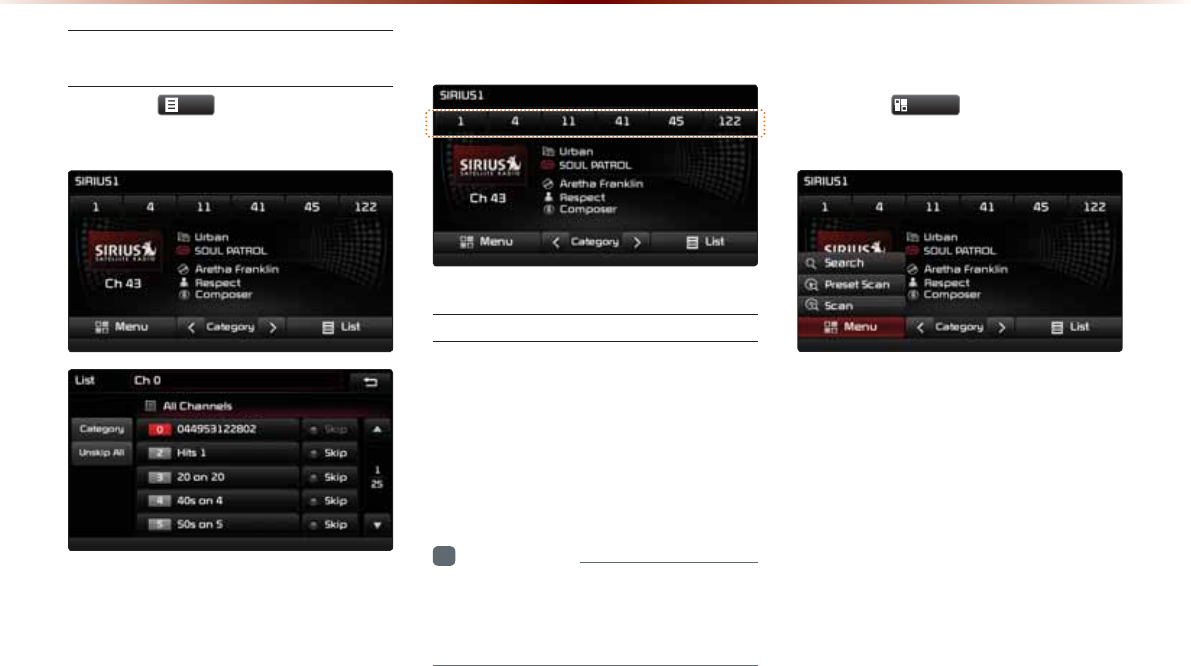
2-12
Selecting through Channel/Cat-
egory List
Press the
/LVW
button ƙ Select the
desired category and channel.
Once selected, the previous screen will be
restored and the selected channel will begin
playing.
6DYLQJ6,5,86&KDQQHOV
Saving Manually
After selecting channel ƙ Press and hold
(over 0.8 seconds) the preset button.
A confirmation 'beep' will be heard and the
channel will be saved to the selected pre-
set button.
i
Information
У
Six preset frequencies each for SIRIUS1/
SIRIUS2/SIRIUS3 modes can be stored
using the above instructions.
8VLQJWKH0HQX%XWWRQV
Press the
0HQX
button to use the
Search, Preset Scan, and Scan menus.
6,5,860RGH
SIRIUS Mode
Audio O 2-13
Search
Press the
0HQX
button ƙ Press
6HDUFK
ƙ Enter numbers and press
2.
.
Enter the number of the channel you want
to receive.
Preset Scan
Press the
0HQX
button ƙ Press
3UHVHW6FDQ
.
Channels saved to the 6 preset buttons are
each played for 10 seconds and then the
previous channel is restored.
Scan
Press the
6FDQ
button to scan all chan-
nels.
Starting from the current channel, chan-
nels with superior reception are scanned
for 10 seconds and the previous channel is
restored once scanning is complete.

2-14
'LVF
$ERXW',6&
Precautions upon Handling Discs
CAUTION
У After using a disc, put the disc back in its
original case to prevent disc scratches.
У Do not use abnormally shaped discs (8cm,
heart-shaped, octagon-shaped) as such
discs could lead to malfunctions.
У Do not clean discs with chemical solutions,
such as record sprays, antistatic sprays,
antistatic liquids, benzene, or thinners.
У Do not expose the disc to direct sunlight or
high temperatures for prolonged periods
of time. Such exposure may lead to disc
deformation.
У Upon playing a disc contaminated by dirt
or other substances, the sound quality
may deteriorate and result in skipping
sounds. Writing on either side of the disc
could result in damage to disc surfaces.
У Clean fingerprints and dust off the disc
surface (coated side) with a soft cloth.
У Copy-protected CDs, such as S-type CDs,
may not properly operate in the device.
DATA CDs cannot be played. (However,
such discs may still abnormally operate.)
У Do not disassemble the device. Contact
a designated service center in case of
malfunction. (Complete after service
assistance will not be provided if the user
disassembles the device.)
У Do not use water to clean the device.
Exposure to water could lead to product
malfunction.
У Do not to introduce foreign substances into
the disc insert/eject slot. Introducing foreign
substances could damage the device interior.
У The device may fail to properly operate in
extremely hot or cold temperatures. (The
operating temperature range is : 14˚F ~
150˚F)
У Steam can become condensed on the
fiber-optic lens due to rain, wet conditions,
or upon operating the heating system. In
such cases, discs may not be properly
recognized. Remove the disc and wait
until the moisture dries.
У Skipping may occur during audio play
when driving on bumpy roads for pro-
longed periods of time or upon severe
shock to the vehicle. In case of severe
shock, audio may not properly play.
Disc
Audio O 2-15
Supported Disc Formats
This device supports the following disc for-
mats.
Disc Type
Disc Type Disc Format Device Support
CD
3inch (8cm)
5inch (12cm)
CD
CD-R
CD-RW
Multisession-CD
;
ÿ
ÿ
ÿ (Read Only)
ÿ (Read Only)
ÿ (Read Only)
SACD
SACD
(Single, SACD layer)
SACD (Hybrid)
;
;
(Only CD layer)
Disc Format
Disc Type Disc Format Device Support
CD
CD-DA
MP3
WMA
MPEG4 AAC
DTS-CD
CD-ROM
CD-G
CD-EXTRA
CD-TEXT
ÿ
ÿ
ÿ
;
ÿ
ÿ
;
ÿ
ÿ
Disc/Content Format Compatibility
By Format according to Disc Type
Disc Type Disc Format Device Support
CD LPCM
ÿ
MP3
MPEG1, Layer3
MPEG2, Layer3
MPEG2.5
ÿ
ÿ
ÿ
WMA Ver9
ÿ
Ordinary Disc Compatibility
This device has been designed/ manufac-
tured to be compatible with software bear-
ing the following logo marks.
У CD-R/RW discs (Audio CD) created
with CD recording devices or PCs may
not properly operate in the device.
This is a result of various causes, includ-
ing disc format, recording method, and
contamination to the disc or lens.
$XGLR&'

2-16
'LVF
CD-R/RW Compatibility
У This device supports CD-R, CD-RW, and
MP3 discs burned in Audio CD formats.
У The recording of CD-R and CD-RW
discs with this device is not supported.
У CD-R/RW discs recorded as audio CDs
that were not finalized are not supported
by this device.
PC-created Disc Compatibility
У When burning a disc on a PC, the disc
may not operate in this device depending
on the software settings. In such cases,
inquire with the software manufacturer.
У Additional information regarding compat-
ibility is displayed on the CD-R/RW soft-
ware disc box.
У DVD-R/W discs are not compatible with
this device.
Cautions upon Writing CDs
У When a multi-session disc is being
recorded, make sure to close the ses-
sion before recording.
У If MP3/WMA file extensions are
changed, such could result in malfunc-
tions.
У In the case of MP3/WMA, write using
only English. (Other languages are not
supported)
У Unauthorized use of copy-protected
music files is prohibited by law.
У Prolonged use of CD-R/CD-RW prod-
ucts that do not satisfy related specifica-
tions may result in product malfunction.
У When writing CDs, low-speed writing is
recommended.
Compressed Audio Compatibility
У Physical formats of CD : Model 1, Model
2 XA format 1.
У This device supports audio file com-
pressed through MPEG-1 audio stream
layer 3 (MP3) using 8kbps ~ 320kbps. (CBR
or VBR)
У For stable operation, the use of files
in 95kbps~192kbps bit rate range and
44.1kHz SAMPLING frequency is rec-
ommended.
У This device supports WMA audio files
using 20kbps ~ 320kbps. (CBR or VBR)
У Variable bit rate files may operate, but
the play time information may not be
properly displayed.
У This device only supports tracks with file
extension of ".mp3" or ".wma".
У This device does not support multises-
sion discs.
У This device supports only 8 layer folders.

Disc
Audio O 2-17
У This device supports MP3 ID3 tag ver-
sions of Ver. 1.0, Ver. 1.1, Ver. 2.2, Ver.
2.3, Ver. 2.4. When using discs with
other versions, the ID3 info will not be
displayed.
У Although this device has been desig-
nated to be compatible with various bit
rates, playing low bit rate MP3 tracks
may result in low quality sound.
Before Playing an MP3 Disc
Supported MP3 File Specification
У Acceptable standard: MPEG1 Audio
Layer 3.
У Acceptable sampling frequency :
8, 11.025, 12, 16, 22.05, 24, 32, 44.1,
48(KHz).
У Acceptable bit rate : 8 ~ 320 (Kbps).
Recommended Bit Rates and Fre-
quency
У Sampling frequency : 96 ~ 192 Kbps
fixed bit rate/4.1kHz.
NOTICE
У
Supported ID3 tags : ID3v1.0, ID3v1.1,
ID3v1.2, ID3v2.2, ID3v2.3, ID3v2.4.
У
Supported MP3 Media : CD-ROM.
У
Supported media formats : ISO9660
LEVEL1 and LEVEL2.
Detailed Specification
У Maximum directory layers : 8 layers.
У Maximum folder length : 64 bytes, file
name length: 64 bytes.
У Supported characters for folder name/file
name: 2350 characters for Alphanumeric
character and Korean character sets,
4888 characters for Simplified Chinese
character set.
У Maximum number of folders per disc : 256
folders. (including ROOT)
У Maximum number of files per disc : 512
files.
Precautions upon Burning MP3 Files
У The use of ISO 9660 LEVEL 2 JOLIET
format is recommended.
У Up to 32 characters in Korean/Chinese
are supported for file names and up to
20 characters in Korean/Chinese are
supported for folder names.
У The use of CDs exceeding 700MB may
result in faulty disc recognition or errors
upon play.
2-18
'LVF
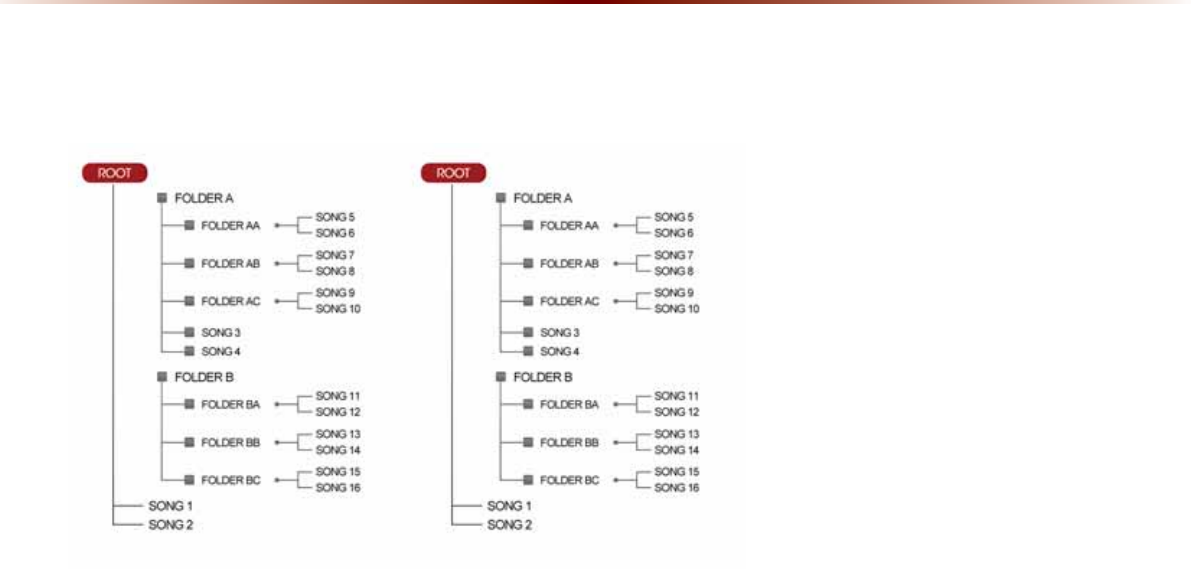
MP3 File Structure
Recognition occurs through the same folder structure used within the disc.
Folder structure as saved in CD-ROM Folder structure as saved in the system
CD Mode
Audio O 2-19
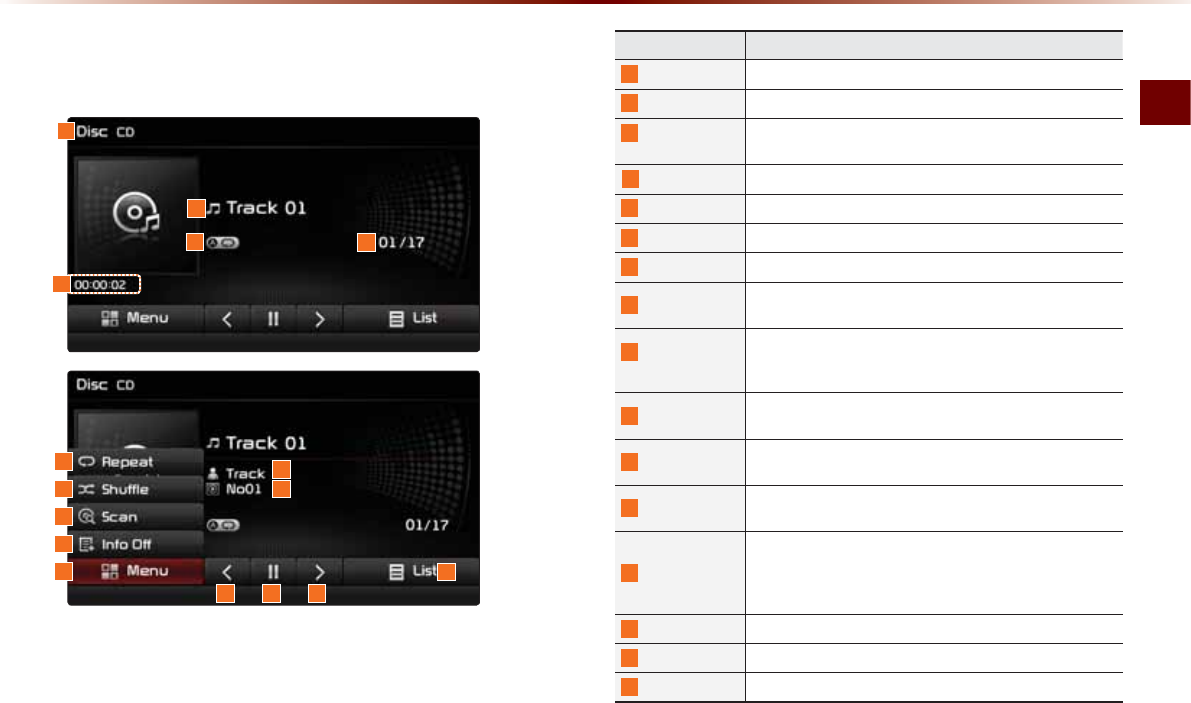
&'0RGH
%DVLF0RGH6FUHHQ
Name description
1
Mode Displays currently operating mode
2
Track Track number of current song
3
Repeat/
Shuffle/Scan
From Repeat/Shuffle/Scan, displays the currently oper-
ating function
4
Track Index Shows the current track/total tracks
5
Play Time Displays the current play time
6
Repeat Repeats the current track
7
Shuffle Plays disc tracks in random order
8
Scan Scans the beginning parts of disc tracks (approx. 10
seconds per track)
9
Info Off
(Info On)
У Info Off : shows only track info
У Info On : shows track info, artist and album info
ü Empty when there is no corresponding information
10
Menu
Displays Repeat, Shuffle, Scan, and Info On (Info Off)
menus
11
Artist Info Displays artist info for current song (Will not be dis-
played if the information does not exist)
12
Album Info Displays album info for current song (Will not be dis-
played if the information does not exist)
13
Previous Track
У When the play time is under 2 seconds : Moves to
the previous track
У When the play time is over 2 seconds : Plays the
current song from the beginning
14
Play/Pause Plays/pauses the current track
15
Next Track Moves to the next track
16
List Moves to the track list screen
1
2
3
10
4
611
712
8
9
1413 15
16
5
2-20
6WDUWLQJ0RGH
Press the
0(',$
key ƙ Press
&'
.
NOTICE
У
Only genuine audio CDs are supported.
Other discs may result in recognition fail-
ure. (e.g. copy CD-R, CDs with labels)
i
Information
У
CD mode will automatically start once a
CD is inserted.
Playing a CD
У Press the
Ԡ
button to play the track.
У Press the
OO
button to pause the track.
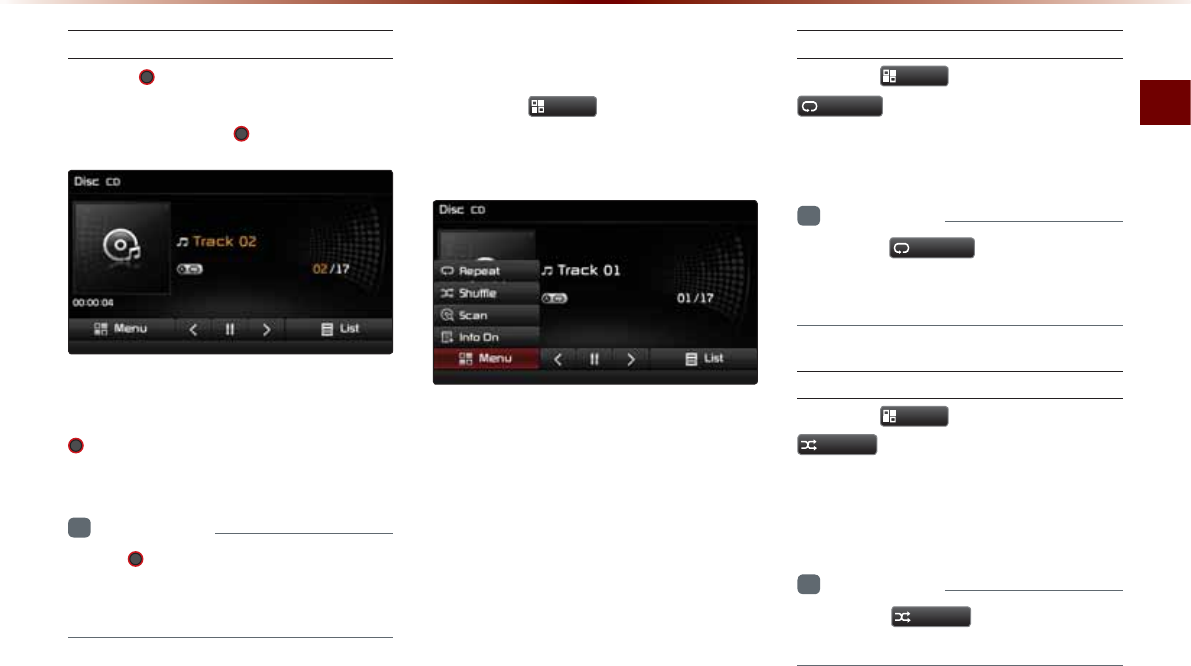
Fast-forwarding or Rewinding
CD Tracks
While playing ƙ Press and hold the
,
key. (over 0.8
seconds)
This will rewind or fast-forward the track.
While the ,
key is
being pressed, the track will rewind or fast-
forward at 20x speed.
Once released, the track will begin playing
at normal speed.
&'0RGH
CD Mode
Audio O 2-21
Searching CD Tracks
Turn the
781(
knob ƙ Search tracks
ƙ Once the desired track name is
displayed, press the
781(
knob.
When searching tracks, the track number
is displayed in orange. Pressing the
781( knob will play the corresponding
track.
i
Information
У
If the 781( knob is not pressed within
5 seconds of searching tracks, the track
info for the current track is restored.
8VLQJWKH0HQX%XWWRQV
Press the
0HQX
button to set the
repeat, shuffle, scan and Info On/Info Off
menus.
Repeat
Press the
0HQX
button ƙ Press
5HSHDW
.
The current track is repeated.
i
Information
У
Press the
5HSHDW
button again to turn
off repeat. If nothing is selected, then all
tracks will be played in sequential order.
Shuffle
Press the
0HQX
button ƙ Press
6KXIIOH
.
Tracks within the disc are played in random
order.
i
Information
У
Press the
6KXIIOH
button again to turn
the shuffle option off.

2-22
Scan
Press the
0HQX
button ƙ Press
6FDQ
.
The beginning (approx. 10 seconds) of all
tracks within the CD are scanned.
i
Information
У
Press the
6FDQ
button again to turn
the scan option off.
Info On/Info Off
Press the
0HQX
button ƙ Press
,QIR2Q
.
The amount of information displayed on
the screen can be selected. When the
title, artist, and album info are displayed,
the button will automatically change to
,QIR2II
.
Press
,QIR2II
to restore the previous
information display setting.
i
Information
У
Artist/album info may be supported within
Text CDs.
&'0RGH
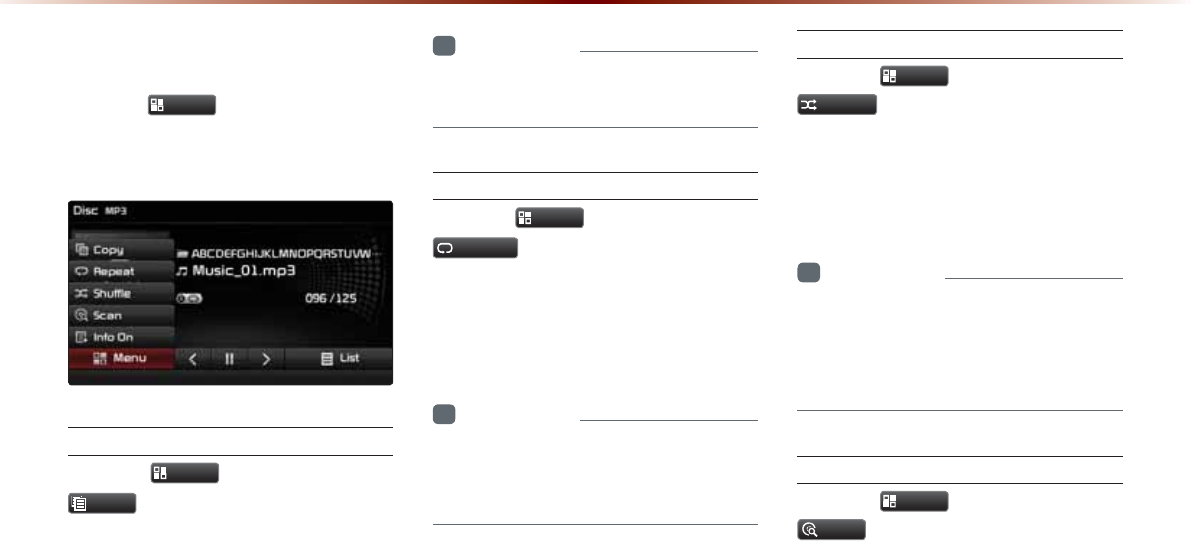
MP3 CD Mode
Audio O 2-23
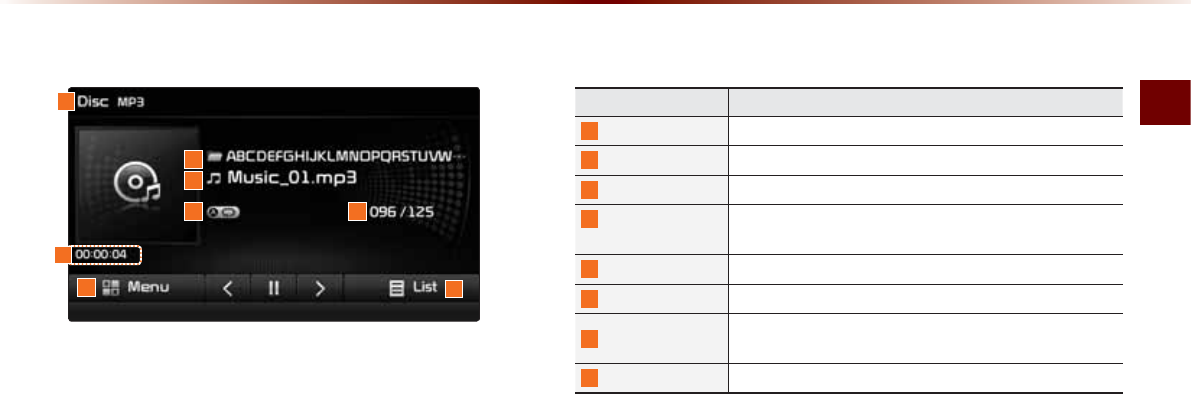
%DVLF0RGH6FUHHQ
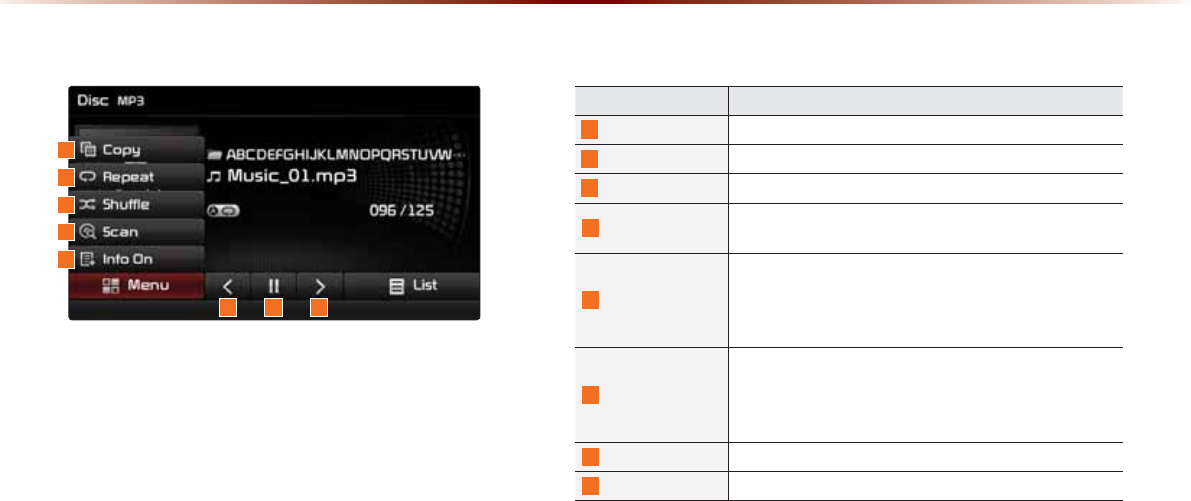
03&'0RGH
Name Description
1
Mode Displays currently operating mode
2
Folder Name Displays folder name for current file
3
File Name Displays the name of the current file
4
Repeat/Shuffle/
Scan
From Repeat/Shuffle/Scan, displays the currently oper-
ating function
5
File Index Shows the current MP3 file/total number of MP3 files
6
Play Time Displays the current play time
7
Menu Displays Copy, Repeat, Shuffle, Scan and Info On (Info
Off) menus
8
List Moves to the list screen
1
7
4 5
8
3
2
6
2-24
03&'0RGH
Name Description
9
Copy Copies the currently playing file into My Music
10
Repeat Repeats the current file
11
Shuffle Plays files in random order
12
Scan Scans the beginning parts of MP3 files (approx. 10 sec-
onds per file)
13
Info Off (Info On)
Changes the display method between Info Off/Info On
У Info Off : shows folder name/file name
У Info On : shows folder name, file name, title, artist, and
album info
14
Previous file
У When the play time is under 2 seconds : Moves to the
previous file
У When the play time is over 2 seconds : Plays the current
file from the beginning
15
Play/Pause Plays/pauses the current file
16
Next file Moves to the next file
%DVLF0RGH6FUHHQ
9
10
11
12
13
15 1614
MP3 CD Mode
Audio O 2-25
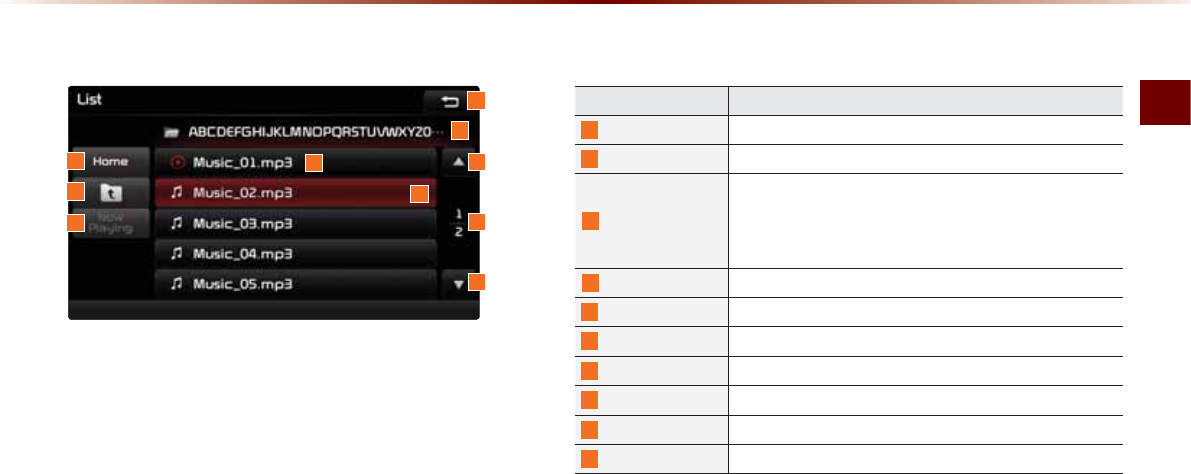
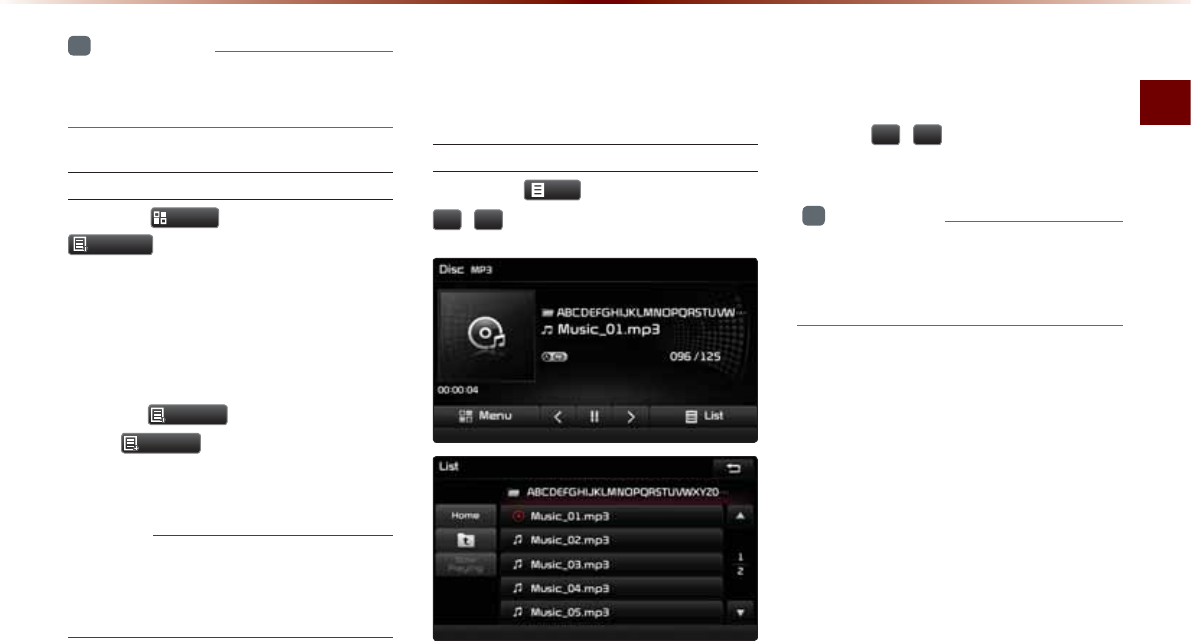
/LVW0HQX6FUHHQ
Name Description
1
Home Folder Moves to home folder
2
Parent Folder Moves to the parent folder
3
Now Playing
When moving to a different list screen, moves to the list
page where the current file is located
(Becomes disabled when the current list includes the current
file)
4
Folder Name Folder name of current list
5
Current Song Shows current playing file name
6
List Focus Creates focus upon operating Tune
7
Back button Converts to basic mode screen
8
Previous list Moves to the previous list
9
List page Shows current file list page/total number of pages
10
Next list Moves to the next list
4
1
2
3
6
9
8
7
5
10
2-26
03&'0RGH
6WDUWLQJ0RGH
Press the
0(',$
key ƙ Press
03
.
i
Information
У
MP3 mode automatically starts when an
MP3 disc is inserted.
У
If there are numerous songs and folders
within the disc, reading time could take
more than 10 seconds and the list may
not be displayed or song searches may
not operate. Once loading is complete, try
again.
У
Only genuine audio CDs are supported.
У
Other discs may result in recognition fail-
ure. (e.g. copy CD-R, CDs with labels)
Playing MP3
У Press the
Ԡ
button to play the file.
У Press the
OO
button to pause the file.
MP3 CD Mode
Audio O 2-27
Selecting MP3 files
Selecting from the Mode Screen
У Press the
,
key to
select the previous or next file.
У Pressing and holding the
,
key will rewind or fast-forward
the current file.
Using Menus within List Screen
Press the
/LVW
button ƙ Select the
file from the list.
Fast-forwarding or Rewinding MP3
Files
While playing ƙPress and hold the
,
key. (over 0.8
seconds)
This will rewind or fast-forward the file.
While the , key is
being pressed, the file will rewind or fast-
forward at 20x speed.
Once released, the file will begin playing at
normal speed.
Searching MP3 Files
Turn the 781( knob ƙ Search files ƙ
Once the desired file name is displayed,
press the 781( knob.
When searching files, pressing the
781(
knob
will play the file highlighted in orange.
i
Information
У
If there are no operations within 5 sec-
onds, info on the current song will be re-
displayed.
2-28
03&'0RGH
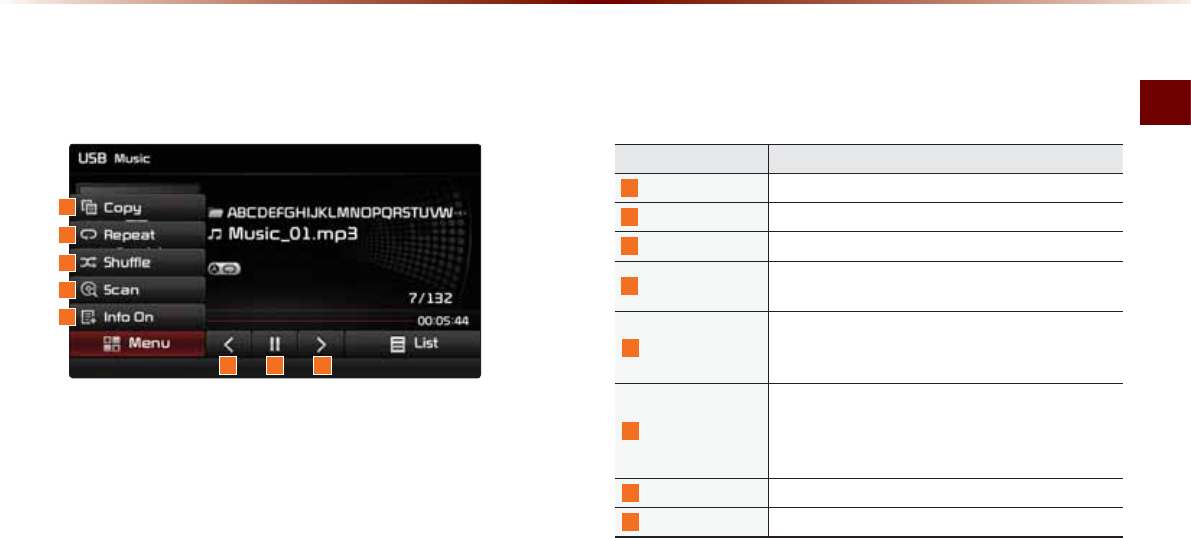
8VLQJWKH0HQX%XWWRQV
Press the
0HQX
button to set the copy,
repeat, shuffle, scan, and Info On/Off
options.
Copy
Press the
0HQX
button ƙ Press
&RS\
.
The file currently playing is copied and
saved in My Music.
i
Information
У
Copied and saved files can be played
within My Music mode.
Repeat
Press the
0HQX
button ƙ Press
5HSHDW
.
Each time the button is pressed, the option
is changed from Repeat Once Ċ Off
(Repeat All).
i
Information
У
Repeat Once : repeats the current file.
У
Repeat Folder : repeats all files in current
folder.
Shuffle
Press the
0HQX
button ƙ Press
6KXIIOH
.
Each time the button is pressed, the option
is changed from Shuffle Folder Ċ Shuffle
All ĊOff (Repeat All).
i
Information
У
Shuffle Folder : plays files in current folder
in random order.
У
Shuffle All : plays all files in DISC in ran-
dom order.
Scan
Press the
0HQX
button ƙ Press
6FDQ
.
Each time the button is pressed, the option
is changed from Folder Scan Ċ Scan All
Ċ Off (Repeat All).
MP3 CD Mode
Audio O 2-29
i
Information
У
Folder Scan : scans files in current folder.
У
Scan All : scans all files in the disc.
Info On/Info Off
Press the
0HQX
button ƙ Press
,QIR2Q
.
The amount of information displayed on
the screen can be changed.
When the title, artist, and album info are
displayed, the button will automatically
change to
,QIR2II
.
Press
,QIR2II
to restore the previous
information display setting.
NOTICE
У
The title, artist and album info are dis-
played only when such information is
recorded within the MP3 file ID3 tag.
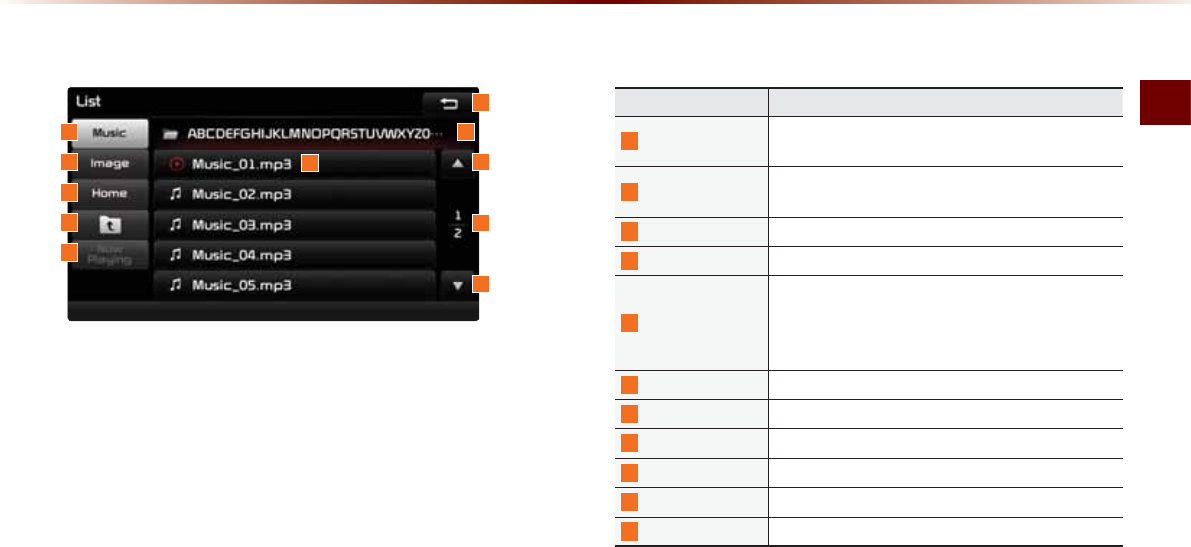
8VLQJ0HQXVZLWKLQWKH
/LVW6FUHHQ
Moving between Lists
Press the
/LVW
button ƙ Press the
Ԟ
,
Ԣ
buttons.
If five (5) or more files or folders exist in the
same folder, the list will be displayed across
two or more pages.
Press the
Ԟ
,
Ԣ
cursor buttons to quickly
find the desired page.
i
Information
У
A lag may occur in displaying the previ-
ous/next list page depending on the file
name or file size.
2-30
03&'0RGH
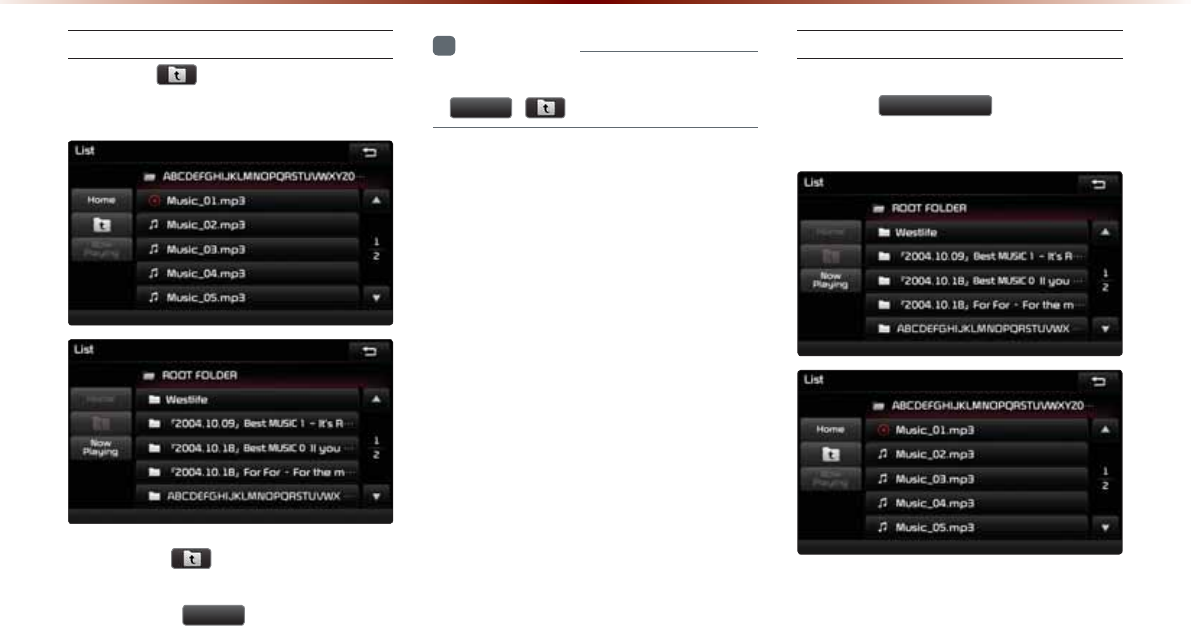
Moving between Folders
Press the button ƙ Select folder
from the folder list.
Pressing the button will move to the
folder one level above the current folder.
Pressing the
+RPH
button folder will
move to the root folder.
i
Information
У
If there are no more parent folders, both
+RPH
, buttons will be disabled.
Returning to Current Location
While searching files within other folders,
press the
1RZ3OD\LQJ
button to return
to the currently playing file screen.

USB Mode
Audio O 2-31
86%0RGH
$ERXW86%
Before Playing a USB MP3
Connect the USB device after turning on
the engine. The USB device may become
damaged if it is already connected when
the ignition is turned on.
CAUTION
У Files that are not standard format music/
image files will not be played.
У For MP3/WMA files, only music files with
compression rates between 8Kbps ~
320Kbps can be played.
У Use caution as static electricity may exist
when connecting/disconnecting external
USB devices.
У Encoded MP3 Players will not be rec-
ognized when connected as an external
device.
У When connecting an external USB device,
the device may not properly recognize the
USB in some states.
У When connecting an external USB device,
the device may not properly recognize the
USB in some states.
У Only products formatted with byte/sectors
under 64Kbyte will be recognized.
У This device recognizes USB devices formatted
in FAT 12/16/32 file formats. This device does
not recognize files in NTFS file format.
У Some USB devices may not be supported due
to compatibility issues.
У Use caution so that the USB connector does
not come in contact with body parts or objects.
У Repeated connecting/disconnecting of USB
devices within short periods of time may
result in product malfunction.
У Make sure to connect/disconnect external
USB devices with the audio power turned off.
У The amount of time required to recognize the
external USB device may differ depending
on the type, size, or file formats stored on the
USB. Such differences in required time are
not indications of malfunction.
У The use of USB devices for purposes other
than playing music and image files is prohibited.
У Do not use the USB I/F to charge batteries or
USB accessories that generate heat. Such acts
may lead to worsened performance or damage
to the device.
У The device may not recognize the USB device
if separately purchased USB hubs and exten-
sion cables are being used. Connect the USB
directly with the multimedia terminal of the
vehicle.
У When using mass storage USB devices with
separate logical drives, only files saved to the
root drive can be played.
У When application programs are installed to
specific USBs, files may not properly play.
У The device may not operate normally if MP3
Players, cellular phones, digital cameras, or
other electronic devices (USB devices not rec-
ognized as portable disk drives) are connected
with the device.
86%0RGH86%0RGH86%0RGH
2-32
86%0RGH
CAUTION
У Charging through the USB may not work for
some mobile devices.
У The device may not support normal
operation when using a USB memory type
besides Metal Cover Type USB Memory.
У The device may not support normal opera-
tion when using formats such as HDD Type,
CF, or SD Memory.
У Upon playing iPods, please use a dedicated
iPod car cable.
У Normal operations cannot be guaranteed
when other cables are being used.
У The device will not support files locked by
DRM. (Digital Rights Management)
У USB memory sticks used by connecting an
Adaptor (SD Type or CF Type) may not be
properly recognized.
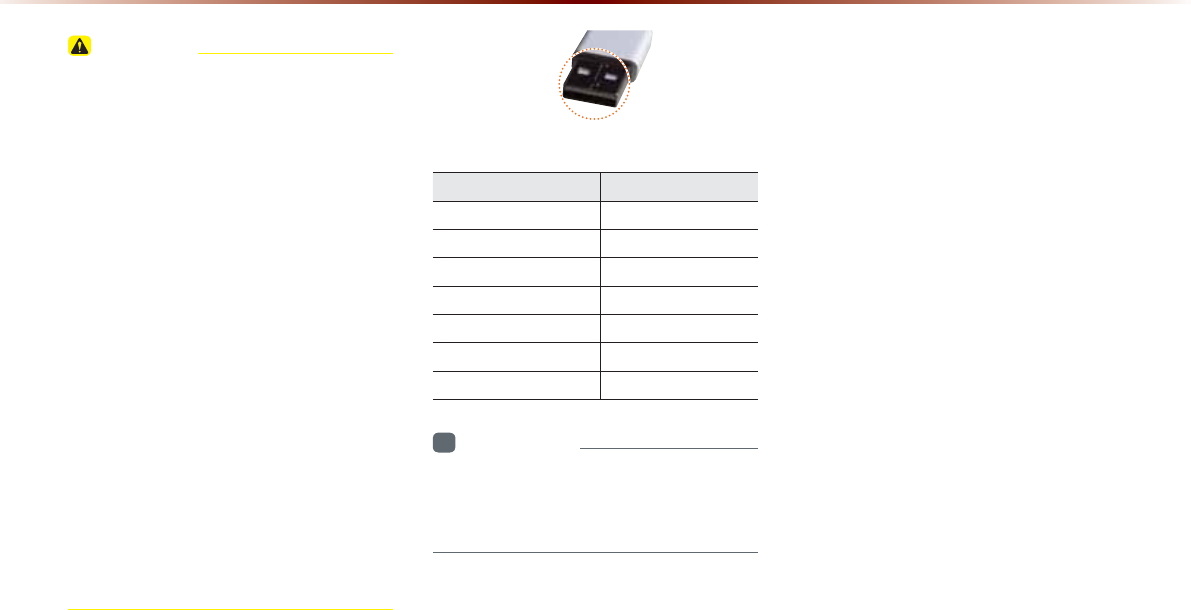
Only use Plug type
connector products, as shown in the fig-
ure below.
Product Name Manufacturer
XTICK LG
BMK BMK Technology
SKY-DRV Sky Digital
TRANSCEND JetFlash Transcend
Sandisk Cruzer SanDisk
Micro ZyRUS ZyRUS
NEXTIK Digiworks
i
Information
У
Problems that occur through use of USB
devices not listed within the above table
are not covered by the product warranty.
Plug Type Connector

USB Mode
Audio O 2-33
USB MP3 Information and Precautions
Name Description
MP3 File
Specification Specification : MPEG1 AUDIO LAYER 3
Recommended
Bit Rates and Sam-
pling Frequency
Acceptable sampling frequency : 32, 44.1, 48 (KHz)
Acceptable bit rate : 32, 40, 48, 56, 64, 80, 96, 112,
128, 160, 192, 224, 256, 320 (Kbps)
96, 128, 192 Kbps fixed bit rate/44.1KHz
ID3 Tag Supports ID3v1.0 and ID3v1.1, ID3v2.2, ID3v2.3,
ID3v2.4 ID3 tags
Detailed
Specifications
Maximum directory layers : 20 layers
Maximum length of folder name/file namev : 255Bytes
Supported characters for folder name/file name : Al-
phanumeric characters, Korean standard character set
2,350 characters, Simplified Chinese 4888 characters
Maximum number of folders which can be stored onto
one USB : 2000 folders (including ROOT)
Maximum number of files which can be stored onto
one USB : 8000
i
Information
У
The sound quality of MP3 files that use bitrates exceeding 192
Kbps cannot be guaranteed. When using files without fixed bit
rates, some features (FF/REW features) may not properly operate.
2-34
86%0RGH
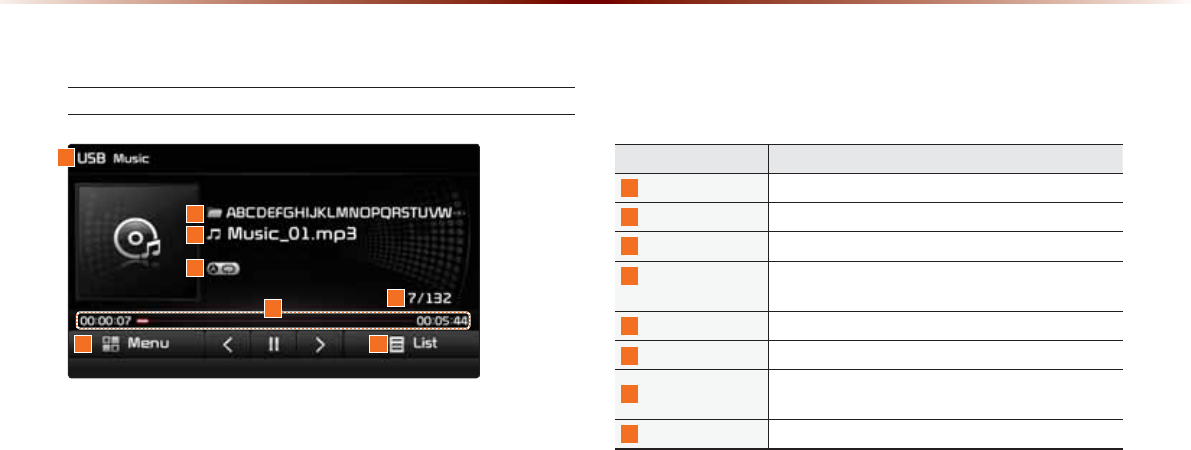
%DVLF0RGH6FUHHQ
USB Music Mode
Name Description
1
Mode Displays currently operating mode
2
Folder Name Displays the name of the current folder
3
File Name Displays the name of the current file
4
Repeat/Shuffle/
Scan
From Repeat/Shuffle/Scan, displays the currently
oper ating function
5
Play Time Displays the current play time/total play time
6
File Index Shows the current file/total files within the USB
7
Menu Displays Copy, Repeat, Shuffle, Scan and Info On
(Info Off) menus
8
List Moves to the list screen
1
7 8
6
5
4
3
2
USB Mode
Audio O 2-35
Name Description
9
Copy Copies the file currently playing into My Music
10
Repeat Repeats the current file
11
Shuffle Plays files in random order
12
Scan Scans the beginning parts of USB files (approx. 10
seconds per file)
13
Info Off (Info On)
У Info Off : shows folder name/file name
У Info On : shows folder name, file name, title, artist,
and album info
14
Previous File
У When the play time is under 2 seconds : Moves to
the previous file
У When the play time is over 2 seconds : Plays the
current file from the beginning
15
Play/Pause Plays/pauses the current file
16
Next File Moves to the next file
9
10
11
12
13
15 1614
2-36
86%0RGH
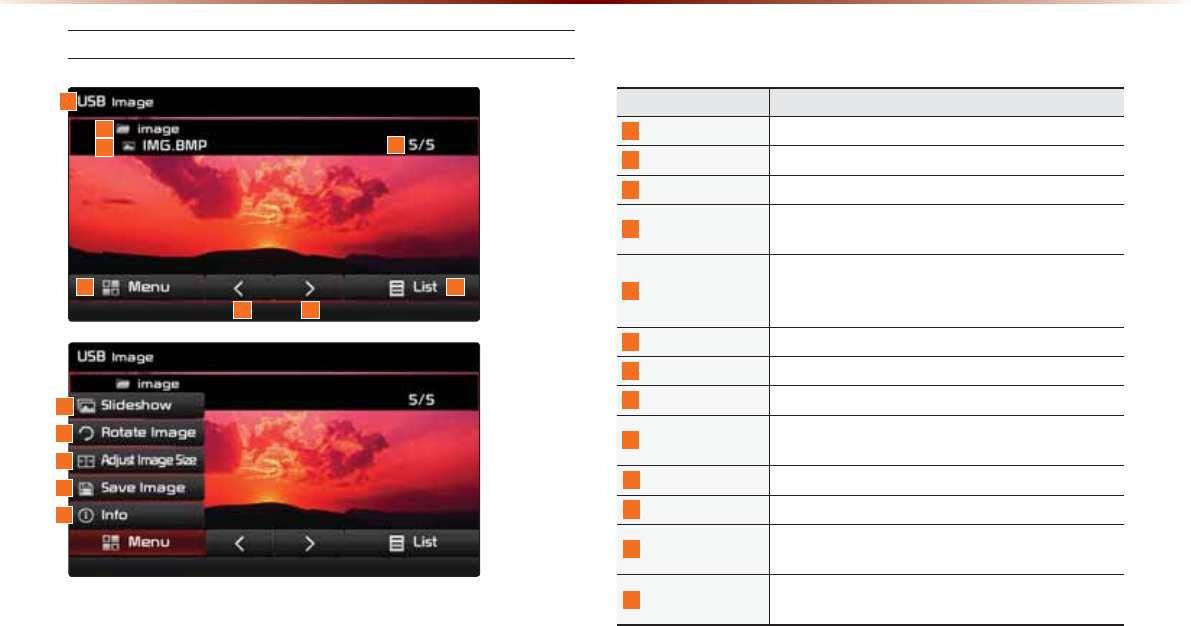
USB Image Mode
Name Description
1
Mode Displays currently operating mode
2
Folder Name Displays folder name where image is located
3
File Name Name of image file
4
File Index Shows the current image file/total image files within
the USB
5
Menu
Displays Slideshow, Rotate Image, Adjust Image
Size, Save Image, and Info menus (Press the button
again to hide the buttons)
6
Previous Image Shows previous image
7
Next Image Shows next image
8
List Moves to the list screen
9
Slideshow View images as slideshow in 5, 10, 20, 30 second
intervals
10
Rotate Image Rotate image in clockwise direction
11 Adjust Image Size
Enlarge/reduce (zoom-in/zoom-out) image size
12
Save Image Add image as frame screen displayed when the sys-
tem power is turned off
13
Info Shows the file name, resolution and file type of cur-
rent image
1
4
8
76
5
2
3
9
10
11
12
13
USB Mode
Audio O 2-37
/LVW0HQX6FUHHQ
Name Description
1
Music Shows the Music list (Disabled when Music list does
not exist)
2
Image Shows the Image list (Disabled when Image list does
not exist)
3
Home Folder Moves to home folder
4
Parent Folder Moves to the parent folder
5 Now Playing
When moving to a different list screen, moves
to the list page where the current file is located
(Becomes disabled when the current list includes the
current file)
6
Folder Name Folder name of current list
7
Current Song Shows current playing file name
8
Back Button Converts to basic mode screen
9
Previous List Moves to the previous list
10
List Page Shows current file list page/total number of pages
11
Next List Moves to the next list
1 6
7
10
9
8
11
2
3
4
5
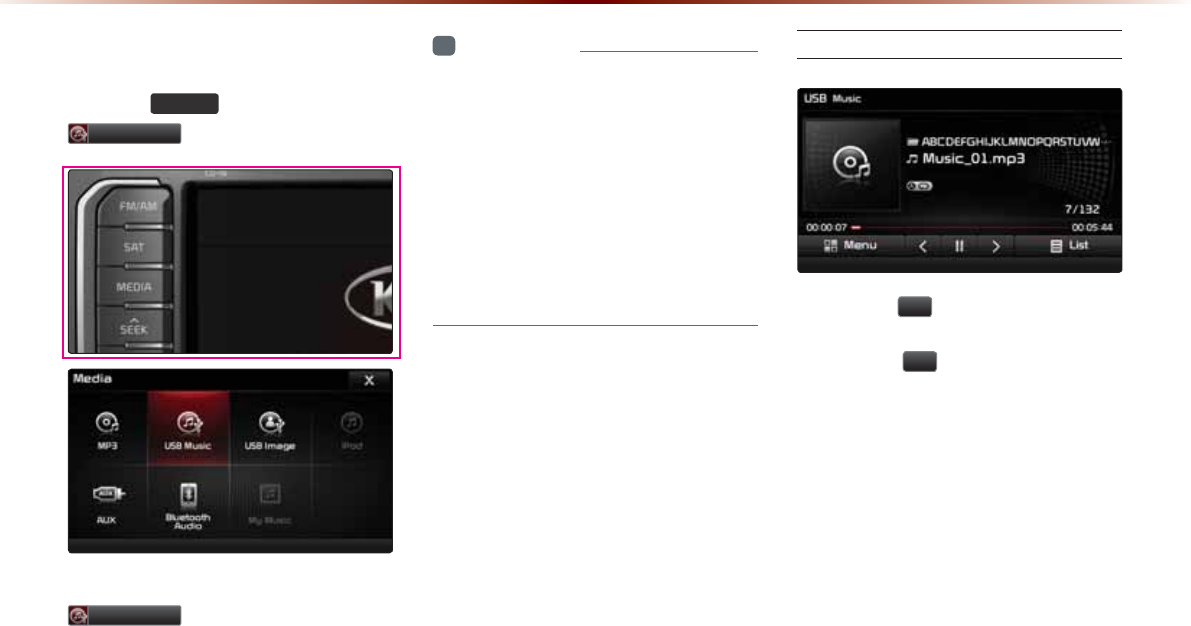
2-38
86%0RGH
6WDUWLQJ86%0XVLF0RGH
Press the
0(',$
key ƙ Press
86%0XVLF
.
If the USB is not connected, then the
86%0XVLF
button will be disabled.
i
Information
У
Once a USB is connected, USB Music
mode will operate automatically.
У
If a previously played USB is recon nected,
then the song after the most recently
played song is played. However, if a differ-
ent USB is connected or the file informa-
tion within the USB was changed, then
the USB will start playing from the first
song within the USB.
Playing USB Music
У Press the
Ԡ
button to play the USB
Music.
У Press the
OO
button to pause USB
Music.
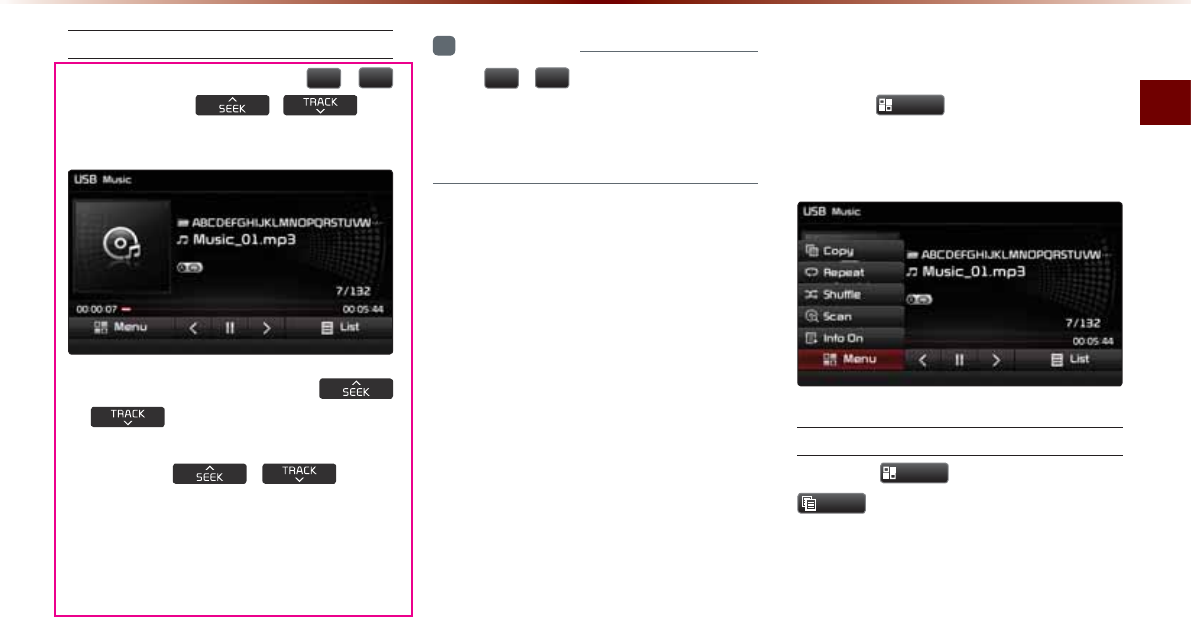
USB Mode
Audio O 2-39
Searching USB Music Files
While Playing ƙ Press the
,
!
buttons or the ,
key
to play the previous/next file.
У Pressing and holding the
, key (over 0.8 seconds) will
rewind or fast-forward the current file.
У While the , key is
being pressed, the track will rewind or
fast-forward at high speeds. Once the
key is released, the USB Music will
begin playing at normal speed.
i
Information
У
The
,
!
buttons displayed on the
screen allow you to select the previous/
next file. These buttons will not rewind or
fast-forward the file.
8VLQJWKH0HQX%XWWRQV
Press the
0HQX
button to set the Copy,
Repeat, Shuffle, Scan, Info On (Info Off)
menus.
Copy
Press the
0HQX
button ƙ Press
&RS\
.
The currently playing file is copied and
saved in My Music.

2-40
86%0RGH
i
Information
У
Copied and saved files can be played
within My Music mode.
NOTICE
У
Time required to copy files into My Music is
approximately 3 seconds per 1 USB MP3
file (4mb) and within 1 minute and 17 sec-
onds per 1 CD MP3 file. These times may
somewhat differ depending on the file size
and system conditions.
У
It is possible play music while copying is in
progress.
У
When copying is in progress, AV,
Bluetooth and Voice Recognition fea-
tures cannot be used. It is possible to use
Information, Settings and Navigation fea-
tures.
Repeat
Press the
0HQX
button ƙ Press
5HSHDW
.
Each time the button is pressed, the option
is changed from Repeat Once Ċ Repeat
Folder Ċ Off(Repeat All).
i
Information
У
Repeat Once : Repeats the current file.
У
Repeat Folder : Repeats all files in current
folder.
Shuffle
Press the
0HQX
button ƙ Press
6KXIIOH
.
Each time the button is pressed, the option
is changed from Shuffle Folder Ċ Shuffle
All ĊOff(Repeat All).
i
Information
У
Shuffle Folder : Plays files within the cur-
rent folder in random order.
У
Shuffle All : Plays files within the USB in
random order.
Scan
Press the
0HQX
button ƙ Press
6FDQ
.
Each time the button is pressed, the option
is changed from Folder Scan Ċ Scan All
Ċ Off(Repeat All).
i
Information
У
Folder Scan : Searches files within the
current folder.
У
Scan All : Scans files within the USB in
random order.
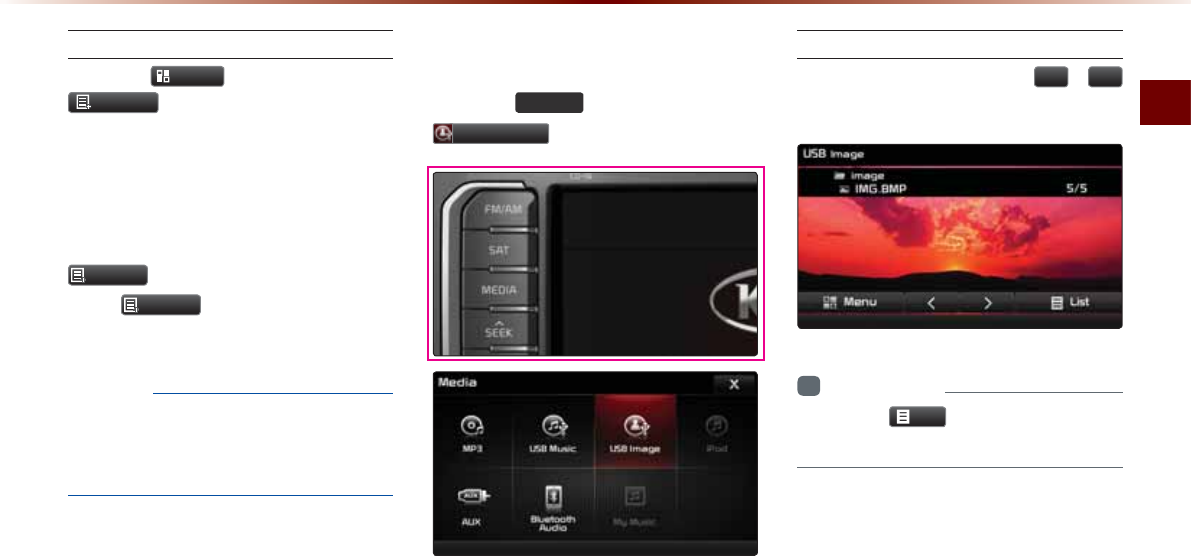
USB Mode
Audio O 2-41
Info On/Info Off
Press the
0HQX
button ƙ Press
,QIR2Q
.
The screen display can be set differently
depending on user selection.
When the title, artist, and album info
are displayed, the button is changed to
,QIR2II
.
Press
,QIR2II
to restore the previous
information display setting.
NOTICE
У
The title, artist and album info are dis-
played only when such information is
recorded within the MP3 file ID3 tag.
6WDUWLQJ86%,PDJH0RGH
Press the
0(',$
key ƙ Press
86%,PDJH
.
Searching USB Image Files
While playing ƙ Press the
,
!
buttons to view the previous/next image.
i
Information
У
Press the
/LVW
button to view the list of
USB images.
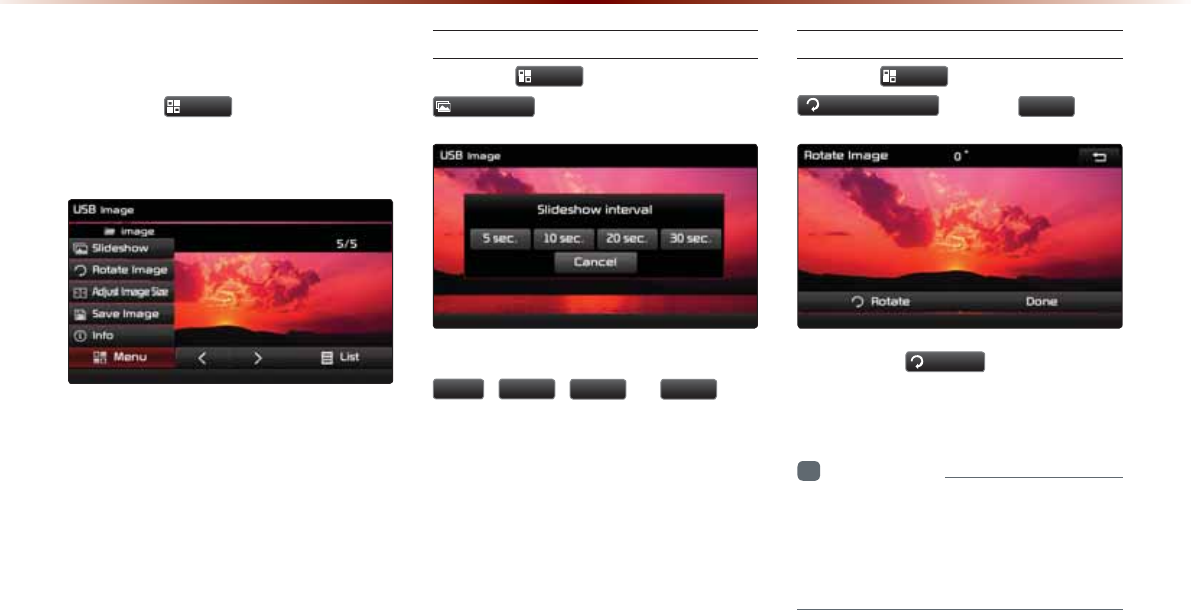
2-42
86%0RGH
8VLQJWKH0HQX%XWWRQV
Press the
0HQX
button to set the
Slideshow, Rotate Image, Adjust Image
Size, Save Image and Info menus.
Slideshow Interval
Press the
0HQX
button ƙ Press
6OLGHVKRZ
.
Image slideshow intervals can be set at
VHF
,
VHF
,
VHF
, or
VHF
inter-
vals.
Rotating Image
Press the
0HQX
button ƙ Press
5RWDWH,PDJH
ƙ Press
'RQH
.
Each time the
5RWDWH
button is pressed,
the image is rotated from 0˚ Ċ 90˚ Ċ 180˚
Ċ270˚ degrees.
i
Information
У
Rotated images are not saved.
У
The image will be restored to its original
position when returning to it after viewing
a different image.
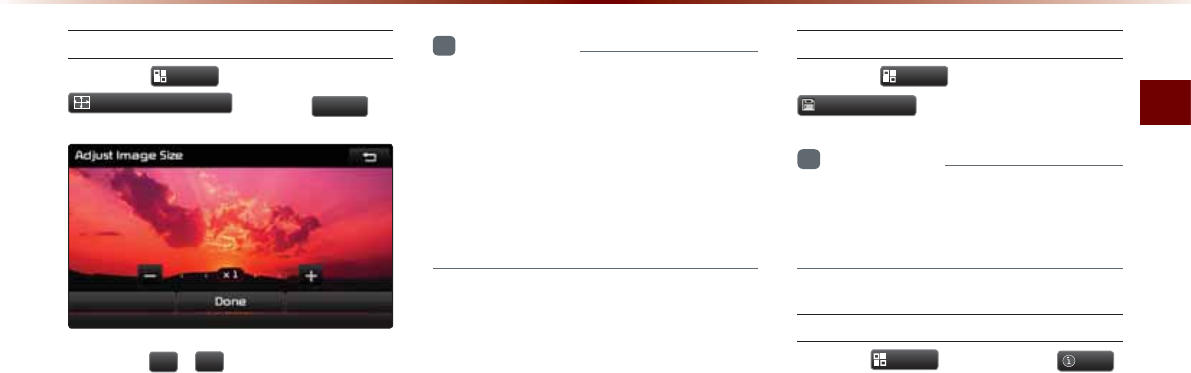
USB Mode
Audio O 2-43
Adjusting Image Size
Press the
0HQX
button ƙ Press
$GMXVW,PDJH6L]H
ƙ Press
'RQH
.
Press the
,
buttons to enlarge or
reduce the image size. The scale can be
changed to x1/4, x1/2, x1, x2, x4.
i
Information
У
Enlarged or reduced images are not
saved. The image will restore its original
size when returning to it after viewing a
different image.
У
If the image cannot be fully displayed on
the screen, touch the image to move the
screen.
Saving Image
Press the
0HQX
button ƙ Press
6DYH,PDJH
.
i
Information
У
For details on using the picture frame,
refer to the Picture Frame Settings within
Setup.
Viewing Info
Press the
0HQX
button ƙ Press
,QIR
.
This menu is used to check image informa-
tion, such as the image resolution and file
type.

2-44
L3RG0RGH
8VLQJL3RG'HYLFHV
CAUTION
У iPod® is a registered trademark of Apple Inc.
УiPod mode will not operate if the con-
nected iPod cannot be recognized due to
operation of unsupported versions that
do not support related protocols, iPod
abnormalities, or iPod device defects.
Some iPods with unsupported communi-
cation protocols may not properly oper-
ate with the multimedia system.
УFor fifth generation iPod Nano devices,
the iPod may not be recognized when
the battery level is low. Please charge
the iPod before use.
У Search/play orders shown within the iPod
device may differ with the orders shown
within the multimedia system.
У If the iPod malfunctions due to an iPod
device defect, reset the iPod and try again.
(To learn more, refer to your iPod manual)
У For some iPod Touch and iPhone devices, con-
necting Bluetooth® while the iPod is operating
may result in discontinued iPod sound. When
such devices with Bluetooth® support are con-
nected, this prob lem occurs as the sound source
changed from the USB cable to Bluetooth®
У To listen to the iPod sound, reconnect the
USB cable or exit then reenter iPod mode.
У In order to use the iPod while operating the
keys, you must use a dedicated iPod cable.
(the cable that is supplied when purchasing
iPod/iPhone products)
üDuring ACC ON state, connecting the iPod
through the iPod cable (The cable that is sup-
plied when purchasing iPod/iPhone product.)
will charge the iPod through the head unit
üThe use of genuine iPod cables supplied
by Apple is recommended. (The use of
other products may result in noise or
abnormal operation.)
У When connecting with the iPod cable,
make sure to fully insert the jack to pre-
vent communication interference. If the
iPod is connected to the vehicle while it is
playing, a high pitch tone may sound for
about 1~2 seconds immediately after con-
nection. If possible, connect the iPod to
the vehicle with the iPod stopped/paused.
У Within iPhones, streaming audio and iPod
control may occasionally conflict. If prob-
lems persist, remove the iPhone and con-
nect again.
У Some iPod versions may not sync with the
system. In such cases, the system may
not properly restore the previously oper-
ated mode. (For iPads, battery charging is
not supported.)
У Applications that are not exclusively used
as iPod Applications within iPhone/iPod
devices are not supported.

iPod Mode
Audio O 2-45
Steps upon Initial Connection
Search Steps may differ depending on the type of iPod device.
Supported iPod Devices
У Operation is supported and Apple Inc. certified : ÿ
У Operation is supported but uncertified :Ć
1 Step 2 Step 3 Step 4 Step 5 Step
Play List Play List Play List name (category is same as iPod)
Artist Artist Artist Album
Name
Song
Name
Album Album Album
Name
Song
Name
Genre Genre Genre
Name
Artist
Name
Album
Name
Song
Name
Song Song Song Name
Composer Composer Composer
Name
Album
Name
Song
Name
Device /
Generation
First Second Third Fourth Fifth Sixth
Seventh
iPod
Mini Not Supported
iPod
5JWHƀG Not Supported
iPod
Nano ÿÿÿÿÿÿĆ
iPod
Touch ÿÿÿÿÿ
Not Released
iPod
Classic Not Released
ÿ
(iPod with
video)
ÿ
(iPod
Classic)
Not
Released
iPad
(iPad Mini) Ć1RGTCVKQPKUUWRRQTVGFDWVWPEGTVKſGF
Device/Type 3GS 4G 4S 5G
iPhone ÿÿÿÿ
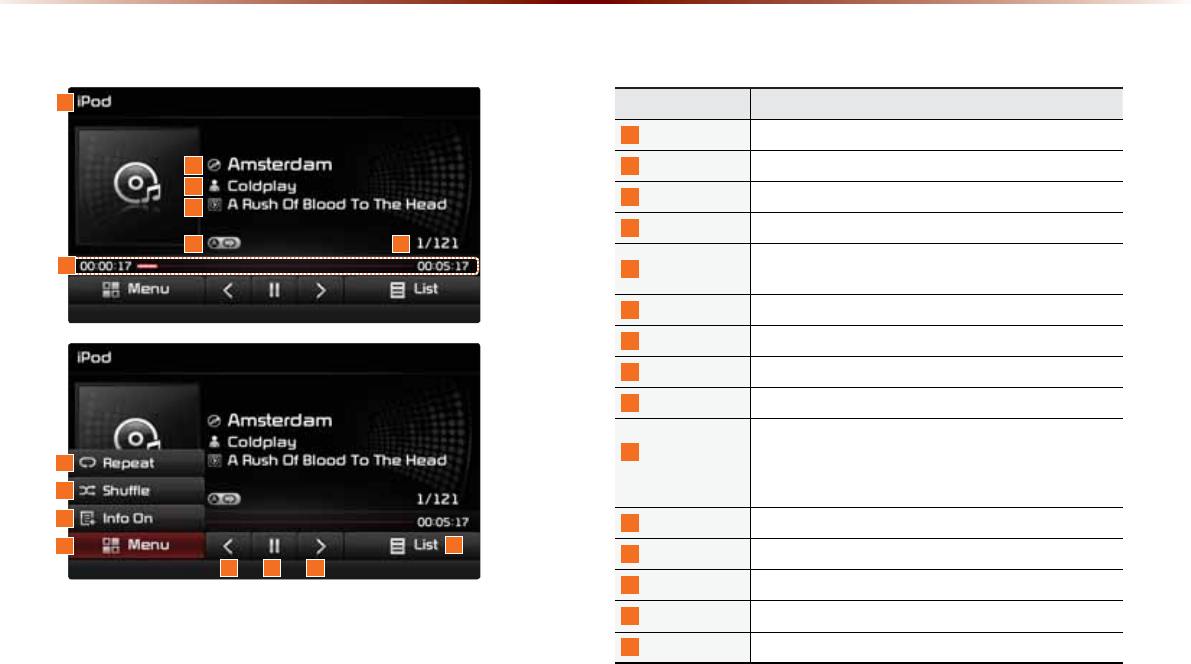
2-46
L3RG0RGH
%DVLF0RGH6FUHHQ
Name Description
1
Mode Displays currently operating mode
2
Title Displays name of current title
3
Artist Info Artist name
4
Album Info Album name
5
Repeat/Shuffle From Repeat/Shuffle, displays the currently oper ating
function
6
File Index Shows the current file/total files within the iPod
7
Play Time Displays the current play time/total play time
8
Repeat Repeats the currently playing file
9
Shuffle Plays files in random order
10
Info Off
(Info On)
Changes the display method between Info Off/Info On
У Info Off : Shows title, artist, and album Info
У Info On : Shows title, artist, album, genre, and
composer info
11
Menu Displays Repeat, Shuffle, and Info On (Info Off) menus
12
Previous File Moves to the previous file
13
Play/Pause Plays/pauses the current file
14
Next File Moves to the next file
15
List Moves to the list screen
1
11
8
9
10
15
12 13 14
4
5 6
3
2
7
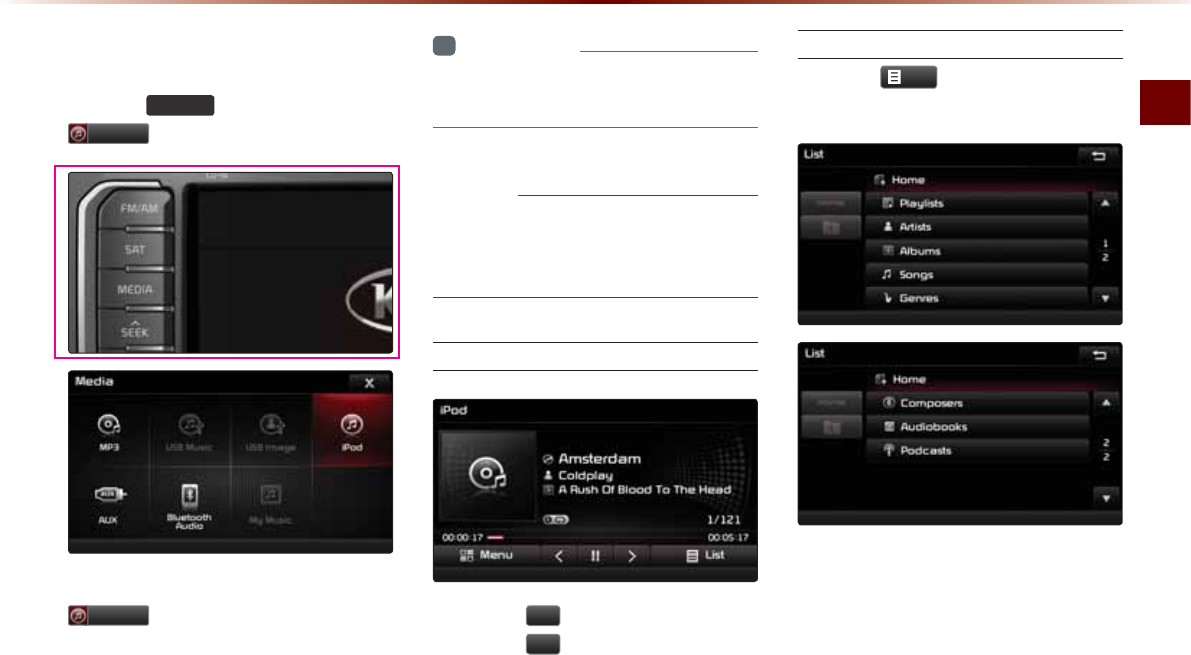
iPod Mode
Audio O 2-47
6WDUWLQJ0RGH
Press the 0(',$ key ƙ Press
L3RG .
If the iPod is not connected, then the
L3RG
button will be disabled.
i
Information
У
Once an iPod is connected, iPod mode
will operate automatically.
NOTICE
У
Some iPods with unsupported communi-
cation protocols may not properly operate
with the Audio system.
Playing iPod
У Press the
Ԡ
button to play the iPod.
У Press the
OO
button to pause the iPod.
Searching iPod
Press the
/LVW
button to display the
initial iPod list screen.
When searching an iPod, it is possible to
search by Playlists, Artists, Albums, Songs,
Genres, Composers, Audiobooks, and
Podcasts.
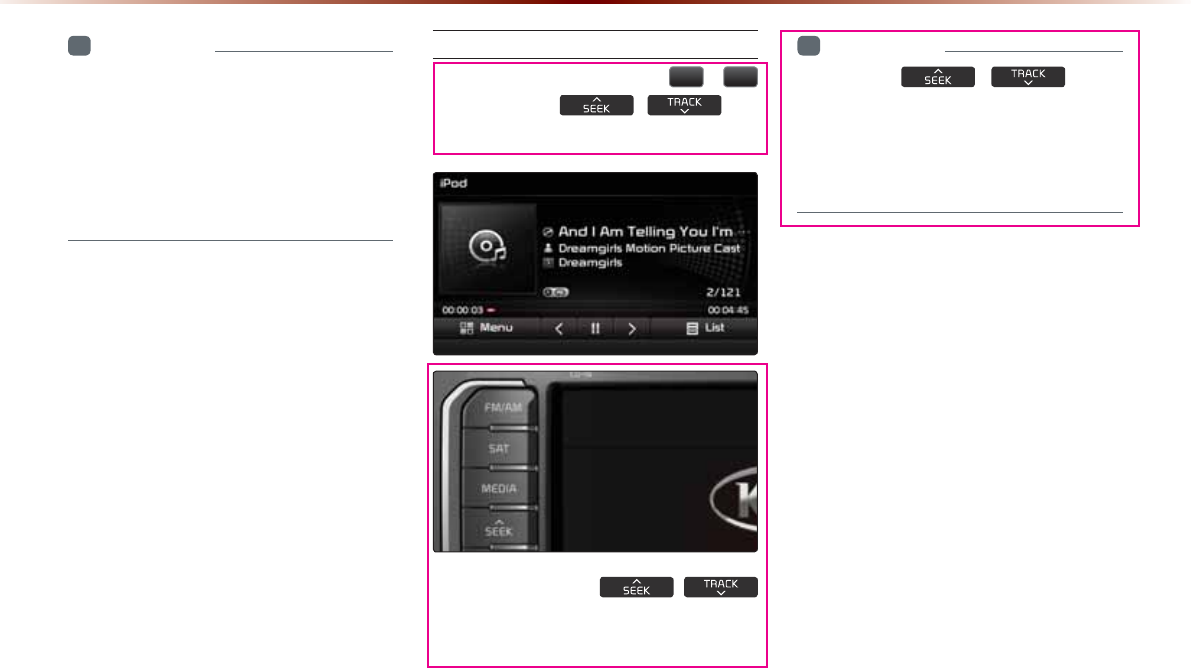
2-48
L3RG0RGH
i
Information
У
Upon accessing search mode while play-
ing a song, search will begin from the
most recently used search step.
У
The search step displayed upon initial
connection may differ depending on type
of iPod device.
Selecting iPod Files
While playing ƙ Press the
,
!
buttons or the ,
key
to play the previous/next file.
Pressing and holding the
,
key (over 0.8 seconds) will rewind or fast-forward
the current song.
i
Information
У
While the ,
key is
being pressed, the track will rewind or
fast-forward at high speeds. Once the key
is released, the Music will begin playing at
normal speed.
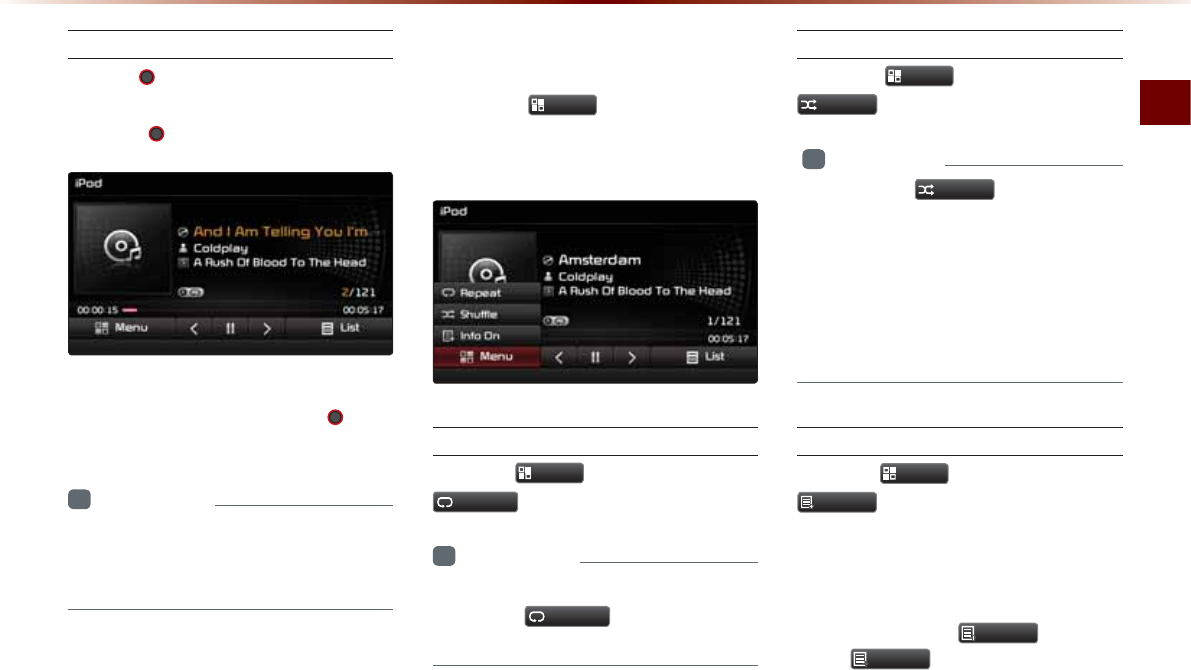
iPod Mode
Audio O 2-49
Searching iPod Files
Turn the
781(
knob ƙ Search files
ƙ
Once the desired file name is displayed,
press the 781(
knob
.
When searching files, the file number is
displayed in orange. Pressing the 781(
knob
will play the corresponding file.
i
Information
У
If there are no operations within 5 sec-
onds, information on the current song will
be re-displayed.
8VLQJWKH0HQX%XWWRQV
Press the
0HQX
button to set the
Repeat, Shuffle, and Info On (Info Off)
menus.
Repeat
Press the
0HQX
button ƙ Press
5HSHDW
.
i
Information
У
The currently playing file is repeated.
У
Press the
5HSHDW
button again to turn
off repeat.
Shuffle
Press the
0HQX
button ƙ Press
6KXIIOH
.
i
Information
У
Each time the 6KXIIOH
button is pressed,
the option is changed from Shuffle Category
Ċ Shuffle Album Ċ Off.
У
Shuffle Category : Plays files within the cur-
rent category in random order.
У
Shuffle Album : Plays files within the current
category in random order.
Info On/Info Off
Press the
0HQX
button ƙ Press
,QIR2Q
.
The screen display can be set differently
depending on user selection.
When the title, artist, and album info are
displayed, the button
,QIR2II
.
Press
,QIR2II
to restore the previous
display setting.
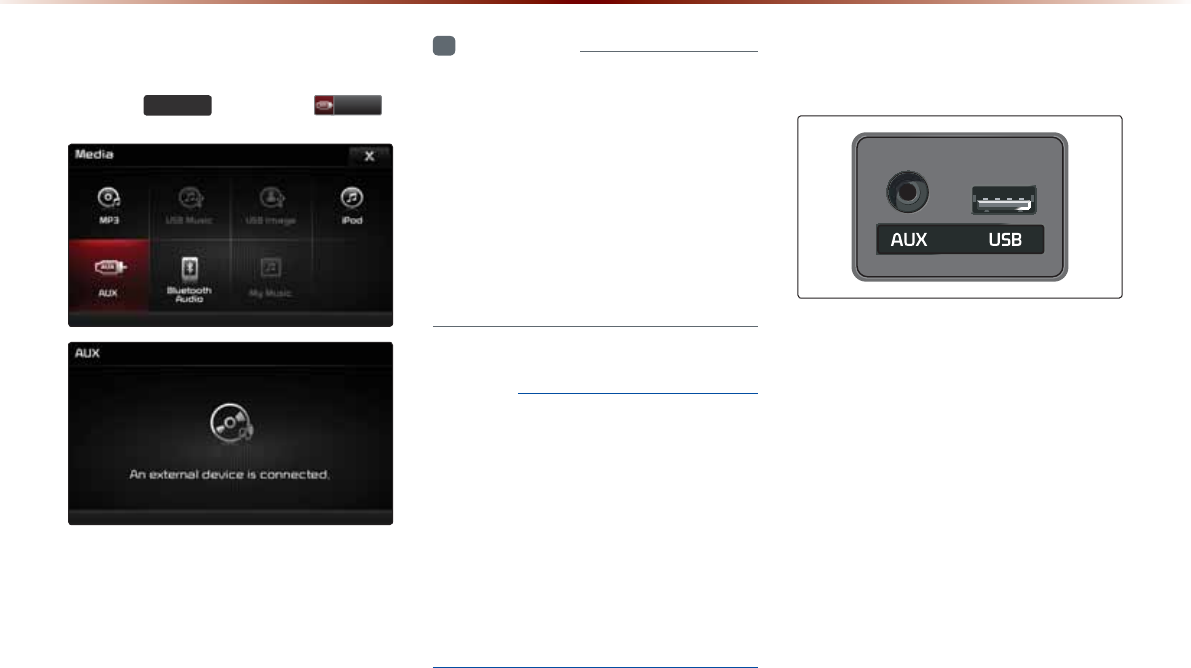
2-50
6WDUWLQJ0RGH
Press the 0(',$ key ƙ Press $8; .
i
Information
У
If an external device connector is con-
nected with the AUX terminal, then AUX
mode will automatically operate. Once the
connector is disconnected, the previous
mode will be restored.
У
AUX mode can be used only when an
external audio player (camcorder, car
VCR, etc.) has been connected.
У
The AUX volume can also be controlled
separately through the connected device.
NOTICE
У
If only cable connected to the AUX with-
out an external device, the mode changed
to AUX, but noise may occur. When an
external device is not being used, remove
the connector jack.
У
When the external device power is con-
nected to the power jack, playing the
external device may output noise. In such
cases, disconnect the power connection
before use.
&RQQHFWLQJDQ
([WHUQDO'HYLFH
External AUDIO players can be played
through a dedicated cable. The position
of the AUX jack is at the top of the gear
shifter located between the driver and pas-
senger seats.
$8;0RGH
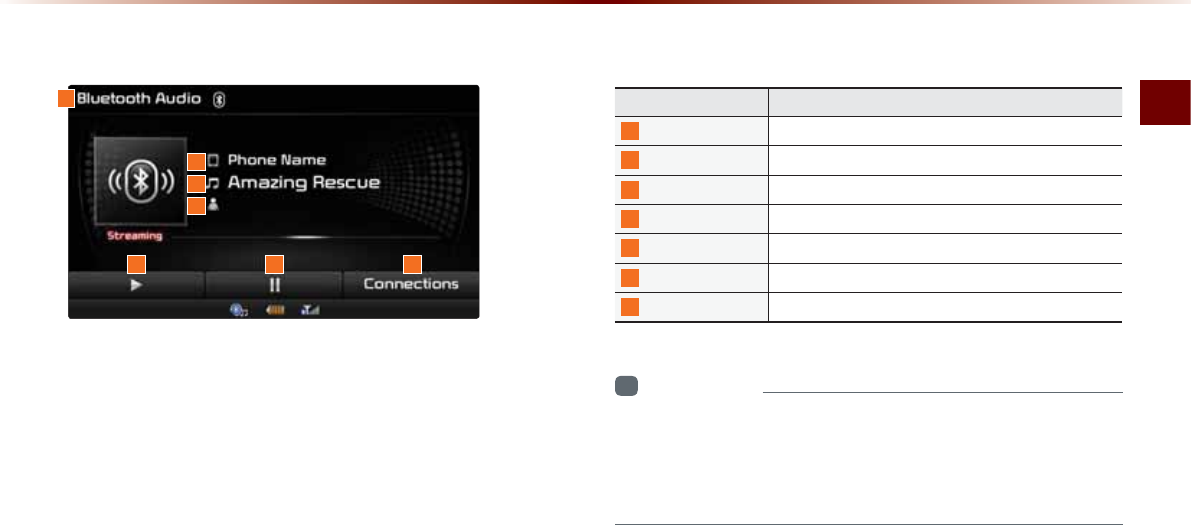
Bluetooth® Audio Mode
Audio O 2-51
%DVLF0RGH6FUHHQ
i
Information
У
The title/artist info may not be supported in some mobile phones.
When it is not supported, a symbol will be displayed.
У
The play/pause feature may operate differently depending on the
mobile phone.
1
2
3
4
5 6 7
Name Description
1
Mode Displays currently playing mode
2
Phone Name Displays name of connected phone
3
Title Name of current song
4
Artist Info Name of current artist
5
Play Plays Bluetooth® Audio
6
Pause Pauses Bluetooth® Audio
7
Connections Displays the Connections screen
%OXHWRRWKq$XGLR0RGH
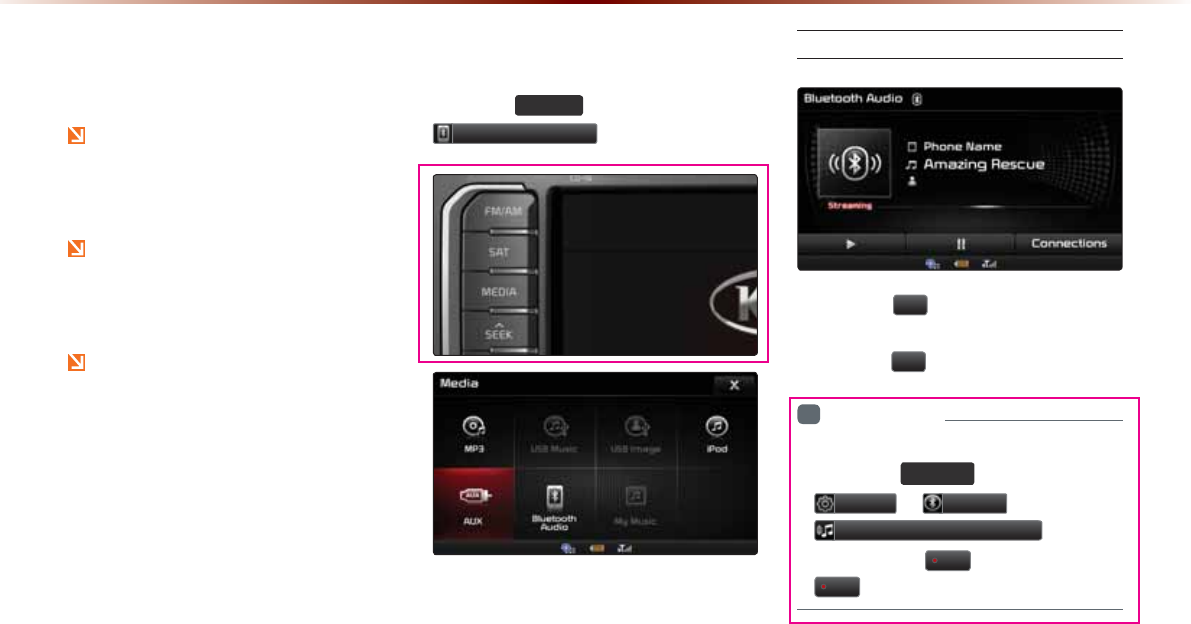
2-52
8VLQJ
%OXHWRRWKp$XGLR
0RGH
Bluetooth® Audio Mode can be used
only when a Bluetooth® Audio mode
capable device has been connected.
While Bluetooth® Audio Mode is playing,
if the Bluetooth® phone is discon nected,
then the music will also stop.
Bluetooth® streaming audio may not be
supported with some mobile phones.
6WDUWLQJ0RGH
Press the
0(',$
key ƙ Press
%OXHWRRWK$XGLR
.
Playing Bluetooth® Audio
У Press the
Ԡ
button to play files saved
within the Bluetooth® phone.
У Press the
OO
button to pause the file.
i
Information
У
If the Bluetooth® audio does not
play, Press
6(783
key ƙ
Press
6HWXS
ƙ
3KRQH
ƙ
$XGLR6WUHDPLQJ6HWWLQJ
ƙ
If the
option is set to
2II
, change to press
2Q
and try again.
%OXHWRRWKq$XGLR0RGH
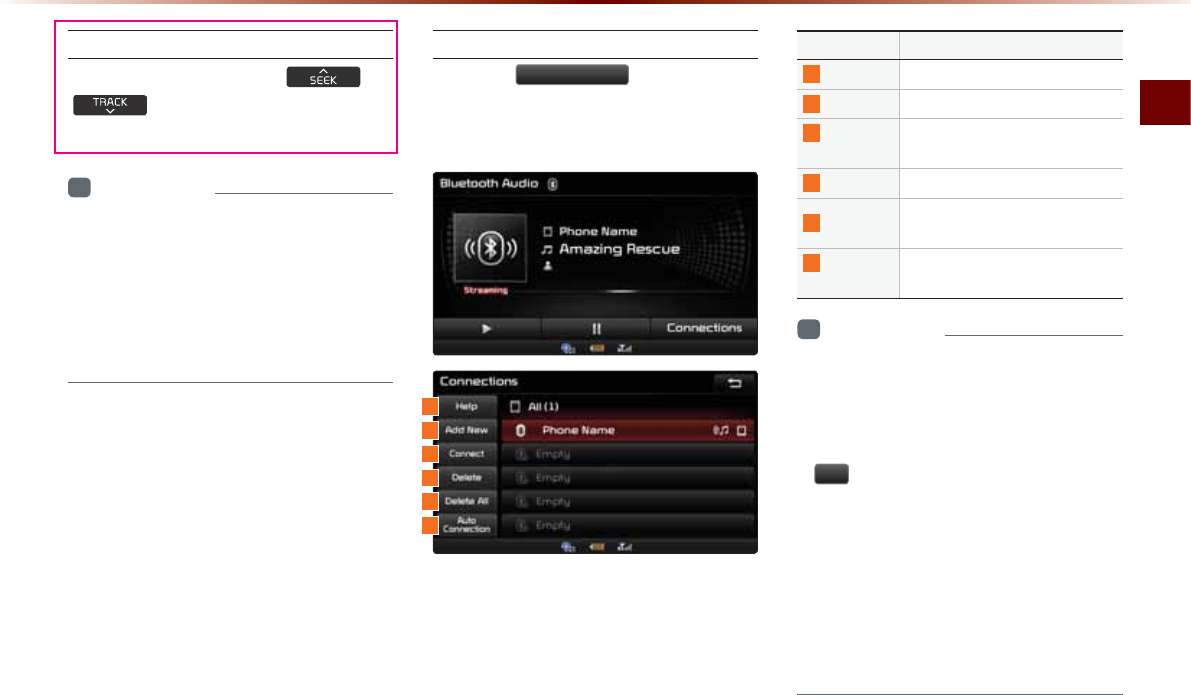
Bluetooth® Audio Mode
Audio O 2-53
Selecting Bluetooth® Audio Files
While playing ƙ Press the
, key ƙ Selects the previous/
next file.
i
Information
У
The title/artist info may not be supported
in some mobile phones. When it is not
supported, only the symbol will be dis-
played.
У
The play/pause feature may operate dif-
ferently depending on the mobile phone.
Setting Connection
Press the
&RQQHFWLRQV
button to add a
new Bluetooth® phone, connect/disconnect,
delete, delete all, or view the Help section.
Name Description
1
Help Displays Bluetooth® Help screen
2
Add New Pair a new Bluetooth® device
3
Connect/
Disconnect
Connect or disconnect a Bluetooth®
device
4
Delete Delete a paired Bluetooth® device
5
Delete All Delete all paired Bluetooth® de-
vices
6
Auto
Connection
Set Bluetooth® phone Auto Con-
nection upon starting car ignition
i
Information
У
If music is not yet playing from your mobile
device after converting to streaming audio
(Bluetooth® Audio) mode or after pressing
Play on the mobile device itself, pressing the
Ԡ
button once may begin playing the music.
Check to see whether music is playing from the
Bluetooth® device after converting to streaming
audio mode. The Streaming audio feature may
not be supported in some mobile phones.
У
For more information on mobile phone com-
patibility, visit the Kia Motor Company website
(http://www.kia.com).
1
3
4
5
6
2
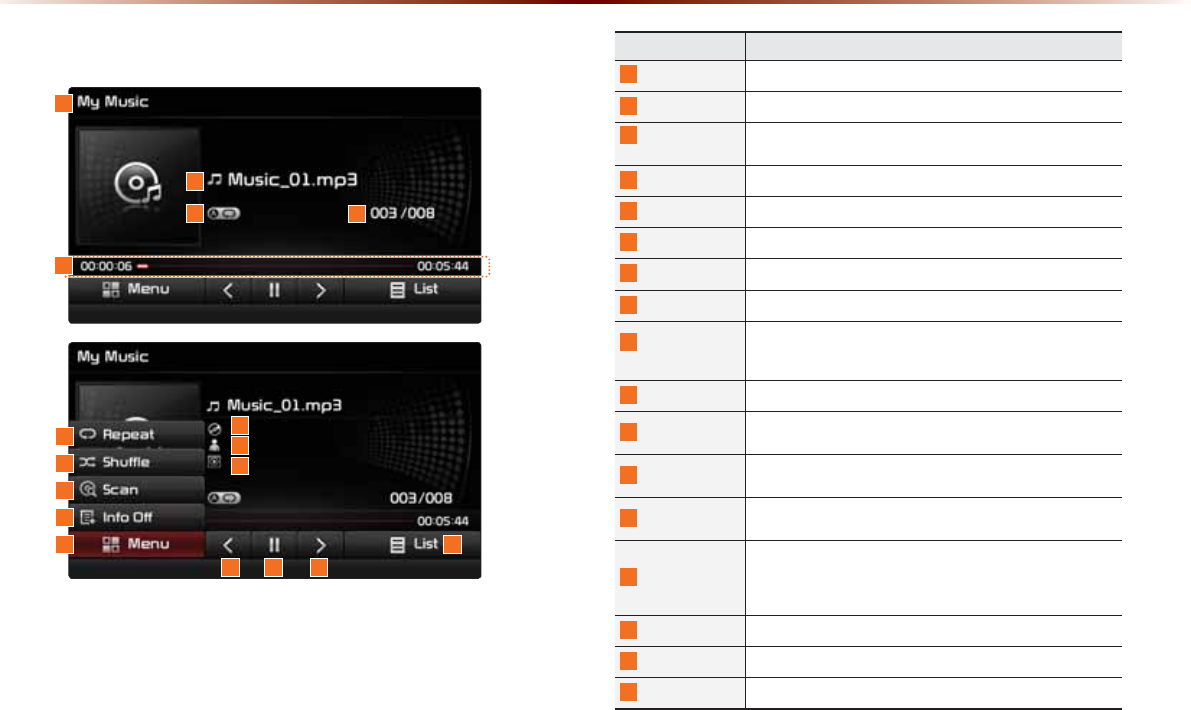
2-54
%DVLF0RGH6FUHHQ
0\0XVLF0RGH
Name Description
1
Mode Displays currently operating mode
2
File Displays the name of the current file
3
Repeat/Shuffle/
Scan
From Repeat/Shuffle/Scan, displays the currently operating
function
4
File Index Shows the current file/total files within the My Music
5
Play Time Displays the current play time/total play time
6
Repeat Repeats the current file
7
Shuffle Plays files in random order
8
Scan Scans the beginning parts of files (approx. 10 seconds per file)
9
Info Off
(Info On)
Changes the display method between Info Off/Info On
У Info Off : shows file name
У Info On : shows file name, title, artist, and album info
10
Menu Displays Repeat, Shuffle, Scan and Info On (Info Off) menus
11
Title Info Displays the song title (Not displayed when information is not
available)
12
Artist Info Displays the artist information (Not displayed when information
is not available)
13
Album Info Displays the album information (Not displayed when informa-
tion is not available)
14
Previous File
У When the play time is under 2 seconds : Moves to the
previous file
У When the play time is over 2 seconds : Plays the current file
from the beginning
15
Play/Pause Plays/pauses the current file
16
Next File Moves to the next file
17
List Moves to the list screen
1
2
34
10
6
7
8
9
13
15 16
17
14
12
11
5
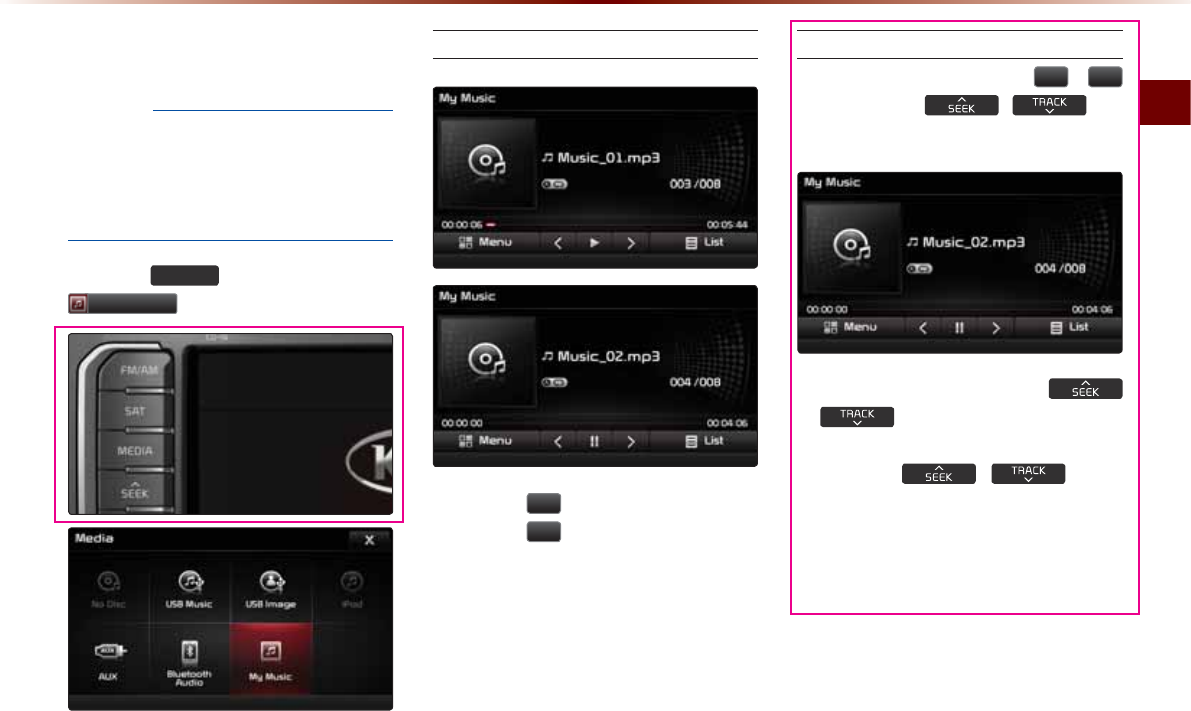
My Music Mode
Audio O 2-55
6WDUWLQJ0RGH
NOTICE
У
My Music refers to a feature where music
files (MP3, WMA) within USB memory
drives or CDs are copied into the multimedia
system to play them within the vehicle.
Press the
0(',$
key ƙ Press
0\0XVLF
.
Playing My Music
У Press the
Ԡ
button to play the file.
У Press the
OO
button to pause the file.
Selecting My Music
While playing ƙ Press the
,
!
buttons or the , key
to play the previous/next file.
У Pressing and holding the
,
key (over 0.8 seconds) will
rewind or fast-forward the current file.
У While the , key is
being pressed, the track will rewind or
fast-forward at high speeds. Once the
key is released, the Music will begin
playing at normal speed.
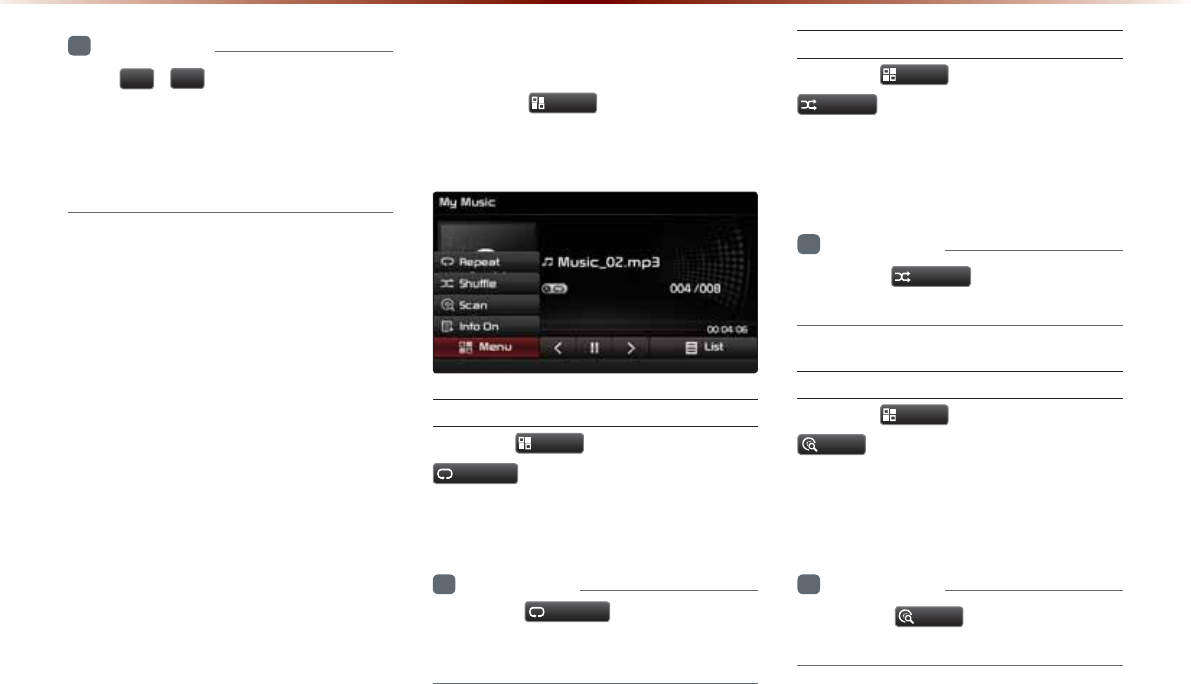
2-56
i
Information
У
The
,
!
buttons displayed on the
screen allow you to select the previous/
next file.
У
These buttons will not rewind or fast-
forward the file.
8VLQJWKH0HQX%XWWRQV
Press the
0HQX
button to set the
Repeat, Shuffle, Scan, Info On (Info Off)
menus.
Repeat
Press the
0HQX
button ƙ Press
5HSHDW
.
The currently playing file is repeated.
i
Information
У
Press the
5HSHDW
button again to turn
off repeat. If nothing is selected, then all
files will be played in sequential order.
Shuffle
Press the
0HQX
button ƙ Press
6KXIIOH
.
When turned on, files are played in random
order.
i
Information
У
Press the
6KXIIOH
button again to turn
the shuffle option off.
Scan
Press the
0HQX
button ƙ Press
6FDQ
.
The beginning (approx 10 seconds) of all
files are scanned.
i
Information
У
Press the
6FDQ
button again to turn
the scan option off.
0\0XVLF0RGH
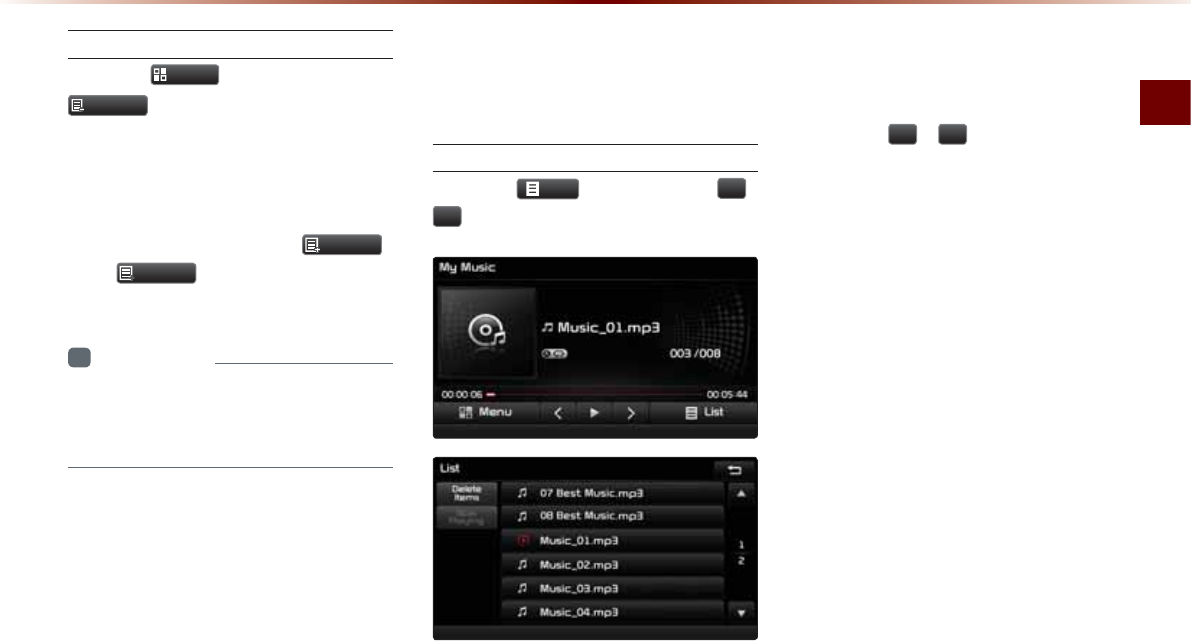
My Music Mode
Audio O 2-57
Info On/Info Off
Press the
0HQX
button ƙ Press
,QIR2Q
.
The screen display can be set differently
depending on user selection.
When the title, artist, and album info are dis-
played, the button is changed to
,QIR2II
.
Press
,QIR2II
to restore the previous
information display setting.
i
Information
У
The title, artist and album info are dis-
played only when such information is
recorded within the MP3 file ID3 tag.
8VLQJ0HQXVZLWKLQWKH
/LVW6FUHHQ
Moving between Lists
Press the
/LVW
button ƙ Press
Ԟ
,
Ԣ
.
If six (6) or more files or folders exist in
the same folder, the list will be displayed
across two or more pages.
Press the
Ԟ
,
Ԣ
cursor buttons to
quickly find the desired page.

2-58
Returning to Current Location
While searching files within other folders,
press the
1RZ3OD\LQJ
button to return
to the currently playing file screen.
Deleting Files
Press the
/LVW
button ƙ Select the
files to delete ƙ Press
'HOHWH,WHPV
.
i
Information
У
The audio system will not operate while
files are being deleted.
У
If the currently playing file is deleted, the
next file will begin playing.
0\0XVLF0RGH

&$508/7,0(',$6<67(0
У
Before Use
У
Starting Navigation
У
Using the Navigation
У
Map Logos and Landmarks
1DYLJDWLRQ

3-2
CAUTION
Please observe and comply with local traf-
fic rules and regulations.
У Some features cannot be operated while-
driving or when vehicle is in motion.
У The route displayed for destination guid-
ance is a reference and the route guid-
ance will take you to the vicinity of your
У destination. The highlighted route is not
always; the shortest distance, the least
congested, or in some cases, the fastest
route.
У Road, name, and POI information may
not always been completely updated.
Some places may not include up to date
information.
У The car position mark does not always
indicate your exact location. This system
uses GPS information, various sensors,
and road map data to display the current
position. However, errors in displaying
your location may occur if the satellite is
transmitting inaccurate signals or two or
less satellite signals are being received.
Errors that occur in such conditions can-
not be corrected.
У Additionally, the car position mark may
differ from the actual position if the map
data is different from the actual road land-
scape, such as changes due to the con-
struction of new roads. If such differences
У occur, driving for a short period of time will
automatically correct the position of the
vehicle through map matching or GPS
information. (several minutes may be nec-
essary in certain cases)
%HIRUH8VH
3UHFDXWLRQVIRU6DIHGULYLQJ

Before Use
Navigation O 3-3
2SHUDWLQJWKH1DYLJDWLRQ
The navigation can be operated by touching the corresponding
button on the screen to operate.
If the button does not respond, take your finger off the screen
and try again.
When a button function is operating, the color of the selected
button will be displayed differently.
To return to the previous screen, press the button.
Press the button to cancel functions that can be operated
on the current screen.
(Some functions may not be cancelled.)
i
Information
У
Buttons that cannot be operated will be disabled.
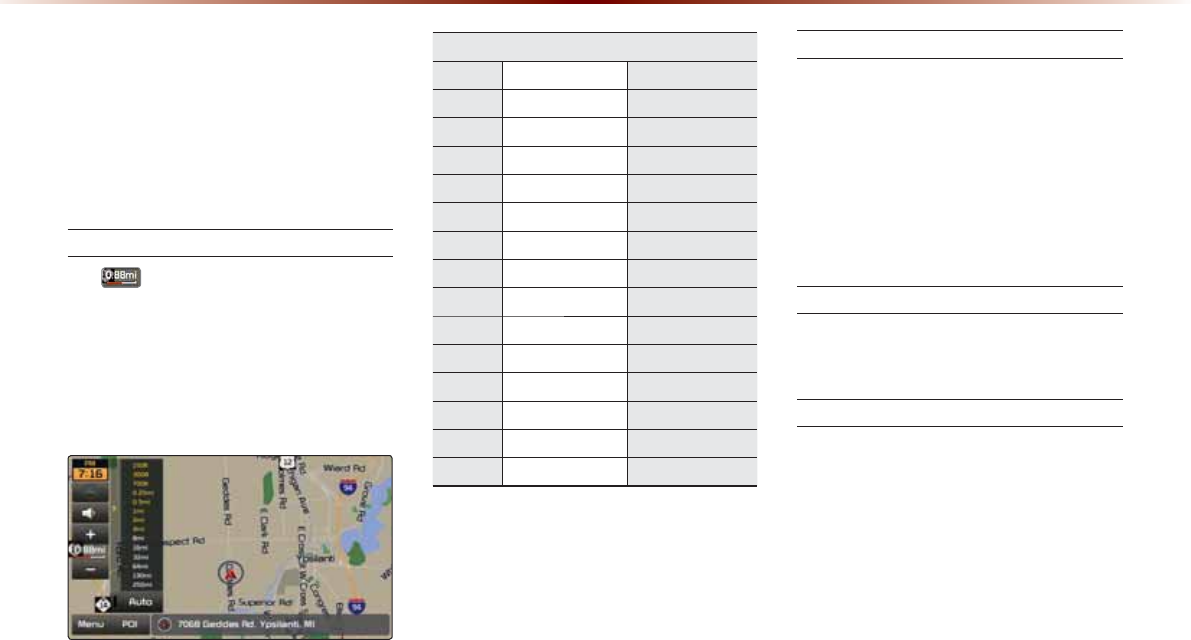
3-4
$ERXWWKH0DS
Some roads, site names, and facility infor-
mation may have changed after map data
update and may differ with actual road
conditions.
About Map Scale
У If is displayed on the left side of
the map, this represents a map scale of
1/4 of a mile.
У For more information on Changing Map
Scale, refer to the ‘Changing Map Scale’
section.
Actual Distance
Level mi/ft km / m
1 150ft 50m
2 300ft 100 m
3 700 ft 200 m
4 0.25 mi 400 m
5 0.5 mi 800 m
6 1 mi 1.6 km
7 2 mi 3.2 km
8 4 mi 6.4 km
9 8 mi 12 km
10 16 mi 25 km
11 32 mi 50km
12 64 mi 100 km
13 130 mi 200 km
14 250 mi 400 km
About Map Icons
The marks of companies displayed by this
product to indicate business locations are
the marks of their respective owners. The
use of such marks in this product does
not imply any sponsorship, approval, or
endorsement by such companies of this
product.
About Map Database
Unlicensed map copying in any form, in full
or in part, is strictly prohibited.
About Map Updates
У Map updates contact your Kia dealer.
У For more information, refer to the
‘System Update’ section in Setup.
%HIRUH8VH
Before Use
Navigation O 3-5
$ERXW9RLFH*XLGDQFH
During destination guidance, voice guidance
will be provided when reaching an intersec-
tion or nearby the destination.
Voice Guidance
Voice guidance is provided in the following
instances.
Example of voice guidance during destina-
tion guidance
У In front of an intersection :
In a half mile, turn right.
Next right.
У Upon entering a toll road
Toll booth ahead.
* Please use voice guidance only as a ref-
erence to assist in your driving.
Example of voice guidance when arriving
at the destination
У In front of the destination :
You have arrived at your destination.
Your route guidance is finished.
i
Information
У
The above voice guidance examples are
normal cases. However, the actual voice
guidance may differ depending on the
road type.
У
If the car position is not accurately
measured,
then voice guidance may not be given, or
may be given later or improperly.
У
It is possible to adjust the Navigation guid-
ance volume.
Guidance when using other modes
У Voice guidance will continue even when
converting from the navigation screen to
a different mode screen.
i
Information
У
With voice guidance muted, destination
guidance will continued to be provided.

3-6
$ERXW*36
GPS (Global Positioning System) :
GPS is a system developed and operated
by the United States which determines the
current location of the user (Longitude/
Latitude, Coordinates, etc.) by generally
using 4 or more satellites. This system is
used with related GPS information, various
sensors, road map data, and other related
information for the purposes of navigation.
For more information on GPS, refer to Part
6 ‘GPS Information’.
%HIRUH8VH
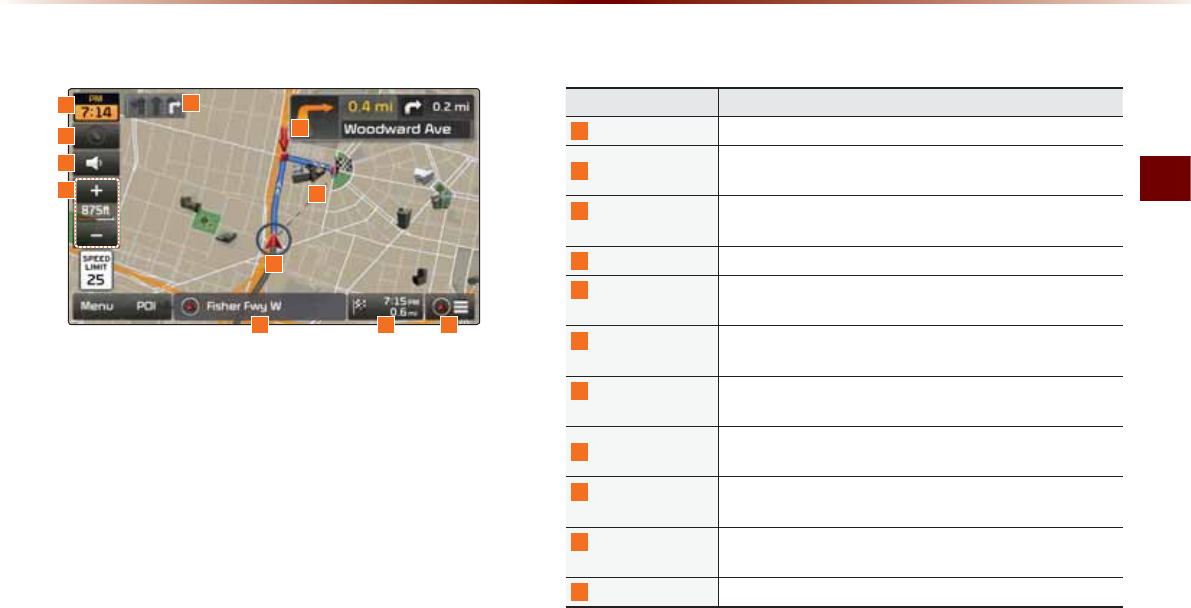
Starting Navigation
Navigation O 3-7
0DS6FUHHQ
6WDUWLQJ1DYLJDWLRQ
7
9
5
11
8
1
2
3
Name Description
1
Current Time Shows the time
2
Map Style Used to set either North up Always or Heading up on both
sides of split screen map
3
Navigation
Guidance Volume Turns the navigation voice guidance ON/OFF
4
Map Scale Adjusts the map scale
5
Current Position
Info Window
Shows current road name and destination name in 5 sec-
ond intervals
6
ETA/Remaining
Time
Shows the ETA (Estimated time of arrival), remaining time
and distance from current position to the destination
7
Route Guidance
Mode
Switches route guidance mode between preliminary guid-
ance mode, Highway mode, and Turn by turn mode
8
Lane Info Shows recommended lanes for use by considering upcom-
ing intersections and expected routes
9
Preliminary
Guidance
Provides distance, direction guidance at turn points and di-
rections within the set route
10
Destination
Direction
Shows straight line distance to destination from current car
position mark
11
Car Position Mark Displays current car position
6
10
4
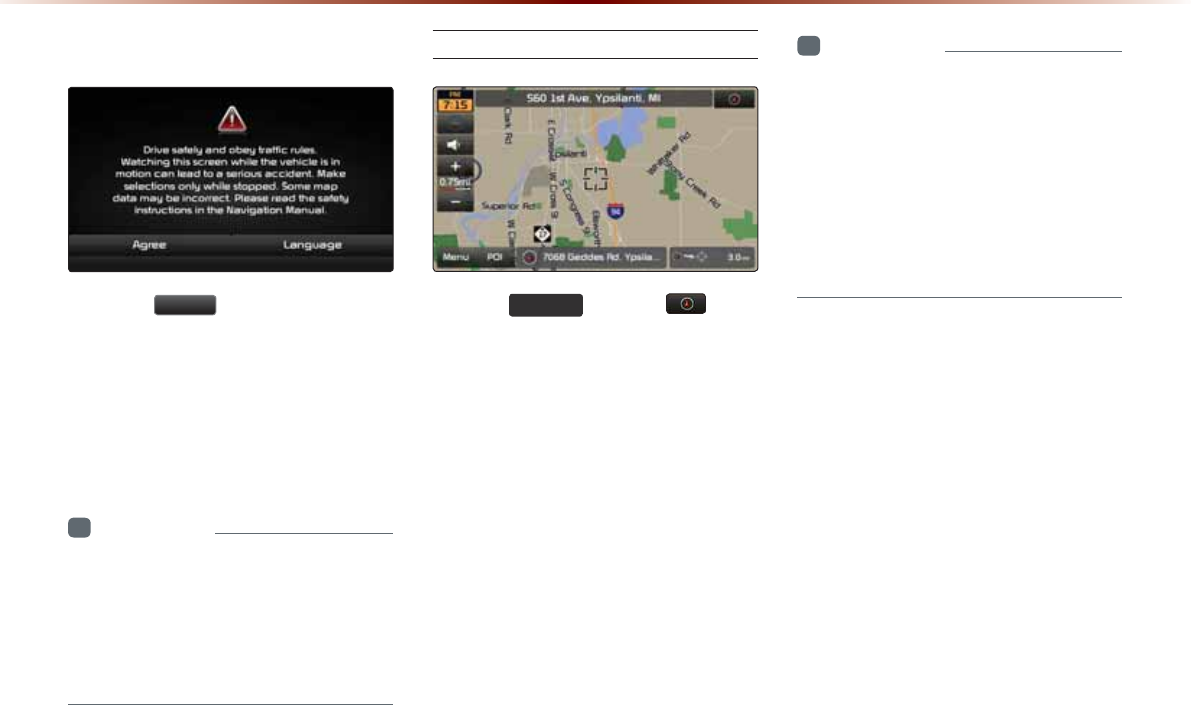
3-8
,QLWLDO6FUHHQ
Press the
$JUHH
button to display the
most recently used mode.
If Audio mode is used with the navigation
turned on, navigation guidance will be
provided in the background. If you turn the
ignition on, then the most recently played
mode will restart.
i
Information
У
Once the vehicle ignition is turned on,
the User Warning screen will always be
displayed. Make sure to carefully read
the warning page as it contains important
information related to system operations
while driving.
Current Position
Press the
0$3
92,&(
key or the button
displayed at the upper right side in some
map conditions to display the map of the
current position and the neighboring area.
i
Information
У
When riding in a new car or after replacing
the battery terminal, the car position mark
may at first appear at a different location.
У
Even if the car position mark on the map is
different, map matching and GPS coordi-
nates are utilized to automatically update
the current position. It may take up to sev-
eral minutes to find your current position.
6WDUWLQJ1DYLJDWLRQ
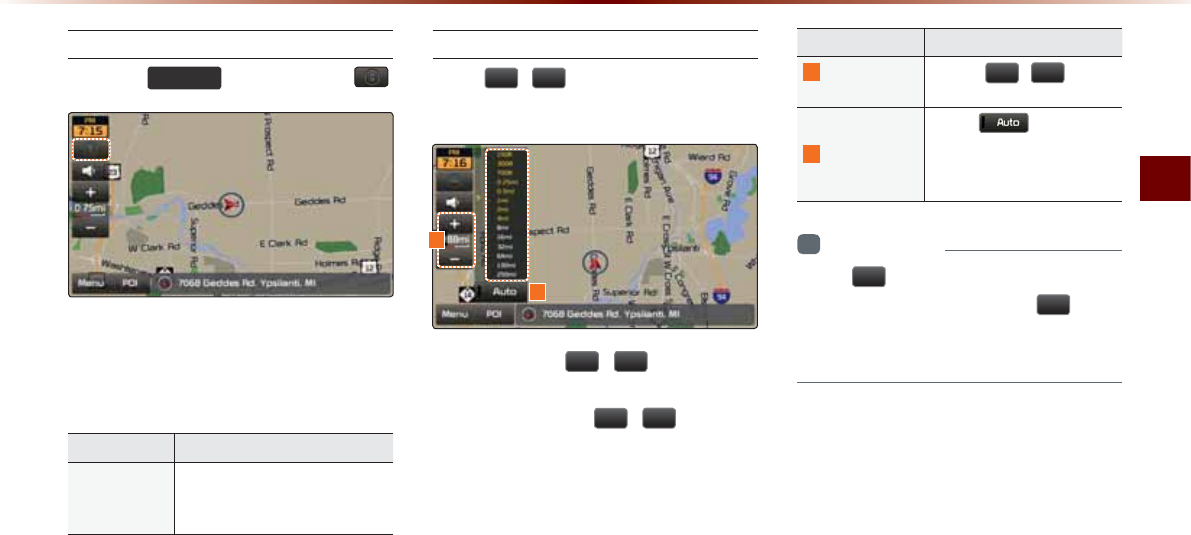
Starting Navigation
Navigation O 3-9
Map Display Settings
Press the
0$3
92,&(
keyƙ Press the .
Each press of this button changes the
direction between Heading-up and
North-up
Name Description
Heading-Up/
North-Up
Display Map in Vehicle Travel-
ing Direction (Heading-Up) or
North-Up direction
Changing Map Scale
Press
/
ƙ Set the desired map
scale.
Press the Scale
/
button to dis-
play a popup showing all scales. To adjust
the scale, press the
/
button or
push the desired scale on the scale pop-
up window.
Name Description
1
Adjust Map
Scale
Use the
/
buttons
to display the scale bar
2
Auto Scale
When is enabled,
map scale automatically
adjusts according to driving
situation
i
Information
У
The
will be disabled when set to
max scale (1/250mi) and the
button
will be disabled when set to min scale
(1/150ft).
2
1

3-10
Map Menu
Press the
0HQX
button.
The Set as Destination, Add Waypoint,
Add to Address Book, Navi Vol. features
can be used.
Some buttons are disabled in states when
they cannot be used.
i
Information
У
The 6HWDV'HVWLQDWLRQ button changes
to 5RXWH2SWLRQ for route recalculation
depending on expected routes and driving
situations.
Adjusting Navigation Volume
Press the
0HQX
button ƙ Press
1DYL9RO
.
Press the button to turn the navi
guidance volume on/off.
Press
0HQX
ƙ
1DYL9RO
button to dis-
play a popup used to adjust volume and
adjust the navi guidance volume to the
desired loudness.
POI Display
Press the
32,
button.
When POI menus are displayed, pressing
one of the 6 POI icon buttons will display
the corresponding POI icons.
Name Description
1
POI Icon Shows/hides corresponding
POIs
2
Unmark All Unmarks selected POI Icons
3
Edit POI Icon Edit the 6 POI icons shown
within the menu
4
Search by
Local POI Searches selected POI
6WDUWLQJ1DYLJDWLRQ
1
2
3
4
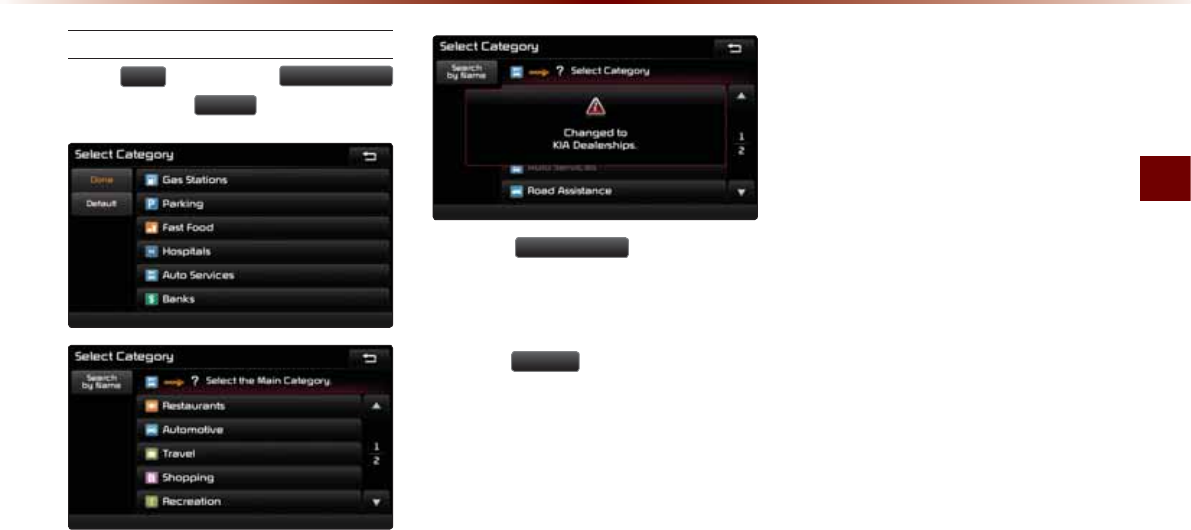
Starting Navigation
Navigation O 3-11
Editing POI Icons
Press
32,
ƙ Press the
(GLW32,,FRQ
button ƙ Press
'RQH
.
Press the
(GLW32,,FRQ
button to select
the desired facility from the various facility
types.
Up to six favorite facilities can be set.
Press the
'HIDXOW
button to reset the dis-
played POI icons.
Initially, Gas Station, Parking, Fast Food,
Hospital, Auto Service, and Bank are set
as default.
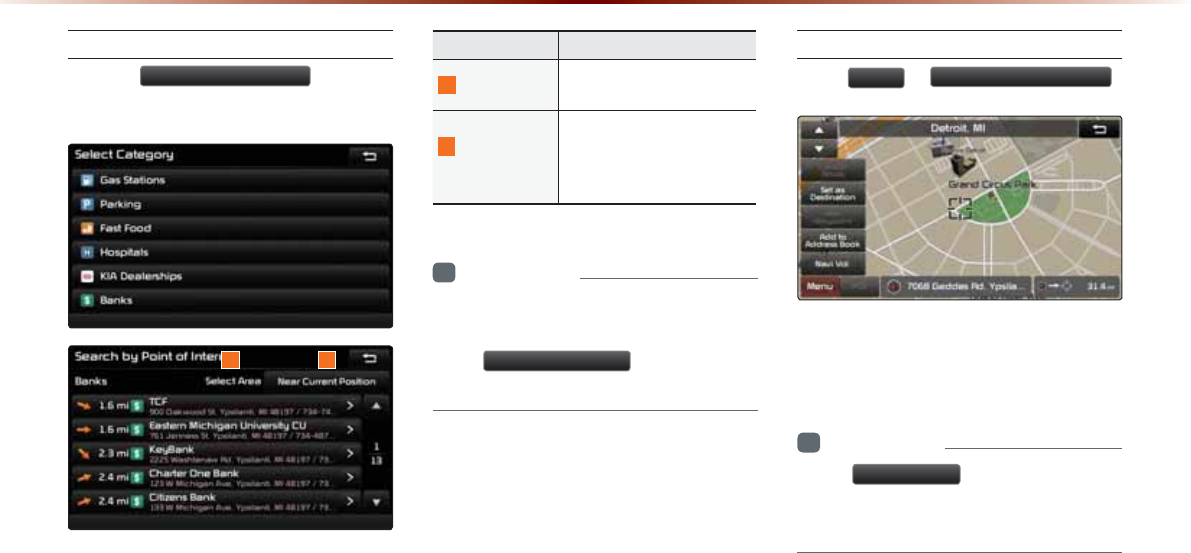
3-12
Searching POIs
Press the 6HDUFKE\ORFDO32, button
.
This feature is used to search nearby POIs.
Name Description
1
Select Area Use the Select Area fea-
ture to change the area.
2
Near Current
Position
Within the ‘Search by POI
menu, searches facilities
based on the current vehicle
positio
i
Information
У
When searching POIs, you can only
search POIs within selected categories.
У
The
1HDUVFUROOPDUN
menu is enabled
only when the map has been scrolled.
Adding a My Place
Press
0HQX
ƙ
$GGWR$GGUHVV%RRN
.
Feature used to save the current position
or scroll position
i
Information
У
The
6SHHG$OHUW
button is displayed
when a point is saved with the speed limit
of the road while driving on the road.
6WDUWLQJ1DYLJDWLRQ
1 2
Using the Navigation
Navigation O 3-13
'HVWLQDWLRQ6HDUFK
8VLQJWKH1DYLJDWLRQ
3
4
1 2
5
9
10 11
6
7 8
12
Name Description
1
Address Used to search destinations by selecting specific
states/cities/roads
2
Previous
Destinations Used for route guidance to recently set destinations
3
Point of Interest
Used to search for neighboring POIs near current
position/near scroll position/near destination/near
city center
4
POI Name Used to search for POIs by name
5
Gas Station Used to search for gas stations
6
Restaurants Used to search for restaurants
7
Emergency Used to make emergency related searches
8
My Places Displays list of saved My Places
9
Phone Number
Used to search destinations by entering POI phone
numbers
10
Intersection
Search
Used to search destinations by selecting street inter-
sections
11
Exit/Entrance
Used to search destinations by searching for ex-
pressway exits/entrances
12
Coordinates Used to search destinations by entering the Lat/
Long coordinates
Press the
'(67
key to display the Destination Search menu
screen.
The Destination Search screen includes various search menus as
well as shortcuts to Favorites that provide maximum convenience in
searching for destinations.

3-14
8VLQJWKH1DYLJDWLRQ
Address
Press the
'(67
key ƙ Press
$GGUHVV
.
Feature used to search destinations
through addresses, including House No.,
Street name, City name, etc.
Enter the name of the Street, City and
State corresponding to the desired destina-
tion. Once search is complete, press the
6HDUFK
button to select the desired loca-
tion from the list.
Previous Destinations
Press the
'(67
key ƙ Press
3UHYLRXV'HVWLQDWLRQ
.
Name Description
1
By Date Sorts POIs and locations by
added date
2
By Name Sorts POIs and locations by
name
3
Delete Items
From various entries, items
can be selected and deleted
all at once
i
Information
У
If the POI or region name is too long and
cannot be displayed within one screen,
pressing the
!
button will move the
name to the left to display the full name.
1
2
3
Using the Navigation
Navigation O 3-15
POI (Point of Interest) Search
Press the
'(67
key ƙ Press
32,
.
This feature is used to search facilities
using POI categories. It is possible to
search through previous search history.
POI Name Search
Press the
'(67
key ƙ Press
32,1DPH
.
Feature used to search facilities by enter-
ing POI names
Use the Select Area and Select Category
features to select the category or area to
conduct searches.
3-16
8VLQJWKH1DYLJDWLRQ
Gas Station
Press the
'(67
key ƙ Press
*DVVWDWLRQ
.
This search feature is used to search des-
tinations by street intersections throughout
the map.
Enter the name of the Street, City and
State corresponding to the desired desti-
nation. Once search is complete, press the
6HDUFK
button to select the desired loca-
tion from the list.
Restaurants
Press the
'(67
key ƙ Press
5HVWDXUDQWV
.
This search feature is used to search des-
tinations by street intersections throughout
the map.
Enter the name of the Street, City and
State corresponding to the desired desti-
nation. Once search is complete, press the
6HDUFK
button to select the desired loca-
tion from the list.
Using the Navigation
Navigation O 3-17
Emergency
Press the
'(67
key ƙ Press
(PHUJHQF\
.
This search feature is used to search for
police stations, hospitals, and dealerships
in emergency situations.
Name Description
1
Police
Station
Displays list of Police Stations
closest to the current position
2
Hospital Displays list of Hospitals clos-
est to the current position
3
Dealership
Displays list of Kia Motor Deal-
erships closest to the current
position
My Places
Press the
'(67
key ƙ Press
0\3ODFHV
ƙ Press
*URXS
.
This search feature is used to search des-
tinations by selecting previously saved My
Places to set as destinations. My Places
can be placed in groups, and group names
can be edited within Setup.
Name Description
1
By Date Sort POIs and locations by date
2
By Name
Sort POIs and locations by
name
3
By Symbol Sort POIs and locations by sym-
bol
4
Delete
Items
From various entries, items can be
selected and deleted all at once
i
Information
У
If the POI or region name is too long and
cannot be displayed within one screen,
pressing the
!
button will move the
name to the left.
У
It is possible to save up to 100 My Places
per Group.
1
1
2
3
4
2 3
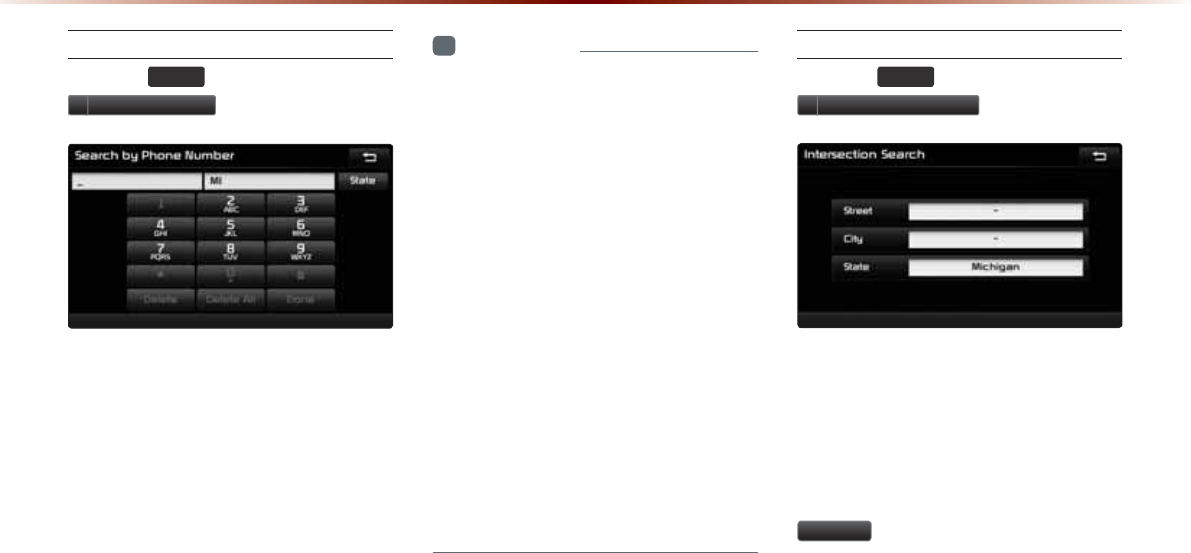
3-18
8VLQJWKH1DYLJDWLRQ
Phone Number
Press the
'(67
key ƙ Press
3KRQH1XPEHU
.
This search feature is used to search the
locations of POIs by entering the phone
number of the desired POI destination.
У Area codes must be entered to complete
the search.
i
Information
У
The phone number and location may
differ for some POIs. In addition, the fol-
lowing types of facilities may be more
frequently located in other locations.
У
Locations of department stores, muse-
ums, and amusement parks may some-
what differ from the set destination.
Check the exact address when trying to
reach such destinations.
У
Within general information newspapers,
there are cases when phone numbers of
concert halls actually list the numbers of
management companies. In such cases,
destination searches will be made to the
management companies.
У
The telephone number and addresses
may change at any time.
Intersection Search
Press the
'(67
key ƙ Press
,QWHUVHFWLRQ6HDUFK
.
This search feature is used to search des-
tinations by street intersections throughout
the map.
Enter the name of the Street, City and
State corresponding to the desired desti-
nation. Once search is complete, press the
6HDUFK
button to select the desired loca-
tion from the list.
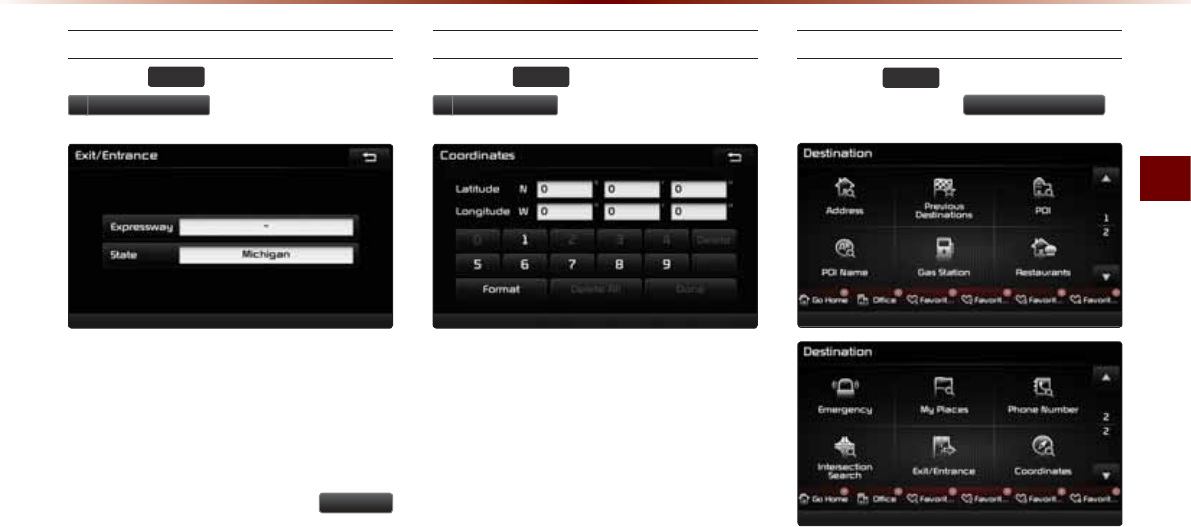
Using the Navigation
Navigation O 3-19
Exit/Entrance
Press the
'(67
key ƙ Press
([LW(QWUDQFH
.
This search feature is used to search
destinations by entering the Exits and
Entrances of corresponding expressways.
Enter the name of the Freeway corre-
sponding to the desired destination. Once
search is complete, press the
6HDUFK
button to select the desired location from
the list.
Coordinates
Press the
'(67
key ƙ Press
&RRUGLQDWHV
.
This search feature is used to search desti-
nations by entering coordinates. Two coor-
dinate entry formats are supported. Select
the desired format upon starting search.
Setting a Destination
Press the
'(67
key ƙ Search for the
Destination ƙ Press
6HWDV'HVWLQDWLRQ
.
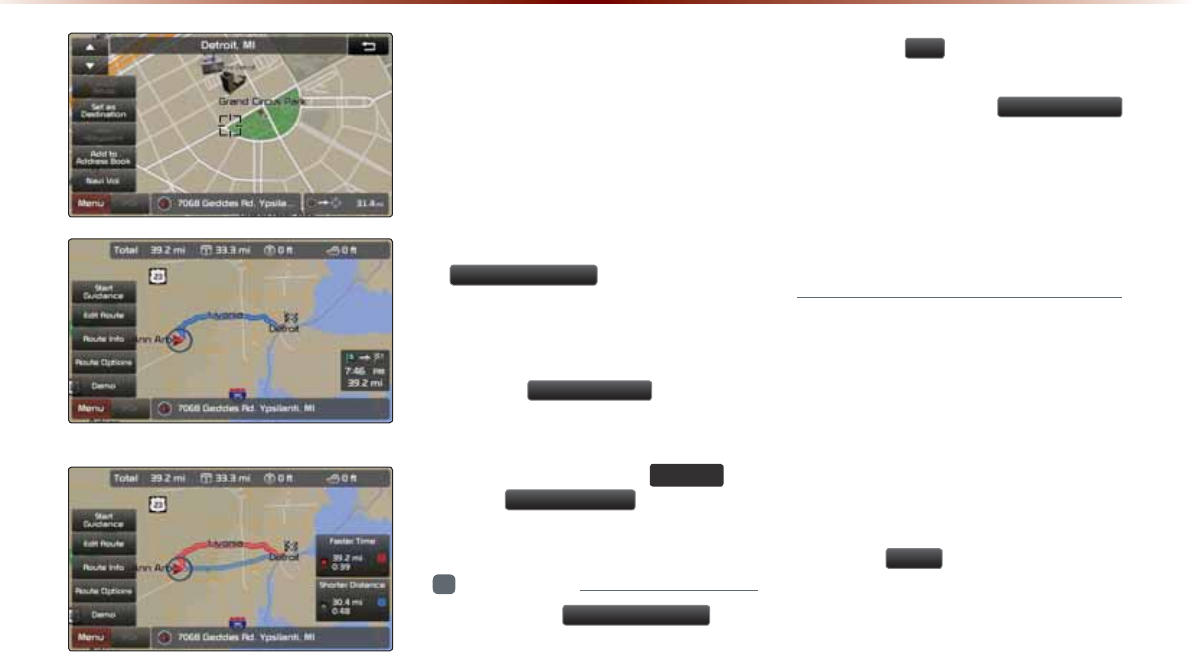
3-20
8VLQJWKH1DYLJDWLRQ
(Alternative Route)
(Route Overview)
У To conduct a destination search through
the desired search method, select the
desired destination from the list. (For
more information on destination search
methods, refer to the ‘Destination
Search’ section.)
У After verifying the location of the
searched destination, press the
6HWDV'HVWLQDWLRQ
button to calcu-
late the route. The Route Overview or
Alternative Route screen will be the dis-
played.
У Press the
$GG:D\SRLQW
button to add
a waypoint destination.
У Within the Route Overview or Alternative
Route screen, press the
0$3
92,&(
key
or the
6WDUW*XLGDQFH
button to start
route guidance.
i
Information
У
If you press the 6HWDV'HVWLQDWLRQ button
while a previous destination has already
been set, the pop-up ‘Replace destina-
tion?’ will be displayed.
У
If you press
<HV
, then the previous des-
tination is deleted and the new destination
will be set. Pressing the
$GG:D\SRLQW
button will add a waypoint destination.
У
After route calculation, the Route
Overview screen or Alternative Route
screen is displayed depending on whether
the “Use Alternative Route Search” fea-
ture is on/off within Navigation settings.
One Touch Scroll Setting
The destination can be set to the current
map display.
У Within the map screen, touching a position
on the map will move the map to the center
of the selected position and display the
scroll mark.
У Press the
0HQX
button to set the selected
position as a waypoint or destination.
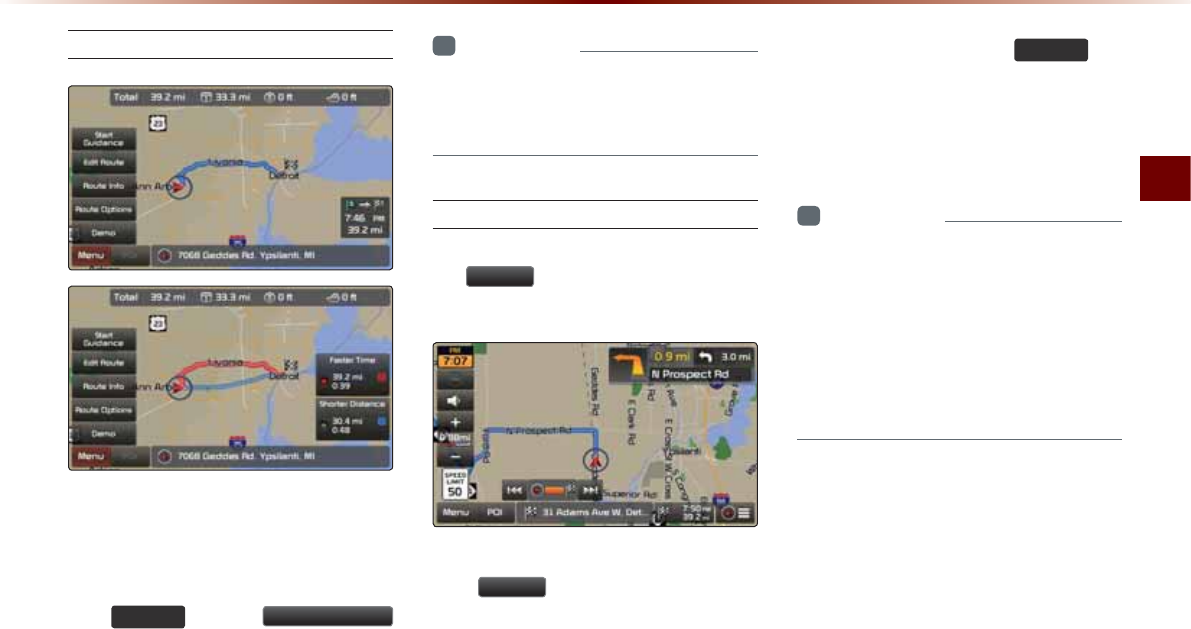
Using the Navigation
Navigation O 3-21
Route Calculation
У Once you have set a destination, calculate
the route. The route overview and route
option menus will be displayed.
У After checking the Route Overview, press
the 0$3
92,&( key or the 6WDUW*XLGDQFH
button or just drive for over 3 mph or for
approximately 5 seconds to start guidance.
i
Information
У
To learn more about ‘Alternative Route’,
‘Route Overview’, or ‘Detailed Route
Settings’ refer to the ‘Route Menu’ section.
Demo
After a route has been calculated, press
the
'HPR
button to begin simulated
driving of the calculated route.
У Within the Route Overview screen, press
the
'HPR
button.
У During Demo, press the
0$3
92,&(
key
to end the demo and display the current
map position. If you start driving while
viewing the route demo, demo will end
and route guidance will start.
i
Information
У
Demo will not operate after starting route
guidance. To use the Demo feature, use
after route calculation but prior to starting
route guidance.
У
During Demo the “Fast/Normal/Auto”
menus are displayed and it is possible to
adjust the demo speed.
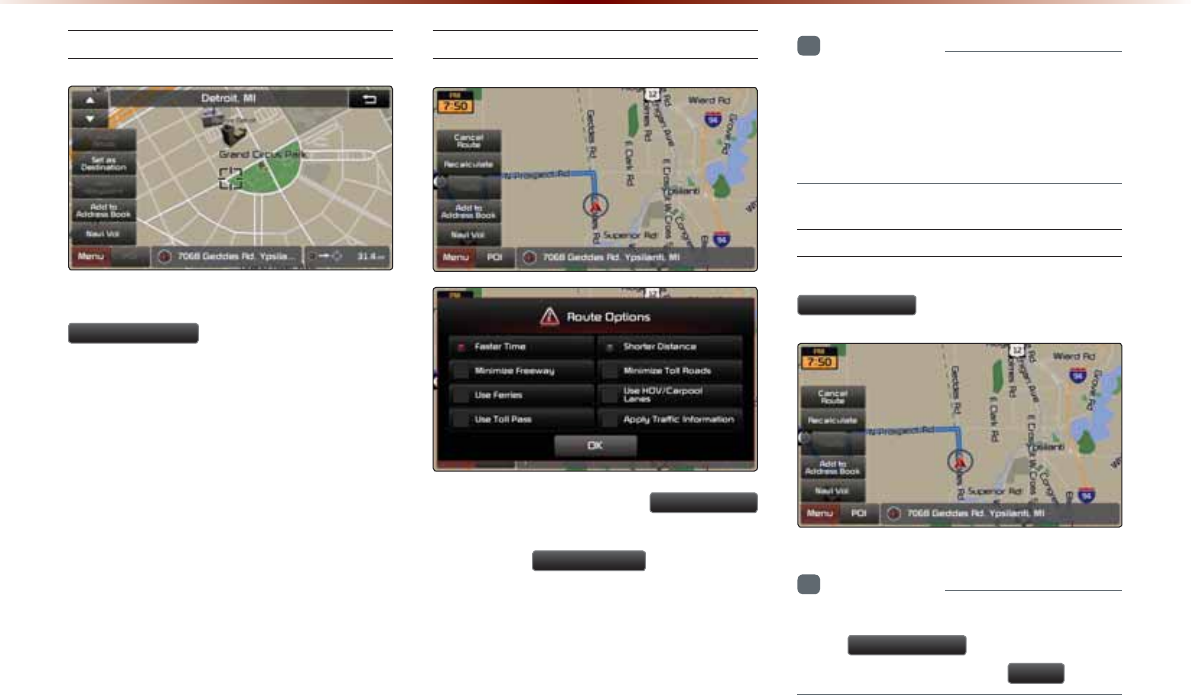
3-22
8VLQJWKH1DYLJDWLRQ
Add Waypoint
After searching for waypoints, press the
$GG:D\SRLQW
button to add the way-
point to the current route.
Route Recalculation
Once a route has been set, the
5HFDOFXODWH
button is displayed at the top of the menus.
Pressing the
5HFDOFXODWH
button will dis-
play a pop-up that allows you to change route
options. Once the settings are changed,
the route is recalculated by reflecting the
changes.
i
Information
У
For more information on Faster Time,
Shorter Distance, and other route calcula-
tion options, refer to the route calculation
section.
Cancel Route
In the Map menu screen, press the
&DQFHO5RXWH
button.
i
Information
У
You can cancel the route by pressing
the
&DQFHO5RXWH
button that is dis-
played after pressing the
0HQX
button.

Using the Navigation
Navigation O 3-23
5RXWH*XLGDQFH
Preliminary guidance, highway mode, turn
list guidance, and other guidance screens
are displayed according to the current road
condition.
Within the guidance map screen, if the cur-
rent position is on route, then intersection
guidance will be provided once you are
nearby an intersection.
Also, the intersection zoom screen is dis-
played when nearby an intersection.
i
Information
У
Within all guidance mode screens, press-
ing the button at the bottom right side of
the screen will change the route guidance
mode.
У
Each time the button is pressed, the guid-
ance mode will change in order of prelimi-
nary guidance Ċ turn list Ċ highway guid-
ance mode. (The icon within the button
indicates the mode that will be displayed
upon next press.)
У
Highway and intersection zoom guidance
are displayed during guidance at corre-
sponding roads.
Preliminary Guidance Mode
At the top right side of the screen, the next/
after next turn info, remaining distance,
direction, and other information are dis-
played.
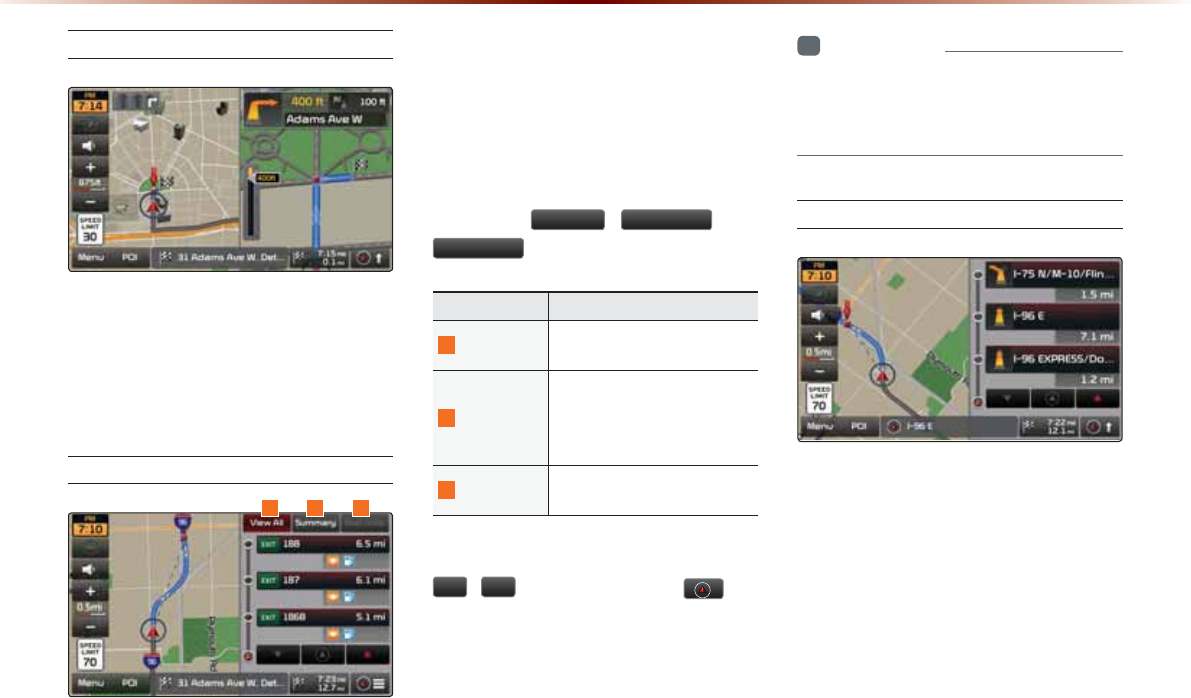
3-24
8VLQJWKH1DYLJDWLRQ
Intersection Zoom Mode
This mode provides detailed guidance
nearby intersections before the next turn.
This mode is displayed starting from 0.5mi
before the intersection.
Highway Mode
Upon entering a highway during route guid-
ance, the highway mode will automatically
be displayed. This mode is displayed when
driving on a highway and mainly displays
highway related POIs.
You can check information for various POIs
by using the
9LHZ$OO
,
6XPPDU\
, and
5HVW$UHD
buttons.
Name Description
1
View All Guidance for all POIs on the
highway
2
Summary
Shows list of turn points and
other directional route
guidance while driving within
highway
3
Rest Area Guidance for only the rest ar-
eas on the highway
When scrolling through POIs by using the
Ԣ
,
Ԟ
buttons, pressing the
but-
ton will select the POI closest to the cur-
rent position.
i
Information
У
When there are more than four POI marks
that can be listed, some POIs may be
omitted and not displayed.
Turn List Mode
Turn List Mode shows turn information on
the current route.
123
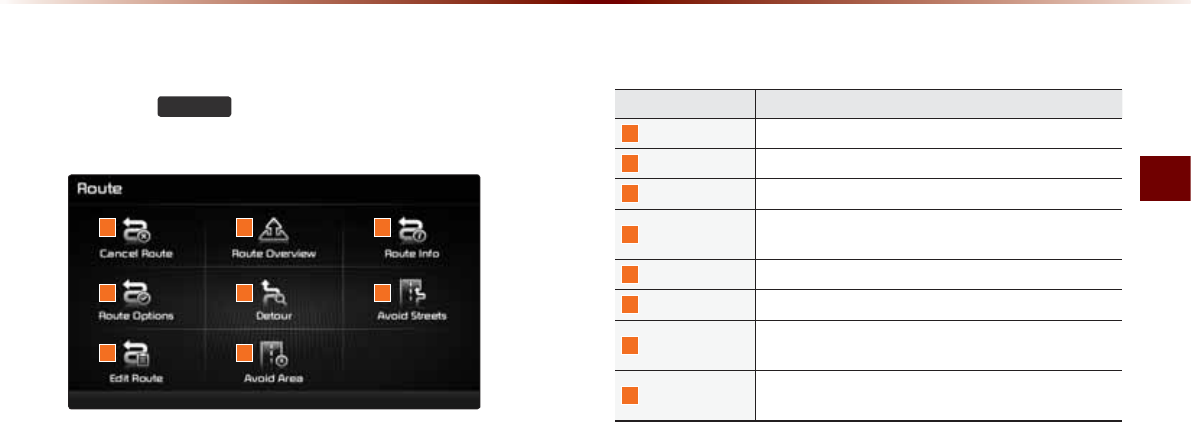
Using the Navigation
Navigation O 3-25
5RXWH0HQX
Press the
5287(
key to use, edit, or optimize
various route options.
Name Description
1
Cancel Route Cancels the currently set route
2
Route Overview Shows the route overview to the set destination
3
Route Info Shows detailed info for the current route
4
Route OptionsRoute calculation settings with various options for cal-
culating a route
5
Detour Used to select and edit detour road/streets
6
Avoid Streets Used to edit the route by avoiding streets
7
Edit Route Used to add/delete/change the order of destinations/
waypoints
8
Avoid Area
Used to edit route by adding Avoid Areas/Editing Avoid
Areas and Deleting Avoid Areas
1
4
7
2
5
8
3
6
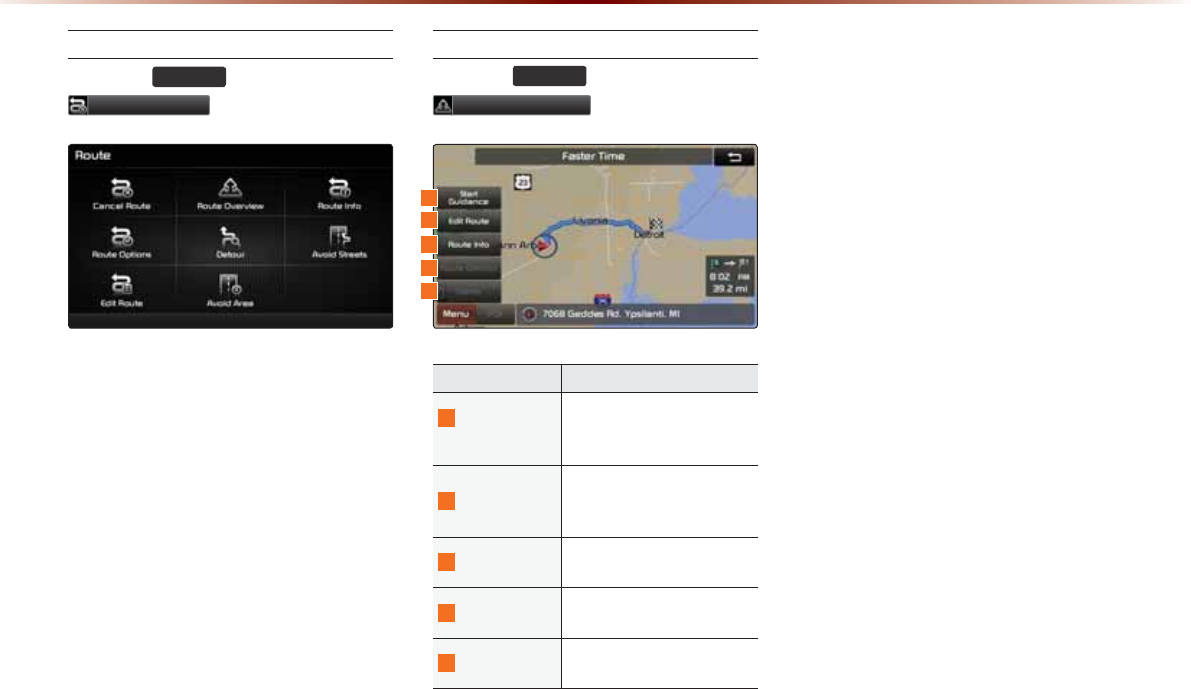
3-26
8VLQJWKH1DYLJDWLRQ
Cancel Route
Press the
5287(
key
ƙ Press
&DQFHO5RXWH
.
Route Overview
Press the
5287(
key ƙ Press
5RXWH2YHUYLHZ
.
Name Description
1
Start
Guidance
Starts guidance to the set
Route/Displays the current
vehicle position
2
Edit Route
Used to add/delete/change
order of destinations/ way-
points
3
Route Info Shows route info to the set
destination
4
Route Options Used to set route calculation
options
5
Demo
Starts demo to the set desti-
nation
Within the Overview screen, buttons that
cannot be used are disabled.
1
3
2
4
5
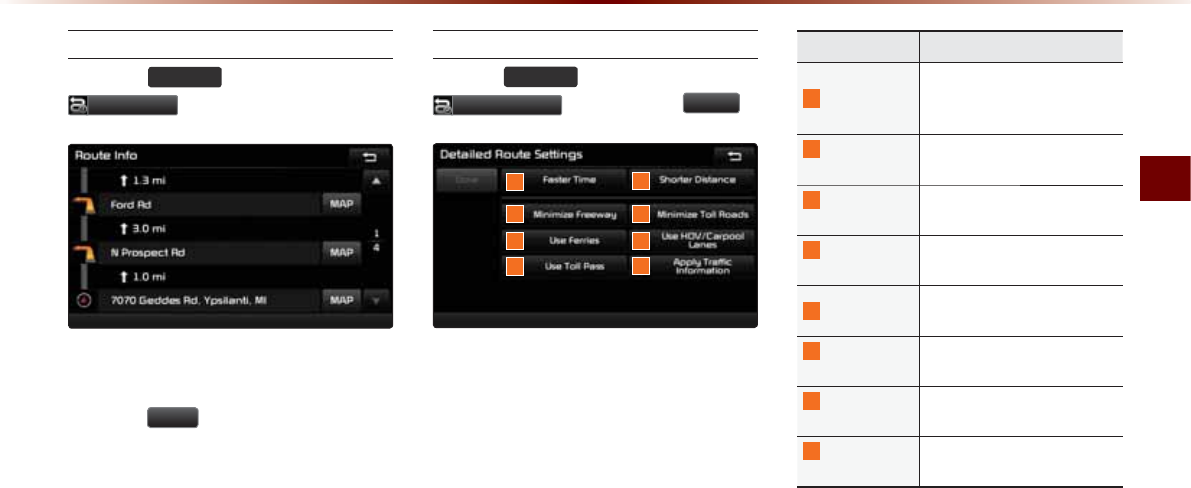
Using the Navigation
Navigation O 3-27
Route Info
Press the
5287(
key ƙ Press
5RXWH,QIR
.
The turn points and distance information
by
key roads within the set route are displayed.
Press the
0$3
button next to each road
name to display the map position for the
corresponding location.
Route Option
Press the
5287(
key ƙ Press
5RXWH2SWLRQ
ƙ Set and press
'RQH
.
1
3
5
2
4
7
6
Route Options refer to conditions used to
calculate the route to the destination. The
route is automatically recalculated if the
route options and detailed route settings
are changed.
Name Description
1
Faster Time
(CUVGTVKOGTQWVGVJCVTGƀGEVU
distance and traffic condi-
tions
2
Shorter
Distance
The shortest distance from
start point to the destination
3
Minimize
Freeway
Route calculation with mini-
mal use of highway
4
Minimize Toll
Roads
Route calculation with mini-
mal use of toll roads
5
Use Ferries Route calculation by includ-
ing use of ferries
6
Use HOV/
Carpool Lanes
Route calculation by includ-
ing use of carpool lanes
7
Use Toll
Pass
Route calculation by includ-
ing use of Toll Pass
8
#RRN[6TCHſE
Information
1RVKQPVJCVCRRNKGUVTCHſEKP-
formation to calculate routes
8
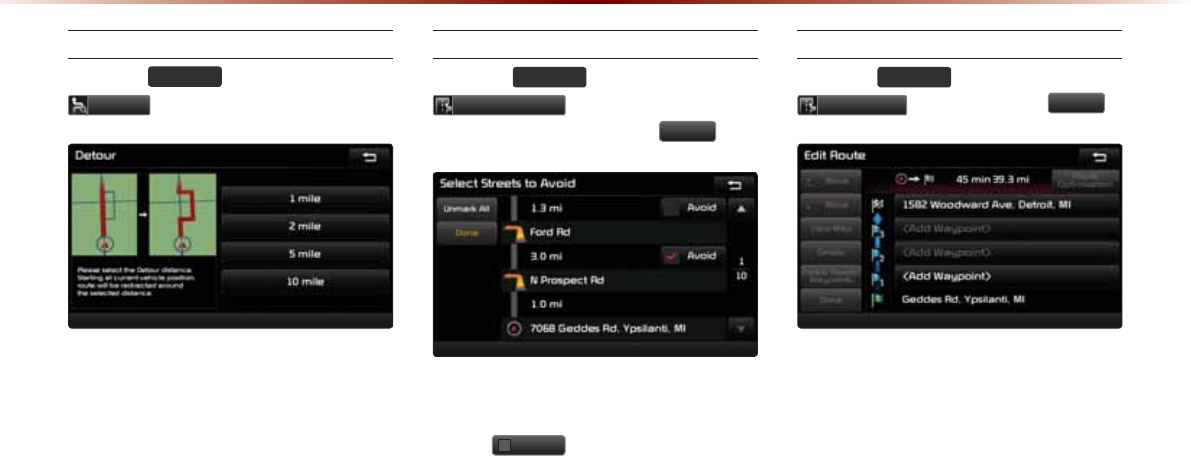
3-28
8VLQJWKH1DYLJDWLRQ
Detour
Press the
5287(
key ƙ Press
'HWRXU .
The Detour menu is used to redefine the
route by setting a detour to a certain dis-
tance from the current position.
Avoid Streets
Press the
5287(
key ƙ Press
$YRLG6WUHHWV
ƙ Select the streets
you want to avoid and press
'RQH
.
This feature is used to select specific
streets to avoid within the current route.
Select
$YRLG
to avoid the particular
streets in the route overview that are
desired to be avoided.
Edit Route
Press the
5287(
key ƙ Press
(GLW5RXWH
ƙ Set and press
'RQH
.
The Edit Route menu displays the start
point, waypoints, and the destination in list
format and is used to edit corresponding
positions or the order of destinations within
the route.

Using the Navigation
Navigation O 3-29
Avoid Area
Press the
5287(
key ƙPress
$YRLG$UHD
ƙ Set and press
'RQH
.
This feature is used by creating a rectangle
over the area to avoid.
An area set as an avoid area is excluded
from the calculated route. If a route had
been calculated prior to creating an avoid
area, the route will automatically be recal-
culated.
The screen will prompt to select the first
corner of the square of the avoid area, fol-
lowed by the second corner.
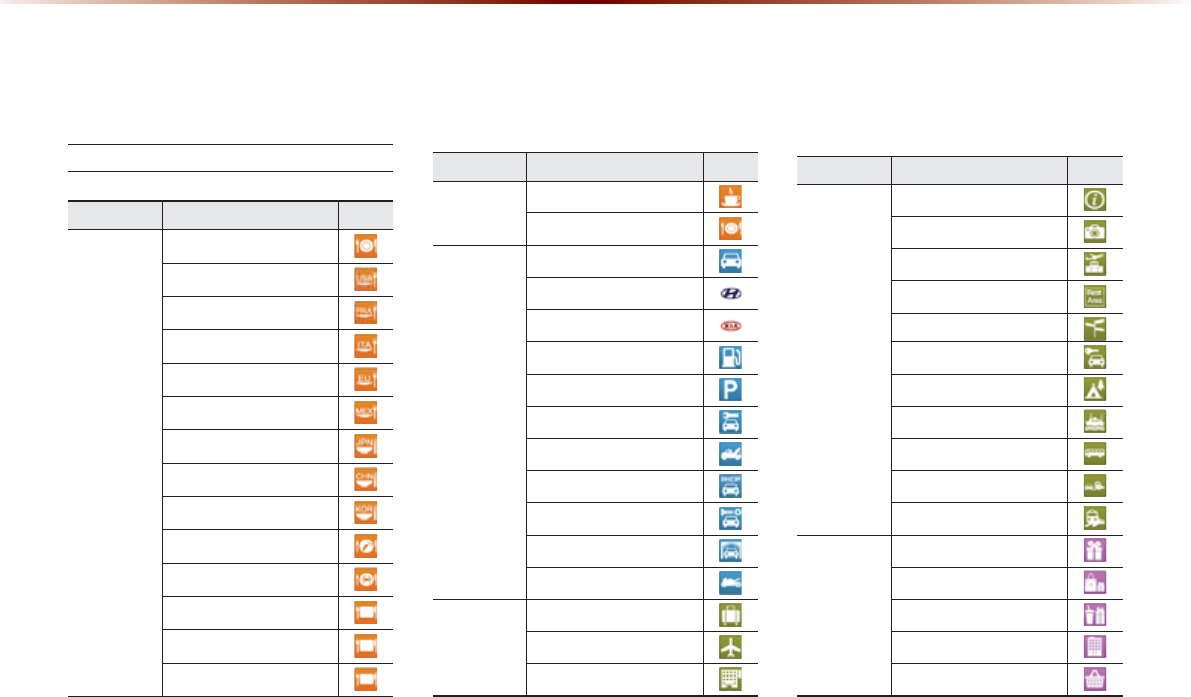
3-30
These are landmark and logo icons that display facilities within 2D map mode. The size of the
symbol may be displayed differently according to the map scale. Symbols may change without
prior notice during map updates. Symbols shown within the manual represent a portion of all sym-
bols and shou as a reference.
/RJR/DQGPDUNV
Category Sub-category Icon
Restaurants
Restaurants
American
French
Italian
Continental
Mexican
Japanese
Chinese
Korean
Vegetarian Food
Seafood
Latin American
Asian
African
Logo
Category Sub-category Icon
Restaurant Coffee Shop
Others
Automotive
Automotive
Hyundai Dealerships
Kia Dealerships
Gas Stations
Parking
Auto Services
Road Assistance
Automotive Dealerships
Auto Parts
Car Washes
Motorcycle Dealerships
Travel
Travel
Airports
Hotels
Category Sub-category Icon
Travel
Tourist Information
Tourist Attractions
Travel Agents
Rest Areas
City Centers
Rental Car Agencies
Campgrounds
Ferry Terminals
Bus Stations
Local Transit
Train Stations
Shopping
Shopping
Department Stores
Convenience Stores
Shopping Centers
Grocery Stores
0DS/RJRVDQG/DQGPDUNV
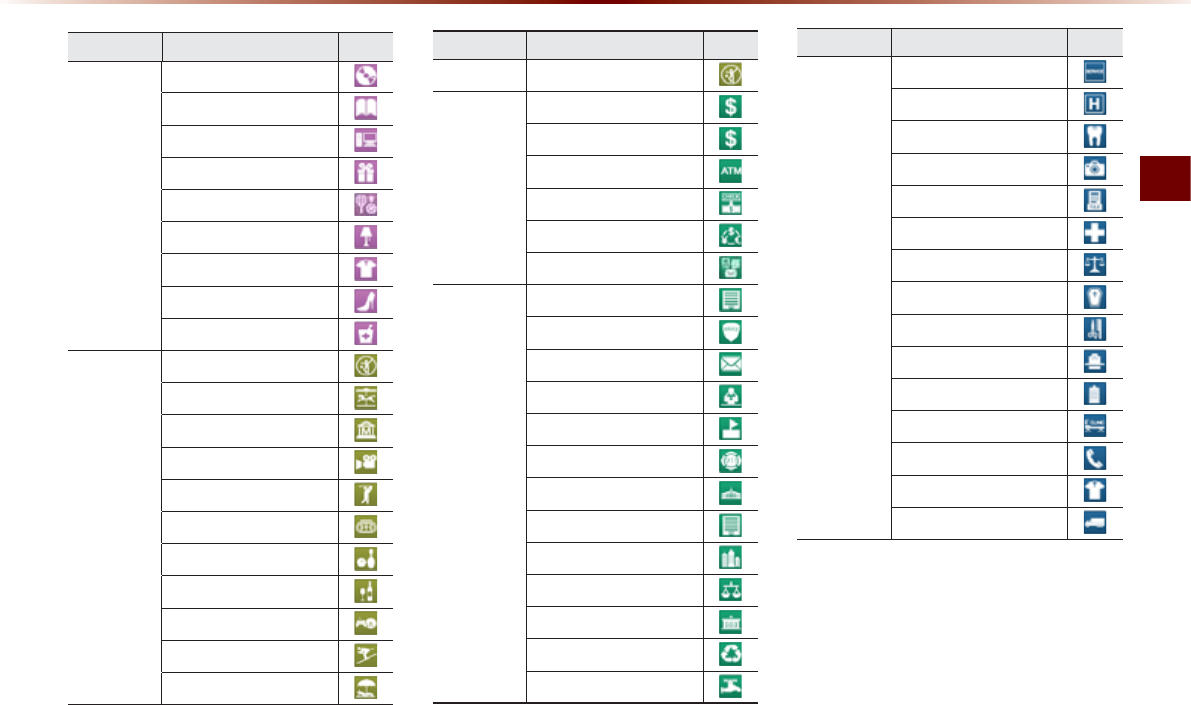
Map Logos and Landmarks
Navigation O 3-31
Category Sub-category Icon
Shopping
Music Store
Bookstore
Electronics
Gifts
Sporting Goods
Home Specialty Store
Clothing
Shoe Store
Pharmacies
Recreation
Recreation
Amusement Park
Museum
Cinema
Golf Course
Sports Complexes
Sports Activities
Wineries
Video & Game Rental
Ski Resort
Recreation Area
Category Sub-category Icon
Recreation Other Recreation Areas
Financial
Service
Financial Services
Banks
ATMs
Check Cashing Services
Money Transfer
Business Facilities
Community
Community
Police Stations
2QUV1HſEGU
Libraries
Schools
Fire Departments
Convention Centers
City Halls
Civic Centers
Court Houses
)QXGTPOGPV1HſEGU
Waste & Sanitary
Utilities
Category Sub-category Icon
Services
Services
Hospitals
Dentists
Photography
Tax Services
Medical Services
Attorneys
Funeral Homes
Hair & Beauty
Cleaning & Laundry
Social Services
Physicians
Communication
Tailors & Alterations
Movers

3-32
2D Landmarks
Category Sub-category Icon
Airport
Park
Golf course
University
SHOPPING CENTER
Industrial Complex
Hospital
Cemetery
Sports Complex
Emergency Service
Building
2QUV1HſEG$WKNFKPI
Amusement park
Animal Park
HATCI
0DS/RJRVDQG/DQGPDUNV

&$508/7,0(',$6<67(0
%OXHWRRWKp
+DQGVIUHH
У
Before Use
У
Basic Mode Screen
У
Using
Bluetooth
®
Wireless Technology

4-2
%HIRUH8VH
%HIRUH8VLQJWKH
%OXHWRRWKp+DQGVIUHH
What is Bluetooth® Wireless
Technology?
Bluetooth®
Wireless Technology refers
to a short-distance wireless networking
technology which uses a 2.45GHz fre-
quency to connect various devices
within a certain distance.
Supported within PCs, external devices,
Bluetooth® phones, PDAs, various elec-
tronic devices, and automotive environ-
ments,
Bluetooth®
Wireless Technology
to be transmitted at high speeds without
having to use a connector cable.
Bluetooth® Handsfree refers to a device
which allows the user to conveniently
make phone calls with Bluetooth®
mobile phones through the multimedia
system.
The Bluetooth® Handsfree feature may
not be supported in some mobile
phones. For more information on mobile
phone compatibility, visit the Kia Motor
website. (http://www.kia.com)
CAUTION
У Bluetooth® Handsfree is a feature that
enables drivers to conveniently make calls,
Connecting the head unit with a Bluetooth®
phone allows the user to conveniently make
calls, receive calls, and manage the phone
book. Before using
Bluetooth®
Wireless
Technology, carefully read the contents of
this user’s manual.
У Excessive use or operation while driving
may lead to negligent driving practices and
be the cause of accidents. Do not operate
the device when unsafe or illegal to do so.
У Viewing the screen for prolonged periods
of time is dangerous and may lead to
accidents. When driving, view the screen
only for short periods of time and only
when safe to do so.
Bluetooth® Handsfree O 4-3
Before Use
CAUTION
У Before connecting the head unit with
the mobile phone, check to see that the
mobile phone supports Bluetooth® fea-
tures.
У Even if the phone supports
Bluetooth®
Wireless Technology, the phone will not
be found during device searches if the
phone has been set to hidden state or the
Bluetooth® power is turned off.
Disable
the hidden state or turn on the Bluetooth®
power prior to searching/connecting with
the head unit.
У If Auto Connection is used, the Bluetooth®
phone is automatically connected when
the ignition is turned on, making it unnec-
essary to have to connect the phone with
the head unit every time.
У If you do not want automatic connec-
tion with your Bluetooth® device, turn the
Bluetooth® feature off of the Bluetooth®
device.
У To set Auto Connection, go to
6(783
ƙ
6HWXS
ƙ
3KRQH
ƙ
%OXHWRRWK&RQQHFWLRQ
ƙ
$XWR&RQQHFWLRQ
.
У The car name can be set at
6(783
ƙ
6HWXS
ƙ
3KRQH
ƙ
'HYLFH,QIRUPDWLRQ
.
У The passkey needed to connect the
mobile phone can be verified/changed at
6(783
ƙ
6HWXS
ƙ
3KRQH
ƙ
&KDQJH3DVVNH\
.
У If the Bluetooth
®
audio does not play, go
to
6(783
ƙ
6HWXS
ƙ
3KRQH
ƙ
$XGLR6WUHDPLQJ6HWWLQJ
. If the
feature is set to
2II
, turn
2Q
and
try again.
У Park the vehicle when connecting the head
unit with the mobile phone.
У Bluetooth®
connection may become inter-
mittently disconnected in some mobile
phones. Follow these steps to try again.
1. Turn the Bluetooth
®
function within the mobile
phone OFF/ON and try again.
2. Turn the mobile phone power OFF/ON and try
again.
3. Completely remove the mobile phone battery,
reboot, and then again.
4. Reboot the multimedia system and try again.
5. Delete all paired devices, pair and try again.
У The handsfree call volume and qual-
ity may differ depending on the mobile
phone.
У Pairing Bluetooth® devices and use of
other Bluetooth® features are not sup-
ported when the vehicle is in motion.
Please first park your vehicle.
У When downloading contacts, phenom-
enon not described within this user’s
manual may be related with the mobile
device. When such occurs, inquire within
the mobile phone manufacturer.
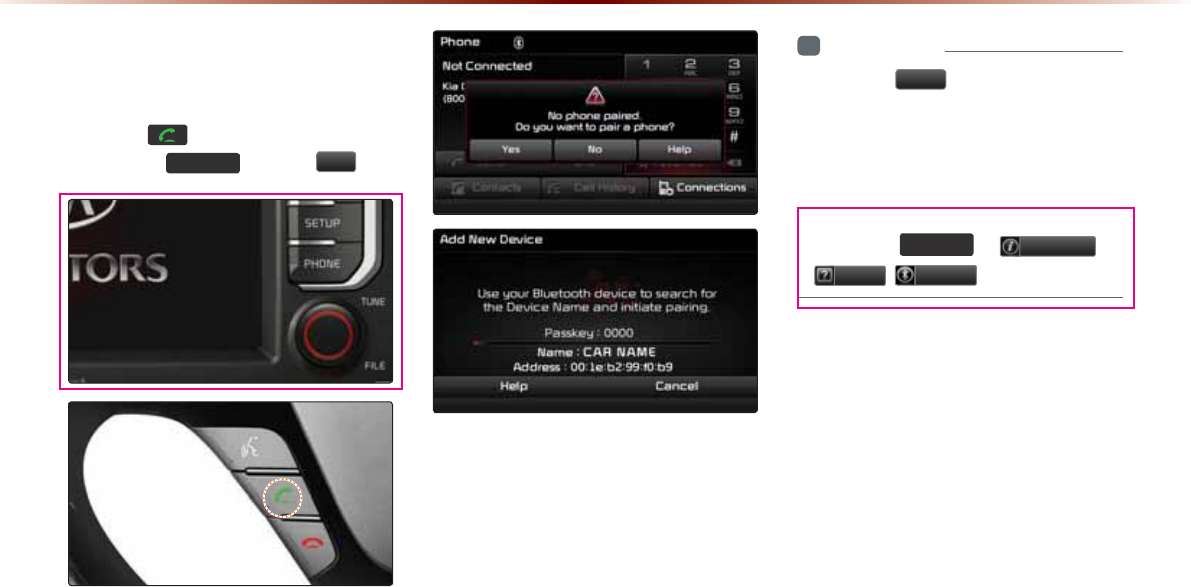
4-4
%DVLF0RGH6FUHHQ
:KHQQR3KRQHV+DYH
%HHQ3DLUHG
Press the key on the steering wheel
or press the
3+21(
ƙ Press
<HV
.
-
i
Information
У
Press the
+HOS
button within the pop-
up to view the help section with informa-
tion related to pairing and connecting
Bluetooth® devices and using Handsfree
related features.
У
The same Help section can be viewed
by going to
6(783
ƙ
,QIR892
ƙ
+HOS
3KRQH
.
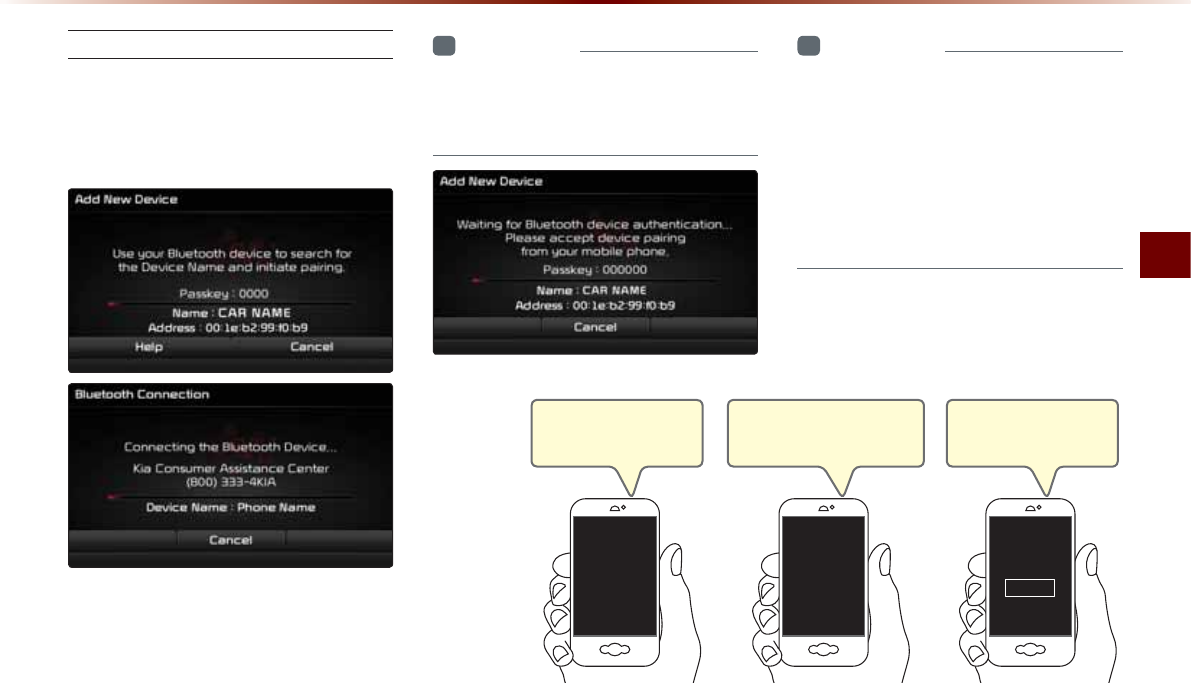
Basic Mode Screen
Bluetooth® Handsfree O 4-5
Pairing from the Bluetooth® Device
In the Search from Device screen
ƙ Search for the car name and pair
the device ƙ Enter the Passkey ƙ
Bluetooth® becomes connected.
From the Bluetooth® device, search for the
car name and pair the device.
When searching from the Bluetooth®
device, the car name is KIA MOTORS and
the default passkey is '0000'.
i
Information
У
If phone supported SSP, check the pass-
key on your Bluetooth® device and con-
firm the authentication.
i
Information
У
To learn more about searching from
Bluetooth® devices and pairing, refer to
the user's manual for your Bluetooth®
device.
У
Bluetooth® devices cannot be paired
when the vehicle is in motion. first park
the vehicle to pair a Bluetooth® device.
Step 1)
Turn on the Bluetooth on
your phone
Bluetooth
On
Step 2)
Search and select device “Car
Name” in Bluetooth menu.
Car Name Passkey
0000
Step 3)
Enter the passkey ‘0000’
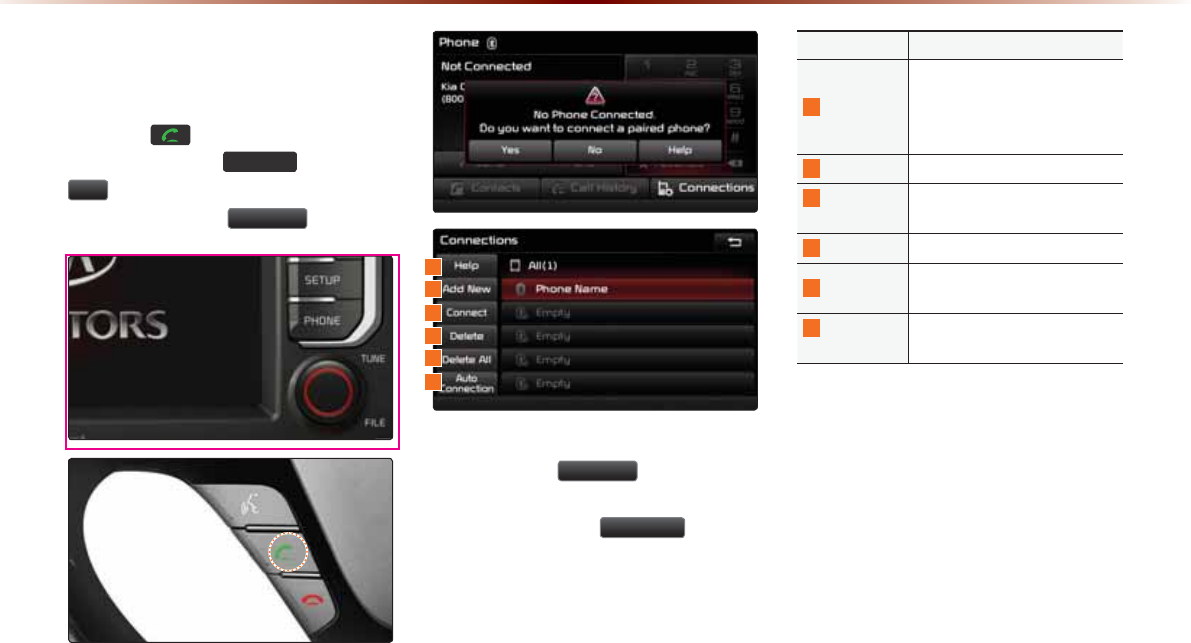
4-6
:KHQD3KRQHLV$OUHDG\
3DLUHG
Press the key on the steering
wheel or press the
3+21(
ƙ Press
<HV
ƙ Select the device from the
device list ƙ Press
&RQQHFW
.
У Select the device you want to connect
and press the
&RQQHFW
button.
У If the phone you want to connect does
not exist, press the
$GG1HZ
button to
pair a new Bluetooth® device.
Name Description
1
Help
Help section related to pairing
and connecting/disconnecting
Bluetooth® devices and Hands-
free phone features
2
Add New Pair a new Bluetooth® device
3
Connect/
Disconnect
Connect or disconnect a
Bluetooth® device
4
Delete
Delete a paired Bluetooth
®
device
5
Delete All Delete all paired Bluetooth®
device
6
Auto
Connection
Set Bluetooth® auto-connection
when car ignition is turned on
%DVLF0RGH6FUHHQ
1
2
3
4
5
6

Basic Mode Screen
Bluetooth® Handsfree O 4-7
When Pairing Additional Device
Press the
$GG1HZ
button to pair a new
Bluetooth® device.
For more information on pairing, refer to
the 'When no phones have been paired'
section.
i
Information
У
When a Bluetooth® device is connected, a
new device cannot be paired. If you want
to pair a new phone, first disconnect the
connected Bluetooth® device.
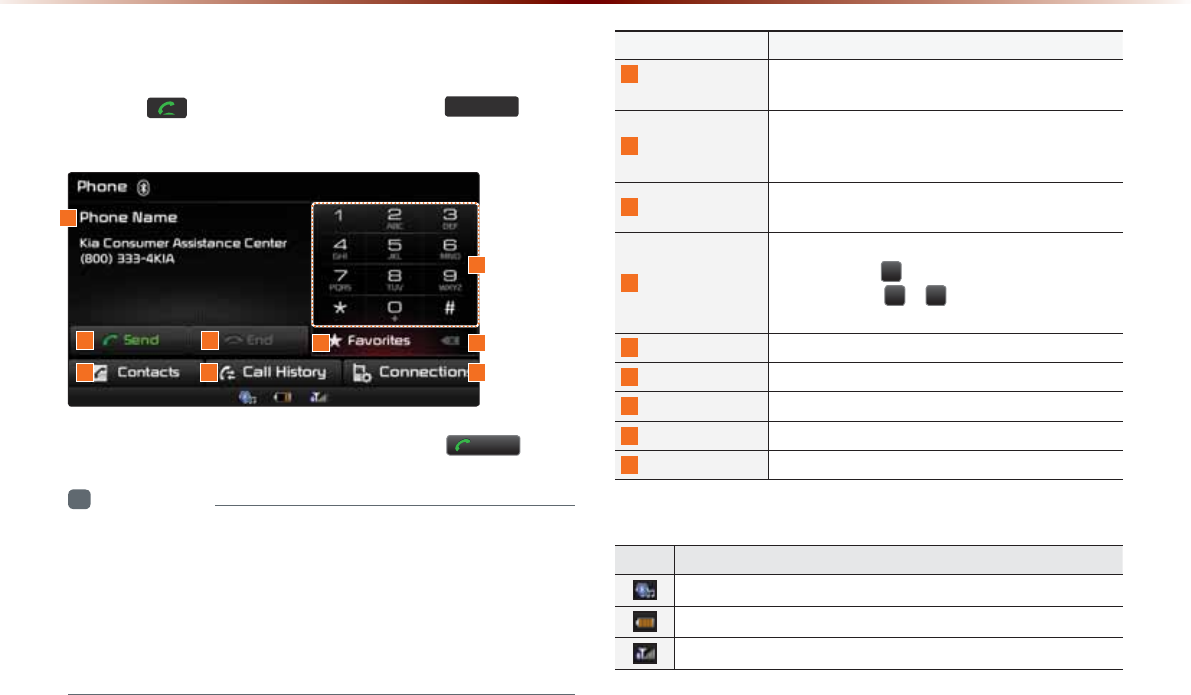
4-8
8VLQJ
%OXHWRRWKq
:LUHOHVV7HFKQRORJ\
:KHQ7KHUHLVD&RQQHFWHG'HYLFH
Press the key on the steering wheel or the
3+21(
key on
the head unit to display the following screen.
Enter the phone number you wish to call and press the
6HQG
button.
i
Information
У
The mobile phone battery and signal strength icons may not be sup-
ported in some mobile phones.
У
The remaining battery level displayed on your mobile phone battery
icon may slightly differ with the device display.
У
The speed dial feature may not be supported in some mobile
phones.
1
2
7 9
3
8
5 6
4
Name Description
1
Info Display
Window
Displays name of currently connected device and
number of Kia Consumer Assistance Center
2
Send
If no number has been entered, switches to call
history screen If a number has been entered, calls
the number
3
End If a number has been entered, deletes the number
During a call, ends the current call
4
Dial Pad
Used to enter the phone number
Press and hold to enter a '+'
Press and hold ~ to connect to the speed
dial saved within the mobile phone
5
Favorites Displays the Favorites list screen
6
Delete Deletes entered numbers one digit at a time
7
Contacts Displays contacts list screen
8
Call History Displays recent call history
9
Connections Displays the Bluetooth® device Connections screen
Name Description
A state when Bluetooth® Handsfree and streaming Audio is all connected
Displays the remaining battery for the connected Bluetooth® device
Displays the call signal strength
6WDWXV%DU,FRQV
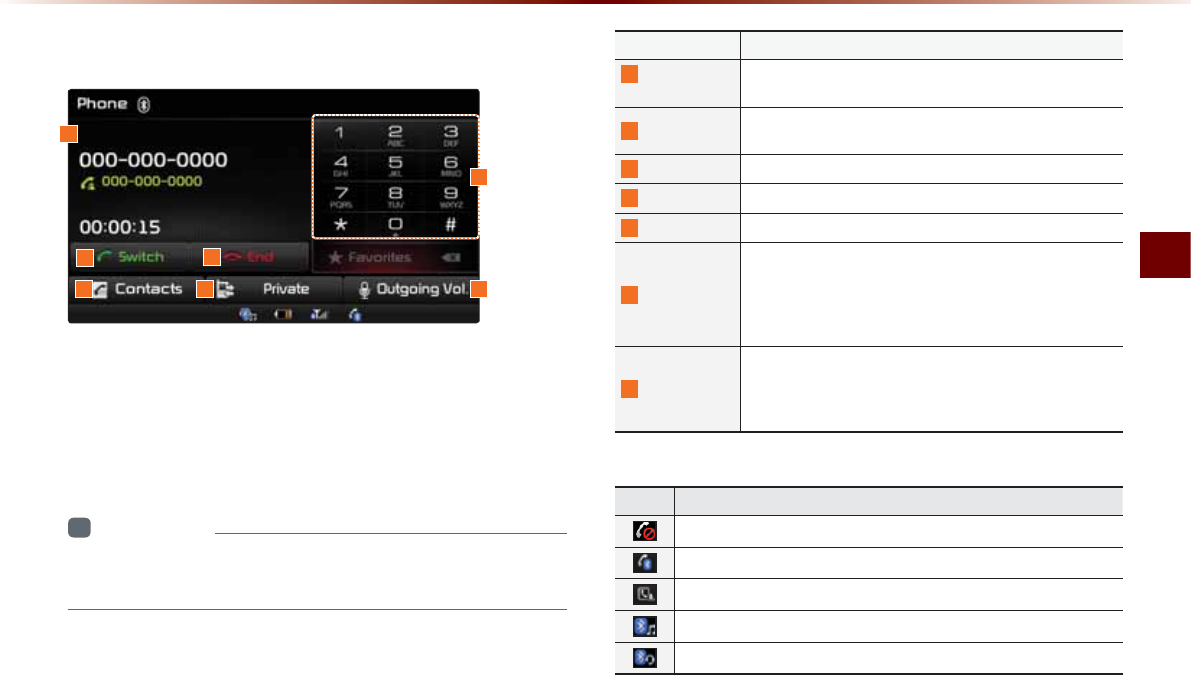
Using
Bluetooth
®
Wireless Technology
Bluetooth® Handsfree O 4-9
'XULQJD&DOO
The name of the other party is displayed if the number is saved
within your contacts. If not, only the phone number is displayed.
During a call, the other party's name/number and the call time are
displayed.
i
Information
У
The telephone number may not be displayed in some mobile
phones.
Name Description
1
Info Display
Window
Displays other party's name/number
If there is a waiting call, displays the call waiting information
2
Switch
If there is a call waiting, switches the current call and con-
nects the waiting call
3
End
Ends call
4
Dial Pad
Used to enter phone number
5
Contacts
Displays the Contacts screen
6
Private
During a handsfree call, this function is used to switch the
call to the mobile phone
Upon switching the call to Private, the vehicle mic and
speaker will turn off to allow a private conversation
through the mobile phone
7
Outgoing Vol.
Adjusts outgoing volume during calls
Sets call volume as heard by the other party (Levels 0~5)
The outgoing volume may be heard differently depending
on the connected Bluetooth® device
1
2
5 76
3
4
Name Description
Mutes call volume
Bluetooth® phone call
Mobile phone contacts or call history download status
State when Bluetooth® streaming Audio is connected
State when Bluetooth® Handsfree is connected
6WDWXV%DU,FRQV
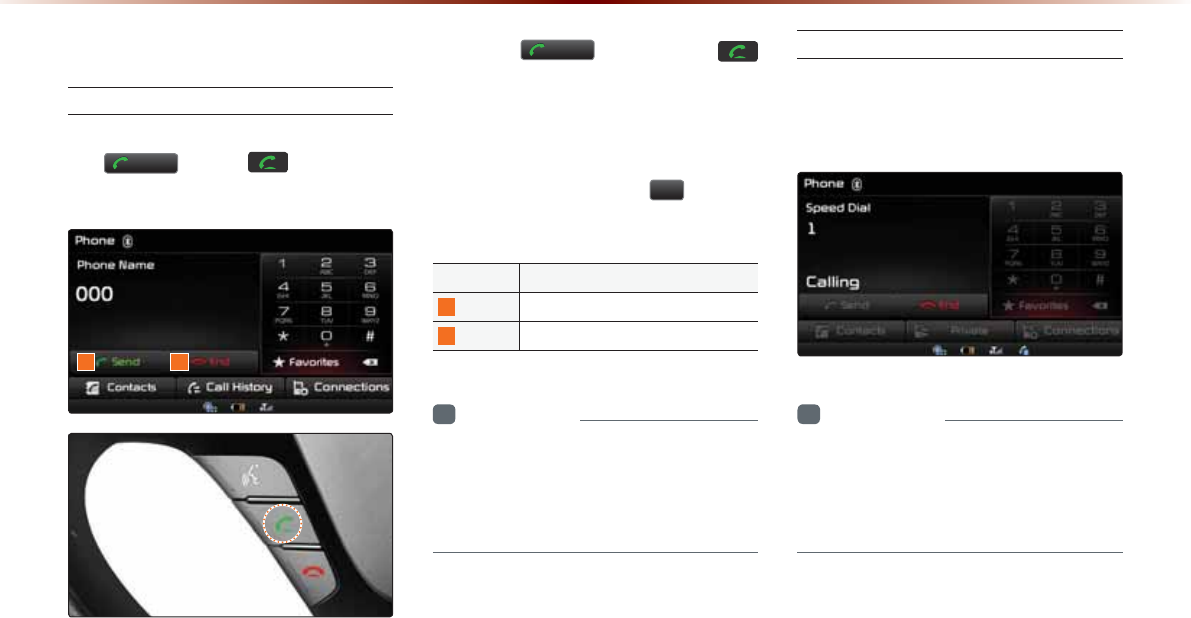
4-10
8VLQJ
%OXHWRRWKq
:LUHOHVV7HFKQRORJ\
0DNLQJ$QVZHULQJ&DOOV
Calling by Dialing a Number
Enter number on the Dial Pad ƙ Press
the
6HQG
or the key on the
steering wheel.
Press the
6HQG
button or the
key on the steering wheel to re-enter the
most recently called number on the phone
screen. If pressed again, a call is made to
the number.
Press and hold the dial pad
(over 0.8
seconds) to enter a "+".
Name Description
1
Send
Calls the entered phone number
2
End Deletes all entered numbers
i
Information
У
Most Audio and Setup mode features will
not operate during a Bluetooth® handsfree
call. Only the call volume and Navigation
mode screen can be operated.
Making a Call from Speed Dial
Enter the 1 or 2 digit speed dial number
with the Dial Pad ƙ Press and hold the
last number.
i
Information
У
For speed dials saved within mobile
phones, up to 2 digits are supported.
У
Saving or changing speed dial numbers
through the head unit is not supported.
1 2
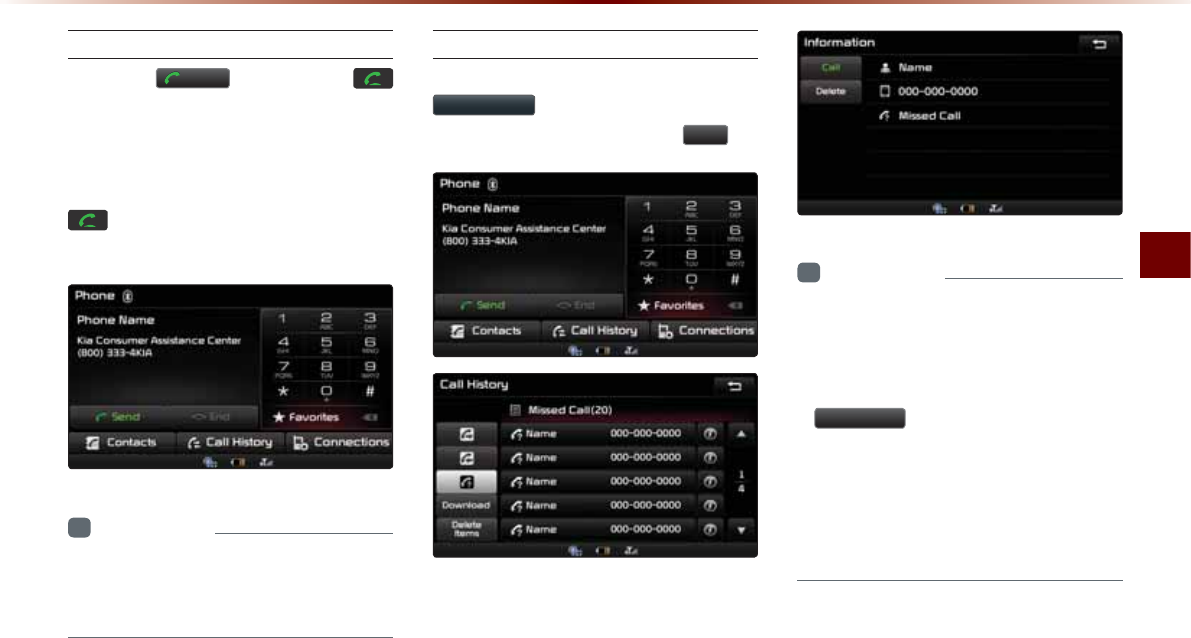
Using
Bluetooth
®
Wireless Technology
Bluetooth® Handsfree O 4-11
Calling through Redial
Press the
6HQG
button or the
key on the steering wheel to re-enter the
most recently called number on the phone
screen. If pressed again, a call is made
to the number. Pressing and holding the
key on the steering wheel will also
redial the most recently called number.
i
Information
У
Redialing is not possible when there is no
call history or the Bluetooth® phone has
not been connected.
Making a Call from Call History
Within the Phone screen, press the
&DOO+LVWRU\
button ƙ Select contact
from the Call History ƙ Press
&DOO
.
i
Information
У
Calling through the call history is not pos-
sible when there is no call history or the
Bluetooth® phone has not been connected.
У
Within the call history screen, press the
'RZQORDG
button to download the call
history saved in your mobile phone into
the vehicle.
У
For more information on downloading
call histories, refer to the "Call Historyƙ
Downloading Call History" section.
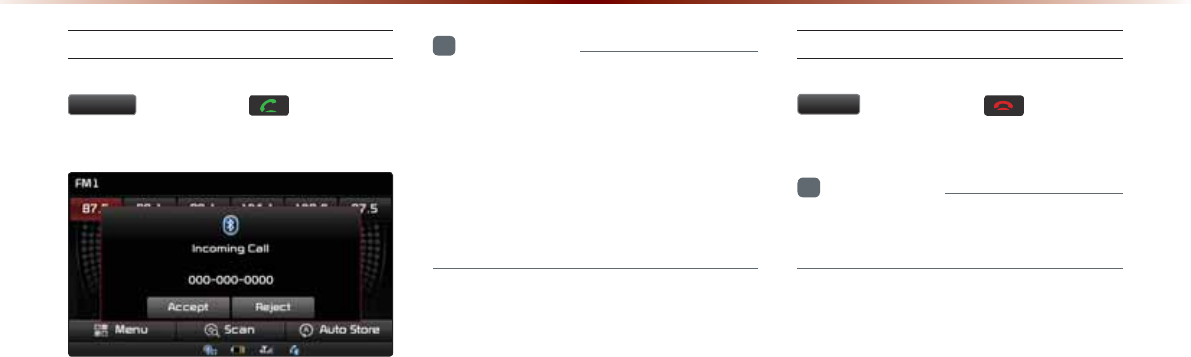
4-12
8VLQJ
%OXHWRRWKq
:LUHOHVV7HFKQRORJ\
Answering a Call
Incoming call notice ƙ Press the
$FFHSW
button or the key on the
steering wheel
When there is an incoming call, the bell will
sound and the phone number of the other
party will be displayed on the incoming call
pop-up, as shown here.
i
Information
У
When the incoming call pop-up is dis-
played, most audio and SETUP mode
functions will not operate. Only the call
volume and Navigation screens can be
operated.
У
The telephone number may not be dis-
played
in some mobile phones.
Rejecting a Call
Incoming call notice ƙ Press the
5HMHFW
button or the key on the
steering wheel
i
Information
У
The reject call function may not be sup-
ported in some mobile phones.
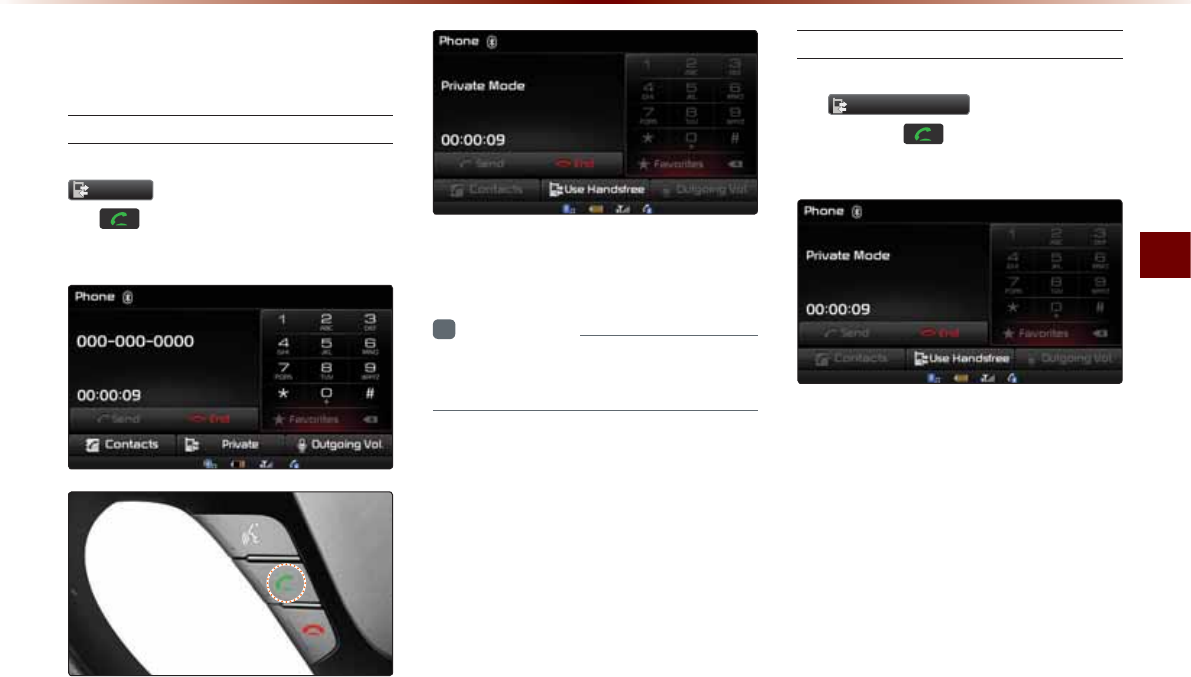
Using
Bluetooth
®
Wireless Technology
Bluetooth® Handsfree O 4-13
2SHUDWLQJ0HQXV
GXULQJD&DOO
Switching Call to Bluetooth® Phone
During handsfree call ƙ Press the
3ULYDWH
button or press and hold
the key (over 0.8 seconds) on the
steering wheel
The call will be switched from the hands-
free to the Bluetooth® mobile phone.
i
Information
У
The Private function may not be sup-
ported in some mobile phones.
Switching Call to Handsfree
During call on mobile phone ƙ Press
the
8VH+DQGVIUHH
button or press
and hold the key (over 0.8
seconds) on the steering wheel
The call will be switched from the Bluetooth®
mobile phone to the car handsfree.
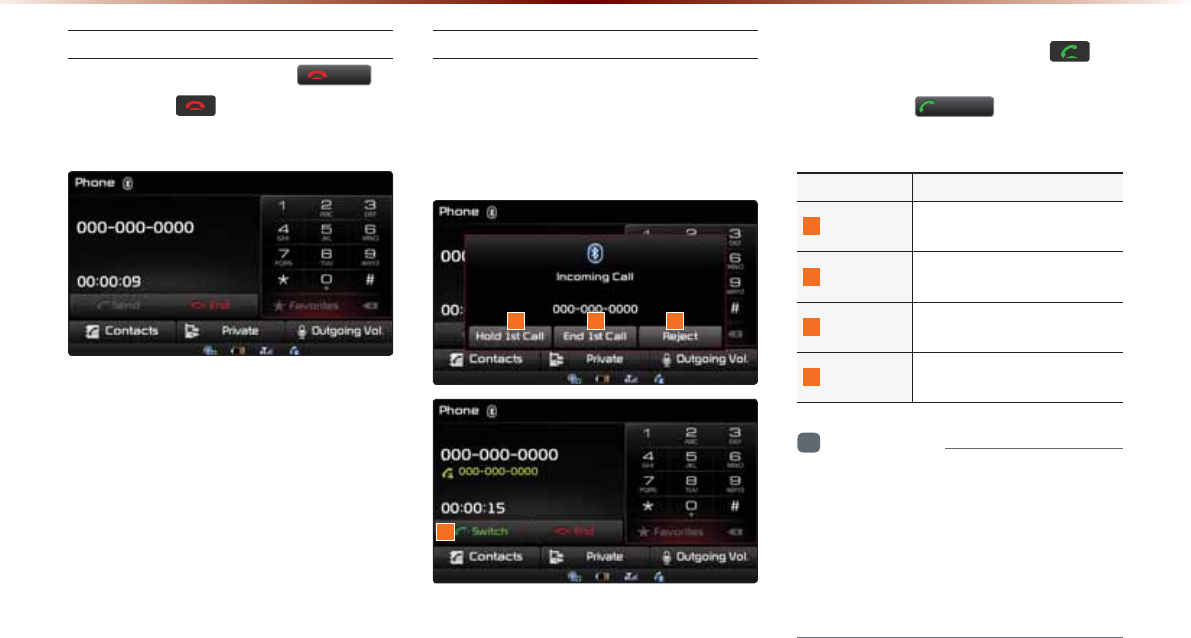
4-14
8VLQJ
%OXHWRRWKq
:LUHOHVV7HFKQRORJ\
Ending a Call
While on a call ƙ Press the
(QG
button or the key on the steering
wheel.
The Bluetooth® handsfree call will end.
Switching to Call Waiting
If another person calls while you are
already on a call, the current call must be
placed on hold or ended to answer the
new call.
If there is waiting call, press the key
on the steering wheel (under 0.8 seconds)
or press the
6ZLWFK
button on the
Phone screen.
Name Description
1
Hold 1st Call Places current call on call
waiting and answers new call
2
End 1st Call Ends current call and answers
new call
3
Reject Rejects new call and maintain
current call
4
Switch
If there is a call waiting, switch-
es to the waiting call
i
Information
У
Call waiting is a feature that allows the
caller to answer a second call while
already on a call. When call waiting is
used, the first call is placed on hold.
У
Switching to call waiting may not be sup-
ported in some mobile phones.
1 32
4
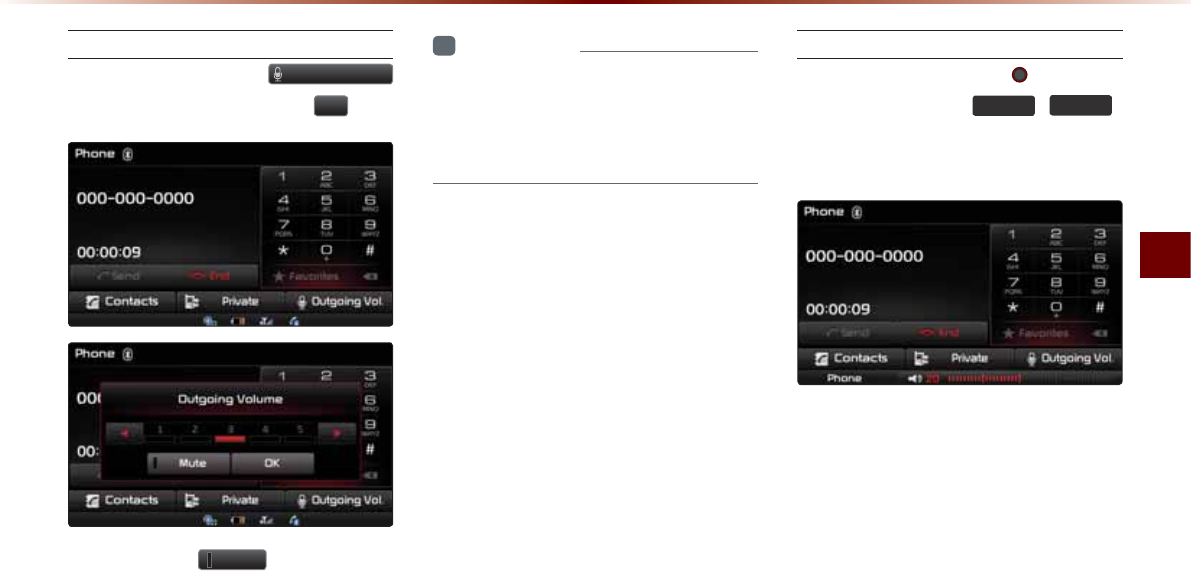
Using
Bluetooth
®
Wireless Technology
Bluetooth® Handsfree O 4-15
Setting Mic Volume
While on a call ƙ Press the
2XWJRLQJ9RO
ƙ Set Outgoing Volume ƙ Press
2.
.
If you press the
0XWH
button, the out-
going volume is muted and blocked to the
other party.
i
Information
У
The volume heard by the other party may
differ depending on the mobile phone. If
call volume heard by the other party is too
low or too high, adjust the volume setting.
Adjusting the Ring/Call Volume
While on a call ƙ Use the VOL knob
on the head unit or the
92/
,
92/
keys on the steering wheel to adjust the
ring/call volume.
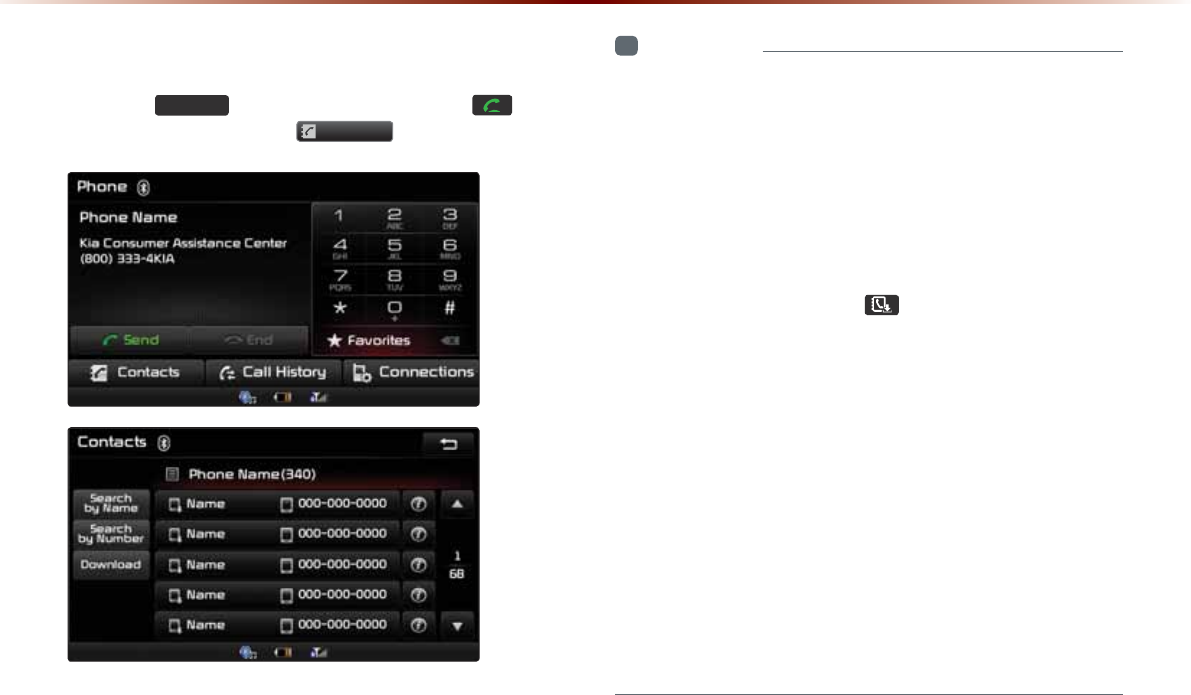
4-16
8VLQJ
%OXHWRRWKq
:LUHOHVV7HFKQRORJ\
&RQWDFWV
Press the
3+21(
key on the head unit or the key on
the steering wheel ƙ Press
&RQWDFWV
.
i
Information
У
For contacts, up to 5,000 entries can be downloaded to each paired
Bluetooth® device.
У
Contacts can be viewed only when a Bluetooth® device has been con-
nected.
У
If there are numerous list entries, selecting the list page area will move
to the corresponding list page.
У
It is possible to download contacts during a call or while operating
Bluetooth® streaming audio mode.
У
When downloading contacts, the icon will be displayed within the
status bar.
У
It is not possible to download contacts when the contacts download
setting has been turned off within your Bluetooth® device.
У
Some devices may also require device authorization to download con-
tacts.
У
If downloading cannot be normally conducted, check the Bluetooth®
device settings or whether download confirm popup is displayed on the
phone screen.
У
The download feature may not be supported in some mobile phones.
У
Check to see that the Bluetooth® device supports the download fea-
ture.
У
For more information on mobile phone compatibility, visit the Kia
Motors America, Inc website (http://www.kia.com).
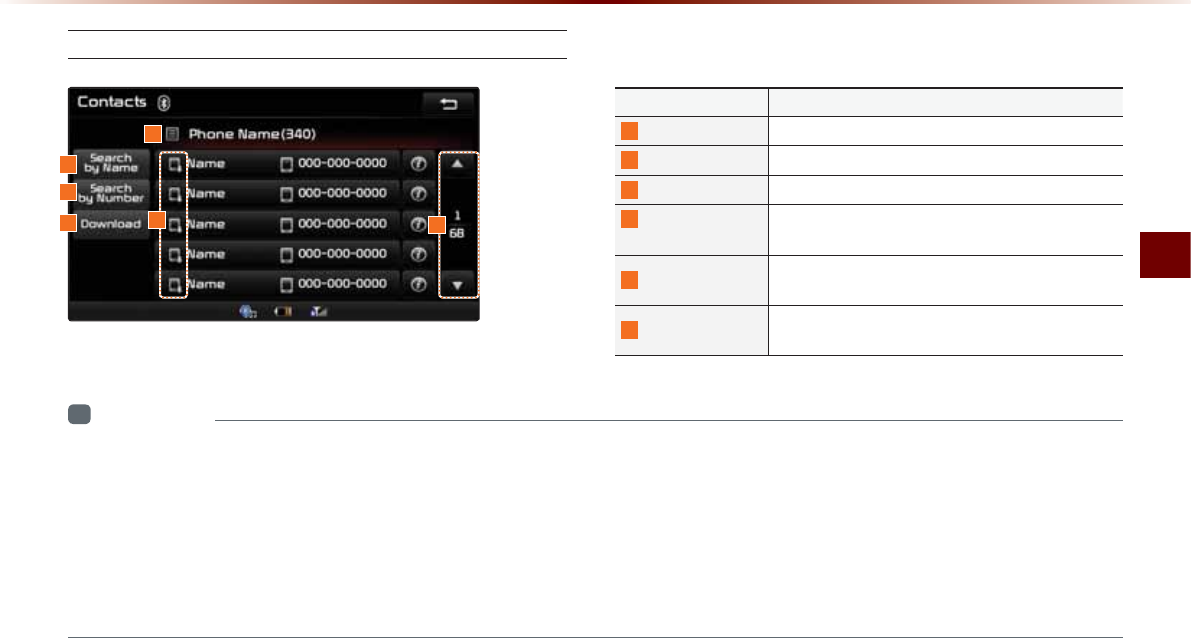
Using
Bluetooth
®
Wireless Technology
Bluetooth® Handsfree O 4-17
/QDKNG%QPVCEVU5ETGGP%QPſIWTCVKQP
Name Description
1
Search by Name Name search downloaded mobile phone contacts
2
Search by Number Number search downloaded mobile phone contacts
3
Download Download contacts from Bluetooth® device
4
Bluetooth®
Device Name Name of connected Bluetooth® device
5
List Page Displays total number of list pages and current list
page (List page jump upon selecting scroll area)
6
Download Source Displays whether contacts were downloaded from
the mobile phone or SIM
i
Information
У
Mobile phone contacts can be searched only when a Bluetooth® device is connected.
У
Up to 5,000 contacts from your Bluetooth® phone or SIM can be downloaded into the car contacts. Contacts that have been downloaded to
the car cannot be edited or deleted.
У
Mobile phone contacts are managed separately for each paired Bluetooth® device (max 5 devices x 5,000 contacts each). Previously down-
loaded data will be stored even if the Bluetooth® device has been disconnected. (However, the contacts and call history saved to the phone
will be deleted if the paired phone is deleted.)
У
Downloaded contacts could be lost depending on the state of the head unit. Always make sure to back up important data.
1
4
2
35
6
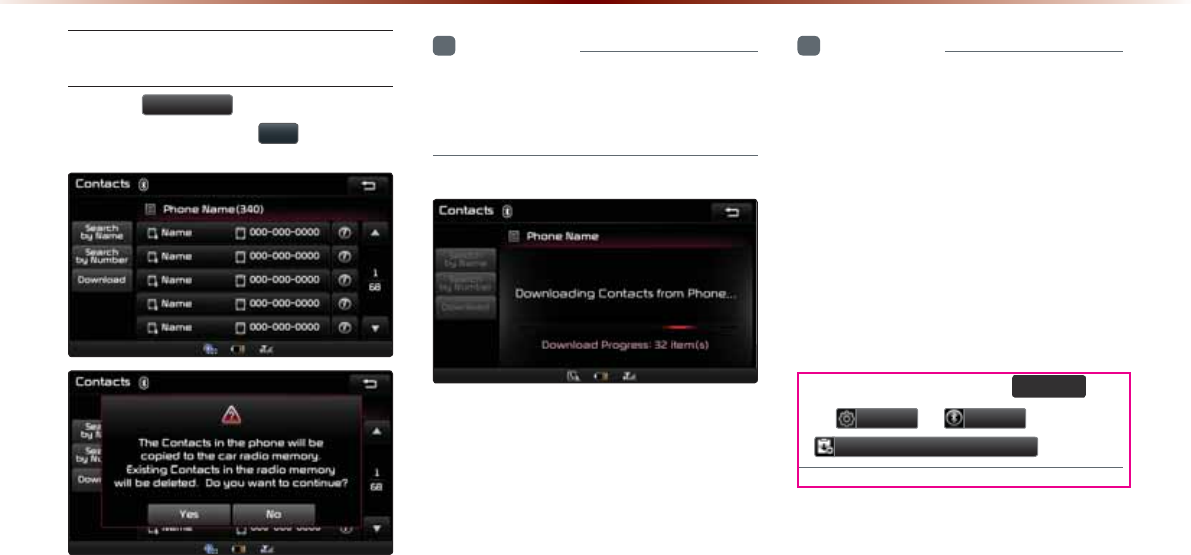
4-18
8VLQJ
%OXHWRRWKq
:LUHOHVV7HFKQRORJ\
Downloading Mobile Phone
Contacts
Press the 'RZQORDG button in the
Contacts screen ƙ Press <HV .
i
Information
У
Time required to download contacts may
differ depending on your mobile phone
model or data size.
After Pairing is complete, a contacts down-
load request is sent to your mobile phone.
Some phones require additional confirma-
tion. Please check your phone and accept
the download request if necessary.
i
Information
У
Upon downloading mobile phone con-
tacts, the previous data is deleted.
У
This feature may not be supported in
some mobile phones.
У
Upon downloading, contacts saved in
your SIM and mobile phone are down-
loaded simultaneously.
У
When using Contacts Sync, the contacts
and call histories within your mobile
phone are automatically downloaded
once Bluetooth® is connected.
У
To turn this feature off, go to
6(783
ƙ
6HWXS
ƙ
3KRQH
ƙ
&RQWDFWV6\QF6HWWLQJ
.

Using
Bluetooth
®
Wireless Technology
Bluetooth® Handsfree O 4-19
Checking Mobile Contacts Details
Select the desired phone number from
the mobile contacts list to check details
about the contact.
Adding as a Favorite
Select number from the Contacts
screen ƙ Within the details screen,
press
$GGDV)DYRULWH
.
i
Information
У
Up to 8 Favorites can be added.
У
Saved Favorites can be viewed by press-
ing the
Ԯ)DYRULWHV
button in the Phone
screen.
У
The Favorites Information screen is dis-
played only when there are more than 2
saved numbers.
У
If there is only 1 saved number, then the
number is directly saved to the Favorites list.
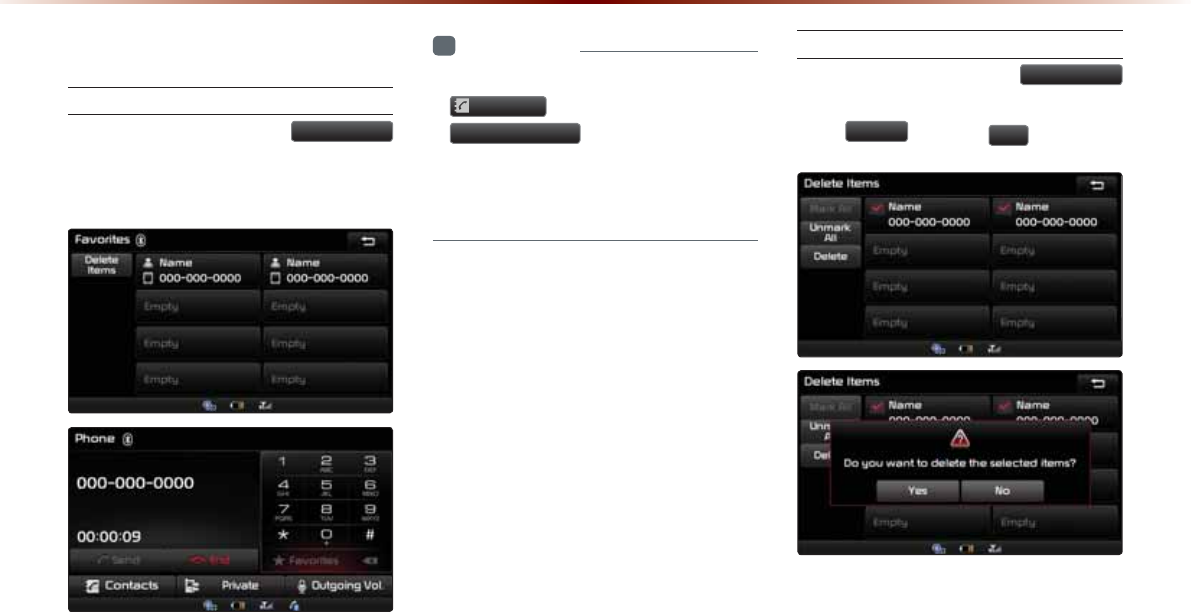
4-20
8VLQJ
%OXHWRRWKq
:LUHOHVV7HFKQRORJ\
)DYRULWHV
Calling Favorites
In Phone screen ƙ Press
Ԯ)DYRULWHV
ƙ Select the desired Favorite ƙ Call is
connected.
i
Information
У
Favorites can be added through Phone
&RQWDFWV
ƙ Select contact ƙ
$GGDV)DYRULWH
.
У
Up to 8 Favorites can b
e added and
Favorites can be used only when a
Bluetooth® device has been connec
ted
.
Selecting/Deleting Favorites
In Favorites screen ƙ Press
'HOHWH,WHPV
ƙ Select items you want to delete and
press
'HOHWH
ƙ Press
<HV
.
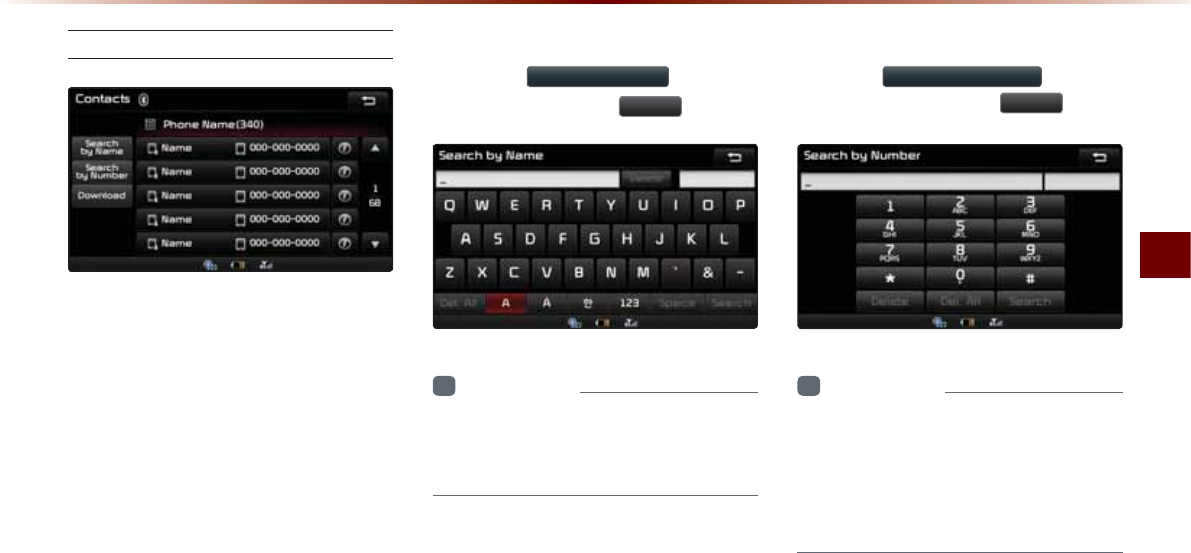
Using
Bluetooth
®
Wireless Technology
Bluetooth® Handsfree O 4-21
Searching Contacts
Search by Name
Press the
6HDUFKE\1DPH
button ƙ
Enter name and press
6HDUFK
.
i
Information
У
When searching for a number it is possible
to search by entering just a part of the
name.
Searching by Number
Press the
6HDUFKE\1XPEHU
button ƙ
Enter number and press
6HDUFK
.
i
Information
У
When searching a number, it is possible
to search by entering just a part of the
entire number.
(ex : if you enter "1544", all numbers that
include "1544" will be searched.)
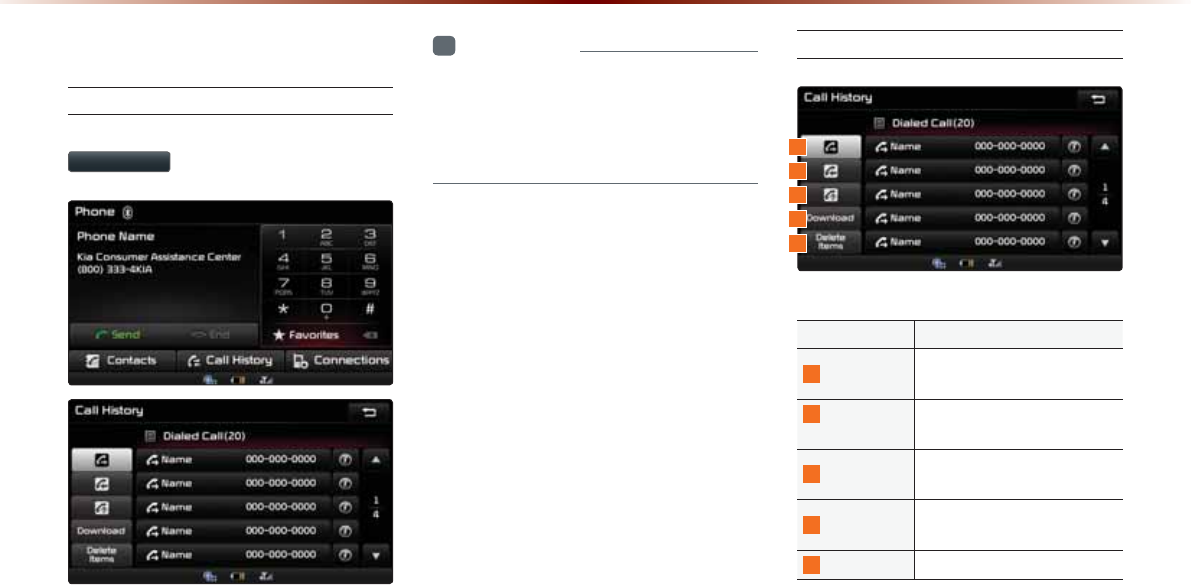
4-22
8VLQJ
%OXHWRRWKq
:LUHOHVV7HFKQRORJ\
&DOO+LVWRU\
Entering Call History Screen
Within the Phone screen, press the
&DOO+LVWRU\
button.
i
Information
У
The call history may not be saved in the
call history list in some mobile phones.
У
Calls received with hidden caller ID will
not be saved in the call history list.
%CNN*KUVQT[5ETGGP%QPſIWTCVKQP
Name Description
1
Dialed Call Displays the outgoing call his-
tory list
2
Received
Call
Displays the incoming call
history list
3
Missed Call Displays the missed call his-
tory list
4
Download Downloads call history from
mobile phone
5
Delete Items Deletes the call history
1
3
2
4
5

Using
Bluetooth
®
Wireless Technology
Bluetooth® Handsfree O 4-23
Downloading Call History
In Call History screen ƙ Press
'RZQORDG
.
i
Information
У
Up to 20 dialed, incoming, and missed
call history lists can be downloaded. The
dialed/incoming time and call time infor-
mation are not supported.
У
Sorting call histories by time is not supported.
У
It is possible to download call history even
during a call or during Bluetooth® streaming
audio.
У
When downloading call histories, the
icon will be displayed within the status bar.
У
It is not possible to start downloading
when the call history download feature
is turned off within the Bluetooth® device.
Also some devices may require device
authorization upon attempting to down-
load call history. If downloading cannot be
normally conducted, check the Bluetooth®
device settings or the screen state.
У
The download feature may not be sup-
ported in some mobile phones. Check to
see that the Bluetooth® device supports
the download feature.
У
After Pairing is complete, a contacts
download request is sent to your mobile
phone. Some phones require additional
confirmation. Please check your phone
and accept the download request if
necessary. (ex: Android and Blackberry
phones)
У
For more information on mobile phone
compatibility,
visit the Kia Motors America,
Inc website
(http://www.kia.com).
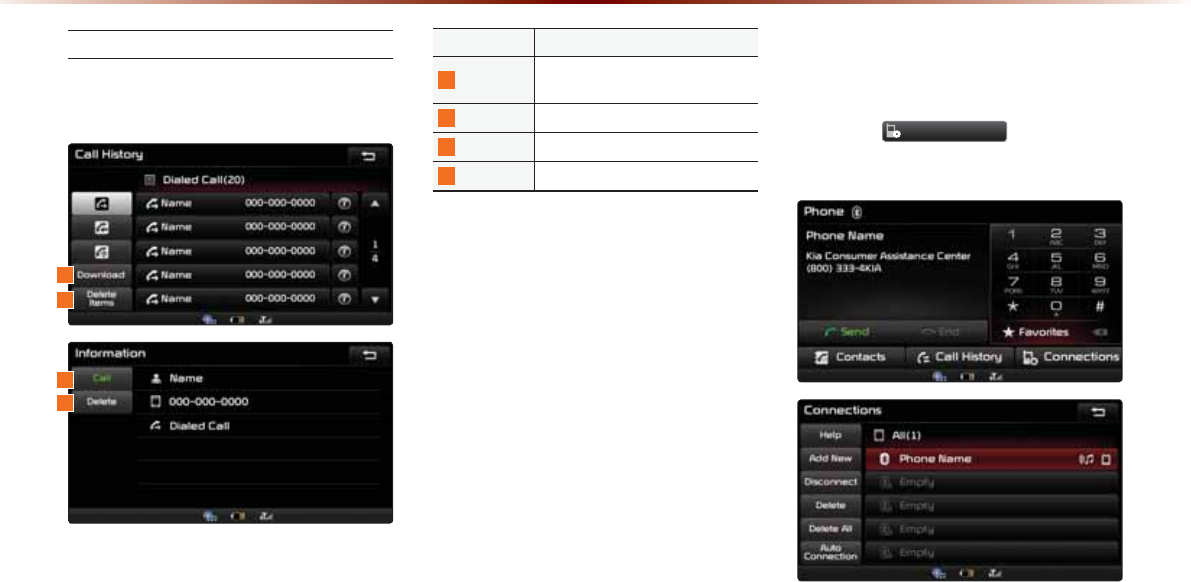
4-24
8VLQJ
%OXHWRRWKq
:LUHOHVV7HFKQRORJ\
Viewing Call History Information
Within the Call History screen, select the
wanted call.
Name Description
1
Download Download call histories from mobile
phone
2
Delete Items Deletes the call history
3
Call Calls the number
4
Delete Deletes the call history
6HWWLQJ%OXHWRRWKp
&RQQHFWLRQ
Press the
&RQQHFWLRQV
button on the
Phone screen.
1
4
3
2
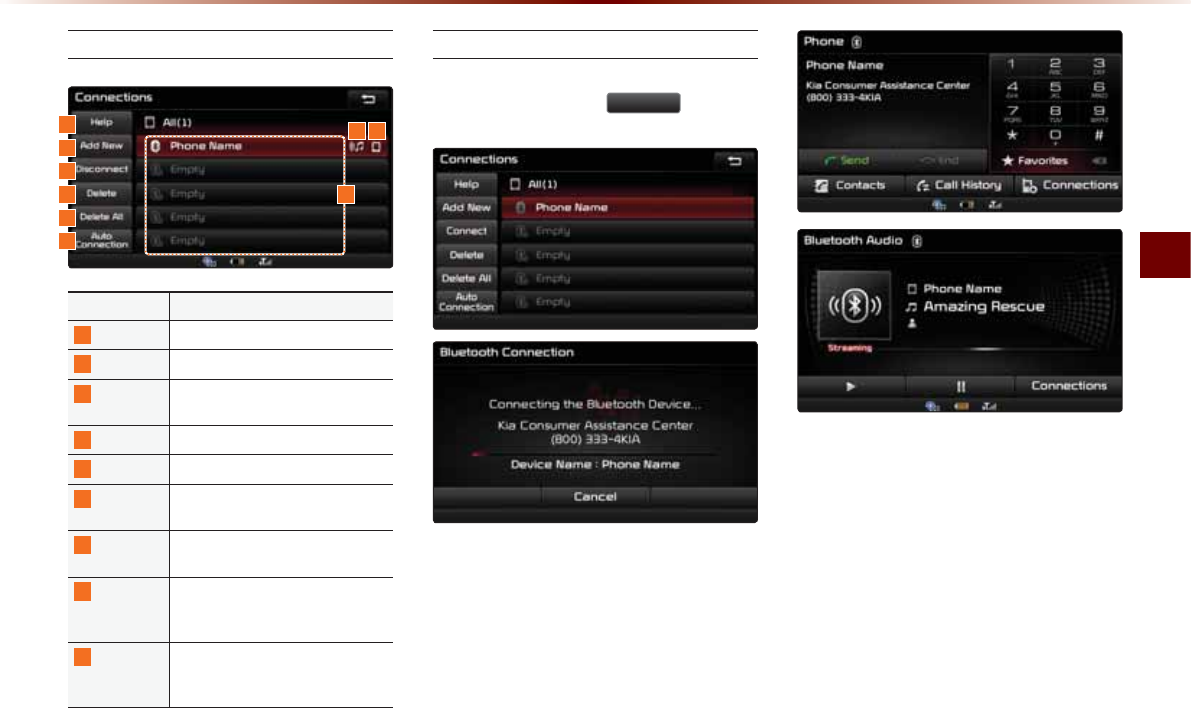
Using
Bluetooth
®
Wireless Technology
Bluetooth® Handsfree O 4-25
Connections Menu
Name Description
1
Help Displays Bluetooth® Help screen
2
Add New Pairs a new Bluetooth® device
3
Connect/
Disconnect Connects/disconnects a Bluetooth®
device
4
Delete Deletes a paired Bluetooth® device
5
Delete All
Deletes all paired Bluetooth® devices
6
Auto
Connection Sets Bluetooth® device auto connec-
tion when car ignition is turned on
7
Paired
Device List Shows list of paired Bluetooth® de-
vices
8
Streaming
Connection
State
Shows Bluetooth® Streaming con-
nection state
9
Handsfree
Connection
State
Shows Bluetooth® Handsfree con-
nection state
Connecting a Device
Select the device you wish to connect
from the list ƙ Press
&RQQHFW
.
The Phone screen is displayed once
Bluetooth® Handsfree is connected, and
the Bluetooth® Audio screen is displayed
once audio streaming is connected.
18 9
2
3
4
5
6
7

4-26
8VLQJ
%OXHWRRWKq
:LUHOHVV7HFKQRORJ\
Pairing a New Device
For more information on pairing, refer to
the 'When no phones have been paired'
section.
i
Information
У
Bluetooth® features supported
within the
vehicle are as follow
s. Some features may
not be supported depending on your
Bluetooth® device.
-
Answering and placing Bluetooth®
Handsfree calls
-
Menu operation during call (Switch to Private,
Switch to Call Waiting, Outgoing Volume
-
Download Call History
-
Download Mobile Contacts
-
Download SIM Contacts
-
Contacts/ Call History Auto Download
-
Bluetooth® device auto connection
-
Playing Bluetooth® Streaming Audio
У
It is possible to pair up to five Bluetooth®
devices to the car system.
У
Only one Bluetooth® device can be con-
nected at a time.
У
Other devices cannot be paired while a
Bluetooth® device is already connected.
У
When a Bluetooth® device is in the pro-
cess of connecting, the connection pro-
cess cannot be canceled.
У
Only Bluetooth® Handsfree and Bluetooth®
Audio related features will operate within
this system.
У
Normal operation is possible only for
devices that support handsfree or audio
features, such as a Bluetooth® mobile
phone or a Bluetooth® audio device.
У
Only one function can be used at a time
between the Bluetooth
®
handsfree and
Bluetooth
®
audio. (While playing Bluetooth
®
audio, streaming will end upon entering the
Bluetooth
®
phone screen.)
i
Information
У
If a connected Bluetooth® device becomes
disconnected for various reasons, such
as being out of range, turning the device
OFF, or a Bluetooth® communication error,
Bluetooth® devices are automatically
searched and connected.
У
If the system becomes unstable due
to communication errors between the
vehicle and the Bluetooth® device,
reset the Bluetooth® feature and try
again. Upon resetting Bluetooth® fea-
ture, the system is restored to its fac-
tory release state. Press the
6(783
key
ƙ
6HWXS
ƙ
3KRQH
ƙ
5HVWRUH)DFWRU\6HWWLQJV
.
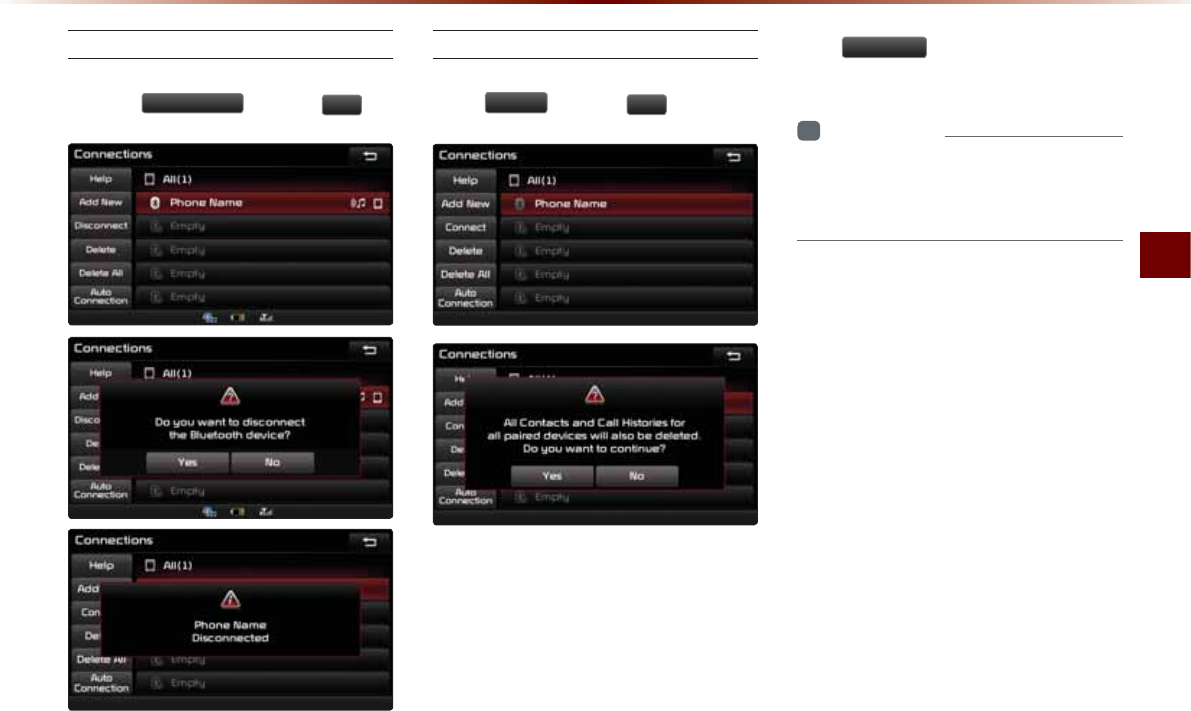
Using
Bluetooth
®
Wireless Technology
Bluetooth® Handsfree O 4-27
Disconnecting a Device
Select the device you wish to disconnect
ƙ Press
'LVFRQQHFW
ƙ Press
<HV
.
Deleting a Device
Select the device you want to delete ƙ
Press
'HOHWH
ƙ Press
<HV
.
A device cannot be deleted if it is connected.
To delete a paired device, first disconnect
the Bluetooth® connection and then delete
the paired device and then delete the
paired device.
Press
'HOHWH$OO
to delete all paired
Bluetooth® devices.
i
Information
У
If a paired phone is deleted, its call history
and contacts lists will also be deleted from
the system.
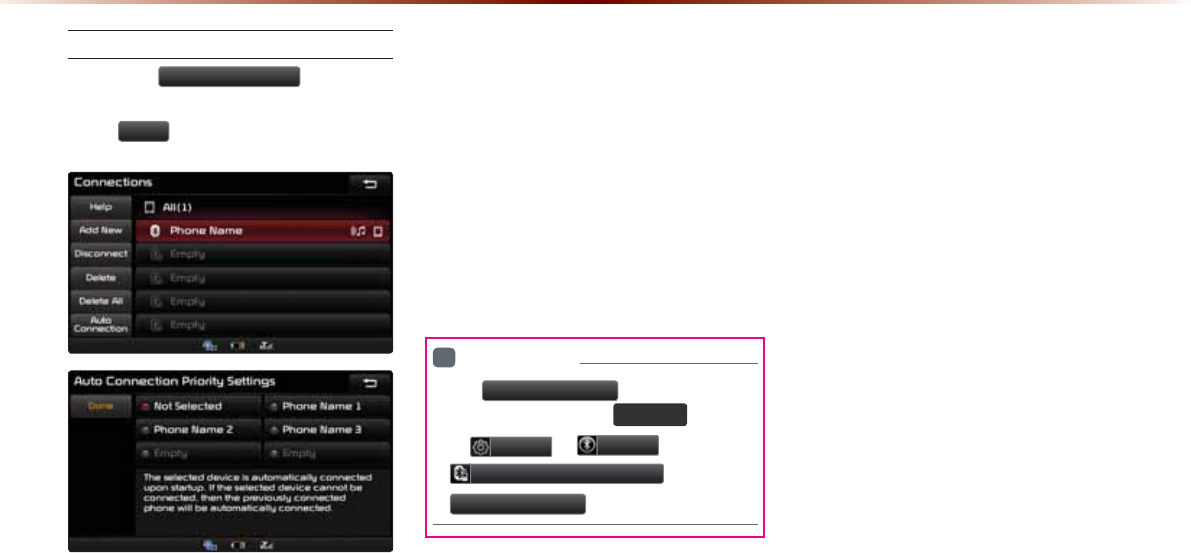
4-28
8VLQJ
%OXHWRRWKq
:LUHOHVV7HFKQRORJ\
Setting Auto Connection
Press the
$XWR&RQQHFWLRQ
button ƙ
Select the desired option ƙ Set and
press
'RQH
.
The Bluetooth® device will automatically
be connected according to the option set
when the car ignition is turned on.
When the user selected phone cannot
be connected, the system automatically
attempts to connect the most recently con-
nected phone. When the most recently
connected phone cannot be connected,
the system attempts to connect all paired
phones continuously. If you do not want to
connect automatically, turn off Bluetooth
within your mobile phone.
i
Information
У
The
$XWR&RQQHFWLRQ
button is a
shortcut menu to go to
6(783
ƙ
6HWXS
ƙ
3KRQH
ƙ
%OXHWRRWK&RQQHFWLRQ
ƙ
$XWR&RQQHFWLRQ
.

&$508/7,0(',$6<67(0
9RLFH
5HFRJQLWLRQ
У
Using Voice Recognition
У
Voice Command Lists
5-2
8VLQJ9RLFH5HFRJQLWLRQ
8VLQJ9RLFH5HFRJQLWLRQ
Creating a suitable cabin environment
When using the voice recognition feature, only commands listed
within the user's manual are supported.
Voice Recognition and Phone Contact Tips The Kia Voice
Recognition System may have difficulty understanding
some accents or uncommon names. To maximize the use
of Voice Recognition, consider these guidelines when
storing contacts:
У Do not store single-name entries (e.g., “Bob”, “Mom”, etc.).
Instead, always use full names. (including first and last names)
for these contacts
У Do not use special characters (e.g., ‘@’, ‘-’, ‘*’, ‘&’, etc.).
У Do not use abbreviations (i.e., use ""Lieutenant"" instead of “Lt.”)
or acronyms (i.e., use “County Finance Department” instead
of “C. F. D.”; Be sure to say the name exactly as it is entered in
the contacts list.
Be aware that during the operation of the voice recognition sys-
tem, pressing some keys other than the key will terminate
voice recognition mode.
For superior voice recognition performance, position the micro-
phone used for voice recognition above the head of the driver’s
seat and maintain a proper position when saying commands.
Within the following situations, voice recognition may not func-
tion properly due to external sound.
У When the windows and sunroof are open
У When the wind of the cooling/heating device is strong
У When entering and passing through tunnels
У When driving on rugged and uneven roads
У During severe rain (heavy rains, windstorms)
After downloading the Bluetooth® contacts, it takes some times
to convert the contacts into voice information. During this time,
voice recognition may not properly operate.
Speak voice commands in a moderate tone, with clear pronuncia-
tion.
The system may slow down slightly when using the Navigation
to calculate a new route or re-calculating an existing route. In
such cases, use voice recognition features after waiting a few
moments.
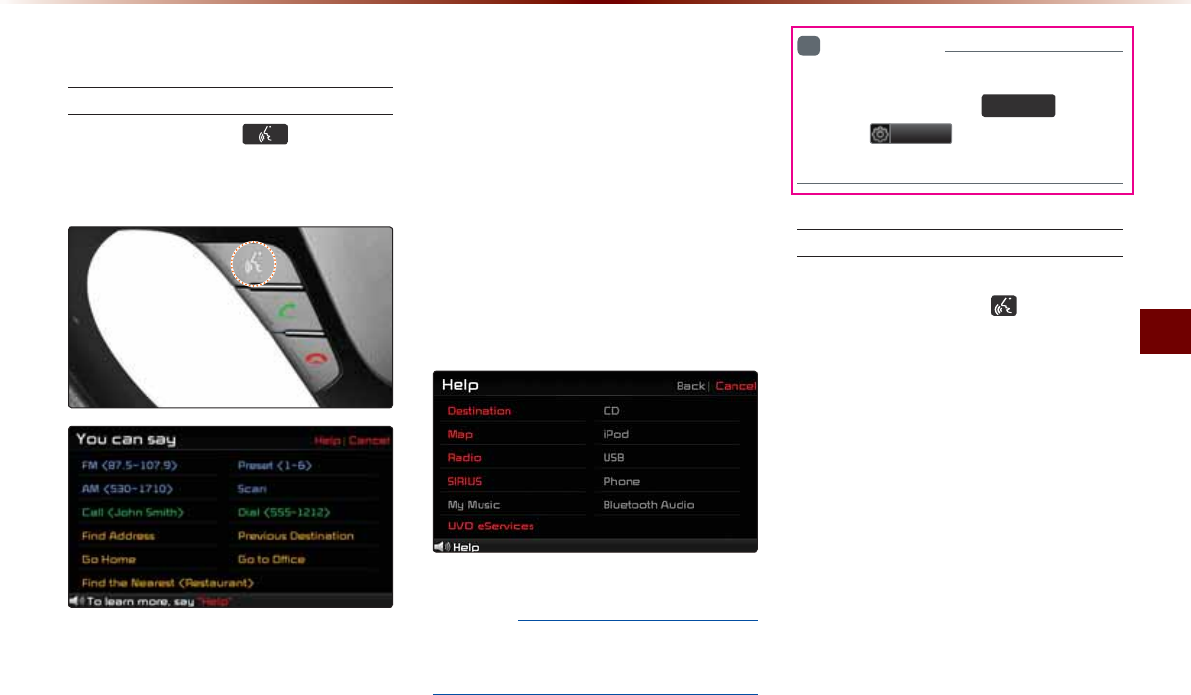
Using Voice Recognition
Voice Recognition O 5-3
6WDUWLQJ9RLFH5HFRJQLWLRQ
Starting Voice Recognition
Shortly press the key on the
steering wheel (under 0.8 seconds) ƙ
Say a command.
Once voice recognition starts, the voice
command entry window and the six repre-
sentative commands are displayed.
У If voice recognition is in [Normal Mode],
then the system will say "Please say a
command after the beep", followed by a
beep tone.
У If voice recognition is in [Expert Mode],
then you will only hear a beep.
(e.g. screen displayed when ‘Help’ is said)
NOTICE
У
For proper recognition, say the command
after the voice instruction and beep tone.
i
Information
У
To change the Normal/Expert set-
ting, press the
6(783
key ƙ
Press
6HWXS
and enter the Voice
Recognition settings screen.
Skipping Prompt Messages
While prompt message is being stated
ƙ Shortly press the key on the
steering wheel. (under 0.8 seconds)
The prompt message is immediately
ended and the beep tone will sound. After
the "beep", say the voice command.
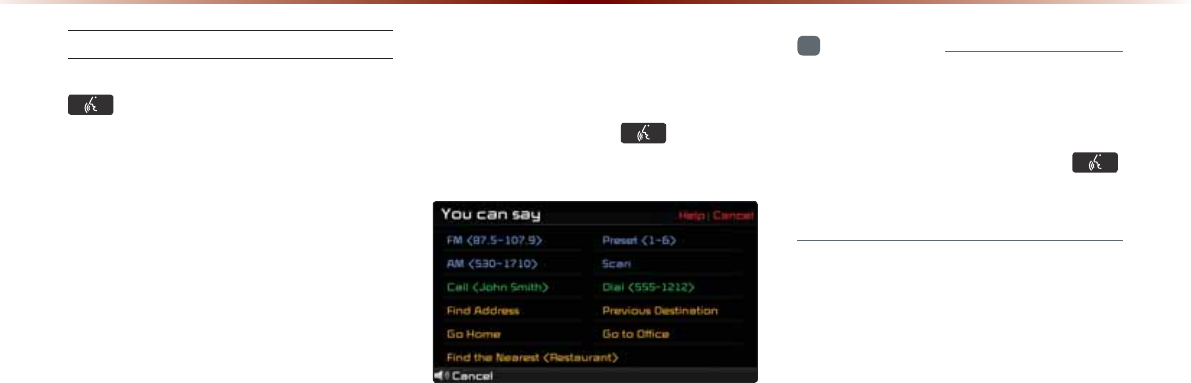
5-4
8VLQJ9RLFH5HFRJQLWLRQ
Re-starting Voice Recognition
While system waits ƙ Shortly press the
key on the steering wheel. (under
0.8 seconds)
The command wait state will end and the
beep tone will sound. After the "beep", say
the voice command.
(QGLQJ9RLFH5HFRJQLWLRQ
While Voice Recognition is operating
ƙ Press and hold the key on the
steering wheel. (over 0.8 seconds)
While using voice recognition, pressing a
steering wheel or a different key will end
voice recognition.
i
Information
У
In a state where the system is waiting for
a voice command, say "cancel" or "exit"
to end voice recognition.
У
You can also press and hold the
key on the steering remote controller to
end voice recognition.

Using Voice Recognition
Voice Recognition O 5-5
8VLQJ9RLFH5HFRJQLWLRQ
Press the key on the steering
wheel(under 0.8 seconds). The voice
command entry window and the six
representative commands are displayed.
i
Information
У
If voice recognition is set to 'Expert', then
the 'Please say a command after the
beep' prompt will not be provided. Only
the 'beep' will sound.
У
If voice recognition is set to 'Expert', then
the six representative commands are not
shown on the screen.
У
After the 'Beep', the icon will change
to the icon to indicate that a command
can now be stated.
$GMXVWLQJ9RLFH
5HFRJQLWLRQ9ROXPH
While Voice Recognition is operating ƙ
Turn the 92/ knob left/right to adjust
the voice recognition prompt volume.
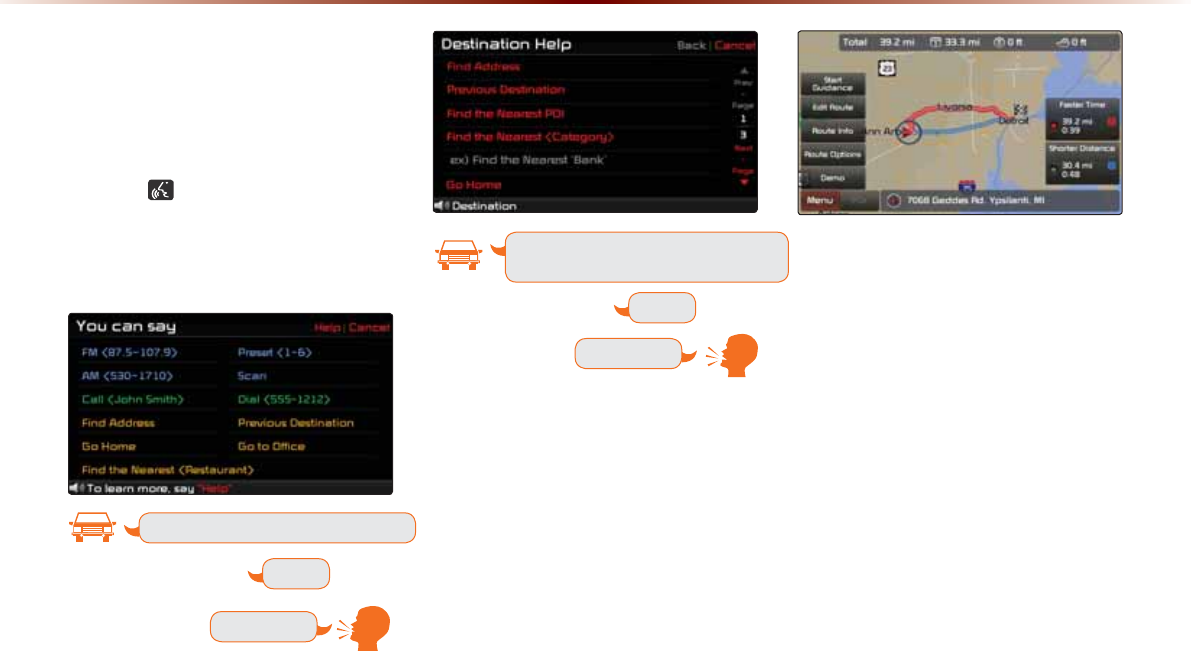
5-6
8VLQJ9RLFH5HFRJQLWLRQ
,OOXVWUDWLRQRQ8VLQJ
9RLFH5HFRJQLWLRQ
6HWWLQJ+RPHDVWKH'HVWLQDWLRQ
Press the key (under 0.8 seconds).
The system awaits for your command
and display a list of accessible commands
on the screen.
Go Home
Beep
Destination
Please say a command after the beep
Destination
Please say a command after the beep
Beep

Voice Command Lists
Voice Recognition O 5-7
9RLFH&RPPDQG/LVWV
9RLFH&RPPDQG/LVW
Voice commands within this system are categorized into "Common
Commands" and "Mode Commands."
У Common Commands ( ) : commands that can be used in all
situations.
У Mode Commands ( ) : commands that can be used in spe-
cific multimedia/navigation/Bluetooth® mode states.
i
Information
У
Some commands will operate properly only when a USB, iPod,
Bluetooth® or other device has been connected.
+HOS&RPPDQG/LVW
Command Operation
Help Displays the main Help screen
Destination Help Displays the Destination related command list
Map Help Displays the Map related command list
Radio Help Displays the FM/AM radio related command list
SIRIUS Help Displays the SIRIUS radio related command list
Disc Help Displays the DISC mode related command list
for the disc inserted in the CD Player
iPod Help Displays the iPod related command list
USB Help Displays the USB related command list
Phone Help Displays the Phone related comand list
UVO eServices Help
(Optional)
Display the UVO eServices releated command list
5-8
9RLFH&RPPDQG/LVWV
$XGLR6\VWHP&RPPDQG/LVW
FM/AM Radio
Command Operation
Radio Plays the most recent frequency for the most
recently operated band
AM Plays the most recent frequency for the corre-
sponding band
FM
Plays the most recent frequency for the corre-
sponding band In the case of FM.
The most recent frequency within the most re-
cently played FM1 or FM2 band is played
FM1/FM2 Plays the most recent frequency for the corre-
sponding band
AM <530~1710> Plays the desired AM band frequency (e.g. AM
"Five-Hundred Thirty")
FM <87.5~107.9> Plays the desired FM band frequency (e.g. FM
"Eighty-Seven point Five")
AM Preset <1~6> Plays the desired AM band preset frequency
FM1 Preset <1~6> Plays the desired FM1 band preset frequency
FM2 Preset <1~6> Plays the desired FM2 band preset frequency
Command Operation
Preset <1~6> Plays the desired preset frequency for the cur-
rent band
Scan Scans receivable frequencies from the current
broadcast and plays for 10 seconds each
Preset Scan Plays through all presets 10 seconds each, be-
ginning with the current preset
Voice Command Lists
Voice Recognition O 5-9
SIRIUS Radio
Command Operation
SIRIUS Plays the last channel within the last band from
SIRIUS1, SIRIUS2, and SIRIUS3
SIRIUS1/SIRIUS2/
SIRIUS3
Plays the most recent channel for the corre-
sponding band
SIRIUS Channel
<0~223>
Plays the desired SIRIUS band channel (e.g.
SIRIUS channel "Eleven")
SIRIUS1 Preset <1~6> Plays the desired preset channel for SIRIUS1
band
SIRIUS2 Preset <1~6> Plays the desired preset channel for SIRIUS2
band
SIRIUS3 Preset <1~6> Plays the desired preset channel for SIRIUS3
band
Channel <0~223> Plays the desired channel of the current band
Preset <1~6> Plays the desired preset channel of the current
band
Scan Scans receivable channels from the current
broadcast and plays for 10 seconds each
Preset Scan Plays through all presets for 10 seconds each,
beginning with the current preset
CD(Audio Type)
Command Operation
CD
If the DISC inserted in the CD Player is either a
CD or MP3 DISC, then the CD or MP3 will be
played
Play Plays the currently paused song
Pause Pauses the current song
Repeat Repeats the current track
Repeat Off Cancels repeat play to play tracks in sequential
order
5JWHƀG Randomly plays the tracks within the CD
5JWHƀG1HH Cancels random Play to play tracks in sequen-
tial order
Track <1~99> Plays the desired track number

5-10
9RLFH&RPPDQG/LVWV
CD(MP3 Type)
Command Operation
CD
If the DISC inserted in the CD Player is either a CD
or MP3 DISC, then the CD or MP3 will be played
Play Plays the currently paused song
Pause Pauses the current song
Next Folder 2NC[UVJGſTUVſNGKPVJGPGZVHQNFGT
Previous Folder 2NC[UVJGſTUVſNGKPVJGRTGXKQWUHQNFGT
Repeat 4GRGCVUVJGEWTTGPVſNG
Repeat Off
%CPEGNUTGRGCVRNC[VQRNC[ſNGUKPUGSWGPVKCNQTFGT
5JWHƀG 2NC[UCNNſNGUYKVJKPVJG%&KPTCPFQOQTFGT
5JWHƀG1HH
%CPEGNUTCPFQORNC[VQRNC[ſNGUKPUGSWGPVKCNQTFGT
USB Music
Command Operation
USB If the USB has been connected to the device,
RNC[VJG/2QTKOCIGſNGUYKVJKPVJG75$
USB Music If the USB has been connected to the device,
RNC[UVJG/2ſNGUYKVJKPVJG75$
Play Plays the currently paused song
Pause Pauses the current song
Next Folder 2NC[UVJGſTUVſNGKPVJGPGZVHQNFGT
Previous Folder 2NC[UVJGſTUVſNGKPVJGRTGXKQWUHQNFGT
Repeat 4GRGCVUVJGEWTTGPVſNG
Repeat Off
%CPEGNUTGRGCVRNC[VQRNC[ſNGUKPUGSWGPVKCNQTFGT
5JWHƀG 2NC[UCNNſNGUYKVJKPVJG75$KPTCPFQOQTFGT
5JWHƀG1HH
%CPEGNUTCPFQORNC[VQRNC[ſNGUKPUGSWGPVKCNQTFGT
Voice Command Lists
Voice Recognition O 5-11
iPod
Command Operation
iPod Plays the songs within the iPod if the iPod has
been connected to the device
Play Plays the currently paused song
Pause Pauses the current song
Repeat 4GRGCVUVJGEWTTGPVſNG
Repeat Off Cancels repeat play to play files in sequential
order
5JWHƀG 2NC[UCNNſNGUYKVJKPVJGEWTTGPVECVGIQT[KPTCP-
dom order
5JWHƀG1HH %CPEGNUTCPFQORNC[VQRNC[ſNGUKPUGSWGPVKCN
order
My Music
Command Operation
My Music Plays the songs within the My Music
Play Plays the currently paused song
Pause Pauses the current song
Repeat 4GRGCVUVJGEWTTGPVſNG
Repeat Off Cancels repeat play to play files in sequential
order
5JWHƀG 2NC[UCNNſNGUYKVJKPVJGEWTTGPVECVGIQT[KPTCP-
dom order
5JWHƀG1HH %CPEGNUTCPFQORNC[VQRNC[ſNGUKPUGSWGPVKCN
order
Others
Command Operation
Bluetooth Audio Plays Bluetooth
®
Audio
Auxiliary Plays the connected auxiliary device

5-12
9RLFH&RPPDQG/LVWV
3KRQH&RPPDQG/LVW
Command Operation
Call
Displays list of saved contacts
Say the name to connect the call to the corre-
sponding contact
Call <Name> Call <Name> saved in Contacts (e.g. Call "John Smith")
Dial Number Makes the call to the number
Dial <Number> Call can be made by dialing the spoken numbers
(e.g. Dial "111 555 1234")
Call History The user can select a number from the outgo-
ing, incoming, and missed calls
Redial Connects the most recently called number
Command Operation
UVO eServices
Display the UVO eServices related command list
Roadside Assist Connect with a Roadside Assist agent.
eService Guide
Provides guidance on how to use UVO eServices
Vehicle Diagnostics Informs you if a diagnostic issue is found in
your vehicle
My POIs Show Points of Interest list which downloaded
from Google Maps and MyUVO
892H6HUYLFHV&RPPDQG/LVW2SWLRQDO
Voice Command Lists
Voice Recognition O 5-13
1DYLJDWLRQ&RPPDQG/LVW
Destination
Command Operation
Find Address Sets the destination through address search for
route guidance
Previous Destinations Sets the previous destination as the current
destination
Find Nearest POI Sets a POI near the current position as the
destination for route guidance through the POI
category search
Find the Nearest
<POI Category>
Sets a POI near the current position as the desti-
nation by directly inputting the POI name for route
guidance (e.g. Find the Nearest "Restaurants")
For more information on <POI Category>, refer to
Page 3-30.
Find Emergency
Police station
Searches for a police station near the current
position and sets it as the destination for route
guidance
Find Emergency
Hospital Searches for a hospital near the current position
and sets it as the destination for route guidance
Command Operation
Find Emergency
Dealership
Searches for a dealership near the current posi-
tion and sets it as the destination for route guid-
ance
Go Home Sets the previously registered home address as
the destination for route guidance
)QVQ1HſEG 5GVUVJGRTGXKQWUN[TGIKUVGTGFQHſEGCFFTGUUCU
the destination for route guidance

5-14
9RLFH&RPPDQG/LVWV
Map
Command Operation
Map Current Location
Displays the current position of the vehicle
Voice Guidance On Turns the Voice Guidance On
Voice Guidance Off Turns the Voice Guidance Off
Repeat Voice Guidance
Repeats the route guidance
Cancel Route Deletes the designated destination and termi-
nates the route guidance
Distance to Destina-
tion
Reports the remaining distance until destination
by voice
Time to Destination
Reports the remaining time until destination by voice
Replan Faster Time
Route Recalculates the route with faster time route
Replan Shorter
Distance Route
Recalculates the route with shorter distance
route
Command Operation
Zoom In/Zoom Out Decreases/Increases the map zoom by one level
Zoom Maximum
Displays the map screen in the maximum zoom level
Zoom Minimum
Displays the map screen in the minimum zoom level
View Route If the destination has been set, displays the en-
tire route on the screen until the destination
Auto Zoom On Turns the Auto Zoom feature on
Auto Zoom Off Turns the Auto Zoom feature off
Auto Mode Automatically converts the map display between
daylight and night mode
Daylight Mode Converts the map display into daylight mode
Night Mode Converts the map display into night mode
Voice Command Lists
Voice Recognition O 5-15
32,&DWHJRU\/LVW
Restaurants
African Restaurants
American Restaurants
Asian Restaurants
Chinese Restaurants
Coffee Shop
Continental Restaurants
Fast Food
French Restaurants
Italian Restaurants
Japanese Restaurants
Korean Restaurants
Latin American Restaurants
Mexican Restaurants
Seafood Restaurants
Vegetarian Restaurants
Other Restaurants
Automotive
Auto Parts
Auto Service
Automobile Dealership
Car Wash
Gas Station
Kia Dealership
Motorcycle Dealership
Parking
Rest Area
Road Assistance
Travel
Airport
Bus Station
Campground
City Center
Ferry Terminal
Hotel
Local Transit
Rental Car Agency
Tourist Attraction
Tourist Information
Train Station
Travel Agent
Shopping
Bookstore
Clothing Shop
Convenience Store
Department Store
Electronics Store
Gift Shop
Grocery Store
Home Specialty Store
Music Store
Pharmacy
Shoe Store
Shopping Center
Sporting Goods Store
Recreation
Amusement Park
Cinema
Golf Course
Museum
Recreation Area
Ski Resort
Sports Activities
Sports Complex
Video & Game Rental
Winery
Other Recreation
Financial Services
ATM
Bank
Check Cashing Service
Money Transfer
Community
Business Facility
City Hall
Civic Center
Convention Center
Court House
Fire Department
)QXGTPOGPV1HſEGU
Library
Police Station
2QUV1HſEG
School
Utilities
Waste & Sanitary
Services
Attorney
Cleaning & Laundry
Communication Services
Dentist
Funeral Home
Hair & Beauty
Hospital
Medical Service
Mover Services
Photography
Physician
Social Service
Tailor & Alteration
Tax Service

0(02
5-16

&$508/7,0(',$6<67(0
,QIRUPDWLRQ
У
UVO eServices (Optional)
У
GPS Information
У
Help

6-2
892H6HUYLFHV2SWLRQDO
When the vehicle ignition is not turned on
When the phone Bluetooth® feature is set to off
When the phone Bluetooth® cannot be connected or becomes
disconnected
When there are no phones paired with the vehicle
When cellular service is unavailable
When the power turns off due to phone power (battery) issues
When a Bluetooth® device without phone feature support has
been connected, such as an MP3 device
When the system is booting
When the system power supply is unstable
When the attempted call is blocked due to user operations
When the 9-1-1 call is unstable due to phone or other communi-
cation network issues
When the call feature is not operating due to phone settings set
by the user
When the phone cannot be controlled via Bluetooth® due to
phone specifications or characteristics
7KH&RQQHFWIHDWXUHPD\
QRWRSHUDWHLQWKHIROORZLQJVLWXDWLRQV

UVO eServices
Information O 6-3
8VLQJ892H6HUYLFHVDQG&DXWLRQV
Download the UVO eServices App and install it on your smartphone.
The app can be downloaded from your smartphone's app store.
Pair and connect your smartphone with the vehicle. For information on
connecting your Bluetooth device, refer to the smartphone user's man-
ual and instructions on the Phone Help screen on your radio. Up to 5
Bluetooth devices can be paired with the vehicle.
Login and activate the UVO eServices App on your smartphone.
Some UVO eServices features will only be available when the your
smartphone is connected with the vehicle via Bluetooth and the UVO
eServices App is running.
UVO eServices is fully compatible within some smartphones but may
not operate properly within incompatible smartphones.
To view the list of
compatible smartphones, please visit MyUVO.com.
Communication between the vehicle and smartphone app may tempo-
rarily disconnect depending on the phone state.
If the feature is not operating properly, you may need to reset the UVO
eServices App or the smartphone to try again according to the following
steps.
1. Try again 2. Reset smartphone app
3. Re-connect BT 4. Reset smartphone
5. Delete BT and pair again
Some services use the customer’s mobile phone data plan for data
communication. And thus the features will function in accordance with
the cellular plan.
Use of the most up-to-date app version is recommended.
For smartphone related inquiries, please visit MyUVO.com.

6-4
892H6HUYLFHV2SWLRQDO
$ERXW892H6HUYLFHV
UVO eServices provides the following features through Bluetooth
communication between the vehicle and your Smartphone.
Name Description
1
911 Connect If an airbag deploys, your vehicle automatically initi-
ates a call to 9-1-1 and sends your vehicle’s location
information to the 9-1-1 operator.
2
Roadside
Assist
If a diagnostic issue exists, you can connect with a
Roadside Assist agent.
3 Vehicle
Diagnostics
Informs you if a diagnostic issue is found in your vehicle.
If an issue is found, you can contact a call center through
Roadside Assistance or reserve an appointment with your
preferred Kia dealer through Schedule Service.
4
Parking Minder
Save the location of your parked vehicle on your UVO
eServices smartphone app.
You can check where your vehicle is parked through
the UVO eServices App on your smartphone.
5
My POIs
Downloads Points of Interest to your multimedia sys-
tem from Google Maps and MyUVO.com
6
My Car Zone
Keep track of pre-defined triggered alerts such as
Speed Alert, Curfew Limit Alert or Geo Fence Alert
from the My Car Zone feature.
7
eServices Guide Receive guidance on how to use UVO eServices.
i
Information
У
UVO eServices is an optional feature available in select models, on
select trims.
i
Information
У
24-hour Roadside Assistance is a service plan provided by Kia
Motors America, Inc. Certain limitations apply. Coverage details are
available in the Kia Warranty and Consumer Information Manual.
For access to Enhanced Roadside Assistance, a connected mobile
phone via Bluetooth within the cellular service coverage area is
required.
To use UVO eServices, the following conditions must be met.
1. The UVO eServices smartphone app must be installed and you
must log in using your MyUVO account credentials.
2. The smartphone must be connected via Bluetooth.
3. Once this is complete, eServices must be activated (from the
eServices Settings screen).
UVO eServices
Information O 6-5
%HIRUHXVLQJ892
H6HUYLFHV
Installing the UVO eServices App on your
smartphone
1. Download and install the UVO eServices
App on your smartphone.
The app can be downloaded from the
Apple App Store or Google Play.
2. Register your vehicle and account at
MyUVO.com
Note: MyUVO.com is accessible from
your phone’s browser.
3. Start the UVO eServices App on your
smartphone and log in.
&RQQHFWLQJ%OXHWRRWK
Press the key on the steering wheel
or press the
3+21(
key on the UVO
eServices system.
Press
<HV
on the touch screen when
prompted to pair a phone.
Download and install the UVO eServices
App on your smartphone.
Car Name
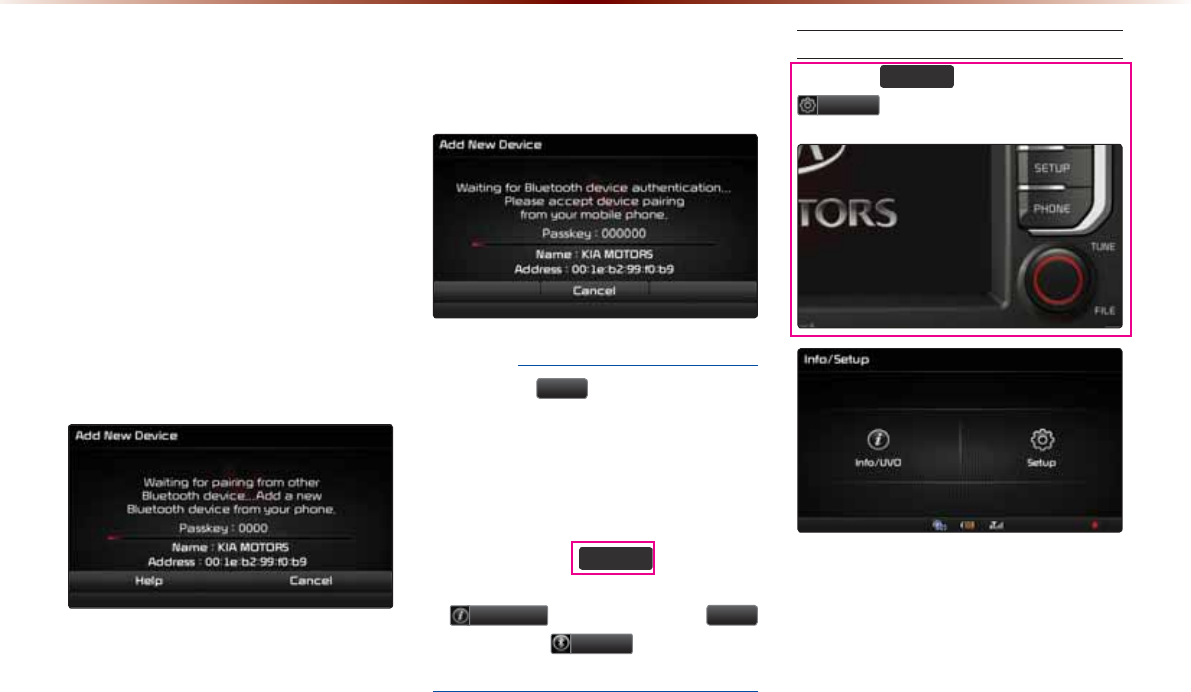
6-6
892H6HUYLFHV2SWLRQDO
3DLUDGHYLFHIURP
%OXHWRRWKHQDEOHGSKRQH
1. Turn on the Bluetooth feature on your
smartphone’s Bluetooth settings screen.
2. Wait for “KIA MOTORS” to appear on
your smartphone’s Bluetooth settings
screen. Note: “KIA MOTORS” may differ
depending on your vehicle.
3. Select “KIA MOTORS” from your phone
and enter the passkey shown on the
touch screen.
The default passkey is "0000".
If phone supported SSP, check the pass-
key on your Bluetooth® device and confirm
the authentication.
NOTICE
У
Press the
+HOS
button on the touch
screen to view the help section related
to pairing and connecting Bluetooth®
devices, and using handsfree related fea-
tures.
У
Help section can also be viewed by
pressing the
6(783
key on the
UVO eServices system, then pressing
,QIR892
button, followed by
+HOS
button and
3KRQH
button on the
touch screen.
Activating UVO eServices
Press the
6(783
key ƙ Press
6HWXS
button.
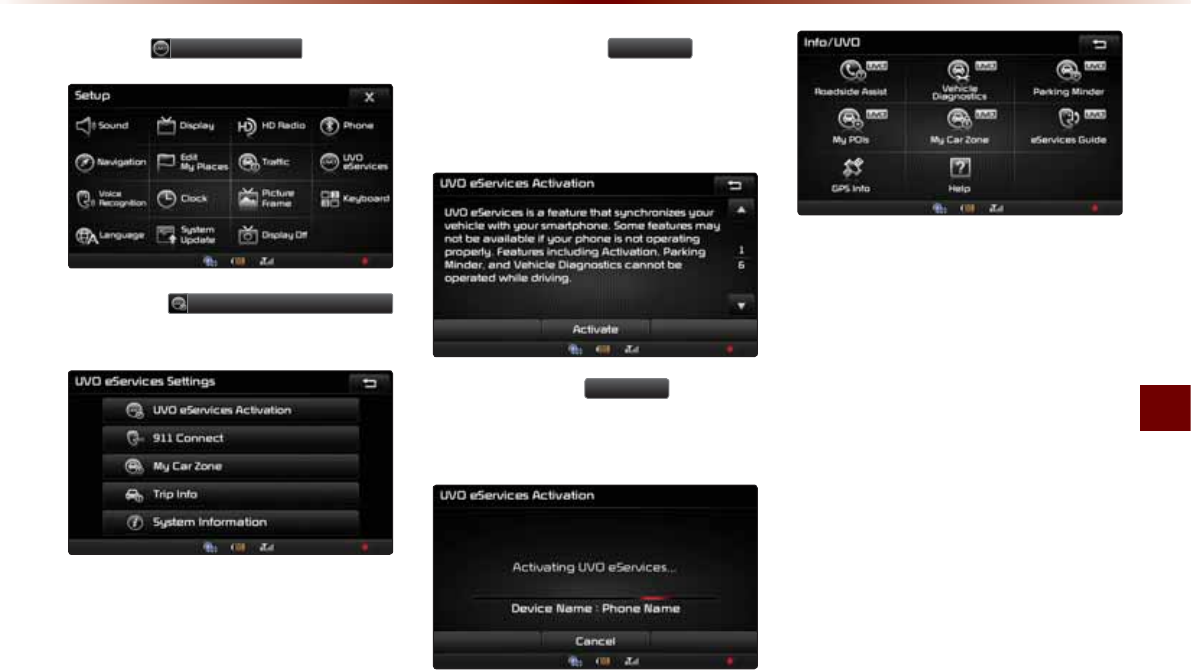
UVO eServices
Information O 6-7
Press the
892H6HUYLFHV
button.
Press the
892H6HUYLFHV$FWLYDWLRQ
button on the touch screen.
Before pressing the
$FWLYDWH
button,
ensure that you are running UVO eSer-
vices App on your smartphone and are
logged in.
After pressing the
$FWLYDWH
button, on
the touch screen, the UVO eServices acti-
vation process will begin.
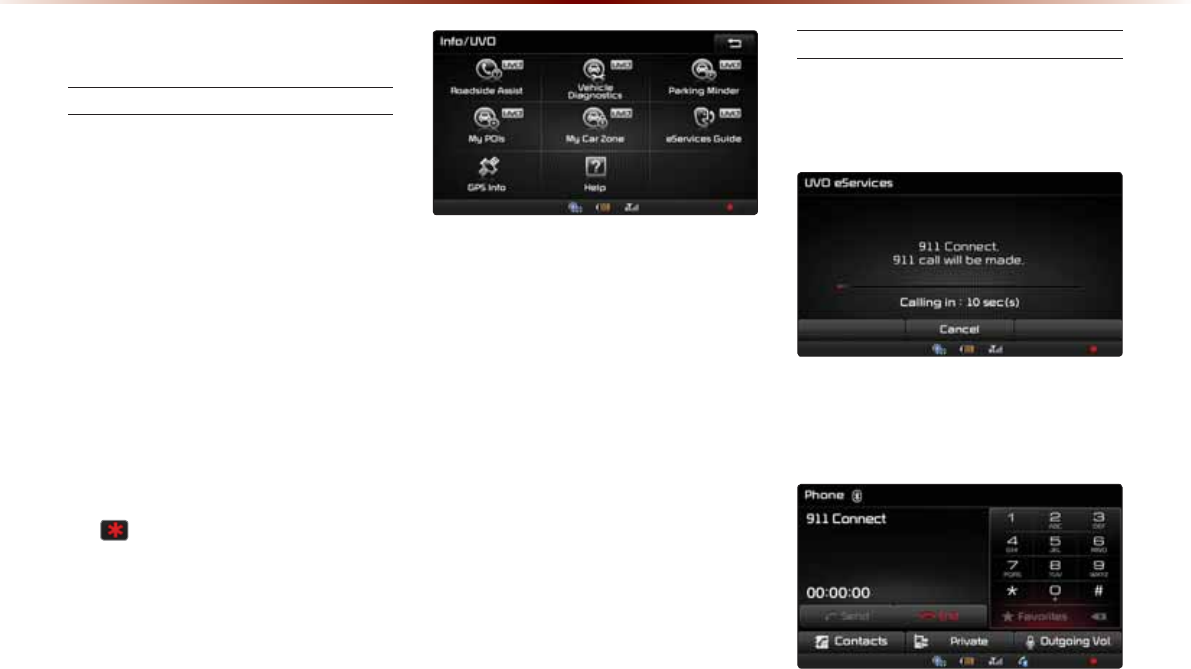
6-8
892H6HUYLFHV2SWLRQDO
&RQQHFW
911 Connect
If an airbag deploys, your vehicle automati-
cally initiates a call to 9-1-1 and sends your
vehicle’s location information to the 9-1-1
operator.
The 911 Connect feature is available only
when the mobile phone is connected via
Bluetooth.
By default, this feature is turned off. To turn
it on, you must turn it on in the eServices
Settings menu. By enabling this feature,
you are agreeing the 911 Connect terms of
use.
An ( ) icon is displayed at the bottom of
the touch screen as shown below when
911 Connect is enabled and a mobile
phone is connected via Bluetooth.
Initiating a 911 Call
If an airbag deploys, the following screen is
displayed and a call is automatically placed
to 9-1-1 after 10 seconds.
Once a call is connected with a 9-1-1 opera-
tor, it is possible to request emergency ser-
vices to be dispatched to your location.

UVO eServices
Information O 6-9
The 9-1-1
operator
may request information
on the current location of your vehicle.
When the 9-1-1
operator
requests your
vehicle location, “Sending Location” is dis-
played on the screen and the vehicle location
is automatically sent to the 9-1-1
operator
.
When the 9-1-1 operator attempts to call
the driver again, the call time is displayed
and allows the driver to speak with the
9-1-1 operator.

6-10
892H6HUYLFHV2SWLRQDO
5RDGVLGH$VVLVW
Roadside Assist
The Roadside Assist feature can be used
only when your phone is connected via
Bluetooth.
Press the
6(783
key, then press
,QIR892
button on the touch screen.
Press the
5RDGVLGH$VVLVW
button on the
touch screen to connect with a Roadside
Assist agent.
9HKLFOH'LDJQRVWLFV
Conducting Vehicle Diagnostics
Vehicle Diagnostics is available only when
the ignition is turned on and the vehicle is
parked.
It also requires that UVO eServices is
activated, and the Phone is connected
via Bluetooth before starting Vehicle
Diagnostics.
Press the
6(783
key.
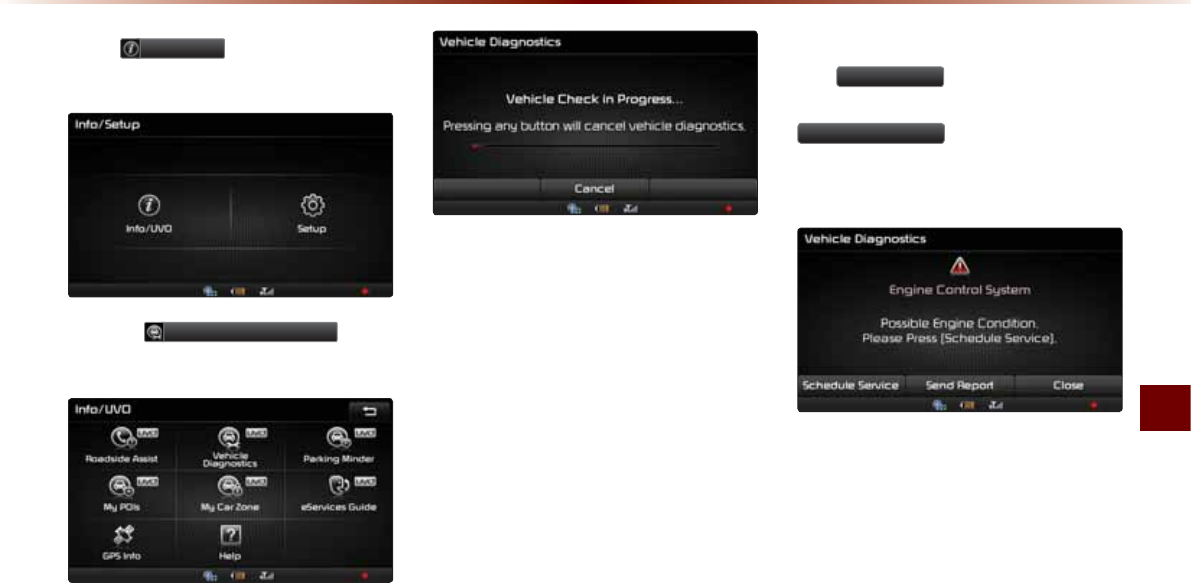
UVO eServices
Information O 6-11
Press
,QIR892
button on the touch
screen.
Press the
9HKLFOH'LDJQRVWLFV
button
on the touch screen.
The Vehicle Diagnostics process will begin.
When a diagnostics check is in progress,
keep the vehicle in park with the ignition
on. To cancel diagnostics, press the Cancel
button on the touch screen or any hardkey.
If diagnostic issues are found, press
the
6HQG5HSRUW
button to send to
your MyUVO account or press the
6FKHGXOH6HUYLFH
button to schedule an
appointment with your preferred or nearby
Kia dealer.
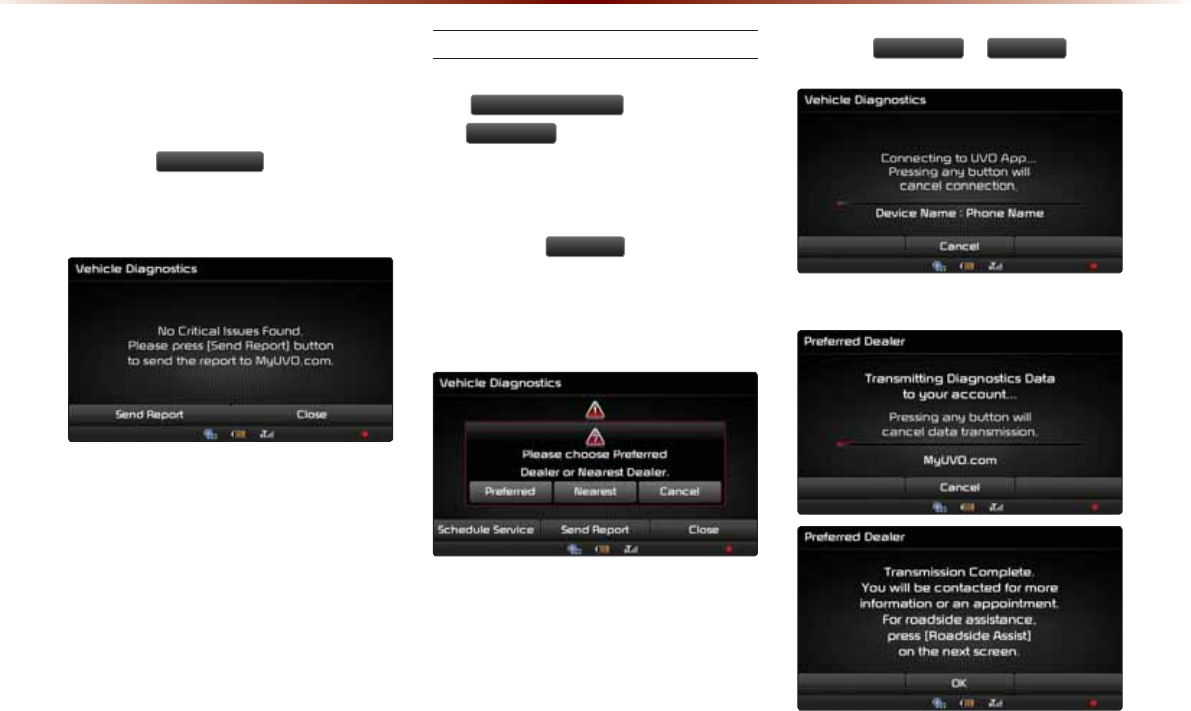
6-12
892H6HUYLFHV2SWLRQDO
Even if diagnostic issues are not found
after Vehicle Diagnostics, it is recom-
mended that you send the diagnostic
results to your MyUVO account.
Press the
6HQG5HSRUW
button to send
the diagnostics results to your MyUVO
account.
Schedule Service
When scheduling an appointment using
the
6FKHGXOH6HUYLFH
button, pressing
the
3UHIHUUHG
button will allow you to
request an appointment with your preferred
Kia dealer and send your vehicle’s diag-
nostics information.
Pressing the
1HDUHVW
button will allow
you to request an appointment with the
nearest Kia dealer and your vehicle’s diag-
nostics information.
Press the 3UHIHUUHG or 1HDUHVW button.
Diagnostics Data is transmitted to MyUVO.com
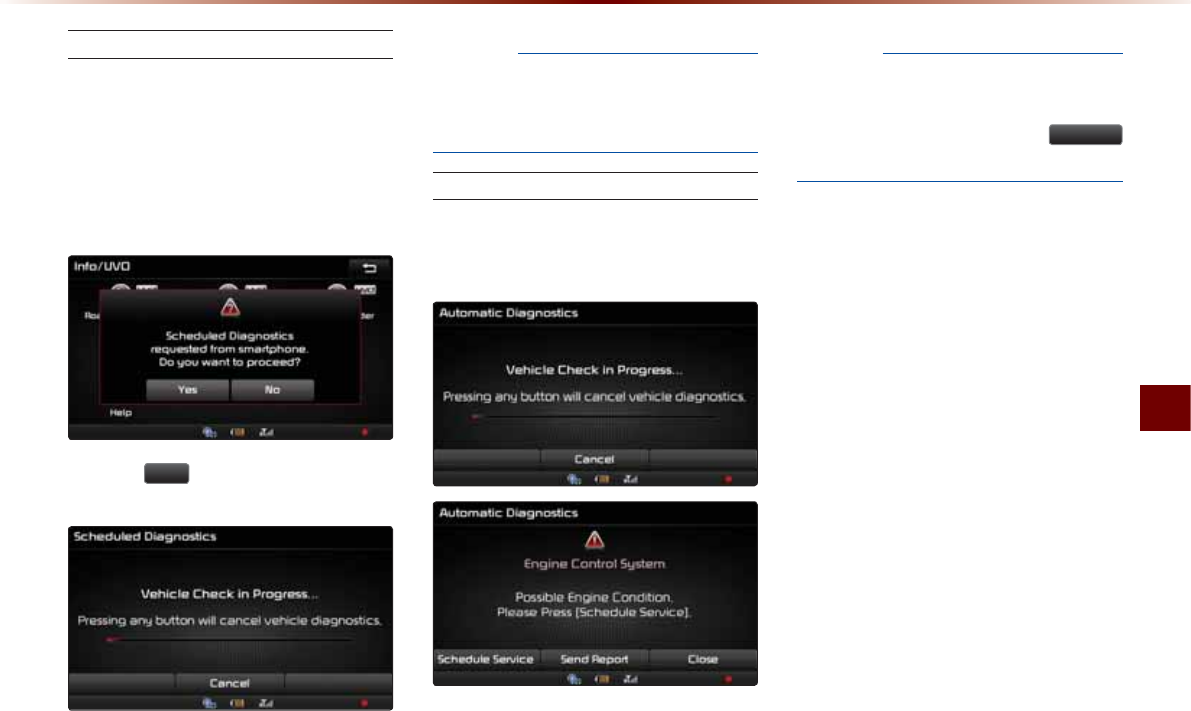
UVO eServices
Information O 6-13
Scheduled Diagnostics
If you have set up Scheduled Diagnostics
on your UVO eServices App, a vehicle
diagnostics check will automatically start
on the day you selected.
On the date of the Scheduled Diagnostics,
the following window will be displayed.
Press the <HV button on the touch screen
to proceed with diagnostics.
NOTICE
У
The date of Scheduled Diagnostics may be
incorrect if the UVO eServices App on your
smartphone is not connected regularly.
Conducting Auto Diagnostics
If a critical diagnostics issue with your
vehicle’s powertrain is detected, you will be
notified on your vehicle’s touch screen.
NOTICE
У
When diagnostics is in progress, do not
drive the vehicle or turn off the ignition. To
cancel diagnostics, press the
&DQFHO
button or any key.
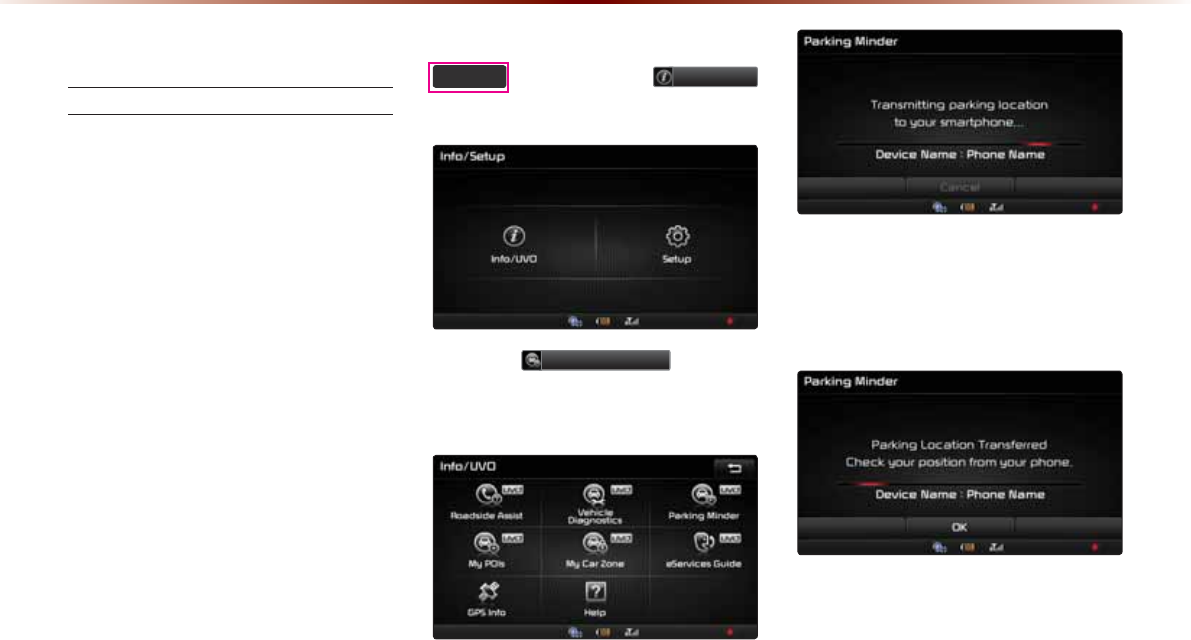
6-14
892H6HUYLFHV2SWLRQDO
3DUNLQJ0LQGHU
Sending Parking Location
The location where your vehicle is
currently parked can be sent to your
smartphone.
The Parking Minder feature is only
available when the ignition is turned on
and the vehicle is parked.
Ensure that the UVO eServices system
is activated via Bluetooth with the
UVO eServices App running on your
smartphone before using this feature.
After parking the vehicle, press the
6(783
key, then press
,QIR892
button on the touch screen.
Press the
3DUNLQJ0LQGHU
button on
the touch screen to send the vehicleÓs
location to your smartphone.
Once the parking location has been sent,
you can view your vehicle’s location from
the UVO eServices App on your smart-
phone.
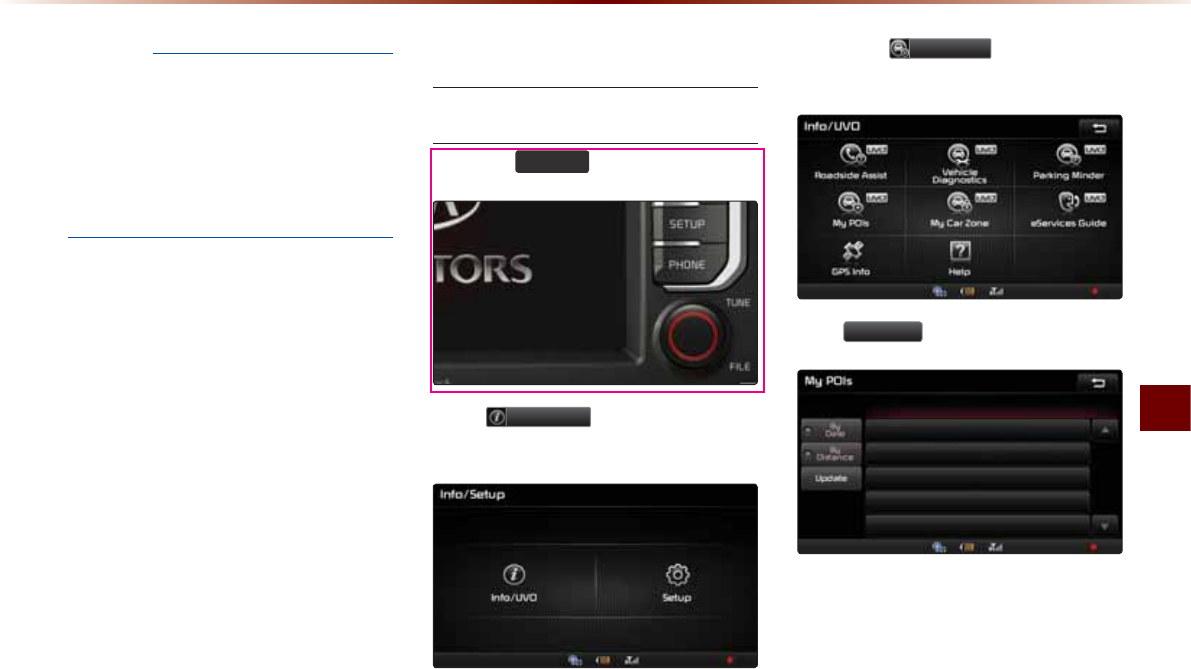
UVO eServices
Information O 6-15
NOTICE
У
When the parking location is being sent,
do not drive the vehicle or turn off the igni-
tion. Ensure that you have logged in to the
UVO eServices App, and your phone is
connected to multimedia system through
Bluetooth connection.
0\32,V
Sending Points of Interest to
Your Navigation System
Press the
6(783
key.
Press
,QIR892
button on the touch
screen.
Press the
0\32,V
button on the
touch screen.
Press 8SGDWH button on the touch screen.
6-16
892H6HUYLFHV2SWLRQDO
UVO eServices system will attempt to
download the POIs from MyUVO via your
smartphone.
NOTICE
У
Ensure that you have logged in to the
UVO eServices App, and your phone is
connected to the UVO eServices system
via Bluetooth connection.
Once the POIs have been downloaded,
select a POI from the list to see more
details.
0\&DU=RQH
My Car Zone is a feature that provides
alerts and driving history for Curfew Limits,
Speed Alerts, and Geo Fence Alerts set by
the user.
Name Description
1
Curfew Limit
Alert
Curfew Limit Alerts are alerts
that are triggered when a
driver is driving within a pre-
defined time range.
2
Speed Alert
Speed Alerts are alerts that
are triggered when a driver
exceeds the pre-defined maxi-
mum speed.
3
Geo Fence
Alert
Geo Fence Alerts are alerts
that are triggered when a driv-
er enters into a pre-defined
geographical location.
My Car Zone feature is supported only
when UVO eServices has been activated.
UVO eServices
Information O 6-17
Press the
6(783
key.
Press the
,QIR892
button on the
touch screen.
Press the
0\&DU]RQH
button on the
touch screen.
Curfew Limit Alert
You can check the Curfew Limit Alert history
for a list of past triggered curfew alerts.
Press the corresponding alert to view
detailed alert information.
Name Description
1
Phone Name of phone connected
upon triggered curfew limit
2
Alert Time Initial alert time
3
Duration Total duration of driving while
curfew limit was triggered
4
Driving Time
Total driving time from turning
ignition on until turning igni-
tion off
1
2
3
4
6-18
892H6HUYLFHV2SWLRQDO
Speed Alert
You can check the Speed Alert history
for triggered speed limit alerts of the
vehicle.
Name Description
1
Phone Name of phone connected
upon triggered speed limit alert
2
Max. Speed Maximum vehicle speed upon
triggered speed limit alert
3
Alert Time Time from first triggered alert
until last triggered alert
4
Duration
Total triggered alert time from
turning ignition on to turning
ignition off
Geo Fence Alert
You can check the Geo Fence Alert history
for triggered Geo Fence alerts of the vehicle.
Name Description
1
Phone Name of phone connected upon
triggered geo fence alert
2
Alert Time Initial alert time
3
Center
Location
Radius from set center location
address
4
Radius Radius from set geo fence ad-
dress
To check My Car Zone alert history from
your smartphone, you must first send the
alert history to your MyUVO account.
Press the
6HQG'DWD
button on the
touch screen.
1
2
3
4
1
2
3
4
UVO eServices
Information O 6-19
NOTICE
У
Before using
6HQG'DWD , ensure your
phone is connected to the UVO eSevices
system via Bluetooth.
H6HUYLFHV*XLGH
eServices Guide
eServices Guide provides guidance on
how to use UVO eServices.
This feature is only available when the
mobile phone is connected via Bluetooth.
Press the
6(783
key, then press
,QIR892
button on the touch screen.
У

6-20
$ERXW*36*OREDO3R
VLWLRQLQJ6\VWHP
GPS (Global Position System) :
GPS is a system developed and operated
by the United States that determines the
user’s current position (longitude, latitude,
etc.) by using 4 or more satellites.
This system is used with related GPS infor-
mation, various sensors, road map data,
and other related information to provide
navigation services.
i
Information
У
F
or continued map updates, information-
gathering and surveys are conducted con-
tinuously to monitor road changes or new
road constructions. Nonetheless, roads,
facilities, and fares are under constant
change and it is impossible to completely
remove all errors, including road updates,
names, facilities, and fares. Please keep
this in mind when using GPS.
У
In principle, roads with widths less than
3 yards are not included within the map
data. Roads with sections with widths less
than 3 yards may be deleted in future map
data updates.
When GPS Info Cannot Be Used
GPS info may not operate under the follow-
ing conditions :
У When buildings, tunnels, or other
obstructions block satellite signals.
У When materials are placed above the
GPS antenna and block satellite signals.
У When the satellite is not transmitting.
У When a digital cellular phone (1.5GHz)
is placed near the GPS antenna.
Errors Unavoidable Due to Sys-
tem Characteristics
У The multimedia system uses GPS infor-
mation, various sensors, road map data,
and other related information to display
the current position.
У Errors may occur if the satellite is trans-
mitting inaccurate signals or only two or
less satellite signals can be received.
У Errors that occur in such conditions can-
not be corrected.
*36,QIRUPDWLRQ
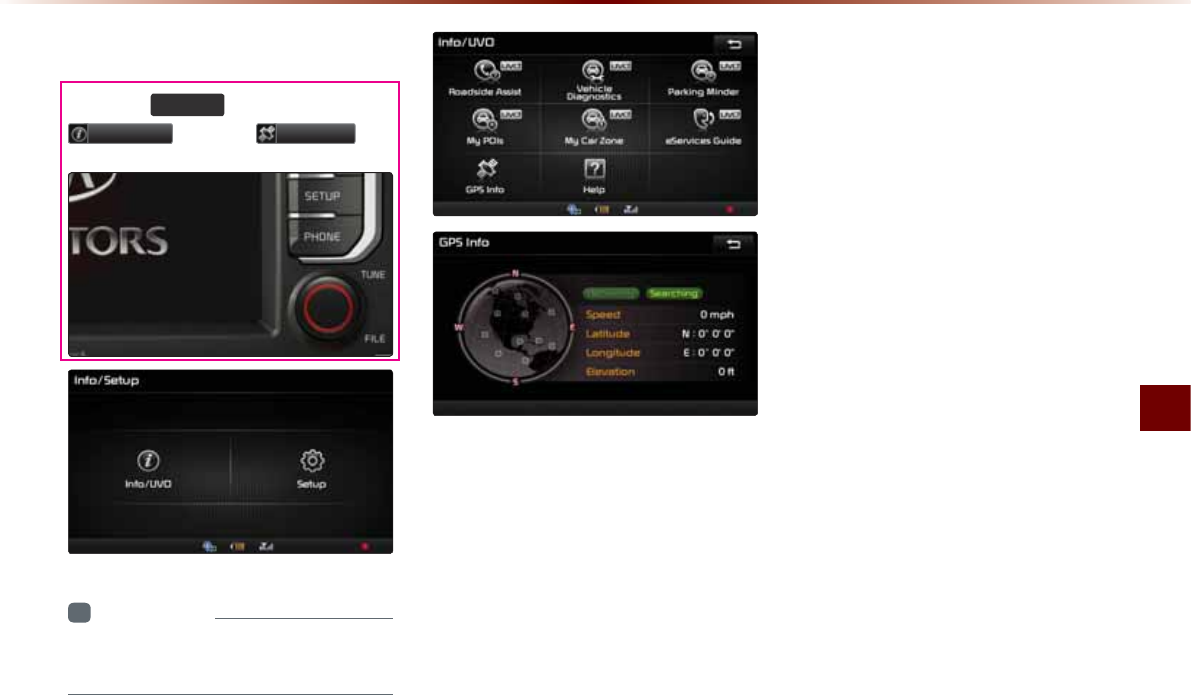
GPS Information
Information O 6-21
9LHZLQJ*36,QIR
Press the
6(783
key ƙ Press
,QIR892
ƙ Press
*36,QIR
i
Information
У
UVO eServices are an optional feature
equipped in select vehicles.
The GPS reception and vehicle speed
information are displayed.
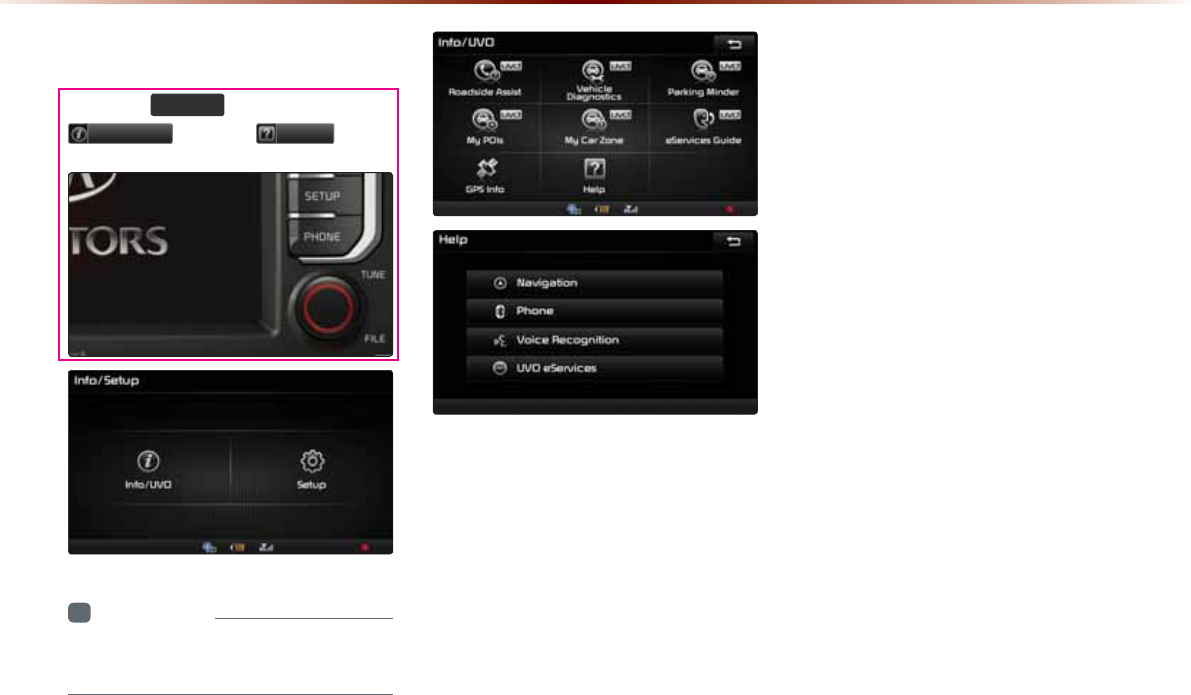
6-22
+HOS
9LHZLQJ+HOS
Press the
6(783
key ƙ Press
,QIR892
ƙ Press
+HOS
i
Information
У
UVO eServices are an optional feature
equipped in select vehicles.
Help sections on the Navigation, Phone,
Voice Recognition and UVO eServices fea-
tures can be selected and viewed.

&$508/7,0(',$6<67(0
2WKHU
)HDWXUHV
У
Rear camera display

7-2
$ERXW5HDU'HWHFWLRQ
&DPHUD
У This system has been equipped with
a rear camera to help allow wider rear
range of vision.
У The rear camera will operate automati-
cally when the ignition KEY is turned ON
and the gear shifter is set to Reverse,
or R. The rear camera will automatically
stop operating when shifted to a different
position.
Operating sequence of the Rear
Camera
1. Position the ignition key in ACC or ON.
2. Position the transmission lever to R.
3. The rear camera mode will be displayed
on the screen.
i
Information
У
The rear camera has been equipped with
an optical lens to provide a wider range of
vision and may appear different from the
actual distance.
CAUTION
У The rear-camera display is not a substi-
tute for proper and safe backing-up proce-
dures. The rear-camera display may not
display every object behind the vehicle.
Always drive safely and use caution when
backing up.
5HDUFDPHUDGLVSOD\

&$508/7,0(',$6<67(0
У
Using Setup
6HWXS
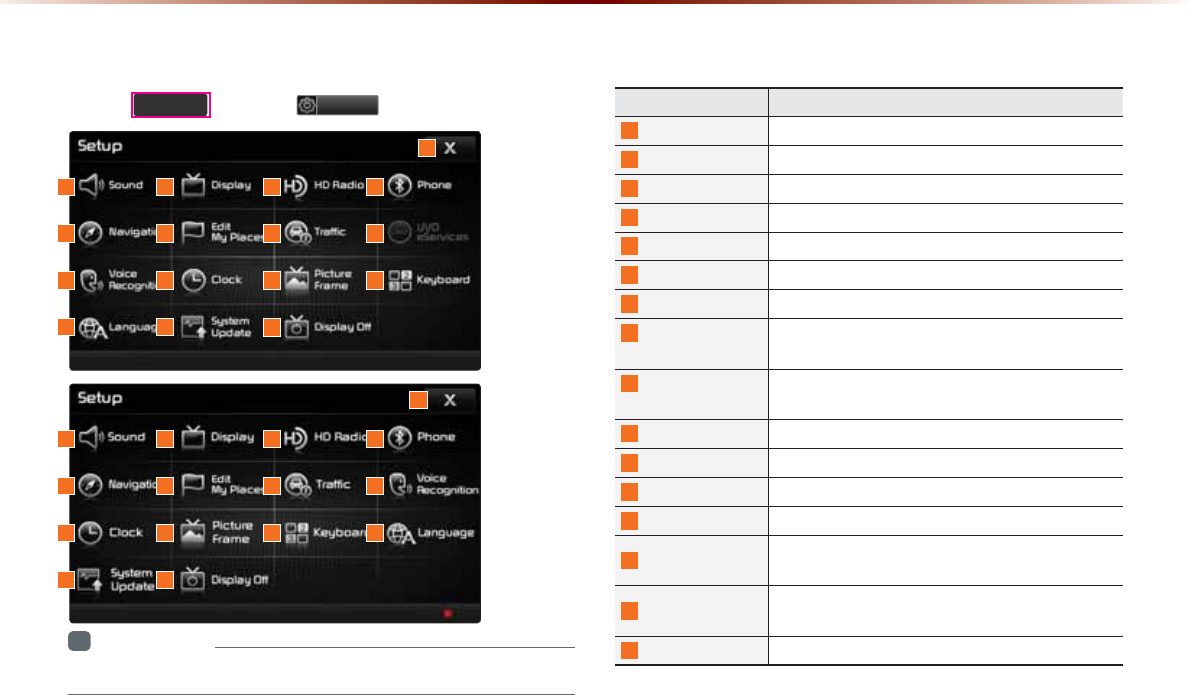
8-2
8VLQJ6HWXS
%DVLF0RGH6FUHHQ
Press the
6(783
key ƙ Press
6HWXS
to display the Setup screen.
Name Description
1
Sound Sets sound related settings
2
Display Sets display related settings
3
HD Radio Sets HD Radio related settings
4
Phone Sets Bluetooth® related settings
5
Navigation Sets various settings found within Navigation mode
6
Edit My Places Set/Edit My Places within Navigation Mode
7
Traffic Sets Traffic Information related settings
8
UVO eServices
(Optional)
Sets UVO eServices related Settings
9
Voice
Recognition
Sets voice recognition related settings
10
Clock Sets current time and clock display
11
Picture Frame Sets screen display when device is turned off
12
Keyboard Sets the keyboard type
13
Language
Sets language for use within the system
14
System Update Checks system software version and receives up-
dates
15
Display Off Turn device display on/off (The device power will not
be turned off)
16
Close Close Setup menu screen
1
5
9
13
2
6
10
14
3
7
11
4
8
12
16
15
1
5
10
14
2
6
11
15
3
7
12
4
9
13
16
i
Information
•
UVO eServices is an optional feature available in select vehicles on select trims.
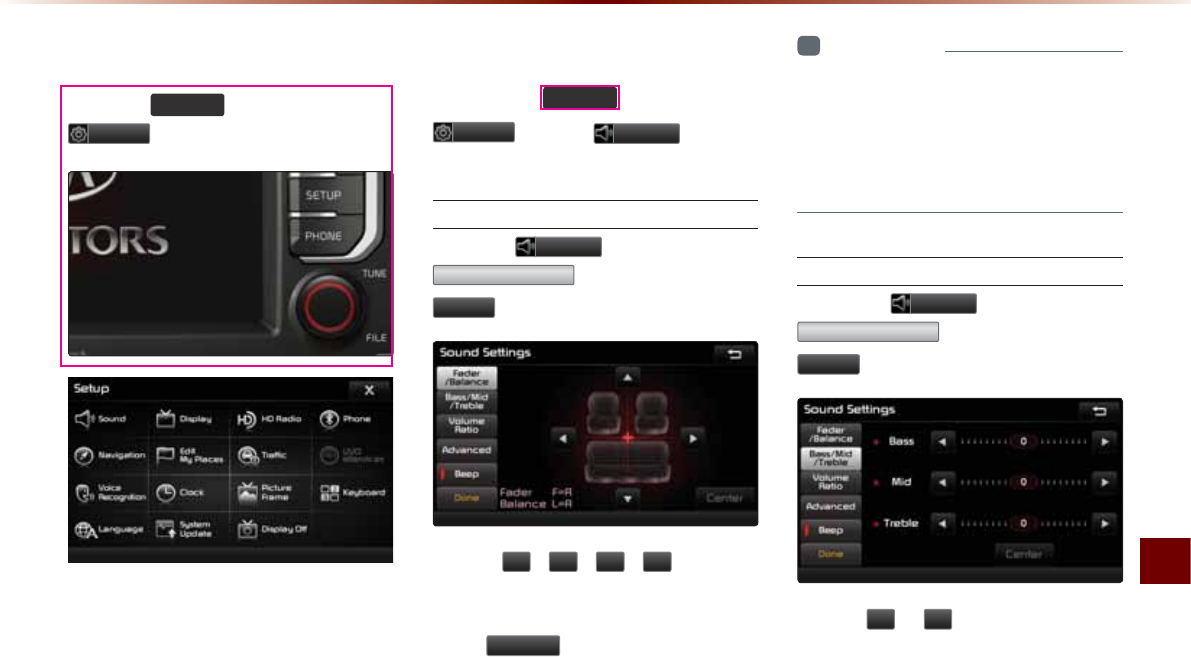
Using Setup
Setup O 8-3
6WDUWLQJ0RGH
Press the
6(783
key ƙ Press
6HWXS
to display the Setup screen.
Within Setup, you can check and change
the settings for all features found within the
multimedia system.
6RXQG
Press the
6(783
key ƙ Press
6HWXS
ƙ Press
6RXQG
.
Setting Balance/Fader
Press the
6RXQG
button ƙ Press
)DGHU%DODQFH
ƙ Set and press
'RQH
.
Use the
ԟ
,
ԣ
,
ԥ
,
ԡ
buttons to
move the cursor on the control screen to
the desired position.
Press
&HQWHU
to restore sound to the
center position.
i
Information
У
The Balance/Fader settings allows you to
set the sound position. For example, you
can set the sound close to the driver-seat
so that the volume is relatively lower in the
passenger or rear seats.
Setting Bass/Mid/Treble
Press the
6RXQG
button ƙ Press
%DVV0LG7UHEOH
ƙ Set and press
'RQH
.
Use the
Ԥ
or
Ԡ
buttons to adjust the
Bass/Mid/Treble settings.
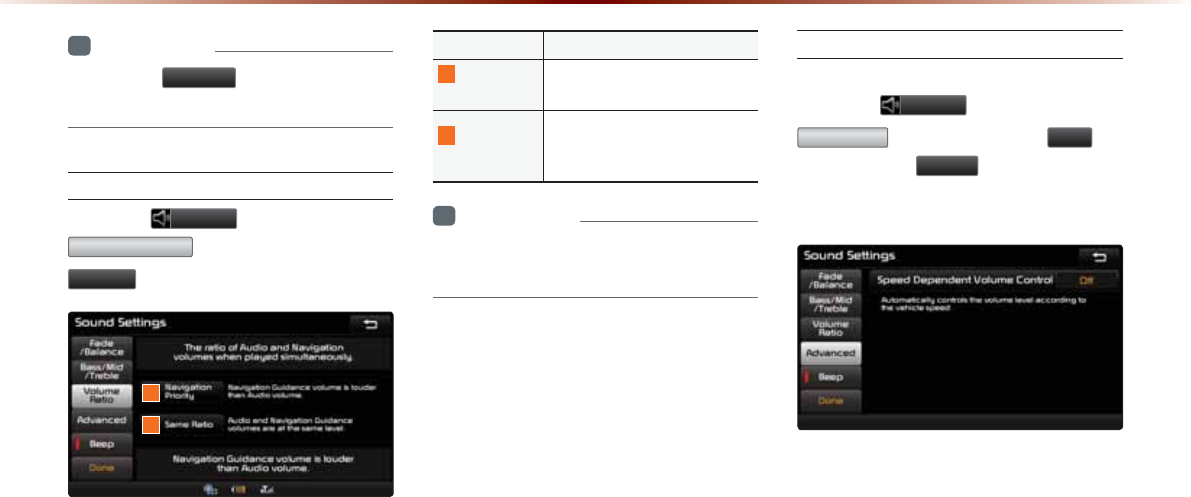
8-4
8VLQJ6HWXS
i
Information
У
Press the
&HQWHU
button to restore the
Bass/Mid/Treble to the center position.
Setting Volume Ratio
Press the
6RXQG
button ƙ Press
9ROXPH5DWLR
ƙ Set and press
'RQH
.
These options are used to set the volume
ratio by selecting from Navigation Priority/
Audio Priority/Same Ratio.
Name Description
1
Navigation
Priority
Navigation Guidance volume is
louder than Audio volume.
2
Same
Ratio
Audio and Navigation Guid-
ance volumes are at the same
level.
i
Information
У
The rear speakers will maintain the same
audio volume ratio.
Advanced
Speed Dependent Volume Control
Press the
6RXQG
button ƙ Press
$GYDQFHG
ƙ Turn the feature
2Q
ƙ
Set and press
'RQH
.
When turned on, volume level is controlled
automatically according to the vehicle speed.
.
1
2
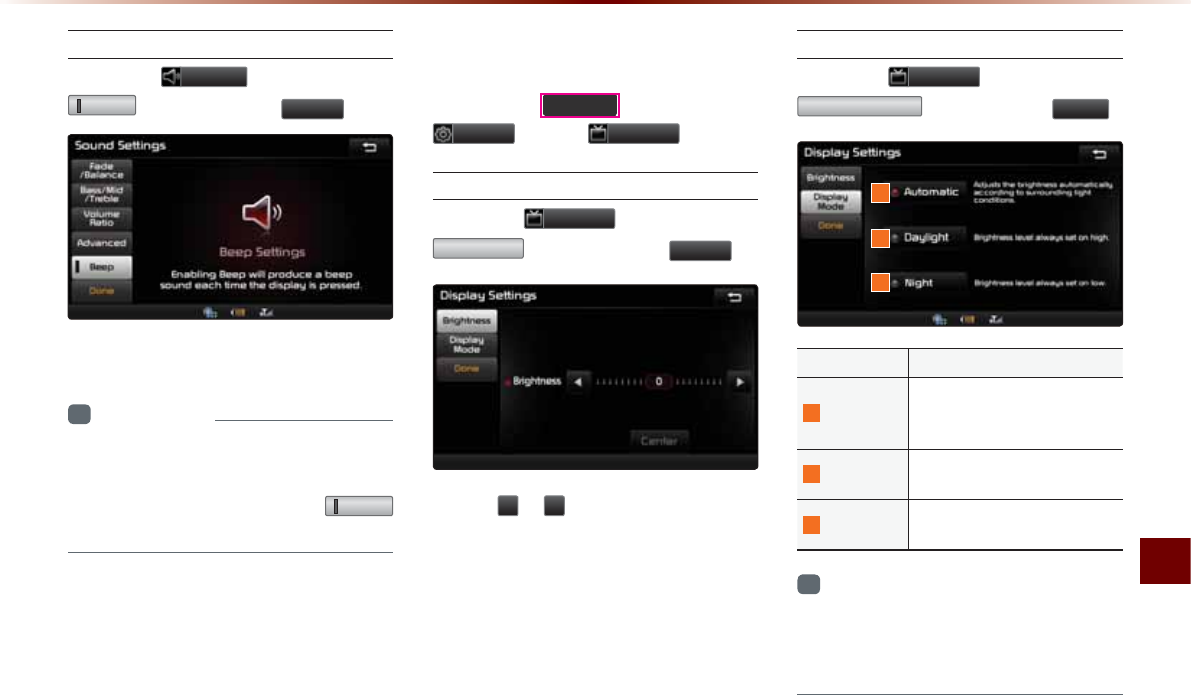
Using Setup
Setup O 8-5
Setting Beep
Press the
6RXQG
button ƙ Press
%HHS
ƙ Set and press
'RQH
.
Each press of this button turns the BEEP
tone on/off.
i
Information
У
When the light on the left side of the but-
ton is turned on, this indicates that the
BEEP tone is active. Press the
%HHS
button again to turn off the BEEP tone.
'LVSOD\
Press the
6(783
key ƙ Press
6HWXS
ƙ Press
'LVSOD\
.
Adjusting Brightness
Press the
'LVSOD\
button ƙ Press
%ULJKWQHVV
ƙ Set and press
'RQH
.
Use the
Ԥ
or
Ԡ
buttons to adjust the dis-
play brightness.
Setting Display Mode
Press the
'LVSOD\
button ƙ Press
'LVSOD\0RGH
ƙ Set and press
'RQH
.
Name Description
1
Automatic
Adjusts the brightness auto-
matically according to sur-
rounding light conditions.
2
Daylight Brightness level always set on
high.
3
Night Brightness level always set on
low.
i
Information
У
When set to Automatic, the screen bright-
ness and color will automatically be adjusted
according to the surrounding brightness.
1
2
3
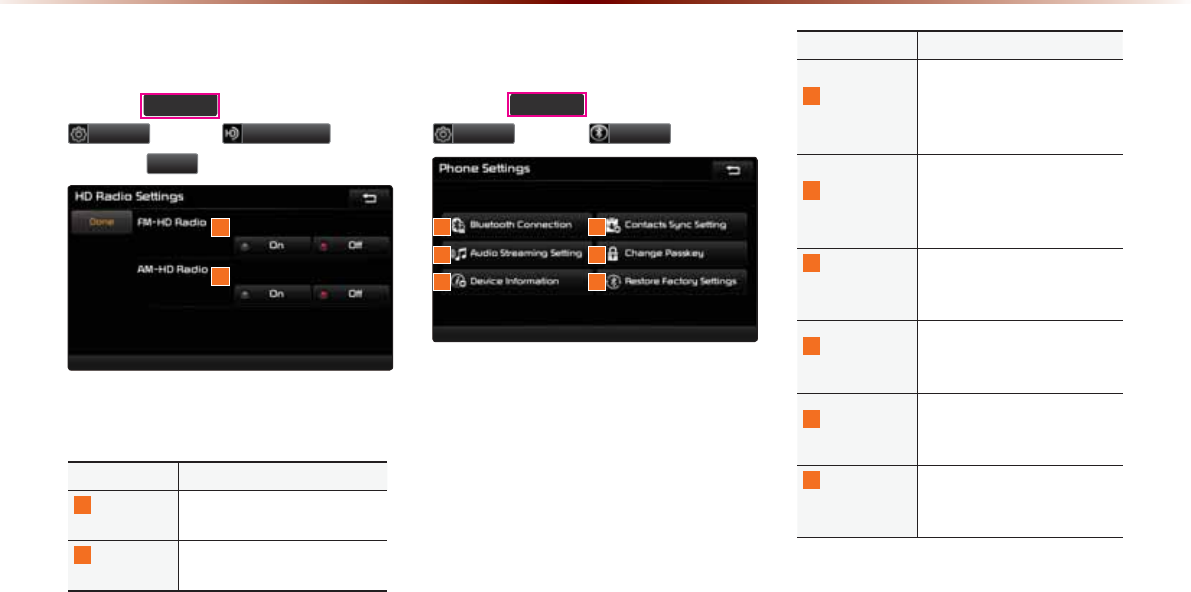
8-6
8VLQJ6HWXS
+'5DGLR705HFHSWLRQ
Press the 6(783
key ƙ Press
6HWXS ƙ Press +'5DGLR ƙ Set
and press 'RQH .
These settings are used to set whether to
turn HD RadioTM
reception
On/Off.
Name Description
1
FM-HD
Radio
Used to turn FM-HD Radio
reception On/Off
2
AM-HD
Radio
Used to turn AM-HD Radio
reception On/Off
3KRQH
Press the
6(783
key ƙ Press
6HWXS
ƙ Press
3KRQH
.
These menus allow you to set
Bluetooth
®
Wireless Technology related features.
Name Description
1
Bluetooth
Connection
Manages the Bluetooth de-
vice list, such as pairing, con-
necting or deleting Bluetooth
devices
2
Contacts
Sync Setting
Automatically downloads the
mobile phone contacts and
call histories to the car upon
connecting Bluetooth® device
3
Audio
Streaming
Setting
Sets whether to use the
streaming audio feature
4
Change
Passkey
Changes the passkey used
to authenticate Bluetooth®
device
5
Device
Information
Searches car Bluetooth® de-
vice information and change
device name
6
Restore
Factory
Settings
Restores Bluetooth® factory
state settings
1
2
1 2
3 4
5 6
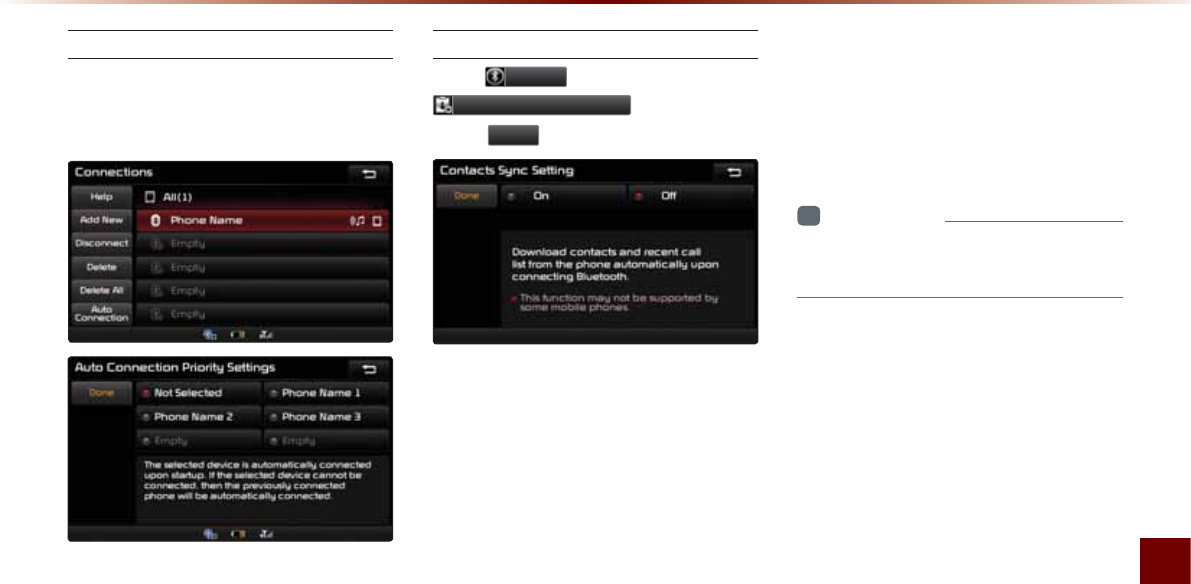
Using Setup
Setup O 8-7
Connections
Manages the Bluetooth device list,
such as pairing, connecting or deleting
Bluetooth devices.
Contacts Sync Setting
Press
3KRQH
button ƙ Press
&RQWDFWV6\QF6HWWLQJ
ƙ Set and
press
'RQH
.
This feature automatically downloads the
mobile phone contacts and call histories to
the car upon Bluetooth® connection.
If you do not wish to use Contacts Sync,
turn the feature off.
Ŗ If Contact Sync is set to ON, contacts
stored your phone will download each
time your phone is connected. There
may be a delay before the system is
available to place a call.
Ŗ If Contact Sync is set to OFF, your
phone contacts will download only at the
initial pairing. This allows you to make
calls without waiting for your phone con-
tact list to download.
i
Information
У
This feature may not be supported by
some Bluetooth® devices.
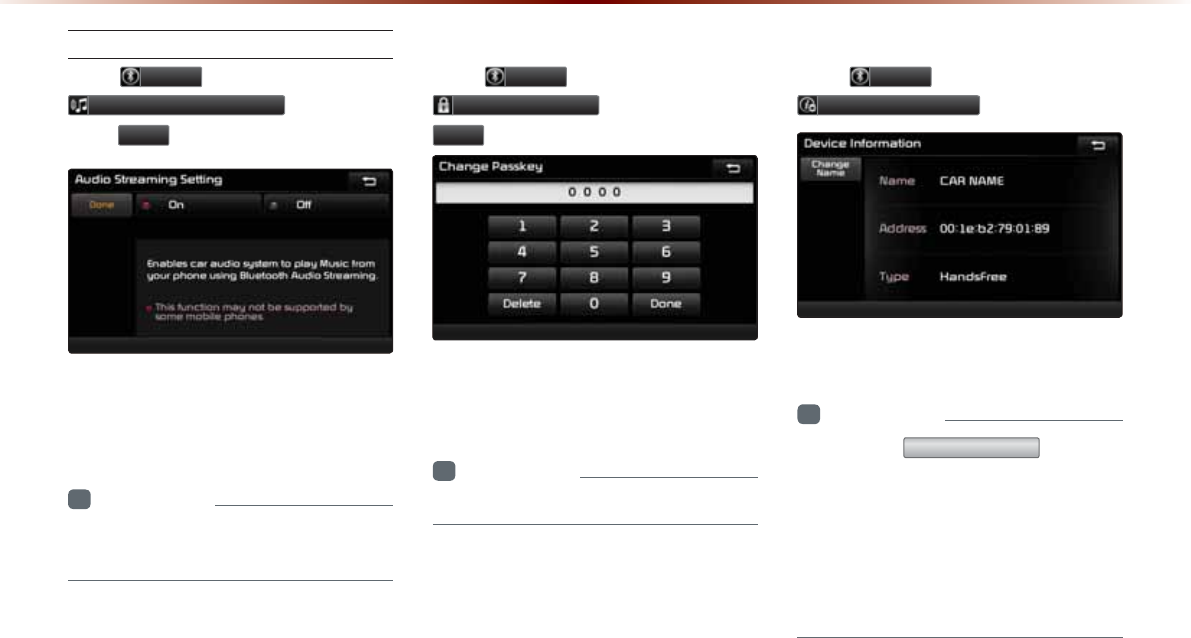
8-8
8VLQJ6HWXS
Audio Streaming Setting
Press
3KRQH
button ƙ Press
$XGLR6WUHDPLQJ6HWWLQJ
ƙ Set and
press
'RQH
.
When Streaming Audio is turned On, you
can play music files saved in your Bluetooth®
device from the car.
i
Information
У
This feature may not be supported by
some Bluetooth® devices.
Change Passkey
Press
3KRQH
button ƙ Press
&KDQJH3DVVNH\
ƙ Set and press
'RQH
.
This feature is used to change the passkey
required to connect a Bluetooth® device to
the car.
i
Information
У
The default passkey is 0000.
Device Information
Press
3KRQH
button ƙ Press
'HYLFH,QIRUPDWLRQ
.
This feature allows you to check device
information.
i
Information
У
Press the
&KDQJH1DPH
button to
change the name of the device.
У
The default car name is set to KIA
MOTORS.
У
The device name and address shown in
the above is only an example. Check your
device for the actual device information.
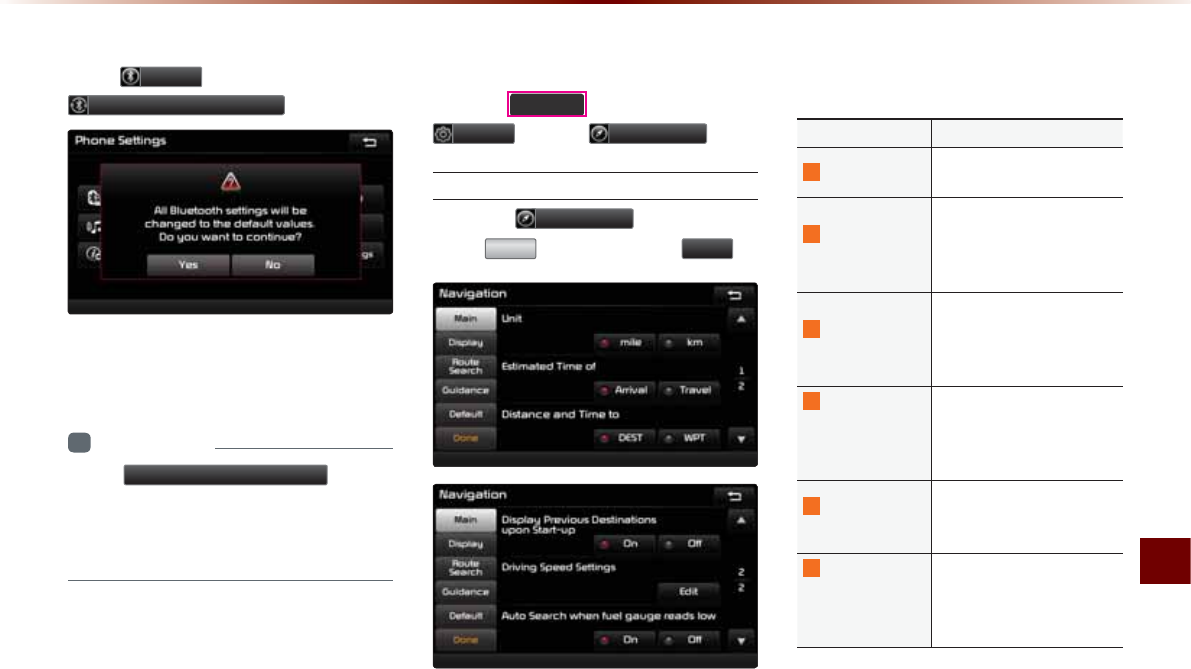
Using Setup
Setup O 8-9
Restore Factory Settings
Press
3KRQH
button ƙ Press
5HVWRUH)DFWRU\6HWWLQJV
.
Turning on this feature will erase all paired
phones and allows you to restore the fac-
tory default Bluetooth® settings.
i
Information
У
The 5HVWRUH)DFWRU\6HWWLQJV feature
cannot be used when a Bluetooth® device is
connected. To use this feature, first disconnect
the Bluetooth® device.
1DYLJDWLRQ
Press the
6(783
key ƙ Press
6HWXS
ƙ Press
1DYLJDWLRQ
.
Main
Press the
1DYLJDWLRQ
button ƙ
Press
0DLQ
ƙ Set and press
'RQH
.
This menu is used to set general naviga-
tion options.
Name Description
1
Unit Sets whether to display dis-
tance as kilometers or miles
2
Estimated
Time of
Sets whether to display esti-
mated time of arrival or travel
on the route info display
screen
3
Distance
and Time to
Sets whether to display dis-
tance and time to destination
or to waypoint on the route
info display screen
4 Display
Previous
Destinations
upon Start-up
Sets whether to display the
previous destinations popup
upon starting system
5
Driving
Speed Setting
Sets basic info to calculate
estimated arrival time to des-
tination or waypoint
6
Auto search
when fuel
gauge
reads low
Automatically search for gas
stations when fuel gauge
reads low
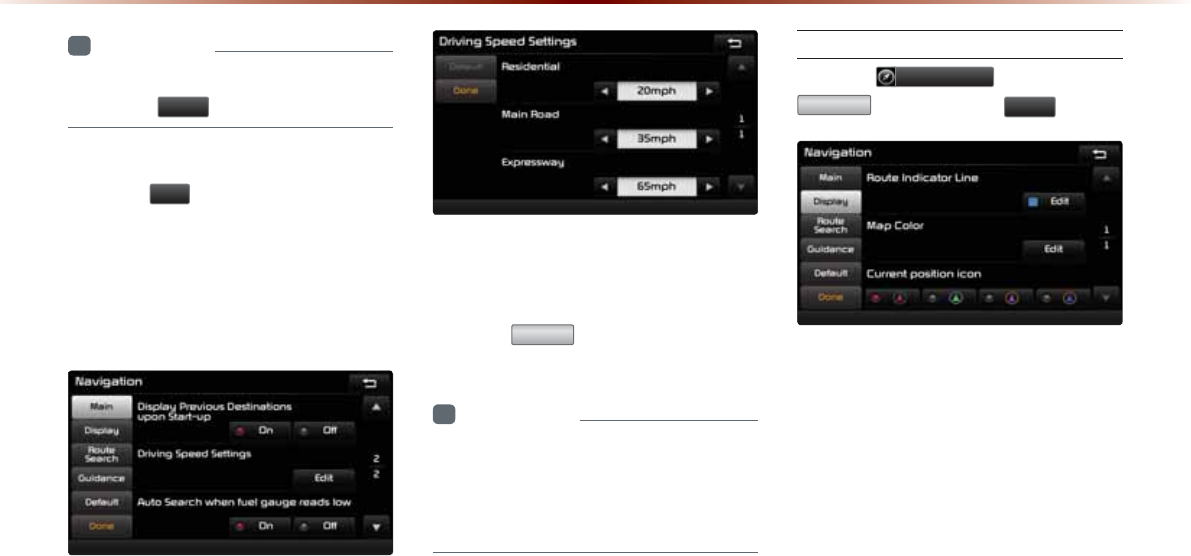
8-10
8VLQJ6HWXS
i
Information
У
When you have finished with the settings,
press the
'RQH
button to save changes.
Driving Speed Setting
Press the
(GLW
button within the "Driving
Speed Setting" menu to set the estimated
driving speed for residential roads, main
streets, and expressways. The set driving
speed is applied to calculate the estimated
time to reach the destination or waypoint.
The changed driving speed is used to cal-
culate the estimated time until the destina-
tion or waypoint.
Press the
'HIDXOW
button to reset the driv-
ing speed settings.
i
Information
У
Default Driving Speed Settings for
Residential, Main Streets, and Expressways
are 20mph, 35mph, and 65mph, respec-
tively.
Display
Press the 1DYLJDWLRQ button ƙ Press
'LVSOD\ ƙ Set and press 'RQH .
This menu is used to set the colors dis-
played within Navigation mode.
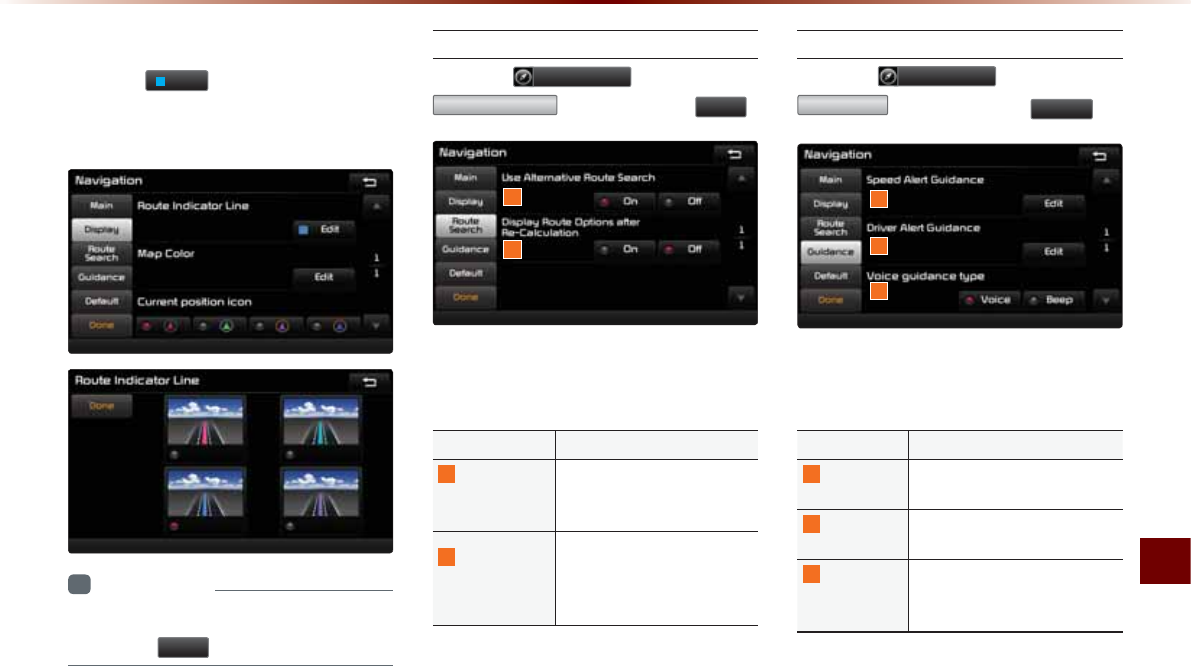
Using Setup
Setup O 8-11
Route Indicator Line
Press the
(GLW
button within the Route
Indicator Line menu to change the color of
the route indicator line.
i
Information
•
When you have finished with the settings,
press the
'RQH
button to save changes.
Route Search
Press the 1DYLJDWLRQ button ƙ Press
5RXWH6HDUFK ƙ Set and press 'RQH .
This menu is used to set route search
related options.
Name Description
1
Use
Alternative
Route Search
Set whether to first display
alternative routes upon con-
ducting route search
2
Display Route
Options after
Re-Calculation
Set whether to display the
pop-up screen that allows
changes to route options
upon route recalculation
Guidance
Press the
1DYLJDWLRQ
button ƙ Press
*XLGDQFH
ƙ Set and press
'RQH
.
This menu is used to set options on speed
alerts and driver alerts.
Name Description
1
Speed Alert
Guidance
Set options related to various
camera alerts
2
Driver Alert
Guidance
Set options related to curves,
and merges
3
Voice
Guidance
Type
When Beep is selected, all
navigation voice guidances are
replaced with a beep sound
1
2
1
2
3
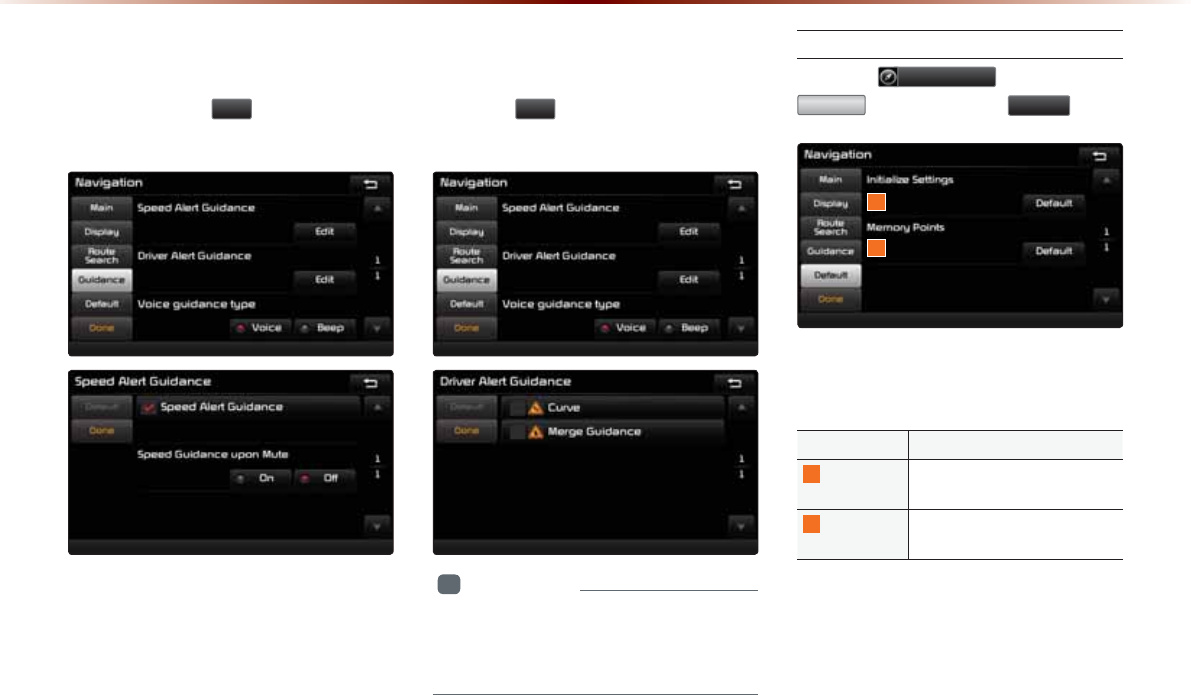
8-12
8VLQJ6HWXS
Speed Alert Guidance
To change the Speed Alert Guidance
option, press the
(GLW
button within the
"Speed Alert Guidance" menu.
Driver Alert Guidance
To set the Driver Alert Guidance, option,
press the
(GLW
button within the "Driver
Alert Guidance" menu.
i
Information
•
Alerts provided within Driver Alert
Guidance may differ depending on actual
road conditions.
Default
Press the
1DYLJDWLRQ
button ƙ Press
'HIDXOW
ƙ Set and press
'RQH
.
This menu is used to reset saved changes
and user preferences.
Name Description
1
Initialize
Settings
Resets all settings back to the
default state
2
Memory
Points
Resets all saved memory point
information
1
2
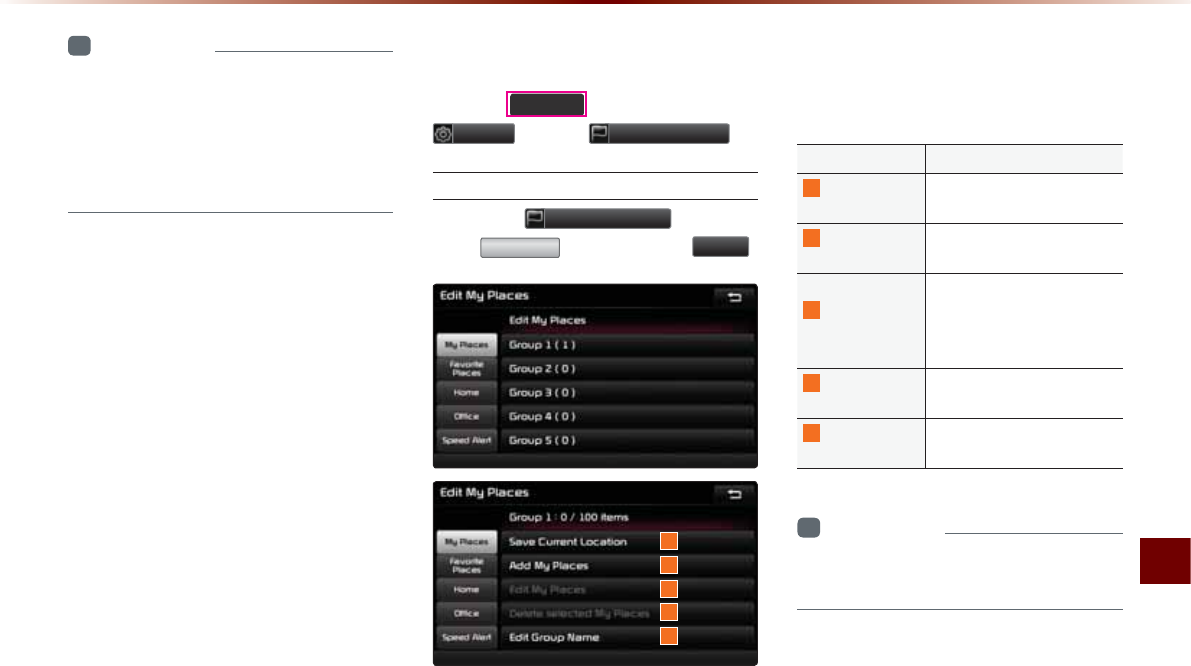
Using Setup
Setup O 8-13
i
Information
У
If the settings of an option are reset, then
all settings will be restored to the default
factory state.
У
Heed caution as Home, Office and other
user locations may become deleted.
0\3ODFHV
Press the
6(783
key ƙ Press
6HWXS
ƙ Press
(GLW0\3ODFHV
.
My Places
Press the
(GLW0\3ODFHV
button ƙ
Press
0\3ODFH
ƙ Set and press
'RQH
.
From the My Places list, select the desired
menu to either add, delete, or edit My
Places.
Name Description
1
Save Current
Location
Add the current vehicle po-
sition as a My Place
2
Add My
Places
Add a My Place by using
search functions
3
Edit My
Places
Edit information pertaining
to saved My Places, such
as name, location, and tele-
phone number
4
Delete selected
My Places
Delete one or all saved My
Places
5
Edit Group
Name
Edit name of corresponding
group
i
Information
У
By default, names of folders have been set
as "Group".
1
2
3
4
5
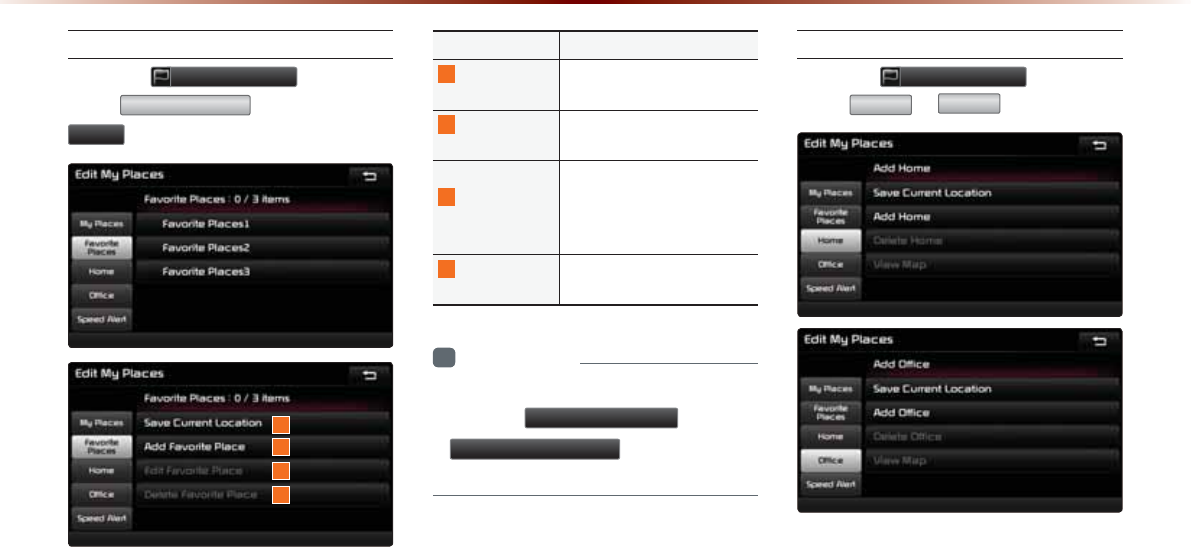
8-14
8VLQJ6HWXS
Favorite Places
Press the
(GLW0\3ODFHV
button ƙ
Press
)DYRULWH3ODFHV
ƙ Set and press
'RQH
.
A total of 4 Favorite Places can be saved.
Favorite Places can be selected at the bot-
tom of the Destination Search main screen.
Name Description
1
Save Current
Location
Adds the current vehicle po-
sition as a Favorite Place
2
Add Favorite
Place
Add a Favorite Place by us-
ing search functions
3
Edit Favorite
Place
Edit information pertaining
to saved Favorite Places,
such as name, location, and
telephone number
4
Delete
Favorite Place
Delete one or all saved Fa-
vorite Places
i
Information
•
If Favorite Places have not been added,
the
(GLW)DYRULWH3ODFH
and
'HOHWH)DYRULWH3ODFH
buttons will be
disabled.
Home and Office
Press the
(GLW0\3ODFHV
button ƙ
Press
+RPH
or
2IILFH
.
One Home and Office can each be saved.
The set Home and Office positions can be
selected at the bottom of the Destination
Search main screen.
1
2
3
4
1
2
3
4
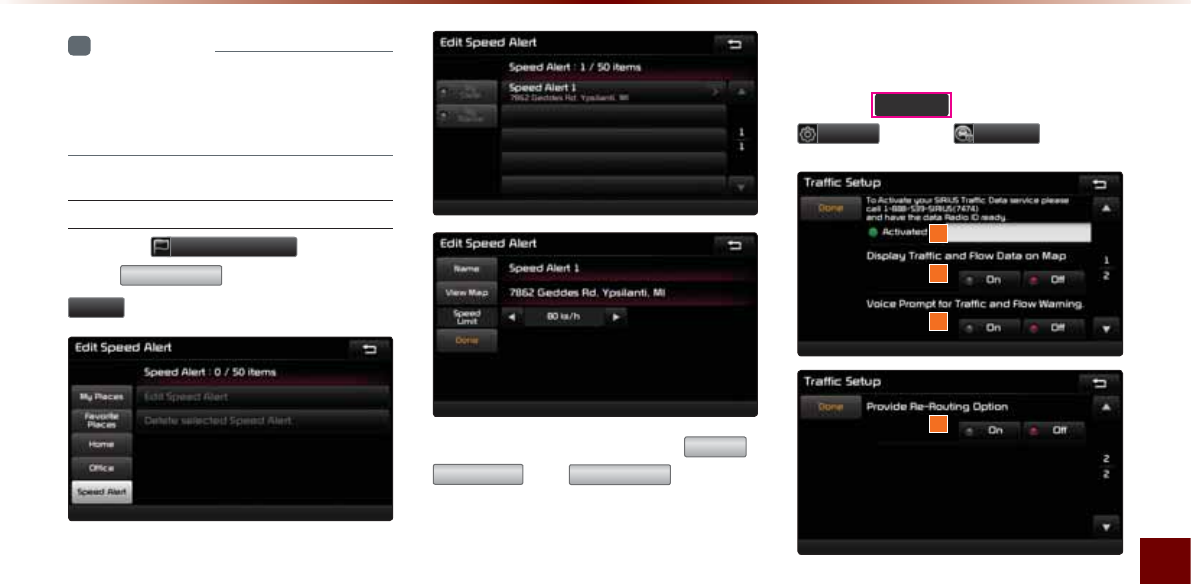
Using Setup
Setup O 8-15
i
Information
•
If the Home and Office has not been set,
these buttons will be disabled within the
Destination Search screen.
Speed Alerts
Press the
(GLW0\3ODFHV
button ƙ
Press
6SHHG$OHUW
ƙ Set and press
'RQH
.
In the Edit Speed Alert screen,
1DPH
,
9LHZ0DS
, and
6SHHG/LPLW
speed can
be set and edited.
7UDIILF6HWXS
Press the
6(783
key ƙ Press
6HWXS
ƙ Press
7UDIILF
.
This menu is used to set options related to
traffic and flow data, voice prompts, and re-
routing options based on traffic conditions.
1
2
3
4
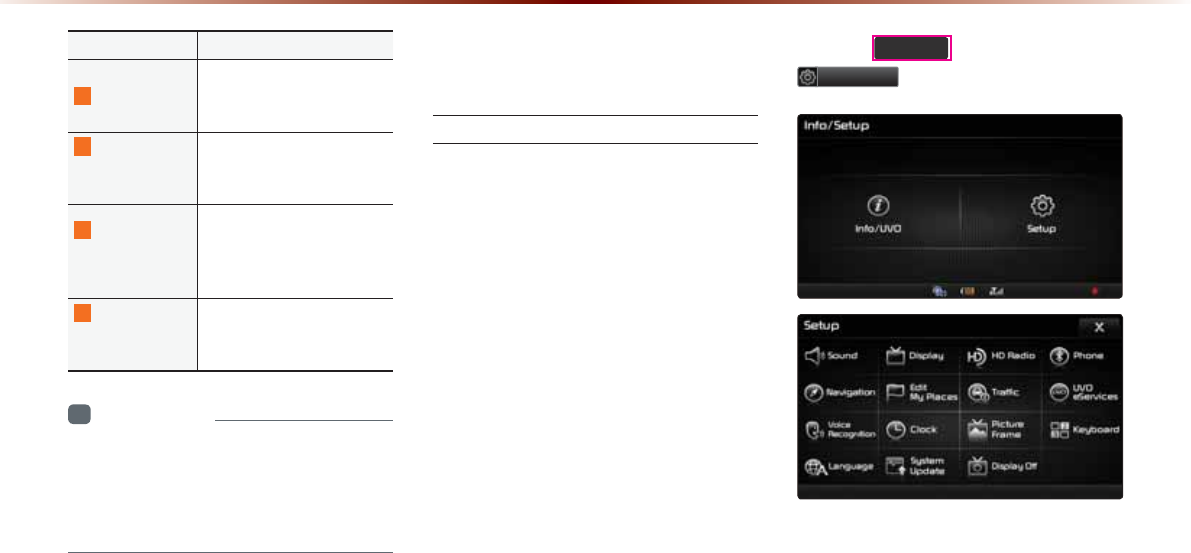
8-16
8VLQJ6HWXS
Name Description
1
Data Radio ID
Check information on
SIRIUS traffic data service
activation and activation ID
2
&KURNC[6TCHſE
and Flow Data
on Map
Sets whether to display real-
time traffic information on
map
3
Voice Prompt
HQT6TCHſECPF
Flow Warning
Sets whether to receive
voice prompts for real-time
VTCHſEKPHQTOCVKQPCPFEQPFK-
tions
4
Provide
Re-Routing
Option
Sets whether to use re-
TQWVKPIQRVKQPUD[TGƀGEVKPI
VTCHſEEQPFKVKQPU
i
Information
У
SIRIUS Traffic Data service requires a
separate subscription. To subscribe to this
service, please contact the number dis-
played on the screen.
892H6HUYLFHV6HWWLQJV
2SWLRQDO
UVO eServices Settings
Within the eServices Settings screen, UVO
eServices related features can be set,
such as activating UVO eServices and set-
ting the My Car Zone.
For safety reasons, UVO eServices
Settings can not be adjusted while driv-
ing. Park the vehicle before making any
changes to your settings.
Press the
6(783
key, then press
,QIR892
button on the touch screen.
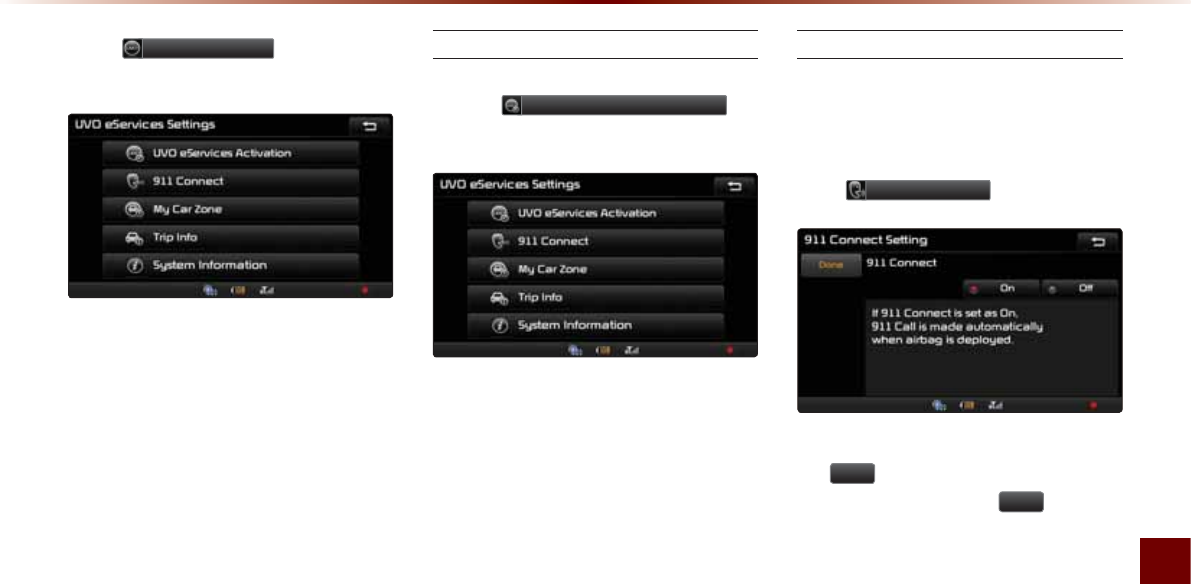
Using Setup
Setup O 8-17
Press
892H6HUYLFHV
button on the
touch screen.
UVO eServices Activation
If UVO eServices has not yet been activated,
press the 892H6HUYLFHV$FWLYDWLRQ but-
ton to start the activation process.
911 Connect Setting
This feature is used to turn on or off the
911 Connect feature.
From the UVO eServices Setting screen,
Press
&RQQHFW .
To enable 911 Connect, ensure that
the
2Q
button is selected. To disable
this feature, ensure the
2II
button is
selected.
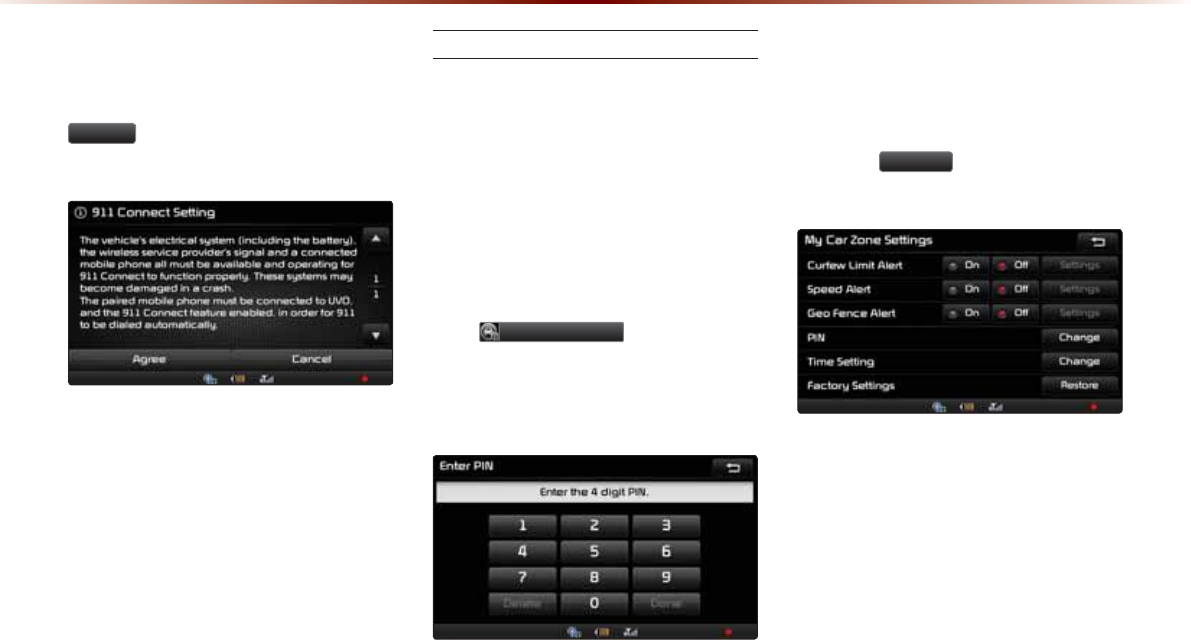
8-18
8VLQJ6HWXS
When enabling this feature, you must first
agree to the 911 Connect terms of use.
After reading the terms of use, press the
$JUHH button on the touch screen to
accept.
My Car Zone
This feature is used to set My Car Zone
(Curfew Limit, Speed, Geo Fence) alert
conditions.
My Car Zone Settings is unavailable when
UVO eServices has not been activated or
GPS signals cannot be received.
From the UVO eServices Setting screen,
press
0\&DU=RQH .
The PIN must be entered to use My Car
Zone Settings.
This screen is used to turn Curfew Limit,
Speed, and Geo Fence Alert features On/
Off.
Press the
6HWWLQJV
button to change the
alert conditions.
Within Curfew Limit Alert Settings, you can
set the Curfew Limit Alert Start and End
Time. You can also set the Alert Interval of
alerts upon Curfew Limit.
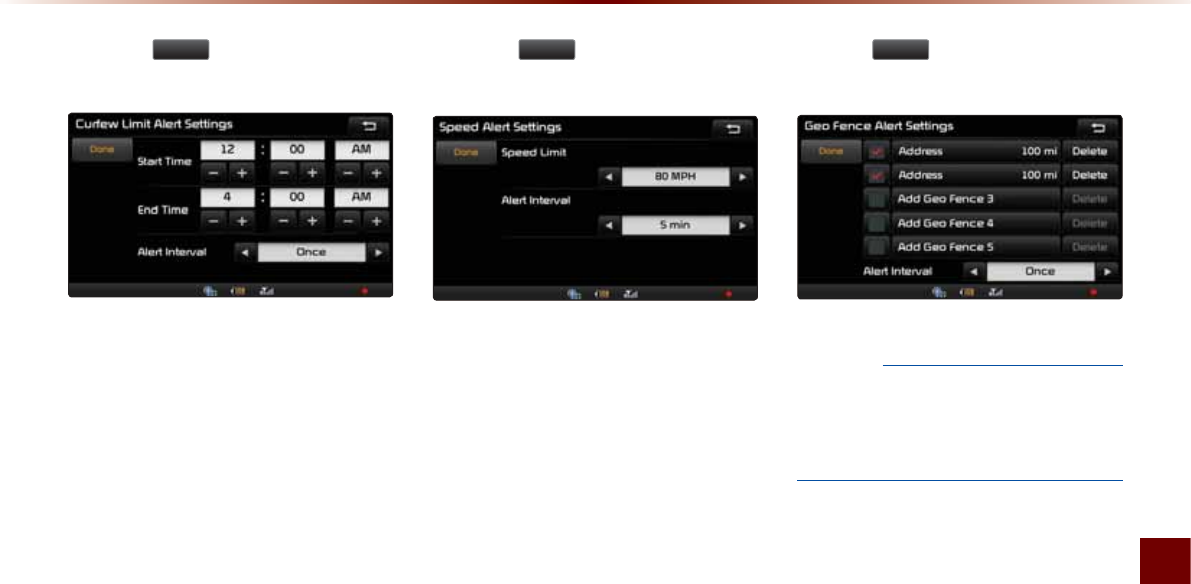
Using Setup
Setup O 8-19
Press the
'RQH
button to start Curfew
Limit Alert based on the set conditions.
Within Speed Alert Settings, you can set
the vehicle speed limit. You can also use
Alert Interval to set the vehicle speed limit
vehicle speed limit vehicle speed limit alert
interval.
Press the
'RQH
button to start Speed
Alert based on the set conditions.
Within Geo Fence Alert Settings, you can
set entry-restricted areas. Press Add Geo
Fence and set the center point and radius
of the desired Geo Fence on the Map
screen. You can also set the Alert Interval
of alerts upon Geo Fence alerts.
Press the 'RQH
button to start Geo Fence
Alert based on the set conditions.
NOTICE
У
Geo Fence Alert cannot be set if there is
no SD card. At least one Geo Fence must
be added to turn on Geo Fence Alert
Settings.
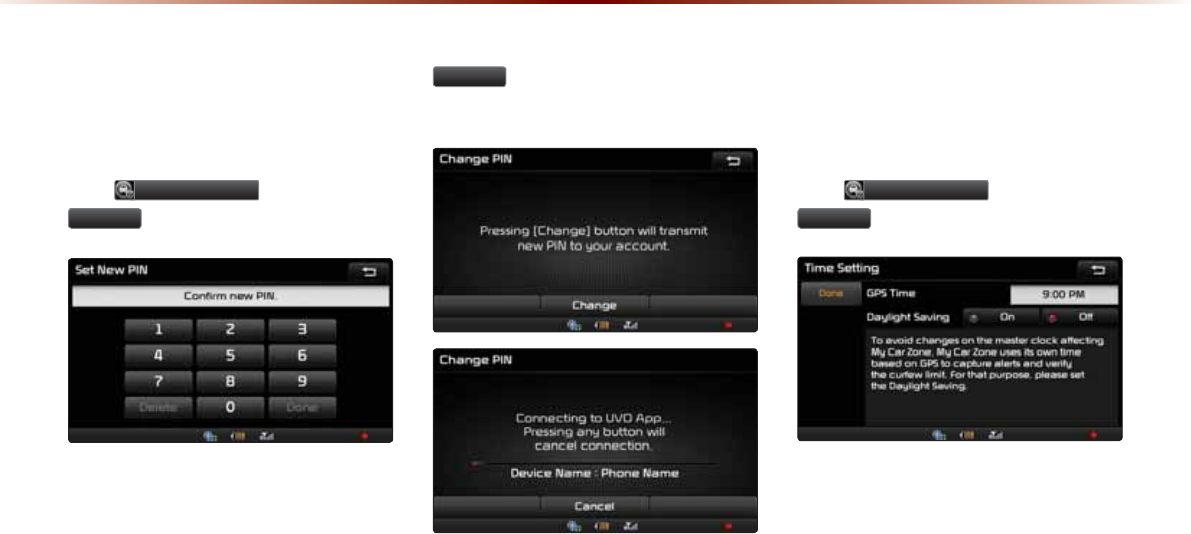
8-20
8VLQJ6HWXS
Change PIN
This feature is used to change the PIN to
enter My Car Zone Settings.
Press 0\&DU=RQH ƙ Press
&KDQJH of PIN.
After changing the PIN, press the
&KDQJH
button to transmit the new PIN
to your MyUVO.com account.
Time Setting
This feature is used to avoid the change of
curfew limit alert according to daylight saving.
Press 0\&DU=RQH ƙ Press
&KDQJH
of Time Setting.
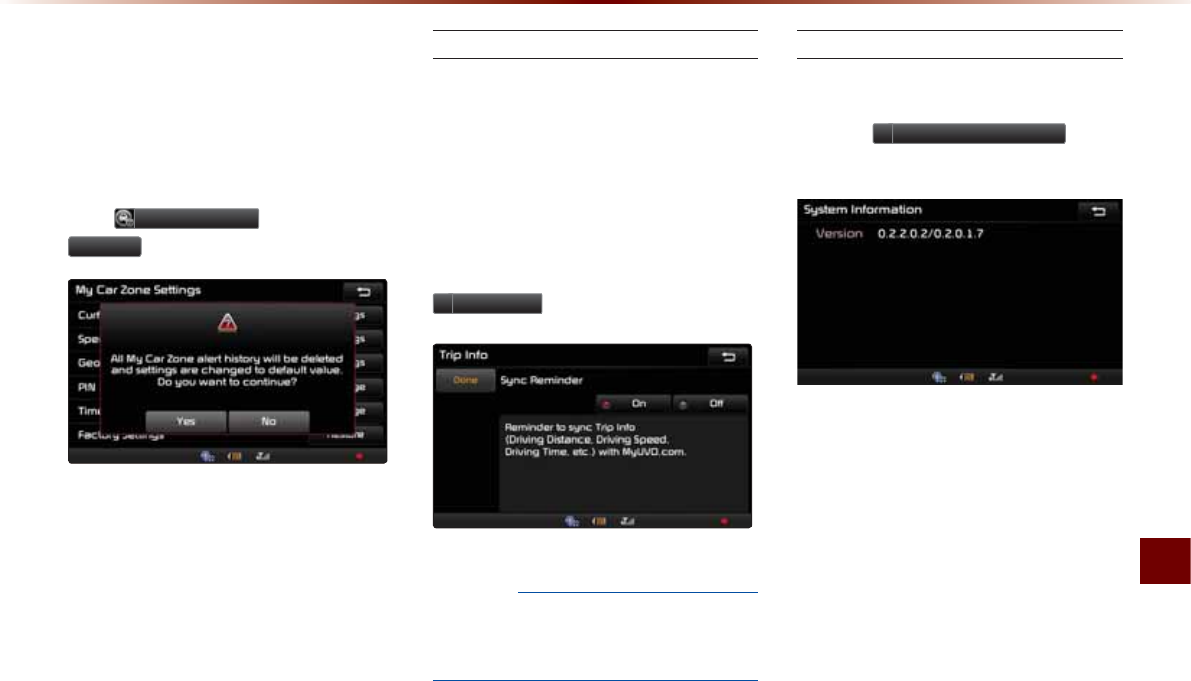
Using Setup
Setup O 8-21
Restore Factory Settings
This feature is used to restore all My Car
Zone alert history and settings back to
default state.
Press 0\&DU=RQH ƙ Press
5HVWRUH
.
Trip Info
Trip Info is a feature used to send Trip Info
(Driving Distance, Driving Speed, Driving
Time, etc.) to your MyUVO account.
UVO eServices must be activated to use this
feature.
From the eSurvices Setting screen, press
7ULS,QIR .
NOTICE
У
To enable Trip Info, ensure that the On
button is selected. To disable this feature,
ensure the Off button is selected.
System Information
From the UVO eServices Setting screen
you can view the System Information by
pressing
6\VWHP,QIRUPDWLRQ
button
on the touch screen.
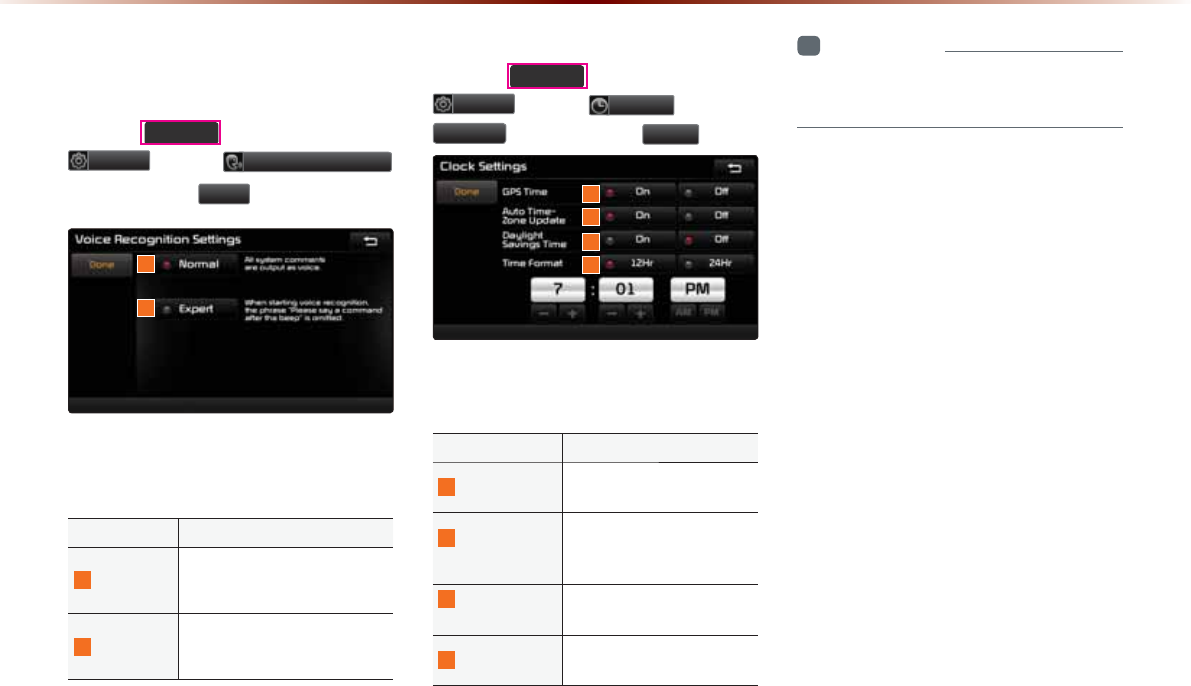
8-22
8VLQJ6HWXS
9RLFH5HFRJQLWLRQ
6HWWLQJV
Press the 6(783
key ƙ Press
6HWXS ƙ Press 9RLFH5HFRJQLWLRQ
ƙ Set and press 'RQH .
This menu is used to set voice recognition
mode between Normal and Expert mode.
Name Description
1
Normal
When using voice recognition,
provides detailed prompts and
is suited for beginner users
2
Expert
When using voice recognition,
omits certain prompts and is
suited for experienced users
&ORFN6HWWLQJV
Press the
6(783
k
ey ƙ Press
6HWXS
ƙ Press
&ORFN
ƙ
Press
7LPH
ƙ
Set and press
'RQH
.
This menu is used to set the time used
within the multimedia system.
Name Description
1
GPS Time Displays time according to
the received GPS time
2
Auto Time
Zone Update
When the Time Zone
changes, the time is reset
automatically
3
Daylight
Saving Time
Turns on/off daylight saving
time feature
4
Time Format Converts the digital clock
display to 12 or 24 hours
i
Information
•
When Daylight Savings Time is turned on,
the clock is moved forward one hour.
1
2
1
2
3
4
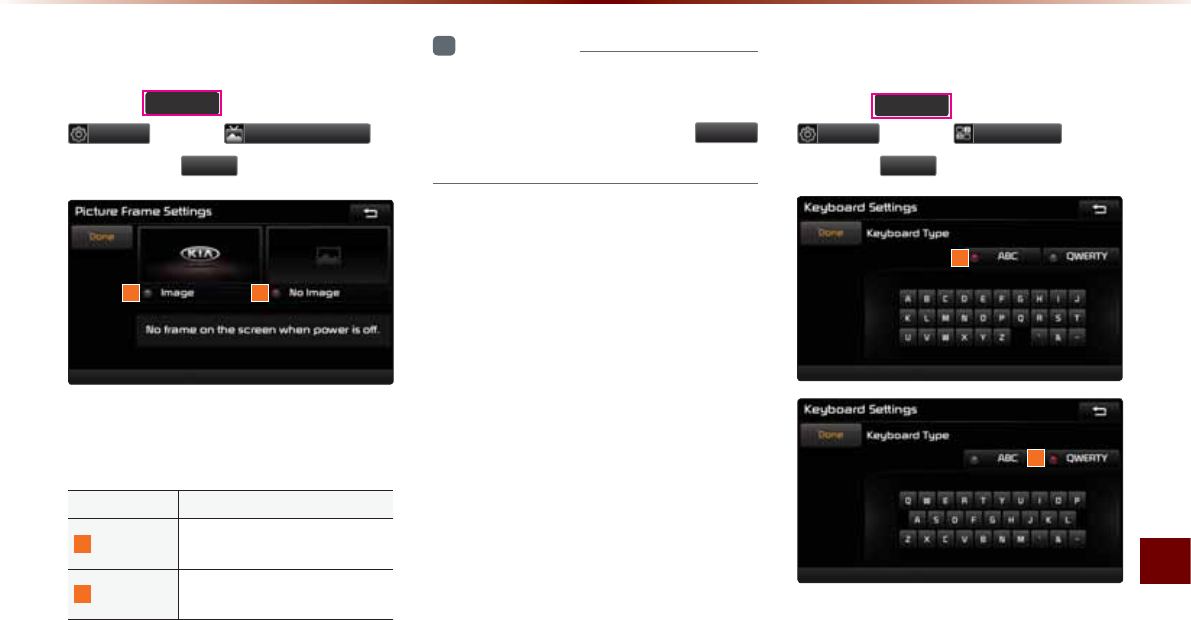
Using Setup
Setup O 8-23
3LFWXUH)UDPH
Press the
6(783
key ƙ Press
6HWXS
ƙ Press
3LFWXUH)UDPH
ƙ
Set and Press
'RQH
.
This menu is used to select the screen dis-
played when the system power is turned off.
Name Description
1
Image Displays an image when the
system power is turned off
2
No Image No image is displayed when
the system power is turned off
i
Information
У
When the picture frame is set to Image,
images saved within a USB can be set as
the picture frame by pressing the
%URZVH
button.
.H\ERDUG
Press the
6(783
key ƙ Press
6HWXS
ƙ Press
.H\ERDUG
ƙ Set
and Press
'RQH
.
This option allows you to change the type
of keyboard used within the system.
1 2
1
2
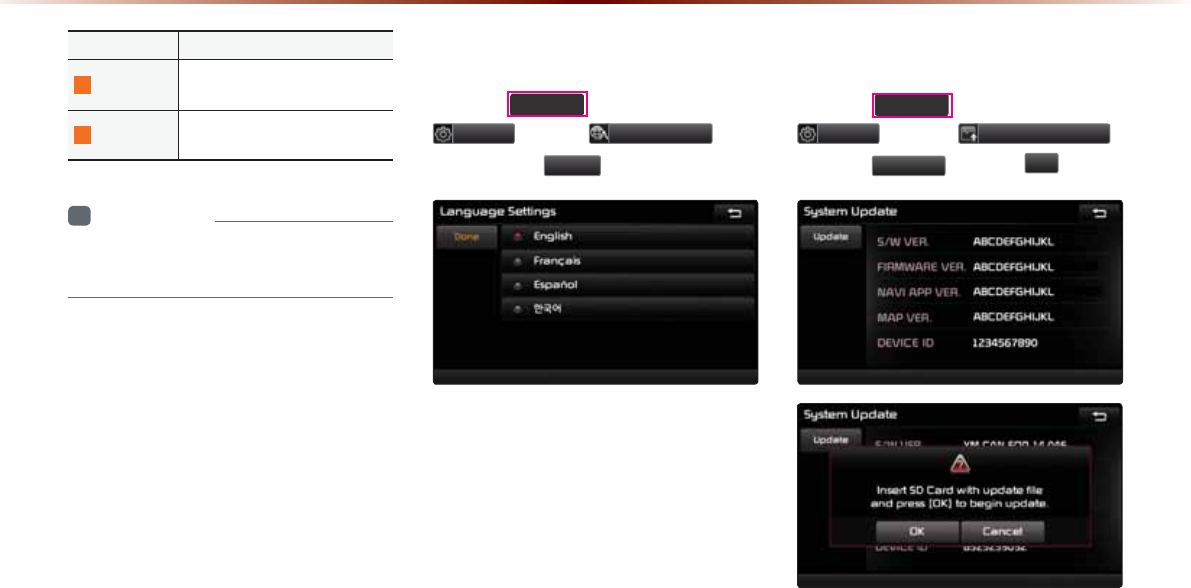
8-24
8VLQJ6HWXS
Name Description
1
ABC Keyboard with characters ar-
ranged in alphabetical order
2
QWERTY Keyboard similar to the one
used within a computer
i
Information
У
The set keyboard will be applied to all
input modes across the entire system.
/DQJXDJH
Press the
6(783
key ƙ Press
6HWXS
ƙ Press
/DQJXDJH
ƙ
Set and press
'RQH
.
This menu is used to set the language of
the system display and voice language.
You can select the desired language from
English, Français, Español or
㓰Ⳅㆿ
.
6\VWHP8SGDWH
Press the
6(783
key ƙ Press
6HWXS
ƙ Press
6\VWHP8SGDWH
ƙ Press
8SGDWH
ƙ Press
2N
.
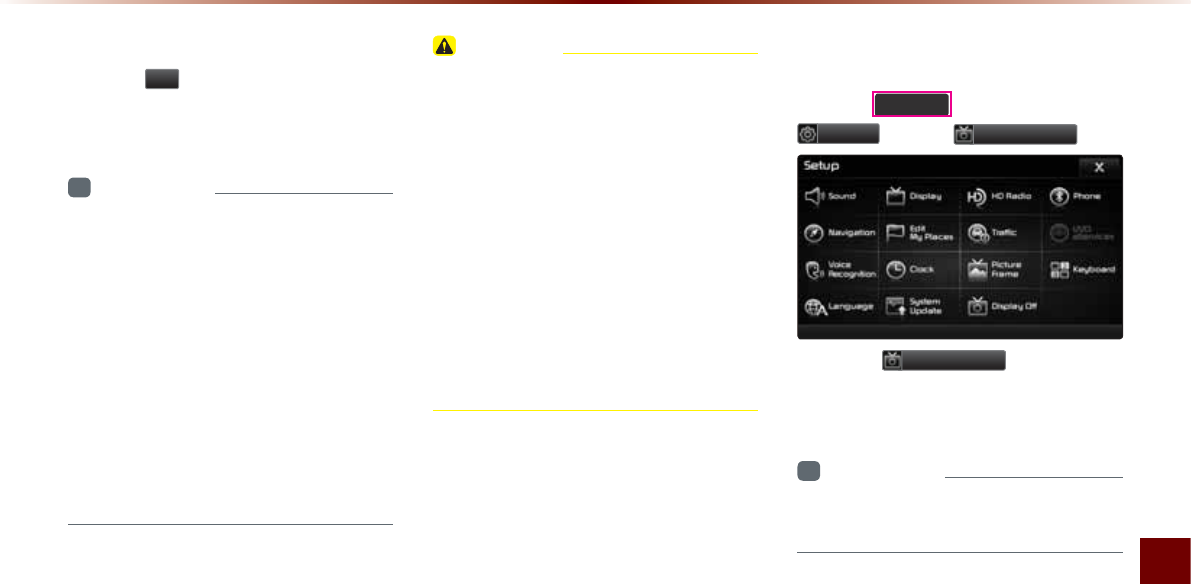
Using Setup
Setup O 8-25
After inserting the SD card with the update
file, press
2N
to start the update.
Once updating is complete, the system will
automatically restart.
i
Information
У
This product requires regular updates for
software corrections, new functions and
map updates. Updating may require up to
1 hour depending on the data size.
У
Turning off the power or ejecting the SD
card during the update process may result
in data loss. Make sure to keep the igni-
tion on and wait until updating is complete.
У
To have map updates, contact
your Kia dealer or visit the website
(www.mapnsoft.com).
CAUTION
У Please use only the SD card that was
purchased from Kia dealers.
У The use of a separately purchased SD
card may result in damage due to heat
related deformation.
У Product malfunctions caused by the use
of separately purchased SD cards shall
not be covered within the product war-
ranty.
У Repeatedly connecting/disconnecting
the SD card in a short period of time may
cause damage to the device.
'LVSOD\2II
Press the
6(783
key ƙ Press
6HWXS
ƙ Press
'LVSOD\2II
.
Press the
'LVSOD\2II
button to turn
off the display. Touch anywhere on the
touch screen to turn the display back on.
i
Information
У
Even when the display is off, sound will be
played.

8-26
0(02

&$508/7,0(',$6<67(0
У
Product Specification
У
Before Thinking There is a
Product Defect
У
Before Thinking the Product
Has Malfunctioned
У
Troubleshooting
У
FAQ
$SSHQGL[

9-2
$SSHQGL[
3URGXFW6SHFLILFDWLRQ
TFT-LCD
Screen Size Navigation Device - 17.78cm (152.4 x 91.44mm)
Resolution
Navigation Device - 384,000 pixels (Resolution: 800 x 480)
Operating
Method
TFT(Thin Film Transistor) Active Matrix
Viewing Angle Left/Right : 70ê Top : 60êBottom : 50ê
Internal Lighting
LED 14EA, UP/DOWN arrangement
Radio
Channels
FM : 87.5 MHz ~ 107.9 MHz(Step : 200 kHz)
AM : 530 kHz ~ 1710 kHz(Step : 10 kHz)
Sensitivity FM : Under 10dBu/AM : Under 40dBu
Distortion Factor
Within 2% Speakers 4 :
Integrated Antenna
Operating
Temperature
-30 ~ +85í
(-22Ɣ ~ +185Ɣ)
Storage
Temperature
-40~ 105í
(-40Ɣ ~ 220Ɣ)
Dimensions 137.7mm(W) x 65.6mm(H) x 74.2mm(L)
Weight 210g
Common
Name Car TFT LCD Display Navigation Unit
Power Supply DC 14.4V Operating
Power
DC 9V ~ DC 16V
Current
Consumption
2.5A Dark Current 2mA
(Head Unit Only)
Operating
Temperature
-20 ~ +70í
(-4 ~ +158
Ɣ
Storage
Temperature
-30 ~ 80í
(-22 ~ 176
Ɣ
Dimensions 230mm(W) x 177mm(H) x 188mm(D)
Weight 2.7Kg
$SSHQGL[

Appendix O 9-3
Appendix
Bluetooth®
Wireless Technology
Frequency
Range
2402 ~ 2480 MHz Supported
Bluetooth®
Specification
2.1 + EDR
Supported
Profile
Handsfree(1.5), A2DP(1.0), AVRCP(1.3), PBAP(1.0),
SPP(1.1)
Output 0.05mW Transmission F1E, G1E
Number of
Channels 79 channels
CAUTION
У The producer and installer cannot provide services related to life
safety as the concerned radio equipment is liable to radio interfer-
ence.

9-4
$SSHQGL[
%HIRUH7KLQNLQJ7KHUHLVD3URGXFW'HIHFW
The current position as shown on the navigation may differ from
the actual position under the following conditions.
The following occurrences are not malfunctions :
У When driving on Y-shaped roads
with narrow angles the current posi-
tion may be displayed in the oppo-
site direction
У Within city streets, the current posi-
tion may be displayed on the oppo-
site side or on an off-road position
У When changing the zoom level
from maximum to a different level,
the current position may become
displayed on a different road
У If the vehicle is loaded onto a ferry
or a car transport vehicle, the
current position may become stalled
on the last position prior to loading
У When driving on a spiral-shaped
road
У When driving in mountain regions
with sharp turns or sudden brakes
У When entering a road after passing
an underground parking structure,
building parking structure, or roads
with many rotations
У When driving in heavy traffic with
frequent starts and stops
У When driving under slippery condi-
tions, such as heavy sand, snow,
etc.
У When driving on spiral-shaped roads
У When the tires have recently been
replaced (Especially upon use of
spare or studless tires).
У When using tires of improper size
У When the tire pressure for the 4 tires
are different
У When the replacement tire is worn
or used (Especially studless tires
having passed a second season).
У When driving near high-rise build-
ings
У When a roof carrier has been
installed
У When a long distance route is calcu-
lated while driving on an expressway
In such cases, continued driving will
automatically enable the system
to conduct map matching or use
updated GPS information to provide
the current position (In such cases,
up to several minutes may be
required)
Correct route guidance may not occur due to search conditions
or driving position.
The following occurrences are not malfunctions :
У Guidance to go straight may be
given while driving on a straight
road
У Guidance may not be given even
when having turned at an intersec-
tion
У There are certain intersections in
which guidance may not occur
У A route guidance signaling for a
u-turn may occur in some inter-
sections where a u-turn is not
permitted.
У Route guidance signaling entrance
into a No-entry zone may occur
(No-entry zone, road under construc-
tion, etc.)
У Guidance may be given to a position
that is not the actual destination if
roads to reach the actual destination
do not exist or are too narrow
У Faulty voice guidance may be given
if the vehicle breaks away from the
designated route. (e.g. if a turn is
made at an intersection while the
navigation provided guidance to go
straight.)
These situations may occur after conducting route calculation.
The following occurrences are not malfunctions :
У Guidance may be given to a posi-
tion differing from the current posi-
tion when turning at an intersection
У When driving in high speeds, route
recalculation may take a longer
period of time
У Route guidance signaling for a
u-turn may occur in some inter-
sections where a u-turn is not
permitted.
У Route guidance signaling entrance
into No-entry zone may occur.
(No-entry zone, road under construc-
tion, etc.)
У Guidance may be given to a position
removed from the actual destination if
roads to reach the actual destination
do not exist or are too narrow
У Faulty voice guidance may be given
if the vehicle breaks away from the
designated route (e.g. If a turn is
made at an intersection while the
navigation provided guidance to go
straight.)

Appendix O 9-5
Appendix
%HIRUH7KLQNLQJWKH3URGXFW+DV
0DOIXQFWLRQHG
1. Errors which occur during the operation or installation of the device
may be mistaken as a malfunction of the actual device.
2. If you are having problems with the device, try the suggestions
listed below.
3. If the problems persist, contact your Kia dealer.
Problem Possible Cause
There are small red,
blue, or green dots on the
screen
У Because the LCD is manufactured with tech-
nology requiring high point density, a pixel or
lighting deficiency may occur within 0.01%
of total pixels
The sound or image is not
working
У Has the Switch for the vehicle been turned
to [ACC] or [ON]?
У Has the SYSTEM been turned OFF?
The screen is being
displayed but sound is not
working
У Has the volume been set to a low level?
У Has the volume been muted?
When the power is turned
on, the corners of the
screen are dark
У The display appearing somewhat dark after
prolonged periods of use is normal with LCD
panels. It is not a malfunction
У If the screen is very dark, contact your
nearest Kia dealer for assistance
Sound is working from
only one speaker
У Are the positions of Fader or Balance sound
controls adjusted to only one side?
Problem Possible Cause
Sound does not work in
AUX mode
У Are the audio connector jacks fully inserted
into the AUX terminal?
The external device is not
working
У Is the external device connected with a stan-
dard connector cable?
Upon turning power on,
the most recent mode
screen is not displayed
Within modes that play files by reading external
sources, such as discs, USB, iPod, or Blue-
tooth® streaming mode, the most recently
played mode screen prior to turning off power
may not properly load
У If there is no disc or the corresponding
device is not connected, the mode operated
prior to the most recent mode will operate
У If the previous mode still cannot be properly
played, the mode operated prior to that will
operate

9-6
$SSHQGL[
7URXEOHVKRRWLQJ
Problem Possible Cause Countermeasure
The image
color/tone
quality is low
У The brightness, satura-
tion, hue, and contrast
levels are not set prop-
erly
У Properly adjust the brightness,
saturation, hue, and contrast
levels through Display Setup
Sound does
not work
У The volume level is
set to the lowest level
У The connection is not
proper
У The device is currently
fast-forwarding,
rewinding, scanning,
or playing in slow
mode
У Adjust the volume level
У Check to see that the device
has been properly connected
У The sound will not work when
the device is fast-forwarding,
rewinding, scanning, or playing
in slow mode
The sound or
image quality
is low
У The disc is dirty or
scratched
У Vibration is occur-
ring from where the
conversion switch
has been installed
У Image color/tone
quality is low
У Wipe off water or dirt from the
disc Do not use a disc which
has been scratched
У The sound may be short-
circuited and the image
distorted if the device vibrates
У The device will return to normal
once vibrations stop
$SSHQGL[
Problem Possible Cause Countermeasure
The power
does not turn
on
The fuse is discon-
nected
У Replace with a suitable fuse
У If the fuse is disconnected
again, please contact your
point of purchase or service
center
Device is not properly
connected
У Check to see that the device
has been properly connected
The system
does not
play
The disc has not been
inserted or has been
inserted upside down
У Insert the disc properly so that
the sides are facing the correct
direct
The disc has been
contaminated
У Wipe away dirt and other
foreign substances from the
disc
The vehicle battery is
low
У Charge the battery If the
problem persists, contact your
point of purchase or service
center
A disc not supported by
the device has been
inserted
У Insert a disc which is
supported by the device

Appendix O 9-7
Appendix
Problem Possible Cause Countermeasure
The USB
does not
work
У USB memory is
damaged
У USB memory has
been contaminated
У A separately purchased
USB HUB is being
used
У A USB extension
cable is being used
У A USB which is not
a Metal Cover Type
USB Memory is
being used
У An HDD type, CF, SD
Memory is being used
У There are no music
files which can be
played
У Please use after formatting the
USB into FAT 12/16/32 format
У Remove any foreign substances
on the contact surface of the USB
memory and multimedia terminal
У Directly connect the USB memory
with the multimedia terminal on
the vehicle
У Directly connect the USB
memory with the multimedia
terminal on the vehicle
У Use standard USB Memory
У Use standard USB Memory
У Only MP3, WMA file formats
are supported. Please use
only the supported music file
formats
The iPod is
not recog-
nized even
though it has
been con-
nected
У There are no titles
which can be played
У The iPod firmware
version has not been
properly updated
У The iPod device does
not recognize down-
loads
У Use iTunes to download and
save MP3 files into the iPod
У Use iTunes to update the firm-
ware version and reconnect the
iPod with the device
У Reset the iPod and reconnect
with the device
i
Information
У
While operating the device, if an abnormality occurs that can-
not be corrected with the above described measures, press the
5HVHW
key to reset the system.
У
Press and hold the
5HVHW
key (over 0.8 seconds). The device
power will turn off and the system will reset.

9-8
$SSHQGL[
)$4
About Pairing Mobile Phones
Q I cannot pair my mobile phone. What is the cause?
A Check to see that the mobile phone supports Bluetooth® func-
tion. If your phone is a Bluetooth® phone, then check to see
whether the Bluetooth® setting within your phone been is set to
‘Hidden’. If the device is set to hidden, please un-hide the device
(set to unhidden state).
Q What is the difference between pairing a mobile phone and con-
necting a mobile phone?
A Pairing occurs through authenticating the head unit and mobile
phone. Mobile phones paired to the head unit can be connected
and disconnected until the paired mobile phone is deleted from
the system. Bluetooth® Handsfree features, such as making/
answering calls or managing contacts, are supported only in
mobile phones connected with the head unit.
Q What is a Passkey?
A A passkey is the password used to authenticate the connection
between the head unit and mobile phone. The passkey only
needs to be entered once when pairing the mobile phone for the
first time.
The initial passkey is 0000. The passkey can be changed
by pressing
6(783
key ƙ
6HWXS
ƙ
3KRQH
ƙ
&KDQJH3DVVNH\
.
Appendix O 9-9
Appendix
About Making/Answering Phone Calls
Q How can I answer a call?
A When there is an incoming call, a notification pop-up will become
displayed. To answer the incoming call, press the
$FFHSW
but-
ton on the screen or the key on the steering remote con-
troller.
To reject the call, press the
5HMHFW
button on the screen or
press the key on the steering remote controller.
Q What should I do if I am talking on the Handsfree but want to
switch the call to the mobile phone?
A While one a call, press and hold (over 0.8 seconds) the
key on the steering remote controller or press the
3ULYDWH
button at the bottom of the Phone screen to switch the call to
your mobile phone. Please ensure you are in a safe and legal
location.
About
Bluetooth
®
Wireless Technology/Head Unit
Use Environment
Q What is the range of my wireless connection?
A
The wireless connection can be used within approximately 15 yards.
Q How many mobile phones can be paired?
A It is possible to pair up to five mobile phones.
Q Why is call quality sometimes poor?
A
Check the reception sensitivity of the mobile phone when call
quality becomes worsened. The call quality may deteriorate when
the signal strength is low. Call quality may also worsen if metal
objects, such as drink cans, are placed near the mobile phone.
Check to see if there are metal objects in the vicinity of the mobile
phone. The call sound and quality may differ depending on the
type of mobile phone.

9-10
,QGH[
a
2D Landmarks
3-32
911 Connect Setting
8-17
911 Connect
6-8
$
About Bluetooth® Wireless Technology/
Head Unit Use Environment
9-9
About DISC
2-14
About GPS
(Global Positioning System)
6-20
About GPS
3-6
About HD Radio™ Technology
2-7
About Making/Answering Phone Calls
9-9
About Map Database
3-4
About Map Icons
3-4
About Map Scale
3-4
About Map Updates
3-4
About Pairing Mobile Phones
9-8
About Rear Detection Camera
7-2
About the Map
3-4
About USB
2-31
About UVO eServices
6-4
About Voice Guidance
3-4
Activating UVO eServices
6-6
Add Waypoint
3-22
Adding a My Place
3-12
Adding as a Favorite
4-19
Address
3-14
Adjusting Brightness
8-5
Adjusting Image Size
2-43
Adjusting Navigation Volume
3-10
Adjusting the Ring/Call Volume
4-15
Adjusting Voice Recognition Volume
5-5
Advanced
8-4
Answering a Call
4-12
Audio Streaming Setting
8-8
Audio System Command List
5-8
Avoid Area
3-29
Avoid Streets
3-28
%
Basic Mode Screen
2-19, 2-23, 2-34
Basic Mode Screen
(HD RadioTM reception OFF)
2-2
Basic Mode Screen
(HD RadioTM reception ON)
2-3
Basic Mode
Screen
2-10, 2-46, 2-51, 2-54, 8-2
Battery Warning Message
1-11
Before Playing a USB MP3
2-31
Before Playing an MP3 Disc
2-17
Before Thinking the Product Has
Malfunctioned
9-5
Before Thinking There is a
Product Defect
9-4
Before Using the
Bluetooth® Handsfree
4-2
Before using UVO eServices
6-5

Index O 9-11
Index
&
Call History Screen Configuration
4-22
Call History
4-22
Calling by Dialing a Number
4-10
Calling Favorites
4-20
Calling through Redial
4-11
Cancel Route
3-22
Cancel Route
3-26
Cautions
1-3
CD(Audio Type)
5-9
CD(MP3 Type)
5-10
Changing Map Scale
3-9
Checking Mobile Contacts Details
4-19
Clock Settings
8-22
Conducting Auto Diagnostics
6-13
Conducting Vehicle Diagnostics
6-10
Connecting a Device
4-25
Connecting an External Device
2-50
Connecting Bluetooth
6-5
Connections
8-7
Connections Menu
4-25
Contacts Sync Setting
8-7
Contacts
4-16
Coordinates
3-19
Copy
2-28, 2-39
Creating a suitable cabinenvironment 5-2
Curfew Limit Alert
6-17
Current Position
3-8
'
Default
8-12
Deleting a Device
4-27
Deleting Files
2-58
Demo
3-21
Destination Search
3-13
Destination
5-13
Detour
3-28
Disc/Content Format Compatibility
2-15
Disconnecting a Device
4-27
Display Off
8-25
Display
8-5, 8-10
Downloading Call History
4-23
Downloading Mobile Phone Contacts
4-18
During a Call
4-9
(
Edit Route
3-28
Editing POI Icons
3-11
Emergency
3-17
Ending a Call
4-14
Ending Voice Recognition
5-4
Entering Call History Screen
4-22
Errors Unavoidable Due to
System Characteristics
6-20
eServices Guide
6-19
eServices Guide
6-19
Exit/Entrance
3-19
)
FAQ
9-8
Fast-forwarding or Rewinding
CD Tracks
2-20
Favorite Places
8-14
Favorites
4-20
FM/AM Radio
5-8

9-12
,QGH[
*
Gas Station
3-16
Geo Fence Alert
6-18
Guidance
8-11
+
HD RadioTM Digital Broadcast On/Off... 2-9
HD RadioTM Reception.......................... 8-6
Head Unit ................................................ 1-6
Help Command List ................................ 5-7
Highway Mode ...................................... 3-24
Home and Office ................................... 8-14
,
Illustration on Using Voice Recognition
(Setting Home as the Destination) .... 5-6
Info On/
Info Off .... 2-22, 2-29, 2-41, 2-49, 2-57
Initial Screen ................................. 3-8
Initiating a 911 Call ........................6-8
Intersection Search ..................... 3-18
Intersection Zoom Mode .............. 3-24
iPod .............................................5-11
.
Key Product Features
1-4
Keyboard
8-23
/
Language
8-24
List Menu Screen
2-25
List Menu Screen
2-37
Logo
3-30
Logo/Landmarks
3-30
0
Main
8-10
Making a Call from Call History
4-11
Making a Call from Speed Dial
4-10
Making/Answering Calls
4-10
Map Display Settings
3-9
Map Menu
3-10
Map Screen
3-7
Map
5-15
Mobile Contacts Screen
Configuration
4-17
Moving between Folders
2-30
Moving between Lists
2-29
Moving between Lists
2-57
My Car Zone
6-16
My Car Zone
8-18
My Music
5-11
My Places
3-17
My Places
8-13
My Places
8-13
My POIs
6-15
1
Navigation Command List
5-13
Navigation
8-9
2
Operating HD RadioTM Mode
2-8
Operating Menus during a Call
4-13
Operating sequence of the
Rear Camera
7-2
Operating the Navigation
3-3
Others
5-11

Index O 9-13
Index
3
Pair a device from Bluetooth-enabled phone ...6-6
Pairing a New Device .......................................... 4-26
Pairing from the Bluetooth® Device ....................4-5
Parking Minder ...................................................... 6-14
Phone Command List ......................................... 5-12
Phone Number...................................................... 3-18
Phone ..........................................................................8-6
Picture Frame ........................................................ 8-23
Playing a CD .......................................................... 2-20
Playing Bluetooth® Audio ................................... 2-52
Playing iPod ............................................................ 2-47
Playing MP3 ........................................................... 2-26
Playing My Music .................................................. 2-55
Playing USB Music .............................................. 2-38
POI (Point of Interest) Search ............................ 3-15
POI Category List .................................................. 5-18
POI Display ............................................................. 3-10
POI Name Search ................................................ 3-15
Precautions for Safe driving ...................................3-2
Precautions upon Handling Discs .................... 2-14
Preliminary Guidance Mode .............................. 3-23
Preset Scan ............................................................ 2-13
Preset Scan ...............................................................2-6
Previous Destinations .......................................... 3-14
Product Specification ...............................................9-2
5
Re-starting Voice Recognition
5-4
Rejecting a Call
4-12
Repeat
2-21
Repeat
2-28
Repeat
2-40
Repeat
2-49
Repeat
2-56
Resetting the System
1-11
Restaurants
3-16
Returning to Current Location
2-30, 2-58
Roadside Assist
6-10
Rotating Image
2-42
Route Calculation
3-21
Route Guidance
3-23
Route Info
3-27
Route Menu
3-25
Route Option
3-27
Route Overview
3-26
Route Recalculation
3-22
Route Search
8-11
6
Saving Automatically
2-5
Saving Image
2-43
Saving Manually
2-5, 2-12
Saving Radio Frequency
2-5
Saving SIRIUS Channels
2-12
Scan
2-13, 2-22, 2-28, 2-40, 2-56
Scanning Radio Frequency
2-5
Schedule Service
6-12
Scheduled Diagnostics
6-13
Search
2-13
Searching CD Tracks
2-21
Searching Contacts
4-21
Searching iPod
2-47
Searching iPod Files
2-49
Searching POIs
3-12

9-14
,QGH[
Searching USB Image Files
2-41
Searching USB Music Files
2-39
Selecting a Frequency
2-8
Selecting Bluetooth® Audio Files
2-53
Selecting iPod Files
2-48
Selecting MP3 files
2-27
Selecting My Music
2-55
Selecting Presets
2-4, 2-11
Selecting through Channel/
Category List
2-12
Selecting through Preset
2-9
Selecting/Deleting Favorites
4-20
Sending Parking Location
6-14
Sending Points of Interest to
Your Navigation System
6-15
Setting a Destination
3-19
Setting Auto Connection
4-28
Setting Balance/Fader
8-3
Setting Bass/Mid/Treble
8-3
Setting Beep
8-5
Setting Bluetooth® Connection
4-24
Setting Connection
2-53
Setting Display Mode
8-5
Setting Mic Volume
4-15
Setting Volume Ratio
8-4
Shuffle
2-21, 2-28, 2-40, 2-49, 2-56
SIRIUS Radio
5-9
Skipping Prompt Messages
5-3
Slideshow Interval
2-42
Song-Tagging
2-9
Sound
8-3
Speed Alert
6-18
Speed Alerts
8-15
Starting Mode
2-4, 2-8, 2-11, 2-20, 2-26,
2-47, 2-50, 2-52, 2-55, 8-3
Starting USB Image Mode
2-41
Starting USB Music Mode
2-38
Starting Voice Recognition
5-3
Starting Voice Recognition
5-3
Status Bar Icons
4-8, 4-9
Steering Wheel Remote Controller
1-8
Steps upon Initial Connection
2-45
Supported Disc Formats
2-15
Supported iPod Devices
2-45
Switching Call to Bluetooth® Phone
4-13
Switching Call to Handsfree
4-13
Switching to Call Waiting
4-14
System Information
8-21
System Update
8-24
7
Text On/Text Off
2-6
The 911 Connect feature may not
operate in the following situations
6-2
Traffic Setup
8-15
Trip Info
8-21
Troubleshooting
9-6
Turn List Mode
3-24
Turning the System Off
1-10
Turning the System On
1-10
Turning the System On/Off
1-10
8
USB Image Mode
2-36
USB MP3 Information and
Precautions
2-33
USB Music Mode
2-34
USB Music
5-10
Using Bluetooth® Audio Mode
2-52

Index O 9-15
Index
Using iPod Devices
2-44
Using Menus within the List Screen
2-29
Using Menus within the List Screen
2-57
Using SEEK
2-4, 2-11
Using the MenuButtons
2-6, 2-12, 2-21,
2-28, 2-39, 2-42, 2-49, 2-52
Using TUNE
2-4, 2-8, 2-11
Using UVO eServices and Cautions
6-3
Using Voice Recognition
5-2
Using Voice Recognition
5-5
UVO eServices Activation
8-17
UVO eServices Command List
(Optional)
5-12
UVO eServices Settings
8-16
UVO eServices Settings(Optional)
8-16
9
Vehicle Diagnostics
6-10
Viewing Call History Information
4-24
Viewing GPS Info
6-21
Viewing Help
6-22
Viewing Info
2-43
Voice Command List
5-7
Voice Guidance
3-5
Voice Recognition Settings
8-22
:
Warnings
1-2
What is Bluetooth® Wireless
Technology?
4-2
When a Phone is Already Paired
4-6
When GPS Info Cannot Be Used
6-20
When no Phones Have Been Paired
4-4
When Pairing Additional Device
4-7
When There is a Connected Device
4-8

9-16
Microsoft® Windows® Automotive Operating System
Important Safety Information
Read and Follow Instructions
Before using your Windows Automotive-based system, read and follow all instructions and safety information provided in this end user manual
("User's Guide"). Not following precautions found in this User's Guide can lead to an accident or other serious consequences.
CAUTION
Keep User's Guide in Vehicle
У When kept in the vehicle, the User's Guide will be a ready reference for you and other users unfamiliar with the Windows Automotive-based
system. Please make certain that before using the system for the first time, all persons have access to the User's Guide and read its instruc-
tions and safety information carefully.
WARNING
У Operating certain parts of this system while driving can distract your attention away from the road, and possibly cause an accident or other
serious consequences. Do not change system settings or enter data non-verbally (using your hands) while driving. Stop the vehicle in a
safe and legal manner before attempting these operations. This is important since while setting up or changing some functions you might be
required to distract your attention away from the road and remove your hands from the wheel.
0LFURVRIW

Microsoft O9-17
General Operation
Voice Command Control
Functions within the Windows Automotive-based system may be accomplished using only voice commands. Using voice commands while driv-
ing allows you to operate the system without removing your hands from the wheel.
Prolonged Views of Screen
Do not access any function requiring a prolonged view of the screen while you are driving. Pull over in a safe and legal manner before attempting
to access a function of the system requiring prolonged attention. Even occasional short scans to the screen may be hazardous if your attention
has been diverted away from your driving task at a critical time.
Volume Setting
Do not raise the volume excessively. Keep the volume at a level where you can still hear outside traffic and emergency signals while driv-
ing. Driving while unable to hear these sounds could cause an accident.
Navigation Features
Any navigation features included in the system are intended to provide turn by turn instructions to get you to a desired destination. Please make
certain all persons using this system carefully read and follow instructions and safety information fully.
Distraction Hazard
Some navigation features may require manual (non-verbal) setup. Attempting to perform such set-up or insert data while driving can seriously
distract your attention and could cause an accident or other serious consequences. Stop the vehicle in a safe and legal manner before attempt-
ing these operations.

Let Your Judgment Prevail
Any navigation features are provided only as an aid. Make your driving decisions based on your observations of local conditions and existing traf-
fic regulations. Any such feature is not a substitute for your personal judgment. Any route suggestions made by this system should never replace
any local traffic regulations or your personal judgment or knowledge of safe driving practices.
Route Safety
Do not follow the route suggestions if doing so would result in an unsafe or illegal maneuver, if you would be placed in an unsafe situation, or if
you would be directed into an area that you consider unsafe. The driver is ultimately responsible for the safe operation of the vehicle and there-
fore, must evaluate whether it is safe to follow the suggested directions.
Potential Map Inaccuracy
Maps used by this system may be inaccurate because of changes in roads, traffic controls or driving conditions. Always use good judgment and
common sense when following the suggested routes.
Emergency Services
Do not rely on any navigation features included in the system to route you to emergency services. Ask local authorities or an emergency servic-
es operator for these locations. Not all emergency services such as police, fire stations, hospitals and clinics are contained in the map database
for navigation features.
CAUTION
Use of Speech Recognition Functions
У Speech recognition software is inherently a statistical process which is subject to errors. It is your responsibility to monitor any speech recogni-
tion functions included in the system and address any errors.
0LFURVRIW
9-18

)&&:DUQLQJ
WARNING
U.S.FEDERAL COMMUNICATIONS COMMISSION RADIO FREQUENCY INTERFERENCE
STATEMENT INFORMATION TO THE USER
NOTE : This equipment has been tested and founded to comply with the limits for a
Class B digital device pursuant to Part 15 of the FCC Rules.
These limits are designed to provide reasonable protection against harmful interference in a residential installation.
This equipment generates, uses, and can radiate radio frequency energy and, if not installed and used in accordance with the instructions,
may cause harmful interference to radio communications.
However, there is no guarantee that interference will not occur in a particular Installation.
If this equipment dose cause harmful interference to radio or television reception, which can be determined by turning the equipment off and
on, the user is encouraged to try to correct the interference by one or more of the following measures:
У
Reorient or relocate the receiving antenna.
У
Increase the separation between the equipment and receiver.
У
Connect the equipment into an outlet of a circuit different from that to which the receiver is connected.
У
Consult the dealer or an experienced radio/TV technician for assistance.
Changes or modification not expressly approved by the party responsible for compliance could void the user’s authority to operate the
equipment.
This equipment complies with FCC radiation exposure set forth for an uncontrolled environment
This equipment should be installed and operated with minimum 20 cm between the radiator and your body. This transmitter must not be col-
located or operating in conjunction with any other antenna or transmitter unless authorized to do so by the FCC.

,&:DUQLQJ
WARNING
This device complies with Industry Canada licence-exempt RSS standard(s).
Operation is subject to the following two conditions: (1) this device may not cause interference, and
(2) this device must accept any interference, including interference that may cause undesired operation of the device.
Le présent appareil est conforme aux CNR d'Industrie Canada applicables aux appareils radio exempts de licence.
L'exploitation est autorisée aux deux conditions suivantes : (1) l'appareil ne doit pas produire de brouillage, et
(2) l'utilisateur de l'appareil doit accepter tout brouillage radioélectrique subi, même si le brouillage est susceptible d'en compromettre le
fonctionnement.

0(02

0(02

0(02

0(02