HYUNDAI MOBIS AV242INAN CAR AVN (Bluetooth) User Manual H YFaTMU EN
HYUNDAI MOBIS CO., LTD. CAR AVN (Bluetooth) H YFaTMU EN
UserManual.wiki
>
HYUNDAI MOBIS
>
AV242INAN User Manual
Users Manual
Navigation menu
Upload a User Manual
Namespaces
Wiki Guide
HTML
PDF
Info
Views
User Manual
Discussion / Help
Navigation
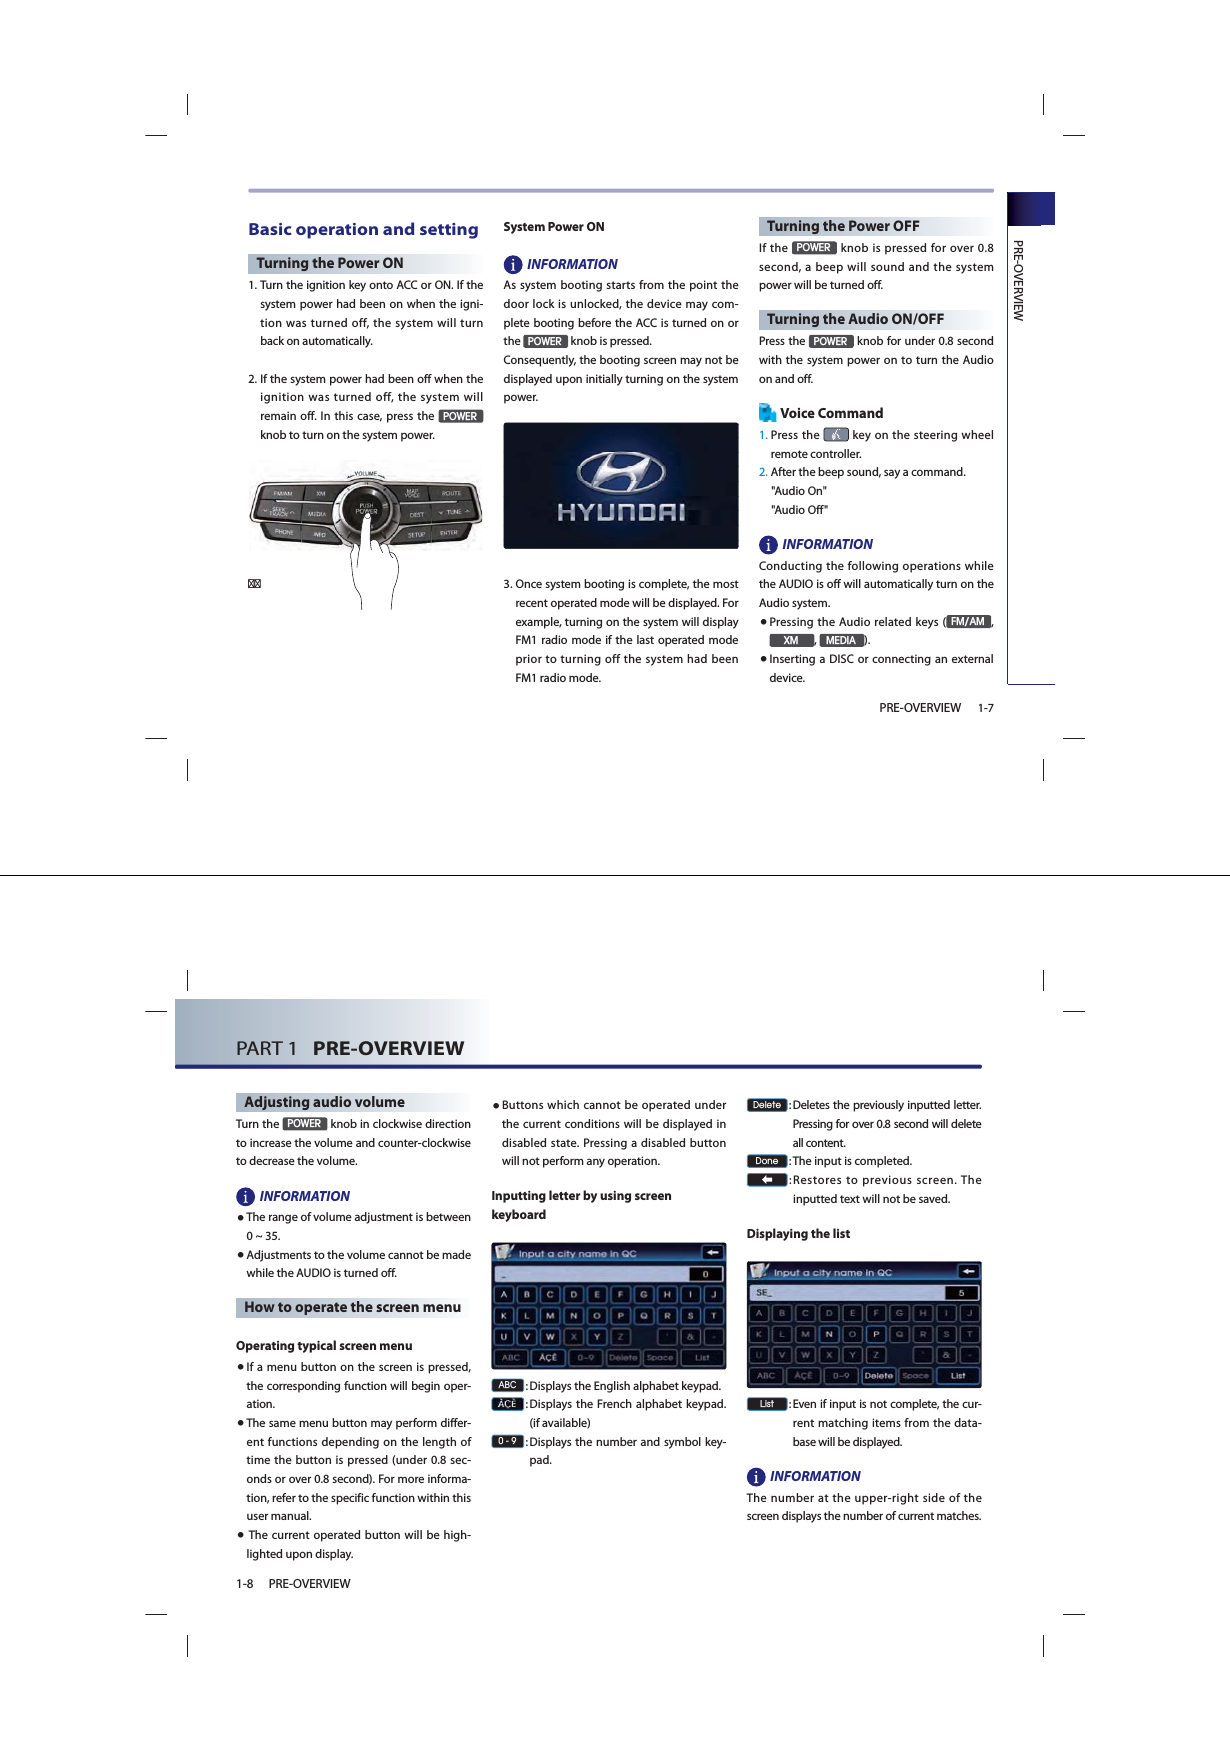
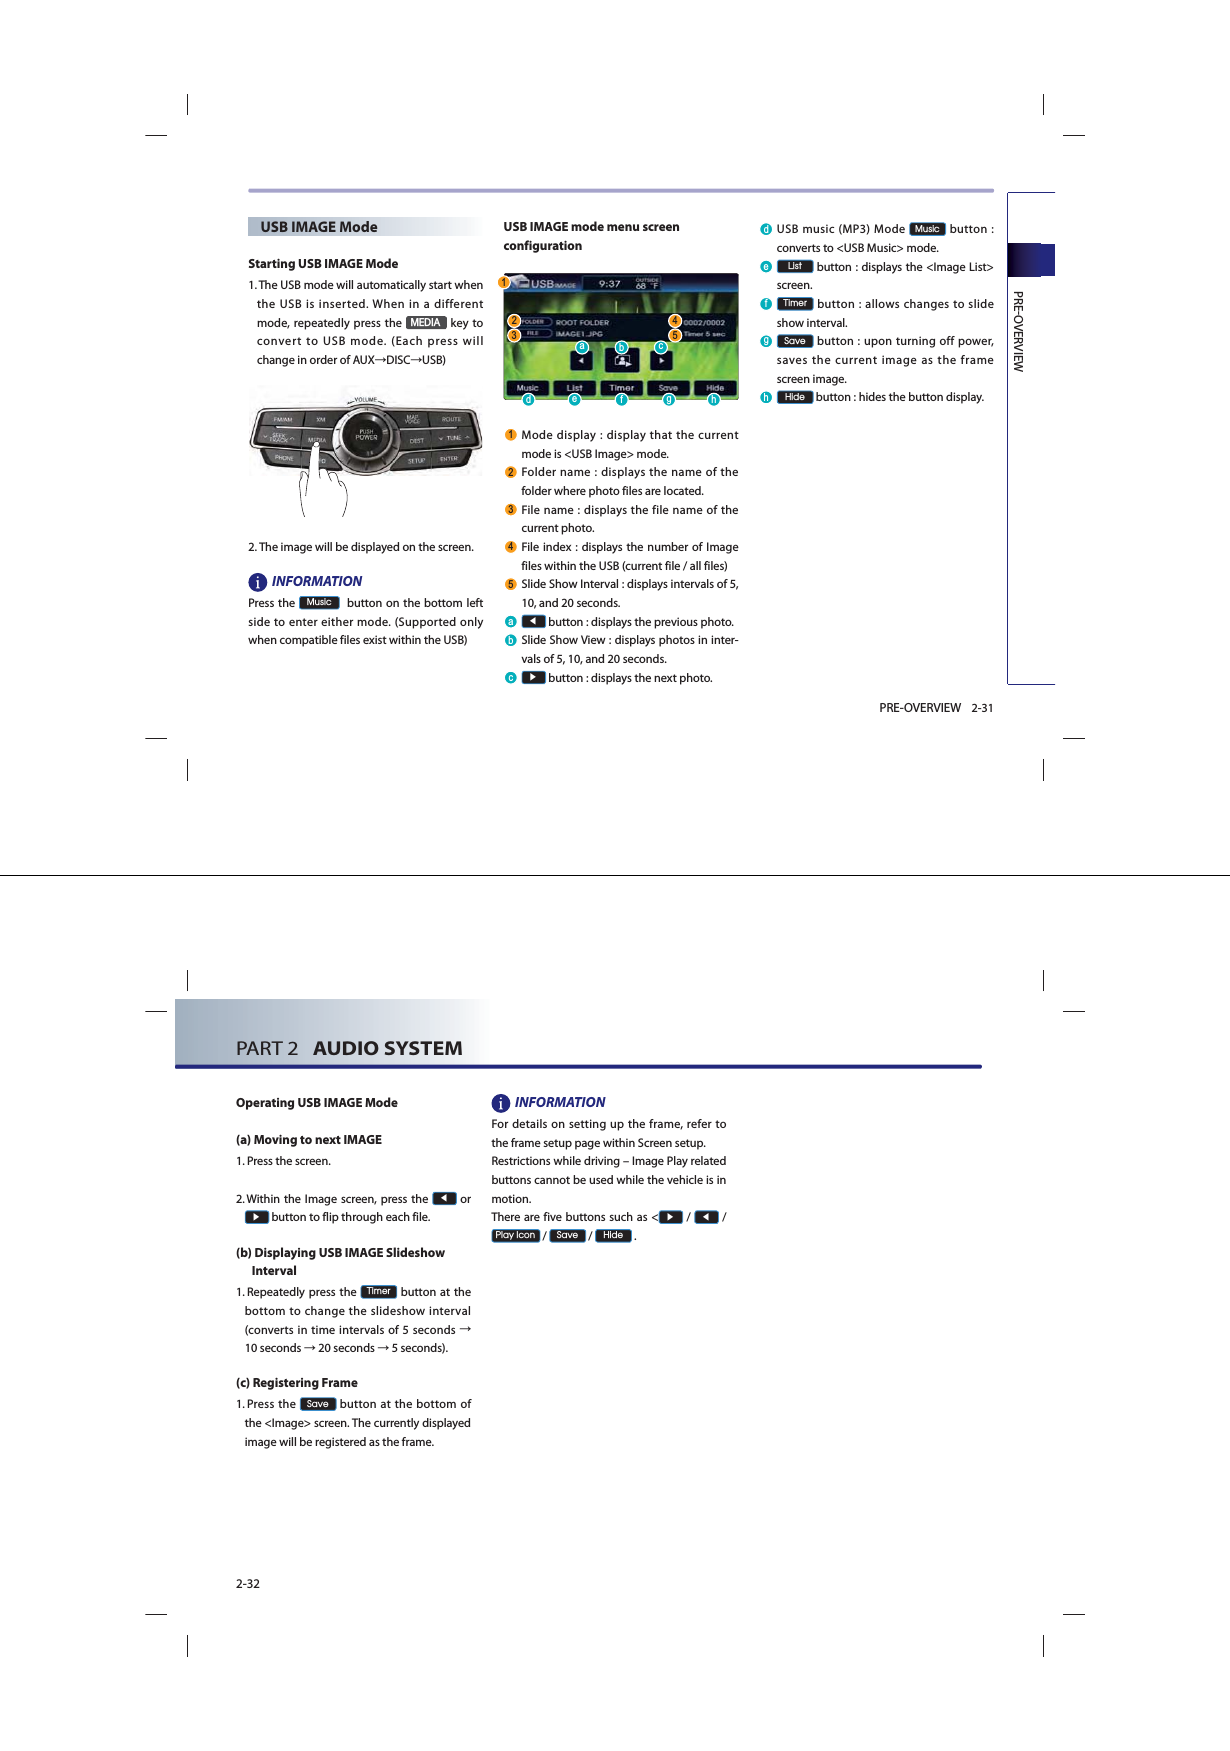
![PRE-OVERVIEW1-9PRE-OVERVIEW Selecting an item in a list▲ ▼: Moves to the next page or previous page. Ԣ Ԧ: The Ԣ button will be displayed if the text is too long to be displayed in one button.Press the Ԣ button to move the cursor to the end of the text. Press the Ԧ button to move the cursor to the front of the text. Sorting items from listSelect the desired sorting method to reorga-nize the list in accordance to the selected method. How to operate menu by voice command Conditions for voice recognition systemMost of the functions within the Audio and Navigation system can be operated by voice. Please follow the instructions below for opti-mal voice recognition performance.● Close all windows and the sunroof. The voice recognition can be improved when in a quiet environment. ● Press the voice recognition button and say the desired voice command after the sound of the beep. ● The microphone is positioned above the driver so that voice commands can be said while maintaining a proper posture. ● Pronounce the voice commands naturally and clearly as if in normal conversation. PART 1 PRE-OVERVIEW1-10 PRE-OVERVIEW Giving voice command1. Press the key on the steering wheel remote controller. A voice command window will be displayed on the lower side of the screen followed by a "Command please" system voice com-ment. 2. Once the icon changes into the icon on the pop-up screen with a beep sound, say the desired voice command. [Voice command list], page 5-6.[ Searching a destination by voice com-mand], page 5-19. INFORMATIONPress the key shortly to input the desired voice command. The system voice instruction comment will immediately terminate. When the icon changes into the icon with a beep sound, it is possible to input voice com-mands. Sound settingPress the 6RXQG button on the main screen of each Audio mode (FM/AM, XM, CD, MP3, USB, iPod) to display the Sound setting screen. FAD/BALThe position of the sound can be adjusted by using the up-down and left-right (▲, ▼, ▶, ◀) buttons on the left side of the screen. Press the &HQWHU button to position the sound in the center of the vehicle.](https://usermanual.wiki/HYUNDAI-MOBIS/AV242INAN/User-Guide-1453479-Page-7.png)
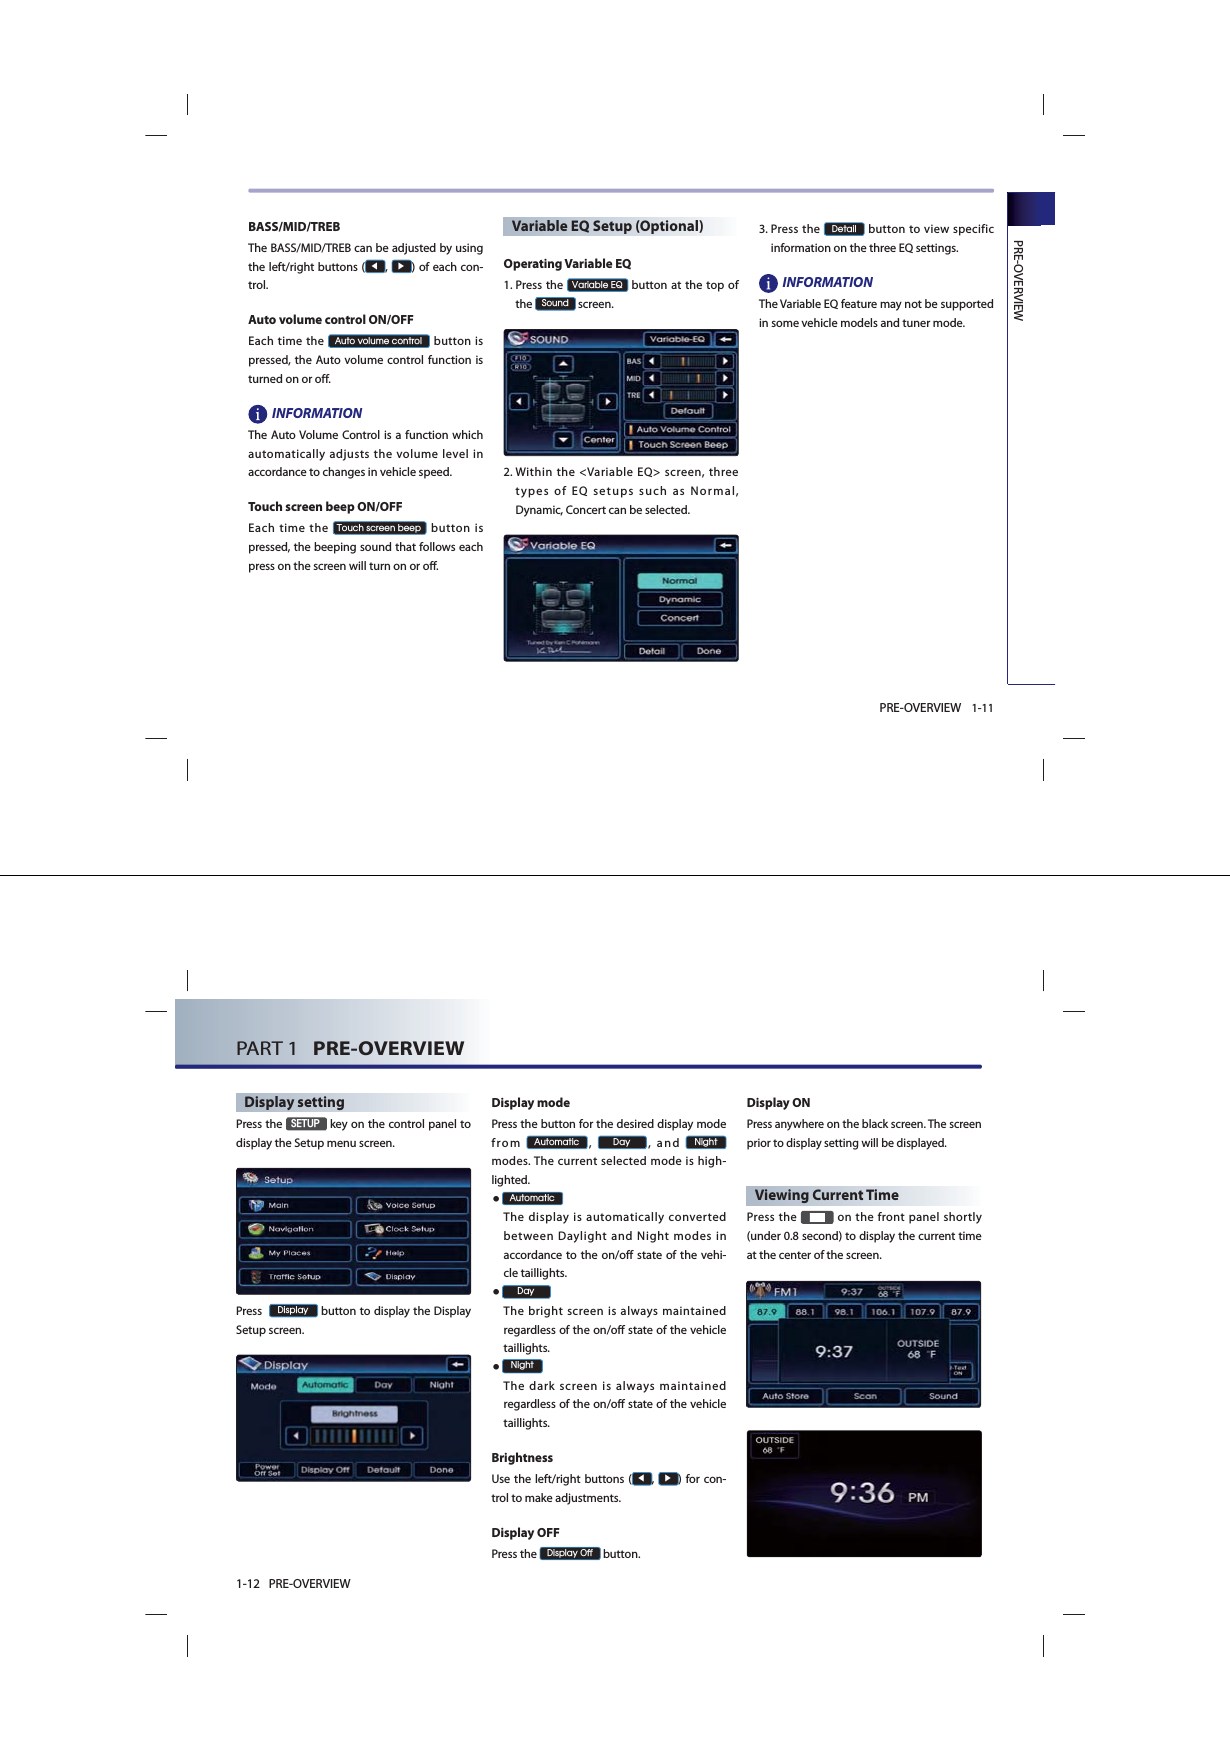
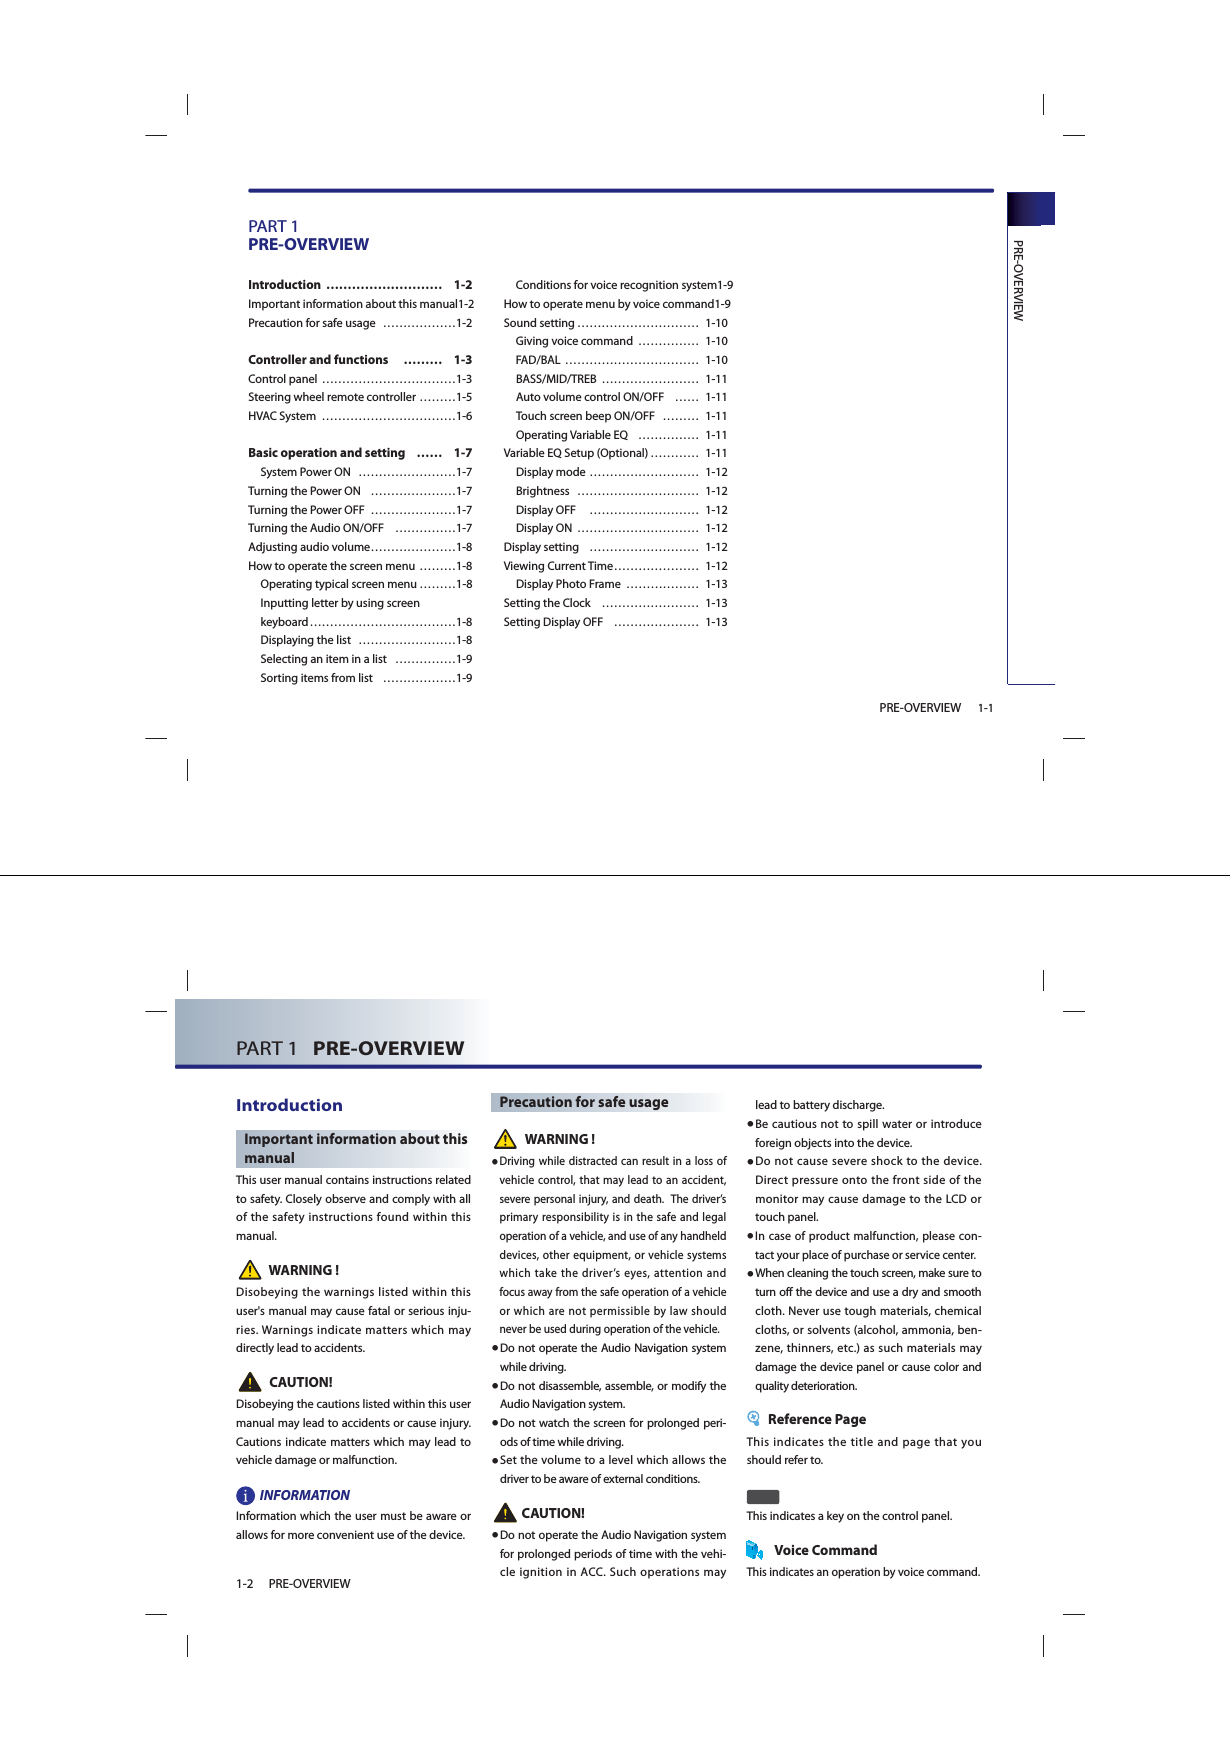
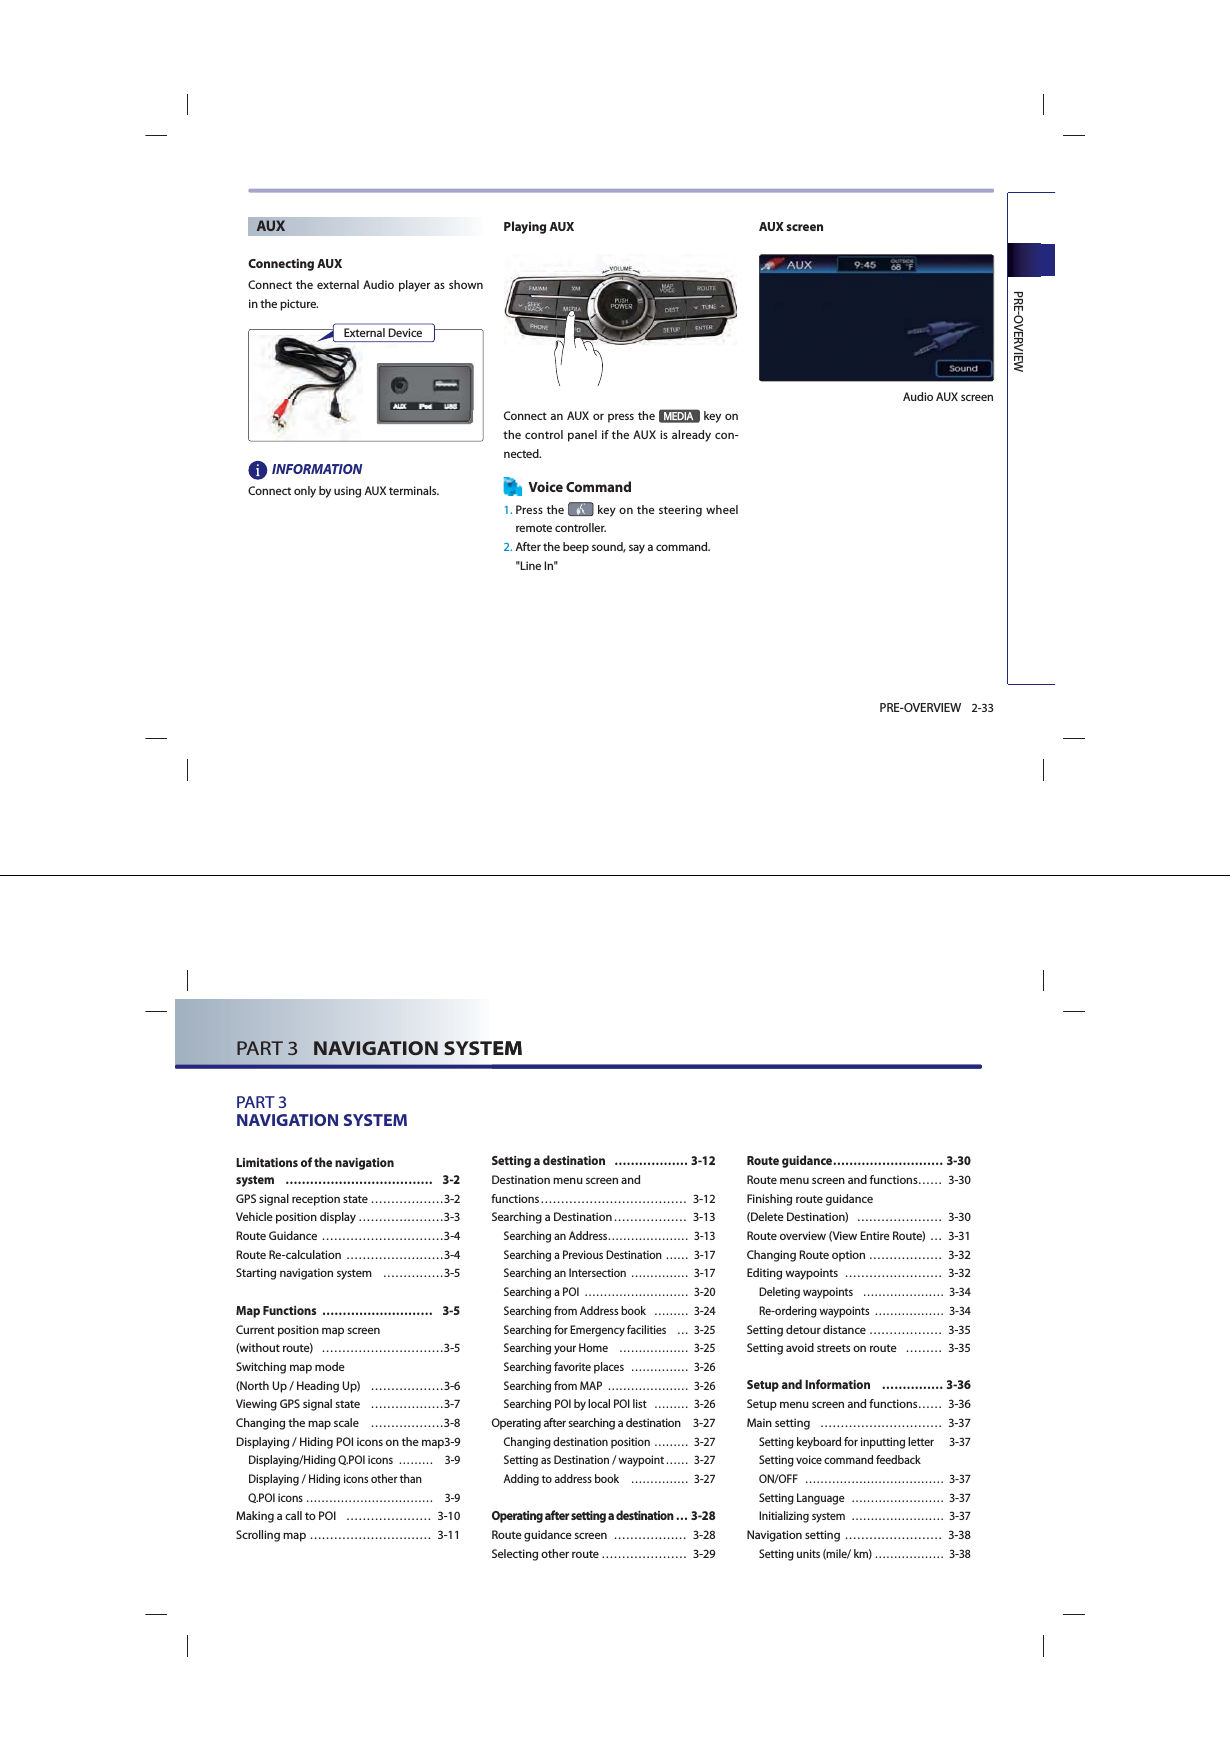
![PREOVERVIEW2-1PRE-OVERVIEWPART 2Audio SYSTEM Operating external devices …… 2-24 Connecting iPod devices ………… 2-24iPod® ……………………………… 2-24Listening to iPod music …………… 2-25iPod screen and functions ………… 2-25Selecting an iPod song …………… 2-26REW/FF iPod song ………………… 2-27Setting Repeat function for iPod song ………………………… 2-27 Setting Random function for iPod song …………………………… 2-27 USB MP3 related information and precaution ………………………… 2-28Precautions upon handling USB … 2-28Connecting the USB ……………… 2-30Listening to USB music …………… 2-30 Starting USB IMAGE Mode ………… 2-31 USB IMAGE mode menu screen configuration ……………………… 2-31 Operating USB IMAGE Mode ……… 2-32Connecting AUX …………………… 2-33Playing AUX ……………………… 2-33AUX screen ………………………… 2-33AUX …………………………………… 2-33PART 2 AUDIO SYSTEM2-2Operating the radio FM/AM RadioListening to the FM/AM radio1. Press the )0$0 key on the control panel. The FM/AM radio band of the most recent listened station will be displayed. 2. Press the )0$0 key to change the desired radio band. Each press will change the bands in the following order: FM1ĺFM2ĺAMĺFM1 ...3. Select the desired broadcast frequency. [Selecting FM/AM broadcast frequency], page 2-3.Voice Command1. Press the key on the steering wheel remote controller.2. After the beep sound, say a command. " Radio""(Radio) AM""(Radio) FM""(Radio) FM <1 or 2>""AM Frequency <530 to 1710>""FM Frequency <87.5 to 107.9>""AM Preset <1 to 6>""FM <1 or 2> Preset <1 to 6>"FM/AM screen and functions Mode display : displays the FM1/FM2/ AM modes. SEEK/SCAN/PRESET SCAN/AUTO PRESET indicator : if SEEK/SCAN/PRESET SCAN /AUTO PRESET is operating, the switch is displayed. EFFGGHHDD](https://usermanual.wiki/HYUNDAI-MOBIS/AV242INAN/User-Guide-1453479-Page-10.png)
![PREOVERVIEW2-3PRE-OVERVIEW Program Service name : displays the pro-gram service name if data is being broad-cast. Frequency : displays the current playing frequency. Program type name : displays the program type name if data is being broadcast. Radio Text : displays the radio text infor-mation if data is being broadcast. Frequency Bar : displays the position of the current frequency within the total fre-quency range. Current time : displays the current time manually automatically according to the GPS time.D 3UHVHW buttons : the desired frequency can be preset and selected. [Storing FM/AM preset], page 2-4.E 57H[W ON/OFF button : turns the Radio Text information on and off. INFORMATIONIf the 57H[W is on OFF state, text will not be displayed even if there is text being transmit-ted from the broadcast station.If the 57H[W is on ON state, the frequency bar will not be displayed. Even if the 57H[W in on ON state, text may not be displayed if text is not being received from the broadcast station.F $XWR6WRUH button : searches the 6 fre-quencies with the most superior reception and automatically stores as preset buttons in corresponding order.[Storing FM/AM preset], page 2-4.G 6FDQ button : scans all frequencies or just the preset frequencies for 5 seconds each. [Scanning FM/AM broadcast frequency], page 2-5.H 6RXQG button : adjusts the FAD/BAL, BASS/MID/TREB controls.[Sound setting], page 1-10.Selecting FM/AM broadcast frequencyThere are 3 ways to select the broadcast fre-quency - (a) selecting through preset, (b) selecting through SEEK, (c) selecting through manual search.(a) Selecting a frequency through presetPress the preset button of the desired broad-cast frequency. INFORMATION ● Press the Ѧ or ѧ key on the steering wheel remote controller shortly. The preset frequencies of the current band will be select-ed in order.● There are 6 preset frequencies each for FM1, FM2, and AM modes. [Storing FM/AM preset], page 2-4.Voice Command1. Press the key on the steering wheel remote controller.2. After the beep sound, say a command."Preset <1 to 6>""Preset Up""Preset Down" PART 2 AUDIO SYSTEM2-4(b) Selecting a Broadcast frequency through SEEKPress the key on the control panel for less than 0.8 second. Once the SEEK function is operating (SEEK indicator blinking), the next or previous broadcast frequency with superior reception will be searched automatically.INFORMATION● Press the key on the control panel or steering wheel remote controller for more than 0.8 second to quickly move to the nearest desired frequency. Once the button is released, the next frequency with superior reception will be searched auto-matically.● If the SEEK function is operating, pressing the key on the control panel again will terminate SEEK operation and select the current frequency. Voice Command1. Press the key on the steering wheel remote controller.2. After the beep sound, say a command. "Seek Up""Seek Down"(c) Selecting a broadcast frequency through manual search Press the ѧ781(Ѧ key to search for desired frequency.Each click on the ѧ781(Ѧ key will increase or decrease the frequency by 1 step (FM: 0.2 MHz, AM: 10 kHz). Storing FM/AM presetThere are 2 ways to store preset frequencies - (a) storing manually and (b) auto store. (a) Storing manually1. Select the desired frequency. [Selecting FM/AM broadcast frequency], page 2-3.2. Press the preset button to store for over 0.8 second. The frequency will become stored along with a beep sound. INFORMATIONSix preset frequencies each for FM1/ FM2/AM modes can be stored using the above instruc-tions.(b) Auto storeAfter selecting the desired band, press the $XWRVWRUH button. The 6 frequencies with the most superior reception will be stored as pre-set buttons in corresponding order. INFORMATION If the $XWRVWRUH button is pressed again while operating Auto Store, then the Auto Store operation will be terminated and the previously played frequency will be restored.](https://usermanual.wiki/HYUNDAI-MOBIS/AV242INAN/User-Guide-1453479-Page-11.png)
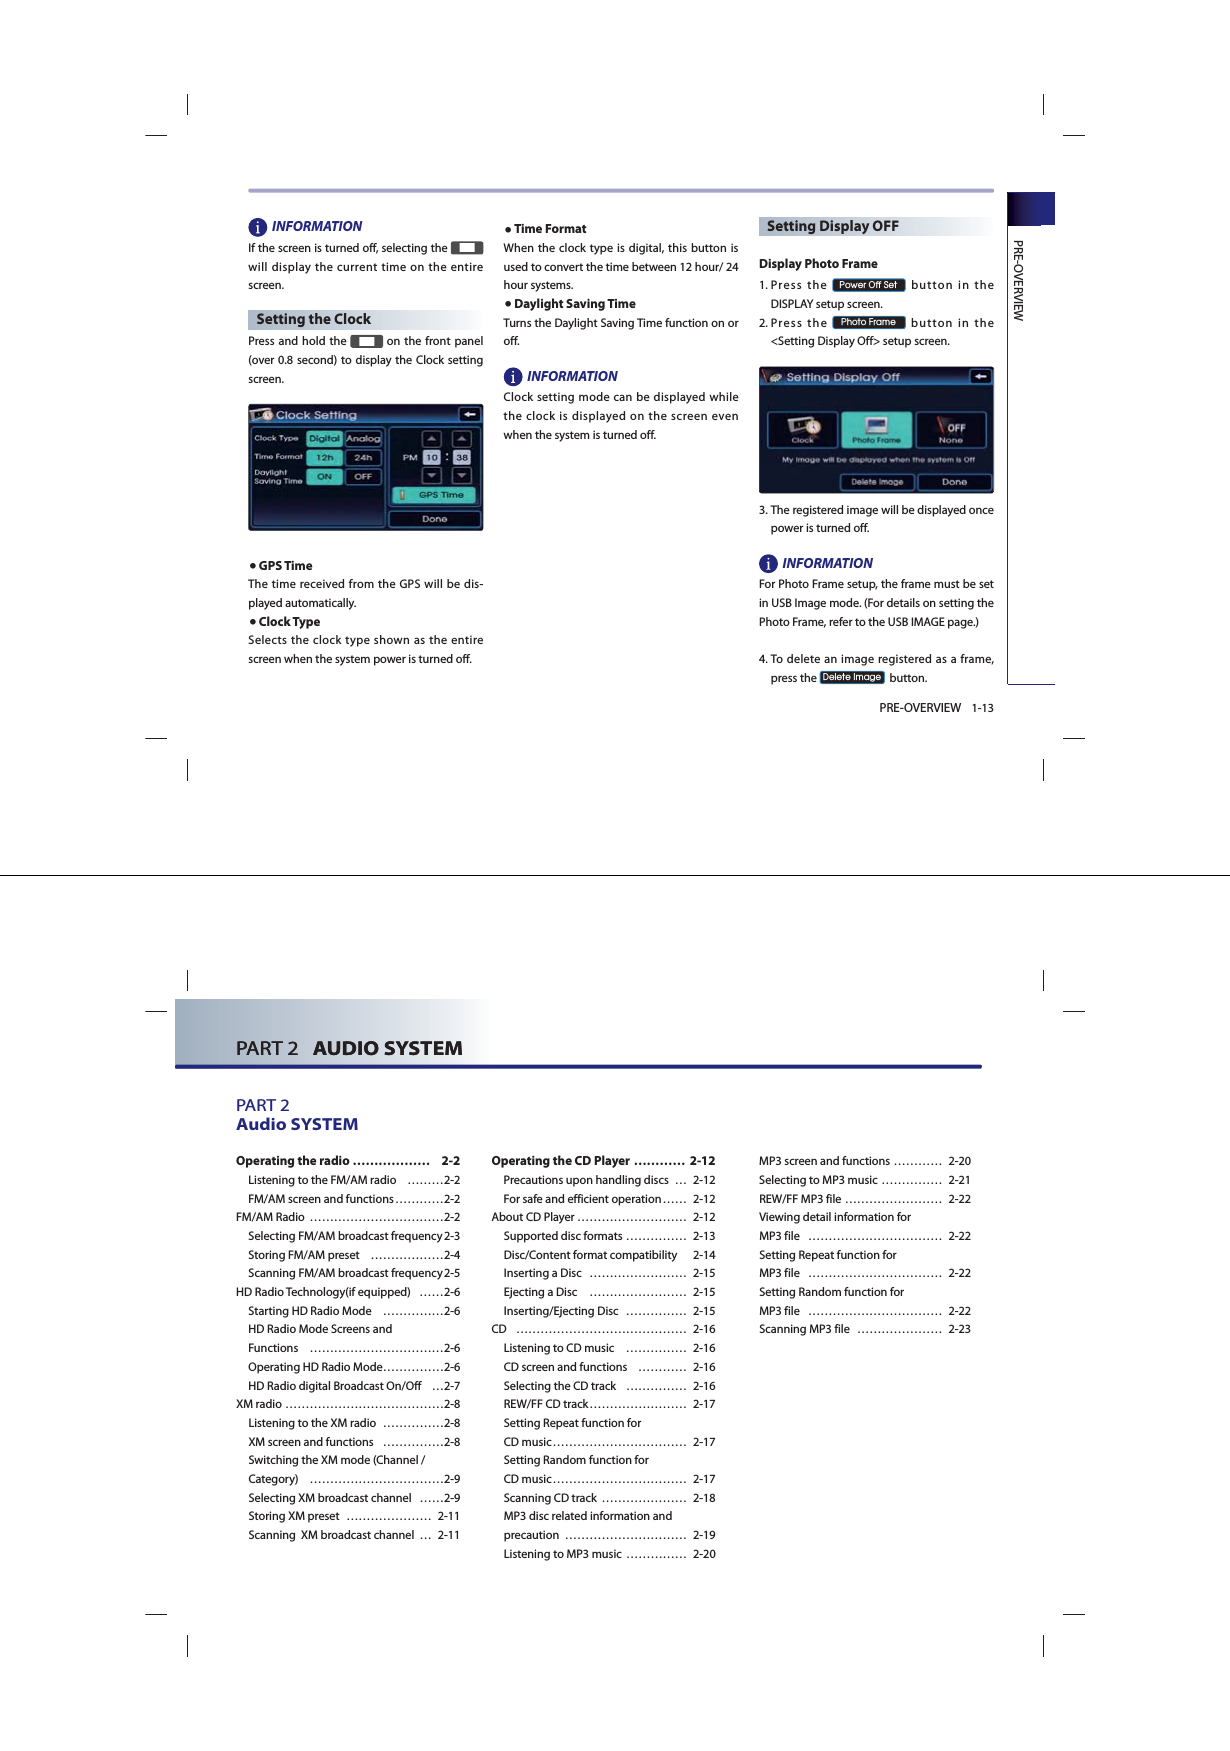
![PREOVERVIEW2-7PRE-OVERVIEWHowever, while the HD Radio reception is turned on, the HD Radio related icon display will become active when within regions where an HD Radio signal can be received.● Selecting frequency through PresetThis allows you to select previously saved HD Radio frequencies for broadcast.1. Press the buttons with HD1~HD8 displayed above the preset button to listen to the cor-responding HD Radio channel broadcast.● Selecting frequency through TUNE1. Select a channel receiving HD Radio broad-cast automatically or manually and press the 00 button to move to the corresponding HD Radio channel sub broadcast. INFORMATIONFor HD Radio broadcast channels without sub channels, the sub channels of sub numbers will be skipped to move only to channels which can be received.● Storing a frequency to a preset button● Storing ManuallyThis function allows you to manually save the desired sub broadcast frequency within the currently playing HD Radio broadcast channel. Method of saving is identical with the method of saving radio presets. After saving is com-plete, the HD Radio sub broadcast number will be displayed on above the frequency.HD Radio Digital Broadcast On/OffHD Radio Broadcasts can be turned on and off for HD Radio FM and AM mode.In Setup > Main setup screen, press the On/Off setting for the desired HD Radio mode. PART 2 AUDIO SYSTEM2-8XM radioListening to the XM radio1. Press the ;0 key on the control panel. The XM radio band screen of the most recent listened station will be displayed. 2. Press the ;0 key to change the desired radio band. Each press will change the bands in the following order: XM1 ĺ XM2 ĺ XM3 ĺ XM1 ...3. Select the desired broadcast channel. [Selecting XM broadcast channel], page 2-7.Voice Command1. Press the key on the steering wheel remote controller.2. After the beep sound, say a command. "XM""XM <1 or 2 or 3>""XM Channel <0 to 255>""XM <1 or 2 or 3> Preset <1 to 6>"XM screen and functions Mode display : displays the XM1/XM2/ XM3 modes. SCAN/PRESET SCAN indicator : if SCAN/PRESET SCAN is operating, the switch is displayed. Channel number : displays the current playing channel. Channel mode indicator : displays the channel mode in orange. Category mode indicator : displays the cat-egory mode in orange. Channel name : displays the channel name. NAME : displays the artist and other relat-ed information. Title name : displays the title name. Category name : displays the category name. Current time : displays the current time manually automatically according to the GPS time.D 3UHVHW buttons : the desired channel can be preset and selected. [Storing XM preset], page 2-9.E 0RGH buttons : switches between channel mode and category mode.[Switching the XM mode], page 2-7.E F G H ID](https://usermanual.wiki/HYUNDAI-MOBIS/AV242INAN/User-Guide-1453479-Page-13.png)
![PREOVERVIEW2-9PRE-OVERVIEWF /LVW button : displays the channel or category list. [Selecting XM broadcast channel], page 2-7.G 6HDUFK button : selects the channel by directly inputting the channel number.[Selecting XM broadcast channel], page 2-7.H 6FDQ button : scans all frequencies or just the preset channels for 5 seconds each. [Scanning XM broadcast channel], page 2-9.I 6RXQG button : adjusts the FAD/BAL, BASS/MID/TREB controls. [Sound setting], page 1-10. Switching the XM mode (Channel / Category)Each time the 0RGH button is pressed, the mode will switch between channel mode and category mode. Use the tune knob to change categories and press the tune knob change to selected cate-gory.Selecting XM broadcast channelThere are 5 ways to select a broadcast channel - (a) selecting through preset, (b) selecting with channel Up/Down, (c) Selecting a chan-nel through manual search, (d) selecting through channel/ category list, (e) selecting by directly inputting the channel number.(a) Selecting a channel through presetPress the preset button of the desired chan-nel.INFORMATION● Press the Ѧ or ѧ key on the steering wheel remote controller for less than 0.8 second. The preset channels of the current band will be selected in order. ●There are 6 preset channels each for XM1, XM2, and XM3.[Storing XM preset], page 2-9.Voice Command1. Press the key on the steering wheel remote controller.2. After the beep sound, say a command. "Preset <1 to 6>""Preset Up""Preset Down"(b) Selecting with Channel Up/DownPress the key on the control panel for less than 0.8 second.The previous or next channel will be selected. INFORMATION●If in Channel mode, the channel is selected from all channels. If in Category mode, the first channel of each category is selected. ●Press the key on the control panel or steering wheel remote controller for more than 0.8 second to quickly move to the nearest desired channel. Once the but-ton is released, the current channel will be selected.PART 2 AUDIO SYSTEM2-10Voice Command1. Press the key on the steering wheel remote controller.2. After the beep sound, say a command. "Channel Up""Channel Down"(c) Selecting a channel through manual search Press the ѧ781(Ѧ key to display the previ-ous or next channel information. After a brief moment, the selected channel will be displayed.INFORMATIONIf in channel mode, the channel is selected from all channels. If in category mode, the first channel of each category is selected.(Category search)(d) Selecting channel through channel/category list 1. Press the /LVW button.● If in category mode, the all category list screen will be displayed. Select the desired category button to dis-play the channel list screen for the corre-sponding category. ● If in channel mode, the all channels list screen will be displayed.2. Select the desired channel button. The pre-vious screen will be restored and the select-ed channel will begin playing.(e) Selecting channel by directly inputting the channel number 1. Press the 6HDUFK button. The channel input screen will be displayed.2. Input desired channel number, and press the 2. button.](https://usermanual.wiki/HYUNDAI-MOBIS/AV242INAN/User-Guide-1453479-Page-14.png)
![PREOVERVIEW2-11PRE-OVERVIEWThe previous screen will be restored and the selected channel will begin playing.INFORMATION To prevent inputting a channel which exceeds the channel range, numbers which cannot be inputted are set to disabled state.Voice Command1. Press the key on the steering wheel remote controller.2. After the beep sound, say a command. "Channel<0 to 255>"Storing XM preset1. Select the desired channel. [Selecting XM broadcast channel], page 2-7.2. Press the preset button for over 0.8 second. The frequency will be saved along with beep sound. INFORMATION Six preset frequencies each for XM1/ XM2/ XM3 modes can be stored using the above instructions. Scanning XM broadcast channel1. Press the 6FDQ button. ● SCAN (under 0.8 second): scans all channels for 5 seconds each if in channel mode. If in category mode, scans all channels within the current category for 5 seconds each. Voice Command1. Press the key on the steering wheel remote controller.2. After the beep sound, say a command. "Scan"● PRESET SCAN (over 0.8 second): scans the 6 preset channels within the current band for 5 seconds each. Voice Command1. Press the key on the steering wheel remote controller.2. After the beep sound, say a command. "Preset Scan"1. Press the 6FDQ button again to continue playing the channel. The scan will be termi-nated and the current channel will continue to be played. INFORMATION● When scanning has completed an entire revolution, the scan function is automatical-ly terminated and the previous played chan-nel will be restored. ● Channel 0 is the radio ID and contains infor-mation required for XM Activation. PART 2 AUDIO SYSTEM2-12Operating the CD PlayerAbout CD PlayerPrecautions upon handling discs ● After using a disc, keep it in the original case to prevent it from becoming scratched, which may cause the CD to make popping sounds. ● Do not use heart-shaped discs, octagon-shaped discs, or any other abnormally shaped disc. Such discs may be the cause of malfunctions. ● Do not clean discs with chemical solutions such as record sprays, antistatic sprays, anti-static liquids, benzene, or thinners. Such materials may cause the surface of DISC to be unrecoverable.● Do not expose the disc to direct sunlight for prolonged periods of time. Such exposure may lead to disc deformation.● Dust, scratch, and other substances may cause popping sound while playing as well as sound deterioration. ● Never place paper on either side of the disc or write on disc surfaces. Sharp writing utensils and inks used in felt-tip pens may cause damage to disc surfaces● Clean fingerprints and dust off the signal surface (coated side) of the disc with a soft cloth. Only soft cloths should be used as there are no grooves for dust to get in as is the case with LPs. ● Copy-protected CDs such as S-type CDs may not function in the device.● DATA CDs are not supported by the device. (However, such discs may operate abnor-mally.)For safe and efficient operation● Do not disassemble the CD Player for repair purposes. Contact your place of purchase in the case of malfunction. (Complete service assistance will not be provided if the user disassembles the device.)● Do not use water to clean the device. Exposure to water may cause damage to the device.● Be cautious not to introduce foreign sub-stances into the disc insert slot. Foreign substances may cause damage to the interior of the device. ● The device may fail to operate properly in extremely hot or cold temperatures. Discontinue the use of the device unless normal temperature is maintained. ( The operational temperature range is: -10℃ ~ 65℃).● Steam can be condensed on the fiberoptic lens due to rain, wet conditions, or upon operating the heating system.● Skipping may occur to the audio when driv-ing on bumpy roads for prolonged periods of time or upon severe shock to the vehicle.● Do not use chemical solvent to clean the device. Such solvents may cause damage to the surfaces of the device.Always use a clean and dry cloth.](https://usermanual.wiki/HYUNDAI-MOBIS/AV242INAN/User-Guide-1453479-Page-15.png)

![PREOVERVIEW2-15PRE-OVERVIEWAlthough this device supports low bit rate MP3 tracks, such tracks may only provide low quality sound. • For stable operation, the use of files in 95kbps ~ 192kbps bit rate range and 44.1kHz SAMPLING frequency is recom-mended.Inserting/Ejecting Disc Inserting a Disc Insert the disc into the slot. The disc will begin playing automatically after it has been inserted. INFORMATION If the operation mode had been Audio mode before inserting the disc, the device will con-vert to the DISC mode screen and begin play-ing. If the operation mode had been Navigation mode, then Navigation mode screen will remain and the disc play status will be dis-played through the Audio bar. Ejecting a Disc Press the key. The disc will immediately be stopped and ejected. INFORMATION● If the operation mode had been in Audio mode before ejecting the disc, the device will be converted back to Audio mode. If the operation mode had been in Navigation mode, then Navigation mode screen will remain. ● If the disc is straddled on the slot without removing for approximately 10 seconds, the disc will be re-inserted automatically into the disc player. In such a case, the disc will not begin play-ing automatically. PART 2 AUDIO SYSTEM2-16CDListening to CD music1. Insert the CD or press the 0(',$ key on the control panel if the CD is already inserted.2. Select the desired track. [Selecting the CD track], page 2-15.Voice Command1. Press the key on the steering wheel remote controller.2. After the beep sound, say a command."DISC""CD""CD Track <1 to 665>"CD screen and functions Mode display : displays that the current mode is CD mode. REPEAT/RANDOM/SCAN indicator : if REPEAT/RANDOM/SCAN is operating, the switch is displayed. Track number : displays the track number. Play Time : displays the play time. Current time : displays the current time manually automatically according to the GPS time.D 5HSHDW buttons : repeat the current play-ing track. [Setting Repeat function for CD music], page 2-15.E 5DQGRP button : plays the tracks on the disc in random order. [Setting Random function for CD music], page 2-16.F 6FDQ button : scans all tracks on the disc for 10 seconds each. [Scanning CD track], page 2-16.G 6RXQG button : adjusts the FAD/BAL, BAS, MID, TRE controls. [Sound setting], page 1-10.Selecting the CD trackThere are 2 ways to select a CD Track - (a) selecting through Track Up/Down, (b) select-ing through searching Track.(a) Selecting through Track Up / DownPress the key on the control panel or steering wheel remote controller for less than 0.8 second. The next or previous track will begin playing. D FE G](https://usermanual.wiki/HYUNDAI-MOBIS/AV242INAN/User-Guide-1453479-Page-17.png)
![PREOVERVIEW2-19PRE-OVERVIEWMP3 MP3 disc related information and precaution ● Information• The MP3 file standards supported by the device are as follows. • Acceptable standard: MPEG1 AUDIO LAYER 3• Acceptable sampling frequency: 32, 44.1, 48 (KHz)• Acceptable bit rate: 32, 40, 48, 56, 64, 80, 96, 112, 128, 160, 192, 224, 256, 320 (Kbps)• Recommended bit rate & reference sam-pling frequency: 96,128, 192 Kbps fixed bit rate /44.1KHz• ID3 tag This device supports ID3v1.0, ID3v1.1, ID3v2.2, ID3v2.3, and ID3v2.4 ID3 tags.• Supported media The MP3 media supported by the device are CD-ROM and USB.•Supported media formats This device supports ISO9660 LEVEL1 and LEVEL2. Detailed specification is as below.• Maximum directory layers: 8 layers• Maximum folder length: 64 Bytes, file name length: 64 Bytes• Supported characters for folder name/ file name: Alphanumeric characters, Korean standard character set 2350 characters, Simplified Chinese 4888 characters• Maximum number of folders which can be stored onto one disc: 256 folders (including ROOT directory)• Maximum number of files which can be stored onto one disc: 512 files • Precautions upon burning MP3 files • The use of ISO 9660 LEVEL 2 JOLIET format is recommended when burning MP3 files. Burning in other formats may abnormally display the file names. • It is possible to display up to 32 characters for file and folder names in case of UNICODE, and up to 64 characters in case of ASCII. Although the full length of the file name can be dis-played by using the scroll function, the full length of folder names may not be displayed as the scroll function does not operate when displaying folder names. ●PrecautionPlease use a MP3 bit rate which is less than 128 kbps. The sound quality cannot be guar-anteed for MP3s exceeding 128kbps.PART 2 AUDIO SYSTEM2-20Listening to MP3 music1. Insert the MP3 disc or press the 0(',$ key on the control panel if the MP3 disc is already inserted.2. Select the desired file. [Selecting the MP3 file], page 2-19.Voice Command1. Press the key on the steering wheel remote controller.2. After the beep sound, say a command."DISC""CD""MP3"MP3 screen and functions Mode display : displays that the current mode is MP3 disc mode. (MP3 files on DVD discs are not supported.) REPEAT/RANDOM/SCAN indicator : if REPEAT/RANDOM/SCAN is operating, the switch is displayed. Play Time : displays the play time. Folder name : displays the folder name. File name : displays the file name. Current time : displays the current time manually automatically according to the GPS time.D ,QIR2Q2II button : displays or hides the detailed file information for the current playing file. [Viewing detail information for MP3 file], page 2-20.E /LVW button : displays the MP3 folders and file lists for the disc. [Selecting the MP3 file], page 2-19.F 5HSHDW button : repeats the current play-ing folder or file. [Setting repeat function for MP3 file], page 2-20.G 5DQGRP button : plays all files on the disc or folder in random order. [Setting random function for MP3 file], page 2-20.I 6FDQ button : scans all files on the disc or folder for 10 seconds each. DEFGHI](https://usermanual.wiki/HYUNDAI-MOBIS/AV242INAN/User-Guide-1453479-Page-19.png)
![PREOVERVIEW2-25PRE-OVERVIEWListening to iPod music1. Connect the iPod or press the 0(',$ key on the control panel if the iPod is already connected.INFORMATIONEven if the iPod is connected, message may be displayed if an error has occurred. In such a case, reconnect the iPod. 2. Select the desired song. [Selecting an iPod song], page 2-23.Voice Command1. Press the key on the steering wheel remote controller.2. After the beep sound, say a command. "iPod"iPod screen and functions Mode display : displays that the current mode is iPod mode. REPEAT/RANDOM indicator : if REPEAT/ RANDOM is operating, the switch is dis-played. Title name : displays the title name of the playing file. Play Time : displays the play time. Artist name : displays the artist name of the playing file. Album name : displays the album name of the playing file. Current time : displays the current time manually automatically according to the GPS time.D 0HQX button : converts to the search menu screen. [Selecting an iPod song], page 2-23.E 5HSHDW buttons : repeats the current playing song. [Setting repeat function for iPod song], page 2-25.F 5DQGRP button : plays all songs in the current playing list in random order or ran-domly in album unit. [Setting random function for iPod song], page 2-25.G 6RXQG button : adjusts the FAD/BAL, BASS/MID/TREB controls.[Sound setting], page 1-10.DEFGPART 2 AUDIO SYSTEM2-26Selecting an iPod songThere are 3 ways to select songs from the iPod device - (a) selecting song through Up/Down, (b) selecting song through sequential search, (c) selecting song through menu.(a) Selecting song through Up / DownPress the key on the for less than 0.8 second. The next or previous song will begin playing. INFORMATION If the key on the control panel or steering wheel remote controller is pressed shortly while the track has played for more than 3 seconds, the start of the current song will begin playing. If the track has been playing for less than 2 seconds, the start of the previous song will begin playing. Voice Command1. Press the key on the steering wheel remote controller.2. After the beep sound, say a command. "Next Song""Previous Song"(b) Selecting song through search 1. Press the ѧ781(Ѧ key to search for desired to display file. Operate the ѧ781(Ѧ key dial to display the previous or next channel information. After a brief moment, the select-ed channel will be displayed. INFORMATION If the operation of the ѧ781(Ѧ key is too rapid, there may be a delay in displaying the song information.(c) Selecting song through Menu1. Press the 0HQX button. The iPod menu screen will be displayed. 2. Press the button for the desired search method. INFORMATIONIf the search mode is accessed while playing a song, the most recent searched step will be displayed. The search steps upon initial con-nection are listed below. 3. Press the desired song button to return to the main screen and play the selected song.](https://usermanual.wiki/HYUNDAI-MOBIS/AV242INAN/User-Guide-1453479-Page-22.png)
![PREOVERVIEW2-29PRE-OVERVIEW1. Only MP3 files with compression rates between 8Kbps~320Kbps are supported. 2. Only WMA files with compression rates between 8Kbps~320Kbps are supported. ● Be cautious of static electricity when con-necting/disconnecting the external USB device. ● Encoded MP3 Players will not be recognized when connected as the external device. ● When connecting an external USB device, the device may not be properly recognize the USB when the USB is in some states. ● When formatting the external USB device, the device may not be properly recognize a Byte/Sector selection other than 512Byte or 2048Byte. ● The device will only recognize USB devices formatted in FAT 12/16/32.● Some USB devices may not operate proper-ly because of compatibility issues. Verify that the external device is supported by the device before starting use.● Avoid contact between the USB connector with bodily parts and foreign substances. ● Repeatedly connecting/disconnecting the USB in a short period of time may cause damage to the device. ● When disconnecting the USB, an abnormal sound may occur occasionally.● Abruptly disconnecting the external USB device while the USB is operating may cause the device to be damaged or function abnormally. Make sure to disconnect the USB device only after the audio power is turned off or when the audio is operating in a different mode. ● The amount of time required to recognize the external USB device may differ depend-ing on the type, size, or file formats stored on the USB. Such differences in the required time are not indications of malfunction. Please wait the period of time required to recognize the device.● The device supports only USB devices used to play music files. ● Do not use the USB I/F to charge batteries or USB accessories which generate heat. Such acts may lead to deteriorated perfor-mance or damage to the device. ● The device may not recognize the USB device if separately purchased USB hubs and extension cables are being used. Connect the USB directly to the multimedia terminal of the vehicle. ● In the case of high capacity USB devices, there are instances where the logical drives are partitioned for user convenience. In this case, only the USB music in the top-level logical drive will be possible to play. When using partitioned drives, save the songs desired to play on the device only in the top-level logical drive. In addition, certain USB devices are config-ured with a separate drive used to install application programs and songs from such drives may not be possible to play for the reasons as described above. PART 2 AUDIO SYSTEM2-30● The device may not support normal opera-tion if MP3 Players, cellular phones, digital cameras, or other electronic devices (USB devices not recognized as portable disk drives) are connected to the device. ● The device may not support normal opera-tion when using a USB memory type besides the Metal Cover Type USB Memory. ● The device may not support normal opera-tion when using formats such as HDD Type, CF, or SD Memory. ● The device will not support files locked by DRM (Digital Rights Management).● The device many not support normal opera-tion if the proper connection with the USB memory fails due to vibrations caused by the vehicle. (i-stick type, etc.)● Please avoid using USB memory products which can be used as key chains or cellular phone accessories as they could cause dam-age to the USB jack. Please make certain only to use plug type connector products as shown below.Connecting the USBConnect the USB as shown in the picture. Listening to USB music1. Connect a USB or press the 0(',$ key on the control panel if the USB is already con-nected.2. Select the desired file. [Selecting the MP3 file], page 2-19.INFORMATIONThe USB screen and operation method is the same with MP3 mode. Please refer to the MP3 mode section for more information. Plug Type Connector](https://usermanual.wiki/HYUNDAI-MOBIS/AV242INAN/User-Guide-1453479-Page-24.png)
![NAVIGATION SYSTEM3-5NAVIGATION SYSTEMStarting navigation system Press the Navigation mode key (0$392,&(, '(67, 5287(, 6(783). The Caution screen will always be displayed when first entering into Navigation mode. Read the contents of the caution screen carefully and press the $JUHH button.Map Functions Current position map screen (without route)Press the 0$392,&( key on the control panel to display the map of current position and the neighboring area. GPS signal state indicator : displays the state of GPS signal reception.[Viewing GPS signal state], page 3-7. Map scale level indicator : displays the cur-rent map scale.[Changing the map scale], page 3-8. Landmark icons : landmark icons are dis-played on the map when the map scale level is set to under 300 ft (100m depend-ing on map data)[Appendix : landmark icons], page 10-7. POI icons : POI icons are displayed on the map when the map scale level is set to under 0.5 mi (800m).[Appendix : POI icons], page 10-5. Current vehicle position icon : displays the current position of the vehicle.DEFPART 3 NAVIGATION SYSTEM3-6 NAVIGATION SYSTEMD North Up / Heading Up switch : displays the current map mode and the map mode can be switched between North Up and Heading Up. [Switching map mode], page 3-6.E POI : displays or hides the POI icon on the map.[Displaying/Hiding POI icons on the map], page 3-9.F Map scale : increases or decreases the map scale. [Changing the map scale], page 3-8.Switching map mode (North Up / Heading Up)Each time the compass button is pressed, the screen will switch in the order shown below. Heading Upĺ North Upĺ Heading Up ...INFORMATION All map screens (map screen after setting des-tination & whole route display screen) except the current position screen will always be dis-played in North Up mode. ● North Up : displays the map always facing the North direction regardless of the direc-tion which the vehicle is traveling. The vehicle icon is displayed in the center position of the map. ● Heading Up : displays the map always fac-ing the direction which the vehicle is travel-ing. The vehicle icon is displayed in the lower center position of the map.Voice Command1. Press the key on the steering wheel remote controller.2. After the beep sound, say a command."North Up""Heading Up"](https://usermanual.wiki/HYUNDAI-MOBIS/AV242INAN/User-Guide-1453479-Page-29.png)
![NAVIGATION SYSTEM3-7NAVIGATION SYSTEMViewing GPS signal stateThe state of GPS signal reception is displayed as shown below.● (active) : GPS reception is satisfactory.● (inactive) : GPS reception is unsatisfactory. [System information and update], page 3-51.INFORMATION● GPS (Global Position System) : GPS is a sys-tem developed and operated by the United States which determines the current loca-tion of the user (longitude, latitude, etc.) by generally using 4 or more satellites. This system is used with related GPS informa-tion, various sensors, road map data, and other navigation related information.●GPS information may not operate under thefollowing conditions. • When buildings, tunnels, or other obstruc-tions block satellite signals.• When materials are placed above the GPS antenna and block satellite signals.• When the satellite does not transmit sig-nals (signal transmission is controlled by the satellite control center in the United States and may not transmit when under repair, modification, etc). • When a digital cellular phone (1.5GHz) is placed near the GPS antenna.● This system uses GPS information, various sensors, road map data, and other related information to display the current position. Errors may occur if the satellite is transmit-ting inaccurate signals or only two or less satellite signals can be received. Errors which occur in such conditions can-not be corrected. PART 3 NAVIGATION SYSTEM3-8 NAVIGATION SYSTEM Changing the map scalePress the or button. The map scale will be increased or decreased by one level. INFORMATION Each time the or button is pressed, the scale bar will be displayed. The scale can be changed by directly pressing the scale level on the scale bar. The green color on the scale bar indicates the current scale level while the orange color indi-cates the selected scale level. ƔPress the or button for over 0.8 second. The scale will continuously change. ƔIf the scale range limit is reached, the or button will be disabled. Ɣ The map scale range is between 1 and 14: 10,240,000 ~ 1 : 5,000. Actual distanceLevelmi / ft km / m1 150 ft 50 m2 300 ft 100 m3 700 ft 200 m4 0.25 mi 400 m5 0.5 mi 800 m6 1 mi 1.6 km7 2 mi 3.2 km8 4 mi 6.4 km9 8 mi 12 km10 16 mi 25 km11 32 mi 50 km12 64 mi 100 km13 130 mi 200 km14 250 mi 400 km](https://usermanual.wiki/HYUNDAI-MOBIS/AV242INAN/User-Guide-1453479-Page-30.png)
![NAVIGATION SYSTEM3-9NAVIGATION SYSTEMVoice Command1. Press the key on the steering wheel remote controller.2. After the beep sound, say a command."Zoom In""Zoom Out""Zoom Maximum""Zoom Minimum""Zoom level <1 to 14>""Zoom <actual distance>"" (ex. Zoom 700ft)"Displaying / Hiding POI icons on the mapDisplaying/Hiding Q.POI icons1. Press the 32,Ԥ button. Related menu buttons will be displayed at the bottom of the screen. INFORMATION The Q.POI icons are set to - Gas Station, - Parking, - Hotel, - Golf Course, - Bank, - Fast Food (6 icons) by default. This setting can be changed in SETUP. [Setting Q.POI icons], page 3-42. 2. Press the icon buttons to display or hide. To turn off all POI icons displayed on the map, press the $//2)) button. INFORMATION ●The current displayed POI icons are high-lighted while the icons not being displayed are shown as normal buttons.●If there are no POI icons being displayed, the $//2)) button will be disabled. ●POI icons are displayed when the scale is under 0.5 mi (800m). Displaying / Hiding icons other than Q.POI icons1. Press the 32,▼ button. Related menu buttons will be displayed at the bottom of the screen. 2.Press the 2WKHUV button. INFORMATIONQ.POI stands for Quick POI and refers to the function which turns POI icon display on or off on the map. PART 3 NAVIGATION SYSTEM3-10 NAVIGATION SYSTEM(a) by category list3.Press the desired main category button. 4. Select the desired sub category menu to display or hide (Multiple selections are pos-sible). Press the selected menu again to cancel the selection. 5. If the 6KRZ,FRQV button is pressed, the selected menus will be displayed or hidden on the map screen. Voice Command1. Press the key on the steering wheel remote controller.2. After the beep sound, say a command. "Show <POI name>" (ex. Show ATM)"Hide <POI name>" (ex. Hide ATM)"Hide All"Making a call to POI After searching a POI, the POI phone number information can be used to make a call to the POI facility. 1. Use the various search methods, such as the map scroll function, Q.POI search function, and destination search function to search for a POI.2.Press the button.](https://usermanual.wiki/HYUNDAI-MOBIS/AV242INAN/User-Guide-1453479-Page-31.png)
![NAVIGATION SYSTEM3-11NAVIGATION SYSTEM3. Bluetooth is used to make a call to the POI facility.4. Once the call is ended, the map is restored to the current vehicle location. INFORMATION● Making a call is not possible if there is no telephone information for a POI or if there is no mobile phone connected through Bluetooth.● For more information of mobile phone authentication through Bluetooth or detailed information on conducting search, refer to [Pairing and connecting a Bluetooth phone], page 5-4.Scrolling map Press the map area on the map screen. The selected point will be centered on the screen and the scroll mark will be displayed. Information about the marked point and straight line distance from the current posi-tion will be displayed at the top of the screen. INFORMATION If a map area on the map screen is pressed, the map will continuously scroll in the corre-sponding direction until the pressing is released. PART 3 NAVIGATION SYSTEM3-12 NAVIGATION SYSTEMSetting a destination Destination menu screen and functionsPress the '(67 key on the control panel to display the destination menu screen. D Address : sets the destination through address search. [Searching an Address], page 3-13.E Previous Dest : sets the destination through the previous destination list. [Searching a Previous Destination], page 3-17 .F Intersection : sets the destination through intersection search. [Searching an Intersection], page 3-17.G POI Search : sets the destination through POI Category search. [Searching a POI], page 3-20 .H Address Book : sets the destination through address book search. [Searching from Address book], page 3-24 .I Emergency : sets the destination through emergency facilities search. [Searching for Emergency facilities], page 3-25 .J HOME : sets the stored HOME as the desti-nation. [Searching your Home], page 3-25 .K Favorite place ~ : sets the destina-tion with one of the stored favorite places. [Searching favorite places], page 3-26 .DGJKEHFI](https://usermanual.wiki/HYUNDAI-MOBIS/AV242INAN/User-Guide-1453479-Page-32.png)
![NAVIGATION SYSTEM3-15NAVIGATION SYSTEM12. This screen will be displayed if the House number had not been inputted during step 6 and more than 2 house numbers ranges exist. Select the desired House number range. 13. This screen will be displayed if the House number had not been inputted and only one house numbers range exists.Input the House number and press the 'RQH button to complete. The corresponding position will be dis-played on the map. (b) by city5.Press the &LW\ button.6. Input the city name and press and press the /LVW button. If the number of matches with the input is less than 4 results, then the city list screen will be displayed automatically. 7.Select the desired city from the list. PART 3 NAVIGATION SYSTEM3-16 NAVIGATION SYSTEM8. Input the house number and press the 'RQH button to complete. If the House number is not recognized, press the 6NLS button. In this case, the range of house numbers will be displayed during the last step.9. Input the Street name and press the /LVW button to complete. If the number of matches with the input is less than 4 results, then the street list screen will be displayed automatically.10. Select the desired street from the list and the corresponding position will be dis-played on the map. 11. This screen will be displayed if the House number had not been inputted during step 8 and more than 2 House number ranges exist. Select the desired House number range.12. This screen will be displayed if the House number had not been inputted during step H and only one House number range exists. Select the house number range and Press the 'RQH button to complete. The corresponding position will be dis-played on the map.Voice Command1. Press the key on the steering wheel remote controller.2. After the beep sound, say a command. "Find address" [Find address], page 5-19.](https://usermanual.wiki/HYUNDAI-MOBIS/AV242INAN/User-Guide-1453479-Page-34.png)
![NAVIGATION SYSTEM3-17NAVIGATION SYSTEMSearching a Previous Destination1.Press the '(67 key.2.Press the 3UHYLRXV'HVW button.3. Select the desired previous destination. The corresponding position will be displayed on the map. Voice Command1. Press the key on the steering wheel remote controller.2. After the beep sound, say a command."Previous destination"[Previous destination], page 5-24. "Previous start point"[Previous start point], page 5-25. Searching an Intersection There are two ways to set the destination through intersection search-(a) by street, (b) by city. 1.Press the '(67 key. 2.Press the ,QWHUVHFWLRQ button. 3. Press the 6WDWH button to change the state. 4. Input the state name and press the /LVW button. If the number of matches with the input is less than 4 results, then the state list screen will be displayed automatically. If the number of matches is only one result, then the state will automatically be changed without having to manually select the state.5. Select the desired state from the list to change the state. PART 3 NAVIGATION SYSTEM3-18 NAVIGATION SYSTEM(a) by street6.Press the 6WUHHW button.7. Input the name of the 1st street and press the /LVW button. If the number of matches with the input is less than 4 results, then the street list screen will be displayed automatically. 8.Select the desired 1st street from the list. 9. Input the name of the 2nd street and press the /LVW button. If the number of matches with the input is less than 4 results, then the street list screen will be displayed automatically. 10. Select the desired 2nd street menu from the list. The corresponding position will be displayed on the map. 11. If the selected 2nd street is within more than 2 cities, then the city list screen will be displayed. Select the desired city menu from the list. The corresponding position will be dis-played on the map.](https://usermanual.wiki/HYUNDAI-MOBIS/AV242INAN/User-Guide-1453479-Page-35.png)
![NAVIGATION SYSTEM3-21NAVIGATION SYSTEM(a) By category Searches for facilities nearby the current posi-tion or from the city center.6.Press the &DWHJRU\ button.7. Press the 1HDUFXUUHQWSRVLWLRQ button to search for facilities nearby the current posi-tion, or press the 1HDUFLW\FHQWHU button to search for facilities in the near city center. (a-1) Near current position Searches for facilities within a 50 mi (80Km) radius of the current position. 8.Press the desired main category menu. Voice Command1. Press the key on the steering wheel remote controller.2. After the beep sound, say a command. "Find nearest POI"[Find nearest POI], page 5-20.9. Press the desired sub category menu. 10.Select the desired menu button. The corresponding position will be dis-played on the map. PART 3 NAVIGATION SYSTEM3-22 NAVIGATION SYSTEM(a-2) Near city center Searches for facilities from the city center. 8. Input the city name and press the /LVW button. If the number of matches with the input is less than 4 results, then the city list screen will be displayed automatically. 9.Press the desired city menu. 10.Press the desired main category. 11.Press the desired sub category.12. Select the desired menu button. The corresponding position will be dis-played on the map. INFORMATIONThe distance on each POI item button refers to the distance from the city center.](https://usermanual.wiki/HYUNDAI-MOBIS/AV242INAN/User-Guide-1453479-Page-37.png)
![NAVIGATION SYSTEM3-23NAVIGATION SYSTEM(b) By name6.Press the 1DPH button.7. Input the name of the POI and press the /LVW button. If the number of matches with the input is less than 4 results, then the facilities list screen will be displayed automatically. 8. Select the desired POI menu. The corresponding position will be dis-played on the map. INFORMATION When necessary, the search conditions for the city and category can be changed by pressing the $GYDQFHG button. ●Changing City 1.Press the &LW\ button.2. Input the city name and press the /LVW button.3.Select the desired city name.●Changing Category1.Press the &DWHJRU\ button.2.Select the desired main category menu. 3.Select the desired sub category menu. (c) By phone number6.Press the 3KRQH button.PART 3 NAVIGATION SYSTEM3-24 NAVIGATION SYSTEM7. Input the phone number and Press the 'RQH button to complete. The corresponding position will be dis-played on the map. Voice Command1. Press the key on the steering wheel remote controller.2. After the beep sound, say a command."Destination POI by Phone Number"[Destination POI by phone number], page 5-22.Searching from Address book1.Press the '(67 key.2.Press the $GGUHVVERRN button.3. Select the desired address book (user) menu. INFORMATIONThis system provides 5 address books. Each addresses book can hold up to 200 entries. 4. Select the desired address name from the list. The corresponding position will be displayed on the map. [Registering new address in address book], page 3-43.Voice Command1. Press the key on the steering wheel remote controller.2. After the beep sound, say a command. "Destination by address book"[Destination by address book], page 5-24.](https://usermanual.wiki/HYUNDAI-MOBIS/AV242INAN/User-Guide-1453479-Page-38.png)
![NAVIGATION SYSTEM3-25NAVIGATION SYSTEMSearching for Emergency facilities1.Press the '(67 key.2.Press the (PHUJHQF\ button.3.Select the desired facility category. 4.Select the desired facility. The corresponding position will be dis-played on the map. Voice Command1. Press the key on the steering wheel remote controller.2. After the beep sound, say a command. "Find emergency <Category>" [Find emergency <Category>], page 5-23. Searching your Home1.Press the '(67 key.2.Press the +20( button. The Home position will be displayed on the map. INFORMATION If the Home address is not registered, then the +20( button will not be displayed. [Registering home address], page 3-48.Voice Command1. Press the key on the steering wheel remote controller.2. After the beep sound, say a command."Go home" [Go home], page 5-25. PART 3 NAVIGATION SYSTEM3-26 NAVIGATION SYSTEMSearching favorite places1.Press the '(67 key.2. Select the desired button from ~ .The corresponding position will be dis-played on the map. INFORMATIONIf the address of the Favorite place is not regis-tered, then the ~ buttons without registered addresses will be disabled.[Registering favorite place], page 3-49.Voice Command1. Press the key on the steering wheel remote controller.2. After the beep sound, say a command. "Destination by memory point <1 to 5>"[Destination by memory point <1 to 5>], page 5-25.Searching from MAP Position the scroll mark at the destination by scrolling the map on the map screen. Searching POI by local POI list1. Press the 32,▼ button on the map screen. 2.Press the 2WKHUV button.3.Press the /RFDO32,OLVWV button.4.Select the desired POI menu. The corresponding position will be dis-played on the map. Voice Command1. Press the key on the steering wheel remote controller.2. After the beep sound, say a command. "Find nearest <POI name>"[Find nearest <POI name>], page 5-21.](https://usermanual.wiki/HYUNDAI-MOBIS/AV242INAN/User-Guide-1453479-Page-39.png)
![NAVIGATION SYSTEM3-27NAVIGATION SYSTEMOperating after searching a destinationChanging destination position : Changes the position of the destination by scrolling the map. [Scrolling map], page 3-11.Setting as Destination / waypoint :Sets the position as the destination or way-point. Voice Command1. Press the key on the steering wheel remote controller.2. After the beep sound, say a command. "Start guidance" (Sets the position of the scroll mark as the destination and begins route guidance.)Adding to address book : Saves the position in the address book. [Registering new address in address book], page 3-43. Voice Command1. Press the key on the steering wheel remote controller.2. After the beep sound, say a command. "Store Marked Location to <text tag>"PART 3 NAVIGATION SYSTEM3-28 NAVIGATION SYSTEMOperating after setting a destination Starting Route Guidance Press the 6WDUW*XLGDQFH button. Route Guid-ance will start. ●Route simulation• If the 6WDUW*XLGDQFH button is pressed and held for over 0.8 second, then the route simulation will start. • If the 0$392,&( key on the control panel is pressed during route simulation, then route simulation will be terminated. Voice Command1. Press the key on the steering wheel remote controller.2. After the beep sound, say a command. "Time to destination" "Distance to destination"Route guidance screen● Symbol guidance mode : if the button is pressed, then the following route guid-ance screen will be displayed. ● Turn-List mode : if the button is pressed, then the following route guidance screen will be displayed.](https://usermanual.wiki/HYUNDAI-MOBIS/AV242INAN/User-Guide-1453479-Page-40.png)
![NAVIGATION SYSTEM3-29NAVIGATION SYSTEM● Highway mode : if the button is pressed, then the following route guidance screen will be displayed.● Intersection zoom mode : this route guidance screen is automatically displayed during guidance at an intersection. Once guidance at the intersection is com-plete, the screen will automatically disappear and the previous guidance screen will be restored. ● Highway junction mode : this route guid-ance screen is automatically displayed dur-ing guidance at highway junctions. Once guidance at a highway junction is complete, this screen will automatically dis-appear and the previous guidance screen will be restored. Selecting other route1.Press the $OWUHQDWLYH5RXWH button. 2. Other routes can be selected by pressing the ◀ or ▶ buttons. PART 3 NAVIGATION SYSTEM3-30 NAVIGATION SYSTEMRoute guidance Route menu screen and functionsPress the 5287( key on the control panel. The ROUTE menu screen will be displayed. D Cancel Route: deletes destination, way-points and terminates route guidance. [Finishing route guidance], page 3-30 .E Route Overview: displays the entire route and route detailed.[Route overview], page 3-31 .F Route Option: the route option can be changed. [Changing Route option], page 3-32 .G Edit Waypoint: waypoints can be added/deleted and the order can be changed. [Editing waypoints], page 3-32 . H Detour : searches detour routes. [Setting detour distance], page 3-35 .I Avoid Streets: searches routes which avoid the selected streets. [Setting avoid streets on route], page 3-35. Finishing route guidance (Delete Destination)1. Press the 5287( key.2. Press the &DQFHO5RXWH button. 3.Press the <HV button. The destination and waypoints are deleted and the route guidance is terminated.[Finishing route guidance], page 3-30 .DGEHFI](https://usermanual.wiki/HYUNDAI-MOBIS/AV242INAN/User-Guide-1453479-Page-41.png)
![NAVIGATION SYSTEM3-33NAVIGATION SYSTEM(a) Searching POI lists near route 4.Press the 1HDU32,/LVWVRQ5RXWH button. 5.Select the desired category. 6.Select the desired sub category from list. 7. Select the desired POI from the list. The corresponding position will be dis-played on the map. 8.Press the $GGDV:D\SRLQW button. 9. Press the 'RQH button to complete. Guidance will restart after recalculating the route.PART 3 NAVIGATION SYSTEM3-34 NAVIGATION SYSTEM(b) Using advanced Search The method for searching waypoints through the $GYDQFHGPRUH button is the same method as searching destination.[Searching a Destination], page 3-13.Deleting waypoints1. Press the 5287( key.2.Press the (GLWZD\SRLQW button. 3. Select the waypoint and press the 'HOHWH button. 4.Press the <HV button.5. After deleting, press the 'RQH button to complete. Guidance will be restart after recalculating the route. Re-ordering waypoints1.Press the 5287( key.2.Press the (GLWZD\SRLQW button. 3. Select the desired waypoint and use the 0RYH▲, 0RYH▼ buttons to change the order. 4. Once re-ordering is complete, press the 'RQH button to complete. Guidance will restart after recalculating the route.](https://usermanual.wiki/HYUNDAI-MOBIS/AV242INAN/User-Guide-1453479-Page-43.png)
![NAVIGATION SYSTEM3-35NAVIGATION SYSTEMSetting detour distance1.Press the 5287( key.2.Press the 'HWRXU button. 3. Select the desired detour range.Guidance will restart after recalculating the detour route. Voice Command1. Press the key on the steering wheel remote controller.2. After the beep sound, say a command. "Detour <1 or 2 or 5 or 10> miles""Detour <1 or 2 or 5 or 10> kilometers"Setting avoid streets on route1.Press the 5287( key.2.Press the $YRLGVWUHHWV button. 3. Select the desired streets to avoid( avoid, allow) and press the 'RQH button to complete. Guidance will restarted after recalculating the route to avoid the selected streets. PART 3 NAVIGATION SYSTEM3-36 NAVIGATION SYSTEMSetup and Information Setup menu screen and functionsPress the 6(783 key on the control panel to display the setup menu screen.D Main button : changes to the input key-board type, voice command feedback ON/OFF settings and system initialization can be made. [Main setting], page 3-36 .E Voice Setup button : adjusts the Navigation guidance volume. [Voice guidance volume setting], page 3-51.F Navigation button : navigation related set-tings can be set. [Navigation setting], page 3-38 .G Clock Setup buttonH My Places button : the Address book, Home address, Favorite places, Previous destina-tion can be edited. [My places setting], page 3-43 .I Help button : the help contents can be viewed. [Help], page 3-54 .J Traffic Setup : sets to display traffic informa-tion on map, or to provide upcoming traffic information voice guidance, and or to dis-play the detour route popup showing upcoming traffic information. DEFGHIJ](https://usermanual.wiki/HYUNDAI-MOBIS/AV242INAN/User-Guide-1453479-Page-44.png)
![NAVIGATION SYSTEM3-43NAVIGATION SYSTEMMy places setting Registering new address in address bookThere are 3 ways to register a new address in the address book - (a) by DEST menu, (b) by registering address in address book, (c) from map scroll. (a) by DEST menu1.Press the '(67 key.2.Search through the desired method. The search process is the same as the meth-od for destination search.[Searching a destination], page 3-13.3.Press the $GGWR$GGUHVV%RRN button.4. Press the desired address book (user) but-ton. 5. Input the name and telephone information and press the 'RQH button to complete.[Editing an address of address book], page 3-45.(b) by registering in the address book 1.Press the 6(783 key.2.Press the 0\3ODFHV button.3.Press the $GGUHVV%RRN button.4. Press the desired address book (user) but-ton.PART 3 NAVIGATION SYSTEM3-44 NAVIGATION SYSTEM5.Press the 1HZ$GGUHVV button.6. Press the $GGUHVV button to search the address. [Searching an address], page 3-13.INFORMATION Press the 6WRUHFXUUHQWSRVLWLRQ button to input the address of the current position. 7. Input the name and telephone information and press the 'RQH button to complete.[Editing an address of address book], page 3-45. (c) from map scroll1. In the map screen, scroll the map to the desired position. 2.Press the $GGWR$GGUHVV%RRN button.3. Press the desired address book (user) but-ton. 4. Input the name and telephone information and press the 'RQH button to complete.[Editing an address of address book], page 3-45.](https://usermanual.wiki/HYUNDAI-MOBIS/AV242INAN/User-Guide-1453479-Page-48.png)
![NAVIGATION SYSTEM3-45NAVIGATION SYSTEMEditing an address of address book1.Press the 6(783 key.2. Press the 0\3ODFHV button.3.Press the $GGUHVV%RRN button.4. Select the desired address book (user) but-ton .5.Select the desired address to edit. 6. Press the 1DPH button to input the address name.7. Input the address name and press the 'RQH button to complete.8. Press the $GGUHVV button to search the address. The process is the same as the method for searching an address.[Searching an Address] , page 3-13.INFORMATIONPress the 6WRUHFXUUHQWSRVLWLRQ button to input the address of the current position.PART 3 NAVIGATION SYSTEM3-46 NAVIGATION SYSTEM9. Press the 3KRQH button to input the phone number.10. Input the phone number and press the 'RQH button to complete.11.Press the 'RQH button to complete.Deleting an address of address book1.Press the 6(783 key.2.Press the 0\3ODFHV button.3. Press the $GGUHVV%RRN button.4. Select the desired address book (user) but-ton.5. Select the desired address button to delete. 6.Press the 'HOHWH button.](https://usermanual.wiki/HYUNDAI-MOBIS/AV242INAN/User-Guide-1453479-Page-49.png)
![NAVIGATION SYSTEM3-47NAVIGATION SYSTEM7.Press the <HV button.Deleting an address book1.Press the 6(783 key.2.Press the 0\3ODFHV button.3. Press the $GGUHVV%RRN button.4. Press the desired address book (user) but-ton.4.Press the 'HOHWHDOO button. 5.Press the <HV button.PART 3 NAVIGATION SYSTEM3-48 NAVIGATION SYSTEMRegistering home address1.Press the 6(783 key.2.Press the 0\3ODFHV button.3.Press the +RPH$GGUHVV button.4.Press the 6HDUFK button.INFORMATIONPress the 6WRUHFXUUHQWSRVLWLRQ button to reg-ister the current position as Home. 5.Search the address. The process is the same method as search-ing an address. [Searching an Address], page 3-13.6.Press the 'RQH button to complete.Deleting home address1.Press the 6(783 key.2.Press the 0\3ODFHV button.3. Press the +RPH$GGUHVV button.4.Press the 'HOHWH button.](https://usermanual.wiki/HYUNDAI-MOBIS/AV242INAN/User-Guide-1453479-Page-50.png)
![NAVIGATION SYSTEM3-49NAVIGATION SYSTEM5.Press the <HV button.Registering favorite place1. Press the 6(783 key.2.Press the 0\3ODFHV button.3.Press the )DYRULWH3ODFHV button.4. Press the number of the Favorite Place to register. 5. Press the 6HDUFK button.INFORMATIONPress the 6WRUHFXUUHQWSRVLWLRQ button to reg-ister the current position as a Favorite place. 6.Search the address. The process is the same as the method for searching an address.[Searching an Address], page 3-13.PART 3 NAVIGATION SYSTEM3-50 NAVIGATION SYSTEM7.Press the 'RQH button to complete.Deleting favorite place1. Press the 6(783 key.2.Press the 0\SODFHV button.3.Press the )DYRULWH3ODFHV button.4. Select the desired favorite place button to delete. 5.Press the 'HOHWH button.6.Press the <HV button.](https://usermanual.wiki/HYUNDAI-MOBIS/AV242INAN/User-Guide-1453479-Page-51.png)

![VOICE COMMAND SYSTEM 5-1VOICE COMMAND SYSTEMPART 5VOICE COMMAND SYSTEM Operating voice command ………… 5-2Condition for voice command system …… 5-2Basic operation for voice command control ……………………… 5-2Voice command Help …………………… 5-3Setting up the voice command system 5-4Setting voice Prompt ON/OFF ………… 5-4Speaker adaptation …………………… 5-4Voice command list ………………… 5-6Command list of Audio system ………… 5-6FM/AM Radio ………………………… 5-6XM Radio …………………………… 5-7CD …………………………………… 5-8MP3 …………………………………… 5-9USB MP3 ……………………………… 5-10USB IMAGE …………………………… 5-10iPod …………………………………… 5-11Others ………………………………… 5-11Command list of Navigation system ……… 5-12Map …………………………………… 5-12Destination …………………………… 5-14Route ………………………………… 5-15Others ………………………………… 5-16Searching destination by voice command 5-19Find address ………………………… 5-19Find nearest POI ……………………… 5-20Find nearest <POI name> …………… 5-21Destination POI by phone number … 5-22Find emergency <Category> ……… 5-23Destination by address book ………… 5-24Previous destination ………………… 5-24Previous start point ………………… 5-25Go home ……………………………… 5-25Destination by memory point <1 to 5> ……………………… 5-255-2 VOICE COMMAND SYSTEMPART 5 VOICE COMMAND SYSTEMOperating voice command Condition for voice command systemMost of the functions within the Audio and Navigation system can be operated by voice. Please follow the following instructions for optimal voice recognition performance. ● Close all windows and the sunroof. The per-formance of the voice recognition can be improved if the environment of the car inte-rior is quiet. ● Press the voice recognition button and say the desired voice command after the sound of the beep.● The microphone is positioned above the driver so that voice commands can be spo-ken while maintaining a proper posture.● Pronounce the voice commands naturally and clearly as if in a normal conversation. Basic operation for voice command control1. Press the key on the steering wheel remote controller. A voice command win-dow will be displayed on the lower side of the screen followed by a "Command please" system voice comment. INFORMATIONThe System voice comment "Command Please" will not be provided when the Voice prompt is turned OFF. 2. Once the icon changes into the icon on the pop-up screen with a beep sound, say the desired voice command (ex : previ-ous destination)[Voice command list], page 5-6. [Searching destination by voice com-mand], page 5-19.If the exact command is not known, use the "Help" command to view the commands list in detail. INFORMATIONPress the key shortly to input a voice command from among the system voice com-ments. The system voice instruction comment will immediately terminate. When the icon changes into the icon with a beep sound, input the desired voice command.](https://usermanual.wiki/HYUNDAI-MOBIS/AV242INAN/User-Guide-1453479-Page-56.png)
![VOICE COMMAND SYSTEM 5-13VOICE COMMAND SYSTEMCommand Operation 16 miles / 25 kilometers32 miles / 50 kilometers64 miles / 100 kilometers130 miles / 200 kilometers250 miles / 400 kilometers(ex.Zoom 0.25 miles, zoom 400 meters)㿊 North up Displays the map in North Up mode. 㿊 Heading up Displays the map in Heading Up mode. 㿊 Show <POI name> (ex. Show ATM) Displays the selected POI categories. [POI Category list], page 5-17.㿊 Hide <POI name> (ex. Hide ATM) Hides the selected POI categories. [POI Category list], page 5-17.㿊 Hide all Hides all POI categories. 㿊 Daylight mode Converts the map display into daylight mode. 㿊 Night mode Converts the map display into night mode. 㿊 Auto mode Converts the map display is between daylight/night modes automatically.5-14 VOICE COMMAND SYSTEMPART 5 VOICE COMMAND SYSTEMDestinationCommand Operation㿋Find address Sets the destination through address search for route guidance.㿋Find nearest POI Sets a POI near the current position as the destination for route guidance through POI category search.㿋Find nearest <POI name> Sets a POI near the current position as the destination by directly inputting the POI name for route guidance. [POI Category list], page 5-17.㿋Destination POI by phone number Sets the destination by searching the phone number of the facility.㿋Find Emergency <Category>(ex. Find Emergency Hospital) Searches for an emergency facility which is nearby the current position and sets it as the destination for route guidance. Emergency facilities are police stations, hospitals, and dealerships. 㿋Destination by address book Sets one of the list of previously registered addresses in the address book for the user as the destination.㿋Previous destination Sets one of the previous destination as the current destination.㿋Previous start point Sets the previous start point as the current destination.㿋Go home Sets the previously registered home address as the destination for route guidance. 㿋Destination by memory point <1 to 5> Sets a previously registered memory point as the destination for route guidance](https://usermanual.wiki/HYUNDAI-MOBIS/AV242INAN/User-Guide-1453479-Page-62.png)


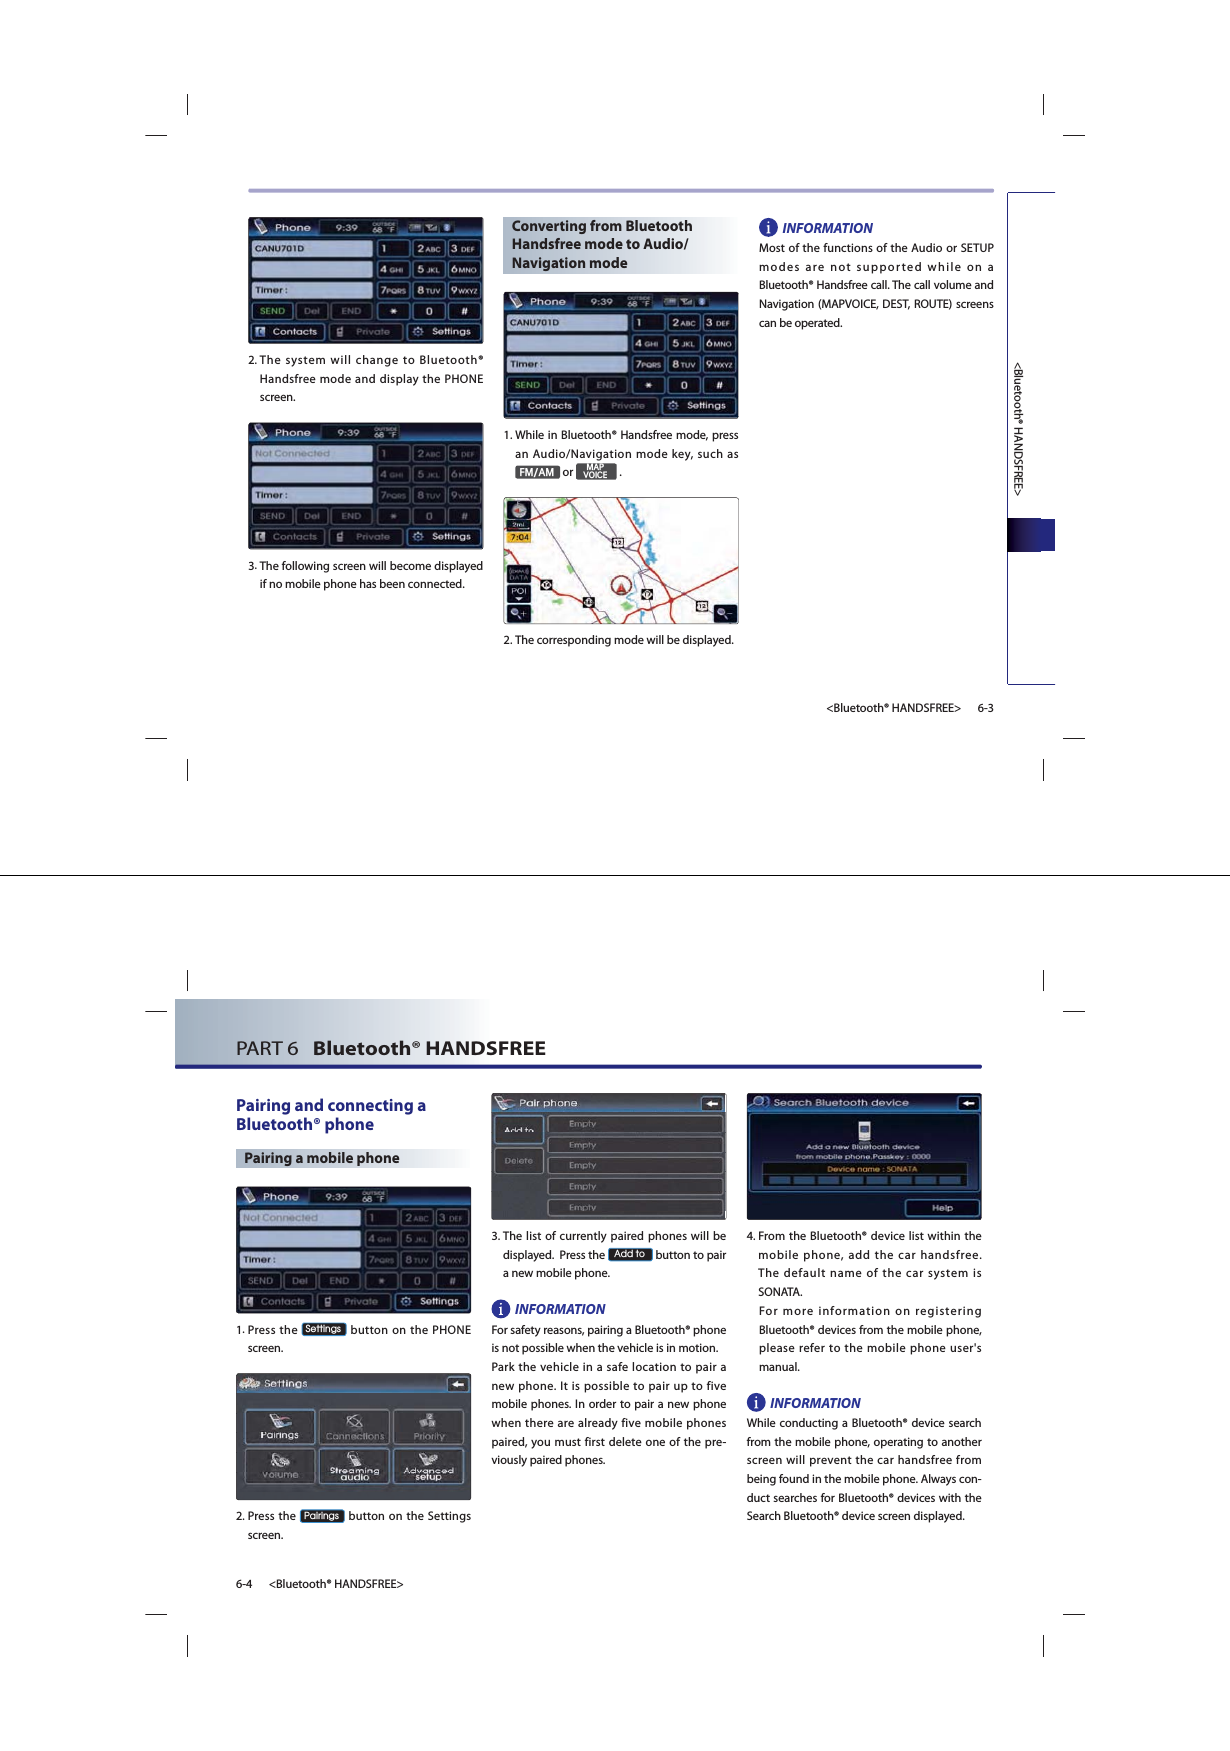
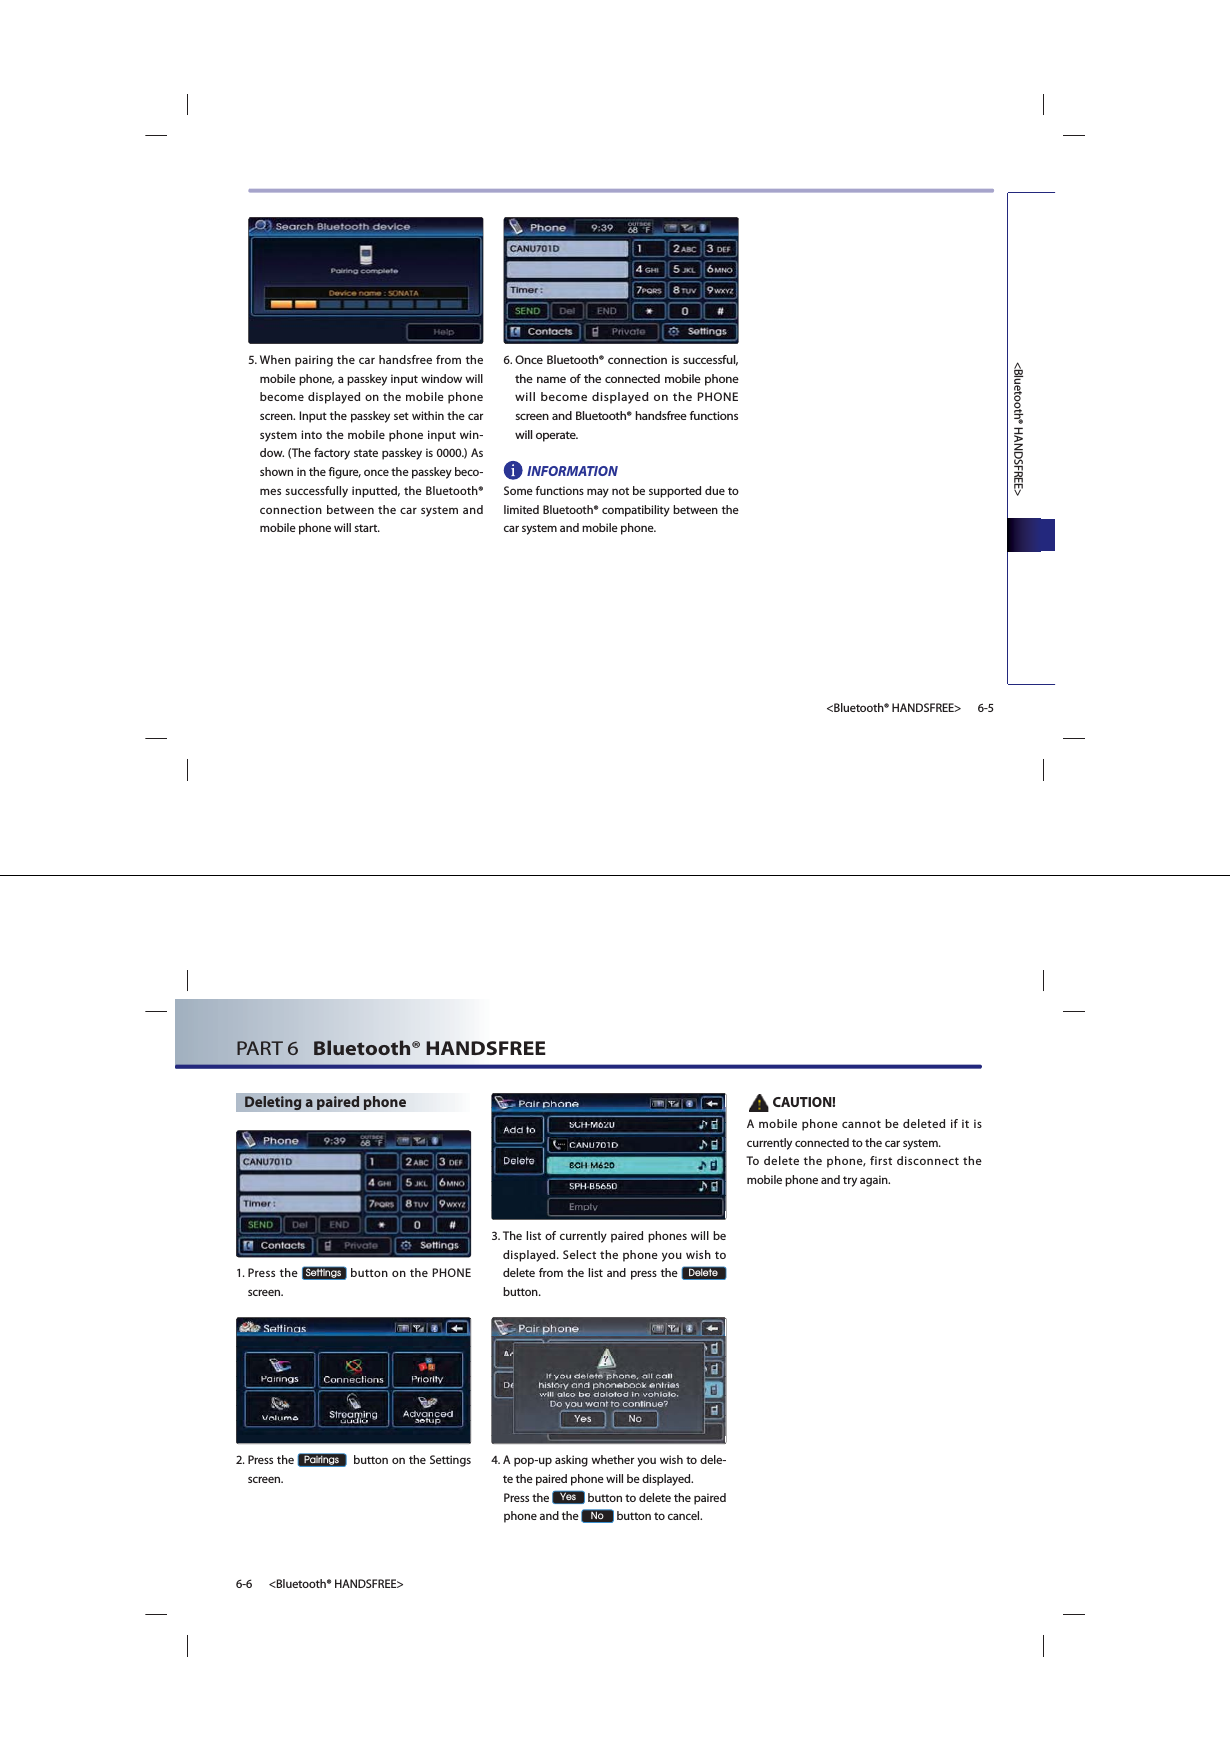
![<Bluetooth® HANDSFREE>6-7<Bluetooth® HANDSFREE> Connecting a mobile phone1. Press the 6HWWLQJV button on the PHONE screen. 2. Press the &RQQHFWLRQV button on the Settings screen. 3. The list of currently paired phones will be displayed. Select the phone you wish to connect from the list and press the &RQQHFW button. INFORMATIONWhen there are no paired phones, pair the mobile phone through [Settings>Pairings> Add to]. For more information on pairing mobile phones, refer to the user's manual [Pairing and Connecting a Bluetooth® phone > Pairing a mobile phone]. 4. The Bluetooth® connection between the car system and mobile phone will start.5. Once Bluetooth® connection is successful, the name of the connected mobile phone will become displayed on the PHONE screen and Bluetooth® handsfree functions will operate.PART 6 Bluetooth® HANDSFREE6-8 <Bluetooth® HANDSFREE>4. If the connection between the mobile phone and Bluetooth® fails, the following pop-up will be displayed. If problems occur while connecting Bluetooth®, check for the following conditions.● Whether the mobile phone you wish to con-nect is in the vicinity of the car system● Whether the power of the mobile phone Bluetooth® has been turned off● Whether the mobile phone Bluetooth® has been set to hidden state● Whether there are Bluetooth® compatibility issues between the car system and another mobile phoneDisconnecting a mobile phone1. Press the 6HWWLQJV button on the PHONE screen. 2. Press the &RQQHFWLRQV button on the Settings screen. 3. The list of currently paired phones will be displayed. Select the phone you wish to dis-connect from the list and press the 'LVFRQQHFW button.4. pop-up asking whether you wish to discon-nect the mobile phone will be displayed. Press the <HV button to disconnect the mobile phone and the 1R button to cancel.](https://usermanual.wiki/HYUNDAI-MOBIS/AV242INAN/User-Guide-1453479-Page-72.png)

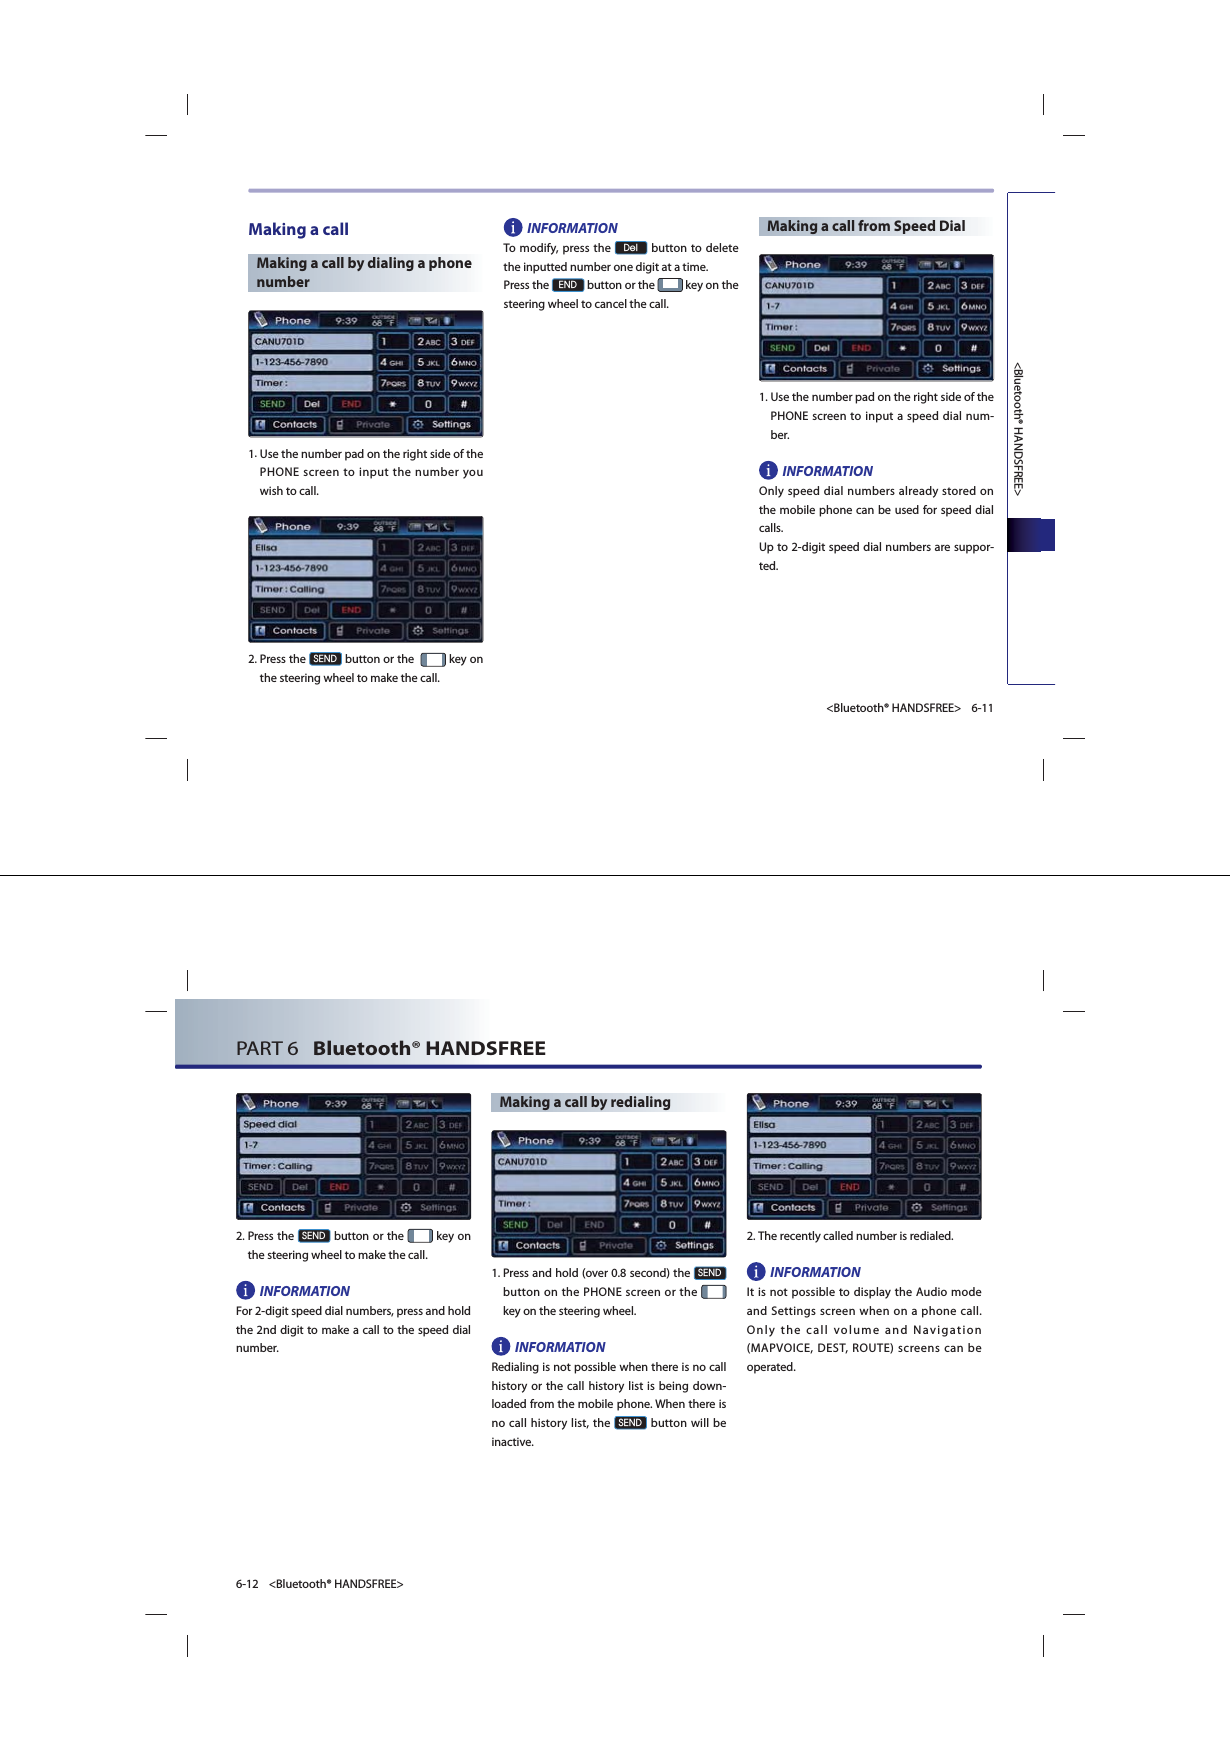
![<Bluetooth® HANDSFREE>6-13<Bluetooth® HANDSFREE>Answering a callAnswering an incoming call 1. The following screen will be displayed when you receive an incoming call.2. To answer the incoming call, press the $FFHSW button or the key on the steering wheel.Rejecting an incoming1. The following screen will be displayed when you receive an incoming call.2. To reject the incoming call, press the 5HMHFW button or the key on the stee-ring wheel. The incoming call will be rejec-ted. INFORMATIONUpon receiving a call, the [Reject] function may not be supported in some mobile pho-nes.PART 6 Bluetooth® HANDSFREE6-14 <Bluetooth® HANDSFREE>Operating menus during a callSwitching call to the mobile phone1. If you wish to switch the call to the mobile phone while talking on the car handsfree, press the 3ULYDWH button or press and hold (over 0.8 second) the key on the stee-ring wheel.2. As shown, the call will be switched to the mobile phone.INFORMATIONIf you wish to switch the call to the car hands-free while talking on the mobile phone, press the 8VHKDQGVIUHH button or press and hold (over 0.8 second) the key on the steering wheel. The call will be switched to the car handsfree.Activating Call waiting1. If another person calls while already on a call, the following screen will be displayed. 2. Press the $FFHSW button or the key on the steering wheel to receive the inco-ming call by switching to the new caller.](https://usermanual.wiki/HYUNDAI-MOBIS/AV242INAN/User-Guide-1453479-Page-75.png)
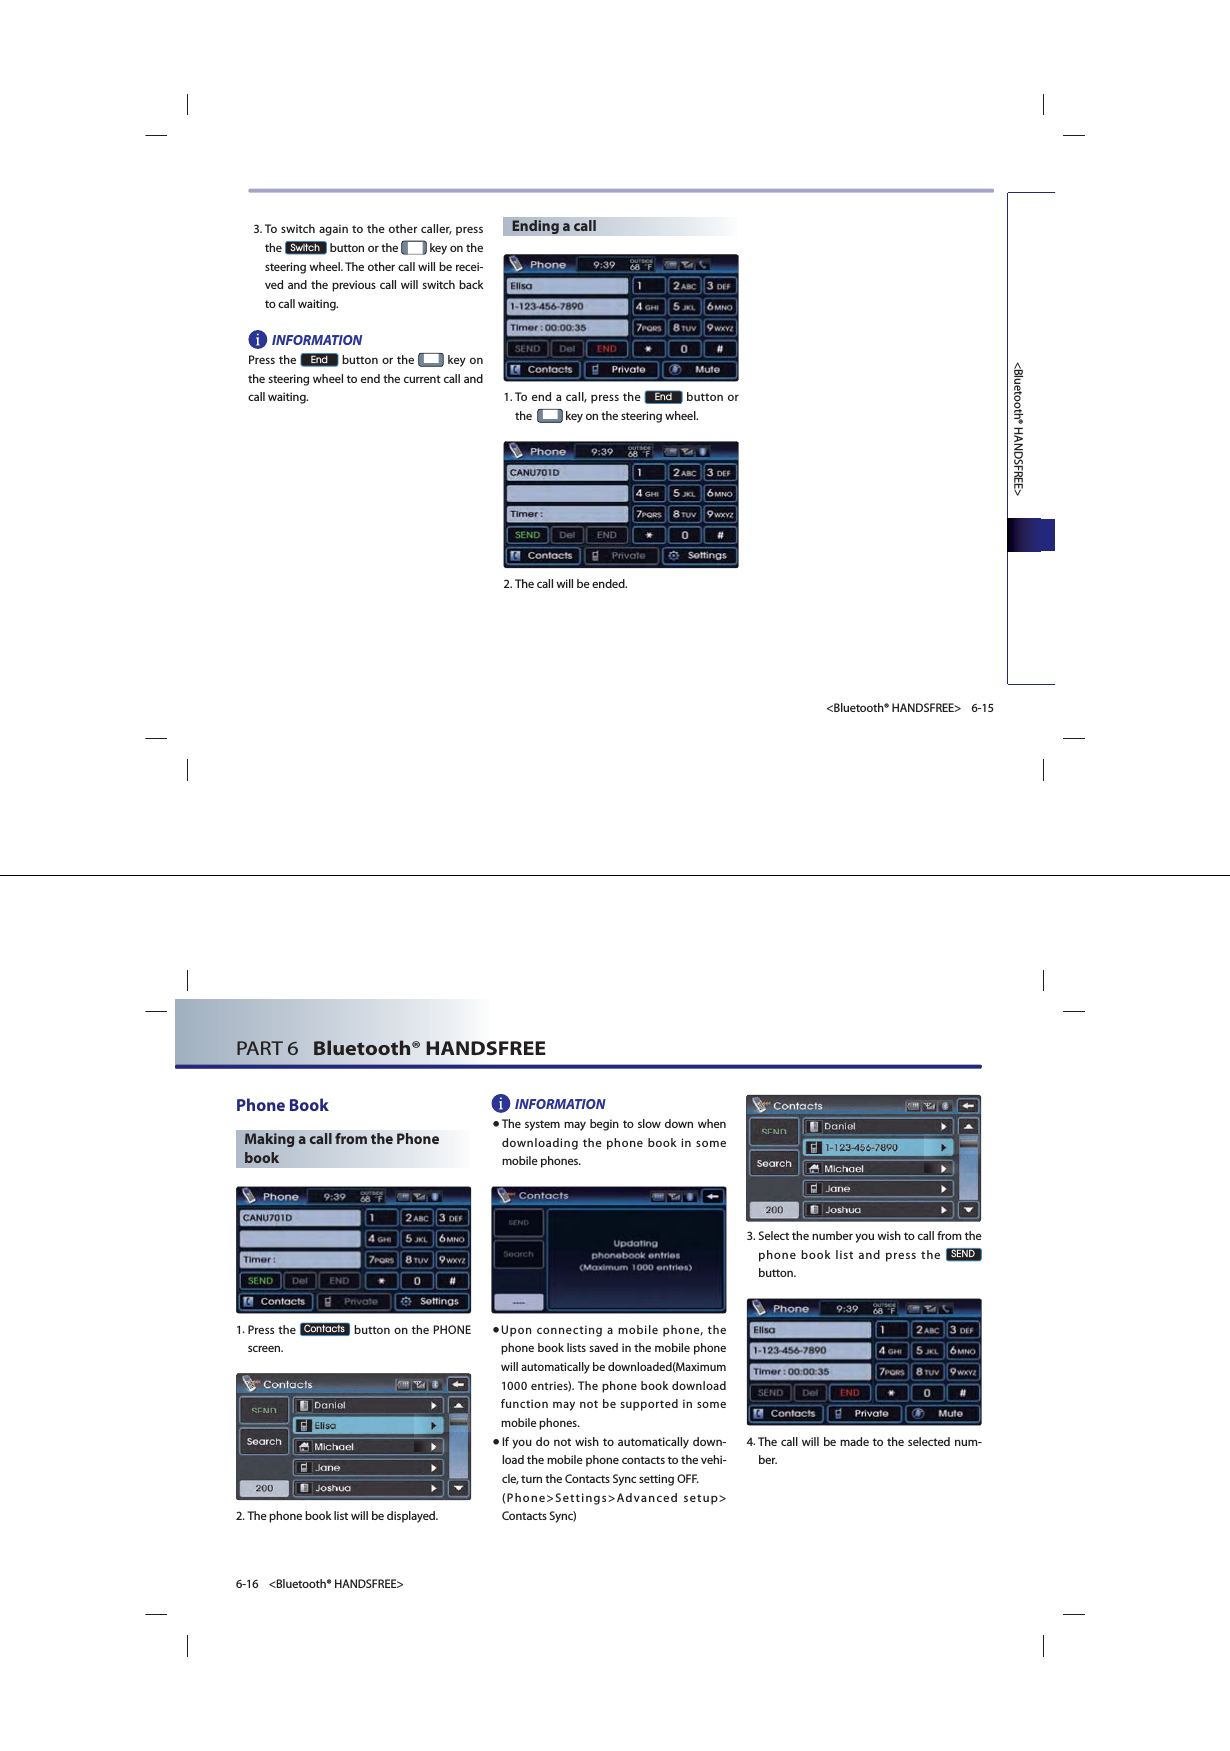

![<Bluetooth® HANDSFREE>6-21<Bluetooth® HANDSFREE>Phone MusicBefore playing Phone musicMusic saved in the mobile phone can be pla-yed in the car through Bluetooth® audio strea-ming.Phone music can be played only when a Bluetooth® phone has been connected. To play phone music, connect the Bluetooth® phone to the car system. For more informa-tion on connecting Bluetooth®, please refer to the user's manual [Pairing and Connecting a Bluetooth® phone]. If the Bluetooth® is disconnected while pla-ying phone music, the music will be disconti-nued. The audio streaming function may not be supported in some mobile phones. Only one function can be used at a time bet-ween the Bluetooth® handsfree or Phone music function. For example, if you convert to the Bluetooth® handsfree while playing Phone music, the music will be discontinued. Playing music from the car is not possible when there are no music files stored in the mobile phone. Starting Phone Music1. Repeatedly press the 0(',$ key on the front panel or the 02'( key on the stee-ring wheel to enter Phone music mode. PART 6 Bluetooth® HANDSFREE6-22 <Bluetooth® HANDSFREE>INFORMATIONEach press of the 0(',$ key on the front panel will change the function in the order of DISC ĺ USB or iPod ĺ AUX ĺ Phone Music ĺ DISC ... Each press of the 02'( key on the steering wheel will change the audio mode in the order of FM1 ĺ FM2 ĺ AM ĺ XM1 ĺ XM2 ĺXM3 ĺ DISC ĺ USB or iPod ĺ AUX ĺ Phone Music ĺ FM1...It is not possible to enter Phone music mode if the mobile phone is not connected or if the audio streaming setting within Bluetooth® handsfree settings has been set to [Disable streaming audio]. For more information on audio streaming set-ting, please refer to the user’s manual [Bluetooth® settings > Setting Audio strea-ming]. 2.The Phone music screen is displayed. INFORMATIONWhile music saved in the mobile phone will automatically begin playing after converting to the Phone music screen, this music player function may not be supported in some mobi-le phones. If music does not begin playing even after converting to the Phone music screen, try starting the music directly from the mobile phone.Phone music screen layout Information Bar : displays information for the currently playing song. File Down button : plays the previous song. Play/Pause button : plays/pauses the song. File Up button : plays the next song. Sound button : sets the FAD/BAL and BAS/MID/TRE. ](https://usermanual.wiki/HYUNDAI-MOBIS/AV242INAN/User-Guide-1453479-Page-79.png)
![<Bluetooth® HANDSFREE>6-23<Bluetooth® HANDSFREE>Selecting Phone music files1. Press the , buttons on the Phone music screen or the key on the system. The previous or next song will be played each time the button or key is pressed.INFORMATIONThe file selection function may not be suppor-ted in some mobile phones. PART 6 Bluetooth® HANDSFREE6-24 <Bluetooth® HANDSFREE>Bluetooth® settingsPairing and connecting a mobile phoneFor more information on pairing and connec-ting a mobile phone, please refer to [Pairing and Connecting a Bluetooth® phone]. Setting mobile phone auto connect priorityINFORMATIONAfter turning on the car ignition and the sys-tem is booted up, the Bluetooth® connection between the car system and mobile phone is automatically made. The Bluetooth® connection will be conducted in the order of mobile phone priority. The auto connect priority will be supported only for previously paired mobile phones. 1. Press the 6HWWLQJV button on the PHONE screen. 2. Press the 3ULRULW\ button on the Settings screen. 3. The paired mobile phone list and the mobi-le phone connection priority will be displa-yed. When wishing to change the priority order, select the mobile phone from the list and use the , buttons to change its priority. Press the 'RQH button to save the chan-ged mobile phone priority.](https://usermanual.wiki/HYUNDAI-MOBIS/AV242INAN/User-Guide-1453479-Page-80.png)
![<Bluetooth® HANDSFREE>6-29<Bluetooth® HANDSFREE>2. A pop-up asking whether you wish to dele-te all paired phone will be displayed. Press the <HV button to delete all paired phones or the 1R button to cancel. 3. If <HV button is pressed, all currently pai-red phones will be deleted.Initializing Bluetooth® handsfree 1. Press the 5HVWRUHIDFWRU\VHWWLQJV button on the Advanced setup screen. 2. A pop-up asking whether you wish to initia-lize the Bluetooth® handsfree will be displa-yed. Press the <HV button to initialize the Bluetooth® handsfree system and the 1R button to cancel.INFORMATIONUpon initializing the Bluetooth® handsfree, the entire paired phone list will be deleted and all Bluetooth® related settings will be res-tored to factory state.3. If <HV is pressed, the Bluetooth® hands-free settings will be initialized. PART 6 Bluetooth® HANDSFREE6-30 <Bluetooth® HANDSFREE>Important information About pairing mobile phones I cannot search for mobile phones through the car system. What is the cause? Check to see whether the mobile phone you wish to connect supports Bluetooth® function. If your mobile phone supports Bluetooth®, check to see that whether the Bluetooth® settings in the mobile phone have been set to hidden state or if the Bluetooth® power has been turned off. If the device has been set to hidden, release the hidden state and if the Bluetooth® power has been turned off, turn the power ON and try searching again. What is the difference between pairing a mobile phone and connecting a mobile phone? Paring is the process of creating a secure communication connection between the mobile phone and the car Bluetooth® sys-tem.Through a two-way passkey between the car system and mobile phones, up to 5 mobile phones can be paired with the car system. The paired mobile phone will remain paired with the car system until the user deletes it manually. In addition, the call history lists and phone number books saved in each mobile phone will also be maintained until the paired phone is deleted. For more information on pairing mobile pho-nes, please refer to the manual [Pairing and Connecting a Bluetooth® phone > Pairing a mobile phone]. Connecting a mobile phone to Bluetooth® by selecting the desired mobile phone from the paired phones. Within the car system, only one Bluetooth® phone can be connected at one time. For more information, please refer to the manual [Pairing and Connecting a Bluetooth® phone > Pairing a mobile phone]. What is a Passkey? A passkey is an authentication code used for two-way communication of the car system and the mobile phone. Only 4-digit numbers can be used as pas-skeys. Passkeys are registered only once when pairing the phone number for the first time. The factory-set passkey is 0000. Q.A.A.A.Q.Q.](https://usermanual.wiki/HYUNDAI-MOBIS/AV242INAN/User-Guide-1453479-Page-83.png)

![7-13blueLinkblueLinkCar Management InformationEco DrivingTracks the customer’s driving performance habits (MPG and CO2 emissions) on a conti-nual and historical basis. Results and environ-mentally responsible driving recommenda-tions are provided on the Owner’s Website.1. In the blueLink main screen, press the (FR'ULYLQJ menu. 2. The Eco Driving screen is displayed.INFORMATIONWhat is Eco Coach?Every 2.5 minutes, Eco Coach compares your fuel economy against the government tested average (EPA) or other similar Hyundai models (community), based on your preference. Each month, or after every tank fill up, Eco Coach rates your extended average and gives you a reward star if you best the average.See your MyHyundai web page for more infor-mation.What does the bar graph and horizontal line mean?Green bar means you exceeded the average. Yellow means you met the average or were within 20%. Brown designates fuel economy more than 20% below the average. The horizontal line is adjusted once per month or at each tank full, based on your preference; it represents the EPA combined average or community average fuel economy target.What is My Eco MPG?Your actual fuel economy average over 2.5 minutes.This value is also shown in bar graph as your “now” rating.What are Eco Rewards?If you beat the average (the EPA or communi-ty), you will receive an Eco Reward point.See your MyHyundai web page for more infor-mation.Eco Driving will not operate if the vehicle igni-tion is not turned on. Please operate with the ignition turned on.7-14 blueLinkPART 7 blueLink Maintenance Alert NotificationMaintenance WARNING: Before 250 miles from Service expiration, message should be shown. Automated DTC (Diagnostic Trouble Code) NotificationProvides explanation and repair assistance using vehicle data and off-board diagnosis capabilities to better inform the customer of vehicle trouble alerts. A combination of inve-hicle display alerts and what to do next (this information is also sent to the customer’s pre-ferred dealer to assist with the repair process).Vehicle Check in Progress[Warning] Possible Engine Malfuntion! Park car when safe and push the blueLink button for help.Scheduled Vehicle Diagnostics (T.B.D)Provides a report of vehicle diagnostics, eco-coach performance and other important information in a monthly email report and web page update, starting 30 days after regis-tering with the service.Recall and campaign advisorUpon receiving a recall or campaign notice, the following pop-up is displayed.](https://usermanual.wiki/HYUNDAI-MOBIS/AV242INAN/User-Guide-1453479-Page-91.png)
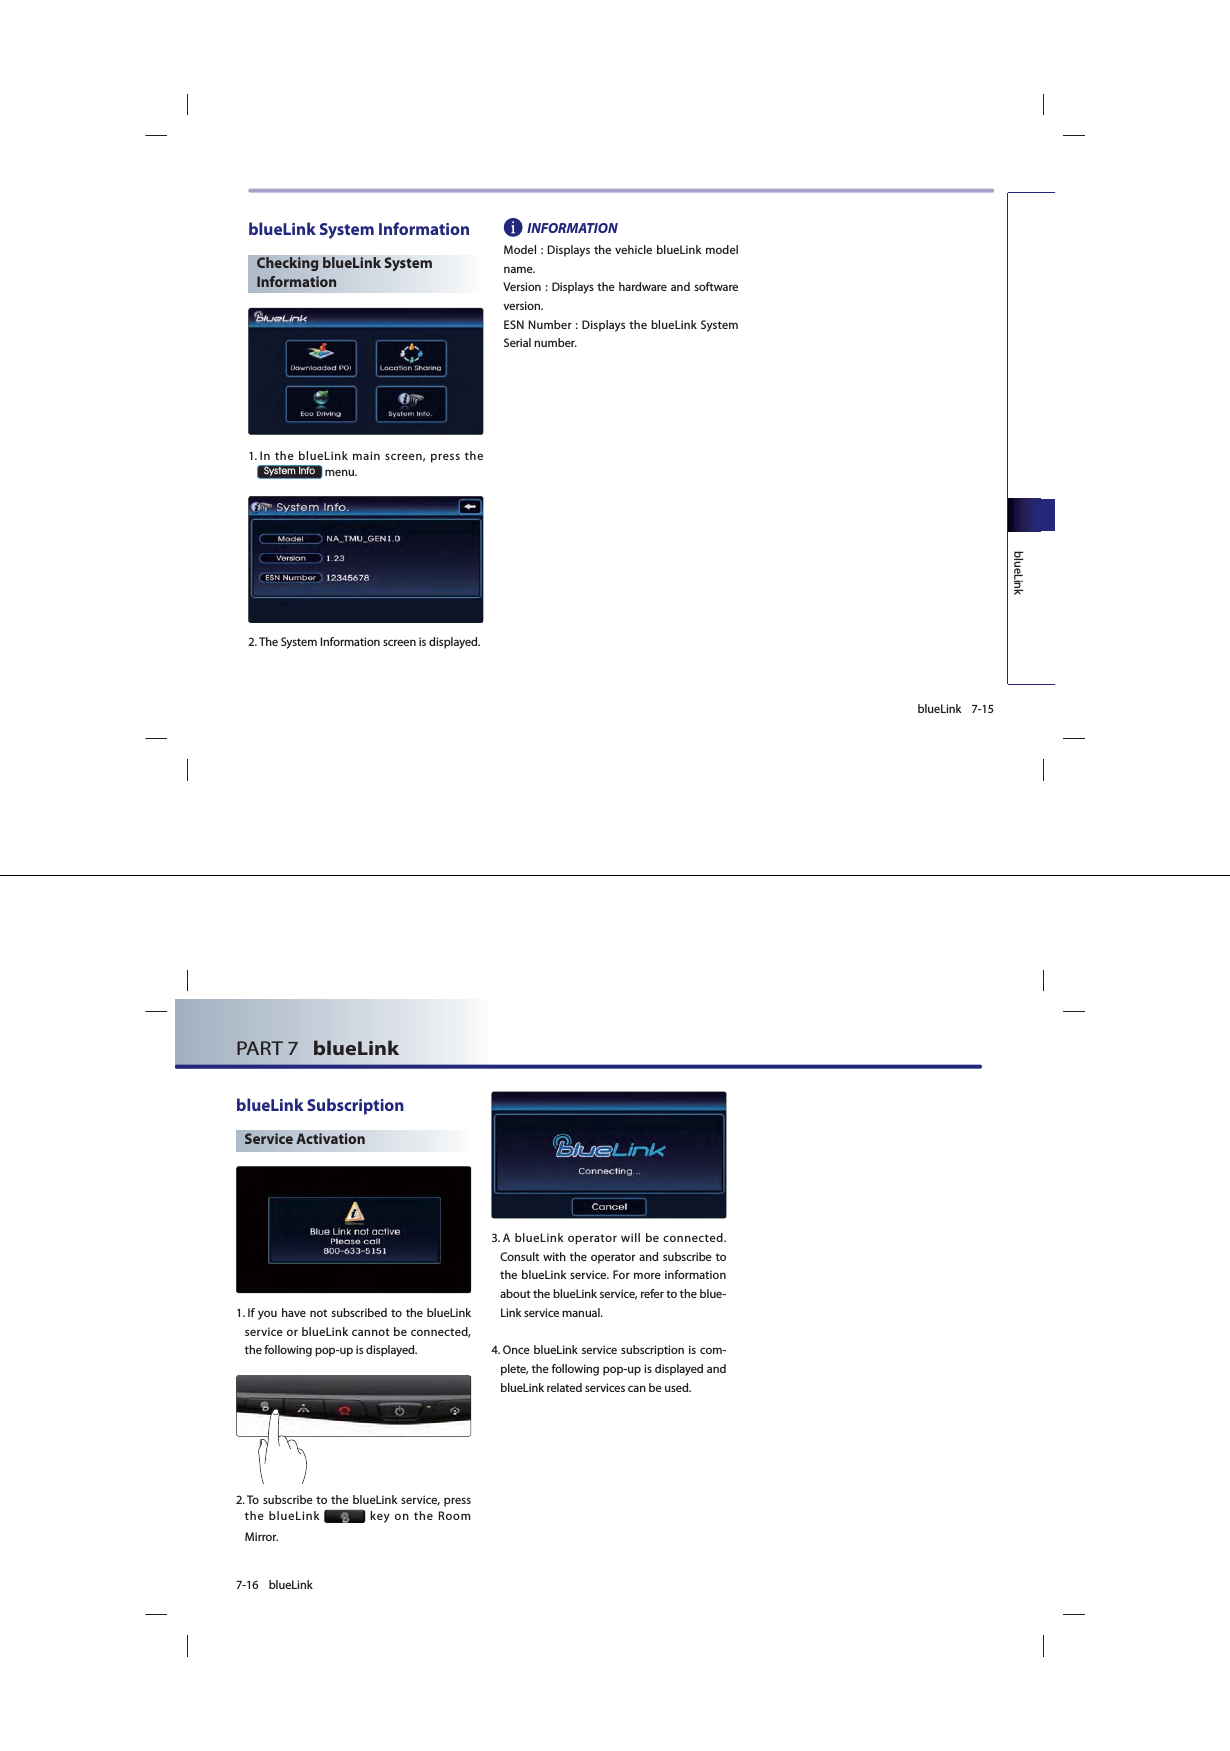
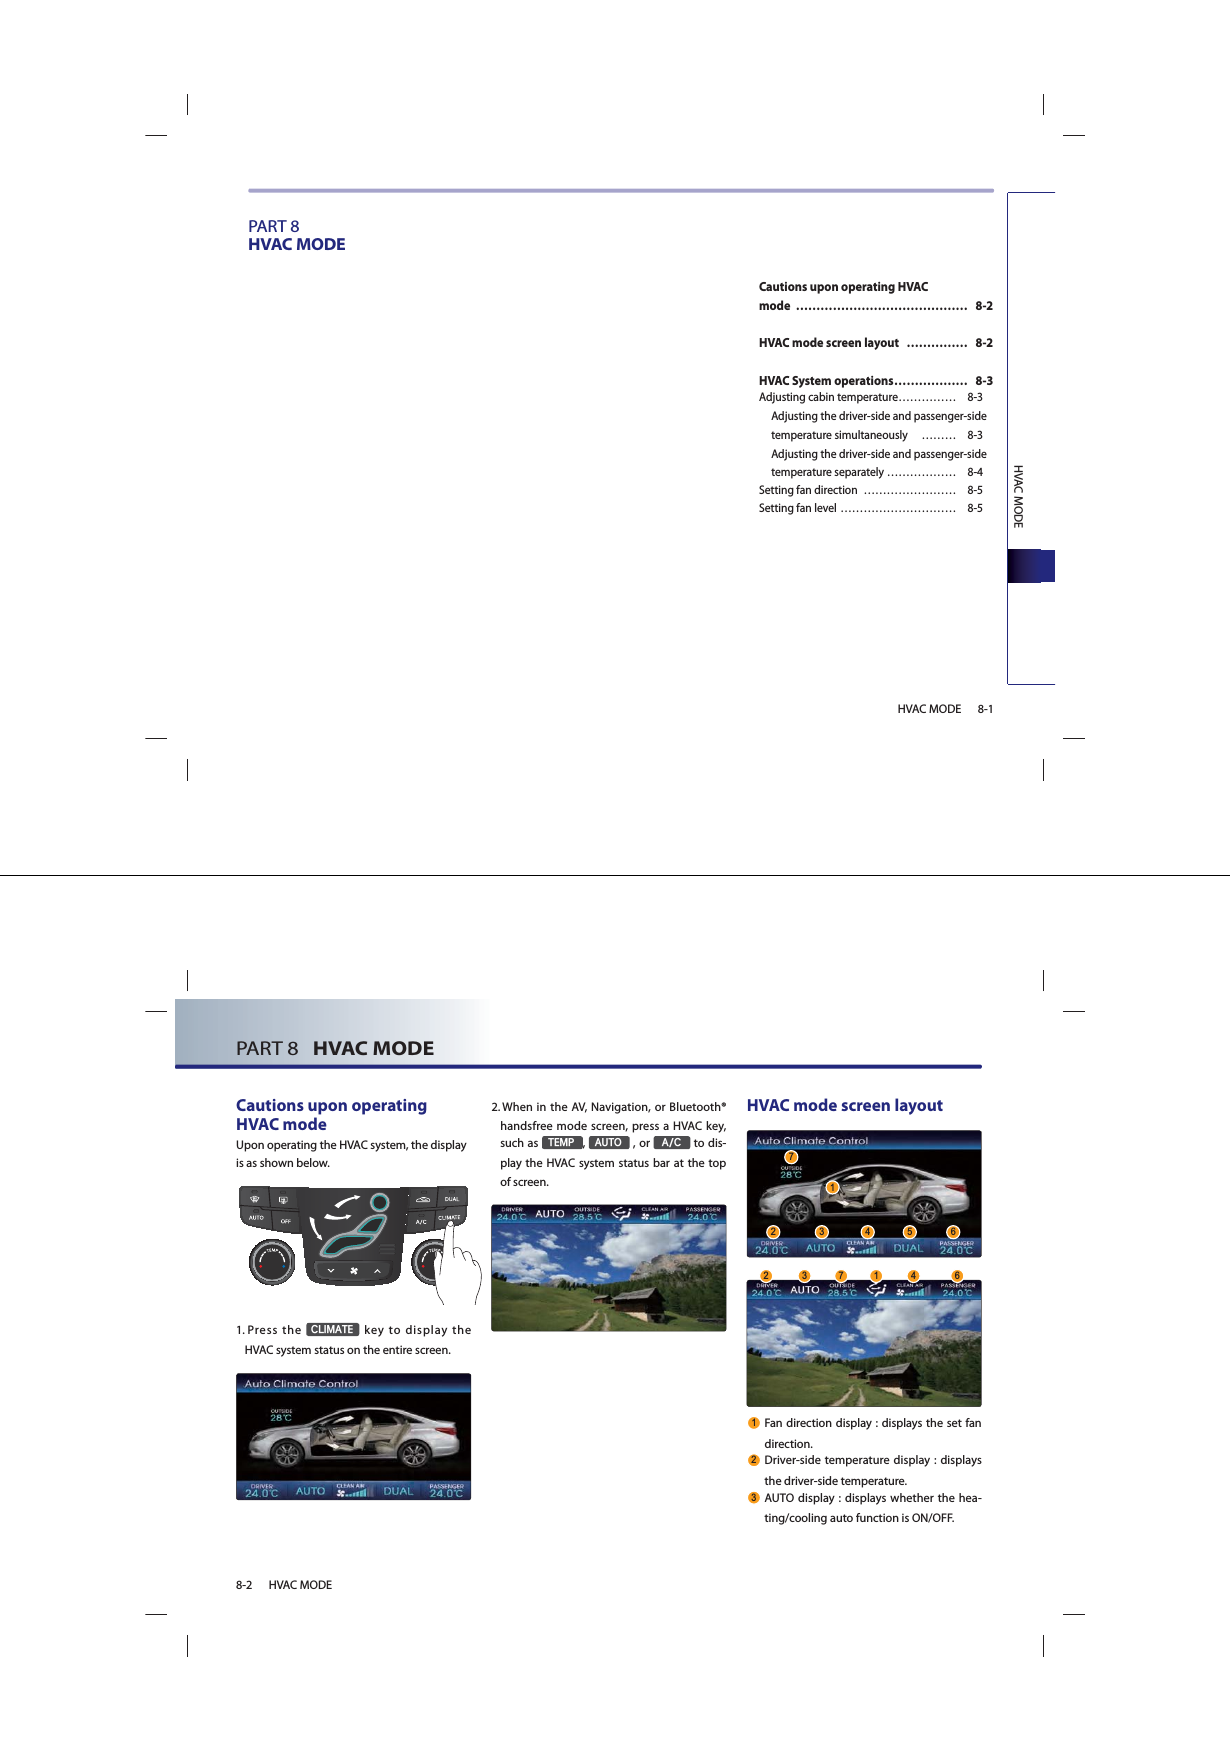
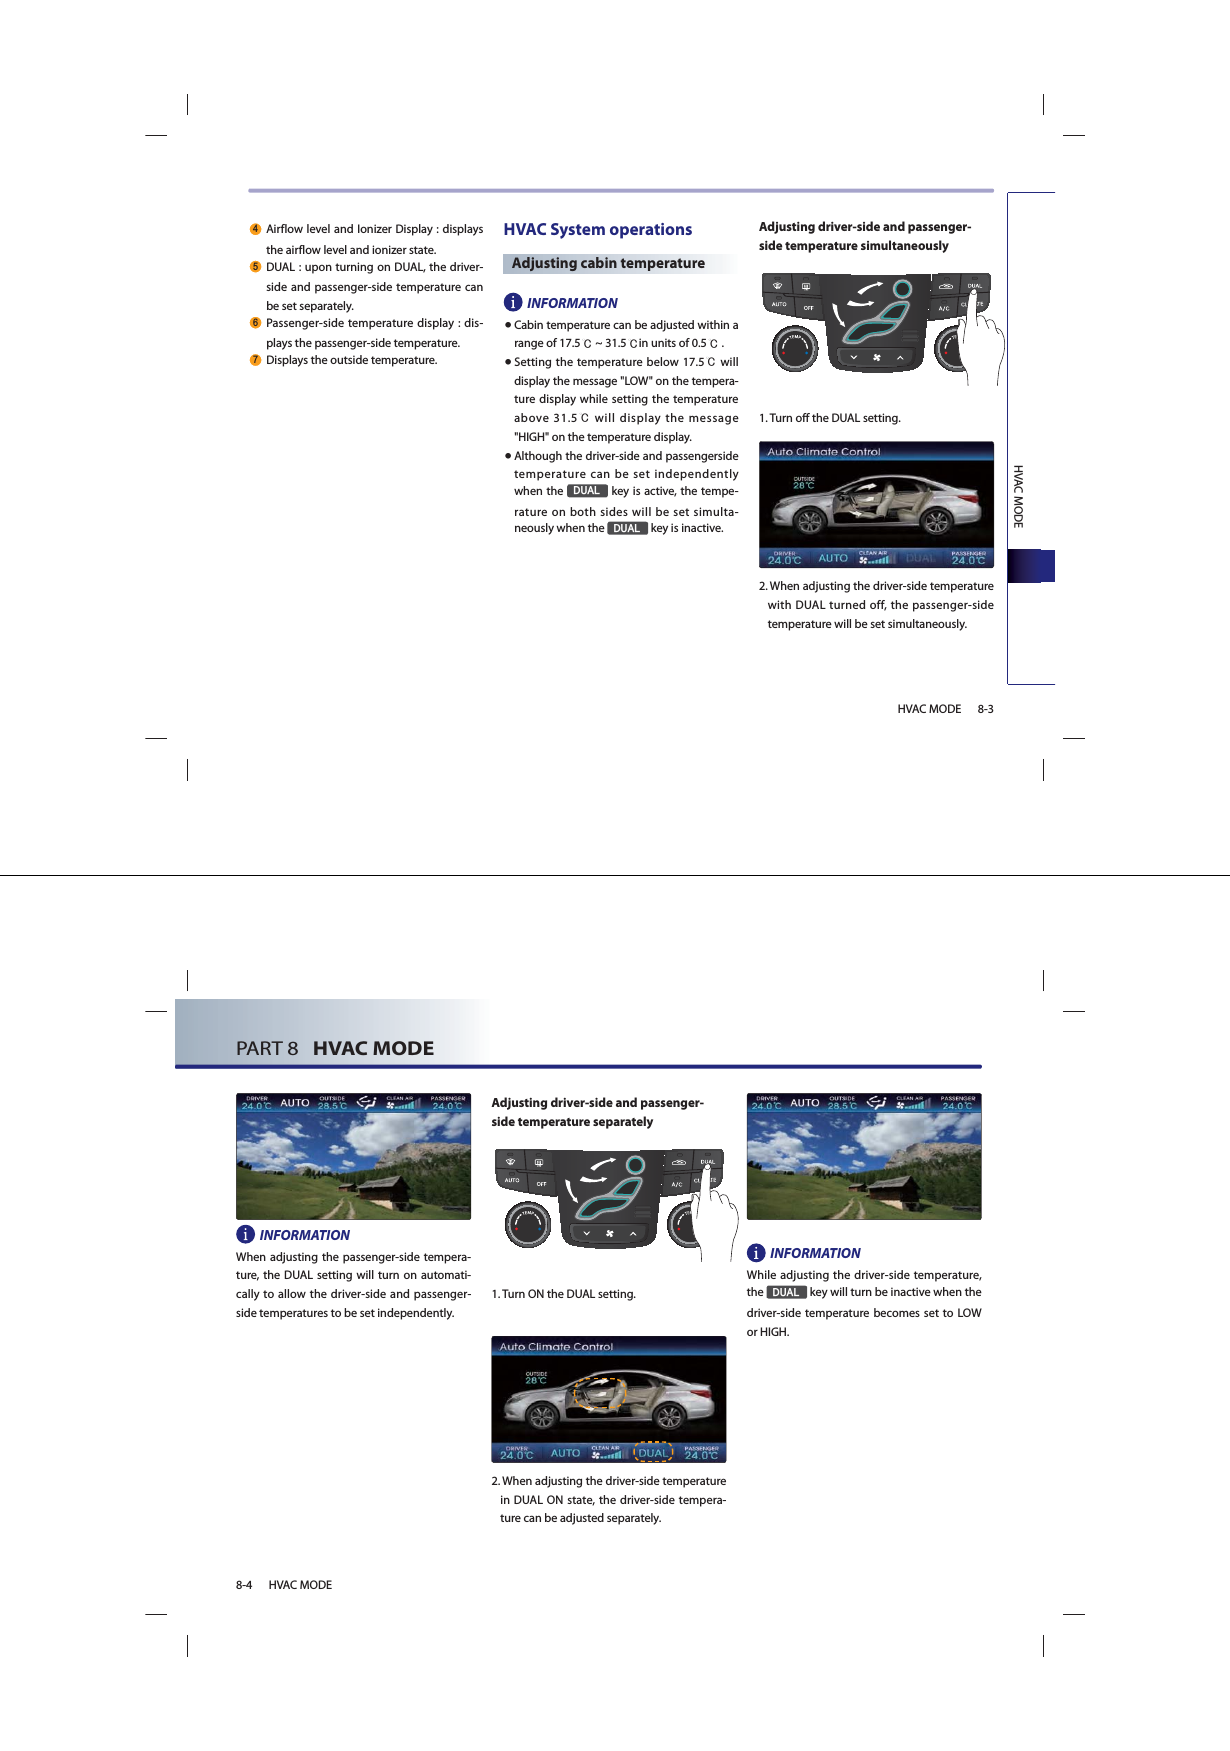
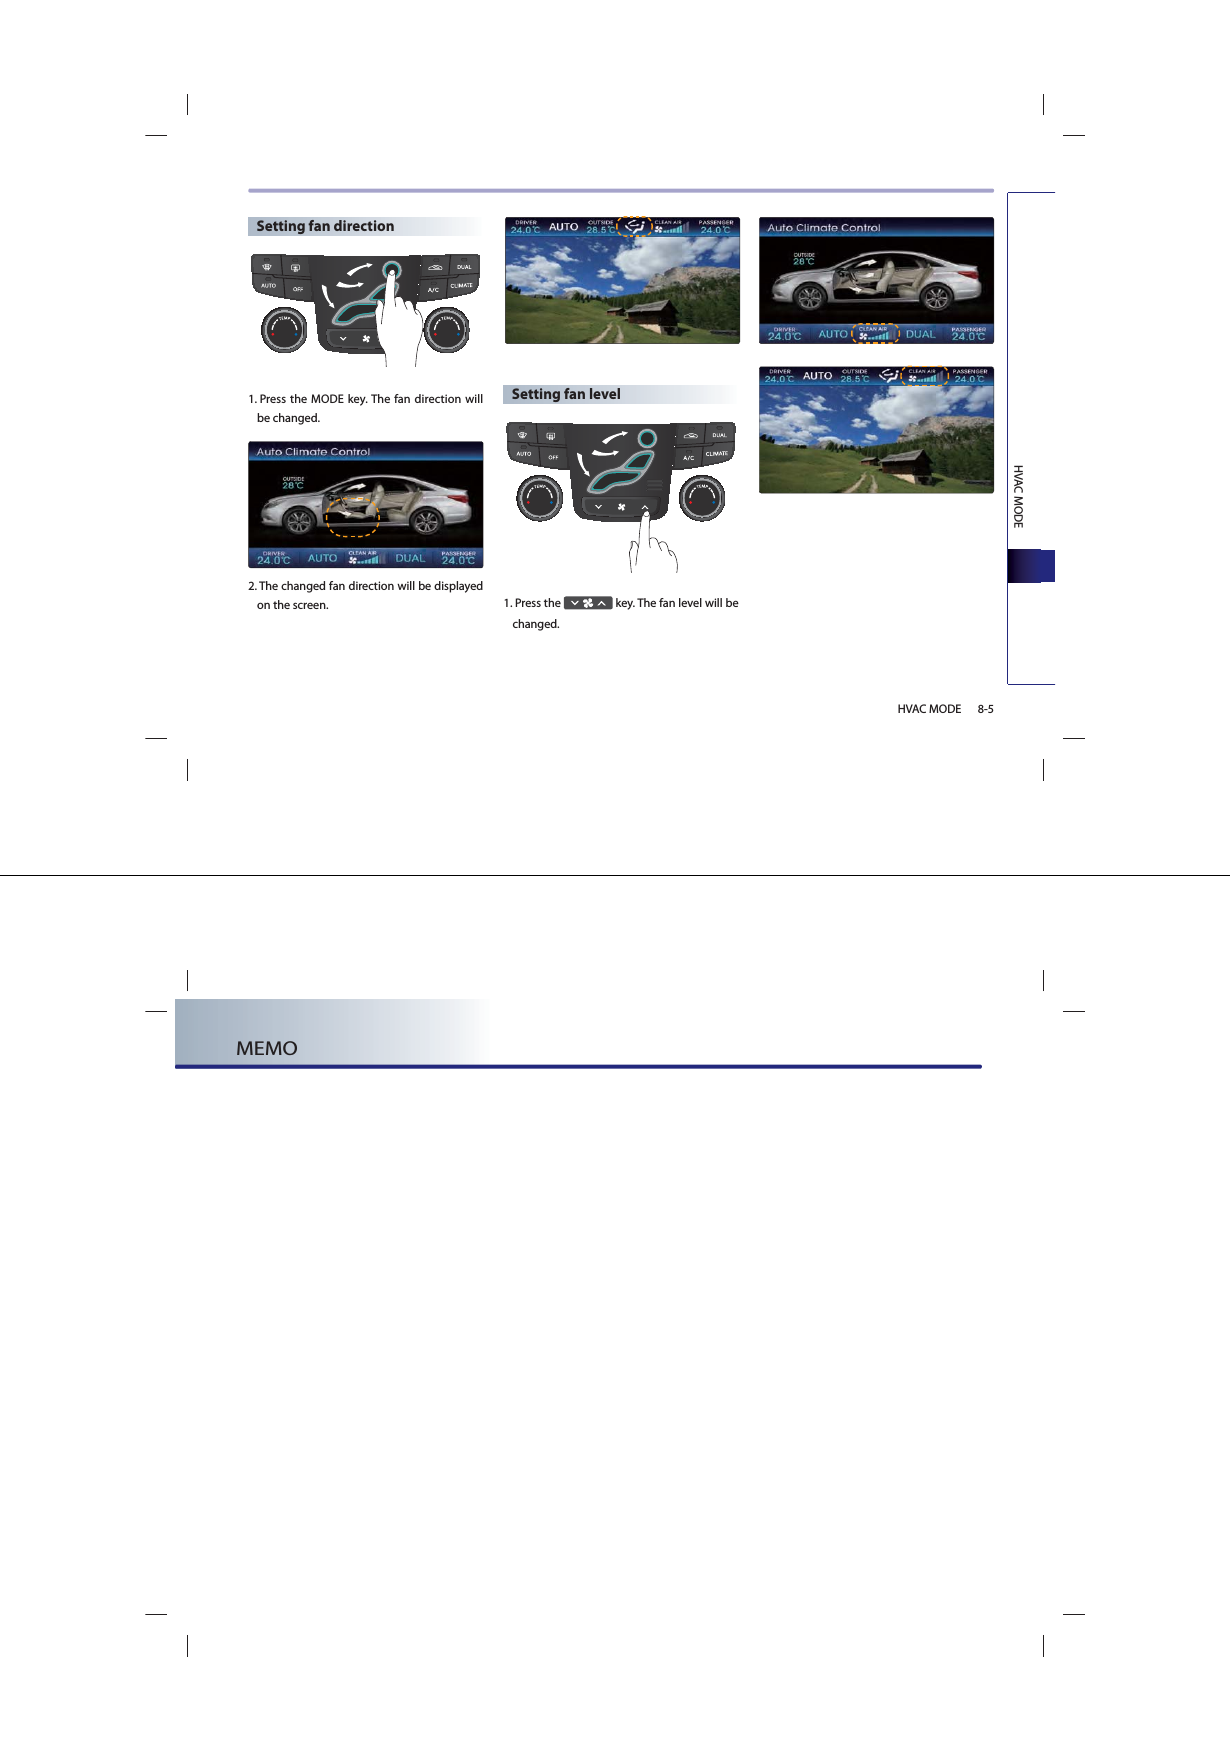
![APPENDIX10-1APPENDIXPART 10APPENDIXTroubleshooting guide …………… 10-2Before thinking the product has malfunctioned ………………………… 10-2Troubleshooting ………………………… 10-3Map legend ………………………… 10-5Road color ……………………………… 10-5POI icons ………………………………… 10-5Landmark icons ………………………… 10-7INDEX ………………………………… 10-8PART 10 APPENDIX10-2 APPENDIXTroubleshooting guideBefore thinking the product has malfunctioned1. Errors which occur during the operation or installation of the device may be mistaken as a malfunction of the actual device. 2. If you are having problems with the device, try the suggestions listed below. 3. If the problems persist, contact your HYUNDAI dealer. Problem FunctionThere are small red, blue, or green dots on the screenBecause the LCD is manufactured with technology requiring high point density, a pixel deficiency or lighting may occur within 0.01% of total pixels.The sound or image is not working● Has the Switch for the vehicle been turned to [ACC] or [ON]?●Has the SYSTEM been turned OFF?The video is being displayed but sound is not working●Has the volume been set to a low level?●Has the volume been set on mute?When the power is turned on, the corners of the screen are dark● The display looking somewhat darker after prolonged periods of use is a normal phenomenon with LCD panels. It is not a malfunction.● If the screen is very dark, contact your nearest HYUNDAI dealer for assistance.Sound is working from only one speaker Is the position of FAL/BAL sound controls or volume adjusted to only one side?Sound and video does not work in AUX mode Are the audio and video connector jacks fully inserted into the AUX terminal?The external device is not working Is the external device connected with a standard connector cable?The road is missing Some map data may be missing or incorrect. The road name is spoken incorrectly The TTS(Text To Speech) engine speaks the street name based on the phonetic spelling. This will continuously be update with the map database.](https://usermanual.wiki/HYUNDAI-MOBIS/AV242INAN/User-Guide-1453479-Page-97.png)