HYUNDAI MOBIS AV2B0SDAN CAR AVN User Manual
HYUNDAI MOBIS CO., LTD. CAR AVN
Users Manual
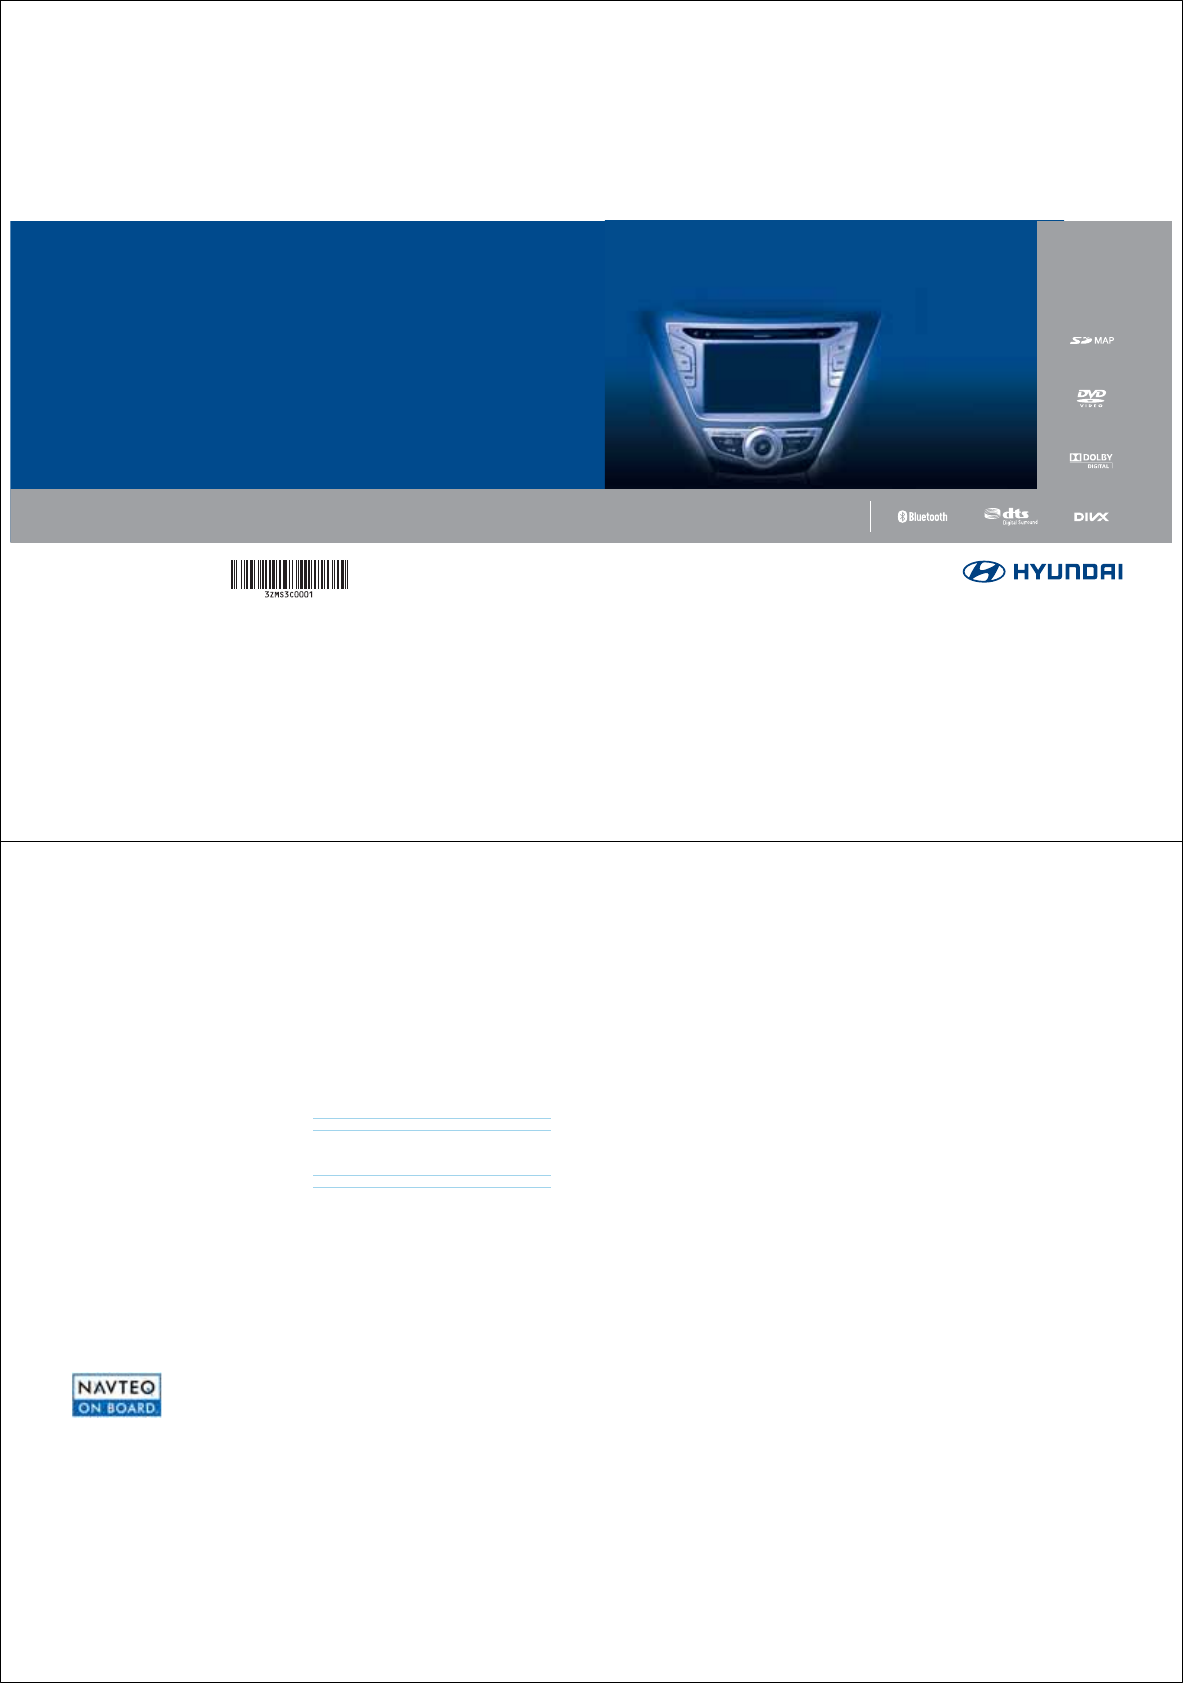
',*,7$/1$9,*$7,216<67(0O
',*,7$/1$9,*$7,216<67(0
2:1(560$18$/
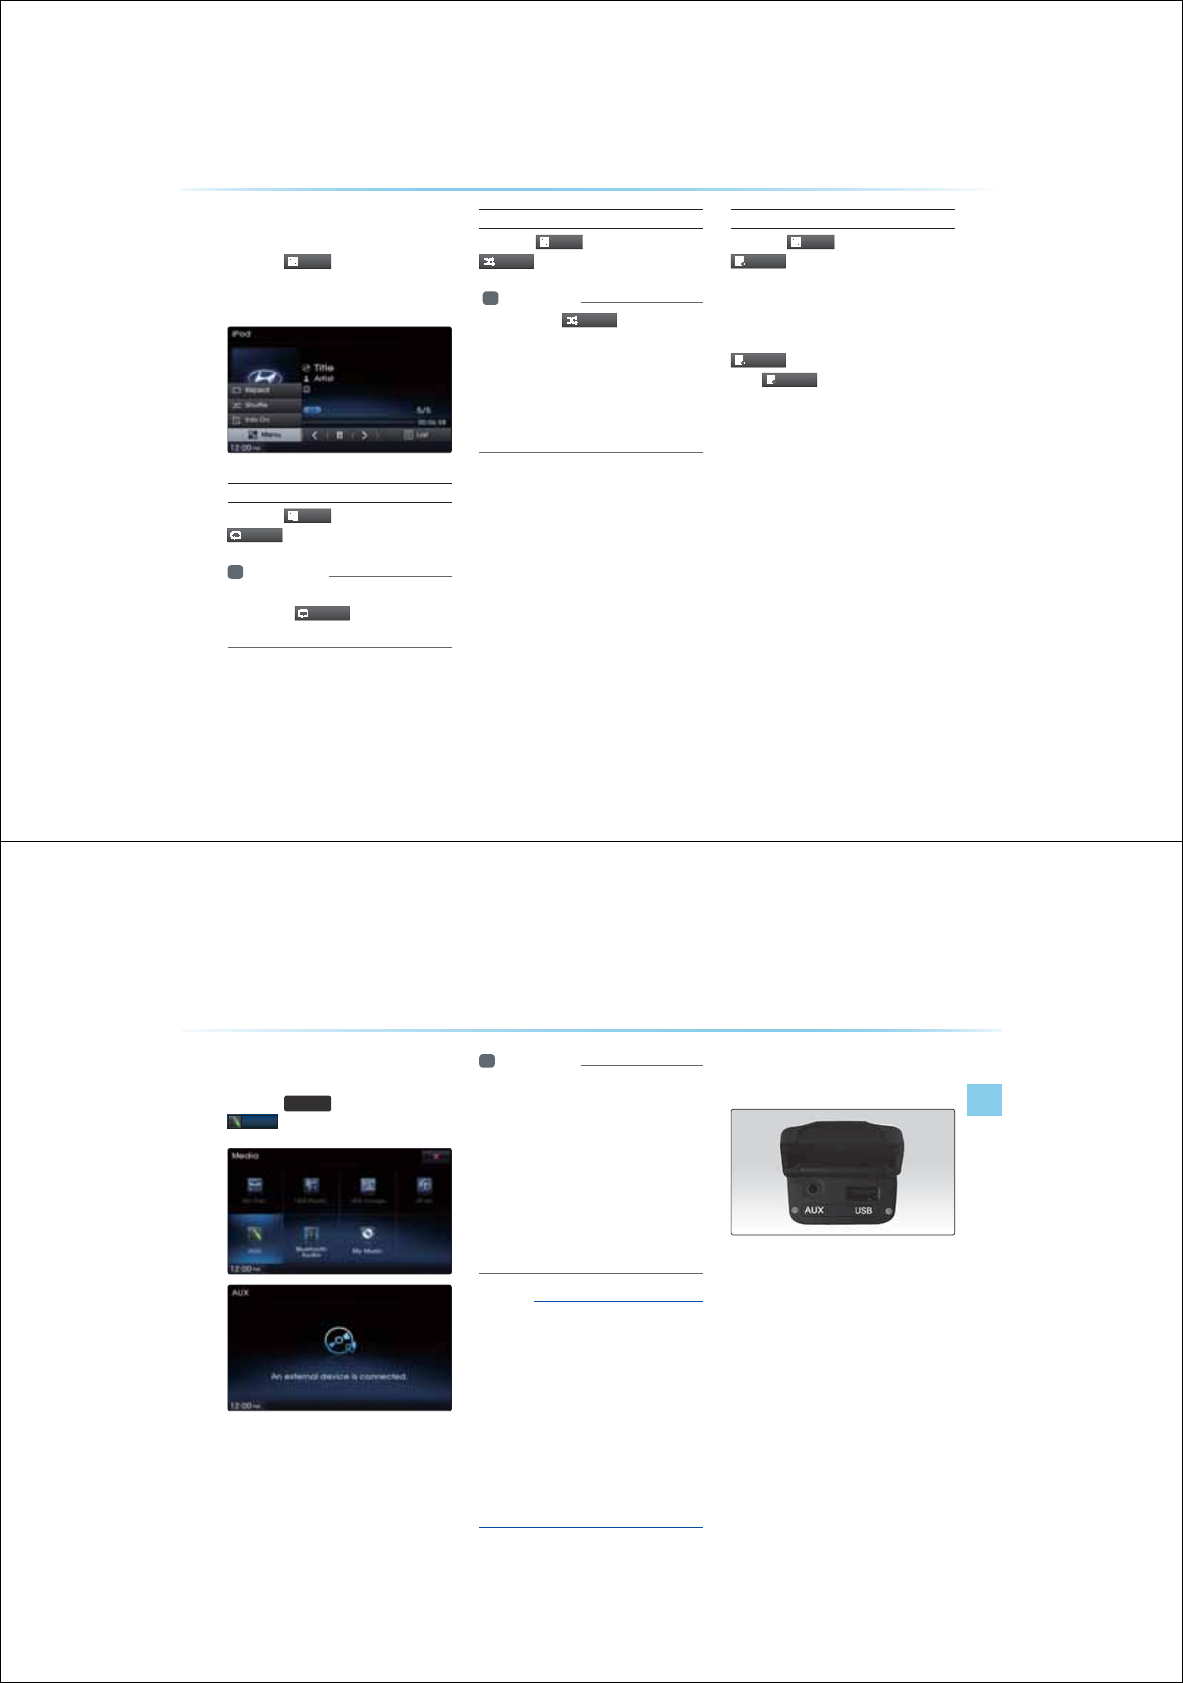
iPod®
Bluetooth®
&$5$916<67(0
У Warnings and Cautions
У Key Product Features
У Component Names and Functions
%DVLF
1-2
6DIHW\:DUQLQJV
Even when receiving route guidance from the Navigation system,
please abide by actual traffic and road regulations.
Following only the Navigation route guidance may lead to violations
of actual traffic and road regulations and lead to traffic accidents.
Do not stare at the screen while driving. Staring at the screen for pro-
longed periods of time could lead to traffic accidents.
Do not operate the Navigation system while driving, such as entering
POIs or conducting route searches. Such acts could lead to acci-
dents, fire, or electric shock. Park the vehicle before operating the
device.
Do not disassemble, assemble, or modify the Navigation system.
Such acts could result in accidents, fire, or electric shock.
Heed caution not to spill water or introduce foreign objects into the
device. Such acts could lead to smoke, fire, or product malfunction.
Please refrain from use if the screen is blank or no sound can be
heard as these signs may indicate product malfunction. Continued
use in such conditions could lead to accidents (fires, electric shock)
or product malfunctions.
Do not touch the antenna during thunder or lightening as such acts
may lead to lightning induced electric shock.
Do not stop or park in parking-restricted areas to operate the prod-
uct. Such acts could lead to traffic accidents.
For most AV and multimedia modes, the display will not operate
when the vehicle is in motion. For your safety, first park the vehicle to
watch or view the screen. (The screen will operate when the parking
brake is set to ON for manual transmission vehicles and when set to
P or Parking Brake On state for auto transmission vehicles.)
:DUQLQJVDQG&DXWLRQV
Warnings and Cautions
Basic l 1-3
6DIHW\&DXWLRQV
In some instances, the navigation may provide guidance through
restricted areas.
Operating the device while driving could lead to accidents due to a
lack of attention to external surroundings. First park the vehicle
before operating the device. In addition, the touch screen may not
work for some functions when the vehicle is in motion. The touch
screen feature will be supported once the vehicle has stopped.
Adjust the volume to levels that allow the driver to hear sounds from
outside of the vehicle. Driving in a state where external sounds can-
not be heard may lead to accidents.
Pay attention to the volume setting when turning the device on. A
sudden output of extreme volume upon turning the device on could
lead to hearing impairment. (Adjust the volume to a suitable levels
before turning off the device.)
If you want to change the position of device installation, please
inquire with your place of purchase or service maintenance center.
Technical expertise is required to install or disassemble the device.
Turn on the car ignition before using this device. Do not operate the
Navigation system for long periods of time with the ignition turned off
as such operations may lead to battery discharge.
Upon using the Navigation system for more than 10 minutes with the
car engine turned off, the following warning will be displayed. After 10
minutes, the warning will be displayed for 5 seconds every 1 minute.
Do not subject the device to severe shock or impact. Direct pressure
onto the front side of the monitor may cause damage to the LCD or
touch screen.
When cleaning the device, make sure to turn off the device and use
a dry and smooth cloth.
Never use tough materials, chemical cloths, or solvents(alcohol, ben-
zene, thinners, etc.) as such materials may damage the device panel
or cause color/quality deterioration.
When experiencing product malfunctions, inquire with your place of
purchase or service maintenance center.
1-4
This device is an Audio Navigation system equipped with a multifunctional disc player that supports Radio (FM1, FM2, AM), Audio CD, MP3, USB, iPod,
and Audio AUX features. The WIDE VGA LCD provides a high quality resolution while the powerful and rich sound system adds to driving enjoyment.
Display
Wide TFT-LCD Display
У
Provides high quality video and music through a Wide TFT-LCD Display using an LED Back Light
У
Touch screen for maximum user convenience
Radio
Digital Tuner Feature
У
Digital Tuner using PPL method that supports memory of 6 broadcast stations for each AM, FM1, and FM2 modes
Integrated Antenna (RADIO+NAVI)
У
Outstanding reception via integrated antenna with high sensitivity
Radio broadcast station name
У
Displays broadcast station names for key locations
HD Radio/Satellite Radio feature
У
Supports HD Radio and Satellite Radio (XM)
Multimedia
Player
Support for various Media Formats
У
Support for various media formats, including Radio, audio MP3 CD, USB, iPod and AUX
У
Supports USB, iPod, and Bluetooth Audio Streaming modes
My Music
У
Supports copying of music stored within USB or iPod devices into My Music (internal memory) mode
USB Image
У
Copy to view and save images saved in USB devices
Navigation
Voice Guidance
У
Voice route guidance to safely and conveniently reach set destinations
У
Various map scales that enables drivers to accurately view map and surrounding areas
Automatic Correction for Current Location
У
Automatically corrects current position using map matching and GPS information
.H\3URGXFW)HDWXUHV
.H\3URGXFW)HDWXUHV
Basic l 1-5
Blue Link
Sync with Blue Link Center
У
Synchronization with the Blue Link Center to provide various types of information
Vehicle Diagnostics/Maintenance
У
Supports Vehicle Theft Protection, Parts Diagnostics and Recall Information
Eco Driving and Fuel Economy Management
У
Supports Economic driving practices by providing driver/community fuel economy information and Eco Rewards
Miscellaneous
Bluetooth
®
Handsfree
У
Convenient use of Bluetooth
®
Handsfree by using buttons within the steering remote controller
Digital Screen Control Features
У
Easy control of screen controls through touch screen options
Steering Remote Controller
У
Control over audio features, voice recognition and Bluetooth
®
through the steering remote controller for maximum convenience
1-2
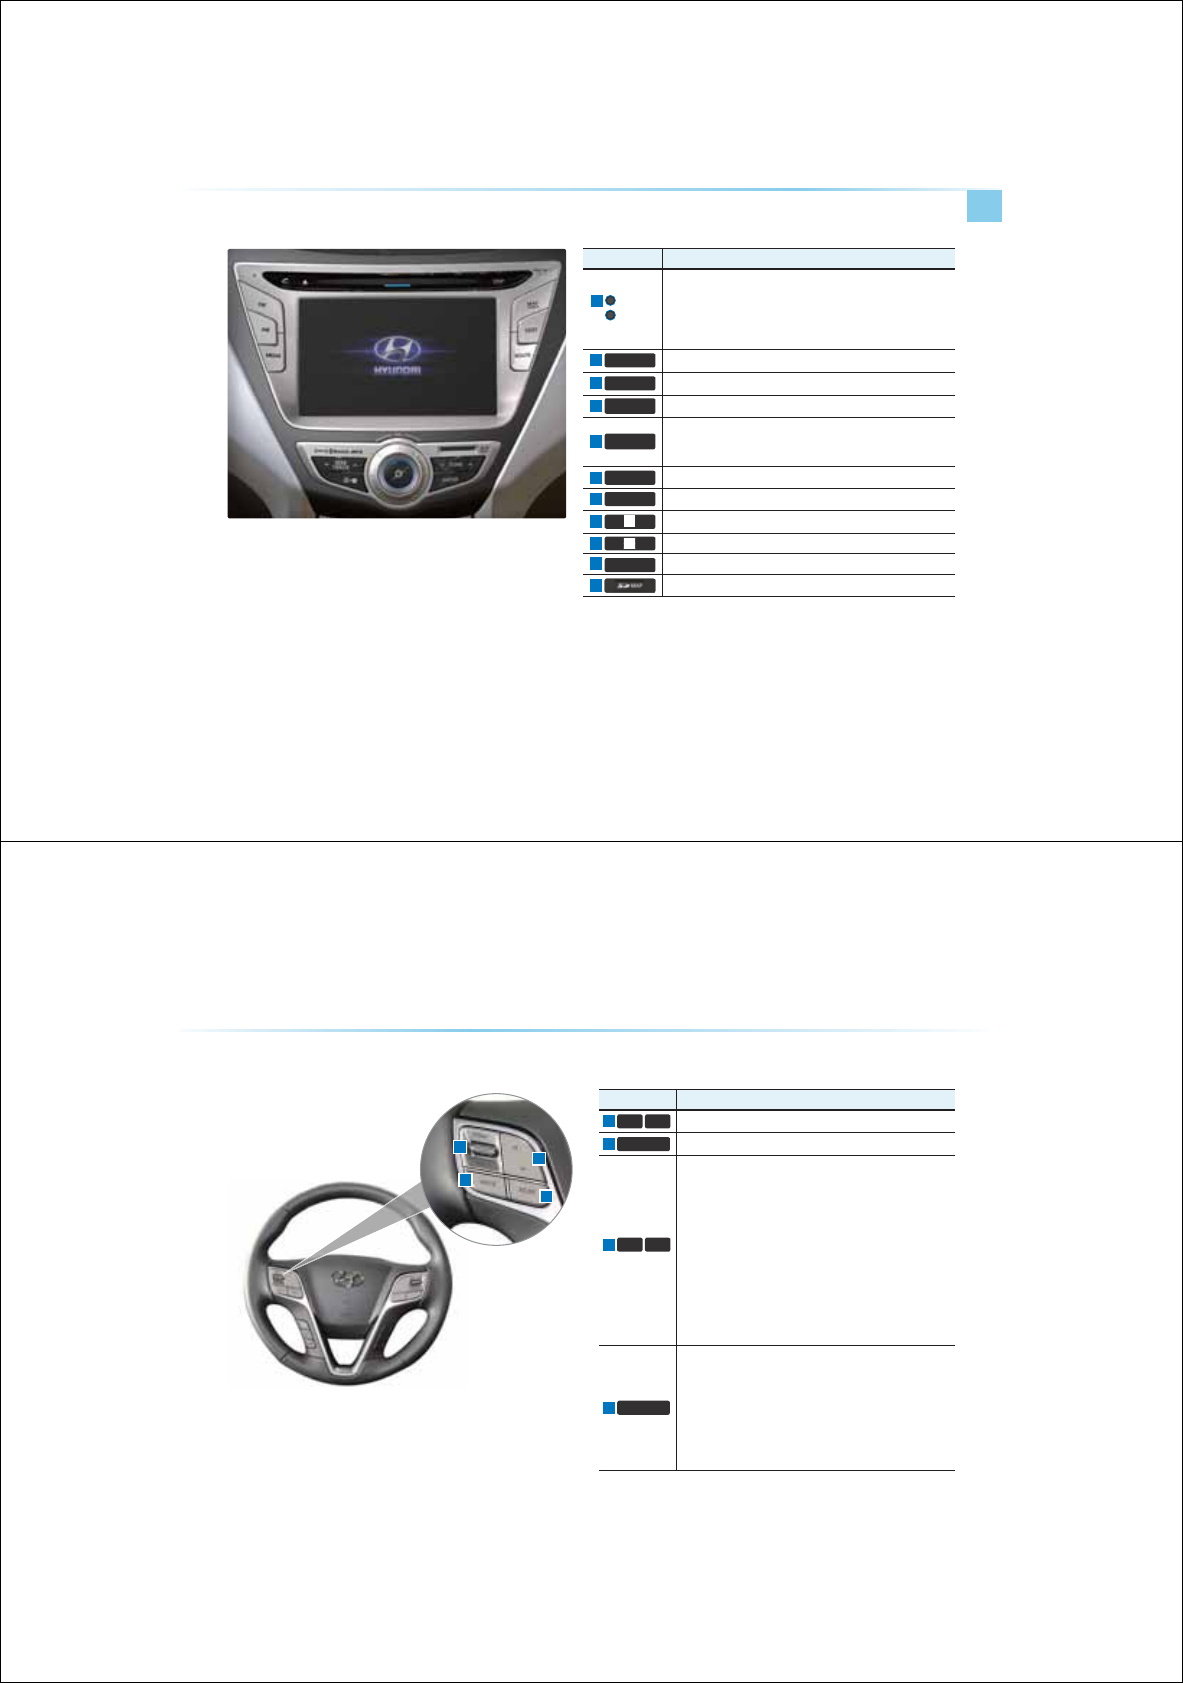
Notation Description
3+21( Converts to Bluetooth
®
Handsfree mode
6((.
75$&.
ѿ
Ҁ
When
6((.
75$&.
ѿ
Ҁ
keys are pressed shortly (under 0.8 seconds)
ˍG
In FM/AM mode, plays previous/next frequency
ˍG
In XM mode, plays the previous/next channel
ˍG
In CD/MP3/USB/iPod/My Music modes, changes the track,
file or chapter
When
6((.
75$&.
ѿ
Ҁ
keys are pressed and held (over 0.8 seconds)
ˍG
In FM/AM mode, continuously changes the frequency until the
key is released and plays the current frequency
ˍG
In XM mode, continuously changes the channel until the key is
released and plays the current channel
ˍG
In CD/MP3/USB/iPod/My Music modes, rewinds or fast-
forwards the track or file
)0$0
ˍG
Converts to FM/AM mode
ˍG
Each time the key is pressed, the mode is changed in order of
FM1 → FM2 → AM → FM1
,1)2
Displays the Info mode screen
0(',$
ˍG
Displays CD, MP3, USB, iPod, AUX, Bluetooth Audio
Streaming, My Music modes
ˍG
If the media is not connected or a disc is not inserted, corre-
sponding modes will be disabled.
6$7
Converts to XM mode
ˍG
Each time the key is pressed, the mode is changed in order of
XM1 → XM2 → XM3 → XM1
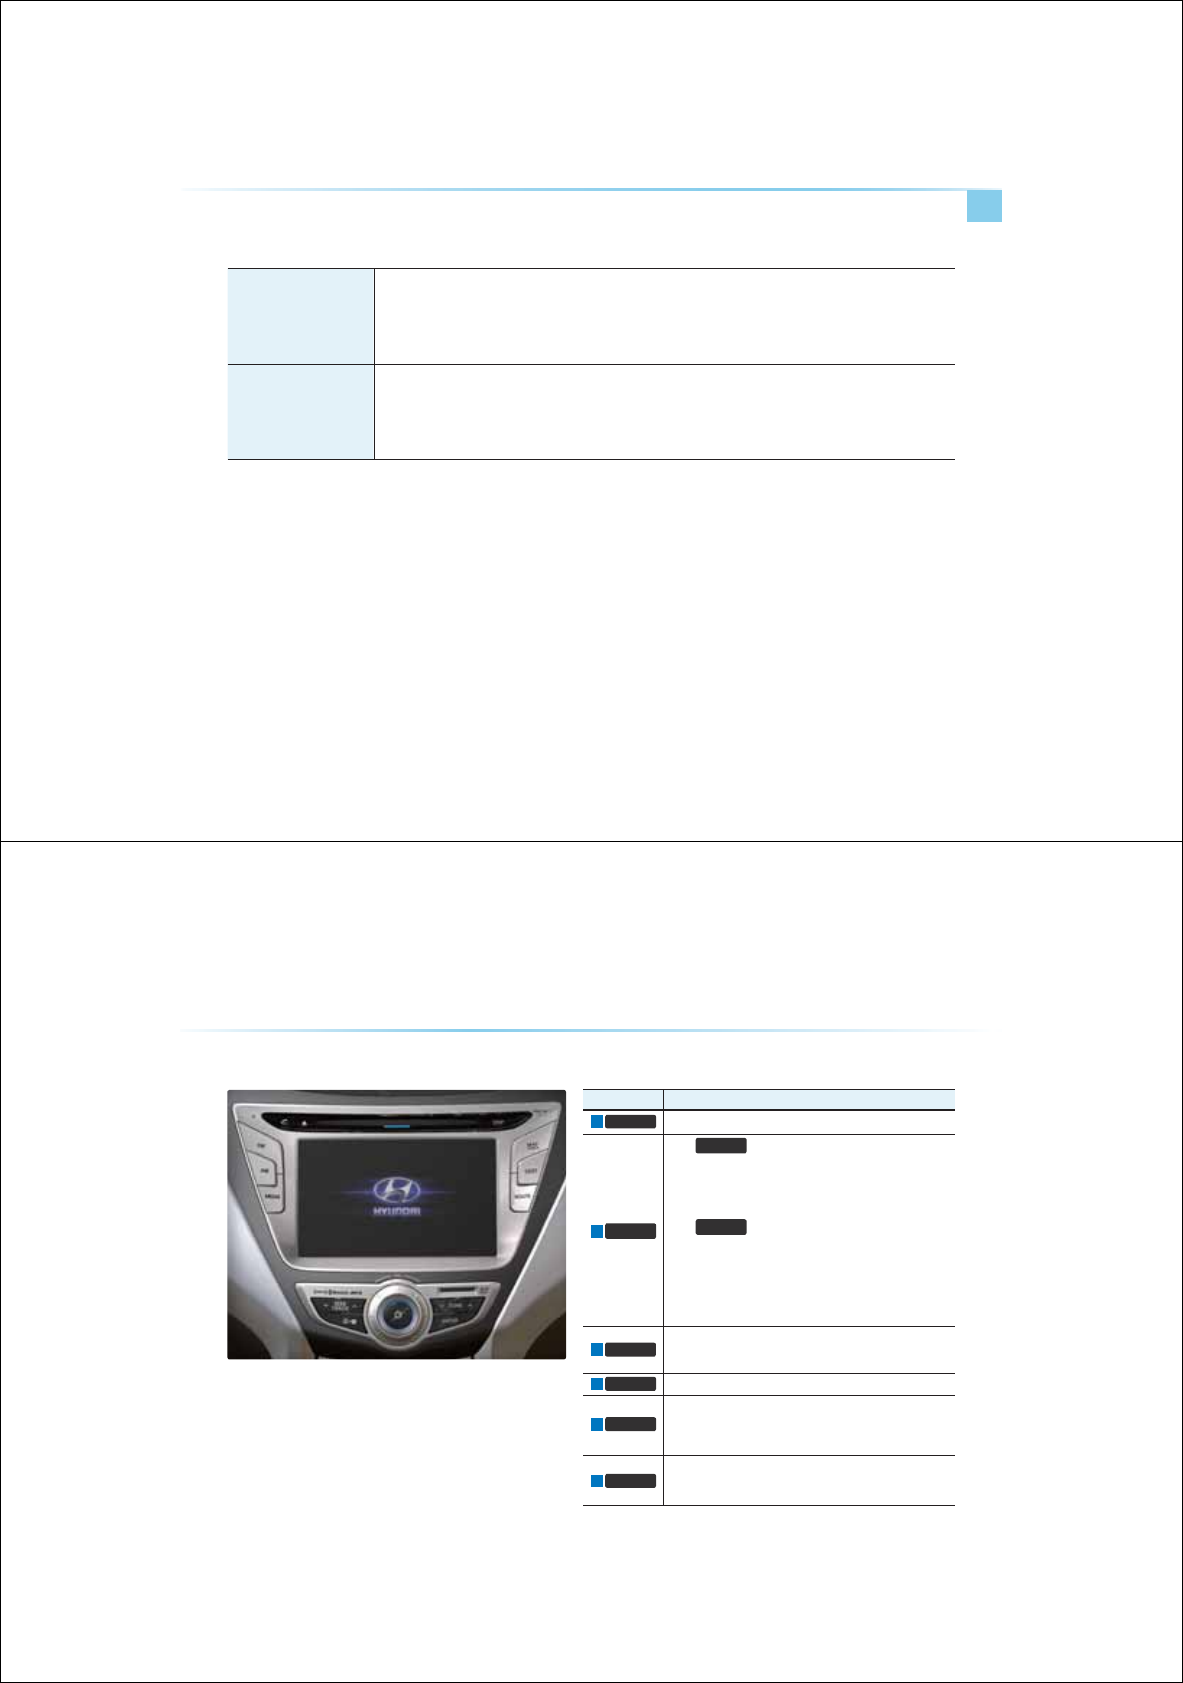
&RPSRQHQW1DPHVDQG)XQFWLRQV
Component Names and Functions
Basic l 1-3
Notation Description
PWR key
VOL Knob
ˍG
When power is off, press to turn power on
ˍG
When power is on, press and hold (over 0.8 seconds) to turn
power off
ˍG
When power is on, press shortly (under 0.8 seconds) to turn AV off
ˍG
Turn left/right to control volume
5287( Displays Route menu screen
6(783 Displays the Setup mode
0$3
92,&(
Displays the map for the current position
781(
ѿ
Ҁ
ˍG
In FM/AM mode, changes the frequency
ˍG
In XM mode, changes the channel
ˍG In CD, MP3, USB, iPod, My Music modes, changes the track/file
'(67
Displays the Destination setup menu
(17(5
Executes the selection
Press to insert or eject disc
Displays current time and date
5(6(7 Resets and restarts the system
SD Card insert slot
1-4
&RPSRQHQW1DPHVDQG)XQFWLRQV
Notation Description
92/
92/
Controls the volume
087( Mutes the sound
ȋ
9
When keys are pressed shortly (under 0.8 seconds)
ˍG
In FM/AM mode, searches broadcast frequencies saved to
Presets
ˍG
In XM modes, searches broadcast channels saved to Presets
ˍG
In CD/MP/USB/iPod/My Music modes, changes the track,
file or chapter.
When keys are pressed and held (over 0.8 seconds)
ˍG
In FM/AM mode, automatically searches broadcast frequen-
cies and channels
ˍG
In XM modes, automatically searches broadcast channels
ˍG
In CD/MP/USB/iPod/My Music modes: rewinds or fast
forwards the track of file.
02'(
ˍG
Each time this key is pressed, the mode is changed inorder
of FM1→ FM2→ AM→ XM1→ XM2→ XM3 → USB(Music
→ Image) or iPod → AUX→ Bluetooth Audio → My Music
ˍG
If the media is not connected or a disc is not inserted, corre-
sponding modes will be disabled.
ˍG
Press and hold the key (over 0.8 seconds) to turn the AV
system on/off
ˍG
When power is off, press the key to turn power back on
Component Names and Functions
Basic l 1-5
Notation Description
Converts to voice recognition mode
When pressed shortly (under 1.2 seconds)
ˍG
When pressed in the phone screen, displays call history
screen
ˍG
When pressed in the dial screen, makes a call
ˍG
When pressed in the incoming call screen, answers the call
ˍG
When pressed during call waiting, switches to waiting call
(Call Waiting)
When pressed and held (over 1.2 seconds)
ˍG
When pressed in the Bluetooth
®
Handsfree wait mode,
redials the last call
ˍG
When pressed during a Bluetooth
®
Handsfree call,switches
call back to mobile phone (Private)
ˍG
When pressed while calling on the mobile phone, switches
call back to Bluetooth
®
Handsfree
(Operates only when Bluetooth
®
Handsfree is connected)
When pressed during a call, ends the phone call
When pressed in the incoming call screen, rejects the call
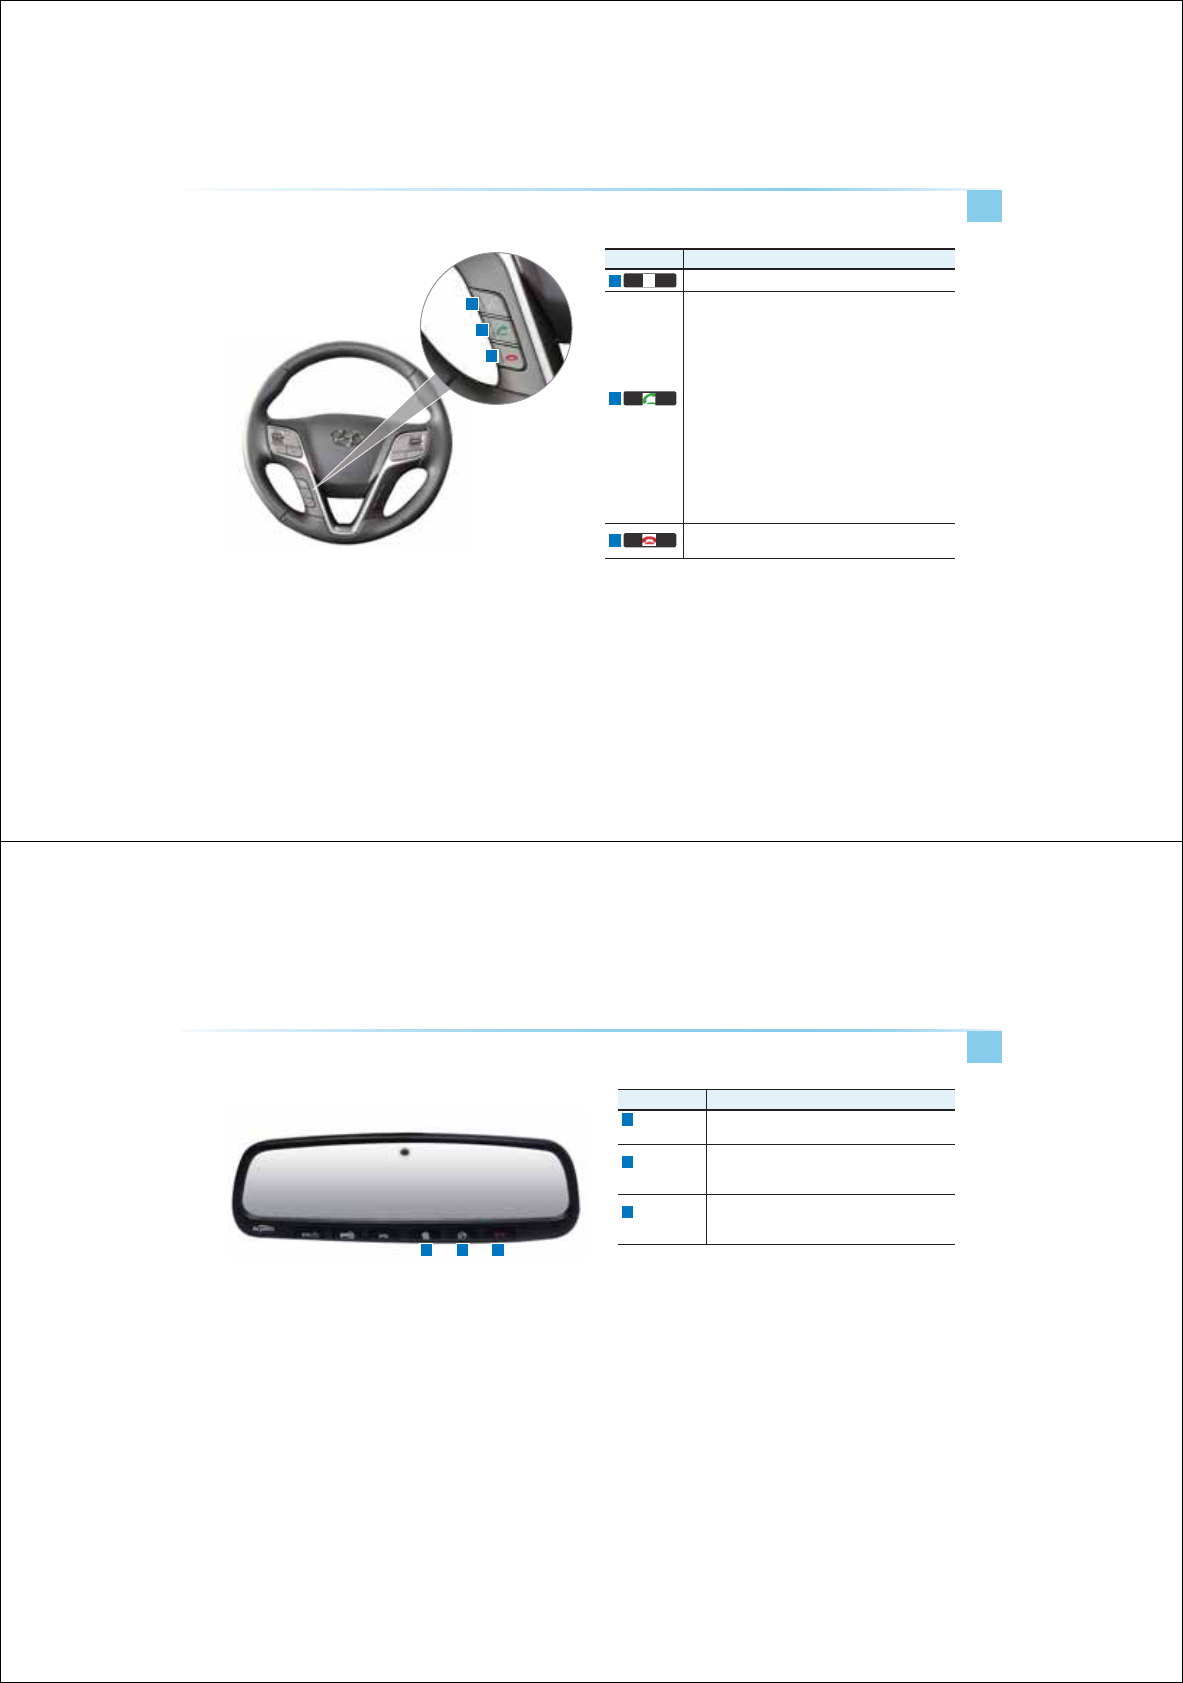
&RPSRQHQW1DPHVDQG)XQFWLRQV
Basic l 1-11
Notation Description
1
Blue Link
Center
Connects to the Blue Link Center to speak with consul-
tants When pressed again during call, ends call
2
Blue Link for
POI
After connecting to the Blue Link Center, used to
request POI information through voice recognition When
pressed again during call, ends call
3
Blue Link for
SOS
When an unforeseen emergency occurs, used to make
call and request Blue Link SOS service. When pressed
again during call, ends call
1 32
1-12
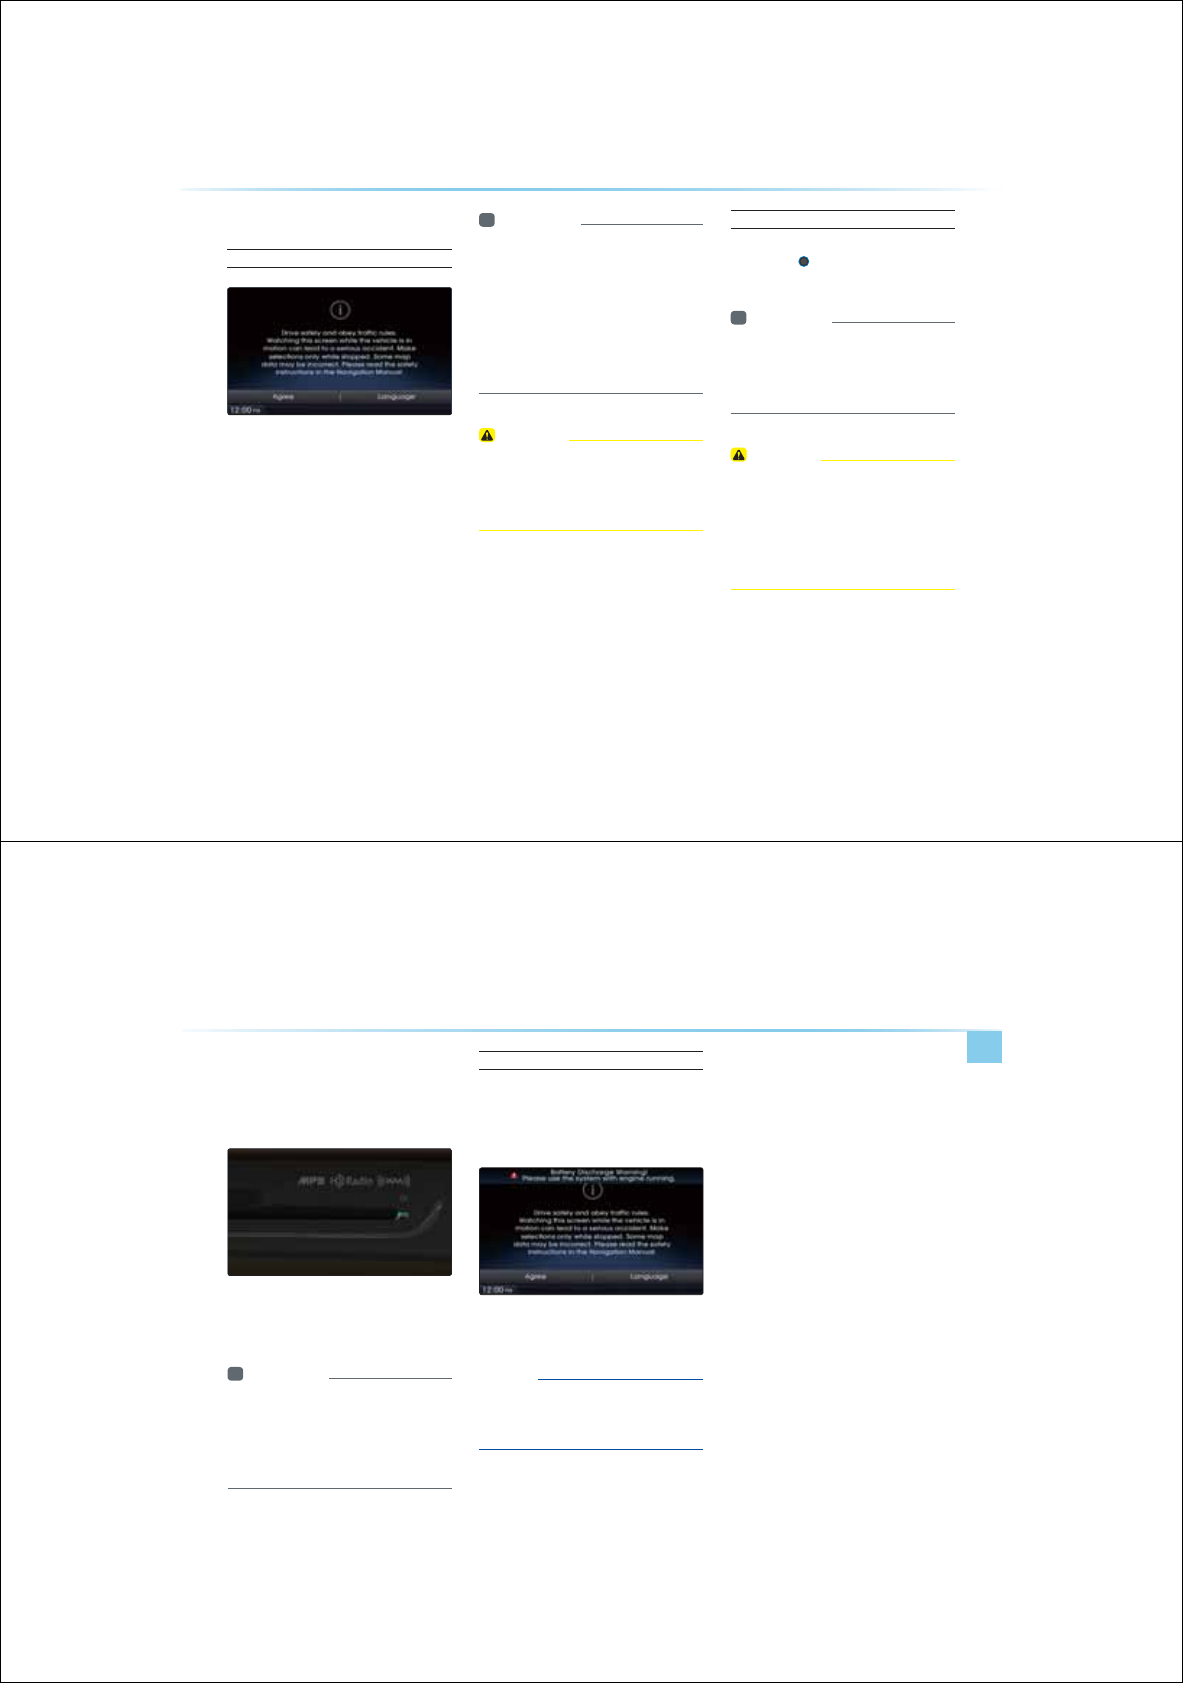
7XUQLQJWKH6\VWHP2Q2II
Turning the System On
Once the system is turned on, the booting
process will start and the safety warning page
is displayed.
i Information
У
If the engine start button is pressed without
pressing the brakes, then the ACC and sys-
tem will turn on. If the brakes are pressed,
then the IGN and system will turn on and
the ignition will start.
У
No operations are supported while the sys-
tem is booting. Some time may be required
until all features are ready for use.
CAUTION
У
The safety warning page is displayed every
time the ignition is turned on. As these mat-
ters are related to safety, closely read and
comply with the safety warnings.
Turning the System Off
Press the engine start button again or press
and hold the power key on the system to
turn the system off.
i Information
У
If the system is turned off while the
Handsfree is being used, then the call will
automatically switch back to the mobile
phone.
CAUTION
У
Pay attention to the volume setting when
turning the device on. A sudden output of
extreme volume upon turning the device
on could lead to hearing impairment. Adjust
the volume to a suitable levels before turn-
ing off the device.
6WDUWLQJWKH6\VWHPIRUWKH)LUVW7LPH
.H\3URGXFW)HDWXUHV
Basic l 1-13
5HVHWWLQJWKH6\VWHP
This feature is used to reset the system in the
occurrence of an unforeseen error or problem.
Press and hold the RESET key (about 1 second).
The use of a clip or pin is recommended when
resetting the system.)
i Information
У
8SRQUHVHWWLQJWKH V\VWHPVDYHGGDWDDQG
VHWWLQJVLQIRUPDWLRQUDGLR IUHTXHQFLHVYRO
XPHDQGGLVSOD\VHWWLQJVZLOOEHUHVWRUHG
EDFNWRWKHGHIDXOWIDFWRU\VWDWH6XFK DUH
QRWLQGLFDWLRQVRIPDOIXQFWLRQV
Battery Warning Message
Use the system only when the engine is
running. If the system is turned on with the
engine off, then the following warning will be
displayed.
This message will automatically disappear
once the engine is turned on.
NOTICE
У
Using the system for prolonged periods of
time without the engine running may result
in battery discharge.

0(02
1-14
&$5$916<67(0
У///QG
У*&4CKQ/QG
У//QG
УDQ&+%
У%&/QG
У/2%&/QG
У7$/QG
УK2Q/QG
У7/QG
У$NGQQJKQ/QG
У//UKE/QG
$XGLR

2-2
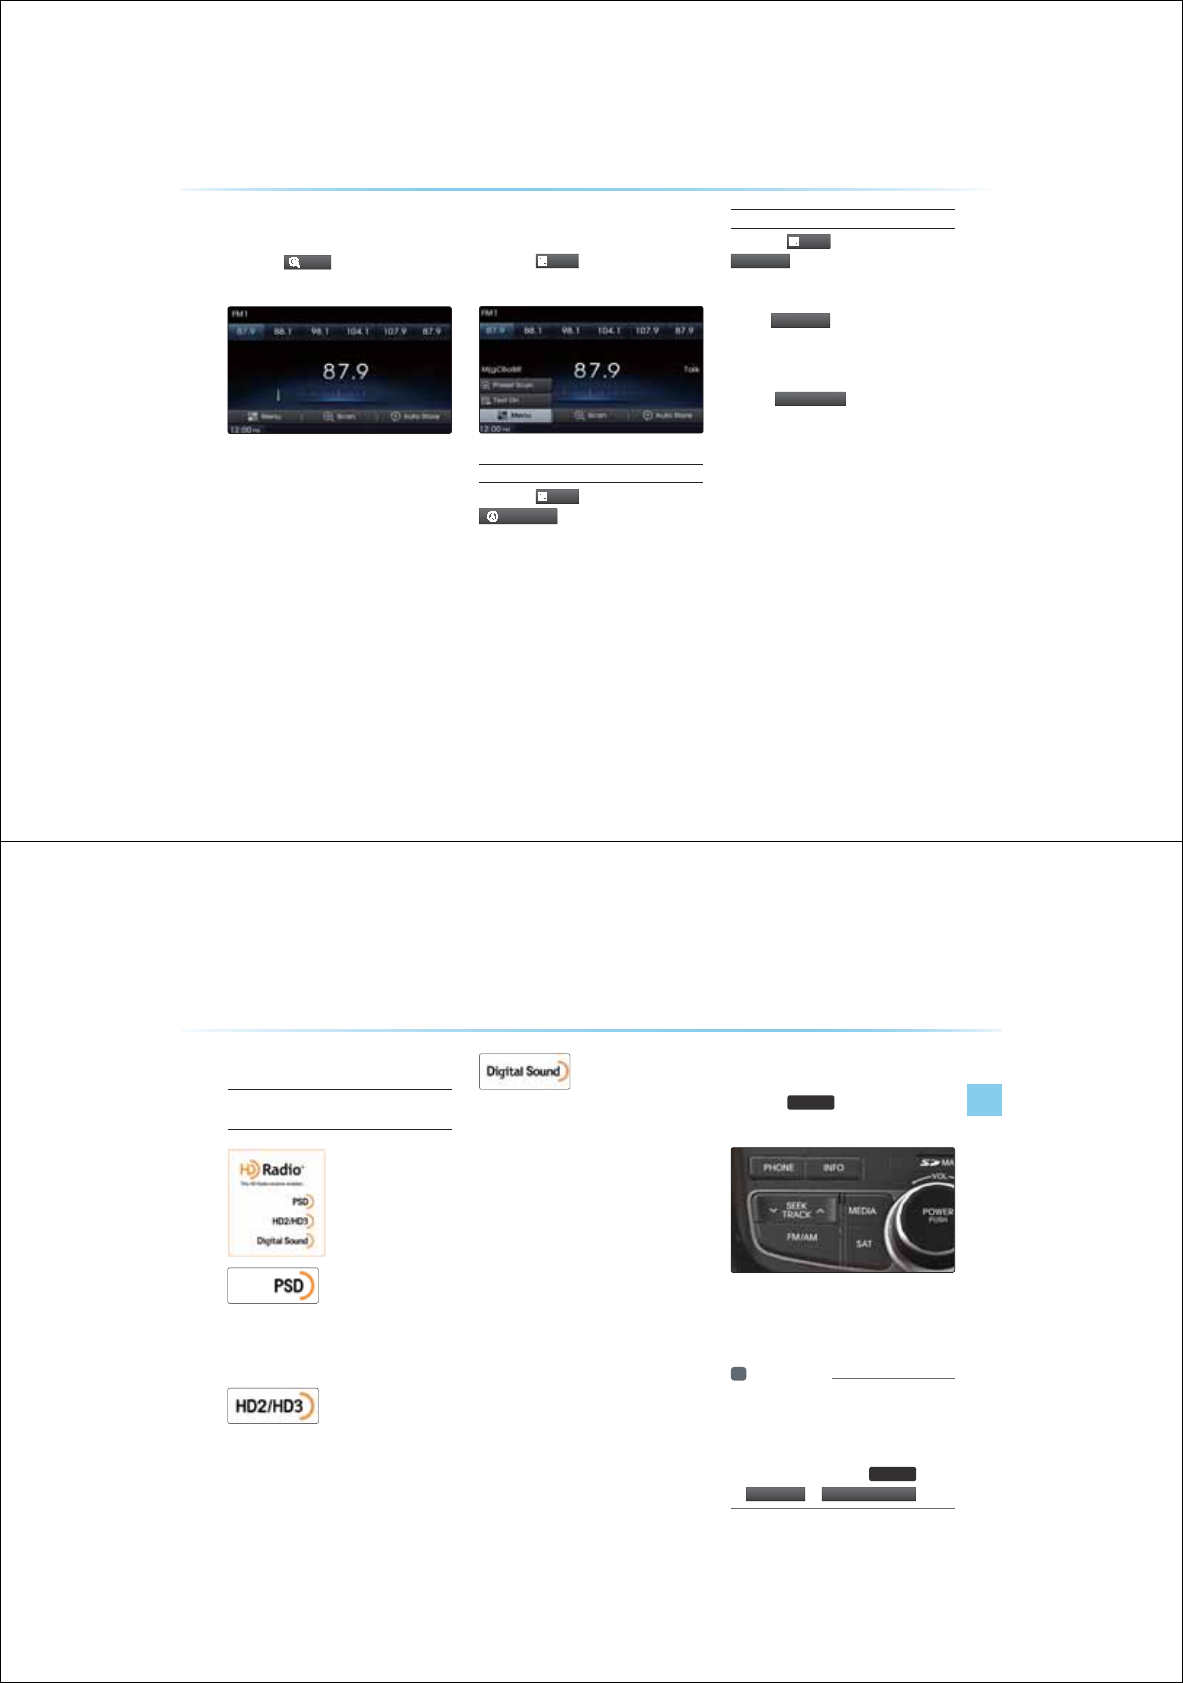
%DVLF0RGH6FUHHQ
Name Description
Mode Display Displays currently operating mode
Preset Shows saved presets for user selection
Setting Display Displays currently operating features/options
Frequency Displays the current frequency
Broadcast Station Displays the current broadcast station
Menu Displays Preset Scan and Text On (Text Off) menus
Scan Plays frequencies with superior reception for 5 seconds each
Auto Store Saves frequencies with superior reception to Preset buttons
Text On
(Text Off) Turns the Radio Text information on and off
Preset Scan Plays preset frequencies for 5 seconds each
)0$00RGH
FM/AM Mode
AV l 2-3
%DVLF0RGH6FUHHQ+'5DGLR21
Name Description
Mode Display Displays currently operating mode
Preset Shows saved presets for user selection
Setting Display Displays currently operating features/options
Frequency Displays the current frequency
Broadcast Station Displays the current broadcast station
Menu Displays Preset Scan and Text On (Text Off) menus
Scan
Plays frequencies with superior reception for 5 seconds each
Auto Store Saves frequencies with superior reception to Preset buttons
Text On
(Text Off) Turns the Radio Text information on and off
Preset Scan Plays preset frequencies for 5 seconds each
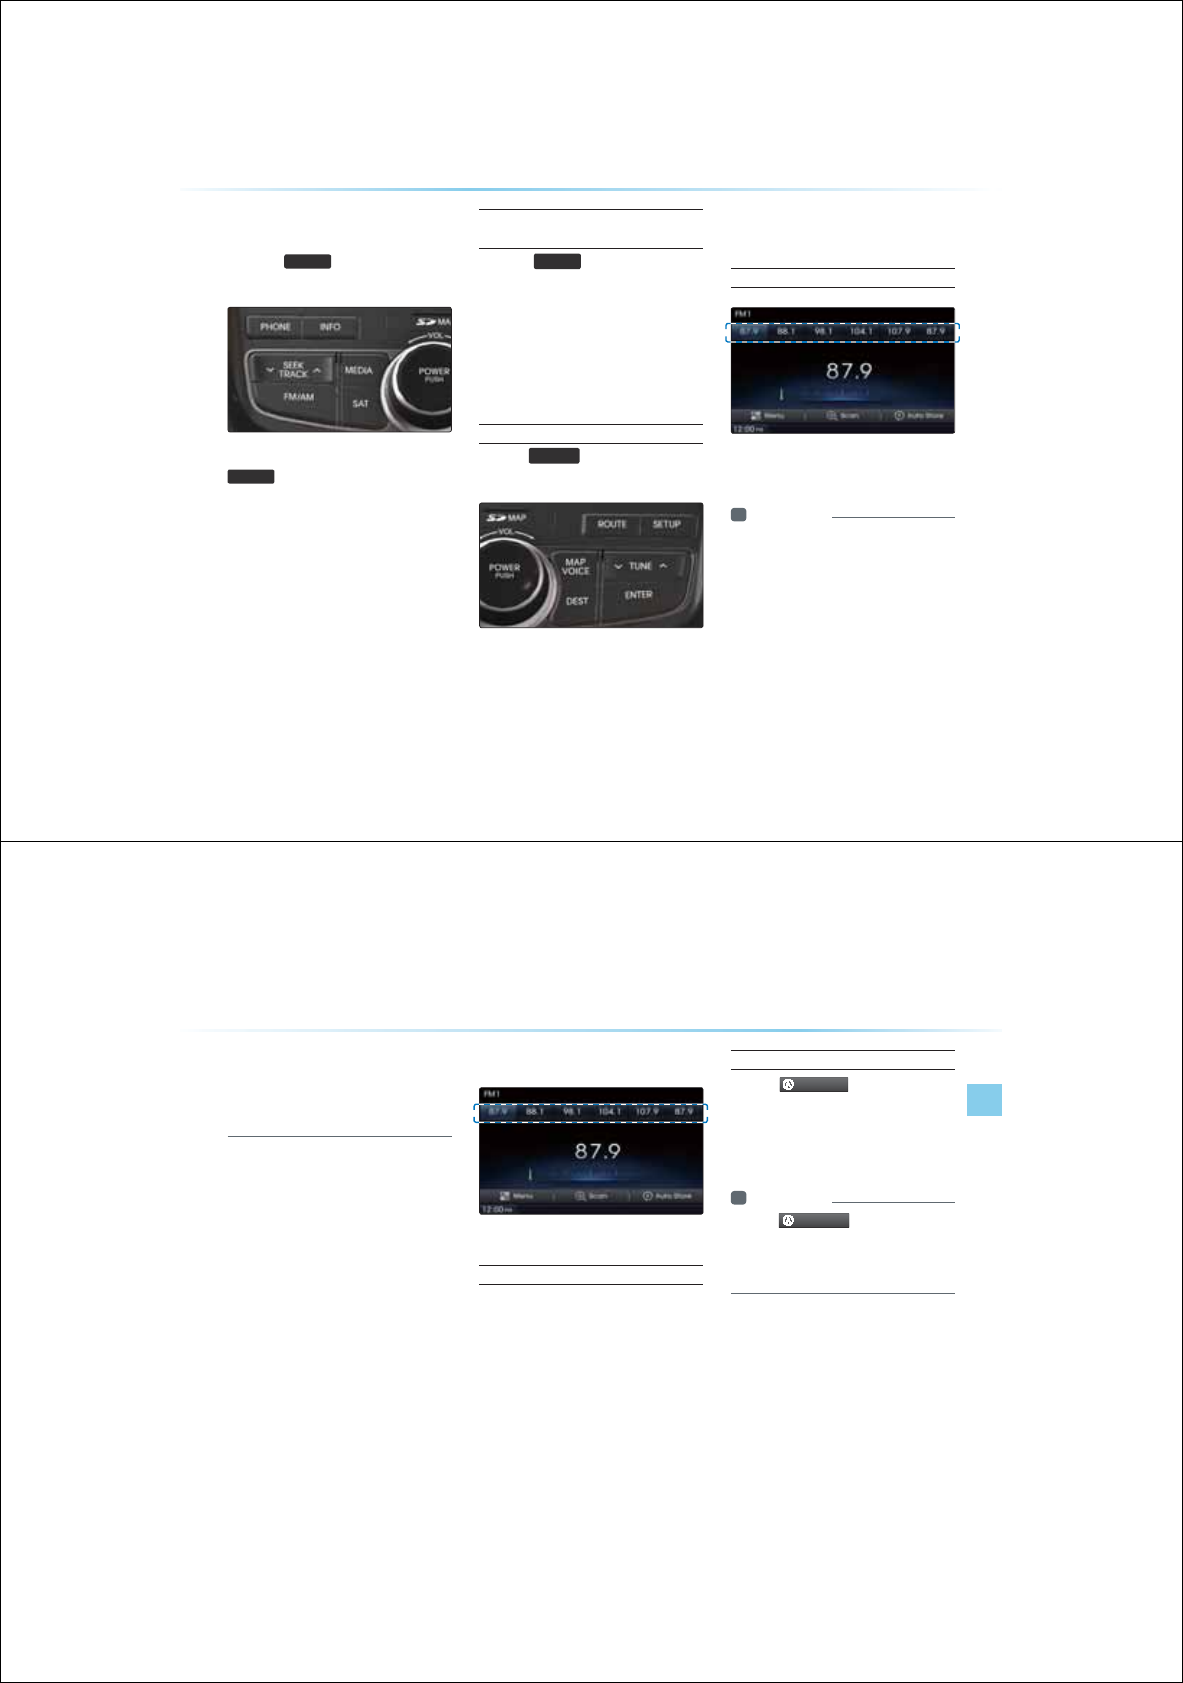
2-4
6WDUWLQJ0RGH
Press the
)0$0
key to change the
mode in order of FM Ċ FM Ċ AM.
When the power is OFF, pressing the
)0$0
key will turn the power on and
play a radio broadcast.
Searching Frequencies
Automatically
Press the
6((.
75$&.
Ѧ
ѧ
keys to automatically
search for frequencies.
У
Shortly press the key (under 0.8 seconds):
Plays previous/next frequency
У
Press and hold the key (under 0.8 sec-
onds): Changes the frequency while
pressed and receives the next frequency
upon release.
Using TUNE
Turn the
781(
Ѧ
ѧ
key to manually
select the frequency.
У FM1/FM2 : Increases/decreased by 100kHz
У
AM : Increases/decreased by 9kHz
Selecting Presets
From the 6 presets, select the frequency
you want to listen to.
Information
У
QECPUCGRQRTGUGEJCPPGNUHQT
GCEJ//CP/
У
6JGUCKQPPCOGCPTGIKQPKUKURNCGD
UKPI)2EQQTKPCGUCPCTGPQKURNCG
JGPJGKPHQTOCKQPECPPQDGTGEGKG
)0$00RGH
FM/AM Mode
AV l 2-5
У
6JGKURNCGUCKQPPCOGCPTGIKQPKU
PTGNCGQTCKQUGPUKKK6JGUCKQP
PCOGKPHQTOCKQPOCKHHGTHTQOJGCECN
DTQCECU
6DYLQJ5DGLR)UHTXHQF\
Saving Manually
After selecting frequency ƙ Press and
hold (over . seconds) the preset
button.
У
A 'beep' will sound and the frequency is
saved to the selected preset button.
Saving Automatically
Press the
$XWR6WRUH
to automatically
save receivable frequencies to Preset buttons.
A total of 18 frequencies with six preset fre-
quencies each for FM1/FM2/AM
modes can be saved.
Information
У
JKNG
$XWR6WRUH
KUQRGTCKPIRTGUU
KPIJGQQTGDQPCICKPKNNECPEGN
JGHPEKQPCPRNCJGRTGKQUHTG
SGPE
2-6
6FDQQLQJ5DGLR)UHTXHQF\
Press the
6FDQ
button to scan all
radio frequencies.
Starting from the current frequency, frequen-
cies with superior reception are scanned for
5 seconds and the previous frequency is
restored.
8VLQJWKH0HQX%XWWRQV
Press the
0HQX
button to use the
Preset Scan menu.
Preset Scan
Press the
0HQX
button ƙ Press
$XWR6WRUH
У
Frequencies saved to the 6 preset buttons
are each played for 5 seconds and the pre-
vious frequency is restored.
Text On/Text Off
Press the
0HQX
button ƙ Press the
7H[W
2
Q
The Text feature is turned on/off.
У
If the
7H[W2
Q
button is displayed (Text
off state), information will not be displayed
even if there is information being transmit-
ted from the broadcast station.
У
If the
7
H
[W
2
II
button is displayed
(Text on state), then broadcast information
will be displayed. Information may not be
displayed if there is no information being
transmitted from the broadcast station.
)0$00RGH
HD Radio Mode
AV l 2-7
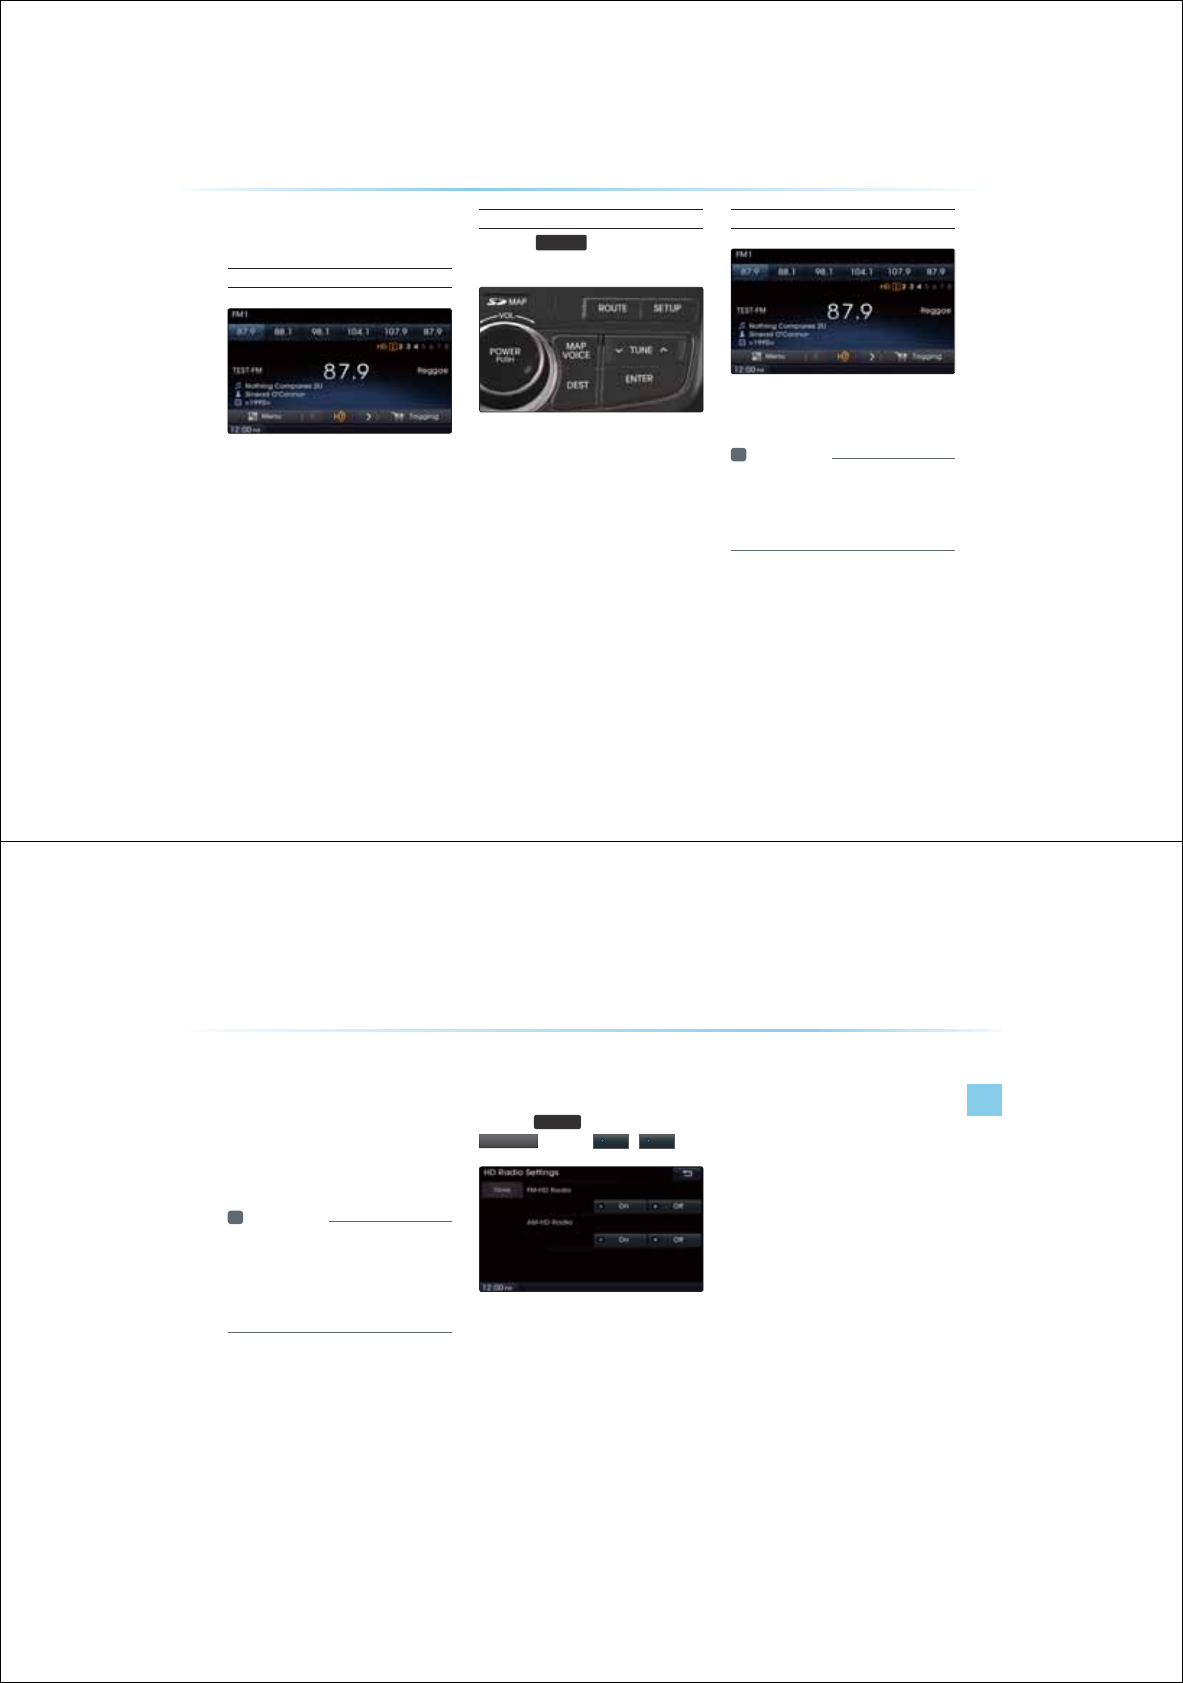
$ERXW+'5DGLR
HD RadioTM Technology
(if equipped)
PSD : (Program Service Data)
Contributes to the supe-
rior user experience of HD Radio Technology.
Presents song name, artist, station IDs, HD2/HD3
Channel Guide, and other relevant data streams.
HD2/HD3 : Adjacent tradi-
tional main stations are extra
local FM channels. Theses HD2/HD3 Channels
provide new, original music as well as deep cuts
into traditional genre.
Digital Sound : Digital, CD
-quality sound. HD Radio
Technology enables local radio stations to broad-
cast a clean digital signal. AM sounds like today’s
FM and FM sounds like a CD
6WDUWLQJ0RGH
Press the
)0$0
key to turn on Radio
mode.
If an HD Radio broadcast is received, the
radio mode will switch from analog broadcast
to HD Radio broadcast.
Information
У
6JG*&4CKQUETGGPKUKURNCGQPN
JGPC*&4CKQDTQCECUKUDGKPI
TGEGKG
У
6QGPUTG*&4CKQUCKQPUCTGTGEGKG
TPJGHGCTGQPC
6HWXS
MG
ƙ
+'5
DG
L
R
ƙ
+'5DGLR6HWWLQ
J
+'5DGLR0RGH
2-8
2SHUDWLQJ+'5DGLR0RGH
Selecting a Frequency
As HD Radio reception is included within
Radio mode, the methods of moving between
channels, saving presets, searching, or meth-
ods of searching frequencies are identical.
However, while the HD Radio related icon dis-
play will become active when within regions
where an HD Radio signal can be received.
Using TUNE
Press the
781(
Ѧ
ѧ
key to manually
select the frequency.
Selecting through Preset
From the 6 presets, select the HD Radio
broadcast you want to listen to.
Information
У
QT*&4CKQDTQCECUEJCPPGNUKJ
QUDEJCPPGNUUDEJCPPGNUKNNDG
UMKRRGCPQPNOCKPEJCPPGNUKNNDG
TGEGKG
+'5DGLR0RGH
HD Radio Mode
AV l 2-9
6RQJ7DJJLQJ
Song-tagging is a feature that song data of
the currently playing broadcast.
Upon connecting an iPod
®
, song information
is transferred to the iPod
®
and can be down-
loaded through iTunes.
Information
У
7RQUQPIUECPDGUCGKHCPK2Q
GKEGKUPQEQPPGEG
У
QPICCECPDGTCPUHGTTGQCPK2Q
QPNKHJGTGKUCCKNCDNGURCEGKJKPJG
GKEG
+'5DGLR'LJLWDO
%URDGFDVW2Q2II
Press the
6HWXS
key ƙ Press the ƙ
+
'5DGLR
ƙ Press
2II
/
2Q
HD Radio Broadcasts can be turned On and
Off for HD Radio FM and AM mode.
2-10
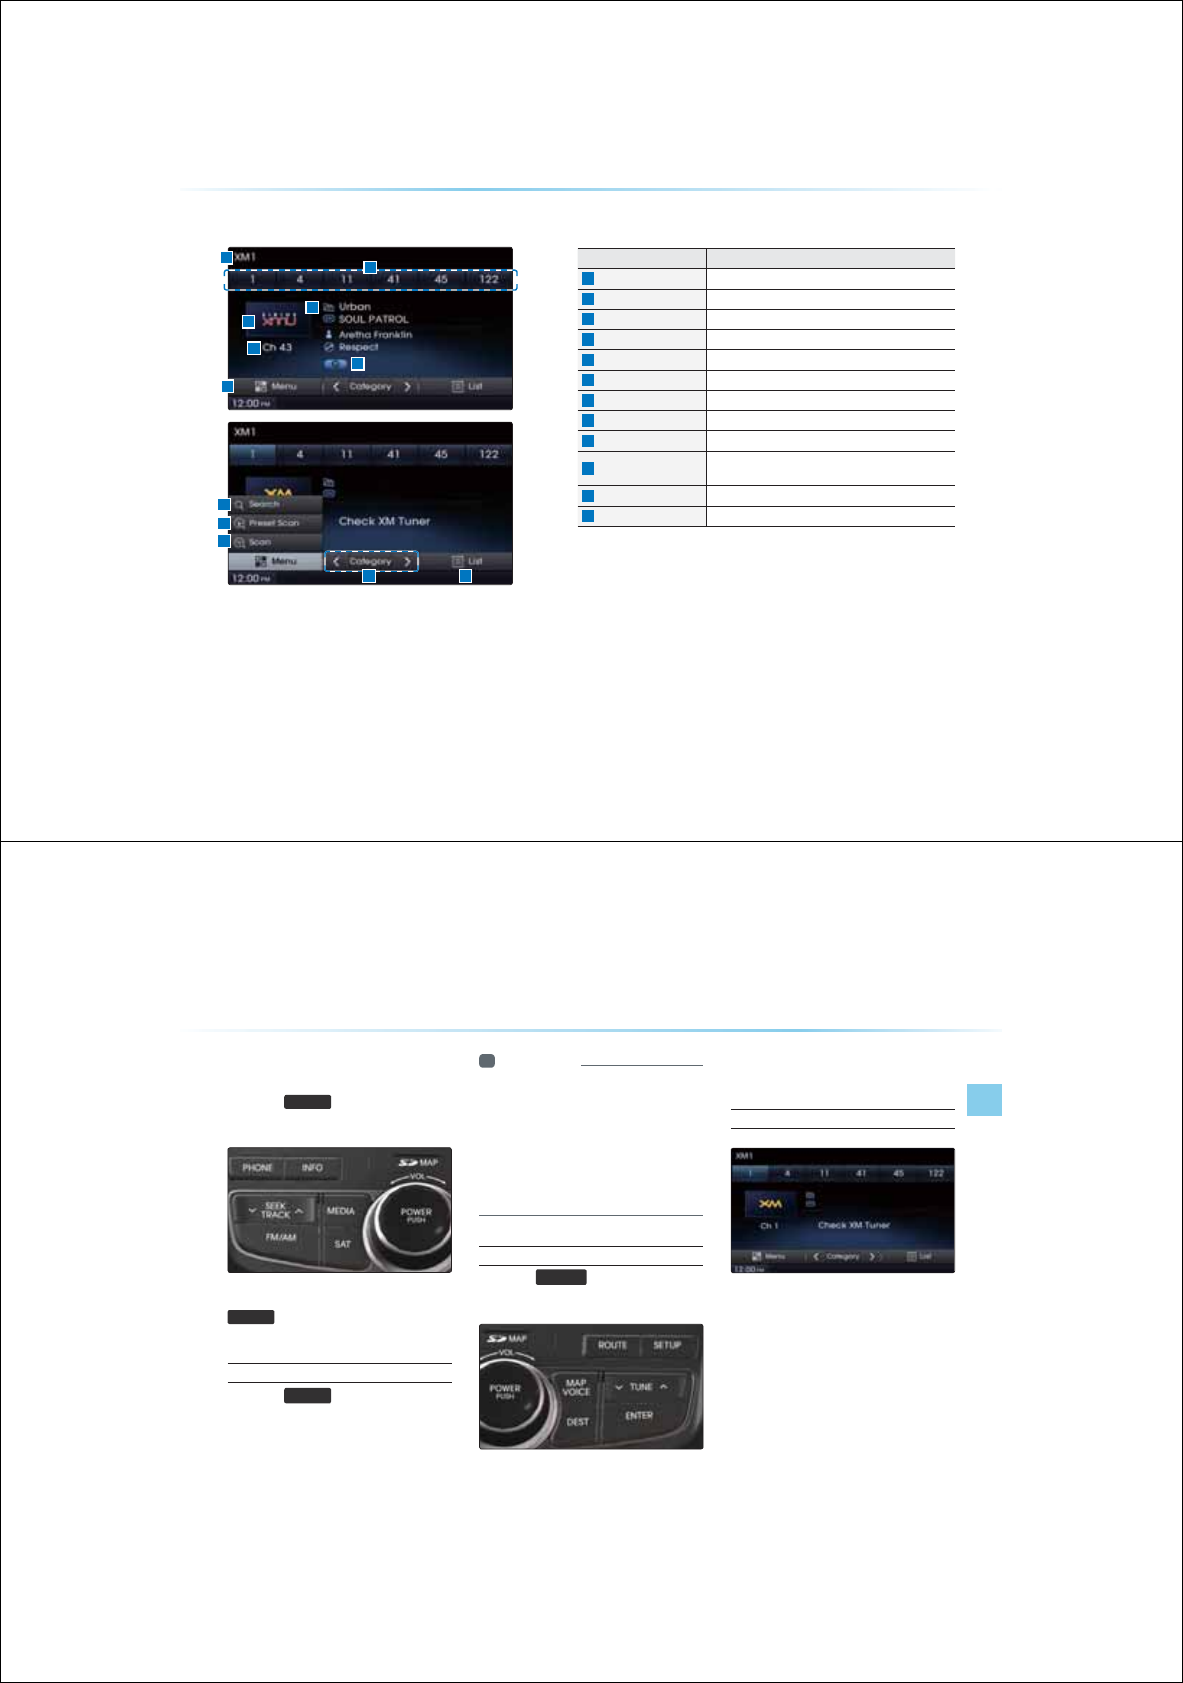
;00RGH
Name Description
Mode Display Displays currently operating mode
Preset
The desired frequency can saved as a preset and selected.
Setting Display Displays the indicator if Scan/ Preset Scan is operating
Category Displays the current category
Channel Number Displays the current channel number
Channel Name Displays the current channel name
Menu Displays Search, Preset Scan and Scan menus
Category Selection Buttons
Used to select the previous/next channel
List Displays XM Radio Categories/Channel Lists
Search Used to search for channels by entering channel num-
bers
Preset Scan Plays preset frequencies for 5 seconds each
Scan Plays all receivable channels for 5 seconds each
%DVLF0RGH6FUHHQ
XM Mode
AV l 2-11
6WDUWLQJ0RGH
Press the
6$7
key to change the
mode in order of XMĊ XM Ċ XM.
When the power is OFF, pressing the
6$7
key will turn the power on and play
a XM Radio broadcast.
Using SEEK
Press the
6((.
75$&.
Ѧ
ѧ
key on the control
panel for under . seconds.
The previous or next channel will be selected.
Information
У
KJKPECGIQTOQGEJCPPGNUKJKPJG
ETTGPEJCPPGNKNNDGRNCG
У
KJKPEJCPPGNOQGCNNEJCPPGNUKPCNN
ECGIQTKGUKNNDGRNCG
У
+HJGTGCTGPQQRGTCKQPUHQTUGEQPU
JKNGKPECGIQTOQGJGPEJCPPGN
OQGKNNCQOCKECNNDGTGUQTG
Using TUNE
Press the
781(
Ѧ
ѧ
key to display the
previous or next channel information.
After a brief moment, the selected channel will
be displayed.
Selecting Presets
From the 6 presets, select the channel you
want to listen to.
2-12
Selecting through Channel/
Category List
Press the
/LV
W
button ƙ Select the
desired category and channel
Select the desired category and the channel.
Once selected, the previous screen will be
restored and the selected channel will begin
playing.
6DYLQJ;0&KDQQHOV
Saving Manually
After selecting channel ƙPress and
hold (over . seconds) the preset
button.
У
A 'beep' will sound and the channel is
saved to the selected preset button.
Information
У
KRTGUGHTGSGPEKGUGCEJHQT/
//OQGUECPDGUQTGUKPIJG
CDQGKPUTEKQPU
8VLQJWKH0HQX%XWWRQV
Press the
0HQX
button to use the
Search, Preset Scan, and Scan menus
;00RGH
XM Mode
AV l 2-13
Search
Press the
0HQX
button ƙ Press
6
HDUF
K
ƙ Enter numbers and press
'RQ
H
Enter the number of the channel you want to
receive.
Preset Scan
Press the
0HQX
button ƙ Press
3UHVHW6FD
Q
Channels saved to the 6 preset buttons are
each played for 5 seconds and the previous
channel is restored.
Scan
Press the
6FDQ
button to scan all
channels.
Starting from the current channel, channels
with superior reception are scanned for 5
seconds and the previous channel is restored
once scanning is complete.
2-14
$ERXW'LVFV
3UHFDXWLRQVXSRQKDQGOLQJGLVFV
After using a disc, put the disc back in its original case to prevent
disc scratches.
Do not use abnormally shaped discs (8cm, heart-shaped, octagon-
shaped) as such discs could lead to malfunctions.
Do not clean discs with chemical solutions, such as record
sprays, antistatic sprays, antistatic liquids, benzene, or thinners.
Do not expose the disc to direct sunlight or high temperatures for pro-
longed periods of time. Such exposure may lead to disc deformation.
Upon playing a disc contaminated by dirt or other substances, the
sound and video quality may deteriorate and result in skipping
sounds. Writing on either side of the disc could result in damage to
disc surfaces.
Clean fingerprints and dust off the disc surface (coated side)
with a soft cloth.
Copy-protected CDs, such as S-type CDs, may not properly oper-
ate in the device.
Do not disassemble the device. Contact a designated service center
in case of malfunction. (Complete after service assistance will not be
provided if the user disassembles the device.)
Do not use water to clean the device. Exposure to water could lead
to product malfunction.
Do not to introduce foreign substances into the disc insert/eject slot.
Introducing foreign substances could damage the device interior.
The device may fail to properly operate in extremely hot or cold tem-
peratures. (The operating temperature range is : -10í ~ 65í)
Steam can become condensed on the fiber-optic lens due to
rain, wet conditions, or upon operating the heating system. In
such cases, discs may not be properly recognized could be the
cause of product malfunction. Remove the disc and wait until the
moisture dries.
Skipping may occur to the audio and video when driving on
bumpy roads for prolonged periods of time or upon severe
shock to the vehicle. In case of severe shock, video and audio may
not properly play.
About DISC
AV l 2-15
Supported Disc formats
This device supports the following disc formats.
Disc Type
Disc Type Disc Format Device Support
CD
3inch (8cm)
5inch (12cm)
CD
CD-R
CD-RW
Multisession-CD
ÿ
ÿ
ÿ
ÿ(Read Only)
ÿ(Read Only)
ÿ(Read Only)
SACD
SACD
(Single, SACD layer)
SACD(Hybrid)
x
ÿ(Only CD layer)
Disc Format
Disc Type Disc Format Device Support
CD
3CD-DA
MP3
WMA
MPEG4 AAC
DTS-CD
CD-RM
CD-G
CD-EXTRA
CD-TEXT
O
O
O
X
O
O
O
O
O
Disc/Content Format Compatibility
By Format according to disc Type
Disc Type Disc Format Device Support
CD LPCM
ÿ
MP3
MPEG1, Layer3
MPEG2, Layer3
MPEG2.5
ÿ
ÿ
ÿ
WMA Ver9
ÿ
Ordinary disc compatibility
This device has been designed/ manufac-
tured to be compatible with software bearing
the following logo marks.
У
CD-R/RW discs (Audio CD) created with
CD recording devices or PCs may not
properly operate in the device.
У
This is a result of various causes, including
disc format, recording method, and con-
tamination to the disc or lens.
$XGLR&'

2-16
CD-R/RW compatibility
This device supports CD-R, CD-RW, and
MP3 discs burned in Audio CD formats.
У
The recording of CD-R and CD-RW discs
with this device is not supported.
У
CD-R/RW discs recorded as audio CDs
that were not finalized are not supported by
this device.
PC-created disc compatibility
У
When burning a disc on the PC, the disc
may not operate in this device depending
on the software settings. In such cases,
inquire with the software manufacturer.
У
Additional information regarding compatibil-
ity is displayed on the CD-R/RW software
disc box.
У
DVD-R/W discs are not compatible with
this device.
Cautions upon writing CDs
У
When a multi-session disc is being
recorded, make sure to close the session
before recording.
У
If mp3/wma file extensions are changed,
such could result in malfunctions.
У
In the case of MP3/WMA, write using only
English. (Other languages are not sup-
ported)
У
Unauthorized use of copy-protected music
files is prohibited by law.
У
Prolonged use of CD-R/CD-RW products
that do not satisfy related specifications
may result in product malfunction.
У
When writing CDs, low-speed writing is
recommended.
Compressed audio compatibility
У
Physical formats of CD : Model 1, Model 2
XA format 1.
У
This device supports audio file compressed
through MPEG-1 audio stream layer 3
(MP3) using 8kbps ~ 320kbps (CBR), VBR.
У
For stable operation, the use of files in
95kbps~192kbps bit rate range and
44.1kHz SAMPLING frequency is recom-
mended.
У
This device supports WMA audio files using
20kbps ~ 320kbps(CBR), VBR.
У
Variable bit rate files may operate, but the
play time information may not be properly
displayed.
У
This device only supports tracks with file
extension of ".mp3" or “.wma".
У
This device does not support multisession
discs.
У
This device supports only 8 layer folders.
У
This device supports MP3 ID3 tag versions
of Ver. 1.0, Ver. 1.1, Ver. 2.2, Ver. 2.3, Ver.
2.4. When using discs with other versions,
the ID3 info will not be displayed.
$ERXW'LVFV
About DISC
AV l 2-17
У
Although this device has been designated
to be compatible with various bit rates,
playing low bit rate MP3 tracks may result
in low quality sound.
Before playing a MP3 Disc
Supported MP3 File Specification
У
Acceptable standard: MPEG1 AUDIO
LAYER 33
У
Acceptable sampling frequency : 8, 11.025,
12, 16, 22.05, 24, 32, 44.1, 48(KHz)
У
Acceptable bit rate : 8 ~ 320 (Kbps)
Recommended bit rates and fre-
quency
У
Sampling frequency : 96 ~ 192 Kbps fixed
bit rate/4.1kHz
NOTICE
УSupported ID3 tags :
ID3v1 0, ID3v1 1,
ID3v2 2, ID3v2 3, ID3v2 4
У
Supported MP3 Media : CD-ROM
У
Supported media formats : ISO9660
LEVEL1 and LEVEL2
Detailed Specification
У
Maximum directory layers : 8 layers
У
Maximum folder length : 64 bytes, file name
length: 64 bytes
У
Supported characters for folder name/ file
name: Alphanumeric characters, Korean
standard character set 2350 characters,
Simplified Chinese 4888 characters
У
Maximum number of folders per disc : 256
folders (including ROOT)
У Maximum number of files per disc : 512 files
Precautions upon burning MP3 files
У
The use of ISO 9660 LEVEL 2 JOLIET for-
mat is recommended.
У
Up to 32 characters in Korean/Chinese are
supported for file names and up to 20 char-
acters in Korean/Chinese are supported for
folder names.
У
The use of CDs exceeding 700M may
result in faulty disc recognition or errors
upon play.
2-18
MP3 File Structure
Recognition occurs through the same folder structure used within the disc.
Folder structure as saved in CD-ROM Folder structure as saved in the system.
$ERXW'LVFV
CD Mode
AV l 2-19
&'0RGH
%DVLF0RGH6FUHHQ
Name description
Mode Displays currently operating mode
Track Index Shows the current track/total tracks
Repeat/
Shuffle/Scan
From Repeat/Shuffle/Scan, displays the currently operating func-
tion
Play Time Displays the current play time
Track Track number of current song
Menu Displays Repeat, Shuffle, Scan, and Info On (Info Off) menus
Repeat Repeats the current track
Shuffle Plays disc tracks in random order
Scan
Scans the beginning parts of disc tracks (approx 10 seconds per track)
Info Off
(Info On)
У
Info Off : shows only track info
У
Info On : shows track info, artist and album info
üempty when there is no corresponding information.
Previous Track
У
When the play time is under 2 seconds : Moves to the previous
track
У
When the play time is over 2 seconds : Plays the current song from
the beginning
Play/Pause
Plays/pauses the current track
Next Track Moves to the next track
List Moves to the track list screen
Artist Info Displays artist info for current song
(Will not be displayed if the information does not exist)
Album Info Displays album info for current song
(Will not be displayed if the information does not exist)
2-20
6WDUWLQJ0RGH
Press the
0(',$
key ƙ Press
&'
NOTICE
УOnly genuine audio CDs are supported.
Other discs may result in recognition
failure (e.g. copy CD-R, CDs with labels)
Information
У
%&OQGKNNCQOCKECNNUCTQPEGC
%&KUKPUGTG
Playing a CD
У
Press the
Ԣ
button to play the track.
У
Press the
O
O
button to pause the track.
Fast-forwarding or Rewinding
CD Tracks
While playing
ƙ Press and hold the
6((.
75$&.
Ѧ
ѧ
key (over . seconds)
This will rewind or fast-forward the track.
While the
6((.
75$&.
Ѧ
ѧ
key is being pressed, the
track will rewind or fast-forward at 20x speed.
Once released, the track will begin playing at
normal speed.
&'0RGH
CD Mode
AV l 2-21
Searching CD Tracks
Press the
781(
Ѧ
ѧ
key ƙ Search tracks
ƙ Once the desired track name is
displayed, press the
(17(5
key
When searching tracks, the track number is
displayed in blue. Pressing the
(17(5
key
will play the corresponding track.
Information
У
+HJG
781(
Ѧ
ѧ
MGKUPQRTGUUGKJKP
UGEQPUQHUGCTEJKPITCEMUJGTCEM
KPHQHQTJGETTGPTCEMKUTGUQTG
8VLQJWKH0HQX%XWWRQV
Press the
0HQX
button to set the
repeat, shuffle, scan and Info On/Info
Off menus.
Repeat
Press the
0HQX
button ƙPress
5H
S
HD
W
The current track is repeated.
Information
У
2TGUUJG
5H
S
HD
W
DQPCICKPQTP
QHHTGRGC+HPQJKPIKUUGNGEGJGPCNNTCEMU
KNNDGRNCGKPUGSGPKCNQTGT
Shuffle
Press the
0HQX
button ƙPress
6KXIIOH
Tracks within the disc are played in random
order.
Information
У
2TGUUJG
6KXIIOH
DQPCICKPQTP
JGUJHHNGQRKQPQHH
Scan
Press the
0HQX
button ƙ Press
6FDQ
The beginning (approx 10 seconds) of all
tracks within the CD are scanned.
Information
У
2TGUUJG
6FDQ
DQPCICKPQTP
JGUECPQRKQPQHH
2-22
Info On/Info Off
Press the
0HQX
button ƙ Press
,QIR2Q
The amount of information displayed on
the screen can be selected. The title, art-
ist, and album info are additionally displayed
and the button will automatically change to
,QIR2II
.
Press
,QIR2II
to restore the previous infor-
mation display setting.
Information
У
TKUCNDOKPHQCTGURRQTGKJKP6G
%&U
&'0RGH
MP3 CD Mode
AV l 2-23
%DVLF0RGH6FUHHQ
03&'0RGH
Name Description
Mode Displays currently operating mode
File Index Shows the current MP3 file/total number of MP3 files
Repeat/Shuffle/
Nomal Play
From Repeat All/Repeat One Song/Repeat Folder/Shuffle
Folder/Shuffle All/Folder Scan/Scan All, displays the currently
operating function
Play Time Displays the current play time
Folder Name Displays Folder Name for current file
File Name Displays the name of the current file
Menu Displays Copy, Repeat, Shuffle, Scan and Info On (Info Off)
menus
List Moves to the list screen
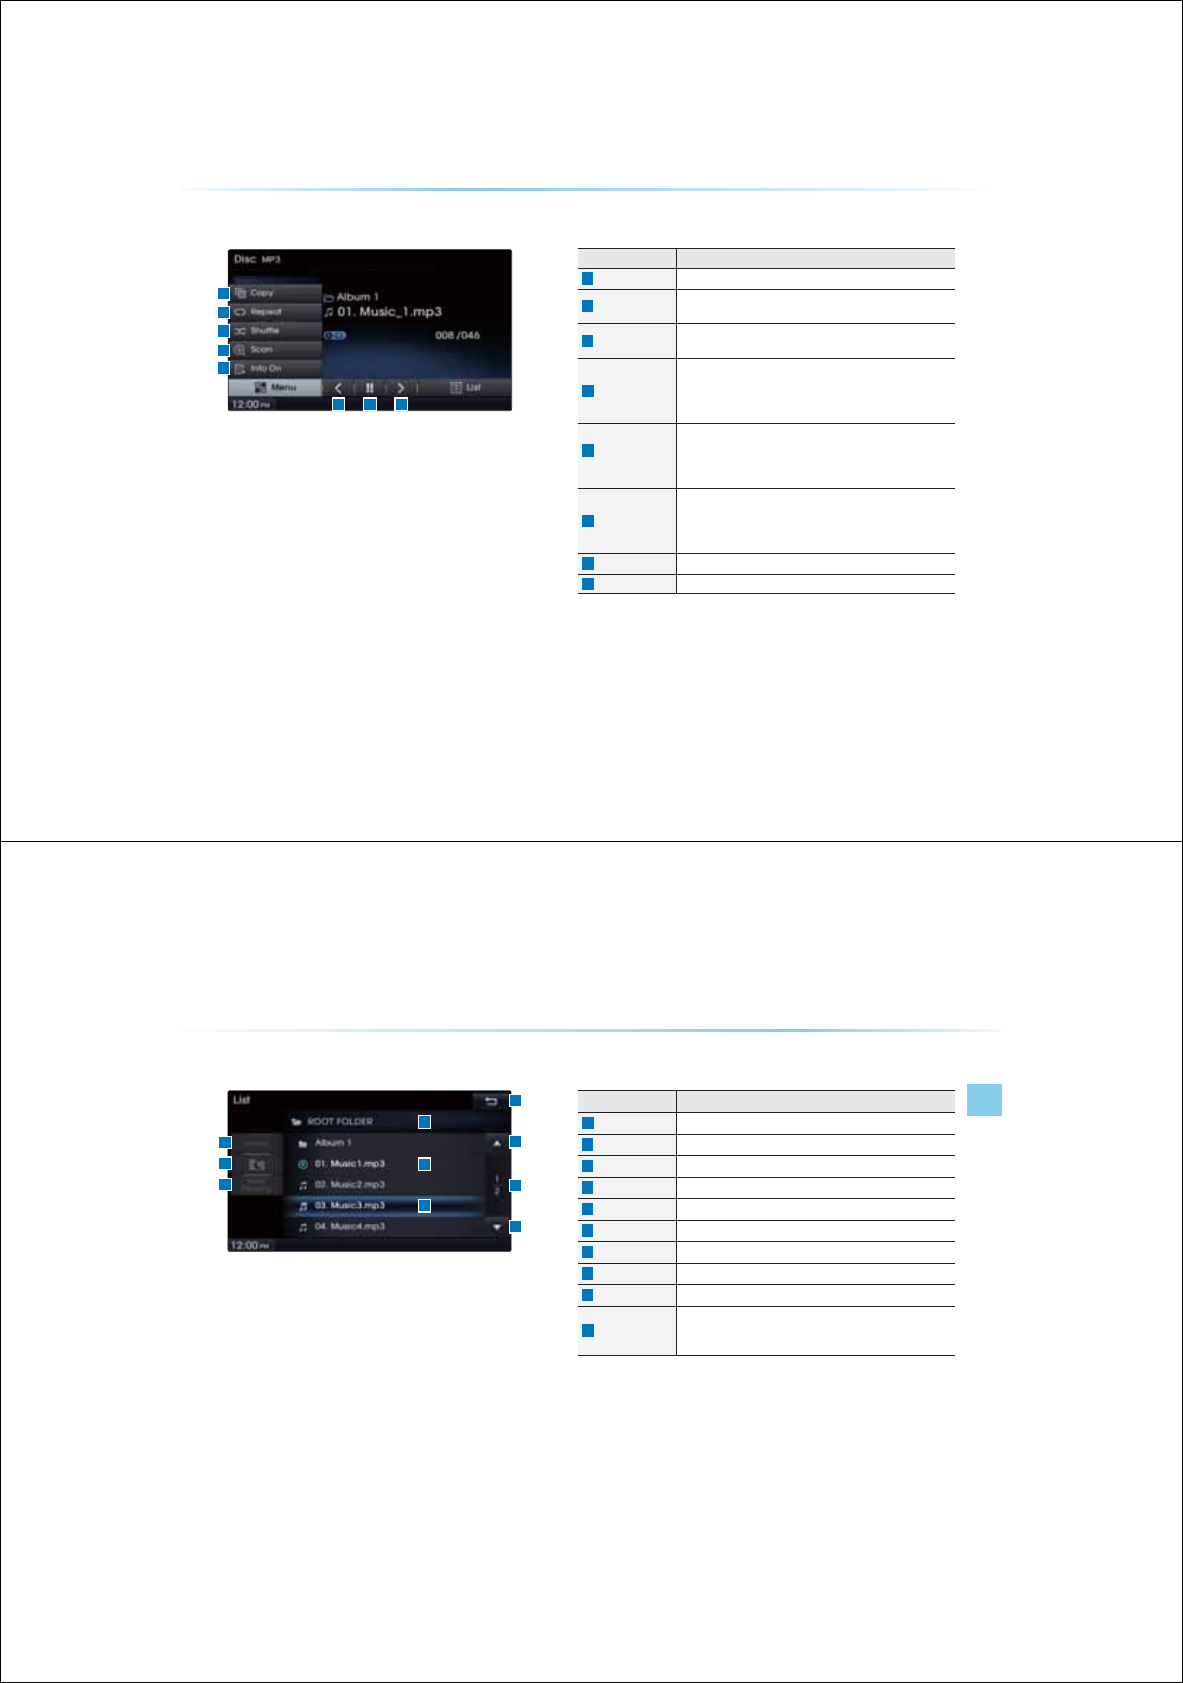
2-24
Name Description
Copy
Copies the currently playing file into My Music
Repeat
Repeats the current file (each time the button is pressed,
changes in order of Repeat Once Ċ Repeat Folder Ċ Off)
Shuffle
Plays files in random order (each time the button is pressed,
changes option in order of Shuffle Folder Ċ Shuffle All Ċ Off)
Scan
Scans the beginning parts of MP3 files (approx. 10 seconds
per file)
(Each time the button is pressed, changes option in order of
Folder Scan Ċ Scan All Ċ Off)
Info Off
(Info On)
Changes the display method between Info Off/Info On
У
Info Off : shows folder name/file name
У
Info On : shows folder name, file name, title, artist, and
album info
Previous file
У
When the play time is under 2 seconds : Moves to the previ-
ous file
У
When the play time is over 2 seconds : Plays the current file
from the beginning
Play/Pause
Plays/pauses the current file
Next file
Moves to the next file
03&'0RGH
%DVLF0RGH6FUHHQ
MP3 CD Mode
AV l 2-25
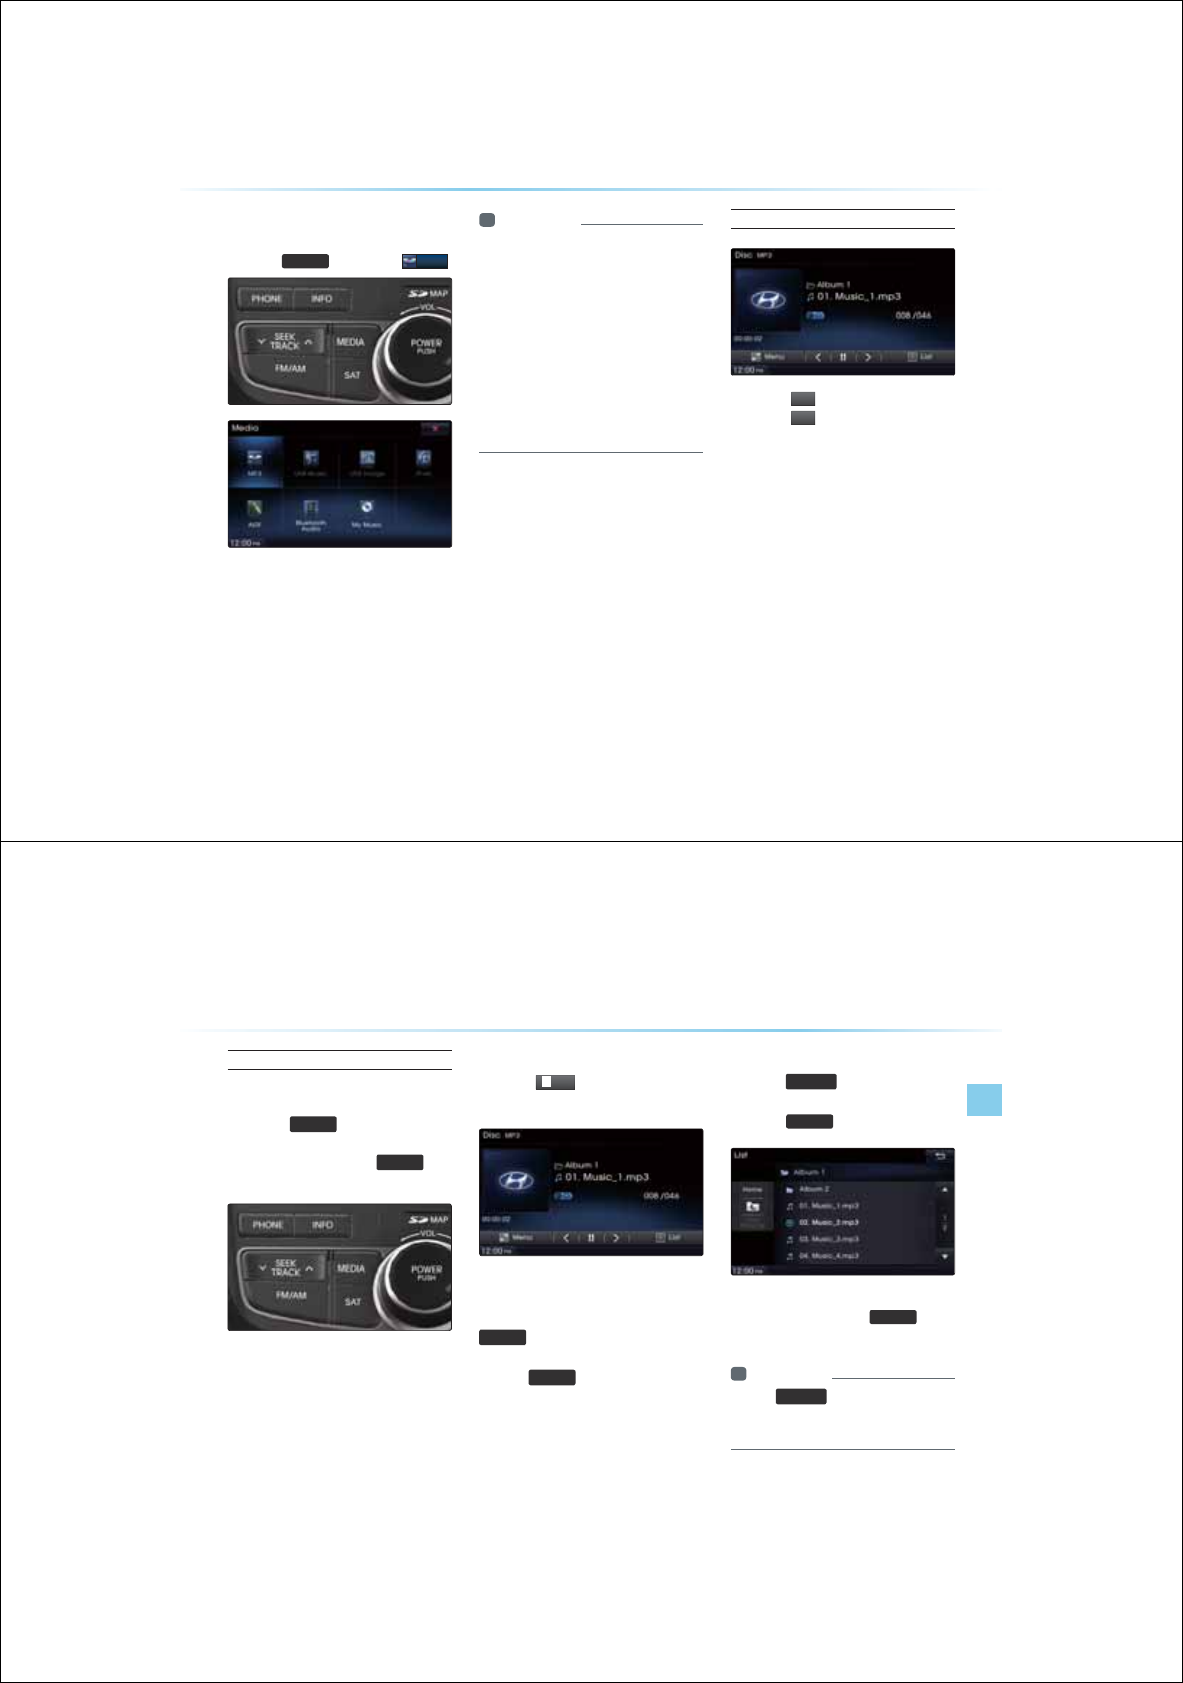
/LVW0HQX6FUHHQ
Name Description
Folder Name Folder name of current list
Current Song Shows current file name highlighted
Back button Converts to basic mode screen
Previous list Moves to the previous list
Next list Moves to the next list
List page Shows current file list page/total number of pages
List Focus Creates focus upon operating Tune
Home Folder Moves to home folder
Parent Folder Moves to the parent folder
Now Playing
When moving to a different list screen, moves to the list page
where the current file is located
Becomes disabled when the current list includes the current file
2-26
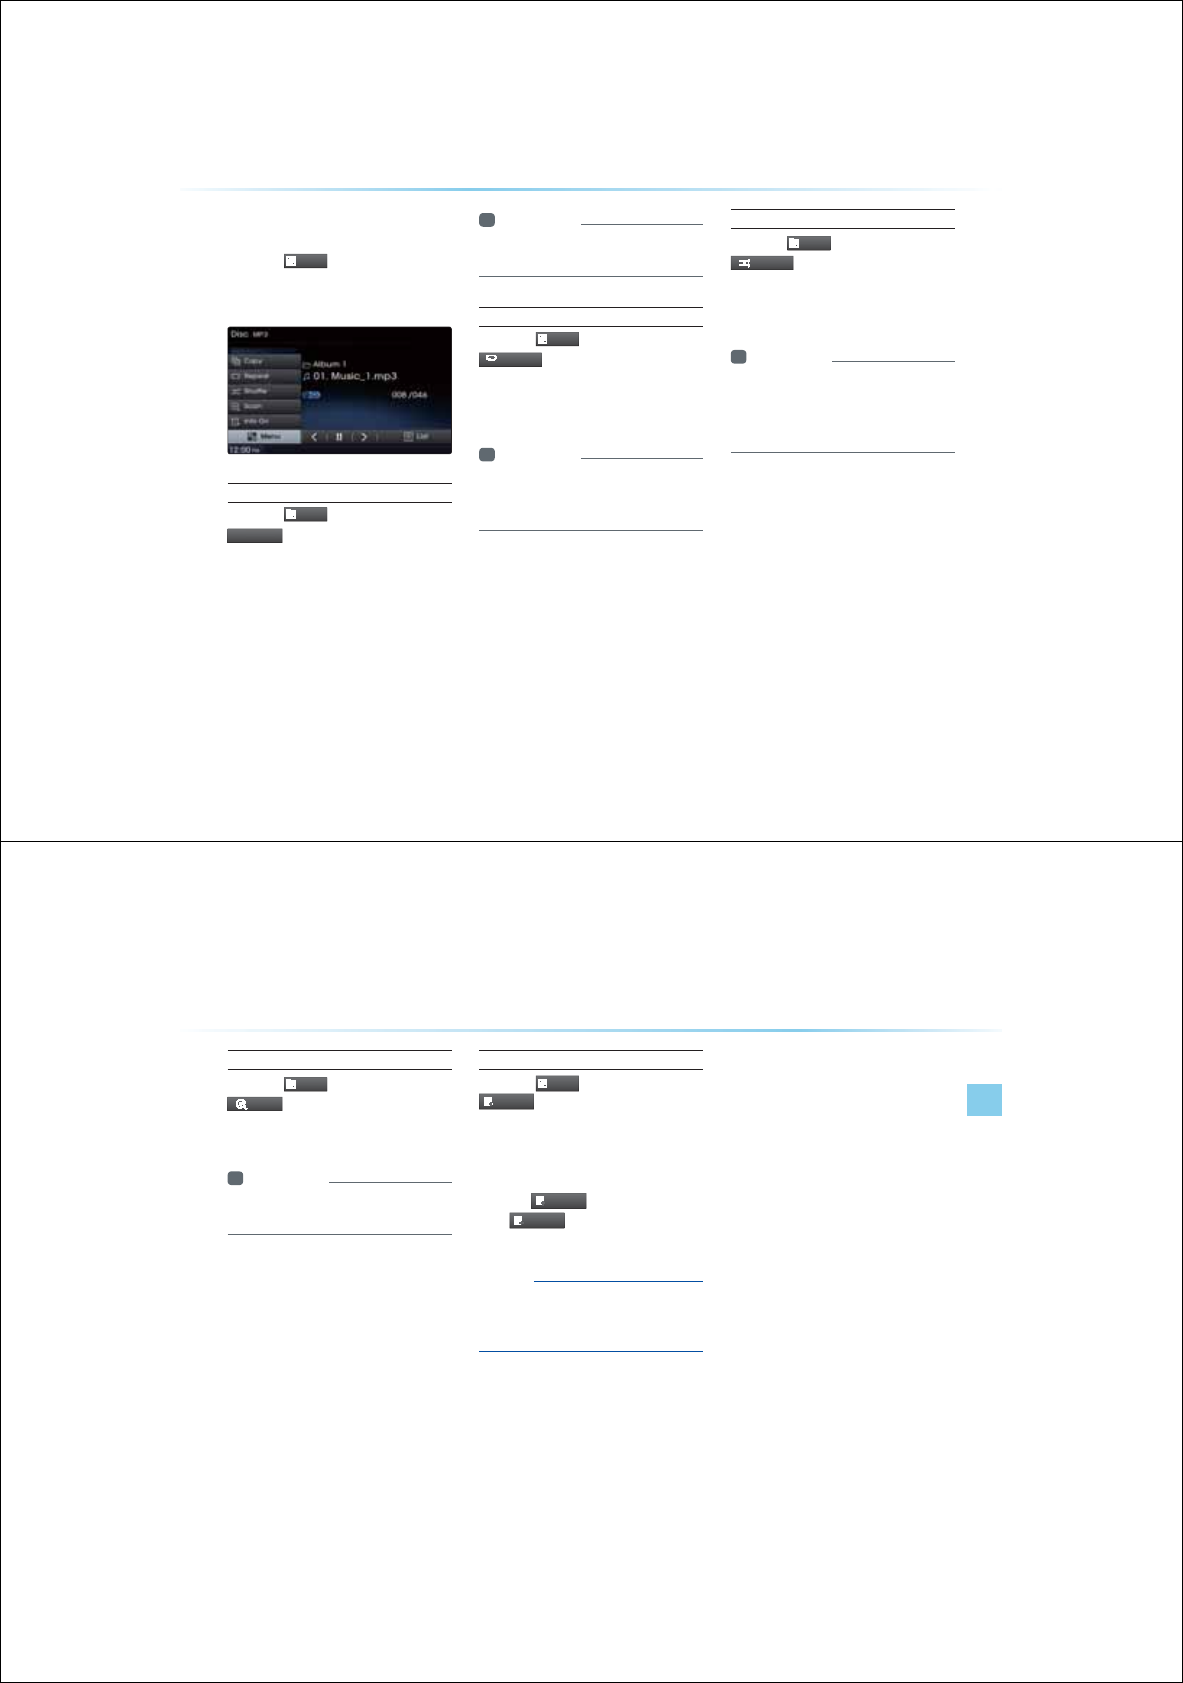
03&'0RGH
6WDUWLQJ0RGH
Press the
0(',$
key ƙ Press
03
Information
У
/2OQGCQOCKECNNUCTUJGPCP
/2KUEKUKPUGTG
У
+HJGTGCTGPOGTQUUQPIUCPHQNGTU
KJKPJGKUETGCKPIKOGEQNCMG
OQTGJCPUGEQPUCPJGNKU OC
PQDGKURNCGQTUQPIUGCTEJGUOC
PQQRGTCG1PEGNQCKPIKUEQORNGGT
CICKP
У
1PNIGPKPGCKQ%&UCTGURRQTG
У
1JGTKUEUOCTGUNKPTGEQIPKKQPHCKN
TGGIEQR%&4%&UKJNCDGNU
Playing MP3
У
Press the
Ԣ
button to play the file.
У
Press the
OO
button to pause the file.
MP3 CD Mode
AV l 2-27
Selecting MP3 files
Selecting from the Mode Screen
У
Press the
6((.
75$&.
Ѧ
ѧ
keys to select the pre-
vious or next file.
У
Pressing and holding the
6((.
75$&.
Ѧ
ѧ
keys
will rewind or fast-forward the current file.
Using Menus within List Screen
Press the
/LVW
button ƙ Select the
file from the list
Fast-forwarding or Rewinding MP3 Files
While playing ƙPress and hold the
6((.
75$&.
Ѧ
ѧ
key (over . seconds)
This will rewind or fast-forward the file.
While the
6((.
75$&.
Ѧ
ѧ
key is being pressed, the
file will rewind or fast-forward at 20x speed.
Once released, the file will begin playing at
normal speed.
Searching MP3 Files
Press the
781(
Ѧ
ѧ
key ƙ Search files ƙ
Once the desired file name is displayed,
press the
(17(5
key
When searching files, the file number is dis-
played in blue. Pressing the
(17(5
key will
play the corresponding file.
Information
У
+HJG
781(
Ѧ
ѧ
MGKUPQRTGUUGKJKP
UGEQPUQHUGCTEJKPIHKNGUJGHKNGKPHQ
HQTJGETTGPTCEMKUTGUQTG
2-28
03&'0RGH
8VLQJWKH0HQX%XWWRQV
Press the
0HQX
button to set the
copy, repeat, shuffle, scan, and Info
On/Off options.
Copy
Press the
0HQX
button ƙ Press
&RS\
The currently playing file is copied and saved
in My Music
Information
У
%QRKGCPUCGHKNGUECPDGRNCG
KJKP//UKEOQG
Repeat
Press the
0HQX
button ƙ Press
5HSHDW
Each time the button is pressed, the option is
changed from Repeat Once Ċ Off.
Information
У
4GRGC1PEGTGRGCUJGETTGPHKNG
У
4GRGCQNGTTGRGCUCNNHKNGUKPETTGP
HQNGT
Shuffle
Press the
0HQX
button ƙ Press
6KXIIOH
Each time the button is pressed, the option is
changed from Shuffle Folder Ċ Shuffle All Ċ
Off.
Information
У
JHHNGQNGTRNCUHKNGUKPETTGPHQNGT
KPTCPQOQTGT
У
JHHNGNNRNCUCNNHKNGUKP&+%KPTCP
QOQTGT
MP3 CD Mode
AV l 2-29
Scan
Press the
0HQX
button ƙ Press
6FD
Q
Each time the button is pressed, the option is
changed from Folder Scan ĊScan All Ċ Off.
Information
У
QNGTECPUECPUHKNGUKPETTGPHQNGT
У
ECPNNUECPUCNNHKNGUKPJGKUE
Info On/ Info Off
Press the
0HQX
button ƙ Press
,QIR2Q
The amount of information displayed on
the screen can be selected.
The title, artist, and album info are additionally
displayed and the button will automatically
change to
,QIR2II
.
Press
,QIR2II
to restore the previous infor-
mation display setting.
Notice
УThe title, artist and album info are dis-
played only when such information is
recorded within the MP3 file ID3 tag.
2-30
8VLQJ0HQXVZLWKLQ/LVW
6FUHHQ
Moving between Lists
Press the
/LV
W
button ƙ Press the
Ԡ
,
Ԥ
buttons
If five (5) or more files or folders exist the
same folder, in the list will be displayed
across two or more pages.
Press the
Ԡ
,
Ԥ
cursor buttons to
quickly find the desired page.
Information
У
NCIOCQEETKPKURNCKPIJGRTGKQU
PGNKURCIGGRGPKPIQPJGHKNGPCOG
QTHKNGUKG
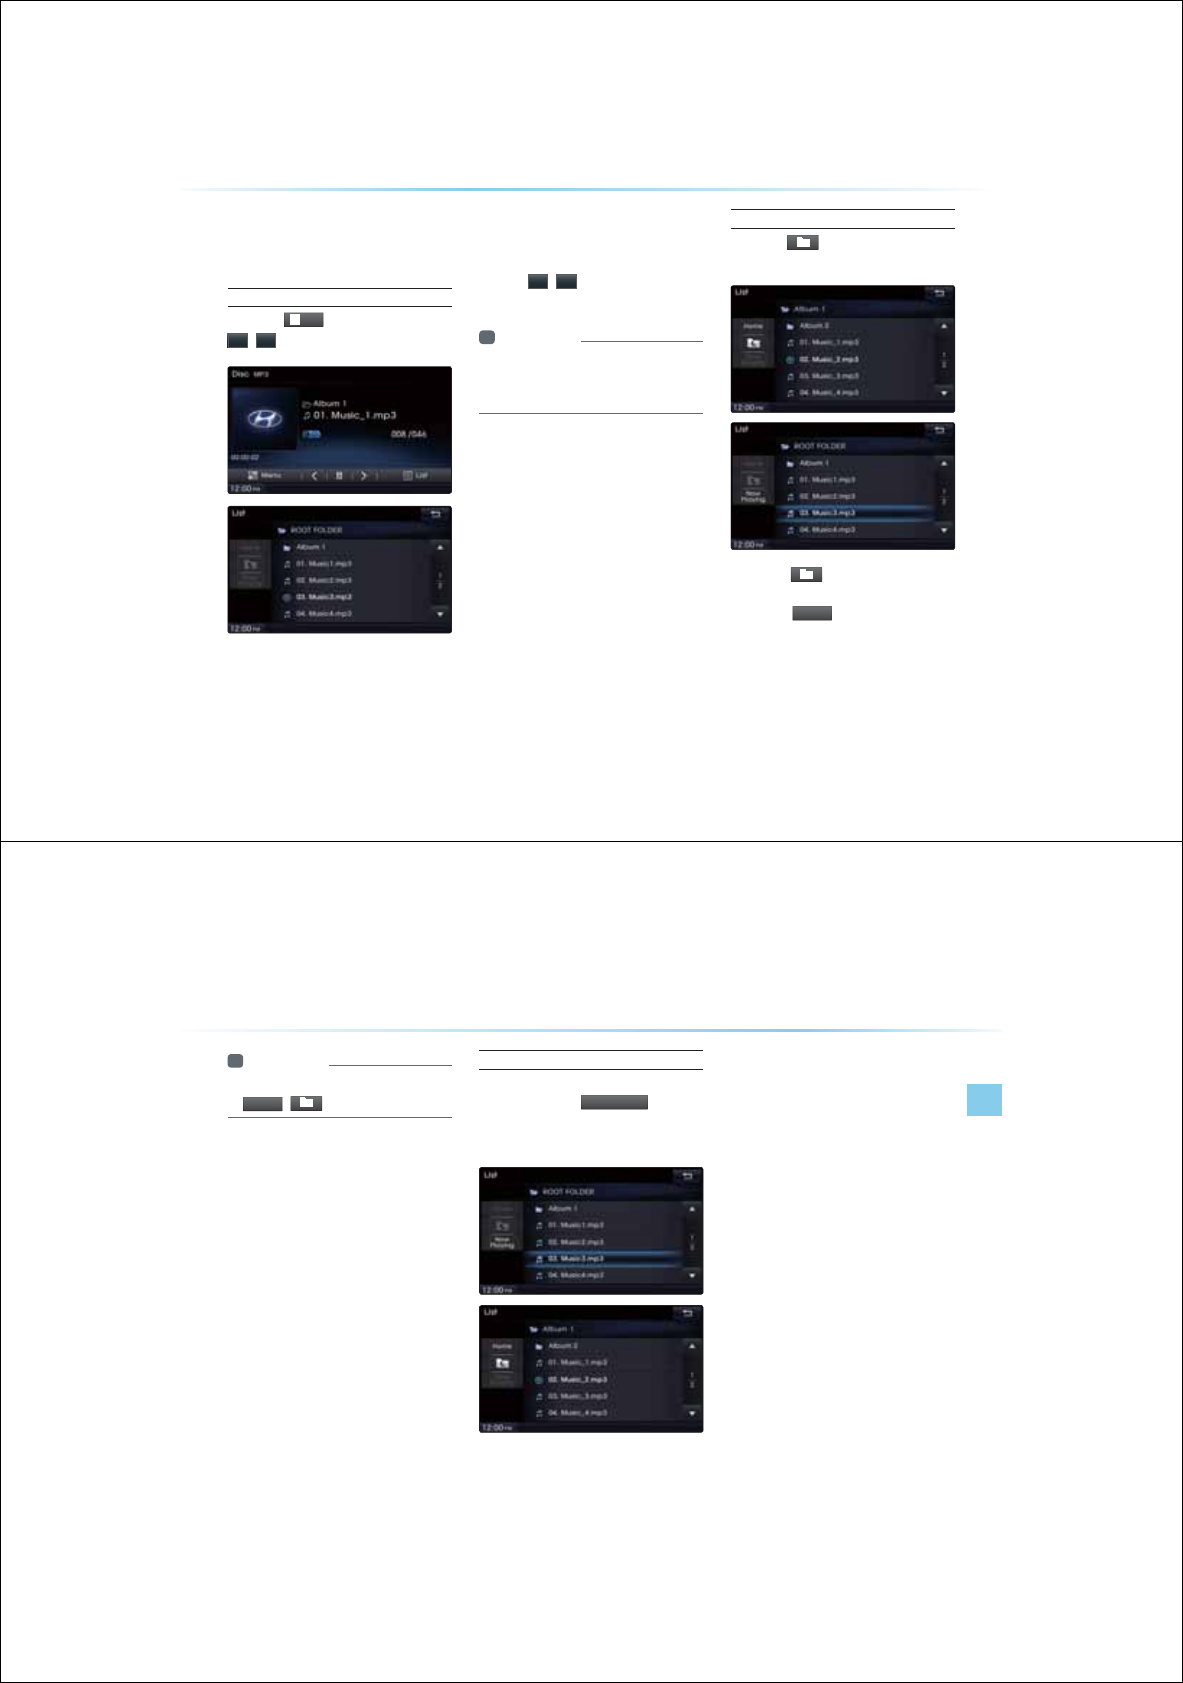
Moving between folders
Press the button ƙ Select folder
from the folder list
Pressing the button will move to the
folder one level above the current folder.
Pressing the
+R
P
H
button folder will move to
the root folder.
03&'0RGH
MP3 CD Mode
AV l 2-31
Information
У
+HJGTGCTGPQOQTGRCTGPHQNGTUDQJ
+RP
H
DQPUKNNDGKUCDNG
Returning to current location
While searching files within other
folders, press the
1
RZ3OD
\
LQ
J
button
to return to the currently playing file
screen.
2-32
86%0RGH
%HIRUHSOD\LQJD86%03
Before playing a USB MP3
Connect the USB device after turning on the engine. The USB device
may become damaged if it is already connected when the ignition is
turned on.
Files that are not standard format music/image files will not be played.
For MP3/WMA files, only music files with compression rates between 8Kbps
~ 320Kbps can be played.
Heed caution to static electricity when connecting/disconnecting external
USB devices.
Encoded MP3 Players will not be recognized when connected as an external
device.
When connecting an external USB device, the device may not properly rec-
ognize the USB is in some states.
Only products formatted with byte/sectors under 64Kbyte will be recognized.
This device recognizes USB devices formatted in FAT 12/16/32 file
formats. This device does not recognize files in NTFS file format.
Some USB devices may not be supported due to compatibility
issues.
Avoid contact between the USB connector with bodily parts/foreign
objects.
Repeated connecting/disconnecting of USB devices within short
periods of time may result in product malfunction.
Make sure to connect/disconnect external USB devices with the
audio power turned off.
The amount of time required to recognize the external USB device
may differ depending on the type, size, or file formats stored on the
USB. Such differences in required time are not indications of mal-
function.
The use of USB devices for purposes other than playing music and
image files is prohibited.
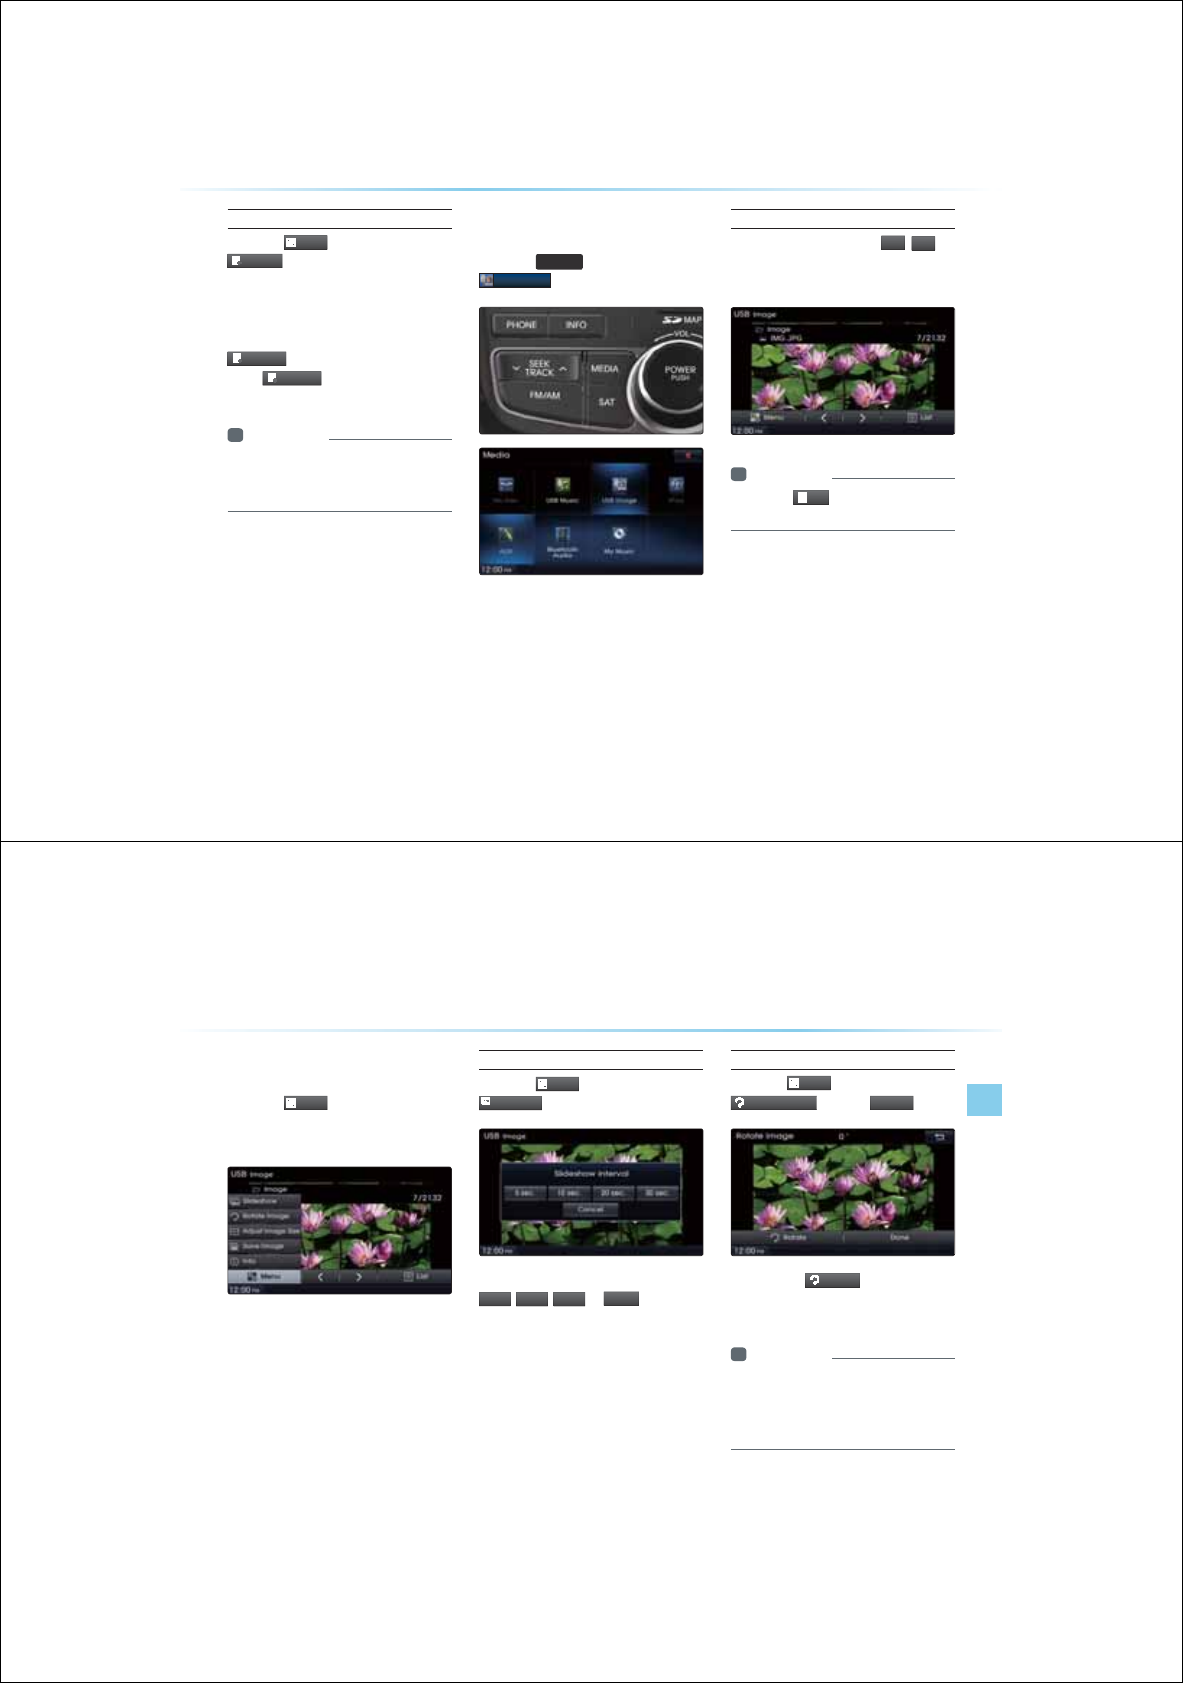
USB Mode
AV l 2-33
Do not use the USB I/F to charge batteries or USB accessories that
generate heat. Such acts may lead to worsened performance or
damage to the device.
The device may not recognize the USB device if separately pur-
chased USB hubs and extension cables are being used. Connect
the USB directly with the multimedia terminal of the vehicle.
When using mass storage USB devices with separate logical
drives, only files saved to the root drive can be played.
When application programs are installed to specific USBs, files may
not properly play.
The device may not operate normally if MP3 Players, cellular phones,
digital cameras, or other electronic devices (USB devices not recog-
nized as portable disk drives) are connected with the device.
Charging through the USB may not work for some mobile devices.
The device may not support normal operation when using a USB
memory type besides Metal Cover Type USB Memory.
The device may not support normal operation when using formats
such as HDD Type, CF, or SD Memory.
Upon playing iPods, please use a dedicated iPod
®
car cable.
Normal operations cannot be guaranteed when other cables are
being used.
The device will not support files locked by DRM (Digital Rights
Management.)
USB memory sticks used by connecting an Adaptor (SD Type or CF
Type) may not be properly recognized.
Only use Plug type connector products, as shown in the figure
below.
2-34
86%0RGH
Product Name Manufacturer
XTICK LG
BMK BMK Technology
SKY-DRV Sky Digital
TRANSCEND JetFlash Transcend
Sandisk Cruzer SanDisk
Micro ZyRUS ZyRUS
NEXTIK Digiworks
Information
У
2TQDNGOUJCQEETJTQIJUGQH7$GKEGUPQNKUGKJKPJG
CDQGCDNGCTGPQEQGTGDJGRTQECTTCP
USB MP3 Information and Precautions
Name Description
MP3 File
Specification Specification : MPEG1 AUDIO LAYER 3
Recommended
bit rates and
sampling frequency
Acceptable sampling frequency : 32, 44.1, 48 (KHz)
Acceptable bit rate : 32, 40, 48, 56, 64, 80, 96, 112,
128, 160, 192, 224, 256, 320 (Kbps)
96, 128, 192 Kbps fixed bit rate/44.1KHz
ID3 tag Supports ID3v1.0 and ID3v1.1, ID3v2.2, ID3v2.3,
ID3v2.4 ID3 tags
Detailed
Specifications
Maximum directory layers : 20 layers
Maximum length of folder name/file namev: 255Bytes
Supported characters for folder name/file name :
Alphanumeric characters, Korean standard character
set 2350 characters, Simplified Chinese 4888 charac-
ters
Maximum number of folders which can be stored onto
one USB : 2000 folders (including ROOT)
Maximum number of files which can be stored onto
one USB : 8000
Information
У
+PECUGUJCCTGPQHKGDKTCGUJGRNCKOGOCPQDGRTQR
GTNKURNCG
USB Mode
AV l 2-35
%DVLF0RGH6FUHHQ
Name Description
Mode Displays currently operating mode
File Index Shows the current file/total files within the USB
Repeat/
Shuffle/Scan
From Repeat All/Repeat One Song/Repeat Folder/Shuffle
Folder/Shuffle All/Folder Scan/Scan All, displays the currently
operating function
Play Time Displays the current play time/total play time
Folder Name Displays folder Displays the name of the current file
File Name Displays the name of the current file
Menu
Displays Copy, Repeat, Shuffle, Scan and Info On (Info Off) menus
List Moves to the list screen
2-36
Name Description
Copy Copies the currently playing file into My Music
Repeat Repeats the current file (each time the button is pressed,
changes in order of Repeat Once Ċ Repeat Folder Ċ Off)
Shuffle Plays files in random order (each time the button is pressed,
changes option in order of Shuffle Folder Ċ Shuffle All Ċ Off)
Scan
У
Scans the beginning parts of USB files
(approx. 10 seconds per file)
У
Each time the button is pressed, changes option in order of
Folder Scan Ċ Scan All Ċ Off)
Info Off
(Info On)
У
Info Off : shows folder name/file name
У
Info On : shows folder name, file name, title, artist, and album info
Previous File
У
When the play time is under 2 seconds : Moves to the previous file
У
When the play time is over 2 seconds : Plays the current file from
the beginning
Play/Pause Plays/pauses the current file
Next File Moves to the next file
86%0RGH
86%0RGH
USB Mode
AV l 2-37
USB Image Mode
Name Description
Mode Displays currently operating mode
Folder Name Displays folder name where image is located
File Name Name of image file
File Index
Shows the current image file/total image files within the USB
Menu
Displays Slideshow, Rotate Image, Adjust Image Size, Save Im-
age, and Info menus (Press the button again to hide the buttons)
Previous Image Shows previous image
Next Image Shows next image
List Moves to the list screen
Slideshow View images as slideshow in 5, 10, 20, 30 second intervals
Rotate Image Rotate image in clockwise direction
Adjust Image Size
Enlarge/reduce (zoom-in/zoom-out) image size
Save Image Add image as frame screen displayed when the system power
is turned off
Info
Shows the file name, resolution and file type of current image
2-38
86%0RGH
0HQX/LVW6FUHHQ
Name Description
Folder Name Folder name of current list
Current Song Shows current file name highlighted
Back button Converts to basic mode screen
Previous list
Moves to the previous list
Next list Moves to the next list
List page Shows current file list page/total number of pages
Music Shows the Music list
(Disabled when Music list does not exist)
Image Shows the Image list
(Disabled when Image list does not exist)
Home Folder Moves to home folder
Parent Folder Moves to the parent folder
Now Playing
When moving to a different list screen, moves to the list page
where the current file is located
(Becomes disabled when the current list includes the current file)
USB Mode
AV l 2-39
6WDUWLQJ86%0XVLF0RGH
Press the
0(',$
key
ƙ Press
86%0XVLF
If the USB is not connected, then the
86%0XVLF
button will be disabled.
Information
У
1PEGC7$KUEQPPGEG7$/UKE
OQGKNNQRGTCGCQOCKECNN
У
+HCRTGKQUNRNCG7$KUTGEQPPGEG
JGPJGUQPICHGTJGOQUTGEGPN
RNCGUQPIKURNCG*QGGTKHCKHHGT
GP7$KUEQPPGEGQTJGHKNGKPHQTOC
KQPKJKPJG7$CUEJCPIGJGPJG
7$HKNGQTGTKPHQTOCKQPKUGNGGCP
KNNUCTRNCKPIHTQOJGHKTUUQPIKJKP
JG7$
Playing USB Music
У
Press the
Ԣ
button to play the USB Music.
У
Press the
OO
button to pause USB Music.

2-40
Searching USB Music Files
While Playing ƙPress the
,
!
buttons or the
6((.
75$&.
Ѧ
ѧ
key to play the
previous/next file.
У
Pressing and holding the
6((.
75$&.
Ѧ
ѧ
keys
(over 0.8 seconds) will rewind or fast-
forward the current file.
У
While the
6((.
75$&.
Ѧ
ѧ
key is being pressed,
the track will rewind or fast-forward at high
speeds. Once the key is released, the USB
Music will begin playing at normal speed.
Information
У
6JG
!
DQPUKURNCGQPJG
UETGGPCNNQQQUGNGEJGRTGKQU
PGHKNG6JGUGDQPUKNNPQTGKPQT
HCUHQTCTJGHKNG
8VLQJWKH0HQX%XWWRQV
Press the
0HQX
button to set the
Copy, Repeat, Shuffle, Scan, Info On
(Info Off) menus.
Copy
Press the
0HQX
button ƙ Press
&
R
S\
The currently playing file is copied and saved
in My Music.
86%0RGH
USB Mode
AV l 2-41
Information
У
%QRKGCPUCGHKNGUECPDGRNCG
KJKP//UKEOQG
Repeat
Press the
0HQX
button ƙ Press
5HSHDW
Each time the button is pressed, the option is
changed from Repeat Once Ċ Off.
Information
У
4GRGC1PEGTGRGCUJGETTGPHKNG
У
4GRGCQNGTTGRGCUCNNHKNGUKPETTGP
HQNGT
Shuffle
Press the
0HQX
button ƙ Press
6KXIIOH
Each time the button is pressed, the option is
changed from Shuffle Folder Ċ Shuffle All Ċ
Off.
Information
У
JHHNGQNGT2NCUHKNGUKJKPJGET
TGPHQNGTKPTCPQOQTGT
У
JHHNGNN2NCUHKNGUKJKPJG7$KP
TCPQOQTGT
Scan
Press the
0HQX
button ƙ Press
6FDQ
Each time the button is pressed, the option is
changed from Folder Scan ĊScan All Ċ Off.
Information
У
QNGTECPGCTEJGUHKNGUKJKPJGET
TGPHQNGT
У
ECPNNECPUHKNGUKJKPJG7$KP
TCPQOQTGT
2-42
Info On/ Info Off
Press the
0HQX
button ƙ Press
,QIR2Q
The screen display can be set differently
depending on user selection.
The title, artist, and album info are addition-
ally displayed and the button is changed to
,QIR2II
.
Press
,QIR2II
to restore the previous
information display setting.
Information
У
6JGKNGCTKUCP CNDOKPHQCTGKU
RNCGQPNJGPUEJKPHQTOCKQPKU
TGEQTGKJKPJG/2HKNG+&CI
6WDUWLQJ86%,PDJH0RGH
Press the
0(',$
key ƙ Press
86%,PDJH
Searching USB Image Files
While playing ƙPress the
,
!
buttons to view the previous/next
image
Information
У
2TGUJG
/LV
W
DQPQKGJGNKUQH
7$KOCIGU
86%0RGH
USB Mode
AV l 2-43
8VLQJWKH0HQX%XWWRQV
Press the
0HQX
button to set the
Slideshow, Rotate Image, Adjust Image
Size, Save Image and Info menus.
Slideshow Interval
Press the
0HQX
button ƙ Press
6OLGHVKRZ
Image slideshow intervals can be set at
VHF
,
VHF
,
VHF
, or
VHF
intervals.
Rotating Image
Press the
0HQX
button ƙ Press
5RWDWH,PD
J
H
ƙ Press
'RQH
Each time the
5RWDWH
button is pressed,
the image is rotated from 0˚ Ċ 90˚ Ċ 180˚ Ċ
270˚ degrees.
Information
У
4QCGKOCIGUCTGPQUCG
У
6JGKOCIGKNNTGUQTGKUQTKIKPCNCPING
JGPTGTPKPIQKCHGTKGKPICKHHGT
GPKOCIG
2-44
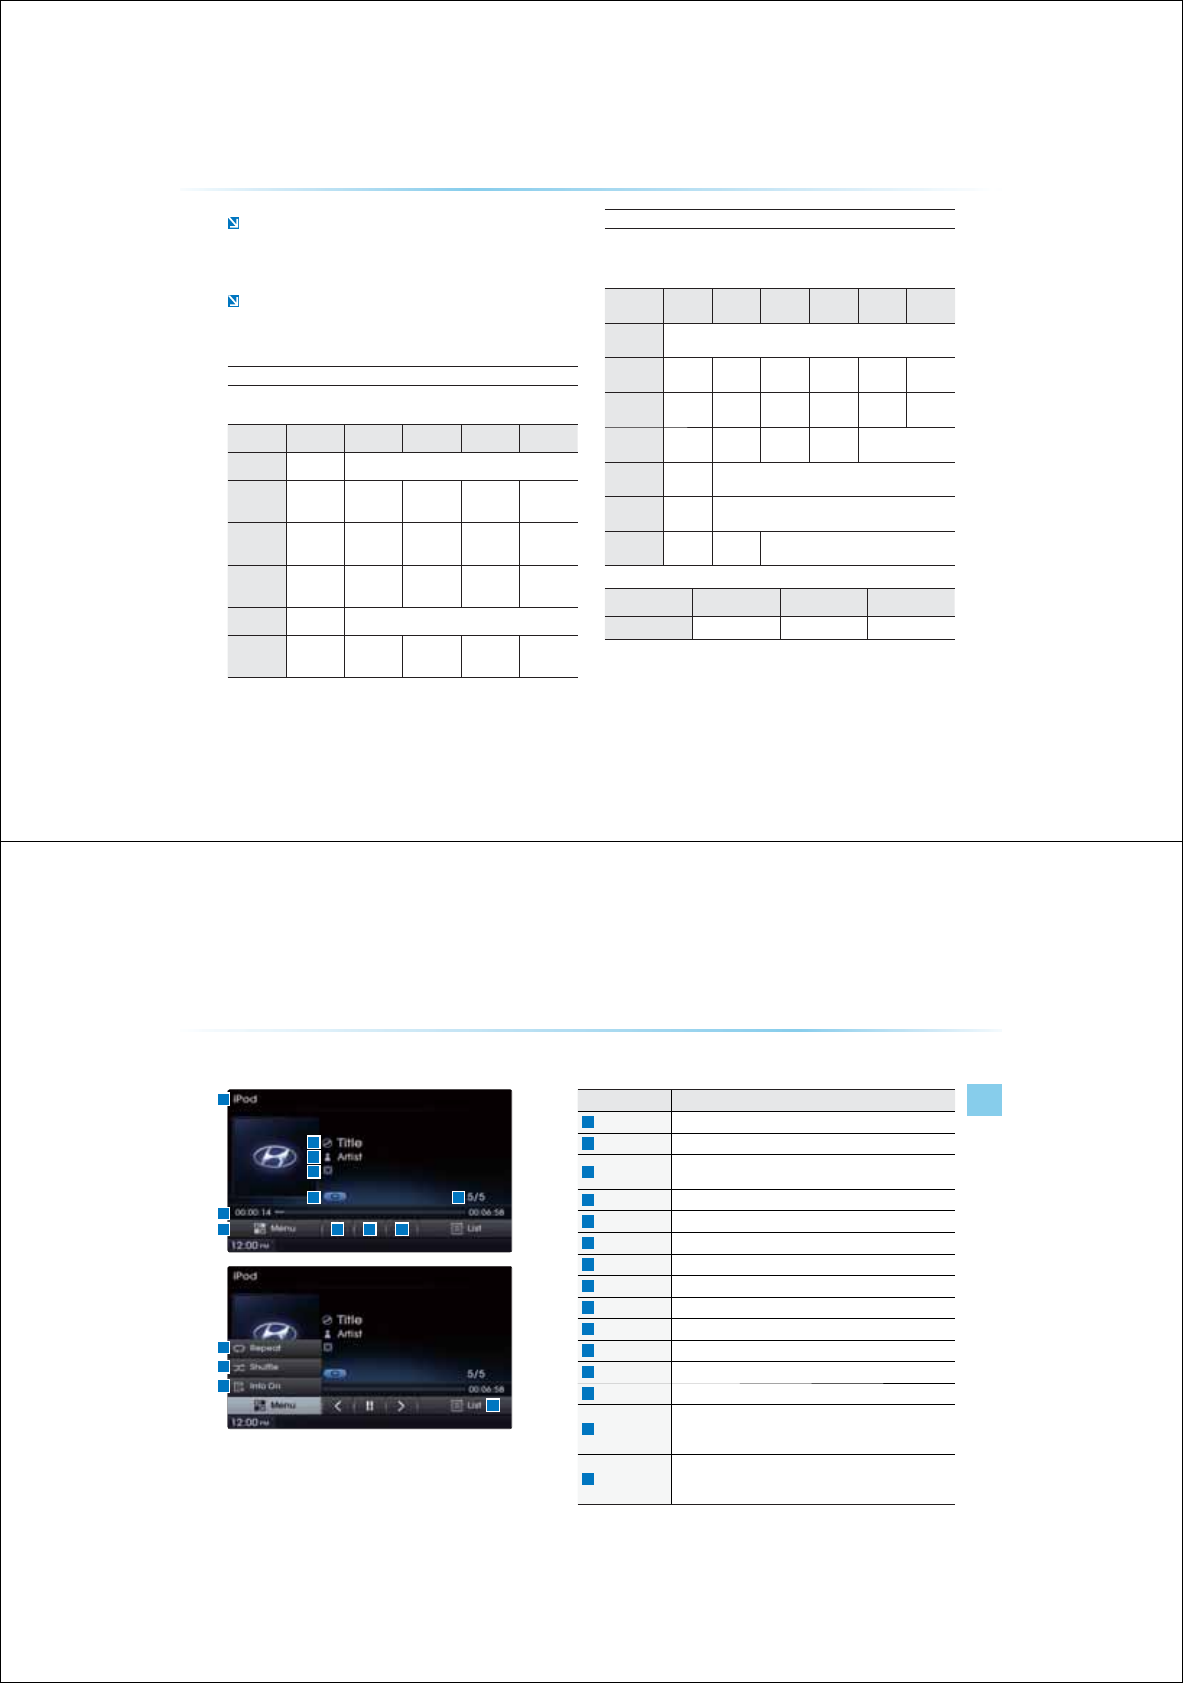
Adjusting Image Size
Press the
0HQX
button ƙ Press
$GMXVW,PDJH6L]H
ƙ Press
'
RQH
Press the
,
buttons to enlarge or
reduce the image size. The scale can be
changed from 1/4, 1/2, 1x, 2x, to 4x.
Information
У
PNCTIGQTTGEGKOCIGUCTGPQ
CG6JGKOCIGKNNTGUQTGKUQTKIKPCN
UKGJGPTGTPKPIQKCHGTKGKPICKH
HGTGPKOCIG
У
+HJGKOCIGECPPQDGHNNKURNCGQP
JGUETGGPQEJJGKOCIGQOQGJG
UETGGP
Saving Image
Press the
0HQX
button ƙPress
6DYH,PDJH
Information
У
QTGCKNUQPUKPIJGRKETGHTCOG
TGHGTQJG2KETGTCOGGKPIUKJKP
GR
Viewing Info
Press the
0HQX
button ƙ Press
,QIR
This menu is used to check image informa-
tion, such as the image resolution and file
type.
86%0RGH
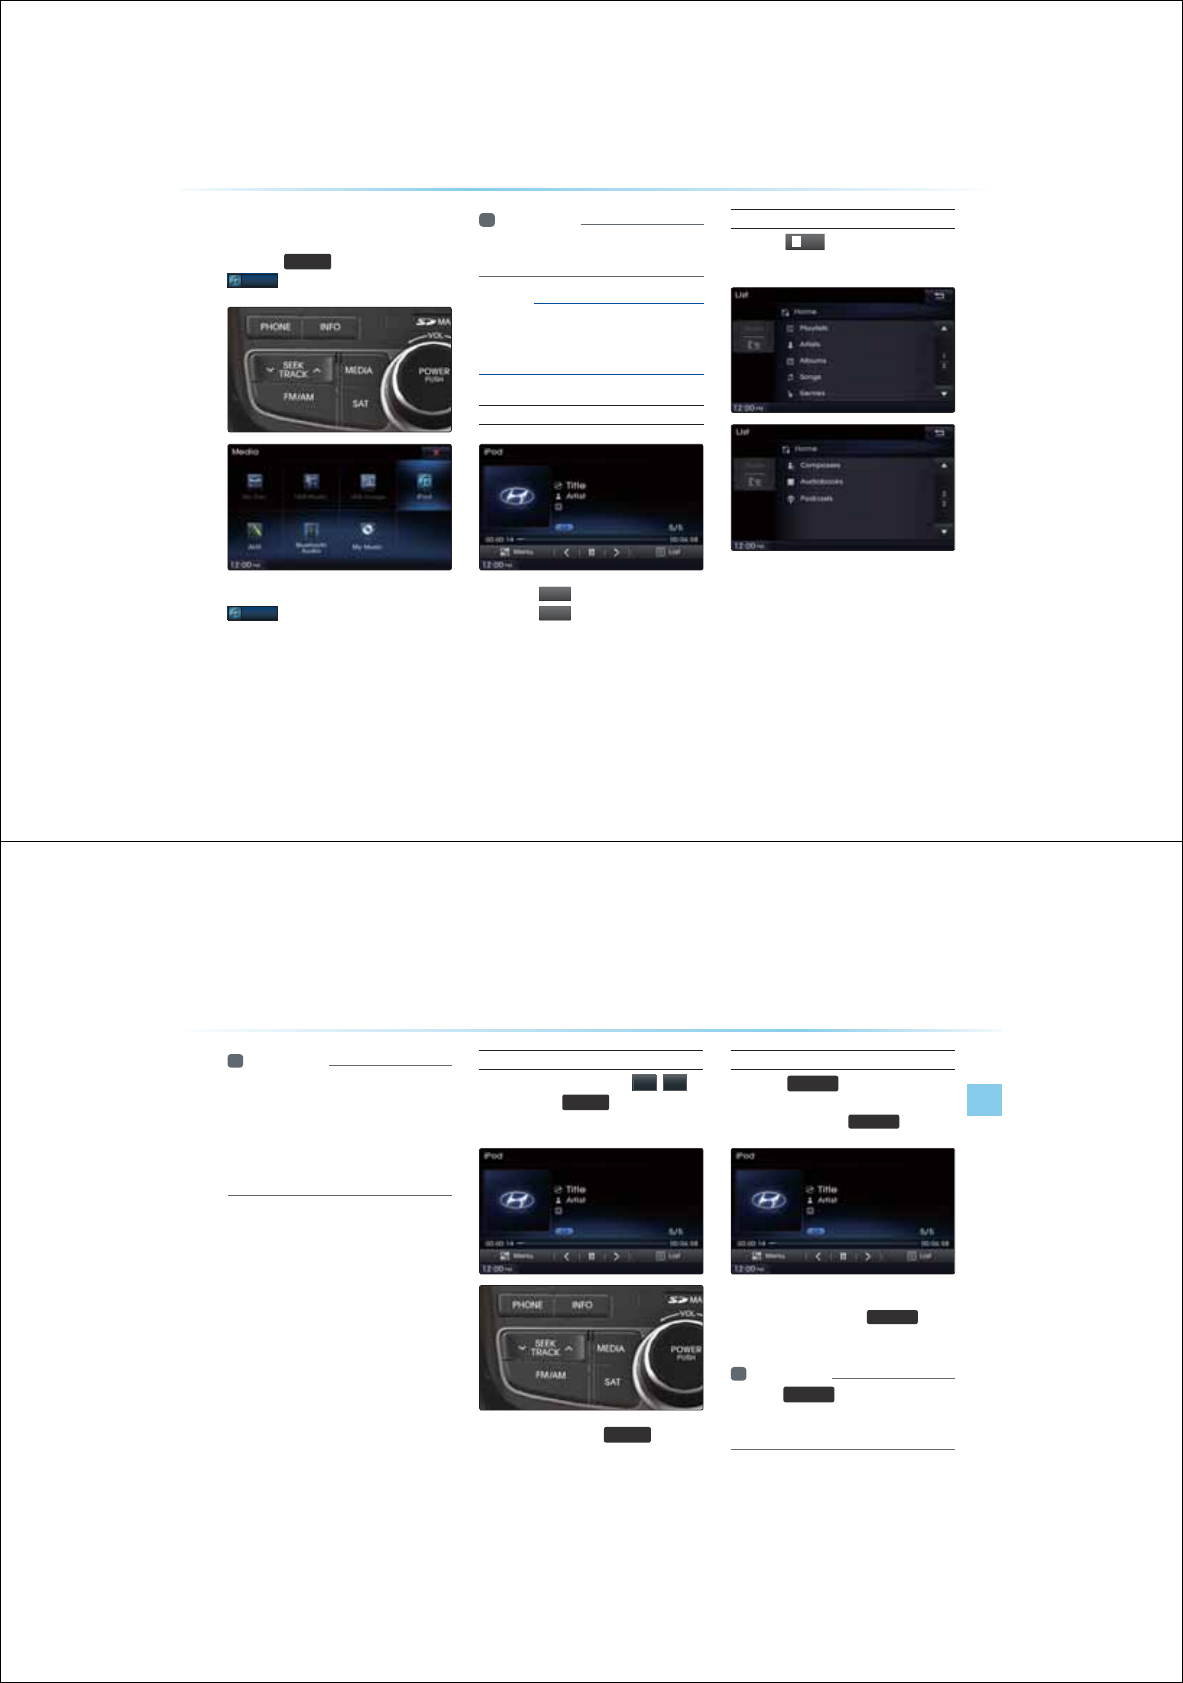
iPod
®
Mode
AV l 2-45
L3RG
q
0RGH
8VLQJL3RG
p
'HYLFHV
iPod® is a registered trademark of Apple Inc.
iPod® mode will not operate if the connected iPod® cannot be rec-
ognized due to operation of unsupported versions that do not sup-
port related protocols, iPod® abnormalities, or iPod® device defects.
Some iPods with unsupported communication protocols may not
properly operate in the Navigation system.
For fifth generation iPod® Nano devices, the iPod® may not be recog-
nized when the battery level is low. Please charge the iPod® for use.
Search/play orders shown within the iPod® device may differ with the
orders shown within the Navigation system.
If the iPod® malfunctions due to an iPod® device defect, reset the
iPod® and try again. (To learn more, refer to your iPod® manual)
For some iPod® Touch and iPhone devices, connecting Bluetooth
®
while the iPod® is operating may result in discontinued iPod® sound.
When such devices with Bluetooth
®
support is connected, this prob-
lem occurs as the sound source is changed from the Dock
Connector (USB connector cable) to Bluebird (Bluetooth
®
Module).
To listen to the iPod® sound, re-connect the USB cable or exit then
re-enter iPod® mode.
In order to use the iPod® while operating the keys, you must use a
dedicated iPod® cable. (the cable that is supplied when purchasing
iPod®/iPhone products) During ACC ON state, connecting the iPod®
through the iPod cable (the cable that is supplied when purchasing
iPod®/iPhone products), will charge the iPod® through the head unit.
ü The use of genuine iPod® cables supplied by Apple is recom-
mended. (The use of other products may result in noise or abnor-
mal operation)
When connecting with the iPod® cable, make sure to fully insert the
jack to prevent communication interference. If the iPod® is connected
to the vehicle while it is playing, a high pitch tone may sound for
about 1~2 seconds immediately after connection. If possible, con-
nect the iPod® to the vehicle with the iPod® stopped/paused.
Within iPhones, streaming audio and iPod® control may occasionally
conflict. If problems persist, remove the iPhone and connect again.
2-46
L3RG
q
0RGH
Some iPod® versions may not sync with the system.
then the system may not properly restore the previously operated
mode. (For iPads, battery charging is not supported.)
Applications that are not exclusively used as iPod®Applications within
iPhone/iPod® Touch devices are not supported.
Steps upon Initial Connection
Search Steps may differ depending on the type of iPod® device.
Supported iPod® Devices
У
Operation is supported and Apple Inc. certified : ÿ
У
Operation is supported but uncertified :Ć
1 Step 2 Step 3 Step 4 Step 5 Step
Play List Play List Play List name (category is same as iPod
®
)
Artist Artist Artist Album
Name
Song
Name
Album Album Album
Name
Song
Name
Genre Genre Genre
Name
Artist
Name
Album
Name
Song
Name
Song Song Song Name
Composer Composer Composer
Name
Album
Name
Song
Name
Device/
Generation 1st 2st 3st 4st 5st 6st
iPod
®
Mini Not Supported
iPod
®
Shuffle ÿÿÿÿÿÿ
iPod
®
Nano ÿÿÿÿÿÿ
iPod
®
Touch ÿÿÿÿNot Released
iPod
®
Classic ÿNot Released
iPod
®
With
video ÿNot Released
iPad ĆĆ Not Released
Device/Type 3GS 4G 4S
iPhone Not Released O Ć
iPod
®
Mode
AV l 2-47
%DVLF0RGH6FUHHQ
Name Description
Mode Displays currently operating mode
File Index Shows the current file/total files within the iPod
®
Repeat/Shuffle From Repeat Once/Shuffle Category/Shuffle Random, displays
the currently operating function
Play Time Displays the current play time/total play time
Title Displays name of current title
Artist Info Artist name
Album Info Album name
Menu Displays Repeat, Shuffle, and Info On (Info Off) menus
Previous File Moves to the previous file
Play/Pause Plays/pauses the current file
Next File Moves to the next file
List Moves to the list screen
Repeat Repeats the currently playing file.
Shuffle
Plays files in random order (each time the button is pressed,
changes option in order of Shuffle Category Ċ Shuffle Album Ċ
Off)
Info Off (Info on)
Changes the display method between Info Off/Info On
У
Info Off : Shows title, artist, and album Info
У
Info On : Shows title, artist, album, genre, and composer info
2-48
L3RG
q
0RGH
6WDUWLQJ0RGH
Press the
0(',$
key ƙ Press
L3RG
If the iPod
®
is not connected, then the
L3RG
button will be disabled.
Information
У
1PEGCPK2Q
KUEQPPGEGK2Q
OQG
KNNQRGTCGCQOCKECNN
NOTICE
УSome iPods with unsupported com-
munication protocols may not properly
operate in the Navigation system.
Playing iPod
®
У Press the
Ԣ
button to play the iPod
®
.
У Press the
OO
button to pause the iPod
®
.
Searching iPod
®
Press the
/LV
W
button to display the
initial iPod® list screen.
When searching an iPod
®
, it is possible to
search by playlists, artists, albums, songs,
genres, composers, audiobooks, and
Podcasts.
iPod
®
Mode
AV l 2-49
Information
У
+HJGUGCTEJOQGKUCEEGUUGJKNGRNC
KPICUQPIJGOQUTGEGPN UGCTEJG
UGRKUKURNCG
У
GCTEJUGRURQPKPKKCNEQPPGEKQP
OCKHHGTGRGPKPIQPJGRGQHK2Q
GKEG
Selecting iPod
®
File
While playing ƙ Press the
,
!
buttons or the
6((.
75$&.
Ѧ
ѧ
key to play the
previous/next file
Pressing and holding the
6((.
75$&.
Ѧ
ѧ
keys (over
0.8 seconds) will rewind or fast-forward the
current song.
Searching iPod Files
Press the
781(
Ѧ
ѧ
key ƙ Search
files ƙ Once the desired file name is
displayed, press the
(17(5
key
When searching files, the file number is dis-
played in blue. Pressing the
(17(5
key will
play the corresponding file.
Information
У
+HJGe
781(
Ѧ
ѧ
MGKUPQRTGUUGKJKP
UGEQPUQHUGCTEJKPIHKNGUJGHKNGKPHQHQT
JGETTGPTCEMKUTGUQTG
2-50
L3RG
q
0RGH
8VLQJWKH0HQX%XWWRQV
Press the
0HQX
button to set the
Repeat, Shuffle, and Info On (Info Off)
menus.
Repeat
Press the
0HQX
button ƙ Press
5H
S
HD
W
Information
У
6JGETTGPNRNCKPIHKNGKUTGRGCG
У
2TGUUJG
5
H
S
HD
W
DQPCICKPQTP
QHHTGRGC
Shuffle
Press the
0HQX
button ƙ Press
6KXIIOH
Information
У
CEJKOGJG
6KXIIOH
DQPKURTGUUG
JGQRKQPKUEJCPIGHTQOJHHNG%CGIQT
ĊJHHNGNDOĊ1HH
У
JHHNG%CGIQT2NCUHKNGUKJKPJGET
TGPECGIQTKPTCPQOQTGT
У
JHHNGNDO2NCUHKNGUKJKPJGETTGP
ECGIQTKPTCPQOQTGT
Info On/Info Off
Press the
0HQX
button ƙ Press
,QIR2Q
The screen display can be set differently
depending on user selection.
The title, artist, and album info are addition-
ally displayed and the button is changed to
,QIR2II
.
Press
,QIR2II
to restore the previous dis-
play setting.
AUX Mode
AV l 2-51
6WDUWLQJ0RGH
Press the
0(',$
key ƙ Press
$8;
Information
У
+HCPGGTPCNGKEGEQPPGEQTKUEQP
PGEGKJJG7GTOKPCNJGP7
OQGKNNCQOCKECNNQRGTCG1PEGJG
EQPPGEQTKUKUEQPPGEGJGRTGKQU
OQGKNNDGTGUQTG
У
7OQGECPDGUG QPNJGPCP
GGTPCNCKQRNCGTECOEQTGTECT
%4GEJCUDGGPEQPPGEG
У
6JG7QNOGECPDGEQPTQNNGUGRC
TCGNHTQOQJGTOQGU
NOTICE
У
Connecting a connector jack to the AUX
terminal without an external device will
convert the system to AUX mode, but only
output noise. When an external device is
not being used, also remove the connector
jack.
УWhen the external device power is con-
nected to the power jack, playing the
external device may output noise. In
such cases, disconnect the power con-
nection before use.
&RQQHFWLQJDQ([WHUQDO
'HYLFH
External AUDIO players can be played
through a dedicated cable. The position of the
AUX jack is at the top of the gear box located
between the driver and passenger seats.
$8;0RGH
2-52
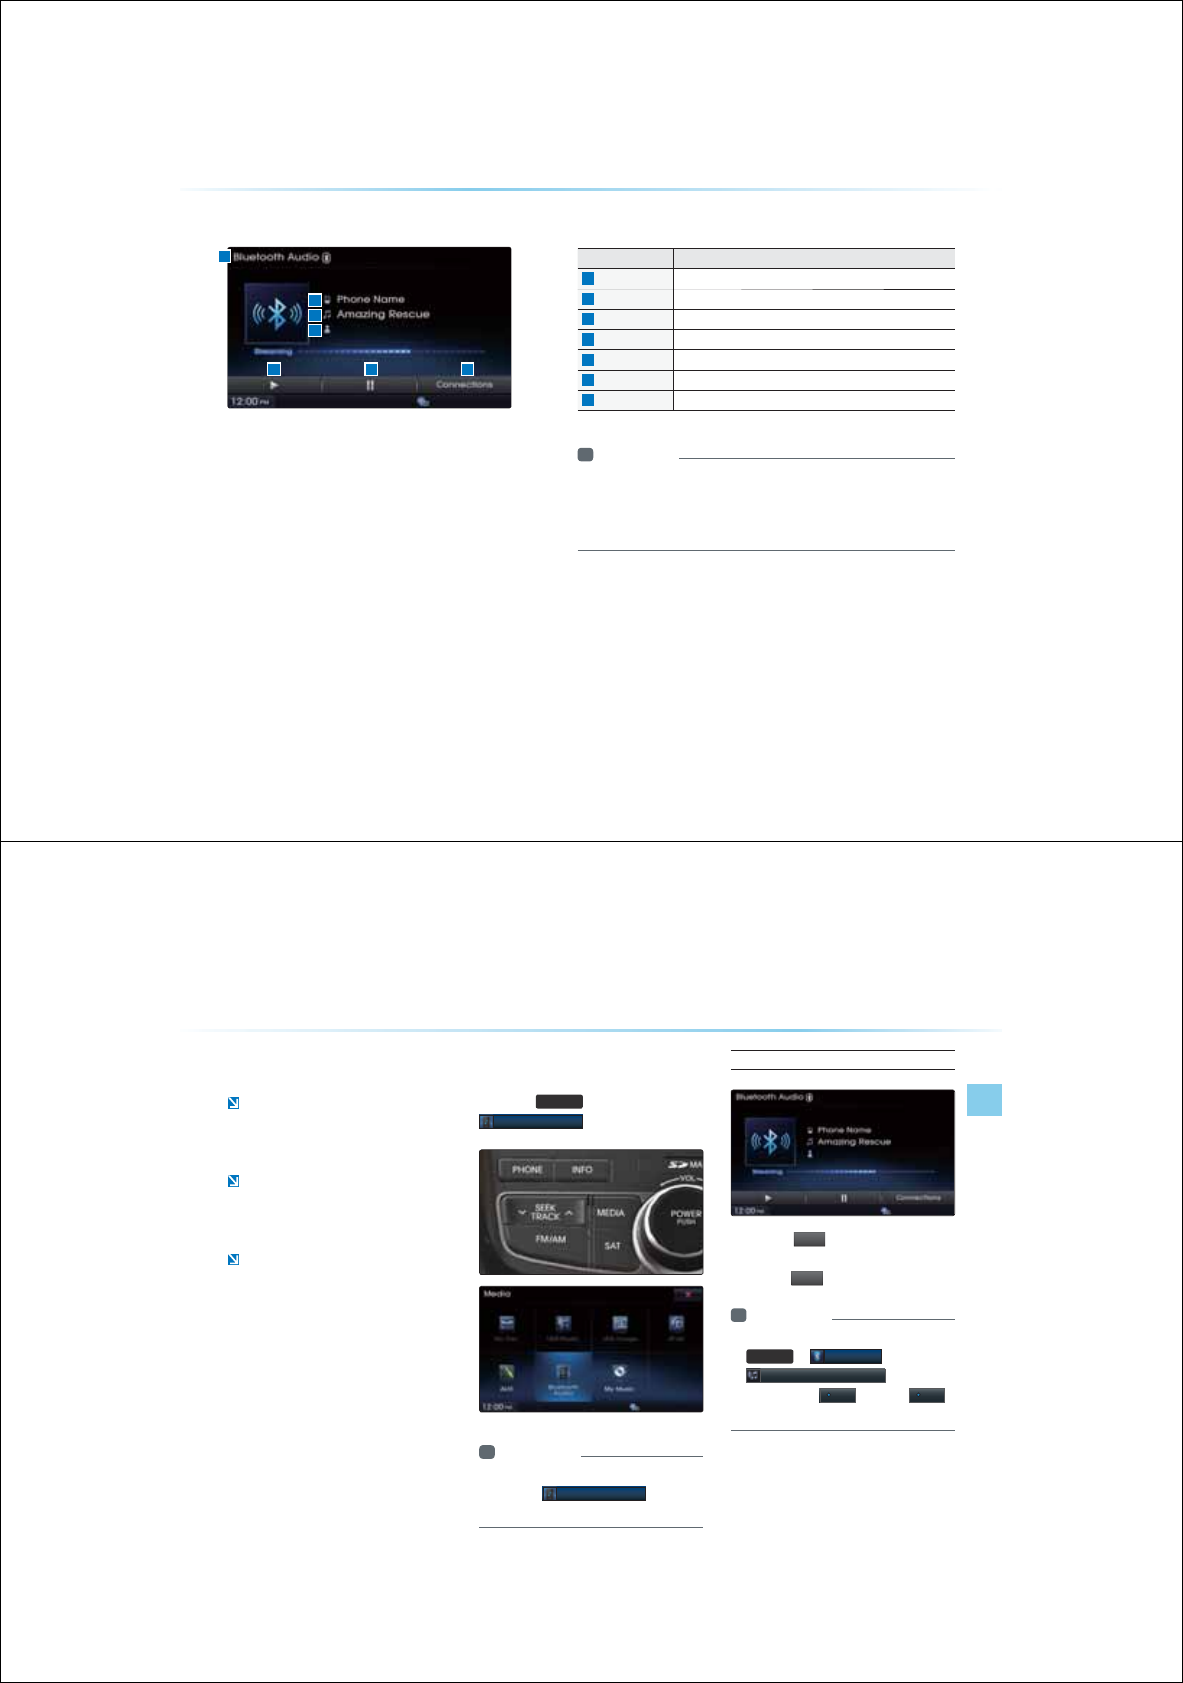
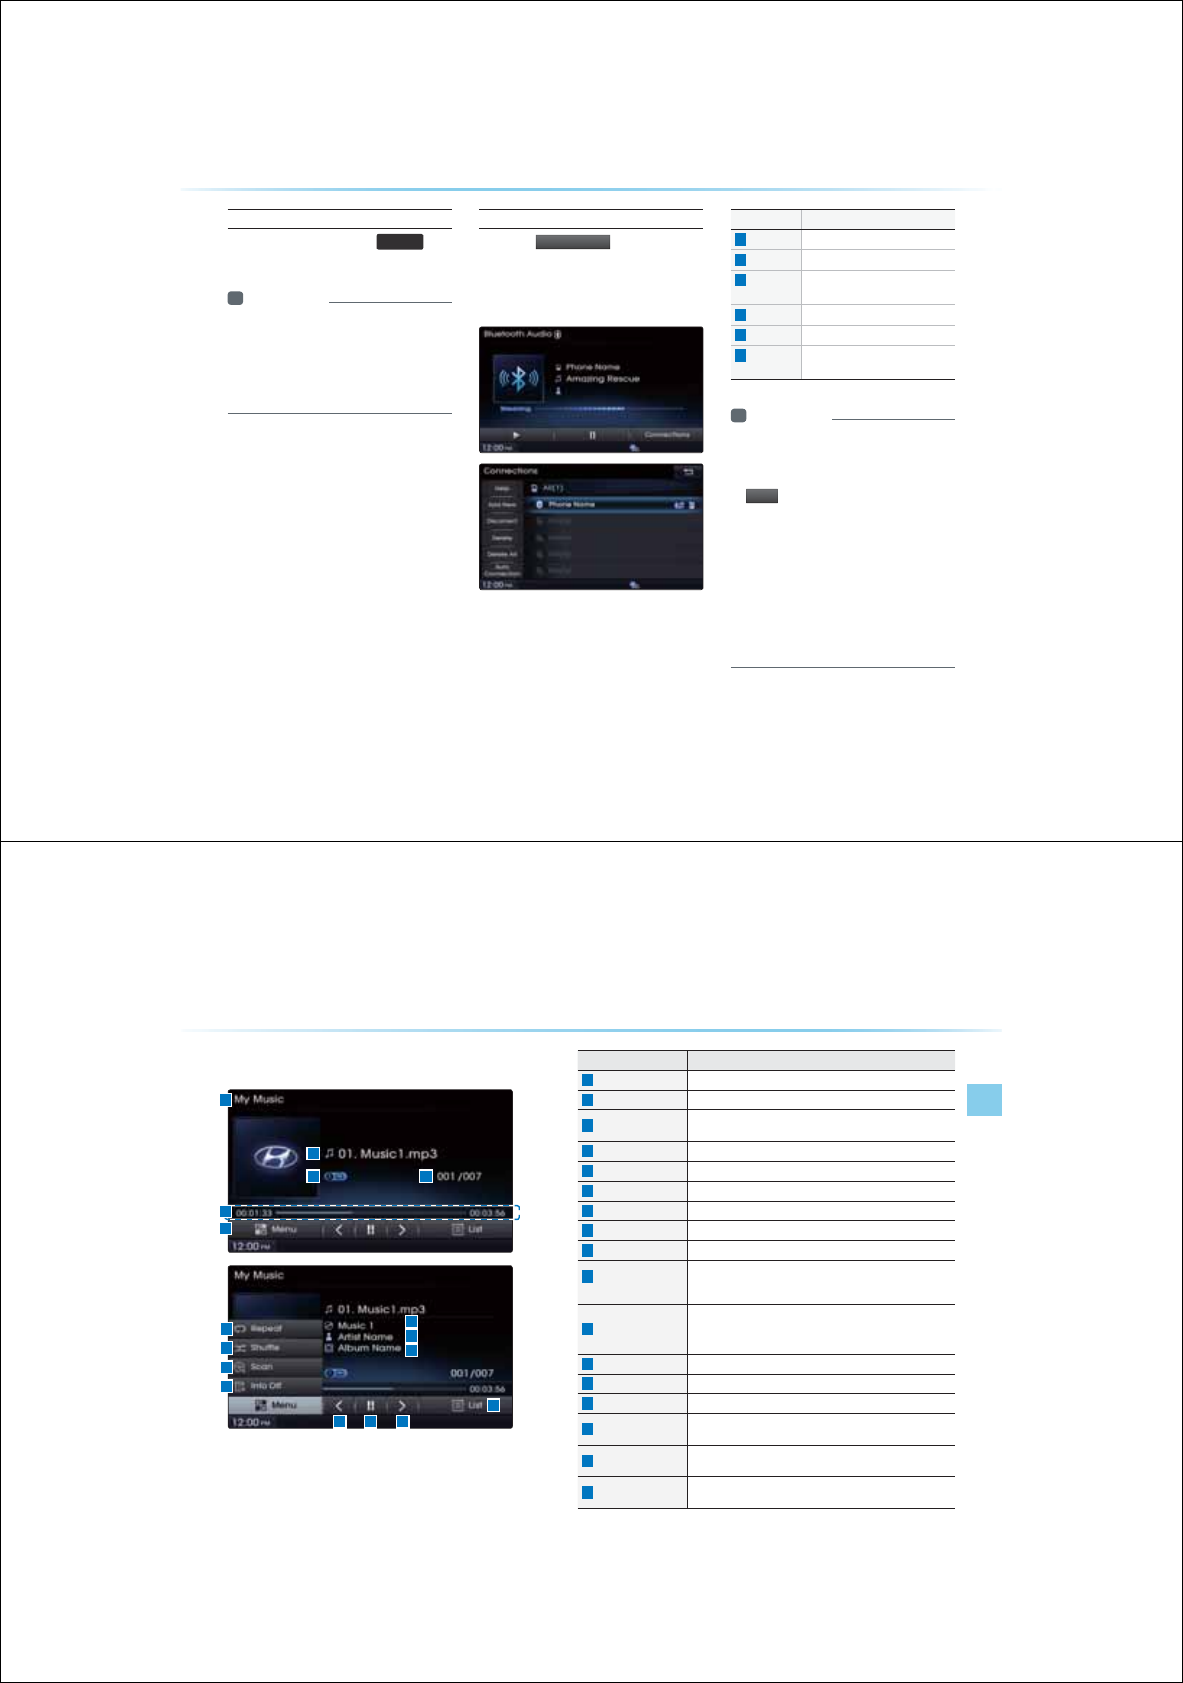
%DVLF0RGH6FUHHQ
%OXHWRRWK
q
$XGLR0RGH
Name Description
Mode Displays currently playing mode
Phone Name Displays name of connected phone
Title Name of current song
Artist Info Name of current artist
Play Plays Bluetooth
®
Audio
Pause Pauses Bluetooth
®
Aaudio
Connections Displays the Connections screen
Information
У
6JGKNGCTKUKPHQOC PQDGURRQTGKPUQOGOQDKNGRJQPGUJGP
PQURRQTGCUODQNKNNDGKURNCG
У
6JGRNCRCUGHGCTGOCQRGTCGKHHGTGPNGRGPKPIQPJGOQDKNG
RJQPG
Bluetooth
®
Audio Mode
AV l 2-53
8VLQJ%OXHWRRWK
p
$XGLR
Bluetooth
®
Audio Mode can be used only
when a Bluetooth
®
phone has been con-
nected.
While Bluetooth
®
Audio is playing, if the
Bluetooth
®
phone is connected, then the
music will also stop.
Bluetooth
®
streaming audio may not be
supported in some mobile phones.
6WDUWLQJ0RGH
Press the
0(',$
key ƙ Press
%OXHWRRWK$XGLR
Information
У
+HJG$NGQQJ
GKEGKUPQEQPPGEG
JGPJG
%OXHWRRWK$XGLR
DQPKNN
DGKUCDNG
Playing Bluetooth
®
Audio
У
Press the
Ԣ
button to play files saved
within the Bluetooth
®
phone.
У
Press the
OO
button to pause the file.
Information
У
+HJG$NGQQJ
CKQQGUPQRNC
6(783
ƙ
%OXHWRRWK
ƙ
6WUHDPLQJ$XGLR6HWWLQJ
ƙ
+HJG
QRKQPKUUGQ2II EJCPIGQ2Q
CPTCICKP
2-54
Selecting Bluetooth
®
Audio
While playing
ƙ Press the
6((.
75$&.
Ѧ
ѧ
key
ƙ Select the previous/next file
Information
У
6JGKNGCTKUKPHQOCPQDGURRQTG
KPUQOGOQDKNGRJQPGUJGPPQUR
RQTGCUODQNKNNDGKURNCG
У
6JGRNCRCUGHGCTGOCQRGTCGKHHGT
GPNGRGPKPIQPJGOQDKNGRJQPG
Setting Connection
Press the
&
RQQHFWLRQ
V
button to add
a new Bluetooth® phone, connect/
disconnect, delete, delete all, or view
the Help section.
Name Description
Help
Displays Bluetooth® Help screen
Add New Pair a new Bluetooth
®
device
Connect/
Disconnect
Connect or disconnect a
Bluetooth
®
device
Delete
Delete a paired Bluetooth
®
device
Delete All
Delete all paired Bluetooth
®
devices
Auto
Connection
Set Bluetooth
®
phone Auto Con-
nection upon starting car ignition
Information
У
+HOUKEKUPQGRNCKPIHTQOQTOQDKNG
GKEGCHGTEQPGTKPIQUTGCOKPICKQ
$NGQQJ
KQ OQGRTGUUKPIJG
Ԣ
DQPQPEGOCDGIKPOQGRNC
%JGEMQUGGJGJGTOUKEKURNCKPI
HTQOJG$NGQQJ
GKEGCHGTEQPGTKPI
QUTGCOKPICKQOQG6JGTGCOKPI
CKQHGCTGOCPQDGURRQTGKP
UQOGOQDKNGRJQPGU
У
QTOQTGKPHQTOCKQPQPOQDKNGRJQPG
EQORCKDKNKKUKJG*PCK/QQTGD
UKGJRJPCKUCEQO
%OXHWRRWK
q
$XGLR0RGH
My Music Mode
AV l 2-55
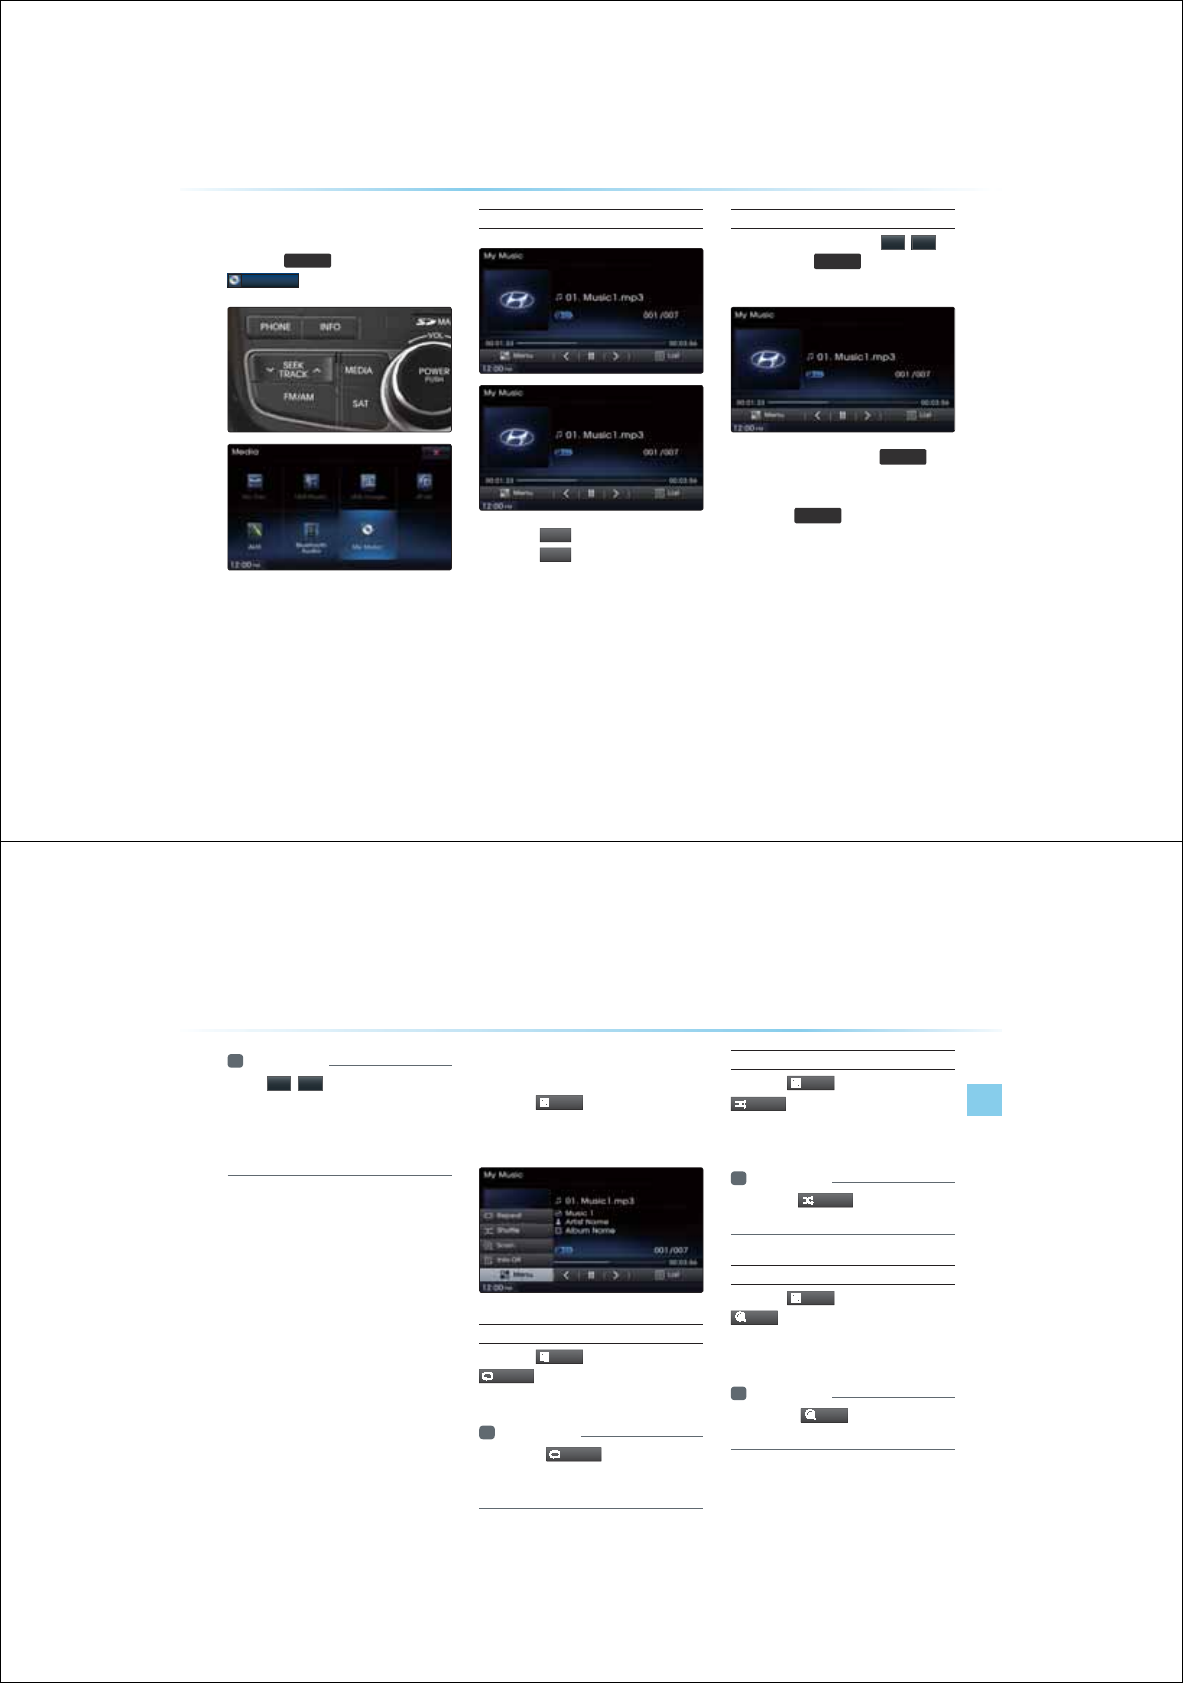
%DVLF0RGH6FUHHQ
Name Description
Mode Displays currently operating mode
File Index Shows the current file/total files within the iPod
®
Repeat/Shuffle/Scan From Repeat Once/Shuffle Category/Shuffle Random, dis-
plays the currently operating function
Play Time Displays the current play time/total play time
File Displays the name of the current file
Menu Displays Repeat, Shuffle, Scan and Info On (Info Off) menus
Repeat Repeats the current file
Shuffle Plays files in random order
Scan Scans the beginning parts of files (approx. 10 seconds per file)
Info Off
(Info on)
Changes the display method between Info Off/Info On
У
Info Off : shows file name
У
Info On : shows file name, title, artist, and album info
Previous File
When the play time is under 2 seconds : Moves to the previous file
When the play time is over 2 seconds : Plays the current file from
the beginning
Play/Pause Plays/pauses the current file
Next File Moves to the next file
List Moves to the list screen
Title Info Displays the song title
(Not displayed when information is not available)
Artist Info Displays the artist information
(Not displayed when information is not available)
Album Info Displays the album information
(Not displayed when information is not available)
0\0XVLF0RGH
2-56
6WDUWLQJ0RGH
Press the
0(',$
key ƙ Press
0\0XVLF
Playing My Music
У
Press the
Ԣ
button to play the file.
У
Press the
OO
button to pause the file.
Selecting My Music
While playing ƙ Press the
,
!
buttons or the
6((.
75$&.
Ѧ
ѧ
key to play the
previous/next file
У
Pressing and holding the
6((.
75$&.
Ѧ
ѧ
keys
(over 0.8 seconds) will rewind or fast-
forward the current file.
У
While the
6((.
75$&.
Ѧ
ѧ
key is being pressed,
the track will rewind or fast-forward at high
speeds. Once thekey is released, the USB
Music will begin playing at normal speed.
0\0XVLF0RGH
My Music Mode
AV l 2-57
Information
У
6JG
,
!
DQPUKURNCGQPJG
UETGGPCNNQQQUGNGEJGRTGKQU
PGHKNG
У
6JGUGDQPUKNNPQTGKP QTHCU
HQTCTJGHKNG
8VLQJWKH0HQX%XWWRQV
Press the
0HQX
button to set the
Repeat, Shuffle, Scan, Info On (Info Off)
menus.
Repeat
Press the
0HQX
button ƙ Press
5H
S
HD
W
The currently playing file is repeated.
Information
У
2TGUUJG
5
H
S
HD
W
DQPCICKPQTP
QHHTGRGC+HPQJKPIKUUGNGEGJGPCNN
HKNGUKNNDGRNCGKPUGSGPKCNQTGT
Shuffle
Press the
0HQX
button ƙ Press
6KXIIOH
When turned on, files are played in random
order.
Information
У
2TGUUJG
6KXIIOH
DQPCICKPQTP
JGUJHHNGQRKQPQHH
Scan
Press the
0HQX
button ƙ Press
6FDQ
The beginning (approx 10 seconds) of all files
are scanned.
Information
У
2TGUUJG
6FDQ
DQPCICKPQTP
JGUECPQRKQPQHH

2-58
Info On/Info Off
Press the
0HQX
button ƙ Press
,QIR2Q
The screen display can be set differently
depending on user selection.
The title, artist, and album info are
additionally displayed and the button is
changed to
,QIR2II
Press
,QIR2II
to restore the previous
information display setting.
Information
У
6JGKNGCTKUCP CNDOKPHQCTGKU
RNCGQPNJGPUEJKPHQTOCKQPKU
TGEQTGKJKPJG/2HKNG+&CI
8VLQJ0HQXVZLWKLQ/LVW
6FUHHQ
Moving between Lists
Press the
/L
V
W
button ƙ Press
Ԡ
,
Ԥ
If six (6) or more files or folders exist the same
folder, in the list will be displayed across two
or more pages.
Press the
Ԡ
,
Ԥ
cursor buttons to quickly
find the desired page.
0\0XVLF0RGH
My Music Mode
AV l 2-59
Returning to Current Location
While searching files within other folders,
press the
1
RZ
3O
D
\L
Q
J
button to return to
the currently playing file screen.
Deleting Files
Press the
/L
V
W
button ƙ Select the
files to delete ƙ Press
'HOHWH,WHPV
Information
У
6JGCKQUUGOKNNPQQRGTCGJKNG
HKNGUCTGDGKPIGNGG
У
+HJGETTGPNRNCKPIHKNGKUGNGGJG
PGHKNGKNNDGIKPRNCKPI

2-60
0(02
&$5$916<67(0
УBefore Use
УStarting Navigation
УUsing the Navigation
УMap Landmarks and Logos
1DYLJDWLRQ

3-2
Please observe and comply with local traffic rules and regulations.
Some features cannot be operated while driving for your safety.
Features that cannot be operated will be disabled.
The route displayed for destination guidance is a reference that will
take you to the vicinity of your destination.
This does not always refer to the shortest distance route, route with
the least traffic or the fastest route.
Road, name, and POI information may not always been completely
updated. Some places may not include up to date information.
The car position mark does not always indicate your exact location.
This system uses GPS information, various sensors, and road map
data to display the current position. However, errors in displaying
your location may occur if the satellite is transmitting inaccurate
signals or two or less satellite signals can be received. Errors that
occur in such conditions cannot be corrected.
The position of the vehicle within the navigation may differ from your
actual location depending on various reasons, including the satellite
transmission state, vehicle state (driving location and conditions), etc.
Additionally, the car position mark may differ from the actual position
if the map data is different from the actual road landscape, such as
changes due to the construction of new roads. If such differences
occur, driving for a short period of time will automatically correct the
position of the vehicle through map matching or GPS information.
(several minutes may be necessary in certain cases)
%HIRUH8VH
3UHFDXWLRQVIRUVDIHGULYLQJ
3-3
Navigation l
Before Use
2SHUDWLQJWKH1DYLJDWLRQ
The navigation can be operated via touch. Touch the corresponding
button on the screen to operate.
If the button does not respond, take your finger off the screen and try
again.
When a button function is operating, the color of the selected
button will be displayed differently.
To return to the previous screen, press the button
Press the button to cancel functions that can operate on the
current screen.
(Some functions may not be canceled.)
i Information
У
Buttons that cannot be operated will be disabled.
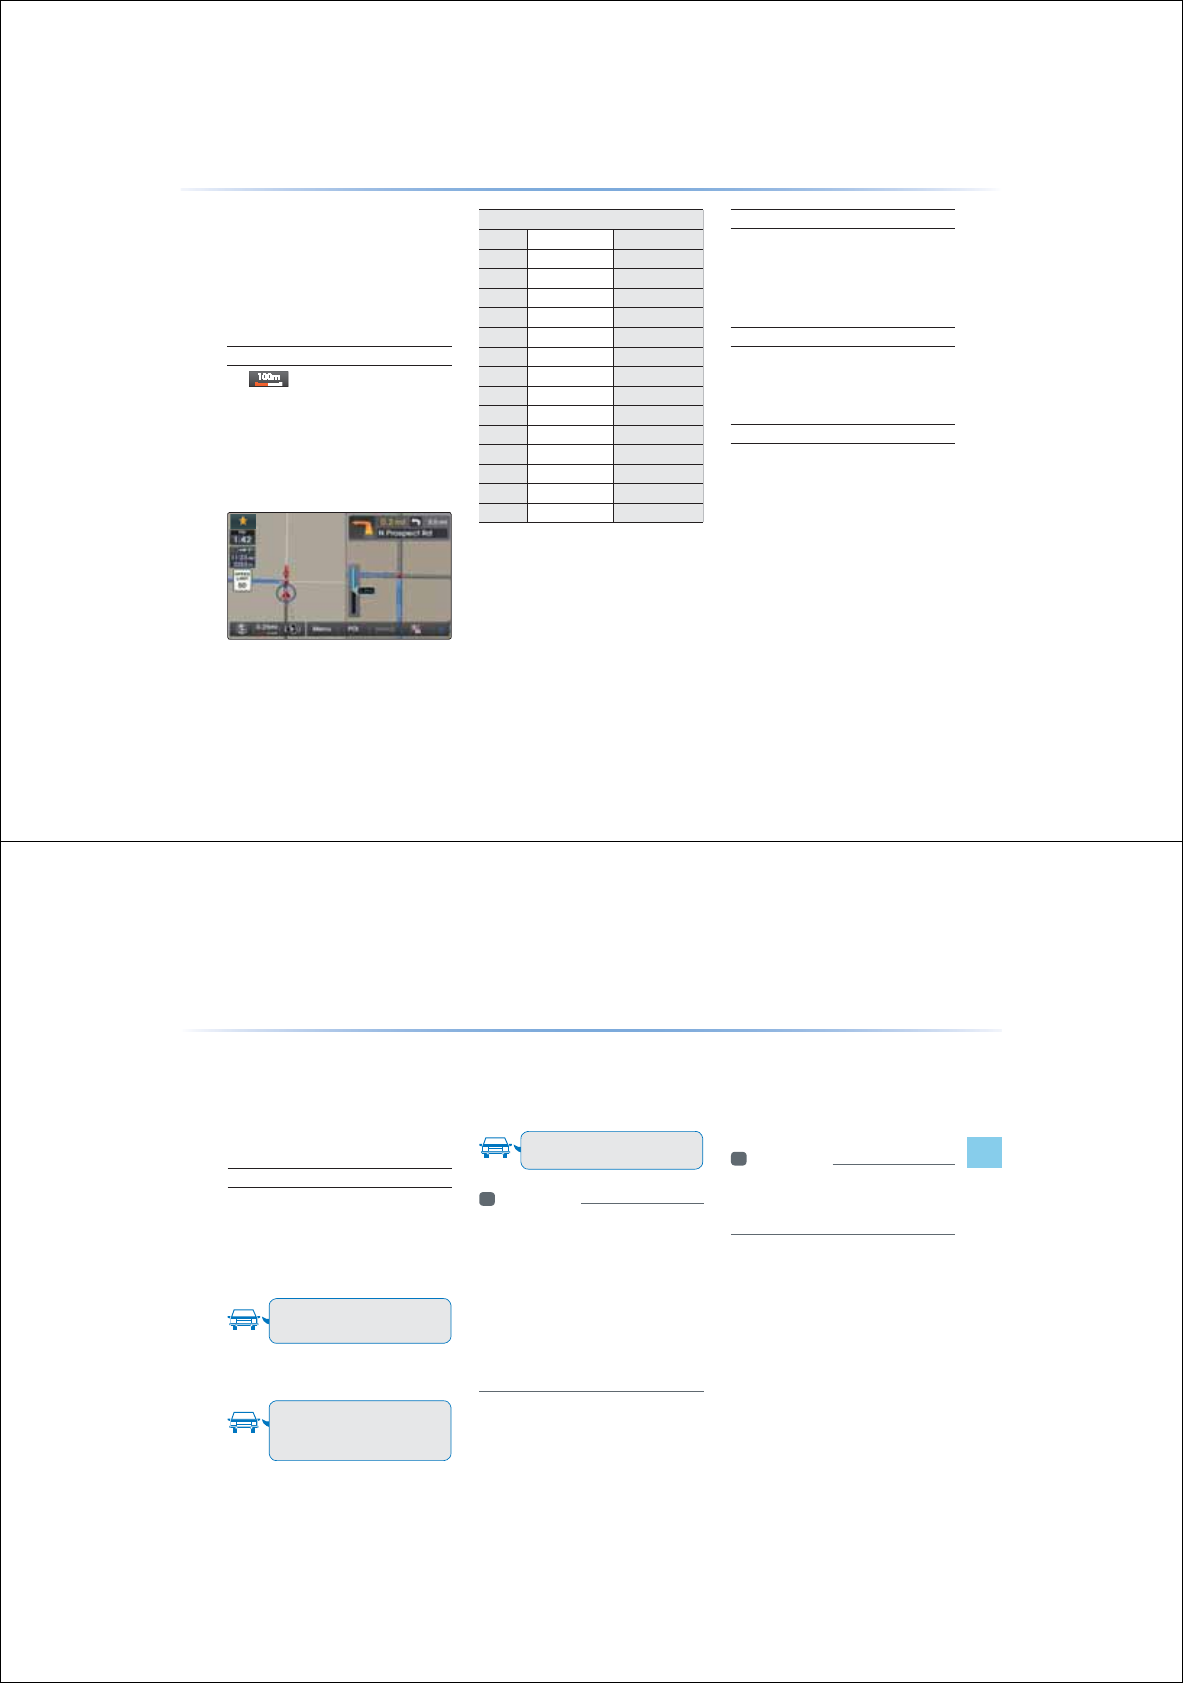
3-4
$ERXWWKH0DS
Some roads, site names and facility infor-
mation may have changed after map data
update and may differ with actual road condi-
tions.
About Map Scale
У
If is displayed on the left side of
the map, this represents a map scale of
1/10,000.
У
For more information on Changing Map
Scale, refer to the ‘Changing Map Scale’
section.
Actual Distance
Level mi/ft km / m
1 150ft 50m
2 300ft 100 m
3 700 ft 200 m
4 0.25 mi 400 m
5 0.5 mi 800 m
6 1 mi 1.6 km
7 2 mi 3.2 km
8 4 mi 6.4 km
9 8 mi 12 km
10 16 mi 25 km
11 32 mi 50km
12 64 mi 100 km
13 130 mi 200 km
14 250 mi 400 km
About Map Icons
Icons displayed on the map may differ
from actual conditions. Multiple icons
may also be displayed as one mark.
About Map Database
Unlicensed map copying in any form, in
full or in part, is strictly prohibited.
About Map Updates
У
Map updates can be downloaded from
the designated website (http://www.
hyundaiusa.com) and updated through
the SD card.
У
For more information, refer to the ‘System
Update’ section in Setup.
%HIRUH8VH
3-5
Navigation l
Before Use
$ERXW9RLFH5HFRJQLWLRQ
During destination guidance, voice guidance will
be provided when reaching an intersection or
you are nearby the destination.
Voice Guidance
Voice guidance is provided in the following
instances.
Example of voice guidance during desti-
nation guidance
У
In front of an intersection:
In about a half mile, turn right.
After a moment, turn right
У
Upon entering a toll road
You must turn right in a moment.
You are reaching an expressway.
There is a toll gate ahead.
* Please use voice guidance only as a refer-
ence to assist in your driving.
Example of voice guidance when arriving
at the destination
У
In front of the destination :
You are near your destination.
Voice guidance will end.
i Information
У
The above voice guidance examples are
normal cases. However, the actual voice
guidance may differ depending on the road
type.
У
If the car position is not accurately measured,
then voice guidance may not be given, or may
be given later or improperly.
У
It is possible to adjust the Navigation guid-
ance volume.
Guidance when using other modes
У
Voice guidance will continue even when
converting from the navigation screen to
a different mode screen.
i Information
У
Even when voice guidance has been
muted, destination guidance will continued
to be provided.
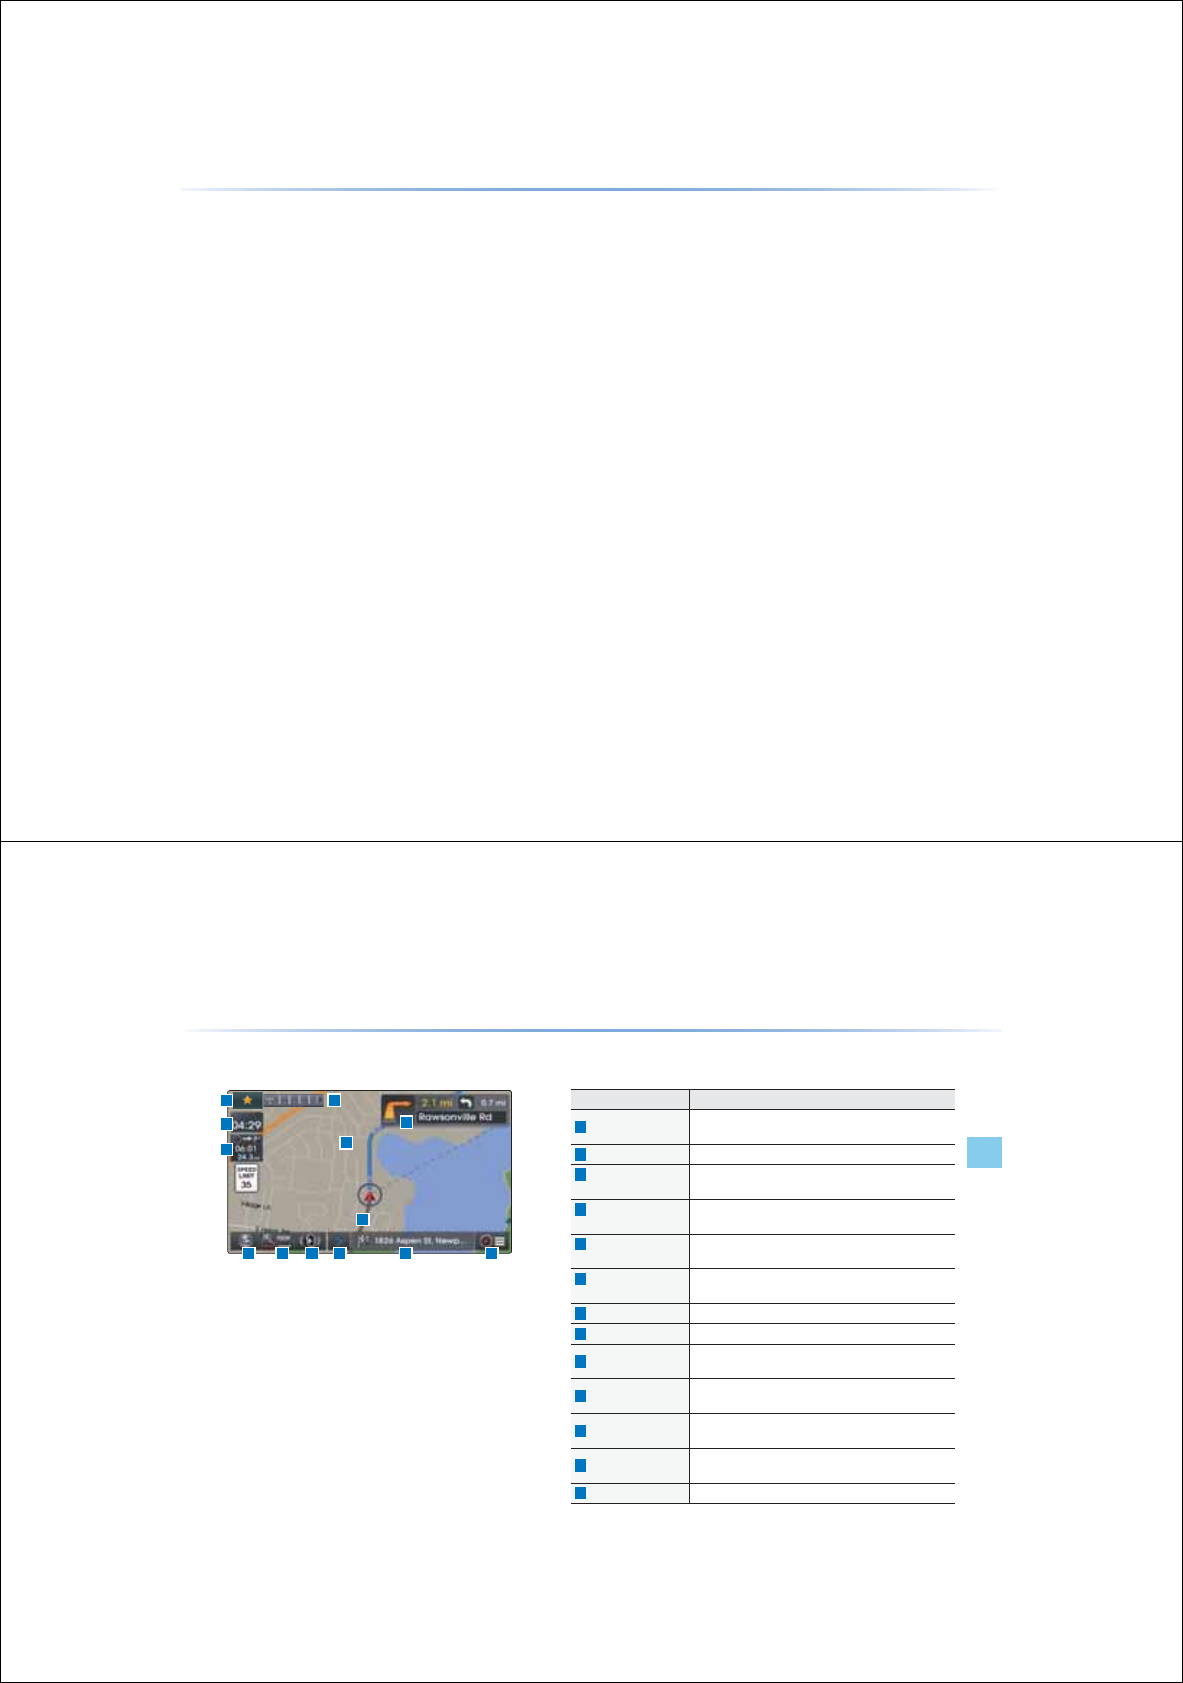
3-6
$ERXW*36
GPS (Global Position System) :
GPS is a system developed and operated
by the United States which determines
the current location of the user (Longitude/
Latitude, Coordinates, etc.) by generally using
4 or more satellites. This system is used with
related GPS information, various sensors,
road map data, and other related informa-
tion for the purposes of navigation. For more
information on GPS, refer to Part 5 ‘GPS
Information’.
%HIRUH8VH
3-7
Navigation l
Starting Navigation
0DS6FUHHQ
6WDUWLQJ1DYLJDWLRQ
6
9
1 2 3 4
13
12
7
8
9
Name Description
1
Car Direction Used to set split map and shows map display mode and
GPS status
2
Map Scale Shows current map scale
3
Navigation Guidance
Volume
Used to adjust navigation guidance volume
4
Function/Info
Window Shows map function buttons or current position info
5
Current Position
Info Window
Shows current road name and destination name in 5
second intervals
6
Route Guidance
Mode Conversion
Switches route guidance mode between preliminary guid-
ance mode, motorway mode and TBT mode
7
Quick Menu Allows users to easily and quickly access desired menus
8
Current Time Shows the time
9
ETA/Remaining Time
Shows the ETA (Estimated time of arrival), remaining time
and distance from current position to the destination
10
Preliminary Guidance Provides distance, direction guidance at turn points and
directions within the set route
11
Destination Direction Shows recommended lanes for use by considering up-
coming intersections and expected routes
12
Lane Info Shows recommended lanes for use by considering up-
coming intersections and expected routes
13
Car Position Mark Displays current car position
5
11
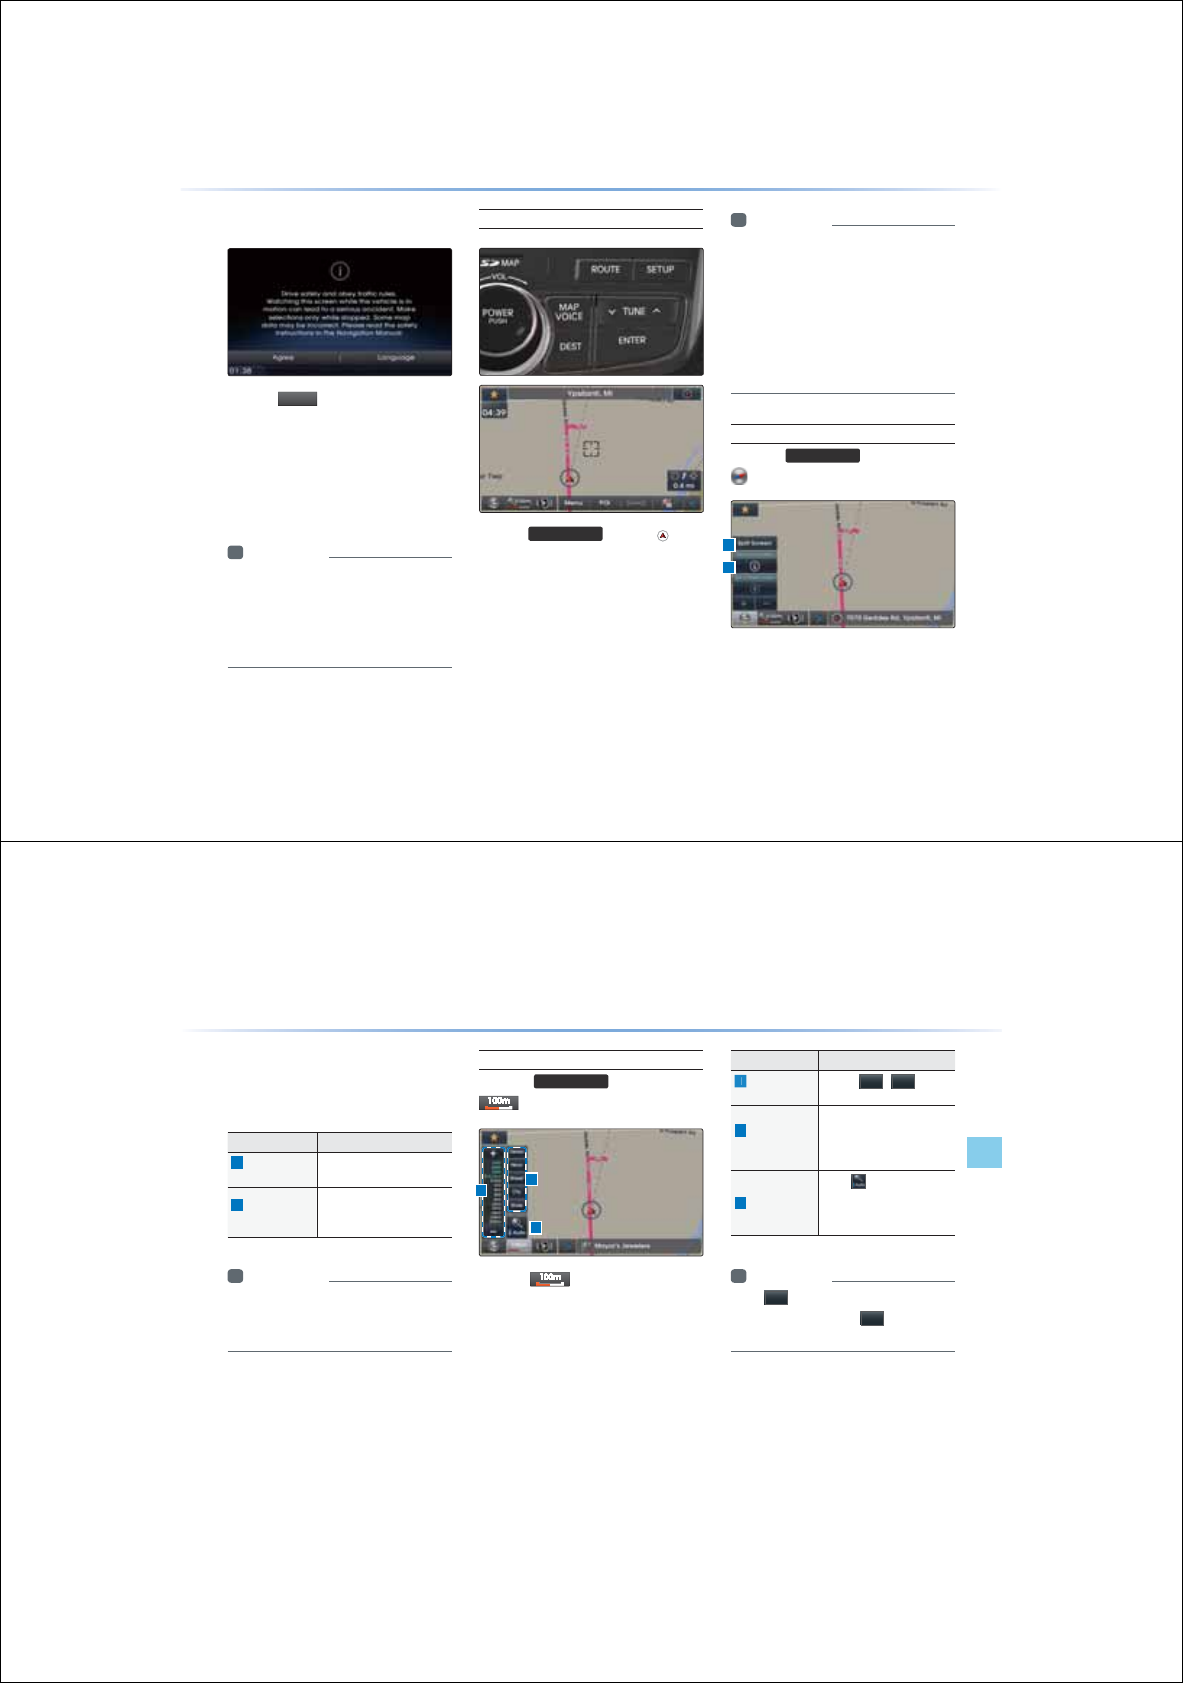
3-8
,QLWLDO6FUHHQ
Press the
$J
UHH
button to display the most
recently used mode.
If Audio mode is used with the naviga-
tion turned on, navigation guidance will be
provided in the background. If you turn the
ignition on, then the most recently played
mode will restart.
i Information
У
Once the vehicle ignition is turned on, the
User Warning screen will always be dis-
played. Make sure to carefully read the warn-
ing page as it contains important information
related to system operations while driving.
Current Position
Press the
0$392,&(
key or the button
displayed at the upper right side in some map
conditions to display the map of the current
position and the neighboring area.
i Information
У
When riding in a new car or after replacing
the battery terminal, the car position mark
may at first appear at a different location.
У
Even if the car position mark on the map is
different, map matching and GPS coordi-
nates are utilized to automatically update
the current position. It may take up to sev-
eral minutes to find your current position.
Map Display Settings
Press the
0$392,&(
keyƙ Press the
6WDUWLQJ1DYLJDWLRQ
1
2
3-9
Navigation l
Starting Navigation
This button is used to set map screen related
options, such as Split screen, Heading-Up/
North Up, and Left/Right screen display.
Name Description
1
Split Screen/
Single Screen
Select between Split Screen
or Single Screen Map.
2
Heading-Up/
North-Up
Display Map in Vehicle Trav-
eling Direction (Heading-Up)
or North-Up direction
i Information
У
The Heading-Up/North-Up, 2D/3D, and
map scale adjustments can be used when
using Split Screen map.
Changing Map Scale
Press the
0$392,&(
key ƙ Press
ƙ Set the desired map scale
Press the button to display the map
scale menu and change the map to the
desired scale.
Name Description
1
Adjust Map
Scale
Use the
/
buttons
to display the scale bar
2
Administrative
District Scale
Shows map scales in cat-
egories of detail (300ft), Near
(0.25mi), Street (1mi), City
(4mi), State (16mi)
3
Auto Scale
When is enabled,
automatically adjust map
scale according to driving
situation
i Information
У
The
will be disabled when set to max
scale (1/250mi) and the
button will be
disabled when set to min scale (1/150ft).
3
1
2
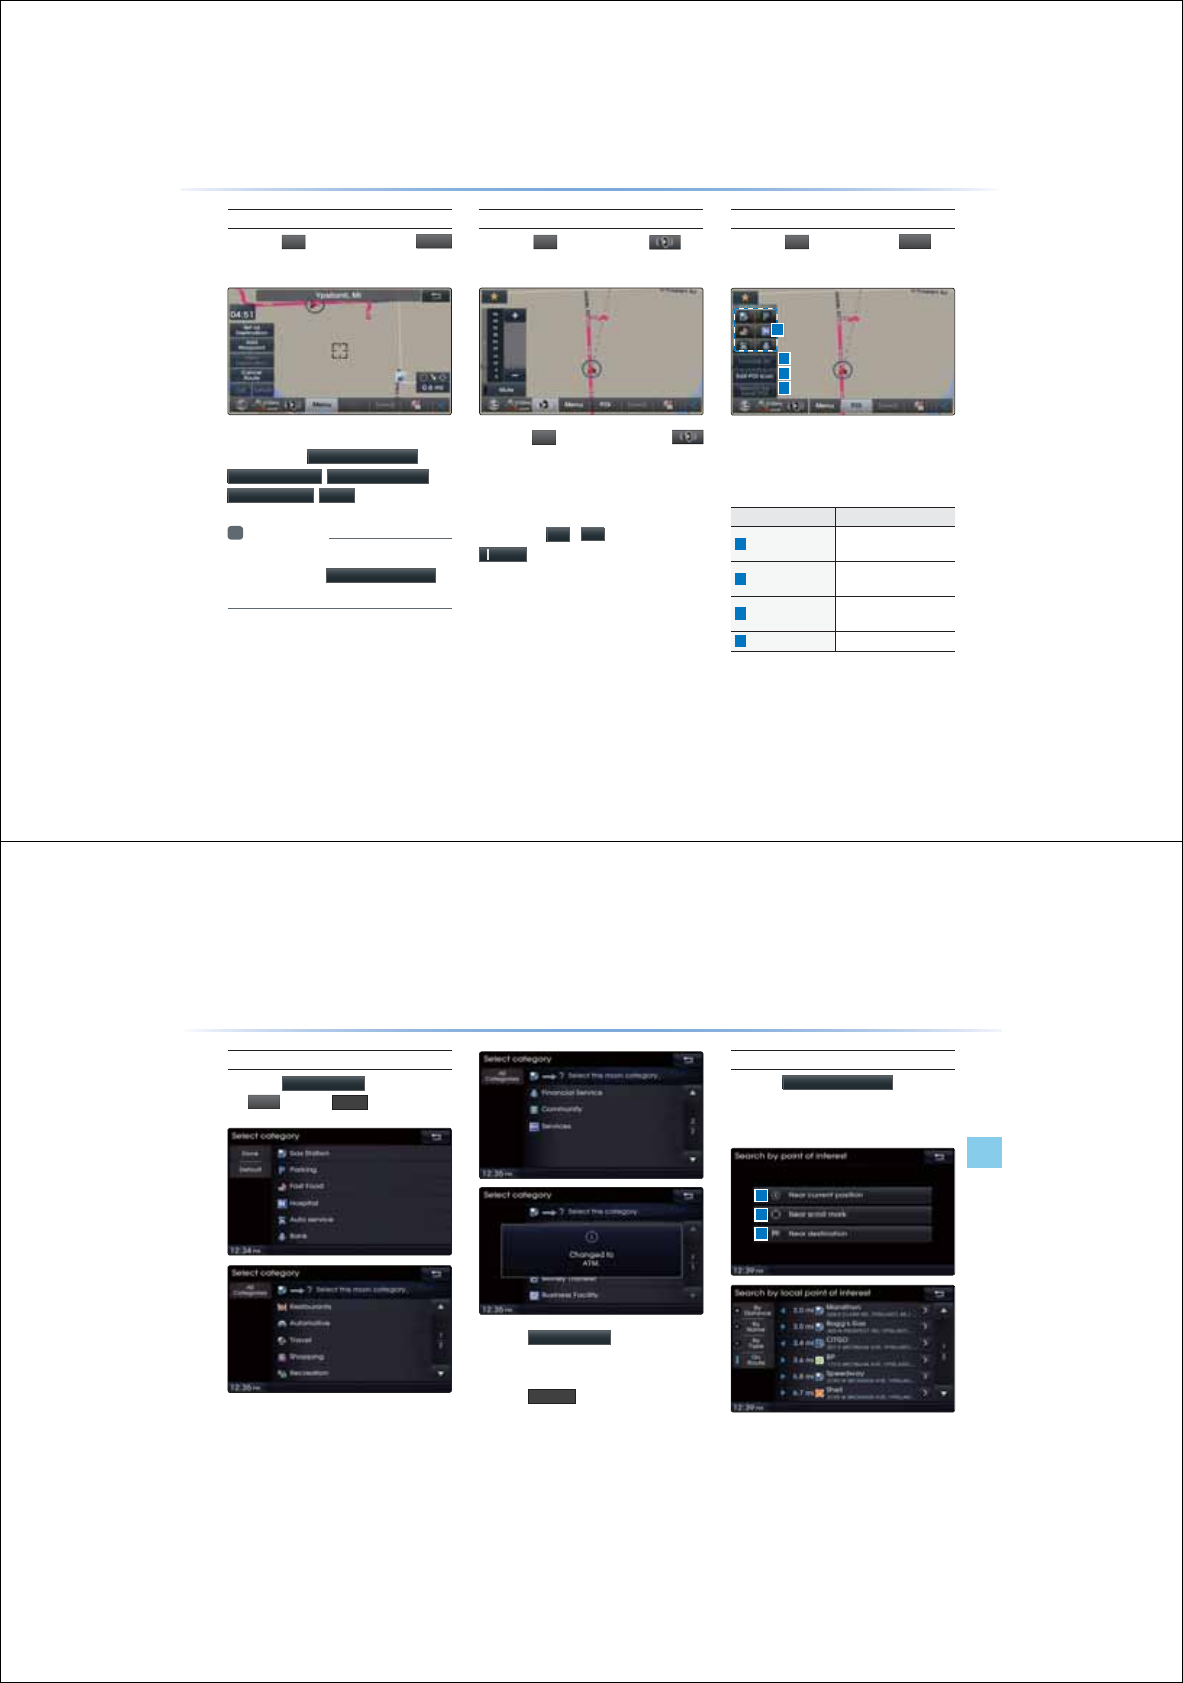
3-10
Map Menu
Press the
!
!
!
!
button ƙ Press the
0H
Q
X
button
Features frequently used within the map
screen, such as
6HWDV'HVWLQDWLRQ
,
$GG:D\SRLQW
,
9LHZ'HVWLQDWLRQ
,
&DQFHO5RXWH
,
&DOO
are displayed.
i Information
У
If the screen is scrolled, then the top menu
is changed to the
6HWDV'HVWLQDWLRQ
button.
Adjusting Navigation Volume
Press the
!
!
!
!
button
ԢPress
ƙ
Adjust volume
Press the
!
!
!
!
button and then the
button. The volume menu is displayed and
allows you to adjust the navigation voice guid-
ance volume.
The volume can be adjusted from 0~45
through the
/
button. Press the
PXWH
button to turn off the sound.
POI Display
Press the
!
!
!
!
button ƙ Press
3
2
,
When POI menus are displayed, pressing
one of the 6 POI icon buttons will display the
corresponding POI icons.
Name Description
1
POI Icon Shows/hides corre-
sponding POIs
2
Unmark All Unmarks selected POI
Icons
3
Edit POI Icon Edit the 6 POI icons
shown within the menu
4
Search by local POI
Searches selected POI
6WDUWLQJ1DYLJDWLRQ
1
2
3
4
3-11
Navigation l
Starting Navigation
Editing POI Icons
Press the
(GLW32,,FRQ
button ƙ Press
the
3
2
,
ƙ Press
'RQH
Press the
(GLW32,,FRQ
button to select
the desired facility from the various facility
types. Up to six favorite facilities can be set.
Press the
'HIDXOW
button to reset the
displayed POI icons.
Initially, Gas Station, Parking, Fast Food,
Hospital, Auto Service, and Bank are set as
default.
Searching POIs
Press the
6HDUFKE\ORFDO32,
button ƙ
Press the search criteria (Near current posi-
tion, Near scroll mark, Near destination)
The POI mark is displayed according to
the selected criteria.
1
2
3
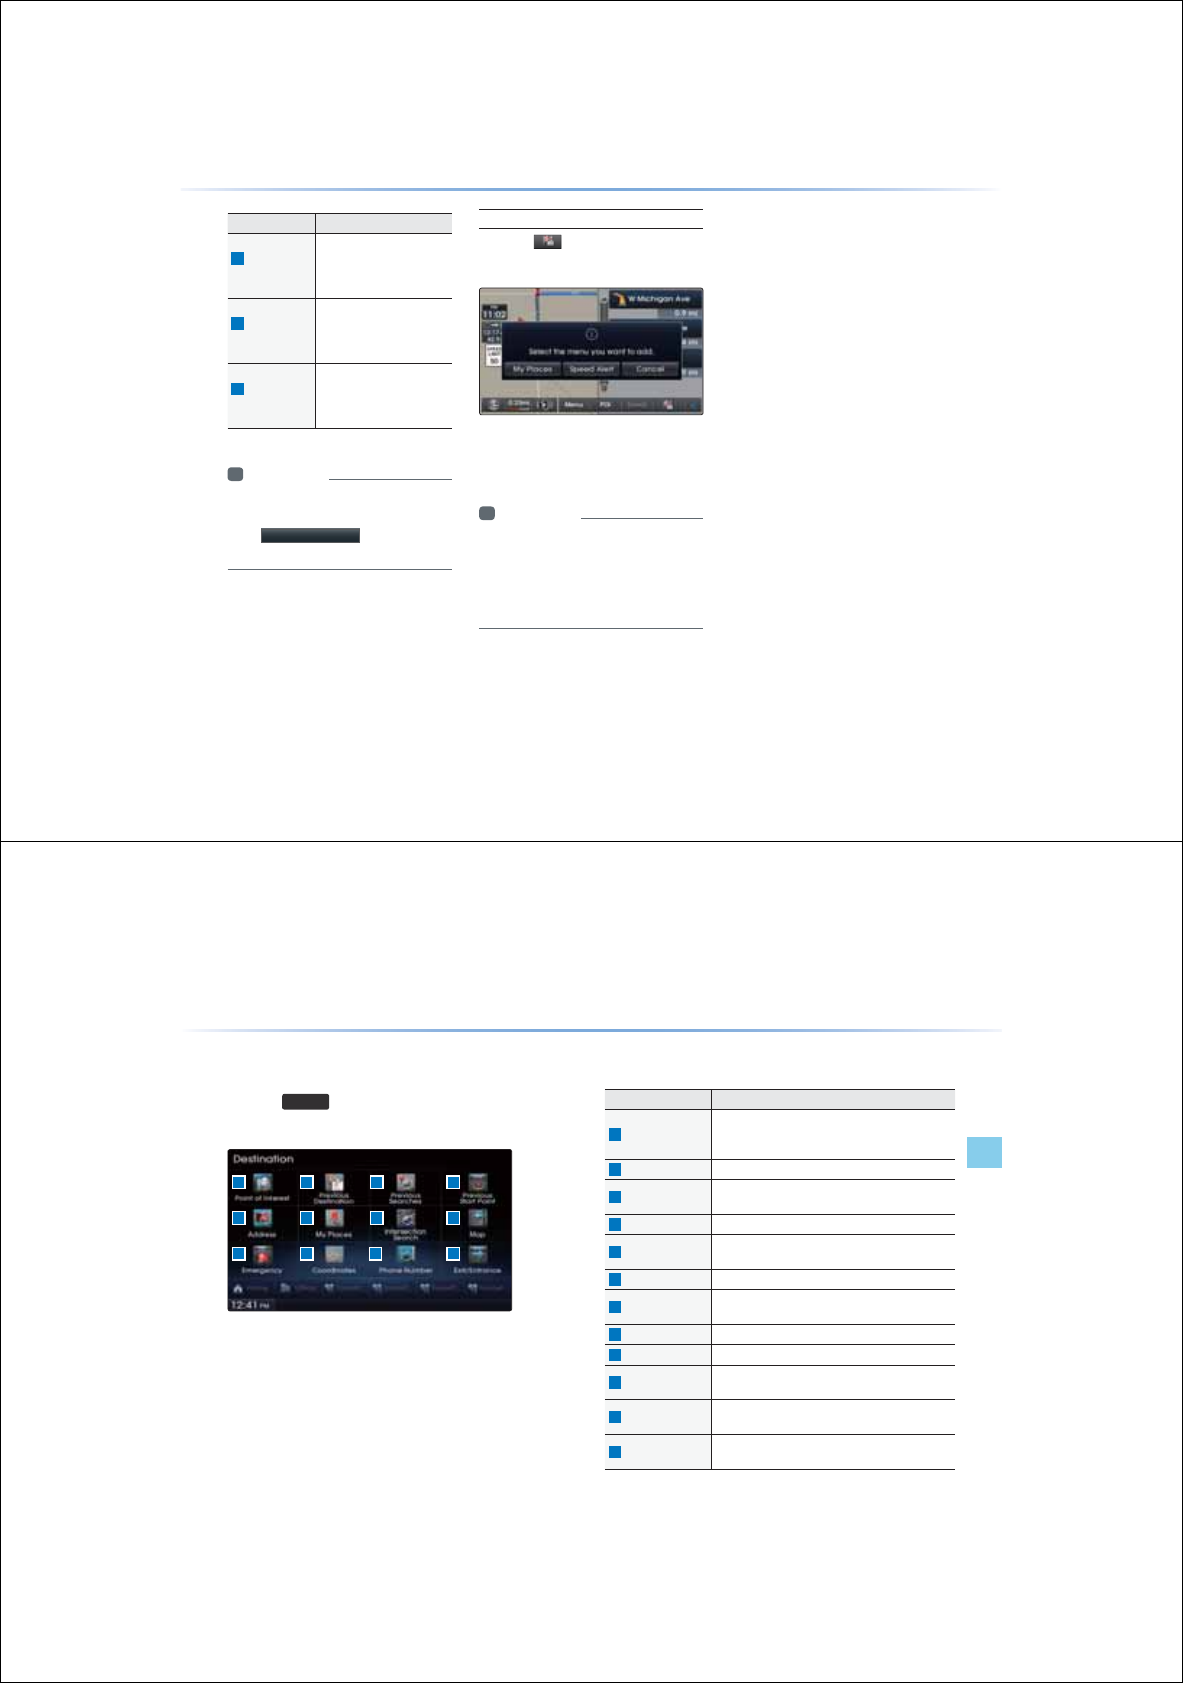
3-12
Name Description
1
Near Current
Position
Within the ‘Search by POI’
menu, searches facilities
based on the current ve-
hicle position
2
Near Scroll
Mark
Within the ‘Search by POI’
menu, searches facili-
ties based on the current
scrolled position
3
Near
Destination
Within the ‘Search by POI’
menu, searches facilities
based on the location of
the destination
i Information
У
When searching POIs, you can only search
POIs within selected categories.
У
The
1HDUVFUROOPDUN
menu is enabled
only when the map has been scrolled.
Adding a My Place
Press the button ƙ Press the de-
sired group
This feature is used to save the current posi-
tion or the scrolled position as a My Place or
Speed Alert.
i Information
У
My Places are saved without distinction for
the driving or scrolled state.
У
The Speed Alert button is displayed when a
point is saved with the speed limit of the road
while driving on the road.
6WDUWLQJ1DYLJDWLRQ
3-13
Navigation l
Using the Navigation
'HVWLQDWLRQ6HDUFK
Press the
'(67
key to display the Destination Search menu
screen.
The Destination Search screen includes various search menus as
well as shortcuts to Favorites that provide maximum convenience in
searching for destinations.
Name Description
1
Point of Interest
Used to search for neighboring POIs near current
position/near scroll position/near destination/near
city center
2
Previous Destination
Used for route guidance to recently set destinations
3
Previous Searches Used for route guidance to recently searched
Locations
4
Previous Start Point
Used for route guidance to recent start positions
5
Address Used to search destinations by selecting specific
states/cities/roads
6
My Place Display list of saved My Places
7
Intersection Search
Used to search destinations by selecting streets/
intersections
8
Map Moves to the map screen
9
Emergency Used to make emergency related searches
10
Coordinates Used to search destinations by entering the
Coordinates
11
Phone Number Used to search destinations by entering POI phone
numbers
12
Exit/Entrance Used to search destinations by searching for ex-
pressway exits/entrances
8VLQJWKH1DYLJDWLRQ
3 41 2
5
9 10 11
6 7 8
12
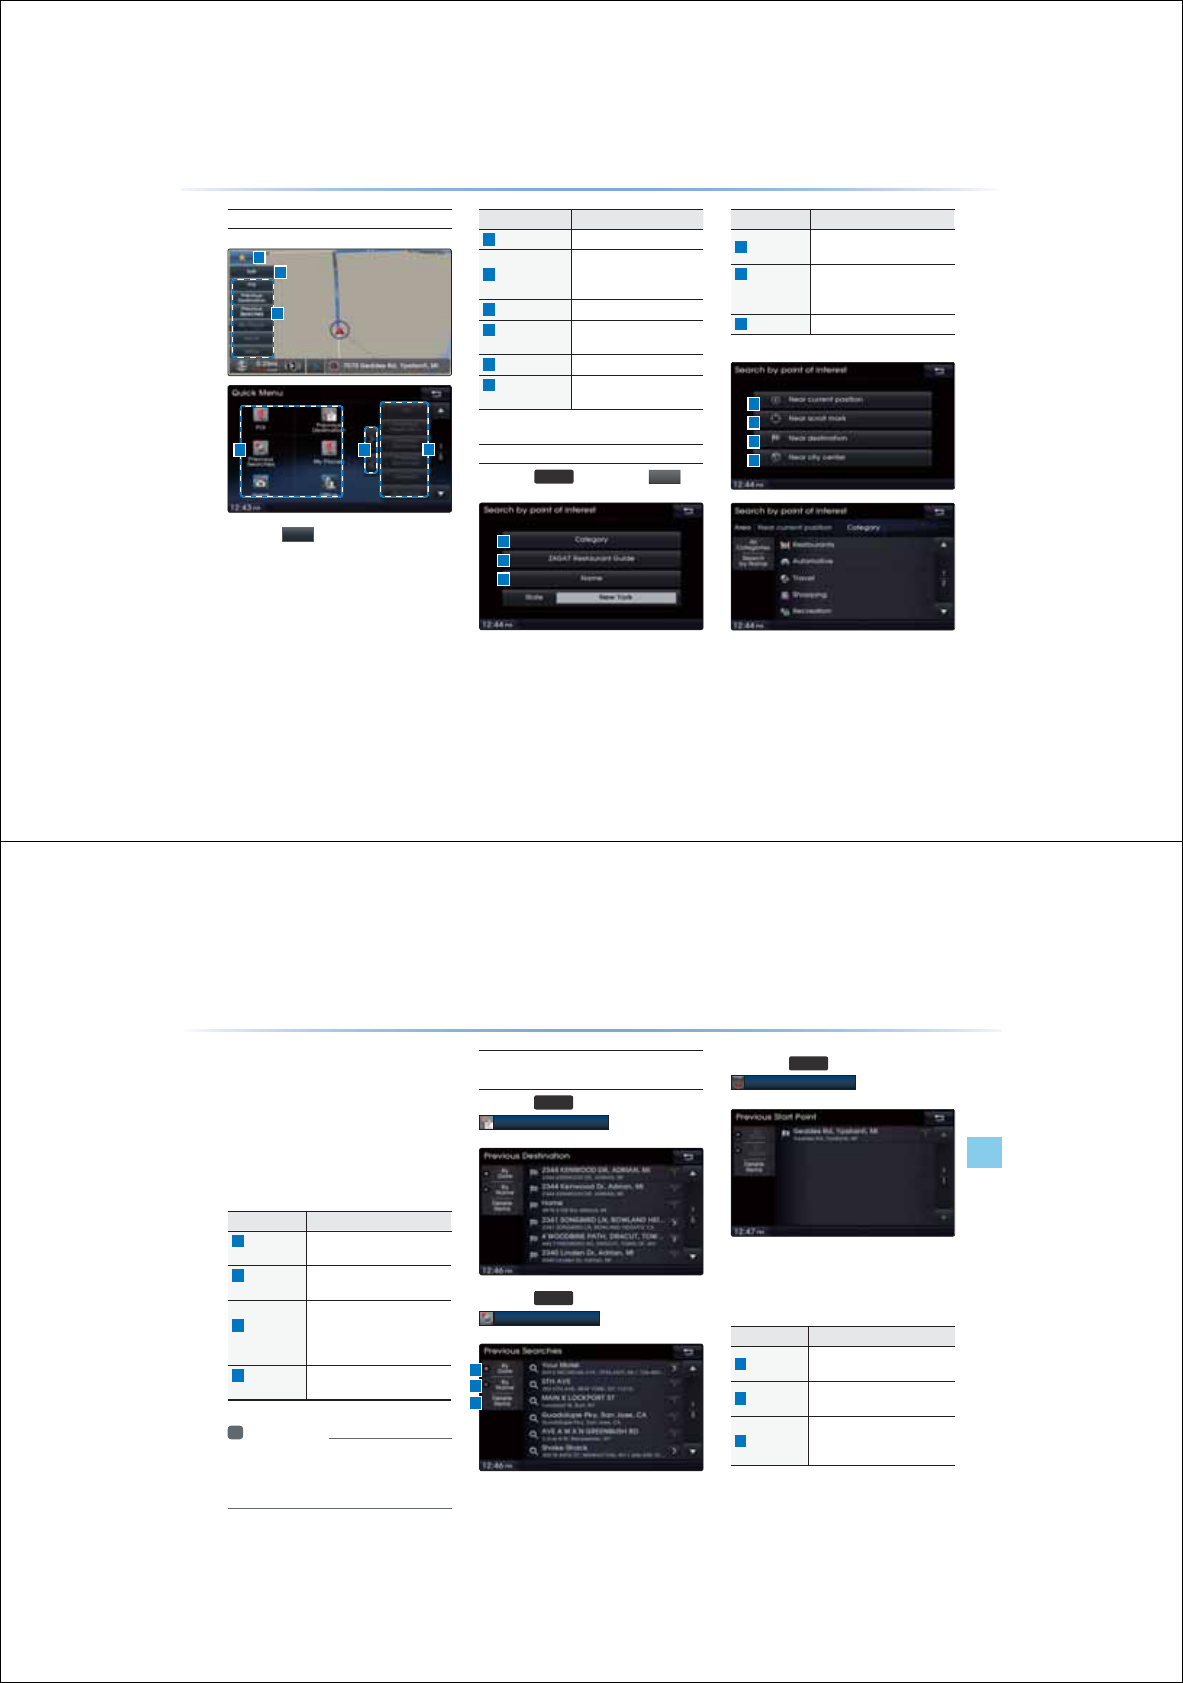
3-14
8VLQJWKH1DYLJDWLRQ
Quick Menu
Press the
button on the left side of
the map screen to display the Quick Menu.
Name Description
1
Quick Menu (þ)
Display/hide Quick Menus
2
Quick Menu Bar
Menus added to the Quick
Menu (possible to set up to
6 menus)
3
Edit Add/Delete Quick Menus
4
Current Quick
Menus
Shows list of current Quick
Menus
5
Add/Remove
Add or remove Quick Menus
6
Quick Menu
Categories
List of categories that can
be added to Quick Menus
Point of Interest (POI) Search
Press the
'(67
key ƙ Press
32,
Name Description
1
Category Search for POIs by selecting
through POI categories
2
ZAGAT
Restaurant
Guide
Search for ZAGAT restaurant
guide POIs from among POIs
within the vicinity
3
Name Search POIs by name
1
2
46
3
5
1
2
3
1
2
3
4
3-15
Navigation l
Using the Navigation
POI Search is a feature that allows you to search
for POIs that are near your current position, near
a scroll mark, near the destination, or near the
city center.
Categories are sub-categorized and the selected
area and category are displayed at the top of the
screen for user convenience.
Name Description
1
Near Current
Position
Searches POIs based on the
current vehicle position
2
Near Scroll
Mark
Searches POIs based on the
current map scroll position
3
Near
Destination
Searches POIs nearby the set
destination (feature is disabled
when a destination has not
been set)
4
Near City
Center
Searches POIs nearby a
selected area
i Information
У
The searched location may not be the exact
location of a specific destination, but display a
representative position of a POI address.
Previous Destination, Previous
Searches, Previous Start Point
Press the
'(67
key ƙ Press
3UHYLRXV'HVWLQDWLRQ
Press the
'(67
key ƙ Press
3UHYLRXV6HDUFKHV
Press the
'(67
key ƙ Press
3UHYLRXV6WDUW3RLQW
These search features allow you to search
previous routes, previous searches and start
points.
Name Description
1
By Date Sorts POIs and locations by
added date
2
By Name Sorts POIs and locations by
name
3
Delete Items
From various entries, items can
be selected and deleted all at
once.
1
2
3
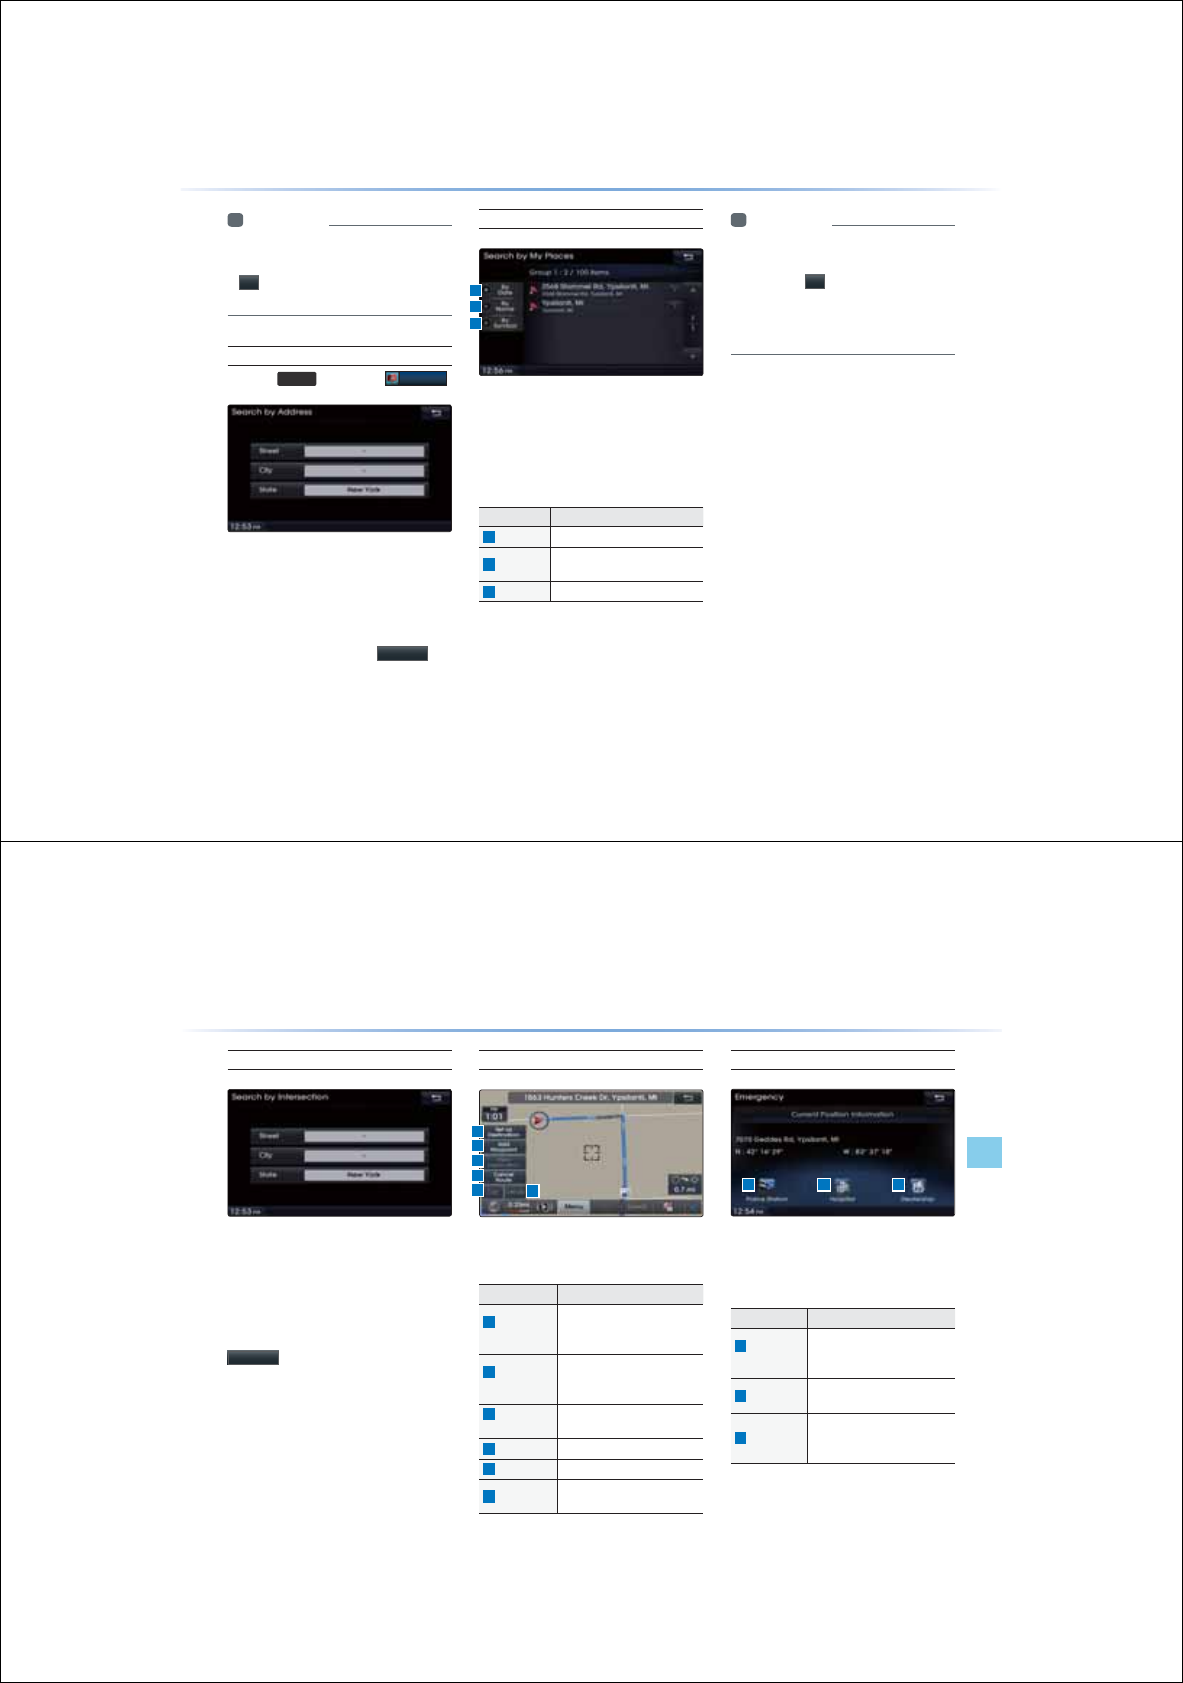
3-16
8VLQJWKH1DYLJDWLRQ
i Information
У
If the POI or region name is too long and cannot
be displayed within one screen, pressing the
!
button will move the name to the left to
display the full name.
Address
Press the
'(67
key ƙ Press
$GGUHVV
T
his search feature is used to search
destinations by addresses through state city/
street.
Enter the name of the Street, City and State
corresponding to the desired destination. Once
search is complete, press the
6HDUFK
but-
ton to select the desired location from the list.
My Places
This search feature is used to search destina-
tions by selecting previously saved My Places
to set as destinations. My Places can be
placed in groups, and group names can be
edited within Setup.
Name Description
1
By Name
Sort POIs and locations by name
2
By Symbol Sort POIs and locations by
symbol
3
By Date Sort POIs and locations by date
i Information
У
If the POI or region name is too long and
cannot be displayed within one screen,
pressing the
!
button will move the name
to the left.
У
It is possible to save up to 100 My Places
per Group.
1
2
3
3-17
Navigation l
Using the Navigation
Intersection Search
This search feature is used to search
destinations by streets and intersections
through state/city/state.
Enter the name of the Street, City and
State corresponding to the desired destina-
tion. Once search is complete, press the
6HDUFK
button to select the desired loca-
tion from the list.
Map
The map screen can be scrolled to display
other positions where you can set destinations.
Name Description
1
Set as
Destination
Sets the POI or region where
the cursor is positioned as the
new destination
2
Add
Waypoint
Sets the POI or region where
the cursor is positioned as a
waypoint
3
View
Destination
Displays information for the set
destination
4
Cancel Route
Cancels the currently set route
5
Call Calls the selected POI facility
6
Details Displays details for the se-
lected POI facility
Emergency
This search feature is used to search for
police stations, hospitals, and dealerships in
emergency situations.
Name Description
1
Police
Station
Displays list of Police Sta-
tions closest from the current
position
2
Hospital Displays list of Hospitals clos-
est from the current position
3
Dealership
Displays list of Hyundai Motor
Dealerships closest from the
current position
1
2
3
4
561 2 3
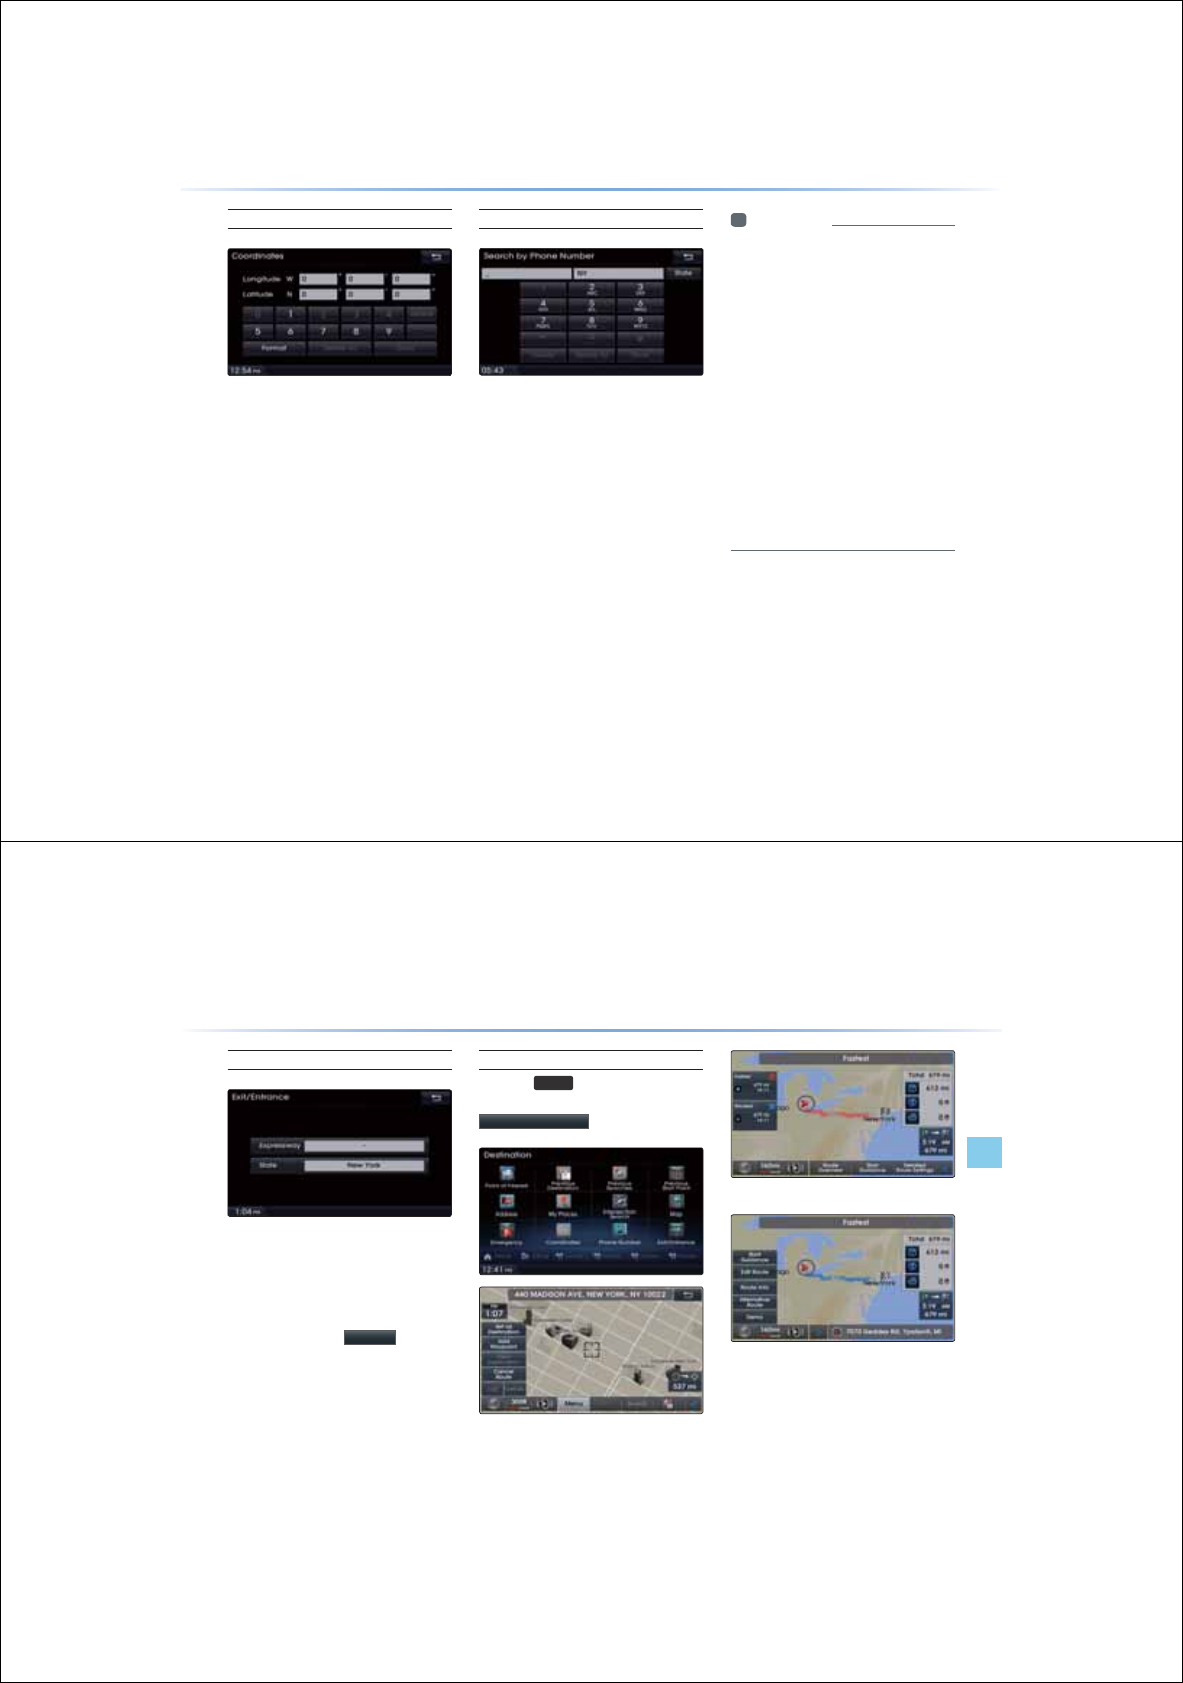
3-18
8VLQJWKH1DYLJDWLRQ
Coordinates
This search feature is used to search destina-
tions by entering coordinates. Two coordi-
nate entry formats are supported. Select the
desired format upon starting search.
Phone Number Search
This search feature is used to search the
locations of POIs by entering the phone
number of the desired POI destination.
У
Area codes must be entered to complete
the search.
i Information
У
The phone number and location may differ
for some POIs. In addition, the following
types of facilities may be more frequently
located in other locations.
У
Locations of department stores, museums,and
amusement parks may somewhat differ from
the set destination. Check the exact address
when trying to reach such destinations.
У
Within general information newspapers,
there are cases when phone numbers of
concert halls actually list the numbers of
management companies. In such cases,
destination searches will be made to the
management companies.
У
The telephone number and addresses may
change at any time.
3-19
Navigation l
Using the Navigation
Exit/Entrance
destinations by entering the Exits and
Entrances of corresponding expressways.
Enter the name of the Freeway corresponding
to the desired destination. Once search is
complete, press the
6HDUFK
button to
select the desired location from the list.
Setting a Destination
Press the
'(67
key ƙ Search
for the Destination ƙ Press
6HWDV'HVWLQDWLRQ
(Alternative Route)
(Route Overview)
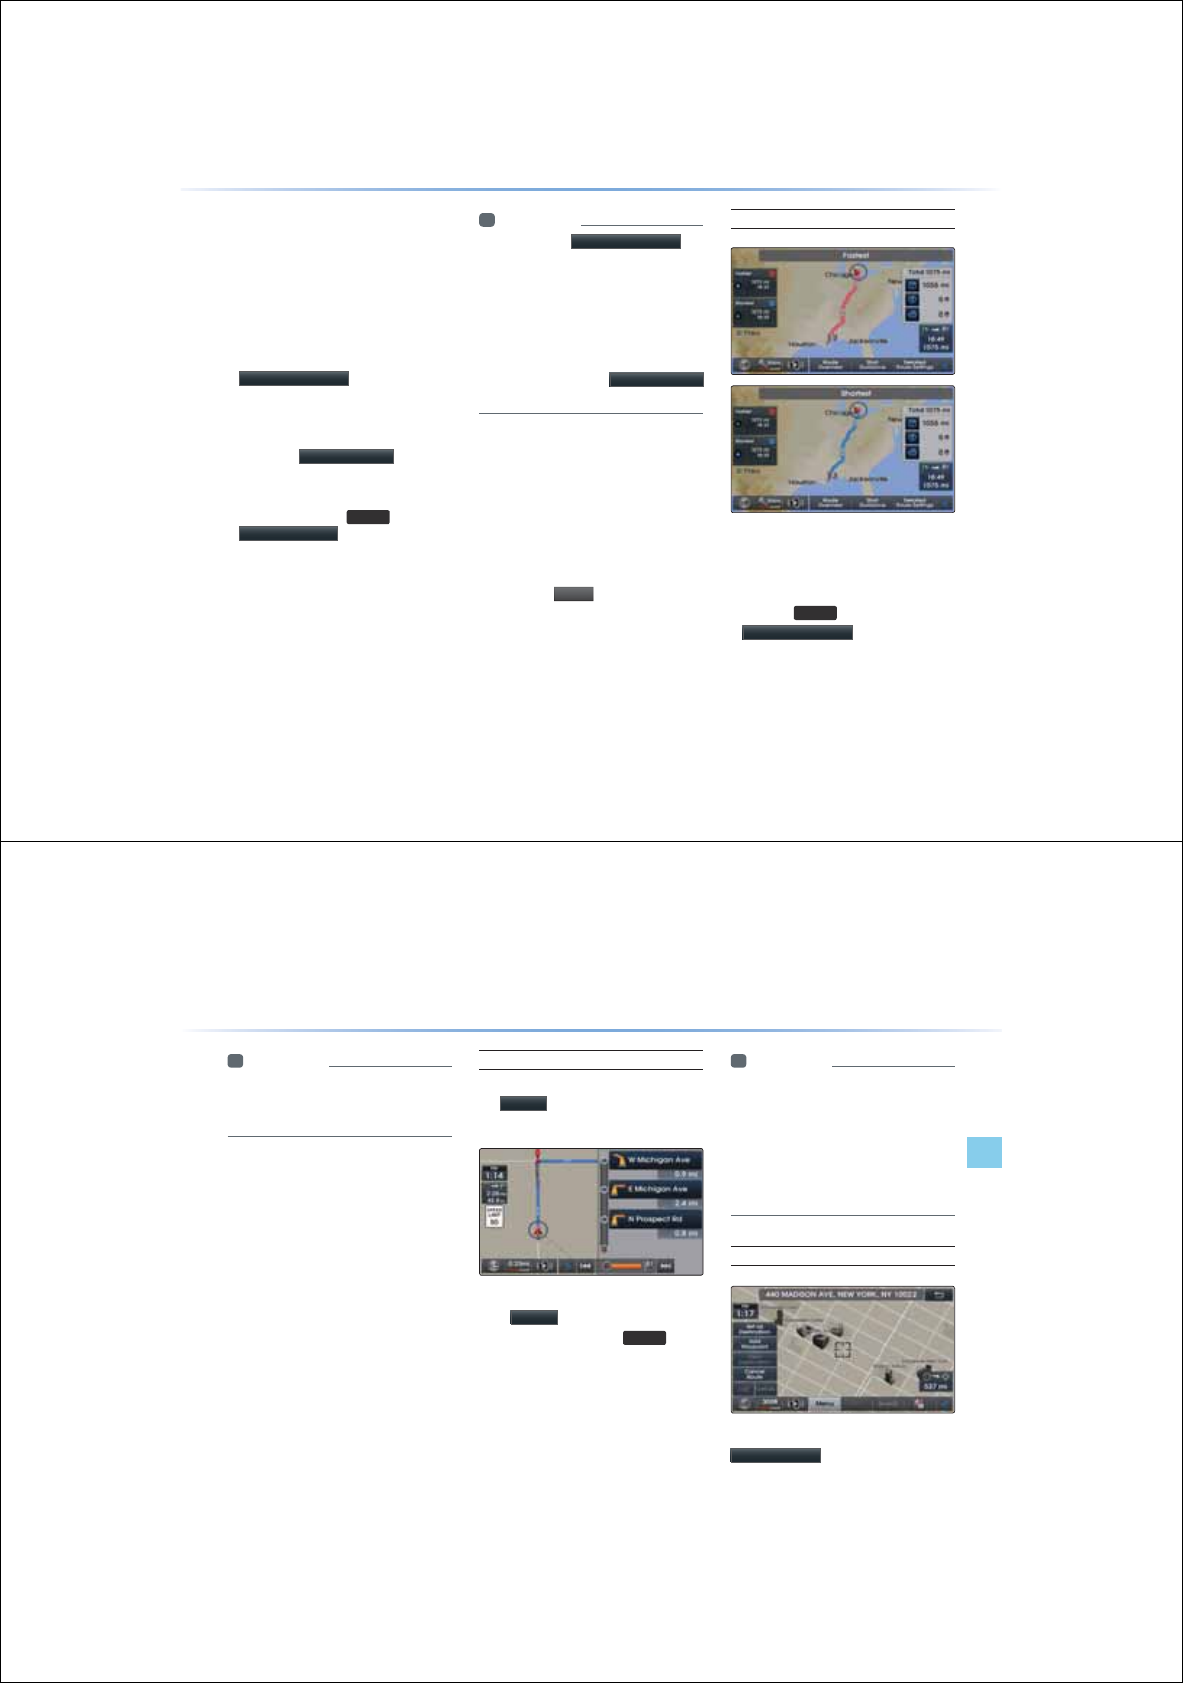
3-20
8VLQJWKH1DYLJDWLRQ
У
Conducting a destination search through
the desired search method, select the
desired destination from the list. (For
more information on destination search
methods, refer to the ‘Destination
Search’ section.)
У
After verifying the location of the
searched destination, press the
6HWDV'HVWLQDWLRQ
button to calcu-
late the route. The Route Overview or
Alternative Route screen will be the dis-
played.
У
Press the
$GG:D\SRLQW
button to
add a waypoint destination. Within the
Route Overview or Alternative Route
screen, press the
0$3
key or the
6WDUW*XLGDQFH
button to start route
guidance.
i Information
У
If you press the
6HWDV'HVWLQDWLRQ
button while a previous destination has
already been set, the pop-up ‘Do you
want to change the destination?’ will be
displayed.
У
If you press Yes, then the previous desti-
nation is deleted and the new destination
will be set. Pressing the
$GG:D\SRLQW
button will add a waypoint destination.
One Touch Scroll Setting
The destination can be set to the current
map display.
У
While in the map screen, touching a
position on the map will move the map
to the center of the selected position and
display the scroll mark.
У
Press the
0
HQ
X
button to set the
selected position as a waypoint or desti-
nation.
Route Calculation
У
Once you have set a destination, calcu-
late the route. The route overview and
route option menus will be displayed
У
After checking the Route Overview,
press the
0$3
key or the
6HWDV'HVWLQDWLRQ
button or just drive
for over 5km/h for approximately 5 sec-
onds to start guidance.
3-21
Navigation l
Using the Navigation
i Information
У
To learn more about ‘Alternative Route’,
‘Route Overview’ or ‘Detailed Route
Settings’, refer to the ‘Route Menu’ section.
Demo
After a route has been calculated, press
the
'HPR
button to begin simulated
driving of the calculated route.
У
Within the Route Overview screen, press
the
'HPR
button.
У
During Demo, press the
0$3
key to
end the demo and display the current
map position. If you start driving while
viewing the route demo, demo will end
and route guidance will start.
i Information
У
Demo will not operate after starting route
guidance. To use the Demo feature, use
after route calculation but prior to starting
route guidance.
У
During Demo, WKHÔⲚヨ㉜㉧⹂Õ㉔㓶
⾎㉈㓄ㄶ㓮⾄ⱎオ㋁㓿㉔ヨ⸸㊡㊏㉙ⱎ
ⷮ㓴ⷴⷾ
Add Waypoint
After searching for waypoints, press the
$GG:D\SRLQW
button to add the waypoint
to the current route.
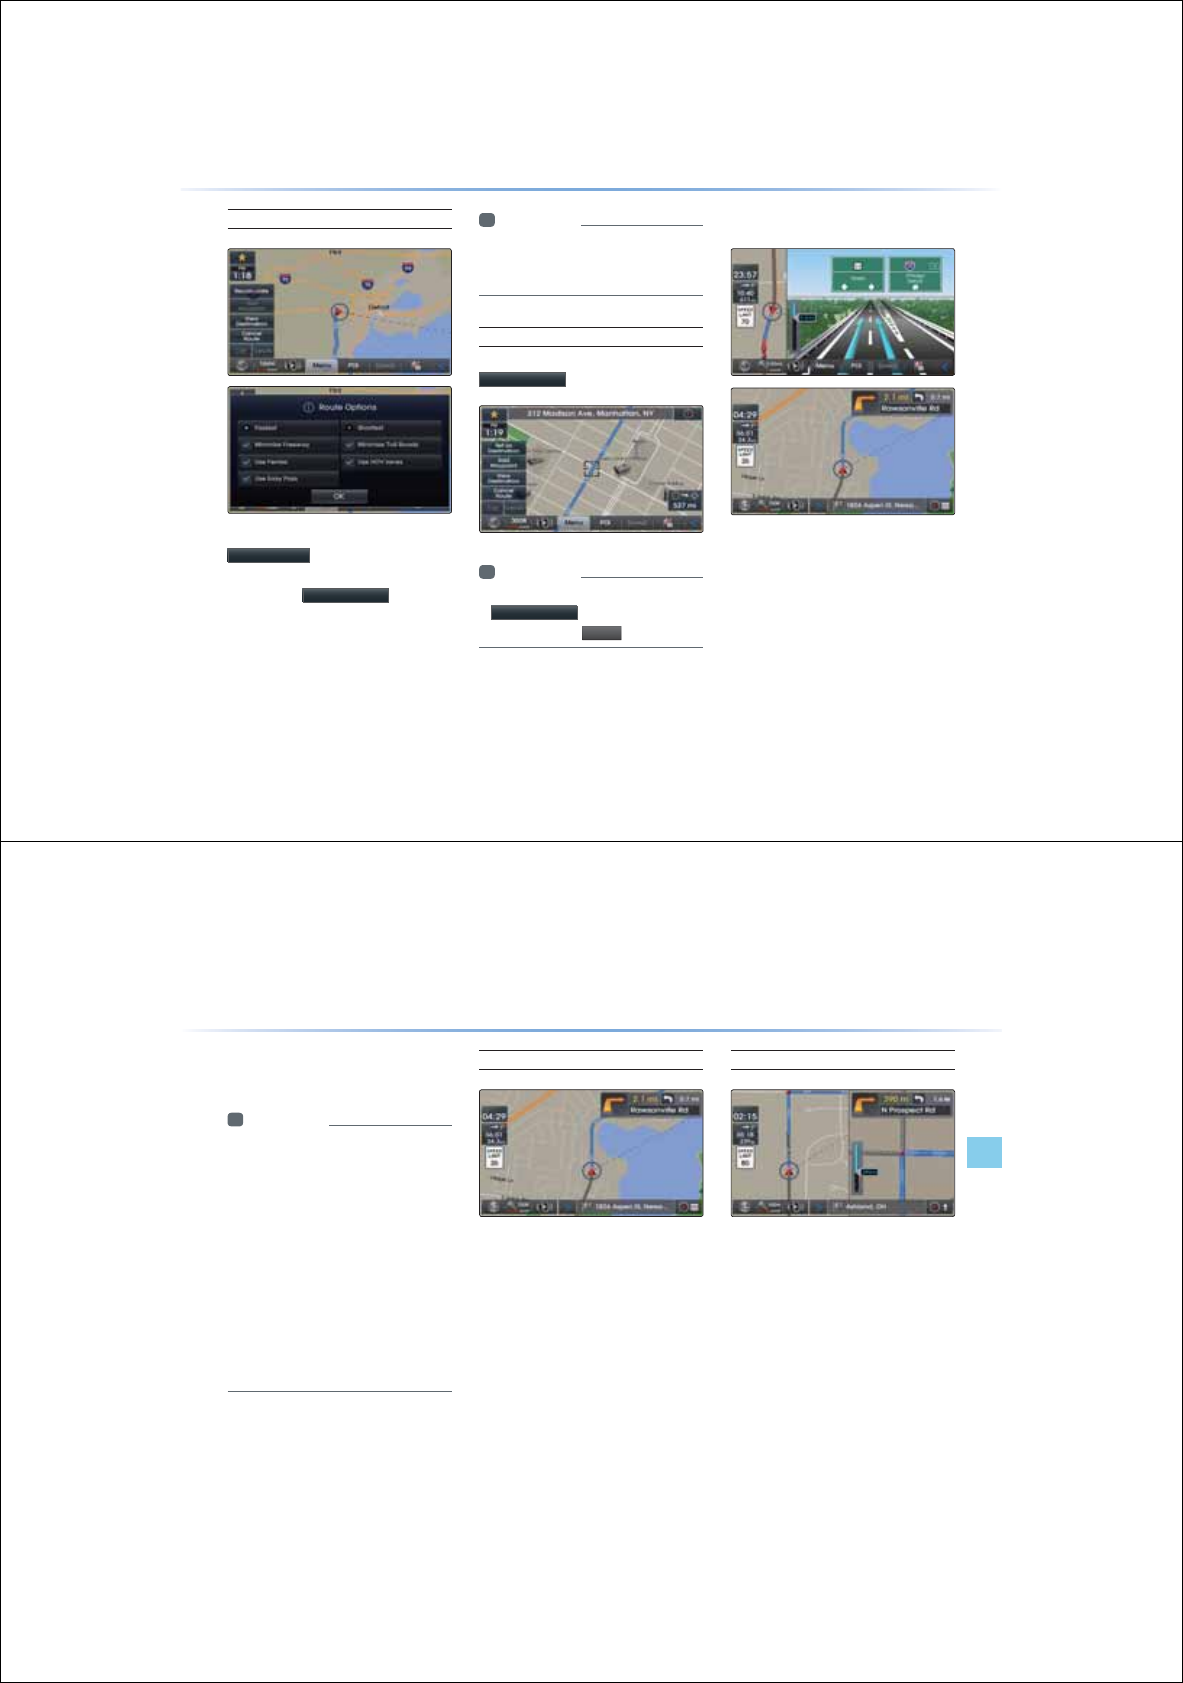
3-22
8VLQJWKH1DYLJDWLRQ
Route Recalculation
Once a route has been set, the
5HFDOFXODWH
button is displayed at the
top of the menus.
Pressing the
5HFDOFXODWH
button will
display a pop-up that allows you to change
route options. Once the settings are changed,
the route is recalculated by reflecting the
changes.
i Information
У
For more information on Fastest, Shortest,
and other route calculation options, refer to
the route calculation section.
Cancel Route
In the Map menu screen, press the
&DQFHO5RXWH
button.
i Information
У
You can cancel the route by pressing the
&DQFHO5RXWH
button that is displayed
after pressing the
0
HQ
X
button.
5RXWH*XLGDQFH
Preliminary guidance, motorway mode, turn
list guidance and other guidance screens
are displayed according to the current road
condition.
Within the guidance map screen, if the current
position is on route, then intersection guid-
ance will be provided once you are nearby an
intersection.
3-23
Navigation l
Using the Navigation
Also, the intersection zoom screen is
displayed when nearby an intersection.
i Information
У
Within all guidance mode screens, pressing
the button at the bottom right side of the
screen will change the route guidance
mode.
У
Each time the button is pressed, the guid-
ance mode will change in order of prelimi-
nary guidance Ą turn list Ą motorway
guidance mode. (The icon within the button
indicates the mode that will be displayed
upon next press.)
У
Motorway and intersection zoom guidance are
displayed on during guidance at corresponding
roads.
Preliminary Guidance Mode
At the top right side of the screen, the next/
after next turn info, remaining distance, direc-
tion and other information are displayed.
Intersection Zoom Mode
This mode provides detailed guidance nearby
intersections before the next turn.
This mode is displayed starting from 300m
before the intersection.
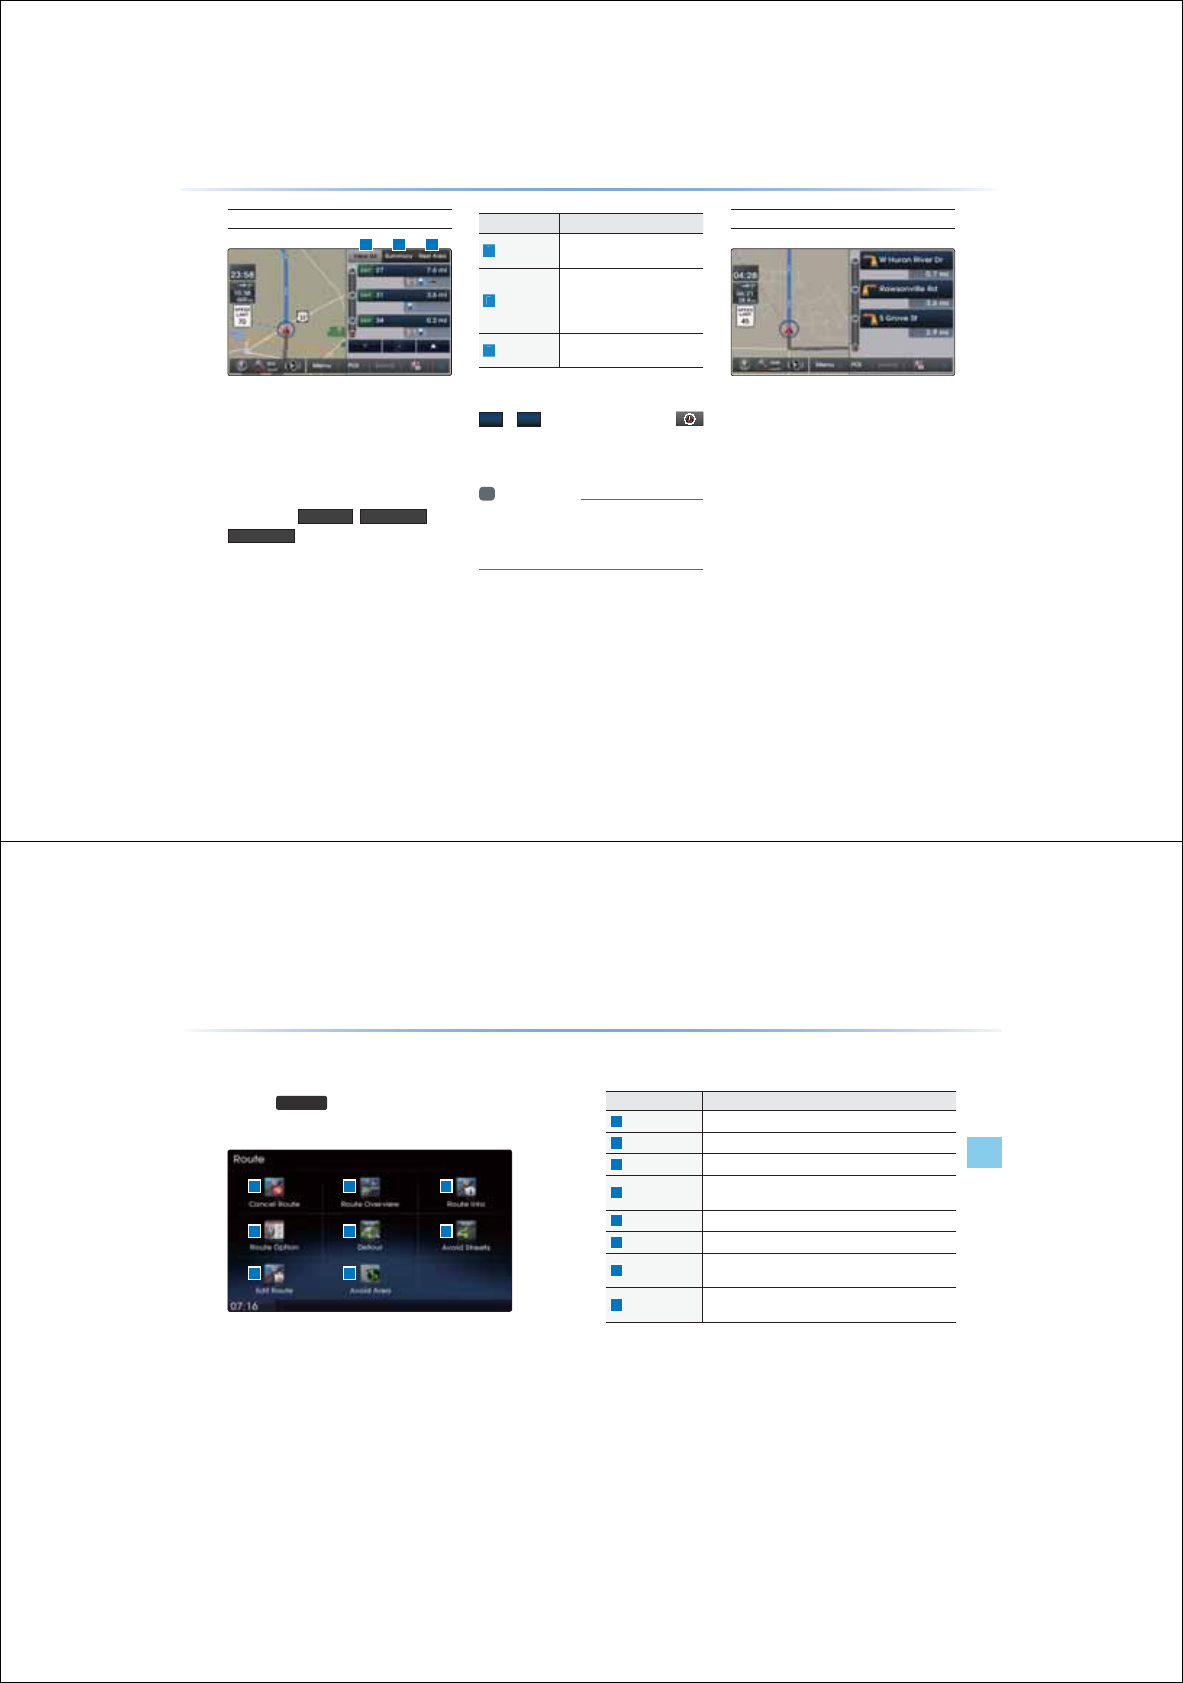
3-24
8VLQJWKH1DYLJDWLRQ
Motorway Mode
Upon entering a motorway during route guid-
ance, the motorway mode will automatically be
displayed. This mode is displayed when driving
on a motorway and mainly displays motorway
related POIs.
You can check information for various POIs
by using the
9LHZ$OO
,
6XPPDU\
and
5HVW$UHD
buttons.
Name Description
1
View All Guidance for all POIs on the
Motorway
2
Summary
Shows List of turn points and
other directional route
guidance while driving within
motor ways
3
Rest Area Guidance for only the rest
areas on the motorway
When scrolling through POIs by using the
Ԡ
,
Ԥ
buttons, pressing the
button will select the POI closest to the
current position.
i Information
У
When there are more than four POI marks
that can be listed, some POIs may be omit-
ted and not displayed.
Turn List Mode
Turn list mode shows turn information on
the current route.
1 2 3
3-25
Navigation l
Using the Navigation
5RXWH0HQX
Pres the
5287(
key to use, edit, or optimize various route
options.
Name Description
1
Cancel Route Cancels the currently set route
2
Route Overview Shows the route overview to the set destination
3
Route Info Shows detailed info for the current route
4
Route Option Route calculation features with various route calcula-
tion options and settings
5
Detour Used to select and edit detour road/streets
6
Avoid Streets Used to edit the route by selecting avoid streets
7
Edit Route Used to add/delete/change the order of destinations/
waypoints
8
Avoid Area Used to edit route by adding Avoid Areas/Editing
Avoid Areas and Deleting Avoid Areas
1
4
7
2
5
8
3
6
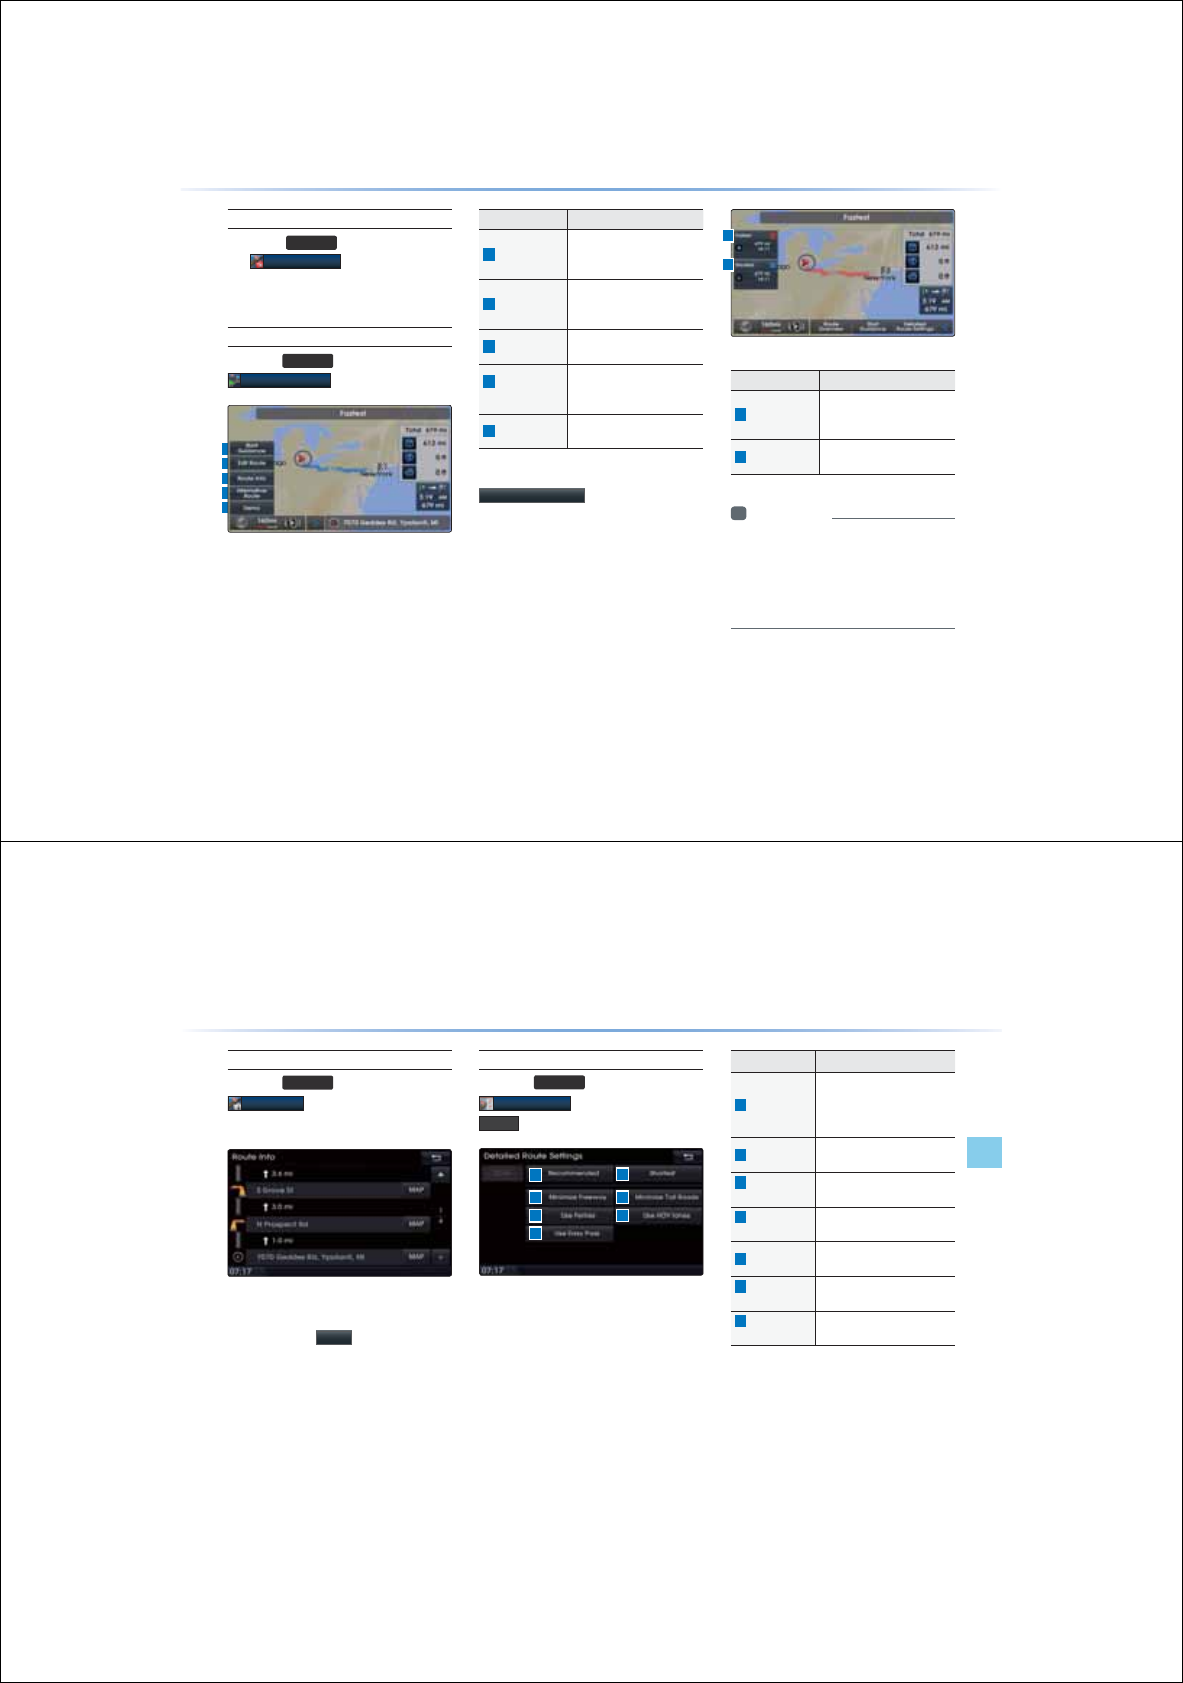
3-26
8VLQJWKH1DYLJDWLRQ
1
3
2
4
5
Cancel Route
Press the
5287(
key and then press
the
&DQFHO5RXWH
button to cancel
the currently set route.
Route Overview
Press the
5287(
key ƙ Press
5RXWH2YHUYLHZ
Name Description
1
Start Guidance
Starts guidance to the set
Route/Displays the current
vehicle position
2
Edit Route
Used to add/delete/change
order of destinations/
waypoints
3
Route Info Shows route info to the set
destination
4
Alternative
Route
Displays various alterna-
tive route options for route
calculation
5
Demo
Starts demo to the set
destination
Within the Route Overview screen, press the
$OWHUQDWLYH5RXWH
button to display other
potential routes to the set destination.
From the alternative route options, select the
desired route.
Name Description
1
Recommended
Fastest route that re-
flects distance and traffic
conditions
2
Shortest
The shortest distance from
start point to destination
i Information
У
Even if the “Use Alternative Route Search”
option is turned on, the Route Overview
screen (not the Alternative Route screen)
when calculating routes that include way-
points.
1
2
3-27
Navigation l
Using the Navigation
Route Info
Press the
5287(
key ƙ Press
5RXWH,QIR
The turn points and distance information
by key roads within the set route are is
played. Press the
0$3
button next to each
road name to display the map position for the
corresponding location.
Route Option
Press the
5287(
key ƙ Press
5RXWH2SWLRQ
ƙ Set and press
'RQH
1
3
5
2
4
7
6
Route Options refer to conditions used to
calculate the route to the destination. The
route is automatically recalculated if the route
options and detailed route settings
are changed.
Name Description
1
Recommended
Optimal route as determined
by the system upon con-
sideration of various route
conditions
2
Shortest The shortest distance from
start point to the destination
3
Minimise
Motorway
Route calculation with mini-
mal use of motorways
4
Minimise
Toll Roads
Route calculation with mini-
mal use of toll roads
5
Use Ferries Route calculation by includ-
ing use of ferries
6
Use HOV
Lanes
Route calculation by includ-
ing use of HOV lanes
7
Use Easy
Pass
Route calculation by includ-
ing use of Easy Pass
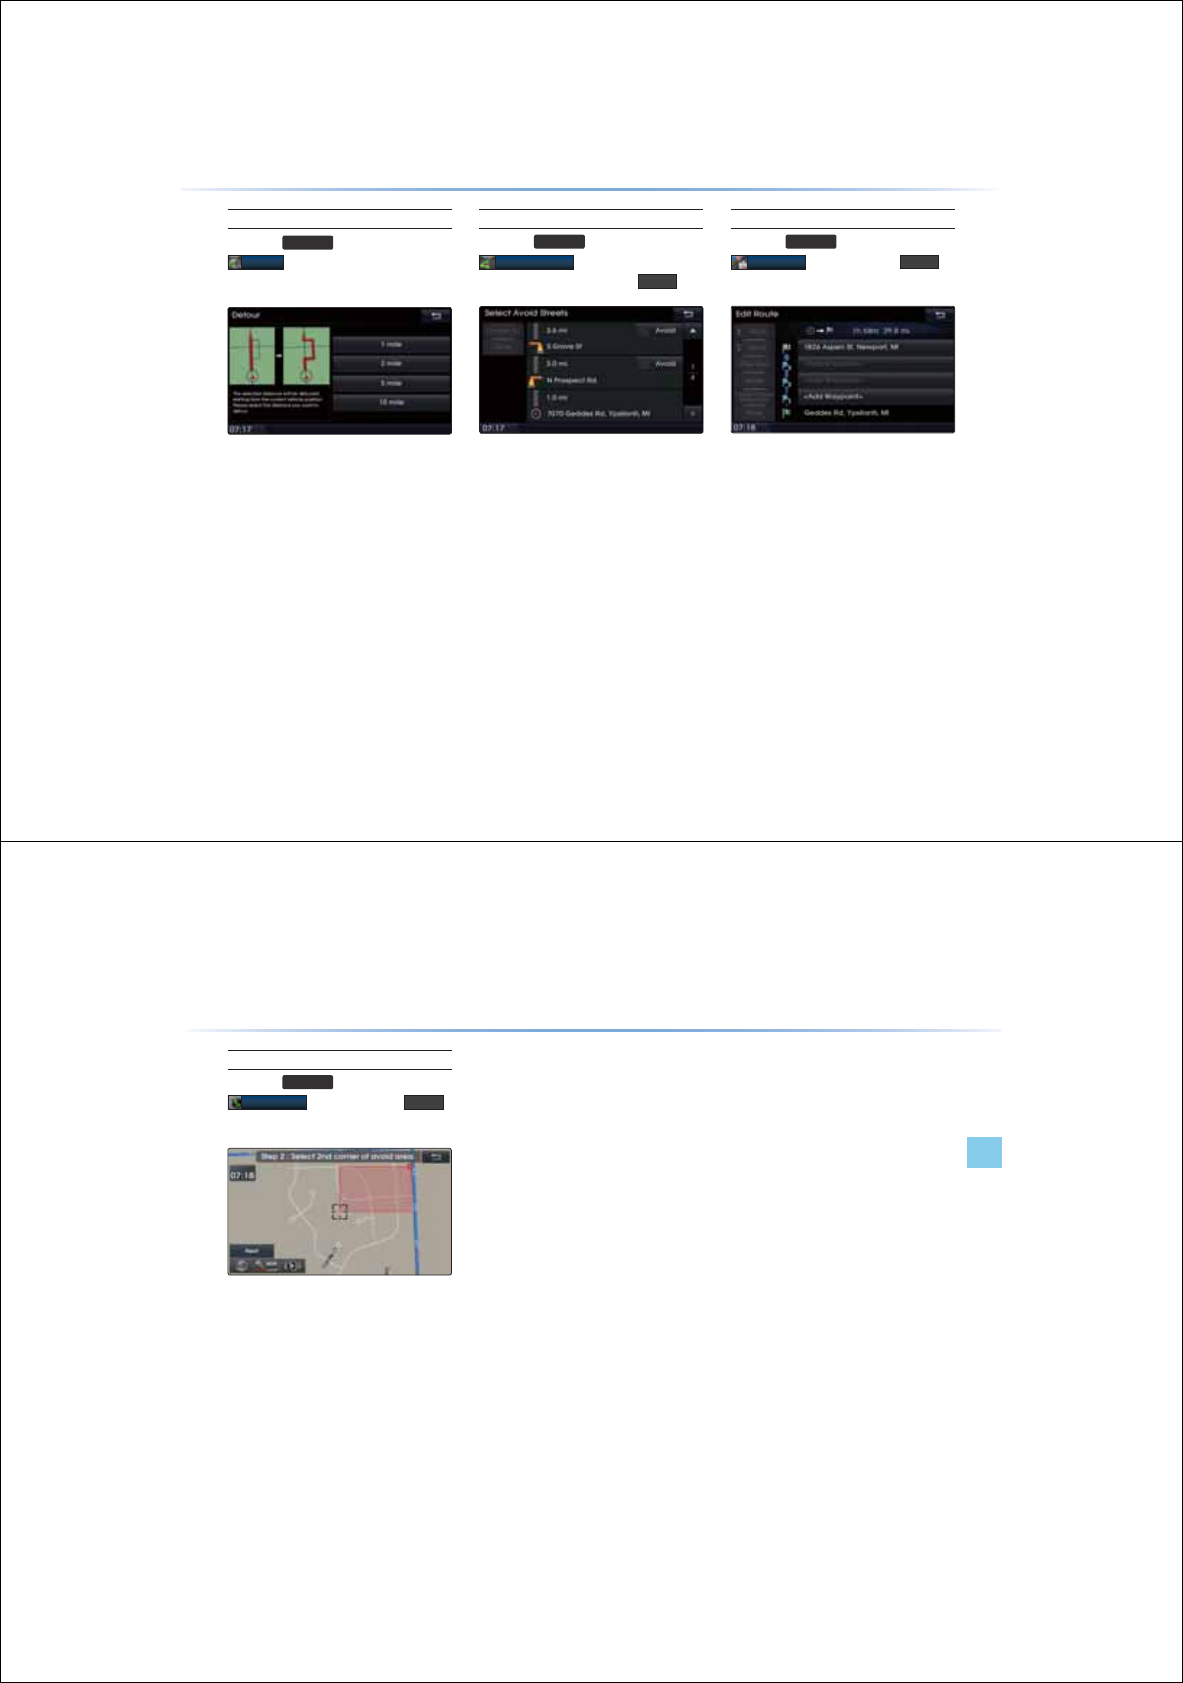
3-28
8VLQJWKH1DYLJDWLRQ
Detour
Press the
5287(
key ƙ Press
'HWRXU
The Detour menu is used to re-define the
route by setting a detour to a certain distance
from the current position.
Avoid Streets
Press the
5287(
key ƙ Press
$YRLG6WUHHWV
ƙ Select the streets
you want to avoid and press
'RQH
This feature is used to select specific streets
to avoid within the current route.
Edit Route
Press the
5287(
key ƙ Press
(GLW5RXWH
ƙSet and press
'RQH
The Edit Route menu displays the start point,
waypoints and the destination in list format
and is used to edit corresponding positions or
the order of destinations within the route.
8VLQJWKH1DYLJDWLRQ
3-29
Navigation l
Using the Navigation
Avoid Area
Press the
5287(
key ƙPress
$YRLG$UHD
ƙ Set and press
'RQH
This feature is used by creating a rectangle
over the area to avoid.
An area set as an avoid area is excluded
from the calculated route. If a route had been
calculated prior to creating an avoid area, the
route will automatically be recalculated.
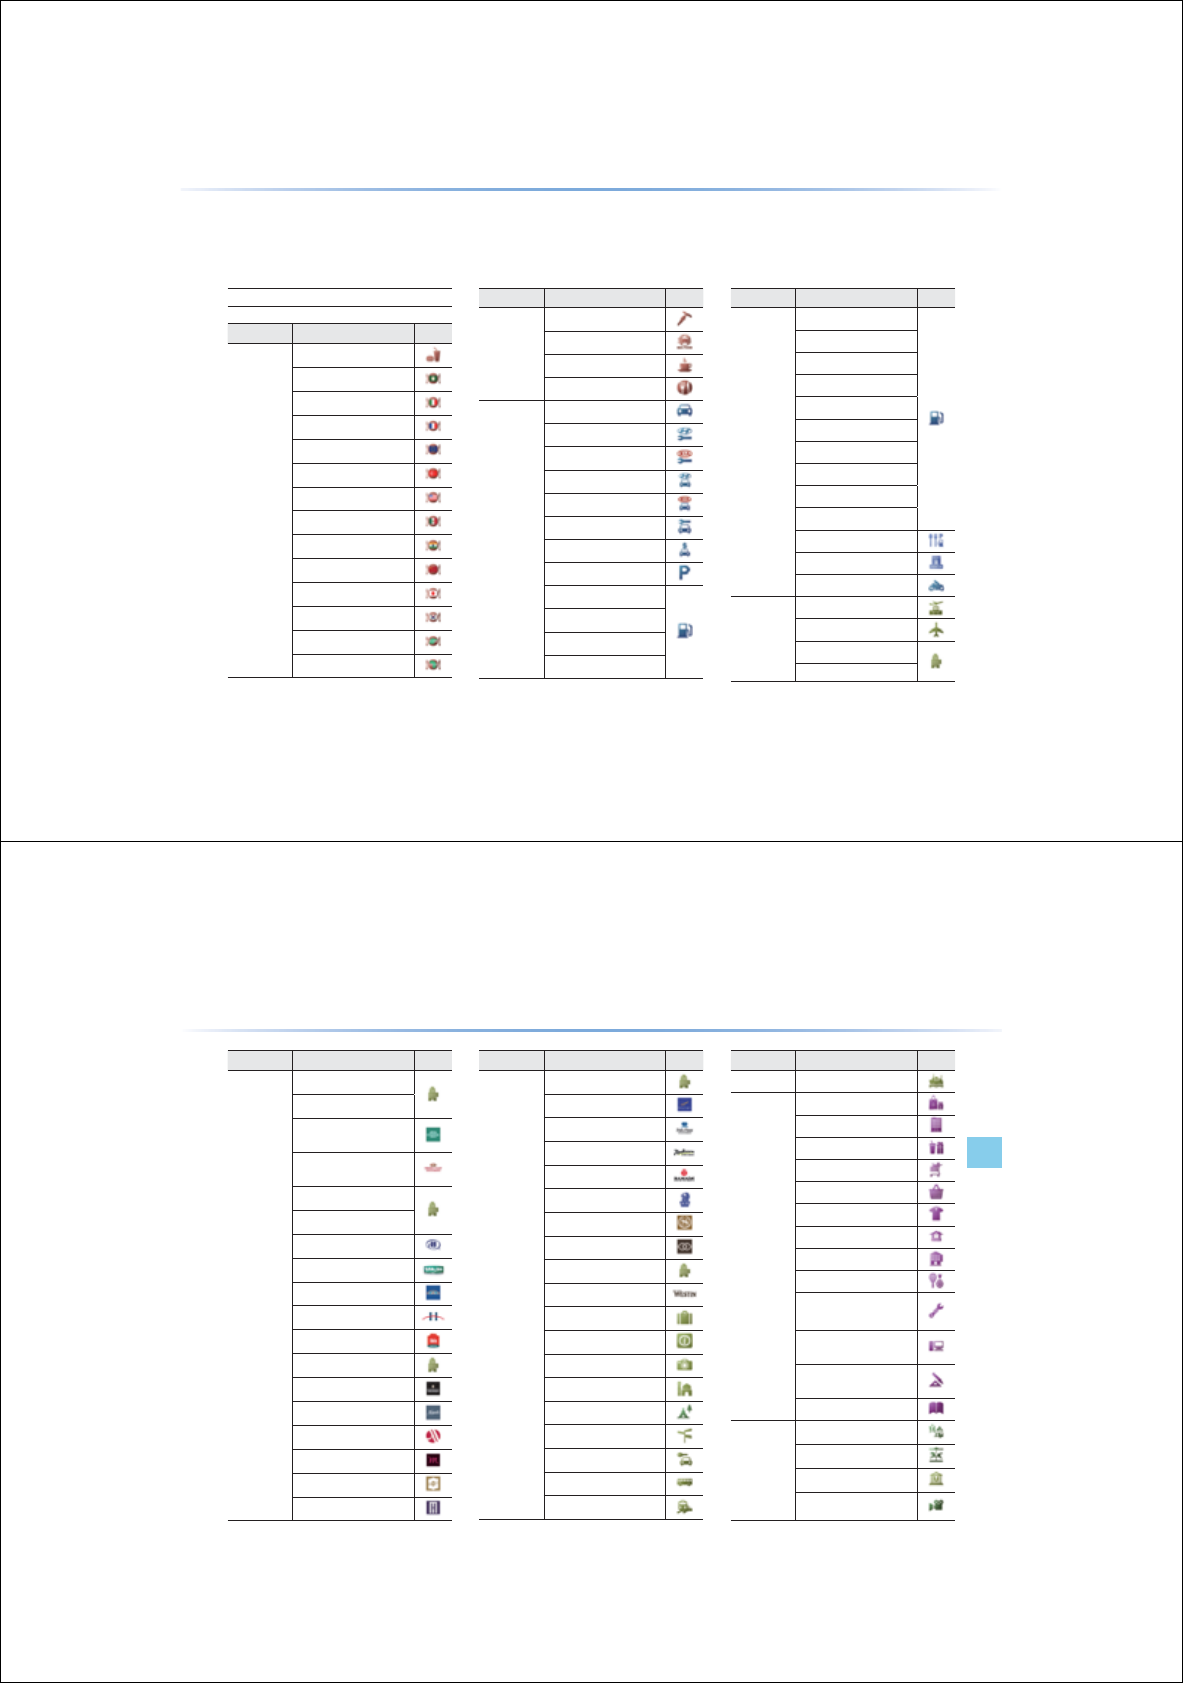
3-30
These are landmark and logo icons that display facilities within 2D map mode. The size of the symbol may be displayed
differently according to the map scale. Symbols may change without prior notice during map updates. Symbols shown
within the manual represent a portion of all symbols and should only be used as a reference.
'/DQGPDUNV
0DS/DQGPDUNVDQG/RJRV
Category Sub-category Icon
Restaurant
Vegetarian Food
Seafood
Coffee Shop
Other
Automotive
Automotive
Hyundai Auto Service
Kia Auto Service
Hyundai Dealership
Kia Dealership
Auto Service
Automobile Dealership
Parking
ADNOC FOD
AL DREES
BAPCO
CALTEX
Category Sub-category Icon
Automotive
EMARAT
EMIRATES
ENOC
EPPCO
KNPC
MOBIL
NAFT
PETROL
SHELL
Petrol Station
Rest Area
Frontier Crossing
Motorcycle Dealership
Travel
Travel
Airport
Hotels
AMBASSADOR
Logo
Category Sub-category Icon
Restaurant
Fast Food
Middle Eastern Food
Italian Food
French Food
Continental Food
Turkish Food
American Food
Mexican Food
Indian Food
Chinese Food
Japanese Food
Korean Food
Asian Food
African Food
Navigation l3-31
Map Landmarks and Logos
Category Sub-category Icon
Travel
BEST WESTERN
CARLTON
COURTYARD BY
MARRIOTT
CROWNE PLAZA
HOTEL
FOUR SEASONS
GOLDEN TULIP
HILTON
HOLIDAY INN
HOWARD JOHNSON
HYATT REGENCY
IBIS
IMA
INTERCONTINENTAL
KEMPINSKI
MARRIOTT
MERCURE
MERIDIEN
METROPOLITAN
Category Sub-category Icon
Travel
MÖVENPICK
NOVOTEL
PLAZA HOTEL
RADISSON
RAMADA
RITZ-CARLTON
SHERATON
SOFITEL
TULIP INN
WESTIN
Other accommodation
Tourist Office
Tourist Attraction
Historical Monument
Camp Ground
City Centre
Rent A Car Facility
Bus Station
Railway Station
Category Sub-category Icon
Travel Ferry Terminal
Shopping
Shopping
Shopping Centre
Department Store
Grocery Store
Convenience Store
Clothing Store
Home Specialty Store
Specialty Store
Sporting Goods Store
Home Improvement &
Hardware Store
Consumer Electronics
Store
Office Supply & Services
Store
Book Store
Recreation
Recreation
Amusement Park
Museum
Cinema
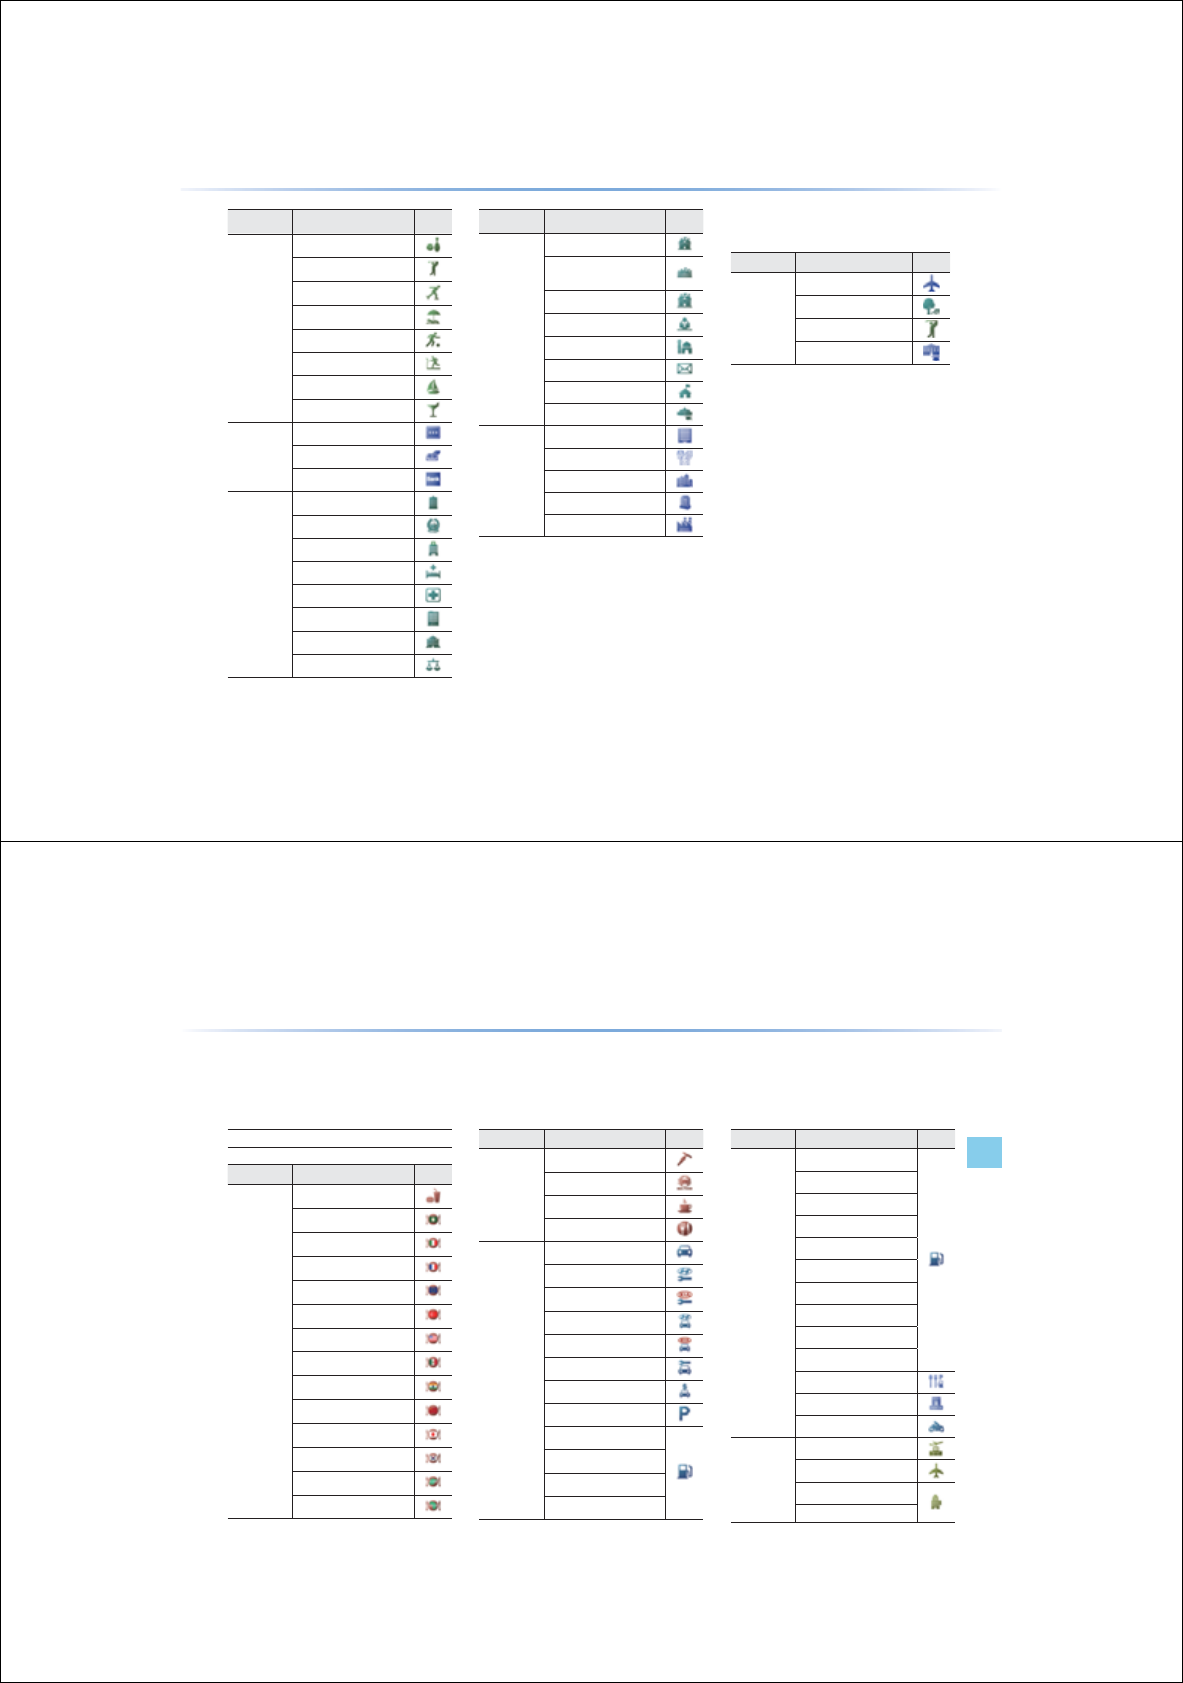
3-32
Category Sub-category Icon
Recreation
Bowling Centre
Golf Course
Ice Skating Rink
Recreation Facility
Sports Activity
Sports Centre
Marina
Nightlife
Financial
Service
Financial Service
ATM
Bank
Public
places
Public places
Police Station
Hospital/Polyclinic
Medical Service
Pharmacy
City Hall
Community Centre
Court House
Category Sub-category Icon
Public
places
Embassy
Exhibition or Conference
Centre
Government Office
Library
Place of Worship
Post Office
School
University or College
Other
ETC
Business Facility
Resident’l Area/Bldg
Cemetery
Industrial Zone
2D Landmark
Category Sub-category Icon
Service
Airport
Park
Golf
University
0DS/DQGPDUNVDQG/RJRV
Navigation l3-33
Map Landmarks and Logos
These are landmark and logo icons that display facilities within 3D map mode. The size of the symbol may be displayed
differently according to the map scale. Symbols may change without prior notice during map updates. Symbols shown
within the manual represent a portion of all symbols and should only be used as a reference.
'/DQGPDUNV
Logo
Category Sub-category Icon
Restaurant
Vegetarian Food
Seafood
Coffee Shop
Other
Automotive
Automotive
Hyundai Auto Service
Kia Auto Service
Hyundai Dealership
Kia Dealership
Auto Service
Automobile Dealership
Parking
ADNOC FOD
AL DREES
BAPCO
CALTEX
Category Sub-category Icon
Automotive
EMARAT
EMIRATES
ENOC
EPPCO
KNPC
MOBIL
NAFT
PETROL
SHELL
Petrol Station
Rest Area
Frontier Crossing
Motorcycle Dealership
Travel
Travel
Airport
Hotels
AMBASSADOR
Category Sub-category Icon
Restaurant
Fast Food
Middle Eastern Food
Italian Food
French Food
Continental Food
Turkish Food
American Food
Mexican Food
Indian Food
Chinese Food
Japanese Food
Korean Food
Asian Food
African Food
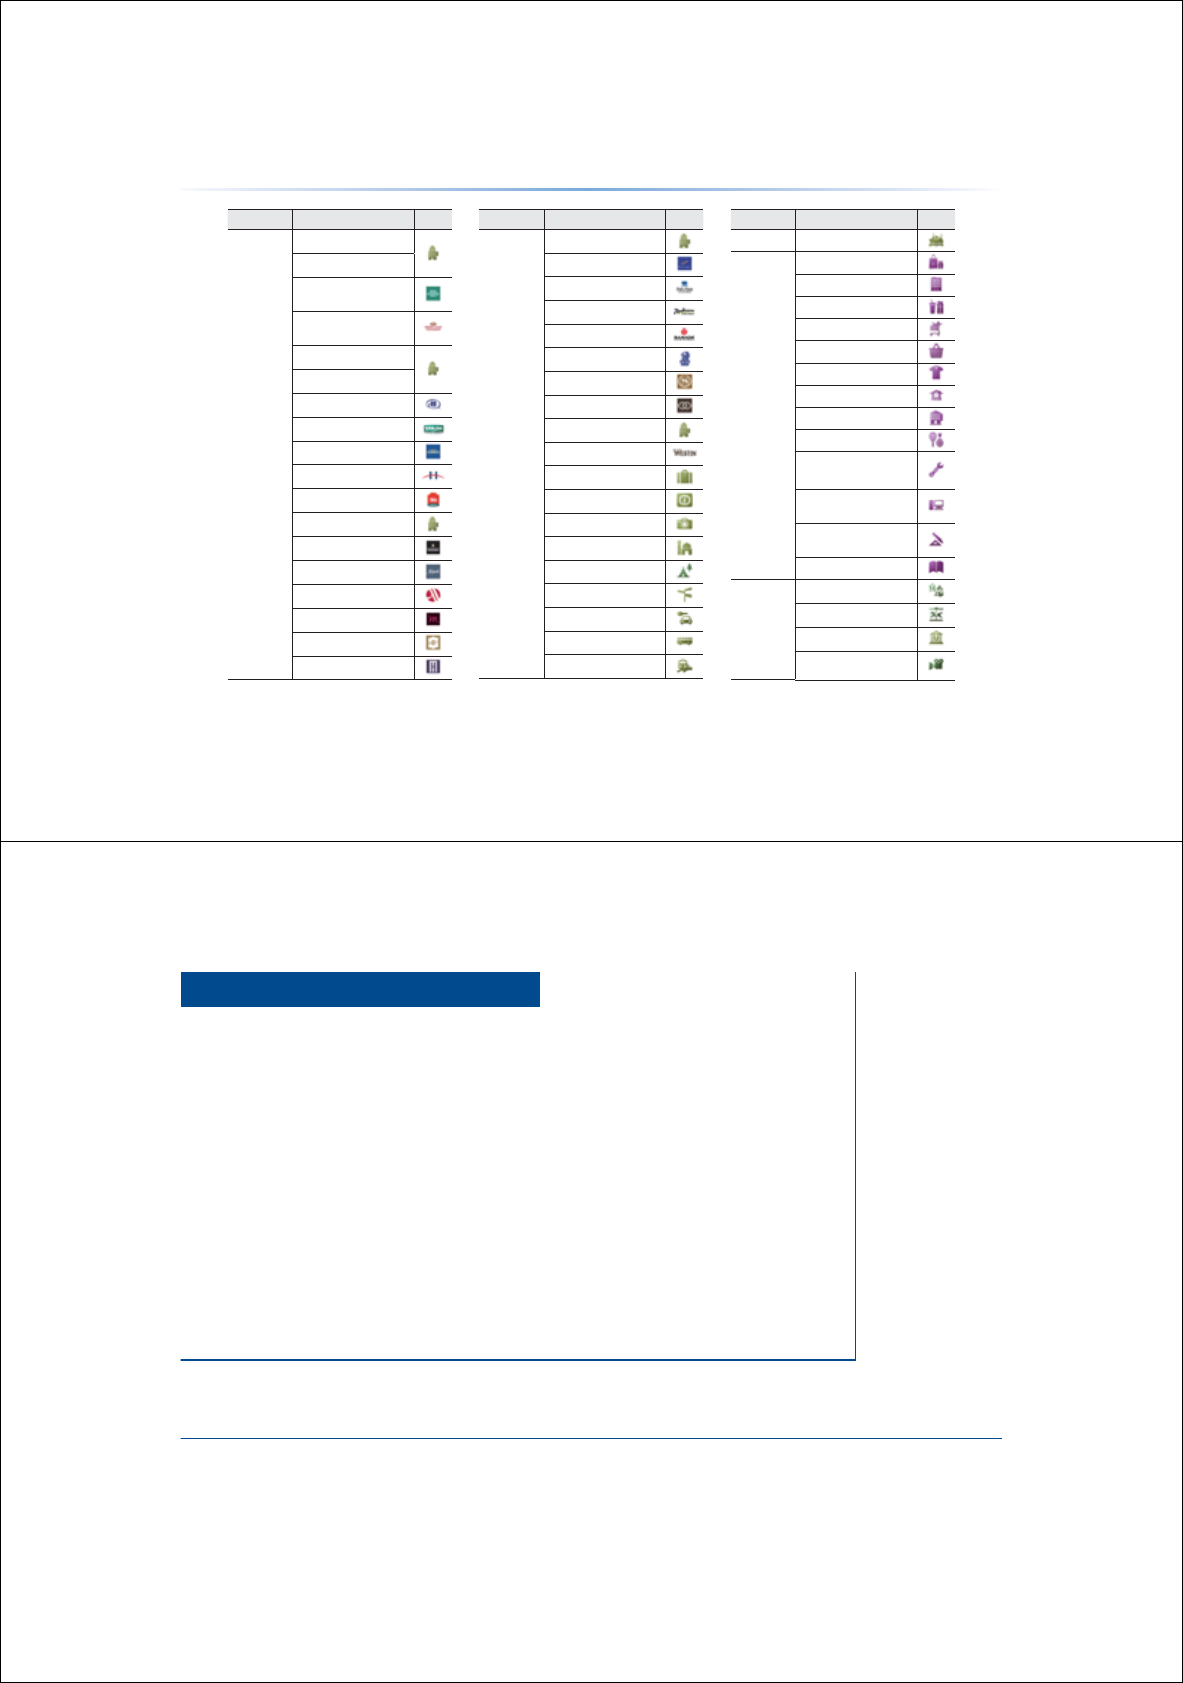
3-34
0DS/DQGPDUNVDQG/RJRV
Category Sub-category Icon
Travel
BEST WESTERN
CARLTON
COURTYARD BY
MARRIOTT
CROWNE PLAZA
HOTEL
FOUR SEASONS
GOLDEN TULIP
HILTON
HOLIDAY INN
HOWARD JOHNSON
HYATT REGENCY
IBIS
IMA
INTERCONTINENTAL
KEMPINSKI
MARRIOTT
MERCURE
MERIDIEN
METROPOLITAN
Category Sub-category Icon
Travel
MÖVENPICK
NOVOTEL
PLAZA HOTEL
RADISSON
RAMADA
RITZ-CARLTON
SHERATON
SOFITEL
TULIP INN
WESTIN
Other accommodation
Tourist Office
Tourist Attraction
Historical Monument
Camp Ground
City Centre
Rent A Car Facility
Bus Station
Railway Station
Category Sub-category Icon
Travel Ferry Terminal
Shopping
Shopping
Shopping Centre
Department Store
Grocery Store
Convenience Store
Clothing Store
Home Specialty Store
Specialty Store
Sporting Goods Store
Home Improvement &
Hardware Store
Consumer Electronics
Store
Office Supply & Services
Store
Book Store
Recreation
Recreation
Amusement Park
Museum
Cinema
&$5$916<67(0
%OXHWRRWKp
+DQGVIUHH
УBefore Use
УBasic Mode Screen
У
Using
Bluetooth
®
Wireless Technology
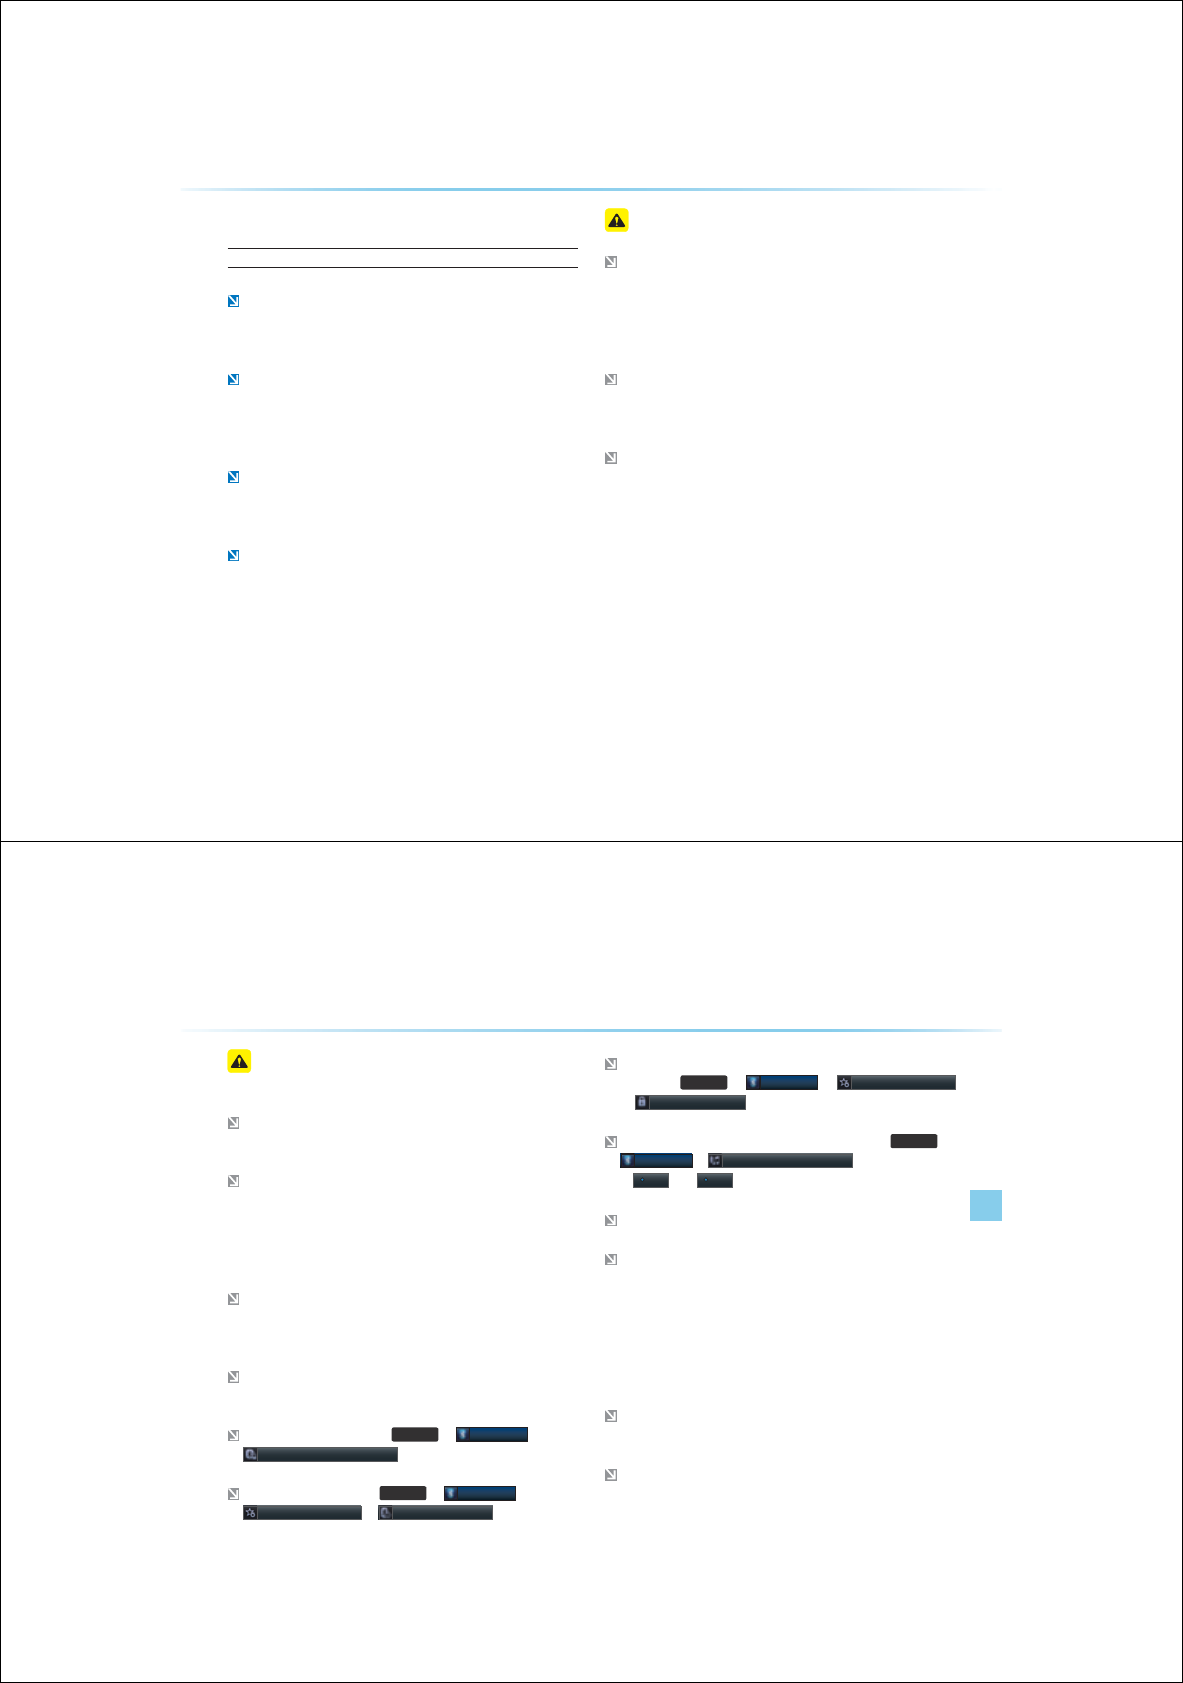
4-2
%HIRUHXVLQJWKH%OXHWRRWK
p
+DQGVIUHH
What is
Bluetooth
®
Wireless Technology?
Bluetooth
®
Wireless Technology refers to a short-distance wireless
networking technology which uses a 2.45GHz frequency to connect
various devices within a certain distance.
Supported within PCs, external devices, Bluetooth
®
phones, PDAs,
various electronic devices, and automotive environments, Bluetooth
®
allows data to be transmitted at high speeds without having to use a
connector cable.
Bluetooth
®
Handsfree refers to a device which allows the user to
conveniently make phone calls with Bluetooth
®
mobile phones
through the Navigation system.
The Bluetooth
®
handsfree feature may not be supported in some
mobile phones. For more information on mobile phone compatibility,
visit the Hyundai Motor website (http://www.hyundaiusa.com).
3UHFDXWLRQVIRUVDIHGULYLQJ
Bluetooth
®
Handsfree is a feature that enables drivers to practice
safe driving. Connecting the head unit with a Bluetooth
®
phone
allows the user to conveniently make calls, receive calls, and man-
age the phone book. Before using
Bluetooth
®
Wireless Technology,
carefully read the contents of this user’s manual.
Excessive use or operations while driving may lead to negligent driv-
ing practices and be the cause of accidents. Do not operate the
device excessively while driving.
Viewing the screen for prolonged periods of time is dangerous and
may lead to accidents. When driving, view the screen only for short
periods of time.
%HIRUH8VH
Bluetooth
®
Handsfre l 4-3
Before Use
&DXWLRQVXSRQFRQQHFWLQJ
%OXHWRRWK
p
SKRQH
Before connecting the head unit with the mobile phone, check to
see that the mobile phone supports Bluetooth
®
features.
Even if the phone supports
Bluetooth
®
Wireless Technology, the
phone will not be found during device searches if the phone has
been set to hidden state or the Bluetooth
®
power is turned off.
Disable the hidden state or turn on the Bluetooth
®
power prior to
searching/connecting with the Head unit.
If Auto Connection is used, the Bluetooth
®
phone is automatically
connected when the ignition is turned on, making it unnecessary to
have to connect the phone with the head unit every time.
If you do not want automatic connection with your Bluetooth
®
device, turn the Bluetooth
®
power off.
To set Auto Connection, go to
6(783
ƙ
%OXHWRRWK
$XWR&RQQHFWLRQV6HWWLQJV
The car name can be set at
6(783
ƙ
%OXHWRRWK
$GYDQFHG6HWWLQJV
ƙ
'HYLFH,QIRUPDWLRQ
The passkey needed to connect the mobile phone can be verified/
changed at
6(783
ƙ
%OXHWRRWK
ƙ
$GYDQFHG6HWWLQJV
ƙ
&KDQJH3DVVNH\
If the Bluetooth
®
audio does not play, go to
6(783
ƙ
%OXHWRRWK
ƙ
6WUHDPLQJ$XGLR6HWWLQJ
If the feature is set
to
2II
, turn
2Q
and try again.
Park the vehicle when connecting the head unit with the mobile phone.
Bluetooth
®
connection may become intermittently disconnected in
some mobile phones. Follow these steps to try again.
1. Turn the Bluetooth
®
function within the mobile phone OFF/ON and try again.
2. Turn the mobile phone power OFF/ON and try again.
3. Completely remove the mobile phone battery, reboot, and then again.
4. Reboot the Audio Navigation System and try again.
5. Delete all paired devices, pair and try again.
The handsfree call volume and quality may differ depending on the
mobile phone.
Pairing Bluetooth devices and use of other Bluetooth
®
features are
not supported when the vehicle is in motion. For safety, please first
park your vehicle.
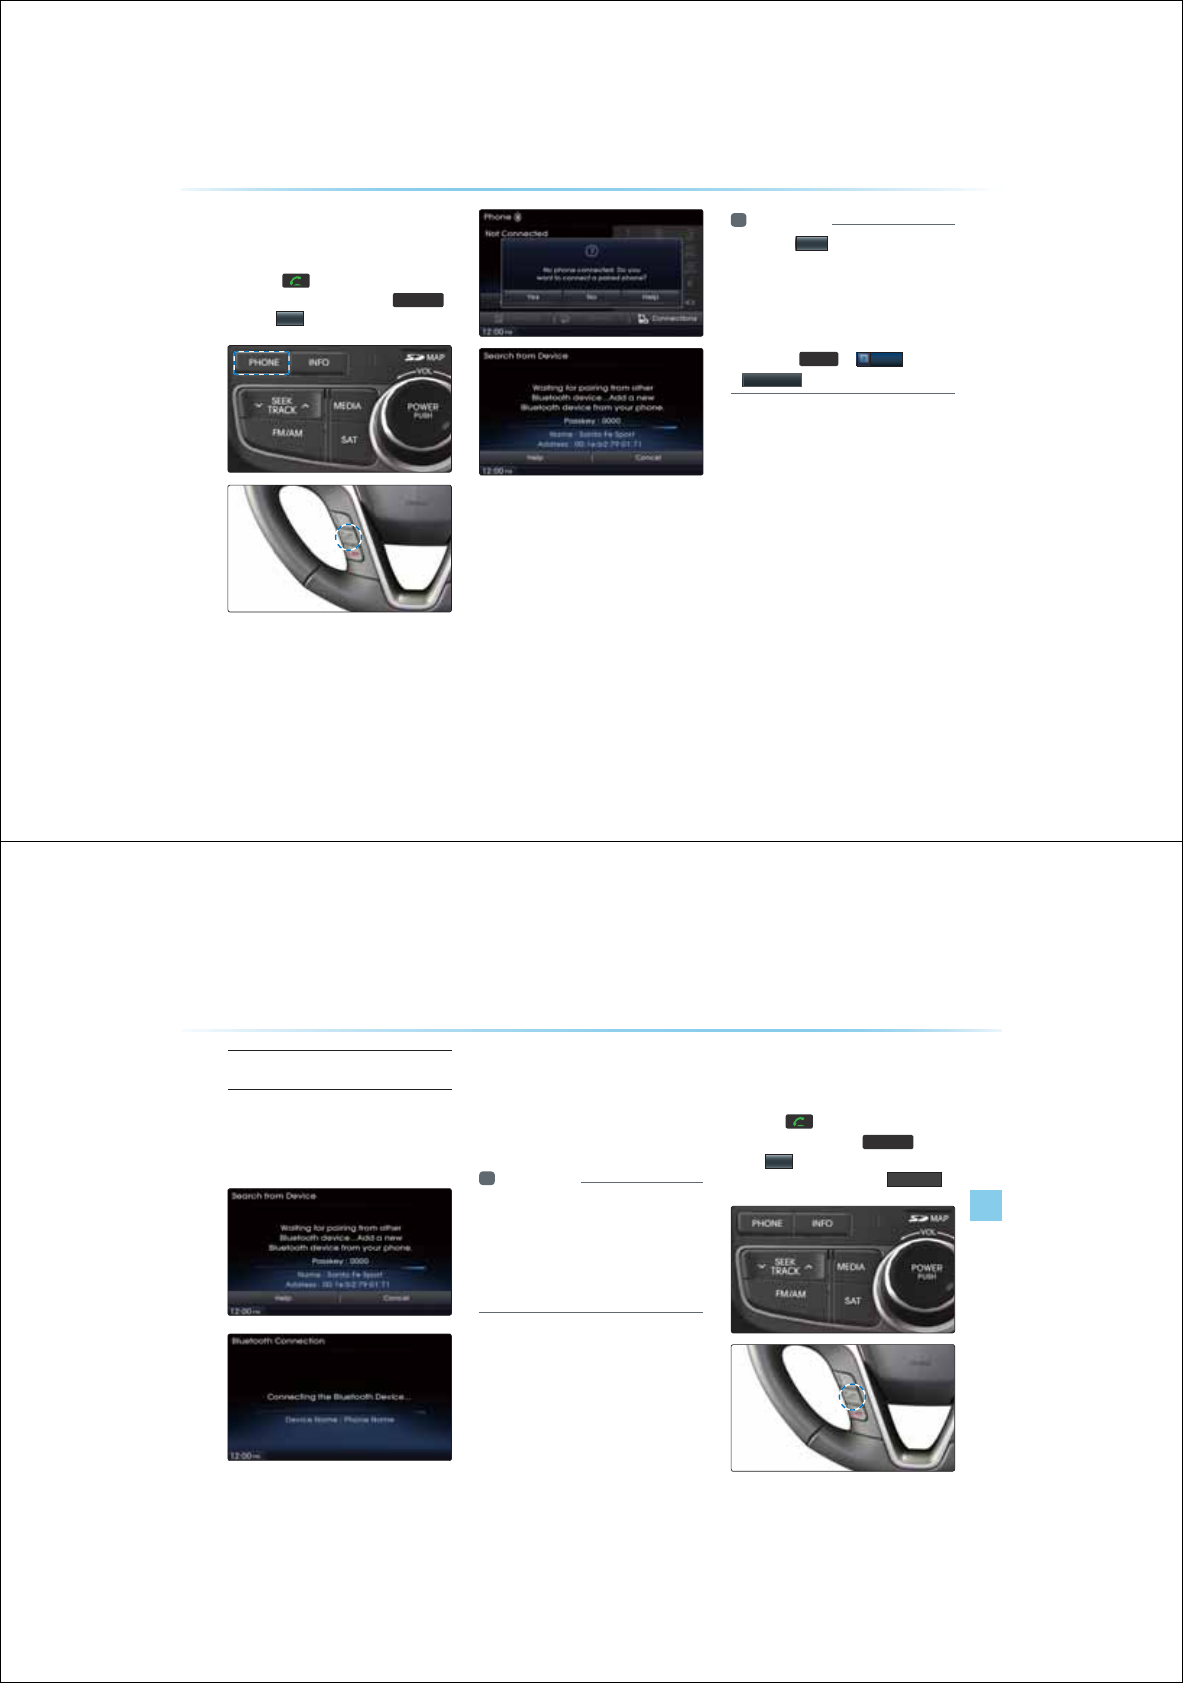
4-4
%DVLF0RGH6FUHHQ
:KHQQRSKRQHVKDYH
EHHQSDLUHG
Press the
key on the steering
remote controller or press the
3+21(
ƙ Press
<HV
i Information
У
Press the
+HOS
button within the pop-up
to view the help section with information
related to pairing and connecting Bluetooth
®
devices, and using Handsfree related fea-
tures.
У
The same Help section can be viewed
by going to
,1)2
ƙ
+HOS
ƙ
%OXHWRRWK
Bluetooth
®
Handsfre l 4-5
Basic Mode Screen
Pairing from the Bluetooth
®
Device
In the Search from Device screen ƙ
Search for the car name and pair the
device ƙ Enter the Passkey ƙ Bluetooth
becomes connected
From the Bluetooth
®
device, search for the
car name and pair the device.
When searching from the Bluetooth
®
device,
the car name is Santa Fe and the default
passkey is '0000'.
i Information
У
To learn more about searching from
Bluetooth
®
devices and pairing, refer to the
user's manual for your Bluetooth
®
device.
У
Bluetooth
®
devices cannot be paired when
the vehicle is in motion. For your safety, first
park the vehicle to pair a Bluetooth
®
device.
:KHQDSKRQHLV
DOUHDG\SDLUHG
Press the key on the steering
remote controller or the
3+21(
key ƙ
Press
<HV
ƙ Select the device
from the device list ƙ Press
&RQQHFW
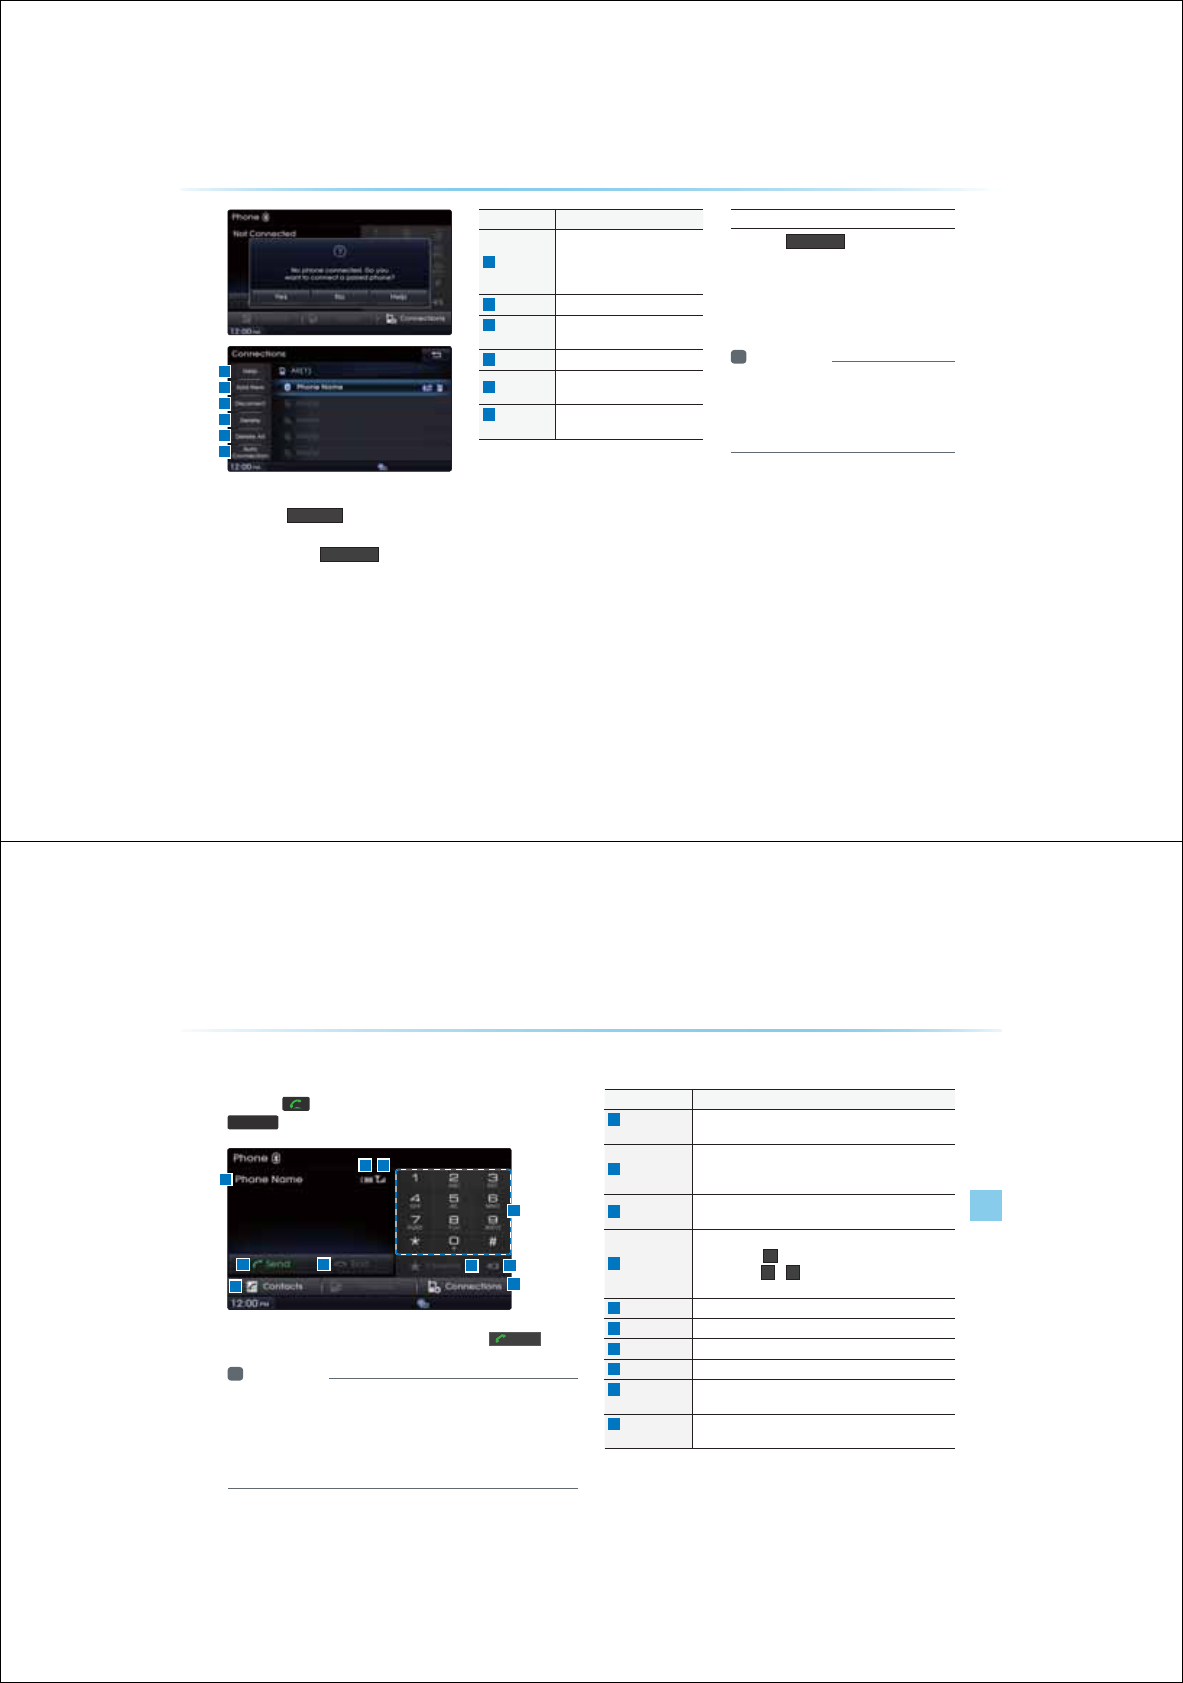
4-6
У
Select the device you want to connect and
press the
&RQQHFW
button.
У
If the phone you want to connect does not
exist, press the
$GG1HZ
button to pair
a new Bluetooth
®
device.
Name Description
1
Help
Help section related to pairing
and connecting/disconnecting
Bluetooth
®
devices and Hands-
free phone features
2
Add New Pair a new Bluetooth
®
device
3
Connect/
Disconnect
Connect or disconnect a
Bluetooth
®
device
4
Delete
Delete a paired Bluetooth
®
Device
5
Delete All Delete all paired Bluetooth
®
Devices
6
Auto
Connection
Set Bluetooth
®
auto connection
when car ignition is turned on
When Pairing Additional Device
Press the
$GG1HZ
button to pair a
new Bluetooth® device.
For more information on pairing, refer to the
'When no phones have been paired' section.
i Information
У
When a Bluetooth
®
device is connected, a
new device cannot be paired. If you want to
pair a new phone, first disconnect the con-
nected Bluetooth
®
device.
%DVLF0RGH6FUHHQ
1
2
3
4
5
6
Bluetooth
®
Handsfre l 4-7
Basic Mode Screen
Name Description
1
Info Display
Window Displays name of currently connected device
2
Send
If no number has been entered, switches to call history
screen
If a number has been entered, calls the number
3
End If a number has been entered, deletes the number
During a call, ends the current call
4
Dial Pad
Used to enter the phone number
Press the hold
to enter a '+'
Press the hold
~
to connect to the speed dial saved
within the mobile phone
5
Favorites Displays the Favorites list screen
6
Delete Deletes entered numbers one digit at a time
7
Contacts Displays contacts list screen
8
Connections Displays the Bluetooth
®
device Connections screen
9
Remaining
Battery
Displays the remaining battery for the connected Bluetooth
®
device
10
Call Signal
Strength Displays the call signal strength
:KHQWKHUHLVDFRQQHFWHGGHYLFH
Press the key on the steering remote controller or the
3+21(
key on the head unit to display the following screen
Enter the phone number you wish to call and press the
6HQG
button.
i Information
У
The mobile phone battery and signal strength icons may not be sup-
ported in some mobile phones.
У
The remaining battery level displayed on your mobile phone battery
icon may slightly differ with the device display.
У
The speed dial feature may not be supported in some mobile phones.
1
2
78
3
109
5 6
4

4-8
8VLQJ
%OXHWRRWK
q
:LUHOHVV7HFKQRORJ\
4-8
8VLQJ
%OXHWRRWK
q
:LUHOHVV7HFKQRORJ\
'XULQJD&DOO
Name Description
1
Info Display
Window
Displays other party's name/number
If there is a call waiting, displays call waiting information
2
Switch If there is a call waiting, switches the current call and con-
nects the waiting call
3
End Ends call
4
Dial Pad Used to enter phone number
5
Contacts Displays the Contacts screen
6
Private
During a handsfree call, this function is used to switch the
call to the mobile phone
Upon switching the call to Private, the vehicle mic and
speaker will turn off to allow a private conversation through
the mobile phone
7
Outgoing Vol.
Adjusts outgoing volume during calls
Sets call volume as heard by the other party (Levels 0~5)
The outgoing volume may be heard differently depending
on the connected Bluetooth® device
The name of the other party is displayed if the number is saved within
your contacts. If not, only the phone number is displayed. During a call,
the other party's name/number and the call time are displayed.
i Information
У
The telephone number may not be displayed in some mobile phones.
1
2
5 76
3
4
Name Description
Mutes call volume
Bluetooth
®
phone call state
Mobile phone contacts or call history download status
A state when Bluetooth
®
Handsfree and streaming Audio is all connected
State when Bluetooth
®
streaming Audio is connected
State when Bluetooth
®
Handsfree is connected
6WDWXV%DU,FRQV
Using
Bluetooth
®
Wireless Technology
Bluetooth
®
Handsfre l 4-9 Bluetooth
®
Handsfre l 4-9
0DNLQJ$QVZHULQJ&DOOV
Calling by Dialing a Number
Enter number on the dial pad ƙ Press
the
6HQG
or the key on the
steering remote controller.
If you press the
6HQG
button without
entering a number, the Call History screen is
displayed Press and hold the dial pad
(over 0.8 seconds) to enter a "+".
Name Description
1
Send
Calls the entered phone number
2
End Deletes all entered numbers
3
Favorites Displays the Favorites list screen
i Information
У
Most audio and SETUP mode features will
not operate during a Bluetooth
®
handsfree
call. Only the call volume and Navigation
mode screen can be operated.
Making a Call From Speed Dial
Enter the 1 or 2 digit speed dial umber
with the Dial Pad ƙ Press and hold the
last number.
i Information
У
For speed dials saved within mobile
phones, up to 2 digits are supported.
У
Saving or changing speed dial numbers
through the head unit is not supported.
1 32
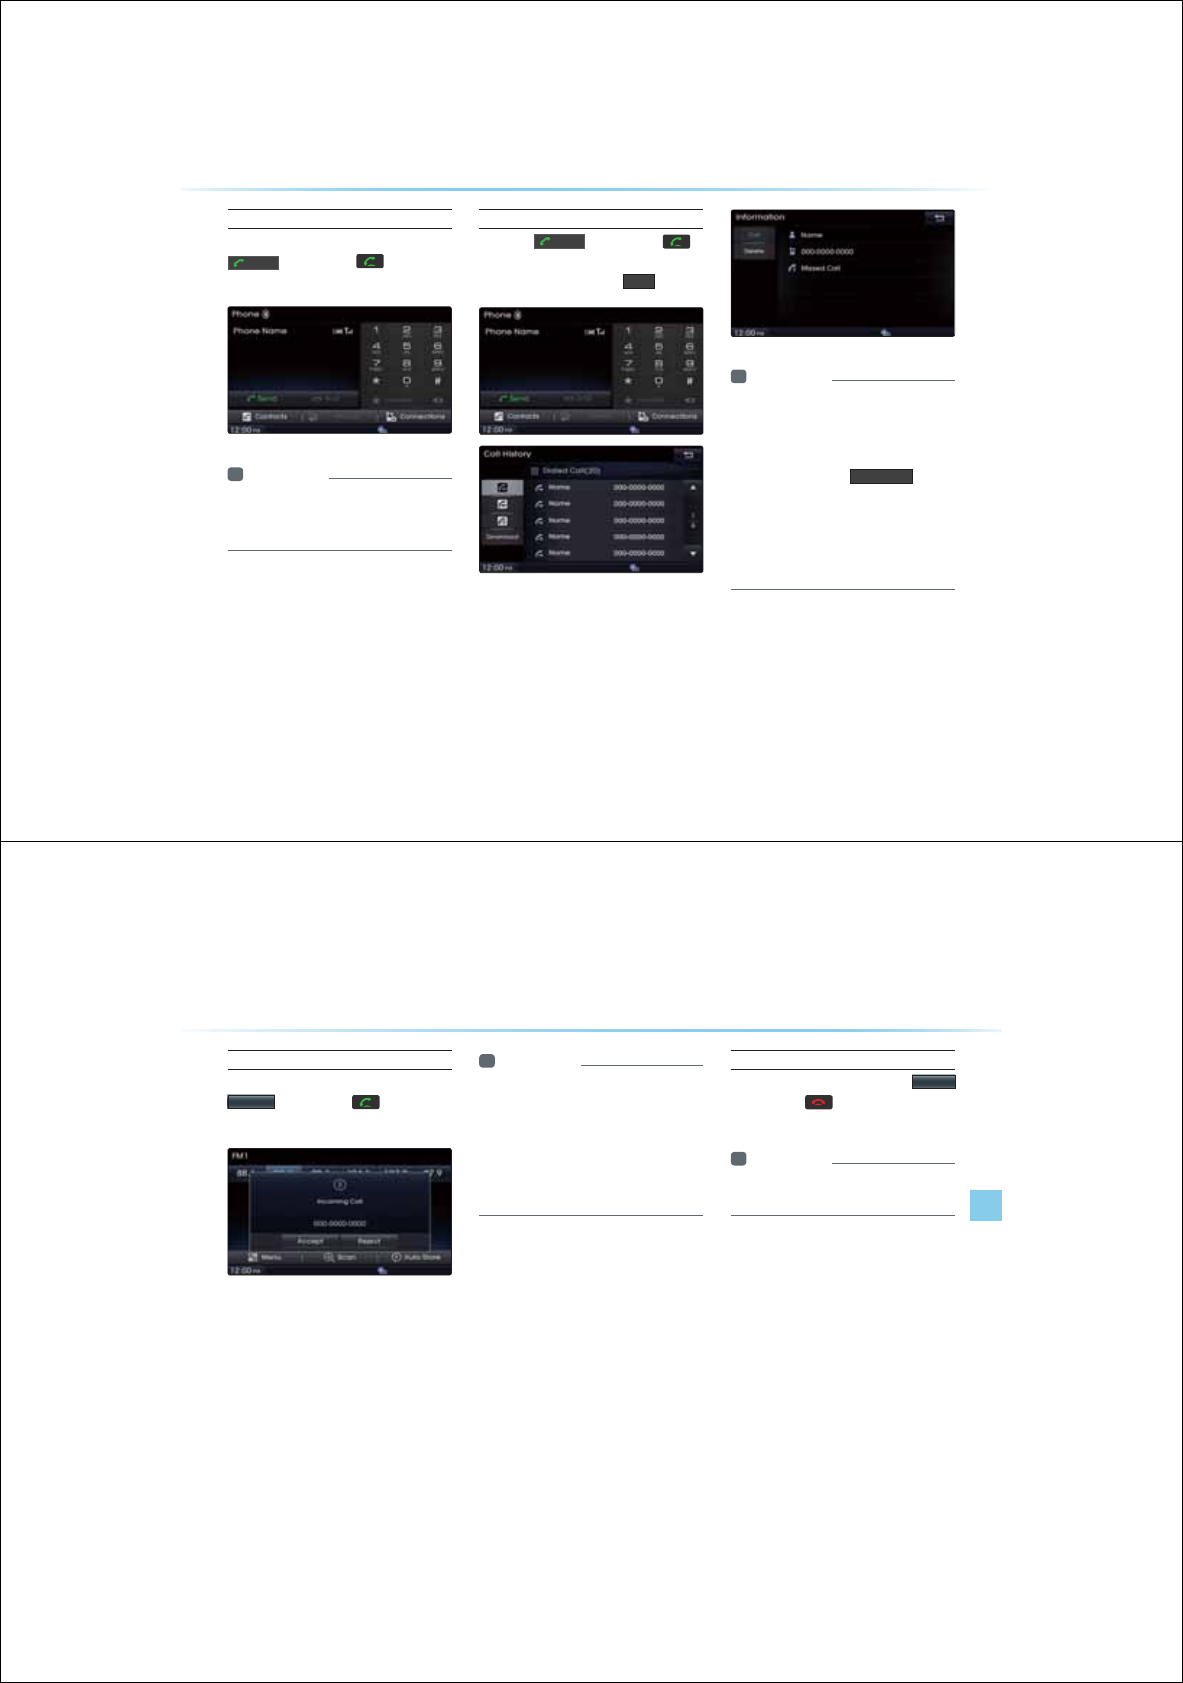
4-10
8VLQJ
%OXHWRRWK
q
:LUHOHVV7HFKQRORJ\
4-10
Calling through Redial
Press the hold (over 0.8 seconds) the
6HQG
button or the key on the
steering remote controller.
i Information
У
Redialing is not possible when there is no
call history or the Bluetooth
®
phone has not
been connected.
Making a Call from Call History
Press the
6HQG
button or the
Key on the steering remote controller ƙ
press the call list ƙ Press
&DOO
i Information
У
Calling through the call history is not pos-
sible when there is no call history or the
Bluetooth
®
phone has not been connected.
У
Within the call history screen, press the
Download button to GRZQORDG
the call
history saved in your mobile phone into the
vehicle.
У
For more information on downloading
call histories, refer to the "Call History
ƙ
Downloading Call History" section.
Using
Bluetooth
®
Wireless Technology
Bluetooth
®
Handsfre l 4-11
Using
Bluetooth
®
Wireless Technology
Bluetooth
®
Handsfre l 4-11
Answering a Call
Incoming call notice ƙ Press the
$FFHSW
button or the key on the
steering remote controller.
When a call is received on the connected
phone, the bell will sound and the phone
number of the other party will be displayed
on the incoming call pop-up, as shown here.
i Information
У
When the incoming call pop-up is dis-
played, most functions within audio and
SETUP mode will not operate. Only the
call volume and Navigation screens can be
operated.
У
The telephone number may not be dis-
played
in some mobile phones.
Rejecting a Call
Incoming call notice ƙ Press the
5HMHFW
button or the key on the steering
remote controller.
i Information
У
The reject call function may not be sup-
ported in some mobile phones.
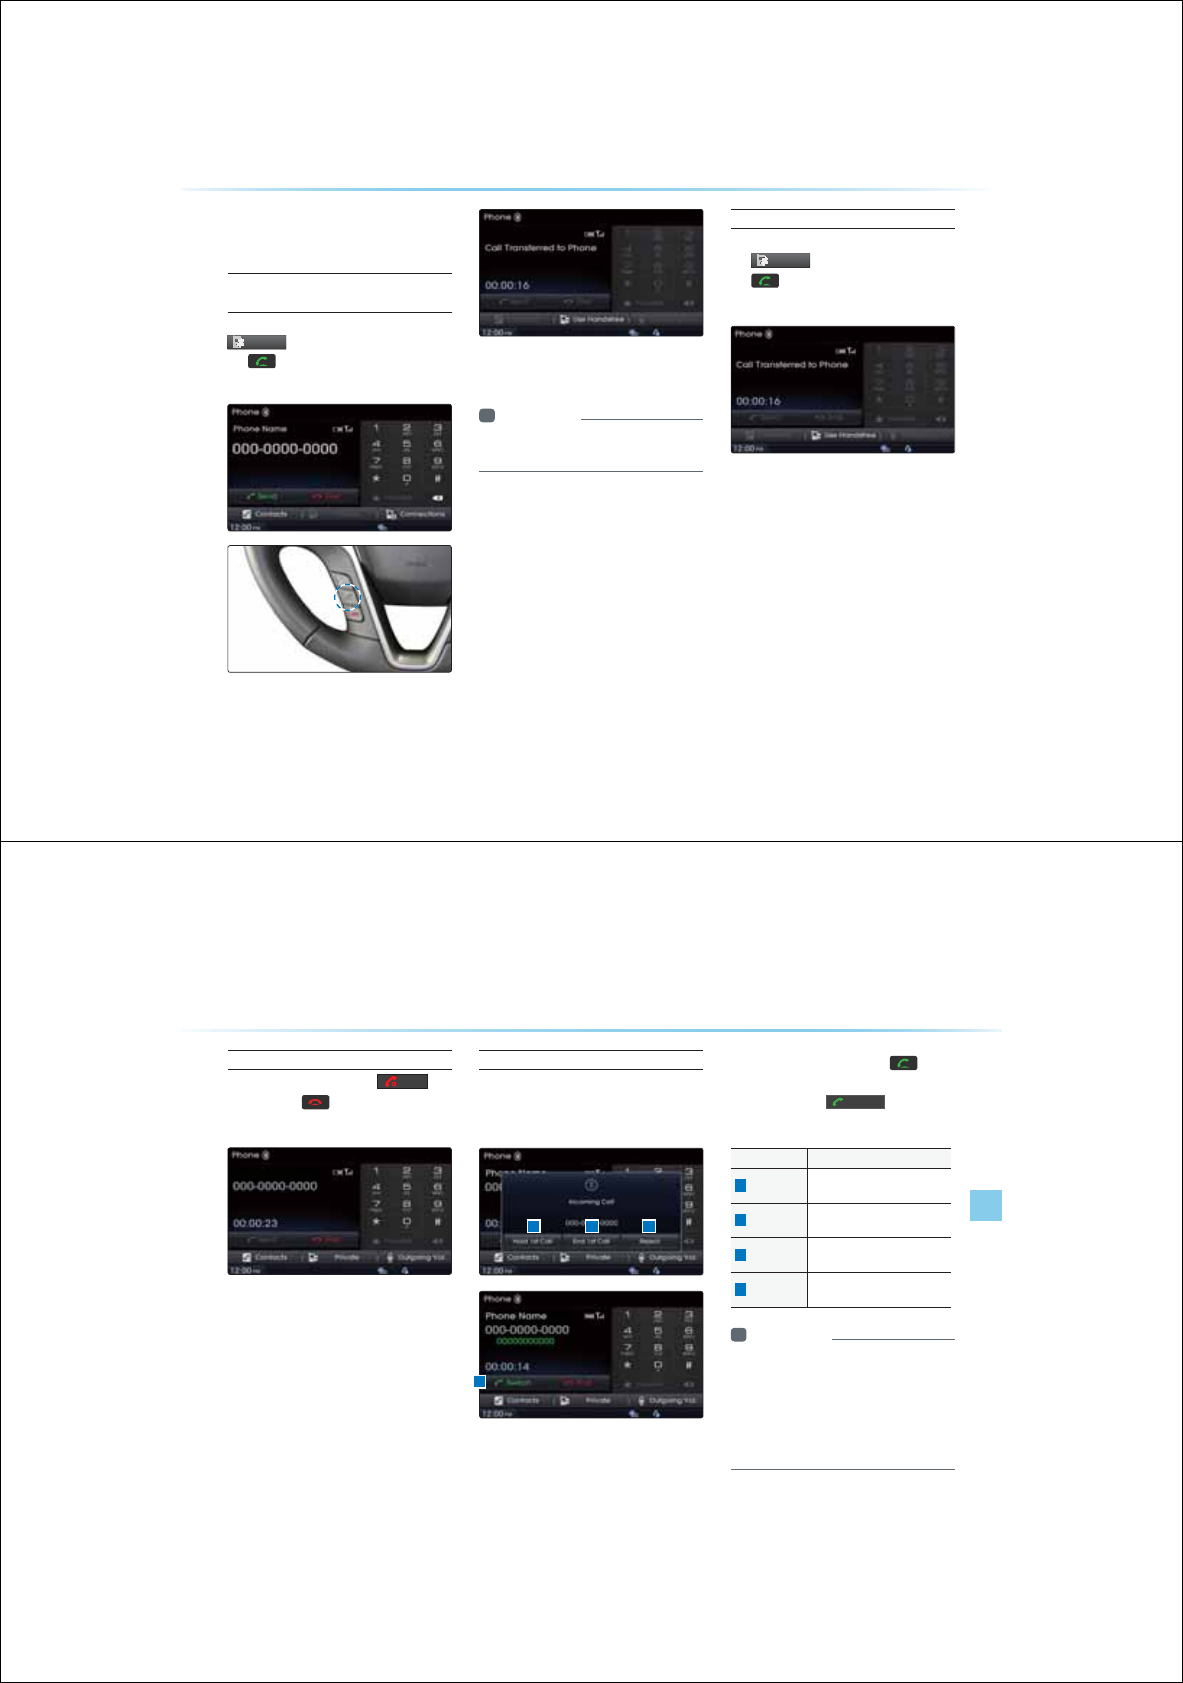
4-12
8VLQJ
%OXHWRRWK
q
:LUHOHVV7HFKQRORJ\8VLQJ
%OXHWRRWK
q
:LUHOHVV7HFKQRORJ\
2SHUDWLQJ0HQXV
GXULQJD&DOO
Switching Call to the Bluetooth®
Phone
During handsfree call ƙ Press the
3ULYDWH
button or press and hol d
the key (over 0.8 seconds) on the
steering remote controller.
The call will be switched from the handsfree
to the Bluetooth
®
mobile phone.
i Information
У
The Private function may not be supported
in some mobile phones.
Switching Call to the Handsfree
During call on mobile phone ƙ Press
the
3ULYDWH
button or press and hold
the key (over 0.8 seconds) on the
steering remote controller.
The call will be switched from the Bluetooth
®
mobile phone to the car handsfree.
Using
Bluetooth
®
Wireless Technology
Bluetooth
®
Handsfre l 4-13
Ending a Call
While on a call ƙPress the
(QG
button or the Key on the steering
remote controller.
The Bluetooth
®
handsfree call will end.
Switching to Call Waiting
If another person calls while you are already
on a call, the current call must be placed on
hold or ended to answer the new call.
If there is waiting call, press the
key on
the steering remote controller (under 0.8 sec-
onds) or press the
6ZLWFK
button on the
Phone screen.
Name Description
1
Hold 1st call Places current call on call wait-
ing and answer new call
2
End 1st call Ends current call and answer
new call
3
Reject Rejects new call and maintains
current call
4
Switch If there is a call waiting, switches
to the waiting call waiting call
i Information
У
Call waiting is a feature that allows the
caller to answer a second call while already
on a call. When call waiting is used, the first
call is placed on waiting mode.
У
The Switch to Call Waiting feature may not
be supported in some mobile phones.
1 32
4
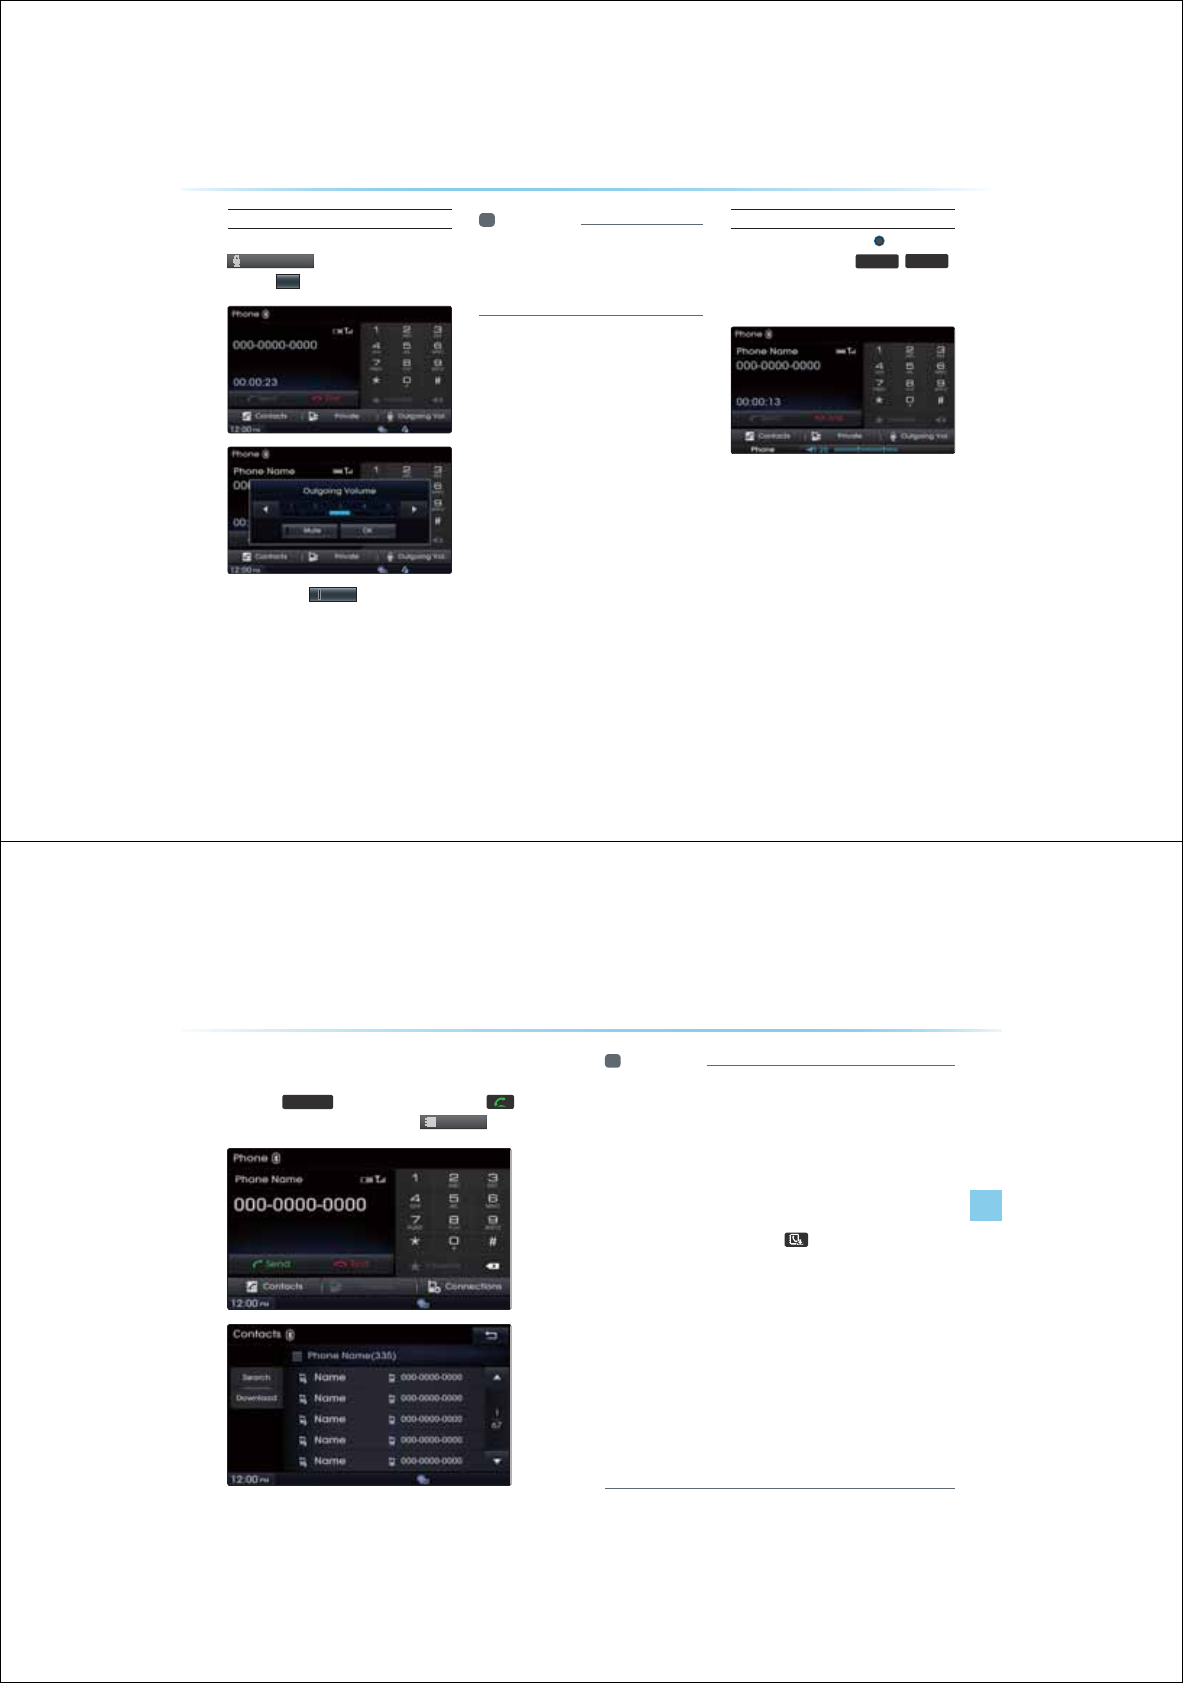
4-14
8VLQJ
%OXHWRRWK
q
:LUHOHVV7HFKQRORJ\
Setting Mic Volume
While on a call ƙ Press the
2XW
J
RLQ
J
9RO
ƙ Set Outgoing Volume
ƙ Press
2.
If you press the
PXWH
button, the outgo-
ing volume is muted and blocked to the other
party.
i Information
У
The volume heard by the other party may
differ depending on the mobile phone. If call
volume heard by the other party is too low
or too high, first adjust the volume setting.
Adjusting the Ring/Call Volume
While on a call ƙ Use the
VOL knob
on the head unit or the
92/
,
92/
keys on the steering remote controller to
adjust the ring/call volume.
Using
Bluetooth
®
Wireless Technology
Bluetooth
®
Handsfre l 4-15
&RQWDFWV
Press the
3+21(
key on the head unit or the key on the
steering remote controller ƙ Press
&R
QW
DF
W
V
i Information
У
For contacts, up to 5,000 entries can be downloaded to each paired
Bluetooth
®
device.
У
Contacts can be viewed only when a Bluetooth
®
device has been
connected.
У
If there are numerous list entries, selecting the list page area will
move to the corresponding list page.
У
It is possible to download contacts during a call or while operating
Bluetooth
®
streaming audio mode.
У
When downloading contacts, the
icon will be displayed within
the status bar.
У
It is not possible to download contacts when the contacts download
setting has been turned off within your Bluetooth
®
device.
У
In addition, some devices may require device authorization to down-
load contacts.
У
If downloading cannot be normally conducted, check the Bluetooth
®
device settings or the screen state.
У
The download feature may not be supported in some mobile phones.
У
Check to see that the Bluetooth
®
device supports the download fea-
ture.
У
For more information on mobile phone compatibility, visit the Hyundai
Motor website (http://www.hyundaiusa.com).
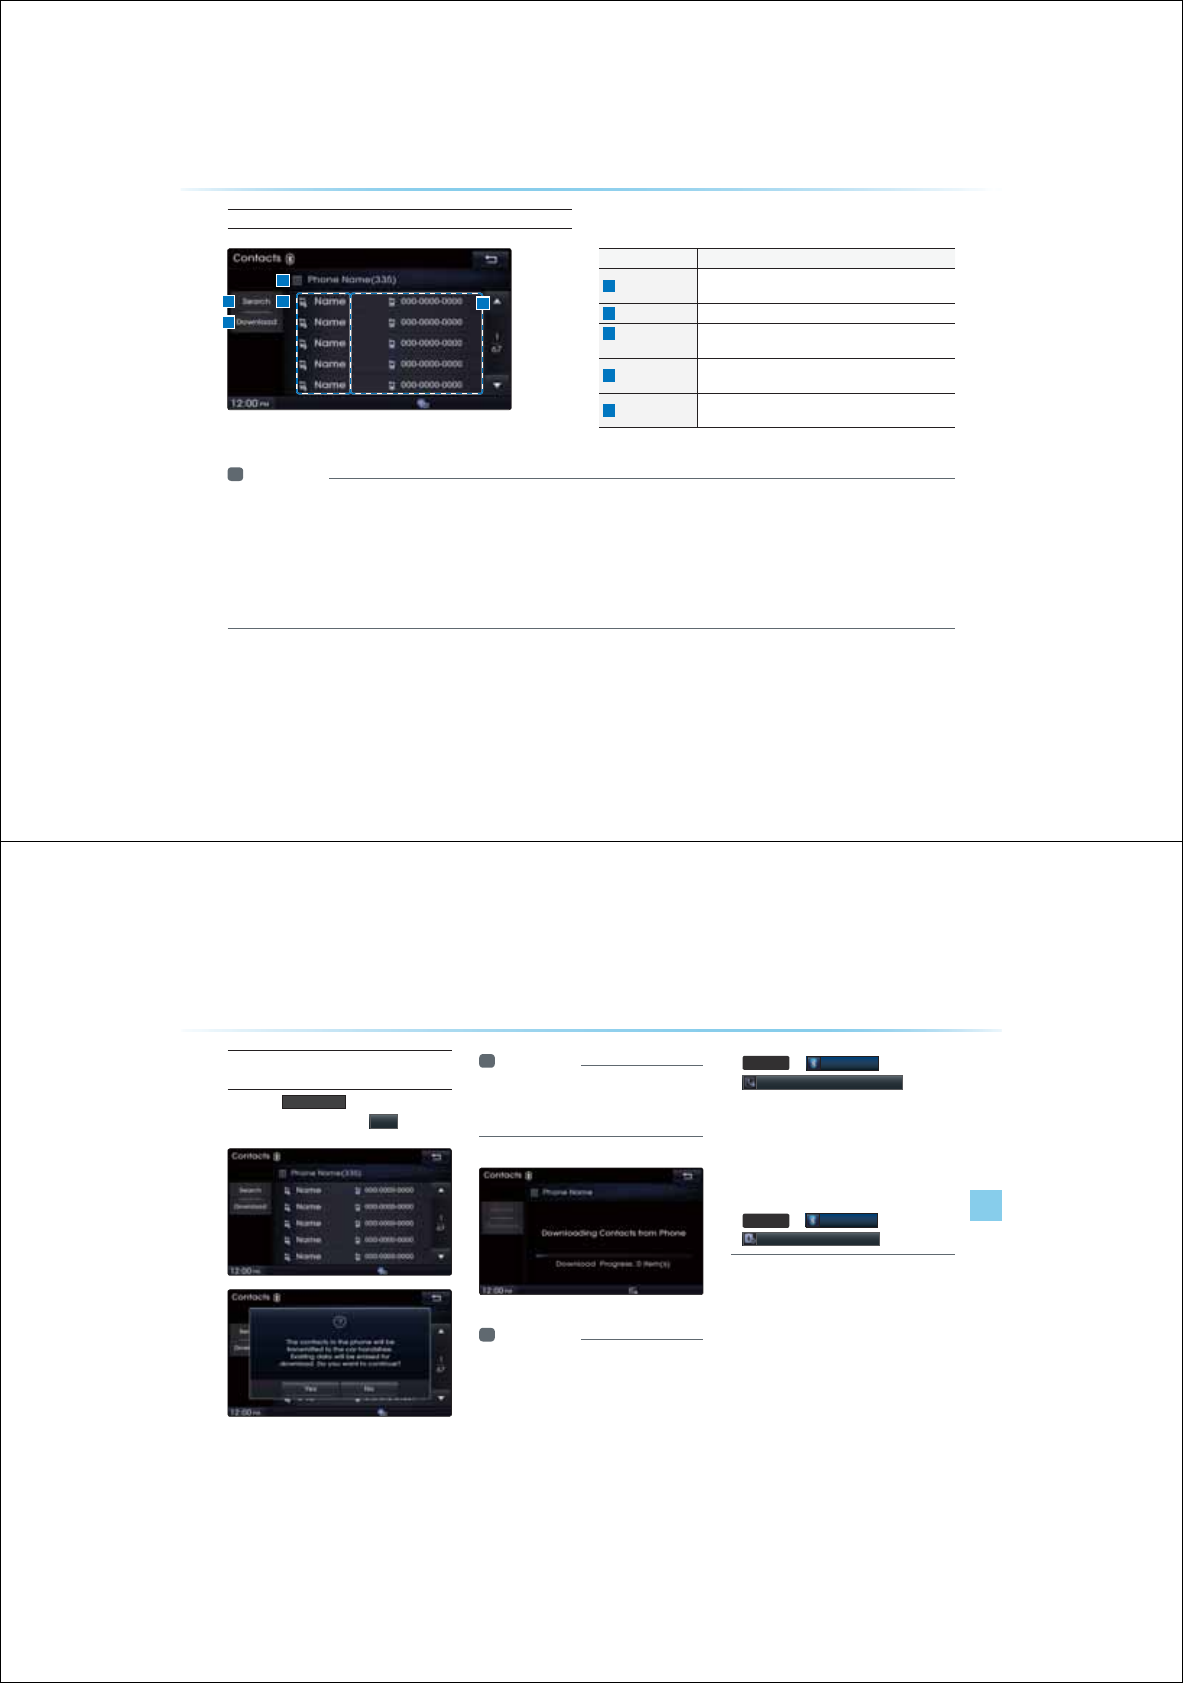
4-16
8VLQJ
%OXHWRRWK
q
:LUHOHVV7HFKQRORJ\
Mobile Contacts Screen Configuration
Name Description
1
Search Search car contacts and mobile phone contacts
(Search by name or number)
2
Download Download contacts from Bluetooth
®
device
3
Bluetooth
®
Device Name Name of connected Bluetooth
®
device
4
List page Displays total list pages and current list page
(List page jump upon selecting scroll area)
5
Download source Displays whether contacts were downloaded from the
Mobile phone or SIM
i Information
У
Mobile phone contacts can be searched only when a Bluetooth
®
device is connected.
У
Up to 5,000 contacts from your Bluetooth
®
phone or SIM can be downloaded into the car contacts. Contacts that have been downloaded to the car
cannot be edited or deleted.
У
Mobile phone contacts are managed separately for each paired Bluetooth
®
device (max 5 devices x 5,000 contacts each). Previously downloaded
data will be stored even if the Bluetooth
®
device has been disconnected. (However, the contacts and call history saved to the phone will be deleted
if the paired phone is deleted.)
У
Downloaded contacts could be lost depending on the state of the head unit. Always make sure to back up important data.
1
3
5
2
4
Using
Bluetooth
®
Wireless Technology
Bluetooth
®
Handsfre l 4-17
Downloading Mobile Phone
Contacts
Press the
'RZQORDG
button from the
Contacts screen ƙ Press
<HV
i Information
У
Time required to download contacts may
differ depending on your mobile phone
model or data size.
i Information
У
Upon downloading mobile phone contacts,
the previous corresponding data is deleted.
У
This feature may not be supported in some
mobile phones.
У
Upon downloading, contacts saved in your
SIM and mobile phone are simultaneously
downloaded.
У
To change the contacts download settings,
change the following menu setting.
У
6(783
ƙ
%OXHWRRWK
ƙ
&RQWDFWV'RZQORDG6HWWLQJ
У
When using Contacts Sync, the contacts
У
and call histories within your mobile phone
are automatically downloaded upon con-
necting
Bluetooth
®
Wireless Technology.
У
If you do not wish to use this fea-
ture, turn this feature off at
6(783
ƙ
%OXHWRRWK
ƙ
&RQWDFWV6\QF6HWWLQJ
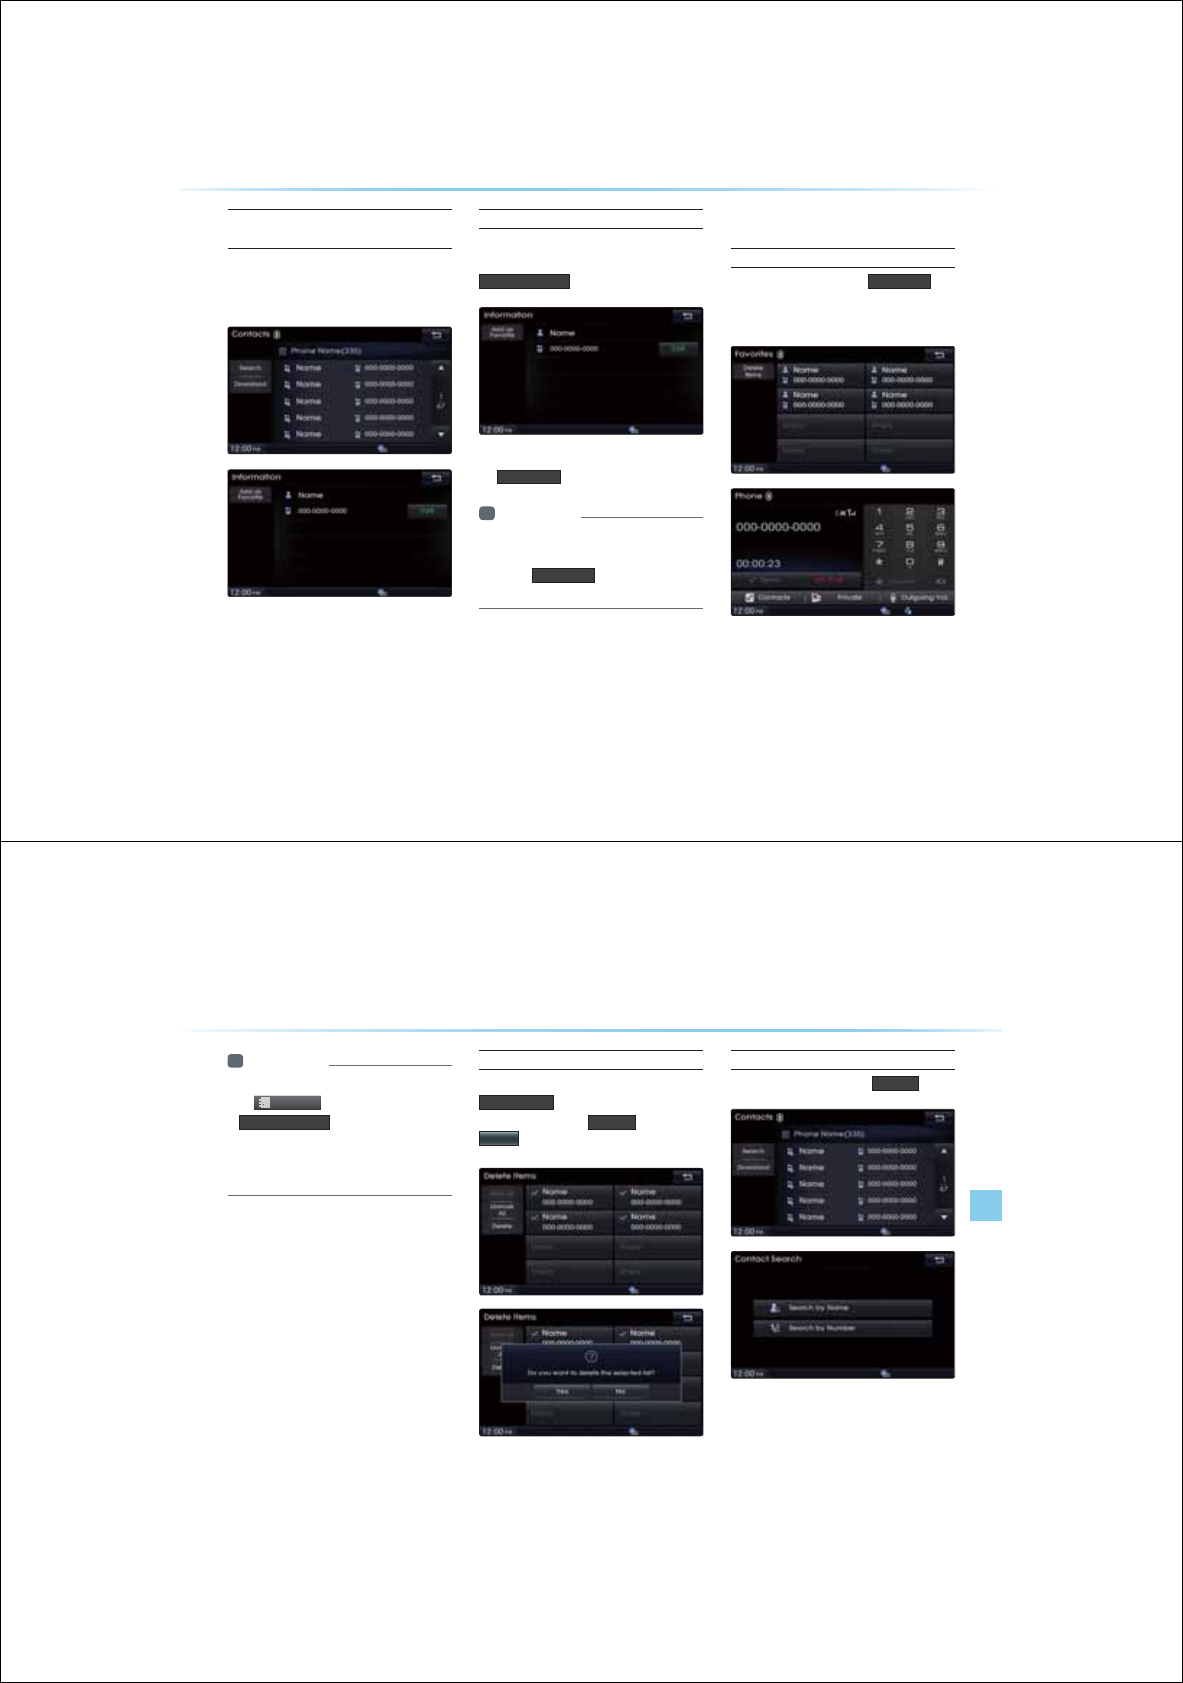
4-18
8VLQJ
%OXHWRRWK
q
:LUHOHVV7HFKQRORJ\
Checking Mobile Contacts
Details
Select the desired phone number from
the mobile contacts list to check details
about the number.
Adding as a Favorite
Select number from the Contacts screen
ƙ Within the details screen, press
$GGDV)DYRULWH
Saved Favorites can be viewed by pressing
the
)DYRULWH
button in the Phone screen.
i Information
У
Up to 8 Favorites can be added.
У
Saved Favorites can be viewed by press-
ing the )DYRULWH button in the Phone
screen.
)DYRULWHV
Calling Favorites
In Phone screenƙ Press
)DYRULWH
ƙ Select the desired Favorite ƙ Call
connected
Using
Bluetooth
®
Wireless Technology
Bluetooth
®
Handsfre l 4-19
i Information
У
Favorites can be added through Phone
ƙ
&
RQWDFW
V
ƙSelect contact ƙ
$GGDV)DYRULWH
У
Up to 8 Favorites can b
e added and
Favorites can be used only when a
Bluetooth device has been connec
ted
.
Selecting/Deleting Favorites
In Favorites screen ƙ Press
'HOHWH,WHPV
ƙ Select items you want
to delete and press
'HOHWH
ƙ Press
<HV
Searching Contacts
In Phone screen ƙ Press
6HDUFK
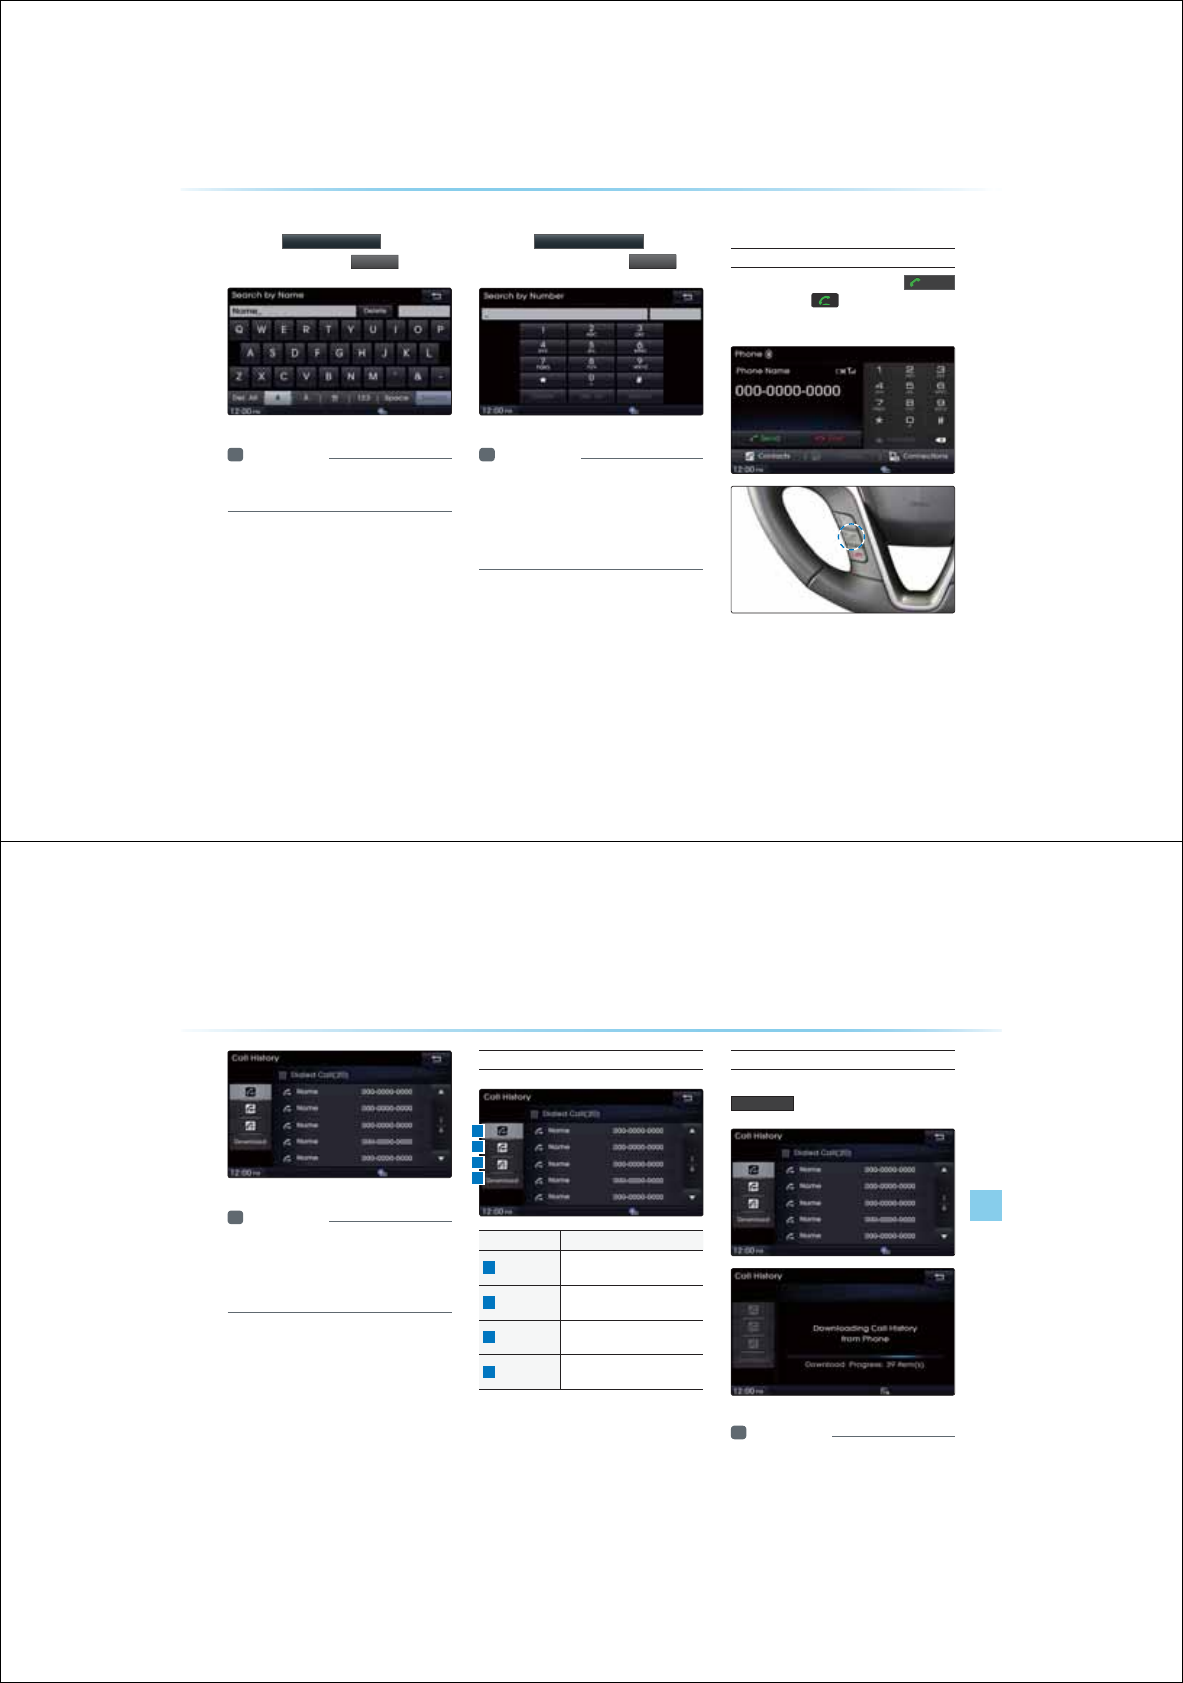
4-20
8VLQJ
%OXHWRRWK
q
:LUHOHVV7HFKQRORJ\
Search by Name
Press the
6HDUFKE\1DPH
buttonƙ
Enter name and press
6
HDUF
K
i Information
У
When searching a number, it is possible to
search by entering just a part of the name.
Searching by Number
Press the
6HDUFKE\1XPEHU
button
ƙ Enter number and press
6
HDUF
K
i Information
У
When searching a number, it is possible to
search by entering just a part of the
entire number.
(ex : if you enter "1544", all numbers that
include "1544" will be searched.)
&DOO+LVWRU\
Entering Call History Screen
Within the Phone screen, press the
6HQG
button or the
key on the steering
remote controller.
Using
Bluetooth
®
Wireless Technology
Bluetooth
®
Handsfre l 4-21
i Information
У
The call history may not be saved in the call
history list in some mobile phones.
У
Calls received with hidden caller ID will not
be saved in the call history list.
Call History Screen Configuration
Name Description
1
Dialed Call Displays the outgoing call
history list
2
Received Call Displays the incoming call
history list
3
Missed Call Displays the missed call history
list
4
Download Downloads call history from
mobile phone
Downloading Call History
Within the Call History screen, press the
'RZQORDG
button.
i Information
У
Up to 20 dialed, incoming, and missed call
history lists can each be downloaded.The
dialed/incoming time and call time information
are not supported.
1
3
2
4
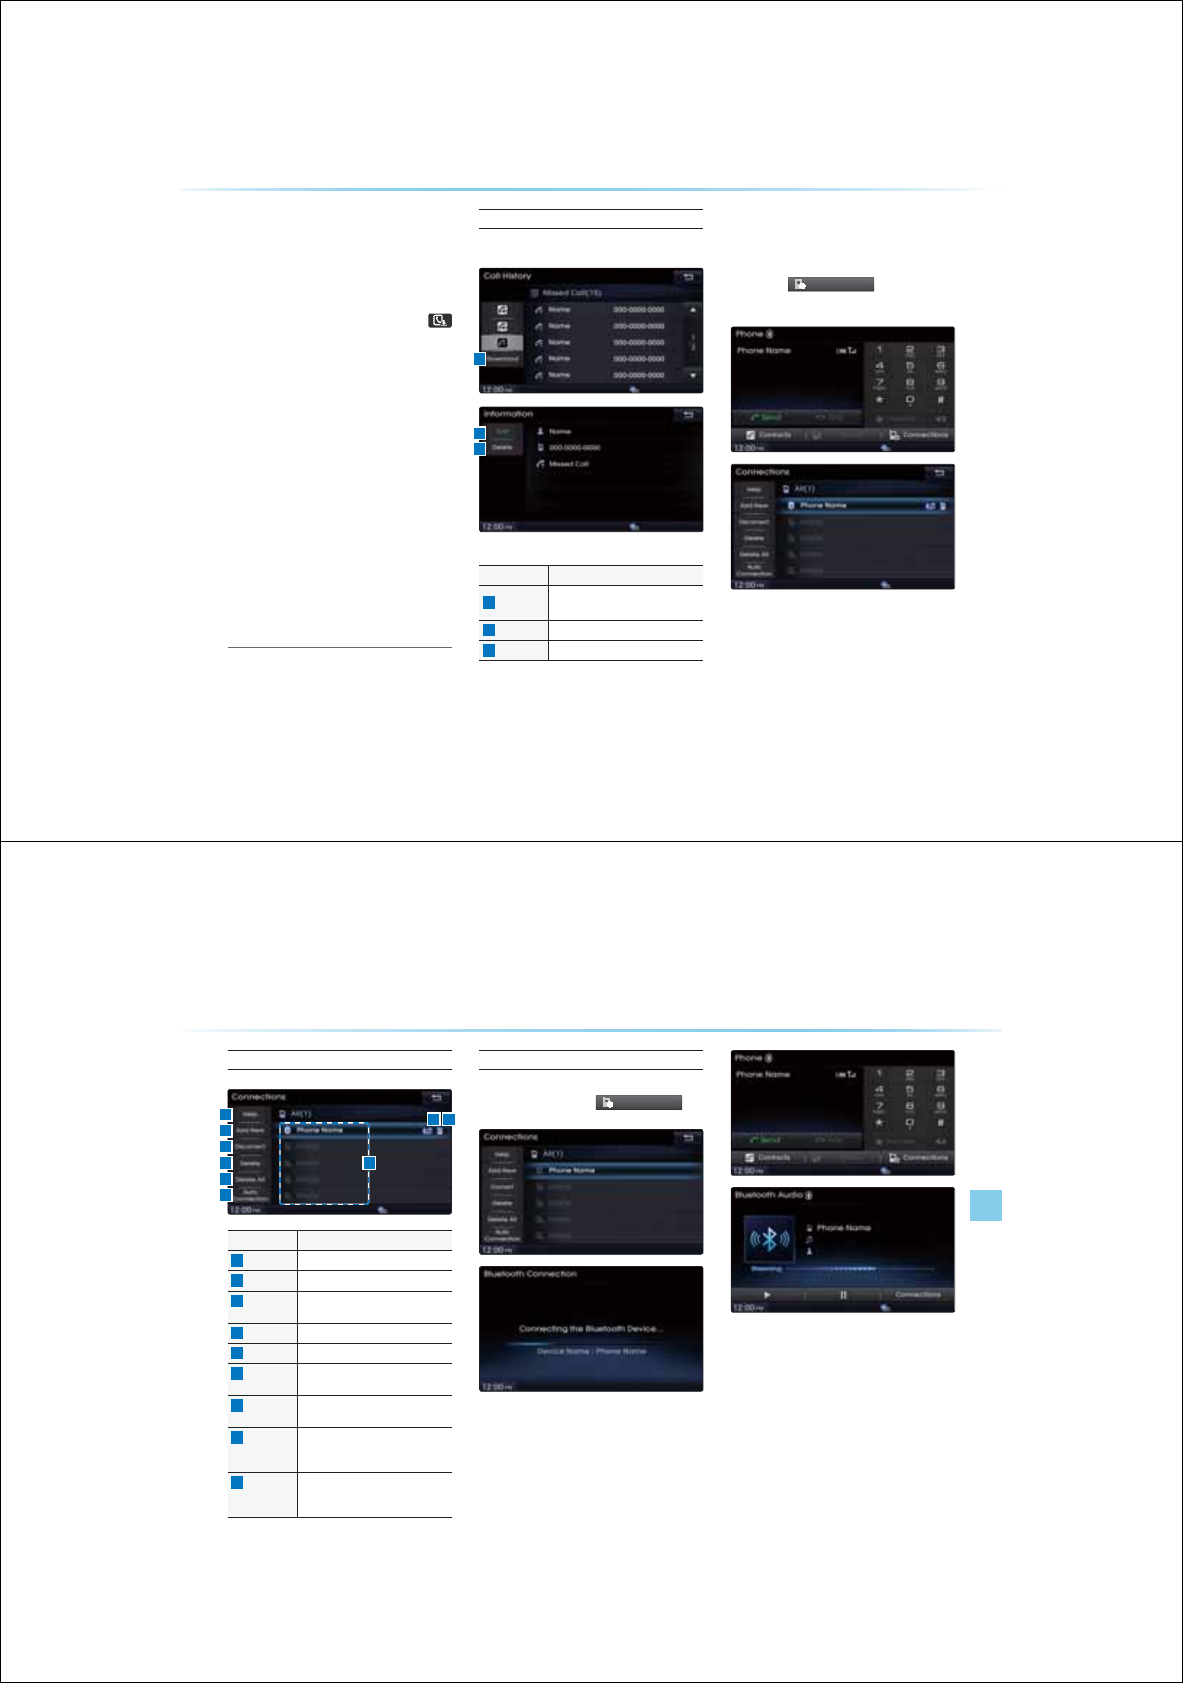
4-22
8VLQJ
%OXHWRRWK
q
:LUHOHVV7HFKQRORJ\
У
Sorting all call histories by time is not sup-
ported.
У
It is possible to download call history even
during a call or during Bluetooth® streaming
audio.
У
When downloading call histories, the
icon will be displayed within the status bar.
У
It is not possible to commence download
when the call history download feature is
turned off within the Bluetooth® device. Also
some devices may require device authoriza-
tion upon attempting to download call history.
If downloading cannot be normally conducted,
check the Bluetooth® device settings or the
screen state.
У
The download feature may not be supported
in some mobile phones. Check to see that
the Bluetooth® device supports the download
feature.
У
For more information on mobile phone
compatibility, visit the Hyundai Motor web-
site (http://www.hyundaiusa.com).
Viewing Call History Information
Within the Call History screen, select the list.
Name Description
1
Download Download call histories from
mobile phone
2
Call Calls the number
3
Delete Deletes the call history
6HWWLQJ%OXHWRRWK
p
&RQQHFWLRQ
Press the
&RQQHFWLRQ
V
button on the
Phone screen.
1
3
2
Using
Bluetooth
®
Wireless Technology
Bluetooth
®
Handsfre l 4-23
Connections Menu
Name Description
1
Help Displays Bluetooth
®
Help screen
2
Add New Pairs a new Bluetooth
®
device
3
Connect/
Disconnect
Connects/disconnects a Bluetooth
®
device
4
Delete Deletes a paired Bluetooth
®
device
5
Delete All Deletes all paired Bluetooth
®
devices
6
Auto
Connection
Sets Bluetooth
®
device auto connec-
tion when car ignition is turned on
7
Paired
device list
Shows list of paired Bluetooth
®
devices
8
Streaming
connection
state
Shows Bluetooth
®
Streaming
connection State
9
Handsfree
connection
state
Shows Bluetooth
®
Handsfree
connection State
Connecting a Device
Select the device you wish to connect
from the list ƙ Press
&
RQQHFWLRQ
V
The Phone screen is displayed once a
Bluetooth
®
Handsfree is connected while
the Bluetooth
®
Audio screen is displayed
once streaming Audio is connected.
18 9
2
3
4
5
6
9
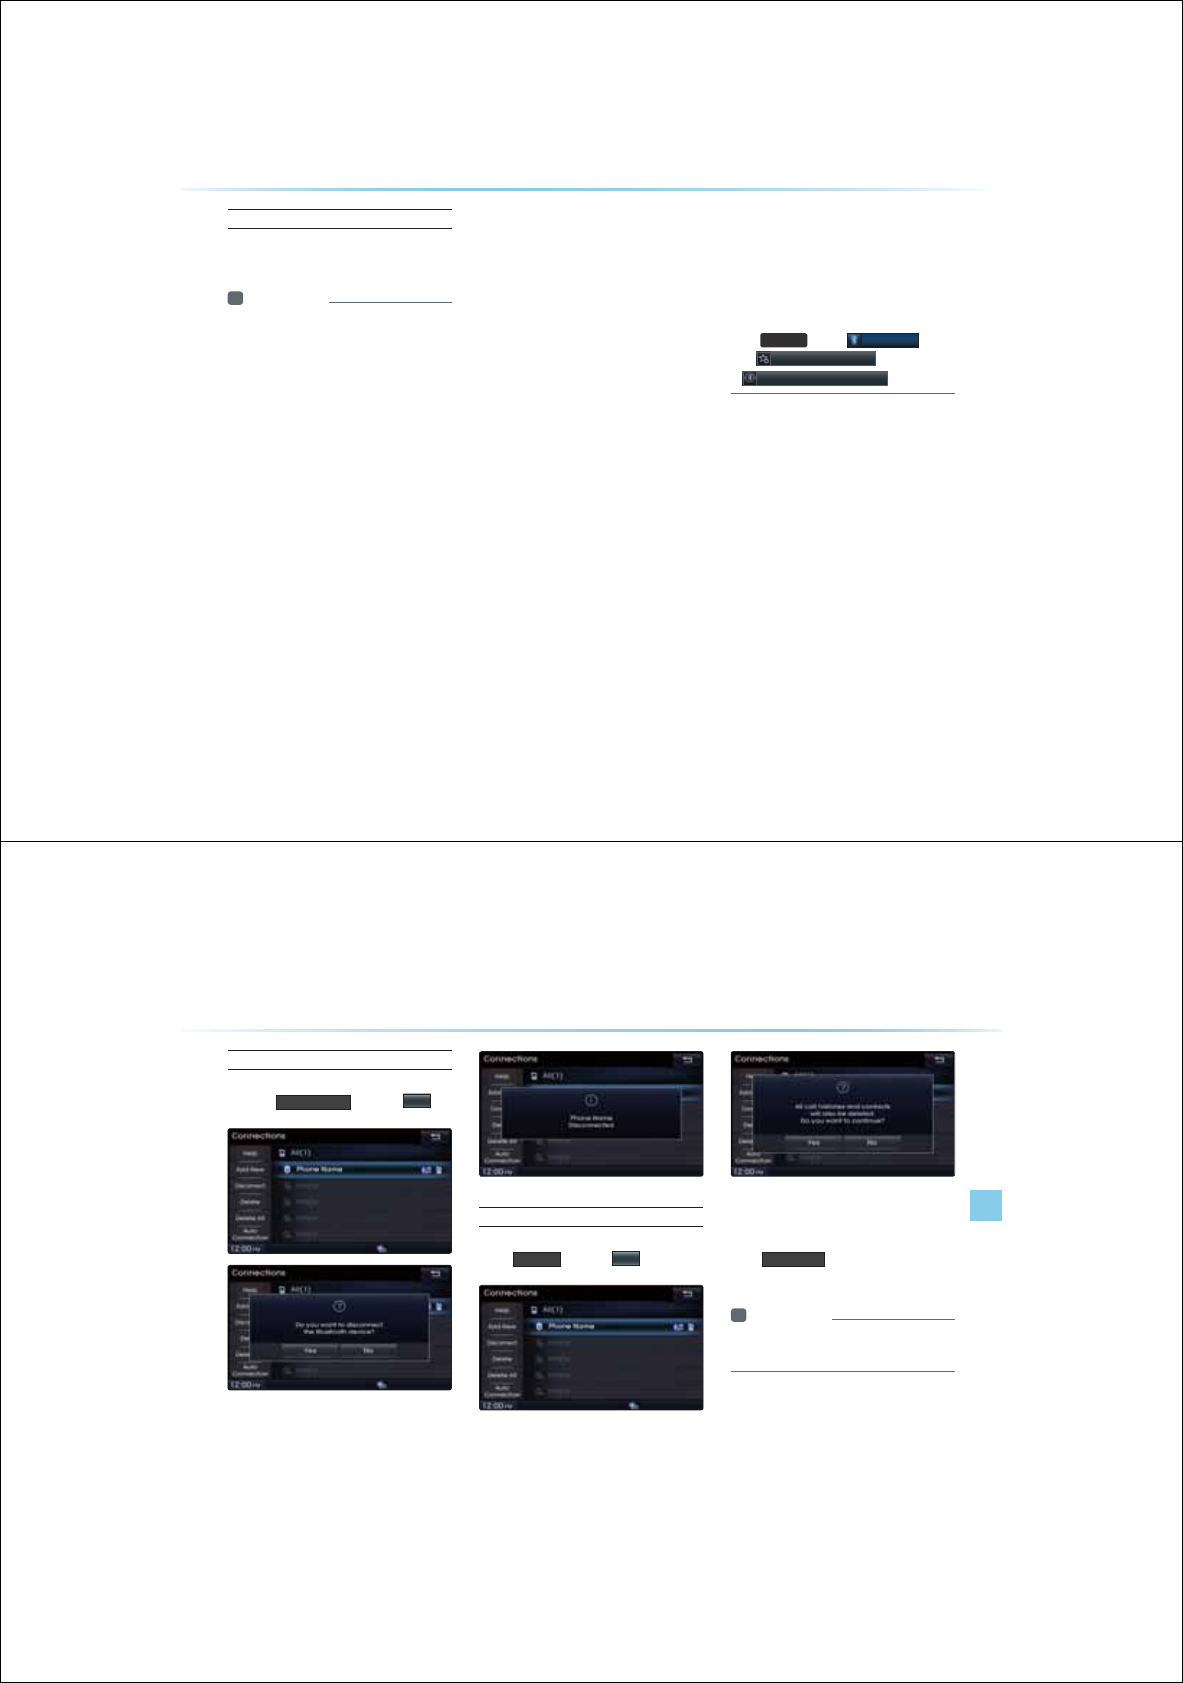
4-24
8VLQJ
%OXHWRRWK
q
:LUHOHVV7HFKQRORJ\
Pairing a New Device
For more information on pairing, refer to the
'When no phones have been paired' section.
i Information
У
Bluetooth
®
features supported
within the
vehicle are as follow
s. Some features may
not be supported depending on your
Bluetooth
®
device.
-
Answering and placing Bluetooth
®
Handsfree calls
-
Menu operation during call (Switch to
Private, Switch to call waiting, Outgoing
volume)
-
Download Call History
-
Download Mobile Contacts
-
Download SIM Contacts
-
Contacts/ Call History Auto Download
-
Bluetooth
®
device auto connection
-
Playing Bluetooth
®
Streaming Audio
У
It is possible to pair up to five Bluetooth
®
devices to the car system.
У
Only one Bluetooth
®
device can be con-
nected at a time.
У
Other devices cannot be paired while a
Bluetooth
®
device is already connected.
У
When a Bluetooth
®
device is being con-
nected, the connection process cannot be
canceled.
У
Only Bluetooth
®
Handsfree and Bluetooth
®
audio related features will operate within
this system.
У
Normal operation is possible only for
devices that support handsfree or audio
features, such as a Bluetooth
®
mobile
phone or a Bluetooth
®
audio device.
У
Only one function can be used at a time
between the Bluetooth
®
handsfree and
Bluetooth
®
audio. (While playing Bluetooth
®
audio, streaming will end upon entering the
Bluetooth
®
phone screen.)
У
If a connected Bluetooth
®
device
becomes
disconnected for various reasons, such
as being out of range, turning the device
OFF, or a Bluetooth
®
communication
error, Bluetooth
®
devices are automatically
searched and connected.
У
If the system becomes unstable due to com-
munication errors between the vehicle and
the Bluetooth® device, reset the
Bluetooth
®
Wireless Technology and try again. Upon
resetting Bluetooth® ,
the system is
restored to its factory release state. Press
the
6(783
key ƙ
%OXHWRRWK
ƙ
$GYDQFHG6HWWLQJV
ƙ
5HVWRUH)DFWRU\6HWWLQJV
Using
Bluetooth
®
Wireless Technology
Bluetooth
®
Handsfre l 4-25
Disconnecting a Device
Select the device you wish to disconnect
ƙ Press
'LVFRQQHFW
ƙ Press
<HV
Deleting a Device
Select the device you want to delete ƙ
Press
'HOHWH
ƙ Press
<HV
A device cannot be deleted if it is connected.
To delete a paired device, first disconnect
the Bluetooth® connection.
Press
'HOHWH$OO
to delete all paired
Bluetooth® devices.
i Information
У
If a paired phone is deleted, its call history
and contacts lists will also be deleted.
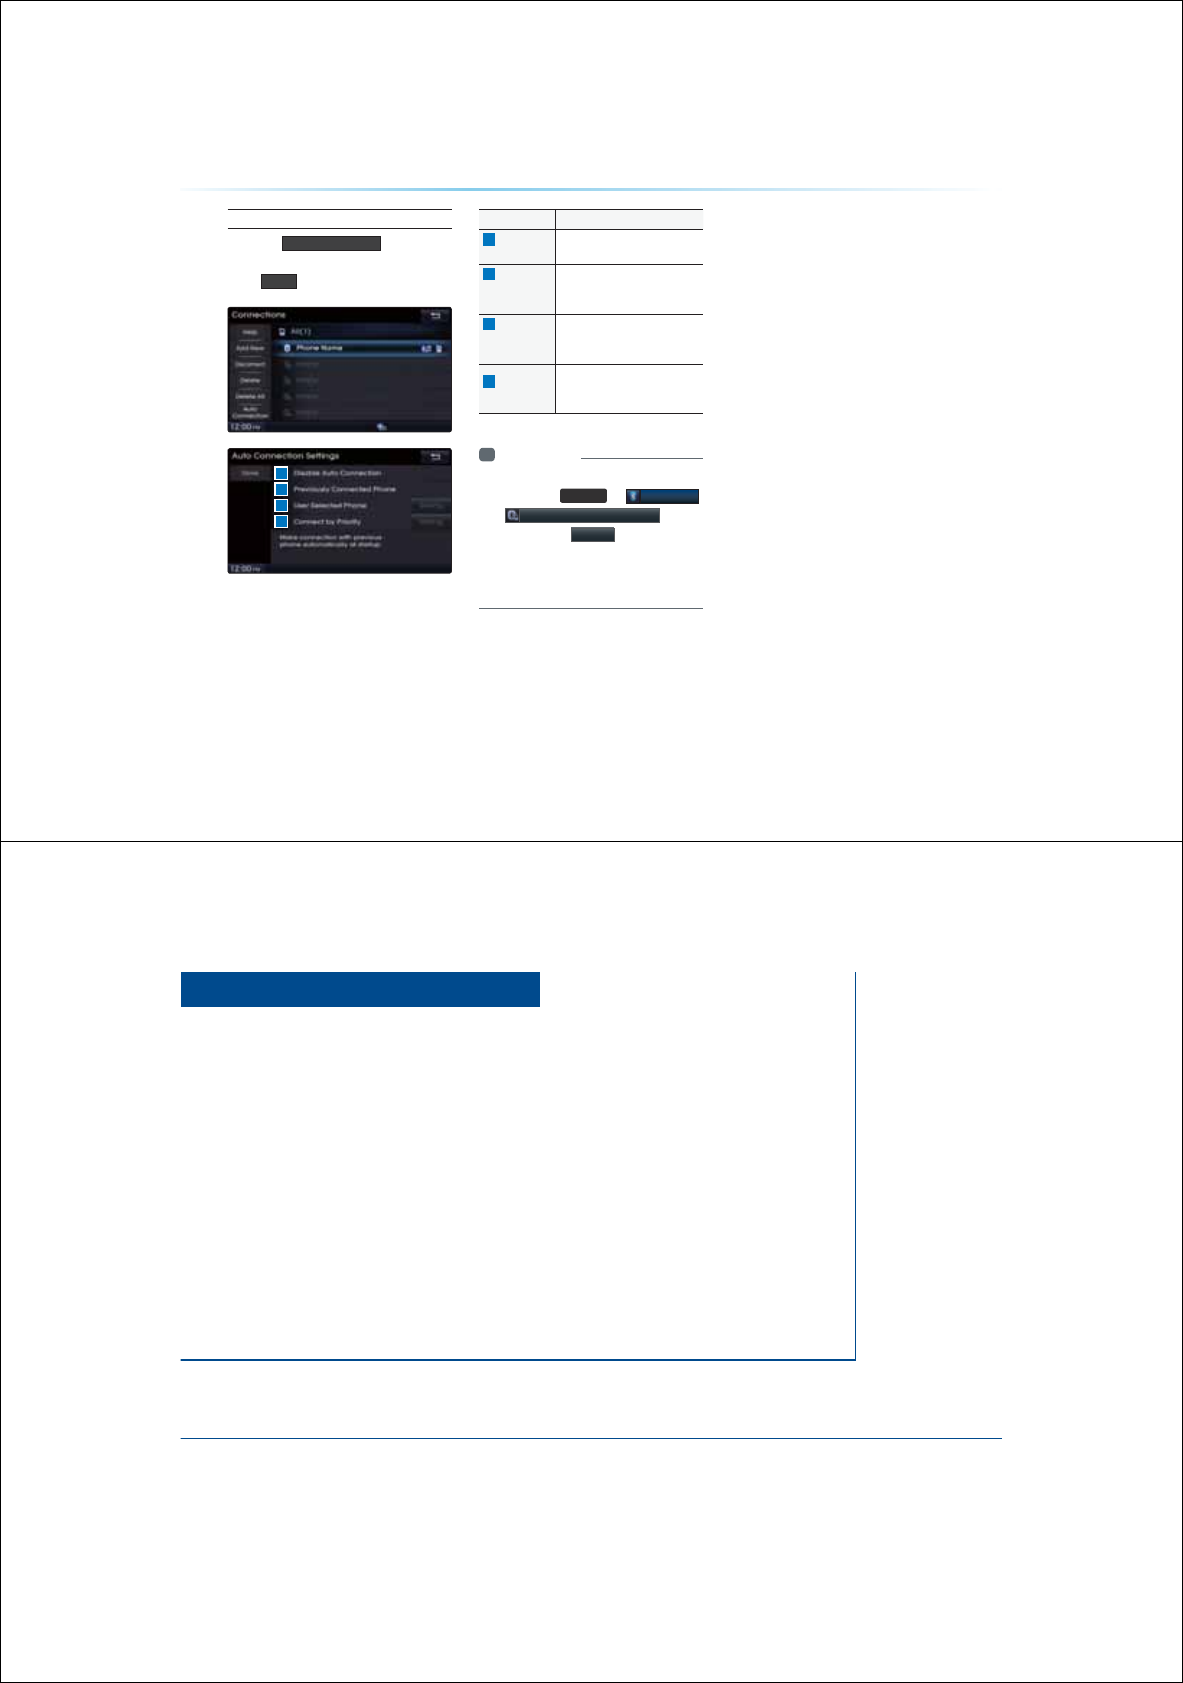
4-26
8VLQJ
%OXHWRRWK
q
:LUHOHVV7HFKQRORJ\
Setting Auto Connection
Press the
$XWR&RQQHFWLRQ
button ƙ
Select the desired option ƙ Set and
press
'RQH
If auto connection is turned on, a
Bluetooth
®
device will automatically be
connected according to the set option
when the car ignition is turned on.
Name Description
1
Disable Auto
Connection Disables auto connection
2
Previously
Connected
Phone
Auto connection with the
previously connected Bluetooth
®
phone
3
User
Selected
Phone
Automatically connects to a user
selected Bluetooth
®
device
4
Connect by
Priority
Automatically connects accord-
ing to the set Bluetooth
®
phone
priority
i Information
У
The Auto Connection button is a shortcut
menu to go to
6(783
ƙ
%OXHWRRWK
ƙ
$XWR&RQQHFWLRQV6HWWLQJV
У
If you press the
6HWWLQJ button next to the
User Selected Phone and Connect by Priority
options, you can designate the phone you
wish to connect or set the phone priority.
1
2
3
4
&$5$916<67(0
9RLFH
5HFRJQLWLRQ
УStarting Voice Recognition
УVoice Command Lists
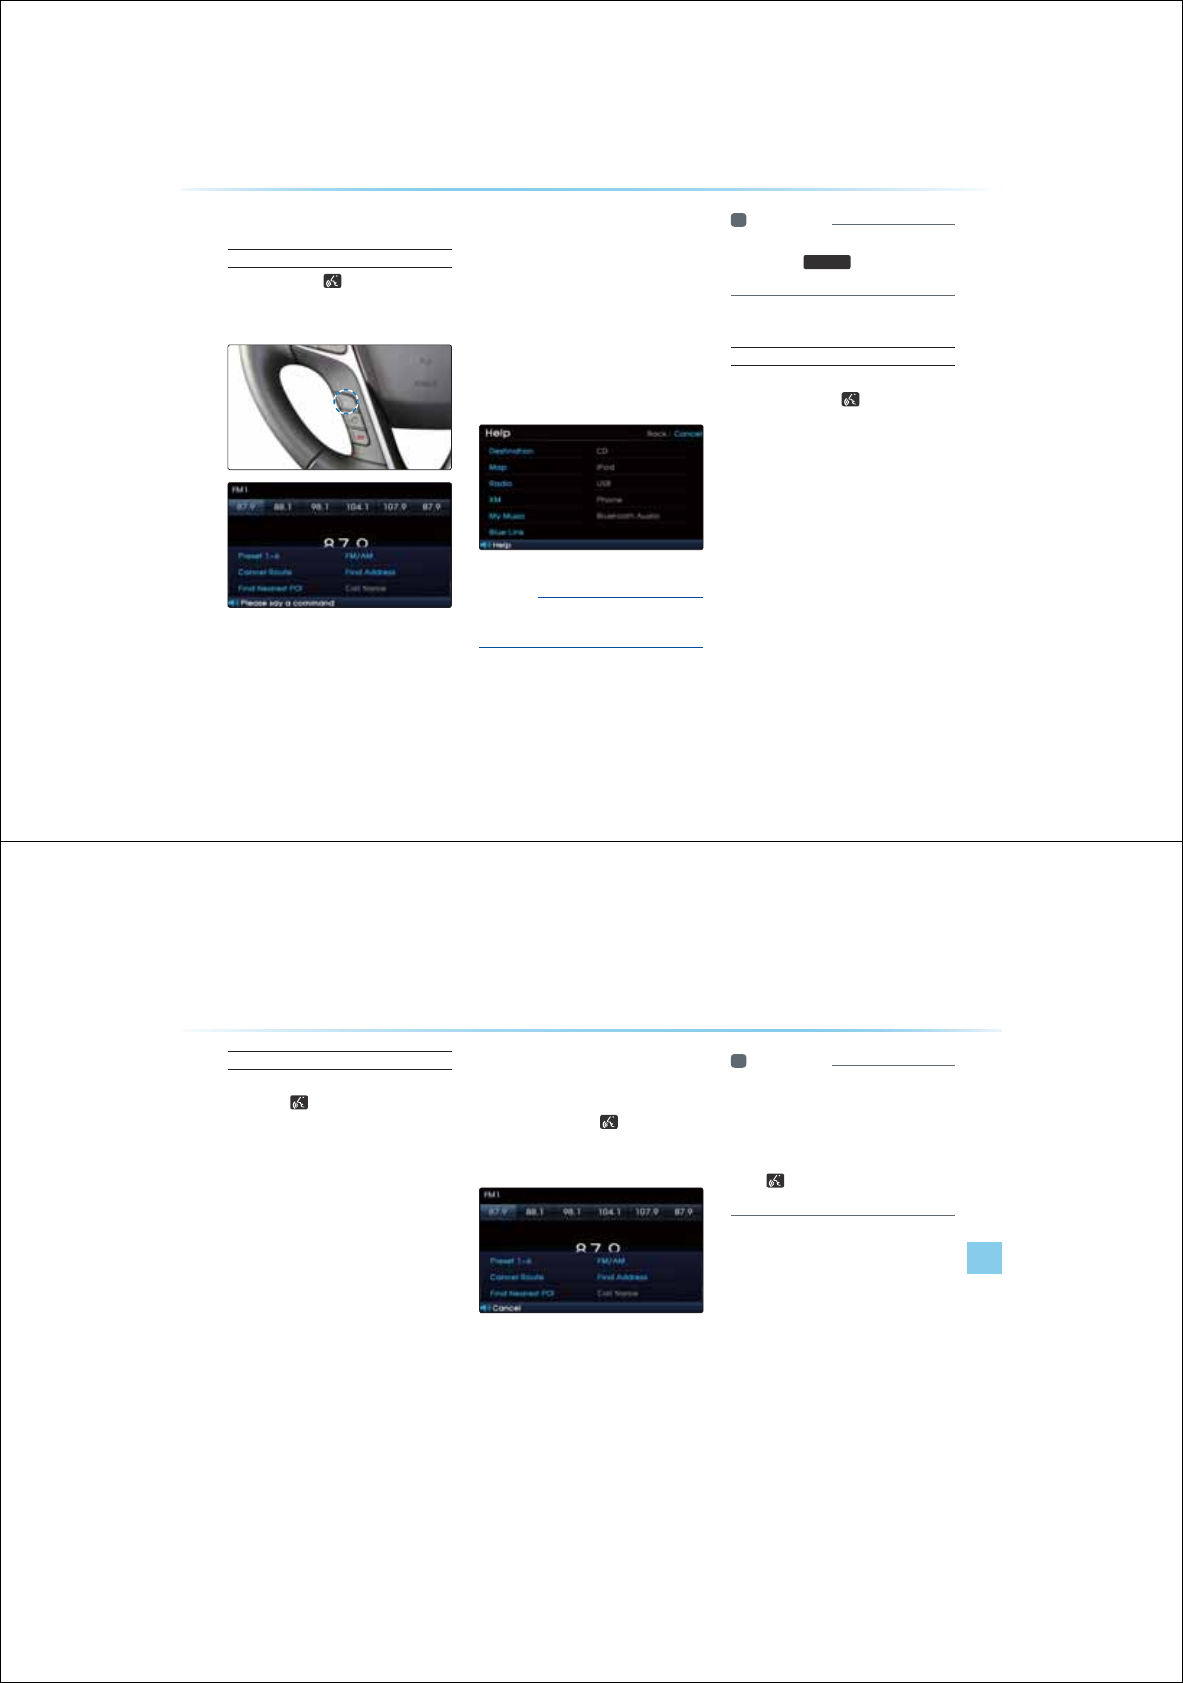
6WDUWLQJ9RLFH5HFRJQLWLRQ
Starting Voice Recognition
Shortly press the key on the steering
remote controller (under 0.8 seconds) ƙ
Say a command
Once voice recognition starts, the voice com-
mand entry window and the six representative
commands are displayed.
У
If voice recognition is in [Normal Mode],
then the system will say "Please say a com-
mand."
"
Beep~
"
У
If voice recognition is in [Expert Mode], then
the system will only say a
"
Beep~
"
(e.g. : screen displayed when ‘Help’ is stated)
NOTICE
У
For proper recognition, say the command
after the voice instruction and beep tone.
i Information
У
To change the Normal/Expert setting,
press the
6HWXS
key and enter the
Voice Recognition settings screen.
Skipping Prompt Messages
While prompt message is being stated
ƙ Shortly press the key on the
steering remote controller (under 0.8
seconds)
The prompt message is immediately ended
and the beep tone will sound. After the
"
beep
"
, say the voice command.
8VLQJ9RLFH5HFRJQLWLRQ
6WDUWLQJ9RLFH5HFRJQLWLRQ
9RLFH5HFRJQLWLRQl
Re-starting Voice Recognition
While system waits for a command Shortly
ƙpress the key on the steering remote
controller (under 0.8 seconds)
The command wait state is immediately
ended and the beep ton will sound. After the
"beep", say the voice command.
(QGLQJ9RLFH5HFRJQLWLRQ
While Voice Recognition is operating
ƙ Press and hold the key on the
steering remote controller (over 0.8
seconds)
While using voice command, pressing a
steering wheel remote control or a different
key will end voice command.
i Information
У
In a state where the system is waiting
for a voice command, say "cancel" or
"exit" to end voice command.
У
In a state where the system is waiting
for a voice command, press and hold
the
key on the steering remote con-
troller to end voice command.
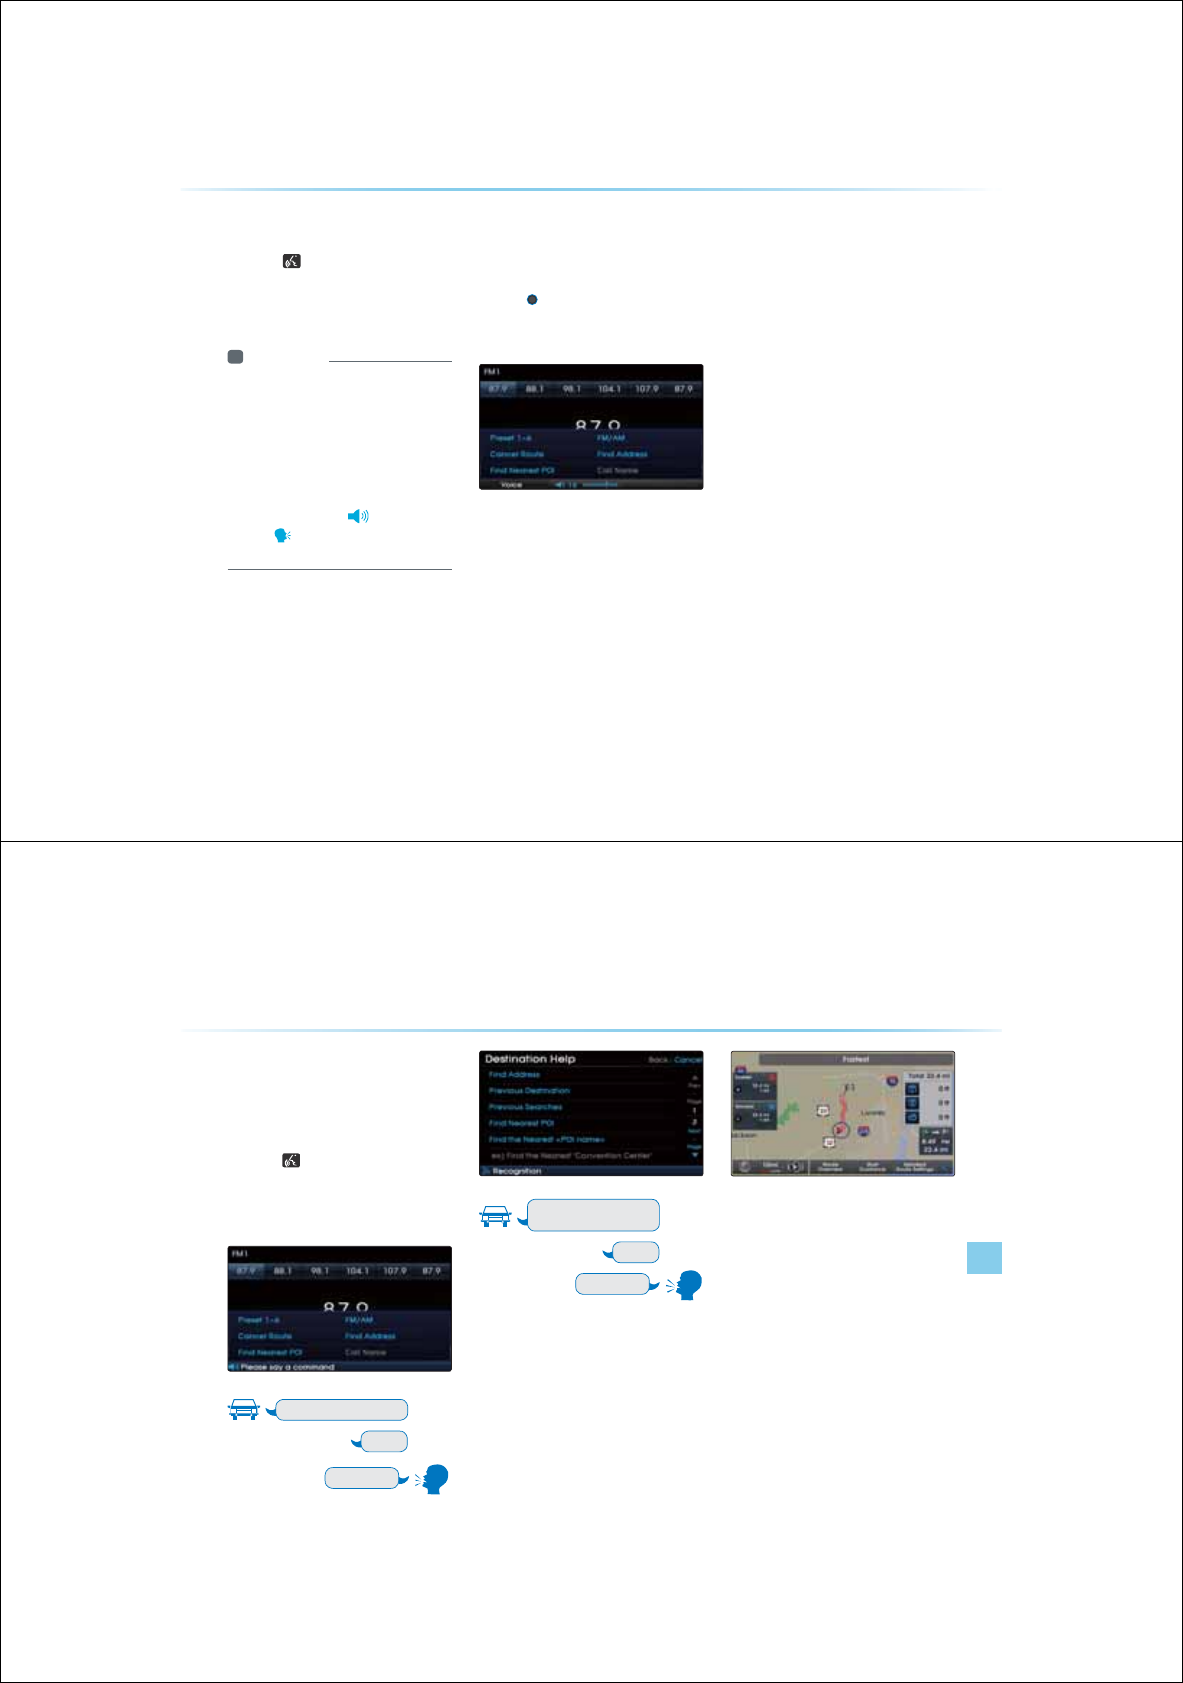
8VLQJ9RLFH5HFRJQLWLRQ
Press the key on the steering remote
controller. The voice command entry
window and the six representative
commands are displayed.
i Information
У
If voice recognition is set to 'Expert', then
the 'Please say a command' prompt will
not be provided. Only the 'beep-' will
sound.
У
If voice recognition is set to 'Expert', then
the six representative commands are not
shown on the screen.
У
After the 'Beep-', the
icon will change
to the
icon to indicate that a command
can now be stated.
$GMXVWLQJ9RLFH
5HFRJQLWLRQ9ROXPH
While Voice Recognition is operating ƙ
Turn the
Volume knob left/right to
adjust the voice recognition prompt
volume
8VLQJ9RLFH5HFRJQLWLRQ
6WDUWLQJ9RLFH5HFRJQLWLRQ
9RLFH5HFRJQLWLRQl
,OOXVWUDWLRQRQ8VLQJ9RLFH
5HFRJQLWLRQ:KHQ+RPH
LVVHWDVWKHGHVWLQDWLRQ
Press the key (under 0.8 seconds).
The system will await for your command
and display a list of accessible
commands on the screen.
Destination
Please say a command
Go Home
Beep-
Destination
Please say a command
Beep-
9RLFH&RPPDQG/LVW
Voice commands within this system are categorized into "Common
Commands" and "Mode Commands".
У
Common Commands ( ) : commands that can be used in all
situations.
У
Mode Commands ( ) : commands that can be used in specific
multimedia/navigation/Bluetooth mode states.
i Information
У
Some commands will operate properly only when a USB, iPod,
Bluetooth or other device has been connected.
+HOS&RPPDQG/LVW
Command Operation
Help Displays the main Help screen
Destination Help Displays the Destination related command list
Map Help Displays the Map related command list
Radio Help Displays the FM/AM radio related command list
XM Help Displays the XM radio related command list
Disc Help Displays the DISC mode related command list
for the disc inserted in the CD Player
iPod Help Displays the iPod related command list
USB Help Displays the USB related command list
Pandora Help Displays the Pandora radio related command list
Phone Help Displays the Phone related command list
9RLFH&RPPDQG/LVW
9RLFH&RPPDQG/LVWV
9RLFH5HFRJQLWLRQl
$XGLR6\VWHP&RPPDQG/LVW
FM/AM Radio
Command Operation
Radio Plays the most recent frequency for the most
recently operated band
(Radio) AM Plays the most recent frequency for the corre-
sponding band
(Radio) FM
Plays the most recent frequency for the corre-
sponding band In the case of FM, the most recent
frequency within the most recently played FM1 or
FM2 band is Played
FM1/FM2 Plays the most recent frequency for the corre-
sponding band
AM frequency
<530~1710>
Plays the desired AM band frequency
(ex : AM Frequency "Five-Hundred Thirty")
FM frequency
<87.5~107.9>
Plays the desired FM band frequency
(ex : FM Frequency "Eighty-Seven point Five")
AM Preset <1~6> Plays the desired AM band preset frequency
FM1 Preset <1~6> Plays the desired FM1 band preset frequency
FM2 Preset <1~6> Plays the desired FM2 band preset frequency
Command Operation
Preset <1~6> Plays the desired preset frequency for the current
band
Seek Up Searches and plays the next frequency of the cur-
rent band
Seek Down Searches and plays the previous frequency of the
current band
Preset Up Plays the next preset frequency of the current
band
Preset Down Plays the previous preset frequency of the current
Auto Store
Searches all frequencies within the current band
and stores the 6 frequencies with the most supe-
rior reception as preset buttons
Scan On Scans receivable frequencies from the current
broadcast and plays for 5 seconds each
Scan Off Ends the currently operating Scan or Preset Scan
feature
Preset Scan Moves to the next preset from the current present
and plays for 5 seconds each
XM Radio
Command Operation
XM Plays the last channel within the last band from
XM1, XM2, and XM3
XM1/XM2/XM3 Plays the most recent channel for the correspond-
ing Band
XM Channel <1~255> Plays the desired XM band channel
(ex : XM channel "Eleven")
XM1 Preset <1~6> Plays the desired preset channel for XM1 band
XM2 Preset <1~6> Plays the desired preset channel for XM2 band
XM3 Preset <1~6> Plays the desired preset channel for XM3 band
Channel <1~255> Plays the desired channel of the current band
Preset <1~6> Plays the desired preset channel of the current
band
Channel Up Plays the next channel of the current band
Channel Down Plays the previous channel of the current band
Command Operation
Preset Up Plays the next preset channel of the current band
Preset Down Plays the previous preset channel of the current
band
Scan On Scans receivable channels from the current broad-
cast and plays for 5 seconds each
Scan Off Ends the currently operating Scan or Preset Scan
feature
Preset Scan Moves to the next preset from the current present
and plays for 5 seconds each
Scan Off Ends the currently operating Scan or Preset Scan
feature
Preset Scan Moves to the next preset from the current present
and plays for 5 seconds each
9RLFH&RPPDQG/LVW
9RLFH&RPPDQG/LVWV
9RLFH5HFRJQLWLRQl
CD(Audio Type)
Command Operation
CD If the DISC inserted in the CD Player is either a CD
or MP3 DISC, then the CD or MP3 will be played
CD Track <1~99> If the DISC inserted in the CD Player is a CD, then
CD Mode will start and plays the desired track
Play Plays the currently paused song
Pause Pauses the current song
Next Track Plays the next track
Previous Track Plays the previous track
Repeat On Repeats the current track
Repeat Off Cancels repeat play to play tracks in sequential
order
Shuffle On Randomly plays the tracks within the CD
Shuffle Off Cancels random Play to play tracks in sequential
order
Scan On Scans the files from the next files for 10 seconds
each
Scan Off Ends the currently operating Scan feature
Track <1~99> Plays the desired track number
CD(MP3 Type)
Command Operation
CD If the DISC inserted in the CD Player is either a CD
or MP3 DISC, then the CD or MP3 will be played
Play Plays the currently paused song
Pause Pauses the current song
Next File Plays the next track
Previous File Plays the previous track
Next Folder Plays the first file in the next folder
Previous Folder Plays the first file in the previous folder
Repeat On Repeats the current file
Repeat Off Cancels repeat play to play files in sequential order
Repeat Folder Repeats all files in the current folder
Shuffle On Plays all files within the CD in random order
Shuffle Off Cancels random play to play files in sequential
order
Shuffle Folder Randomly plays the files within the current folder
Scan On
Scans the files from the next files for 10 seconds each
Scan Off Ends the currently operating Scan or Folder Scan
feature
Folder Scan Plays all songs in the folder in which the current
playing file is located for 10 seconds each
USB Music
Command Operation
USB If the USB has been connected to the device,
plays the MP3 or Image files within the USB
USB Music If the USB has been connected to the device,
plays the MP3 files within the USB
Play Plays the currently paused song
Pause Pauses the current song
Next File Plays the next track
Previous File Plays the previous track
Next Folder Plays the first file in the next folder
Previous Folder Plays the first file in the previous folder
Repeat On Repeats the current file
Repeat Off Cancels repeat play to play files in sequential order
Repeat Folder Repeats all files in the current folder
Shuffle On Plays all files within the USB in random order
Shuffle Off
Cancels random play to play files in sequential order
Shuffle Folder Randomly plays the files within the current folder
Scan On
Scans the files from the next files for 10 seconds each
Scan Off
Ends the currently operating Scan or Folder Scan
feature
Folder Scan Plays all songs in the folder in which the current
playing file is located for 10 seconds each
USB Image
Command Operation
USB If the DISC inserted in the CD plays is either a CD
or MP3 DISC, then the CD or MP3 will be played
USB Image If the USB has been connected to the device,
plays the MP3 files within the USB
Next File Displays the next image file
Previous File Displays the previous image file
Next Folder Displays the first image file within the next folder
Previous Folder Displays the first image file within the previous
folder
9RLFH&RPPDQG/LVW
9RLFH&RPPDQG/LVWV
9RLFH5HFRJQLWLRQl
iPod
Command Operation
iPod Plays the songs within the iPod if the iPod has
been connected to the device
Play Plays the currently paused song
Pause Pauses the current song
Next Song Plays the next song
Previous Song Plays the previous song
Repeat On Repeats the current file
Repeat Off Cancels repeat play to play files in sequential order
Shuffle On Plays all files within the current category in random
order
Shuffle Off Cancels random play to play files in sequential
order
My Music
Command Operation
My Music Plays the songs within the My Music
Play Plays the currently paused song
Pause Pauses the current song
Next File Plays the next file
Previous File Plays the previous file
Repeat On Repeats the current file
Repeat Off Cancels repeat play to play files in sequential order
Shuffle On Plays all files within the current category in random
order
Shuffle Off Cancels random play to play files in sequential
order
Scan On Scans the files from the next files for 10 seconds
each
Scan Off Ends the currently operating Scan or Folder Scan
feature
Others
Command Operation
Audio On Turns on the Audio/Video
Audio Off Turns off the Audio/Video
Bluetooth Audio Plays Bluetooth Audio
Auxiliary Plays the connected auxiliary device
Blue Link Displays the Blue Link mode screen
"Blue Link" is an optional feature.
3KRQH&RPPDQG/LVW
Command Operation
Call Name Makes the call to the name
Call <Name> Call <Name> saved in Contacts
(ex : Call "John")
Dial Number Makes the call to the number
Dial <Number> Call can be made by dialing the spoken numbers
(ex : Dial "123")
Contacts Displays list of saved contacts Say the name to
connect the call to the corresponding contact
Recent Calls The user can select a number from the outgoing,
incoming, and missed calls
Redial Connects the most recently called number
9RLFH&RPPDQG/LVW
9RLFH&RPPDQG/LVWV
9RLFH5HFRJQLWLRQl
1DYLJDWLRQ&RPPDQG/LVW
Destination
Command Operation
Find Address Sets the destination through address search for
route guidance
Previous Destination Sets one of the previous destination as the current
destination
Previous Searches Sets one of the previous searches as the current
destination
Find Nearest POI
Sets a POI near the current position as the des-
tination for route guidance through POI category
search
Find the Nearest
<POI Name>
Sets a POI near the current position as the desti-
nation by directly inputting the POI name for route
guidance
(ex : Find the Nearest "Restaurants")
POI Category list, Page ##
Destination POI by
Phone Number
Sets the destination by searching the phone num-
ber of the facility
Find Emergency
Police Station
Searches for an emergency Police Station which
is nearby the current position and sets it as the
destination for route
Find Emergency
Hospital
Searches for an emergency Hospital which is
nearby the current position and sets it as the
destination for route
Command Operation
Find Emergency
Dealership
Searches for an emergency Dealership which
is nearby the current position and sets it as the
destination for route
My Places
Sets one of the list of previously registered
addresses in the My Places for the user as the
destination
Go Home Sets the previously registered home address as
the destination for route guidance
Go to Office Sets the previously registered office address as
the destination for route guidance
Previous Start Position Sets the previous start position as the current
destination
Favorite Place
<1 ~ 5>
Sets a previously registered favorite place as the
destination for route guidance
Map
Command Operation
Map Current Location Displays the current position of the vehicle
Voice Guidance On Turns the Voice Guidance On
Voice Guidance Off Turns the Voice Guidance Off
Voice Guidance
Lauder Increases the Voice Guidance volume by 1 level
Voice Guidance Softer Decrease the Voice Guidance volume by 1 level
Repeat Voice Guidance
Repeats the route guidance
Cancel Route Deletes the designated destination and terminates
the route guidance
Detour <1, 2, 5, 10>
mile(s)
Searches detour routes within a <1, 2, 5, 10> mile
radius
Detour <1, 2, 5, 10>
kilometer(s)
Searches detour routes within a <1, 2, 5, 10>
kilometer radius
Distance to Destination Reports the remaining distance until destination by
voice
Time to Destination
Reports the remaining time until destination by voice
Store Marked Loca-
tion to <Text Tag>
(ex: Store Marked
Location to "User 1"
Registers the selected location into the selected
Address book
Replan Fastest Route Recalculates the route with the fastest route
Command Operation
Replan Shortest Route Recalculates the route with the shortest route
Zoom In/Zoom Out Decreases/Increases the map zoom by one level
Zoom <Scale>
Displays the map in the corresponding zoom
<scale> : 150, 300, 700 feet/0.25, 0.5 miles/1
mile/2, 4, 8, 16, 64, 130, 250 miles
50, 100, 200, 400, 800 meters/1.6, 3.2, 6.4, 12,
25, 50, 100, 200, 400 kilometers
Zoom Minimum Displays the map screen in the maximum zoom
level
Zoom Maximum Displays the map screen in the minimum zoom
level
View Route If the destination has been set, displays the whole
route screen until the destination
XM Traffic Displays XM Traffic information on the screen
Auto Zoom On Turns the Auto Zoom feature on
Auto Zoom Off Turns the Auto Zoom feature off
Auto Mode Converts the map display is between daylight/
night modes automatically
Daylight Mode Converts the map display into daylight mode
Night Mode Converts the map display into night mode
North Up Displays the map in North Up mode
Heading Up Displays the map in Heading Up mode
9RLFH&RPPDQG/LVW
9RLFH&RPPDQG/LVWV
9RLFH5HFRJQLWLRQl
32,&DWHJRU\/LVW
Restaurants
African Restaurants
American Restaurants
Asian Restaurants
Chinese Restaurants
Coffee Shop
Continental Restaurants
Fast Food
French Restaurants
Italian Restaurants
Japanese Restaurants
Korean Restaurants
Latin American Restaurants
Mexican Restaurants
Seafood Restaurants
Vegetarian Restaurants
Other Restaurants
Automotive
Auto Parts
Auto Service
Automobile Dealership
Car Wash
Gas Station
Hyundai Dealership
Motorcycle Dealership
Parking
Rest Area
Road Assistance
Travel
Airport
Bus Station
Campground
City Center
Ferry Terminal
Hotel
Local Transit
Rental Car Agency
Tourist Attraction
Tourist Information
Train Station
Travel Agent
Shopping
Bookstore
Clothing Shop
Convenience Store
Department Store
Electronics Store
Gift Shop
Grocery Store
Hardware Store
Home Specialty Store
Music Store
Pharmacy
Shoe Store
Shopping Center
Sporting Goods Store
Recreation
Amusement Park
Cinema
Golf Course
Museum
Recreation Area
Ski Resort
Sports Activities
Sports Complex
Video & Game Rental
Winery
Other Recreation
Financial Services
ATM
Bank
Business Facility
Check Cashing Service
Money Transfer
Community
City Hall
Civic Center
Convention & Center
Court House
Fire Department
Government Offices
Library
Police Station
Post Office
School
Utilities
Waste & Sanitary
Services
Attorney
Cleaning & Laundry
Communication Services
Dentist
Funeral Home
Hair & Beauty
Hospital
Medical Service
Mover Services
Photography
Physician
Social Service
Tailor & Alteration
Tax Service

0(02
&$5$916<67(0
,QIRUPDWLRQ
УXM Data
УBlue Link
УGPS Information
УHelp
6-2
$ERXW*36
Press the
,1)2
key ƙ Press
;0'DWD
About XM Data Service
The XM Data Service is a paid membership
Satellite radio service which provides users with
traffic, stock, sports, and weather information.
However, weather information is not supported
for vehicles purchased in Canada.
Name Description
1
Weather
Displays weather information
for the next three days
Press the
0RUH
button to
check details
2
Traffic
Displays road accident/traffic
information
Press the
0RUH
button to
check details
3
Stocks
Shows stock information for
three Favorite Stocks
Press the
0RUH
button to
check details
4
Sports
Shows sports team information
for two My Teams
Press the
0RUH
button to
check details
;0'DWD
1 2
43
XM Data
Information l 6-3
Weather Data Service
Press the
,1)2
key ƙ Press
;0'DWD
ƙ Press
:H
:H
:H
DW
DW
DW
KH
KH
KH
U
U
U
ƙ
0RUH
The Weather Service is a service which pro-
vides weather information updated ever 5
minutes for your region. The Weather Service
includes Tabular Weather, Graphical Weather,
Warnings and Advisories Services.
Forecast
Provides current weather information and
weather information for the coming next three
days for your region.
To change the region, press the
2WKHU&LW\
button and select the desired region.
Map
This service provides weather information,
such as Cloud, Fog, Rain, Snow, and Road
Conditions on the Navigation map as symbols.
Details can be viewed on specific regions by
using the zoom in and zoom out features.
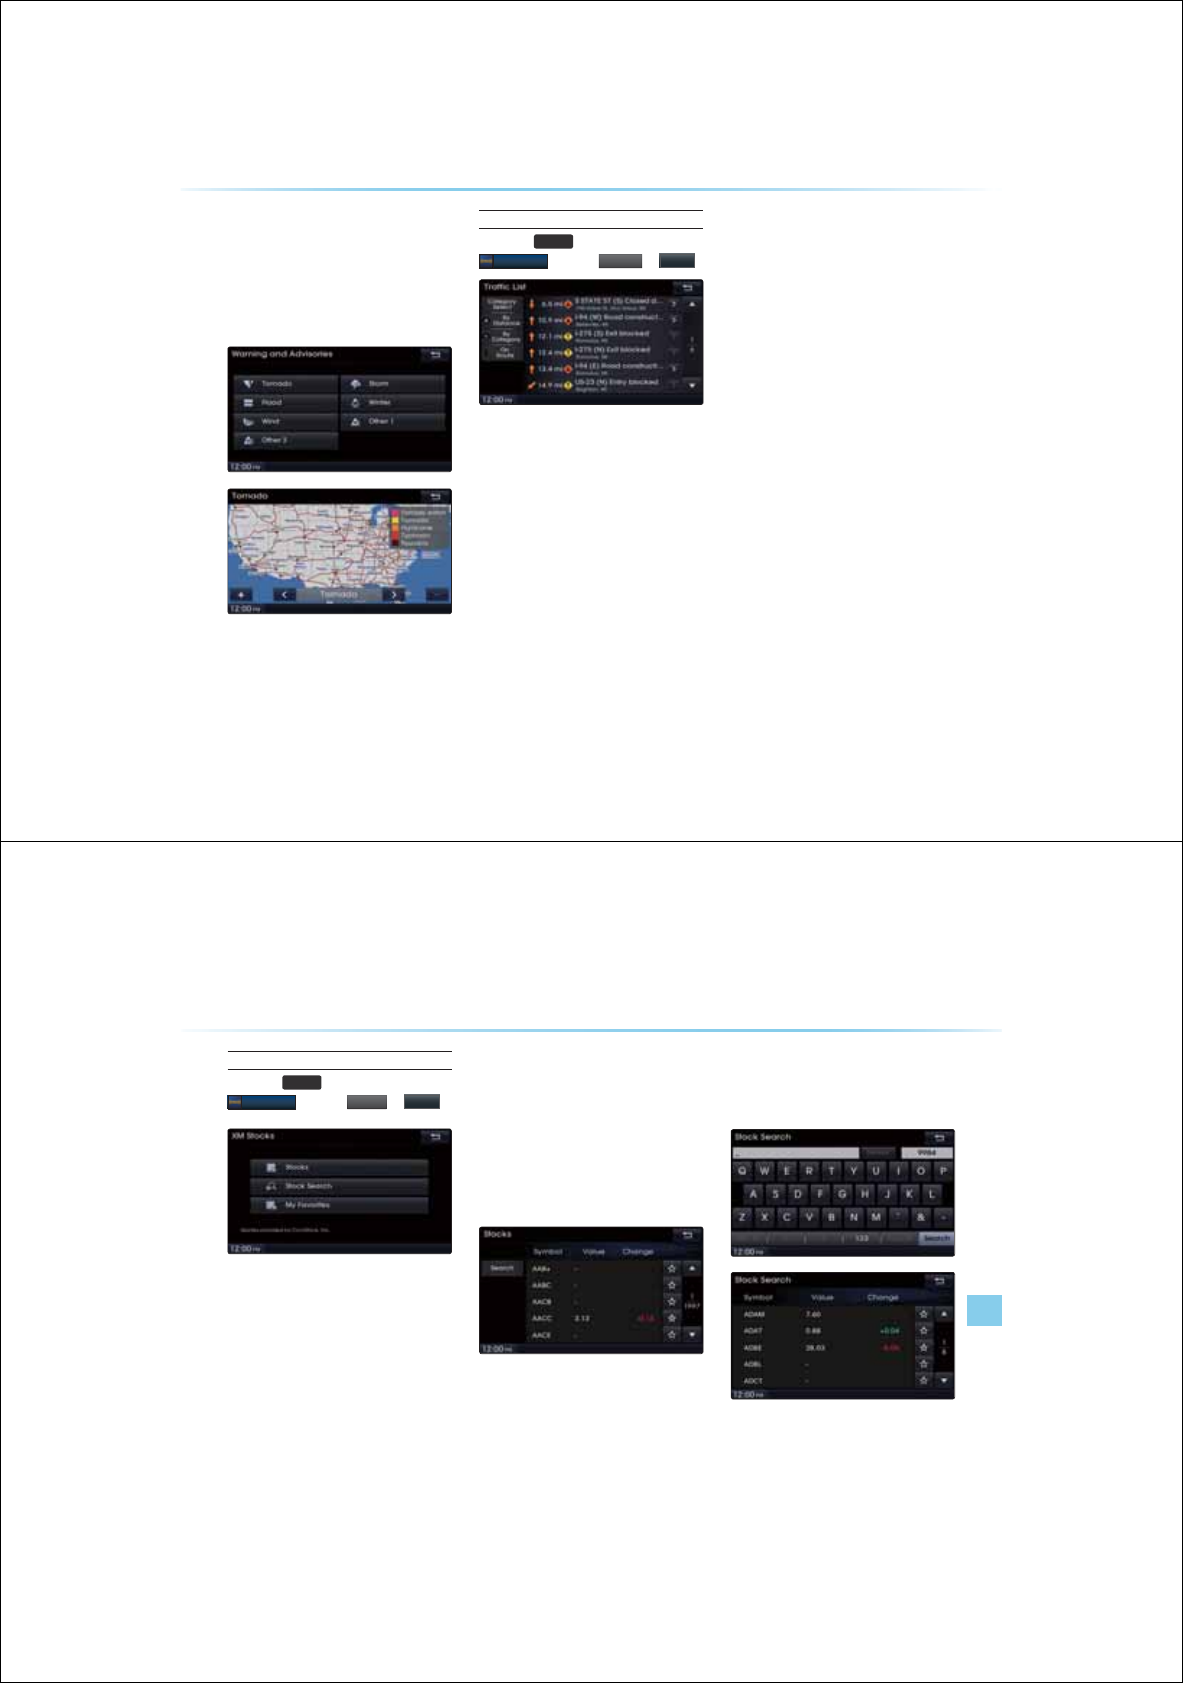
6-4
Warnings and Advisories
This service provides weather warnings and
advisories, such as Tornado, Storm, Flood,
etc. as symbols on the Navigation map.
Details can be viewed on specific regions by
using the zoom in and zoom out features.
Traffic Data Service
Press the
,1)2
key ƙ Press
;0'DWD
ƙ Press
7
7U
7U
7U
I
DI
DI
DI
IL
IL
IL
IL
F
F
F
ƙ
0RUH
У
Automatic route recalculation (guidance)
according to changes in traffic conditions.
У
Provides short-cuts for initially searched
routes.
У
Displays increased detour distance and
estimated driving times.
У
Displays icons by each traffic situation on
the map.
1. Route calculation by incorporating
actual road traffic conditions.
Incorporation of traffic information to route
calculations is a user option which can be
turned on or off by the user.
2. Displays road traffic situations.
RTM (Road Traffic Message) is a feature
which displays symbols of icons for each
type of road traffic condition, such as loca-
tions under construction, accidents, basic
weather, and others on map locations based
on Traffic information provided by XM.
3. Avoidance of locations where traffic
situations have occurred.
If a traffic situation occurs somewhere
along the route, the route is recalculated
to avoid such locations and an avoidance
recalculation popup will be displayed.
4. Displays traffic Event List.
A list providing details on accidents and an
icon which will display the accident location are
displayed. The user can view details by press-
ing on the list or move the map to the accident
location by pressing on the accident icons.
;0'DWD
XM Data
Information l 6-5
Stocks Data Service
Press the
,1)2
key ƙ Press
;0'DWD
ƙ Press
6
6W
6W
6W
RF
RF
RF
N
N
N
ƙ
0RUH
XM Stock data Service is a service which
provides real-time updated information on the
NYSE, NASDAQ, and AMEX (approximately
11,000 symbols)
Stocks
Stocks is a feature that shows the current
value and change of stocks.
For symbols which you are interested in,
press the <Favorites> icon to save the symbol
as a part of <My Favorite>.
Saved symbols can be viewed from the My
Favorites button on the Stock Main screen.
Stock Search
Use the Stock Search menu to search for
specific stocks.
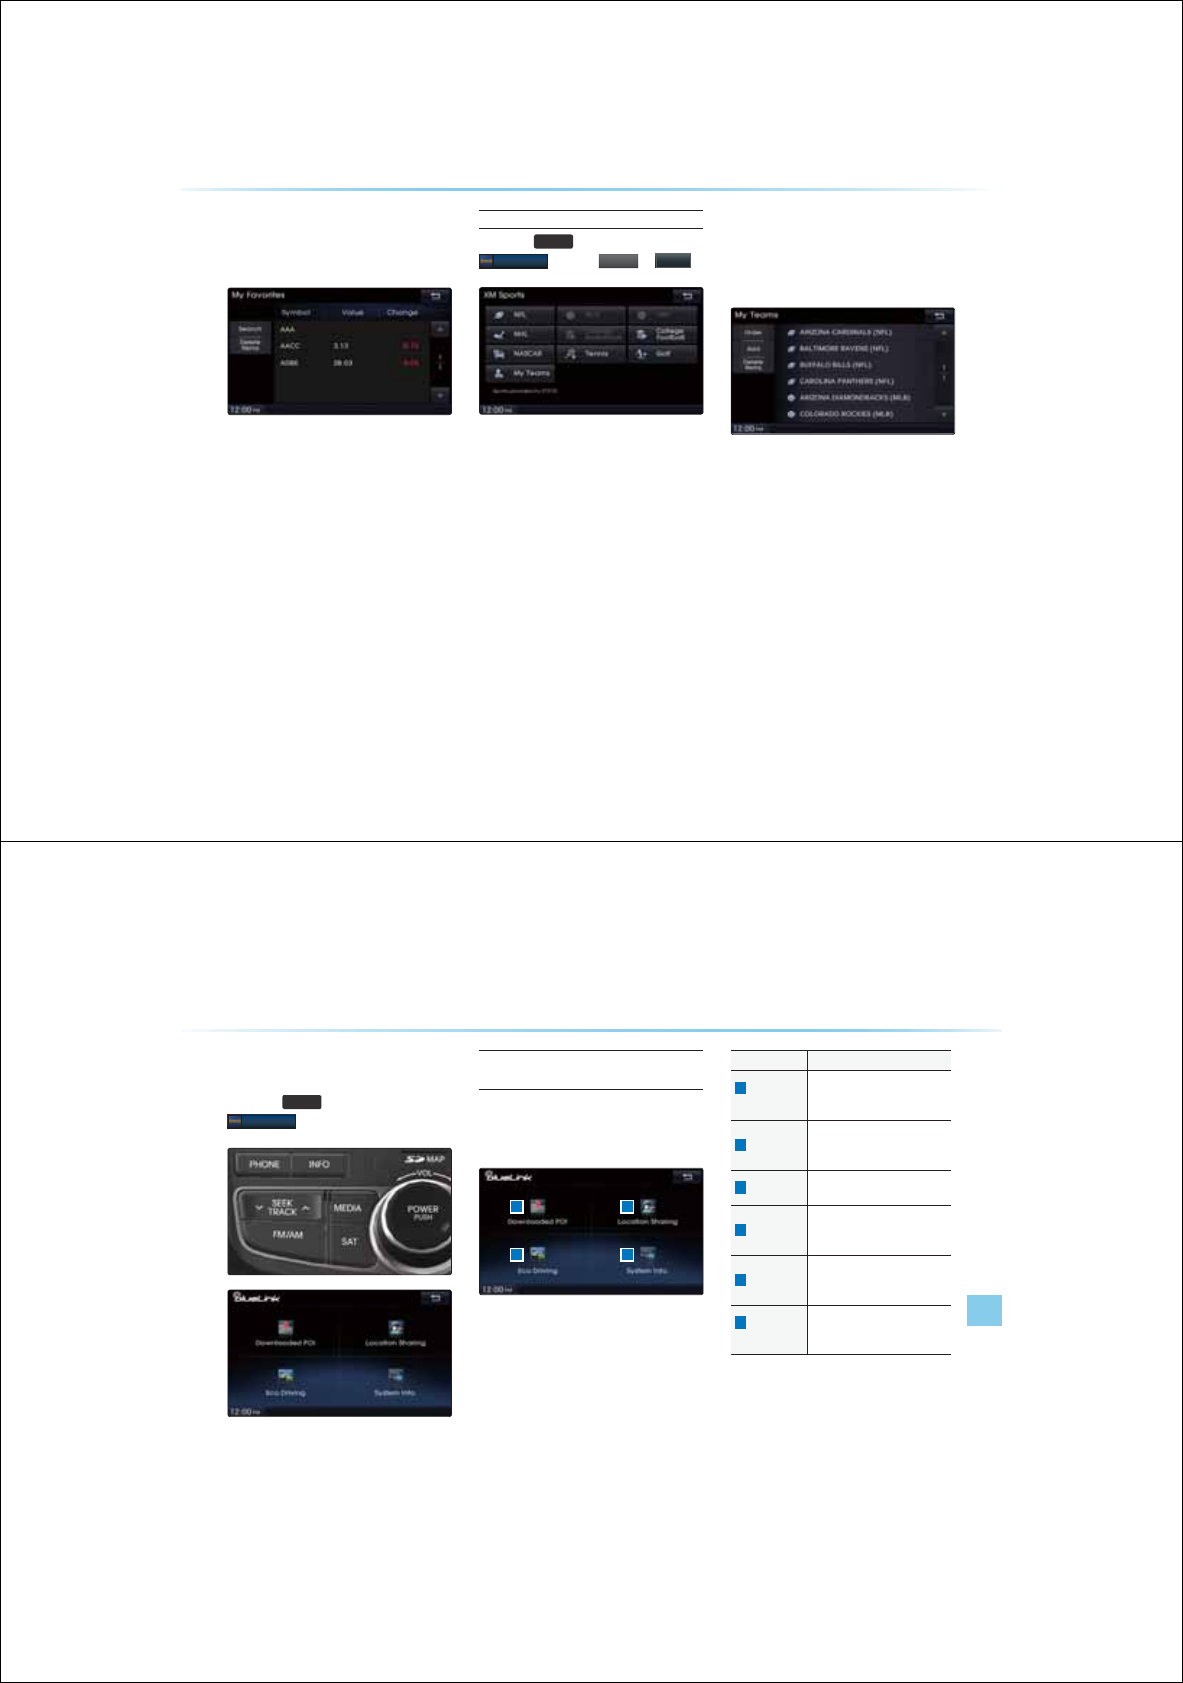
6-6
;0'DWD
My Favorites
My Favorites shows list of stocks added by
the user.
Sports Data Service
Press the
,1)2
key ƙ Press
;0'DWD
ƙ Press
6
6S
6S
6S
S
RU
RU
RU
W
WV
WV
WV
ƙ
0RUH
The service provides real-time updated infor-
mation on scores and schedules for major
sports, such as NFL, NBA, NCAA Football,
NCAA basketball, NHL, MLB, NASCAR and
more.
My Teams
You can save teams which you are inter-
ested in as part of <My teams> to easily view
related scores and schedules.
Blue Link
Information l 6-7
%OXH/LQN
Press the
,1)2
key ƙ Press
%OXH/LQN
Cautions upon Using Blue Link
Service
If you have not subscribed to the Blue Link
service, then only the Eco Driving and System
Info. buttons can be used.
Name Description
1
Downloaded
POI
Check POI information down-
loaded from the Blue Link
center or website
2
ECO Driving
Displays car fuel economy
graphs and eco driving informa-
tion
3
System Info. Check Blue Link system infor-
mation and available updates
4
Gas Station
Check Gas Station information
downloaded from the Blue Link
center or website
5
Restaurants
Check Restaurant information
downloaded from the Blue Link
center or website
6
Location
Sharing
Check locations of location
sharing friends through the Blue
Link center or website
%OXH/LQN
1
2 3
6
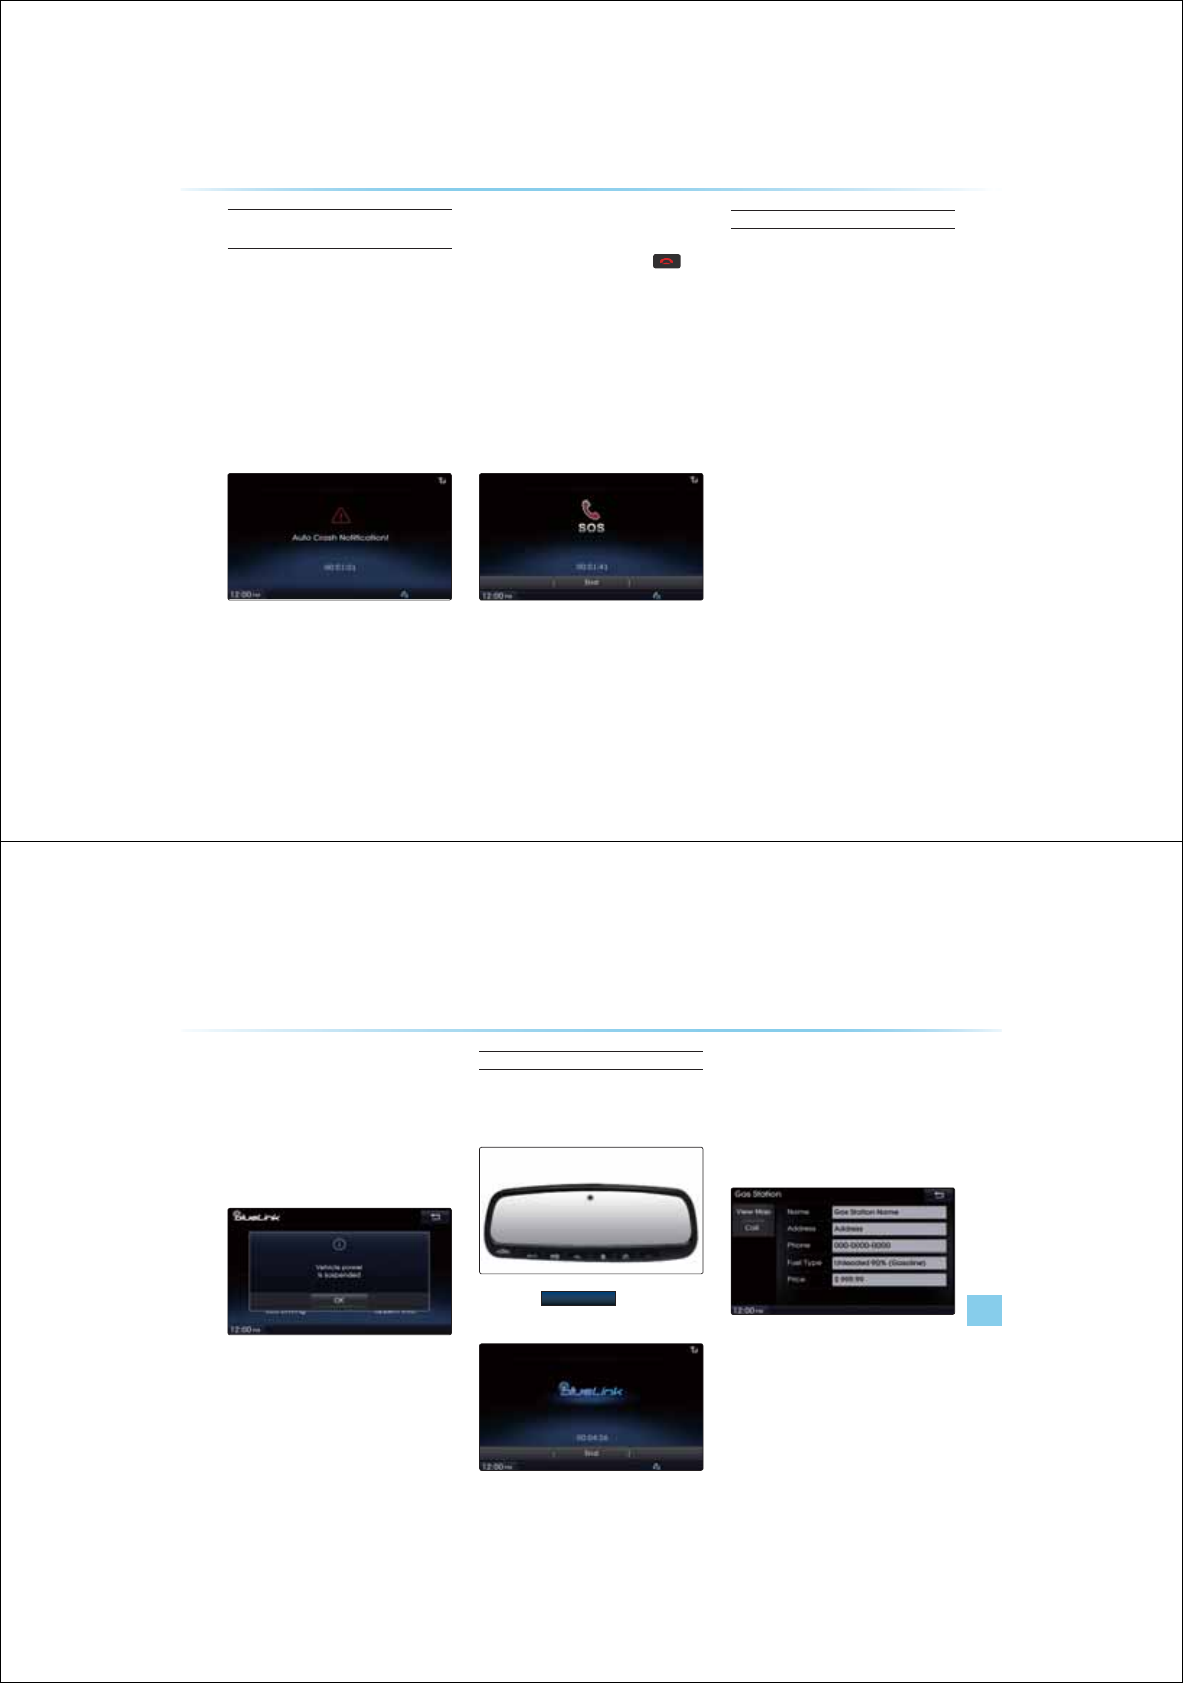
6-8
%OXH/LQN
Blue Link Safety and Security
Service
Auto Crash Notification
Provides immediate assistance when an acci-
dent occurs and an airbag is deployed. In this
event, an ACN signal, containing customer
and location information, will automatically
be transmitted to the response center. Upon
receipt of the signal, a response specialist will
attempt to establish voice communications
with the vehicle occupants and forward any
pertinent information to emergency services.
SOS
Customers request emergency 911 assis-
tance by pressing the dedicated
key
in the vehicle. This action transmits vehicle
information and location to specially trained
response specialists, who assist in coordinat-
ing the dispatch of appropriate emergency
assistance to the customer.
The response specialist remains on the line
with the customer until advised assistance
has arrived.
Stolen Vehicle Recovery
In the event a customer’s vehicle is reported
stolen (and a stolen vehicle report has been
filed with the appropriate police department),
the response center can provide assistance to
the police in an attempt to recover the vehicle.
Vehicle Immobilization
Used with Stolen Vehicle Recovery, this
enables law enforcement to send a signal
to the vehicle which immobilizes the engine
management system, thus preventing
startup. This capability is only valid when the
ignition is off, but can be saved for later immo-
bilization if the vehicle is on or in motion at the
time of signal transmission.
Blue Link
Information l 6-9
Vehicle Slowdown
Used with Stolen Vehicle Recovery, this
enables law enforcement to gradually reduce
the engine power of the vehicle, thus slow-
ing it down to safe levels. A warning shall be
transmitted to the driver prior to the slowdown
procedure.
Location Information Service
Downloading POIs from the Blue
Link Center
1. Press the
%OXH/LQN32,
key on the Room
Mirror to connect with the Blue Link Center.
2. Once connection is complete, request the
desired POI information through voice rec-
ognition to the Blue Link Center.
3. Once the request is processed, the
requested POI information is displayed on
the screen.
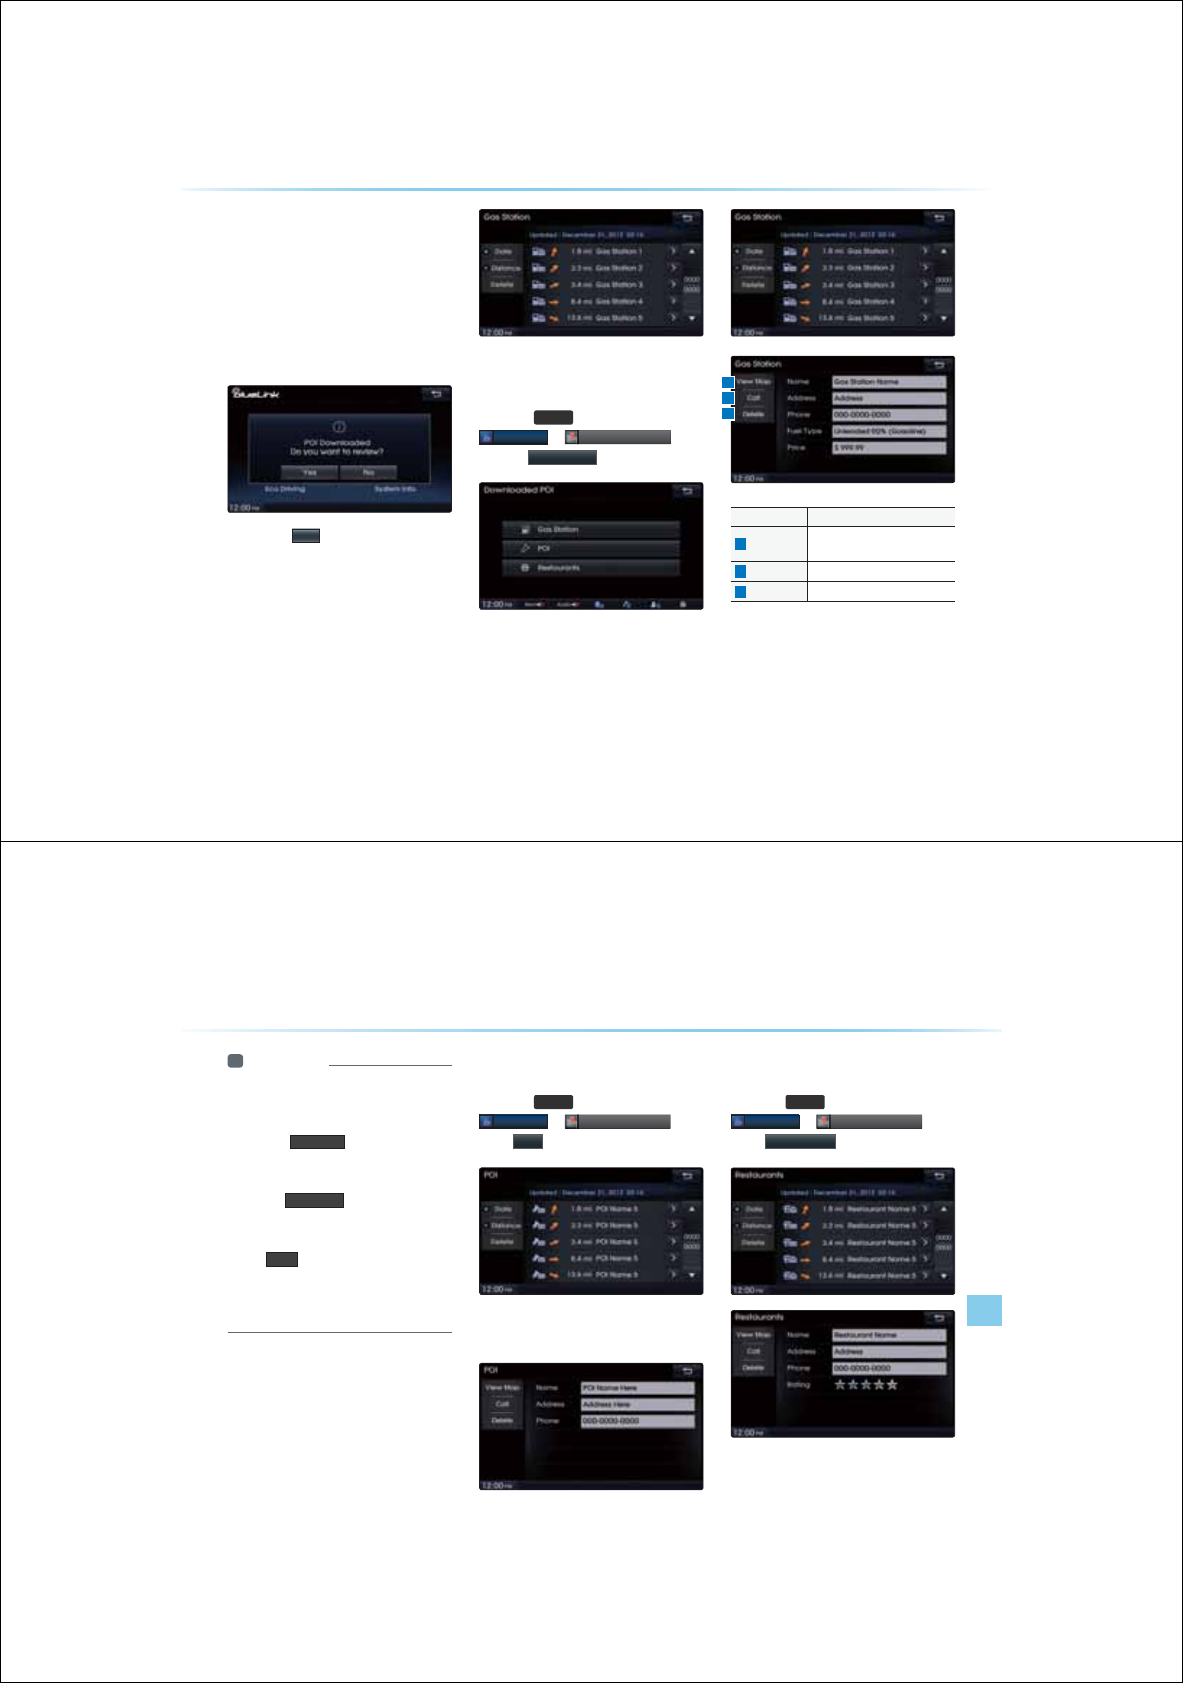
6-10
Downloading POIs through the
Owner’s Website
1. Visit the Blue Link website (www.myhundai.
com) to search for desired POI information
to send to your vehicle.
2. After transmission is complete, the follow-
ing POI downloaded message is displayed
the next time you turn on your vehicle.
3. Press the
<HV
button to check the list of
downloaded POIs.
Checking Downloaded Gas Station
Information
Press the
,1)2
key ƙ Press
%OXH/LQN
ƙ
'R
'R
'R
ZQ
ZQ
ZQ
OR
OR
OR
DG
DG
DG
HG
HG
HG
3
3
3
2
2,
2,
2,
ƙ Press
*DV6WDWLRQ
Name Description
1
View Map Shows location of selected POI
on the map
2
Call Makes call to the selected POI
3
Delete Deletes the selected POI
%OXH/LQN
1
2
3
Blue Link
Information l 6-11
i Information
У
Generally, POI lists are displayed by dis-
tance from the current position by dates. To
display the list by the downloaded distance,
press the
'LVWDQFH
button.
У
If route guidance is being provided to a des-
tination previously set within the Navigation,
then the
9LHZ0DS
button cannot be used
to display the map location. Use the feature
after route guidance is complete.
У
The
&DOO feature can be used only when
a Bluetooth phone has been connected.
To use this feature, first check to see that
a Bluetooth phone has been connected.
Checking Downloaded POI
Information
Press the
,1)2
key ƙ Press
%OXH/LQN
ƙ
'R
'R
'R
ZQ
ZQ
ZQ
OR
OR
OR
DG
DG
DG
HG
HG
HG
3
3
3
2,
2,
2,
ƙ
Press
32,
Select a POI on the POI list to view additional
POI information.
Checking Downloaded Restaurant
Information
Press the
,1)2
key ƙ Press
%OXH/LQN
ƙ
'R
'R
'R
ZQ
ZQ
ZQ
OR
OR
OR
DG
DG
DG
HG
HG
HG
3
3
3
2,
2,
2,
ƙ
Press
5HVWDXUDQWV

6-12
Checking Locations of Location
Sharing Friends
Press the
,1)2
key ƙ Press
%OXH/LQN
ƙ Press
/R
/R
/R
FD
FD
FD
WL
WL
WL
RQ
RQ
RQ
6
6
6
6
KD
KD
KD
UL
UL
UL
QJ
QJ
QJ
J
Sending Your Car Position to a
Friend
1.
Press the
%OXH/LQN32,
key on the Room
Mirror to connect with the Blue Link center.
2. Once connection is complete, request to
the Blue Link Center consultant that your
location be sent to the selected friend.
3. Your location will be sent to the selected
friend.
%OXH/LQN
Blue Link
Information l 6-13
Car Management Information
Eco Driving
Press the
,1)2
key ƙ Press
%OXH/LQN
ƙ Press
(F
(F
(F
R
R
R
'U
'U
'U
LY
LY
LY
LQ
LQ
LQ
J
J
J
J
Name Description
1
Average Fuel
Economy
Displays the average fuel econo-
my after starting the ignition
2
Fuel
Consumption
last 2.5 min
Displays the fuel economy and
consumption for the last 2.5
minutes
3
Eco Reward
Eco Rewards are acquired
when actual fuel economy is
better than the average fuel
economy
5
Help
Provides additional information
on Fuel Economy and Eco Driv-
ing
Maintenance Alert Notification
This feature displays a notice alerts when parts
are due for replacements or inspections.
Parts replacement/inspection alerts are also
provided regularly through the website, emails
and text messages.
Automated DTC (Diagnostic
Trouble Code) Notification
This feature displays potential abnormalities
and countermeasures when potential vehicle
abnormalities are detected.
2 4
5
3
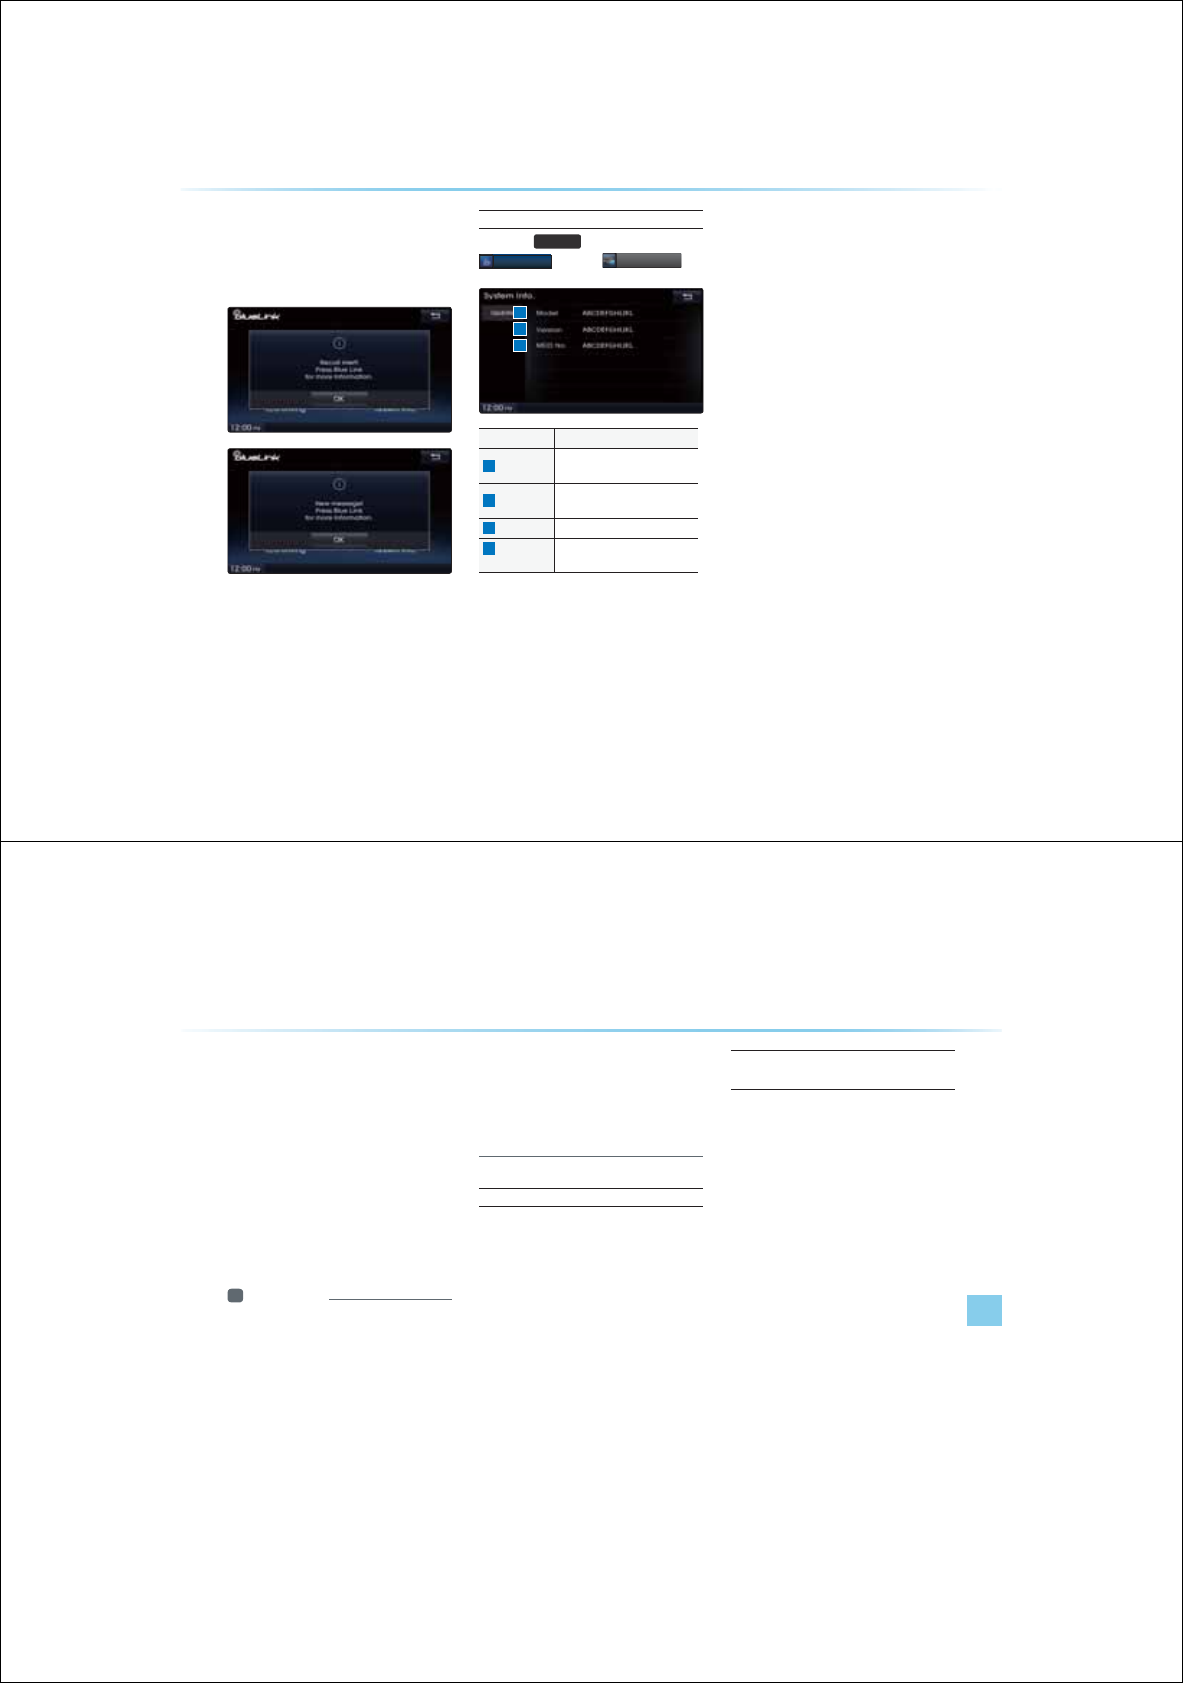
6-14
Recall and Campaign Advisor
The following message alerts are displayed
once vehicle recall or campaign information or
received.
Blue Link System Information
Press the
,1)2
key ƙ Press
%OXH/LQN
ƙ Press
6
6\
6\
6\
\
VW
VW
VW
HP
HP
HP
,
,
,
QI
QI
QI
R
R
R
Name Description
1
Model Displays the vehicle Blue Link
model name
2
Version Displays the hardware and
software Version
3
MEID NO. Blue Link system ID number
4
Update
(USB)
Used to update the Blue Link
system through USB
%OXH/LQN
1
2
3
GPS Information
Information l 6-15
*36,QIRUPDWLRQ
$ERXW*36
GPS (Global Position System) :
GPS is a system developed and operated
by the United States that determines the
user’s current position (longitude · latitude,
etc) by using 4 or more satellites.
This system is used with related GPS
information, various sensors, road map
data, and other related information to
provide navigation services
i Information
У
For continued map updates, information-
gathering and surveys are conducted con-
tinuously to monitor road changes or new
road constructions. Nonetheless, roads,
facilities, and fares are under constant
change and it is impossible to completely
remove all errors, including road updates,
names, facilities, and fares. Please keep
such fact in mind when using GPS.
У
In principle, roads with widths less than
3yards are not included within the map
data. Roads with sections with widths less
than 3yards may be deleted in future map
data updates.
When GPS Info Cannot Be Used
GPS info may not operate under the following
conditions.
У
When buildings, tunnels, or other obstruc-
tions block satellite signals
У
When materials are placed above the GPS
antenna and block satellite signals
У
When the satellite is not transmitting
У
When a digital cellular phone (1.5GHz) is
placed near the GPS antenna
Errors Unavoidable Due to Sys-
tem Characteristics
У
The navigation system uses GPS informa-
tion, various sensors, road map data, and
other related information to display the cur-
rent position. Errors may occur if the satel-
lite is transmitting inaccurate signals or only
two or less satellite signals can be received.
Errors that occur in such conditions cannot
be corrected.
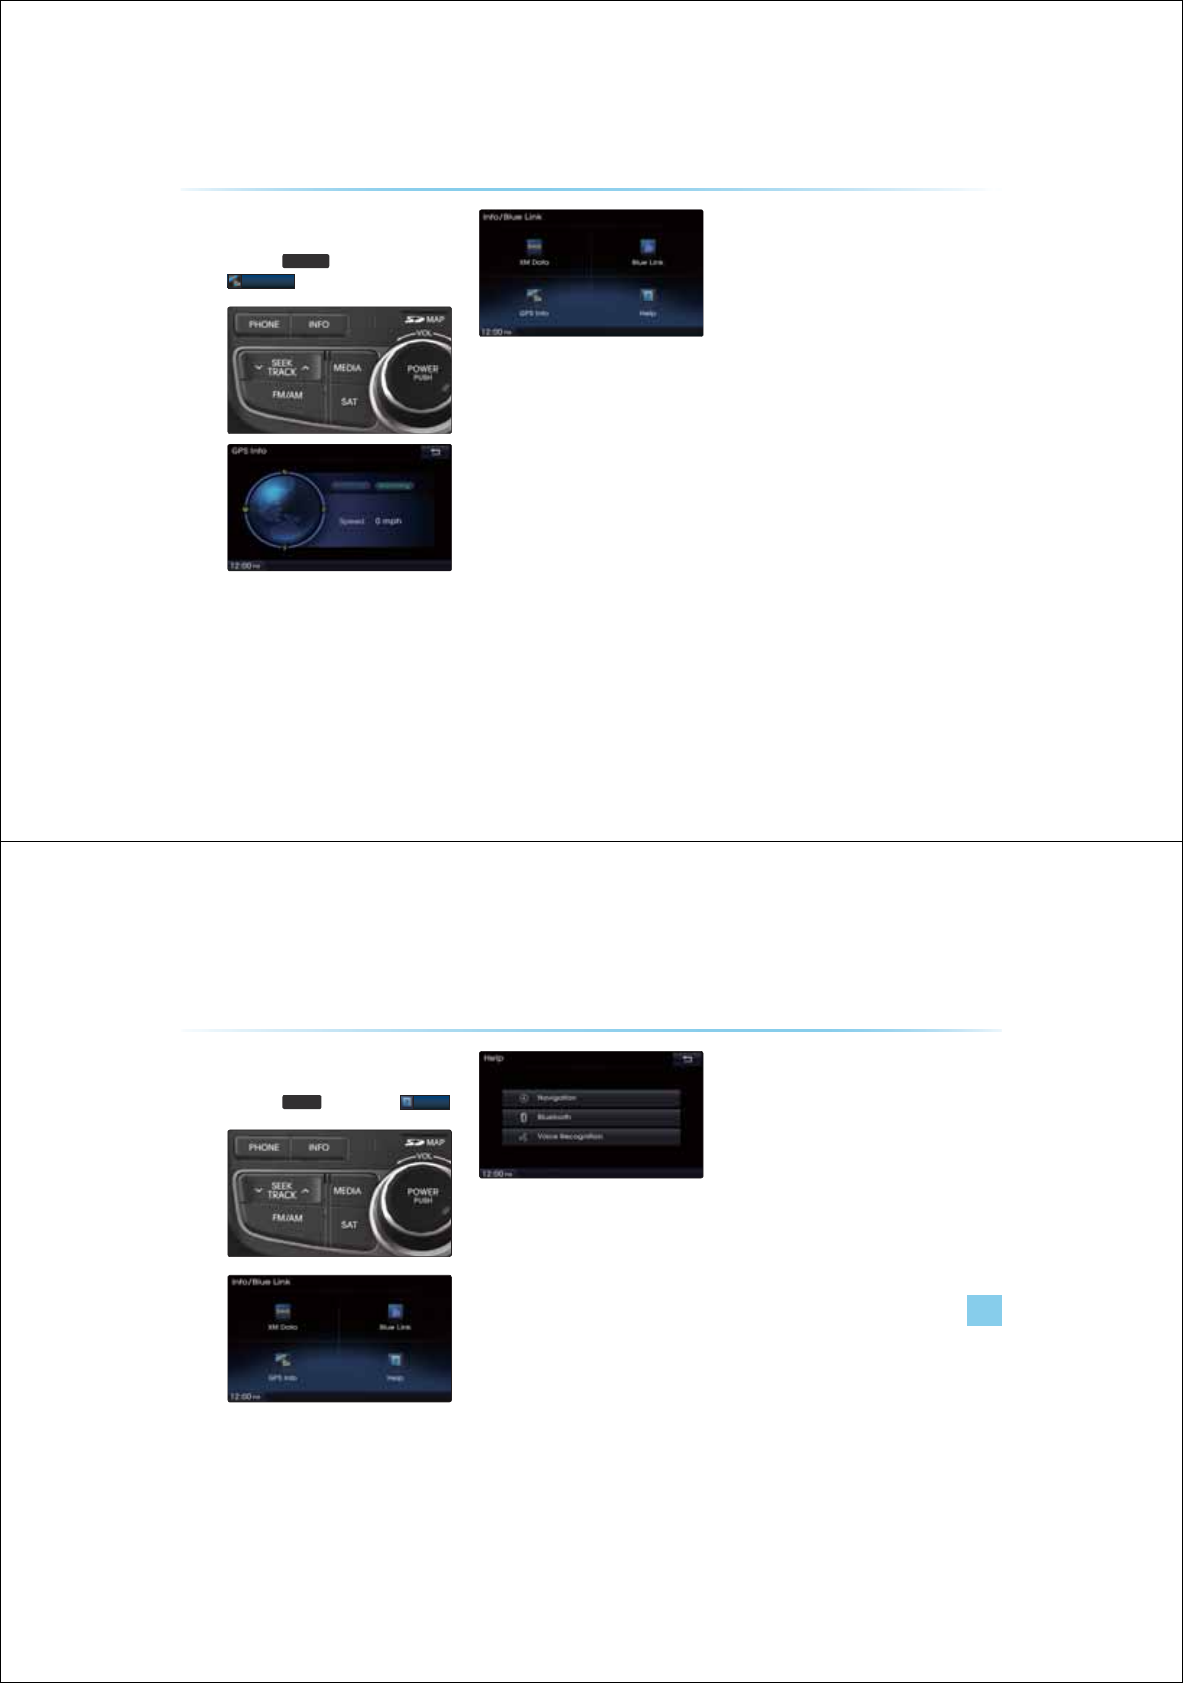
6-16
9LHZLQJ*36,QIR
Press the
,1)2
key ƙ Select
*36,QIR
The GPS reception and vehicle speed
information are displayed.
+HOS
Help
Information l 6-17
9LHZLQJ+HOS
Press the
,1)2
key ƙ Select
+HOS
Help sections on the Navigation and
Bluetooth
®
features can be selected and
viewed.

0(02
6-18
&$5$916<67(0
2WKHU
)HDWXUHV
УClimate Mode
УPGS
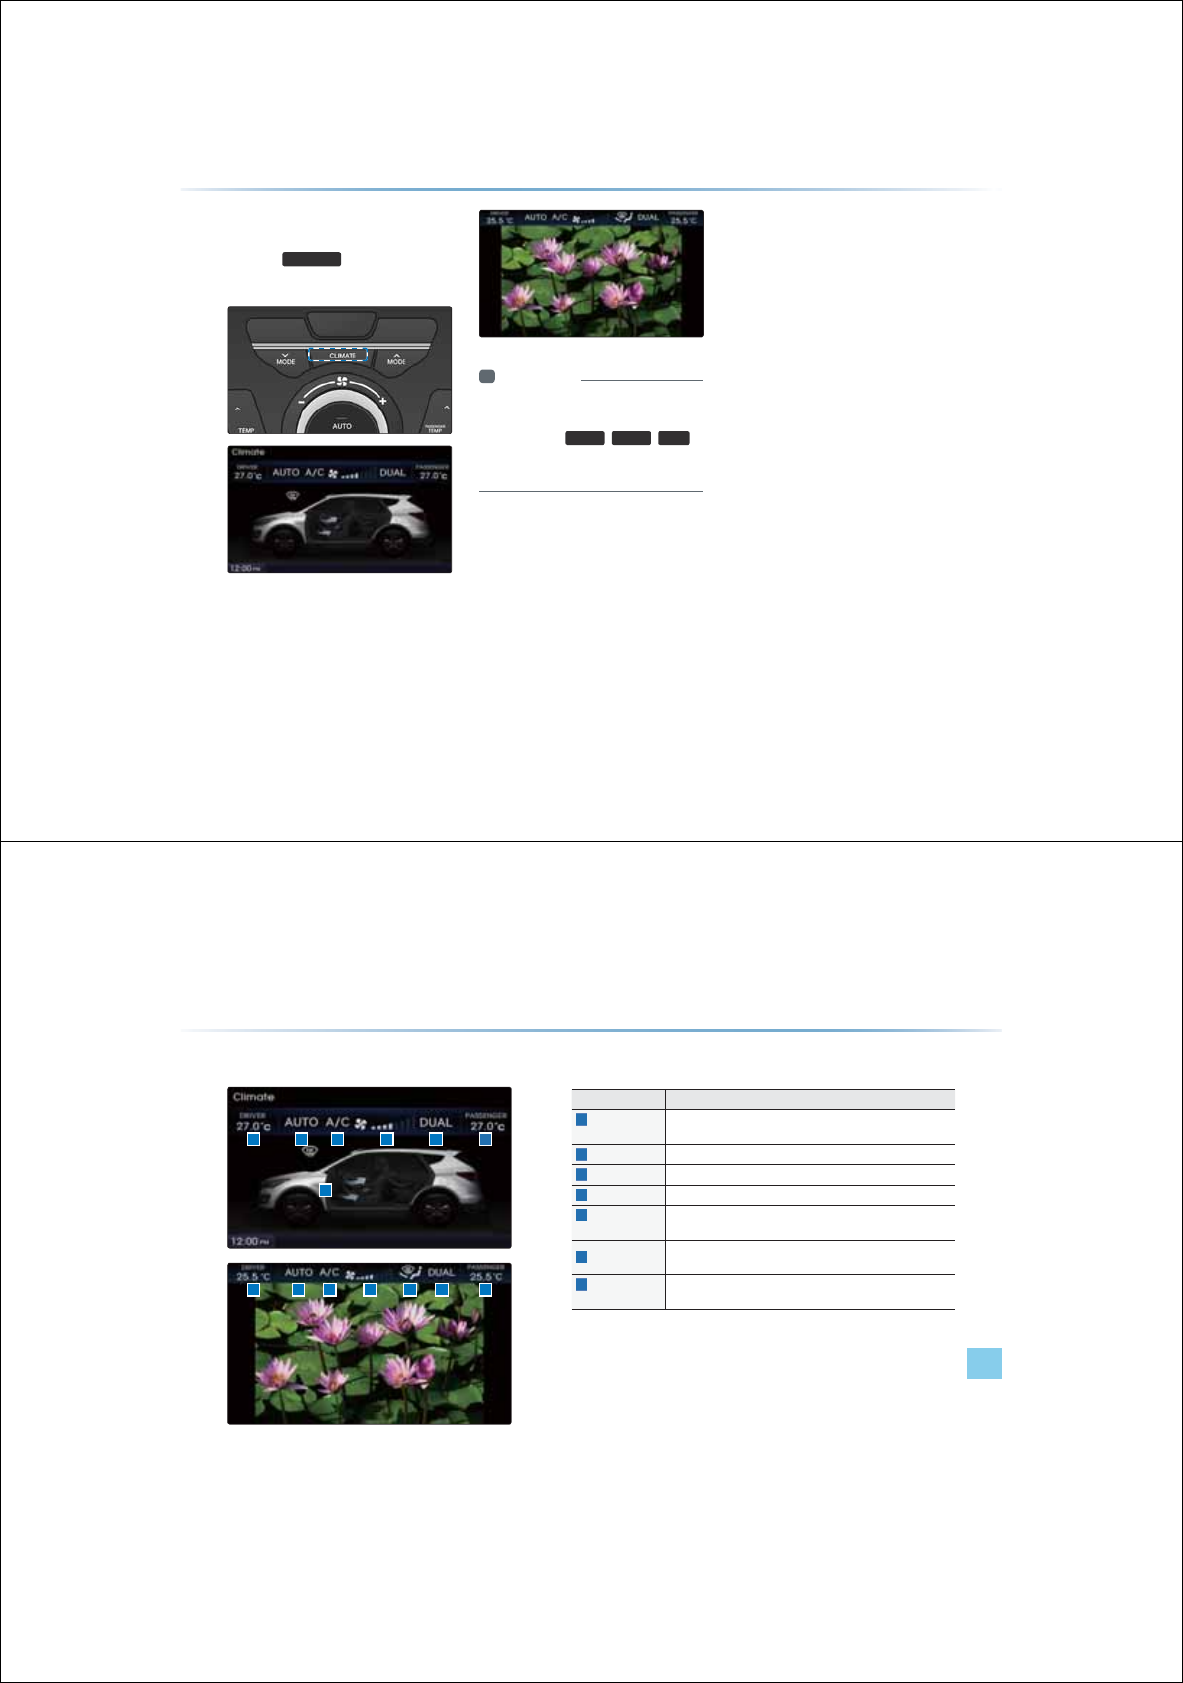
2SHUDWLQJ&OLPDWH0RGH
Press the
&/,0$7(
key to display the
Climate status bar.
i Information
У
When operating the Multimedia or
Navigation mode, press a Climate related
key, such as
7(03
,
$872
,
$&
to
display the Climate status bar at the top of
screen.
&OLPDWH0RGH
&OLPDWH0RGH
2WKHU)HDWXUHVl
%DVLF0RGH6FUHHQ
Name Description
1
Driver-side
temperature Displays the driver-side temperature
2
AUTO Display Displays whether the heating/cooling auto function is on/off
3
A/C Display Displays whether the a/c is on/off
4
Fan level Display Displays the current fan level
5
Fan Direction
Display Displays the set fan direction
6
DUAL Display Enables the driver/passenger temperature to be set indepen-
dently
7
Passenger-side
temperature Displays the passenger-side temperature
1
1
3
3
2
2
4
4
7
7
6
65
5
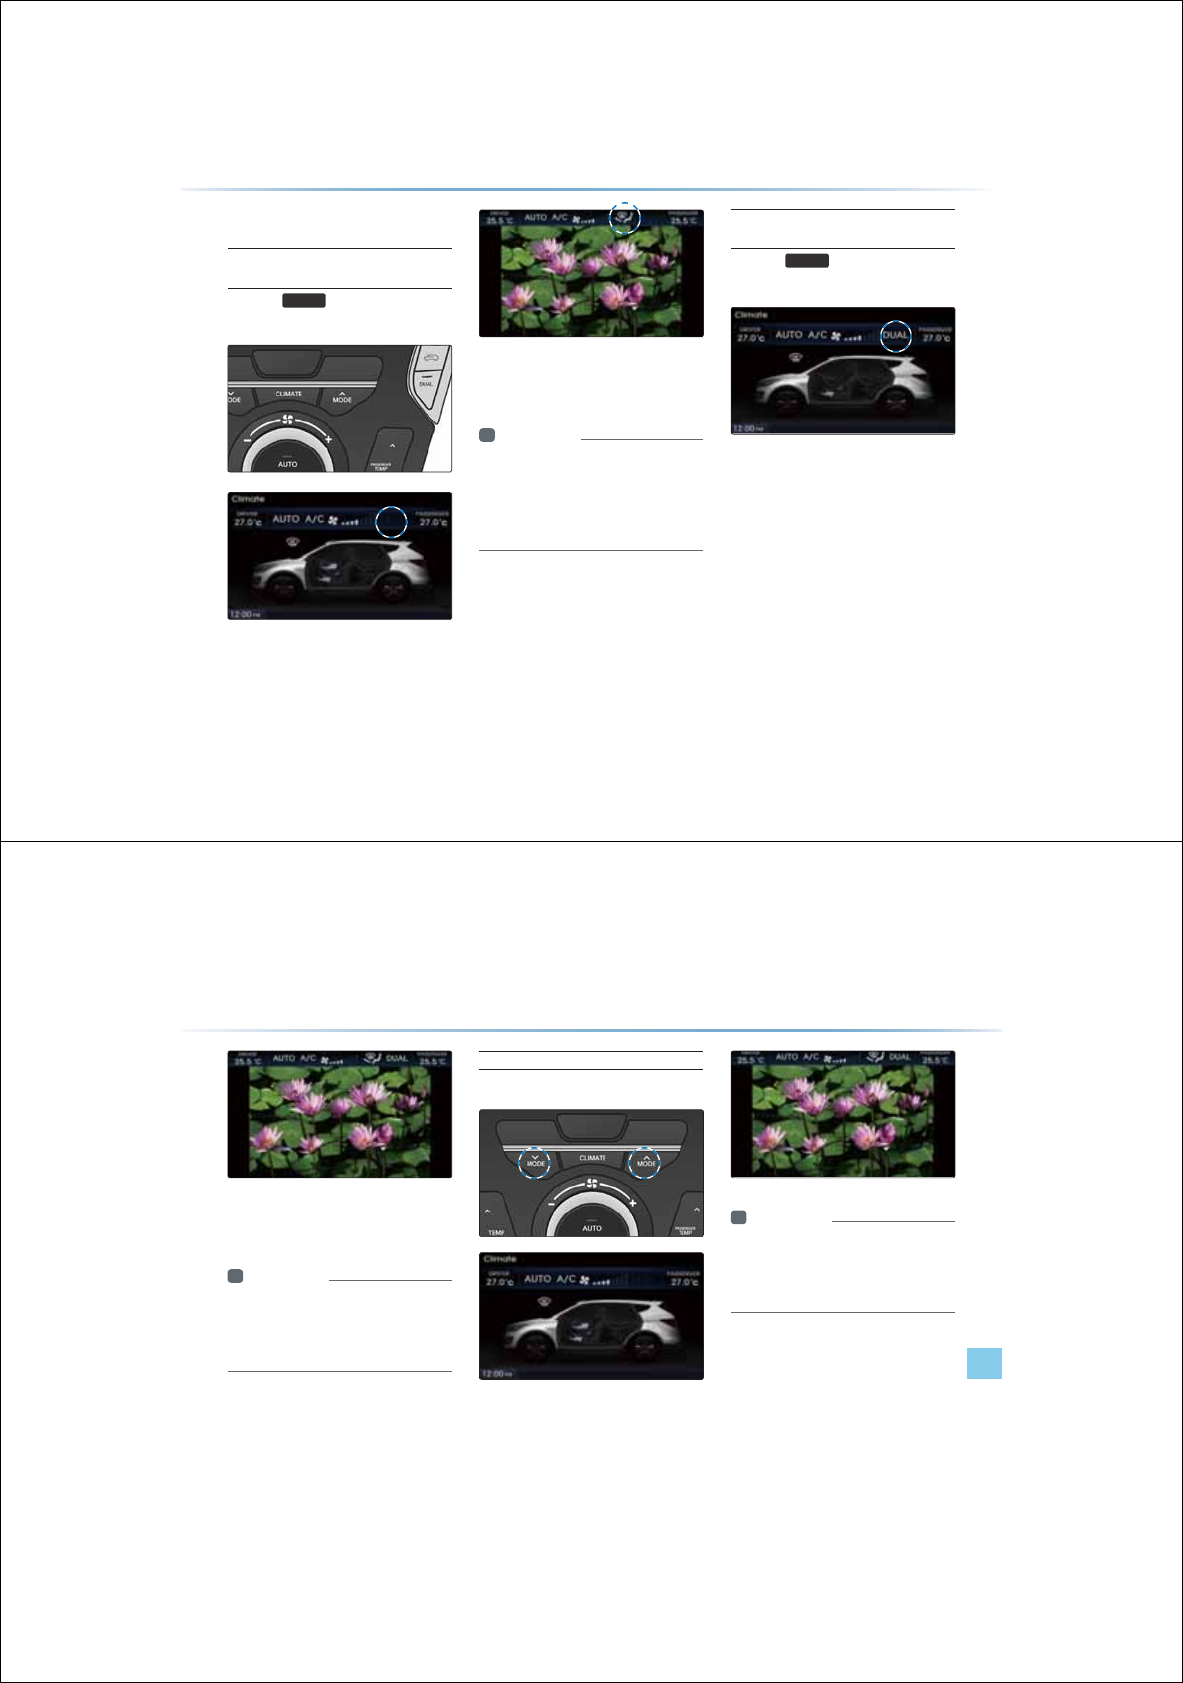
%DVLF2SHUDWLRQ
Controlling Driver/Passenger
Temperature Simultaneously
Press the
'8$/
key to turn the DUAL
setting off.
When DUAL is disabled, the driver-side and
passenger-side temperatures are controlled
simultaneously.
i Information
У
T
he cabin temperature can be adjusted in
0.5
í
units within a range of 17.5
í
~ 31.5
í.
У
The temperature will be displayed as LOW
once it is adjusted below 17.5
í
and HIGH
once it is adjusted above 31.5
í
.
Controlling Driver/Passenger
Temperature Independently
Press the
'8$/
key to turn the DUAL
setting back on.
&OLPDWH0RGH
&OLPDWH0RGH
2WKHU)HDWXUHVl
When DUAL has been enabled, the driver-
side and passenger-side temperatures can
be controlled independently.
i Information
У
When setting the driver-side temperature-
with DUAL on, the DUAL button will turn
OFF if the driver-side temperature is set to
LOW or HIGH.
Setting Fan Direction
Press the fan keys to change the fan direction.
i Information
У
When setting the driver-side temperature-
with DUAL on, the DUAL button will turn
OFF if the driver-side temperature is set to
LOW or HIGH.

Setting Fan Level
Press the key to change the fan
level.
i Information
У
If the fan level is changed while in AUTO
mode, AUTO mode will turn off.
&OLPDWH0RGH
3*6
2WKHU)HDWXUHVl
$ERXW3*6
3DUNLQJ*XLGH6\VWHP
У
PGS System is a system which provides
monitored parking guidance.
У
The PGS will operate automatically when
the ignition Key is turned ON and the trans-
mission level is set to Reverse. The PGS
will automatically stop operating when the
transmission shift lever is set outside of
reverse.
У
The PGS(Parking Guide System)is an
optional feature.
Operating Sequence of the PGS
1. Position the ignition key in ACC or ON.
2. Position the transmission lever to R.
3. The PGS mode will be displayed on the
screen.
i Information
У
Guidance track is as follows.
-
Red line : 1.64 feet from the rear bumper.
-
Yellow line : 3.28 feet from the rear bumper.
-
Blue line : 9.84 feet from the rear bumper.
-
Red line : Track following left side driver
side wheel.
-
Yellow line : Track following right side pas-
senger side wheel.
3*63DUNLQJ*XLGH6\VWHP

0(02
&$5$916<67(0
УUsing Setup
6HWXS
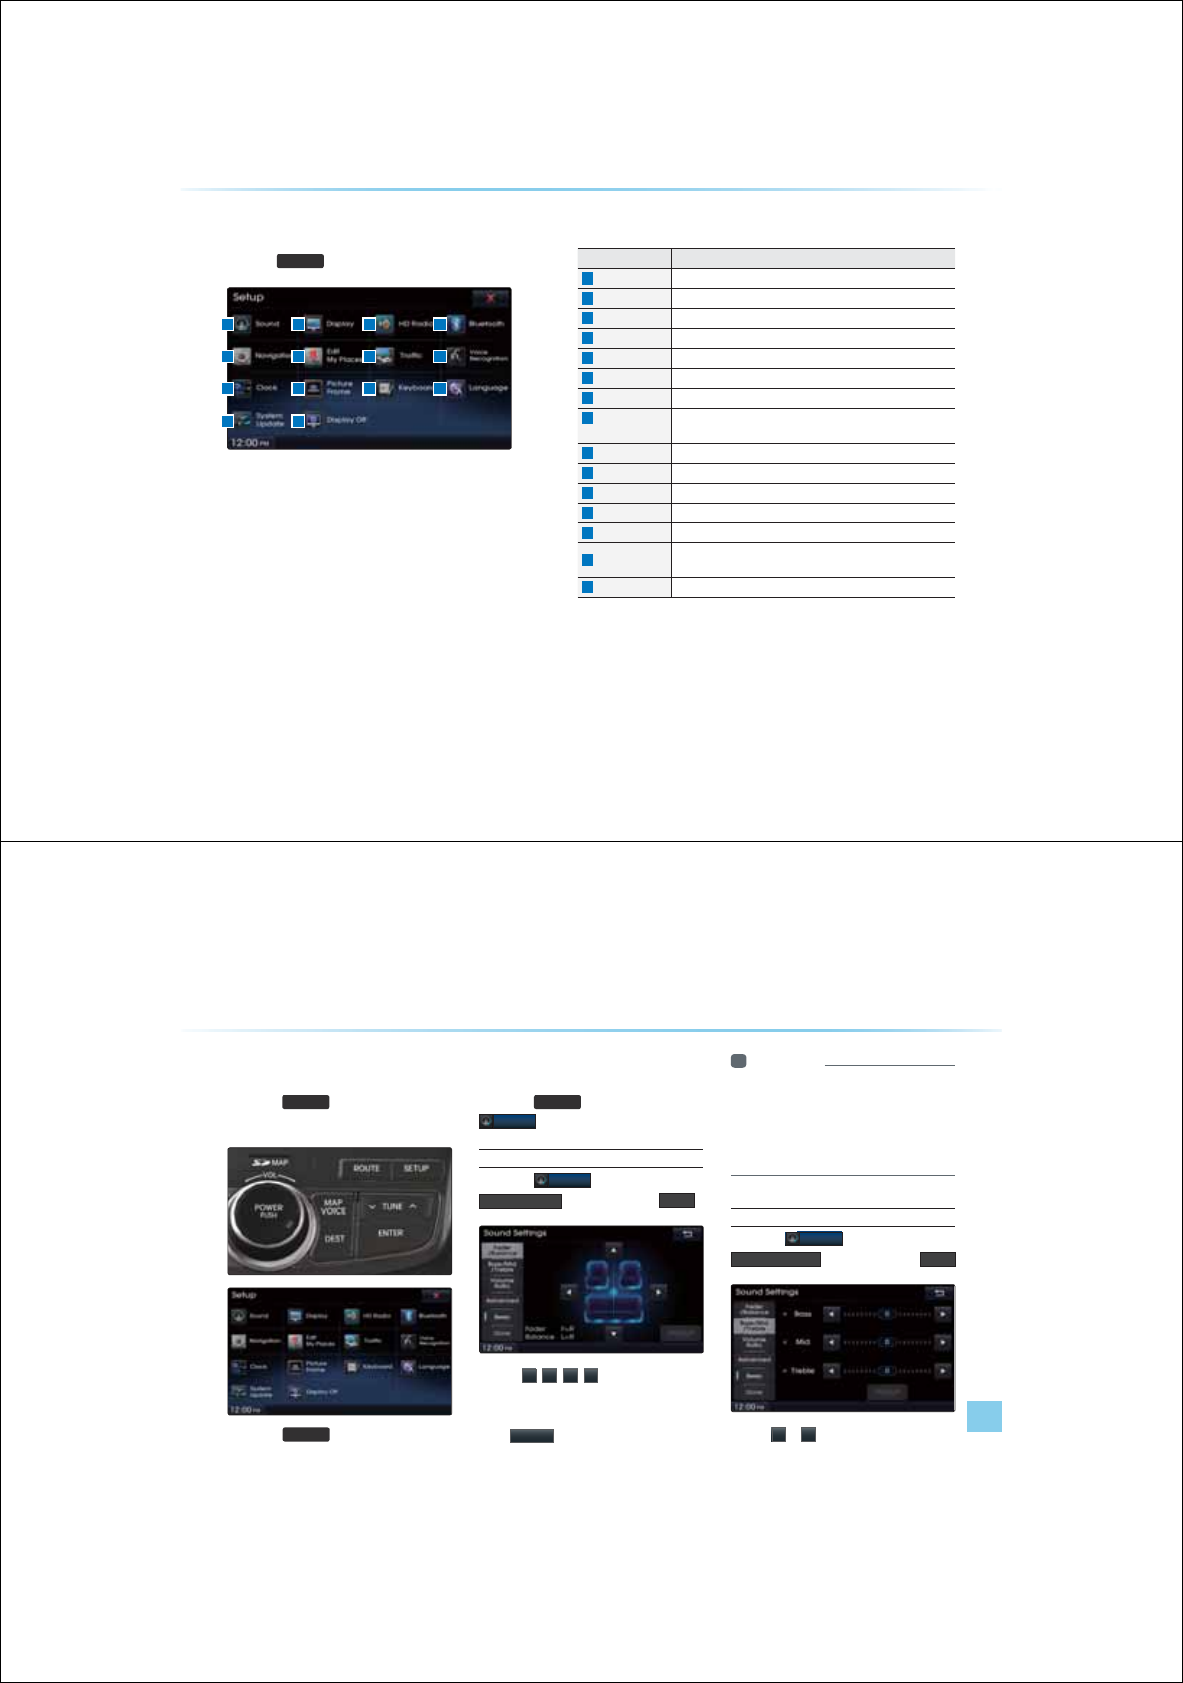
8-2
%DVLF0RGH6FUHHQ
Press the
6(783
key to display the Setup screen.
8VLQJ6HWXS
Name Description
1
Sound Sets sound related settings
2
Display Sets display related settings
3
HD Radio Sets HD Radio related settings
4
Bluetooth
®
Sets Bluetooth
®
related settings
5
Navigation Sets various settings found within Navigation mode
6
Edit My Places Set/Edit My Places within Navigation Mode
7
Traffic Sets Traffic Information related settings
8
Voice
Recognition
Sets voice recognition related settings
9
Clock Sets current time and clock display
10
Picture Frame Sets screen displayed when device is turned off
11
Keyboard Sets the keyboard type
12
Language
Sets language for use within the system
13
System Update Checks system software version and receive updates
14
Display Off Turn device display on/off
(The device power will not be turned off)
15
Close Close Setup menu screen
1
5
9
13
2
6
10
14
3
7
11
4
8
12
Using Setup
Setup l 8-3
6WDUWLQJ0RGH
Press the
6(783
key to display the
Setup screen.
Press the
6(783
key to can check and
change the settings for all features found
within the Navigation system.
6RXQG
Press the
6(783
key ƙ Press
6RXQG
Setting Balance/Fader
Press the
6RXQG
button ƙ Press
)DGHU%DODQFH
ƙ Set and press
'RQH
Use the
Ԡ
,
Ԥ
,
Ԧ
,
Ԣ
buttons to move the
cursor on the control screen to the desired
position.
Press
'HIDXOW
to restore sound to the center
position.
i Information
У
The Balance/Fader settings allows you to
set the sound position. For example, you
can set the sound close to the driver-seat
so that the volume is relatively lower in the
passenger or rear seats.
Setting Bass/Mid/Treble
Press the
6RXQG
button ƙ Press
%DVV0LG7UHEOH
ƙ Set and press
'RQH
Use the
Ԧ
or
Ԣ
buttons to adjust the
Bass/Mid/Treble settings.
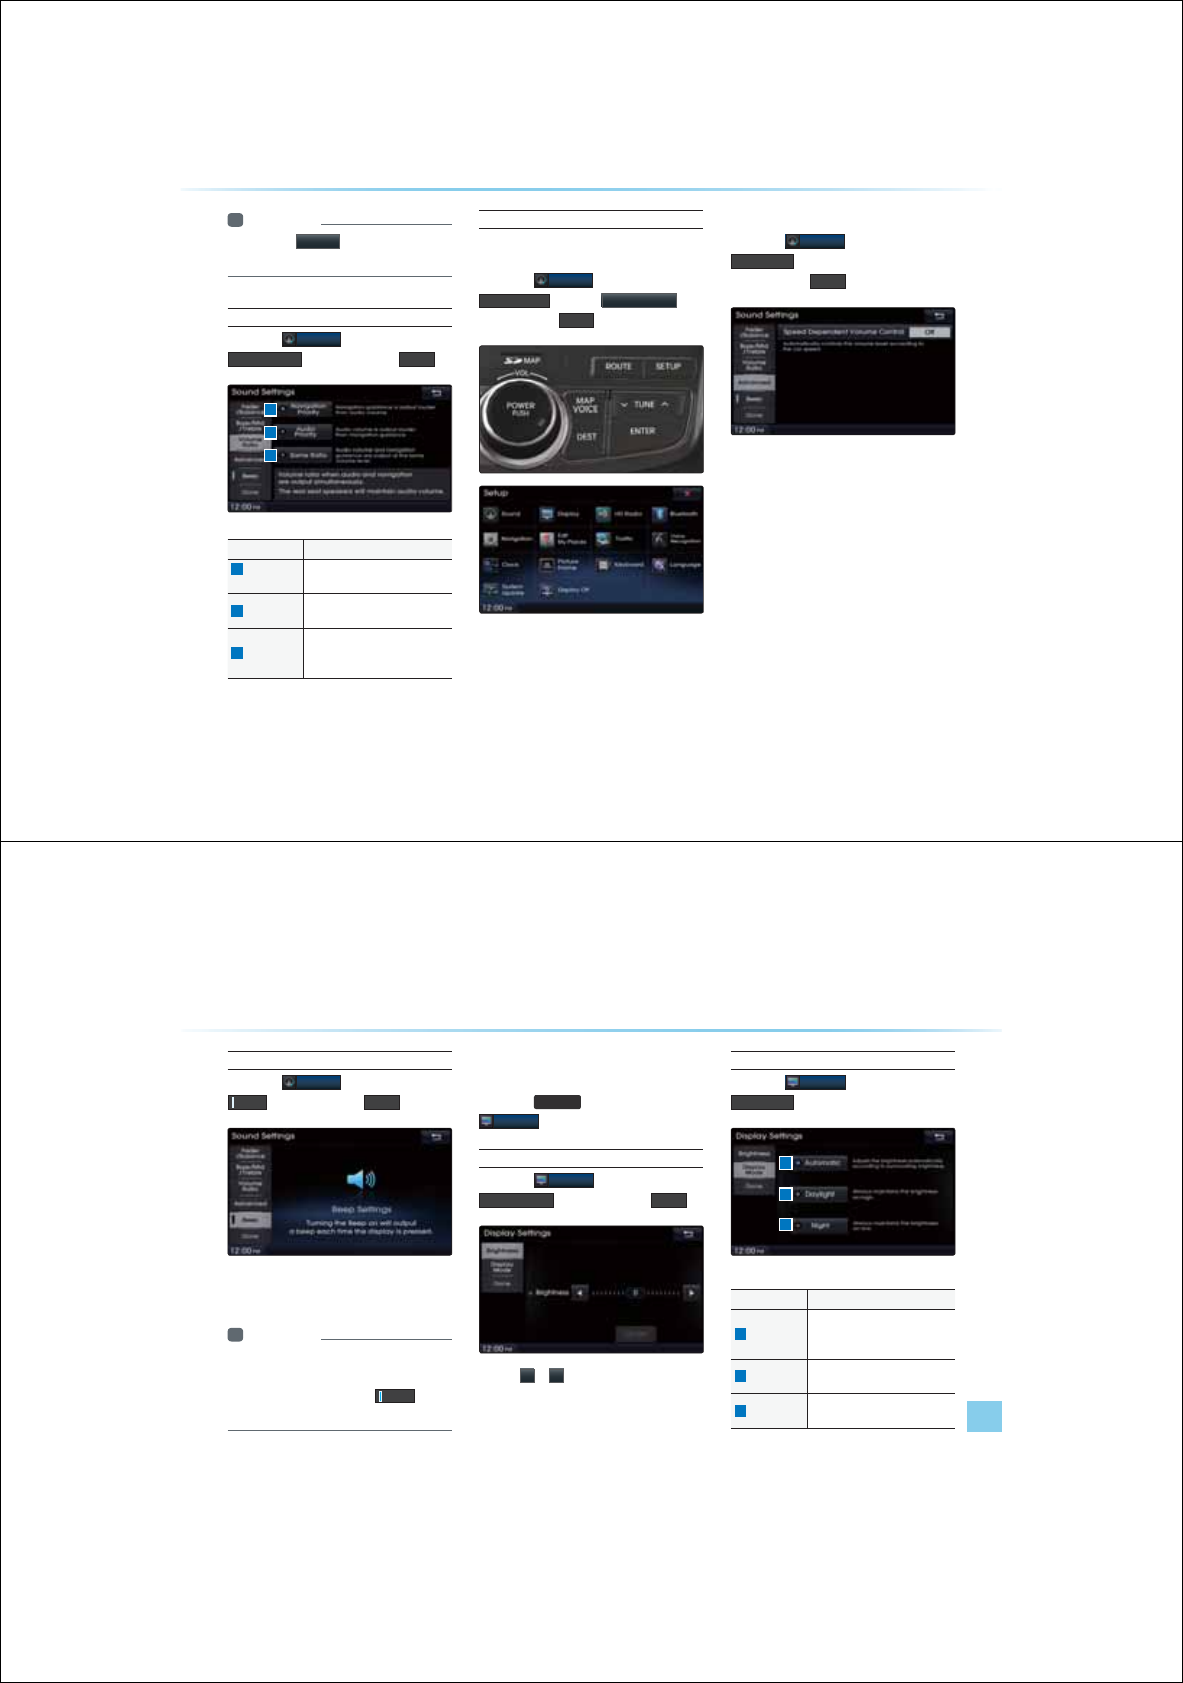
8-4
8VLQJ6HWXS
i Information
У
Press the
'HIDXOW
button to restore the-
Bass/Mid/Treble to the center position.
Setting Volume Ratio
Press the
6RXQG
button ƙ Press
9ROXPH5DWLR
ƙ Set and press
'RQH
Advanced
Variable-EQ (Actune㇔㓠㊈㈚ㄶ)
Press the
6RXQG
button ƙ Press
$GYDQFHG
ƙ Press
9DULDEOH(4
ƙ
Set and press
'RQH
パⱎ㋡㉔㈧㓮ⷧⲚ⳩㉊㔁㔼ⲧ⽃ト㊏㓱ㄋ
㉣ㄳⷴⷾ
Speed Dependent Volume Control
Press the
6RXQG
button ƙ Press
$GYDQFHG
ƙ Turn the feature Onƙ
Set and press
'RQH
The volume level is controlled automatically
according to the vehicle speed.
Name Description
1
Navigation
Priority
Navigation guidance is output
louder than audio Volume
2
Audio Priority
Audio volume is output louder
than the navigation guidance
3
Same Ratio
Audio volume and navigation
guidance are output in identical
volume
1
2
3
Using Setup
Setup l 8-5
Setting Beep
Press the
6RXQG
button ƙ Press
%HHS
ƙ Set and press
'RQH
Each press of this button turns the BEEP tone
on/off.
i Information
У
When the light on the left side of the button
is turned on, this indicates that the BEEP
tone is active. Press the %HHS
button
again to turn off the BEEP tone.
'LVSOD\
Press the
6(783
key ƙ Press
'LVSOD\
Adjusting Screen
Press the
'LVSOD\
button ƙ Press
$GMXVW6FUHHQ
ƙ Set and press
'RQH
Use the
Ԧ
or
Ԣ
buttons to adjust the display
brightness and color.
Setting Illumination
Press the
'LVSOD\
button ƙ Press
,OOXPLQDWLRQ
Name Description
1
Automatic
Adjusts the brightness automati-
cally according to surrounding
brightness
2
Daylight Always maintains the brightness
on high
3
Night Always maintains the brightness
on low
1
2
3
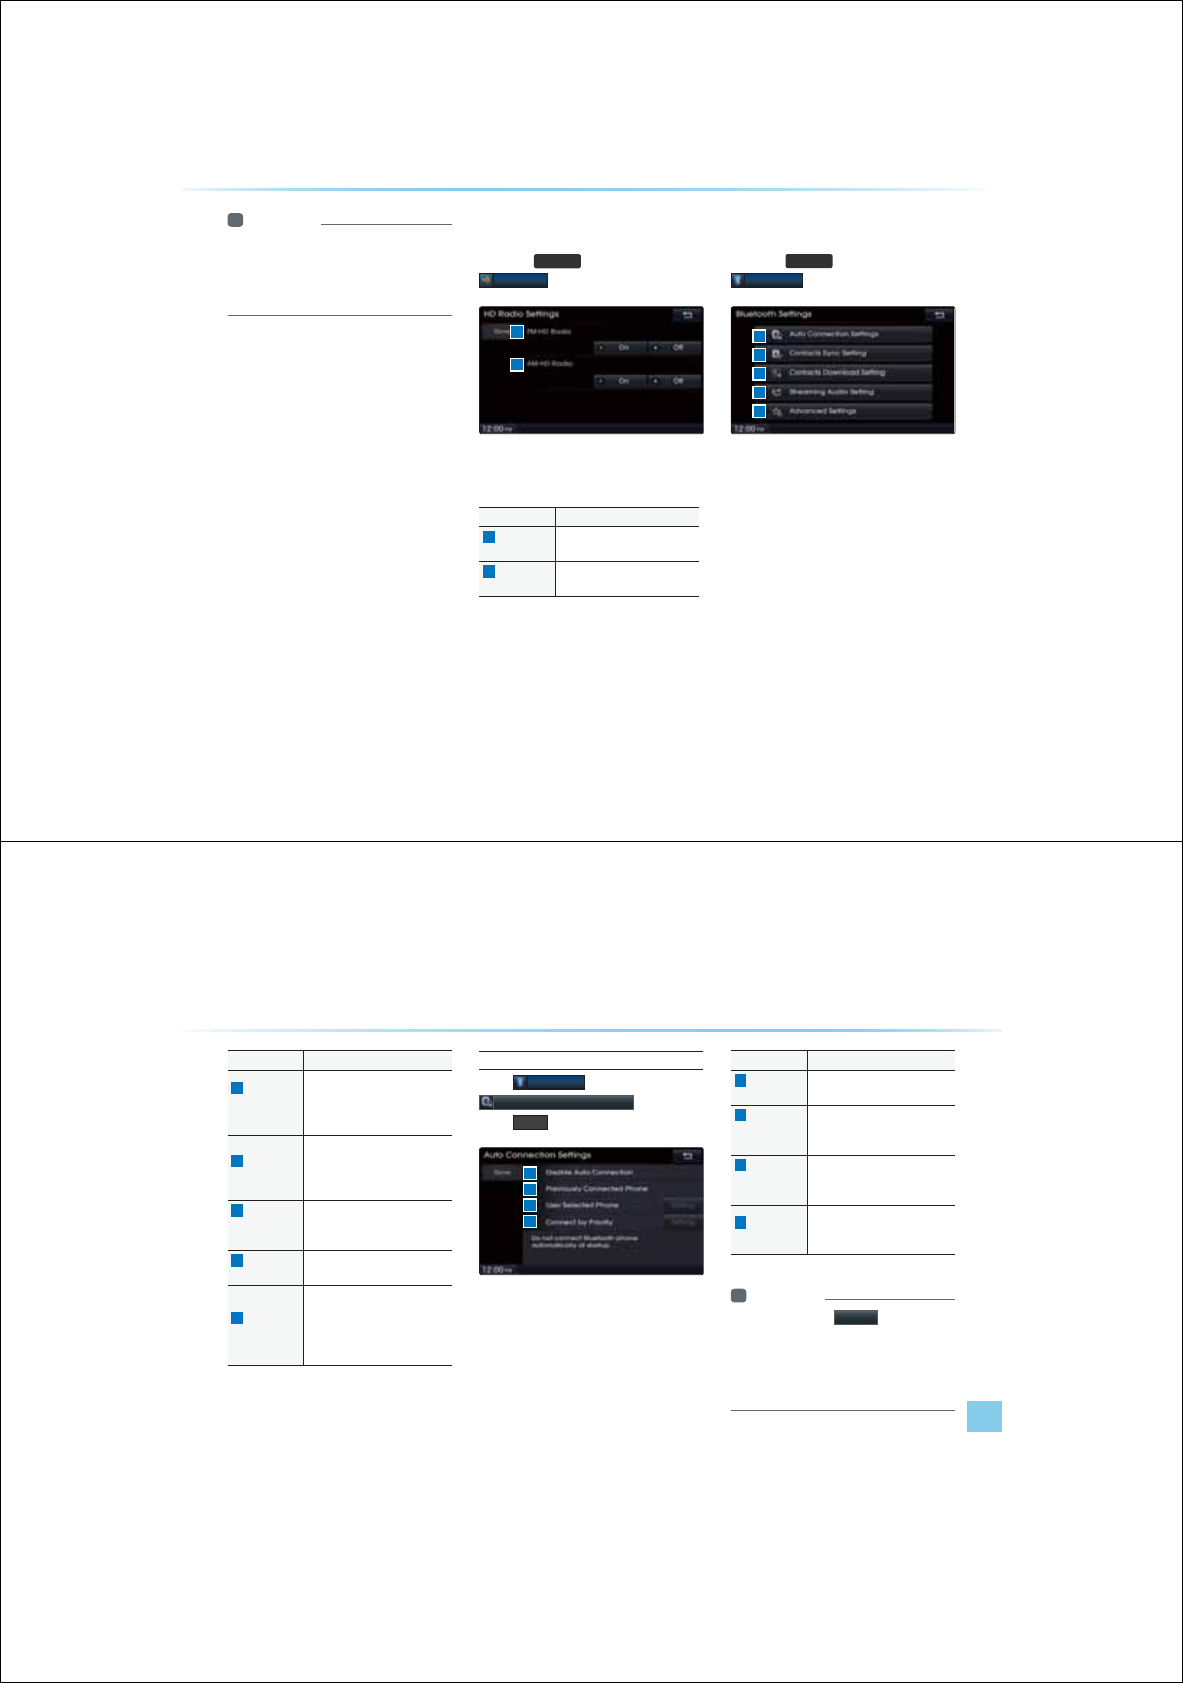
8-6
8VLQJ6HWXS
i Information
У
When set to Automatic, the screen bright-
ness and color will automatically be
adjusted according to the surrounding
brightness.
+'5DGLR
Press the
6(783
key ƙ Press
+'5DGLR
These settings are used to set whether to turn
HD Radio On/Off.
Name Description
1
FM-HD
Radio
Used to set FM-HD Radio On/
Off
2
AM-HD
Radio
Used to set AM-HD Radio On/
Off
%OXHWRRWK
p
Press the
6(783
key ƙ Press
%OXHWRRWK
These menus allow you to set Bluetooth
®
related features.
1
2
3
4
5
2
1
Using Setup
Setup l 8-7
Name Description
1
Auto
Connection
Settings
Sets Bluetooth
®
device auto
connection when car ignition is
turned on between the vehicle
and Bluetooth
®
devices
2
Contacts
Sync Setting
Automatically downloads the
mobile phone contacts and call
histories to the car upon con-
necting Bluetooth
®
3
Contacts
Download
Setting
Sets which Contacts to down-
load from between Mobile or
SIM contacts
4
Streaming
Audio
S
etting
Sets whether to use the stream-
ing audio feature
5
Advanced
Settings
Sets Bluetooth related settings,
including Change Passkey,
Change Device Information, De-
lete Favorites, Delete Call History
and Restore Factory Settings
Auto Connection Settings
Press
%OXHWRRWK
button ƙ Press
$XWR&RQQHFWLRQV6HWWLQJV
ƙ Set and
press
'RQH
If auto connection is turned on, a Bluetooth
®
device will automatically be connected
according to the option setting when the car
ignition is turned on.
Name Description
1
Disable Auto
Connection Disables auto connection
2
Previously
Connected
Phone
Automatically connects the
previously connected Bluetooth
®
device
3
User
Selected
Phone
Automatically connects to the
set Bluetooth
®
device
4
Connect
by Priority
Automatically connects accord-
ing to the set Bluetooth
®
phone
priority
i Information
У
If you press the
6HWWLQJ button next to
the User Selected Phone and Connect
by Priority options, you can designate
the phone you want to connect or set the
phone priority.
1
2
3
4
8-8
Contacts Sync Setting
Press
%OXHWRRWK
ƙ Press
&RQWDFWV6\QF6HWWLQJ
ƙ Set and
press
'RQH
This feature automatically downloads the
mobile phone contacts and call histories
to the car upon Bluetooth
®
connection.
If you do not wish to use Contacts Sync,
turn the feature off.
i Information
У
This feature may not be supported in
some Bluetooth
®
devices.
Contacts Download Setting
Press
%OXHWRRWK
ƙ Press
&RQWDFWV'RZQORDG6HWWLQJ
ƙ Set and
press
'RQH
You can select the contacts you wish to
download.
Name Description
1
Mobile
Contacts
Download contacts saved in
your mobile phone
2
SIM
Contacts
Download contacts saved in
SIM
Streaming Audio Setting
Press
%OXHWRRWK
ƙ Press
6WUHDPLQJ$XGLR6HWWLQJ
ƙ
'RQH
When streaming audio is turned On, you
can play music files saved in your Bluetooth
®
device from the car.
i Information
У
This feature may not be supported in
some Bluetooth
®
devices
8VLQJ6HWXS
1 2
Using Setup
Setup l 8-9
Advanced Settings
Press
%OXHWRRWK
ƙ Press
$GYDQFHG6HWWLQJV
Name Description
1
Change
Passkey
Changes the passkey used to
authenticate Bluetooth
®
Device
2
Device
Information
Searches car Bluetooth
®
device
information and change device
name
3
Delete All
Favorites
Deletes all favorites of connected
Bluetooth
®
Device
4
Delete All
Call History
Deletes all call history of con-
nected Bluetooth
®
Device
5
Restore
Factory
Settings
Restores Bluetooth
®
factory
state settings
Advanced Settings allow you to control
additional Bluetooth
®
related settings. For
safety, first park the vehicle in a safe location
to operate these features.
Change Passkey
Press
%OXHWRRWK
ƙ Press
$GYDQFHG6HWWLQJV
ƙ Press
&KDQJH3DVVNH\
ƙ Set and press
'RQH
This feature is used to change the passkey
required to connect a Bluetooth
®
device
to the car.
i Information
У
The default passkey is 0000.
1
5
4
3
2
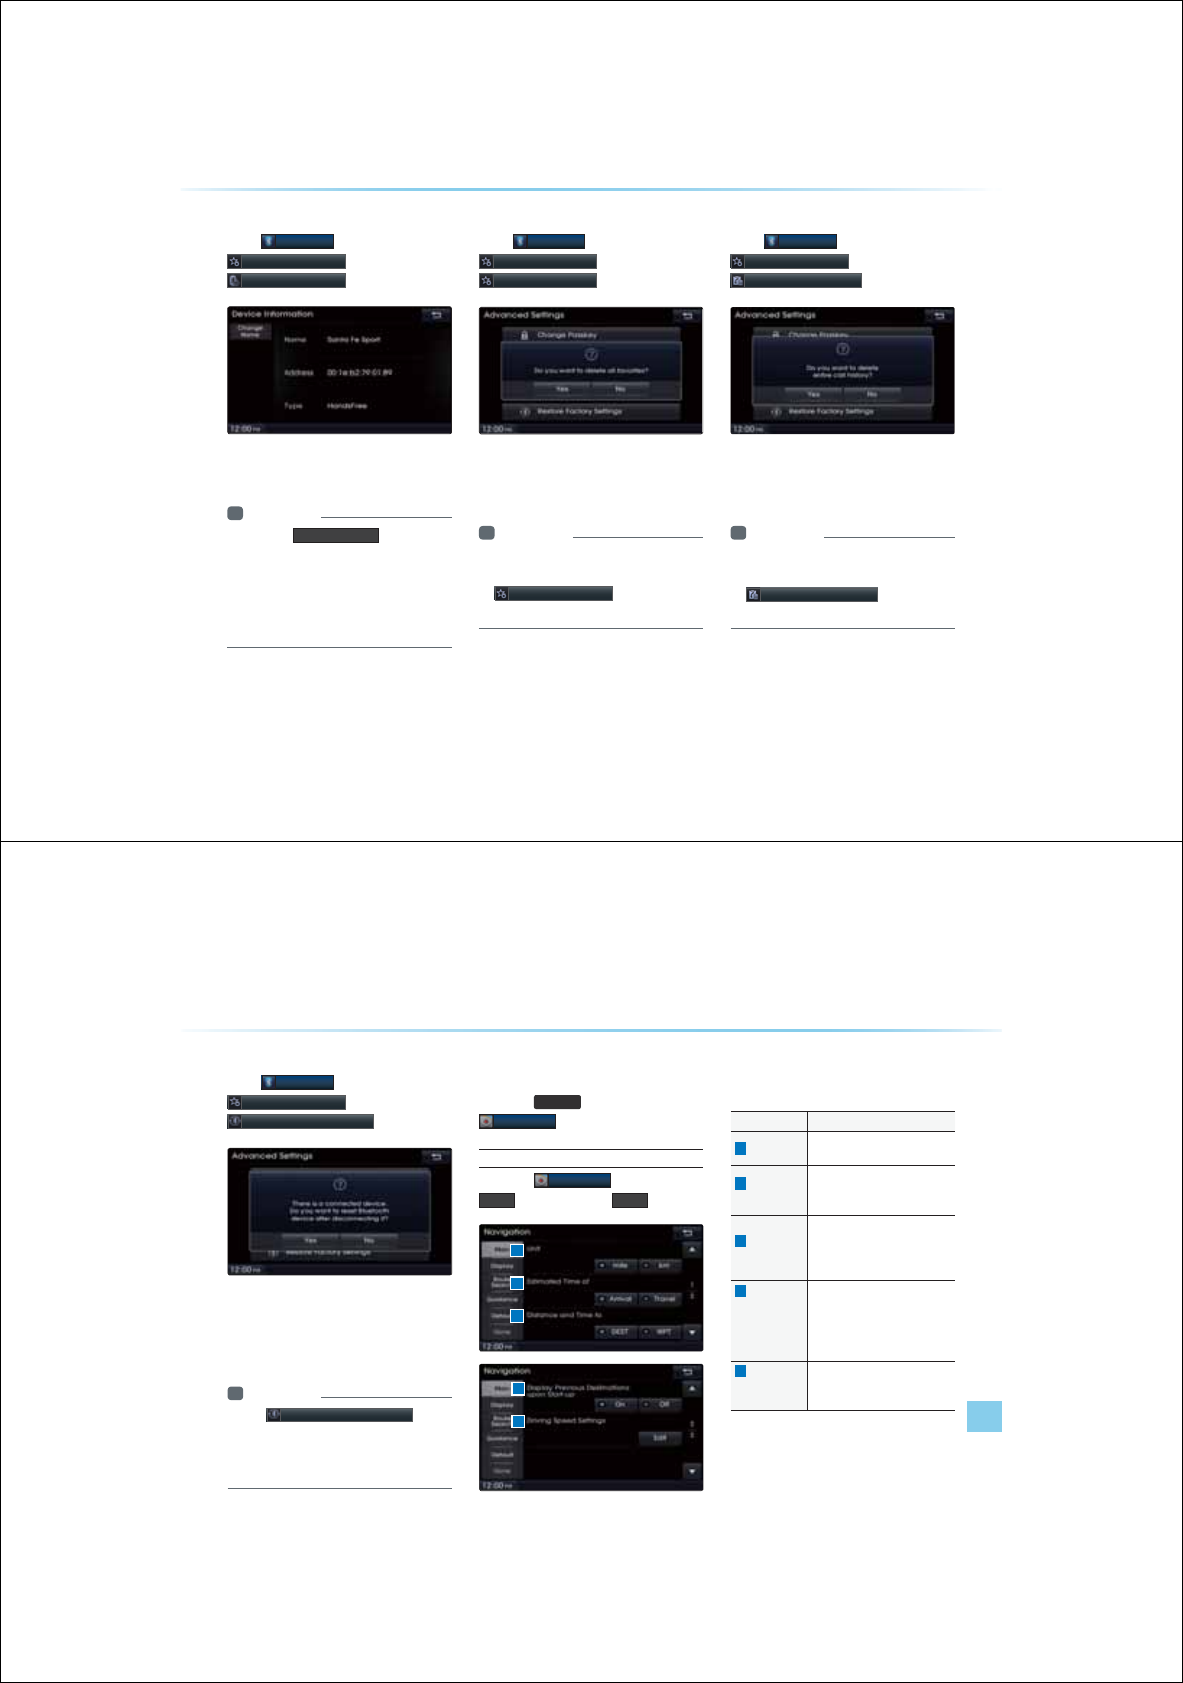
8-10
8VLQJ6HWXS
Device Information
Press
%OXHWRRWK
ƙ Press
$GYDQFHG6HWWLQJV
ƙ Press
'HYLFH,QIRUPDWLRQ
This feature allows you to check device
information.
i Information
У
Press the &KDQJH1DPH button to
change the name of the device.
У
The default car name is set to Santa Fe.
У
The device name and address shown in
the above is only an example. Check your
device for the actual device information.
Delete All Favorites
Press
%OXHWRRWK
ƙ Press
$GYDQFHG6HWWLQJV
ƙ Press
'HOHWH$OO)DYRULWHV
This feature allows you to delete all Favorites
saved in the Car Handsfree for the currently
connected Bluetooth device.
i Information
У
If there are no Favorites or a Bluetooth
®
device is not connected, the
'HOHWH$OO)DYRULWHV
button will be dis-
abled.
Delete All Call History
Press
%OXHWRRWK
ƙ Press
$GYDQFHG6HWWLQJV
ƙ Press
'HOHWH$OO&DOO+LVWRU\
This feature allows you to delete all call histo-
ries saved in the Car Handsfree for the cur-
rently connected device.
i Information
У
If there are no call histories or a
Bluetooth
®
device is not connected, the
'HOHWH$OO&DOO+LVWRU\ button will be
disabled.
Using Setup
Setup l 8-11
Restore Factory Settings
Press
%OXHWRRWK
ƙ Press
$GYDQFHG6HWWLQJV
ƙ Press
5HVWRUH)DFWRU\6HWWLQJV
Turning on this feature will erase all paired
phones and allows you to restore Bluetooth
®
related settings and data to the default factory
settings.
i Information
У
The 5HVWRUH)DFWRU\6HWWLQJV
feature
cannot be used when a Bluetooth
®
device
is connected. To use this feature, first dis-
connect the Bluetooth
®
device.
1DYLJDWLRQ
Press the
6(783
keyƙ Press
1DYLJDWLRQ
Main
Press the
1DYLJDWLRQ
button ƙ Press
0DLQ
ƙ Set and press
'RQH
4
5
This menu is used to set general navigation
options.
Name Description
1
Unit Sets whether to display distance
as km/mi
2
Estimated
Time of
Set whether to display estimated
time of arrival or travel on the
route info display screen
3
Distance
and Time to
Set whether to display distance
and time to destination or to
waypoint on the route info
display screen
4
Display
Previous
Destinations
upon
Start-up
Set whether to display the previ-
ous destinations popup upon
starting system
5
Driving
Speed
Setting
Set basic info to calculate esti-
mated arrival time to destination
or waypoint
1
2
3
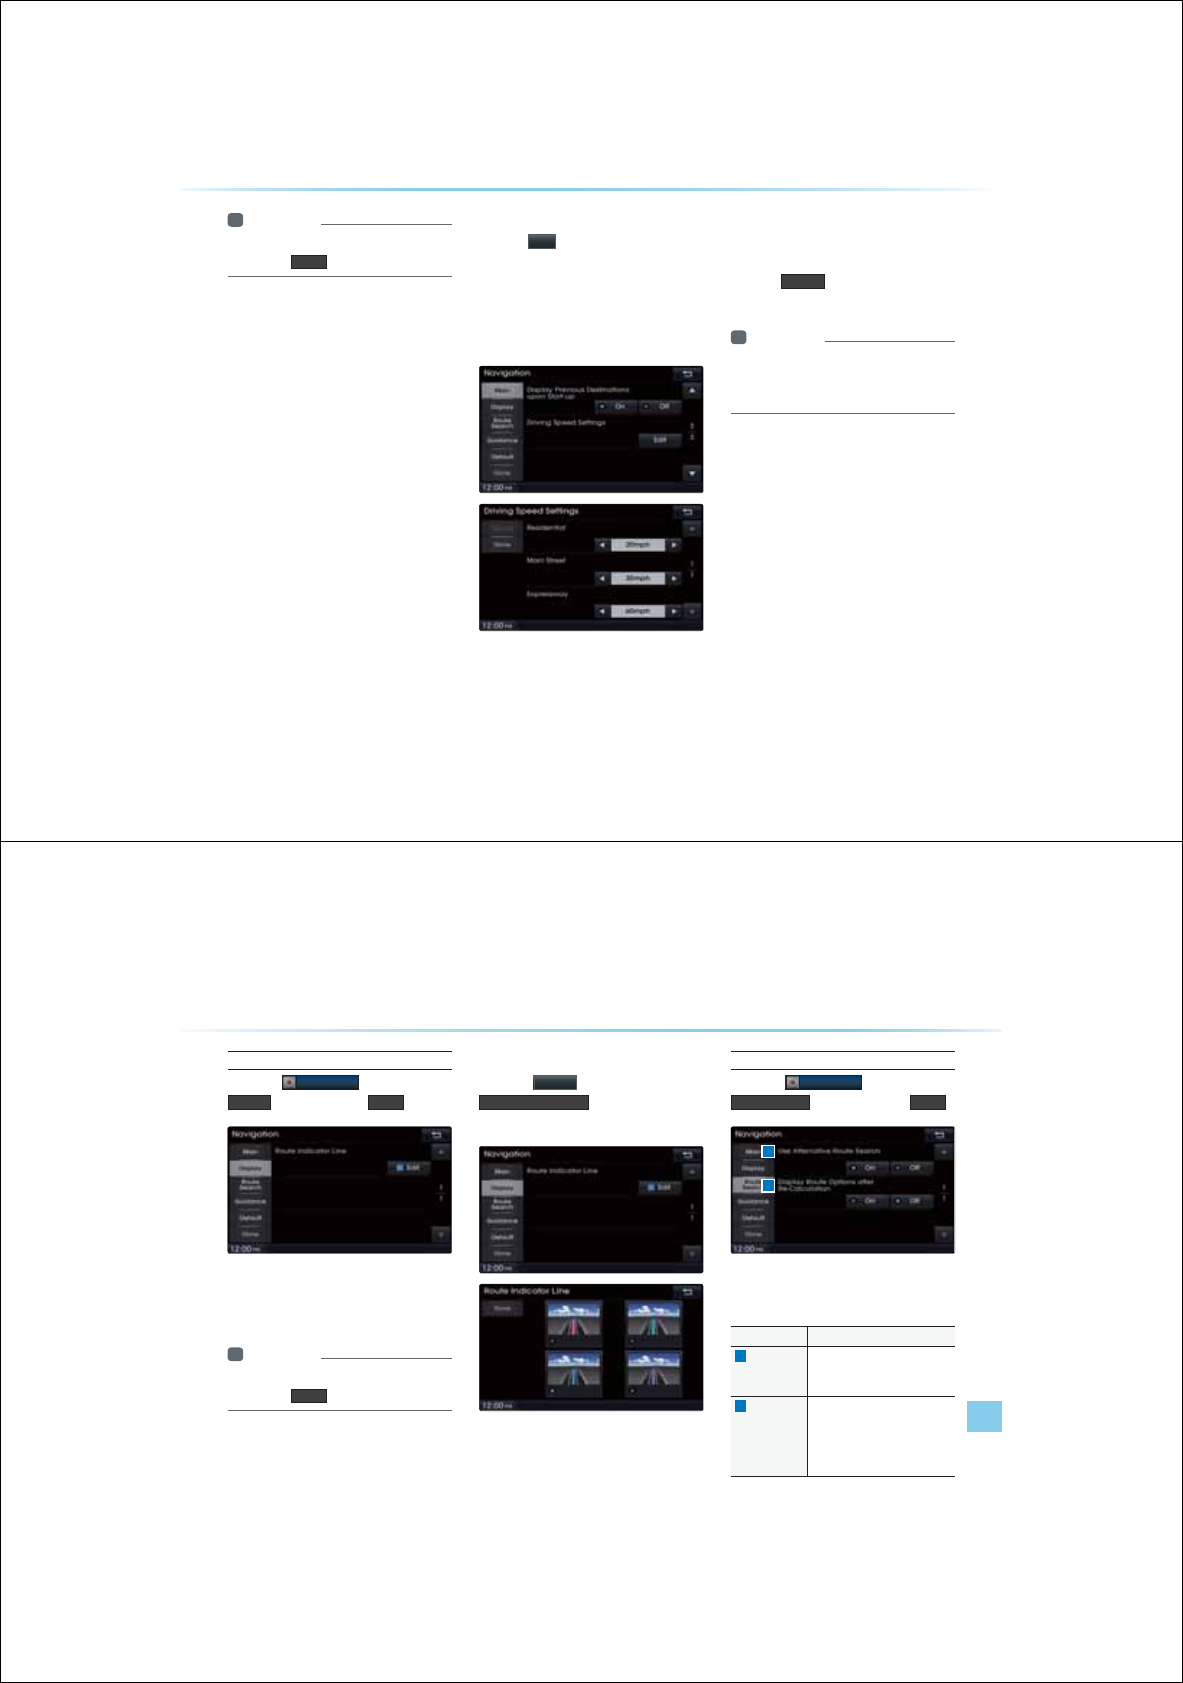
8-12
i Information
У
When you have finished with the settings,
press the 'RQH button to save changes.
Driving Speed Setting
Press the
(GLW
button within the "Driving
Speed Setting" menu to set the estimated
driving speed for residential roads, main
streets, and expressways. The set driving
speed is applied to calculate the estimated
time to reach the destination or waypoint.
The changed driving speed is used to calcu-
late the estimated time until the destination or
waypoint.
Press the
'HIDXOW
button to reset the driving
speed settings.
i Information
У
Default Driving Speed Settings for
Residential, Main Streets, and Expressways
are 20mph, 35mph, and 60mph, respectively.
8VLQJ6HWXS
Using Setup
Setup l 8-13
Display
Press the
1DYLJDWLRQ
button ƙ Press
'LVSOD\
ƙ Set and press
'RQH
This menu is used to set the color of the
Route Indicator line displayed when receiving
route guidance.
i Information
У
When you have finished with the settings,
press the 'RQH button to save changes.
Route Indicator Line
Press the
ԗ(GLW
button within the
5RXWH,QGLFDWRU/LQH
menu to change the
color of the route indicator line.
Route Search
Press the
1DYLJDWLRQ
button ƙ Press
5RXWH6HDUFK
ƙ Set and press
'RQH
This menu is used to set route search related
options.
Name Description
1
Use
Alternative
Route Search
Set whether to first display alter-
native routes upon conducting
route search
2
Display
Route
Options
after Re-
calculation
Set whether to display the pop-
up screen that allows changes
to route options upon route
recalculation
1
2
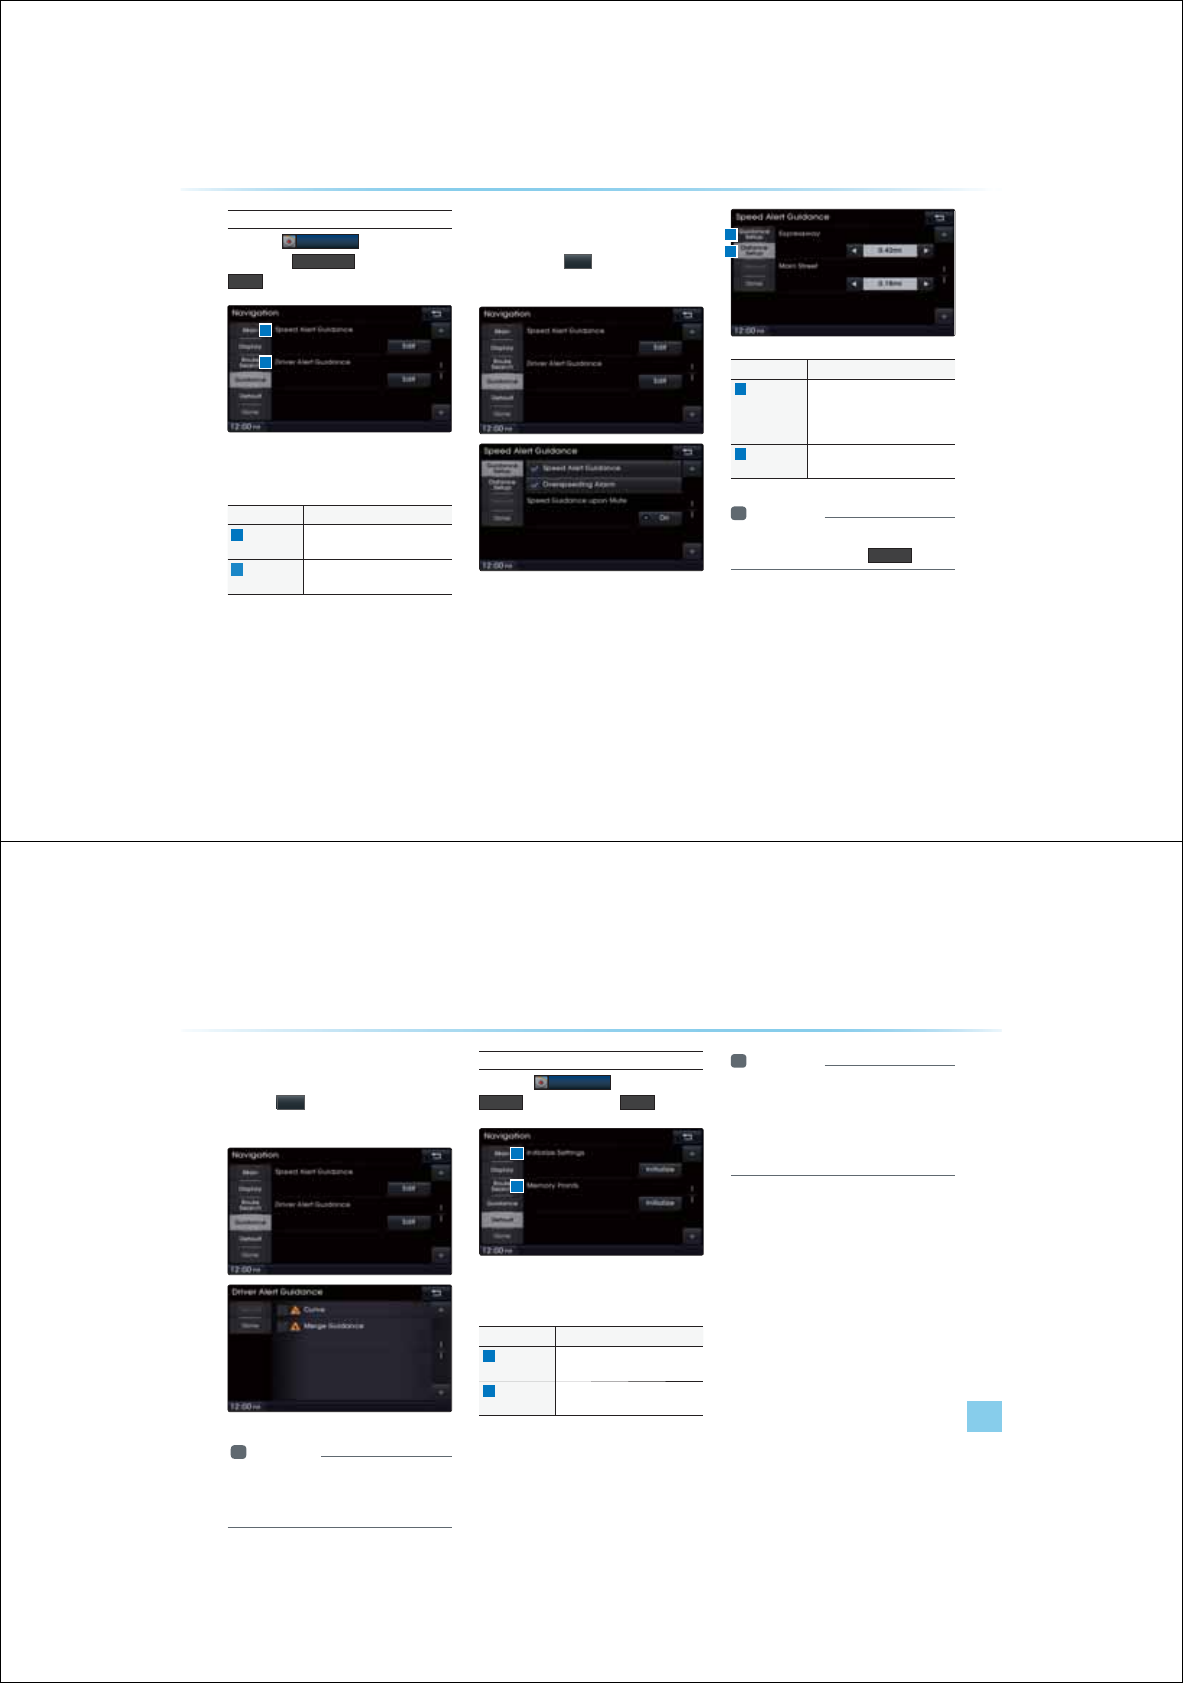
8-14
Guidance
Press the
1DYLJDWLRQ
button ƙ Press
the desired
*XLGDQFH
ƙ Set and press
'RQH
This menu is used to set options on speed
alerts and driver alerts.
Name Description
1
Speed Alert
Guidance
Set options related to various
camera alerts
2
Driver Alert
Guidance
Set options related to speed
bumps, curves, and merges
Speed Alert Guidance
To change the Speed Alert Guidance
option, press the
(GLW
button within the
"Speed Alert Guidance" menu.
Name Description
1
Guidance
Setup
Sets alarm sound for speed
alerts/over speeding and speed
guidance when volume is
muted.
2
Distance
Setup
Sets camera guidance alarm
distance
i Information
У
Distance can be set in 0.06mi units. To ini-
tialize settings, press the
'HIDXOW
button.
8VLQJ6HWXS
1
2
1
2
Using Setup
Setup l 8-15
Driver Alert Guidance
To set the Driver Alert Guidance, option,
press the
(GLW
button within the "Driver Alert
Guidance" menu.
i Information
У
Alerts provided within Driver Alert Guidance
may differ depending on actual road condi-
tions.
Default
Press the
1DYLJDWLRQ
button ƙ Press
'HIDXOW
ƙ Set and press
'RQH
This menu is used to reset saved changes
and user preferences.
Name Description
1
Initialize
Settings
Resets all settings back to the
default state
2
Memory
Points
Resets all saved memory point
information
i Information
У
If the settings of an option are reset, then
all settings will be restored to the default
factory state.
У
Heed caution as Home, Office and other
user locations may become deleted.
1
2
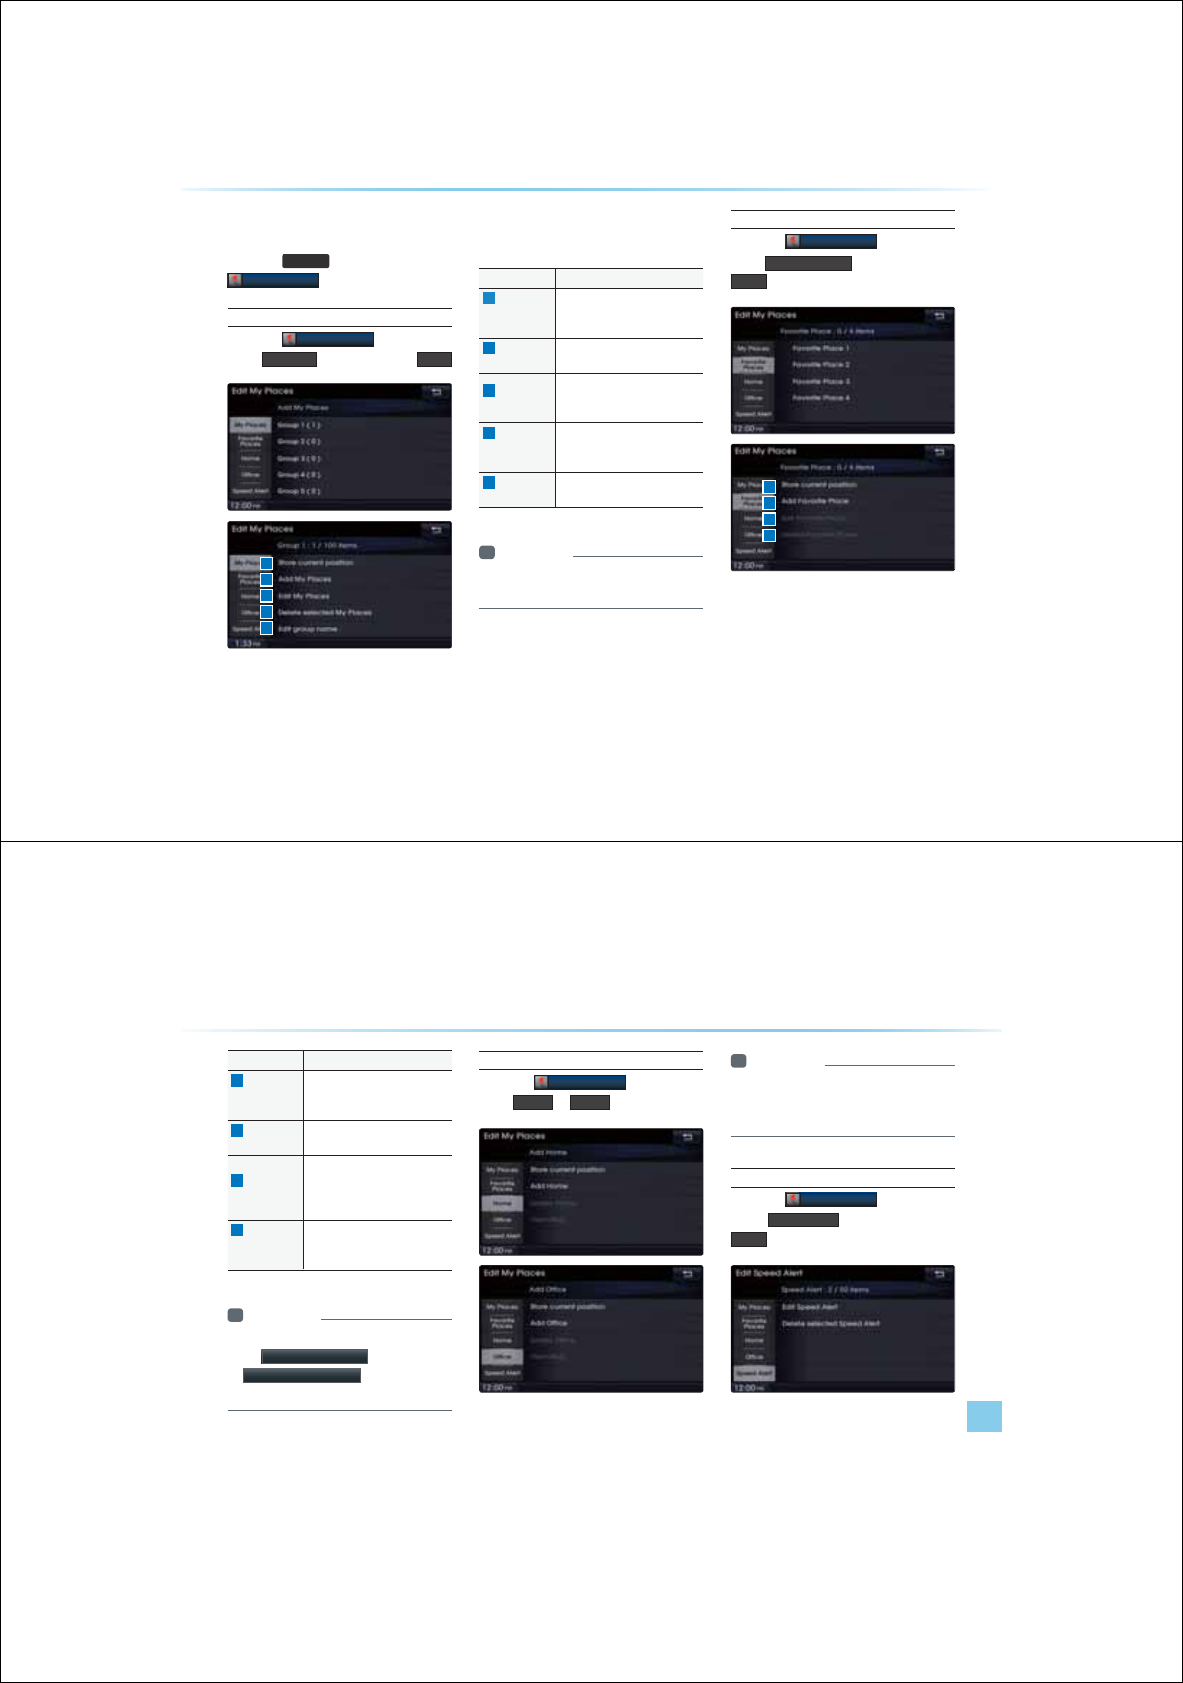
8-16
0\3ODFHV
Press the
6(783
key ƙ Press
(GLW0\3ODFHV
My Places
Press the
(GLW0\3ODFHV
button ƙ
Press
0\3ODFH
ƙ Set and press
'RQH
From the My Places list, select the desired
menu to either add, delete or edit My Places.
Name Description
1
Store
current
Position
Add the current vehicle position
as a My Place
2
Add My
Places
Add a My Place by using search
functions
3
Edit My
Places
Edit information pertaining to
saved My Places, such as name,
location, and telephone number
4
Delete
selected
My Places
Delete one or all saved My
Places
5
Edit Group
name
Edit name of corresponding
group
i Information
У
By default, names of folders have been set
as "Group".
Favorite Places
Press the
(GLW0\3ODFHV
button ƙ
Press
)DYRULWH3ODFHV
ƙ Set and press
'RQH
A total of 4 Favorite Places can be saved.
Favorite Places can be selected at the bottom
of the Destination Search main screen.
8VLQJ6HWXS
1
2
3
4
1
2
3
4
5
Using Setup
Setup l 8-17
Name Description
1
Store
current
Position
Adds the current vehicle position
as a Favorite Place
2
Add Favorite
Place
Add a Favorite Place by using
search functions
3
Edit Favorite
Place
Edit information pertaining to
saved Favorite Places, such as
name, location, and telephone
number
4
Delete
Favorite
Place
Delete one or all saved Favorite
Places
i Information
У
If Favorite Places have not been added,
the
(GLW)DYRULWH3ODFH
and
'HOHWH)DYRULWH3ODFH
buttons will be
disabled.
Home, Office
Press the
(GLW0\3ODFHV
button ƙ
Press
+RPH
or
2IILFH
One Home and Office can each be saved.
The set Home and Office positions can be
selected at the bottom of the Destination
Search main screen.
i Information
У
If the Home and Office has not been set,
these buttons will be displayed as disabled
within the Destination Search screen.
Speed Alerts
Press the
(GLW0\3ODFHV
button ƙ
Press
6SHHG$OHUWV
ƙ Set and press
'RQH
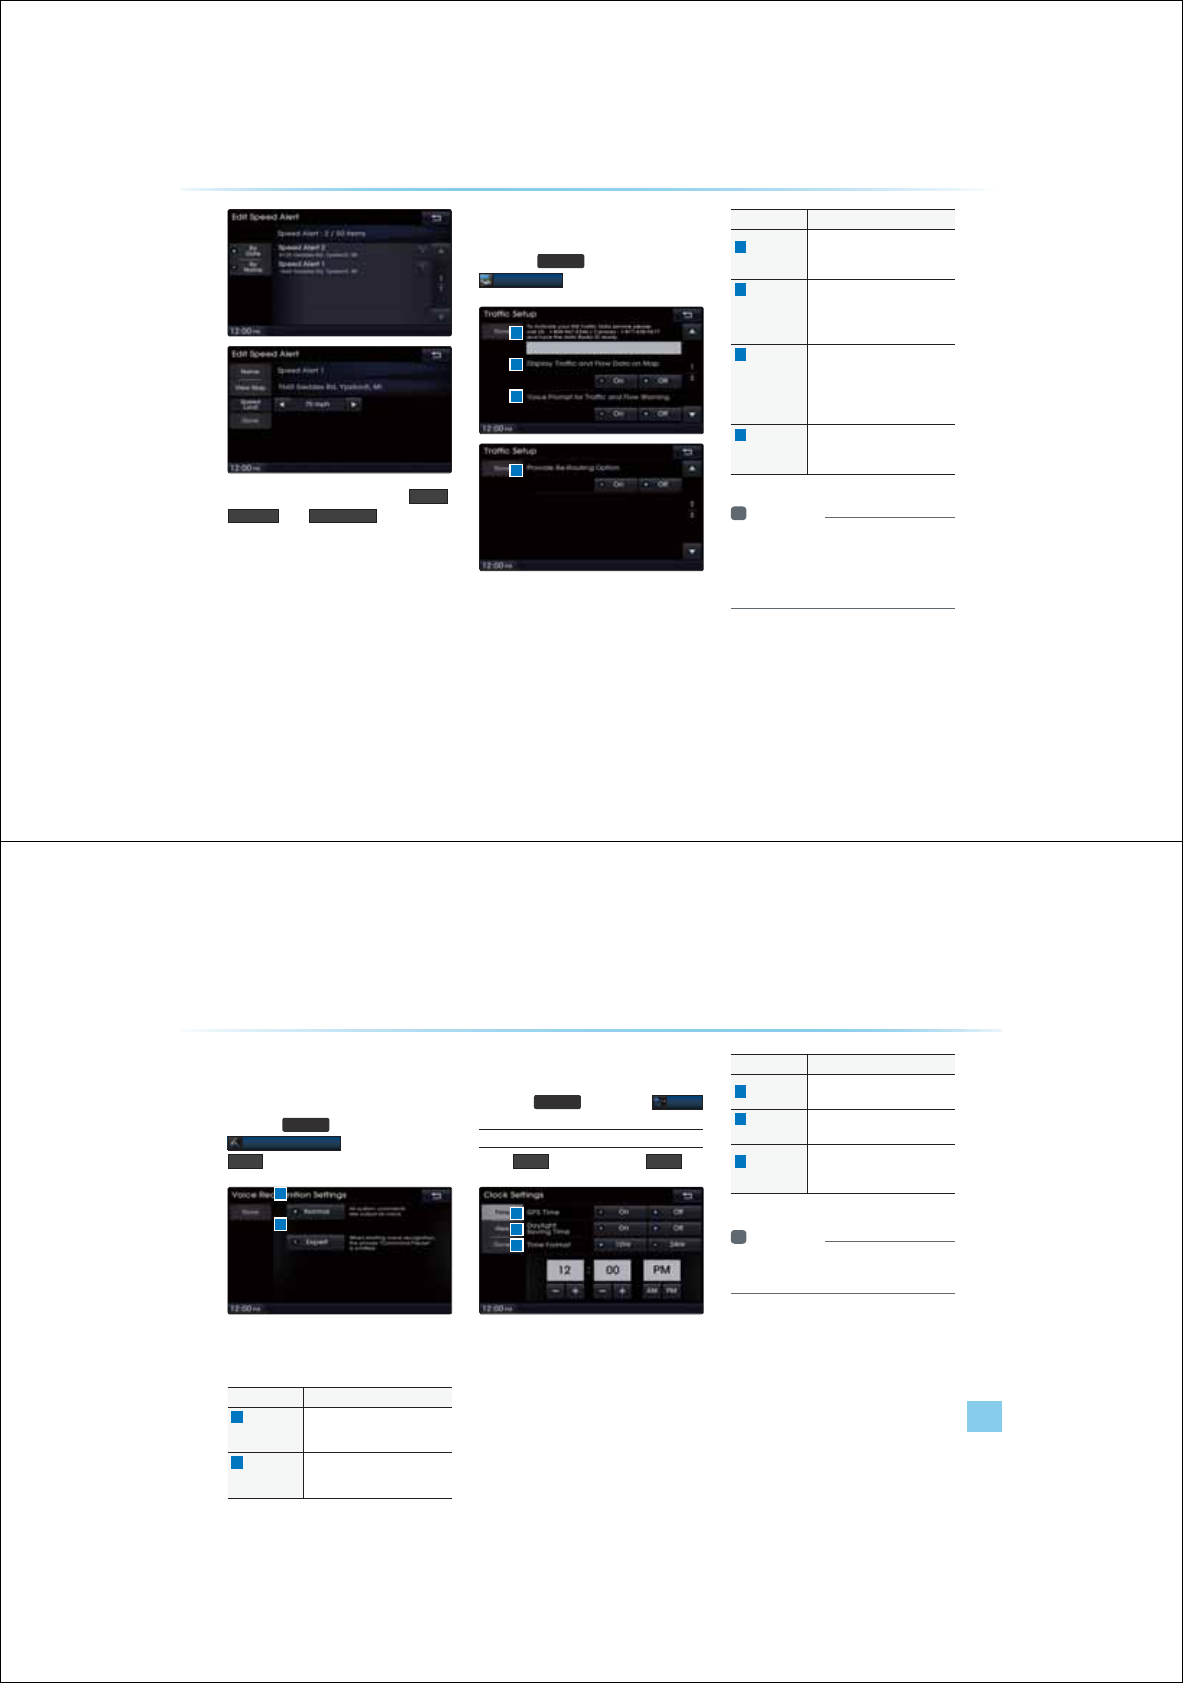
8-18
In the Edit Speed Alert screen,
1DPH
,
$GGUHVV
, and
6SHHG/LPLW
speed can be
set and edited.
7UDIILF6HWXS
Press the
6(783
key ƙ Press
7UDIILF6HWXS
This menu is used to set options related to
traffic and flow data, voice prompts, and re-
routing options based on traffic conditions.
Name Description
1
Data Radio
ID
Check information on XM traffic
data service activation and
activation ID
2
Display
Traffic and
Flow Data
on Map
Sets whether to display real-time
traffic information on map
3
Voice
Prompt for
Traffic and
Flow Warn-
ing
Sets whether to receive voice
prompts for real-time traffic infor-
mation and conditions
4
Provide
Re-Routing
Options
Sets whether to use re-routing
options by reflecting traffic con-
ditions
i Information
У
XM Traffic Data service requires a sepa-
rate subscription. To subscribe to this ser-
vice, please contact the number displayed
on the screen.
8VLQJ6HWXS
1
2
3
4
Using Setup
Setup l 8-19
9RLFH5HFRJQLWLRQ
6HWWLQJV
Press the
6(783
key ƙ Press
9RLFH5HFRJQLWLRQ
ƙ Set and press
'RQH
This menu is used to set voice recognition
mode between Normal and Expert mode.
Name Description
1
Normal When using voice recognition,
provides detailed prompts and is
suited for beginner users
2
Expert When using voice recognition,
omits certain prompts and is
suited for experienced users
&ORFN6HWWLQJV
Press the
6(783
key ƙPress
&ORFN
Clock Setting
Press
7LPH
ƙ Set and press
'RQH
This menu is used to set the time used
within the Navigation system.
Name Description
1
GPS Time Displays time according to the
received GPS time
2
Daylight
Saving Time
Turns on/off daylight saving time
feature
3
Time
Format
Converts the time system
shown when within digital clock
between 12 hour/24 hours
i Information
У
When Daylight Savings Time is turned on,
the clock is moved back one hour.
1
2
1
2
3
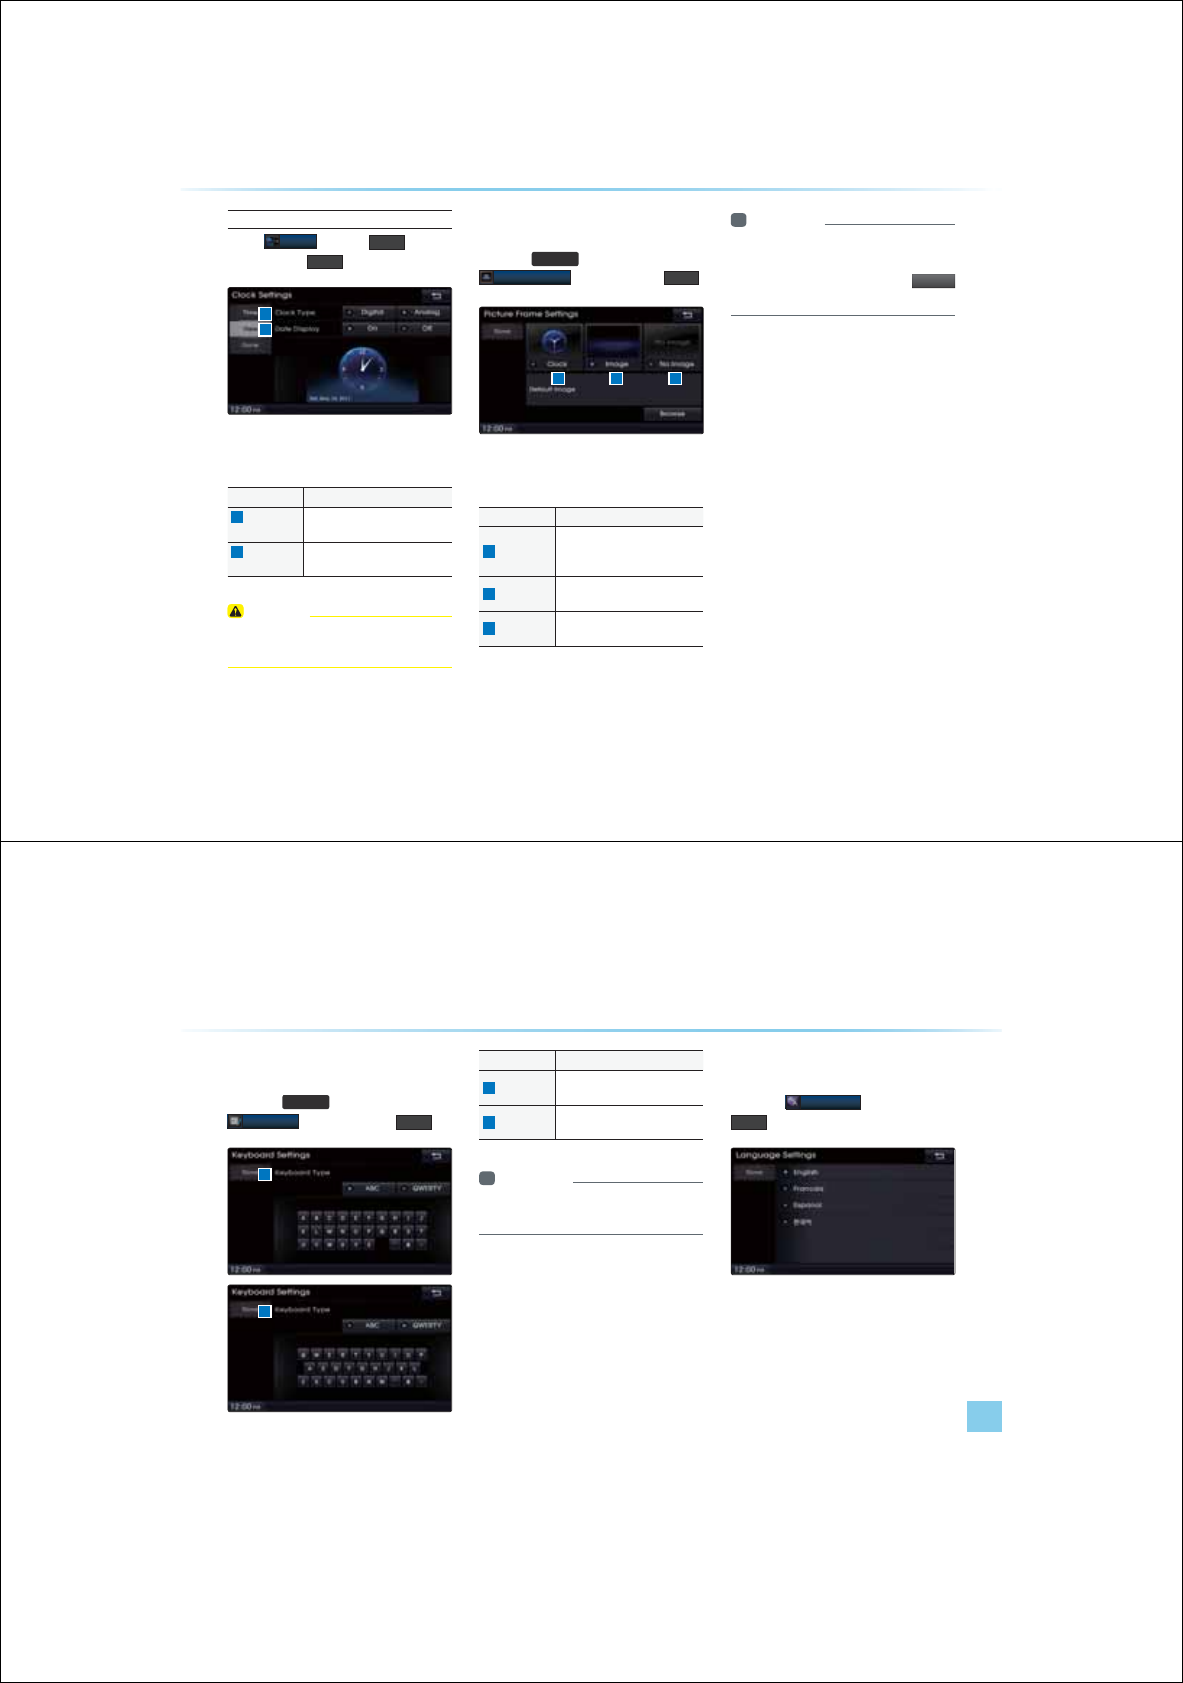
8-20
View
Press
&ORFN
ƙ Press
9LHZ
ƙ
Set and press
'RQH
This menu is used to set the clock type
and date display within the Navigation system.
Name Description
1
Clock Type Changes Clock Type (Digital/
Analog)
2
Date Display Sets whether to display date
within Clock screen
CAUTION
У
The time may not be properly displayed if
the GPS time is not connected.
3LFWXUH)UDPH
Press the
6(783
key ƙ Press
3LFWXUH)UDPH
ƙ Set and Press
'RQH
This menu is used to select the screen dis-
played when the system power is turned off.
Name Description
1
Clock
Displays the clock on the screen
when the system power is
turned off
2
Image Displays an image when the
system power is turned off.
3
No Image No image is displayed when the
system power is turned off
i Information
У
When the picture frame is set to Image,
images saved within a USB can be as the
picture frame by pressing the
%U
R
Z
VH
button.
8VLQJ6HWXS
1 2 3
1
2
Using Setup
Setup l 8-21
.H\ERDUG
Press the
6(783
key ƙ Press
.H\ERDUG
ƙ Set and press
'RQH
This option allows you to change the type of
keyboard used within the system.
Name Description
1
ABC Keyboard with charactersar-
ranged in order
2
QWERTY Keyboard similar to the one used
within a computer
i Information
У
The set keyboard will be applied to all
input modes across the entire system.
/DQJXDJH
Press the
/DQJXDJH
ƙ Set and Press
'RQH
This menu is used to set the language of the
system display and voice language. You can
select the desired language from English,
French, Spanish and Korean.
1
2
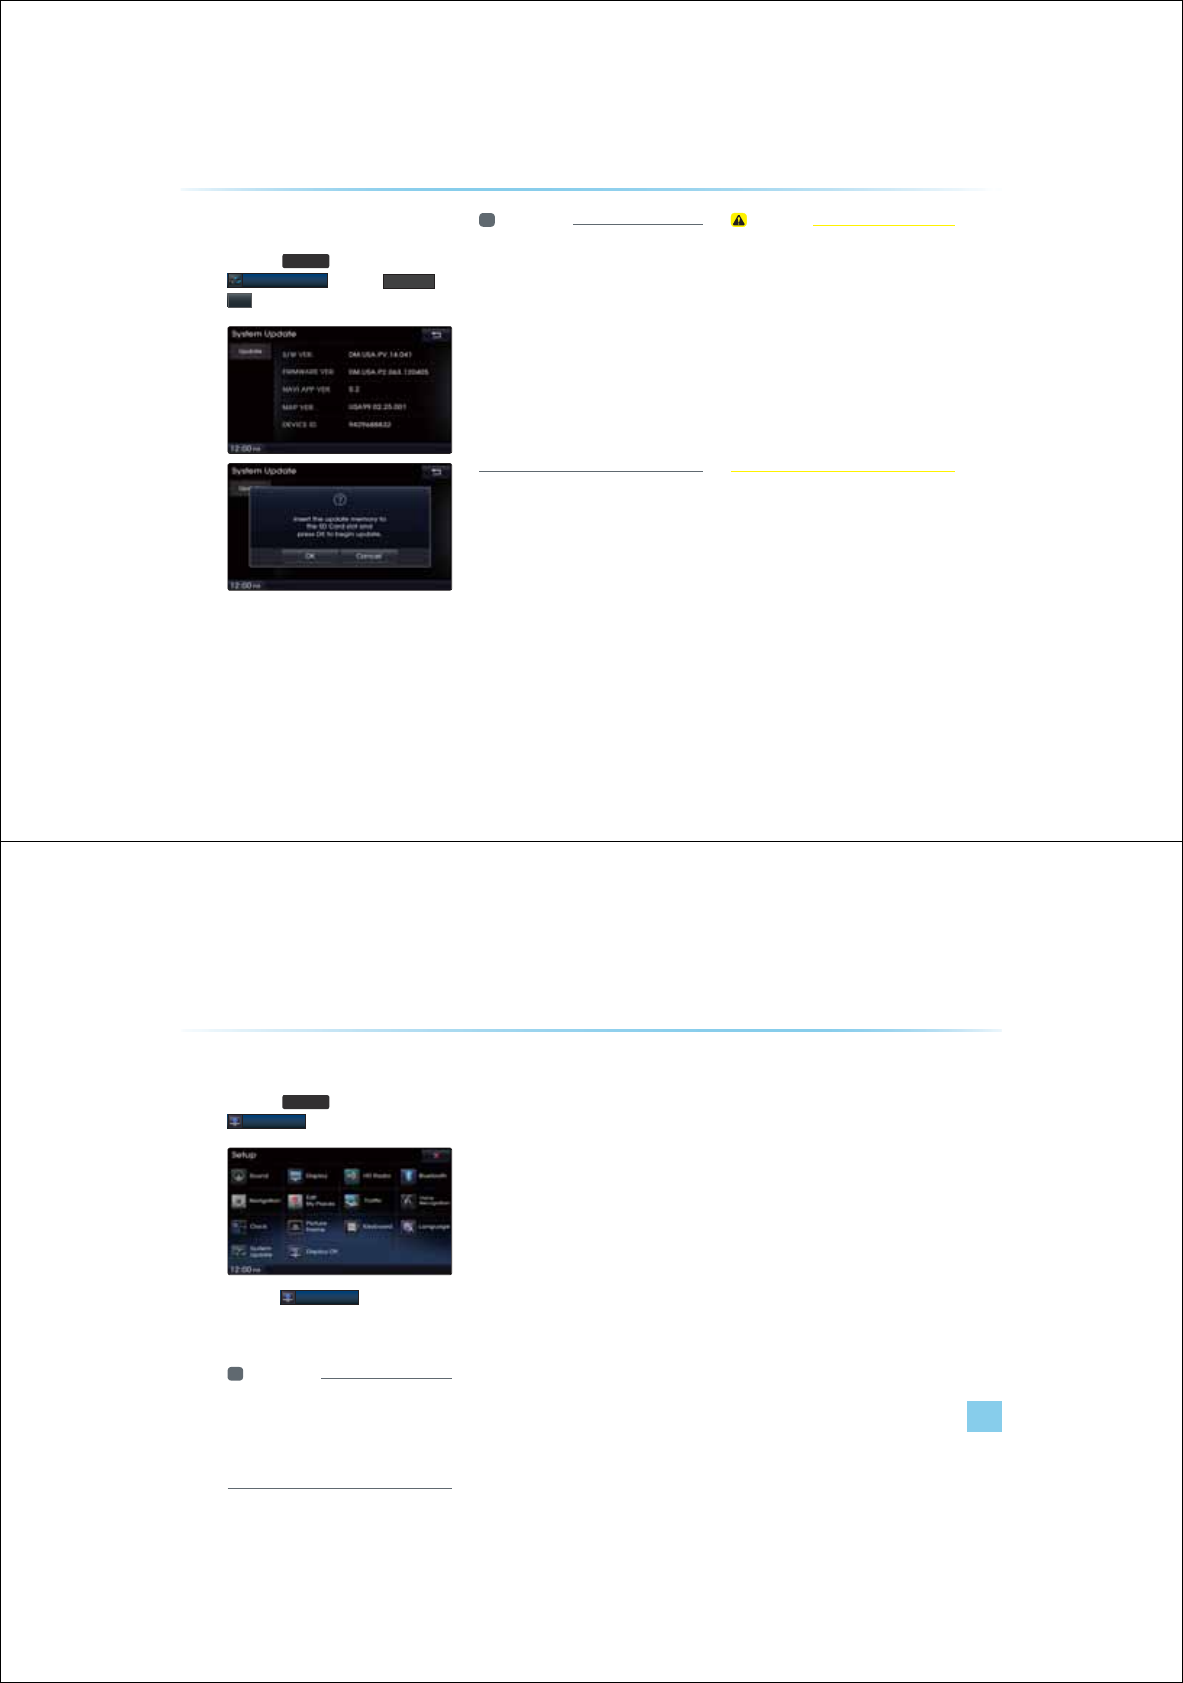
8-22
6\VWHP8SGDWH
Press the
6(783
key ƙ Press
6\VWHP8SGDWH
ƙ Press
8SGDWH
ƙ
2.
After inserting the SD card with the update
file, press OK to start the update.
Once updating is complete, the system
will automatically restart.
i Information
У
This product requires regular updates for
software corrections, new functions and
map updates. Updating may require up to
1 hour depending on the data size.
У
Turning off the power or ejecting the SD
card during the update process may result
in data loss. Make sure to keep the ignition
on and wait until updating is complete.
У
Map and software updates can be down-
loaded from the designated website (http://
www.hyundaiusa.com) and updated
through the SD card.
CAUTION
УPlease use only the SD card that was
included with the vehicle purchase.
УThe use of a separately purchased SD
card may result in damage due to heat
related deformation.
УProduct malfunctions caused by the
use of separately purchased SD cards
shall not be covered within the product
warranty.
У
Repeatedly connecting/disconnecting
the SD card in a short period of time may
cause damage to the device.
8VLQJ6HWXS
Using Setup
Setup l 8-23
'LVSOD\2II
Press the
6(783
key ƙ Press
'LVSOD\2II
Press the
'LVSOD\2II
button to turn off
the display. Touch anywhere on the touch
screen to turn the display back on.
i Information
У
This feature is used to listen to only sound
and can be very helpful in preventing glare
from the screen when driving at night.
У
Even when the display is off, sound will be
played.

8-24
0(02
&$5$916<67(0
У2TQERGEKECKQP
У$GHQTGJKPMKPIJGRTQE
JCUOCNHPEKQPG
У$GHQTGJKPMKPIJGTGKUC
product defect
У6TQDNGUJQQKPI
УFAQ
$SSHQGL[
9-2
3URGXFW6SHFLILFDWLRQ
DOLBY
Manufactured under license from Dolby Laboratories. Dolby and double-D
symbol are trademarks of Dolby Laboratories.
DTS
Manufactured under license under U.S. Patent No.: 5,956,674; 5,974,380;
6,487,535 & other U.S. and worldwide patents issued & pending. DTS, the
Symbol, & DTS and the Symbol double-D symbol are trademarks & DTS Dig-
ital Surround and the DTS logos are trademarks of DTS, Inc. Product includes
software.
© DTS, Inc. All Rights Reserved.
TFT-LCD
Screen Size Navigation Device - 17.78cm (152.4 x 91.44mm)
Resolution
Navigation Device - 384,000 pixels (Resolution: 800 x 480)
Operating
Method
TFT(Thin Film Transistor) Active Matrix
Viewing Angle Navigation Device - left/right: 70ê, Top: 60ê, Bottom 50ê
Internal Lighting LED 14EA, UP/DOWN Assignment
Radio
Channels
FM: 87.5MHz ~ 108.0MHz(Step: 100kHz)
AM : 531kHz ~ 1602kHz(Step : 9kHz)
Sensitivity FM: Under 10dBu /AM: Under 40dBu
Distortion Factor Within 2% Speakers 2 ~ 8 ՟
Integrated Antenna
Operating
temperature
-30í ~ +85íStorage
temperature
-40í ~ +105í
Dimensions 78.7mm(W) x 70.8mm(H) x 153.2mm(L)
Weight 210g
$SSHQGL[
Appendix l 9-3
Appendix
Common
Name Car TFT LCD Display Navigation Unit
Power Supply DC 14.4V Operating
Power
DC 9V ~ DC 16V
Current
consumption
2.5A Dark Current 2mA
(Head Unit Only)
Operating
Temperature
-20˚ ~ 70˚ Storage
Temperature
-30í ~ + 80í
Dimensions 221.8mm(W) x 171mm(H) x 225mm(D)
Weight 2.7 Kg
Bluetooth
Frequency
Range
2402 ~ 2480 MHz Supported
Bluetooth
Specification
2.1 + EDR
Supported
Profile
Handsfree(1.5), A2DP(1.0), AVRCP(1.3), PBAP(1.0)
Output 0.05mW Transmission F1E, G1E
CAUTION
У
6JGRTQEGTCPKPUCNNGTECPPQRTQKGUGTKEGUTGNCGQNKHG
UCHGCUJGEQPEGTPG TCKQGSKROGPKUNKCDNGQTCKQKPGTHGT-
GPEG
KCC Certification
Device Name Low-power wireless communication device
(wireless device for radio data communication)
Model Name AV310DMDG
Certification Number Certification No. : KCC-CMM-HMO-AV310DMDG
Company Name Hyundai Mobis
Manufacturer/
Country
Hyundai Mobis/Republic of Korea
9-4
%HIRUHWKLQNLQJWKHUHLVDSURGXFWGHIHFW
The current position as shown on the navigation may differ from
the actual position under the following conditions.
The following occurrences are not malfunctions
t
When driving on Y-shaped roads with
narrow angles the current position may
be displayed in the opposite direction
t
The current position may be displayed
on the opposite side of the road
t
Within city streets, the current position
may be displayed on the opposite side
or on an off-road position
t
When changing the zoom level from
maximum to a different level, the cur-
rent position may become displayed
on a different road
t
If the vehicle is loaded onto a ferry or a
car transport vehicle, the current posi-
tion may become stalled on the last
position prior to loading
t
When driving on a spiral-shaped road
t
When driving in mountain regions with
sharp turns or sudden brakes
t
When entering a road after passing an
underground parking structure, build-
ing parking structure, or roads with
many rotations
t
When driving in heavy traffic with
frequent go/stops
t
When driving under slippery conditions,
such as heavy sand, snow, etc.
t
When driving on spiral-shaped roads
t
When the tires have recently been re-
placed (Especially upon use of spare or
studless tires)
t
When using tires of improper size
t
When the tire pressure for the 4 tires are
different
t
When the replacement tire is worn or used
(Especially studless tires having passed a
2nd seasons)
t
When driving near high-rise buildings
t
When a roof carrier has been installed
t
When a long distance route is calculated
while driving on an expressway In such
cases, continued driving will automati-
cally enable the system to conduct map
matching or use updated GPS informa-
tion to provide the current position (In
such cases, up to several minutes may be
required)
Correct route guidance may not occur due to search conditions
or driving position.
The following occurrences are not malfunctions
t
Guidance to go straight may be given
while driving on a straight road
t
Guidance may not be given even when
having turned at an intersection
t
There are certain intersections in which
guidance may not occur
t
A route guidance signaling for a u-turn
may occur in some No u-turn intersec-
tions
t
Route guidance signaling entrance into
a No-entry zone may occur (No enter
zone, road under construction, etc.)
t
Guidance may be given to a position
that is not the actual destination if roads
to reach the actual destination do not
exist or are too narrow
t
Faulty voice guidance may be given
if the vehicle breaks away from the
designated route (ex: if a turn is made
at an intersection while the navigation
provided guidance to go straight)
The following may occur after conducting route calculation.
The following occurrences are not malfunctions
t
Guidance may be given to a position
differing from the current position when
turning at an intersection
t
When driving in high speeds, route
recalculation may take a longer period
of time
t
Route guidance signaling for a u-turn
may occur in some No u-turn intersec-
tions
t
Route guidance signaling entrance into
a no enter zone many occur (No enter
zone, road under construction, etc.)
t
Guidance may be given to a position
removed from the actual destination if
roads to reach the actual destination do
not exist or are too narrow
t
Faulty voice guidance may be given
if the vehicle breaks away from the
designated route (ex: if a turn is made
at an intersection while the navigation
provided guidance to go straight)
$SSHQGL[
Appendix l 9-5
Appendix
%HIRUHWKLQNLQJWKHSURGXFWKDV
PDOIXQFWLRQHG
1. Errors which occur during the operation or installation of the device
may be mistaken as a malfunction of the actual device.
2. If you are having problems with the device, try the suggestions listed
below.
3. If the problems persist, contact your HYUNDAI dealer.
Problem Possible Cause
There are small red, blue, or
green dots on the screen
t Because the LCD is manufactured with technol-
ogy requiring high point density, a pixel defi-
ciency or lighting may occur within 0.01% of
total pixels
The sound or image is not
working
t Has the Switch for the vehicle been turned to
[ACC] or [ON]?
t Has the SYSTEM been turned OFF?
The video is being displayed
but sound is not working
t Has the volume been set to a low level?
t Has the volume been set on mute?
When the power is turned
on, the corners of the
screen are dark
t The display looking somewhat darker after pro-
longed periods of use is a normal phenomenon
with LCD panels It is not a malfunction
t If the screen is very dark, contact your nearest
HYUNDAI dealer for assistance
Sound is working from only
one speaker
t Is the position of FAL/BAL sound controls or
volume adjusted to only one side?
Problem Possible Cause
Sound and video does not
work in AUX mode
t Re the audio and video connector jacks fully
inserted into the AUX terminal?
The external device is not
working
t Is the external device connected with a stan-
dard connector cable?
Upon turning power on, the
most recent mode screen is
not displayed
Within modes that play files by reading external
sources, such as discs, USB, iPod, or Bluetooth
®
streaming mode, the most recently played mode
screen prior to turning off power may not properly
load
t If there is no disc or the corresponding device is
not connected, the mode operated prior to the
most recent mode will operate
t If the previous mode still cannot be properly
played, the mode operated prior to that will
operate
9-6
$SSHQGL[
7URXEOHVKRRWLQJ
Problem Possible Cause Countermeasure
The image
color/tone
quality is low
The brightness, satura-
tion, hue, and contrast
levels are not set properly
t Properly adjust the brightness,
saturation, hue, and contrast levels
through Display Setup
Sound does
not work
t The volume level is set
the lowest level
t The connection is not
proper
t The device is cur-
rently fast-forwarding,
rewinding, scanning, or
playing in slow mode
t Adjust the volume level
t Check to see that the device has
been properly connected
t The sound will not work when the
device is fast-forwarding, rewind-
ing, scanning, or playing in slow
mode
The sound or
video quality is
low
t The disc is dirty or
scratched
t Vibration is occurring
from where the conver-
sion switch has been
installed
t Image color/tone qual-
ity is low
t Wipe off water or dirt from the DISC
Do not use a disc which has been
scratched
t The sound may be short-circuited
and the image distorted if the
device vibrates
t The device will return to normal
once vibrations stop
Problem Possible Cause Countermeasure
The power
does not turn
on
The fuse is disconnected
t Replace with a suitable fuse
t If the fuse is disconnected again,
please contact your point of
purchase or service center
Device is not properly
connected
t Check to see that the device has
been properly connected
The system
does not
Play
The disc has not been
inserted or has been
inserted upside down
t Insert the disc properly so that
the sides are facing the correct
Direction
The disc has been
Contaminated
t Wipe away dirt and other foreign
substances from the disc
The vehicle battery is
Low
t Charge the battery If the prob-
lem persists, contact your point
of purchase or service center
A disc not supported by
the device has been
Inserted
t Insert a disc which is supported
by the device
Appendix l 9-7
Appendix
Problem Possible Cause Countermeasure
The USB does not
work
t USB memory is dam-
aged
t USB memory has been
contaminated
t A separately purchased
USB HUB is being
used
t A USB extension cable
is being used
t A USB which is not a
Metal Cover Type USB
Memory is being used
t An HDD type, CF, SD
Memory is being used
t There are no music files
which can be played
t Please use after formatting the
USB into FAT 12/16/32 format
t Remove any foreign substanc-
es on the contact surface of
the USB memory and multime-
dia terminal
t Directly connect the USB
memory with the multimedia
terminal on the vehicle
t Directly connect the USB
memory with the multimedia
terminal on the vehicle
t Use standard USB Memory
t Use standard USB Memory
t Only MP3,WMA file formats are
supported Please use only the
supported music file formats
The iPod is not
recognized even
though it has
been connected
t There are no titles
which can be played
t The iPod firmware
version has not been
properly updated
t The iPod device does
not recognize down-
loads
t
Use iTunes to download and
save MP3 files into the iPod
t
Use iTunes to update the firm-
ware version and reconnect the
iPod with the device
t
Reset the iPod and reconnect
with the device
i Information
У
JKNGQRGTCKPIJGGKEGKHCPCDPQTOCNKQEETUJCECPPQ DG
EQTTGEGKJJGCDQGGUETKDGOGCUTGURTGUUJG
5HVHW
MG
QTGUGJGUUGO
У
RTGUUCPJQNJG
5HVHW
MGQGTUGEQPU6JGGKEG
RQGTKNNTPQHHCPJGUUGOKNNTGUG

9-8
)$4
About Pairing Mobile Phones
Q I cannot pair my mobile phone. What is the cause?
A Check to see that the mobile phone supports Bluetooth
®
function.
If your phone is a Bluetooth
®
phone, then check to see whether the
Bluetooth setting within your phone been is set to ‘Hidden’. If the
device is set to hidden, please un-hide the device (set to unhidden
state).
Q What is the difference between pairing a mobile phone and connect-
ing a mobile phone?
A Pairing occurs through authenticating the head unit and mobile
phone. Mobile phones paired to the head unit can be connected and
disconnected until the paired mobile phone is deleted from the sys-
tem. Bluetooth
®
Handsfree features, such as making/answering calls
or managing Contacts, are supported only in mobile phones con-
nected with the head unit.
Q What is a Passkey?
A A passkey is the password used to authenticate the connection
between the head unit and mobile phone. The passkey only needs to
be entered once when pairing the mobile phone for the first time.
The initial passkey is 0000. The passkey can be changed by pressing
6(783
ƙ
%OXHWRRWK
ƙ
$GYDQFHG6HWWLQJV
&KDQJH3DVVNH\
menu.
$SSHQGL[
Appendix l 9-9
Appendix
About Making/Answering Phone Calls
Q How can I answer a call?
A When there is an incoming call, a notification pop-up will become dis-
played. To answer the incoming call, press the
$
FFHS
W
button on
the screen or the key on the steering remote controller.
To reject the call, press the
5HMHF
W
button on the screen or press
the key on the steering remote controller.
Q What should I do if I am talking on the Handsfree but want to switch
the call to the mobile phone?
A While one a call, press and hold (over 0.8 seconds) the key on
the steering remote controller or press the
3
ULYDWH
button at the
bottom of the Phone screen to switch the call to your mobile phone.
About Bluetooth
®
/Head Unit Use Environment
Q What is the distance in which wireless connection can be used?
A The wireless connection can be used within 15 yards.
Q How many mobile phones can be paired?
A It is possible to pair up to five mobile phones.
Q What does call quality sometimes worsen?
A
Check the reception sensitivity of the mobile phone when call quality
becomes worsened. The call quality may deteriorate when the signal
strength is low. Call quality may also worsen if metal objects, such as
drink cans, are placed near the mobile phone. Check to see if there are
metal objects in the vicinity of the mobile phone. The call sound and
quality may differ depending on the type of mobile phone.

9-10
0(02
M & SOFT AMERICA MAP CENTER
TEL : 888-757-0010
WEBSITE : www.mapnsoft.com
MAP DATABASE HOTLINE
This equipment has been tested and found to comply with the limits for a Class A digital device, pursuant to part 15 of the FCC Rules.
These limits are designed to provide reasonable protection against harmful interference in a residential installation. This equipment
generates, uses and can radiate radio frequency energy and, if not installed and used in accordance with the instructions, may cause
harmful interference to radio communications. However, there is no guarantee that interference will not occur in a particular
installation. If this equipment does cause harmful interference to radio or television reception, which can be determined by turning the
equipment off and on, the user is encouraged to try to correct the interference by one or more of the following measures:
ˍ Reorient or relocate the receiving antenna.
ˍ Increase the separation between the equipment and receiver.
ˍ Connect the equipment into an outlet on a circuit different from that to which the receiver is connected.
ˍ Consult the dealer or an experienced radio/TV technician for help.
Caution: Any changes or modifications to this device not explicitly approved by manufacturer could void your authority to operate this
equipment.
This device complies with part 15 of the FCC Rules. Operation is subject to the following two conditions: (1) This device may not
cause harmful interference, and (2) this device must accept any interference received, including interference that may cause undesired
operation.
,&:DUQLQJ
7KLVGHYLFHFRPSOLHVZLWK,QGXVWU\&DQDGDOLFHQFHH[HPSW566VWDQGDUGV
2SHUDWLRQLVVXEMHFWWRWKHIROORZLQJWZRFRQGLWLRQVWKLVGHYLFHPD\QRWFDXVHLQWHUIHUHQFHDQG
WKLVGHYLFHPXVWDFFHSWDQ\LQWHUIHUHQFHLQFOXGLQJLQWHUIHUHQFHWKDWPD\FDXVHXQGHVLUHGRSHUDWLRQRIWKHGHYLFH
/HSUpVHQWDSSDUHLOHVWFRQIRUPHDX[&15G,QGXVWULH&DQDGDDSSOLFDEOHVDX[DSSDUHLOVUDGLRH[HPSWVGHOLFHQFH
/H[SORLWDWLRQHVWDXWRULVpHDX[GHX[FRQGLWLRQVVXLYDQWHVODSSDUHLOQHGRLWSDVSURGXLUHGHEURXLOODJHHW
7KLVHTXLSPHQWFRPSOLHVZLWK)&&UDGLDWLRQH[SRVXUHOLPLWVVHWIRUWKIRUDQXQFRQWUROOHGHQYLURQPHQW
7KLVHTXLSPHQWVKRXOGEHLQVWDOOHGDQGRSHUDWHGZLWKPLQLPXPFPEHWZHHQWKHUDGLDWRUDQG\RXUERG\
7KLVWUDQVPLWWHUPXVWQRWEHFROORFDWHGRURSHUDWLQJLQFRQMXQFWLRQZLWKDQ\RWKHUDQWHQQDRUWUDQVPLWWHUXQOHVVDXWKRUL]HGWRGRVRE\WKH)&&