HYUNDAI MOBIS AVC40D9AN DIGITAL CAR AVN SYSTEM User Manual
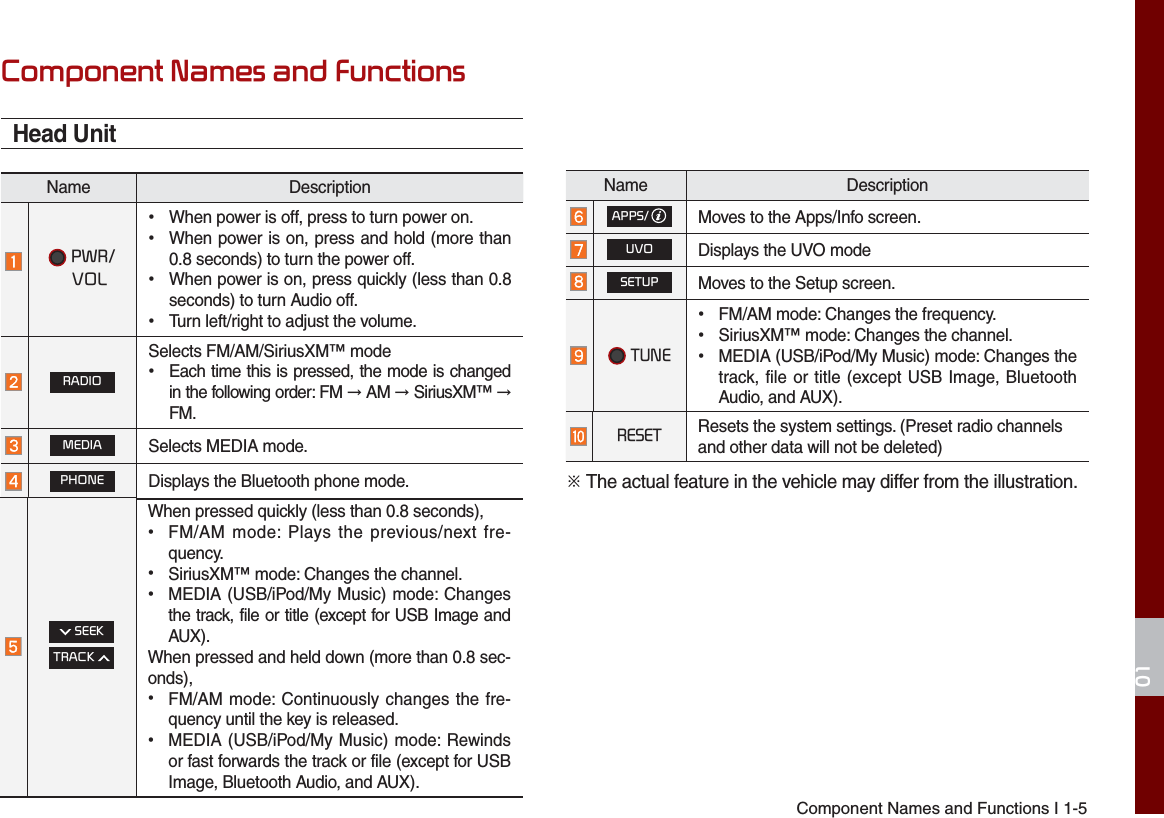
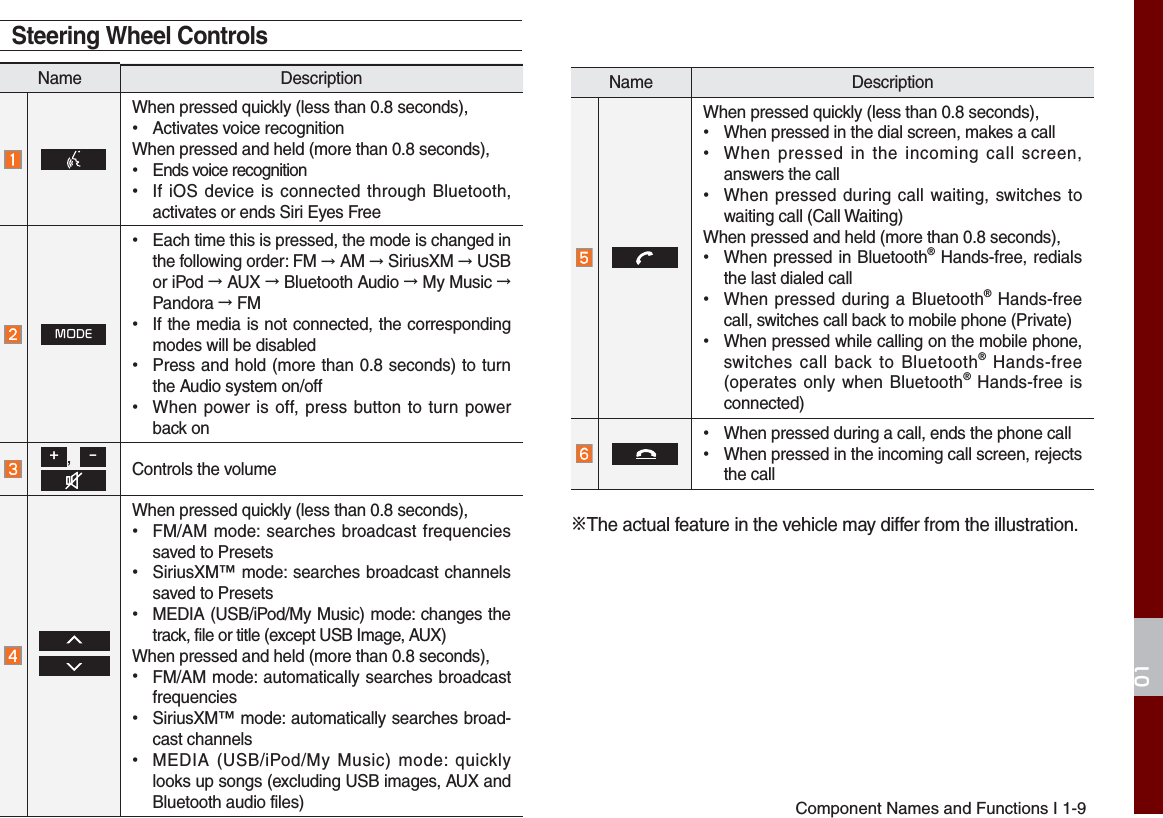
HYUNDAI MOBIS CO., LTD. DIGITAL CAR AVN SYSTEM
UserManual.wiki
>
HYUNDAI MOBIS
>
AVC40D9AN User Manual
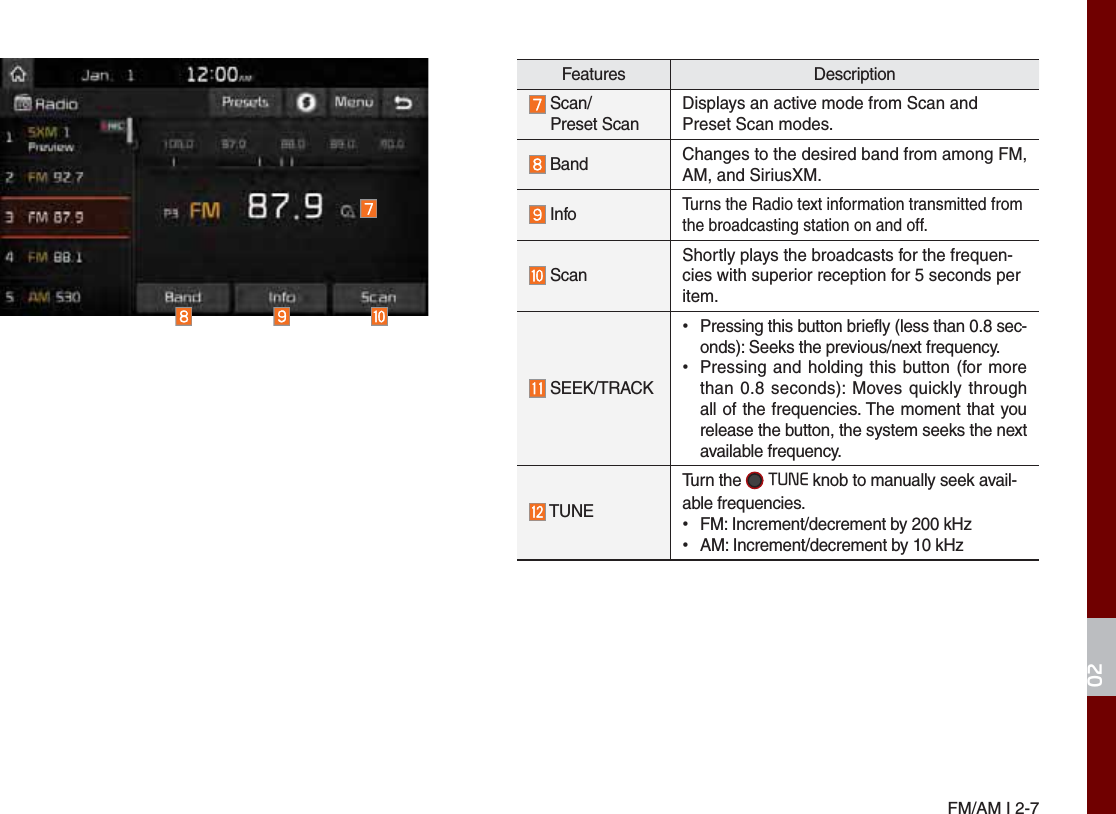
User Manuel
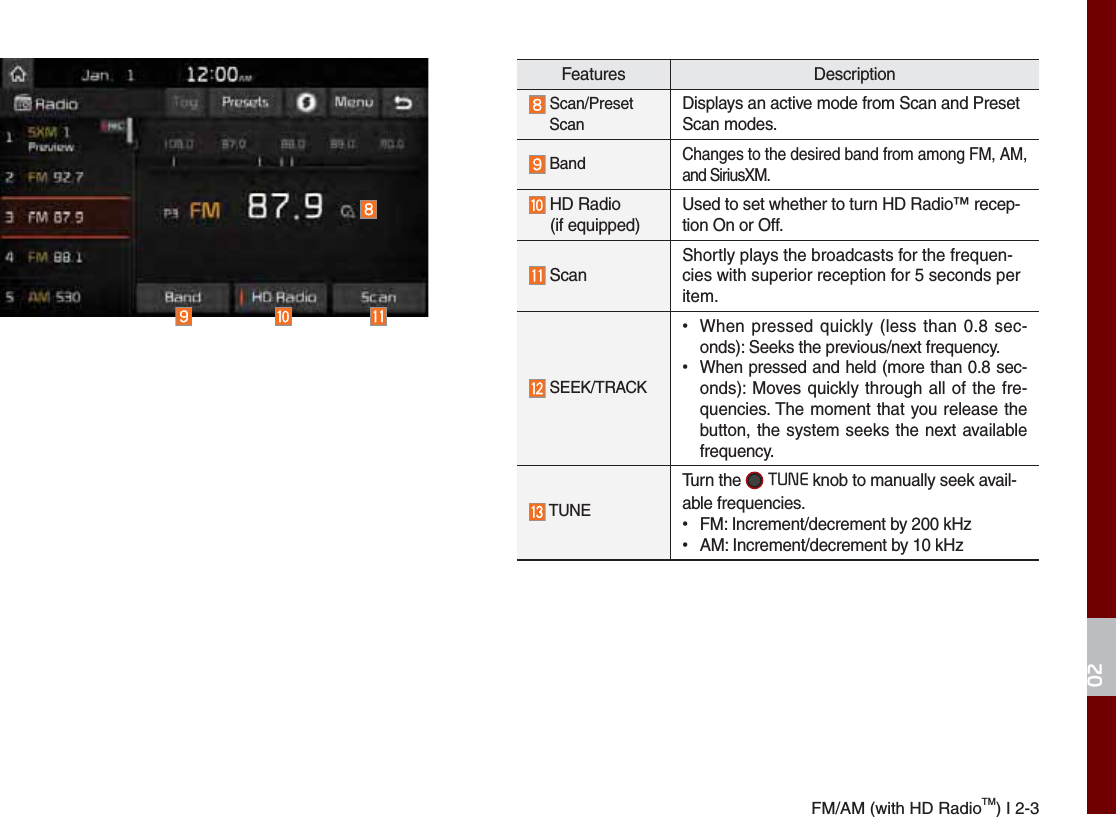
Navigation menu
Upload a User Manual
Namespaces
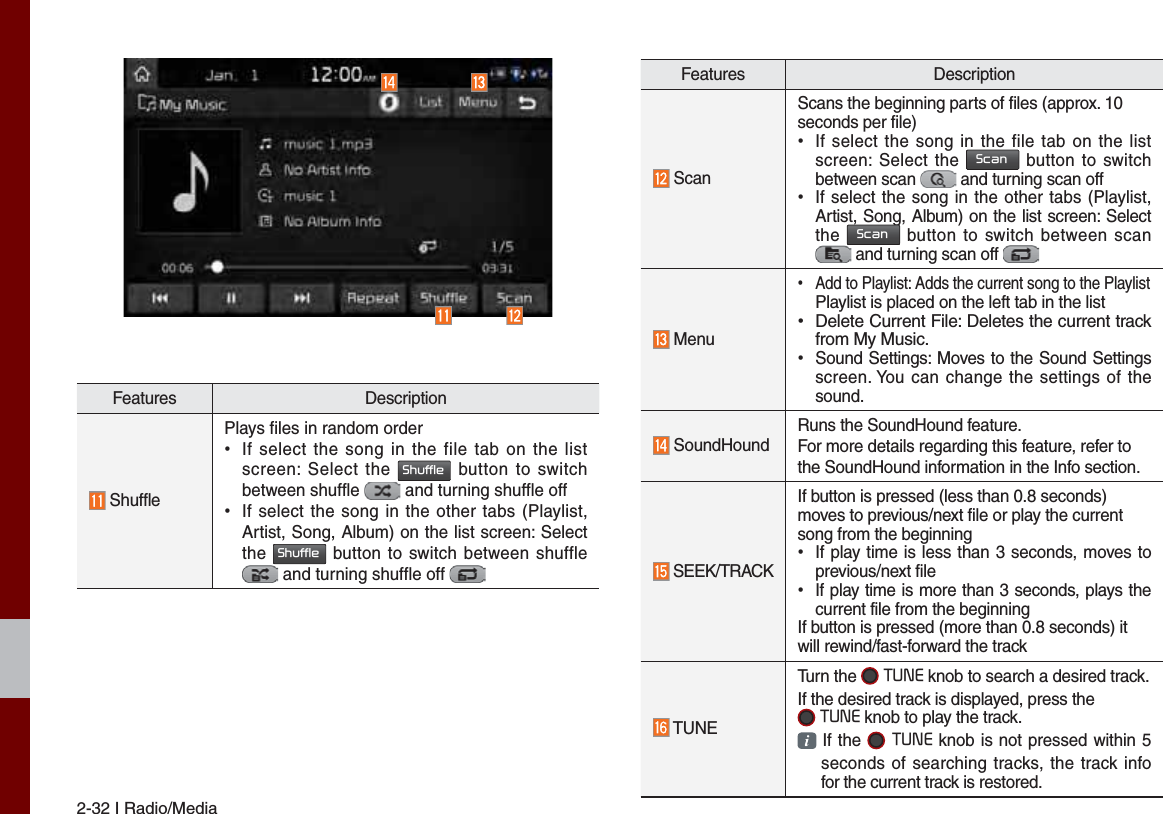
Wiki Guide
HTML
PDF
Info
Views
User Manual
Discussion / Help
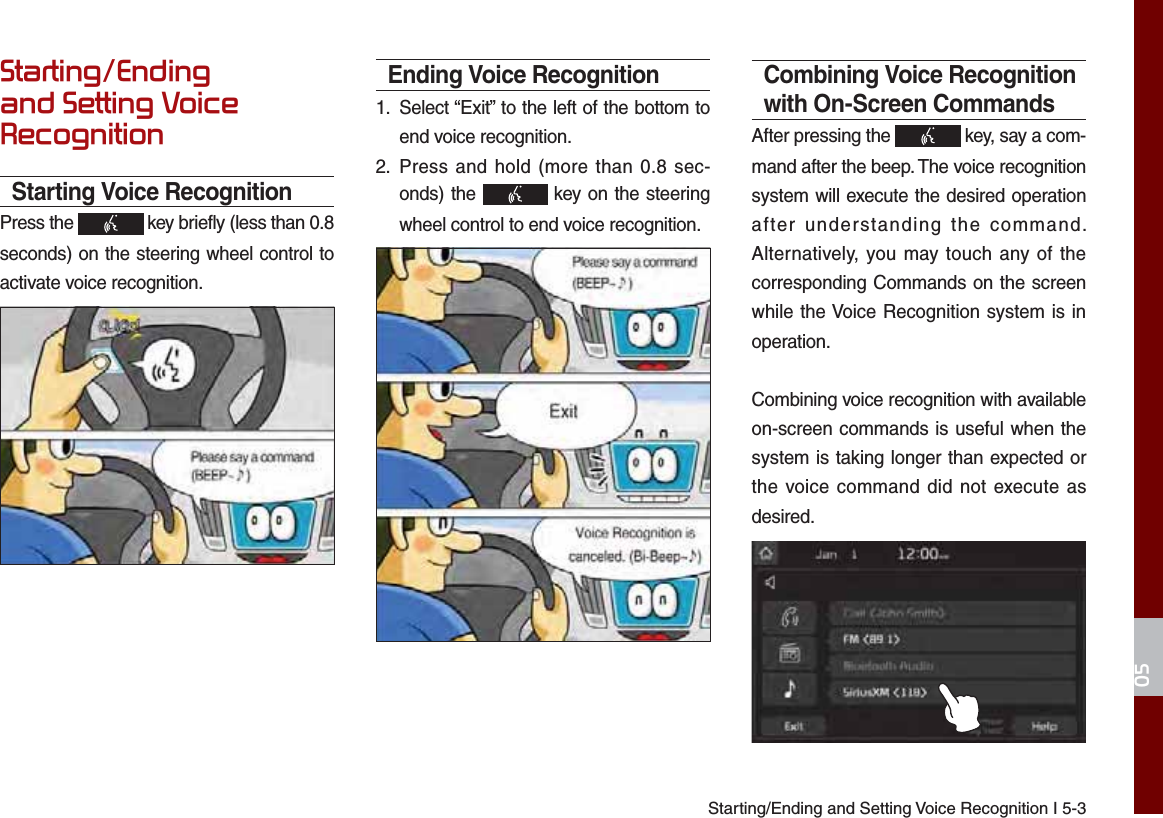
Navigation


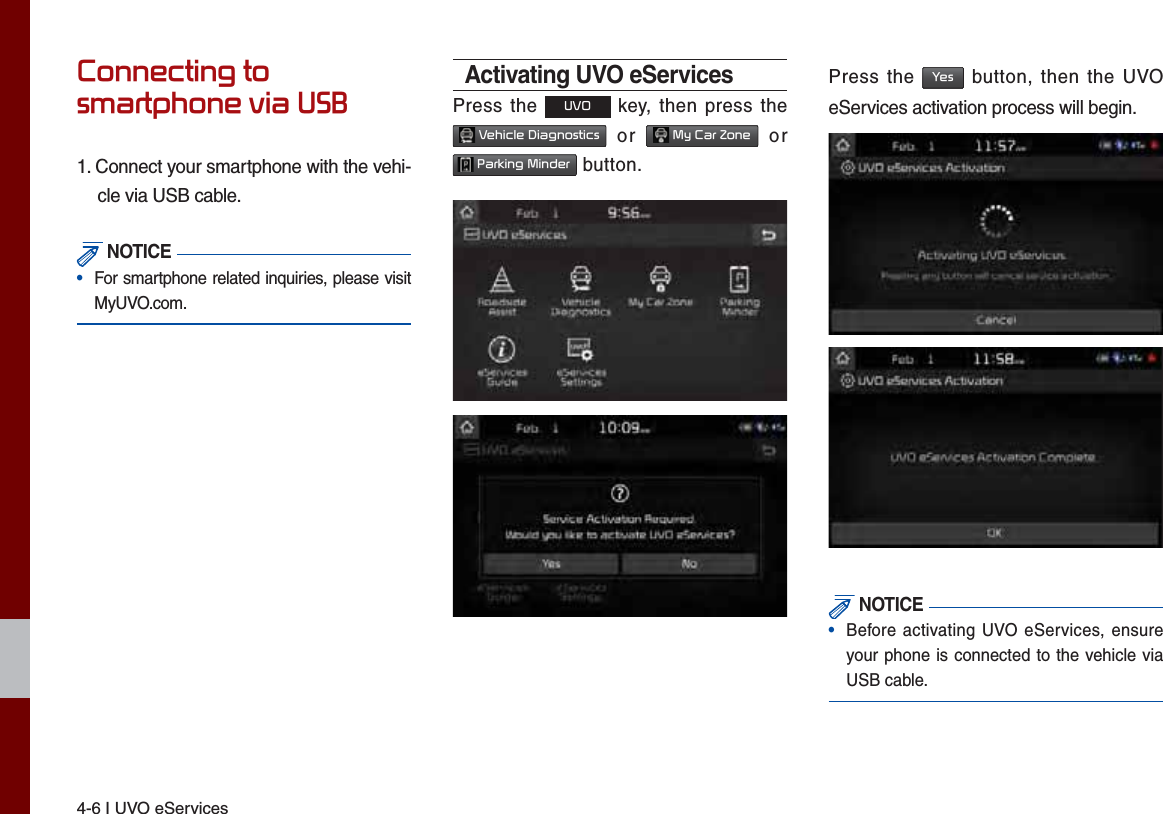

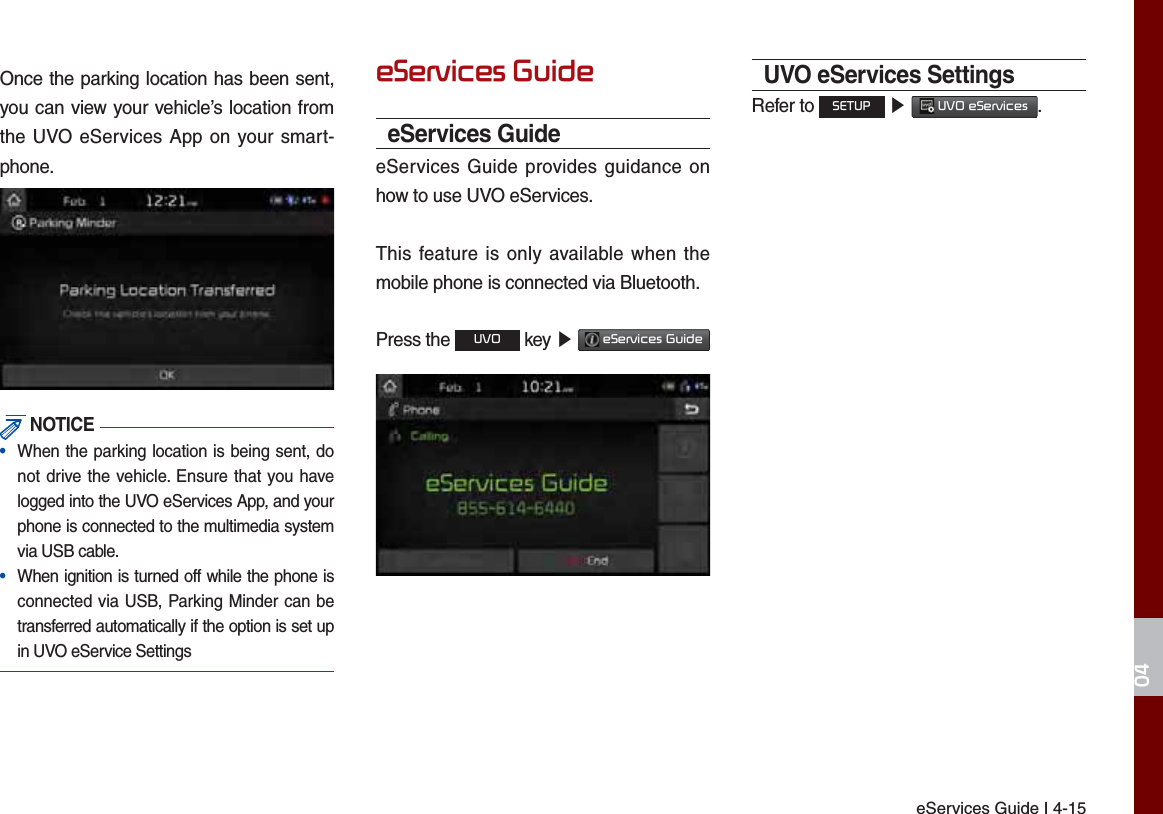


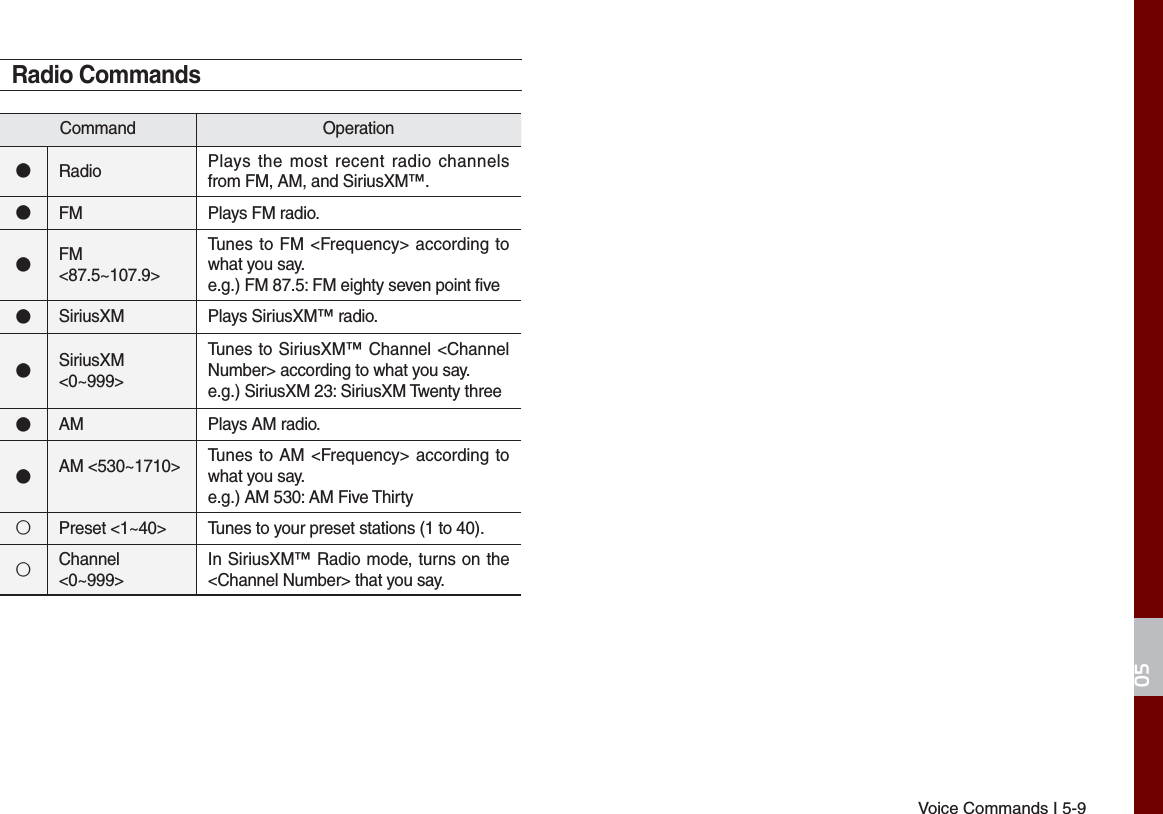
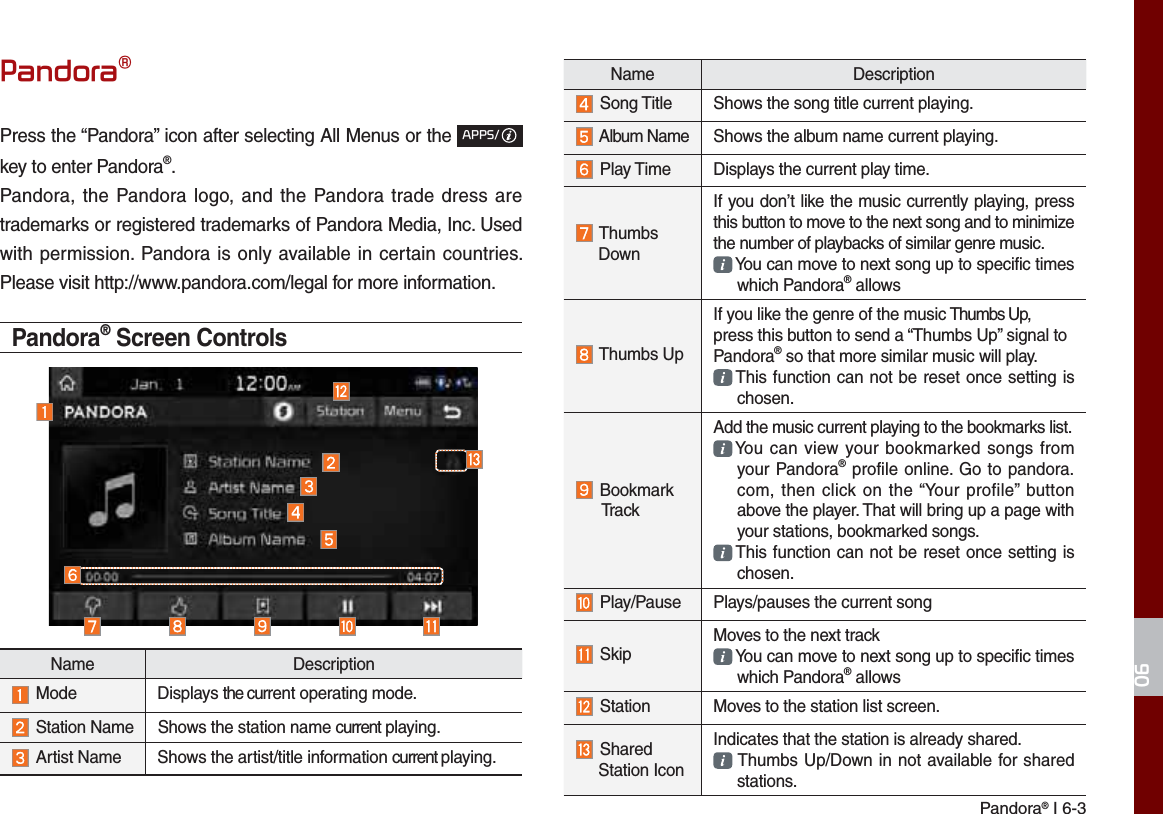
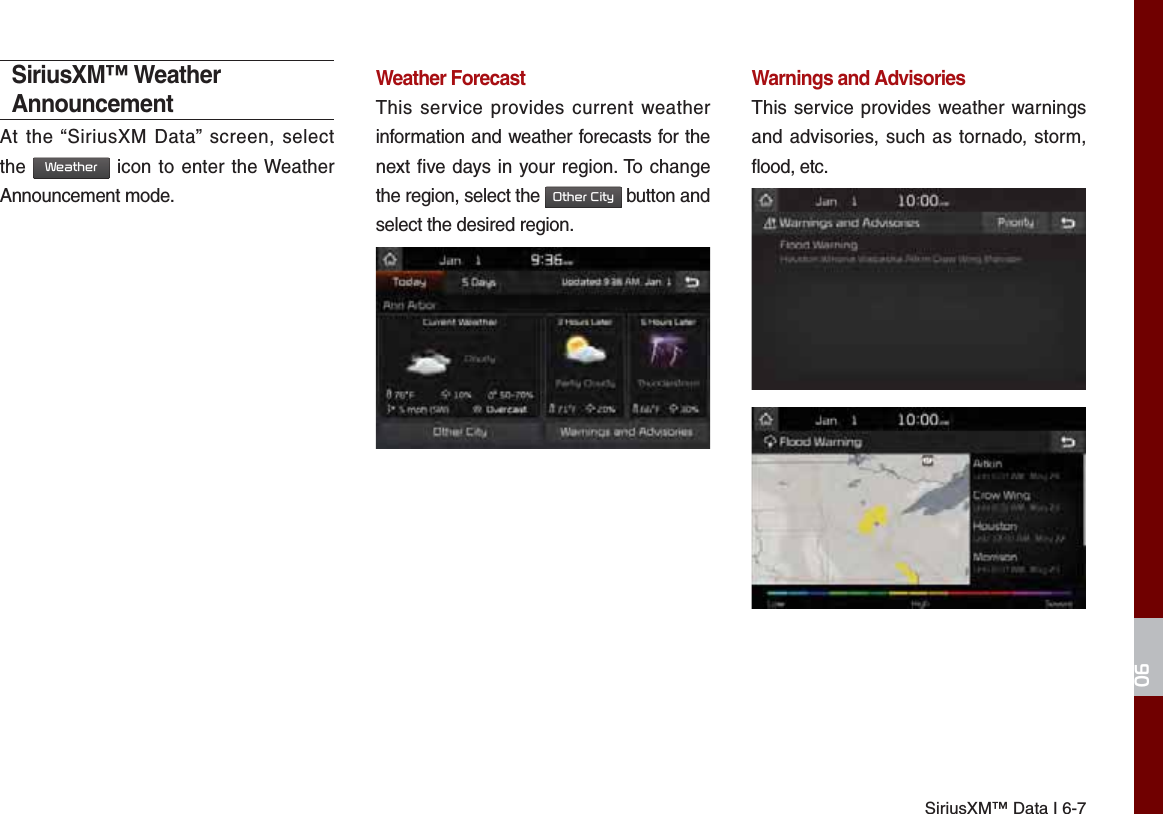
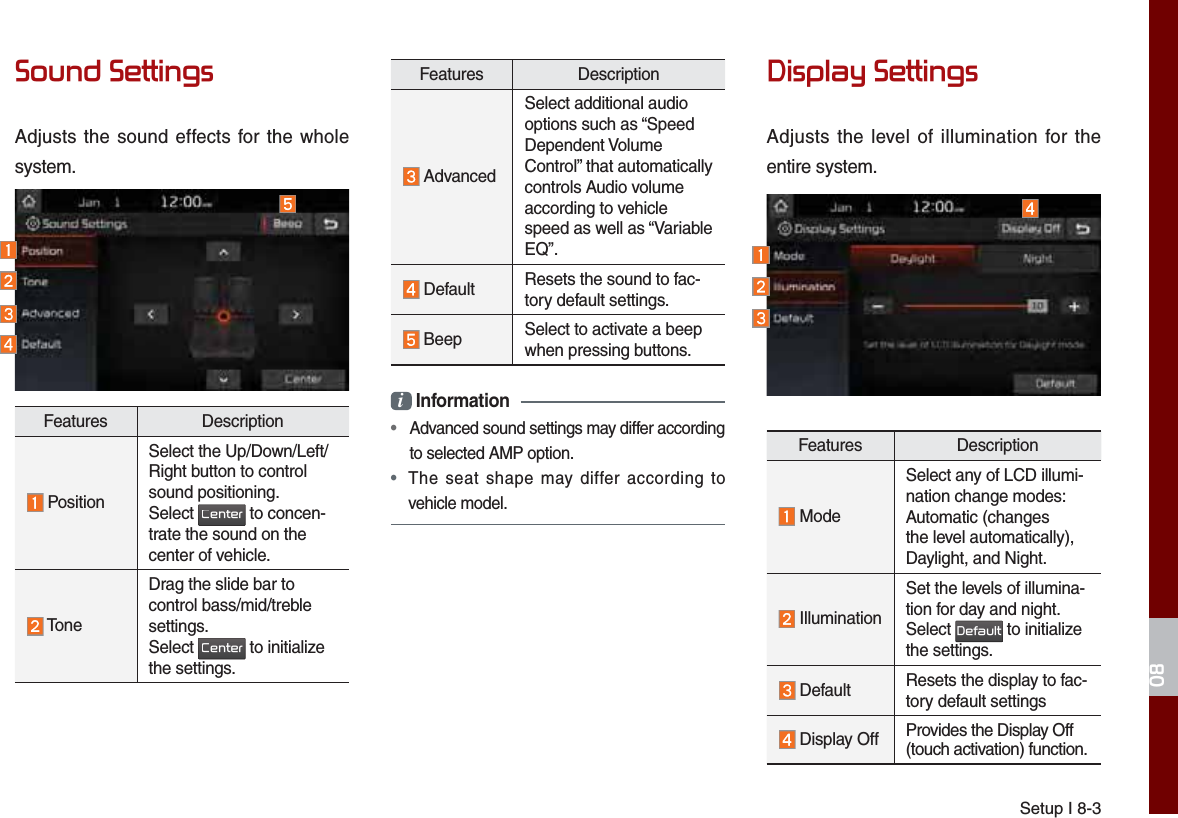
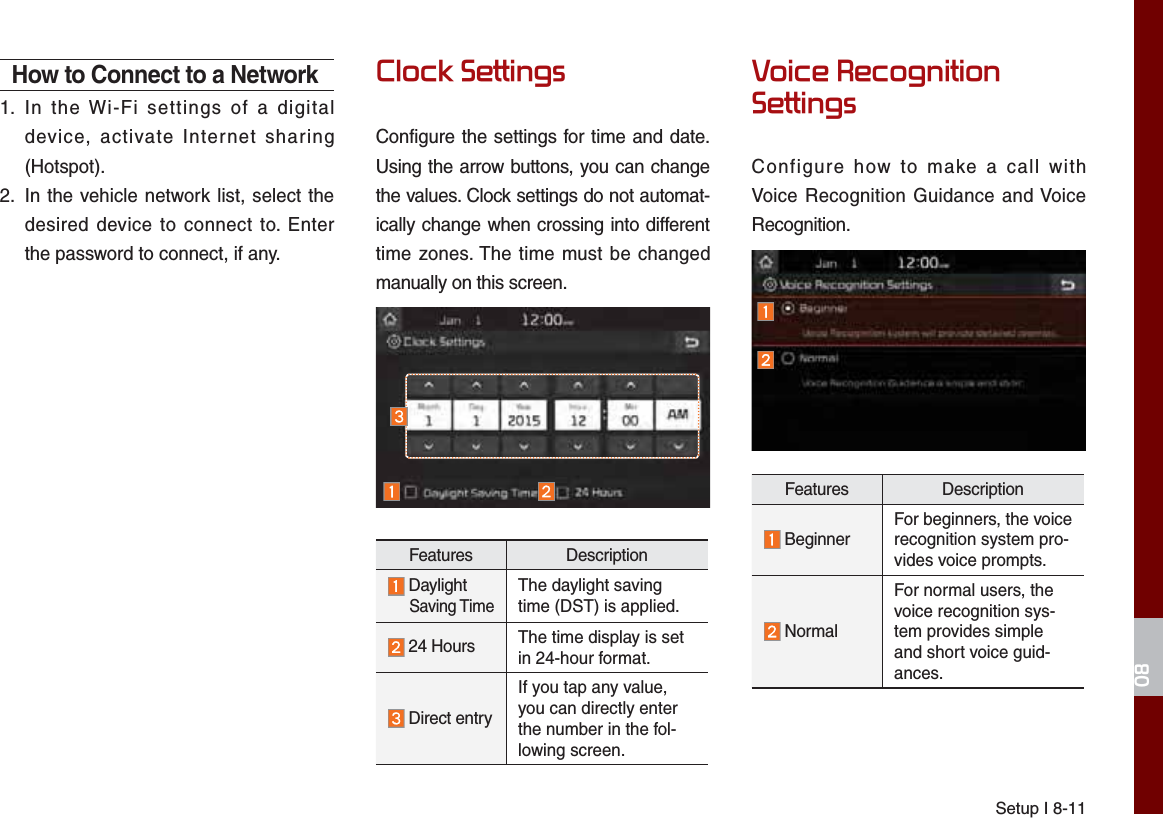
![5-2 I Navigation1DYLJDWLRQ%DVLF)HDWXUHVOperating Navigation ScreenBasic features on the map screen. Name DescriptionMove to Places Menu.Go to the Home screen.Change the map view mode.Adjusts the volume.Zoom in the map.Set the zoom level automatically according to the guidance.Zoom out the map. Quick and easy selection of a destination and options.1DYL0HQXEnter the navigation menu screen.Touch to scroll the map.6HWDV'HVWLQDWLRQQuick and easy selection of a destination from the map screen.$GG:D\SRLQWSet a waypoint to the current route.6DYHSave frequently used address to address book.32,Find a POI(Point Of Interest) around the current position.View the vehicle’s current position on the map screen.K_QL 16_G4.0[USA_EU]AVN_PART5.indd 5-2 2016-06-29 오후 4:02:47](https://usermanual.wiki/HYUNDAI-MOBIS/AVC40D9AN/User-Guide-3159510-Page-77.png)
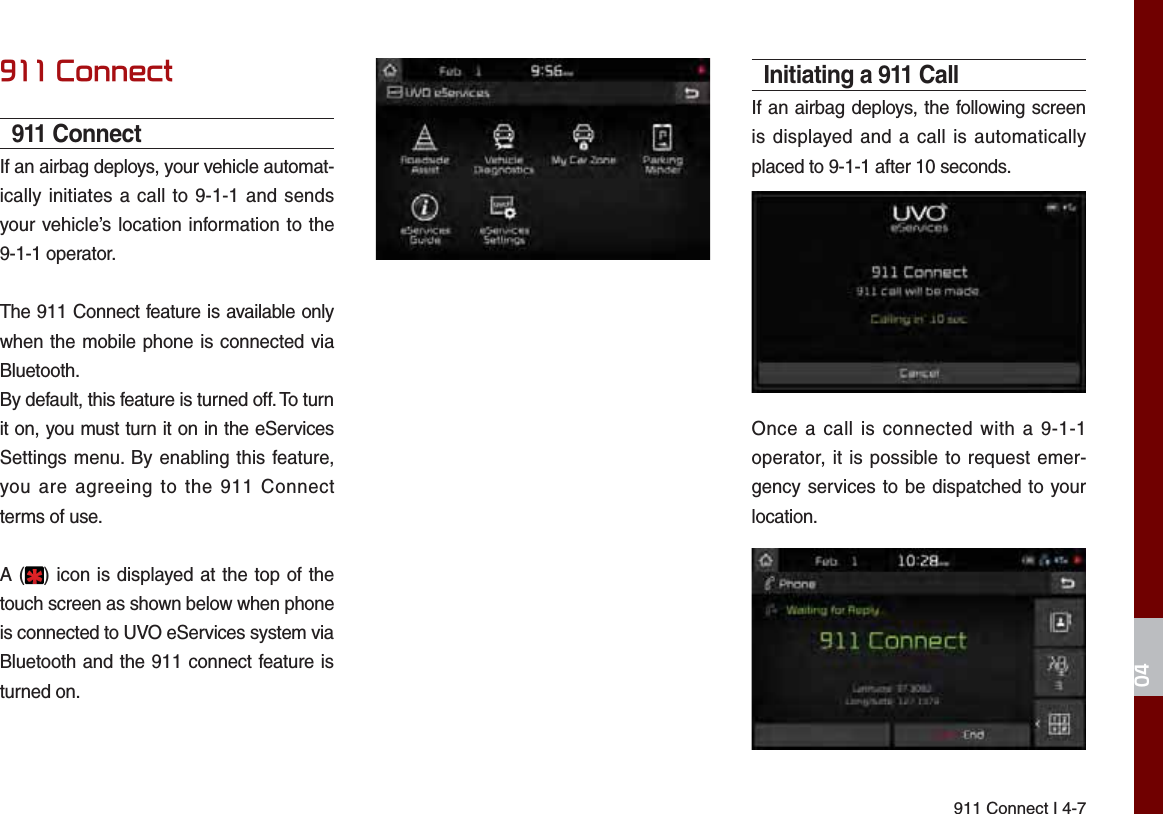
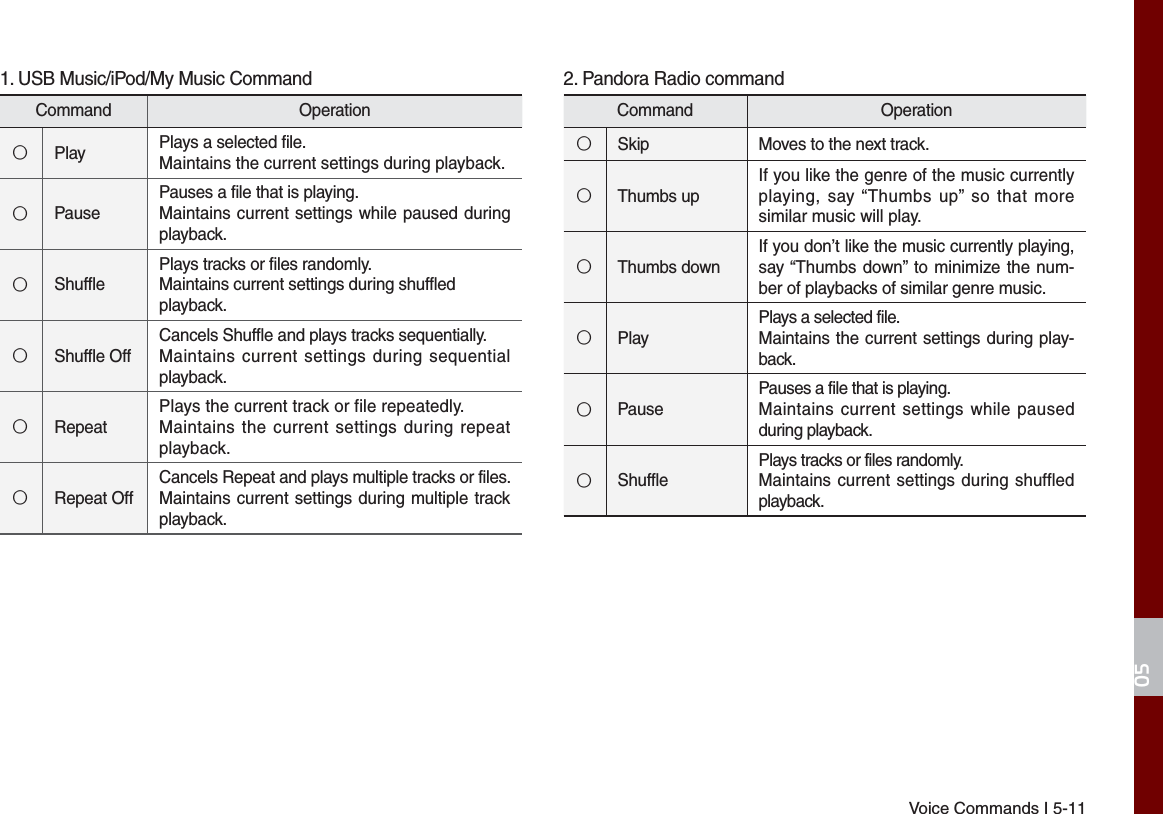
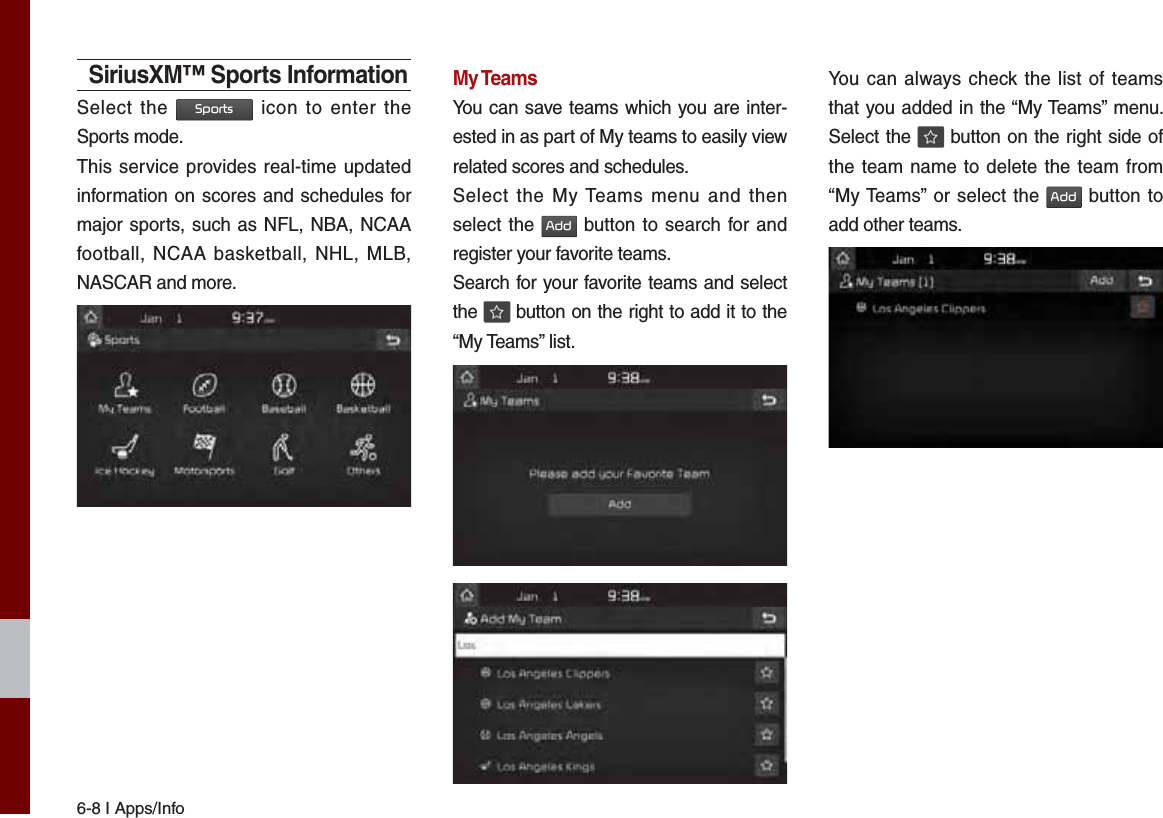
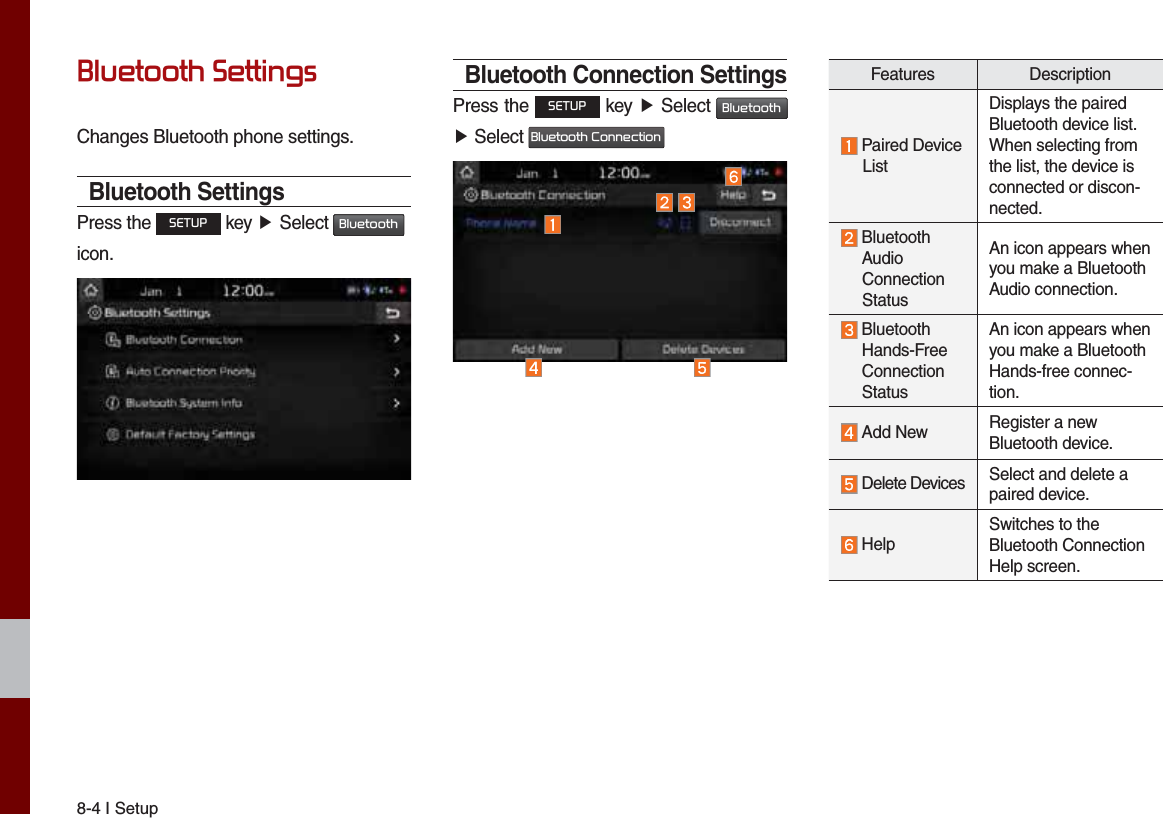
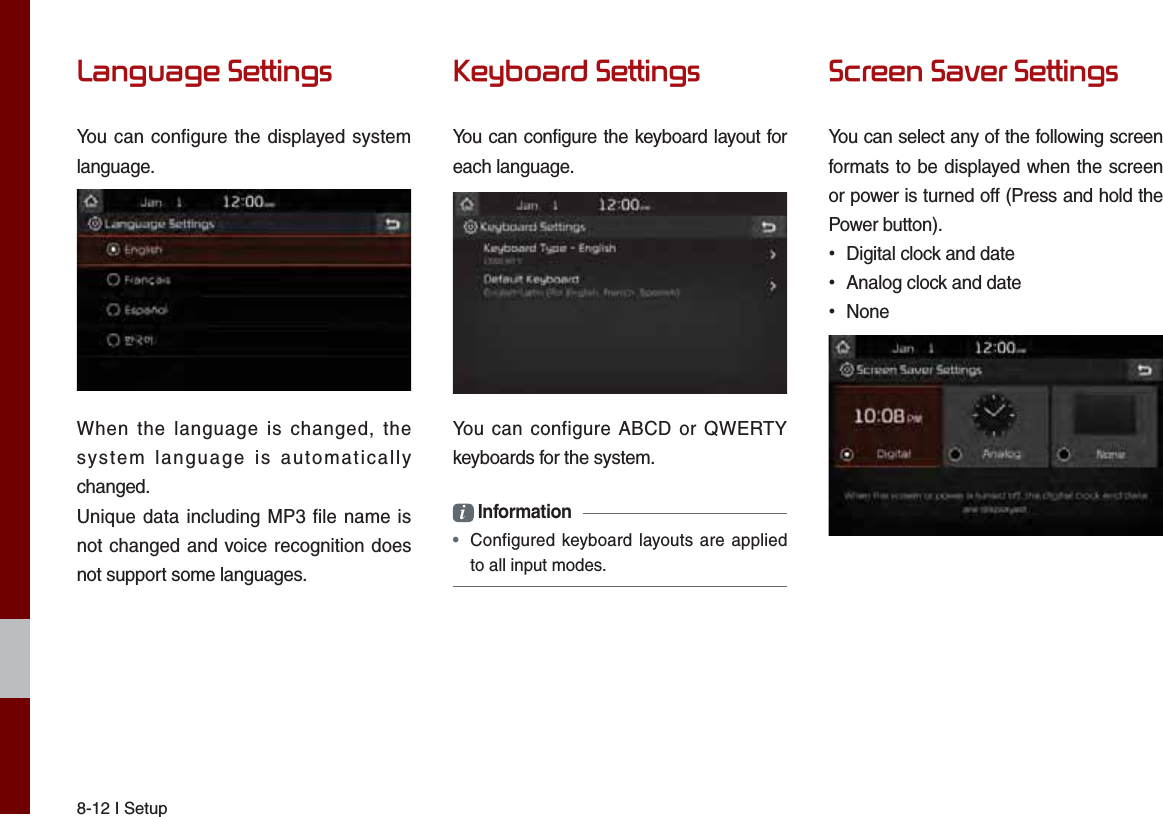
![Basic Features I 5-3PlacesYou can use this menu when the gear is in “Parking” mode and there is no destination set. Press the Search screen to move to “Places”. Please refer to “Places” in “Destination Search” for more details. Changing Map ViewTouch the compass arrow icon to toggle between a map oriented to the North, ori-ented parallel to the vehicle’s heading and 3D View.Navigation Volume Press the button to adjust the naviga-tion volume.Name Description Set the volume to mute. Turn the volume down. Turn the volume up. Slide to set the volume. Sets the volume of voice guid-ance louder than that of audio. K_QL 16_G4.0[USA_EU]AVN_PART5.indd 5-3 2016-06-29 오후 4:02:49](https://usermanual.wiki/HYUNDAI-MOBIS/AVC40D9AN/User-Guide-3159510-Page-78.png)
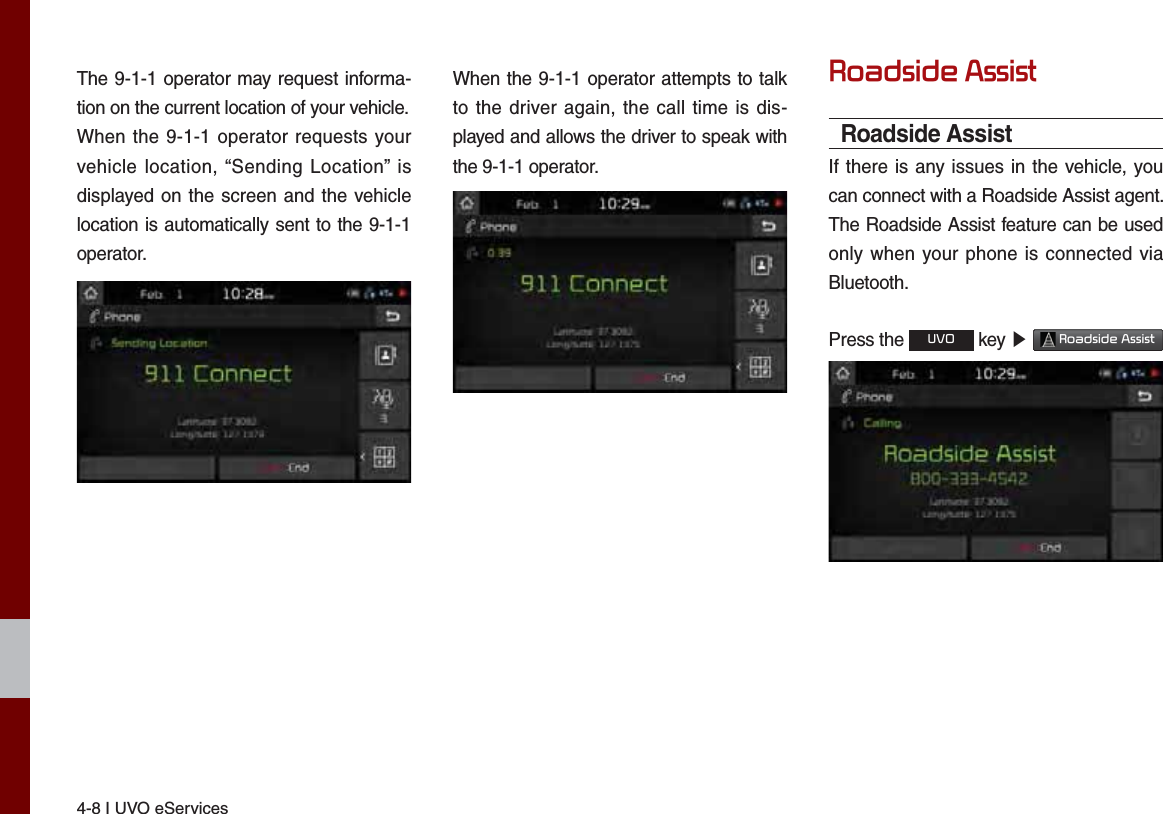
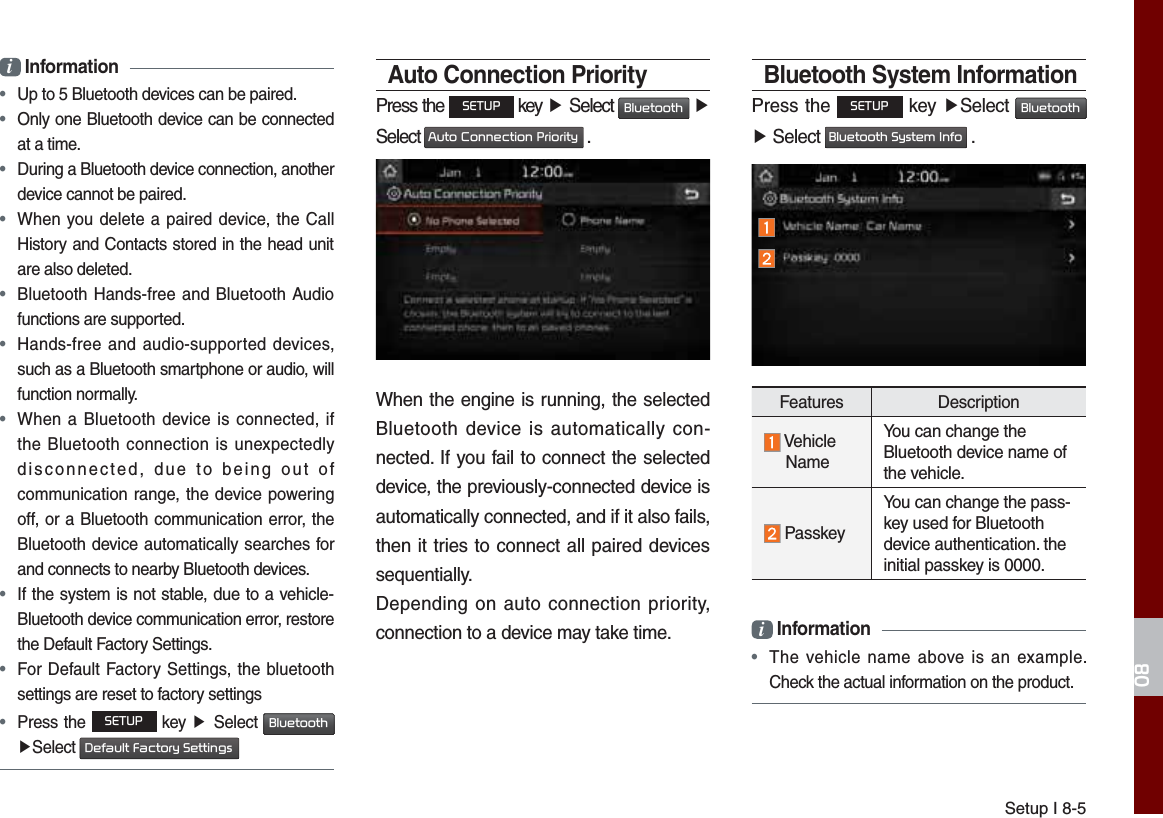
![5-4 I NavigationZoom In/Zoom OutZoom the map view screen in and out. Press or to set the zoom level.Map ScaleSets the zoom level automatically accord-ing to the type of road.Name Description Scale Fix Manually adjust the map scale. Auto Scale Change the map scale automatically depending on the type of road.0HQXRoutePress button on the bottom left of the screen ԡPress 5RXWH button.Select the 5RXWH button to set 5HURXWH, 5RXWH2SWLRQV or 'HWRXU.K_QL 16_G4.0[USA_EU]AVN_PART5.indd 5-4 2016-06-29 오후 4:02:51](https://usermanual.wiki/HYUNDAI-MOBIS/AVC40D9AN/User-Guide-3159510-Page-79.png)
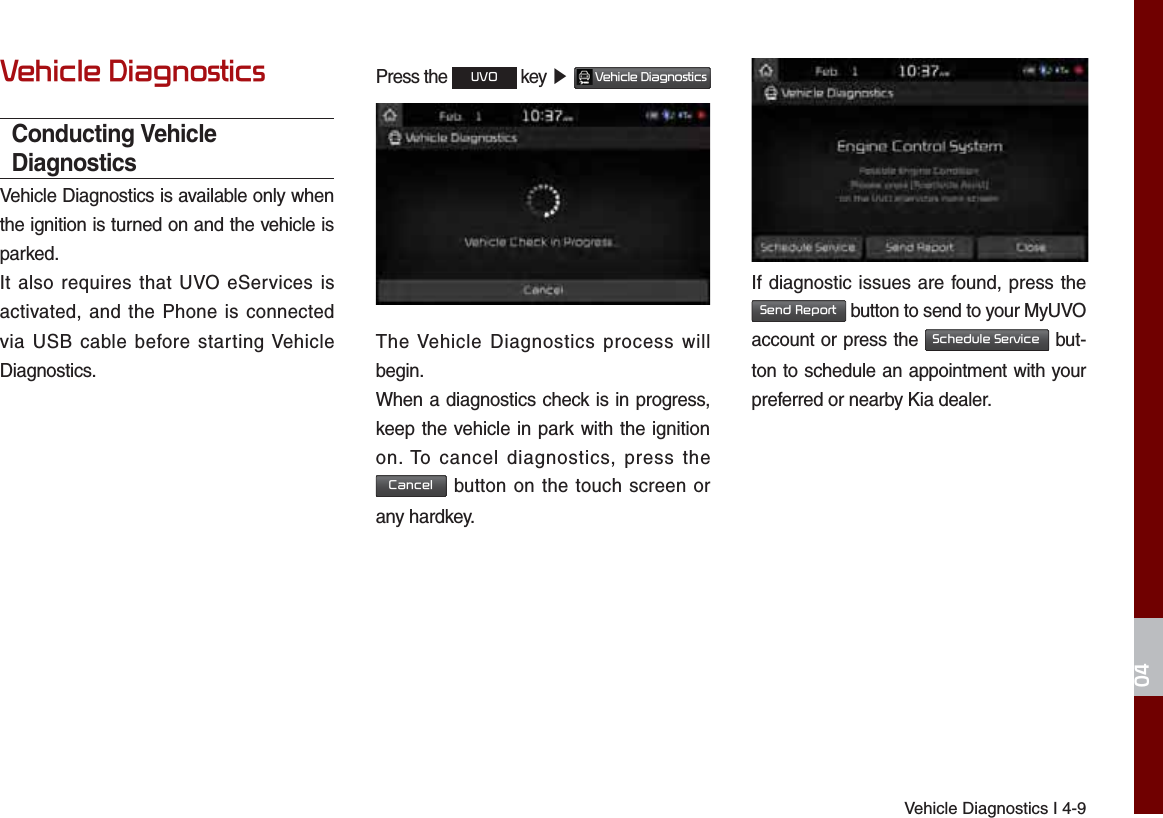
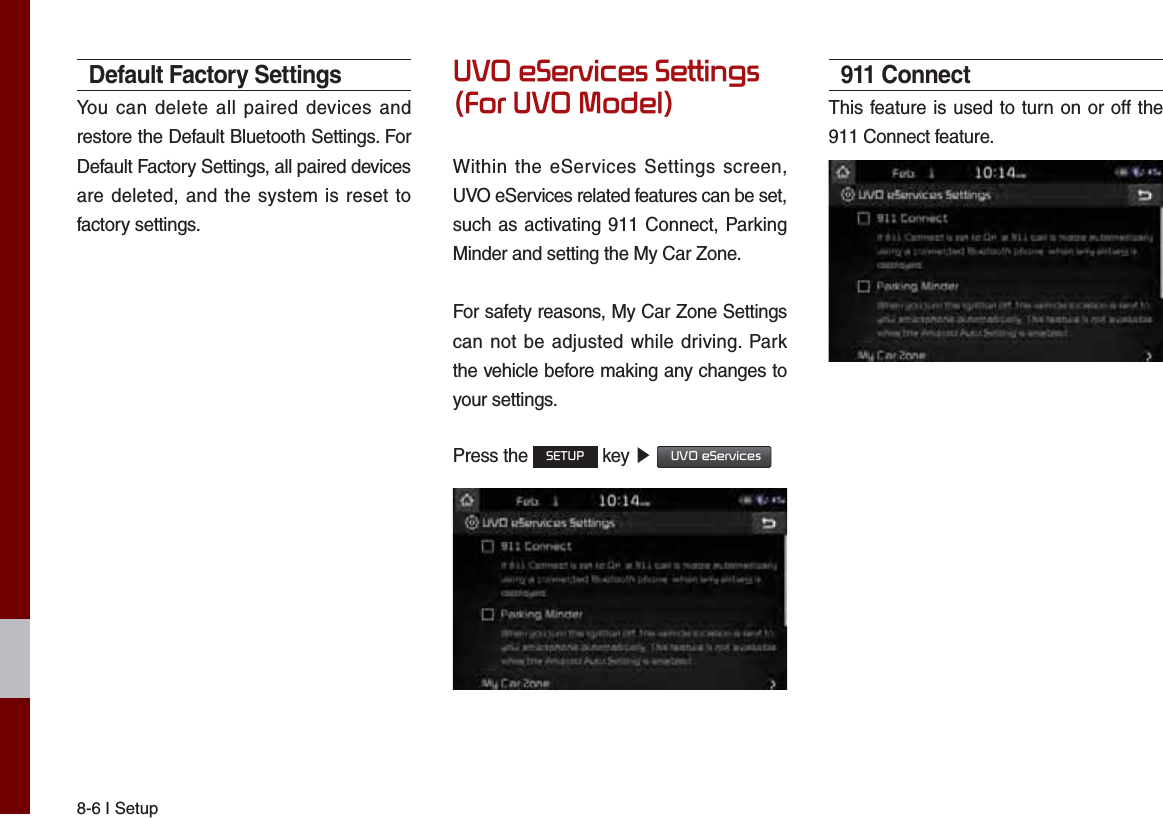
![Menu I 5-5RerouteThe 5HURXWH button is active only when there is an active route.You can search a route again.Route OptionsYou can select an option from Route, Traffic Information, Freeway, Toll Roads, Ferry, HOV/Carpool Lanes, Electronic Toll or Private/Gated Roads. Press 6DYH to save your selection. If there is a route already saved, another route will be searched. DetourThe 'HWRXU button is active only when there is an active route.Selected distance is detoured from the current location. K_QL 16_G4.0[USA_EU]AVN_PART5.indd 5-5 2016-06-29 오후 4:02:52](https://usermanual.wiki/HYUNDAI-MOBIS/AVC40D9AN/User-Guide-3159510-Page-80.png)
![5-6 I NavigationMap DisplayDisplays the direction of the map.Press , or .Name Description North Up (2D)Displays always has north at the top of screen. Heading Up (2D) Displays always shows the vehicle’s direction as proceeding towards the top of the screen. 3D Shows the map in 3 dimentions. 3D BuildingsShows or hides build-ings on the map.POISelect the button on the bottom left of the screen ԡ Select the 32, button.View Nearby POIsPress 2Q, 2II button to set whether to show nearby POIs or not. When catego-ries are selected, they will appear on the map. (ex. Gas Stations)The lists of nearby gas stations are dis-played. The list can be sorted to display in order of distance or name.K_QL 16_G4.0[USA_EU]AVN_PART5.indd 5-6 2016-06-29 오후 4:02:53](https://usermanual.wiki/HYUNDAI-MOBIS/AVC40D9AN/User-Guide-3159510-Page-81.png)
![Menu I 5-7Name Description Call to the selected location (Phone needs to be connected via Bluetooth). 6HWDV'HVWLQDWLRQSet the place as a des-tination. $GG:D\SRLQWSet the location as a waypoint. 6DYHSave the location. 32,Search nearby POIs.EditChange the shortcut POIs to display (ex. Gas Stations)Select the desired category to change. (ex Restaurants) Select new category to display (ex. American)*DV6WDWLRQV is changed to $PHULFDQ.K_QL 16_G4.0[USA_EU]AVN_PART5.indd 5-7 2016-06-29 오후 4:02:55](https://usermanual.wiki/HYUNDAI-MOBIS/AVC40D9AN/User-Guide-3159510-Page-82.png)
![5-8 I NavigationPOI CategoriesSelect the item to search.Press the +LVWRU\ button to check the pre-vious search result.Press the 6HDUFK button to search the POI category by name.Select the desired POI to check the loca-tion and for detailed information. Name Description Search POI around the current position. Search POI around the destina-tion. Active only when a route’s planned. Search POI along route. Active only when a route’s planned. Search POI around the current cursor when the map scrolled. Active only when the cursor position is different from the vehicle position. Search POI around the city selected.K_QL 16_G4.0[USA_EU]AVN_PART5.indd 5-8 2016-06-29 오후 4:02:57](https://usermanual.wiki/HYUNDAI-MOBIS/AVC40D9AN/User-Guide-3159510-Page-83.png)
![Menu I 5-9Traf fi cPress the button on the bottom left of the screen ԡ Select the 7UDIILF button.Traffi c ListOn the traffic list, the current traffic/road event information is displayed in order of distance. Name Description Direction from the current location. Distance from the current loca-tion (mi or km). Displays traffic info symbol based on the type of event. Description of traffic event. Additional traffic information may be dis-played upon clicking on the &DWHJRU\ button.Name DescriptionDisplay ‘Road Construction’ infor-mation.Display ‘Accident’ information.Display ‘Slow Traffic’ information.Display ‘Incident’ information.Display ‘Hazardous Road Conditions’ information.Display ‘Travel Information’.When 2Q5RXWH is activated, only traffic information on your route is displayed. K_QL 16_G4.0[USA_EU]AVN_PART5.indd 5-9 2016-06-29 오후 4:02:58](https://usermanual.wiki/HYUNDAI-MOBIS/AVC40D9AN/User-Guide-3159510-Page-84.png)
![5-10 I NavigationOn the traffic list, the current basic traf-fic/road event information is displayed in order of distance.Select the combo box to change the arrangement in order of Category/Distance.Name Description Select the combo box to arrange. Arrangement by category: Display traffic information arranged in order of traffic information event type. Arrangement by distance: Display the traffic information in order of distance closer to the current location.Traffi c detailSelect the traffic information on the traffic list to display the detailed screen as shown in the screen.Display the symbol of traffic event and arrow which indicates the road from start to end of the traffic event. Detailed infor-mation is available on the right screen. Name DescriptionSymbol of traffic event.Event name of traffic information. Road name/road number includ-ing direction. Direction and distance from the current location. Intersection where traffic event starts.Intersection where traffic event ends. Total distance of traffic event.Estimated delay time. Check the previous traffic infor-mation.Check the next traffic information. Detour the route based on the traffic information.K_QL 16_G4.0[USA_EU]AVN_PART5.indd 5-10 2016-06-29 오후 4:02:59](https://usermanual.wiki/HYUNDAI-MOBIS/AVC40D9AN/User-Guide-3159510-Page-85.png)
![Menu I 5-11Traffi c detourIf there is traffic information on the route, it is possible to detour the route using traffic information and search other routes.When the 'HWRXU button is enabled in the View Traffic Detail, press the 'HWRXU button to detour. on.Select the desired section..Check the information and press the 'HWRXU button.Press the 6WDUW*XLGDQFH button to apply the detoured sections and search other routes.K_QL 16_G4.0[USA_EU]AVN_PART5.indd 5-11 2016-06-29 오후 4:03:01](https://usermanual.wiki/HYUNDAI-MOBIS/AVC40D9AN/User-Guide-3159510-Page-86.png)
![5-12 I NavigationTraffi c Pop-upIf there is “red traffic flow” on the route, a traffic information pop-up is displayed.On the traffic information pop-up window, brief information is displayed and Details and Detour can be selected.If you do not wish to see this pop-up dis-played again during the current route, select ,JQRUH$OO(YHQWVRQ7KLV5RXWH button on the display. Name DescriptionPop-up Icon Symbol of traffic event Road Name/Road Number Distance from current location.Estimated delay time. Search detour route.View the detailed information regarding traffic event.Close the pop-up message. Set not to display pop-up on the current route. (Maintained until the destination is reset) On the traffic information pop-up, select detour or details to perform action.Press 'HWRXU to change the route.Press 'HWDLOV for further information.K_QL 16_G4.0[USA_EU]AVN_PART5.indd 5-12 2016-06-29 오후 4:03:03](https://usermanual.wiki/HYUNDAI-MOBIS/AVC40D9AN/User-Guide-3159510-Page-87.png)
![Menu I 5-13SavePress the button on the bottom left of the screen ԡ Select the 6DYH. To store the location on the current map to the address book.Name DescriptionChange the name.Enter the phone number.Select the 21, 2)) button to set the sound notification.Possible to register Symbol.Press ,FRQ1DPH, ,FRQ or 1RQH to display on the map screen. Designate to the Favorite item.When the favorite is designated, press the button on the bottom of the Destination menu and request the route guide immedi-ately.Save the setting.Turn ListPress the button on the bottom left of the screen ԡ Select the 7XUQ/LVW.Turn on or off the Turn List.K_QL 16_G4.0[USA_EU]AVN_PART5.indd 5-13 2016-06-29 오후 4:03:04](https://usermanual.wiki/HYUNDAI-MOBIS/AVC40D9AN/User-Guide-3159510-Page-88.png)
![5-14 I Navigation'HVWLQDWLRQ6HDUFKPlacesYou can enter POI Name, Address or Coordinates that you wish to search by.Press the 0$392,&( head unit key. ԡ Select the 1DYL0HQX in the bottom of right of the screen. ԡ Select the 'HVWLQDWLRQ tab. ԡ Select the Search Bar.Enter the POI Name, Address and Coordin-ates of the location you want in the input window above, and press the 'RQH button.If you select a location from the search result list, it will bring you to the point.If you press the )LOWHUE\&LW\ button on the search result screen, it will bring you to the City search screen where you can filter the search results by city names.If you press the )LOWHUE\&DWHJRU\ button from the search result screen, it will bring you to the POI Categories screen where you can filter the search results by POI Categories.Once the destination has been identified either by POI name, address, or coordi-nates, the map screen will be displayed.From this screen you can set the desti-nation or add a waypoint, or add the dis-played destination to your address book.K_QL 16_G4.0[USA_EU]AVN_PART5.indd 5-14 2016-06-29 오후 4:03:06](https://usermanual.wiki/HYUNDAI-MOBIS/AVC40D9AN/User-Guide-3159510-Page-89.png)
![Destination Search I 5-15AddressSet destination by address search.Press the 0$392,&( head unit key. ԡ Select the 1DYL0HQX in the bottom of right of the screen. ԡ Select the 'HVWLQDWLRQ tab. ԡ Select the $GGUHVV icon.How to Search AddressSearch criteria can be entered in any order. Example: 6WDWH then &LW\ then 6WUHHW then +RXVH1R.Name Description Select state to search. Enter house number. If you don’t know the house number, press 6NLS button. Enter a street name. If same street names exist in other cities, the list of cities will be displayed. Select a city before entering the street name. Addresses are searched only from the selected city. Enter the address to check the location information on the map.Name Description 6HWDV'HVWLQDWLRQSet the location as a destination. $GG:D\SRLQWSet the location as a waypoint. 6DYHSave the location. 32,Search nearby POIs.K_QL 16_G4.0[USA_EU]AVN_PART5.indd 5-15 2016-06-29 오후 4:03:08](https://usermanual.wiki/HYUNDAI-MOBIS/AVC40D9AN/User-Guide-3159510-Page-90.png)
![5-16 I NavigationPrevious DestinationsSelect from previously inputted addresses and POIs.Press the 0$392,&( head unit key. ԡ Select the 1DYL0HQX in the bottom of right of the screen. ԡ Select the 'HVWLQDWLRQ tab. ԡ Select the 3UHYLRXV'HVWLQDWLRQV icon. Arrange by all, latest destinations, latest searched places and latest departing places. Arrange in order of date and time. Name Description $OODisplay all destinations, departing places, and searched places. 'HVWLQDWLRQVDisplay previous desti-nation places for route guidance. 6WDUW3RLQWVDisplay previous depart-ing places for route guidance. 6HDUFKHVDisplay previously searched places for route guidance. But, not displayed when the searched places are set as destination.Press the 'HOHWH button to delete the information.Name Description 0DUN$OOSelect all. 8QPDUN$OODeselect all. 'HOHWHDelete the selected item(s).K_QL 16_G4.0[USA_EU]AVN_PART5.indd 5-16 2016-06-29 오후 4:03:09](https://usermanual.wiki/HYUNDAI-MOBIS/AVC40D9AN/User-Guide-3159510-Page-91.png)
![Destination Search I 5-17Local SearchPress the 0$392,&( head unit key. ԡ Select the 1DYL0HQX in the bottom of right of the screen. ԡ Select the 'HVWLQDWLRQ tab. ԡ Select the /RFDO6HDUFK icon.Runs Google Local Search.Enter the desired keywords and press the 'RQH button. Searching is in progress.If one or more results are found, the search results are displayed. Select one of the search result. Press the 6HWDV'HVWLQDWLRQ button to start guidance. K_QL 16_G4.0[USA_EU]AVN_PART5.indd 5-17 2016-06-29 오후 4:03:10](https://usermanual.wiki/HYUNDAI-MOBIS/AVC40D9AN/User-Guide-3159510-Page-92.png)
![5-18 I NavigationPOI CategoriesPress the 0$392,&( head unit key. ԡ Select the 1DYL0HQX in the bottom of right of the screen. ԡ Select the 'HVWLQDWLRQ tab. ԡ Select the 32,&DWHJRULHV icon.Select the desired item.Select the desired item in the sub-categories.Name Description Select the desired destination among the searched items and add it as a way point. Arrange in order of Distance and Name. Arrange in order of Near Current Position, Near Destination, Along Route, Near Scroll Mark and Near City Center.Gas Stations Search for gas stations.Press the 0$392,&( head unit key. ԡ Select the 1DYL0HQX in the bottom of right of the screen. ԡ Select the 'HVWLQDWLRQ tab. ԡ Select the *DV6WDWLRQV icon.Select the desired destinations among the search items. K_QL 16_G4.0[USA_EU]AVN_PART5.indd 5-18 2016-06-29 오후 4:03:11](https://usermanual.wiki/HYUNDAI-MOBIS/AVC40D9AN/User-Guide-3159510-Page-93.png)
![Destination Search I 5-19RestaurantsSearch restaurants.Press the 0$392,&( head unit key. ԡ Select the 1DYL0HQX in the bottom of right of the screen. ԡ Select the 'HVWLQDWLRQ tab. ԡ Select the 5HVWDXUDQWV icon.Select the desired destination among the searched items.EmergencySearch emergency facilities.Press the 0$392,&( head unit key. ԡ Select the 1DYL0HQX in the bottom of right of the screen. ԡ Select the 'HVWLQDWLRQ tab. ԡ Select the (PHUJHQF\ icon.Check the current location information and select the desired item in the sub menu (ex. Police Stations)Select the desired destination among the searched items.K_QL 16_G4.0[USA_EU]AVN_PART5.indd 5-19 2016-06-29 오후 4:03:12](https://usermanual.wiki/HYUNDAI-MOBIS/AVC40D9AN/User-Guide-3159510-Page-94.png)
![5-20 I NavigationAddress BookSearch the destination with the address book.Press the 0$392,&( head unit key. ԡ Select the 1DYL0HQX in the bottom of right of the screen. ԡ Select the 'HVWLQDWLRQ tab. ԡ Select the $GGUHVV%RRN icon.Select the desired group.If you save address in the Favorites tab, you can set destinations easily by pressing the icons such as *R+RPH and 2IILFH at the bottom of the Destination menu.Name Description Select the desired destination from the searched items.Edit the item. Register a new Address. Delete the desired item.Phone NumberPress the 0$392,&( head unit key. ԡ Select the 1DYL0HQX in the bottom of right of the screen. ԡ Flick the screen in up direction to scroll to the bottom row of icons in the Destination tab. ԡ Select the 3KRQH1XPEHU to search POI by phone.Search destination by phone number.K_QL 16_G4.0[USA_EU]AVN_PART5.indd 5-20 2016-06-29 오후 4:03:13](https://usermanual.wiki/HYUNDAI-MOBIS/AVC40D9AN/User-Guide-3159510-Page-95.png)
![Destination Search I 5-21Type phone number to search. To search for a list of numbers based on a partial phone number entry, enter a few numbers and press 'RQH to narrow the search results.Select the desired destination among the searched items.Press the 6HWDV'HVWLQDWLRQ button to start guidance. Freeway Exit/EntrancePress the 0$392,&( head unit key. ԡ Select the 1DYL0HQX in the bottom of right of the screen. ԡ Select the )UHHZD\([LW(QWUDQFH to search by freeway exit/entrance.Type freeway name and exit/entrance. Press the 6HWDV'HVWLQDWLRQ button to start guidance.K_QL 16_G4.0[USA_EU]AVN_PART5.indd 5-21 2016-06-29 오후 4:03:14](https://usermanual.wiki/HYUNDAI-MOBIS/AVC40D9AN/User-Guide-3159510-Page-96.png)
![5-22 I NavigationIntersectionPress the 0$392,&( head unit key. ԡ Select the 1DYL0HQX in the bottom of right of the screen. ԡ Select the ,QWHUVHFWLRQ to search by intersection. Type 1st Street name, the State, 2nd Street name.Press the 6HWDV'HVWLQDWLRQ button to start guidance. CoordinatesPress the 0$392,&( head unit key. ԡ Select the 1DYL0HQX in the bottom of right of the screen. ԡ Select the &RRUGLQDWHV to search by coordinates.There are two ways to search by coordi-nates (D.M.S or Decimal Degrees). After typing coordinates, press the 'RQH but-ton to search.K_QL 16_G4.0[USA_EU]AVN_PART5.indd 5-22 2016-06-29 오후 4:03:16](https://usermanual.wiki/HYUNDAI-MOBIS/AVC40D9AN/User-Guide-3159510-Page-97.png)
![Destination Search I 5-23Press the 6HWDV'HVWLQDWLRQ button to start guidance. Favorite PlacesSet the route using your favorite places. Press the 0$392,&( head unit key. ԡ Select the 1DYL0HQX in the bottom of right of the screen. ԡ Select the 'HVWLQDWLRQ tab. ԡ Select from favorite places.On the button where locations are not reg-istered, the icon is displayed. When a location is registered, the button disap-pears and the buttons 1 to 3 are displayed as your favorite places.Press the *R+RPH button then press the <HV button to set the Favorite ‘Go Home’.K_QL 16_G4.0[USA_EU]AVN_PART5.indd 5-23 2016-06-29 오후 4:03:18](https://usermanual.wiki/HYUNDAI-MOBIS/AVC40D9AN/User-Guide-3159510-Page-98.png)
![5-24 I NavigationOffice, Special 1, Special 2, and Special 3 can also be set as a Favorite using the same steps.Pressing any of the Favorite Place buttons will start the route guidance to the saved Favorite address.Route SettingThe route can be set after searching for a destination.While the destination is set, the buttons 6HWDV'HVWLQDWLRQ and $GG:D\SRLQW appear. Press the desired button to change a des-tination or add a waypoint.Destination SettingAfter searching the destination, press the 6HWDV'HVWLQDWLRQ button to set the location as a destination.K_QL 16_G4.0[USA_EU]AVN_PART5.indd 5-24 2016-06-29 오후 4:03:18](https://usermanual.wiki/HYUNDAI-MOBIS/AVC40D9AN/User-Guide-3159510-Page-99.png)
![Destination Search I 5-25All RoutesWhen the alternative routes option is enabled in navigation setting, two routing options are displayed based on faster time and shorter distance. • Faster Time: Select time-optimized route, being the fastest roads.• Shorter Distance: Select short distance, irrespective of how fast or slow progress will be calculated.Name Description Display total distance, travel time. Select the desired route. 6WDUW*XLGDQFHStart the guidance with the route. 5RXWH2SWLRQVChange the route option. 5RXWH,QIRYou can check route information. (GLW5RXWHEdit the route. Total Display total distance of the route. Freeway Display length of freeway on the route. Toll Road Display length of toll road on the route. Ferry Display length of Ferry route on the route.The route will be calculated using the option “Faster Time” by default.Alternative routes can be suggested if necessary, 6(783 key ԡ1DYLJDWLRQIcon ԡ Route ԡAlternative: ONK_QL 16_G4.0[USA_EU]AVN_PART5.indd 5-25 2016-06-29 오후 4:03:19](https://usermanual.wiki/HYUNDAI-MOBIS/AVC40D9AN/User-Guide-3159510-Page-100.png)
![5-26 I NavigationAdding WaypointPress the $GG:D\SRLQW button to set the position as a waypoint and search the route.Name Description Display the selected point on the map screen. Move the selected item up. Move the selected item down. Delete the selected item. 'RQHPress the button to fin-ish editing. $GG:D\SRLQWPress the button to add waypoint.Registering LocationPress 6DYH at the desired location to register the location.Enter the detailed information of the loca-tion to save.K_QL 16_G4.0[USA_EU]AVN_PART5.indd 5-26 2016-06-29 오후 4:03:20](https://usermanual.wiki/HYUNDAI-MOBIS/AVC40D9AN/User-Guide-3159510-Page-101.png)
![Destination Search I 5-27Route GuidanceShow route guidance detailed information. Route Guidance ScreenRemaining Time: Display the time remain-ing until destination.Arrival Time: Display the estimated time of arrival.Name Description Displays the distance and direction to the first turn point. Displays the distance and direction to the second turn point. Displays the lane infor-mation at the current location. Display the recommended direc-tion in white, travelable direction in white, and the non-travelable direction in grey. Displays the distance to the destination and the estimated time of arrival. Press the button to check the detailed information. If no way-point is set, you will see the remaining distance or estimated time of arrival in turn each time you click the button. &DQFHO5RXWHCancel the route. 1DYL0HQXEnter the navigation menu screen. 'HVWLQDWLRQ,QIRDisplays the destina-tion information. 7XUQ/LVWTurn on or off the Turn List.K_QL 16_G4.0[USA_EU]AVN_PART5.indd 5-27 2016-06-29 오후 4:03:21](https://usermanual.wiki/HYUNDAI-MOBIS/AVC40D9AN/User-Guide-3159510-Page-102.png)
![5-28 I NavigationSplit Screen during Route GuidanceApproaching the turning point, the detailed road and travel information is automatically displayed on the right side of the screen.Name Description • Turn Point: Displays direction and shape to turn shortly.• Distance to turn: Displays distance to next turn point. Road name to maneu-ver: Info of the road. Detail Distance Bar:Displays distance to nextturn point.'HWDLOV additional info can be displayed on Freeway.Additional info of Freeway exit or Rest area can be displayed by pressing the but-ton 'HWDLOV. Detailed information for POIs around free-way exit is listed by pressing POI symbols. K_QL 16_G4.0[USA_EU]AVN_PART5.indd 5-28 2016-06-29 오후 4:03:23](https://usermanual.wiki/HYUNDAI-MOBIS/AVC40D9AN/User-Guide-3159510-Page-103.png)
![Route Search I 5-295RXWH6HDUFKCanceling RouteCancel the route.Press the 0$392,&( head unit key. ԡ Select the 1DYL0HQX in the bottom of right of the screen. ԡ Press the 5RXWH tab. ԡ Select &DQFHO5RXWH.Click &DQFHO5RXWH the icon.Press the <HV button to cancel the route.Display Route InformationPress the 0$392,&( head unit key. ԡ Select the 1DYL0HQX in the bottom of right of the screen. ԡ Press the 5RXWH tab. ԡ Select 5RXWH,QIR.Press the 5RXWH,QIR icon.Check the information on the map. Select the desired item to see the map informa-tion. Avoiding a roadClick the $YRLG6WUHHW button to avoid the street or road.Check the desired item and press the 'RQH button to finish.K_QL 16_G4.0[USA_EU]AVN_PART5.indd 5-29 2016-06-29 오후 4:03:24](https://usermanual.wiki/HYUNDAI-MOBIS/AVC40D9AN/User-Guide-3159510-Page-104.png)
![5-30 I NavigationRoute OverviewCheck the information on route including the distance, estimated time, toll fees, etc. Press the 0$392,&( head unit key. ԡ Select the 1DYL0HQX in the bottom of right of the screen. ԡ Press the 5RXWH tab. ԡ Select 5RXWH2YHUYLHZ.Press the 5RXWH2YHUYLHZ icon.Name Description 5RXWH2SWLRQVChange the search option. 5RXWH,QIRYou can check route information. (GLW5RXWHEdit the current route.Route PreviewCheck the detailed turn-by-turn list.Press the 0$392,&( head unit key. ԡ Select the 1DYL0HQX in the bottom of right of the screen. ԡ Press the 5RXWH tab. ԡ Select 5RXWH3UHYLHZ.Press the 5RXWH3UHYLHZ icon.K_QL 16_G4.0[USA_EU]AVN_PART5.indd 5-30 2016-06-29 오후 4:03:25](https://usermanual.wiki/HYUNDAI-MOBIS/AVC40D9AN/User-Guide-3159510-Page-105.png)
![Route Search I 5-31Name Description Departure PlaceMove to the departure location. Previous Move to the previous maneuver. Forward Move to the next maneuver. Destination Move to the destina-tion location. Section Displaying BarTouch bar to move to the specific position. Close the route pre-view.Editing RouteEdit the current route.Press the 0$392,&( head unit key. ԡ Select the 1DYL0HQX in the bottom of right of the screen. ԡ Press the 5RXWH tab. ԡ Select (GLW5RXWH.Press the (GLW5RXWH icon.Name Description Display the selected point on the map screen. Move the selected item up. Move the selected item down. Delete the selected item. 'RQHPress the button to finish editing. $GG:D\SRLQWPress the button to add an waypoint.K_QL 16_G4.0[USA_EU]AVN_PART5.indd 5-31 2016-06-29 오후 4:03:26](https://usermanual.wiki/HYUNDAI-MOBIS/AVC40D9AN/User-Guide-3159510-Page-106.png)
![5-32 I NavigationAdd the waypoint through various search-ing methods.Route OptionsPress the 0$392,&( head unit key. ԡ Select the 1DYL0HQX in the bottom of right of the screen. ԡ Press the 5RXWH tab. ԡ Select 5RXWH2SWLRQV. Press the 5RXWH2SWLRQV icon.Determine the route options to guide the route.Avoid StreetSearch new route by avoiding the selected street(s).Press the 0$392,&( head unit key. ԡ Select the 1DYL0HQX in the bottom of right of the screen. ԡ Press the 5RXWH tab. ԡ Select $YRLG6WUHHW.Press the $YRLG6WUHHW icon.Press the 'RQH to plan new route after selecting the street(s) that you want to avoid.K_QL 16_G4.0[USA_EU]AVN_PART5.indd 5-32 2016-06-29 오후 4:03:26](https://usermanual.wiki/HYUNDAI-MOBIS/AVC40D9AN/User-Guide-3159510-Page-107.png)
![Navigation Settings I 5-331DYLJDWLRQ6HWWLQJVGeneralChange general settings.Name Description Unit Change the unit of PLOH, NP . Show Previous Destinations after Navigation Start-UpPress the 21,2)) button to change the previous desti-nation view setting when starting the navigation. GPS Information Check the GPS information. 5HVWRUHIDFWRU\VHWWLQJVPress the 5HVWRUHIDFWRU\VHWWLQJVbutton to initialize.Press the *36,QIRUPDWLRQ to display the detail GPS satellites information. Name Description 5HFHLYLQJActive when current posi-tion is being calculated. Speed Display current speed of the vehicle. Location Display current position of the vehicle. Elevation Display current elevation of the vehicle. Time Display time. Date Display date. DisplayChange the display map settings.Change the map colors and the route guidance line colors.Change the vehicle symbol.K_QL 16_G4.0[USA_EU]AVN_PART5.indd 5-33 2016-06-29 오후 4:03:28](https://usermanual.wiki/HYUNDAI-MOBIS/AVC40D9AN/User-Guide-3159510-Page-108.png)
![5-34 I NavigationGuidanceChange the guidance setting.Name Description Number of Guidance PromptsSet the frequency of guidance. )HZHURoute guidance is given less frequently. 0RUH Guidance will be pro-vided frequently. Curve AlertChange whether to turn curve alert 21 and 2)). Speed LimitChange whether to show speed limit by pressing 21 and 2)).RouteChange the route setting.Press the 21 or 2)) button to change the Alternative Routes setting.• Alternative on: Alternative routes will be suggested (depending on the route preference between “Faster time” and “Shorter Distance”). NOTICE• Alternative routes can be shown only while the vehicle is not moving.• Alternative off: No alternative routes will be suggested. Guidance will start right after calculating with the route prefer-ence (Faster time or Shorter distance).Traf fi cChange the traffic information setting.Press the 21 or 2)) button to change the settings.• Show Traffic Information On/Off: Select whether to display traffic information or not. • Traffic Event Pop-up Freeway On/Off: Select whether to display Pop-up mes-sage for traffic information on freeway. • Traffic Event Pop-up Surface Road On/Off: Select whether to display Pop-up message for traffic information on sur-face road.K_QL 16_G4.0[USA_EU]AVN_PART5.indd 5-34 2016-06-29 오후 4:03:29](https://usermanual.wiki/HYUNDAI-MOBIS/AVC40D9AN/User-Guide-3159510-Page-109.png)
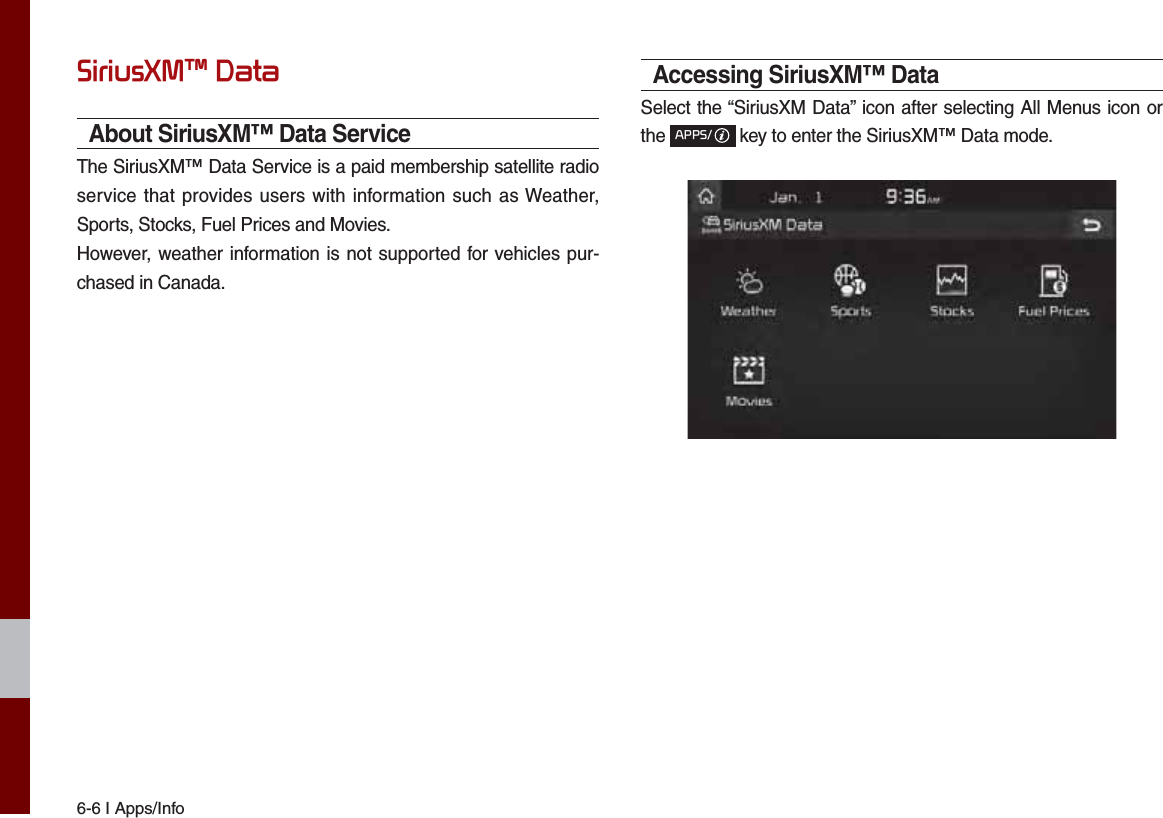
![Troubleshooting I 5-357URXEOHVKRRWLQJThe current position as shown on the navigation may differ from the actual position under the following conditions. The following occurrences are not malfunctions :• When driving on Y-shaped roads with narrow angles the current position may be displayed in the opposite direction• Within city streets, the current posi-tion may be displayed on the oppo-site side or on an off-road position• When changing the zoom level from maximum to a different level, the current position may become displayed on a different road• If the vehicle is loaded onto a ferry or a car transport vehicle, the cur-rent position may become stalled on the last position prior to loading• When driving on a spiral-shaped road• When driving in mountain regions with sharp turns or sudden brakes• When entering a road after passing an underground parking structure, building parking structure, or roads with many rotations• When driving in heavy traffic with frequent starts and stops• When driving under slippery condi-tions, such as heavy sand, snow, etc.• When driving on spiral-shaped roads• When the tires have recently been replaced (Especially upon use of spare or studless tires).• When using tires of improper size• When the tire pressure for the 4 tires are different• When the replacement tire is worn or used (Especially studless tires hav-ing passed a second season).• When driving near high-rise buildings• When a roof carrier has been installed• When a long distance route is calcu-lated while driving on an expressway In such cases, continued driving will automatically enable the system to conduct map matching or use updated GPS information to pro-vide the current position (In such cases, up to several minutes may be required)Correct route guidance may not occur due to search conditions or driving position.The following occurrences are not malfunctions :• Guidance to go straight may be given while driving on a straight road• Guidance may not be given even when having turned at an inter-section• There are certain intersections in which guidance may not occur• A route guidance signaling for a u-turn may occur in some No u-turn intersections• Route guidance signaling entrance into a No-entry zone may occur (No-entry zone, road under construction, etc.)• Guidance may be given to a posi-tion that is not the actual destina-tion if roads to reach the actual destination do not exist or are too narrow• Faulty voice guidance may be given if the vehicle breaks away from the designated route. (e.g. if a turn is made at an intersection while the navigation provided guidance to go straight.)These situations may occur after conducting route calculation. The following occurrences are not malfunctions :• Guidance may be given to a position differing from the current position when turning at an inter-section• When driving in high speeds, route recalculation may take a longer period of time• Route guidance signaling for a u-turn may occur in some No u-turn intersections• Route guidance signaling entrance into No-entry zone may occur. (No-entry zone, road under construc-tion, etc.)• Guidance may be given to a position removed from the actual destination if roads to reach the actual destina-tion do not exist or are too narrow• Faulty voice guidance may be given if the vehicle breaks away from the designated route (e.g. If a turn is made at an intersection while the navigation provided guidance to go straight.)K_QL 16_G4.0[USA_EU]AVN_PART5.indd 5-35 2016-06-29 오후 4:03:30](https://usermanual.wiki/HYUNDAI-MOBIS/AVC40D9AN/User-Guide-3159510-Page-110.png)
![END USER LICENSE AGREEMENTEND USER LICENSE AGREEMENTPLEASE READ THIS END USER LICENSE AGREEMENT (“EULA”) CAREFULLY BEFORE USING THE NAVIGATION SYSTEM.PLEASE READ THIS END USER LICENSE AGREEMENT (“EULA”) CAREFULLY BEFORE USING THE NAVIGATION SYSTEM.This is a license agreement between you and Hyundai MnSoft, INC. including its affiliates (“COMPANY”) regarding a copy of the COMPANY navigable map database together with associated software, media and explanatory printed documentation published by COMPANY(jointly the “Product”). The Product is provided for your personal, internal use only and not for resale. It is protected by copyright and is subject to the following terms which are agreed to by you, on the one hand, and COMPANY and its licensors (and their licensors and suppliers) (collectively, “Licensors”) on the other hand.By using the Product, you accept and agree to all terms and conditions in this End User License Agreement (“EULA”). IF YOU DO NOT AGREE TO THE TERMS OF THIS EULA, YOU MUST PROMPTLY EXIT THE PRODUCT OPERATION PROGRAM AND DO NOT USE OR ACCESS TO THE PRODUCT. YOU AGREE THAT YOUR RIGHTS UNDER THIS EULA MAY BE TERMINATED AUTOMATICALLY WITHOUT NOTICE IF YOU FAIL TO COMPLY WITH ANY TERM(S) OF THIS EULA. K_QL 16_G4.0[USA_EU]AVN_PART5.indd 5-36 2016-06-29 오후 4:03:30](https://usermanual.wiki/HYUNDAI-MOBIS/AVC40D9AN/User-Guide-3159510-Page-111.png)
![Terms and Conditions Personal Use Only. You agree to use this Product together with COMPANY’s authorized application for the solely personal, non-commer-cial purposes for which you were licensed, and not for service bureau, time-sharing or other similar purposes. Accordingly, but subject to the restrictions set forth in the following paragraphs, you agree not to otherwise reproduce, copy, modify, decompile, disassemble, create any derivative works of, or reverse engineer any portion of this Data, and may not transfer or distribute it in any form, for any purpose, except to the extent permitted by mandatory laws. You may not assign this EULA or any of the rights or licenses granted under this EULA, except when installed in the system for which it was created.Restrictions. Except where you have been specifically licensed to do so by COMPANY, and without limiting the preceding paragraph, you may not use the Product (i) with any products, systems, or applications installed or otherwise connected to or in communication with vehi-cles, capable of vehicle navigation, positioning, dispatch, real time route guidance, fleet management or similar applications; or (ii) with or in communication with any positioning devices or any mobile or wireless-connected electronic or computer devices, including without lim-itation cellular phones, palmtop and handheld computers, pagers, and personal digital assistants or PDAs.COPYING OR USE OF THE PRODUCT EXCEPT AS PERMITTED BY THIS EULA IS UNAUTHORIZED AND IS COPYRIGHT COPYING OR USE OF THE PRODUCT EXCEPT AS PERMITTED BY THIS EULA IS UNAUTHORIZED AND IS COPYRIGHT INFRINGEMENT UNDER THE LAWS OF YOUR COUNTRY. IF YOU COPY OR USE THE PRODUCT WITHOUT COMPANY’S INFRINGEMENT UNDER THE LAWS OF YOUR COUNTRY. IF YOU COPY OR USE THE PRODUCT WITHOUT COMPANY’S PERMISSION, EXCEPT AS PERMITTED BY THIS EULA, YOU ARE VIOLATING THE LAW AND LIABLE TO COMPANY AND ITS PERMISSION, EXCEPT AS PERMITTED BY THIS EULA, YOU ARE VIOLATING THE LAW AND LIABLE TO COMPANY AND ITS LICENSORS FOR DAMAGES, AND YOU MAY BE SUBJECT TO CRIMINAL PENALTIES.LICENSORS FOR DAMAGES, AND YOU MAY BE SUBJECT TO CRIMINAL PENALTIES.K_QL 16_G4.0[USA_EU]AVN_PART5.indd 5-37 2016-06-29 오후 4:03:30](https://usermanual.wiki/HYUNDAI-MOBIS/AVC40D9AN/User-Guide-3159510-Page-112.png)
![THE PRODUCT MAY INCLUDE ENFORCEMENT TECHNOLOGY DESIGNED TO PREVENT (i) UNAUTHORIZED COPYING OF THE PRODUCT ONTO PHYSICAL STORAGE MEDIA OR VIA TRANSFER OVER THE INTERNET OR OTHER ELECTRONIC COMMUNICATION MEANS AND/OR (ii) ILLEGAL USAGE OF THE PRODUCT OTHER THAN BY A SPECIFICALLY AHTORIZED DEVICE. YOU AGREE THAT COMPANY MAY USE THESE MEASURES TO PROTECT COMPANY AND THE LICENSORS AGAINST COPYRIGHT INFRINGEMENT.Uploads. The Product may provide functionality through which you are able to upload certain information about your use of the Product (collectively, “Uploads”) to COMPANY’s servers or receive other services from COMPANY (collectively, the “Services”). If you use such functionality, you authorize COMPANY to retain your Uploads on its servers. COMPANY will have no obligation to provide any Services, may change the form and nature of any Services at any time with or without notice to you, will have no liability whatsoever to you for any failure of the Product or Services to transmit your Uploads to or from COMPANY’s servers, may cease providing any Services at any time with or without notice to you, and will have no obligation to retain your Uploads (or any other materials you may provide to COMPANY) on its servers or return your Uploads (or any other materials you may provide to COMPANY) to you before deleting them from its servers.Storage. The Product may provide functionality through which you are able to store information (such as images) on the device on which you are using the Product. COMPANY will have no liability whatsoever to you or any third party for any failure of the Product to store any such information on such device.K_QL 16_G4.0[USA_EU]AVN_PART5.indd 5-38 2016-06-29 오후 4:03:31](https://usermanual.wiki/HYUNDAI-MOBIS/AVC40D9AN/User-Guide-3159510-Page-113.png)
![Personal Information. By using the Product, you agree to the collection, retention and processing of your personal data (including the loca-tion of your mobile device) by COMPANY and to the storage and processing of such personal information on computers located outside of the country in which you reside. Even though COMPANY has taken steps intended to protect your personal information from being intercepted, accessed, used, or disclosed by unauthorized persons, COMPANY cannot fully eliminate security risks associated with your personal information and cannot guarantee that its systems will not be breached. See [*] for additional information regarding COMPANY’s use of your personal information.WARNING.WARNING. THE PRODUCT REFLECTS REALITY AS EXISTING BEFORE YOU RECEIVED THE PRODUCT AND IT COMPRISES THE PRODUCT REFLECTS REALITY AS EXISTING BEFORE YOU RECEIVED THE PRODUCT AND IT COMPRISES DATA AND INFORMATION FROM GOVERNMENT OTHER SOURCES. ACCORDINGLY, THE PRODUCT MAY CONTAIN INACCURATE DATA AND INFORMATION FROM GOVERNMENT OTHER SOURCES. ACCORDINGLY, THE PRODUCT MAY CONTAIN INACCURATE OR INCOMPLETE INFORMATION DUE TO THE PASSAGE OF TIME, CHANGING CIRCUMSTANCES, SOURCES USED AND OR INCOMPLETE INFORMATION DUE TO THE PASSAGE OF TIME, CHANGING CIRCUMSTANCES, SOURCES USED AND THE NATURE OF COLLECTING COMPREHENSIVE GEOGRAPHIC PRODUCT, ANY OF WHICH MAY LEAD TO INCORRECT THE NATURE OF COLLECTING COMPREHENSIVE GEOGRAPHIC PRODUCT, ANY OF WHICH MAY LEAD TO INCORRECT RESULTS. THE PRODUCT AND SERVICES MAY NOT TO BE USED FOR SAFETY OF LIFE APPLICATIONS, OR FOR ANY OTHER RESULTS. THE PRODUCT AND SERVICES MAY NOT TO BE USED FOR SAFETY OF LIFE APPLICATIONS, OR FOR ANY OTHER APPLICATION IN WHICH THE ACCURACY OR RELIABILITY OF THE PRODUCT OR SERVICES COULD CREATE A SITUATION APPLICATION IN WHICH THE ACCURACY OR RELIABILITY OF THE PRODUCT OR SERVICES COULD CREATE A SITUATION WHERE PERSONAL INJURY OR DEATH MAY OCCUR. DO NOT ATTEMPT TO CONFIGURE THE PRODUCT OR INPUT WHERE PERSONAL INJURY OR DEATH MAY OCCUR. DO NOT ATTEMPT TO CONFIGURE THE PRODUCT OR INPUT INFORMATION WHILE DRIVING. FAILURE TO PAY FULL ATTENTION TO THE OPERATION OF YOUR VEHICLE COULD RESULT IN INFORMATION WHILE DRIVING. FAILURE TO PAY FULL ATTENTION TO THE OPERATION OF YOUR VEHICLE COULD RESULT IN DEATH, SERIOUS INJURY, OR PROPERTY DAMAGE. BY USING THE PRODUCT, YOU ASSUME ALL RESPONSIBILITY AND RISK.DEATH, SERIOUS INJURY, OR PROPERTY DAMAGE. BY USING THE PRODUCT, YOU ASSUME ALL RESPONSIBILITY AND RISK.K_QL 16_G4.0[USA_EU]AVN_PART5.indd 5-39 2016-06-29 오후 4:03:31](https://usermanual.wiki/HYUNDAI-MOBIS/AVC40D9AN/User-Guide-3159510-Page-114.png)
![Disclaimer of Warranty. The Product is provided to you “as is,” and you agree to use it at your own risk. SUBJECT TO THE APPLICABLE LAWS, COMPANY AND THE LICENSORS MAKE NO GUARANTEES, REPRESENTATIONS OR WARRANTIES OF ANY KIND, EXPRESS OR IMPLIED, ARISING BY LAW OR OTHERWISE, INCLUDING BUT NOT LIMITED TO, CONTENT, QUALITY, ACCURACY, COMPLETENESS, EFFECTIVENESS, RELIABILITY, PERFORMANCE, MERCHANTABILITY, FITNESS FOR A PARTICULAR PURPOSE, NON-INFRINGEMENT, USEFULNESS, USE OR RESULTS TO BE OBTAINED FROM THE PRODUCT, OR THAT THE PRODUCT OR SERVER WILL BE UNINTERRUPTED OR ERROR-FREE, OR THAT ERRORS IN THE PRODUCT OR NONCONFORMITY TO ITS DOCUMENTATION CAN OR WILL BE CORRECTED. YOU ACKNOWLEDGE THAT THE PROVISIONS OF THIS SECTION ARE A MATERIAL INDUCEMENT AND CONSIDERATION TO COMPANY AND THE LICENSORS TO GRANT THE LICENSE CONTAINED IN THIS EULA AND TO PROVIDE YOU WITH ACCESS TO THE SERVICES. Limitation of Liability: TO THE MAXIMUM EXTENT PERMITTED UNDER THE APPLICABLE LAWS, COMPANY AND THE LICENSORS SHALL NOT BE LIABLE TO YOU: IN RESPECT OF ANY CLAIM, DEMAND OR ACTION, IRRESPECTIVE OF THE NATURE OF THE CAUSE OF THE CLAIM, DEMAND OR ACTION ALLEGING ANY LOSS, INJURY OR DAMAGES, DIRECT OR INDIRECT, INCURRED BY YOU OR ANY THIRD PARTY WHICH MAY ARISE IN CONNECTION WITH OR RESULT FROM THE USE OR POSSESSION OF THE PRODUCT; OR FOR ANY LOSS OF DATA, PROFIT, REVENUE, CONTRACTS OR SAVINGS, OR OTHER DIRECT, INDIRECT, INCIDENTAL, SPECIAL OR CONSEQUENTIAL DAMAGES ARISING OUT OF YOUR USE OF OR INABILITY TO USE THE PRODUCT, ANY DEFECT IN THE PRODUCT, OR THE BREACH OF THESE TERMS OR CONDITIONS, WHETHER IN AN ACTION IN CONTRACT OR TORT OR BASED ON A WARRANTY, EVEN IF COMPANY OR THE LICENSORS HAVE BEEN ADVISED OF THE POSSIBILITY OF SUCH DAMAGES AND NOTWITHSTANDING THE FAILURE OF ANY LIMITED REMEDY PROVIDED HEREIN.K_QL 16_G4.0[USA_EU]AVN_PART5.indd 5-40 2016-06-29 오후 4:03:31](https://usermanual.wiki/HYUNDAI-MOBIS/AVC40D9AN/User-Guide-3159510-Page-115.png)
![Exclusions. Some jurisdictions do not allow certain warranty exclusions or the limitation or exclusion of liability, so to that extent the above exclusion may not apply to you. To the extent that COMPANY may not, as a matter of applicable law, disclaim any implied warranty or limit its liabilities, the scope and duration of such warranty and the extent of COMPANY’s liability shall be the minimum permitted under such applicable law. The disclaimer of warranty and limitation of liability set forth in this EULA does not affect or prejudice your statutory rights where you have acquired the Product otherwise than in the course of business.Third-Party Copyright Notices. The third-party sourced data has been incorporated into or made a part of the Product and is being subli-censed to you subject to the terms and conditions of this EULA. In this regard, you shall not remove or tamper with any intellectual prop-erty rights notice attached or used in relation to data supplied by the Licensors.Entire Agreement. This EULA is the entire agreement between COMPANY (and the Licensors) and you pertaining to the subject matter hereof, and supersedes in their entirety any and all previous written or oral communications or documents (including, if you are obtaining an update, any agreement that may have been included with an earlier version of the Product) with respect to such subject matter.Governing Law. This EULA shall be governed by the laws of the jurisdiction in which you reside at the date of acquisition of the Product. Should you at that moment reside outside the European Union or Switzerland, the law of the jurisdiction within the European Union or Switzerland where you acquired the Product shall apply. In all other cases, or if the jurisdiction where you acquired the Product cannot be defined, the laws of the Republic of Korea shall apply. This EULA will not be governed by the U.N. Convention on Contracts for the International Sale of Goods. The courts competent at your place of residence at the time you acquired the Product shall have jurisdiction over any dispute arising out of, or relating to this EULA, without prejudice to COMPANY’s right to bring claims at your then current place of residence.Export Control. You agree not to export or re-export from anywhere any part of the Product in any form except in compliance with appli-cable export laws, rules and regulations, including but not limited to the laws, rules and regulations administered by the Office of Foreign Assets Control of the U.S. Department of Commerce and the Bureau of Industry and Security of the U.S. Department of Commerce.K_QL 16_G4.0[USA_EU]AVN_PART5.indd 5-41 2016-06-29 오후 4:03:31](https://usermanual.wiki/HYUNDAI-MOBIS/AVC40D9AN/User-Guide-3159510-Page-116.png)
![Miscellaneous. If any provision of this EULA is found to be invalid or unenforceable, it will be enforced to the extent permissible and the remainder of this EULA will remain in full force and effect. Failure by COMPANY to prosecute any right with respect to a default hereun-der will not constitute a waiver by COMPANY of the right to enforce rights with respect to the same or any other breach. No refunds or replacements will be permitted on damaged Product.U.S. Government End Users. If the Product is being acquired by or on behalf of the United States Government or any other entity seek-ing or applying rights similar to those customarily claimed by the United States Government, this Product and related documentation are “Commercial Items” as that term is defined at 48 C.F.R. (“FAR”) 2.101. This Product and related documentation are licensed to the United States Government end users (a) only as “Commercial Items” and (b) with only those rights as are granted to all other end users in accor-dance with this EULA, and each copy of Product delivered or otherwise furnished shall be marked and embedded as appropriate with the following “Notice of Use,” and shall be treated in accordance with such Notice:NOTICE OF USENOTICE OF USECONTRACTOR (MANUFACTURER/ SUPPLIER) NAME: Hyundai MnSoft, Inc.CONTRACTOR (MANUFACTURER/SUPPLIER) ADDRESS: 74 Wonhyo-ro, Yongsan-gu, Seoul 140-711, Republic of KoreaThis Product and related documentation are commercial items as defined in FAR 2.101 and is subject to this EULA under which this Product is provided.© 2013 Hyundai MnSoft. All rights reserved.If the Contracting Officer, federal government agency, or any federal official refuses to use the legend provided herein, the Contracting Of-ficer, federal government agency, or any federal official must notify COMPANY prior to seeking additional or alternative rights in the Prod-uct.K_QL 16_G4.0[USA_EU]AVN_PART5.indd 5-42 2016-06-29 오후 4:03:31](https://usermanual.wiki/HYUNDAI-MOBIS/AVC40D9AN/User-Guide-3159510-Page-117.png)
![End-User Terms Required by HERE. The Product utilizes map data that COMPANY licenses from HERE and the following copyright notices apply to such map data (the “HERE Data”): © 2013 HERE. All rights reserved.The HERE Data for areas of Canada includes information taken with permission from Canadian authorities, including: © Her Majesty the Queen in Right of Canada, © Queen’s Printer for Ontario, © Canada Post Corporation, GeoBase ®, © Department of Natural Resources Canada. All rights reserved.HERE holds a non-exclusive license from the United States Postal Service® to publish and sell ZIP+4® information.©United States Postal Service® 2010. Prices are not established, controlled or approved by the United States Postal Service®. The fol-lowing trademarks and registrations are owned by the USPS: United States Postal Service, USPS, and ZIP+4. The HERE Data for Mexico includes certain data from Instituto Nacional de Estadística y Geografía.Austria: © Bundesamt für Eich- und VermessungswesenCroatia, Cyprus, Estonia, Latvia, Lithuania, Moldova, Poland, Slovenia and/or Ukraine: © EuroGeographicsFrance: source: © IGN 2009 – BD TOPO ®Germany: Die Grundlagendaten wurden mit Genehmigung der zustaendigen Behoerden entnommenGreat Britain: Contains Ordinance Survey data © Crown copyright and database right 2010, and Royal Mail data © Royal Mail copyright and database right 2010.Greece: Copyright Geomatics Ltd.Italy: La Banca Dati Italiana è stata prodotta usando quale riferimento anche cartografia numerica ed al tratto prodotta e fornita dalla Regione Toscana.Norway: Copyright © 2000; Norwegian Mapping AuthorityPortugal : Source: IgeoE – PortugalSpain: Información geográfica propiedad del CNIGSweden: Based upon electronic data Ó National Land Survey SwedenSwitzerland: Topografische Grundlage: Ó Bundesamt für LandestopographieK_QL 16_G4.0[USA_EU]AVN_PART5.indd 5-43 2016-06-29 오후 4:03:31](https://usermanual.wiki/HYUNDAI-MOBIS/AVC40D9AN/User-Guide-3159510-Page-118.png)
![United Kingdom: Contains public sector information licensed under the Open Government Licence v1.0 (see for the license http://www.nationalarchives.gov.uk/doc/open-government-licence/) and is adapted from data from the office for National Statistics licensed under the Open Government Licence v.1.0.Israel: © Survey of Israel data sourceJordan: © Royal Jordanian Geographic Centre. The foregoing notice requirement for Jordan Data is a material term of the Agreement. If Client or any of its permitted sublicensees (if any) fail to meet such requirement, HERE shall have the right to terminate Client’s license with respect to the Jordan Data.Mozambique: Certain Data for Mozambique provided by Cenacarta © 20XX by CenacartaRéunion: source: © IGN 2009 - BD TOPO ®End-User Terms Required by ZENRIN. The Product utilizes map data that COMPANY licenses from ZENRIN and the following copyright notices apply to such map data (the “ZENRIN Data”):Europe: Junction View Data provided by ZENRIN CO., LTD. Copyright © 20XX, All Rights Reserved.Europe: Junction View Data and Exit View Data provided by ZENRIN CO., LTD. Copyright © 20XX, All Rights Reserved.North America: Junction View Data provided by ZENRIN USA, INC. Copyright © 20XX, All Rights Reserved; Junction View Data fourni par ZENRIN USA, INC. Copyright © 20XX. Tous droits réservés; Las imágenes de las rutas alternas son proveídas por ZENRIN USA, INC. Copyright © 20XX. Todos los derechos reservados.© 2013 Hyundai MnSoft. All rights reserved.K_QL 16_G4.0[USA_EU]AVN_PART5.indd 5-44 2016-06-29 오후 4:03:31](https://usermanual.wiki/HYUNDAI-MOBIS/AVC40D9AN/User-Guide-3159510-Page-119.png)
![Copyright for Brand Icon Copyright for Brand Icon The marks of companies displayed by this product to indicate business locations are the marks of their respective owners. The use of such marks in this product does not imply any sponsorship, approval, or endorsement by such companies of this product.Copyright for Junction ViewCopyright for Junction ViewJunction View Data provided by ZENRIN USA, INC. Copyright(C) 20XX, All rights Reserved. K_QL 16_G4.0[USA_EU]AVN_PART5.indd 5-45 2016-06-29 오후 4:03:31](https://usermanual.wiki/HYUNDAI-MOBIS/AVC40D9AN/User-Guide-3159510-Page-120.png)
![About Map Updates About Map Updates • You can contact your KIA dealer or call at 1-888-757-0010. Information Information• This product requires regular updates for software corrections, new functions and map updates. Updating may require up to 1 hour depending on the data size. • Turning off the power or ejecting the SD card during the update process may result in data loss. Make sure to keep the ignition on and wait until updating is complete. CAUTION CAUTION • Please use only the SD card that was included with the vehicle purchase. • The use of a separately purchased SD card may result in damage due to heat related deformation. • Product malfunctions caused by the use of separately purchased SD cards shall not be covered within the product warranty. • Repeatedly connecting/disconnecting the SD card in a short period of time may cause damage to the device.K_QL 16_G4.0[USA_EU]AVN_PART5.indd 5-46 2016-06-29 오후 4:03:31](https://usermanual.wiki/HYUNDAI-MOBIS/AVC40D9AN/User-Guide-3159510-Page-121.png)


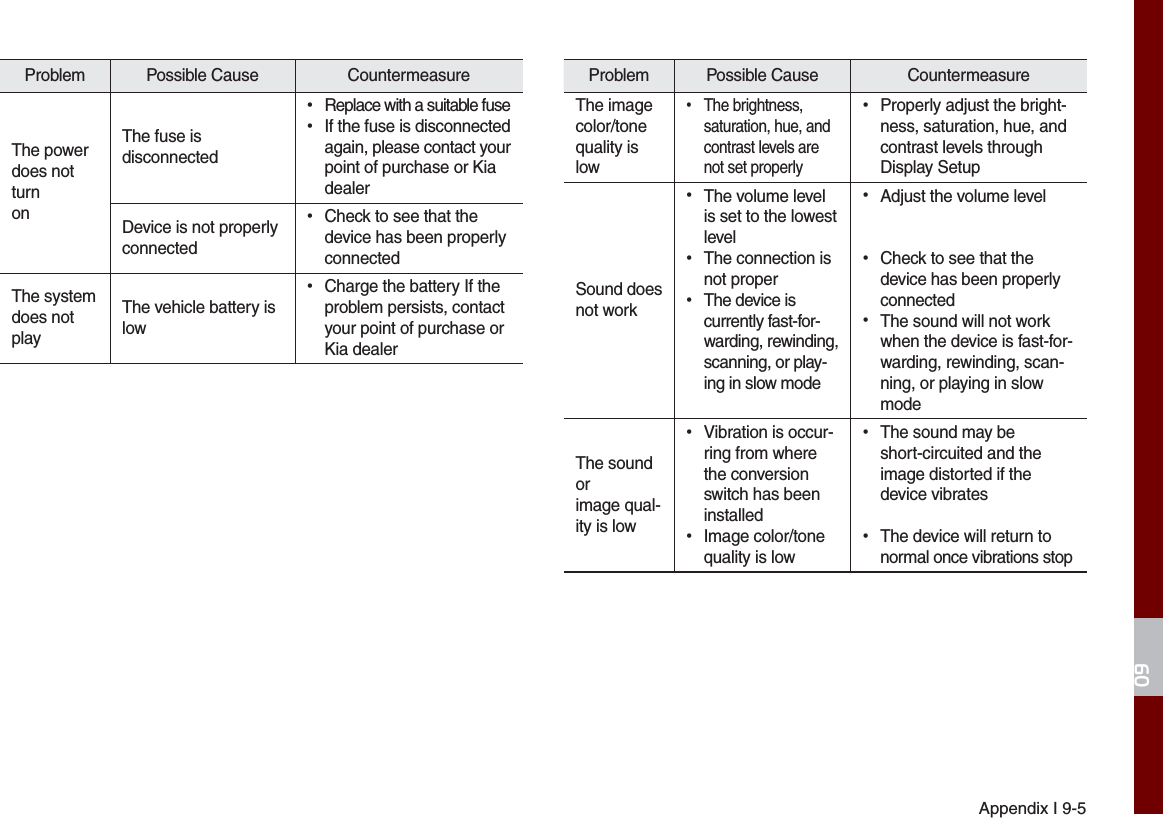
![9-4 I Appendix7URXEOHVKRRWLQJ1. Errors which occur during the operation or installation of the device may be mistaken as a malfunction of the actual device.2. If you are having problems with the device, try the suggestions listed below.3. If the problems persist, contact your Kia dealer.Problem Possible CauseThere are small red, blue, or green dots on the screen ˍBecause the LCD is manufactured with technology requiring high point density, a pixel or lighting deficiency may occur within 0.01% of total pixelsThe sound or image is not working ˍHas the Switch for the vehicle been turned to [ACC] or [ON]? ˍHas the SYSTEM been turned OFF?The screen is being displayed but sound is not working ˍHas the volume been set to a low level? ˍHas the volume been muted?When the power is turned on, the corners of the screen are dark ˍThe display appearing somewhat dark after prolonged periods of use is normal with LCD panels. It is not a malfunction ˍIf the screen is very dark, contact your nearest Kia dealer for assistanceSound is working from only one speaker ˍAre the positions of Fader or Balance sound controls adjusted to only one side?Problem Possible CauseSound does not work in AUX mode ˍAre the audio connector jacks fully inserted into the AUX terminal?The external device is not working ˍIs the external device connected with a standard connector cable?Upon turning power on, the most recent mode screen is not displayedWithin modes that play files by reading external sources, such as USB, iPod, or Bluetooth® streaming mode, the most recently played mode screen prior to turn-ing off power may not properly load ˍIf the corresponding device is not con-nected, the mode operated prior to the most recent mode will operate ˍIf the previous mode still cannot be properly played, the mode operated prior to that will operate](https://usermanual.wiki/HYUNDAI-MOBIS/AVC40D9AN/User-Guide-3159510-Page-171.png)