HYUNDAI MOBIS PA710AMLSB Car Audio Bluetooth User Manual K AM USA 081210
Hyundai MOBIS Co., Ltd. Car Audio Bluetooth K AM USA 081210
User Manual

FCC ID: PINPA710AMLSB / IC: 4018A-PA710AM
HCT CO., LTD.
SAN 136-1, AMI-RI, BUBAL-EUP, ICHEON-SI, KYOUNGKI-DO, 467-701, KOREA
TEL:+82 31 639 8517 FAX:+82 31 639 8525 www.hct.co.kr
Report No. : HCT-RF09-0521 1/1
ATTACHMENT E.
- User Manual -

31
Knowing your vehicle
1. FM/AM Selection Button
2. CD/AUX Selection Button
3. Power ON/OFF Button & Volume Control
Knob
4. Automatic Channel Selection Button
5. SCAN Button
6. SETUP Button & Clock Control Button
7. TUNE Knob & Sound Quality Control Knob
8. Preset Button
RADIO, SET UP, VOLUME CONTROL(PA710/PA715 AMAB, USA)
❈ There will be no logo if the Bluetooth feature is not supported.
Knowing your vehicle
23
1. FM/AM Selection Button
Turns to FM or AM mode, and toggles in
the order of FM1 ➟ FM2 ➟ AM ➟ FM1...
when the button is pressed each time.
2. CD/AUX Selection Button
If there is a CD in the CDP DECK it turns
to CD mode. If a device is connected to
AUX, then it toggles in the order of CD ➟
AUX ➟CD... when the button is pressed
each time. (It will not turn to AUX if there
is no auxiliary device connected.)
3. Power ON/OFF Button &
Volume Control Knob
Turns on/off the set when the IGNITION
SWITCH is on ACC or ON. If the button
is turned to the right, it increases the vol-
ume and left, decreases the volume.
4. Automatic Channel Selection
Button
• When the [SEEK ] button is pressed,
it reduces the band frequency by
200kHz to automatically select a chan-
nel. Stops at the previous frequency if
no channel is found.
• When the [SEEK ] button is pressed,
it increases the band frequency by
200kHz to automatically select a chan-
nel. Stops at the previous frequency if no
channel is found.
5. SCAN Button
If this button is pressed, the frequencies
will become increased and receive the
corresponding broadcasts. This function
will play the frequencies for 5 seconds
(SIRIUS MODE:10 seconds) each and
find other broadcasts as the frequency
increases. Press the button again when
desiring to continue listening to the cur-
rently playing broadcast.
6. SETUP Button & Clock Control
Button
Press this button to turn to the SIRIUS
option and the other adjustment mode.
If no action is taken for 5 seconds after
pressing the button, it will return to the
play mode. (After entering SETUP mode,
move between items using the left, right
and PUSH functions of the [TUNE]
knob.)
■ PA710 AMAB is an internal AMP
MODEL with Bluetooth feature.
The setup changes in the order of
CLOCK ↔ SAT ↔ SCROLL ↔ P.BASS
↔ RETURN ↔ TEMP ↔PHONE ↔
SDVC ↔ CLOCK...
■ PA710 AMA is an internal AMP MODEL
without Bluetooth feature.
The setup changes in the order of
CLOCK ↔ SAT ↔ SCROLL ↔ P.BASS
↔ TEMP ↔ SDVC ↔ CLOCK...
■ PA715 AMAB is an external AMP
MODEL with Bluetooth feature.
The setup changes in the order of
CLOCK ↔ SAT ↔ SCROLL ↔ TEMP ↔
PHONE ↔ SDVC ↔ CLOCK...
■ PA715 AMA is an external AMP MODEL
without Bluetooth feature.
The setup changes in the order of
CLOCK ↔ SAT ↔ SCROLL ↔ RETURN
↔ TEMP ↔ SDVC ↔ CLOCK...

33
Knowing your vehicle
• Adjusting the Clock
Press the [SETUP] button. Use the vol-
ume controller to adjust the clock in the
following order: CLOCK ➟ENTER ➟
hour or minute.
Adjust the hour and press the [ENTER]
button to set. Use the same method to
adjust the minute and press the [ENTER]
button to complete and exit from clock
adjustment mode.
Pressing the [SETUP] button while in
POWER OFF screen will allow the user
to make immediately adjustments to the
clock.
• SCROLL
This function is used to display charac-
ters longer than the LCD text display and
can be turned ON/OFF through the vol-
ume controller.
• RETURN
This function displays the previous
MODE screen.
• TEMP
This function is used to change the tem-
perature display setting.
• SDVC
This function automatically adjusts the
volume level according to the speed of
the vehicle and can be turned ON/OFF
through the volume controller.
• POWER BASS(P.BASS)
Based on psychoacoustic technology, this
technology overcomes BASS limitations
which may occur due to the limited num-
ber and size of speakers to offer dynamic
BASS sound quality. It is possible to
adjust in 3 levels of LOW/MID/HIGH.
OFF ➟LOW ➟MID ➟HIGH
Modes: CD/FM/AUX/IPOD/USB (exclud-
ing AM Mode)
7. TUNE Knob & Sound Quality
Control Knob
Rotate the knob clockwise by one notch
to increase frequency by 200kHz from
current frequency.
Rotate the knob counterclockwise by one
notch to decrease frequency by 200kHz
from current frequency.
• Pressing the button changes the BASS,
MIDDLE, TREBLE, FADER and BAL-
ANCE TUNE mode. The mode selected
is shown on the display. After selecting
each mode, rotate the Audio control
knob clockwise or counterclockwise.
(Sound Quality Control will operate in FM,
AM, CD, AUX, USB, iPod and SAT
modes.)
• BASS Control
To increase the BASS, rotate the knob
clockwise, while to decrease the BASS,
rotate the knob counterclockwise.
• MIDDLE Control
To increase the MIDDLE, rotate the knob
clockwise, while to decrease the MID-
DLE, rotate the knob counterclockwise.
• TREBLE Control
To increase the TREBLE, rotate the knob
clockwise, while to decrease the TRE-
BLE, rotate the knob counterclockwise.
• FADER Control
Turn the control knob clockwise to
emphasize rear speaker sound(front
speaker sound will be attenuated). When
the control knob is turned counterclock-
wise, front speaker sound will be empha-
sized(rear speaker sound will be attenu-
ated).

Knowing your vehicle
43
• BALANCE Control
Rotate the knob clockwise to emphasize
right speaker sound(left speaker sound
will be attenuated). When the control
knob is turned counter clockwise, left
speaker sound will be emphasized(right
speaker sound will be attenuated).
8. Preset Button
Push [1]~[6] buttons less than 0.8 second
to play the channel saved in each button.
Push Preset button for 0.8 second or
longer to save current channel to the
respective button with a beep.
35
Knowing your vehicle
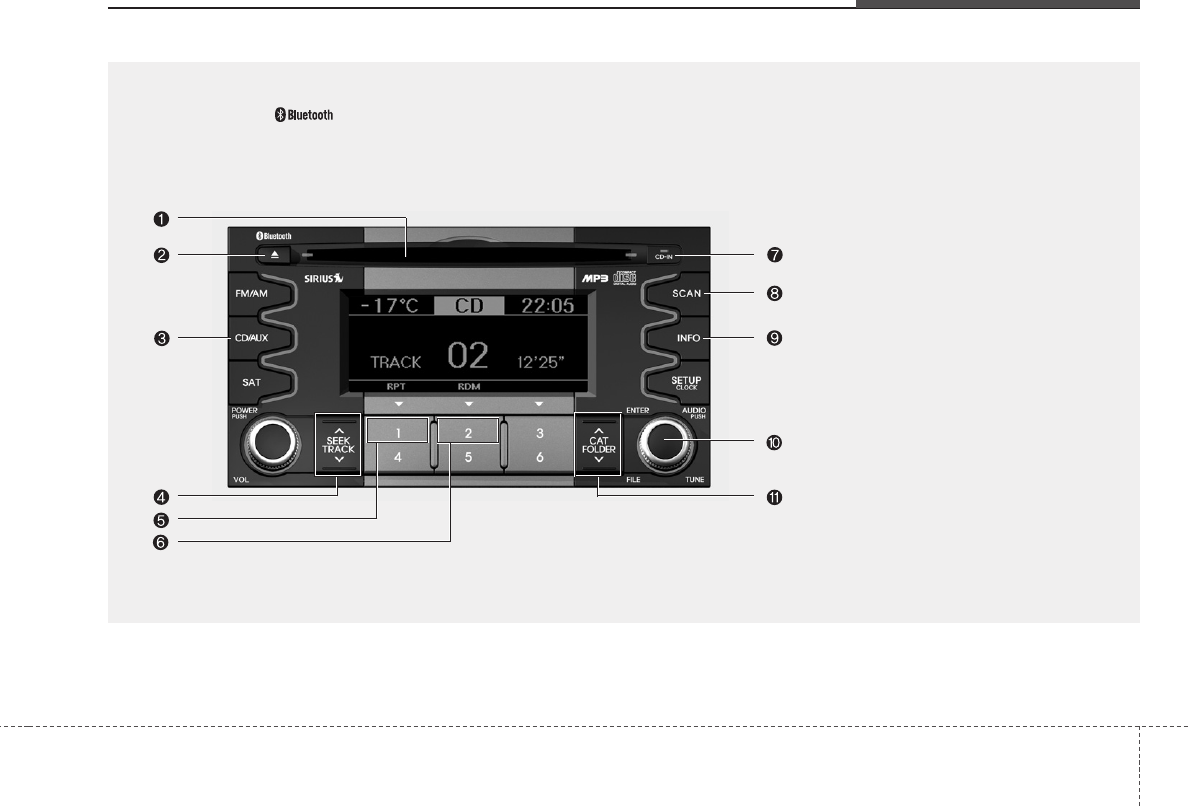
1. CD Loading Slot
2. CD Eject Button
3. CD/AUX Selection Button
4. Automatic Track Selection Button
5. REPEAT Button
6. RANDOM Play Button
7. CD Indicator
8. SCAN Play Button
9. INFO Button
10. SEARCH Knob & ENTER Button
11. FOLDER Moving Button
CD(PA710/PA715 AMAB, USA)
❈ There will be no logo if the Bluetooth feature is not supported.
Knowing your vehicle
63
1. CD Loading Slot
Please face printed side upward and gen-
tly push in. When the ignition switch is on
ACC or ON and power is off, power is
automatically turned on if the CD is loaded.
This CDP supports only 12cm CD. If VCD
or Data CD are loaded, a "Reading Error"
message will be displayed and the CD will
be ejected.
2. CD Eject Button
Push button to eject the CD during
CD playback. This button is enabled
when ignition switch is off.
3. CD/AUX Selection Button
• If an auxiliary device is connected, it
switches to AUX mode from the other
mode to play the sounds from the aux-
iliary player.
• If the CD is loaded, turns to CD mode,
and if a device is connected to AUX
then it toggles in the order of CD ➟AUX
➟CD... when the button is pressed
each time.(It will not turn to AUX if the
auxiliary device is not connected.)
• If there is no CD or auxiliary device,
then it displays the message "No
Media" for 3 seconds and returns to the
previous mode.
4. Automatic Track Selection
Button
• Press [TRACK ] button for less than
0.8 second to play from the beginning
of current song.
• Press [TRACK ] button for less than
0.8 second and press again within 1
seconds to play the previous song.
• Continue to press down the [TRACK ]
button to initiate reverse direction high
speed sound search of current song.
• Press [TRACK ] button for less than
0.8 second to play the next song.
• Continue to press down the [TRACK ]
button to initiate high speed sound
search of current song.
5. REPEAT Button
Repeats current song when the button is
pressed for less than 0.8 second.
Repeats the entire DISC when the button
is pressed for 0.8 second or longer.
(In the case of MP3, the Repeat function
will operate only within folder.)
6. RANDOM Play Button
Press this button for less than 0.8 second
to activate ‘RDM’ mode and longer than
0.8 second to activate ‘A.RDM’ mode.
• RDM : Only files/tracks in a folder/disc
are played back in a random sequence.
• A.RDM(MP3/WMA Only) : All files in a
disc are played back in the random
sequence.
7. CD Indicator
When car ignition switch is ACC or ON
and if the CD is loaded, this indicator is
lighted. If the CD is ejected, the light is
turned off.
8. SCAN Play Button
Scans first 10 seconds of each song in
the DISC. To cancel the mode, press the
button once again.
9. INFO Button
Displays the information of the current
CD TRACK(FILE) in the order shown
below each time the button is pressed.
• CDDA : Disc Title ➟ Disc Artist ➟Track
Title ➟ Track Artist ➟Total Track...

37
Knowing your vehicle
• MP3/WMA : File Name ➟ Title ➟Artist ➟
Album ➟ Folder Name ➟Total File...
(not displayed if the information is not
available on the DISC.)
10. SEARCH Knob & ENTER
Button
Rotate the knob clockwise to display the
songs after the currently played song.
Rotate the knob counterclockwise to dis-
play the songs before the currently
played song. Press the button to skip and
play the selected song.
11. FOLDER Moving Button
• Press [FOLDER ] button to move
child folder of the current folder and dis-
play the first song in the folder. Press
TUNE/ ENTER knob to move to the
folder displayed. It will play the first
song in the folder.
• Press [FOLDER ] button to move
parent folder and display the first song
in the folder. Press TUNE/ENTER knob
to move to the folder displayed.

Knowing your vehicle
83
1. USB Selection Button
2. TRACK Moving Button
3. REPEAT Selection Button
4. RANDOM Playback Button
5. SCAN Selection Button
6. INFO Button
7. SEARCH Knob & ENTER Button
8. FOLDER Moving Button
USING USB(PA710/PA715 AMAB, USA)
❈ There will be no logo if the Bluetooth feature is not supported.
39
Knowing your vehicle
1. USB Selection Button
If USB is connected, it switches to the
USB mode from the other mode to play
the song files stored in the USB. If no CD
and auxiliary device is not connected, it
displays "NO Media" for 3 seconds and
returns to the previous mode.
2. TRACK Moving Button
• Press the [TRACK ] button for less
than 0.8 second to play from the begin-
ning of the song currently played.
Press the button for less than 0.8 second
and press it again within 1 seconds to
move to and play the previous track.
Press the button for 0.8 second or
longer to play the song in reverse direc-
tion in fast speed.
• Press the [TRACK ] button for less
than 0.8 second to move to the next
track. Press the button for 0.8 second
or longer to play the song in forward
direction in fast speed.
3. REPEAT Button
Press this button for less than 0.8 second
to activate 'RPT' mode and longer than
0.8 second to activate ' ' mode.
• RPT : Only thr current file is repeatedly
played back.
• : All files in a folder are repeat-
edly played back.
4. RANDOM Playback Button
Press this button for less than 0.8 second
to activate 'RDM' mode and longer than
0.8 second to activate 'A.RDM' mode.
• RDM : All files in a folder are played
back in random sequence.
• A.RDM : All files in a USB memory are
played back in random sequence.
5. SCAN Selection Button
Scan 10 seconds of each song in the USB
device.
Press the button once again to cancel
scanning.
6. INFO Button
Displays the information of the currently
played file in the order of File Name ➟
Title ➟ Artist ➟ Album ➟ Folder ➟ Total
File ➟Normal Display ➟ File Name ➟…
(Displays no information if the file has no
song information.)
7. SEARCH Knob & ENTER
Button
Rotate the knob clockwise to display the
songs after the currently played song.
Rotate the knob counterclockwise to dis-
play the songs before the currently
played song.
Press the button to skip and play the
selected song.
8. FOLDER Moving Button
• Press [FOLDER ] button to move
child folder of the current folder and dis-
play the first song in the folder. Press
TUNE/ENTER knob to move to the
folder displayed. It will play the first
song in the folder.
• Press [FOLDER ] button to move
parent folder and display the first song
in the folder. Press TUNE/ENTER knob
to move to the folder displayed.

Knowing your vehicle
103
CAUTION IN USING
USB DEVICE
• To use an external USB device,
make sure the device is not
mounted when starting up the
vehicle and mount the device
after starting up.
• If you start the vehicle when the
USB device is mounted, it may
damage the USB device. (USB is
not ESA)
• If the vehicle is started up or
turned off while the external USB
device is connected, the external
USB device may not work.
• It may not play inauthentic MP3 or
WMA files.
1) It can only play MP3 files with
the compression rate between
8Kbps~320Kbps.
2) It can only play WMA music
files with the compression rate
between 8Kbps~320Kbps.
• Take cautions for static electricity
when mounting or dismounting
the external USB device.
• An encoded MP3 player is not
recognizable. (Continued)
(Continued)
• Depending on the condition of
the external USB device, the con-
nected external USB device can
be unrecognizable.
• When the formatted byte/sector
setting of External USB devices is
not either 512BYTE or 2048BYTE,
then the device will not be recog-
nized.
• Use only a USB device formatted
to FAT 12/16/32.
• USB devices without USB I/F
authentication may not be recog-
nizable.
• Make sure the USB connection
terminal does not come in contact
with a human body or any object.
• If you repeat mounting or dis-
mounting USB device in a short
period of time, it may break the
device.
• You might hear a strange noise
when mounting or dismounting a
USB device. (Continued)
(Continued)
• If you dismount the external USB
device during playback in USB
mode, the external USB device
can be damaged or malfunction.
Therefore, mount the external USB
device when the engine is turned
off or in another mode.
• Depending on the type and capac-
ity of the external USB device or
the type of the files stored in the
device, there is a difference in the
time taken for recognition of the
device, but this is not an indicator
of trouble and you only have to
wait.
• Do not use the USB device for other
purposes than playing music files.
• Use of USB accessories such as
recharger or heater using USB I/F
may lower performance or cause
trouble.
• If you use devices such as a USB
hub you purchased separately,
the vehicle’s audio system may
not recognize the USB device.
Connect the USB device directly
to the multimedia terminal of the
vehicle. (Continued)
311
Knowing your vehicle
(Continued)
• If USB device is divided by logical
drives, only the music files on the
highest-priority drive are recog-
nized by the car audio.
• Devices, such as MP3 players,
cellular phones, or digital cam-
eras not recognized by standard
USB I/F may not be recognized.
• USB devices other than standard-
ized goods (METAL COVER TYPE
USB) can be unrecognizable.
• USB flash memory reader (such
as CF, SD, microSD, etc.) or exter-
nal-HDD type devices may be
unrecognized.
• Music files protected by DRM
(DIGITAL RIGHTS MANAGEMENT)
are not recognizable.
• The data in the USB memory may
be lost while using this AUDIO. It
is recommeded to back up impor-
tant data on a personal storage
device.
(Continued)
(Continued)
• Please avoid using USB memory
products which can be used as
key chains or cellular phone
accessories as they could cause
damage to the USB jack. Please
make certain only to use plug type
connector products as shown
below.
Knowing your vehicle
123
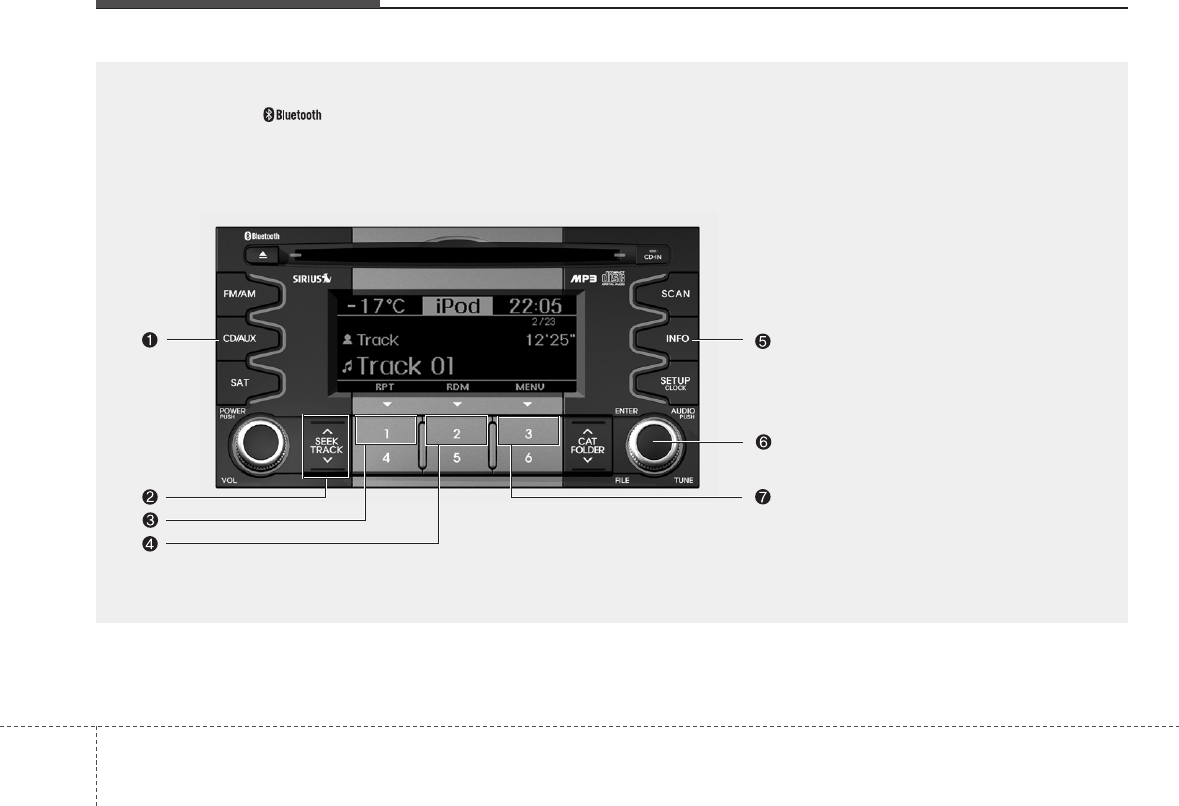
1. iPod Selection Button
2. TRACK Moving Button
3. REPEAT Selection Button
4. RANDOM Playback Button
5. INFO Button
6. SEARCH Knob & ENTER Button
7. CATEGORY Selection Button
RUNNING iPod®(PA710/PA715 AMAB, USA)
iPod®is a trademark of Apple Inc.
❈ There will be no logo if the Bluetooth feature is not supported.

313
Knowing your vehicle
1. iPod Selection Button
If iPod is connected, it switches to the
iPod mode from the current mode to play
the song files stored in the iPod. If there
is no iPod connected, it displays "No
Media" for 3 seconds and returns to the
previous mode.
2. TRACK Moving Button
• Press the [TRACK ] button for less
than 0.8 second to play from the begin-
ning of the song currently played.
Press the button for less than 0.8 second
and press it again within 1 seconds to
move to and play the previous track.
Press the button for 0.8 second or
longer to play the song in reverse direc-
tion in fast speed.
• Press the [TRACK ] button for less
than 0.8 second to move to the next
track. Press the button for 0.8 second or
longer to play the song in forward direc-
tion in fast speed.
3. REPEAT Button
Repeats the song currently played.
4. RANDOM Playback Button
Press the button for less than 0.8 second
to start or stop the random playback of
the songs within the current category.
Press the button for longer than 0.8 sec-
ond to randomly play all songs in the
entire album of the iPod.
Press the button once again to cancel the
mode.
5. INFO Button
Displays the information of the file cur-
rently played in the order of Title ➟ Artist
➟ Album ➟… (Displays no information if
the file has no song information.)
6. SEARCH Knob & ENTER
Button
When you rotate the knob clockwise, it
will display the songs (category) next to
the song currently played (category in
the same level).
Also, when you rotate the knob counter-
clockwise, it will display the songs (cate-
gory) before the song currently played
(category in the same level).
To listen to the song displayed in the
song category, press the button to skip to
and play the selected song.
7. CATEGORY Selection Button
Moves to the upper category from cur-
rently played category of the iPod.
To move to (play) the category (song)
displayed, press TUNE/ENTER knob.
You will be able to search through the
lower category of the selected category.
The order of iPod’s category is Playlist,
Albums, Artists, Genres, songs, com-
posers.
Knowing your vehicle
143
✽NOTICE FOR USING iPod
DEVICE
• Some iPod models might not sup-
port the communication protocol
and the files will not be played.
(iPod models supported: Mini, 4G,
Photo, Nano, 5G)
• The order of search or playback of
songs in the iPod can be different
from the order searched in the
audio system.
• If the iPod crashes due to its own
malfunction, reset the iPod. (Reset:
Refer to iPod manual)
• An iPod may not operate normally
on low battery.
CAUTION IN USING
iPod DEVICE
• You need the power cable exclu-
sive for an iPod in order to oper-
ate an iPod with the buttons on
the audio system. The PC cable
provided by Apple may cause a
malfunction and do not use it for
vehicle use.
• When connecting the device with
an iPod cable, push in the jack
fully not to interfere with commu-
nication.
• When adjusting the sound effects
of an iPod and the audio system,
the sound effects of both devices
will overlap and might reduce or
distort the quality of the sound.
• Deactivate (turn off) the equalizer
function of an iPod when adjust-
ing the audio system’s volume,
and turn off the equalizer of the
audio system when using the
equalizer of an iPod. (Continued)
(Continued)
• When the iPod cable is connected,
the system can be switched to the
AUX mode even without the iPod
device and can cause noise.
Disconnect the iPod cable when
you are not using the iPod device.
• When the iPod is not used for the
audio system, the iPod cable has
to be separate from iPod devices.
Original display of iPod may not be
displayed.
315
Knowing your vehicle
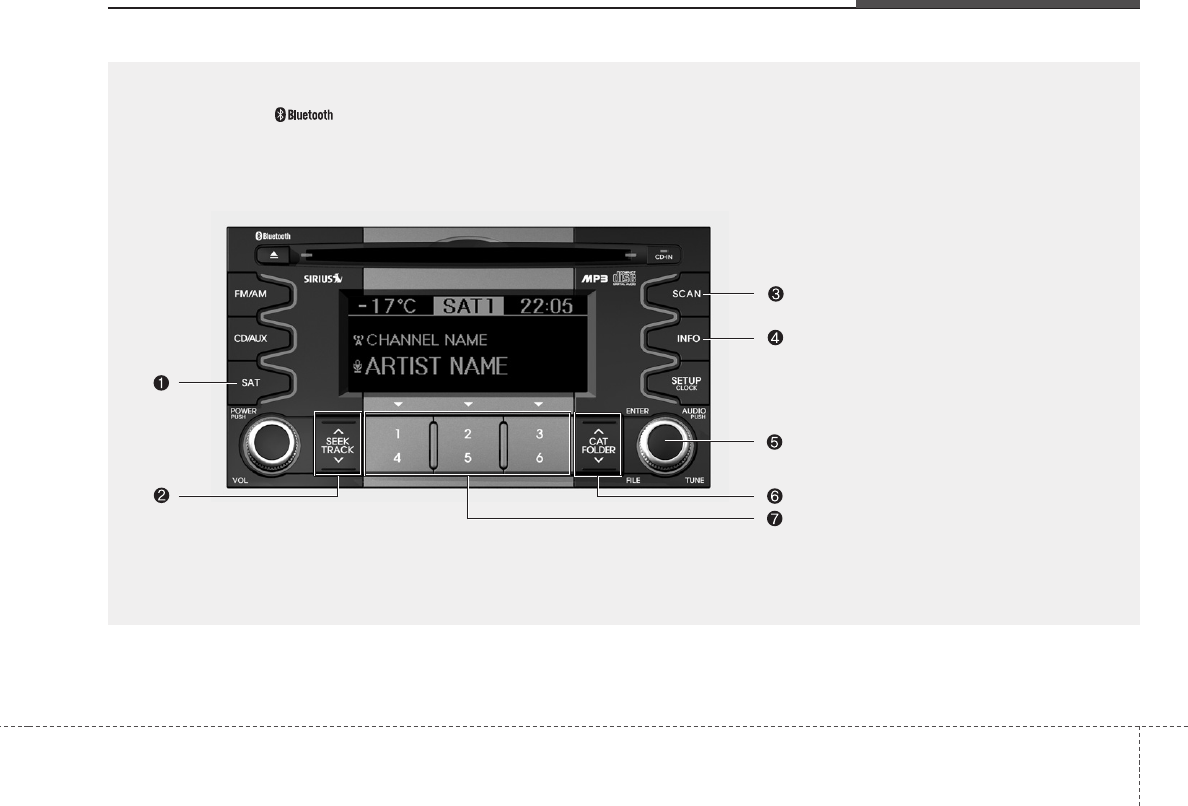
1. SATELLITE RADIO Selection Button
2. Channel Selection Button
3. SCAN Button
4. INFO Button
5. TUNE Knob and ENTER Button
6. CAT/FOLDER Button
7. Preset Selection Button
SIRIUS SATELLITE RADIO(PA710/PA715 AMAB, USA)
❈ There will be no logo if the Bluetooth feature is not supported.

Knowing your vehicle
163
How to Use SIRIUS Satellite
Radio
Your Kia vehicle is equipped with 3 months
complimentary period of SIRIUS Satellite
Radio so you have access to over 130
channels of music, information, and enter-
tainment programming.
Activation
In order to extend or reactivate your sub-
scription to SIRIUS Satellite Radio, you
will need to contact SIRIUS Customer
Care at 888-539-7474. Have your 12
digit SID (Sirius Identification
Number)/ESN (Electronic Serial Number)
ready. To retrieve the SID/ESN, turn on
the radio, press the [SAT] button and tune
to channel zero. Please note that the
vehicle will need to be turned on, in Sirius
mode, and have an unobstructed view of
the sky in order for the radio to receive
the activation signal.
1. SATELLITE RADIO Selection
Button(SIRIUS Satellite Radio)
Press the [SAT] button to switch to SIR-
IUS Satellite Radio. It cycles through the
different bands as noted below.
SAT1 ➟ SAT2 ➟ SAT3 ➟ SAT1 ➟...
2. Channel Selection Button
• Press [TRACK ] or [SEEK ] but-
ton for less than 0.8 second to select
previous or next channel.
• Press [TRACK ] or [SEEK ] but-
ton for 0.8 or longer to continuously
move to previous or next channel.
• If "CATEGORY" Icon is displayed at the
top of the screen, channel up/down is
done through the channels within cur-
rent category.
3. SCAN Button
• When the button is pressed, it automat-
ically scans the radio stations upwards.
• The SCAN feature steps through each
channel, starting from the initial chan-
nel for ten seconds.
• Press the [SCAN] button again to stop
the scan feature and to listen to the cur-
rently selected channel.
• If "CATEGORY" Icon is displayed at the
top of the screen, channel changing is
done through the channels in current
category.
4. INFO Selection Button
Displays the information of the channel
currently played by in the order of Artist/
Song title ➟Category/Channel name ➟
Composer(if available) ➟ Artist/Song title ➟
Category/Channel name ➟... (ART/TITLE
Selection)
Displays the information of the channel
currently played by in the order of
Category/Channel name ➟ Artist/Song
title ➟Composer(if available) ➟ Category
/Channel name ➟ Artist/Song title ➟...
(CAT/CH Selection) (If there is no infor-
mation of COMPOSER NAME, it returns
to main display.)
5. TUNE Knob and ENTER Button
While listening to SIRIUS broadcast,
rotate this knob to the right or left to
search other channels while listening to
current channels and push this knob to
select what you want to listen to.
(Turn to the right to search higher chan-
nels and left lower channels)

317
Knowing your vehicle
6. CAT/FOLDER Button
• Press [CAT ] or [FOLDER ] button
to enter the Category List Mode, it dis-
plays category items and highlights the
category that currently tuned channel
belongs to.
• On Category List Mode, press these
buttons to navigate category list.
• Press [ENTER] button to select the low-
est channel in highlighted category.
• If channel is selected by selecting cate-
gory "CATEGORY" Icon is displayed at
the top of the screen.
7. Preset Selection Button
• Push [1]~[6] buttons less than 0.8 sec-
ond to play the channel saved in each
button.
• Hold down the [PRESET] button for 0.8
second or longer to save current chan-
nel. An audible beep will play to confirm
the preset is stored.
✽Troubleshooting
1. Antenna Error
If this message is displayed, the anten-
na or antenna cable is broken or
unplugged. Please consult with your
Kia dealership.
2. Acquiring Signal
If this message is displayed, it means
that the antenna is covered and that
the SIRIUS Satellite Radio signal is
not available. Ensure the antenna is
uncovered and has a clear view of the
sky.
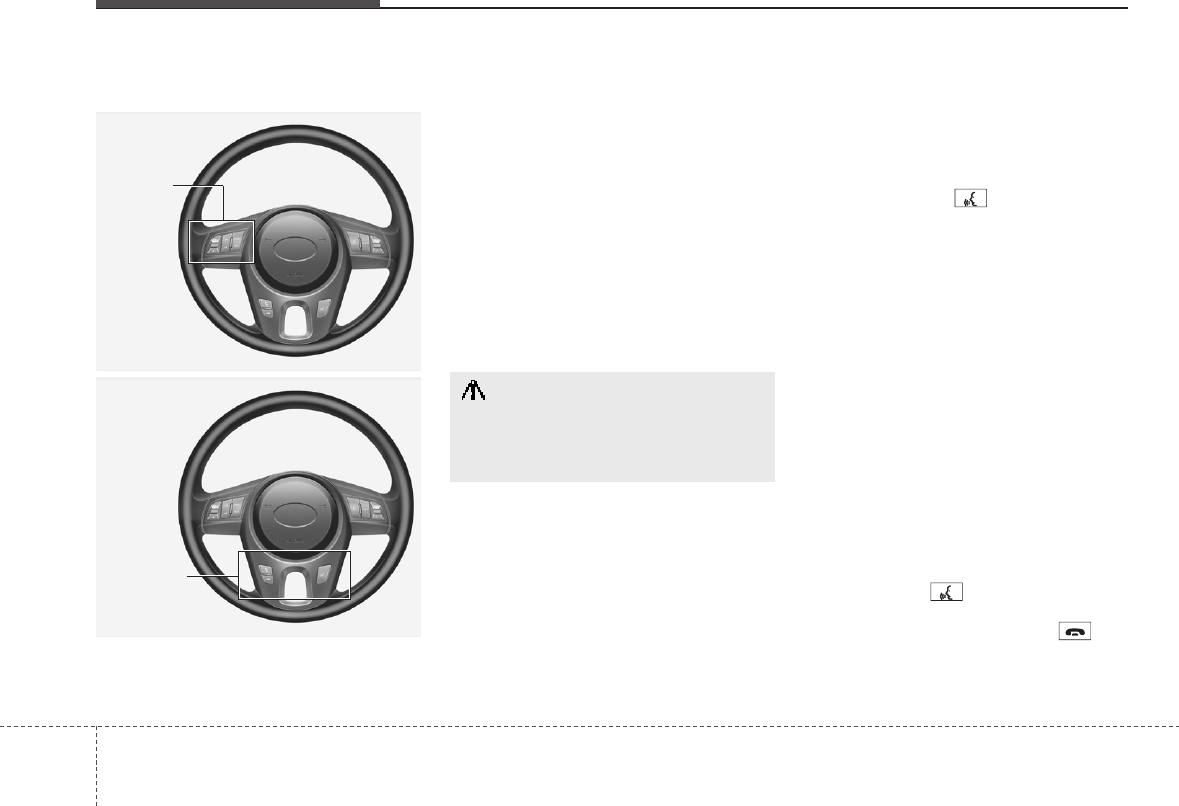
BLUETOOTH PHONE OPERATION ■ General Feature
• This system supports Bluetooth, a wire-
less system that allows you to make or
receive calls without taking your hands
from the steering wheel and without
using cables to connect the phone and
system.
• The phone must be paired to the system
before using the hands-free feature.
Only one linked cellular phone can be
used with the system at a time. The
System is available in English, US
Spanish, or Canadian French languages.
✽NOTICE
Some Bluetooth devices do not offer a
perfect compatibility with this system.
■Voice Recognition Activation
• The voice recognition engine contained
in the Bluetooth System can be activat-
ed in the following conditions:
- Button Activation
The voice recognition system will be
active when the button is pressed
and after the sound of a Beep.
- Active Listening
The voice recognition system will be
active for a period of time when the
Voice Recognition system has asked
for a customer response.
• The system can recognize single digits
from zero to nine while number greater
than ten will not be recognized.
• If the command is not recognized, the
system will announce "Pardon" or No
input voice signal from microphone. (No
response)
• The system shall cancel voice recogn-
tion mode in following cases : When
pressing the button and saying
cancel following the beep. When not
making a call and pressing the but-
ton. When voice recognition has failed 3
consecutive times.
Knowing your vehicle
183
Bluetooth
Volume
Operation
Button
CAUTION
If the vehicle is moving do not use a
cellular phone or connect the
Bluetooth phone.
319
Knowing your vehicle
• At any time if you say "help", the sys-
tem will announce what commands are
available.
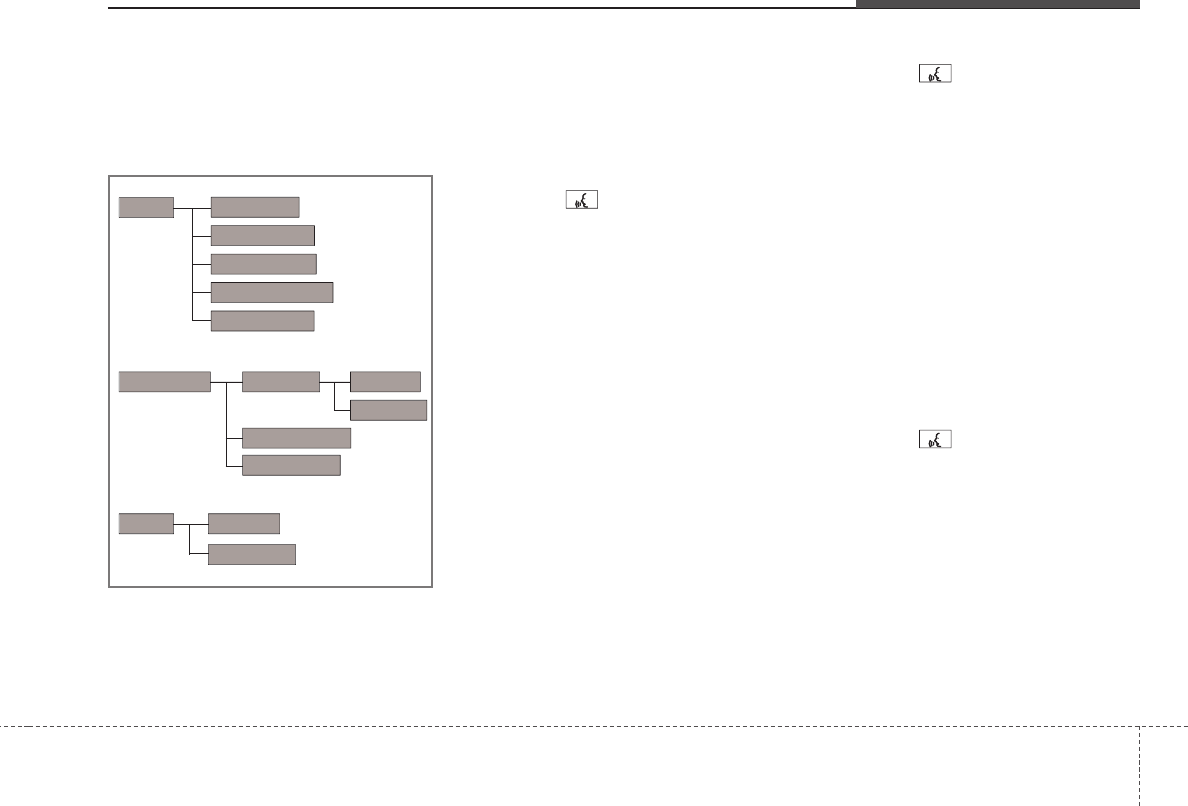
■ Menu tree
■Phone Setup
• Pairing phone
To use the hands-free system, you need
to register your phone in the system. Up to
5 phones can be registered in the system.
1. Press the button.
2. Say "Set Up".
3. Say "Pair Phone".
4. Say "Yes".
5. Say the name of the contact.
6. Say "Yes".
7. The Pairing procedure of the cellular
phone varies according to each cellu-
lar phone.
✽NOTICE
The system may not function in the fol-
lowing cases:
If 5 phones have already been registered.
If the system cannot communicate with
the phone.
• To connect phone
The registered phones can be selected.
When the system connects to Bluetooth,
the phone previously used is automati-
cally selected. Select a different phone if
necessary. Only the selected phone can
be used with the hands-free system.
1. Press the button.
2. Say "Set Up".
3. Say "Select Phone".
4. Say the name of the contact or the
number of the contact.
5. Say "Yes".
✽NOTICE
The system may not function in the fol-
lowing cases:
If the phone is not found.
If the system does not recognize the
voice command.
• Deleting phone
The registered phones can be deleted.
1. Press the button.
2. Say "Set Up".
3. Say "Delete Phone".
4. Say the name of the contact, the num-
ber of the contact or "Delete all phone".
5. Say "Yes".
Pair phone
Select phone
Change priority
Delete phone
Bluetooth off
Setup
Add entryPhonebook
Change name
Delete name
By Phone
By voice
Call By name
By number
Knowing your vehicle
203
• Changing Priority
The connection priority for registered
phones can be changed.
1. Press the button.
2. Say "Set Up".
3. Say "Change Priority".
4. Say the name of the contact or the
number of the contact.
5. Say "Yes".
•Turning Bluetooth on / off
Bluetooth function can be switched ON/
OFF. initial status : Bluetooth ON
1. Press the button.
2. Say "Set Up".
3. Say "Bluetooth off".
4. Say "Yes".
• Turning Bluetooth on
1. Press the send or button.
2. Say "yes".
3. The Bluetooth will be turned on.
■ Phone Book
• Adding Entry
Phone numbers and voice tags can be
registered. Entries registered in the phone
can also be transferred.
• Adding Entry by Voice
1. Press the button.
2. Say "phonebook".
3. Say "add entry".
4. Say "by voice".
5. Say the name of the contact.
6. Say "yes".
7. Say the phone number.
8. Say "store".
9. Say "Home", "Office", "Mobile", "Other"
or "default".
10. Say "Yes" to store an additional loca-
tion for this contact.
• Adding Entry by phone
1. Press the button.
2. Say "phonebook".
3. Say "add entry".
4. Say "by phone".
5. Say "yes".
6. Transfer procedures may vary depend-
ing on the cellular phone.
✽NOTICE
The system can recognize single digits
from zero to nine. Numbers that are ten
or greater are not recognized.
To speed up input, it is a good idea to
group all digits into a continuous string.
However, you can enter each digit indi-
vidually or group digits together in pre-
ferred string lengths.
The display corresponding to each oper-
ation appears on the screen as follows:
Input operation
1. say: "Nine, nine, five"
Display: "995"
2. say: "Seven, three, four"
Display: "995734"
• Changing Name
The registered names can be changed.
1. Press the button.
2. Say "phonebook".
3. Say "Change name".
4. Say the name of the phonebook [voice
tag].
5. Say "yes".
6. Say the name of the phonebook to be
changed.

321
Knowing your vehicle
• Deleting name
The registered names can be deleted.
1. Press the button.
2. Say "phonebook".
3. Say "Delete name".
4. Say the name of the contact.
5. Say "yes".
■ Making a phone call
• Calling by Name
The system dials the numbers corre-
sponding to the spoken names regis-
tered in the system.
1. Press the button.
2. Say "Call".
3. Say "name".
4. Say "<John>".
6. Say "<at home>".
7. Say "yes".
✽Tip
A shortcut to each of the following func-
tions is available.
1. Say "Call name".
2. Say "Call <john>".
3. Say "Call <john at home>".
• Dialing by Number
The system will make a phone call by
dialing the spoken numbers.
The system can recognize single digits
from zero to nine.
1. Press the button.
2. Say "Call".
3. Say "Number".
4. Say "<digit number>".
5. Say "<added digit number>".
6. Say "Dial".
✽Tip
A shortcut to each of the following func-
tions is available.
1. Say "Dial number".
2. Say "Dial <digit>".

Knowing your vehicle
223
■ Receiving a phone call
When receiving a phone call, a ring tone
is audible and the system changes into
telephone mode.
When receiving a phone call, the phone
number and the message "Incoming" will
be displayed.
• Do either one of the following:
Press the send switch to take the call.
Press the end switch to refuse the call.
• To adjust the ring volume, push "+" or "-
" on the steering volume controls.
Volume adjustment cannot be made
using the audio system.
• To transfer a call to the phone:
The received call can be transferred
from the hands-free system to the cellu-
lar phone that is connected to Bluetooth.
For details, please refer to you user's
manual for the cellular phone or go to the
Key matrix in this manual (next page).
■ Talking on the phone
When talking on the phone, the display
will differ depending on whether or not
the vehicle is in motion.
Number and "active call" is displayed.
When the call is finished, press the end
switch.
✽NOTICE
In the following situations, your voice
may not reach the other party:
1. Talk alternately with the other party
on the phone. If you talk at the same
time, the voice may not reach each
other parties. (This is not a malfunc-
tion.) (It is not a malfunction.)
2. Keep the volume of receiving voice to
a low level. Otherwise, high volumes
may result in an echo. When you talk
on the phone, speak clearly towards
the microphone.
3. When driving on a rough road.
4. When driving at high speeds.
5. When the window is open.
6. When the air conditioning vents are
facing the microphone.
7. When the sound of the air condition-
ing fan is loud.
323
Knowing your vehicle
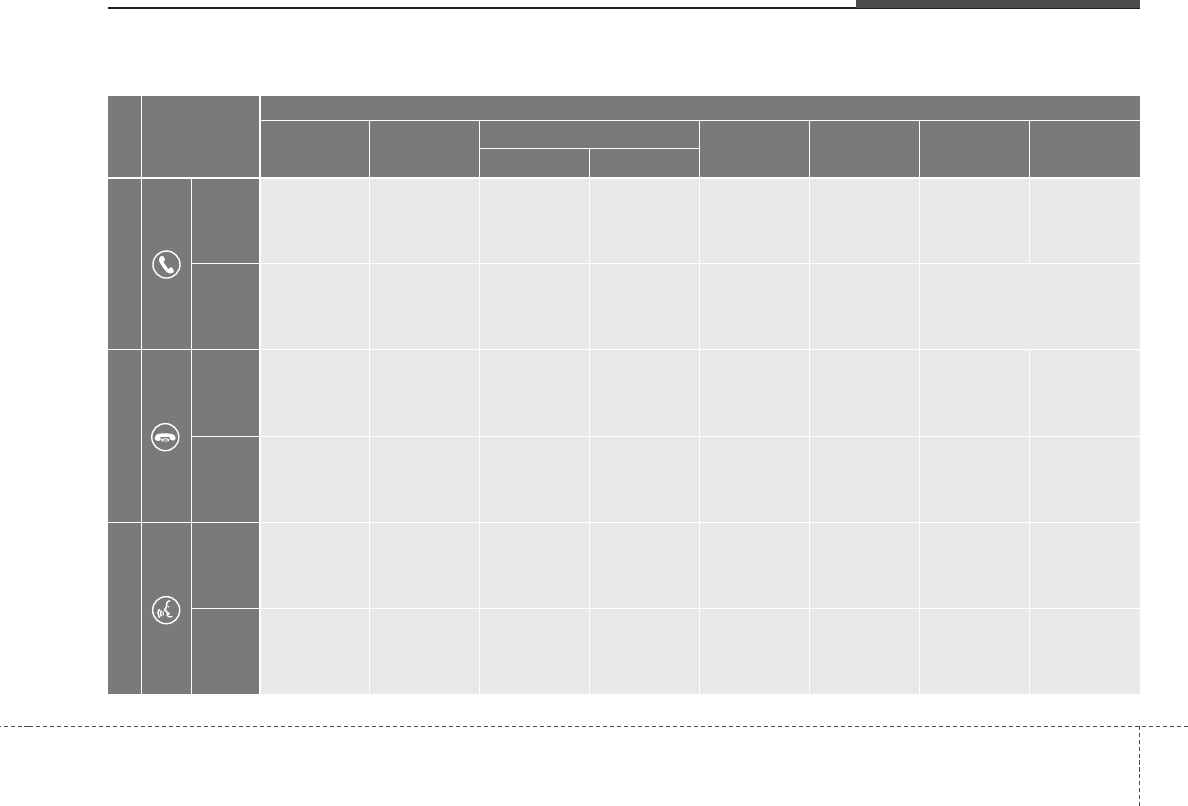
■ Key matrix
No.
Class
Paired H/P
Empty Disconnected
1
SHORT
LONG
SHORT
SHORT
LONG
[10sec]
LONG
[10sec]
Normal mode
BT SETUP menu
Incoming Call Outgoing Call Active Call 2nd Call
Not Paired Not Connecting --
Accept Call
Connected
-
2nd call
1st Call:waiting
2nd Call:active
2nd Call
2nd Call:waiting
1st Call:active
KEY
------Transfer call:secret call
End Call
VR
MODE Cancel
VR
MODE Cancel
VR
MODE Cancel
VR
MODE Cancel Reject Call End Call End Call
-
Active
Change
language
-
Active
Speaker
Adaptation
(Only English)
Change
language
Active
Change
language
Active
-
Speaker
Adaptation
(Only English)
Change
language
-
-
-
-
-
-
-
-
-
--
2
3

4
1
This equipment has been tested and found to comply with the limits for a Class A digital device, pursuant to part 15 of the FCC Rules.
These limits are designed to provide reasonable protection against harmful interference in a residential installation. This equipment
generates, uses and can radiate radio frequency energy and, if not installed and used in accordance with the instructions, may cause
harmful interference to radio communications. However, there is no guarantee that interference will not occur in a particular
installation. If this equipment does cause harmful interference to radio or television reception, which can be determined by turning the
equipment off and on, the user is encouraged to try to correct the interference by one or more of the following measures:
• Reorient or relocate the receiving antenna.
• Increase the separation between the equipment and receiver.
• Connect the equipment into an outlet on a circuit different from that to which the receiver is connected.
• Consult the dealer or an experienced radio/TV technician for help.
Caution: Any changes or modifications to this device not explicitly approved by manufacturer could void your authority to operate this
equipment.
This device complies with part 15 of the FCC Rules. Operation is subject to the following two conditions: (1) This device may not
cause harmful interference, and (2) this device must accept any interference received, including interference that may cause undesired
operation.
This equipment complies with FCC radiation exposure limits set forth for an uncontrolled environment. This equipment should be
installed and operated with minimum 20 cm between the radiator and your body. This transmitter must not be collocated or operating
in conjunction with any other antenna or transmitter unless authorized to do so by the FCC.
IC Warning
Operation of this device is subject to the following two conditions: (1) this device may not cause interference, and (2) this device must
accept any interference, including interference that may cause undesired operation of the device.