HYUNDAI MOBIS PA710VGXMB-MY CAR AUDIO User Manual K VG 1003 BT GEN 0304 qxp
HYUNDAI MOBIS CO., LTD. CAR AUDIO K VG 1003 BT GEN 0304 qxp
UserManual.wiki
>
HYUNDAI MOBIS
>
PA710VGXMB MY User Manual
User Manual
Navigation menu
Upload a User Manual
Namespaces
Wiki Guide
HTML
PDF
Info
Views
User Manual
Discussion / Help
Navigation

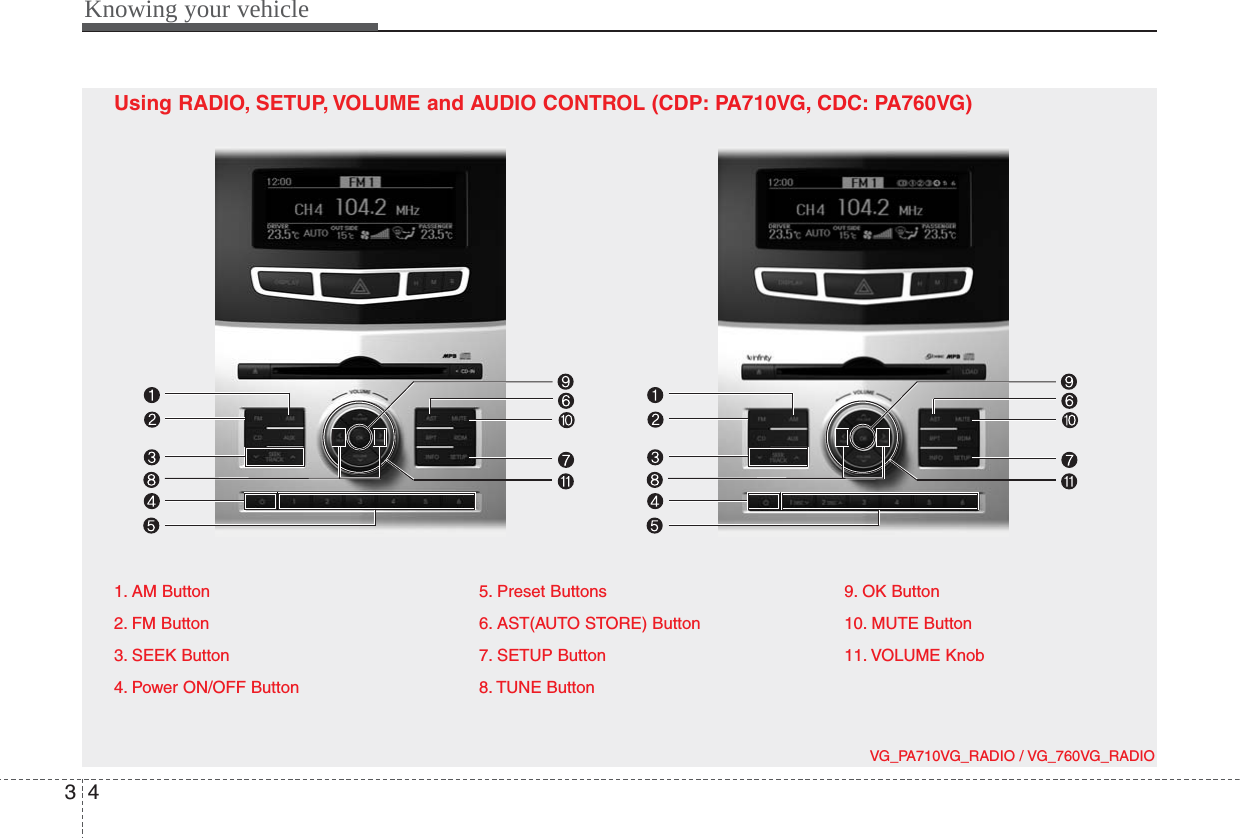
![Using RADIO, SETUP, VOLUMEand AUDIO CONTROL1. AM ButtonPressing the [AM] button selects the AMband. AM Mode is displayed on the LCD.2. FM ButtonTurns to FM mode and toggles FM1andFM2 when the button is pressed each time.3. SEEK Button• When the [SEEK ] button is pressed,it increases the band frequency to auto-matically select channel. Stops at theprevious frequency if no channel isfound.• When the [TRACK ] button is press-ed, it reduces the band frequency toautomatically select channel. Stops atthe previous frequency if no channel isfound.4. Power ON/OFF Button• Turns on/off the set when the IGNI-TION SWITCH is on ACC or ON.5. Preset ButtonsPush [1]~[6] buttons less than 0.8 sec-ond to play the channel saved in eachbutton. Push Preset button for 0.8 sec-ond or longer to save current channel tothe respective button with a beep.6. AST(AUTO STORE Button)When the button is pressed, it automati-cally selects and saves channels withhigh reception rate to PRESET buttons[1]~[6] and plays the channel saved inPRESET1. If no channel is saved afterAST, it will play the previous channel.7. SETUP Button■ PA710VGPress this button to turn to the SCROLLoption and the other adjustment mode. Ifno action is taken for 5 seconds afterpressing the button, it will return to theplay mode. (After entering SETUP mode,select Manual tune Button and push OKButton. )The setup change in the order ofSOUND➟SDVC➟CLOCK➟TEMP➟SCROLL➟RETURN■ PA760VGThe setup change in the order ofSOUND➟V-EQ➟SDVC➟CLOCK➟TEMP➟SCROLLIn the case of JBL AMPSOUND➟SDVC➟CLOCK➟TEMP➟SCROLL• SDVCThis function automatically adjusts thevolume level according to the speed ofthe vehicle and can be turned ON/OFFthrough the sound quality control knob.• SOUNDSelect this menu to adjust the sound infollowing order: BASS, MIDDLE, TRE-BLE and FADER /BALANCE. To movebetween items, press [OK] button.BASS/MIDDLE/TREBLE: Use [ FILE], [ TUNE ] buttons to adjust the menu.FADER/BALANCE: Use [ FILE ],[ TUNE ] buttons to adjust BALANCE and [ FOLDER ] buttons to adjustFADER.35Knowing your vehicle](https://usermanual.wiki/HYUNDAI-MOBIS/PA710VGXMB-MY/User-Guide-1378780-Page-5.png)
![Knowing your vehicle63• V-EQPress [ FILE ], [ TUNE ] buttonchanges the Innocente, Forza,Concertro mode, and push [OK] Button.• CLOCK <PA760VG>Pressing the [ FILE ], [ TUNE ] but-ton select the time mode(12, 24mode),and push the [OK] button.8. TUNE ButtonPush this button to manually adjust fre-quency, While listening to the radio chan-nel.9. OK ButtonPush this button to select each mode.10. MUTE ButtonWhen the button is pressed, stops soundand “Audio Mute” is displayed on LCD.11. VOLUME KnobIf the knob is turned clockwise/counter-clockwise, the volume will increase/decrease.](https://usermanual.wiki/HYUNDAI-MOBIS/PA710VGXMB-MY/User-Guide-1378780-Page-6.png)
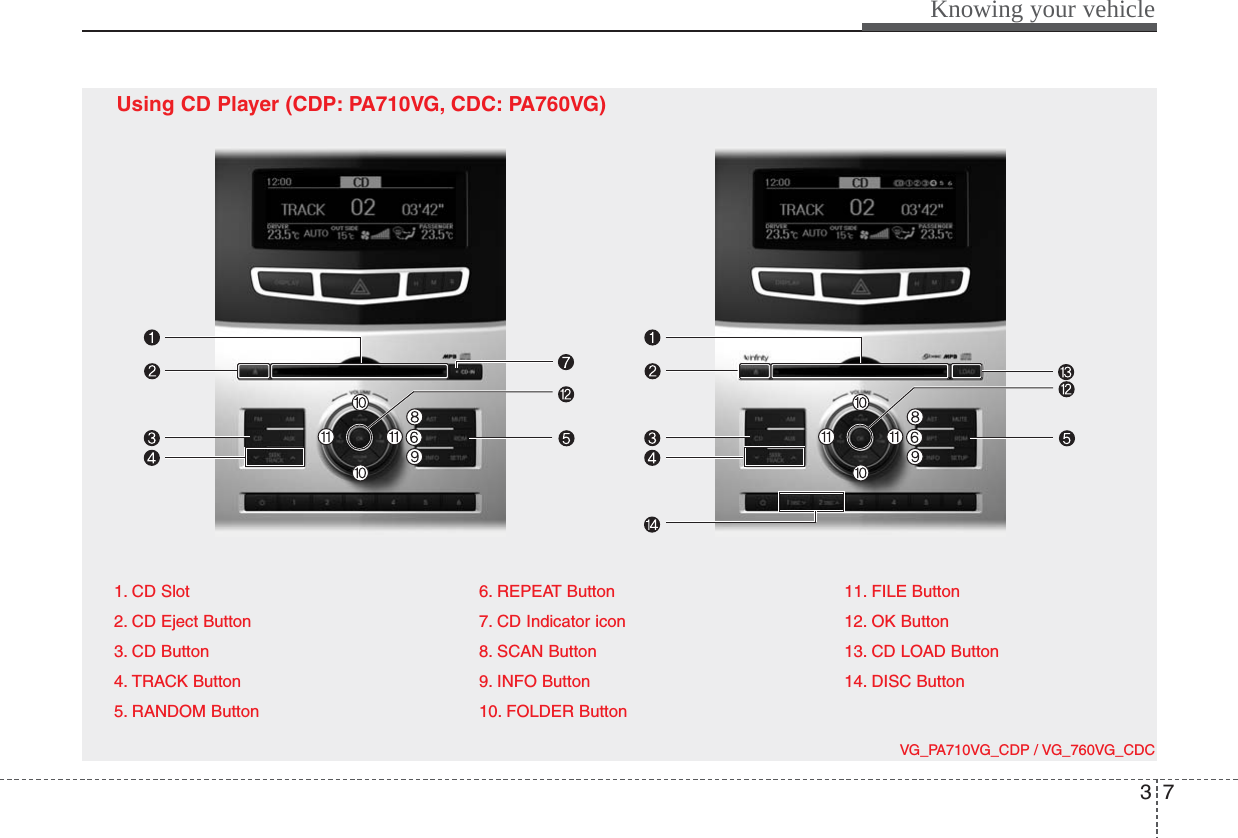
![Knowing your vehicle83Using CD Player1. CD SlotPlease face printed side upward and gen-tly push in. When the ignition switch is onACC or ON and power is off, power isautomatically turned on if the CD isloaded. This CDP supports only 12cm CD.If VCD, Data CD are loaded, "ReadingError" message will appear and CD will beejected.2. CD Eject ButtonPush button for less than 0.8 secondsto eject the CD during CD playback. Thisbutton is enabled when ignition switch isoff.• ALL EJECT(CDC Only)Press this button for more than 0.8seconds to eject all discs inside thedeck in respective order.3. CD ButtonIf the CD is loaded, turns to CD mode. Ifno CD, it displays "No Disc" for 3 sec-onds and returns to the previous mode.4. TRACK Button• Push [TRACK ] button for less than0.8 second to play from the beginningof current song.• Push [TRACK ] button for less than0.8 second and press again within1 seconds to play the previous song.• Push [TRACK ] button for 0.8 orlonger to initiate reverse direction highspeed sound search of current song.• Push [SEEK ] button for less than0.8 second to play the next song.• Push [SEEK ] button for 0.8 orlonger to initiate high speed soundsearch of current song.5. RANDOM ButtonPress this button for less than 0.8 secondto activate ‘RDM’ mode and more than0.8 seconds to activate ‘ALL RDM’ mode.• RDM : Only files/tracks in a folder/discare played back in a random sequence.• ALL RDM(MP3/WMA Only) : All files ina disc are played back in the randomsequence.6. REPEAT ButtonPress this button for less than 0.8 secondto activate ‘RPT’ mode and more than 0.8seconds to activate ‘ RPT’ mode.• RPT : Only a track(file) is repeatedlyplayed back.• RPT(MP3/WMA Only) : Only files ina folder are repeatedly played back.7. CD Indicator icon(CDP Only)When car ignition switch is ACC or ONand if the CD is loaded, this indicator iconis on. If the CD is ejected the icon is off.8. SCAN ButtonPlays first 10 seconds of each song inthe DISC. To cancel the mode, press thebutton once again.9. INFO ButtonDisplays the information of the currentCD TRACK(FILE) as below when thebutton is pressed each time.• CDDA : DISC TITLE ➟DISC ARTIST➟TRACK TITLE➟TRACK ARTIST➟TOTAL TRACK...](https://usermanual.wiki/HYUNDAI-MOBIS/PA710VGXMB-MY/User-Guide-1378780-Page-8.png)
![39Knowing your vehicle• MP3/WMA : FILE NAME➟TITLE➟ARTIST➟ALBUME➟FOLDER➟TOTAL FILE...(not displayed if the information is notavailable on the DISC.)10. FOLDER Button• Press the [FOLDER ] button tomove to child folder of the current fold-er and displays the first song in thefolder. Press [OK] button to move to thefolder displayed. It will play the firstsong in the folder.• Press the [FOLDER ] button to move toparent folder of the current folder and dis-plays the first song in the folder. Press [OK]to move the folder displayed.11. FILE Button• Press the [ TUNE ] button to displaythe songs next to the currently playedsong.• Press the [ FILE ] button to displaythe songs before to the currentlyplayed song.12. OK ButtonPress the [OK] button to play the select-ed song.13. CD LOAD ButtonPush [LOAD] button to load CD to avail-able CDC deck (from 1~6). Push [LOAD]button for more than 2 seconds to loadinto all available decks. The last CD willplay. 10 seconds idle status will disableloading process.14. DISC Button• [DISC ] Change Button Changesdisc to the previous disc.• [DISC ] Change Button Changesdisc to the next disc.](https://usermanual.wiki/HYUNDAI-MOBIS/PA710VGXMB-MY/User-Guide-1378780-Page-9.png)
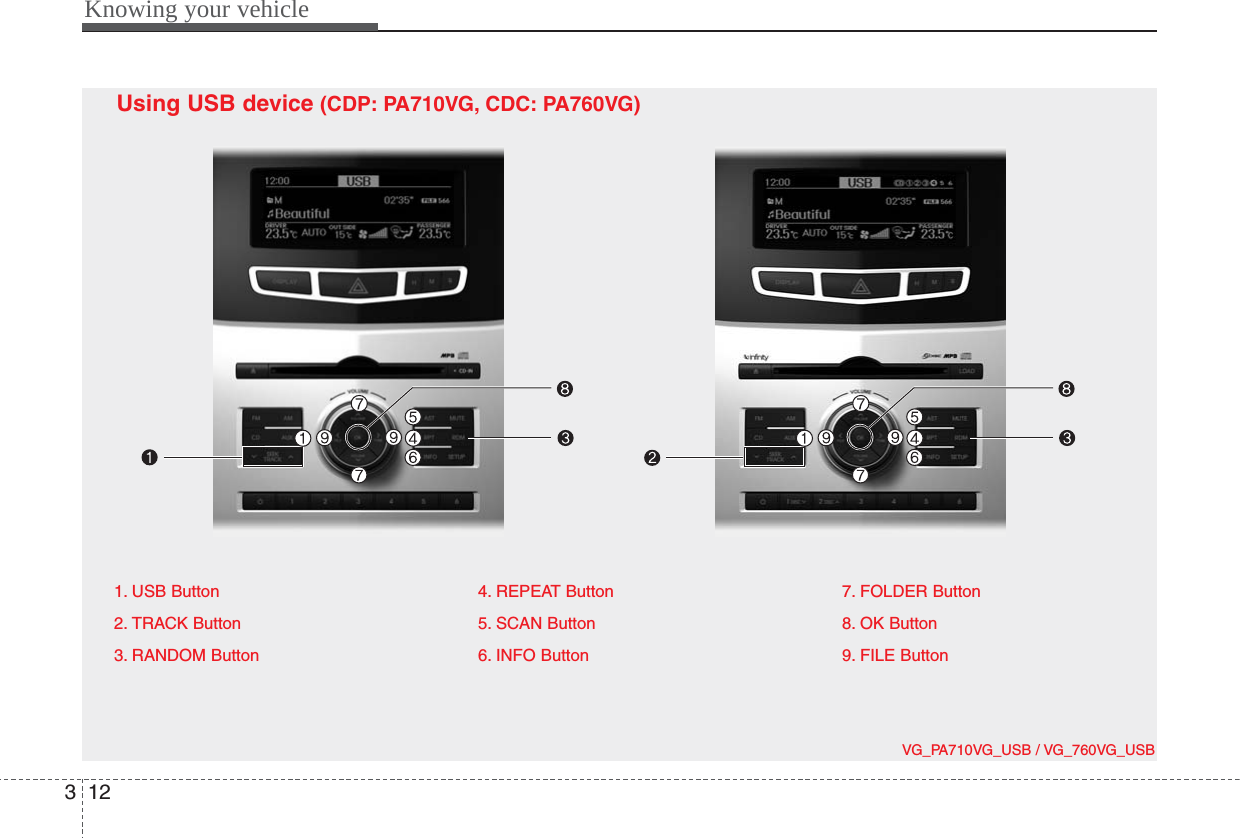
![313Knowing your vehicleUsing USB device1. USB ButtonIf USB is connected, it switches to theUSB mode from the other mode to playthe song files stored in the USB. If no CDand auxiliary device is not connected, itdisplays "NO Media" for 3 seconds andreturns to the previous mode.2. TRACK Button• Press the [TRACK ] button for lessthan 0.8 second to play from the begin-ning of the song currently played.Press the button for less than 0.8 sec-ond and press it again within 1 sec-onds to move and play the previoustrack. Press the button for 0.8 secondor longer to play the song in reversedirection in fast speed.• Press the [SEEK ] button for lessthan 0.8 second to move to the nexttrack. Press the button for 0.8 secondor longer to play the song in forwarddirection in fast speed.3. RANDOM ButtonPress this button for less than 0.8 sec-onds to activate 'RDM' mode and morethan 0.8 seconds to activate 'ALL RDM'mode.• RDM : Only files in a folder are playedback in a random sequence.• ALL RDM : All files in a USB memoryare played back in the randomsequence.4. REPEAT ButtonPress this button for less than 0.8 sec-onds to activate ‘RPT’ mode and morethan 0.8 seconds to activate ‘ RPT’mode.• RPT : Only a file is repeatedly playedback.• RPT : Only files in a folder arerepeatedly played back.5. SCAN ButtonPlays 10 seconds of each song in theUSB device. Press the button once againto cancel scanning.6. INFO ButtonDisplays the information of the file cur-rently played in the order of FILE NAME➟TITLE➟ARTIST➟ALBUM➟FOLDER➟TOTAL FILE➟NORMAL DISPLAY➟FILENAME➟... (Displays no information if thefile has no song information.)7. FOLDER Button• Press the [FOLDER ] button tomove to child folder of the current fold-er and displays the first song in thefolder. Press [OK] button to move to thefolder It will play the first song in thefolder.• Press the [FOLDER ] button tomove to parent folder and displays thefirst song in the folder.Press [OK] button to move to the folderdisplayed.8. OK ButtonPress the [OK] button to play the select-ed song.9. FILE ButtonPress the [ TUNE ] button to displaythe songs next to the currently playedsong. Press the [ FILE ] button to dis-play the songs before to the currentlyplayed song.](https://usermanual.wiki/HYUNDAI-MOBIS/PA710VGXMB-MY/User-Guide-1378780-Page-13.png)
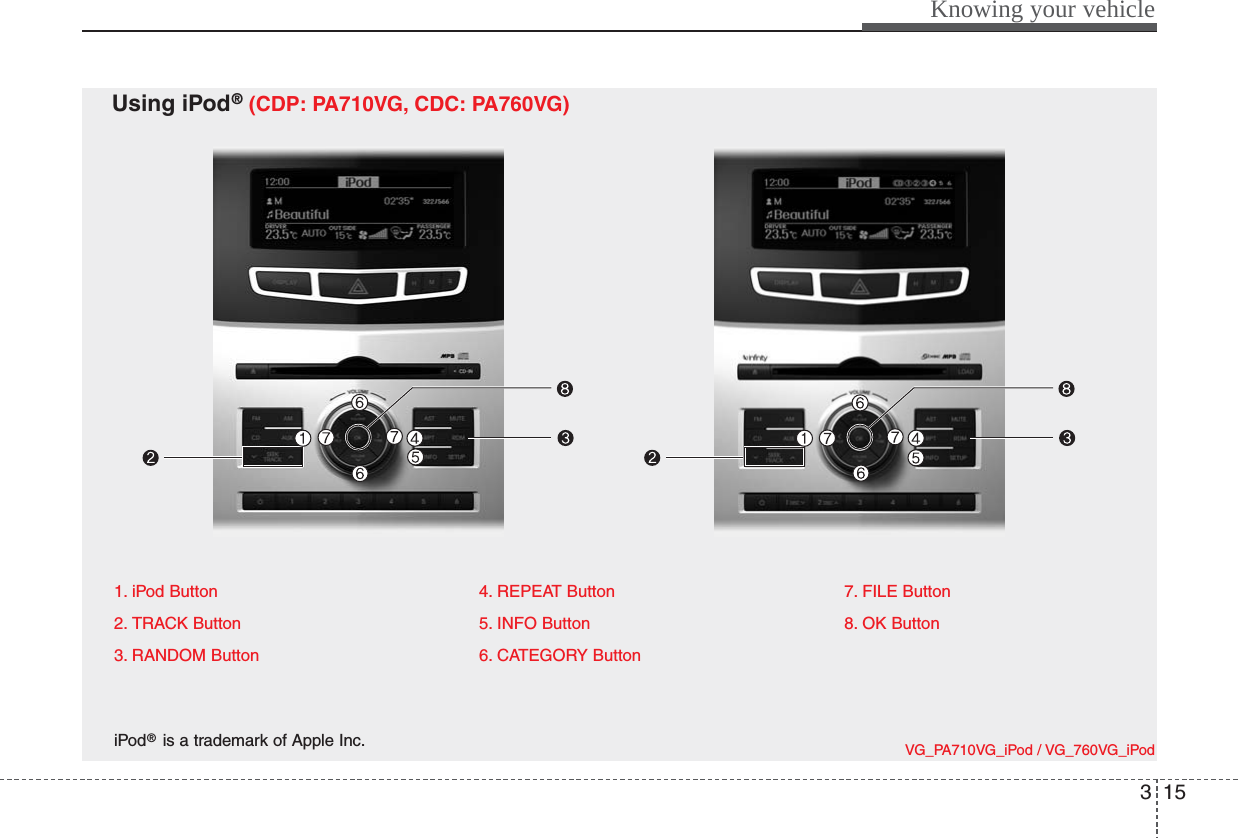
![Knowing your vehicle163Using iPod®1. iPod ButtonIf iPod is connected, it switches to iPodmode from the CD mode to play the songfiles stored in iPod. If no CD and auxiliarydevice is not connected, it displays "NOMedia" for 3 seconds and returns to theprevious mode.2. TRACK Button• Press the [TRACK ] button for lessthan 0.8 second to play from the begin-ning of the song currently played.Press the button for less than 0.8 sec-ond and press it again within 1 sec-onds to move and play the previoustrack. Press the button for 0.8 secondor longer to play the song in reversedirection in fast speed.• Press the [SEEK ] button for lessthan 0.8 second to move to the nexttrack. Press the button for 0.8 secondor longer to play the song in forwarddirection in fast speed.3. RANDOM ButtonPress the button for less than 0.8 secondto activate or deactivate the random play-back of the songs within the current cat-egory. Press the button for longer than0.8 second to randomly play all songs inthe entire album of iPod.Press the button once again to cancelthe mode.4. REPEAT ButtonRepeats the song currently played.5. INFO ButtonDisplays the information of the file cur-rently played in the order of TITLE➟ARTIST➟ALBUM➟NORMAL DISPLAY➟TITLE➟... (Displays no information if thefile has no song information.)6. CATEGORY ButtonMove to the upper category from current-ly played category of iPod.7. FILE ButtonPress the [ TUNE ] button to displaythe songs(category) next to the songcurrently played (category in the samelevel). Press the [ FILE ] button to dis-play the songs(category) before to thesong currently played(category in thesame level).8. OK ButtonPress the [OK] button to play the select-ed song.](https://usermanual.wiki/HYUNDAI-MOBIS/PA710VGXMB-MY/User-Guide-1378780-Page-16.png)
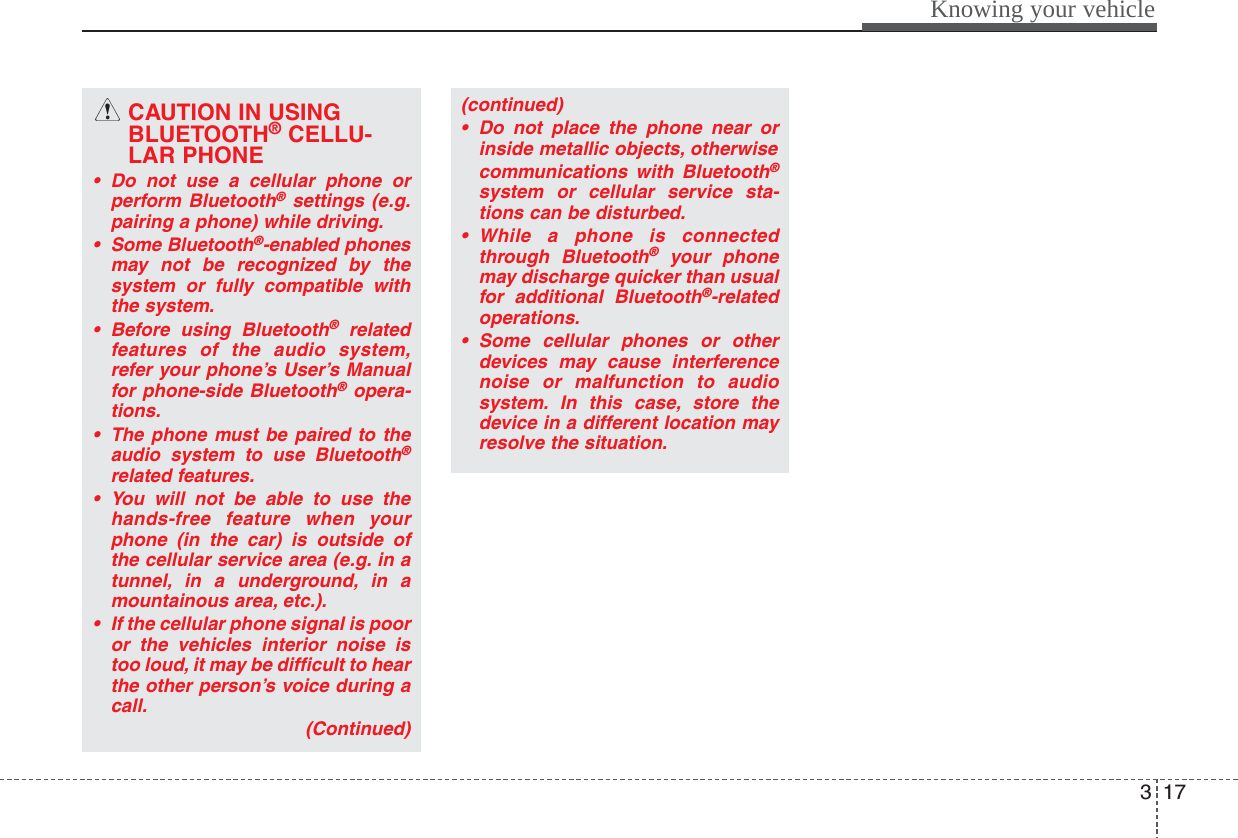
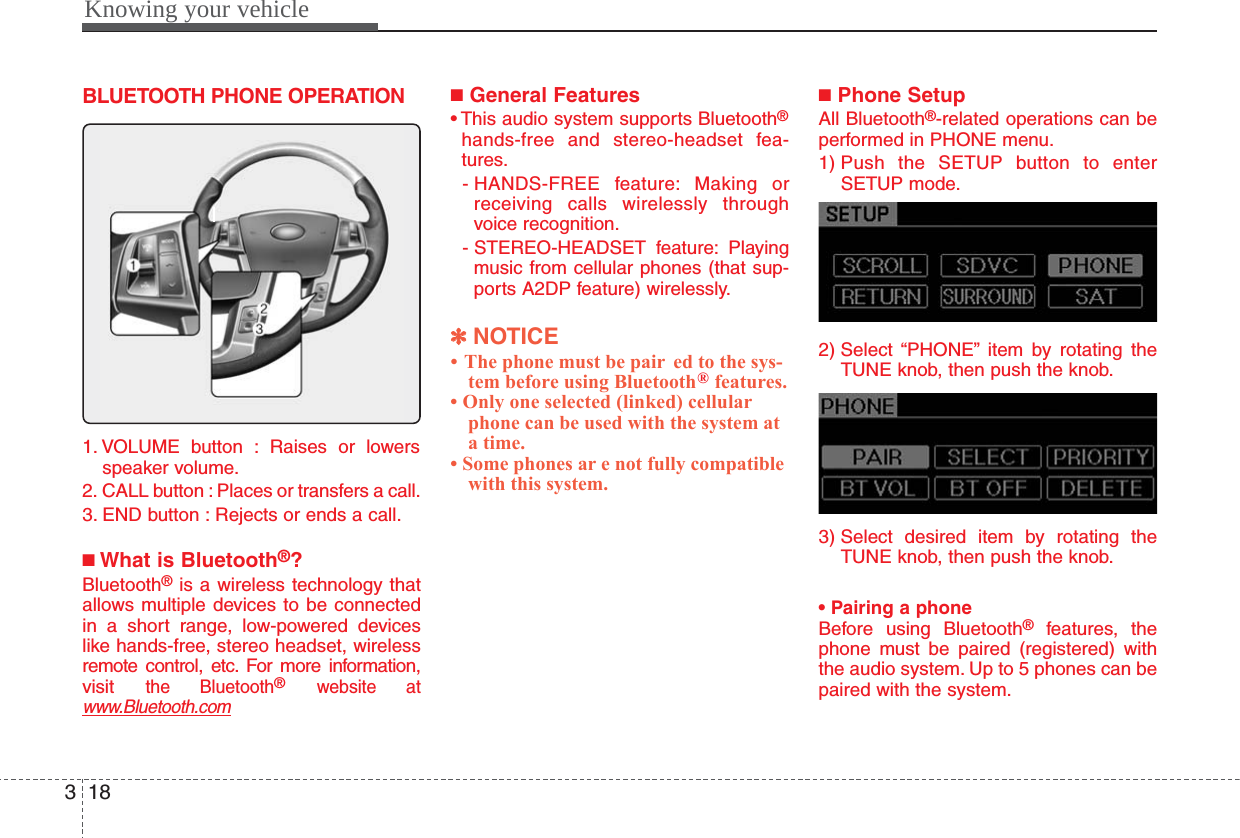
![319Knowing your vehicleNOTE:• The pairing procedure of the phonevaries according to each phonemodel. Before attempting to pairphone, please see your phone’sUser’s Guide for instructions.• Once pairing with the phone is com-pleted, there is no need to pair withthat phone again unless the phoneis deleted manually from the audiosystem (refer “Deleting Phone” sec-tion) or the vehicle’s information isremoved from the phone.1. Press [SETUP] button to enter SETUPmode.2. Select “PHONE”, then “PAIR” inPHONE menu.3. The audio displays “searching ----passkey: 0000” and asks you to initiatepairing procedure from the phone.4. Search the Bluetooth®system on yourphone .Your phone should display your[vehicle model name] on theBluetooth®device list. Then attemptpairing on your phoneNOTE:• Until the audio displays “TransferComplete”, Bluetooth®hands-freefeature may not be fully operational.• If the phone is paired with two ormore vehicles of the same model,some phones may not handleBluetooth®devices of that namecorrectly. In this case, you may needto change the name displayed onyour phone.For example, if the vehicles' name isKMC CAR, you may need to changethe name displayed on you phonefrom KMC_CAR to JOHNS_CAR orKMC CAR_1 to avoid ambiguity.Refer to your phone User’s Guide,or contact your cellular carrier orphone manufacturer for instruc-tions.• Connecting a phoneWhen the Bluetooth®system is enabled,the phone previously used is automati-cally selected and re-connected. If youwant to select different phone previouslypaired, the phone can be selectedthrough “Select Phone” menu.Only a selected phone can be used withthe hands-free system at a time.1. Press [SETUP] button to enter SETUPmode.2. Select “PHONE”, then “DELETE” inPHONE menu.3. Select desired phone name from the listshown.• Changing PriorityWhen several phones are paired with theaudio system, the system attempts toconnect following order when theBluetooth®system is enabled:1) “Priority” checked phone.2) Previously connected phone3) Gives up auto connection.1. Press [SETUP] button to enter SETUPmode.2. Select “PHONE”, then in “DELETE” inPHONE menu.3. Select desired phone name from thelist shown.• Adjusting Bluetooth VolumeBluetooth®system volume can be adjust-ed separately from main volume of theaudio system.1.Press [SETUP] button to enter SETUPmode.2. Select “PHONE”, then “BT VOL” inPHONE menu.](https://usermanual.wiki/HYUNDAI-MOBIS/PA710VGXMB-MY/User-Guide-1378780-Page-19.png)
![Knowing your vehicle2033. Adjust volume to desired level by turn-ing the TUNE knob, then press theknob to confirm.• Turning Bluetooth®ON/OFFBluetooth®system can be enabled (ON)or disabled (OFF) by this menu.- If Bluetooth®is disabled, all the com-mands related to Bluetooth®systemprompts whether you wish to turnBluetooth®ON or not.1. Press [SETUP] button to enter SETUPmode.2. Select “PHONE”, then “BT OFF” inPHONE menu.■Receiving a Phone CallWhen receiving a phone call, a ringtoneis audible from speakers and the audiosystem changes into telephone mode.When receiving a phone call, “Incoming”message and incoming phone number (if available) are displayed on the audio.• To Answer a Call:- Press button on the steering wheel.• To Reject a Call:- Press button on the steering wheel.• To Adjust Ring Volume:- Use VOLUME buttons on the steeringwheel.• To Transfer a Call to the Phone(PrivateCall):- Press and hold button on the steer-ing wheel until the audio system trans-fers a call to the phone.■Talking on the PhoneWhen talking on the phone, “Active Calls”message and the other party’s phonenumber (if available) are displayed on theaudio.• To Mute the Microphone- Press [MUTE] button on the audio.• To Finish a Call- Press button on the steering wheel.■Making a Phone CallA Call Back can be made by pressingbutton on the steering wheel.- This is the same function as using thebutton solely on the cellular phone.NOTE:Some phone models require pressingbutton twice to make a call.✽✽NOTICEIn the following situations, you or theother party may have difficulty hearingeach other:1. Speaking at the same time, your voicemay not reach each other parties. (Thisis not a malfunction.) Speak alternate-ly with the other party on the phone.2. Keep the Bluetooth(R) volume to alow level. High-level volume mayresult in distortion and echo.3. When driving on a rough road.4. When driving at high speeds.5. When the window is open.6. When the air conditioning vents ar efacing the microphone.7. When the sound of the air condition-ing fan is loud.](https://usermanual.wiki/HYUNDAI-MOBIS/PA710VGXMB-MY/User-Guide-1378780-Page-20.png)
![321Knowing your vehicle■Using the head unit as BluetoothmusicThis audio system supports A2DP (AudioAdvanced Distribution Profile) andAVRCP(Audio Video Remote ControlProfile).Both profiles are available for listening tothe MP3 music via Bluetooth cellular phonesupporting above Bluetooth profiles.To play MP3 music from the Bluetoothcellular phone, press the [AUX] buttonuntil “MP3 Play” is displayed on the LCD.Then try playing music by phone.When playing music from the Bluetooth cellular phone, the head unit displaysMP3 MODE.NOTE:• Not only MP3 files, all the soundsthat the phone supports can beheard by the audio system.• The Bluetooth cellular phones shallfeature A2DP and AVRCP functions.• Some A2DP and AVRCP Bluetoothcellular phones may not play musicthrough the head unit on first try.Please try the below;i.e : Menu➟Filemanager➟Music➟Option➟Play via Bluetooth • Please refer to User's Guide of yourphone for more.To stop music, try stop playingmusic from the phone then changethe audio mode to other than “MP3Play” mode (e.g. FM, AM, CD, etc.)](https://usermanual.wiki/HYUNDAI-MOBIS/PA710VGXMB-MY/User-Guide-1378780-Page-21.png)