Haier Information Technology Y11C laptop User Manual user guide v1 0 en 08252017
Haier Information Technology(Shenzhen)CO.,Ltd laptop user guide v1 0 en 08252017
user manual

1
User Manual V1.0
Note
• This manual is mainly for Windows 10. There might be some slight differences if
you use other windows systems.
• This manual contains the common functions of most models. Maybe it does not
fit very well with your model for some functions, or maybe some of your model
functions are not contained in this manual.
• The illustrations in this manual may differ from the actual products. Please
prevail in kind.
■Before using the computer, please read the safety precautions and important
tips carefully and patiently first!

2
Content
Chapter 1 Know your computer ........................................................................................ 3
Front View ............................................................................................................... 3
Left View .................................................................................................................. 7
Right View ............................................................................................................... 8
Bottom View .......................................................................................................... 10
Chapter 2 Operating Windows10 ..................................................................................... 11
Configuring the operating system in initial use. ..................................................... 11
Operating System Interface ................................................................................... 11
Keep the computer in sleep mode or shut down ................................................... 13
Connect to the wireless network ............................................................................ 15
Touch screen operation ......................................................................................... 16
Chapter 3 Troubleshooting .............................................................................................. 17
Common problems ................................................................................................ 17

3
Chapter 1 Know your computer
Front View
Attention:
• When you close the display, please be careful not to leave pens or any other objects in
between the display and the keyboard. Otherwise, the display may be damaged.
1. MIC For Voice recording.
2. Built-in camera Use the camera for video communication or taking photos.
3. Multi-touch display The LCD display with LED backlight provides brilliant visual output.
Multi-touch function is available on this display.
4. Keyboard For input.
5. Speaker Output audio.
6. Touchpad The touchpad functions as a conventional mouse. One piece multi-touch.
Click Pad: To move the pointer on the screen, slide your fingertip over the
pad in the direction in which you want the pointer to move.
Left-click area: Clicking in this area corresponds to the functions of clicking
the left button on a conventional mouse. Right-click area: Clicking in this
area corresponds to the functions of clicking the right button on a
conventional mouse.
4
Chapter 1 know your computer
■Using the keyboard
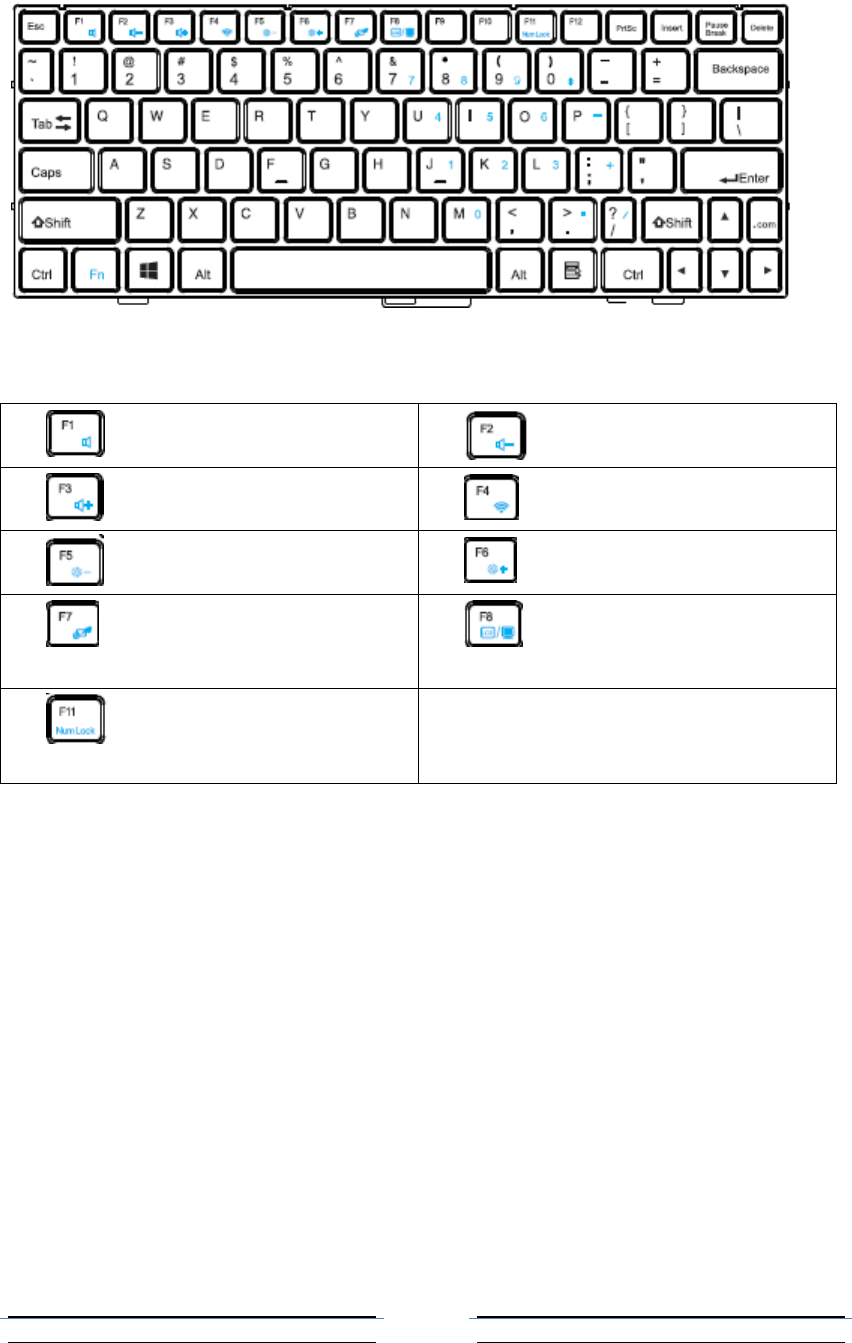
Keyboard function keys
Pressing certain function key to enter the corresponding system settings immediately.
Keyboard Function
F1 Turn on or off the mute F2 Turn down the volume
F3 Turn Up the volume F4 Enable or disable the wlan
F5 Turn down the LCD brightness F6 Turn up the LCD brightness
F7 Enable or disable the touch pad F8 Toggles the display between the
computer and an external display device.
F11 Enable or disable the numeric
key pad
5
Chapter 1 know your computer
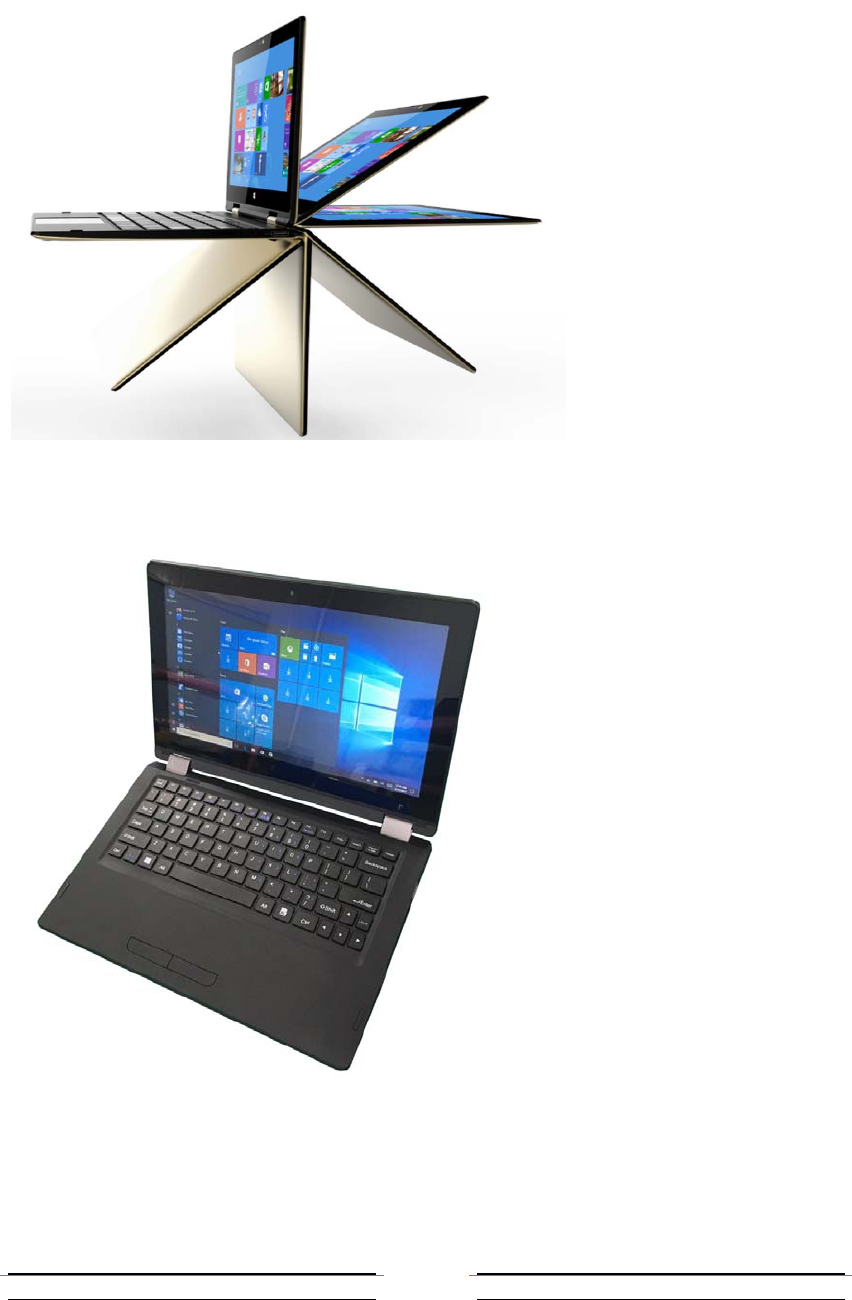
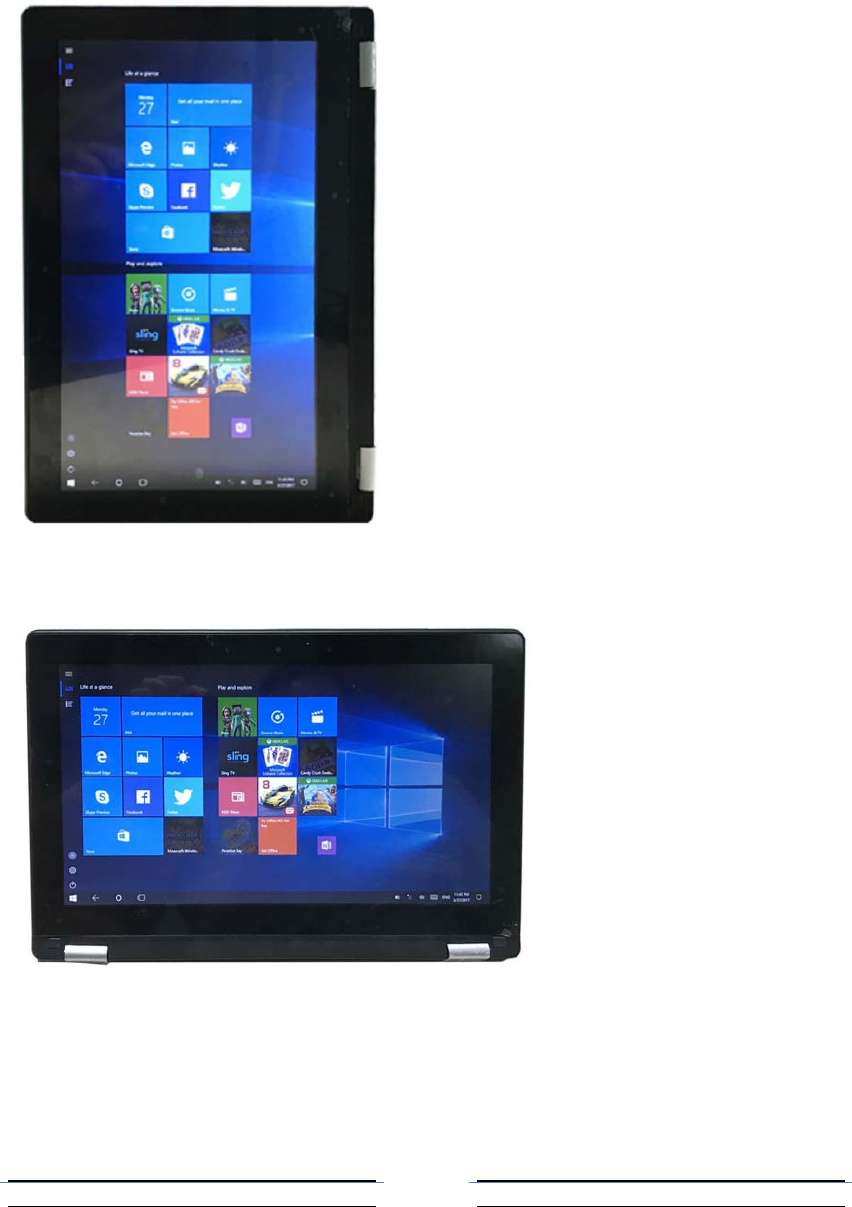
Positioning the display panel
The display panel can be opened to any angle up to 360 degrees
Notebook Mode
Suitable for tasks that require a keyboard and mouse (such as creating documents,
writing e-mails, and so on)
6
Chapter 1 know your computer
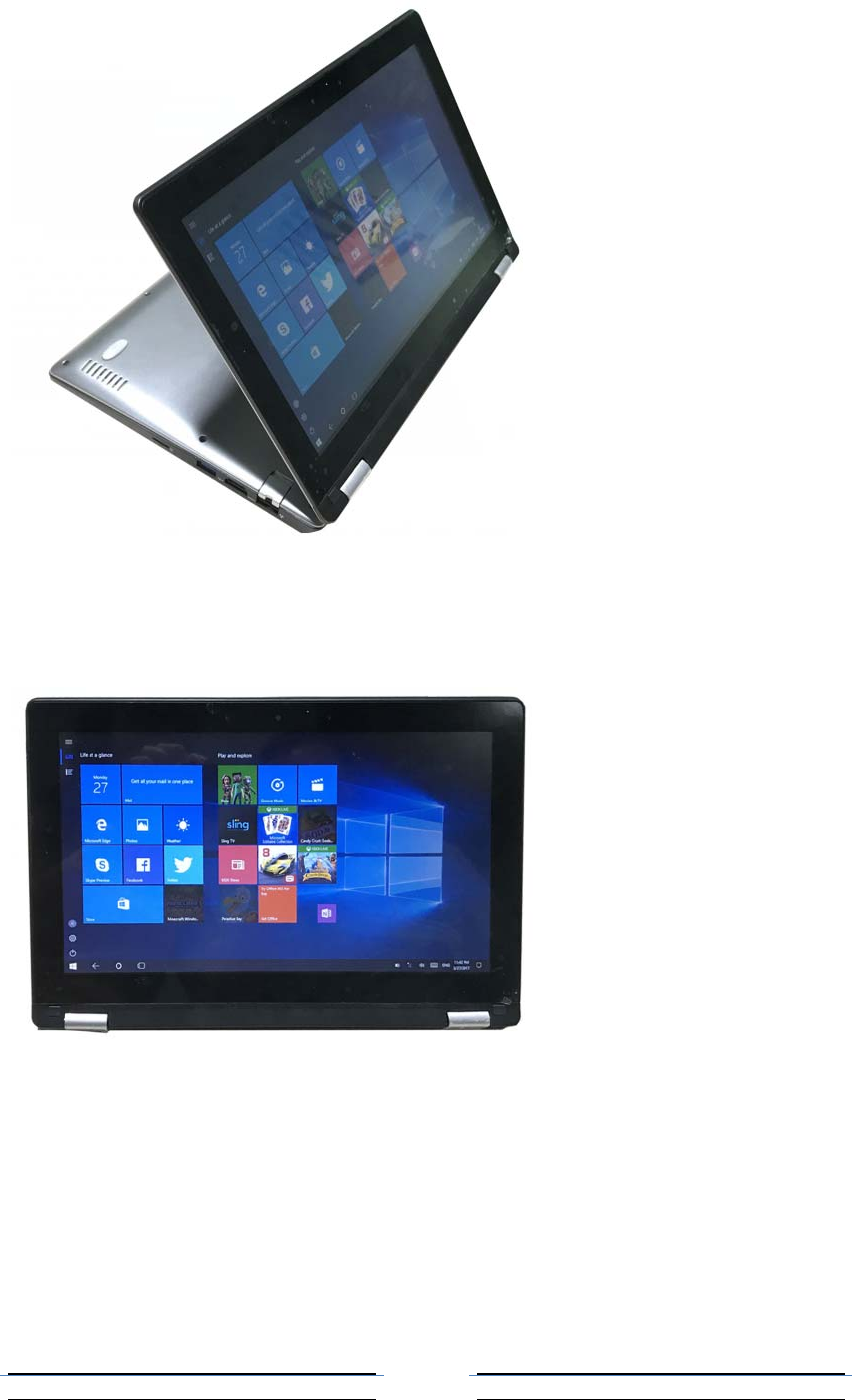
■Vertical (standing mode)
You can use this mode when you do not need too many operations, just view the picture
or play a video, etc.
■Tablet Mode
You can use in this mode when you frequently operate the touch screen, such as: the
Internet, play games, etc.
7
Chapter 1 know your computer
■Tent type
Suitable for tasks that require limited interaction with the touch screen (such as displaying
graphs or PowerPoint presentations).
Note:
• Do not open the display with too much force, otherwise the panel or hinges may be
damaged.
• When the display opening angle is bigger than 180 degree, the keypad locks
automatically.
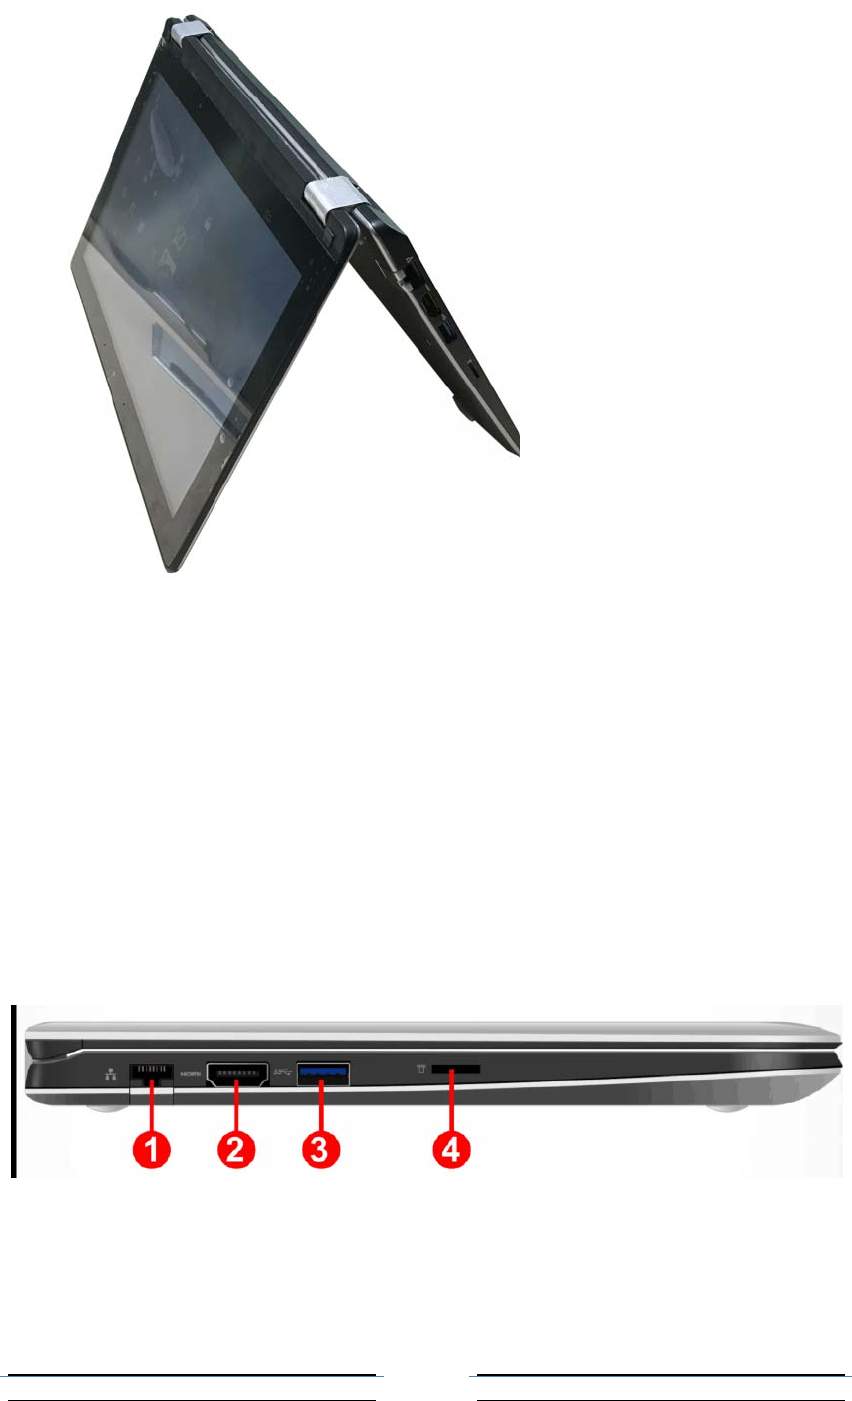
Left View
1. RJ45 Port
2. HDMI port
3. USB3.0 Port
4. Micro SD card port
8
Chapter 1 know your computer
Note:
• The combo audio jack does not support a conventional microphone connection.
• Due to differences in industry-standard, when third-party connects headphones or
headset microphone, recording functions may not be supported well.
■Using memory cards (not supplied)
The computer supports the following types of memory cards:
• Secure Digital (SD) card
• Secure Digital High Capacity (SDHC) card
• Secure Digital Extended Capacity (SDXC) card
■Using memory cards
• Note
You can only insert one memory card in the slot each time. Please insert memory card
until into the bottom of the slot.
Remove the memory card from the memory card slot and gently pull the memory card.
NOTE: Before removing the memory card, safely remove hardware and eject media utility
to disable the card to avoid data corruption.
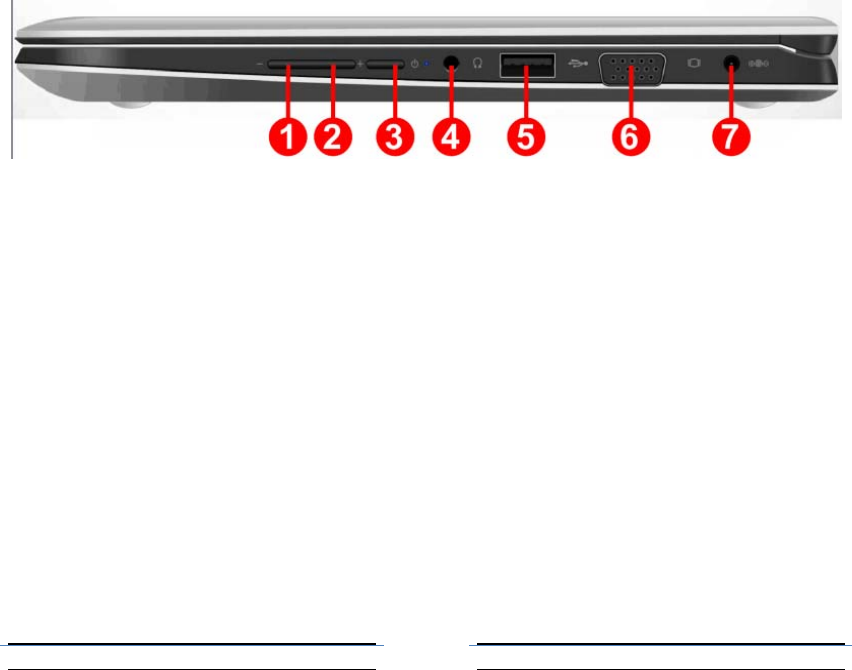
Right View
1. Volume Down button to decrease the volume
2. Volume Up button to increase the volume
3. Press this button to turn on the computer
4. Headphone Jack
5. Connects to USB devices
6. VGA jack
7. AC power adapter jack
9
Chapter 1 know your computer
■Screen orientation
You can rotate the display panel to your preferred orientation. The orientation of the
display automatically changes (alternating between portrait and landscape modes)
depending on how you hold it.
■Vertical
■Horizontal
10
Chapter 1 know your computer
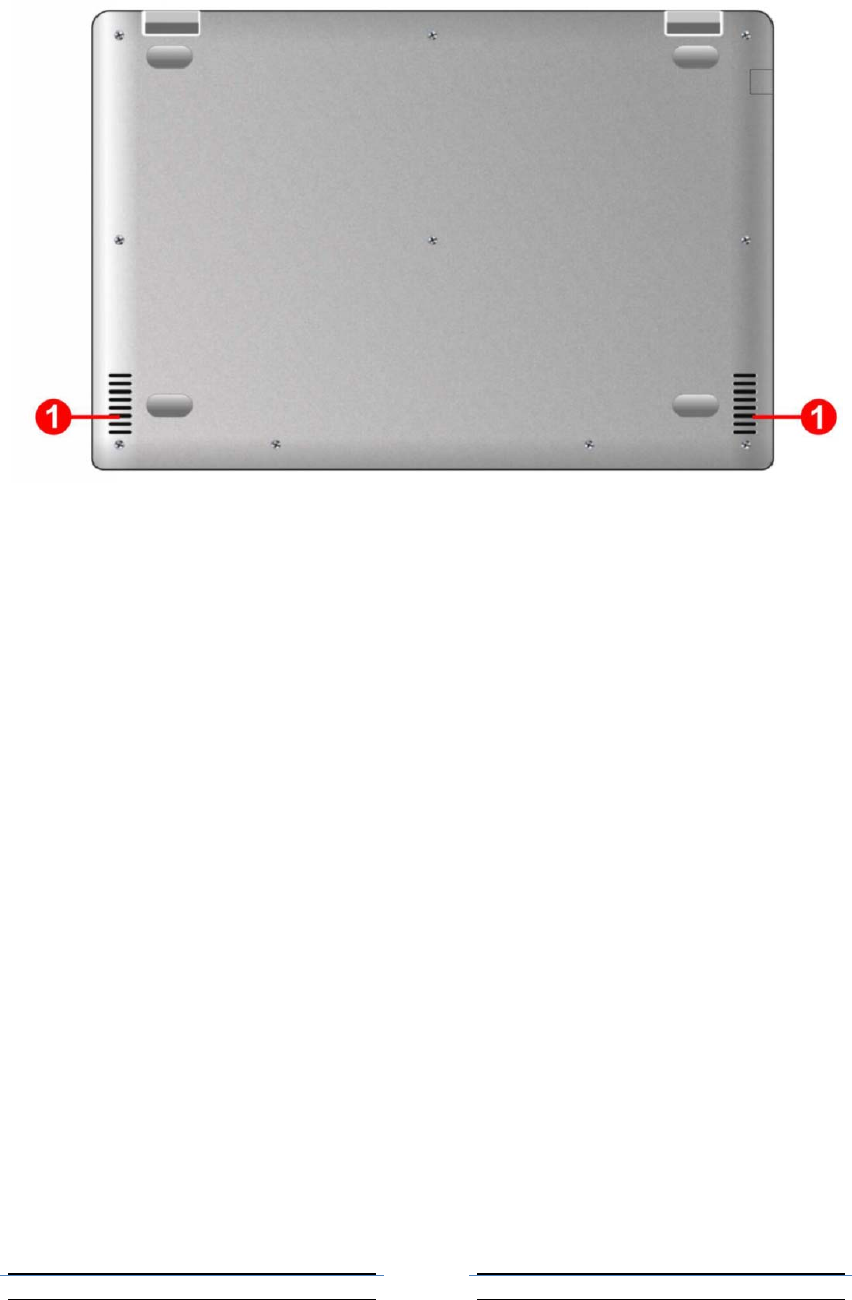
Bottom View
Speaker Speaker
11
Chapter 2 Operating Windows10
Configuring the operating system in initial use.
The first time you use, you need to configure the operating system. The configuration
process may include the following steps:
• Accepting the End User License Agreement
• Configuring the Internet connection
• Registering the operating system
• Creating a user account
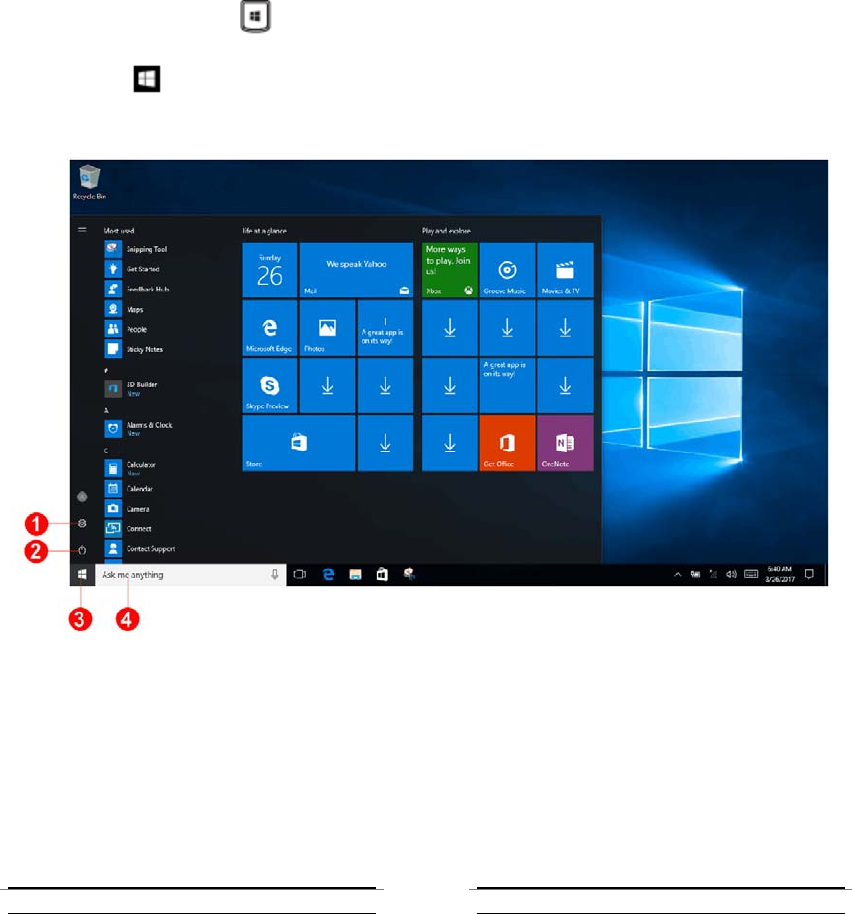
Operating System Interface
Windows 10 comes with a powerful and useful start menu.
To open the start menu, do one of the following:
• Press the Windows key on the keyboard
• Select Start on the lower-left corner of the desktop
1 Settings button
2 Power button
3 Start button
4 Search box
12
Chapter 2 Operating Windows10
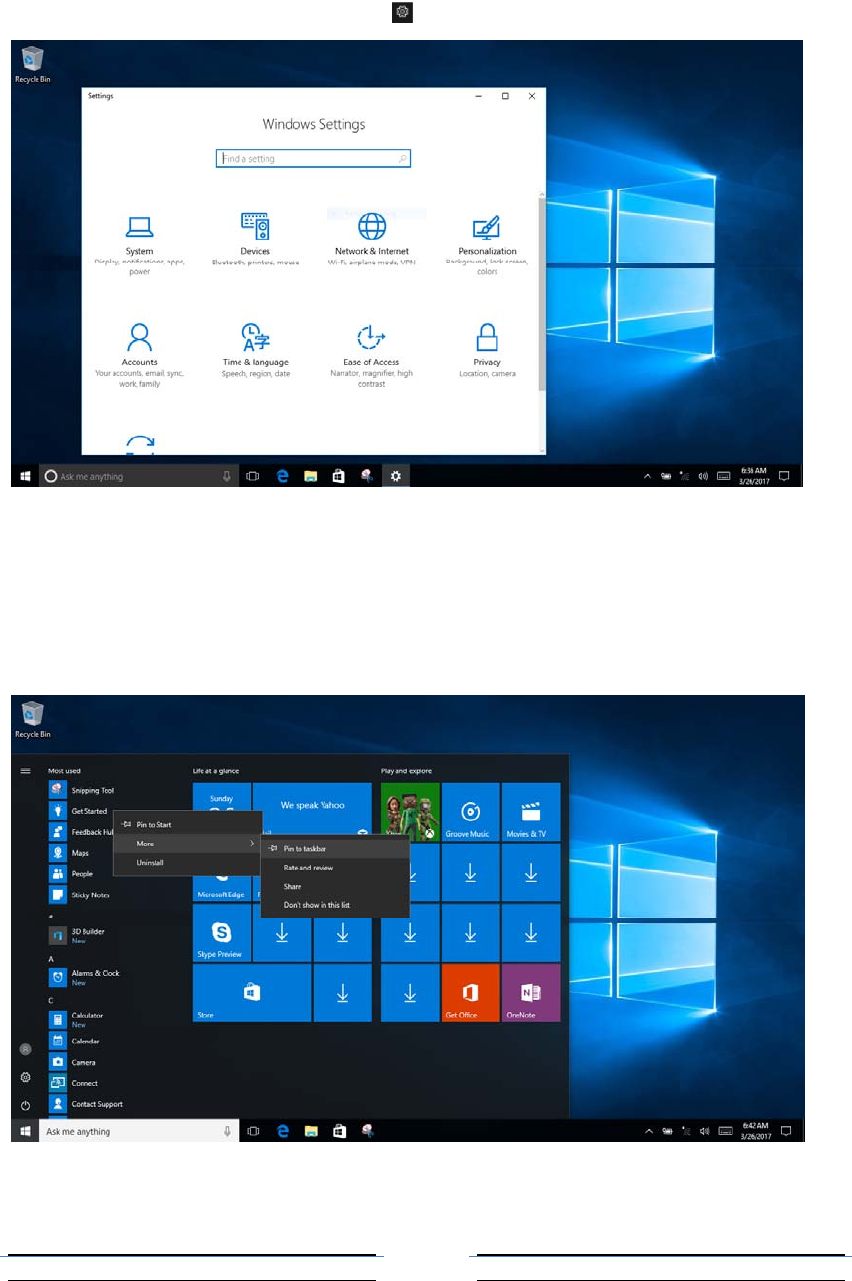
Settings
Settings let you perform basic tasks. You can also search for more settings with the settings
search box in the upper-right corner.
To open the settings, do the following:
• Open the Start menu and select Settings .
Personalized Start menu
You can personalize the start menu with your favorite apps.
To personalize the Start menu, do the following:
• Right-click the application which you want to add to the Start menu, then select Pin to Start
menu.
Note: You can also drag apps from the Most used or All apps columns to add them to the start menu.
13
Chapter 2 Operating Windows10
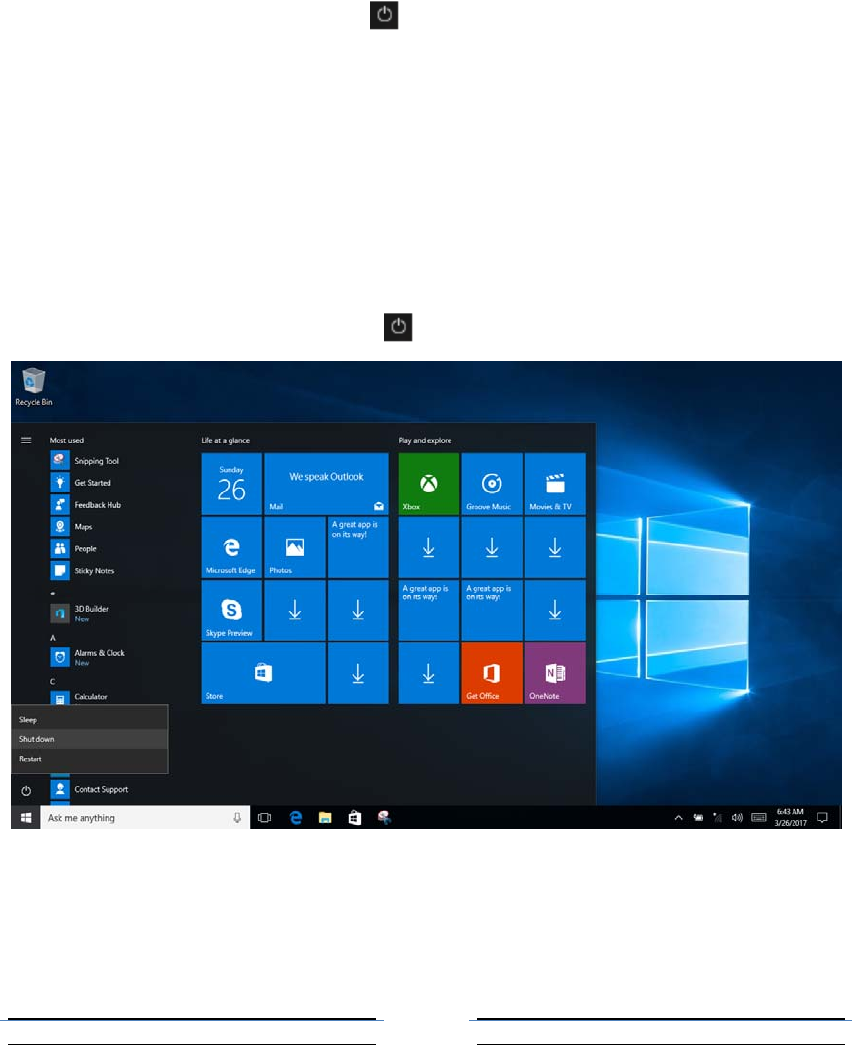
Keep the computer in sleep mode or shut down
When you finish using your computer, you can turn the computer into sleep mode or shut
down.
■Putting your computer to sleep
If you will be away from your computer for only a short time, put the computer to sleep.
When the computer is in sleep mode, you can quickly wake it to resume use, bypassing
the startup process.
To turn the computer to sleep mode, do one of the following:
• Close the display lid.
• Press the Power button.
•Open the Start menu, and then select power -sleep
To wake the computer, do one of the following:
• Press any key on the keyboard. (Notebook only)
• Press the power button.
■Turn off the computer
If you will not use your computer, please turn off the computer.
To shut down the computer, do one of the following:
• Open the Start menu, and then select power - shut down.
Long press or right-click the Start button on left bottom, and then select Shut down or log off.
14
Chapter 2 Operating Windows10
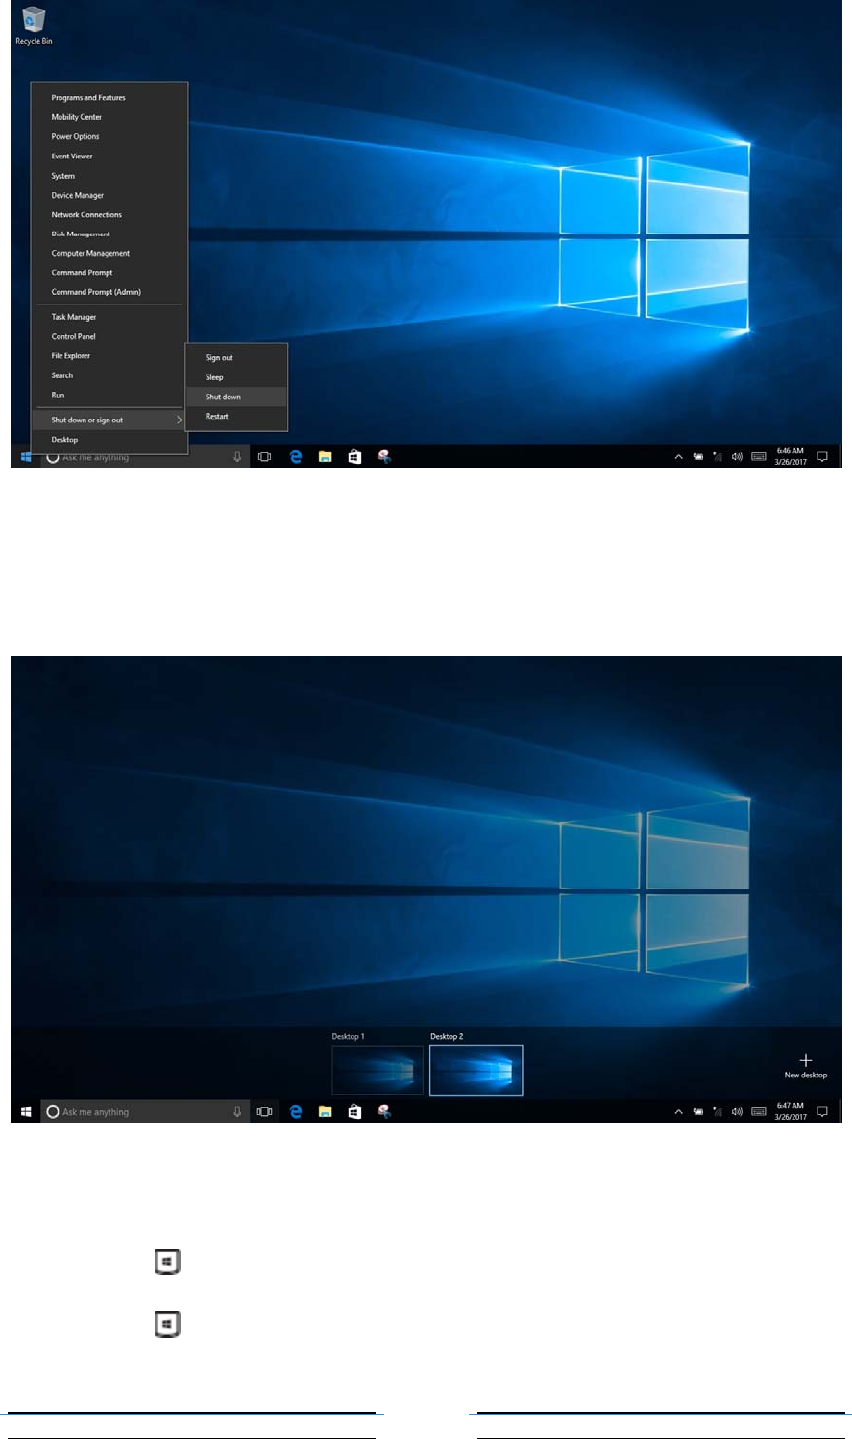
■Tasks and desktop management
Tasks view
To open the task view, do one of the following:
• Select the task view button on the taskbar.
• Press the Windows + Tab key.
• Swipe from the left edge of the screen to the middle.
■Virtual Desktop Manager
Windows 10 can create, manage, and switch the virtual desktop.
To create a new virtual desktop, do one of the following:
• Open the task view, and then select the new desktop.
• Press Windows + Ctrl key + D key to switch different virtual desktop, do one of the following:
• Open the task view and select the desktop you want active.
• Press Windows + Ctrl + / to scroll through the desktops you’ve created.
15
Chapter 2 Operating Windows10
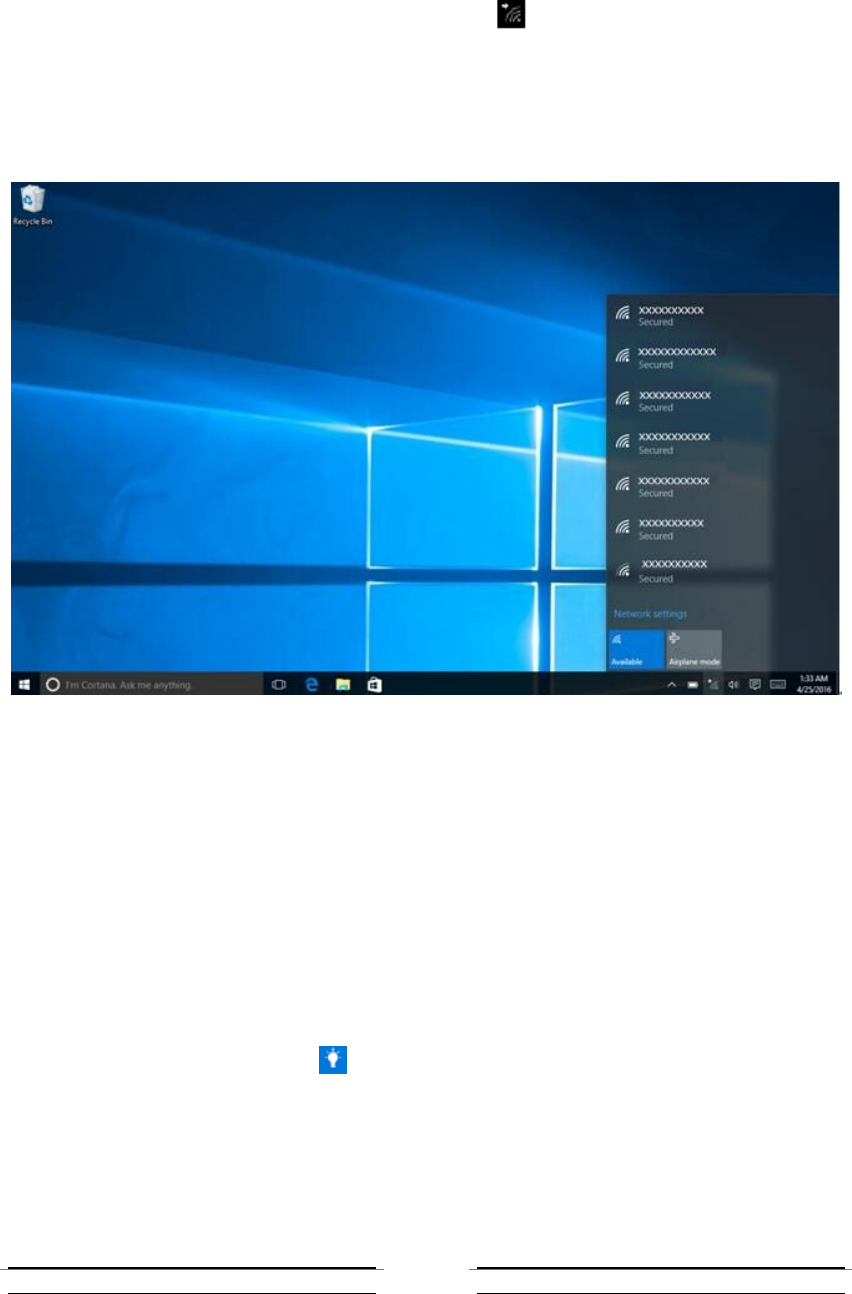
Connect to the wireless network
Enabling wireless connection
To enable the wireless feature, do the following:
1. Click the network menu on the right bottom of the taskbar , to open the Network configuration
page Connect to a wireless network
2. The computer will automatically scan for available wireless networks and list them in the list when
wireless is enabled.
3. Click the network name in the list to choose, and click Connect.
NOTE: Some of the networks need to connect the network on basis of security key or password. You
need to enter a security key or password. To connect to such a network, you need to ask your network
administrator or Internet, and the service provider for security key or password.
■Getting applications
Windows 10 also provides entry application that demonstrates the new features of Windows 10. You can
find it in the Start menu.
To open an entry application, do one of the following:
Open the Start menu and select entry

16
Chapter 2 Operating Windows10
Touch screen operation
The display can be like a tablet using a multi-touch screen for input, and can also be
used the same as the conventional portable computer using the keyboard and
touchpad input.
Common gestures tasks
Tap
Tap once on an item.
Performs an action, such as starting an
app, opening a link, or performing a
command. Similar to left-clicking with a
mouse.
Press and hold
Press your finger down and leave it there
for a moment.
Enables you to see detailed information
before selecting an action. Can also open
a menu with more options. Similar to right
clicking with a mouse.
Zoom
Move two fingers together or apart while
touching the screen.
Zooms in and out on visual apps, such as
pictures and maps. Can also jump to the
beginning or end of a list.
Slide
Drag your finger across the screen.
Pans or scrolls through lists and pages.
Can also move an object or be used to
draw or write, depending upon the app.
Similar to pressing and holding to pan and
to scrolling with a mouse.
Swipe
Start from left/right edge of the screen,
then swipe inwards toward the center.
Swiping in from the left edge of the screen
can open the task view.
Swiping in from the right edge of the
screen displays the action center.

17
Chapter 3 Troubleshooting
Common problems
1.Display issues
When I turn on the computer, nothing appears on the screen.
• If the screen is blank, please make sure:
- The AC power adapter is connected to the computer, and plugged into a
working electrical outlet.
- The computer power is on. Press the power button again to confirm.
• If these items are properly set, and the screen remains blank, have the
computer serviced.
The screen goes blank while the computer is on
• Your screen saver or power management may be enabled. Do one of the
following to resume from sleep mode: Recovery from sleep mode:
- Press any key on the keyboard. (Notebook only)
- Press the power button.
2.Sleep problems
The critical low-battery error message appears, and the computer immediately
turns off.
• The battery power is getting low. Connect the AC power adapter to the computer.
The computer does not return from sleep mode, and the computer does not work.
• If the computer is in sleep mode, please connect the AC adapter to the computer,
and then press the Power button..
• If the system still does not return from sleep mode, stops responding, or cannot
be turned off, reset the computer. Unsaved data may be lost. To reset the computer,
press and hold the Power button for eight seconds or more. If the computer is still not
reset, remove the AC power adapter.
3.Voice problems
Even turn up the volume, you still cannot hear any sound from the speaker.
Answer: • Make sure that:
- Mute function is turned off.
- Do not use combo audio jack. - The speakers are selected as a playback device.
4.Other problems
The touchpad does not function well
•Press key “Fn+F7” to make sure the touchpad is turned on.
The computer is not responding
•To turn off your computer, press and hold the Power button for eight seconds or

18
more. If the computer still does not respond, remove the AC power adapter.
•Your computer might lock when it enters sleep mode during a communication
operation. Disable the sleep timer when you are working on the network.
The connected external device does not work
•Do not connect or disconnect the non-USB cable device in the boot state, otherwise
you may damage your computer.
•When using high power consumption external devices such as an external USB
optical disk drive, use an external device power adapter. Otherwise, the device may
not be recognized, or the system may shut down as a result.
FCC Statement
1. This device complies with Part 15 of the FCC Rules. Operation is subject to the
following two conditions:
(1) This device may not cause harmful interference.
(2) This device must accept any interference received, including interference that may
cause undesired operation.
2. Changes or modifications not expressly approved by the party responsible for
compliance could void the user's authority to operate the equipment.
NOTE:
This equipment has been tested and found to comply with the limits for a Class B
digital device, pursuant to Part 15 of the FCC Rules. These limits are designed to
provide reasonable protection against harmful interference in a residential installation.
This equipment generates uses and can radiate radio frequency energy and, if not
installed and used in accordance with the instructions, may cause harmful
interference to radio communications. However, there is no guarantee that
interference will not occur in a particular installation. If this equipment does cause
harmful interference to radio or television reception, which can be determined by
turning the equipment off and on, the user is encouraged to try to correct the
interference by one or more of the following measures:
Reorient or relocate the receiving antenna.
Increase the separation between the equipment and receiver.
Connect the equipment into an outlet on a circuit different from that to which the
receiver is connected.
Consult the dealer or an experienced radio/TV technician for help.
FCC Radiation Exposure Statement
This device was evaluated for typical body-worn operations. To comply with RF
exposure requirements, a minimum separation distance of 25 mm must be maintained
between the user’s body or the handset, including the antenna. The highest
Calculated Threshold Value is 2.21, which is less the SAR Test Exclusion Threshold
limit for 1-g SAR to determine SAR test exclusion.