Haier Telecom 0507M1610 Mobile phone User Manual M1610usermanual
Haier Telecom (Qingdao) Co., Ltd. Mobile phone M1610usermanual
UserManual.wiki
>
Haier Telecom
>
0507M1610 User Manual
Users Manual
Navigation menu
Upload a User Manual
Namespaces
Wiki Guide
HTML
PDF
Info
Views
User Manual
Discussion / Help
Navigation
![1. Phone Introduction 1.1 Keypad Area There are 23 keys on keypad of this phone, which can be divided into two parts: • Number/letter area, total 12 keys • Control keys area, total 12 keys 1.1.1 Number/letter key Number/letter area consists of 12 keys, which arranges according to definite standard, and includes [0]~[9], [*] and [#]. Keys in keypad area allows users input numbers or characters, according to different screen environment, same key can produce different key value, which is shown as following table: Multi-Tap Number (Dialing) Keypad Label Capital letter ABC Small letter abc Short press Long press Password Time Counter 1 Blank 1@_#= <>()&£$¥ Blank 1@_#= <>()&£$¥ 1 1 1 1 1 2ABC ABC2AÄÅÆç abc2àäåæç 2 2 2 2 2 3DEF DEF3ÉE def3éè 3 3 3 3 3 4GHI GHI4 ghi4ì 4 4 4 4 4 5JKL JKL5 jkl5 5 5 5 5 5 6MNO MNO6ÑòÖØ mno6ñòöø 6 6 6 6 6 7PQRS PQRS7ß pqrs7ß 7 7 7 7 7 8TUV TUV8Üù tuv8üù 8 8 8 8 8 9WXYZ WXYZ9 wxyz9 9 9 9 9 9 0 .0/”’?!,:;¡¿*+-% .0/”’?!,:;¡¿ *+-% 0 . 0 0 0](https://usermanual.wiki/Haier-Telecom/0507M1610/User-Guide-573674-Page-2.png)
![* Switching input mode Switching input mode * + + - * / #. Press and hold for a long time: switching capital and small mode Press and hold for a long time: input symbols Press and hold for a long time: switching capital and small mode Press and hold for a long time: input symbols # wp . 1.1.2 Control key [On/Off]: Right red key at keypad area, also called red key or power key. • Press and hold the key for a long time to turn on the phone when it is off. • Press and hold for a long time under state to turn off the phone when it is on. • Press and hold for a short time under menu and edit state to return stand-by menu. • Press the key to end current call during the call. • Press the key to reject answering when you receive a call. [PickUp]: Left green key at keypad area, also called green key or send key. Press the key to answer call or dial phone number. [SKL] and [SKR] [SKL] is at left and upper area of keypad, and [SKR] is at right and upper area of key pad. They usually have different functions corresponding to the functions indicated at SK hint area of lower menu according to different definition of program. Direction key: includes up, down, left and right four keys. [Up] and [Down]: • Turn over page to display stand-by character in editor. • Scroll screen up and down. • Turn over page on stand-by row under Pinyin and Bihua input state.](https://usermanual.wiki/Haier-Telecom/0507M1610/User-Guide-573674-Page-3.png)
![• Browse short message or other long text message. • Turn to last and next picture when previewing pictures. Note: [Up] and [Down] keys have automatic repeating function; if we press and hold one key of them for a long time, it is equal to press the key for many times. It means that when the time you press the key exceeds preset time, phone starts the automatic repeating function of the key. Interval for automatic repeating has been preset, and you can’t change it. [Left] and [Right]: • Move cursor to left and right in editor. • Move selected words or pin combination under pinyin and bihua input states • Browse main menu • Turn to last and next picture when previewing pictures [OK] In the middle of four direction keys, also called middle key. It is ok key in default. [C] At the bottom of the UP key, also named CANCEL key. • Delete editor content or input symbol in editor. • Return to the last level at other windows. Up/down keys on side • Press and hold for a short time to answer the call when you receive a call and when phone cover is closed and earphone is inserted. • Press and hold for a long time when you receive a call to stop ring, vibration and shining of background light when phone cover is closed, nor matter if earphone is inserted. • Press and hold for a long time to hang up current call in call state when phone cover is closed and earphone is inserted. • Press and hold for a short time to adjust volume of headphone or earphone during call. • Press and hold for a long time to stop ring and vibration when you receive a call no matter if earphone is inserted. 1.1.3 Key operation under stand-by state When screen displays stand-by menu, you can. • Press [PickUp] to enter dialed phone list.](https://usermanual.wiki/Haier-Telecom/0507M1610/User-Guide-573674-Page-4.png)
![• Press [OK] to enter WAP. • Press [Up] to enter message. • Press [Down] to enter STK. • Press [Left] to visit Phonebook. • Press [Right] to enter camera. • Press [SKL] to enter calllist. • Press [SKR] to enter phonebook menu. • Input phone number directly by digit number, then dial phone and enter relevant option menu. • Use hotkey, which should be customized. (Refer to hotkey setup). 1.1.4 Key operation without SIM card • Press [OK] to enter first level menu. • Pres [SKR] to enter SOS. 1.2Display The phone has single liquid crystal display, graphic area of the display is 128(width)×160(Height)pixels, can display 64K colors and takes CSTN technology. Following icons can only be displayed under stand-by state, used to display current state of phone, such as electricity, network signal and etc. Icon Name of icons Description Battery Display energy of battery, there is five battery indicator levels. The icon scrolls during charge process. Network Nework icon is divided into two parts, left part indicates if it register in network, left part indicateds signal strength, which is divided into five levels (from no signal to strongest signal). Roam When phone regesters in network outside home network, display the icon . Otherwise don’t display the icon. Home network When phone registers in home network, display the icon. Otherwise don’tdisplay the icon. (The function needs network support) If logon GPRS Display when GPRS network exist and phone logon GPRS, otherwise nodisplay. (The function needs network support) MMS Above two icons show at least one MMS is not read now in message list and MMS memory is full respectively. If there is unread MMS and MMS memory is also full, only display the full icon. Message Above icons shown there is at least one message that is not read now in message list and message memory is full respectively. If there is unread MMS and MMS memory is also full, only display the full icon. Voicemail Shows there are untreated voicemails Alarm clock Shown alarm clock is enabled.](https://usermanual.wiki/Haier-Telecom/0507M1610/User-Guide-573674-Page-5.png)
![Vibration Shows phone will vibrate when receiving a call. Call transfer Shows call transfer function is enabled. Silent Shows silent function is enabled. No answer Shows no answer function is enabled. Only answer Shown answer function is enabled. Stand-by screen event ¾ Unansowered call: when there is unreceived call indication, you press [OK] to see it and press [On/Off] to enter stand-by state. Once exit, there is no new indication any more. ¾ New message: when phone receives new messages or MMS it displays them on stand-by screen, you can press [OK] to see it and press [On/Off] to enter stand-by state. Once exit, there is no new indication any more. ¾ Notepad prompt: priority is the lowest, once there are incidents with high priority, there is only prompt sound and no pictures displayed, the prompt pictures will be displayed when you quit other event. Press [OK] to see it and press [On/Off] to enter stand-by screen. Dial dialed number Pess [PickUp] on stand-by screen, phone displays the list of dialed number. You can use [Up]/[Down] to select one of them and press [PickUp] to dial the number directly. 1.3 Install and remove battery Install battery 1. Back of phone face upwords, hold phone, see from the direction of phone back, thereisa opening at side of phone, move outside at the opening to remove back cover of phone. 2. Aim positive and negative metal sheet on battery at four metal sticks in battery slot ofphone; 3. Push batter to phone and press it until it is locked. 4. Cover back cover (aim arc side of back cover at arc side of phone and press the two corner of straight side tightly). Remove battery Move small regular handle at left of bottom of battery and pull it outside to separate battery from phone, then remove it.](https://usermanual.wiki/Haier-Telecom/0507M1610/User-Guide-573674-Page-6.png)
![1.4 Install and remove SIM card Install SIM card Purchase SIM cards from your network service provider. Your phone number and user register information are saved in your SIM card. SIM card can be used on any GSM phone, here your phone number and register information is invariable. · Confirm phone is turned off · Turn phone back upwords, hold phone, see from the back of phone, there is a opening at side of phone, move outside at the opening to remove back cover of phone. · Remove battery of phone. · Make metal side of SIM card toward down (facing phone), bevel of SIM card is at left-up corner, insert the SIM card into slot flatly. · Push inside flatly until it reaches the end. · Install battery · Cover back cover (aim arc side of back cover at arc side of phone and press the two corner of straight side tightly). Remove SIM card · Remove back cover and battery of phone after it is turned off. · Press SIM card with finger and pull it out flatly. · Remove SIM card. · Install battery and cover the back cover. 1.5 Battery charge · Plug the pin charger into 220AC power socket. · Plug adapter of charger into the interface at the bottom of the phone (the side with arrow sign up), plug adapter into interface socket. · When phone is turned on, battery stick in battery icon on screen start to scroll, which showsn that mobile is in charging state. When phone is charged under off state, screen will display charging act. ·After charging is complete, battery icon stops to scroll, and now you can take it out from phone interface. Note: the only way to stop charging when charging starts is to plug charger out, please try to use power socket which is convenient for plug in and plug out. 2. Function introduction 2.1 Turn on Turn on power Usually press and hold [On/Off] to turn on the phone.](https://usermanual.wiki/Haier-Telecom/0507M1610/User-Guide-573674-Page-7.png)
![During the process of on act, press any key to stop playing the act and enter next operation. Please plug USB cable into phone when phone is off or when you confirm phone is turned on, don’t plug USB cable into phone when it is being turned on to avoid to affect the play of MIDI. Input PIN code To avoid others randomly to use your SIM card, you can setup protection password (PIN code). After it is set, phone will ask you to input PIN code firstly when phone is turned on. z Input PIN code. (For secrect, * is used to substitute input number on screen.) z Press [OK], phone confirms PIN code is correct, and starts to register on network. Once network name appears on screen, you can dial or answer call. If there is no network name, it needs register newly. Note: SIM card will be locked if worng PIN code is input for three times continuously. In this case, please contact with SIM card provider. 2.2 Trun off Turn off power Press and hold [On/Off] for a long time in any situation to turn off phone power. 2.3 Dial number • This function can be used only after network name displays on screen. • Input phone number. • Press [PickUp] to dial directly; or enter option menu, select dial or IP dial. The function of Dial is completely same as [PickUp]. If you select IP dial and has input IP number in phonebook menu (such as IP service number of China Mobile is 17951), phone will automatically add the service number in fron of the number you input then dial, if no IP service number is input, it will ask you to input the service number. Stop call You can press [Stop] or [On/Off] to stop call. Fold phone up also can stop call. Dial up international long distance • Press and hold [*] until + appear on screen. • Input country number. • Input section number (it usually doesn’t include front 0) and phone number. • Press [PickUp] to dial directly; or enter option menu, select dial or IP dial.](https://usermanual.wiki/Haier-Telecom/0507M1610/User-Guide-573674-Page-8.png)
![Dial two phones at the same time (need network support) You can set current call in holding state and dial another phone at the same time: • Use Call menu to set current call in holding state. Enter phonebook and select a number, or input the number from keypad directly. • Press [Dial] soft key or [PickUp] to dial Switch call (need network support) If phone now receives two calls at the same time, one is in holding state and the other is in active state, you can use call menu to swith between two calls. 2.4 Answer call Answer call Press [Answer] soft key or [PickUp] to answer. Reject call Press [Reject] soft key or [On/Off] to reject call. Answer for second call (need network support) If phone set call waiting function, it will give a prompt when there is a second call, here you can: • Set current call in holding state and answer for second call. • Press [On/Off] to stop current call then take usual operation to answer for or reject second call. 2.5 Input method The phone uses T9 input method. You often need to input text message when using phone. Such as, name in phonebook, nickname of QQ book, SMS and QQ message text, test in notebook, grouping name and etc. There are four different input modes, which is shown as following: • T9 spanish(T9spa/T9Spa):allow to use T9 spanish; • T9 English (T9eng/T9Eng): allow to use T9 english; • Multi-Tap(abc/ABC):press the key including the letters you need, first letter will be displayed when you press the key for first time, press twice quickly to display second letter on the key, the rest may be deduced by analogy to display required letter on screen. • Number (123): allow to input number;](https://usermanual.wiki/Haier-Telecom/0507M1610/User-Guide-573674-Page-9.png)
![Switch input mode After open a editor, press [#] to switch input mode. Press [#] repeatly to switch circulately between four input modes. Note:when enter editor,the default input method id ABC. Switch capital and small English/Spanish In English editor, press [*] can switch capital and small English. In Spanish editor,press[*] can switch capital and small Spanish. Input symbol In any input mode, press [*] (in English/Spanish input mode, you need to press and hold [#] for a long time) tow switch symbol input screen. Press corresponding number at left of symbol to input symbol and return orginal input mode automatically. If number of symbols is more than one screen, press [Up]/[Down] to turn. Delete operation When input row is non-empty, press [C] will delete the rightest character or symbol in the row firstly. At the same update the content of stand-by row until whole input row is delected. Press and hold [C] will clear input rows. When stand-by row is non-empty and input row is blank, press [C] will clear content in stand-by row firstly. When input row and stand-by row all are blank, press and hold [C] for a short time will delete the character at left of cursor in text area. If there is no character at left of cursor, delete right character. Press and hold [SKR] for a long time will delect all content in text area. When text row is blank, press [C] to exit current editor and return fore state. 2.5.1 T9 Spanish(T9spa/T9Spa) To every letter of Spanish words to be input, only need press corresponding number key with ti once without needing the arrangement of the letter on the key. Input row will automatically display possible letter combination (maybe many kinds of letter combination, you can use [Up]/[Down] to turn front). When correct words appears on input row, press [OK], the Spanish words will be added together with a blank to the position of cursor in text area. 2.5.2 T9 English(T9eng/T9Eng) To every letter of English words to be input, only need press corresponding number key with ti once without needing the arrangement of the letter on the key. Input row will automatically display possible letter combination (maybe many kinds of letter combination, you can use [Up]/[Down] to turn front). When correct words appears on input row, press [OK], the English words will be added together with a blank to the position of cursor in](https://usermanual.wiki/Haier-Telecom/0507M1610/User-Guide-573674-Page-10.png)
![text area. 2.5.3 Multi-Tap(abc/ABC) The inpu is operated directly in text area. Press the key including the letter you need, first letter will be displayed when you press the key for first time, press twice quickly to display second letter on the key, the rest may be deduced by analogy to display required letter on screen. 2.5.4 Number(123) The input is operated directly in text area. Press number keys from [0] to [9] directly to add corresponding number to edited text area. 2.6 Phonebook The phone support phonebook function so that you can save often used number and message into SIM card or phonebood on phone, it also provide looking up, adding, modifying, deleting, direct dialing, sending message and other functions at the same time. Note: when it is ust turned on, phonebook cannot be used because it is initialization, so please wait for a moment. Classification of phonebook Phonebook is classified into class: phonebook on SIM card (capacity depends on SIM card) and phonebook on phone (support 500 name card records). The record of two phonebooks is mixed together but operation of them is different. Right of call record on SIM card is a icon like SIM card. Right of phonebook on phone is the default type icon. z Phonebook on SIM card Every record in SIM includes a name and a number. z Phonebook on phone (smart phonebook) Every record in smart phonebook is called ‘Name card’. A name card can include following information: Name (40 bytes at most) Number (a name card can include five numbers at most, type can be repeated. Maximal length of every number is 21 bytes, where if number length is 21 bytes, first byte must be kept as ‘+’, the other 20 bytes can be “0-9”、“*”、“#”、](https://usermanual.wiki/Haier-Telecom/0507M1610/User-Guide-573674-Page-11.png)
![“w”、“p”.) Default number type (If record of SIM card is copied or moved to phone, number will be placed in this area) Mobile Office number Home number Fax number Bp call number E-mail (50 bytes at most) Notes (50 bytes at most) Post Address (50 bytes at most) Post code (10 bytes at most) Every name card (when user creats it) should include name (unnull), and must include a piece of other information at least. In phonebook of phone, you can group namecard. Groups have Default, Home, Friend, Colleague, Society, Private (you can modify the name of group and corresponding group icon). Different group can be distinguished by different ring. 2.6.1 Looking up You can enter mixed list of phonebook of SIM card and phone by this menu. Firstly, youcan input the front character of the name to bee looked or directly press [OK] to enter list. If input character and it exists in list, list scrools to the first position that meets requirements. Otherwise, display from the first one. Use skill: press[Down] in stand-by state to enter phonebook list directly. Enter name list, you can move to the records use the character as head by first character of name, then continue press [Up]/[Down] to browse. Such as key [2], Characters on key [2] only include ‘A’, ‘B’ and ‘C’. So when press [2] in phonebook list[A record means the record whose first character is A]: When first press, if there have records whose first character is A,then move to the first record of A, if there no records whose first character is A, then move to the first record of B,if there no records whose first character is B,then move to the first record of C, if there no](https://usermanual.wiki/Haier-Telecom/0507M1610/User-Guide-573674-Page-12.png)
![records of C, then stay original position. If there have records of A,B,C, then first press 2, move to the first A record, press 2 again then move to the first B record, press 3 again, then move to first C record. If press 2 key after press another key, it will repeat these process. 2.6.2 Add new number SIM card If current storage is SIM card, then open a name editor firstly, input name, press [OK], openanumber editor, input code and press [OK] again to complete the input of a record. Phone If current storage is phone, open a name editor firstly, input name, press [OK], here enter name card field option list, you can select different type of information (such as number, e-mail, etc.), press [OK], input information, press [OK] again to complete the input of a record. You can add different field to newly created name card, set default field and do grouping and other operations. Note: newly created record will be placed in Default group, user can reset it later. 2.6.3 Phonebook list 2.6.3.1 Operation of phonebook list Phonebook list displays name list, left of the name is the type icon of the record, if it is SIM card record, it is SIM card icon, if it is phone record, then it dispays the default number of the phone. Select some name in the list, you can do following operation by soft option menu on left: • IP dial: if you still don’t IP service number, prompte you to insert it firstly, then do IP dial. • Send message: send message to default numbers of selected records. • Send name cards: you can sent selected record in text format by message. (Note: because length of message is limited, too much record information may be lost during sending.) • Change (name): change selected record (name) • Delete: delete the selected record. • Change picture (if the name card has associated picture): Enter picture class list, only the picture that is not biger than 128×128 will appear,every breadth is on every screen, turn [Up]/{Down} key to select, and press [OK] for confirmation. When some name is associated with a picture, when he call by](https://usermanual.wiki/Haier-Telecom/0507M1610/User-Guide-573674-Page-13.png)
![any storaged number or dial any number of the person, corresponding picture will appear on phone. • Cancell picture (if the name card is associated with a picture): After prompte you if will cancel and confirmation, cancel association between the name card and picture. • Set up picture (if no associated picture is set to the namecard): Can enter class picture list, only the picture that is not biger than 128×128 will appear,every breadth is on every screen, turn [Up]/{Down} key to select, and press [OK] for confirmation. • Set group: only record in phonebook has this opetion to set the group of the record. • Quick dial: set hotkey to default number of selected record. • Copy to phone (if record is in SIM card): To selected SIM card record, copy it to the namecard of phonebook of phone, number of SIM card record will be placed in default number field (and is set as default area automatically). • Copy to SIM card (if record is in phone): To selected namecard in phonebook, there are 5 numbers at most, the operation will and only copy all numbers to SIM card, every number will occupy one record in SIM card. These records have same name that is from the name field of name card. • Move to phone (if record is in SIM card) It is similar with copy, but after copy, delete original record. • Move to SIM card (if record is in phone): It is similar with copy, but after copy, and delete original record. To select phonebook record, if there is unnumber field in record (such as e-mail, note, address, post code field), these fields will be kept constantly. If selected smart phonebook record only has number field, then after aall field corresponding to the record are moved to phonebook in SIM card, all record will be deleted. • Dial: dial number. • Add new number: you can add new number. 2.6.3.2 Operation of phonebook record After select a record in phonebook list, press [OK] to operate selected record. Operation to SIM card record](https://usermanual.wiki/Haier-Telecom/0507M1610/User-Guide-573674-Page-14.png)
![In addition, if there is no number field in phonebook, jump over the record and copy next redord. 2.6.7 Move all It is similar with above copy all, but after copy, original record will be deleted. To selected phonebook record, if the record include non-number field (such as e-mail, record, address and post code field), these field will be kept. If selected smart phonebook record only has number field, the record will be deleted after all correspondint fields are moved to SIM cards. 2.6.8 Group set To 6 group, you can change group name, or set the piture of the group. 2.6.9 Selection of storage position if you select a kind of phonebook type (SIM card or phone), when you add new numbers,they will be saved to the phonebook of the corresponding type. 2.6.10 IP service number The function is used to store IP service number you input so that you can dial IP call but need not to input again. z Only after input IP service number is supported by registered operator, you can dial normally. z You can look or edit the number. z When phone change new SIM cards, it will automatically clear all save IP service number. z Phone has no any check to the IP service you input, you need to confirm it is correct by yourself. 2.6.11 Individual information You can send, display, change and delect individual information of of phone owner here. Change individual information According to prompte, you can input different field here. If no, press [OK] to jump directly. Delete individual information You can clear the individual information of phone owner, which means clear all fields of owner information. Send individual information You can send your individual information in text format by message.](https://usermanual.wiki/Haier-Telecom/0507M1610/User-Guide-573674-Page-16.png)
![(Note: because length of message is limited, too much record information may be lost during sending.) Display individual information Display all owner information input in advance, it can be looked up by [Up]/[Down]. 2.8 Transfer between phone and PC (optional) PC Sync software is strong phone information management software, you can use PC Syncsoftware to back the information in your phone by a matching data cable and a computer. Note: PC Sync is not the standard fittings of the phone, you need to purchase the software and matching data cable from your providers. PC Sync software mainly realize the synchronization and backup of six kinds of information, which include wallpaper, ring, phonebook, message, MMS and Mp3. 2.8.1 Use preparation for PC Sync software 2.8.1.1 System requirement To install and run PC Sync software, you need: ¾ A computer: Pentium200MHz or above processor 32MB or above RAM Windows 95/98/Me//2000/XP operating system At least 40 MB or above harddisk space ¾ A data cable: connect PC and phone 2.8.1.2 Connection of phone and PC 1. Confirm phone is turned on, connect data cable to phone; 2. Connect the other end of the data cable to the USB interface of PC. 3. enter Fun/Connet to PC, display “PC connected” 2.9.2 Use PC Sync software Before upload and download any files, must confirm data line is correctly connected and connection between PC and phone is successful. 2.8.2.1 Wallpaper You can use PC Sync software to open a picture file that is saved on PC and to be download to MS, and can zoom in, zoom out, intercept some part of picture or resize it to view fram, and rename it to download to phone later, also can delet or save pictures in phone on PC by PC Sync software. After success connection, saved pictures information and blank position of phone will be displayed on list fram, you can select a picture to delect or select a blank position to down new](https://usermanual.wiki/Haier-Telecom/0507M1610/User-Guide-573674-Page-17.png)
![In stand-by state, you can press [SKL] to enter main menu. Main nmenu has act menu and 9 cases menu two style, you can also press ‘*’ to switch between the two style. You can select menu by [Up]/[Down]/[Left]/[Right] keys. Press [OK] or [SKL] after selecting any menu to enter next sub menu, later menu all are displayed in list. Note: in main menu, you can press from [1] to [9] direction to select a menu. You also can browse every menu by [Up]/[Down] key. Press [OK]/[Confirmation] soft key to enter next submenu. Press [return] software key for a short time to return front menu. Press [On]/[Off] to enter stand-by state directly. 3.1 Information (need network support) 3.1.1 Message (need network support) Message service provide a kind of convenient and cheep communication method and cantransfer text message to others quickly. You can use ‘message’ menu to send messages to other phone or devices that can recive message. Phone support long SMS(concatenate SMS) function, every concatenate can contain not more than 10 normal SMS. Max number of concatendate is 10. 3.1.1.1 Message inbox Phone keeps received messages into message inboxs. Storage position of messages except SIM card (capacity depends on SIM card), but alsocan be into phone, phone can provide extra 1000 storage positions. You can select prefer position for storage. If prefer position for storage is full,(SIM card will keep two blank), messages will be saved in unprefer medium. If message inboxs is empty, phone will prompt message list is empty. There is a ‘unread’ icon on the right of new new message in message inbox. If you enter the detail screen of th emessage, the message state becomes read, corresponding icon also become read icon. After entering message inbox, display saved message list. Use [Up]/[Down] to scroll to view it, if it stops on someone, the message will display all content with plane scroll. Select any message, press [OK] to enter detailed screen, if display exceeds one screen, use [Up]/[Down] to scroll the screen. To some message, there are following operation options: • Reply: automatically take opposite number as destination number and reply a message.](https://usermanual.wiki/Haier-Telecom/0507M1610/User-Guide-573674-Page-21.png)
![• Transmit:after select Transmit, content of selected message will appear in editor, you can also edit it and then send it. • Delete: delete the message from message inbox. • Dial: pick up the number of outbox from message and dial the number. • Move to dustbin: when you think current message is waste message, you can select the option, phone will move current message to dustbin and query if set arrive number as waste number. • Pick up number: if opposite number is not in phonebook, the menu appears, used to pick up number and save it. • Move to safety box: move the selected SMS to safetybox. 3.1.1.2 Outbox Phone keep saved messages in outbox. Outbox can be divided into sub mail box used to save sent and not sent message. If mailbox is empty, phone prompt message list is empty. • If select ‘save message’ when editing message, the message is saved in unsent message mail box; • If select ‘send and save’ when sending message, the message is saved in sent message mail box; • If select ‘send immediately’ when sending message, the message is directly sent and not saved in outbox. After enter ‘sent messages’ and ‘not sent messages’ mail box, display saved message list. Use [Up]/[Down] to scroll and view it. Select any message and press [OK] to enter detail screen. If display exceed one screen, you also can use [Up]/[Down] keys to scroll the screen. Press [OK] again and enter Option list: • Send • Transmit • Delete You can select send or transmit the message, or delete the message from outbox. If select a message from not sent messages and send it, the message will be moved to sent message box after it is successfully sent.](https://usermanual.wiki/Haier-Telecom/0507M1610/User-Guide-573674-Page-22.png)
![3.1.1.3 Write message Note: to sent message, you need to set correct number of message service number. The number can be obtained from network providers. New message Select ‘new message’, phone open a text editor after confirmation, you can input message here ,you can see such as “160/1” at the left-top corner,first number means the left characters which can input in the current page, second number means the number of page which has been inputted. Complete input and confirm, appear reciver edit screen, the phone support message group send function (it can sent messages to 12 destination number once). You can: • Input phone number directly in blank row, then press [Up]/[Down] key to switch on another item. • Press [SKL] to option menu, select phonebook in option menu to open name selection screen, press [Select]/[Cancell] to select/cancel (if it is not selected before, select it, otherwise, cancel it). Right of selected items has selected icon. Selected name corresponding to its default number, if you want to selected other number of him, press [Detail] to operate. After complete multi selection, press [OK] to confirm, then all selected name will appear on message inbox editor screen. • Edit input number: when cursor is at the row of input number, you can edit the numberber or even delete all row. Complete message inbox edit, press [SKL] or [OK] to enter Optional list, you can select • Send immediately: send the message • Phonebook: can select message inbox • Add sensibility icon • Save • Send and save • Save as customization If select Save, the message is saved in not sent messages of outbox. If select ‘save as customization’, edited message will be saved in customization area of preset message (if customization area is full, you must deleat unneed one then you can save it.) It can be transmited again if send is not success. If send always fails, please check if number of message service center is correctly set.](https://usermanual.wiki/Haier-Telecom/0507M1610/User-Guide-573674-Page-23.png)
![Preset message Phone provides some preset messages for you. You can select one of the from several messages. After confirmation you can continue to edit preset message and creat new messate. Later operation is the same as ‘new message’. Except this, you can also set 10 often used preset messages in customization by yourself. Operation of customization is the same basically, just can select save as customization to save just edited message before send after complete editing the message. 3.1.1.4 Dustbin Dustbin is used to store recived waste message, the messages in the mail box are saved in phone. When the box is full, phone will automally delect earliest saved waste message to save new received waste message. Enter box list, select some message, press [OK] to read current message. In message readscreen press ‘option’ to do following operation: ‘delete’, ‘clear’, which means clear dustbin; ‘move to message inbox’, which means move current waste message into message inbox. Note: refer to description of message firewall. 3.1.1.5 Message Setting Number of message service center Used to save the number of message service center for the network you are in. the number can be edited. If the number is null, you cannot send message. Save time Used to set the time that network try to send some message: 12 hours, 1 days, 1 week, lonthe gest time. Receive report You can select ‘on’ or ‘off’ to set if prompt you the state of sent message: if message is 您succesfully transmit to opposite or not sent. Reply path You can select ‘on’ or ‘off’. If it si on, when reciver use reply function, the message he sent will automatically select the message center you just used to send message. Signature You can select ‘on’ or ‘off’. If it is ‘on’, please continue to input text content of signature. After this, every time you send message, will automatically add a signature of your at the end](https://usermanual.wiki/Haier-Telecom/0507M1610/User-Guide-573674-Page-24.png)
![of the message text you edit. Note: if adding your signature exceeds the maximal legth of message, signature will notbe added. Select memory You can select first save location: SIM first of phone first. Note:if fisrt selected location is full, then save to non-first location. Customize message You can edit customized message. If to delete redundant customized message, only needto clear the content of the customized message. 3.1.1.6 Delete message the mmenu provides two functions: • Message inbox • Outbox After select and confirm, phone will delete all messages in message inbox/outbox. 3.1.1.7 Capacity query You can view the quantity of used message, total amount and used pencent on SIM card and phone. 3.1.1.8 Voicebox Note:you can set “call transfer’ function to transfer call to voicebox (the number used to left words). Head words When there is voicemail, phone will prompt. Here you can dial voicebox number to hearleft words. In stand-by state press and hold [1] for a long time will dial your voicebox number automatically. If the number is num, phone will prompt ‘input number of voice box’. Number of voice box In common cases, you need to get number from network provider, the number can salsoused to: • Leave word (can set the number in call transfer/…/voice boix)](https://usermanual.wiki/Haier-Telecom/0507M1610/User-Guide-573674-Page-25.png)
![• You can take left workds, use keypad to input. 3.1.1.9 Village broadcast Network service allow you to receive every kind of text information, such news, traffic information. These messages are provided to all user in some area by network. If you have open the service, network will provide avaible information channel number. You can set 15 channel at most. Receive village boradcast You can select on or off to receive village broadcast message service. If you select off, any broadcast message cannot be received no matter if you set corresponding channel number. When recive a villiage broadcast, message content is directly displayed on stand-by screen, until you press key to return. Broadcast message can not be saved in phone or SIM card, so once exit you cannot read it again. Note: when turn on the function, stand-by time of the phone will be shorter. Channel list <New list> you can add new channel number into channel list, which means adding a kind of new broadcast type to be received. Channel list is a number consisted of three numerics. List of existing channel Select any number and press [option] to proceed following operation: z Change: change channel number. z Delete: delete the channel number from the list, and don’t receive the message of the channel. 3.1.2 MMS (need network support) The phone support MMS business, except the text content of the message service we are familiar, MMS message can transmit and receive MMS multimedia message including picture and sound. Except transmission between phones, it can also be transmited between mobile and E-mail box. 3.1.2.1 New Note: to send MMS, set address of MMS center correctly in advance. The address can be gotten from network provider, the phone provide default address.](https://usermanual.wiki/Haier-Telecom/0507M1610/User-Guide-573674-Page-26.png)
![After confirmation phone enter MMS editor, you can edit new MMS here. Press [SKL] to edit MMS text or insert picture, sound and new page. z Edit text: select the menu to open text editor, you can input MMS text, press left key to save it. z Add picture: select a class of picture and enter picture list, you can preview selected picture by [option] menu, and also can insert or browse detail, press [OK] can also insert. z Add music: select some kind of music, phone enter music list, you can play it by the menu in [Option], and also insert or browse detail, press [OK] can also realize insert operation. z Add new page: if there is blank page in the MMS being edited, the option will not appear. After edit MMS, you can implement send, preview and other operation by the menu in ‘Option’, the menus [SKL] provides include: Next page: if current MMS includes many pages, and current page is not the last page, the menu appears, select the menu can see next page. Last page: if current MMS includes many pages, and current page is not the first page, the menu appears, select the menu can open last page.. Delet page: if current MMS includes many pages, the menu appears, select the menu can delete current page. Send: you can send newly edited MMS. After ‘send’, phone firstly enter edit screen of message inbox, the phone support MMS group send function (it can be sent to 8 destination numbers and addresses at the same time), select [phonebook] in SKL [option] can pick up send number and address directly from phonebook, select [edit] menu in SKL [Option] to open editor and input send code and address from keypad. After input file, press [OK] to enter text input screen, you can input the text no more than 20 chineses here, can also press [confirmation] direction, here phone think the MMS being sent has no subject. Then phone enter send option menu, the menu provide following functions: Send: you can sent edited MMS. Copy to: phone enter group send name input screen, you can add copier, the most copier is8. Topic: you can change topic again.](https://usermanual.wiki/Haier-Telecom/0507M1610/User-Guide-573674-Page-27.png)
![Setup: you can implement setting for network and MMS center, and if automatic save the MMS when send it and etc. No: maximal capacity of MMS is 50K, otherwise it cannot insure correct send. Save: save currectly edited MMS into draft box, select the menu, open topic edit field firstly, you can input the topic for the MMS to be saved, the topic cannot be blank and the maximal words is 20. Saved as template: save currently edited MMS into template, select the menu, open topic edit blank firstly, you can input the topic for the MMS to be saved, the topic cannot be blank and the maximal words is 20. Preview: preview the MMS being edited currently. Page timing: set the play time of page Return: exit MMS editor 3.1.2.2 Message inbox After new MMS arrives, phone will prompt you new MMS arrives, then the MMS will be saved in message inbox. MMS in message inbox arranges according to its incept time (last received MMS is on the frontest) In MMS arriving prompt, press [view], then enter MMS message inbox. Select new MMS to be viewed in message inbox and press middele key, phone start to download MMS. After successful download, phone will save and automatically play the MMS, and set the icon at the let of the MMS in message inbox is read icon. If MMS cannot be download because of network reason, phone will prompt download failure. Select some MMS, press SKL to open option menu, including following function: View: select the menu to play selected MMS, press OK can also play it. Reply: reply sender Reply all: when the copier sheet of the MMS you receive is not blank, which means the same MMS is also sent to other contacts at the same time, then if you select the function, except the sender, also reply the contacts in copier sheet. Transmit: after select Transmit”, selected MMS content will appear in editor, and you can send it after editing it. Delete: delete selected MMS 3.1.2.3 Not sent outbox Enter not sent outbox, failed MMS lists on screen, select some MMS, [Option] include following functions: View: select the menu to play selected MMS, press OK can also play it](https://usermanual.wiki/Haier-Telecom/0507M1610/User-Guide-573674-Page-28.png)
![Edit: select the menu to open MMS edit interface, can edit selected MMS, original content of MMS is played on edit screen, you can edit it. Delete: delete selected MMS Send: can send MMS again 3.1.2.4 Draft box Draft box is used to store the edited but not sent MMS. Enter draft box, select some MMS, [Option] include following functions: View: select the menu to play selected MMS, press OK can also play it Edit: select the menu to open MMS edit interface, can edit selected MMS, original content of MMS is played on edit screen, you can edit it. Delete: delete selected MMS Send: can send MMS again 3.1.2.5 Outbox Enter outbox, successfully sent and saved MMS are listed on screen, select some MMS, [Option] include following functions: View: select the menu to play selected MMS, press OK can also play it Edit: select the menu to open MMS edit interface, can edit selected MMS, original content of MMS is played on edit screen, you can edit it. Delete: delete selected MMS Send: select the menu to open MMS edit interface, selected MMS content displays on edit screen, yu can change it before sent it out. 3.1.2.6 Template The box is used to store the MMS you saved as template when editing MMS. Enter template,该select some MMS, [Option] include following functions: View: select the menu to play selected MMS, press OK can also play it Use template to creat message: select the menu to open MMS edit interface, selected MMS displays on screen ,you can use the MMS as plate to creat new MMS. Edit: select the menu to open MMS edit interface, can edit selected MMS, original content of MMS is played on edit screen, you can edit it. Delete: delete selected MMS 3.1.2.7 Setting The setting function MMS setting menu make you to set MMS center and do some personal settings. Seting options in the menu include:](https://usermanual.wiki/Haier-Telecom/0507M1610/User-Guide-573674-Page-29.png)
![Automatically save when it is sent You can select turn on or turn off the option, if you turn on the option, then when you sent MMS, no matter if MMS is successfully sent, it will be saved in box, if it is sent successfully, it will be saved outbox, on the contrary it will be saved in not sent box. MMS center You can edit MMS center. Network You can do some network settings, such as select some account, edit gateway and etc. Effective time By the menu you can set the time to keep the MMS in MMS service center. Read report Then option can be set as ‘turn on’ or ‘turn off’, if it is set as ‘turn on’, then it will give you a read report to inform you if the MMS you sent is read. Arriving report Then option can be set as ‘turn on’ or ‘turn off’, if it is set as ‘turn on’, then it will give you a arriving report to inform you if the MMS you sent is received or sending is failure or rejected. Priority The option can make you set the priority of MMS to be sent. Page timing The menu allows you set the playtime of MMS page. Download mode The menu allow you set to use manual down or automatic download when some send MMS该to you. 3.2 Call record Call record can be classified into three classes: • Dialed call (dial out from the phone no matter it is connected or not). • Received call • Unreceived call (if call is reject, it is also unreceived call) Every class can save 15 numbers at most. The latest record is listed in frontest of call record list. If list is full, the last item will be deleted after new record is product. Select some record in every class of record list, press green [send] key can dial the number directly, can also press [confirmation] key to entyer next screen to view call time, here press [option] to enter option list, excuted functions include: • IP dialing • Send message: send message to selected number • Send number: send select number to others by means of message](https://usermanual.wiki/Haier-Telecom/0507M1610/User-Guide-573674-Page-30.png)
![Brightness adjustment Enter the menu, you can press direction key to adjust the contrast of the screen display. Lighting setting You can select that backlight is turned off after 10 seconds, 30 seconds or 60 seconds. In following situation, LCD baground light and keypad light (except background light is set off) is lighted: Press some key (when it is folded you need to press and hold side key for a long time). In definite time that accessories is connected to phone. In definite time after a new accident happen. In definite time when receiving a call. In definit time to display call information after call end In definite time receiving information from network Set hotkey Functions of hotkeys are to make you to excute some common functions quickly but needn’t to confirm by enter different menu level, so that use is very convienent. Where functions of [0], [1] ,[9] and [#] is fixted, you cannot change them. Press and hole [0] for a long time to select Language; Press and hole [1] for a long time to dial voice box; Press and hole [9] for a long time to enter dial 060 SOS call; Press and hole [#] for a long time to turn on silent mode or usual mode. (if current mode is not silent mode, then press and hold [#] for a long time to turn silent mode, and press # key to turn usuall mode. Note: hotkey is only effective in stand-by state, if phone is in stand-by with restriction to use, function of hot hey lese its effect. (but you can still use hotkey [0] to change language.) The mobile provides seven hotkeys ( [2] -[8]) for you to set shortcut. After enter hotkeymenu, firstly select a hotkey, press [OK] or SKL to enter function list. Here it can be selected from it. If select ‘clear hotkey’, the shortcut setting is canceled. In stand-by state press some key from 2 to 8 directly, uf the key is set, excut the function set. If the key is still not set, phone prompts unset hotkey, confirm and open function list, here](https://usermanual.wiki/Haier-Telecom/0507M1610/User-Guide-573674-Page-34.png)
![you can set its function directly. 3.3.3 call setting 3.3.3.1 Call transfer (need network support) In the situation that it is not easy to answer for a phone or in other situations, it is used to set received call to other phone (or voicebox), and set transfer condition. The function need netrwork support. Unconditional transfer In such situation, all call from network are transferred to a prest number in advance. Busy transfer If user is busy, call will be transfered to a preset phone. No responding transfer If no responding, call will be transferred to a preset number. Transfer When can not contact If the called party cannot be finds, call will be transferred to a preset number. Cancel transfer Display four kinds of call transfer list after entering menu. Select one of them and confirm, then phone sends request to network to turn off transfer function.。 State query Use the menu to can get current state of four kinds of call transfer by once query. Note: when call transfer is turned on, call transfer soft icon displays on stand-by screen. 3.3.3.2 Wishful (need work support) This function help you to use call transferring feature saftly. Sometimes after set call transferring, you forgot to transfer back and lost many calls,using this function you won’t have this trouble for ever. Entering Wishful menu, you can set transferring to “Home Number”,”Office Number” and “Other Number”. • Home Number: it will inform you to input home number first ,then input the time when to transfer back to phone, and last to set repeat style,after these setting, press[OK] , the setting value is saved. When this activated, the incoming call will transfer to the home number set beforehand,when the time you set come, the call will come back to phone again.](https://usermanual.wiki/Haier-Telecom/0507M1610/User-Guide-573674-Page-35.png)
![• Office Number: it will inform you to input office number first ,then need to input the time, press [OK], the setting value is saved.when this activated, the incoming call will transfer to the office number set beforehand. When the time you set come, the call will transfer back to phone again. • Other Number: it will inform you to input other number, then need to input the time, press [OK] ,the setting value is saved. When this activated, the incomin call will transfer to the other number set beforehand. When the time you set come, the call will transfer back to phone again. 3.3.3.3 Call waiting (need work support) • GSM Call: After start the function, if there is new call during current call, phone will display call waiting screen to let you select if receive the second call. If the function is turned off, phone will not display it when new call is received, call side will hear busy sound. You can turn on, turn off or query state. • GPRS call: When GPRS operation is being done, if there is another voice call, if prompt you the call will be decided by this menu. You can turn it on or off. 3.3.3.4 Minute prompt You can select if there is prompt during call, which means to prompt at the fifty second during every minute after the call starts. 3.3.3.5 answer by press any key After the function is turned on, any keys except press [power] or SKR can connect the call. 3.3.3.6 automatic redialing You can select to turn on or turn off automatic redialing function. After turning on the function, if call cannot be connected, phone will automatically redial every definite time terminal. Screen will prompt every redialing. Press SKL can automatic redialing process. During the process of redialing, if you use the phone, the automatic redialing exits automatically.](https://usermanual.wiki/Haier-Telecom/0507M1610/User-Guide-573674-Page-36.png)
![Prompt method There are two prompt methods of waste message, after wast message prompt is set, when receiving waster message, only display icon prompt of new waste message and no any sound and vibration prompt, press OK to close prompt diaglog and don’t see the content of the message. After usuall message prompt is set, when receiving waste message, it will be displayed on screen, and there is iconof waste message, but press OK to close close diaglog and don’t read message. 3.3.5.2 Call firewall Call firewall provide a kind of convenient and short method to protect you from disturbofannoy phone. Where reject list includes the phones that will be rejected automatically(10 at most), only connecting list includes the number to be connect, and other phones are rejected (at most 10_. Reject list The menu is used to add, query, change and delete rejected phone list. The menu includes add new number and query tow submenus. New number and phonebood are also included in Add new number, where New member menu is used to open number editor, input new number, save the new number into reject list; phonebook menu is used to open phonebook to select one phone from the phone and save it into reject list. Query menu item is used to scrool display rejected phone list, select a rejected phone from [up]/[down] key, press SKL to enter change, delete optional list, ‘change’ item is used to select rejected phone number in open number editor, delete item is used to dele selected rejected number. Only connecting list Operation is similar with idem. Setting of tamper-proof In taper-proof setting of firewall you can turn rejected phone function, turn on only connecting function and turn off taper-proof (one of the three can only be effective at some time). When you select “turn on rejecting phone’ function, phone will automatically reject call from rejected phone list. If you select ‘only connecting’ function, mobile can only connect the call in connecting list, and reject all other phones. After selecting turn off function, taper-proof of call firwall doesn’t work any more.](https://usermanual.wiki/Haier-Telecom/0507M1610/User-Guide-573674-Page-38.png)
![Note: when no connection function /only connection function is turned on, standard soft icon is displayed on stand-by screen. 3.3.5.3 Private firewall You can protece the important information on your phone, which include message, phonebook and call record. Upi cam set password to message, phonebook, call record, or only set passward to some items of them, or don’t set; when setting passwards, it is needed to select the option and press [SKL]for selection. If you enable above some or several protections, if you want to view or use the function and the menu, you are required to input passward of private firewall which can only be used after correct verification. If you input wrong passwork, it will prompt you passwork is wrong directly. Password of private firewall is four digital, default passward is ‘0000’, and you can change it. 3.3.5.4 Change password You can change the password of private firewall here. 3.3.6 Safety Settings 3.3.6.1 PIN code to turn on the phone You can select to enable or disable the function of PIN code. If you select enable, phone will prompt you to input PIN code when it is turned on, you cannot use many function of phone without correct PIN code. 3.3.6.2 Call restriction (network support) The function can let you to restrict the dialing or receiving call. Before use, restriction password provided by service provider should be input, this password will be sent to web for verification. • Prohibit dial all phone: once it is turn on, all dialing call will be prohibited. • Prohibit dial intermational phone: once it is enabled, it restrict interntional call. • Prohibit dial except home number: once it is enabled, all international call exceep web register contry are borbidden.](https://usermanual.wiki/Haier-Telecom/0507M1610/User-Guide-573674-Page-39.png)
![Information options you need to set include: Contact number: you can set 6 contact number at most. Information method: you can turn on or turn off ‘call information’ and ‘message information’. Information period: you can select information date. • Change password: you change the password of smart guard against theft. • Turn on smart guard against theft: you can turn on or turn off smart guard against theft function. 3.3.6.4 Change password You can change password by the menu, includes: change PIN code, change PIN2 code and call restriction. They all take same steps: • Input old password and confirm. • Input new password and confirm. • Input new password again and confirm, system prompt that change is sccesful. 3.3.7 Networ setting In stand-by screen, phone will display the name of network. If phone cannot distinguishthe name of the network, it will display country number and the network number of unknown network. Prefer netwok Perfer network list is saved on SIM card, and decide the order phone try when registering on network. • Preferred network Display prefer network list, the priority of the fornt item is the highest. Press [ok] to enter ‘prefer’ screen, press ‘prefer’again, system will prompt ‘prefer network is confirmed’, the the network will be move the front of prefer network list which shows it has the highest priority. • Delete network Display prefer network list after confirmation, you can select some network from it press’delete’ to delet it.](https://usermanual.wiki/Haier-Telecom/0507M1610/User-Guide-573674-Page-41.png)
![• Add available netwok Phone starts to search abaiable network after confirmation, then networks are displayed on by list. Select one from them, press [add] the network is added to the end of prefer network list. • Add existing network Display network list saved in phone. You can select any one from it, press [add], the network will be added to the end of prefer network list. • Add network code After confirmation, mobile opens editor, input mobile contry number and mobile network number in it. Confirm again, the code will be added to prefer network table. Logon GPRS The phone supports GPRS, this item means the time to logon GPRS, if it logon continuously or only when using data business. Register again After confirmation phone start to search available network, then display it on screen in list form. Select one of the networks, press [register], phone try to regiser to that network. Setting connection account The menu allows you select some connection account, use selected mode to connect to GSM or GPRS network when using WAP or transferring MMS. Note: following contents in square brackets are the example of existing parameter of Chinese Mobile, particular content should be provided by operator. All following items depends on different operator. Wrong information appearing when connenting is main because of parameter mististake, please connect your network provider at first time to get detail. Some operator will sent network parameter by message. Some prest mode may be locket to avoide newly setting and rename. Enter the menu of ‘connection account setting’, screen displays connection account list, you can select some account in it, press ‘Option’ or OK to open option menu, include ‘view’ and ‘edit’ menu, select ‘view’ to browse the information of currently selected account; select ‘edit’ to edit the account information, particular editing contents include: Account name Can rename the name of selected connection account Network load You have two method to use WAP: by traditional GSM or GPRS. Here you can set which method is used:](https://usermanual.wiki/Haier-Telecom/0507M1610/User-Guide-573674-Page-42.png)
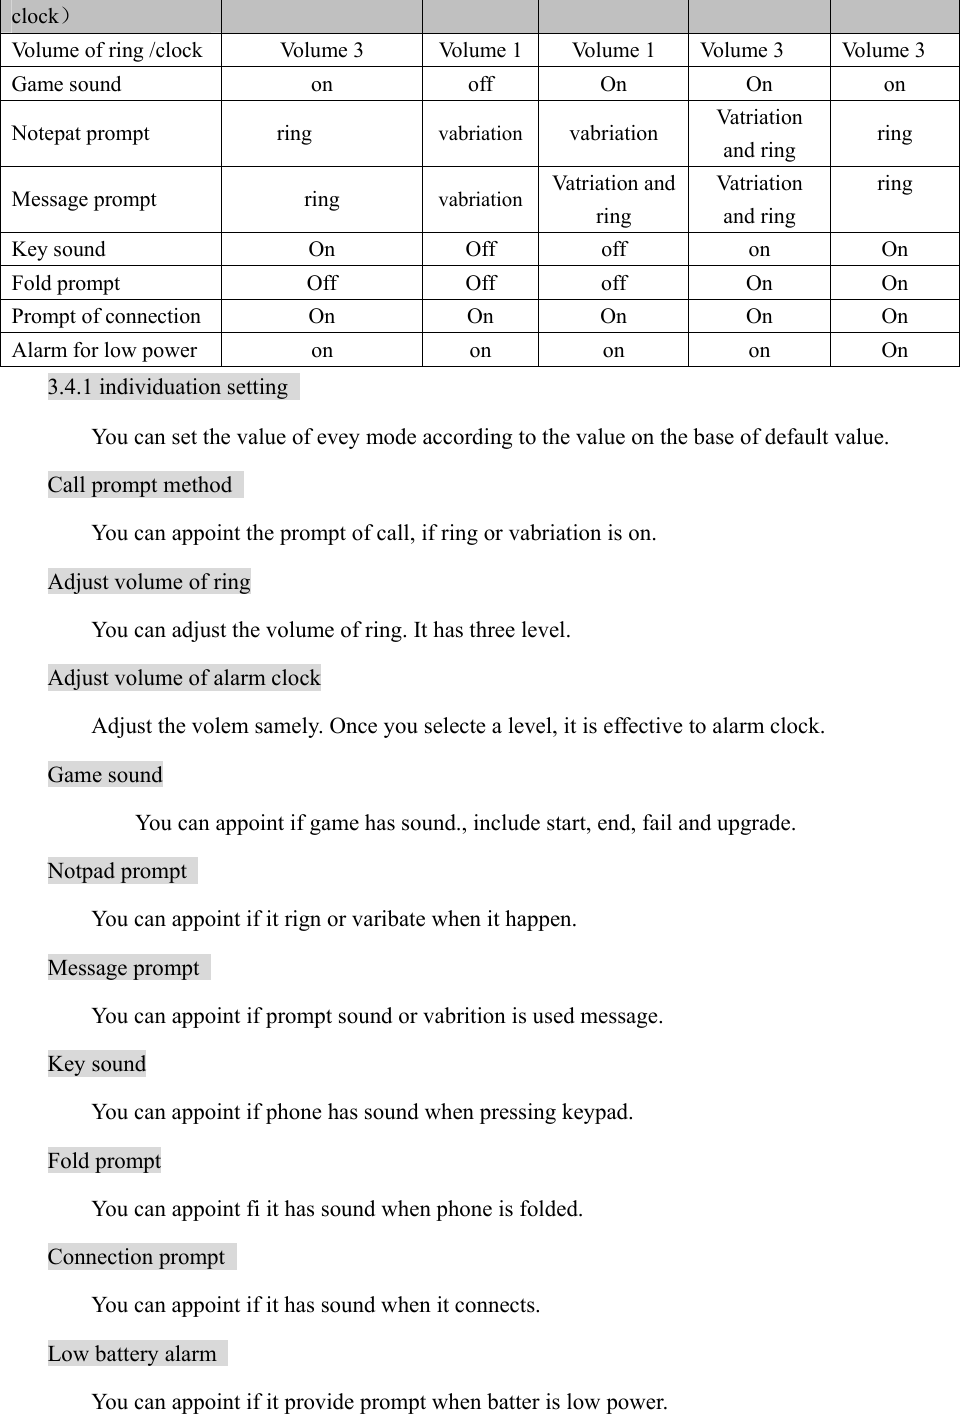
![Only use GPRS: only use GPRS. Only use GSM: only use GSM. GSM setting You can set: z Data call type: ISDN (digit method) or simulation method. z Phone number: input required number. When phone go into on-line method, it will dial the number automatically. [17266] z User name: username required to logon WAY server [wap] z User password: password that logon require [wap] GPRS setting. You can set: z APN setting:set the mane of connection。[cmwap] z User name:required name to logon wap server.[wap] z User passwordz: required password for logon. [wap] 3.3.8 setting at factory Used to restore a set of pameter set when phone is out of factory, include envormnent setting, call setting and etc. use the menu will make your setting lost. So before retore, you should be confirmed. 3.4 environment setting Environment setting function can make you use preset parameter combination under special environment by simble operation. Left of the current mode has a selected mark. Environment setting is a group of preset character definition, it directly overwrite all original settings after start up. Phone provide a group of default mode, include: normal mode, silent mode, meeting mode and outdoor mode, and in-car mode. To every mode, there is a set of default value (see following table), you can change andsave it in the mode according to your prefer. If the mode is active, the changed setting active immediately. In addition, you can change the name of mode. Normal mode Silent mode Meeting mode Outdoor mode In-car mode Call prompt method (include alarm ring vabriation vabriation Vatriation and ring ring](https://usermanual.wiki/Haier-Telecom/0507M1610/User-Guide-573674-Page-43.png)
![3.5.1.8 Attention The influence of power off for the memo When power off the event in your memo will be remined after power on. About the repeating event ,only the nearest one will be reminded. Below mentioned rules should be followed while Changing the date and time: ● only considering the nearest one in the repeating events ,you can deal with it in the normal way. ● The un –repeating event will not be revised. It means that if the event is past and you still set the time before the event date then the system will remind you over again.. 3.5.2 Alarm clock With 24-hour alarming function .Total with 3 groups alarm clock and your can set them separately. In this menu you can choose one group alarm clock and input alarming time and select the repeating way, press ”TURN ON” to start the clock.. Below mentioned four repeating ways you can choose: ● Start the alarm clock on the settled time of certain day ● Start the alarm clock on the settled time everyday ● Start the alarm clock on the settled time in the work day ( From Monday to Friday) ● Start the alarm clock on the settled time From Monday to Saturday except for Sunday. Press “up” and “down “ to choose the repeating way column and press “right” &”left” to choose repeating way. In addition you can choose clock bell ring by “RIGHT”&”LEFT”. 3.5.3 CALCULATOR Addition ,subtraction, multiplication and division can be done in the calculator. You can input figure to do the calculation ,press”#” to input decimal.. after inputtng the first figure you press [Up] /[Down]/[Left]/[Right] to act “×”、“/”、“+”、“-”.Also you can press [*]to select four types operation character, the first press is “+” ,the second is “-“,the third is “*”and the fourth is “/ “. By pressing fig menu or [#]to input the second operation figure and you can get the result by pressing “OK”. ] Pressing [ SKL] you can do the option including: clear,MC,MR,MS M+,details is as below: CLEAR : Clear all the contexts and start a new calculation. MC MEMORY CLEAR ,clear the figure in the memorizer. MR MEMORY READ, read the figure in the memorizer MS MEMORY STORE store the figures into the memorizer M+ MEMROY PLUS calculate all the figures of the memorizer and store them. EXIT: EXIT FROM THE CALCULATOR Only less than 10 bits can be put into the edit window.](https://usermanual.wiki/Haier-Telecom/0507M1610/User-Guide-573674-Page-47.png)
![3.5.4 STOPWATCH The original time is 00:00:0 shown on the screen ,press “START” to do the timing .LEFT/RIGHT will be the PAUSE/CLEAR. Press “pause” to pause the timing.and keep the value .By pressing “CONTIUE”or “ok”to go on time again and pressing “CLEAR” will come back to 00:00:0. 3.5.5 TIMER The function is very similar with alarm clock, the small difference is setting how long to remain for reminding you. ATTENTION: The timer can turn on automatically reminding you . 3.5.6 TURN ON & TURN OFF AUTOMATICALLY With the function of turn on and turn off automatically.You can set turn on or turn off separately. Select “start” to get into the editor and input time of turn on and turn off.. While turning on the mobile phone you should test the PIN code otherwise it will stay in the PIN code iput process. ATTENTION: Do not use mobile phone while taking air plane,pls note to avoid turning on automatically by this function.Our company refuse to be responsible for any aftereffect caused by this. 3.5.7 WORLD TIME You can check the time of different time zone. There is a line of time in the up and below of the world map,the up is the time of other city and below is local time. If there is a mark of daylight saving time then it is daylight saving time here. You can choose city by Pressing [LEFT]/[RIGHT] on longitudePressing [UP]/[DOWN] to choose city on latitude. You can do the setting to other city in the option menu for example whether it is daylight saving time of you can set the time of other city as local time. 3.5.8 Currency conversion You can do the exchange rate conversion by this function. In currency conversion the currency for change is the currency you want to change .The target currency is the currency which you want to change into. Exchange rate is the propotion of changing currency.Amount is the the amount of the currency that you want to change. You can get the result by finishing choosing above items . When the cursor stay in exchange currency and the target currecy ,you press “revise”then you can do the selection among the 17 countries.When the cursor stay in the rate and the amount ,if you press”revise”then you can input the relevant figures.](https://usermanual.wiki/Haier-Telecom/0507M1610/User-Guide-573674-Page-48.png)
![3.6 entertainment 3.6.1 camera When enter camera preview menu, press [OK] or side key to take a phot, press RSK to save picture into my document. [LSK] has following option, its function is shown as following: Shoot new picture: enter preview menu. Enter album: enter album list. In addition, in preview menu, press LSK to enter set function (when shooting mode is different there will be different function set), following is the instruction of every function: Environment mode: adjust the bright of background. Photo quality: can set photo mode with different quality. Photo size: set the size of picture. Color effet: adjust the color of background. Time shoot: enable time shooting function can shoot automatically when it reach specified time. Fold: background is golded so that fram is together with background. Fram speeed: the more fram speed, the fast the film is. Press [RSK] to enter shooting mode: Shoot: shoot mode. Effect: shoot mode with picture fram, press [Left] and ,[Right] to change different fram. Continue shoot:Continue shoot mode. Record: short film mode. 3.6.2 Establish PC connection When you enter PC connect interface, connect PC and phone by USB, thus you can transfer every kind of files between computer (such picture, MP3 and etc). 3.6.3 MP3 The mobile support MP3 paly function, you can down MP3 to your mobile by USB, and 本play it by this function.](https://usermanual.wiki/Haier-Telecom/0507M1610/User-Guide-573674-Page-49.png)
![with a ? mark also can be removed, every marking a mine, mine counter reduce one. If all mines surrounding some digit square are marked out you can clear around no-mine area. 3.6.5 biological clock Function of biological clock is to draw strength, intelligency and motion change curve according to the birth and calculate date. You also can press on main interface to view the situation of yesterday [Left], tomorrow {right}, last month [up] and next month [down] 3.7 WAP(need network support) The phone has inner WAP browser. Use WAY you can brow every the content of WAP website on internet. Note: you need to register data business function to network provider to access internet.consult the local network operator for detail. When you brow WAY browsers for the first time, you need to set the configuration of WAP firstly. Note: some items in the configuration of phone may be set as the WAP parameter of somenetwork operation when leaving factory, if you are the userof the network operator , you can use it directly. If you are userof other operator, you need to set configuration newly. Note: because network operator change its WAP configuration or internet content provider change its WAP websit or content sothat you cannot browse WAP net page, our company will not inform it.and don’t answer for the result caused by it. please consult network operator and internet provider to get latest information. 3.7.1 homepage Select the menu, you can enter homepage directly. You can also set the address of homepagein settings. 3.7.2 Bookmark By the menu,you can add, manage bookmarks, and diretly connect bookmark to definited website, you can add 10 bookmarks at most. 3.7.3 input addres Select the menu you can directly insert the address of the page you want to browse. 3.7.4 Last page Select this menu to directly accress the webpage you browse last time. 3.7.5 settign You can pocess following setting by the menu: Edit homepage](https://usermanual.wiki/Haier-Telecom/0507M1610/User-Guide-573674-Page-51.png)