Haier Telecom 0508D1000 D1000 User Manual D1000
Haier Telecom (Qingdao) Co., Ltd. D1000 D1000
USERS MANUAL

Thanks for purchasing Haier mobile phones, which are a combination of the
essence of high technology, stylish designs and a plenty of functions. They
are expected to bring endless funs to your life.
BeforetheuseofHaiermobilephones,pleasereadthisusers'guideandkeep
it carefully for further reference. This guide serves as an operation guide
instead of a quality warranty. Qingdao Haier Telecom Co.,Ltd reserves all
therightstointerprettypingerrorsinthisguide,inconsistencywiththelatest
materials and upgrading of soft wares and make changes at any time. Such
changeswilldirectlybeeditedintotheneweditionofusers'guidewithout
further notice.
This users' guide is edited and printed by Qingdao Haier Telecom Co .,Ltd.
Copyrights reserved! Quality guarantee to be held responsible for reprint!
Users' Guide

1
2
12
13
15
16
17
18
18
18
19
19
20
20
20
23
23
1. Parts of the Phone
1.1 Screen lcons
1.2 Install battery and UIM card
1.3 Charge battery
1.4 Switch on/off
1.5 Dial a number
1.6 End a call
1.7 Redial a number
1.8 Make an international calls
1.9 During a phone call
2. Operation of menu
2.1 Names
2.1.1 Using the Keypad to Enter Information
2.1.2 Editing Names
2.1.2.1 list
Important notes
FCC SAR
CONTENTS
1

23
23
24
24
24
25
25
25
26
26
27
28
29
29
30
30
30
2 New
2.1.2.3 Search
2.1.3 Multicopy
2.1.4 Groups
2.1.5 Erase All
2.1.6 Speed Dial
2.1.7 Memory state
2.1.8 My number
2.2 Messages
2.2.1 Write Message
2.2.2 Inbox
2.2.3 Outbox
2.2.4 Draft
2.2.5 Templates
2.2.6 Erase Msgs
2.2.7 Voice Mail
2.2.8 Settings
2.1.2.
2

32
33
33
33
33
34
34
36
36
37
37
38
38
39
39
39
43
3
2.2.9 Multimedia Box
2.3 Call Logs
2.3.1 Missed
2.3.2 Received Call
2.3.3 Dialled Call
2.3.4 Erase Lists
2.3.5 Call Timers
2.4 Tools
2.4.1 Schedule
2.4.2 Alarm Clock
2.4.3 Calculator
2.4.4 Tip Calculator
2.4.5 Stop Watch
2.5 Settings
2.5.1 Ringers
2.5.2 Profiles
2.5.3 Display

43
44
45
45
46
47
47
48
49
50
53
4
2.5.4 Security
2.5.5 Call Setup
2.5.6 Phone Info
2.5.7 Key guard
2.5.8 Network Service
2.6 Amusement
2.6.1 Kong Ming
2.7 TATA Zone
4
. Trouble shooting
. Maintenances and repairs
5
3. Input method

1
Important notes
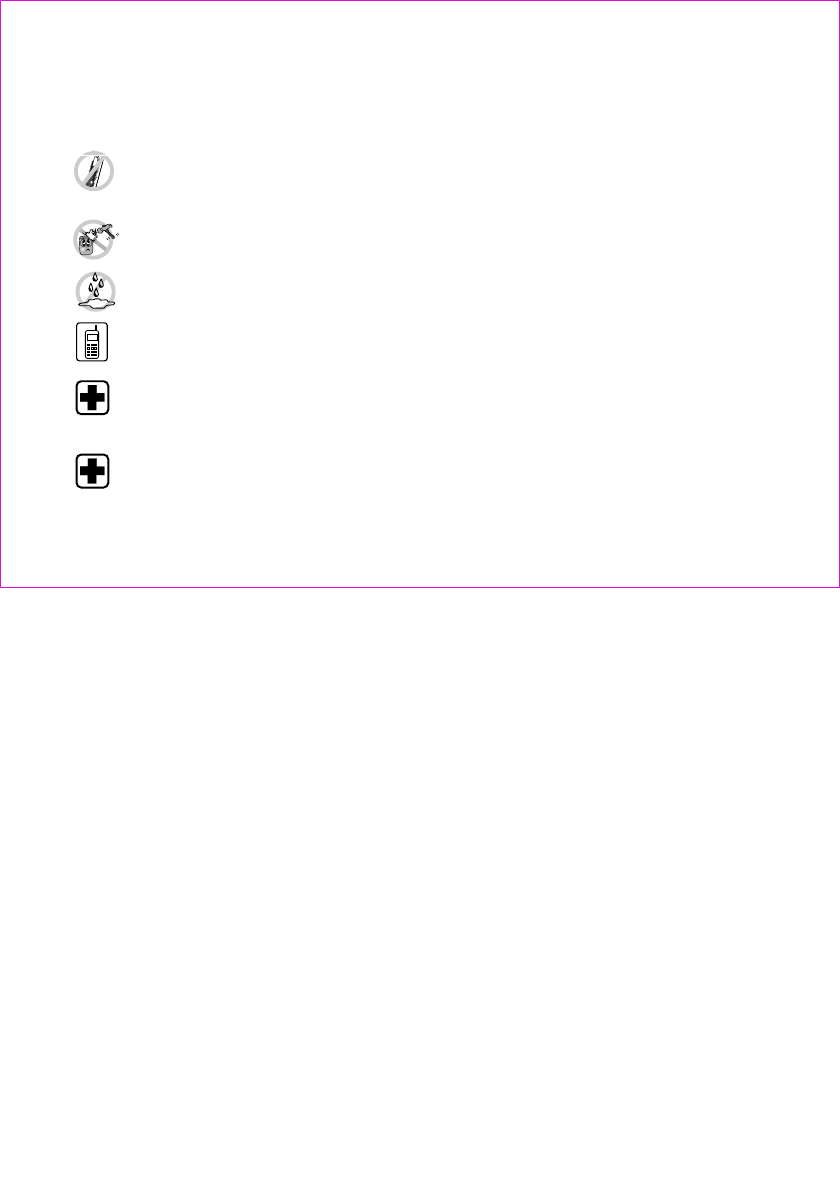
Do not use the mobile phone without hand-free settings while driving. Please stop your car
before you want to use your phone.
Do not use your phone at filling stations or the areas with inflammables and explosive products
or chemicals.
Mobile phones will cause interference. Using mobile phones on the plane is both a danger and
a violation of laws.
Switch off your phone when you are close to medical equipments and follow all the existing
provisions.
Follow the special rules of relative places. Please switch off your phone where the use of
mobile phones is forbidden or may cause interference or dangers (for example,in the hospital).
Use your phone normally (near your ears). Do not touch the wire without reason after switching
off your phone.
You can dial emergency calls anytime, even the PIN/PUK locked, no UIM card or the phone
locked.Input local emergency number and press send key.
The Emergency call number are 100/101/102/12524.
Please follow the following rules before you use the phone. Otherwise, it may result in
dangers or make you violate laws.
Follow traffic regulations
Switch off your phone at filling stations
Switch off your phone on the plane
Switch off your phone in the hospital
Special provisions
Careful Use
Emergency calls

FCC SAR
This chapter addresses the safety guidelines and precautions to follow when operating your phone.
Please make sure to be aware of all the details about the safety to operate your phone in the way that
you are supposed to.
Before operating your phone, please be aware of all the safety details.
SAFETY INFORMATION FOR WIRELESS
HANDHELD PHONES
SAFETY INFORMATION FOR FCC RF EXPOSURE
SAR INFORMATION
FDA CONSUMER UPDATE
PROTECT YOUR WARRANTY
12 MONTHS LIMITED WARRANTY
2

Read This Information Before Using Your Handheld
Portable Cellular Telephone
EXPOSURE TO RADIO FREQUENCY SIGNALS
Your wireless handheld portable telephone is a low power radio transmitter and receiver. When it is ON,
it receives and also sends out radio frequency (RF) signals.
In August 1996, the Federal Communications Commissions (FCC) adopted RF exposure guidelines with
safety levels for handheld wireless phones. Those guidelines are consistent with the safety standards
previously set by both U.S. and international standards bodies:
ANSI C95.1 (1992) *
NCRP Report 86 (1986) *
ICNIRP (1996) *
Those standards were based on comprehensive and periodic evaluations of the relevant scientific
literature. For example, over 120 scientists, engineers, and physicians from universities, government
health agencies, and industry reviewed the available body of research to develop the ANSI Standard
(C951).
The design of your phone complies with the FCC guidelines (and those standards).
3

ANTENNA CARE
Use only the supplied or an approved replacement antenna.
Unauthorized antennas, modifications, or attachments could damage the phone and may violate FCC
regulations.
1* : American National Standards Institute.
2* : National Council on Radiation protection and measurements.
3* : International Commission on Nonionizing Radiation Protection.
Talking on the phone while driving is extremely dangerous and is illegal in some states. Remember,
safety comes first. Check the laws and regulations on the use of phones in the areas where you drive.
Always obey them.
Also, if using your phone while driving, please:
Give full attention to driving. Driving safely is your first responsibility.
Use hands-free operation, if available.
Pull off the road and park before making or answering a call, if driving conditions so require.
DRIVING SAFETY
4

If you must use the phone while driving, please use one-touch, speed dialing, and auto answer modes.
An airbag inflates with great force. DO NOT place objects, including both installed or portable wireless
equipment, in the area over the airbag or in the air bag deployment area. If in-vehicle wireless equipment
is improperly installed and the air bag inflates, serious injury could result.
: Failure to follow these instructions may lead to serious personal injury and possible property
damage.
WARNING
5

ELECTRONIC DEVICES
) inches
be maintained between a handheld
ALWAYS keep the phone more than six inches from your pacemaker when the phone is turned on.
Do not carry the phone in a breast pocket.
Use the ear opposite the pacemaker to minimize the potential for interference.
If you have any reason to suspect that interference is taking place, turn your phone OFF immediately.
OTHER MEDICAL DEVICES
obtaining this information.
Turn your phone OFF in healthcare facilities when any regulations posted in these areas instruct you to
do so. Hospitals or healthcare facilities may be using equipment that could be sensitive to external RF
energy.
Most modern electronic equipment is shielded from RF energy.
However, certain electronic equipment may not be shielded against the RF signals from your wireless
phone.
PACEMAKERS
The Health Industry Manufacturers Association recommends that a minimum separation of six (6"
wireless phone and a pacemaker to avoid potential interference
with the pacemaker. These recommendations are consistent with the independent research by and
recommendations of Wireless Technology Research.
Persons with pacemakers :
If you use any other personal medical device, consult the manufacturer of your device to determine if
they are adequately shielded from external RF energy Your physician may be able to assist you in
6

POSTED FACILITIES
OTHER SAFETY GUIDELINES
AIRCRAFT
BLASTING AREAS
POTENTIALLY EXPLOSIVE ATMOSPHERES
Turn your phone OFF where posted notices so require.
FCC and Transport Canada Regulations prohibit using your phone while in the air. Turn your phone
OFF before boarding an aircraft.
To avoid interfering with blasting operations, turn your phone OFF when in a "blasting area" or in areas
posted: "Turn off two-way radio". Obey all signs and instructions.
Turn your phone OFF when in any area with a potentially explosive atmosphere and obey all signs and
instructions. Sparks in such areas could cause an explosion or fire resulting in bodily injury or even death.
fueling areas such as gas stations ; below deck on boats ; fuel or chemical transfer or storage facilities;
vehicles using liquefied petroleum gas (such as propane or butane); areas where the air contains
chemicals or articles, such as grain, dust, or metal powders; and any other area where you would
normally be advised to turn off your Vehicle's engine.
Areas with a potentially explosive atmosphere are often, but not always,clearly marked. They include
7
PRECAUTIONS
Your Handheld Portable Telephone is a high quality piece of equipment. Before operating, read all instructions
and cautionary markings on (1) AC Adaptor (2) Battery and (3) Product Using Battery.
DO NOT use this equipment in an extreme environment where high temperature or high humidity
exists.
DO NOT abuse the equipment. Avoid striking, shaking or shocking. When not using, lay down the
unit to avoid possible damage due to instability.
DO NOT expose this equipment to rain or spilled beverages.
DO NOT use unauthorized accessories.
DO NOT disassemble the phone or its accessories. If service or repair is required, return unit to
an authorized Audiovox cellular service center. If unit is disassembled, the risk of electric shock or
fire may result.
DO NOT short-circuit the battery terminals with metal items etc.
8

WARNING! Read this Information before using
CAUTIONS
BODY-WORN OPERATION
In August 1996 the Federal Communications Commossion (FCC) of the United States with its action in
Report and Order FCC 96-326 adopted an updated safety standard for human exposure to radio
consistent with the safety standard previously set by both U.S. and international standards bodies.
The design of this phone complies with the FCC guidelines and these international standards.
Use only the supplied or an approved antenna. Unauthorized antennas, modifications, or attachments
could impair call quality, damage the phone, or result in violation of FCC regulations.
Do not use the phone with a demaged antenna. If a demaged antenna comes into contact with the skin,
a minor burn may result. Please contact your local dealer for replacement antenna.
Thisdevicewastestedfortypicalbody-wornoperationswiththebackofthephonekept1.5cm.from
the body. To maintain compliance with FCC RF exposure requirements, use only belt-clips, holsters or
similaraccessoriesthatmaintaina1.5cm.separationdistancebetweentheuser'sbodyandtheback
of the phone, including the antenna. The use of belt-clips, holsters and similar accessories should not
contain metallic components in its assembly.
TheuseofaccessoriesthatdonotsatisfytheserequirementsmaynotcomplywithFCCRFexposure
requirements, and should be avoided.
frequency electromagnetic energy emitted by FCC regulated transmitters. Those guidelines are
NOTE : For more information about RF exposure, please visit the FCC website at www.fcc.gov
9

THIS MODEL PHONE MEETS THE GOVERNMENT 'S REQUIREMENTS FOR EXPOSURE TO
RADIO WAVES.
Your wireless phone is a radio transmitter and receiver. It is designed and manufactured not to exceed
the emission limits for exposure to radiofrequency (RF) energy set by the Federal Communications
Commission of the U.S. Government. These limits are part of comprehensive guidelines and establish
permitted levels of RFenergy for the general population. The guidelines are based on standards that
were developed by independent scientific organizations through periodic and thorough evaluation of
scientific studies. The standards include a substantial safety margin designed to assure the safety of all
persons, regardless of age and health.
The exposure standard for wireless mobile phones employs a unit of measurement known as the
Specific Absorption Rate, or SAR. The SAR limit set by the FCC is 1.6 W
with the phone transmitting at its highest certified power level in all tested frequency bands.
Although the SAR is determined at the highest certified power level, the actual SAR level of the phone
you are to a wireless base station antenna, the lower the power output.
Before a phone model is available for sale to the public, it must be tested and certified to the FCC that
it does not exceed the limit established by the governmentadopted requirement for safe exposure. The
/kg. * Tests for SAR are
conducted
while operating can be well below the maximum value. This is because the phone is designed to operate
at multiple power levels so as to use only the power required to reach the network. In general, the closer
10
W/Kg;and when worn on the body with the back of the unit to the user is 0.716W/Kg.(Body worn measurements
differ among phone models,depending upon available accessories and FCC requirements.While there may be
differences between the SAR levels of various phones and at various positions,they all meet the govement
requirement for safe exposure.
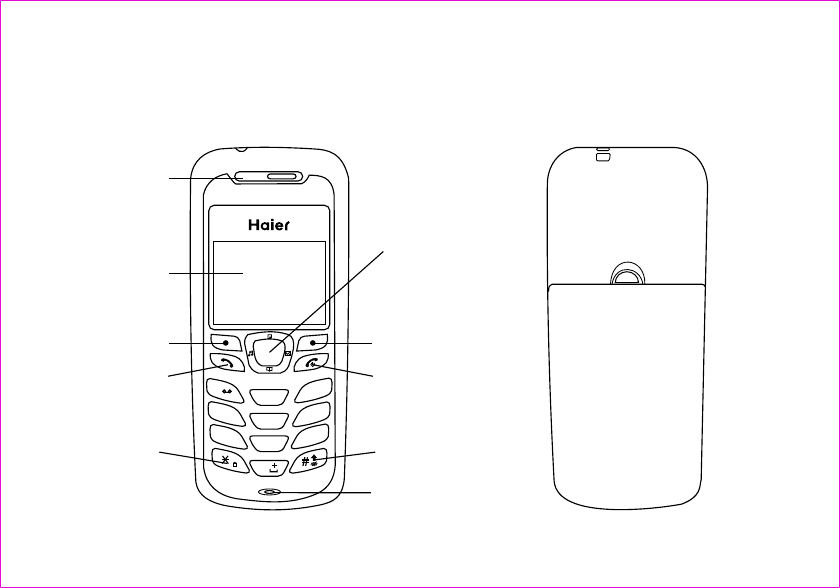
The illustration below shows the main components of your phone.
(in the text boxes in the picture below, type in names of the major components)
1. Parts of the Phone
123
456
789
0
GHI
ABC
DEF
JKL
MNO
PQRS
TUV
WXYZ
Receiver
LCD screen
Soft key
Send
Up/down key
Soft key
End
# key
key
*
Microphone
12
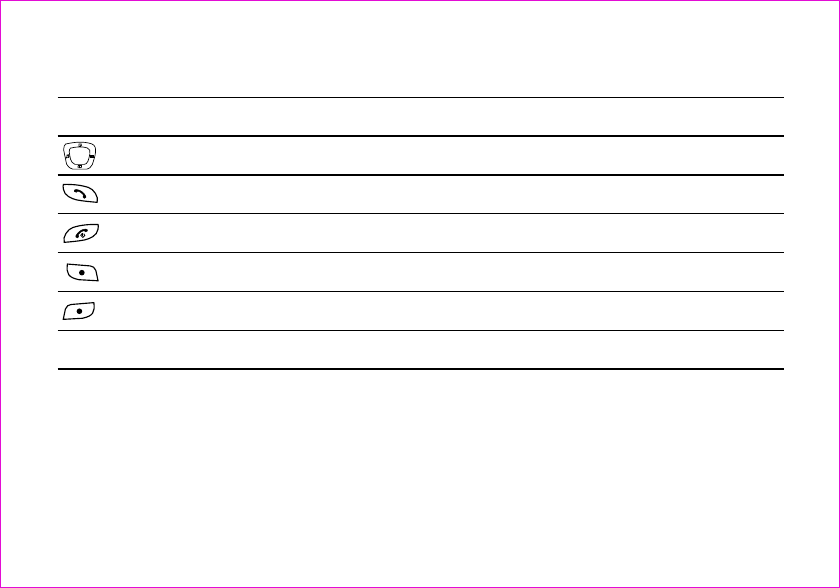
(type in descriptions of the phone's components in the table below)
Up/down key Use up/down to navigate in menus
Send key Use this key to dial, or answer a call
End key Use this key to end a call, or turn power on/off
Soft key (left) Use this key to select or confirm something
Soft key (right) Use this key to cancel something
Alphanumeric keypad Use these keys to input numbers, or characters
Key Description
(insert all of the screen icons in the table below--or instead of using the table, insert a sample
LCD screen with call-outs showing each of the possible screen icons)
When the phone is powered on, the following icons may display:
1.1 Screen Icons
13
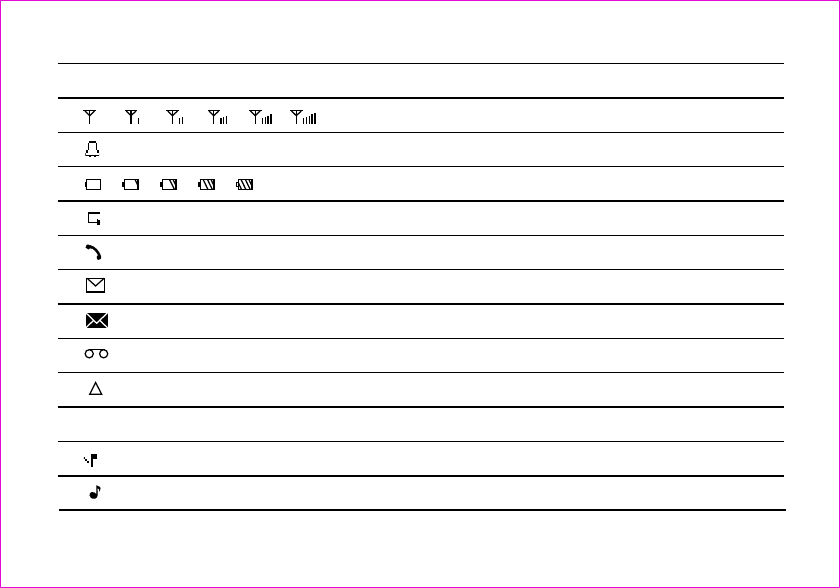
Indicate the strength of rssi
Indicate the alarm is set
Indicate the level of battery
Indicate call forward enabled
Indicate the phone is in a call
Indicate new message's arrival
Indicate new urgent message
Indicate voice mail
Indicate phone is in roaming
Indicate all kinds of phone mode
No ring
Ring
DescriptionIcon
( )
14

aim the protruding part at the bottom of the battery at the bottom of phone.
push the top part of the battery to the phone and press down the lock until it is locked.
Switch off the phone, push up the lock at the bottom of the battery to uplift the top of the battery
and separate with the main machine.
Purchase a UIM card from network operator. Your phone number and registration information
are stored in your UIM card. Your UIM card can be used in any a CDMA phone. Your number and
information will not change.
Make sure to switch off your phone before take out the battery.
Make the metal face of the UIM card down and put it conferring the bevel of the card.
Cover the sheet metal used for fixing and install the battery.
1.2 Install battery and UIM card
Install the battery
Take out the battery
Install UIM card
15

take out the battery after switch off your phone.
uncover the sheet metal and take out the UIM card.
install the battery
Connect the charger with power supply.
Insert the plug of the charger into charging connector of the bottom of the phone.
The rolling of the electric quantity bar indicates that the phone begins to charge.
When the battery level full and stop rolled to displays charging finishes.
Disconnect the charger and the phone after the charging of the phone. Take out charger from
supply socket.
1. Press and hold the buttons of both sides of the charger after the charging to plug out the
charger.
2. We suggest you to charge the battery fully when you use the phone for the first time. It takes
about 3 hours for full charging.
Take out UIM card
Notes:
1.3 Charge battery
16

3. Do not pull out the plug of the charger during the charging to avoid harming of the phone and
charger.
Pressing and holding can switch on/off the phone.
If you have set PIN code, please enter PIN when switch on your phone.
You can set protection code (PIN CODE) in order to prevent random using of your phone by
others. Each time you restart your phone, the phone will ask you to input PIN code after setting.
Input PIN code (supplied by network operator which can be revised. In order to keep it in
security, will be shown on the screen to replace the number you input.)
Press OK, and after a short time, your mobile phone will confirm its correctness and begin to
register on the network. Once the network name is shown on the screen, you can dial or answer
a call. If no network name is shown on the screen, you need to register again.
1.4 Switch on/off
Input PIN code
Input wrong PIN code
17

Note:
If you make a wrong input, you can press to reenter numbers. Three continuous wrong
inputs of PIN code will lock the UIM card. If this circumstance appears, please contact the UIM
card suppliers.
Do not touch the wire in unnecessary conditions after the phone is turned on. Otherwise,
it will affect the call quality and make the phone consume so more energy.
you can only use the function only after the network name is shown on the screen.
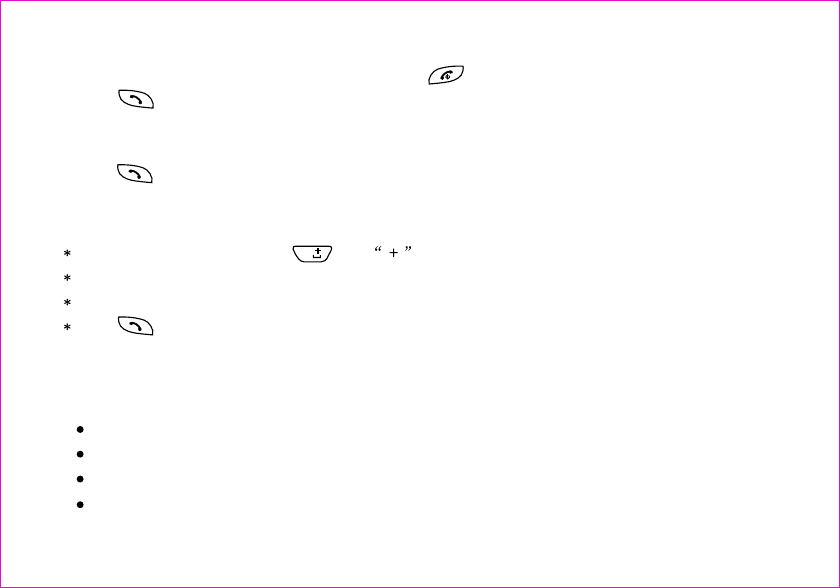
input district code and telephone number or mobile phone number, press to dial.
Pressing can end a call.
You can press twice to redial the number you dial last time.
The mobile phone can store 29 latest call logs (incomings or outgoings). In order to redial one
of the numbers, you can do as the followings:
1.5 Dial a number
1.6 End a call
1.7 Redial a number
18
1 if characters are shown on the screen presses to return to the idle mode.
2 press to display the latest call list.
3 press up/down keys of navigation key to view the telephone numbers and display the needed
names and numbers.
4 press to dial the displayed numbers.
in idle mode, press and hold until appears on the screen.
press country code
input district code (usually no 0 in the front) and telephone number
press to dial
Pressing menu key left soft key can:
Recent calls
Message
Record
Silence
1.8 Make an international calls
1.9 During a phone call
19
0

Names is a list of your contacts. Each name can contain three phone numbers, address,
email, URL, and note.
you can use keypad to enter something. There is a cursor, which looks like | , at the right side
of current character.
1.press alphanumeric key to insert text before cursor.
2.if you make a mistake, you can press the right soft key Erase to delete current character
before cursor.
3.you can use to move the cursor.
4.after editing, select Save to save your editing.
5.to cancel editing, long-press Erase key until it changes to Back , then press it again.
1.press several times unti 123 is displayed at the top-right corner of the screen.
2 Operation of menu
2.1 Names
2.1.1 Using the Keypad to Enter Information
To enter text
To enter numbers
20

2.press numberic keys to input numbers.
1.press # several times until abc is displayed at the top-right corner of the screen, then you
can input lowercased letters.
2.press # several times until ABC is displayed at the top-right corner of the screen, then
you can input uppercased letters.
3.press alphanumeric key several times(no longer than 0.5 seconds between each two pressing)
to enter a specified letter written in the key.
4.if the cursor is hidden, you can keep on pressing to change current character. current character
will be entered when the cursor appears.
5.if you want to enter a letter which in the same key, you must wait for 0.5 seconds until the cursor
appears, so you can press the key again. If you want to enter a letter which in a different key, you
need not wait for the cursor, and can press the key as you want directly.
To enter uppercase or lowercase letters
To enter symbols or special characters
1.press * .
2. Use up and down to select the symbol you need.
21

3.Press the left soft key to confirm.
1.select Settings in main menu
2.select Display
3.select Language
4.select the language you want.
5.if you set your phone to another language which you cannot read, you can press 5,3,3 after
entering the main menu, then select the correct language.
To change the language
22

1.select Names in main menu
2.select List
1.At the main menu, select Names .
2.Select new .
3.input the contact name, press Save
4.choose [mobile], press change
5.press save after editing
1.select Names in main menu
2.select Search
3.enter the full name you want to search, press Find
2.1.2 Editing Names
2.1.2.1 list
2.1.2.2 New
2.1.2.3 Search
23

With the copy function, allows you copy items in the mobile phone entries in UIM card memory
to phone memory and vice versa.
All Copy: you can copy all of the UIM card memory entries to phone memory and vice versa.
Choice Copy: You can select one or more of the recorded list to copy it.
Note: in the selecting option of the popup menu, through press left soft key to select multi-records,
then press left soft key to copy these selected records in the popup menu.
There are five groups: 'No Group'. 'Family','Friends','Colleagues','VIP',
Press 'option' key you may enter the following menus:
No group:
You can view/add group and change/Erase the group's name here.
Select Erase All in menu to erase all the contacts.
2.1.3 Multicopy
2.1.4 Groups
2.1.5 Erase All
Names
24

1.select in Main Menu
2.select Speed Dial
3.select one short number (the index is the short number) , press Options soft key
4.select Set Entry in Option menu
5.select one contact
6.select one phone number, save it to speed list
Default Speed Number:
1# 1500 - Voice Mail;
2# 1590 - Fundoo Calling;
3# 121 - Customer Care;
4# 197 - Directory Assistance.
Allows you inquire the memory state of the UIM card and phonebook, including used number
and total memories.
This function allows you to set and view this UIM card number.
2.1.6 Speed Dial
2.1.7 Memory state
2.1.8 My number
Names
25

This chapter introduces the usage of Short Message and Ring Tone.
You can use Short Message function to send and receive message,There is an inbox and an
outbox in you phone, each messages can contain a maximum of 150 characters, you can send
the message now or later, etc.
Allows you write text letter, the number at the top right comer show character number for enable
input. Press number key to input letter you need. Press option key as following action:
1. Send
You can send a message.
Pressing Option select object you want to insert your SMS message.
Press number key input phone number or press Option to select phone number from the phone
book.
2.2 Messages
Using Short Message
2.2.1 Write Message
26

2. Insert templates
You can insert templates when composing an SMS message.
3. Send to many
To send this message to multi-user.
Press Option to select number interface.
Press Select Send\Select One\Select All\Cancel All to send this message.
4. Insert Number
Press Select to choice a phone number from contacts.
5. Save
You can save the contents of edited to outbox.
Note: The SMS message length is 160 characters.There's a sound alert when text edit full.
When you receive a new message, the new message-prompting icon will be displayed on the
screen, to view messages in the Inbox. Press up/down key to scroll and then choose either SMS
2.2.2 Inbox
27
messages to view. While you view the message press to enter the following options:
Reply: you can reply the selected message.
If you wand to reply the message, press key to entry the Edit Interface.
Press key to send the message after finished it.
Forward: to forward the selected and edited message.
If you wand to forward the message, press key to entry the edit interface.
Press key to select send option to enter text interface.
Input the desired phone number then press key to send the message.
Call: to call the sender of the selected message.
If you wand to dial the sender's number, press key confirm then dialing.
Move to phone box: Move the selected message to the phone box.
If you wand to save the message in the phone box, press key to move to the phone box.
Notice: only to save the message of the UIM card into the phone box.
Save number: To save the number of the sender.
Erase: To erase the selected message.
2.2.3 Outbox
Your mobile phone will store messages in outbox list. Select a message, press key to scroll
28
the desired option press to view the details of the messages and press to open a message
and to enter the following options as the 2.2: Forward, save address, copy to phone box and
erase.
Store the messages which you save.
Allows you to set the no more the 20 quick texts, 11 texts can not be edited and Chinese or
English displays, the other 9 texts can be edited and only either Chinese or English display.
Press key scroll to the desired message and press key to access the following:
The quick text can be edited:
Edit: allows you revised text then save it.
Erase: erase the selected text.
Add new: you can edit text then save it.
Send: you can send the selected text. When the quick text cannot be edited, you can select
add and send option.
2.2.4 Draft
2.2.5 Templates
29

1.
Erase the entire messages in the inbox folder
2. Outbox
You can delete the entire messages in the outbox folder.
3. Erase all
To delete messages in the mobile phone and SIM card folder
The network determines whither this function is affective or not.
Press key to view details of the voice mail.
Press key to view the following option:
Call: Dialing the callback number or the voice mail number.
Erase: to erase the selected voice mail.
Press key to display the following option:
1. Auto save
Allows you select Auto save or no save option. If you select 'auto save' option, you can save
2.2.7 Voice Mail
2.2.8 Settings
2.2.6 Erase Msgs
Inbox
30

the send message or un-send message at the memory space is not be full state.
2. Auto Delete
Allows you select On or Off option. If you select 'On' option, you can delete the send message
or un-send message at the memory space is be full state.
3. Call back
You can press dial key to call back directly.
4. Send Time
In accordance with different requirements to set times format, you can set the length the
messages try out to send: you can choose immediate, after 3 days, after 2 days, after 1 day,
after 12 hours, after 2 hours, after 1 hour, after 30 minutes. First the text sends to the message
center, the center will send the text to object terminal after the time is expiring.
Notice: the network determines whither this function is affective or not.
5. Validity
In accordance with different requirements to set times format, you can set the length the
messages try out to send: immediate, after 3 days, after 2 days, after 1 day, after 12 hours,
after 2 hours, after 1 hour, after 30 minutes. The message center will be try to send the text to
object terminal, when the send time for a long time the operation may be failure.
Notice: the network determines whither this function is affective or not.
31

6. Priority
With the function allow you to select general or emergency.
7. Voice Mailbox
Select menu Voice Mailbox #
Enter Voice mailbox number, then press Save key.
8. Broadcast
1.Select menu Broadcast Service
2.Select On/Off to enable/disable broadcast message service.
9. Delivery reports
Allow you select turn on or off.
You can choose on or off to set the status of message you sent, if you select turn on, the
information that you have successfully sent the message is displayed through network.
Notice: the network determines whither this function is affective or not.
Store the Multimedia files Ringtone.
2.2.9 Multimedia Box
32

With the function, you can view the current missed calls (no more than 30 messages). You can
save and view this saved number and also to send the message and dialing to the selected
number.
Please refer to the submenu of the recent calls.
This function allows you to preview the 30 most recent received numbers, you can save and
view this saved number and also to send the message and dialing to the selected number.
Please refer to the submenu of the recent calls.
This function allows you to preview the 30 most recent dialed numbers, you can save and view
this saved number and also to send the message and dialing to the selected number.
Please refer to the submenu of the recent calls.
2.3 Call Logs
2.3.1 Missed
2.3.2 Received Call
2.3.3 Dialled Call
33

The recent calls submenu
Details: You can save the number to the phone or view the details of the phone number.
Send message: you can send a message to the phone number.
Call: call this number.
Erase: erase the selected text.
Erase All: erase all the text.
With the function you can erase all the recorded in the missed calls, incoming calls and outgoing
calls option.
Allows you view the latest call time and to view total time of all the dialed outgoing calls and the
incoming calls. Allow you clear the call-timer.
1. Last
Your phone displays the last call times. Display the time used by the last call.
2. Incoming
2.3.4 Erase Lists
2.3.5 Call Timers
34

Display the time used by the last call.
3. Outgoing
Display total time used by all outgoing calls since the timer was reset.
4. Reset Timer
This function clears all call history and resets the history timers
5. Total Airtime
35

Phone tools menu includes schedule, alarm clock, calculator,tip calculator.
You can use schedule to associate an alert with an event.
The Time entry in 12 hour format only.
1.select Tools from main menu
2.select Schedule
3.select add new
4.edit the date, then press OK to save.
5.add the description, then press Ok
6.set the time, then press Ok
1.select Tools in main menu
2.select Schedule
3.select List All
4.select the item you want to delete
5.Select Erase in options
2.4 Tools
2.4.1 Schedule
To add a schedule
To delete the schedule
36

37
1.select Tools in main menu
2.select Alarm Clock
3.press the option
4. select set in Option
5.set alarm time, then press Done
1.select Tools in main menu
2.select Alarm Clock
3.press the option
4.select Enble or Disable in Option
1.select Tools in main menu
2.Select Calculator .
3.Enter the number.
4.Select option to select an operator.
2.4.2 Alarm Clock
2.4.3 Calculator
To set the alarm time
To turn on/off the alarm
Calculate

38
5.Enter another number.
6.Select the option item.
7.Select = operator to get the result.
1.select Tools in main menu
2.Select Tip Calculator , and enter bill amount.
3.Select the 'Next'.
4.select Rate
5.Press left soft key, and get the result.
6.select Option soft key.
7.select Split option to split the payment.
1. select Start ,start to count the time in second.
2. select Stop , stop to count the time.
3. select Split , count every period of time.
4. select Restart , go on counting the time.
5. select Reset , reset the time.
2.4.4 Tip Calculator
2.4.5 Stop Watch
To calculate a tip

2.5 Settings
To personalize your phone, you can select ring tones, volumes, alerts,
phone information, network service.
Can select different ring tones, can set ring tones for calls with or without caller id, restricted
calls.
1.Select Settings in main menu
2.Select Ringer of Call or SMS Ringer
3.Select one; press the select soft key to save.
1.Select Call mode menu item.
2.Select a call mode and select select soft key to save.
1.Select Message Prompt Mode menu item.
2.Select a message prompt mode and select select soft key to save.
Change volume of ringer, key beep and speaker
display, call setup,
password,
.
2.5.1 Ringers
2.5.2 Profiles
4
Call Prompt mode
Message Prompt Mode
Volume
39

the Ringer volume
the Key Beep
the Speaker volume
the Key Tone
Alerts
1.Select Volume menu item.
2.Select Ringer menu item.
3.Select one level from High , High Med , Med , Med Low , Low . then select
ok to save.
1.Select Volume menu item.
2.Select Key Beep menu item.
3.Select one level from med , med low , low , off , and then select ok to save.
1.Select Volume menu item.
2.Select Speaker menu item.
3.Select one level from High , High Med , Med , Med Low , Low . then select
ok to save.
1.Select Key Tone menu item.
2.Select an option and select ok to save.
You can set alerts for service change, minute beep, call connect on/off.
Minute beep is a beep when your call near to minutes.
40

Setting alert for Service Change
Minute Beep
Call Connect
Call End
When the alert for Service Change is enabled, it means that every time your phone loses
service, or changes from its carrier to a different carrier, an alert will be sound.
1.Select Alerts menu item.
2.Select Service Change menu item.
3.Select On to enable service change alert.
When the alert for Minute Beep is enabled, during a phone call, as your connection nears a
minute, an alert will sound 10 seconds before every minute. This is to help the user know how
many minutes have gone by while they are talking (if conversation is short.)
1.Select Alerts menu item.
2.Select Minute Beep menu item.
3.Select On to enable Minute Beep alert.
When the alert for Call Connect is enabled, when a user has successfully connected when
making a phone call, an alert will sound.
1.Select Alerts menu item.
2.Select Call Connect menu item.
3.Select On to enable Call Connect alert.
41

When an alert for Call End is enabled, when a call is ended (either by the caller, or ithe call
is dropped), an alert will sound.
1.Select Alerts menu item.
2.Select Call End menu item.
3.Select On to enable Dropped Call alert.
When the alert for Fail on Outgoing is enabled, the alert is made when a call is unable to
connect.
1.Select Alerts menu item.
2.Select Fail on Outgoing menu item.
3.Select On to enable Fail on Outgoing alert.
1.Select Alerts menu item.
2.Select Charger Beep menu item.
3.Select on or off to turn on / off the charge beep
1.Select Alerts menu item.
2.Select Power Tone menu item.
3.Select On to enable Power Tone alert.
Fail on Outgoing
Charger Beep
Power Tone
42

2.5.3 Display
2.5.4 Security
Creating a display banner
Setting backlight
Setting the display language
Customizing your display by creating a banner, adjusting the backlight, selecting the language
for display text, etc.
1.Select Display menu item.
2.Select Banner menu item.
3.Editing the banner
4.Select OK to save banner.
Setting the timer for the backlight.
1.Select Display menu item.
2.Select Backlight menu item.
3.Select an option.
4.Select OK to save.
1.Select Language menu item.
2.Select a language and select OK to save.
Provide password protection for Reset to Default, Call Restriction.
43

Login Security
Changing lock code
Reset to default
Call Restriction
1 Auto answer
1.Select Security menu item.
2.Enter the password, and the default password is 0000 .
1.Select Change code menu item.
2.Input new password.
3.Confirm password
1.Select Reset to Default menu item.
2.Select Yes soft key to reset to default.
Call restriction provide methods for the user to restrict the operations of originating outgoing
calls, accepting incoming calls or viewing phone book.
.
Close: Close the auto answer function.
After 3 seconds: the calling will auto answer when the incoming call display after 3 seconds.
2.5.5 Call Setup
44

2 Voice privacy
3. Auto Redial
4.Answer Call
.
The function allows you set the voice privacy mode in enhanced.
1.Select Call Setup menu item.
2.Select Auto Redial menu item.
3.Select an option, and then save or back.
1.Select Call Setup menu item.
2.Select Answer Call l menu item.
3.Select an option, and then save or back.
Allows you search software version of the mobile phone when the software be upgraded.
2.5.6 Phone Info
2.5.7 Key guard
Enable user to lock the keypad during phone's idle status.
1.Select Key guard menu item.
2.Select Off to disable key guard. Or select Customize to enable key guard.
45
46
1.Select Network Service menu item.
2.Select Divert Call menu item.
3.Select a option then press select soft key.
1.Select Network Service menu item.
2.Select Call Waiting menu item.
3.Select Disable or Enable .
2.5.8 Network Service
1.Divert Call
2.Call Waiting
2.6 Amusement
2.6.1 Kong Ming
If you have saved the former game record, you can choose start game or resume game, or select
game to start it again.
1. Start Game
2. Resume Game
3. Select Games
4. Instructions
Using up (2), down (4), left (4), right (6), those four keys to move the red square to select the
chess. If the A chessman jumps over the B chessman, the former chess eats over the latter one.
Only chess can jump in one process. At last only chess left on the chessboard is winning.
47

This function is a kind of network value added service of CDMA. Press enter key to come into the
sub-menu of this function under the alert condition.
Only your R-UIM card supports this kind of function, you can use it. Different UIM cards are vary
in menu name and content.
2.7 TATA Zone
48

3.Input method
This mobile phone used the eZi input method. When using your mobile phone there will be many
times that you will need to input text e.g.sending messages ,entering names into the Phonebook ,
editing the greetings message ,editing Browser settings ,etc.
There are 5 input methods:
1.Number(123):To provide input number.
2.Character(abc): To provid input character with lowercase , Press the demanded number key ,
one times press to input a character , twice press quickly to display the second character , by
analogy to finished the text.
3.Character(ABC): To provid input character with uppercase , Press the demanded number key ,
one times press to input a character , twice press quickly to display the second character , by
analogy to finished the text.
4.en: Allows you use eZi English input method.
5.En: Allows you use eZi English input method, and the first character of every word is capital.
will display at the last line on screen.
Note: If you press the key , you find nothing but a > display at last line on screen .Don,t worry
about this , it ,s just a page down mark . When you press the down key , the input character
49

Your mobile is in fine designing and elaborate manufacture. Please use your phone carefully
and maintain it. The following suggestions can help you extend the useful life of your phone:
Put your phone and the fittings in the place where children cannot reach.
Keep your phone dry. Mineral substance contained in rain, moisture and liquid will erode
the electric circuit of your phone.
Do not put your phone at dirty, disordered and dusty place.
Do not use or store your phone in high temperature place. High temperature will shorten
the life of electronic components, damage the phone and distort or dissolve the plastic
parts of the phone.
Do not use or store your phone in low temperature place. When it comes back to normal
temperature, the moisture will coagulate in the phone and cause the damages of circuit
board.
Do not open your phone by yourself, as non-professional disposal may damage the phone.
Please avoid throwing; knocking and shaking your phone, improper external force may
result in the damage of inner circuit.
Do not use chemical solvents or detergent to clean your phone. Please use cotton material
4. Maintenances and repairs
50

with water or soap water to clean the outer shell of mobile phone.
Please use or purchase Haier fittings.
Please contact professional maintenance personnel to repair your phone if your phone and
its fittings are in trouble.
Use the batteries and fittings manufactured by Haier Company. The use of other fittings may
cause dangerous accidents and make all guarantees null and void.
Haier phone can use the following fittings:
If you connect the earphone with the phone:
To activate earphone mode.
To match the volume of earphone with that of mobile phone.
Increase or decrease the volume through up and down side key during call.
If you plug out the earphone from the phone, the phone will return to normal mode automatically.
Insert charger, the background light is on and send out prompting sound. The phone enters into
charging mode automatically.
Plug out the charger, the background light is on and the phone returns to normal mode
Earphones (nonstandard collocation)
Charger:
51

automatically.
You can charger a battery both in on/off mode.
Connect the power source with one side of the original traveling charger. Inserting it into span
of table mode charger that it connects with the plug of mobile phone, the green light of the
indicator light is on; put battery into table mode charger, the red light of indicator light is on, it is
charging normal; after definite time the green light is on show the battery completely.
Table mode charger:
Batteries
* Use the batteries specified by the manufactures. The standard collocation of the phone is
600mAh lithium-polymer battery whose waiting time is 70-90 hrs and call time is 160-180 hrs,
The 880mAh lithium-polymer battery whose waiting time is 120-140 hrs and call time is 190-210
hrs (waiting time and call time will vary wit h t h e ne t wo rk e n vi r on me nt s ). T h e us e o f oth e r
chargers may cause dangerous accidents and make all guarantees null and void. You will mobile
phone responsible for maintain when damages are induce by applying other batteries specified
by the manufactures to the mobile phone.
* Do not allow metal objects (such as keys in your pocket) to short circuit the battery contacts.
* Do not deform or open the battery.
* Avoid exposure to moisture or fire.
52

5. Trouble shooting
If there are troubles when using your phone, please refer to the following table. If there are still questions,
please dial Haier service telephone to solve.
Abnormal
circumstance Trouble reasons Means of settlement
Bad signals or
drop the line
1.Using mobile phone in bad signal area,
such as near the high building or in the
basement.
2. In call rush hour. The line is stuffed so
you cannot make a call.
3. keep away from base station of network
operator.
4.Electromagnetic interference source
nearby
Please move near the window if you
are in a building, and move to a wild
place if the signal is weak.
Try to avoid
Ask network operator supply service
Map.
Try to avoid using your phone here
Echo or noise
Waiting time
becomes short.
1. Imperfect function line of network operator.
2. Imperfect local line in some calling areas.
Hang up and redial.
1. Waiting time and network's operator system
is connected. The same mobile phone is used
in different networks.
2. The user's moving make the frequent
switchover between areas.
Power off in week signal place.
Make a call at a fixed place as possible
as you can.
53