Haier Telecom 0512D1200 CDMA2000 1X Mobile Phone User Manual User s Guide
Haier Telecom (Qingdao) Co., Ltd. CDMA2000 1X Mobile Phone User s Guide
Users Manual
D1200 User's Guide
Congratulations on purchase of Haier mobile phone, which is a combination of the essence of
high technology, stylish designs and functions which are practical for daily use such as alarm
clock, calculator, scheduler and more. Before the use of your Haier mobile phone, please read this
user's/operation guide for efficient use of the Handset.
Haier Telecom Company reserve all the rights to interpret typing errors in
this guide, inconsistency with the latest materials and upgrading of software's and make changes at
any time. Such changes will directly be
edited into the new edition of user's guide without further notice. This user's
guide is edited and printed by Haier Group Company.
All rights reserved
Notes
Important Notes 1
FCC SAR 2
Ⅰ Phone at a glance 9
1.1 Keypad 10
1.2 Screen Indicators and Icons 11
1.3 Install Battery and UIM Card 12
1.4 Charge Battery 13
1.5 Switch On / Off 14
1.6 Dial a Number 15
1.7 During a Phone Call 15
Ⅱ. Menu Overview 16
1. Names 16
1.1 List Contacts 17
1.2 Add New .17
1.3 Find Name 18
1.4 Multicopy 18
1.5 Groups 18
1.6 Erase All Contacts 19
1.7 Speed Dial List 19
1.8 Memory Status 19
1.9My Number 19
2. Messages 19
2.1 Write Message 19
2.2 Inbox 21
2.3 Outbox 21
2.4 Phone Box 22
2.5 Templates 22
2.6 MSG Settings 22
2.7 Erase Messages 23
2.8 Memory Status 23
2.9 Voice Mail 23
3. Call History 24
3.1 Missed Calls 24
3.2 Received Calls 24
3.3 Dialled Calls 24
3.4 Erase Lists 24
3.5 Call Timers 24
4. Profiles 25.
4.1 Normal 25
4.2 Silent 25
4.3 Outdoor 25
4.4 Car 26
4.5 Meeting 26
5. Settings 27
5.1 Display 27
5.2 Security 27
5.3 Phone Info 28
6. Call Setup 28
6.1 Answer Call 28
6.2 Auto Answer 28
6.3 Call Waiting 28
6.4 Call Forwarding 28
6.5 Voice Privacy. 28
7. Tools 30
7.1 Schedule. 29
7.2 To Do List 29
7.3 Alarm Clock 29
7.4 Voice Memo 29
7.5 Calculator 30
7.6 World Clock 31
7.7 Stop Watch 32
7.8 Game. 32
8. Haier Feature 32
8.1 Lock Code Menu Items 32
8.2 Incoming Call Guard33
9. Fun & Utilities 33
9.1 TATA Zone 33
9.2 SMS Services 34
10. My Media 34
Ⅲ Input Method 34
Ⅳ Care and Maintenances 35
Ⅴ Trouble shooting 38
VI ACCESSORIES 39
Important notes
Please follow the following rules before you use the phone. Otherwise, it may result in dangers or
make you violate laws.
Follow traffic regulations
Do not use the mobile phone without hand-free settings while driving. Please stop your car before
you want to use your phone.
Switch off your phone at filling stations
Do not use your phone at filling stations or the areas with inflammables and explosive products or
chemicals.
Switch off your phone on the plane
Mobile phones will cause interference. Using mobile phones on the plane is both a danger and a
violation of laws.
Switch off your phone in the hospital
Switch off your phone when you are close to medical equipments and follow all the existing
provisions.
Special provisions
Follow the special rules of relative places. Please switch off your phone where the use of mobile
phones is forbidden or may cause interference or dangers (for example, in the hospital).
Careful Use
Use your phone normally (near your ears). Do not touch the wire without reason after switching
off your phone.
Emergency Calls
You can dial emergency calls anytime, even the PIN/PUK locked, no UIM card or the phone
locked. Input local emergency number and press send key. The Emergency call number are
100/101/102.
SAR INFORMATION
The SAR limit of USA (FCC) is 1.6 W/kg averaged over one gram of tissue. Device types D1200
(FCC ID: SG70512D1200) has also been tested against this SAR limit. The highest SAR value
reported under this standard during product certification for use at the ear is 1.453 W/kg and when
properly worn on the body is 0.254 W/kg. This device was tested for typical body-worn operations
with the back of the handset kept 1.5cm from the body. To maintain compliance with FCC RF
exposure requirements, use accessories that maintain a 1.5cm separation distance between the
user's body and the back of the handset. The use of beltclips, holsters and similar accessories
should not contain metallic components in its assembly. The use of accessories that do not satisfy
these requirements may not comply with FCC RF exposure requirements, and should be avoided.
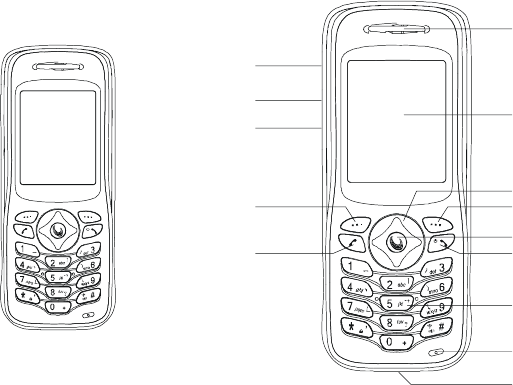
Front Open View
Front close picture
speaker
display
right selection keyleft selection key
fourways navigation key
power / end keycall key
keypad
charging port
microphone
1.1 Keypad
Power /hang up key
The red key on top right corner of the keypad is power key. Press and hold the key can switch
on/off the mobile phone. Pressing the key can end a call during a phone call or reject to answer a
phone call. Pressing the key in the menu can also return to the idle mode.
Send key
The green key on top left corner of the keypad is send key. You can dial or answer a call with the
key.
Left/ right Soft key
Left/right soft keys are used to carry out the corresponding operation of last line on display screen,
in accordance with the procedure are adopted to acquire different functions.
Four ways navigation key
The navigation keys can control the cursor directions.
In idle mode:
Up key: Press this key, you can entry the Recent Calls list.
Left key: Press the key to active the Contacts list.
Right key: Press the key to entry the Message menu directly.
Down key: Press the key to enter the Profiles directly.
W@P key
Pressing the key in idle mode can e
Nter WAP menu. Almost time pressing the key in menu mode can confirm the selected option or
enter the next menu.
Pressing the key in idle mode can enter menu option directly.
Number key
Pressing these key can input numbers(idle mode) or some characters(text editing mode).
# key:
In idle mode ,"#" key can use to switching from meeting mode to normal mode.
Volume side key
You can adjust microphone's volume using side keys directly during a call. You can adjust key
tone volume in idle mode.
Recording Key:
If User press recording key during the call, Voice get recorded and complete after the call ends.
To retrieve the Recording, click Tools→Voice Memo.
1.2 Idle mode screen
Depending on your wireless service provider, some or all of the following indicators and icons
may appear on the standby mode.
When the phone is powered on, the following icons may display:
Explanations of icons
Battery level Indicator for
Navigation of bars from right to left display the charging of the battery.
If charging bars stop navigating or display show "Charge Complete" means battery is charged
fully.
Message
The icon is displayed when a new message arrives. The icon disappears when you read all the
unread messages.
Alarm clock
That indicates function that the alarm clock has been activated.
Network
Composed of two parts. The left part indicates that the mobile phone is duly registered to a
network. The right part shows the signal strength.
1.3 Install battery and UIM card
Install the battery
Push the top part of the battery to the phone and press down the lock until it is locked.
Take out the battery
Switch off the phone, push up the lock at the bottom of the battery to uplift the top of the battery
and separate with the main board.
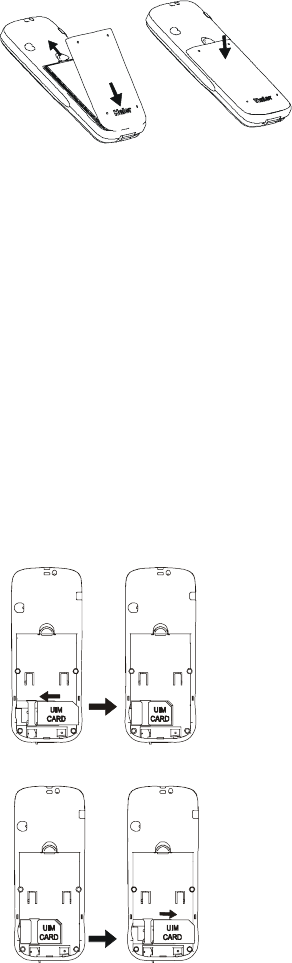
Install UIM card
Purchase a UIM card from network operator. Your phone number and registration information are
stored in your UIM card. Your UIM card can be used in any a CDMA phone. Your number and
information will not change.
﹡Make sure to switch off your phone before take out the battery.
﹡Make the metal face of the UIM card down and put it conferring the bevel of the card.
﹡Cover the sheet metal used for fixing and install the battery.
Remove UIM card
﹡Remove the battery after switch off your phone.
﹡install the battery.
Installing the UIM card
Take out the UIM card
1.4 Charge battery
1.Plug the charger transformer into a standard ac outlet.
2.Insert the charger output plug into the round jack at the bottom end of the phone. After few
seconds battery indicators moves from left to right.
Note:
●If battery i s low phone Display warming "battery is low".
● If battery charged complete phone display message "harging Complete" also movement of
Battery indicator stop.
1. Press and hold the buttons of both sides of the charger after the charging to plug out the charger.
2. We suggest you to charge the battery fully when you use the phone for the first time. It takes
about 3 hours for full charging.
3. Do not pull out the plug of the charger duri-ng the charging to avoid harming of the phone and
charger.
1.5 Switch on/off
Pressing and holding can switch on/off the phone.
If you have set PIN code, please enter PIN when switch on your phone.
Input PIN code
You can set protection code (PIN CODE) in order to prevent random using of your phone by
others. Each time you restart your phone, the phone will ask you to input PIN code after setting.
﹡Input PIN code (supplied by network oper-ator which can be revised. In order to keep it in
security, ﹡ will be shown on the screen to replace the number you input.)
﹡Press OK, and after a short time, your mo-bile phone will confirm its correctness and begin to
register on the network. Once the network name is shown on the screen, you can dial or answer a
call. If no network name is shown on the screen, you need to register again.
Note:
●To enter the security menu Default PIN is 0000 (Four times zero).
●To Enabled / Disable PIN Default PIN is 1234.
Input wrong PIN code
If you make a wrong input, you can press rig-ht soft key to reenter numbers. Three conti-nuous
wrong inputs of PIN code will lock the UIM card. In this condition phone ask for PUK (PIN
Unlocking key) . User can get PUK from service provider customer care.
1.6 Dial a number
﹡you can only use the function only after the network name is shown on the screen.
﹡input district code and telephone number or mobile phone number, press to dial.
End a call
Pressing can end a call.
Redial a number
You can press twice to redial the number you dial last time.
The mobile phone can store 30 latest call lo-gs (incomings or outgoings). In order to red-ial one of
the numbers, you can do as the followings:
1 if characters are shown on the screen pres-ses to return to the idle mode.
2 press to display the latest call list.
3 press up/down keys of navigation key to view the telephone numbers and display the needed
names and numbers.
4 press to dial the displayed numbers.
Make an international calls
﹡Press and hold "0" key until "+" appeared
on screen or input two zero (00).
﹡Enter the country code , area code (without prefix zero) and phone number.
﹡press to dial
1.7 During a phone call
After pressing key user can view following contents given below:
Contact
Messages
Mute
Start Recording
Ⅱ Menu Overview
Operator authorized UIM card can be used in the handset for accessing menu detailed below. If
UIM card not inserted user can make SOS (emergency) calls.
Note: you can also directly press 1 to 9 to select a menu in the main menu.
1. Names
Allows you to store the often-used numbers into UIM card or the mobile phone and at the same
time supply you with search, add group, store, and erase and memory capacity.
1. Press and hold the buttons of both sides of the charger after the charging to plug out the charger.
2. We suggest you to charge the battery fully when you use the phone for the first time. It takes
about 3 hours for full charging.
3. Do not pull out the plug of the charger duri-ng the charging to avoid harming of the phone and
charger.
1.5 Switch on/off
Pressing and holding can switch on/off the phone.
If you have set PIN code, please enter PIN when switch on your phone.
Input PIN code
You can set protection code (PIN CODE) in order to prevent random using of your phone by
others. Each time you restart your phone, the phone will ask you to input PIN code after setting.
﹡Input PIN code (supplied by network oper-ator which can be revised. In order to keep it in
security, ﹡ will be shown on the screen to replace the number you input.)
﹡Press OK, and after a short time, your mo-bile phone will confirm its correctness and begin to
register on the network. Once the network name is shown on the screen, you can dial or answer a
call. If no network name is shown on the screen, you need to register again.
Note:
●To enter the security menu Default PIN is 0000 (Four times zero).
●To Enabled / Disable PIN Default PIN is 1234.
Input wrong PIN code
If you make a wrong input, you can press rig-ht soft key to reenter numbers. Three conti-nuous
wrong inputs of PIN code will lock the UIM card. In this condition phone ask for PUK (PIN
Unlocking key) . User can get PUK from service provider customer care.

1.6 Dial a number
﹡you can only use the function only after the network name is shown on the screen.
﹡input district code and telephone number or mobile phone number, press to dial.
End a call
Pressing can end a call.
Redial a number
You can press twice to redial the number you dial last time.
The mobile phone can store 30 latest call lo-gs (incomings or outgoings). In order to red-ial one of
the numbers, you can do as the followings:
1 if characters are shown on the screen pres-ses to return to the idle mode.
2 press to display the latest call list.
3 press up/down keys of navigation key to view the telephone numbers and display the needed
names and numbers.
4 press to dial the displayed numbers.
Make an international calls
﹡Press and hold "0" key until "+" appeared
on screen or input two zero (00).
﹡Enter the country code , area code (without prefix zero) and phone number.
﹡press to dial
1.7 During a phone call
After pressing key user can view following contents given below:
Contact
Messages
Mute
Start Recording
Ⅱ Menu Overview
Operator authorized UIM card can be used in the handset for accessing menu detailed below. If
UIM card not inserted user can make SOS (emergency) calls.
Note: you can also directly press 1 to 9 to select a menu in the main menu.
1. Names
Allows you to store the often-used numbers into UIM card or the mobile phone and at the same
time supply you with search, add group, store, and erase and memory capacity.
1 List Contacts You can revise, copy, erase, sent message and voice dialing for
recorded..
2 Add New Add a new name to the Contacts List.
3 Find Name To search according to name.

4 Multi-Copy Allows you to copy items in the mobile phone to UIM card or to
mobile phone memory.
5 Groups To set names in different groups.
6 Erase all contacts Allows you to erase all items in mobile phone and UIM card
memory.
7 Speed Dial Your mobile phone can store the most 98 items in its memory for
easy/quick dial.
8 Memory Status Allows you inquire the capacity of UIM card and phonebook,
including used number and total capacity.
9 My Number This service allows you to set and view the UIM number.
1.1 List Contacts
You can use this function to search records to dial directly, and to execute erase, copy, IP dial,
send message, edit and erase operation.
Press key to enter View all function. If you need to browse phonebook information,
input the alignment characters (e.g. a, b), your mobile phone will attempt to match the characters
with names in your Phonebook.
If you search the stored phone numbers, preferred number display in the screen and you can press
key to call this number.
When viewing all submenus, press key (Option) to access the following functions:
Details: You can search details of the select-ed list, such as name, number and remark information
(e-mail or fax information). (If the phone number too long, it will be displayed completely)
Edit: allows you edit the selected option name, number, group, security and remark messages (e.g.
email or fax).
Erase: you can erase selected item.
Copy: you can copy all UIM card memory entries to phone memory and vice versa.
When viewing details of submenus, to access the following functions:
Send message: allows you send message to selected number.
Change: You can edit the saved number.
Erase: You can erase the desired entries.
1.2 Add New
With the Add New function, you can add phone number, email address, street address, URL and
Note.
Phone memory capacity is 200 including 5 items mentioned above.
UIM card memory dependent on the network service providers.
Press key (select) enter the add function.
There are one name, five numbers, two addresses of email and streets, two addresses of email
and streets, two URL's and one Note in your phone. There are including one name and a number
in UIM card.
Note: press # key to change input methods during input name.
1.3 Find Name
1. Input the name or the first character required.
2. According to the requirement press up/-down key to search the needed calls.
Names→ Find Name→ Enter initial alphabets→OK
1.4. Multi-copy
With the copy function, allows you copy ite-ms in the mobile phone entries in UIM card memory
to phone memory and vice versa.
All Copy: you can copy all of the UIM card memory entries to phone memory and vice versa.
Choice Copy: You can select one or more of the recorded list to copy it.
Names→ Multicopy→ AllCopy/Choice Copy→ Copy UIM to Phone/Copy→ Phone to UIM→
Select→ Yes /N o .
1.5 Groups
There are six groups, including two group 1, 2 can be renamed by user, Press 'option ' key you
may enter the following menus:
View groups: allows you search the needed numbers or other information in the group, press
key to manage your groups after searching.
Change group name: You can change a gro-up name into a found name.
Group ringers: To customize specific ringers for Incoming Calls.
You can allocate numbers to specific groups for your phone conserved. But you don't allocate
numbers for the UIM card recorded.
If there are few same name of the recorded in your phone, and allocate either of the groups, the
group information may be losing efficacy during incoming call. You can use two ways to prevent
it:
1. Erase the same number thereof haven't allocated group.
2. You can use the same number to record the same groups.
1.6 Erase all contacts
This feature allows a complete erase of all contacts either in UIM card memory or Phone memory;
the information thus deleted is un-recoverable.
Names→Erase All→ UIM Contacts/Phone Contacts→ Ok
1.7 Speed Dial
Your mobile phone has 99 speed dial entries in which 4 speed dial entries are by default other 95
speed dial entries can be set by user.
How to Save Number in Speed Dial?
Names→ Speed Dial→ Option→ Set Number→ OK
How to Dial Speed Dial Numbers?
*Speed Dial Keys from 1 to 9→ Press and Hold the Key , automatically dial the number.
*Speed Dial keys from 10 to 99→ Type the Numbers along with # key and press dial key. (E.g.
Speed dial 11th entry. Type 11# and press dial key.)
Default Speed Dial Number:
1# 1500-Voice Mail;
2# 1590-Fundoo Calling;
3# 121-Customer Care.
1.8 Memory status
Allows you inquire the status of the UI-M card and phonebook, including used number and total
memories.
1.9 My number
You can save his mobile number in my number menu.
2. Message
You can send, receive and save the message by using message menu.
2.1 Write Message
Allow user to edit text message. When composing text messages, check the number of characters
allowed in the top right corner of the message.
Note: Message length is 160 characters, if text entering limit cross 160 characters phone prompt
pop-up --Text is Full.
Press key for following actions detailed below:
2.1.1 Send
After writing the Message→ Option→ send→ Number, enter the recipient's number or retrieve a
number from the phone book.
2.1.2 Templates
You can insert templates when composing an SMS message.
Messages→Templates→Option→Add new/Send→Insert Recipient's number→OK.
Press key to select the quick text you needed.
Press key insert this quick text into the send message text interface.
2.1.3 Sent to many
User can send single message to all user saved in the Phone Book memory.
Message→Write Message→Send to many→Ok→option→Select/Select All/Cancel All (Select
any of the option)→option→Send.
2.1.4 Save
You can save the contents of edited to outbox Message→Write message→Option→Save.
2.2 Inbox
2.2.1 Inbox
When you receive a new message, message icon will prompt on the LCD right Corner.
If you can receive a message while on conversation, you can hear a beep on arrival of new
message.
During Urgent message UI display "you have 1 New Message (urgent)!"
While you view the message press to enter the following options:
Reply:
You can reply to the sender after opening the received message.
Message→Inbox→Select Received message then press OK→Option→Reply→OK
Forward:
You can forward the received message to desired number.
Message→Inbox→Select Received message then press OK→Option→Forward→OK
Copy:
You can save the received message in phone box.
Message→Inbox→Select Received message then press OK→Option→Copy→OK
Lock/Unlock:
You can lock and unlock the message. When you select "erase all message" menu in UIM or
Phone, this message won't be erased. If you want to erase the message, you need to unlock the
message.
Message→Inbox→Select Received message then press OK→Option→Lock/UnLock→OK
Save address:
You can save the Numbers available in the received message.
Message→Inbox→Select Received Message then press OK→Option→Save Address OK (Select
any of the available numbers)→OK.
Erase:
You can erase the selected message.
Message then press OK→Option→Erase→OK
Connect to URL:
If there is any url in the sms, you can get to the accordance WAP site with this function.
Note: currently D1200 only can recognize "Http://" format url address.
Message then press OK→Option→Connect to URL→OK
2.3 Outbox
In Outbox menu user can store the saved messages.
After opening the Outbox message user can forward, Copy, Lock/unlock, erase, connect URL. For
operation please refer menu 2.2
2.4 Phone Box
All received, sent, saved, messages stored in Phone Box , If Storage device is selected as Phone
and UIM or Phone. After opening the Phone box message user can forward, Copy, Lock/unlock,
erase, connect URL. For operation please refer menu 2.2
2.5 Templates
Phone having 12 default Templates. User can also compose more the 20 templates (Depends on
Messages memory status).
Message→Templates→Send→type recipients phone number or search from phone book→ OK.
Message→Templates→Add New→OK.
Note: Composed templates can edited and erased by user.
2.6 MSG settings
You can change the message settings in this menu.
2.6.1 Auto save
Allows you select Auto save or no save option. If you select 'auto save' option, if memory is not
full user and save the sent and unsent messages.
Message→Msg Settings→Auto Save→Auto Save/Do not Save→OK.
2.6.2 Priority
With the function allow you to select Normal or emergency.
Message→Msg Settings→Priority→Normal/Urgent→OK.
2.6.3 Delivery Reports
Allow you select turn on or off., You can choose on or off to set the status of message you sent, if
you select turn on, the information that you have successfully sent the message is displayed
through network.
Notice: the network determines whither this function is affective or not.
Message→Msg Settings→Delivery Report→Normal/Urgent→OK.
2.6.4 Storage Device
You can select storage device in which the sms can be stored in UIM card or phone device.
Message→Msg Settings→Srorage Device→UIM/Phone/Phone and UIM→OK.
2.7 Erase message
By using erase menu user can erase the messages.
2.7.1 Inbox
Erase the entire messages in the inbox folder
Message→Erase Message→Inbox→OK.
2.7.2 Outbox
You can erase the entire messages in the out-box folder.
Message→Erase Message→Outbox→OK
2.7.3 Phone Box
You can erase the entire messages in the draft folder.
Message→Erase Message→PhoneBox→OK
2.7.4 Erase all
To delete messages in from phone memory and UIM card
Message→Erase Message→Erase All→OK
2.8 Memory Status
You can view SMS memory status as total memory , occupied memory, free memory.
Note: Phone total memory capacity→200 messages: UIM total memory capacity→10 Message→
Msg Setting→Memory Status
2.9 Voice mail
If you subscribe to voice mail, your service provider will furnish you with a voice mailbox number.
You need to save this number to your phone to use voice mail. When you receive a voice message,
your phone lets you know by beeping, displaying a message, or both. If you receive more than one
message, your phone shows the number of messages received.
Listen to received voicemail need to press and hold the key 1 (Default speed dial for Key 1 is
Voice mail).
3. Call History
Call register stores information about the last 30 missed, 30 received, and 30 dialled calls. It also
adds the total duration of all calls. When the number of calls exceed the maximum, the most recent
call replaces the oldest.
3.1 Missed Calls
You can view missed calls and also use options like save, send message etc.
Call History→Missed Calls→Details/Send message/Delete/Delete All→OK.
3.2 Received calls
You can view received calls and also use options like save, send message etc.
Call History→Received Calls→Details/Send message/Delete/Delete All→OK.
3.3 Dialled calls
You can view received calls and also use options like save, send message etc.
Call History→Dialled Calls→Details/Send message/Delete/Delete All→OK.
3.4 Erase Lists
You can erase the all Call history with this menu.
3.5 Call timers
Allows you view the latest call time and to view total call duration i.e. Dialled, received, missed.
Call history→Call Timer.
3.5.1 Last call
Phone display the time used by the last call.
Call history→Call Timer→Last Call
3.5.2 Received call
Phone display the time used by received call.
Call history→Call Timer→Call Received.
3.5.3 Dialled calls
Phone display the time used by dialed call.
Call history→Call Timer→Dialled Call
3.5.4 Total call duration
Phone display the total duration used by all call.
Call history→Call Timer→Total Call Duration.
3.5.5 Timer Reset
You can reset the all calls timer to zero.
Call history→Call Timer→Timer Reset→Reset.
4 Profiles
The profiles function provides a quick and convenient way to reset your mobile phone setting for a
particular environment (e.g. to set your mobile to not ring when you are in a meeting, or increase
the volume of the ringtone when outside or driving). Each pro-files has a factory default, however
you can adjust each profile to suit your requirements.
Note: Quick switch to the profile mode , user need to press down navigation key. Or Profile→
Normal/Silent/Outdoor/Car/Meeting Select/Edit Profile.
The profiles available are:
4.1 Normal
Select profile: you can the profile to available are normal.
Edit profile: in according to the ambient envir-onment, you can personal setting the profile mode.
4.2 Silent
Select profile: if you locate the needing quiet environment, you can active the silent option of the
profile.
Edit profile: in according to the quiet enviro-nment, you can personal setting the profile mode.
4.3 Outdoor
Select profile: if you are away from home, ac-tive t to available outdoor mode
Edit profile: you can create the personal set-ting under outdoor menu. Volume of the default
setting is the maximum ring volume.
4.4 Car
Select profile: if you are driving, you can set to the car mode immediately.
Edit profile: in according to the outside environment, you can personal setting the profile mode.
4.5 Meeting
Select profile: if you hold a meeting, you can set to a meeting mode of the profile.
Edit profile: in according to the meeting environment, you can personal setting the profile mode.
The default setting is the vibrate mode.
Personal setting as following:
Call mode
The incoming call ringer modes have: ringer, vibration, vibration then ring, simultaneous, and
silence mode.
Call ringer
Allows you set the incoming call ringer for no group's number. The ringer of the group's number
setting under the phonebook groups setting state.
Message Alerts
Allow you to setting the ringer format when a new sms incoming: ringer, vibration and silence.
SMS ringer
You can select different new SMS ringer for-mat.
Vo l u m e
Allow you to adjust the volume of the ringer, microphone, and key tone.
Key tone
Allow you to select the key tone mode: normal (the prolonged sound and the brevi sound are
fixed.), long (when you are pressing the key, the key tone is alerts until un-pressing).
Alerts
You can Change the status of alerts detailed Below:
Profile→Normal/Silent/Outdoor/Car/
Meeting→Edit
Profile→Alerts→Service Change/Minute
Beep/Call Connect/Dropped Call/Fail on outgoing/power On/Off Tone/ Low Battery→On/Off→
OK.
Alert for Service Change
When the alert for Service Change is on, it means that every time your phone loses service, or
changes from its carrier to a different carrier, an alert will be sound.
Minute Beep
When the alert for Minute Beep is on, during a phone call, as your connection nears a minute, an
alert will sound 10 seconds before every minute. This is to help the user know How many minutes
have gone by while they are talking (if conversation is short.)
Call Connect
When the alert for Call Connect is enabled, when a user has successfully connected when making
a phone call, an alert will sound.
Dropped Call
When alert for dropped call is on. Phone sounds alert after dropped the call.
Fail on Outgoing
When alert for fail on outgoing is on. Phone sounds alert after failed on outgoing .
Power on/Off Tone
If Power on/off tone is on. Every time phone is switched on/off sounds alert.
Low battery
When alert for low battery is low. Phone sounds alert on low battery.
5. Settings
5.1 Display
5.1.1Banner: You can edit the banner in idle mode.
Settings→Display→banner (user can put banner of 14 words limit)→Ok
5.1.2 Backlight:
This function allows you to set up the timer and, as well as, adjust the backlight settings.
Settings→Back Light→Timer (7 sec, 15 sec, 30 Sec)/Brightness (25%,50%,75%,100%)→OK
5.1.3 Screens:
Allow you to select the wall-paper pictures.
Setting→Display→Screens→Wallpaper→OK.
5.1.4 Menu style:
You can select different style of the function.
Setting→Display→Menustyles (Default style,style1, style2)→OK
5.1.5 Theme colors:
Allow you to select key-pad background light color.
Setting→Display→Theme colours (Defalt, Green, Voilet, Orange, B&W)→OK.
5.1.6 Language:
Allows you set the displ-ayed languages.
Language→Settings→Display→Language→English→OK.
5.1.7 Contrast :
You can adjust LCD contrast from 0~9 level.
Setting→ Display→Contrast (0-9)→OK.
5.2 Security
Security menu protect your phone from unauthorized use.
Settings→Security→Enter Lock Code (preset code is 0000 )→Ok.
5.2.1 Lock phone
Phone lock code controls access to Menu inside the phone.
If user wants to access the phone menu need to enter the phone code (By Default is 0000 ).
Settings→Security→Lock Code (preset code is 0000 )→Lock Phone→OK (Unlock, Lock, On
Power on) select any of the option→OK.
5.2.2 Change code
User can change the Lock Code using change code menu.
Settings→Security→Lock Code (preset code is 0000 )→Change Code→Enter New Code→OK→
Confirm New Lock Code→OK.
5.2.3 Reset to default
Allows you restore your phone to the factory settings.
Settings→Security→Lock Code (preset code is 0000 )→Reset to Default→OK.
5.2.4 PIN management
You canlock/unlock the UIM using this menu.
Enable PIN:
If user enable the PIN and reboot the Phone will ask for PIN. By default the UIM PIN is 1234.
Settings→ Security→ Lock Code (preset code is 0000 )→PIN Management→Enable PIN→OK
→Enter PIN (by default 1234)→OK.
Note: if user enter wrong UIM PIN wrong 15 times, it block the UIM. In this condition phone will
ask PUK (PIN Unblocking Key) Number, which is available with the Service provider.
Disable PIN:
Settings→Security→Lock Code (preset code is 0000 )→PIN Management→Disable
PIN→OK→Enter PIN (by default 1234)→OK.
Change PIN:
User can change the UIM PIN if PIN is already enabled.
Settings→Security→Lock Code (preset code is 0000 )→PIN Management→Change
PIN→OK→Enter PIN (by default 0000)→Enter New PIN→Repeat new PIN→OK.
5.3 Phone info
You can view the software version numberby using this menu.
Settings→Phone Info→OK.
6 Call setup
The function supplies your calls settings.
Detailed below:
6.1 Answer call
6.1.1 Any key:
Any key answer allows you to answer an incoming call by briefly pressing any key except the
Power key, Volume key, and Recording key.
Call Setup→Answering Call→Any Key→OK.
6.1.2 Send only:
Enable answer call on pressing Send key, during incoming c a l l user can st a r t conversation by
pressing only send key.
6.2 Auto answer
If user got incoming call, that time call will connect automatically as per the setting explaine
below:
6.2.1 Off:
You can set answer mode in off condition.
Call Setup→Auto Answer→OFF→OK.
6.2.2 After 3 seconds:
This feature is work same as answering machine in fixed phones. User has to record message in
answering machine1,2,3. After 4 consecutive rings of incoming call phone will be connected to
answering machine.
Step 1→Tools→Voice Memo→Answering machine→Answering machine1,2,3 (Record voice in
one of the Answering machine , duration of recording is 30 seconds each)→Ok→Record→
Complete.
6.2.3 Answering Machine:
This feature is work same as same as answering machine in fixed phones. User has to record
message in answering machine1,2,3. After 4 consecutive rings of incoming call phone will be
connected to answering machine.
Step 1 →Tools→Voice Memo→Answering machine→Answering machine1,2,3 (Record
voice in one of the Answering machine ,duration of recording is 30 seconds each)→
OK→Record→Complete.
Step 2 →Call Setup →Auto Answer→Answering machine (None, Answering1,2,3,-
- Select answering machine in which user record voice)→OK.
6.3 Call waiting
If your wireless provider supports this feature, call waiting notifies of an incoming call even while
you are in a call. You can then accept, reject, or ignore the incoming call.
Call Setup→Call Waiting→Disable/Enable→OK.
During a call, press Call key to answer the waiting call. The first call is put on hold. Press the key
to end the active call.
6.4 Call forwarding
Call forwarding tells your network to redirect incoming calls to another number or to voice mail.
Call forwarding is a network service and may not work the same in all networks, so contact your
wireless provider for availability. Call forwarding to voice mail:
Call Setup→Call Forwarding→To Voicemail→All Call/When Busy/No reply(not reachable) to
select any of the condition→OK→Disable/Enable →OK.
Call forwarding to other numbers:
Call Setup →Call Forwarding →To other numbers →All Call/When Busy/No reply(not
reachable)to select any of the condition OK→Disable/Enable→Input the Number in which user
wants to forward the call→Call Setup→Call Forwarding→To Voicemail→All Call/When
Busy/No reply(not reachable)-to select any of the condition→OK→Disable/Enable→OK.
Call All:
Call Setup→Call Forwarding→Cancel All→OK.
6.5 Voice privacy
Voice privacy is a network service. If your wireless service provider supports this feature, the
voice privacy feature protects the privacy of your current phone conversation from other callers
placing phone calls on your same network. By default Voice privacy is set on Enhanced Mode.
Call Setup→Enhanced→OK.
7 Tools
7.1 Scheduler
This function only can be used when the phone's time has been set. When user entering the
schedule interfaces, a calendar will appear. The first row of the calendar shows the year and the
month; the second row of the calendar shows days from Sunday to Saturday in order. One black
square can be align over date for which user wants to set the schedule..
7.1.1 Add New
User can set date to the calendar. Inputting the information ( 36 English letters) to the phone and
then add alarm clock time and ring tone, at last press the entering key. Tools→Scheduler→Ok
→Set date on calenda→Option→Add New Type→Contents (36 character limit)→Ok→Set Alarm
time & Ringer→ OK.
7.1.2 List All
Entering the schedule, you can see all the records.(according to the time sequence) Press
key to select one record and then press Key to enter the menu item. Enter:
After pressing enter option user can view the scheduler details.
Tools→Scheduler→ Ok→Option→ List all→OK →Option →Enter →OK.
Erase:
User can delete the scheduler by using this option.
Tools→Schedule →Ok→Option→List all→OK →Option →Delete →OK.
7.1.3 Erase All
All Scheduler can be erased by using this Function.
Tools→Scheduler→Ok→Option→Erase All→OK.
7.2 To do list
Use the To-do list feature to keep track of your tasks. You can save a note for a task, select a
priority level for the note and mark it as done when you have completed it.
List:
Tools→To Do List→Ok→ Lists (To do, Done, All) choose any of the option →OK.
Add New:
Tools→To Do List→Add new→Ok→Type Details →Priority (high, normal, low)→Deadline
Save.
Batch Deletion:
Using this function All done, All expired , All , To do lists can be deleted.
Tools→To do list→Batch Deletion (All done, All expired , All ,) →Ok.
7.3 Alarm Clock
The alarm clock is based on the phone clock. It sounds an alert any time you specify and even
works if the phone is turned off. This function supports three alarm clocks and a quick speed
alarm clock. Entering the alarm clock setup, press key to choose between “turn on” and
“turn Off” . press right navigation key to edit the time, day, ringer. The quick alarm clock can set
different alarm Times “after 30 minutes” , “after one hour”, “after three hours” . The alarm cannot
be used when the mobile is power off.
Tools→Alarm Clock→Ok→Alarm1,2,3, Quick Alarm select any of the alarm→Set alarm on/off,
time, day, ringer,→OK.
7.4 Voice Memo
7.4.1 Memo List
This voice memo record function. Phone can save 10 voice memo recordings. Each record can last
30 seconds. If the record time is beyond 30 seconds, the record process will stop automatically.
Sub menu:
Play: Play memo that recorded under the idle mode condition; the play interface shows the
remaining time of the record.
View: View the information like date, memo length (in seconds) of recorded memo.
Add: When record a new memo, the interface shows the remaining time of the record.
Erase: Erase the selected memo.
Erase All: Erase all the memo that recorded under idle mode condition.
Tools Voice memo→memo list→Option (play, add, view, erase, erase all,) select any of the option
→OK.
7.4.2 Voice List
This function allows voice recording during call conversation. The mobile can save 10 records.
Each record can last 30 seconds at best. If the record time is beyond 30 seconds, the record
process will stop automatically.
Supportive operations:
Submenu:
Play:
Play Voice memo that recorded during call conversation; the play interface shows the remaining
time of the record.
View:
View the information like date, memo length (in seconds) of voice memo.
Erase:
Erase the selected voice Memo.
Erase All:
Erase all the voice memo that recorded under during call conversation.
Methods of recording during call:
1. While making a call, press the record key.
The interface of the mobile shows “recording” . Press the record key again to stop recording.
2. While user make a call press the left soft
key to select “starting record” on the submenu. Then begin recording new memo and the interface
shows “recording” . Meanwhile “recording” changed to “stop recording ”on the sub-menu,press
stop recording to stop this process.
3. Getting reply from the automatic record machine, the machine will record the message. The
length of the message should be controlled within 30 seconds. If the record time exceeds 30
seconds, the machine will stop automatically.
7.4.3 Answering Record
This function supports recording when phone is in idle state. Three records of 30 seconds can be
saved, which used as auto answers of the incoming call. If the record time is beyond 30 seconds,
the recording process will stop automatically. Tools→Voice Memo→Answering Recording
Answering 1,2,3, choose any anwering machine in which user want to record→OK→Record
→Complete.
7.5 Calculator
This function includes four calculation functions, addition (+), subtraction (-), multiplication (x ),
and division (÷). Press number key to input the number. If you want to cancel this calculation
process, please press Key.
Tools →Calculator →Type number as required,for operation need to press navigation key for (+)
(upper navigation key) , (-) (down navigation key), (←) (left navigation key), (→) (Right
navigation key) Result.
Notice: For the limited degree of accuracy, this function only used for reference.
7.6 World Clock
User can view the timing of different cities in the world.
Tools →World Clock →(New Delhi is save as default) press down navigation key for viewing the
timings of other cities.
7.7 Stop watch
After entering the stopwatch interface, press Key to start timing and press key to
record one event. 10 event can be recorded.
Press key to pause timing.
Press key to look over the former records.
Start Timing again: press reset key to clear the time. Press start key for new event
Notice: For the limited degree of accuracy, this function only used for reference.
7.8 Games
Kong Ming
If you have saved the former game record, you can choose start game or resume game , or
select game to start it again.
1. Start Game
2. Resume Game
3. Select Games
4. Instructions
Using up (2), down (4), left (4), right (6), those four keys to move the red square to select the
chess. If the A chessman jumps over the B chessman, the former chess eats over the latter one.
Only chess can jump in one process. At last only chess left on the chessboard is winning.
8 Haier Feature
8.1 Menu items Lock Code
User can protect important information in the mobile used by others. The information includes
message, names, call record, voice memo, alarm clock and scheduler. User can choose the any of
the menu or all the menu for password protection, before opening the particular locked menu
phone will ask for Password. Haier Feature menu item lock ok Enter lock code Ok Select any of
the menu item listed option (Enable, Enable All, Disable All )→OK
Note: Default menu lock code is “0000” .
User can change the password in security menu. Settings→ Security→ Enter lock Code→ Change
Code →Enter New Lock Code →Confirm New Lock Code →OK.
8.2 Incoming Call Guard
This function is used for incoming call screening in simple words phone can restrict the callers
after save the mobile numbers in the lists explained below.
8.2.1 Black List
User can save 10 phone numbers in black list. The listed numbers can not connect to user's phone
number.
Haier Feature→ Incoming Call Guard →Black List →Option→ Edit, Delete, Delete All, OK.
8.2.2 White List
User can save 10 phone numbers in white list. Only the listed numbers can connect to user's phone
number.
Haier Feature →Incoming Call Guard →White
List →Option→ Edit, Delete, Delete All, →OK.
8.2.3 Setting
With this menu user can activate the black / white list phone numbers.
Note: User need to activate the white/black list in the guard setting other wise in coming call
screening will not work. Haier Feature →Incoming Call Guard→ Settings →Activate Black List/
Activate White List/ cancel All →OK.
9 Fun & Utilities
Your phone supports wap 2.0. user can use to connect to selected services on the mobile internet.
If your wireless service provider supports this feature, then you can view weather reports, check
news, flight timings, view financial information, and much more. The web browser on your phone
can display WAP-based content.
9.1 TATA Zone
Press key directly launch the menu items for wap: Home page , History, Bookmark, Push
messages, Advanced, Exit browser. In the idle mode. User can download rintones and wallpapers
from service provider website, Notice: Downloaded rintones and wallpaper saved in My Media
Tones/Images. User can set wallpaper for LCD background. Settings Display Screens Wallpapers
OK.
9.2 SMS Services
Only your R-UIM card supports this kind of function, you can use it. Different UIM cards are vary
in menu name and content. In this menu user can get information related to Fun, Cricket,
Astrology, News Stock, Life style, Emergency etc through SMS. Click any of the option detailed
above user get reply SMS from the service provide server.
10 My Media
In this menu user can view downloaded images, downloaded ring tones and available memory
status for wap etc.
Ⅲ Input method
This mobile phone used the eZi input Method. When using your mobile phone there will be many
times that you will need to input text e.g. sending messages, entering names into the Phonebook,
editing the greetings message, editing Browser settings, etc. There are 5 input methods:
1.Number(123):To provide input number ;
2.Character(abc):Press desired number key, one time press to input a character, twice press quickly
to display the second character, by analogy to finished the Text ;
3.Zien:Allows User to use eZi predictive English input method.(First letter small) ;
4.ZiEn:Allows you touse eZi predictive English input method (First letters Capital) .
Note: If you press the key , you find a ">?display at last line on screen. No need to worry about
this, it's just a page down mark. When you press the "down key" the input character will display at
the last line on screen. User has to press and hold the key for typing the word that key.
Mode switch
Under the input mode press # key enter to switch the input mode.
Input symbol
Under “Zien”/”ZiEn”/”abc”/”ABC”/”123” input mode, press“*”you can switch to the symbol
mode. You can long press number left of symbol, then the phone will auto return the last mode. If
the total number of the symbols cannot be showed in one screen page, press up/down key to turn
pages.
Ⅳ Maintenances and repairs
Your mobile is in fine designing and elaborate manufacture. Please use your phone carefully and
maintain it. The following suggestions can help you extend the useful life of your phone:
■Put your phone and the fittings in the place where children cannot reach.
■Keep your phone dry. Mineral substance contained in rain, moisture and liquid will erode the
electric circuit of your phone.
■Do not put your phone at dirty, disordered and dusty place.
■Do not use or store your phone in high temperature place. High temperature will shorten the life
of electronic components, dam-age the phone and distort or dissolve the plastic parts of the phone.
■Do not use or store your phone in low temperature place. When it comes back to nor-mal
temperature, the moisture will coagulate in the phone and cause the damages of circuit board.
■Do not open your phone by yourself, as non-professional disposal may damage the phone.
■Please avoid throwing; knocking and shaking your phone, improper external frce may result in
the damage of inner circuit.
■Do not use chemical solvents or detergent to clean your phone. Please use cotton material with
water or soap water to clean the outer shell of mobile phone.
■Please use or purchase Haier fittings.

■Please contact professional maintenance personnel to repair your phone if your phone and its
fittings are in trouble.
Use the batteries and fittings manufactured by Haier Company. The use of other fittings may cause
dangerous accidents and make all guarantees null and void.
Haier phone can use the following fittings:
Earphones (nonstandard collocation)
If you connect the earphone with the phone:
To activate earphone mode.
To match the volume of earphone with that of mobile phone.
Increase or decrease the volume through up and down side key during call.
If you plug out the earphone from the phone, the phone will return to normal mode automatically.
Charger:
Insert charger, the background light is on and send out prompting sound. The phone enters into
charging mode automatically.
Plug out the charger, the background light is on and the phone returns to normal mode
automatically.
You can charger a battery both in on/off mode.
Table mode charger:
Connect the power source with one side of the original traveling charger. Inserting it into span of
table mode charger that it connects with the plug of mobile phone, the green light of the indicator
light is on; put battery into table mode charger, the red light of indicator light is on, it is charging
normal; after definite time the green light is on show the battery completely.
Batteries
* Use the batteries specified by the manufactures. The standard collocation of the phone is
600mAh lithium-polymer battery whose waiting time is 70-90 hrs and call time is 160-180 hrs,
The 880mAh lithium-polymer battery whose waiting time is 120-140 hrs and call time is 190-210
hrs (waiting time and call time will vary with the network environments). The use of other
chargers may cause dangerous accidents and make all guarantees null and void. You will mobile
phone responsible for maintain when damages are induce by applying other batteries specified by
the manufactures to the mobile phone.
* Do not allow metal objects (such as keys in your pocket) to short circuit the battery con-tacts.
* Do not deform or open the battery.
* Avoid exposure to moisture or fire.
Ⅴ Trouble shooting
If there are troubles when using your phone, please refer to the following table. If there are still
questions, please dial Haier service tele-phone to solve.
Abnormal circumstance Trouble reasons Means of Settlement
Bad signals or drop the line 1.Using mobile phone in bad
signal area, such as near the
high building or in the
basement.
Please move near the window
if you are in a building, and
move to a wild place if the
signal is weak.

Please move near the window
if you are in a building, and
move to a wild place if the
signal is weak.
Try to avoid
3 keep away from base station
of network operator.
Ask network oper-ator supply
service map
4.Electromagnetic interference
source nearby.
Try to avoid using your phone
here
1. Imperfect function line of
network operator.
Hang up and redial Echo or noise
2. Imperfect local line in some
calling areas
1. Waiting time and network's
operator system is connected.
The same mobile phone is
used in different networks
Power off in week signal place
2. The user's moving make the
frequent switchover between
areas
Make a call at a fixed place as
possible as you can.
Waiting time becomes short
3.Battery waste. Battery
function will fall after a period
of using
Change battery
4. The mobile phone will
launch continuously and sea-
rch base station when not
receive signals. Mass
consuming of electric quantity
shorten the waiting time.
Move to a nice signal area or
power off temporarily.
1. No battery or the battery is
not installed well.
Charger the battery or install
the battery correctly.
The phone cannot be started
2. Time of pressing the power
key is not long enough.
Press the power key about 2
seconds to power on..
1. Damaged UIM card Send to network operator for
examination.
2. UIM card is not installed
well
Reinsert UIM card correctly
The UIM card is not available
3. Unclean UIM card contact. Wipe the touching point with a
clean cloth.
No network service Be not in service area Check the service area of
network operator.
Weak signal Move near the window or
select another service network
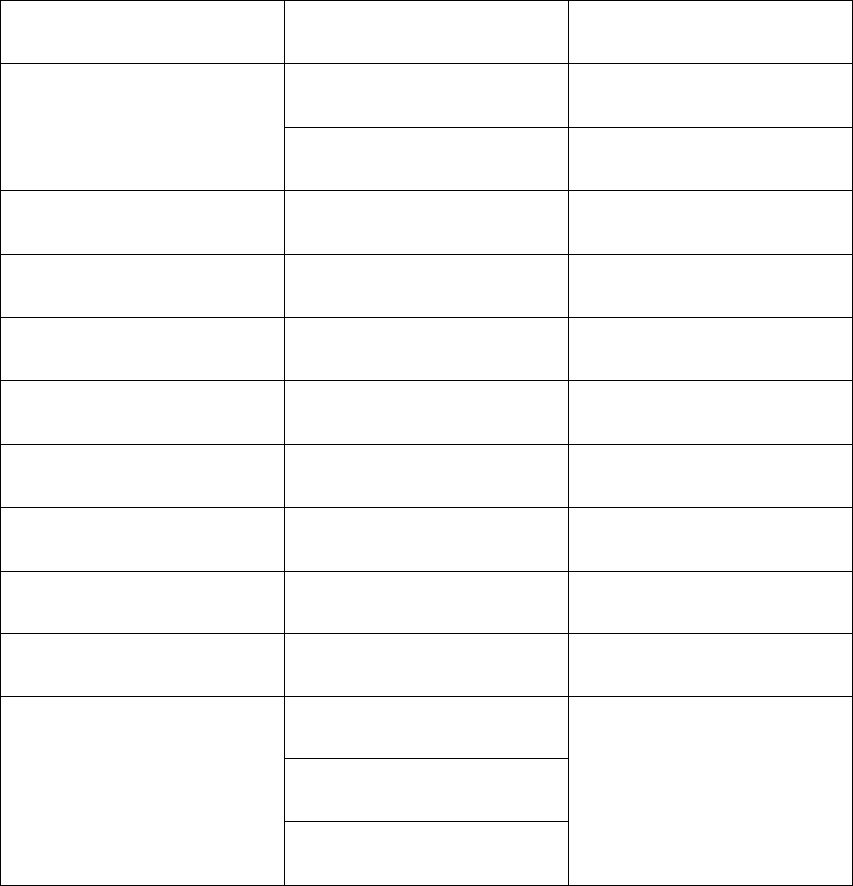
Cannot send messages The service is not
available
Coperator On tact network
1.The fixed dial or call
restrictions has been set.
Power off fixed dial or call
restriction
The telephone cannot be
dialled out
2. Be in peak hours of using
network
Dial later
Wrong PIN code Input wrong PIN code three
times
Contact network operator
The battery can not be charged
or do not display the charging
1. The battery or charger has
been damaged.
Change a new battery or
charger
2. The phone temperature is
below 5. ℃ or above 40℃
Adjust charging environment
3. Bad contact Check if the charger contact
has connected well.
4. Not enough charger last
time
Wait for a moment or pull out
the plug and try again.
Some functions cannot be set The network operator does not
supply this function.
Contact network operator
Power off automatically 1. No electrical voltage Charger the battery.
2. Bad contact between battery
and the phone
Install the battery correctly and
restart the phone.
1. You are in weak signal area
2. You are in unsteady signal
area
Displaying calling ending or
cannot start a call or return to
idle mode directly
3. You are in bad quality signal
area
Move to outdoors or the places
with good signal.
VI ACCESSORIES
Standard Accessories:
Mobile phone (1)
User guide (1)
Travel Charger (1)
Battery (1): 550mA lithium battery, providing 120 hours operating time and 150 minutes call
time.*
* The duration varies from the actual situations.