Haier Telecom 0707HC-C2000 CDMA 1X DIGITAL MOBILE User Manual USERS MANUAL
Haier Telecom (Qingdao) Co., Ltd. CDMA 1X DIGITAL MOBILE USERS MANUAL
USERS MANUAL
Welcome to use C2000 mobile phone from [Company] Technologies Co.., Ltd.
[Company]® C2000 CDMA Mobile Phone User Manual
Copyright©2007[Company] Technologies Co.., Ltd
All Rights Reserved
Reproduction, transfer, distribution or storage of part or all of the contents in this document
in any form without the prior written permission as [Company] Technologies Co.., Ltd.
Statement
The contents of this manual maybe different with the cell phone please according the cell
phone.
[Company] reserves the right to revise this document or withdraw it at any time without
prior notice.
Safety Precautions
Please read these simple guidelines. Not following them may be dangerous or illegal. For
further information, see the section of “Warnings and Precautions”.
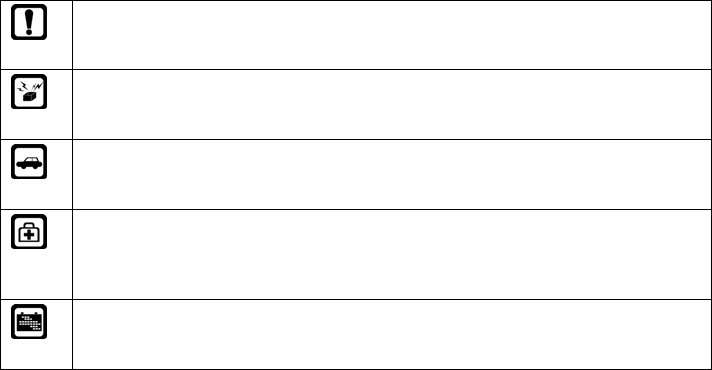
Do not switch the phone on when Mobile Phone use is prohibited or when it
may cause interference or danger.
Do not place your phone and its accessories in containers with strong
electromagnetic field.
Obey all local laws. Always keep your hands free to operate the vehicle while
driving. Your first consideration while driving should be road safety.
Hospitals or health care facilities may be using equipment that could be
sensitive to external radio frequency energy. Follow any regulations or rules in
force.
Do not use the phone at a refueling point. Do not use near fuel or chemicals.
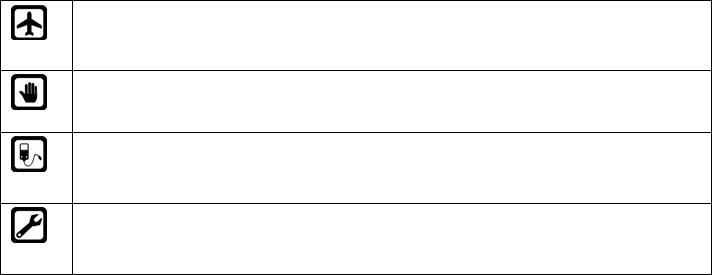
Follow any restrictions. Wireless devices can cause interference in aircraft.
Keep the phone and all its parts, including accessories, out of the reach of
small children.
Use only approved batteries and chargers. Disconnect the charger from the
power source when it is not in use. Do not leave the battery connected to a
charger for more than a week, since overcharging may shorten its lift.
Only qualified personnel should service the phone or install the phone in a
vehicle. Faulty installation or service may be dangerous and may invalidate
any warranty applicable to the device.
Contents
1 Getting to Know Your Phone....................................................................... 1
Packing list ......................................................................................................................1
Basic specification ...........................................................................................................1
Mobile phone appearance ...............................................................................................2
2 Getting Started ............................................................................................. 8
Install and charge the phone ...........................................................................................8
3 Basic Functions ........................................................................................... 9
Switching On/Off..............................................................................................................9
Making phone call............................................................................................................9
Answering the call.......................................................................................................... 11
Operations during a call................................................................................................. 11
Keypad lock...................................................................................................................12
4 Text Entry.................................................................................................... 13
Text input method ..........................................................................................................13
i
Change the input method ..............................................................................................14
5 Contacts...................................................................................................... 15
Add new.........................................................................................................................15
List.................................................................................................................................16
Search ...........................................................................................................................16
Groups...........................................................................................................................17
Copy ..............................................................................................................................18
Speed dial......................................................................................................................18
Delete ............................................................................................................................19
Storage location.............................................................................................................19
Memory status ...............................................................................................................19
My number.....................................................................................................................19
6 Messages.................................................................................................... 20
Text message (SMS) .....................................................................................................20
Text message menus.....................................................................................................21
Write and send SMS messages.....................................................................................22
Text message options....................................................................................................23
ii
Templates ......................................................................................................................25
Delete messages...........................................................................................................25
Message setting.............................................................................................................26
Memory status ...............................................................................................................27
Voice mail ......................................................................................................................27
7 Call history ................................................................................................. 28
Missed calls ...................................................................................................................28
Received calls ...............................................................................................................29
Dialled calls ...................................................................................................................29
Delete ............................................................................................................................29
Call timers......................................................................................................................29
8 Settings....................................................................................................... 30
Display...........................................................................................................................30
Phone setting.................................................................................................................31
Call setting.....................................................................................................................32
Firewall ..........................................................................................................................35
Security..........................................................................................................................38
iii
Phone info .....................................................................................................................41
9 Profiles........................................................................................................ 42
10 Fun and Utilities ....................................................................................... 44
Alarm .............................................................................................................................44
Scheduler ......................................................................................................................44
Calculator ......................................................................................................................45
Stopwatch ......................................................................................................................46
11 Games ....................................................................................................... 47
Games...........................................................................................................................47
12 TATA zone ................................................................................................. 49
13 My data...................................................................................................... 50
Ring ...............................................................................................................................50
14 SMS services............................................................................................ 50
15 Care And Maintain.................................................................................... 51
16 Safe Information....................................................................................... 53
iv

1 Getting to Know Your Phone
Packing list
Your phone package box contains the following items:
z TBD
z TBD
z TBD
Basic specification
z Size: 99.6mm [L] ×42mm [W] ×14.0mm [H]
z Weight: TBD (including 800mAh Li-polymer battery)
z Standby Time: about 115 hours
z Talking Time: about 3 hours
Notice:
Standby time is the handset continuous working time without making phone calls. Standby
time and talking time are both depending on mobile phone using situations, network
situations and environments.
1

Mobile phone appearance
Mobile phone view
2
⑴ Left soft key
⑵ Right soft key
⑶ 4-way navigation key
⑷ Send key
⑸ End (Power) key
⑹ Number keys
⑺ Charger connector
⑻ Headset hole
3

The apartment of the mobile phone and introductions
Name Description
Left soft key In standby mode, press left soft key to main menu.
Right soft key In standby mode, press right soft key to Contacts list.
Up key In standby mode, short press up key will show the TATA zone
menu.
In menus or function options, used to select the upper menu.
Down key In standby status, press down key to show Scheduler menu.
In menus or function options, used to select the down menu.
Left key In standby mode, press left key to show Settings menu.
Right key In standby mode, press right key to show Messages menu.
Send key Making or answering a call.
In standby mode, press this key to access the All calls screen.
End (Power) key End calls or reject calls.
Long press: Power on, power off.
Charger connector Plug the travel adapter into the charger connector.
4

Name Description
Headset hole Before using headset, pull in the headset to this hole.
Notice:
Long press means pressing key time more than or equal 2 seconds; short press means
pressing key time less than 2 seconds.
Icon bar
Icon Description
Indicating signal strength.
Indicating in call status.
Indicating without network.
You have one or several missed call.
Indicating the mobile phone is under data service mode currently, such as brew
download, PC data service.
Indicating the mobile phone is protecting your voice content during a call.
5
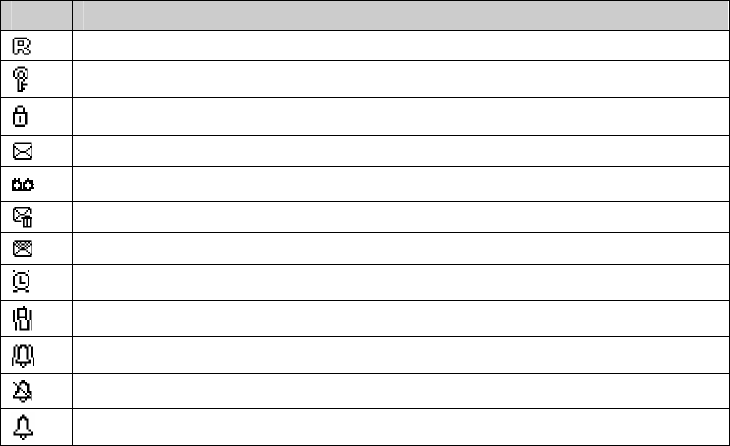
Icon Description
Indicating the mobile phone is under roaming service mode.
Indicating the keypad is locked.
Indicating the phone is locked.
You have one or several new text messages.
You have one or several new voice mail.
You have one or several new garbage messages.
Indicating full SMS.
You have set the alarm clock.
You have set the meeting mode.
You have set the outdoor mode.
You have set the silence mode.
You have set the general mode.
6

Icon Description
Indicating battery power level.
7
2 Getting Started
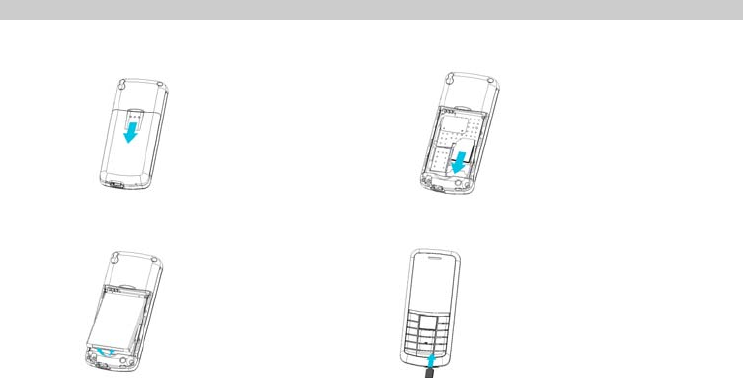
Install and charge the phone
1. Remove the battery cover 2. Insert the RUIM card
3. Install the battery 4. Plug the travel adapter into the phone
8

3 Basic Functions
Switching On/Off
z In the power off status, long press the Power Key to switch on the phone.
z In the power on status, long press the Power Key to switch off the phone.
Making phone call
Making phone call using the keypad
1. In the standby mode, enter the phone number you want to dial, and press the Send Key to
make the call.
To delete a character to the left of the cursor, press <Clear>.
To save the number, press <Options> and select Save number.
2. To end the call, press the End Key.
Making phone call using contacts
1. In the standby mode, press <Contacts> or press <Menu> to access the Main menu >
Contacts;
9
2. Select List to view the contacts list, and press Up/Down key to choose a contact, or
select Search to search out the contact you want to call, either by name or by number.
3. Press the Send Key to make the phone call.
Making phone call using last dialled number
1. In the standby mode, press the Send Key to display the last 10 numbers dialled.
2. Scroll to the number or name you wish to redial, and press the Send Key.
Making phone call using speed dial
In standby mode, long press a number key to make phone call. See chapter 5 contacts for
more information about configuring speed dial.
Making a conference call
Conference calling is a network service that allows you to take part in a conference call with
other participants.
1. Make a call to the first participant.
2. Enter the phone number of the second participant; or retrieve a number from your
Contacts, press <Search> and find out the number you want to call.
3. Press the Send Key, The first participant is put on hold.
4. When the second participant picks up, press the Send Key to connect the calls.
5. To end the conference call, press the End Key.
10

Answering the call
Answer or silence an incoming call
1. To answer the call, press the Send Key or select <Accept>.
Press <Silence> to mute the ringing tone before you answer the call.
2. To reject the call, press the End Key or select <Reject>.
Adjust the earpiece volume
Press the navigation key of your phone to adjust the volume of the earpiece, during a call.
When adjusting the volume, a bar chart appears in the display indicating the volume level.
The adjustment range is 1-5 (That means you can not set the earpiece volume to level 0).
Answer a call with the keypad locked
To answer a call with the keypad locked, simply press the Send Key.
During the call, all features function as normal. When you end or reject the call, the keypad
automatically relocks.
Operations during a call
During a call press <Options> and one of the following options:
¾ Contacts: To the contacts menu.
11

¾ Message: To the message menu.
¾ DTMF on (off): To enable or disable the DTMF tone of your phone during a call.
¾ Hand free on (off): To activate or deactivate the loudspeaker.
¾ New call: Initiate a conference call. See “Make a conference call” P9 for information.
¾ Mute on (off): To mute or unmute your phone during a call.
¾ Phone info: Shows the details version information for the phone.
¾ Voice privacy: There are two options for your choice: Standard and Enhanced.
Keypad lock
To prevent the keys from being accidentally pressed, you can lock the keypad. The keypad
lock can prevent you form accidental calls. If the keypad is locked, it unlocks when you
receive a call. After the call, the lock automatically relocks.
When the keypad is locked, calls may be possible to the official emergency number
programmed in your phone.
Press [*] key for more then 2 seconds to unlock the keypad.
12

4 Text Entry
Text input method
Your phone provides following text input methods:
z English input method: input English characters;
z Numeric input method: input numeric characters;
Input method Icon Letter case
EN Upper case
en Lower case
Intelligent
En Word case text, only available at the
beginning of a word.
Abc Word/sentence case text, only
available at the beginning of a
word/sentence.
ABC Upper case
Multi-tap
abc Lower case
13
Numeric 123 -
Change the input method
z Press [*] to switch between upper case, lower case and word/sentence case;
Long press [*] to enter symbol list;
z Press [#] to switch between Intelligent, Multi-tap and Numeric mode.
Notice:
Press [1] to insert common symbol under the intelligent mode or multi-tap mode.
14

5 Contacts
You can save names and phone numbers (contacts) in the phone memory
and in the RUIM card memory.
The phone memory may save contacts with additional details, such as
various phone numbers and text items. The RUIM card memory can save names with one
phone number attached to them.
Add new
1. In the standby mode, press <Menu> to access the Main menu > Contacts > Add new;
2. Change the settings and enter information about the contact (saved in Phone).
z Name: Assign a name.
z Default: Assign a default group.
z Mobile 1/Mobile 2/Home/Office: Add a number in any type.
z E-mail: Assign an e-mail address.
z URL: Assign a URL address.
z Note: Add a memo about the person.
3. Press <Options> and one of the following:
z Edit: Enter the name, the phone number, or other details.
15

z Save: Save the record in the Contacts list.
List
1. In the standby mode, press <Menu> to access the Main menu > Contacts > List;
2. Press <Options> and one of the following options:
¾ View: View the details of the contact.
¾ Call: Make a phone call with the contact.
¾ Send message: Send a message to the contact.
¾ Send card: Send the business card.
¾ Edit: Edit the details of the contact.
¾ Delete: Delete the contact from your phone.
¾ Copy: Copy the contact between phone memory and RUIM card memory.
¾ Add to blacklist: Add the first number of the contact to blacklist.
¾ Add to whitelist: Add the first number of the contact to whitelist.
Search
1. In the standby mode, press <Menu> to access the Main menu > Contacts > Search;
2. Press left soft key to search a contact you want:
z By name: Search out the contact through inputting the name.
z By number: Search out the contact through inputting the number.
16

Notice:
If you input the wrong name or the wrong number, the phone will inform you “No match
found”.
Groups
1. In the standby mode, press <Menu> to access the Main menu > Contacts > Groups;
2. Highlight a group, press <Options> and one of the following options:
z Rename: Edit the group’s name (RUIM and Default can not be renamed).
z Ringer: Set special ring to the group.
z List: View the members of the group.
z Add new: Add a record from Contacts (RUIM can not be added new).
Notice:
If the group ringer is not set, the call ringer will play when there is an incoming call except
in Silence or Vibration mode.
17

Copy
1. In the standby mode, press <Menu> to access the Main menu > Contacts >Copy;
2. The Copy includes copy all, copy selected.
z Copy all: Copy all the contacts between phone memory and RUIM card memory.
Phone to RUIM: Copy one group to RUIM.
RUIM to Phone: Copy all RUIM memory to the default group of Phone.
z Copy selected: Copy the contacts you want between phone memory and RUIM card
memory.
Speed dial
Use this menu to assign a speed dial number (6 to 9) for 4 of your most frequently dialled
numbers. In Idle mode, press and hold the appropriate key to dial the speed dial entries.
1. In the standby mode, press <Menu> to access the Main menu > Contacts > Speed dial;
2. Scroll to any empty slot, and press <Assign>, or if a number has already been assigned to
the key, press <Options> > and select View, Edit or Delete.
Enter the number, and press <OK>; or press <Search> to retrieve a number from your
Contacts.
3. You can also View, Edit, Reset a Voice mail. Press <Options> when Voice mail is
highlighted.
18

Delete
1. In the standby mode, press <Menu> to access the Main menu > Contacts > Delete;
2. Select Delete all to delete all contacts.
Select Delete selected to select the contacts that you want to delete.
Storage location
Use this feature to choose storing phone numbers on your RUIM card or in your phone’s
memory.
Memory status
Check the number of contacts you have stored in the phone’s memory and on the RUIM card.
My number
Use this feature to check your phone number, or to assign a new number. Changes made
here do not affect the actual subscriber numbers on your RUIM card.
19

6 Messages
Your phone is capable of creating, sending and receiving text messages.
Text message (SMS)
Text messaging is a network service. If your wireless service provider supports this feature,
you can send and receive text messages to compatible phones that are also subscribed to
the service. When composing text messages, check the number of characters allowed in the
top right corner of the message. Using special characters takes up more space. If there are
special characters in your message, the indicator may not show the message length correctly.
When you’re editing a message, the phone will tell you if the message exceeds the maximum
length allowed for one message. Also, you can make distribution lists that contain phone
numbers and names from your contact list.
Notice:
When sending messages, your phone may display [Message sent]. This is an indication
which shows the message has been sent by your device to the message center number
programmed into your device. This is not an indication which shows the message has been
received at the intended destination.
20

Text message menus
In the standby mode, press <Menu> to access the Main menu > Messages and one of the
following menus:
¾ Write message: Create and send messages.
¾ Inbox: Check for received text messages. Text messages are automatically stored in the
inbox when they are received. A notification appears when a message arrives in the inbox.
¾ Outbox: Text messages are automatically stored in this box, if “Auto save” in message
settings is enable.
¾ Draft: Save incomplete text messages in a draft. Store drafts of text messages in this box
to be completed at a later time.
¾ Garbage: Save your garbage messages in this box.
¾ Archive: Save your important text messages in this box.
¾ Templates: Use templates of frequently used messages or passages.
¾ Delete messages: Delete the text messages on your phone that are in Inbox, Outbox,
Draft and Garbage box, Archive, Delete selected or Delete all.
¾ Message setting: Change settings for receiving and sending text messages.
¾ Memory status: View the amount of memory currently in use for messages.
¾ Voice mail: The mobile phone will notify you on receiving a voice message. Enter the
voice message menu to view it. Contact your network carrier for more details about voice
messages.
21

Write and send SMS messages
1. In the standby mode, press <Menu> to access the Main menu > Messages > Write
message;
2. Enter your message.
3. Press <Options> and select Send.
4. Enter a destination number.
To send the message to more than one recipient, fill in additional destination fields.
5. Press the <OK>to send the message.
Using options while writing SMS messages
While composing a message, press <Options> to access the following options:
¾ Send: Send the message.
¾ Insert Symbol: Insert a special character.
¾ Insert Expression: Insert an expression.
¾ Insert templates: Insert a predefined template or personalized template.
¾ Insert number: Add a number from Contacts.
¾ Save to draft: Save the message to the draft folder.
22

Text message options
Inbox
1. In the standby mode, press <Menu> to access the Main menu > Messages > Inbox;
2. While viewing a message, press <Options> to access the following options:
¾ Reply: Reply to the sender via SMS.
¾ Forward: Edit and forward the message to other people.
¾ Delete: Delete the message.
¾ Use number: Call the number, save the number to contacts, send message to the number,
or add the number to blacklist or whitelist.
¾ Copy: Copy the message between the phone’s memory and RUIM card.
¾ Move to garbage: Move the message to the garbage folder.
¾ Move to archive: Move the message to the archive folder.
Outbox
1. In the standby mode, press <Menu> to access the Main menu > Messages > Outbox;
2. While viewing a message, press <Options> to access the following options:
¾ Resend: Retry sending the message.
¾ Forward: Edit and forward the message to other people.
¾ Delete: Delete the message.
¾ Copy: Copy the message between the phone’s memory and RUIM card.
23
¾ Move to archive: Move the message to the archive folder.
Draft
1. In the standby mode, press <Menu> to access the Main menu > Messages > Draft;
2. Press <Options> to access the following options:
¾ Send: Send the message.
¾ Delete: Delete the message.
¾ Delete all: Delete all messages in draft box.
Garbage
1. In the standby mode, press <Menu> to access the Main menu > Messages > Garbage;
2. Press <Options> to access the following options:
¾ Read: You can read messages saved in garbage box.
¾ Delete: Delete the message.
¾ Delete all: Delete all messages in garbage box.
Archive
1. In the standby mode, press <Menu> to access the Main menu > Messages > Archive;
2. While viewing a message, press <Options> to access the following options:
¾ Forward: Edit and forward the message;
24

¾ Delete: Delete the selected message.
Templates
1. In the standby mode, press <Menu> to access the Main menu > Messages > Templates;
2. Select the template message you want to use.
3. Press <Options> to edit, delete and use the template.
Delete messages
In the standby mode, press <Menu> to access the Main menu > Messages >Delete
messages and one of the following options:
¾ Inbox: Delete messages in the Inbox, including read messages, delivery report and all
messages.
¾ Outbox: Delete all messages in the Outbox.
¾ Draft: Delete all messages in the draft box.
¾ Garbage box: Delete all messages in the garbage box.
¾ Archive: Delete all messages in the archive box.
¾ Delete selected: Delete the messages according your choice.
¾ Delete all: Delete all messages on your phone.
25

Message setting
In the standby mode, press <Menu> to access the Main menu > Messages > Message
setting and one of the following options:
z Storage location: Allow you to select a storage location for a message.
It can be either stored in the phone memory or on the RUIM card.
z Priority: Message sending priority levels are classified as: Normal, Urgent and
Emergency.
z Delivery report: Set the network to inform you when your messages have been
Delivered.
z Deferred delivery: There are four choices of deferred delivery: Immediate, After 1 hour,
After 5 hours and After 1 day.
z Validity period: The SMS valid period is that when the contact’s phone is power off,
the inbox is full and so on situation that it can’t receive the SMS, the SMS center will
store the SMS sent time, if longer than the valid period, the SMS would be deleted and
no longer sent to the contact again. The SMS valid period has the following options:
Default, 30 minutes, 1 hour, 2 hours, 12 hours, 1 day, 2 days or 3 days.
z Auto save: The sent or unsent message will be automatically saved in the outbox.
z Auto delete: Auto deletes the message when message box full.
26

z SMS on call reject: If you select Enable, when receive an incoming call, press <Reject>,
phone will send a reject message which user edited before.
Memory status
View the amount of memory currently in use for messages.
Voice mail
The voice mailbox is a network service and you may need to subscribe to it. For more
information and for your voice mailbox number, contact your service provider.
z Listen: Connect to the voicemail server to listen to your messages.
z View details: View the detail of last voicemail.
z Voice mailbox number: Edit the voice mail server number.
z Clear voice mail icon: Clear the prompt icon in standby mode.
27

7 Call history
Call history stores information about the last 10 missed, 10 received, or 10
dialled calls. It also adds the total duration of all calls. When the number of
calls exceeds the maximum, the most last call replaces the oldest.
Missed calls
1. In the standby mode, press <Menu> to access the Main menu > Call history;
2. Go to Missed calls, Received calls, or Dialled calls, select a call record,
press <Options> to access the following options:
¾ View: View the time of the record.
¾ Call: Dial the number.
¾ Save number: Save the number (except emergency number) to the Contacts.
¾ Send message: Send message to the selected number.
¾ Delete: Delete the selected record.
¾ Delete all: Delete all records.
¾ Add to blacklist: Add the number to blacklist.
¾ Add to whitelist: Add the number to whitelist.
28

Received calls
The received calls are calls that have been answered or rejected.
Dialled calls
The dialled calls are previous calls you have dialled from your phone.
Delete
You can delete any missed calls, received calls, dialed calls, or all calls from phone memory.
Call timers
You can view the duration of your calls.
z Last call: Check the length of your last call.
z Received calls: Check the total length of all calls you have received.
z Dialled calls: Check the total length of all calls you have dialled.
z Total airtimes: Check the total length of all calls.
z Reset timer: Reset the call timers.
29

8 Settings
The settings menu provides you with various setting options to customize the
phone to your preferences and needs. You can also reset the settings to their
default status.
Display
Banner
Use this menu to choose whether the display shows a customized banner under the
operation logo, when the phone is in the standby mode.
In the standby mode, press <Menu> to access the Main menu >Settings > Display >
Banner; you can edit the banner as per you want it.
Backlight
You can control the time-out of the backlight on your phone.
In the standby mode, press <Menu> to access the Main menu >Settings > Display >
Backlight > Always off, 10 sec., 30 sec., 1min., or Always on.
Contrast
You can adjust the contrast of the display for varying lighting conditions.
30

In the standby mode, press <Menu> to access the Main menu >Settings > Display >
Contrast.
Phone setting
Use this menu to change the setting of Auto key lock, Input setting, and Time format.
Auto key lock
Use this menu to set the keypad of your phone to lock automatically after a preset time delay
when the phone is in the standby mode and no function of the phone has been used.
In the standby mode, press <Menu> to access the Main menu >Settings >Phone setting >
Auto key lock > Off, 10 sec., 30 sec., 1 min. or select 5 min. to disable the feature;
Input setting
Use this menu to set the default input method for editing.
In the standby mode, press <Menu> to access the Main menu >Settings >Phone setting >
Input setting> abc, Abc, ABC, en, EN, En, 123;
Time format
Use this menu to change the time format and display on your phone.
In the standby mode, press <Menu> to access the Main menu >Settings >Phone setting >
Time format > 12 hours or 24 hours.
31

Call setting
Answer call
Use this menu to set the phone answer call method.
In the standby mode, press <Menu> to access the Main menu >Settings >Call setting>
Answer call> Press send key or Press any key;
Auto answer
Set the phone to answer the incoming call automatically when the headset inserted.
In the standby mode, press <Menu> to access the Main menu >Settings >Call setting>
Auto answer> After 5 sec. or Off;
Voice privacy
Use this menu to protect your voice content during a call. In the standby mode, press
<Menu> to access the Main menu >Settings >Call setting> Voice privacy > Standard or
Enhanced;
Auto redial
Set the phone to make up to three attempts to redial a phone number after an unsuccessful
call in the standby mode, press <Menu> to access the Main menu >Settings >Call setting>
Auto redial> Enable or Disable;
32
Call forward
This network service reroutes incoming calls to a phone number that you specify.
In the standby mode, press <Menu> to access the Main menu >Settings >Call setting>
Call forward;
1. Select call forward options:
¾ Immediate: after this function is enabled, all incoming calls will be forwarded to
the number designated or voice mail.
¾ When busy: after this function is enabled, when in-call, the incoming call will be forwarded
to the number designated or voice mail.
¾ No reply/Not reachable: when you have not answered an incoming call, it will be
forwarded to the number designated or voice mail.
2. Select the type of calls to be diverted.
3. To activate call diverting, select Enable.
To deactivate call diverting, select Disable.
You can change the feature code by choosing Edit feature code.
4. Enter the number to which calls are to be diverted, and select OK.
Call waiting
Call if your wireless provider supports this feature, call waiting notifies you of an incoming call
33
even while you are in a call. You can accept, reject, or ignore the incoming call.
In the standby mode, press <Menu> to access the Main menu >Settings >Call setting>
Call waiting> Enable or Disable or Edit feature code;
To activate call waiting, select Enable.
To deactivate call waiting, select Disable.
You can change the feature code by choosing Edit feature code.
During a call, press<Answer> or press the Send Key to answer the waiting call. The first call
is put on hold. Press the End Key to end all calls.
International prefix
In the standby mode, press <Menu> to access the Main menu >Settings >Call setting>
International prefix, and use the following menus.
¾ Automatic: When user dialled international number start with "+", the number will
automatic transfer "+" to "00", for example the number "+1234456", will be "00123456".
¾ Manual: When user dialled international number start with "+", the number will transfer
"+" to the number you setted in setting menu.
Call Time
Use this menu to display or hide the call time during your conversation and call ended
screen.
34

Press <Menu> to access the Main menu >Settings >Call setting>Call Time> Call Time
Show or Call Time Hide.
Firewall
Call
Use this menu to block or allow some numbers for incoming calls.
Blacklist
To set the blacklist, do the following:
1. In the standby mode, press <Menu> to access the Main menu >Settings > Firewall>Call
> Blacklist;
2. Scroll to any empty entry, and press <Assign>.
3. Enter the number, and press <OK>; or select Search to retrieve a number from your
contacts.
If you want to change or delete the entry in blacklist, you can use the options and go to
one of the following:
¾ View: View the number.
¾ Edit: Edit the number.
¾ Delete: Delete the entry.
¾ Delete All: Delete all entries.
35
Whitelist
To set the whitelist, do the following:
1. In the standby mode, press <Menu> to access the Main menu >Settings > Firewall> Call
> Whitelist;
2. Scroll to any empty entry, and press <Assign>.
3. Enter the number, and press <OK>; or select Search to retrieve a number from your
contacts.
If you want to change or delete the entry in whitelist, you can use the options and one of
the following menus:
¾ View: View the number.
¾ Edit: Edit the number.
¾ Delete: Delete the entry.
¾ Delete All: Delete all entries.
Settings
Use this menu to enable or disable the blacklist and whitelist.
Private
Use this menu to protect your content of messages, contacts, and call history for accessing
36
by other person. To access the menu, you must enter the preset lock code. By default, the
preset lock code is 0000.
In the standby mode, press <Menu> to access the Main menu >Settings > Firewall>
Private > Message, Contacts, or Call history> On or Off;
SMS
Use this menu to block some numbers for incoming messages.
In the standby mode, press <Menu> to access the Main menu >Settings > Firewall>
SMS, and use the following menus:
¾ Spam number:
1. Scroll to any empty entry, and press <Assign>.
2. Enter the number, and press <OK>; or select Search to retrieve a number from your
contacts.
If you want to change or delete the entry in garbage number list, you can use the options
and go to one of the following:
z View: View the number.
z Edit: Edit the number.
z Delete: Delete the entry.
z Delete All: Delete all entries.
37

¾ Prompt: Use this menu to enable or disable the special prompt for incoming garbage
messages.
¾ Settings:
z Reject Spam number: If activated reject garbage number feature, the mobile phone
will compare the short message number with the "Spam number" number one by one, if the
number belongs to the garbage list, then the message is regarding as garbage message; if not,
it is an normal message.
z Only receive phone message: After activating this feature, the mobile phone will judge if
the message came from a normal mobile phone number; if not, this message will be regarded
as garbage message; if the message came from a normal phone number, it will be regarded as
normal message.
z Off: Deactivate SMS firewall on your phone.
Security
To access security for the every time, you must enter the preset lock code. By default, the
preset lock code is 0000. If none of this work, contact your wireless service provider for help.
Phone lock
The phone lock feature protects your phone from unauthorized outgoing calls or
unauthorized access to information stored in the phone.
38
When the device is locked, you can still call the official emergency number programmed into
your phone.
In the standby mode, press <Menu> to access the Main menu >Settings > Security>
Phone lock and one of the following menus:
¾ Lock now: Enable the phone lock right now.
¾ On power up: Phone locked is displayed each time you turn your phone on.
¾ Disable: Disable the phone lock.
Theft proof
This menu allows your phone to work only with the RUIM card which is in RUIM list.
In the standby mode, press <Menu> to access the Main menu >Settings > Security> Theft
proof> Enable, Disable, or RUIM bind list;
PIN management
In the standby mode, press <Menu> to access the Main menu >Settings > Security> PIN
management and one of the following menus:
¾ Enable PIN: Enable the PIN code protection.
¾ Disable PIN: Disable the PIN code protection.
¾ PIN Change: Change the PIN code.
39
Change security code
By default, the preset lock code is 0000.
1. In the standby mode, press <Menu> to access the Main menu >Settings > Security >
Change security code;
2. Enter your four-digit lock code and press <OK>.
3. Enter the new lock code (only 4 characters), and press <OK>.
4. Enter the new lock code again for verification, and press <OK>.
When you change your lock code, make sure to remember it. If necessary, write it down
and store it in a safe place away from your phone.
Call restriction
This network service allows you restrict your calls.
In the standby mode, press <Menu> to access the Main menu >Settings > Security > Call
restriction and one of the following menus:
¾ Received calls: Enable or disable restricting your all incoming calls.
¾ Dialled calls: Enable or disable restricting your all outgoing calls.
Factory reset
Use this menu to reset the phone’s settings you have changed.
40

Clear memory
Use this menu to clear all data (include Call History, Contacts (RUIM), Contacts (Phone) or
Clear All) that you have stored.
Phone info
You can get SW version, HW version, and PRL version.
41

9 Profiles
Profiles define how your phone reacts when you receive a call or message,
and other settings for each of the available profiles can be left at their
default settings, or customized to suit your needs. The following profiles
are available: General, Silent, Meeting and Outdoor.
Activate
In the standby mode, press <Menu> to access the Main menu > Profiles > General, Silent,
Meeting or Outdoor > Activate;
Personalise
In the standby mode, press <Menu> to access the Main menu > Profiles > General, Silent,
Meeting or Outdoor > Personalise and one of following:
¾ Prompt: Use this menu to change the alert prompt for incoming call prompt, SMS prompt,
Alarm prompt and Scheduler prompt individually.
¾ Ringers: Use this menu to change the ringers for Call ringer, SMS ringer, Alarm ringer and
Scheduler ringer individually.
¾ Volume: Use this menu to change the sound volume of Ringer, Keypad tone, Earpiece,
Alarm, and Scheduler.
You can use the [Up/Down/Left/Right] navigation keys to adjust the volume.
:
¾ Alerts: Use this menu to change the phone alerts for the following
42
z Power on/off: Enable or disable the alert for power on or off.
z Low battery beep: You can choose to switch Enable/Disable.
z Minute beep: Set the phone to beep ten seconds before every minute during a call to
keep you informed of the length of your call.
z Call connect beep: Set the phone to beep when an outgoing call connects to the system.
z Call end beep: Set the phone to beep when a call end to the system.
z Service change: Enable or disable the alert for service change.
z Fail on outgoing: Enable or disable the alert for outgoing call failed.
z Charger beep: Set the phone to beep when plug the adapter.
Rename
In the standby mode, press <Menu> to access the Main menu > Profiles > General, Silent,
Meeting or Outdoor > Rename and edit the name.
43

10 Fun and Utilities
Your phone contains features to help organize your life, including Alarm,
Scheduler, Calculator, and Stopwatch.
Alarm
Use this menu to set alarms. The alert type for a normal alarm corresponds to the call alert
type settings.
Setting an alarm
1. In the standby mode, press <Menu> to access the Main menu > Fun and Utilities >
Alarm;
2. Select an alarm, and each alarm options:
z Time: Enter the time for alarm to ring.
z Period: Select an alert period for the alarm.
z On: Turn on or off the alarm.
Scheduler
Use this menu to enable you to keep track of reminders. It can even sound an alarm for
any of these events.
44

1. In the standby mode, press <Menu> to access the Main menu > Fun and Utilities >
Scheduler;
2. View the current calendar. Press left soft key to enter the options, press options to access
functions. The functions include View, Add, Delete, Delete expired and Delete All.
¾ View: To examine details of current Item reminders.
¾ Add: To add new Item reminders.
¾ Delete: Delete the current Item reminders.
¾ Delete expired: To delete all the expired Item reminders in record.
¾ Delete All: To delete all or expired Item reminders in record. It will prompt “Empty” if there
is no record in the Item Reminder.
Calculator
Use this menu to perform basic arithmetic functions, such as addition, subtraction,
multiplication, and division.
1. In the standby mode, press <Menu> to access the Main menu > Fun and Utilities >
Calculator;
2. Enter the first number.
3. Press one of the navigation keys to access the math function you want.
4. Press the # key to view the result.
5. If necessary, repeat from step 3 to continue the calculation.
45

Stopwatch
1. In the standby mode, press <Menu> to access the Main menu > Fun and Utilities >
Stopwatch;
2. Press <Start> to start the stopwatch.
3. Press <Pause> to pause the stopwatch.
4. Press <Resume> to continue the stopwatch.
5. Press <Reset> to reset the stopwatch.
46

11 Games
Games
Your phone have 2 games available.
LinkLong
The snake will get longer after having eaten a food. Making your snake eat more food and
keep away from its body. You may control the moving directions of the snake by pressing
navigation keys. Pressing the left soft key will play or pause your game, and pressing right
soft key will pause it and exit to game main menu.
z Resume: Go on with your paused game.
z Start: Start a new game.
z Sound: Enable or disable the game sound effect.
z Score: List the top 5 scores achieved.
z Help: Give the game operation instructions.
z About: Show the version and copyright information.
z Exit: Exit LinkLong game menu.
MagicBlock
Put 3 or more blocks with the same figure on one line, these blocks will disappear and you
47
will gain the score. If the blocks are piled up to the top of the screen, new blocks will have no
space to drop and then game over. Pressing left or right key will move dropping blocks to left
or right, pressing up key will move the upmost block of the dropping blocks to the downmost
block, and pressing down key will make the dropping blocks accelerate down. Pressing the
left soft key will play or pause your game, and pressing right soft key will pause it and exit to
game main menu.
z Resume: Go on with your paused game.
z Start: Start a new game.
z Sound: Enable or disable the game sound effect.
z Score: List the top 5 scores achieved.
z Help: Give the game operation instructions.
z About: Show the version and copyright information.
z Exit: Exit MagicBlock game menu.
48

12 TATA zone
Under the TATA Zone menu, there are three function options, including:
“MobileShop”, “Settings” and “Help”. The icons of internet applications will
display here, if some internet applications have been downloaded.
z MobileShop: Consist of Catalog, Search, About Download.
z Settings: You could access following options: Order Apps, Move Apps, Manage Apps,
Main Menu View, Screen Savers and View Log.
z Help: You can inquire related help information in “Help” menu.
Notice:
The number of applications which download or saved in phone is only related with the
capacity of phone memory, not the RUIM card.
49
13 My data
My data menu allows you to access ring stored in the phone’s memory.
Ring
You could play or use the ringers that in download folder.
14 SMS services
This menu option allows you to access a range of SMS based services that
help you do more. Simply select the desired service from the service menu.
Choose from Ringtones, Logos, Fun, Cricket, Astrology, News, Stocks,
Lifestyle, Information and Call Divert. To get the list of services available for your handset or
for assistance on any of these services.
Notice:
There are different menus according to different cards.
50

15 Care And Maintain
If your mobile phone had abnormal conditions, please check it with the following table. If
the problem still remains, please ask mobile phone sales for help.
Common problems Check item
Can not charge Please checks if the charger is properly connect to the
phone and the power source jack.
Can not power on Please check if the battery level is too low;
Please check if the batter is properly loaded;
Please press Power Key enough time.
Insert the R-UIM card but can
not read the information in the
R-UIM card
Please check if properly inserted the R-UIM card;
Please check if your R-UIM card is valid.
The mobile phone displays
“Input PUK Code” Please communicate with the service provider to get
the PUK code and use it to unlock.
Can not make phone call Please check if the phone number is valid.
Please check if you are in service area.
51

Common problems Check item
Weak talk quality Please check if the phone signal is strong enough;
If you are in the building, please move the phone or
move near the window.
The contact can not get your
voice when making phone call Please check if your mike has blocked by fittings or
other blocks.
Receiver sound is too low Please check if your receiver volume has been
adjusted to the largest.
The mobile phone has a weak
receive signal or usually drop
in the phone call
Please check if the phone has a strong signal.
If no signal, please use it in a strong signal place.
The screen display the
information such as “No
Service”
Please check if you are in a weak signal area (in the
channel or surround by buildings), change the area
and retry.
Please check if you can try to get the services without
the service provider permission. If needed the service,
please contact the service provider for more
information.
52
16 Safe Information
Electronic Device
Most modern electronic equipment is shielded from radio frequency (RF) signals. However,
certain electronic equipment may not be shielded against the RF signals from your Mobile
Phone. Consult the manufacturer to discuss alternatives.
Hospital
z Do not take your phone into the operating room (OR), intensive care unit (ICU), or
coronary care unit (CCU).
z Do not use your phone at places for medical treatment where it is prohibited to use mobile
phones.
z When you use your phone near someone who is suffering from a heart disease, turn down
the ring tone volume or vibration properly so that it does not influence the person.
Storage Environment
Switch off your phone when in any area with a potentially explosive atmosphere, and obey
all signs and instructions. Sparks in such areas could cause an explosion or fire resulting in
bodily injury or even death.
Users are advised to switch off the phone while at a refueling point (service station). Users
53
are reminded of the need to observe restrictions on the use of radio equipment in fuel
depots (fuel storage and distribution areas), chemical plants, or where blasting operations
are in progress.
Areas with a potentially explosive atmosphere are often but not always clearly marked.
They include the areas below decks on boats, chemical transfer or storage facilities,
vehicles using liquefied petroleum gas, such as propane or butane, areas where the air
contains chemicals or particles, such as grain, dust or metal powders, and any other area
where you would normally be advised to turn off your vehicle engine.
Children Safety
z Put your phone, battery, and charger in places beyond the reach of children. Do not allow
children to use the phone, battery, or charger without guidance.
z Do not allow children to put the battery in mouth, for electrolyte in the battery is poisonous.
z Do not allow children to touch the small fittings. Otherwise, suffocation or gullet jam can be
caused if children swallow the small fittings.
Operating Environment
Remember to follow any special regulations in force in the area you are in, and always
switch off your phone whenever it is forbidden to use it, or when it may cause interference
or danger. When connecting the phone or any accessory to another device, read its user’s
guide for detailed safety instructions. Do not connect incompatible products.
54
As with other mobile radio transmitting equipment, users are advised that for the
satisfactory operation of the equipment and for the safety of personnel, it is recommended
that the equipment should only be used in the normal operating position (held to your ear
with the antenna pointing over your shoulder).
Care and Maintenance
z Keep your phone and all its parts and accessories out of the reach of small children and
pets. They may accidentally damage these things or choke on small parts.
z Keep the phone dry. Precipitation, humidity, and liquids contain minerals that corrode
electronic circuits.
z Do not use the phone with a wet hand. Doing so may cause an electric shock to you or
damage to the phone.
z Do not use or store the phone in dusty, dirty areas, as its moving parts may be damaged.
z Do not store the phone in hot areas. High temperatures can shorten the life of electronic
devices, damage batteries, and warp or melt certain plastics.
z Do not store the phone in cold areas. When the phone warms up to its normal operating
temperature, moisture can form inside the phone, which may damage the phone’s electronic
circuit boards.
z Do not drop, knock, or shake the phone. Rough handling can break internal circuit boards.
55
z Do not use harsh chemicals, cleaning solvents, or strong detergents to clean the phone.
Wipe it with a soft cloth slightly dampened in a mild soap-and water solution.
z Do not paint the phone. Paint can clog the device’s moving parts and prevent proper
operation.
z Do not put the phone in or on heating devices, such as a microwave oven, stove, or
radiator. The phone may explode when overheated.
z When the phone or battery gets wet, the label indicating water damage inside the phone
changes colour. In this case, phone repairs are no longer guaranteed by the manufacturer's
warranty, even if the warranty for your phone has not expired.
Emergency Call
You can use your phone for emergency calls. However, connections in call conditions
cannot be guaranteed. You should never rely solely on the phone for essential
communications.
Battery
z Never use a charger or battery that is damaged in any way.
z Use the battery only for its intended purpose.
If you use the phone near the network’s base station, it uses less power. Talk and
standby time are greatly affected by the signal strength on the cellular network and the
parameters set by the network operator.
56
z Battery charging time depends on the remaining battery charge, the type of battery, and
the charger used. The battery can be charged and discharged hundreds of times, but it will
gradually wear out. When the operation time is noticeably shorter than normal, it is time to buy a
new battery.
z If left unused, a fully charged battery will discharge itself over time.
z Extreme temperatures will affect the charging capacity of your battery: it may require
cooling or warming first.
z Do not leave the battery in hot or cold places because the capacity and lifetime of the
battery will be reduced. Try to keep the battery at room temperature. A phone with a hot or cold
battery may not work temporarily, even when the battery is fully charged. Li-ion batteries are
particularly affected by temperatures below 0°C (32°F).
z Use only approved batteries and chargers. Disconnect the charger from the power source
when it is not in use. Do not leave the battery connected to a charger for more than a week,
since overcharging may shorten its lift.
57
1 RF Exposure Information and Statement
The SAR limit of USA (FCC) is 1.6 W/kg averaged over one gram of tissue. Device types
HC-C2000 (FCC ID: SG70707HC-C2000) has also been tested against this SAR limit. The
highest SAR value reported under this standard during product certification for use at the
ear is 1.192 W/kg and when properly worn on the body is 0.263 W/kg. This device was
tested for typical body-worn operations with the back of the handset kept 1.5cm from the
body. To maintain compliance with FCC RF exposure requirements, use accessories that
maintain a 1.5cm separation distance between the user's body and the back of the
handset. The use of belt clips, holsters and similar accessories should not contain metallic
components in its assembly. The use of accessories that do not satisfy these requirements
may not comply with FCC RF exposure requirements, and should be avoided.
This device complies with part 15 of the FCC rules. Operation is subject to the following
two conditions: (1) this device may not cause harmful interference, and (2) this device
must accept any interference received, including interference that may cause undesired
operation.
NOTE: The manufacturer is not responsible for any radio or TV interference caused by
unauthorized modifications to this equipment. Such modifications could void the user’s
authority to operate the equipment.
58

NOTE: This equipment has been tested and found to comply with the limits for a Class B
digital device, pursuant to part 15 of the FCC Rules. These limits are designed to provide
reasonable protection against harmful interference in a residential installation. This
equipment generates uses and can radiate radio frequency energy and, if not installed and
used in accordance with the instructions, may cause harmful interference to radio
communications. However, there is no guarantee that interference will not occur in a
particular installation. If this equipment does cause harmful interference to radio or
television reception, which can be determined by turning the equipment off and on, the
user is encouraged to try to correct the interference by one or more of the following
measures:
- Reorient or relocate the receiving antenna.
- Increase the separation between the equipment and receiver.
-Connect the equipment into an outlet on a circuit different from that to which the receiver
is connected.
-Consult the dealer or an experienced radio/TV technician for help
59