Haier Telecom 0803HC-C200 MOBILE PHONE User Manual USERS MANUAL
Haier Telecom (Qingdao) Co., Ltd. MOBILE PHONE USERS MANUAL
UserManual.wiki
>
Haier Telecom
>
0803HC C200 User Manual
USERS MANUAL
Navigation menu
Upload a User Manual
Namespaces
Wiki Guide
HTML
PDF
Info
Views
User Manual
Discussion / Help
Navigation
![Welcome to use C200 mobile phone from [Company] Technologies Co.., Ltd. [Company]® C200 CDMA Mobile Phone User Manual](https://usermanual.wiki/Haier-Telecom/0803HC-C200/User-Guide-922426-Page-1.png)
![Copyright©2007[Company] Technologies Co.., Ltd All Rights Reserved Reproduction, transfer, distribution or storage of part or all of the contents in this document in any form without the prior written permission as [Company] Technologies Co.., Ltd. Statement The contents of this manual maybe different with the cell phone please according the cell phone. [Company] reserves the right to revise this document or withdraw it at any time without prior notice.](https://usermanual.wiki/Haier-Telecom/0803HC-C200/User-Guide-922426-Page-2.png)


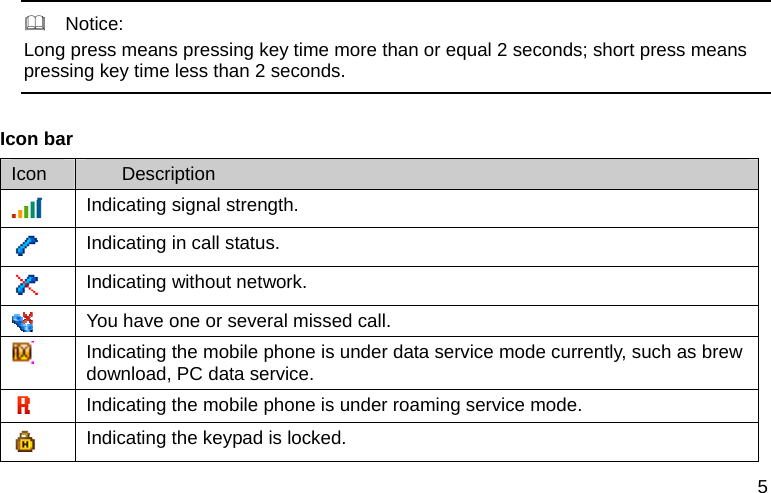
![11 Operations during a call During a call press <Options> and one of the following options: ¾ Contacts: To the contacts menu. ¾ Message: To the message menu. ¾ DTMF on (off): To enable or disable the DTMF tone of your phone during a call. ¾ Hand free on (off): To activate or deactivate the loudspeaker. ¾ New call: Initiate a conference call. See “Make a conference call” P9 for information. ¾ Mute on (off): To mute or unmute your phone during a call. ¾ Phone info: Shows the details version information for the phone. ¾ Voice privacy: There are two options for your choice: Standard and Enhanced. Keypad lock To prevent the keys from being accidentally pressed, you can lock the keypad. The keypad lock can prevent you form accidental calls. If the keypad is locked, it unlocks when you receive a call. After the call, the lock automatically relocks. When the keypad is locked, calls may be possible to the official emergency number programmed in your phone. Press [*] key for more then 2 seconds to unlock the keypad.](https://usermanual.wiki/Haier-Telecom/0803HC-C200/User-Guide-922426-Page-21.png)
![13 Change the input method z Press [*] to switch between upper case, lower case and word/sentence case; Long press [*] to enter symbol list; z Press [#] to switch between Intelligent, Multi-tap and Numeric mode. Notice: Press [1] to insert common symbol under the intelligent mode or multi-tap mode.](https://usermanual.wiki/Haier-Telecom/0803HC-C200/User-Guide-922426-Page-23.png)
![20 6 Messages Your phone is capable of creating, sending and receiving text messages. Text message (SMS) Text messaging is a network service. If your wireless service provider supports this feature, you can send and receive text messages to compatible phones that are also subscribed to the service. When composing text messages, check the number of characters allowed in the top right corner of the message. Using special characters takes up more space. If there are special characters in your message, the indicator may not show the message length correctly. When you’re editing a message, the phone will tell you if the message exceeds the maximum length allowed for one message. Also, you can make distribution lists that contain phone numbers and names from your contact list. Notice: When sending messages, your phone may display [Message sent]. This is an indication which shows the message has been sent by your device to the message center number programmed into your device. This is not an indication which shows the message has been received at the intended destination.](https://usermanual.wiki/Haier-Telecom/0803HC-C200/User-Guide-922426-Page-30.png)

![42 9 Profiles Profiles define how your phone reacts when you receive a call or message, and other settings for each of the available profiles can be left at their default setting, or customized to suit your needs. The following profiles are available: General, Silence, Meeting and Outdoor. Activate In the standby mode, press <Menu> to access the Main menu > Profiles > General, Silence, Meeting or Outdoor > Activate; Personalise In the standby mode, press <Menu> to access the Main menu > Profiles > General, Silence, Meeting or Outdoor > Personalise and one of following: ¾ Prompt: Use this menu to change the alert prompt for incoming call prompt, SMS prompt, Alarm prompt and scheduler prompt individually. ¾ Ringers: Use this menu to change the ringers for Call ringer, SMS ringer, Alarm ringer and scheduler ringer individually. ¾ Volume: Use this menu to change the sound volume of Ringer, Keypad tone, Earpiece, Alarm, and Scheduler. You can use the [Up/Down/Left/Right] navigation keys to adjust the volume (Volume level is 0-5 except the Earpiece Volume is 0-5.).](https://usermanual.wiki/Haier-Telecom/0803HC-C200/User-Guide-922426-Page-52.png)