Haier Telecom 0902HC-CG210 MOBILE PHONE User Manual CG210 user guide
Haier Telecom (Qingdao) Co., Ltd. MOBILE PHONE CG210 user guide
UserManual.wiki
>
Haier Telecom
>
0902HC CG210 User Manual
Users Manual
Navigation menu
Upload a User Manual
Namespaces
Wiki Guide
HTML
PDF
Info
Views
User Manual
Discussion / Help
Navigation


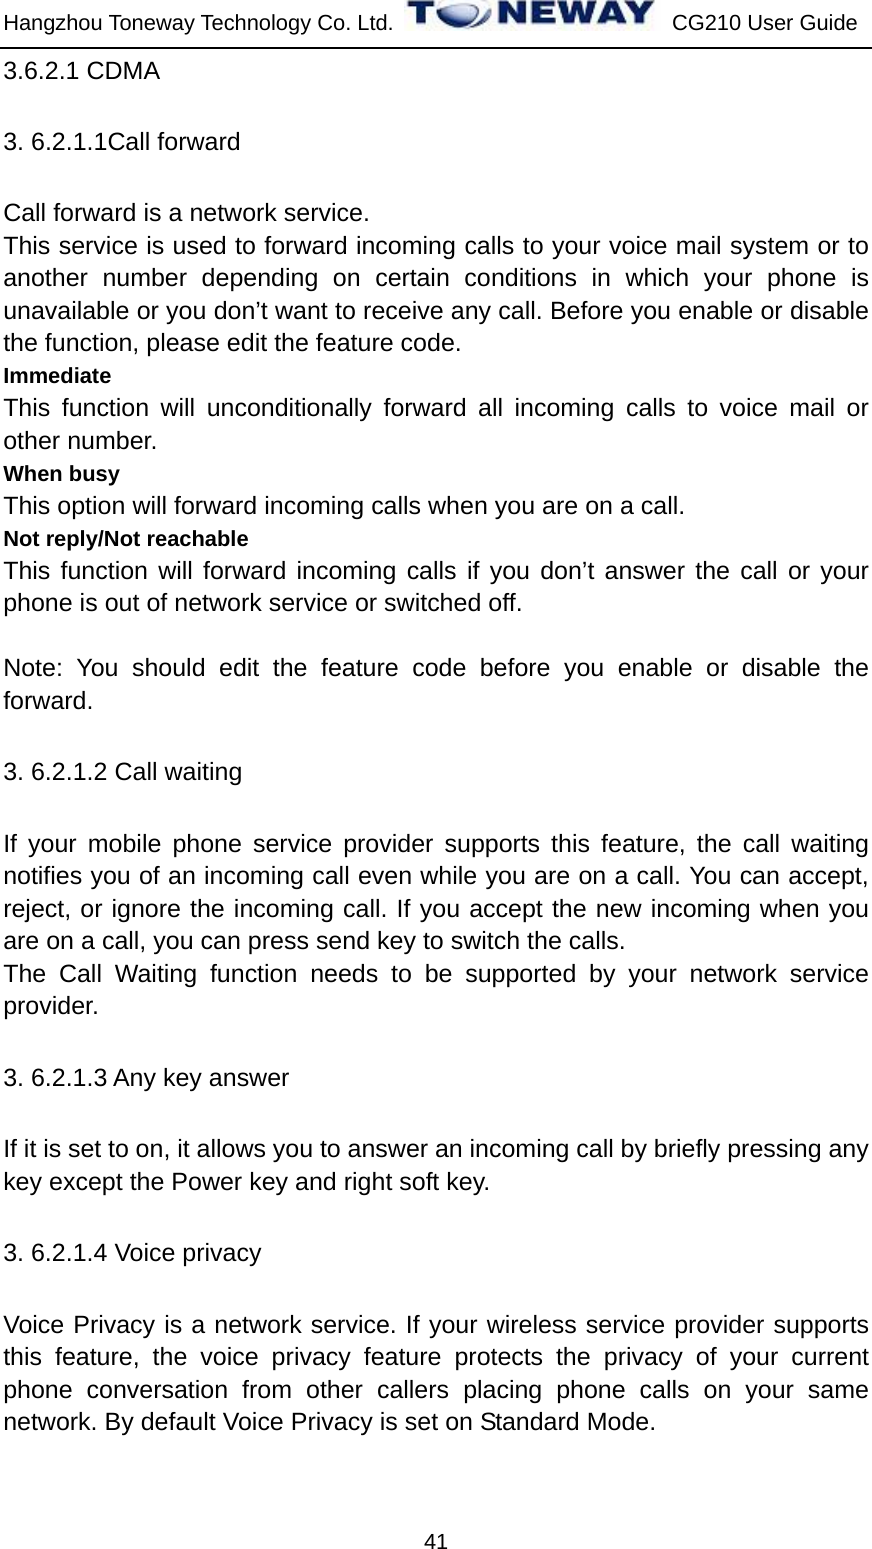
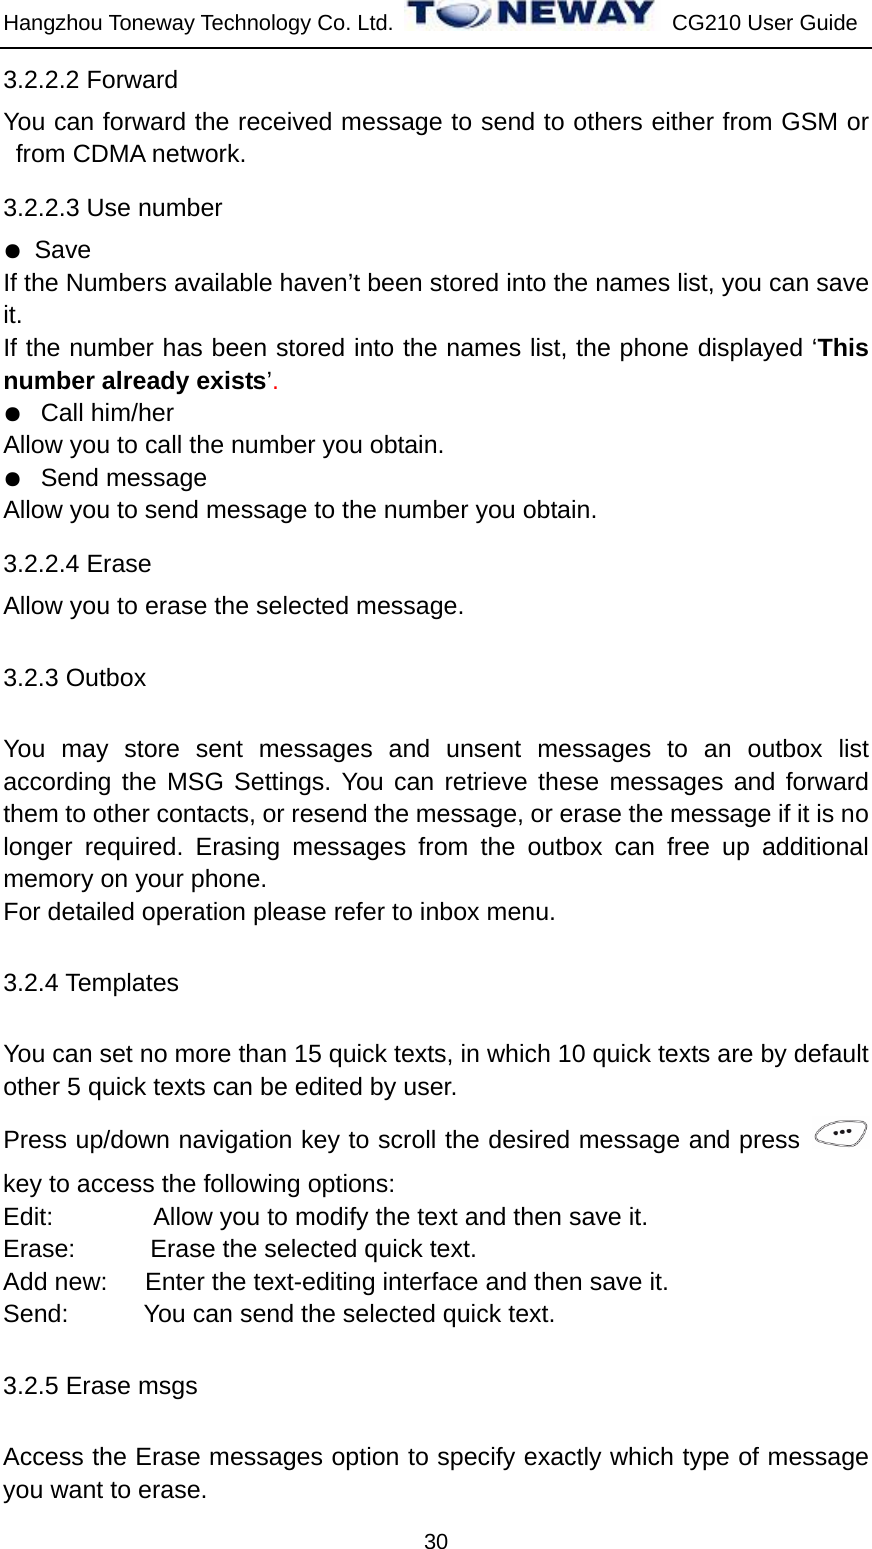
![Hangzhou Toneway Technology Co. Ltd. CG210 User Guide 29 The message icon is displayed. See ‘Table [1]’. The sender’s phone number is displayed. When the sender’s phone number is stored in the contacts list, the sender’s name and number are displayed in the corresponding place. z Press key to display the whole message details, the message contents, the phone number who sent it and when it was received. Here pressing key allows you to call the sender. Table [1]: The message icons in Inbox Icon Description This is a new normal message which stored in UIM Card Memory. This is an old normal message which stored in UIM Card Memory. This is a new urgent/emergency message which stored in UIM Card Memory. This is an old urgent/emergency message which stored in UIM Card Memory. This is a new normal message which stored in SIM card memory This is an old normal message which stored in SIM card memory This is a new urgent/emergency message which stored in SIM Card Memory. This is an old urgent/emergency message which stored in SIM Card Memory. Note: The difference of message icons which stored in phone memory and SIM/UIM card memory is color. The saving in phone memory message icon is blue, other is red. Note: you can press right/left navigation key to view adjacent message when you are viewing a message. From the message view, you can choose to access the following options: 3.2.2.1 Reply You can reply to the sender from GSM or CDMA network after opening the received message.](https://usermanual.wiki/Haier-Telecom/0902HC-CG210/User-Guide-1084171-Page-29.png)

![Hangzhou Toneway Technology Co. Ltd. CG210 User Guide 39 by pressing one of the four direction keys. Input the second number after that. To clear the entered number or operand, press key [Clear]. Press key to select the operator’=’, then you will get the result. 3. If you wish to start a new calculation, press key and select the reset option to start a new calculation. 4. If you wish to close the calculator function, press key [Back] Note: For a limited degree of accuracy, this function should only be used for reference. 3.5.4 Tip calculator This function allows you to quickly calculator the tip along with bill amount as well as an option to split the total bill. 1, Press key to enter the tip calculator main interface. 2, Input the bill amount, press key to select the rate. The tip and total will display on the screen . 3, If the number of drawee is more than one, press key to select split option, then input the number. Press key again. The total and payment that you need to pay will be on the screen. 4, If you wish to close the tip calculator function, press key [Back] . 3.5.5 World clock User can view the timing of different cities in the world. New Delhi Time is save as default. Press navigation key to view the timings of other cities. 3.5.6 Stop watch After entering the stopwatch main interface, the phone displays the starting time 00:00:0, press key [Start] to start timing. Here press key](https://usermanual.wiki/Haier-Telecom/0902HC-CG210/User-Guide-1084171-Page-39.png)
![Hangzhou Toneway Technology Co. Ltd. CG210 User Guide 40 [Pause] to pause timing, press key [Resume] again to continue timing, and that press key [Reset] to return to the stopwatch main interface. In the process of the timing, press key [Split] every time you need to count a lap. Press up/down navigation key to look over the former records. Note: For the limited degree of accuracy, this function should only be used for reference. 3.6 Settings Settings allow you to customize your phone as per your preferences. 3.6.1 Display You can customize your display by creating a banner, adjusting the backlight, setting clock to show or hide, selecting the language, selecting the wallpaper. 3. 6.1.1 SDCA name 3. 6.1.2 Banner You can set the greeting message which will appear in idle screen. 15 characters can be stored as a greeting message. 3. 6.1.3 Backlight: You can specify the duration of the backlight. The phone provides 4 timers (7 Seconds, 15 Seconds, 30 Seconds and Always on) to allow you to select. 3. 6.1.4 Wallpaper Allow you to set the wallpaper displayed on idle screen.The phone provides 2 kinds of paper 3. 6.1.5 Clock You can set the clock whether show on the idle screen or not. 3. 6.1.6 Language Allow you to set the displayed languages. 3. 6.2 Call The function allows you to set related to calls.](https://usermanual.wiki/Haier-Telecom/0902HC-CG210/User-Guide-1084171-Page-40.png)