Haier Telecom 1007HG-U53 MOBILE PHONE User Manual HG U53
Haier Telecom (Qingdao) Co., Ltd. MOBILE PHONE HG U53
Users Manual
1
Contents
1 About your phone .............................................. 9
1.1 Appearance .............................................. 9
1.2 Key instructions ...................................... 10
1.3 Icons ........................................................ 13
1.4 Earphone ................................................. 14
2 Getting started .................................................. 15
2.1 The Battery ............................................. 15
2.1.1 Install & remove a battery ......... 16
2.1.2 Charging ...................................... 17
2.2 SIM card installation .............................. 19
2.3 Memory card installation ....................... 20
2.4 Storage Management ............................ 21
2.5 Power on and off .................................... 23
3 Call functions .................................................... 23
3.1 Make a call .............................................. 23
3.1.1 Make a domestic call ................. 24
3.1.2 Make an extension call .............. 24
3.1.3 Make an international call ......... 25
3.1.4 Make a call from Phone book .. 25
3.1.5 Redial a call by recent call lists 26
2
3.2 Answer a call .......................................... 26
3.3 Reject a call ............................................ 27
3.4 Call options ............................................. 27
4 Write text ............................................................ 28
4.1 Switch input methods ............................ 29
4.2 English method ...................................... 29
4.3 Input special character .......................... 29
5 Menu operation ................................................ 30
5.1 Access menus by scrolling ................... 30
6 Menu functions ................................................ 31
6.1 Extra ......................................................... 31
6.2 Phonebook .............................................. 33
6.2.1 Quick Search .............................. 34
6.2.2 Search contact ............................ 34
6.2.3 Add New contact ........................ 35
6.2.4 Copy All ....................................... 36
6.2.5 Delete .......................................... 36
6.2.6 Caller groups .............................. 36
6.2.7 Extra Number ............................. 37
6.2.8 Settings ........................................ 37
6.3 Fun & Games ......................................... 38
6.3.1 Games ......................................... 38
3
6.3.2 MSN ............................................. 38
6.4 Call center ............................................... 39
6.4.1 Call history .................................. 39
6.4.2 General call settings .................. 39
6.5 Messages ................................................ 43
6.5.1 SMS ............................................. 43
6.5.2 MMS ............................................. 51
6.5.3 Chat ........................... ................... 57
6.5.4 Voice Mail Server ....................... 58
6.5.5 Broadcast Message ................... 58
6.6 Multimedia ............................................... 59
6.6.1 Camera ........................................ 59
6.6.2 Image Viewer .............................. 59
6.6.3 Video Recorder .......................... 60
6.6.4 Video player ................................ 60
6.6.5 Audio player ................................ 61
6.6.6 Sound Recorder ......................... 62
6.6.7 FM Radio ..................................... 63
6.7 Organizer ................................................ 64
6.7.1 Calendar ...................................... 64
6.7.2 To do ............................................ 65
6.7.3 Alarm ............................................ 65
4
6.7.4 World Clock ................................. 65
6.7.5 E-book reader ............................. 66
6.8 Settings .................................................... 66
6.8.1 Dual SIM settings ....................... 66
6.8.2 Phone Setup ............................... 67
6.8.3 Network Setup ............................ 68
6.8.4 Security Setup ............................ 69
6.8.5 Restore Factory settings ................ 73
6.8.6 Sound effect ................................ 73
6.9 User profiles ............................................ 73
6.10 File Manager ........................................... 74
6.11 Services ................................................... 75
6.11.1 STK .............................................. 75
6.11.2 WAP ............................................. 75
6.11.3 Data Account .............................. 78
6.12 Shortcuts ................................................. 79
7 Battery information ......................................... 79
8 Safety information ........................................... 81
8.1 Operating environment ......................... 81
8.2 Electronic devices .................................. 82
8.2.1 Pacemaker .................................. 82
8.2.2 Hearing aids ................................ 83
5
8.2.3 Other medical devices ............... 83
8.2.4 Vehicles ....................................... 84
8.3 Potentially dangerous situations .......... 84
9 Care and maintenance ................................... 85
Preface
Thank you very much for your choice of this product
designed by our company!
Our phone complies with the Telecommunication
industries standards of both the People's Republic
of China and Europe.
The product described in this guide is approved for
use on the GSM networks, and has the GPRS
functions.
GSM network is a global cellular communications
system of international standards.
Allow you to receive an international telephone call
used as in your homeland.
However, before using these advanced network
functions, you must firstly apply for these required
6
services.
In order to better use your cell phone, we suggest
you to carefully read this statement to know all the
functions well.
Note: Due to the cellular network settings and the
services provided, some functions may be
unavailable, please query local service providers.
For your safety
Read these simple guidelines. Breaking the rules
may be dangerous or illegal. Further detailed
information is given in this manual.
ROAD SAFETY
Always keep your hands free to operate the vehicle
while driving. Park the vehicle before using your
phone.
SWITCH OFF IN AIRCRAFT
Using of wireless telephones in aircraft may disrupt

7
the operation of the aircraft. It is dangerous and
illegal. Insure switching off the phone before going
aboard.
SWITCH OFF IN HOSPITALS
Follow any restrictions or rules. Switch off the phone
near medical equipment.
SWITCH OFF WHEN REFUELING
Switch off the phone at a refueling point or any fuel
or chemicals places.
SWITCH OFF NEAR BLASTING POINT
Don’t use the phone where blasting is in progress.
Observe restrictions, and follow any regulations or
rules.
INTERFERENCE
All wireless phones may be susceptible to
interference, which could affect the performance.
USE NORMALLY
8
Use in the normal position explained in the product
documentation. Don't touch the antenna
unnecessarily.
ENHANCEMENTS AND BATTERIES
Use only the approved enhancements and batteries.
Do not connect incompatible products.
EMERGENCY CALLS
Ensure the phone is switched on and in service.
Enter the emergency number, and then press
the key. It will give your location. Do not end the
call until the permission.
9
1 About your phone
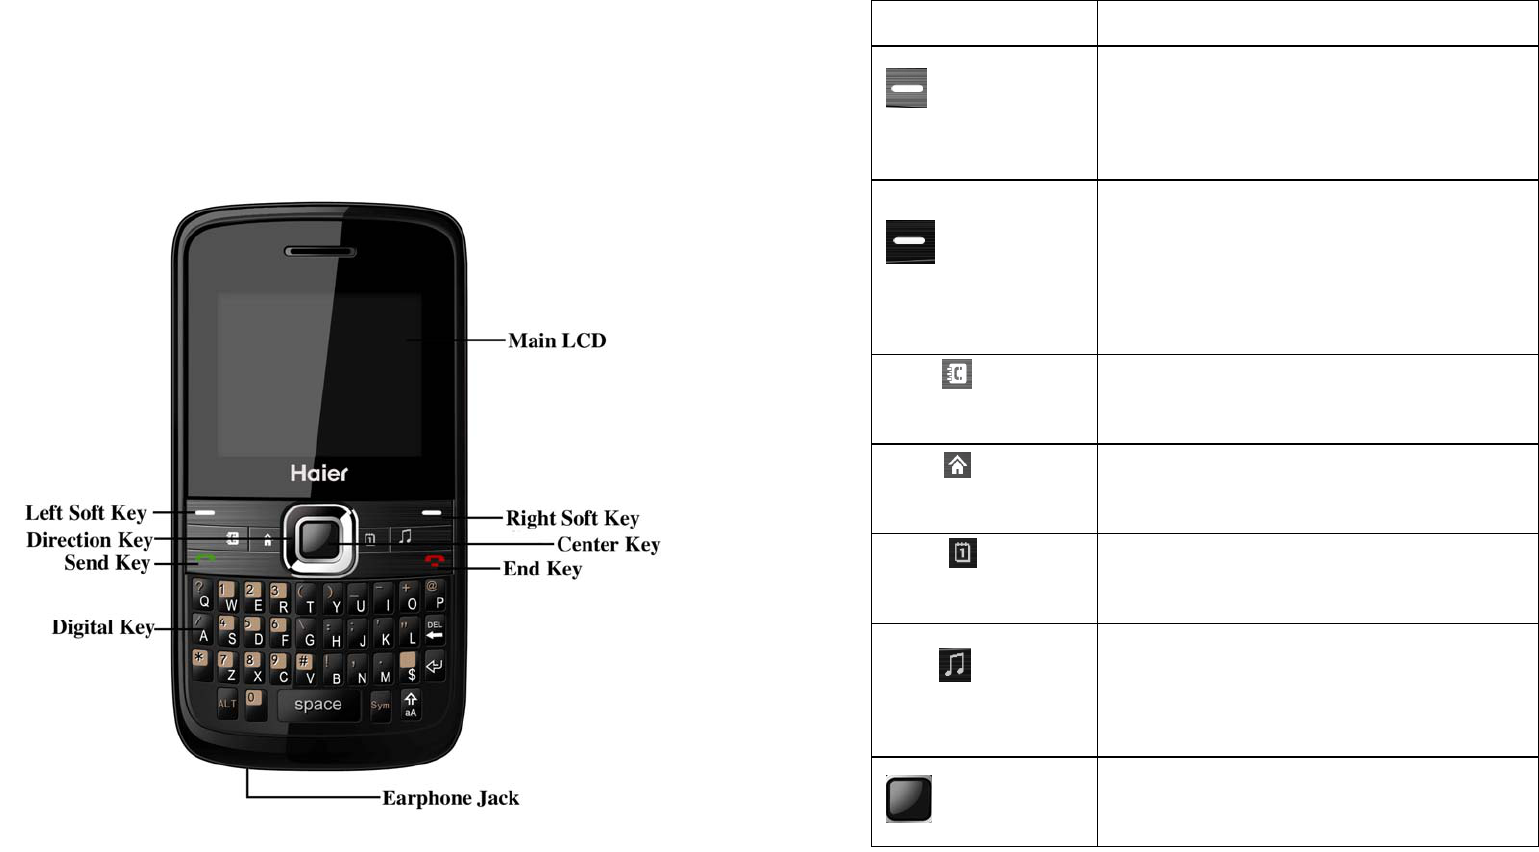
1.1 Appearance
10
1.2 Key instructions
Keys Details
Left soft
key
On the button above the
screen shows the description
text.
Right soft
key
On the button above the
screen shows the description
text.
Left Center
soft key 1
In standby mode, you can use
key to access the phone book.
Left Center
soft key 2
In standby mode, you can use
key to access the menu.
Righ Center
soft key 1
In standby mode, you can use
key to access the calendar.
Rig Center
soft key 2
In standby mode, you can use
key to access the Audio
player.
Center Key Standby mode, the equivalent
of confirmation key. Most of the
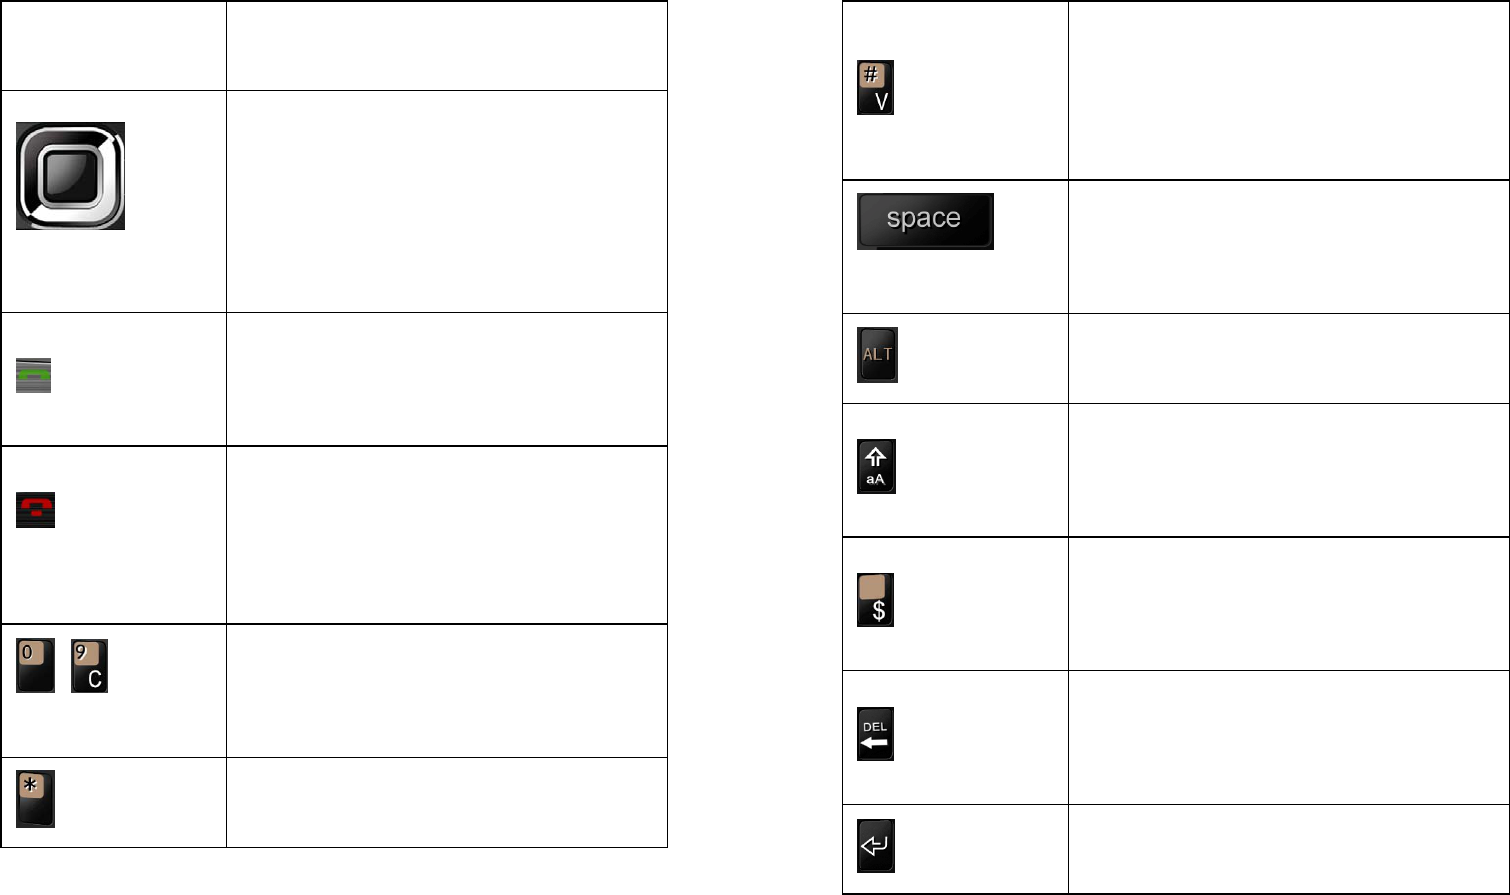
11
menu functions with the left
soft key
Directi
on key
To Roll to browse names,
numbers and menus.
In the idle screen by pressing
the arrow keys to enter the
corresponding shortcut.
Dialing key
To answer or make a call.
In standby mode to enter call
log.
Hang up
key
To end the current call, to
return to standby mode from
the other menus.
Press and hold to power off.
~
Digital key
To input digitals, letters and
special characters.
Star key
It has different functions for
different uses.
12
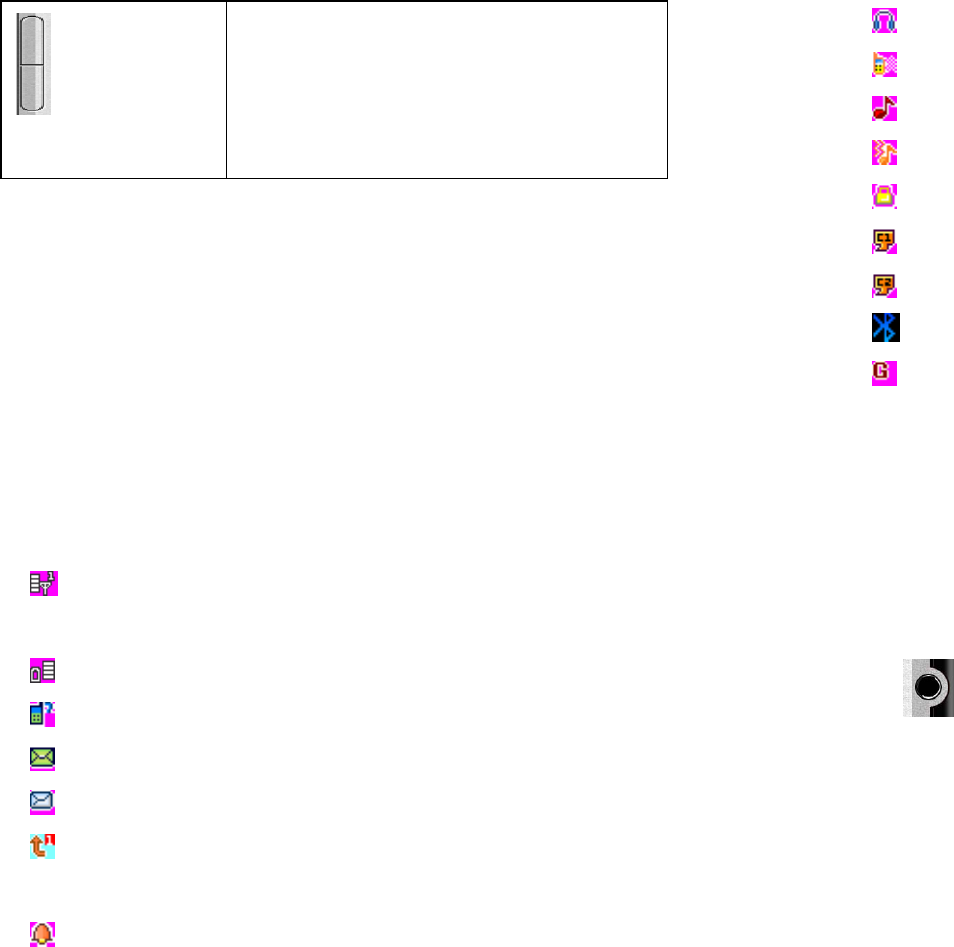
Hash key
It has different functions for
different uses. In Standby
mode, Press and hold to
Activate the saving mode
Spac
e key
To input space.
Alt key The key in the input interface, a
considerable upside key
aA key
The key in the input interfaces,
switching input method for the
ABC
$ key
The key in the input interface,
to switch the various input
methods
DEL key
The key in the input interface,
clear the contents of the input
before
Enter key The key in the input interface, a
considerable ENTER
13
ide up/down
key
This 2 may adjust the volume
size in the volume control
contact surface;
Note: This Manual "Press" certain keys, the key is
pressed after the loose; "Press and hold" of a button,
the key is kept pressed for two or more seconds.
1.3 Icons
ICONS Detail
SIM: show the current location of the
cellular network signal intensity.
Show the battery charge level.
As the missed calls.
Has not read short messages.
Has not read multimedia messages.
Has opened the unconditional call
forwarding.
The alarm is set ‘ON’.
14
The handset is plugged.
Your phone is set to the conference profile.
Your phone is set to the general profile.
Your phone is set to the open-air profile.
Key pad is locked.
The first chart room is opened.
The second chart room is opened.
The Bluetooth is opening.
Use GPRS.
1.4 Earphone
Insert the headset plug into the headset jack in the
phone.
15
2 Getting started
2.1 The Battery
The lithium battery can be charged and discharged
hundreds of times. Please use the approved
batteries, and only use the battery charger
approved by the phone producer to charge your
16
battery.
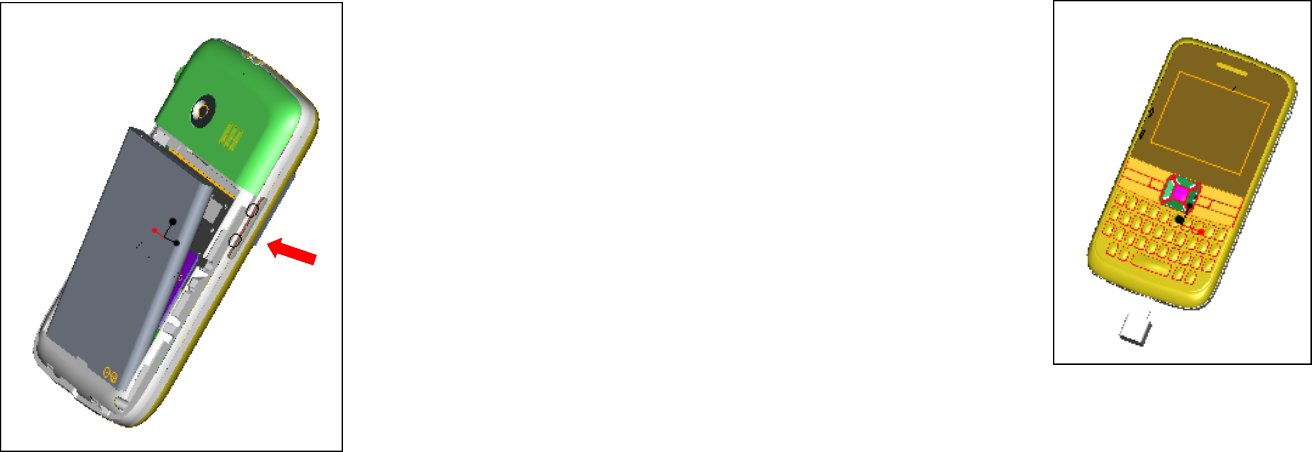
2.1.1 Install & remove a battery
Remove:
(1) Open the lid from the bottom of the phone.
(2) Lift the battery from its slot and take it out.
Install:
(1) Place the battery into the battery slot.
(2) Slide the back cover toward the top of the phone
to lock the cover into its place.
17
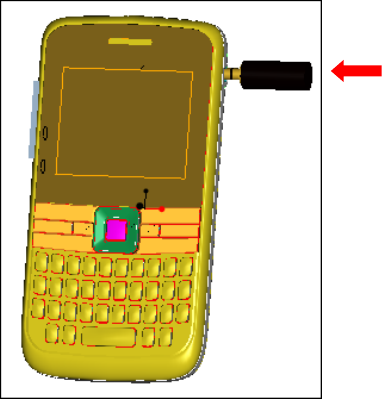
2.1.2 Charging
To plug in the power charger, the charger cable plug
at the top of the phone.
.
18
Note:
1. It is beneficial to the battery to charge it until full
at the first three times.
2. When charging, don’t remove or take out off the
battery to avoid the battery circuit to burn out.
3. While charging, it is normal that the phone and
charger will become hot.
4. If the battery is completely empty, it may take a
period of time before the charging icon appears on
the display.
19
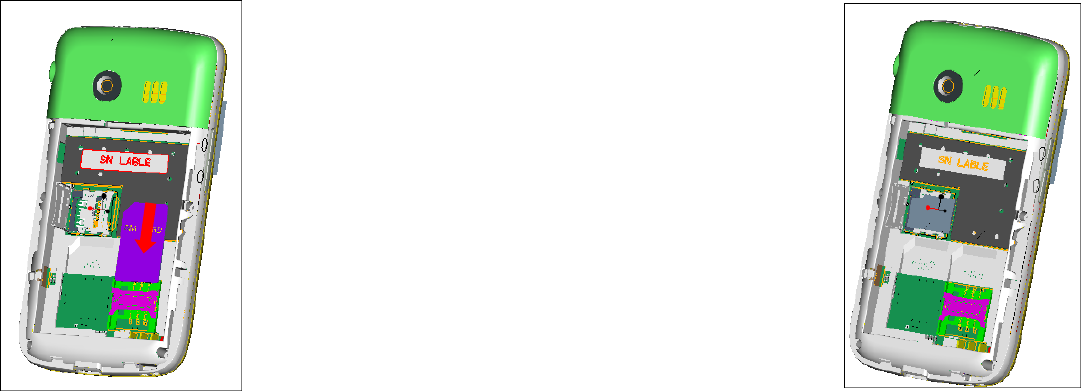
2.2 SIM card installation
Turn off the phone, and take out the battery.
Keep the gold color side of the SIM card downward,
and slide it gently to the right place.
20
2.3 Memory card installation
Power off the phone, and take out the battery or any
other electrical supply.
Keep the golden color side of the Memory card
downward, and push it gently to the right place.
Before take out off the memory card, be sure to
Power off the phone and remove the battery first.
21
2.4 Storage Management
To manage the memory card storage space.
1. The computer and synchronize
This phone does not support USB boot function.
When inserted in a boot USB line, will automatically
enter the "USB settings," the choice of interface.
Election "is the" cell phone turned off automatically
after the start resource management. Election "no",
a state-of-charge cell phones.
In the off-line USB inserted automatically into the
"USB settings" interface. And then automatically
start resource management.
You can enter after the discovery has a number of
preset folders, for normal use, set the relevant
documents were deposited with the corresponding
directory, that is, which corresponds to MP3 folder
My music and video files corresponding folder
Videos, Photos corresponding album Folder,
e-books Ebook corresponding folders, pictures
22
corresponding Images folder. Sound recording,
self-Tone Audio corresponding folder.
Upon completion of the operation, from the desktop
computer when you click on the USB icon in the
lower right corner, appeared to be the "Safely
Remove Hardware" prompt window, select the USB
device and to stop, after the success of the tips off
USB cable.
2. Format
If you format the memory card, all files saved in it
will be lost. By two ways you can format your
Memory card:
Format by phone: enter File Manager—>select
Memory card —>select Format.
Format by computer: Please complete the format
work as following steps:
(1) Right-click "My Computer" and choose
"management", after entering the option "store" ->
"Disk Management";
(2) In the memory card on the disk where the
right-click and choose "format";

23
(3) "Allocation unit size," select "default" to confirm.
After the completion of the format, you need to
manually create Audio, Ebook, Images, My Music,
Photos, Videos, MyNes empty folder, and so on.
2.5 Power on and off
Press and hold key to turn on/off the phone.
And if you have set PIN or phone code, input it
correctly.
3 Call functions
3.1 Make a call
When the network supplier's symbol appears when
the display monitor, you might dial or answer the
telephone. Under readiness for action, display
24
monitor top left-hand corner information strip
demonstration network signal strength (when has 4
information strip expressed signal is strongest).
3.1.1 Make a domestic call
Enter the phone number including the area code.
Press key to make a call.
3.1.2 Make an extension call
When making an extension call, press and hold o
key to get “P” that is a prefix of extension numbers.
It will dial automatically in several seconds since
you dialed the telephone exchange.
viz.: area code—telephone exchange
numbers—P—extension numbers, then press
key.

25
3.1.3 Make an international call
Enter the country code, the area code and the
phone number, press key to dial. ”+” is needed
when input country code, and it can be got by
pressing and holding o key. Dial to Hongkong,
Macao and Taiwan phone ibid.
3.1.4 Make a call from Phone
book
Enter the telephone directory tabulation, the
telephone number which the choice must dial, the
pressed key passes the excessively leftist soft key
choice to use the SIM dials.
26
3.1.5 Redial a call by recent
call lists
In standby mode, press key to find the recent call
lists, scroll to the number or name, and then press
key to use the SIM dials.
3.2 Answer a call
An incoming call window will be displayed as the
phone receives a call. The number will appear on
the window if you have opened this function. Press
key to answer it.
If an incoming call arrived during your operation in
sub window, a new window will be popped to inform
you and your any operation will be broken. If you
missed a call, a missed call log will appear after you
return to the start screen.

27
3.3 Reject a call
You can press key to reject an incoming call.
3.4 Call options
In the call, press up and down arrow keys to adjust
call volume. Left softkey "options" to enter the call
option, or softkey An You "hands-free" public
address activated, hands-free in the activation of
the right softkey "normal" closure of the PA. Call
options with the operation of the menu features the
same method of operation.
The call option only if the call to see the process,
and call waiting, call hold, multi-functional
conference needs to support the network, contact
your network vendor.
In the call option, you can be as follows:
Hold single call To suspend the current call.
End single call At present, the end of the call.
28
New call Enter a new dial-up interface.
Phonebook Into the phonebook menu.
Messages messages into the menu.
Sound recorder The current call for sound
recording.
Silent Open set for the closure, in the quiet of
the open cases, do not send a local voice.
DTMF DTMF for the switch operation.
4 Write text
You may be requested to input text message many
times when you using this phone. For example,
when you write a message or add a new phone
book record, (you can use the corresponding input
methods, Multitap ABC, Multitap abc, Multitap ES,
Multitap es and Numeric.)
You can input characters, letters, digitals or special
characters including punctuations.
29
4.1 Switch input methods
While input a text, press the $ key to switch from
one method to another method.
4.2 English method
Switch to uppercase or lowercase mode.
Press a key once to insert the first letter on the key,
twice for the second letter, etc.
According to the letters and numbers on the keys,
enter the desired.
4.3 Input special character
When use any kind of method, press Sym key to
display the character list, and then press the
direction key to select the item.
30
5 Menu operation
The phone provides a serious of menu. And you can
select it according to your need. The functions exist
in these menus and submenus. Access the menus
by pressing the shortcut key or scrolling.
5.1 Access menus by scrolling
In standby mode, according to the OK button to
enter menu, the arrow keys to scroll through to the
main menu requirements, into the left softkey;
If the menu includes some of the sub-menu, the
arrow keys to scroll through the features you need,
left softkey to enter; An You Back softkey on a menu.
If you choose the features also include options,
repeat this step.
31
6 Menu functions
6.1 Extra
It includes calculator, unit currency converter,
Bluetooth。
6.1.1.1 Calculator
Your cell phone to provide you with a simple
function calculator, you can be up and down arrow
keys around conducting calculation of the operation.
Note: This calculator accuracy is limited, will have a
rounding error.
32
6.1.1.2 Currency converter
Input current exchange rate, you can carry between
domestic and foreign currency translation.
6.1.1.3 Bluetooth
Power: Bluetooth options on and off.
Inquiry audio devices: According to determine
started to search for Bluetooth-free devices, in the
search process you can choose to have the search
link Bluetooth devices operate, the search process
on abolition stop the search.
My device : In your own device, select Bluetooth
devices to enter the option, user can "connect,
rename, delete, delete all, service list, Inquiry new
device" such an operation.
Active device: View online in the name of the
installation and services, select the corresponding
disconnect service disconnection.
33
Settings: enter setup options, you can "Visibility
(on and off), change device name, authentication
(on and off), audio path (leave in phone, forward to
BT headset), FTP settings (shared folder, access
right) "options settings.
About: Bluetooth devices revealed that the Device name,
address Bluetooth devices, supported services and other
information.
6.2 Phonebook
You can store the information in phonebook like
name, phone number etc.
The phone number can be stored in phone or SIM
card.
Press soft right key 1 to enter phonebook in standby
mode. Select a number, then you can use the Call
Send SMS, view, edit, delete, copy, move, duplicate,
send VCard .
34
Note: Sending VCard can only be supported when
the received phone also has this function.
Otherwise the VCard can not be displayed normally
on the received phone.
Printing VCard needs to connect the support which
is the blue tooth the printer. After you connect it
successfully, you may print the VCard.
6.2.1 Quick Search
Select this item to enter viewing phonebook screen.
And there are several rows of character. Click to
select or input the first character of the name. Then
the name satisfying this condition will be displayed.
6.2.2 Search contact
Input the name to fine the corresponding record.
35
6.2.3 Add New contact
Add a new record to phone or SIM.
If add a new record to phone, you can input name,
number, home number, company name, email
address, office number, fax number and Birthday.
Beside these, you can set items as following:
-Associate Picture
Set the current record number of personalized
photo calls. You can choose the default phone as a
personalized picture of the caller picture.
-Associate Sound
From left to right through the phone system's built-in
ring tones and document management folder,
choose Individualized or close calls ring (Note:
document management in a document sent to the
scene only after the model can be chosen).
-Caller Group
You can move any phone number existing in your
phone to a group.
36
Note: The phone records of the existence of SIM
cards, which telephone records can only record the
name, phone number information.
6.2.4 Copy All
-From SIM to phone: Duplicates the SIM card
number to phone.
-From phone to SIM: Duplicates the phone number
to SIM card .
6.2.5 Delete
-From SIM: Delete all the record in SIM card .
-From phone: Delete all the record in phone.
-One by one: Delete the record one by one.
6.2.6 Caller groups
Select caller groups and edit its detail information
37
like Group name, Associate sound, Associate
picture and Member list.
Note: Only the record in Phone can be set as the
member in the group.
6.2.7 Extra Number
- Service dialing Number: service dialing number.
Note: This function needs the network support
- SOS Number: Input SOS number.
Note: This function needs the network support.
6.2.8 Settings
-Memory Status: User can query the memory
capability and already used capability in phonebook
of phone or SIM.
-Preferred Storage: Set the storage place for
record. User can also set it while save the record.
-Fields: Set the content of the vCard in phonebook.
38
-My VCard: Edit the detail information of the owner.
-VCard version: The establishment name card
edition is 2.1 editions or 3.0 editions.
6.3 Fun & Games
6.3.1 Games
Games contain Copter, Puzzle game. Select “Game
Help” to view the details about the games.
6.3.2 MSN
Users can chat in real time through MSN.
39
6.4 Call center
Select call center from main menu, you can view the
information about call history and the general call
settings.
6.4.1 Call history
Access this menu, user can select these items call
history.
call history: You can view the information about
call history, including missed calls, dialed calls,
received calls, you can delete call logs, call timers,
call costs, SMS counter and GPRS counter.
6.4.2 General call settings
Access the general call settings to establish the
sub-menu below, you may carry on establish:
40
6.4.2.1 call settings
Access the call settings to establish the sub-menu
below, you may carry on establish:
- Caller ID: There are these options: “Set By
Network”, “Hide Id”, and “Send Id”.
-Call Waiting:
If it is supported by your service provider, call
waiting will notifies you of an incoming call even if
you are in a call. You can then accept, reject, or
ignore the incoming call.
To make this function available, please contact local
network provider.
-Call divert
Call diverting is a network services, it tells your
network to divert incoming calls to another number
to avoid missing a call.
The following is available: divert All Voice Calls,
Divert If Unreachable, Divert If No Answer, Divert If
Busy, Divert All Data Calls, Cancel All Divert.
-Call Barring
41
If it is supported by your service provider, this
function will enable you to restrict the incoming or
outgoing calls.
-Line Switching
You can switch between line 1 and line 2.
Note: It depends on the service provider whether
line 2 is available.
6.4.2.2 Blacklist
Can be set black list numbers, refused to take calls.
6.4.2.3 Auto Redial
It can dial the same phone number automatically
after a failing dial with this function.
42
6.4.2.4 Speed Dial
Speed dials is a shortcut to dial frequently called
numbers. Set the numbers to speed dials before
use it. User can choose the SIM1 or SIM2 to call.
6.4.2.5 SMS Auto Reply
This feature is open, when the caller refused to take the
local auto-reply message to each other's phone number.
6.4.2.6 More
- Call Time Display
Set it to “on” or “off” state
- Call Time Reminder
There will be a hint sound when the setting time
passed during a call.
43
Off: turn off the function
Single: Input 1-3000(second) between the random
numeral.
Periodic: Input 30-60(second) between the random
numeral.
-Auto quick end:
During the calling, the system hangs up the current
telephone conversation automatically in the user
establishment deadline time.
6.5 Messages
Access this menu, user can select these items like
SMS, MMS, Chat, voice mail server and broadcast
message.
6.5.1 SMS
EMS can be supported in this phone.
44
User can insert picture, animation, melody and
sound etc. User can use template to create the
SMS.
Enter the submenu of Messages, there are several
items like Inbox, outbox, write message, templates
and message settings.
6.5.1.1 Write Message
Enter the submenu of Write Message, user can
select Text Message.
Access Text Message menu to edit message, press
“option” to do as following:
-Done
After finished edit, user can choose “save and
send” ,“send only”, “save”, , “send to many” and
“send By Group”.
-Use Templates
Insert the predefined text in the phone to the
message.
45
-Insert object
EMS can be supported in this phone. User can
insert picture, my picture, predefined animation,
melody, my melody and predefined sound.
Note: Only the phone supporting EMS can received
the message with picture, animation and sound.
-Format Text
Set text style, alignment, new paragraph of the
message.
-Insert Number
Enter phonebook to select the number.
-Insert Name
Enter phonebook to select the name.
-Insert Bookmark
Enter the bookmark in Wap.
-input Method
Change the input method.
46
6.5.1.2 Inbox
Access this menu to view the received short
Messages. Enter it to read the received short
Messages
Press left soft key in view Text Message screen to
do the following functions
-Reply
-Delete
-Edit
-Forward
-Copy to SIM (Or Copy to phone)
-Move to SIM (Or Move to phone)
-Chat: After setting the chat room, you can begin to
chat with the sender.
-Delete all
-Copy all
-Move all
-Use number: Extract the number of the message
or in the message. The length of the number is
between 3 and 40. User can call the number directly
47
or save it to phonebook.
-Use URL: Extract the website in the message and
visit it.
6.5.1.3 Outbox
Access this menu to view the received short
Messages. Enter it to read the uncompleted short
Messages and sent Messages, drafts.
Press left soft key in view Text Message screen to
do the following functions
-Send from
-Edit
-Delete
-Copy to phone (Or Copy to SIM)
-Move to phone (Or move to SIM)
-Delete all
-Copy all
-Move all
-Use number: Extract the number of the message
48
or in the message. The length of the number is
between 3 and 40. User can call the number directly
or save it to phonebook.
-Use URL: Extract the website in the message and
visit it.
6.5.1.4 Write Message
Enter the submenu of Write Message, user can
select Text Message.
Access Text Message menu to edit message, press
“option” to do as following:
-SIM1Done
After finished edit, user can choose “send only”,
“save”, “save and send”, “send to many” and “send
By Group”.
-SIM2Done
After finished edit, user can choose “send only”,
“save”, “save and send”, “send to many” and “send
By Group”.
49
-Use Templates
Insert the predefined text in the phone to the
message.
-Insert object
EMS can be supported in this phone. User can
insert picture, my picture, predefined animation,
melody, my melody and predefined sound.
Note: Only the phone supporting EMS can received
the message with picture, animation and sound.
-Format Text
Set text style, alignment, new paragraph of the
message.
-Insert Number
Enter phonebook to select the number.
-Insert Name
Enter phonebook to select the name.
-Insert Bookmark
Enter the bookmark in Wap.
-input Method
Change the input method.
50
6.5.1.5 Templates
There are ten predefined texts. User can use them
to edit, Erase or Write message.
6.5.1.6 SMS settings
Before using message function, you should do
some settings as following:
-Profile Settings
Contact with local network provider to get the SC
address. After entering the submenu, the setting list
will be displayed. The number of the list is different
according to the network and the type of SIM card,
Select the mode and press “edit” to set the profile
name, SC address, valid period and message type.
-Common settings
Set the delivery report and reply path.
-Memory Status
51
Check memory space of messages in phone or
SIM.
-Preferred Storage
Select to save in phone or SIM.
6.5.2 MMS
6.5.2.1 Write message
Access submenus of “MMS”, there are several
items: To, Cc, Bcc, subject and edit content etc.
Press left soft key in view Text Message screen to
do the following functions.
-Add Number: Add number for receivers.
-Edit: Edit the number of receivers.
-Delete: Delete the current number from receiver
number list.
-Delete All: Delete all the number from receiver
number list.
The subject of MMS can be empty. If it is sent
52
without subject, it will has a default subject: void of
subject.
In the MMS edit interface, you can edit the text, and
press “option” to enter the following items:
-Done: accomplish the edit.
-Input method: Change the input method.
-Add: add picture, audio, video, attachment slide
and bookmark text to the current slide.
-Remove *: delete picture, audio, video, attachment
slide and bookmark text to the current slide.
-Edit *: replace picture, audio, video, attachment
slide and bookmark text to the current slide.
-Preview: preview the current MMS information.
Settings; set slide time, text settings and SMIL
settings.
-Slide timing: select the input method.
After finished the edit work, you can choose “send
only”, “save and send”, “save to drafts”, “send
options” and “exit”.
Note: the option with “*” icon can be displayed in
certain condition. For example, when the current
MMS has the information includes image, sound,
53
video, slide and phone book contact. The size of the
current page will be shown on the upward side of
the edit screen.
6.5.2.2 Inbox
Access this menu to view the received Multimedia
Messages.
Press left soft key in view Text Message screen to
do the following functions.
-Download: download the MMS to the phone.
-Delete: delete the current MMS.
-Delete All: delete all the MMS.
-Use Detail: you can use number or email.
-Properties: you can read the detail information of
the MMS.
After downloaded the current MMS to the phone,
you can do the following work:
-View: view the content of the current MMS. Press
right soft key to stop playing. If the picture size is out
54
of the window’s size, press up/down key to move
and view the picture.
-Reply: select to reply MMS to the sender, and the
subject will be “Re:” and plus the origin subject.
-Reply by SMS: select to reply SMS to the sender.
-Reply All: select to reply MMS to the senders, and
the subject will be “Re:” and plus the origin subject.
-Forward: sent the current MMS to others.
-Delete: delete the current MMS.
-Delete All: delete all the MMS.
-Properties: user can read the detail information of
the MMS.
-Use Details: user can use number or email.
6.5.2.3 Outbox
Access this menu to view the received short
Messages. Choose the SIM1 outbox and enter it to
read the uncompleted MMS and sent MMS, drafts.
55
Press left soft key in view Text Message screen to
do the following functions
Press left soft key in viewing multimedia message
screen to view, forward, edit, delete, delete all, save
as template, properties, use details.
6.5.2.4 Drafts
Store the MMS if user has choose to “save to drafts”
after writing MMS.
Press left soft key in viewing multimedia message
screen to view, send, edit, delete, delete all, save as
template, properties, use details.
6.5.2.5 Templates
Access submenu of Templates, user can choose
Multimedia Message. There are two predefined
MMS in the default and User can view and use them.
User also can save MMS as user defined.
56
6.5.2.6 MMS Settings
Access submenu of Message Settings, user can
choose Multimedia Message. User should do some
necessary settings before using MMS.
-Compose: set creation mode, picture resizing,
Auto signature, signature.
-Send: set validity period, delivery report (the report
that the MMS has been sent successfully or not),
read report (the report that the MMS has been read
or not by the receiver), priority (normal, high and
low), slide timing and delivery time.
-Retrieve: set home network, roaming, read report
and delivery report.
-Filter:set anonymous,advertisement.
-Server Profile: you can select SIM\carry on GPRS
for the settings. The default profile is china mobile
MMS. If you use other network SIM, please contact
with the local operator and set the parameters.
57
-Memory Status: check the space condition.
Note:
1. MMS is multimedia short message. It can provide
multimedia function, transfer various format
message such as word, image and sound etc.
This function needs the supporting of network
operators. Before using, be sure your SIM provides
this function or not. You can consult the network
operators.
If your SIM provides this function, you can send
MMS after some necessary settings.
2.The report situation is related to the service of
your network. Please contact with them for more
information.
3. The storage space left for MMS in the phone is limited.
So if the space is insufficient, please delete some
unnecessary MMS.
6.5.3 Chat
Here provides two chat rooms. User can set “my
58
nickname” and “remote number”..
6.5.4 Voice Mail Server
This is a Network Service, and should be supported
by the service provider.
\
6.5.5 Broadcast Message
Broadcast public information sent by the network
providers. Use Cell Broadcast service, you can
receive information on various subjects from
network provider. For more available information,
please contact your local network providers.
59
6.6 Multimedia
6.6.1 Camera
From the main menu select [media] / cameras,
according to the "OK" to enter. In the preview, you
can be left softkey "options" are as follows: Photos,
Camera settings, Image setting, Storage, Restore
default, to restore the default values in order to carry
out a more detailed set of parameters.
6.6.2 Image Viewer
Select submenu album, you can easily view the
album stored in the camera in the picture list, it may
also choose to view, browse style, use, send,
rename, delete, delete all files, entire albums of
pictures in order and switch Photo album in the
60
store path.
6.6.3 Video Recorder
Access the menu, the screen is in preview state.
While preview, press “option” and do as following:
-Camcorder Settings: include white balance,
banding and video quality.
-Storage: set the storage to phone or memory card.
-Restore default: press left soft key, then the
parameters of the video recorder will restore to
default ones.
6.6.4 Video player
Select video player, you can easily view the saved
list of movies, and "options" to choose the video
player can send, rename, delete, delete all the files,
sorting, storage location of the operation.
61
In the video, according to the * key to switch to
full-screen, full-screen when they press the "*" key
to exit full-screen, according to the # key to switch
Mute,according to the center button can film play /
pause function, according to the up key and the
down key or Side up/down key adjusting the volume,
Note: in the video player to play in the documents
must be placed on the phone or memory card
Videos of document.
6.6.5 Audio player
Select multimedia/audio player item in main menu
to enter audio player interface. Press the scroll up
key to play or pause and scroll down key to stop
Mp3, Press the scroll left/right key to switch to the
previous/next song, Press Side up/down key to
adjust volume. In playing interface, press “List” to
enter the list of song, then press “option” to do the
work such as Play, Details, Add to Rings, Refresh
62
List and Settings.
The concrete operations in Settings are “Pre.Play
List”, “List auto gen”, “Repeat”, “Shuffle”,
“Background play” “Sound effects”and “Lyrics
display”.
Note: If “List auto gen” is opened, the play list will be
created automatically form phone or memory card
according to the storage. If closed, the user should
create or delete the file in play list manually.
6.6.6 Sound Recorder
Access this menu, it will display the saved files in
the list.
Press “option”, and the sub menu is:
Record: begin to record.
Play: begin to play the selected record file.
Append: add record to the selected file which
should be AMR file.
Rename: rename the selected file.
Delete: delete the selected file.
63
Delete all files: delete all the record files in the list.
Settings: set storage and format.
Use: could be the currently selected audio file, use
the User profiles.
Forward: forward the selected record file to User
profile, MMS and Bluetooth.
6.6.7 FM Radio
Enter FM radio, you can press left/right key to
switch the channel manually, down key to pause or
play, up key to set the function of the auto search,
digital key to select the channel in channel list, and
Side up/down key to adjust the volume.
Channel list: it shows the number and name of the
channel stored in the list.
Manual input:You can input your favorite channel
manually.
Preset auto search :Search new channel
automatically, and it will be stored in channel list.
Settings :Enter this menu to open or close
64
background play and loud speaker, set Record
format or select record storage.
6.7 Organizer
You can use various functions provided in this
phone, including calendar, To Do, Alarm, world
clock and E-book reader.
6.7.1 Calendar
Access this menu, the calendar will be shown on the
screen. Press the direction key to change the date,
and the calendar shown on the screen will be
changed accordingly.
65
6.7.2 To do
User can add new task, read the old one or delete
all tasks. After setting a task, the phone will remind
user the information at the time appointed.
6.7.3 Alarm
Set the alarm time and it will remind you by alert
tone or vibration when the alarm time expires.
You can set 5 alarms in the phone at most.
6.7.4 World Clock
User can view the local time of some cities around
the world.
66
6.7.5 E-book reader
You can read TXT format file. While reading, press
“Option” to do the work such as Find, Jump to, Go to
bookmark, Add bookmark etc.
6.8 Settings
6.8.1 Dual SIM settings
- Normal mode: supports SIM simultaneously to
wait for an opportunity the work.
-Flight mode: Select Normal Mode (connect to the
network), Flight Mode (disconnect to the network),
Query When Power On.
67
6.8.2 Phone Setup
- Time and Date
Set the home city, time and date, time and date’s
format.
- Schedule Power On/off
You can set 4 power on/off schedule, and the phone
will power on or power off according to the settings.
- Language
Change the language of the phone.
- Pref. input methods
Select preferred input method.
- Display Characteristic
This can set up wallpaper, screen saver, animated
boot, shutdown animation.
- Greeting text
Edit the greeting text.
- Auto update of date and time
Set the state to “on” or “off”. If the state is “on”, when
connect to the network, the date and time will be
update.
68
- Misc. Setting
Set the time to turn off LCD backlight and set the
Brightness step.
6.8.3 Network Setup
This feature is available to operate network
settings when you are roaming or travel outside.
Access the menu, you can select the network
manually or automatically.
Before use the network, you must contact your local
service provider or the roaming area before you use
this function.
69
6.8.4 Security Setup
6.8.4.1 Security Setup
- SIM Lock
Set the phone to ask for your PIN code each time
you start your phone (if this function is supported by
your SIM card).
Note: After three consecutive incorrect PIN code
entries, the code will be blocked, and you need the
PUK code to unblock it.
The PIN code and PUK code are usually supplied
by the SIM card. If you don’t get them, please
contact with the supplier. The default PIN code is
1234 usually.
-Fixed Dial
If your SIM support Fixed dial, it can limit you to call
fixed number. When the function is on, it can only
call the phone number or phone number start by the
fixed dial number.
70
Note: it needs you to input PIN2 code to open or
close this function. You can get the PIN2 code from
service supplier. If the fixed dial is on, the
phonebook only show the number of fixed dial.
- Change Password
You can change SIM PIN code, PIN2 code
password here.
Note: the three codes are numbers between 4 and 8
digits.
6.8.4.2 Phone lock
Set the Phone lock on or off.
Note: The default password is 0000, please as soon
as possible its change as own establishment
password.
71
6.8.4.3 Auto keypad lock
Press left soft key in standby mode and enter Main
Menu, then press Alt key to lock the keypad. If the
keypad is locked, you can unlock it by pressing left
soft key and then Alt key.
You can set the auto lock time in the submenu of
this function, then the key will automatically be
locked if there is no more action of the phone.
6.8.4.4 Change password
You can change phone lock password here.
Note: the three codes are numbers between 4 and 8
digits.
72
6.8.4.5 Anti theft Setup
Anti-theft phone tracking can be achieved after the
loss, as long as your mobile phone SIM card is
replaced, the phone automatically to the
pre-configured number (tracking number) to send
text messages, users will be able to know whom the
use of mobile phones are.
Enable Abtu Theft: to open or close the anti-theft
tracking.
DesignateNumbers: edit the default tracking number,
when the mobile phone SIM card to replace the
default automatically to the tracking number to send
text messages.
Enable Alarming: open lock feature, when the End
of follow-up messages sent automatically lock the
phone, need to enter the correct password can
unlock.
ChangePassword: modified lock machine password, for
security, please open this feature to modify the initial
73
password (initial password: 0000)
6.8.5 Restore Factory settings
You can reset some of the Phone settings to their
original values by input phone lock password
(0000).
6.8.6 Sound effect
Enters the menu establishment sound special effect,
may use the high and low about key to choose each
effect the balancer and the closure balancer
6.9 User profiles
Profiles define how your phone reacts when you
receive a call or a message, how your keypad
sounds when you press a key, and more. Each of
74
the available profiles can be left at their default
setting or customized to suit your needs. Select and
customize the most suitable profile for your situation.
The available modes are General, Meeting, Outdoor,
Indoor, Headset , Bluetooth and Power-Saving.
In standby mode, you can press and hold key # to
switch to silent mode.
6.10 File Manager
It provides you the functions such as browsing
media files, checking storage space and formatting
function.
When browsing the media files, you can operate the
selected files such as copy,Move, delete etc.
75
6.11 Services
6.11.1 STK
In addition to the functions available on the phone,
your SIM card may provide additional services that
you can access in this menu. It is shown only if it is
supported by your SIM card. The name and
contents of the menu depends on the available
services.
Warning:Contact your service provider for more
information.
6.11.2 WAP
Your phone support WAP function. After the
necessary settings, you can use this function
normally.
Note: To open this function, you should apply
76
GPRS service to your SIM card.
6.11.2.1 Homepage
Visit homepage. If you have not set homepage, it
will visit the default one.
6.11.2.2 Bookmarks
Display the exist bookmarks. And you can visit the
website in this bookmark.
6.11.2.3 Recent Pages
It records the website you have visited recently.
77
6.11.2.4 Input Address
You can input the web address manually.
6.11.2.5 Service Inbox
Store the information sent from the service provider.
6.11.2.6 Settings
Carries on the surfer browsing the establishment.
Edit Profile: the parameter for WAP, including
homepage, data account and connection type.
Browser Options: the interface setting for view the
website, including color, word and background.
Service Message settings: can open it to receive
service message or not.
Clear Cache: empty the cache.
Clear Cookies: empty the cookies.
78
Trusted certificates: Demonstrates the certificate
the name
6.11.3 Data Account
It contains “GSM Data” and “GPRS” data account.
6.11.3.1 GSM Data
Account Name: the name of this account. And it
can be edited.
Number: the number of this account.
User Name: the name of server.
Password: the password of server.
Line Type: set the line type: analogue or ISDN.
Speed: set the speed.
DNS: the IP address.
79
6.11.3.2 GPRS
Account Name: the name of this account. And it
can be edited.
APN: input APN.
User Name: the name of server.
Password: the password of server.
Auth. Type: set the auth. type.
6.12 Shortcuts
You can select application quickly using this
function.
7 Battery information
Your device is powered by a rechargeable battery.
The battery can be charged and discharged
hundreds of times but it will eventually wear out.
80
When the talk and standby times are noticeably
shorter than normal, please buy a new battery.
Use only the approved batteries, and recharge your
battery only with approved chargers designated for
this device.
Unplug the charger from the electrical plug and the
device when not in use. Do not leave the battery
connected to a charger. Overcharging may shorten
its lifetime. If left unused, a fully charged battery will
lose its charge over time.
Warning
Do not drop, knock, or shake the device. Rough
handling can shorten the life of the battery.
Do not make short-circuit occur to the battery.
The battery put in hot or cold places, such as in a
closed car in summer or winter, will reduce the
capacity and lifetime of the battery.
Do not put the battery near flammable or explosive
goods.
Do not dispose of batteries in a fire!
Never use any charger or battery that is damaged.
Use the battery only for its intended purpose.
81
Dispose of batteries according to local regulations.
Please recycle when possible. Do not dispose as
household waste.
8 Safety information
8.1 Operating environment
Remember to follow any special regulations in force
in any area and always switch off your device when
its use is prohibited or when it may cause
interference or danger. Use the device only in its
normal operating positions. Do not keep the device
near credit cards and other magnetism medium,
some accessories can bring magnetism that may be
delete the data.
82
8.2 Electronic devices
Some electronic devices are not adequately
shielded from external RF energy.
8.2.1 Pacemaker
Pacemaker manufacturers recommend that a
minimum separation of 6in (20cm) should be
maintained between a wireless phone and a
pacemaker to avoid potential interference with the
pacemaker. These recommendations are consistent
with the independent research by and
recommendations of Wireless Technology
Research. To minimize the potential interference,
persons with pacemakers should do as below:
Always keep the device more than 6 in (20 cm) from
their pacemaker when the device is switched on.
Not carry the device in a breast pocket.
Hold the device to the ear opposite the pacemaker.
83
If you have any reason to suspect that interference
is taking place, switch off your device immediately.
8.2.2 Hearing aids
Some digital wireless devices may interfere with
some hearing aids. If interference occurs, consult
your service provider.
8.2.3 Other medical devices
Operation of any radio transmitting equipment,
including wireless phones, may interfere with the
functionality of inadequately protected medical
devices. Switch off your phone in health care
facilities when any regulations are posted in these
areas instructing you to do so.
84
8.2.4 Vehicles
RF signals may affect improperly installed or
inadequately shielded electronic systems in motor
vehicles. For more information, check with the
manufacturer or its representative of your vehicle or
any equipment that has been added.
8.3 Potentially dangerous
situations
Switch off your device when in any area with a
potentially explosive atmosphere and obey all signs
and instructions. Sparks in such areas could cause
an explosion or fire resulting in body injury even
death.
Switch off the device at refueling points such as
near gas pumps at service stations. Observe
restrictions on the use of radio equipment in fuel
85
depots, storage, and distribution areas, chemical
plants or where blasting operations are in progress.
Areas with a potentially explosive atmosphere are
often but not always clearly marked. They include
below deck on boats, chemical transfer or storage
facilities, vehicles using liquefied petroleum gas
(such as propane or butane), and areas where the
air contains chemicals or particles such as grain,
dust or metal powders.
9 Care and maintenance
Your device is a product of superior design and
craftsmanship and should be treated with care. The
suggestions below will help you protect your
warranty coverage and enjoy your device for many
years.
Keep your phone and all accessories out of the
reach of small children.
Keep the device dry.
86
Do not use or store the device in dusty, dirty areas.
Its moving parts and electronic components can be
damaged.
Do not store the device in hot areas. High
temperatures can shorten the life of electronic
devices, damage batteries, and warp or melt certain
plastics.
Do not store the device in cold areas. When the
device returns to its normal temperature, moisture
can form inside the device and damage electronic
circuit boards.
Do not attempt to open the device other than as
instructed in this guide.
Do not drop, knock, or shake the device. Rough
handling can break internal circuit boards and fine
mechanics.
Do not contact the device by wet hands, the electric
current may strike and damage it.
Precipitation, humidity, and all types of liquids or
moisture can contain minerals that will corrode
electronic circuits.
Do not use harsh chemicals, cleaning solvents, or
87
strong detergents to clean the device.
Do not paint the device. Paint can clog the moving
parts and prevent proper operation.
All of the above suggestions apply equally to your
device, battery, charger, or any enhancement. If any
device is not working properly, take it to the nearest
authorized service facility for service.
88
RF Exposure Information
The SAR limit of USA (FCC) is 1.6 W/kg averaged
over one gram of tissue. This model (FCC ID:
SG71007HG-U53) has also been tested against this
SAR limit. The highest SAR value reported under
this standard during product certification for use at
the ear is 0.448 W/kg and when properly worn on
the body is 0.387 W/kg. This device was tested for
typical body-worn operations with the back of the
handset kept 1.5cm from the body. To maintain
compliance with FCC RF exposure requirements,
use accessories that maintain a 1.5cm separation
distance between the user's body and the back of
the handset. The use of belt clips, holsters and
similar accessories should not contain metallic
components in its assembly. The use of accessories
that do not satisfy these requirements may not
comply with FCC RF exposure requirements, and
should be avoided.
89
This device complies with part 15 of the FCC rules.
Operation is subject to the following two conditions:
(1) this device may not cause harmful interference,
and (2) this device must accept any interference
received, including interference that may cause
undesired operation.
NOTE: The manufacturer is not responsible for
any radio or TV interference caused by
unauthorized modifications to this equipment. Such
modifications could void the user’s authority to
operate the equipment.
NOTE: This equipment has been tested and found
to comply with the limits for a Class B digital device,
pursuant to part 15 of the FCC Rules. These limits
are designed to provide reasonable protection
against harmful interference in a residential
installation. This equipment generates uses and
can radiate radio frequency energy and, if not
installed and used in accordance with the
90
instructions, may cause harmful interference to
radio communications. However, there is no
guarantee that interference will not occur in a
particular installation. If this equipment does
cause harmful interference to radio or television
reception, which can be determined by turning the
equipment off and on, the user is encouraged to try
to correct the interference by one or more of the
following measures:
- Reorient or relocate the receiving antenna.
- Increase the separation between the equipment
and receiver.
-Connect the equipment into an outlet on a circuit
different from that to which the receiver is
connected.
-Consult the dealer or an experienced radio/TV
technician for help