Haier Telecom 200611HG-A7 GSM Mobile Phone User Manual H2113 eng version
Haier Telecom (Qingdao) Co., Ltd. GSM Mobile Phone H2113 eng version
UserManual.wiki
>
Haier Telecom
>
200611HG A7 User Manual
users manual
Navigation menu
Upload a User Manual
Namespaces
Wiki Guide
HTML
PDF
Info
Views
User Manual
Discussion / Help
Navigation

![CEC Wireless 84-20-0042-20-06 6 Shayla 2006/04/20 3.2.1.4 Hotkey settings Description was changed to “press [OK] or [Confirm] soft key to enter function list”. 3.4.1 E-book Change “Add” to “Create”. 3.5.1.1 Edit SMS Options of “Phonebook” and “Group” were deleted and option of “Insert preset SMS” was added. 3.5.1.2 Mailbox Change “Distill sender’s number” to “ Save sender’s number”. 3.6.1.4 Options menu Change “Picture album” to “Photo album”. 3.6.7 Multimedia date Change “Phone capacity query” to “Capacity query”. 3.6.4 Video player For “Send”option, descriptions of “Up/Down” and “Left/Right” keys were modified. 3.6.2 MP3 player Descriptions of “Up/Down” and “Left/Right” keys were modified. 3.8.4 Universal time Change “Universal time idle screen” to “Universal time”. 1.2 Screen Icon of Call diverting was modified.](https://usermanual.wiki/Haier-Telecom/200611HG-A7/User-Guide-749847-Page-6.png)
![CEC Wireless 84-20-0042-20-06 7 Shayla 2006/05/18 All “Short messages” were changed to “SMS”. 1.1.1 Number/alphabet key Correlative operation definitions were modified. For the details you can refer to “Editor inputting content form”. 1.1.4 Key operation when without SIM card Change pressing [SKL] to enter MP3 to entering main menu. 3.2.1.1 Screen settings For “Color theme”option, description was modified to “you can select certain scheme to preview by “Up”/ “Down” key and save the settings by the Left Soft or “OK” key. 3.2.6.1 Firewall For option of “Junk number list” under “SMS Firewall”, “Query” was changed to “Lookup”. For option of “Reject list” under “Incoming call Firewall”, the description was changed to “this menu includes 3 sub-menus of “Add new name”, “Lookup”and “Delete all”. “Delete all” was added. For “Secret Firewall”, the description was changed to “you can activate/inactivate this option by the Left Soft key and save the settings by OK key”. 3.3 Enviorment modes “Activate settings” was changed to “Activate” and “Change name” was changed to “Rename”. 3.5.1.1 Write SMS “Send immediately” was changed to “Send”. 3.5.2.1 Write MMS For “Add/delete pictures”, Change “Picture album” to “Photo album”. 3.5.2.6 MMS settings “Valid period” was changed to “Valid time limit”. 3.3.6 Games Description of “you can also select the embedded games by “JAVA” menu” was deleted. 3.7.6.1 Create shopping list “Press Left/Right key to select finish/unfinished” was changed to “Press OK key to select finish/unfinished”. 3.8.1 Mobile phone dog Additional description of “Service center number: 0571-88850667” was added. 2.6.2 Phonebook list “Query” was changed to “Lookup”. 3.1 Haier Eden Description was changed to “this mobile phone provides operations of SMS world, MMS world, Internet surf and entertainment zone, etc”. 3.2.4 Date and time Additional description of “when the value you input is not in the range, the default minimum/maximum date or time will be displayed automatically” was added. 3.3 Enviorment modes “SMS remind” was changed to “SMS reminding way” and “Notebook remind” was changed to “Notebook reminding way”. 3.5.1.2 Mailbox “Set to favorite” was changed to “Move to favorite” and “Set to dustbin” was changed to “Move to dustbin”.](https://usermanual.wiki/Haier-Telecom/200611HG-A7/User-Guide-749847-Page-7.png)
![CEC Wireless 84-20-0042-20-06 9 Description of “you can also press [*] key to input minus” was changed to “after inputting numbers you can also press [*] key to input minus /cancel minus”. Shayla 2006/06/06 3.8.4 Universal time “Universal time zone” was changed to “Universal time”. Shayla 2006/06/15 Modifications for Russian version: 1.1 Keypad area “Haier Eden key” was removed. 1.1.2.1 Keypad control key “Confirm([OK])key(Haier H key)” was changed to “Confirm ([OK]) key”. 1.1.3 Key operation under idle state “Press confirm ([OK]) key to enter Haier Eden” was changed to “Press confirm ([OK]) key to enter main menu”. 3.1 Call record “3.1 Haier Eden” was changed to “3.1 Call record”. 3.4.1 E-book Description of “only support E-book coded with Unicode” was added; Description of “embedded files of《Haier is sea》and 《Sunzi military science》cannot be deleted” was deleted. 3.6.7 Multimedia data Description of “Mobile phone cartoon” was deleted. 3.5 Personal information Sections of “3.5.4 Mobile QQ” and “3.5.3 Call record” were deleted。3.8 Haier treasure box Sections of “3.8.1 Mobile dog” and “3.8.6 Haier service number” were deleted. Shayla 2006/06/20 Modifications for Russian version: 2 Function introduction Sections of “2.7 Lunar calendar and 24 solar terms” and “2.8 Reminder of festival congratulations” were deleted. 3.2.1.1 Screen settings For menu of “Idle screen settings”, sub-menu of “Lunar calendar” was removed. 3.7 Tool box Section of “3.7.1 Constellation and luck” was deleted. 3.2.5.3 Network account Some descriptions on China network settings was deleted 3.6.7 My documents “3.6.7 Multimedia data” was changed to “My documents”. 3.8 Tool box “3.8 Haier treasure box” was changed to “3.8 Tool box”. 1.1.1 Number/alphabet key Descriptions on Chinese Star Pinyin and Chinese Star Stroke were deleted. 2.5 Inputting method Descriptions on Chinese Star Pinyin and Chinese Star Stroke were deleted and Russian Multi-Tap was added. Descriptions on “Inputting line”and “Line waiting for choosing” under option of “Screen layout”were modified.](https://usermanual.wiki/Haier-Telecom/200611HG-A7/User-Guide-749847-Page-9.png)
![CEC Wireless 84-20-0042-20-06 10 Shayla 2006/06/21 Modifications for Russian version: 3.4.3 IRDA Description of “Above parameters set, such as “*98*1#”, are parameters of China mobile and just for your reference” was added. 1.2 Screen Network icons were modified. Shayla 2006/06/22 2.6 Phonebook For option of “Phonebook classifying”, number of supported name card records was changed from 1000 to 500. 1.1.1 Number/alphabet key Under capital letter mode, it was changed to long pressing number keys can input correlative numbers. 1.1.2.1 Keypad control key For option of “Left and Right key”, description of “Under Pinyin and Stroke inputting state, it is used to move the selected character or Pinyin combination” was deleted. 2.6.1 Lookup Description of “For Chinese records it is looked up according to the first letter of Pinyin” was deleted. 3.5.1.2 Mailbox For option of “Store SMS text number”, description of “This option appears only when there is number in SMS text” was added. 1. Mobile phone introduction 1.1 Keypad area This phone has total 26 keys, which can be divided, into 3 parts: • Number/alphabet key area, total 12 keys • Keypad control key area, total 9 keys, including Up/Down/Left/Right/OK/Left Soft/Right Soft/On/off/PickUp keys. • The outer flip of the phone has 5 control keys that are Up/Down/Left/Right/OK keys. 1.1.1 Number/alphabet key There are 12 Number/alphabet keys, which are listed in certain standard. 10 of them are [0]~[9] keys and the others are [*] and [#] keys. In keypad area you can input number or character. According to different screen environments the same key can input different values, which is illustrated as the following table: Number Calculator Keypad Tag Capital letter Small letter Chinese Star English Long press Short press Password Currency Time Short press Long press](https://usermanual.wiki/Haier-Telecom/200611HG-A7/User-Guide-749847-Page-10.png)
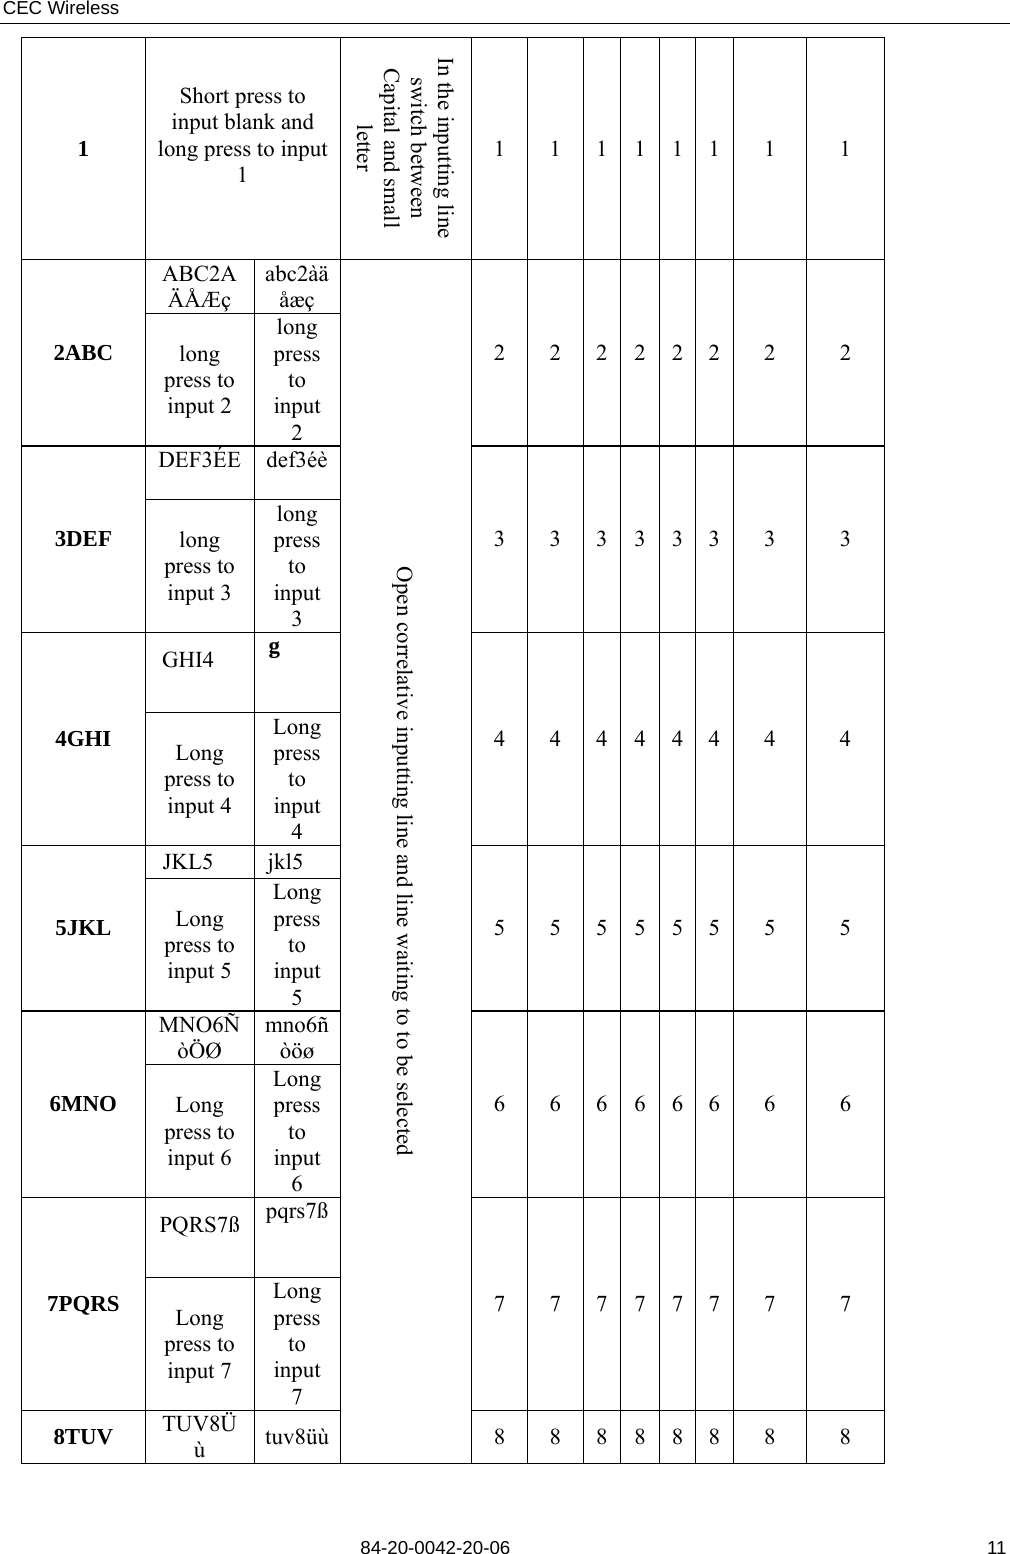
![CEC Wireless 84-20-0042-20-06 12Long press to input 8 Long press to input 8 WXYZ9 wxyz9 9WXYZ Long press to input 9 Long press to input 9 9 9 9 9 9 9 9 9 0 Short press to input blank and long press to input 0 0 0 0 0 . 0 0 0 * Input symbols . Plus/minus sign Plus/minus sign # Switch between inputting modes . . 1.1.2 Control key 1.1.2.1 Keypad control key [On/Off] key: It is red key on the right side of keypad. Another names are red key or power supply key. • When it is off, you can turn on the phone by long pressing the key. • When it is on, you can turn off the phone by long pressing the key under any state. • Under menus and editing state, short pressing the key can return to idle screen. • During a talk you can end the current call by pressing this key. • When there is an incoming call you can reject the call by this key. [PickUp] key: It is green key on the left side of keypad. Another name is green key. • When there is an incoming call you can answer the call by this key. • When dialing a call you can short press the key for normal dial and long press to dial with IP(if the special service number of IP has been set) Left Soft ([SKL]) key and Right Soft ([SKR]) key In keypad area the Left Soft key is on the uppermost left and the Right Soft key is on the uppermost right. Generally they are corresponded to functions indicated on the soft key indicating area on the lower screen. Basing on different definitions of programs there are different functions. Direction key: Includes 4 keys of Up/Down/Left/Right keys. [Up] key and [Down] key: • They are used to turn pages to display characters waiting to be selected in editor. • Browse menu/list with same level • Browse SMS’s content or other long text information.](https://usermanual.wiki/Haier-Telecom/200611HG-A7/User-Guide-749847-Page-12.png)
![CEC Wireless 84-20-0042-20-06 13• When pictures are under previewing they are used to select previous/next picture. • When talking they are used to regulate volume to turn up/down volume gradually. [Left] key and [Right] key: • They are used to move the cursor left/right in the editor. • Browse main menu. • Turn pages when contact list in phonebook is browsed. • When pictures are under previewing they are used to select previous/next one. • During talking short pressing Left key can activate silence mode and press the 2nd time to cancel silence. • During talking short pressing Right key can activate hand free and press the 2nd time to cancel hand free. [OK] key It is in the middle of 4 direction keys and another name is middle key. It is the default confirm key. 1.1.2.2 Outer flip control key There are 5 control keys on the outer flip of the phone: Up/Down/Left/Right/Middle keys. These 5 keys can be valid only when the flip is closed. Operation details on Outer flip control keys are as following: • Under flip-closed and idle state long pressing Middle key can play MP3. • When playing MP3 you can regulate volume by pressing Up/Down key on the outer flip; you can select previous/next file by short pressing Left/Right key and speed/quickly back by long pressing; You can pause/resume playing by short pressing Middle key and exit from player by long pressing it. 1.1.3 Key operation under idle state z Press [OK] key to enter main menu. z Press [Up] key to enter call record. z Press [Down] key to enter phonebook list. z Press [Left] key to enter multimedia player. z Press [Right] key to enter SMS menu. z Press [PickUp] key to enter outgoing call list. z Press the Left Soft key to enter main menu. z Press the Right Soft key to enter phonebook. z You can input phone number directly by number keys. Then you can dial or enter correlative options menu. z You can use hot keys(long press number keys)to enter correlative shortcut menu. In the above keys definitions, shortcut functions of 4 direction keys and hot key are the default shortcut functions ex-factory and you can reset under menu of hot key settings. But hot key functions of 0, 1, *, and # are fixed and you cannot modify. 1.1.4 Key operation when without SIM card z Press [OK] key to enter main menu. z Press [SKL] to enter main menu. z Press [SKR] to enter “SOS”. 1.2 LCD This phone is a clamshell with sole LCD. The graphic area of the main display is 128(width)×160](https://usermanual.wiki/Haier-Telecom/200611HG-A7/User-Guide-749847-Page-13.png)
![CEC Wireless 84-20-0042-20-06 151.4 SIM card assembly and unassembly SIM card assembly Please buy SIM card from network service supplier. There is your phone number and user registered information stored in the SIM card. SIM card can be used in any GSM mobile phone with your phone number and registered information unchanged. z Ensure the phone is off. z Unpack the battery cover(push the side button downward by one hand and pull the battery cover out from the groove near the button by the other hand at the same time). z Unpack the phone battery. z Put the SIM card’s metal side downward(towards the phone), with the SIM card with bevel outward and push the SIM card to the SIM card slot horizontally. z Pack the battery. z Cover with the battery cover(Put the couple of wider tubers on the side of the battery cover right on the grooves of the mobile side slot. then push the other side of the battery cover and it can be locked with the phone). SIM card unassembly z After the phone is turned off, unpack the battery cover and the battery. z Push the SIM card outward horizontally to get the SIM card out. z Pack the battery and cover the battery cover. 1.5 Battery charging Warn: Only battery, charger and accessories certificated by Haier to be applicable to the specific type of mobile phone can be used. Using other types of battery, charger and accessories is possible to violate the recognization or guarantee clauses of the mobile phone and lead to danger. Don’t place the battery on the places overheated or overcooling and please put it on the place where children are out of reach. z Insert the charger’s plug into the electrical socket of 220V alternating current. z Insert the charger’s adapter into the connector at the bottom of the mobile phone and push the adapter into the connector slot. z The electricity bar in the icon of the battery power starts to scroll, which indicates the mobile phone is in charge state. In off state, charging cartoon will be displayed on the LCD. z After the battery is fully charged, the icon stops scrolling and now you can take it out from the mobile connector. Note: The only way to stop charging after beginning to charge is drawing the charger out. So please use plug easy to insert and draw. 2. Function introduction 2.1 On Turn on Normally you can turn on the mobile phone by long pressing [On/Off] key. Input PIN code To prevent others from using your SIM card easily you can set PIN code. After settings PIN code is](https://usermanual.wiki/Haier-Telecom/200611HG-A7/User-Guide-749847-Page-15.png)
![CEC Wireless 84-20-0042-20-06 16needed when the mobile phone is turned on. z Input PIN code.(For the concern of secrecy, “*” will replace the inputted number; for wrong inputting you can use the Right Soft key to clear). z The mobile will confirm the PIN code is right by [OK] key. Then it starts to register network. Once network’s name is displayed on the screen, you can dial or answer calls. Otherwise registering to the network for the second time is needed. Note: SIM card will be locked after inputting of PIN code is wrong for three times. Then you should contact SIM card supplier. 2.2 Off Turn off In all conditions you can turn off the mobile phone by long pressing [On/Off] key. 2.3 Dial • You can use this function only after network’s name is displayed on the screen. • Input phone number. • You can press [PickUp] key to dial directly or you can choose dial menu in options menu. If you choose IP dialing and IP number has been inputted under phonebook menu(for example IP special service number China Mobile supports is 17951)the service number will be added before the inputted number by you automatically and dialing is made. End a call You can end a c all by pressing [End] soft key or [On/Off] key. Dial a dialed number If you press [PickUp] key on the idle screen “Outgoing call” list will be displayed on the phone. You can choose any one of them by [Up]/[Down] key, then press [PickUp] key to dial directly. Dial an international call • You can press [*] key until “+”is displayed on the screen. • Input country number. • Input area number(Generally the beginning “0” is not included)and phone number. • You can press [PickUp] key to dial directly or you can choose dial menu in options menu. Dial two numbers at the same time (Network support is needed) You can hold the current call and dial another call at the same time: • Press the Left Soft key to enter menus to select “Call holding” to hold the current call and input phone number directly on keypad. Then press [PickUp] key to dial. • You can also press the Left Soft key to enter menu of “Phonebook” to select a number. Then you press [PickUp] key to dial and the previous call will be in holding state. Switch calls (Network support is needed) If you have 2 calls at the same time, one is held and the other is activated. You can press the Left Soft key to enter menus to select “Switch” to switch between the 2 calls. 2.4 Answer a call Answer a call You can press [Answer] soft key or [PickUp] key to answer. Reject a call](https://usermanual.wiki/Haier-Telecom/200611HG-A7/User-Guide-749847-Page-16.png)
![CEC Wireless 84-20-0042-20-06 17You can press [Reject] soft key or [On/Off] key to reject. Answer the second call (Network support is needed) If call-waiting function has been set when there is a second call, reminding will pop up. Now you can: • Answer the second call and the current call is held. • Reject the second call by pressing [On/Off] key. 2.5 Inputting method The inputting method used in the mobile phone is Chinese Star. During using you need to input text messages frequently, such as names in phonebook, SMS, text in notebook, etc. There are 5 types of inputting mode: • Russian Multi-Tap • Intellectual English: Chinese Star Intellectual English is allow; • Multi-Tap(abc/ABC): You can press the key with the letter you need. Once pressing will display the first letter on the key and quick pressing twice will display the second letter on the key. Analogically you can press until the needed letter displayed on the screen; • Number(123): Inputting of numbers is allowed; Switch inputting mode After opening an editor you can switch inputting mode by pressing [#]. Pressing [#] key repeatedly can switch between inputting modes calculatedly. Input symbol Under all inputting modes you can switch to symbol inputting screen by pressing [*] key. You can input symbol by pressing the number key on the left side of the symbol. Then it will return to the previous inputting mode automatically. If the symbols cannot be displayed on one screen you can turn pages by [Up]/[Down] keys. Screen layout Text area Inputted text will be displayed. Inputting line The most popular letters combination that consists of letters inputted by you will be displayed. Line waiting to be chosen The line waiting to be chosen is under the inputting line. If the letters combinations cannot be displayed in one line you can turn pages by [Up]/[Down] keys. Delete If the inputting line is not empty the most right character or symbol will be deleted firstly if you press the Right Soft key. At the same time the content of the line waiting to be chosen will be updated until the whole inputting line is deleted to empty. Long pressing the Right Soft key will clear the whole inputting line. If the line waiting to be chosen is not empty and the inputting line is empty the content of the line waiting to be chosen will be cleared firstly if you press the Right Soft key. If both of the inputting line and the line waiting to be chosen are empty the character left to the cursor in text area will be deleted if you short press the Right Soft key. If no character is on the left side, the character on the right side will be deleted. Long pressing the Right Soft key will delete all contents in text area. If the text line is empty, short pressing the Right Soft key twice will exit from the current editor and return to the previous state. 2.5.1 Russian Multi-Tap The operation is the same with that of Intellectual English and you can refer to “2.5.2 Chinese Star](https://usermanual.wiki/Haier-Telecom/200611HG-A7/User-Guide-749847-Page-17.png)
![CEC Wireless 84-20-0042-20-06 18Intellectual English”. 2.5.2 Chinese Star Intellectual English For each letter of the wanted English word, you only need to press the corresponding number key once, regardless of the list sequence of the letter on the key. All possible letter combinations will be displayed on the inputting line. You can move the cursor to the line waiting to be chosen by [Down] key. If there is an arrowhead on the right it means there are alternatives and you can press [Up]/[Down] key to choose. Then press [Left]/[Right] key to move the selecting box to the desired word and press [OK] key to finish the word’s inputting. The English word will be added after the current cursor in the text area. 2.5.3 Multi-Tap(abc/ABC) The inputting is operated in the text area directly. You can press the key with the letter you need. Once pressing will display the first letter on the key and quick pressing twice will display the second letter on the key. Analogically you can press the key repeatedly until the needed letter displayed on the screen. 2.5.4 Number(123) The inputting is operated in the text area directly. You press number keys of [0]-[9] and the corresponding number will be added to the editing text area. 2.6 Phonebook The mobile phone provides phonebook and you can save the frequently used numbers and messages in the SIM card or mobile phonebook. At the same time you can also lookup, add, modify, dial, send SMS and etc. Note: When the phone is just turned on the phonebook cannot be used temporarily for it is under initialization. You can try later. Phonebook classifing Phonebook can be classified into 2 kinds: SIM card Phonebook(Capacity depends on that of SIM card)and mobile Phonebook(Can save 500 name cards). Their contents and operations are different. However they are mixed in the list. There is a icon seemingly like SIM card on the right of the SIM card number records while there is a seeming icon of the default domain on the right side of the mobile phonebook’s records. z SIM card Phonebook Each record of SIM card includes a name, a number and an ID image. z Mobile Phonebook(That is Intellectual Phonebook) Each record of Intellectual Phonebook is called “Name card”. Each name card includes the following information: Name ID image Group Number, includes 5 kinds of numbers and you can input one or several types of them. The numbers are Mobile number, Office number, Family number, Fax number and Pager number. Email Address Postal code](https://usermanual.wiki/Haier-Telecom/200611HG-A7/User-Guide-749847-Page-18.png)
![CEC Wireless 84-20-0042-20-06 19 Note Each name card should contain name (Can not be empty) and at least one piece of information of other catalogs. In mobile Phonebook, you can group the name cards. When the focus is on the group settings box you can select different group by the Left/Right key and different group has different ring. 2.6.1 Lookup You can enter the mix list of SIM card and the mobile phonebooks through the menu. Firstly you can input the desired name or the first character of the name or directly press [OK] key to enter the list. If the inputted name or the first character exists in the list, the list will scroll to the first record satisfying the requirement. Otherwise it will display from the first record. Using technique: You can press [Down] key to enter phonebook list directly under idle state. When looking up phonebook list, you can move to the record beginning with the letter quickly by pressing the first letter of the name and then browse with the keys of [Up]/[Down]. Take [2] key for example, there are only characters of “A”, “B”, “C”defined as valid “Pinyin character” for this key. Then if you press key [2] in the phonebook list, it will automatically look up the Chinese and English names beginning with the three characters one after another in the phonebook. Using technique: if there are names beginning with A and C in the phonebook and record beginning with C is your needing, you can press key [2] once to get names beginning with A and press key [2] twice to get names beginning with C. 2.6.2 Phonebook list You can enter the mix list of SIM card and the mobile phonebooks through the menu to view all records. Entering the phonebook list, you can select certain record by pressing “Up”/ “Down” key. In options menu you can take the following operations: z Add: Add new contacts and numbers. z Lookup: You can input the first character of the desired name to look up the contact. z Dial : This menu of “Dial”includes “IP Dial”、 “Dial”、 “IP Hand free dial”、 “Hand free dial”. Before IP Dial you need to input IP special service number first. z Send SMS: You can send SMS to the default number of the selected record. z Send MMS: You can send MMS to the default number of the selected record. z Send name card: You can send the information of selected contact to others by SMS. z Send by IRDA: You can send the selected contact to the available IRDA equipment nearby. z Modify: Modify the selected record. z Delete record: Delete the selected record. z Quick dial: Set the shortcut key for the default number of the selected record. z Copy to the mobile(If the record is in the SIM card): If you copy the selected SIM card record to the name card of the mobile phonebook, the phone number of SIM card record will be put in the cell phone number domain in the name card(and is automatically set as default domain). z Copy to SIM card(If the record is in the mobile): The name card of selected mobile phonebook has 5 phone numbers for the most. This operation will copy all phone numbers to the SIM card and each number is a record in the SIM card. The names of the records are the same, which come from the name domain of the name card.](https://usermanual.wiki/Haier-Telecom/200611HG-A7/User-Guide-749847-Page-19.png)
![CEC Wireless 84-20-0042-20-06 22 In idle state you can enter main menu by pressing the Left Soft key. You can select menus by [Up]/[Down]/[Left]/[Right] keys. After choosing any menu you can enter the sub-menu by pressing [OK] key. Note: In the main menu you can also directly press keys from “1” to “9” to enter the corresponding menus. You can browse all levels menus by keys of [Up]/[Down] and enter the sub-menu by pressing [OK] key or [Confirm] soft key. Short pressing [Return] soft key will return the upper-level menu. Short pressing [On/Off] key can directly return to idle state. 3.1 Call record 3.1.1 Outgoing call After entering “Outgoing call” menu you can see outgoing calls records(All dialed calls from the phone no matter if it is answered). Selecting certain record in the list you can directly dial by the green PickUp key and also check the time of the outgoing call by pressing “OK” key. Now you can press [Options] soft key to enter options list and the functions can be operated are: • Dial: This “Dial” menu includes “IP dial”, “Dial”, “IP hand free dial” and “Hand free dial”. • Send SMS: You can send SMS to the selected number. • Edit before dial: You can open dial screen with the selected number displayed on the screen. You can directly press the green key to dial or edit before dial. • Send number: You can send the others the selected number by SMS. • Delete: You can delete the call record. • Check number: You can check the phone number. • Save(this option will appear only for unsaved number): You can save the selected number into phonebook. • Set as rejecting call: You can add the number into the rejecting call list. If the selected item is in the phone the default number will be added into the rejecting call list. • Set as desiring call: You can add the number into the desiring call list. If the selected item is in the phone the default number will be added into the desiring call list. 3.1.2 Answered call After entering “Answered call” menu you can see answered calls records on the screen. Operation is same with that of “Outgoing call”. 3.1.3 Missed call After entering “Missed call” menu you can see missed calls records on the screen.(The rejected incoming calls are also missed calls). Operation is same with that of “Outgoing call”. 3.1.4 Delete You can delete all call records under “Outgoing call”, “Answered call” or “Missed call”. 3.1.5 Call timer • Last call: Last call time. • Outgoing call: Outgoing calls time. • Answered call: Answered calls time. • Reset: Reset all calls time to zero.](https://usermanual.wiki/Haier-Telecom/200611HG-A7/User-Guide-749847-Page-22.png)
![CEC Wireless 84-20-0042-20-06 233.1.6 Last GPRS operation The byte numbers of last GPRS throughput will be displayed. 3.2 Mobile phone settings 3.2.1 Phone settings 3.2.1.1 Screen settings Wallpaper You can select pictures under different folders as wallpaper. Color theme You can set the color theme of the phone. After entering menu of “ Color theme”, you can select certain theme to preview by “Up”/ “Down” and save the settings by the Left Soft or “OK” key. Contrast adjust You can change the backlight contrast of the screen. Idle screen settings You can designate the idle screen type of the screen, such as “Digital”, “Analog”, etc. Backlight You can set the lasting time of backlight. Welcome text This menu will open text editor and you can edit the welcome text after the On animated picture. 3.2.1.2 Auto on/off The phone can be turned on/off automatically. You can set it on or off. 3.2.1.3 Languages You can set the language of the displayed menus and reminding messages. 3.2.1.4 Hot key settings This function provides you quick execution of some often used orders without entering menus to confirm one by one and it is very convenient. Thereunto, keys of [0], [1], [*], and [#] are fixed and not to be changed by you. Long pressing [0] key you can enter WAP; Long pressing [1] key you can dial voice mailbox; Long pressing [*] key you can input “+”; Long pressing [#] key you can activate or close meeting mode. Note: Hotkeys are only valid in the idle screen. After entering hotkeys menu you should select a hotkey firstly and press keys of [OK] or [Confirm] soft to enter functions list. Now you can select from them and reset for the hotkey. The shortcut settings can be canceled by selecting “Clear hotkey”. In idle state if the key is preset long pressing certain key from 2-9 can execute the set function. If it is still not set “No hotkey” will be alerted. After confirming the functions list will be opened and you can set directly. 3.2.2 Ringer settings 3.2.2.1 Incoming call ringer There are totally 6 groups in the mobile phonebook. Different group has different ringer to let you know which group the incoming call comes from. In each group there are 2 kinds of ringer to select. When you are browsing the selected ringer will be](https://usermanual.wiki/Haier-Telecom/200611HG-A7/User-Guide-749847-Page-23.png)
![CEC Wireless 84-20-0042-20-06 25When the user is busy or rejects to answer, the incoming call will be forwarded to the preset number. No reply When the user does not reply the incoming call will be forwarded to the preset number. Not reachable When the user is unreachable the incoming call will be forwarded to the preset number. Cancel The phone applies to the network to turn off call forwarding. Status You can get all forwarding status by the query. 3.2.4 Date and time You can input and set the date and time of the phone. You can press “Up”/“Down” key to move the cursor to the editor of date and time and directly press number keys to input. If the value you input exceeds the range, the default minimum/maximum values of date or time will be displayed automatically. 3.2.5 Network settings 3.2.5.1 Preferred networks Preferred networks list is saved in the SIM card and the list decides the trying sequence of the phone when auto registering networks. z Show list The preferred networks list is displayed and the network with highest priority is listed in the upper. You can enter “Preferred networks” by pressing [Confirm] soft key. Then pressing [Preferred] soft key you will be reminded with “Preferred networks confirmed”. As a result the network is moved to the utmost of the list, indicating it is with the highest priority. z Delete list After confirming you can see the preferred networks list and you can select one of them to delete by pressing [Delete] soft key. z Available networks After it is confirmed the available networks will be searched and listed on the screen. You can select any one of them and add it at the end of the preferred networks list by pressing [Add] soft key. z Add existing networks After it is confirmed the existing networks saved in the phone will be searched and listed on the screen. You can select any one of them and add it at the end of the preferred networks list by pressing [Add] soft key. z Add network code After it is confirmed the editor will be opened. You can input the mobile country code and mobile network code ordinally. After confirming again you can add the code into the preferred networks list. 3.2.5.2 Attach GPRS When you are attaching GPRS you can choose from “Always attached" or “Attached during using data”. 3.2.5.3 Network account In this menu you can select certain connecting account. When you use WAP or send MMS, the selected mode is connected to GSM or GPRS network. Note: Normally the configured files and parameters of the phone have been set when it is from factory. If you want to add or change configured parameters you should contact the network operator to get the correct ones. If you cannot use normally for reasons that you have changed the configuration or the network operator has changed the configured parameters, please forgive that we will not inform and not assume the](https://usermanual.wiki/Haier-Telecom/200611HG-A7/User-Guide-749847-Page-25.png)
![CEC Wireless 84-20-0042-20-06 26following results. Please consult the network operator to get the latest information. The following options depend on the operator and or the applied service. The main reason of wrong information during connection is wrong parameter. If wrong connection occurs please contact your network operator for more details. Some operator will send you Internet surfing parameters in SMS. Some preset configured modes may be locked to avoid resetting and renaming. In this menu the connecting account list will be displayed and you can select certain account. You can open options menu by pressing the Left Soft “Option” or OK key. The options include “Check” and “Edit”. You can browse the currently selected account information by “Check” and edit the account information by “Edit”. The detailed editing contents are: Account name You can rename the selected connecting account. Network carrying You can use WAP in 2 ways: the classical GSM or GPRS. Now you can set : Only use GPRS: Only use GPRS. Only use GSM: Only use GSM. GSM settings You can set: z Data call type: ISDN(number way)or analog way. z Phone number: Input the needed outgoing number. When the phone is on line the number will be dialed automatically. z User name: Logging on the WAP server needs the user name. z User password: Logging on the WAP server needs the user password. GPRS settings You can set: z APN settings: Set the name of importing point. z User name: Logging on the WAP server needs the user name. z User password: Logging on the WAP server needs the user password. 3.2.5.4 Register again After confirmation the phone will search the available network immediately that will be listed on the screen. After you have selected one of them and press [Register] soft key the phone will try to register on the network. 3.2.6 Guard settings 3.2.6.1 Firewall SMS Firewall SMS Firewall function provides you with a simple and quick way to avoid the Garbage SMS. After receiving the SMS the phone recognizes if it is “Garbage SMS” and saves “Garbage SMS” in “Garbage SMS box” temporarily. • SMS Firewall settings You can make correlative settings related with garbage SMS receiving by the menu. If you have set “Against garbage”, when there is a new SMS from the Garbage SMS number, you will be reminded of garbage SMS according to the “Alert type” you have set. Then it will be moved to “Garbage SMS box”. If you have set “By mobile phone only”, when there is a new SMS, the phone will judge if the SMS](https://usermanual.wiki/Haier-Telecom/200611HG-A7/User-Guide-749847-Page-26.png)
![CEC Wireless 84-20-0042-20-06 30once. 3.4.2.5 Delete passed By selecting the menu and confirming, you can delete all passed schedules once. 3.4.2.6 Capacity You can check the using conditions, used numbers, total numbers and used percentage of schedules by this menu. 3.4.2.7 Weekly/Monthly After Organizer is entered, the current monthly calendar is the firstly displayed. Mark on the date box of certain day means there is a schedule at that day. You can switch to weekly calendar by selecting “Weekly” soft key. Under weekly screen you can also switch to monthly calendar by selecting “Monthly” soft key. You can check the detailed schedules of certain day by pressing direction keys to select the day and then pressing [OK] key. 3.4.3 IRDA The phone is integrated with infrared technology, called IrDA, which allows you to connect wirelessly with another equipment up to IrDA standards(such as another mobile phone, computer or PDA, printer, etc)to send or receive data. Note: The files with copyright protection cannot be sent. When connecting with a computer you should enable the IrDA firstly. Receive To ensure the success of connecting you need to put the IrDA connector of the phone rightly on another equipment’s IrDA connector in a valid range. When other equipment is sending you data, you will be reminded of if to accept. When receiving you can see the correlative information on the screen. The receiving will be canceled on the following conditions: z The mobile phone cannot find the other equipment and there is an over-elapse of time before data transmission. z IRDA connection blocked. z The delivered file is oversized and cannot be managed in the mobile phone. Modem You may connect the mobile phone with PC in this option. If connection succeeds, the mobile phone can be used as a Modem. You should put the IrDA connector of the phone rightly on PC’s IrDA connector in a valid range. It will begin to connect by the menu is selected and the below setting process takes Windows 2000 for example. 1. Put the IrDA connector of the phone rightly on PC’s IrDA connector closely and select “Modem”. Then the phone will begin to connect. 2. If it is the first time to connect a drive will be installed on the PC automatically. If it is successfully installed, a wireless icon will appear in the tray of taskbar on the right-down corner of the PC screen. 3. Selecting “Phone and modem options” from control panel of PC and switching to “Modem” after opening the dialog box, you will see a successfully linked modem in the modem list, normally named as "Standard Modem over IR link”. If several IrDA modems have been installed, it may be named as “Standard Modem over IR link #n”, n is plus integer, such as 1, 2, 3, etc. Certain connecting COM port will be displayed after the modem, such as COM3, COM4, etc. 4. Select the modem of “Standard Modem over IR link #n” connected to certain COM port and press “Property” button on the dialog box to set the property of the modem. Switch to “Advanced” and input at+cgdcont=1,"IP","cmnet" in “Additional initializing order” inputting box. Finally you](https://usermanual.wiki/Haier-Telecom/200611HG-A7/User-Guide-749847-Page-30.png)
![CEC Wireless 84-20-0042-20-06 32• Entertainment • Personal assistant • Email • Customer service 3.5 Personal information 3.5.1 SMS(Network support is needed) SMS service provides a convenient and cheap way to communicate and you can send text messages to the accepter quickly. You can send messages to other mobile phones or other equipments that can receive SMS by “SMS” menu. 3.5.1.1 Write SMS Note: Before sending SMS you should set correct SMS service center number that can be gotten from the network supplier. When you enter “Write SMS”, the cursor stays at the editing box of “Send to” firstly. If the editing box of “Send to” is empty you can input numbers in the editing box directly or open phonebook list to select contact by “OK” key. If the editing box of “Recipients” is not empty you can press OK key to open group recipients list to add numbers. After inputting recipients, you can press “Down” key to move the cursor to the text-editing box of SMS to input. After the SMS is inputted you can press the Left Soft key to open options and operations provided are : z Send and save: Send and save SMS. z Send now: Send SMS. z Save: Save SMS to unsent messages. z Save as user define: Save SMS to user define SMS list. z Add icon: Open icon list and you can select icon. z Insert defined SMS: Open defined SMS list and you can select and insert. Note: When sending fails, you can resend. If sending always fails please check the SMS service center number. 3.5.1.2 Mailbox Received SMS is saved in mailbox. SMS can be saved not only in SIM card(capacity depends on SIM card)but also in the phone which can save 1000 numbers. You can choose the preferred place and if the preferred space is full (an empty position will be maintained in SIM card) it will be saved to non-preferred place. In mailbox, saved SMS list is displayed, which can be checked by [Up]/[Down] keys. After selecting any SMS at random and pressing [SKL] key you can delete the SMS or all SMS in the set. After selecting any SMS at random and pressing [OK] key you can enter the next page to check the detailed content of the SMS. Now the Left Soft “Options” are: z Reply: Set the sender’s number as the aim number and open SMS editor in which you can input SMS content and send to the sender. z Forward: By menu of “Forward”, the selected SMS content will be displayed in the editor. You can send it out after editing. z Delete: Delete the SMS.](https://usermanual.wiki/Haier-Telecom/200611HG-A7/User-Guide-749847-Page-32.png)
![CEC Wireless 84-20-0042-20-06 33z Dial: Distill the sender’s number and dial. z Move to garbage bin: Move the SMS to garbage bin. z Save sender’s number:(If the sender’s number is not in phonebook)you can distill the sender’s number and save. z Store SMS text number: You can distill the number in SMS text and save and dial. The option will appear only when SMS text contains numbers. z Move to phone: The option will appear only when SMS is saved on SIM card. z Move to favorite: Move the SMS to favorite. z Move to safer: Move the SMS to safer. 3.5.1.3 Unsent messages If you select “Save” after editing, the SMS will be saved in the mailbox. In the mailbox, saved SMS list is displayed on the screen in list, which can be selected by [Up]/[Down] keys. Pressing the Left Soft key can delete the selected SMS or all SMS in the set. After selecting any SMS at random and pressing [OK] key you can enter the next page to check the detailed content of the SMS. Now the Left Soft “Options” are: z Send now: You can send SMS to the sender directly. If no sender you can input. z Forward: By menu of “Forward”, the selected SMS content will be displayed in the editor. You can send it out after editing. z Delete: Delete the SMS. 3.5.1.4 Sent messages If you select “Send and save” when sending, the SMS will be saved in the mailbox after successfully sent. In the mailbox, SMS is displayed on the screen in list, which can be selected by [Up]/[Down] keys. Pressing [SKL] key can delete the selected SMS or all SMS in the set. After selecting any SMS at random and pressing [OK] key you can enter the next page to check the detailed content of the SMS. Now the Left Soft “Options” are: z Send now: You can send SMS to the sender directly. z Forward: By menu of “Forward”, the selected SMS content will be displayed in the editor. You can send it out after editing. z Delete: Delete the SMS. 3.5.1.5 Favorite You can move the SMS in Inbox to favorite. In favorite, you can select any SMS by [Up]/[Down] keys. Pressing the Left Soft “Delete" key can delete the selected SMS. After selecting any SMS from the list and pressing [OK] key you can enter the next page to check the detailed content of the SMS. Now the Left Soft “Options” are “Reply”, “Forward”, “Delete” and etc. 3.5.1.6 Garbage bin it is used to save garbage SMS. After selecting any SMS at random and pressing [OK] key you can enter the detailed page. Now the Left Soft “Options” are: • Delete: Delete the current SMS. • Clear: Clear all garbage SMS. • Move to inbox: Move the selected SMS to Inbox. 3.5.1.7 Settings All options listed on the screen are:](https://usermanual.wiki/Haier-Telecom/200611HG-A7/User-Guide-749847-Page-33.png)
![CEC Wireless 84-20-0042-20-06 36Details By selecting the menu you can check information of the currently edited MMS, such as topic, recipients, etc. 3.5.2.2 Inbox Received MMS is saved in Inbox. You can select certain MMS by [Up]/[Down] keys and download or play the MMS by OK key or open “Options” by the Left Soft key. If the selected MMS is still not downloaded, the options provided by the Left Soft key are “Download”, “Delete” and “Delete all”. “Download” can download the MMS from the server to the phone and “Delete” can delete the selected MMS. If the selected MMS has been downloaded to the phone, the “Options” provided by the Left Soft key are: z Check: You can play the selected MMS by the menu or by OK key. z Reply: Reply the sender. z Reply all: If CC of your received MMS is not empty, that is the sender has copied the MMS to other contacts when sending to you, you can reply all contacts including both the sender and the CC by selecting the menu. z Forward: Forward the MMS with opening MMS editing screen and the original content in the editor. You can send after editing. z Dial: You can distill the sender’s number and dial. z Delete: Delete the selected MMS. z Delete all: Delete all MMS in the mailbox. 3.5.2.3 Unsent messages Unsent MMS are listed. If certain MMS has been selected from the unsent MMS list, the “Options” provided by the Left Soft key are: z Check: You can play the selected MMS by the menu or by OK key. z Send now: You can resend. After successful sending this MMS will be deleted from “Unsent MMS” automatically and saved in Send MMS. If sending fails the MMS will still be saved in “Unsent MMS”. z Delete: Delete the selected MMS. z Delete all: Delete all MMS in the mailbox. 3.5.2.4 Sent messages There are MMS sent successfully and you choose to save. If certain MMS has been selected from the sent MMS list, the “Options” provided by the Left Soft key are: z Check: You can play the selected MMS by the menu or by OK key. z Send now: You can resend. z Delete: Delete the selected MMS. z Delete all: Delete all MMS in the mailbox. 3.5.2.5 Draft box After editing and choosing to select you can save the MMS to draft box. If certain MMS has been selected from the MMS list, the “Options” provided by the Left Soft key are: z Check: You can play the selected MMS by the menu or by OK key. z Edit: You will enter editing state of MMS editor with the first page content of selected MMS displayed and you can modify the current MMS. z Delete: Delete the selected MMS.](https://usermanual.wiki/Haier-Telecom/200611HG-A7/User-Guide-749847-Page-36.png)
![CEC Wireless 84-20-0042-20-06 37z Delete all: Delete all MMS in the mailbox. 3.5.2.6 Settings In the menu all options that can be set will be displayed on the screen: Auto-save on send You can enable or close. If it is enabled MMS will be saved in mailbox no matter whether it is sent successfully. Successfully sent it is saved in Sent MMS and failed to send, in Unsent MMS. MMSC You can input or change the MMS service center number. Network settings By selecting the menu you can enter the next page with 3 sub-menus: Network account, Gateway address and Gateway port. You can select an account from the network account list and you can edit Gateway address and Gateway port. Validity period You can set the validity period of the sent MMS and saved in service center. Read report You can enable or close. If it is enabled, the recipient is required to send you a read report. If the recipient chooses to send you can receive a read report; if he refuses to send you cannot receive. Delivery report You can enable or close. If it is enabled you can get a delivery report to inform you the delivery status. Priority You can set the priority of the currently edited MMS. Page timing You can set page-playing time. Message retrieval You can select the downloading mode after receiving MMS: Manual or Auto. Maximum message size (KB) You can set maximum message size of received and sent MMS. 3.5.2.7 Capacity You can check the saved MMS numbers in each mailbox, total occupied space and the rest space. 3.5.3 Voice mail Note: You can forward the incoming call to voice mail by setting “Call forward”(the number used by the caller to leave voice messages). Call voice mail When there is a voice mail, the phone will give reminder. Now you can call voice mail number to listen to the messages. In idle state long pressing [1] key will auto dial your voice mail number. Voice mail number Generally you need to get number from network supplier and the number can be used to: • leave messages by the caller(the number can be set in Call forward/…/Voice mail) • You can get the messages by keypad inputting. Here you can input “Get voice mail number” to use “Call voice mail” function.](https://usermanual.wiki/Haier-Telecom/200611HG-A7/User-Guide-749847-Page-37.png)
![CEC Wireless 84-20-0042-20-06 383.5.6 Community Broadcast Network service allows you to receive all kinds of text messages, such as news, transportation information. These SMS are provided by network to all users of certain area. If the service has been enabled, network will provide you with available message channel number. Reception You can choose to enable or close. If it is closed, any broadcast message will not be received no matter whether the corresponding channel number has been set. When broadcast SMS arrives, content of SMS will be displayed on the idle screen until you press keys to return. Broadcast SMS will not be saved in the phone or SIM card. So you cannot check once after you exit. Note: If the function is enabled, the lasting time of the battery will be shortened. Channel list < New channel> You can add new channel in channel list, which is to add a new type of received broadcast. The channel number can have 3 digits for the most. Existing channel list After certain number has been selected at random, operations provided by [Options] soft key are: z Change: You can change channel number. z Delete: You can delete the channel number from list and then you cannot receive the channel messages. 3.6 Entertainment assistant 3.6.1 DC and DV The phone has embedded digital camera which can shoots photos with different pixel, quality and effect and photos can be added frame. In DC and DV you can switch to DV or DC by the Left Soft “Option”. 3.6.1.1 Preview After entering “DC” or “DV” in “Entertainment assistant”, the phone will enter view finding and previewing state. On the left-up corner of previewing screen the current state of DC or DV will be displayed. Under view finding and previewing state you can operate as followings: z Left Soft key: Activate the option menu whose detailed contents please refer to the next section. z Right Soft key: When the shortcut option column or option menu is not opened, pressing the key will exit the DC/DV; if the shortcut option column or option menu is open it is used to shut off the shortcut option column. z Left/Right key: it is used to activate and select the options provided by shortcut option column at the bottom of screen. Operations on shortcut option column please refer to the next section. z Up/Down key: When the shortcut option column is not opened, it is used to adjust focus; if the shortcut option column is open it is used to select the currently selected options provided by shortcut option column at the bottom of screen. z OK key: it can be used for shooting or recording. 3.6.1.2 Shoot/Record You can press OK key to shoot or record. Shot photos will be saved in phone with default file name. After shooting and the phone has returned to view finding and previewing state, you can shoot continuously. Shot photos will be saved in phone with default file name after they are shot and the phone will return to](https://usermanual.wiki/Haier-Telecom/200611HG-A7/User-Guide-749847-Page-38.png)
![CEC Wireless 84-20-0042-20-06 42Rename the selected file. Detail Display the detailed information of the selected file, such as file name, file size, etc. Send Send the selected file in 2 ways: “By MMS” and “By IRDA”. After selecting a file by Up/Down key, you can play the selected file by OK key. In playing screen you can take following operations: z OK key: Play/Pause, long pressing can stop playing. z Up/Down key: Short pressing can select the previous/ next file and long pressing can quickly back /speed. z Left/Right key: Regulate volume. z Left Soft key: Full screen/Normal, it is used to switch to view in full screen. z Right Soft key: Stop/Return. Note: For playing effects of high quality please try to select video files with the bitrate no higher than 256kbps and frame speed no higher than 15 fps. If bitrate of the file you select is too high playing will be not smooth. You can check the bitrate of the selected file by “Details” in the Left Soft “Options”. 3.6.5 Audio recorder The phone supports audio recording for a long time. As long as you have enough saving space you can record at your will. Entering “Audio recorder” you can begin to record by OK key or selecting “New episode” in “Options”. During recording you can Pause/Resume recording by OK key or the Left Soft key. You can stop recording by the Right Soft key or long pressing OK key with the audio file saved in “Audio album” in “Audio recorder” with the default name. Now the operations provided by the Left Soft “Options” are: z New episode: You can record new audios. z Audio player: You can open audio player and play the just recorded audio. If episode has just been recorded you can directly play the just recorded file after opening audio player. Otherwise it will not be played. 3.6.6 Games The phone supports embedded games for your entertainment. 3.6.7 My documents “My documents” is used to manage all photos, videos, mp3, pictures and audios in the phone. You can select certain set and press OK key to enter. Files in the phone will be displayed in list or breviary picture. Now the Left Soft serves as “Options”. Basing on different files types you can take all kinds of operations, such as preview, play, delete, rename, view details, etc. You can check the total capacity, used capacity, and used percentage of total capacity of the phone by “Capacity” in “My documents”. For the reason that file allocating table produced by file system or profiles of the phone will occupy some space, the used space is not zero even though no any file is saved in your phone. 3.6.8 JAVA The phone supports JAVA. You can not only enable the embedded JAVA, but also install and enable the other games and application programs downloaded by WAP or USB by JAVA 3.7 Health assistant 3.7.1 Biorhythm graphs In this function you can get the changing graphs of Energy, IQ and Mood during a month basing on Birthday and calculating day you input. You can also check conditions of the previous day ([Left] key), the](https://usermanual.wiki/Haier-Telecom/200611HG-A7/User-Guide-749847-Page-42.png)
![CEC Wireless 84-20-0042-20-06 43next day ([Right] key), the previous month ([Up] key) and the next month ([Down] key) in main interface. 3.7.2 BMI When entering the menu you can switch between inputting boxes of weight and height by Up/down key. You can input your weight and height by pressing number keys in inputting boxes. During inputting you can clear by the Right Soft key. When inputting finished, you can get the BMI by pressing the Left Soft or OK key. The corresponding explanations of BMI in different ranges are: • 16 or less->cacotrophia • 16 – 18.5-> underweight • 18.5 – 24.99 -> normal weight • 25 – 29.99 -> overweight • 30 – 39.99 -> obesity • 40 or greater -> morbid obesity 3.7.3 Calorie Calculator Calorie Calculator calculates calorie consumed to maintain the basic living without the effects of mental tension, diet, muscle activity, outer temperature, physiology and pathology, etc, in quiet or sleeping state. Entering the menu you can select gender by Left/Right key and switch the cursor between inputting boxes of age, weight, height by Up/Down key to input. When inputting finished, you can get the optimum calorie absorbed quantity by pressing the Left Soft or OK key. 3.7.4 Menses The function can help ladies to calculate the safe period and dangerous period conveniently. Entering the menu and after inputting correlative values in inputting boxes you can open the following options by OK key or the Left Soft key: z Check contraception date: you can enter the next page to check contraception information. z Check pregnancy date: you can enter the next page to check pregnancy information. z Help: you can open to check helps information. Check screen In the screen you can check the conditions of the previous/next month basing on your inputted parameters by Left/Right key. Different colors have different meanings: Purple: Using graduate changing purple to mean the dangerous period and the darker means that the chance to be pregnant is bigger. Blue: Means it is safe. Pink: Means menstrual cycle. Note: For contraception/pregnancy information normally displayed the values inputted by you must be in the inputting range. 3.7.5 Rational shopping The function can help you to record the goods need to be bought conveniently. You can view, add, modify, and delete the buy list. Entering the menu added shopping list will be displayed. If the list is empty, “list is empty, if create?” will be reminded to you. If the shopping list the icons in different colors indicate the different types of shopping list. For lists with close preset period and still not finished a red icon will be displayed on the left; for list still not finished a green icon will be displayed on the left; for the list outdated and finished it will turn to grey. You can select certain shopping list by Up/down key and operations provided by the Left Soft “Options”](https://usermanual.wiki/Haier-Telecom/200611HG-A7/User-Guide-749847-Page-43.png)
![CEC Wireless 84-20-0042-20-06 45This mobile phone supports lazy bone. When it is on you must press OK key twice to shut off alarm really. Otherwise pressing other keys can only pause ringer temporarily and it will resume after a while. 3.8.2 Calculator The calculator can execute the four basic arithmetic operations of Plus/Minus/Multiple/Divide. You can enter the number for calculation directly in the calculator menu. The numeric keys correspond to numbers, and the [#] key refers to the decimal point. You can input "*/+-" by pressing the [Up] /[Down]/[Left]/[Right] keys. You can input Minus/Cancel minus by pressing [*] key after numbers are inputted. Finally pressing [OK] key to get the calculating result. Pressing [SKL] key can have following options: Reset, MC, MR, MS, M+, and Exit. • Reset: Clear editing window and input again(has no effect on contents of memory) • MC: Memory Clear, Clear numbers in memory. • MR: Memory Read, read numbers in memory with the numbers saved in memory. • MS: Memory Store, store the displayed number into memory. • M+: Memory Plus, plus the displayed number with the number in memory and save the result in memory. • Exit: you can exit from calculator. 3.8.3 Universal time The function helps you to check times of main cities in different time zones and you can set the phone time with the selected city’s time. You can select if to use Summer time. There are 2 time lines respectively on the upper and down side of the world map. The upper line is time of certain foreign area and the down line is local time. If there is a mark of Summer time on the side of the city it means it is Summer time for the city. You can check other cities with different longitudes and latitudes using direction keys. You can set foreign cities in options menu: Summer time and Set as local. 3.8.4 Stopwatch The starting time of 00:00.0 is displayed on the screen. It will begin to time after [Start] soft key is pressed with the soft keys change to [Pause] and [Clear]. Pressing [Pause] key can pause timing and you can resume timing by [Resume] soft key or OK key. Pressing [Clear] soft key can reset the stopwatch value to zero. The phone’s stopwatch allows you to record several groups’ values. You can record several groups’ values by pressing OK key during timing. The maximum groups number is 6. After 6 groups have been recorded, you still can record new value by OK key with the earliest record replaced by the new one. 3.8.5 Count-down timer The function is similar to that of alarm clock except that you need to set the rest time of reminding for timer. After it is enabled, you should input time and press OK key to save. Then the timer begins to count down. When time is up you will be reminded. Note: If the phone is off the timer can be auto turned on to remind you that time is up. 3.9 WAP The phone has embedded WAP browser through whom you can browse contents of WAP in Internet. Note: You need to register data business function to network operator to visit Internet. For details please consult your local network operator. When using WAP browser for the first time you need to set WAP first. Note: some items allocated in your phone may have been set as WAP parameters of certain network operator when in factory. if you are user of the network operator you can use directly. If you are not the user of the network operator, you must reset.](https://usermanual.wiki/Haier-Telecom/200611HG-A7/User-Guide-749847-Page-45.png)