Users Manual
1 of 35 Copy Right Reserved
User Manual
Copyright
The copyright of this manual is reserved. Without written permission, any part of this manual is not
allowed to be revised, copied or transmitted in any way.
Statement
This manual does not provide any warranty or related declaration. We will not be responsible for
any directly or indirectly data lost caused by this manual or products it mentioned. All information
in this manual including the products specification, pictures and literatures are just for reference,
we reserve the rights to update contents of this manual without further information.
Trademark
The trademark used in this manual is just for interpretation if possible.
Guidelines for operating environment
z Please do not operate your laptop in a dirty or dusty environment.
z Do not use your laptop in a moist place, such as exposing it in rain or humidity; don’t
use it in moist basement; Never leave your laptop near the electrical cooker or kettle
full of vapor.
z Do not expose the laptop to the direct sunlight for long time. Never leave your laptop
in the car with direct sun shining.
z Always keep the venting holes clear. Do not operate the laptop on soft surface; such
as the quilt, sofa or blanket, to make sure venting hole can work normally and avoid
the laptop over heat. Also please leave the laptop keep away from electrical heater or
furnace to keep good ventilation.
z Do not keep laptop in cold (under 0℃) or high temperature (above 50 ℃), which may
lead to hardware working unnormally.
z Do not put the laptop near magnetic field.
z Don’t place the laptop on unstable go-cat, chair or desk, to avoid any damage once
laptops slip down.
z Do not put heavy objects on the laptops, to avoid any damage.
z Make sure the laptop free of dramatic shock or impact; always use proper bag to
carry the laptop, don’t hide many things in the bag to avoid any damage to the LCD
screen.
z Never spill any liquid to the laptop; never eating when using the computer, keep the
drinks far away, to avoid the food or drink spoil any components or cause malfunction.
Do not use the computer by wetting hand, to avoid water soaking inside.
z Shut down your laptop when plane taking off or landing off. Do not use the laptop
near the medical apparatus in hospital.
Instructions for Laptop using
z Do not use laptop for long time, which could cause tiredness or injury. Watching the
LCD screen could cause eyestrain; keeping your body in the same pose for long time
or repeating same action may result in muscle injury, such as operating keyboard,
touch pad or mouse frequently or long time.
z Please adjust LCD screen angle, height of desk and chair to get most convenient and
comfortable position.
2 of 35 Copy Right Reserved
z The laptop will emit heat to the surface of machine during operating or charging;
don’t put the laptops on your knees or any other parts of your body, to avoid any
discomfort caused by the heat from laptop.
z Don’t touch or press the LCD screen with hand and never shut laptop heavily to
avoid violent damage.
z To avoid overheating and make sure machine working normally, never cover the heat
emitting holes.
z Don’t insert any objects into ventilation or other holes in the laptop, otherwise could
lead damage to the internal components.
z In case the laptop can not be shut down normally, please press down the power key
for over 4 seconds to switch off.
Instructions for using the LCD screen correctly
z To avoid unnecessary damage to the laptop, please handle it gently when open or
close the LCD screen cover.
z Don’t put any objects on the LCD screen, to avoid damage to inside components.
z Don’t touch the LCD screen with finger or any other sharp objects.
z To avoid scratching, don’t let the LCD screen touched with hard objects (such as
button, watch belt and buckle, etc.)
z Don’t use any chemical reagent for cleaning the screen.
z Please use the special cloth to wipe the screen, don’t use hand to avoid leaving
fingerprints on it.
z Don’t let any liquid soak into the LCD screen to avoid damaging inside components.
Instructions for using the power adapter
z To make sure the laptop work normally, the power supply must comply with the
voltage range marked on the adapter. If you are not sure of working voltage, please
consult with distributor or your local power supply company.
z Please don’t use unapproved adaptor to this laptop, and it could not be used for
other electrical equipments.
z Please don’t place any objects on the power line, don’t put it at trampled place.
z Hold plug socket when plug out power line, don’t drag the cable line directly.
z The adapter will be heating after working, please keep it into good ventilation.
Cautions for battery using
z Please only use dedicated battery together with this laptop, or buy the same model
battery from authorized distributors.
z Please shut down the laptop before changing or taking out the battery.
z Don’t refit or disassemble the battery without authorization.
z Don’t play with the battery and keep it away from children’s reach.
z Handle the battery safely. Never expose the battery to fire, otherwise it could lead
explosion.
z Please handle waste battery according to local laws or rules, don’t discard it widely.
Cleaning
z Before cleaning the laptop, please shut off the computer, take out the plug from
socket and take battery out.
z Please use the special cloth and water for cleaning the laptop, don’t use rough or
corrosive material for cleaning, and never use any chemical cleanser.
Maintenance
z Improperly disassembly could lead to electrical shock or other dangerous results.
Please consult our technicians if you have any questions.
z Please keep the packing box in case there is need to send it back for maintenance.
z Please refer to distributor’s warranty manual for detailed guarantee clauses.
z Please take out the power plug and consult with professional technicians in the
following cases:
9 Damages on the cable line and plug
9 Liquid entry into the machine.
9 The laptop dropping to floor or housing case broken.
3 of 35 Copy Right Reserved

DIRECTORY
READING INDEX ...........................................................................................................5
MAIN CONTENTS ...........................................................................................................5
REGULATION ...........................................................................................................5
CHAPTER 1ST LAPTOP INTRODUCTION .........................................................................................6
1.1 POSITIVE ............................................................................................................................…6
1.2 LEFT SIDE..............................................................................................................................7
1.3 RIGHT SIDE............................................................................................................................8
1.4 BOTTOM ...............................................................................................................................9
1.5 STATU S INDICATOR ...............................................................................................................9
1.6 POWER KEYPAD & IMPLEMENTATION KEYPAD ..................................................................11
CHAPTER 2ND HOW TO USE ............................................................................................12
2.1 CONNECTING THE BATTERY.................................................................................................13
2.2 CONNECTING AC ADAPTER...............................................................................................13
2.3 LAPTOP CARRYING ...............................................................................................................14
CHAPTER 3RD OPERATION METHOD ..........................................................................................15
3.1 USING TOUCHING PAD.........................................................................................................15
3.2 KEYPAD OPERATION............................................................................................................17
3.3 SOUND SYSTEM....................................................................................................................18
CHAPTER 4TH POWER SYSTEM.................................................................................................19
4.1 POWER ADAPTER..................................................................................................................19
4.2 BATTERY SYSTEM.................................................................................................................19
4.3 POWER MANAGEMENT........................................................................................................20
CHAPTER 5TH BIOS SETTING ..................................................................................................24
5.1 ENTER BIOS SETTING INTERFACE.........................................................................................24
5.2 ADVANCE SETTINGS ............................................................................................................25
5.3 SETTING BOOT SEQUENCY ...................................................................................................26
5.4 SECURITY.............................................................................................................................27
5.5 SAV E & EXIT…………………...………………………………....………………...……28
CHAPTER 6TH SOFTWARE INSTALLATION.....................................................................29
CHAPTER 7TH TROUBLE SHOOTING ...............................................................................31
APPENDIX SPECIFICATIONS ...............................................................................................34
FCC STATEMENT...........................................................................................................35
4 of 35 Copy Right Reserved

Laptop User Manual
INDEX READING
Main content
Chapter 1ST The whole laptop Introduction Introducing laptop all the features
Chapter 2nd How to use Introducing basic knowledge to use Laptop.
Chapter 3rd Methods of Operation Introducing basic methods of operating.
Chapter 4th Power System How to manage power system and use battery
reasonably.
Chapter 5th BIOS Setting How to set system security
Chapter 6th Softwear Installation How to install Driver system
Chapter 7th Trouble Shooting How to resolve basic troubles.
Appendix Introduction Introduction of specifications
Regulation
Symbol In this user-guide as follows:
■ ■ ■ ■ ■Remind of data loss, equipment damages or personal security risks
because of improper operation.
■ ■ ■ ■ Remind of possible damages because of improper operation.
■ ■ ■ ■ Remind of important information, key points, using of computer-related
5 of 35 Copy Right Reserved
Laptop User Manual
Chapter 1st: The whole laptop introduction
Laptop basic parts and features as following:
Positive side
Left side
Right side
Bottom
Status indicator
Power keypad & implementation keypad
Mentioned pictures in this user manual are for reference only, which
subject to laptop model you bought if any difference in product appearance and color.
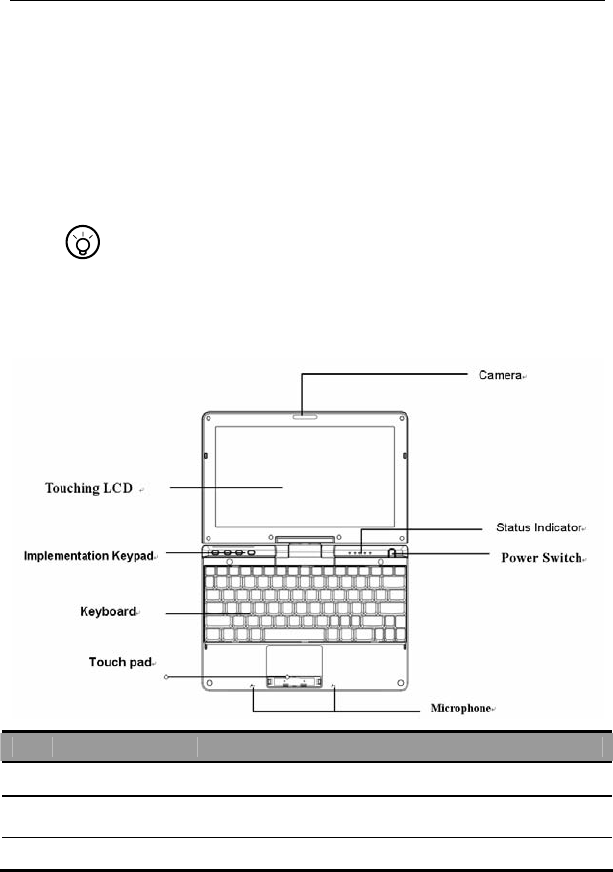
1.1 POSITIVE SIDE
No Item Description
1 Touching LCD Displaying output contents, touching screen
2 Implementation
Keypad
3G/LCD Rotary, Mute, WIFI, Touch Pad
3 Power button Turning on/off the power
6 of 35 Copy Right Reserved
Laptop User Manual
4 Keyboard Data Input
5 Touch pad Touching device to select functions, same with the mouse
6 Camera Built-in camera
7 Status indicator Indicating status of laptop and components running
8 Built-in
microphone
Omni-directional audio input devices, accepting the stereo
sound, and transmitting it and other audio data to sound input
programmer
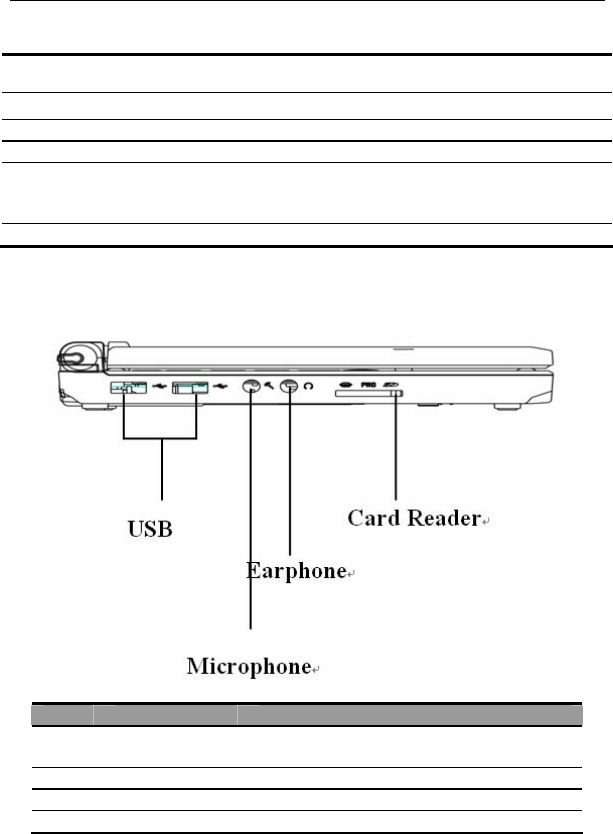
1.2 Left Side
No. Item Description
1 USB(V2.0) Connection with external devices and support
high-speed USB2.0
2 Microphone jack Connection with mono microphone
3 Headphone jack Connection with headphones and speakers
4 Card reader MS/SD/MMC card
7 of 35 Copy Right Reserved
Laptop User Manual
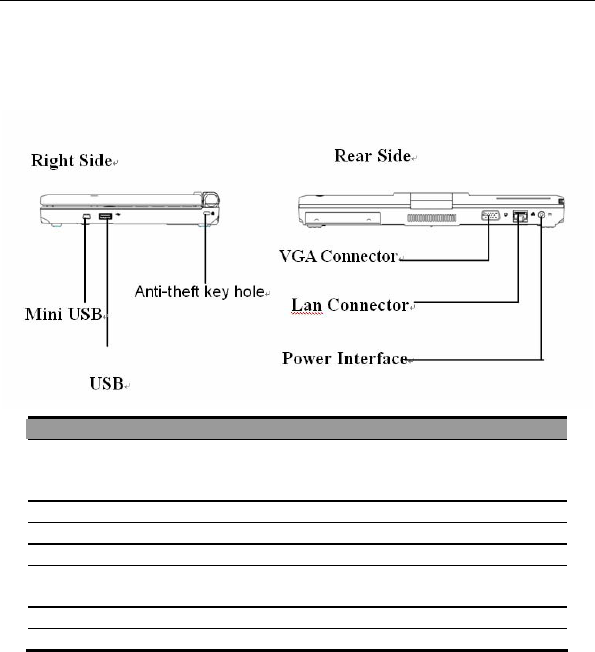
1.3 Right Side & Rear Side
No. Item Description
1 Mini USB
When power off, laptop works as movable
HDD through this connector. (option
function)
2 USB (V2.0) Connection with USB devices
3 Anti-theft key hole Locking the laptop to prevent theft.
4 VGA Connector Connection with external monitor
5 LAN interface (RJ-45) Support 10/100/Mbps;
1000Mbps (optional)
6 Power input interface Power supplying and charging battery.
1.4 Bottom Side
8 of 35 Copy Right Reserved
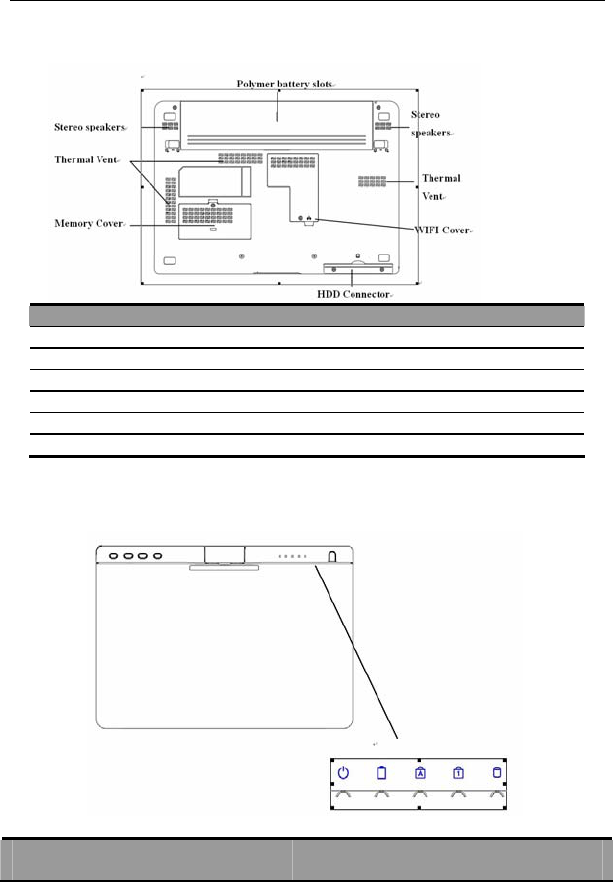
Laptop User Manual
No. Item Description
1 Polymer battery slot Installation of polymer battery
2 Stereo speakers Double wins, output stereo sounds
3 Memory Cover Memory built in
4 WIFI Cover WIFI Module built in
5 HDD Connector HDD built in
6 Thermal Vent Keeping air in good cooling circulation.
1.5 Status Indicator
Every indicator indicates running information of laptop. Indicator symbol as follows.
Icon Item Description
9 of 35 Copy Right Reserved
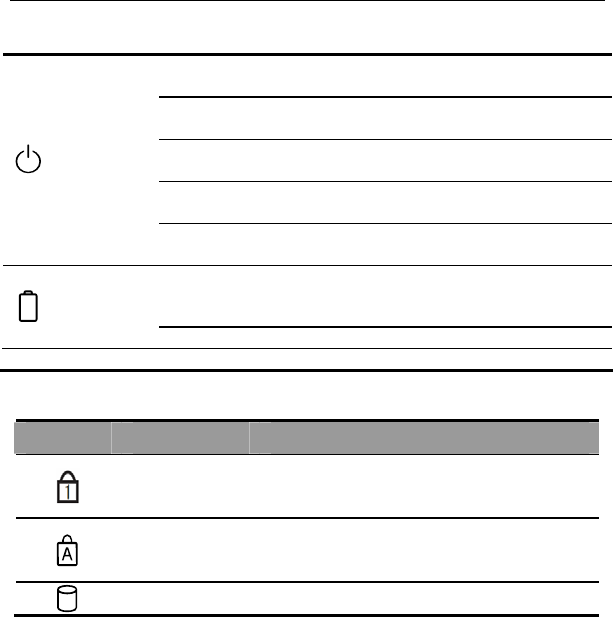
Laptop User Manual
OFF System keeps sleep mode or turn off.
Blue flashing System keeps standby status.
Blue System keeps running.
Purple
Flashing
Charging batter for lower capacity
Power
Supply
Red flashing Charging batter immediately for lack of battery
power, or shut down laptop after saving data
OFF
Charging finished
No battery
No external power through AC adapter.
Battery
status
BLUE Charging
Icon Item Description
Figure key lock When Num Lock key locks, the light will turn on.
Caps lock When Caps Lock key locks, the light will turn on
Hard drive When hard disk running, the light will turn on.
10 of 35 Copy Right Reserved
Laptop User Manual
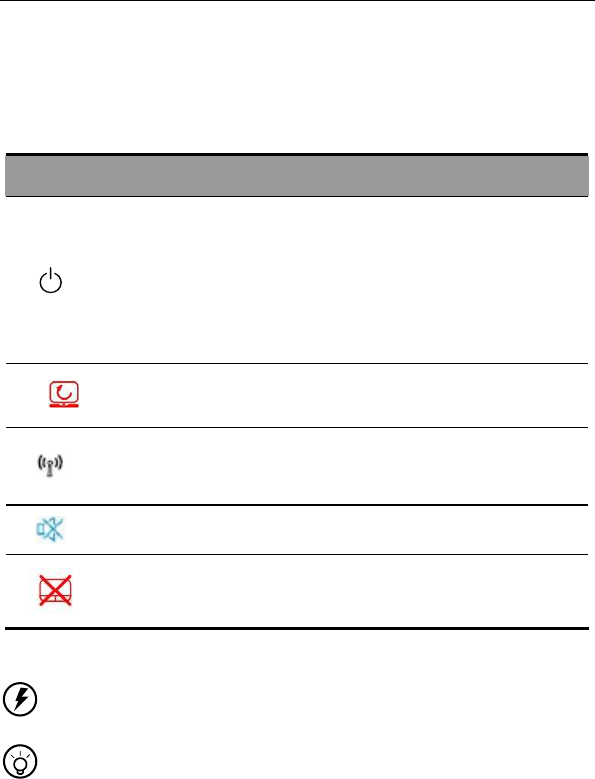
1.6 Power keypad and implementation keypad
Power keypad is used for starting laptop. The implementation keypad is used for running
procedures directly, when starting the corresponding function, the indicator light will be turned
on as follows.
Icon Item Description
Power keypad
Under system power off, pressing and holding
the power button 1second to power on. When
system running, operating system will manage
the power. Pressing power button 4seconds,
you can turn off the computer.
3G/ 3G/LCD Rotary
Rotary LCD or 3G antenna on/off (up to the
model you buy)
Wireless
Network
Open or close wireless network.
Mute Sound on or off
Touch Pad Switch on/off touching pad
■ ■ ■ ■ ■ ■ ■ ■ ■ ■ ■ ■ ■ ■ ■Forcibly turning off the laptop may lead to data lost!
■ ■ ■ ■ ■ ■ ■ ■ ■ ■ ■ ■ ■ All All implementation keypads is ordered by operating systems.
After operating system installed correctly, function keys can be implemented. Power
buttons and implementation keypads are divided into keys model and touching model.
11 of 35 Copy Right Reserved

Chapter 2nd : How to use it
In this chapter it introduce some basic issues in using laptop, including the
following topics:
Connecting the battery
Connecting AC adapter
Laptop Carrying
12 of 35 Copy Right Reserved
2.1 Connecting the battery
Installing Battery
1、 Laptop will be flat placed with the bottom leveled up.
2、 The battery is packed into the battery slot.
3、 When right locker back automatically ( ), push left locker to the closed
position ( ), finally to fix the battery.
■ ■ ■ ■ ■ ■ ■ ■ ■ ■ ■ ■ ■ ■
When using the battery pack, please note the following:
1) Don’t dissemble the battery arbitrarily;
2) Don’t get it connected with metal or conductive materials to prevent
short-circuit;
3) Preventing immersion in water or getting wet in the rain;
4) Keeping it out of children’s reach.
Disassemble battery
1、 Being sure the computer has been shut down and LCD display is closed.
2、 Laptop flatted with bottom side up.
3、 Pushing the left locker into unlock position ( ).
4、 Push the right locker into unlock position ( ), remove the battery pack.
■ ■ ■ ■ ■ ■ ■ ■ ■ ■ ■ ■ ■ ■ ■
Before dissembling battery pack, please plug in AC adapter when continuous to use the
computer. Otherwise, please shut down to prevent data lost.
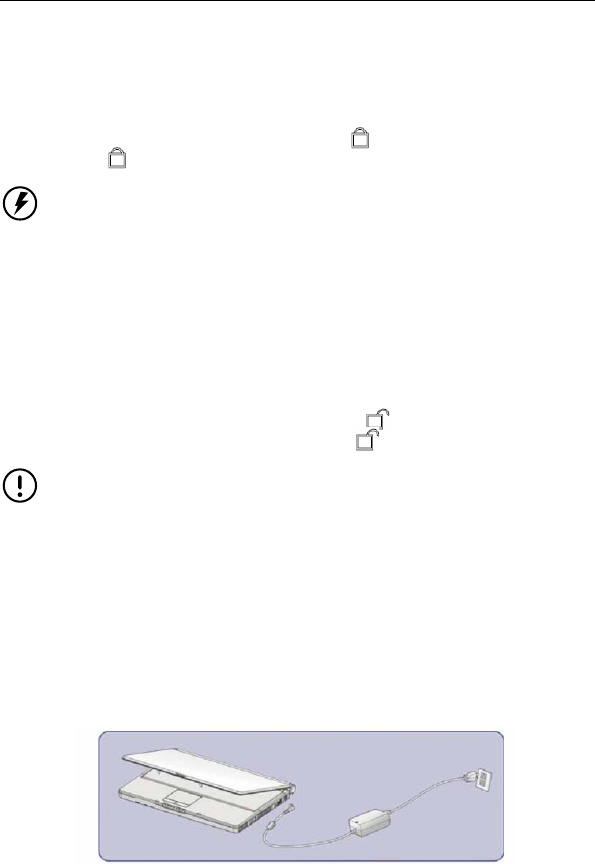
2.2 Connecting AC adapter
Follow these steps to connect the adapter:
1. Take out the adapter and power cord and then connect the adapter with power
cord.
2. Put AC power plug into power socket.
3. Put AC adapter output jack into the computer power supply.
4. Make sure that all connections have been fully connected.
13 of 35 Copy Right Reserved

■ ■ ■ ■ ■ ■ ■ ■ ■ ■ ■ ■ ■ ■ ■
Do not use dedicated adaptor on the other electrical equipment, although other adaptor
shape have most similarity with the adapter.
■ ■ ■ ■ ■ ■ ■ ■ ■ ■ ■ ■ ■ ■ ■
Because different countries have different Voltage and design of power plug, if you will
use this product in other countries, please choose a suitable local power cord or socket
converter.
2.3 Laptop Carrying
If you want to bring laptop outside, please note the following:
Please make sure the entire disk stopped, check whether disk drive indicator is
extinguished or not.
Please turn off the power supply or make laptop into the hibernation state.
Please disconnect all external equipment and AC adapter before moving
Please be sure that the closing the housing case in proper place.
Please do not carry laptop through the laptop rear or the LCD screen.
Please use dedicated laptop bag and prevent other objects placed together.
■ ■ ■ ■ ■ ■ ■ ■ ■ ■ ■ ■ ■ ■ ■
If you need carry laptop for short-distance moving , and want to keep working , you can
set the laptop to hibernation, when you open, the computer will return to the working
status.
■ ■ ■ ■ ■ ■ ■ ■ ■ ■ ■ ■ ■ ■ ■
\Do not move laptop when the hard disk is still running, so it is likely to damage the
computer, especially the hard disk. Please move it under the state of standby or
hibernation.
■ ■ ■ ■ ■ ■ ■ ■ ■ ■ ■ ■ ■ ■ ■
If you will travel in different countries or regions, please check whether the power cord fit
local power standard or not, it is better to buy the power cord in accordance with local
requirements. If laptop need connection through phone line, check computer modem and
phone line if they are suitable with the local phone system.
14 of 35 Copy Right Reserved
Chapter3rd Operation Method
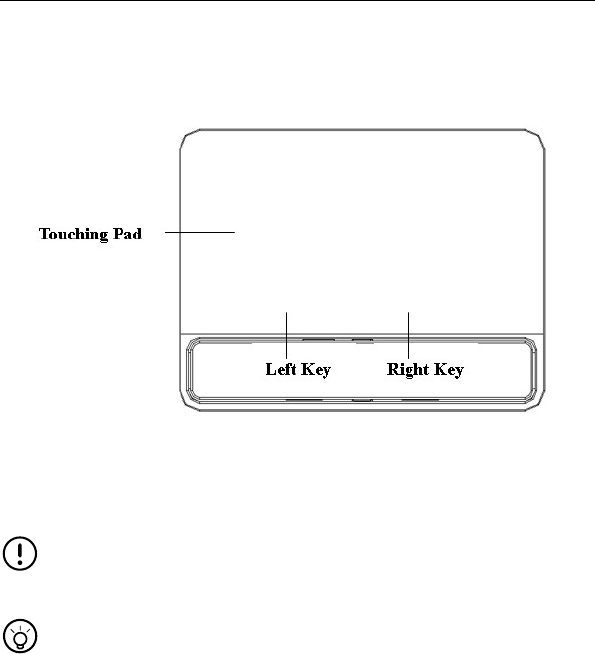
3.1 Using Touching Pad
Touching Pad can position file location when you move finger on the surface
Clicking on touching pad can select target file, double clicking can complete
implementation function.
Left key is same with that of mouse,can select menu or file.
Right key is same with that of mouse, can display designated menu or complete
selected function.
■ ■ ■ ■ ■ ■ ■ ■ ■ ■ ■ ■ ■ ■ ■
Please keep fingers and touching pad clean and dry to avoid reaction disable.
■ ■ ■ ■ ■ ■ ■ ■ ■ ■ ■ ■ ■ ■ ■
Please keep gentle touching of the pad. Pressing down heavily can not changing any
implementation speed.
15 of 35 Copy Right Reserved
Keypad Operation
This is enhanced keyboard with 2 kinds of window function key, including
standard function.
Lock Key
Icon Description
Caps Lock When indicator light, all input letter is Capital
Num Lk When indicator light, number key is locked and embedded
number keypad is valid
Scrl Lk
(Fn+Num LK)
When Scroll Lock locked,pages can be rolling in specific
circumstances
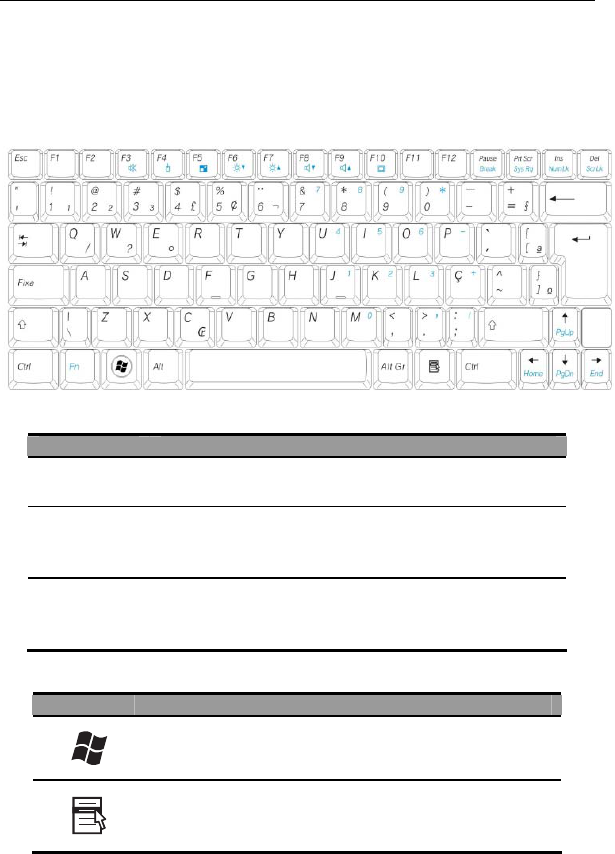
Windows Function Key
Icon Description
Press and go to START menu
Same with right key of Mouse
16 of 35 Copy Right Reserved
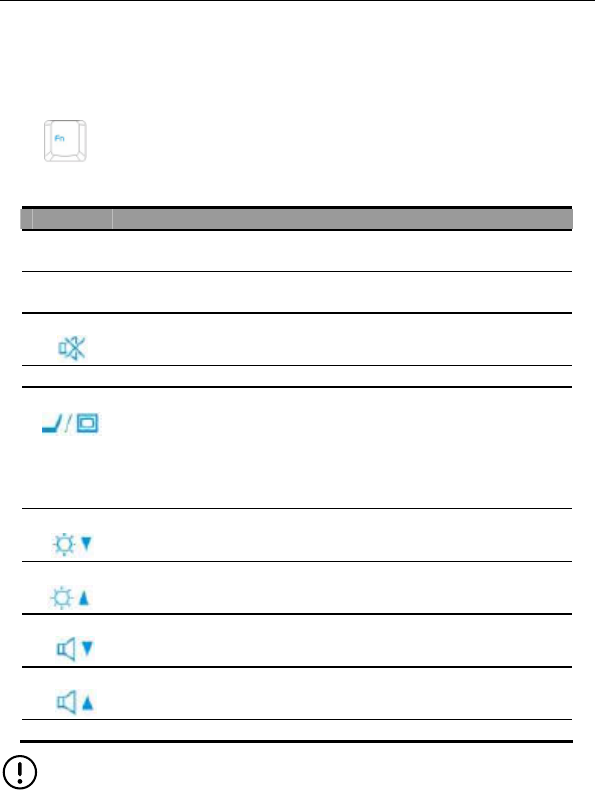
Fn Keys
Fn button is used together with other keys to turn off or turn
on specific function.
Icon Description
Fn+F1
Fn+F2
Fn+F3
Mute
Audio signal turn on/off
Fn+F4 Touchpad power on/off
Fn+F5
Switching LCD / External Monitor
When external monitor is properly connected, this key can display 3
kinds of models:
1.LCD display mode
2. External monitor display mode
3. LCD / external monitor display together
Fn+F6
Reducing brightness
This combination can reduce screen brightness
Fn+F7
Enhancing brightness
This combination can enhance the screen brightness.
Fn+F8
Reducing the volume
This combination can reduce the output of the volume.
Fn+F9
Enhancing the volume key
This combination can enhance the volume of output.
Fn+F10 LCD backlight turn on/off
■ ■ ■ ■ ■ ■ ■ ■ ■ ■ ■ ■ ■ ■ ■
Parts of the operation are subject to support from operating system and software, please
refer to the operating system documentation.
3.2 Embedded numeric keypad
17 of 35 Copy Right Reserved
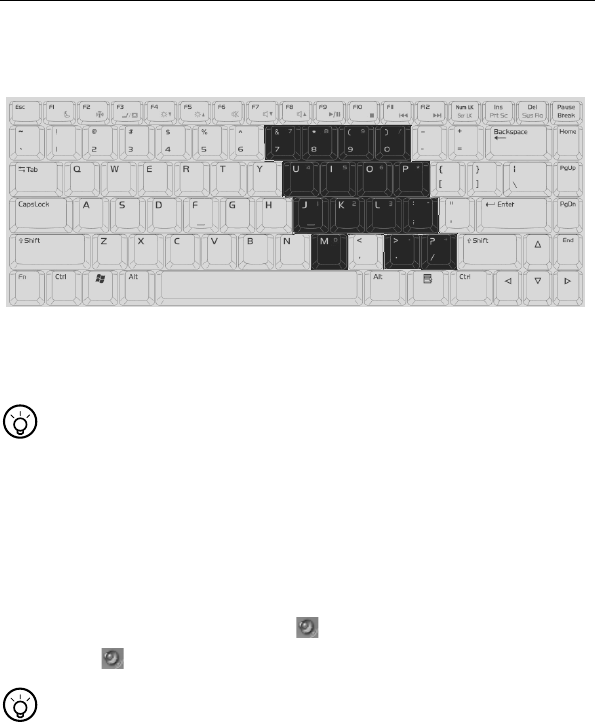
Embedded numeric keypad is same with that of desktop. Labeled figure and character
are printed as following chart:
When embedded numeric keypad locked, you can do the following:
z Inputting numbers.
z Press Fn key and embedded numeric keypad together to input characters;
simultaneously press Fn key+ Shift key to input capital letters.
■ ■ ■ ■ ■ ■ ■ ■ ■ ■ ■ ■ ■ ■ ■
Keyboard maintenance: Keys are usually the accumulation of space dust for long
time using, a small brush can be used to clean the cracks, high-pressure jet can
blow the dust, or using a handheld vacuum cleaner can remove dust and debris
from the keyboard. Cleaning the keyboard surface can be coated with a soft cloth
on some cleaning agents, wiping the keyboard surface when power off.
3.3 Sound System
Using audio programmer:
On the system task column, double click to adjust volume down or up.
Or click to choose audio volume column to adjust volume
■ ■ ■ ■ ■ ■ ■ ■ ■ ■ ■ ■ ■ ■ ■
You can use function key to adjust the volume; details as "FN key."
Please lower audio voice before plugging in external audio equipment in your laptop.
18 of 35 Copy Right Reserved

Chapter 4th Power Systems
This chapter will introduce the power and the power supply method. Laptop power
supply include AC adapter and internal battery. Topics as following:
z Power adapter
z Battery pack
z Power Management
4.1 Power Adapter
Power adapter's is to convert AC supply into DC power required from laptop.
How to connect the power adapter, please see "Getting Started" section of the "Connect
AC adapter"
■ ■ ■ ■ ■ ■ ■ ■ ■ ■ ■ ■ ■ ■ ■Please read "power adapter attention" before using
■ ■ ■ ■ ■ ■ ■ ■ ■ ■ ■ ■ ■ ■ ■Adapter contains internal high-voltage components, in order to
avoid harm to your body, do not make any dissembling and repairing.
4.2 Batteries Systems
Charging
To charge the battery, we should firstly have to confirm the correct installation of battery
into battery slot. Plug the AC adapter to the computer, and then connect the power
socket, you can charge the computer.
How to connect battery pack, please see "Getting Started" section of "connecting the
battery"
■ ■ ■ ■ ■ ■ ■ ■ ■ ■ ■ ■ ■ ■ ■
In the charging process, you are still able to engage in normal computer operation. In the
state of shutdown, charging time can be shortened.
■ ■ ■ ■ ■ ■ ■ ■ ■ ■ ■ ■ ■ ■ ■Please read "battery pack Note" before using
Extension of battery life
Long time using of battery will degrade the performance of battery life. To maximize
battery life, we recommend that you:
New battery calibration status
At the first using battery pack, please execute "calibration" process:
1、 Install the battery pack to the battery slot, no boot, then connect AC adapter to
19 of 35 Copy Right Reserved

the battery, it will be fully charged.
2、 Disconnect the AC adapter, open running system for battery power .
3、 Fully discharged, until the emergence of power is less than warning power.
4、 Reconnect AC adapter, and once again fully charge battery pack.
5、 Repeat implementation of the above steps until the battery full and discharged
3times.
6、 Do not charging over time and be sure of charging full and releasing
completely
7、 If there is socket ,please make full use of AC power and remove the battery.
■ ■ ■ ■ ■ ■ ■ ■ ■ ■ ■ ■ ■ ■ ■
Make executive of calibration process. Please plug out power if no using laptops.
If you do not use computer, please remove the battery pack.
■ ■ ■ ■ ■ ■ ■ ■ ■ ■ ■ ■ ■ ■ ■
Do not place the battery pack below 0 degrees Celsius or above 50 degrees Celsius, the
temperature anomalies will affect battery performance. Do not let battery contact point
short-circuit; otherwise will seriously affect the life of the battery or even damage. Do not
drop, impact battery. Do not place it near heat source or put battery pack into fire to avoid
dangerous explosion. Please follow the right way to deal with end-of-life or unworkerable
battery packs.
■ ■ ■ ■ ■ ■ ■ ■ ■ ■ ■ ■ ■ ■ ■
z Battery life and charging times are limited, when you find the rechargeable battery
pack power is sharply declined in usage, please run the battery calibration flow. If
the battery pack can not be upgraded after calibration battery life, it is possible that
your battery life will end, please replace new battery.
4.3 Power management
The reasonable use of power management will reduce power consumption.
Setting Power management model
Start> control panel>power option
20 of 35 Copy Right Reserved
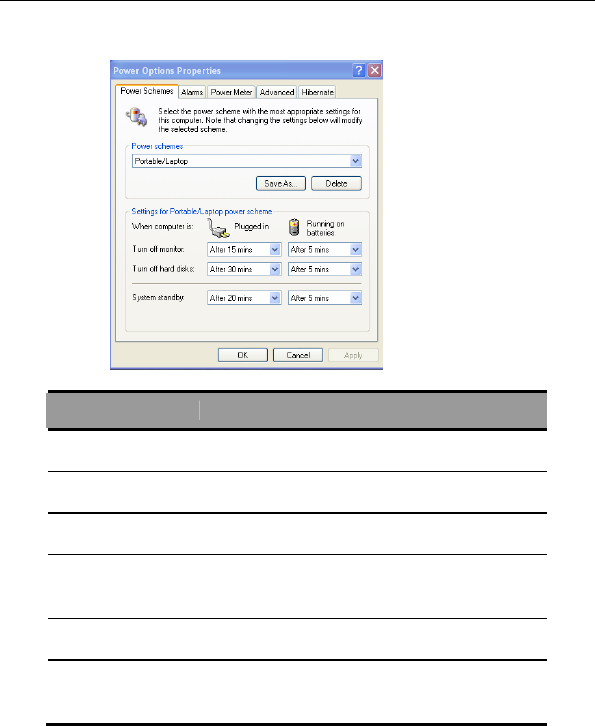
Power management model
Model Working Status
Home/Office
Desk
AC power, CPU running at mostly
Battery power, CUP running at energy saving
Portable/Laptop CPU running at full speed or save model based on
task requirement
Presentation Monitor opened all the way and CPU running at
energy saving model
Always on Opened all the way and CUP running at full speed,
not standby
Minimum Power
Management
CPU running at full speed or save model according
to task
Max Battery
Avoid battery consumption and enhance battery
working time. Only battery power supply, and CPU
running at energy saving model
System standby
When you leave your computer a short time, it stores tasks into memory, and shuts down
monitor and hard disk, but power indication is on. Laptop will return to previous working
state when pressing power key.
System Hibernate
When your computer hibernates, it stores whatever it has in memory on your hard disk,
and then shuts down. When your computer comes out of hibernation, it returns to its
previous state.
21 of 35 Copy Right Reserved
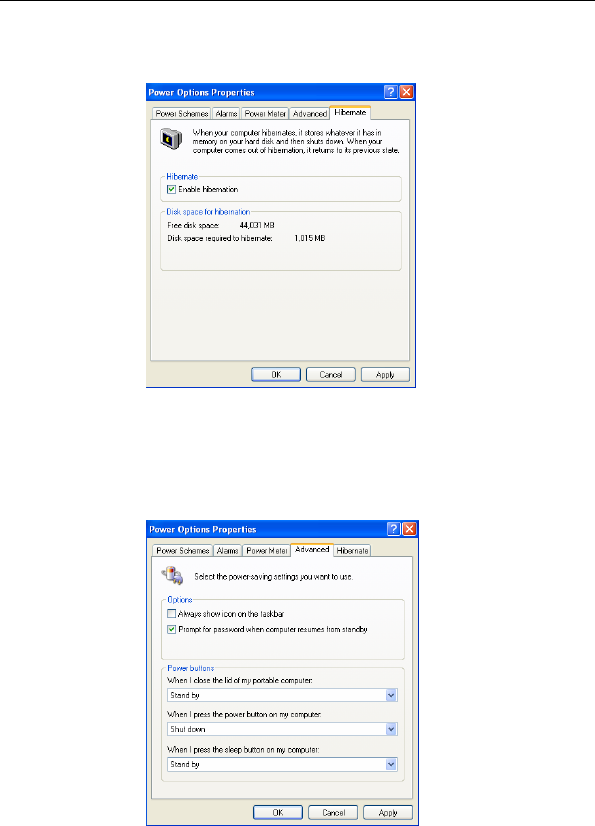
Default setting of hibernation is closed, please follow mentioned instruction
Getting in standby /
ement model, system will get in standby /
z
ing LCD cover will get in stand by or hibernation.
Extension of batter
ment model
z Hibernation using at most to save power. Standby or hibernation first before
hibernation state
z As per selected power manag
hibernation automatically when you are off laptop.
Start>Turn off > Stand By
z Pressing power key or clos
Start > Control Panel > Power Option > Advanced
y power supply
z Choose suitable power manage
22 of 35 Copy Right Reserved

leaving laptop.
z Turn off the wireless function when you do not use it.
Remove the PCz card when you do not use.
s)
umption. Dark brightness is better if
z Make a battery calibration in one Period of time (2-4 week
z Adjustment of LCD brightness to reduce cons
necessary.
23 of 35 Copy Right Reserved
Chapter 5th BIOS SETTING
BIOS SETTING includes import setting information of hardware and software. Main contents as
following:
z Entering BIOS setting interface
z Advance Setting
z Setting Boot Sequence
z Security
z Save and Exit
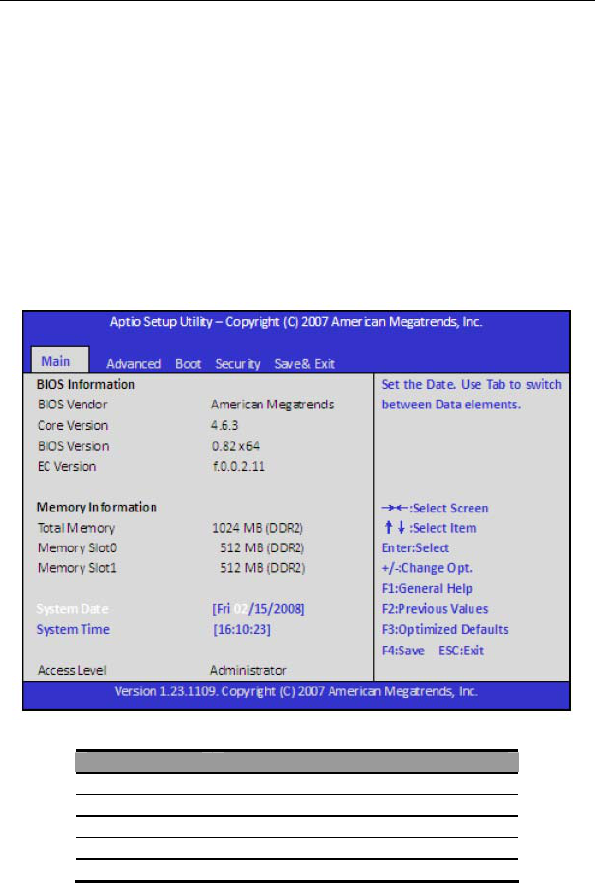
5.1 Entering BIOS setting interface
Press F2 when system power on and starting menu display ,to enter into
system setting interface
Introduction of BIOS Menu。
Menu Description
Main System working environment
Advanced Setting function of system main chipsets
Boot Setting booting information
Security System security information
Save& Exit Setting Exit information
24 of 35 Copy Right Reserved
■ ■ ■ ■ ■ ■ ■ ■ ■ ■ ■ ■ ■ ■ ■
Original BIOS setting is perfect to meet laptops running do not change it freely.
■ ■ ■ ■ ■ ■ ■ ■ ■ ■ ■ ■ ■ ■ ■
The above mentioned settings may be different from the one you buy, please
follow right displaying of your laptop.
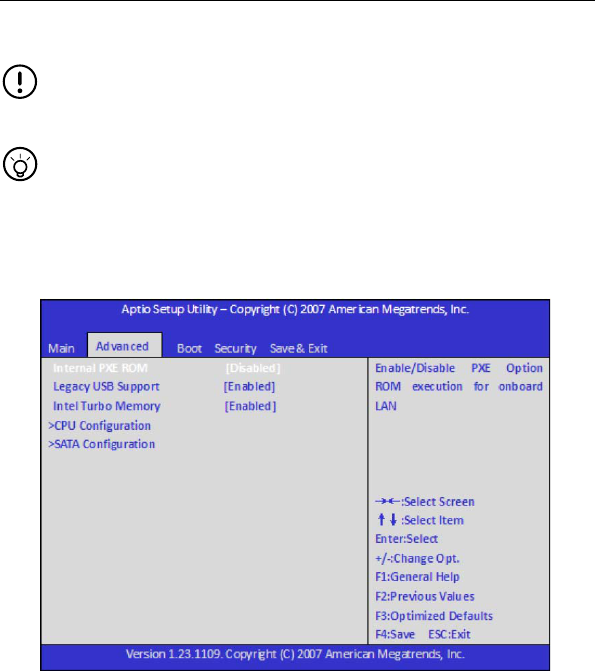
5.2 Advance Setting
Setting advance setting as following:
Main Option Introduction
Interal PXE ROM
Setting booting from Internet.
Legacy USB Support
Setting system booting from USB1.1 device,like Keyboard,Mouse
25 of 35 Copy Right Reserved
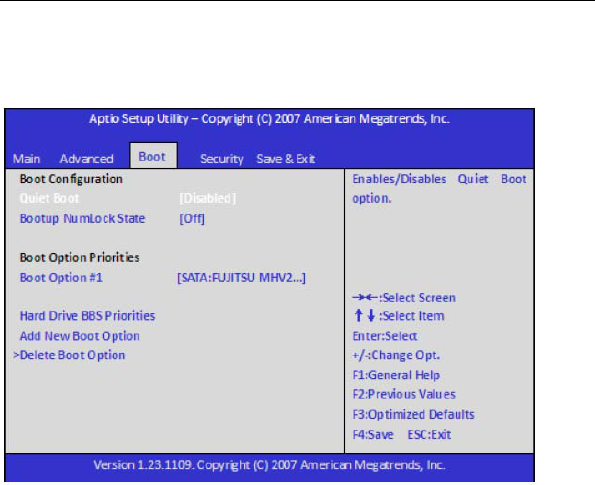
5.3 Setting Boot Sequence
Setting equipment to advance booting sequence
26 of 35 Copy Right Reserved
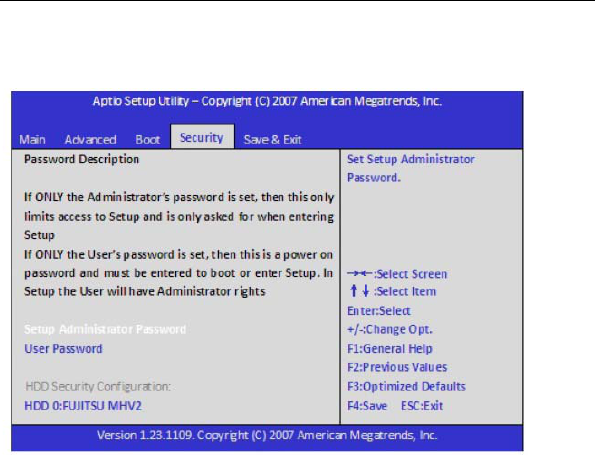
5.4 Security
Setup Administrator Password
Only authorized user can visit system setting menu after adiministrator
passwordsetup. Press <Enter> to set or delete administrator password.
Seup User Password
Same setting routine except different authorization .
HDD Security Configuration
Only authorized user can step into OS after setting HDD booting password.
27 of 35 Copy Right Reserved
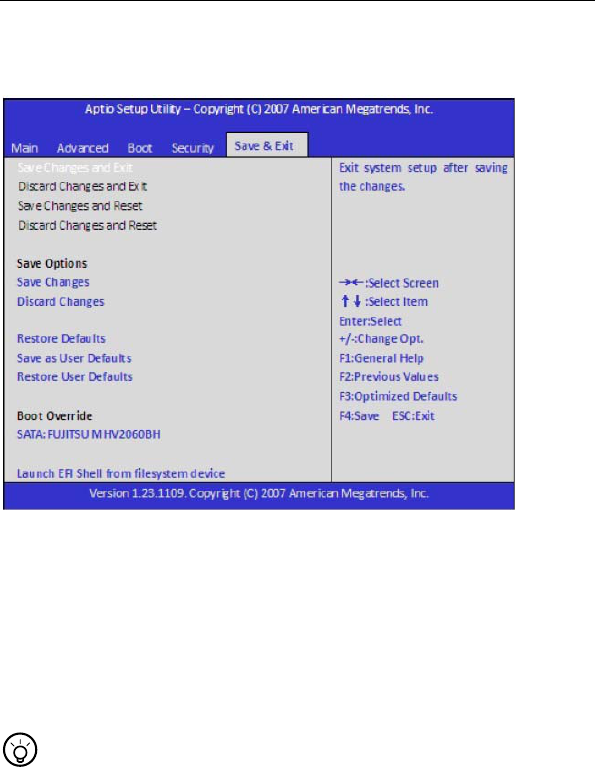
5.5 Save & Exit
Save Changes and Exit:
Save setting data and exit setting interface
Discarding Changes and Exit:
Discard setting data and exit setting interface
Restore Defaults:
Restore defaults parameter of set items.
Save as User Defaults:
Save Setting data and remain in setting interface
Restore User Defaults:
Discard all set data and restore previous settign parameters
■ ■ ■ ■ ■ ■ ■ ■ ■ ■ ■ ■ ■ ■ ■
If you changed BIOS setting but can not back original setting, you can refer
to above instruction
28 of 35 Copy Right Reserved

Chapter 6th Software Driver Installation
This chapter will briefly introduce the installation of the driver. Includes the following
topics:
Driver installation
You can select installation of the necessary drivers according to the actual need , follow
the prompts for easy operation.
The following instructions to XP driver system installation:
Chipset driver’s installation
1、 Open the CD-ROM drive and see a folder called Chipset, double-click to enter.
2、 Double-click the setup.exe file, start the driver installation, please follow the prompts
to complete the installation.
3、After the closure of the installation dialog box, if at this time the dialogue jumped out
in the window screen is asked to restart the laptop to complete the settings, click OK. If
the screen does not jump out of the dialogue window and not asked to restart the laptop,
the device driver installation is completed.
4、After restarting the laptop, the device driver installation is completed.
The graphics card driver’s installation.
1,Open the CD-ROM drive and see a folder called Graphics, double-click to enter.
2,Double-click the setup.exe file, start the driver installation, please follow the prompts
to complete the installation.
3, after the closure of the installation dialog box, at this time if the dialogue window
jumped out from the screen is asked to restart the laptop to complete the settings, click
OK. If the screen does not jump out of the dialogue window and no need asked to restart
the laptop, the device driver installation is completed.
4, restart the laptop, the device driver installation is completed.
Sound card driver installation
1,Open the CD-ROM drive and see a folder called Audio, double-click to enter.
2,Double-click the setup.exe file, start the driver installation, please follow the prompts
to complete the installation.
3, After the closure of the installation dialog box, at this time if the dialogue window
jumped out from the screen is asked to restart the laptop to complete the settings, click
OK. If the screen does not jump out of the dialogue window and no need asked to restart
the laptop, the device driver installation is completed.
4, restart the laptop, the device driver installation is completed.
Network card driver installation
1, Open the CD-ROM drive and see a folder called LAN, double-click to enter.
2, Double-click the setup.exe file, start the driver installation, please follow the prompts
to complete the installation.
3, After the closure of the installation dialog box, at this time if the dialogue window
jumped out from the screen is asked to restart the laptop to complete the settings, click
29 of 35 Copy Right Reserved

OK. If the screen does not jump out of the dialogue window and no need asked to restart
the laptop, the device driver installation is completed.
4, restart the laptop, the device driver installation is completed.
Wireless LAN driver installation
1. Open the CD-ROM drive and see a folder for Wlan, double-click access to the laptop
on the basis for models with wireless card driver selection.
2. In the corresponding models of wireless card driver .double-click the Setup.exe file,
start the driver installation; please follow the prompts to complete the installation
3 after the closure of the installation dialog box, at this time if the dialogue window
jumped out from the screen is asked to restart the laptop to complete the settings, click
OK. If the screen does not jump out of the dialogue window and no need asked to restart
the laptop, the device driver installation is completed.
4. After restarting the laptop, the device driver installation is completed.
(Note: only part of drive type for wireless network in the CD-ROM, these drives listed
models does not match the drive, then please do not install)
■ ■ ■ ■ ■ ■ ■ ■ ■ ■ ■ ■ ■ ■ ■
If you have selected driver installed, then during the installation process, the program
will prompt you that the driver have been installed and please compare these driver
versions. You'd better use a newer version.
■ ■ ■ ■ ■ ■ ■ ■ ■ ■ ■ ■ ■ ■ ■
Pictures show the contents are for reference only in this chapter, and you find they
probably will have little difference with computer shows, please make the actual as
standard.
30 of 35 Copy Right Reserved

Chapter 7th Trouble Shooting
This chapter describes how to deal with common system problems, please read the
contents of this chapter before search for technical staff.
■ ■ ■ ■ ■ ■ ■ ■ ■ ■ ■ ■ ■ ■ ■
Serious problems may need open computer to repair, do not try to open and repair by
yourself. When you can not rule out the failure after reading the contents of this chapter,
please contact as soon as possible local authorized distributor, and repair, so as to get
professional services.
Adapter
Issue Treatment process
Check the joints and make sure there is a reliable connection
between the power socket and the computer's power cord.
power adapter
do not supply
power Check power cord and power plug, if there is damage, please
make timely replacement.
Battery pack
Issue Treatment process
supplying no
power
Possible lack of battery power, connect the AC adapter for
charging.
Check the battery status of the hot or cold, if the battery pack
is overheating or too cold, it will not be able to charge under
the normal state .please set them for some time, please
recharge after it is in line with the room temperature.
Such as fully discharged battery pack .it will not start charging
immediately, please wait a few minutes.
For the protection of battery life, only when the battery is lower
than 95% of electricity, the system will be the implementation
of charging operation.
do not charge
after connect AC
adapter
If the indicator light is not on, then the battery pack may be the
end of life, please contact your dealer and buy the new battery
pack for replacement.
continuous
working time
supplied by
Battery-powered
Different operating systems and power management settings
will affect the status of battery power, the working hours of
computer will be different, you can try to reduce this type of
LCD screen brightness to reduce system power consumption.
31 of 35 Copy Right Reserved

is less than the
estimated
If the battery pack is the frequent use under the state of not
fully charged, the battery pack may not be able to exert its full
capacity. Please make Executive battery calibration operation.
Standby / hibernation
Issue Treatment process
system can not
enter standby
hibernation
Please check whether you are running Windows Media
Player software, if the software is running, the computer
may not be able to enter the wait / sleep.
Keyboard
Issue Treatment process
Press alphabet
keys and figure
appear
Please check whether the number lock is activated. Press
Fn + Num Lock key, the number of indicator for the lock
button goes out, try to enter.
Show confusion Make sure that you do not set the keyboard after installing
the software
Hard Drives
Issue Treatment process
System Operated with error or damaged by computer
virus, it can not start ;after clearing the virus, the right
documents is set up in accordance with the operating
system
Do not Guide Hard
drive
Operating system files are probably wrong; please refer
to the operating system documentation.
Running slowly Too much paper debris. Run the procedures to check the
disk and disk files.
LCD screen
Issue Treatment process
LCD display become
Black
Press Fn key combinations and change the display
mode. Make sure the LCD screen is not turned off.
System has been confirmed not to enter the sleep or wait
status.
Sound System
Issue Treatment process
32 of 35 Copy Right Reserved

Use Fn key combinations to adjust the volume.
Check the software volume settings.
Check the headset is connected firmly.
Do not hear the
voice Check the Windows Device Manager. Voice recognition
feature is turned on, pay attention not to conflict with
other hardware.
Printer
Issue Treatment process
Printer does not
start
Please check whether the printer is connected to power
or not.
Confirmed that the printer is turned on and online.
Check connection cables between the printer and
computer is damaged or not and firmly connected.
Communications
between computer
and printers can
not work Make sure your printer has been configured to identify
printer.
Print Error Check your printer documentation.
USB
Issue Treatment process
Check the computer's USB port to connect with the USB
cable firmly or not.
USB devices do not
work Make sure USB device driver installed correctly.
LAN
Issue Treatment process
Unable to connect Please make sure the cable between the network card
interfaces with the hubris connected firmly.
33 of 35 Copy Right Reserved

Appendix Specifications
Processor
Intel Series processors
Chipset
Intel chipset
Wireless LAN
Support 802.11b/g/n
Memory
DDR2 533 / 667 memories, maximum reach 2GB
Data Storage
Laptop Dedicated hard drive
Videos
10.1 " wide screen display
1024*600resolutions
Audio
Speaker
Built-in microphone
Separate audio input / output port, respectively headphone output and
microphone input device equipment
Keyboard and touch keypad
Compatible101/102 keyboard, support Windows-specific keys, embedded digital
keys
Ergonomically designed touch pad with two buttons
I / O ports and connecting devices
USB 2.0 interface
External display interface
Microphone interface
Headset Interface
RJ11 interface (non-standard configuration)
RJ45 interface
Power Interface socket
Card reader (supports SD / MS / MMC card)
Bluetooth (non-standard configuration)
3G Module (non-standard configuration)
GPS(non-standard configuration)
Weight and size
About 1.35Kg (with battery pack)
261mm (L) x 185mm (W) x 28.8mm (H)
Operating Environment
Temperature
Operating: 5 ~ 35 ℃℃
34 of 35 Copy Right Reserved

Storage: -20 ~ 60 ℃℃
Humidity
Homework: 20% ~ 80%
Storage: 10% ~ 90%
Power Battery
AC adapter,40 watts, 100 ~ 240 volts
High-capacity Polymer lithium battery
OS
Support Windows ® XP
Linux
FCC and IC Statement
This device complies with Part 15 of the FCC Rules.
Operation is subject to the following two conditions:
(1) This device may not cause harmful interference, and
(2) This device must accept any interference received, including interference that
may cause undesired operation.
Note:
The manufacturer is not responsible for ANY interference, for example RADIO or
TV interference, caused by unauthorized modifications to this equipment. Such
modifications could void the user’s authority to operate the equipment.
■ ■ ■ ■ ■ ■ ■ ■ ■ ■ ■ ■ ■ ■ ■
The above mentioned specification is only for reference, and subject to the final configurations
you buy.
35 of 35 Copy Right Reserved