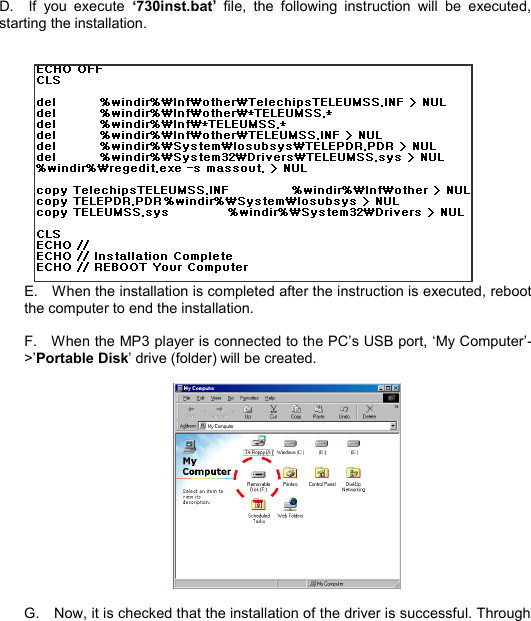
Hanbit Electronics MP3N306 MP3 Player User Manual MP3 N DRIVE manual Eng 031007
Hanbit Electronics Co., LTD. MP3 Player MP3 N DRIVE manual Eng 031007
UserManual.wiki
>
Hanbit Electronics
>
MP3N306 User Manual
USERS MANUAL
Navigation menu
Upload a User Manual
Namespaces
Wiki Guide
HTML
PDF
Info
Views
User Manual
Discussion / Help
Navigation
![USB port, and you will see the following window. Click [Next] button. J. The window like the one below will appear. Click [Next] button. K. The window like the one below will appear. Select the location you want to search as seen below and select Win98_driver through <Browse...>. [When installing win98_driver, using CD, select <CD-INSTALL12](https://usermanual.wiki/Hanbit-Electronics/MP3N306/User-Guide-375558-Page-12.png)
![ROM drive>. If downloaded from the Internet, you can specify the directory through < Browse...>] After selecting the location, click [Next] button. L. The window like the one below will appear. M. When you see the window like the one above, click [Next]. If you see the message reading ‘the driver is not found’, this is because you did not specify the location of the driver in the previous step. In this case, click [Back] I N S T A L L 13](https://usermanual.wiki/Hanbit-Electronics/MP3N306/User-Guide-375558-Page-13.png)
![button to go back to the previous step. Specify the accurate location of the driver once again to proceed to the next. N. When the window like the one above pops up, the driver is successfully installed. Click the [Finish] button to complete the installation. INSTALL14](https://usermanual.wiki/Hanbit-Electronics/MP3N306/User-Guide-375558-Page-14.png)


![2.3 Changing the Mode of MP3 Player A. MP3 player features the following three modes. ▶PLAY Mode ▶LANGUAGE Mode ▶RECORD Mode B. Changing the Mode You can change the mode in STOP mode. Press PLAY button for two seconds or so to shift to LANGUAGE mode. Press PLAY button for two seconds or so once again to shift to RECORD mode. Another press of the PLAY button for longer than two seconds will shift to PLAY mode. [Refer to 2.10] As seen in the above picture, PLAY mode changes in the order of PLAY->LANGUAGE->RECORD->PLAY. PLAY Mode LANGUAGE Mode RECORD Mode · Changing the Mode - Press PLAY 2 Sec. when Player Stop C H A N G E M O D E 17](https://usermanual.wiki/Hanbit-Electronics/MP3N306/User-Guide-375558-Page-17.png)
![C. Turn the power on Press the PLAY button for long to turn the power on with the LED flickering. Press the STOP button for three seconds or so in STOP mode, and the LED will be off as the power is turned off. You can see whether power is on or off by looking at the LED [Refer to 2.10] D. Press PLAY button. You can either play or stop the player only when the power is on. Lightly press the PLAY button to play music. If you repress the PLAY button while music is playing, it shifts to PAUSE mode. Press the PLAY button once again to play the music. If you press STOP button while in PLAY mode, music will stop. PLAY / Power On Button STOP / Power Off Button PLAY/PAUSE STOP P O W E R O N / P L A Y 19](https://usermanual.wiki/Hanbit-Electronics/MP3N306/User-Guide-375558-Page-19.png)
![G. Selecting EQ To select the EQ, you have to change the mode to EQ, first. Under EQ mode, you can change the mode in PLAY mode. To shift to EQ mode, press PLAY button for two seconds or so while in PLAY. You can check that the device is in EQ mode through the LED light. [Refer to 2.10] In EQ mode, press ‘EQ select’ (STOP) button to change the EQ. EQ will be changed as seen in the below picture, and you will see the mode selected through the LED light. [Refer to 2.10] To return to PLAY mode, press the PLAY button for longer than two seconds. PLAY Press 2 Sec. –Change Mode STOP(EQ Select) S E L E C T E Q 21 NORMAL POP LIVE CLASSIC ROCK](https://usermanual.wiki/Hanbit-Electronics/MP3N306/User-Guide-375558-Page-21.png)
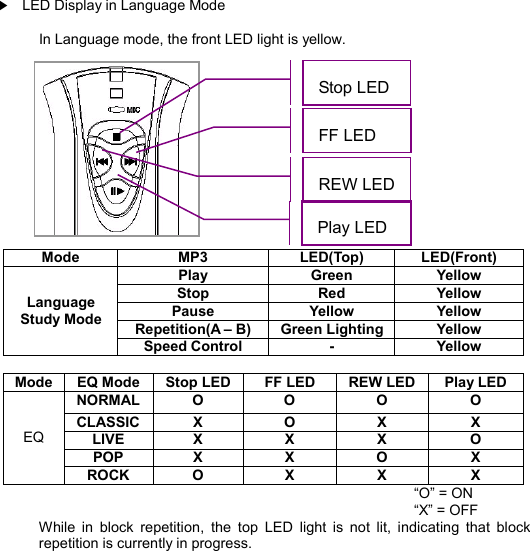
![2.5 Learning Languages with MP3 Player A. Shifting to Language Mode Refer to clause 2 and 3 of page 17, regarding language mode selection. Save language files on the player in RECORD mode, and press the PLAY button for two seconds or so in PLAY mode to shift to LANGUAGE mode. [Refer to 2.10 of page 33] B. Play / Pause / Stop in LANGUAGE mode. Instructions with PLAY mode are exactly the same as with Language mode. If you lightly press the PLAY button, the file will be played. Another press of the PLAY button will pause the play. Press the PLAY button once again to shift to PLAY mode. Press the STOP button for two seconds or so to stop the playing of the music. PLAY(Mode Change) LANGUAGESTUDY22PLAY / PAUSE STOP](https://usermanual.wiki/Hanbit-Electronics/MP3N306/User-Guide-375558-Page-22.png)
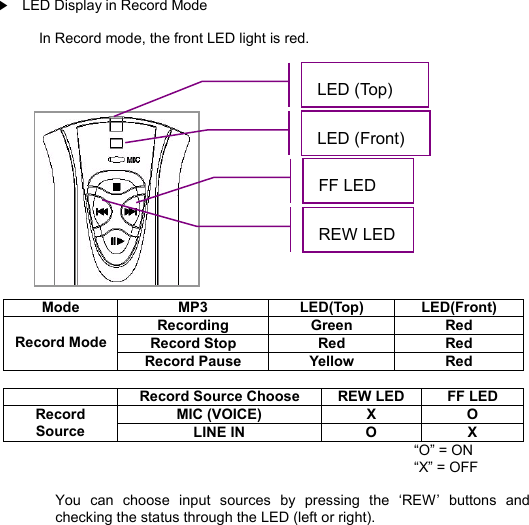
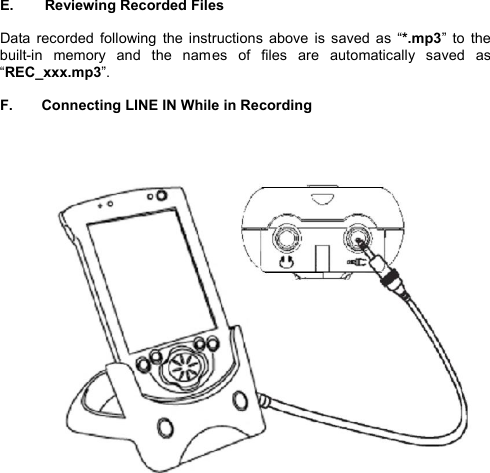
![2.6 Recording A. Switching to Record Mode How to switch Record mode is explained in sections 2.3 of page 17 Press Play for a couple of seconds while stopped in Language mode to switch to Record mode. You can see whether the device is in Record mode by looking at the LED light. [Refer to 2.10] B. Selecting Input Source in Record Mode (MIC or LINE IN) There are two input sources: built-in ‘MIC’ and ‘Line in’. In Record mode, it is set to ‘MIC’ recording. Press the ‘Rew’ button to switch to ‘Line in’ recording. To return to ‘MIC’ recording, press ‘Rew’ once again. [Refer to 2.10] REW-Recording Source Select R E C O R D I N G 25 PLAY – Mode Change](https://usermanual.wiki/Hanbit-Electronics/MP3N306/User-Guide-375558-Page-25.png)
![C. Recording in Record Mode Start recording by pressing the Play button. Pressing Play while recording will pause the recording. Press Play once again to resume recording. To end recording, press Stop. D. Switching from Record to Play Mode How to switch from Record to Play mode is explained in sections 2 and 3 Hold down Play for a couple of seconds while stopped in Record mode to switch to Play mode. You can see if the player is now in Play mode through the LED light. [Refer to 2.9] Start/Pause Record STOP PLAY – Mode Change RECORDING26](https://usermanual.wiki/Hanbit-Electronics/MP3N306/User-Guide-375558-Page-26.png)
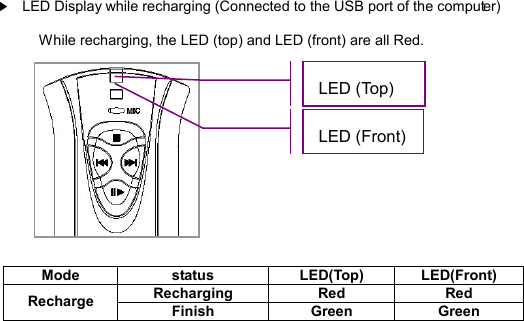
![2.8 Recharging the MP3 Player The MP3 player offers the convenience of having built-in batteries. The batteries are recharged through the USB port. It is very simple to recharge the batteries. You simply need to connect the player to the USB port. You can check the status of recharging through the LED light. [Refer to 2.10] R E C H A R G I N G 29](https://usermanual.wiki/Hanbit-Electronics/MP3N306/User-Guide-375558-Page-29.png)
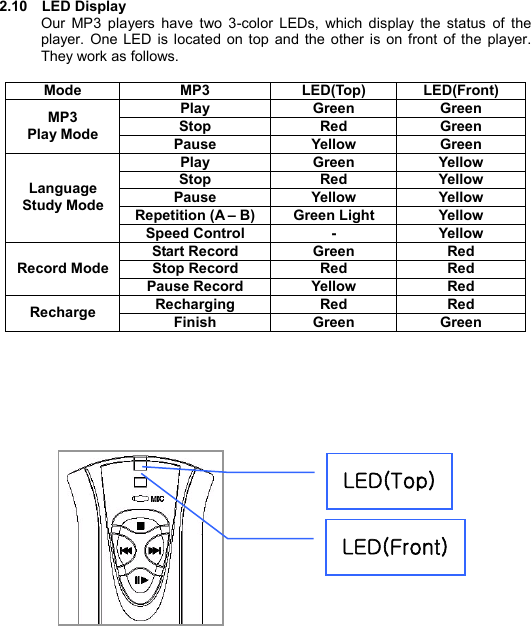
![▶ LED Display in Play mode In MP3 Play mode, the front LED light is green. Mode MP3 LED(Top) LED(Front) Play Green Green Stop Red Green MP3 Play Mode Pause Yellow Green The top LED indicates the current status (play, stop, and pause) of the player and the front LED indicates the mode [MP3 Play, Language, and Record]. LED is built-in inside the buttons. When a button is pressed for the first time, four LEDs are turned on for a few seconds to indicate the location of buttons in dark places. Stop LED FF LED REW LED Play LED LEDDISPLAY32](https://usermanual.wiki/Hanbit-Electronics/MP3N306/User-Guide-375558-Page-32.png)