Handan BroadInfoCom R-200 Bike Safety Tail Light User Manual
HANDAN BroadInfoCom Co., Ltd. Bike Safety Tail Light
User Manual
User’s Manual NB-600 R-200
For Your Safe Biking !!
1. Features
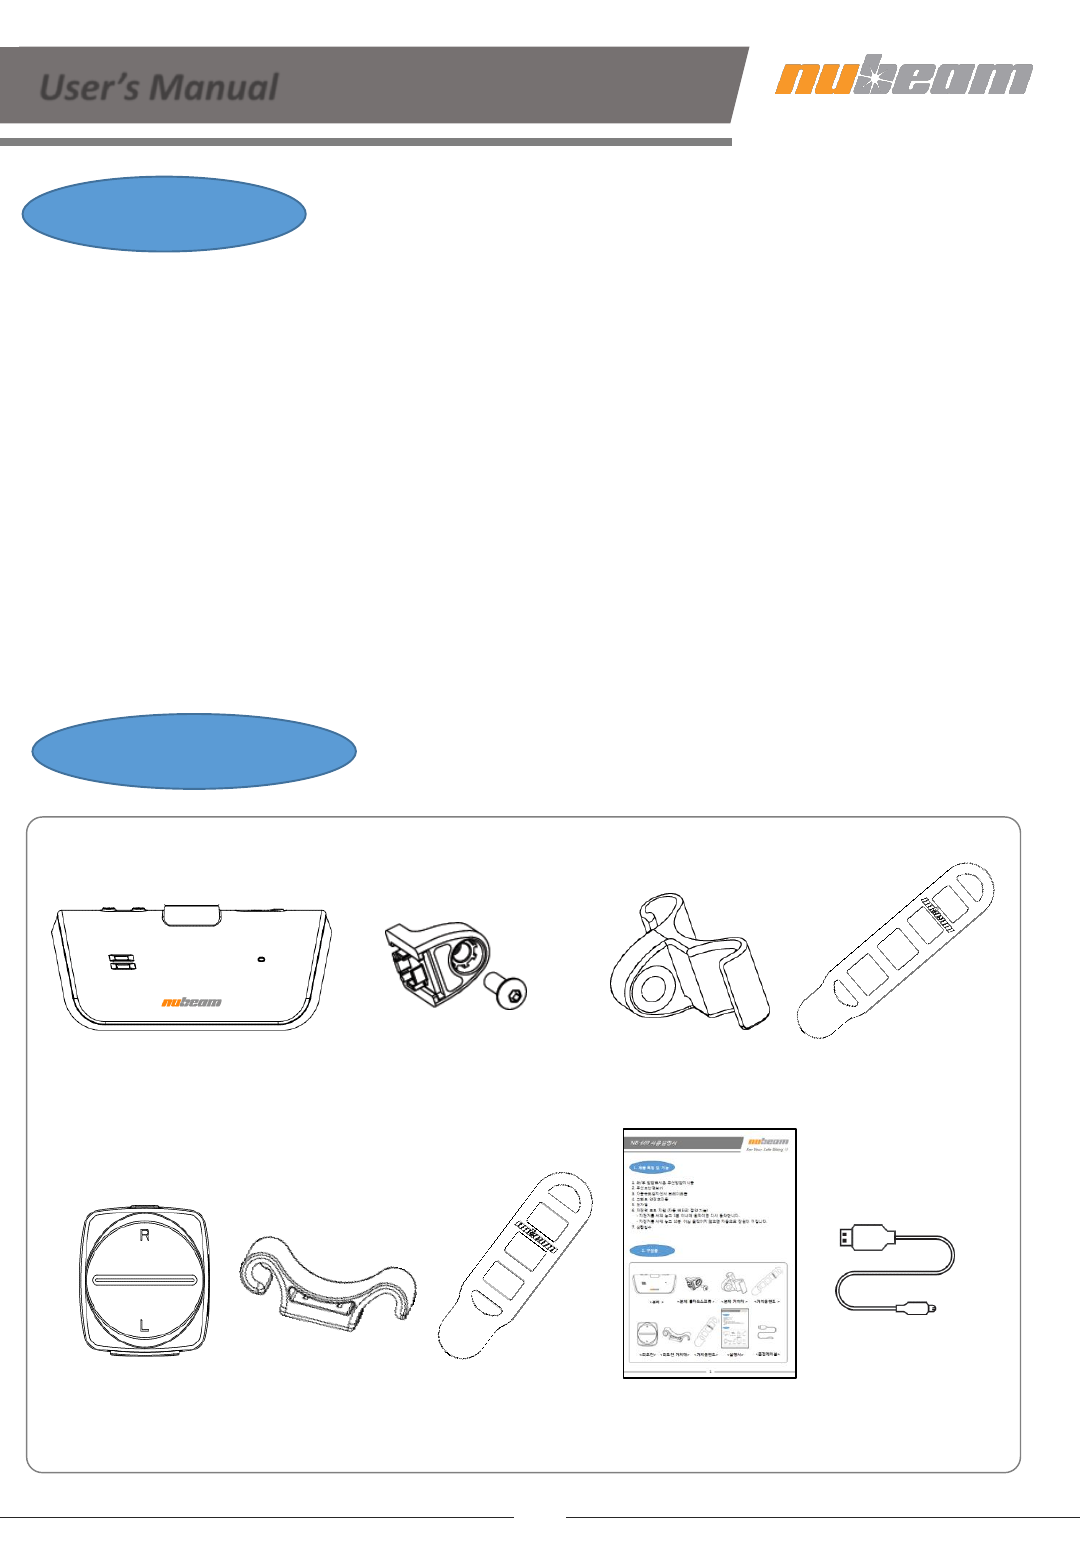
2. Contents on Package
1. Wireless Directional Turn Signal Light
2. Burglar Alarm
3. Automatic Brake Signal Light
4. Safety Tail Light
5. Electric Bell Horn
6. Automatic energy saving mode
- When idle for 5 minutes and bicycle moves, the Lighting unit works again.
- When idle for additional 10 minutes, Lighting unit turns off automatically.
7. Water Resistant
1
< Charging Cable >
< Instruction
Manual >
< RCU >
< Lighting Unit Holder &
Angle Adjusting Screw >
< Lighting unit > <Seatpost
Mounting Holder >< Mounting
Rubber(Long) >
< Mounting
Rubber(Short) >
< Mounting
Holder >
3. Overview
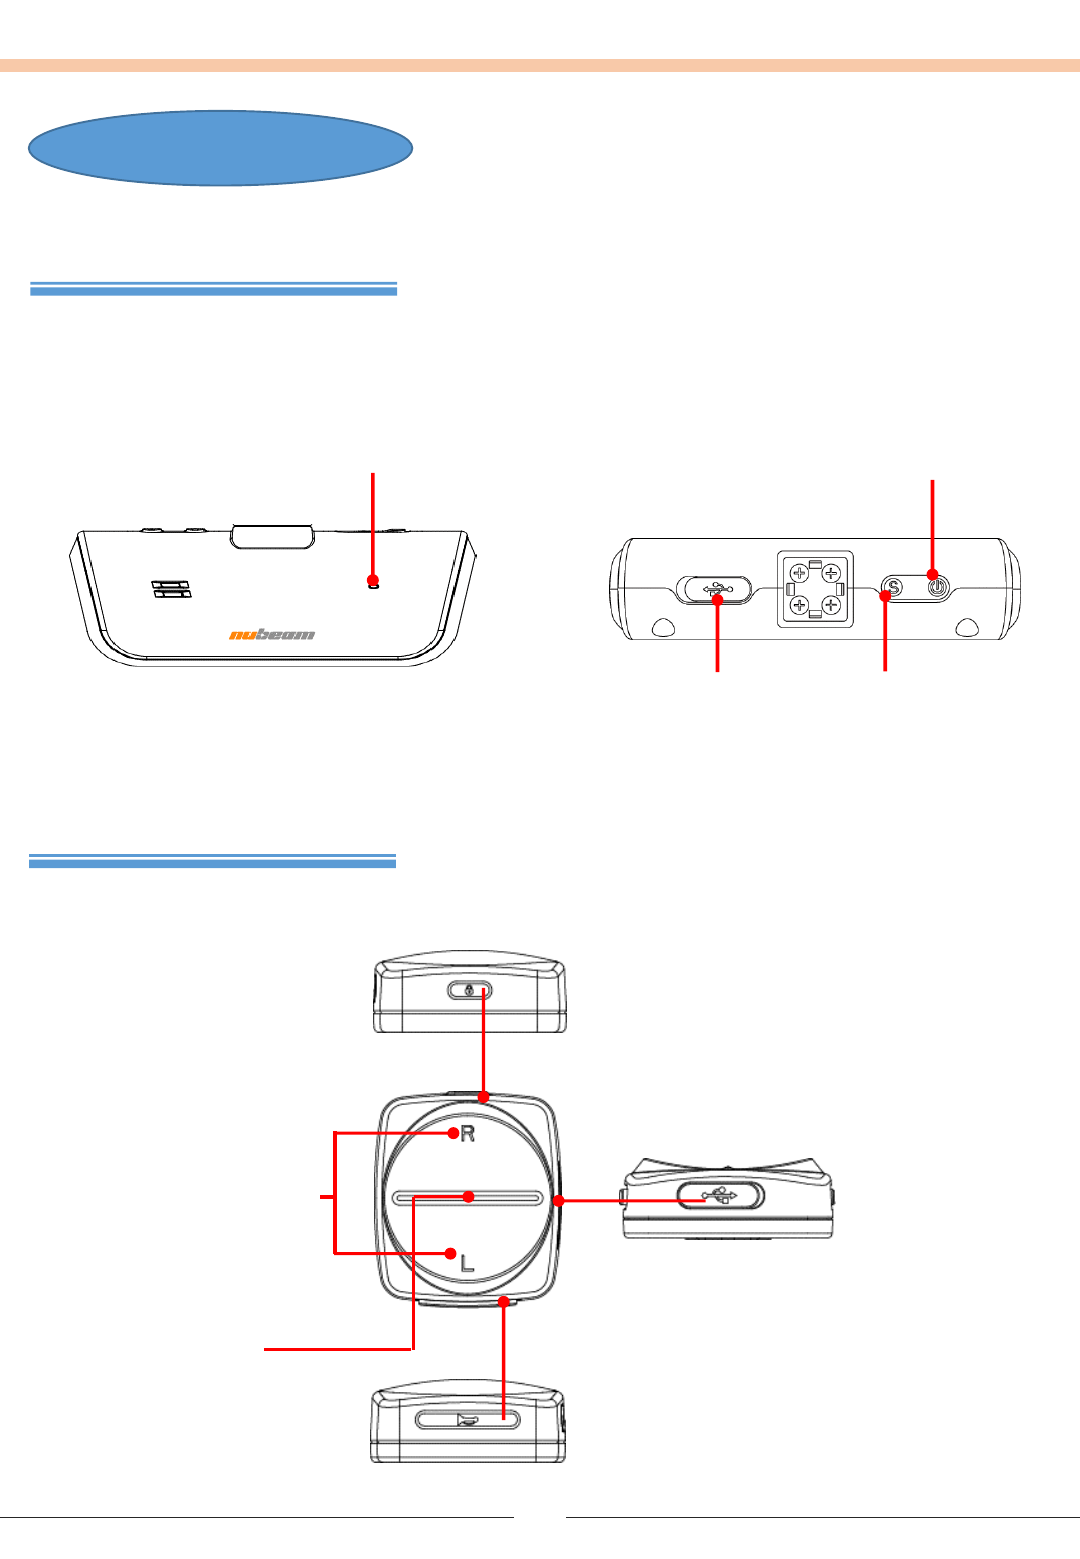
1. Lighting unit
2. Remote Control Unit (RCU)
Power Button
- Power on/off (Press a few seconds)
- Tail light mode setting (Press shortly)
Sound Button
- Sound on/off
1. Left/Right Button
- Directional signal light
control (Left / Right)
2. Burglar Alarm Button
- Burglar alarm Arm/Disarm
(Press a few seconds)
- Lamp On/Off (Press shortly)
2
Bell Button
USB connector
(Charging)
Battery Level Indicator
- Charging : LED OFF
- Indicating battery level
- Charged fully : Blue LED
USB connector
(Charging)
Battery Level
Indicator
4. Installation
3
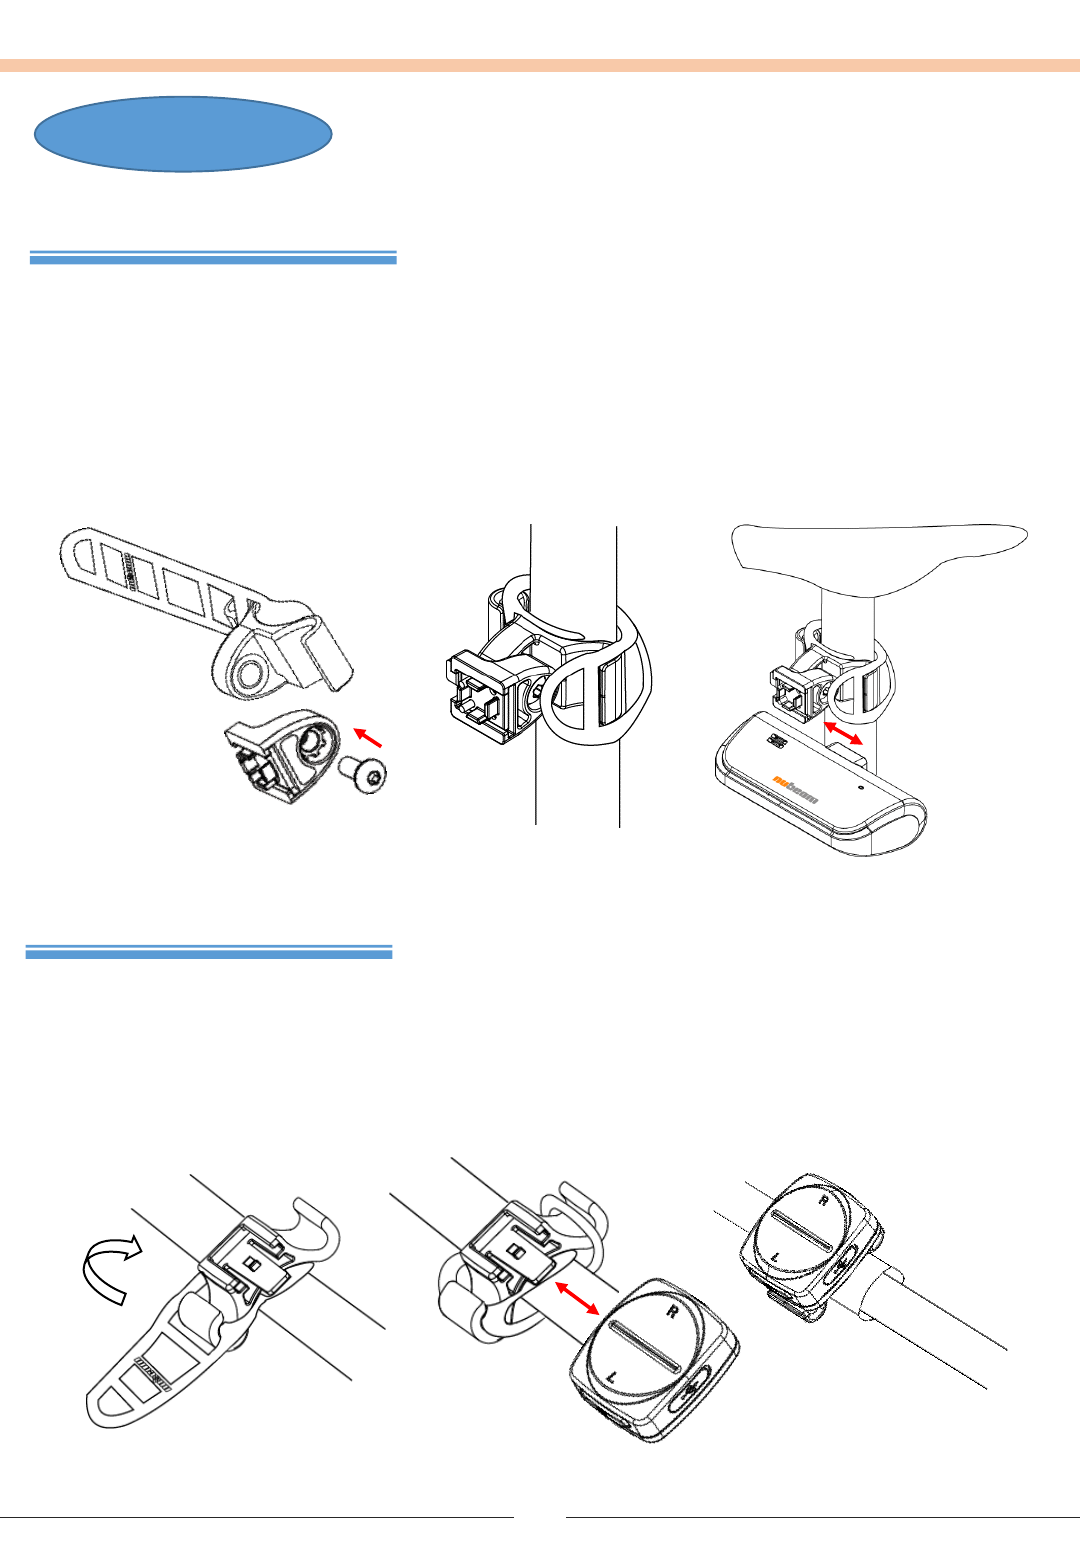
RCU Installation
1. Put the “Mounting Rubber” into round part of the “Mounting Holder” in order to be
tight on the seat post.
2. It is possible to rotate(90 degree) the direction of the RCU for user’s preference.
3. Push “RCU” in the sliding hole of “Mounting Holder” and mount on handlebar or grip.
4. To take out the RCU, pull the unit with pushing the hook of “Mounting Holder”.
Lighting unit Installation
1. Put the “Mounting Rubber” into round part of the “Seatpost Mounting Holder” in order to be
tight on the seat post.
2. After adjusting the favorite angle, assemble “Lighting Unit Holder” and “Seatpost Mounitng
Holder” with “Angle Adjusting Screw”.
3. Install the “Lighting Unit” onto “Seatpost Mounting Holder”. (Refer to the below image.)
4. To take out the lighting unit, pull the unit with pushing the hook of “Lighting Unit Holder”.
[ Picture1 ] [ Picture2 ] [ Picture3 ]
[ Picture1 ] [ Picture2 ] [ Picture3 ]
5. Functions
5
1. Safety Light Mode Change
Press “Power Button” shortly, then safety light modes are changed with following 6 modes.
Mode 1 : Red LEDs blinking with lower brightness
Mode 2 : Red LEDs blinking with higher brightness
Mode 3 : Red LEDs ON with lower brightness
Mode 4 : Red LEDs ON with higher brightness
Mode 5 : Emergency (Right and Left Yellow LED’s blinking)
Mode 6: LED OFF (daytime mode)
** Directional Light works on all security Lighting modes.
** If the battery level becomes low during biking, Lighting mode changes into Mode 1 for
reducing power consumption.
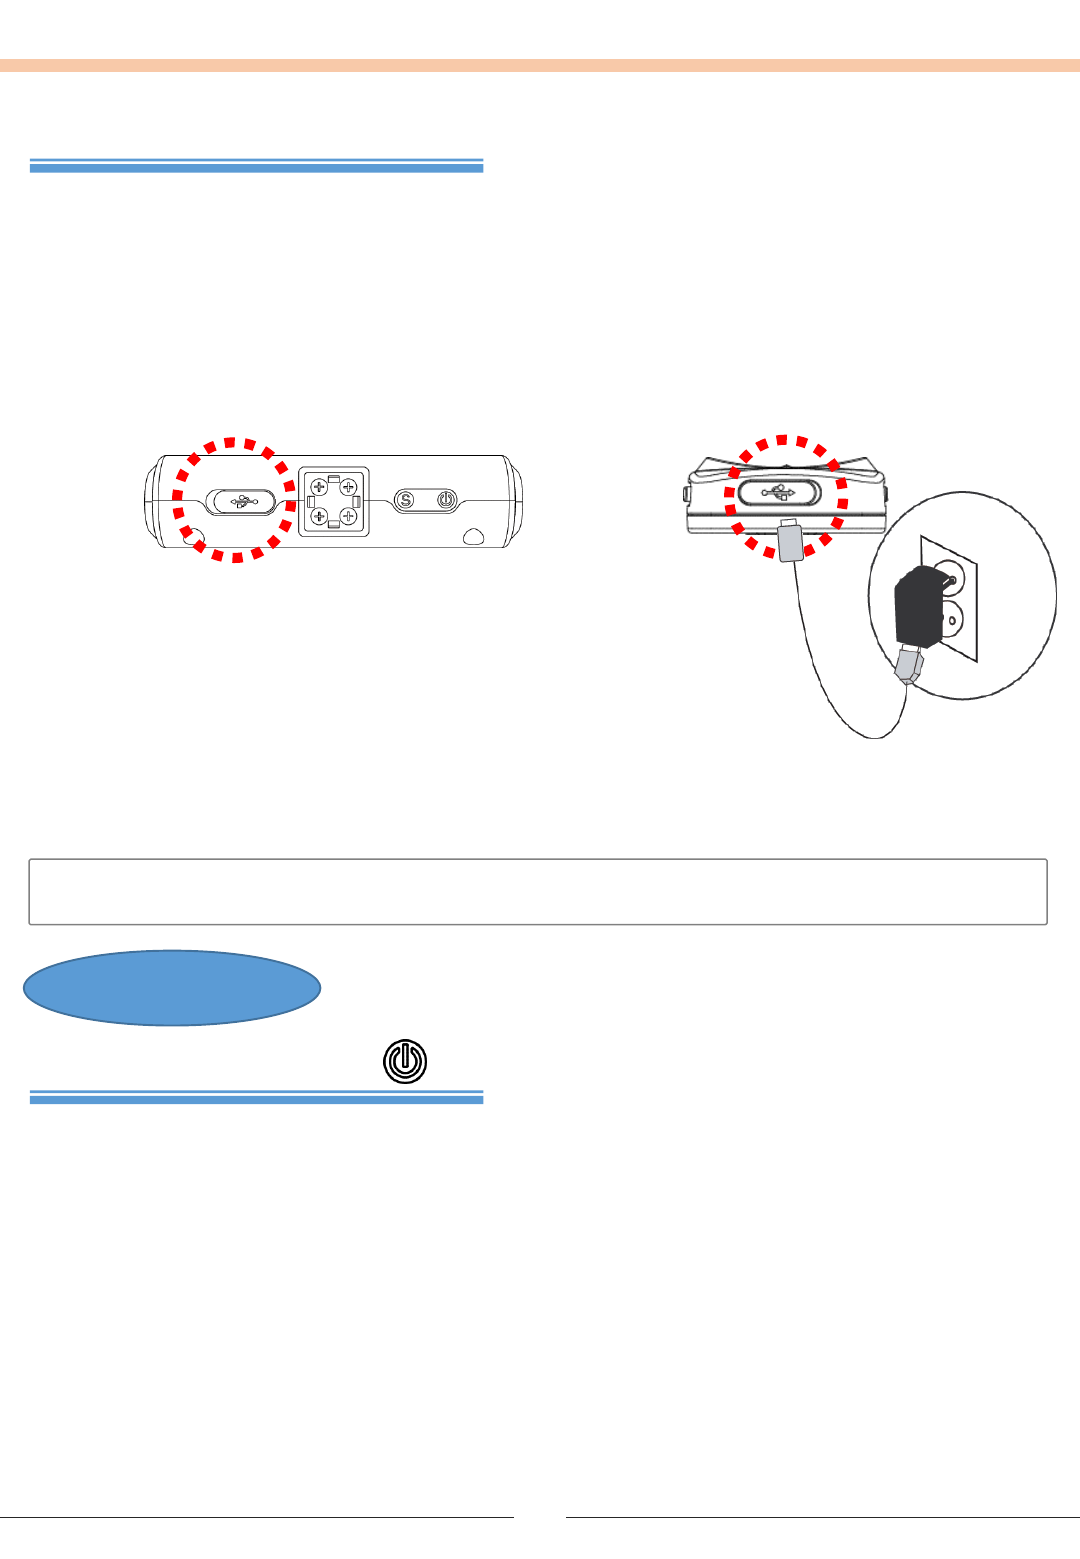
Battery Charging
•After opening the USB cover of lighting unit(side of RCU), charge by connecting the
“Charging Cable”.
• When the “Charging Cable” is plugged in power outlet, Blue LED blinks and turned off
during charging with beep sound. If the battery is charged fully, BLUE LED is turned ON.
• When the “Charging Cable” is unplugged, the current battery level is showed on “Battery
Level Indicator” with 2times beep sounds.
• If the “Charging Cable” is not connected correctly, beep sounds twice, check the connection.
•Turn off the Lighting unit and RCU during battery charging to save energy
•Checking Battery Level
-RCU : Press “Burglar Alarm” button and “Electric Bell Horn”
button at the same time, the battery level indicates on
Battery Level Indicator” LED. If RED light blinks, charging is
necessary
- Lighting Unit : Power on the unit, then battery level indicates on
“Battery Level Indicator” LED.
•It is recommended to use other anti-theft locking product together with NUBEAM.
•Wireless burglar alarm shall be turned off when the alarm is not necessary condition
because battery power consumption on burglar alarm mode is very high.
For longer battery runtime, it is very important.
•RF Signal range can be changed according to surroundings condition. It is affected from
other RF frequencies like WiFi or Bluetooth.
•If RCU is discharged fully when the user arms Burglar Alarm, it is not possible to disarm
Burglar Alarm. In this case, charge RCU’s battery and disarm Burglar Alarm.
5
3. Burglar Alarm
•Press Burglar Alarm button 2-3 seconds for Alarm’s Arming / Disarming(toggle).
•When the Alarm is armed, Yellow LEDs of lighting unit and Red LEDs of the RCU blinks with
buzzer sounds.
•During the alarm is armed, Red LEDs of RCU(L/R LEDs) blink periodically till alarm is
disarmed.
•If RF signal is out of range between “Lighting Unit” and “RCU”, or the battery level of “Lighting
Unit” is low(needed charging), LEDs of RCU(L/R LEDs) is turned on and warning
buzzer(different with burglar alarm sound) sounds(Beep).
•If any shock or vibration is detected,
- RCU : LEDs(Red Color on L/R) of the RCU blink continuously and burglar alarm sounds till
alarm is disarmed.
* Caution !
This function is operated only within the RF signal range of the RCU and Lighting unit.
- Lighting unit : Whole LEDs of the lighting unit blink and burglar alarm sounds till alarm
is disarmed.
2. Directional Signal Lights
•Press Directional signal Lighting Button(R/L) of RCU, then yellow lamp of Lighting unit
shows Right and Left direction(blinking).
•During direction lamp of Lighting unit blinks, LEDs(Red Color on L/R) of RCU blink and
buzzer sounds at the same time.
** If the “Charging Cable” is connected to “Lighting Unit”, Directional Signal Light do not work.
/
•It is set to sound ON and OFF (toggle) of burglar alarm on the lighting unit by pressing the
“sound button” of Lighting unit.
•When any vibration is detected,
- If Sound is set ON, burglar alarm sounds on the lighting unit.
- If Sound is set OFF, burglar alarm does not sound.
- Warning Alarm of RCU works at both cases.
6
6. Burglar Alarm Sound ON/OFF
7. Lamp ON/OFF (Lighting unit)
•Press “Burglar Alarm Button”(RCU) shortly for Turning ON and OFF the tail lamp of
Lighting unit.
•When the biker needs to drive into dark space(e.g. tunnel) in daytime, user can turn
on the tail lamp with this function.
•When Lamp is ON, LEDs of RCU(L/R LEDs) blink at the same time.
•When Lamp is OFF, LEDs of RCU(L/R LEDs) blink alternately.
8. RESET
If the set is on malfunction, “RESET” function is used for RESET of units.
- RCU : Press 2~3 seconds “burglar alarm” button and “Electric Bell Horn” button at the same
time.
-Lighting unit : Press 2~3 seconds “Power” and “Sound ON/OFF” button at the same time.
+
+
4. Brake Light
Brake lighting operation depends on road condition and biker’s ride habit.
•When the speed of bicycle slow down during biking, brake light turns on automatically
(Brighter than normal tail light).
•This function works always if Lighting unit is ON.
•This function does not work on directional lights are working.
5. Electric Bell Horn
•Press the Bell Button of RCU.
•If the button is pressed one time shortly, bell works one time. If the button is pressed
continuously, Bell rings continuously.
•Buzzer is installed on Lighting unit.
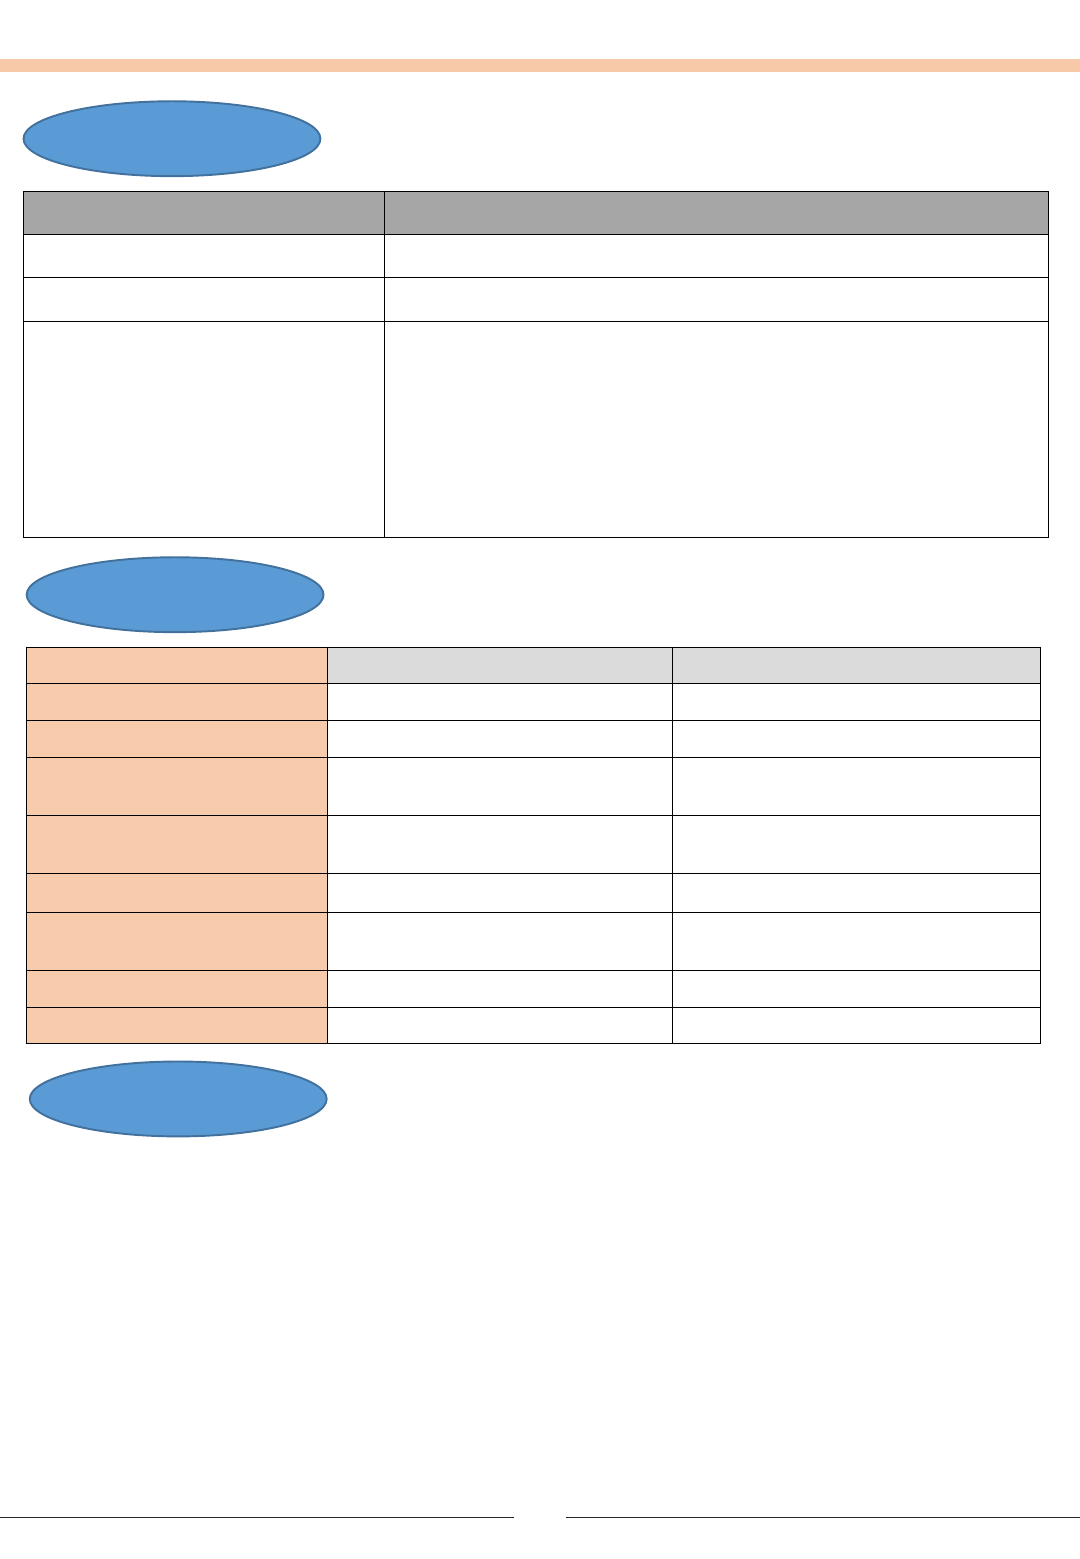
7. Specification
Remote Control Unit Lighting unit
Frequency 2403.5MHz 2403.5MHz
Size 40 x 45 x 17 (mm) 103 x 46 x 25 (mm)
Weight
(including batteries) 0.99oz (28g) 2.89oz (82g)
Battery DC 3.7V
(200mAh Li-Polymer battery) DC 3.7V
(700mAh Li-Polymer battery)
Battery Life about 1 week 15hours (Operated on Mode 1)
LED 2 LED (Red) / 1LED(2color) 18 LED (Red) /10 LED(Yellow)
1 LED(2color)
KEY 4 (Left, Right, Bell, Mode) 2 (Power, Sound)
Operating Temperature 14~ 122℉(-10 ~ 50℃) 14~ 122℉(-10 ~ 50℃)
7
•After reading the instruction manual, store it in easy accessible place.
•Do not throw or expose to excessive force.
(This product may be damaged when exposed to excessive force. Please regard that
warranty does not cover damages due to customer negligence or outside forces during
biking or storage, etc.)
•Keep out of excessive rain, humidity, toxic gas, volatile chemicals, heat, etc. It can cause
damage to the product.
•Obstacles between the Lighting unit and the RCU may affect RF signal range.
•The wireless feature of the product may malfunction. The company cannot provide any
services regarding personal safety.
•Discard as industrial waste.
8. Safety Warnings
Problem Solution
Light does not turn on. Charge the battery.
The sound does not turn off. Charge the battery.
The burglar alarm does not
turn off. - Press the burglar alarm button (for 2 seconds), then
RCU’s burglar alarm is deactivated. And press again
burglar alarm button (for 2 seconds), then Lighting
unit’s anti-theft mode is deactivated.
- If RCU is discharged fully when the user arms Burglar
Alarm, it is not possible to disarm Burglar Alarm. In this
case, charge RCU’s battery and disarm Burglar Alarm.
6. Troubleshooting

Caution
1. Any manufacturing defect visible to a naked eye may be dangerous. Immediately consult a
manufacturer or seller.
2. Do not touch the live terminal with any metallic objects like necklaces, coins, keys, watches, etc.
3. Do not disassemble, compress, penetrate, etc.
4. Do not drop from high altitudes or apply excessive force.
Warning
This equipment may generate or use radio frequency energy. Changes or modifications to this
equipment may cause harmful interference unless this modifications are expressly approved in the
instructional manual.
The user could lose the authority to operate this equipment if an unauthorized change or modification
is made.
FCC Notice
This device complies with part 15 of the FCC rules. Operation is subject to the following two
conditions :
(1) This device may not cause harmful interference.
(2) This device must accept any interference received including interference that may cause
undesired operation.
Note> This equipment has been tested and found to comply with the limits for digital device pursuant
to part 15 of the FCC Rules. These limits are designed to provide reasonable protection against
harmful interference in a residential installation. This equipment generates, use and can radiate radio
frequency energy and if not installed and used in accordance with the instructions, may cause
harmful interference to radio communications. However there is no guarantee that interference will
not occur in a particular installation. If this equipment does cause harmful interference to radio or
television reception, which can be determined by turning the equipment off and on. The user is
encouraged to try to correct the interference by one or more of the following measures ;
- Reorient or relocate the receiving antenna.
- Increase the separation between the equipment and receiver.
- Connect the equipment into an outlet on a circuit different from that to which the receiver is
connected.
- Consult the dealer or an experienced radio/ TV technician for help.
This product provides the following warranty.
Contact the store of purchase to request service or receive repair service at the assigned service
centers.
1. Please provide the following when requesting service:
; Name of the product, serial number, date of purchase, store of purchase, receipt.
Service is limited to genuine products and use under normal conditions. (Does not include physical
damage due to customer negligence or outside forces.)
2. Free service : 1 year from purchase date.
Service is provided at no cost for any manufacturing defects, (internal, electrical, functional, etc.
problem with the device itself) not including physical damages due to customer negligence or
outside forces.
3. Repair services for damages due to customer negligence, outside forces (excessive force, humidity,
heat, etc.), or products with expired warrantee are offered as well.
9. Warranty Policy
8