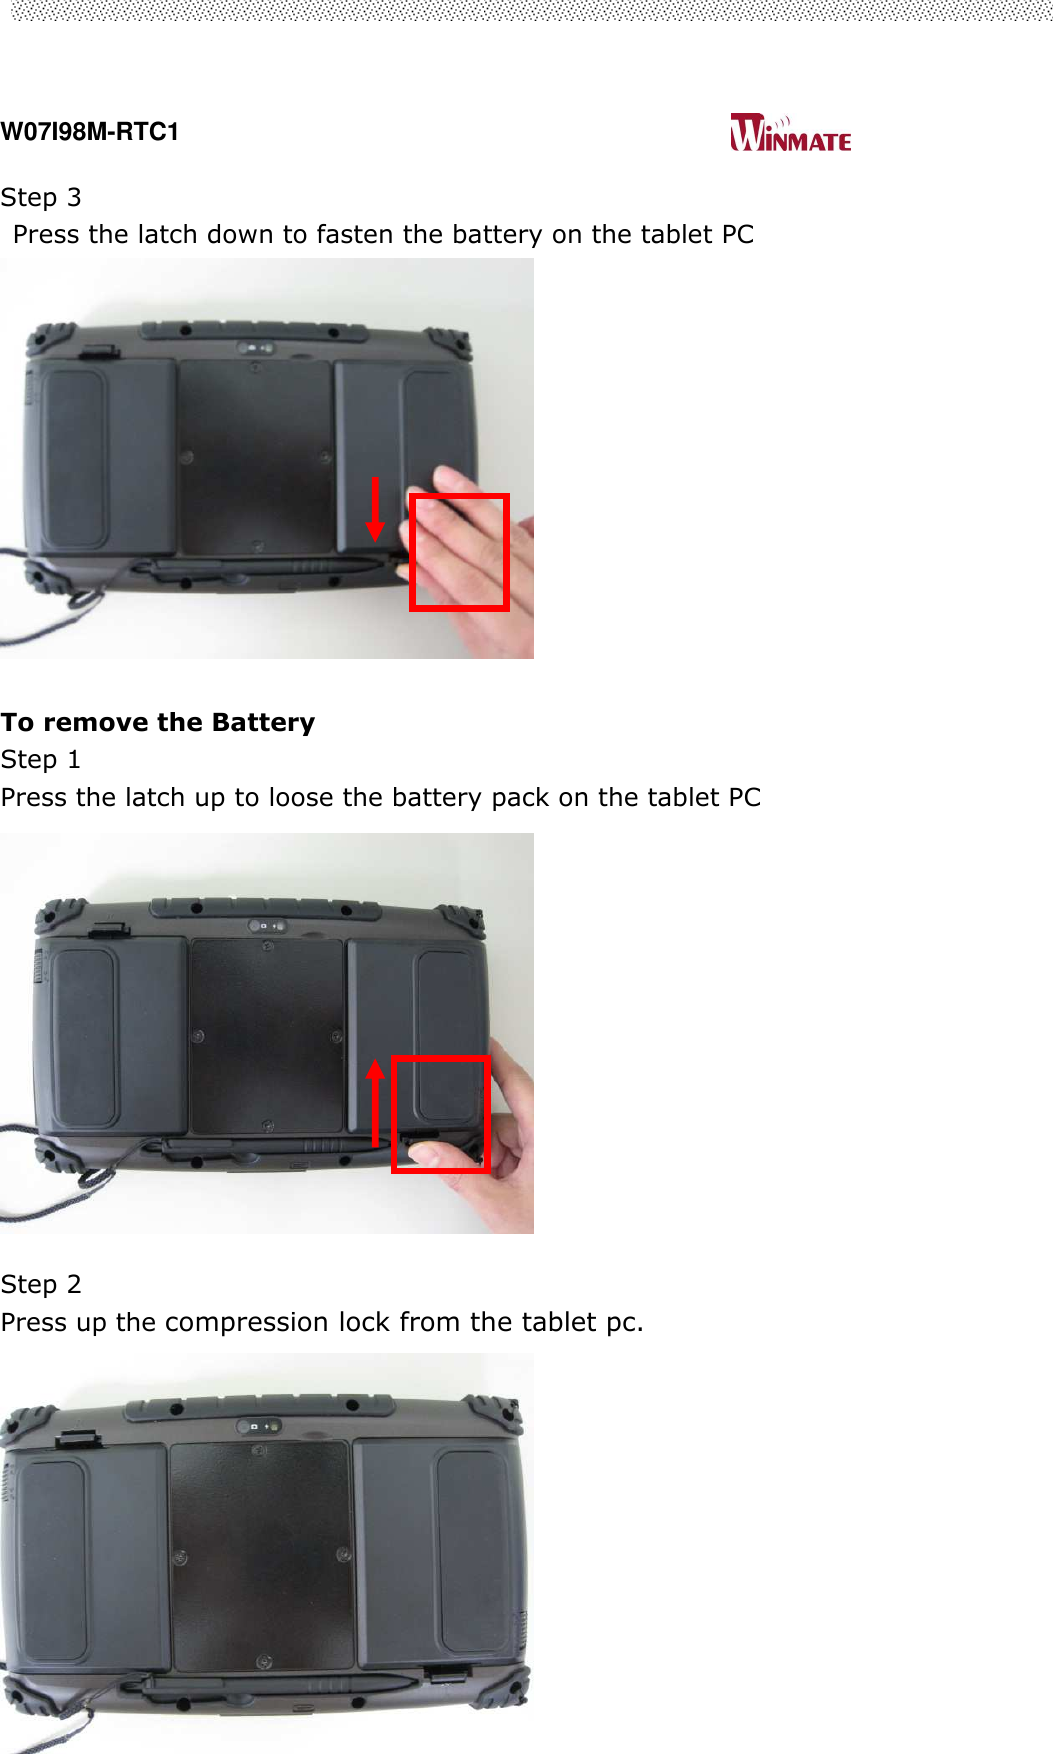
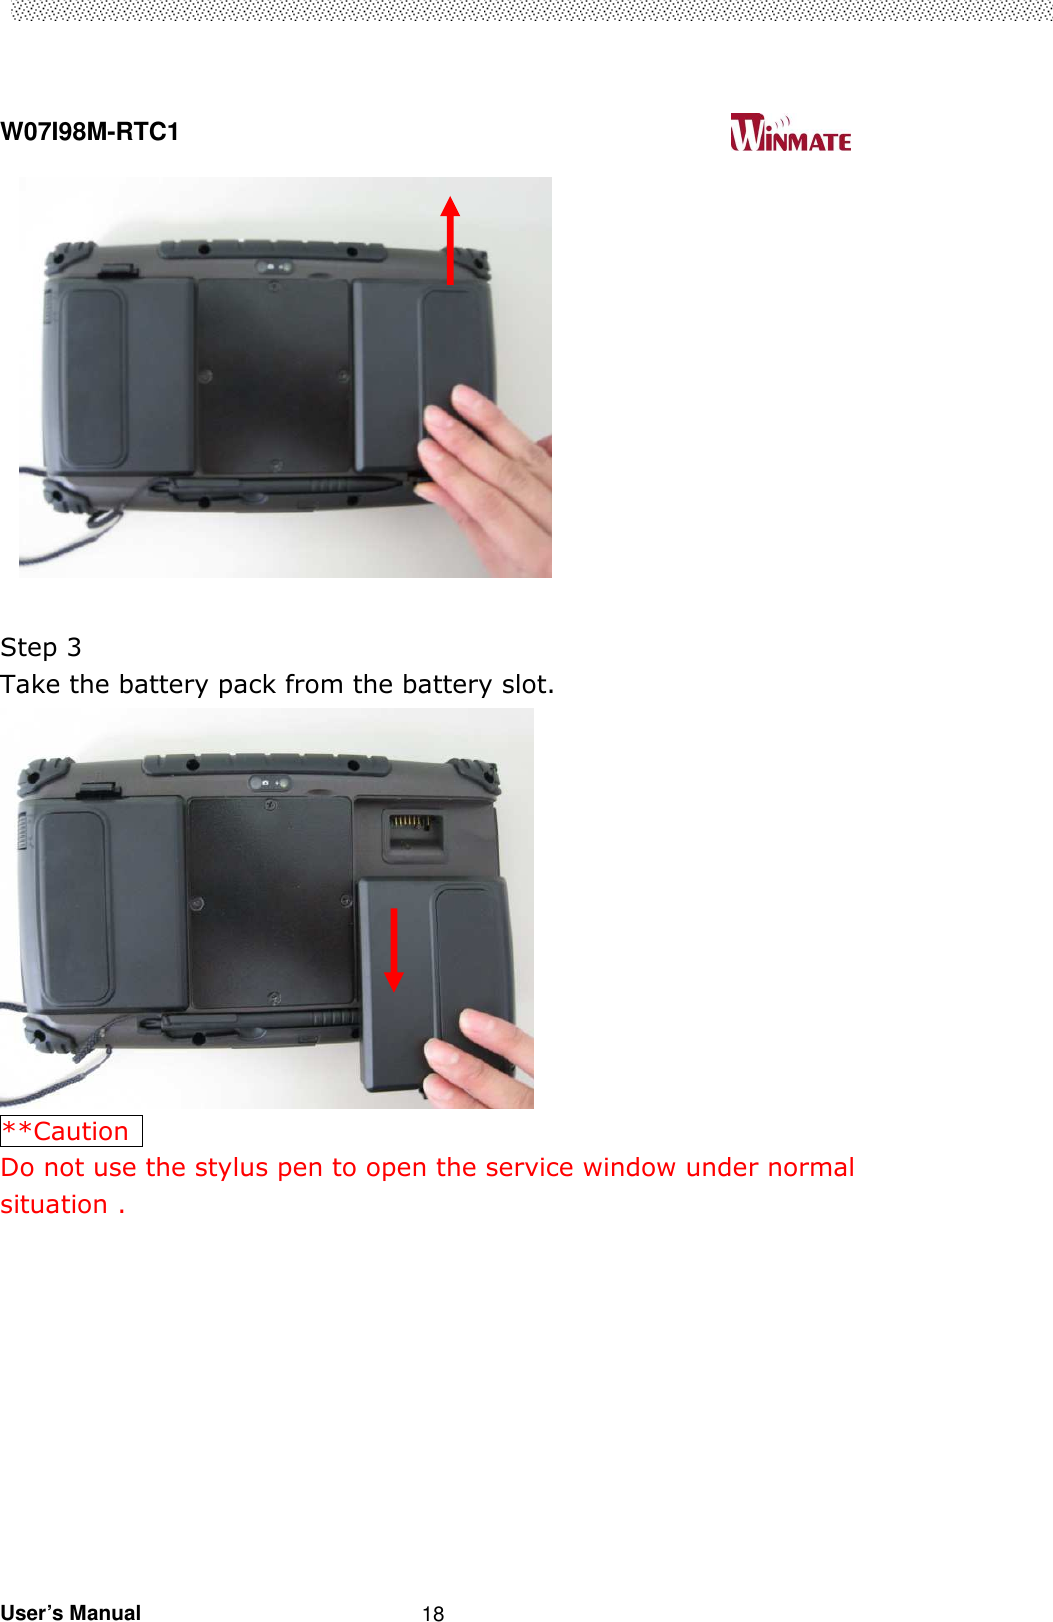
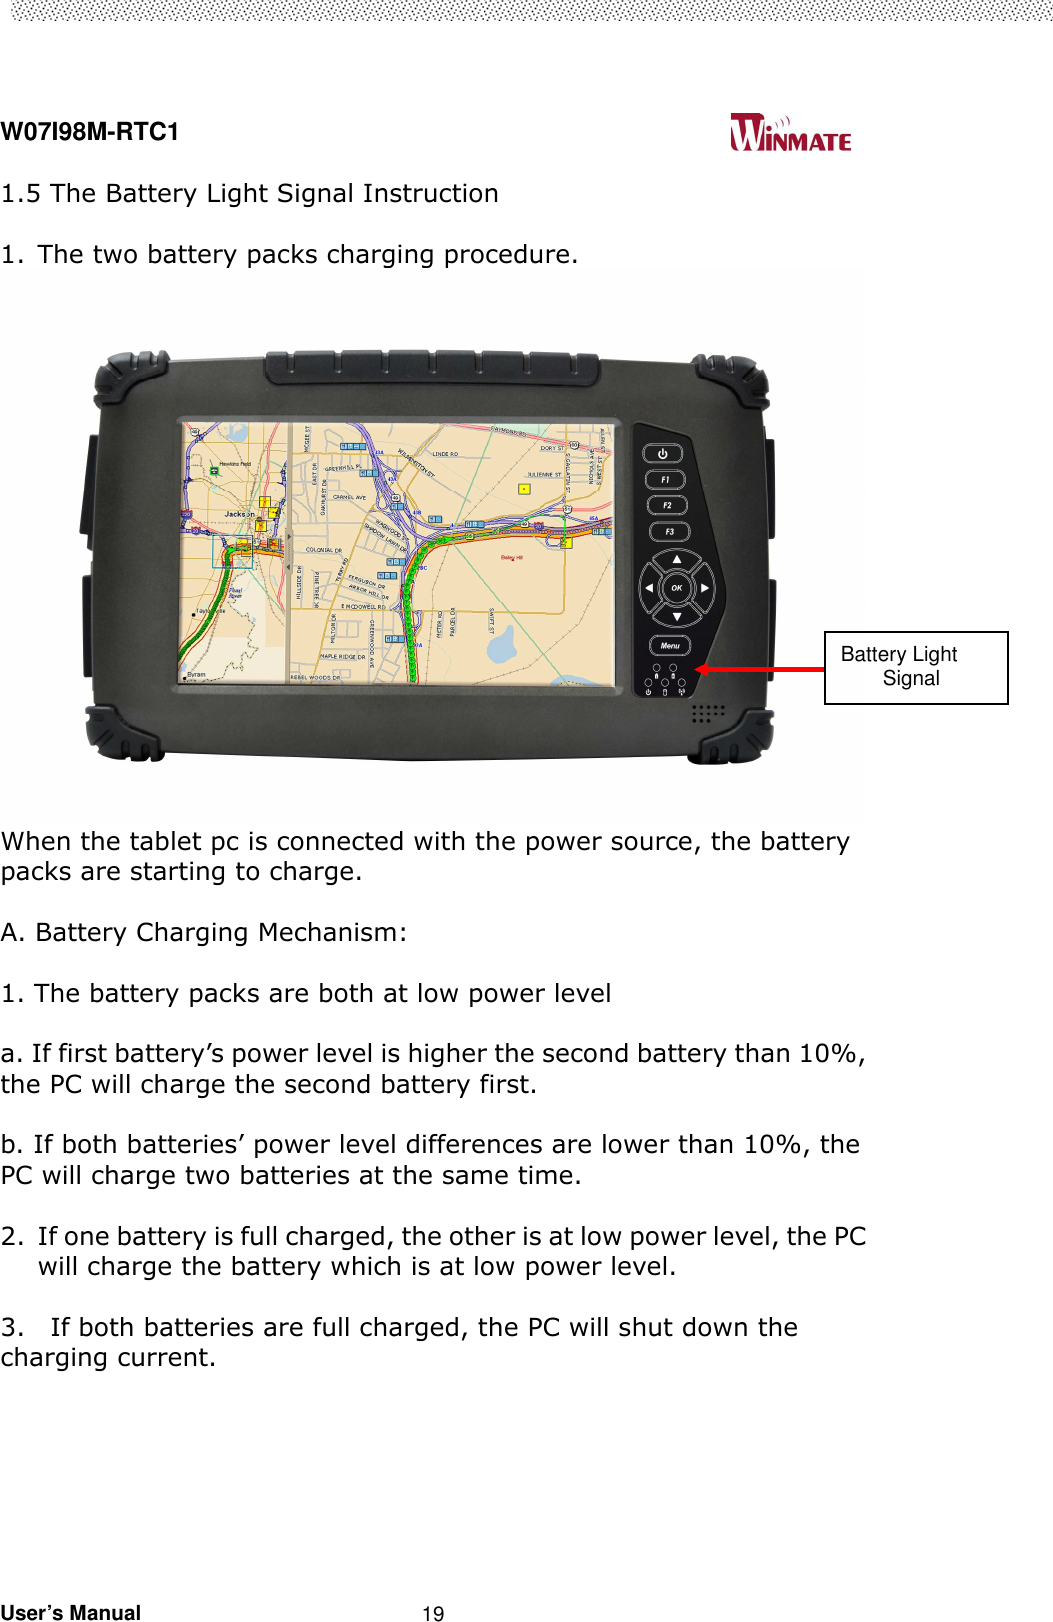
Handheld Group 01120709267 7 Rugged Tablet PC User Manual W07I98M RTC1 manual 0513rev

Handheld Group AB 7 Rugged Tablet PC W07I98M RTC1 manual 0513rev

User Manual

 W07I98M-RTC1                                                                                   User’s Manual                                                               7 inch Tablet PC   Quick Start Guide  Version: 1.0         W07I98M-RTC1  7 inch Rugged Tablet PC
 W07I98M-RTC1                                                                                   Users Manual                                                                                                      Rugged Table PCs 2 Accessory  Item  Description  Note  2 piece of 2 Cell Li-Polymer Battery Pack Hot-swappable for battery change 1 piece of Rugged Tablet PC Quick Start Guide.  1 piece of CD for System Driver Utility.  1 piece of 12V Adapter w/ Standard Power Cord. Euro / U.S. Std type, 1.8m   Operation System Packing List  Item  Description  Note  1 piece of CD for Recovery CD for Operation System (Windows 7 or Windows XP embedded). Optional with Windows XP embedded preinstalled  1 piece of Windows 7 or Windows XP embedded Recovery User’s Guide. Optional with Windows XP embedded preinstalled
 W07I98M-RTC1                                                                                   Users Manual                                                                                                      Rugged Table PCs 3 IMPORTANT SAFETY INSTRUCTIONS Please read these instructions carefully before using the product and save for later reference. Follow all warnings and instructions marked on the product. Unplug this product from the wall outlet before cleaning. Clean the product with a damp soft cloth. Do not use liquid or aerosol cleaners as it may cause permanent damage to the screen. Do not use this product near water. Do not place this product on an unstable cart, stand, or table. The product may fall, causing serious damage to the product. This product should be operated from the type of power indicated on the marking label. If you are not sure of the type of power available, consult your dealer or local power company. This product is equipped with a 3-wire grounding type plug, a plug having  a  third  (grounding)  pin.  This  plug  will  only  fit  into  a grounding-type  power  outlet.    This  is  a  safety  feature.    If  you  are unable to insert the plug into the outlet, contact your electrician to replace your obsolete outlet. (For AC version only) Do not defeat the purpose of the grounding-type plug. Do not allow anything to rest on the power cord.    Do not locate this product where persons will walk on the cord.   Never push objects of any kind into this product through cabinet slots as they may touch dangerous voltage points or short out parts that could result in a risk of fire or electric shock.    Never spill liquid of any kind on the product. Do  not  attempt  to  service  this  product  by  yourself,  as  opening  or removing  covers  may  expose  you  to  dangerous  voltage  points  or other risks and will void the warranty.    Refer all servicing to qualified service personnel. Unplug  this  product  from  the  wall  outlet  and  refer  servicing  to qualified service personnel under the following conditions: When the power cord or plug is damaged or frayed. If liquid has been spilled into the product. If rainy or water has been exposed to the product. If  the  product  does  not  operate  normally  that  the  operating instructions are followed. Adjust only those controls that are covered by  the  operating  instructions  since  improper  adjustment  of  other controls may result in damage and will often require extensive work by a qualified technician to restore the product to normal operation. If the product has been dropped or the cabinet has been damaged. If the product exhibited  a  distinct  change  in  the performance, that indicates a need for service.
 W07I98M-RTC1                                                                                   User’s Manual                                                   4 Copyright Notice Copyright © 2008 Winmate Communication Inc., ALL RIGHTS RESERVED. No part of this document may be reproduced, copied, translated, or transmitted in any form or by any means, electronic or mechanical, for any purpose, without the prior written permission of the original manufacturer. Trademark Acknowledgement Brand  and  product  names  are  trademarks  or  registered  trademarks  of  their respective owners. Disclaimer Winmate Communication Inc. reserves the right to make any product changes without  notice, including  circuits  and/or  software  described  or  contained in this manual in order to improve design and/or performance. Winmate Communication assumes  no  responsibility  or  liability  for  the  use  of  the  described  product(s), conveys no license or title under any patent, copyright, or masks work rights to these products, and makes no representations or warranties that these products are free from patent, copyright, or mask work right infringement, unless otherwise specified.  Applications  that  are  described  in  this  manual  are  for  illustration purposes only. Winmate Communication Inc. makes no representation or warranty that such application will be suitable for the specified use without further testing or modification. Warranty   Winmate  warrants  that  each  of  its  products  will  be  free  from  material  and workmanship defects for a period of one year from the invoice date. If the customer discovers  a  defect,  Winmate  will,  at  its  option,  repair  or  replace  the  defective product at no charge to the customer, provided it is returned during the warranty period of one year, with transportation charges prepaid. The returned product must be properly packaged in it’s original packaging to obtain warranty service. If the serial number and the product shipping data differ by over 30 days, the in-warranty  service  will  be  made  according  to  the  shipping  date.  In  the  serial numbers the third and fourth two digits give the year of manufacture, and the fifth digit  means  the  month  (e.  g.,  with  A  for  October,  B  for  November  and  C  for December).  For example, the serial number 1W08Axxxxxxxx means October of year 2008.
 W07I98M-RTC1                                                                                   User’s Manual                                                   5 Customer Service We provide service guide for any problem as follow steps:First, visit the website at http://www.winmate.com.tw    to find the update information about the product. Second, contact with your distributor, sales representative, or our customer service center for technical support if you need additional assistance. You may have the following information ready before you call:  Product serial number  Peripheral attachments  Software (OS, version, application software, etc.)  Description of complete problem    The exact wording of any error messages In  addition,  free  technical  support  is  available  from  our  engineers  every business day. We are always ready to give advice on application requirements or specific information on the installation and operation of any of our products. Please do not hesitate to call or e-mail us.  Notice 1. Do not touch the LCD panel surface with sharp or hard objects. 2. Do not use abrasive cleaners, waxes or solvents for cleaning, use only a dry or damp, soft cloth. 3. Use only with a high quality, safety-approved, AC/DC power adapter.
 W07I98M-RTC1                                                                                   User’s Manual                                                   6 Safety Precautions  Warning!  Always  completely  disconnect  the  power  cord  from  your chassis  whenever  you  work  with  the  hardware.  Do  not  make connections  while  the  power  is  on.  Sensitive  electronic components  can  be  damaged  by  sudden  power  surges.  Only experienced electronics personnel should open the PC chassis.   Caution!  Always ground yourself to remove any static charge before touching  the  CPU  card.  Modern  electronic  devices  are  very sensitive to static electric charges. As a safety precaution, use a grounding  wrist  strap  at  all  times.  Place  all  electronic components in a static-dissipative surface or static-shielded bag when they are not in the chassis
Users Manual                                                                                                        Rugged Tablet PCs   UL Safety Announcement    UL Classification: Class I mark: with respect to electronic shock; Fire and hazardous material only in accordance with the regulation of UL-60950 and CAN/CSA C22.2 No. 601.1.   Power Supply Announcement The  Handheld  Rugged  Tablet  PC  Power  Supplies  are  supported  by Power Adapter and Battery Pack, the power rating announcement and manufacturer information list as below.       Power Notice!    (1) Please aware of the power code of adapter need to be connected to the Earth ground.   (2)  Please  notice  the  Power  Standby  mode  when  push power button at least 4 seconds to go to sleep status. (See Chapter 2.1 Starting and Stopping the Tablet PC)      Power Adapter  Manufacture: EDAC Power Electronics Co Ltd Model: EA1050C-120 Input Rated: 100-240Vac, 1.8A, 50-60Hz. Output Rated: DC  12V, 4.16A. Battery Pack  Manufacture: JHT energy International Co Ltd Model: RTB-1 Rated: 2600mAh DC 7.4V
 W07I98M-RTC1                                                                                   User’s Manual                                                   8   Battery Notice!                                              WARNING Do not fix or replace battery, it may cause explosion! Only use with specified battery by following the manufacturer’s user manual’s instruction.
 W07I98M-RTC1                                                                                   User’s Manual                                                   9  Contents IMPORTANT SAFETY INSTRUCTIONS................................................3 CHAPTER 1 SPECIFICATION ......................................................................12 1.1 SYSTEM SPECIFICATION........................................................................................................12 1.2 HOW TO USE THE TABLET PC...............................................................................................13 1.3 LED INDICATOR....................................................................................................................14 1.4 USING THE BATTERY PACKS.................................................................................................15 1.5 THE BATTERY LIGHT SIGNAL INSTRUCTION........................................................................19 CHAPTER 2    SOFTWARE OPERATION.....................................................22 2.1 TURNING ON AND OFF THE TABLET PC...............................................................................22 2.1.1 TURN ON THE TABLET PC..................................................................................................22 2.1.2 TURN OFF THE TABLET PC ................................................................................................22 2.2 HOW TO USE THE SOFTWARE UTILITY......................................................................................23 2.3 HOT TAB SOFTWARE UTILITY FUNCTIONS..............................................................................24 CHAPTER 3 TABLET PC POWER MANAGEMENT............................34 3.1 ABOUT AC ADAPTER.................................................................................................................34 3.2 CHARGING AND CHECKING CHARGING STATUS......................................................................35 3.3 POWER-SAVING TIPS................................................................................................................38 CHAPTER 4 EXPANDING YOUR TABLET PC ...................................40 4.1 HOW AND WHEN TO USE BIOS SETUP...................................................................................40 4.2 BIOS FUNCTIONS.....................................................................................................................41 4.2.3 Boot Menu.......................................................................................................................44 4.2.4 Security Menu................................................................................................................45 4.2.5 Exit Menu ........................................................................................................................46
 W07I98M-RTC1                                                                                   User’s Manual                                                   10                   CHAPTER 1 Specification
 W07I98M-RTC1                                                                                   User’s Manual                                                   11    This User Manual cover the use of an W07I98M-RTC1 with Microsoft Windows 7 and Windows XP E OS, but other operating systems can also be used. Please contact your supplier for further information.  The  W07I98M-RTC1  is  a  compact  high  performance,  low  weight rugged  Tablet  PC  designed  for  outdoor  fieldwork  purpose.  The W07I98M-RTC1  can  survive  in  severe  environmental  conditions including vibration, shock, moisture and temperature variations. The W07I98M-RTC1  is  suitable  for  use  in  harsh  environments  such  as construction  sites,  warehousing,  defense,  manufacturing  and  field service. The W07I98M-RTC1 is delivered with two batteries and an AC adapter.
 W07I98M-RTC1                                                                                   User’s Manual                                                   12 CHAPTER 1 SPECIFICATION   This Chapter introduces the W07I98M-RTC1 specification. 1.1 System Specification  System Processor  Intel® ATOM™ Z530 BIOS  AMI System BIOS Chipset  Intel US15W Memory  1 x SODIMM, Max 2GB DDR2 400/533 (Default 512MB) LAN Controller  Realtek RTL811B Chipset, 10/100/1000 Mbps Storage  PATA interface support Mini-PCIe interface SSD (Default 32GB) Audio  Audio out for headset, Micro-in for microphone jack,1.5W Speaker (Internal) I/O Connectors Left I/O Port    1x Micro-In, 1x Audio Out,1x Giga LAN, 1x USB, 1x DC Power Jack Right I/O Port  1x RS232, 1x USB In Front Control Control Button  1x Power On/Off, 1x Menu, 1x Up, 1x Down, 1x Left, 1x Right 3x Programmable Hotkeys LED indicator  1x Power Status, 1x HDD Status, 2x Battery Status, 1x Wireless Status Display Specification Size    7” (16:9) Resolution  1024x600 Brightness  600 nit Touch  4 Wire Resistive Touch Power Management Power Input  12 V DC @ 4.16A Power Consumption 9W Battery  Li-Polymer 7.4V    2S1P, 2600mAh /2S2P, 5200mAh Adapter  100-240V, 50-60Hz, 12VDC
 W07I98M-RTC1                                                                                   User’s Manual                                                   13 Wireless Communication WLAN  802.11b/g/n (USB Half-Mini-Card.) built-in   Bluetooth  Bluetooth (internal by usb module)   WWAN  PCI Express® full size (Type F1) mini-card form factor 3G Modem Supported frequency range: WCDMA Release 99、HSDPA Release 5、HSUPA Release 6、  GPRS、EGPRS、CDMA2000 1X、CDMA2000 1xEV-DO(for Optional) GPS  MTK GPS Solution (internal UART module) (for Optional)    1.2 How to Use the Tablet PC   This section describes how to control this Tablet PC.   Components  Function Description  See Other Intro. 1 Power On Button PUSH 4 seconds to turn on the tablet pc
 W07I98M-RTC1                                                                                   User’s Manual                                                   14 2 LED Indicator Shows the Power Status, HDD Status, Left and Right Battery Status, and Wireless Status  3 Menu  Push Menu function to show Brightness, Volume,Battery status and Wireless Enable/Disable.  4 F1 – F3 Hotkey 6 programmable Hot-key functions for user to define by application, default first short push key (F1 short) will turn-on Outlook Express  5 Up/Down/ Left/ Right/OK Button Cotrol the up, down, left, right and Enter function.   1.3 LED Indicator         Power mode Green: System Turn On. No Light : System Turn Off   Battery Status No Light: 100% full charge or power on with AC adapter Orange Light: Product under charge Green Light: Discharging battery between 3% ~ 100% Red Light: Discharging batery under 3% Red light : Battery Absent Storage Status  Green Light blinking: HDD is using Wifi status  Green Light blinking: Wifi is using No Light: Wifi is not working
 W07I98M-RTC1                                                                                   User’s Manual                                                   15 1.4 Using the Battery Packs  This section describes the details of using the battery packs.  Using the Battery Packs   Before you use your Handheld tablet PC on the road, you will have to charge the battery packs, the battery packs begins to charge as soon as the Handheld    tablet PC is connected with the external power source. Please fully charge the batteries before using them in the first time. The new battery packs must 100% charged before the Handheld tablet PC is disconnected with the external power source. The battery pack is fully charged when the battery light indicator turns OFF. It takes about couple of hours to fully charge the battery when the Handheld tablet PC is turned OFF.    Battery Care The Handheld tablet packs like all rechargeable batteries, it have limit on  the  number  times  it  can  be  fully  recharged.  Fully  draining  and charging the battery once a day in each day will leave the batteries last  over  a  year,  but  rechargeable  time  limits  are  based  on  your environmental temperature, humidity, and how your tablet PC is used. The ideal environmental temperature range between 10∘C and 29∘C (50∘F and 85∘F).    Battery Power System The Handheld tablet PC is designed to work with two removable battery packs located inside the battery pack compartment. The fully charged batteries pack will provide several hours of battery life, which can further extended by using power management features through the BIOS setup. The battery system implements the power management software which allows the battery to accurately report the amount of charge percentage left in the battery.     Charging the Battery Pack   You can charge the battery pack by using the power adapter. When the power adapter is plugged in, the inserted batteries packs automatically recharges whether your tablet PC is ON or OFF. It takes
 W07I98M-RTC1                                                                                   User’s Manual                                                   16 about couples of hours for battery to receive fully charge when the power is OFF but takes twice as long when the tablet PC is in use. When the red charge LED indicator in flashing, charging is required. The battery is charging when the red LED is solid, when the LED is turned OFF, the battery pack is fully charged.     Insert the battery pack   Step 1   Insert the battery pack into the battery slot.            Step 2   Press down the compression lock into the tablet pc.
 W07I98M-RTC1                                                                                   User’s Manual                                                   17 Step 3 Press the latch down to fasten the battery on the tablet PC               To remove the Battery Step 1 Press the latch up to loose the battery pack on the tablet PC             Step 2   Press up the compression lock from the tablet pc.
 W07I98M-RTC1                                                                                   User’s Manual                                                   18             Step 3   Take the battery pack from the battery slot.  **Caution   Do not use the stylus pen to open the service window under normal situation .
 W07I98M-RTC1                                                                                   User’s Manual                                                   19 1.5 The Battery Light Signal Instruction    1. The two battery packs charging procedure.  When the tablet pc is connected with the power source, the battery packs are starting to charge.    A. Battery Charging Mechanism:  1. The battery packs are both at low power level  a. If first battery’s power level is higher the second battery than 10%, the PC will charge the second battery first.    b. If both batteries’ power level differences are lower than 10%, the PC will charge two batteries at the same time.    2. If one battery is full charged, the other is at low power level, the PC will charge the battery which is at low power level.        3.    If both batteries are full charged, the PC will shut down the charging current.     Battery Light         Signal
 W07I98M-RTC1                                                                                   User’s Manual                                                   20 B. Battery Discharging Mechanism:  1. If the battery on the right is full charged (>3%), the PC will select the right   one as the power source.   2. If the battery on the left is full charged (>3%), the PC will select the left one   as the power source.    3. If the both batteries are full charged, long push the F3 hot tab to switch the   battery power source.      4. When the battery’s power level is under 3%, the PC will automatically switch the power source to the other battery.      5. When both batteries power level are under 3%, the PC will turn off the power automatically to protect the battery pack.     Battery Light Signal: Charging ●   Low Power ◎                     Battery Left(#1)\Right(#2) Right: 3%~100% Right: 0%~3%  Right :No battery Left: 3%~100%  Use Left : ● ○ Use Right: ○ ●  Use Left: ● ◎ Use Right: Switch to Left Left: ●◎  Left: 0%~3%  Use Left : Switch to Right Use Right: ◎ ● Turn off the PC  Turn off the PC Left: No battery  Use Right: ◎ ● Turn off the PC  Turn off the PC
 W07I98M-RTC1                                                                                   User’s Manual                                                   21          CHAPTER 2   Software Operation
 W07I98M-RTC1                                                                                   User’s Manual                                                   22 CHAPTER 2    SOFTWARE OPERATION This Chapter will guide you how to operate the Tablet PC, including start  /  stop  the  PC,  and  how  to  use  menu  function  including  basic hardware function adjustment and the Hot Tab hotkey utility software that is very easy & helpful for operating the computer.  2.1 Turning On and Off the Tablet PC  2.1.1 Turn on the Tablet PC  1. Place your tablet PC on a flat and stable surface or hold the tablet PC on your hand.  2. Make sure the tablet PC is either connected with AC power adapter or the battery pack with power. 3. Press the power button at least for 4 seconds to turn it on.  2.1.2 Turn off the Tablet PC Turn  off  the  tablet  PC  power  source  by  using  the  “Shut  Down” command of your operating system.  **Caution   If you have to turn the tablet PC on again immediately after turning it off, please wait for at least for five seconds. Be sure to know that turn the tablet PC off and on rapidly can damage the whole device. Power On/Off Switch
 W07I98M-RTC1                                                                                   User’s Manual                                                   23 2.2 How to use the software utility  Hot-Tab Hotkey Function     PUSH Menu Function Description  Function Adjustment 1st Time  Show Current Brightness    2nd Time  Show current Volume   Click “Left/ Down” button to increase brightness (Or Drag by Touch)   Click ”OK” to confirm and eliminate UI. Click ”Right/Up” to decrease brightness(Or Drag by Touch) Click ”OK” to confirm and eliminate UI. 3rd Time  Show current Battery Usage and Two BTR status        4th Time Show current on/off   of Wireless\ Bluetooth mode      Use touch button to select all kind of wireless communication function and the led indicator on the membrane Enable/ Disable  5th Time Show software version for                                               a. Hot TAB Utility version b. BIOS / EC version LONG PUSH 4 sec  Lock/Unlock all button function Push 4 seconds to Lock all button**(not including Touch)    Push 4 seconds to Unlock back to normal operation
 W07I98M-RTC1                                                                                   User’s Manual                                                   24 2.3 Hot TAB Software Utility Functions  2.3.1 F1 Hot TAB functions will show four functions   A. The first is virtual mouse          B. Screen rotation     C. Onscreen Keyboard
 W07I98M-RTC1                                                                                   User’s Manual                                                   25 D. F2 to F3 functional Hot key   You can use “Browse” and choose the execution program file.       2.3.2 Power Manage function       2.3.3 System Information   1. When you press menu 5th time, you can see the system information.
 W07I98M-RTC1                                                                                   User’s Manual                                                   26   2. Low battery warning notice:
 W07I98M-RTC1                                                                                   User’s Manual                                                   27 2.3.4 Connecting to a Wireless Network To connect to a wireless network:  1. Push Menu function and making sure the Wireless function is “On”.   2. By using the defult build-in module, the Windows Wireless Network Connection will be disabled. The Ralink wireless connection utility is recommended in our Tablet PC systems.
 W07I98M-RTC1                                                                                   User’s Manual                                                   28 3. Right-click the Ralink utility in Windows system tray and choose “Launch Configu Utility”.   4. The Ralink Utility program will detect all wireless links automatically and show each status, choose one you want to link and click “Connect”.
 W07I98M-RTC1                                                                                   User’s Manual                                                   29 5. Log in password if necessary, and click “OK” to enter detail connection quality status.   6. Log in password if necessary, and click “OK” to enter detail connection quality status.
 W07I98M-RTC1                                                                                   User’s Manual                                                   30 2.3.5 Using the Bluetooth Wireless Feature We apply Bluetooth 2.1+ EDR module for default function of the Tablet PC series. Depending on your application, the Bluetooth module can give you capability for short-range wireless communicaitons between devices without requiring a cable connection. The transmission can go through  walls,  pockets  and  briefcases  as  long  as  two  devices  are within range around 10 meters. Following the easy step to connect to the Bluetooth communication.   1. Choose HotTab AP Menu function and making sure the Bluetooth function is “On”.   2. After installing the driver utility, the Bluetooth shortcut will shown on screen, double click the shortcut and it will search any bluetooth device automatically. Or double click “Search Devices” to search again.
 W07I98M-RTC1                                                                                   User’s Manual                                                   31 3. Choose the bluetooth device you want to connect, and left click to choose “Connect”. Then the device will be connected to the module.  4. When under connecting, left click to check the connection status, or choose “Unplug” to remove the connection.
 W07I98M-RTC1                                                                                   User’s Manual                                                   32 2.3.6   Using the 3G Feature   We apply a PCI Express® full size 3G module for default function of the Tablet PC series. Depending on your application, the 3G module can datacard and host PC software combination deliver multiband CDMA2000® 1xEV-DO, UMTS, and GSM wireless wide area network (WWAN) connectivity in a single hardware configuration.    1. Choose HotTab AP Menu function and making sure the 3G Module is “On”.                                                                     2. After installing the driver utility, the 3G shortcut will shown on screen, double click the shortcut and it will search any bluetooth device automatically. Or double click “Search Devices” to search again. 3. Choose HotTab AP Menu function and making sure the 3G Module is “On”.
 W07I98M-RTC1                                                                                   User’s Manual                                                   33              CHAPTER 3  Tablet PC Power Management
 W07I98M-RTC1                                                                                   User’s Manual                                                   34 CHAPTER 3 TABLET PC POWER MANAGEMENT 3.1 About AC Adapter Our Tablet PC support one set of AC adapter and power code by country area. Please confirm with your dealer for appropriate power code if necessary.       **Caution   1. When you disconnect the AC adapter, disconnect from the electrical outlet first and then from the tablet PC. A reverse procedure may damage the AC adapter or tablet PC. 2. Always hold the plug head when you unplug the connector, Never pull on the cord.   3. The AC adapter is designed for use with your tablet PC only. Connecting the AC adapter to another device can damage the adapter.  The adapter operates on any voltage in the range of 100~240 V AC. The AC adapter serves as a converter from AC (Alternating Current) to DC (Direct Current) power because the tablet PC runs on DC power input,  but  an  electrical  outlet  usually  provides  AC  power.  It  also charges the battery pack when connected to AC power.
 W07I98M-RTC1                                                                                   User’s Manual                                                   35 3.2 Charging and Checking Charging Status 3.2.1 Charging the Battery Pack The battery pack is the internal power source for the tablet PC. It is rechargeable using the AC adapter. The operating time of a fully charged battery pack depends on how you are using the tablet PC. When your applications often access peripherals, you will experience a shorter operating time.            NOTE: 1. Charging will not start if the battery’s temperature is below 0 °°°°C (32 °°°°F). It is also recommended not to charge the battery when temperature is above 45 °°°°C (113 °°°°F)  2. To prevent damage, the charging process may stop and the Battery Charge Indicator flashes red when the environmental temperature gets above 55 °°°°C (131°°°°F)  3. The battery level may automatically lessen due to the self-discharge process (0.21 % per day), even when the battery pack is fully charged (100 %). This happens no matter if the battery pack is installed in the tablet PC.
 W07I98M-RTC1                                                                                   User’s Manual                                                   36 3.2.2 Regulating the Battery If the battery is used frequently, recommend you to regulate the battery every month. And if you have following conditions, please regulate the battery immediately:  The battery status is incorrect battery level.  The battery pack is not use above one month.  The battery work time have striking change.  Following the step by step to set up Battery Calibration in BIOS. 1. Enter to the Tablet PC BIOS setup, select in “Advanced” option. 2. Enter to the Battery Calibration, press “OK” to go next.  When you Push “OK” to start Battery Calibration, following below indicated to regulate the battery. 3. Please plug-in an AC adapter to supply power,it will recalibrate the gauge of battery now.  4. Initialize battery and adjust LCD brightness. It is charging the battery, the waiting time depend on the battery level between few second and four hours. 5. While the battery is fully charged, please remove the AC adapter and LEAVE the Battery RUNNING OUT OF POWER that normally need to wait for few hours. 6. While the power level running out, you can charge the battery again. When the battery is fully charged, it’s finished to regulate. You can turn on the tablet PC to normal use.
 W07I98M-RTC1                                                                                   User’s Manual                                                   37 3.2.3 Battery Low Signals and Actions Battery Low occurs when the battery has approximately 10 % (Windows default setting) of its charge remaining. The tablet PC’s Battery Charge Indicator (    )    blinks red to alert you take actions. NOTICE:   1. You can set up the Battey Low threshold and signals under Windows. Immediately save your data upon Battery Low. The remaining operating time depends on how you are using the tablet PC. If you are using the audio subsystem, PC card, hard or USB flash disk, the battery might run out of charge very quickly. 2. Always respond to Battery Low by placing your tablet PC on the Standby or Hibernation mode, turning off the tablet PC, or connecting the AC adapter.  CAUTION: 1. If you do not take any action, the tablet PC will automatically hibernate and turn off. 2. If you are using a PC card, do not access the card during battery low periods. The access may takes longer time than battery to run out of charge, thus making your access to the card fail. 3. If you fail to save your data when the battery completely runs out of charge, then you will lose your data.
 W07I98M-RTC1                                                                                   User’s Manual                                                   38 3.3 Power-Saving Tips The following are some Power-Saving Tips suggestions to maximize the battery’s operating time.  Do not disable Power Management.  Decrease the LCD brightness to the lowest comfortable level.  Shorten the length of time before Windows turn off the display.  USB devices use power just by being connected. If you use a USB mouse, you can save power by disconnecting the mouse and using the optional touchscreen pen.    If you use a USB flash drive, unplug it when you are not using it.  If you work with an application that uses a PC card, exit the application when you finish using it.  If you have a PC card installed, remove it when not in use. Some PC cards drain power even while they are inactive.  Deactivate the Wireless LAN function if you are not using it (see Chapter 2).  Deactivate the Bluetooth wireless feature if you are not using it (see Chapter 2)  Turn off the tablet PC when you are not using it.
 W07I98M-RTC1                                                                                   User’s Manual                                                   39       CHAPTER 4 Expanding Your Tablet PC
 W07I98M-RTC1                                                                                   User’s Manual                                                   40 CHAPTER 4 EXPANDING YOUR TABLET PC 4.1 How and When to Use BIOS Setup                                                                         For enter to the Tablet PC BIOS setup, you need connect to external usb  keyboarb,  press  “Del”  key  when  the  prompt  appears  on  the screen during start up. The prompt screen shows only few seconds so need press Del key quickly.  **NOTICE   Updated  BIOS  version  may  be  published  after  the  manual  is released. Check with the latest version of BIOS on website. You may need to run BIOS setup utility when the below status. 1. Error message on sreen indicate to check BIOS setup. 2. Restoring the factory default settings. 3. Modifing the specific hardware specification 4. Want to opttimize the specification.  To control the keyboard to select BIOS utility setup, you need   Keyboard Icon Function Description ,  Selects a menu title ,  Selects an item or option Enter  Go to the sub-menu when available   Opens or closes the option window when an item is selected Esc  To leave sub-menu and return to main menu.  **NOTICE   You can press the F1, F9, F10, –/+, and Esc keys by connecting a USB keyboard to your tablet PC. Make sure that the item “Legacy USB Support” under the Main menu is set at Enabled (default).
 W07I98M-RTC1                                                                                   User’s Manual                                                   41 4.2 BIOS Functions  3.2.3 Main Menu The main menu contains the information of the Tablet system including BIOS version, processor, system memory, time, and date.   4.2.2 Advanced Menu The advanced menu contains the configuration information of CPU, IDE/ SATA, ACPI, APM Configuration and Battery Calibration(see Chapter 3.2.4 for detail).
 W07I98M-RTC1                                                                                   User’s Manual                                                   42 1. CPU Configuration   2. IDE/ SATA Configuration
 W07I98M-RTC1                                                                                   User’s Manual                                                   43 3. ACPI Configuration  4. ACPI Configuration Sets the Resume On LAN and Resume On RTC Alarm function.   (1). Resume On LAN:Disable or Enable LAB GPI to generate a wake event.  (2). Resume On RTC Alarm  Note::::The LAN Resume function only works in AC mode, not works in
 W07I98M-RTC1                                                                                   User’s Manual                                                   44 battery mode. 5. Battery Calibration  The detail of Battery calibration is show in chapter 3.2.4.  4.2.3 Boot Menu The Boot menu sets the sequence of the devices to be searched for the operating system.  The bootable devices will be automatically detected during POST and shown here, allowing you to set the sequence that the BIOS uses to look for a boot device from which to load the operating system. A brief description of button usage is listed next:
 W07I98M-RTC1                                                                                   User’s Manual                                                   45                    Chck the Hard Disk Device in Hard Disk Drives.  4.2.4 Security Menu Change Supervisor Password, Change User Passwaord and Clear User Password.
 W07I98M-RTC1                                                                                   User’s Manual                                                   46 4.2.5 Exit Menu The Exit menu displays ways of exiting BIOS Setup utility. After finishing with your settings, you must save and exit so that the changes can take effect.  Save Canges and Exit saves the changes you have made and exits BIOS Setup utility.  Discarding Changes and Exit exits BIOS Setup utility without saving the changes you have made. Discard Changes restores the previous values for all the items.  Load Optimal Default loads the factory default values for all the items.
 W07I98M-RTC1                                                                                   User’s Manual                                                   47 FCC regulatory statements, notices and warning  IMPOTANT SAR INFORMATION  Your wireless phone is a radio transmitter and receiver. It is designed and manufactured not to exceed the emission limits for exposure to radiofrequency (RF) energy set by the FCC of USA. These limits are part of comprehensive guidelines and establish permitted levels of RF energy for the general population. The guidelines are based on standards that were developed by independent scientific organizations through periodic and thorough evaluation of scientific studies. The standards include a substantial safety margin designed to assure the safety of all persons, regardless of age and health. The exposure standard for wireless mobile phones employs a unit of measurement known as the Specific Absorption Rate, or SAR. The SAR limit set by the FCC is 1.6 W/kg. * Tests for SAR are conducted with the phone transmitting at its highest certified power level in all tested frequency bands. Although the SAR is determined at the highest certified power level, the actual SAR level of the phone while operating can be well below the maximum value. This is because the phone is designed to operate at multiple power levels so as to use only the power required to reach the network. In general, the closer you are to a wireless base station antenna, the lower the power output.   Before a phone model is available for sale to the public, it must be tested and certified to the FCC that it does not exceed the limit established by the government adopted requirement for safe exposure. The tests are performed in positions and locations (e.g., at the ear and worn on the body) as required by the FCC for each model. The highest SAR value for this model phone when worn on the body, as described in this user guide, is 0.529 W/Kg. (Body-worn measurements differ among phone models, depending upon available accessories and FCC requirements). While there may be differences between the SAR levels of various phones and at various positions, they all meet the government requirement for safe exposure.    * In the United States and Canada, the SAR limit for mobile phones used by the public is 1.6 watts/kg (W/kg) averaged over one gram of tissue. The standard incorporates a substantial margin of safety to give additional protection for the public and to account for any variations in measurements.  Use only the supplied or an approved antenna. Unauthorized antennas, modifications, or attachments could impair call quality, damage the phone, or result in violation of FCC regulations. Do not use the phone with a damaged antenna. If a damaged antenna comes into contact with the skin, a minor burn may result. Please contact your local dealer for replacement antenna.  This transmitter must not be co-located or operating in conjunction with any other antenna or transmitter.   FCC Part 15 Notice   This  device  complies  with  part  15  of  the  FCC  Rules.  Operation  is  subject  to  the following two conditions: (1) This device may not cause harmful interference, and (2) this  device  must  accept  any  interference  received,  including  interference  that  may cause undesired operation.     Warning: This device has been tested and found to comply with the limits for a Class B digital device pursuant to Part 15 of the Federal Communications Commissions Rules and Regulations. These limits are designed to provide reasonable protection
 W07I98M-RTC1                                                                                   User’s Manual                                                   48 against harmful interference when the equipment is operated in a commercial environment. This equipment generates, uses, and can radiate radio frequency energy and, if not installed and used in accordance with the instruction manual, may cause harmful interference to radio communications. However, there is no guarantee that interference will not occur in a particular installation.   If this equipment does cause harmful interference to radio or television reception, which can be determined by turning the equipment off and on, the user is encouraged to try and correct the interference by one or more of the following measures:   . Relocate this device   . Increase the separation between the device and the receiver   . Connect the device into an outlet on a circuit different from that of other electronics. Consult the dealer or an experienced radio technician for help.   FCC Radiation Exposure Statement   Important Note: To comply with FCC RF exposure compliance requirement, the antenna used for this transmitter must not be co-located or operating in conjunction with any other transmitter.   Caution:   Any changes or modifications not expressly approved by the party responsible for compliance could void the user's authority to operate this equipment.

Navigation menu