Handheld Group 11024V3 Rugged Tablet PC User Manual
Handheld Group AB Rugged Tablet PC
User Manual
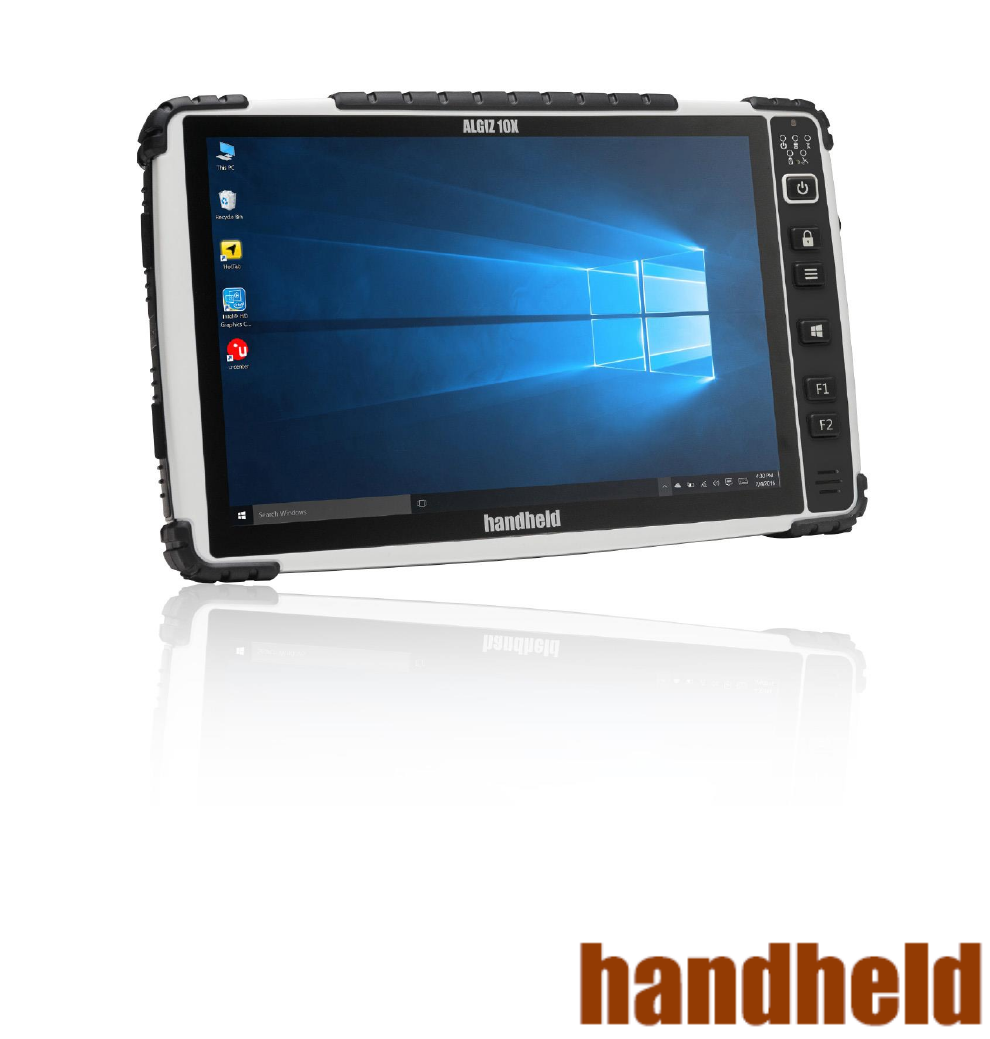
ALGIZ 10X
MANUAL

INDEX
What’s in the Box ....................................................................................................................... 4
1.IDENTIFYING ALGIZ 10X .................................................................................................... 5
Specification ......................................................................................................................... 5
System ................................................................................................................................................ 5
Display Specification ........................................................................................................................... 5
I/O Connectors.................................................................................................................................... 5
Buttons and Indicators ........................................................................................................................ 5
COM Port Assignment ......................................................................................................... 6
Boot Options ........................................................................................................................ 6
Factory Reset ....................................................................................................................... 6
Front Side ............................................................................................................................ 7
Left and Right Side .............................................................................................................. 8
Rear Side ............................................................................................................................. 9
Function Keys .................................................................................................................... 10
LED Indicators ................................................................................................................... 10
LED Term ......................................................................................................................................... 10
2. USING ALGIZ 10X ............................................................................................................ 11
AC Power ........................................................................................................................... 12
Battery Power .................................................................................................................... 12
Insertion of the Battery Pack .............................................................................................. 13
Removal of the Battery Pack ............................................................................................. 13
Charging the Battery .......................................................................................................... 14
Power Supply ..................................................................................................................... 14
Starting ALGIZ 10X ............................................................................................................ 15
Installing SIM Card, SD Card ............................................................................................. 15
3.SOFTWARE ......................................................................................................................... 16
Hot-Tab .............................................................................................................................. 17
Adjusting the LCD Brightness ............................................................................................ 17
Adjusting the Speaker Volume .......................................................................................... 17
Battery Status .................................................................................................................... 18
WWAN (LTE) - Optional..................................................................................................... 19
GPS…. ............................................................................................................................... 20
Camera .............................................................................................................................. 22
External GPS Antenna ....................................................................................................... 25
System Information ............................................................................................................ 26

4.REGULATORY INFORMATION ......................................................................................... 26
FCC Compliance Statement .................................................................................................... 26
FCC Warning ........................................................................................................................... 26
FCC RF Radiation Exposure ................................................................................................... 27
Copyright Notice ...................................................................................................................... 27
Trademark Acknowledgement ................................................................................................. 27
Disclaimer 27
Customer Service .................................................................................................................... 27
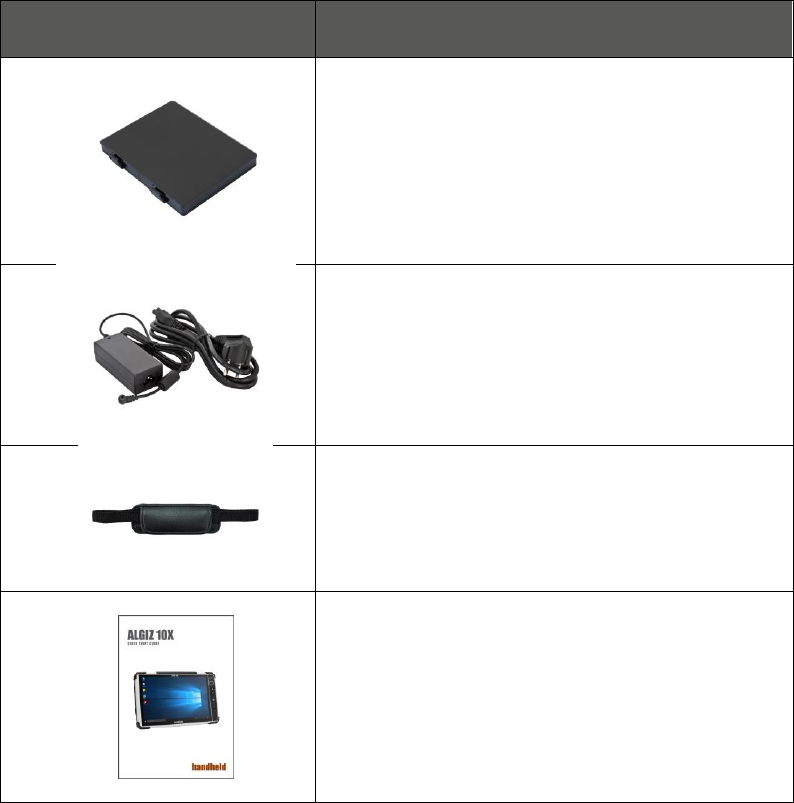
What’s in the Box
Item
Description
One 2 Cell Li-Ion Battery Pack
19V Adapter w/ standard power cord.
Standardtype, 1.8M
Handstrap
ALGIZ 10X Quick start guide

ALGIZ 1ALVer 3.1
5
PART 1:
IDENTIFYING ALGIZ 10X
Specification
ALGIZ 10X is a rugged tablet PC designed for use in various challenging environments, e.g. field work,
outdoor activities and construction sites. With its rugged design, ALGIZ 10X is able to withstand shocks,
vibrations, high humidity as well as high/ low temperatures.
System
Processor
Intel® Celeron® N2930 Quad Core 1.83 GHz Processor
BIOS
AMI System BIOS
Chipset
Intel ATOM SocIntegrated
Memory
SODIMM, DDR3L 16004GB
LAN Controller
Intel® Ethernet ControllerI211-AT
Storage
SATA interface support Mini-PCIe interface SSD 128GB
Audio
Audio-out / Audio-in / Microphone-in. Internal Speaker
Display Specification
Size
10.1” (16:10)
Resolution
1920 x 1200
Brightness
600 cd/m2 (typ.)
Touch
10 points projective capacitive touch
I/O Connectors
LeftSide
1xDC Power Jack,1xVGA, 1Xusb 2.0,1xRS232
Right Side
1xLAN, 1xUSB 3.0, 1xMic/Audio Jack,
1xSIM Card Slot, 1xMicro SD Card Slot
BottomSide
Pogo-pin for docking
Rear Side
Service Window
Buttons and Indicators
Control Button
Power On/Off, Menu, windows key, two programmable hotkeys
LED Indicators
Power Status, SSD Status, RF Device Status, Battery Status, GPS Status
ALGIZ 1ALVer 3.1
6
COM Port Assignment
COM1
RS232
COM2
B+ Power & UART Wafer
COM3
GPS
COM6
WWAN virtual COM
COM7
WWAN virtual COM
COM8
WWAN virtual COM
COM11
Docking Station
COM12
Docking Station
Boot Options
F1
Initiatefactoryreset
F2
Enter BIOS
FactoryReset
The ALGIZ 10X has a built-in recovery utility that can be used to reset your computer’s SSD disk to its factory
state. Press F1 during booting when the Handheld logo screen appears. Follow the instructions on the screen
to continue with the factory reset.
CAUTION: This procedure will erase all data on your disk.
ALGIZ 1ALVer 3.1
7
FrontSide
Ref.
Item
Description
1
Front Microphone
Receives sound to make voice recordings.
2
Light Sensor
Senses the ambient light for automatic adjustment
of the display backlight. The features can be enabled
through the OSD Control Keypad.
3
Keypad
TheKeypad provides hotkeys with all functions
including
Power On/Off, Menu, programmable hotkeysand
aWindows Home key
4
Speaker
Front Speaker
ALGIZ 1ALVer 3.1
8
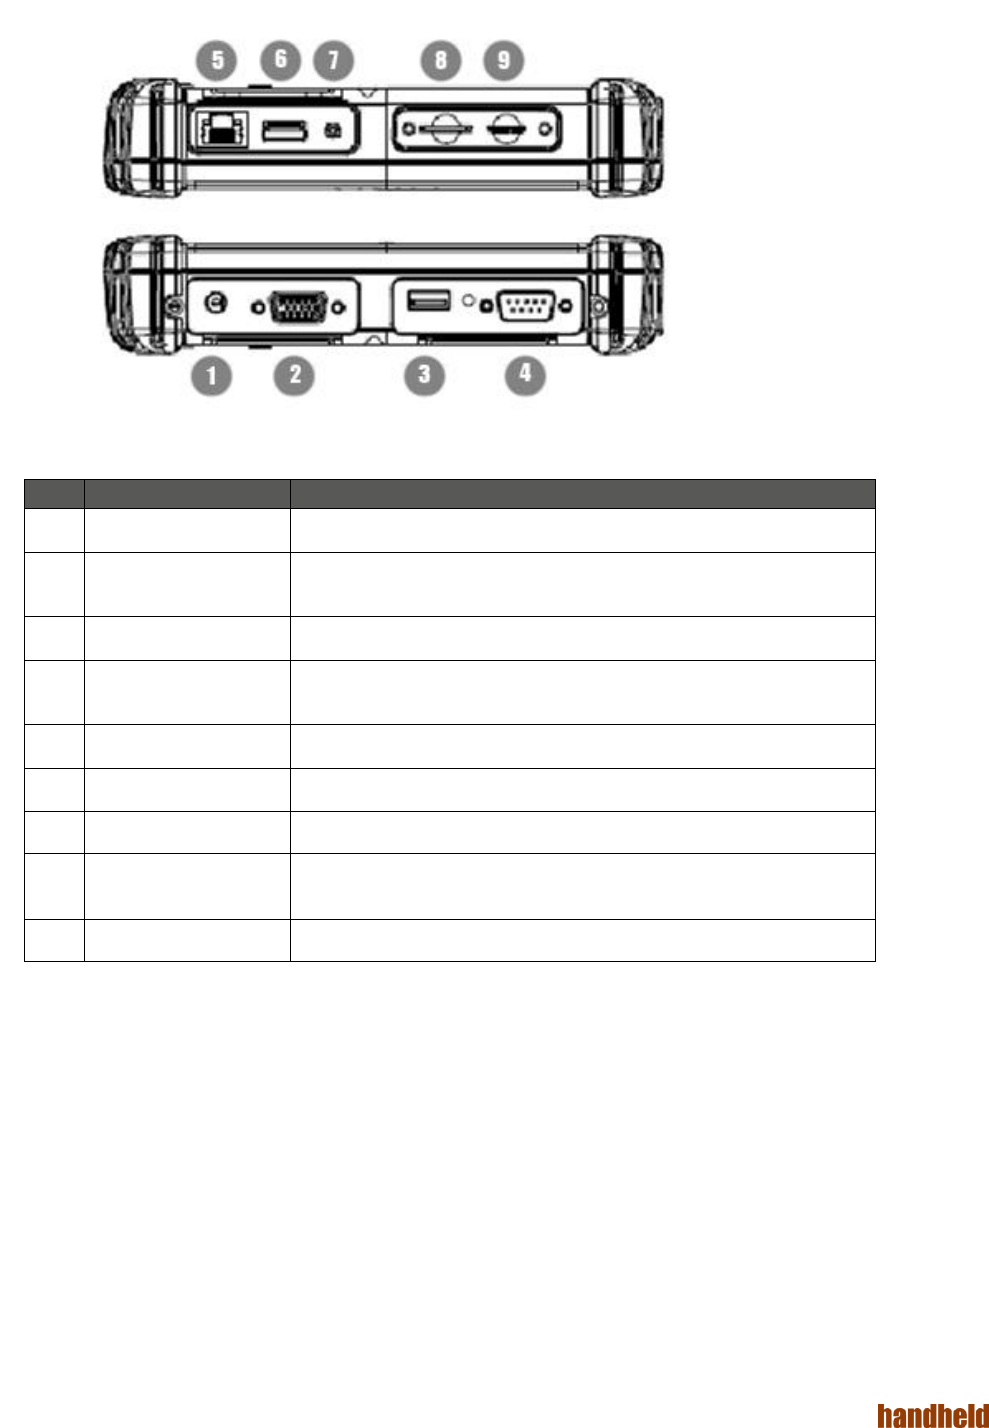
Left and Right Side
Ref.
Item
Description
1
DC Power Jack
DC plug for supplying power to the device
2
VGA
For connection to external display devices such as monitors and
projectors
3
USB 2.0 Port
Can be connected to USB-interface peripherals
4
RS232
Accepts external connections using the interface of RS232 (D-sub 9
pins)
5
Ethernet(RJ45) Port
For connection to an Ethernet 10/100/1000-based network
6
USB 3.0 Port
Can be connected to any USB-interface peripherals
7
Combo Audio Jack
For connection to a set of headphones or external speakers.
8
SIM CardSlot
Accepts a SIM Card, use the WWAN feature to connect to the
Internet.
9
Micro SD CardSlot
Accepts a Micro SD Card for additional features.
ALGIZ 1ALVer 3.1
9
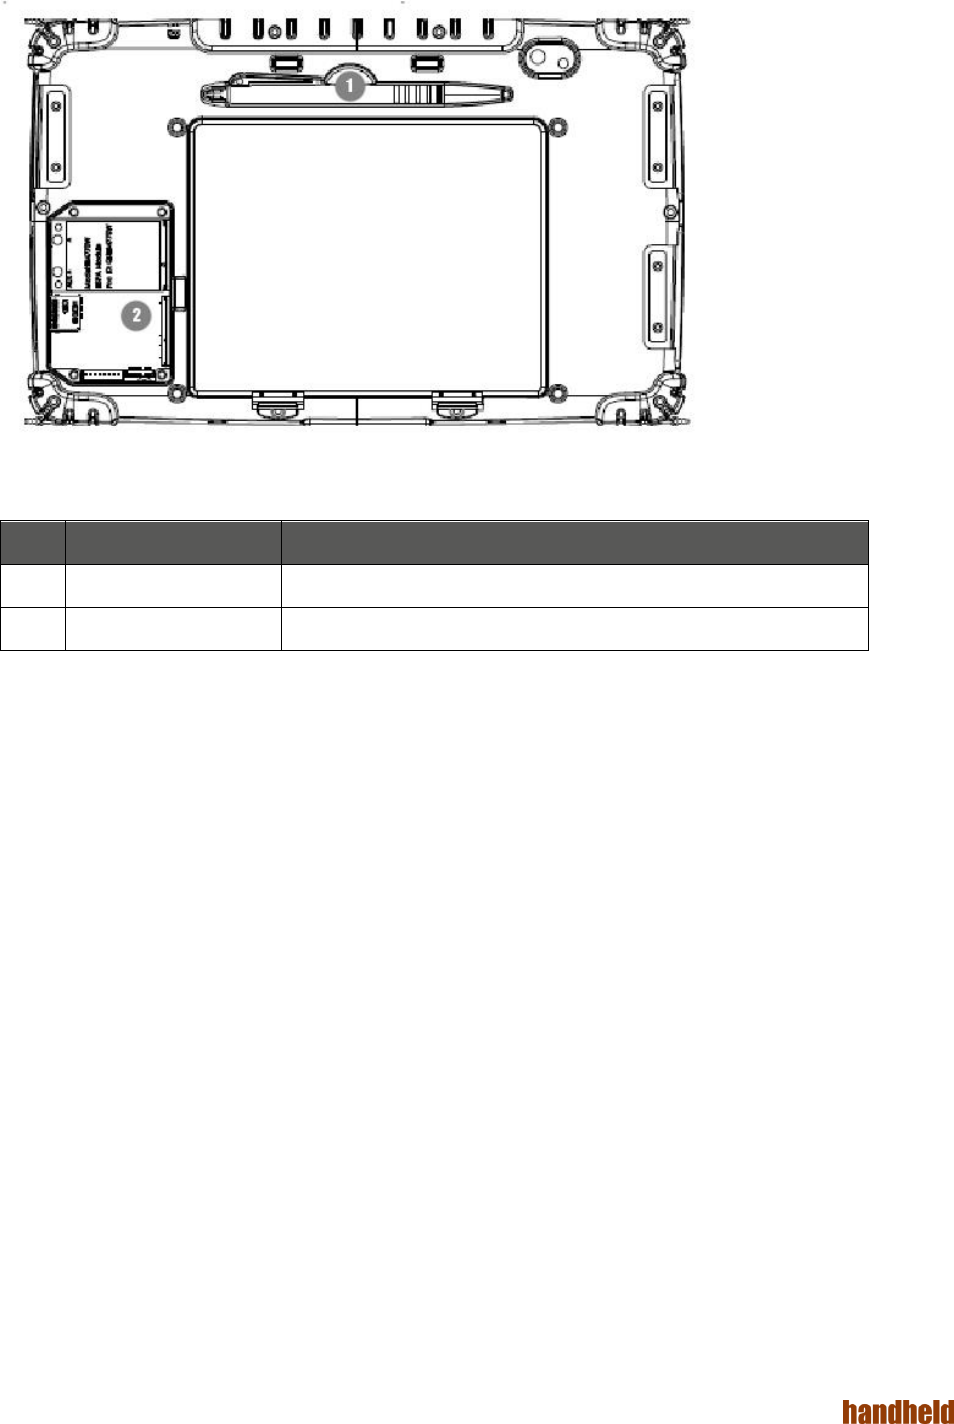
Rear Side
Item
Description
1
Stylus Pen
2
Service Window
User-accessiblecompartment.
ALGIZ 1ALVer 3.1
10
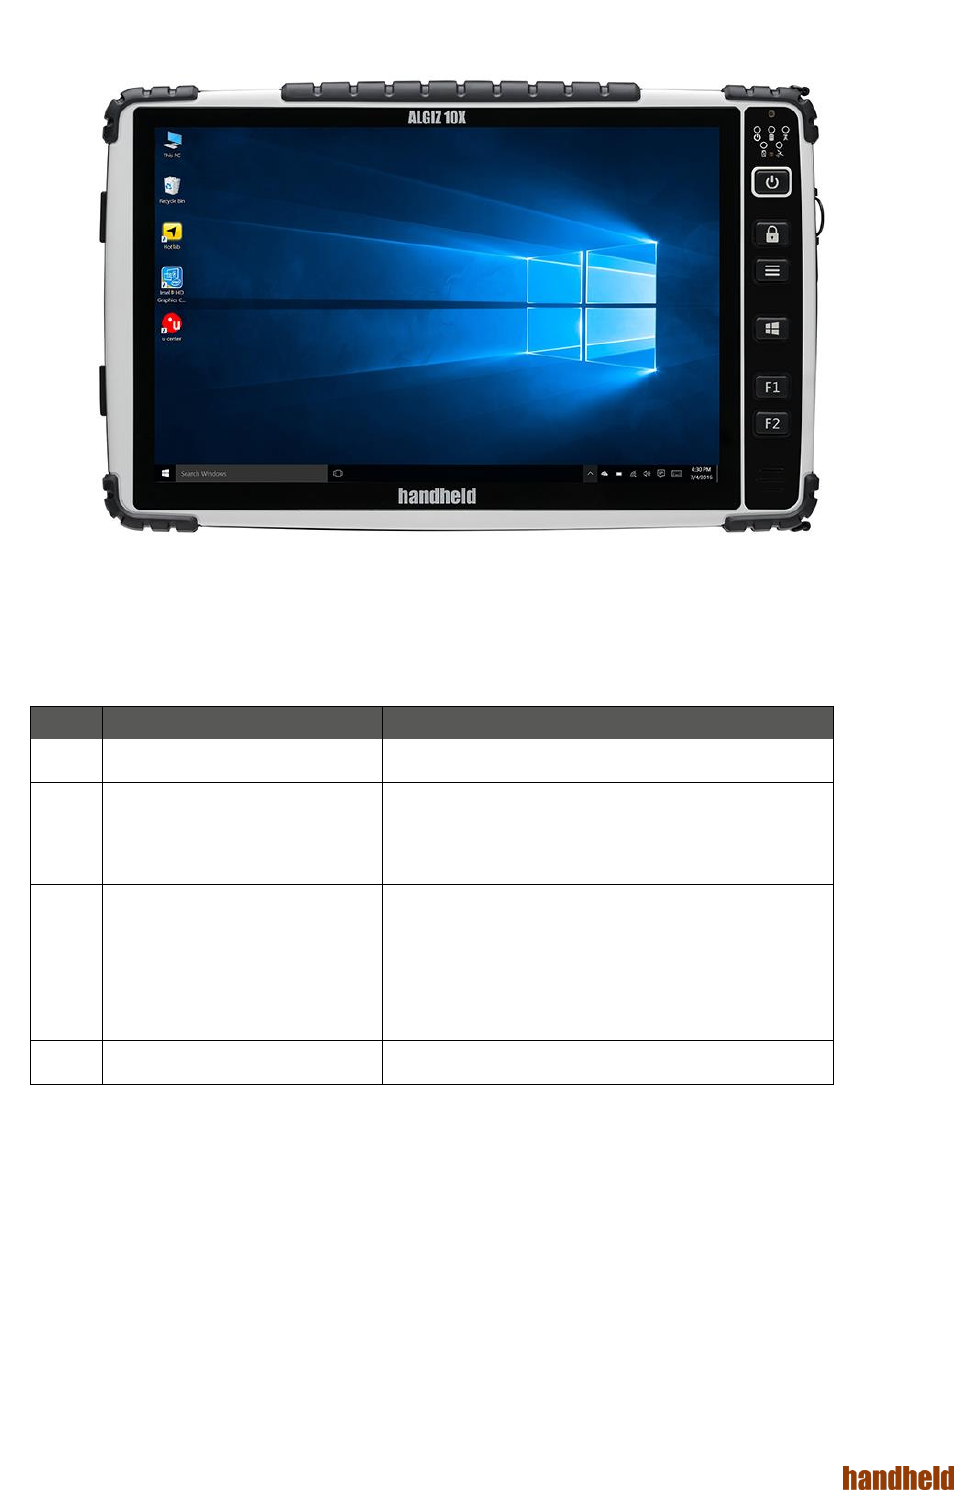
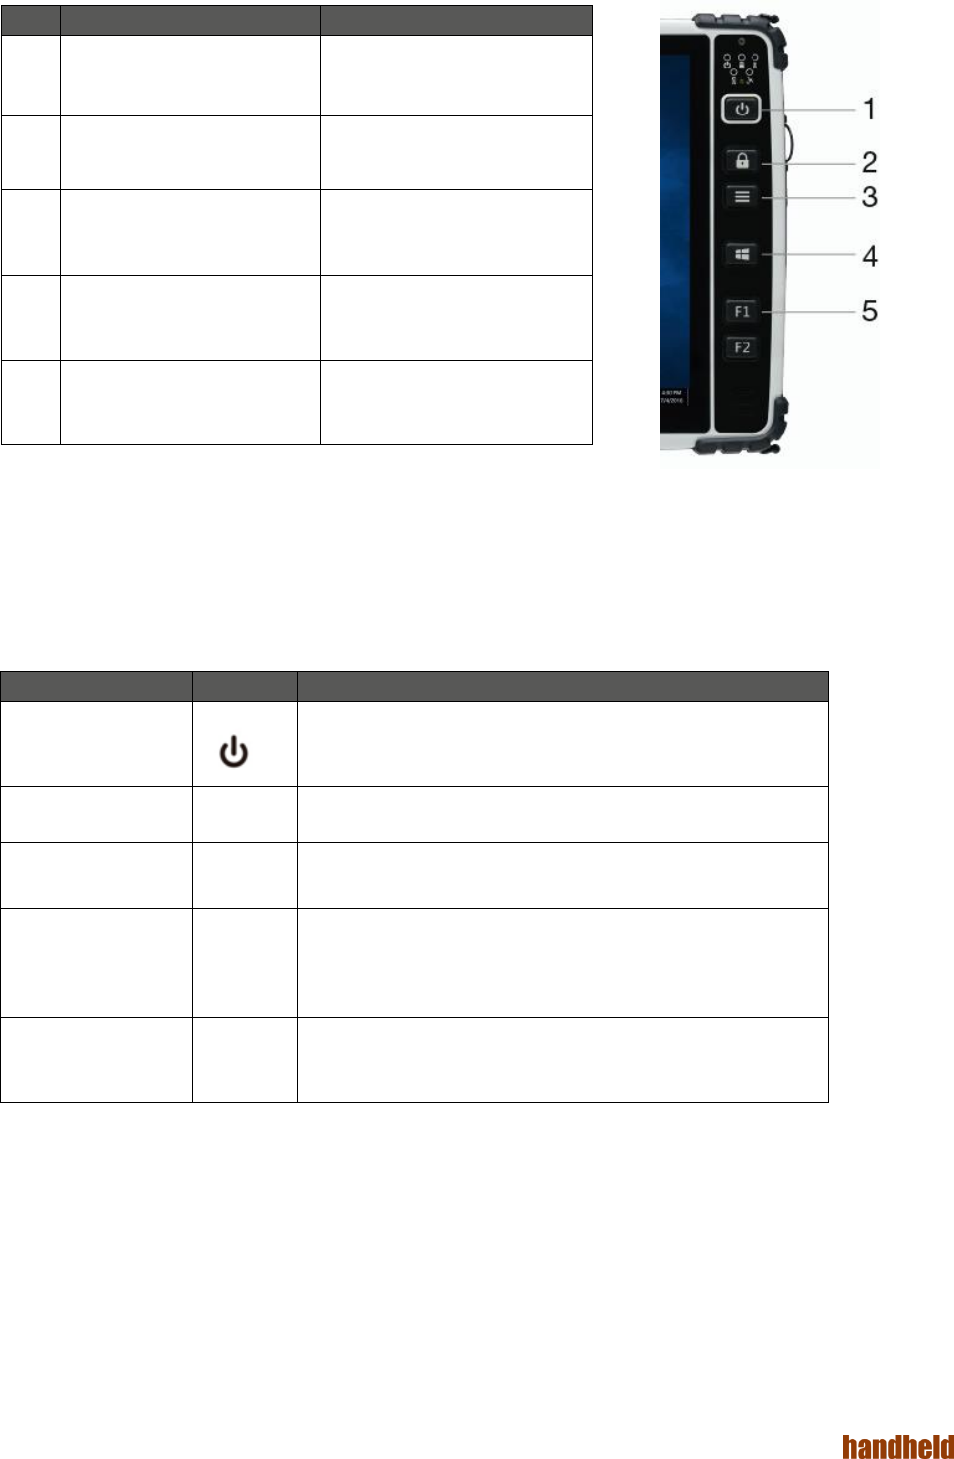
Function Keys
Components
Description
1
Power Button*
Hold down for 4 seconds to
turn the computer on.
2
Touch mode/lock
Touch mode selection. Lock
screen.
3
Menu
Controls brightness, volume,
battery, power to modules and
system information.
4
Windows key
Open start menu
5
Function keys
Two programmable buttons.
Press menu to configure.
* If computer does not respond you can power it off by holding down the Power Button until the LEDs are
switched off. Hold down for about 10 seconds.
LED Indicators
LED Term
Symbol
Indicator Status Description
Power mode
Green: System is on
No light: System is off or LED indicators are off in Hot-tab.
Storage Status
Flashing green light: SSD is reading/writing data
Radio Status
Green: Indicates that any transmitting radio is turned on.
( WWAN)
Battery Status
Green: Full battery
Red: Low battery
Orange: Charging
Flashing red: Running on Hot-swap battery
GPS Status
Green: Indicates GPS power on

ALGIZ 1ALVer 3.1
11
PART 2:
USING ALGIZ 10X

ALGIZ 1ALVer 3.1
12
Before turning the unit on, make sure that the tablet is either connected to AC power or the battery.
AC Power
The ALGIZ 10X power supply is comprised of two parts, the power adapter and the battery. The power
adapter converts AC power from a wall outlet to the DC power required by the ALGIZ 10X. Your ALGIZ 10X
comes with a universal AC-DC adapter. That means that you may connect the power cord to any 100V-120V
as well as 220V-240V outlets without using power converters. Different countries may require an adapter to be
used to connect the supplied standard AC power cord to a different standard.
Battery Power
The ALGIZ 10X is designed to work with two types of battery. A standard battery with 5300mAh and an
extended battery with double the capacity.The battery life is especially dependent on the battery’s condition,
tablet usage, as well as the temperature.
ALGIZ 1ALVer 3.1
13
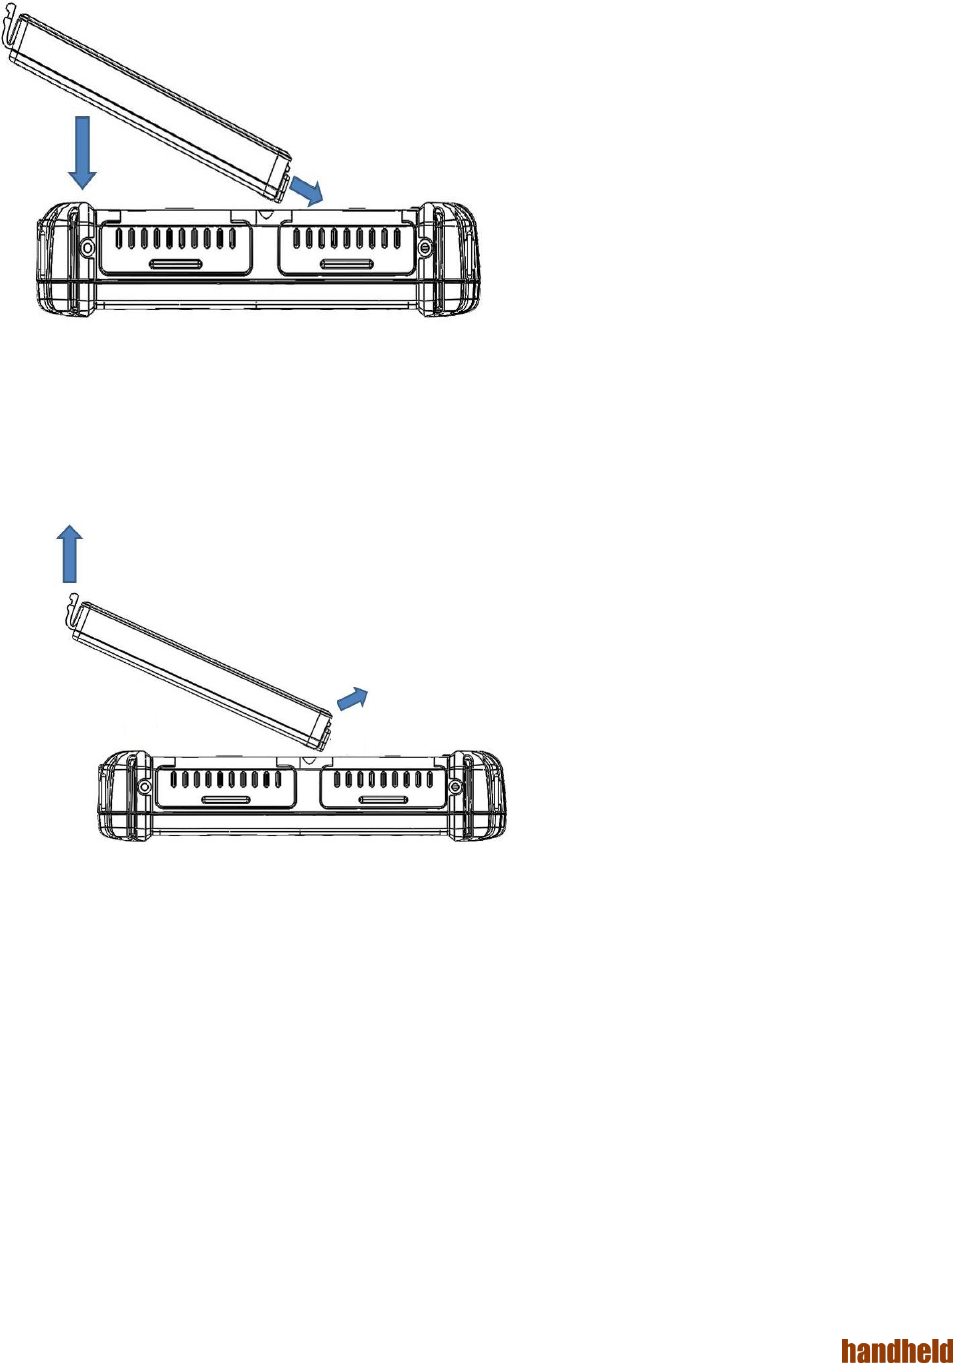
Insertion of the Battery Pack
Removal of the Battery Pack
ALGIZ 1ALVer 3.1
14
Charging the Battery
When the power adapter is plugged in, the battery automatically recharges regardless of whether your tablet
PC is in the ON or OFF mode. It takes a couple of hours for the battery to be fully charged when the power is
OFF and twice as long when the tablet PC is in use. When the charger LED indicator lights up orange,
charging is required. The battery is charging when the red LED is permanently on. When the LED turns OFF,
the battery pack is fully charged.
CAUTION: If unit is kept in storage for longer periods of time (6 months) without it being used, the hotswap battery might enter
deep discharge, meaning it will no longer function as expected.
To prevent this,please make sure to, every 5-6 months, equip the unit with a standard or extended battery and connect ac
charger. Power it on and leave it be for atleast 2 hours to fully charge the hotswap battery.
Power Supply
The power for the Handheld rugged tablet PC is supplied by the power adapter and battery pack, the power
rating and manufacturer information are listed as below. For safety reasons, the adapter must be connected to
ground (earth).
CAUTION: Do not attempt to fix or replace the battery, as this may cause an explosion! Only use the specified battery and
follow the instructions in the manufacturer's user manual.
Power Adapter
Manufacturer: EDAC Power Electronics Co Ltd
Model: EA10633B
Input Rated: 100-240Vac, 2.0A, 50-60Hz.
Output Rated: DC 19V, 3.42A.
Battery Pack
Manufacturer: T-Gee Electronic Co., Ltd
Model: ALG10X-08A
Rated: 5300mAh DC 7.4V
ALGIZ 1ALVer 3.1
15
Starting ALGIZ 10X
Press the power button for 4 seconds to power on the ALGIZ 10X. Follow the Microsoft Windows on-screen
instructions to get started with Windows.
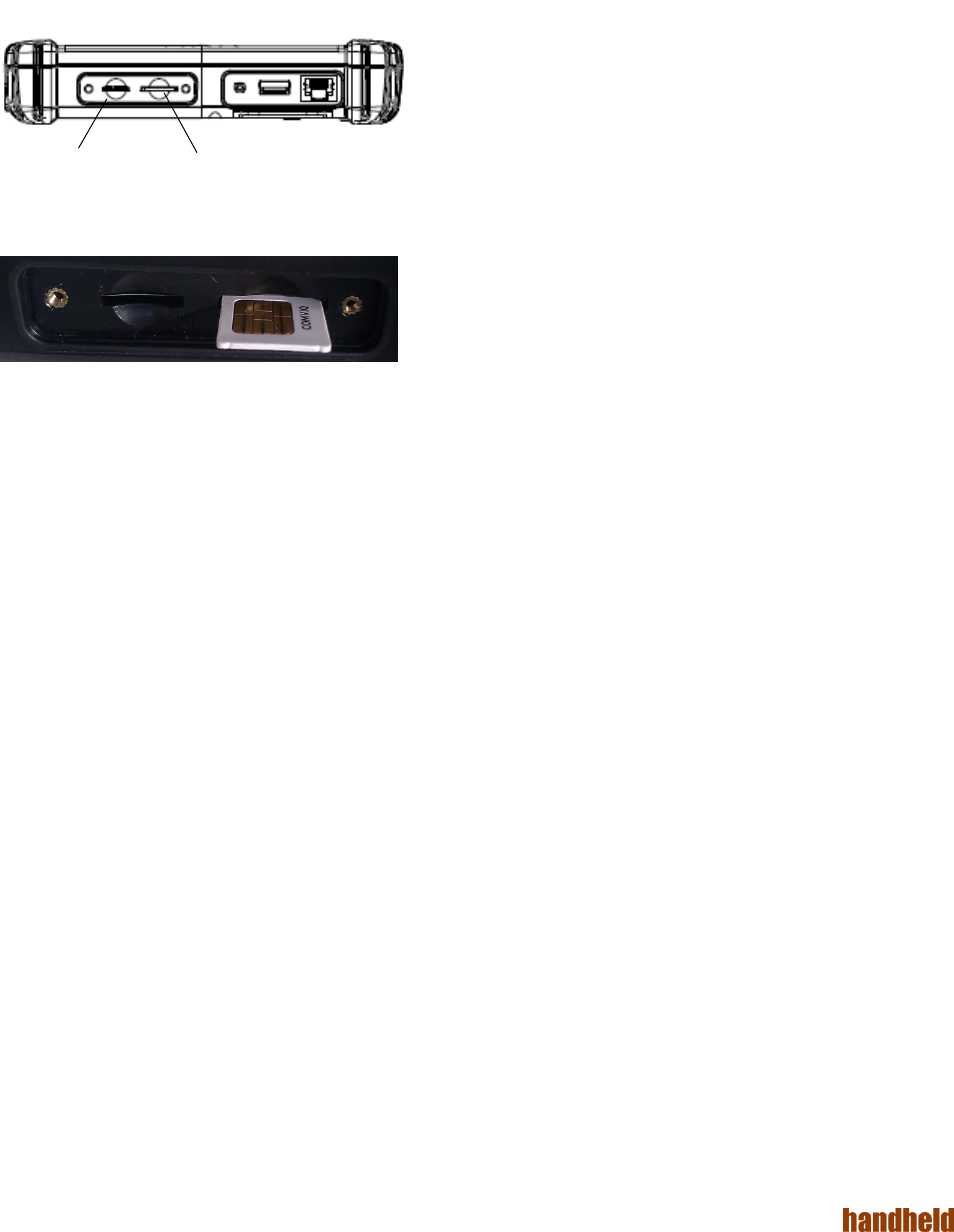
Installing SIM Card, SD Card
Remove the SIM/SD card cover on the right side. This cover is secured with two screws. Insert the SIM card
according to the picture.
Micro SD SIM Card

ALGIZ 1ALVer 3.1
16
PART 3:
SOFTWARE
ALGIZ 1ALVer 3.1
17
Hot-Tab
ALGIZ 10X has a pre-installed control application, Hot-Tab. The control application is used to monitor and
control features such as brightness, volume, battery status, power to modules and system information.
The control application is accessed by pressing menu on the ALGIZ 10X.
To exit Hot-Tab: Click the menu key again or click the “x” in the top right corner.
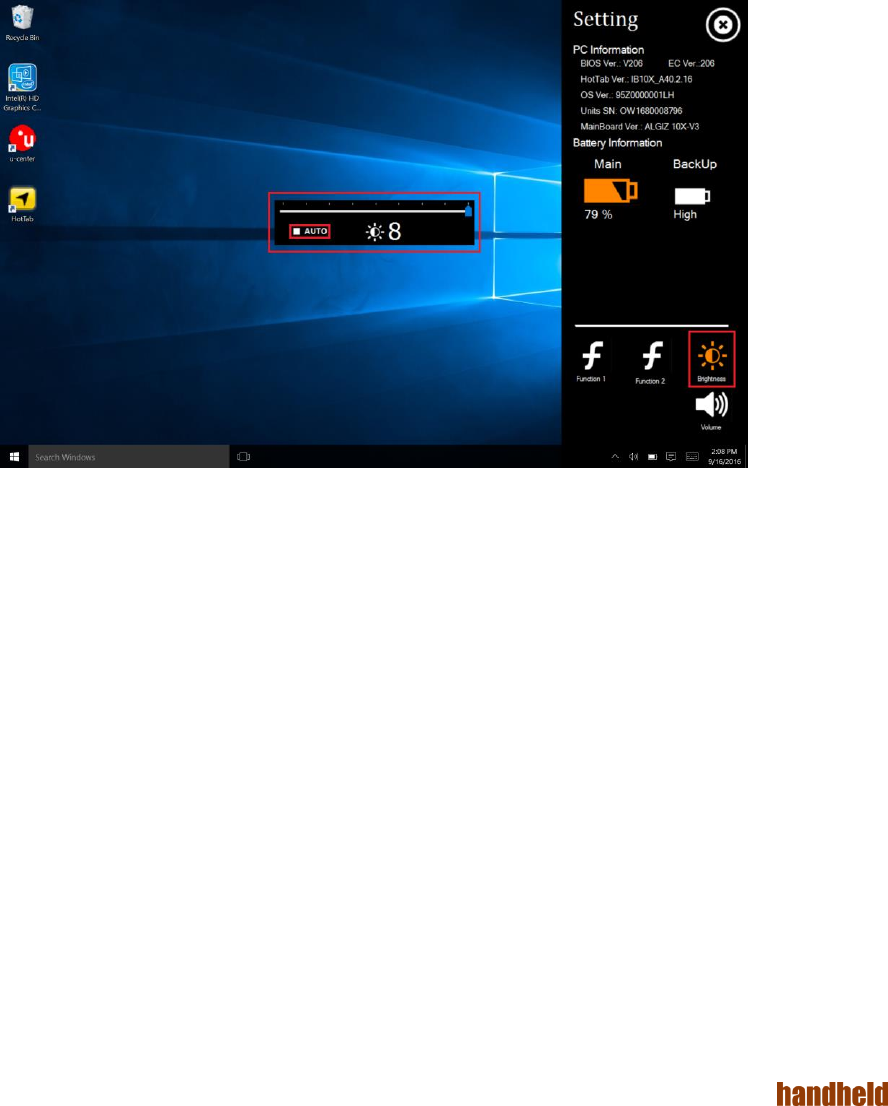
Adjusting the LCD Brightness
The Brightness Control is accessed by pressing
menu once and chooses“Setting”.
Check Auto Brightnessto activate automatic brightness. With this item checked, ALGIZ 10X will adjust the
LCD brightness based on the ambient light.
Adjusting the Speaker Volume
ALGIZ 1ALVer 3.1
18
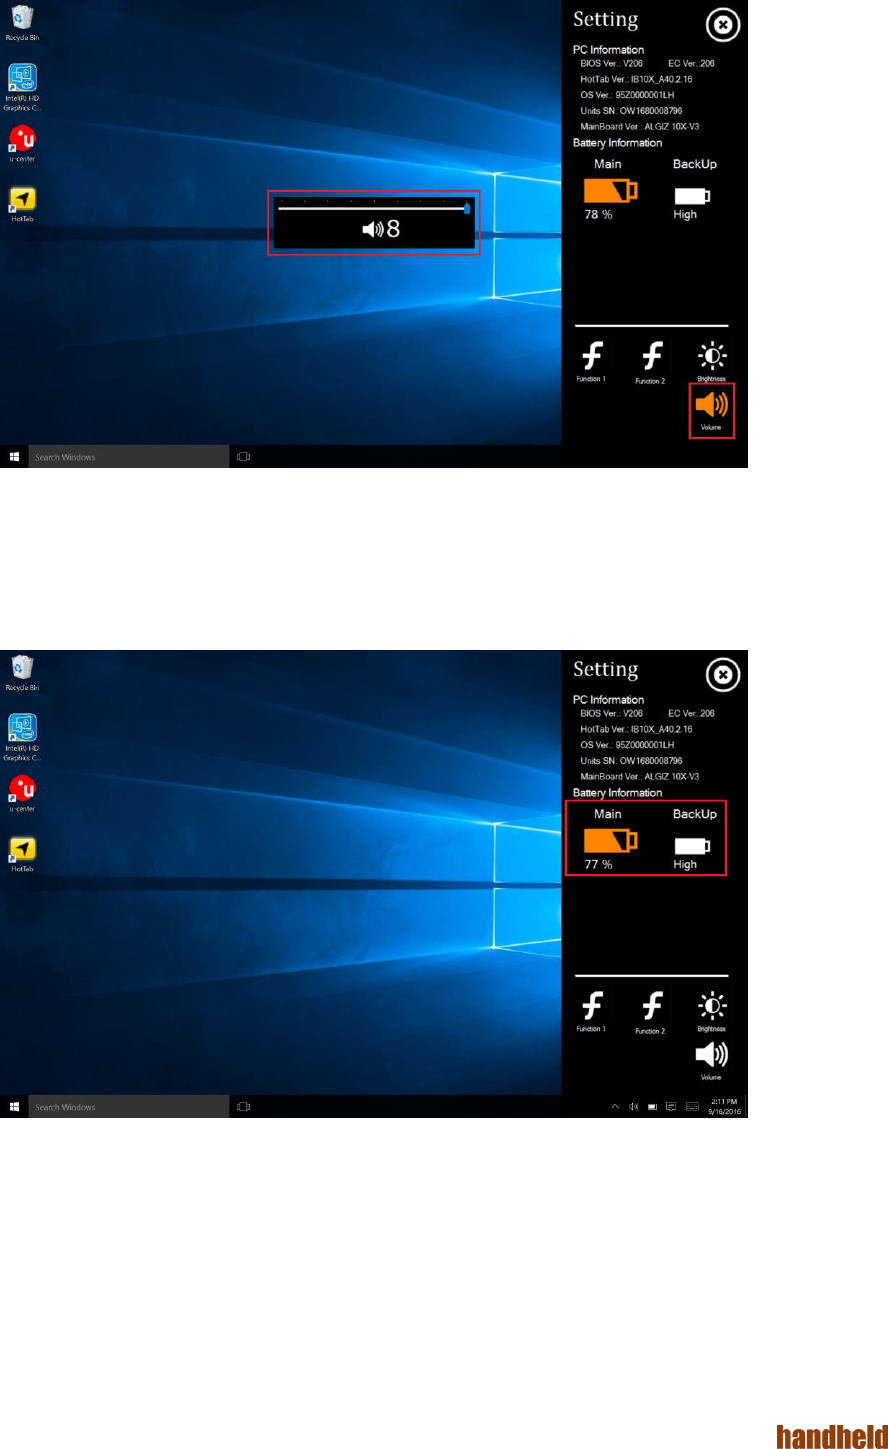
The Speaker Control is accessed by pressing menu->Setting.
BatteryStatus
The Battery status is accessed by pressing menu->Setting.
The ALGIZ 10X has a replaceable Main battery as well as a second built-inhot-swap battery. The hot-swap
battery will activate once the main battery is empty or unplugged.
ALGIZ 1ALVer 3.1
19
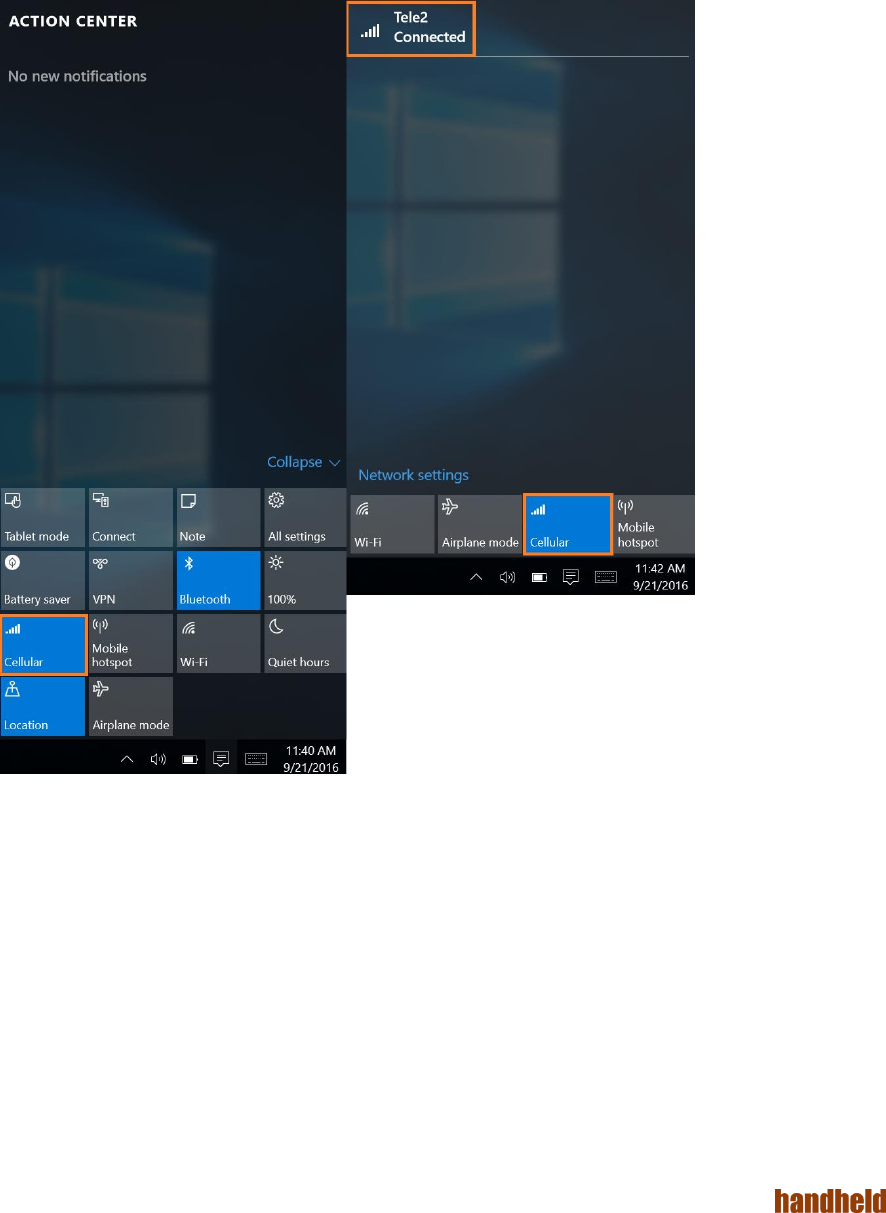
WWAN (LTE) - Optional
The ALGIZ 10X is prepared for WWAN (LTE) connectivity. If you have a WWAN modem installed, then
navigate to the WWANby pressing menu ->Device.Check WWAN 3G/4G to turn the WWAN on/off.
Note: You must install a SIM card in order for the ALGIZ 10X to access a WWAN network.
ALGIZ 1ALVer 3.1
20
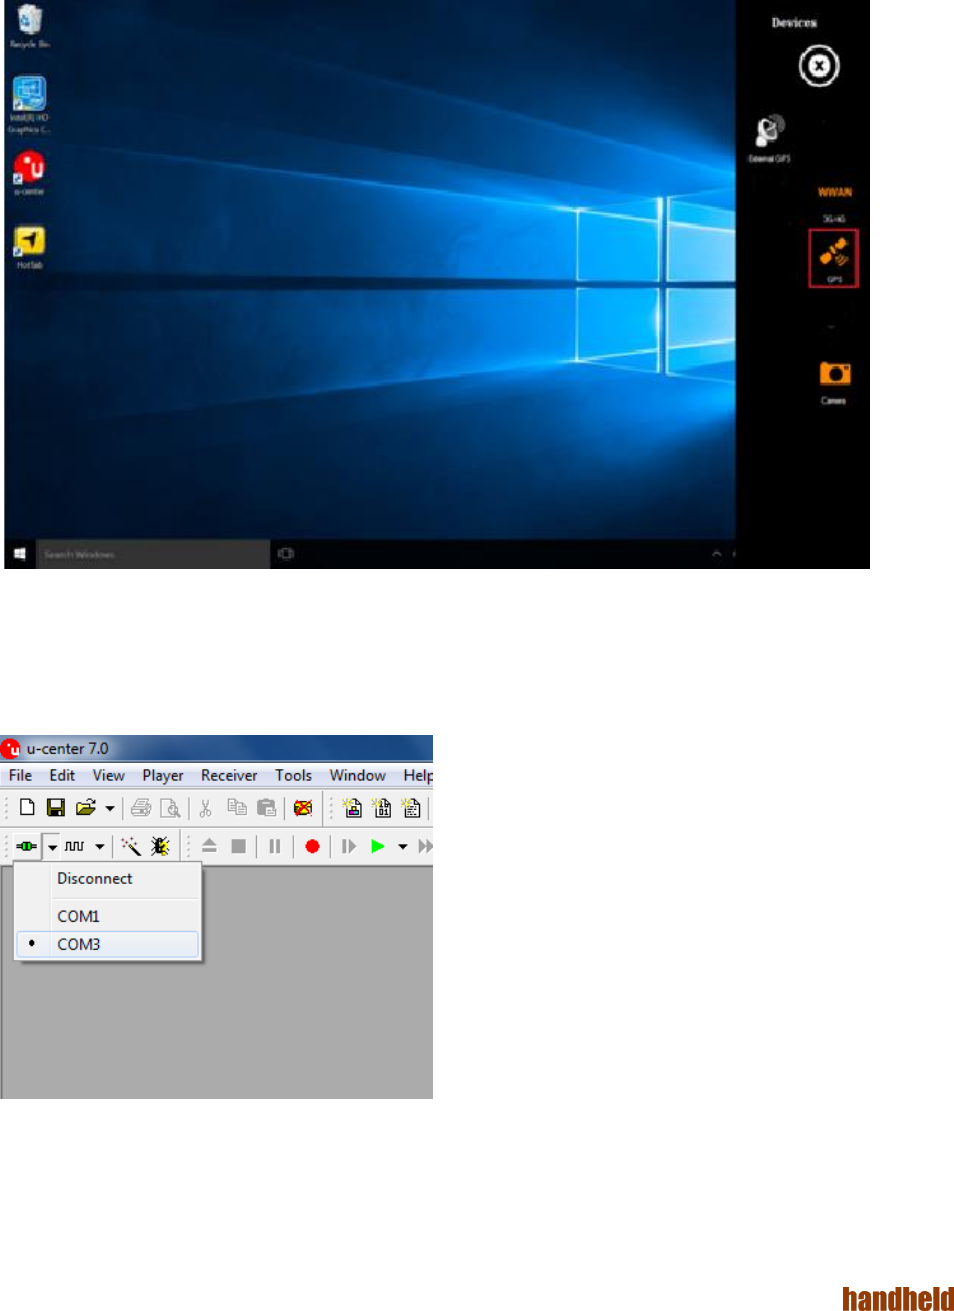
GPS
ALGIZ 10X is equipped with a dedicated GPS receiver for optimum performance.
The FunctionControl is accessed by pressing menu ->Device. Check GPSto turn the GPS receiver on.
Uncheck GPS to turn it off.
The GPS evaluation software, U-Center, is accessed by double-clicking the U-Center icon available on the
desktop.
Set the port to COM3

ALGIZ 1ALVer 3.1
21
SetBaud rateto 9600
GPS will now start looking for satellites to calculate its position. This procedure may take from a few seconds
to a few minutes depending on satellite positions, interference, environmental factors and radio noise.
Tip: See the U-Center manual for more information about this GPS evaluation software.
ALGIZ 1ALVer 3.1
22
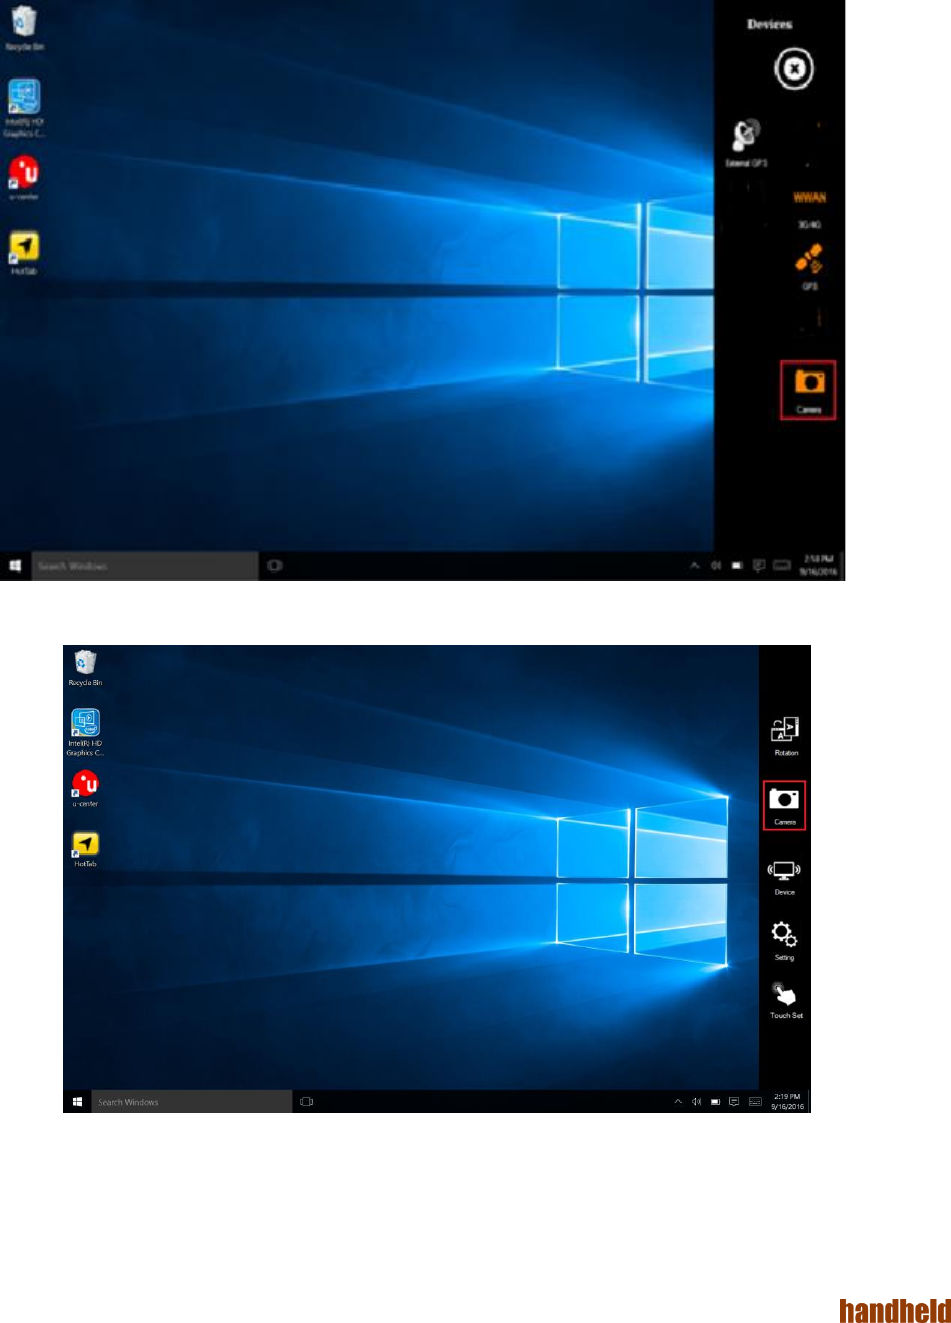
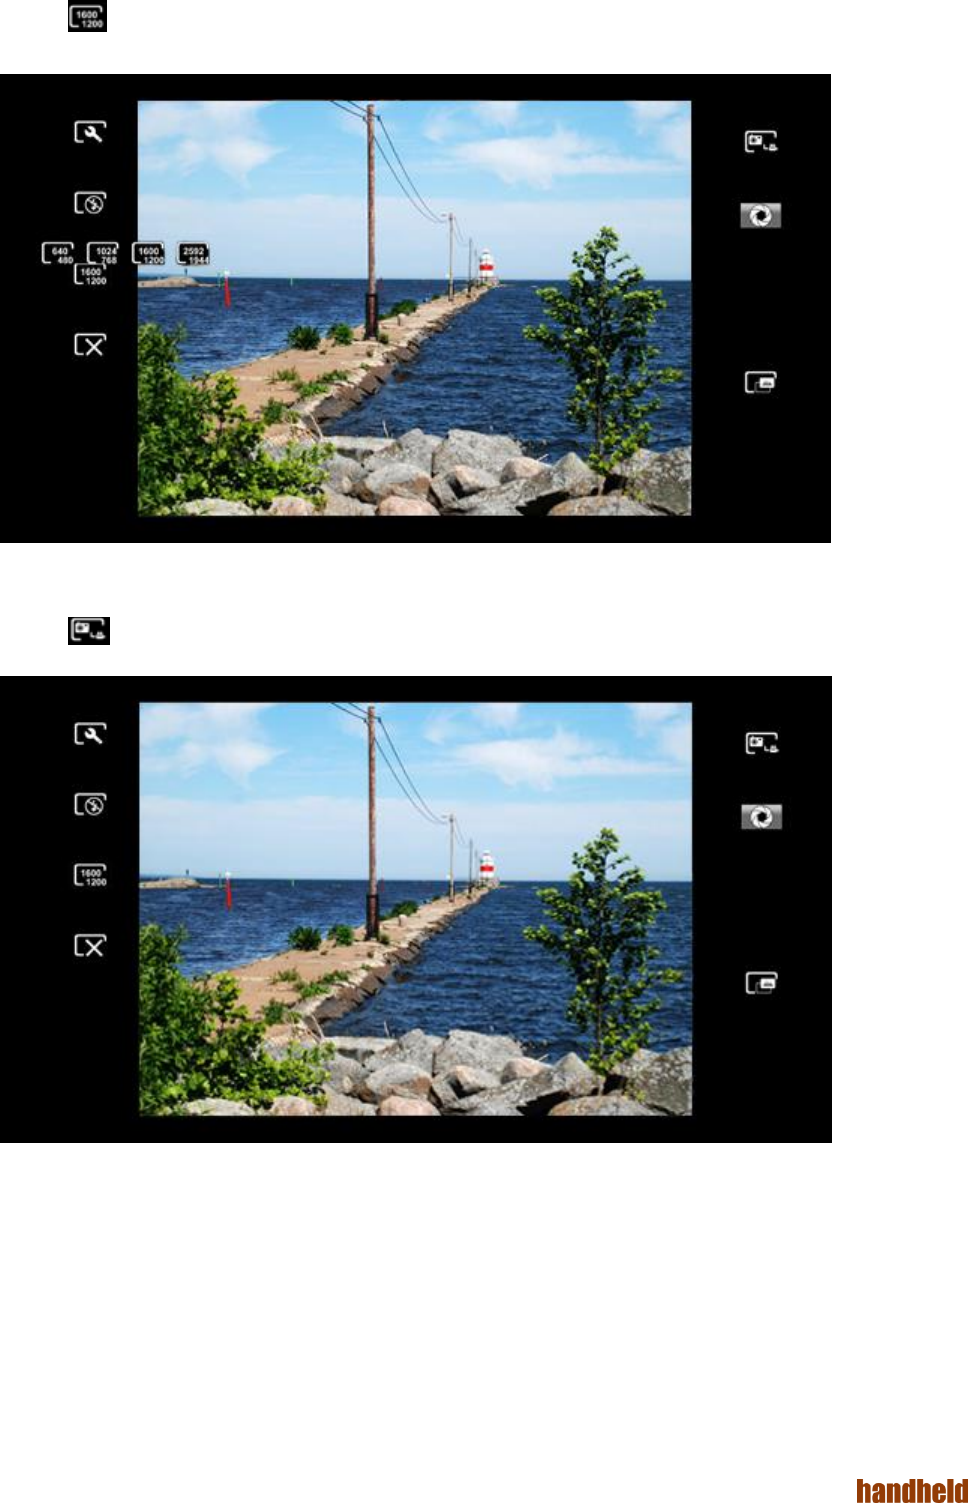
Camera
The ALGIZ 10X has a built-in 5-megapixel camera.
The FunctionControl is accessed by pressing menu ->Device. Check Camerato turn the Camera on. Uncheck
Camera to turn it off.
Or press menu and click the Camera icon to start the Camera.
ALGIZ 1ALVer 3.1
23
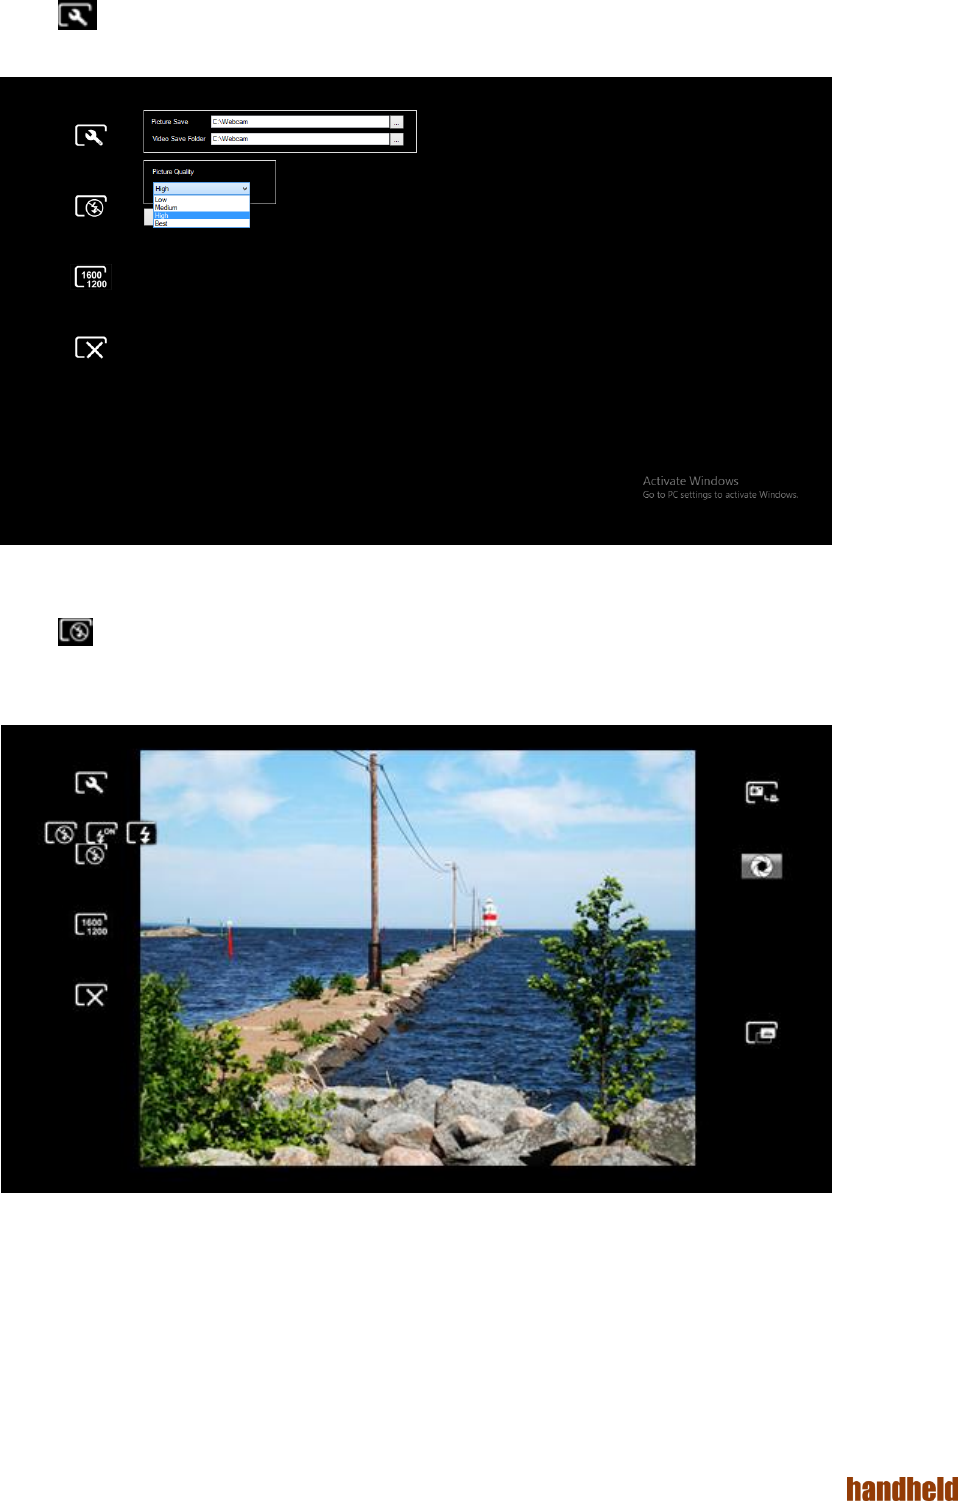
In thesettings you can control the destination folder for saved pictures or videos, previews, as well as image
resolution.
In the settings you can control the flash light mode to on/off/auto.
ALGIZ 1ALVer 3.1
24
In the settings you can control the image resolution.
In thesettings you can switch to photograph or videomode.
ALGIZ 1ALVer 3.1
25
In thesettings you can take a picture.
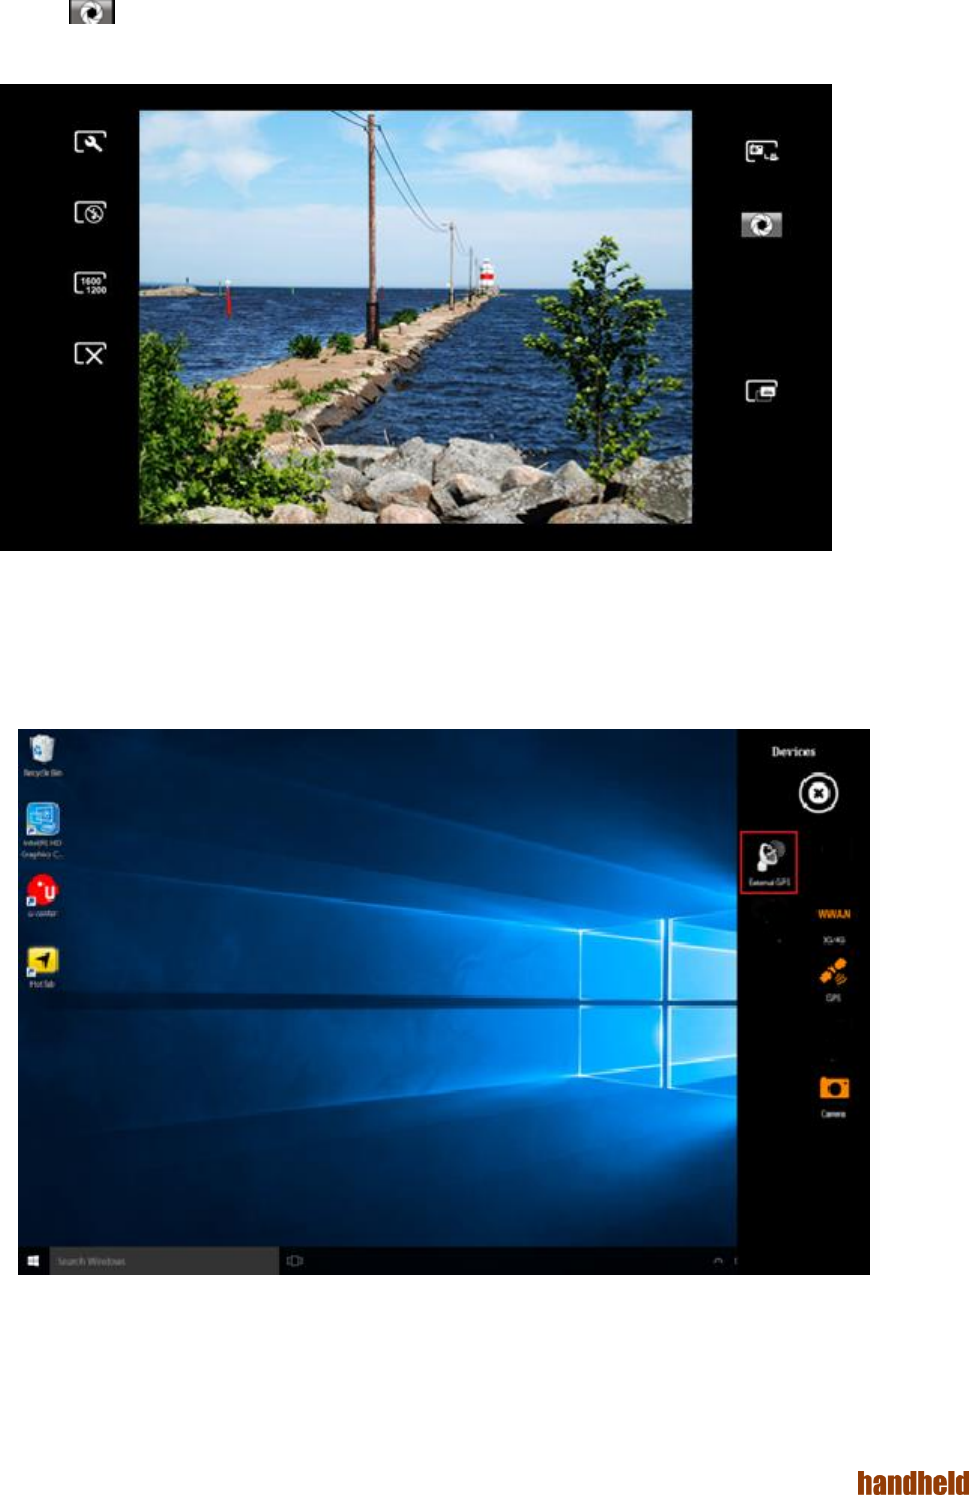
External GPS Antenna
The FunctionControl is accessed by pressing menu ->Device. Check External Antenna (auto)to activate an
external antenna installed on the vehicle dock Alg10X-05A/05B. When this item is checked, Alg10X will
automatically switch to the external antenna when the unit is docked. Do not check this item unless you have
an external antenna installed on your Alg10X vehicle dock.
Uncheck ExternalGPS (auto) to turn this feature off.

ALGIZ 1ALVer 3.1
26
System Information
Press menu ->Settingto view system information. Please have this information ready if you are contacting
Handheld support.
PART 4:
REGULATORY INFORMATION
FCC Compliance Statement
This device complies with Part 15 of the FCC Rules. Operation is subject to the following two conditions:
1. This device must not cause harmful interference, and
2. This device must be able to withstand any interference received, including interference that may cause
undesired operation.
FCC Warning
This equipment has been tested and found to comply with the limits for a Class B digital device, pursuant to
Part 15 of the FCC Rules. These limits are designed to provide reasonable protection against harmful
interference in a residential installation. This equipment generates, uses and can radiate radio frequency
energy and, if not installed and used in accordance with the instructions, may cause harmful interference to
radio communications. However, there is no guarantee that interference will not occur in a particular
installation. If this equipment does cause harmful interference to radio or television reception, which can be
determined by turning the equipment off and on, the user is encouraged to try to correct the interference by
one or more of the following measures:
• Reorienting or relocating the receiving antenna.
• Increasing the distance between the equipment and the receiver.
• Connecting the equipment to a different outlet from that to which the receiver is connected.
• Consulting the dealer or an experienced radio/TV technician for help.
Caution:
To comply with the limits for an FCC Class B computing device, always use the shielded signal cord supplied
with this unit. The Federal Communications Commission warns that changes or modifications to the unit not

ALGIZ 1ALVer 3.1
27
expressly approved by the party responsible for compliance could invalidate the user’s authority to operate the
equipment.
FCC RF Radiation Exposure
This equipment complies with the FCC RF radiation exposure limits stipulated for an uncontrolled
environment. This device and its antenna must not be co-located or operated in conjunction with any other
antennas or transmitters. To comply with FCC RF exposure compliance requirements, the antenna used for
this transmitter must be installed so as to provide a separation distance of at least 20 cm from all persons and
must not be co-located or operated in conjunction with any other antennas or transmitters.
FOR PORTABLE DEVICE USAGE (<20cm from body/SAR needed)
Radiation Exposure Statement:
This device meets the government’s requirements for exposure to radio waves.
This device is designed and manufactured not to exceed the emission limits for exposure to radio frequency
(RF) energy set by the Federal Communications Commission of the U.S. Government.
The exposure standard for wireless device employs a unit of measurement known as the Specific Absorption
Rate, or SAR. The SAR limit set by the FCC is 1.6W/kg. *Tests for SAR are conducted using standard
operating positions accepted by the FCC with the device transmitting at its highest certified power level in all
tested frequency bands.
FOR COUNTRY CODE SELECTION USAGE (WLAN DEVICES)
Note: The country code selection is for non-US model only and is not available to all US model. Per FCC
regulation, all WiFi product marketed in US must fixed to US operation channels only.
Copyright Notice
Copyright © 2010 Handheld Group AB, ALL RIGHTS RESERVED. No part of this document may be
reproduced, copied, translated or transmitted in any form or by any means, electronic or mechanical, for any
purpose, without the prior written permission of the original manufacturer.
Trademark Acknowledgement
Brand and product names are trademarks or registered trademarks of their respective owners.
Disclaimer
Handheld Group AB reserves the right to make any product changes without notice, including to circuits
and/or software described or contained in this manual, in order to improve design and/or performance.
Handheld Group AB assumes no responsibility or liability for the use of the described product(s), conveys no
license or title under any patent, copyright, or mask works rights to these products and makes no
representations or warranties that these products are free from patent, copyright, or mask works rights
infringement, unless otherwise specified. Applications described in this manual are for illustration purposes
only. Handheld Group AB makes no representation or warranty that such applications will be suitable for the
specified use without further testing or modification.
Customer Service
Support is provided by Handheld. Visit our website at www.handheldgroup.com to find updated information
about the product. You can also contact your distributor, sales representative or our customer support center
for further assistance. If you contact our customer support center please have the following information ready
before you call:
Product serial number
Peripheral attachments
Software (OS, version, application software, etc.)
Description of complete problem
The exact wording of any error messages with print screen images
In addition to this, free technical support is available from our engineers during working hours. We are always
ready to provide advice on application requirements or specific information about the installation and operation
of any of our products. Please do not hesitate to call or e-mail us.
Manufacturer: Handheld Group AB
Address: Handheld Group AB, Kinnegatan 17 A, SE-531 33, Lidköping, Sweden
TEL: +46 (0) 510-54 71 70 FAX: +46 (0) 510-282 05