Handheld Group 118207 Rugged 7in Tablet User Manual Manual
Handheld Group AB Rugged 7in Tablet Manual
Manual
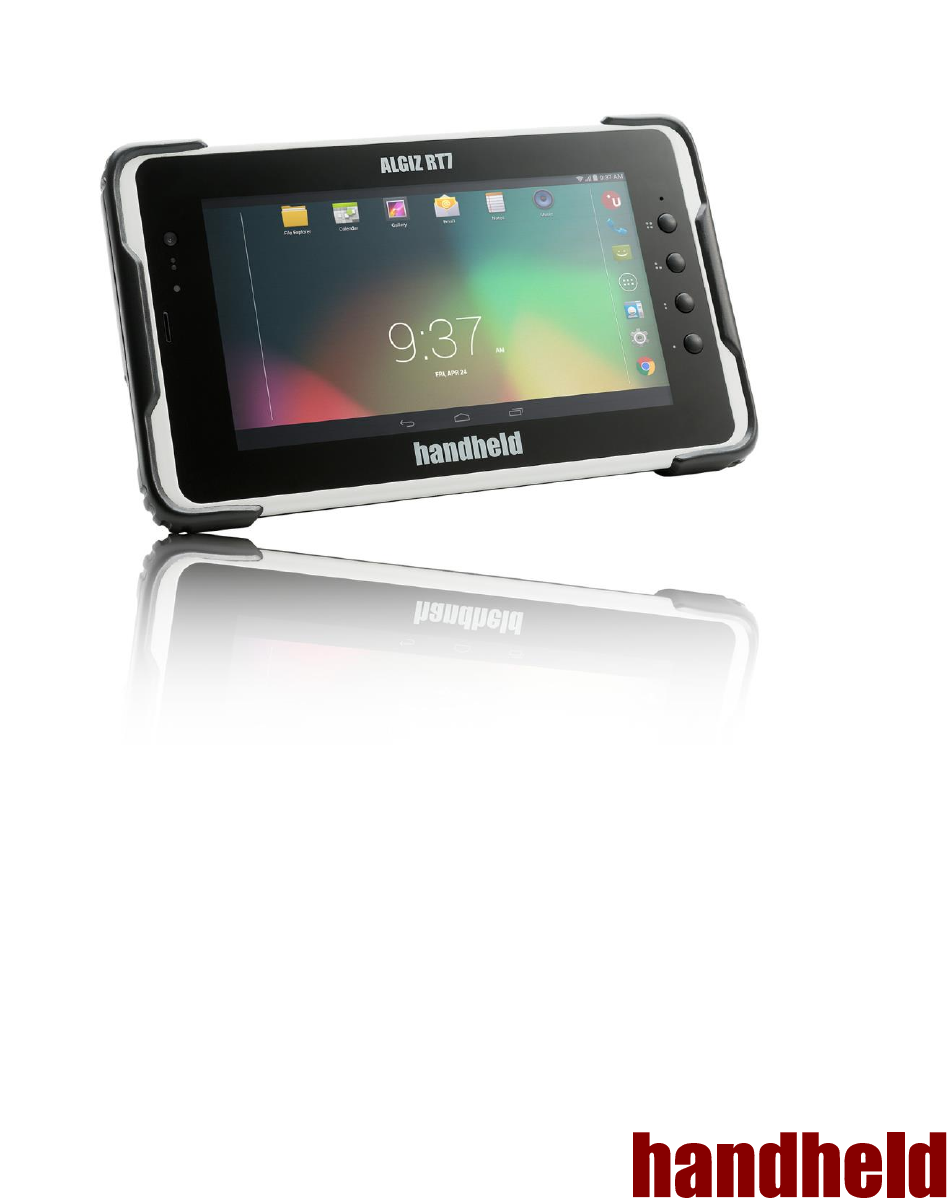
ALGIZ RT7
MANUAL

2
Ver 1.4
FEDERAL COMMUNICATIONS COMMISSION
This equipment has been tested and found to comply with the limits for a Class B digital device, pursuant to Part
15 of the FCC Rules. Operation is subject to the following two conditions: (1) this device may not cause
interference, and (2) this device must accept any interference, including interference that may cause undesired
operation of the device. IEEE 802.11b or 802.11g operation of this product is firmware-limited to channels 1
through 11.
These limits are designed to provide reasonable protection against harmful interference in a residential
installation. This equipment generates, uses and can radiate radio frequency energy and, if not installed and
used in accordance with the instructions, may cause harmful interference to radio communications. However,
there is no guarantee that interference will not occur in a particular installation. If this equipment does cause
harmful interference to radio or television reception, which can be determined by turning the equipment off and
on, the user is encouraged to try to correct the interference by one or more of the following measures:
Reorient or relocate the receiving antenna.
Increase the separation between the equipment and receiver.
Connect the equipment into an outlet on a circuit different from that to which the receiver is connected.
Consult the dealer or an experienced radio/TV technician for help.
CAUTION: Any changes or modifications not expressly approved by the party responsible for compliance could void the user's
authority to operate the equipment.
RF exposure warning
A separation distance of 10mm shall be maintained from the Human body in normal use.
RF exposure information (SAR)
This Rugged Tablet PC meets the government's requirements for exposure to radio waves. This Rugged Tablet
PCis designed and manufactured not to exceed the emission limits for exposure to radio frequency (RF) energy
set by the Federal Communications Commission of the U.S. Government. The exposure standard for wireless
Rugged Tablet PC employs a unit of measurement known as the Specific Absorption Rate, or SAR. The SAR
limit set by the FCC is 1.6W/kg. Tests for SAR are conducted using standard operating positions accepted by
the FCC with the Rugged Tablet PC transmitting at its highest certified power level in all tested frequency bands.
Although the SAR is determined at the highest certified power level, the actual SAR level of the Rugged Tablet
PC while operating can be well below the maximum value. This is because the Rugged Tablet PC is designed to
operate at multiple power levels so as to use only the poser required to reach the network. In general, the closer
you are to a wireless base station antenna, the lower the power output.
Industry Canada Class B Statement
This Class [B] digital apparatus complies with Canadian ICES-003. Cet appareil numérique de la classe [B] est
conforme à la norme NMB-003 du Canada.
This device complies with Industry Canada license-exempt RSS standard(s).Operation is subject to the following
two conditions: (1) this device may not cause interference, and (2) this device must accept any interference,
including interference that may cause undesired operation of the device. IEEE 802.11b or 802.11g operation of
this product in the Canada is firmware-limited to channels 1 through 11.
Déclarations d'exposition aux RF liées Avertissement d'exposition RF:
L'équipement est conforme aux limites d'exposition aux RF établies pour un environnement non contrôlé.
L'antenne (s) utilisée pour ce transmetteur ne doit pas être Co-localisés ou fonctionnant en conjonction avec une
autre antenne ou transmetteur. Ce dispositif est conforme à la norme de l'industrie Canada exempts de licence
RSS (s). L'opération est soumise aux deux conditions suivantes: (1) Cet appareil ne peut causer d'interférences
nuisibles, et (2) cet appareil doit accepter toute interférence reçue, y compris les interférences qui peuvent
causer un mauvais fonctionnement de l'appareil.

3
Ver 1.4
CONTENTS
1. Introduction ......................................................................................................................................................... 6
2. Regulatory ........................................................................................................................................................... 7
2.1. Device Specification ..................................................................................................................................... 8
2.1.1. Barcode Scanner .................................................................................................................................. 11
2.2. Accessories ................................................................................................................................................. 12
2.3. Physical Layout ........................................................................................................................................... 13
2.3.1. Bottom Panel ........................................................................................................................................ 14
3. Device Setup ..................................................................................................................................................... 15
3.1. SIM Card Insertion ...................................................................................................................................... 15
3.2. SD Card ...................................................................................................................................................... 16
3.3. Charging the device .................................................................................................................................... 16
4. Basic Usage Instructions ................................................................................................................................... 17
4.1. Power ON.................................................................................................................................................... 17
4.2. Audio Volume .............................................................................................................................................. 17
4.3. Initial Startup ............................................................................................................................................... 18
4.4. Home Screen .............................................................................................................................................. 18
4.4.1. Navigation Bar ...................................................................................................................................... 19
4.5. Applications Screen .................................................................................................................................... 19
4.6. Lock Screen ................................................................................................................................................ 20
4.7. Quick Settings ............................................................................................................................................. 21
4.7.1. Adjusting Screen Brightness ................................................................................................................ 21
4.7.2. Control Wi-Fi ........................................................................................................................................ 21
4.7.3. Control Bluetooth ................................................................................................................................. 21
4.7.4. Invert Screen Colors ............................................................................................................................. 21
4.7.5. Airplane Mode ...................................................................................................................................... 21
4.7.6. Screen Auto-Rotate .............................................................................................................................. 21
4.7.7. Location ................................................................................................................................................ 21
4.8. Make a Phone Call/SMS ............................................................................................................................. 22
4.8.1. Pair a Bluetooth headset ...................................................................................................................... 22
4.9. Connect to a Network ................................................................................................................................. 22
4.10. Configure Google Account ........................................................................................................................ 22
4.11. Useful Applications ................................................................................................................................... 22
4.11.1. Install Applications ............................................................................................................................. 22
4.12. Configure Hotkeys .................................................................................................................................... 22
4.13. Notifications .............................................................................................................................................. 22
4.14. Scanning Barcodes ................................................................................................................................... 22
4.15. Software Updates ..................................................................................................................................... 22
4.16. Factory Reset ............................................................................................................................................ 23
5. Settings ............................................................................................................................................................. 23
5.1 Wireless & network ...................................................................................................................................... 23
5.1.1. WI-FI ..................................................................................................................................................... 24

4
Ver 1.4
5.1.2. Bluetooth .............................................................................................................................................. 25
5.1.3. SIM cards ............................................................................................................................................. 30
5.1.4. Ethernet ................................................................................................................................................ 30
5.1.5. Network Selection Policy ...................................................................................................................... 33
5.1.6. Tethering .............................................................................................................................................. 33
5.2. Device ......................................................................................................................................................... 33
5.2.1. Display .................................................................................................................................................. 34
5.2.2. Sound & notification ............................................................................................................................. 35
5.2.3. Storage ................................................................................................................................................. 36
5.2.4. Battery .................................................................................................................................................. 38
5.2.5. USB Host .............................................................................................................................................. 38
5.2.6. Barcode ................................................................................................................................................ 39
5.2.7. Apps ..................................................................................................................................................... 40
5.3. Personal ...................................................................................................................................................... 41
5.3.1. Location ................................................................................................................................................ 41
5.3.2. Security ................................................................................................................................................ 43
5.3.3. Accounts .............................................................................................................................................. 43
5.3.4. Language & input ................................................................................................................................. 43
5.3.5. Backup & Reset .................................................................................................................................... 43
5.4. System ........................................................................................................................................................ 44
5.4.1. Date & time ........................................................................................................................................... 44
5.4.2. Printing ................................................................................................................................................. 44
5.4.3. Accessibility .......................................................................................................................................... 45
5.4.4. About tablet .......................................................................................................................................... 45
5.5. User Configurable Hotkeys ......................................................................................................................... 46
5.6. Applications ................................................................................................................................................ 48
6. Storage .............................................................................................................................................................. 49
6.1. Internal Storage ........................................................................................................................................... 49
6.2. SD card ....................................................................................................................................................... 49
6.3. USB Storage ............................................................................................................................................... 49
7. Input .................................................................................................................................................................. 50
7.1. Touch Screen .............................................................................................................................................. 50
7.2. USB Input devices ...................................................................................................................................... 50
7.3. Bluetooth Input devices .............................................................................................................................. 50
8. Communication ................................................................................................................................................. 51
8.1. Ethernet ....................................................................................................................................................... 51
8.2. Wireless Communication ............................................................................................................................ 52
8.2.1. Bluetooth .............................................................................................................................................. 52
8.2.2. Wi-Fi ..................................................................................................................................................... 54
9. Location ............................................................................................................................................................. 55
9.1. Internal GPS ................................................................................................................................................ 55
9.2. u-Blox GPS Module .................................................................................................................................... 55
10. RFID ................................................................................................................................................................. 56
10.1. NFC ........................................................................................................................................................... 57

5
Ver 1.4
10.2. Arcontia RFID Module (eTicket version only) ............................................................................................ 56
11. Barcode Scanner ............................................................................................................................................. 58
12. USB ................................................................................................................................................................. 59

6
Ver 1.4
1. INTRODUCTION
This guide covers the Algiz RT7 tablet, and optional accessories.
The Algiz RT7 is a rugged tablet, designed for use by field personnel in demanding conditions. It integrates best-
in-class connectivity with efficient computing and multimedia features. The tablet runs Android Lollipop (5.1.1)
operating system, and comes pre-installed with many Google applications, including Google Play.
NOTE: The images in this guide may slightly differ from the actual screens that you see in the device.

7
Ver 1.4
2. REGULATORY
The 15.203 antenna requirements:
1) An intentional radiator shall be designed to ensure that no antenna other than that furnished by the
responsible party shall be used with the device.
Adherence - In our design we are using customized antenna made of a carrier and conductive part (pogo spring
pins) which makes contact with the antenna pads of PCB. This is not the standard type and hence any other
antenna cannot be used in place of currently used antenna. This approach is applicable for both cellular as well
as non-cellular RF sections. The pictures of the customized antenna are available in the above section.
2) Further, this requirement does not apply to intentional radiators that must be professionally installed, such as
perimeter protection systems and some field disturbance sensors, or to other intentional radiators which, in
accordance with § 15.31(d), must be measured at the installation site. However, the installer shall be responsible
for ensuring that the proper antenna is employed so that the limits in this part are not exceeded.
Adherence The antenna in our EUT (tablet) cannot to remove by a user as the antenna is fixed inside the unit.
Removal of antenna requires the unit to be sent to service Centre where the professionally trained person
removes/replaces/reworks the antenna if at all necessary.2.1. Device Specification

8
Ver 1.4
2.1. Device Specification
The base specifications of the Algiz RT7 tablet are below:
Physical Dimensions
216.1 mm x 132.3 mm x 23.8 mm
(including the shock bumpers)
Weight
650 grams (including battery)
Storage Environment
Temperature range -40 to 70 C
Operating Environment
-20 to 50C in a humidity up to 95% noncondensing
Processor
Qualcomm MSM8916 chipset, with a 64 bit quad-core ARM Cortex A53 application
processor running at 1.2 GHz
RAM
1GB of LPDDR3 RAM (533MHz)
Storage
16 GB internal storage, with more than 10 GB available for user applications and
data.
OS
Android Lollipop 5.1.1 Operating System.
Application Compatibility
64 bit and 32 bit applications are supported.
Display
7" WSVGA (1024x600), high-brightness (600 nits) display supporting 16 million
colors.
Touch panel
5 point capacitive touch panel, chemically strengthened glass
Rear Camera
8MP rear camera with Autofocus and high brightness flash, capable of 1080p video
recording
Front Camera
2MP fixed-focus front camera suitable for conferencing
WWAN
Quad-band GSM, 3G, LTE. Voice calling support. Data connectivity over 2G, 2.5G,
3G and LTE networks.
SIM slots
WLAN
Bluetooth
2 microSIM slots, DSDS (dual SIM, dual standby)
Wi-Fi 802.11b/g/n 2.4GHz, Wi-Fi direct
BT 4.1 (Classic BT + BT LE), with user selectable class 1/class 2 operation. Profiles:
A2DP, HFP, SAP, DUN, AVRCP, PAN, HID, SPP, SDP, FTP, PBAP
Ethernet
10/100 Ethernet
Location
AGPS, User selectable internal GPS (Qualcomm iZat Gen8), u-Blox EVA-7M
Audio
Earpiece, Speaker, 3.5mm headset socket
Haptic Feedback
Internal vibrator
Accessibility
Four user programmable hot-keys
9
Ver 1.4
The following optional modules are supported by the Algiz RT7:
Barcode Scanner module
RFID module.
The Reader is based on the 13.56 MHz contactless technology platform and is designed for increased
reliability, security and high speed communication. The Smart Card Reader is intended for complete
integration into the Algiz RT7 for e-ticketing and fare collection.
The Algiz RT7 is available as four SKUs:
TABLE 2.1. LTE BAND SUPPORT
Input Devices
USB keyboard & mouse, BT keyboard & mouse.
Extendable Storage
SD card (up to 32 GB), USB mass storage devices formatted with a single FAT
partition
USB
1x B type micro USB OTG port, 1x USB A type host port
Sensors
Accelerometer, e-Compass, Gyroscope, Ambient Light Sensor, Proximity & SAR
sensors.
NFC
Yes
Miscellaneous
FM player
Battery
6000 mAh lithium polymer rechargeable battery, with Fuel Gauge
Battery Charging
Fast charging via dedicated DC jack
ALGIZRT7-EU
This model supports the LTE bands prevalent in the European Union
ALGIZRT7-EU-BC
ALGIZRT7-NA
Equivalent to the ALGIZRT7-EU, with the barcode scanner module.
This model supports the LTE bands prevalent in the North American region.
ALGIZRT7-NA-BC
Equivalent to the ALGIZRT7-NA, with the barcode scanner module
NA Model
GSM 850 and GSM1900 (GSM900 and GSM1800 roaming)
UMTS B2, B4, B5 (B1 and B8 roaming)
LTE B2, B4, B5, B17 (B1 and B8 roaming)
10
Ver 1.4
11
Ver 1.4
2.1.1. Barcode Scanner
The Barcode scanner module, based on the Motorola SE4710 engine, provides robust support for a wide variety
of 1D/2D barcodes, as well as postal codes. Detailed specifications are below:
TABLE 2.2. BARCODE DECODE RANGES
Scanner Engine
Motorola SE4710
Imager Resolution
1280x800 pixels
Field of View
Horizontal 42 degree, Vertical 28 degrees
Skew Tolerance
+- 60 degrees
Pitch Tolerance
+- 60 degrees
Roll Tolerance
+- 360 degrees
Focal Distance
From front of engine: 7.64 in
Aiming LED
610nm LED
Illumination LED
610nm LED
Regulatory LED
classification
Exempt Risk Group LED product per IEC/EN 62471
Near
Far
4 mil Code 39
5 mil code 128
5 mil code 39
5 mil PDF 417
3.3 in./8.4 cm
2.8 in./7.1 cm
2.0 in./5.08 cm
3.1 in./7.9 cm
8.8 in./22.4 cm
8.2 in./20.8 cm
13.5 in./34.3 cm
8.4 in./21.3 cm
10 mil DataMatrix
2.9 in./7.4 cm
10.1 in./25.7 cm
100% UPCA
1.8* in./4.6* cm
26.0 in./66.0 cm
20 mil code 39
2.0* in./5.08* cm
30.0 in./76.2 cm
12
Ver 1.4
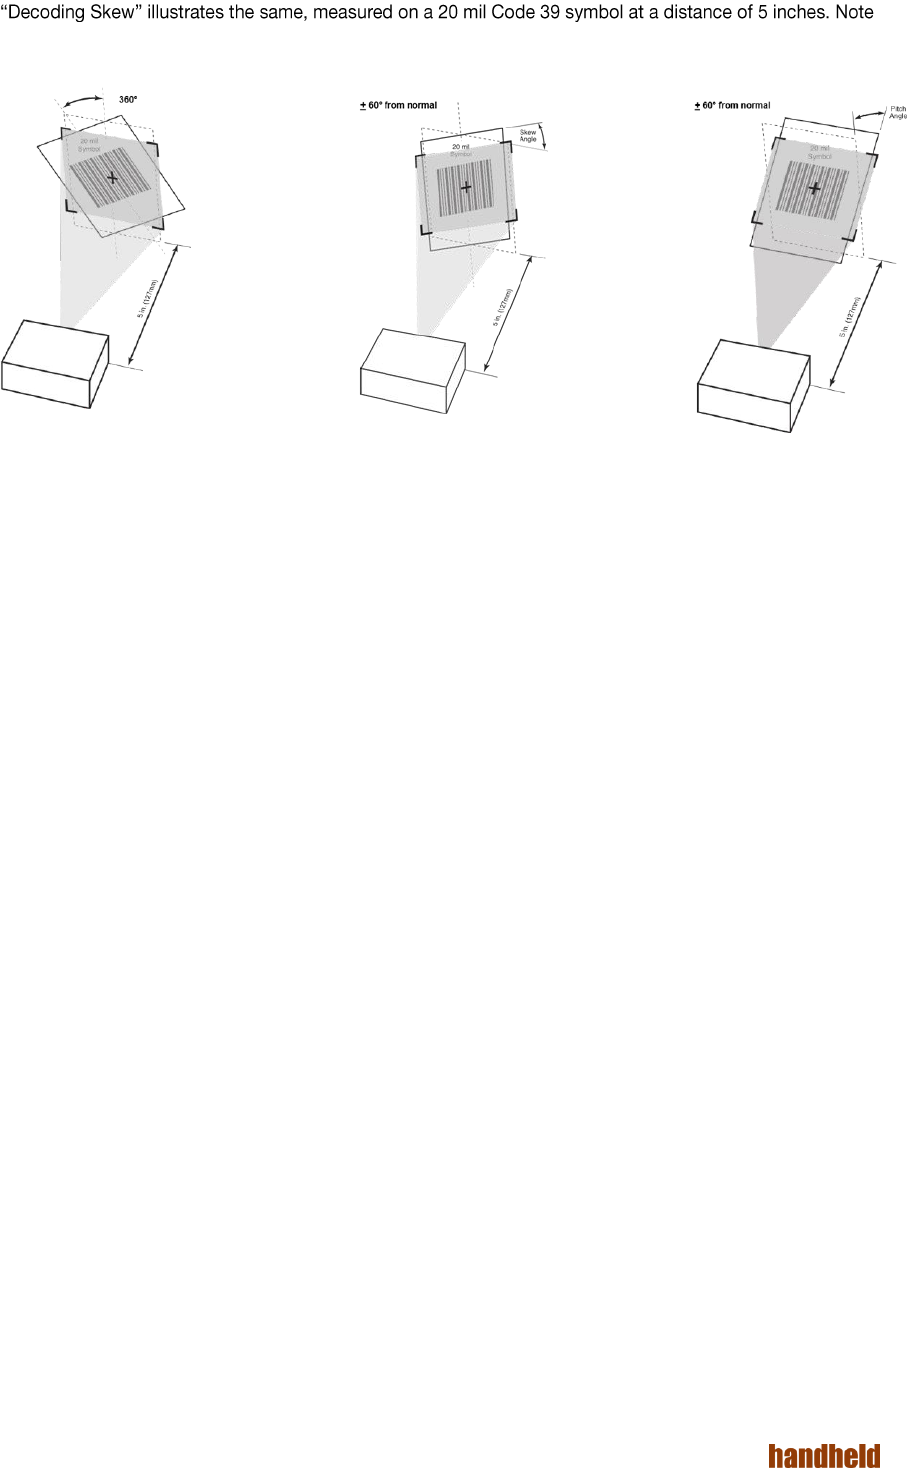
As shown in the specifications, barcode scanning is tolerant to a wide range of orientations. Figure 2.1,
that tolerance for skew and pitch is reduced at the extreme ends of the working range.
FIGURE 2.1. DECODING SKEW
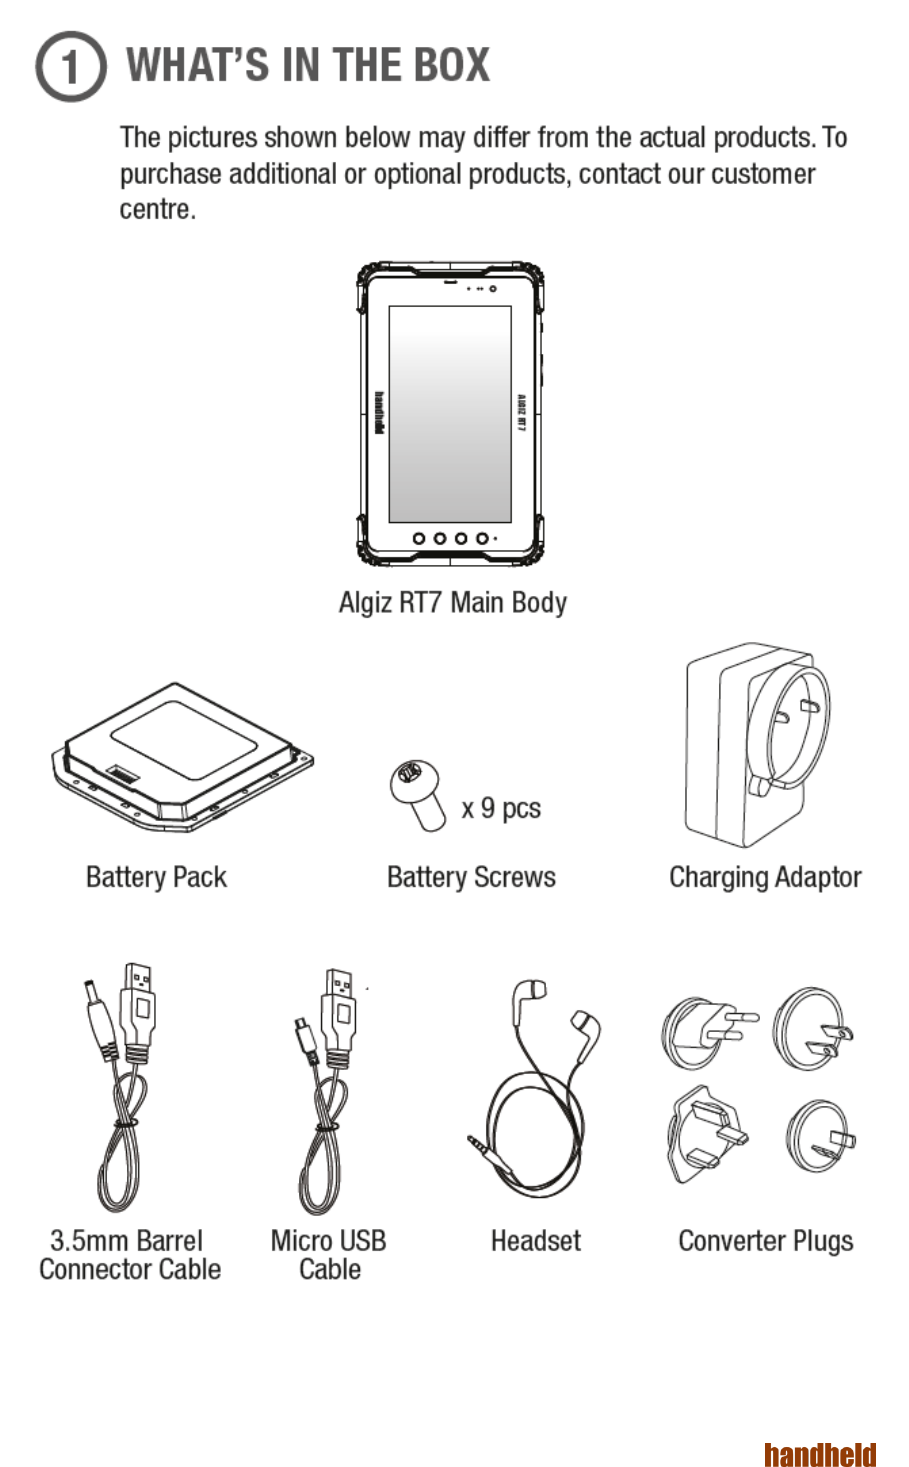
2.2. Accessories
The Algiz RT7 comes with the following accessories:
5Vdc 2A USB Wall charger
USB cable and DC cable
Stereo headset with MIC and button
Battery pack
Quick Start Guide
For best performance, we strongly recommend that you use only the supplied charger and headset with this
tablet.

13
Ver 1.4
2.3. Physical Layout
consists of:
1. Front Camera
2. Light/Proximity Sensor
3. RGB LED
4. Earpiece
5. Display and Touch panel
6. 4x Hotkeys
FIGURE 2.2. FRONT PANEL
1. Flash LED
2. Rear Camera
3. Speaker
4. Battery Pack
5. Kensington Lock
FIGURE 2.3. BACK PANEL
14
Ver 1.4
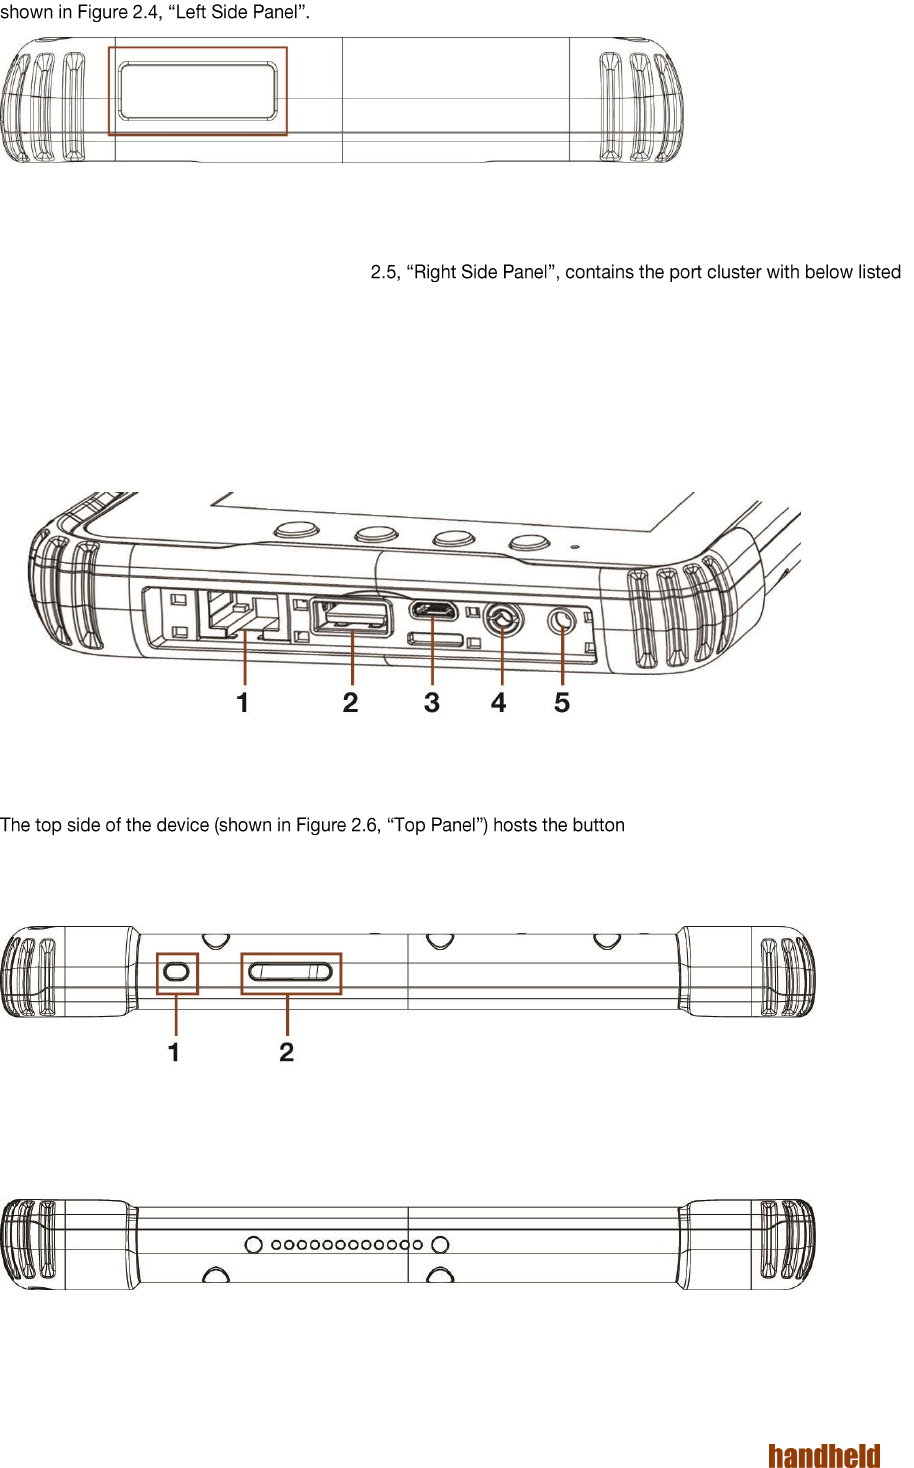
If the device is configured with the optional barcode scanner module, then that can be seen on the left panel, as
FIGURE 2.4. LEFT SIDE PANEL
The right panel of the device, shown in Figure
ports:
1. Ethernet port
2. USB A port
3. Micro USB port
4. Audio port
5. DC charger port
FIGURE 2.5. RIGHT SIDE PANEL
panel:
1. Power button
2. Volume up & down button
FIGURE 2.6. TOP PANEL
2.3.1. Bottom Panel
FIGURE 2.7. BOTTOM PANEL
15
Ver 1.4
3. DEVICE SETUP
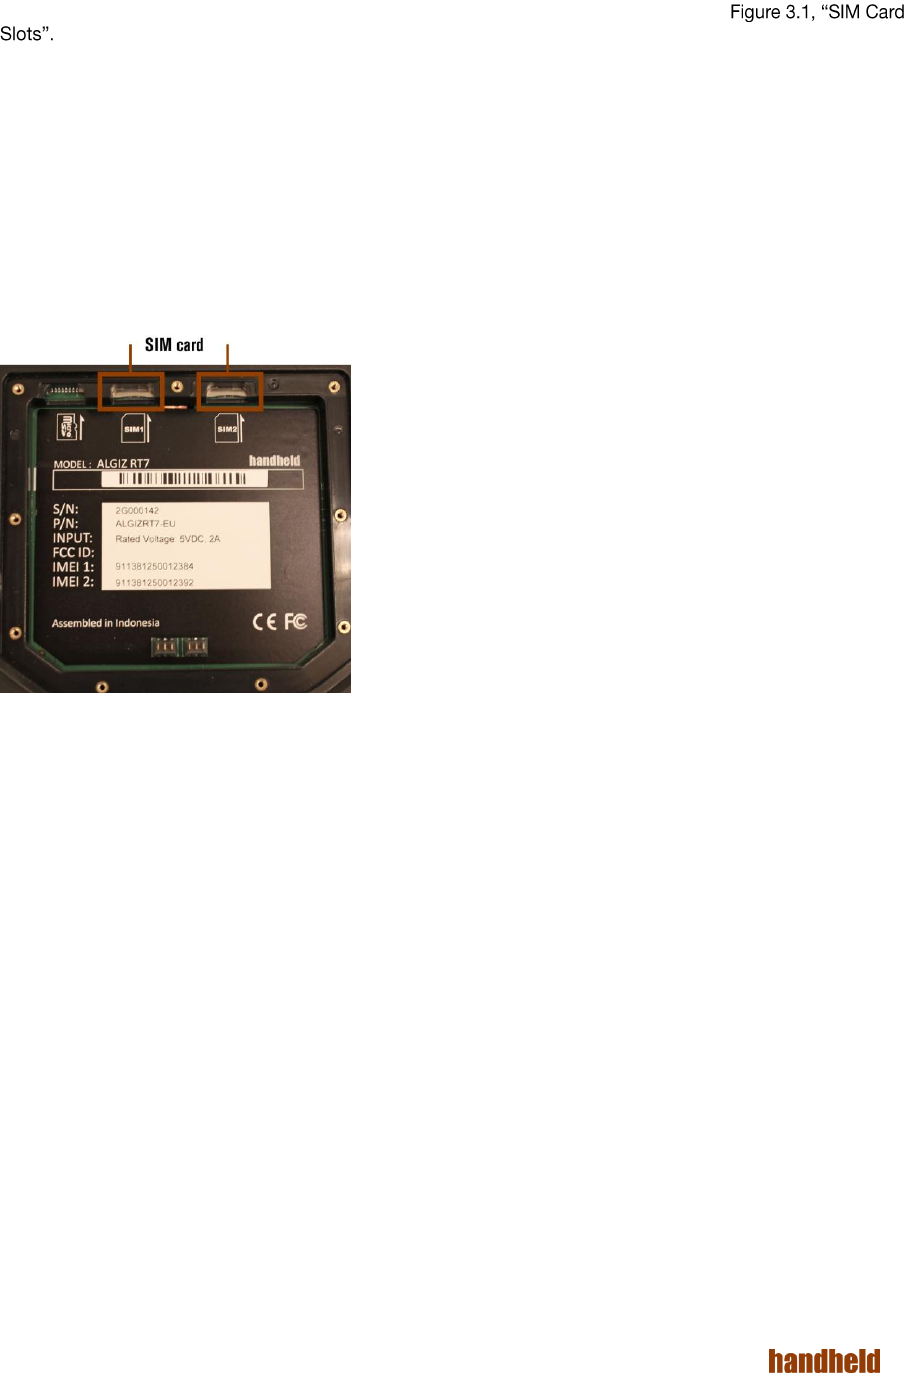
3.1. SIM Card Insertion
This tablet supports two SIM cards. There are two slots on back side of tablet as shown in
The device supports the dual SIM dual standby configuration. Both the SIM cards can be used. However, only
one of them can used for phone calls at any time.
To insert a SIM card:
1. Power OFF the tablet.
2. Place the tablet on flat surface, with the screen facing down.
3. Remove the battery pack.
4. Insert the SIM card.
FIGURE 3.1. SIM CARD SLOTS
You can see more details about inserted SIM cards in Device Setup
Settings → Wireless & networks → SIM cards
16
Ver 1.4
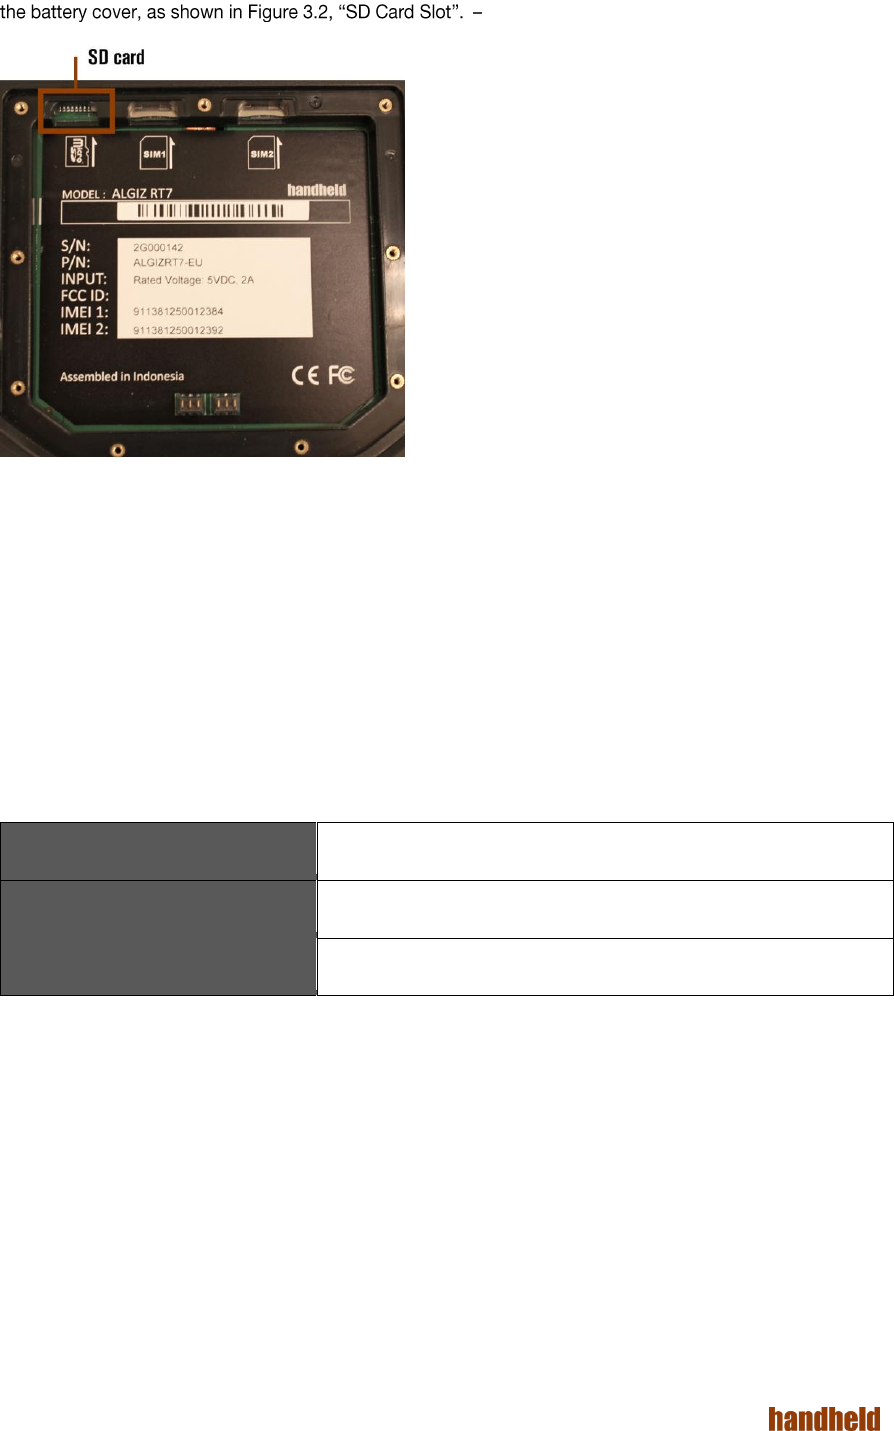
3.2. SD Card
This tablet supports a single microSD card for secondary storage. SD card slot is on back side of tablet, under
FIGURE 3.2. SD CARD SLOT
Once SD card inserted successfully, you can check its details in
Settings → Device → Storage → SD card
3.3. Charging the device
We recommend that you fully charge the battery prior to first use. A high power DC jack is provided; we
recommend that this is used to charge the device.
When a charger is connected, the charging LED on the device gives a visual indicator of the state of charge:
During low battery conditions (<15% charge), the LED will blink red when the device is in use without a charger
being connected.
In rare cases, during use, the battery may discharge to a very weak state. In such a state, when a user attempts
to turn on the device using the power button, the device may not respond. To recover from this, connect the
charger to the device. The LED will then glow red, and stay that way for a few minutes. The device will then boot
into charging mode.
Green LED
Green indicates that the battery is fully charged
Yellow/ Orange LED
Yellow/orange indicates that the battery capacity is above 15%
Red
Red indicates that the battery is charged to less than 15%
17
Ver 1.4
4. BASIC USAGE INSTRUCTIONS
The Algiz RT7 runs Android Lollipop (5.1.1). The Algiz RT7 is packed with the same features you would expect in
a feature-rich tablet/smartphone. The device provides the intuitive Android user interface with no modifications.
If you are already familiar with any Android device, then you will feel right at home using this device.
The Algiz RT7 can be used in all screen orientations. However, the portrait and landscape orientations would be
the preferable orientations for most applications.
4.1. Power ON
To power ON the tablet, press and hold the power button for 3 seconds.
The power button can also be used for other functions:
When the tablet is ON, tap the power button to wake up the device or send it to sleep. The tablet uses
minimum power when it is asleep.
When the tablet is ON, press and hold the power button to bring a menu of actions.
In rare cases, if the tablet stops responding to any input for a long time, you can press and hold the
power button for about 10 seconds to hard reset the tablet.
If, after a single press of the power button, the display does not turn on, please press the power button
a second time. This will power up the display after an ESD event.
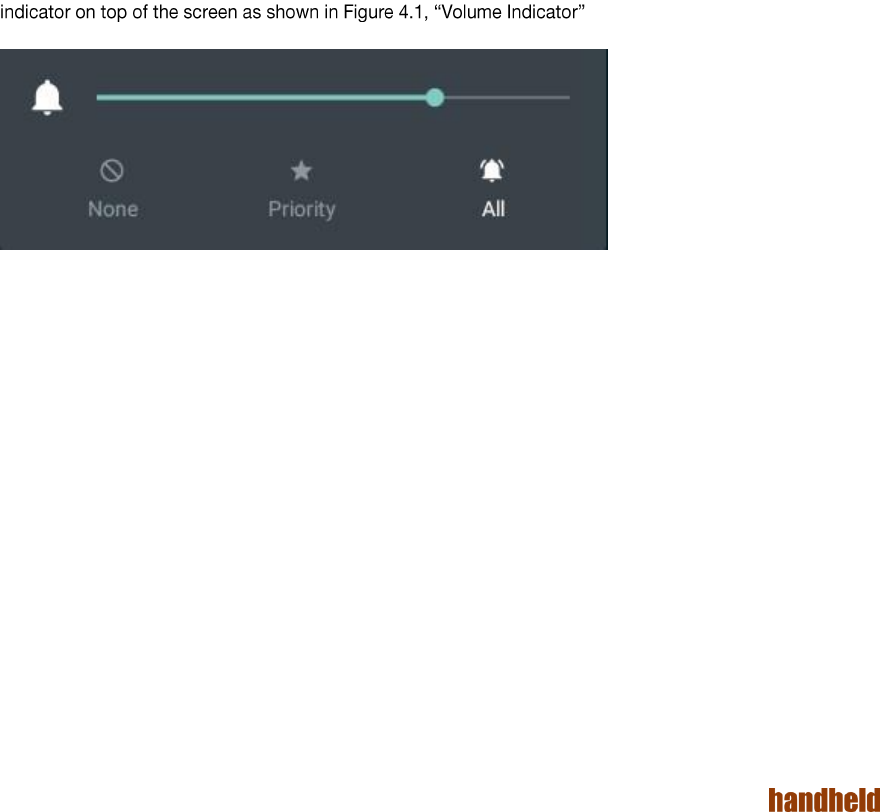
4.2. Audio Volume
Use volume buttons to control the audio volume of tablet. Pressing the volume buttons will pop up the volume
FIGURE 4.1. VOLUME INDICATOR
18
Ver 1.4
4.3. Initial Startup
When the device is first powered on, it boots into the startup interface. This interface guides you step by step
through the device setup process. You can configure the language of usage, time zone, date & time settings. At
this time, the tablet also connects to the internet using any available data network via the SIM cards. If no
network is available, then you get an option to connect to any available Wi-Fi network. Optionally, you may also
associate a Google account with the device at this time. Doing this is highly recommended. A Google account is
required for using many pre-installed Google applications like Gmail. A Google account is required for installing
applications from the Google Play Store.
Once you are through the setup process, then the device is ready to use.
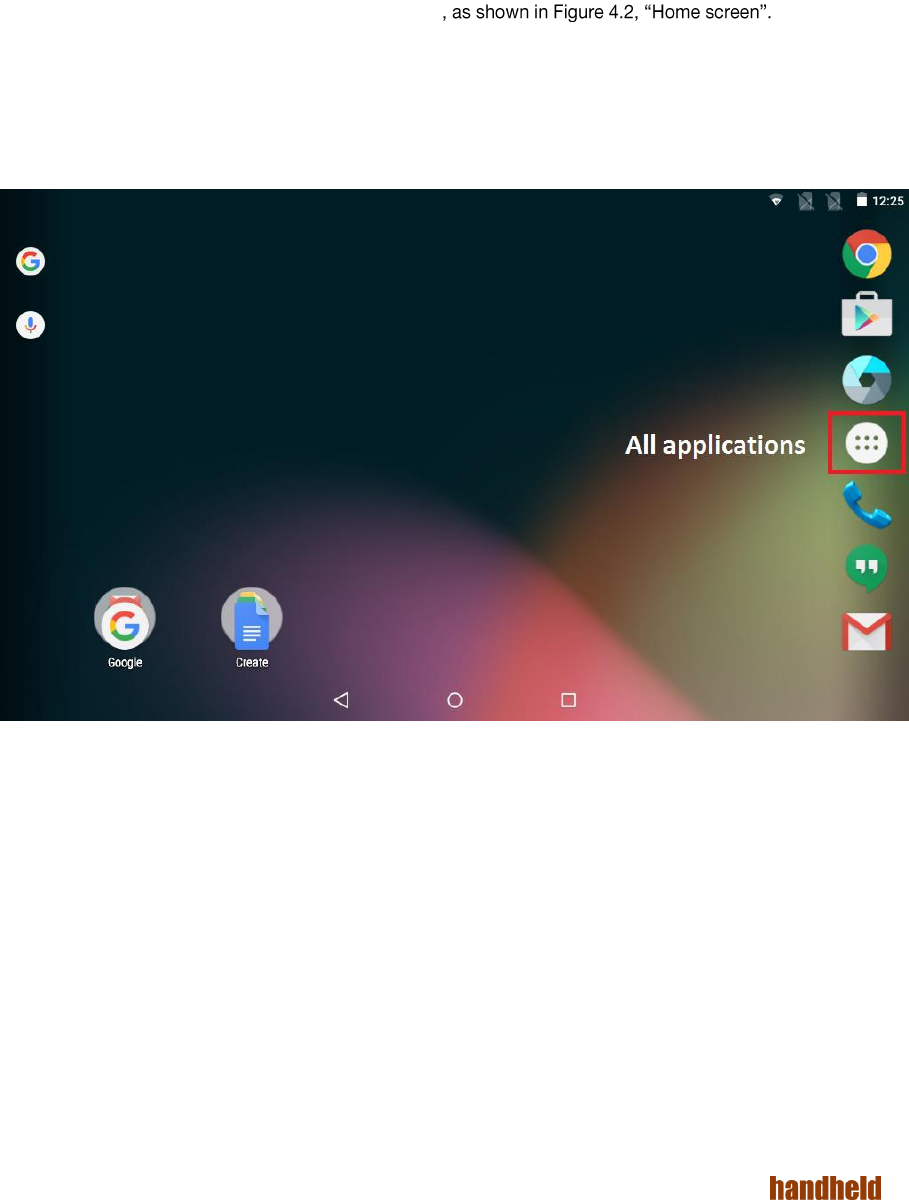
4.4. Home Screen
The tablet boots to the home screen after initial startup
You can start various applications by touching their icons.
The top of the screen is the status bar, which shows:
o On the right side, the current system time, battery status and connectivity status.
o On the left side, notification icons. To see notifications, swipe down with a finger.
To see the all the installed applications, touch the icon at the center.
FIGURE 4.2. HOME SCREEN
19
Ver 1.4
4.4.1. Navigation Bar
At the bottom of the screen, you will find the Navigation Bar with three soft buttons. The three buttons, in order
are:
1. Back Button. Touching this generally takes you to the previous screen. The exact behavior may
depend on the active application.
2. Home Button. Touching this takes you to the home screen.
3. "Recent Apps" Button. Touching this shows you the running applications. You may directly switch
to another application by touching on it.
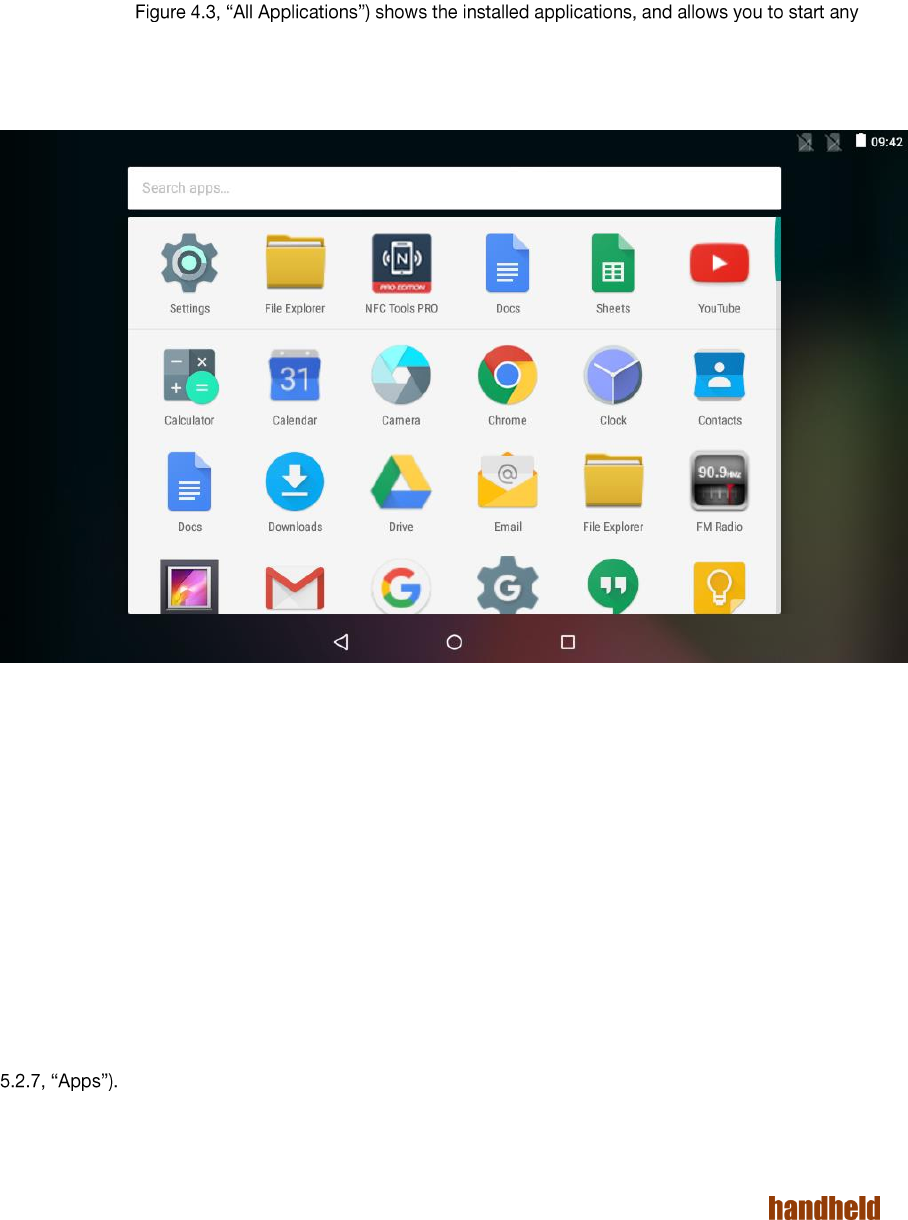
4.5. Applications Screen
This screen (see
application of your choice. Your device may have more apps installed than can be shown on the screen; swipe
the screen left and right to navigate.
Touch any app icon to start it.
FIGURE 4.3. ALL APPLICATIONS
If you are using an app frequently, then you may place it on home screen for quicker access. To move an app to
the home screen:
1. Touch and hold the application icon
2. Select the screen by sliding the finger
3. Lift the finger to drop the application icon
If you want to remove an application from home screen:
1. Touch and hold the application icon
2. Move the finger towards top-left corner of screen
3. Drop the application icon on "Remove" icon
If you want to see detailed information about any app. Touch and hold the application icon. Drop it over "Info"
icon on top-left corner of screen. You can also view and manage applications using "Apps" settings (see Section
20
Ver 1.4
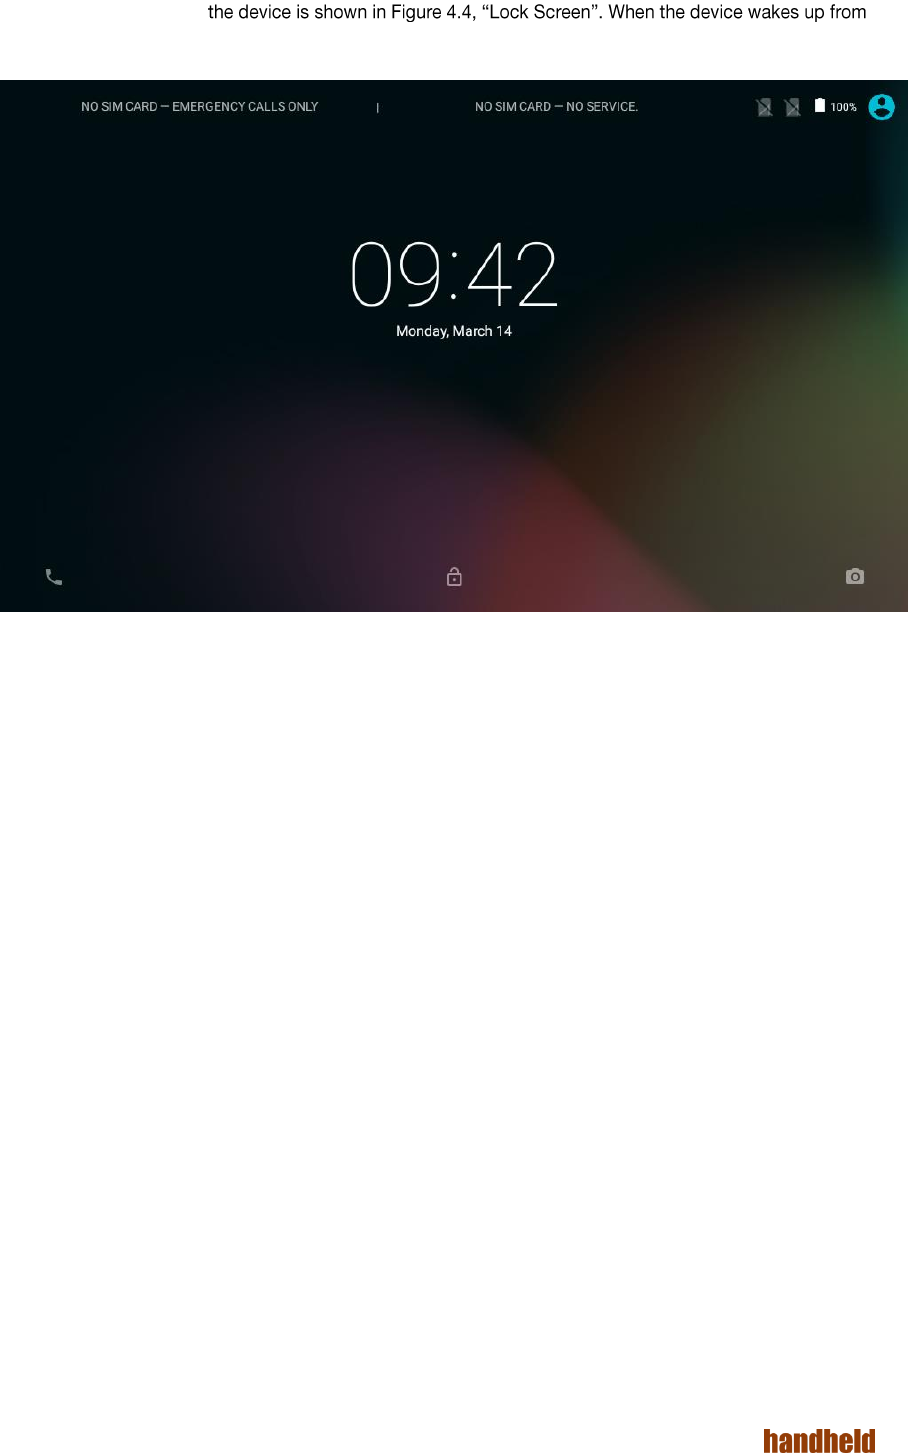
4.6. Lock Screen
The default lock screen of
sleep, this screen becomes visible.
FIGURE 4.4. LOCK SCREEN
For ready reference, the lock screen shows the status of the SIM cards on the top.
21
Ver 1.4
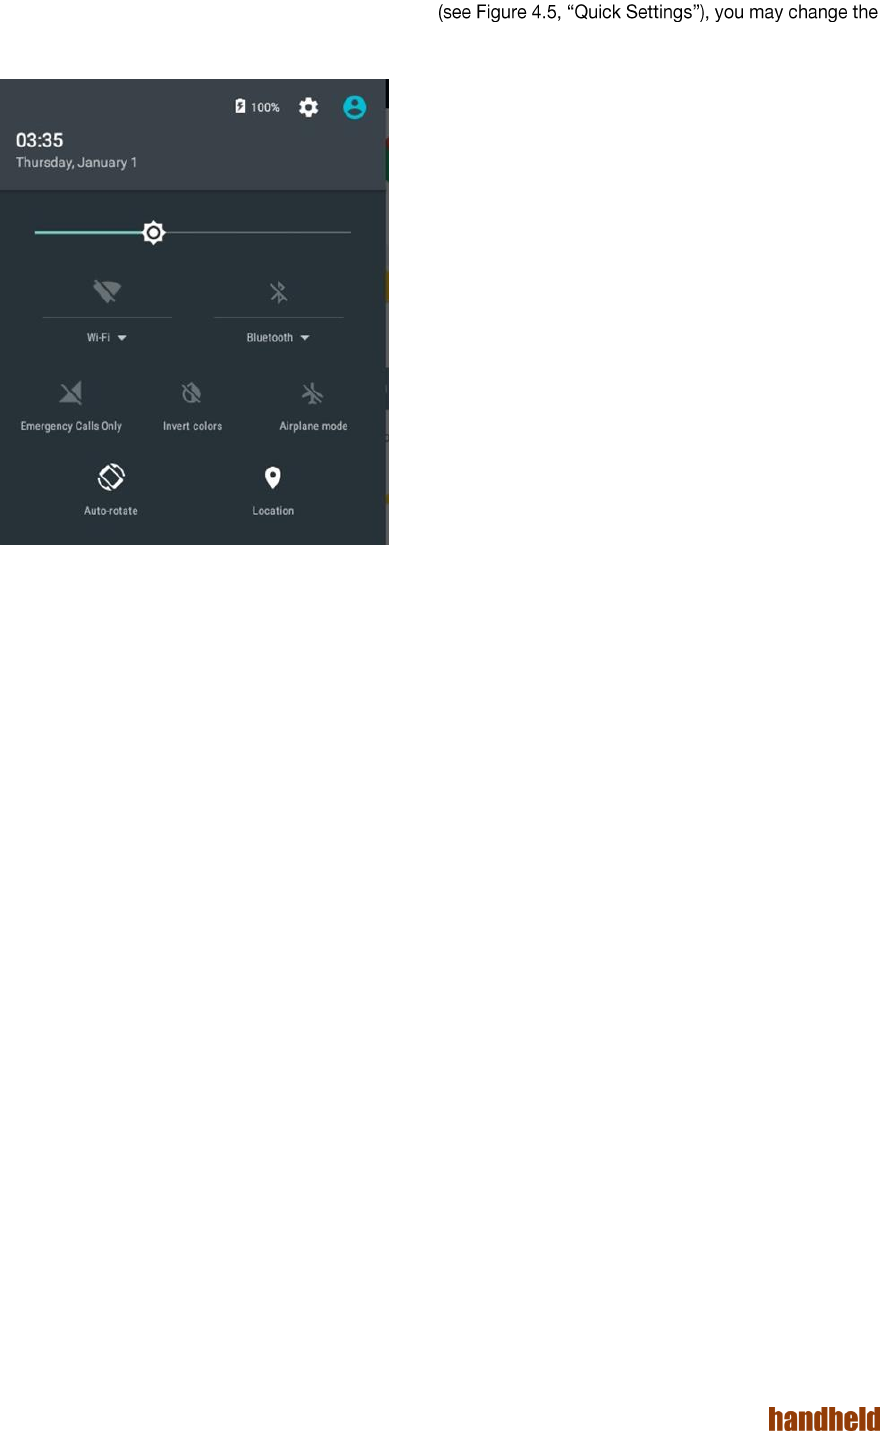
4.7. Quick Settings
Common settings may be quickly accessing using "Quick Settings". To access Quick Settings, simply swipe
down from the top of the screen. From Quick Settings
screen brightness, connect to Wi-Fi networks, Bluetooth devices and SIM networks, as well as control automatic
screen rotation.
FIGURE 4.5. QUICK SETTINGS
4.7.1. Adjusting Screen Brightness
In Quick Settings, drag the slider to set the screen brightness.
4.7.2. Control Wi-Fi
Touch the Wi-Fi icon to quickly enable/disable Wi-Fi.
4.7.3. Control Bluetooth
Touch the Bluetooth icon to quickly enable/disable Bluetooth
4.7.4. Invert Screen Colors
In very brightly lit environments, you may have trouble reading the contents of the screen. The "Invert colors"
option reverses the colors (i.e. black becomes white, and vice versa). This may help readability. This mode is
most effective for reading text on the screen. Due to the color inversion, it is not recommended if you are looking
at images.
4.7.5. Airplane Mode
Airplane mode disables all radios. One touch on the Airplane mode icon enables/ disables airplane mode.
4.7.6. Screen Auto-Rotate
By default, the applications on the screen follow the orientation of the device. You may change this to force
applications to lock to the current screen orientation (portrait/ landscape).
4.7.7. Location
This option controls the location usage of applications. If this option is turned off, then Android apps & services
do not get location data.
22
Ver 1.4
4.8. Make a Phone Call/SMS
Use the Phone app to make phone calls. This app shows the call history as well. Use the headset included with
the device for comfort. The button on the headset can be used to accept/reject/hang-up calls.
The Hangouts app can be used to send/receive SMS.
4.8.1. Pair a Bluetooth headset
A Bluetooth headset may be used during phone calls for maximum comfort. To use a Bluetooth headset, you
is paired, it will be used during phone calls.
4.9. Connect to a Network
If a SIM is inserted into the tablet, and you are subscribed to a data plan, then the tablet will automatically
connect to the internet.
If a Wi-Fi -
connect. A wired data connection is possible using Eth
instructions.
4.10. Configure Google Account
A Google account is required for making the most use of many applications installed on the device. If you did
not configure a google account on startup, then you can add one from Settings | Accounts.
4.11. Useful Applications
The Algiz RT7 ships with many useful applications. Please see Section 5.6 Applications .
4.11.1. Install Applications
Please use the Google Play application to install applications from the Google Play store. Note that a Google
account is required for this.
4.12. Configure Hotkeys
The Algiz RT7 has four user configurable hot keys. Each of the keys may be independently mapped to various
functions. Please see Section 5.5,
4.13. Notifications
Android applications use notifications to indicate to the user that some action is required. In general, two types
of notifications are supported:
Notifications in the user interface. These show up on the top of the screen. Users can see details by
swiping down on the screen. Android supports rich notifications. Users may respond to notifications by
touching. All active notifications can be dismissed as well with a single touch.
LED notifications: Some applications use LED notification lights to indicate to the user that some action
is required. LED notifications are only visible when the device screen is off. A blinking blue LED
indicates that a notification is active. Typically, this corresponds to incoming messages (SMS, email)
and missed calls.
4.14. Scanning Barcodes
If your table is equipped with the optional barcode module, then you may directly scan barcodes with the press
of a button. Any of the four hotkeys can be configured to scan barco
shows how the scanner be configured to selectively scan specific symbologies.
4.15. Software Updates
You may check for Software Updates to the tablet from Settings | About Tablet.
23
Ver 1.4
4.16. Factory Reset
To reset the device to the default state, you may use the Factory Reset functionality. Note that this will remove
all installed apps and data. The factory reset option is available from Settings | Backup and Reset.
This tablet includes a safety feature known as "factory reset permission". If any Google Account is associated
with the device, then you will need to login to that account when the device reboots post the factory reset.
If you are planning to associate another google account with the device after factory reset, then it is highly
recommended that you remove the google account before issuing the factory reset.
5. SETTINGS
The Settings application can be used to connect to various networks, as well as configure the wide variety of
options available. The Settings applications may be accessed from the applications screen. Swiping down the
screen and touching on the settings icon is a faster way to reach there.
Many applications will have its own settings, which can accessed by using menu icon on top right corner.
The Settings application groups controls under four categories, as below:
Wireless & networks
Device
Personal
System
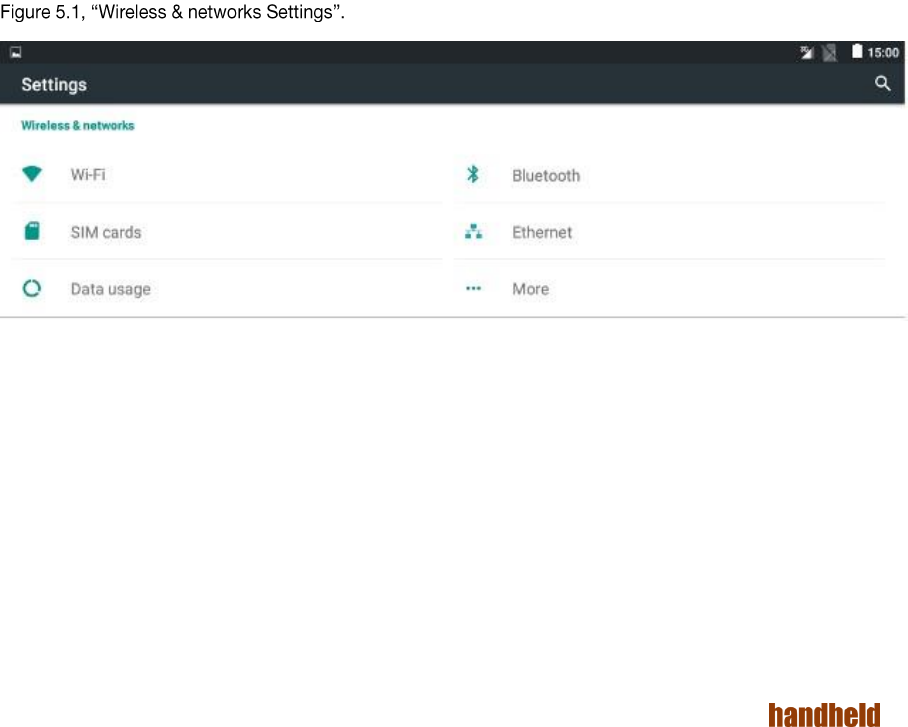
5.1 Wireless & network
To perform network related settings, select respective option under Wireless & network settings as shown in
FIGURE 5.1. WIRELESS & NETWORKS SETTINGS
24
Ver 1.4
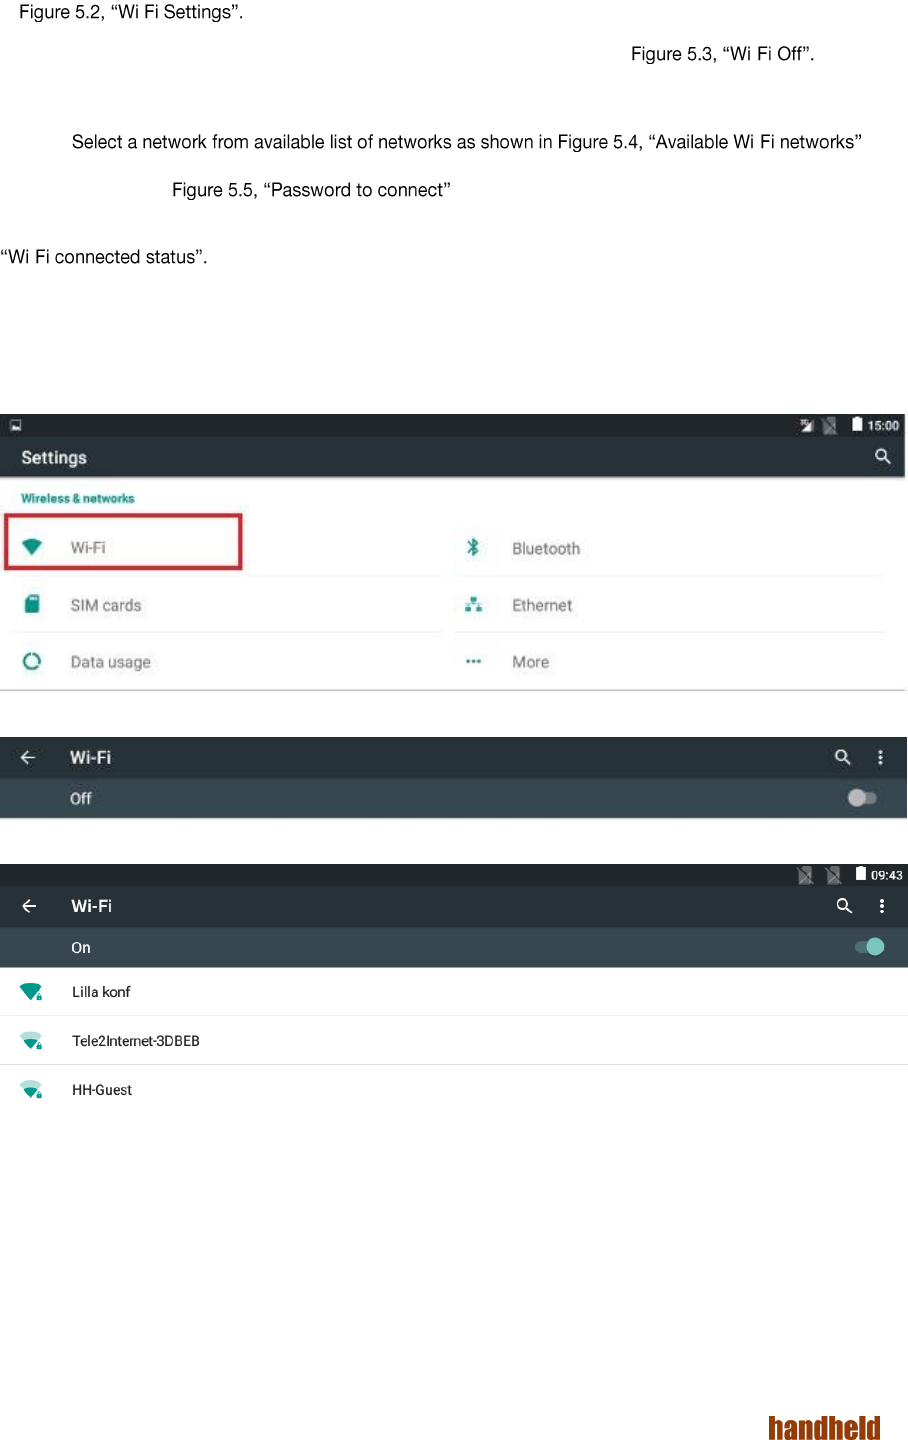
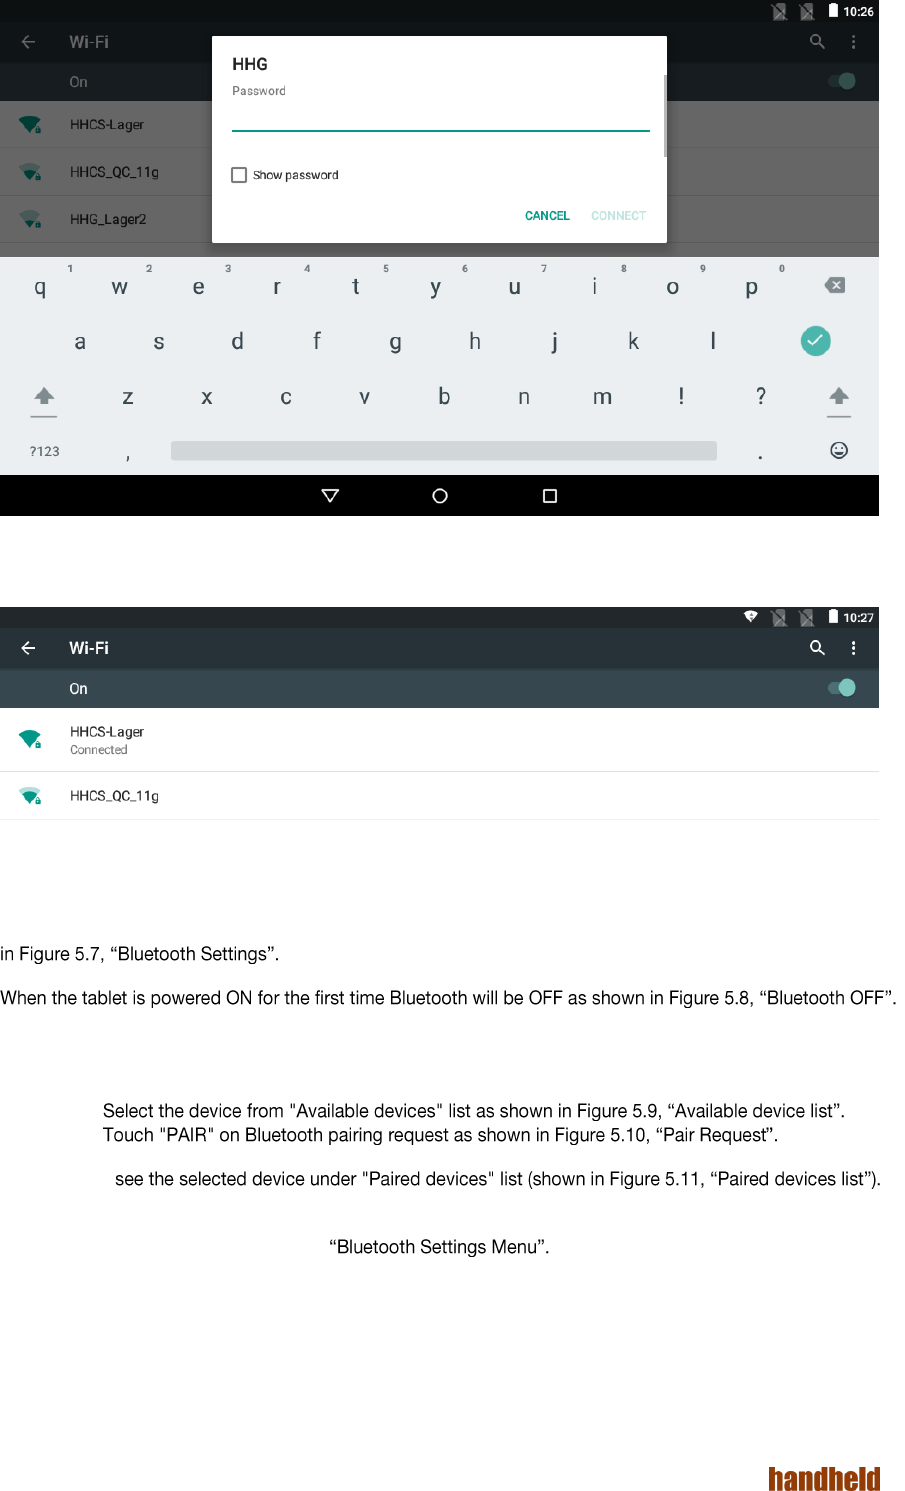
5.1.1. Wi-Fi
To perform Wi-Fi related settings select the "Wi-Fi" option under Wireless & network group in settings as shown
in -
When the tablet is powered ON for the first time Wi-Fi will be OFF as shown in - To
connect to Wi-Fi network:
1. Turn ON Wi-Fi.
2. -
3. If a password is required to connect to the network, then you will be prompted to enter the password,
as shown in
If the device is successfully able to connect to the network, then the network status is shown, as in in Figure 5.6,
-
Touching the connected Wi-Fi network pops up all the properties of the network: IP address, Status, Signal
strength, Link speed, Frequency and Security.
You may perform operations like, add network, view saved networks, refresh by using menu icon on top right
corner. You can check the current Wi-Fi status from home screen by scrolling down from the top.
FIGURE 5.2. WIFI SETTINGS
FIGURE 5.3. WIFI OFF
FIGURE 5.4. AVAILABLE WIFI NETWORKS
25
Ver 1.4
FIGURE 5.5. PASSWORD TO CONNECT
FIGURE 5.6. WIFI CONNECTED STATUS
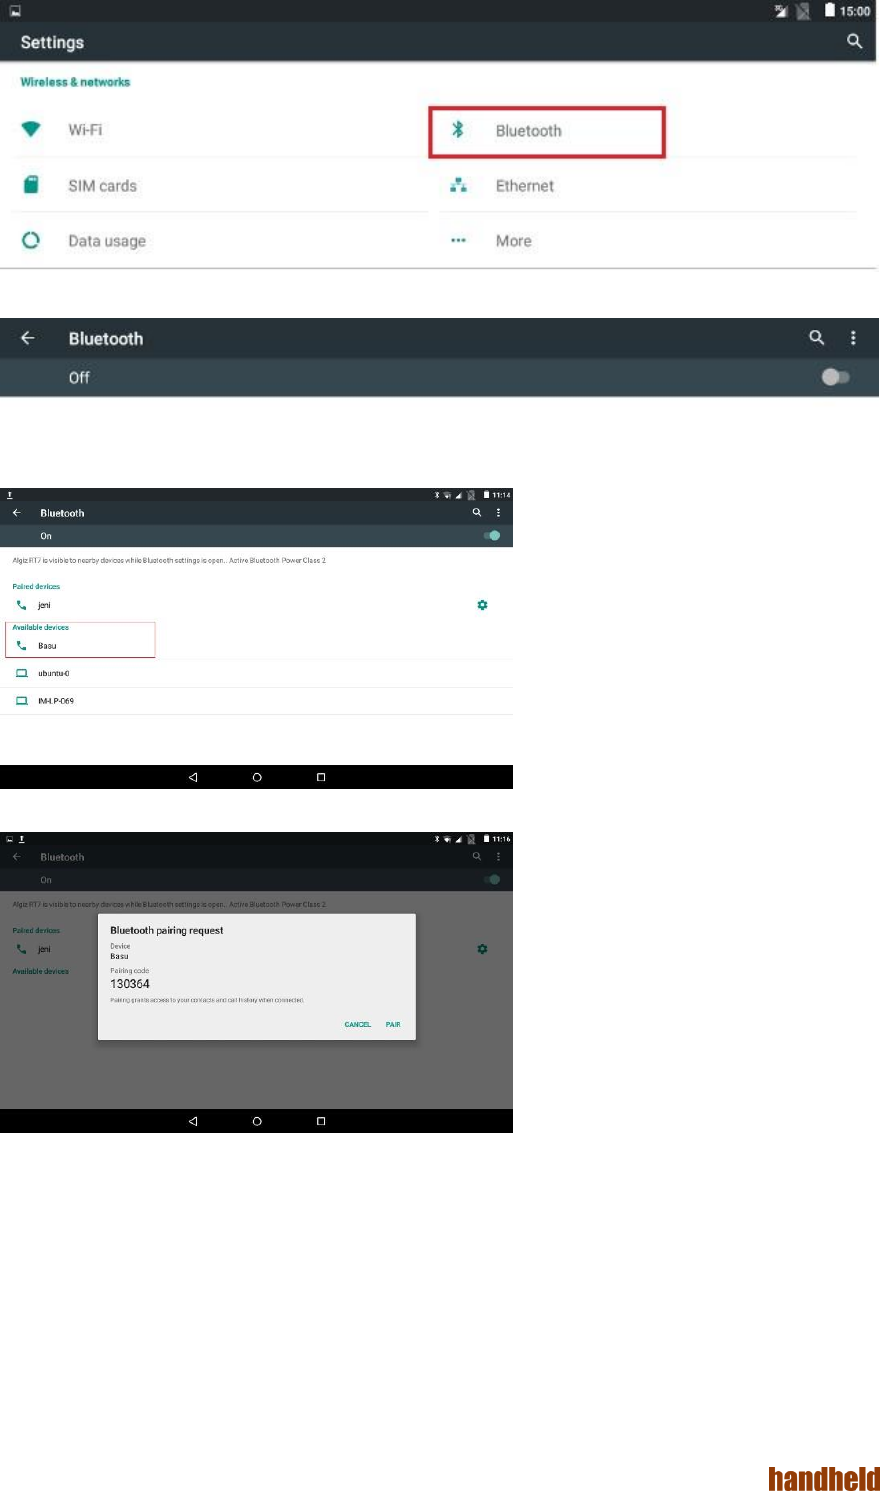
5.1.2. Bluetooth
Bluetooth related settings are under the "Bluetooth" option under "Wireless & network settings" group, as shown
Prior to using a Bluetooth device, you need to pair the device with the tablet, as follows:
1. Turn on Bluetooth.
2.
3.
Now, you can
You can do additional operations like renaming the device, Refresh, View all received files by touching menu
icon on top-right corner see Figure 5.12,
26
Ver 1.4
FIGURE 5.7. BLUETOOTH SETTINGS
FIGURE 5.8. BLUETOOTH OFF
FIGURE 5.9. AVAILABLE DEVICE LIST
FIGURE 5.10. PAIR REQUEST

27
Ver 1.4
Figure 5.11. Paired devices list
FIGURE 5.12. BLUETOOTH SETTINGS MENU

28
Ver 1.4
Configurable Bluetooth Power Class
The Bluetooth interface on the Algiz RT7 may be configured to run at two power levels:
Class 2 operation. This is the default, and provides a short range of operation.
Class 1 operation. This is a high power mode, providing a longer range of operation.
To make effective use of the higher power, both devices must operate in Class 1.
To change the power class, select the "Bluetooth Power" menu option from Bluetooth configuration, as shown in
disabled when Bluetooth is on. The user can then select the required power class, as shown in Figure 5.14,
d, as shown in Figure
FIGURE 5.13. SELECT BLUETOOTH POWER FROM BLUETOOTH SETTIN

29
Ver 1.4
FIGURE 5.14. SELECT POWER CLASS
FIGURE 5.15. BLUETOOTH STATUS
30
Ver 1.4
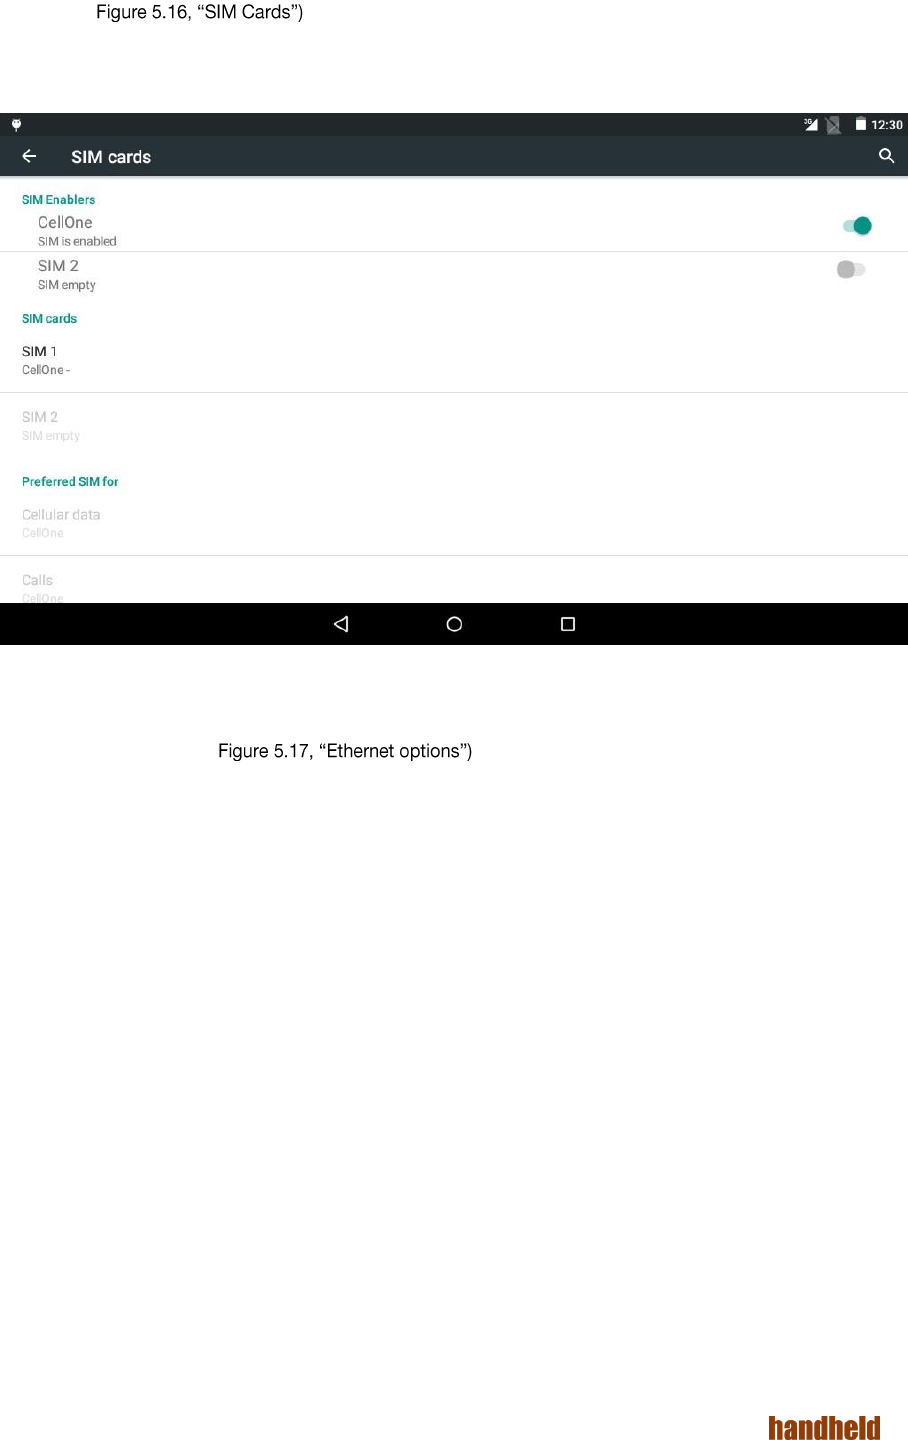
5.1.3. SIM cards
The Algiz RT7 supports up to two SIM cards in a Dual SIM, Dual Standby (DSDS) configuration. The SIM cards
screen (see allows you to configure your preferences for the inserted SIM cards.
Either SIM card may be individually enabled/disabled, you may also configure preferred SIM to use for data or
voice calls.
FIGURE 5.16. SIM CARDS
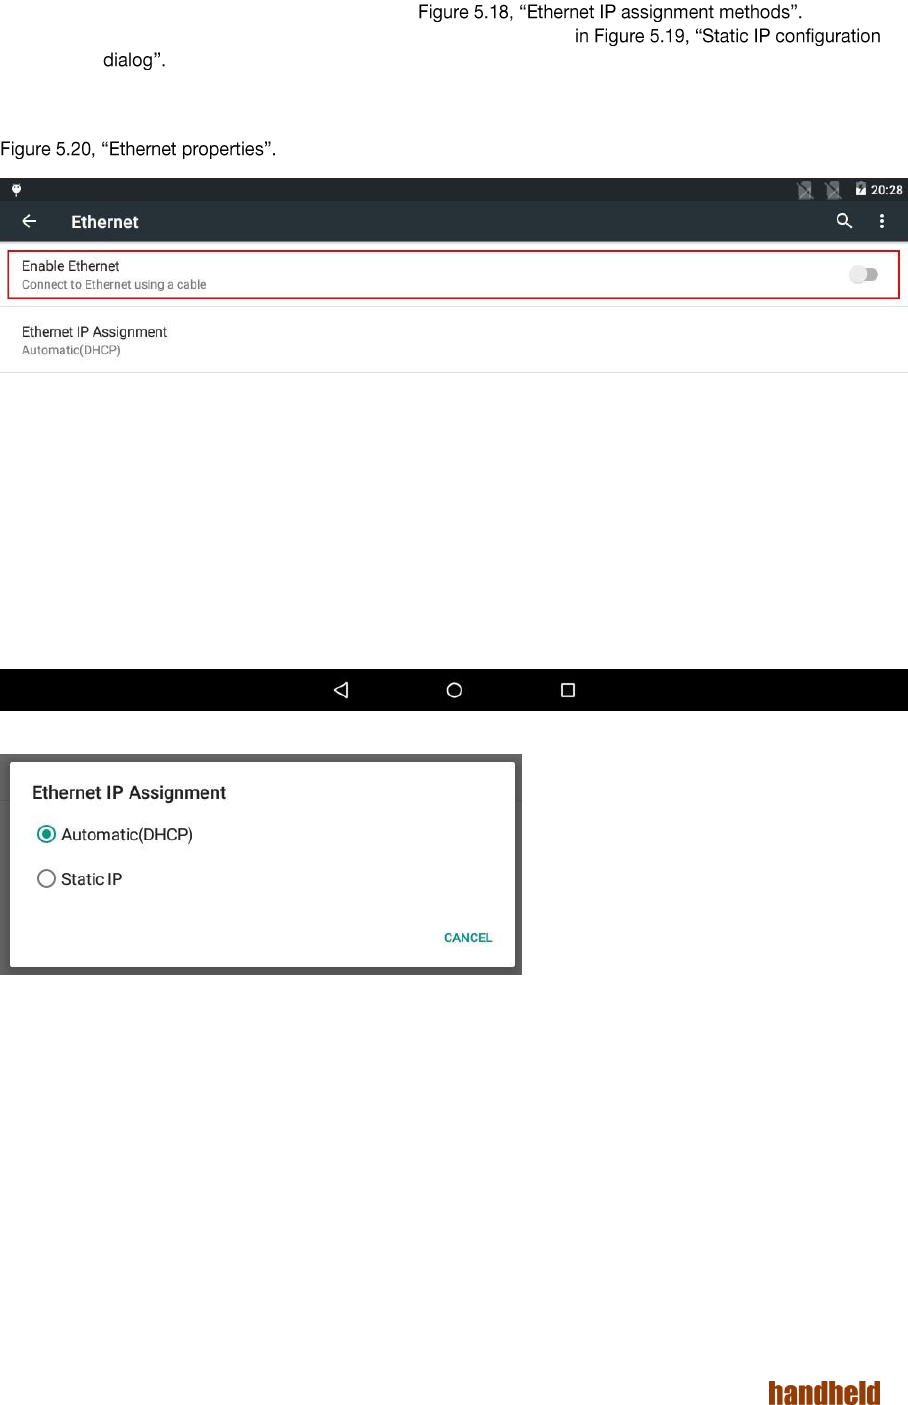
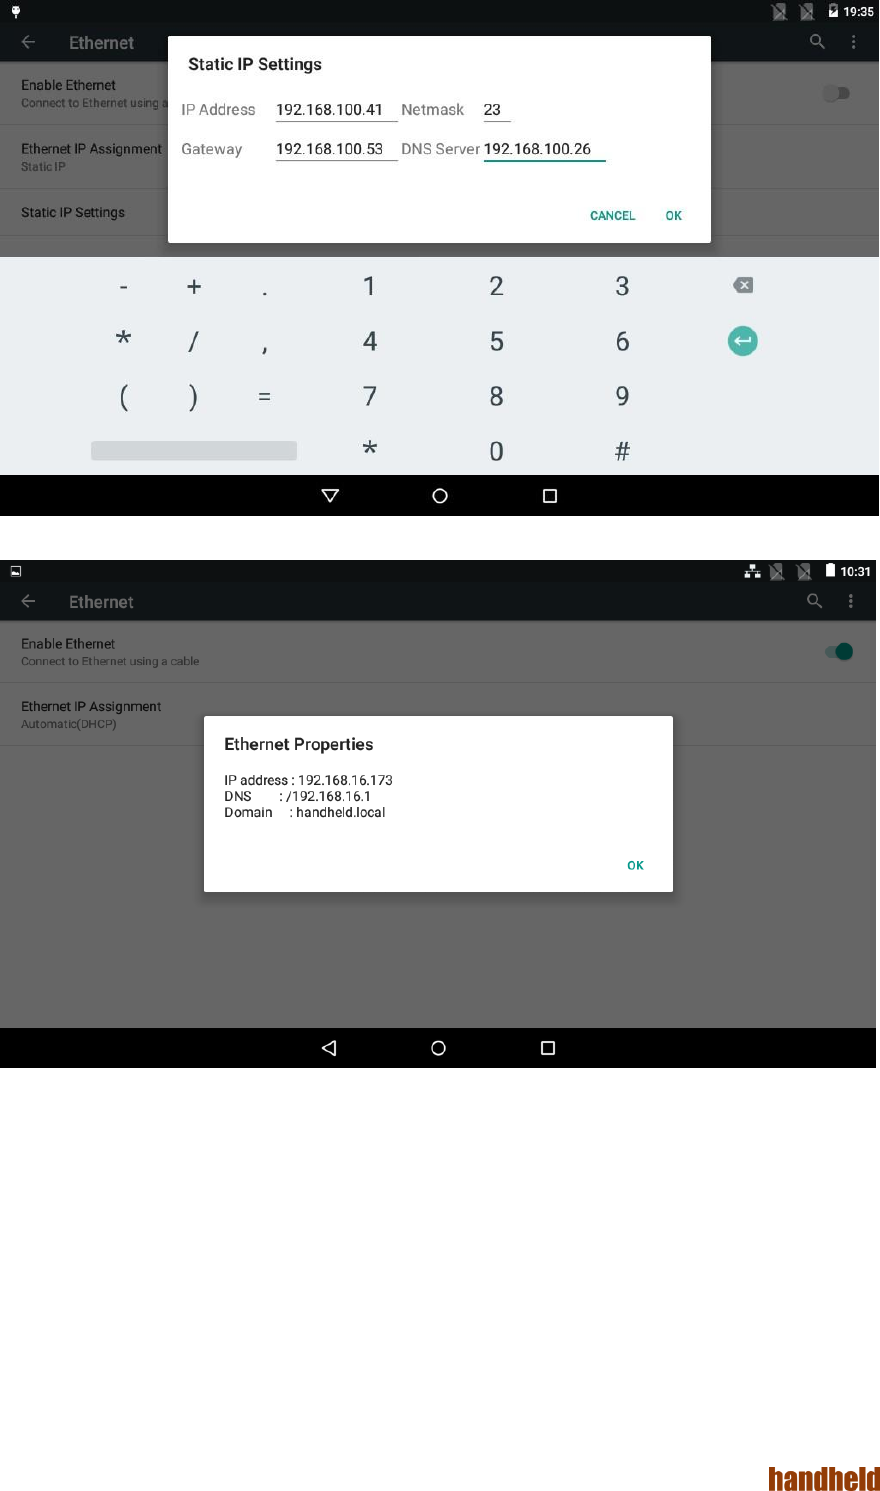
5.1.4. Ethernet
To connect to an Ethernet network, use the "Ethernet" option under Wireless & networks settings. The "Enable
Ethernet" option (shown in allows you to turn ON or turn OFF the Ethernet
connection as needed.
The "Ethernet IP Assignment" option provides two methods of configuring the Ethernet port:
Automatic IP address configuration using DHCP. This is on by default.
Static IP address.
You may directly assign the properties of the Ethernet port using "Static IP" option. To do this, you needs to
have the following information handy:
The IP address you wish to assign to the device.
The netmask of the network you are connecting to.
The IP address of the gateway.
The IP address of the DNS server.
All the IP addresses (interface address, gateway, DNS) are entered in dotted IP notation e.g. "192.168.100.152".
The netmask needs to be entered in CIDR format, e.g. "24" is equivalent to "255.255.255.0".
31
Ver 1.4
To configure the static IP:
1. Change "Ethernet IP Assignment" option to "Static IP".
2. Select "Static IP Settings" as shown in
3. Enter the values in Static IP configuration dialog as shown
You can see the information about the Ethernet port by selecting "properties" option in menu at the top-right
corner. A dialog pops up with information. This dialog shows the MAC address of the Ethernet port, as shown in
FIGURE 5.17. ETHERNET OPTIONS
FIGURE 5.18. ETHERNET IP ASSIGNMENT METHODS
32
Ver 1.4
FIGURE 5.19. STATIC IP CONFIGURATION DIALOG
FIGURE 5.20. ETHERNET PROPERTIES
33
Ver 1.4
5.1.5. Network Selection Policy
The data networks on the tablet, in order of priority, are
Ethernet (highest)
Wi-Fi
SIM based networks (lowest)
Only one data network may be active on the tablet at a time. When a connection to any network of higher priority
is available, then the lower priority networks are disabled automatically. As an example, when Wi-Fi is enabled, it
takes priority over 2G/3G/4G networks. Similarly, when an Ethernet connection is established, it takes
precedence over all other networks.
5.1.6. Tethering
Explain Wi-Fi Hotspot & Bluetooth tethering here.
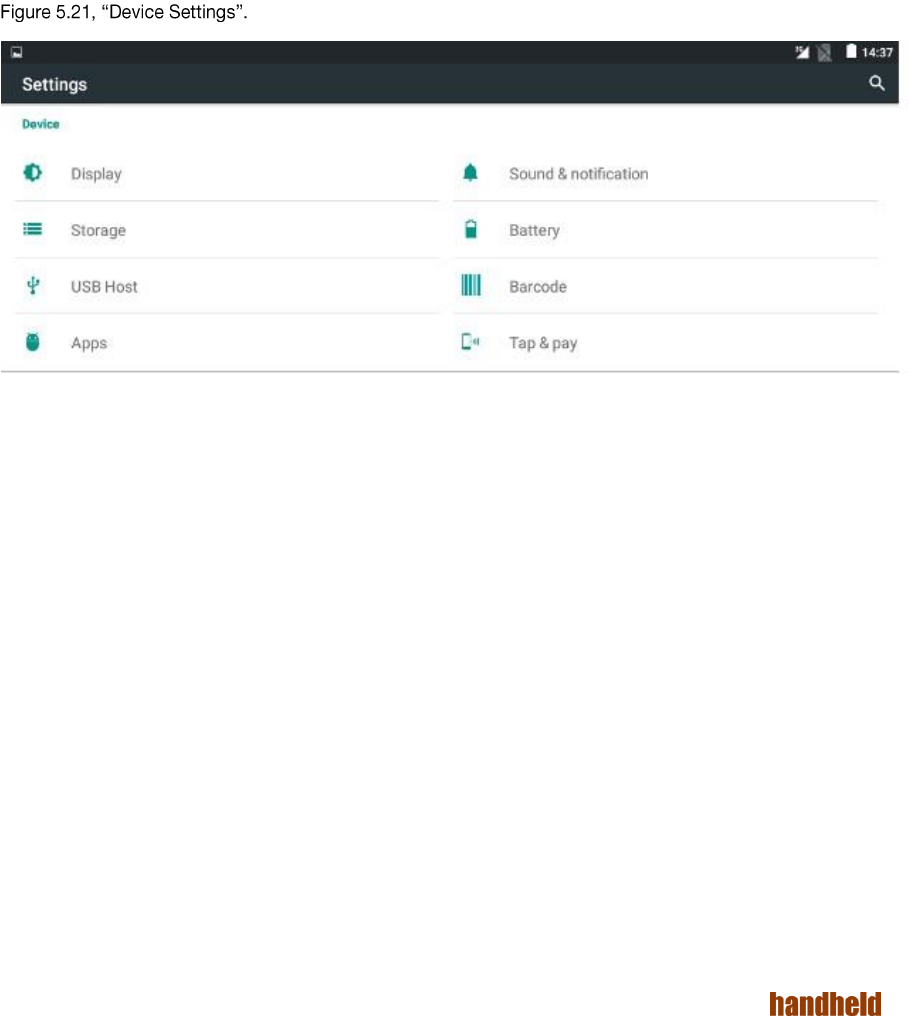
5.2. Device
You can use device settings to set device properties such as display, sound, battery, storage etc. as shown in
FIGURE 5.21. DEVICE SETTINGS
34
Ver 1.4
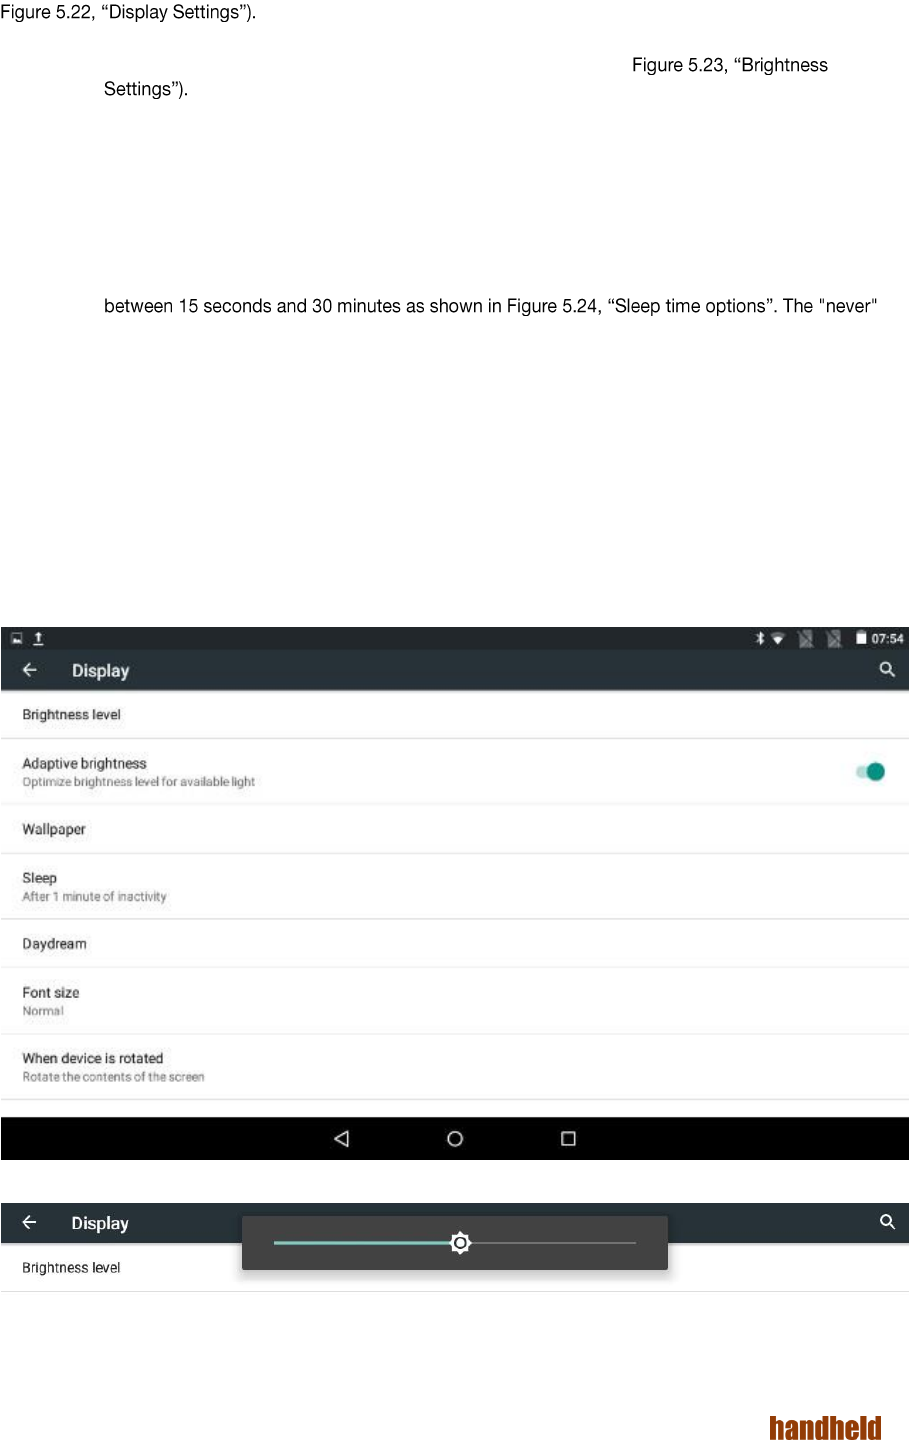
5.2.1. Display
The "Display" option under Device settings allows you to set below display properties for your tablet (shown in
1. Brightness level - Adjust the slider to set the brightness level (see
2. Adaptive brightness - Enabling this option sets the brightness level of the screen appropriately for
the available light. The adaptive brightness function uses a very low backlight level in pitch
darkness, reasonable level in typical indoor office lighting, and maximum brightness while using the
tablet outdoors or in direct sunlight. Using this option gives reasonable power savings, and is
recommended.
3. Wallpaper - Personalize your device. You may select an image from Gallery, Live Wallpapers or
Wallpapers.
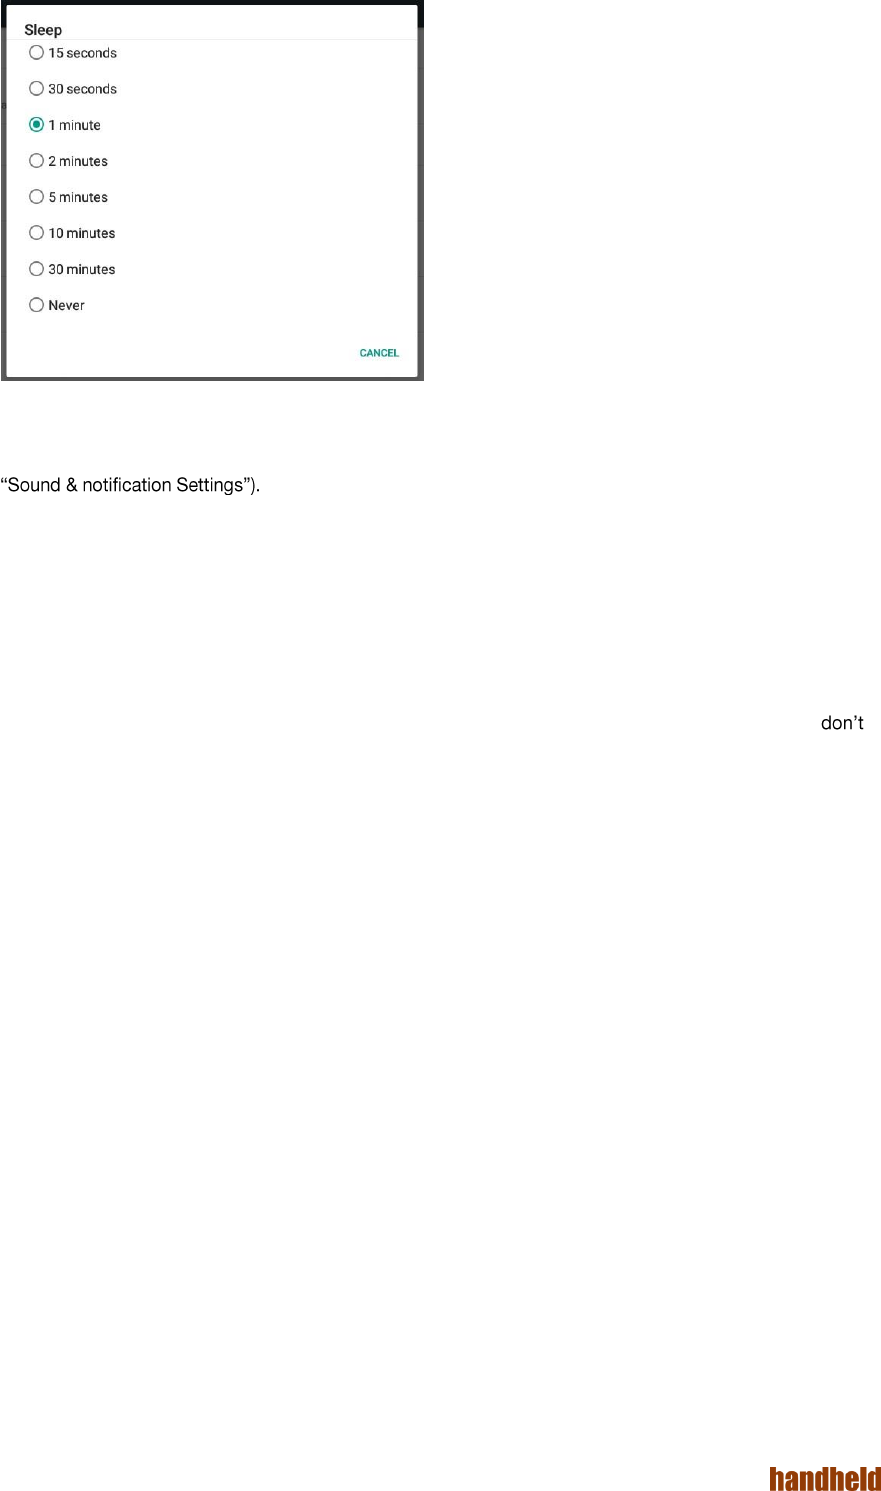
4. Sleep - This sets the idle timeout after which the device goes to sleep. You may set a value
setting may be used when you do not want the screen to go to sleep automatically. This is typically
used for benchmarking the device. Using this option can drain the battery faster than normal. If very
long operation times are required, then we recommend that you keep the charger connected.
5. Daydream - to control what happens when the phone is docked and/or sleeping. You can set clock,
colors, and photo frame or photo table as daydream. Using menu you can specify when to
daydream (while docked, while charging or either).
6. Font size - to the set the font size to small, normal, large or huge. Larger sizes make for easier
reading, at the cost of showing less content on screen.
7. When device is rotated - to set what should happen for the content of the screen when screen is
rotated. You can set rotate the contents or stay in current orientation.
8. Cast screen - by enabling wireless display option in menu, you may mirror the tablet display onto
another display that is connected to a Miracast dongle.
FIGURE 5.22. DISPLAY SETTINGS
FIGURE 5.23. BRIGHTNESS SETTINGS
35
Ver 1.4
FIGURE 5.24. SLEEP TIME OPTIONS
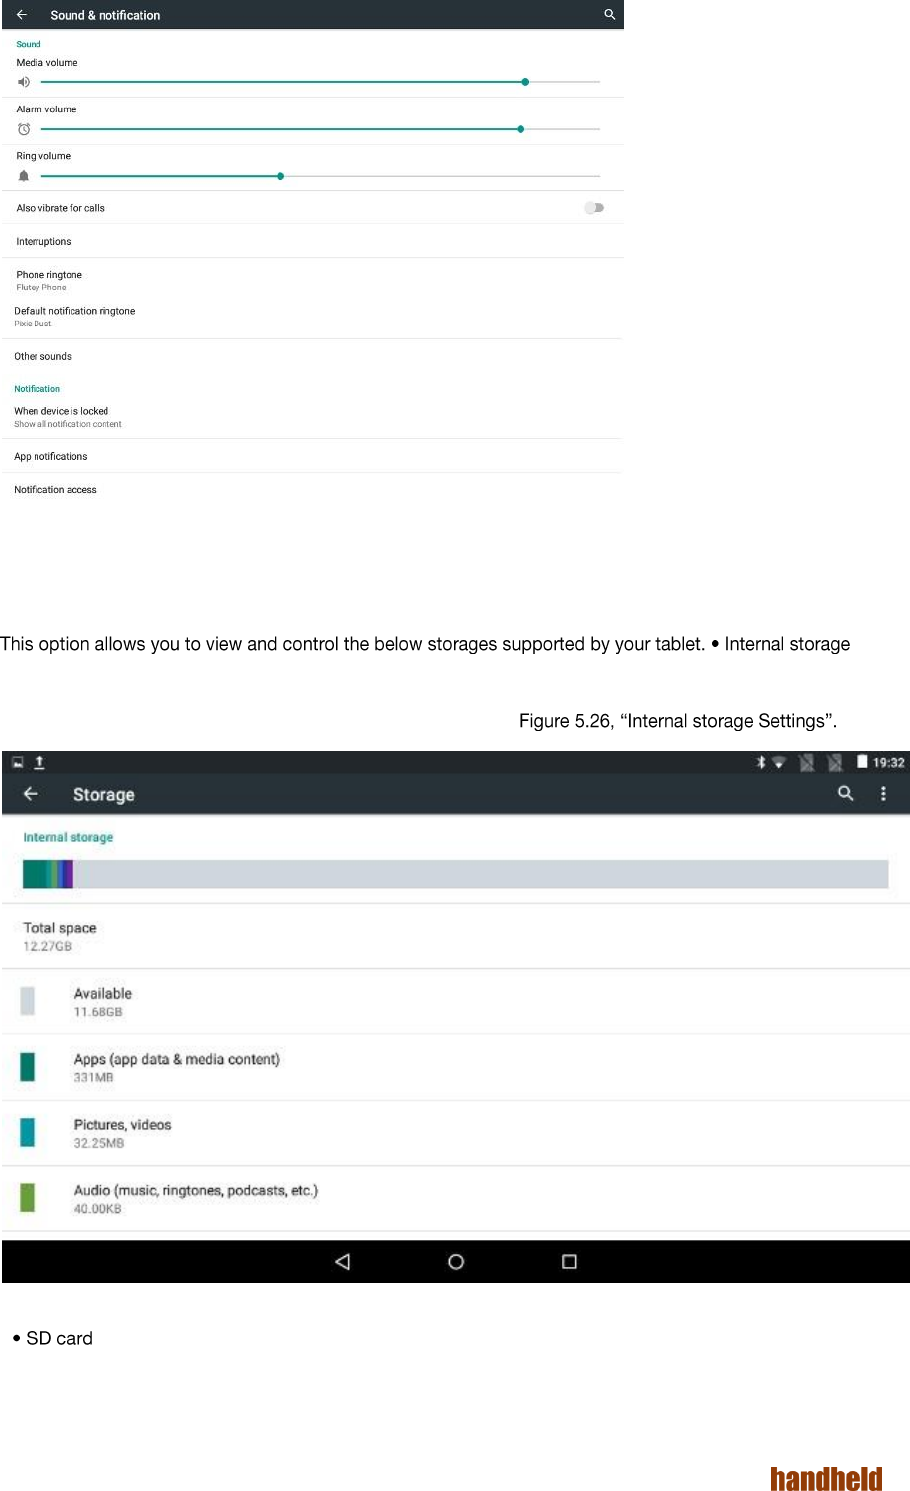
5.2.2. Sound & notification
This option allows you to control below sound and notification properties for your tablet (shown in Figure 5.25,
1. Sound
a. Media volume - to set volume for media file such as videos, audio songs etc. by scrolling from left to
right.
b. Alarm volume - to set volume for alarm ring.
c. Ring volume - to set volume for phone ring tone.
d. Also vibrate for calls - turn on/off vibrator during incoming phone calls.
e. Interruptions - to set the interruption for calls and notifications. You can set Always interrupt,
interrupt or priority interruption by specifying the time interval. You can set the priority interruptions for
Events & reminders, calls and messages.
f. Phone ringtone - to set phone ringtone from list of ringtones available.
g. Default notification ringtone - to set ringtone for notification.
h. Other sounds - to set enable sound for dial pad, screen locking and touch. You can also enable vibrate
for touch.
2. Notification
a. When device is locked - to enable/disable notification content view when tablet is locked.
b. App notification - to set notification priority for applications installed in your tablet. You can also block
the notification from an application.
c. Notification access - to set the listeners for notification.
36
Ver 1.4
FIGURE 5.25. SOUND & NOTIFICATION SETTINGS
5.2.3. Storage
It displays total space allowed to store under internal storage, currently available space and list of all
applications using internal storage with space used as shown in
FIGURE 5.26. INTERNAL STORAGE SETTINGS
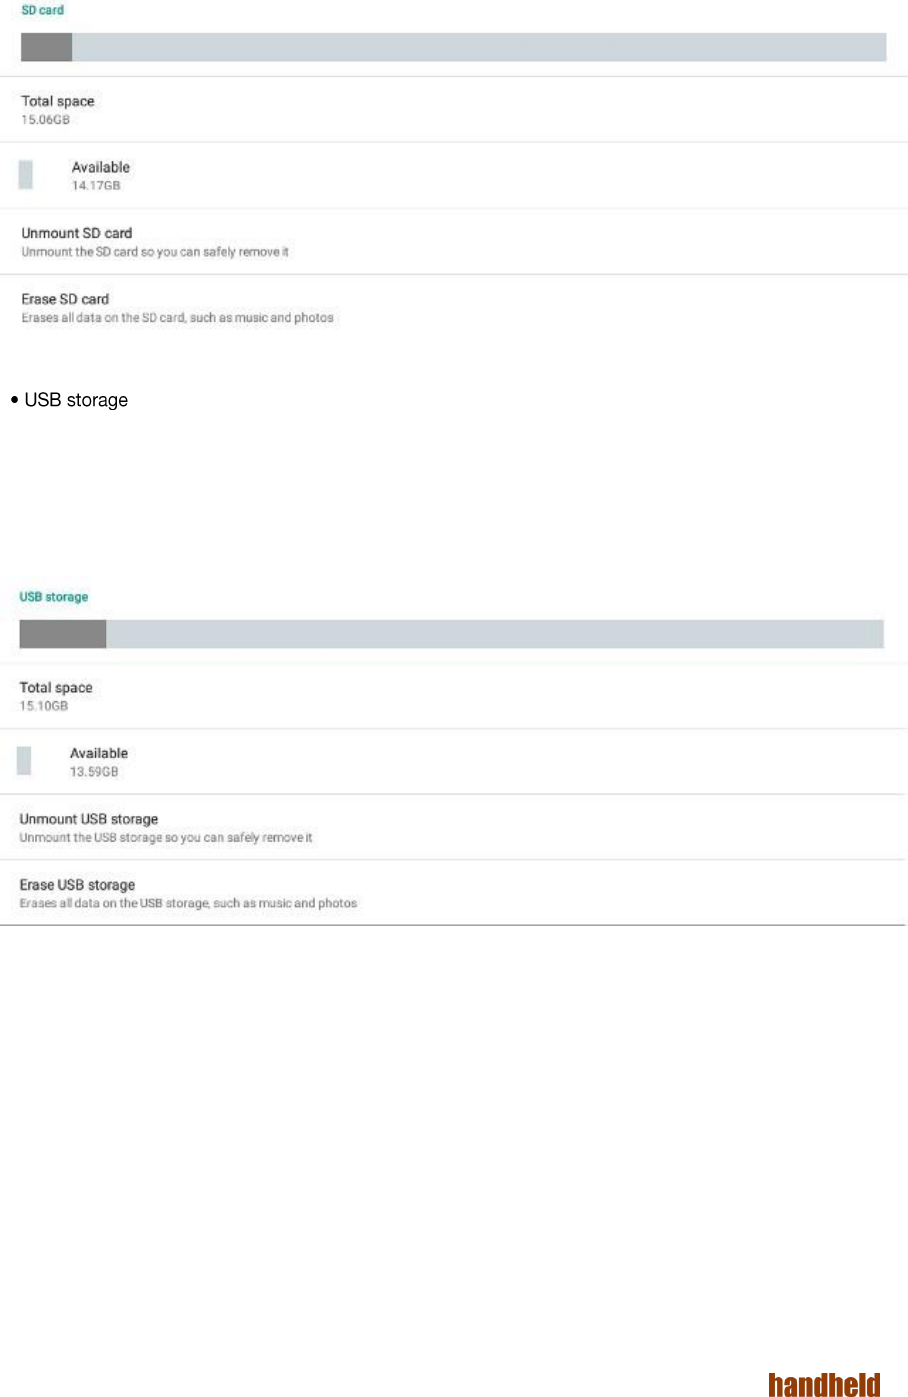
It displays total space allowed to use, currently available space in SD card.
37
Ver 1.4
Unmount SD card - to unmount the SD card before removing it, to avoid data loss.
Erase SD card - to remove all the data stored in the SD card.
FIGURE 5.27. SDCARD STORAGE SETTINGS
It displays total space allowed to use, currently available space in USB storage.
Unmount USB storage - to unmount the USB device before removing it, to avoid data loss.
Erase USB storage - to remove all the data stored in the USB.
FIGURE 5.28. USB STORAGE SETTINGS
38
Ver 1.4
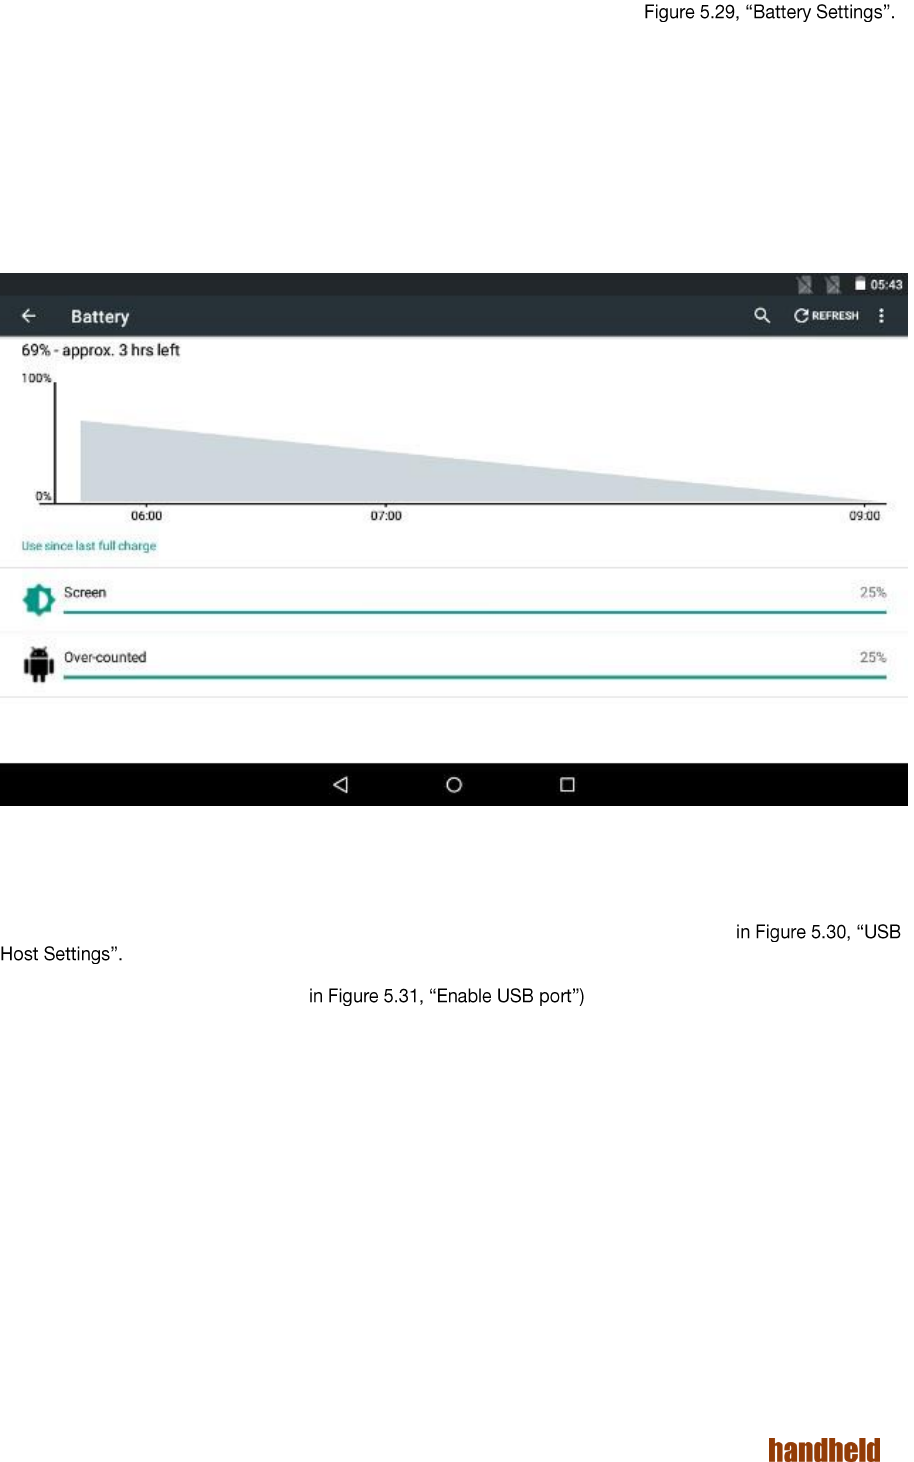
5.2.4. Battery
This option allows you to view the current battery status and usage as shown in
It also shows the percentage of battery used by screen and other applications since last full charge.
You can do refresh for the current battery status using REFRESH option on top-right corner.
You can enable "Battery saver" option in menu. Using "Turn on automatically" option you can specify when
battery saver should turn on automatically (at 5% battery, at 15% battery or never).
To improve battery life, battery saver reduces your tablet performance.
Battery saver turns off automatically when your tablet is charging.
FIGURE 5.29. BATTERY SETTINGS
5.2.5. USB Host
This setting option allows you to enable the USB host mode to use USB peripherals shown
The "Enable USB port" option (shown allows you to turn ON or turn OFF the
USB port as needed.

39
Ver 1.4
FIGURE 5.30. USB HOST SETTINGS
FIGURE 5.31. ENABLE USB PORT
5.2.6. Barcode
The barcode settings option allows you to enable/disable list of symbologies supported by barcode scanner.
These may be individually enabled as shown All supported symbologies
are enabled by default.
FIGURE 5.32. BARCODE SYMBOLOGIES
40
Ver 1.4
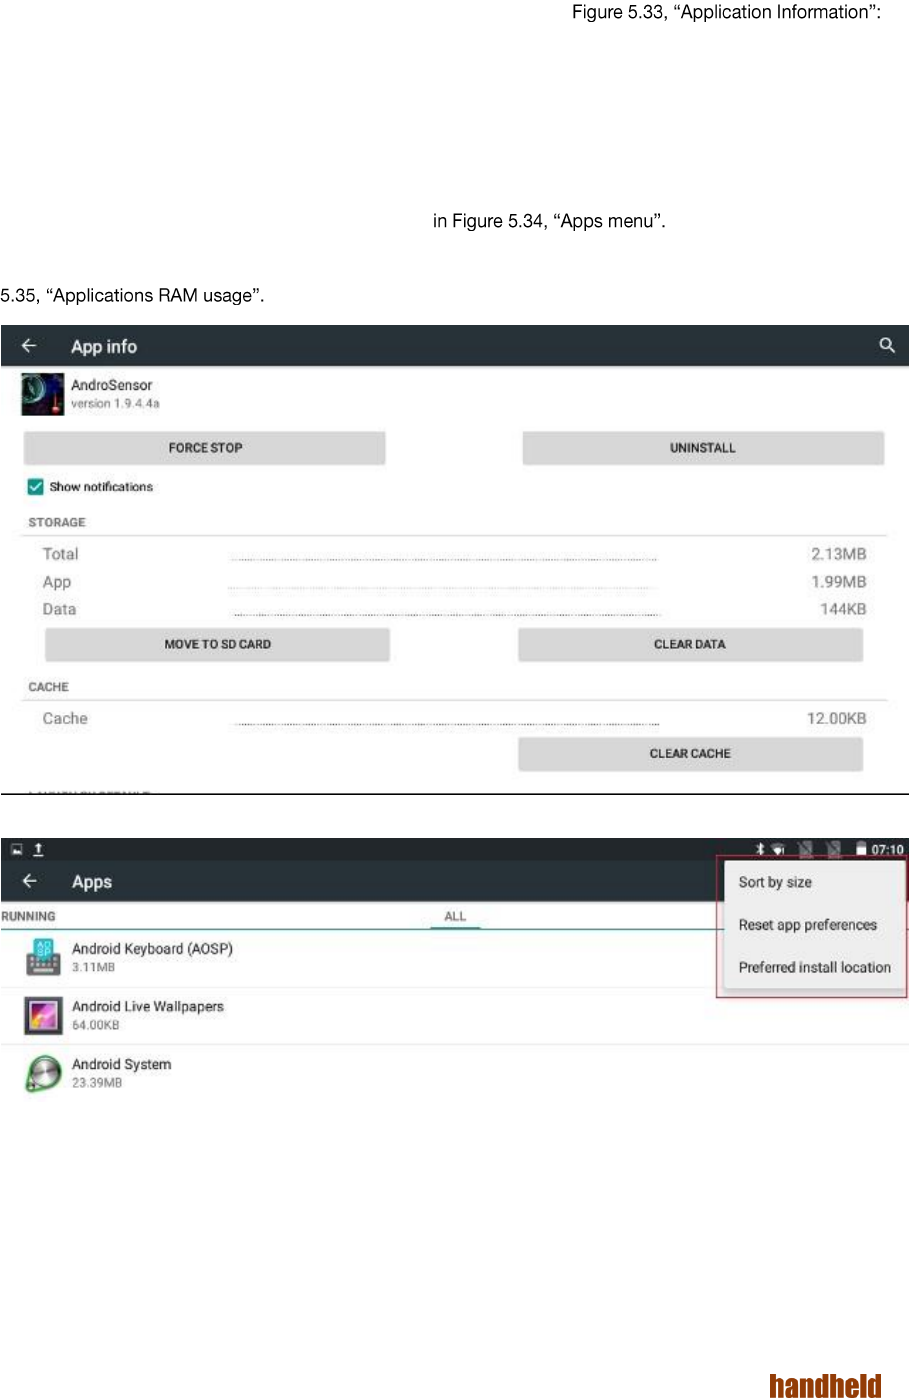
5.2.7. Apps
By using Apps settings you can view and manage applications. Here you can view all the applications installed in
your tablet. To view category vise like Downloaded, On SD card, running scroll from right to left.
You can do following operations on a selected application as shown in
Uninstall the application
Stop the application forcefully
Enable notifications
Move application to SD card
View permissions assigned for application
Using the menu on top-right corner you can: sort the application by size, reset app preferences and specify the
install location (Internal storage or SD card) as shown
You can also see the RAM used by running application under "Running" applications list as shown in Figure
FIGURE 5.33. APPLICATION INFORMATION
FIGURE 5.34. APPS MENU

41
Ver 1.4
FIGURE 5.35. APPLICATIONS RAM USAGE
5.3. Personal
You can set language, location, security, backup for your tablet and add Google account details using options
shown in
FIGURE 5.36. PERSONAL SETTINGS
5.3.1. Location
When Location is turned ON, you can select the following option in location mode as shown in Figure 5.37,
High accuracy mode - uses GPS, Wi-Fi and cellular networks to determine the location.
Battery saving mode - uses Wi-Fi and cellular networks to determine the location.
Device only mode - uses GPS to determine your location.

42
Ver 1.4
FIGURE 5.37. LOCATION MODE
To enable u-Blox GPS module:
Turn Off Location.
Touch "GPS Device" option and select "uBlox".
Go to Location mode, then select the u-Blox platform model under Enhanced location as shown in
-
Selecting uBlox platform model gives uBlox module a hint about the mobility of the user.
Appropriate value can enable the module to generate better location.
FIGURE 5.38. U-BLOX PLATFORM MODEL
43
Ver 1.4
5.3.2. Security
You can use below options to manage the security on your tablet:
Screen Security - provides options to set security to touch screen.
◦ Screen lock - you can set Swipe, Pattern, PIN or Password to unlock the screen.
◦ Owner info - you can set a text to display on lock screen, by checking "Show owner info on lock
screen" checkbox.
◦ Smart Lock - you can set smart lock only when screen lock is set.
Encryption - you can encrypt your accounts, settings, downloaded apps and their data, media and
other files. After encrypting, you need to unlock the screen to decrypt the tablet every time you power it
on.
Passwords - You can make password visible.
Device administration
◦ Device administrators - you can view and deactivate device administrators.
◦ Unknown sources - if enabled, it allows installation of applications from unknown sources.
Credential storage - shows the storage type, trusted credentials and allows to install certificates from
SD card
Screen pining - if turned ON, you can use screen pinning to keep the current screen in view until you
unpin.
5.3.3. Accounts
To download applications from Google play store, you need to associate a google account with the tablet. Any
added account remains effective till it is removed. To prevent data loss, you may sync the added account data
automatically by checking "Auto-sync data" option in menu. Manual sync is also possible.
5.3.4. Language & input
The below options allows you to manage and control the language and input to your tablet.
Language - select the language to use in your tablet from the available language list.
Spell checker - if turned ON, you can select the language to be used and also you can enable the spell
checker to use entries from contact list.
Personal dictionary - you can maintain a personal dictionary by adding word using Add icon on top-
right corner.
Keyboard & input methods - allows you to select the keyboard type, and set preferences and text
correction properties.
Speech - allows you to select the voice input service and set text-to-speech conversion properties.
Mouse/trackpad - provides a scroll bar to set the pointer speed by scrolling left to right.
5.3.5. Backup & Reset
Back up my data - if you turned on, it back up app data, Wi-Fi passwords and other settings to google
servers.
Automatic restore - if turned on, when an app is reinstalled, it restores the backed up settings and data.
Factory data reset -
Google account, system and app data and settings, downloaded apps and other user data.
44
Ver 1.4
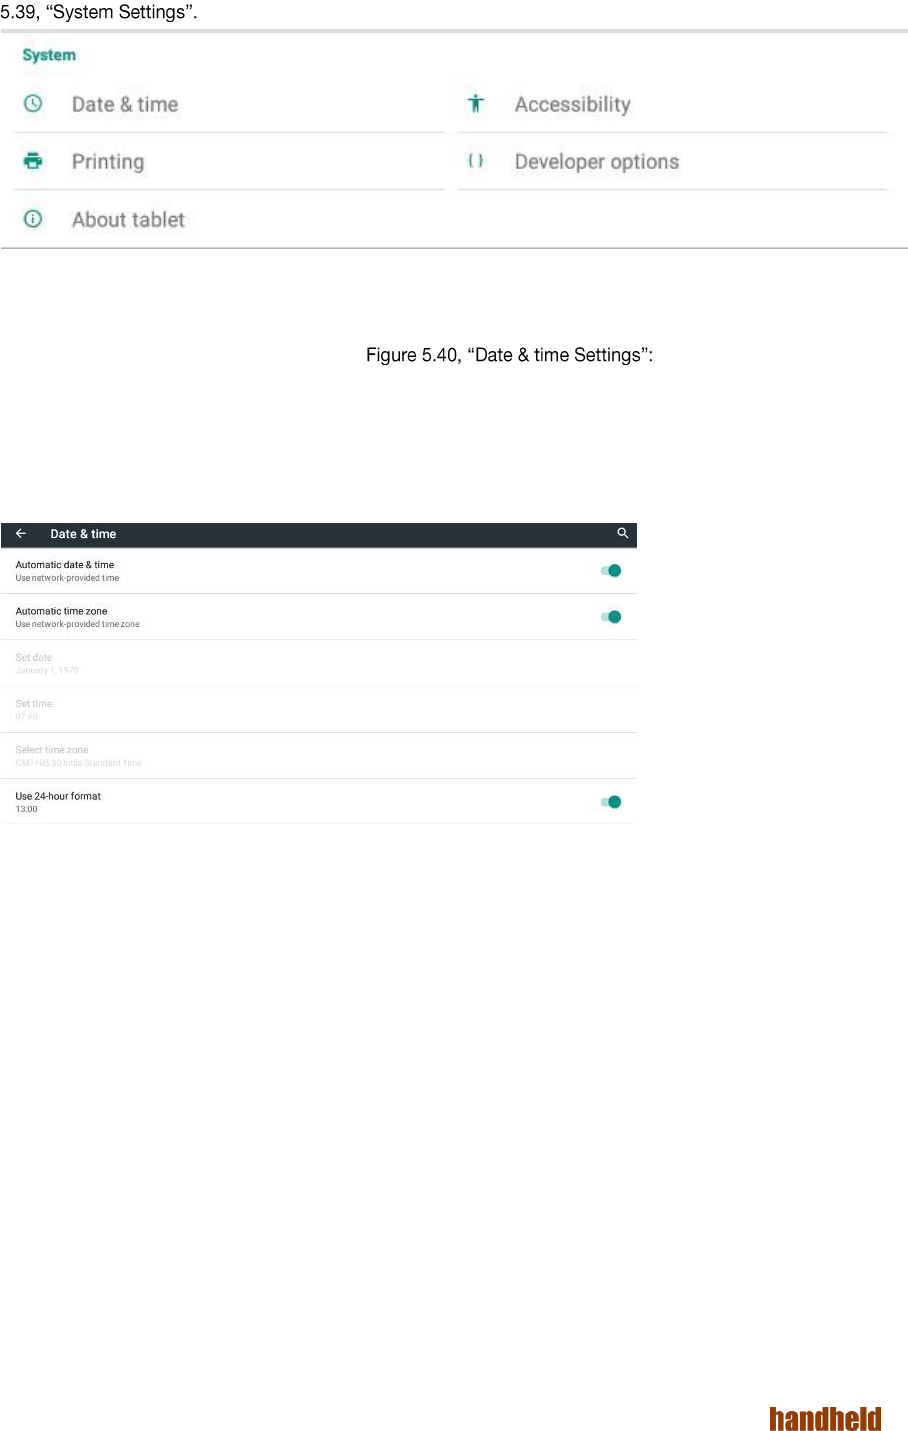
5.4. System
System settings allows you to set system properties such as date & time, accessibility etc. as shown in Figure
FIGURE 5.39. SYSTEM SETTINGS
5.4.1. Date & time
You can do following operations as shown in
Set date and time manually
Select the time zone
Enable 24-hour time format
Enable automatic date & time update
Enable automatic time zone selection
FIGURE 5.40. DATE & TIME SETTINGS
5.4.2. Printing
You can install the printer service to access it.

45
Ver 1.4
5.4.3. Accessibility
The accessibility settings allows you to do following operations:
Configure the hot keys
Set captions
Enable magnification gesture
Set large text
Set High contrast text
Enable power button ends call
Enable Auto-rotate screen
Enable speek passwords
Text to speech conversion
Set delay for touch & hold
Invert the color
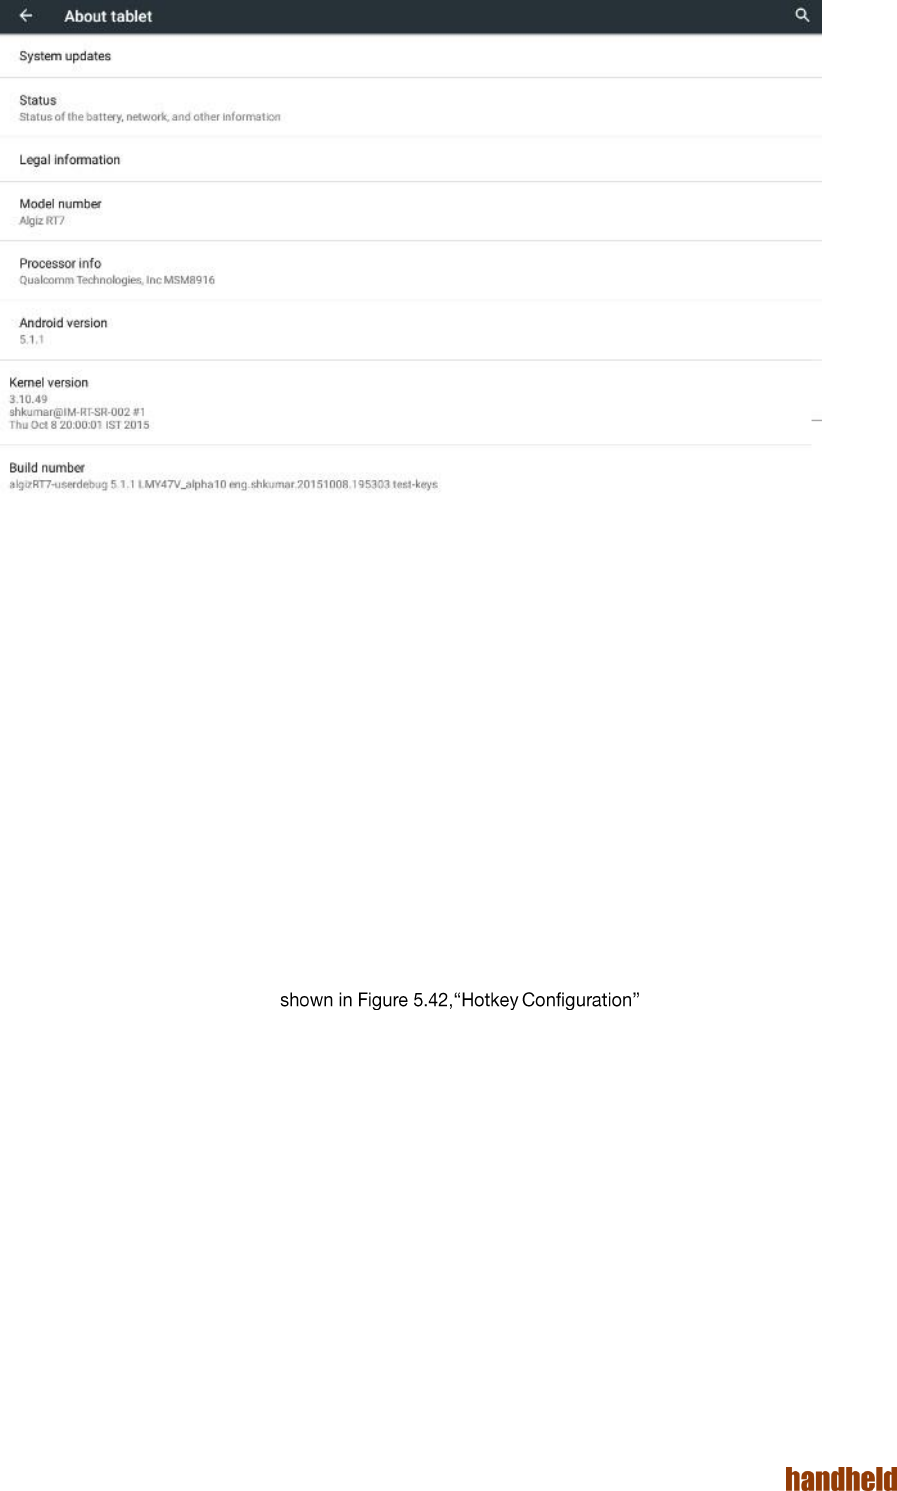
5.4.4. About tablet
You can see the following information about your tablet in this option as shown in
System updates - shows when last updated and you can check for the updates
Status - shows battery and network related information, such as charging status, remaining battery, IP
address, Wi-Fi MAC address, Bluetooth address, Unit serial number, Serial number, Up time.
Legal information - shows open source licenses, Google legal information and wallpapers providers
information
Model number
Android version
Kernel version
Build number
Software Update Level - this identifies the version of software installed on your tablet.
46
Ver 1.4
FIGURE 5.41. ABOUT TABLET
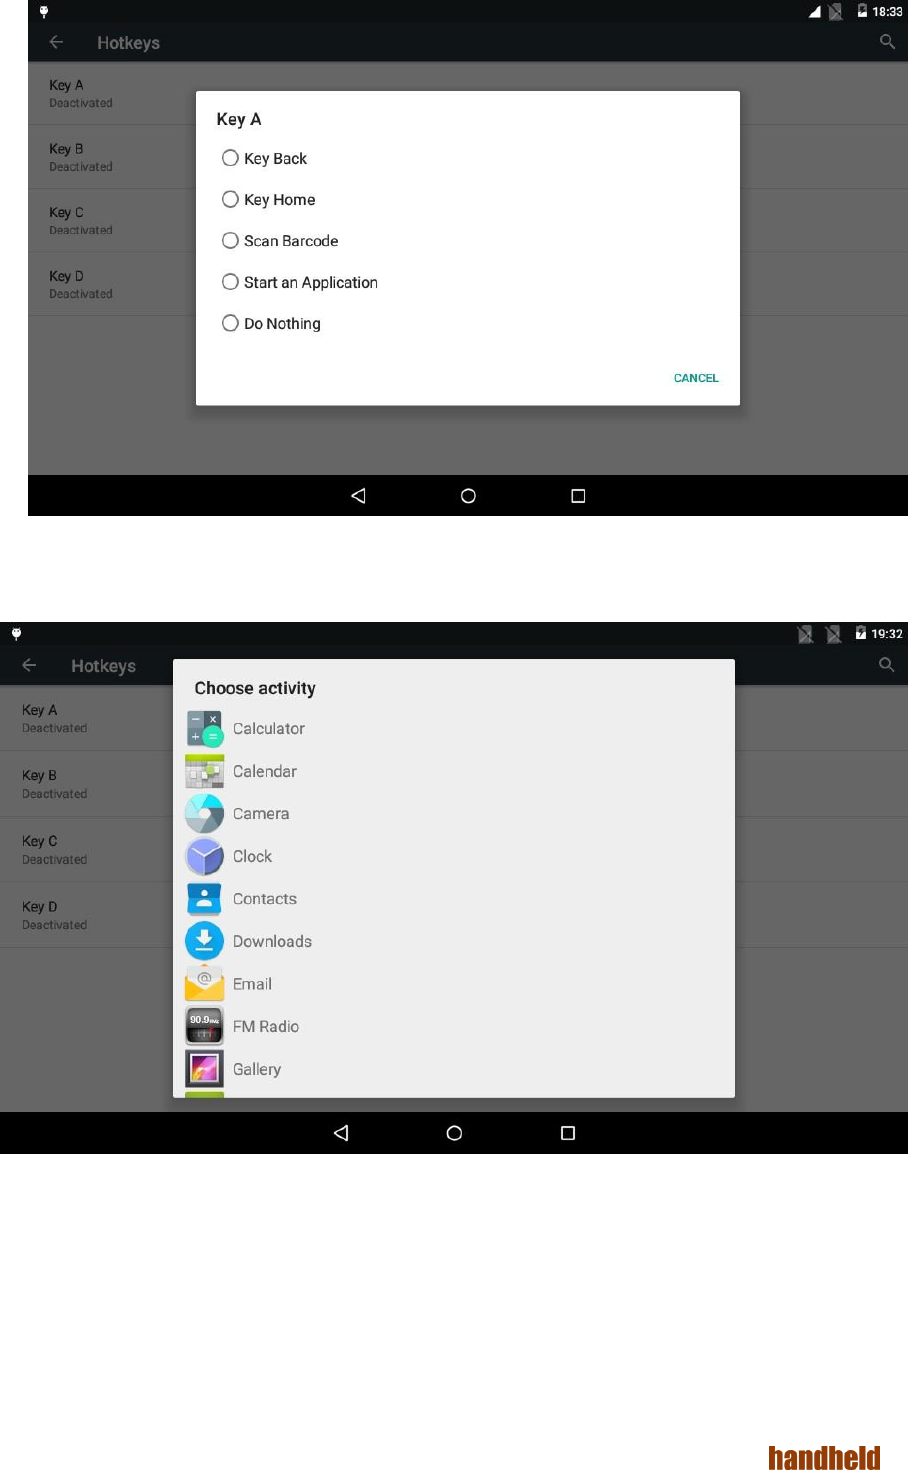
5.5. User Configurable Hotkeys
The Algiz RT7 includes four user configurable hotkeys. Each hotkey can be configured for the following
functions:
Android Back Key
Android Home Key
Scan barcode (using the barcode scanner)
Launch an Application
Deactivated
Hotkey configurations is access from the Settings application, under "Accessibility". Each of the four keys can
be configured independently, as
47
Ver 1.4
FIGURE 5.42. HOTKEY CONFIGURATION
If you select to launch an application, then another dialog will be presented, where you will need to select the
application to launch. Once selected, the change is effective immediately.
FIGURE 5.43. CHOOSE THE APPLICATION TO LAUNCH

48
Ver 1.4
5.6. Applications
Your tablet is pre-installed with several useful applications:
Calculator for simple calculations on the go.
Clock to keep a tab on time and setup alarms.
Calendar to maintain your calendar, and keep it synced online.
Camera to record up-to 8 megapixel picture, or capture 1080p videos.
Email for connecting to your email provided.
Gmail for email via your google account.
File Explorer to navigate around the storage on the device.
Keep for taking notes.
Maps for navigation.
Phone for making phone calls.
Hangouts for messaging.
Play Store to install apps from the Google Play Store
YouTube for movies
FM Radio to listen to radio. The device uses a headset connected to the 3.5mm audio socket as the
antenna, so that needs to be plugged in to use the FM radio.
Sheets, Slides, and Docs allow you to edit spreadsheets, presentations and documents, respectively
49
Ver 1.4
6. STORAGE
Storage is a place where your data, applications, media files etc are stored. This tablet comes with an internal
storage and supports external storage through SD card and USB drive.
6.1. Internal Storage
This tablet comes with 16 GB internal storage capacity, in which the operating system and built-in applications
are stored.
When you install any application by default it stores in internal storage.
If you go to Settings → Device → Storage → Internal storage it shows the details such as total space allowed,
available space and space used by different applications as show
To view the data stored under internal storage use the File Explorer app.
When you connect the tablet to computer, you can see a drive named "Internal storage".
If you click the drive, it displays different folders contains the categorized data.
6.2. SD card
This tablet supports SD card up to 32 GB.
Once SD card mounted, you can view the files in SD card using File Explorer application.
When you connect the tablet to computer, you can see a drive named "SD card". If you click the drive, it
displays different folders contains the categorized data.
You can remove the content in SD card and unmount by using options in Storage Settings shown in Figure 5.27,
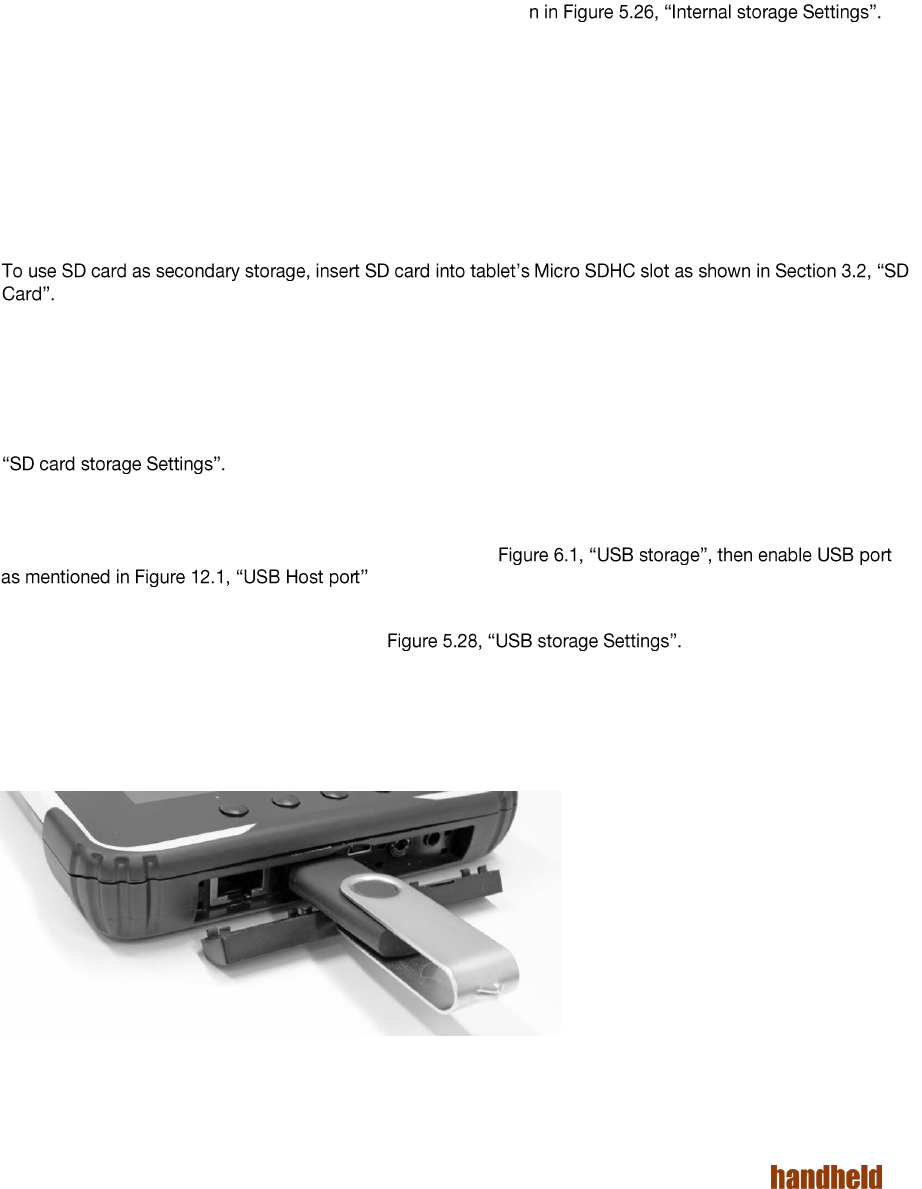
6.3. USB Storage
To use USB storage connect the device to tablet as shown in
If a USB storage device is connected, then you can see the available space, erase all data and unmount it by
using options in USB storage settings shown in
Such devices must be formatted with a single FAT partition; NTFS partitions are not supported.
Only one USB storage device may be used at any time. To prevent data loss, it is always advisable to unmount
the USB storage using "Unmount USB storage" option in Settings, prior to disconnecting it.
FIGURE 6.1. USB STORAGE

50
Ver 1.4
To view the files stored in connected USB device, use the File Explorer app.
7. INPUT
7.1. Touch Screen
The touch-screen features an anti-glare coating. Five point touch is supported.
Common gestures like pinch-zoom can be used.
7.2. USB Input devices
You can use USB keyboard or USB mouse as USB input device.
To use USB Input device follow below steps as mentioned in Chapter 12, USB.
1. Connect the device to the tablet through the USB host port.
2. Select "USB Host" option in Settings.
3. Turn ON the "Enable USB port" option.
Now, the connected input device is ready to use. If you connected a keyboard, then the on-screen soft keyboard
will get disabled automatically.
If you connected a mouse, then you will see a pointer on the screen. Moving the mouse will move the pointer.
Most applications treat the left click as a touch at the pointer location.
When you do not want to continue using connected input device, disconnect it from the tablet, and turn off the
USB host mode.
7.3. Bluetooth Input devices
Bluetooth input devices (keyboards and mice) can be used with the tablet. Pair them to the tablet, as you would
do for any Bluetooth device. The device will then be ready to use.
51
Ver 1.4
8. COMMUNICATION
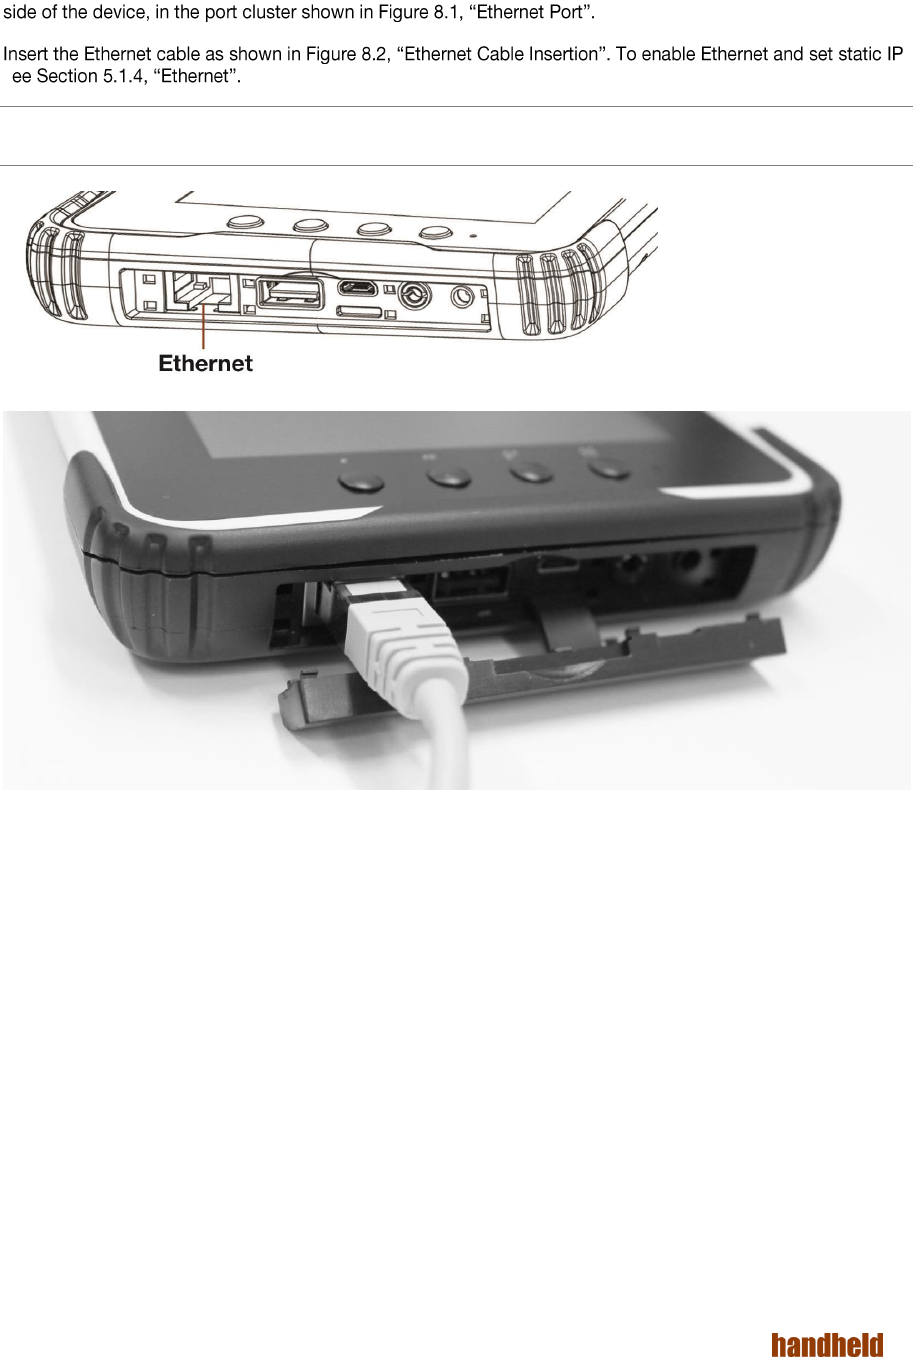
8.1. Ethernet
10/100 Ethernet port on the device allows you to connect to Ethernet. The Ethernet port is located on the right
s
It is recommended to use Ethernet cables with length less than 3 meters.
FIGURE 8.1. ETHERNET PORT
FIGURE 8.2. ETHERNET CABLE INSERTION
Once tablet is connected to Ethernet cable, the connection status is shown on the status bar:
• A white Ethernet icon means that the tablet is connected to the Ethernet network.
• A green Ethernet icon means that the Ethernet network link is UP. The device is attempting to connect to the
Ethernet network at this time.
• A red Ethernet icon means that Ethernet is enabled, but the Ethernet network link is down. To achieve a
connection, you need to ensure that both ends of the Ethernet cable are properly connected to the respective
ports.

52
Ver 1.4
8.2. Wireless Communication
8.2.1. Bluetooth
This tablet supports Bluetooth communication 10m and 100m. To do Bluetooth communication with other
device, you need to pair it with this tablet (
53
Ver 1.4
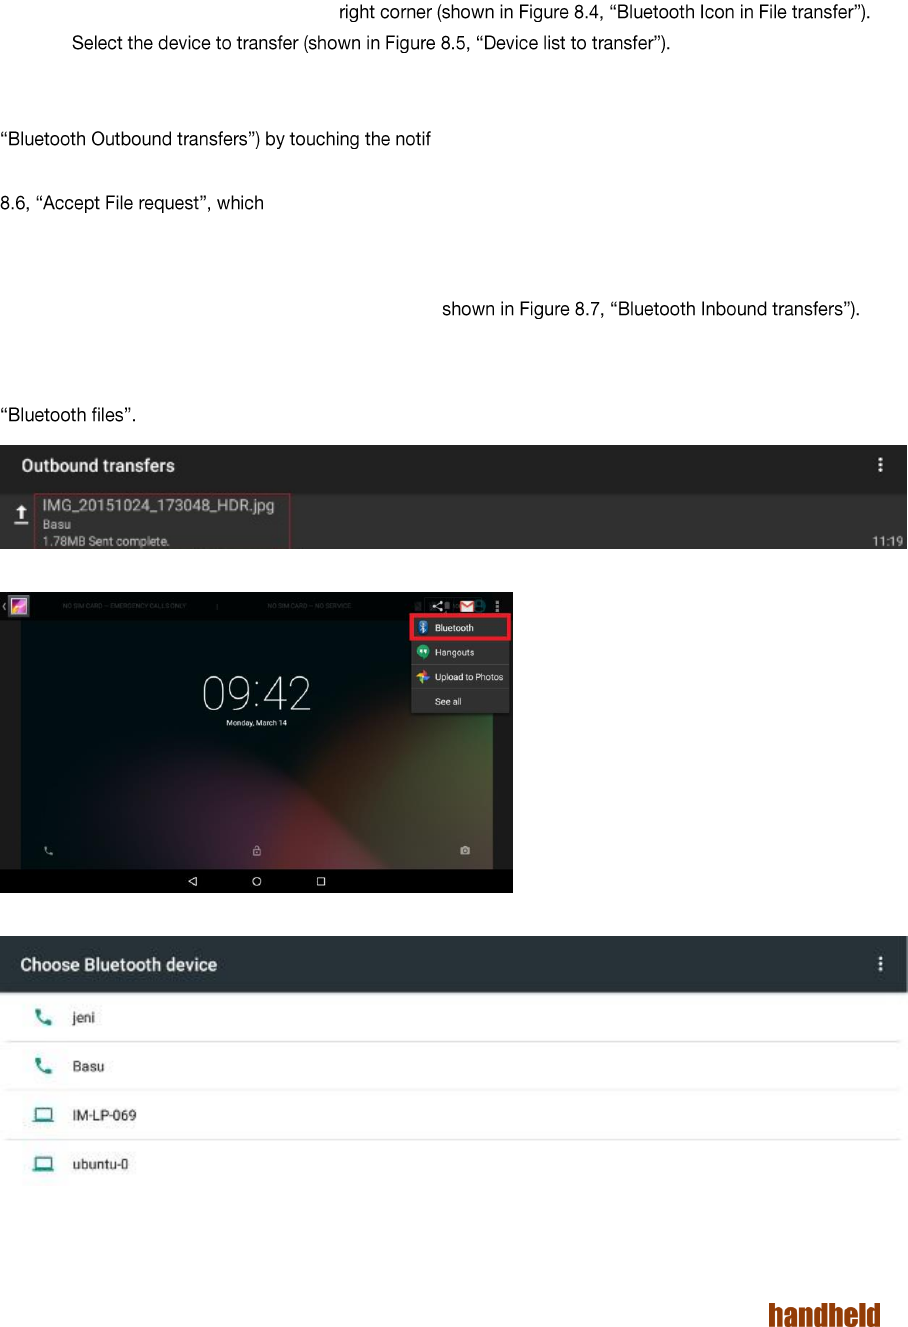
Bluetooth file transfer
To transfer a file to paired device using Bluetooth:
1. Turn ON Bluetooth.
2. Select the file to transfer.
3. Touch the Bluetooth icon on top-
4.
Once the connection is successful, it starts transferring the file. You can see the file sending notification on
screen. If the file transfer is successful, you can see the file listed under outbound transfers (shown in Figure 8.3,
ication.
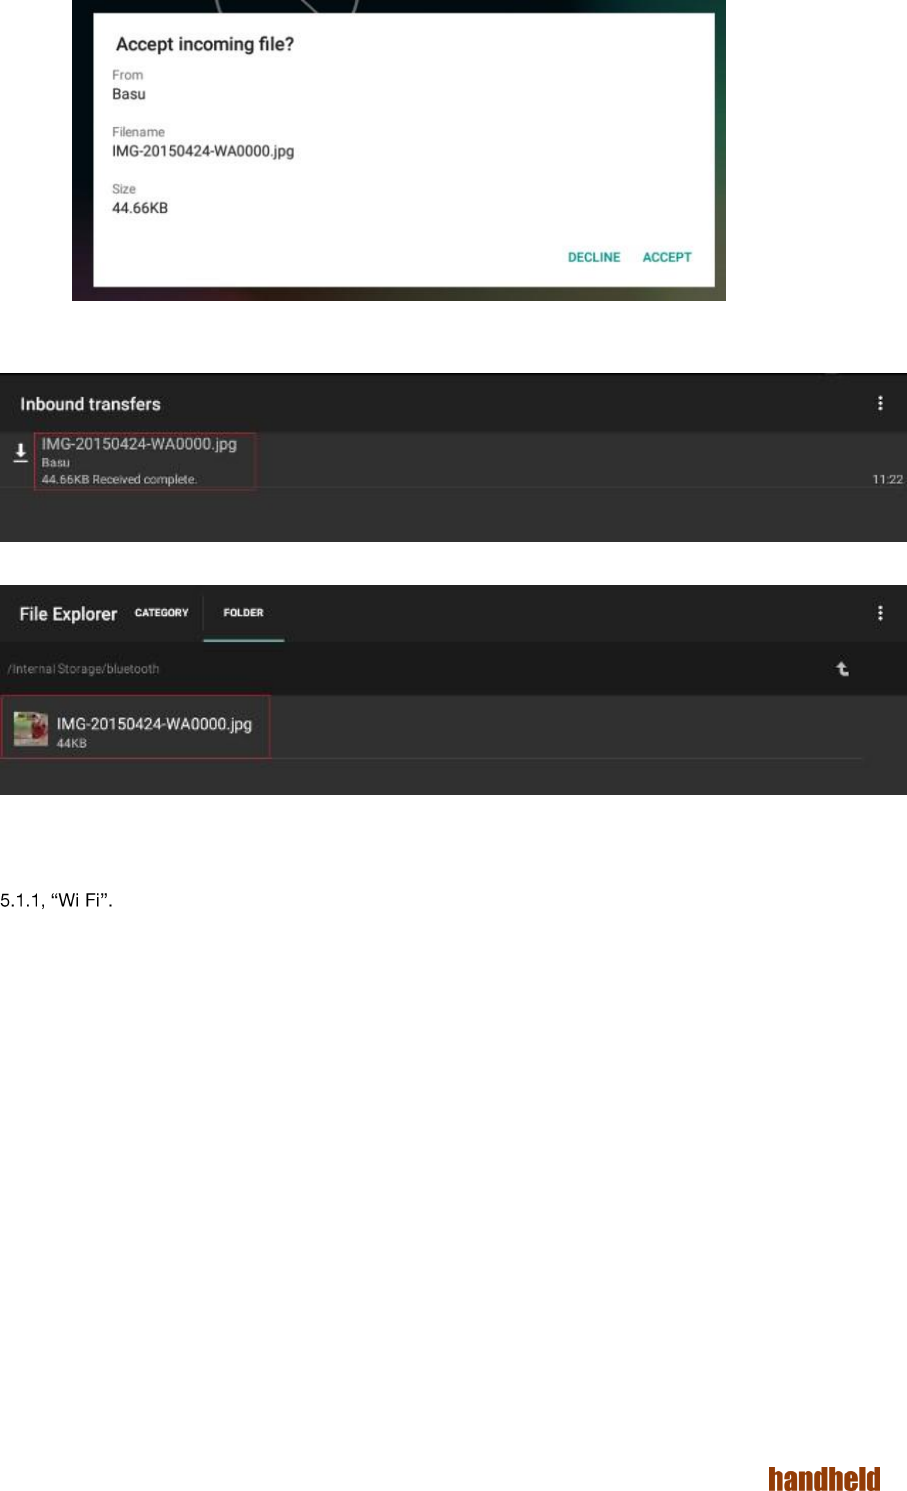
When there is an incoming file from paired Bluetooth device, the tablet pops up a message as shown in Figure
shows the details such as sending device name, file name and size. You can
either accept or decline the incoming file.
Touch "ACCEPT" on Accept incoming file message, to receive the file.
The received file will be listed under inbound transfers (
Received file stores in internal storage Bluetooth folder.
You can use File Explorer application to see all files received from Bluetooth devices as shown in Figure 8.8,
FIGURE 8.3. BLUETOOTH OUTBOUND TRANSFERS
FIGURE 8.4. BLUETOOTH ICON IN FILE TRANSFER
FIGURE 8.5. DEVICE LIST TO TRANSFER
54
Ver 1.4
FIGURE 8.6. ACCEPT FILE REQUEST
FIGURE 8.7. BLUETOOTH INBOUND TRANSFERS
FIGURE 8.8. BLUETOOTH FILES
8.2.2. Wi-Fi
This tablet supports Wi-Fi 802.11 b/g/n. To use any available Wi-Fi network, setup Wi-Fi as shown in Section
-
Sometimes, you may want to know the MAC address of the Wi-Fi interface. This is available from Settings →
About Tablet → Status → Wi-Fi MAC address
55
Ver 1.4
9. LOCATION
9.1. Internal GPS
The device uses the Qualcomm iZat GPS by default. The currently enabled GPS can be checked, using the
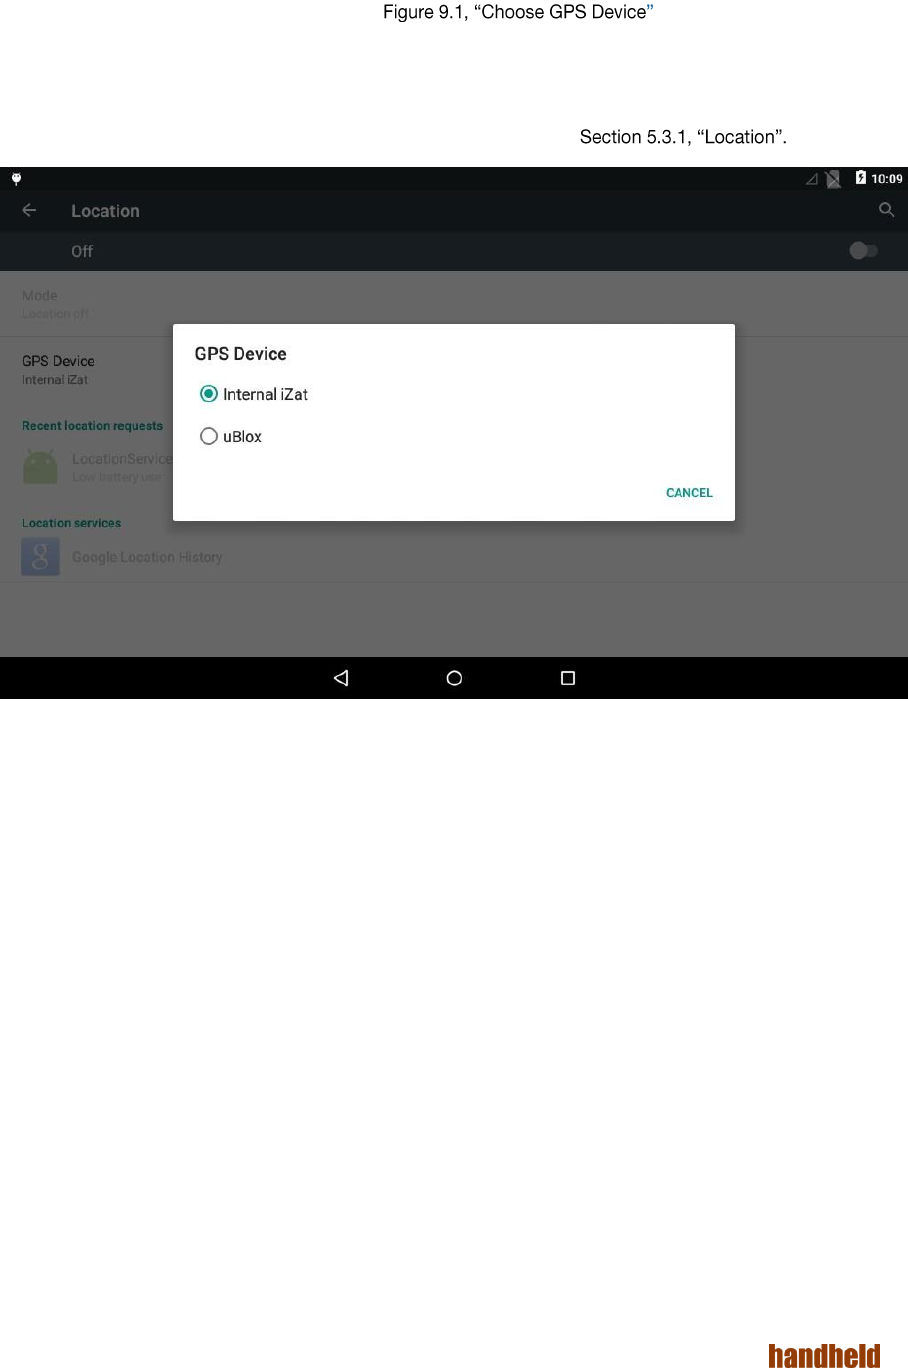
"GPS Device" option under Settings | Location. shows the currently enabled
GPS module.
9.2. u-Blox GPS Module
The u-Blox GPS module can be enabled when needed, as mentioned in
FIGURE 9.1. CHOOSE GPS DEV
56
Ver 1.4
10. RFID
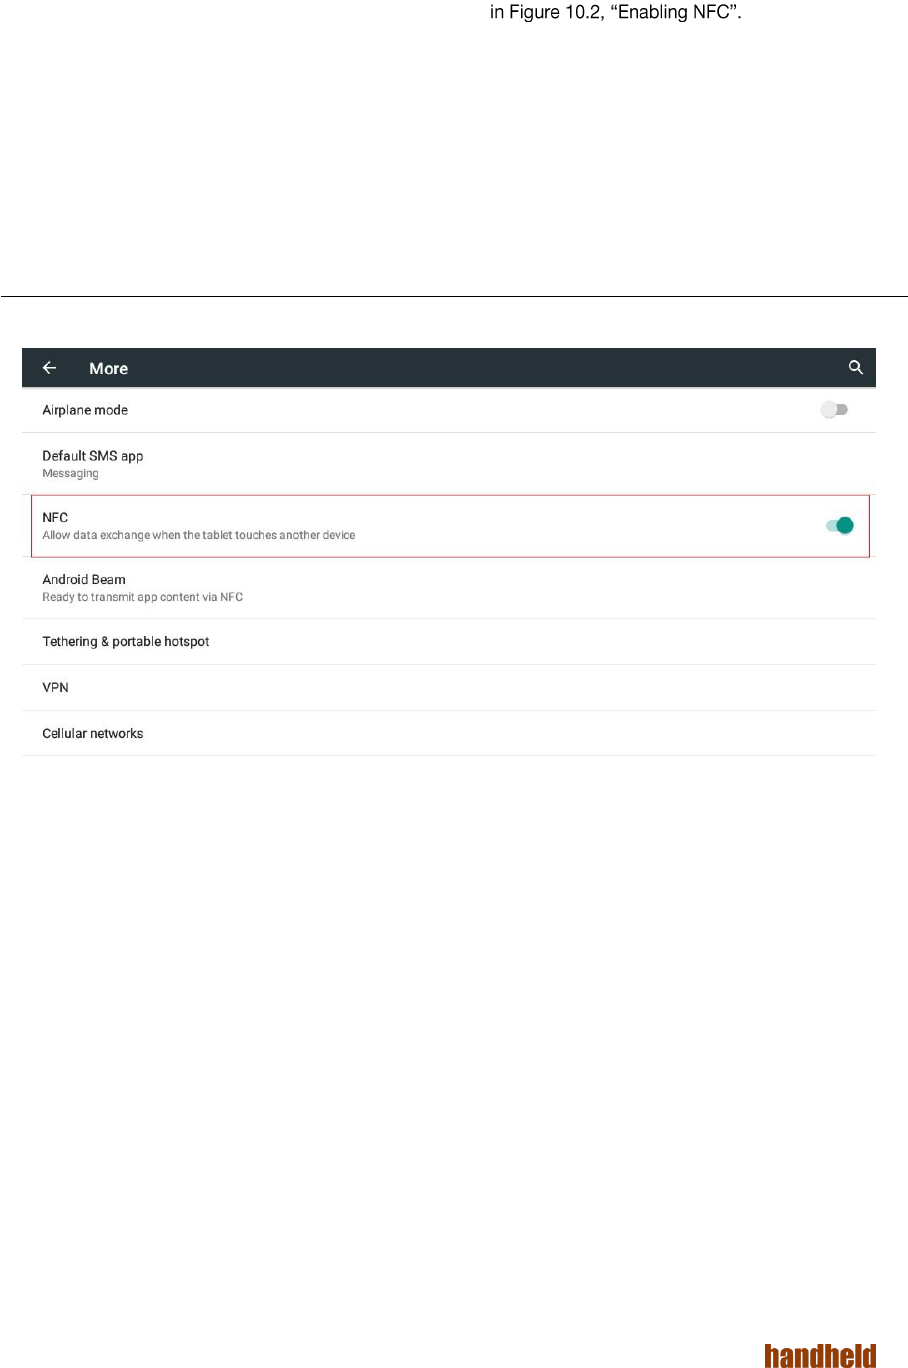
10.1. NFC
You can use NFC (Near Field Communication) to exchange data when your tablet touches another device.
Enable NFC option in Wireless & networks settings as shown
To exchange data using NFC:
Turn ON NFC and Android beam on both devices.
Go to screen which contains information to exchange.
Move your tablet towards back of other device.
One a connection is established, you will hear a sound.
Touch screen to transfer the data.
FIGURE 10.1. ENABLING NFC
57
Ver 1.4
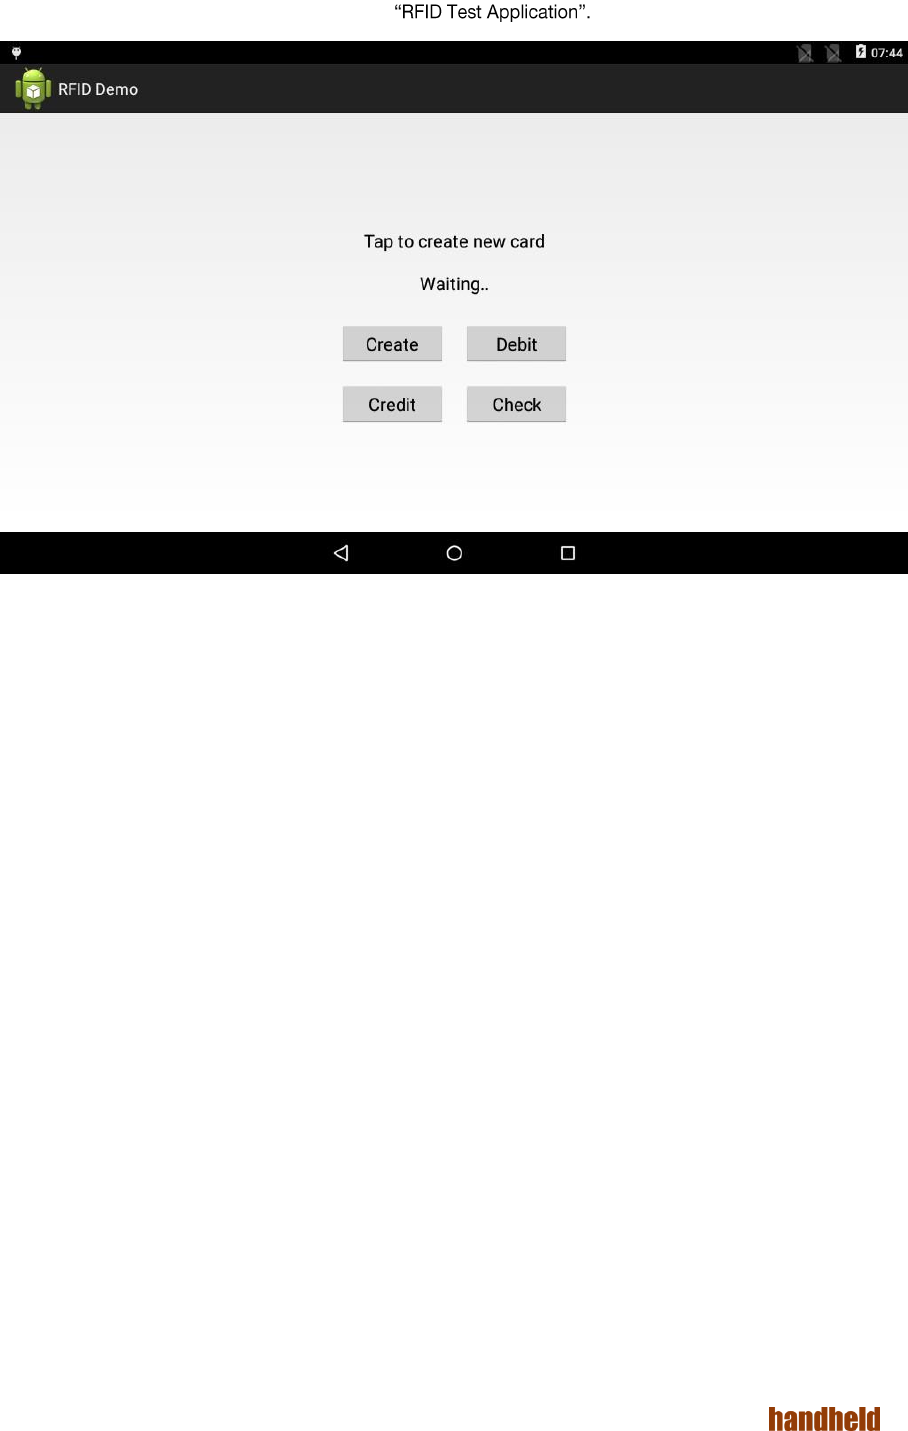
10.2. Arcontia RFID Module (eTicket version only)
The eTicket version of Algiz RT7 is equipped with an Arcontia RFID reader. This can be tested using the included
"RFID test" application, as shown in Figure 10.2.
FIGURE 10.2. RFID TEST APPLICATION

58
Ver 1.4
11. BARCODE SCANNER
If any of the hotkeys is mapped to scan a barcode, then the barcode scanner can be activated on a touch of that
hotkey.
The red LED aimer turns ON shortly after the hotkey is pressed. The user needs to keep the hotkey pressed for
the duration of the scanning. The scanning remains active till a barcode is found, or the user releases the hotkey,
or ten seconds have elapsed (i.e. timeout), whichever is earlier. Scanning is kept active for a minimum of two
seconds, even if the user releases the hotkey in that time. This allows quick scanning of barcodes by a quick
push of the hotkey.
If the scan is successful, then the scanned barcode is sent as text to the running application. To properly
capture the barcode, it is recommended that the user selects a text control prior to scanning a barcode.
The barcode scanner supports a variety of symbologies: 1D, 2D and Postal codes. User may restrict the barcode
A test application "Barcode Decoder" for the barcode scanner is also installed on the device. This directly
supports decoding barcodes. The symbologies to decode is configurable via Settings provided in the application
itself. Note that the settings of this application are independent of the system defined settings.
59
Ver 1.0
12. USB
A dedicated A-type USB host port is available on the device. The following types of USB devices may be
connected to it
USB storage devices like disk drives & pen drives.
USB keyboard or USB mouse.
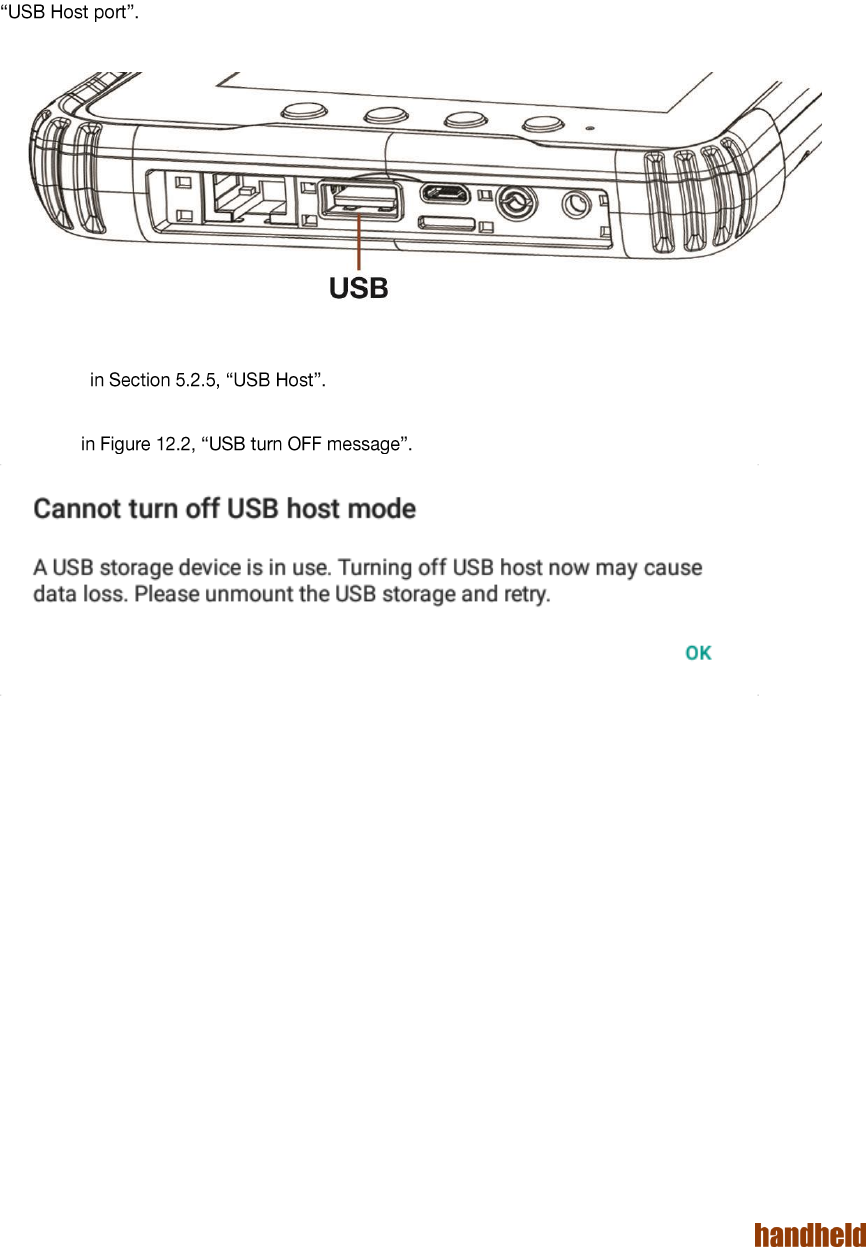
The user need to connect the USB peripherals through USB host port in right side panel shown in Figure 12.1,
FIGURE 12.1. USB HOST PORT
Once USB peripheral is connected, the user needs to enable the USB host mode to use USB peripherals as
mentioned
While using the USB device you cannot turn OFF USB mode. If you try to turn OFF device will pop up a message
as shown
FIGURE 12.2. USB TURN OFF MESSAGE
It is also possible to connect a second USB device to the OTG port using a host type cable. When this is done,
the connected device will get power immediately. However, it will not be usable unless the USB host mode is
enabled from settings.
When Ethernet is enabled, then the connect USB devices will get power. However, the USB devices will not
work unless the USB host mode is enable