Handheld Group 1824V1 Intel Dual Band Wireless-AC 3165 User Manual 3165NGW Host rev3
Handheld Group AB Intel Dual Band Wireless-AC 3165 3165NGW Host rev3
Contents
- 1. (3165NGW) User Manual
- 2. 3165NGW_Host user Manual_rev3
3165NGW_Host user Manual_rev3

ALGIZ 8X User Manual
ALGIZ 8X
User’s Manual V1.0

ALGIZ 8X User Manual
Copyright Notice
Copyright © 2012 Handheld Inc., ALL RIGHTS RESERVED. No part of this
document may be reproduced, copied, translated, or transmitted in any form or by
any electronic or mechanical means, for any purposes without the permission of the
original manufacturer in advance.
Trademark Acknowledgement
Brand and product name are trademarks or registered trademarks of their
respective owners.
Disclaimer
Handheld Inc. reserves the right to make any product changes without notice,
including circuits and/or software described or contained in this manual in order to
improve product design and/or performance. Handheld Inc. assumes no
responsibility or liability for the use of the described product(s), conveys no license
or title under any patent, copyright, or masks work rights to these products, and
makes no representations or warranties that these products are free from patent,
copyright, or mask work right infringement, unless otherwise specified. Applications
that are described in this manual are for illustration purposes only. Handheld Inc.
makes no representation or warranty that such application will be suitable for the
specified use without further testing or modification.
Warranty
Handheld Inc. guarantees that all Handheld products will be free including
material and workmanship defects for one year from the invoice date. If the customer
discovers any defects, Handheld will, at its option, repair or replace the defective
product without any charge to customers, and ship the returned product with prepaid
transportation charges during the warranty time of one year. The returned product
must be properly packaged in its original packaging to be qualified for warranty service.
If there is a time gap of over 30 days between the date marked on the serial
number and the shipping date, the one-year warranty time will then activate from the
shipping date. The third and fourth digits of the serial numbers stand for the

ALGIZ 8X
User’s Manual
manufacturing year and the fifth digit stands for the manufacturing month (e. g., with
A for October, B for November and C for December). For example, the serial number
1W10Axxxxxxxx means October of year 2010.

ALGIZ 8X User Manual
Customer Service
We provide service guide for any problem as follow steps:
1. Visit Handheld website www.handheldgroup.comto get the updated product
information.
2. Contact with your distributor, sales representative, or our customer service
center for technical support if you need further assistance. You may have the
following information ready before you make the phone call:
Product serial number
Peripheral attachments
Software (OS, version, application software, etc.)
Detailed description of problems
The exact wording or print screen images of any error messages
In addition, free technical support is available at Handheld in every business day.
We are always ready to provide guidance in terms of application requirements or
specific information in terms of installation and operation of all our products. Please
feel free to call or e-mail us.
Manufacturer:Handheld Inc.
Address:Handheld GroupAB, Kinnegatan 17 A, S-531 33, Linkoping, Sweden
TEL:+46 (0) 510-54 71 70
FAX:+46 (0) 510-282 05

ALGIZ 8X User Manual
Safety Precautions
Warning!
Always completely disconnect the power cord from the
device before you uncover the device and work on the hardware.
Do not connect the electronic device with power socket while the
power is on. Sensitive electronic components can be damaged by
sudden power surges. Only experienced electronics personnel are
suggested to open mechanical housing.
Caution!
Always ground yourself to remove any static charge before
touching the CPU card. The electronic devices are very sensitive
to static electricity. For safety concerns, please use a grounding
wrist strap all the time. Place all electronic components in a static-
dissipative surface or static-shielded bag when they are outside
of the chassis.
UL Safety Announcement
UL Classification: Class I mark: with respect to electronic shock; Fire and
hazardous material only in accordance with the regulation of UL-60950
and CAN/CSA C22.2 No. 601.1.
Power Supply Announcement
The Handheld Rugged Tablet PC Power is supplied by Power Adapter and Battery
Pack, the power rating announcement and manufacturer information are listed as
below.
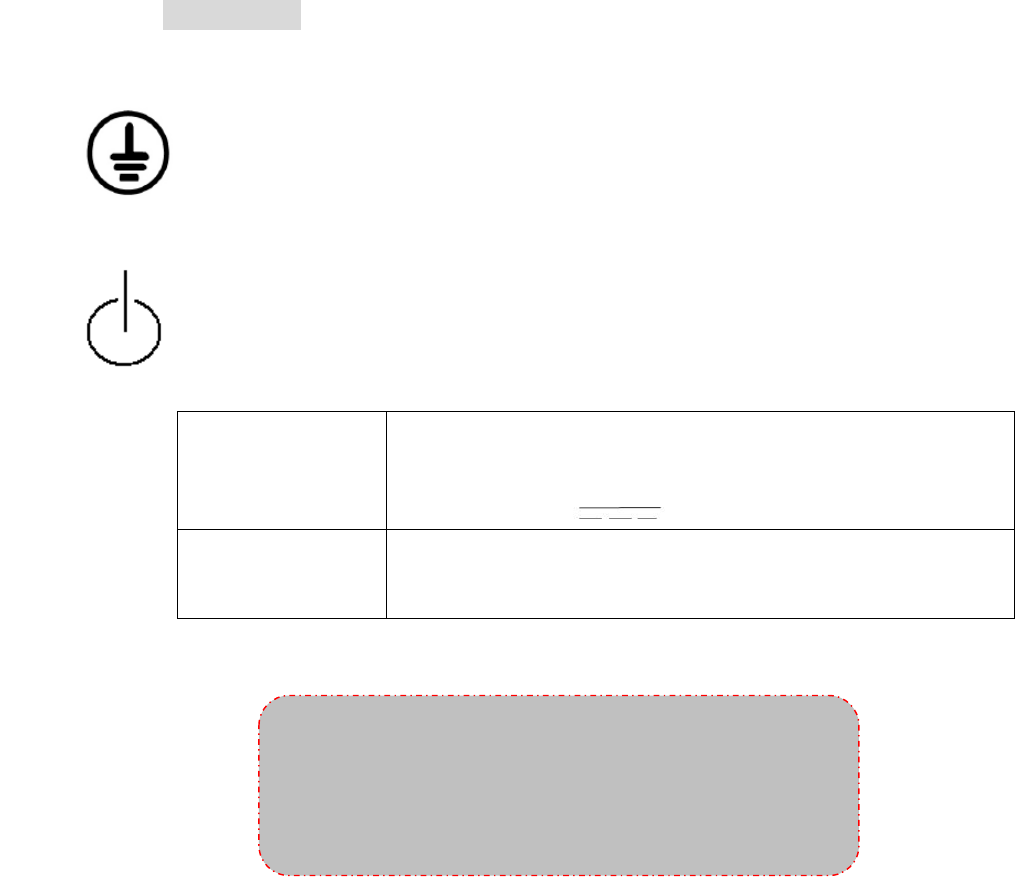
ALGIZ 8X User’s Manual
Power Notice!
Please notice that the power code of adapter needs to be connected to the ground (earth).
Please push the power button for at least 4 seconds to enter sleep mode.
Starting and Stopping the Tablet PC).
Power Adapter
Manufacture: EDAC Power Electronics Co Ltd
Model: EA10633B(01)Level IV
Input Rated: 100-240Vac, 2.0A, 50-60Hz.
Output Rated: DC 19V, 3.42A.
Battery Pack
Manufacture :JHT Electronic Co., Ltd
Model: ALG8X-08A
Rated: 5200mAh DC 7.6V
WARNING
Do not fix or replace battery, it may cause explosion!
Only use with specified battery by following the
manufacturer’s user manual’s instruction.

ALGIZ 8X User’s Manual
Chapter 1
Read Me First

ALGIZ 8X User’s Manual
1. Safety Information
Follow and adhere to all warnings and instructions in this manual. For your safety, please read all
safety and operating instructions before using the product. Keep this manual for future
reference.
Precaution on Battery Pack
1. Do not expose the battery pack to excessive heat, or extreme heat (Near fire, in direct sunlight for
example) generation of heat, ignition or rupture may result
2. Do not disassemble, modify, or insert sharp objects into the battery pack. Electrolyte leakage,
generation of heat, ignition or rupture may result.
3. Do not short the Positive (+) and Negative (-) terminals of the battery. Generation of heat, ignition or
rupture may result. When carrying or storing the device, do not place the battery pack together with
articles that may contact electricity.
4. Do not apply shocks to the battery by dropping it or applying strong pressure to It. Electrolyte leakage,
generation of heat, ignition or rupture of battery may occur.
5. Do not charge the battery other than methods those spec using one of the specified methods,
electrolyte leakage.
6. When the battery pack has deteriorated, replace it with a new battery. Continued use of a damaged
battery pack may result in heat generation, ignition or battery rupture.
7. Do not use the battery pack with any other products. The battery pack is rechargeable and is only
designed for this specific product. If it is used with a product generation of heat, ignition or rupture
may result.
8. Do not use this product with battery other than the On
9. Risk of explosion if battery is replaced by an incorrect type. Dispose of Used Batteries According to the
Instructions.

ALGIZ 8X User’s Manual
General Product Safety
1. This product should not be used near water such as bathtubs, sinks, swimming pools, wet basement,
etc.
2. Do not block any ventilation openings. Do not place the product against a wall or in an enclosed space
as doing so might impede the flow of cooling air.
3. Do not place the product near any heat sources such as radiators, warm air intakes, stoves or other
heat-generating devices (including amplifiers or other heat
4. Do not disregard the safety that a polarized or grounded connection can provide. A polarized
connection consists of two plugs, one of which is larger than the other. A grounded connection has
two blades and a third one that is grounded. If the main plug provided cannot be inserted into your
outlet, consult an electrician to replace your obsolete outlet.
5. Protect the power cord from being crushed or pinched, particularly in the area of the plugs, any
receptacles used, and the point of exit from the apparatus. Do not break off the ground pin of the
power cord.
6. Use only accessories specified. by the manufacturer
7. Use only with its transport carriage, stand, tripod, c product. When using a carriage, move the carriage
assembly with the product carefully to avoid damage from falling over.
8. Unplug this apparatus during lightning storms or when it is not being used for long periods.
9. Refer all servicing to qualified service personnel. A been damaged in any way, for example if the power
cord have fallen inside the unit, if the product has been exposed to rain or moisture, if it does not
operate normally or if it has been dropped.

ALGIZ 8X User’s Manual
2. Handling and Maintenance
Follow and adhere to all warnings and instructions in this manual. For you’rethelongevity of the product
usage, pleaseread all operating instructions before usingthe product. Keep this manual for future
reference.
General Guideline
1. Keep the product at least 13 cm (5 inches) away from electrical appliances that can generate a strong
magnetic field such as TV, refrigerator, motoror a large audiospeaker.
2. Do not place heavy objects on top of the tablet computer as this may damage the display.
3. The screen surface can be easily scratched. Use with care. Do not use paper towels to clean the display
but use the included cleaning cloth. Avoid touching it with a pen or pencil.
4. To maximize the life of the backlight in the display, allow backlight to automatically turn off as a result
of power management. Avoid using a screen saver or other software that prevents the power
management from working.
Cleaning Guideline
1. Use a soft cloth moistened with water or a non-alkaline detergent to wipe the exterior of the product.
2. Gently wipe the display with a soft, lint-free cloth. Do not use alcohol or detergent on the product.
Touchscreen Guideline
1. Use your finger or the stylus on the display.Using sharp or metallic object may causescratches and
damage the display, therebycausing errors.
2. Use a soft cloth to remove dirt on the display. The touchscreen surface has a special protective coating
that prevents dirt from sticking to it. Not using a soft cloth may cause damage to the special protective
coating on the touchscreen surface. To clean off hard to remove dirt, blow some steam on the
particular area and gently wipe away using a soft cloth.
3. Do not use excessive force on the display. Avoid placing objects on top of the display as this may cause
the glass to break.
4. When there is a noticeable discrepancy in the operation of the touchscreen function (your touch does
not correlate to the proper location on the screen), recalibrate the touchscreen display.
ALGIZ 8X User’s Manual
Chapter 2
Getting Started

ALGIZ 8X User’s Manual
Thank you for purchasing ALGIZ 8X rugged Tablet Computer. The rugged design allows you to use it in
harsh outdoor environments.
This chapter tells you step by step how to get the Tablet Computer up and running. You will find
instructions for the following procedures:
System Specification
Unpacking
Description of Parts
First Time Operations
Powering On/Off
1. System Specification
System
Processor
Intel® Pentium® Processor N3710
(2M Cache, up to 2.56 GHz)
BIOS
AMI System BIOS
Memory
1 x SODIMM, DDR3L 16004GB
Storage
SATA III 6Gb/s M.2 SSD 128GB
Audio
Digital Microphone with noise canceling (Internal)
1.5W Speaker (Internal)
Display Specification
Size
8” (16:10)
Resolution
800 x 1280
Brightness
700 cd/m2 (typ.)
Touch
Projected Capacitive Touch.Support Normal Mode,
Rain Mode, Gloves Mode.
I/O Connectors
Right Side
2x USB 3.0 , 1xMicro HDMI ,4 different types of inter-
changeable I/O Port(Dummy--Deafault,LAN,COM,2D Barcode,

ALGIZ 8X User’s Manual
Bottom Side
1x Pogo-pin for Docking, 1x DC Power Jack
Rear Side
1x Pogo-pin for Expansion I/O Port
Buttons and Indicators
Control Button
1 x Power (Front)
1 x Touch Lock Key,1 x Menu Key, 1x Home Key,
2 programmable Function Keys
LED indicators
1 x Power LED (Green)
1 x Storage(Green)
1 x Battery (Green & Red)
1 x Configuration (It should be off unless configured by the
user.)
ALGIZ 8X User’s Manual
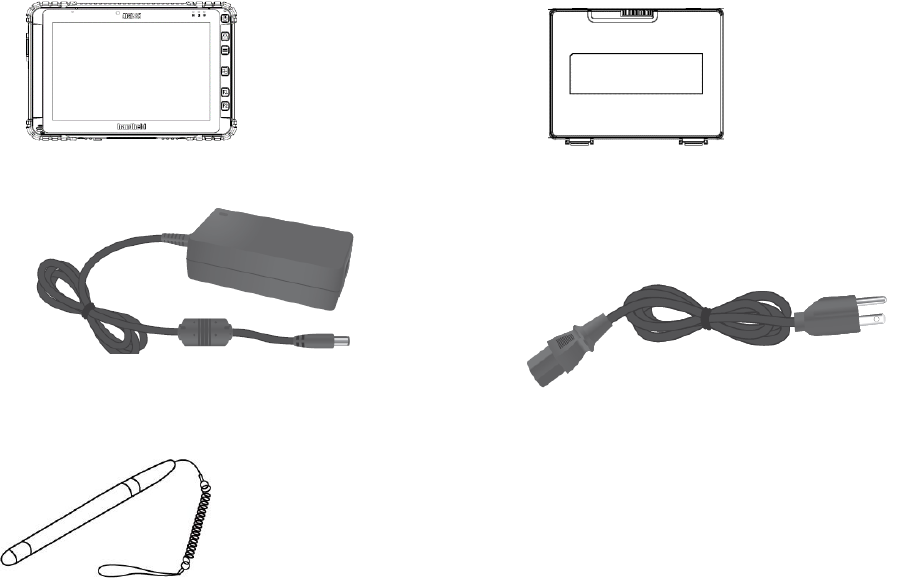
2. Unpacking
Check and identify the supplied accessories:
Tablet Computer
Standard Battery
Power Adapter
Power Cord and Plugs
Capacitive Touch Stylus(Optional)
ALGIZ 8X User’s Manual
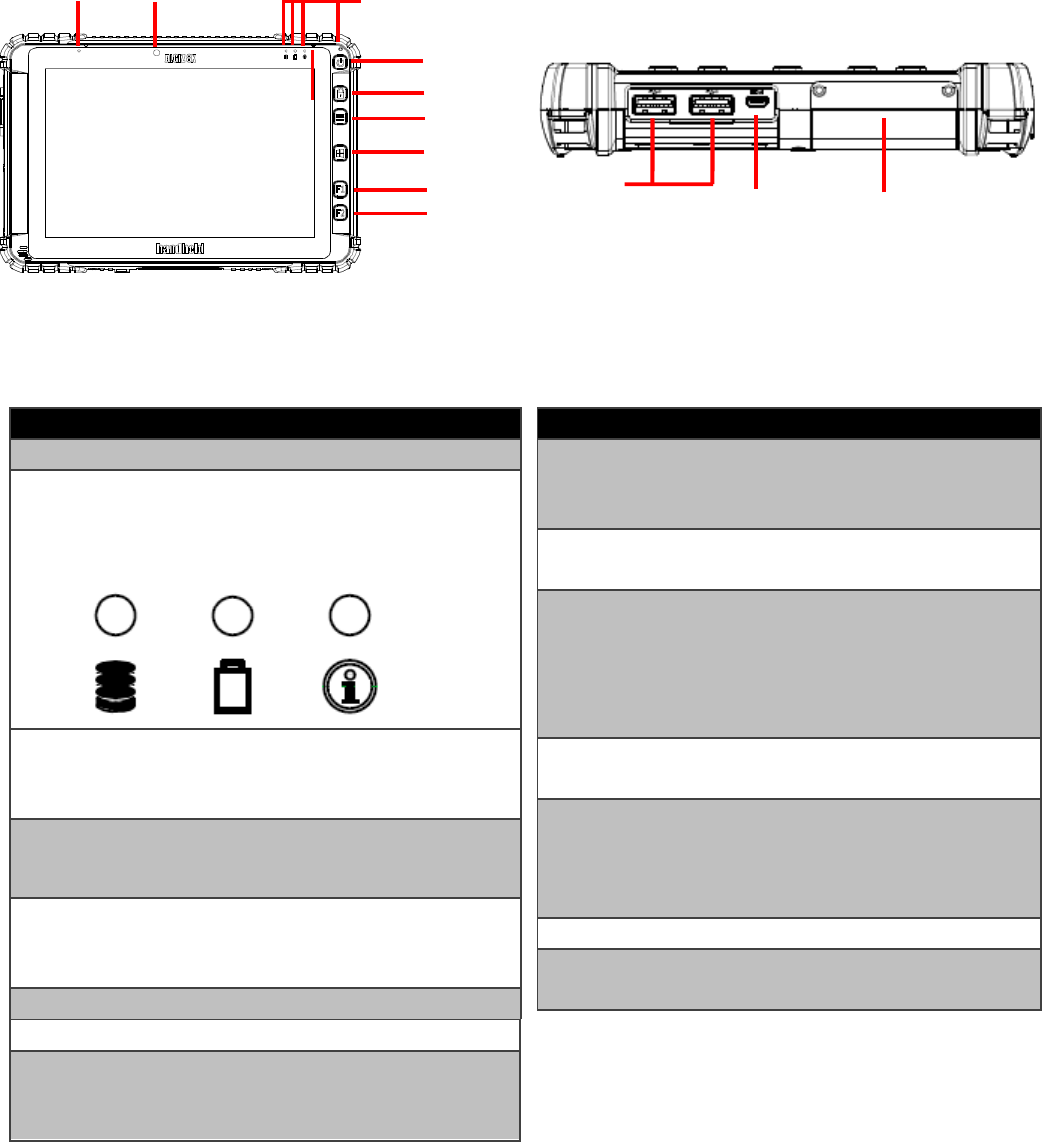
3. Description Of Parts
Front:
Left:
No
Item
Description
1
Front Camera
2 Megapixel Webcam
2
LED Indicators:
Show the current status
of the Tablet Computer
Front LED Indicators Detail:
3
Touch Screen
Display and act as one of
the inputs for the Tablet
Computer
4
Power Button
Power on/off tablet
5
Touch Lock
All function keys and
touch will not be able to
work.
6
Menu Button
Hottab Quick Access
7
Home Button
Windows Start Menu
8.
F1 Button
Programmable function
key configured by Hottab
Utility
No
Item
Description
8
F2 Button
Programmable function
key configured by Hottab
Utility
9
Digital
Microphone
With noise canceling
function.
10
USB 3.0
High speed USB port
connects to USB devices,
such as USB flash drive,
mouse, keyboard,
printer, etc.
11
Micro HDMI
HDMI output to external
display
12
Changeable
I/O Port
Adapter port for
LAN/RS232/2D Barcode
Reader. Default is
dummy.
13
Power Jack
DC-IN power input jack
14
MicroSD Card
Reader
Memory card reader port
for MicroSD Card
○
1
○
2
○
3
○
3
○
4
○
5
○
6
○
7
○
8
○
9
○
9
○
10
○
11
○
12
ALGIZ 8X User’s Manual
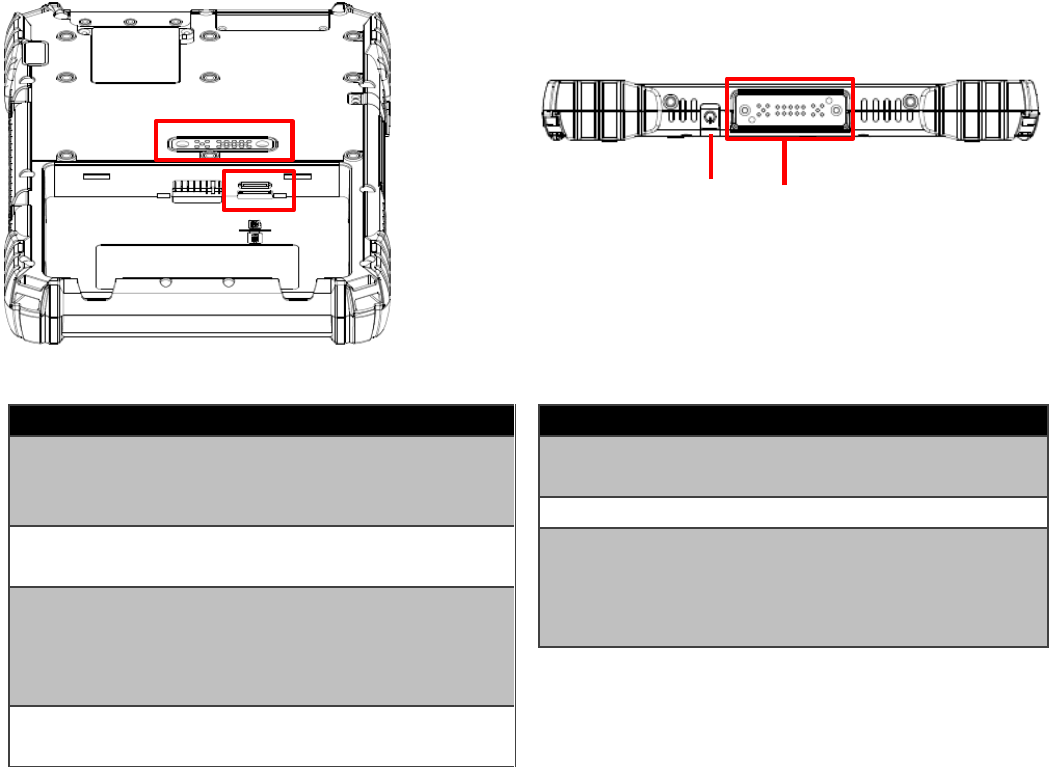
Rear:
Bottom:
No
Item
Description
13
Rear Camera
8MP Autofocus Camera.
Captures photos and
videos.
14
Service
Windows
15
Expansion Port
Provide optional
connectivity to custom
modules for special
application (Lima,Hotel).
16
Main Battery
Slot
For Main Battery pack.
No
Item
Description
17
MicroSD Card
Port
Memory card card reader
port
18
Power Jack
DC-IN power input jack
19
Docking
Connector
Port to docking solutions
such as vehicle docking to
provide power and
external antenna
○
15
○
16
○
18
○
19
○
13
○
14
○
15
○
16
○
17
ALGIZ 8X User’s Manual
4. HotKey For Specific Functions
For the physical buttons on the ALGIZ 8X tablet computer, in addition to their dedicated functions
detailed in the previous section, they can also be used to emulate commonly used keyboard key strokes.
Under different scenario, a single physical button or acombination of physical buttons provide different
keyboard key strokes, which are specified below:
Under POST (before Windows boots up):
Buttons
Keystroke
Menu
F7 to enter BIOS
setup screen
F1
Recovery Menu
F2
ESC
Menu + F1
Enter
Under Windows:
Buttons
Keystroke
Power
Power ON/ OFF
Touch Lock
All function keys and
touch will not be able
to work.
Menu
Hottab Quick Access
Home
Normal start menu
Quick Access
F1
Default: Web Browser
F2
Default: Windows 10
Action Center
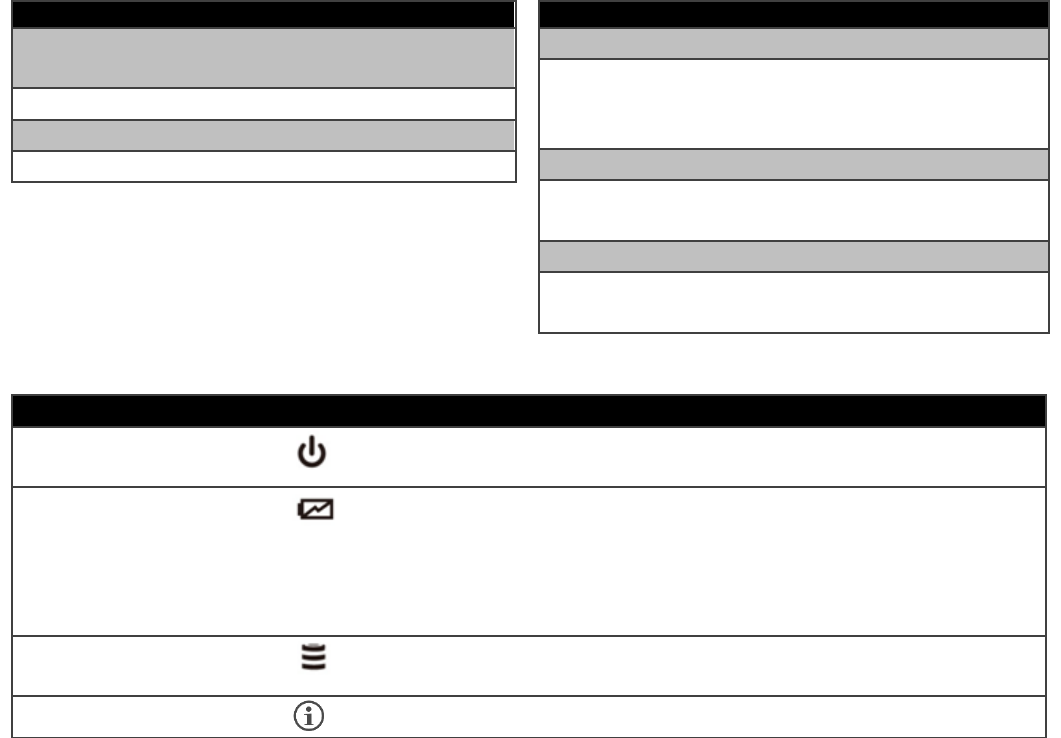
LED Indicators:
Item
Description
Power Indicator
Green– Tablet is ON
No light – Tablet is OFF
Battery Status
Orange – AC adapter is plugged in and charging
Green – AC adapter is plugged in and battery is full charged
Solid Red - Low battery (<10%)
Blinking Red – Battery is being hot swapped.
No light – Battery is in use and more than 10%
Disk Activity Indicator
Green - Disk Activity
No light - Disk Idling
Configuration)
It should be off unless configured by the user.
ALGIZ 8X User’s Manual
5. First-time Operation
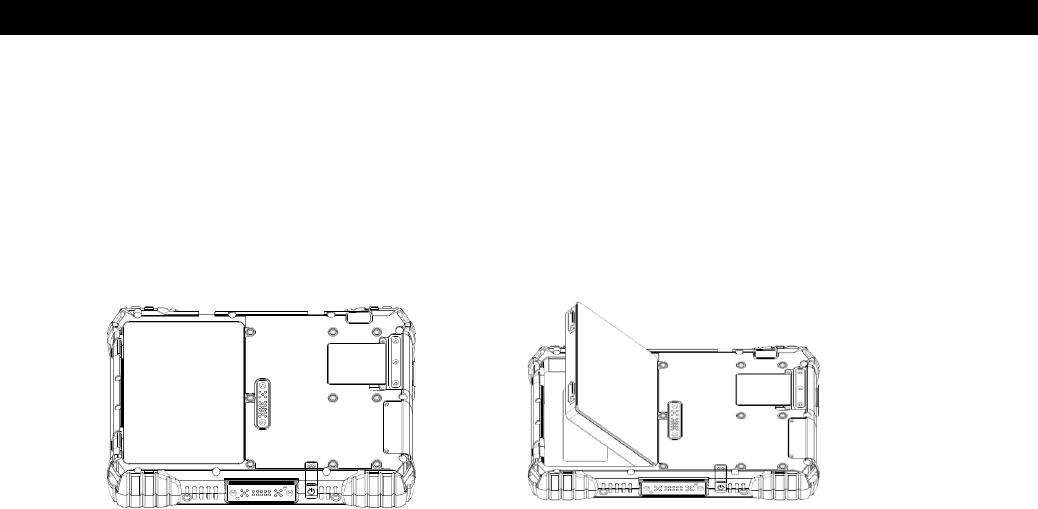
Inserting Battery Pack
To insert the standard battery pack into the Tablet Computer:
1. Disconnect AC adapter and power cord from the tablet computer.
2. Turn the tablet computer over, back facing up.
3. Insert the battery on the connector-pins side first, and then lower the battery into the battery
compartment. Continue to hold the Battery before battery is fully inserted.
4. Make sure the battery is completely lowered into the compartment before letting go the Battery
will be flat against the housing once fully inserted
Removing the Battery Pack
1. Power off the tablet computer (or put it to sleep). Disconnect any cords connected to the
computer.
2. Turn the tablet computer over, back facing up.
3. Lift the battery out using the opening on side of battery compartment.
ALGIZ 8X User’s Manual
Connecting to Power Supply
The Tablet Computer operates either on external AC power or internal battery power. It isrecommended
to use AC power when you start up the Tablet Computer for the first time.
Caution
Use only the AC adapter included with your Tablet Computer. Using other
AC adapters may damage the Tablet Computer and the Battery.
Caution
For users start up the Tablet Computer for the first time with internal
battery power, please make sure the battery is full charged before using.
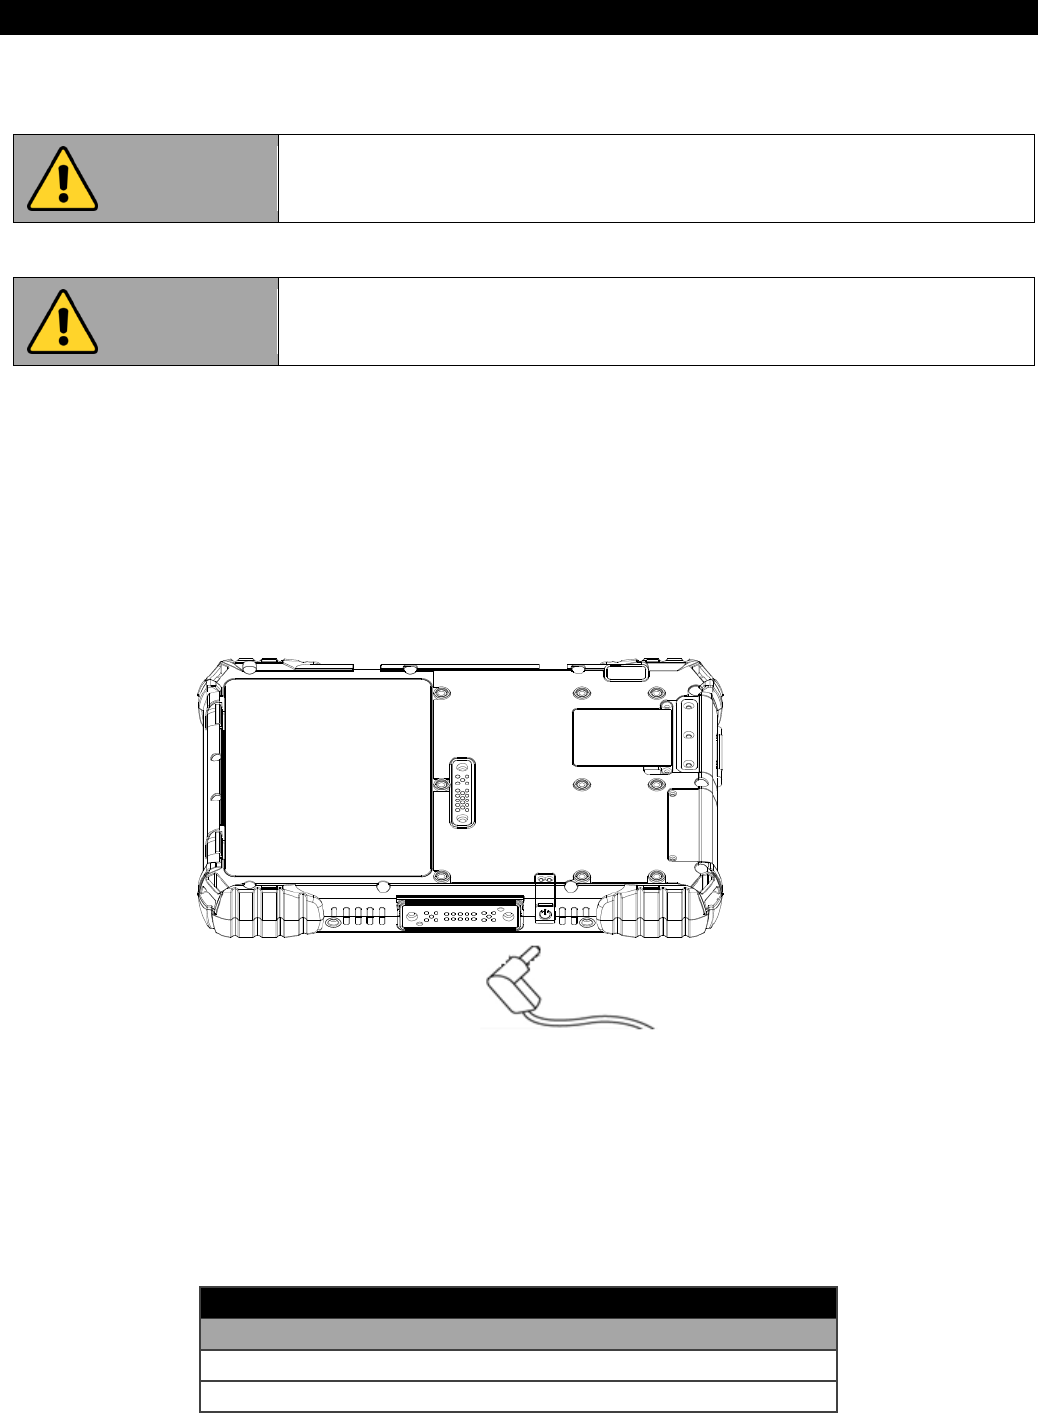
Perform the following to connect the Tablet computer to AC Power:
1. On the side of the Tablet computer, lift the I/O protective cover by pulling on the latch
2. Plug the DC cord of the AC adapter into the Power Jack of the tablet computer.
3. Plug the AC power cord into the AC adapter.
4. Finally, Plug the AC power cord into the electrical outlet.
When the AC Adapter is connected, the battery pack starts charging. The battery LED indicator on the
tablet computer would show different states. Please refer to description of LED indicator on Description
of Parts.
Item
Hours
Battery Life
Standard Battery (ALG8X-08A)
6.75 Hours
High Capacity Battery (ALG8X-08B)
13 Hours

ALGIZ 8X User’s Manual
6. Powering On / Off
Powering On
Press and hold the power button for 3.5 seconds until the blue LED power indicator light up.
Note:
Do not press the power button repeatedly.
Do not perform the following operations until the Disk Activity Indicator off
o Connecting or disconnecting the AC adapter
o Pressing the power button
o Touching the tablet buttons, screen, or external keyboard/mouse
Powering Off
Perform the following procedure to power off the Tablet Computer:
1. Make sure you have closed any programs that are open on the Desktop.
2. Under Windows 10 OS, click the Start menu, you'll see a lengthy pop-up shortcut menu .
3. Tap on Power.
4. Tap on Shut Down.
5. Wait for Tablet Computer to power off.
Note:
The computer will forcibly be powered off if the power button is pressed and held for 6 seconds or
longer.
ALGIZ 8X User’s Manual
Chapter 3
Set up Windows for
the First Time
ALGIZ 8X User’s Manual
Caution
For users start up the Tablet Computer for the first time with internal
battery power, please make sure the battery is full charged before using.
This section details how to setup different version of the Windows that may be installed on the tablet for
the first time.
Note:
Please notice that BIOS will vary with different Windows OS; for users going to change OS, please
contact our sales contact window for details.
1. Setting up Windows 10
This section details how to setup different version of the Windows that may be installed on the tablet for
the first time. 3.1 Setting up Windows 10 IoT Enterprise Follow the steps below to complete the setup
process.
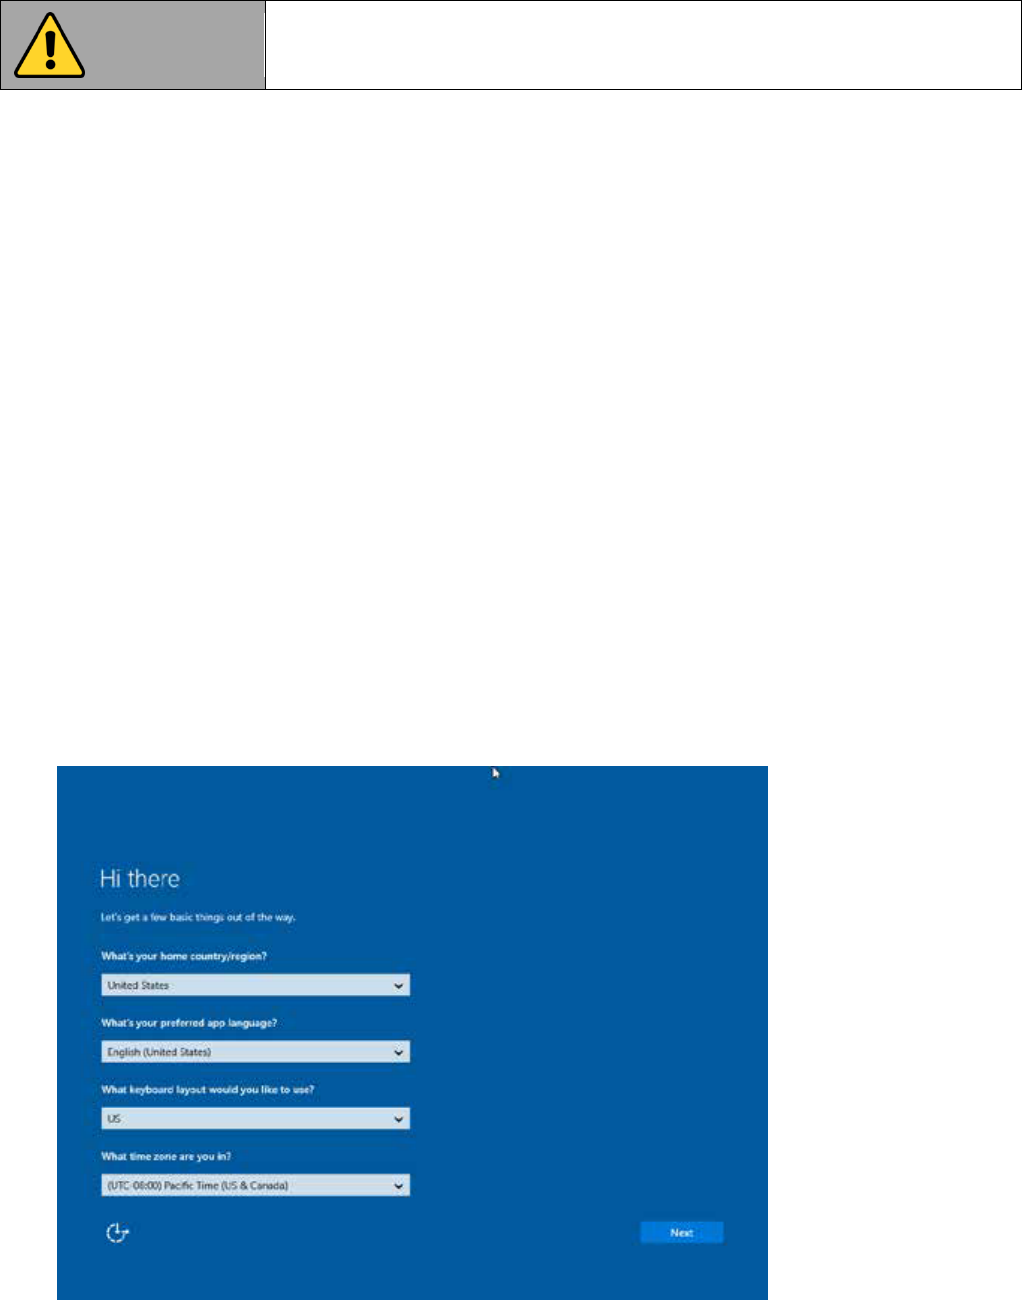
1. Press the power button to turn on the computer.
2. First, select your country/region, your preferred app language, your preferred keyboard layout, and
your time zone, then tap Next.
ALGIZ 8X User’s Manual
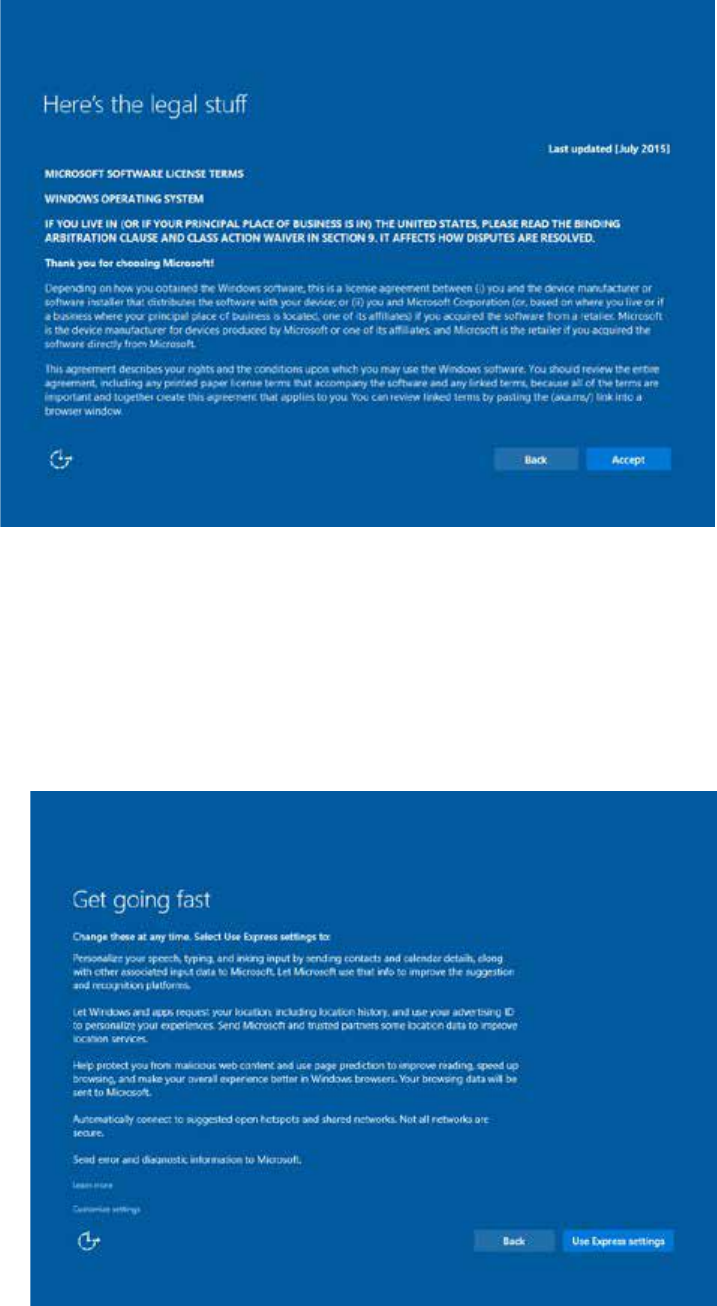
3. On the Here’s the legal stuff screen, read through the disclosures, then tap Accept.
4. Windows will then try to connect to network. Tap Skip this step to continue without a wireless
connection as you can then set up the network later.
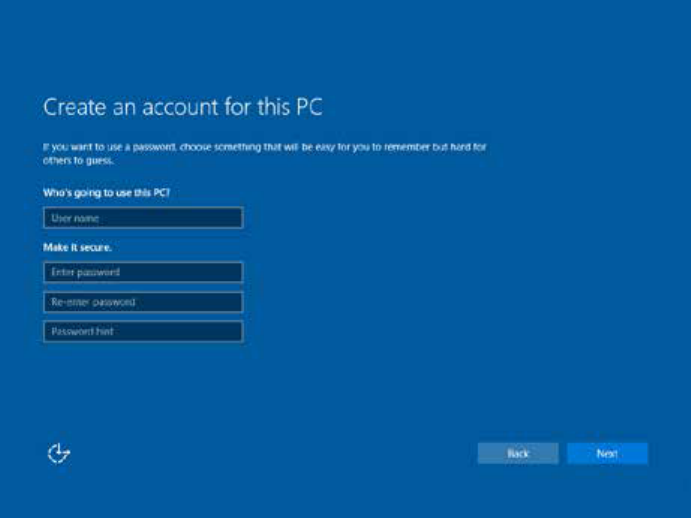
5. On the Get going fast screen, click Use Express settings for the fastest setup. If you would like more
information, tap Learn more, or if you would like to select your own options, click Customize
settings.
ALGIZ 8X User’s Manual
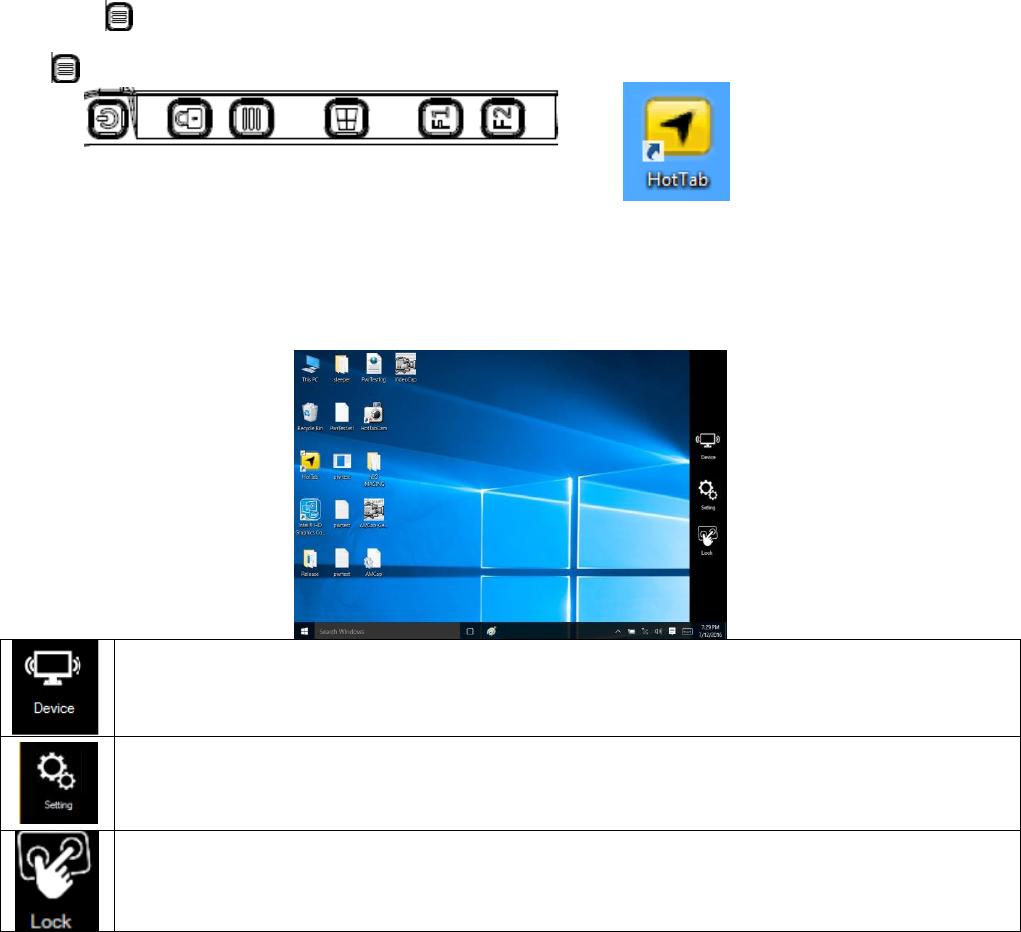
6. To create a local account, type your User name, password, and Password hint in the fields provided,
then tap Next.
7. The initial setup screens are complete, and the desktop is displayed.
8. Read any introductory screens describing features of your computer, and tap Next upon completing
each. You are now done with the initial setup process
ALGIZ 8X User’s Manual
Chapter 4
Quick Access through
Hottab
ALGIZ 8X User’s Manual
1. Hottab Introduction
Hottab provides quick access to the tablet’s functions and features, such as setting up shortcuts, using
camera, powering on/off built-in devices, programming function key, and changing power management.
As Windows starts up, Hottab starts and runs in the background. To display the Hottab control utility,
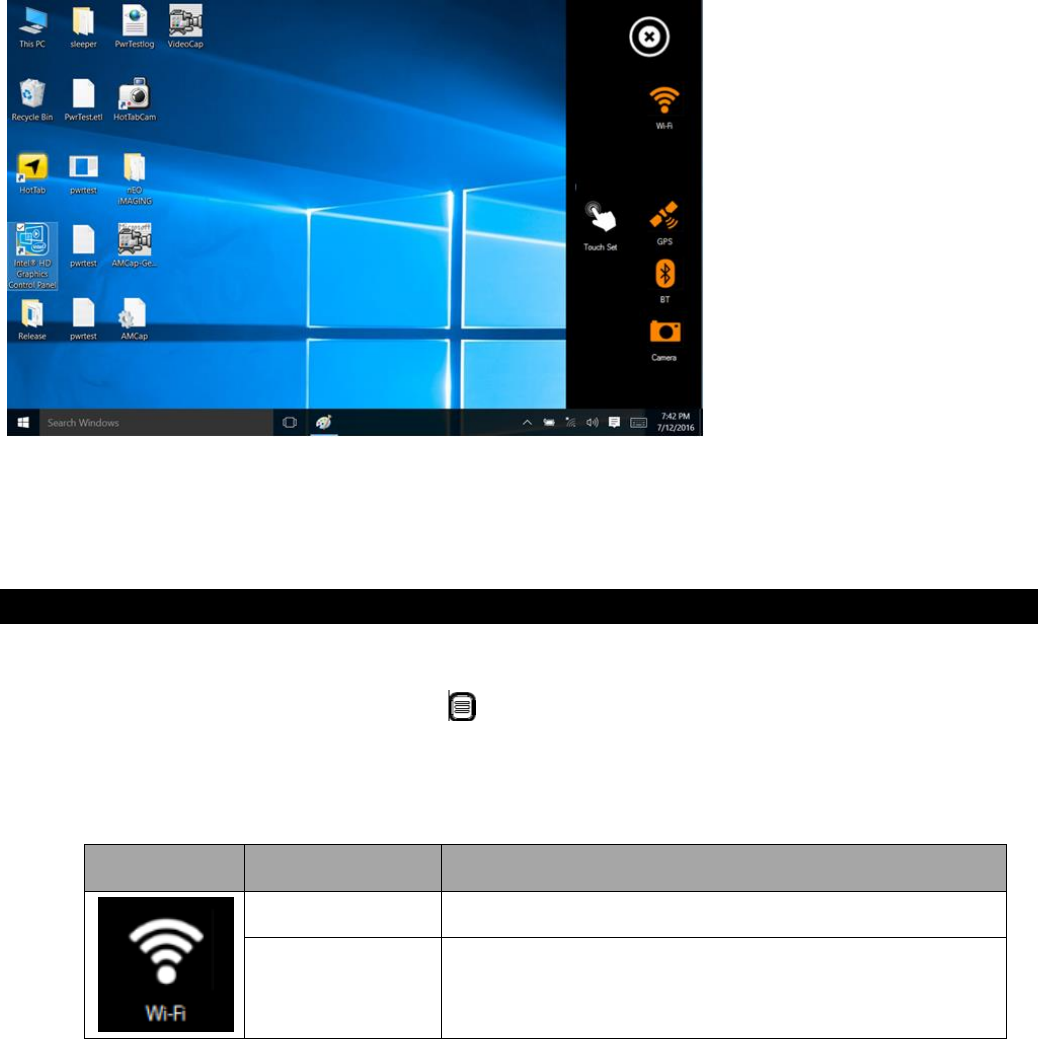
press the (Menu) Button located on the front panel, or launching the Hottab Utility application.
(Menu) Button on the Front Panel:
Hottab Utility Icon:
The main user interface is located on the right side of the screen. There are 3 main menu options: Device
ON/OFF, Settings and Touch Lock. Operations and functions on each menu options is explained in detail
in the coming section.
Device button enables/disables tablet computer’s hardware functions. The configurable
functions are Wi-Fi, GPS, Bluetooth, Camera and Touch mode options..
Setting button provides users information such as PC Information, Battery status, and also
device settings such as power management setting, and function key mappings.
Disable the double click and front panel OSD functions.
ALGIZ 8X User’s Manual
2. Device ON/OFF
This section provides a quick access to set-up built-in devices, including turning on/off RF modules,
camera module and setting up touch mode.
Using theWireless LAN (Wi-Fi) feature
To use the wireless LAN (Wi-Fi) feature to connect to the network, perform the following procedure:
1. Open the Hottab utility by press the (Menu) Button located on the front panel, OR
launching the Hottab Utility application.
2. Tap on the Device button.
3. Check the status color of the Wi-Fi icon:
Item
Status Color
Description
Orange
Wi-Fi is enabled.
White
Wi-Fi is disabled.
4. If the Wi-Fi feature is disabled (white), tap on the Wi-Fi icon to enable it (orange).
5. Click the wireless network connection status icon in the Windows notification area. A list of
available wireless networks is displayed.
6. Double-click a network to connect to it. Provide required authentication information if needed.
ALGIZ 8X User’s Manual
7. To check the connection status, observe wireless network connection status icon in the Windows
notification area. The more bars the icon shows, the better the wireless LAN connection strength
is.
8. Now wireless LAN connection is setup, try connection to the network with an internet browser
such as Internet Explorer.
ALGIZ 8X User’s Manual
Using the GPS feature
To enable the wireless GPS feature, perform the following procedure:
1. Open the Hottab utility by press the (Menu) Button located on the front panel, OR launching
the Hottab Utility application.
2. Tap on the Device ON/OFF button.
3. Check the status color of the GPS icon:
Item
Status Color
Description
Orange
GPS is enabled.
White
GPS is disabled.
4. If the GPS feature is disabled (white), tap on the GPS icon to enable it (orange).
5. Now the GPS feature is ready to be used with an application utilizing the GPS.
ALGIZ 8X User’s Manual
Using the Bluetooth feature
To enable the wireless Bluetooth feature, perform the following procedure:
1. Open the Hottab utility by press the (Menu) Button located on the front panel, OR
launching the Hottab Utility application.
2. Tap on the Device button.
3. Check the status color of the Bluetooth icon:
Item
Status Color
Description
Orange
Bluetooth is enabled.
White
Bluetooth is disabled.
4. If the Bluetooth feature is disabled (white), tap on the Bluetooth icon to enable it (orange).
5. Click the Bluetooth icon in the Windows notification area. A contextual menu for Bluetooth is
displayed.
6. To add a device, tap on Add a Bluetooth Device. Windows will search any Bluetooth device
automatically
7. Choose the Bluetooth device that user wants to connect and follow onscreen prompt to continue
the pair procedure and use the Bluetooth device.
ALGIZ 8X User’s Manual
Using Camera Features
This Hottab menu option allows users take a picture or record a video. Before use, make sure the Camera
is powered on under Devices menu with the following scenarios:
1. Open the Hottab utility by press the (Menu) Button located on the front panel, OR
launching the Hottab Utility application.
2. Tap on Device button to check the built-in devices status.
3. Check the status color of the Camera icon:
Item
Status Color
Description
Orange
Camera is enabled.
White
Camera is disabled.
4. If the Camera feature is disabled (white), tap on the Camera icon to enable it (orange).
5. Go back to the Hottab main menu by pressing the (Menu) Button located on the front panel
OR click on the back arrow on top.
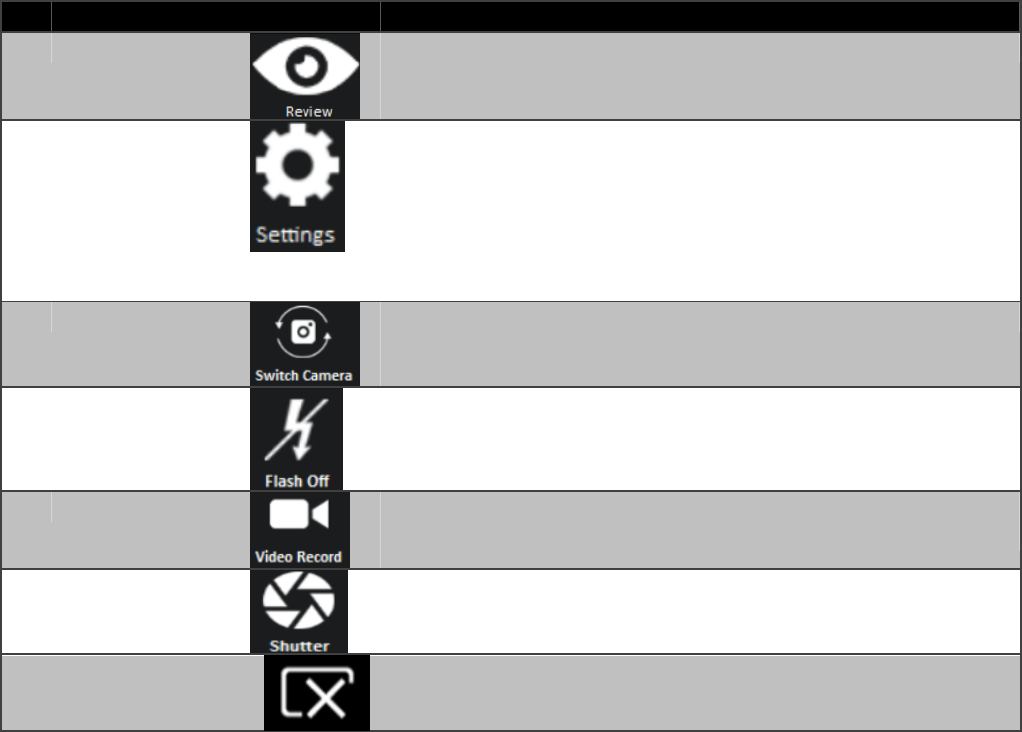
6. Tap on the HotTabCamera shortcut to go into the Camera menu. The Camera user interface
will take up the entire screen as shown below:
ALGIZ 8X User’s Manual
Description of Camera User Interface Buttons:
No
Item
Description
1
Review
Preview the take picture.
2
Settings
Brings up Camera settings page.
Available Settings:
Photo format: modify/inspect saved location for pictures.
Rear Video Resolution: Picture compression quality.
File Location:Opens the location where pictures and
videos are saved in a window.
3.
Switch Camera
Switches the front or rear camera device.
4
Flash Control
Enable/Disables LED Flash when taking picture.
5.
Video Record
Video Record Button. Tap to Start, and press again to stop
recording.
6
Shutter
Camera Shutter Button. Tap to take picture.
7
Exit
Exits the Camera and hide Hottab Utility.
ALGIZ 8X User’s Manual
Switch Touch Modes
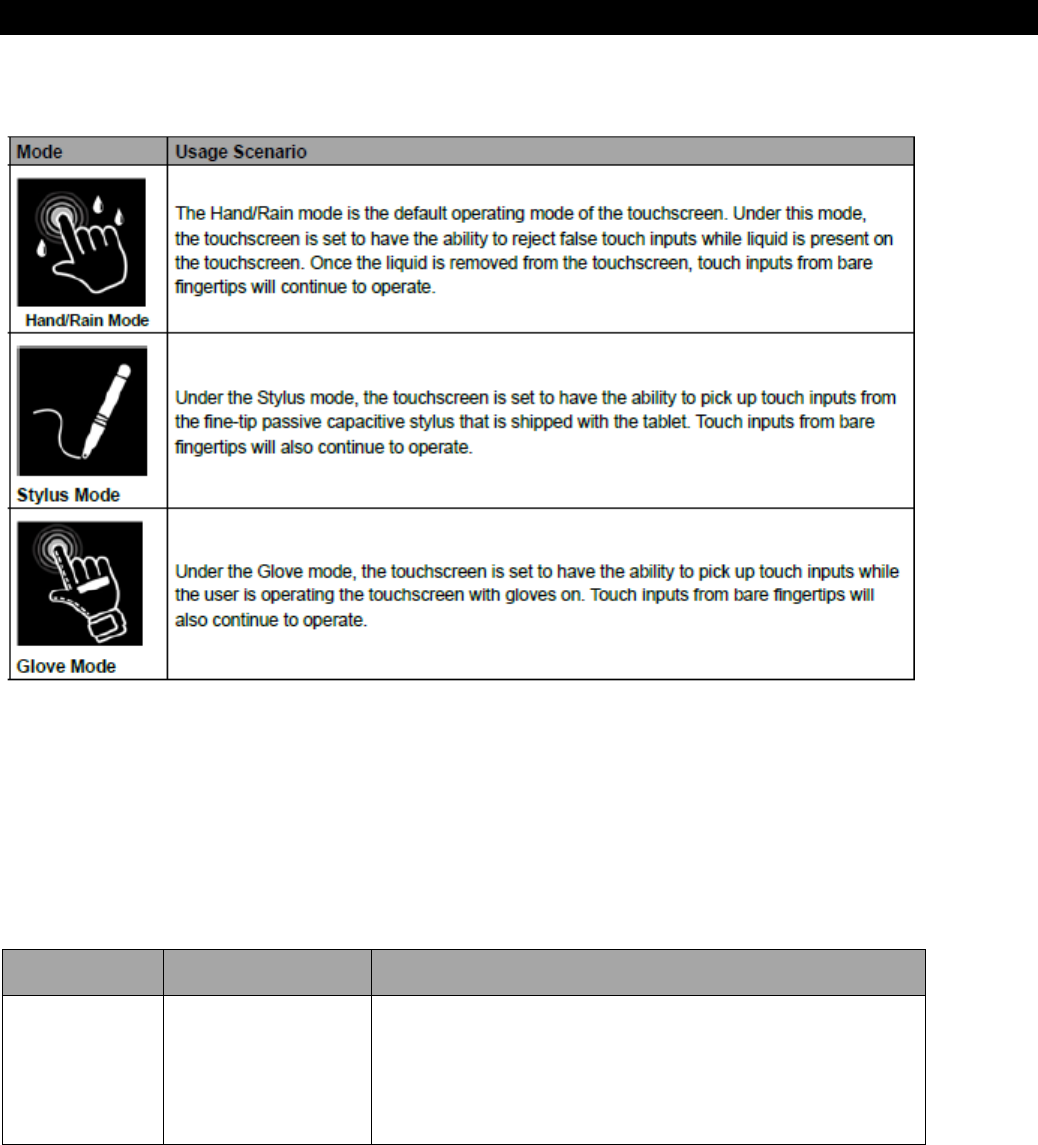
The tablet’s advanced capacitive touchscreen has 3 built-in operating modes, for users to choose under
different usage scenarios:
To switch between the different touchscreen modes via the HotTab utility, perform the following
procedure:
1. Open the Hottab utility by press the (Menu) Button located on the front panel, OR launching the
Hottab Utility application.
2. Tap on the Device button.
3. Check the status color of the Touch Set icon:
Item
Status Color
Description
White
Open Touch Mode Select wedge
ALGIZ 8X User’s Manual
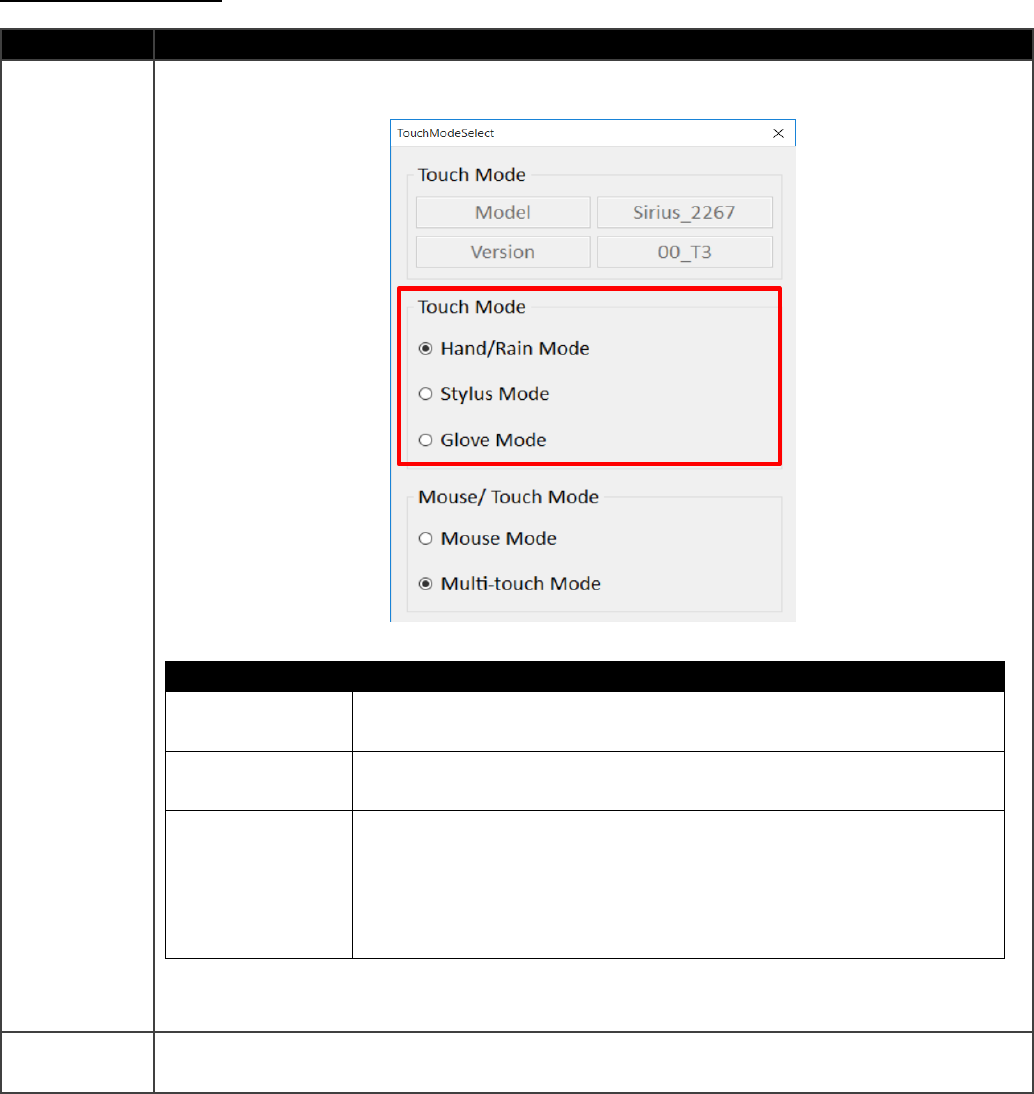
Touch Mode Selection
Item
Description
Touch Mode
This setting defines the sensitivity of touch screen for different applications. Three
options are available:
Item
Description
Hand/Rain
Mode
The default setting of the touch screen is Hand/Rain Mode,
which supports finger control under slight rain.
Stylus Mode
This setting is to have the touch screen compatible with the
fine-tip stylus coming with the tablet.
Glove Mode
This setting is to have the touch screen compatible with regular
gloves for working station. The touch sensitivity might be
effected with different material or thickness of the gloves. To
solve these problems, please contact your sales contact window
for further touch tuning.
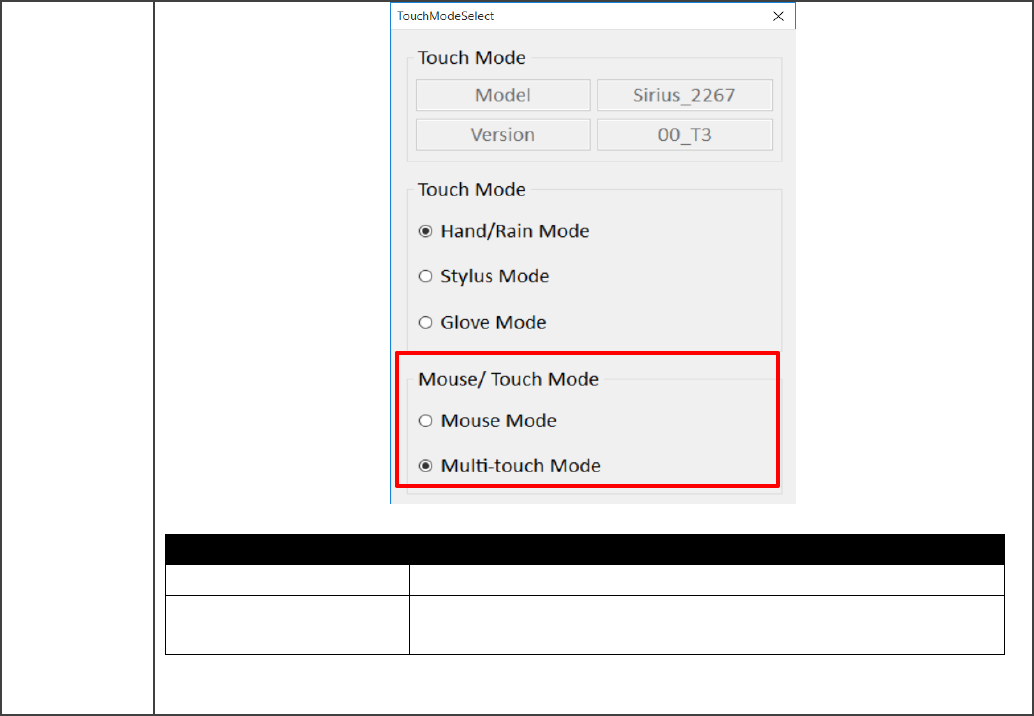
Mouse/
Touch Mode
This setting defines the touch points supported. Two options are available:
ALGIZ 8X User’s Manual
Item
Description
Mouse Mode
Single touch point supported.
Multi-touch Mode
The default setting of the touch screen supports multi-
touch mode (up to 10 points).
ALGIZ 8X User’s Manual
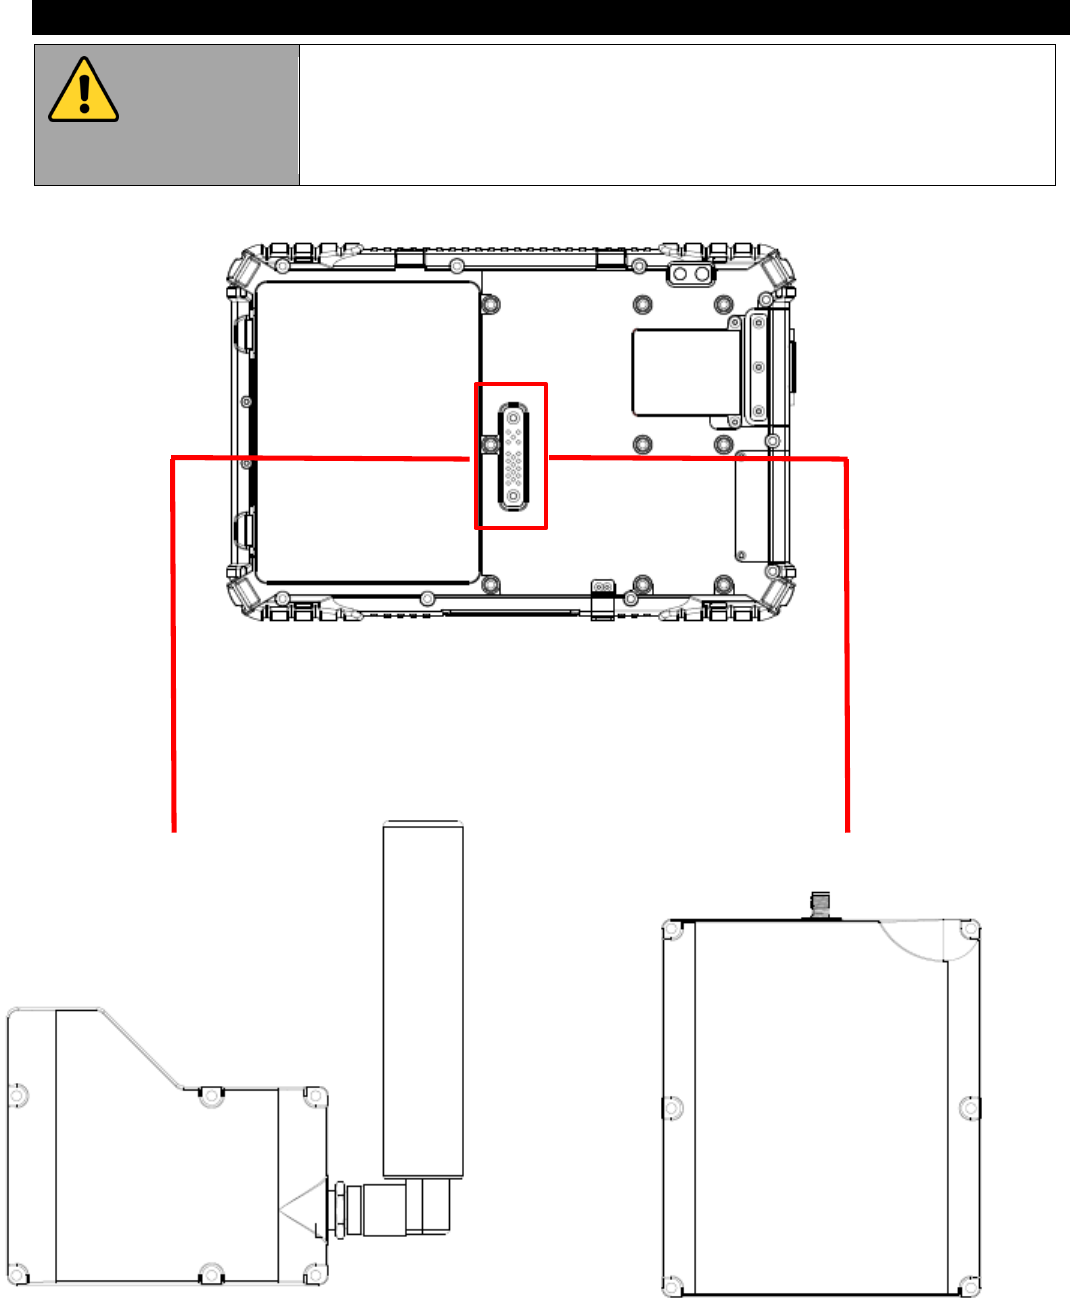
Using the Expansion Module feature
1.
Caution
The Expansion Port is optional for ALGIZ 8X Tablet PC and is not re-
workable by the end user. To work with Add-on module, please make
sure the tablet PC is built-in expansion port before use, or contact our
sales contact window for more details.
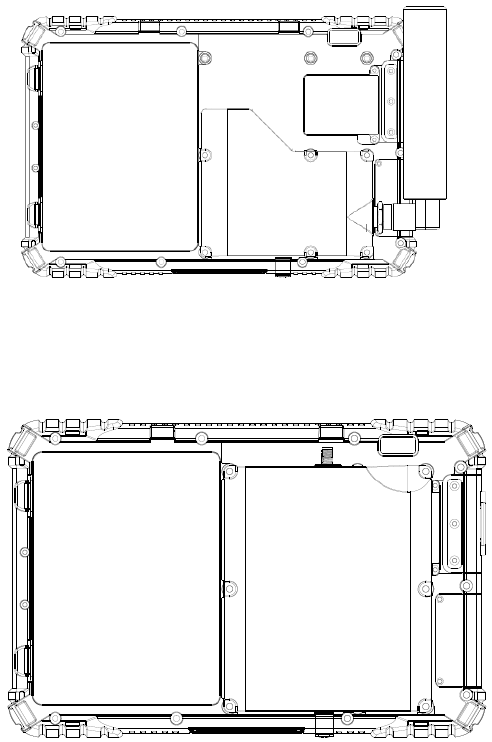
Expansion Port
Lima
Hotel
Lima
Hotel
ALGIZ 8X User’s Manual
2. Configuration of Lima
Support NOVATEL OEM-9719B COMPACT, FOUR-FREQUENCY GNSS RECEIVER
3. Configuration of Hotel
Support HF RFID Reader/Smart Card Reader /Sith Card Reader
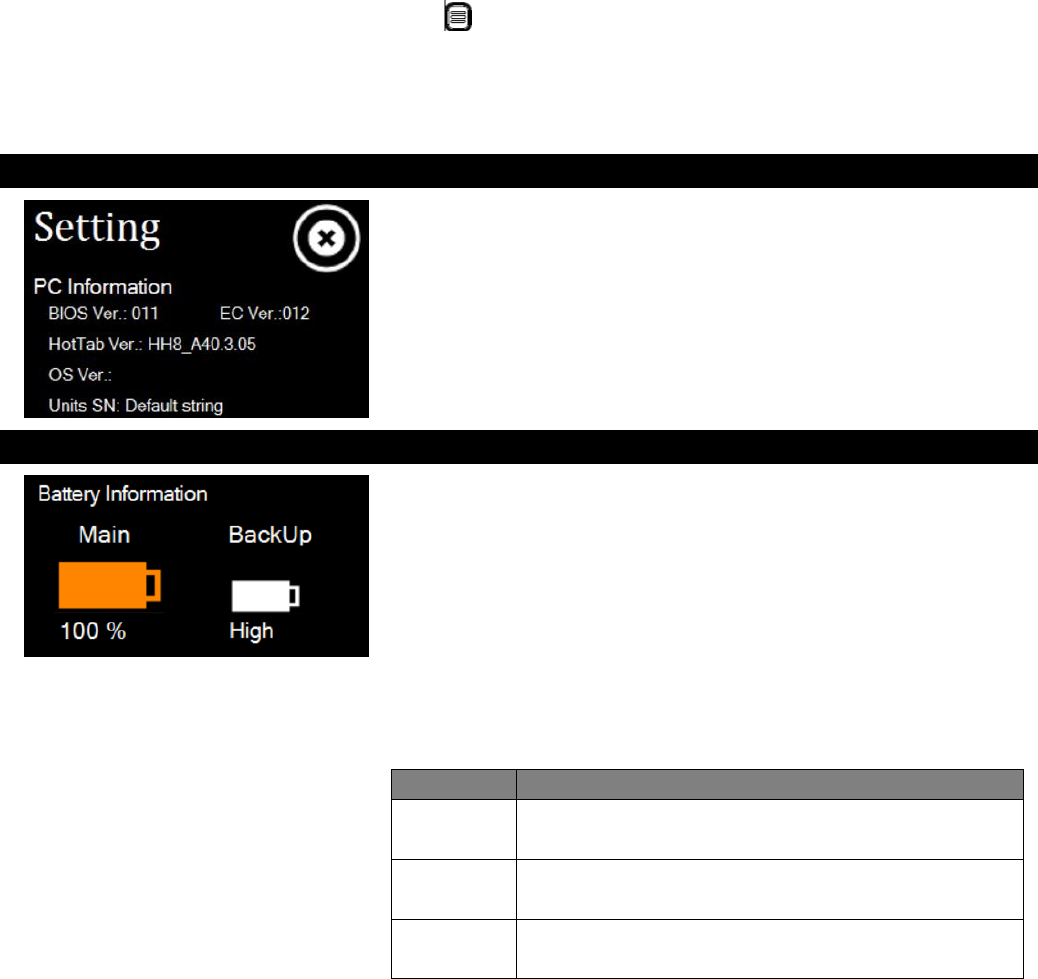
Note:The Ext. Module function allows users to choose either LIMA or Hotel type.
ALGIZ 8X User’s Manual
3. Setting
This Hottab menu option provides users information such as PC Information, Battery status, and also
device settings such as power management setting, and function key mappings. Perform the following
procedure to access the Hottab Setting menu:
1. Open the Hottab utility by press the (Menu) Button located on the front panel, OR launching
the Hottab Utility application.
2. Tap on the Settings button.
3. Below shows the items listed in Settings Menu.
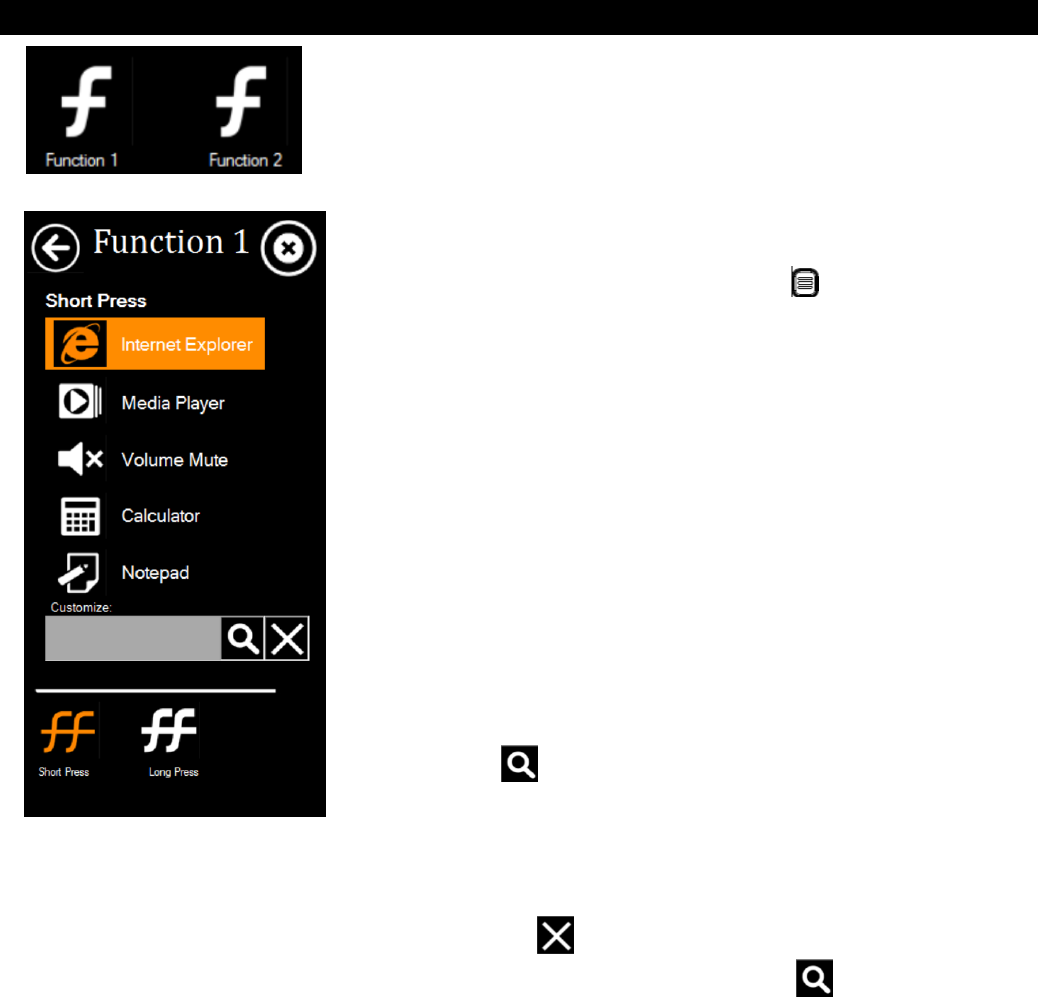
PC Information:
This section provides user device information in regards to BIOS
Version, EC Versions, Hottab Versions, OS Versions, as well as
Unit Serial Number, shown in the picture sample.
Battery Information:
This section provides user battery Information.
Main Battery:
The main battery Icon displays the battery level in percentages
(0 to 100%).
Backup Battery: (Optional)
The backup battery used for battery hot swapping displays its
state in text with the following meanings.
Status
Description
High
Backup battery is fully charged, and can be used
for hot swapping
Medium
Backup battery level is intermediate, but can be
used for hot swapping
Low
Backup battery level is low, and hot swapping is
not recommended.
Battery Charge Time:
The Battery Information also displays estimated time needed to
fully charge the main battery when AC adapter is plugged in.
Meanwhile, the backup battery is charged by the main battery.
ALGIZ 8X User’s Manual
Using the physical function keys (Hotkeys)
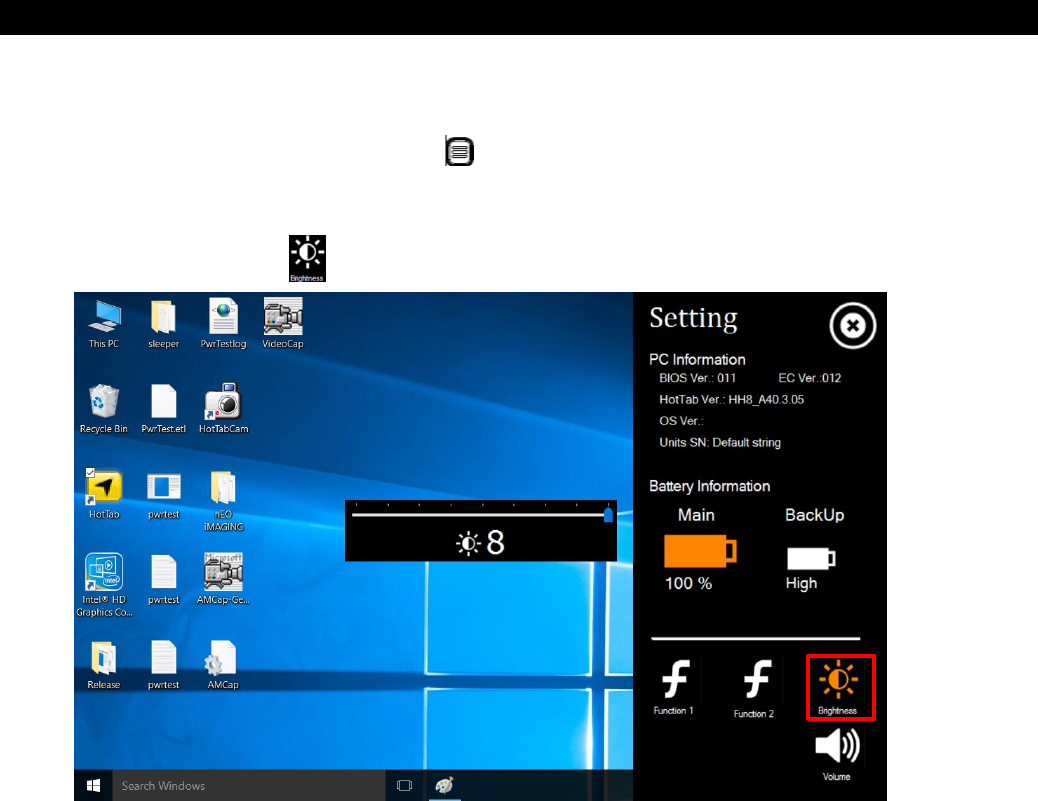
The function key mapping menu option allows user to change the
physical function buttons, F1 and F2. Users can change what
application will be launched with short press or long press of keys.
To configure function key mapping, perform the following:
1. Open the Hottab utility by press the (Menu) Button
located on the front panel, or launching the Hottab Utility
application.
2. Tap on the Setting button.
3. Tap on function key icon for the corresponding key that you
want to change.
4. At top of utility, it will say “Short Press” or “Long Press” to
indicate what type of press is being configured
5. You can switch what type of press you want to configure by
tapping on the “Short Press” or “Long Press” icon at the
bottom of the utility window.
6. Pick from list of preset applications by tapping on the
application icons OR customize which application to execute
using the picker.
Using the Custom picker:
1. Tap the icon to reveal browser window
2. Navigate to the desired executable to map to function key
3. Tap on “Done” to save selection.
To map the function key to another application:
1. Tap on the icon to remove connection to the original
application, and pick again tapping on icon.
Using the physical function keys:
1. While operating the tablet, click on the physical function keys
to activate functions mapped via the setup in this section.
ALGIZ 8X User’s Manual
Adjust the Brightness Level
The panel brightness can be adjusted from Hottab menu. To adjust the brightness, perform the following
procedure:
1. Open the Hottab utility by press the (Menu) Button located on the front panel, or launching
the Hottab Utility application.
2. Tap on the Settingbutton.
3. Tap on the Brightness icon:
ALGIZ 8X User’s Manual
How to disable automatic brightness adjustments
For computers with a light sensor, Windows 10 has the ability to automatically adjust the screen
brightness depending on the ambient light levels.
This feature can be more annoying than helpful, either leaving your screen too dark or frequently
adjusting the brightness levels.
Here’s three ways to disable the Ambient light sensor
1: using the systems setting
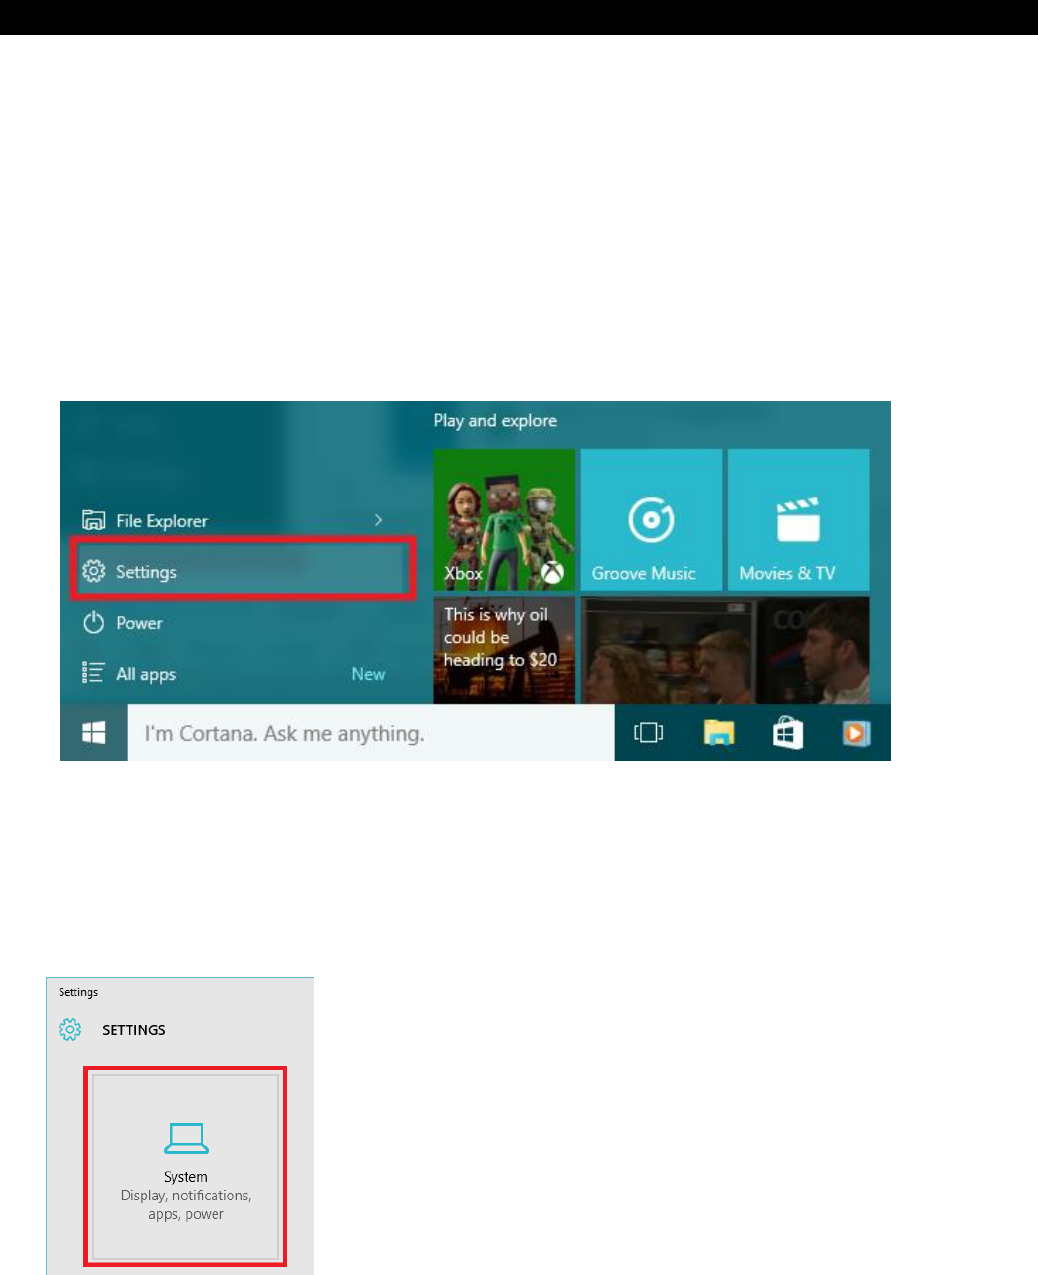
Open the Windows start menu and click on ‘Settings’
1. In the settings window, click on ‘System’
2. The ‘Display’ menu should selected on the left, if it is not – click on‘Display’
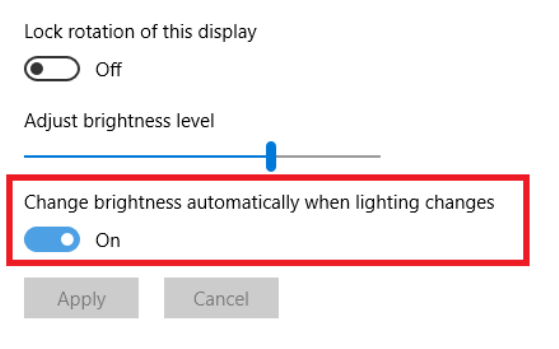
3. Turn the ‘Change brightness automatically when lighting changes’ to ‘Off’
4. Click ‘Apply’ to save the changes.
ALGIZ 8X User’s Manual
ALGIZ 8X User’s Manual
Adjust the Volume Level
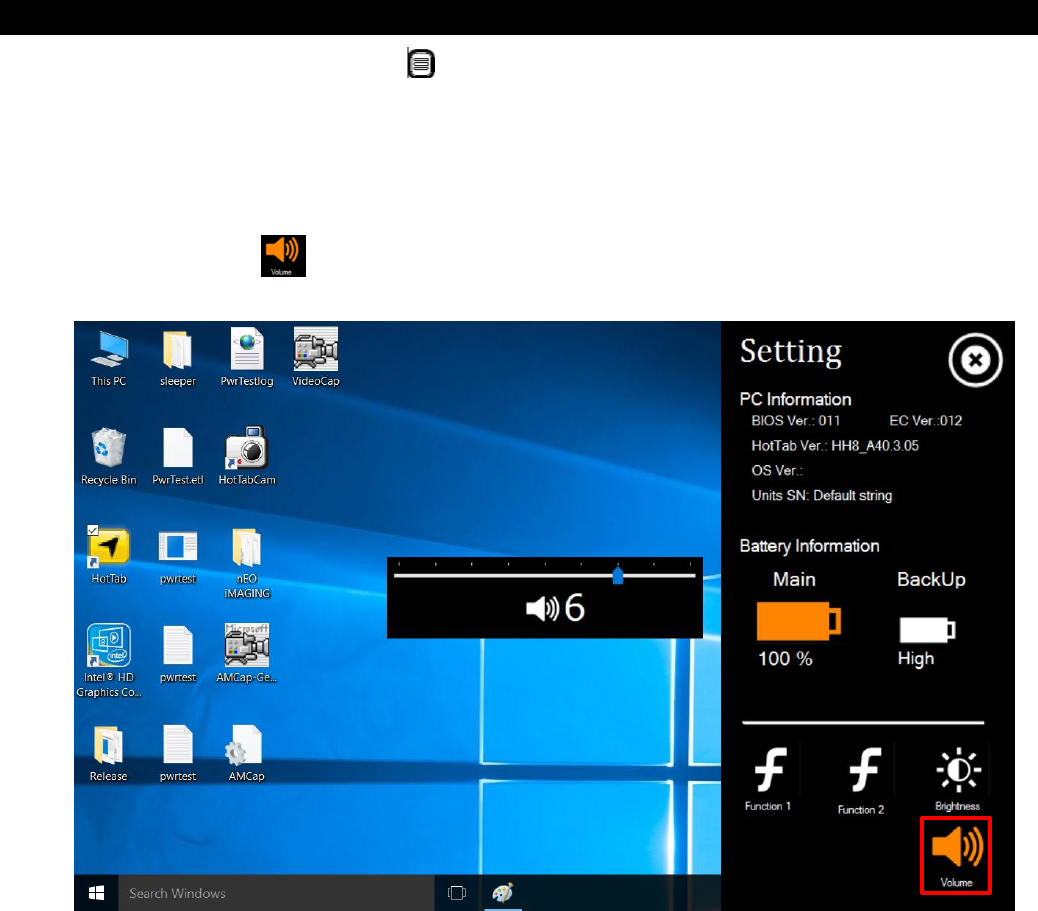
The volume level can be adjusted from Hottab menu. To perform volume adjustment. The
adjustment slide bar will appear on screen transparently. Tap on the right side of the bar to increase the
volume and Tap on the left side of the bar to decrease the volume .Open the Hottab utility by press the
(Menu) Button located on the front panel, or launching the Hottab Utility application.
1. Tap on the Settingbutton.
2. Tap on the Volume icon:
ALGIZ 8X User’s Manual
Chapter 5
Frequently Used
Settings
ALGIZ 8X User’s Manual
1. Screen Resolution Scaling and Setting
The ALGIZ 8X’s 800x 1280 high resolution display is perfect for viewing image, video, or other
applications, however, Windows user interface (icons, buttons, and other user interface elements) may
be too small to read and operate at the default Windows settings. By changing the display scaling or the
display resolution setting of the device, you can adjust the size of the text and other items on the desktop
for optimal viewing. Display scaling is the recommended method because it has the effect of adjusting
user interface element without having to move away from the optimal resolution setting at 800 x 1280.
This section will explain how you can adjust the built-in windows display scaling setting and resolution
setting.
We recommend the users set the scaling to this setting for optimal text and image viewing.
Before proceeding to change the scaling option, make sure any opened document is saved and
close, and all running applications are closed before proceeding to change the display scaling,
because this procedure requires users to log out of their account to apply display scaling change.
Changing display scaling setting (Recommended)
Perform the following to change display scaling setting:
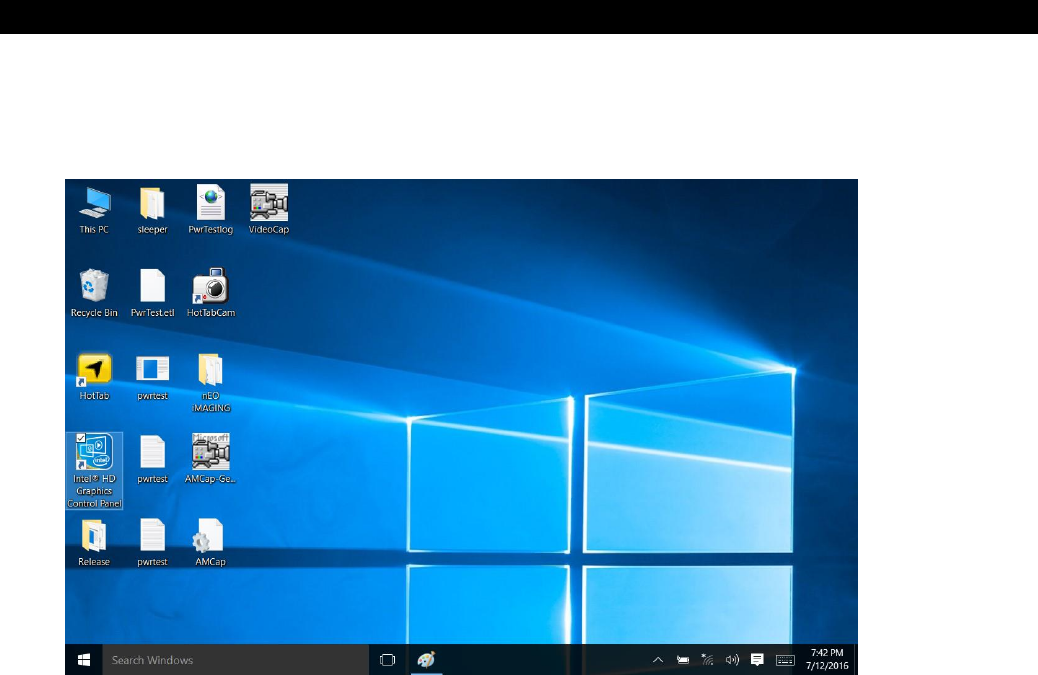
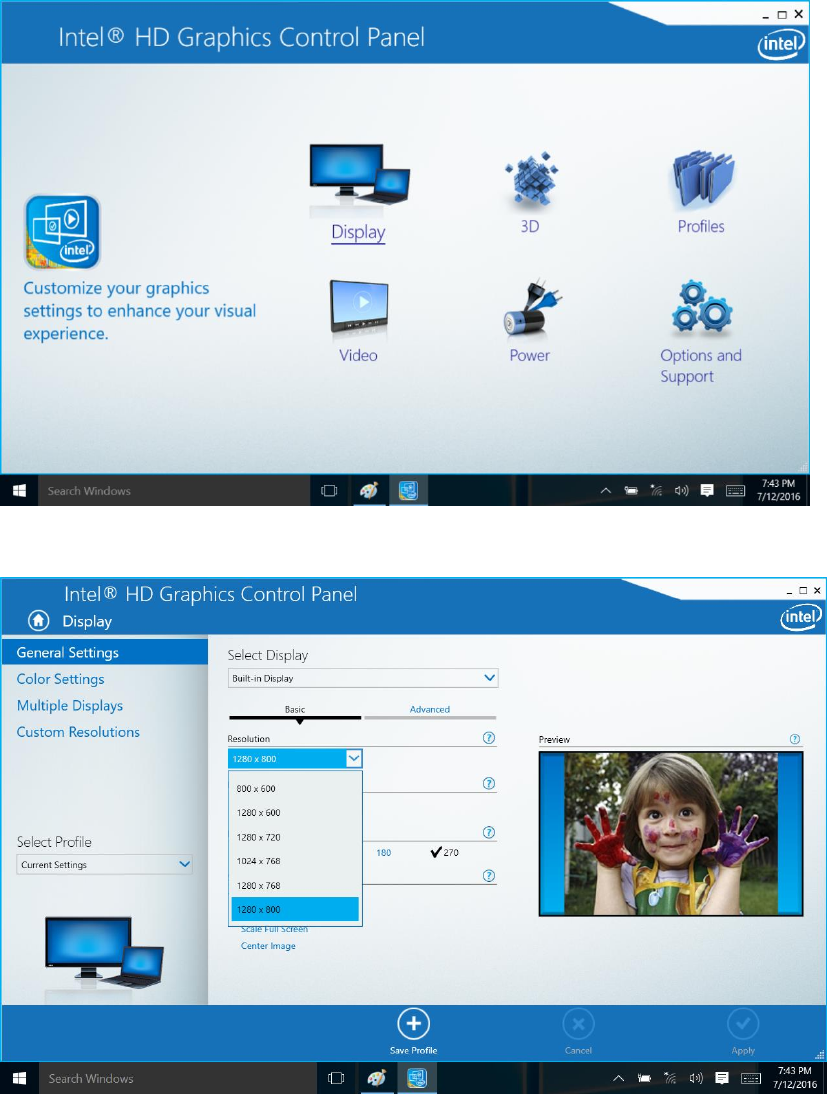
1. Tap and hold anywhere on the desktop for 3 seconds or tap the Intel HD Graphic Control
Panelshortcut to bring up the context menu, and select “Display” option as shown below:
ALGIZ 8X User’s Manual
2. Click on the dropdown option next to “Resolution” and select the desire resolution by tapping on
the scale:
3. Hit “Apply”. A prompt “Display Settings” prompt will show up to ask the user if the applied
resolution is usable.
4. If the new resolution is the desired display setting hit “Keep changes” and continue to next step. If
the new resolution is not desirable, hit “Revert” and select a different resolution to change to,
and start again from step 2.
5. The user may now use the device with the new resolution setting.

ALGIZ 8X User’s Manual
2. Replacing Hot Swappable Battery
The tablet computer supports hot-swapping of batteries, meaning the tablet doesn’t need to be powered
off in order to replace the mainbattery. To support such mechanism, there is a backup battery inside the
tablet that is charged up with the main battery. This backup battery cannot be removed, and needs to
have adequate power for hot swapping of main battery to be done without issue. When the backup
battery is fully charged, it can sustain up to 5 minutes of runtime to allow for battery hot-swapping.
Perform the following to hot swap the batteries:
1. While the tablet is powered on, go to Hottab utility to check on the power level of the Backup
battery.
2. If the Backup battery level is at “Low”, please charge the tablet with AC Power until the Backup
battery level is at “Medium” or “High”, and do not remove the main battery.
3. If the Backup battery level is at “Medium” or “High”, continue to remove the main battery.
4. Insert a new charged up removable battery into the battery compartment.
5. Go to Hottab utility to check if Main battery level can be correctly read. If not, check if the new
removable battery is inserted properly.
6. If Main battery level can be read, continue to use the tablet computer.
Caution
To keep battery health and prevent possible issues from battery over-
discharged, please charge the tablet built-in back-up battery once for
every 2 months.
ALGIZ 8X User’s Manual
3. Using Recovery Wizard to Restore Computer
ALGIZ 8X tablet computer has a dedicate recovery partition stored on the hard drive of the tablet to
enable quick one-key recovery process. This partition occupies about 11GB of the storage space, and
comes built-in to each ALGIZ 8X tablet computer.
Warning:Before starting the recovery process, be sure to backup all user data, as all data will be lost after
the recovery process.
Follow the procedure below to enable quick one-key recovery procedure:
1. Plug-in the AC adapter to ALGIZ 8X tablet computer. Make sure the ALGIZ 8X tablet computer
stays plugged in to power source during the recovery process.
2. Power on the tablet computer, and when the boot screen shows up, press the F1 button
(Recovery Key) on the front bezel or press F6when using an external USB keyboard to initiate the
Recovery Wizard.
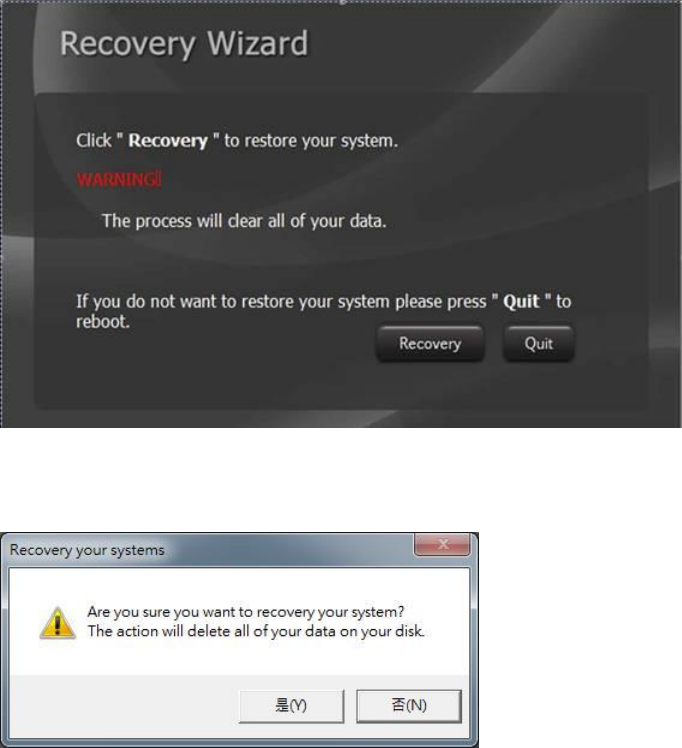
3. The following screen shows the Recovery Wizard. Click on “Recovery” button to continue.
4. A warning message about data loss will show up. Make sure data is backed up before recovery,
and click on “Yes” to continue.
ALGIZ 8X User’s Manual
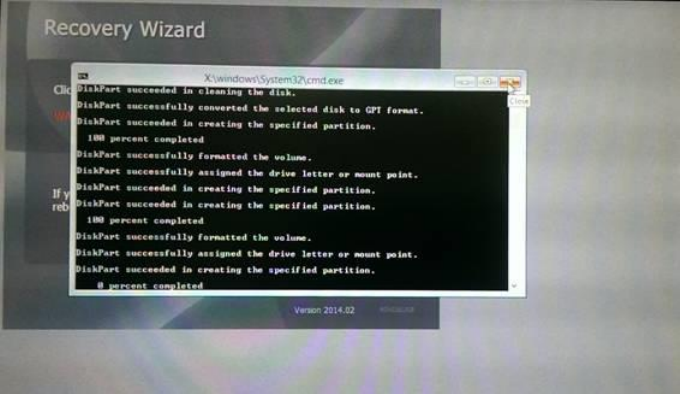
5. Wait till the recovery process to complete. During the recovery process, a command prompt will
show up to indicate the percent of recovery process.After recovery is completed, and the tablet
computer will restart automatically.
ALGIZ 8X User’s Manual
4. Docking Connector Pin Definition
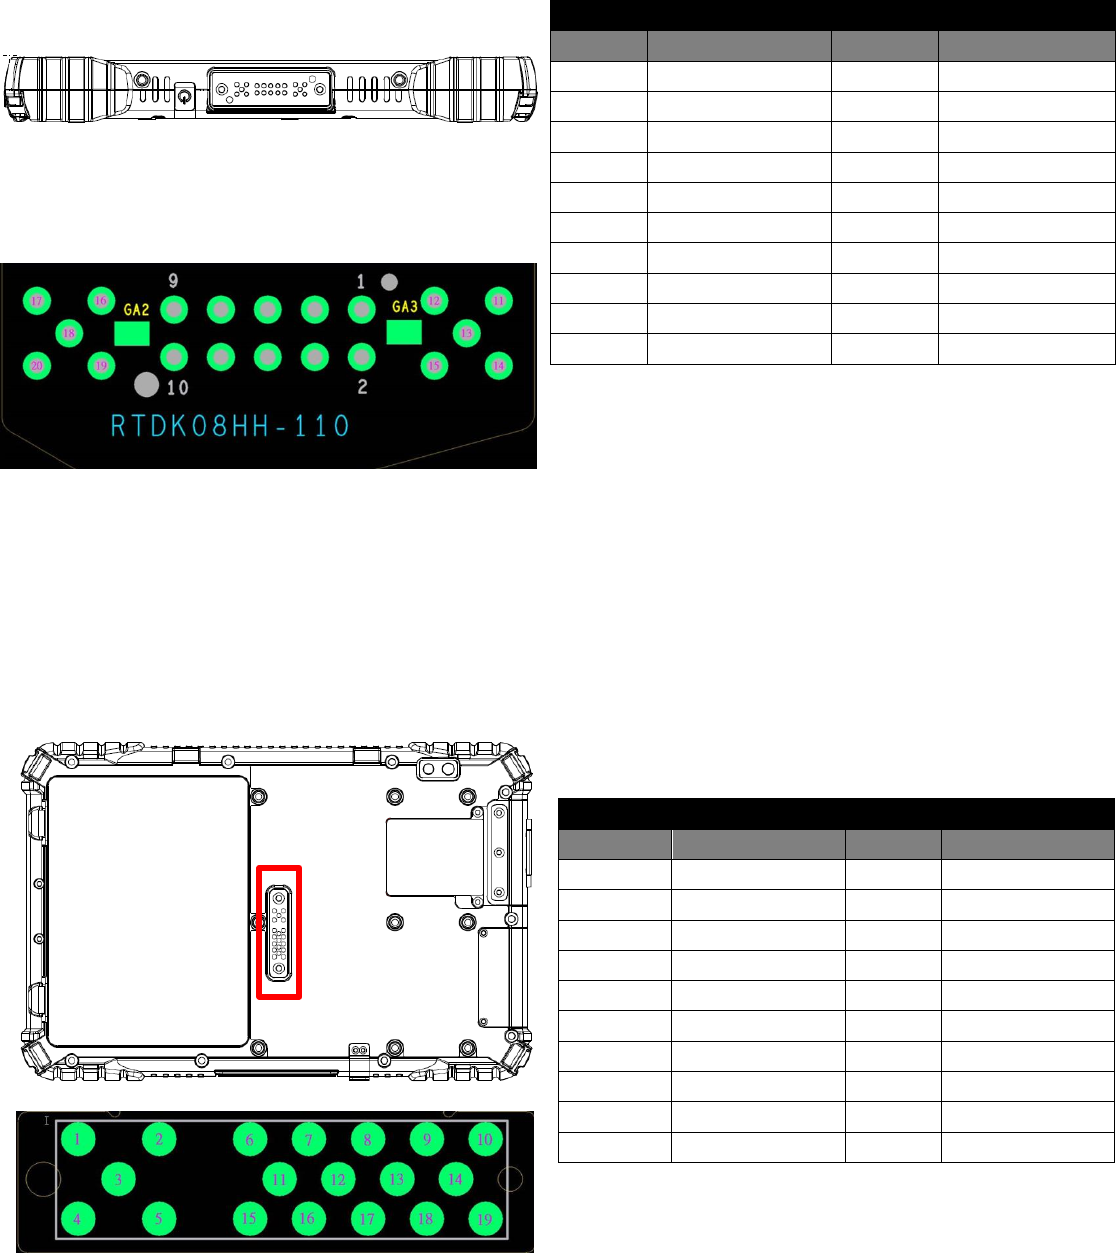
ALGIZ 8X tablet computer supports one 20-pin docking connector at the bottom side. The pin definition is
listed as the following table.
20 Pin Docking Connector
Pin No.
Description
Pin No.
Description
1
DOCK1_USB_P
11
GND
2
DOCK_DET#
12
GND
3
DOCK1_USB_M
13
N/A
4
DOCK_USB_P
14
GND
5
GND
15
N/A
6
DOCK_USB_N
16
N/A
7
DOCK_PWR
17
N/A
8
GND
18
N/A
9
DOCK_PWR
19
DETECT-
10
DOCK_PWR
GND
5. Expansion Port Pin Definition
ALGIZ 8X tablet computer supports one optional 19-pin expansion port at the rear side. The pin definition
is listed as the following table
19 Pin Expansion Port
Pin No.
Description
Pin No.
Description
1
POGO_PWR
11
GND
2
USB3V_POGO
12
USB_D4-
3
POGO_PWR
13
USB_D4+
4
POGO_PWR
14
GND
5
USB5V_POGO
15
FK_CTS2
6
DET
16
DETECT_POGO
7
FK_SOUT2
17
GND
8
GND
18
FK_RTS2
9
FK_SIN2
19
DET
10
GND
ALGIZ 8X User’s Manual
6. COM Port Definition
ALGIZ 8X tablet computer uses Hottab utility for built-in peripherals control. All the COM port numbers
have been defined in the OS image coming with the package.
COM Port
Device
COM 1
RS232 at I/O
COM 2
RS232 of Expansion Port (optional)
COM 3
GPS
COM 11
RS232 at Docking (optional)
COM 12
RS232 at Docking (optional)
COM 15
Barcode Reader (optional)
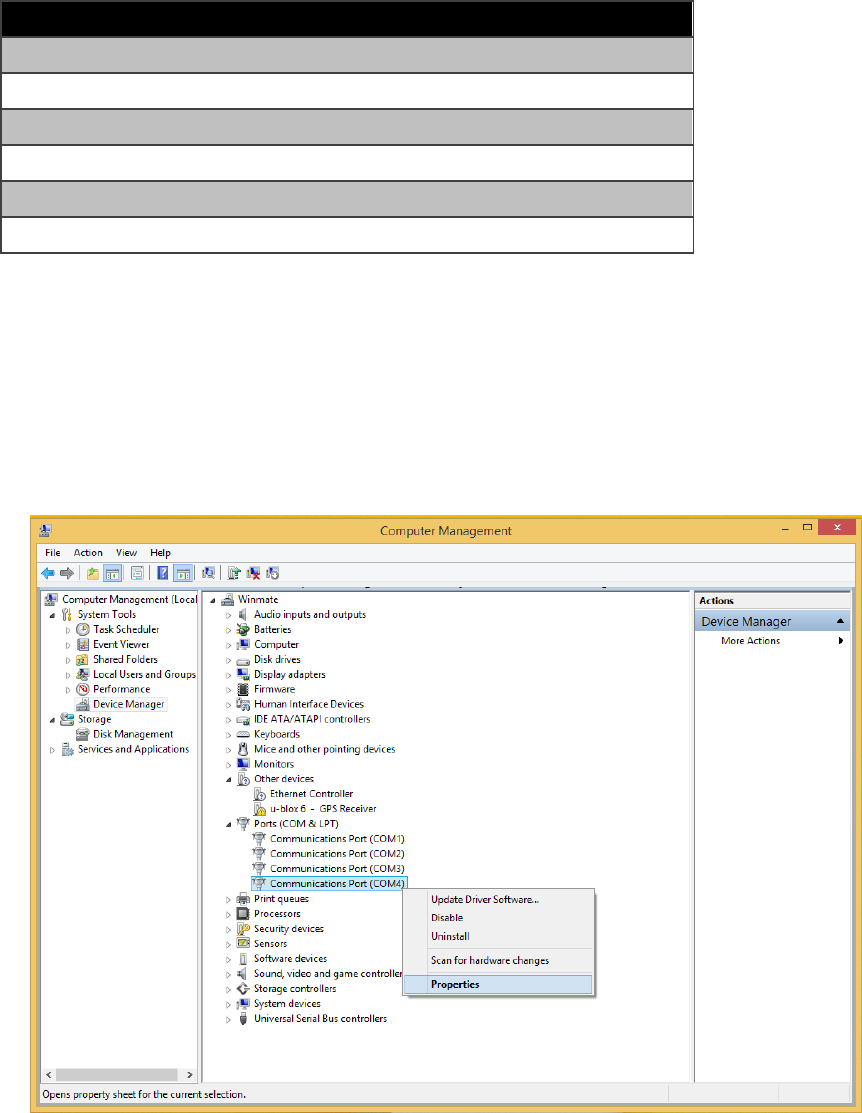
For some special applications, user might re-install OS and lose the COM port settings. To make sure the
features works properly with Hottab utility, please follow the procedure below to re-define the COM port
numbers:
1. Go to "Device Manager", right click on the COM number need to be changed, and tap on"Properties"
to open the setting page.
ALGIZ 8X User’s Manual
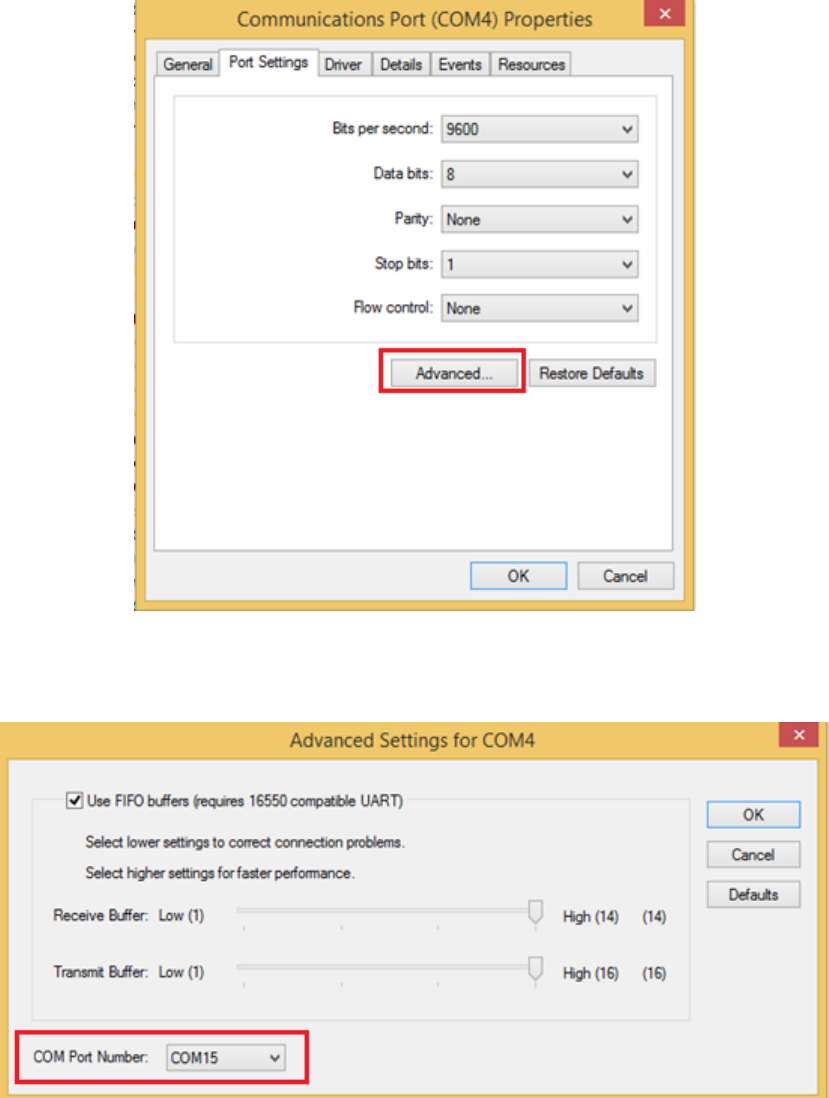
2. Tap on "Port Setting" tab and click on "Advanced" button.
3. Tap on the dropdown list and choose the correct COM Port Number (refer to the COM Port
Definition Table), and click "OK".
4. Double check "Device Manager" to make sure the COM Port number has been re-defined
successfully, and then restart the system.

ALGIZ 8X User’s Manual
7. Accessories
ALGIZ 8X offers the following optional accessories that can be purchased:
Gigabit Ethernet Adapter
For LAN from changeable I/O port
Connector: RJ45, female
Gigabit LAN, 10/100/1000 Mbps
RS232 Ethernet Adapter
For RS232 from changeable I/O port
Connector: DB9 Serial RS232 Cable, female
High Capacity Battery
Capacity: 7.6V 10400mAh (2S4P)
Li-Ion Battery
Hand Strap
Ergonomic hand-strap can help you handle
the Rugged Tablet PC much more easily and
comfortably.
Active Stylus
Passive Stylus
Screen Protector
Vehicle Docking
VESA Mounting support
USB 2.0 x2
LAN (10/100) x1
RS232 x2
HDMI x1
9-36V DC IN with 3-pin terminal block
9-36V DC IN with water proof connector
19V DC IN 2.5mm power Jack
Chapter 6
Troubleshooting

Troubleshooting (Basic)
Problem
Solution
The removable battery is not charging.
Make sure the AC adapter is properly
connected, and that the removable battery is
properly inserted.
Nothing appears on the screen.
The tablet computer may be in sleep mode.
Press the power button to wake up the
display.
The brightness level may be too low. Increase
brightness.
The screen suddenly turns blank and the
power indicator goes off.
Make sure that LED indicator is not powered
off in Hottab.
Make sure the AC adapter is properly
connected.
If running on battery power, the battery may
be depleted, charge the battery.
Wireless LAN signal quality is poor.
The tablet computer may be out of range.
Move the tablet computer closer to the
access point or another wireless LAN device
associated with it.
Check if your surroundings have
interferences, such as microwave ovens,
cordless phones. Move the tablet computer
away from objects causing interference.
I cannot connect to another wireless LAN
device.
Make sure that wireless LAN feature is
powered on.
Make sure that the SSID setting is the same
for every wireless LAN device in the network.
Restart the tablet computer
Make sure the IP address or subnet mask
setting is correct.
I cannot connect to another device with
Bluetooth.
Make sure that both devices have Bluetooth
powered on (For the Tablet Computer, check
Hottab to see if Bluetooth is powered on).
Make sure that the distance between the two
devices is within 10 meters and there are no
walls or large obstructions between the
devices.
Make sure the both devices are powered on
and configured to be discoverable.
Make sure that both devices are compatible.

The GPS application cannot find my location.
Make sure that GPS is powered on in Hottab.
Make sure that GPS receiver and the location
sensor are enabled in Control Panel.
The tablet computer may be out of coverage
area. Move your tablet computer outdoors or
closer to a window.
Check if your surroundings have
interferences, such as microwave ovens,
cordless phones. Move the tablet computer
away from objects causing interference.
No sound is produced.
Adjust volume of the tablet computer by
pressing on the volume rocker.
If using an external audio device, make sure
that the cable is properly connected.
I cannot project the tablet computer display to
another monitor.
Make sure the VGA driver is installed.
Make sure the output setting selected is
correct.
Barcode scanner does not emit laser beam and
does not seem to work.
Make sure the Barcode scanner device is
enabled in Hottab utility.
Make sure under Windows, the Barcode
Reader is set to COM 15 port, so that Hottab
can trigger the Barcode Reader hardware.
Barcode Scanner emits laser beam but does
not read barcode presented to it.
Adjust the distance between barcode scanner
of the device and the barcode being scanned.
Make sure the barcode code type is enabled
in the tablet. To enable/disable a specific
barcode code type, go through the “Barcode
Scanner Configuration” section.
I am having GPS accuracy issue
When utilizing the GPS function, we
recommend disabling the Barcode Reader in
Hottab to reduce interference.
FCC Statement
1. This device complies with Part 15 of the FCC Rules. Operation is subject to the following two
conditions:
(1) This device may not cause harmful interference.
(2) This device must accept any interference received, including interference that may cause
undesired operation.
2. Changes or modifications not expressly approved by the party responsible for compliance could
void the user's authority to operate the equipment.
NOTE: This equipment has been tested and found to comply with the limits for a Class B digital
device, pursuant to part 15 of the FCC Rules. These limits are designed to provide reasonable
protection against harmful interference in a residential installation.
This equipment generates uses and can radiate radio frequency energy and, if not installed and
used in accordance with the instructions, may cause harmful interference to radio communications.
However, there is no guarantee that interference will not occur in a particular installation. If this
equipment does cause harmful interference to radio or television reception, which can be
determined by turning the equipment off and on, the user is encouraged to try to correct the
interference by one or more of the following measures:
- Reorient or relocate the receiving antenna.
- Increase the separation between the equipment and receiver.
-Connect the equipment into an outlet on a circuit different from that to which the receiver is
connected.
-Consult the dealer or an experienced radio/TV technician for help
The SAR limit of USA (FCC) is 1.6 W/kg averaged over one gram of tissue. Device types
Portable Tablet Computer has also been tested against this SAR limit. The highest SAR value
reported under this standard during product certification when properly worn on the body is
1.423W/kg. This device was tested for typical body-worn operations with the back of the handset
kept 0cm from the body. To maintain compliance with FCC RF exposure requirements, use
accessories that maintain a 0cm separation distance between the user's body and the back of the
handset. The use of belt clips, holsters and similar accessories should not contain metallic
components in its assembly. The use of accessories that do not satisfy these requirements may not
comply with FCC RF exposure requirements, and should be avoided.
IC Statement
This device complies with Industry Canada licence-exempt RSS standard(s). Operation is subject
to the following two conditions: (1) this device may not cause harmful interference, and (2) this
device must accept any interference received, including interference that may cause undesired
operation.
Le présent appareil est conforme aux CNR d'Industrie Canada applicables aux appareils radio
exempts de licence. L'exploitation est autorisée aux deux conditions suivantes :
(1) l'appareil ne doit pas produire de brouillage, et
(2) l'utilisateur de l'appareil doit accepter tout brouillage radioélectrique subi, même si le
brouillage est susceptible d'en compromettre le fonctionnement.