Hangzhou Ezviz Network C3A Wire-free Indoor/Outdoor Battery Camera User Manual
Hangzhou Ezviz Network Co., Ltd Wire-free Indoor/Outdoor Battery Camera
User Manual
EN
ES
FR

About the Documents
The documents include instructions for using and managing the product. Pictures, charts, images and all other information
hereinafter are for description and explanation only. The information contained in the documents is subject to change, without
notice, due to firmware updates or other reasons. Please find the latest version in the website (http://www.ezvizlife.com).
Any and all information, including, among others, wordings, pictures, graphs are the properties of EZVIZ Inc. or its subsidiaries
(hereinafter referred to be “EZVIZ”). The documents cannot be reproduced, changed, translated, or distributed, partially or wholly,
by any means, without the prior written permission of EZVIZ. Unless otherwise stipulated, EZVIZ does not make any warranties,
guarantees or representations, express or implied, regarding to the documents.
Trademarks Acknowledgement
™, ™, and other EZVIZ’s trademarks and logos are the properties of EZVIZ in various jurisdictions. Other
trademarks and logos mentioned in the documents are the properties of their respective owners.
Legal Disclaimer
TO THE MAXIMUM EXTENT PERMITTED BY APPLICABLE LAW, THE PRODUCT DESCRIBED, WITH ITS HARDWARE, SOFTWARE AND
FIRMWARE, IS PROVIDED “AS IS”, WITH ALL FAULTS AND ERRORS, AND EZVIZ MAKES NO WARRANTIES, EXPRESS OR IMPLIED,
INCLUDING WITHOUT LIMITATION, MERCHANTABILITY, SATISFACTORY QUALITY, FITNESS FOR A PARTICULAR PURPOSE, AND NON-
INFRINGEMENT OF THIRD PARTY. IN NO EVENT WILL EZVIZ, ITS DIRECTORS, OFFICERS, EMPLOYEES, OR AGENTS BE LIABLE TO YOU
FOR ANY SPECIAL, CONSEQUENTIAL, INCIDENTAL, OR INDIRECT DAMAGES, INCLUDING, AMONG OTHERS, DAMAGES FOR LOSS OF
BUSINESS PROFITS, BUSINESS INTERRUPTION, OR LOSS OF DATA OR DOCUMENTATION, IN CONNECTION WITH THE USE OF THIS
PRODUCT, EVEN IF EZVIZ HAS BEEN ADVISED OF THE POSSIBILITY OF SUCH DAMAGES.
TO THE MAXIMUM EXTENT PERMITTED BY APPLICABLE LAW, IN NO EVENT SHALL EZVIZ’S TOTAL LIABILITY FOR ALL DAMAGES
EXCEED THE PURCHASE PRICE THE PRODUCT.
EZVIZ does not undertake any liability for personal injury or property damage, as the result of product interruption or service
termination cause by: a) improper installation or usage other than as requested; b) the protection of national or public interests; c)
Force Majeure; d) yourself or the third party, including not limitation, using any third party’s products, software, applications, and
among others.
REGARDING TO THE PRODUCT WITH INTERNET ACCESS, THE USE OF PRODUCT SHALL BE WHOLLY AT YOUR OWN RISKS. EZVIZ
SHALL NOT TAKE ANY RESPONSIBILITES FOR ABNORMAL OPERATION, PRIVACY LEAKAGE OR OTHER DAMAGES RESULTING FROM
CYBER ATTACK, HACKER ATTACK, VIRUS INSPECTION, OR OTHER INTERNET SECURITY RISKS; HOWEVER, EZVIZ WILL PROVIDE
TIMELY TECHNICAL SUPPORT IF REQUIRED.
Regulatory Information
FCC Information
FCC compliance: This device complies with Part 15 of the FCC Rules. Operation is subject to the following two conditions:
(1) This device may not cause harmful interference, and
(2) This device must accept any interference received, including interference that may cause undesired operation.
Note: This product has been tested and found to comply with the limits for a Class B digital device, pursuant to Part 15 of the FCC
Rules. These limits are designed to provide reasonable protection against harmful interference in a residential installation. This
product generates, uses, and can radiate radio frequency energy and, if not installed and used in accordance with the instructions,
may cause harmful interference to radio communications. However, there is no guarantee that interference will not occur in a
particular installation. If this product does cause harmful interference to radio or television reception, which can be determined
by turning the equipment off and on, the user is encouraged to try to correct the interference by one or more of the following
measures:

—Reorient or relocate the receiving antenna.
—Increase the separation between the equipment and receiver.
—Connect the equipment into an outlet on a circuit different from that to which the receiver is connected.
—Consult the dealer or an experienced radio/TV technician for help.
Please take attention that changes or modification not expressly approved by the party responsible for compliance could void the
user’s authority to operate the equipment.
This equipment should be installed and operated with a minimum distance 20cm between the radiator and your body
This device complies with Industry Canada licence-exempt RSS standard(s). Operation is subject to the following two conditions:
(1) this device may not cause interference, and
(2) this device must accept any interference, including interference that may cause undesired operation of the device.
Under Industry Canada regulations, this radio transmitter may only operate using an antenna of a type and maximum (or lesser)
gain approved for the transmitter by Industry Canada. To reduce potential radio interference to other users, the antenna type
and its gain should be so chosen that the equivalent isotropically radiated power (e.i.r.p.) is not more than that necessary for
successful communication.
EU Conformity Statement
This product and - if applicable - the supplied accessories too are marked with "CE" and comply therefore with
the applicable harmonized European standards listed under the Radio Equipment Directive 2014/53/EU, the EMC
Directive 2014/30/EU, the RoHS Directive 2011/65/EU.
2012/19/EU (WEEE directive): Products marked with this symbol cannot be disposed of as unsorted municipal
waste in the European Union. For proper recycling, return this product to your local supplier upon the purchase
of equivalent new equipment, or dispose of it at designated collection points. For more information see: www.
recyclethis.info.
2006/66/EC and its amendment 2013/56/EU (battery directive): This product contains a battery that cannot be
disposed of as unsorted municipal waste in the European Union. See the product documentation for specific
battery information. The battery is marked with this symbol, which may include lettering to indicate cadmium
(Cd), lead (Pb), or mercury (Hg). For proper recycling, return the battery to your supplier or to a designated
collection point. For more information see: www.recyclethis.info.
Industry Canada ICES-003 Compliance
This device meets the CAN ICES-3 (B)/NMB-3(B) standards requirements.
This device complies with Industry Canada licence-exempt RSS standard(s). Operation is subject to the following two
conditions:
(1) this device may not cause interference, and
(2) this device must accept any interference, including interference that may cause undesired operation of the device.
Le présent appareil est conforme aux CNR d'Industrie Canada applicables aux appareils radioexempts de licence.
L'exploitation est autorisée aux deux conditions suivantes :
(1) l'appareil ne doit pas produire de brouillage, et
(2) l'utilisateur de l'appareil doit accepter tout brouillage radioélectrique subi, même si le brouillage est susceptible d'en
compromettre le fonctionnement.
This equipment should be installed and operated with a minimum distance 20cm between the radiator and your body
Cet équipement doit être installé et utilisé à une distance minimale de 20 cm entre le radiateur et votre corps

Under Industry Canada regulations, this radio transmitter may only operate using an antenna of a type and maximum (or
lesser) gain approved for the transmitter by Industry Canada. To reduce potential radio interference to other users, the
antenna type and its gain should be so chosen that the equivalent isotropically radiated power (e.i.r.p.) is not more than
that necessary for successful communication.
Conformément à la réglementation d'Industrie Canada, le présent émetteur radio peut
fonctionner avec une antenne d'un type et d'un gain maximal (ou inférieur) approuvé pour l'émetteur par Industrie
Canada. Dans le but de réduire les risques de brouillage radioélectrique à l'intention des autres utilisateurs, il faut
choisir le type d'antenne et son gain de sorte que la puissance isotrope rayonnée équivalente (p.i.r.e.) ne dépasse pas
l'intensité nécessaire à l'établissement d'une communication satisfaisante.
La operación de este equipo está sujeta a las siguientes dos condiciones: (1) es posible que este equipo o dispositivo
no cause interferencia perjudicial y (2) este equipo o dispositivo debe aceptar cualquier interferencia, incluyendo la que
pueda causar su operación no deseada.
Safety Instruction
CAUTION: THE PRODUCT IS BUILT IN A REPLACEABLE BATTERY. RISK OF EXPLOSION IF BATTERY IS
REPLACED BY AN INCORRECT TYPE. DISPOSE OF USED BATTERIES ACCORDING TO THE INSTRUCTIONS.
Due to the product shape and dimension, the name and address of the importer/manufacturer
are printed on the package.
EC DECLARATION OF CONFORMITY
Hereby, Hangzhou Hikvision Digital Technology Co., Ltd. declares that the radio equipment type [CS-
W2S,CS-CV316] is in compliance with Directive 2014/53/EU.
The full text of the EC DECLARATION OF CONFORMITY is available at the following web link:
http://www.ezvizlife.com/declaration-of-conformity.
For more information, please visit www.ezvizlife.com
Need help? Contact us:
Phone:
USA/CAN: +1-855-693-9849
MX: +52-55-8526-1060
Email:
USA/CAN/MX: service@ezvizlife.com
Other countries: support@ezvizlife.com
SAVE THIS MANUAL FOR FUTURE REFERENCE
1
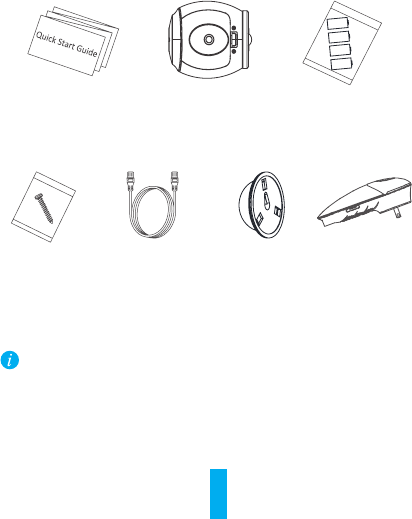
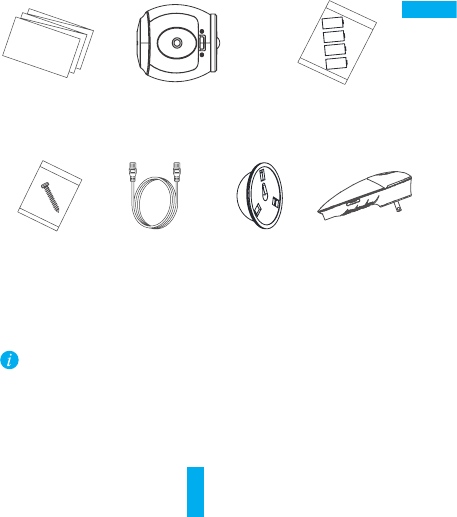
Box Contents
Quick Start
Guide (x1)
Screw Kit (x1)
Mini Trooper
(x1)
Network Cable
(Within Bundle)
CR123A
Battery (x4)
Metal Plate
(x1) Base Station
(Within Bundle)
Plug type may vary according to countries, e.g. UK plug is
available in the box in UK market.
2
EN
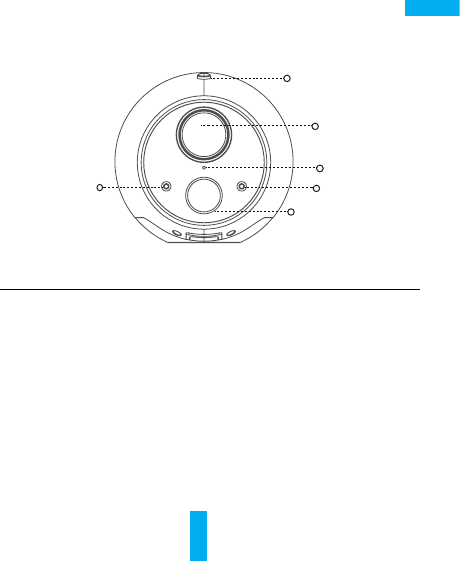
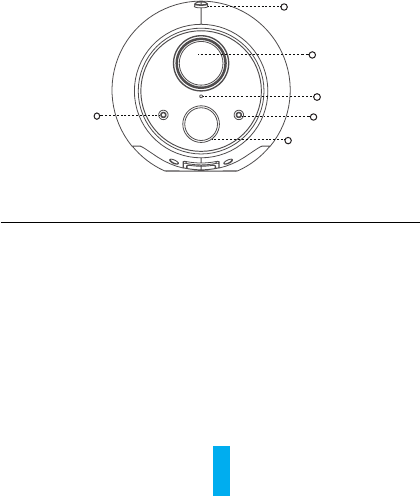
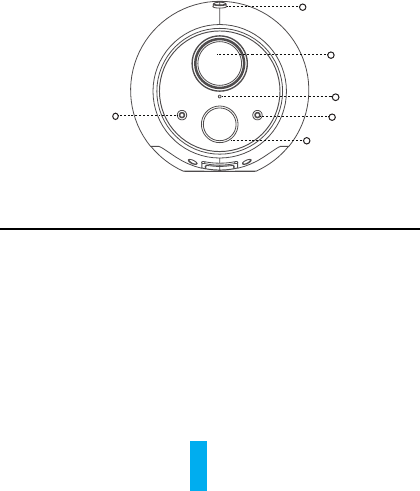
Mini Trooper
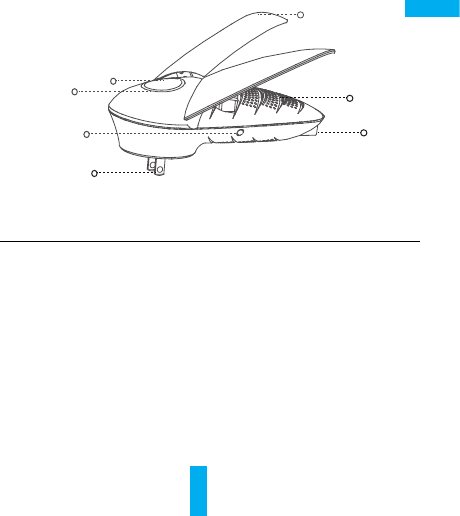
Name Description
SYNC Button Use to synchronize the camera.
PIR With the PIR (Passive Infrared), the device can
detect a human body to determine when there is a
possible break in and begins to record footage.
LED Indicator • Steady Red: The camera is starting.
• Slow-Flashing Blue: The camera is starting to
synchronize or the device is updating.
• Fast-Flashing Blue: The synchronization is
complete.
• Fast-Flashing Red: The synchronization failed.
Photoresistor Detects the environment's light conditions to
activate the Day/Night switch function.
PIR
Photoresistor
Overview
Microphone
LED Indicator
Lens
SYNC Button

3
Reset Button
Base Station
Name Description
Antenna Enhances the transmission of wireless network
signal between the base station and camera(s) or
other wireless network terminals.
LED Indicator • Steady Green: The system works properly.
• Steady Blue: Device is not connected to internet.
• Flashing Blue: Memory card is formatting or device
starting synchronization with Mini Trooper.
• Flashing Red: Exception occured.
Main Button Use to start synchronization with the Mini Troopers
(The synchronization lasts 2 mins).
Network
Indicator
• Steady Green: The network cable is connected.
• Flashing Green: Data transmission is working.
Reset Button Use to restart and reset all parameters to default.
LED Indicator
Network Interface
Network Indicator
Antenna
Power Input
Main Button
4
EN
Setup Process
The Mini Trooper should be used with the EZVIZ Base
Station. Base Station sold separately (unless in bundle).
Step 1 Download the EZVIZ App
- Download the App (If you already have an EZVIZ account,
login to the App).
- Search for “EZVIZ” in the App Store/Google Play™ from your
mobile device to download and install the App.
- Launch the App.
- Create an EZVIZ user account.
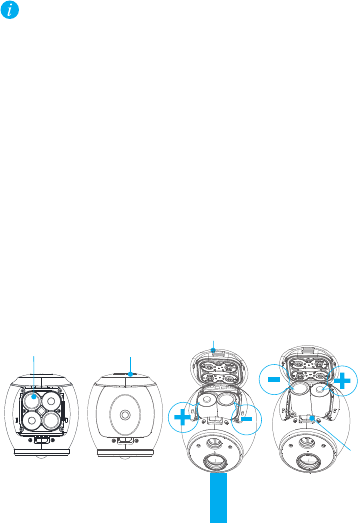
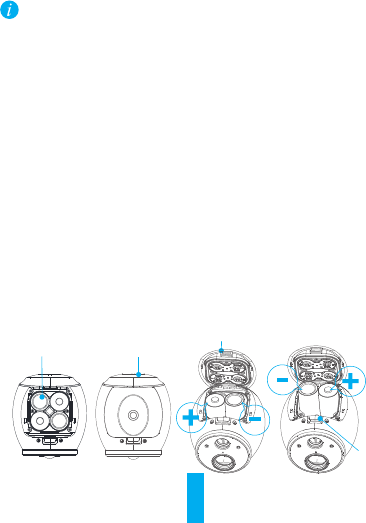
Step 2 Insert Batteries into Camera
- 4 batteries are included for maximum battery life.
*Note: Only 2 batteries are required for camera operation,
as long as they are inserted into top or bottom horizontal
chambers.
- Release the battery chamber latch to open battery cover.
- Insert the enclosed four batteries as shown below.
- Cover the batteries with the battery cover.
Battery Cover
Magnetic Base
Battery
Chamber
Latch
CR123A
Battery
5
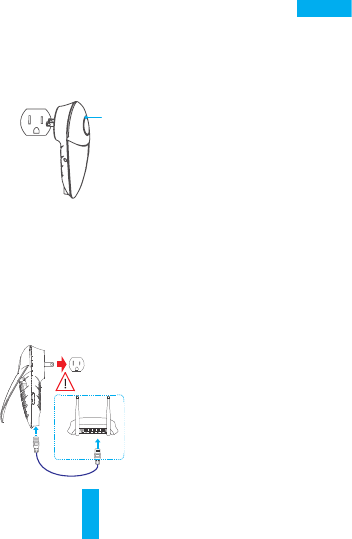
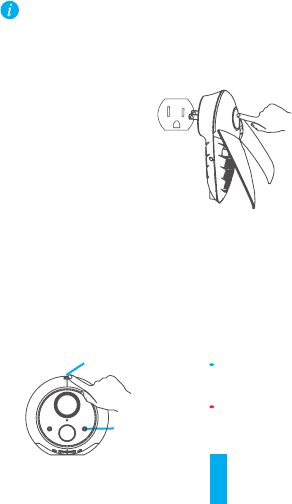
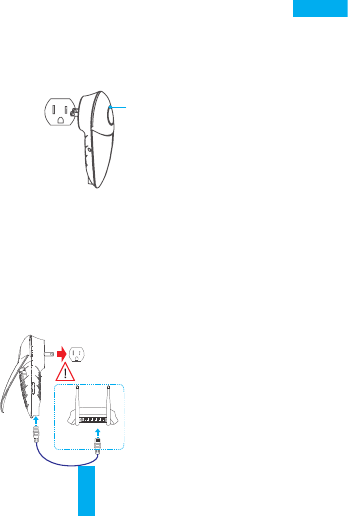
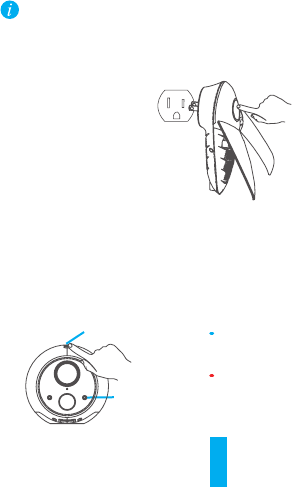
Step 3 Plug in the Base Station
- Plug the Base Station into the power outlet and the LED
indicator will turn green, followed by light blue and then
solid blue. The device will turn on within 2 minutes. Once
the LED indicator on the Base Station is a solid blue,
proceed to the next step.
Step 4 Connect Base Station to Internet via Ethernet Cable
(for Connection via Wi-Fi, please see page 9)
- Connect the base station to your Wi-Fi router by inserting
the Ethernet cable into the bottom of the Base Station as
shown below.
- Proceed to the next step. The Base Station LED indicator
will display steady green.
Power Outlet
Network Cable
LED Indicator
POWER WAN LAN2 LAN4LAN1 LAN3 WPS/
RESET
6
EN
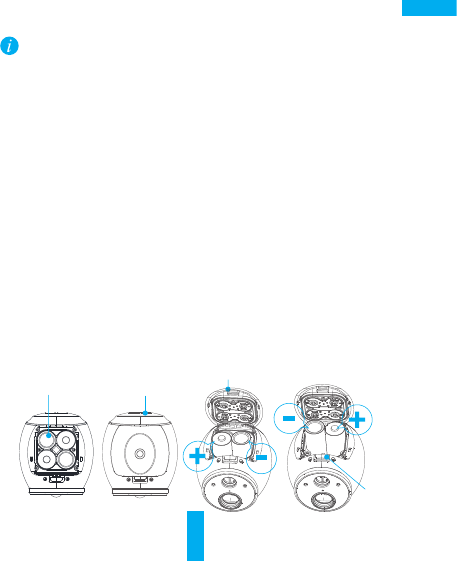
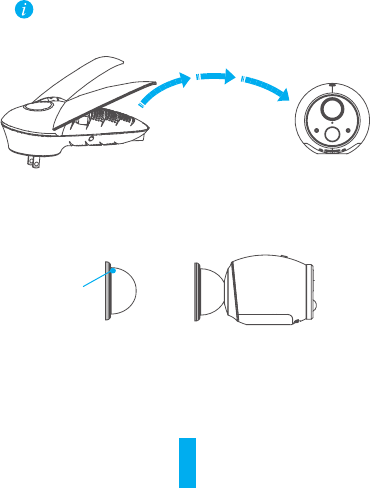
Step 5 Synchronize Base Station to Camera(s)
• Make sure the camera is within 2' to 3' (0.6 m to 1 m) of
the base station.
• The synchronization process takes about 2 minutes.
1. Tap the Main Button on the Base Station. The circular LED
indicator flashes Blue.
2. Press and hold the Sync button on the camera for 6
seconds. The LED indicator will slowly flash blue. When
flashing blue becomes more rapid and then stops, sync is
conrmed.Proceedtothenextstep.
*Note: During the 2-minute Sync Mode, you can sync up to 6
Mini Trooper cameras to the Base Station at the same time.
Fast-Flashing Blue:
Synchronization complete.
Fast-Flashing Red: Sync
failed. Repeat the Sync
Process.
LED Indicator
SYNC Button

7
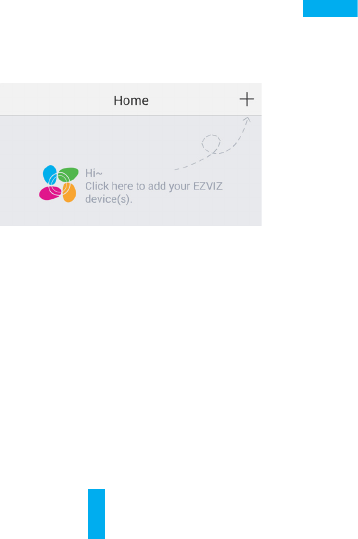
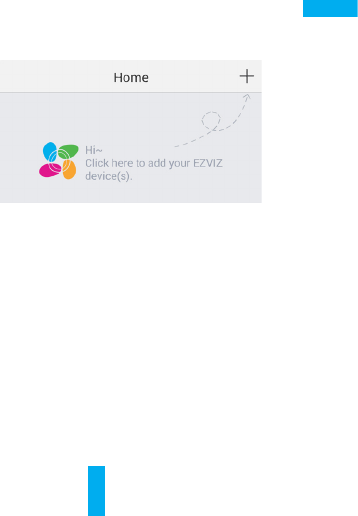
Step 6 Add the base station to your EZVIZ Account
- When logged into your account on the EZVIZ App, Tap the “+”
on the top right of your Home page to Scan the QR Code.
- Scan the QR Code on base station (located on the device
label or Quick Start Guide cover), or manually enter the
Serial Number.
-Enterthebasestationvericationcode(i.e.password)from
the device label and click “OK.”
-Clickthe“Add”buttontonishsetup.Thiswilltake
approximately 1 minute.
- Click “View Camera” to start using and viewing your Mini
Trooper(s) in the mobile app.
- Proceed to Camera Installation instructions below to place
the camera in the desired location, indoors or outdoors.
8
EN
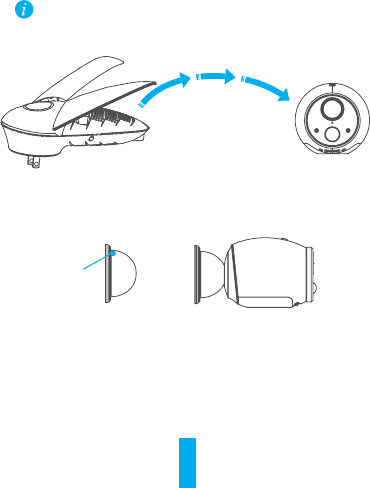
Step 1 Pick a clean and flat surface, indoors or outdoors.
Camera range is up to 300 feet (100 m) from the Base
Station (range could decrease based on environmental
factors).
Step 2 Secure the magnetic mount with the enclosed screw.
Step 3 Mount the camera to the metallic mount or attach it
directly to a metallic surface.
Camera Installation
Metallic
Mount
1' to 300 '
(0.3 m to 100 m)

9
1. NoteSerialNumberandVericationCode
-Writedowntheserialnumberandvericationcodelocatedonthe
base station.
2. Connect to the base station Wi-Fi.
In your mobile device, look for the Wi-Fi Network named “ezviz_xxxxxx”
(xxxxxx stands for the six digit combination after “ezviz_”)
- Once you choose the “ezviz_xxxxxx” network, enter the Wi-Fi
password which is the last four digits of the Serial Number + the
VericationCode,(listedonthedeviceandpackagelabel)
If the wizard does not pop up, access the IP address (192.168.7.1) in
your Web browser.
3. Wireless Relay Gateway Setup (connecting the base station to
your local Wi-Fi network):
- In your mobile device press the “Start Button.”
- Adjust antenna on the base station. Once that is complete, click
the “Antenna adjusted” button.
- Follow the prompt to create a login password for the base station.
- Choose your preferred Time Zone and select Daylight Savings
Time (DST) On or Off.
- Choose the “Wi-Fi Relay Internet Access”
option as your connection mode.
- Search for and choose your local Wi-Fi network and enter your Wi-
Fi password. Press “Connect to Network.”
- Check your Base Station Wi-Fi settings. Note: You can change you
Base Station Wi-Fi Name and Password to your own preference.
- Press the “Save” button to save Wi-Fi settings.the LED indicator
on the Base Station will become from blue to steady green when
Internet is connected successfully.
- Proceed to Step 5 above through to Camera Installation.
Connect Base Station to Internet via Wi-Fi
(Optional)
10
ES
Contenido de la caja
1 guía de inicio
rápido
1 Mini Trooper 4 baterías CR123A
1 kit de tornillos Cable de red
(dentro del
paquete)
1 placa de
metal Estación base
(dentro del
paquete)
El tipo de enchufe puede variar según cada país. Por ejemplo,
la caja a la venta en el Reino Unido trae un enchufe compatible
en la UK.
11
Mini Trooper
Fotoresistor
Micrófono
Indicador LED
PIR
Lente
Botón SYNC
Nombre Descripción
Botón SYNC Utilice para sincronizar la cámara.
PIR Con el PIR (infrarrojo pasivo), el dispositivo puede detectar la
presencia de un cuerpo humano para determinar si hay un
posible robo y comenzar la grabación de imágenes.
Indicador LED • Rojo estable: La cámara se está iniciando.
• Parpadeo lento en azul: La cámara comenzó la
sincronización o el dispositivo se está actualizando.
• Parpadeo rápido en azul: Se completó la sincronización.
• Parpadeo rápido en rojo: La sincronización falló.
Fotoresistor Detecta las condiciones de luminosidad del ambiente para
activar la función de Día/Noche.
Vista general

12
ES
Estación base
Botón de reinicio
Indicador LED
Interfaz de red
Indicador de red
Antena
Entrada de
alimentación
Botón principal
Nombre Descripción
Antena Mejora la transmisión de la señal de red inalámbrica entre
la estación base y la(s) cámara(s) u otros terminales de red
inalámbricos.
Indicador LED • Verde estable: El sistema funciona correctamente.
• Azul estable: El dispositivo no está conectado a Internet.
• Azul parpadeante: La tarjeta de memoria se está formateando
o el dispositivo inició la sincronización con el Mini Trooper.
• Rojo parpadeante: Una excepción.
Botón principal Utilice este botón para iniciar la sincronización con los Mini
Troopers (La sincronización demora 2 minutos).
Indicador
de red
• Verde estable: El cable de red está conectado.
• Verde parpadeante: La transmisión de datos está funcionando.
Botón de
reinicio
Utilice este botón para reiniciar y restablecer todos los
parámetros a los valores por defecto.
13
Procesodeconguración
El Mini Trooper debe utilizarse con la estación base
EZVIZ. La estación base se vende por separado (a menos
que esté en el paquete).
Paso 1 Descargue la aplicación EZVIZ
- Descargue la aplicación (si ya tiene una cuenta de EZVIZ;
inicie sesión en la aplicación).
- Busque "EZVIZ" en el App Store/Google Play™ de su
dispositivo móvil para descargarla e instalarla.
- Inicie la aplicación.
- Cree una cuenta de usuario de EZVIZ.
Paso 2 Inserte las baterías en la cámara
- Se incluyen 4 baterías para lograr el máximo rendimiento.
*Nota: La cámara funciona solo con 2 baterías, siempre y
cuando se inserten en los compartimientos horizontales
superiores o inferiores.
- Suelte el seguro del compartimiento para remover la tapa
que cubre la batería.
- Inserte las cuatro baterías adjuntas, como se muestra a
continuación.
- Cubra las baterías con la tapa.
Tapa de la batería
Base magnética
Seguro del
compartimiento
de la batería
Batería CR123A
14
ES
Paso 3 Enchufe la estación base
- Conecte la estación base al toma corriente y el indicador
LEDsepondráverde,luegocelesteynalmenteazul
estable. El dispositivo se encenderá en un lapso de
2 minutos. Una vez que el indicador LED se muestre azul
estable en la base, proceda con el siguiente paso.
Indicador LED
Paso 4 Conecte la estación base a Internet con el cable
Ethernet
(para conexión vía Wi-Fi, consulte la página 18 )
- Conecte la estación base a su Enrutador Wi-Fi insertando
el cable Ethernet en la parte inferior de la estación base,
como se muestra a continuación.
- Proceda con el siguiente paso. Estación base indicador
LED mostrada Verde estable.
Toma de corriente
Cable de red
POWER WAN LAN2 LAN4LAN1 LAN3 WPS/
RESET
15
Paso 5 Sincronice la estación base con la cámara
• Asegúrese de que la cámara esté dentro de un rango de
0,6 m a 1 m de distancia de la estación base.
• El proceso de sincronización demora alrededor de 2 minutos.
1. Pulse el botón principal en la estación base. El indicador LED
circular parpadea en azul.
2. Pulse y mantenga presionado el botón de sincronización de
la cámara durante 6 segundos. El indicador LED parpadeará
en azul lentamente. Cuando el parpadeo en azul se acelere
ysedetenga,signicaqueseconrmólasincronización.
Proceda con el siguiente paso.
*Nota: Durante el modo de sincronización de 2 minutos,
puede sincronizar hasta 6 cámara Mini Trooper a la estación
base al mismo tiempo.
Parpadeo rápido en azul:
Se completó la sincronización.
Parpadeo rápido en rojo: La
sincronización falló. Repita el
proceso de sincronización.
Indicador LED
Botón SYNC
16
ES
Paso 6 Agregue la estación base a su cuenta EZVIZ
- Una vez que inició sesión con su cuenta en la aplicación
EZVIZ, pulse el botón "+" en la parte superior derecha de la
página de Inicio para escanear el código QR.
- Escanee el código QR en la estación base (ubicado en la
etiqueta del dispositivo o en la portada de la Guía de inicio
rápido), o ingrese manualmente el número de serie.
- Ingreseelcódigodevericacióndelaestaciónbase(es
decir, la contraseña) de la etiqueta del dispositivo y haga
clic en "OK" (Aceptar).
- Haga clic en el botón "Add" (Agregar) para completar la
instalación. Esto demorará aproximadamente 1 minuto.
- Haga clic en "View Camera" (Ver cámara) para comenzar a
usar y visualizar sus Mini Trooper(s) en la aplicación móvil.
- Siga con las instrucciones de instalación de la cámara a
continuación para colocar la cámara en el lugar deseado,
ya sea en un entorno interior o exterior.
17
Paso 1 Elijaunasupercielimpiayplana,eninterioro
exterior.
El alcance de la cámara es de hasta 100 m desde
la estación base (La distáncia puede reducirse por
factores ambientales).
De 0,3 m a 100 m
Paso 2 Fije el montaje magnético con el tornillo incluido en
la caja.
Paso 3 Coloque la cámara sobre el montaje metálico o
únaladirectamenteaunasuperciemetálico.
Montaje
Metálico
Instalación de la cámara

18
ES
1. Anoteelnúmerodeserieyelcódigodevericación
- Apunteelnúmerodeserieyelcódigodevericaciónubicados
en la estación base.
2. Conéctese al Wi-Fi de la estación base.
En su dispositivo móvil, busque la red Wi-Fi de nombre
"ezviz_xxxxxx" (xxxxxx representa la combinación de seis dígitos
después de "ezviz_")
- Cuando haya elegido la red "ezviz_xxxxxx", ingrese la contraseña
de Wi-Fi, que son los últimos cuatro dígitos del número de serie
+elcódigodevericación(incluidoseneldispositivoyenla
etiqueta del paquete)
Si no emerge el asistente, ingrese la dirección IP (192.168.7.1) en
su buscador Web.
3. ConguracióndeGatewayderetrasmisiónimalabrica(conexión
de estación base con su red Wi-Fi local):
- En su dispositivo móvil pulse el botón "Start" (Iniciar).
- Ajuste la antena en la estación base. Una vez que lo haga, haga
clic en el botón "Antenna adjusted" (Antena ajustada).
- Siga las indicaciones para crear una contraseña de inicio de
sesión para la estación base.
- Elija la zona horaria de su preferencia y seleccione Horario de
verano (DST) Encendido o Apagado.
- Elija la opción "Wi-Fi Relay Internet Access" (Acceso
a Internet por relé Wi-Fi) como su modo de conexión.
- Elija su conexión Wi-Fi local e ingrese su contraseña. Pulse
"Connect to Network" (Conectar a la red).
Conecte la estación base a Internet vía Wi-Fi
(Opcional)

19
- CompruebelaconguraciónWi-Fidelaestaciónbase.Nota:
Puede cambiar su nombre y contraseña de Wi-Fi de la estación
base según sus preferencias.
- Pulseelbotón"Save"(Guardar)paraguardarlaconguración
de Wi-Fi.
- Proceda con el paso 5 anterior hasta la instalación de la cámara.
20
FR
Contenu de la boite
Guide de
démarrage rapide
Guide de
démarrage
rapide (1)
Mini Trooper (1) Pile CR123A (4)
Ensemble
de vis (1) Câble réseau
(inclus dans le
paquet)
Plaque en
métal (1) Station de base
(incluse dans le
paquet)
Letypedechepeutvarierselonlespays,parexemplelache
R.-U. est offerte dans la boite dans le marché du R.-U.
21
Mini Trooper
Photosenseur
Microphone
Voyant DEL
IRP
Objectif
Bouton SYNC
Nom Description
Bouton SYNC Permet de synchroniser la caméra.
IRP Avec l’IRP (infrarouge passif), l’appareil peut détecter
un corps humain pour déterminer s’il y a une possible
effraction et lancer l’enregistrement vidéo.
Voyant DEL • Rouge continu : la caméra est en démarrage.
• Clignotement lent bleu : la caméra commence la
synchronisation ou l’appareil se met à jour.
• Clignotement rapide bleu : la synchronisation est
terminée.
• Clignotement rapide rouge : la synchronisation a
échoué.
Photosenseur Détecte les conditions de luminosité de l’environnement
pour activer la fonction de commutation jour/nuit.
Aperçu
22
FR
Station de base
Bouton de
réinitialisation
Voyant DEL
Interface réseau
Indicateur de
réseau
Antenne
Entrée
d’alimentation
Bouton principal
Nom Description
Antenne Améliorelatransmissiondusignalderéseausanslentrela
station de base et la ou les caméras ou d’autres terminaux de
réseausansl.
Voyant DEL • Vert continu : le système fonctionne correctement.
• Bleu continu : l’appareil n’est pas connecté à Internet.
• Bleu clignotant : la carte mémoire est en formatage ou
l’appareil a lancé la synchronisation avec le Mini Trooper.
• Rouge clignotant : Une exception s’est produite.
Bouton
principal
Permet de lancer la synchronisation avec les Mini Trooper
(la synchronisation dure 2 minutes).
Indicateur de
réseau
• Vert continu : le câble réseau est connecté.
• Vert clignotant : la transmission de données fonctionne.
Bouton de
réinitialisation
Permet de redémarrer et de réinitialiser tous les paramètres
par défaut.
23
Processus d’installation
Le Mini Trooper doit être utilisé avec la station de base
EZVIZ. La station de base est vendue séparément (à moins
d’être incluse dans un ensemble).
Étape 1 Télécharger l’application EZVIZ
- Téléchargez l’application (si vous avez déjà un compte
EZVIZ, connectez-vous à l’application).
- Cherchez « EZVIZ » dans l’App Store ou sur Google Play™ à
partir de votre appareil mobile pour télécharger et installer
l’application.
- Lancez l’application.
- Créez un compte d’utilisateur EZVIZ.
Étape 2 Insérer les piles dans la caméra
- 4 piles sont incluses pour une autonomie maximale.
*Remarque : Seulement 2 piles sont requises pour le
fonctionnement de la caméra, pourvu qu’elles soient insérées
dans les logements horizontaux du dessus ou du dessous.
- Dégagez le loquet du logement des piles pour ouvrir le
couvercle des piles.
- Insérez les quatre piles incluses comme décrit ci-dessous.
- Replacez le couvercle des piles.
Couvercle des piles
Base magnétique
Loquet du
logement
des piles
Pile CR123A
24
FR
Étape 3 Brancher la station de base
- Branchez la station de base dans la prise de courant et
le témoin DEL passera au vert, puis au bleu pâle, puis au
bleu continu. L’appareil s’allumera en moins de 2 minutes.
Lorsque le témoin DEL sur la station de base est d’un bleu
continu, passez à l’étape suivante.
Voyant DEL
Étape 4 Connecter la station de base à Internet à l’aide d’un
câble Ethernet
(Pour la connexion par Wi-Fi, veuillez consulter la page 28 )
- Connectez la station de base à votre routeur Wi-Fi en
insérant le câble Ethernet sous la station de base, comme
montré ci-dessous.
- Passez à l’étape suivante. Voyant DEL la station de base
afchevertstable.
Prise électrique
Câble réseau
POWER WAN LAN2 LAN4LAN1 LAN3 WPS/
RESET
25
Étape 5 Synchroniser la station de base avec la ou les
caméras
• Assurez-vous que la caméra se trouve dans un rayon de 0,6
à 1 m (2 à 3 pi) de la station de base.
• Le processus de synchronisation prend environ 2 minutes.
1. Appuyez sur le bouton principal de la station de base. Le
témoin DEL rond clignote en bleu.
2. Appuyez et maintenez le bouton Sync sur la caméra pendant
6 secondes. Le témoin DEL clignotera lentement en bleu.
Lorsque le clignotement en bleu s’accélère puis s’arrête, la
synchronisationestconrmée.Passezàl’étapesuivante.
*Remarque : Pendant le mode de synchronisation de 2 minutes,
vous pouvez synchroniser jusqu’à 6 caméras Mini Trooper vers
la station de base en même temps.
Clignotement rapide bleu :
Synchronisation terminée.
Clignotement rapide rouge :
Synchronisation échouée.
Répéter le processus de
synchronisation.
Voyant DEL
Bouton SYNC
26
FR
Étape 6 Ajouter la station de base à votre compte EZVIZ
- Lorsque vous êtes connecté à votre compte sur
l’application EZVIZ, appuyez sur le « + » dans le coin supérieur
droit de la page d’accueil pour scanner le code QR.
- Scannez le code QR sur la station de base (situé sur
l’étiquette de l’appareil ou sur la couverture du Guide de
démarrage rapide), ou saisissez manuellement le numéro
de série.
- Saisissezlecodedevéricationdelastationdebase(le
mot de passe) à partir de l’étiquette de l’appareil, puis
cliquez sur « OK ».
- Cliquez sur le bouton « Add » (Ajouter) pour terminer
l’installation. Cela prendra environ 1 minute.
- Cliquez sur « View Camera »(Afcherlacaméra)pour
commenceràutiliseretàafchervotreouvosMini
Trooper dans l’application mobile.
- Passez aux instructions d’installation de la caméra ci-
dessous pour placer la caméra dans l’emplacement désiré,
à l’intérieur ou à l’extérieur.
27
Étape 1 Choisissez une surface propre et plane, à
l’intérieur ou à l’extérieur.
La portée de la caméra va jusqu’à 100 m (300 pi) de la
station de base (la portée pourrait être diminuée selon
les facteurs environnementaux).
0,3 m à 100 m
(1 à 300 pi)
Étape 2 Fixez le support magnétique avec la vis incluse.
Étape 3 Fixez la caméra au support métallique ou attachez-
la directement à une surface métallique.
Support
métallique
Installation de la caméra

28
FR
1. Notezlenumérodesérieetlecodedevérication
- Notezlenumérodesérieetlecodedevéricationsituéssurla
station de base.
2. Connectez-vous au Wi-Fi de la station de base.
Dans votre appareil mobile, cherchez le réseau Wi-Fi nommé
« ezviz_xxxxxx » (xxxxxx représente la combinaison de six chiffres
après « ezviz_ »)
- Après avoir choisi le réseau « ezviz_xxxxxx », saisissez le mot de
passe Wi-Fi, qui est les quatre derniers chiffres du numéro de
série+lecodedevérication,(inscritsurl’appareiletl’étiquette
de l’emballage)
Si l’assistant n’apparait pas, accédez à l’adresse IP (192.168.7.1)
dans votre navigateur Web.
3. Installationdelapasserellederelaissansl(connexiondela
station de base à votre réseau Wi-Fi local) :
- Dans votre appareil mobile, appuyez sur bouton « Start »
(Démarrage).
- Ajustez l’antenne sur la station de base. Une fois l’ajustement
terminé, cliquez sur le bouton « Antenna adjusted » (Antenne
ajustée).
- Suivez les indications pour créer un mot de passe de connexion
pour la station de base.
- Choisissez votre fuseau horaire préféré et sélectionnez Heure
avancée (HA) activée ou désactivée.
- Choisissez l’option « Wi-Fi Relay Internet Access »
(Accès Internet par relais Wi-Fi) comme mode de
connexion.
Connecter la station de base à Internet
à l’aide d’une connexion Wi-Fi (Optionnel)

29
- Choisissez votre connexion Wi-Fi locale et saisissez votre mot
de passe. Appuyez sur « Connect to Network » (Se connecter au
réseau).
- VériezvosparamètresWi-Fidelastationdebase.Remarque:
VouspouvezmodiervotrenometmotdepasseWi-Fidela
station de base selon vos préférences.
- Appuyez sur le bouton « Save » (Sauvegarder) pour sauvegarder
les paramètres Wi-Fi.
- Passez à l’étape 5 ci-dessus jusqu’à l’installation de la caméra.

UD05776B-A