Hangzhou Ezviz Network X3C-8E Wi-Fi Video Recorder User Manual
Hangzhou Ezviz Network Co., Ltd Wi-Fi Video Recorder Users Manual
Contents
- 1. Users Manual
- 2. User Manual
Users Manual

About the Documents
The documents include instructions for using and managing the product. Pictures, charts, images and all other information hereinafter are for
description and explanation only. The information contained in the documents is subject to change, without notice, due to firmware updates or
other reasons. Please find the latest version in the website (http://www.ezvizlife.com).
Any and all information, including, among others, wordings, pictures, graphs are the properties of EZVIZ Inc. or its subsidiaries (hereinafter
referred to be “EZVIZ”). The documents cannot be reproduced, changed, translated, or distributed, partially or wholly, by any means, without the
prior written permission of EZVIZ. Unless otherwise stipulated, EZVIZ does not make any warranties, guarantees or representations, express or
implied, regarding to the documents.
Trademarks Acknowledgement
™, ™, and other EZVIZ’s trademarks and logos are the properties of EZVIZ in various jurisdictions. Other trademarks and logos
mentioned in the documents are the properties of their respective owners.
Legal Disclaimer
TO THE MAXIMUM EXTENT PERMITTED BY APPLICABLE LAW, THE PRODUCT DESCRIBED, WITH ITS HARDWARE, SOFTWARE AND FIRMWARE, IS
PROVIDED “AS IS”, WITH ALL FAULTS AND ERRORS, AND EZVIZ MAKES NO WARRANTIES, EXPRESS OR IMPLIED, INCLUDING WITHOUT LIMITATION,
MERCHANTABILITY, SATISFACTORY QUALITY, FITNESS FOR A PARTICULAR PURPOSE, AND NON-INFRINGEMENT OF THIRD PARTY. IN NO EVENT
WILL EZVIZ, ITS DIRECTORS, OFFICERS, EMPLOYEES, OR AGENTS BE LIABLE TO YOU FOR ANY SPECIAL, CONSEQUENTIAL, INCIDENTAL, OR
INDIRECT DAMAGES, INCLUDING, AMONG OTHERS, DAMAGES FOR LOSS OF BUSINESS PROFITS, BUSINESS INTERRUPTION, OR LOSS OF DATA OR
DOCUMENTATION, IN CONNECTION WITH THE USE OF THIS PRODUCT, EVEN IF EZVIZ HAS BEEN ADVISED OF THE POSSIBILITY OF SUCH DAMAGES.
TO THE MAXIMUM EXTENT PERMITTED BY APPLICABLE LAW, IN NO EVENT SHALL EZVIZ’S TOTAL LIABILITY FOR ALL DAMAGES EXCEED THE
PURCHASE PRICE THE PRODUCT.
EZVIZ does not undertake any liability for personal injury or property damage, as the result of product interruption or service termination cause by: a)
improper installation or usage other than as requested; b) the protection of national or public interests; c) Force Majeure; d) yourself or the third
party, including not limitation, using any third party’s products, software, applications, and among others.
REGARDING TO THE PRODUCT WITH INTERNET ACCESS, THE USE OF PRODUCT SHALL BE WHOLLY AT YOUR OWN RISKS. EZVIZ SHALL NOT TAKE
ANY RESPONSIBILITES FOR ABNORMAL OPERATION, PRIVACY LEAKAGE OR OTHER DAMAGES RESULTING FROM CYBER ATTACK, HACKER ATTACK,
VIRUS INSPECTION, OR OTHER INTERNET SECURITY RISKS; HOWEVER, EZVIZ WILL PROVIDE TIMELY TECHNICAL SUPPORT IF REQUIRED.
Regulatory Information
FCC Information
FCC compliance: This device complies with Part 15 of the FCC Rules. Operation is subject to the following two conditions:
(1) This device may not cause harmful interference, and
(2) This device must accept any interference received, including interference that may cause undesired operation.
Note: This product has been tested and found to comply with the limits for a Class B digital device, pursuant to Part 15 of the FCC Rules. These
limits are designed to provide reasonable protection against harmful interference in a residential installation. This product generates, uses, and
can radiate radio frequency energy and, if not installed and used in accordance with the instructions, may cause harmful interference to radio
communications. However, there is no guarantee that interference will not occur in a particular installation. If this product does cause harmful
interference to radio or television reception, which can be determined by turning the equipment off and on, the user is encouraged to try to
correct the interference by one or more of the following measures:
—Reorient or relocate the receiving antenna.
—Increase the separation between the equipment and receiver.
—Connect the equipment into an outlet on a circuit different from that to which the receiver is connected.
—Consult the dealer or an experienced radio/TV technician for help.
Please take attention that changes or modification not expressly approved by the party responsible for compliance could void the user’s authority
to operate the equipment.
This equipment should be installed and operated with a minimum distance 20cm between the radiator and your body
This device complies with Industry Canada licence-exempt RSS standard(s). Operation is subject to the following two conditions:
(1) this device may not cause interference, and
(2) this device must accept any interference, including interference that may cause undesired operation of the device.
Under Industry Canada regulations, this radio transmitter may only operate using an antenna of a type and maximum (or lesser) gain approved
for the transmitter by Industry Canada. To reduce potential radio interference to other users, the antenna type and its gain should be so chosen
that the equivalent isotropically radiated power (e.i.r.p.) is not more than that necessary for successful communication.

EU Conformity Statement
This product and - if applicable - the supplied accessories too are marked with "CE" and comply therefore with the applicable
harmonized European standards listed under the Radio Equipment Directive 2014/53/EU, the EMC Directive 2014/30/EU, the RoHS
Directive 2011/65/EU.
2012/19/EU (WEEE directive): Products marked with this symbol cannot be disposed of as unsorted municipal waste in the European
Union. For proper recycling, return this product to your local supplier upon the purchase of equivalent new equipment, or dispose of it
at designated collection points. For more information see: www.recyclethis.info.
2006/66/EC and its amendment 2013/56/EU (battery directive): This product contains a battery that cannot be disposed of as unsorted
municipal waste in the European Union. See the product documentation for specific battery information. The battery is marked with
this symbol, which may include lettering to indicate cadmium (Cd), lead (Pb), or mercury (Hg). For proper recycling, return the battery
to your supplier or to a designated collection point. For more information see: www.recyclethis.info.
Industry Canada ICES-003 Compliance
This device meets the CAN ICES-3 (B)/NMB-3(B) standards requirements.
This device complies with Industry Canada licence-exempt RSS standard(s). Operation is subject to the following two conditions:
(1) this device may not cause interference, and
(2) this device must accept any interference, including interference that may cause undesired operation of the device.
Le présent appareil est conforme aux CNR d'Industrie Canada applicables aux appareils radioexempts de licence. L'exploitation est
autorisée aux deux conditions suivantes :
(1) l'appareil ne doit pas produire de brouillage, et
(2) l'utilisateur de l'appareil doit accepter tout brouillage radioélectrique subi, même si le brouillage est susceptible d'en
compromettre le fonctionnement.
This equipment should be installed and operated with a minimum distance 20cm between the radiator and your body
Cet équipement doit être installé et utilisé à une distance minimale de 20 cm entre le radiateur et votre corps
Under Industry Canada regulations, this radio transmitter may only operate using an antenna of a type and maximum (or lesser) gain approved
for the transmitter by Industry Canada. To reduce potential radio interference to other users, the antenna type and its gain should be so chosen
that the equivalent isotropically radiated power (e.i.r.p.) is not more than that necessary for successful communication.
Conformément à la réglementation d'Industrie Canada, le présent émetteur radio peut
fonctionner avec une antenne d'un type et d'un gain maximal (ou inférieur) approuvé pour l'émetteur par Industrie Canada. Dans le but de
réduire les risques de brouillage radioélectrique à l'intention des autres utilisateurs, il faut choisir le type d'antenne et son gain de sorte que la
puissance isotrope rayonnée équivalente (p.i.r.e.) ne dépasse pas l'intensité nécessaire à l'établissement d'une communication satisfaisante.
Safety Instruction
CAUTION: THE PRODUCT IS BUILT IN A REPLACEABLE BATTERY. RISK OF EXPLOSION IF BATTERY IS REPLACED BY AN INCORRECT TYPE. DISPOSE
OF USED BATTERIES ACCORDING TO THE INSTRUCTIONS.
Due to the product shape and dimension, the name and address of the importer/manufacturer are printed on the package.
EC DECLARATION OF CONFORMITY
Hereby, Hangzhou Ezviz Network Co., Ltd. declares that the radio equipment type [CS-X3C-8E] is in compliance with Directive 2014/53/
EU.
The full text of the EC DECLARATION OF CONFORMITY is available at the following web link:
http://www.ezvizlife.com/declaration-of-conformity.
For more information, please visit www.ezvizlife.com
Need help? Contact us:
Phone:
USA/CAN: +1-855-693-9849
MX: +52-55-8526-1060
Email:
USA/CAN/MX: service@ezvizlife.com
Other countries: support@ezvizlife.com
SAVE THIS MANUAL FOR FUTURE REFERENCE
1
Basic Information
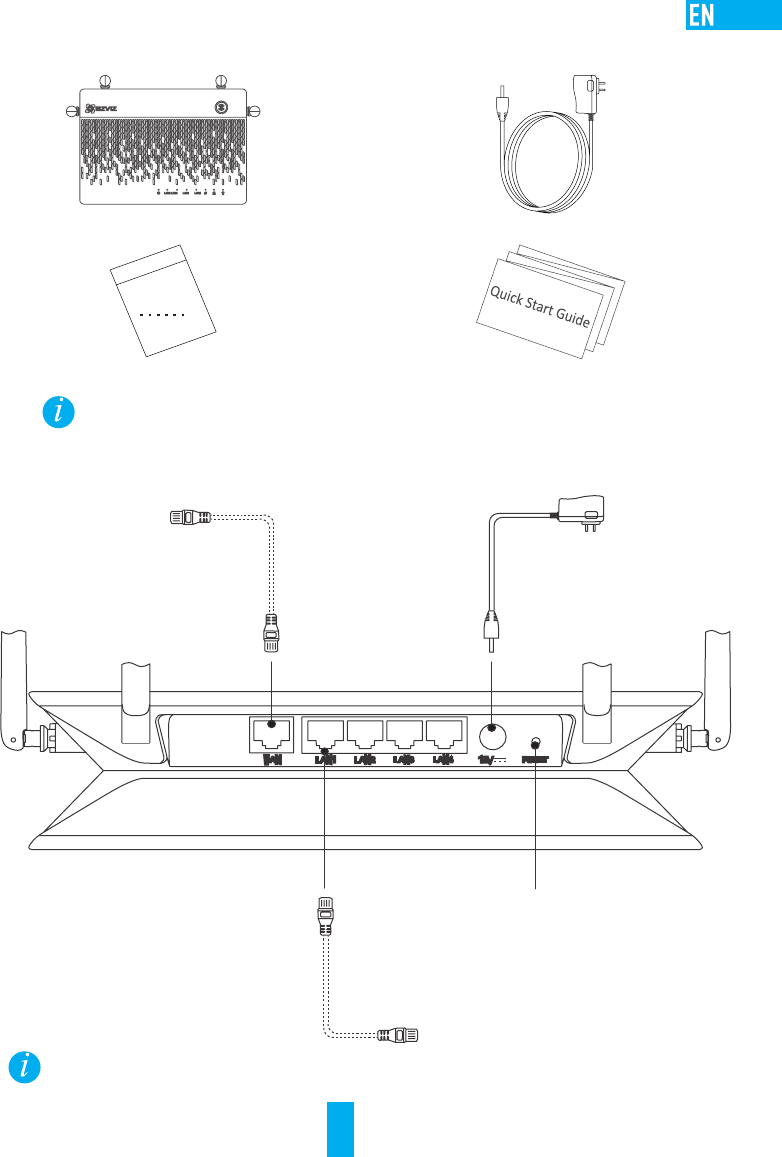
Box Contents
Vault Plus (x1) Power Adapter (x1)
Accessories (x1) Quick Start Guide (x1)
For models equipped with HDDs, the accessories are not included in the box contents. For models not equipped with HDDs, the accessories
include screw kits, and HDD radiator.
Rear Panel Overview
The cables with dotted lines above are not included.
Power Input
12V 1.5A
WAN Interface
For Router
LAN Interface
for Cameras
RESET Hole
Insert a pin and hold for 10s
The device restores and reboots
2
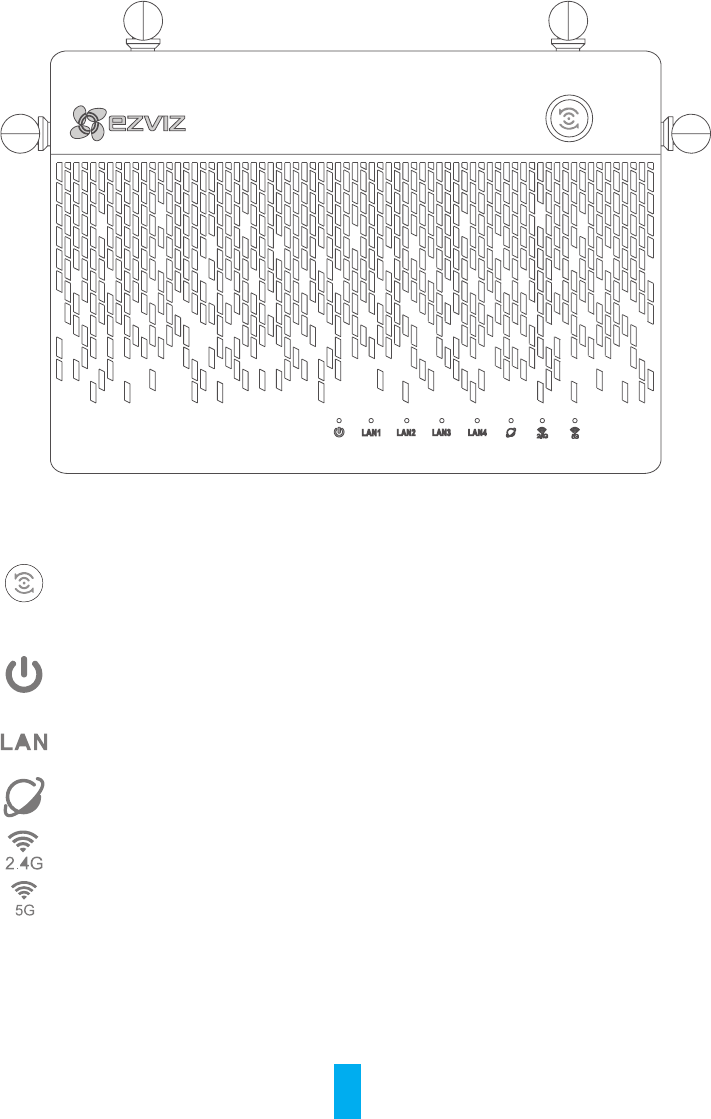
Product View
LED Indicator Status
One-Touch Access
Press the button and the system status indicator flashes. The Ezviz cameras nearby
automatically connect to the Wi-Fi within two minutes. Other devices may also be
connected to the Wi-Fi by pushing WPS button within the same 2 minutes. (For Android
devices, you can find the WPS function in Settings > WLAN > Advanced Settings.)
System Status Indicator
Green: Device is starting up or working properly.
Blue: Network unconnected, upgrading or HDD formatting.
Red: HDD is not formatted, unidentified, or running error.
LAN Network Indicator Steady: Device is connected to the LAN interface.
Flashing: Data is transmitting.
WAN Network Indicator Green: Network is connected.
No Light: Network is not connected.
2.4G Wi-Fi Indicator Green: 2.4G Wi-Fi is enabled. Unlight: 2.4G Wi-Fi is disabled.
5G Wi-Fi Indicator Green: 5G Wi-Fi is enabled. Unlight: 5G Wi-Fi is disabled.
3
Wiring
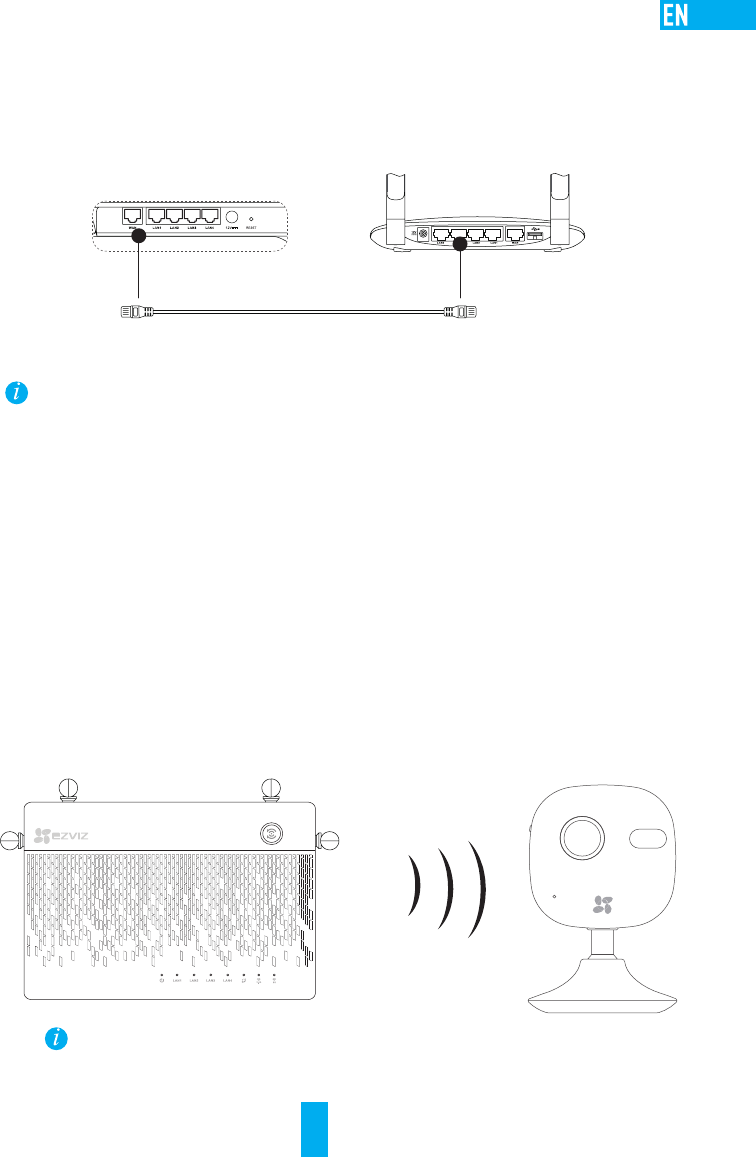
Cable Connection
1. Connect the WAN interface of Vault Plus to the LAN interface of router, see figure below. When the
connection succeeds, the WAN network indicator displays green, and the system status indicator
displays green.
2. (Optional) Connect the LAN interface of Vault Plus to the computer.
3. Connect the power cable to the Vault Plus, and the Vault Plus starts up within two minutes.
If you want to install the HDD by yourself, refer to the Appendix.
Setup
Powering on Device
(Before You Start) The camera should be within 3' to 20' (1m to 6m) from the Vault Plus.
1. Power on the camera.
- Wait until camera status light blinks alternating Blue and Red.
2. Press the One-Touch Access button of the Vault Plus.
- Its system status indicator light will start to flash.
- The EZVIZ camera will automatically connect to it.
(Result) When the camera status light starts to flash Blue, the connection process is complete.
Restore the camera if it has been connected to Wi-Fi before. You can connect to the device with One-touch
access. For cameras that do not support Wi-Fi, connect the camera to the LAN interface with the network cable.
4
Linkage
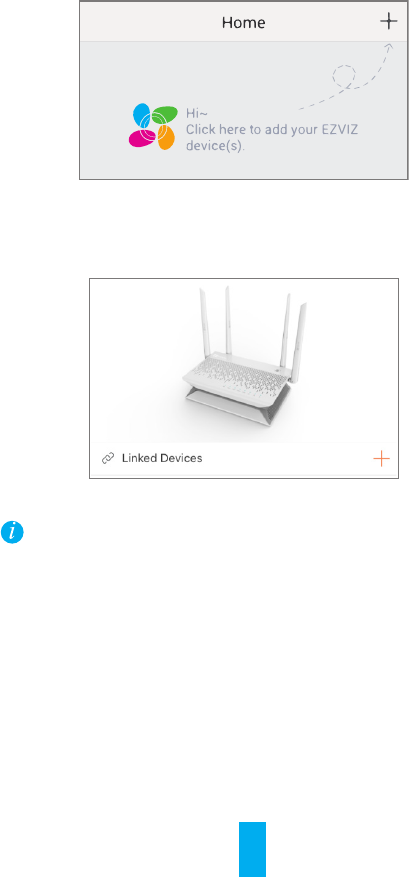
Linking to Device
1. Download the App in your Phone (For users without an existing EZVIZ account)
- Search for "EZVIZ" in the App Store/Google Play TM in your mobile device to download and install
the App.
- Launch the App.
- Create an EZVIZ user account.
2. Add the Vault Plus and Camera
- Log into the EZVIZ app.
- Click the “+” on the upper-right hand corner to go to QR code scanning interface.
- Scan the QR Code on Camera with the EZVIZ App (on device label).
- Scan the QR Code of Vault Plus with the EZVIZ App (on device label).
3. Access the Vault Plus in the EZVIZ App.
4. Click the “+” to add the camera.
For more advanced settings of Vault Plus, please connect the computer to the LAN interface of Vault Plus,
enable computer local area connection to obtain an IP address automatically. Then open the computer web
browser (Internet Explorer 8.0 and later version is recommended), and go to 192.168.7.1 for more settings.
5
Appendix
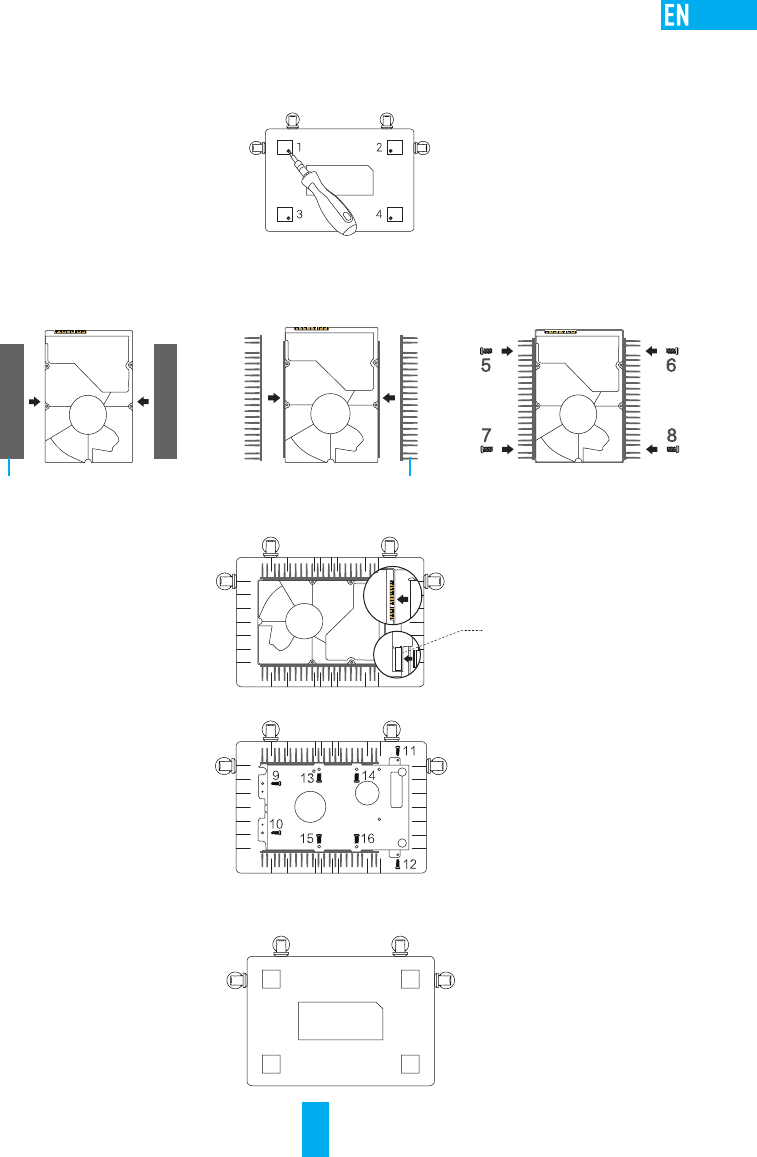
HDD Installation
1. (Optional) Remove the rubber mats.
2. Loosen four screws on the bottom of the device to take apart the base, see figure below.
3. Stick the thermal conductive silicon pads to both sides of the HDD, and attach the HDD radiator to the
silicone pads.
4. Use the four screws to secure the radiator to the HDD, see figure below.
5. Connect the data cable. Make sure the limit line (white) aligns with the connector edge.
6. Install the HDD shield. See figure below., see figure below.
7. Re-assemble the base of the VAULT Plus. Replace the screws and rubber mats to complete the HDD
installation.
Thermal Conductive Silicon Pad HDD Radiator
Limit Line