Hangzhou Hikvision Digital Technology HW10000 Network Camera User Manual
Hangzhou Hikvision Digital Technology Co., Ltd. Network Camera Users Manual
Users Manual
Download App
User Manual
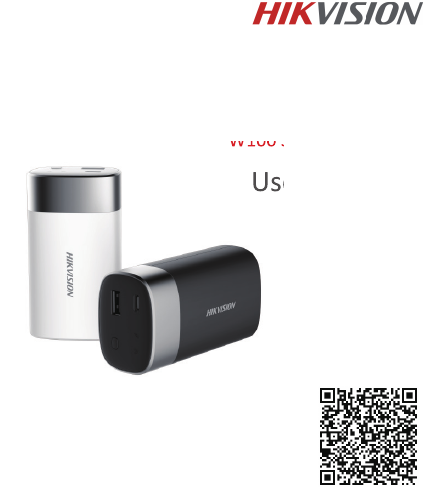
W100 Series Mobile NAS
UD04537B
User ManualUser ManualUser ManualUser Manual
W100 Series Mobile NASW100 Series Mobile NASW100 Series Mobile NASW100 Series Mobile NAS

2
User Manaul
COPYRIGHT ©2017 Hangzhou Hikvision Digital Technology Co., Ltd.
ALL RIGHTS RESERVED.
Any and all information, including, among others, wordings, pictures, graphs are
the properties of Hangzhou Hikvision Digital Technology Co., Ltd. or its subsidiaries
(hereinafter referred to be “Hikvision”). This user manual (hereinafter referred to be “the
Manual”) cannot be reproduced, changed, translated, or distributed, partially or wholly,
by any means, without the prior written permission of Hikvision. Unless otherwise
stipulated, Hikvision does not make any warranties, guarantees or representations,
express or implied, regarding to the Manual.
About this Manual
This Manual is applicable to W100 Series Mobile NAS.
The Manual includes instructions for using and managing the product. Pictures, charts,
images and all other information hereinafter are for description and explanation only.
The information contained in the Manual is subject to change, without notice, due
to firmware updates or other reasons. Please find the latest version in the company
website (http://overseas.hikvision.com/en/).
Please use this user manual under the guidance of professionals.
Trademarks Acknowledgement
and other Hikvision’s trademarks and logos are the properties of Hikvision in various
jurisdictions. Other trademarks and logos mentioned below are the properties of their
respective owners.
Legal Disclaimer
TO THE MAXIMUM EXTENT PERMITTED BY APPLICABLE LAW, THE PRODUCT DESCRIBED,
WITH ITS HARDWARE, SOFTWARE AND FIRMWARE, IS PROVIDED “AS IS”, WITH ALL
FAULTS AND ERRORS, AND HIKVISION MAKES NO WARRANTIES, EXPRESS OR IMPLIED,
INCLUDING WITHOUT LIMITATION, MERCHANTABILITY, SATISFACTORY QUALITY, FITNESS
FOR A PARTICULAR PURPOSE, AND NON-INFRINGEMENT OF THIRD PARTY. IN NO
EVENT WILL HIKVISION, ITS DIRECTORS, OFFICERS, EMPLOYEES, OR AGENTS BE LIABLE
TO YOU FOR ANY SPECIAL, CONSEQUENTIAL, INCIDENTAL, OR INDIRECT DAMAGES,
INCLUDING, AMONG OTHERS, DAMAGES FOR LOSS OF BUSINESS PROFITS, BUSINESS
INTERRUPTION, OR LOSS OF DATA OR DOCUMENTATION, IN CONNECTION WITH THE
USE OF THIS PRODUCT, EVEN IF HIKVISION HAS BEEN ADVISED OF THE POSSIBILITY OF
SUCH DAMAGES.
REGARDING TO THE PRODUCT WITH INTERNET ACCESS, THE USE OF PRODUCT SHALL
BE WHOLLY AT YOUR OWN RISKS. HIKVISION SHALL NOT TAKE ANY RESPONSIBILITES
FOR ABNORMAL OPERATION, PRIVACY LEAKAGE OR OTHER DAMAGES RESULTING FROM
CYBER ATTACK, HACKER ATTACK, VIRUS INSPECTION, OR OTHER INTERNET SECURITY
RISKS; HOWEVER, HIKVISION WILL PROVIDE TIMELY TECHNICAL SUPPORT IF REQUIRED.
SURVEILLANCE LAWS VARY BY JURISDICTION. PLEASE CHECK ALL RELEVANT LAWS IN
YOUR JURISDICTION BEFORE USING THIS PRODUCT IN ORDER TO ENSURE THAT YOUR
USE CONFORMS THE APPLICABLE LAW. HIKVISION SHALL NOT BE LIABLE IN THE EVENT
THAT THIS PRODUCT IS USED WITH ILLEGITIMATE PURPOSES.
IN THE EVENT OF ANY CONFLICTS BETWEEN THIS MANUAL AND THE APPLICABLE LAW,
THE LATER PREVAILS.

3
Regulatory Information
FCC Information
Please take attention that changes or modification not expressly approved by the party
responsible for compliance could void the user’s authority to operate the equipment.
FCC compliance: This equipment has been tested and found to comply with the limits for
a Class B digital device, pursuant to part 15 of the FCC Rules. These limits are designed to
provide reasonable protection against harmful interference in a residential installation.
This equipment generates, uses and can radiate radio frequency energy and, if not
installed and used in accordance with the instructions, may cause harmful interference
to radio communications. However, there is no guarantee that interference will not
occur in a particular installation. If this equipment does cause harmful interference to
radio or television reception, which can be determined by turning the equipment off
and on, the user is encouraged to try to correct the interference by one or more of the
following measures:
—Reorient or relocate the receiving antenna.
—Increase the separation between the equipment and receiver.
—Connect the equipment into an outlet on a circuit different from that to which the
receiver is connected.
—Consult the dealer or an experienced radio/TV technician for help.
FCC Conditions
This device complies with part 15 of the FCC Rules. Operation is subject to the following
two conditions:
1. This device may not cause harmful interference.
2. This device must accept any interference received, including interference that may
cause undesired operation.
EU Conformity Statement
This product and - if applicable - the supplied accessories too are marked with
"CE" and comply therefore with the applicable harmonized European standards
listed under the EMC Directive 2014/30/EU, the RoHS Directive 2011/65/EU,
and the RED Directive 2014/53/EU.
2012/19/EU (WEEE directive): Products marked with this symbol cannot be
disposed of as unsorted municipal waste in the European Union. For proper
recycling, return this product to your local supplier upon the purchase of
equivalent new equipment, or dispose of it at designated collection points. For
more information see: www.recyclethis.info
2006/66/EC and its amendment¬ 2013/56/EU (battery directive): This product
contains a battery that cannot be disposed of as unsorted municipal waste in the
European Union. See the product documentation for specific battery
information. The battery is marked with this symbol, which may include lettering
to indicate cadmium (Cd), lead (Pb), or mercury (Hg). For proper recycling, return the
battery to your supplier or to a designated collection point. For more information see:
www.recyclethis.info

4
Industry Canada ICES-003 Compliance
This device meets the CAN ICES-3 (B)/NMB-3(B) standards requirements.
This device complies with Industry Canada licence-exempt RSS standard(s). Operation is
subject to the following two conditions:
(1) this device may not cause interference, and
(2) this device must accept any interference, including interference that may cause
undesired operation of the device.
Le présent appareil est conforme aux CNR d'Industrie Canada applicables aux appareils
radioexempts de licence. L'exploitation est autorisée aux deux conditions suivantes :
(1) l'appareil ne doit pas produire de brouillage, et
(2) l'utilisateur de l'appareil doit accepter tout brouillage radioélectrique subi, même si le
brouillage est susceptible d'en compromettre le fonctionnement.
Under Industry Canada regulations, this radio transmitter may only operate using an
antenna of a type and maximum (or lesser) gain approved for the transmitter by Industry
Canada. To reduce potential radio interference to other users, the antenna type and
its gain should be so chosen that the equivalent isotropically radiated power (e.i.r.p.)
is not more than that necessary for successful communication.
Conformément à la réglementation d'Industrie Canada, le présent émetteur radio peut
fonctionner avec une antenne d'un type et d'un gain maximal (ou inférieur) approuvé
pour l'émetteur par Industrie Canada. Dans le but de réduire les risques de brouillage
radioélectrique à l'intention des autres utilisateurs, il faut choisir le type d'antenne
et son gain de sorte que la puissance isotrope rayonnée équivalente (p.i.r.e.) ne
dépasse pas l'intensité nécessaire à l'établissement d'une communication satisfaisante.F
After the laboratory measurement, the SAR value is 1.05W/Kg for 2.4G Band and
1.189W/Kg for 5.2G Band and 1.173W/kg for 5.8G Band which satisfies the RF exposure
To satisfy RF exposure compliance the user should operate the device as the User
Manual introduced and the antenna(s) used for this transmitter must not be co-located
or operating in conjunction with any other antenna or transmitter.
requirement.
The devices are restricted to indoor operation only in the band 5150-5250 MHz.
1
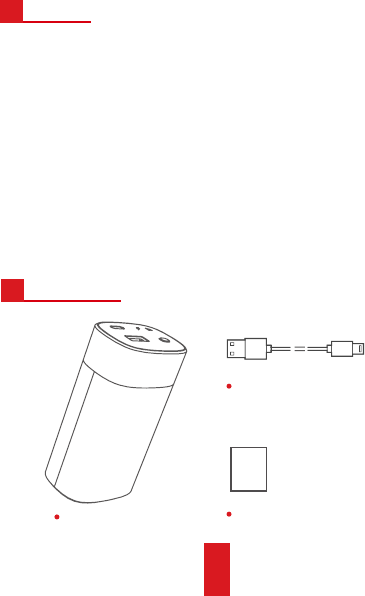
Features
A
W100 x 1 User Manual x 1
USB-C Cord x 1
Package List
B
Compared with traditional NAS, W100 series mobile NAS (hereinafter
referred to as W100) provides following features:
• USB Type-C (hereinafter referred to as USB-C) 3.1 interface with a high
transmission speed.
• Up to 10 users can access W100 simultaneously. Users can share files.
• Wi-Fi Direct feature. While accessing W100 via its Wi-Fi, you can visit Internet
using data cellular.
• Shock-proof feature for the internal SSD (Solid State Drive).
• Storage medias like USB device and SD card are connectable.
• Supports charging your smartphone.
• 6,700 mAh battery enables you to play videos for up to 11 hours.
2
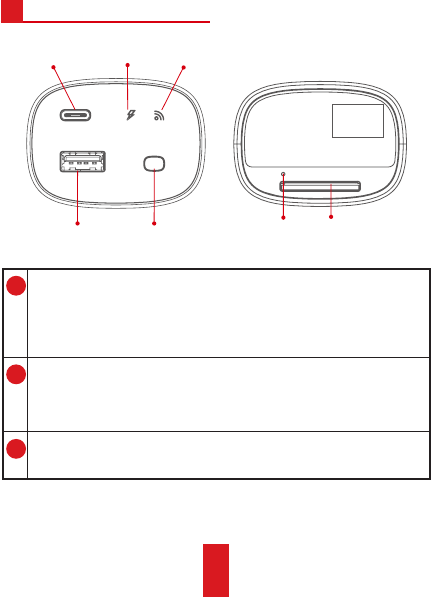
Interfaces and Indicators
C
Wi-Fi
Indicator
USB Interface
USB-C
Interface
Power
Indicator
Power Switch
1USB-C Interface
• Attach it to computer USB interface via USB-C cord to charge W100 or
transmit data.
• Attach it to other device via OTG cable to transmit data.
2USB Interface
• Attach it to other USB device to transmit data.
• Charge up your smartphone.
3SD Card Slot
Slot for SD card.
SD Card Slot
Reset Button
QR Code

3
4Power Switch
• Hold it for 3 seconds to turn on/off W100.
-Wi-Fi indicator on: W100 starts up.
-Wi-Fi indicator and power indicator off: W100 is shut down.
• Press it to check W100 remaining battery. For details, refer to the
following Power Indicator description.
5Power Indicator
• Its color shows the remaining battery.
-Green: battery is full.
-Cyan: 75% battery remaining.
-Yellow: 50% battery remaining.
-Red: 25% battery is remaining. You need to charge the W100.
• When charging, it flashes in green every 3 seconds.
• When fully charged, it is solid green.
6Reset Button
When W100 is running, hold it with a pin or similar thin object for 5
seconds to restore W100 to default settings.
7Wi-Fi indicator
• When Wi-Fi is being turned on, the indicator flashes.
• When Wi-Fi is on, the indicator is solid.
8QR code
Scan the QR code to connect W100. In case the QR code paper is worn
out, you are recommended to take a phone in advance.

4
D
After connecting W100 Wi-Fi in your smartphone, you can configure W100
in HiStor app.
Step 1 Download and install the HiStor app first.
• Option 1: Scan the QR code in the manual cover.
• Option 2: Search HiStor in application store.
Step 2 To build connection between W100 and HiStor, connect W100 Wi-Fi
in your smartphone.
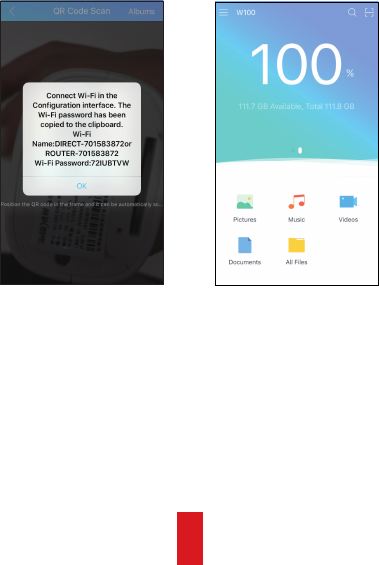
* Android Smartphone User
(1) Scan W100 QR code pasted in its bottom via HiStor scanning
function.
(2) Follow the wizard to connect the Wi-Fi.
* iOS Smartphone User
(1) To obtain W100 Wi-Fi name and password, scan its QR code pasted
in its bottom via HiStor scanning function. A prompt showing the Wi-Fi
name and password will pop up, as shown in Figure 1.
(2) Enter Wi-Fi configuration interface in your smartphone and connect
the Wi-Fi according to the prompt in step 2.
Step 3 After Wi-Fi is connected, HiStor home page is shown as Figure 2.
App Connection
5
Figure 1 Prompt Figure 2 Home Page
6
App Operation
E
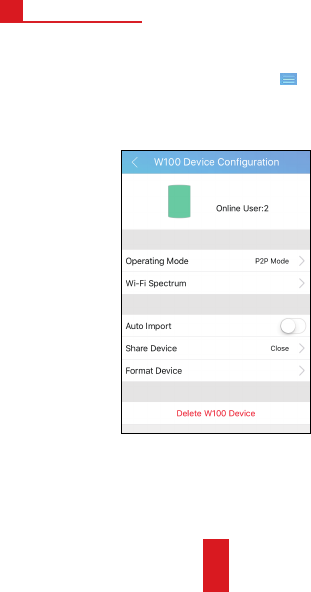
You can configure W100 in configuration interface.
Step To enter W100 Configuration interface, click in home page and
select the W100 Device item.
Figure 3 W100 Configuration Interface
7
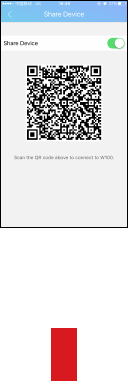
Sharing W100
Sharing feature is designed for W100 quick adding. Other users can add
W100 by scanning the shared QR code. One W100 can be added by up to
10 users.
Step 1 Enter Share Device interface.
W100Configurationinterface→ShareDevice
Step 2 Enable Share Device item to generate a QR code. The QR code is
unique for each W100.
Figure 4 Share Device
Step 3 Add W100 in target smartphones by scanning the QR code via HiStor
and follow the wizard to connect W100. For detailed steps, refer to Step 2
and Step 3 in “App Connection”.
8
You can play music and video and
rename files here.
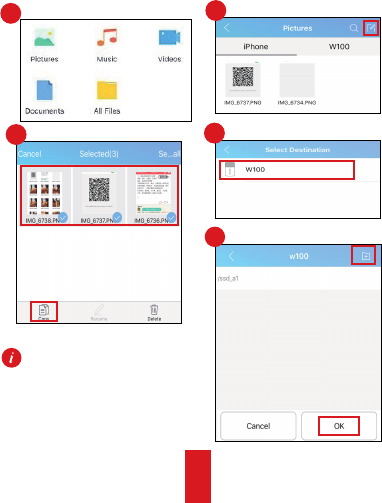
Storing Files
HiStor enables W100, smartphone, USB device, and SD card to exchange
files, including pictures, videos, music, and documents. We take the
example of copying files from smartphone to W100 to describe the steps.
a
b
5
2
34
1
a
b
9
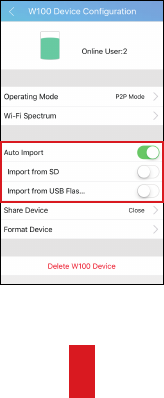
Auto Import
When Auto Import feature is on, once a storage media is attached to W100,
HiStor will automatically import data from the storage media into W100.
Step 1 Enter W100 configuration interface.
Step 2 Turn on Auto Import.
Step 3 Select Import from SD or Import from USB Flash Disk according to
your needs.
Figure 5 Auto Import
10
W100 Configuration
F
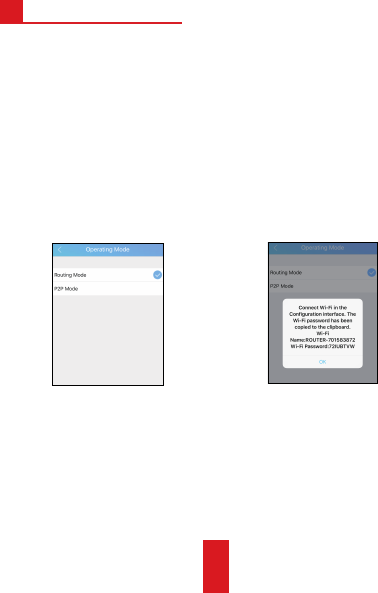
Connecting WLAN
If W100 operation mode is Routing and W100 is connecting with a WLAN,
smartphones and devices attached to W100 can access Internet via W100.
Step 1 Enter W100 Operating Mode configuration interface.
W100Configurationinterface→OperatingMode
Step 2 Select Operating Mode as Routing Mode.
• Routing Mode: W100 WLAN name is ROUTE-XXX.
• P2P Mode: Wi-Fi Direct feature is on. W100 WLAN name is DIRECT-XXX.
Figure 6 Operating Mode Figure 7 Prompt
Step 3 Enter Wi-Fi configuration interface in your smartphone and connect
the correct Wi-Fi according to prompt popped up in step 2.
Step 4 Enter W100 Enable WLAN interface.
W100Configurationinterface→EnableWLAN
Step 5 Choose a WLAN to connect.
11
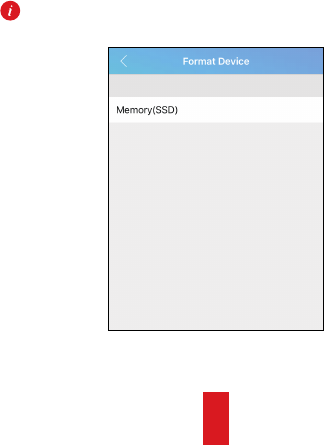
Formatting W100
Data in W100 will be erased after format.
Step 1 Enter Format Device interface. Internal and external storage media
will be listed.
W100Configurationinterface→FormatDevice
Step 2 Select a storage media to format and confirm the operation.
Some models do not support the format feature.
Figure 8 Format

12
Upgrading W100
You can upgrade W100. Before you start, ensure the W100 remains at least
50% battery.
* Auto Upgrade
Step 1 Access W100 to Internet. For detailed steps, refer to Step 4 and Step
5 of “Connecting WLAN”.
Step 2 W100 will automatically download the latest upgrade package.
Step 3 Follow wizard to upgrade W100.
* Manual Upgrade
Step 1 Copy the upgrade package to the root directory of W100 or USB
device or SD card attached to W100. For detailed steps of storing files in
W100, refer to “Storing Files”.
Step 2 Reboot W100 (manually shutdown it and then turn on it) to
upgrade.
Power indicator flashes in blue during upgrade process.

13
For W100 Main Body
• In the use of the product, you must be in strict compliance with the local
regulations.
• Properly keep the user manual for operation reference.
• Purchase SD card from formal channels. SD card with Class 10 speed or above is
recommended.
• Workingenvironment:0̊Cto35̊C(32̊Fto95̊F).Donotexposetheproductto
environment with high or low temperature, high humidity, or high-dust density.
• Keep all liquids away from the product.
• When attaching high-power mobile HDD to W100, you need to power the
mobile HDD with a separate power supply.
• The information contained in the manual is subject to change without notice,
due to firmware updates or other reasons.
For Battery
• Improper use or replacement of the battery may result in hazard of damage.
• Properly dispose the waste battery.
• Do not use the battery in other devices.
• Do not expose the battery to fire source or high-temperature environment.
• Stop using the battery, when its shape changes, temperature is too high, odor
rises, etc.
Preventive and Cautionary Tips
G

14
Troubles Reasons/Resolutions
Smartphone failed to
access Internet via W100.
• Ensure W100 operating mode is Routing.
• Ensure W100 has connected to Internet.
Smartphone accesses
Internet via data cellular
instead of W100.
When W100 operating mode is P2P, the connected
smartphone accesses Internet via data cellular.
Unable to update W100.
• Ensure at least 50% battery remaining in W100.
• During auto upgrade, ensure W100 Internet
connection is well.
• During manual upgrade, ensure upgrade
package is in storage media root directory.
Unable to connect W100
in smartphone.
• HiStor is well installed.
• Ensure W100 is on.
• Reboot W100 and HiStor.
Unable to play video via
HiStor
The trouble may be relevant with the smartphone
player or system. Attach the W100 to your
computer and play the videos.
Connecting W100 Wi-Fi
takes quite a time.
• It may be caused by the interference of the
surrounding Wi-Fi signals. Operate the W100 in
an environment with less interference.
• Close unnecessary programs in your smartphone
to release resources for the HiStor.
Troubleshooting
H