Hangzhou Hikvision Digital Technology MH6111 Wireless Camera/body camera User Manual
Hangzhou Hikvision Digital Technology Co., Ltd. Wireless Camera/body camera Users Manual
Users Manual

Wireless Camera
User Manual
1
User Manual
COPYRIGHT ©2017 Hangzhou Hikvision Digital Technology Co., Ltd.
ALL RIGHTS RESERVED.
Any and all information, including, among others, wordings, pictures,
graphs are the properties of Hangzhou Hikvision Digital Technology Co.,
Ltd. or its subsidiaries (hereinafter referred to be “Hikvision”). This user
manual (hereinafter referred to be “the Manual”) cannot be
reproduced, changed, translated, or distributed, partially or wholly, by
any means, without the prior written permission of Hikvision. Unless
otherwise stipulated, Hikvision does not make any warranties,
guarantees or representations, express or implied, regarding to the
Manual.
About this Manual
This Manual is applicable to Wireless Camera.
The Manual includes instructions for using and managing the product.
Pictures, charts, images and all other information hereinafter are for
description and explanation only. The information contained in the
Manual is subject to change, without notice, due to firmware updates
or other reasons. Please find the latest version in the company website
(http://overseas.hikvision.com/en/).
Please use this user manual under the guidance of professionals.
Trademarks Acknowledgement
and other Hikvision’s trademarks and logos are the properties of
Hikvision in various jurisdictions. Other trademarks and logos
mentioned below are the properties of their respective owners.
Legal Disclaimer
TO THE MAXIMUM EXTENT PERMITTED BY APPLICABLE LAW, THE
PRODUCT DESCRIBED, WITH ITS HARDWARE, SOFTWARE AND
FIRMWARE, IS PROVIDED “AS IS”, WITH ALL FAULTS AND ERRORS, AND
HIKVISION MAKES NO WARRANTIES, EXPRESS OR IMPLIED, INCLUDING
WITHOUT LIMITATION, MERCHANTABILITY, SATISFACTORY QUALITY,
FITNESS FOR A PARTICULAR PURPOSE, AND NON-INFRINGEMENT OF
THIRD PARTY. IN NO EVENT WILL HIKVISION, ITS DIRECTORS, OFFICERS,
EMPLOYEES, OR AGENTS BE LIABLE TO YOU FOR ANY SPECIAL,
CONSEQUENTIAL, INCIDENTAL, OR INDIRECT DAMAGES, INCLUDING,
AMONG OTHERS, DAMAGES FOR LOSS OF BUSINESS PROFITS,
BUSINESS INTERRUPTION, OR LOSS OF DATA OR DOCUMENTATION, IN
CONNECTION WITH THE USE OF THIS PRODUCT, EVEN IF HIKVISION
HAS BEEN ADVISED OF THE POSSIBILITY OF SUCH DAMAGES.
REGARDING TO THE PRODUCT WITH INTERNET ACCESS, THE USE OF
PRODUCT SHALL BE WHOLLY AT YOUR OWN RISKS. HIKVISION SHALL
NOT TAKE ANY RESPONSIBILITES FOR ABNORMAL OPERATION, PRIVACY
LEAKAGE OR OTHER DAMAGES RESULTING FROM CYBER ATTACK,
HACKER ATTACK, VIRUS INSPECTION, OR OTHER INTERNET SECURITY
RISKS; HOWEVER, HIKVISION WILL PROVIDE TIMELY TECHNICAL
SUPPORT IF REQUIRED.
SURVEILLANCE LAWS VARY BY JURISDICTION. PLEASE CHECK ALL
RELEVANT LAWS IN YOUR JURISDICTION BEFORE USING THIS PRODUCT
IN ORDER TO ENSURE THAT YOUR USE CONFORMS THE APPLICABLE
LAW. HIKVISION SHALL NOT BE LIABLE IN THE EVENT THAT THIS
PRODUCT IS USED WITH ILLEGITIMATE PURPOSES.
IN THE EVENT OF ANY CONFLICTS BETWEEN THIS MANUAL AND THE
APPLICABLE LAW, THE LATER PREVAILS.
2
Regulatory information
FCC information
FCC compliance: Please take attention that changes or
modification not expressly approved by the party responsible for
compliance could void the user’s authority to operate the
equipment.
Note: This product has been tested and found to comply with the
limits for a Class B digital device, pursuant to Part 15 of the FCC
Rules. These limits are designed to provide reasonable protection
against harmful interference in a residential installation. This
product generates, uses, and can radiate radio frequency energy
and, if not installed and used in accordance with the instructions,
may cause harmful interference to radio communications.
However, there is no guarantee that interference will not occur in
a particular installation. If this product does cause harmful
interference to radio or television reception, which can be
determined by turning the equipment off and on, the user is
encouraged to try to correct the interference by one or more of
the following measures:
—Reorient or relocate the receiving antenna.
—Increase the separation between the equipment and receiver.
—Connect the equipment into an outlet on a circuit different
from that to which the receiver is connected.
—Consult the dealer or an experienced radio/TV technician for
help.
FCC conditions
This device complies with part 15 of the FCC Rules. Operation is
subject to the following two conditions:
1. This device may not cause harmful interference.
2. This device must accept any interference received, including
interference that may cause undesired operation.
This product and - if applicable - the supplied
accessories too are marked with "CE" and comply
therefore with the applicable harmonized European standards
listed under the Radio Equipment Directive 2014/53./EU, the EMC
Directive 2014/30/EU, the LVD Directive 2014/35/EU, the RoHS
Directive 2011/65/EU.
2012/19/EU (WEEE directive): Products marked with
this symbol cannot be disposed of as unsorted
municipal waste in the European Union. For proper
recycling, return this product to your local supplier upon the
purchase of equivalent new equipment, or dispose of it at
designated collection points. For more information see:
www.recyclethis.info.
2006/66/EC (battery directive): This product
contains a battery that cannot be disposed of as
unsorted municipal waste in the European Union.
See the product documentation for specific battery information.
After the laboratory measurement, the max SAR value is
0.803mW/g for 2.4G band which satisfies the
RF exposure
requirement
Warning
The product is allowed to be used in contact with the body except the
head.

3
The battery is marked with this symbol, which may include
lettering to indicate cadmium (Cd), lead (Pb), or mercury (Hg). For
proper recycling, return the battery to your supplier or to a
designated collection point. For more information see:
www.recyclethis.info.
Industry Canada ICES-003 Compliance
This device meets the CAN ICES-3 (B)/NMB-3(B) standards
requirements.
This device complies with Industry Canada licence-exempt RSS
standard(s). Operation is subject to the following two conditions:
1) this device may not cause interference, and
2) this device must accept any interference, including
interference that may cause undesired operation of the
device.
Le présent appareil est conforme aux CNR d'Industrie Canada
applicables aux appareils radioexempts de licence. L'exploitation
est autorisée aux deux conditions suivantes :
1) l'appareil ne doit pas produire de brouillage, et
2) l'utilisateur de l'appareil doit accepter tout brouillage
radioélectrique subi, même si le brouillage est susceptible
d'en compromettre le fonctionnement.
Under Industry Canada regulations, this radio transmitter may
only operate using an antenna of a type and maximum (or lesser)
gain approved for the transmitter by Industry Canada. To reduce
potential radio interference to other users, the antenna typ e and
its gain should be so chosen that the equivalent isotropically
radiated power (e.i.r.p.) is not more than that necessary for
successful communication.
Conformément à la réglementation d'Industrie Canada, le présent
émetteur radio peut
fonctionner avec une antenne d'un type et d'un gain maximal (ou
inférieur) approuvé pour l'émetteur par Industrie Canada. Dans le
but de réduire les risques de brouillage radioélectrique à
l'intention des autres utilisateurs, il faut choisir le type d'antenne
et son gain de sorte que la puissance isotrope rayonnée
équivalente (p.i.r.e.) ne dépasse pas l'intensité nécessaire à
l'établissement d'une communication satisfaisante.
4
Chapter 1 Product Checking
Checking Steps
After buying a wireless camera (hereinafter referred to as camera
or device), please check the outer packing to see if there is
obvious damage. If not, open the packaging box and check the
attachments according to the package content list.
Make sure that nothing is missing or damaged before installation.
Package Content
The package content list is shown below.
Package Content
No. Name Quantity Unit
1 Camera 1 pc
2 Magnetic Board 1 pc
3 USB Cable 1 pc
4 Adapter 1 pc
Chapter 2 Product Introduction
Features
Wireless camera is a portable video recording device that
supports local storage by TF card. It allows you to view real-time
video and configure parameters on Android system client.
The product has following features.
Magnetic installation, which is easy, convenient, and highly
adaptable to different environment;
Compact and portable design;
Built-in battery to ensure long working time without external
power supply;
Built-in camera to record video in TF card;
H.264 video compression technology to save network
transmission bandwidth and storage space;
Auto connection with terminal Wi-Fi to transmit audio and
video data stably in mobile environment.
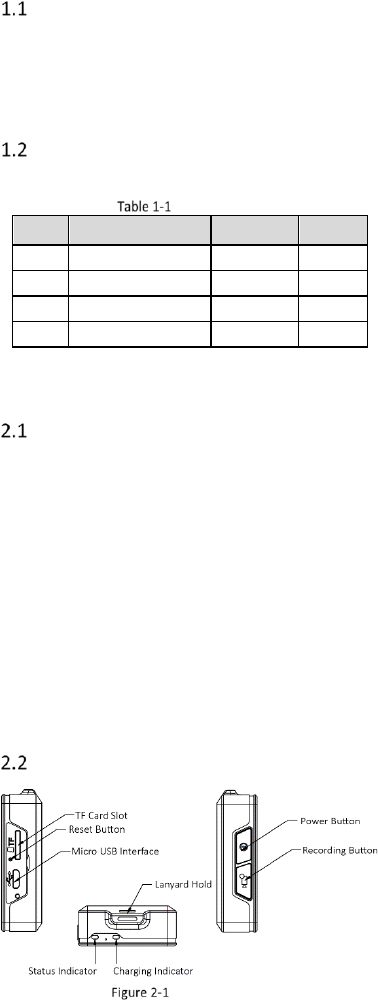
Overview
Product Overview
5
Indicator Description
Indicator
Status
Description
Charging
indicator
Solid red
Charging…
Solid green
Fully charged
Status
indicator
Solid green
Normal
Flashing red
Low battery
Solid red
Failed
Flashing blue
Transmitting data through
Wi-Fi…
Flashing green
Recording…
Solid blue
Upgrading…
Typical Application
Install the iVMS 4500 application on Android mobile terminal (like
mobile phone and portable video recorder), and the camera will
connect to the Wi-Fi network of the terminal automatically. You
can add the device on the software.
Note:
The mobile terminal should use Android V4.1 or above.
Chapter 3 Product Installation
Safety Precations
Charger
The charger you use should meet your local standards.
Do not drop charger.
If the adapter plug, housing or power cord is damaged, please
contact service center for replacement to avoid potential electric
shock or fire disaster.
Do not touch the charging device with wet hand. Do not use
the charger if it is exposed to water or other liquid, to avoid
potential electric shock.
Do not pull the power cord with excessive force.
Battery
The built-in battery is non-removable. To avoid potential
damage and other risks, do not change the battery by yourself.
The battery can be replaced only by authorized service center.
Follow your local lows and regulations to dispose the battery.
Do not dispose it together with household garbage.
Install TF Card
Steps:
1. Open the dust cover on the side of the device.
2. Push in the TF card slowly to the slot. A click sound means
the card is inserted.
3. Close the access flap.
Install Device
The camera supports magnetic installation. You can fix and carry
the device by attaching it to metal objects (like magnetic board).
6
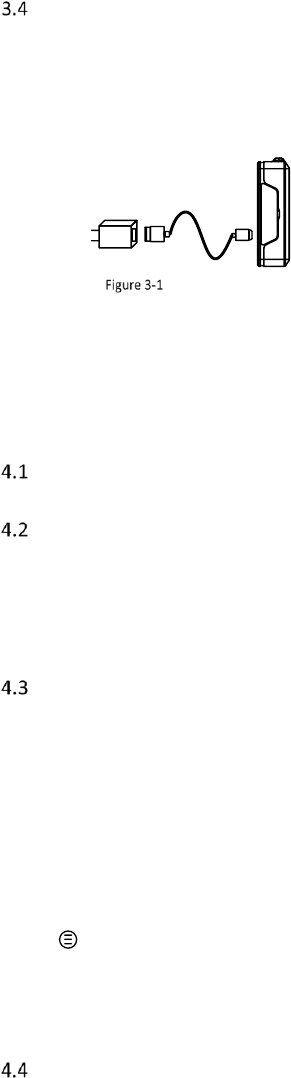
Charge
Please charge the device before your first use, or when the status
indicator is flashing red.
Steps:
1. Open the dust cover on the side of the device.
2. Connect one end of the USB cable to the charger and the
other to the USB interface of the camera.
Connect Power Cord
3. Plug the charger in the outlet.
4. When the charging indicator turns to green, unplug the
charger and disconnect the cable.
5. Close the dust cover.
Chapter 4 Product Application
Power On
Hold power button for 3 seconds, and the camera is on.
Record in TF Card
Before You Start:
Install a TF card.
Steps:
1. Press recording button to start recording. The video will be
stored in the TF card.
2. Press recording button again to stop recording.
Connect to iVMS-4500
You can view camera image and configure camera parameters
remotely after camera is connected with your Android device via
iVMS-4500.
Before You Start:
Ensure version of your Android device (mobile phone or
portable video recorder) is V4.1 or above.
The distance between the camera and the Android device
should be less than 1 meter.
Steps:
1. Install the iVMS-4500 software in your Android device.
2. Power on wireless camera and run software.
3. Tap and select Device List.
Note:
Then the Wi-Fi hotspot on your Android device will be turned
on automatically.
4. Tap the searched camera to connect it automatically and
view its live image.
Start Recording
Steps:

7
1. Tap and select Live View.
2. Tap to start recording.
3. Tap again to stop. The video will be stored in the
memory of Android device.
4. Tap and select Picture & Video to play back the video.
Capture Pictures
Steps:
1. Tap and select Live View.
2. Tap to capture picture. The picture will be stored in the
memory of Android device.
3. Tap and select Picture & Video to view the picture.
Copy Videos to Your Computer
Steps:
1. Tap and select Parameter Settings.
2. Tap the corresponding device IP address.
3. Tap USB Mode Settings.
4. Use the USB cable to connect the camera and the computer.
5. Open the device folder.
6. Copy the videos to the computer.
Note:
The camera will stop recording in USB mode and reboot
automatically after being disconnected from the computer.
Maintenance Management
Power Off
When the device is on, hold power button for 3 seconds.
View Device Information
Steps:
1. Tap and select Devices.
2. Select the corresponding device IP address to view its
detailed information.
Upgrade
Steps:
1. Hold power button for 3 seconds to power off the device.
2. Take out TF card and copy the upgrade file to the TF card root
directory.
3. Reinstall the TF card. Refer to 3.2 Install TF Card for details.
4. Press power button for 3 seconds again to power on the
device.
Note:
The upgrading will take 1 to 10 minutes. Please ensure power is
sufficient during the upgrading process.
Result:
The camera will start up and delete the upgrade file automatically
after being upgraded.
Configure Wi-Fi Parameters
Follow the steps to connect to Wi-Fi of an Android device.
Steps:

8
1. Tap and select Parameter Settings.
2. Tap the corresponding device IP address.
3. Tap Wi-Fi Settings.
4. Input SSID and Password of the Wi-Fi to connect.
5. Tap Confirm.
Note:
The camera will automatically connect to the Wi-Fi of an Android
device within one meter range if it has been connected before.
Configure Encoding Parameters
To modify video resolution, frame rate and bitrate, you can
configure encoding parameters.
Steps:
1. Tap and select Parameter Settings.
2. Tap the corresponding device IP address.
3. Tap Encoding Settings.
4. Modify parameters as needed.
Resolution: Image is clearer with higher resolution.
Frame Rate: Video is more consecutive with higher
frame rate.
Bitrate: Video is of better quality with higher bitrate,
but takes more memory.
5. Tap Save.
Configure Video Duration
The video duration is selectable.
Steps:
1. Tap and select Parameter Settings.
2. Tap the corresponding device IP address.
3. Tap Recording Settings.
4. Select Duration of Video File as needed.
5. Tap Save.
Note:
The longer the video duration is, the larger a video file will be.
Set Camera Time
If the device time in incorrect, you can set time on the iVMS-4500.
Steps:
1. Tap and select Parameter Settings.
2. Tap the corresponding device IP address.
3. Tap Reset System Time. The camera time will be
synchronized with the Android device time.
Restore Factory Settings
If the camera is running abnormally, you can restore it to factory
settings by operating camera or software.
Steps (by camera):
1. Open the dust cover on the side of the camera.
2. Hold reset button for 1 second with a needle or similar
object.
3. Close the dust cover.
Steps (by software):
1. Click and select Parameter Settings.
2. Click the corresponding device IP address.
3. Click Remotely Restore Defaults.

9
Result:
The camera will be restored to factory settings after rebooting.
Reboot Remotely
The device can be rebooted remotely through software.
Steps:
1. Click and select Parameter Settings.
2. Click the corresponding device IP address.
3. Click Remotely Reboot.