Hansol LCD D19BL-1 CRT Monitor User Manual model
Hansol LCD Inc. CRT Monitor model
User Manual
User’s Guide
920D+(D19BL)
COLOR MONITOR
Regulatory Information.......................................................................................................................... 2
Introduction
Features ...................................................................................................................................................3
Controls
OSD Controls ...........................................................................................................................................4
OSD Menus ..............................................................................................................................................5
Power Management Feature................................................................................................................. 8
Standard Signal Table ............................................................................................................................ 8
Specifications .......................................................................................................................................... 9
Pin assignment table D-Sub Mini 15pin connector ...................................................................... 10
Troubleshooting .....................................................................................................................................11
Table of Contents

Color Monitor
2
Regulatory
Information
- FCC Information
Caution
Changes or modifications not expressly approved by the party responsible for compliance could void the user’s
authority to operate the equipment.
- Canadian Notice This Class B digital apparatus meets all requirements of the Canadian Interference Causing Equipment Regulations.
- Avis Canadien Cet appareil numérique de la classe B respecte toutes les exigences du Règlement sur le matériel brouilleur du
Canada.
- Energy Star As an ENERGY STAR partner, Hansol Electronics Inc. has determined that this product meets energy Star
guidelines for energy efficiency.
Notice
The information contained in this document is subject to change without notice.
This equipment has been tested and found to comply with limits for a class B digital device, pursuant to Part 15 of
the FCC Rules. These limits are designed to provide reasonable protection against harmful interference in a
residential installation.
This equipment can generates, uses, and radiate radio frequency energy and, if not installed and used in
accordance with the instructions, may cause harmful interference to radio communications. However, there is no
guarantee that interference will not occur in a particular installation.
If this equipment does cause unacceptable interference to radio and television reception, which can be determined
by turning the equipment off and on, the user is encouraged to try to correct the interference by one or more of the
following measures.
Reorient or relocate the receiving antenna.
Increase the separation between the equipment and receiver.
Connect the equipment into an outlet on a circuit different from that to which the receiver is connected.
Consult the dealer or an experienced Radio/TV technician for help.

Color Monitor
3
Introduction
- Features 19-inch (18 inch visual) high performance display color monitor
Automatically scans frequencies from
- Horizontal frequency: 30 to 96KHz
- Vertical frequency: 50 to 160Hz
Compatible with VGA, SVGA, VESA, MAC Standards and maximum resolution modes up to 1600 ×1200
Supports VESA flicker free modes including 85Hz refresh rate.
On Screen menu fingertip control system to visually select and adjust screen images using control buttons on
front panel and on screen menus.
Power supply operates on AC 100-240V( ±10%), 50/60Hz for use all over the world.
Power supply operates on AC 220-240V( ±10%), 50/60Hz for use all over the world.(Europe Version)
Equipped with DDC 2B for Plug & Play capability.
Equipped with an energy-saving feature.
Power management circuit signaled by the computer system, will reduce power consumption when the
computer system is not in use.
Monitors with nonglare/antistatic screens are compliant with MPR
1990 Emissions standards and meets requirements for CE Marking.
※TCO : (option)

Color Monitor
4
Controls
- OSD controls
Accessing OSD
Press MENU Button.
- : Direct Brightness access.
+ : Direct Contrast access.
EXIT from OSD
: Press this ( ) button in the main menu and submenu.
Additional front controls
※ Power Switch : Turn the monitor power on or off, When the power is on, the LED is lit.
The OSD apears on the screen when you press MENU button.
“ON SCREEN MENU” controls include the following extended controls such as Size, Position, Geometry
Distortion, Color Temp., Degauss, Moire on & off, Language, OSD-Position, Recall, Cont. & Brt., etc.
Color Monitor
5
Controls
OSD MENU CONTROL
1. NO OSD
• - Proceeds to NO.3
• + Proceeds to NO.4
• No meaning
2. MAIN MENU
• - + Moves to function to choose.
• Exit the OSD controls.
• MENU : Proceed to the selected menu.
3. BRIGHTNESS
• - Proceed to the Brightness menu.
• - + Increases or decrease the Brightness.
4. CONTRAST
• + Proceed to the Contrast menu.
• - + Increases or decrease the Contrast
5. H/V-POSITION
position and size Menu control guide
: exit to the main menu.
- / + : Refer to - / +
MENU :Toggle Horizontal and Vertical directly.
• After choosing , push MENU button.
• MENU : Push this button again & again to change the H/V-position.
• -: Moves the image left or down.
• + : Moves the image right or up.
- OSD Menu

Color Monitor
6
6. H/V-SIZE
• After choosing , push MENU button.
• MEUN : Push this button again & again to change the H/V-size.
• -: Decrease the Horizontal or Vertical size of the image.
• + : Increase the Horizontal or Vertical size of the image.
7. GEOMETRY
The Geometry controls allow you to adjust the curvature or angle of
displayed image.
• After choosing , push MENU button.
• Pincushion : Increase or decrease the curvature of the sides either inward
or outward.
• Parallelogram : Increase or decrease the tilt of the sides either to the left
or right.
• Trapezoid : Increase or decreases the bottom of the screen to be the same
as the top.
• Pin Balance : Increase or decrease the curvature of the sides.
• Top Corner : Increase or decreases the curvature of the top sides.
• Bottom Corner : Increase or decrease the curvature of the bottom sides.
• Rotation : Rotate the entire display to clockwise or counterclockwise.
Geometry Menu control guide
: Exit to the main menu.
- / + : Move the function to choose.
MENU : Function to choose.
- / + : Increase or decrease the adjustment.
8. MOIRE
• After choosing , push MENU button.
• Select ON or OFF with - / + key.
• Select H.MOIRE or v.MOIRE with - / + key.
• - / + : Adjust the Moire Control.
Color Monitor
7
9. LANGUAGE
• After choosing , push MENU button.
• - / + : Select the language.
10. OSD POSITION
• After choosing , push MENU button.
• MENU : Push this button again & again to change the H/V-OSD position.
• - : Move the OSD position left or down.
• + : Move the OSD position right or up.
11. COLOR TEMP ※Presetting : Select the desired color setting.
The bar is replaced by the color setting choice.
" USER, 6500k, 9300k "
Color adjustment is available only in USER mode.
• - / + : Move the bar with - or + key to select the user
• MENU : Press MENU button to access the sub-menu.
• - / + : Increcse or decrease the selected color adjustment.
• : Exit to the main menu.
Controls ICON Function
Degauss
This control removes the build-up of magnetic fields that can
affect color purity and convergence.
Note : The picture shakes while degaussing is taking place.
After internal degaussing the circuitry takes about
30 minutes to regain its maximum power.
Recall
This controls recalls certain factory setting such as size,
position, geometry and color by pressing MENU button.
If the monitor is operating in a user mode, this controls has
no effect.
Zoom - / + : Increase or decrease the Vertical and Horizontal size
of image at the same time.
Color Monitor
8
Power
Management
Feature
The monitor is equipped with a power saving circuit that confirms to the world-standard Display Power Manager
Signalling (DPMS) mode of Video Electronics Standard Association(VESA).
The power management feature requires that the video card of the computer should support DPMS function.
Standard Signal
Table
Status LED Sign Power Consumption
Normal mode Green ON 110 Watts
Stand-by mode Green Blinking(0.5Sec) Less than 15 W
Power-Off mode Green Blinking(1Sec) Less than 5 W
Resolution Horizontal
Frequency(kHz)
Vertical
Frequency(Hz)
Clock Frequency
(MHz)
Sync Polarity
(H/V)
VGA (720 x 400) 31.469 70.087 28.322 - / +
VGA (640 x 480) 31.469 59.940 25.175 - / -
VGA (640 x 480) 37.500 75.000 31.500 - / -
VGA (640 x 480) 43.269 85.008 36.000 - / -
SVGA (800 x 600) 46.875 75.000 49.500 + / +
SVGA (800 x 600) 53.674 85.061 56.250 + / +
XGA (1024 x 768) 60.023 75.029 78.750 + / +
XGA (1024 x 768) 68.677 84.997 94.500 + / +
SXGA (1280 x 1024) 79.976 75.025 135.000 + / +
SXGA (1280 x 1024) 91.146 85.024 157.500 + / +
UXGA (1600 x 1200) 93.750 75.000 202.500 + / +
No image is displayed with Green blinking
Monitor is in power saving mode.
Use mouse or keyboard to release power saving mode.
No image is displayed without LED on.
Power cable plug must be pulled out.
Check the power plug on monitor and on the wall.
"Out of range" displayed on the screen.
This message is displayed when the signal from video card exceeds the maximum
frequency of the monitor. Readjust resolution and frequency in accordance with the monitor
capacity.(Refer to Standard Signal Table)
Color Monitor
9
Specifications
ITEM 920D+(D19BL)
CRT Type 19", 90° deflection, FLAT
CRT Horizontal Dot pitch 0.20mm
CRT Surface Non-glare, Anti-Reflection & Anti-Static
Input
Signal
Sync. H/V Separate, TTL, positive/negative
H/V Composite, TTL, positive/negative
Video RGB Analog (0.7Vp-p), positive
75 Ω Terminated
Scanning
frequency
Horizontal 30KHz~96KHz (Automatically)
Vertical 50Hz~160Hz (Automatically)
Maximum Resolution 1600Dots x 1200Lines (Non-interlace)
Pixel Clock(Max.) 210 MHz
Display Size (Standard) Horizontal 350mm, Vertical 262mm
Power Consumption(Max.) 110 Watts
Power Supply AC 100~240V( ±10%), 50/60Hz ±3Hz
AC 220~240V( ±10%), 50/60Hz ±3Hz (Europe Version)
Input Connector D-Sub, 15Pin Connectors(3layer)
Display Colors Unlimited
Dimension Unit 18.5" (W) x 18.4" (D) x 18.3"(H) / 470mm(W) x 466.5mm(D) x 466mm(H)
Carton 22.6" (W) x 24.4" (D) x 22.2"(H) / 573mm(W) x 620mm(D) x 564mm(H)
Weight Net 47.3lbs (21.5kg)
Gross 55lbs (25kg)
Temperature
Operating 32°F to 104°F (0°C to 40°C)
Storage -4°F to 140°F (-20°C to 60°C)
Humidity 10% to 85% R.H. Non-condensing
Color Monitor
10
Pin assignment
table D-Sub Mini
15pin connector
z
The 15-pin D-Sub connector
(male) of the signal cable
(IBM Systems) :
1
5
610
11 15
(15 Pin D-Sub)
Pin No. Assignment
1Red Video
2 Green Video
3Blue Video
4 Frame Ground
5Ground
6 Red Video Ground
7Green Video Ground
8 Blue Video Ground
9 N.C
10 ID
11 Monitor Ground
12 SDA
13 H-Sync
14 V-Sync
15 SCL
Color Monitor
11
Troubleshooting Problem Solution
No picture Check that the AC cord is correctly connected.
Check that the AC socket is live by plugging in another piece of equipment.
Power switch and computer power switch should be in position.
Ensure that the signal cable is properly connected to the video card or PC.
Ensure that the video card is securely seated in the PC.
Check the connector for bent or pushed-in pins.
Press a key on the keyboard or move the mouse, in case the screen
power-saver mode has blanked the screen.
Image is scrolling or unstable Signal cable should be securely attached to the computer.
Check the pin assignments and signal timings of the monitor and your video
card with respect to recommended timings and pin assignments.
Ensure that the video card is securely seated in the PC.
Picture is fuzzy Adjust the Contrast and Brightness Controls.
Push the Degauss Button once.
Picture bounces or a waving
pattern is present in the picture
Move electrical devices that may be causing electrical interference away from
the monitor.
See the inside front cover of this manual for FCC information.
Unshielded audio speakers placed next to the monitor can cause picture
distortion. Move the speakers away.
Edges of the display image are
not square
Adjust the distortion using the Side Pincushion or Trapezoid Pincushion
Balance, Parallel adjustment controls under the on screen menu.
Display image is not centered,
too small, or too large
Adjust the horizontal and vertical image sizes using the Horizontal and Vertical
Size adjustment controls under the on screen menu.
Caution
A minimum interval of 20 minutes should exist before the Degauss Button
is used a second time. Do not hold the button down continuously.
User’s Guide
COLOR MONITOR
Visit for more Information www.hansolel.co.kr
Color Monitor
2
Table of
Contents
Introduction
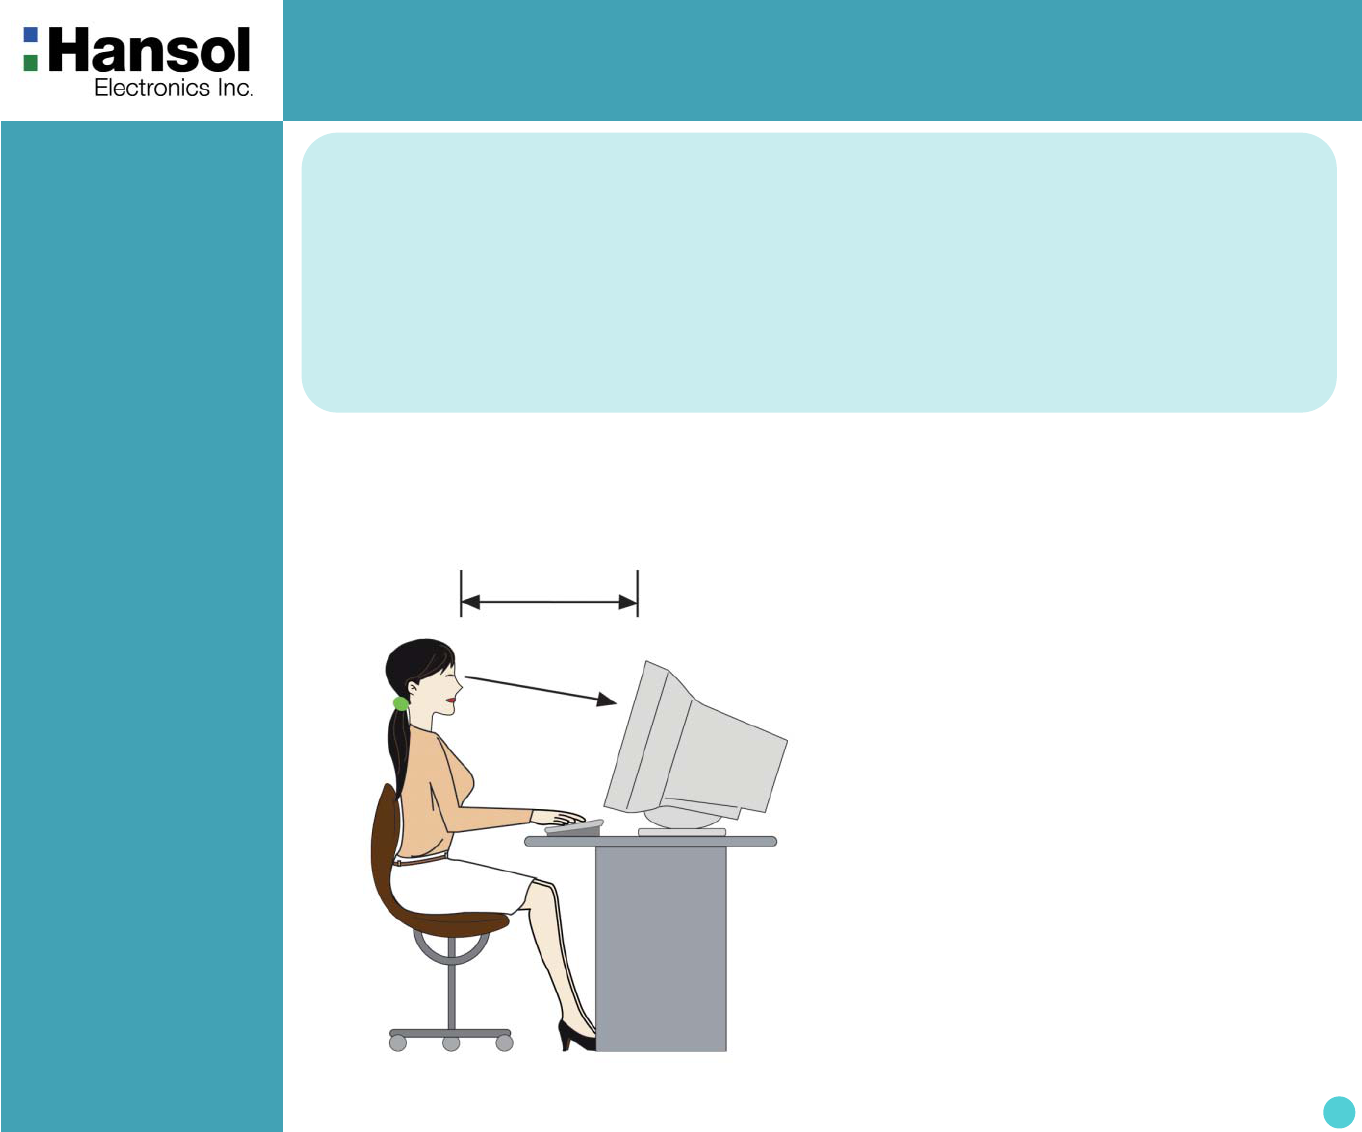
- Good Posture
Guide
Look down the monitor below the horizon.
Adjust the monitor to prevent reflection.
Relax shoulders and arms, and sit back on
the chair.
Adjust the monitor stand to acquire required
angle.
Maintain the arms horizontally and place
hands softly on the keyboard.
Keep feet flat on the ground.
about 50cm
Introduction
Good Posture Guide ........................................................................................................................................... 2
Safety Information ............................................................................................................................................... 3
Package ..............................................................................................................................................................5
Stand Assembly ..................................................................................................................................................5
Connection to your computer ..............................................................................................................................6
Installing Monitor Driver ............................................................................................................................7
Service Center .............................................................................................................................................. 11
* Place the monitor to face the user and then adjust the monitor angle.
* Take a break(for about 10 minutes) at every hour during the work with monitor.
* Refer to the following figure to take the correct posture
Color Monitor
3
Introduction
- Safety infomation
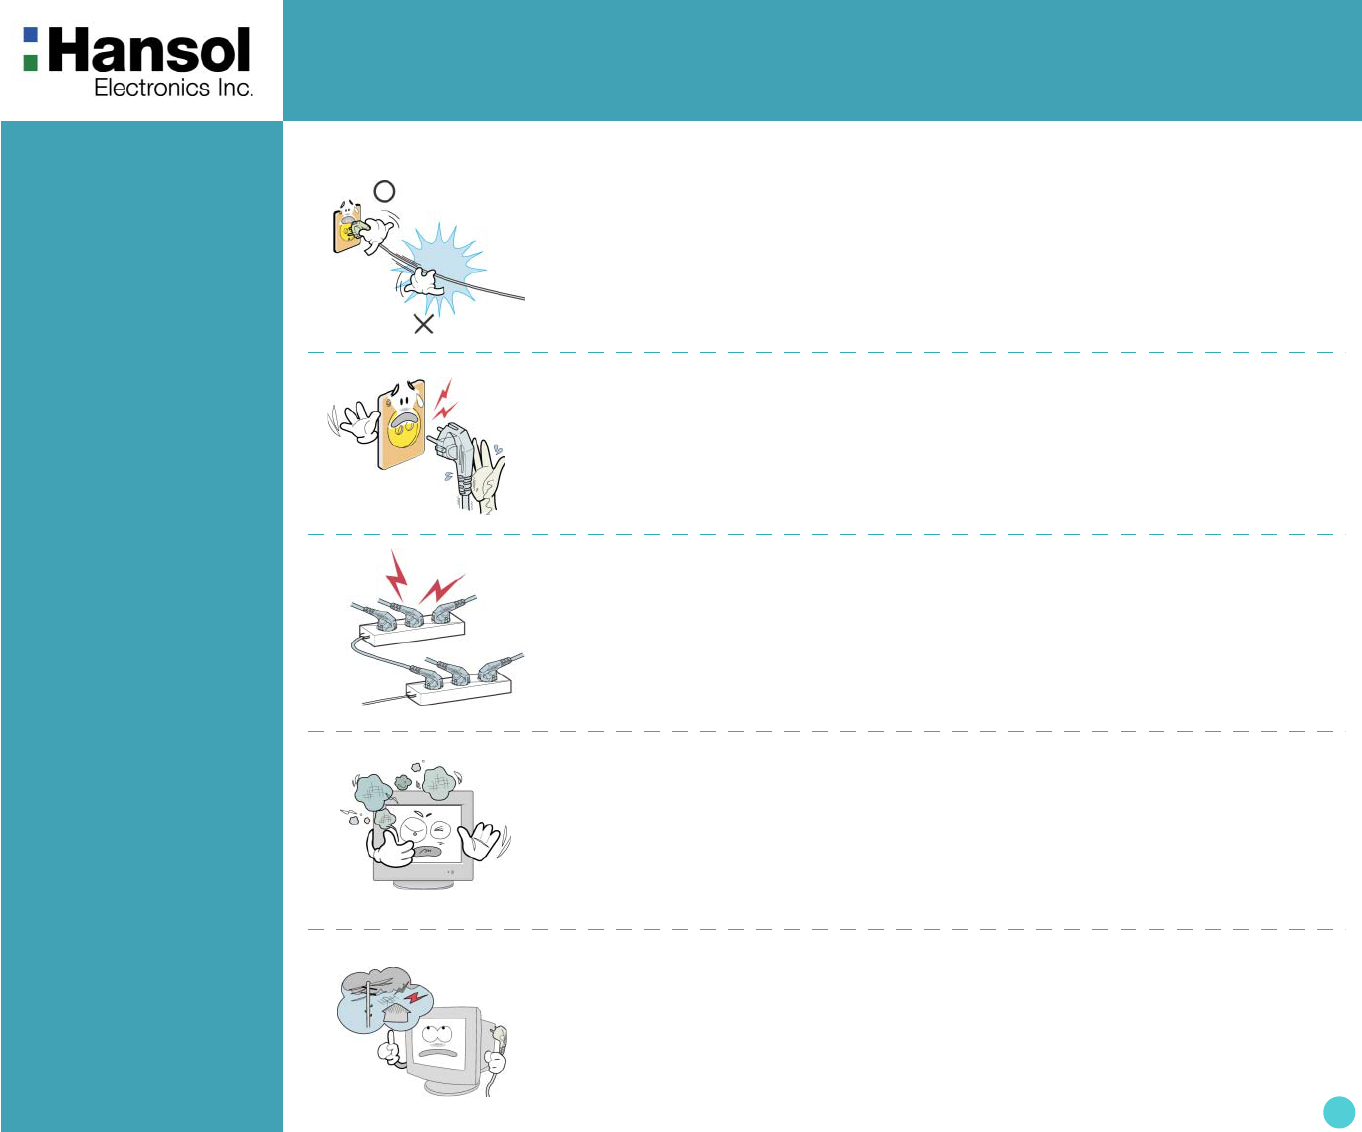
When connecting/disconnecting the plug, pull out the plug itself, and never pull the cord
to prevent fire caused by short.
To prevent electric shock, do not connect/disconnect the plug with wet hand.
If you see smoke or smell something burning, stop using the unit, switch off the power,
pull out the plug, and then contact your local service station.
To prevent fire and electric shock, pull out the plug in case of thunder and
lightening.
To prevent fire, do not connect a large number of equipments in a single line.
To prevent damage or loss, please read this warning carefully.

Color Monitor
4
Install the monitor near an outlet that you can reach easily. Disconnect the product by
grasping the plug firmly and pulling in from the outlet.
Never disconnect it by pulling the cord.
Slots and openings in the cabinet are provided for ventilation;
these openings must not be blocked or covered. Never push objects of any kind into
cabinet slots or other openings.
To prevent fire and electric shock, do not try to take the monitor apart or repair it your self.
Contact your local sevice station or customer sevice center for inspection, modification or
repair.
Unplug the monitor from the wall outlet before cleaning. Do not use liquid cleaners or
aerosol cleaners. Use a damp, lint-free cloth for cleaning.
Never insert anything metallic into the monitor openings.
Doing so may create a danger of electric shock
Color Monitor
5
Introduction
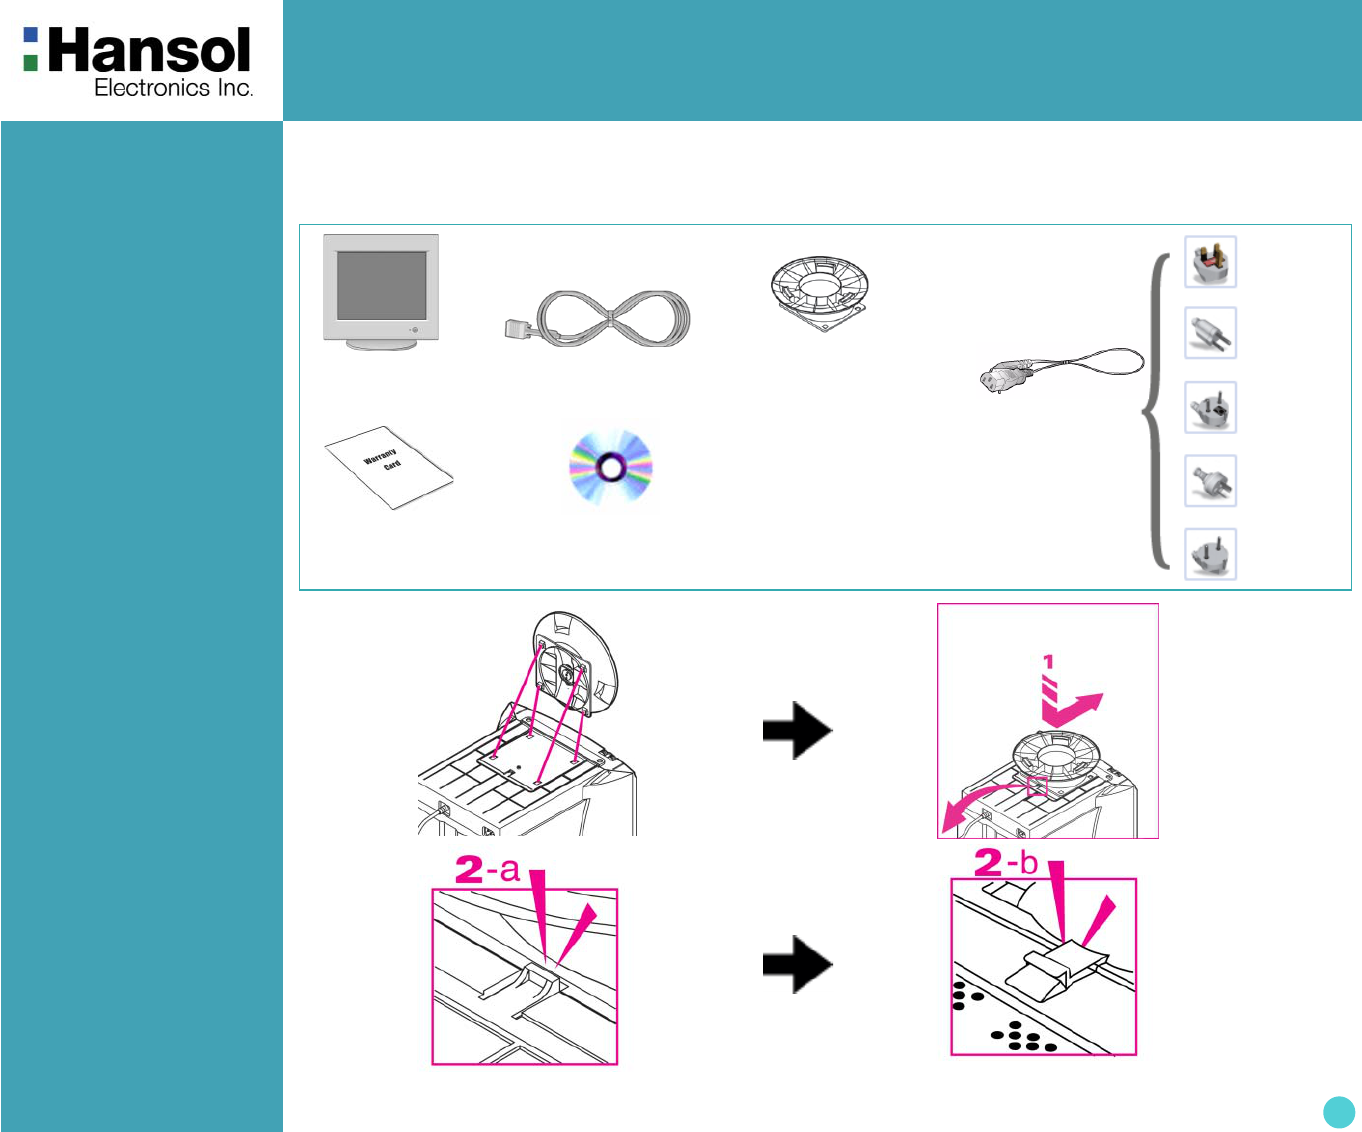
- Package
- Stand Assembly
Display
Monitor
UK
U.S.A/
Canada
Europe
Australia
Korea
AC Power
Input Cable
Attached Signal
Cable
C D
(User’s Guide & etc)
Stand-Assy
Warranty
Card
This stand is applied to the several monitors.
Your monitor may be look different, but the installation procedure is the same.
Congratulations on your purchase of this top quality color monitor!
The items illustrated below are contained in the carton.
First, be sure that your carton includes all of them.
If any items are missing or damaged, please contact your local dealer or supplier.
Color Monitor
6
Introduction
- Connection to
your computer
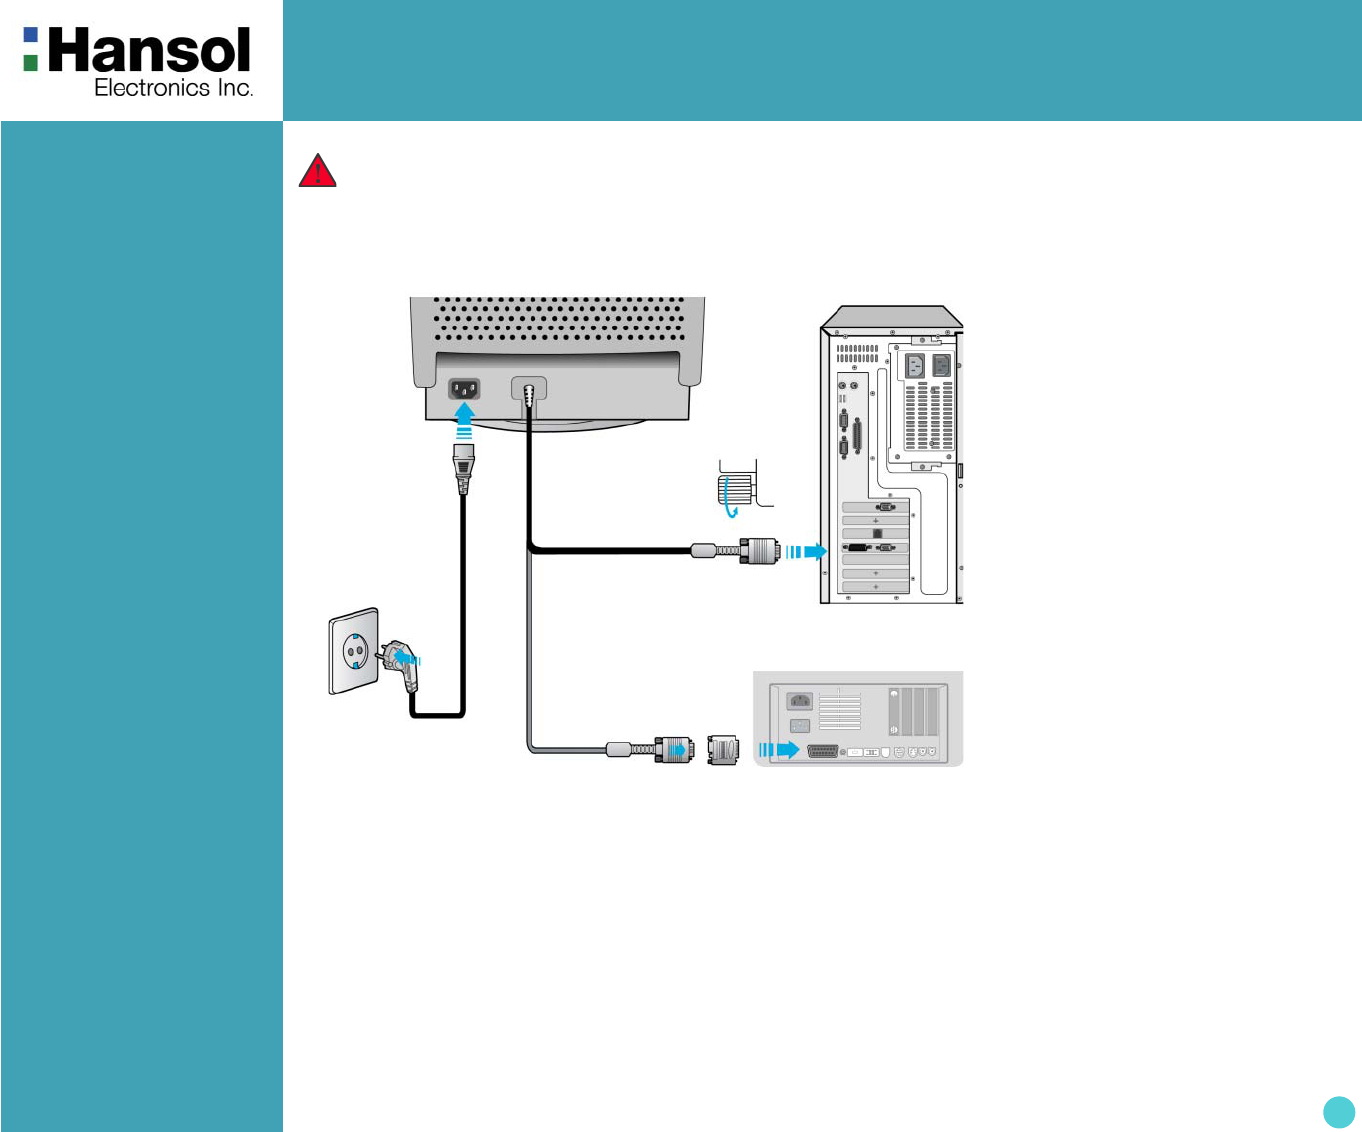
CAUTION
Ensure that both the PC and the display monitor are switche off.
To attach the monitor to your system, as shown in the following illustrations.
1. Insert the AC power cord ② into monitor and then into an AC power outlet.
2. Connect the signal cable ① to the 15pin graphics connector of the system and tighten the fastening
screws.
3. To turn on the monitor, push the power switch.
Note
To attach the monitor to the Macintosh system, please contact an authorized dealer.
IBM
Mac
①
②
Color Monitor
7
Installing
Monitor Driver
- Automatic
Installation
- Manual Installation
(Windows 2000)
1. Insert the CD to the CD-ROM driver.
2. Double-click “Install.exe”.
3. Select the model and click “OK” button.
4. Select inf file, and then click “OK” button.
5. Click “Exit” button to close the installation.
1. Insert the CD to the CD-ROM driver.
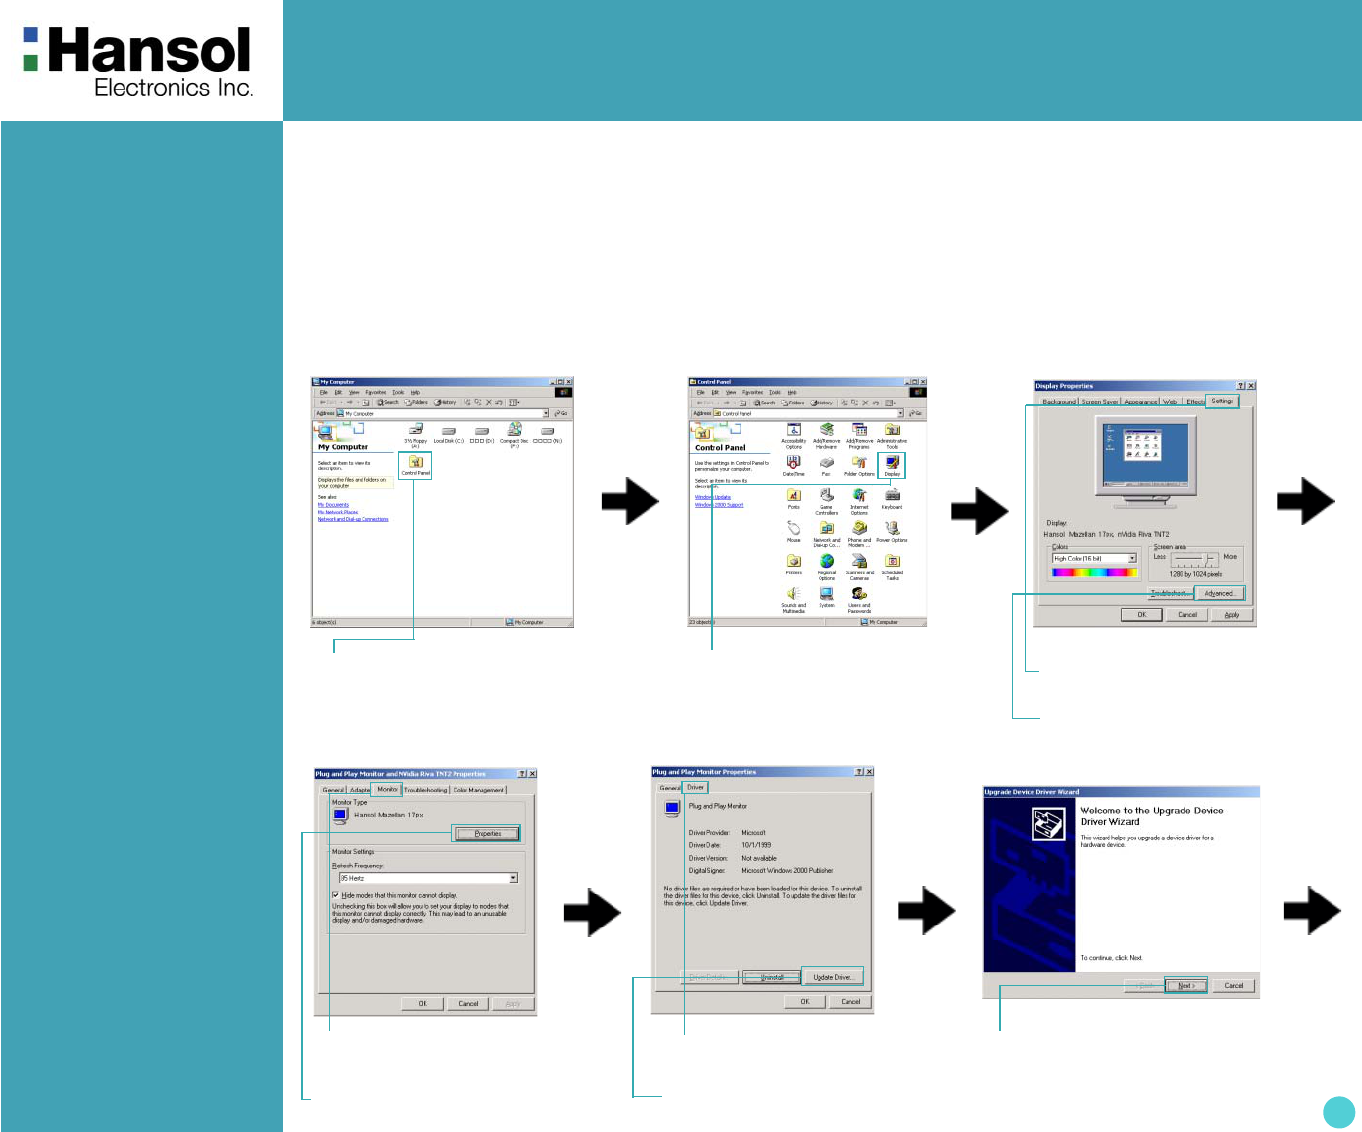
2. Click ‘My Computer’ and follow the procedure below.
① Click 'Control Panel'. ② Click ‘Display’. ③ Click ‘Settings’.
④ Click ‘Advanced..’.
⑦ Click ‘Driver’.
⑧ Click ‘Update Driver’.
⑨ Click ‘Next>’.
⑤ Click ‘Monitor’.
⑥ Click ‘Properties’.
Color Monitor
8
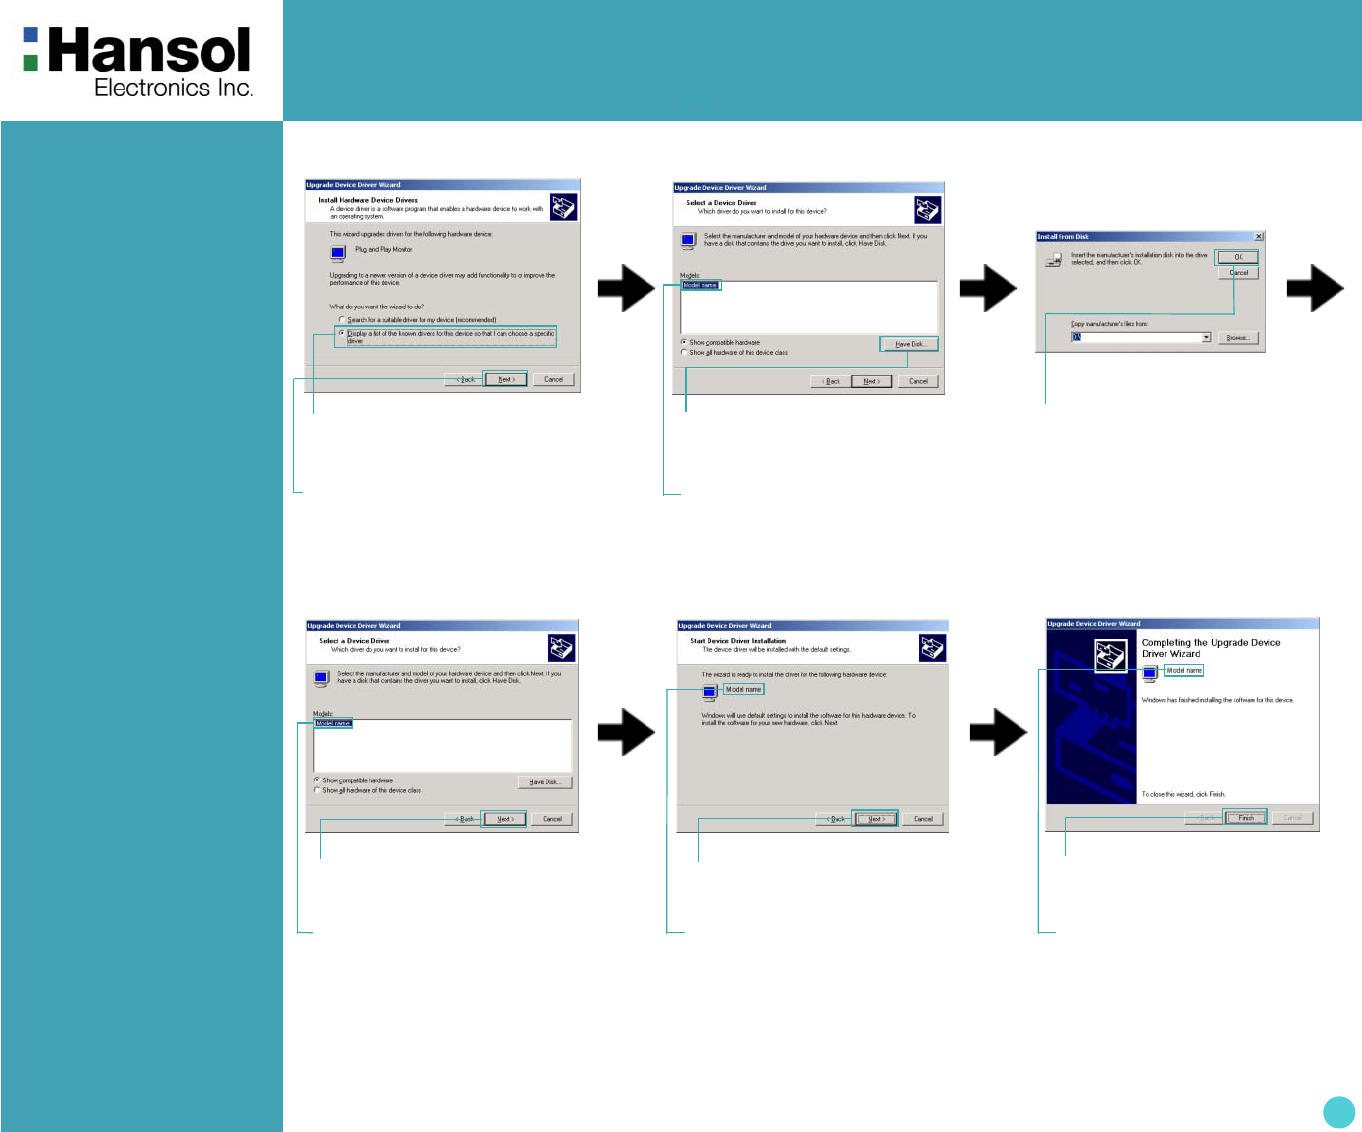
●Click ‘Finish’.
(ex : H711, 730ED...)
⑩ Click ‘Display a list of all...’.
⑪ Click ‘Next>’.
⑫ Click ‘Have Disk...’
⑭ Click ‘Next>’. ⑮ Click ‘Next>’
⑬ Select the driver and
click ‘OK’.
3. Select “Exit” if the monitor model is changed, and then reboot the Windows.
(ex : H711, 730ED...)
(ex : H711, 730ED...) (ex : H711, 730ED...)
Color Monitor
9
(Windows XP) Microsoft ® Windows ® XP Operating System
1. Insert CD into the CD-ROM driver.
2. Click "Start" →"Control Panel" then click the "Appearance and Themes" Icon.
3. Click "Display" icon and choose the "Settings" tab then click "Advanced..".
4. Click the "Properties" button on the "Monitor" tab and select "Driver" tab
5. Click "Update Driver.." and select "Install from a list or.." then click "Next" button.
6. Select "Don't search ,I will.." then click "Next" and then click "Have disk".
7. Click the "Browse" button then choose A:(D:\Driver) and choose your monitor model in the model list and click the
"Next" button.
8. Click the "Close" button then click "OK" button continually.
9. Monitor driver installation is completed.
(Windows Me) Microsoft ® Windows ® Millennium Operating System
1. Click "Start" , "Setting" , "Control Panel".
2. Double click "Display" icon.
3. Select the "Settings" tab and click "Advanced Properties" button.
4. Select the "Monitor" tab.
5. Click the "Change" button in the "Monitor Type" area.
6. Choose "Specify the location of the driver".
7. Choose "Display a list of all the driver in a specific location.." then click "Next" button.
8. Click the "Have Disk" button.
9. Specify A:\(D:\driver) then click "OK" button.
10. Select "Show all devices" and choose the monitor that corresponds to the one you connected to your computer
and click "OK".
11. Continue choosing "Close" button and "OK" button until you close the Display Properties dialogue box.
(You can get some other screen for warning message or others, then click the appreciate option for your monitor.)
Microsoft ® Windows ® 98 Operating System
1. Click "Start" , "Setting" , "Control Panel".
2. Double click "Display" icon.
3. Select the "Settings" tab and click "Advanced Properties" button.
4. Select the "Monitor" tab.
5. Click the "Change" button in the "Monitor Type" area then click "Next" button.
6. Choose "Display a list of all the driver.." then click "Next" button.
7. Click the "Have Disk" button, then click "browse.." button.
8. Specify A:\(D:\driver) then click "OK" button.
9. The "Select Device" dialogue box will appear. Select "Show all devices" then choose the monitor that corresponds
to the one you connected to your computer and click OK.
10. Continue choosing "Close" button and "O.K" button until you close the Display Properties dialogue box.
(Windows 98)

Color Monitor
10
(Windows 95) Microsoft ® Windows ® 95 Operating System
.
First determine the Windows 95 version installed on your computer by right-clicking the My Computer icon on PC and
selecting Properties. The version number is listed under System. Perform the steps for the appropriate version.
Version 4.00.950A
1. Click Start, Settings, Control Panel, and then double-click "Display" icon.
2. In the "Display Properties" window, click the "Settings" tab and click "Change Display Type".
3. In the "Change Display Type" window, click "Change" and then click "Have Disk".
4. Click "browse.." button and specify A:\(D:\driver) and click "OK".
5. In the Select Device window, click the appropriate monitor model and then click OK.
6. Continue choosing "Close" button and "OK" button until you close the "Display Properties" dialogue box.
Version 4.00.950B
1. Click Start, Settings, Control Panel, and then double-click "Display" icon.
2. In the "Display Properties" window, click the Settings tab and then click "Advanced Properties" button.
3. In the "Advanced Display Properties" window, click the "Monitor" tab and then click "Change" button.
4. In the "Select Device" window, click "Have Disk" button.
5. Click "browse.." button and specify A:\(D:\driver) and click "OK".
6. In the "Select Device" window, click the appropriate monitor model and then click "OK".
7. Continue choosing "Close" button and "OK" button until you close the "Display Properties" dialogue box.
Microsoft ® Windows ® NT Operating System
1. Click Start, Settings, Control Panel, and then double-click Display icon.
2. In Display Registration Information window, click Settings Tab and then click All Display Modes.
3. Select a mode that you wish to use (Resolution, Number of colors and Vertical frequency) and then click OK.
4. Click Apply button if you see the screen working normally after clicking Test. If the screen is not normal, change to
a different mode (lower mode of resolution, colors or frequency).
Note: If there is no Mode at All Display Modes, select the level of resolution and vertical frequency by referring to the
Preset Display Modes in the user guide.
(Linux) Linux Operating System
To execute X-Window, you need to make the X86Config file, which is a type of system setting file.
1. Press Enter at the first and the second screen after executing the X86Config file.
2. The third screen is for setting your mouse.
3. Set a mouse for your computer.
4. The next screen is for selecting a keyboard.
5. Set a Keyboard for your computer.
6. The next screen is for setting your monitor.
7. First of all, set a horizontal frequency for your monitor. (You can enter the frequency directly.)
8. Set a vertical frequency for your monitor. (You can enter the frequency directly.)
9. Enter the model name of your monitor. This information will not affect the actual execution of X-Window.
10. You have finished setting up your monitor.
Execute X-Window after setting other requested hardware.
(Windows NT)
11
Service Center
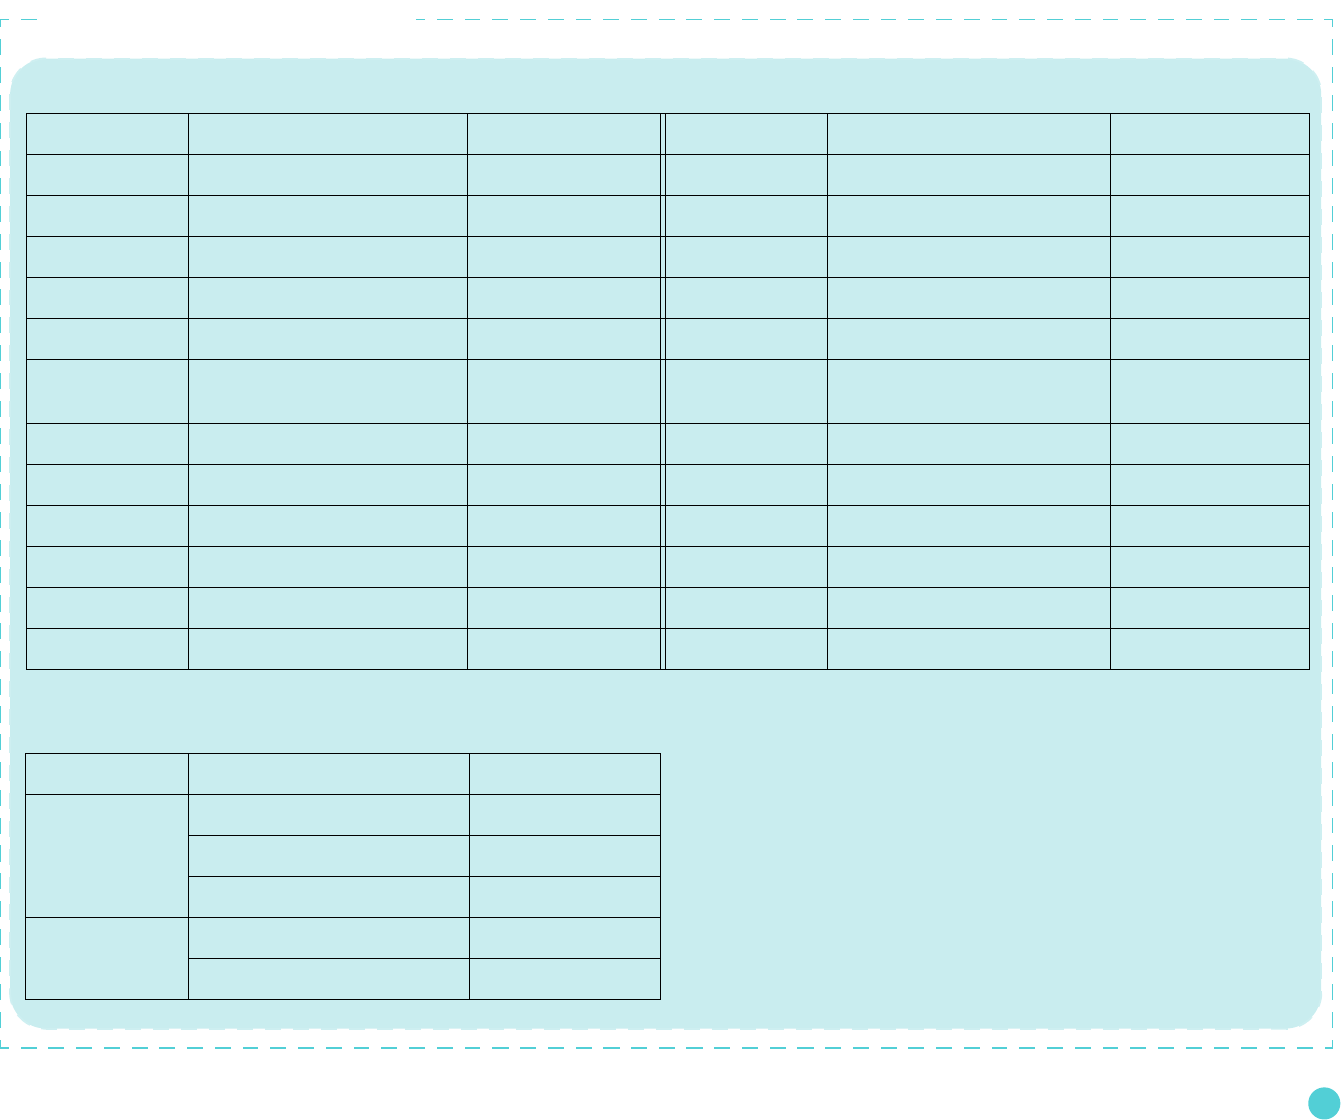
Country ASC Tel Country ASC Tel
U. K Pulse Service Centre Ltd. 44-(0)-870-013-4470 Hungary Profit Service Center Kft. 36 1 399 0405
Germany BITRONICS GmbH 49-3634-683313 Bulgaria RTS 359-2-971-2020
France DATEX 33-1- 69- 310101 SWITZERLANDS TPA PANATLANTIC AG 41 1 886 10 16
Spain FREE ELECTRONICA S.A 34 91 6774787 SLOVAKIA BGS-Distribution a.s 421 7 49101563
Finland PowerMill OY 358 9 561 86130 LATVIA ELKO-RIGA 371-709-3240
Ireland Power Supplies Repair
Agency LTD 353 1 286 1343 Greece Alman Hellas Ltd. 3010 2409150
Belgium SIMEX NV 32 16 40 58 44 SLOVENIA ACORD 92 d.o.o. 386 1 583 72 62
Norway Effekt A/S 47 333 00 630 Croatia ZEL-COS d.o.o 358-1-615-9644
Portugal CorpoTecnico 351 21 317 0210 Romania S.C. Shark Industries S.A 40 1 224 22 58
Sweden ANOVO Nordic 46 13 202 428 Romania Flamingo Computers SA 4 236 2000(231)
Denmark Strax 45 70 10 7101 Yugoslavia PAKOM A.D. 381 18 52 11 16
Czech ExtraPoint(Karma) 42022576650 Ukraine MTI 380 44 458 00 32
EUROPE
Country ASC Tel
USA
Think AT(West Area) 1-562-531-3815
Far East(East Area) 1-201-935-5939
Techpoint(South Area) 1-813-249-5808
CANADA
Ko-Am Electronics(West Area) 1-604-273-5622
Electrodesign(East Area) 1-514-331-3202
U.S.A , CANADA