Hansong ADIO150 Studio Controller and amplifier User Manual
Hansong(Nanjing) Technology Ltd. Studio Controller and amplifier Users Manual
Hansong >
Users Manual

1
PHASX PX150 DESKTOP AUTHORING SYSTEM
OPERATION MANUAL VERSION 1.1
07/29/2018
To You, our newest Partner:
Thank you for choosing the Phasx PX150 Audio Authoring
Suite. We are very proud to have created, in our humble opinion, one
of the most advanced Personal Recording Systems in the world, and
prouder still that you have chosen to agree with us and give our
technologies a try.
The Phasx team’s mission and ambition is to create a line of Best
in Class “Mastering Worthy” Professional Audio Systems that
Empower Media Arts Professionals in ways never before possible,
Excel in every benchmark of performance and sound quality, and
Exceed user expectations on every front.
The PX150 has taken over ten years to develop, and called on the
skills, efforts, and inputs of dozens of Acoustics, DSP, and Recording
Engineering Professionals.
.
We hope that you will agree with us that the result was worth the
wait!
Sincerely,
The Phasx Team

2
To receive important information and updates, as becomes available,
please take a moment to register your PX15 Audio Authoring System. Go
to www.phasx.com/PX150/Register
Table of Contents
1. Introduction and System Overview
2. Important Safety Information and Instructions ……………………………. Page 4
Section I: SYSTEM COMPONENTS OVERVIEW……………………….…. Page 9
SECTION II: GETTING STARTED: ………………………………………….... Page 13
SECTION III: COMPUTER CONNECTIONS AND SETUP…………………. Page 17
SECTION IV: TECHNICAL DATA SPECIFICATIONS………………………. Page 25
SECTION V: TROUBLESHOOTING…………………………………………... Page 26
List of Illustrations:
Fig. 1 Complete PX150 System………………………………………………………………. Page 3
Fig. 2 The S150Satellite Speaker Cabinet………………………………………………………...….... Page 8
Fig. 3 Placing the S150 Satellite Speakers and ADIO150 Bass Cabinet on Desktop… Page 9
Fig. 4 Illustrating the use of the Acoustic Pinpoint System on the Desktop………….…Page 10.
Fig. 5 The ADIO150 Desktop Bass Cabinet which doubles as a Computer Monitor Stand….... Page12
Fig. 6 One of the Specialty Screens from Control, Data, and Setup APP for the ADIO150….…Page 13
Fig.7 The ADIO150 Front Panel…………………………………………………….…………….…. Page 14
Fig.8 The ADIO150 Rear Panel Audio I/O Connectors……………………………………………..Page16
Fig.9 The ADIO150’s USB/DAW and Speaker Connectors…………………………………..……Page 17
Fig.10 The ADIO150 Rear Panel AC MAINS Connector……………………………………..……..Page 18
Fig.11 ADIO150 Multi-Functional Gain and Balance Setting System………………………………Page 22
3
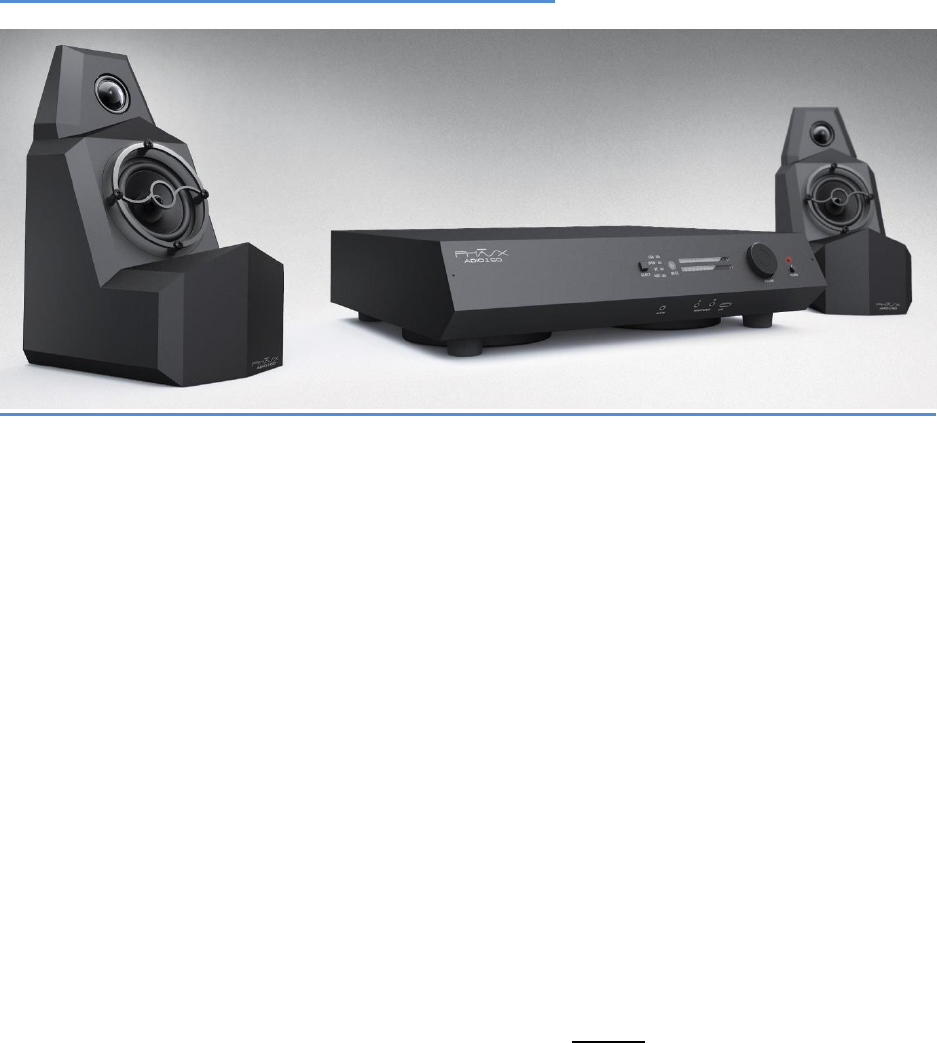
Introduction & System Overview
Fig. 1 Complete PX150 System
The Phasx PX150 system is a complete self-contained audio authoring system that
requires only a computer running a quality DAW program and an iPhone or iPad to run
Routing and Settings APPs.
The PX150 is effectively a true 3-way system because the ADIO150 Power/Bass Unit
is placed directly in front of the user where it can act as a Computer Monitor Stand.
The S150 Satellite Speakers handle the midrange and high frequencies. They
employ the patented Shadocastertm shape that allows astonishing position, phase, and
frequency accuracy on a standard desktop as small as 48” X 24”.
The S150 Satellites are both dedicated passive speakers. Crossover, Driver
Compensation, Power Amplifiers, and Woofer/Subwoofer Drivers are all built in to the
ADIO150 Power/Bass Unit.
The ADIO150 was designed to interface with any modern DAW and is capable of
routing 4 input channels and 8 output channels of 192kHz/24bit audio to and from the
DAW via the computer’s USB2 system.
Every digital signal in the system, in and out, is always routed through an Analog
Devices ASRC (asynchronous rate converter) so that input signals always arrive at the
DAW perfectly timed to the rate and depth of the DAW with NO user intervention
whatever.

4
This means that the user can mix any bit rate/bit depth audio signal on any
input simultaneously with any other bit rate/depth on any other input, and never
have to change any settings. The inputs are always automatically set to match
the bitrate/depth selected by the user’s DAW project. The only limiting factors are
the DAW itself and the 96kHz 24bit limit of the S/PDIF input side hardware.
The ADIO150 is also equipped with a Bluetooth LE based APP
connection system that allows the user to run an extremely sophisticated
router/switcher/comparator/monitor-controller APP on any iPhone or iPad,
Gen. 3 and up.
The PX150 system is extremely powerful and has far more functions than can be
mastered in a single sitting or from a quick start guide. However, it is programmed to
run with very little user intervention, both from the start with pre-programmed factory
settings, and every day thereafter with easy APP-saved user preferences that will grow
with the user’s familiarity with the system.
Because the system is designed to “wake up running”, it is very easy for the user get
results within minutes of firing the system up!
It is critical to note that the PX150 is primarily meant to work with
input from and outputs to a computer or tablet hosted multi-channel
DAW. When used this way, the signal path includes no Digital to Analog
converters until digital signal is converted directly to Speaker Cone motion.
So, one of the most serious deficits of anything but the very most
expensive equipment, bad DACs and ADC’s, is almost completely
eliminated in the PX150.
1. IMPORTANT Safety Information and Instructions
Read the following safety instructions and operations manual before
setting up and using your PX150 System!
Keep this manual for future reference.
Heed all the warnings and follow the instructions.
1.1. Listening Level Warning
• The PX150 System is capable of producing very
high SPL levels!

5
• Permanent hearing damage may occur if exposed to high SPL levels
for a prolonged and or multiple periods of time.
• Extended periods of high SPL listening may allow mistakes in your
mixes or reduce your critical listening ability as your hearing tends to
adapt and become less sensitive over time allowing the missing of
important and subtle sounds or instrument layering in the mix
• Please use safe listening levels when playing back your music
material.
1.2. Important Enclosure Notice / Warning
Do not remove any cover plate screws or open any part of the
PX150 System.
Hazardous Voltages exist inside the enclosure and a potential
of severe or fatal electrical shock!
The PX150 System has no user serviceable parts inside any of
the three chassis included. Tampered Seals Void All
Warrantees.
▪ To reduce the risk of failure, fire,
or electrical shock, do not expose the any part of the PX150
System to rain, moisture, high humidity, or use near water or
other liquids.
▪ The PX150 System must not be exposed to dripping,
splashing, or spills of liquids.
▪ Do not use in dusty environments as particles
could enter the enclosure or collect on the speaker
diaphragms.
▪ Refer all service to a Phasx Authorized Service Center Only
▪ Servicing is required when any part of the
PX150 System has been damaged in any way, does not
operate normally that cannot be solved with technical
support, has been dropped, or exposed to liquids that have
entered any of the speakers or the ADIO150.
1.3. Mains AC Power Connection

6
The ADIO150 System Controller should only be operated when
connected to an appropriate AC mains power source and
appropriate type of 2 pin connection. This includes any
extension cords or power distribution strips. Appropriate
power cords are supplied with each ADIO150.
▪ The ADIO150 System Controller can operate on 120VAC @
60Hz or 220/240VAC @ 50Hz.
▪ To completely disconnect from AC mains, disconnect the
ADIO150 AC power cord from the AC mains supply
receptacle or the back of the Speaker.
▪ The PX150 System should be installed using the shortest
practical wiring and disconnection of the device should be
easily accessible.
Power-Cord Protection
▪ Power-supply cords should be routed so that
they are not likely to be walked on or pinched by items
placed upon or against them.
▪ Particular attention should be given to cords
at plugs, power strip receptacles, and power entry connector
of the ADIO150 System Controller.
Power Line Surges and Lightning
▪ As with all sensitive electronic equipment, it is
suggested to use AC Main Power sources that have surge
protection.
▪ For additional protection during a lightning
storm, or when left unattended and unused for long periods
of time, unplug the ADIO150 from the AC Mains Power
source.
Mains Power Source Overloading
▪ Do not overload wall outlets, extension cords,
or integral convenience receptacles as this can result in a
risk of fire or electric shock.
7
1.4 General Cable Connection
▪ Before making connections to the PX150 System, ensure
that the power switch is off and connecting components are
in mute or stand-by mode.
▪ Make sure all cables and connectors are of
the highest quality, and fully checked. Defective cables can
harm your speakers. They are a common source of noise,
hum, crackling etc.
▪ Always be careful when making connections which may
have hazardous voltages on them during operation.
▪ Always switch off your entire system before connecting or
disconnecting any cables, or when cleaning any
components.
1.5 Placement
▪ The ADIO150 will get warm to the touch on
its top panel and if rack mounted must have 1 rack space
above it left open and clear to the outside to allow air flow for
cooling. Do not place anything on top of the chassis or closer
than 6 inches to the rear surface to assure air flow.
▪ Do not place the ADIO150 near high heat generating
sources such as radiant heaters, radiators, open flames,
candles, or other devices that generate high heat or flames.
▪ Do not place flammable material behind,
above, or beneath the ADIO150
▪ Never operate this product or its components I n an
explosive atmosphere.
▪ Do not place the speakers or ADIO150
Controller on an unstable cart, stand, bracket, or table. The
unit may fall, causing serious injury and or serious damage.
o When a cart or stand is used, use
caution when moving both together.
o Using Isolation dampers under the speaker cabinets to
help decouple the speaker cabinet from the stand that

8
will help dampen vibration noise and other objects which
could fall.
1.6 Cleaning
▪ Clean only with soft cotton dry cloth.
▪ Never use liquid cleaners, aerosol cleaners,
or flammable / combustible chemicals for cleaning.
▪ Avoid touching the speaker diaphragms.
▪ Do not use a vacuum cleaner or high pressure air source on
the speaker diaphragms as damage may or will occur.
1.7 Magnetic Considerations:
▪ S150 Speakers have two drivers; mid-range,
and high frequency, and they are NOT Magnetically
Shielded
▪ The ADIO150 Power/Bass Unit has two
Drivers for Low Frequency, and they are also Magnetically
Unshielded.
▪ Please keep magnetically sensitive items at least 1.5 Feet
away from any of the speaker cabinets.
▪ CRITICALLY IMPORTANT
The ADIO150 Bass Drivers are not shielded and
therefore can “fool” some laptops placed on the top of
the ADIO150 into thinking that the cover has been
closed.
MacBook Pro models, the best solution is to download
and install a free “stay awake” utility such as InsomniaX
2.1.8
Windows 10 machines have a “Power Buttons and Lid”
setting in the advanced power settings page which
allows the user to cause a closing lid (or placing the unit
atop the ADIO150) to have no effect.
1.8 Warning:
▪ This device complies with Part 15 of the FCC Rules.
Operation is subject to the following two conditions:
(1) This device may not cause harmful interference, and
9
(2) This device must accept any interference received,
including interference that may cause undesired operation.
Note: This product has been tested and found to comply with the limits for a Class B
digital device, pursuant to Part 15 of the FCC Rules. These limits are designed to
provide reasonable protection against harmful interference in a residential installation.
This product generates, uses, and can radiate radio frequency energy and, if not
installed and used in accordance with the instructions, may cause harmful interference
to radio communications. However, there is no guarantee that interference will not occur
in a particular installation. If this product does cause harmful interference to radio or
television reception, which can be determined by turning the equipment off and on, the
user is encouraged to try to correct the interference by one or more of the following
measures:
—Reorient or relocate the receiving antenna.
—Increase the separation between the equipment and receiver.
—Connect the equipment into an outlet on a circuit different from that to which the
receiver is connected.
—Consult the dealer or an experienced radio/TV technician for help.
■ Please take attention that changes or modification not expressly approved by the
party responsible for compliance could void the user’s authority to operate the
equipment.
This equipment complies with FCC/IC RSS-102 radiation exposure limits set forth for an
uncontrolled environment. This equipment should be installed and operated with
minimum distance 20cm between the radiator & your body.
This device complies with Industry Canada licence-exempt RSS standard(s). Operation
is subject to the following two conditions:
(1) this device may not cause interference, and
(2) this device must accept any interference, including interference that may cause
undesired operation of the device.
Le présent appareil est conforme aux CNR d'Industrie Canada applicables aux appareils
radioexempts de licence. L'exploitation est autorisée aux deux conditions suivantes :
(1) l'appareil ne doit pas produire de brouillage, et
(2) l'utilisateur de l'appareil doit accepter tout brouillage radioélectrique subi, même si le
brouillage est susceptible d'en compromettre le fonctionnement.
Under Industry Canada regulations, this radio transmitter may only operate using an
antenna of a type and maximum (or lesser) gain approved for the transmitter by Industry
10
Canada. To reduce potential radio interference to other users, the antenna type and its
gain should be so chosen that the equivalent isotropically radiated power (e.i.r.p.) is not
more than that necessary for successful communication.
Conformément à la réglementation d'Industrie Canada, le présent émetteur radio peut
fonctionner avec une antenne d'un type et d'un gain maximal (ou inférieur) approuvé pour l'émetteur par
Industrie Canada. Dans le but de réduire les risques de brouillage radioélectrique à l'intention des autres
utilisateurs, il faut choisir le type d'antenne et son gain de sorte que la puissance isotrope rayonnée
équivalente (p.i.r.e.) ne dépasse pas l'intensité nécessaire à l'établissement d'une communication
satisfaisante.
11
Section I: SYSTEM COMPONENTS OVERVIEW
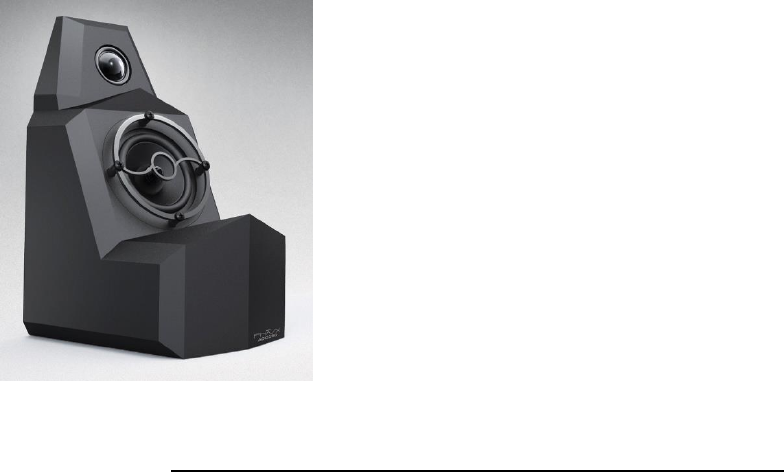
1) S150 Satellite Speaker
Fig. 2 The S150 Satellite Speaker Cabinet
• THE ShadocasterTM ACOUSTIC Cabinet Construction:
The Patented ShadocasterTM system allows the small space over a desktop
(or similar size area) to behave as if it were a part of an acoustically corrected
soffit-mount speaker control room playback system, even though it is operating in
a more or less standard domestic room.
The effect is to deliver astonishing sound staging and even accurate elevation
effect reproduction, something that is nearly impossible in an acoustically
untreated room.
You have to hear it to believe it --- and now you are about to!
12
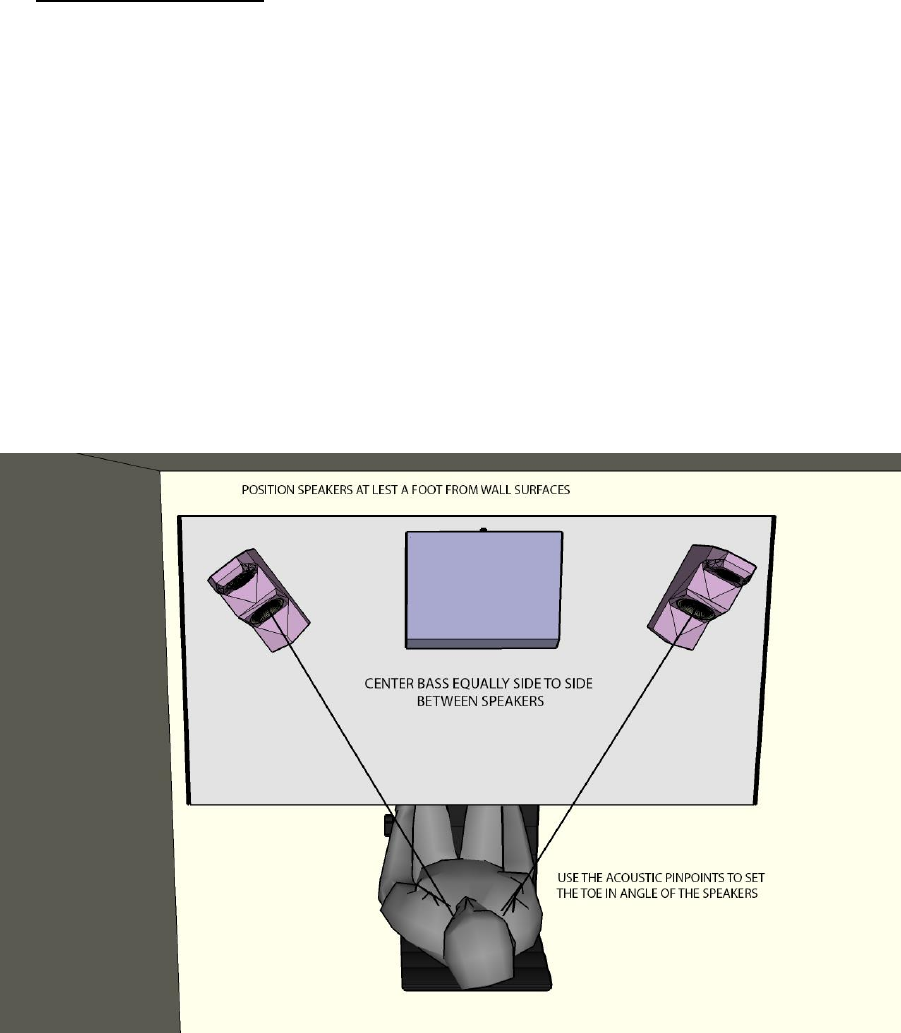
Speaker Placement:
The S150 Satellites and ADIO150 Power/Bass Unit are designed to be positioned
primarily on a desktop at about 28”-30” above the floor (Standard Desk Height) and
at about 2 to 3 feet from the user’s ears, with the ADIO150 Power/Bass directly in
front of the user and the S150’s placed as far apart on the desk as is practical, and
then toed in toward the user. Although a very precise balance set-up control is
available, it is important to place the speakers at the same distance from the user as
in the diagram below.
The S150’s should be positioned a minimum of 1foot from the nearest back wall,
and at least 2’ from the nearest side wall. Walls any nearer than this will need to
have diffusion panels strategically placed to manage wall reflections.
This is particularly true in the case of rooms which have hard ceilings at a height of
10 feet or lower, or soft (suspended) ceilings at less than 8 feet above the floor.
Fig. 3 Placing the S150 Satellite Speakers and ADIO150 Power/Bass Unit on the Desktop
13
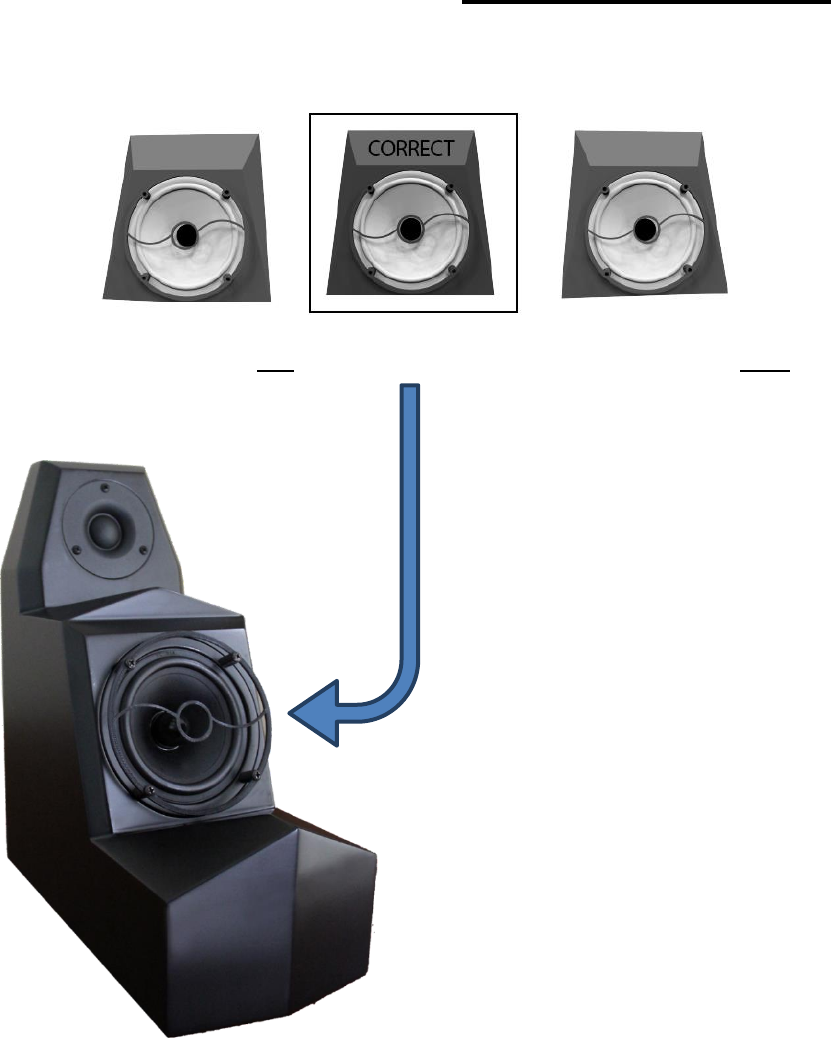
2) THE PATENTED PHASX ACOUSTIC PINPOINT tm
(Possibly the simplest Speaker Positioning System ever)
Panned too far Left OK! Panned too far Right
14
Fig.4 Illustrating the use of the Acoustic Pinpoint System on the Desktop
The patented Phasx Acoustic Pinpointtm gives users the highly consistent, dead-
accurate system timbre match they need to do delicate “continuity” work day-in and day-
out.
The Phasx engineering team developed a distinctive, stylish “gun sight” mounted in
alignment with the driver. Just by looking through the sight until the midrange driver is
centered in the inner circle and the dust cap fills the inner circle, the user can position
his or her ears precisely in relation to the speaker time after time.
Acoustic Pinpoint Positioning ensures sonic consistency from session to session,
user to user, and day to day. The user will face the monitor in exactly the same way
every time just by sighting through Acoustic Pinpoint to the midrange driver on each of
the S150 Satellite Speakers.
3) THE PHASX ADIO150 POWER/BASS UNIT
Fig.5 The ADIO150 Power/Bass Unit which doubles as a Computer Monitor Stand
A fundamental principle in the Phasx engineering philosophy is that non-sinusoidal
Bass frequencies CAN be located by the ear/mind.
The fact, in our opinion, is that sharp transients (in particular) are subject to IATD at
even the lowest frequencies. For this reason, we decided to build our smaller systems
around a centrally located bass cabinet (doubling as a computer video monitor stand)
that uses two very linear 5.5” Bass Drivers in a sealed box configuration.
15
The fact that this cabinet is centered and very near the user means that even
though low frequencies are summed to mono below around 125 Hz, the user never has
to work with location mis-cues. This holds true even on seriously LF heavy effects such
as car wrecks and cannon fire.
For the acoustics aficionado, “Zero Stored Energy” is a critical mandate for Phasx.
Accordingly, we never use Bass Reflex alignments of any sort in any of our systems. For
that reason, all of our systems, even the lowest cost, are either true or quasi 3-way.
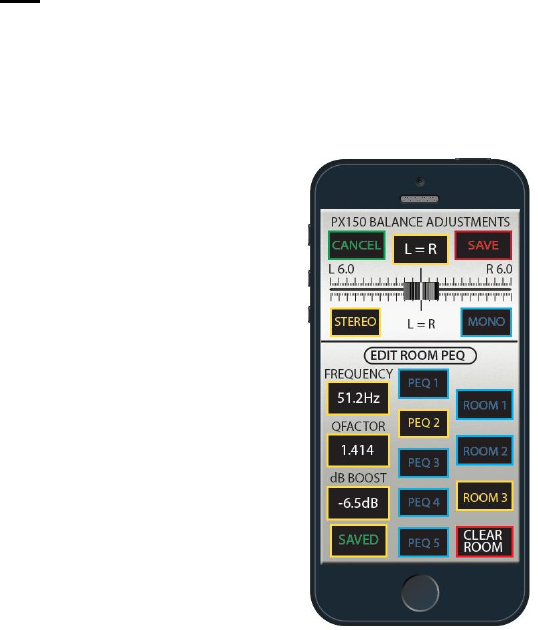
7) THE APPS
Fig.6 One of the Specialty Screens from Control and Setup APP for the ADIO150
The system ships with a link to a free suite of APPs that add a higher degree of
flexibility than has ever been built into an Audio Monitoring System before. From input
signal level monitoring to true 100% capable signal routing, to comprehensive setup and
instant recall of every important parameter, the ADIO150 APP suite is unmatched in the
industry.
16
SECTION II: GETTING STARTED:
A) Getting to Know the ADIO150 Front Panel
Section I: Input Selection Section II: Level Meter and Gain Setting Standby/On Switch
Fig.7 ADIO150 Front Panel
The ADIO150 combines a desktop Bass Cabinet with a studio grade USB2 interface,
top grade Bluetooth receiver, state of the art ADI DSP, six power amplifiers, and a 32 bit
microprocessor to tie it all together.
Well go over manual operation here, but it is important to note that the PX150 doesn’t
reach anything like its full capability unless it is controlled by our custom Apps,
which are provided free to any registered Phasx user. Just go to
http://www.phasx.com/PX150/Userportal to learn more.
• Input Selection -- selects the input that is currently routed to the Main Speakers
and Headphone Output 1. This does not affect routing to or from the DAW. A
short press of the Select Button sequences through the inputs. The Input
Section Switch can be overridden by the APP input settings if they are invoked.
Selection will revert to “normal” when the power is cycled. A long press on the
• IR Control Window: The unmarked Round Plastic Window is the window for the
IR Remote Control included with your PX150 system.
• Level Metering – The Volume level metering system is a multifunctional system
designed to minimize gain staging errors. In normal operation, the meter
indicates the output level in dBFS. The level shown is always 3dB above the
actual level. For example: if the output level is reading 0dBFS, the actual level is
-3dBFS and the corresponding SPL at the users’ ears is about 97dBspl. More
information can be found in the training videos located in the PX150 user portal.
• Volume Control – The Rotary Encoder marked “Volume” is used to set the
current Output Attenuation Level. Although it is always the fastest way to set
output volume, the use of the APP for output level setting is always
recommended.
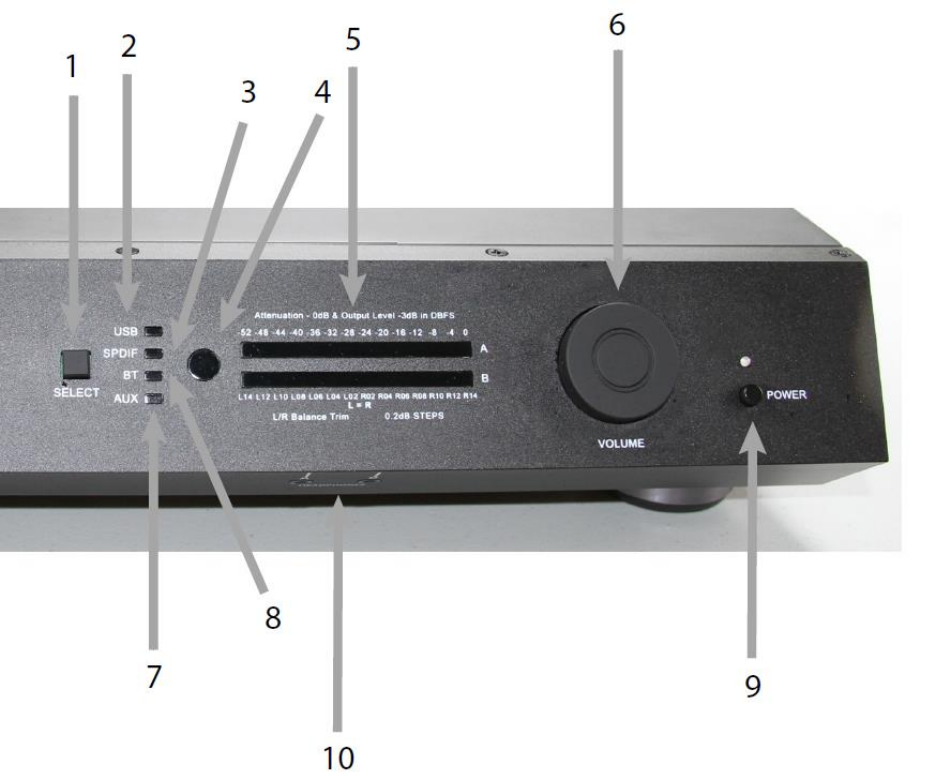
17
• Standby/On Switch – When the rear power switch is set to on, LED glows Red
when the ADIO150 is in Standby Mode and Blue when it is On. The Power
button toggles between the two states.
DETAILED FRONT PANEL LISTING:
1) Select Button: Sequences through the various Inputs
2) USB/DAW Digital Multi-Channel Input from Computer, Tablet, or Phone
3) S/PDIF Stereo Input from rear-panel selectable Toslink or Coax Inputs.
4) Optical Window for Included IR “Credit Card” Remote Control
5) Multi-Functional Gain Setting and Level Indication Meters
6) Rotary Encoder for Volume, Mute, and Precision Balance Functions.
7) Stereo Analog Rear Panel RCA Inputs with -10dBV sensitivity
8) High Quality Blue Tooth Stereo Audio Input
9) Standby/On Switch and Indicator (Red=Standby, Blue = On, Purple = Bass
Compression Warning!
10) Two Semi Independent Headphone Output Jacks
18
19
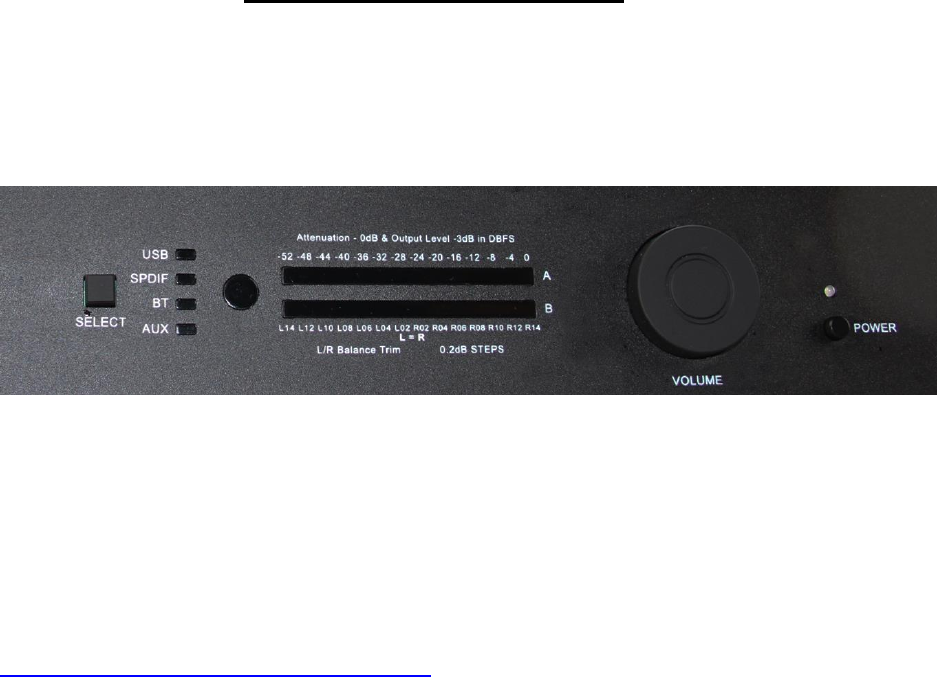
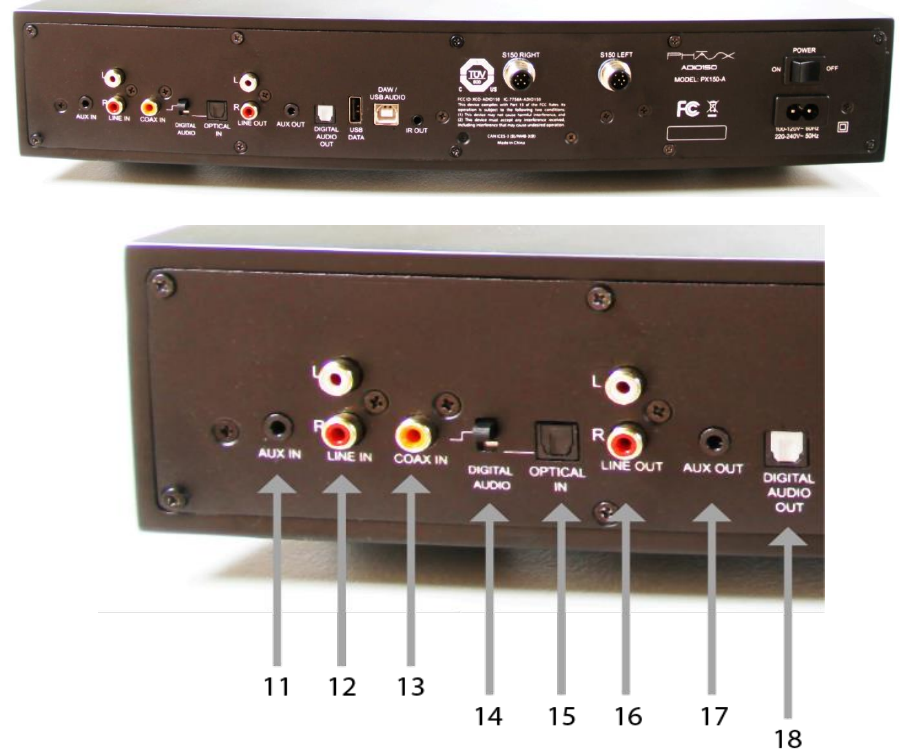
Getting to Know the ADIO150 Rear Panel
Analog and Digital Inputs and Outputs Speaker Outputs Mains In/Switch
Fig.8 ADIO150 Rear Panel Audio I/O Connectors
INPUTS:
11) A 3.5mm TRS Stereo Analog input for Portable Media Players and the like.
12) Stereo Line Input on RCA: -10dBV will produce the internal equivalent of -18dBFS
13) S/PDIF COAX Input. Standard input with resolution to 96kHz/24bit
14) Slide Switch used to select either COAX or Optical S/PDIF Input
15) Optical S/PDIF (TOSLINK) Input with resolution to 96kHz/24bit
20
Outputs:
16) RCA Stereo Analog Line Output: -10dBV = -18dBFS, Max out is about +9dBV
17) Aux Output: TRS Stereo Analog Output similar to #16 and separately routable
18) S/PDIF Output with resolution up to 192kHz 24bit and separately routable
SECTION III: Computer Connection and Setup
A) Connecting your MAC computer using the USB-B
connector on the ADIO150 Back Panel
Next, we will hook up your computer so that you will be able to begin hearing the
system playing back tracks. There are very few things that can go wrong here,
particularly if you are using a USB2 Compatible Mac computer which will require no
drivers or additional software (outside of your DAW, Music Playback, or Video
Editing Application).
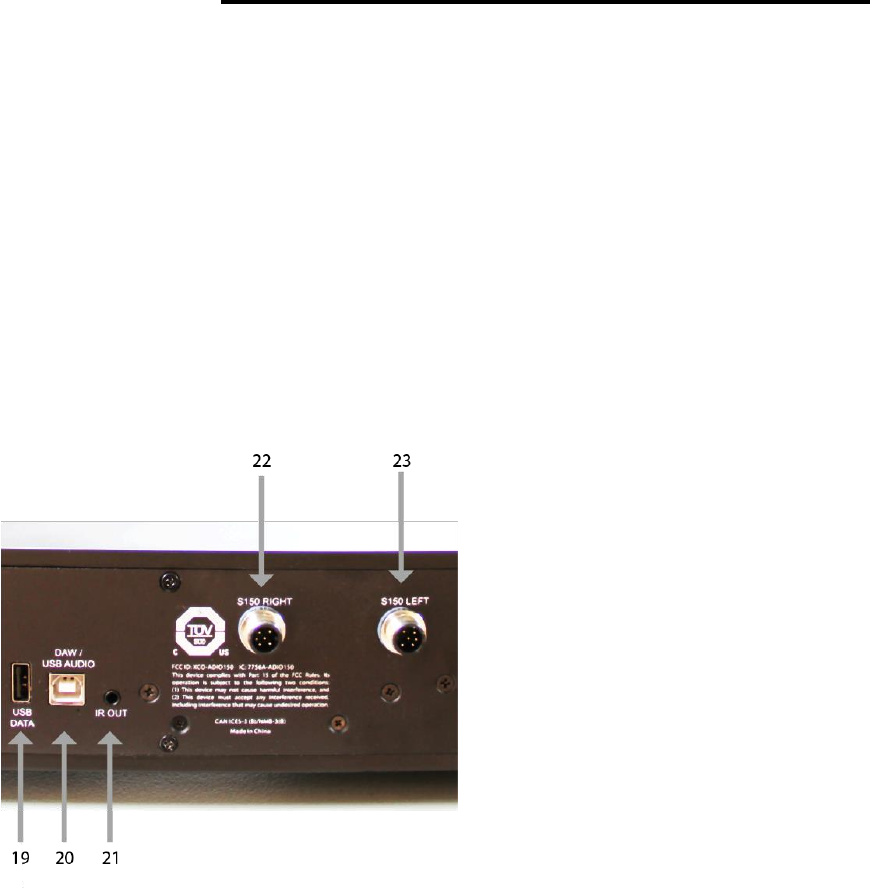
Start by connecting the two S150 Satellite Speakers to the rear panel via the
supplied 2 Meter Cables. Run the cables from the S150 rear connectors to the
ADIO Connectors #22 and #23 shown below. Be sure that the connectors are fully
tightened on both ends.
19) USB connector for Program Updates
20) USB2 DAW Interconnect
21) IR Out (future use)
22) Right S150 Connect
23) Left S150 Connect
Fig.9 The ADIO150’s Rear Panel USB/DAW and Speaker Connectors
21
1) With the ADIO150 powered Off, connect a USV A-B Cable between any open
USB port on your computer and #20, the ADIO’s USB/DAW connector, which is
located on the ADIO150’s Back Panel.
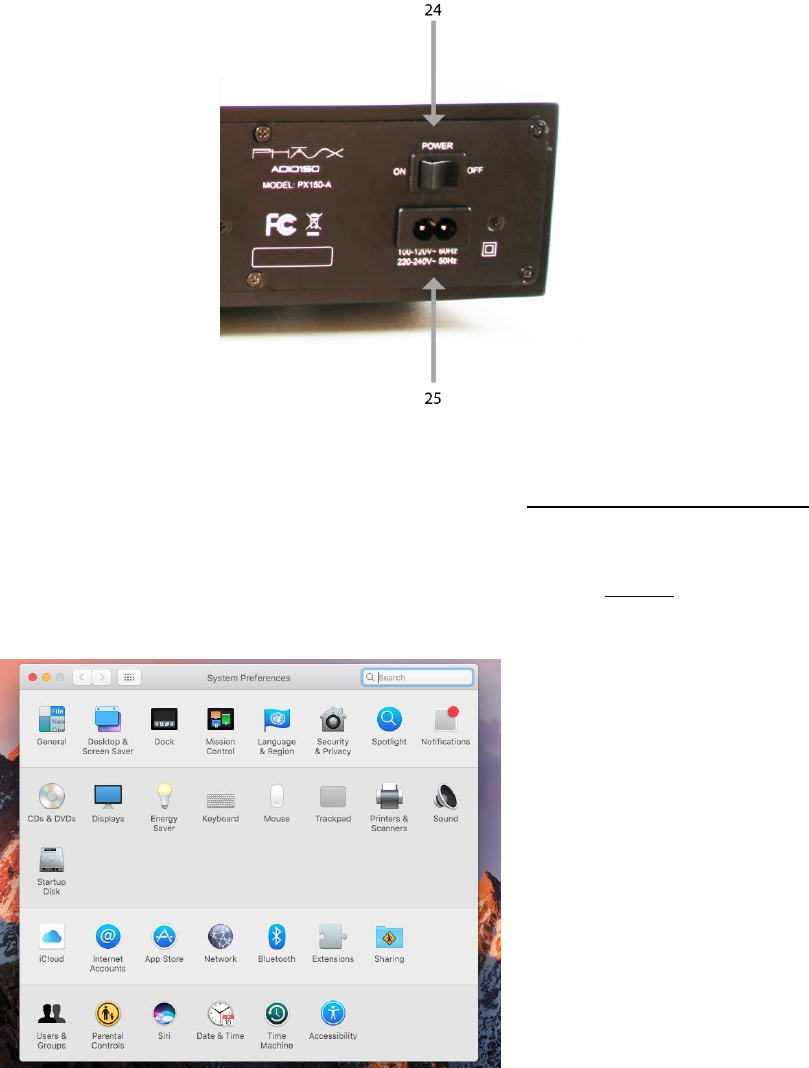
Fig.10 ADIO150 Rear Panel AC MAINS Connector
2) Connect the included AC Mains cable to #25, the AC Mains Input Connector
located on the ADIO150’s Back Panel on the right-hand side.
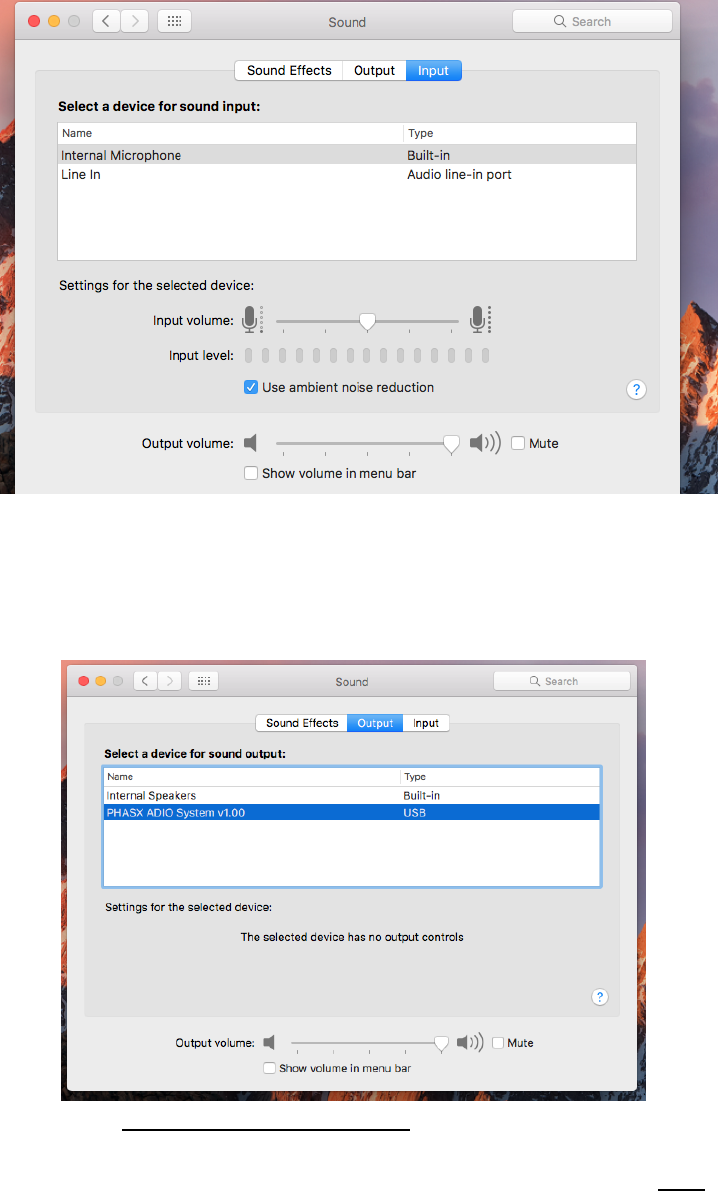
3) On your MAC, go to System Preferences, and select the Sound icon
4) After selecting the “Sound” icon, you will see a screen similar to this:
22
5) Now Power Up your ADIO150, using first the rear panel “hard” switch (#24 in
Figure 12), and then the front panel Standby/On Switch. The front panel power
LED should be Blue. Then the Sound Preferences Screen will change to
something like this:
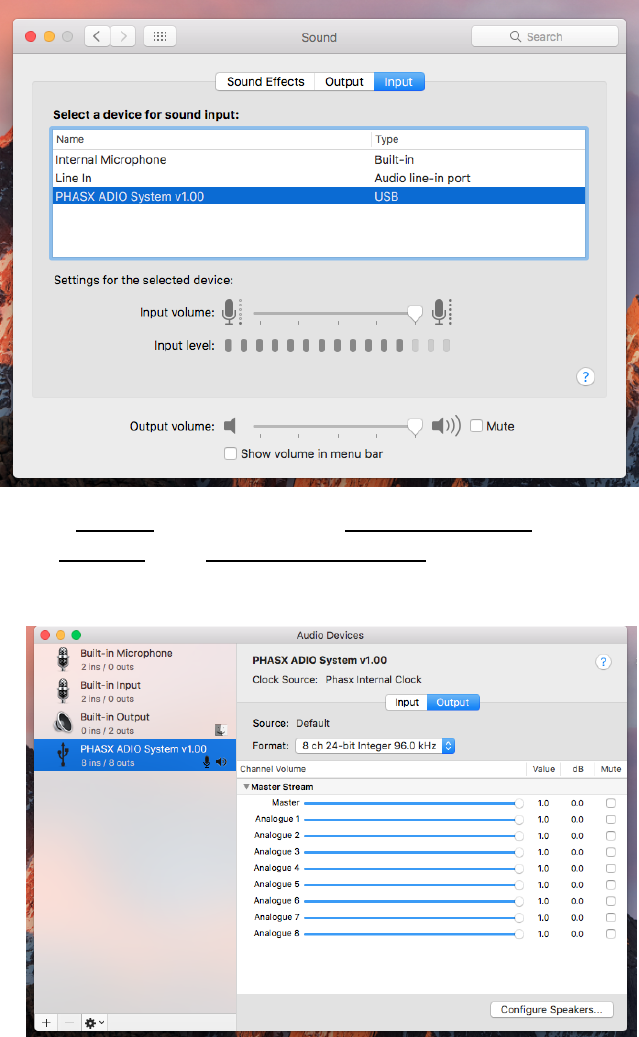
6) Select the Phasx ADIO System V1.00 (or later) device
7) Be sure to change the Sound Preference for BOTH the Input and Output:
23
8) Next, in Utilities, locate and open Audio MIDI Setup
9) Under Window click Show Audio Devices
10) Here you can set the default device to Phasx ADIO, and you can also set the
default bit-rate and volume levels for each of the available channels on both
input and output sides. We recommend setting a 96kHz/24bit default for
maximum compatibility with third party Applications, but anything up to 192/24 is
fine. Again, be sure to check both input and output
24
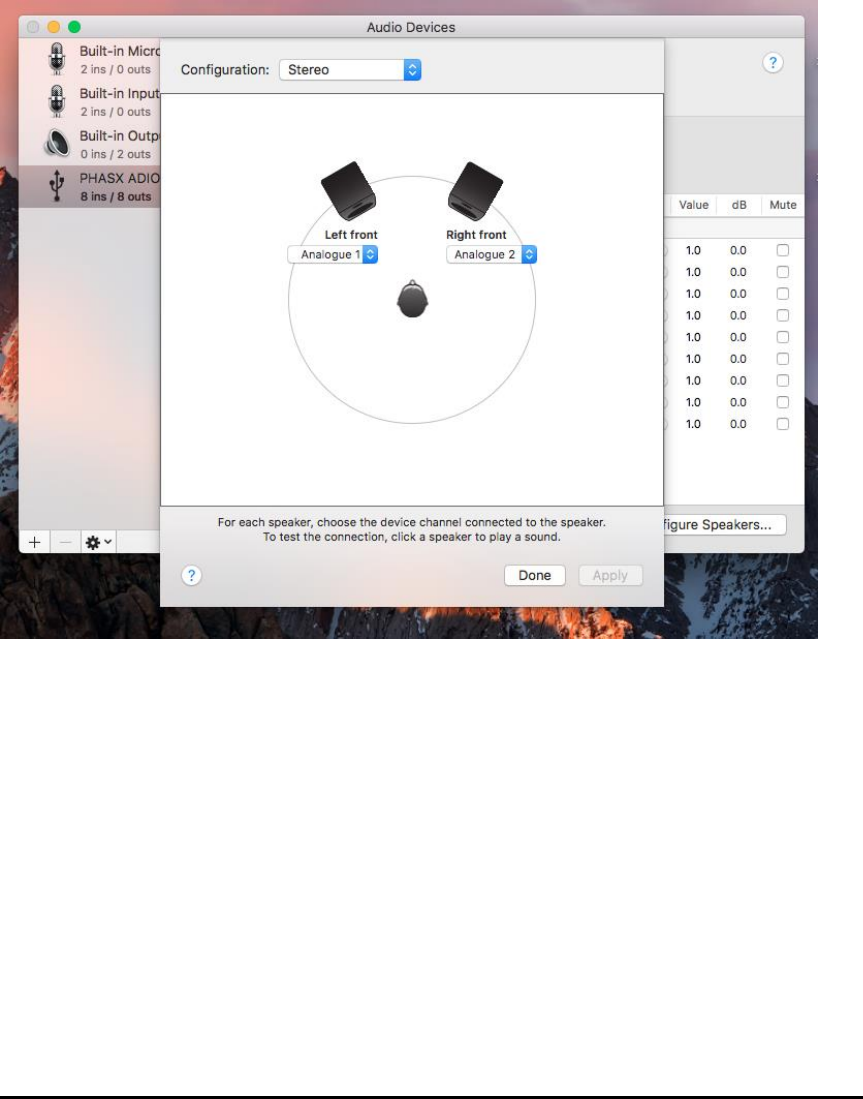
11) Navigate to the Configure Speakers section of Audio MIDI Setup, and make
sure that your default setting is for a Stereo Speaker pair on Analog1 and
Analog2 so that System sounds and sounds from other 2-channel Apps will be
routed correctly. Click “done”, and then exit the Audio Devices Menu.
About the Muti-Function Rotary Encoder Volume Control:
In order to simplify manual (with no APP Running) operation without compromising the all-
important Project Gain Staging, we have designed in a unique approach to Level Indication
and Gain Adjustment.
25
First, a short press on the Volume Spinner (it’s a pushbutton as well as a spinner) puts the
system in MUTE mode. Speakers and Headphones are Muted, and the Input Indicator (USB in
this case) will BLINK to indicate that Mute is active.
Here is what happens when you start to move the Volume Spinner:
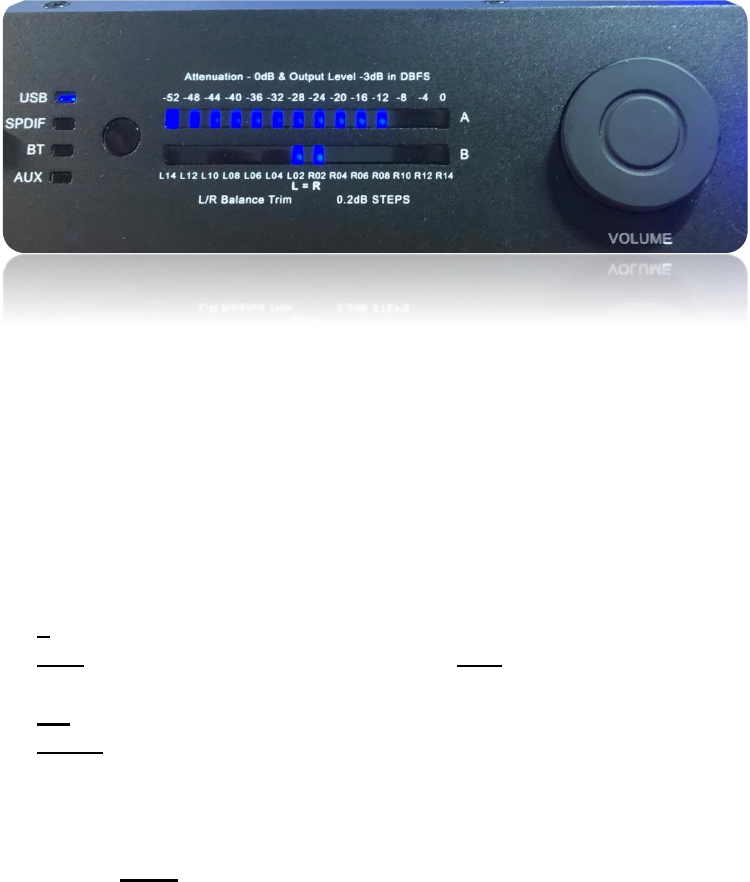
Fig.13 ADIO150 Multi-Functional Gain and Balance Setting System
As you move the spinner clockwise or counterclockwise, the normally displayed Level Meter
shuts off and the “A” meter shows the current Gain Setting. Since the display is calibrated in
dBFS, the gain will be set to something less that 0dB. Standard “Calibrated” Playback is
predicated on a Gain setting of -10dBFS (our reasoning is laid out in Videos accessible on the
PX150 User Portal).
The bottom line is this:
1) If the Gain is set to -10dB (a more accurate setting may be had using the free APP)
2) AND the input is Correlated Pink Noise (or very heavily compressed MONO Music☺)
set to -18dBFS at one of the Digital Inputs.
3) OR -10dBV at one of the Analog Inputs.
4) THEN the level at the user’s ears will be 80dBSPL.
The “B” Meter shows two dots at the middle of the display. These indicate that the Precision
Balance Control is set to the middle, and Left Gain exactly equals Right Gain.
If you perform a long press on the Volume Spinner button, the unit will enter Balance Mode,
and display ONLY the two dots in the middle of the “B” Meter. Now, you can rotate the spinner
left or right to change the balance approximately 0.4dB (total) per click. When you are happy
with the new balance setting, a short press on the spinner will set that balance until the next
power cycle. If you don’t do the short press, the unit will revert to the previously stored balance,
usually 0dB.
NOTE: The changed balance is ONLY saved until the PX150 is power cycled. This prevents
the current user from inheriting the last user’s balance setting.

26
About the Included “Credit Card” IR Remote Control
The IR Remote control Duplicates Front panel controls and adds a few functions. The important
ones are Mute Speakers ONLY (Not Headphones) and Blind BT Pair which is handy for hi Fi
Bluetooth Adapters which have no screen.
…. That’s it!
Open a music playback application such as
iTunes, set the volume control on the ADIO150 to
somewhere around -25 or so and start playing
music!

27
Of course, there is a lot more to creating a sound track than
just Stereo Playback! You will find that the PX150 system
includes many, many APP accessible features that allows
for almost any imaginable need or setting, including:
• Complete Routing and Fader capability to allow for
very complex surround projects including elevation
speaker routing.
• Monitor Management features such as target playback
system modelling and a complete multi-monitor Equal-
Level A/B/C Comparator
• Room EQ to eliminate “One Note Bass” in bedroom
sized spaces.
• Compression Onset Warning System so you can be
confident that the System never went near protection
during your project. (This is a problem that every
powered speaker has but no maker ever talks about…)
• Built in Test Signal Generation including Pink Noise
and Calibrated Log Sine Sweep.
You will also find a great deal on information,
instruction, and examples in both print and video
on the PX150 User’s Portal at
http://phasx.com/PX150/UserPortal
28
SECTION IV: Technical Data Specifications
• Patented Shadocaster Self Diffusing Cabinet Technology
• Quasi 3-Way Operation with Separately Amplified Woofer, 2-
Midrange, and 2-Tweeter
• 31Hz to 23kHz +/- 1.5dB in Free Air Without a Subwoofer
• 98 dBspl Continuous & 108 dBspl Peaks at Listening Position
• S/PDIF /TOSLINK inputs with Asynchronous Rate
Conversion for any rate to 96Khz, depth to 24bit
• Elite Class “Hot-Rodded” TI CLASS D amps Throughout:
• 30Watt Woofers x2 (60 Watts RMS total), 15Watt Stereo
Midrange (30W Total), 10Watt Stereo Tweeter (20W
Total)
• Patented Acoustic PinpointTM system minimizes Multi-User
and Continuity issues.
• Proprietary Zero-Attack Time Peak detectors protect drivers
and warn the user of Compression
• Three-Band, Three Level in-App indicator system provides
confidence and impending compression warning
• Flexible Room Correction Filter set provides three Banks
(presets) each of 5 Bands of Parametric EQ to remove “1
Note Bass” Room Boom
• Precision (per Session) Balance Adjustment System
• User Playback Device Simulation System and Library

29
SECTION V: Troubleshooting
No Sound
1. Check an audio player with ear buds, set the volume to mid-range
and then unplug the ear buds.
2. Use a 3.5mm to 3.5mm Stereo Cable to connect the player to Audio
Unbalanced input on the ADIO150 rear Panel
3. Power Cycle your ADIO150, and wait for Boot to Complete.
4. Select the Analog Input, and set the Player to Play a track. Be Sure
that the PHASX SPEAKER outputs are Connected and that the
connectors are fully tightened. Make sure that MUTE is off and that
the Volume setting indicator is above -24dBFS when you slightly
spin the volume control.. You can also user the Monitor Phones
Main output with a pair of known good Headphones or Ear Buds if
that is easier. You should hear sound, but in the event that none of
this helps and no other explanation is possible, contact Phasx
Service.
5.
No Computer Sound
Problems in Computer Sound are almost always caused by an
incorrect setting in the computer’s sound system user interface.
Review Section III, Computer Connection and Set-Up, and consult
user manuals for both your computer and for your Audio/Video
Players and/or DAW Application. Sections. If all else fails, contactl
Phasx Service.
Distorted signal
The ADIO150 is made to accept an unbalanced Analog signal
up to a maximum level of approximately +9dBv. Anything more will
certainly cause distortion but is not indicative of any failure.
It is important to note that the ADIO150 is meant to decode
ONLY standard S/PDIF digital signals (commonly called PCM
audio) on both the COAX and OPTICAL inputs. NO other sort of

30
Digital Audio Signal can be decoded by the ADIO150. Be sure you
are wiring a known good S/PDIF signal to the ADIO150. The bit rate
and depth (up to 96kHz/24bits) should not matter, but Life
Happens.
While not very likely, incorrect signals could even cause driver
damage by creating crackling noise and the like.
If you do not know for sure that the signal you are using is
standard PCM, double check it by connecting it to another
independent decoder, also known good.
If the independent decoder sounds OK, please take note of the Bit
Rate and Bit Depth and contact Phasx Service.
Register Your Product
• To register your product, go to phasx.com/PX150/register
Limited Warranty
PHASX LIMITED WARRANTY
PHASX. warrants that this product is free from defective material and workmanship. PHASX further warrants that if
product fails to operate properly within the specified warranty period and the failure is due to improper workmanship or
defective material, PHASX will repair or replace the product at its option. All warranty repairs must be performed by a
PHASX authorized service center. The name and address of the location nearest you can be obtained by calling toll free:
1-800 823 2383 or on line at WWW.Phasx.com/support.
Transportation to and from the service center is the customer’s responsibility but Phasx will pay one way for warranty
repair. The original dated sales receipt must be retained by the customer and is the only acceptable proof of purchase. It
must be presented to the authorized service center.

31
WHAT IS NOT COVERED
This warranty does not cover damage due to accident, fire, flood and/or other acts of God; misuse, incorrect line
voltage, improper installation, improper or unauthorized repairs, commercial use, or damage that occurs in shipping.
Exterior and interior finish, LEDs, and cables are not covered under this warranty.
Customer adjustments, which are explained in the instruction manual, are not covered under the terms of this warranty.
This warranty will automatically be voided for any unit found with a missing or altered serial number. Some States do
not allow the exclusions or limitations of incidental or consequential damages, or allow limitations on how long an
implied warranty lasts, so the above limitations or exclusions may not apply to you. This warranty gives you specific legal
rights, and you may also have other rights, which vary from State to State.
CONTACTING PHASX
To obtain warranty service for your product, please choose one of the following:
Contact PHASX Service via text message to: +1-321-830-4729
OR fill out our convenient, online service request form at
www.Phasx.com/PX150/Userportal
Power consumption and Auto Power Standby:
-The System contains a Auto Power safe mode for Standby.
In case of any Analog Input source the Auto Power feature will turn the System into Standby after
20min. no Signal appearing on the Inputs.
In Case of any Digital Input source the Auto Power feature will turn the System immediately into
Standby once the Source device is disconnected or power off.
Power consumption Standby ***W
Power consumption Network Standby ***W
Power consumption Idle: ***W