User Manual-Rev2
USER GUIDE - ENGLISH

Model: MiniPod Bluetooth MK II – User Guide revision v1.0 – Sept 2016
We accept no liability for printing errors.
Specications are subject to change without notice.
PODSPEAKERS 2016
EET Group A/S, Tempovej 41, DK2750 Ballerup, Denmark.
USER GUIDES
Download this user guide in other languages at:
www.podspeakers.dk
Télécharger ce guide de l’utilisateur dans d’autres
langues à: www.podspeakers.dk
Hier können Sie die Bedienungsanleitung auch in
anderen Sprachen herunterladen:
www.podspeakers.dk
Descargar éste manual de usuario in otro idioma aquí:
www.podspeakers.dk
请在此下载其他语言的用户指南:
www.podspeakers.dk

THANK
YOU!
Dear Customer,
Congratulations on your new MiniPod Bluetooth Hi-Fi speaker.
The iconic design now includes the latest in Wireless Bluetooth
technology.
We wish you many years of audible and visible enjoyment together
with your MiniPod Bluetooth.
Best Regards from,
Your Podspeakers Team.

In the box.................................................
Power.......................................................
How you want to use MiniPod..................
Stand Alone Setup...................................
Wireless Stereo Setup..............................
Stereo Setup..........................................
Connections......................................
Buttons.............................................
Remote............................................
5
6
7
8
9
10
11-12
13-22
23-26
USER GUIDE - INDEX

LED / Remote Control Sensor................
Running-In Period..................................
Care & Cleaning.....................................
Environmental Information......................
For Your Safety.......................................
Warranty.................................................
Compliance Information....................
For Your Safety (China).....................
Main Specications................................
27
28
29
30
31
32
33-34
35-36
37
USER GUIDE - INDEX

What’s in the box?
1 x MiniPod Bluetooth Wireless Hi-Fi speaker.
1 x Remote control including battery.
4 x AC power cords (1 x EU / 1 x UK / 1 x US / 1 x CN).
1 x User guide in multiple languages.
IN THE BOX
5

POWER
1. Connect the power cable to the bottom of your MiniPod Bluetooth and to your wall outlet.
2. Power ON your MiniPod Bluetooth either by pressing the /Mode button on the speaker,
or by using the -button on the remote control. As default, MiniPod Bluetooth will be in
Bluetooth mode when powered on.
You are now ready to nalize the setup depending on how you want to use your MiniPod
Bluetooth.
NOTE: If your MiniPod BT has not played back audio for 5 minutes, it will automatically go to
Network Standby mode, to minimizing power consumption. This is according to EU regulations.
Power consumption in Network Standby mode is below 1.1W.
NOTE: All Wireless communication can be disabled (or enabled again) by pressing and
holding the 2 buttons (BT Pairing and Stereo Pairing) simultaneously for 8 seconds. This is a
mandatory feature according to EU regulations.
Power on the MiniPod Bluetooth
6

7
HOW DO YOU WANT TO USE
YOU MINIPOD BLUETOOTH?
1. As a stand alone speaker
Go to “Stand Alone Setup” page 8
2. As wireless stereo with two MiniPod Bluetooth speakers
Go to “Wireless Stereo Setup” page 9
3. As a stereo set with one MiniPod Bluetooth speaker and
one passive MiniPod speaker
Go to “Stereo Setup” page 10
Setup your MiniPod Bluetooth
as a single speaker
Stand Alone Setup
8
Before powering the speaker ON make sure the “Wireless Stereo” switch is set to ON.
Want to play using…
1. Bluetooth: Switch to Bluetooth mode (see 9. on page 26) and connect Bluetooth device
(see 5. on page 16).
2. A source connected to OPT-IN Switch to OPT mode (see 10. on page 26) and connect a
source to OPT-IN using a Toslink cable (see 3. on page 11).
3. A source connected to AUX-IN: Switch to AUX mode (see 11. on page 26) and connect a
source to AUX-IN using a 3.5 mm cable (see 1. on page 11).
For daily use, please see “Remote” on page 23 to see how to operate all functions.
You are ready to go - enjoy!
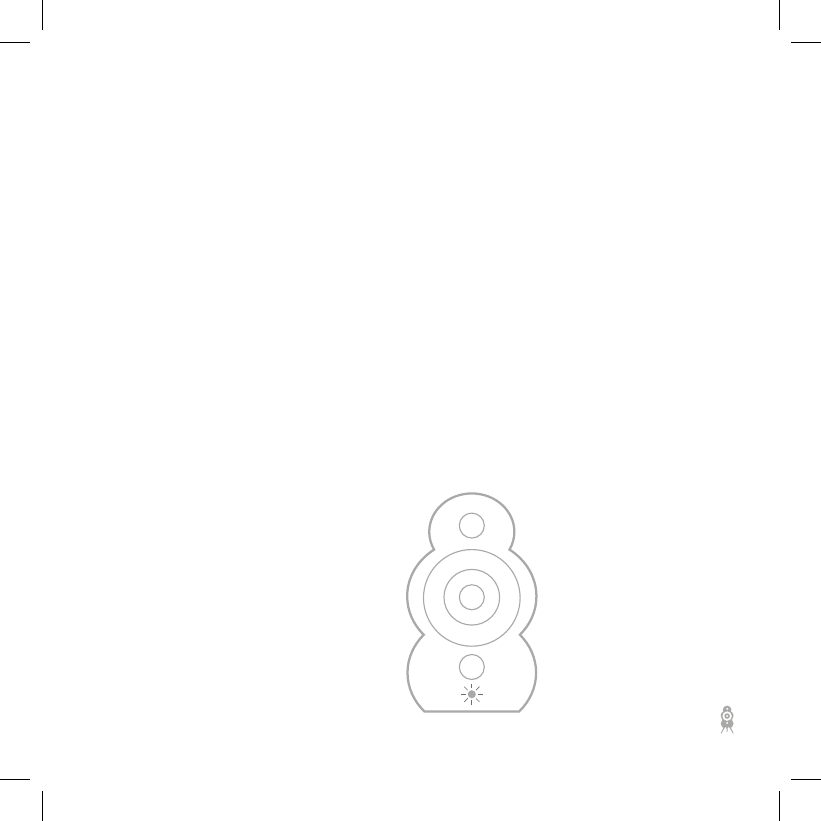
Setup two MiniPod Bluetooth
for wireless stereo
WIRELESS STEREO SETUP
Before powering the speaker ON make sure the “Wireless Stereo” switch is set to ON.
Pair the two MiniPod Bluetooth speakers to play wireless stereo as described in “Stereo Pairing”
page 20 under “Buttons”.
Want to play using…
1. Bluetooth: Switch to Bluetooth mode (see 9. on page 26) and connect Bluetooth device
(see 5. on page 16).
2. A source connected to OPT-IN: Switch to OPT mode (see 10. on page 26) and connect a
source to OPT-IN using a Toslink cable (see 3. on page 11).
3. A source connected to AUX-IN: Switch to AUX mode (see 11. on page 26) and connect a
source to AUX-IN using a 3.5 mm cable (see 1. on page 11).
For daily use, please see “Remote” on page 23 to see how to operate all functions.
You are ready to go - enjoy!
9
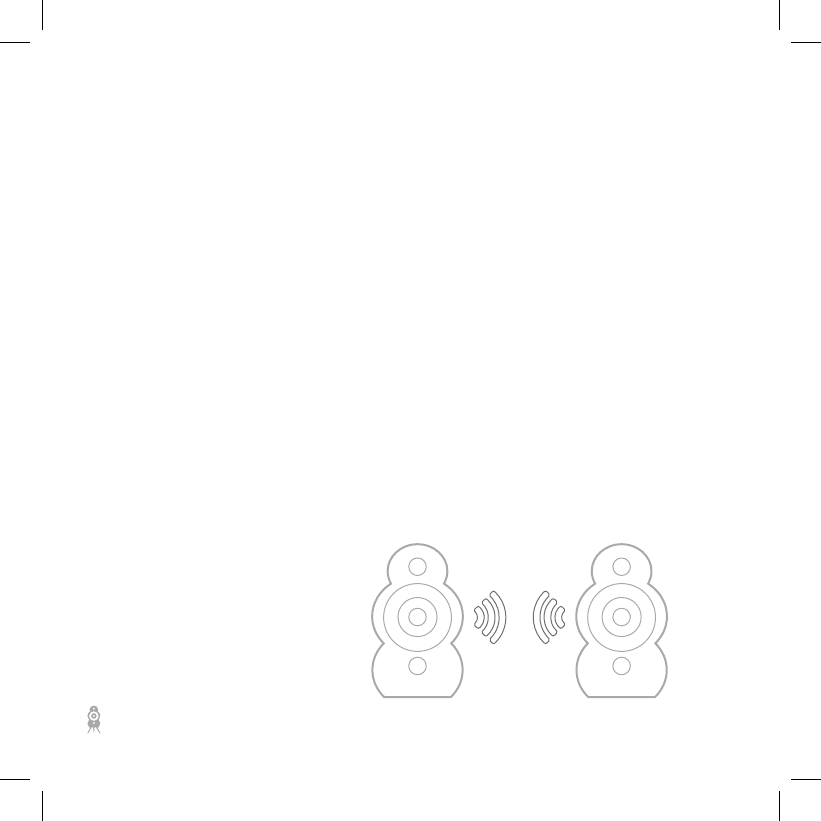
Setup one MiniPod Bluetooth and
one MiniPod Passive for stereo
STEREO SETUP
Before powering the speaker ON make sure the “Wireless Stereo” switch is set to OFF.
Connect a Passive MiniPod to the MiniPod Bluetooth using a common speaker cable between
the speaker terminals on both speakers.
Want to play using…
1. Bluetooth: Switch to Bluetooth mode (see 9. on page 26) and connect Bluetooth device
(see 5. on page 16).
2. A source connected to OPT-IN: Switch to OPT mode (see 10. on page 26) and connect a
source to OPT-IN using a Toslink cable (see 3. on page 11).
3. A source connected to AUX-IN: Switch to AUX mode (see 11. on page 26) and connect a
source to AUX-IN using a 3.5 mm cable (see 1. on page 11).
For daily use, please see “Remote” on page 23 to see how to operate all functions.
You are ready to go - enjoy!
10
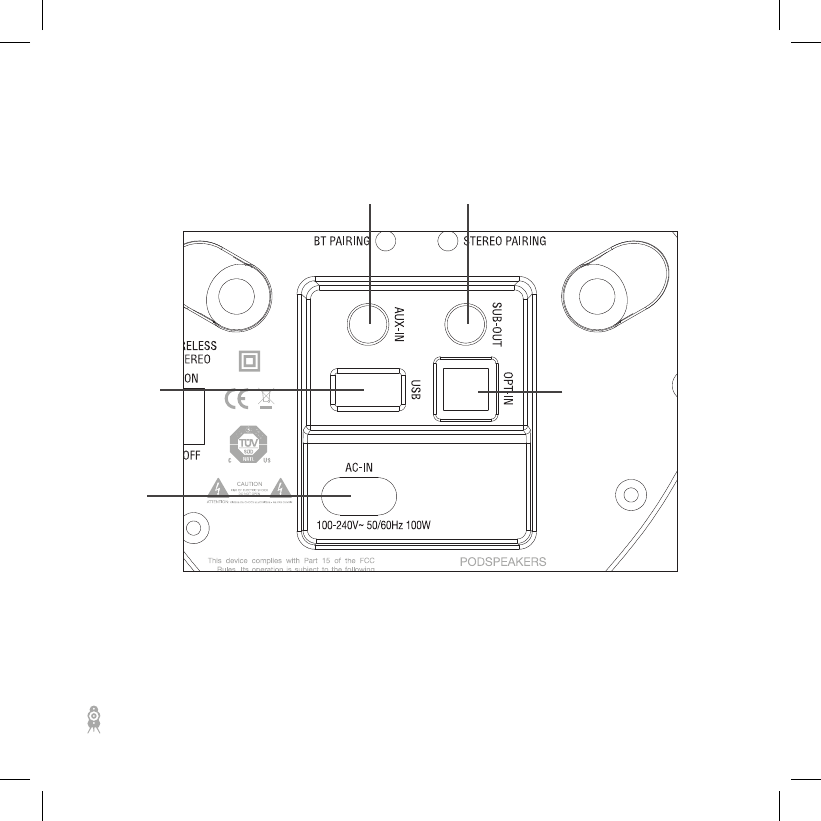
Descriptions of MiniPod
Bluetooth input and output
CONNECTIONS
Bottom view
4
5
2
3
1
11

Descriptions of MiniPod
Bluetooth input and output
CONNECTIONS
12
1. Auxiliary Input:
3.5 mm mini jack stereo input, where sources with analogue output fx CD Players,
Turntables with built-in RIAA, TV sets etc. can be connected.
2. Subwoofer Output:
3.5 mm mono mini jack output with down mixed stereo for adding an active subwoofer.
3. Optical Input:
Toslink input, where sources with digital optical outputs fx DVD, BluRay players, TV sets
etc. can be connected.
4. Power Input:
Connect the supplied power cable suitable for your country.
5. USB Port:
For service only. No devices should be connected.
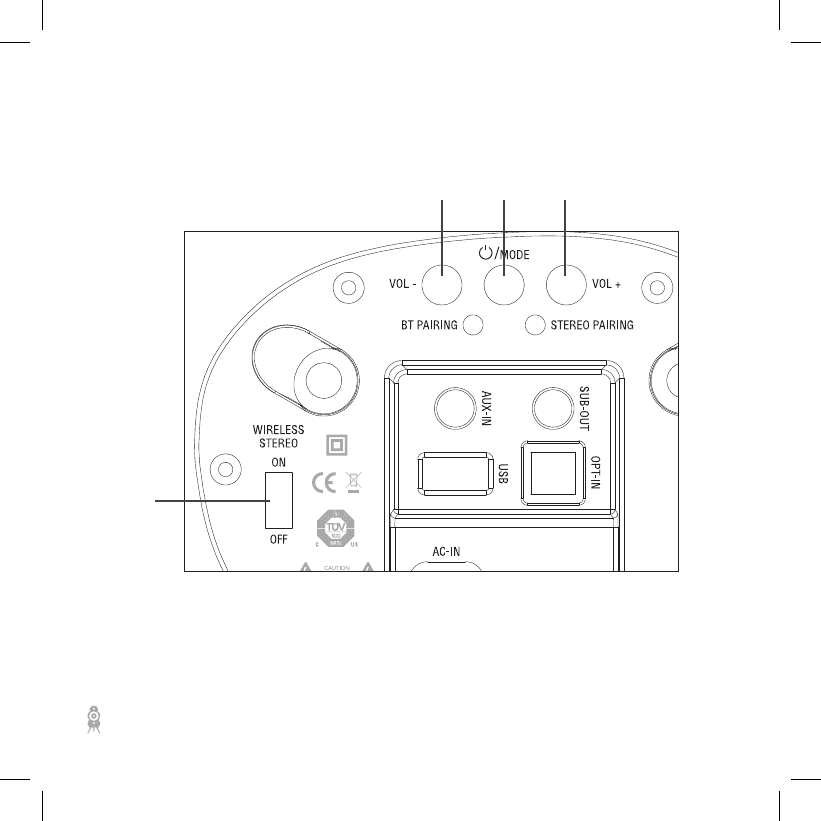
Description of MiniPod
Bluetooth buttons
BUTTONS
13
21 3
4
Bottom view

Description of MiniPod
Bluetooth buttons
BUTTONS
1. Volume Down:
Press and hold to turn the volume down. (Secondary use: Press and hold simultaneously
with VOL+ (3) for 4 seconds to do a factory reset of the speaker).
2. / Mode:
Press once to power on the MiniPod Bluetooth. Press and hold for 4 seconds to set the
MiniPod in standby mode. Always wakes in Bluetooth Mode. / When the speaker is ON
press repeatedly to switch between input modes: Bluetooth, OPT and AUX.
3. Volume Up:
Press and hold to turn the volume up. (Secondary use: Press and hold simultaneously with
VOL- (1) for 4 seconds to do a factory reset of the speaker).
4. Wireless Stereo:
IMPORTANT NOTE: Only operate this switch when speaker is powered OFF.
Set to ON (default) when using the MiniPod Bluetooth speaker as Stand Alone or in
Wireless Stereo setup.
Set to OFF when using the MiniPod Bluetooth in a Stereo Setup where a passive MiniPod
is connected and driven by the built-in stereo amplier.
14
Description of MiniPod
Bluetooth buttons
BUTTONS
5
15
Bottom view

Description of MiniPod
Bluetooth buttons
BUTTONS
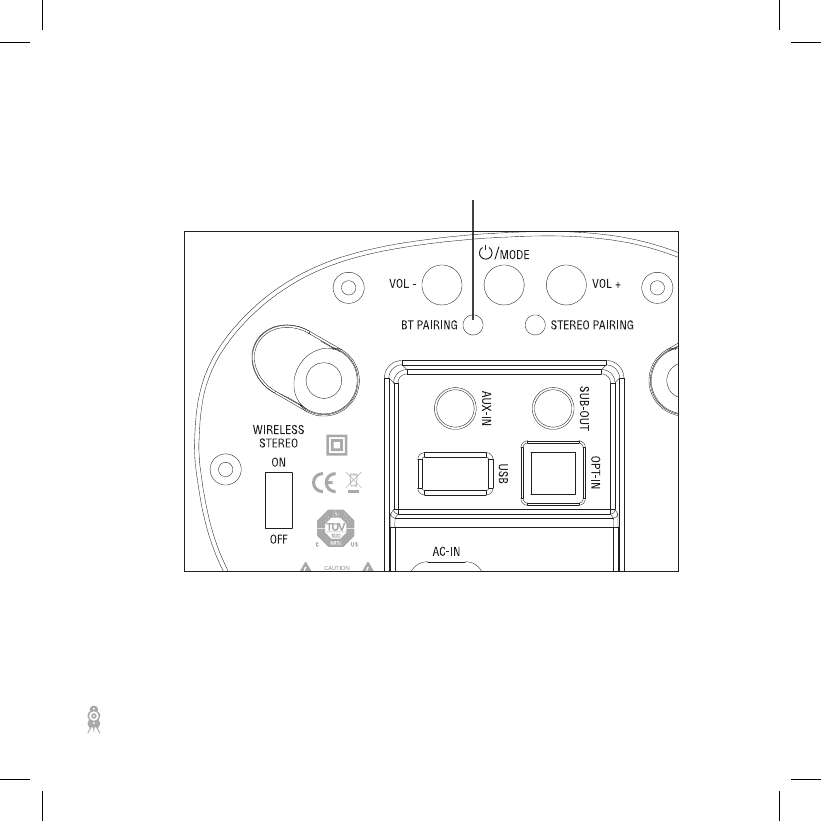
5. Bluetooth Pairing:
Press and hold for 4 seconds. MiniPod Bluetooth will enter Discoverable Mode (Pairing
Mode) for 1 minute, where it will be visible as a Bluetooth device on the list of Bluetooth
devices on your phone, PC etc. Simply choose MiniPod Bluetooth on the list to establish
the connection.
When entering Pairing Mode 2 short beeps will sound and the LED will start blinking
fast. Once connected to a device a single beep will sound. If no connection is made
within 1 minute, a long beep will sound.
After 1 minute the speaker will go into Connectable Mode where it will be able to manually
connect to known devices (up to 8 devices). Once your device is connected to MiniPod
Bluetooth you can play your music wirelessly by choosing MiniPod Bluetooth as the
playback source.
(Secondary use: For 8 seconds press and hold together with Bluetooth Pairing (7) to
disable (or enable again) all wireless communication).
16

Description of MiniPod
Bluetooth buttons
BUTTONS
17
Bottom view
6

Description of MiniPod
Bluetooth buttons
BUTTONS
6. Audio Settings: (EQ settings)
While playing back audio press repeatedly to change between 3 preset audio settings in
the following sequence Optimal - Flat - Boost. When changing audio setting, the speaker
will briey mute and then start play again using the new audio setting.
When in True Wireless stereo setup this has to be done on left and right channel
individually
Factory default is: Optimal.
18
7
Bottom view
Description of MiniPod
Bluetooth buttons
BUTTONS
19

Description of MiniPod
Bluetooth buttons
BUTTONS
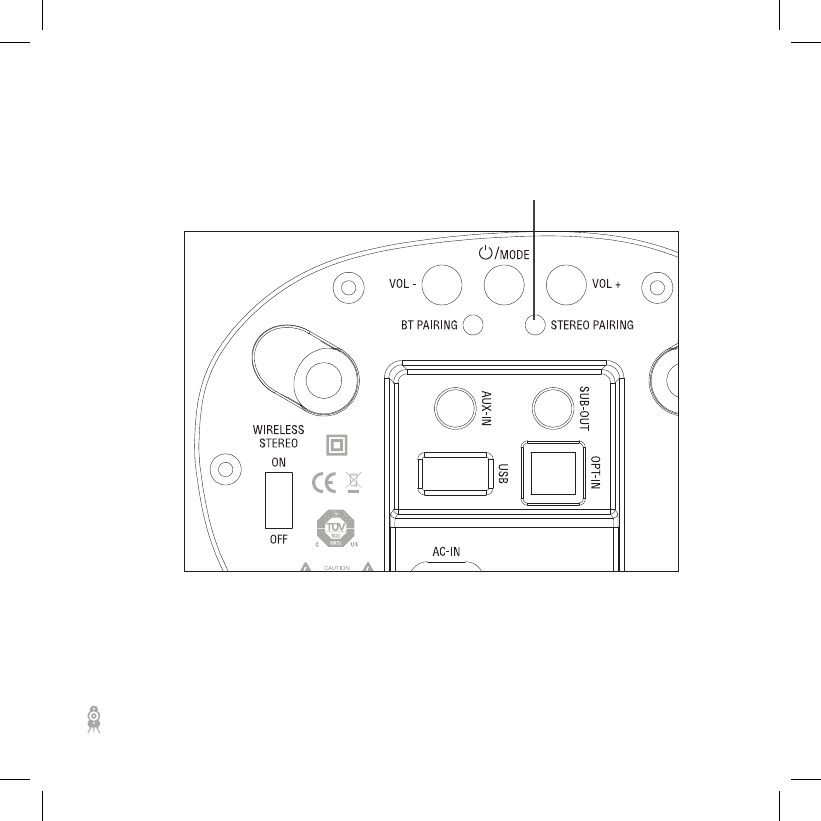
7. Stereo Pairing:
Your MiniPod Bluetooth support wireless stereo by using two MiniPod Bluetooth speakers.
It gives you full wireless freedom by stereo pairing two MiniPod Bluetooth. Wireless Stereo
Mode (4) must be ON before below is possible.
Power ON both of your MiniPod Bluetooth speakers.
Press and hold the stereo pairing button on the rst speaker for 4 seconds until you hear
two short beeps. This speaker is now the left channel speaker and waiting to make the
stereo pairing with the second speaker.
Press the stereo pairing button on the second speaker twice (double press). You will hear
two short beeps and the speaker is now the right channel speaker. The two speakers
will proceed to make stereo pairing and you will hear a short beep, when the pairing is
done. The right channel speaker will enter ‘slave’ mode and LED will turn o, and physical
buttons and connections will be disabled.
If the stereo pairing is not made within 2 minutes, the speaker/s will return to normal
mode (single speaker mode, down mixed stereo).
Continue on the next page...
20

7
Bottom view
Description of MiniPod
Bluetooth buttons
BUTTONS
21

Description of MiniPod
Bluetooth buttons
BUTTONS
Continued from the last page...
The stereo paring can be temporarily released, by pressing and holding Stereo Pairing (7)
for 4 seconds. You will hear one beep and both speakers will enter Stand Alone mode. To
reconnect the two speakers into Wireless Stereo again simply power OFF/ON or choose
another mode and then switch back to Bluetooth again.
To release the two Podspeakers from True Wireless Mode permanently, simply make a
factory reset of both speakers.
(Secondary use: For 8 seconds press and hold together with Bluetooth Pairing (5) to
disable (or enable again) all wireless communication).
22

MUTE
OPT
PAIR
BT AUX
V+
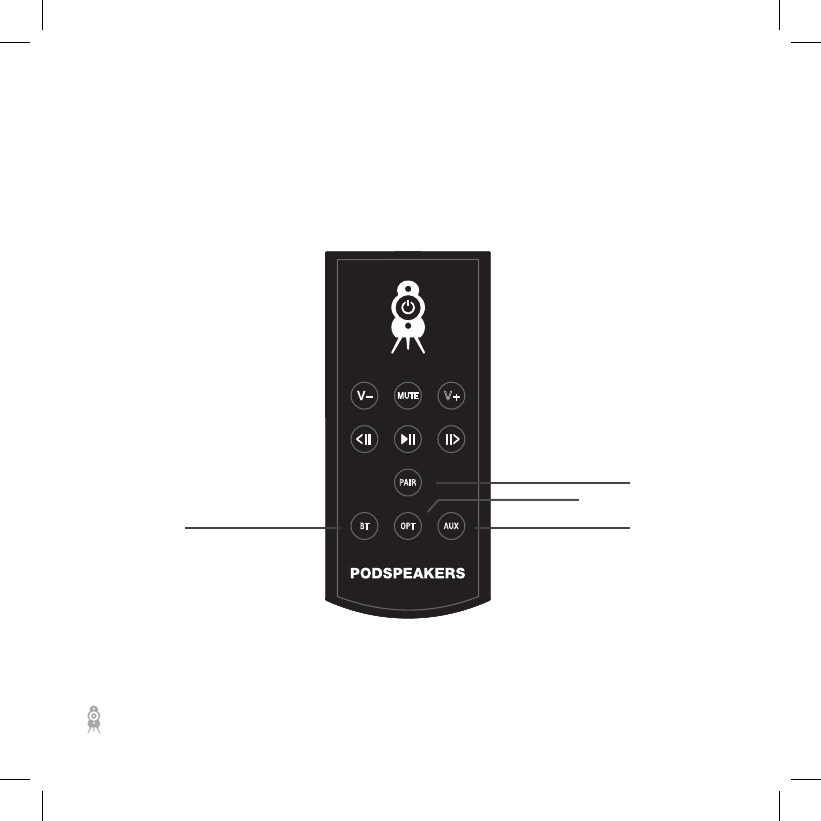
Description of MiniPod
Bluetooth Remote Control
REMOTE
4
3
2
6
7
5
1
23

Description of MiniPod
Bluetooth Remote Control
REMOTE
1. :
Sets/wakes the MiniPod Bluetooth to/from Standby Mode. Always wakes in Bluetooth
Mode.
2. Volume Up:
Press and hold to turn the volume up.
3. Mute Sound:
Press to turn o/on the audio completely.
4. Volume Down:
Press and hold to turn the volume down.
5. Previous Song:
Only works in Bluetooth mode. Press to skip to previous audio track in the playlist.
6. Play / Pause:
Only works in Bluetooth mode. Press to start playing or pausing the current audio track
in the playlist.
7. Next Song:
Only works in Bluetooth mode. Press to skip to next audio track in the playlist.
24
MUTE
OPT
PAIR
BT AUX
V+
Description of MiniPod
Bluetooth Remote Control
REMOTE
9
10
11
8
25

Description of MiniPod
Bluetooth Remote Control
REMOTE
8. Bluetooth Pairing:
Press once and MiniPod Bluetooth will enter Discoverable Mode (Pairing Mode) for 1
minute, where it will be visible as a Bluetooth device, on the list of Bluetooth devices
on your phone, PC etc. Simply choose MiniPod Bluetooth on the list to establish the
connection.
When in Pairing Mode two short beeps will sound. Once connecting to a device a single
beep will sound. If no connection is made within 1 minute, a long beep will sound.
After 1 minute the speaker will go into Connectable Mode where it will be able to
manually connect to known devices (up to 8 devices). Once your device is connected to
MiniPod Bluetooth you can play your music wirelessly by choosing MiniPod Bluetooth as
the playback source.
Once your device is connected to MiniPod Bluetooth you can play your music wirelessly
by choosing MiniPod Bluetooth as the playback source.
9. Bluetooth Mode:
Press to switch MiniPod Bluetooth to Bluetooth Mode.
10. Optical Mode:
Press to listen to the audio source connected to OPT-IN.
11. Auxiliary Mode:
Press to listen to the audio source connected to AUX-IN.
26
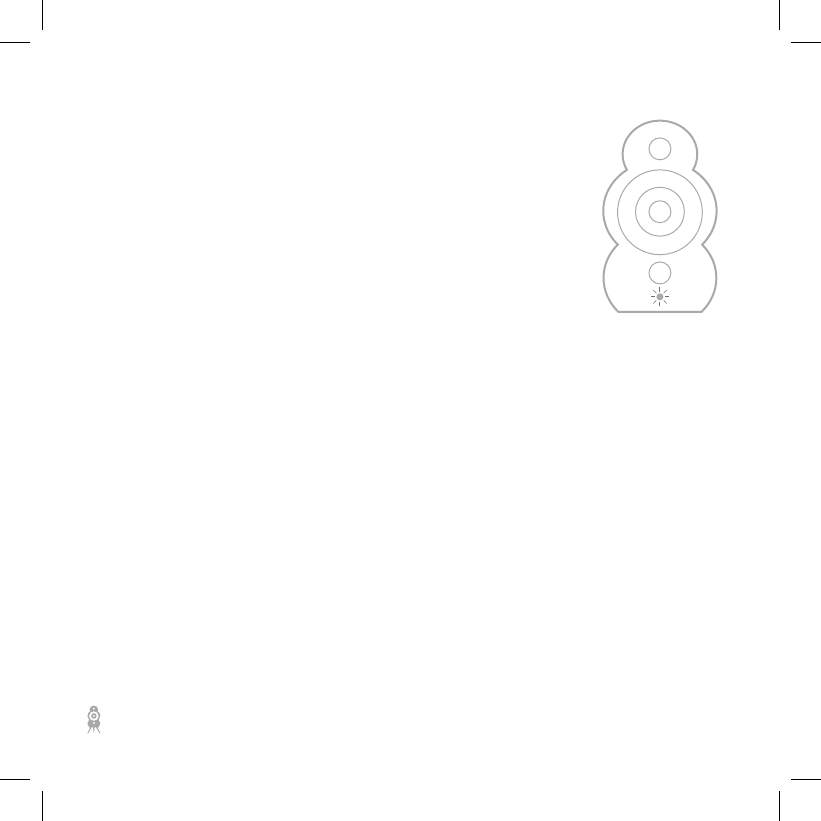
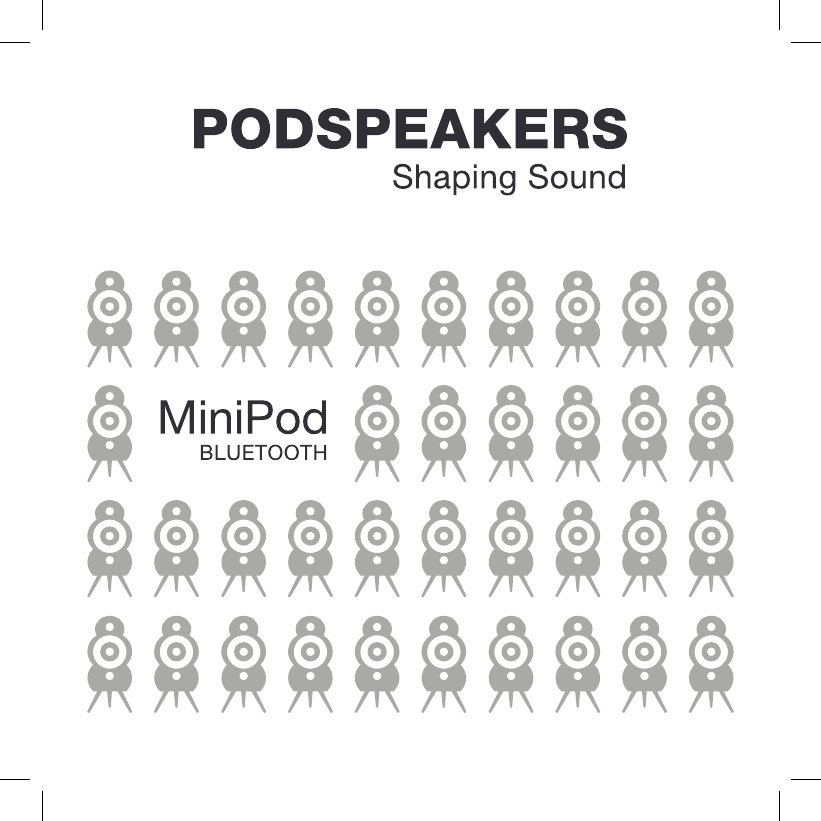
Description of LED
LED / REMOTE CONTROL SENSOR
Blue:
Bluetooth Mode
• Solid: ON / Device connected and playback ongoing.
• Blinking: Connectable Mode.
• Blinking fast: Pairing Mode.
• Breathing at full brightness: Idle. Waiting for source.
• Breathing at half brightness: Network standby. The speaker can be turned on by a source.
White: Optical Mode
• Solid: ON
• Breathing at full brightness: Idle. Waiting for source.
• Breathing at half brightness: Network standby. The speaker can be turned on by a source.
Green:
Auxiliary Mode
• Solid: ON
• Breathing at full brightness: Idle. Waiting for source.
• Breathing at half brightness: Network standby. The speaker can be turned on by a source.
OFF:
Standby mode. In a Wireless Stereo setup, right speaker is in ‘slave’ mode.
27

Making sure your MiniPod
sound as good as it can
RUNNING-IN PERIOD
We recommend a running-in period of your new MiniPod loudspeakers of approximately 15-20
hours at normal listening level before you decide on the nal positioning of the loudspeakers.
During the running-in period, the drive units will settle in to perform as intended.
28

Keeping your MiniPod
Bluetooth neat and tidy
CARE AND CLEANING
We strongly advise against the use of any solvents or cleaners on the lacquered MiniPod
cabinets. The cabinet surface usually only requires dusting or cleaning with a damp soft cloth
(only use cold clean water). Avoid touching the drive units, especially the tweeter, as damage
may result.
29
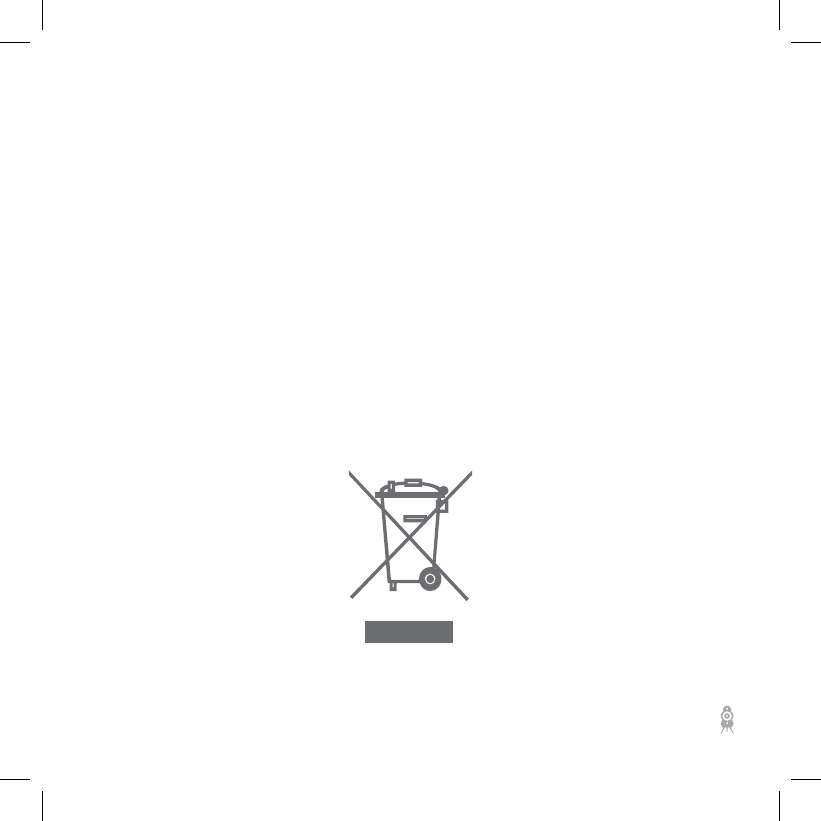
Correct disposal of this product
ENVIRONMENTAL INFORMATION
This marking shown on the product or its literature, indicates that it should not be disposed
with other household wastes at the end of its working life. To prevent possible harm to the
environment or human health from uncontrolled waste disposal, please separate this from other
types of wastes and recycle it responsibly to promote the reuse of material resources.
Household users should contact either the retailer where they purchased this product, or their
local government oce, for details of where and how they can take this item for environmentally
safe recycling.
Business users should contact their supplier and check the terms and conditions of the purchase
contract. This product should not be mixed with other commercial wastes for disposal.
30

For your safety and protection
of your MiniPod Bluetooth
FOR YOUR SAFETY
• Do not use MiniPod in wet, misty or dusty conditions. This might damage MiniPod and
void warranty.
• MiniPod should not be used in heavy direct sunlight. Damages from sunlight exposure
might void your warranty.
• To avoid damaging your MiniPod speaker always make sure to place MiniPod on a at
and stable surface.
• Never try to open or repair your MiniPod. Always consult authorized service personal in
case of defects that might require repair.
• Make sure that MiniPod has adequate free space around to ensure proper ventilation.
*Please carefully notice and follow above safety guidelines to avoid risk of electric shock or any
other personal injury!!
REMOTE CONTROL BATTERY
• Remote control contains one non- rechargeable Li-ion battery.
• Replace only with same or equivalent battery type.
• Do not expose battery to strong heat or direct sunlight.
• Remote control contains small parts. keep out of reach for children.
• Do not ingest/swallow the battery. It can cause severe internal burns and will need
immediate medical care!
31

Your MiniPod Bluetooth is of
cause covered by warranty
WARRANTY
Your Podspeakers is covered by warranty according to the local rules of the country/region, in
where they were bought. Please always consult your local dealer for any questions related to
warranty. As warranty documentation (proof of purchase), please always store/keep the original
receipt in a safe place.
32

The next few pages contains FCC and Canada
compliance information for MiniPod Bluetooth
COMPLIANCE INFORMATION
This device complies with Part 15 of the FCC Rules. Its operation is subject to the following two conditions:
1. This device may not cause harmful interference, and
2. This device must accept any interference received, including interference that may cause undesired
operation.
Cet appareil est conforme à la section 15 des réglementations de la FCC. Le fonctionnement de l’appareil
est sujetaux deux conditions suivantes :
1. cet appareil ne doit pas provoquer d’interférences néfastes, et
2. cet appareil doit tolérer les interférences reçues, y compris celles qui risquent de provoquer un
fonctionnement indésirable.
Note: This product has been tested and found to comply with the limits for a Class B digital device, pursuant
to Part 15 of the FCC Rules. These limits are designed to provide reasonable protection against harmful
interference in a residential installation.
This product generates, uses, and can radiate radio frequency energy and, if not installed and used in
accordance with the instructions, may cause harmful interference to radio communications. However, there
is no guarantee that interference will not
occur in a particular installation. If this product does cause harmful interference to radio or television reception,
which can be determined by turning the equipment o and on, the user is encouraged to try to correct the
interference by one or more of the
following measures:
• Reorient or relocate the receiving antenna.
• Increase the separation between the equipment and receiver.
• Connect the equipment into an outlet on a circuit dierent from that to which
• the receiver is connected.
• Consult the dealer or an experienced radio/TV technician for help.
33
This equipment should be installed and operated with a minimum distance 20 cm between the radiator and
your body. The device compliance with the limits for general radiation exposure.

The next few pages contains FCC and Canada
compliance information for MiniPod Bluetooth
COMPLIANCE INFORMATION
Please take attention that changes or modication not expressly approved by the party responsible for
compliance could void the user’s authority to operate the equipment. This device complies with Industry
Canada license-exempt RSS standard(s). Operation is subject to the following two conditions:
1. this device may not cause interference, and
2. this device must accept any interference, including interference that may cause undesired operation of
the device.
Le présent appareil est conforme aux CNR d’Industrie Canada applicables aux appareils radioexempts de
licence. L’exploitation est autorisée aux deux conditions suivantes :
1. l’appareil ne doit pas produire de brouillage, et
2. l’utilisateur de l’appareil doit accepter tout brouillage radioélectrique subi, même si le brouillage est
susceptible d’en compromettre le fonctionnement.
This equipment should be installed and operated with a minimum distance 20 cm between the radiator and
your body. Under Industry Canada regulations, this radio transmitter may only operate using an antenna of a
type and maximum (or lesser) gain approved for the transmitter by Industry Canada. To reduce potential radio
interference to other users, the antenna type and its gain should be so chosen that the equivalent isotropically
radiated power (e.i.r.p.) is not more than that necessary for successful communication.
Conformément à la réglementation d’Industrie Canada, le présent émetteur radio peut fonctionner avec une
antenne d’un type et d’un gain maximal (ou inférieur) approuvé pour l’émetteur par Industrie Canada. Dans
le but de réduire les risques de brouillage radioélectrique à l’intention des autres utilisateurs, il faut choisir le
type d’antenne et son gain de sorte que la puissance isotrope rayonnée équivalente (p.i.r.e.) ne dépasse pas
l’intensité nécessaire à l’établissement d’une communication satisfaisante.
34

For your safety and protection
of your MiniPod Bluetooth
FOR YOUR SAFETY
重要安全指示:
1、 阅读这些指示
2、 保存这些说明
3、 注意所有警告
4、 遵守所有指示
5、 不要在近水处使用本设备
6、 仅用干布清洁本设备
7、 不要堵塞任何通风口,按照制造商的指示进行安装。
8、 不要安装在热源附近,例如散热器、热风调节器、火炉或其
它产生热量的设备(包括放大器)。
9、 防止电源线受踩踏或挤压,特别是插头处,插座处及其设备
出口处。
10、 仅使用制造商指定的附件/配件
11、 只能使用由制造商指定或随设备销售的推车、支架、三脚
架、架子或桌子。使用手推车时,请小心移动车/设备组
合,以免因翻倒而受伤。
12、 雷雨天或长时间不使用时,请拔下插头。
35
For your safety and protection
of your MiniPod Bluetooth
FOR YOUR SAFETY
13、 把所有维护工作交给有资质的维护人员,设备有任何损伤,
例如电源线或插头受损、液体或异物进入设备、设备淋雨或
受潮、不能正常工作或摔坏时,需要维护。
14、 请勿让本设备淋水或溅水,切勿将盛有液体的物体(如花
瓶)放置在设备上。
15、 如需完全断开本设备的交流电源,请从交流电源插座拔下电
源插头。
16、 设备电源线(有时也被称为“电源插头”)用作断开装置,
应在任何时候都能接触和操作。
17、 点燃的蜡烛等明火不应该放在设备上。
警告:为减少火灾或触电危险,请勿让本设备淋雨或受潮
等边三角形内带箭头符号的闪电图案旨在提醒用户产品外壳
中存在非绝缘的“危险电压”,可能足以构成对人员的触电
危险。
等边三角形内的感叹号旨在提醒用户随机文档中存在重要的
操作和维护(维修)指示。
36

Some good-to-know details
MAIN SPECIFICATIONS
Speaker type: Active Bluetooth.
Amplier: 25W*2
Frequency ranges: 45Hz-22kHz
Sensitivity: 86dB@1m1W
Nominal impedance: 6 ohm
Input: Bluetooth (wireless), stereo line-in (3.5 mm mini-jack), optical digital, USB (for service only).
Output: Subwoofer, speak cable to right speaker.
Speaker dimensions WxHxD: 210 x 340 x 200 mm.
Weight: 3.0Kgs
37

THANK
YOU!
Once again -
Thank you for purchasing a MiniPod Bluetooth speaker
Best Regards from,
Your Podspeakers Team.
