Hansong SOUNDUNIT 2.0 Sound Unit User Manual XCO SOUNDUNIT Manual
Hansong(Nanjing) Technology Ltd. 2.0 Sound Unit XCO SOUNDUNIT Manual
Hansong >
XCO-SOUNDUNIT Manual
Owner’s manual
English - Version 1.7 - November 2013
Safety Instructions
Be sure all the safety and operation instructions should be read before the Montana Sound Unit is
connected to the main supply and operated.
Important general safety instructions:
1) Read Instructions:
All the safety and operation instructions should be read before the product is operated.
2) Retain Instructions:
The safety and operating instructions should be read and retained for future reference
3) Heed Warnings:
All warnings on the product and in the operating instructions should be adhered to.
4) Follow instructions:
All operation and user instructions should be followed.
5) Water and Moisture:
The product should not be used near water (e.g. near a bathtub, washbowl, kitchen sink,
laundry tub, in a wet basement, or near a swimming pool etc.)
6) Ventilation:
The product should be situated so that its location or position does not interfere with the
its proper ventilation. For example the product should not be situated on a bed, sofa rug,
or similar that may block the ventilation openings, or placed in a build-in installation, such
as a bookcase or cabinet that may impede the flow of the air through the ventilation
openings.
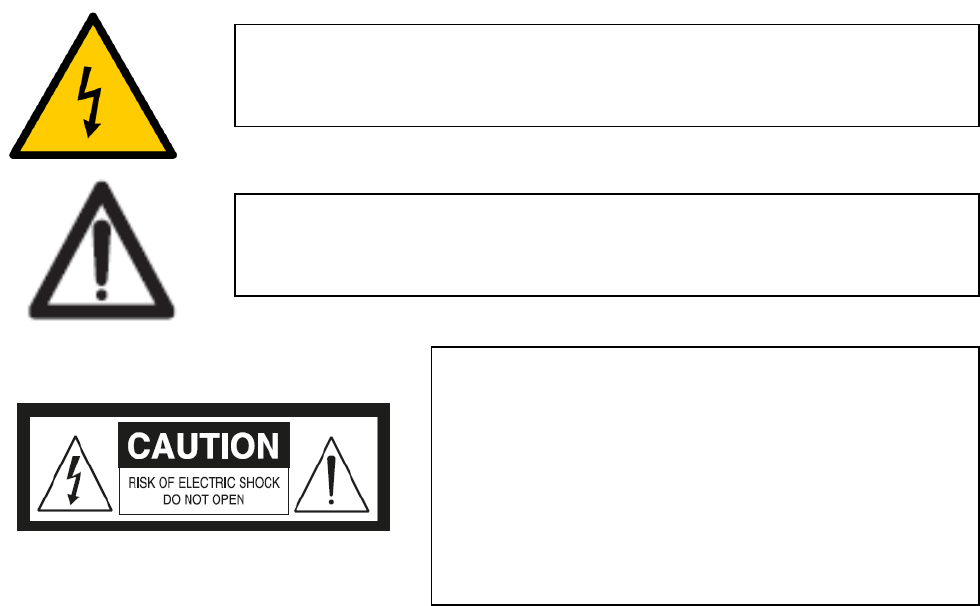
This symbol, alerts the user to the presence of uninsulated dangerours
voltage inside the enclosure – voltage that may be sufficient to
constitute a risk of shock.
CAUTION:
To remove the risk of electrical shock, do not
remove the cover. No user serviceable parts inside.
Refer servicing to qualified personal.
WARNING:
To reduce the risk of fire or electrical shock, do not
expose this product to rain or moisture.
This symbol, alerts the user to important operating and maintenance
instructions in the accompanying the Montana Sound Unit, guidelines
and owner’s manual.

7) Heat:
The product should be situated away from heat sources such as radiators, heat registers,
stoves, or other products (including amplifiers) that produce heat.
8) Power Sources:
The product should be connected to a power supply only of the type described in the
operating instructions or as marked on the product.
9) Grounding or Polarization
Precautions should be taken so that the grounding or polarization means of a product is
not defeated.
10) Power-Cord Protection:
Power supply cords should be routed so that they are not likely to be walked on or pinched
by items placed upon or against them, paying particular attention to the cords and the
plugs, convenience receptacles ad the point where they exit from the product.
11) Cleaning:
The product should be cleaned only as recommended by the manufacturer.
12) Non-Use Periods:
The power cord of the product should be unplugged from the outlet when left unused for a
long period of time.
13) Object and Liquid Entry:
Care should be taken so that objects do not fall and liquids are not spilled into the
enclosure through openings.
14) Damage Requiring Service:
The product should be serviced by qualified service personnel when:
a. The power-supply cord or plug has been damaged
b. Objects have fallen or liquid has been spilled into the product.
c. The product has been exposed to rain.
d. The product does not appear to operate normally or exhibits a marked change in
performance.
15) Servicing:
The user should not attempt to service the product beyond that is described in the
operating instructions. All other servicing should be referred to qualified service personnel.
16) Lighting:
For added protection for the product during a lightning storm or when it is left unattended
and unused for a long period of time, unplug it from the wall outlet.
17) Overloading:
Do not overload wall outlet, extension cords or integral convenience receptacles as this can
be result in risk of fire or electric shock.
18) Battery Disposal:
When disposing of used batteries, please comply with governmental regulations or
environmental public instructions rules that apply in your country or area.
Caution:
Danger of explosion if battery is incorrectly replaced.
Replace only with the same or equivalent type
Batteries (battery pack or batteries installed) must not be exposed to excessive
heat such as sunshine, fire or the like. WARNING
WARNING
Do not ingest battery, chemical Burn Hazard
19) The remote control supplied with this product a coin/Button cell battery. If the coin/Button
cell battery is swallowed, it can cause severe internal burns in just 2 hours and can lead to
death.
20) Keep new and used batteries away from children, if the battery compartment does not
close securely, stop using the product and keep it away from children.
21) If you think batteries might have been swallowed or places inside any part of the body,
seek immediate medical attention.
22) Where the mains plug or an appliance couple is used disconnect device shall remain
readily operable.
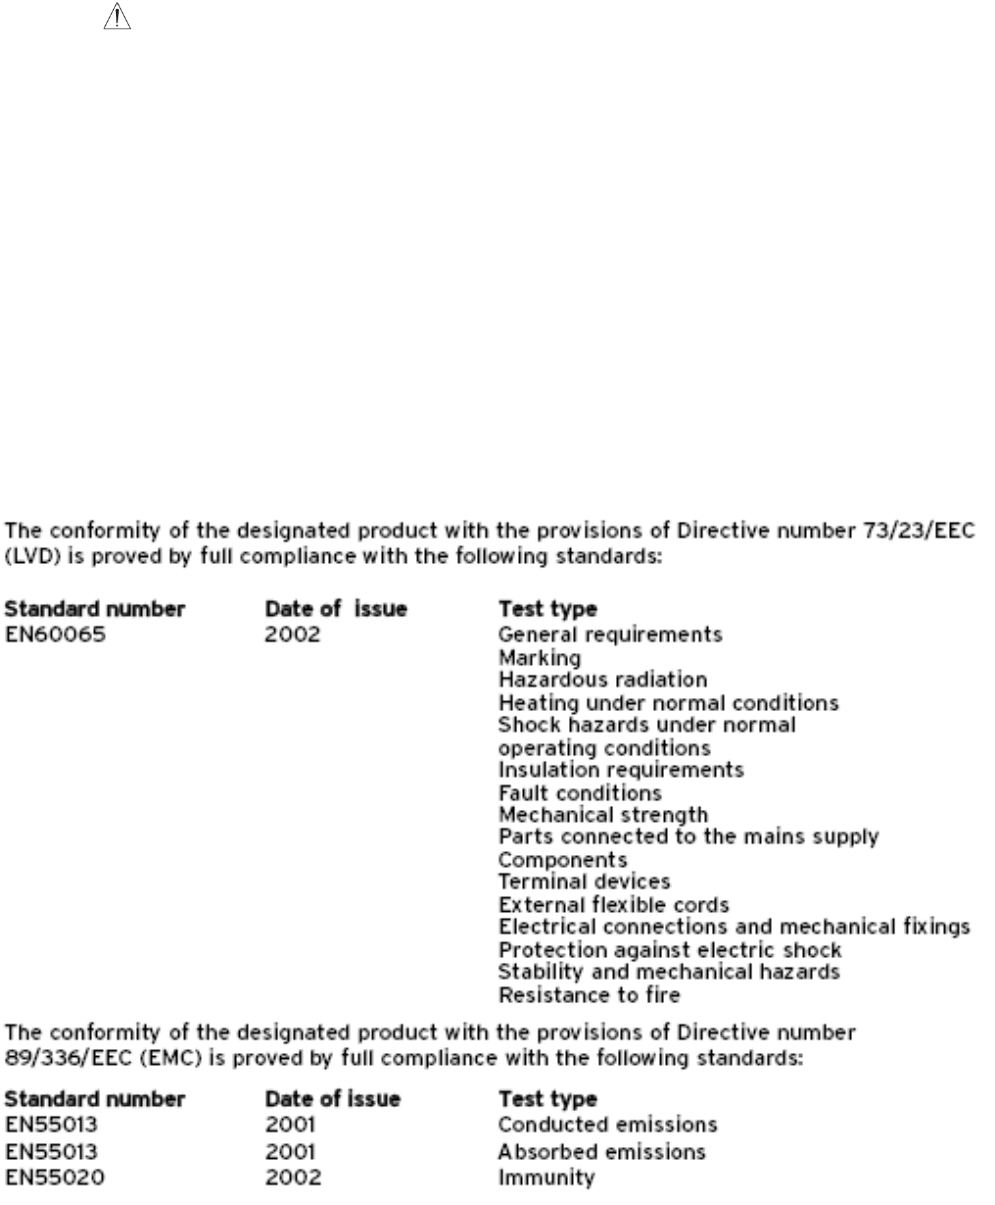
CE declaration of conformity

Acknowledgements
FCC STATEMENT
This device complies with part 15 of the FCC rules and Industry Canada Licence-exempt RSS
standard(s). Operation is subject to the following to conditions:
1) This device may not cause harmful interference, and
2) This device must accept any interference received, including interference that may cause
undesired operation.
DÉCLARATION DE LA FCC
Cet appareil est conforme à la section 15 des réglementations de la FCC. Le fonctionnement de
l’appareil est sujet aux deux conditions suivantes :
1) cet appareil ne doit pas provoquer d’interférences néfastes, et
2) cet appareil doit tolérer les interférences reçues, y compris celles qui risquent de
provoquer un fonctionnement indésirable.
Manufactured under license under U.S. Patent Nos: 5,956,674; 5,974,380; 6,487, 535 & other U.S.
and worldwide patents issued & pending, DTS, the Symbol, & DTS and the Symbol together are
registered trademarks & DTS Digital Surround and the DTS logos are trademarks of DTS, Inc. DTS,
Inc. All Rights Reserved.
Manufactured under license from Dolby Laboratories.
Dolby and double-D symbol are trademarks of Dolby Laboratories.
Made for
· iPhone 5S
· iPhone 5C
· iPhone 5
· iPhone 4S
· iPhone 4
· iPad Air
· iPad (4th generation)
· iPad (3rd generation)
· iPad 2
· iPad mini with Retina display
· iPad mini
· iPod touch (4th generation)
· iPod touch (3rd generation)
· iPod touch (2nd generation)
“Made for iPod,” “Made for iPhone,” and “Made for iPad” mean that an electronic accessory
has been designed to connect specifically to iPod, iPhone, or iPad, respectively, and has been
certified by the developer to meet Apple performance standards. Apple is not responsible for
the operation of this device or its compliance with safety and regulatory standards. Please
note that the use of this accessory with iPod, iPhone, or iPad may affect wireless performance.
AirPlay, iPad, iPhone, iPod, iPod classic, iPod nano, and iPod touch are trademarks of Apple
Inc., registered in the U.S. and other countries.
Caution:
This device complies with Part 15 of the FCC Rules / Industry Canada licence-exempt
RSS standard(s). Operation is subject to the following two conditions: (1) this device
may not cause harmful interference, and (2) this device must accept any interference
received, including interference that may cause undesired operation.
Le présent appareil est conforme aux CNR d'Industrie Canada applicables aux
appareils radio exempts de licence. L'exploitation est autorisée aux deux conditions
suivantes : (1) l'appareil ne doit pas produire de brouillage, et (2) l'utilisateur de
l'appareil doit accepter tout brouillage radioélectrique subi, même si le brouillage est
susceptible d'en compromettre le fonctionnement.
Changes or modifications not expressly approved by the party
responsible for compliance could void the user's authority to operate the
equipment.
This equipment has been tested and found to comply with the limits for
a Class B digital device, pursuant to part 15 of the FCC Rules. These
limits are designed to provide reasonable protection against harmful
interference in a residential installation. This equipment generates
uses and can radiate radio frequency energy and, if not installed and
used in accordance with the instructions, may cause harmful interference
to radio communications. However, there is no guarantee that interference
will not occur in a particular installation. If this equipment does cause
harmful interference to radio or television reception, which can be
determined by turning the equipment off and on, the user is encouraged
to try to correct the interference by one or more of the following
measures:
—Reorient or relocate the receiving antenna.
—Increase the separation between the equipment and receiver.
—Connect the equipment into an outlet on a circuit different from that
to which the receiver is connected.
—Consult the dealer or an experienced radio/TV technician for help.
Under Industry Canada regulations, this radio transmitter may only operate using an
antenna of a type and maximum (or lesser) gain approved for the transmitter by
Industry Canada. To reduce potential radio interference to other users, the antenna
type and its gain should be so chosen that the equivalent isotropically radiated power
(e.i.r.p.) is not more than that necessary for successful communication.
Conformément à la réglementation d'Industrie Canada, le présent émetteur radio peut
fonctionner avec une antenne d'un type et d'un gain maximal (ou inférieur) approuvé
pour l'émetteur par Industrie Canada. Dans le but de réduire les risques de
brouillage radioélectrique à l'intention des autres utilisateurs, il faut choisir le type
d'antenne et son gain de sorte que la puissance isotrope rayonnée équivalente
(p.i.r.e.) ne dépasse pas l'intensité nécessaire à l'établissement d'une communication
satisfaisante.
MPE Reminding
To satisfy FCC / IC RF exposure requirements, a separation distance of 20 cm or more should be
maintained between the antenna of this device and persons during device operation.
To ensure compliance, operations at closer than this distance is not recommended.
Les antennes installées doivent être situées de facon à ce que la population ne puisse
y être exposée à une distance de moin de 20 cm. Installer les antennes de facon à ce
que le personnel ne puisse approcher à 20 cm ou moins de la position centrale de l’
antenne.
La FCC des éltats-unis stipule que cet appareil doit être en tout temps éloigné d’au
moins 20 cm des personnes pendant son functionnement.
Only for detachable antennas:
This radio transmitter (identify the device by certification number, or model number if
Category II) has been approved by Industry Canada to operate with the antenna types
listed below with the maximum permissible gain and required antenna impedance for
each antenna type indicated. Antenna types not included in this list, having a gain
greater than the maximum gain indicated for that type, are strictly prohibited for use
with this device.
WIFI Antenna:
Gain of antenna: 2.0dBi max.
Type of antenna: Omni-directional
Impedance of antenna: 50ohm
Le présent émetteur radio (identifier le dispositif par son numéro de certification ou
son numéro de modèle s'il fait partie du matériel de catégorie I) a été approuvé par
Industrie Canada pour fonctionner avec les types d'antenne énumérés ci-dessous et
ayant un gain admissible maximal et l'impédance requise pour chaque type d'antenne.
Les types d'antenne non inclus dans cette liste, ou dont le gain est supérieur au gain
maximal indiqué, sont strictement interdits pour l'exploitation de l'émetteur.
Antenne WIFI
Gain d'antenne: 2.0dBi maximal
Type d'antenne: Omni-directionnel
Impédance d'antenne: 50ohm
Table of Contents
1. Package Contains
2. Overview of front and rear panel
3. Overview of the remote control
4. MSU menu structure and settings
5. Installation and setup wireless network
6. Input selection
7. Select and use of settings
8. Specifications
9. Appendix 1: Setup WiFi network
10. Appendix 2: Connecting external equipment
Package Contains
Please control that all listed items are in the package and inspect they are all intact.
1) 1x Montana Sound Unit
2) 1x Remote Control
3) 1x Battery (CR2025 3V Lithium)
4) 1x AC Power Cord
5) 2x WiFi antennas
6) 1x DAB+/FM antenna
7) 1x Owner’s Manual
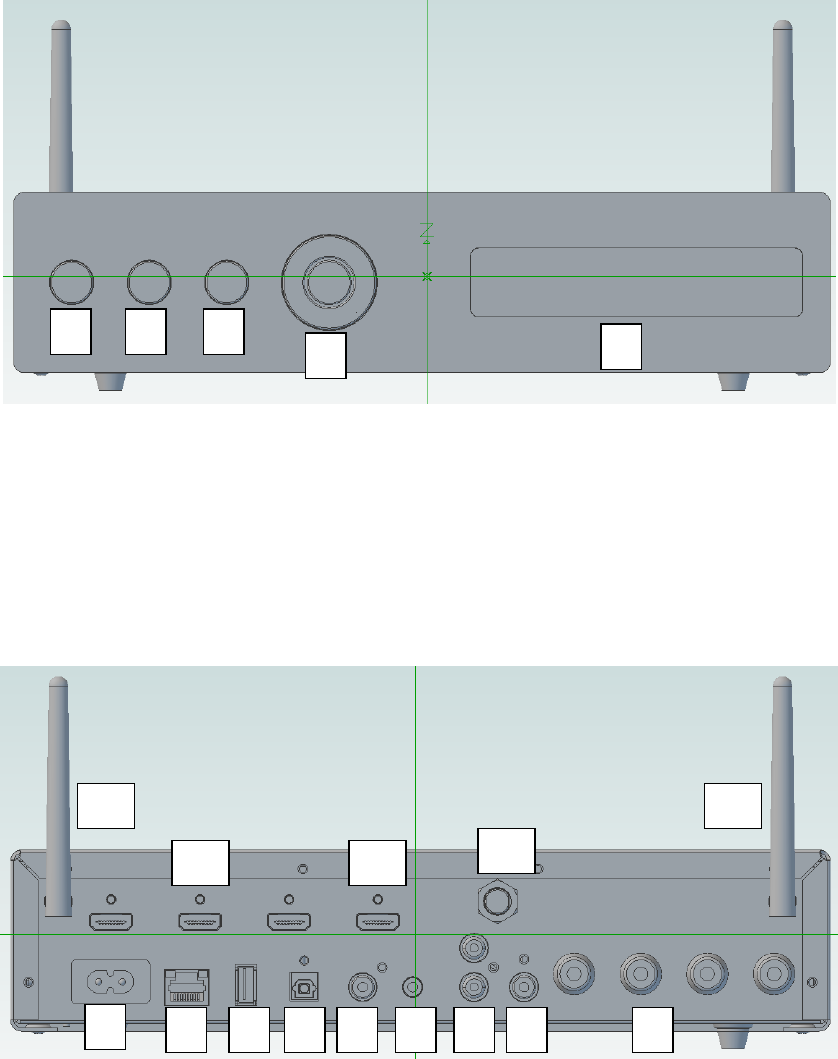
Overview of front and rear panel
Front panal:
1) Power on/off
2) Input select
3) Return (when using the menu/select wheel)
4) Menu/select
5) Display
Rear Panal:
1) AC Power cord connection
2) LAN network connector
3) USB2.0 connector (Share, dock, 5V for charging iPad)
4) Optical (Digital)
1
2
3
4
5
1
2
3
4
5
6
7
9
8
10
11
10
12
13
5) Coaxial (Digital)
6) Mini jack connector (AUX1 analog)
7) Phone connectors Red&White (AUX2 analog)
8) Subwoofer Pre-out (purple Phone connector)
9) Left/Right Speaker terminals
10) 2x Antenna connectors for WiFi
11) Antenna connector for DAB and FM antenna
12) HDMI 3x input connectors
13) HDMI 1x Output connectors
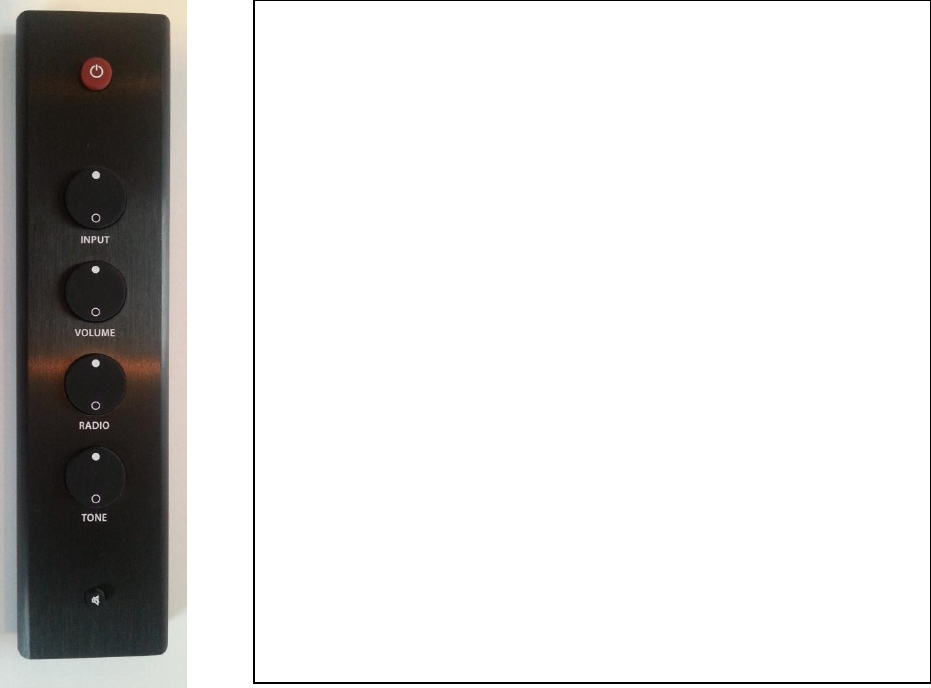
Remote Control
The remote control has 6 buttons. The basic operations are:
On/Off
Used to turn the MSU on and off. If Sleep mode is
activated in the menu, it controls Sleep On/Off.
Input
Change the input on the MSU.
Volume
Turn up/down the volume. Hold to make continuous
adjustment.
Radio
Change the radio program on input FM and DAB.
Tone
Change the tone/EQ of the sound between 7 presets.
Mute
Toggle mute on/off.

To navigate the remote control
The remote control contains only 6 buttons, 2 small with only single press function and 4 bigger
buttons with up and down function.
Power
The first red power button is used to turn on and off the sound unit.
Functions in Sleep and CEC mode
If CEC or Sleep is activated the MSU will enter sleep mode when the power button is
pressed.
When holding down the “power button” 3sec the MSU will turn off.
Input
The second button is input select. The used always need to select manually from where the sound
comes from (Wifi, CD, BluRay, PlayStation ect.). When pressing “up” or “down” through the inputs
they will show in the sound unit display.
Volume
For turning the volume up and down.
Radio
The main function of the radio button is to select the pre-stored Radio stations. But the button
also works:
In FM input mode to scan the FM range
In DAB input mode to scan and store the DAB stations
In WiFi mode to shift from wireless network and wireless direct and back
Functions in FM input mode:
If the input mode is FM the button works to select the pre-stored FM stations by pressing
“up” and “down”.
When holding down the “upper” button 3sec it is possible to scan the FM frequency band
and search for next nearby station. The found station can only be permanently stored by
Important! The volume steps are divided into 100 steps.
They are very small to support all external mobile devices.
When adjusting the volume you can keep the volume
button down and the adjustment goes faster
Important! The function of the Radio button is depending
on the selected input and the time the button is pressed
down!

using the Menu/select button on the sound unit (see section how to pre-store FM
stations).
Functions in DAB input mode:
If the input mode is DAB the button works to select the pre-stored DAB stations.
If holding down the “upper” button 3sec (Repeat up to 3 times) it is possible to scan the
DAB frequency band and the found DAB stations will be automatically stored.
First time pressing the RadioUpperKey after scanning the DAB stations will be organized.
Functions in WiFi mode:
If the input mode is in WiFi the radio button has an different function. Then it is possible to
switch between the WiFi home network and WiFi direct where the sound unit create its
own network.
To switch between the home network (WiFi N.) and the Montana sound units own network
(WiFi D.) then press RadioUpperKey 3sec for direct connect and RadioDownKey 3sec for
WiFi home network.
Tone
Press “up” or “down” to select the pre-set preferred tone genre such as Pop, Rock, Jazz, Classic
ect.
Mute
For quickly muting the sound without turning off the sound unit or turning down the volume
which takes time.
To navigate the remote control
The two small buttons power and mute is simple press down function.
The 4 bigger buttons Input, Volume, Radio and Tone have press “up” and “down” function.
The volume bottom has the feature when keep pressing on the volume bottom it is
possible to turn the volume “up” or “down” fast.
The RadioKey has multiple functionally depending on the selected input and the time
pressing on the key. The time separation between normal press function and long press
function is 3sec.
Important! To ensure correct WiFi connection when
changing from WiFi D. to WiFi N. then turn “off” and “ON”
the MSU after changed WiFi connection.
Note: Only 2.4GHz network is supported!
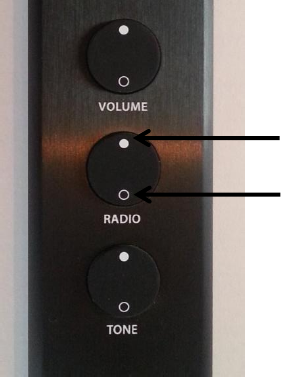
Radio Up 3 seconds
Radio Down 3 seconds
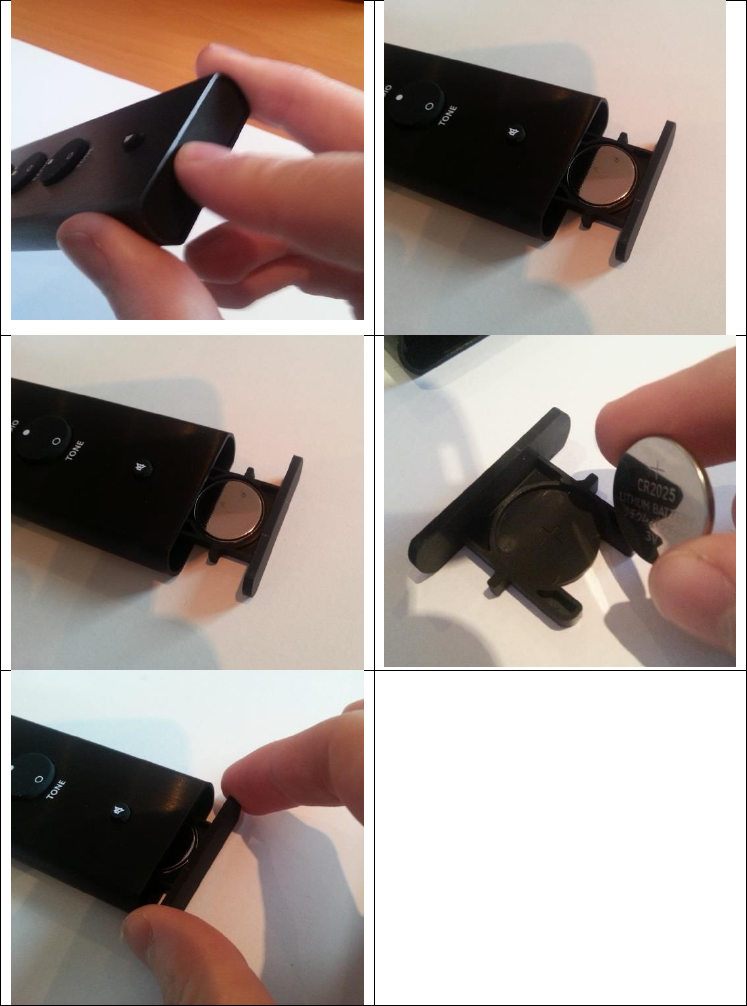
Change battery in the remote control
Press in the bottom of the remote control and release to “click out” the battery holder
Grap the battery holder and take it out of the remote control
Remove the used battery
Insert new battery. Put the plus side of the battery downwards in the battery holder, so
the “plus” signs on the battery and battery holder face each other.
Put the battery holder back into the remote control until it says “click” then release
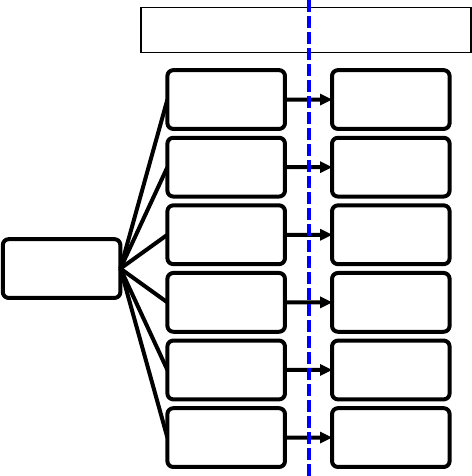
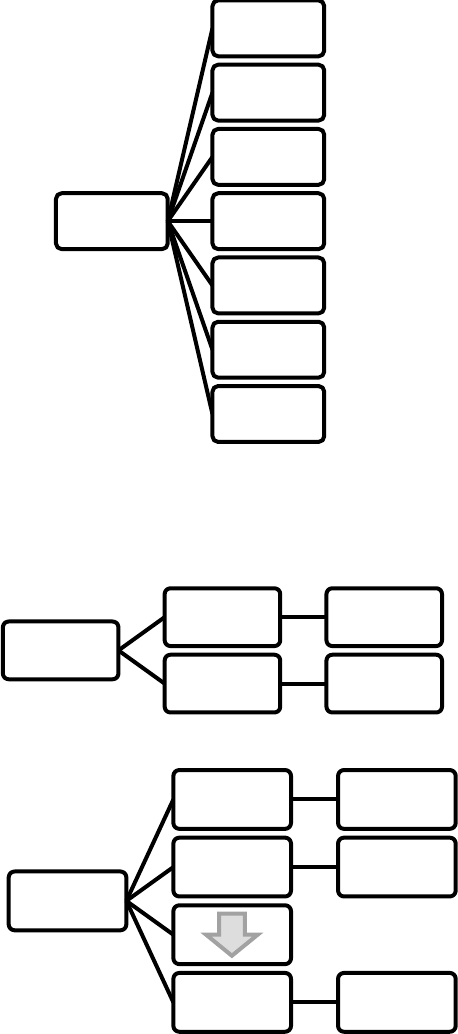
Montana Sound Unit Menu Structure
Setup Menus
How to navigate the setup menus
The main menu contains of 6 different
headers
Tuner
For storing FM tuner frequencies into presets
which can be selected from the remote
control.
Tone Genre
For changing the tone of the sound to one of
the equalizer pre-settings.
Tone Control
For adjusting the amount of bass and treble.
Input Level
For adjusting the individual levels of the
inputs.
Speaker Setup
For configuring the unit to the front
loudspeakers and a subwoofer.
System Setup
For adjusting general system settings such as
HDMI, Start Up Level, Auto Shutdown and
WiFi connection.
To navigate in the setup menus
On the front panel press ‘Menu/select’ button in the middle of the ‘selection wheel’ to
enter the setup menus.
Menu
Tuner ...
Tone
Genre ...
Tone
Control ...
Input Level ...
Speaker
Setup ...
System
Setup ...
Main menu Sub menu
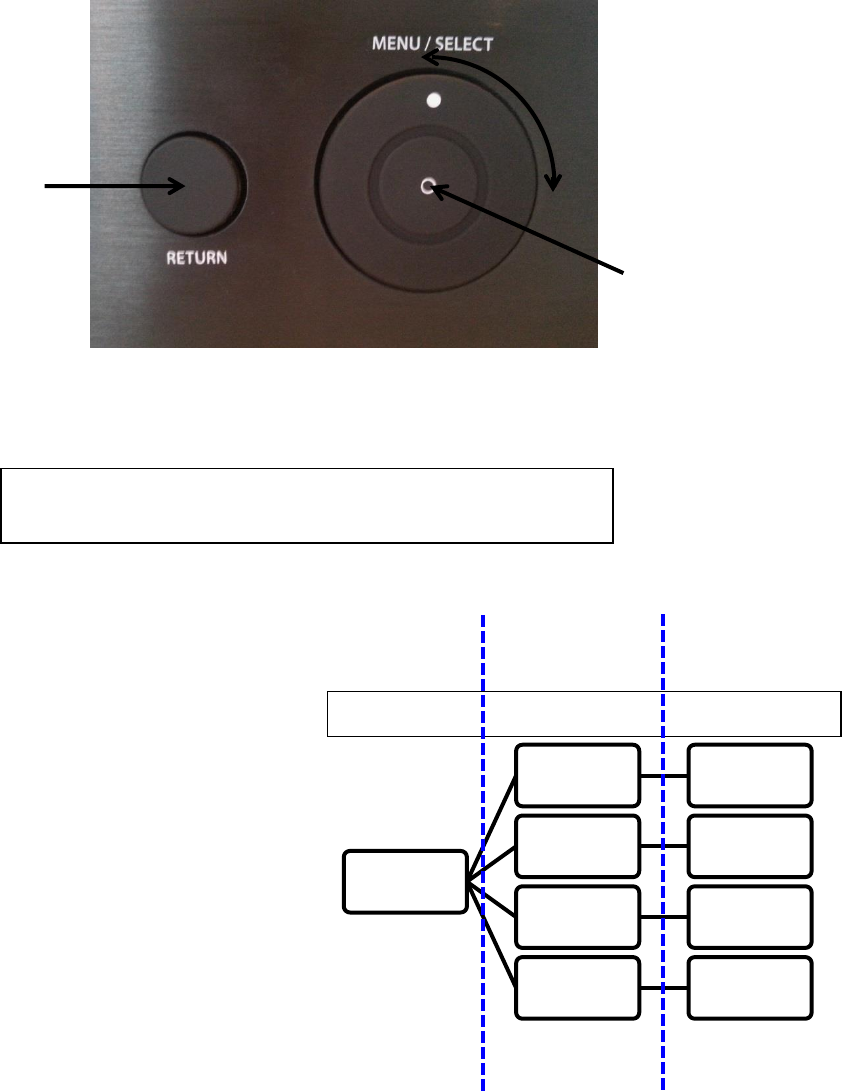
Use the ‘selection wheel’ to move around in the menus.
Use the ‘select’ button in the middle of the ‘Menu/select wheel’ to enter submenus.
Use the ‘selection wheel’ to change settings. The changes take effect immediately.
Use the ‘return’ button on the left of the Menu/select button to exit submenus.
Tuner
Presets
Use Presets to choose between the the 10
presets, which can store FM stations.
Frequency
Change the current FM frequency by turning
the wheel.
Store
Used to store the current frequency to the a
preset. After Store is chosen, the wheel can
be used to choose to which preset the
frequency should be stored. Press
“Menu/Select” to confirm.
Erase Memory
Erases the stored frequencies in the presets.
This removes both stored channels on FM
and DAB.
Tuner
Presets FM 01 - 10
Frequency 87.5kHz -
108kHz
Store Store 01 -
10
Erase
Memory? Reset all?
Important! The Tuner setup can only be accessed when the
input is set to FM.
Select
Wheel
Return
Main menu Sub menu Configuration
Tone Genre
An equaliser is used to change the tone of
the sound. The MSU has 7 equalizer pre-sets
named after different music genre. These are
Neutral (Default)
Pop
Rock
Classic
Jazz
Blues
Club
These can also be changed directly from the
remote control by pressing “Tone” up or
down.
Tone Control
The bass and treble can be adjusted from -
10dB to +10dB, with 0dB being neutral.
Input Level
The sensitivity level can be adjusted for each
source input from -10dB to +10dB. This can
be used to amplify a low output source to
match the sound level of the other inputs or
to attenuate a high output source.
Tone Genre
NEUTRAL
POP
ROCK
CLASSIC
JAZZ
BLUES
CLUB
Tone
Control
Treble +/- 10dB
Bass +/- 10dB
Input Level
Wifi +/- 10dB
HDMI 1 +/- 10dB
ARC-TV +/- 10dB

Speaker Setup
Crossover
When adding a subwoofer it is necessary to
set the crossover frequency between front
speakers “left” and “Right” and the
subwoofer. The crossover can be adjusted
from 40Hz to 220Hz. This will both control
the subwoofer high frequency cut-off and the
low frequency cut-off of the speakers.
Levels
The output level for the front speakers can
be adjusted from -10dB to +10dB. This can be
used to move the “center” of the sound field.
E.g. if the left speaker is placed further away
from the wanted center position than the
right speaker, increase the level of the left
speaker until the wanted center position is
achieved.
Lip Sync
This feature is used to delay the audio signal in HDMI signals. The video processing is sometimes
slower than audio processing which can lead to that the audio and video signal are not
synchronised. The audio signal can be delayed from 0ms to 200ms in steps of 10ms to match the
video signal.
Tip: It is often most easy to adjust the audio signal to the video signal by looking at lips and listen
to when the spoken words is heard.
Phase Sub
When a subwoofer is connected it is important that the subwoofer and the front speakers play in
phase. This means that when the bass driver in the front speakers move outwards the subwoofer
moves outwards also. When the subwoofer is placed closely to one of the front speakers the
phase should be set to 0 degrees. If the subwoofer is placed far from the front speakers a better
bass might be obtained by setting the phase to 180 degrees.
Tip: Place the subwoofer and the front loudspeakers in their wanted position. Place yourself in the
listening position and play a song with a lot of bass. Then make a friend change the setting back
and forth between 0 and 180 degrees. The setting given the most bass it the best setting.
Speaker
Setup
Crossover FULL BW-
220Hz
Levels
Left +/- 10dB
Right +/- 10dB
Lip Sync
HDMI 1 0ms -
200ms
HDMI 2 0ms -
200ms
HDMi 3 0ms -
200ms
Other
Inputs
0ms -
200ms
Phase Sub 0 / 180

System Setup
HDMI
Under the HDMI setting CEC and ARC can be
switched on/off.
Consumer Electronics Control (CEC) is an
HDMI feature which allows one device to be
controlled from another device. If the MSU is
connected to a TV which supports CEC then
volume control can be controlled from the
television. Turning on and off the television
will also turn on/off the MSU depending on
the settings on the television.
Audio Return Channel (ARC) is an HDMI
feature which allows audio to be sent back
from the TV to the MSU through the HDMI
output cable from the MSU. When the MSU
is connected to a TV with ARC through an
HDMI cable the video signal are send to the
TV. When watching TV the audio signal is
send back through the same HDMI cable to
the MSU so the TV sound is played through
the MSU instead. This way only one cable is
needed between MSU and TV.
Power Auto
This controls how the MSU works when no input signal is detected. The MSU can be set to shut
down after 30 or 60 minutes of inactivity. Chose ‘Never’ if you do not want the MSU to shut down
unless you do it yourself.
Setting the MSU to ‘Sleep’ means that the MSU will enter a sleep mode when pressing the turn off
button on either the MSU or remote control. ‘Sleep’ mode means that the display and amplifier
shuts down to minimise power consumption when not used but the WiFi network connection is
on. This allows the MSU to be turned on from the MSU iPhone App.
Volume Level
This sets the volume level when the MSU starts up. It can either be set to Last or Custom. When
Last is chosen the volume level at last shutdown will be used when turning on again.
Custom is used to manual chose the start-up volume level in the range 10 to 99.
WiFi Module 2.4GHz
The MSU can connect to WiFi networks or create its own when needed. When choosing ‘Direct’
the MSU will create its own network which devices can connect and stream to without use of
System
Setup
Sleep OFF/ON
HDMI
CEC OFF/ON
ARC OFF/ON
Power Auto
30 min
60 min
Never
Volume
Level
Last
Custom 10dB - 99dB
WiFi Module
Direct
WPS
Connect
Login Share
System
Reset OK?
password.
Setting up the MSU to the WiFi can be done in various ways:
Login Share – Select ”Login Share” in the sound unit menu. Then take you portable device
(mobile phone) which already contain the WiFi network data you wish to share with the
sound unit.
o It is only possible to use the share function with an iOS device
o It is important you have selected the WiFi network under settings on you mobile
phone then insert the cable from your phone to the USB connector on the back side
of the sound unit.
A menu on your phone pops up asking if you like to share your network data. Press yes and
wait a few seconds. The network data from the phone is then stored in the sound unit and
is now connected on you WiFi Home network.
When “WiFi N” is displayed, complete the process by pressing return bottom to come back
to the mail menu and turn off the sound unit and on again.
Connect – The MSU can be configured to a WiFi network with a device connected to the
MSU on its own network. See section “WiFi setup methods” in appendix 1 and name your
sound unit via computer or tablet.
WPS (WiFi Protected Setup) – If you have a router with WPS then click on the WPS button
on the router and chose WPS on the MSU. This connecs the MSU to the home network
without use of passoword.
o Important using this function the password of the network cannot be saved.
When the MSU is connected to WiFi it can be switched back and forth between a Direct
network and the home WiFi. To choose different home WiFi choose ‘Connect’
System Reset
The MSU can be reset to default settings by choosing ‘System Reset’.
Setup and use of the Radio (FM and DAB)
Scan DAB stations
Follow the instructions below to scan for DAB stations
1. Change input to “DAB”
2. Press and hold Radio Up on the remote for 3 seconds. The MSU will scan for all DAB
stations available (Memory Max 30 stations)
3. When the MSU is done scanning pressing Radio Up will rearrange the stations in to
ascending order.
4. Toggle between the stations afterwards by using the Radio Up/Down button on the
remote.
Store FM presets
Follow the instructions below to set up the presets channels.
There are 10 presets channels which a given FM station can be saved to.
5. Change input to “FM”
6. Press and hold Radio Up/Down on the remote for 3 seconds. The MSU will search for the
next radio station.
7. When the MSU has found a radio station it will ask whether the station should be stored or
not.
o Store -> Use the wheel to change the presets which to the station should be stored.
Click the “Menu/Select” button on the MSU to confirm.
o Not store -> Use the Radio Up/Down button again to continue the search or wait 5
seconds until the frequency is shown again.
8. Repeat step 2-3 for each radio station that is to be stored.
Tip: If the frequencies of the wanted FM stations are known the Tuner menu can be used instead:
1. Change input to “FM”
2. Use the Menu/Select to enter the Tuner setup.
3. Go to “Frequency” and use the wheel to find the FM stations which you want to store.
4. Go to “Save” and press on the menu/select again to confirm.
5. Use the wheel to change the preset which the frequency should be saved to. Use the
menu/select button to confirm
6. Repeat step 3-5 for each radio station that is to be stored.
Daily FM use
Use the “Radio Up” and “Radio Down” button on the remote control to change between the
different stored presets.
To listen to a radio station which is not stored as a preset, hold “Radio Up” or “Radio Down” for
three seconds. The MSU will scan and find the next radio station. Skip the Store-option. Press and
hold 3 seconds again to find another station

Specifications for Montana Sound Unit:
Dimensions
Montana Sound Unit 2.0
Sound Unit Dimensions (WxHxD)
295x71.3x235 (Height incl. feet)
Net Weight
3.8kg
Amplifier Specifications
Rated Power at 4 ohm
100W
Signal / Noise Ratio better than
-74.5dB
Total Harmonic Distortion (1W/1kHz)
Total Harmonic Distortion (100W/1kHz)
0.045%
0.181%
IMD (SMPTE) – Left 1W (7kHz/60Hz)
IMD (SMPTE) – Right 1W
IMD (SMPTE) – Left 100W
IMD (SMPTE) – Right 100W
0.19%
0.18%
0.145%
0.156%
IMD (CCIF) – Left 1W (19.5kHz/1kHz)
IMD (CCIF) – Right 1W
IMD (CCIF) – Left 100W
IMD (CCIF) – Right 100W
0.005%
0.0025%
0.014%
0.035%
Others
Standby power consumption
=<0.5W
Sleep mode power consumption
???
On power consumption
???
WiFi module
2.4GHz (5GHz is not supported)
Main support bit rate
24bit / 48kHz
Appendix 1:
WiFi Setup methods
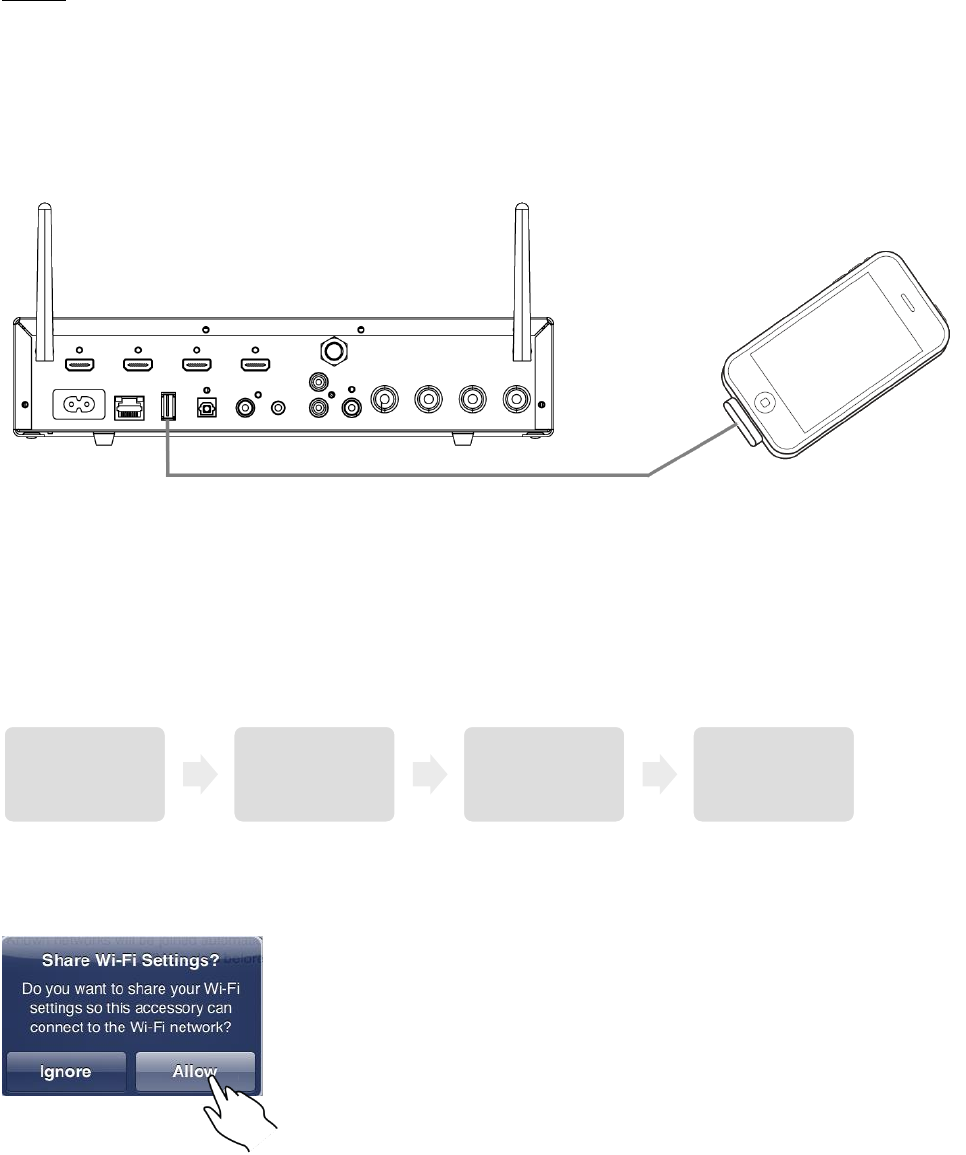
Share:
In Apple devices a feature is incorporated which allows for sharing the information for connecting
to the WiFi home network to other devices.
1. Connect a WiFi-connected iOS device (iPad, iPhone) to the USB input on the MSU through
an Apple USB Cable (not supplied).
2. Press in the middle of the Menu/Select wheel on the MSU to enter the Menu and go to
System Setup (“SysSetup”). Choose the “WiFi” and then select “Share” by pressing the
middle of the Menu/Select wheel.
3. A “Share Wi-Fi Settings” dialogue box appears on the iOS device, tap “Allow”.
Menu SysSetup WiFi Share
4. Complete the process by pressing return bottom to come back to the mail menu and turn
off the sound unit and on again.
5. The sound unit is now connected to your home network and you can stream and play
music from your phone or tablet or steam music from the internet.
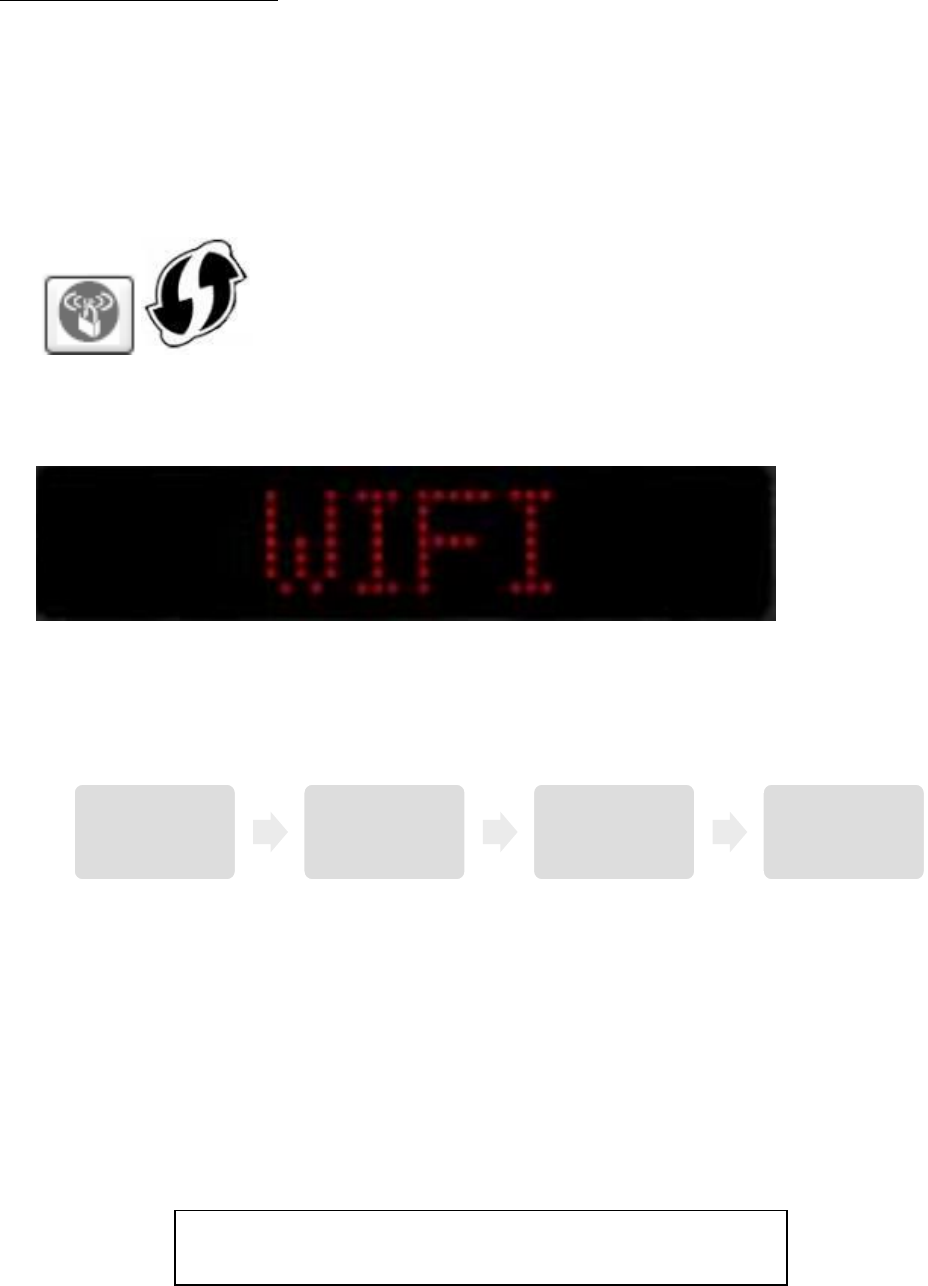
WiFi Protected Setup (WPS)
Your home network router must have a WPS button in order for this to work. To determine
whether your router has WPS consult the manual of the router or your internet provider in case
the router was provided by them.
1. Press the WPS button on your router (model dependent). Note that the “WPS” symbol can
vary.
2. Select input “WiFi” on the MSU either by the Input button on the MSU or the Remote
Control. The Sound unit display should show “WiFi”
3. Press in the middle of the Menu/Select wheel on the MSU to enter the Menu and go to
System Setup (“SysSetup”). Choose the “WiFi” and then select “WPS”. The MSU will start
connecting to the home network. The display will blink “Link” doing the process.
Note: This step can also be completed on the remote control by pressing and holding
“Radio Down” button for three seconds.
4. When “WiFi N” is displayed, complete the process by pressing return bottom to come back
to the mail menu and turn off the sound unit and on again.
5. The sound unit is now connected to your home network and you can stream and play
music from your phone or tablet or steam music from the internet.
Menu SysSetup WiFi WPS
Important! The Sound Unit cannot store the Network
settings in this mode
Setup WiFi from the Direct Network
The MSU can create its own network to which devices can connect to allow direct streaming music
without use of a home network. This can be used to configure the MSU to connect to the home
network.
1. Select input “WiFi” on the MSU either by the Input button on the MSU or the Remote
Control
2. Press in the middle of the Menu/Select wheel on the MSU to enter the Menu and go to
System Setup (“SysSetup”). Choose the “WiFi” and then select “Direct”. The MSU will
generate its own network. The display will blink “Link” doing the process.
Note: This can also be completed on the remote control by pressing and holding
“RadioUpperKey” down in 3 seconds.
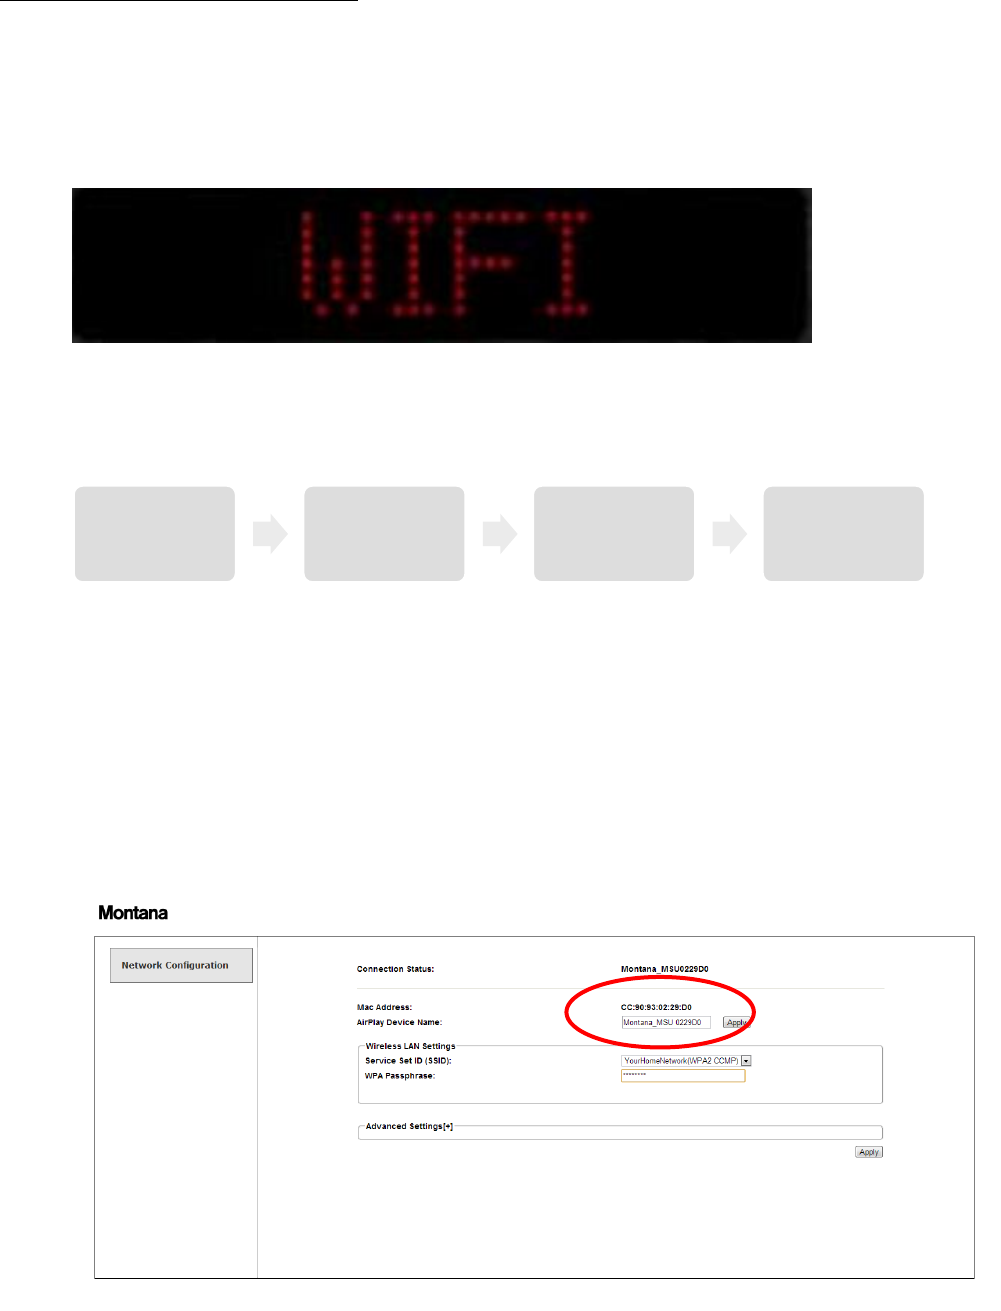
3. When “WiFi D” is displayed, the MSU has created a network named
“Montana_MSUxxxxxx” where “xxxxxx” is an unic id-number for the given MSU.
4. Connect to the “Montana_MSUxxxxxx” network from a device with WiFi, e.g. PC, Mac,
smartphones, tablets or computers.
5. Open an internet browser (e.g. Internet Explorer, Chrome, Safari) and in the URL adresse
enter: “192.168.1.1”. This will open the network configuration page on the MSU.
Menu SysSetup WiFi Direct
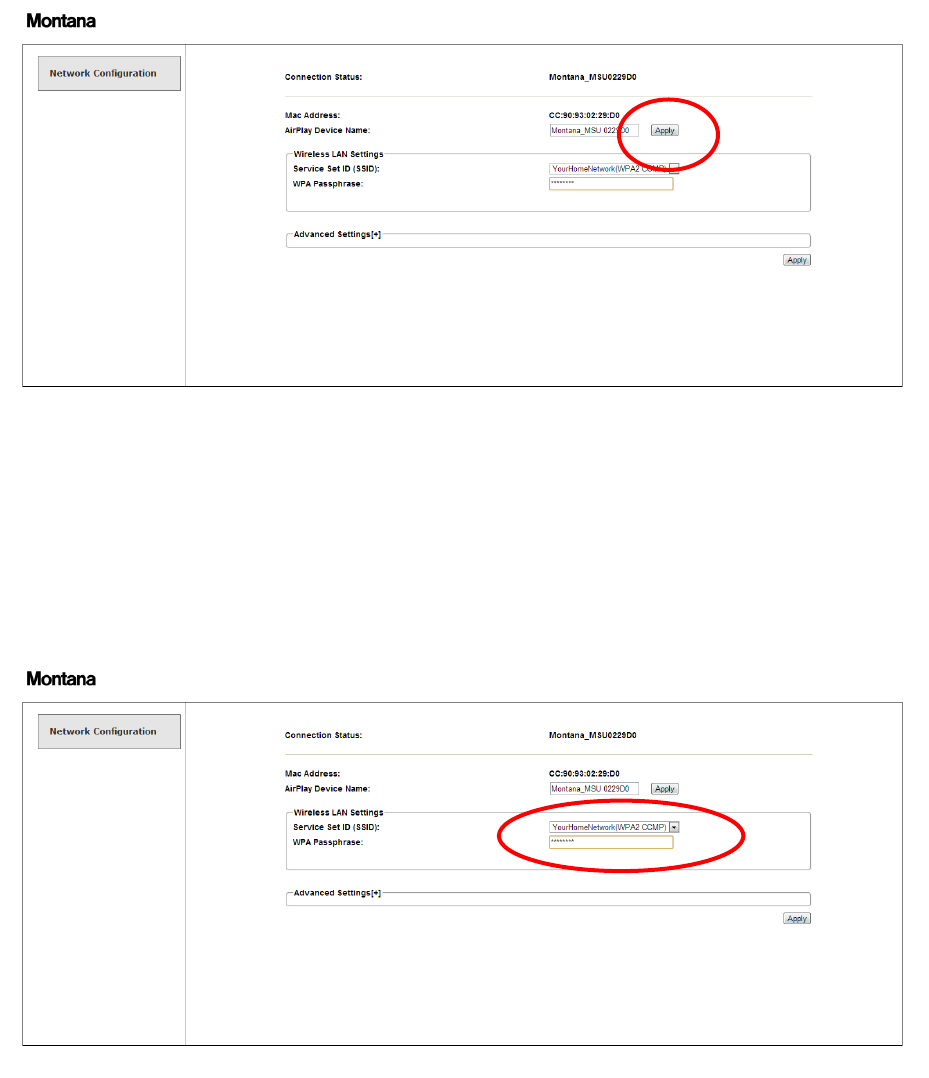
6. You can change the default sound unit network name from “Montana_MSUxxxxxx” to
some name that makes more sense like “TV living room”, “Kitchen”, “Bedroom” etc. after
changing the name press “Apply”
Note: The name shown in AirPlay and DLNA can be changed here too. Write the desired
name under “Airplay Device Name” and click apply next to.
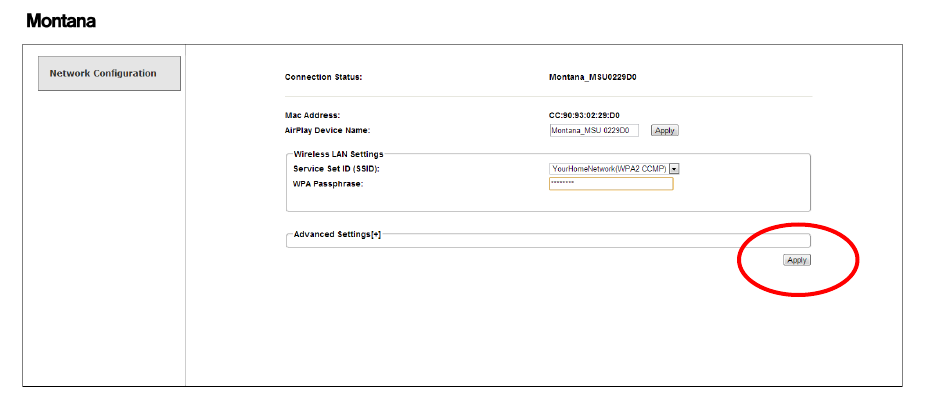
7. Recall the Montana Webpage to change “Wireless LAN Settings”
8. Under the “Wireless LAN Settings” choose your home network name and enter the
password below
9. When done click “Apply” down in the right corner. The MSU will now connect to the WiFi
home network. First it will show “LINK” while searching for the network.
10. When “WiFi N.” is displayed, complete the process by turn Off and On again the sound unit
. The sound unit is now connected to your home network and you can stream and play
music from your phone or tablet or steam music from the internet.
Appemdix 2.
Connections
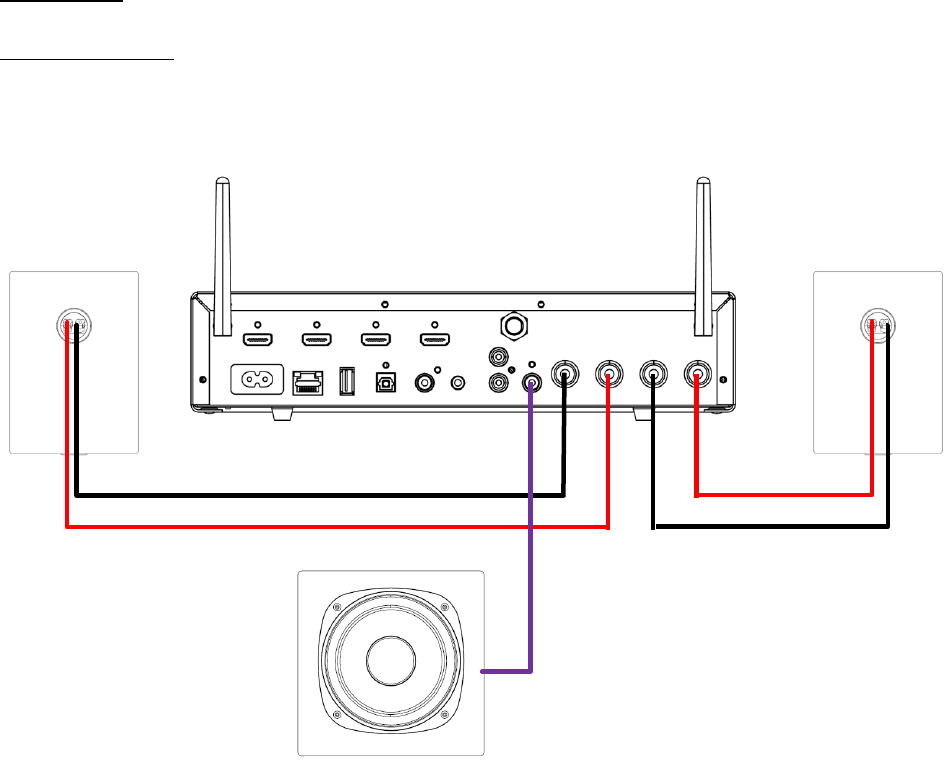
Connect Speakers
Connect a set of loudspeakers as shown below. An active subwoofer can be added and should be
connected to the purple connection on the MSU into the input on the subwoofer.
Right
Left
Sub
Line in /
Input
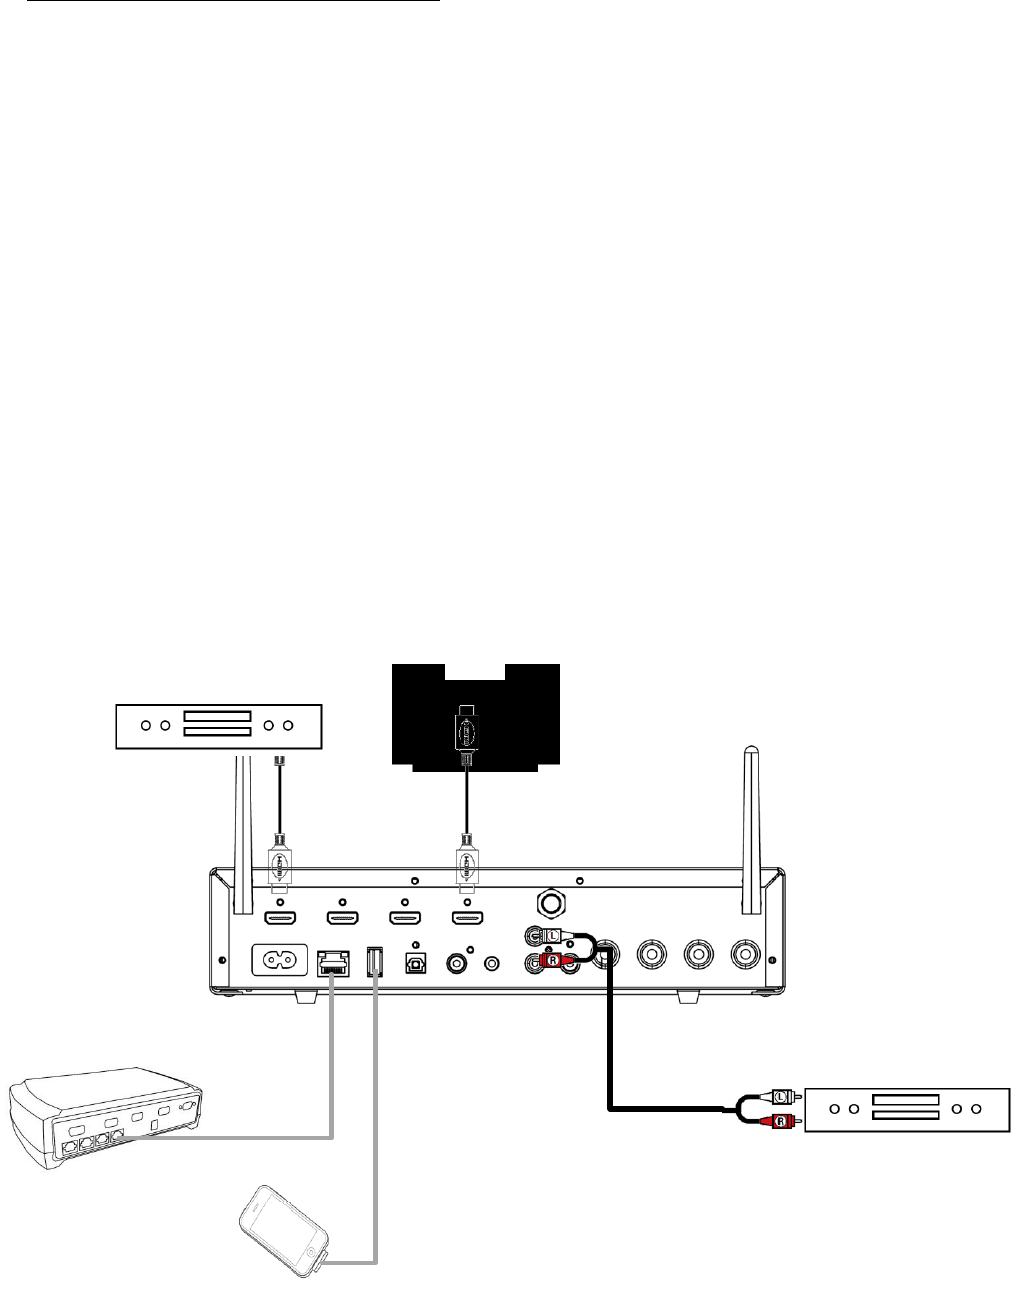
Connecting the MSU to other components
HDMI OUT: Connect the MSU to a TV through HDMI OUT with an HDMI cable. If your television
supports ARC (Audio Return Channel) then connect the HDMI Cable into the HDMI port which says
ARC on the TV. This allows sound to be transported from the TV to the MSU without using other
cables.
Note: If your TV does not have ARC, then either connect it to one of the AUX inputs or digital
inputs depending on the make and model of your TV.
HDMI 1-3: Connect any device which uses HDMI. This be gaming consoles such as PS3 and
Xbox360, BluRay Players, DVD Players and PC.
Network (Ethernet): Connect a Ethernet Cable from your router to the MSU if you do not have
WiFi or want a wired connection.
USB: Can be used to connect an iPad, iPhone or iPod through the Apple USB cable. An Apple
docking station can also be connected.
Digital: There are one Optical and one Coaxial input. Can be used to connect the audio from
components with digital outputs such as TVs without HDMI ARC, DVD players without HDMI and
CD players.
Analog: There are two analog inputs. AUX 1 is used to connect audio from mobile phones, tablets
and PCs without HDMI. AUX 2 is used to connect analog sources such as CD players and older
video devices without HDMI and digital output.
TV
HDMI device
CD Player
Router
CD Player
iOS device
CD Player