Hantech WG100R ENZO Wireless Network Router User Manual Usermanual FCC
Hantech Corporation ENZO Wireless Network Router Usermanual FCC
Hantech >
Contents
- 1. users manual 1
- 2. users manual 2
users manual 1
1
54M
Wireless
Router
User
Manual
IP0489
Ver1.0.0.c
2
Contents
Section one:introduction………………………………… ………… …4
1.1 About 54M Wireless Router……….………………….. .4
1.2 Package contents………………………………………. 4
1.3 Features…………………………………………………..5
Section two:Hardware installation……………………………………5
2.1 Panel Layout……………………………………………..5
2.11 The Front Panel………………………………………...5
2.12 The Rear Panel…………………………………………6
2.2 The System Requirement…………………………..…..7
2.3 Installation Environment Requirement………………...7
2.4 Connectting The Router…………………………………7
Section Three: Quick Installation Guide……………………………..8
3.1 TCP/IP Configuration……………………………………9
3.2 Quick Setup Wizard…………………………………….11
3.3 Operation mode…………………………………………19
Section four Configuration Guide…………………….………………19
4.1Login………………………………………………………19
4.2 Wireless………………………………………………….19
4.2.1 Wireless Basic settings………………………………19
4.2.2 Wireless Advanced settings………………………….22
4.2.3 Wireless Security Setup………………………………23
4.2.4 Wireless Access Control……………………………...25
4.2.5 WDS Settings…………………………………………..26
4.2.6 Wireless Site Survey …………………………............27
4.2.7 WPS Setting…………………………………………….27
4.3 TCP/IP settings…………………………………………...28
4.3.1 LAN Interface……………………………………….......28
4.3.2 WAN Interface…………………………………………..29
4.4 Firewall………..……………………………………………31
4.4.1 Port Filtering………………………………..........….....31
4.4.2 IP Filtering………………………………………...............32
4.4.3 MAC Filtering……………………………………..............33
4.4.4 Port Forwarding ……………………………………..........34
4.4.5 URL Filtering …………………………………….……...35
4.4.6 DMZ……………………………………….........................36
4.4.7 AntiARP Cheating…………………………………...........37
4.5 Management………………………………………………….38
4.5.1Status……………………………………..…………..38
4.5.2 Statistics…………………………...………………….……...39
4.5.3 Dynamic DNSSetting……………………………………..39
4.5.4 Time Zone Setting………………………………..………..40
4.5.5 Dneial of Service……………………………..…………...41
4.5.6 Log…………………………………………..………………42
4.5.7 Upgrade Firmware…………………..…………………….43
4.5.8 Save/Reload settings……………….…………………….43
4.5.9 Password setup …………………….…………………….44
Appendix 1 FAQ……………………………….…………………45
Appendix 2 Specification…………………………….………….47
Appendix 3 Glossary……………………………….……………48
3
Section one Introduction
Thank
you
for
purchasing
54M
Wireless
Broadband
Router.
This
user
guide
will
assist you
with
the
installation
procedure.
1.1
About
the
54M Wireless Router
54M Wireless
Router
is
a
hybrid
design
product
which
combines Ethernet technology
and
wireless
access
into
a
single
stand-alone
unit.
The
device allows
you
take
advantages
of
both
mobility
and
fast
connection.
All
PCs
whenever
on wireless
LAN
or
Ethernet
LAN
can
share
files,
printers
and
other
network
resource. Moreover,
all
users
can
share
single
account
of
Internet
access
by
having
this
device connect
to
a
DSL/Cable
modem.
1.
Ethernet
/
Fast
Ethernet
Ethernet
is
the
most
widely-used
network
access
method,
especially
in
a
Local
Area
.
Network
(LAN)
and
is
defined
by
the
IEEE
as
the
802.3
standard.
Normally,
Ethernet
is
a
shared
media
LAN.
All
stations
on
the
segment
share
the
total
bandwidth,
which could
be
10
Mbps
(Ethernet),
100
Mbps
(Fast
Ethernet).
With
a
switched
Ethernet,
each
sender
and
receiver
has
the
full
bandwidth.Fast
Ethernet
is
defined
by
the
IEEE
802.3u
standard,
a
high-speed
version
of Ethernet
with
100
Mbps
transmission
rate.
2.
Wireless
LAN
Wireless
Local
Area
Network
systems
(WLANs)
transmit
and
receive
data
through
the air
by
using
radio
frequency
(RF).
This
offers
some
advantages
like
mobility,
ease
of installation,
and
scalability
over
traditional
wired
systems.
Mobility
:
WLANs
combine
data
connectivity
with
user
mobility.
This
provides
users with
access
to
network
anywhere
in
their
organization.
For
example,
users
can
roam from
a
conference
room
to
their
office
without
being
disconnected
from
the
LAN.
This is
impossible
with
wired
networks.
1.2 Package
contents
After
carefully
unpacking
the
shipping
carton,
check
the
contents
listed
below.
¾ 54M
Wireless
Broadband
Router Router
¾
A
power
adapter
¾
54M Wireless
Broadband
Router
User
Manual
If any of the listed contents are damaged or missing, please contact the retailer from whom you
purchased the
54M
Wireless Router for assistance.
1.3
Features
The
54M Wireless Router has
the
following
features
that
make
it
excellent
for
network connections.
¾ Complies with IEEE802.11g, IEEE802.11b, IEEE802.3, IEEE802.3u standards
¾ 1 10/100M Auto-Negotiation WAN RJ45 port, 4 10/100M Auto-Negotiation LAN RJ45 ports
¾ Supports Auto MDI/MDIX
¾ Supports Wireless Roaming, can move among different AP and no break
¾ Supports 54/48/36/24/18/12/9/6/11/5.5/3/2/1Mbps wireless LAN data transfer rates
¾ Provides 64/128 bit WEP encryption security
¾ Supports wireless Relay/Bridging/WDS/WDS+AP mode
¾ Provides WPA and WPA2 authentication and TKIP/AES encryption security
¾ Provides wireless LAN ACL (Access Control List) filtering
¾ Built-in NAT and DHCP server supporting static IP address distributing
¾ Supports Virtual Server, Special Application, and DMZ host
¾ Built-in firewall supporting IP address filtering, Domain Name filtering, and MAC address filtering
¾ Supports TCP/IP, PPPoE, DHCP, ICMP, NAT
¾ Supports UPnP, Dynamic DNS, Static Routing,
¾ Supports Flow Statistics
¾ Supports ICMP-FLOOD, UDP-FLOOD, TCP-SYN-FLOOD filter
¾ Supports firmware upgrade
¾ Supports Remote and Web management
Section Two Hardware Installation
2.1 Panel Layout
2.1.1 The Front Panel
The front panel of the
54M Wireless Router
consists of several LED indicators, which is designed to
indicate connections. Viewed from left to right. The table describes the LEDs on the front panel of the
router.
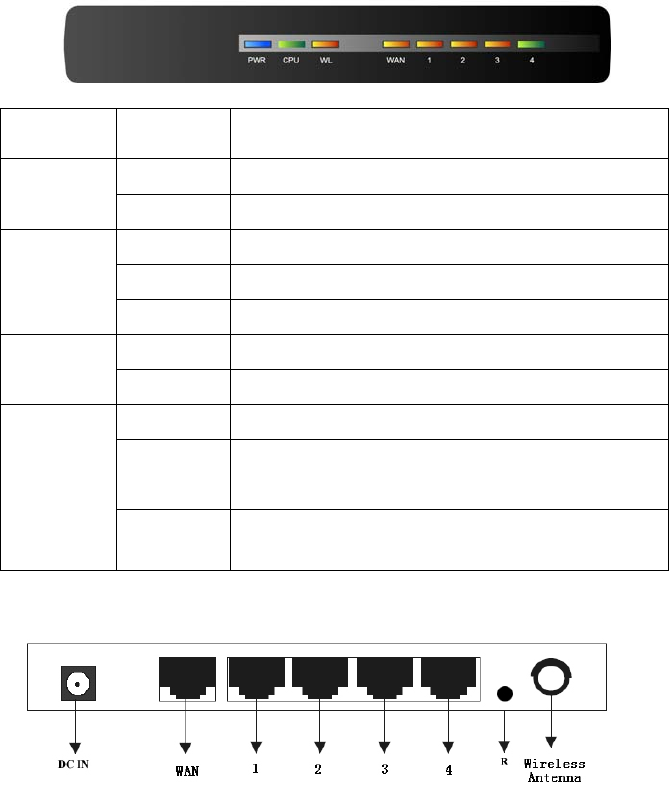
4
Name Action Description
OFF No Power
Power
ON Power on
ON The router is initialising
Flashing The router is working properly
M1
OFF The router has a hardware error
OFF The Wireless Radio function is disabled
WLAN
Flashing The Wireless Radio function is enabled
OFF There is no device linked to the corresponding port
ON There is a device linked to the corresponding port but
no activity
1/2/3/4
Flashing There is an active device linked to the corresponding
port
2.1.2 The Rear Panel
The rear panel contains the following features. (Viewed from left to right:)
1. Wireless antenna
2. WAN RJ45 port for connecting the router to a cable, DSL modem or Ethernet
3. Four LAN 10/100Mbps RJ45 ports for connecting the router to the local PCs
4. AC power socket: only use the power adapter supplied with the 54M WIRELESS ROUTER
54Mbps Wireless Router, use of a different adapter may result in product damage.
5. Factory Default Reset button
There is a way to reset the router's factory defaults:
1.Use the Factory Default Reset button: First, turn on the router's power. Second, press and hold
the default reset button, until the system LED lights up(about 5 seconds). Last, release the reset
button and wait for the router to reboot.
Notice: Ensure the router is powered on before it restarts completely.
2.2 System Requirements
¾ Broadband Internet Access Service (DSL/Cable/Ethernet)
¾ One DSL/Cable modem that has an RJ45 connector (you do not need it if you connect the
router to Ethernet)
¾ Each PC on the LAN needs a working Ethernet Adapter and an Ethernet cable with RJ45 connectors
¾ TCP/IP protocol must be installed on each PC
¾ Web browser, such as Microsoft Internet Explorer 5.0 or later, Netscape Navigator 6.0 or later
2.3 Installation Environment Requirements
¾ Not in direct sunlight or near a heater or heating vent
¾ Not cluttered or crowded. There should be at least 2 inches (5 cm) of clear space on all sides of the
router
5
¾ Well ventilated (especially if it is in a closet)
¾ Operating temperature: 0 ~40 ℃℃
¾ Operating Humidity: 5%~90%RH, Non-condensing
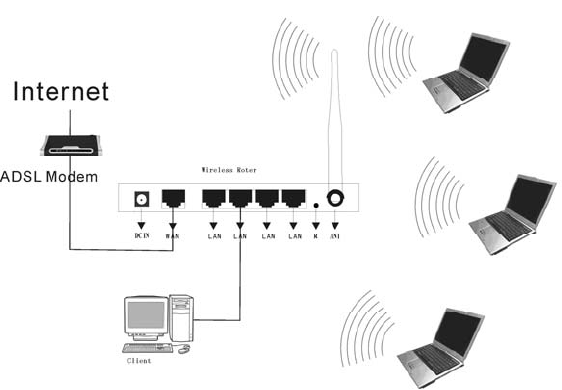
2.4 Connecting the Router
Before you install the router, you should connect your PC to the Internet through your
broadband service successfully. If there is any problem, please contact your ISP. After that, please
install the router according to the following steps. Don't forget to pull out the power plug and keep your
hands dry.
1. Power off your PC(s), Cable/DSL modem, and the router.
2. Locate an optimum location for the router. The best place is usually near the center of the area in
which your PC(s) will wirelessly connect. The place must accord with the Installation Environment
Requirements.
3. Adjust the direction of the antenna. Normally, upright is a good direction.
4. Connect the PC(s) and each Switch/Hub on your LAN to the LAN Ports on the router.
5. Connect the DSL/Cable Modem to the WAN port on the router.
6. Connect the AC power adapter to the AC power socket on the router, and the other end into an
electrical outlet. The router will start to work automatically.
7. Power on your PC(s) and Cable/DSL modem.
Section
Three:
Quick
Installation
Guide
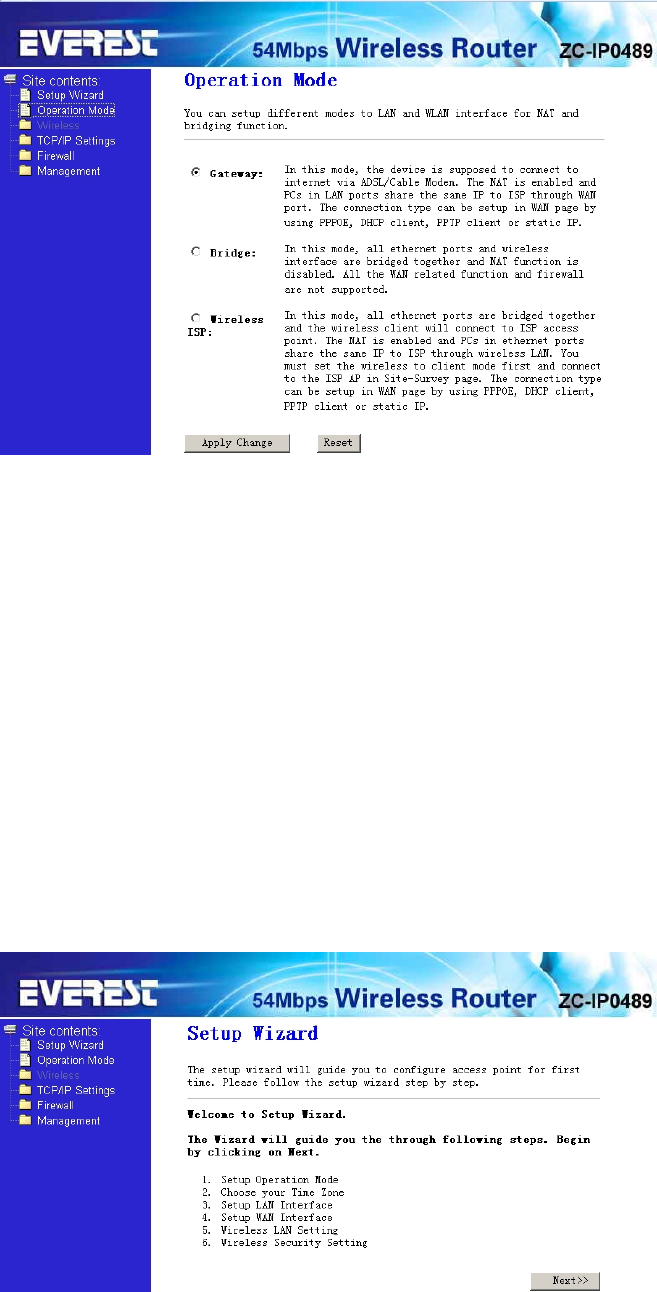
After connecting the 54M Wireless Router into your network, you should configure it. This chapter
describes how to configure the basic functions of your 54M Wireless Router. These procedures only
take you a few minutes. You can access the Internet via the router immediately after successfully
configured.
3.1 TCP/IP configuration
The default IP address of the 54Mbps Wireless Router is 192.168.1.254, and the default
Subnet Mask is 255.255.255.0. These values can be seen from the LAN. They can be changed
as you desire, as an example we use the default values for description in this guide.
Connect the local PCs to the LAN ports on the router. There are then two means to configure
the IP address for your PCs.
Configure the IP address manually
1) Set up the TCP/IP Protocol for your PC(s). If you need instructions as to how to do this.
2) Configure the network parameters. The IP address is 192.168.1.xxx ("xxx" is from 2 to 254),
Subnet Mask is 255.255.255.0, and Gateway is 192.168.1.254
(The router's default IP address)
6
Obtain an IP address automatically
1) Set up the TCP/IP Protocol in "Obtain an IP address automatically" mode on your PC(s). If you
need instructions as to how to do this,
2) Power off the router and PC(s). Then turn on the router, and restart the PC(s). The built-in DHCP
server will assign IP addresses for the PC(s).
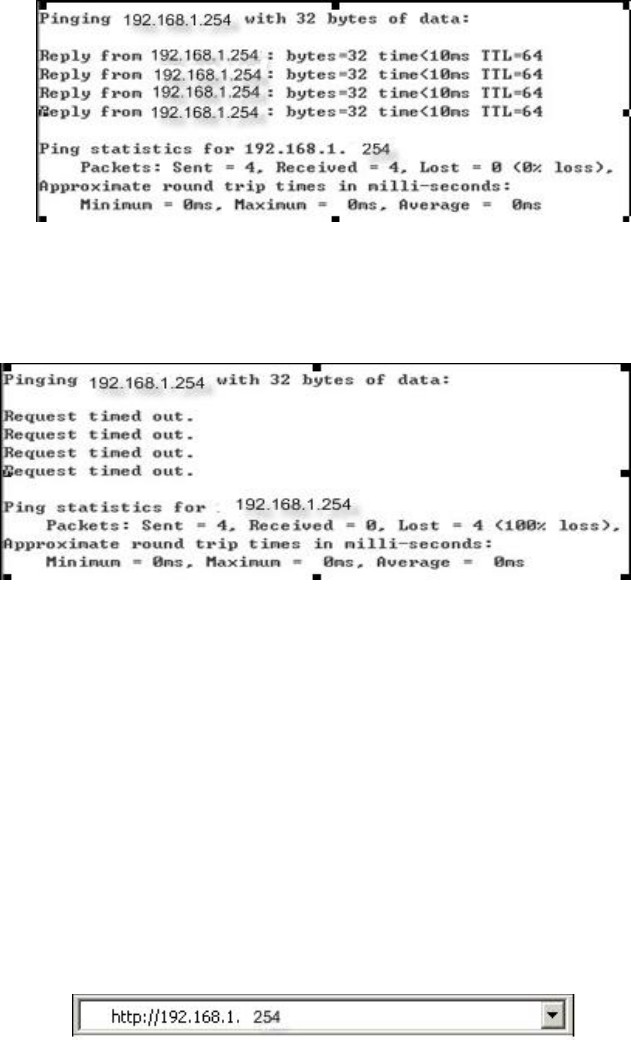
Now, you can run the Ping command in the command prompt to verify the network connection
between your PC(s) and the router.
Open a command prompt, and type ping 192.168.1.254, then press Enter.
If the result displayed is similar to that shown in the top of figure, the connection between your PC
and the router has been established.
If the result displayed is similar to that shown in the top of figure, it means that your PC has not
connected to the router. Please check it following these steps:
1. Is the connection between your PC and the router correct?
Notice: The 1/2/3/4 LEDs of LAN port on the router and LEDs on your PC's adapter should be lit.
2. Is the TCP/IP configuration for your PC correct?
Notice: If the router's IP address is 192.168.1.254, your PC's IP address must be within the range of
192.168.1.2 ~ 192.168.1.253, the gateway must be 192.168.1.254
3.2 Quick Setup wizard
With a Web-based (Internet Explorer or Netscape® Navigator) utility, the 54Mbps Wireless
Router is easy to configure and manage. The Web-based utility can be used on any Windows, Macintosh
or UNIX OS with a web browser.
Connect to the router by typing http://192.168.1.254 in the address field of web browser.
After a moment, a login window will appear similar to that shown in Figure. Enter admin for
the User Name and Password, both in lower case letters. Then click the OK button or press the Enter
key.
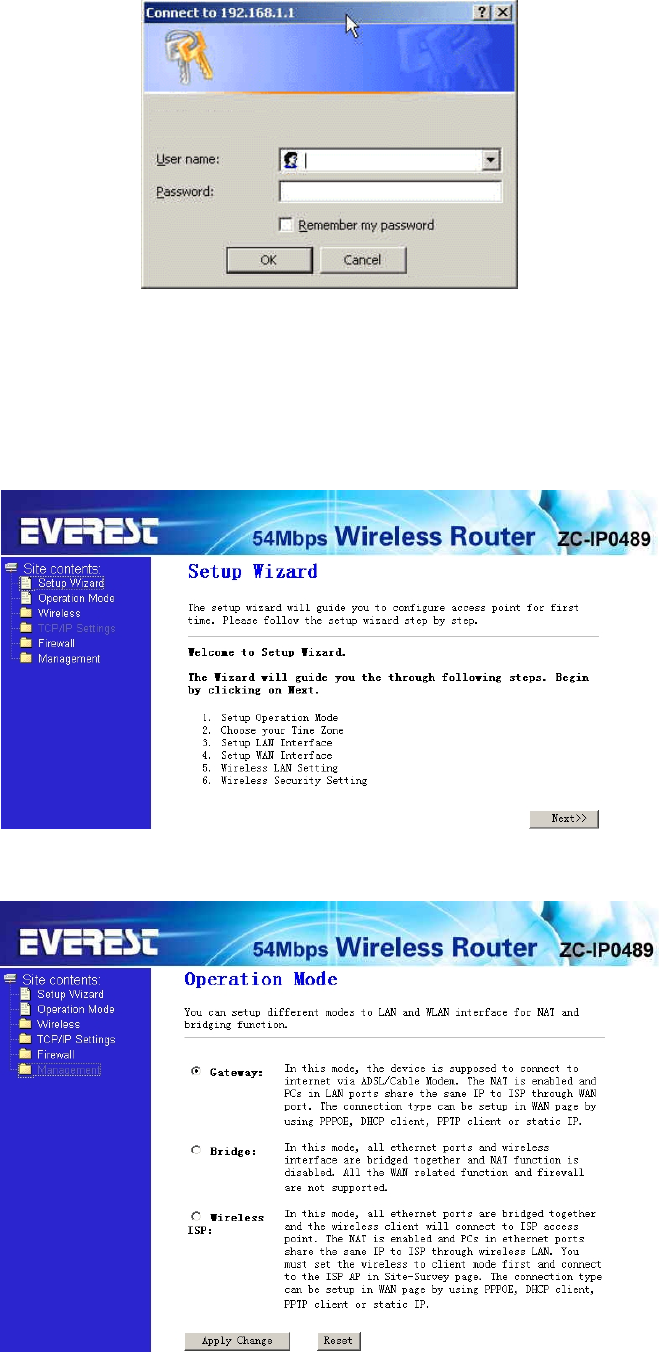
7
Note: If the above screen does not prompt, it means that your web-browser has been set to a proxy. Go to
Tools menu>Internet Options>Connections>LAN Settings, in the screen that appears, cancel the Using
Proxy checkbox, and click OK to finish it.
If the User Name and Password are correct, you can configure the router using the web browser.
Please click the Setup Wizard link on the left of the main menu and the Setup Wizard screen will
appear.
Click SetupWizard, the SetupWizard will appear.
The router supports three modes: gateway, bridge, wireless ISP. You can setup different modes to LAN
and WLAN interface for NAT and bridging function.
Click next, Time Zone Setting will appear. You can select the time zone what you need.
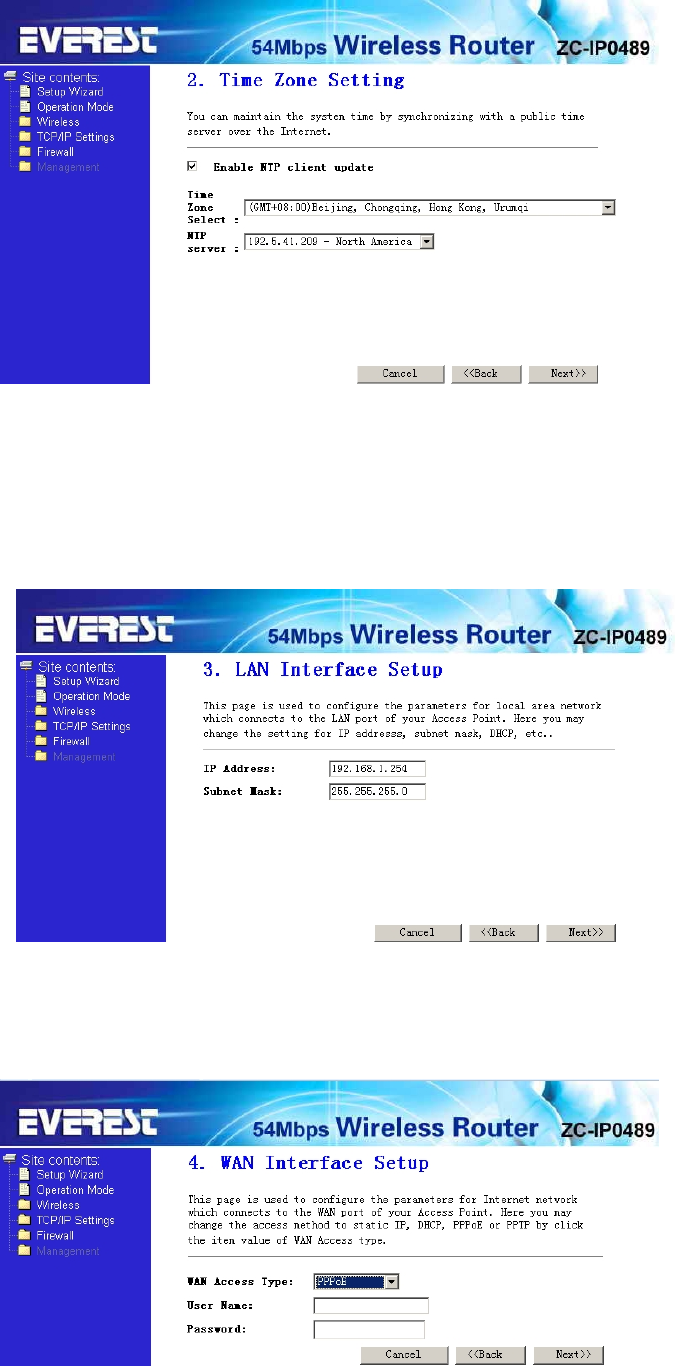
8
Click next, LAN Interface setup will appear. In this page, you can set IP address, Subnet Mask.
IP Address - Enter the IP address of your router in dotted-decimal notation (factory default:
192.168.1.254).
Subnet Mask - An address code that determines the size of the network. Normally use 255.255.255.0 as
the subnet mask.
Notice : The same to all PCs’ Subnet Mask with router in you LAN.
Click next, WAN Interface will appear. In this page is used to configure the parameters for Internet
network which connects to the WAN port of your Access Point.
WAN Access Type: Here you can select the access method to static IP, DHCP, PPPoE or PPTP by
click the item value of WAN Access type.
User Name and Password - Enter the User Name and Password provided by your ISP.
Services name: Default is blank.
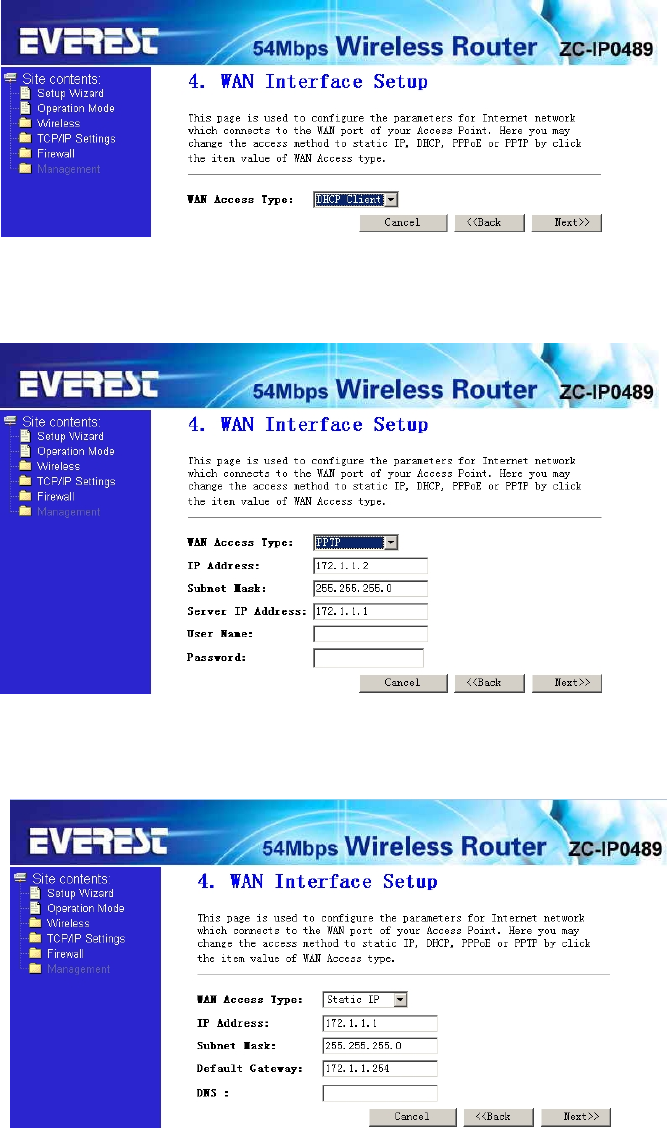
9
If you choose " DHCP Client", the router will automatically receive the IP parameters from your
ISP without needing to enter any parameters.
If you Choose "PPTP", the Static IP settings page will appear, shown in the figure.
You can get IP Address Subnet Mask, server IP Address, User Name and Password from
your ISP
If you Choose "Static IP", the Static IP settings page will appear, shown in figure.
Note: The IP parameters should have been provided by your ISP.
IP Address - This is the WAN IP address as seen by external users on the Internet
(including your ISP). Enter the IP address into the field.
Subnet Mask - The Subnet Mask is used for the WAN IP address, it is usually
255.255.255.0
Default Gateway - Enter the gateway into the box if required.
DNS - Enter the DNS Server IP address into the boxes if required.
Click next, wireless basic setting will appear.
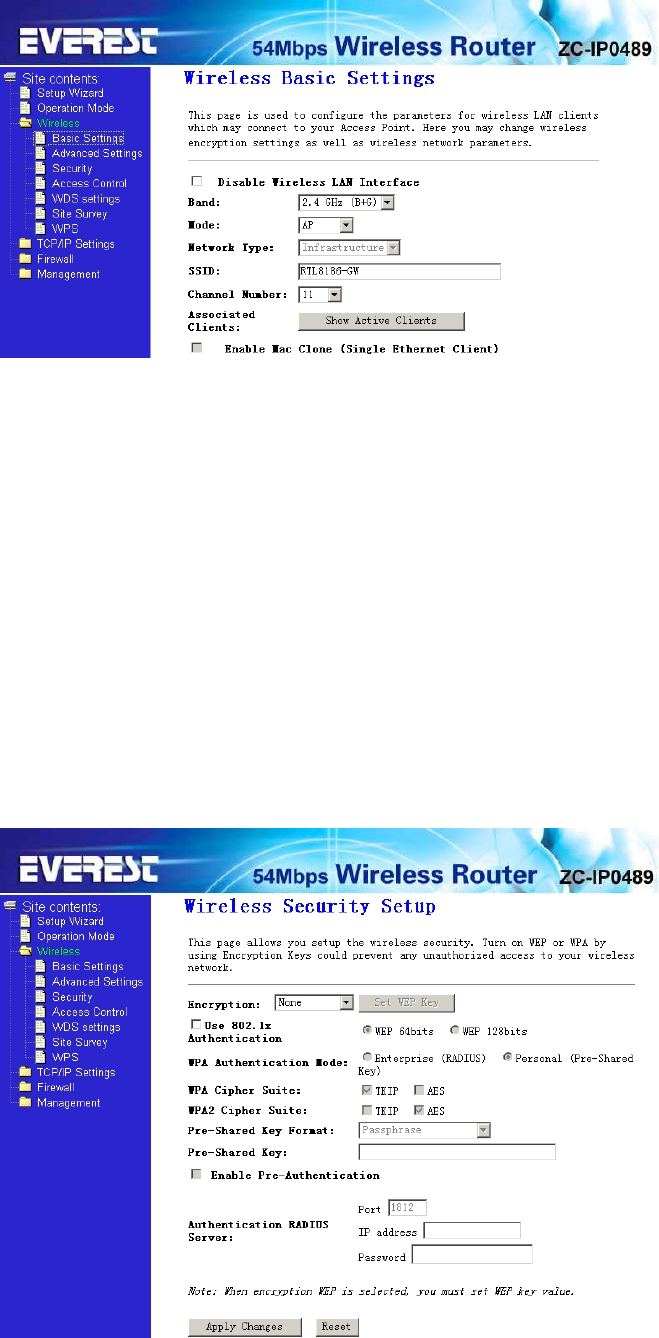
10
This page is used to configure these parameters.
Band - Indicates the current mode (2.4GHz(G)-54Mbps (802.11g), 2.4GHz(B)11Mbps (802.11b)).
2.4GHz(G+B), which allows both 802.11g and 802.11b wireless stations to connect to the router.
Mode-Default is AP,you can select Client,WDS,AP+WDS
Network Type-Default is Infrastructure,when mode is client,Network Type may be AD-HOC
SSID - Enter a value of up to 32 characters. The same name (SSID) must be ssigned to all
wireless devices in your network. The default SSID is Kingnet, but
it is recommended strongly that you change your networks name (SSID) to a different value.
This value is case-sensitive.
Channel – Fro m 1 t o 13 .This field determines which operating frequency will be used. It is not
necessary to change the wireless channel unless you notice interference problems with another
nearby access point.
Click next, Wirelss Security Setup will appear.this page allow you setuo the security. You can
select None WEP WPA(TKIP),WPA2(AES),WPA2 Mixed.
Click Apply Changes,you will find the page show set secceful.
Notice: If you change the parameters of wireless, The router will reboot automatically.
11
3.3 Operation mode
Gateway:(default) In this mode, the device is supposed to connect to internet via ADSL/Cable Modem.
The NAT is enabled and PCs in LAN ports share the same IP to ISP through WAN port. The connection
type can be setup in WAN page by using PPPOE, DHCP client, PPTP client or static IP.
Bridge: In this mode, all ethernet ports and wireless interface are bridged together and NAT function is
disabled. All the WAN related function and firewall are not supported.
Wireless ISP: In this mode, all ethernet ports are bridged together and the wireless client will connect to
ISP access point. The NAT is enabled and PCs in ethernet ports share the same IP to ISP through
wireless LAN. You must set the wireless to client mode first and connect to the ISP AP in Site-Survey
page. The connection type can be setup in WAN page by using PPPOE, DHCP client, PPTP client or
static IP.
4 Section four Configuration Guide
4.1 Login
After you login successful, Browser will show administrator WEB. on the left is contents. it
contains: Wireless setting, WAN Settings, LAN Settings, Network Security, System Services,
Management, Status Show, Exit Setting.
12
4.2 Wireless Setting
it contains Wireless Basic settings, Advance Settings, security, Access Control, WDS
Settings, Site Survey.
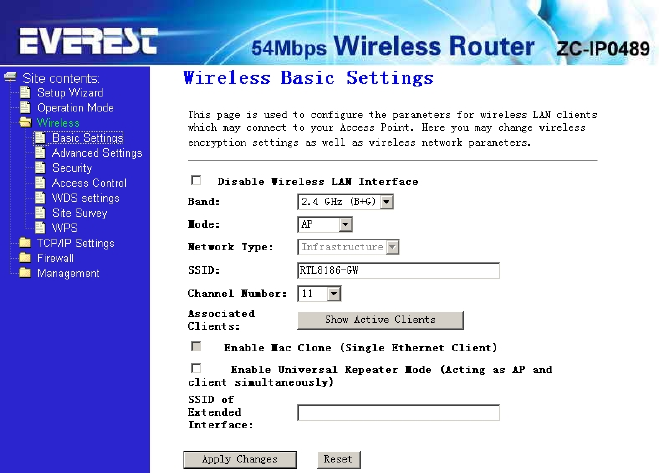
4.2.1 Wireless Basic settings
Band: Indicates the current mode (2.4GHz(G)-54Mbps (802.11g), 2.4GHz(B)11Mbps (802.11b)).
2.4GHz(G+B), which allows both 802.11g and 802.11b wireless stations to connect to the router.
Mode: Default is AP,you can select Client,WDS,AP+WDS
Network Type: Default is Infrastructure,when mode is client,Network Type should be setting AD-HOC
SSID: Enter a value of up to 32 characters. The same name (SSID) must be ssigned to all wireless
devices in your network. The default SSID is Kingnet, but
it is recommended strongly that you change your networks name (SSID) to a different value.
This value is case-sensitive.
Channel: Fro m 1 to 13. This field determines which operating frequency will be used. It is not
necessary to change the wireless channel unless you notice interference problems with another nearby
access point.
Associated Client: click show active client, you can check the list of wireless client.
Enable MAC Clone: it only adapt to wireless client.
4.2.2 Wireless Advanced Settings
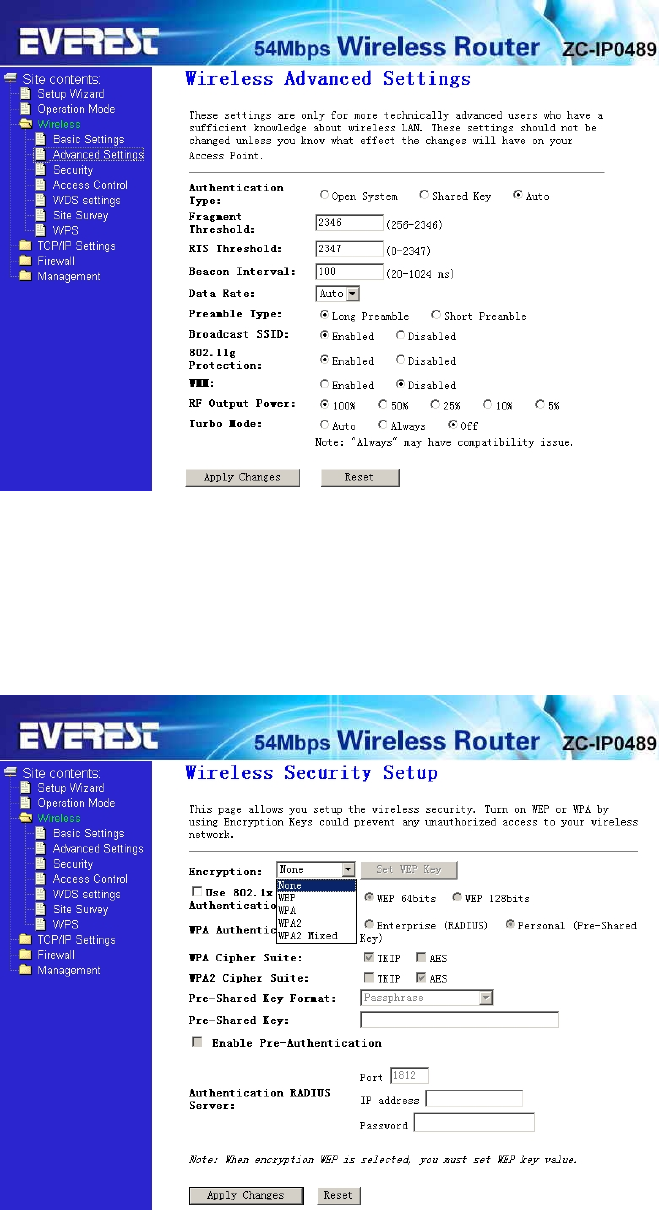
13
These settings are only for more technically advanced users who have a sufficient knowledge
about wireless LAN. These settings should not be changed unless you know what effect the changes will
have on your Access Point.
4.2.3 Wireless security setup
This page allows you setup the wireless security. Turn on WEP or WPA by using Encryption Keys
could prevent any unauthorized access to your wireless network.
Encryption: you can select None,WEP,WPA,WPA2, WPA2 Mixed
WEP:Wired Equivalent Protoco.
WPA:(WI-FI Protected Access Wi-Fi) WPA is an intermediate solution for the security issues. It uses
Temporal Key Integrity Protocol (TKIP) to replace WEP.
TKIP: TKIP is a compromise on strong security and possibility to use existing hardware. It still uses RC4
for the encryption like WEP, but with per-packet RC4 keys. In addition, it implements replay protection,
keyed packet authentication mechanism (Michael MIC).
WPA Authentication Mode: Keys can be managed using two different mechanisms. WPA can either