Hantel HTP-800 Fixed Wireless Local Loop Phone (CDMA) User Manual HTP v30
Hantel Co., Ltd. Fixed Wireless Local Loop Phone (CDMA) HTP v30
UserManual.wiki
>
Hantel
>
HTP 800 User Manual
Users Manual
Navigation menu
Upload a User Manual
Namespaces
Wiki Guide
HTML
PDF
Info
Views
User Manual
Discussion / Help
Navigation
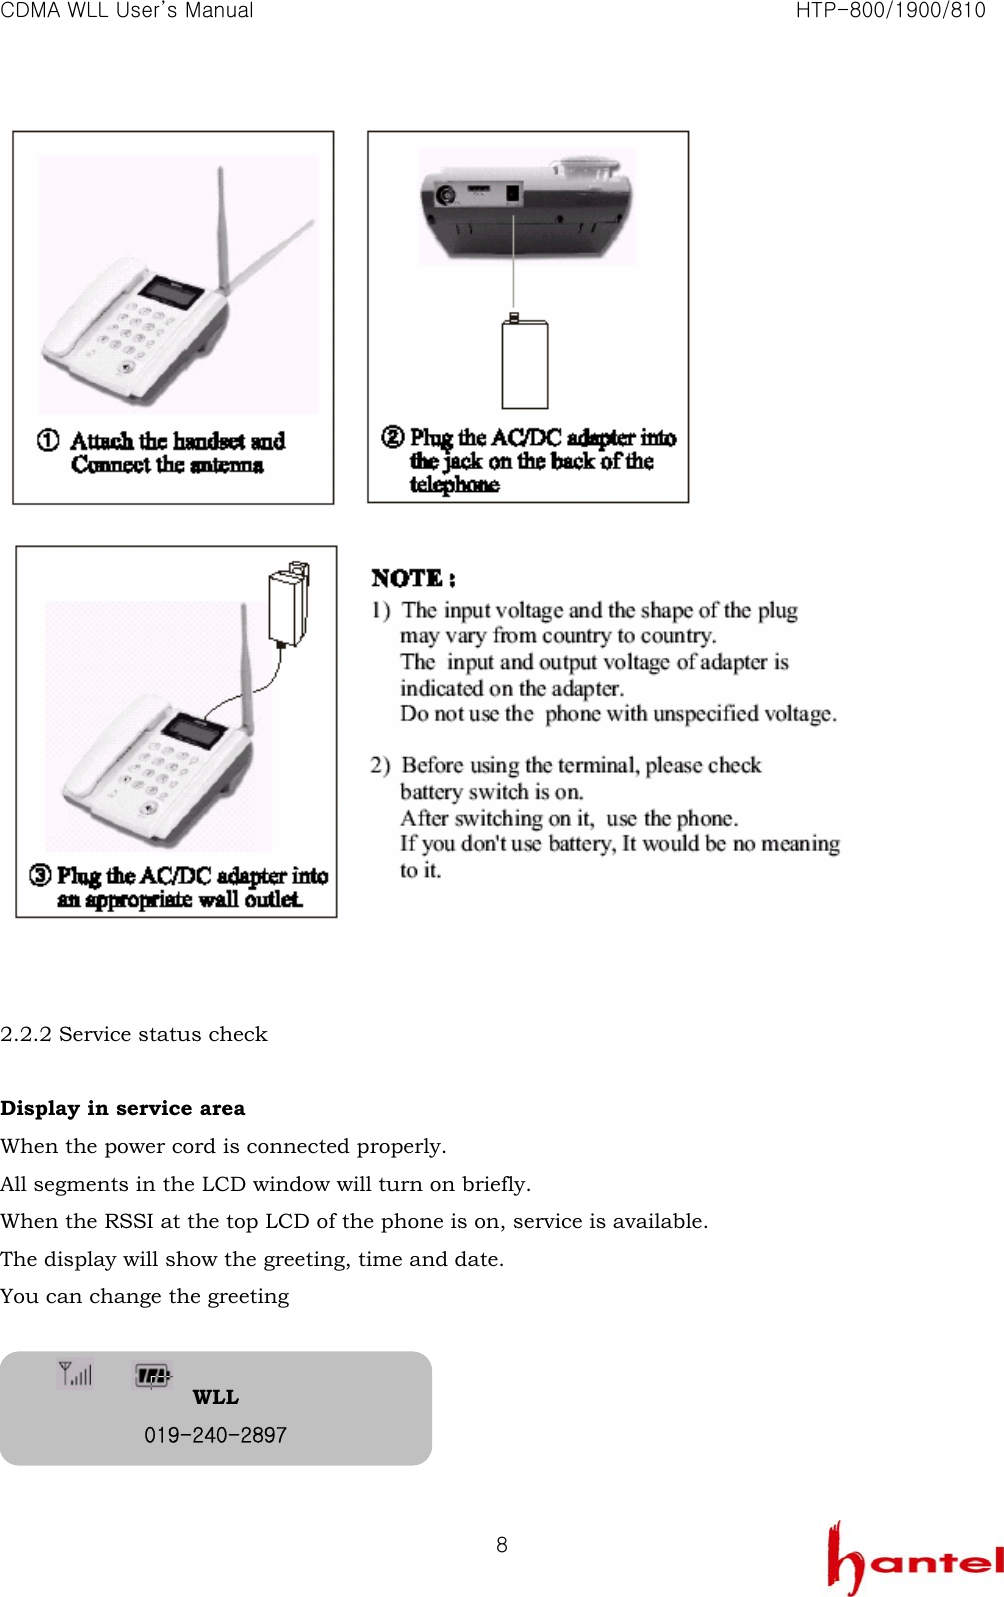
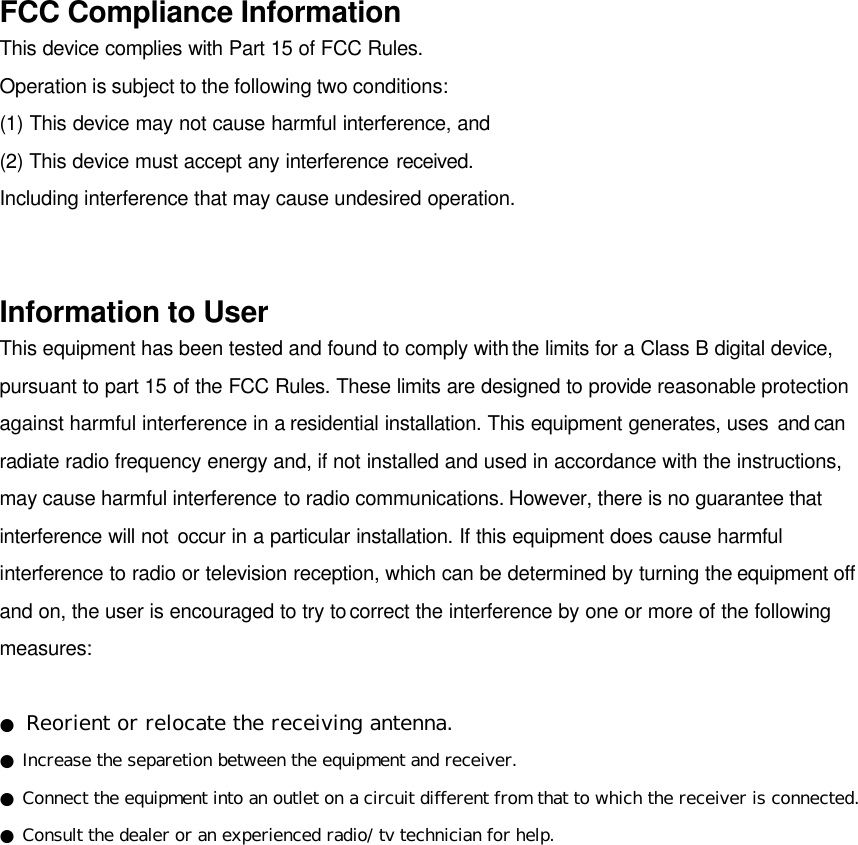
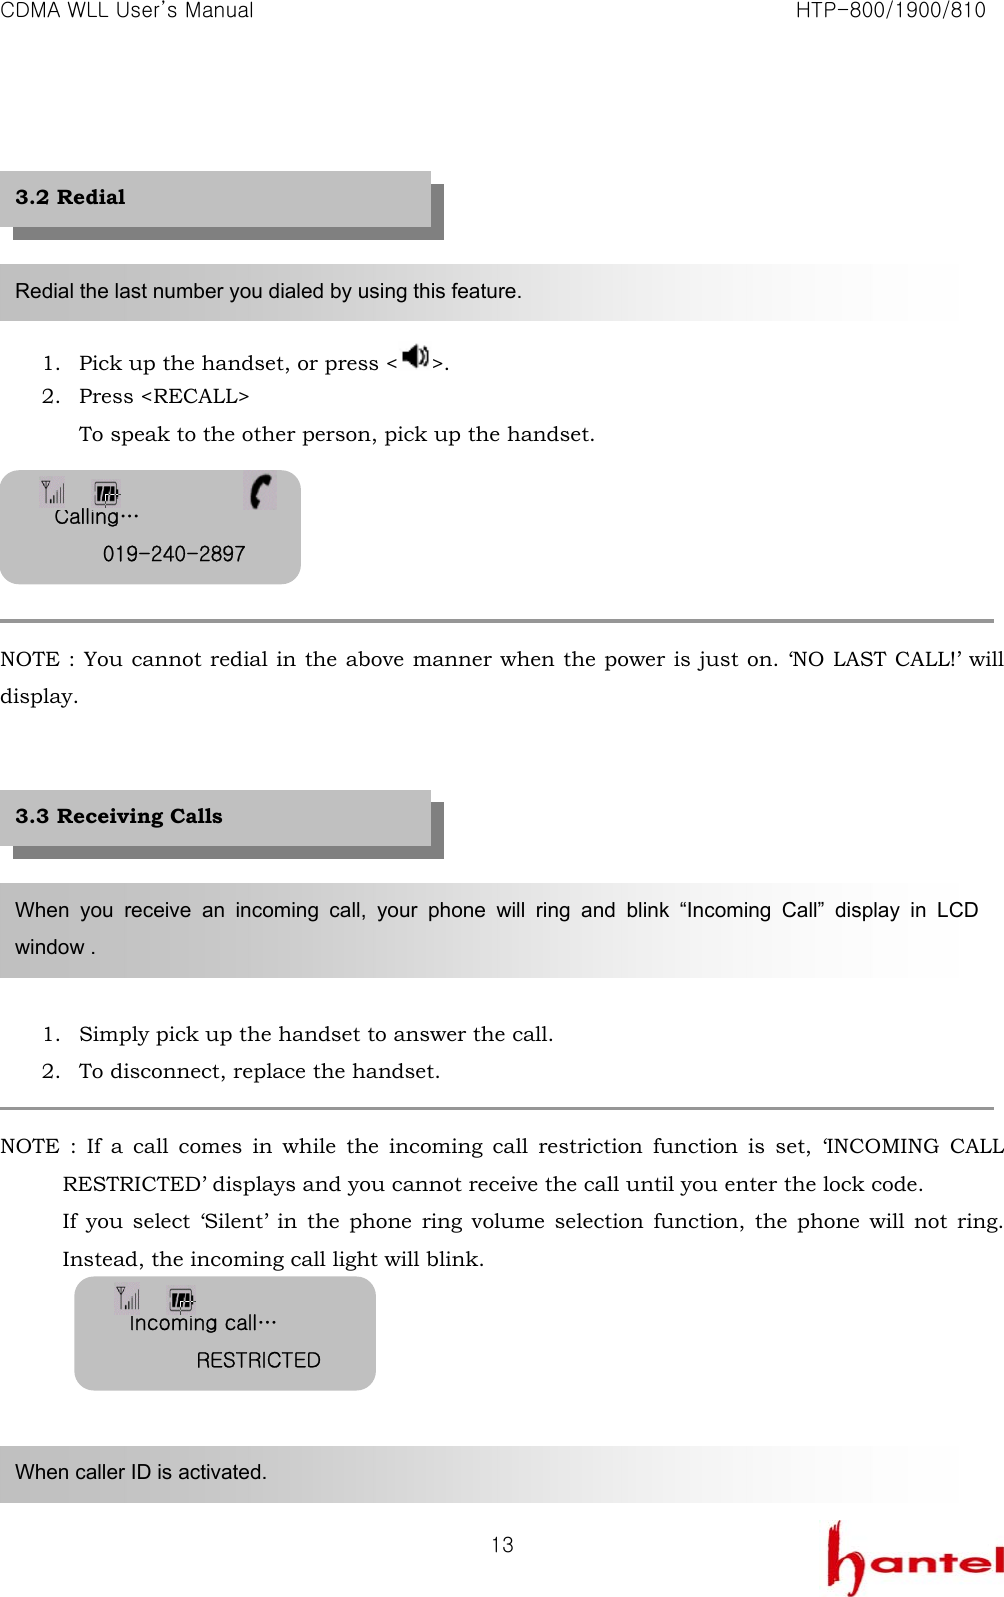
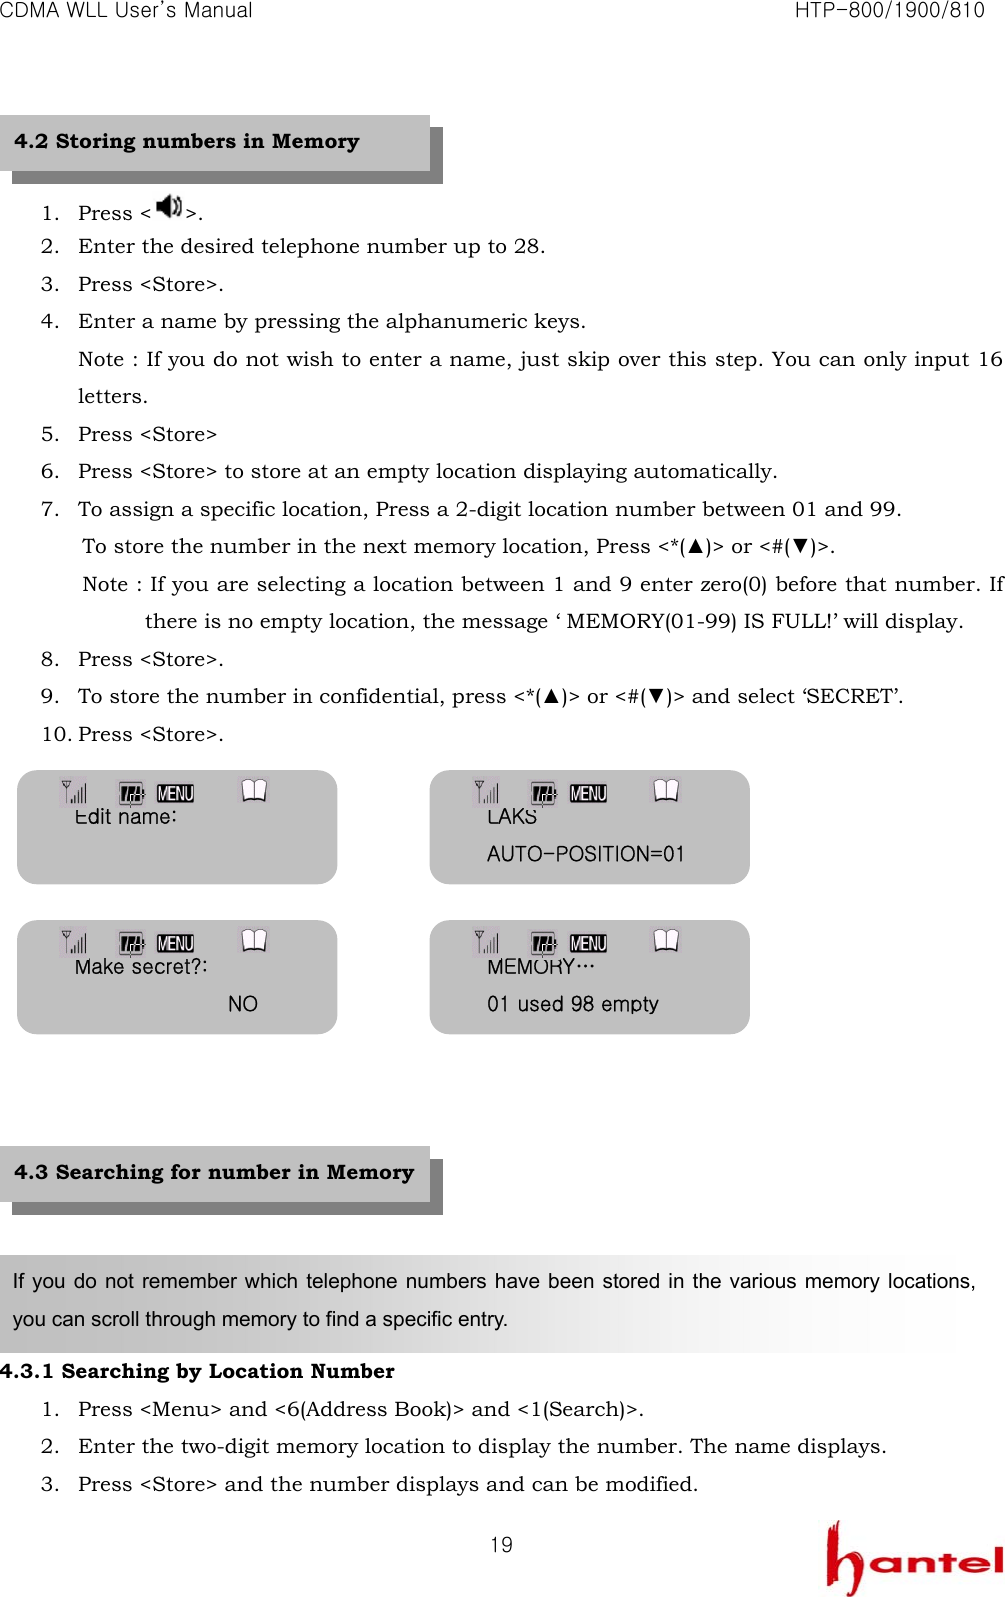
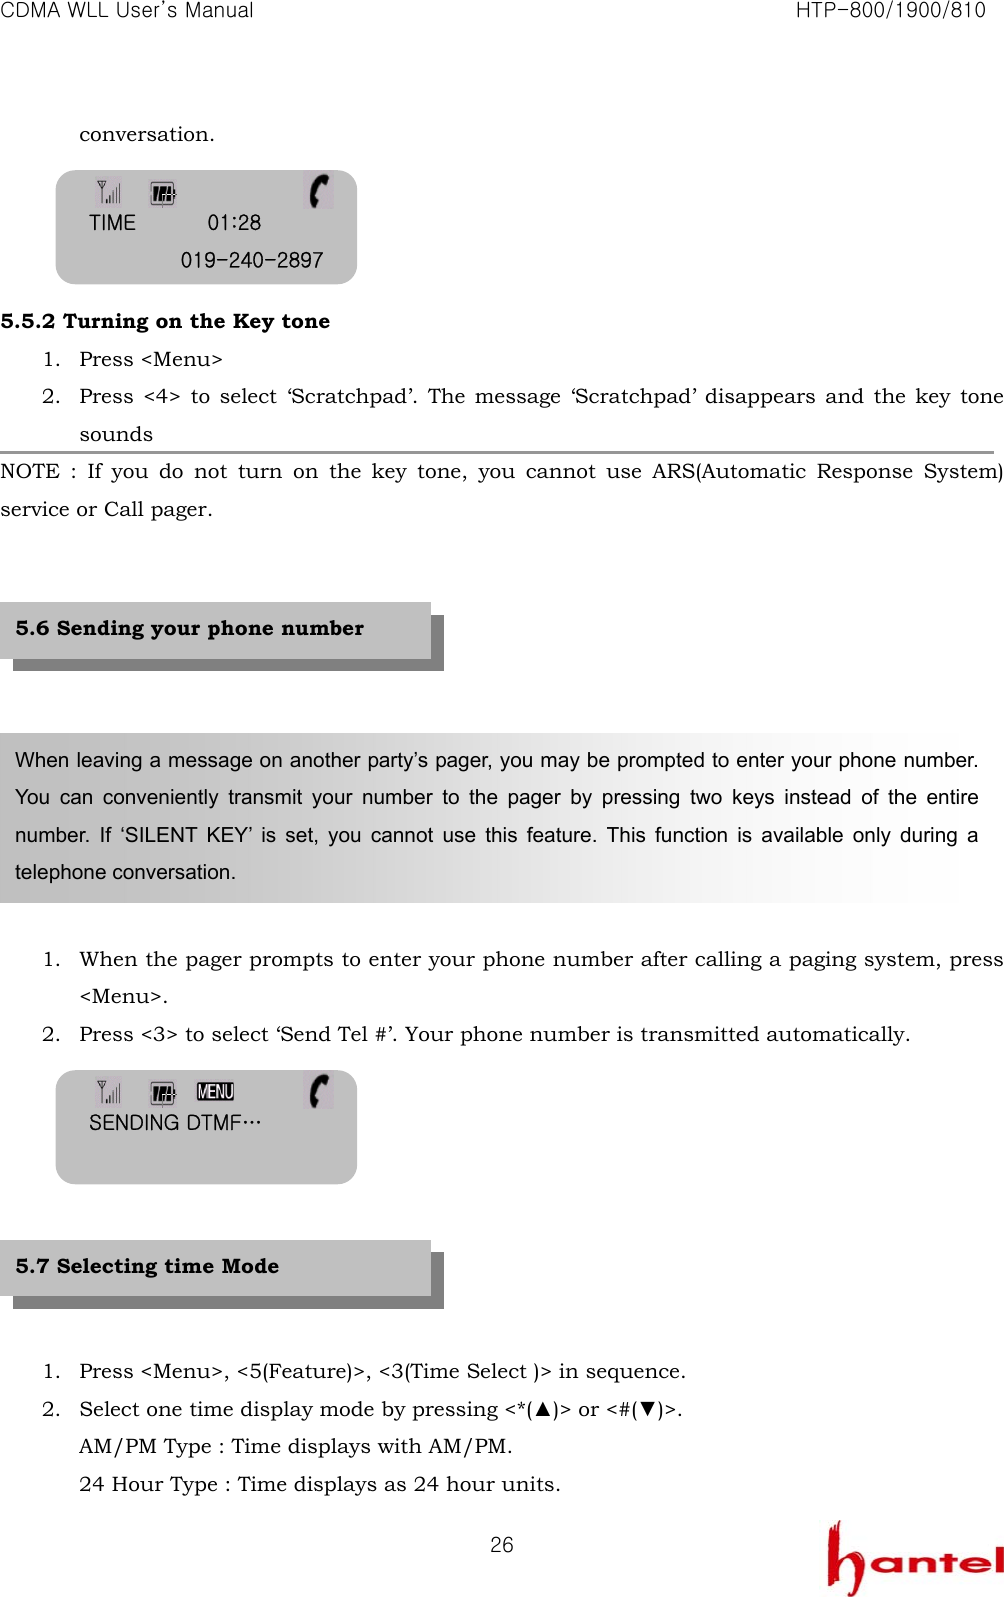
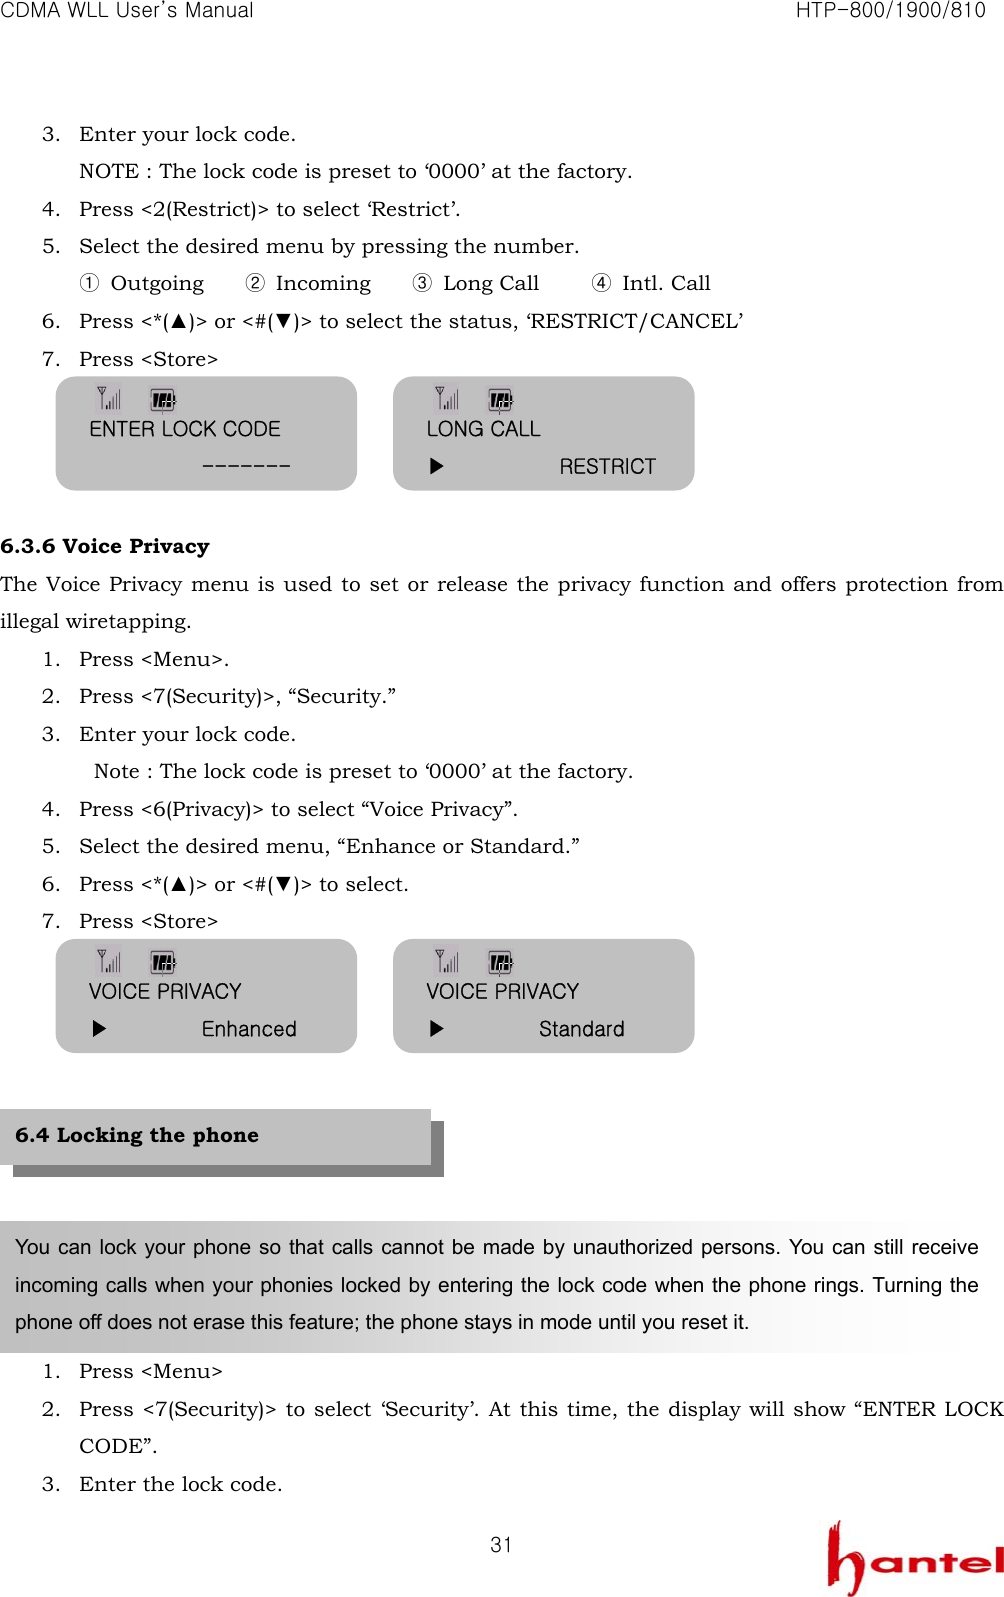
![CDMA WLL User’s Manual HTP-800/1900/810 12 1. First, check to see that your WLL Phone is turned on. If the LCD is lit, the power is on. 2. Pick up the handset or press < > to hear a dial tone. If the service is not available, you hear a no service tone (intermittent tone.) 3. Using the keypad, dial the desired telephone number. The LCD window displays the number. 4. Wait for moment or press <RECALL> 5. When the other person answers, begin your conversation. If you pressed < > in step 2, pick up the handset before you begin conversation. 6. To end the call, replace the handset< >. NOTE : Modifying a phone number. - Modifying the number by one digit : Press <CLEAR> briefly. - Modifying the entire number : Press <CLEAR> and hold. 3. Basic Functions 3.1 Making Calls HANTEL 4/12[WE] 1:58 AM PLEASE DIAL… Calling… 019-240-2897](https://usermanual.wiki/Hantel/HTP-800/User-Guide-359622-Page-12.png)
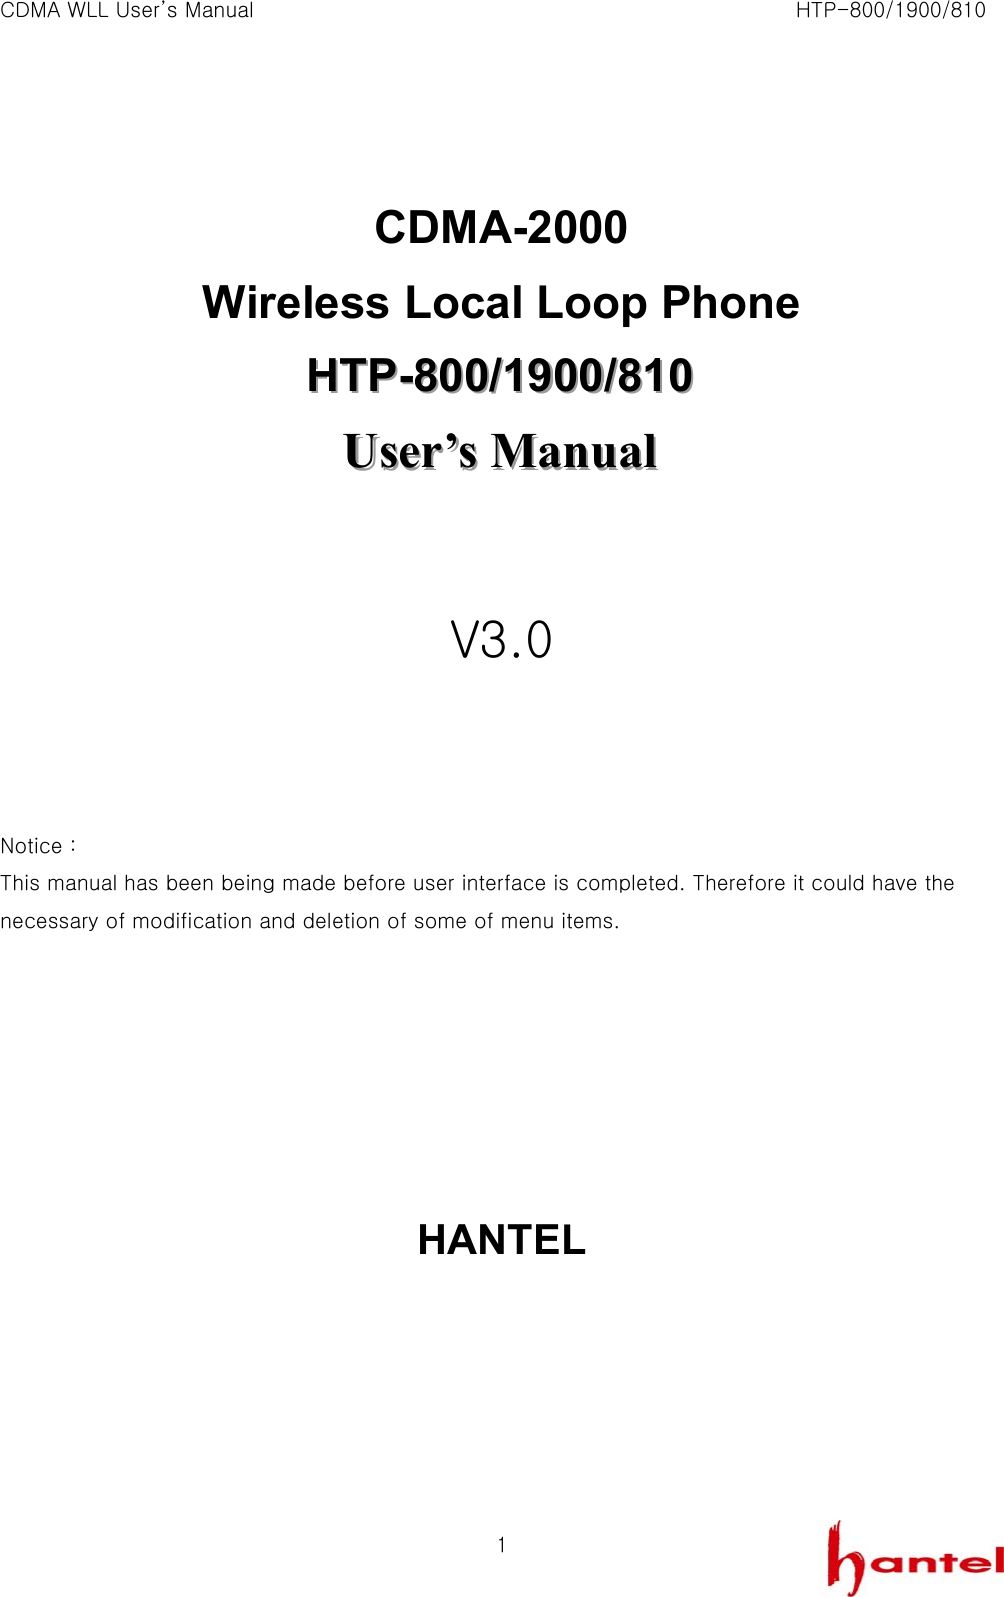
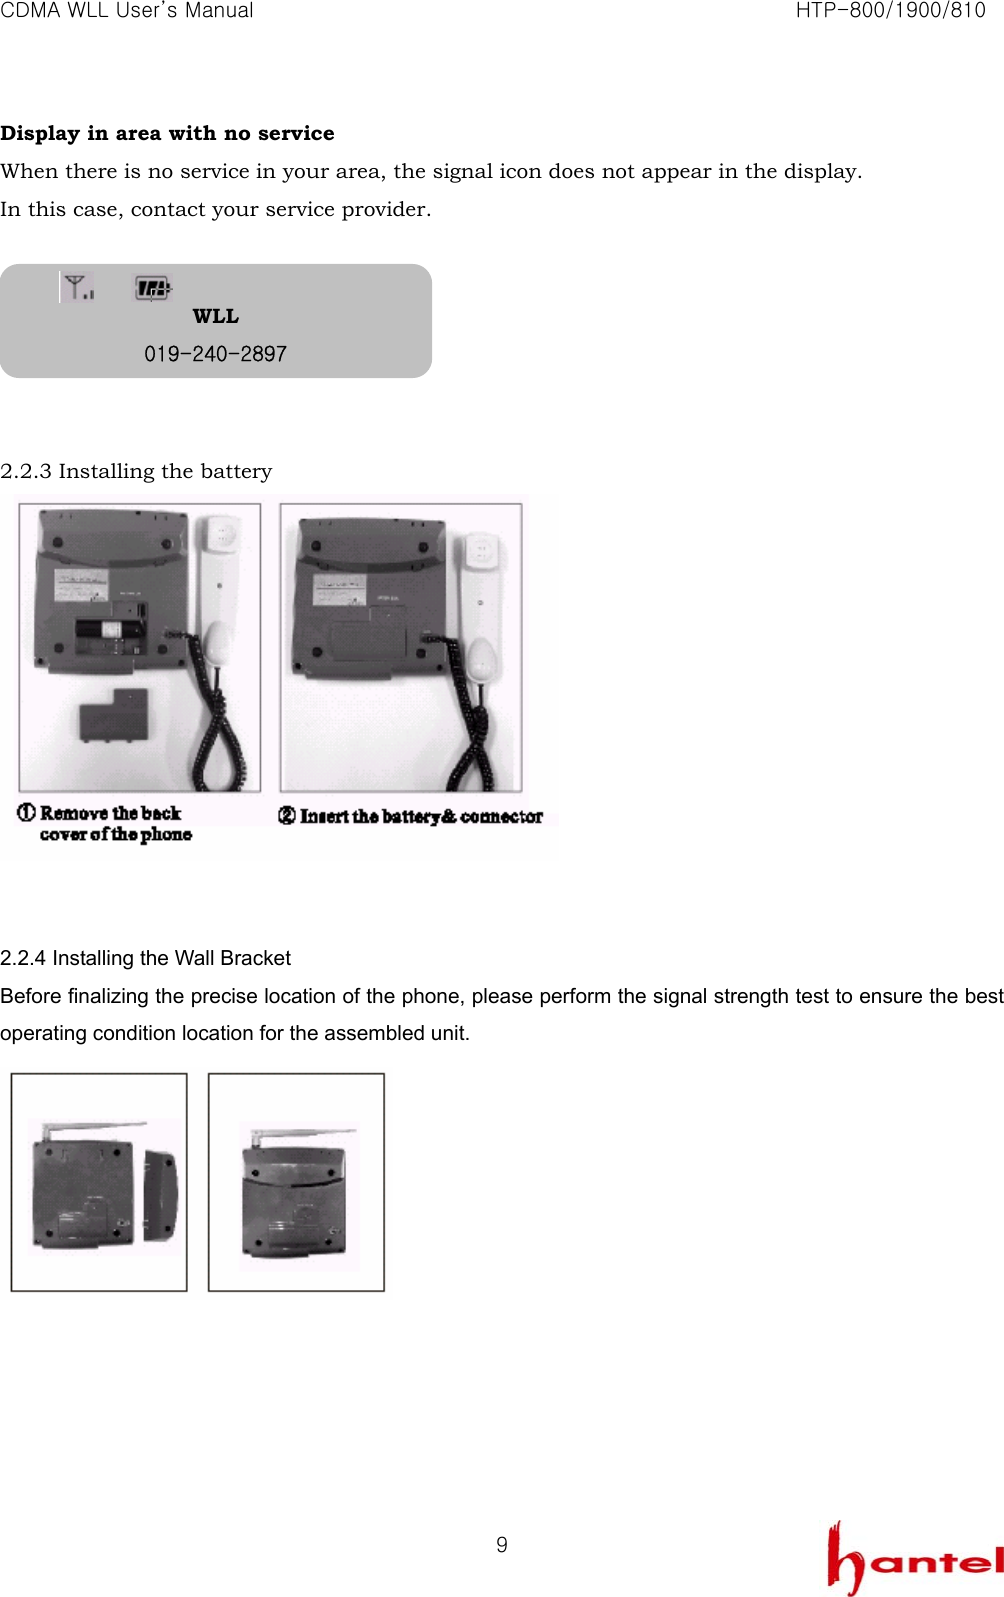
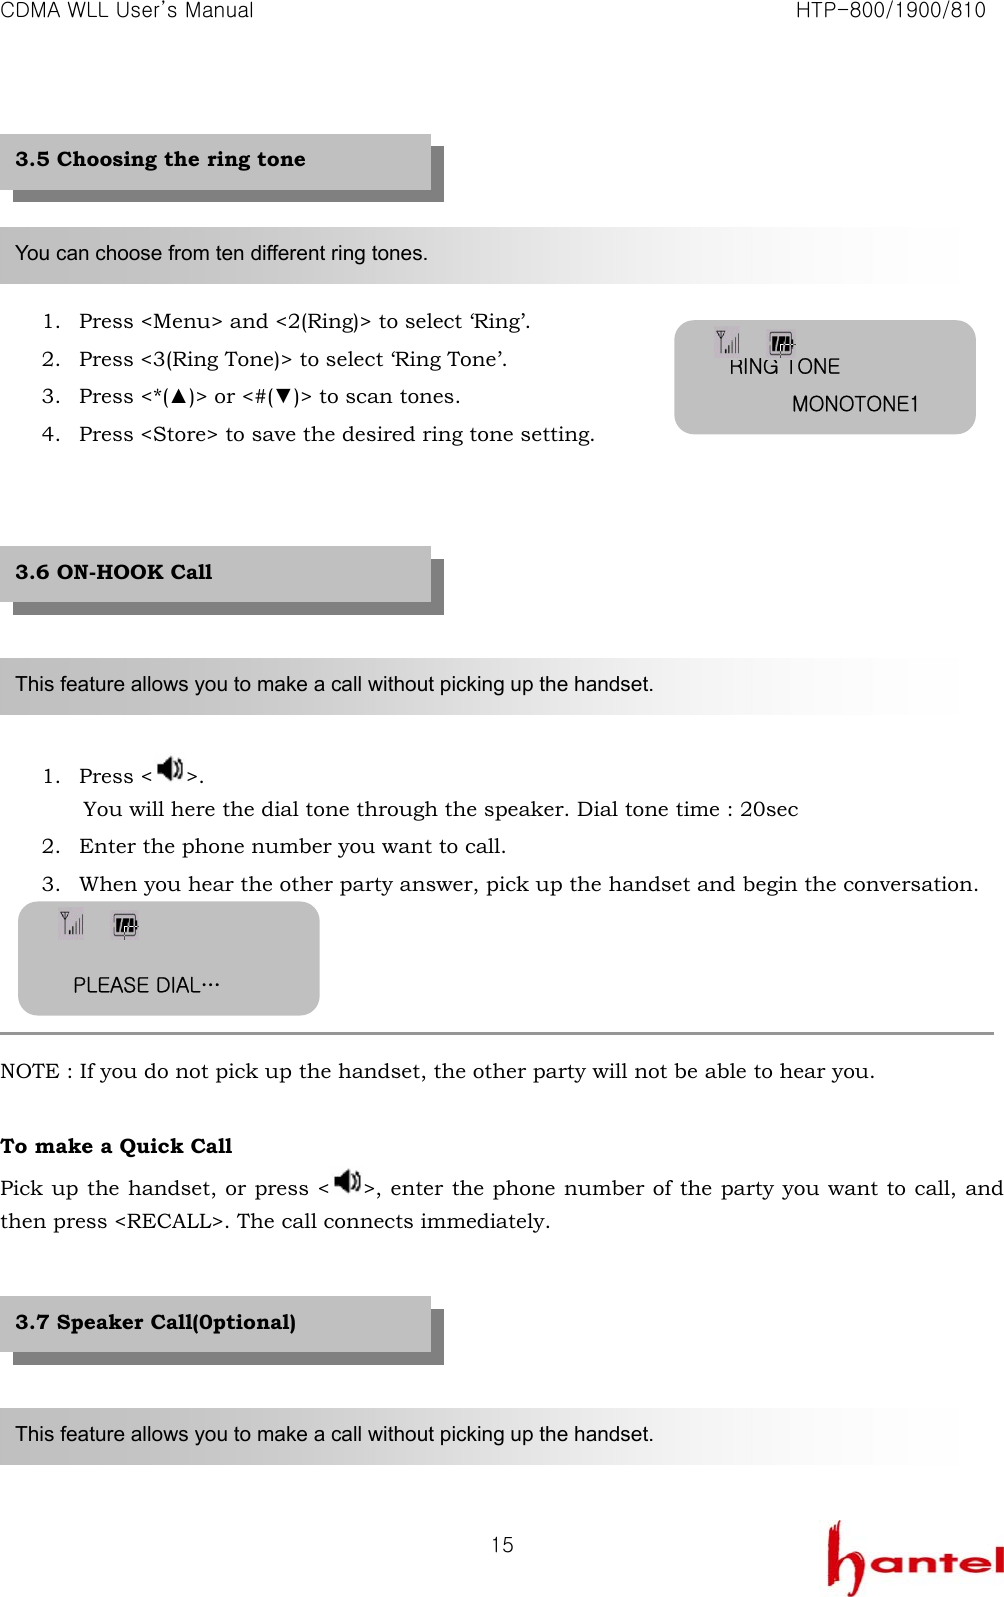
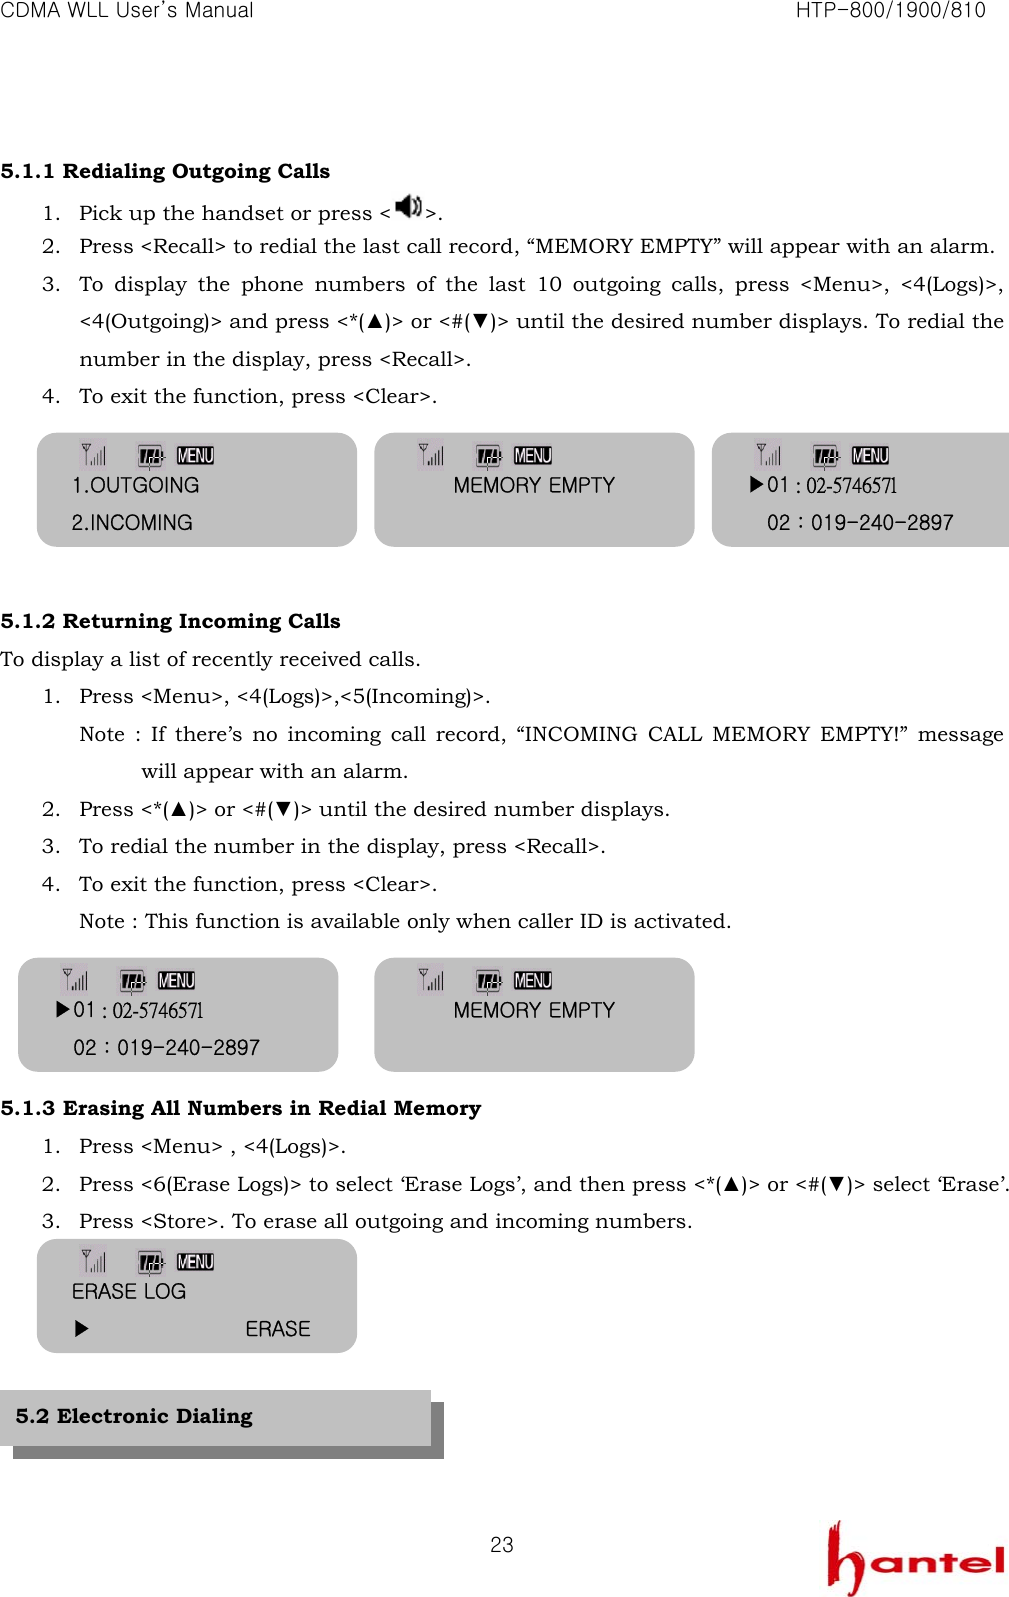
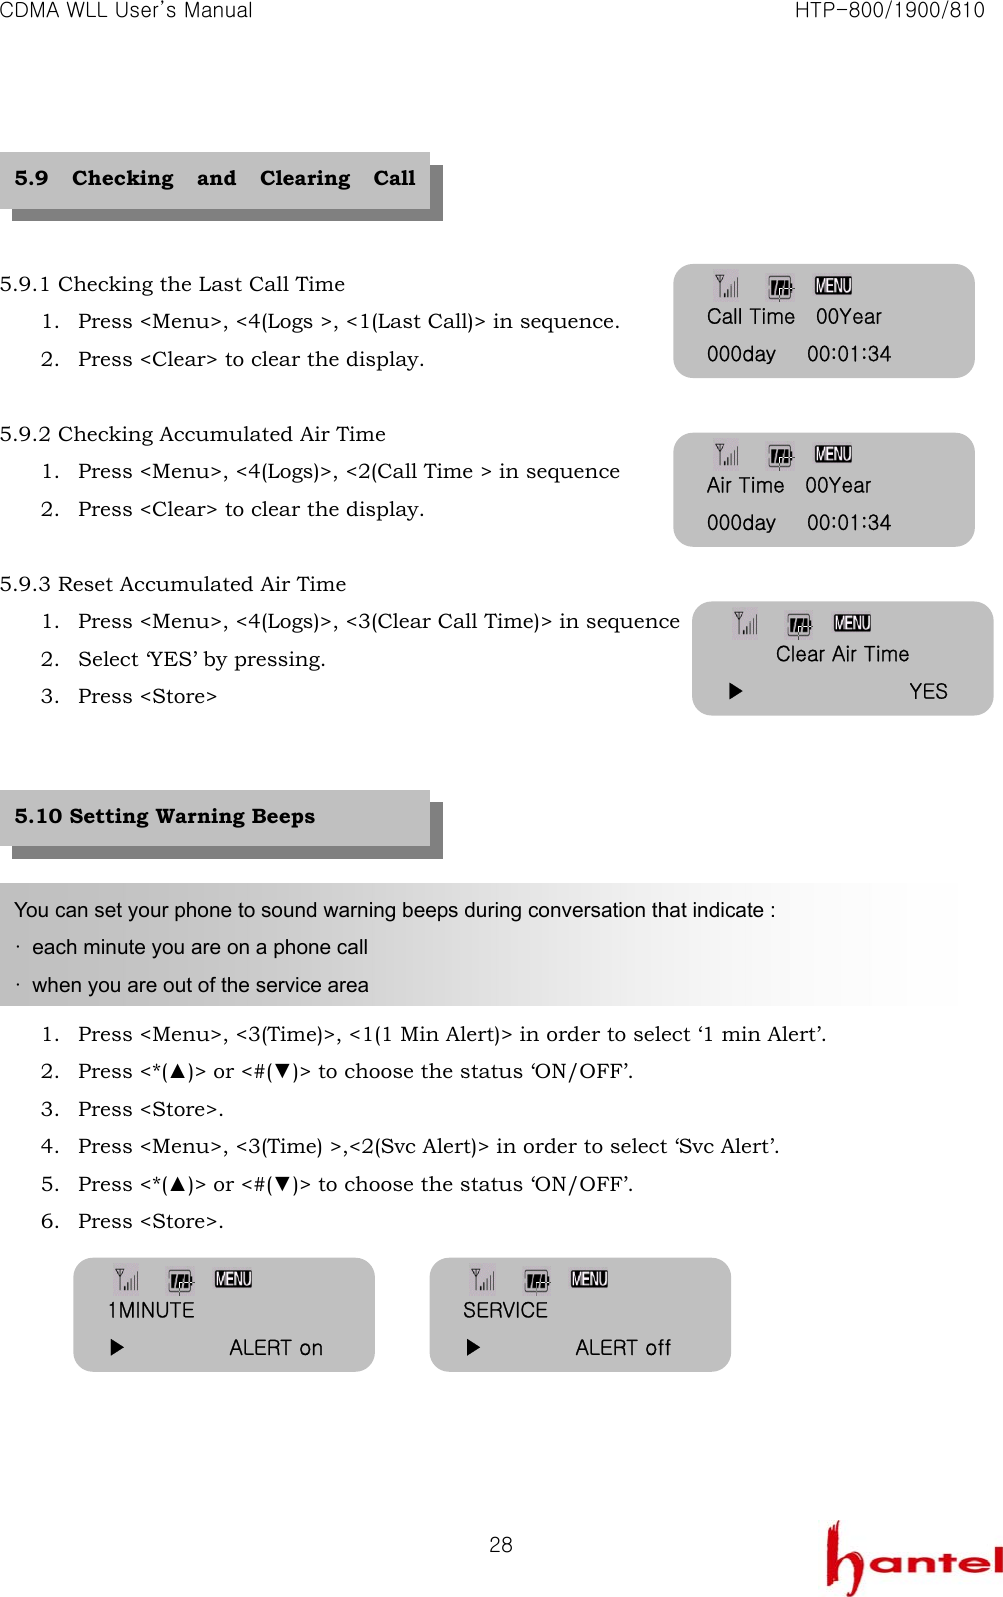
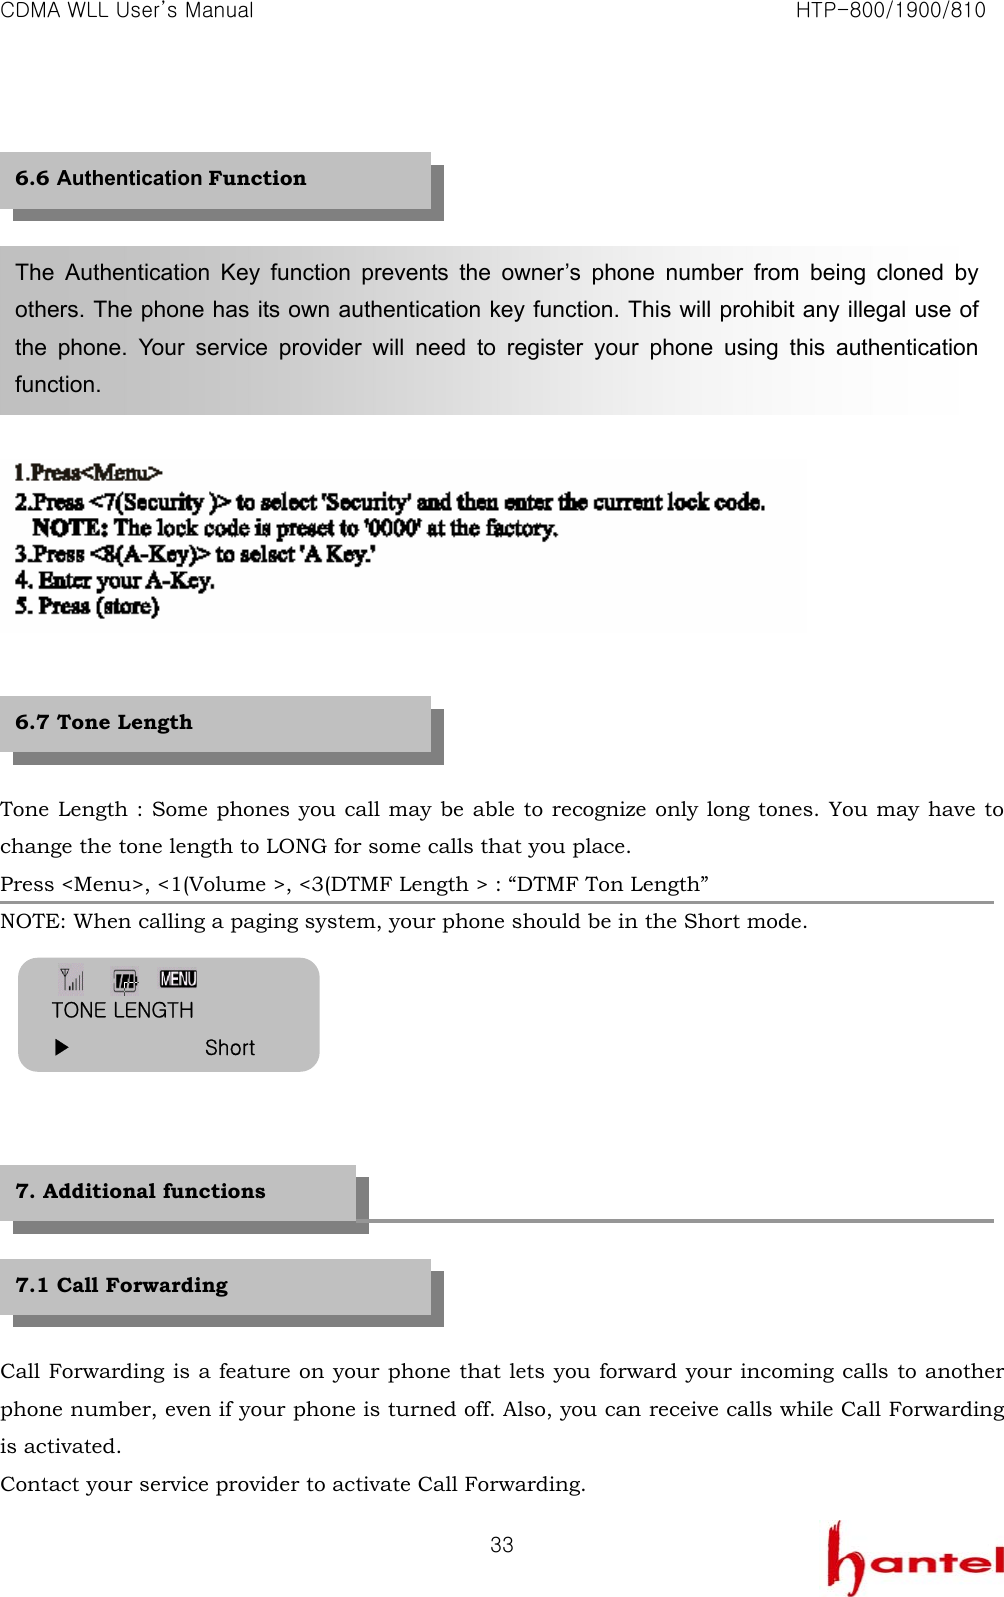
![CDMA WLL User’s Manual HTP-800/1900/810 14 3.3.1 Caller ID Display The Caller ID feature displays the caller’s number when the phone rings. If the caller’s name and number are stored together in your phone’s memory, the caller’s name will display. Contact your service provider to activate this feature. NOTE : If there is a missed call (the call not answered), the missed call number will display. 3.4.1 Ear volume Lift the handset and press <Menu>, <1(Volume)>, <1(Ear Volume)> and press <*(▲)> or <#(▼)> and <Store> to adjust voice volume. It’s 4 step. 3.4.2 key volume Lift the handset or press <Menu>, <1(Volume)>, <2(Key Volume)> and press <*(▲)> or <#(▼)> and <Store> to adjust key tone volume. It’s 5 step. 3.4.3 ring volume Lift the handset or press <Menu>, <2(Ring)>, <1(Ring Volume)> and press <*(▲)> or <#(▼)> and <Store> to adjust ring tone volume. It’s 5 step. You can control the sound volumes on your phone, including the key tone (the sound you hear when you press a key), the conversation volume (the sound of the other party during a phone call) and the ring volume of an incoming call. 3.4 Adjusting Volumes Incoming call… 019-240-2897missed 1 call 2/13[MO] 2:13P EARPIECE ██████ KEY VOLUME ██████ RING VOLUME ██████](https://usermanual.wiki/Hantel/HTP-800/User-Guide-359622-Page-14.png)
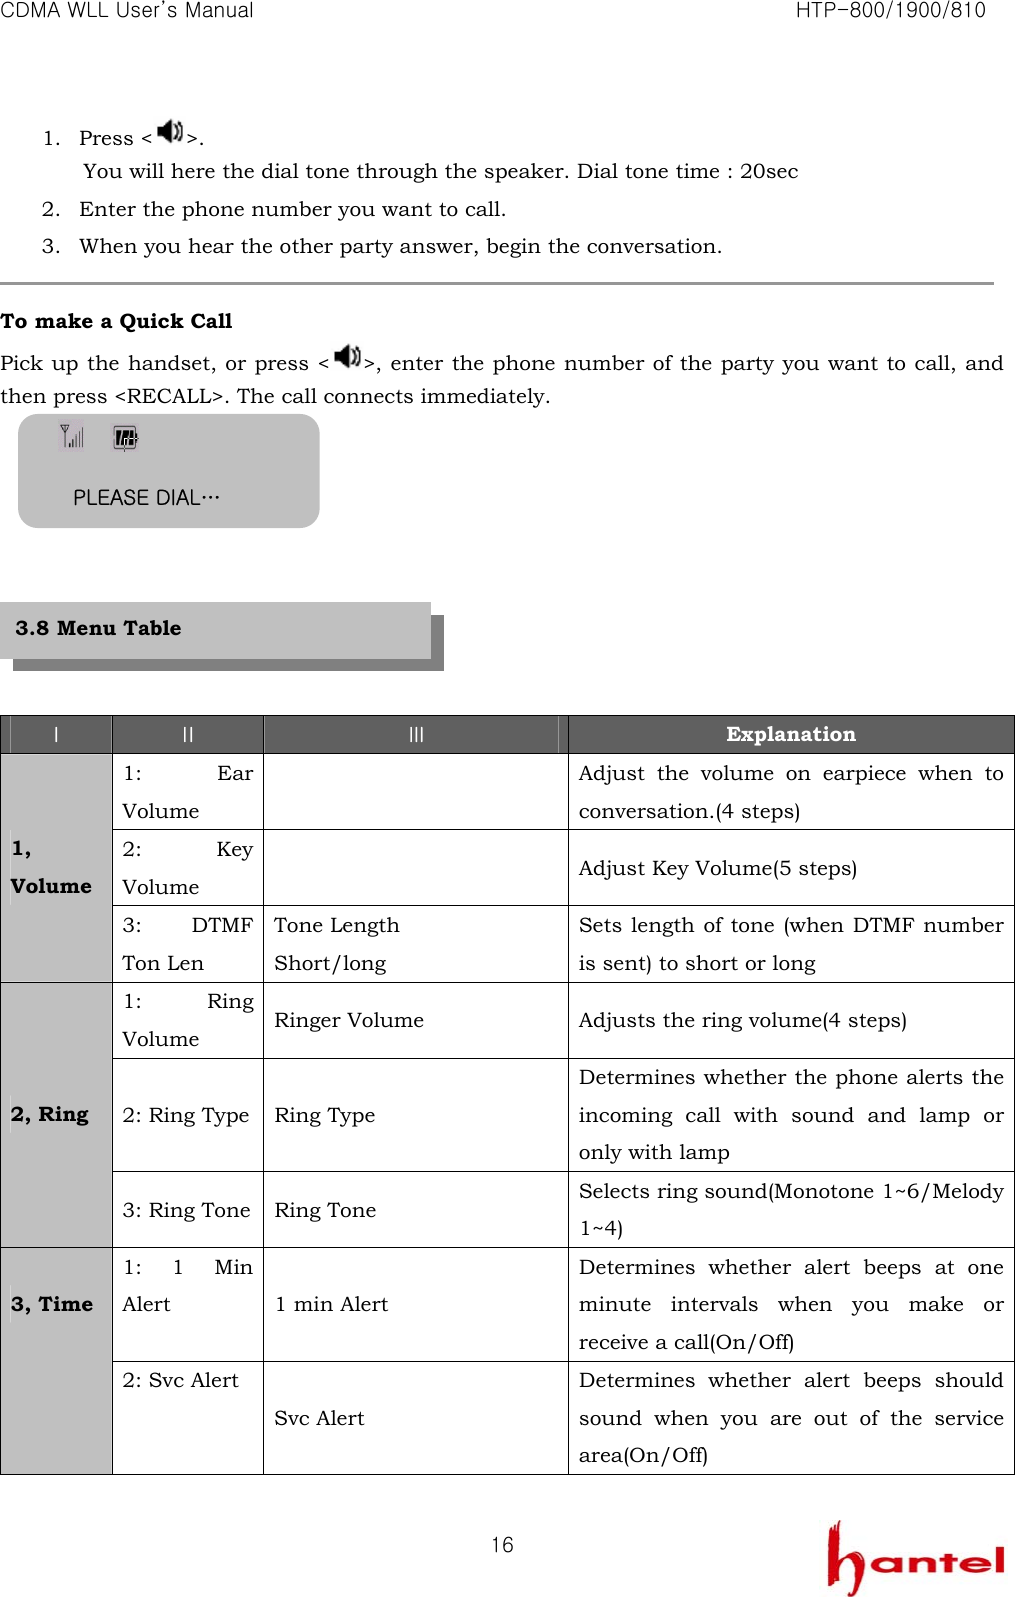
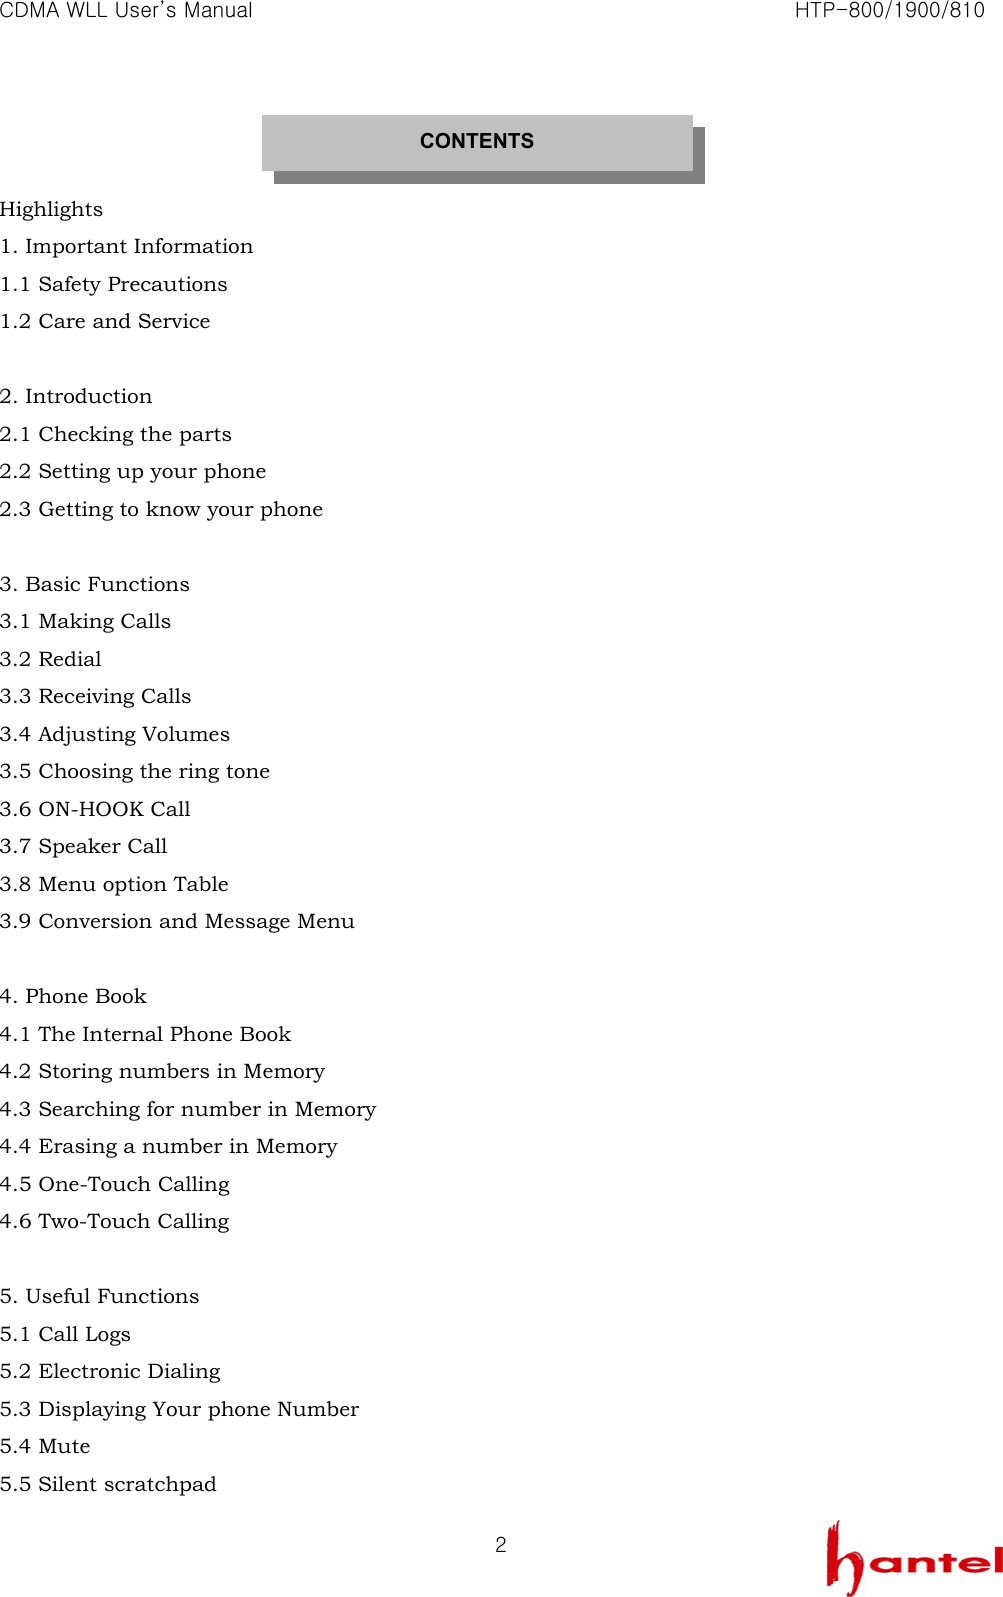
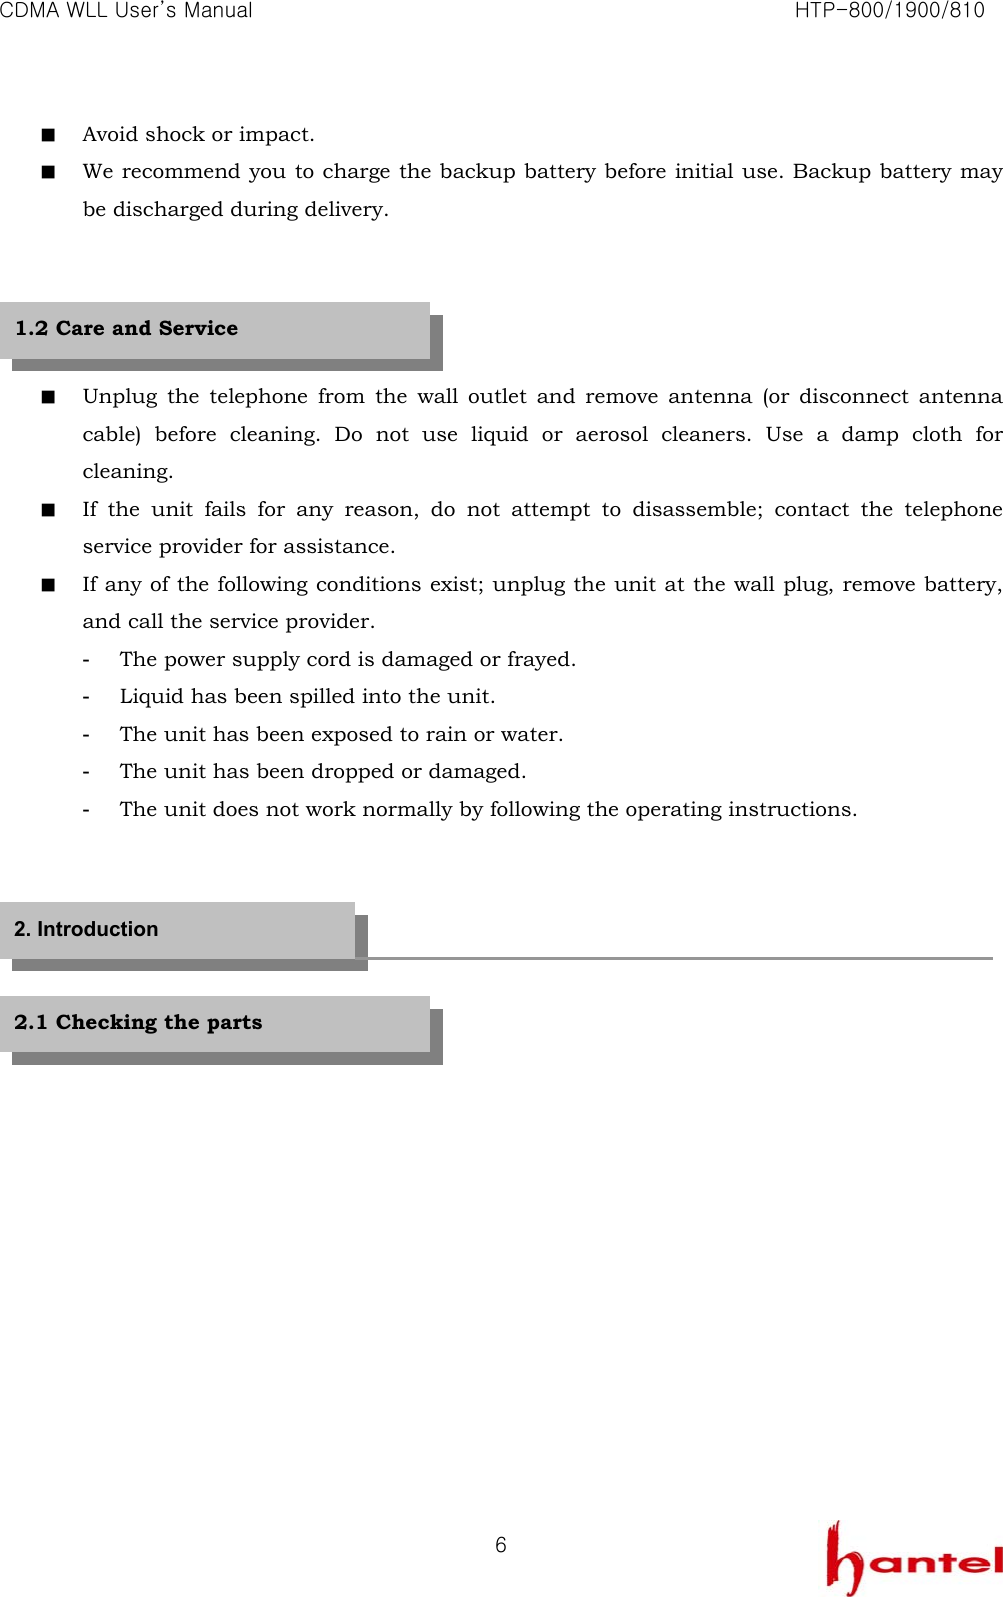
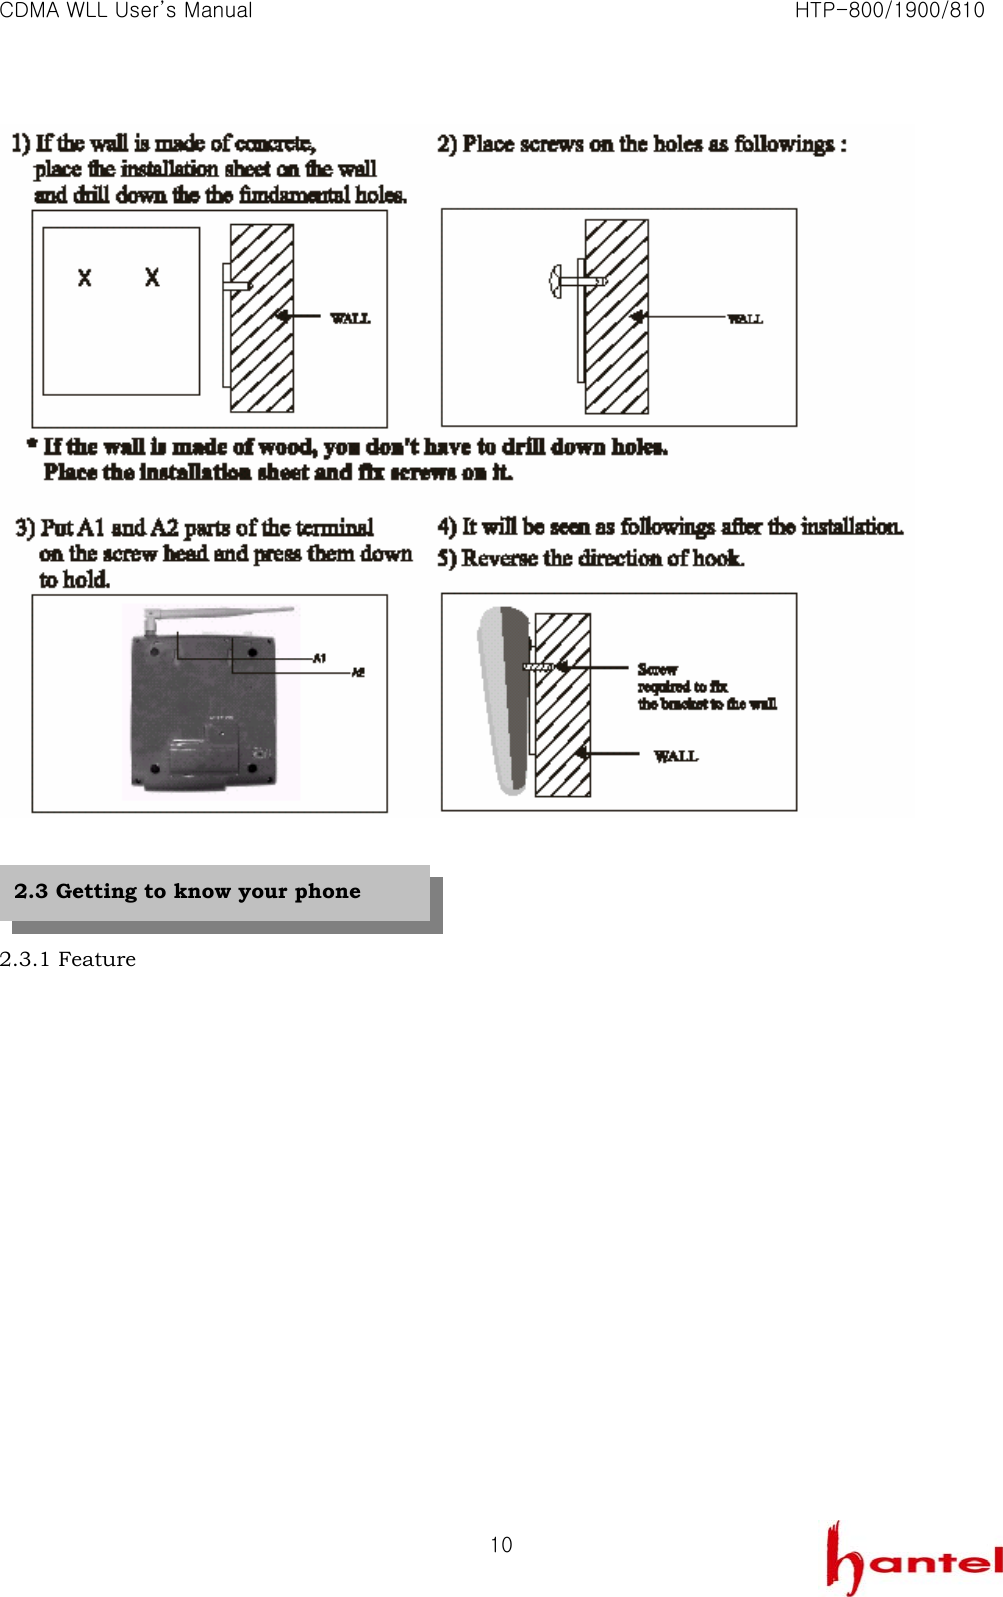
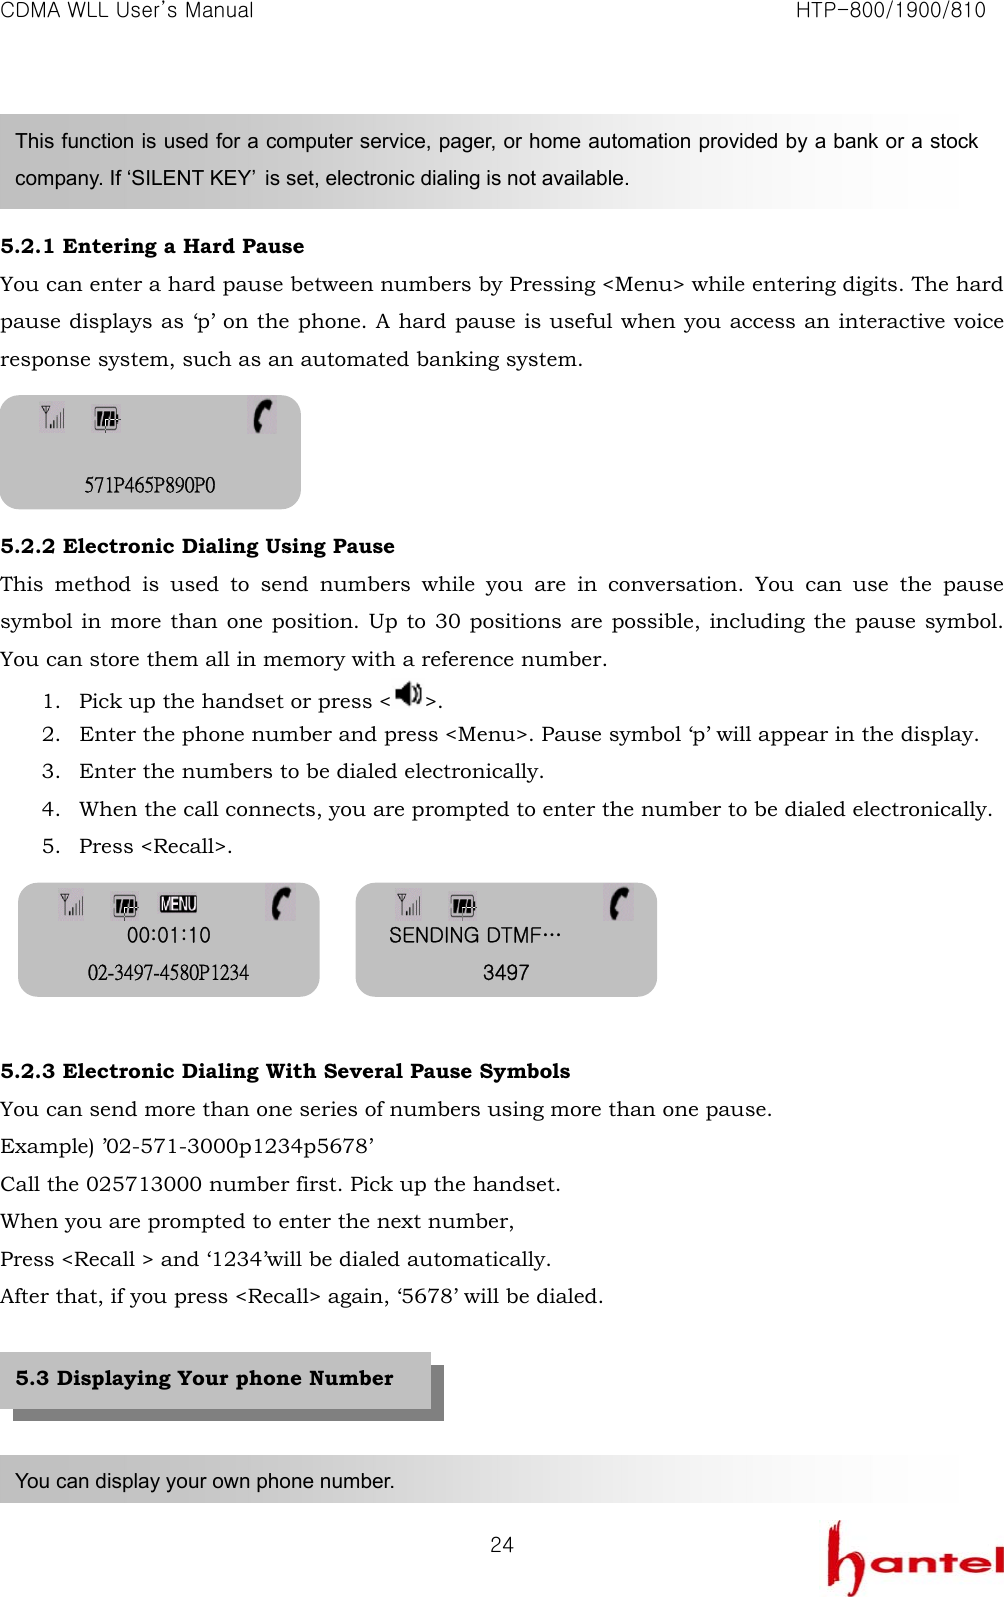
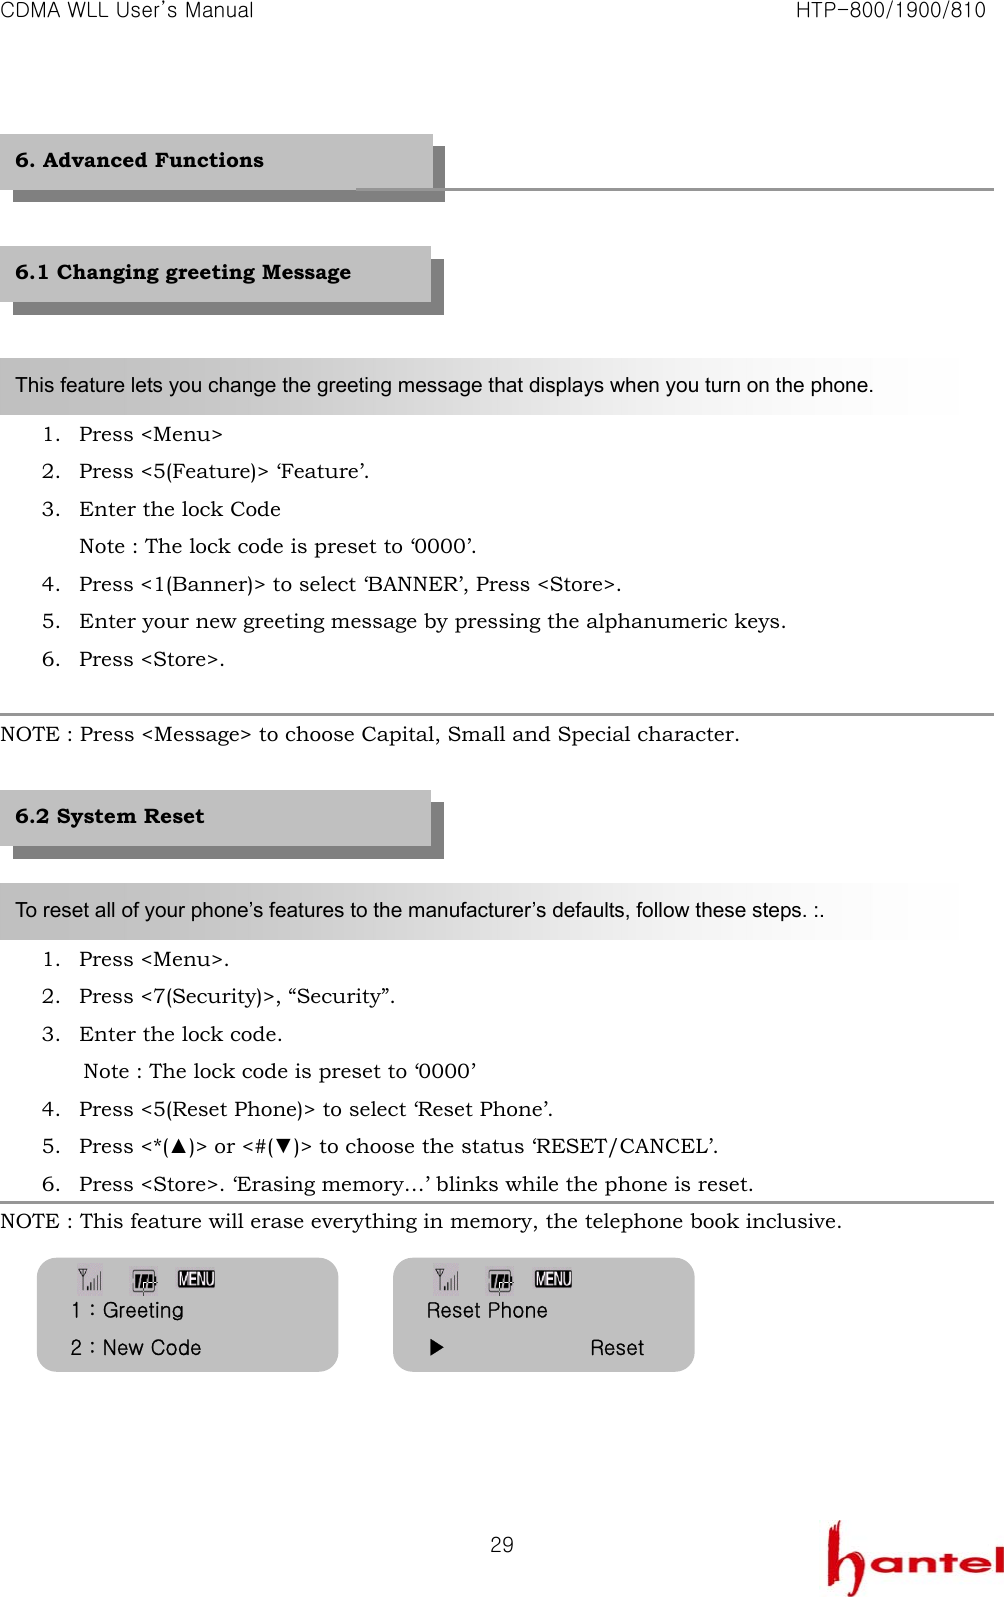
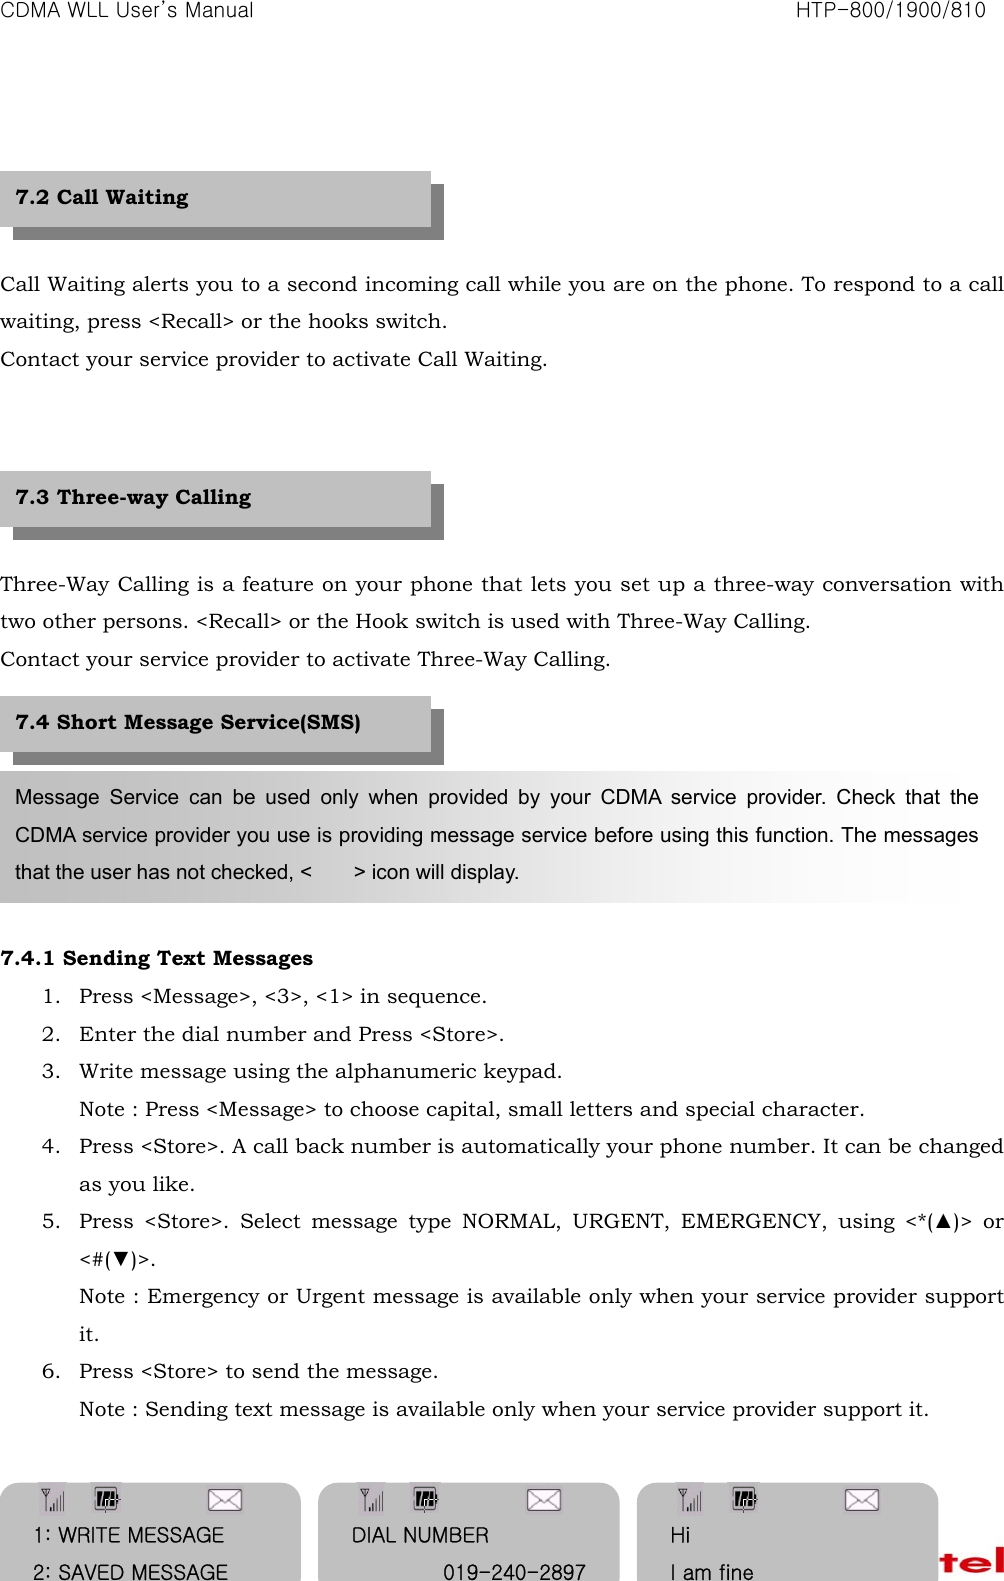
![CDMA WLL User’s Manual HTP-800/1900/810 173: Alarm Tone Alarm Tone Selects alarm sound(Monotone 1~6/Melody 1~4) 4: Alarm Set/Release Sets/ Release an alarm([One Time | Daily] Î Set time Æ Select Alarm Duration[minu-tes] Æ Confirm Tone) 1: Last Call Display the time of last call mad 2: Call Time Display accumulated call time 3: Clear Call Time Resets accumulated call time(Yes/No) 4: Outgoing Stores ten phone numbers called most recently 5: Incoming Stores ten phone numbers of calls received most recently 4, Logs 6: Erase Logs Erase outgoing/Incoming log(Erase/Cancel) 1: Banner Used to change greeting 2: Back Light Selects Back Light function 5, Feature 3: Time Select Selects time expression mode(no Time & Date | AM/PM Type 25 Hours Type) 1: Search SEARCH OPTION NAME/MEMORY/NUMBER Used when searching for a phone number in the phone book by all/number/stored memory reference number 6, Address Book 2: Erase SEARCH OPTION NAME/MEMORY/NUMBER Used when searching for a phone number in the phone book by memory and number 1: New code Used to change lock code 2: Restrict Used to limit outgoing calls(Outgoing [Cancel|Restrict] Incoming, Long Call, Intl. Call) 3: Auto Lock Used to lock the phone(never, on power up, now, Always) 7, Security 4: My Phone # Used to check your phone number](https://usermanual.wiki/Hantel/HTP-800/User-Guide-359622-Page-17.png)
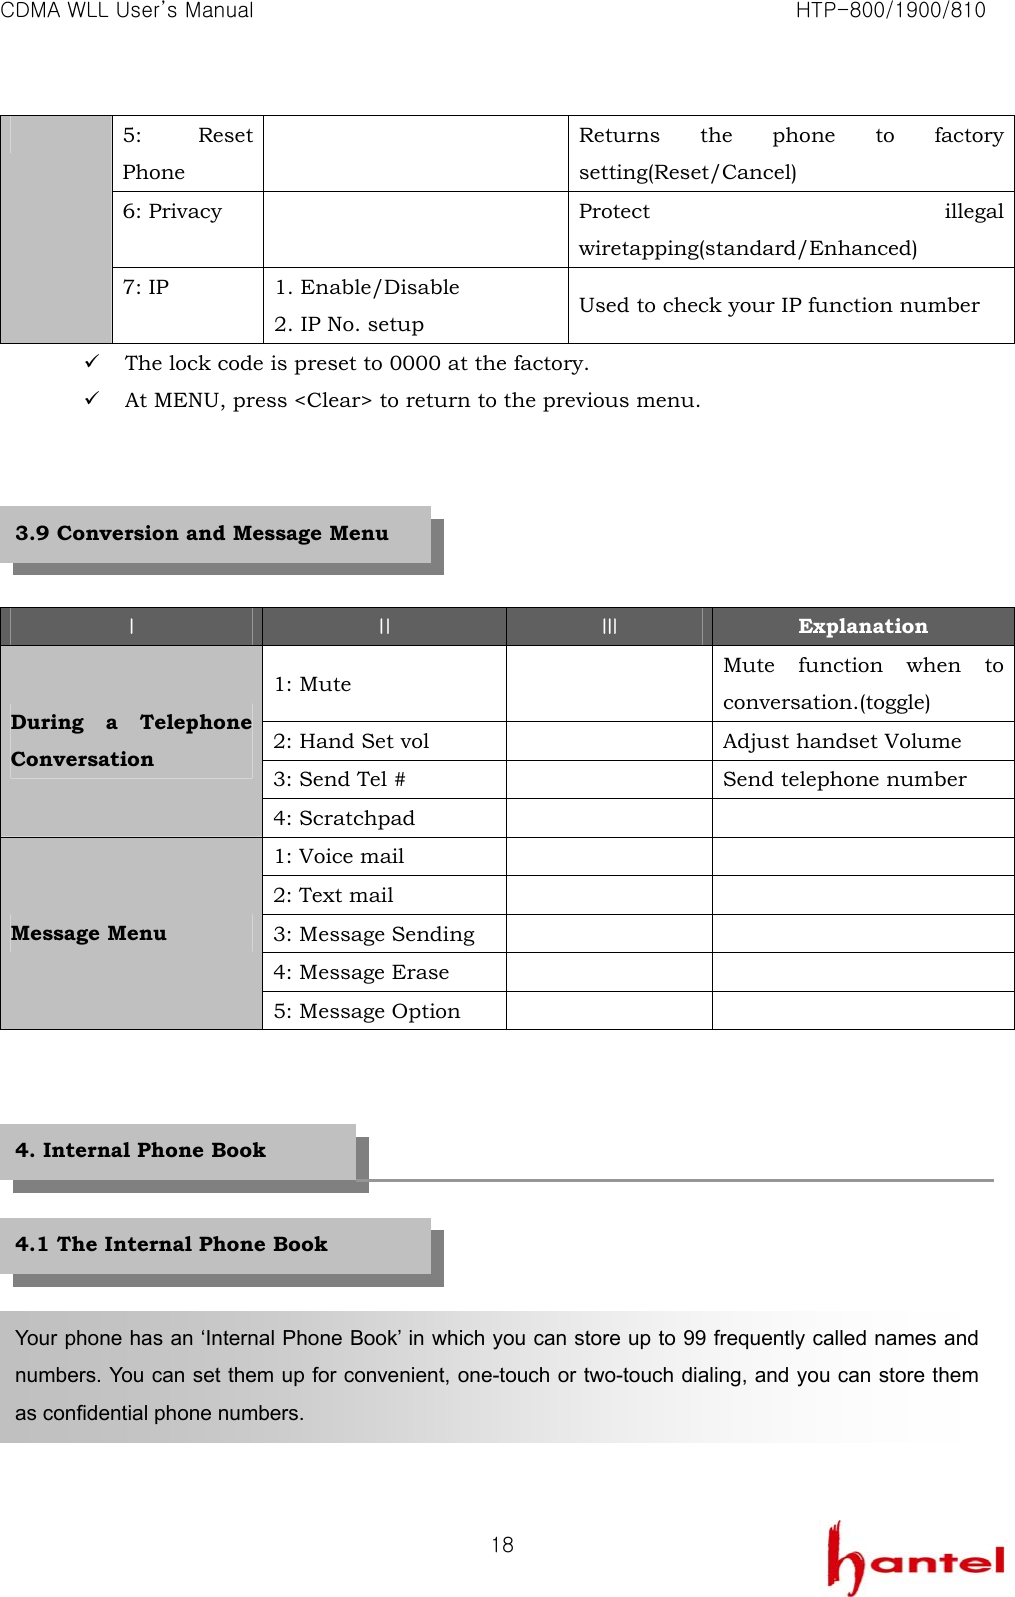
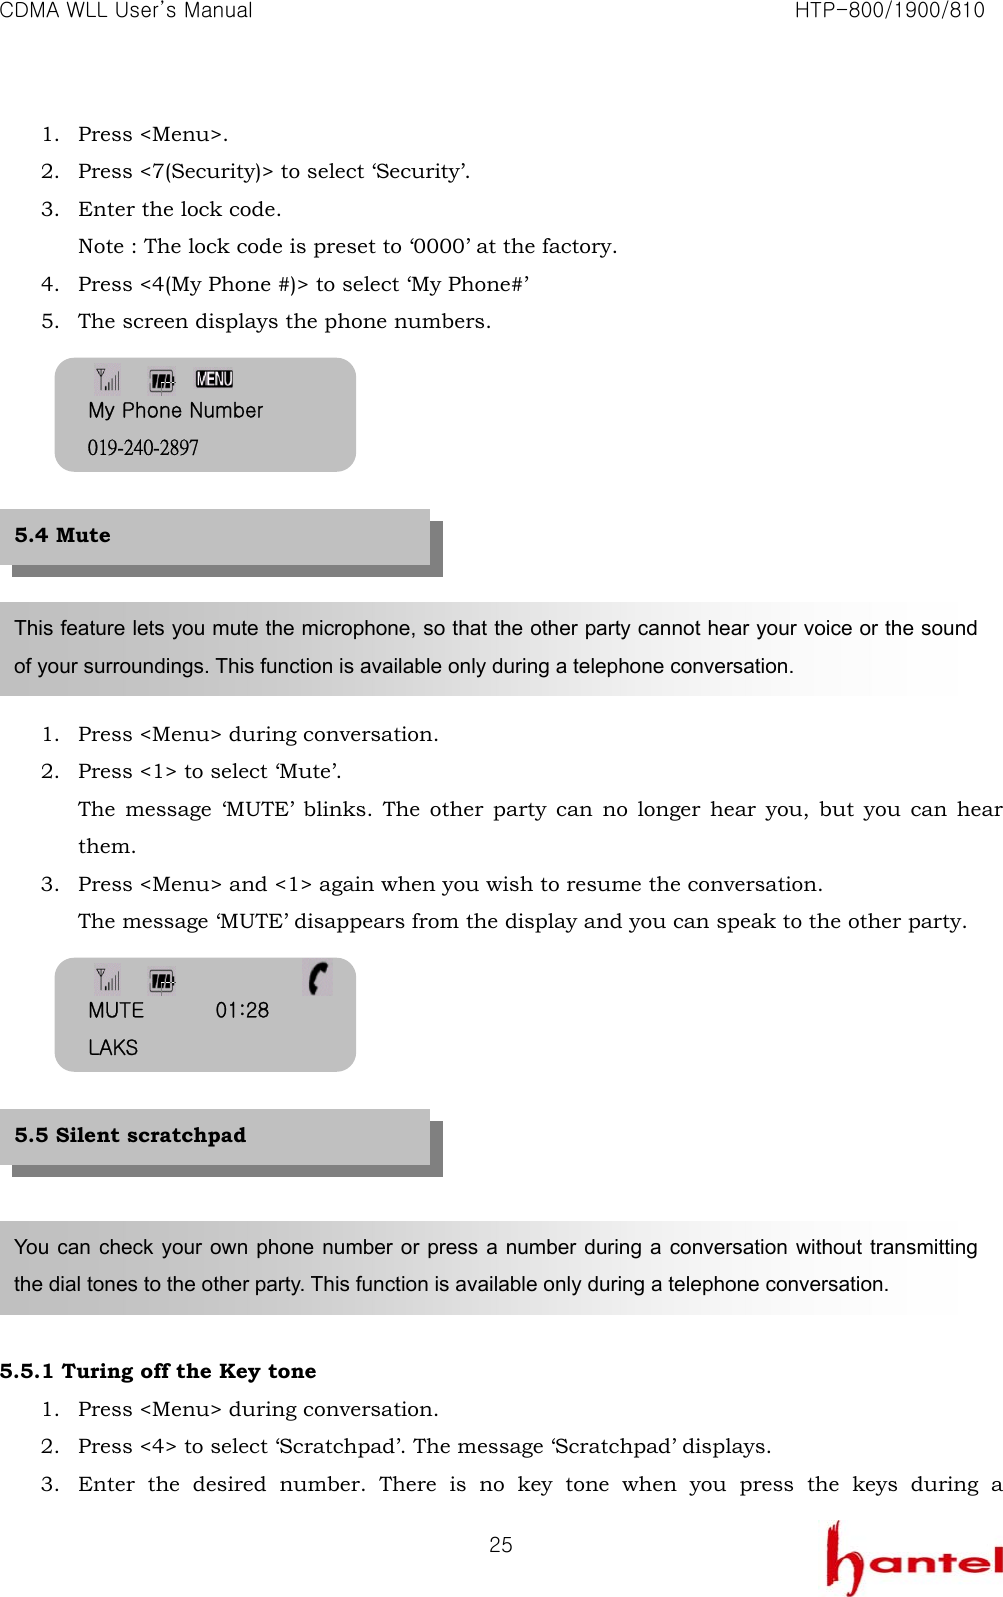
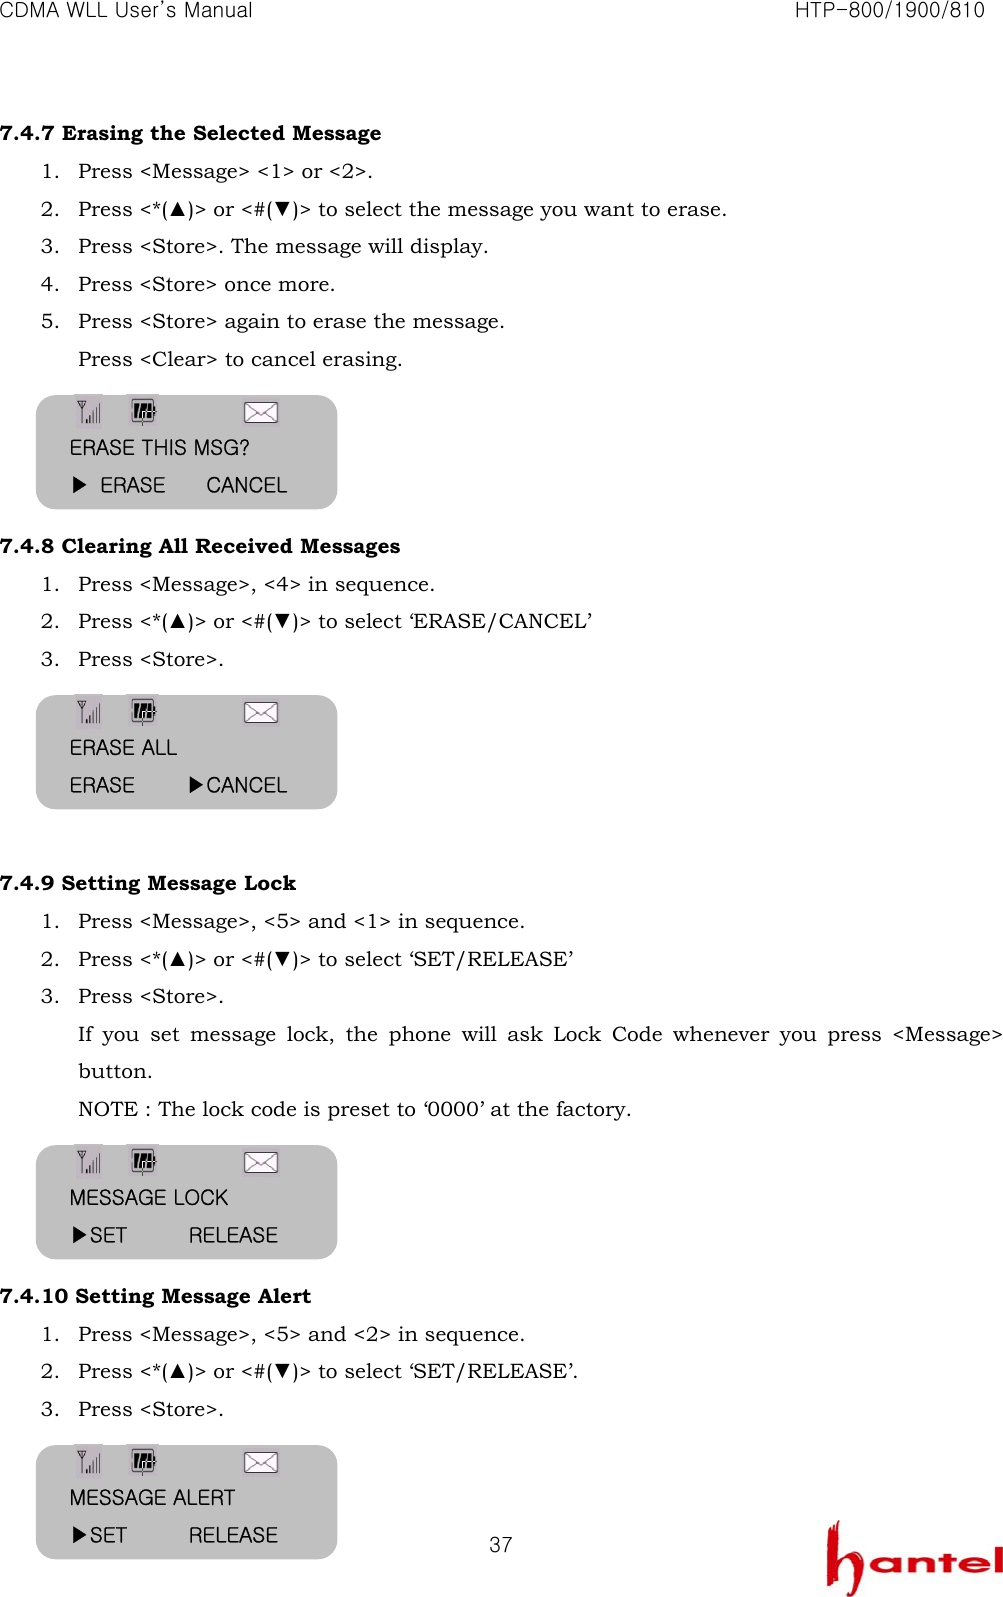
![CDMA WLL User’s Manual HTP-800/1900/810 20Note : If the location is empty, ‘Empty Location!’ will displays. 4. When the desired number displays. To make the call, press <Recall>. To exit the function, press <Clear>. 4.3.2 Searching by Name 1. Press <Menu> and <6(Address Book)> and <1(Search)> in sequence. 2. Press <Store> and you can enter all or part of the name by pressing the alphanumeric keys on the keypad. Example) Enter A to find all names beginning from the letter A. 3. Press <Store>. The phone briefly displays the memory location number along with the name and number of the first match. If the number displayed is not the one you want, press <*(▲)> or <#(▼)> to scroll through the list until the desired number displays. 4. When the desired number displays, press <Recall> to dial the number automatically. 4.3.3 Searching All 1. Press <Menu> and <6(Address Book)> and <1(Search)> in sequence, 2. To browse all stored list, press <*(▲)> or <#(▼)>. 3. Press <Store> to select one among the list and see the details. 4. When the desired number displays, press <Recall> to make the call. [SEARCH] ◀▶ : all STO:name, NUM:mem LOOK UP 01 Empty Location LAKS [STO]:edit [SEARCH] ◀▶ : all STO:name, NUM:mem SEARCH FOR T_ ▶01 : TAESEOK Calling… TAESEOK Calling… LAKS 01 : TAESEOK ▶02 : LAKS](https://usermanual.wiki/Hantel/HTP-800/User-Guide-359622-Page-20.png)
![CDMA WLL User’s Manual HTP-800/1900/810 214.4.4 Searching Confidential Number To see the phone number stored in a confidential memory location, follow these steps : 1. Press <Menu> and <6(Address Book)> and <1(Search)> in order. 2. Search the one who you want to look by a searching method said previously and The name (if any) displays. 3. Press <Store>, “INPUT LOCK CODE” displays. 4. Enter the lock code. Note : The lock code is preset to ‘0000’ at the factory. 5. To make the call, press <Recall>. To exit the function, press <Clear>. 4.4.1 To Erase a Specific Number 1. Press <Menu> and <6(Address Book)> and <2(Erase)> in order. 2. Search the one who you want to look by a searching method said previously and The name (if any) displays. 3. Press <Store> on one who you want to erase among the list. 4. Press <Message> to erase it. Confirming message displays. 5. To confirm, press <Store>. To cancel, press <Clear> 6. If you erase a secret one, you have to enter lock code instead of pressing <Store> to confirm. NOTE : In order to erase everything in the memory, you must reset the phone. 4.4 Erasing a number in Memory ADDRESS : #23 LAKS 02-3497-4580 INPUT LOCK CODE ----- [SEARCH] ◀▶ : all STO:name, NUM:mem ▶03 : KIM 03 : PARK KIM [MSG] : del ERASE #07? [STO] : ok [MSG] : no - ERASE -](https://usermanual.wiki/Hantel/HTP-800/User-Guide-359622-Page-21.png)

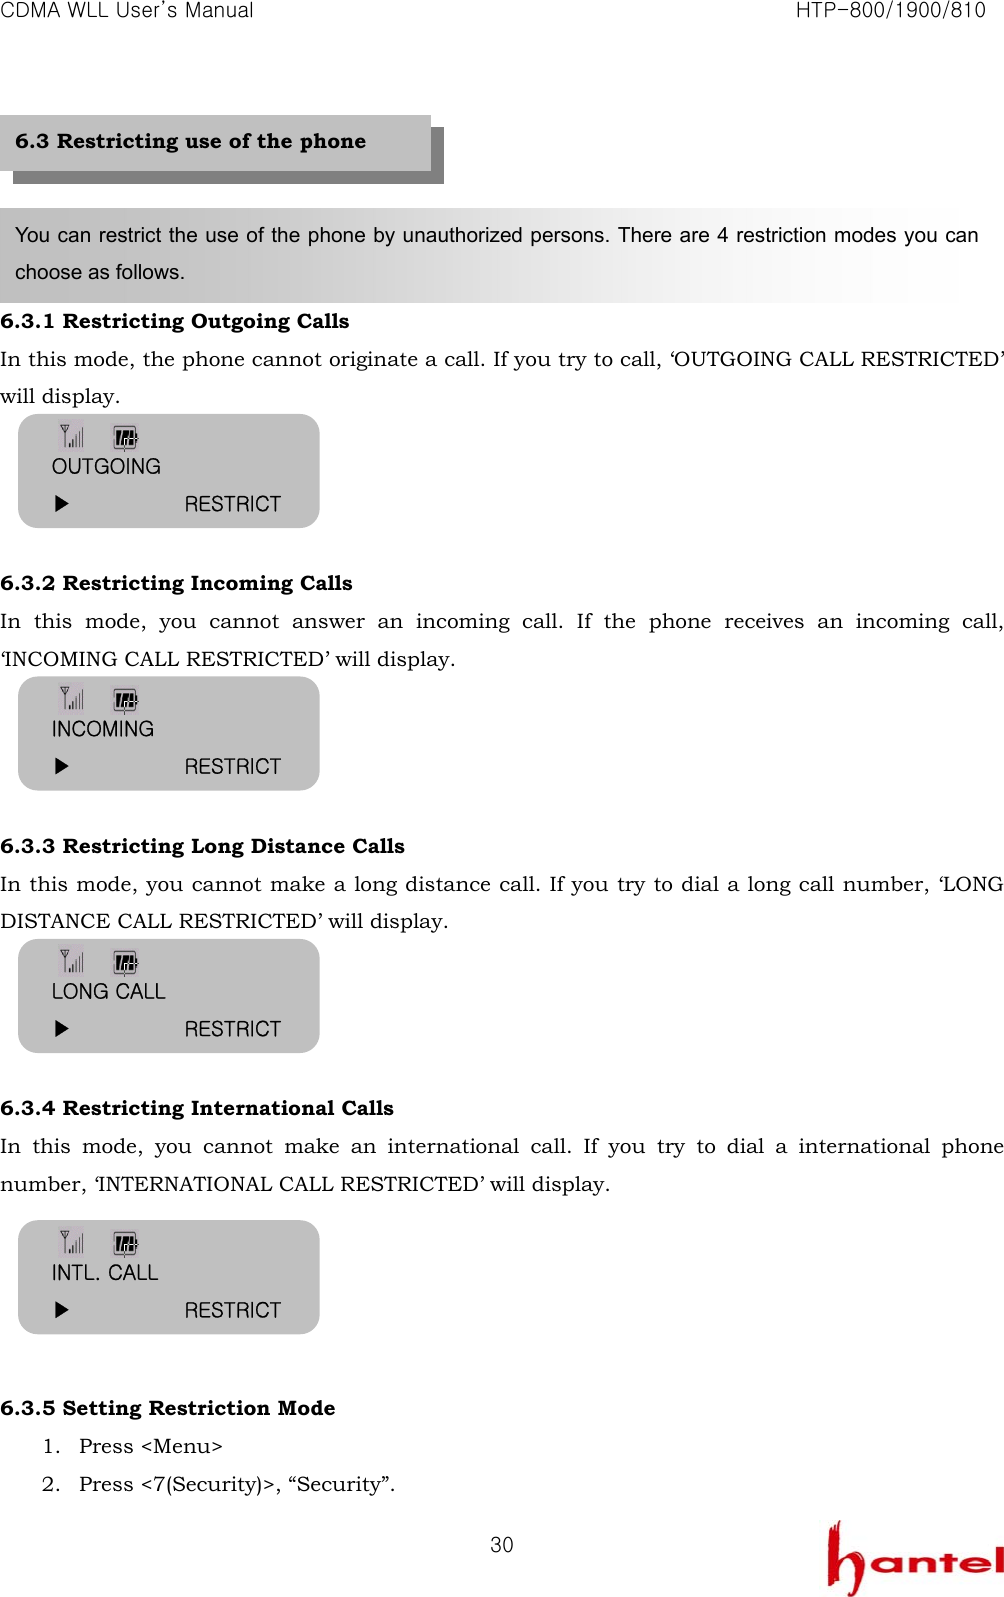
![CDMA WLL User’s Manual HTP-800/1900/810 27No Time and Date. : Not display time and date. 3. Press <Store>. 1. Press <Menu>, <3(Time >, <2(Alarm)> and in sequence. 2. Select one method of alarm by pressing <*(▲)> or <#(▼)>. Daily : Alarm sounds daily. One time : Alarm sounds only one time. 3. Press <Store> If the alarm function is set, ‘ALARM TIME’, date, present time, and alarm hour displays. 4. Input alarm time. Hours should be input as 24 hour units. To modify the alarm, press <*(▲)> or <#(▼)>. You can enter a specific time for the alert to sound. 5. Press <Store> and enter the number of minutes that you want the alert to sound. 6. Press <Store>. When the alarm time arrives, a melody sounds and ‘<ALARM TIME>’ displays. The sound will stop if you press any button. 1. Press <Menu>, <3(Time >, <2(Alarm)> and in sequence. 2. Select ‘RELEASE’ to off alarm. Bell icon disappears. You can set the alarm sound daily or one time only. 5.8.1 Setting/ Canceling the Alarm Time 5.8 Setting the Alarm DATE TIME ▶ AM/PM Type ALARM REPEAT ▶ DAILY ALARM SETTING ▶ SET 5/23[WE] 10:20 12:34 ALARM SET ▶ RELEASE Type](https://usermanual.wiki/Hantel/HTP-800/User-Guide-359622-Page-27.png)
![CDMA WLL User’s Manual HTP-800/1900/810 32NOTE: The lock code is preset to ‘0000’ at the factory. 4. Press <3(Auto Lock)> to select ‘SET LOCK ‘, and you can set the desired lock state. Choice “Never, On power up, Now Aways.” The default setting is “Never”. 5. Press <*(▲)> or <#(▼)> to select the status, ‘SET’. 6. Press <Store> to auto lock the phone. –LOCKED – displays. If you try to dial numbers, it will ask you to key in Lock Code. NOTE: The lock code is preset to ‘0000’ at the factory. 7. If you want to unlock the phone. 8. Follow the same steps above and select ‘never’ on the step 5. 1. Press <Menu>. 2. Press <7(Security )> to select ‘Security’ and then enter the current lock code. NOTE: The lock code is preset to ‘0000’ at the factory. 3. Press <1(New code)> to select ‘New Code’. 4. Enter your new lock code. NOTE : The lock code must be four numeric digits. 5. Press <Store>. 6. Re-enter new lock code for verification. 7. Press <Store> to confirm. NOTE: If the digits for confirmation is not matched with digits you enter first, ‘DO NOT MATCH TRY AGAIN!’ displays. You can repeat from step 4. above. When you purchase your phone, the lock code is preset to 0000. You can change the lock code to any 4-digit code. 6.5 Changing the lock code SET LOCK ▶ Never 5 : AUTO LOCK 6 : MY PHONE # 2/14[TH] 2:56PM LOCKED Enter Lock Code ------ 1 : Greeting 2 : New Code ENTER NEW CODE ------ RE-ENTER CODE ------](https://usermanual.wiki/Hantel/HTP-800/User-Guide-359622-Page-32.png)
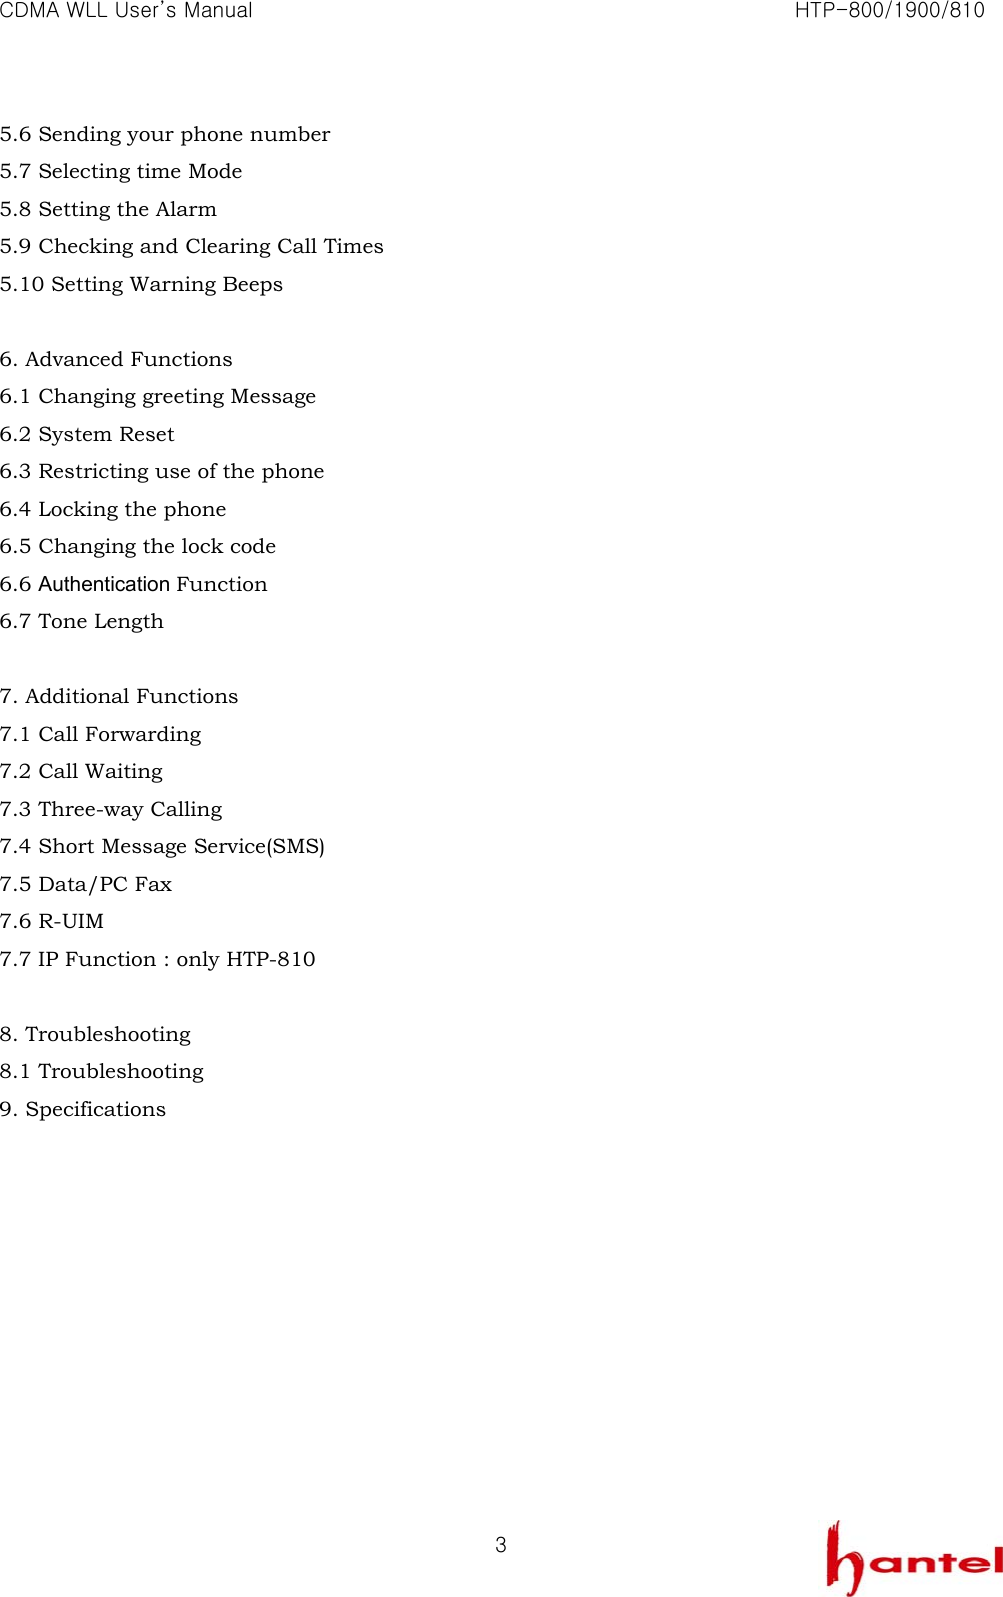
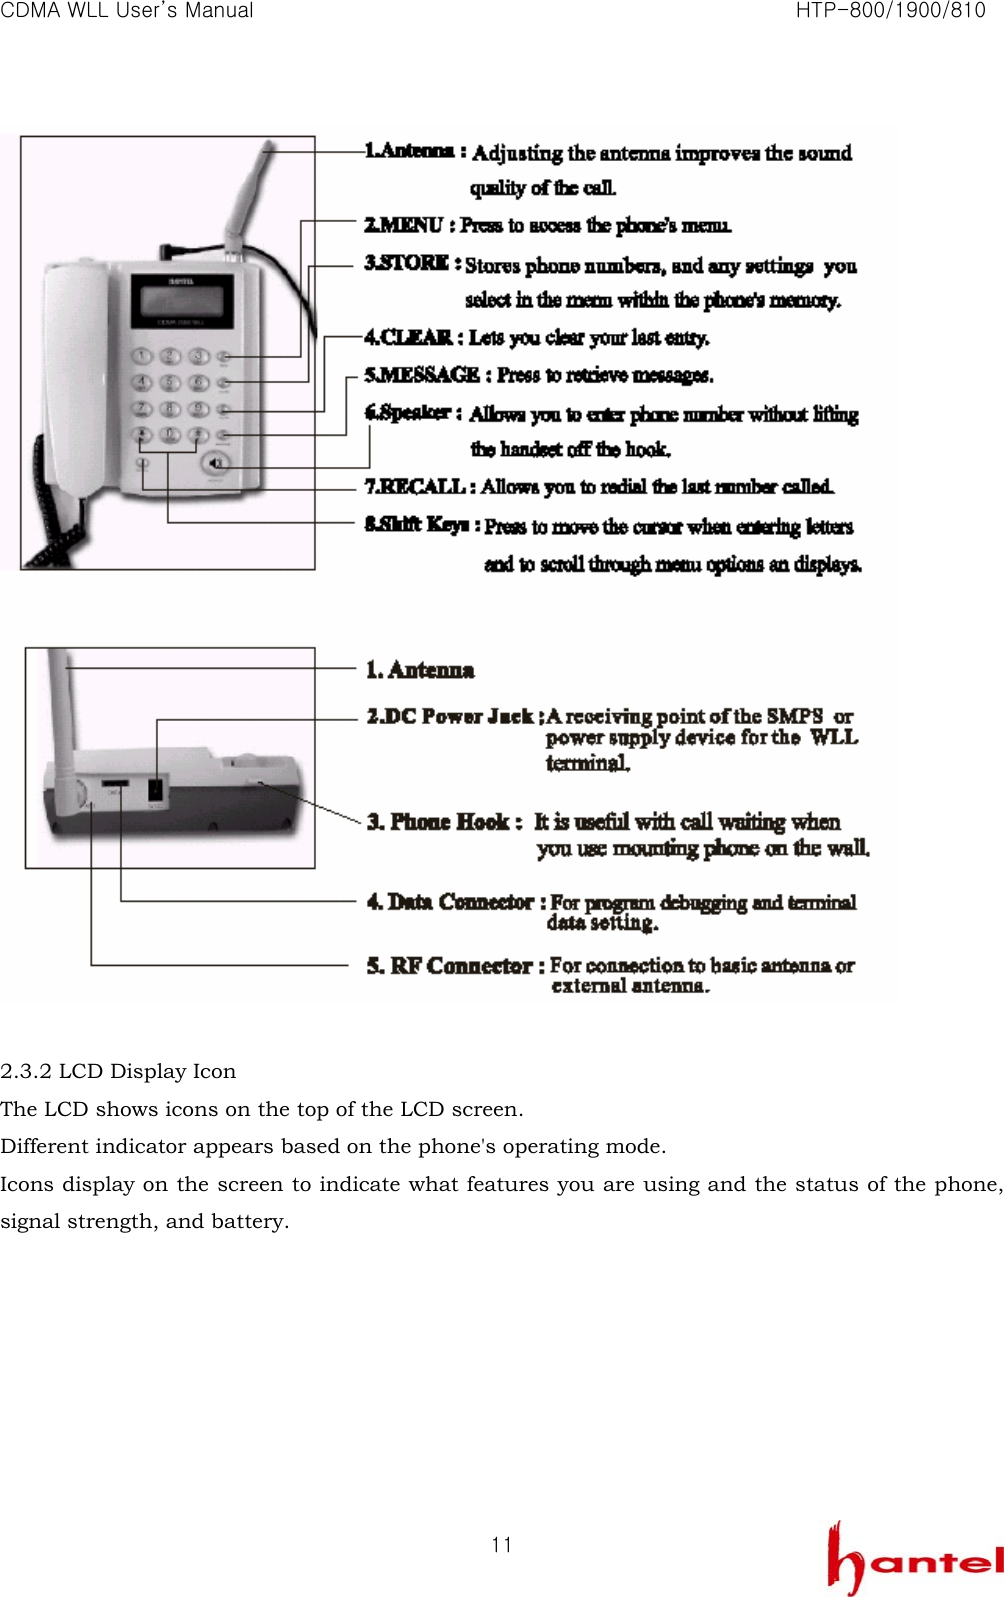
![CDMA WLL User’s Manual HTP-800/1900/810 35 7.4.2 Receiving Voice Message 1. If a voice message is received, ‘—VOICE MAIL—‘ and < > will display. 2. Press <Recall> to connect voice mail center and hear the message. 3. Press <Recall> again to call back if the caller leaves a phone numbers. Note : If the phone number is stored in the phone book with a name, the name will display instead of the phone number. 7.4.3 Receiving Text Messages 1. If a text message is received, CALL BACK NUMBER and < > display. 2. Press <*(▲)> or <#(▼)> scroll down the message. 3. Press <Recall> and one more <Recall> the number automatically. 4. Press <Store>. The message will erase. Note : If the phone number is stored in the phone book with a name, the name will display instead of the phone number. 7.4.4 Receiving Page Messages CALL BACK NUMBER 019-240-2897 SMS PRIORITY IS ▶ NORMAL MESSAGE SEND SENDING 3/04[SA] 11:58A VOICE MAIL 02-571-4653 THE NUM OF MSG 2 [STO] : ERASE MENU [RECALL] : SEND 3/04[SA] 11:58A [CALL BACK NUM] 02-571-4653 [MESSAGE] Hi [STO] : ERASE MENU [RECALL] : SEND](https://usermanual.wiki/Hantel/HTP-800/User-Guide-359622-Page-35.png)
![CDMA WLL User’s Manual HTP-800/1900/810 361. If a page message is received, PHONE NUMBER and, < > will display. 2. Press <Recall> to call back or <Store> to erase Page message. Note : If the phone number is stored in the phone book with a name, the name will display instead of the phone number. Note : If the incoming message tone is operating, a beep tone will be sound at internals of two minutes until you check the message. If a new message is the same as the previous message, ‘DUPLICATE’ will display. 7.4.5 Checking Received Voice Messages Press <Message> and <1> in sequence. The message volume which is stored in the voice service center and the last received time will display. 7.4.6 Viewing Received Text Messages 1. Press <Message> and <2> in sequence. The received message you want to see. 2. Press <*(▲)> or <#(▼)> select message you want to see. 3. Press <Store>. Received message and time will display. If there is a phone number, it will display as well. If there is a phone number, it will display as will. If the message is long, it will scroll down in 3 seconds automatically. Press <*(▲)> or <#(▼)> to scroll up and down manually. 4. Press <Recall> twice if you want to call back. 5. Press <MSG> if you want to SMS reply. 6. To view the next message, press <Clear>. The screen will return to step 2 above. 3/04[SA] 11:58A [CALL BACK NUM] [STO] : ERASE MENU [RECALL] : SEND 3/04[SA] 11:58A [DUPLICATE] 1: VOICE MAIL[2] 2: TEXT MAIL[1] 3/04[SA] 11:58A VOICE MAIL 1: VOICE MAIL[2] 2: TEXT MAIL[1] ▶01: Hi 02: 019-240-2897 Calling… 019-240-2897](https://usermanual.wiki/Hantel/HTP-800/User-Guide-359622-Page-36.png)
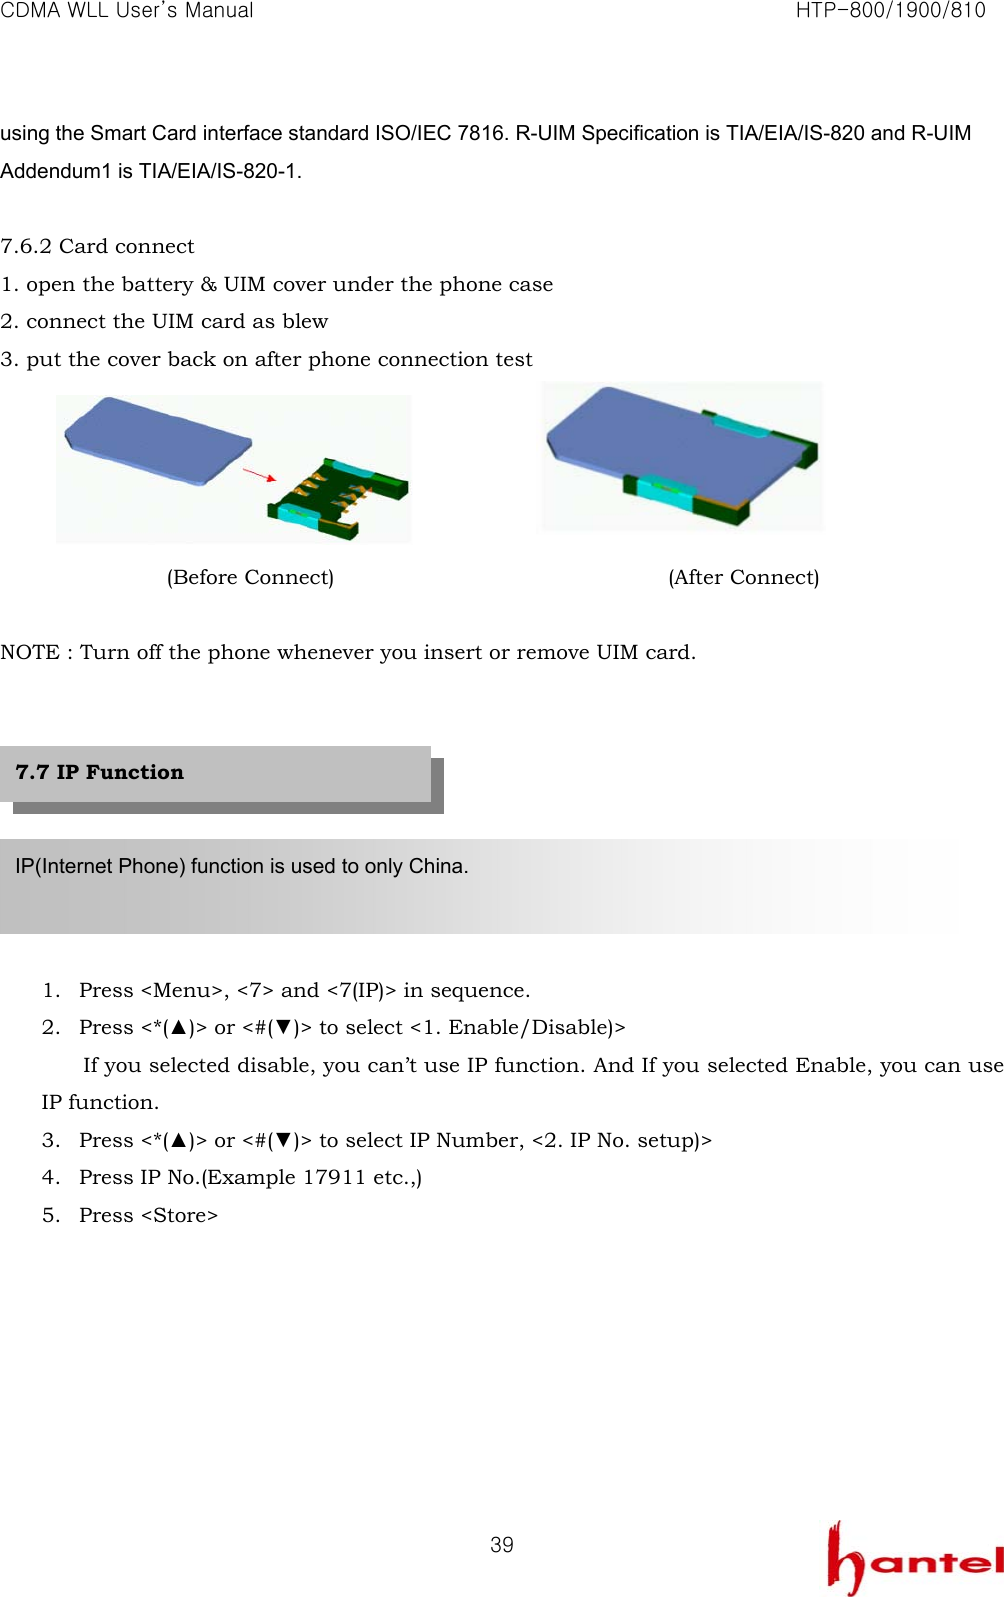
![CDMA WLL User’s Manual HTP-800/1900/810 38 The PC Fax & Modem menu is used to set the phone to data receive mode when using Data Service to receive a facsimile to PC or when communicating to PC. 7.5.1 Definition HTP-800/1900/810 provides Data and Fax service. It is capable of transmitting and receiving Data or Facsimile information through a wireless path by being connected to a Notebook (or Desktop PC). The following services are available. ① Async Data Service - File transmit and receive - PC communication ② PC Fax Service - Wireless Fax transmit/receive using the Winfax or Hotfax ③ Packet Data Service - FTP, Internet, Intranet, LAN, E-Mail etc. 7.5.2 using the data service To receive data using the Async Data Service and PC Fax Service. [Note] This phone supports both Async Data Service benefiting the large capacity of file transmission at up to 153Kbps as the international standard and Packet Data Service ideal in the business which requires the frequent access. An Internet account (free or charged) must be acquired by a service provider to use the Packet Data Service, 7.6.1 Definition The removable user identity module (R-UIM) is similar to the SIM card concept in the GSM standard. It is 7.5 Data/PC Fax 7.6 R-UIM](https://usermanual.wiki/Hantel/HTP-800/User-Guide-359622-Page-38.png)