Users Manual

FCC ID : ODGQOOLQEEX
REPORT NO. : HCT-F05-0603 HYUNDAI C–TECH 1/1
ATTACHMENT E.
- USER’S MANUAL -

1
[TABLE OF CONTENTS]
Chapter 0 QUICK START
1. Power On / Off
2. Listening to music
3. Listening to radio
4. Charging the battery
Chapter 1 GETTING STARTED
1. Introduction
2. Copyrights and Certification
3. Registered Trademarks
4. Product Features
5. Package Contents
6 Product Overview
7. Button Operations
Chapter 2 BASIC OPERATIONS
1. Before installation
2. Installing software
- Install CD
3. Connecting the product to a PC
4. File Management using a removable disk
- File Upload / Download
- Format
5. Disconnecting the product from a PC
6. Firmware Upgrade
7. Mode Switch
Chapter 3 MP3 MODE
1. MP3 Play / Stop
2. Fast-forward / Rewind
4. REPEAT Mode Setup
5. LED On / Off
6. EQ
7.Volume Control

2
Chapter 4 FM RADIO MODE
1. How to scan
2. How to auto-scan
3. Changing channel
4. LED On / Off
5.Volume Control
Chapter 5 MISCELLANEOUS
1. General Cautions
2. Earphone-related Cautions
3. Battery-related Caution
4. Troubleshooting
5. Product Specifications
3
Chapter 0 QUICK START
1. Power On / Off
1) While the product is off, press and hold the <Play / Pause> button to turn the power on.
2) While the product is on, press and hold the <Play / Pause> button to turn the power off.
2. Listening to music
1) Press the <Play / Pause>
button briefly to play or stop music in MP3 mode.
3. Listening to radio
1)To enter FM RADIO mode, press and hold the <Mode Change> button briefly.
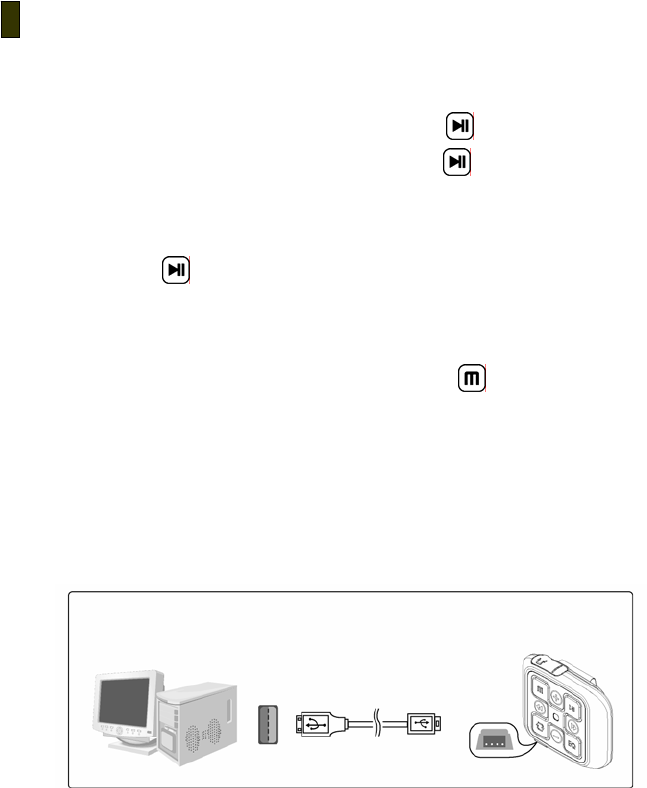
4. Charging the battery
The Qoolqee X can be charged by a PC and a USB adaptor.
If the device is connected to a PC that is powered on, or to a USB cable, it goes into USB CONNECT status and starts charging.
If the battery goes low, a red led will blink. After fully discharged, the device will turn off, automatically.
To charge the battery with your PC: After lifting the USB cover located at the bottom of the product as shown in the picture,
connect it to your PC via a USB cable.
4
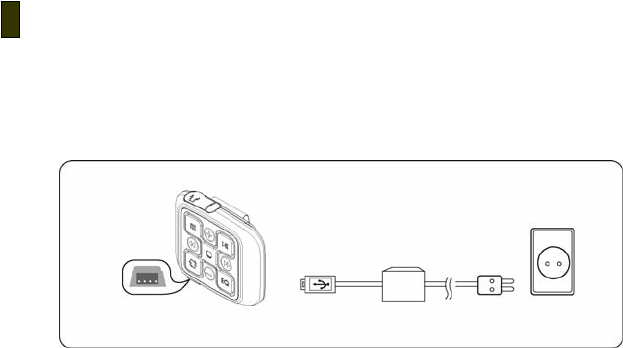
While charging is in progress, the led is red, and led become blue when charging is complete. To fully charge,
it takes 3 hours and the battery lasts for 10 hours.
To charge the battery with a USB adapter: After lifting the USB cover located at the bottom of the product, connect the USB
plug of an adapter that is connected to power to the USB port of the product.
(!!) The suitable adapter for Qoolqee X 5V, 1.2A.

5
Chapter 1 GETTING STARTED
1. Introduction
1) Qoolqee K7
Thank you for purchasing our product. This manual is provided for correct use of the product. Please read it
horoughly before using the product.
http://www.qoolqee.com
2) You can obtain product information, and also have your questions answered. By registering with the product
serial number indicated on the manual, you can receive online support from us, and upgrade firmware for
enhancement of the product’s features.
The content of the manual may be revised according to product specifications at the time of
release. The revised manual may be downloaded via our web site.
2. Copyrights and Certification
1) The copyright of this manual is owned by Hantel Co., Ltd. Any unauthorized duplication or distribution of all or
any part of the manual is prohibited.
WMA is the registered trademark of Microsoft corp.
The copyright of the Hantel MP3 software program is owned by Hantel Co., Ltd. and any unauthorized duplication,
distribution or commercial use of the program without the prior written consent of Hantel Co., Ltd. is against the
law. With the exception of the right provided to the user specifically for use of the product, this manual does not
grant the user any other right to use patents, trademarks, copyrights or any other intellectual property rights owned
by Hantel Co., Ltd.

6
2) FCC Certification
This equipment has been tested and found to comply with the limits for a Class B digital device, pursuant to part 15 of the
FCC Rules. These limits are designed to provide reasonable protection against harmful interference in a residential
installation.
This equipment generates, uses and can radiate radio frequency energy and, if not installed and used in accordance with the
instructions, may cause harmful interference to radio communications. However, there is no guarantee that interference will
not occur in a particular installation. If this equipment does cause harmful interference to radio or television reception, which
can be determined by turning the equipment off and on, the user is encouraged to try to correct the interference by one or
more of the following measures:
- Reorient or relocate the receiving antenna.
- Increase the separation between the equipment and receiver.
- Connect the equipment into an outlet on a circuit different from that to which the receiver is connected.
- Consult the dealer or an experienced radio / TV technician for help.
CAUTION : Changes or modifications not expressly approved by the party responsible for compliance could void the user’s
authority to operate the equipment.
3. Registered Trademarks
1. Windows, Windows 98 SE, Windows ME, Windows 2000, Windows XP and Windows Media Player are the
registered trademarks of Microsoft Corp.

7
4. Product Features
z Light just like a feather -26g
z It was born for the outdoor sports-water resistance such as rain, sweat
z USB 2.0 High speed
z Support MP3, WMA, ASF, OGG (Q1~Q10)
z Random
z Edit your own Play List
z Resume
z Various EQs such as Normal, Rock, Jazz, Classic, Pop, Live
z User friendly UI
z FM Radio Listening
z Built-in Lithium Polymer Battery
z Firmware Upgradeable
z Use it as a Removable disk

8
5. Package Contents
Main Unit, Install CD (including User’s manual), USB Cable , Quick Guide, Earphones, A/C adapter (Option)
[NOTE] The above components may change without prior notice for enhancement of product performance.
9
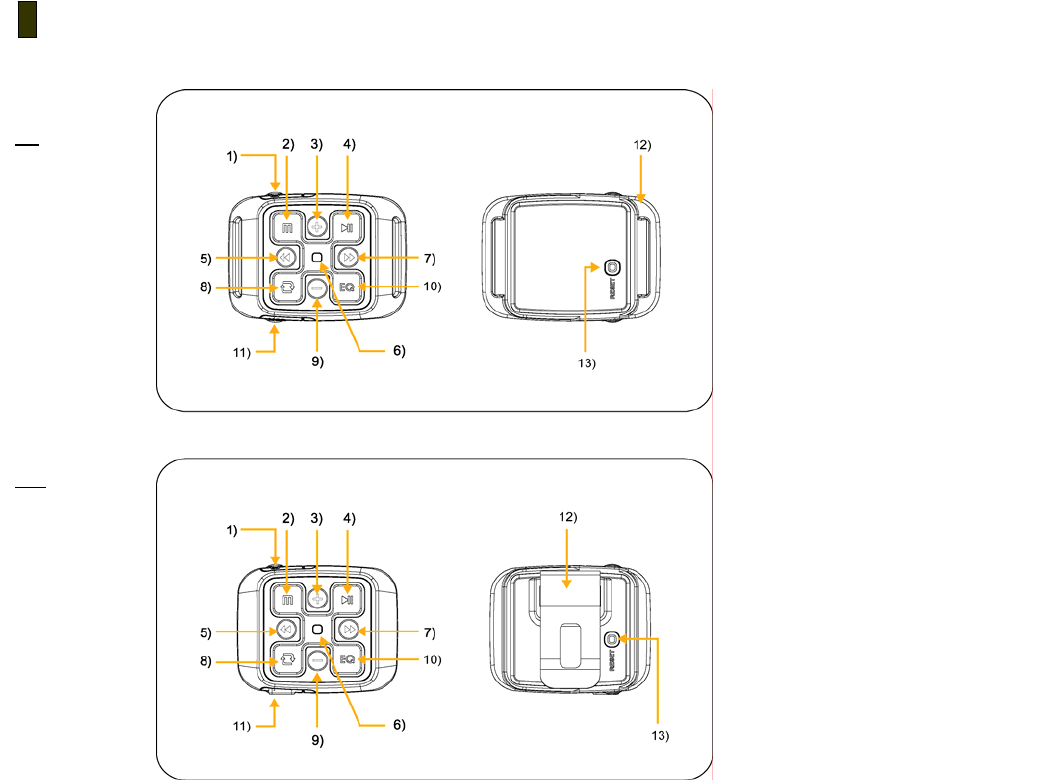
6. Product Overview
)
1) Earphone Jack
2) Mode change
3) Volume +
4) Power On / Off
5) REW
6) LED
7) FF
8) Auto Scan / Shuffle
9) Volume –
10) EQ
11) USB Cover
12) X2: Clip for hang
X3: Band Clip
13) Reset button
X2
X3
10
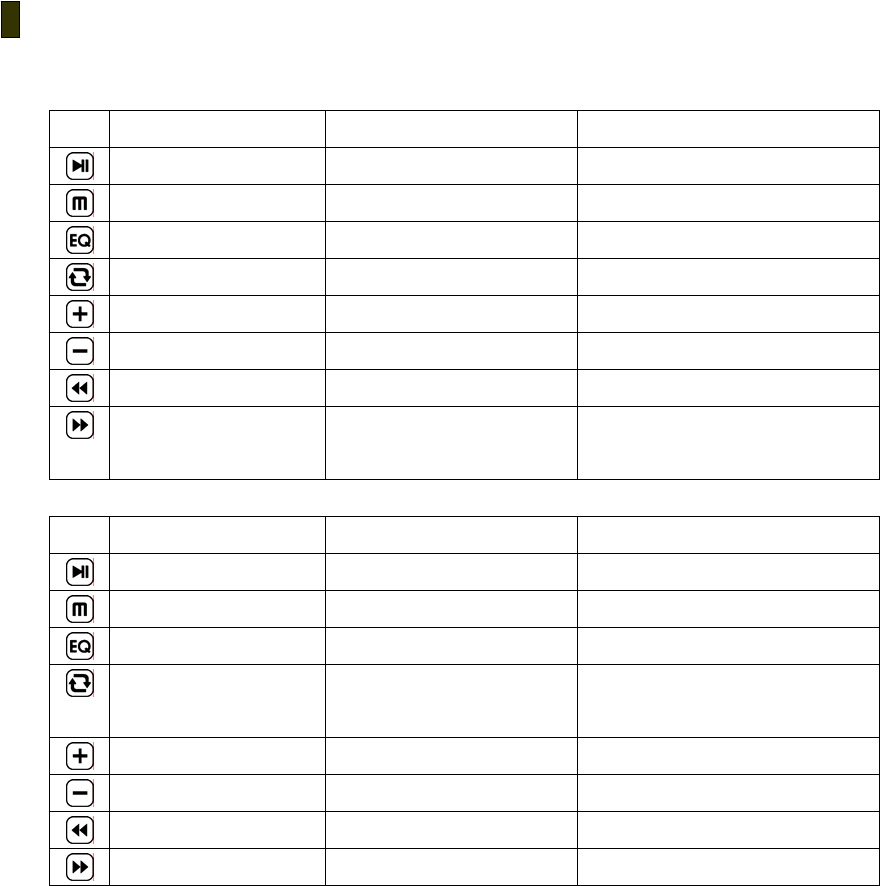
7. How to use buttons
MP3 Mode
Button Name Press Short Press Long
Play / Pause Play / Pause Power On / Off
Mode Switch to the FM Mode LED On / Off
EQ EQ Change Move to the Normal EQ
Shuffle / Auto Scan Play in random Play in order
Volume + Increment the volume Increment the volume continuously
Volume - Decrement the volume Decrement the volume continuously
REW Move to the previous track Rewind (to the first part of the file).
FF Move to the next track Fast-forward (go ahead while pressing the
button.)
FM Radio Mode
Button Name Press Short Press Long
Play / Pause Play / Pause Power On / Off
Mode Switch to the MP3 Mode LED On / Off
EQ - -
Shuffle / Auto Scan Move to the next channel After auto scanning, move to the first
channel
Volume + Increment the volume Increment the volume continuously
Volume - Decrement the volume Decrement the volume continuously
REW Decrement 50KHz Previous channel scan
FF Increment 50KHz Next channel scan

11
LED
MP3 & FM Mode RED & BLUE LED blink alternately
Transmission Data A BLUE LED blinks continuously
Low Battery When the battery is low, a red LED blinks for a while. Then the device will not be functioned. After
that the device turns off.
Play -> Pause RED & BLUE LED Off
Pause -> Play RED & BLUE LED On

12
Chapter 2 BASIC OPERATIONS
1. Before installation
Minimum requirements for software installation
z Pentium 133 MHz or above
z Windows 98SE / ME / 2000 / XP
z More than 20 MB of available hard disk space
z CD-ROM drive
z USB port support
(!) For Windows 2000 systems, you must log in to an account with administrator privileges for software
installation.
(!!)The USB driver is automatically installed for Windows 98SE users when installing the program using
the master CD, and may be recognized without installing a separate drive in Windows ME/2000/XP.
2) USB driver confirmation method
● Windows 98SE : Control Panel → System → Device Manager → General Serial Bus Controller
● Windows 2000 : Control Panel → System → Hardware → Device Manager → General Serial Bus Controller
● Windows XP : Control Panel → Performance and Maintenance → System → Hardware → Device Manager
→ General Serial Bus Controller
13
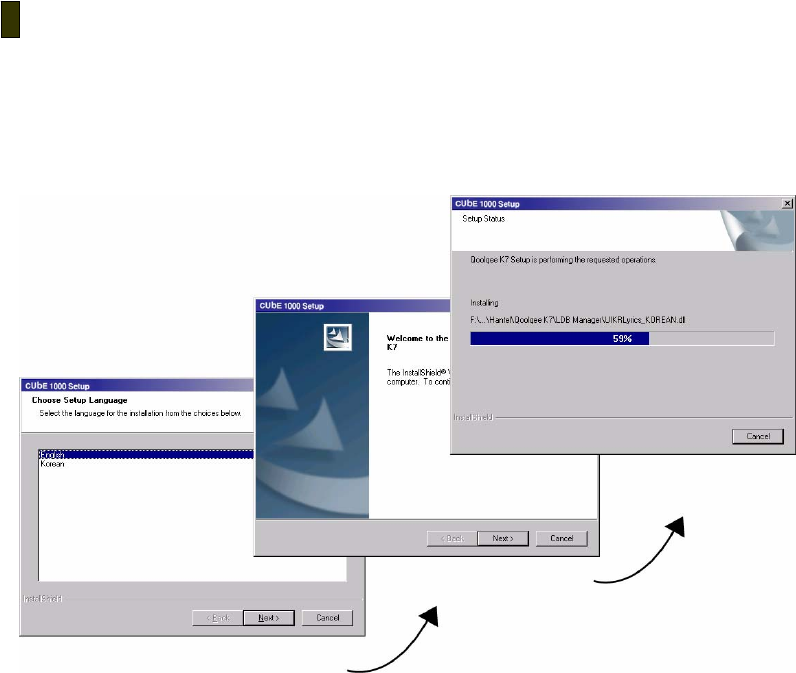
2. Installing software
- Install CD
1) Insert the installation CD into the CD-ROM drive.
2) Choose "Next" in the windows that follow.
14
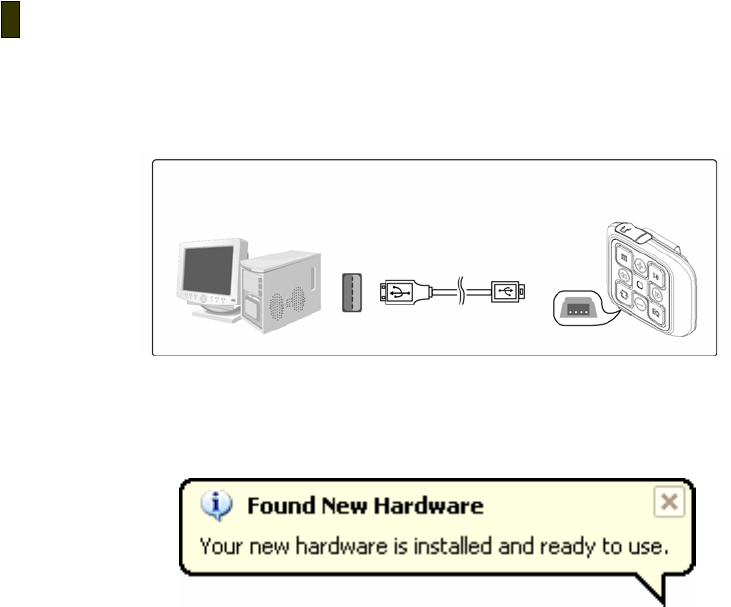
3. Connecting the product to a PC
1) Connect the USB port of the product and the USB port of your PC with the cable provided.
The connection should be made after the product is turned on.
2) Following the message "Searching for a new device", the required USB driver is installed.
The installation screen may not be visible.
(!) Connecting the product to your PC while playing or while another operation is in progress may cause
the product to malfunction. Please make sure that all operations in progress are stopped before connecting.
15
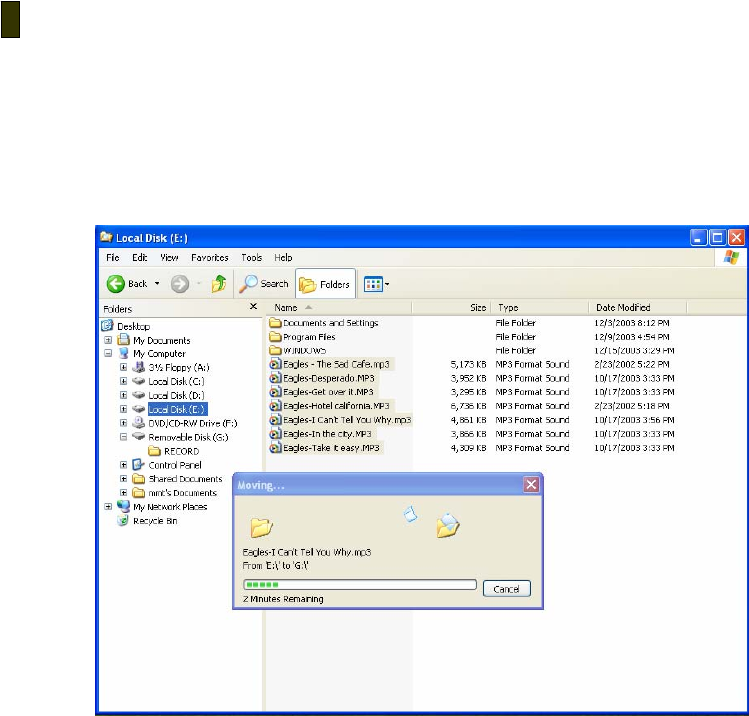
4. File Management using a removable disk
-File Upload / Download
1) After connecting the player to your PC, run Windows Explorer.
2) After selecting a file or a folder to save, drag & drop the selected file or folder to the desired folder in the
removable disk drive.
[NOTE] When saving a music file in the removable disk, it is recommended to create a separate folder
shown in Windows Explorer.
[NOTE] Do not remove the USB cable while files are being moved. It may cause the product to malfunction.
16
-Format
1) It is possible to format in Windows explorer.
(!) Once formatting is done, all the data in the removable disk is deleted. Please make sure to back up all
important data before formatting
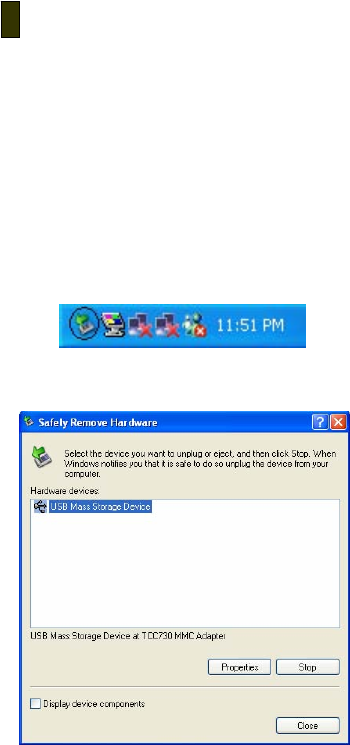
5. Disconnecting the product from a PC
1) Double-click the "Safely Remove Hardware" icon in the system tray at the lower right corner of the PC screen.
2) Select a USB device and click the <Stop> button.
When the message "Safely Remove Hardware?" is displayed, click the <OK> button and then unplug the USB cable
from the product.
[NOTE] In Windows 98 systems, the above icon is not available in the system tray.

17
6. Firmware Upgrade
● Firmware upgrade is needed to keep the product up-to-date.
1. Download the latest YUF file from our web page.
2. Connect the product to your PC.
3. Copy the downloaded YUF file to the root directory of the product.
4. After removing the product safely from your PC, turn the product on again.
5. Firmware upgrade begins to progress as the player boots.
(!) Since the player needs to be powered on for firmware upgrading, please be sure to have it fully charged before
starting the firmware upgrade.
(!!) Do not turn off the device while processing the firmware upgrade, it may cause the program error.
7. Mode Switch
Press the <Mode Change> button briefly to switch the mode.
(Select from MP3 or FM modes to change to.)
18
chapter 3 MP3 Mode
1. MP3 Play / Pause
Press the <Play / Pause> button briefly to switch between Play and Pause.
2. Move to the next / Previous file
Press the <REW / FF> button to move to the next / Previous track.
3.Rewind / Fast-forward
Press and hold the <REW >button to rewind while playing. It will go to the first part of the file.
Press and hold the <FF>button to fast-forward while playing. It will go ahead while pressing the button.
4.Repeat Mode setup
you can specify how to repeat a track. Press the <Shuffle / Auto Scan> button briefly to listen in order.
Press and hold the <Shuffle / Auto Scan> button to listen in random.
5. LED On / Off
Press and hold the <Mode Change> button to change the LED On / Off status.
6. EQ
You can select ad enjoy one of the EQ settings, such as Normal, Rock, Jazz, Classic, Pop, Live. Press the
<EQ>button to change the EQ status. Press and hold the <EQ>button to go back to the Normal EQ.

19
7.Volume Control
Press the <Volume + / ->button briefly to increase/decrease the volume level. Press and hold the
<Volume + / ->button to increase/decrease continuously.
20
chapter 4 FM Radio mode
1. How to scan
Press and hold the <REW / FF> button to scan the previous / next channel.
2. How to auto-scan
Press and hold the <Shuffle / Auto Scan>button to auto-scan. After scanning, it will go to the first channel.
3. Changing channel
Press the <REW / FF>button to set up the frequency.
Press the <Shuffle / Auto Scan>button to go to the next channel, while listening..
4. LED On / Off
Press and hold the <Mode Change> button to change the LED On / Off status.
6. Volume Control
Press the <Volume + / ->button brief increase/decrease the volume level.
Press and hold the <Volume + / > button to increase/decrease continuously.
21
chaper 5 MISCELLANEOUS
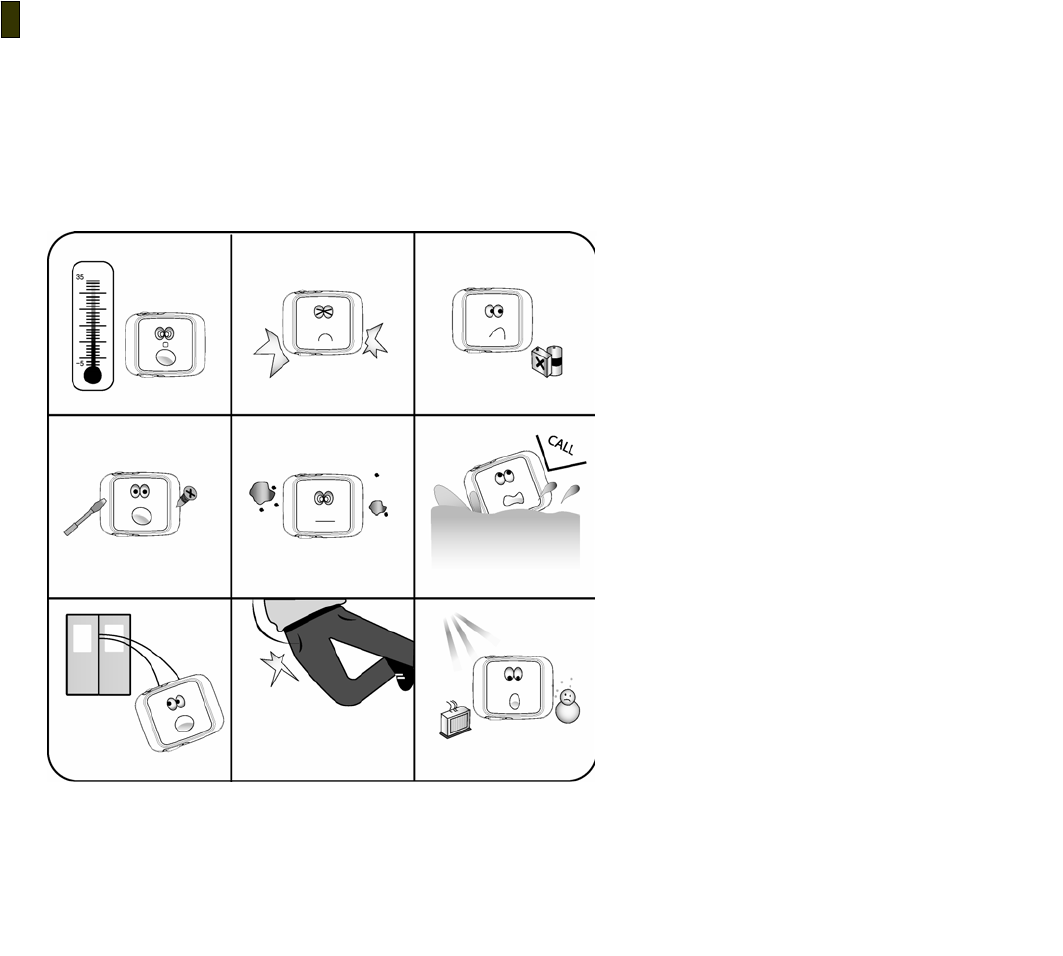
1. General Cautions
The following content is provided to protect the user's safety and prevent property damage. Please read it thoroughly for
correct use of the product.
1) Do not store the product where the temperature is too
high (over35℃) or too low (bellow-5℃).
2) Do not drop the product, subject it to impact or place it
near a magnet.
3) Avoid contact with chemicals such as benzene or thinner
as they may cause deterioration of the product.
4) Do not attempt to disassemble, repair or modify the
product.
5) Avoid dusty or dirty locations.
6) Do not make the product wet or drop in water.
7) Please exercise care when using the neck strap as the
strap can get caught in a door.
8) Falling or colliding while carrying the product In your
pocket may cause injuries such as bruising or bone fracture.
9) Do not store the product in humid places. Avoid direct
heat source such as a heater.
22
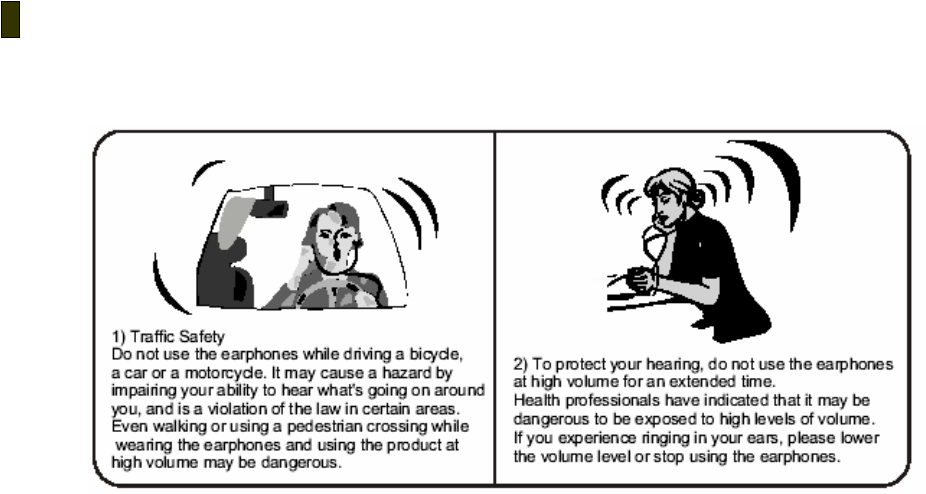
2. Earphone-related Cautions

23
3. Troubleshooting
Q. The product does not power on.
A. Check the Hold switch. If the Hold switch is locked, the device doesn’t get any key input. Unless the Hold switch is locked, the
battery might have been completely discharged. Connect the product to a USB port of your PC to see if the power comes on.
Q. The power goes off automatically.
A. After changing to the pause status the product will turn off automatically in 1 minute. Or if the battery is low, the device goes
power off automatically. Please check the battery.
Q. There is no sound output.
A. Check if the volume level is set to "0".
Q. There is some noise during listening to the music by earphone.
A, Check if the earphone jack has any foreign matter on it.
A. If any part of the MP3, WMA ,OGG, ASF file is damaged, it may result in sound distortion or noise. Try playing another music
file to see if this is the cause of your problem.
Q. I can't download a file.
A. Make sure that the USB cable has been properly connected.
A. Check if the OS of your PC is Windows 98. (For a Windows 98 system, you need to install a driver separately. The driver is in the
Install CD or available at www.qoolqee.com)

24
4.Product Specifications
Classification Option Specification
MP3 MPEG1,2,2.5 Layer3(8~320Kbps, VBR)
WMA Version 9 (32~192Kbps)
ASF OK
OGG Ogg Vorbis (Q1–Q10)
파일 형태
MS DRM PD-DRM 9.0
USB version USB 2.0 (High Speed : 25 Mbps, transmission speed : 480Mbps), mass storage
PC Interface Supported OS Windows98SE / ME / 2000 / XP and MAC 9.2
FM Radio FM Tuner(20Preset), Band selectable
File System FAT12, FAT16, FAT32
Audio post
Processing Equalizer Normal, Rock, Jazz, Classic, Pop, Live
Music play
Output power FM play TBD
Music play Over 85dB
S/N ratio FM play Over 50dB
Music play 20 Hz ~ 20 KHz
Frequency
range FM play 76MHz ~ 108 MHz
Distortion Under 0.1 %
Battery Li-polymer ( Under 350mAH )
Earphone 3.5φ stereo, 16 Ω, 110±4dB at 1KHz