Hanwang Technology WR61005 WISEreader User Manual
Hanwang Technology Co., Ltd WISEreader
User Manual
WISEreader N618
E-Book Reader
User Manual
Contents
QUICK START GUIDE..........................................................................................4
DEVICE BUTTONS....................................................................................................4
TIPS AND ADVICE ....................................................................................................6
BASIC OPERATIONS ...........................................................................................8
MAIN MENU .........................................................................................................8
READING INTERFACE ................................................................................................8
RECENT FILES .........................................................................................................9
SURFING INTERNET .................................................................................................9
BOOKCASE...........................................................................................................11
DIGITAL EDITIONS ................................................................................................. 17
PICTURES ............................................................................................................17
AUDIO ................................................................................................................18
SINGLE/CYCLE: USING THE STYLUS, CLICK “REPEAT/CYCLE” TO SELECT THE PLAYING............19
NOTEPAD ............................................................................................................20
MEMO ...............................................................................................................23
TOOLS ................................................................................................................25
SETTINGS ............................................................................................................25
ADOBE READER INSTRUCTIONS ...................................................................... 32
FORMATS ............................................................................................................32
DRM .................................................................................................................32
STEPS FOR SETTING UP DRM ..................................................................................32
OTHER OPERATIONS........................................................................................ 34
BATTERY CHARGING...............................................................................................34
FILE MANAGEMENT ..............................................................................................34
APPENDIX ....................................................................................................... 36
TECHNICAL SPECIFICATIONS.....................................................................................36
WARNINGS..........................................................................................................36
PRODUCT MAINTENANCE........................................................................................39
Contains Reader® Mobile technology by Adobe Systems
Incorporated.
Due to our continuous updates on the product, all figures
in this manual are only for reference and may change
without notice.
Quick Start Guide
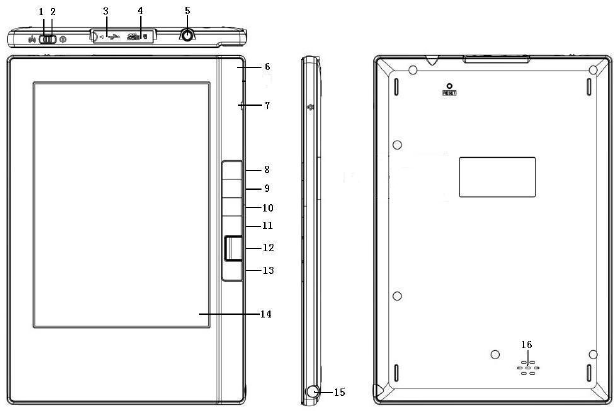
Device Buttons
1) Network switch
Push this button to left to turn ON/OFF the wireless network.
2) Power button
Push to the right to turn the device on/off. Push to the
right and hold to turn off the device directly.
3) Mini USB port

The USB connection port is used for charging the device and
transferring data to and from a PC.
4) Micro SD card slot
Insert Micro SD card here.
5) Earphone jack
Listen to the audio via earphones
6) LED indicator
The red indicator will illuminate when the device is charging;
the yellow indicator will glow while the device is being used.
7) Microphone
Used for recording audio.
8) MENU button
Press this button to display the function menu.
9) Return/Cancel button
When making a selection or inputting information,
press this button to cancel the operation. In
sub-menus and interfaces, press this button to return
to the previous interface.
10) Tab
When navigating file lists, press the “Tab” button to
turn to the next page. In the reading interface, press
the “Tab” button to turn ten pages at once.

11) Button
Press this button to turn the page forward.
12) OK button
When viewing lists or dialog boxes, press the “OK”
button to confirm the operation. The “OK” button will
be illuminated to indicate the corresponding function
is being processed; the light will turn off while the
system is sleeping or turned off.
13) Button
Press this button to turn the page backward.
14) Display screen
15) Stylus and stylus slot
The stylus is automatically enabled or disabled when
removed from or placed into its slot.
16) Speaker
Tips and advice
1.Return to the main menu: In operating interfaces
,
press the “MENU” button and
then select “Main
Menu.” In the “Recent Files,” “System Settings,”
and
“User Manual” interfaces, press the Return button
to
return to the main menu.
2.When reading, press the “OK” button
to refresh the
screen.
3.While reading, input the page number and press “OK” to
jump to the corresponding page.
4.Power saving techniques: use sleep mode;
place
the stylus in its slot when not in use; move the stylus
away from the screen when not in use.
5.Handwriting recognition settings: for
slow writing
speeds select “long,” for faster writing speeds select
“short.”
6.It is faster and safer to use a Micro SD card reader to
transfer data between PC and device.
7.If you forget your password, please email the Serial Number
on the back of the device to ebookstech@hanvon.com. We
will then send you a new password.
Basic Operations
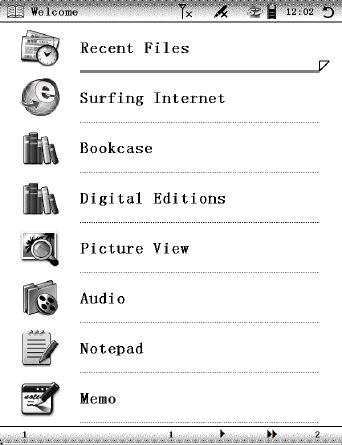
Main Menu
The main menu is displayed when the device is turned on.
Reading interface
The screen is separated into 3 parts. The status area is
located at the top of the screen; the reading and
writing area is in the middle; the page information
area is at the bottom.

1.Status Area: the e-book title, time, menu, WIFI,
stylus, Micro SD card, battery, and “ESC” icons are
located in this area.
2.Reading and writing area: function list, file lists, text and
pictures are displayed in this area.
3.Page information area: displays the current page number,
total number of pages, “Previous” and “Next” page buttons,
and skip forward/back 10 pages buttons.
Recent Files
The 14 most recent files will be displayed. Press /
buttons to select a book and press the “OK” button to confirm,
or use the stylus to open the book directly. The last page
read will be displayed when the book is opened.
Note: if one of the books on the list is deleted from the Micro
SD card, the reading record will still remain in the “Recent
Files” list but cannot be opened.
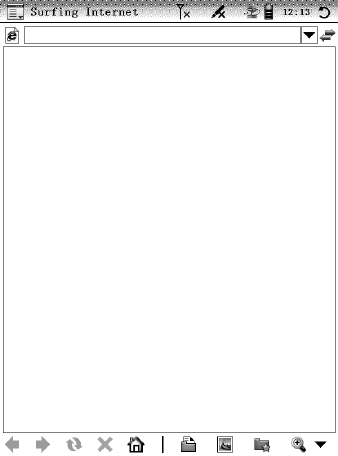
Surfing Internet
Connect to wireless network
: open Wifi switch and click
wireless icon, choose the network and input the right
password in the popup list of network, then the system begin
to connect to wireless network. When succeeding ,the signal
strength will be displayed in the screen.

Start the browser: press “Surfing Internet” and the “Open
WIFI?” prompt will be displayed; press “OK”
to access internet.
Click “Home Page” and a keyboard will appear at the bottom
of the interface. Enter the web address with the stylus and
press “OK” to connect to the network.
Click” ”、
、、
、” ” to switch between pages.
Click” ” to make refresh action.
When the current page has not finished loading, click ” ” to
close the loading page.
Click ” ” to return to the default page.
Click ” ” to do some related operations.
Click’’ ” to choose the display mode of the current webpage.
Click ” ” to do password management and historty and
favorites management operations.
Click” ” to make the corresponding scaling operation in
this page.
Bookcase
Book reading
Select “Bookcase,” then select a book and press OK to open
it.
Font Settings
While reading TXT, HTXT and HTML documents, press the
“MENU” button and select “Font settings.” The “Adjust Line
Spacing” window will pop up. Select desired font size; press
up/down key, or click -/+ to decrease or increase line spacing.
Click “OK” to confirm.
Fast page turning
When viewing lists, press the Tab button to turn to the
next page; when reading, press Tab to turn forward
10 pages.
Page jumping
While reading, press “MENU” button, and select
“Page Jump.” Enter the page number with stylus and
press “OK” to confirm. The book will jump to the
corresponding page directly. If you make a mistake,
press “cancel.”
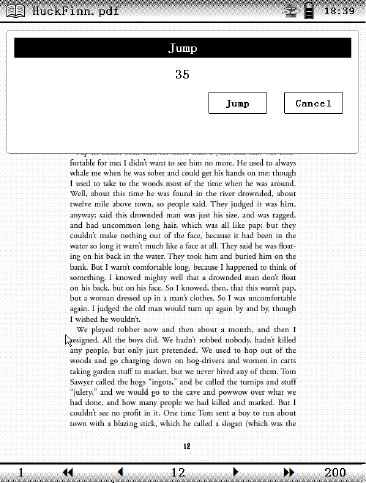
Note: If the number you’ve input exceeds the total number of
pages, the system won’t accept the operation.
Autopage
Press the “MENU” button and select “Autopage” to open
settings window. Select or input autopage time.
Gesture page jumping
In the reading interface, select “browse”,choose the stylus to
control flip.
Font size
For PDF and EPUB files, the device offers 3 font sizes: small,
medium and large. For TXT, HTXT and HTML files, choose
from 8 font sizes.
Page Orientation
Press the “MENU” button and then select “Rotate
Screen” to switch the display between portrait and
landscape views.
Supported formats
The device supports the following formats: TXT, HTXT, PDF,
EPUB, DOC, XLS and HTML.
Search
Press the “MENU” button and select “Search” to
open the search window. Input your search item and
click “Search” or press the “OK” button to search for
content. Click “Close” to close the window.
Bookmark
There are two kinds of bookmarking methods, one for files
(e-books) and one for directories (folders). File bookmarking
allows up to 5 bookmarks per file to be saved. Directory
bookmarking allows up to 5 bookmarks across multiple files
within the same directory to be aggregated and saved. To
choose the bookmarking method, from settings, select
“Continuous Turning.” Highlight the Picture / HTML / TXT
boxes to select directory bookmarking.
Add a bookmark: While reading, press “MENU” and select
“Bookmark…”. Click “Add” to bookmark the current page.
View bookmarks: Press the “MENU” button and select
“Bookmark…” to display the bookmark list. Select a bookmark
to open the corresponding page.
Note: the bookmarks will be sorted by date; only the
5 most recent bookmarks will be shown.
With image files, only directory bookmarks can be
made.
Remarks
While reading, press the “MENU” button and select
“Remark.” Add remarks and annotate file using the
stylus.
Clear Remarks: press the “MENU” button and select
“Clear Remarks…”, then select “Clr remarks from
page” to clear the remarks from current page. Select
“Clr remarks from file” to clear all remarks from the
file.
Note: remarks can be added to TXT, HTXT, HTML
,
PDF and EPUB files. For TXT, HTXT, HTML and
EPUB files, if the page orientation or font is changed,
the remarks will disappear. The remarks in PDFs,
whether embedded or not, are always displayed after
the page orientation or font changes.
Extract
When reading TXT, HTXT, and HTML files, press
“MENU” and select “Extract”, and then use the stylus
to draw a diagonal line from the upper-left to the
lower-right corner of the text to be extracted. The
“ ”button will pop up at the bottom-right of the
screen. Click “ ” to open the save window; press
“OK” to save. It will be saved in the Notepad with the
same name as source file. The saved text can be
read and edited.
Browse and edit excerpts: the extracted files are
saved in Notepad and can be edited.
Digital Editions
After your WISEreader is authorized by Adobe, open Adobe
Digital Editions on your PC. Turn on the activated WISEreader
and connect it to your computer to copy downloaded Adobe
books from Adobe Digital Editions to the folder named “Digital
Editions” in the device’s Micro SD card.
Pictures
Picture turning
Image Viewer
All pictures saved in the same folder can be browsed
continuously when the “picture” option in “Continuous
turning” under “Settings” is selected.
Viewing pictures
There are four display modes for viewing pictures: Fit
Window, Fit Width, Fit Height and Actual Size. Press
the “MENU” button and select the desired display
mode.
Switch picture orientation
From the “menu,” select “rotate screen” to switch
between portrait and landscape views
Supported formats
Supports the following formats: JPG, BMP, GIF, TIF and PNG.
Picture size
Support 3 million pixel maximum.
Audio
There are two audio functions: record and play.
Play music
Select “Audio” from the main menu and press the
“OK” button to display the audio list. Click the desired
audio file to open the “Recorder and Player”
interface.
Supports the following audio formats: mp3, wav,
wma.
Play recorded files
Select “Audio” from the main menu and press the
“OK” button. Then press the “Menu” button and
select “Audio” to open the “Player and Recorder”
interface. Click “Rec” to record. The recorded file will
be saved in the e_record folder as a WAV file.
Player and Recorder controls
Play/Pause: using the stylus, click “Play/Pause” to
play/pause music or recorded file. A speaker icon will
appear in the status area.
Record: using the stylus, click “Rec” to record, and a
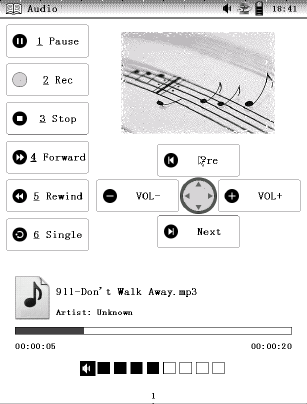
microphone icon will appear in the status area.
Stop: using the stylus, click “Stop” to stop music or
recording.
Forward/Rewind: using the stylus, click “Forward”
and “Rewind” to fast forward and rewind
Single/Cycle: using the stylus, click
“Repeat/Cycle” to select the playing
VOL+/-: click “VOL+/VOL-” to increase or decrease the
volume.
Pre/Next: press up/down direction buttons or click
“Previous/Next” to select the previous or next track
respectively.
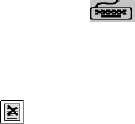
Notepad
Click “Notepad” to create a text file.
Edit Text: In default mode, use the stylus to write any
English words in the “Handwriting area” or click the
soft keyboard icon to input characters with
stylus. Click “Return” to save and then exit after
finishing.
Clear Text: click to clear current text.
Switch input method
Close soft keyboard input: click to change the soft
keyboard input to handwriting input.
Close handwriting input: click to change handwriting
input to the soft keyboard input.
Handwriting Recognition
In English Mode, the words you’ve written in the input
area will be recognized and converted to text.
Note: please keep letters of the same word close
together and ensure there is space between words.
Associated words: Associated words will appear in
the suggestion area. You can select the correct
words or click the arrow buttons located at the side of

the input area to browse more associated words.
If the word has been recognized incorrectly, please
choose the right word in the suggested words area.
Numbers, number strings and symbol
recognition
In default mode, only input English words and
symbols; select “123…” to input numbers, number
strings and certain symbols; select “?” to input “?,”
select “@” to input “@,” etc.
After you finish your text input, you may exit and the
text will be saved. When inputting text, press “MENU”
to select such operations as Main Menu, New Text,
and Delete Text.
Click “Main Menu” to return to the Main menu.
Click “New Text” to create another text.
You can also click the icon at the top to create another
text.
Click “Delete Text” to delete current text.
When several Texts have been created, they will be
listed under the Notepad directory. Select a text and
press the “MENU” button to implement the
corresponding operations: Main Menu; New Text;
Delete Text; Rename and Audio.
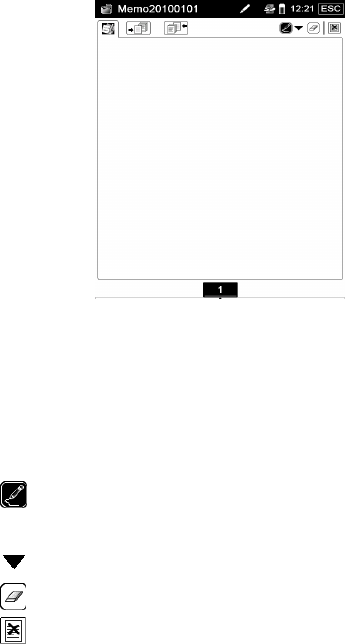
Memo
From the main menu click “Memo,” then press
“Menu” button and select “New Memo” to create a
new memo.
After creating a new memo, follow the instructions
below to create a handwritten memo
Click in the “memo” interface to make remarks
with the stylus.
Click to select line thickness.
Click to erase remarks.
Click to clear all remarks on the current memo
page.
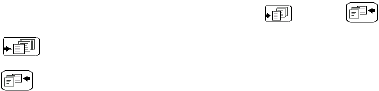
To add more pages, click or icons.
Click to add a new page before current page.
Click to add a new page after current page.
When finished, exit Memo mode or hit the “Return”
button to save your memo and exit.
Press the MENU button or click the Menu icon with
the stylus to open the function menu:
Click Main Menu to return to the Main Interface.
Click New Memo to create another memo file.
Click Clr Memo to clear all remarks in the current
memo.
Click Clr Page to clear remarks on the current page.
Click Forward to move to the previous page.
Click Backward to move to the next page.
Click Del Memo to delete the current memo.
Click Del Page to delete the current page.
When several Memos have been created, they will
be listed under the Memo directory. Select one and
then press the MENU button to implement the
corresponding operations: Main Menu; New Memo;
Del Memo; Rename.
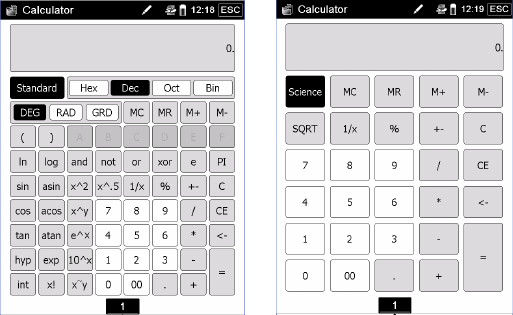
Tools
Calculator
Click “Science” or “Standard” to change calculator mode.
Settings
From the main menu, select “Settings” and press
“OK” to enter the system settings panel. Use “arrow
keys” or the stylus to select the desired operation.
Continuous Turning
All Pictures, HTML, or TXT files saved in one folder
can be browsed continuously when this feature is
activated
Note: This function also controls bookmarking modes.
See “Bookmarks” for more information.
Handwriting Input
Recognition Delay: there are three levels for
handwriting recognition delay time: Short, Medium
and Long. For slower writing speeds, select “Long,”
for faster speeds select “Short.”
Line Thickness: set line thickness for handwriting
recognition in Notepad mode; Thin, Normal, Thick.
Sleep Settings
Sleep: the device enters sleep mode if no operations
are present in the system queue; the LED indicator
will turn off and the internal system will sleep, but the
display will remain visible. Inputting a new operation
or pressing the keypad wakes the system. Select
“Yes” or “No” to enable or disable.
Sleep Delay: three intervals can be selected: Short, Medium,
and Long. Select “Short” and the system will enter sleep mode
after a few seconds of inactivity; select “Long” and the system
will enter sleep mode after roughly 15 seconds.
Recent Files
Select “Record” to keep a record of recently read
files.
Select “Don’t Record” if you do not want to keep a
record of recently read files in the Recent Files list.
Clear List: the Recent Files list will be cleared.
Keypad/Stylus Sounds
Select “On” or “Off” to enable/disable keypad and
stylus input sounds
Font Settings
Font effects: Clear and Smooth. Font choices: Arial
and Black.
System Time
Displays the system’s current date and time.
Set Time Zone: click “Set time zone” to open “Set
time zone” interface, and click direction keys to
choose the appropriate time zone. Then click “OK” to
save the new time zone.
Modify Time: click “Modify” to open the “Modify
Time” interface. Click on-screen buttons directly to
input time. Then click “OK” to save the new time.
Refresh Mode
There are two refresh modes: Partial and Global.
Partial Refresh: part of the screen will be refreshed.
Global Refresh: the whole screen will be refreshed.
Under direct sunlight or in low temperatures, global
refresh is recommended.
Factory Default
Restore default: restore the system to the factory
default settings.
Clear Temp Files: clear the system’s temporary files.
If too much of the system memory is being consumed
or the device’s performance is worsening, please
execute this function.
Note: this function clears all bookmarks and all books
will be reset to be read from the beginning.
Clear Remarks: all remarks left in ebooks and files
will be cleared.
System Maintenance
Driver Updates and Software Updates
Please download official upgrade packages from the
Hanvon website. Copy decompressed packages into
the root directory of the SD card.
If the update packages are “Update.bin” and
“Update.cde,” execute the “Driver Update”. If the
update packages are “hwepb.cck” and “hwepb.upd,”
execute the “Sof. Update”.
Note: During the update process, please ensure the
battery is not low. If the device turns off during an
update, the device may be damaged. It’s best to
remain connected to a PC via USB cable when
updating.
Set Password: click “Set Password,” then enter new
password and reconfirm. Click “OK” to set changes.
Note: your password can’t be over 16 characters.
Change Password: click “Set Password,” then enter
old password, new password and reconfirm. Click
“OK” to set changes.
Cancel Password: click “Set Password” and enter
old password; leave new password fields blank. Click
“OK” to set changes.
Forgot Password: if you forget your password,
email our technical support with your device’s Serial
Number. They will email back a password to clear
your old password.
Set Startup Picture: copy image file named
“start.jpg” to the root directory of the SD card. Click
“Startup Pic” to set. Note: picture filename and size
must be start.jpg and 600*800px respectively.
Cancel Startup Picture: delete start.jpg from the
root directory of the SD card. Click “Startup Pic”, and
then confirm to cancel startup picture.
Update Resources: copy resource files to the root
directory of the SD card, and then click “Upd.
Resources.” After update is completed, please delete
resources.
Device Information
Displays the Device ID and version information.
Device ID: use the device ID to obtain product
support, including technical services, legal ebook
resources, reading authorizations, etc.
WIFI Settings: There are four time settings for “Auto
Shutdown”:Never, 10 mins, 15 mins, and 20 mins.
IP Settings: Auto IP and Static IP. Select Auto IP if you are
unsure how to manually configure the network.
Static IP setting: enter a valid IP address, subnet mask,
gateway and DNS server.
MAC view: click on “MAC” to look at the MAC address of the
device.
Language options: the system offers 12 language settings.
Auto Shutdown Settings
After 40 mins: if no operations are input into the
system for 40 mins, the device will shut down
automatically.
After 60 mins: if no operations are input into the
system for 60 mins, the device will shut down
automatically.
Never: the device will not shut down automatically.
Adobe Reader Instructions
Formats
Supports PDF and EPUB files.
DRM
1. Adobe Digital Editions 1.5 or later must be
installed on your computer in order to authorize
Adobe DRM projection.
2. Digital Rights Management (DRM)
The user’s level of access to a book will depend on
the book’s DRM.
a. Fully viewable: the entire book can be read.
b. Restricted: all or portions of the book cannot be
read.
3. Expiration date
Varies according to each book’s DRM
Steps for setting up DRM
Step 1: Install the Adobe Digital Editions software on
your computer and apply for a user name and
password.
Step 2: After installation, open Adobe Digital Editions
software and enter your Adobe account Information.
Step 3: With Digital Editions open on your computer,
turn on the WISEreader device and connect to
computer. An authorization window will open,
prompting activation. Click “Authorize” to complete
the activation process.
Note: Computer should be connected to internet
throughout entire process.
Additional Notes:
1. The authorization information is stored on the
Micro SD card. If a new Micro SD card is used, the
device will need to be re-authorized.
2. If you’d like to register your WISEreader device
with a new Adobe Digital Editions account, please
delete the hidden folder in the Micro SD card’s root
directory called “.adobe-digital-editions.”
Please refer to below website for more information.
http://www.adobe.com/products/digitaleditions
Other operations
Battery charging
Please charge the battery when the power runs out.
The device can be charged via a USB cable or
charger (optional accessory).
The battery can be charged while the device is
powered on or off.
Connect the device to a computer with the USB cable
.
The red LED indicator will glow. The battery icon in
the status bar indicates that the battery is charging.
Note: charging time is approximately 4 hours. The red LED indicator will turn
off when charging is complete. Please ensure the battery is fully
charged. This will extend the Lithium battery life.
File Management
Connect to computer
Connect the device to a computer with the USB cable.
Turn on the device, “Are you sure you want to transfer
data?” will be displayed on the screen. Press “OK” to
confirm. The computer should automatically detect your
device.
Manage Files
Select “Removable disk” under “My computer” to
remove, copy or delete files or folders from the
device.
There are several pre-loaded folders on the Micro SD
card: e_audio, e_book, e_image. Save audio, ebook,
and image files in their corresponding folders. Notes
and Memos created using the device will be saved in
the “e_notepad” and “e_note” folders respectively.
Note: these pre-loaded folders can’t be renamed or
deleted. Please save the files in the correct folder,
otherwise, the files cannot be opened. For example,
save TXT, HTXT, PDF, EPUB, DOC, HTML files into
“e_book”, save pictures into “e_image” and save
music into “e_audio.”

Appendix
Technical Specifications
Dimensions 176.6mm (H) × 124.8mm (W) ×
10.5mm (D)
Screen
6" Electronic Paper Display
(EPD);
16-level grayscale; Ratio
4:3; Pixel resolution: 800×600
Weight 260g(Net)
PC Operating
System Windows2000/XP/Vista
Storage
device
4G Micro SD card (expandable
up to 32GB)
Power supply
internal Lithium battery
2350mAh; USB Charger
Operating
temperature 0℃~40℃,32℉~104℉
Storing
temperature -20℃~55℃,-4℉~113℉
Warnings
Restarting the device
1.If the device has frozen, click the “RESET” button
located at the back of the device to restart the

system.
2.When the power runs out and device can’t be
turned on, please charge the device.
Stylus not functioning properly
1.Please check whether the stylus is turned-on by
locating the stylus icon in the status area.
2.In Memo mode, please be sure “ ” is selected, not
“ ”.
3.The system will sleep if the stylus is left on top of
screen for too long. Remove the stylus from the
screen briefly and re-touch screen to wake the
device.
4.Be sure the stylus is not damaged.
Remark can’t be used
If the stylus is on, check the function menu to make sure the
“Remarks” function has been selected.
WIFI won’t open normally
Please close application and try again. About the Micro
SD card
If the Micro SD card is not recognized, re-insert the
Micro SD card or restart the device. When the
system is reading data, please do not remove the
Micro SD card or reset the device.
If the Micro SD card needs to be formatted, please
backup all data on the Micro SD card first, and then
select FAT-32 format.
Miscellaneous
1. Under direct sunlight or in low-temperatures
, the
characters displayed on the screen may fade. P
lease
enter the “Settings” interface and select “Global
” to
refresh the entire screen.
2. Due to memory limitations,
the device might not
read certain complicated DOC, PDF and
HTML files
properly.
3. The display format can’t be changed in t
he
following interfaces: “Recorder and Player”, “Settings”
,
“Memo”, “Notepad”, and any menu.
4. Prevent hearing impairment
Using the earphones for an extended period of time
at a high volume may damage your hearing. Please
adjust the volume to a lower level before using the
earphones.
5. Technical support: ebookstech@hanvon.com.
6. Web site: http://www.hanvon.com.
Product maintenance
Driver Updates and Software Updates
Please download official upgrade packages from the
Hanvon website. Copy decompressed packages into
the root directory of the SD card.
If the update packages are “Update.bin” and
“Update.cde,” execute the “Driver Update”. If the
update packages are “hwepb.cck” and “hwepb.upd,”
execute the “Sof. Update”.
Note: During the update process, please ensure the
battery is not low. If the device turns off during an
update, the device may be damaged. It’s best to
remain connected to a PC via USB cable when
updating.
Operating environment
The operating temperature for this device is from 0℃
to 40℃ (from 32℉ to 104℉). The device’s
performance will deteriorate when operating outside
of this temperature range. Please avoid using this
device under the direct sunlight or in damp and dusty
places. In very cold areas, please avoid using this
device outside during the winter.
Keep slots clear
The slots on the device are used for heat output,
please keep slots clear.
Safety
Please don’t read while driving or operating
machinery. This device contains parts that are
sensitive to impacts. Do not drop, bend or subject to
high pressure.
Cleaning
Do not clean the device while it is on or charging.
Please use a soft cloth to clean the screen and
faceplate.
Avoid cleaning with water, soap, solvent or alcohol.

FCC Interference Statement
The device complies with Part 15 of FCC rules. Operation is subject to the following two
conditions:
(1) This device may not cause harmful interference.
(2) This device must accept any interference received, including interference that may
cause undesired operations.
This device has been tested and found to comply with the limits for a Class B digital
device pursuant to Part 15 of the FCC Rules. These limits are designed to provide
reasonable protection against harmful interference in a residential installation. This device
generates, uses, and can radiate radio frequency energy, and if not installed and used in
accordance with the instructions, may cause harmful interference to radio
communications. However, there is no guarantee that interference will not occur in a
particular installation.
If this device does cause harmful interference to radio/television reception, which can be
determined by turning the device off and on, the user is encouraged to try to correct the
interference by one or more of the following measures:
– Reorient or relocate the receiving antenna.
– Increase the separation between the equipment and the receiver.
– Connect the equipment into an outlet on a circuit different from that to which the
receiver is connected.
– Consult the dealer or an experienced radio/TV technician for help.
Warning:
Changes or modifications to this unit not expressly approved by the party responsible for
compliance could void the user’s authority to operate the equipment.
SAR Information
This device meets government requirements for exposure to radio waves. This device is a
radio transmitter and receiver. It is designed and manufactured not to exceed limits for
exposure to radio frequency (RF) energy. These limits are part of comprehensive
guidelines and establish permitted levels of RF energy for the population. The guidelines
were developed and confirmed by independent scientific organizations through periodic
and thorough evaluation of scientific studies. The limits include a substantial safety margin
designed to assure the safety of all persons, regardless of age and health. The exposure
standard for device employs a unit of measurement known as the Specific Absorption
Rate, or SAR. Under the guidelines for your device, the SAR limit is 1.6 W/kg. The highest
reported body SAR value is 0.295 W/kg.
NOTE: For body worn operation, this device has been tested and meets the FCC RF
exposure guidelines when used with an accessory that contains no metal and that
positions the device a minimum of 5 mm from the body. Use of other accessories may not
ensure compliance with FCC RF exposure guidelines.
The FCC has granted an Equipment Authorization for this device with all reported SAR
levels evaluated as in compliance with the FCC RF exposure guidelines. SAR information
on this device is on file with the FCC and can be found under the Display Grant section of
http://www.fcc.gov/oet/fccid after searching on FCC ID: XQIWR61005.