Hanwha Techwin DIGIMAX350SE Digital Camera User Manual
Samsung Techwin Co Ltd Digital Camera
UserManual.wiki
>
Hanwha Techwin
>
DIGIMAX350SE User Manual
User Manual
Navigation menu
Upload a User Manual
Namespaces
Wiki Guide
HTML
PDF
Info
Views
User Manual
Discussion / Help
Navigation

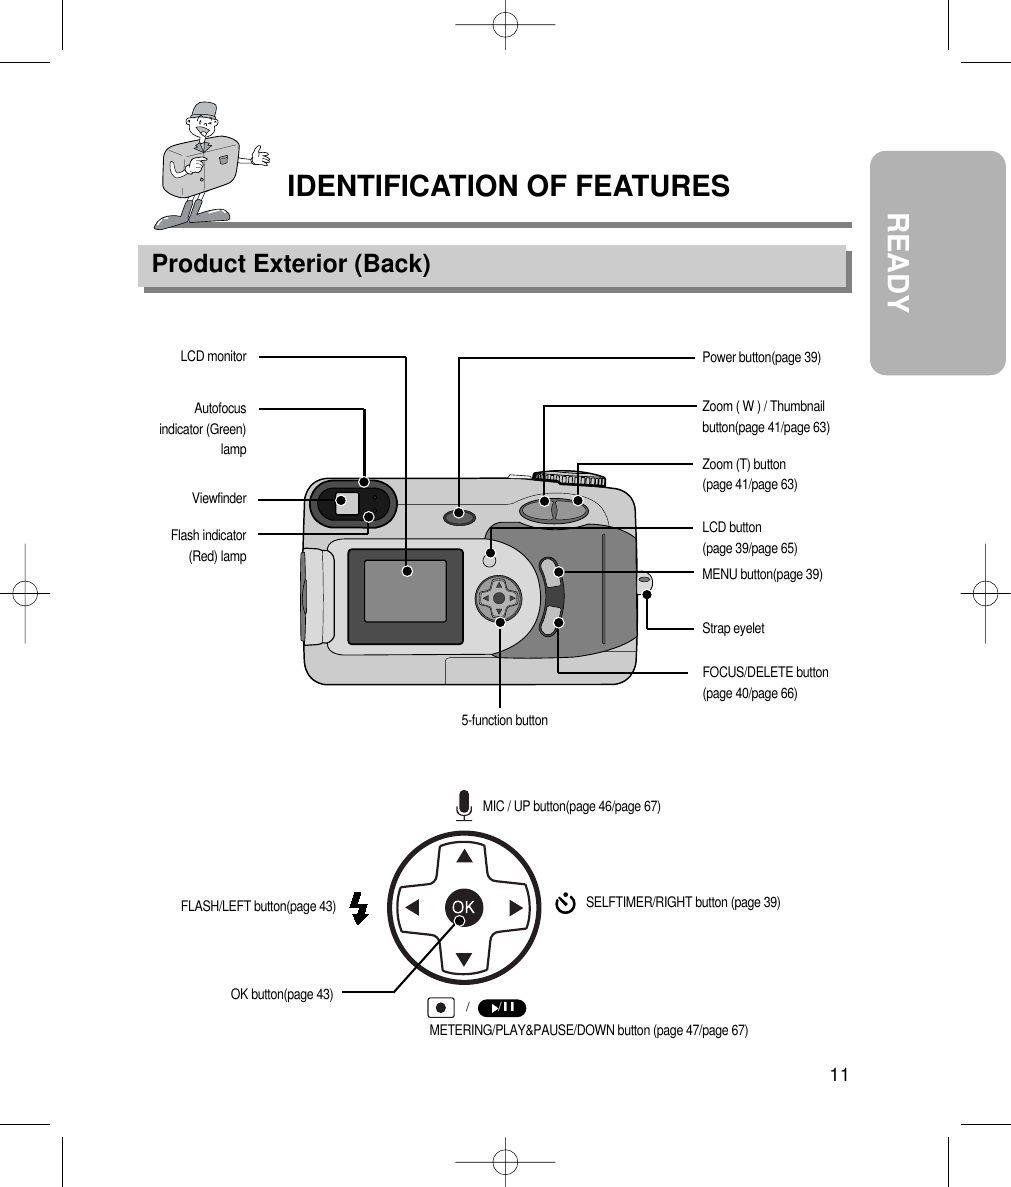
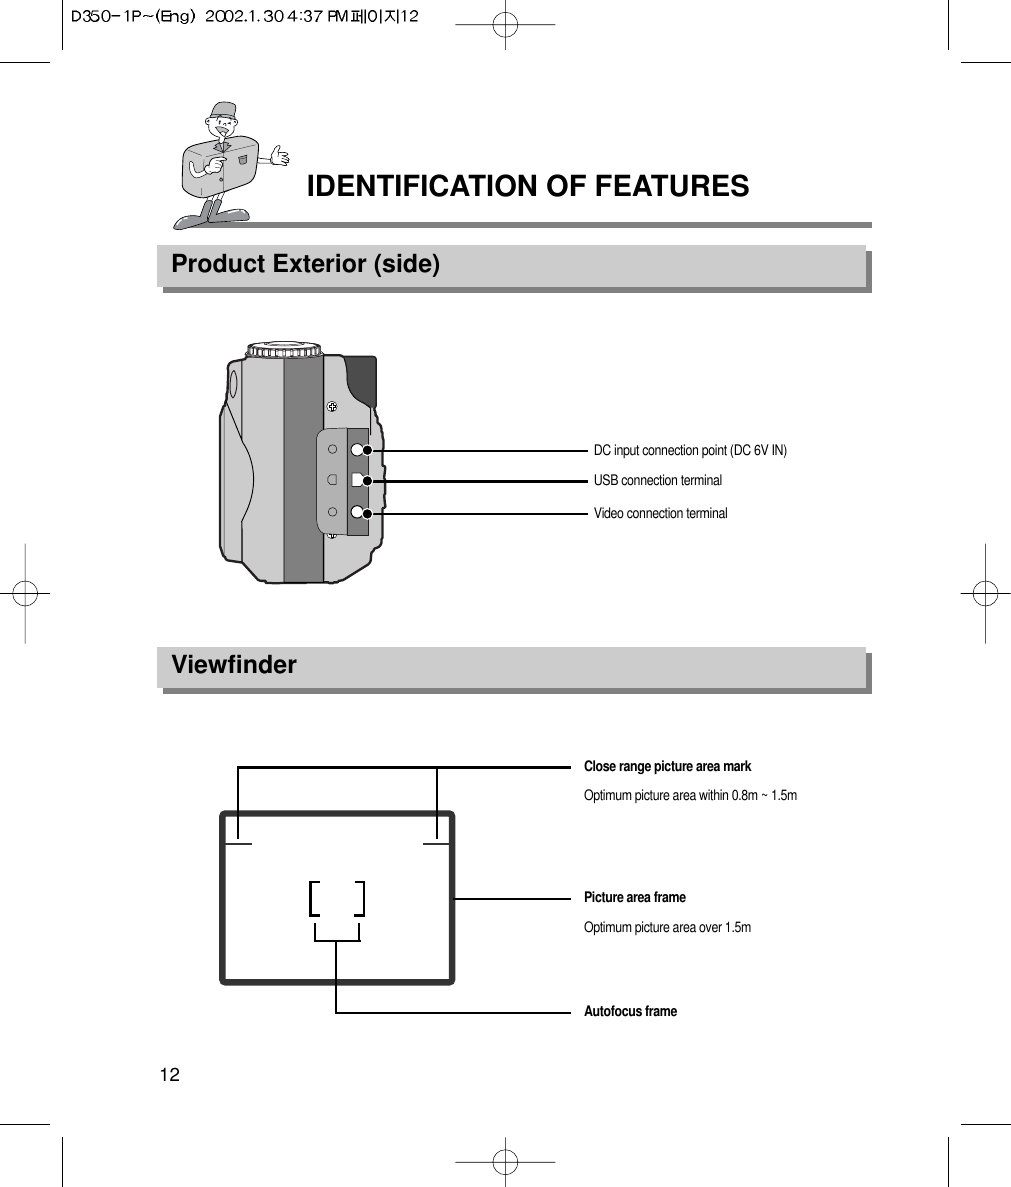
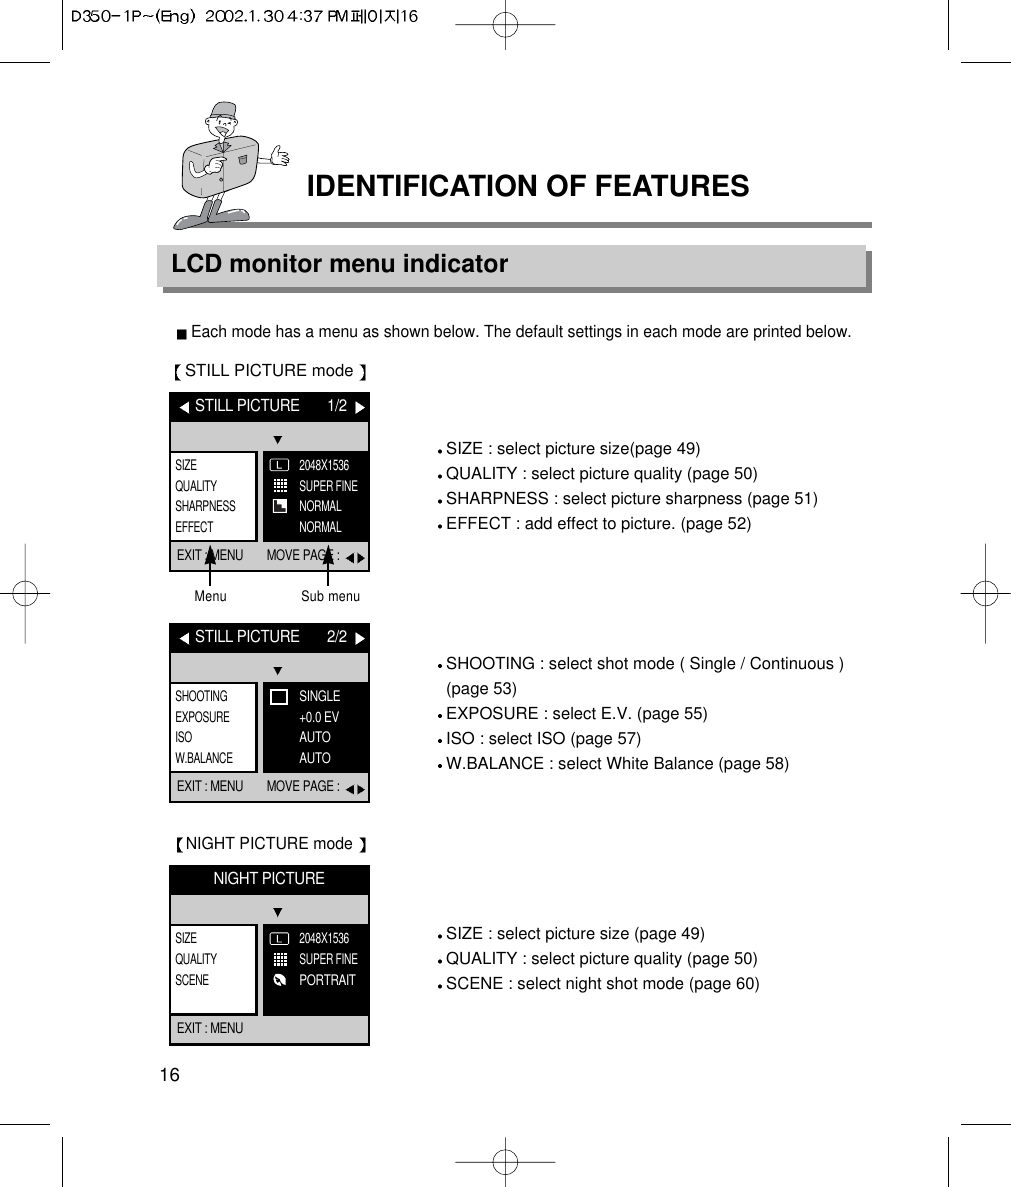
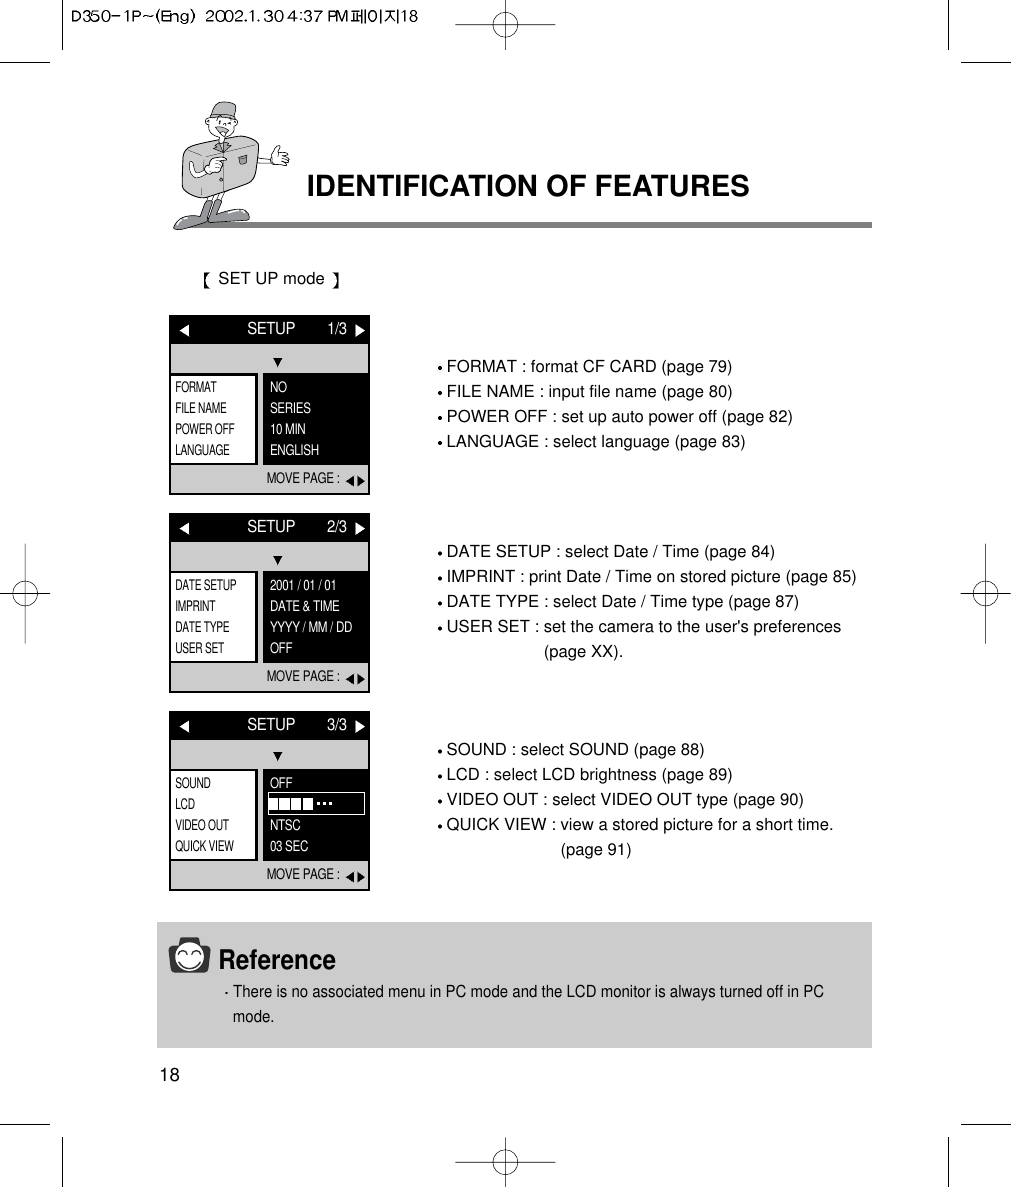
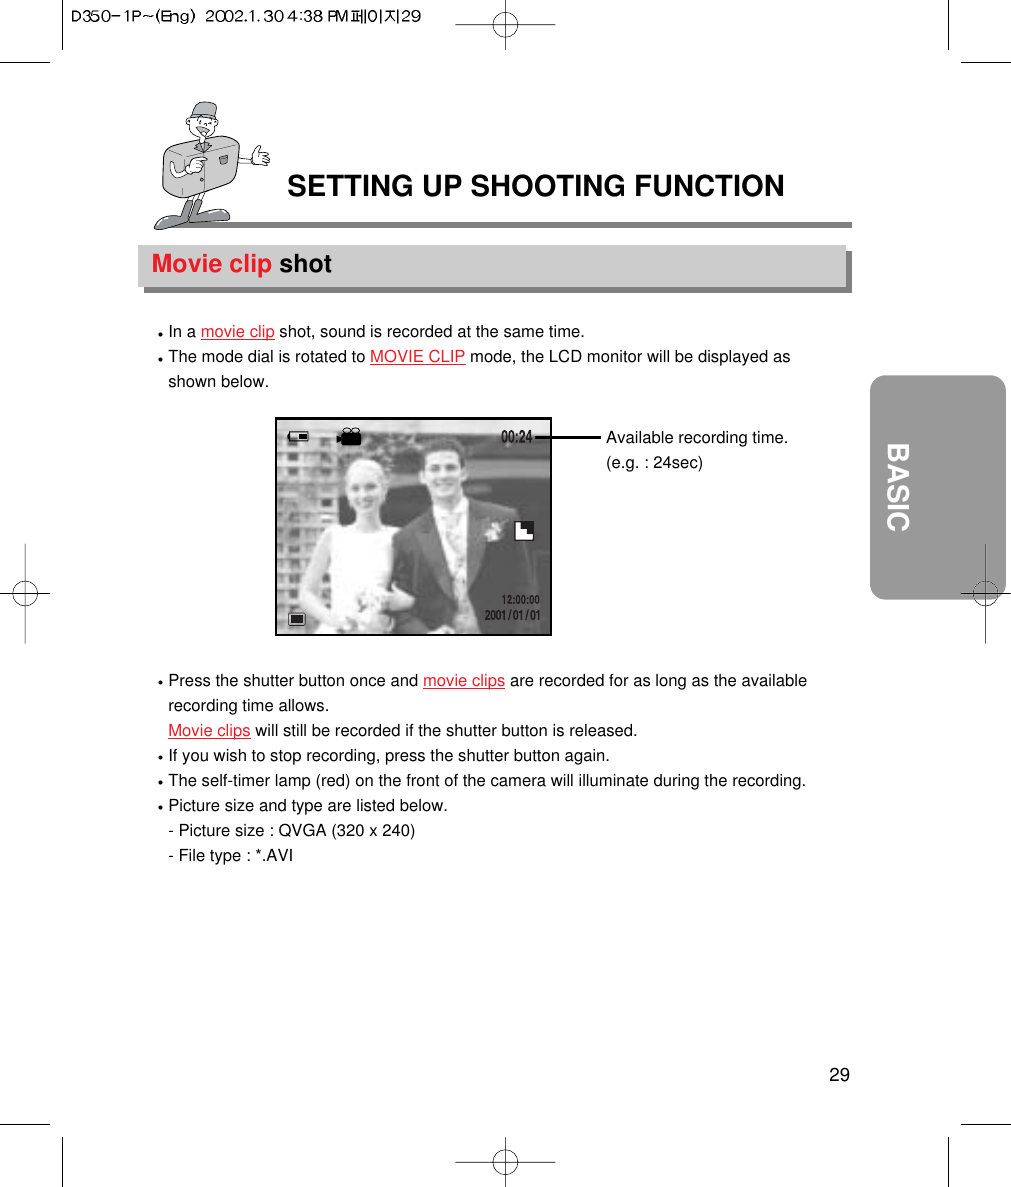
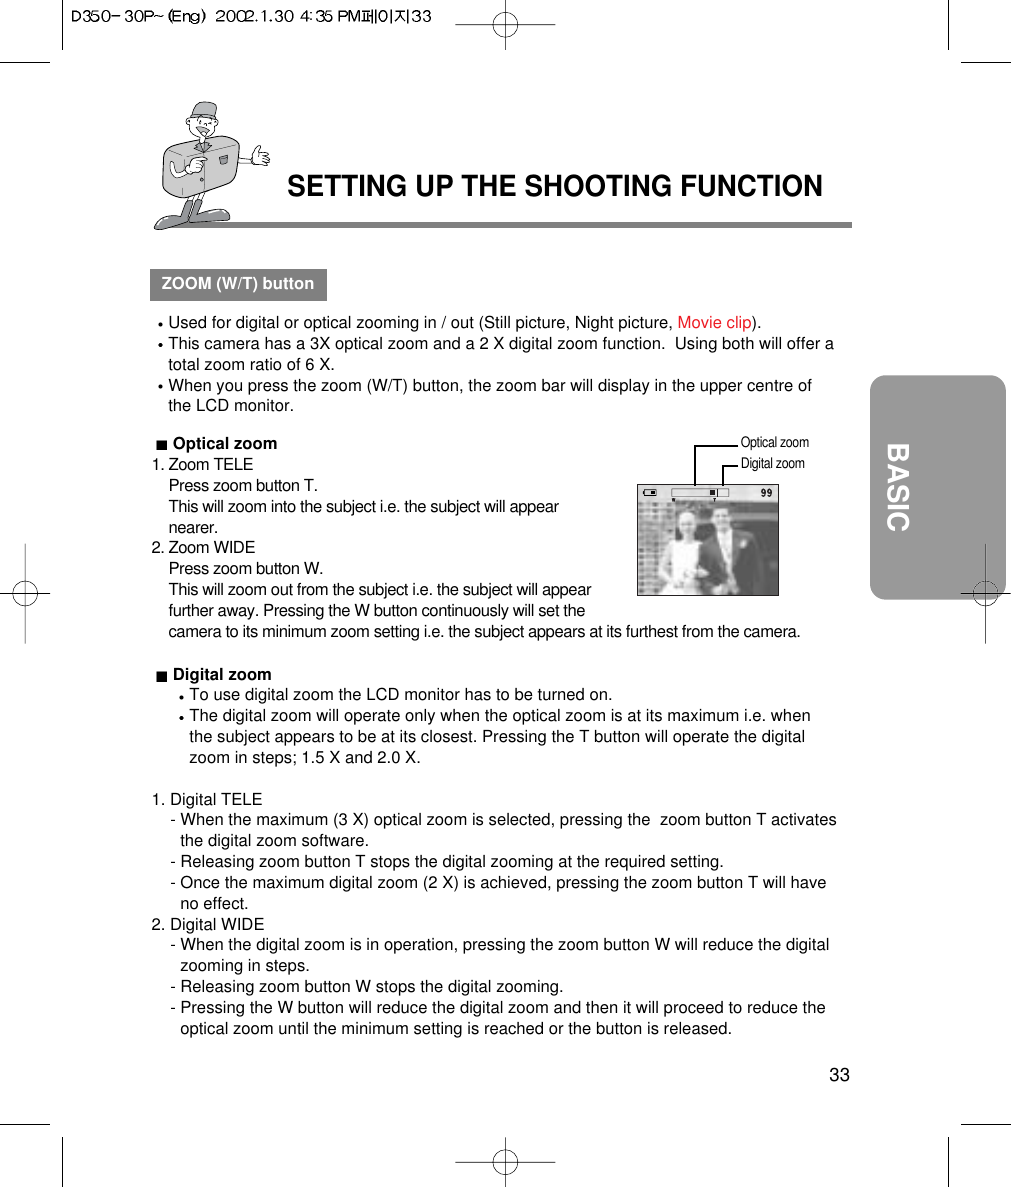
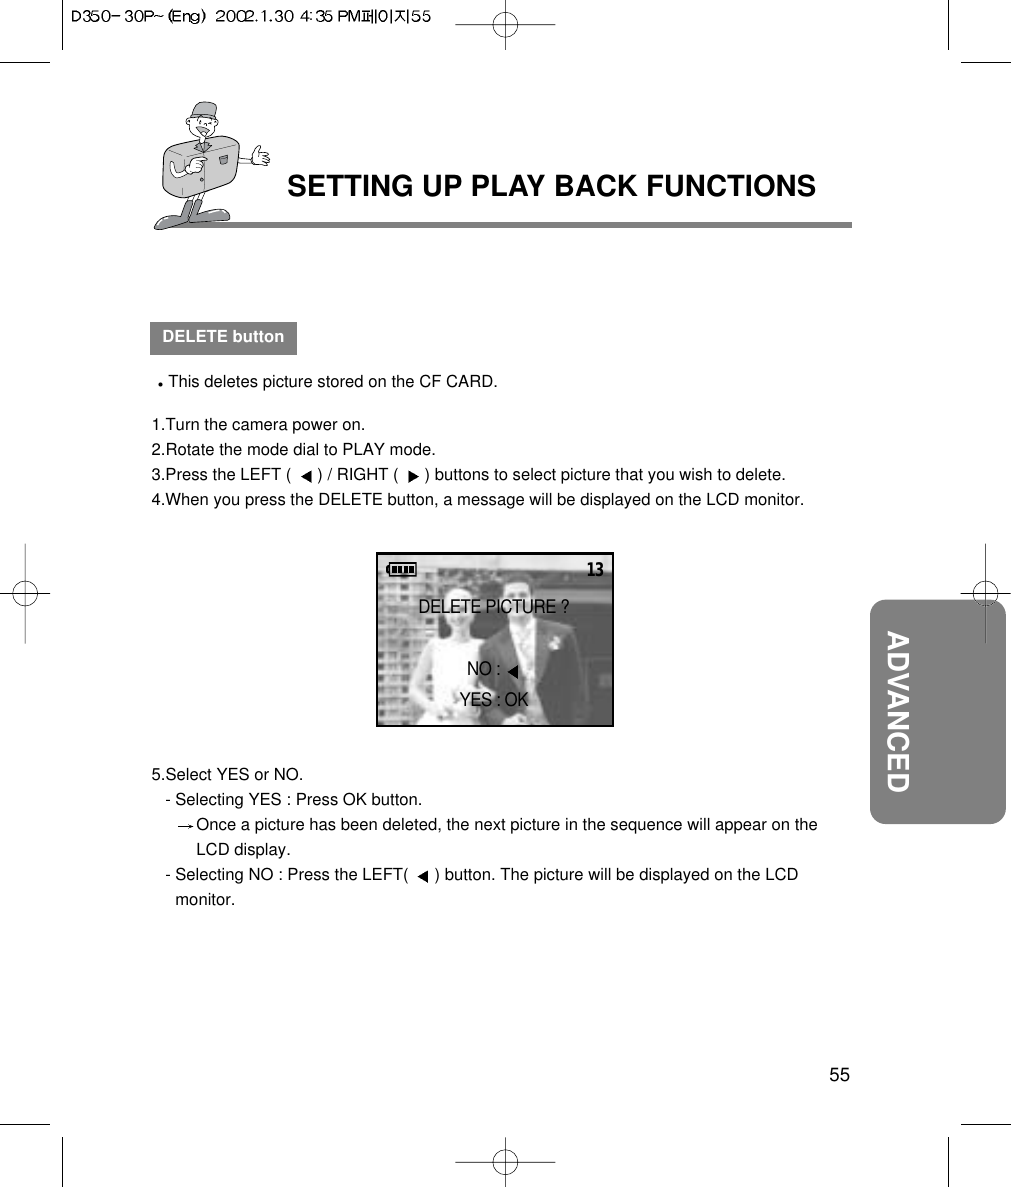
![IDENTIFICATION OF FEATURES13READYReferenceVertical and Horizontal shots are taken in the same way.Avoid obstructing the lens or the flash when you take a picture.NoteAs there can be some differences between what is seen through the Viewfinder and theresulting picture when taken at a range closer than 1.5m, it is recommended that you use theLCD monitor to compose the shot.[ Horizontal shot ] [ Vertical shot ]](https://usermanual.wiki/Hanwha-Techwin/DIGIMAX350SE/User-Guide-226355-Page-12.png)
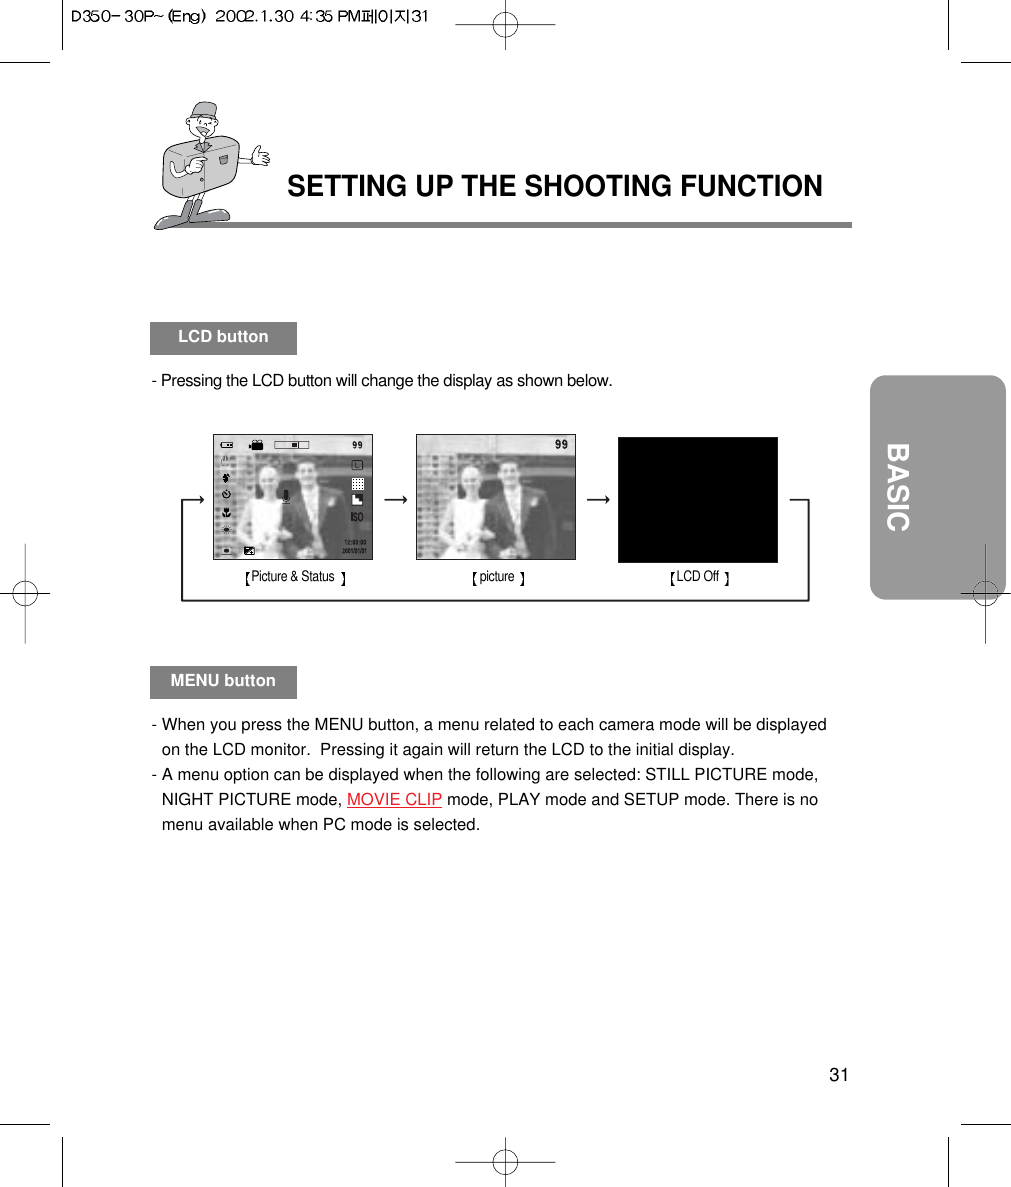
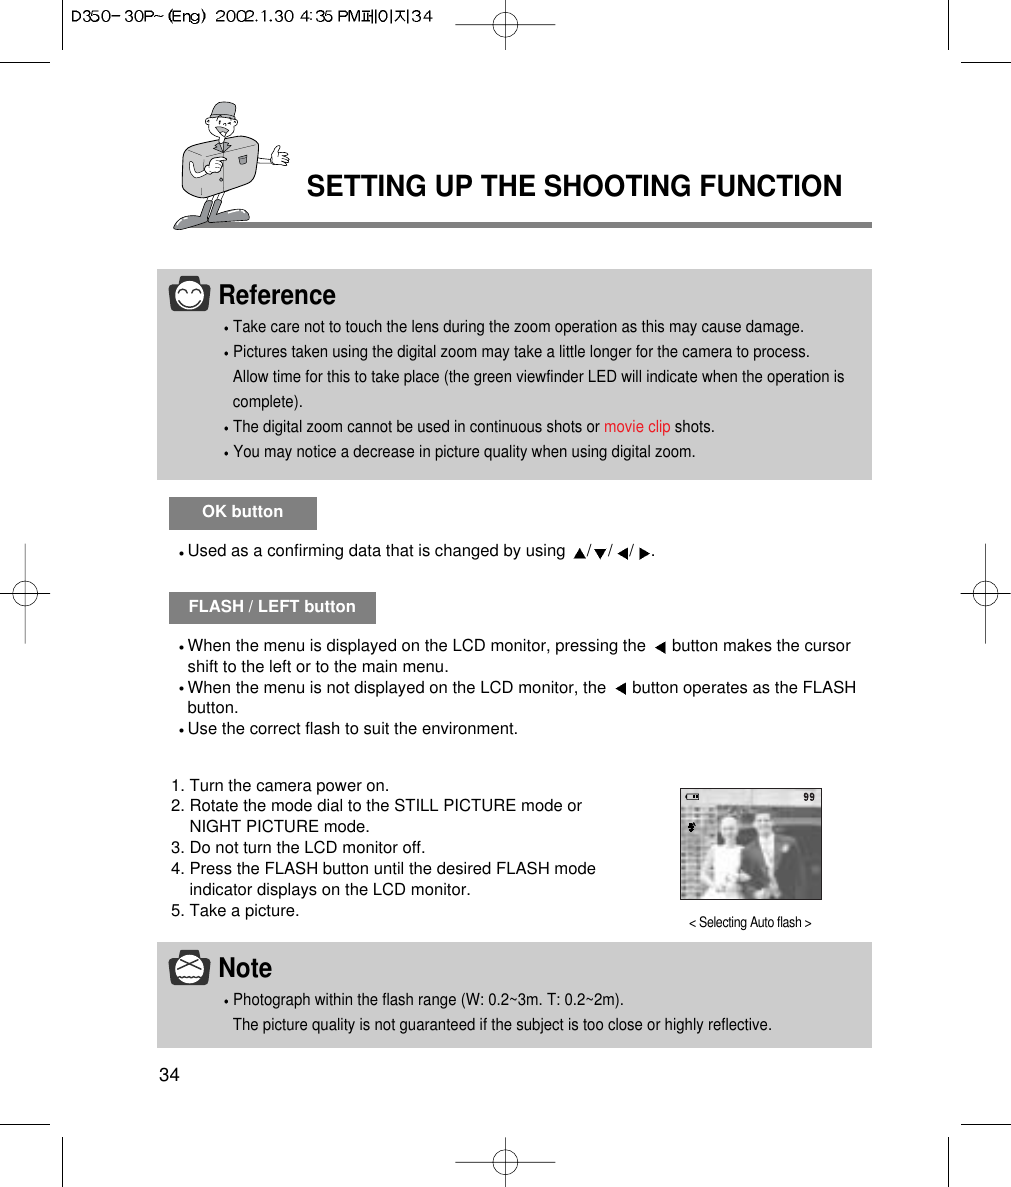
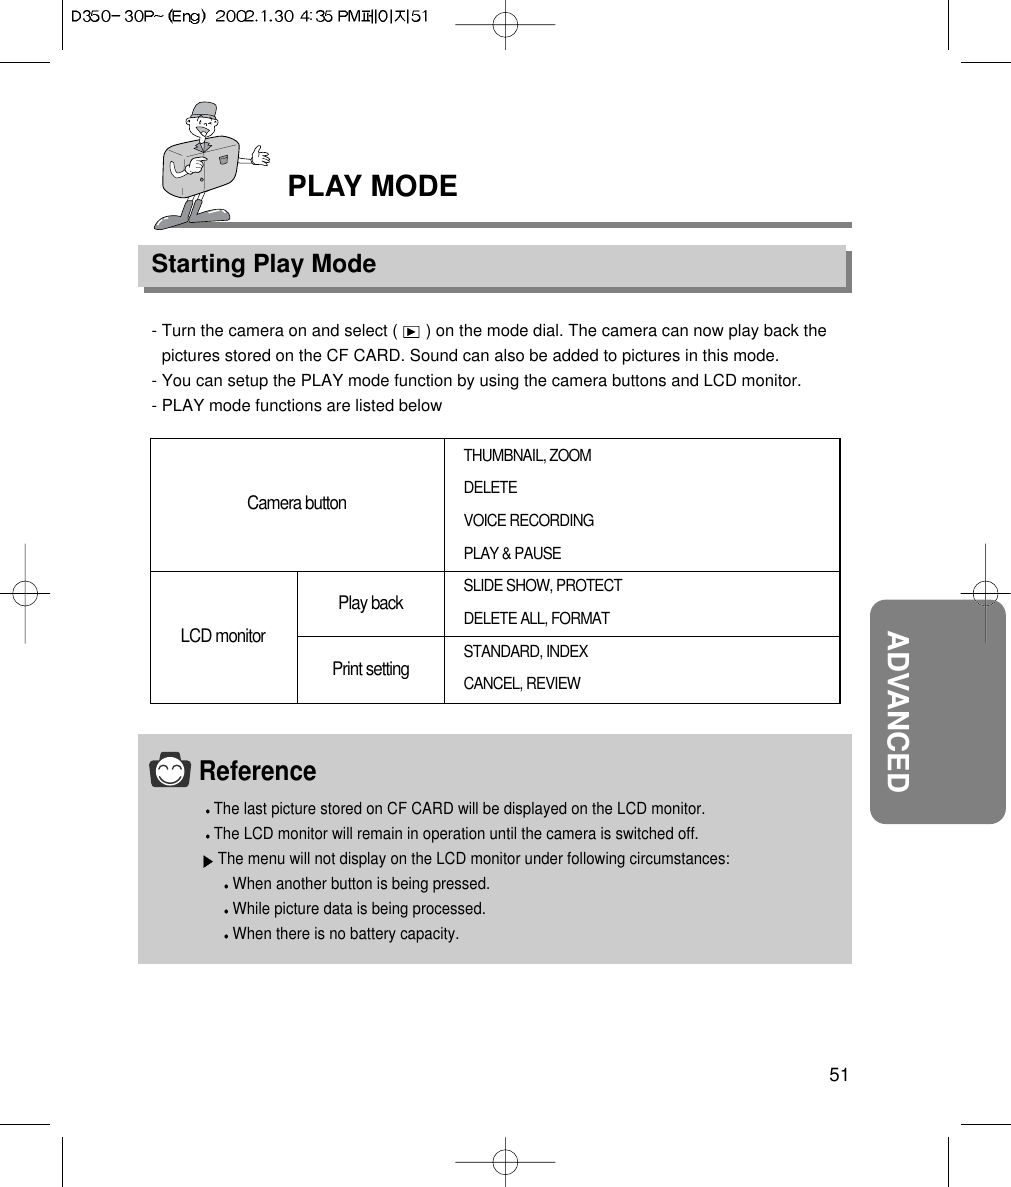
![IDENTIFICATION OF FEATURES17READYEXPOSURE : select E.V. (page 55)ISO : select ISO (page 57)W.BALANCE : select White Balance (page 58)EFFECT : add effect to picture. (page 52)MOVIE CLIP mode MOVIE CLIPEXIT : MENU EXPOSUREISOW. BALANCEEFFECT+0.0 EVAUTOAUTONORMALSLIDE SHOW : play back stored pictures continuously(page 69)PROTECT : protect stored picture (page 70)DELETE ALL : delete all stored pictures. (page 72)STANDARD : set DPOF as STANDARD (page 76)INDEX : set DPOF as INDEX (page 74)CANCEL DPOF : cancel DPOF setting (page 77)REVIEW : review DPOF setting (page 78)PLAY mode PLAY 1/2 EXIT : MENU MOVE PAGE : SLIDE SHOWPROTECTDELETE ALLFORMAT03 SECUNLOCKNONOPLAY [DPOF] 2/2 EXIT : MENU MOVE PAGE : STANDARDINDEXCANCELREVIEW00 PRINTS00 PRINTSNOS[00] / I[00]](https://usermanual.wiki/Hanwha-Techwin/DIGIMAX350SE/User-Guide-226355-Page-16.png)

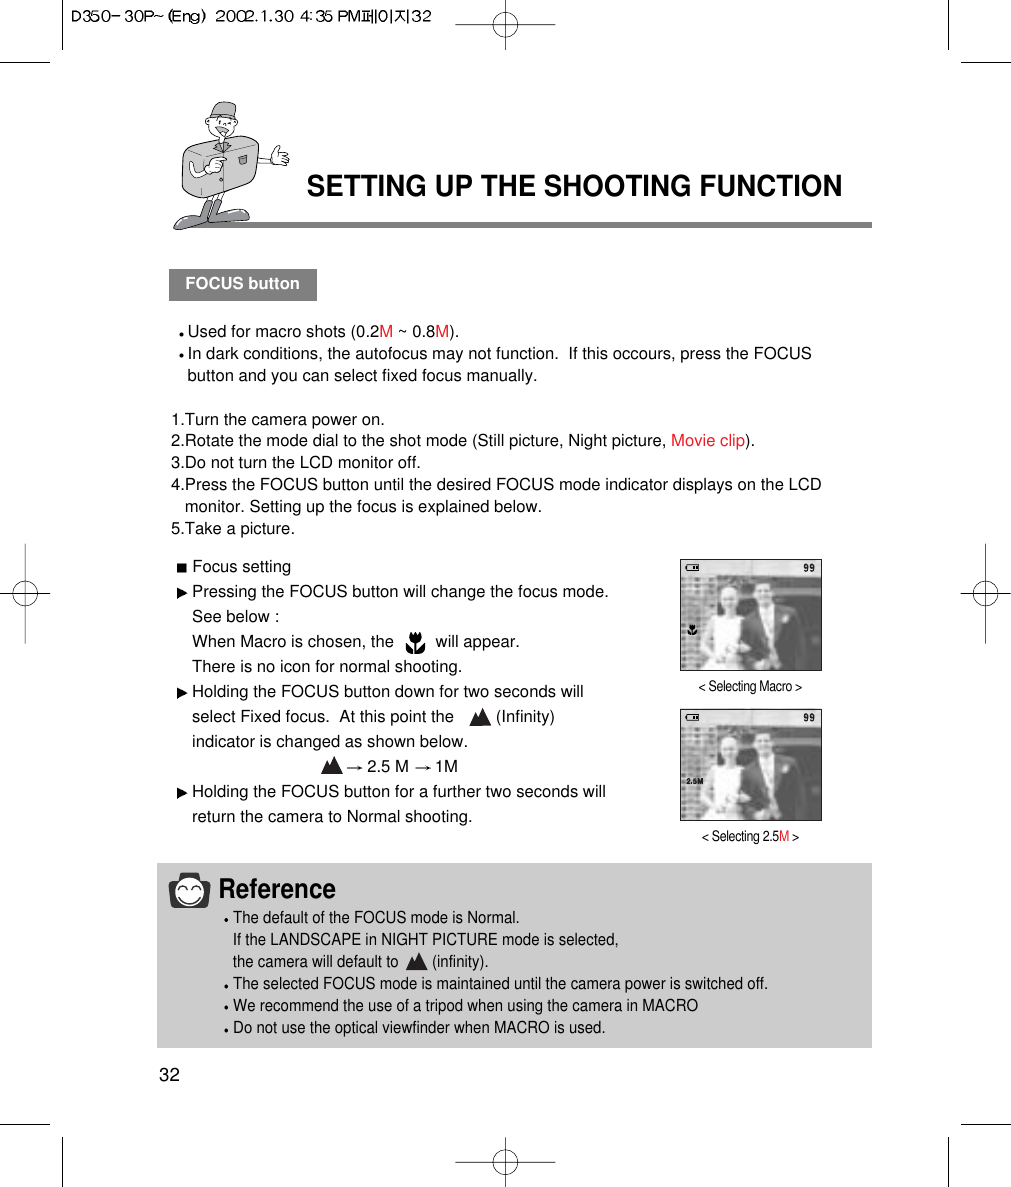
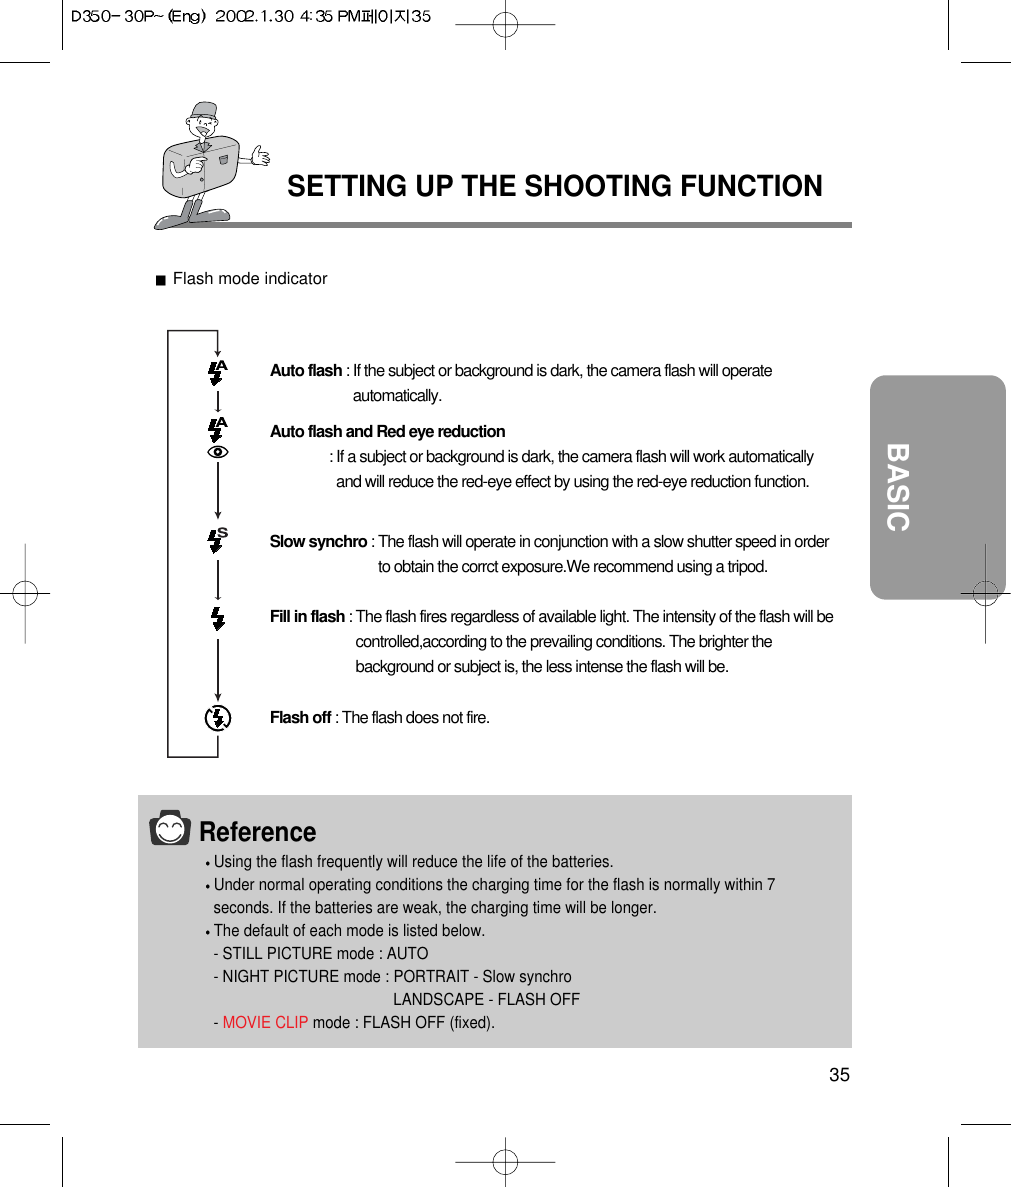
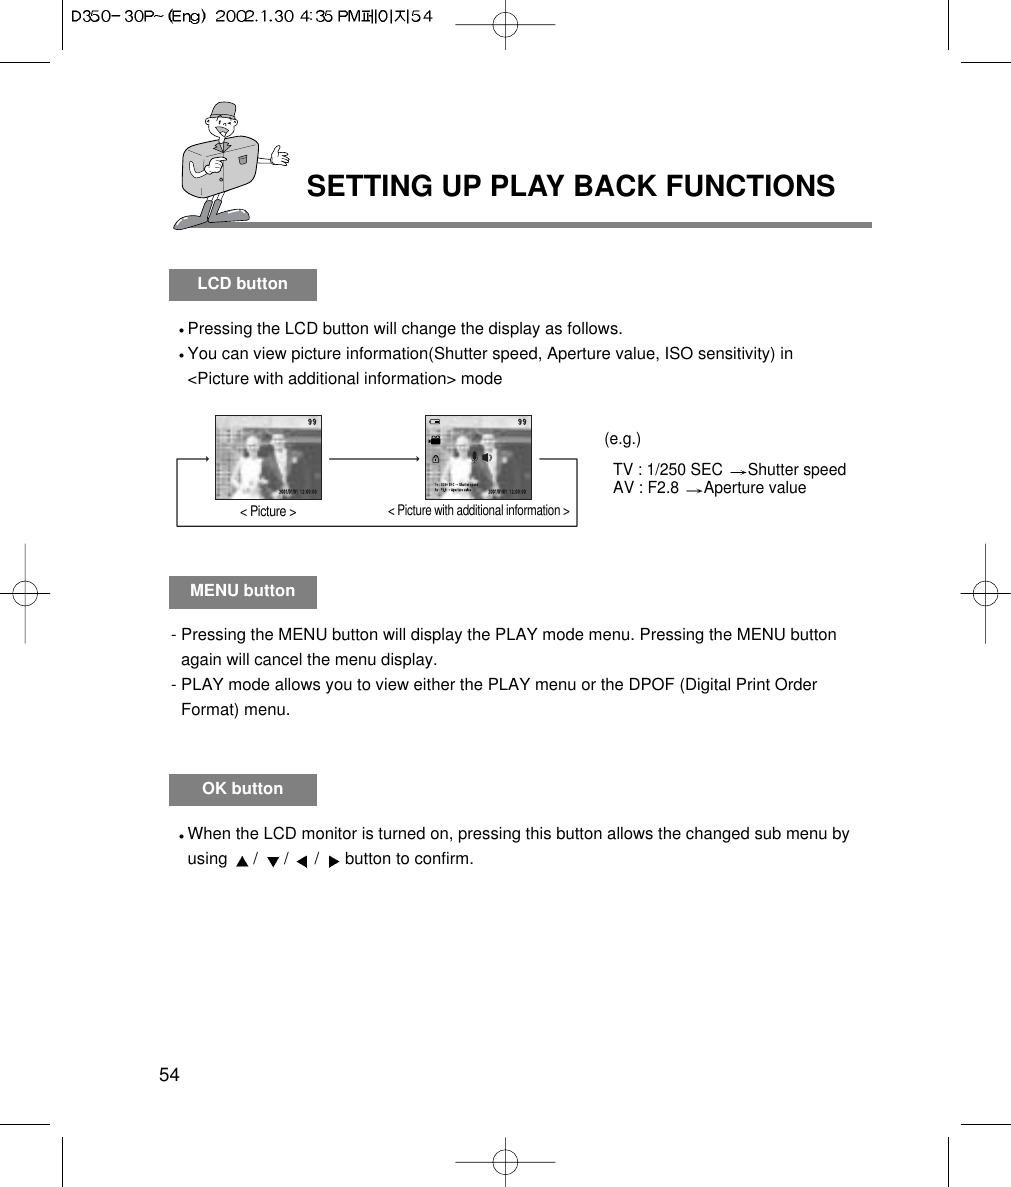
![24PREPARATIONSelecting the date and timeYou can record the date and time with the picture data in the CF CARD when you take a picture.You will need to check and select the correct Date / Time when :The camera is used for the first time. The batteries have been removed for a period longer than 1 hour.1Turn on the power by pressing the Power button.2Set the mode dial to the SETUP mode ( SET ).3The setup menu will show on the LCD monitor.4Move to the SET 2/3 menu by using the RIGHTbutton( ) on the 5-function button.5Move to the DATE SETUP by using the DOWN button( ) onthe 5-function button and press the RIGHT button( ). A menu will then be displayed on the LCD monitor, as shownalongside.6Select correct Date / Time by using the 5 -function button and press the OK button to update Date /Time. SET 2/3 menu will be displayed on the LCD monitor.7The setting is completed. The camera can now be used with the selected camera mode.5-function button SETUP 2/3 BACK : SET : OK2001/01/0112 : 00DATE SETUPIMPRINTDATE TYPEUSER SETReferenceThe selection range for date/time setup covers from 2001~2050.(It is automatically programmed to allow for a leap year/ month)It is originally set as [2001/01/01 12:00]](https://usermanual.wiki/Hanwha-Techwin/DIGIMAX350SE/User-Guide-226355-Page-23.png)
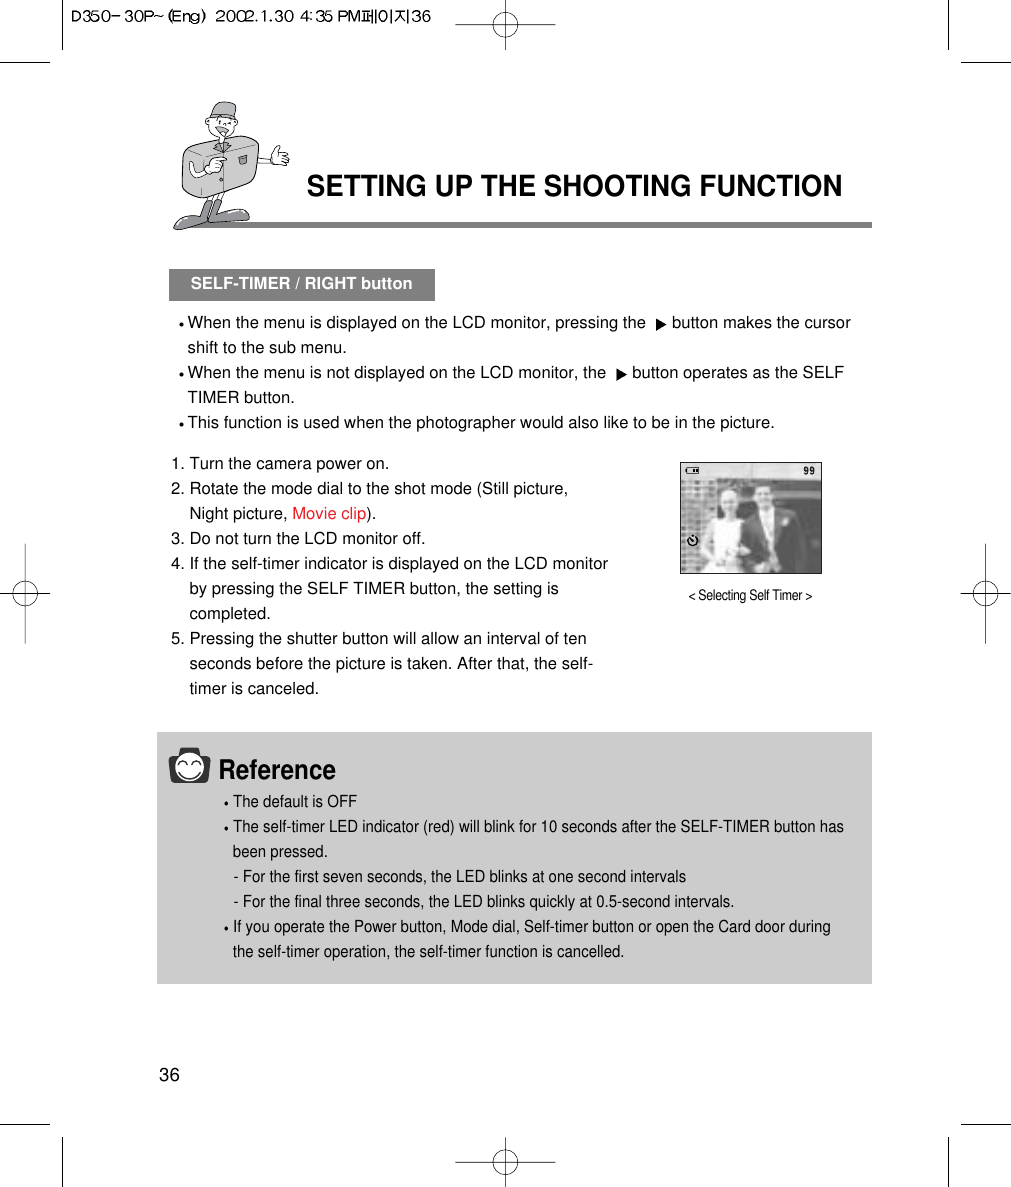
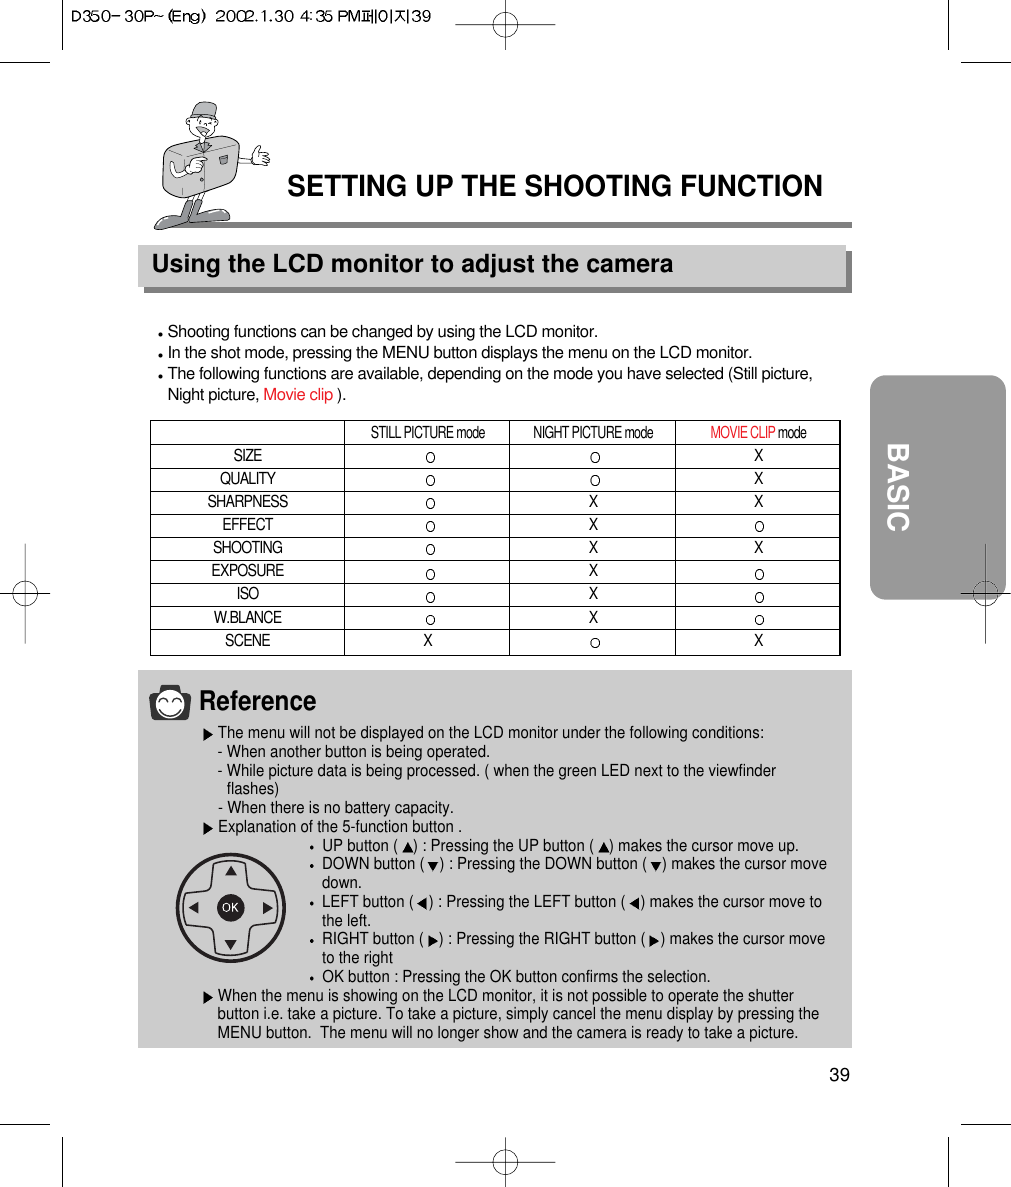
![25BASICCAMERA WORKING MODECamera working modeYou can select the desired working mode by using the mode dial located on the top of thecamera.This digital camera has 6 working modes. These are listed belowSTILL PICTURE mode ( )This mode is used for macro shots between 0.2m ~ 0.8m,normal pictures from 0.8 ~ infinity and taking a moving subjectcontinuously.NIGHT PICTURE mode ( )This mode is used at night or against a dark background. In this mode you can select [LANDSCAPE] for scenery or[PORTRAIT] for both scenery and portrait.MOVIE CLIP mode ( )This mode is used for movie clips.The flash is changed to FLASH OFF when this mode is selected.PLAY mode ( )In this mode, the stored pictures on the CF CARD can be viewed on the LCD monitor onthe back of the camera or on an external monitor using a video output terminal.If you view a shot which has additional sound recording, the sound will play back whilstthe picture is viewed. You can select single picture play back, 9 thumbnail screen, slideshow, picture protection, all picture deletion or CF CARD formatting in this mode.PC mode ( )Your computer will recognize the camera as a Removable Disk when connected by theUSB cable. You can transfer pictures between the computer and the camera.SETUP mode ( )In this mode, you can set up basic settings such as sound, format, auto power off, date /time, LCD brightness.Mode dial information](https://usermanual.wiki/Hanwha-Techwin/DIGIMAX350SE/User-Guide-226355-Page-24.png)
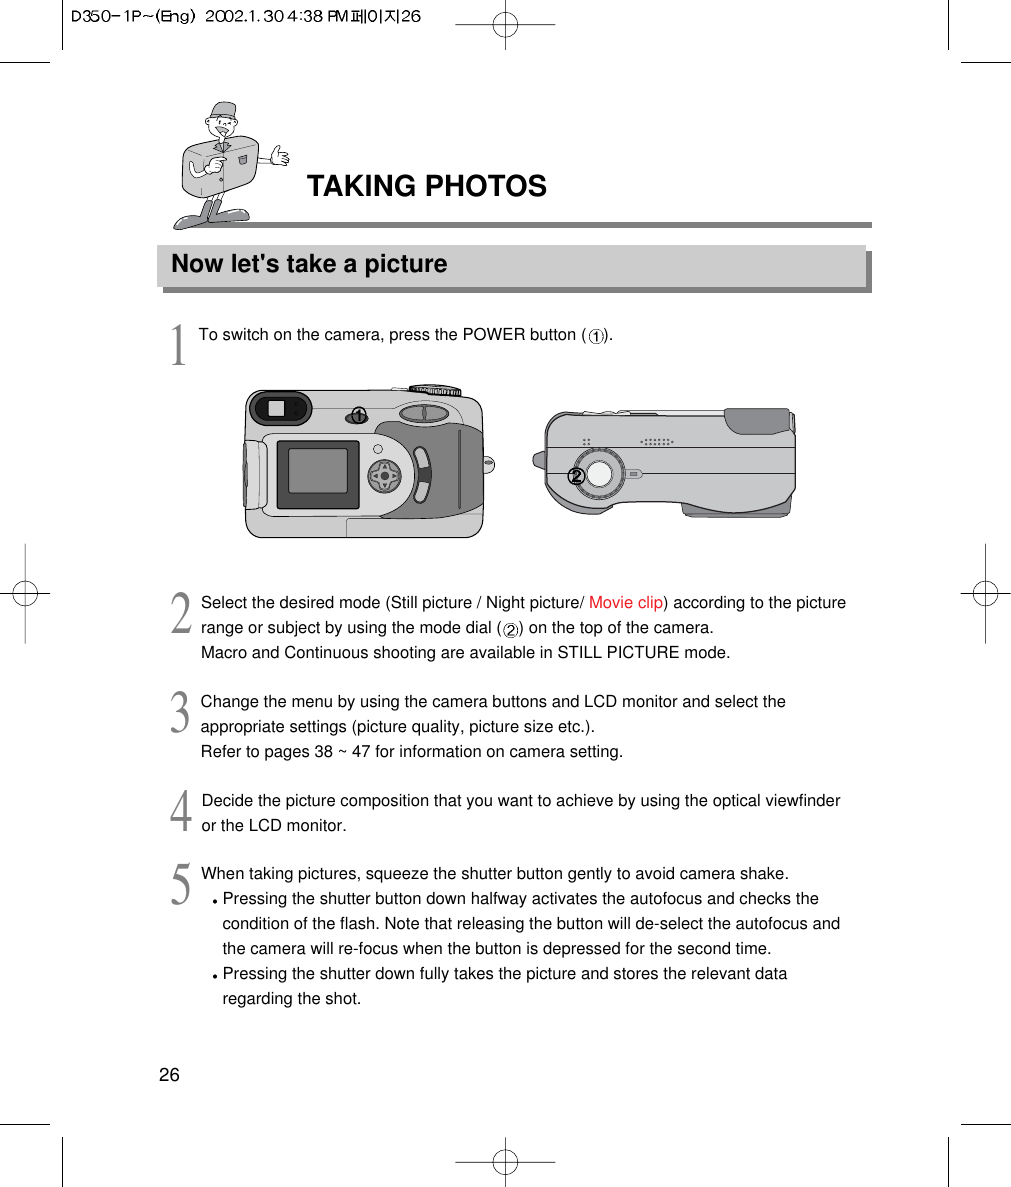
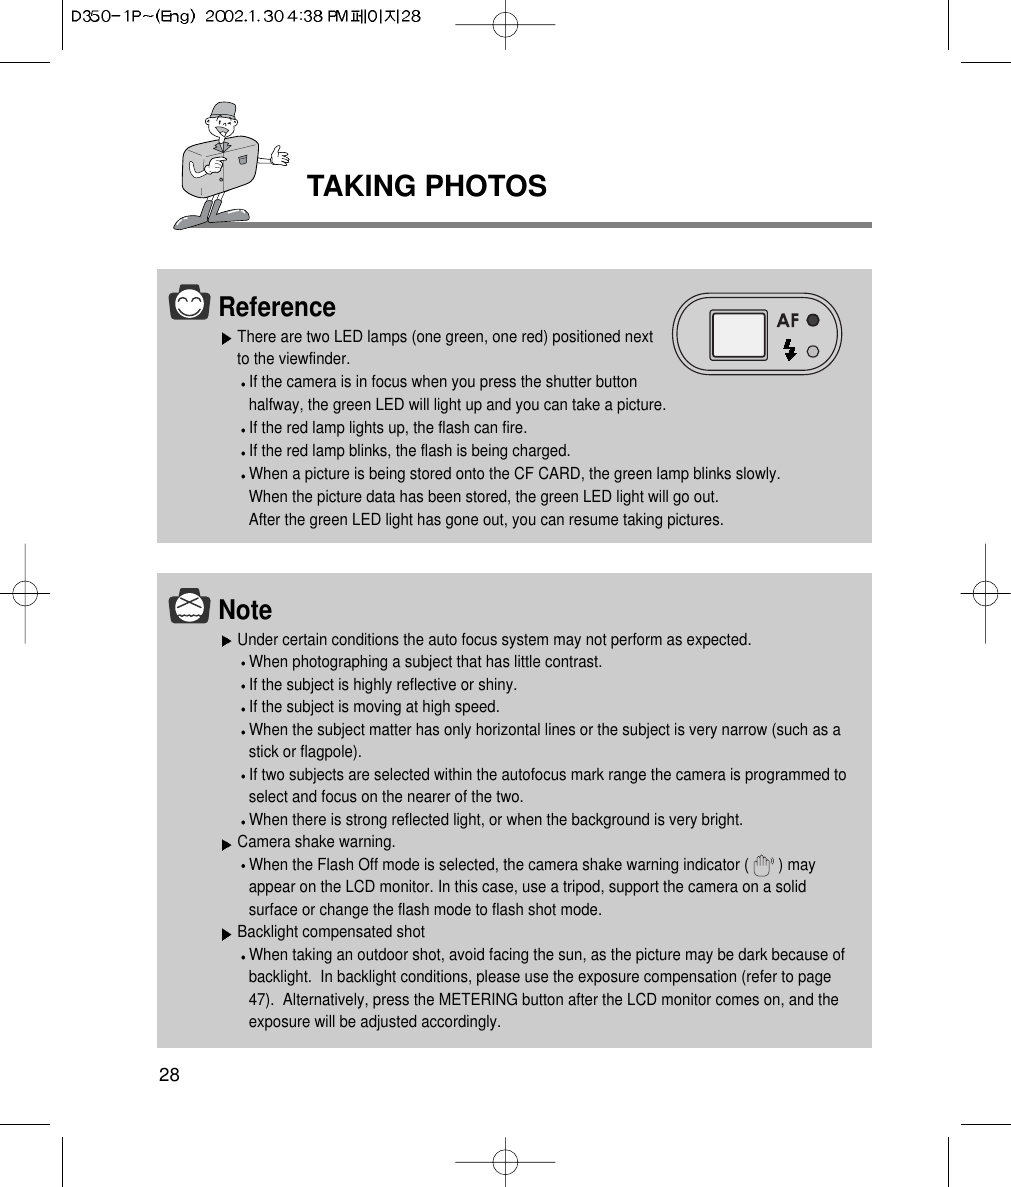
![TAKING PHOTOS27BASICNoteSelect Macro shot mode when the subject is between 0.2m ~ 0.8m from the camera.Refer to page 40 for information on Macro shooting.If you do not select the correct shot mode appropriate to the distance from the subject to thecamera, you will not be able to obtain a clear shot of the subject. Avoid obstructing the Flash control sensor when you take a picture. A picture can be spoiledwhen a finger, hair or camera strap is in front of the Flash control sensor.Using the LCD monitor extensively will drain the batteries. We recommend using the opticalviewfinder as often as possible in order to extend battery life. If the LCD monitor is moreappropriate, switching it off between shots will also help to extend the battery life.ReferenceIf there is no card, [NO CARD!] message will show in the LCD monitor.If there is no card, no buttons will function except for Power button and Mode dial.If there is insufficient memory available:If you press the shutter button halfway for the shot, the following message is displayedand the camera will not operate.To optimise the amount of memory in the camera, replace the CF CARD or deleteunnecessary pictures stored on the CF CARD.CARD FULL !](https://usermanual.wiki/Hanwha-Techwin/DIGIMAX350SE/User-Guide-226355-Page-26.png)
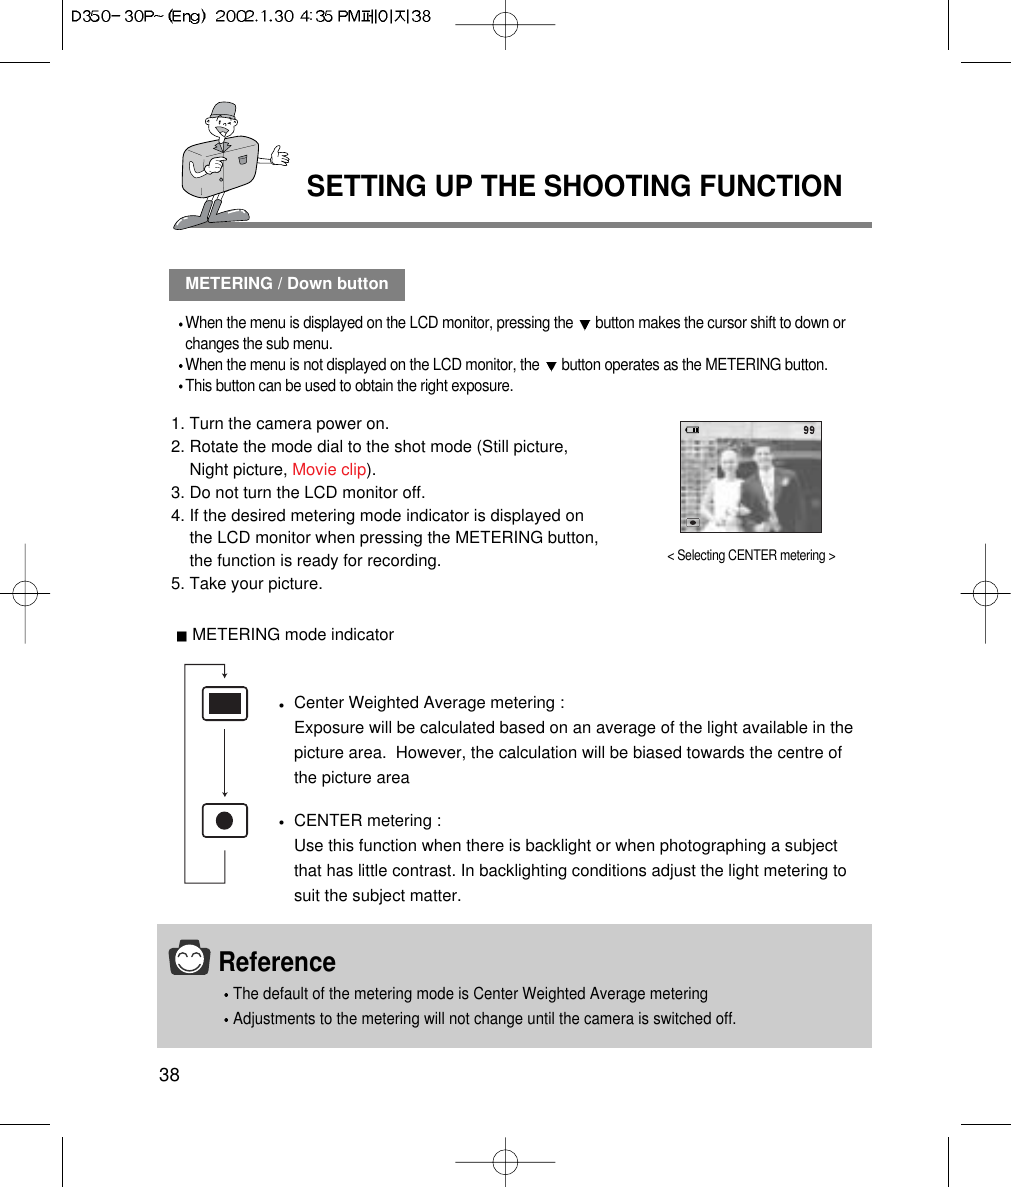
![37BASICSETTING UP THE SHOOTING FUNCTIONMIC / UP buttonWhen the menu is displayed on the LCD monitor, pressing the button makes the cursorshift to up, or changes the sub menu.When the menu is not displayed on the LCD monitor, the button operates as the MIC(sound recording) button.ReferenceThe setting is not changed until the mode dial is rotated or the power is turned off.To cancel the sound recording function, press the MIC button again.STILL PICTURE/ NIGHT PICTURE mode1. Turn the camera power on.2. Rotate the mode dial to the STILL PICTURE mode orNIGHT PICTURE mode.3. Do not turn the LCD monitor off.4. If the MIC indicator is displayed on the LCD monitorwhen pressing the MIC button, the camera is ready forrecording sound.5. Sound will be recorded for ten seconds from the momentthe shutter button is pressed. [RECORDING] isdisplayed during the recording as shown beside.6. In the middle of the sound recording, pressing theshutter button will stop the sound recording.MOVIE CLIP modeIn MOVIE CLIP mode, sound is recorded automatically. There is no need to set up thesound recording function.< Setting up sound recording >< Being recorded >](https://usermanual.wiki/Hanwha-Techwin/DIGIMAX350SE/User-Guide-226355-Page-36.png)
![40SETTING UP THE SHOOTING FUNCTIONSIZEIn STILL PICTURE and NIGHT PICTURE mode, you can select the picture size.A large picture uses more memory, so increasing picture size will reduce the total numberof shots you can store on a CF CARD. The picture sizes are listed below.1.Turn the camera power on.2.Rotate the mode dial to the STILL PICTURE mode or NIGHTPICTURE mode.3.Do not turn the LCD monitor off.4.Press MENU button to display the menu on the LCD monitor.5.Press the DOWN button ( ) and select [SIZE].6.The cursor can be moved by pressing the RIGHT button ( )to the [SIZE] sub menu.7.Select the desired sub menu by pressing the UP ( ) / DOWN( ) buttons. The default is 2048x1536.8.After selecting the desired sub menu, press the OK button toconfirm the setting.9.Press the MENU button to cancel the menu display.2048x1536, 2048x1360, 1024x768, 512x384< NIGHT PICTURE mode >< STILL PICTUR mode >NIGHT PICTUREBACK : SET : OK2048x15362048x13601024x768512x384SIZEQUALITYSCENESTILL PICTURE 1/2BACK : SET : OK2048x15362048x13601024x768512x384SIZEQUALITYSHARPNESSEFFECT](https://usermanual.wiki/Hanwha-Techwin/DIGIMAX350SE/User-Guide-226355-Page-39.png)
![41BASICSETTING UP THE SHOOTING FUNCTIONQUALITYIn STILL PICTURE, NIGHT PICTURE modes, you can select the picture data compression rate.The higher the QUALITY setting, the better the final picture will be. However, the high quality setting willrequire more memory and therefore reduce the number of pictures you can store on the CF CARD.SUPER FINE is the highest quality and NORMAL is the lowest setting. Choose the settingappropriate for your needs.1.Turn the camera power on.2.Rotate the mode dial to STILL PICTURE mode or NIGHTPICTURE mode.3.Do not turn the LCD monitor off.4.Press the MENU button to display the menu on the LCDmonitor.5.Press the DOWN button ( ) and select [QUALITY].6.Shift the cursor to the [QUALITY] sub menu.by pressing theRIGHT button ( ) 7.Select the desired sub menu by pressing the UP ( ) /DOWN ( ) buttons. The default is FINE.8.After selecting desired sub menu, press the OK button toconfirm the setting.9.Press the MENU button to cancel the menu display.< STILL PICTURE mode >< NIGHT PICTURE mode >ReferenceThe picture file is stored in *.jpg.This file format complies with DCF(Design rule for Camera File system).STILL PICTURE 1/2BACK : SET : OKSUPER FINEFINENORMALSIZEQUALITYSHARPNESSEFFECTNIGHT PICTUREBACK : SET : OKSUPER FINEFINENORMALSIZEQUALITYSCENE](https://usermanual.wiki/Hanwha-Techwin/DIGIMAX350SE/User-Guide-226355-Page-40.png)
![42SETTING UP THE SHOOTING FUNCTIONSHARPNESSIn the STILL PICTURE mode, you can select picture sharpness.Select the desired SHARPNESS (SOFT/ NORMAL/ HARD) depending on the subject matter.1.Turn the camera power on.2.Rotate the mode dial to STILL PICTURE mode.3.Do not turn the LCD monitor off.4.Press the MENU button to display the menu on the LCDmonitor.5.Press the DOWN button( ) and select [SHARPNESS].6.Shift the cursor by pressing the RIGHT button ( ) to the[SHARPNESS] sub menu.7.Select the desired sub menu by pressing the UP ( ) /DOWN ( ) buttons. The default is NORMAL.8.After selecting the desired sub menu, press OK button toconfirm the setting.9.Press the MENU button to cancel the menu display.< STILL PICTURE mode >STILL PICTURE 1/2BACK : SET : OKSOFTNORMALHARDSIZEQUALITYSHARPNESSEFFECTReferenceExplanation of SHARPNESS sub menuSOFT : This gives smooth edges and the final picture will have a soft appearance.NORMAL : This setting will give a standard finish to the final picture.HARD : This will give the picture a crisp and clear appearance.](https://usermanual.wiki/Hanwha-Techwin/DIGIMAX350SE/User-Guide-226355-Page-41.png)
![43BASICSETTING UP THE SHOOTING FUNCTIONEFFECTUsing the camera’s digital processor, it is possible to add special effects to your pictures.In STILL PICTURE or MOVIE CLIP mode, select the desired [EFFECT] sub menu.1.Turn the camera on.2.Rotate the mode dial to STILL PICTURE mode or MOVIECLIP mode.3.Do not turn the LCD monitor off.4.Press the MENU button to display the menu on the LCDmonitor.5.Press the DOWN button( ) and select [EFFECT].6.Shift the cursor to the [EFFECT] sub menu by pressing theRIGHT button ( ) 7.Select the desired sub menu by pressing the UP ( ) /DOWN ( ) buttons. The default is NORMAL.8.After selecting the desired sub menu, press the OK button toconfirm the setting.9.Press the MENU button to cancel the menu display.ReferenceEFFECT sub menu explained- NORMAL : No effect is added to the picture.- B & W : Converts the picture to black and white.- sRGB : sRGB is device independent standard color model.Devices supporting sRGB can display exact picture color.- SUNSET : Used for sunset pictures.< STILL PICTURE mode >STILL PICTURE 1/2BACK : SET : OKNORMALB & WsRGBSUNSETSIZEQUALITYSHARPNESSEFFECT< MOVIE CLIP mode >MOVIE CLIPBACK : SET : OKNORMALB & WsRGBSUNSETEXPOSUREISOW. BALANCEEFFECT](https://usermanual.wiki/Hanwha-Techwin/DIGIMAX350SE/User-Guide-226355-Page-42.png)
![44SETTING UP THE SHOOTING FUNCTIONSHOOTINGThis allows continuous shooting.In this mode, you can take moving subjects continuously.Once a continuous shooting sequence has been completed, the camera resets to singleshooting mode.1.Turn the camera on.2.Rotate the mode dial to STILL PICTURE mode.3.Do not turn the LCD monitor off.4.Press the MENU button to display [STILL PICTURE 1/2]menu on the LCD monitor.5.Select [STILL PICTURE 2/2] menu by pressing the LEFT( ) / RIGHT ( ) buttons.6.Press the DOWN button( ) and select [SHOOTING].7.Shift the cursor to the [SHOOTING] sub menu bypressing the RIGHT button ( ) 8.Select the desired sub menu by pressing the UP ( ) /DOWN ( ) buttons. The default is SINGLE.9.After selecting the desired sub menu, press the OKbutton to confirm the setting.The number of shots in the continuous sequence willshow if you select the [CONTINUOUS] icon and thenpress the OK button.STILL PICTURE 2/2BACK : SET : OKSINGLECONTINUOUSSHOOTINGEXPOSUREISOW.BALANCE](https://usermanual.wiki/Hanwha-Techwin/DIGIMAX350SE/User-Guide-226355-Page-43.png)
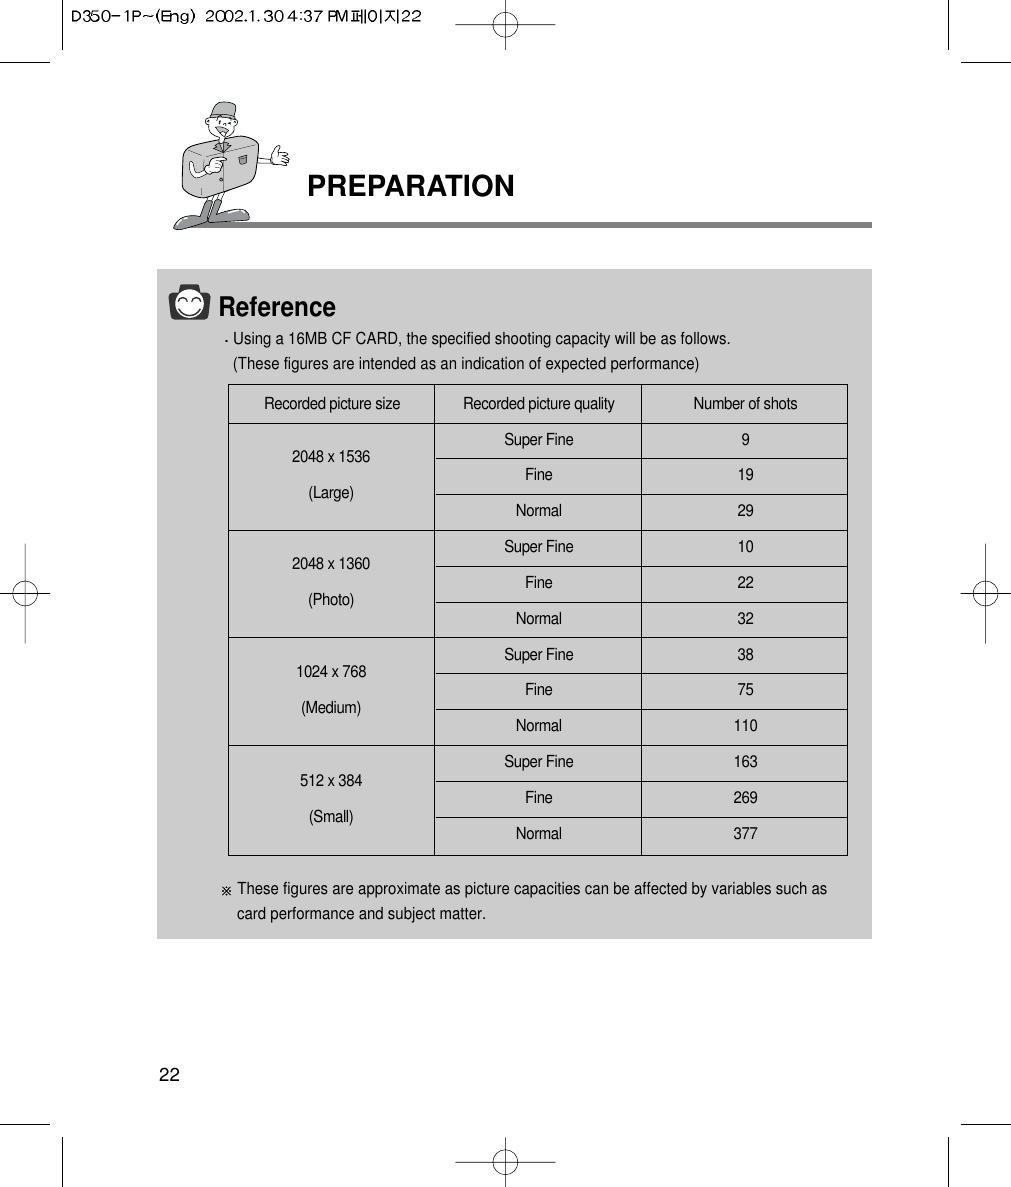
![45BASICSETTING UP THE SHOOTING FUNCTIONSelecting the number of continuous shotsSelect the desired number by pressing the UP ( ) /DOWN ( ) buttons.Press the OK button.10. Press the MENU button to cancel menu display.CONTINUOUS SHOTCANCEL : SET : OK002# OF SHOTSReferenceWhen [CONTINUOUS] is selected, the flash will automatically be cancelled.Once a continuous sequence has begun, it will continue until the selected number of shotshas been taken. Releasing the shutter button will not interrupt this funtion.The maximum number of shots in a sequence is governed by the picture settings.Using a 16MB CF CARD, the specified shooting capacity will be as follows. (These figures are intended as an indication of expected performance)These figures are approximate as picture capacities can be affected by variables such ascard performance and subject matter.SUPER FINE FINE NORMAL2048X1536 5 10 152048X1360 5 10 161024X768 19 39 60512X384 79 100 100](https://usermanual.wiki/Hanwha-Techwin/DIGIMAX350SE/User-Guide-226355-Page-44.png)
![46SETTING UP THE SHOOTING FUNCTIONEXPOSUREThis camera automatically adjusts the exposure according to the ambient lightingconditions. However, you can select the exposure value by using [EXPOSURE] sub menu.This function can be used in STILL PICTURE and MOVIE CLIP mode.If you increase the exposure value, the picture will be brighter.If you decrease the exposure value, the picture will be darker.1.Turn the camera power on.2.Rotate the mode dial to STILL PICTURE or MOVIE CLIPmode.3.Do not turn the LCD monitor off.4.Press the MENU button to display the menu on the LCDmonitor. In STILL PICTURE mode, press the LEFT ( )or RIGHT ( ) button to select [STILL PICTURE 2/2]menu.5.Press the DOWN button( ) and select [EXPOSURE].6.Shift to the [EXPOSURE] sub menu by pressing theRIGHT button ( ).< STILL PICTURE mode >STILL PICTURE 2/2BACK : SET : OK+0.0 EVSHOOTINGEXPOSUREISOW. BALANCE< MOVIE CLIP mode >MOVIE CLIPBACK : SET : OK+0.0 EVEXPOSUREISOW. BALANCEEFFECT](https://usermanual.wiki/Hanwha-Techwin/DIGIMAX350SE/User-Guide-226355-Page-45.png)

![48SETTING UP THE SHOOTING FUNCTIONISOYou can select the camera’s sensitivity to light by selecting the ISO sub menu.Raising the ISO sensitivity will mean that the camera needs less light in order to take apicture. However, the higher the ISO value is, the grainier the picture will be.The setting will remain until the power is turned off.1.Turn the camera on.2.Rotate the mode dial to STILL PICTURE mode orMOVING PICTURE mode.3.Do not turn the LCD monitor off.4.Press the MENU button to display the menu on the LCDmonitor. In STILL PICTURE mode, press the LEFT ( )or RIGHT ( ) button to select the [STILL PICTURE 2/2]menu.5.Press the DOWN button ( ) and select [ISO].6.Shift to the [ISO] sub menu by pressing the RIGHTbutton ( ) 7.Select the desired sub menu by pressing the UP ( ) /DOWN ( ) buttons. The default is AUTO.8.After selecting the desired sub menu, press the OKbutton to confirm the setting.9.Press the MENU button to cancel menu display.< STILL PICTURE mode >STILL PICTURE 2/2BACK : SET : OKAUTO100200400SHOOTINGEXPOSUREISOW.BALANCE< MOVIE CLIP mode >MOVIE CLIPBACK : SET : OKAUTO100200400EXPOSUREISOW.BALANCEEFFECT](https://usermanual.wiki/Hanwha-Techwin/DIGIMAX350SE/User-Guide-226355-Page-47.png)
![49BASICSETTING UP THE SHOOTING FUNCTIONW.BALANCEDifferent lighting conditions may cause a color cast on your pictures.The white balance control allows you to adjust the colors to appear more natural looking.The setting remains until the power is turned off.1.Turn the camera power on.2.Rotate the mode dial to STILL PICTURE mode or MOVIECLIP mode.3.Do not turn the LCD monitor off.4.Press the MENU button to display the menu on the LCDmonitor. In STILL PICTURE mode, press the LEFT ( ) orRIGHT ( ) button to select the [STILL PICTURE 2/2]menu.5.Press the DOWN button ( ) and select [W.BALANCE].6.Shift the cursor to the [W.BALANCE] sub menu by pressingthe RIGHT button ( ) 7.Select the desired sub menu by pressing the UP ( ) /DOWN ( ) buttons. The default is AUTO.8.After selecting the desired sub menu, press the OK button toconfirm the setting.9.Press the MENU button to cancel the menu display.< STILL PICTURE mode >STILL PICTURE 2/2BACK : SET : OKAUTODAYLIGHTFLUORESCENTTUNGSTENSHOOTINGEXPOSUREISOW.BALANCE< MOVIE CLIP mode >MOVIE CLIPBACK : SET : OKAUTODAYLIGHTFLUORESCENTTUNGSTENEXPOSUREISOW.BALANCEEFFECTReferenceW.BALANCE sub menu explainedAUTO : The camera automatically selects the appropriate white balance settings, dependingon the prevailing lighting conditions.DAYLIGHT : For taking pictures outside.FLUORESCENT : For shooting under fluorescent lightingTUNGSTEN : For shooting under tungsten (standard lightbulb) lighting](https://usermanual.wiki/Hanwha-Techwin/DIGIMAX350SE/User-Guide-226355-Page-48.png)
![SETTING UP THE SHOOTING FUNCTION50SCENEIn NIGHT PICTURE mode, Select the desired SCENE mode.- [PORTRAIT] mode : This is used for both portrait and landscape shots.( )- [LANDSCAPE] mode : This is used for landscape shots.( )1.Turn the camera on.2.Rotate the mode dial to the NIGHT PICTURE mode.3.Do not turn the LCD monitor off.4.Press MENU button to display the menu on the LCD monitor.5.Press the DOWN button( ) and select [SCENE].6.Shift the cursor to the [SCENE] sub menu by pressing theRIGHT button ( )7.Select the desired sub menu by pressing the UP ( ) /DOWN ( ) buttons. The default is PORTRAIT.8.After selecting the desired sub menu, press the OK button toconfirm the setting.9.Press the MENU button to cancel the menu display.NIGHT PICTUREBACK : SET : OKSIZEQUALITYSCENEReferenceIn NIGHT PICTURE mode, don’t move for a while after flash firing as the shutter speed isslow. We recommend using a tripod or supporting the camera on a solid object in order toavoid camera shake.PORTRAITLANDSCAPE](https://usermanual.wiki/Hanwha-Techwin/DIGIMAX350SE/User-Guide-226355-Page-49.png)
![SETTING UP PLAY BACK FUNCTIONSSetting up play back function by using the camera button52THUMBNAIL / ZOOM W buttonYou can view up to 9 pictures at a time by using the THUMBNAIL function.1.Turn the camera on.2.Rotate the mode dial to PLAY mode.3. A picture displays on the LCD monitor.4.Press the THUMBNAIL button.The thumbnail display will highlight the picture that had been showing at the time thethumbnail mode was selected.5.Press the / / / buttons to move to desired picture. Selected picture ishighlighted. Icons are displayed to indicate the type of file selected.- : Movie clip file- : DPOF indicator- : Sound recorded file- : Picture protect indicator 6.When viewing a thumbnail picture, press the zoom T button and the selected shot will showin single display mode.Press THUMBNAIL button[ Single display mode ]Highlighted picture(selected picture)[ Thumbnail display mode ]The PLAY mode can be set using the camera button.](https://usermanual.wiki/Hanwha-Techwin/DIGIMAX350SE/User-Guide-226355-Page-51.png)

![56SETTING UP PLAY BACK FUNCTIONSMIC / UP buttonWhen the LCD monitor is turned on, pressing the button will either cause the cursor tomove up or change a selected sub menu.When the LCD monitor is not turned on, pressing the button will allow a sound recordingto be added to a stored still picture.1. Turn the camera on.2. Rotate the mode dial to PLAY mode.3. Press the LEFT ( ) / RIGHT ( ) buttons to selectpicture that you wish to add sound to.4. Press MIC button ( ) and the sound recordingindicator will display. The camera is now ready to recordsound.5. Press the shutter button to start recording. The[RECORDING..] message will be displayed on the LCDmonitor (as shown) and sound is recorded to the stillpicture.6. The sound will record for ten seconds. Recording can bestopped by pressing the shutter button again.[ Pressing MIC button ][ Being recorded ]PLAY & PAUSE / DOWN buttonWhen the LCD monitor is turned on, pressing the button will move the cursor down orchange the sub menu.When the LCD monitor is not turned on, the button is used as the PLAY & PAUSEbutton.The PLAY & PAUSE button is used for playing and pausing a sound recorded still picture,movie clip or slide show.The PLAY & PAUSE button will only operate in single display mode.](https://usermanual.wiki/Hanwha-Techwin/DIGIMAX350SE/User-Guide-226355-Page-55.png)
![57ADVANCEDSETTING UP PLAY BACK FUNCTIONS1.Turn the camera power on.2.Rotate the mode dial to PLAY mode( ).3.Press the LEFT ( ) / RIGHT ( ) buttons to select a sound recorded still picture or amovie clip. Or, select slide show.4.Press PLAY & PAUSE button.PLAY & PAUSE explainedIf a picture is showing, but there is no sound (or movement)Press the PLAY& PAUSE button to play the sound clip or to start the movie clip.If the picture is playing : The progress is paused.If the PLAY & PAUSE button is pressed when the picture is paused, the sound ormovment will resume. : The progress restart.[ A sound recorded still picture ] [ A movie clip ][ A sound recorded still picture ] [ A movie clip ] [ Slide show ]ReferenceWhen a picture is being played back, you can use the PAUSE button, POWER button andthe mode dial.When a picture has paused, you can use the LEFT button, RIGHT button, POWER button,THUMBNAIL button and the mode dial.](https://usermanual.wiki/Hanwha-Techwin/DIGIMAX350SE/User-Guide-226355-Page-56.png)
![Setting up play back function using the LCD monitor58SETTING UP PLAY BACK FUNCTIONSSLIDE SHOWPictures can be displayed continuously at pre-set intervals.1.Turn the camera power on.2.Rotate the mode dial to PLAY mode( ).3.Press the MENU button to display the menu on the LCDmonitor.4.Press the DOWN button( ) and select [SLIDE SHOW].5.Shift the cursor to the [SLIDE SHOW] sub menu by pressingRIGHT button ( ).6.Select the desired sub menu by pressing the UP ( ) /DOWN ( ) buttons. The default is 3 seconds7.After selecting the desired sub menu, press the OK button tostart the slide show.8.To stop the slide show, press the MENU button twice. Pressthe MENU button and the initial menu will be displayed.Press the MENU button again and the menu will becancelled.PLAY 1/2BACK : SET : OK03 SECSLIDE SHOWPROTECTDELETE ALLFORMAT](https://usermanual.wiki/Hanwha-Techwin/DIGIMAX350SE/User-Guide-226355-Page-57.png)
![59ADVANCEDSETTING UP PLAY BACK FUNCTIONSPROTECTThis is used to protect specific shots from accidental erasing (LOCK). It also releasespictures that have been previously protected (UNLOCK).1.Turn the camera on.2.Rotate the mode dial to PLAY mode( ).3.Press the MENU button to display the menu on the LCD monitor.4.Press the DOWN button( ) and select [PROTECT]. At this point, a sub menu will bedisplayed as shown below.The display will show that the picture will not be protected.5.Shift the cursor to the [PROTECT] sub menu by pressing the RIGHT button ( ) PLAY 1/2EXIT : MENU CHANGE : 03 SECUNLOCKNONOSLIDE SHOWPROTECTDELETE ALLFORMATPLAY 1/2BACK : SET : OKONE PICTUREALL PICTURESSLIDE SHOWPROTECTDELETE ALLFORMAT](https://usermanual.wiki/Hanwha-Techwin/DIGIMAX350SE/User-Guide-226355-Page-58.png)
![60SETTING UP PLAY BACK FUNCTIONS6.Select the desired sub menu by pressing the UP ( ) / DOWN ( ) buttons.- ONE PICTURE : This protects a single picture.- ALL PICTURES : This protects all the pictures on the CF CARD.7.Press the OK button and the PROTECT setting display will show on the LCD monitor.Select the desired sub menu by pressing the UP ( ) / DOWN ( ) buttons and press OKbutton.- LOCK : Sets up the PROTECT function.- UNLOCK : Discards the protect function8.If you select [ONE PICTURE] in step 6, the other picture can be protected by pressing theLEFT( ) / RIGHT( ) button. the process of setting up is same as step 7.9.Pressing the MENU button clears the menu display and the LOCK indicator will show on theLCD monitor as shown below.PROTECTEXIT : MENU SET : OKUNLOCKLOCK indicatorThere is no indicator when the UNLOCKfunction has been selected.ReferenceA picture in LOCK mode will be protected from [DELETE] or [DELETE ALL] functions, but willNOT be protected from the [FORMAT] function.](https://usermanual.wiki/Hanwha-Techwin/DIGIMAX350SE/User-Guide-226355-Page-59.png)
![61ADVANCEDSETTING UP PLAY BACK FUNCTIONSDELETE ALLThis enables you to clear all unprotected pictures from the CF CARD.Remember that this will permanently delete unprotected pictures. Important shots shouldbe stored on a computer before deletion takes place.1.Turn the camera on.2.Rotate the mode dial to PLAY mode( ).3.Press the MENU button to display the menu on the LCDmonitor4.Press the DOWN button( ) and select [DELETE ALL].5.Shift the cursor to the [DELETE ALL] sub menu by pressingthe RIGHT button ( ) 6.Select the desired sub menu by pressing the UP ( ) /DOWN ( ) buttons and then press the OK button.7.Select YES or NO.- Selecting YES : After deleting all pictures, [NO PICTURE !] message will show. a message willshow [NO PICTURE!]. Protected pictures are not deleted.- Selecting NO : The display is returned to initial menu, and [DELETE ALL] menu is highlighted.Press the MENU button, and the menu display will no longer show.PLAY 1/2BACK : SET : OKNOYESSLIDESHOWDELETE ALLFORMAT](https://usermanual.wiki/Hanwha-Techwin/DIGIMAX350SE/User-Guide-226355-Page-60.png)
![62SETTING UP PLAY BACK FUNCTIONSFORMATThis is used to format the CF CARD. all pictures INCLUDING protected pictures will bedeleted.1. Turn the camera on.2.Rotate the mode dial to PLAY mode( ).3.Press the MENU button to display the menu on the LCDmonitor.4.Press the DOWN button( ) and select [FORMAT].5.Shift the cursor to the [FORMAT] sub menu by pressing theRIGHT button ( ) 6.Select the desired sub menu by pressing the UP ( ) /DOWN ( ) buttons and then press the OK button.7.Select YES or NO- Selecting YES : After formatting the CF CARD, [FORMAT OK!] message will show in the LCDmonitor and the display is returned to initial menu.Press the MENU button, and the [ NO PICTURE ! ] message will show in the LCD monitor.- Selecting NO : The display returns to the initial menu, and the [FORMAT] menu is highlighted.The menu display will no longer show if the MENU button is pressed.PLAY 1/2BACK : SET : OKNOYESSLIDE SHOWPROTECTDELETE ALLFORMATReferenceYou will need to format the CF CARD under the following circumstances:- If the card is new one or has not been previously formatted.- When the camera fails to read the pictures already stored on the card.](https://usermanual.wiki/Hanwha-Techwin/DIGIMAX350SE/User-Guide-226355-Page-61.png)
![63ADVANCEDSETTING UP PLAY BACK FUNCTIONSDPOF (Digital Print Order Format)DPOF stores printing information onto the CF CARD, enabling you to have pictures printed directly from the CF CARD.Pictures can then be printed on DPOF printers, or at an increasing number of photo laboratories.This function is not adjusted to Movie clip.STANDARDOnly one picture will be printed on a page.1.Turn the camera on.2.Rotate the mode dial to the PLAY mode( ).3.Press the MENU button to display [PLAY 1/2] menu on theLCD monitor.4.Select [PLAY 2/2] menu by pressing the LEFT ( ) / RIGHT( ) buttons.5.Press the DOWN button( ) and select [STANDARD].6.Shift the cursor to the [STANDARD] sub menu by pressingthe RIGHT button ( ) 7.Select ONE PICTURE or ALL PICTURES- ONE PICTURE : Specifying the number of copies from aselected picture.- ALL PICTURES : Specifying the number of copies from allpictures except for movie clips.8.Press the OK button, and a menu confirming the number ofcopies will be displayed.Select desired number of copies by pressing the UP ( ) /DOWN( ) buttons and press OK button.The maximum number of copies is 10.9.If you select [ONE PICTURE] in step 7 , the DPOF can be set tothe other picture by pressing LEFT( ) / RIGHT( ) button.The process of setting up is same as step 8.10.Press the MENU button to cancel menu display.If an picture carries DPOF instructions, the DPOFindicator ( ) will show.PLAY[DPOF] 2/2BACK : SET : OKONE PICTUREALL PICTURESSTANDARDINDEXCANCELREVIEW# OF PRINTSEXIT : MENU SET : OK00](https://usermanual.wiki/Hanwha-Techwin/DIGIMAX350SE/User-Guide-226355-Page-62.png)
![SETTING UP PLAY BACK FUNCTIONS64INDEXThis function will specify the number of copies (except for movie clips) for index print.1.Turn the camera on.2.Rotate the mode dial to PLAY mode( ).3.Press the MENU button to display [PLAY 1/2] menu on theLCD monitor.4.Select [PLAY(DPOF) 2/2] menu by pressing the LEFT ( ) /RIGHT ( ) buttons.5.Press the DOWN button( ) and select [INDEX].6.Shift the cursor to the [INDEX] sub menu by pressing RIGHTbutton ( ) 7.Select desired sub menu by pressing the UP ( ) / DOWN ( ) buttons.The maximum number of copies is 10.8.After selecting the desired sub menu, press the OK button to confirm the setting.9.The display is returned to [PLAY(DPOF) 2/2] menu, and the sub menu is highlighted. Press the MENU button, and the menu display will no longer show.10.( ) indicator will be displayed on the LCD monitor.PLAY[DPOF] 2/2BACK : SET : OK00 PRINTSSTANDARDINDEXCANCELREVIEW](https://usermanual.wiki/Hanwha-Techwin/DIGIMAX350SE/User-Guide-226355-Page-63.png)
![SETTING UP PLAY BACK FUNCTIONS65ADVANCEDCANCELThis is used for canceling STANDARD or INDEX DPOF function.1.Turn the camera on.2.Rotate the mode dial to PLAY mode( ).3.Press the MENU button to display [PLAY 1/2] menu on the LCDmonitor.4.Select [PLAY(DPOF) 2/2] menu by pressing the LEFT ( ) /RIGHT ( ) buttons.5.Press the DOWN button( ) and select [CANCEL].6.Shift the cursor to the [CANCEL] sub menu by pressing theRIGHT button ( ) 7.Select the desired sub menu by pressing the UP ( ) / DOWN ( ) buttons.8.After selecting the desired sub menu, press the OK button to confirm the setting. The display is returned to [PLAY DPOF) 2/2] menu, and the sub menu is highlighted. The number of copies will return to 00.9.Press the MENU button to cancel the menu display.PLAY[DPOF] 2/2BACK : SET : OKSTANDARDINDEXSTANDARDINDEXCANCELREVIEWREVIEWYou can review specified number of STANDARD or INDEX copies.1.Turn the camera on.2.Rotate the mode dial to PLAY mode( ).3.Press the MENU button to display [PLAY 1/2] menu on theLCD monitor.4.Select [PLAY (DPOF) 2/2] menu by pressing the LEFT ( )/ RIGHT ( ) buttons.5.Press the DOWN button ( ) and select [REVIEW] on themenu that is shown below.6.Press the MENU button to cancel the menu display afterreviewing the setting.PLAY[DPOF] 2/2EXIT : MENU00 PRINTS00 PRINTSNOS[00] / I[00]STANDARDINDEXCANCELREVIEWNumber of STANDARD copiesNumber of INDEX copies](https://usermanual.wiki/Hanwha-Techwin/DIGIMAX350SE/User-Guide-226355-Page-64.png)
![FILE NAMEThis enables you to name files- SERIES type : Under this system, the file name will directly follow the last stored filename, regardless of any actions such as file deletion or re-formatting.- RESET type : Using reset, the next file name will be set from 0001 even after formatting,deleting all or inserting a new CF CARD.66SET UP MODEStarting Set up mode- Rotate the mode dial to SET UP mode, allowing you to set up the basic camera settings.FORMATThis is used for formatting the CF CARD.Refet to page 73 regarding formatting.1.Turn the camera on.2.Rotate the mode dial to SET UP mode.3.A menu will display on the LCD monitor.4.Press the DOWN button ( ) and select [FORMAT].5.Shift the cursor to the [FORMAT] sub menu. by pressingthe RIGHT button ( )6.Select [YES] to format the CF CARD.7.Press the OK button to format the CF CARD.After formatting the CF CARD, [FORMAT OK!] messagewill show in the LCD monitor and the display is returnedto initial menu.SETUP 1/3BACK : SET : OKNOYESFORMATFILE NAMEPOWER OFFLANGUAGE](https://usermanual.wiki/Hanwha-Techwin/DIGIMAX350SE/User-Guide-226355-Page-65.png)
![67ADVANCEDSETTING UP THE CAMERA SYSTEM1.Turn the camera on.2.Rotate the mode dial to SET UP mode( ).3.A menu will display on the LCD monitor.4.Press the DOWN button ( ) and select [FILE NAME].5.Shift the cursor to the [FILE NAME] sub menu by pressingthe RIGHT button ( ). 6.Select the desired sub menu by pressing the UP ( ) /DOWN ( ) buttons. The default is SERIES.7.After selecting the desired sub menu, press the OK button toconfirm the setting. After confirming the setting, the cursor willmove to [ SETUP 1/3 ] menu.SETUP 1/3BACK : SET : OKRESETSERIESFORMATFILE NAMEPOWER OFFLANGUAGEReferenceThe first stored folder name is 100SSCAM , and file name is PICT0001Whenever you store an picture, the file number is increased by 1.The file number is named from PICT0001 to PICT9999 automatically, 9999 files will bestored in a folder. Using SERIES, the sequence starts at 100SSCAM and increases inincrements of 1. (e.g. : 101SSCAM, 102SSCAM…..)The files used with the CF CARD conform to the DCF (Design rule for Camera File system)format.](https://usermanual.wiki/Hanwha-Techwin/DIGIMAX350SE/User-Guide-226355-Page-66.png)
![SETTING UP CAMERA SYSTEM68LANGUAGEThere is a choice of languages that can be displayed on the LCD monitor.English, Korean and Chinese are available.1.Turn the camera on.2.Rotate the mode dial to SET UP mode( ).3.A menu will display on the LCD monitor.4.Press the DOWN button ( ) and select [LANGUAGE].5.Shiftt the cursor to the [LANGUAGE] sub menu bypressing the RIGHT button ( ) 6.Select the desired sub menu by pressing the UP ( ) /DOWN ( ) buttons.7.After selecting the desired sub menu, press the OK buttonto confirm the setting. After confirming the setting, theselected language will be displayed on the LCD monitor.SETUP 1/3BACK : SET : OKENGLISHFORMATFILE NAMEPOWER OFFLANGUAGEPOWER OFF- This function switches the camera off after a set amount of time in order to prevent unnecessarybattery drainage.- You can set the power to switch off at any time between one and ten minutes from the last operation.- Setting this function to OFF means that the camera will not switch off automatically.Note that the automatic power off does not operate if the camera is in slide show or PC mode.1.Turn the camera on.2.Rotate the mode dial to SET UP mode( ).3.A menu will display on the LCD monitor.4.Press the DOWN button ( ) and select [POWER OFF].5.Shift the cursor to the [POWER OFF] sub menu by pressingthe RIGHT button ( ) 6.Select the desired sub menu by pressing the UP ( ) /DOWN ( ) buttons. The default is 3 minutes.7.After selecting the desired sub menu, press the OK button toconfirm the setting. After confirming the setting, the cursor willmove to the initial menu display automatically.SETUP 1/3BACK : SET : OK10 MINFORMATFILE NAMEPOWER OFFLANGUAGE](https://usermanual.wiki/Hanwha-Techwin/DIGIMAX350SE/User-Guide-226355-Page-67.png)
![69ADVANCEDSETTING UP CAMERA SYSTEMDATE SETUPThis alters the time and date stored with the pictures.Range: 2001 ~ 2050 year (leap years and months are corrected automatically).The default is 2001/01/01 12:00.1.Turn the camera on.2.Rotate the mode dial to SET UP mode( ).3.[SETUP 1/3] menu will be displayed on the LCD monitor.4.Select [SETUP 2/3] menu by pressing the LEFT ( ) /RIGHT ( ) buttons.5.Press the DOWN button ( ) and select [DATE SETUP].6.Shift the cursor to the [DATE SETUP] sub menu bypressing the RIGHT button ( ) 7.Press / / / to select correct time.8.Press OK button to confirm the setting. After confirming the setting, the cursor will move to[SETUP 2/3] menu automatically.SETUP 2/3BACK : SET : OK2001/01/0112:00DATE SETUPIMPRINTDATE TYPEUSER SETNoteIf the battery is removed, the date and time settings will remain for approximately 1 hour.If the batteries are removed for a period longer than one hour, it may be necessary to resetthe time /date.](https://usermanual.wiki/Hanwha-Techwin/DIGIMAX350SE/User-Guide-226355-Page-68.png)
![70SETTING UP CAMERA SYSTEMIMPRINTThere is an option to include DATE/TIME on still pictures.There are 3 types of IMPRINT.- OFF: IMPRINT function is cancelled.- DATE: The date is included in the still picture.- DATE & TIME: The date and time is included in the still picture.This function is not available in continuous shot and movie clip.1.Turn the camera on.2.Rotate the mode dial to SET UP mode( ).3.[SETUP 1/3] menu will display on the LCD monitor.4.Select [SETUP 2/3] menu by pressing the LEFT ( ) /RIGHT ( ) buttons.5.Press the DOWN button ( ) and select [IMPRINT].6.Shift the cursor to the [IMPRINT] sub menu by pressingthe RIGHT button ( ) 7.Select the desired sub menu by pressing the UP ( ) /DOWN ( ) buttons. The default is OFF.8.After selecting the desired sub menu, press the OK button to confirm the setting. Afterconfirming the setting, the cursor will move to the [SETUP 2/3] menu automatically.SETUP 2/3BACK : SET : OKOFFDATEDATE &TIMEDATE SETUPIMPRINTDATE TYPEUSER SET](https://usermanual.wiki/Hanwha-Techwin/DIGIMAX350SE/User-Guide-226355-Page-69.png)
![71ADVANCEDSETTING UP CAMERA SYSTEMRecorded date and time will be imprinted in the bottom right hand corner of the picture.< Date imprinting > < Date and Time imprinting >ReferenceDate will be imprinted as DATE TYPE setting.TIME is imprinted in the following way: [hour / minute / second]. Hours are shown using the24 hour clock.The IMPRINT function is unaffected by the camera being switched on and off.](https://usermanual.wiki/Hanwha-Techwin/DIGIMAX350SE/User-Guide-226355-Page-70.png)
![72SETTING UP CAMERA SYSTEMDATE TYPEYou can select date type that is imprinted on the picture.- YYYY/MM/DD : year /month/ day- DD/MM/YYYY : day /month /year- MM/DD/YYYY :month/ day /year1.Turn the camera on.2.Rotate the mode dial to SET UP mode( ).3.[ SETUP 1/3] menu will show on the LCD monitor.4.Select [SETUP 2/3] menu by pressing the LEFT ( ) /RIGHT ( ) buttons.5.Press the DOWN button ( ) and select [DATE TYPE].6.Shift the cursor to the [DATE TYPE] sub menu bypressing the RIGHT button ( ) 7.Select the desired sub menu by pressing the UP ( ) /DOWN ( ) buttons. The default is YYYY/MM/DD.8.After selecting the desired sub menu, press the OK button to confirm the setting. After confirming the setting, the cursor will move to [SETUP 2/3] menu automatically.SETUP 2/3BACK : SET : OKYYYY/MM/DDDD/MM/YYYYMM/DD/YYYYDATE SETUPIMPRINTDATE TYPEUSER SET](https://usermanual.wiki/Hanwha-Techwin/DIGIMAX350SE/User-Guide-226355-Page-71.png)
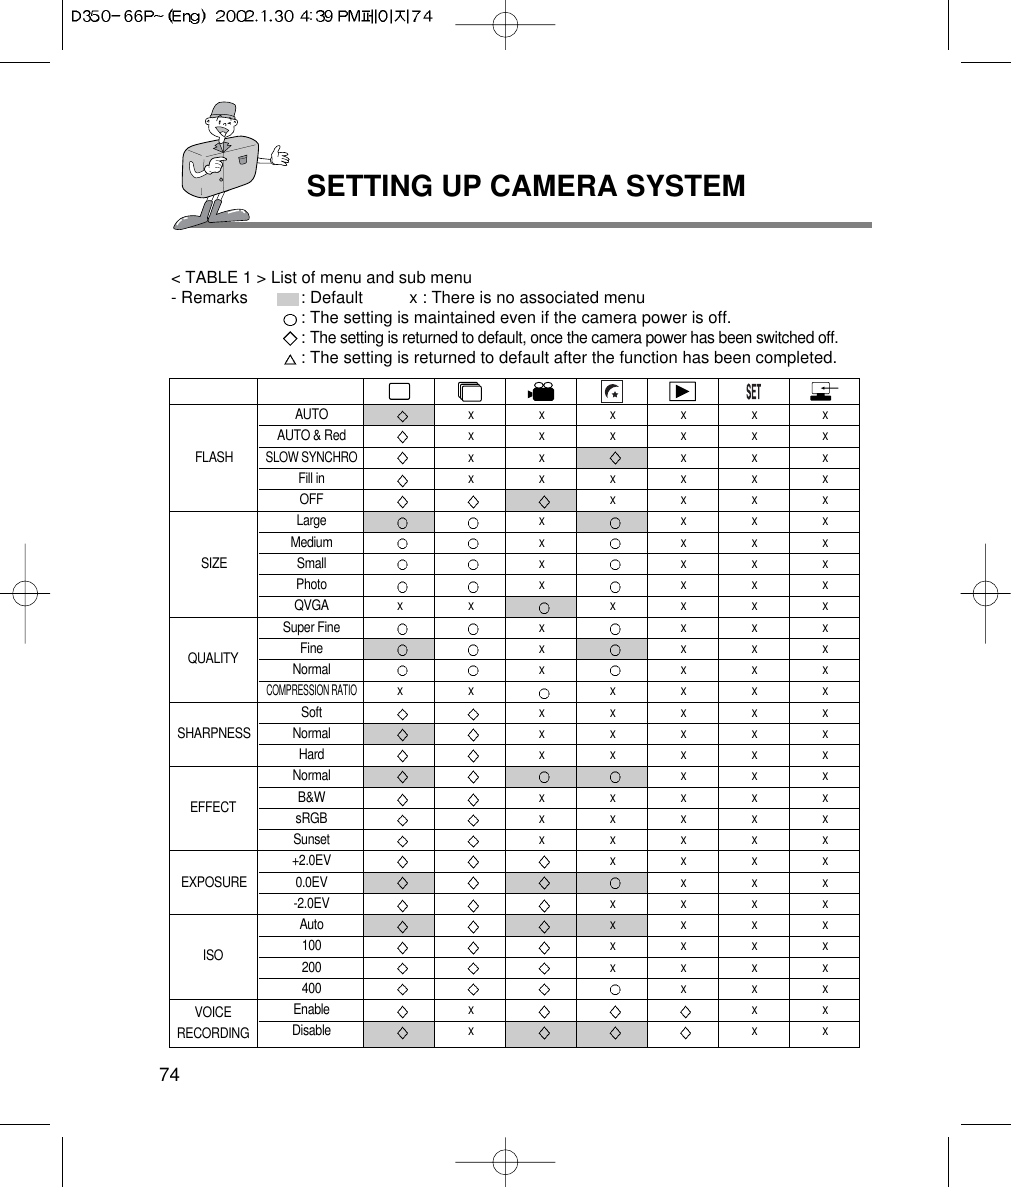
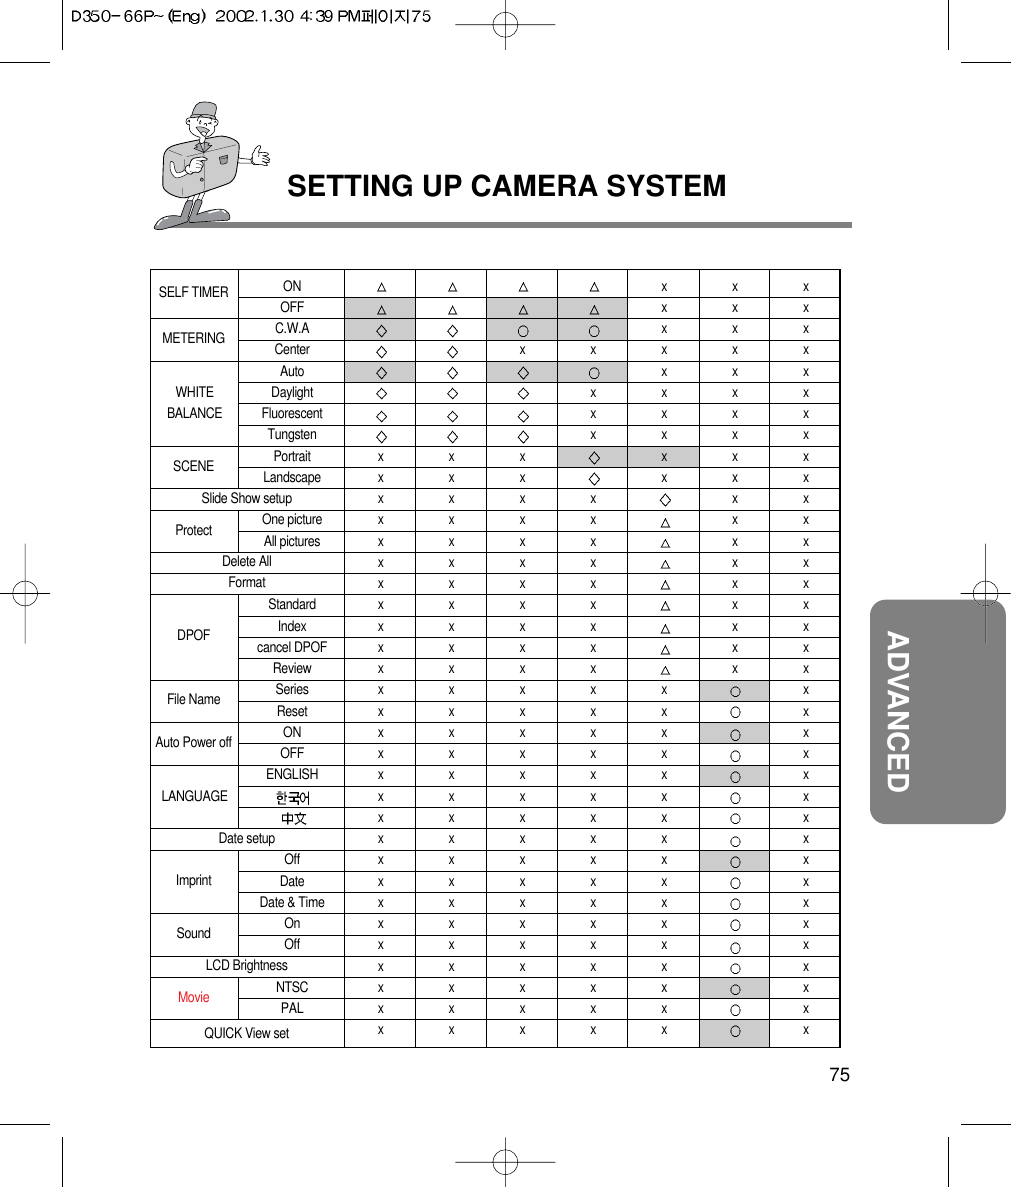
![73ADVANCEDSETTING UP CAMERA SYSTEMUSER SETUser can save the sub menu, that is returned to default when the camera power is off, asuser preferences.Only marked sub menu in the [TABLE 1] can be applied to USER SET function.1.Turn the camera on.2.Rotate the mode dial to SET UP mode( ).3.[ SETUP 1/3] menu will display on the LCD monitor.4.Select [SETUP 2/3] menu by pressing the LEFT ( ) /RIGHT ( ) buttons.5.Press the DOWN button ( ) and select [USER SET].6.Shift the cursor to the [USER SET] sub menu by pressingthe RIGHT button ( ) 7.Select the desired sub menu by pressing the UP ( ) /DOWN ( ) button and press the OK button.The default is NO.8.Select YES or NO.- Selecting YES. : The sub menu setting will be saved, even if the camera is switched off.- Selecting NO. : If NO is selected, the camera will return to default when switched off.SETUP 2/3BACK : SET : OKOFFONDATE SETUPIMPRINTDATE TYPEUSER SET](https://usermanual.wiki/Hanwha-Techwin/DIGIMAX350SE/User-Guide-226355-Page-72.png)
![SETTING UP CAMERA SYSTEM76LCDYou may adjust the LCD brightness.1.Turn the camera on.2.Rotate the mode dial to SET UP mode( ).3.[SETUP 1/3] menu will display on the LCD monitor.4.Select [SETUP 3/3] menu by pressing the LEFT ( ) / RIGHT( ) buttons.5.Press the DOWN button ( ) and select [LCD].6.Shift the cursor to the [LCD] sub menu by pressing the RIGHTbutton ( ) 7.Select the desired sub menu by pressing the UP ( ) / DOWN ( ) buttons. The LCD monitor has 7 brightness settings.8.After selecting the desired sub menu, press the OK button to confirm the setting. After confirming the setting, the cursor will move to the [SETUP 3/3] menu automatically.SETUP 3/3BACK : SET : OKSOUNDLCDMOVIE OUTQUICK VIEWSOUNDA beep will sound when you press the camera button.1.Turn the camera on.2.Rotate the mode dial to SET UP mode( ).3.[SETUP 1/3] menu will display on the LCD monitor.4.Select [SETUP 3/3] menu by pressing the LEFT ( ) /RIGHT ( ) buttons.5.Press the DOWN button ( ) and select [SOUND].6.Shift the cursor to the [SOUND] sub menu by pressing theRIGHT button ( ) 7.Select the desired sub menu by pressing the UP ( ) /DOWN ( ) buttons8.After selecting the desired sub menu, press the OK button to confirm the setting. After confirming the setting, the cursor will move to the [SETUP 3/3] menu automatically.SETUP 3/3BACK : SET : OKOFFONSOUNDLCDMOVIE OUTQUICK VIEW](https://usermanual.wiki/Hanwha-Techwin/DIGIMAX350SE/User-Guide-226355-Page-75.png)
![77ADVANCEDSETTING UP CAMERA SYSTEMMOVIE OUTThe Movie output signal from the camera can be NTSC or PAL. Your choice of output will begoverned by the type of machine (monitor or TV, etc.) to which the camera is connected.Select the correct movie standard for the outer monitor. PAL mode can support only BDGHI.1.Turn the camera on.2.Rotate the mode dial to SET UP mode( ).3.[SETUP 1/3] menu will show on the LCD monitor.4.Shift the cursor to the [SETUP 3/3] sub menu by pressing theRIGHT button ( )5.Press the DOWN button ( ) and select [MOVIE OUT].6.Shift the cursor to the [MOVIE OUT] sub menu by pressingthe RIGHT button ( ) 7.Select the desired sub menu by pressing the UP ( ) /DOWN ( ) buttons. The default is NTSC.8.After selecting the desired sub menu, press the OK button to confirm the setting. After confirming the setting, the cursor will move to the [SETUP 3/3] menu automatically.SETUP 3/3BACK : SET : OKNTSCPALSOUNDLCDMOVIE OUTQUICK VIEWQUICK VIEWWith QUICK VIEW you can pre-set the camera to briefly review the last picture captured. It is possibleto vary the time the picture is visible, according to your particular requirements.1.Turn the camera on.2.Rotate the mode dial to SET UP mode( ).3.[SETUP 1/3] menu will display on the LCD monitor.4.SSelect [SETUP 3/3] menu by pressing the LEFT ( ) / RIGHT ( )buttons.5.Press the DOWN button ( ) and select [QUICK VIEW].6.Shift the cursor to the [QUICK VIEW] sub menu by pressing the RIGHTbutton ( ) 7.Select the desired sub menu by pressing the UP ( ) / DOWN ( )buttons. The default is 1 second and you can change it up to 3 seconds.8.After selecting the desired sub menu, press the OK button to confirm the setting. After confirming the setting, thecursor will move to [SETUP 3/3] menu automatically.SETUP 3/3BACK : SET : OK03 SECSOUNDLCDMOVIE OUTQUICK VIEW](https://usermanual.wiki/Hanwha-Techwin/DIGIMAX350SE/User-Guide-226355-Page-76.png)
![CONNECTING TO AN EXTERNAL MONITORConnecting to an external monitor78In STILL PICTURE or PLAY mode, you can view the stored pictures or movie clips byconnecting the camera to an external monitor via the movie cable. When the camera isconnected to an external monitor, the LCD monitor will be turned off automatically.- when the camera is connected to a external monitor, the menu will be visible on theexternal monitor and the working of the menu is same as the LCD monitorSelecting the Movie output typeYou can select an NTSC or PAL movie output signal, depending on the externalequipment (monitor or TV) that you wish to connect to.- Refer to page 90 [MOVIE OUT] about selecting the movie output from the camera.ReferenceWhen using a TV as an external monitor, you will need to select the external or AV channelof the TV.There will be a digital noise on the external monitor, but it is not malfunction.If the picture is not in the centre of the screen, use the TV controls to centre it.](https://usermanual.wiki/Hanwha-Techwin/DIGIMAX350SE/User-Guide-226355-Page-77.png)
![PC MODEFunctions of PC mode79ADVANCEDNoteThe USB Storage Driver must be installed before using PC mode. Refer to page 109 regarding installation.To save battery power, it is recommended that you use an AC adaptor(Optional) whenconnecting the camera to a computerDownloading stored picturesOnce you have downloaded pictures to your PC, they can be edited and printed.(1) Rotate the mode dial to PC mode, and turn the camera on.(2) Connect the camera to your PC with the USB cable.(3) On your computer’s desktop display, select [My computer] and double click[Removable Disk]. The picture files will then be displayed. Use the COPY orMOVE function to download the pictures to your PC.(4) By using [Digimax Viewer], you can see the stored pictures in the CF CARDdirectly on the PC monitor and you can copy or move the picture files.(5) If you wish to edit downloaded pictures, you can use [MGI PhotoSuite SE].Refer to the software manual regarding editing software installation and usage.In this mode, you can download stored pictures to your PC through the USB cable.There is no menu in the PC mode.When you connect the camera to a PC, ensure that the mode dial is set on PC and thatthe mode dial lamp is illuminated.The Auto focus indicator(green) lamp blinks when the files are transferring via the USBconnection.](https://usermanual.wiki/Hanwha-Techwin/DIGIMAX350SE/User-Guide-226355-Page-78.png)


![About softwaresUSB Storage DriverThis camera uses USB Storage Driver as the camera driver. You can use the camera asa USB card reader. After installing the driver and connecting this camera to the PC, youcan find [Removeable Disk] in [Windows Explorer] or [My computer]USB Storage Driver is provided only for Windows.USB Driver for MAC is not included with the Application CD. But you can use thecamera with Mac OS 9.x.Digimax ViewerYou can see the stored pictures in the CF CARD directly on the PC monitor. And youcan copy, move, delete the picture and scale up /downscale the picture size withDigimax Viewer. For windows only.MGI PhotoSuite SEPicture editing program for downloaded picture.For Windows only.SOFTWARE MANUALPlease ensure that you read the instruction manual carefully before using88Software NotesThe attached software is a camera driver and picture editing software tool for Windows.Under no circumstances should all or part of either the software or the user manual bereproduced.Copyright for both software is licensed only for use with a camera.In the unlikely event of a manufacturing fault, we will repair or exchange your camera.We cannot, however, be held responsible in any way for damage caused byinappropriate use.Before reading this manual, you should have a basic knowledge of computers and O/S(Operating Systems).Windows is a registered trademark of Microsoft.Macintosh, Mac is the registered trademark of Apple computer, USA.](https://usermanual.wiki/Hanwha-Techwin/DIGIMAX350SE/User-Guide-226355-Page-87.png)
![HOW TO SET UP THE SOFTWARE FOR WINDOWSHow to set up the software89SOFTWAREInserting the CD-ROM provided with this camera into the CD-ROM drive, the followingframe is automatically run.1.Driver : This enbles picture to transfer between the camera and PC.Driver installation for Windows : refer to page 109Driver installation for Macintosh : refer to page 1322.Image Viewer : Digimax Viewer3.Application : MGI PhotoSuite SE : picture editing program. Refer to page 111.4.Internet link : You can visit the Samsung web-site through the internet.http://www.samsungcamera.com : Englishhttp://www.samsungcamera.co.kr : KoreanReferenceCheck the system requirements ( 00 page ) before setting up the driver.You should allow 5~10 seconds for running the automatic setup program according to thecapability of the computer. If the frame does not show, run the [Windows Explorer] and select[Samsung.exe] in the CD-ROM Drive root directory.](https://usermanual.wiki/Hanwha-Techwin/DIGIMAX350SE/User-Guide-226355-Page-88.png)
![SETTING UP USB DRIVER FOR WINDOWSHow to set up the software for Windows901Click [ Storage Driver] icon on the Autorunframe and the ‘InstallShield Wizard’ Windowwill open. Click [ Next > ].2[ Storage Driver ] installation has started.3Installation is complete.Click : [Yes, I want to restart my computernow.] to restart your computer.To use this camera with a PC, first install the Camera Driver. After this has been done, thestored pictures in the camera can be moved to the PC and can be edited by a picture editingprogram.](https://usermanual.wiki/Hanwha-Techwin/DIGIMAX350SE/User-Guide-226355-Page-89.png)
![SETTING UP USB DRIVER FOR WINDOWSHow to set up the software for Windows91SOFTWARE4After restarting computer, connect the PC to the camera with the USB cable.5Turn the camera power on with the mode dial set on PC. [Found New Hardware Wizard]will appear and the computer will recognize the camera. If the PC OS is Windows98/98SE, [ Found New Hardware Wizard ] will start twice. Don’t close the [Found NewHardware Wizard] whilst it is being processed. 6USB Driver installation is complete. Afterinstallation, [Removable Disk] will be displayedunder [My computer] as shown alongside.NoteBefore connecting the camera to the PC, you must install the camera driver.After driver installation, you have to restart the computer.Should the computer not find the Camera Driver after installation, please try one or more ofthe following measures.1. Delete the camera driver, and re-install the driver.2. Refer to FAQ to check for a possible solution to the problem.If your PC’s central processing unit is VIA Chip (This is shown in the USB Host Controller),download the patch file from the Samsung Camera webpage.http://www.samsungcamera.com](https://usermanual.wiki/Hanwha-Techwin/DIGIMAX350SE/User-Guide-226355-Page-90.png)
![Setting up Digimax ViewerSetting up Digimax Viewer921Click [Digimax Viewer] on the Autorun window .2Install window will display as shown alongside.Click [Next].3The Software License Agreement window willdisplay. If you agree to it, click [Yes]. This willtake you to the next step. If you disagree, click[No] and the install program will be canceled.4Select destination folder and click [Next].](https://usermanual.wiki/Hanwha-Techwin/DIGIMAX350SE/User-Guide-226355-Page-91.png)
![Setting up Digimax ViewerSetting up Digimax Viewer93SOFTWARE5Select Program folder and click [Next].6Setup status window will display.7Install is completed.If you wish to open this program automaticallywhenever the camera connects to PC, click [Iwould like to launch Digimax Viewer]Checkbox. And click [Finish].](https://usermanual.wiki/Hanwha-Techwin/DIGIMAX350SE/User-Guide-226355-Page-92.png)
![SET UP THE EDITING SOFTWARESetting up the MGI PhotoSuite lll SE942Select language.3A Welcome window will be displayed.Click [Next >] to move to the next step.4The Software License Agreement window willbe displayed.If you agree to this, click [Yes], the window willthen move to the next step. If you disagree,click [Cancel] and the install program will becanceled.1Click the MGI PhotoSuite lll SE icon on autorun frame.](https://usermanual.wiki/Hanwha-Techwin/DIGIMAX350SE/User-Guide-226355-Page-93.png)
![SET UP THE EDITING SOFTWARE95SOFTWARE5Select set up type.Full : the program will be installed with all theoptions.Custom : you can choose what you would liketo install.6Start Copying Files window will display.Click [Next > ] to start installation.7The MGI Registration window will be displayedbefore completing installation.Send : send your name and e-mail address toMGI.Register now : move to the on-line registrationwindow.Register later : postpone registration.](https://usermanual.wiki/Hanwha-Techwin/DIGIMAX350SE/User-Guide-226355-Page-94.png)
![SET UP THE EDITING SOFTWARE968Installation is completed.9You have to check [Yes, I want to restart my computernow.] and restart your computer.If installation is completed correctly, Autoplay isregistered automatically into the start menuprogram as shown alongside.](https://usermanual.wiki/Hanwha-Techwin/DIGIMAX350SE/User-Guide-226355-Page-95.png)
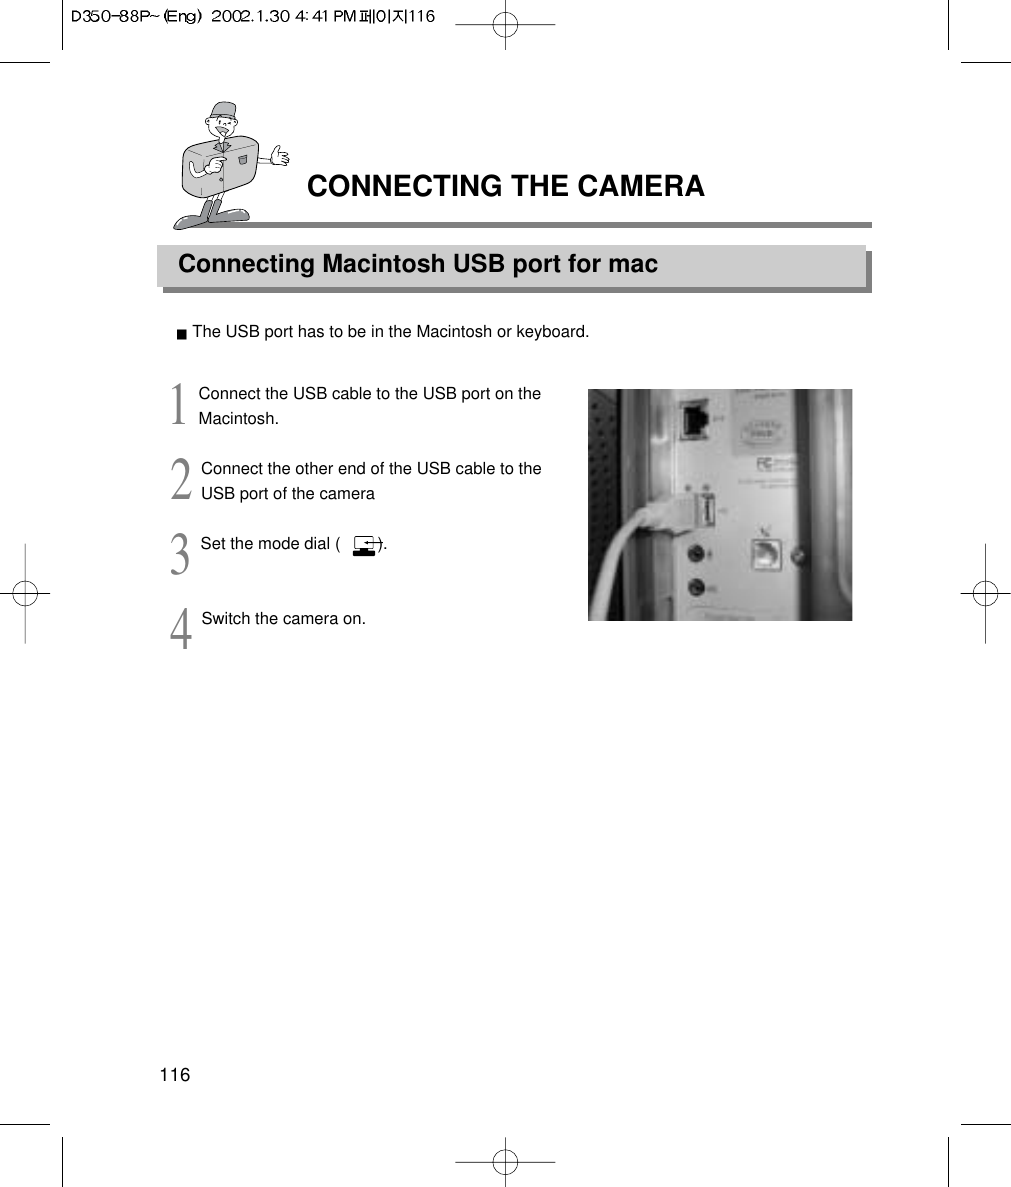
![CONNECTING THE CAMERAConnecting USB cable to the Camera for Windows97SOFTWARETo download pictures, you will need Windows 98 or later and a USB port on yourcomputer.1Connect the USB cable to the USB port on thecomputer.2Connect the other end of the USB cable to theUSB connection terminal of the camera.3Set the mode dial to( )4Switch the camera on.Removable DiskTo use this camera as a Removable Disk, install the USB Driver.1Before turning the camera power on, connect the camera to the PC with the USB cableand rotate the mode dial to PC mode.2Click [ Removable Disk ] under [My computer] or [ Windows Explorer].3Image files stored in the Removable Disk can be transferred to the PC.](https://usermanual.wiki/Hanwha-Techwin/DIGIMAX350SE/User-Guide-226355-Page-96.png)
![REMOVABLE DISK98NoteImportant information whilst using the Removable DiskThe [Removable Disk] indicator will not show when the camera power is off.We recommend that you should copy the pictures to the PC to view them. Opening picturesdirectly from the removable disk may be subject to unexpected disconnection.When uploading images from the PC to the camera, ensure that the uploaded file namesare not the same as those already stored on the CF card.Files with the same file name but different extensions (e.g: PICT0001.jpg/PICT0001.avi),JPG file format will appearfirst. And if the displayed file is deleted, all the same filename pictures are deleted.When you upload a file that is not taken by this camera to Removable Disk, the ERRORFILE message will be displayed on the LCD monitor in PLAY mode, and nothing isdisplayed in THUMBNAIL mode.The green lamp next to the viewfinder will blink, when a file is transferred (copy ordeletion) between the PC and camera. Do not remove the USB cable or rotate the modedial until the lamp stops blinking. To remove the USB cable, use the [Unplug or EjectHardware] icon on the task bar. In Windows 2000, take extra care, as the following mayoccur.1. When an image file from the Removable Disk is deleted : The green lamp will blink forabout 10 seconds after file deletion is completed on the PC.2. When a picture file is transferred between PC and Removable Disk : The green lampwill blink again 15-20 seconds after the first time it blinks.The work is not completed until the lamp has finished blinking.Uploading the sound recorded picture to the camera, you should upload both WAV andJPG file. For example, if you upload PICT0001.wav file to the camera, PICT0001.jpg filehas to be uploaded.](https://usermanual.wiki/Hanwha-Techwin/DIGIMAX350SE/User-Guide-226355-Page-97.png)
![99SOFTWAREREMOVABLE DISKReferenceWhen a downloaded movie won't play back, follow the procedure below. [ solution 1 ] Install JPEG_Decoder.1. Insert Application CD in CD-ROM Drive.2. Open [Windows Explorer] and double click JPEG_Decorder folder in CD-ROM Drive folder.3. Select [Jpegcode.inf] in JPEG_Decoder folder and click right button of mouse.Then, click [Install] and the movie compression code is automatically set up.[ solution 2 ] Install QuickTime.QuickTime is a trademark of Apple Computer, Inc. and can be downloaded from http://www.apple.com/quicktime/download for free.](https://usermanual.wiki/Hanwha-Techwin/DIGIMAX350SE/User-Guide-226355-Page-98.png)
![HOW TO USE DIGIMAX VIEWERDigimax Viewer100This software is only compatible with Windows.To open Digimax Viewer, click the [ Start Programs Samsung Digimax Viewer 1.0 Digimax Viewer 1.0 ] and Digimax Viewer 1.0 will then open.The stored pictures will display as thumbnail picture.You can easily copy, move and delete the stored pictures.If the Auto Launch option is selected, this program will be executed automatically withrecognizing the camera.Refer to [Help] menu in Digimax viewer about futher information.](https://usermanual.wiki/Hanwha-Techwin/DIGIMAX350SE/User-Guide-226355-Page-99.png)
![HOW TO USE EDITING SOFTWAREMGI PhotoSuite SE101SOFTWAREThis software is only compatible with Windows.To open MGI PhotoSuite lll SE, click the [Start Programs MGI PhotoSuite lll SE MGI PhotoSuite lll SE] and MGI PhotoSuite lll SE will then open.](https://usermanual.wiki/Hanwha-Techwin/DIGIMAX350SE/User-Guide-226355-Page-100.png)


![EDITING SOFTWAREGet images104GETTo obtain images from the computer1To acquire images,Click the large [Get] buttonon the Welcome screen, or the [Get] button onthe Navigation bar. Click [Computer] from thelist of options displayed on the activity panel.2The Open file selector is displayed. Now selectthe image file and click [open].3The Welcome screen will change to the nextwork step, with the selected image displayed.: Get images](https://usermanual.wiki/Hanwha-Techwin/DIGIMAX350SE/User-Guide-226355-Page-103.png)
![HOW TO USE EDITING SOFTWAREMGI PhotoSuite lll SE105SOFTWAREWhen you obtain images from the digital camera.1To acquire images, click the large [Get] buttonon the Welcome screen, or the [Get] button onthe Navigation bar. Click [Computer] from thelist of options displayed on the activity panel.2The Open file selector is displayed. Click [Lookin :] to choose Removable Disk( :) and click[open] for the open file window to be displayed.NoteWhen you connect a PC to the Camera, use the following sequence : 1. Turn the Mode dial to PC mode. 2. Turn the power on.3. Connect the USB cable.Refer to page 49 for more information about connecting the cable.](https://usermanual.wiki/Hanwha-Techwin/DIGIMAX350SE/User-Guide-226355-Page-104.png)
![EDITING SOFTWAREMGI PhotoSuite lll SE1063Select [Digital camera( :)] and select folder.Then select image and click [ Open ].4The Welcome screen will change to the nextwork step, with the selected image displayed.ReferenceWhen you use the Digimax camera, only [Computer]and [Album] from the list of options displayed areavailable. You will be able to obtain images from thedigital camera.[Computer and Album Only]](https://usermanual.wiki/Hanwha-Techwin/DIGIMAX350SE/User-Guide-226355-Page-105.png)
![EDITING SOFTWAREMGI PhotoSuite lll SE107SOFTWARE1To acquire images, click the the large [Get]button on the Welcome screen, or the [Get]button on the Navigation bar. Click [Album]from the list of options displayed on the activitypanel.2After selecting Album on the Choose aphoto album, click an image in the album andclick [Open].3The Welcome screen will change to the nextwork step, with the selected image displayed.Acquiring images from an Album.Refer to page 71 for more information about creating an Album.](https://usermanual.wiki/Hanwha-Techwin/DIGIMAX350SE/User-Guide-226355-Page-106.png)
![EDITING SOFTWAREMGI PhotoSuite lll SE108PREPAREWhen the image is loaded, the step changes to Prepare automatically.Menu of [PREPARE] stepRotate & CropYou can rotate, flip or crop images along with ahost of others.TouchupRemove Red eye, Remove Scratches etc.. areavailable in this menu.Special EffectsA number of special effects can be applied.StitchingJoin a series of photos together to create asweeping panoramic effect.](https://usermanual.wiki/Hanwha-Techwin/DIGIMAX350SE/User-Guide-226355-Page-107.png)
![EDITING SOFTWAREMGI PhotoSuite lll SE109SOFTWARECOMPOSEAdd Text , Compound Images etc.. are available in this step.Menu of [COMPOSE] stepsCollage : A collage consists of several photos orsections of photos arranged together on acommon background.Photo Layouts : The Photo Layouts activityincludes many collage and layout options.Card & tag : Use your photos to create itemssuch as Gift Tags, Greeting Cards, Invitations,Postcards, and Sports Cards.Calendars : Use your photos to create a varietyof calendars (monthly, quarterly,seasonal,yearly). Collections : Photos can also be used to createa variety of items for business purposes.Add frames and boarder effects to your photos withthe predefined templates.](https://usermanual.wiki/Hanwha-Techwin/DIGIMAX350SE/User-Guide-226355-Page-108.png)
![EDITING SOFTWAREMGI PhotoSuite lll SE110ORGANIZEOrganize your photos and other media files into albums.Menu of [ORGANIZE] stepChoose a photo album to view or editSelect Album : To create an Album, click[Organize] in the welcome screen or navigationbar.Album.. : Open Master Album.Select a photo, and choose an action below.Open : Open selected image.Delete : Delete selected image.Properties.. : view image information.Choose an action to manage your album.Add : click [Add] to add an image to an Album.Sort : click [Sort] to Sort saved images.Search : click [Search] to Search saved images.Reset : click [Reset] to reset the setting.Update : click [Update] to update images.Create Slide Show.. : click [Create Slide Show]to create a Slide Show.Always start on this page : If you select thisoption, the program will start in [Organize].](https://usermanual.wiki/Hanwha-Techwin/DIGIMAX350SE/User-Guide-226355-Page-109.png)
![EDITING SOFTWAREMGI PhotoSuite lll SE111SOFTWARECreating an Album1To create an Album, click the large Organize button on the Welcome screen, or theOrganize button on the Navigation bar.2Click [Album..] in Choose a photo album toview or edit.3The Master Album window will be displayed,then click [New..].4Put a new Album name in the New Albumwindow and click [OK]. A new album will nowbe created.](https://usermanual.wiki/Hanwha-Techwin/DIGIMAX350SE/User-Guide-226355-Page-110.png)
![EDITING SOFTWAREMGI PhotoSuite lll SE112SHARESaving images1Saving or sharing images.Menu of [SHARE] stepSaveTo save the active file according to itscurrent name and path.Save AsTo assign a new name or path to the file.Send E-maile-mailing images.Send to Kodak PhotoNet OnlineSending images to Kodak PhotoNet.Share Your Pictures At GatherRoom.comSending images to GatherRoom.com andsharing images.Slide ShowViewing images as a slide show.2Click [SAVE] and the Save Project window willbe displayed. Enter the file name and click[Save(S)] to save an image.](https://usermanual.wiki/Hanwha-Techwin/DIGIMAX350SE/User-Guide-226355-Page-111.png)
![EDITING SOFTWAREMGI PhotoSuite lll SE113SOFTWAREReferenceFor more information, please refer to the Help file in [Help MGI PhotoSuite lll help].PRINTPrinting images1You can print images.Menu of [PRINT] stepPrintPrinting images.Print MultiplesPrint multiple copies of a photo or project,or one copy of each of the photos includedin an album, according to a predefinedtemplate.2Choose a printer, choose an orientation,choose the print size, choose the number ofcopies. You can then print the images.](https://usermanual.wiki/Hanwha-Techwin/DIGIMAX350SE/User-Guide-226355-Page-112.png)
![REMOVING THE USB DRIVER FOR WINDOWSRemoving USB Driver (Win 98)1141Click [Add/Remove programs] in Controller.2After selecting [Samsung Digimax 350SECamera], click [Add/Remove] and the followingwindow will display. 3Click [YES] and USB Driver will be removedautomatically.](https://usermanual.wiki/Hanwha-Techwin/DIGIMAX350SE/User-Guide-226355-Page-113.png)
![REMOVING THE USB DRIVER FOR WINDOWS115SOFTWAREReferenceIf you are a Windows 2000/ME/XP user, follow the procedure below to remove the USBDriver.1. Connect the PC to the camera (PC mode, power on)2. As mentioned above, remove [ Samsung Digimax350SE Camera ] in [ Add/Remove programs ]3. Click [Unplug or Eject Hardware] icon on the task bar.Click [Stop] on the [Unplug or Eject Hardware] windowand click [Ok] on the next window.4. Click [ System ] on Control PanelTrace [Device Manager Universal serial buscontroller Samsung USB Mass StorageDevice] and click the right mouse button. Then thefollowing window will be displayed.Click [Remove] to remove the USB Driver. Restartthe computer](https://usermanual.wiki/Hanwha-Techwin/DIGIMAX350SE/User-Guide-226355-Page-114.png)
![FAQAbout USB118Please check the following if the USB connection malfunctions.[case 1] The camera power is off.Turn the camera power on.We recommend using an AC power adapter in PC mode. If you use batteries,check the battery condition.[case 2] The mode dial is not set to PC mode.Rotate the mode dial to PC mode.PC interfacing is available only in PC mode.[case 3] USB Driver is not installed correctly.Install the USB Driver correctly. Refer to pages 106 ~ 107[case 4] The USB cable is not connected or you are using a cable with an incorrectspecification.Use a USB cable with the correct specification.[case 5] The CF CARD is not inserted or the camera can’t recognize the CF CARD.Turn the camera power off and insert the CF CARD again.[case 6] Occasionally the computer recognizes the USB as another device.Install the camera driver correctly.Turn the camera power off and remove the USB cable.Connect the USB cable again and turn the camera power on.Then the computer will recognise the camera.](https://usermanual.wiki/Hanwha-Techwin/DIGIMAX350SE/User-Guide-226355-Page-117.png)
![FAQAbout USB119[case 7] There is an unexpected error during file transfer.Turn the camera power off and on again. Then transfer the file again.[case 8] How do I know my computer supports USB Interface?Check the USB port in your computer or keyboard.Check OS version. USB Interface is available in Windows 98, 98SE, 2000, ME.XP.Check [Universal serial bus controller] in Device Manager.Do the following to check [Universal serial bus controller].Win 98/ME : Trace [start setting controller system Device Manager Universal serial bus controllerWin 2K : Trace [start setting controller system Hardware DeviceManager Universal serial bus controller]. Win XP : Trace [start Control Panel Performance and Maintenance system Hardware Device Manager Universal Serial Buscontroller]. There must be USB Host Controller and USB root hub under [Universal serial buscontroller].When all the conditions mentioned above are met, the computer can support theUSB interface.[case 9] When using USB hub.There may be a problem in connecting the camera to the PC through the USBhub if the PC and the hub are not compatible. Wherever possible, connect thecamera to the PC directly.[case 10] Are other USB cables connected to the PC?The camera may malfunction when it is connected to the PC with another USBcable. In this case, disconnect the other USB cable, and connect only one USBcable to the camera.SOFTWARE](https://usermanual.wiki/Hanwha-Techwin/DIGIMAX350SE/User-Guide-226355-Page-118.png)