Hanwha Techwin DIGIMAX370 Digital Camera User Manual
Samsung Techwin Co Ltd Digital Camera
UserManual.wiki
>
Hanwha Techwin
>
DIGIMAX370 User Manual
User Manual
Navigation menu
Upload a User Manual
Namespaces
Wiki Guide
HTML
PDF
Info
Views
User Manual
Discussion / Help
Navigation
![2Use this camera in the following orderInstructionsInsert the USB cableSet up the camera driverBefore connecting the camera to a PC, via theUSB cable, you will need to set up the cameradriver. Install the camera driver that is contained inthe Application S/W CD-ROM.(p.85)Take a picture (p.20)Insert the supplied USB cable into the PC’s USBport and the camera’s USB connectionterminal.(p.91)Check the camera’s powerIf the power is turned off, press the camera buttonto power it on.Take a pictureCheck the camera’s powerCheck[Removable Disk]Open Window s EXPLORER and search for[Removable Disk].(p.92)If you use a card reader to copy the images on the memory card to your PC, the imagescould be damaged. When transferring the images taken with the camera to your PC, be sureto use the supplied USB cable to connect the camera to your PC. Please note that themanufacturer holds no responsibility for loss or damage of images on the memory card dueto the use of a card reader.](https://usermanual.wiki/Hanwha-Techwin/DIGIMAX370/User-Guide-401707-Page-2.png)


![16Connecting to a Power SourceBattery statusBattery indicatorThe batteries are fullycharged. Prepare new batteries.There is no battery capacity.Replace with new batteries.There are 3 indicators for battery condition that are displayed on the LCD monitor.3. To close the battery chamber cover, push it until it clicks.2. Insert the batteries taking note of thepolarity (+ / -).1. Open the battery chamber cover by pushing in the direction of thearrow.: If the camera does not turn on after you have inserted batteries,please check whether the batteries are inserted with the correctpolarity(+ and-).Using the batteries[Inserting the AA type battery][ Inserting the CR-V3 type battery]](https://usermanual.wiki/Hanwha-Techwin/DIGIMAX370/User-Guide-401707-Page-16.png)
![17Instructions on how to use the memory cardBe sure to format the memory card (see p. 67) if you are using a newly purchased memoryfor the first time, if it contains data that the camera cannot recognize, or if it contains imagescaptured with a different camera.Turn off the camera power whenever the memory card is being inserted or removed.Repeated use of the memory card will eventually reduce the memory card’s performance.Should this be the case, you will need to purchase a new memory card. Wear and tear on the memory card is not covered by the Samsung warranty.The memory card is an electronic precision device. Do not bend, drop or subject the memory card to any heavy impact.Do not store the memory card in an environment with strong electronic or magnetic fields,e.g. near loud speakers or TV receivers.Please do not use or store in an environment where there are extremes in temperature.Do not allow the memory card to become dirty or to come into contact with any liquid. Should this happen, clean the memory card with a soft cloth.Please keep the memory card in its case when not in use.During and after periods of extended use, you may notice that the memory card is warm. This is perfectly normal.Do not use a memory card that is used in another digital camera or memory card reader.Do not use a memory card formatted by another digital camera or memory card reader.Maintenance of the memory cardIf the memory card is subjected to any of the following, the recorded data may becomecorrupted :- When the memory card is used incorrectly.- If the power is switched off or the memory card is removed while recording, deleting(formatting) or reading.Samsung cannot be held responsible for lost data.It is advisable to copy important data onto other media as back-up e.g. floppy disks, harddisks, CD etc.If there is insufficient memory available : If you press the shutter button for the shot, a [CARDFULL !] message will appear and the camera will not operate. To optimize the amount ofmemory in the camera, replace the memory card or delete unnecessary images stored onthe memory.Preserving the memory card data](https://usermanual.wiki/Hanwha-Techwin/DIGIMAX370/User-Guide-401707-Page-17.png)
![18Instructions on how to use the memory cardIf you open the battery chamber cover when the camera power is turned on, the powerwill turn off automatically.Don't remove the memory card when the Auto focus lamp(Green) is blinking as thismay cause damage to data in the memory card.INFORMATION[ SD(Secure Digital) memory card ]Write protectswitchLabelCard pinsRecorded image size Super fine Fine Normal2048x1536 17 33 491600x1200 28 53 751024x768 64 106 139640x480 129 201 227The camera can use SD Memory Cards, MMC (Multi Media Card), and Memory Stick Duo.Please consult the enclosed manual for using the MMC and Memory Stick Duo.The SD memory card has a write protectswitch that prevents image files from beingdeleted or formatted.By sliding the switch to the bottom of the SDmemory card, the data will be protected. Bysliding the switch to the top of the SD memorycard, the data protection will be canceled.Slide the switch to the top of the SD memorycard before taking a picture.When using a 32MB SD memory card, the specified shooting capacity will be as follows.(These figures are intended as an indication of expected performance). These figures areapproximate as image capacities can be affected by variables such as subject matter.](https://usermanual.wiki/Hanwha-Techwin/DIGIMAX370/User-Guide-401707-Page-18.png)
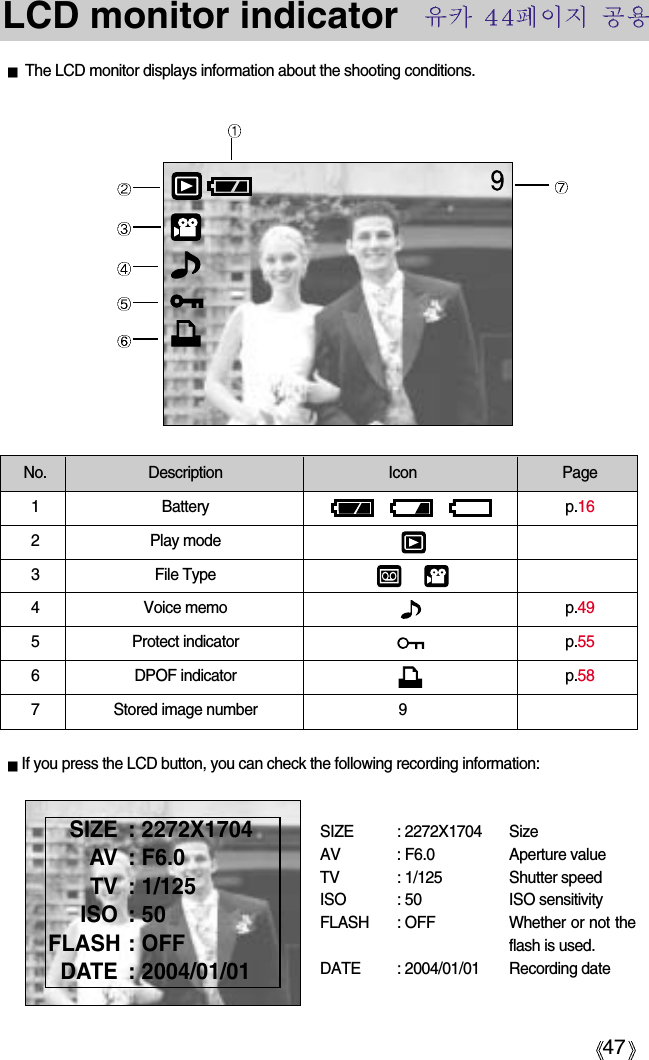
![20LCD monitor indicatorNo. Description Icons Page1 Battery p.163 Camera shake warning p.254 Flash p.315 Self-timer p.336 Voice memo p.287 Macro p.298 Metering p.429SD card/ MS DUO indicator10 Sharpness p.4411 Auto focus frame12 Date/ Time 2004/01/01 01:00 PM p.6813 Exposure compensation p.36The LCD monitor displays information about the shooting functions and selections.Recording mode2p.12~13[ Image & Full Status ]](https://usermanual.wiki/Hanwha-Techwin/DIGIMAX370/User-Guide-401707-Page-20.png)
![21LCD monitor indicator14 White Balance p.3515 RGB p.3516 Image quality p.4117 Image size/ Continuous shot 2048, 1600, 1024, 640 p.41Number of available shots remaining2819 Optical/ Digital Zoom rateStarting the recording mode1. Insert the batteries. (p.16)Insert the batteries taking note of the polarity (+ / -).2. Insert the memory card. (p.19)3. Close the battery chamber cover.4. Press the power button to turn on the camera.(If the date/time that is displayed on the LCD monitor isincorrect, reset the date/time before taking a picture.)5. Select the AUTO mode by rotating the mode dial.6. Point the camera towards the subject and compose theimage by using either the viewfinder or LCD monitor.7. Press the shutter button to capture an image.How to use the AUTO mode ( )[ AUTO mode ]18If the auto focus frame turns to red when you press the shutter button down half way, itmeans that the camera cannot focus on the subject. Should this be the case, thecamera is unable to capture an image clearly.INFORMATIONRemaining time (Movie clip/ Voice recording) 00:01:30/ 01:00:00](https://usermanual.wiki/Hanwha-Techwin/DIGIMAX370/User-Guide-401707-Page-21.png)
![22How to use the MANUAL mode ( )Selecting the automatic mode will configure the camerawith optimal settings. You can still manually configure allfunctions except the iris and shutter speed.Steps from 1-4 are the same as those for AUTO mode.5. Select the MANUAL mode by rotating the mode dial.6. Press the menu button to configure advanced functionssuch as image size (p.41), quality (p.41), metering(p.42), number of pictures in sequential shooting (p.43),picture effects (p.43), sharpness (p.44).7. Point the camera towards the subject and compose theimage by using either the viewfinder or LCD monitor.8. Press the shutter button to capture an image.Starting the recording mode[ MANUAL mode ]How to use the MySET mode ( )This mode allows users to save frequently used shootingsettings for later use.Steps from 1-4 are the same as those for AUTO mode.5. Select the MySET mode by rotating the mode dial.6. You can use the menus that appear when you presscamera and menu buttons to change the desiredcamera functions.The last changed function(s) will automatically be savedas MySET mode.7. If you rotate the Mode Dial to MySET mode while inanother camera operation mode, the camera settingswill switch to the settings you changed in Step 6.8. Point the camera towards the subject and compose theimage by using either the viewfinder or LCD monitor.9. Press the shutter button to capture an image.[ MySET mode ]](https://usermanual.wiki/Hanwha-Techwin/DIGIMAX370/User-Guide-401707-Page-22.png)
![23Starting the recording modeHow to use the MOVIE CLIP mode ( )Steps from 1-4 are the same as those for AUTO mode.5. Select the MOVIE CLIP mode by rotating the mode dial.6. The MOVIE CLIP mode icon and available recordingtime will display on the LCD monitor.7. Point the camera towards the subject and compose theimage by using either the viewfinder or LCD monitor.Press the shutter button and movie clips are recordedfor as long as the available recording time.Movie clips will still be recorded if the shutter button isreleased.The auto focus lamp(green) will blink during the movieclip recording. * If you wish to stop recording, press the shutter buttonagain.* Image size and type are listed below.- Image size : 640x480, 320 x 240(Selectable)- File type : *.aviHow to use the VOICE RECORDING mode ( )Steps from 1-4 are the same as those for AUTO mode.5. Select the VOICE RECORDING mode by rotating themode dial.6. Press the shutter button to record a voice.- Press the shutter button once and voice is recorded foras long as the available recording time(Max : 1 hour)allows. The recording time will be displayed on theLCD monitor. Voice will still be recorded if the shutter button isreleased.- If you wish to stop recording, press the shutterbutton again.- File type : *.wavA distance of 40cm between you and the camera (microphone) is the best distance torecord sound.INFORMATION[ MOVIE CLIP mode ]STANDBY[ VOICE RECORDING mode ]START:SHUTTERSTANDBY](https://usermanual.wiki/Hanwha-Techwin/DIGIMAX370/User-Guide-401707-Page-23.png)
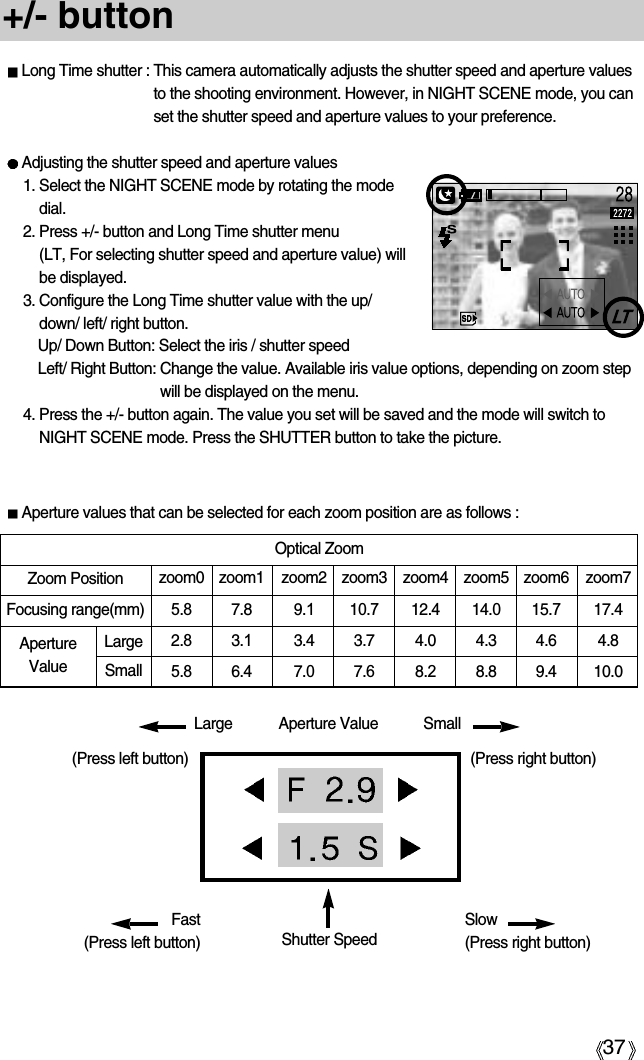
![24How to use the SCENE mode ( )Use the menu to easily configure optimal settings for a variety of shooting situations includingchildren, landscape, close-up, sunset, dawn, backlight, fireworks, beach scenes, andsnowscape.Steps from 1-4 are the same as those for AUTO mode.5. Select the SCENE mode by rotating the mode dial.6. Press the MENU button and the SCENE mode menuwill be displayed. 7. Use the LEFT and RIGHT buttons to select the[SCENE] menu tab.8. Use the UP and DOWN buttons to select the desired[SCENE] sub menu. Please see page 44 for detaileddescriptions for each screen.9. The current scene icon is displayed at the top left of theLCD.10. Point the camera towards the subject and composethe image by using either the viewfinder or LCDmonitor.11. Press the shutter button to capture an image.Starting the recording modePORTRAIT mode ( )This is used for just portrait or both portrait and landscapeshots.NIGHT SCENE mode ( )This mode is used at night or against a dark background.Configure the shutter speed by zoom scale (Long Timeshutter) with the +/- button. Please see page 37 for adetailed description for Long Time shutter.[SCENE mode]](https://usermanual.wiki/Hanwha-Techwin/DIGIMAX370/User-Guide-401707-Page-24.png)
![25Things to Watch Out for When Taking PicturesThe available recording time may vary depending on shooting conditions and camerasettings.When the Flash Off or Slow synchro mode is selected in a low lighting condition, the camerashake warning indicator ( ) may appear on the LCD monitor. In this case, use a tripod,support the camera on a solid surface or change the flash mode to flash shot mode.Backlight compensated shots : When taking an outdoor shot, avoid facing the sun, as theimage may be dark because of the strong backlight. In backlight conditions, please use Fill-in flash(p.31), Spotmetering(p.42) or Exposure compensation(p.36).Avoid obstructing the lens or the flash when you capture an image.As there can be some differences between what is seen through the Viewfinder and theresulting image when taken at a range closer than 1.5m, it is recommended that you use theLCD monitor to compose these shots.Using the LCD monitor extensively will drain the batteries. We recommend turning off the LCD monitor and using the optical viewfinder as often aspossible in order to extend battery life.Under certain conditions the auto focus system may not perform as expected.- When photographing a subject that has little contrast.- If the subject is highly reflective or shiny.- If the subject is moving at high speed.- When there is strong reflected light, or when the background is very bright.- When the subject matter has only horizontal lines or the subject is very narrow (such as a stick or flagpole).- When the surroundings are dark.Pressing the shutter button down half way. Lightly press the shutter button to confirm focus and flash battery charge. (See page. 14)Press the shutter button all way down to take the picture.[ Lightly press the shutter button ] [ Press the shutter button ]](https://usermanual.wiki/Hanwha-Techwin/DIGIMAX370/User-Guide-401707-Page-25.png)
![27ZOOM W/ T buttonThis camera has a 2.8X optical zoom and a 4X digital zoom function. Using both will offer a total zoom ratio of 11X. TELE ZoomOptical zoom TELE : Pressing the ZOOM T button. This will zoom into the subject i.e. thesubject will appear nearer.Digital zoom TELE : When the maximum (2.8X) optical zoom is selected, pressing theZOOM T button activates the digital zoom software. Releasing ZOOM T button stops the digital zooming at the requiredsetting. Once the maximum digital zoom (4X) is achieved, pressingthe ZOOM T button will have no effect.[ WIDE zoom ] [ TELE zoom ] [ Digital zoom 2.0X]Pressing theZOOM T buttonPressing theZOOM T buttonWIDE ZoomOptical zoom WIDE : Pressing the ZOOM W button. This will zoom out from the subjecti.e. the subject will appear further away. Pressing the ZOOM Wbutton continuously will set the camera to its minimum zoom settingi.e. the subject appears at its furthest from the camera.Digital zoom WIDE : When the digital zoom is in operation, pressing the ZOOM W buttonwill reduce the digital zooming in steps. Releasing ZOOM W buttonstops digital zooming. Pressing the ZOOM W button will reduce thedigital zoom and then it will continue to reduce the optical zoom untilthe minimum setting is reached. [ TELE zoom ] [ Optical zoom 2.0X ] [ WIDE zoom ]Pressing theZOOM W buttonPressing theZOOM W button[ Digital zoom 4.0X ] [ Digital zoom 2.0X ] [ TELE zoom ]Pressing theZOOM W buttonPressing theZOOM W buttonOptical zoomDigital zoom](https://usermanual.wiki/Hanwha-Techwin/DIGIMAX370/User-Guide-401707-Page-27.png)
![28ZOOM W/ T buttonTo use the digital zoom the LCD monitor has to be turned on.Images taken using the digital zoom may take a little longer for the camera to process.Allow time for this to take place. Digital Zoom will not work in Night Scene mode. You may notice a decrease in image quality when using the digital zoom.You can record with digital zoom in MOVIE CLIP mode; you can use the digital zoomwhile recording movie clips.Do not use the zoom button while recording video, to avoid accidentally recording theclicking sound. Please adjust the zoom before starting to record.Take care not to touch the lens to avoid taking an unclear image and possibly causingcamera malfunction.If the image is dim, turn the camera power off and on again to modify the lens position.Take care not to press the lens as this may cause a camera malfunction.When the camera is turned on, take care not to touch the camera s moving lens partsas this may cause the resulting image to be dim and unclear.Take care not to touch the lens during zoom operation as this may cause damage.INFORMATIONVoice memo ( ) / UP buttonWhile the menu is showing, press the UP button to move up the submenu cursor.When the menu is not displayed on the LCD monitor, the UP button operates as the voicememo ( ). You can add your voice-over to a stored still image.Recording a voice memo1. Rotate the MODE DIAL to select a RECORDING mode with the exception of MOVIECLIP and VOICE RECORDING modes.2. Press the VOICE MEMO ( ) button. If the voice memo indicator is displayed on the LCD monitor, the setting is completed.[ Recording Voice Memo ][ Preparing for Voice Memo ]STOP:SHUTTER](https://usermanual.wiki/Hanwha-Techwin/DIGIMAX370/User-Guide-401707-Page-28.png)
![29Voice memo ( ) / UP button3. Press the shutter button and take a picture. The picture is stored on the memory card.4. Voice memo will be recorded for ten seconds from the moment the picture is stored.In the middle of the sound recording, pressing the shutter button will stop the voice memo.A distance of 40cm between you and the camera (microphone) is the best distance torecord sound.INFORMATIONWhen the macro mode is selected, it is possible that camera shake will occur. If this is the case, use a tripod to eliminate this. INFORMATIONWhile the menu is showing, press the DOWN button to move from the main menu to asubmenu, or to move down the submenu cursor.When the menu is not showing, you can use the MACRO/ DOWN button to take macropictures (within the distance range of 5cm - 80 cm).Types of focus modes and focus ranges(W: Wide, T: Tele)Macro ( ) / Down button (Focusing)Focus type Auto Focus range 80cm ~ Infinity W : 5 ~ 80cm T : 50 ~ 80cm[ Auto focus ] [ Macro ]Macro ( )](https://usermanual.wiki/Hanwha-Techwin/DIGIMAX370/User-Guide-401707-Page-29.png)
![30Macro ( ) / Down button (Focusing)Available focusing method, by recording mode(O : Selectable , X : Not selectable, ∞: Infinity focus range)Focus lockTo focus on the subject positioned outside of the center, use the focus lock function.Using the Focus Lock1. Ensure the subject in the center of the autofocus frame.2. Press the SHUTTER button halfway. When the green auto lights up, it means the camerais focused on the subject. Be careful not to press the SHUTTER button all the way down toavoid taking an unwanted pictured.3. With the SHUTTER button still pressed down only halfway, move the camera torecompose your picture as desired, and then press the SHUTTER button completely totake the picture. If you release your finger from the SHUTTER button, the focus lockfunction will be canceled.[ The image to be captured ] [ Press the SHUTTER button ]halfway and focus on the subject[Recompose the picture and fully ]depress the SHUTTER buttonOOOOXOOO∞X∞∞ O∞OOOOOX XX XXOXXXXXAuto](https://usermanual.wiki/Hanwha-Techwin/DIGIMAX370/User-Guide-401707-Page-30.png)
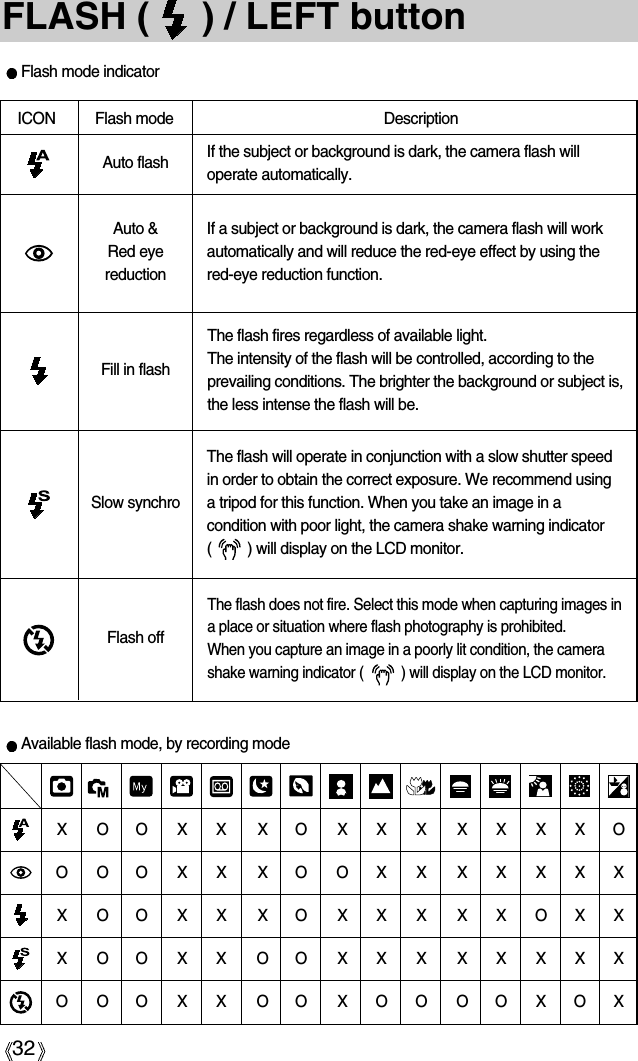
![31FLASH ( ) / LEFT buttonWIDE TELE WIDE TELE0.8 ~ 3.0 0.8 ~ 2.0 0.3 ~ 0.8 0.5 ~ 0.8Unit : m[Selecting the Auto & Red eye]reduction flashFlash rangeWhen the menu is displayed on the LCD monitor,pressing the LEFT button makes the cursor shift to theleft tab.When the menu is not displayed on the LCD monitor,the LEFT button operates as the FLASH ( ) button.Selecting the flash mode1. Rotate the MODE DIAL to select a RECORDINGmode with the exception of MOVIE CLIP and VOICERECORDING modes. 2. Press the Flash button until the desired flash mode indicator displays on the LCD monitor. 3. A flash mode indicator will be displayed on the LCD monitor.Use the correct flash to suit the environment.ISOAUTOMACROAUTOFOCUSUsing the flash frequently will reduce the life of the batteries.Under normal operating conditions the charging time for the flash is normally within 7seconds. If the batteries are weak, the charging time will be longer.During the continuous shot, movie clip mode, the flash function will not operate.Take photographs within the flash range.The image quality is not guaranteed if the subject is too close or highly reflective.INFORMATION](https://usermanual.wiki/Hanwha-Techwin/DIGIMAX370/User-Guide-401707-Page-31.png)
![33Self-timer ( ) / Right buttonSelecting the self-timer1. Rotate the MODE DIAL to select a RECORDING modewith the exception of VOICE RECORDING mode.2. Press the SELF-TIMER button until the desired modeindicator displays on the LCD monitor.A 2 second self-timer or 10 second self-timer icon ( )appears on the LCD monitor. 2SEC self-timer ( ) :Pressing the shutter button will allow an interval of 2seconds before the image is taken. 10SEC self-timer ( ) : Pressing the shutter button will allow an interval of 10seconds before the image is taken.3. When you press the SHUTTER button, the picture willbe taken after the specified time has elapsed.When the menu is displayed on the LCD monitor, pressing the Right button makes the cursorshift to the right tab.When the menu is not displayed on the LCD monitor, the RIGHT button operates as the Self-timer ( ) button. This function is used when the photographer would also like to be in theimage.[ Selecting the 10 SEC self-timer ]When taking a picture using the self-timer, the self-timer lamp works as follows:2 second self-timer setting : The self-timer lamp blinks at 0.25 second interval for 2seconds.10 second self-timer setting : The self-timer lamp blinks at 1 second interval for thefirst 7 seconds. It blinks at 0.25 second interval for theremaining 3 seconds.If you operate the Mode dial and Self-timer button during the self-timer operation, theself-timer function is cancelled.Use a tripod to prevent the camera from shaking.INFORMATION](https://usermanual.wiki/Hanwha-Techwin/DIGIMAX370/User-Guide-401707-Page-33.png)
![34MENU/ OK button If the menu is displayed, use the 5-Function buttons to change the data values and for yourchanges to be accepted.If the menu is not displayed, press the MENU/OK button to display a menu for the currentcamera mode on the LCD monitor. Press the button again to return to the previous state.You can use the +/- button to adjust the values for the RGB, white balance, exposurecompensation and Long Time shutter speed.- There is no menu for VOICE RECORDING mode.- The menu screen may not show on the LCD when another button is pressed or image datais being processed. (The green lamp next to the view finder blinks)- When the menu is showing on the LCD monitor, it is not possible to operate the shutterbutton i.e. capture an image. To capture an image, simply cancel the menu display bypressing the MENU button.[ Menu off ]Pressingthe MENUbutton+/- button Main menu Sub menu Available camera modeRGBShutter speed/ Aperture valueChanged by zoom scale-2.0~0.0~+2.0(0.5EV steps)Exposure compensationWHITE BALANCER (Red), G (Green), B (Blue)AUTO, DAYLIGHT, CLOUDY,FLUORESCENT H, FLUORESCENT L, TUNGSTEN,CUSTOM.[ Menu on ]SIZE2272X1704 22722048X15361600X12001024X768](https://usermanual.wiki/Hanwha-Techwin/DIGIMAX370/User-Guide-401707-Page-34.png)
![36+/- button Using the Custom White BalanceWhite balance settings may vary slightly depending on the shooting environment. You can select the most appropriate white balance setting for a given shooting environmentby setting up the custom white balance.1. Select the CUSTOM ( ) menu of the WhiteBalance.2. Place a sheet of white paper in front of the camera sothat the LCD monitor shows only white, and then pressthe SHUTTER button.3. Your custom white balance value is stored.- The custom white balance value will be applied,starting with the next picture you take.- The user configured white balance will be remaineffective until it is overwritten.[ White paper ]Exposure compensation : This camera automatically adjusts the exposure according to theambient lighting conditions. You can also select the exposure value by using the +/- button.Compensating Exposure1. Press the +/- button, and then use the UP and DOWNbuttons to select the exposure compensation icon ( ).The exposure compensation menu bar will appear asshown.2. Use the LEFT and RIGHT buttons to set the desiredexposure compensation factor.3. Press the +/- button again. The value you set will besaved and the Exposure Compensation setup mode willclose. If you change the exposure value, the exposure indicator ( ) will be displayed onthe bottom of the LCD monitor.* A negative exposure compensation value reduces the exposure. Note that a positive exposure compensation value increases the exposure and the LCDmonitor will appear white or you may not get good pictures.MEASURE:SHUTTER](https://usermanual.wiki/Hanwha-Techwin/DIGIMAX370/User-Guide-401707-Page-36.png)
![38LCD button[ Image & full information ] [ Image & basic information ] [ LCD off ]You can check the recording status in the LCD monitor.Pressing the LCD button in the RECORDING mode willchange the display as shown below.If the LCD monitor is turned off, the auto focus lamp will light up.Pressing theLCD buttonPressing theLCD buttonPressing the LCD button](https://usermanual.wiki/Hanwha-Techwin/DIGIMAX370/User-Guide-401707-Page-38.png)
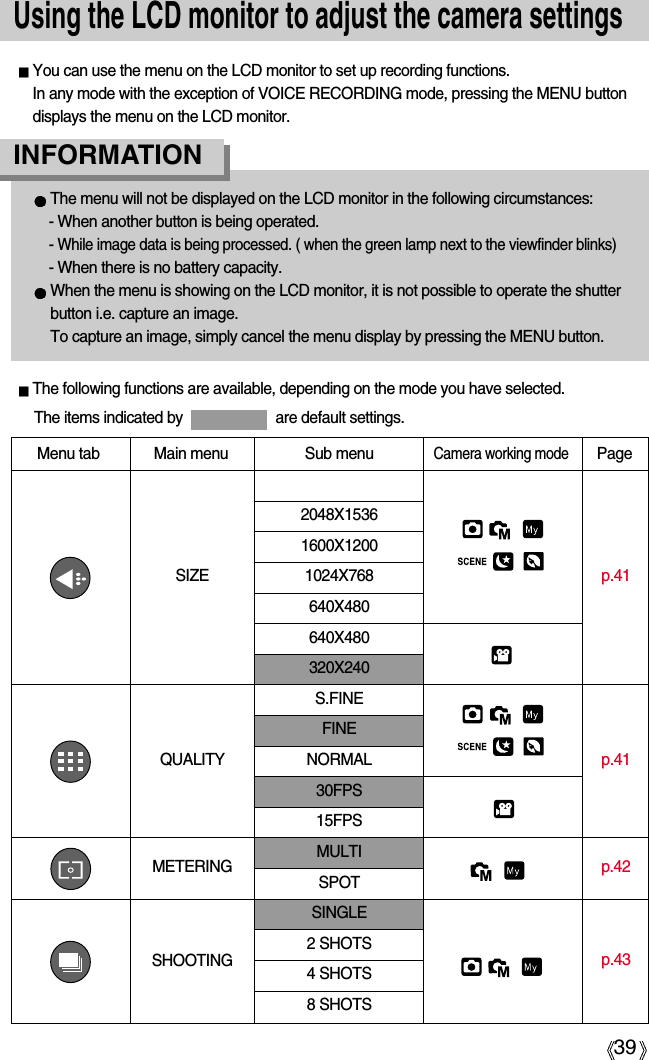
![ModeIconSub menu S.FINE FINE NORMAL 30FPS 15FPSFile Format jpeg jpeg jpeg avi avi41SizeYou can select the image size appropriate for your application. You can select from AUTO,MANUAL, MySET, MOVIE CLIP, NIGHT SCENE, PORTRAIT and SCENE modes.ModeIcon 2048 1600 1024 640Size 2048X1536 1600X1200 1024 768 640 480 640X480 320X240STILL IMAGE mode MOVIE CLIP mode640 320[ AUTO mode ] [ MOVIE CLIP mode ]The higher the resolution, the lower the number of available shots will be because highresolution images require more memory than lower resolution images.INFORMATION QualityYou can select the compression ratio appropriate for your application of the captured images.The higher the compression ratio, the lower the picture quality. You can select from AUTO,MANUAL, MySET, MOVIE CLIP, NIGHT SCENE, PORTRAIT and SCENE modes.STILL IMAGE mode MOVIE CLIP mode[ AUTO mode ] [ MOVIE CLIP mode ]SIZE2272X1704 22722048X15361600X12001024X768SIZE640X480320X240 320QUALITYS.FINEFINENORMAL2272FRAME RATE15 FPS30 FPS 30FPS320NORNOR30FPS](https://usermanual.wiki/Hanwha-Techwin/DIGIMAX370/User-Guide-401707-Page-41.png)
![42QualityNumber of available shots(Still image) & Available recording time(Movie clip)(When using a 32MB SD memory card; based on Samsung's own testing)S.FINE is the highest quality and NORMAL is the lowest setting. Choose the setting appropriate for your needs.This file format complies with the DCF(Design rule for Camera File system).JPEG(Joint Photographic Experts Group): JPEG is the image compression standarddeveloped by the Joint Photographic Experts Group. This type of compression is mostcommonly used for compressing photos and graphics because it can compress the filesefficiently without damaging the data.INFORMATIONIf you cannot obtain suitable exposure conditions, you can change the metering method totake brighter pictures. You can select either MANUAL or MySET mode.MULTI ( ) : Exposure will be calculated based on anaverage of the available light in the imagearea. However, the calculation will bebiased towards the centre of the imagearea. This is suitable for general use.SPOT ( ) : Only the rectangular area in the center ofthe LCD monitor will be metered for light.This is suitable when the subject in thecenter is exposed correctly, regardless of the back lighting. Metering[ MANUAL mode ]2048METERINGMULTISPOT2272 NORModeQuality/Size 2048 1600 1024 640 640 320S.FINE 17 28 64 129 - -FINE 33 53 106 201 - -NORMAL 49 75 139 227 - -30FPS - - - - - 29SEC 107SEC15FPS - - - - - 45SEC 167SECMOVIE CLIP modeSTILL IMAGE mode](https://usermanual.wiki/Hanwha-Techwin/DIGIMAX370/User-Guide-401707-Page-42.png)
![43Select the number of pictures in sequential shooting.You can select from AUTO, MANUAL and MySET modes.- [SINGLE] : Take one picture only. - [2, 4, 8 SHOTS] : Take a specified number of pictures pershooting.Continuous shotEffectBy using the camera s digital processor, it is possible to add special effects to your images.You can select from MANUAL, MySET, MOVIE CLIP and PORTRAIT modes.[ MANUAL mode ] [ MOVIE CLIP mode ][ AUTO mode ]NORMAL : No effect is added to the image.B & W : Converts the image to black and white.SEPIA : Captured images will be stored in a sepia tone (a gradient of yellowish brown colours).2048SHOOTINGSINGLE2 SHOTS4 SHOTS8 SHOTS2048EFFECTNORMAL NORB&WSEPIA2048EFFECTNORMAL NORB&WSEPIA32030FPS2272S.FINE FINE NORMAL2048X1536 2 2 21600X1200 2 2 41024X768 4 8 8640X480 8 8 8Available maximum number of continuous shots, by image size/ quality type* High resolution and picture quality increases file saving time, which increases stand-by time.* Select [SHOOTING] menu to inactivate the flash.(Unit : shot)](https://usermanual.wiki/Hanwha-Techwin/DIGIMAX370/User-Guide-401707-Page-43.png)
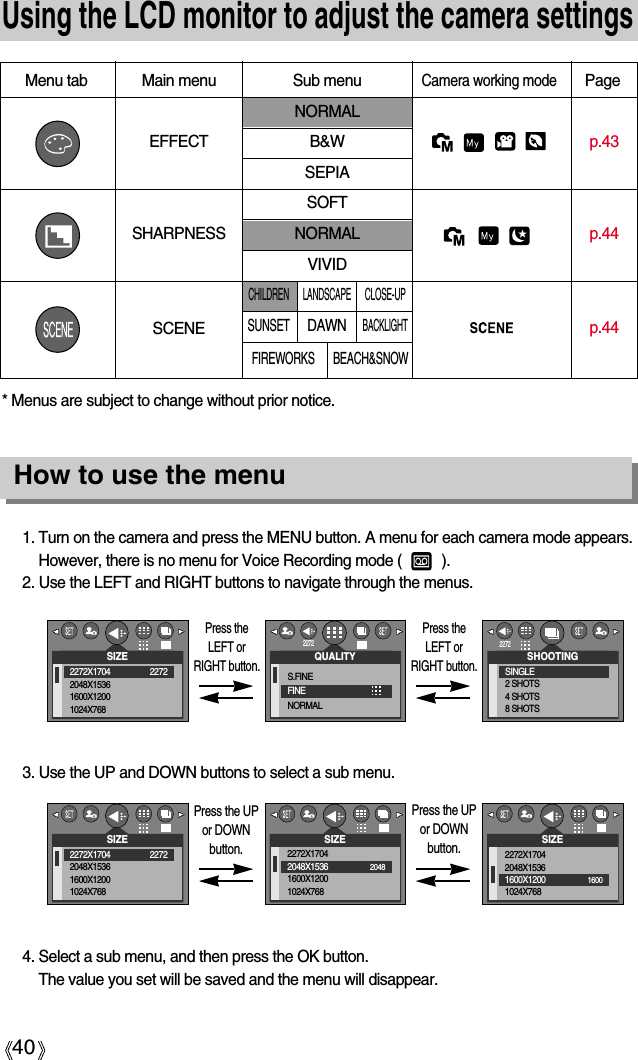
![44SharpnessYou can adjust the sharpness of the picture you want totake. You cannot check the sharpness effect on the LCDmonitor before you take a picture, because this function isapplied only when the captured image is stored on thememory. You can select from MANUAL, MySET andNIGHT SCENE modes.[ MANUAL mode ]Sub menu Icon Description VIVIDNORMALSOFTSub menu Icon DescriptionCHILDRENLANDSCAPECLOSE-UPSUNSETDAWNBACKLIGHTFIREWORKSBEACH&SNOW2048SHARPNESSSOFTNORMALVIVIDNORSelect the [SCENE] submenu to automatically configureoptimal settings, depending on the selected scene.Only available in the Scene Mode.SceneTake a still picture of capturing moving children.Close-up shooting for small objects such as plants andinsects.Splendor of the setting sun.Scenery with green woods or blue sky. Portrait with scenerybackground.Daybreak scenes.Portrait without shadows caused by back light.Firework scenes.For ocean, lake, and beach scenes, and snowscapes.2048SCENECHILDRENLANDSCAPECLOSE-UPSUNSETThe edges of the image are softened. This effect is suitable for editing images on your PC.The edges of the image are emphasized. The edges willappear sharp, but noise may occur in the recorded image.The edges of the image are sharp. This is suitable for printing.2272](https://usermanual.wiki/Hanwha-Techwin/DIGIMAX370/User-Guide-401707-Page-44.png)
![Thumbnail ( ) / Enlargement ( ) button 48Using the camera buttons to adjust the cameraIn Play mode, you can use the buttons on the camera to conveniently set up the Play modefunctions.Image enlargement1. Select an image that you want to enlarge and press the enlargement button.2. Different parts of the image can be viewed by pressingthe 5 function button.3. Pressing the thumbnail button will zoom back to theoriginal full sized image.- You can tell whether the image displayed is anenlarged view by checking the image enlargementindicator shown at the bottom left of the LCD monitor.(If the image is not an enlarged view, the indicator willnot be displayed.) You can also check the area ofenlargement.- Movie clips and WAV files can’t be enlarged.- If an image is enlarged, a loss of quality may occur.[ Normal display mode ] [ Thumbnail display mode ]Pressing the thumbnailbutton ( )Pressing the enlargementbutton ( )Highlighted imageYou can view multiple pictures, enlarge a selected picture, and crop and save a selected areaof an image.Thumbnail display1. While an image is displayed full screen, press thethumbnail button.2. The thumbnail display will highlight the image that hadbeen showing at the time the thumbnail mode wasselected.3. Press the 5 function button to move to a desired image.4. To view an image separately, press the enlargement button ( ).](https://usermanual.wiki/Hanwha-Techwin/DIGIMAX370/User-Guide-401707-Page-48.png)
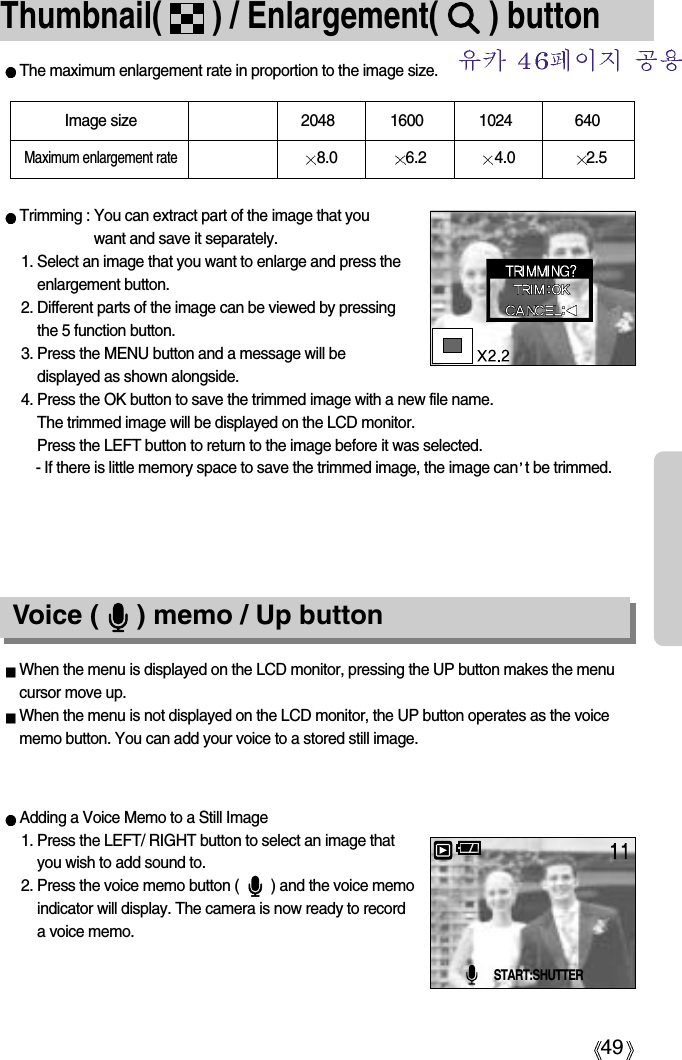
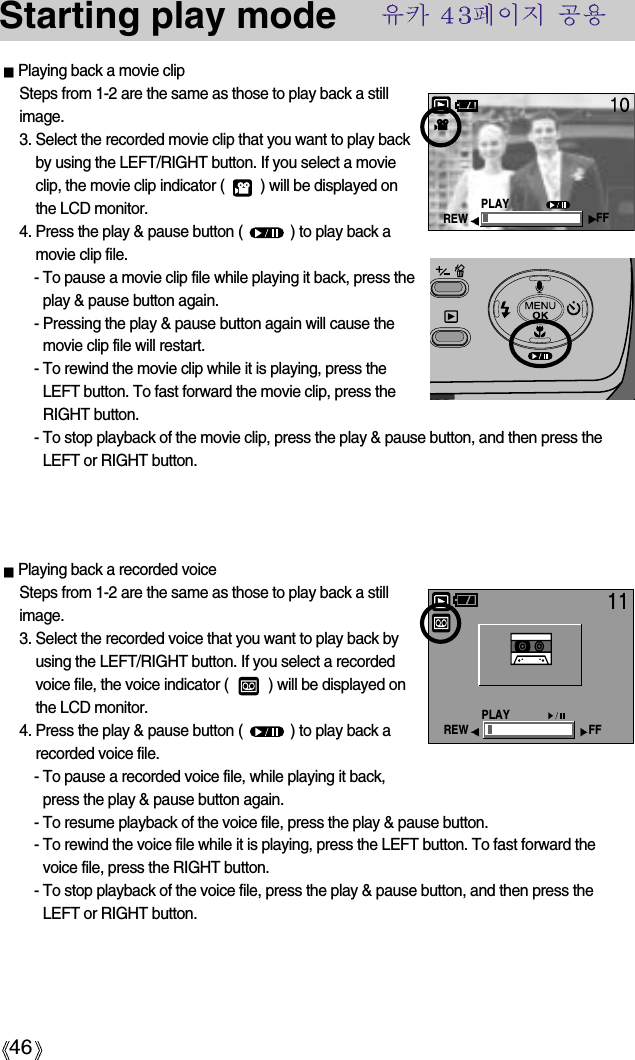
![50Voice ( ) memo / Up button3. Press the shutter button to start recording and voice willbe recorded to the still image for 10 seconds. While thevoice is recording, the recording status window will bedisplayed as shown alongside.4. The recording can be stopped by pressing the shutterbutton again.5. The ( ) icon will be displayed on the LCD monitorafter voice memo recording has finished. - Voice memos can’t be recorded onto movie clip files.- A distance of 40cm between you and the camera(microphone) is the best distance to record sound.- The voice memo will be saved in *.wav format, but hasthe same file name as the still image to which itcorresponds.- If you add a new voice memo to the still image thatalready has a voice memo, the existing voice memo will be erased.Play & Pause ( )/ Down buttonIn Play mode, the play & pause/ down button works as follows:- If the menu is displayedPress the DOWN button to move from the main menu to a sub menu, or to move down thesub menu cursor.- If a still image with a voice memo, a voice file, or a movie clip is playingIn Stop mode : Plays a still image with a voice memo, a voice file, or a movie clip.During playback : Temporarily stops playback.In Pause mode : Resumes playback[ Voice recording is stopped ] [ Voice recording is paused ][ Voice file is playing ]PLAYREW FFPAUSEREW FFPLAYREW FF](https://usermanual.wiki/Hanwha-Techwin/DIGIMAX370/User-Guide-401707-Page-50.png)
![51LEFT/ RIGHT/ MENU/ OK buttonLEFT / RIGHT/ MENU/ OK buttons activate the following.- LEFT button : While the menu is showing, press the LEFT button to select the menutab to the left of the cursor.- RIGHT button : While the menu is showing, press the RIGHT button to select the menutab to the right of the cursor, or to move an secondary menu.- MENU button : When you press the MENU button, the play mode menu will bedisplayed on the LCD monitor. Pressing it again will return the LCD tothe initial display.- OK button : When the menu is displayed on the LCD monitor, the OK button is usedfor confirming data that is changed by using the 5 function button.The shooting information will be displayed on the LCD monitor.The last image stored in the memory is displayed on theLCD monitor by pressing the play mode button.Pressing the LCD button in the PLAY ( ) mode willchange the display as shown below. [Image & Icons] [Image & Information] [Image only][ Image & Icons ] [ Image & Information ] [ Image only ]Pressing the LCD buttonPressingthe LCDbuttonPressingthe LCDbuttonLCD button SIZE : 2272X1704AV : F6.0TV : 1/125ISO : 50 FLASH : OFFDATE : 2004/01/01](https://usermanual.wiki/Hanwha-Techwin/DIGIMAX370/User-Guide-401707-Page-51.png)
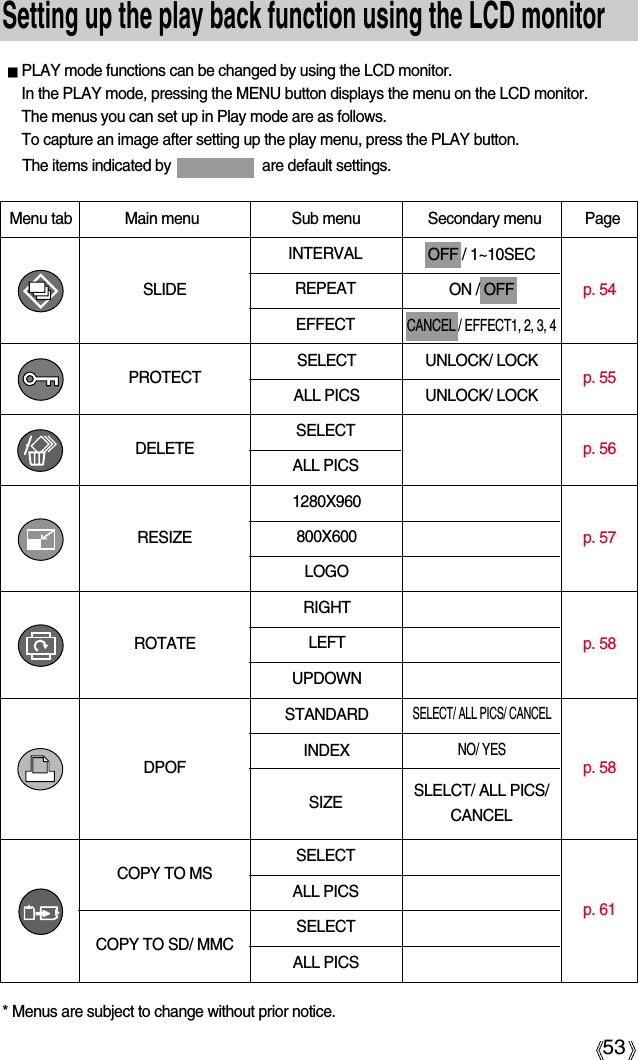
![54Starting the slide showImages can be displayed continuously at pre-set intervals.You can view the slide show by connecting the camera to an external monitor.Configure the interval for the slide show: Configure the length of time to display each picture in the slide show.1. Press the play mode button and press the menu button.2. Press the LEFT/ RIGHT button and select the [SLIDE]menu tab.3. Select the [INTERVAL] sub menu by pressing the UP/DOWN button and press the RIGHT button.4. Use the Up/Down Button to establish the display interval.- Slide Show Display Interval : OFF, 1 ~10 seconds5. Use the Right Button to start the slide show. Use the Pause ( ) Button to pause and resume the slide show. To cancel the slide show in the middle of the show, press the Pause button and the LEFTor RIGHT button.The loading time depends on the image size and quality.The slide show will start from an image that was displayed on the LCD monitor.The [PWR OFF] function can t be activated. While the slide show is playing, only the first frame of an MOVIE file is displayed.INFORMATION Configure slide show repeat mode: Automatically restart the slide show after displaying all pictures.Steps 1 and 2 are the same as for the [INTERVAL] section.3. Select the [REPEAT] sub menu by pressing the UP/DOWN button and press the RIGHT button.4. Use the Up/Down Button to select the repeat mode.[ON] : The slide show will repeat until turned off.[OFF] : The slide show will not repeat after the firstshowing.5. Press the OK button to confirm the setting.6. Press the OK button again and the slide show will start. SLIDEINTERVALREPEATEFFECTMOVE: CHANGE:OFFSLIDEINTERVALREPEATEFFECTBACK: SET:OKONOFF](https://usermanual.wiki/Hanwha-Techwin/DIGIMAX370/User-Guide-401707-Page-54.png)
![55Starting the slide showProtecting imagesConfigure slide show effects: Unique screen effects can be used for the slide show.Steps 1 and 2 are the same as for the [INTERVAL] section.3. Select the [EFFECT] sub menu by pressing the UP/DOWN button and press the RIGHT button.4. Use the Up/Down Button to select the type of effect.[CANCEL] : Normal display.[EFFECT 1] : Image is displayed slowly.[EFFECT 2] : Image is displayed slowly from the centeroutwards.[EFFECT 3] : Image moves from the top left.[EFFECT 4] : The image slides diagonally from top left to bottom right.5. Press the OK button to confirm the setting.6. Press the OK button again and the slide show will start. This is used to protect specific shots from being accidentally erased (LOCK).It also unprotects images that have been previously protected (UNLOCK).Protecting Images1. Press the play mode button and press the menu button.2. Press the LEFT/ RIGHT button and select the[PROTECT] menu tab.3. Select a desired sub menu by pressing the UP/ DOWNbutton and press the OK button.[SELECT] : Selection window for an image to beprotected/released is displayed.Up/Down/Left/Right : Select an imageZoom W/T Button : Protect/release the imageMenu Button : Your changes will be savedand the menu will disappear.[ALL PICS] : Protect/release all saved imagesZoom W/T Button : Protect/release the imagesMenu Button : Your changes will be savedand the menu will disappear.SLIDEINTERVALREPEATEFFECTBACK: SET:OKCANCELEFFECT1EFFECT2PROTECTSELECTALL PICSEXIT:MENU MOVE: SET:OKWUNLOCK TSET:OKWUNLOCK T](https://usermanual.wiki/Hanwha-Techwin/DIGIMAX370/User-Guide-401707-Page-55.png)
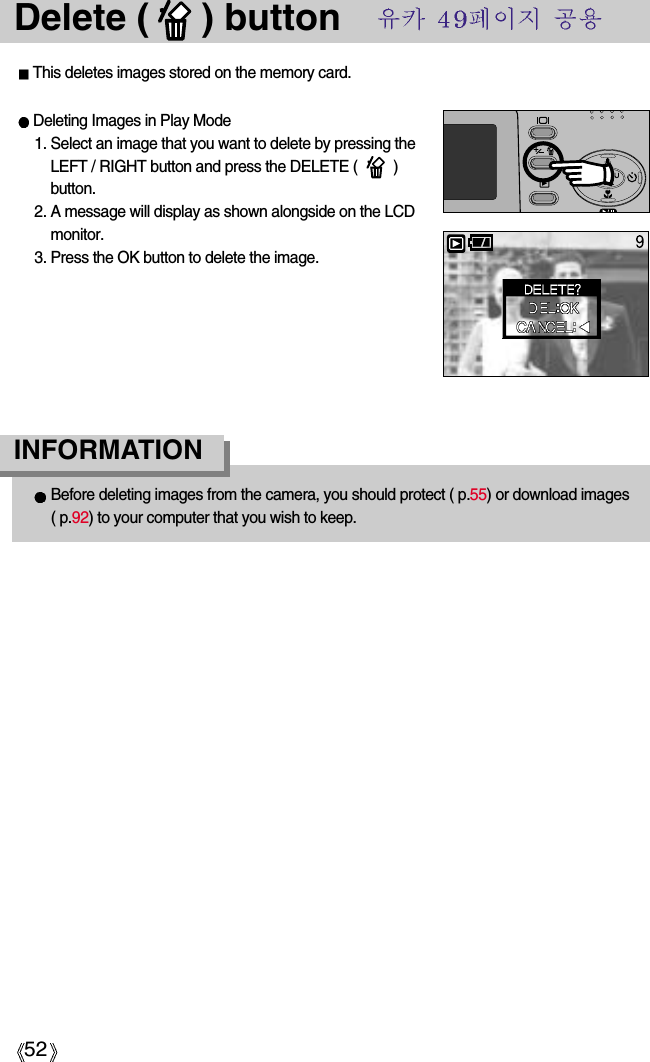
![56Protecting images- If you protect an image, the protect icon will be displayedon the LCD monitor. (An unprotected image has noindicator)- An image in LOCK mode will be protected from thedelete function or [DEL. ALL] functions, but will NOT beprotected from the [FORMAT] function.Deleting imagesOf all the files stored in the memory card, the unprotected files in the DCIM subfolder will bedeleted. Remember that this will permanently delete unprotected images. Important shots should be stored on a computer before deletion takes place. The startupimage is stored in the camera's internal memory (i.e., not on the memory card) and it will notbe deleted even if you delete all files on the memory card.Deleting images1. Press the play mode button and press the menu button.2. Press the LEFT/ RIGHT button and select the [DELETE]menu tab.3. Select a desired sub menu by pressing the UP/ DOWNbutton and press the OK button.[SELECT]: Selection window for an image to delete isdisplayed.Up/Down/Left/Right: Select an imageZoom T Button: Select the image for deletion.(V mark)OK Button: Press the OK Button to displayconfirmation messagePress the OK Button again to delete V marked images.[ALL PICS]: Displays confirmation windowPress the OK Button again to delete allunprotected images. If there aren tprotected images, all the images aredeleted and a [NO IMAGE!] message willdisplay.4. After deletion, the screen will be changed to the playmode screen.DELETESELECTALL PICSEXIT:MENU MOVE: DEL:OKSELECT:T](https://usermanual.wiki/Hanwha-Techwin/DIGIMAX370/User-Guide-401707-Page-56.png)
![57ResizeChange the resolution(size) of pictures taken. Select [LOGO] to save an image to be thestart-up image. The resized image will have a new file name.1. Press the play mode button and press the menu button.2. Press the LEFT/ RIGHT button and select the [RESIZE]menu tab.3. Select a desired sub menu by pressing the UP/ DOWNbutton and press the OK button.[RESIZE] sub menu : 1280X960, 800X600, LOGOA large sized image can be resized to a smaller sized image, but not vice versa.Only still image(JPEG) images can be resized. Movie clip (AVI) and Voice recording(WAV) files can t be resized.You can change the resolution of only those files compressed in the JPEG 4:2:2 format. The resized image will have a new file name. The [LOGO] image is stored not on the memory card but on the internal memory.Only one [LOGO] image can be saved. If you save a new [LOGO] image, the existing startup image will be deleted.If the memory capacity is insufficient to store the resized image, a [CARD FULL!]message will display on the LCD monitor and the resized image will not be stored.INFORMATION Size 1280X960 800X600 LOGO2048 O O O1600 O O O1024 X O O640 X X OImage Resize TypesRESIZE1280X960800X600LOGOEXIT:MENU MOVE:](https://usermanual.wiki/Hanwha-Techwin/DIGIMAX370/User-Guide-401707-Page-57.png)
![58Rotating an imageDPOFDPOF(Digital Print Order Format) allows you to embed printing information on your memorycard’s DCIM/MISC folder. Select the pictures to be printed and how many prints to make.The DPOF indicator will display on the LCD monitor when an image that has DPOFinformation plays back. Images can then be printed on DPOF printers, or at an increasingnumber of photo labs.This function is not available for Movie clips and Voice recording files.You can rotate the stored images by 90, 180, or 270 degrees.You can view a picture in its proper orientation if the picture has been taken with the cameraoriented vertically or up-side-down. Once the playback of the rotated picture is finished, it willswitch back to the original state.1. Press the play mode button and press the menu button.2. Press the LEFT/ RIGHT button and select the [ROTATE]menu tab.3. Select a desired sub menu by pressing the UP/ DOWNbutton.[RIGHT] : Rotate picture in a clock-wise direction[LEFT] : Rotate picture in a counter-clock-wisedirection[UPDOWN] : Rotate picture 180 degrees[ Picture after 90 degrees ] CCW rotation[ Picture after 180 degrees ]rotation[ Picture after 90 degrees ]CW rotation4. Press the OK button. The rotated image will be displayed and the menu will disappear. If you display the rotated image on the LCD monitor, empty spaces may appear to the leftand right of the image.ROTATERIGHTLEFTUPDOWNEXIT:MENU MOVE:](https://usermanual.wiki/Hanwha-Techwin/DIGIMAX370/User-Guide-401707-Page-58.png)
![59DPOF : STANDARDImages (except for movie clips and voice file) are printed as index type.1. Press the play mode button and press the menu button.2. Press the LEFT/ RIGHT button and select the [DPOF]menu tab.3. Select the [INDEX] menu by pressing the UP/ DOWNbutton and press the RIGHT button.4. Select a desired sub menu by pressing the UP/ DOWNbutton.If [NO] is selected : The image will be printed in standardprint format. If [YES] is selected : The image will be printed in index format.5. Press the OK button to confirm the setting.DPOF : INDEXThis function allows you to embed print quantity information on a stored image.1. Press the play mode button and press the menu button.2. Press the LEFT/ RIGHT button and select the [DPOF]menu tab.3. Select the [STANDARD] menu by pressing the UP/DOWN button and press the RIGHT button.4. Select a desired sub menu by pressing the UP/ DOWNbutton and press the OK button.[SELECT]: Selection window for an image to print isdisplayed.Up/Down/Left/Right: Select an image to print.Zoom W/T Button: Select the number of prints.[ALL PICS] : Configure number of prints for all picturesexcept movie and voice files.[CANCEL] : Cancel the print setup.5. Press the OK button to confirm the setting.If an image carries DPOF instructions, the DPOFindicator ( ) will show.DPOFBACK: SET:OKW0 PRINTS TSET:OKDPOFSTANDARDINDEXSIZEBACK: SET:OKNOYESSTANDARDINDEXSIZESELECTALL PICSCANCELDPOFBACK: SET:OKSTANDARDINDEXSIZE0 PRINTS](https://usermanual.wiki/Hanwha-Techwin/DIGIMAX370/User-Guide-401707-Page-59.png)
![60DPOF : PRINT SIZEYou can specify the print size when printing images stored on the memory card.The [SIZE] menu is available only for DPOF 1.1 compatible printers.Setting the Print Size1. Press the play mode button and press the menu button.2. Press the LEFT/ RIGHT button and select the [DPOF]menu tab.3. Select the [SIZE] menu by pressing the UP/ DOWNbutton and press the RIGHT button.4. Select a desired sub menu by pressing the UP/ DOWNbutton and press the OK button.[SELECT] : Selection window for an image to be changedprinted size is displayed.Up/Down/Left/Righ t : Select an image.Zoom W/T Button : Change the print size.MENU button : Your changes will be savedand the menu will disappear.[ALL PICS] : Change print size of all saved images.Up/Down/Left/Right : Select an image.OK button : Confirm the changed setting.[CANCEL] : Cancel all of the print size settings.* DPOF [SIZE] secondary menu : CANCEL, 3X5, 4X6, 5X7,8X10DPOFSTANDARDINDEXSIZEBACK: SET:OKSELECTALL PICSCANCELSET:OKWCANCEL TDPOFSTANDARDINDEXSIZEBACK: SET:OKCANCEL](https://usermanual.wiki/Hanwha-Techwin/DIGIMAX370/User-Guide-401707-Page-60.png)
![61Copy PictureThe camera has multi memory slots for both SD Memory Cards (Multimedia Card) andMemory Stick DUO. Copy contents from one memory card to another while both memoryslots are loaded. [COPY TO MS] menu will be displayed if the current card is an SD MemoryCard (Multimedia Card). [COPY TO SD/MMC] menu will be displayed if the current card is aMemory Stick DUO. This description is for copying images from an SD Memory Card toMemory Stick DUO. Copy Pictures1. Press the play mode button and press the menu button.2. Press the LEFT/ RIGHT button and select the [COPYTO MS] menu tab.3. Select a desired sub menu by pressing the UP/ DOWNbutton and press the OK button.[SELECT] : Selection window for an image to copy is displayed.Up/Down/Left/Right: Select an image.Zoom T Button: Confirm the selection.(V mark)Menu Button: Start copying.[ALL PICS] : All images are copied after displaying[PLEASE WAIT!]4. After copying, the screen will return to play mode.All memory slots need to be loaded for the function.If the destination is smaller than the source, the remaining files are not copied. Please delete unneeded files to free up enough memory space before copying.While copying a picture, the destination file is automatically renamed to the nextsequential filename after the last saved file to avoid filename duplication.INFORMATIONCOPY TO MSSELECTALL PICSEXIT:MENU MOVE: COPY:OKSELECT:T](https://usermanual.wiki/Hanwha-Techwin/DIGIMAX370/User-Guide-401707-Page-61.png)
![62PictBridgeYou can use the USB cable to connect this camera to a printer that supports PictBridge (soldseparately) and print the stored images directly. Movie clips and voice files cannot be printed.Connecting the Camera to a Printer1. Press the POWER button to turn on the camera.2 In a mode with the exception of Voice Recording mode,press the MENU button.3. Press the LEFT/ RIGHT button and select [SETUP]menu tab.4. Select [USB] menu by pressing the UP/ DOWN buttonand press the RIGHT button.5. Select [PRINTER] menu by pressing the UP/ DOWNbutton and press the OK button.6. Press the menu button twice and the menu will disappear.7. Use the supplied USB cable to connect the camera to the printer as shown below.8. Turn on the printer to connect the camera to the printer.If [COMPUTER] is selected at step 5, the camera will not connect to the printer, and the auto-focus lamp will just blink green. If this happens, disconnect the USB cable and start over from step 2.SETUPRESETCARD SEL.USBBACK: SET:OKCOMPUTERPRINTER](https://usermanual.wiki/Hanwha-Techwin/DIGIMAX370/User-Guide-401707-Page-62.png)
![63PictBridgePrint ErrorPrinting is available even if this message is displayed whileprinting.Please check the camera and the printer after printingIf this message is displayed while printing, please press theOK button and repeat step 2.2. After a successful connection, the PictBridge icon( )will show at the top left of the LCD and the file to print isdisplayed (still image)Press the Left/Right button to select a picture to print.Press the OK button to print the selected picture.Print pictures1. Connect the camera to the printer to display the screen.If [USB] submenu in the Setup menu is configured as[COMPUTER], the previous screen will remain and thecamera will not connect to the printer.If this happens, change the [USB] submenu to[PRINTER] (See page 72)CONNECTING...USB I/F : PRINTPRINT:OKMOVE:NOW PRINTINGWARRNINGERRORBACK:OK](https://usermanual.wiki/Hanwha-Techwin/DIGIMAX370/User-Guide-401707-Page-63.png)
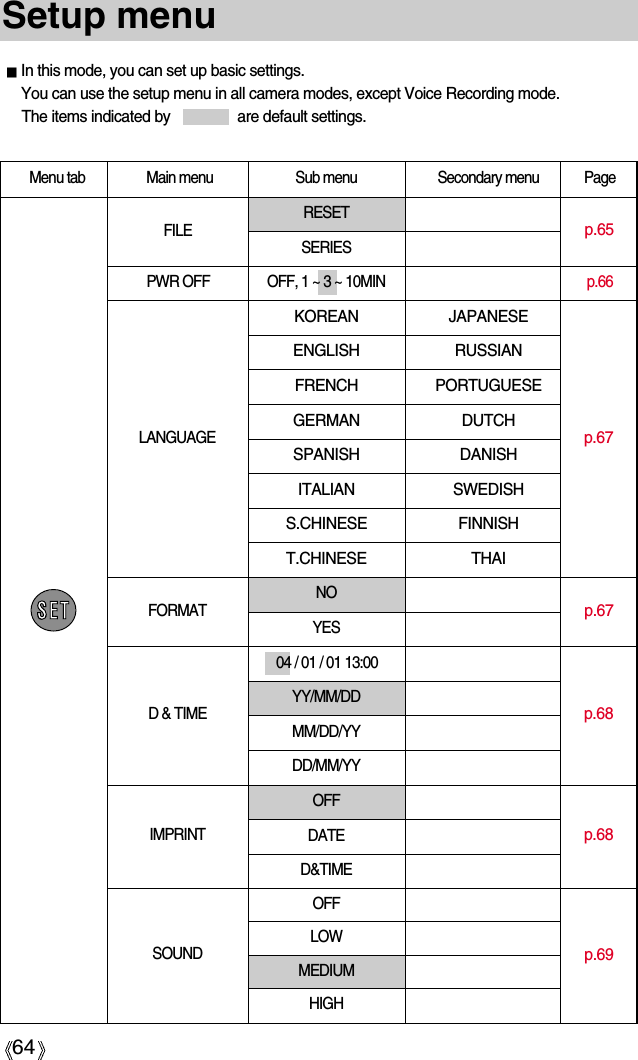
![65Setup menuMenu tab Main menu Sub menu Secondary menu PageDARKNORMALBRIGHTNTSCPALNOYESSD/MMCMS DUOCOMPUTERPRINTERLCDVIDEOQ.VIEWUSBCARD SEL.RESETThis function allows the user to select the file naming format.Assigning File Names1. In any mode with the exception of Voice Recording mode,press the MENU button.2. Press the LEFT/ RIGHT button and select the [SETUP]menu tab.3. Select the [FILE] menu by pressing the UP/ DOWN buttonand press the RIGHT button.4. Select a desired sub menu by pressing the UP/ DOWNbutton and press the OK button.[RESET] : After using the reset function, the next file name will be set from 0001 evenafter formatting, deleting all or inserting a new memory card.[SERIES] : Under this system, the file name will directly follow the last stored file name,regardless of any actions such as file deletion or formatting.5. Press the menu button twice and the menu will disappear.File nameOFF, 1, 2, 3SECp.69p.70p.71p.71p.72p.72SETUPFILEPWR OFFLANGUAGEBACK: SET:OKRESETSERIES* Menus are subject to change without prior notice.](https://usermanual.wiki/Hanwha-Techwin/DIGIMAX370/User-Guide-401707-Page-65.png)
![66File nameThe first stored folder name is 100SSCAM, and the first file name is S4300001.Whenever you store an image, the file number is increased by 1.The file numbers are named from S4300001 to S4309999 automatically, 9999 files willbe stored in a folder.The folder number is assigned sequentially from 100 to 999 as follows : 100SSCAM 101SSCAM .... 999SSCAM.The files used with the memory card conform to the DCF(Design rule for Camera Filesystems) format.INFORMATIONEven if the batteries or AC adapter are removed and inserted again, the power offsetting will be preserved.Note that the automatic power off function will not operate if the camera is in PC mode,slide show, playing back a voice recording or movie clip.INFORMATIONAuto power offSetting Power Off1. In any mode with the exception of Voice Recordingmode, press the MENU button.2. Press the LEFT/ RIGHT button and select the [SETUP]menu tab.3. Select the [PWR OFF] menu by pressing the UP/DOWN button and press the RIGHT button.4. Select a desired sub menu by pressing the UP/ DOWNbutton and press the OK button.Selecting [OFF] : The power off function will not operate.[1~10 MIN] : The power will turn off automatically if not used for the period of timespecified.5. Press the menu button twice and the menu will disappear.This function switches the camera off after a set amount of time in order to preventunnecessary battery drainage.SETUPFILEPWR OFFLANGUAGEBACK: SET:OKOFF](https://usermanual.wiki/Hanwha-Techwin/DIGIMAX370/User-Guide-401707-Page-66.png)
![67LanguageSetting Language1. In any mode with the exception of Voice Recording mode,press the MENU button.2. Press the LEFT/ RIGHT button and select the [SETUP]menu tab.3. Select the [LANGUAGE] menu by pressing the UP/DOWN button and press the RIGHT button.4. Select a desired sub menu by pressing the UP/ DOWNbutton and press the OK button. LANGUAGE sub menu : Korean, English, French, German, Spanish, Italian, T.Chinese,S.Chinese, Japanese, Russian, Portuguese, Dutch, Danish, Swedish, Finnish, Thai.5. Press the menu button twice and the menu will disappear.There is a choice of languages that can be displayed on the LCD monitor. Even if the batteriesor AC adapter are removed and inserted again, the language setting will be preserved.Formatting a memory cardThis is used for formatting the memory card. If you run [FORMAT] on the memory card, allimages, including the protected images, will be deleted. Be sure to download importantimages to your PC before formatting the memory card.Be sure to run [FORMAT] on the following types of memory card.- A new memory card, or an unformatted memory card.- A memory card that has a file this camera can t recognize or one that has been takenfrom another camera.Always format the memory card using this camera. If you insert a memory card that hasbeen formatted using other cameras, memory card readers, or PCs, you will get a[CARD ERROR!] message.INFORMATIONSETUPPWR OFFLANGUAGEFORMATBACK: SET:OKNOYESSETUPFILEPWR OFFLANGUAGEBACK: SET:OKENGLISHFRANÇAISFormatting a Memory Card1. In any mode other than Voice Recording mode, pressthe MENU button.2. Press the LEFT/ RIGHT button and select the [SETUP]menu tab.3. Select the [FORMAT] menu by pressing the UP/ DOWNbutton and press the RIGHT button.4. Select a desired sub menu by pressing the UP/ DOWNbutton and press the OK button.If [NO] is selected : The memory card will not be formatted. Press the menu button twice and the menu display will disappear. If [YES] is selected : A [PLEASE WAIT!] message appears and the memory card will be formatted.If you ran FORMAT in Play mode, a [NO IMAGE!] message will appear.](https://usermanual.wiki/Hanwha-Techwin/DIGIMAX370/User-Guide-401707-Page-67.png)
![68Setting up the Date/ Time/ Date typeYou can change the date and time that will be displayed on the captured images and set up the date type.Setting Date/Time & Selecting Date Format1. In any mode with the exception of Voice Recordingmode, press the MENU button.2. Press the LEFT/ RIGHT button and select the [SETUP]menu tab.3. Select the [D&TIME] menu by pressing the UP/ DOWNbutton and press the RIGHT button.4.Use the UP, DOWN, LEFT, and RIGHT buttons to selectthe desired submenu value, and then press the OK button.RIGHT button : Selects the year/month / day/hour / minute date type.LEFT button : Moves the cursor to the [D&TIME] main menu if the cursor is atthe first item of the date and time setup. In all other cases, thecursor will be shifted to the left of its current position.UP and DOWN buttons : Changes the setting value.- Date type : [YY/MM/DD] /[MM/DD/YY]/[DD/MM/YY]5. Press the menu button twice and the menu will disappear.There is an option to include DATE/TIME on still images.Date Imprinting1. In any mode with the exception of Voice Recordingmode, press the MENU button.2. Press the LEFT/ RIGHT button and select the [SETUP]menu tab.3. Select the [IMPRINT] menu by pressing the UP/ DOWNbutton and press the RIGHT button.4. Use the UP and DOWN buttons to select the desireddate imprint type, and then press the OK button.[OFF] : The DATE & TIME will not be imprinted on the image file.[DATE] : Only the DATE will be imprinted on the image file.[D&TIME] : The DATE & TIME will be imprinted on the image file.5. Press the menu button twice and the menu will disappear.Imprinting the recording dateThe Date & Time are imprinted at the bottom right side of the still image.The date will be imprinted as a DATE TYPE setting.TIME is imprinted in the following way : [Hour : Minute] and hours are shown using the24 hour clock.The imprint function is applied only to still images.INFORMATIONSETUPLANGUAGEFORMATD & TIMEBACK: SET:OK04 / 01/ 01 01:00YY/MM/DDSETUPFORMATD & TIMEIMPRINTBACK: SET:OKOFFDATED & TIME](https://usermanual.wiki/Hanwha-Techwin/DIGIMAX370/User-Guide-401707-Page-68.png)
![69SoundIf you set the operation sound to ON, various sounds will be activated for camera startup,when button are pressed, and if there is a card error, so that you can be aware of the cameraoperation status.Setting Operation Sounds1. In any mode with the exception of Voice Recordingmode, press the MENU button.2. Press the LEFT/ RIGHT button and select the [SETUP]menu tab.3. Select the [SOUND] menu by pressing the UP/ DOWNbutton and press the RIGHT button.4. Select a desired sub menu by pressing the UP/ DOWNbutton and press the OK button.[SOUND] sub menu : OFF/ LOW/ MEDIUM/ HIGH5. Press the menu button twice and the menu will disappear.You can adjust the LCD brightness.Adjusting LCD Brightness1. In any mode with the exception of Voice Recordingmode, press the MENU button.2. Press the LEFT/ RIGHT button and select the [SETUP]menu tab.3. Select the [LCD] menu by pressing the UP/ DOWNbutton and press the RIGHT button.4. Select a desired sub menu by pressing the UP/ DOWNbutton and press the OK button.[LCD] sub menu : DARK, NORMAL, BRIGHT5. Press the menu button twice and the menu will disappear.LCD brightnessSETUPD & TIMEIMPRINTSOUNDBACK: SET:OKOFFLOWMEDIUMSETUPIMPRINTSOUNDLCDBACK: SET:OKDARKNORMALBRIGHT](https://usermanual.wiki/Hanwha-Techwin/DIGIMAX370/User-Guide-401707-Page-69.png)
![70Selecting Video out typeThe Movie output signal from the camera can be NTSC or PAL. Your choice of output will be governed by the type of device (monitor or TV, etc.) to which thecamera is connected. PAL mode can support only BDGHI.Setting the Video Out Type1. In any mode with the exception of Voice Recordingmode, press the MENU button.2. Press the LEFT/ RIGHT button and select the [SETUP]menu tab.3. Select the [VIDEO] menu by pressing the UP/ DOWNbutton and press the RIGHT button.4. Select a desired sub menu by pressing the UP/ DOWNbutton and press the OK button.[VIDEO] sub menu : NTSC, PAL5. Press the menu button twice and the menu will disappear.NTSC : U.S.A, Canada, Japan, South Korea, Taiwan, Mexico.PAL : Australia, Austria, Belgium, China, Denmark, Finland, Germany, U.K., Holland,Italy, Kuwait, Malaysia, New Zealand, Singapore, Spain, Sweden, Switzerland,Thailand, Norway.When using a TV as an external monitor, you will need to select the external or AVchannel of the TV.There will be a digital noise on the external monitor, but it is not a malfunction.If the image is not in the centre of the screen, use the TV controls to centre it.When the camera is connected to an external monitor, the menu will be visible on theexternal monitor and the menu functions are the same as those indicated on the LCDmonitor.INFORMATIONConnecting to an external monitorIn RECORDING/ PLAY mode, youcan view the stored still images ormovie clips by connecting thecamera to an external monitor viathe A/V cable. When the camera isconnected to an external monitor,the LCD monitor will be turned offautomatically. Yellow color-VideoWhite color-VoiceSETUPSOUNDLCDVIDEOBACK: SET:OKNTSCPAL](https://usermanual.wiki/Hanwha-Techwin/DIGIMAX370/User-Guide-401707-Page-70.png)
![71Quick viewIf you enable Quick View before capturing an image, you can view the image you justcaptured on the LCD monitor for the duration set in the [Q.VIEW] setup. Quick view ispossible only with still images.Setting Quick View1. In any mode with the exception of Voice Recordingmode, press the MENU button.2. Press the LEFT/ RIGHT button and select the [SETUP]menu tab.3. Select the [Q.VIEW] menu by pressing the UP/ DOWNbutton and press the RIGHT button.4. Select a desired sub menu by pressing the UP/ DOWNbutton and press the OK button.[OFF] : The quick view function can’t be activated.[1 ~ 3 SEC] : The captured image is briefly displayed during the selected time.5. Press the menu button twice and the menu will disappear.Initialization(RESET ALL)SETUPLCDVIDEOQ.VIEWBACK: SET:OK1 SECAll camera menu and function settings will be restored to their default values. However, values for DATE/TIME, LANGUAGE, VIDEO OUT and CARD SELECT will not bechanged.Initializing the Camera1. In any mode with the exception of Voice Recordingmode, press the MENU button.2. Press the LEFT/ RIGHT button and select the [SETUP]menu tab.3. Select the [RESET] menu by pressing the UP/ DOWNbutton and press the RIGHT button.4. Select a desired sub menu by pressing the UP/ DOWNbutton and press the OK button.If [NO] is selected : Settings will not be restored to their defaults.If [YES] is selected : All settings will be restored to their defaults.5. Press the menu button twice and the menu will disappear.SETUPVIDEOQ.VIEWRESETBACK: SET:OKNOYES](https://usermanual.wiki/Hanwha-Techwin/DIGIMAX370/User-Guide-401707-Page-71.png)
![72Select cardThe camera has multi memory slots for an SD Memory Card (Multi Media Card) and MemoryStick Duo. Select a memory card to use when both memory slots are loaded with a memorycard.Memory card selection1. In any mode with the exception of Voice Recordingmode, press the MENU button.2. Press the LEFT/ RIGHT button and select the [SETUP]menu tab.3. Select the [CARD SEL.] menu by pressing the UP/DOWN button and press the RIGHT button.4. Use the UP and DOWN buttons to select the desiredsubmenu value, and then press the OK button.[SD/MMC] : Selects SD card or Multi Media Card[MS DUO] : Selects Memory Stick DUO5. Press the menu button twice and the menu will disappear.* If all the slots are full, make sure that the card you want is selected before taking a picture.* Configure the submenu of the [CARD SEL.] menu to use the free space in the auxiliarymemory card when a [CARD FULL !] message is displayed.SETUPQ.VIEWRESETCARD SEL.BACK: SET:OKSD/MMCMS DUOConnecting an External Device (USB)You can select an external device to which you want to connect the camera using the USB cable.Selecting an External Device1. In any mode with the exception of Voice Recordingmode, press the MENU button.2. Press the LEFT/ RIGHT button and select the [SETUP]menu tab.3. Select the [USB] menu by pressing the UP/ DOWNbutton and press the RIGHT button.4. Select a desired sub menu by pressing the UP/ DOWNbutton and press the OK button.[COMPUTER] : Select this if you want to connect the camera to your PC. Refer to page 91 for instructions on how to connect the camera to your PC.[PRINTER] : Select this if you want to connect the camera to your printer. Refer to page 62 for instructions on how to connect the camera to your printer.5. Press the menu button twice and the menu will disappear.SETUPRESETCARD SEL.USBBACK: SET:OKCOMPUTERPRINTER](https://usermanual.wiki/Hanwha-Techwin/DIGIMAX370/User-Guide-401707-Page-72.png)
![73Setting up the MYCAM menuYou can set up a start up image, start up sound and shutter sound. Every camera workingmode (with the exception of Voice recording mode) has the MyCAM menu.The items indicated by are default settings.Menu tab Main menu Sub menu PageIMAGE 1IMAGE 2 IMAGE 3OFF SOUND 1SOUND 2 SOUND 3OFF SOUND 1SOUND 2 SOUND 3S.IMAGES.SOUNDSH.SOUNDp.73p.74p.74You can select the image that is first displayed on the LCD monitor whenever the camera isturned on.* Menus are subject to change without prior notice.Setting a Startup Image1. In any mode with the exception of Voice Recordingmode, press the MENU button.2. Press the LEFT/ RIGHT button and select the [MYCAM]menu tab.3. Select the [S.IMAGE] menu by pressing the UP/ DOWNbutton and press the RIGHT button.4. Select a desired sub menu by pressing the UP/ DOWNbutton and press the OK button.5. Press the menu button twice and the menu will disappear.Start up imageUse a saved image for the start-up image with the [LOGO] in the [RESIZE] menu in theplay mode.The start-up image will not be deleted by deleting all images or [FORMAT] menu.INFORMATIONMYCAMS.IMAGES.SOUNDSH.SOUNDBACK: SET:OKOFFUSER IMAGE](https://usermanual.wiki/Hanwha-Techwin/DIGIMAX370/User-Guide-401707-Page-73.png)
![74Start up soundYou can select the sound that is activated whenever the camera is turned on.You can select the shutter sound.Selecting the Shutter Sound1. In any mode with the exception of Voice Recordingmode, press the MENU button.2. Press the LEFT/ RIGHT button and select the [MYCAM]menu tab.3. Select the [SH.SOUND] menu by pressing the UP/DOWN button and press the RIGHT button.4. Select a desired sub menu by pressing the UP/ DOWNbutton and press the OK button.5. Press the menu button twice and the menu will disappear.Shutter soundSetting the Startup Sound1. In any mode with the exception of Voice Recordingmode, press the MENU button.2. Press the LEFT/ RIGHT button and select the [MYCAM]menu tab.3. Select the [S.SOUND] menu by pressing the UP/DOWN button and press the RIGHT button.4. Select a desired sub menu by pressing the UP/ DOWNbutton and press the OK button.5. Press the menu button twice and the menu will disappear.MYCAMS.IMAGES.SOUNDSH.SOUNDBACK: SET:OKOFFSOUND 1SOUND 2MYCAMS.IMAGES.SOUNDSH.SOUNDBACK: SET:OKOFFSOUND 1SOUND 2](https://usermanual.wiki/Hanwha-Techwin/DIGIMAX370/User-Guide-401707-Page-74.png)
![78Before contacting a service centerPlease check the followingSymptom Causes Remedy- Insert fresh batteries- Connect an AC Power Adapter- Insert the batteries according to thepolarity marks (+, -)- There is low batterycapacity- An AC Power Adapter isnot connected- Batteries are insertedincorrectly with thereverse polarities-The batteries are exhausted- The Camera is turned offautomatically- The Adapter plug is notconnected securely- The Camera is beingused in low temperatures- The memory card is notinserted- There is insufficientmemory capacity- The memory card hasnot been formatted- The memory card isexhausted-The camera’s power is off-The batteries are exhausted- The memory card islocked- Batteries are insertedincorrectly with thereverse polaritiesThe cameradoesn t switch onThe camerapower ceaseswhilst in useBatteries drainquicklyCamera doesnot take imageswhen pressingthe Shutterbutton- Insert fresh batteries- Press the power button to reactivatecamera- Remove and re-insert the plug- Keep the camera in warm conditions (i.e. inside a coat or jacket) and onlyremove it in order to take images- After turning the camera off, insert anew memory card- Delete unnecessary image files- Format the memory card (p.67)- Insert a new memory card- Turn the camera power on- Insert fresh batteries- Refer to [CARD LOCKED!] errormessage (p.77)- Insert the batteries according to thepolarity marks (+, -)- The camera was stoppeddue to a malfunctionThe camerasuddenly stopsworking while inuse- Remove /re-insert batteries and switchthe camera on](https://usermanual.wiki/Hanwha-Techwin/DIGIMAX370/User-Guide-401707-Page-78.png)
![80Before contacting a service centerSymptom Causes Remedy- White balance setting isincorrect- Exposure is excessive- Cable connection isincorrect- The camera is off- There are no batteries,the batteries areexhausted or the ACadapter is not connected.- The operating system isnot Windows 98, 98SE,2000, ME, XP/ Mac OS9.0~10.2. Alternativelythe PC does not supportUSB- The camera driver is notinstalledColour of imageis different tothe originalsceneImages are toobrightWhen using thePC’s explorer,the [RemovableDisk] file doesnot show- Select appropriate White balance- Reset exposure compensation- The external monitor hasnot been connectedproperly with the camera- There are incorrect filesin the memory cardNo image onexternal monitor- Check the connection cables- Insert a memory card that has correctfiles- Check the connection- Turn the camera on- Insert new batteries or check theadapter connection- Install Windows 98, 98SE, 2000, ME,XP/ Mac OS 9.0~10.2 to PC thatsupports USB- Install a [USB Storage Driver]](https://usermanual.wiki/Hanwha-Techwin/DIGIMAX370/User-Guide-401707-Page-80.png)

![84About the softwareAfter inserting the CD-ROM provided with this camera into the CD-ROM drive, the followingwindow should automatically run.Before connecting the camera to thePC, you should first install the cameradriver.Camera driver : This enables images to transfer between the camera and PC.This camera uses the USB Storage Driver as the camera driver. You can use the camera asa USB card reader. After installing the driver and connecting this camera to the PC, you canfind [Removable Disk] in [Windows Explorer] or [My computer]. A USB Storage Driver isprovided only for Windows. A USB Driver for MAC is not included with the Application CD.But you can use the camera with Mac OS 9.0 ~ 10.2.Digimax Viewer : This is a program for viewing stored images.You can see the stored images in the memory directly on a PC monitor. You can also copy,move or delete the images and enlarge/downscale the image sizes with Digimax Viewer.This software is only compatible with Windows.PhotoImpression : Image editing program.You can edit or store still images that you download from the camera. This software is onlycompatible with Windows.Be sure to check the system requirements (page 83) before installing the driver.You should allow 5~10 seconds for running the automatic setup program according tothe capability of the computer. If the frame does not show, run the [Windows Explorer]and select [Samsung.exe] in the CD-ROM Drive root directory.INFORMATION](https://usermanual.wiki/Hanwha-Techwin/DIGIMAX370/User-Guide-401707-Page-84.png)
![85Setting up the application softwareTo use this camera with a PC, install the application software first. After this has been done, thestored images in the camera can be moved to the PC and can be edited by an image editingprogram.You can visit the Samsung web-site through the internet.http://www.samsungcamera.com : Englishhttp://www.samsungcamera.co.kr : KoreanClose other programs before installing the application software.Before installing the application software, disconnect the USB connection.INFORMATION 1. Click the [Install] menu in the Autorunframe. The Digimax 430 camera driver isinstalled automatically.2. Camera driver installation is complete.Click the [Finish] button.[Click!][Click!]](https://usermanual.wiki/Hanwha-Techwin/DIGIMAX370/User-Guide-401707-Page-85.png)
![86Setting up the application softwareIf you select [Exit] at the step 3, the application program installation will be cancelled.INFORMATION If you select [Cancel] at step 4, a window for installing PhotoImpression will be displayed.INFORMATION 3. A window for which you can selectapplication software will be displayed.Select the application program and clickthe [Install] button. Refer to page.84 for more informationabout the application program.4. Install Digimax Viewer. Click [Next >] button.5. The Software License Agreement windowwill be displayed. If you agree to this, click[Yes], the window will then move to thenext step. If you disagree, click [No] andthe installation program will be canceled.6. A destination selection window will open.Click [Next >]. To copy to the files toanother folder, click [Browse (R)..] andchoose a folder you want.[Click!][Click!][Click!][Click!]](https://usermanual.wiki/Hanwha-Techwin/DIGIMAX370/User-Guide-401707-Page-86.png)
![87Setting up the application software7. A window will open, asking you to choosea folder to which program icons will beadded. Click [Next >] button. If you want to add the program icons to adifferent folder, choose another folder, andthen click [Next >] button.If you click [Cancel] in Step 8, the PhotoImpression installation will be canceled and theRestart Computer window will appear.INFORMATION[Click!]8. Digimax Viewer Installation is completed. The PhotoImpression installation windowwill be displayed as shown alongside. Click the [OK] button.[Click!]9. A Welcome window will be displayed.Click the [Next >] button.[Click!]10. The Software License Agreementwindow will be displayed. If you agree tothis, click [Yes], the window will thenmove to the next step. If you disagree,click [No] and the installation program willbe canceled.[Click!]](https://usermanual.wiki/Hanwha-Techwin/DIGIMAX370/User-Guide-401707-Page-87.png)
![88Setting up the application software11. A destination selection window will open.Click [Next >]. To copy to the files toanother folder, click [Browse...] andchoose a folder you want.[Click!]12. The [Select Components] window willappear. Click [Next >] button.[Click!]13. A window will open, asking you to choosea folder to which program icons will beadded. Click [Next >] button. If you want to add the program icons to adifferent folder, choose another folder,and then click [Next >] button.[Click!]14. Installation is complete. Click the [Finish] button.[Click!]](https://usermanual.wiki/Hanwha-Techwin/DIGIMAX370/User-Guide-401707-Page-88.png)
![89Setting up the application software15. To apply changes, you must restart thecomputer. Select [Yes, I want to restartmy computer now], and then click [OK].16. After restarting the computer, connect the PC to the camera with the USB cable.18. If you can see [Removable Disk] under[My computer], the camera driverinstallation was successful. Now you can transfer image files from thecamera to PC via the USB cable.[Click!]17. Turn the camera power on. [Found NewHardware Wizard] will open and thecomputer will recognize the camera.If you have ever installed an image viewerprogram or your OS is Windows XP, animage viewer program will open. If the image viewer program opens, thecamera driver was setup successfully.](https://usermanual.wiki/Hanwha-Techwin/DIGIMAX370/User-Guide-401707-Page-89.png)
![90Setting up the application softwareIf you have installed the camera driver, [Found New Hardware Wizard] may not open.On a Windows 98 or 98 SE system, the Found New Hardware Wizard dialog box opensand a window asking you to select a driver file may appear. In this case, specify the[D:\Digimax430 370\Samsung Digimax.KENOX Installation] folder on the suppliedsoftware CD.When connecting the camera to your PC, it is recommended that you use an AC poweradapter.Before connecting the camera to the PC, You should first install the camera driver.After installing the camera driver, you have to restart your PC.If you connect the camera to the PC before installing the camera driver, the [Found NewHardware Wizard] will open.In this case, cancel the [Found New Hardware Wizard] and disconnect the camera.Install the camera driver and connect the camera to the PC again.Should the computer not find the camera driver after installation, please try one or moreof the following measures.1. Delete the camera driver (p.94), and re-install the driver.2. Refer to FAQ (p.101) to check for a possible solution to the problem.3. If your PC’s central processing unit is VIA chip (This is shown in the USB HostController), download the patch file from the Samsung Camera web page.(http://www.samsungcamera.com)INFORMATION](https://usermanual.wiki/Hanwha-Techwin/DIGIMAX370/User-Guide-401707-Page-90.png)
![91Starting PC ModeThe camera driver must be installed before using PC mode.To save battery power, it is recommended that you use an AC adapter (Optional) whenconnecting the camera to a computer.INFORMATIONIf you connect the USB cable to a USB port on your PC and then turn on the power, thecamera will automatically switch to "computer connection mode".In this mode, you can download stored images to your PC through the USB cable.The LCD monitor is always turned off in PC mode.The auto focus lamp will illuminate when the files are transferring via the USB connection.Connecting the camera to a PC1. Turn the PC power on.2. Turn the camera power on.3. In any mode other than Voice Recording mode, pressthe MENU button.4. Press the LEFT/ RIGHT button and select the [SETUP]menu tab.5. Select the [USB] menu by pressing the UP/ DOWNbutton and press the RIGHT button.6. Use the UP and DOWN buttons to select[COMPUTER], and then press the OK button.7. Press the menu button twice and the menu will disappear.8. Connect the PC and the camera via the USB cable.- Insert the small plug of the USB cable into the camera USB connection terminal.- Insert the large connector of the USB cable into the USB port of the PC.- The plugs must be firmly inserted.Disconnecting the camera and PC : Refer to page 96 (Removing the removable disk).If you selected [PRINTER] in Step 6,when you connect the camera to yourcomputer, the [CONNECTING...]message will be displayed on the LCDmonitor and the connection will not beestablished. In this case, disconnect theUSB cable, and then follow the procedurefrom Step 3 and onward.SETUPRESETCARD SEL.USBBACK: SET:OKCOMPUTERPRINTERNOR 2272](https://usermanual.wiki/Hanwha-Techwin/DIGIMAX370/User-Guide-401707-Page-91.png)
![92Starting PC Mode3. Select an image and press the right mousebutton.4. A pop-up menu will open.Click [Cut] or [Copy] menu.- [Cut] : cuts a selected file.- [Copy] : copies files.Downloading stored imagesYou can download the still images stored on the camera to your PC's hard disk and printthem or use a photo editing software to edit them.1. Connect the camera to your PC with the USB cable.2. On your computer's desktop display, select[My computer] and double click [RemovableDisk DCIM 100SSCAM].The image files will then be displayed.5. Click a folder where you want to paste the file.](https://usermanual.wiki/Hanwha-Techwin/DIGIMAX370/User-Guide-401707-Page-92.png)
![93Starting PC Mode6. Press the right mouse button and a pop-upmenu will open. Click [Paste].7. An image file is transferred from the camera toyour PC.- By using [Digimax Viewer], you can see the stored images in the memory directly on the PCmonitor and you can copy or move the image files.](https://usermanual.wiki/Hanwha-Techwin/DIGIMAX370/User-Guide-401707-Page-93.png)
![94Removing the USB Driver for Windows 98SETo remove the USB driver, refer to the process shown below.1. Trace [Start Settings] and click [Control Panel].[Click !]4. A window will open. Click the [OK] buttonand the camera driver will be removed.5. Uninstallation is complete. Click the [Finish] button and thewindow will disappear.[Click !][Click !]2. Double-click [Add/Remove programs].3. The [Add/Remove Programs Properties] windowwill open. Click [Samsung Digimax 430&370] andclick the [Add/Remove] button.](https://usermanual.wiki/Hanwha-Techwin/DIGIMAX370/User-Guide-401707-Page-94.png)
![95Removable DiskTo use this camera as a Removable Disk, install (p.85) the USB Driver.1. Before turning the camera power on, connect the camera to the PC with the USB cable.2. Click [Removable Disk] under [My computer] or [Windows Explorer].3. Image files stored in the Removable Disk (DCIM 100SSCAM) can be transferred to thePC.Important information whilst using the Removable DiskThe [Removable Disk] indicator will not show when the camera power is off or the USBcable is removed.We recommend that you should copy the images to the PC to view them. Openingimages directly from the removable disk may be subject to unexpected disconnection.When uploading images from the PC to the camera, ensure that the uploaded filenames are not the same as those already stored on the memory. When you upload a file that is not taken by this camera to Removable Disk, the [FILEERROR!] message will be displayed on the LCD monitor in the PLAY mode, andnothing is displayed in THUMBNAIL mode.The auto focus lamp will blink, when a file istransferred (copy or deletion) between the PCand the camera. Do not remove the USB cableuntil the lamp stops blinking. To remove the USBcable in Windows 2000/ME/XP, use the [Unplugor Eject Hardware] icon on the task bar.INFORMATION](https://usermanual.wiki/Hanwha-Techwin/DIGIMAX370/User-Guide-401707-Page-95.png)
![96Removing the removable disk[Click!][Double-click!][Click!][Click!]Windows 98SE1. Check whether the camera and PC are transferring a file. If the auto focus lamp blinks, youhave to wait until the lamp illuminates.2. Unplug the USB cable.Windows 2000/ME/XP1. Check whether the camera and PC are transferring a file. If the auto focus lamp blinks, youhave to wait until the lamp illuminates.2. Double-click the [Unplug or Eject Hardware]icon on the task bar.3. The [Unplug or Eject Hardware] window willopen. Select the [USB Mass Storage Device]and click the [Stop] button.4. The [Stop a Hardware device] window willopen. Select the [SAMSUNG Digimax 430USB Device] and click the [OK] button.5. A [Safe to Remove Hardware] window willopen. Click the [OK] button.](https://usermanual.wiki/Hanwha-Techwin/DIGIMAX370/User-Guide-401707-Page-96.png)
![97Removing the removable disk1. A USB Driver for MAC is not included with the software CD as MAC OS supports thecamera driver.2. Check the MAC OS. You can check the MAC OS version during MAC OS start-up. Thiscamera is compatible with MAC OS 9.0 ~ 10.2.3. Connect the camera to the Macintosh and turn the camera power on.4. A new icon will be displayed on the desktop after connecting the camera to the MAC.Using the USB Driver for MACSetting up the USB Driver for MAC1. Double click a new icon on the desktop and the folder in the memory will be displayed.2. Select an image file and copy or move it to MAC.If you use Mac OS 10.0 or later, you may experience an error occurring when youtransfer files from the PC to the camera.INFORMATION6. A [Unplug or Eject Hardware] window willopen. Click the [Close] button and theremovable disk will be removed safely.7. Unplug the USB cable.[Click!]](https://usermanual.wiki/Hanwha-Techwin/DIGIMAX370/User-Guide-401707-Page-97.png)
![98Using PhotoImpressionYou can use PhotoImpression to perform the following tasks.With PhotoImpression, you can edit or store still images that you downloaded from the camera.This software is only available in Windows version.To start the program, click [Start Programs ArcSoft PhotoImpression 4 PhotoImpression4]. The following screen will appear.[ Command Button ][ Tool Bar ]Command ButtonButton DescriptionImports a picture from an album, a source folder, or the camera/scanner, orcaptures screen shots of what is being viewed on the current monitor.Selects Cut, Resize, Edit Image, Insert Text, Enhance Picture, InsertEffects, or Layer.Performs Insert Frame, Insert Borders, Insert Calendar, Insert GreetingCards, Insert Template, or Connect with Other Software.Saves the edited picture, and sends an e-mail or uses it as the backgroundimage.Outputs the edited picture according to your preferences.[ Help Button ]](https://usermanual.wiki/Hanwha-Techwin/DIGIMAX370/User-Guide-401707-Page-98.png)
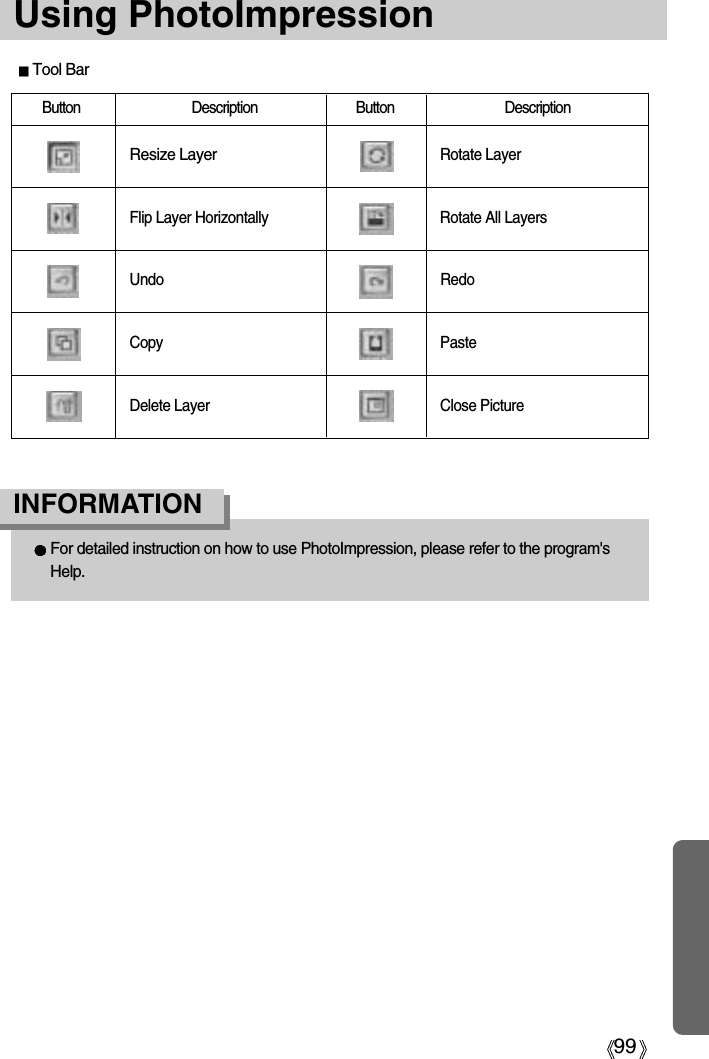
![100Digimax Viewer 2.1This software is only compatible with Windows.1.To open Digimax Viewer, click the [Start ProgramsSamsung Digimax Viewer 2.1 Digimax Viewer 2.1 ]and Digimax Viewer 2.1 will then open. 3. You can easily use the Digimax viewer 2.1 program asit offers a FILE menu and TOOL bar. And, you can usethe pop up menu. Click an image and press the rightmouse button.Digimax Viewer functions are listed below.- Basic functions : Copy, Cut, Paste, Delete, Rotate, Rename, changing file type, Resize,Property.- Advanced functions : Print, Slide show, Export, Sending e-mail, On-line print, Web album etc.2. If the [Auto Launch] option is selected, this program will be executed automatically withrecognizing the camera.Before deleting images from the camera, you should protect or download images toyour computer that you wish to keep.Refer to the [Help] menu in Digimax viewer 2.1 for further information.INFORMATION](https://usermanual.wiki/Hanwha-Techwin/DIGIMAX370/User-Guide-401707-Page-100.png)
![101FAQPlease check the following if the USB connection malfunctions.[Case 1] The camera power is off.Turn the camera power on. We recommend using an AC power adapter in PCmode.[Case 2] USB Driver is not installed correctly.Install the USB Driver correctly. Refer to page 85.[Case 3] The USB cable is not connected or you are using a cable with an incorrectspecification.Use a USB cable with the correct specification.[Case 4] The camera is not recognized by your PC. Sometimes, the camera may appear under [Unknown Devices] in DeviceManager.Install the camera driver correctly.Turn off the camera, remove the USB cable, plug in the USB cable again, andthen turn on the camera.[Case 5] There is an unexpected error during file transferTurn the camera power off and on again. Transfer the file again.[Case 6] How do I know my computer supports a USB Interface?Check the USB port in your computer or keyboard.Check the OS version. A USB Interface is available in Windows 98, 98SE, 2000, ME .XP.Check [Universal serial bus controller] in Device Manager. Do the following to check [Universal serial bus controller].Win 98/ME : Trace [Start Setting Controller System DeviceManager Universal serial bus controller]Win 2000 : Trace [Start Setting Controller System HardwareDevice Manager Universal serial bus controller].](https://usermanual.wiki/Hanwha-Techwin/DIGIMAX370/User-Guide-401707-Page-101.png)
![102FAQWin XP : Trace [Start Control Panel Performance andMaintenance System Hardware Device Manager Universal Serial Bus controller].There must be USB Host Controller and USB root hub under [Universal serialbus controller].In addition, double-click on the USB Universal Host Controller and the USBRoot Hub to check if the Device Status states "This device is working properly".If the Device Status says the device is "not working properly", click the "Driver"tab and then click [Update Driver] or [Reinstall Driver].When all the conditions mentioned above are met, the computer can supportthe USB interface.[Case 7] When using the USB hub.There may be a problem in connecting the camera to the PC through the USBhub if the PC and the hub are not compatible. Wherever possible, connect the camera to the PC directly.[Case 8] Are other USB cables connected to the PC?The camera may malfunction when it is connected to the PC at the same timeas another USB cable. In this case, disconnect the other USB cable, andconnect only one USB cable to the camera.[Case 9] When I open the Device Manager (by clicking Start (Settings) ControlPanel (Performance and Maintenance) System (Hardware) DeviceManager), there are Unknown Devices or Other Devices entries with ayellow question mark(?) beside them or devices with an exclamation mark(!)beside them.Right-click on the entry with the question(?) or exclamation (!) mark and select"Remove". Restart the PC and connect the camera the again. For Windows 98 PC, remove the camera driver also, restart the PC, and thenreinstall the camera driver.Double-click on the entry with the question(?) or exclamation(!) mark, click the"Driver" tab, and click [Update Driver] or [Reinstall Driver]. If a message appearsasking you to specify the location where the appropriate driver for the device is,specify the "D:\Digimax430 370\Samsung Digimax.KENOX Installation" folder(where D: is the drive letter of the CD-ROM where the driver CD is inserted).](https://usermanual.wiki/Hanwha-Techwin/DIGIMAX370/User-Guide-401707-Page-102.png)