Hanwha Techwin DIGIMAXV3 Digital Camera User Manual
Samsung Techwin Co Ltd Digital Camera
UserManual.wiki
>
Hanwha Techwin
>
DIGIMAXV3 User Manual
User Manual
Navigation menu
Upload a User Manual
Namespaces
Wiki Guide
HTML
PDF
Info
Views
User Manual
Discussion / Help
Navigation
![2Use this camera in the following orderInstructionsSet up the cameradriverBefore connecting the USB cable to the PC and thiscamera, you have to set up the camera driver. Install thecamera driver that is contained in the Application S/W CD-ROM. (p.110)Take a picture (p.26)Insert the supplied USB cable into the PC USB port andthe camera USB connection terminal.(p.99)Check the camera power. If the power is turned off, slidethe camera switch to power it on.Take a pictureInsert the USBcableCheck the camerapowerCheck [Removable Disk]Do not insert the cigar jack plug tothe DC input connection point as thisresults in electric shock or severedamage to your camera.Open Window’s EXPLORER and search for [Removable Disk].](https://usermanual.wiki/Hanwha-Techwin/DIGIMAXV3/User-Guide-306385-Page-1.png)

![18Connecting to PowerNOTICEImportant information about battery usage- It is easy to buy the alkaline batteries, but the duration for using batteries varies inaccordance with the battery manufacturers or photography conditions.- Please remove the batteries if the camera will not be used for long periods.Batteries can lose power over time and are prone to leaking if kept inside the camera.- We recommend high capacity ALKALINE batteries as manganese batteries cannot deliversufficient power.- Low temperatures (below O˚C) can affect the performance of the batteries and you mayexperience reduced battery life.- Batteries will usually recover at normal temperatures.- Do not use old and new batteries at the same time.- During extended use of the camera, the camera body may become warm. This is perfectly normal.- If you are planning to use this camera for long periods of time, it is advisable to use an AC adapter.INFORMATIONThis camera will automatically switch off when not in use for a period of time.Refer to [POWER OFF] function (p.81).We recommend batteries for digital camera (Within a year from the date of manufacture).The batteries are listed below.Non rechargeable batteries : AA type - Alkaline, Ni-Mn, Ni-Zn, LithiumCR-V3 type - LithiumRechargeable batteries : AA type - Ni-MH, Ni-Cd (over 1000mA)Exclusive type - SLB-1437 (Digimax V3 only)SBP-1103 (CR-V3 type)](https://usermanual.wiki/Hanwha-Techwin/DIGIMAXV3/User-Guide-306385-Page-17.png)
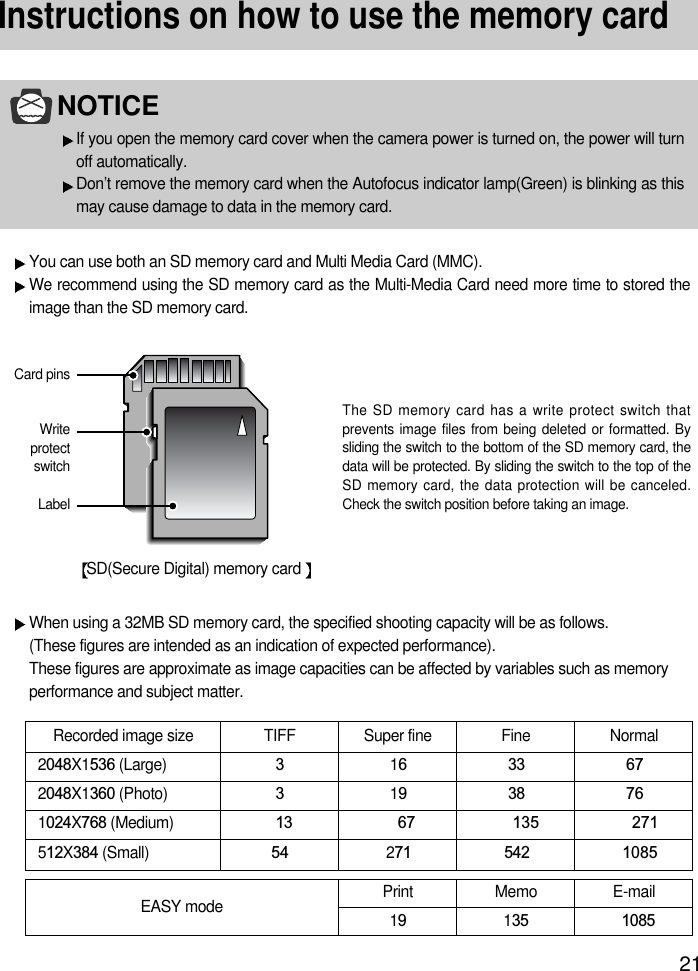
![22Instructions on how to use the memory cardMaintenance of the memory cardTurn off the camera power whenever the memory card is being inserted or removed.Repeated use of the memory card will eventually reduce the memory card s performance.Should this be the case, you will need to purchase a new memory card.Wear and tear on the memory card is not covered by the Samsung warranty.The memory card is an electronic precision device. Do not bend, drop or subject the memory cardto any heavy impact.Do not store the memory card in an environment with strong electronic or magnetic fields, e.g.near loud speakers or TV receivers.Please do not use or store in an environment where there are extremes in temperature.Do not allow the memory card to become dirty or to come into contact with any liquid. Should this happen, clean the memory card with a soft cloth.Please keep the memory card in its case when not in use.During and after periods of extended use, you may notice that the memory card is warm. This is perfectly normal.Do not use the memory card that is used in another digital camera or memory card reader.Do not use the memory card formatted by another digital camera or memory card reader.Preserving the memory card dataIf the memory card is subjected to any of the following, the recorded data may become corrupted :- When the memory card is used incorrectly.- If the power is switched off or the memory card is removed while recording, deleting (formatting)or reading.Samsung cannot be held responsible for lost data.It is advisable to copy important data onto other media as back-up e.g. floppy disks, hard disks,CD etc.If there is insufficient memory available : If you press the shutter button for the shot, [CARD FULL !] message is displayed and the camerawill not operate. To optimize the amount of memory in the camera, replace the memory card ordelete unnecessary images stored on the memory.](https://usermanual.wiki/Hanwha-Techwin/DIGIMAXV3/User-Guide-306385-Page-21.png)
![READY23Selecting the date and timeYou can record the date and time with the image data in the memory card.2. Select the [SETUP] tab by pressing the RIGHT button.Select the [FORMAT] menu by pressing the DOWN/button. Press the DOWN / button again and the next menu page will bedisplayed.Press the UP or DOWN button and select [DATE SET].3. Shift the cursor to the [DATE SET] sub menu by pressing theRIGHT button.1. Turn on the power and press the MENU button.The recording mode menu will be displayed in the RECORDING mode, and the play mode menuwill be displayed in the PLAY mode. (There is no associated menu in VOICE RECORDING mode.)INFORMATIONDate setting range : 2002/01/01 ~ 2050.12.31 (Leap years and months are corrected automatically)The default is 2003/01/01. 12:00 p.m.MOVE:PLAY SETUP MyCAMCHANGE:‘03/01/0112:00 PMYY/MM/DDOFFDATE SETTIME SETD.TYPEIMPRINTBACK:PLAY SETUP MyCAMSET:OKDATE SETTIME SETD.TYPEIMPRINTYEAR03 /01/01](https://usermanual.wiki/Hanwha-Techwin/DIGIMAXV3/User-Guide-306385-Page-22.png)
![24Selecting the date and time6. To select the correct time, select [TIME SETUP] at step 2.Press the MENU button again and the menu will be cancelled.5. Press the OK button to confirm the setting.To return to the main menu or cancel the setting, press the LEFT button.4. Select the correct date by pressing the 5-function button. RIGHT button : selects YEAR/ MONTH/ DAY item.UP or DOWN button : changes the value of each item.NOTICEIf the batteries are removed, the date and time settings will remain for approximately 1 hour.After approximately 1 hour, the date and time will be changed to the default date and time.If the batteries are removed for a period longer than 1 hour, it may be necessary to reset thedate and time.BACK:PLAY SETUP MyCAMSET:OKDATE SETTIME SETD.TYPEIMPRINTMOVE:PLAY SETUP MyCAMCHANGE:DATE SETTIME SETD.TYPEIMPRINT‘03/01/0112:00 PMYY/MM/DDOFFMONTH03/ 01 /01](https://usermanual.wiki/Hanwha-Techwin/DIGIMAXV3/User-Guide-306385-Page-23.png)
![READY25LanguageThere is a choice of languages that can be displayed on the LCD monitor.INFORMATIONThe default language is ENGLISH.You can select 15 languages. Those are listed below.English, Korean, T. Chinese, S. Chinese, Japanese, Russian, Germany, Spanish, French,Italian, Danish, Dutch, Swedish, Finnish, Portuguese.Even if the camera is restarted, the language setting will be maintained.Even if the [SOUND] function is [ON], the sound will not activate in this menu.1. Turn on the power and press the MENU button.The recording mode menu will be displayed in RECORDING mode, and the play mode menu will bedisplayed in the PLAY mode. (There is no associated menu in VOICE RECORDING mode.)2. Select the [SETUP] tab by pressing the RIGHT button.Press the UP or DOWN button and select [LANGUAGE].3. Shift the cursor to the [LANGUAGE] sub menu by pressing theRIGHT button and select the language that you want by pressingthe UP or DOWN button.4. Press the OK button to confirm the setting.To return to the main menu or cancel the setting, press the LEFT button.Press the MENU button again and the menu will be cancelled.BACK:PLAY SETUP MyCAMSET:OKFILEPWR OFFLANGUAGEFORMATENGLISHEXIT:MENUPLAY SETUP MyCAMPAGE:FILEPWR OFFLANGUAGEFORMATSERIESOFFENGLISHNO](https://usermanual.wiki/Hanwha-Techwin/DIGIMAXV3/User-Guide-306385-Page-24.png)
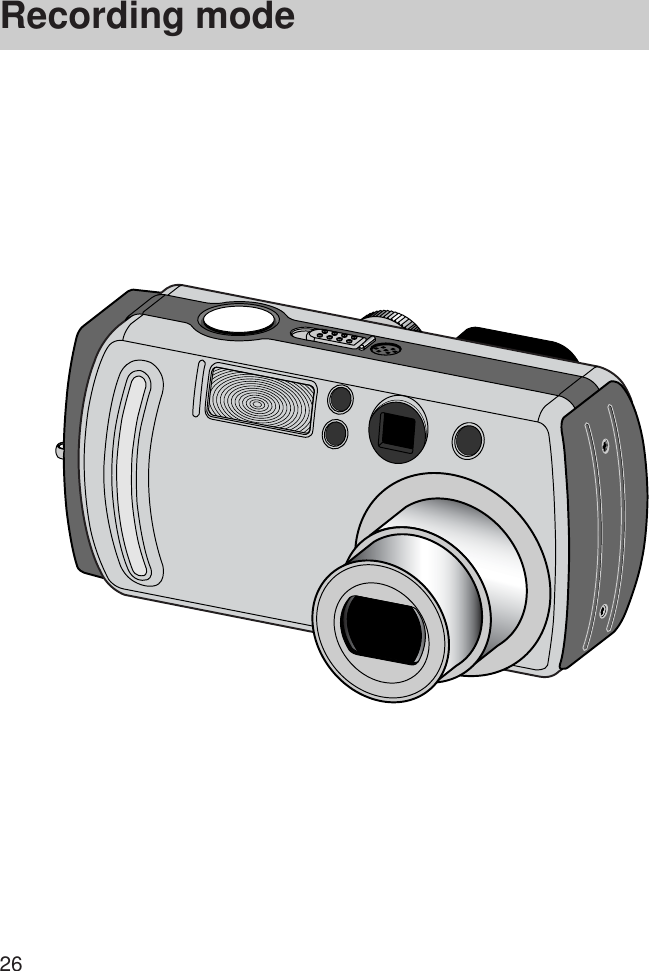
![29RECORDINGStarting recording mode1. Insert the batteries (p.17).Insert the batteries taking note of the polarity (+ / -).2. Insert the memory card (p.20).3. Close the memory card cover.4. Slide the power switch to turn on the camera.5. Select the PROGRAM mode by rotating the mode dial.6. Point the camera towards the subject and compose the image byusing either the viewfinder or LCD monitor.7. Press the shutter button to capture an image.[DELETE] message may be displayed after taking a picture.Refer to p.93 for more information about [DEL. ANSWER].Recording a still imagePROGRAM mode PROGRAM mode INFORMATIONManner modePressing the power button over 2 seconds changes the buzzer and start-up sound setting toOFF, though you have set the settings to ON. If you wish to hear the buzzer sound and start-up sound, set the [SOUND] and [S.SOUND] settings in the SETUP mode to ON.There are two LED lamps (one green, one red) positioned next to the viewfinder.- If the camera is in focus when you press the shutter button halfway, the green LED willilluminate and you can take an image. If the camera can focus on the subject, theautofocus frame in the center of the LCD monitor will change from white to green.- If the red lamp illuminates, the flash can fire.- If the red lamp blinks, the flash is being charged.- When an image is being stored onto the memory card, the green lamp blinks slowly. Whenthe image data has been stored, the green LED light will go out. After the green LED lighthas gone out, you can resume taking images.NOTICEA Blinking autofocus indicator lamp means that the camera cannot focus on the subject.Should this be the case, the camera is unable to capture an image clearly.](https://usermanual.wiki/Hanwha-Techwin/DIGIMAXV3/User-Guide-306385-Page-28.png)
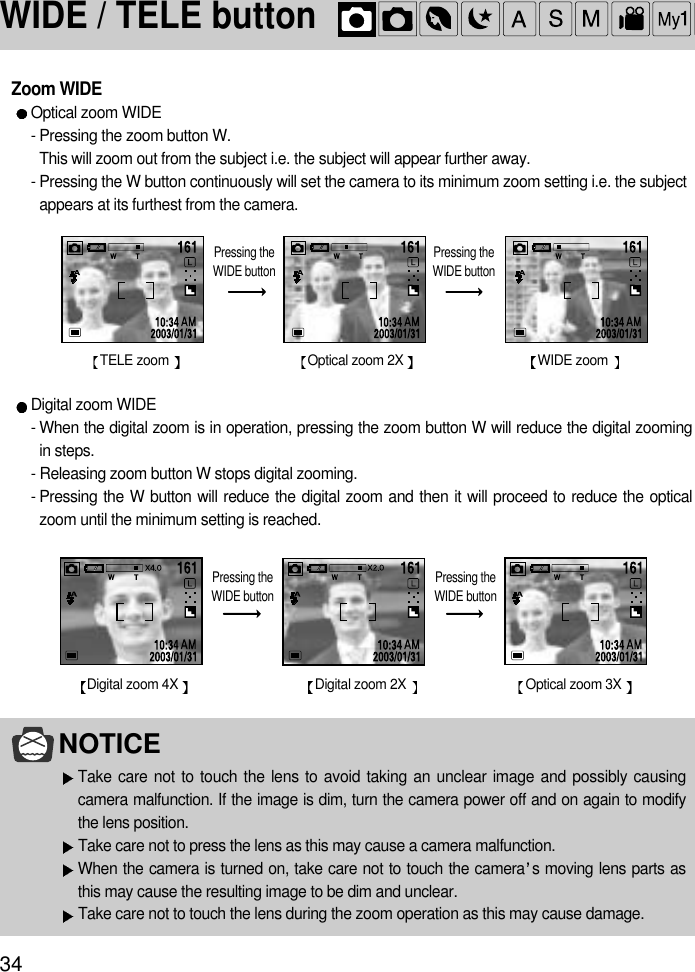
![33RECORDINGINFORMATIONTo use the digital zoom the LCD monitor has to be turned on.Images taken using the digital zoom may take a little longer for the camera to process.Allow time for this to take place.The digital zoom cannot be used in continuous shots, AEB shots and movie clip shots.You may notice a decrease in image quality when using the digital zoom.When the maximum (3X) optical zoom is selected, pressing the zoom button T increases thedigital zoom ratio by 0.1 steps.If the movie clip is being recorded, the zoom operation cannot be activated.WIDE / TELE buttonWIDE zoom Pressing theTELE buttonPressing theTELE buttonTELE zoom Digital zoom 2.0X Used for digital or optical zooming in / out.This camera has a 3X optical zoom and a 4X digital zoom function. Using both will offer a total zoomratio of 12X.When you press the zoom (W/T) button, the zoom bar will display in the upper centre of the LCD monitor.Zoom TELEOptical zoom TELE- Pressing the zoom button T.This will zoom into the subject i.e. the subject will appear nearer.Digital zoom TELE- When the maximum (3X) optical zoom is selected, pressing the zoom button T activates the digitalzoom software.- Releasing zoom button T stops the digital zooming at the required setting.- Once the maximum digital zoom (4X) is achieved, pressing the zoom button T will have no effect.- You can check the digital zoom rate with the [X1.1 ~ X 4.0] numerical mark next to the zoom bar.](https://usermanual.wiki/Hanwha-Techwin/DIGIMAXV3/User-Guide-306385-Page-32.png)


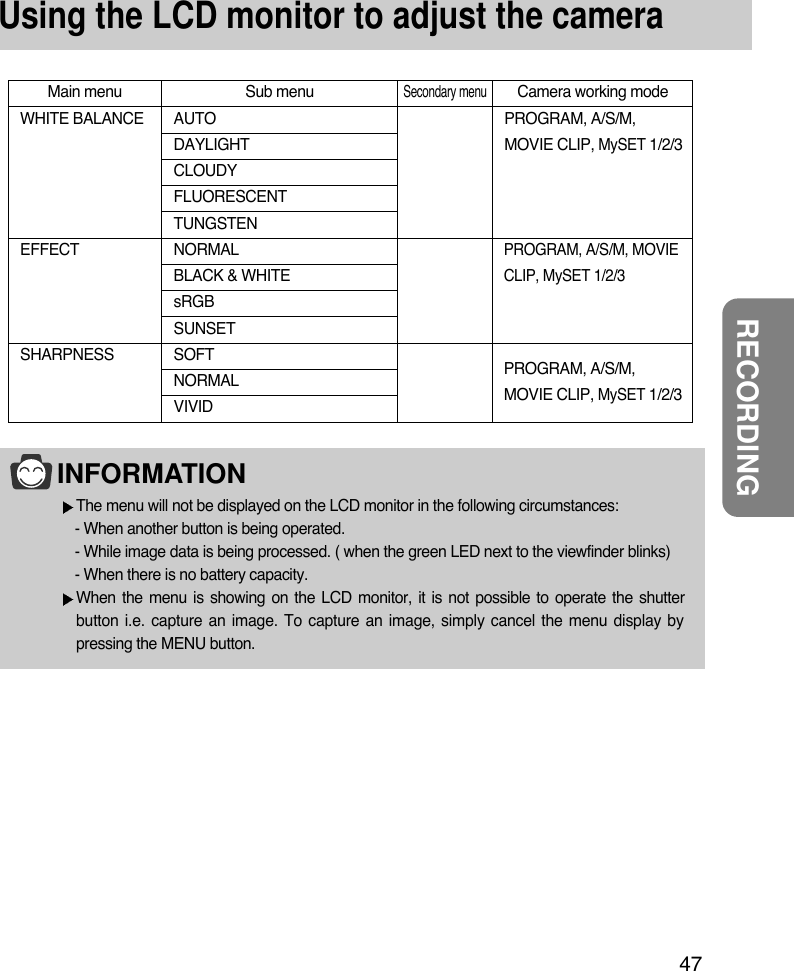
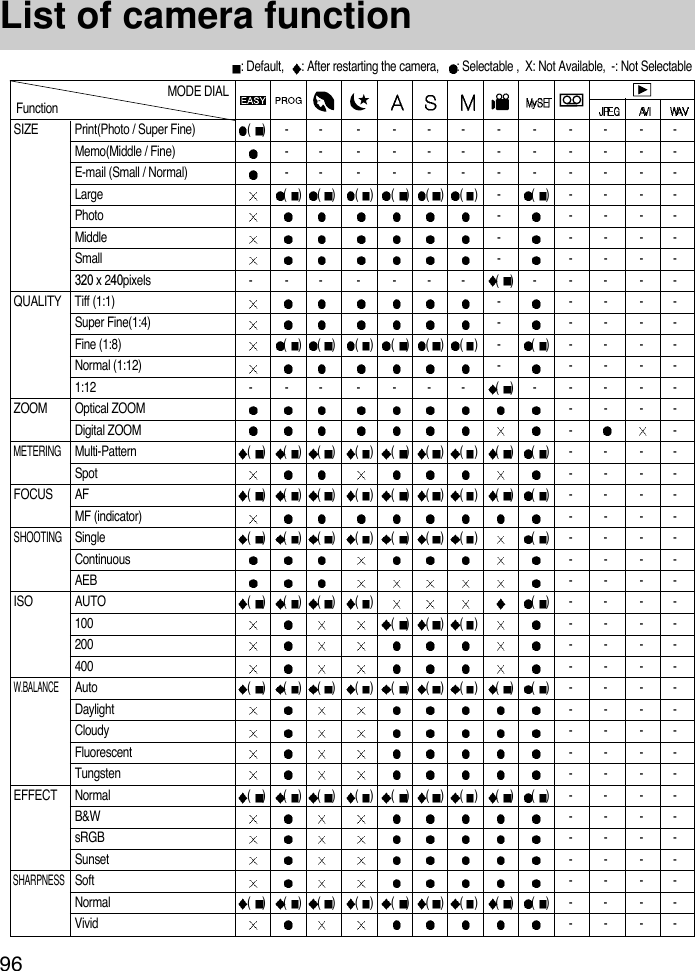
![46Using the LCD monitor to adjust the cameraMain menu Sub menuSecondary menuCamera working modeSIZE PRINT( 2048 x 1360 /SUPER FINE) EASYMEMO( 1024 x 768 /FINE)E-MAIL( 512 x 384 /NORMAL)2048 x 15362048 x 13601024 x 768512x 384QUALITY TIFF SUPER FINEFINENORMALP/A/S/M P/A/S/M MySET 1/2/3A/S/M APERTURE PRIORITYSHUTTER PRIORITYMANUALMETERING MULTI SPOTSHOOT MODE SINGLECONTINUOUSAEBISO AUTO100 200 400PROGRAM, PORTRAIT,NIGHT SCENE, A/S/M,MySET 1/2/3PROGRAM, PORTRAIT,NIGHT SCENE, A/S/M,MySET 1/2/3A/S/M, MySET 1/2/3PROGRAM, PORTRAIT,A/S/M, MySET 1/2/3PROGRAM, A/S/M([AUTO]is not available), MySET1/2/3EASY, PROGRAM,PORTRAIT, MySET 1/2/3# of prints±0.5 EV EASY, PROGRAM,PORTRAIT, MySET 1/2/3Using the LCD monitor to adjust the camera- Recording functions can be changed by using the LCD monitor.- In the RECORDING (EASY, PROGRAM, PORTRAIT, NIGHT SCENE, A/S/M, MOVIE CLIP, MySET,VOICE RECORDING) mode, pressing the MENU button displays the menu on the LCD monitor.- The following functions are available, depending on the mode you have selected.](https://usermanual.wiki/Hanwha-Techwin/DIGIMAXV3/User-Guide-306385-Page-45.png)
![48How to use the menuEvery camera working mode has [SETUP] and [MyCAM] tabs in their own menu. The main menus of the first tab are changed by different camera working modes.1. Turn the camera power on and press the menu button. There are 3 tabs related to each cameramode in the menu. There is no menu available when the VOICE RECORDING mode is selected.2. Shift the tab cursor by pressing the LEFT/ RIGHT button.3. Select a menu by pressing the UP/ DOWN button.4. Shift the cursor to the sub menu by pressing the RIGHT button. To shift the cursor to the main menu,press the LEFT button.5. Select the desired sub menu by pressing the UP/ DOWN button. If there is another menu under thesub menu, press the RIGHT or OK button and the cursor shifts to another sub menu. To shift the cursor to the previous menu or cancel the menu setting, press the LEFT button.6. Press the OK button to confirm the setting.Press the menu button twice and the menu display will disappear.RECORDING mode EXIT:MENUPROG SETUP MyCAMPAGE:SIZEQUALITYMETERINGSHOOTING2048x1536FINEMULTISINGLESETUP mode MyCAM mode Pressing the LEFT / RIGHT buttonPressing the LEFT / RIGHT buttonMOVE:PROG SETUP MyCAMCHANGE:SIZEQUALITYMETERINGSHOOTING2048x1536FINEMULTISINGLEPressing the UP/ DOWN buttonPressing the LEFT/ RIGHT buttonMOVE:PROG SETUP MyCAMCHANGE:SIZEQUALITYMETERINGSHOOTING2048x1536FINEMULTISINGLEBACK:PROG SETUP MyCAMSET:OKSIZEQUALITYMETERINGSHOOTINGTIFFS.FINEFINENORMALEXIT:MENUPROG SETUP MyCAMPAGE:FILEPWR OFFLANGUAGEFORMATSERIESOFFENGLISHNOEXIT:MENUPROG SETUP MyCAMPAGE:S.IMAGES.SOUNDSH.SOUNDIMAGE1SOUND1SH.SOUND1](https://usermanual.wiki/Hanwha-Techwin/DIGIMAXV3/User-Guide-306385-Page-47.png)
![49RECORDINGSizeYou can select the image size you require.1. Rotate the mode dial to the RECORDING mode and press the MENU button.2. Press the DOWN button and the cursor will be shifted to the main menu.3. Select [SIZE] menu by pressing the UP/DOWN button.4. Press the RIGHT button and the cursor will shift to the [SIZE] sub menu.5. Press the OK button to confirm the setting.Press the menu button twice and the menu display will be disappeared. Take a picture.INFORMATIONA large image uses more memory, so increasing the image size will reduce the total numberof shots you can store in the memory.Even though the camera is restarted, the image size setting is maintained.EASY modeSelect the desired sub menu by pressing the UP/DOWN button.- PRINT : Taking a picture for printing(2048 X 1360 / Super fine)- MEMO : Taking a picture for a web site image(1024 X 768 / Fine)- E-MAIL : Taking a picture for e-mail(512 X 384/ Normal)PROGRAM, PORTRAIT, NIGHT SCENE, A/S/M, MySET 1/ 2/ 3 modeSelect the desired sub menu by pressing the UP/DOWN button.- 2048x1536 (LARGE)- 2048x1360 (PHOTO)- 1024x768 (MEDIUM)- 512x384 (SMALL)BACK:EASY SETUP MyCAMSET:OKSIZESHOOTINGPRINTMEMOE-MAILBACK:PROG SETUP MyCAMSET:OKSIZEQUALITYMETERINGSHOOTING2048x15362048x13601024x768512x384](https://usermanual.wiki/Hanwha-Techwin/DIGIMAXV3/User-Guide-306385-Page-48.png)
![50QualityIn RECORDING mode, you can select the image quality (Data compression rate).INFORMATIONThe higher the QUALITY setting, the better the final image will be. However, the high quality setting willrequire more memory and therefore reduce the number of images you can store on the memory.SUPER FINE is the highest quality and NORMAL is the lowest setting. Choose the settingappropriate for your needs.The image file is stored in *.jpg (Default). But, if you select TIFF in the quality menu, theimage file is stored in *.tif.TIFF format is an uncompressed image file format for an expert. If you take a picture with theTIFF file format, the number of available shots is decreased and the time for recording theimage file will be longer because the TIFF file size is bigger than the JPG file format.When the TIFF file is being recorded to the memory card, a [PLEASE WAIT!] message willbe displayed on the LCD monitor.This file format complies with DCF(Design rule for Camera File system).Even if the camera should be restarted, the quality setting is maintained.But, if you select TIFF quality, the quality setting will be changed to FINE after restarting the camera.When using the 32MB SD memory card, the specified shooting capacity will be as follows.(These figures are intended as an indication of expected performance)QUALITY IMAGE SIZELPMSTIFF (1:1) 3 3 13 54Super fine (4:1) 16 19 67 271Fine (8:1) 33 38 135 542Normal (12:1) 67 76 271 10851. Rotate the mode dial to the RECORDING mode and press the MENU button.2. Press the DOWN and the cursor will be shifted to the main menu.3. Select [QUALITY] menu by pressing the UP/DOWN button.4. Press the RIGHT button and the cursor will shift to the[QUALITY] sub menu.5. Select the desired sub menu by pressing the UP/DOWN button. - TIFF : TIFF - FINE :- SUPER FINE : - NORMAL :6. Press the OK button to confirm the setting.Press the menu button twice and the menu display willdisappear. Take a picture.BACK:PROG SETUP MyCAMSET:OKSIZEQUALITYMETERINGSHOOTINGTIFFFINEFINENORMAL](https://usermanual.wiki/Hanwha-Techwin/DIGIMAXV3/User-Guide-306385-Page-49.png)
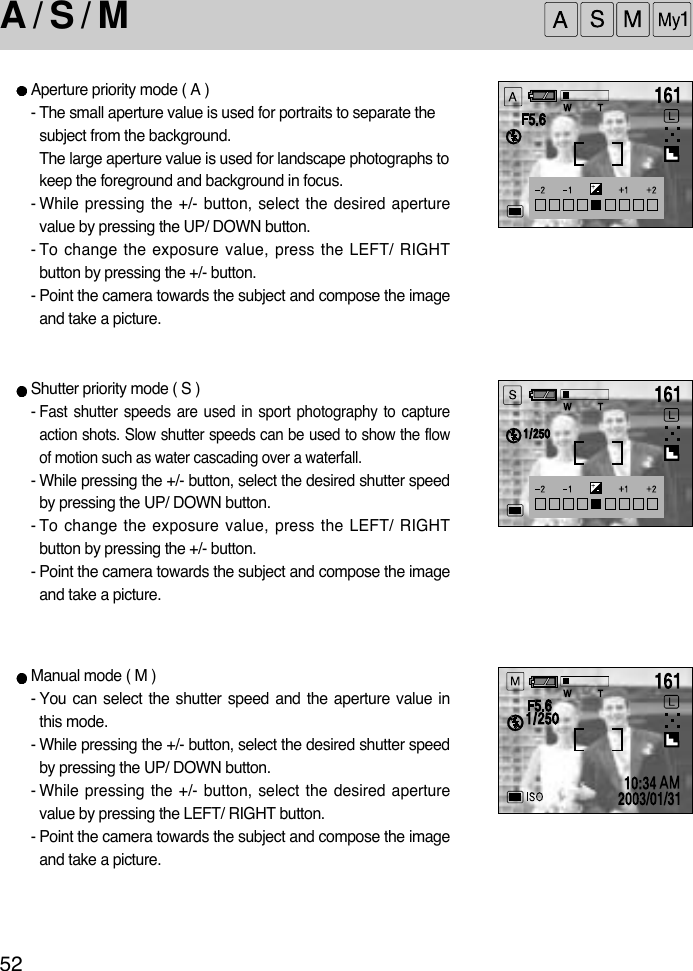
![51RECORDINGA / S / MIn this mode you can select the shutter speed or aperture value to your preference.1. Rotate the mode dial to the A/ S/ M mode and press theMENU button.2. Press the DOWN button and the cursor will be shifted to themain menu.3. Select [A/S/M] menu by pressing the UP/DOWN button.4. Press the RIGHT button and the cursor will shift to the [A/S/M]sub menu.5. Select the desired sub menu by pressing the UP/DOWN button.Aperture priority ( A ) : You can select the aperture value in this mode.The camera calculates the best shutter speed automaticallyto the proper exposure value.Shutter priority ( S ) : You can select the shutter speed in this mode.The camera calculates the best aperture value automaticallyto the proper exposure value.Manual ( M ) :You can select the shutter speed and the aperture value in this mode.6. Press the OK button to confirm the setting.Press the menu button twice and the menu display will disappear. Take a picture.INFORMATIONAfter pressing the shutter button half way down, the values that were changed in the A/S/Mmode will be applied to the picture.If the aperture value or shutter speed is out of the limit of application, the value that is displayedon the LCD monitor will show as red. However, you will still be able to take a picture.BACK:A/S/M SETUP MyCAMSET:OKSIZEQUALITYA/S/MMETERINGASMEXIT:MENUA/S/M SETUP MyCAMPAGE:SIZEQUALITYA/S/MMETERING2048x1536FINEAMULTIIt warns that : To be the properly exposed, the aperture valueshould be smaller than F 2.8. The minimum aperturevalue that you can select is F 2.8.](https://usermanual.wiki/Hanwha-Techwin/DIGIMAXV3/User-Guide-306385-Page-50.png)
![53RECORDINGMetering When the camera cannot calculate a desired exposure, you can change the metering method.INFORMATIONThe default metering mode is Multi pattern metering.If the subject is not the centre of the focus, do not use the spot metering as there may be anexposure error. In this case, use exposure compensation.Even if the camera is restarted, the metering setting is maintained.BACK:PROG SETUP MyCAMSET:OKSIZEQUALITYMETERINGSHOOTINGMULTISPOTEXIT:MENUPROG SETUP MyCAMPAGE:SIZEQUALITYMETERINGSHOOTING2048x1536FINEMULTISINGLE1. Rotate the mode dial to the RECORDING mode and press theMENU button.2. Press the DOWN button and the cursor will be shifted to themain menu.3. Select the [METERING] menu by pressing the UP/DOWN button.4. Press the RIGHT button and the cursor will shift to the[METERING] sub menu.5. Select the desired sub menu by pressing the UP/DOWN button.- Multi pattern metering : Exposure will be calculated based on an average of theavailable light in the image area. However, the calculation willbe biased towards the centre of the image area.- Spot metering : Use this function when there is backlight or whenphotographing a subject that has little contrast. In backlightingconditions adjust the light metering to suit the subject matter.6. Press the OK button to confirm the setting.Press the menu button twice and the menu display will disappear. Take a picture.](https://usermanual.wiki/Hanwha-Techwin/DIGIMAXV3/User-Guide-306385-Page-52.png)
![54ShootingYou can select the continuous shooting or AEB shooting in this menu.AEB is not available in the A/S/M mode.1. Rotate the mode dial to the RECORDING mode and press the MENU button.2. Press the DOWN button and the cursor will be shifted to the main menu.3. Select the [SHOOTING] menu by pressing the UP/DOWN button.4. Press the RIGHT button and the cursor will shift to the[SHOOTING] sub menu.5. Select the desired sub menu by pressing the UP/DOWN button.- SINGLE : you can take only one picture at a time.- CONTINUOUS : In this mode, you can capture movingsubjects continuously.- AEB (Auto Exposure Bracket) : In this mode, you can take a3-image bracket of a scene.There is an over exposed image, normally exposed image andunder exposed image in a bracket.When you select continuous shot or AEB, you can select the exposure bracket and the number ofcontinuous shots in [SHOOTING] sub menu.6. Press the OK button to confirm the setting.Press the menu button twice and the menu display will disappear. Take a picture.INFORMATIONThe flash mode is set to “flash off” in continuous shooting and AEB shooting. After completing thecontinuous or AEB shot, the shooting mode is changed to [SINGLE] automatically.Once a continuous sequence has begun, it will continue until the selected number of shotshas been taken. Releasing the shutter button will not interrupt this function.The maximum number of shots in a sequence is governed by the image settings.Using a 32MB SD memory card, the specified shooting capacity will be as follows.(These figures are intended as an indication of expected performance)If you change the image size or quality after selecting the continuous shot or AEB shot, theshooting mode will be turned to single shot mode automatically.Quality Size Large Photo Medium SmallTIFF (1:1) N/A N/A N/A N/ASuper fine (4:1) 4 4 16 66Fine (8:1) 8 9 32 99Normal (12:1) 16 18 66 99BACK:PROG SETUP MyCAMSET:OKSIZEQUALITYMETERINGSHOOTINGSINGLECONTINUOUSAEB](https://usermanual.wiki/Hanwha-Techwin/DIGIMAXV3/User-Guide-306385-Page-53.png)
![55RECORDINGShootingINFORMATIONContinuous and AEB shots cannot be selected in the TIFF image quality format.To take the continuous shot, the number of available shots must be more than 2 becausethe minimum number of the continuous shots are 2. To take the AEB shots, the number ofavailable shots must be more than 3 because of the same reason.Camera shake can be a problem when using the AEB shooting mode and it takes time tostore the AEB image to the memory. We recommend using a tripod.You can select the camera’s sensitivity to light by selecting the ISO sub menu. The speed or specificlight-sensitivity of a camera is rated by ISO numbers.1. Rotate the mode dial to the RECORDING mode and press the MENU button.2. Press the DOWN button and the cursor will be shifted to the main menu.3. Select the [SHOOTING] menu by pressing the UP/DOWN button.4. Press the DOWN button on the [SHOOTING] menu and the next menu page will be displayed.5. Select the [ISO] menu by pressing the UP/DOWN button.8. Press the OK button to confirm the setting.Press the menu button twice and the menu display will disappear. Take a picture.6. Press the RIGHT button and the cursor will shift to the [ISO] sub menu.7 Select the desired sub menu by pressing the UP/DOWN button.- AUTO : The camera's sensitivity is automaticallychanged by variables such as lighting value orsubject brightness.- 100/ 200/ 400 : In the same lighting conditions, the higher theISO value is, the faster the shutter speed willbe. However, the images can be saturated in very bright conditions.INFORMATIONThe higher the number, the more sensitive it is to light. As with film, the higher speedsusually induce more electronic noise so the image gets grainier.Even if the camera is restarted, the the ISO setting will be maintained.[AUTO] is not applied to A/S/M mode. ISOBACK:PROG SETUP MyCAMSET:OKISOW.BEFFECTSHARPAUTO100200400](https://usermanual.wiki/Hanwha-Techwin/DIGIMAXV3/User-Guide-306385-Page-54.png)
![56White BalanceThe white balance control allows you to adjust the colors to appear more natural looking.1. Rotate the mode dial to the RECORDING mode and press theMENU button.2. Press the DOWN button and the cursor will be shifted to the mainmenu.3. Select the [SHOOTING] menu by pressing the UP/DOWN button.4. Press the DOWN button on the [SHOOTING] menu and the nextmenu page will be displayed.5. Select the [W.B] menu by pressing the UP/DOWN button.6. Press the RIGHT button and the cursor will shift to the [W.B] sub menu.7. Select the desired sub menu by pressing the UP/DOWN button.- AUTO : The camera automatically selects theappropriate white balance settings, dependingon the prevailing lighting conditions.- DAYLIGHT : For taking images outside.- CLOUDY : For taking images under a cloudy andovercast sky.- FLUOR. : For shooting under fluorescent lighting.- TUNGSTEN : For shooting under tungsten (standard light bulb) lighting.8. Press the OK button to confirm the setting.Press the menu button twice and the menu display will disappear. Take a picture.INFORMATIONDifferent lighting conditions may cause a color cast on your images.Even if the camera is restarted, the white balance setting will be maintained.BACK:PROG SETUP MyCAMSET:OKISOW.BEFFECTSHARPAUTODAYLIGHTCLOUDYFLUOR.EXIT:MENUPROG SETUP MyCAMPAGE:SIZEQUALITYMETERINGSHOOTING2048x1536FINEMULTISINGLE](https://usermanual.wiki/Hanwha-Techwin/DIGIMAXV3/User-Guide-306385-Page-55.png)
![57RECORDINGEffectUsing the camera’s digital processor, it is possible to add special effects to your images.1. Rotate the mode dial to the RECORDING mode and press theMENU button.2. Press the DOWN button and the cursor will be shifted to the main menu.3. Select the [SHOOTING] menu by pressing the UP/DOWN button.4. Press the DOWN button on the [SHOOTING] menu and the nextmenu page will be displayed.5. Select the [EFFECT] menu by pressing the UP/DOWN button.6. Press the RIGHT button and the cursor will shift to the [EFFECT]sub menu.7. Select the desired sub menu by pressing the UP/DOWN button.- NORMAL : No effect is added to the image.- B & W : Converts the image to black and white.- sRGB : sRGB is a device independent standard colormodel. Devices supporting sRGB can display theexact image color.- SUNSET : Used for capturing images at sunset8. Press the OK button to confirm the setting.Press the menu button twice and the menu display will disappear.Take a picture.INFORMATIONEven if the camera is restarted, the effect setting will be maintained.BACK:PROG SETUP MyCAMSET:OKISOW.BEFFECTSHARPNORMALB & WsRGBSUNSETEXIT:MENUPROG SETUP MyCAMPAGE:SIZEQUALITYMETERINGSHOOTING2048x1536FINEMULTISINGLE](https://usermanual.wiki/Hanwha-Techwin/DIGIMAXV3/User-Guide-306385-Page-56.png)
![58SharpnessYou can select the sharpness of still image.1. Rotate the mode dial to the RECORDING mode and press theMENU button.2. Press the DOWN button and the cursor will be shifted to the main menu.3. Select the [SHOOTING] menu by pressing the UP/DOWN button.4. Press the DOWN button on the [SHOOTING] menu and the nextmenu page will be displayed.5. Select the [SHARP] menu by pressing the UP/DOWN button.6. Press the RIGHT button and the cursor will shift to the [SHARP] sub menu.7. Select the desired sub menu by pressing the UP/DOWN button.- SOFT : This gives smooth edges and the final imagewill have a soft appearance.- NORMAL : This setting will give a standard finish to thefinal image.- VIVID : This will give the image a crisp and clearappearance.8. Press the OK button to confirm the setting.Press the menu button twice and the menu display will disappear.Take a picture.INFORMATION Even though the camera is restarted, the sharpness setting is maintained.BACK:PROG SETUP MyCAMSET:OKISOW.BEFFECTSHARPEXIT:MENUPROG SETUP MyCAMPAGE:SIZEQUALITYMETERINGSHOOTING2048x1536FINEMULTISINGLESOFTNORMALVIVID](https://usermanual.wiki/Hanwha-Techwin/DIGIMAXV3/User-Guide-306385-Page-57.png)
![59RECORDINGMy SET mode menuYou can select your favorite settings that have been saved in this menu.1. Rotate the mode dial to the MySET mode and press theMENU button.2. Press the DOWN button and the cursor will be shifted to themain menu.3. Select the [MODE] menu by pressing the UP/DOWN button.4. Press the RIGHT button and the cursor will shift to the[MODE] sub menu.5. Select the desired sub menu by pressing the UP/DOWNbutton.6. Press the OK button to confirm the setting.Press the menu button twice and the menu display willdisappear. Take a pictureTo apply this function to the camera, change the MySETmode menu or press the DOWN button and select theCHANGE menu.Refer to the CHANGE menu.You can select your favorite settings and save them in this menuMain menu Sub menuMODE MYSET1MYSET2 MYSET3CHANGE NOYESModeEXIT:MENUMySET SETUP MyCAMPAGE:MODECHANGEMYSET1NOBACK:MySET SETUP MyCAMSET:OKMODECHANGEMYSET1MYSET2MYSET3](https://usermanual.wiki/Hanwha-Techwin/DIGIMAXV3/User-Guide-306385-Page-58.png)
![60ChangeThe loaded My SET setting will be applied to the camera from this menu.1. Rotate the mode dial to the MySET mode and press the MENU button.2. Press the DOWN button and the cursor will be shifted to the mainmenu.3. Select the [CHANGE] menu by pressing the UP/DOWN button.4. Press the RIGHT button and the cursor will shift to the [CHANGE]sub menu.5. Select the desired sub menu by pressing the UP/DOWN button.- Selecting [NO] : The My SET menu will not be changed.- Selecting [YES] : You can change your favorite menus.Refer to page 49 ~ 58 for information aboutthe menus.6. Press the OK button to confirm the setting.Press the menu button twice and the menu display will disappear.Take a pictureINFORMATIONP/A/S/M in the main menu stands for Program mode(P), Aperture priority(A), Shutter priority(S)and Manual mode(M). You can save one of the camera modes in the My SET mode.EXIT:MENUMySET SETUP MyCAMPAGE:MODECHANGEMYSET1NOBACK:MySET SETUP MyCAMSET:OKMODECHANGE NOYES](https://usermanual.wiki/Hanwha-Techwin/DIGIMAXV3/User-Guide-306385-Page-59.png)
![66Thumbnail / Enlargement / Trimming buttonImage enlargement- Select an image that you want to enlarge and press theenlargement button.- Different parts of the image can be viewed by pressing the 5function button.- Pressing the thumbnail button will zoom back to the original fullsized image.- The location indicator is in the bottom left side of the LCD monitor.Trimming : You can extract part of the image that you want andsave it separately.- Select a section that you want to trim by pressing the 5 functionbutton. Press the OK button and a message will be displayed asshown alongside.- Select [YES] or [NO] by pressing the LEFT/ RIGHT button andpress the OK button.Selecting [YES] : a trimmed image that has the latest file namewill be displayed on the LCD monitor.Selecting [NO] : an initial image will be displayed. INFORMATION The maximum enlargement rate in proportion to the image size.If an image is enlarged, the enlargement indicator will be displayed in the bottom left of theLCD monitor.Movie clip, TIFF and WAV files can’t be enlarged.You may notice a decrease in image quality when you enlarge them.The image size of the trimmed image cannot be defined as it extracts only the part of theimage displayed on the LCD monitor.If there is little memory space to save the trimmed image, the image can’t be trimmed.Image size Large (Photo) Middle SmallMaximum enlargement rate X8.3 X4.3 X2.1](https://usermanual.wiki/Hanwha-Techwin/DIGIMAXV3/User-Guide-306385-Page-65.png)
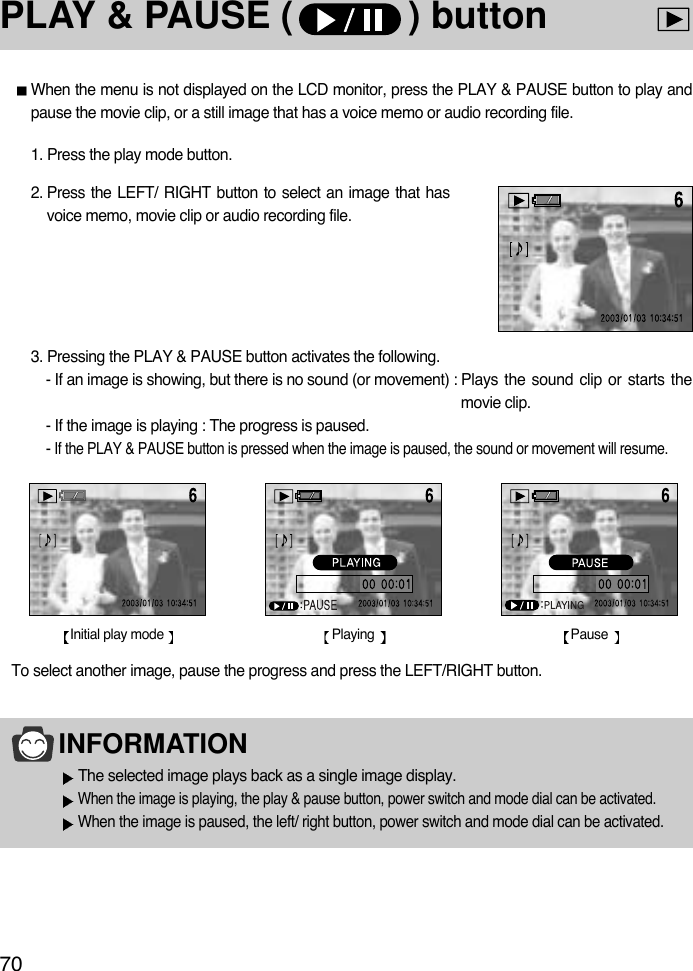
![67PLAYUP / Voice memo button1. Press the play mode button.2. Press the 5 function button to select an image that you wish toadd sound to.3. Press the voice memo button ( ) and the voice memoindicator will display. The camera is now ready to record audio.4. Press the shutter button to start recording.The [RECORDING] message will be displayed on the LCDmonitor (as shown) and audio is recorded to the still image for10 seconds.5. Recording can be stopped by pressing the shutter button again.6. [ ] icon will be displayed on the LCD monitor after finishingthe voice memo.INFORMATIONAudio can’t be recorded onto a movie clip file.When you press the shutter button to stop the audio recording, press the shutter buttonhalfway and the buzzer sound will not be recorded.A distance of 40cm between you and the camera (microphone) is the best distance torecord sound.When the menu is displayed on the LCD monitor, pressing the UP button makes the menu cursormove up or change the sub menu value.When the menu is not displayed on the LCD monitor, the UP button operates as the voice memo button.You can add your audio to a stored still image.](https://usermanual.wiki/Hanwha-Techwin/DIGIMAXV3/User-Guide-306385-Page-66.png)
![69PLAYDELETE ( ) buttonThis deletes an image stored on the memory card.1. Press the play mode button.2. Press the LEFT/ RIGHT button to select the image that youwant to delete, and press the delete ( ) button.3. A message as shown alongside will be displayed on the LCD monitor.NOTICEBefore deleting an image from the camera, you should download (p.100) the image to yourcomputer or protect (p.73) the image, if you want to keep it.4. To cancel the deletion, press the LEFT button. Press the OK button and a message as shown alongside will bedisplayed on the LCD monitor.Select [DELETE] or [CANCEL] by pressing the UP/DOWNbutton and press the OK button.Selecting [DELETE] : Once an image has been deleted, theprevious image in the sequence willappear on the LCD monitor.Selecting [CANCEL] : The image will be displayed on the LCD monitor.](https://usermanual.wiki/Hanwha-Techwin/DIGIMAXV3/User-Guide-306385-Page-68.png)
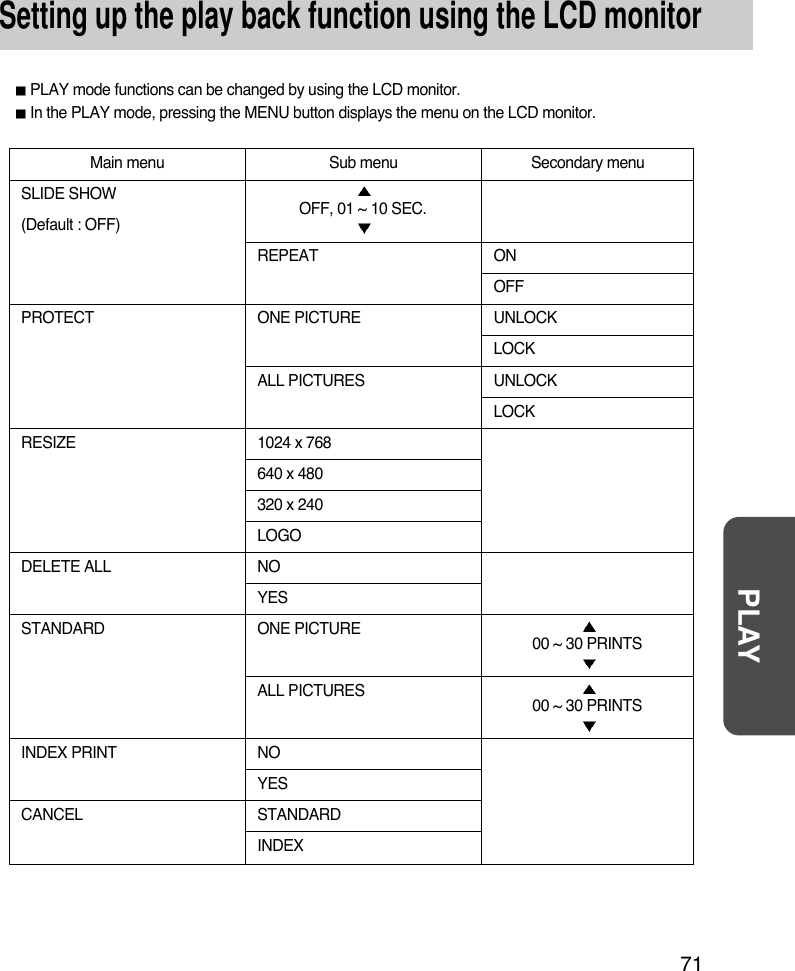
![72Slide showImages can be displayed continuously at pre-set intervals.You can view the slide show by connecting the camera to an external monitor.INFORMATION The default is OFF and the loading time depends on the image size and quality.The slide show will start from an image that was displayed on the LCD monitor. The [POWER OFF] function can’t be activated. While the slide show is playing, only the firstframe of an AVI file is displayed.If there is only an image in the memory card, the slide show will not start.1. Press the play mode button and press the menu button.2. Press the DOWN button and the cursor will be shifted to the main menu.3. Select the [SLIDE SHOW] menu by pressing the UP/DOWN button.4. Press the RIGHT button and the cursor will shift to the [SLIDESHOW] sub menu.5. Select the desired sub menu by pressing the UP/DOWN button.- If you select [01 ~ 10SEC], you can select the [REPEAT]secondary menu.Select [01 ~ 10SEC] and press the RIGHT button and the cursorwill shift to the secondary menu.6. Select the desired menu by pressing the UP/DOWN button.- [OFF] : If a cycle is completed, the slide show will stopautomatically.- [ON] : Even once a cycle(from the first image to the lastimage) is completed, the slide show will continue torepeat itself.7. Press the OK button to confirm the setting.Press the menu button twice and the slide show will start.8. To pause the slide show, press the play & pause button. To start the slide show again, press theplay & pause button again. Press the menu button twice again and the slide show will stop.BACK:PLAY SETUP MyCAMSET:OKSLIDEPROTECTRESIZEDEL. ALL01 SEC BACK:PLAY SETUP MyCAMSET:OKSLIDEPROTECTRESIZEDEL. ALLREPEATOFFON](https://usermanual.wiki/Hanwha-Techwin/DIGIMAXV3/User-Guide-306385-Page-71.png)
![73PLAYProtectThis is used to protect specific shots from being accidentally erased (LOCK).It also releases images that have been previously protected (UNLOCK).1. Press the play mode button and press the menu button.2. Press the DOWN button and the cursor will be shifted to the main menu.3. Select the [PROTECT] menu by pressing the UP/DOWN button.4. Press the RIGHT button and the cursor will shift to the[PROTECT] sub menu.5. Select the desired sub menu by pressing the UP/DOWN button.- [ONE PIC.] : Only an image that is displayed on the LCDmonitor is protected or unprotected. - [ALL PICS.] : All of the stored images are protected orunprotected.6. Select [LOCK] or [UNLOCK] by pressing the UP/ DOWN buttonand press the OK button.- [UNLOCK] : Discards the protect function.- [LOCK] : Sets up the PROTECT function.If you need to protect another image, press the LEFT/ RIGHTbutton.(In case of selecting [ONE PIC]7. Press the shutter button and the menu will disappear. If youprotect an image, the protect icon will be displayed on the LCDmonitor. (An unprotected image has no indicator)NOTICEAn image in LOCK mode will be protected from [DELETE] or [DELETE ALL] functions, butwill NOT be protected from the [FORMAT] function.BACK:PLAY SETUP MyCAMSET:OKSLIDEPROTECTRESIZEDEL. ALLONE PIC.ALL PICS.EXIT:MENUPLAY SETUP MyCAMPAGE:SLIDEPROTECTRESIZEDEL. ALLOFFLOCKLOGONOEXIT:SHUTTERMOVE PIC. : SET:OKUNLOCK](https://usermanual.wiki/Hanwha-Techwin/DIGIMAXV3/User-Guide-306385-Page-72.png)
![74ResizeThe stored image size can be changed and used as logo image. The resized image will have a new file name.NOTICELarge sized images can be resized to be made smaller, but you may notice decreasingimage quality when a small size image is resized to become larger.If you try to resize a Photo or Print size image, a [N/A] (Not available) sub menu will bedisplayed on the menu display.Only JPG images can be resized. TIFF, WAV files can’t be resized.The different compression format image, however the image(.JPG file) size is in the ratio offour to three(2048X1536, 1024X768, 512X384..etc), can’t be resized.Only 4:2:2 compression format file can be resized.The resized image will have a new file name.If the memory capacity is insufficient to store the resized image, [N/A] message will displayon the LCD monitor and the resized image will not be stored.The start-up image is stored not on the memory card but on the internal memory.1. Press the play mode button and select an image that you want toresize by pressing the LEFT/ RIGHT button. 2. Press the menu button.3. Press the DOWN button and the cursor will be shifted to the main menu.4. Select the [RESIZE] menu by pressing the UP/DOWN button.5. Press the RIGHT button and the cursor will shift to the [RESIZE]sub menu.6. Select the desired sub menu by pressing the UP/DOWN button.7. Press the OK button to confirm the setting.Press the menu button twice and the menu display will disappear.BACK:PLAY SETUP MyCAMSET:OKSLIDEPROTECTRESIZEDEL. ALL1024x768640x480320x240LOGOEXIT:MENUPLAY SETUP MyCAMPAGE:SLIDEPROTECTRESIZEDEL. ALLOFFLOCKLOGONO](https://usermanual.wiki/Hanwha-Techwin/DIGIMAXV3/User-Guide-306385-Page-73.png)
![75PLAYDelete allThis enables you to clear all unprotected images from the memory.NOTICERemember that this will permanently delete unprotected images. Important shots should be stored on a computer before deletion takes place.1. Press the play mode button and press the menu button.2. Press the DOWN button and the cursor will be shifted to the main menu.3. Select the [DEL. ALL] menu by pressing the UP/DOWN button.4. Press the RIGHT button and the cursor will shift to the [DEL. ALL]sub menu.5. Select the desired sub menu by pressing the UP/DOWN buttonand press the OK button.- Selecting [NO] : The display returns to the initial menu.- Selecting [YES] : A [PLEASE WAIT!] message will display and allthe unprotected images are deleted. If therearen’t protected images, all the images aredeleted and a [NO IMAGE!] message willdisplay.6. If you select [NO], press the menu button twice and the menudisplay will disappear.If a [NO IMAGE!] message is displayed on the LCD monitor afterselecting [YES], press the play mode button or rotate the modedial. The message will disappear.BACK:PLAY SETUP MyCAMSET:OKSLIDEPROTECTRESIZEDEL. ALLNOYESEXIT:MENUPLAY SETUP MyCAMPAGE:SLIDEPROTECTRESIZEDEL. ALLOFFLOCKLOGONO](https://usermanual.wiki/Hanwha-Techwin/DIGIMAXV3/User-Guide-306385-Page-74.png)
![76DPOF : StandardDPOF(Digital Print Order Format) allows you to embed printing information on your memory card.Select the pictures to be printed and how many prints to make.(Print quantity : 0 ~ 30 )The DPOF indicator will display on the LCD monitor when an image that has DPOF informationplays back. Images can then be printed on DPOF printers, or at an increasing number of photolaboratories.This function is not available for Movie clips and WAV files.This function allows you to embed print quantity information on a stored image.1. Press the play mode button and select an image that you want toembed a print quantity by pressing the LEFT/ RIGHT button. 2. Press the menu button.3. Press the DOWN button and the cursor will be shifted to the main menu.4. Select the [DEL. ALL] menu by pressing the UP/DOWN button.5. Press the DOWN button on the [DEL. ALL] menu and the nextmenu page will be displayed.6. Select [STANDARD] menu by pressing the UP/DOWN button.7. Press the RIGHT button and the cursor will shift to the[STANDARD] sub menu.8. Select the desired sub menu by pressing the UP/DOWN button.- [ONE PIC.] : Specifies the number of copies for a selectedimage. If you need to embed a print quantity onanother image, press the LEFT/ RIGHT button.- [ALL PICS.] : Specifies the number of copies for all imagesexcept for movie clips and voice recording files.9. Press the OK button and a display to select the quantity will display on the LCD monitor.10. Select the print quantity by pressing the UP/DOWN button.11. Press the OK button to confirm the setting.12. If an image carries DPOF instructions, the DPOF indicator ( ) will show. Press the shutter button and the camera working mode is turned to the play mode.BACK:PLAY SETUP MyCAMSET:OKSTANDARDINDEXCANCELONE PIC.ALL PICS.EXIT:SHUTTERMOVE PIC. : SET:OK00 PRINTS](https://usermanual.wiki/Hanwha-Techwin/DIGIMAXV3/User-Guide-306385-Page-75.png)
![77PLAYDPOF : IndexINFORMATIONThe number of copy is 1.There is no indicator for the index print.If the index print was set, the [INDEX] sub menu will be displayed as [YES] on the LCDmonitor.The first printed image is the first stored image.This function will specify the number of copies (except for movie clips and sound clip) for index prints.1. Press the play mode button and press the menu button.2. Press the DOWN button and the cursor will be shifted to the main menu.3. Select the [DEL. ALL] menu by pressing the UP/DOWN button.4. Press the DOWN button on the [DEL. ALL] menu and the nextmenu page will be displayed.5. Select [INDEX] menu by pressing the UP/DOWN button.6. Press the RIGHT button and the cursor will shift to the [INDEX]sub menu.7. Select the desired sub menu by pressing the UP/DOWN button.8. Press the OK button to confirm the setting. Press the menu button twice and the menu display will disappear.BACK:PLAY SETUP MyCAMSET:OKSTANDARDINDEXCANCELNOYESEXIT:MENUPLAY SETUP MyCAMPAGE:SLIDEPROTECTRESIZEDEL. ALLOFFLOCKLOGONO](https://usermanual.wiki/Hanwha-Techwin/DIGIMAXV3/User-Guide-306385-Page-76.png)
![78DPOF : CancelThis is used for canceling the STANDARD or INDEX DPOF function.1. Press the play mode button and press the menu button.2. Press the DOWN button and the cursor will be shifted to the main menu.3. Select the [DEL. ALL] menu by pressing the UP/DOWN button.4. Press the DOWN button on the [DEL. ALL] menu and the nextmenu page will be displayed.5. Select [CANCEL] menu by pressing the UP/DOWN button.6. Press the RIGHT button and the cursor will shift to the [CANCEL]sub menu.7. Select the desired sub menu by pressing the UP/DOWN button.- [STANDARD] : Pre-set print quantity is canceled.- [INDEX] : Index print is canceled.8. Press the menu button twice and the menu display will disappear.BACK:PLAY SETUP MyCAMSET:OKSTANDARDINDEXCANCELSTANDARDINDEXEXIT:MENUPLAY SETUP MyCAMPAGE:SLIDEPROTECTRESIZEDEL. ALLOFFLOCKLOGONO](https://usermanual.wiki/Hanwha-Techwin/DIGIMAXV3/User-Guide-306385-Page-77.png)
![79PLAYSetup menuMain menu Sub meun Secondary menuFILE RESETSERIESPOWER OFF(Default : 3 MIN)LANGUAGE ENGLISH FRENCHKOREAN ITALIANCHINESE 1 DUTCHCHINESE 2 DANISHJAPANESE FINNISHRUSSIAN SWEDISHGERMANY PORTUGUESESPANISHFORMAT NOYESDATA SETTIME SET 12:00 AM/PMDATE TYPE 'YY/MM/DDMM/DD/'YYDD/MM/'YYIMPRINT OFFDATEDATE&TIMESOUND ONOFFLCD BRIGHTNESS LOWNORMAL HIGH VIDEO OUT NTSCPALQUICK VIEWDEL.ANSWER OFFONIn this mode, you can set up basic settings.Every camera working mode has [SETUP] tab in their own menu. OFF / 1~10MIN2003/01/01OFF/ 1~3SEC.](https://usermanual.wiki/Hanwha-Techwin/DIGIMAXV3/User-Guide-306385-Page-78.png)
 tab.2. Press the DOWN button and the cursor will be shifted to the main menu.3. Select the [FILE] menu by pressing the UP/DOWN button.4. Press the RIGHT button and the cursor will shift to the [FILE] sub menu.5. Select the desired sub menu by pressing the UP/DOWN button.- [RESET] : Using reset, the next file name will be set from 0001even after formatting, deleting all or inserting a newmemory card.- [SERIES] : Under this system, the file name will directly followthe last stored file name, regardless of any actionssuch as file deletion or formatting.6. Press the OK button to confirm the setting.Press the menu button twice and the menu display will disappear.INFORMATIONThe first stored folder name is 100SSCAM, and first name is SV300001.Whenever you store an image, the file number is increased by 1.The file number is named from SV300001 to SV309999 automatically, 9999 files will bestored in a folder. Using SERIES, the sequence starts at 100SSCAM and increases in increments of 1.(e.g :101SSCAM, 102SSCAM…)The files used with the memory card conform to the DCF(Design rule for Camera Filesystem) format.BACK:PLAY SETUP MyCAMSET:OKFILEPWR OFFLANGUAGEFORMATRESETSERIESEXIT:MENUPLAY SETUP MyCAMPAGE:FILEPWR OFFLANGUAGEFORMATSERIESOFFENGLISHNO](https://usermanual.wiki/Hanwha-Techwin/DIGIMAXV3/User-Guide-306385-Page-79.png)
 tab.2. Press the DOWN button and the cursor will be shifted to the main menu.3. Select the [PWR OFF] menu by pressing the UP/DOWN button.4. Press the RIGHT button and the cursor will shift to the [PWROFF] sub menu.5. Select the desired sub menu by pressing the UP/DOWN button.- Selecting [OFF] : The power off function will not operate.- Selecting [ON] : A menu will be displayed on the LCD monitoras shown alongside.6. Select the desired time by pressing the UP/DOWN button.7. Press the OK button to confirm the setting.Press the menu button twice and the menu display will disappear.INFORMATIONEven if the batteries or AC adapter are removed and inserted again, the power off setting willbe preserved.Note that the automatic power off does not operate if the camera is in slide show or PC mode.BACK:PLAY SETUP MyCAMSET:OKFILEPWR OFFLANGUAGEFORMATOFFONBACK:PLAY SETUP MyCAMSET:OKFILEPWR OFFLANGUAGEFORMAT01 MINEXIT:MENUPLAY SETUP MyCAMPAGE:FILEPWR OFFLANGUAGEFORMATSERIESOFFENGLISHNO](https://usermanual.wiki/Hanwha-Techwin/DIGIMAXV3/User-Guide-306385-Page-80.png)
![INFORMATIONThe default language is ENGLISH.You can select 15 languages. Those are listed below.English, Korean, T. Chinese, S. Chinese, Japanese, Russian, Germany, Spanish, French,Italian, Portuguese, Danish, Swedish, Finnish, Dutch.Even if the camera is restarted, the language setting will be maintained.Even if the [SOUND] function is [ON], the sound will not activate in this menu.82There is a choice of languages that can be displayed on the LCD monitor.Language 1. Press the menu button and press the RIGHT button to select[SETUP](Second) tab.2. Press the DOWN button and the cursor will be shifted to the main menu.3. Select the [LANGUAGE] menu by pressing the UP/DOWN button.4. Press the RIGHT button and the cursor will shift to the[LANGUAGE] sub menu.5. Select the desired sub menu by pressing the UP/DOWN button.6. Press the OK button to confirm the setting.Press the menu button and the menu display will disappear.EXIT:MENUPLAY SETUP MyCAMPAGE:FILEPWR OFFLANGUAGEFORMATSERIESOFFENGLISHNOBACK:PLAY SETUP MyCAMSET:OKFILEPWR OFFLANGUAGEFORMATENGLISH](https://usermanual.wiki/Hanwha-Techwin/DIGIMAXV3/User-Guide-306385-Page-81.png)
 tab.2. Press the DOWN button and the cursor will be shifted to the mainmenu.3. Select the [FORMAT] menu by pressing the UP/DOWN button.4. Press the RIGHT button and the cursor will shift to the [FORMAT]sub menu.5. Select the desired sub menu by pressing the UP/DOWN button.- Selecting [NO] : The image will be displayed on the LCDmonitor. Press the menu button twice and themenu display will disappear.- Selecting [YES] : The memory card is formatted.(A [NO IMAGE !] message will be displayedafter formatting in play mode)INFORMATIONBefore using the memory card, it must be initialized.- New memory card, unformatted memory card.- A memory card that has a file this camera can’t recognize or one that has been taken fromanother camera.NOTICEAll the files in the memory are deleted by the [FORMAT] function. Before formatting thememory, it is advisable to copy important data onto other media as back-up e.g. floppydisks, hard disks, CD etc.Do not use the memory card formatted by another digital camera or memory card reader.BACK:PLAY SETUP MyCAMSET:OKFILEPWR OFFLANGUAGEFORMATNOYESEXIT:MENUPLAY SETUP MyCAMPAGE:FILEPWR OFFLANGUAGEFORMATSERIESOFFENGLISHNO](https://usermanual.wiki/Hanwha-Techwin/DIGIMAXV3/User-Guide-306385-Page-82.png)
![84FormatNOTICEWhen you format the memory card in your PC that runs on Windows 2000 or XP, pleaseselect the FAT file system.Formatting on a PC1. Select [Removable Disk] in the [Windows Explorer].2. Press the right mouse button and select [Format].3. Select [FAT] file format type and click the [Start] button.](https://usermanual.wiki/Hanwha-Techwin/DIGIMAXV3/User-Guide-306385-Page-83.png)
 tab.2. Press the DOWN button and the cursor will be shifted to the main menu.3. Select the [FORMAT] menu by pressing the UP/DOWN button.4. Press the DOWN button on the [FORMAT] menu and the nextmenu page will be displayed.5. Select the [DATE SET] menu by pressing the UP/DOWN button.6. Press the RIGHT button and the cursor will shift to the [DATESET] sub menu.7. Select the desired sub menu by pressing the UP/DOWN button.RIGHT button : selects YEAR/ MONTH/ DAY item.UP/ DOWN button : changes the value of each item.8. Press the OK button to confirm the setting.Press the menu button twice and the menu display will disappear.EXIT:MENUPLAY SETUP MyCAMPAGE:FILEPWR OFFLANGUAGEFORMATSERIESOFFENGLISHNOMOVE:PLAY SETUP MyCAMCHANGE:‘03/01/0103:58 PMYY/MM/DDOFFDATE SETTIME SETD.TYPEIMPRINTBACK:PLAY SETUP MyCAMSET:OKDATE SETTIME SETD.TYPEIMPRINTYEAR03 /01/01](https://usermanual.wiki/Hanwha-Techwin/DIGIMAXV3/User-Guide-306385-Page-84.png)
 tab.2. Press the DOWN button and the cursor will be shifted to themain menu.3. Select the [FORMAT] menu by pressing the UP/DOWN button.4. Press the DOWN button on the [FORMAT] menu and thenext menu page will be displayed.5. Select [TIME SET] menu by pressing the UP/DOWN button.6. Press the RIGHT button and the cursor will shift to the [TIMESET] sub menu.7. Select the desired sub menu by pressing the UP/DOWN button.RIGHT button : selects HOUR, MINUTE, AM/PM item.UP/ DOWN button : changes the value of each item.8. Press the OK button to confirm the setting.Press the menu button twice and the menu display willdisappear.BACK:PLAY SETUP MyCAMSET:OKDATE SETTIME SETD.TYPEIMPRINTMOVE:PLAY SETUP MyCAMCHANGE:DATE SETTIME SETD.TYPEIMPRINT‘03/01/0103:58 PMYY/MM/DDOFFEXIT:MENUPLAY SETUP MyCAMPAGE:FILEPWR OFFLANGUAGEFORMATSERIESOFFENGLISHNOHOUR03 : 58 PM](https://usermanual.wiki/Hanwha-Techwin/DIGIMAXV3/User-Guide-306385-Page-85.png)
 tab.2. Press the DOWN button and the cursor will be shifted to the main menu.3. Select the [FORMAT] menu by pressing the UP/DOWN button.4. Press the DOWN button on the [FORMAT] menu and the nextmenu page will be displayed.5. Select [D.TYPE] menu by pressing the UP/DOWN button.6. Press the RIGHT button and the cursor will shift to the [D.TYPE]sub menu.7. Select the desired sub menu by pressing the UP/DOWN button.‘YY/ MM/ DD: Year/ Month/ DayMM/ DD/ ‘YY: Month/ Day/ YearDD/ MM/ ‘YY: Day/ Month/ Year8. Press the OK button to confirm the setting.Press the menu button twice and the menu display will disappear.BACK:PLAY SETUP MyCAMSET:OKDATE SETTIME SETD.TYPEIMPRINTYY/MM/DDMM/DD/ YYDD/MM/ YYEXIT:MENUPLAY SETUP MyCAMPAGE:FILEPWR OFFLANGUAGEFORMATSERIESOFFENGLISHNO](https://usermanual.wiki/Hanwha-Techwin/DIGIMAXV3/User-Guide-306385-Page-86.png)
 tab.2. Press the DOWN button and the cursor will be shifted to the mainmenu.3. Select [FORMAT] menu by pressing the UP/DOWN button.4. Press the DOWN button on the [FORMAT] menu and the nextmenu page will be displayed.5. Select the [IMPRINT] menu by pressing the UP/DOWN button.6. Press the RIGHT button and the cursor will shift to the [IMPRINT]sub menu.7. Select the desired sub menu by pressing the UP/DOWN button. - OFF : DATE & TIME will not be stamped on the image file.- DATE : Only DATE will be stamped on the image file.- DATE&TIME : DATE & TIME will be stamped on the image file.8. Press the OK button to confirm the setting.Press the menu button twice and the menu display will disappear.INFORMATIONDate & Time are imprinted at the bottom right side of the LCD monitor.Date will be imprinted as DATE TYPE setting.TIME is imprinted in the following way : [Hour / Minute/ Second] and hours are shown usingthe 12 hour clock.The imprint function is unaffected by the camera being switched on and off.Date & Time is imprinted as you set it in the DATE SET, TIME SET menu.The imprint function is applied only to the still image. BACK:PLAY SETUP MyCAMSET:OKDATE SETTIME SETD.TYPEIMPRINTOFFDATEDATE&TIMEEXIT:MENUPLAY SETUP MyCAMPAGE:FILEPWR OFFLANGUAGEFORMATSERIESOFFENGLISHNO](https://usermanual.wiki/Hanwha-Techwin/DIGIMAXV3/User-Guide-306385-Page-87.png)
 tab.2. Press the DOWN button and the cursor will be shifted to the main menu.3. Select the [FORMAT] menu by pressing the UP/DOWN button.4. Press the DOWN button on the [FORMAT] menu and the nextmenu page will be displayed.5. Select the [IMPRINT] menu by pressing the UP/DOWN button.6. Press the DOWN button on the [IMPRINT] menu and the nextmenu page will be displayed.7. Select the [SOUND] menu by pressing the UP/DOWN button.8. Press the RIGHT button and the cursor will shift to the [SOUND]sub menu.9. Select the desired sub menu by pressing the UP/DOWN button.- [ON] : The sound function is activated.- [OFF] : The sound function is not activated.10. Press the OK button to confirm the setting.Press the menu button twice and the menu display willdisappear.INFORMATIONEven though the SOUND function is set to [OFF], you can hear Movie clip, voice memo andsound clip file. BACK:PLAY SETUP MyCAMSET:OKSOUNDLCDVIDEOQ.VIEWONOFFEXIT:MENUPLAY SETUP MyCAMPAGE:FILEPWR OFFLANGUAGEFORMATSERIESOFFENGLISHNO](https://usermanual.wiki/Hanwha-Techwin/DIGIMAXV3/User-Guide-306385-Page-88.png)
 tab.2.Press the DOWN button and the cursor will be shifted to the main menu.3. Select the [FORMAT] menu by pressing the UP/DOWN button.4. Press the DOWN button on the [FORMAT] menu and the nextmenu page will be displayed.5. Select the [IMPRINT] menu by pressing the UP/DOWN button.6. Press the DOWN button on the [IMPRINT] menu and the nextmenu page will be displayed.7. Select [LCD] menu by pressing the UP/DOWN button.8. Press the RIGHT button and the cursor will shift to the [LCD] sub menu.9. Select the desired sub menu by pressing the UP/DOWN button.There are LOW, NORMAL and HIGH sub menu in the [LCD] menu.10. Press the OK button to confirm the setting.Press the menu button twice and the menu display willdisappear.BACK:PLAY SETUP MyCAMSET:OKSOUNDLCDVIDEOQ.VIEWDARKNORMALBRIGHTEXIT:MENUPLAY SETUP MyCAMPAGE:FILEPWR OFFLANGUAGEFORMATSERIESOFFENGLISHNO](https://usermanual.wiki/Hanwha-Techwin/DIGIMAXV3/User-Guide-306385-Page-89.png)
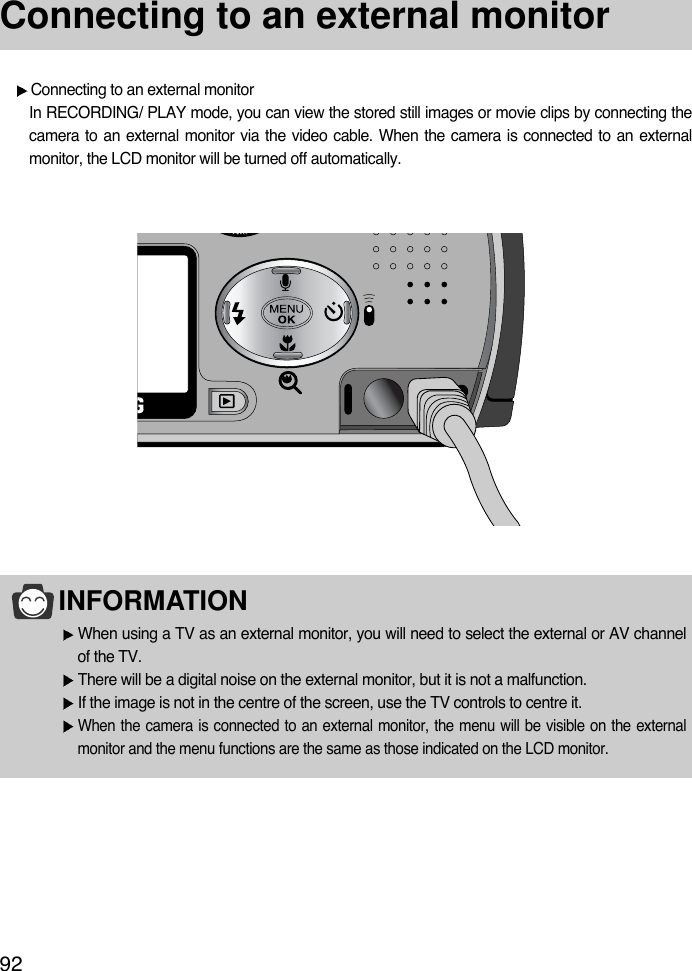
![91PLAYVideoINFORMATIONSelect the correct movie standard for the outer monitor. PAL mode can support only BDGHINTSC : U.S.A, Canada, Japan, South Korea, Taiwan, Mexico.PAL : Australia, Austria, Belgium, China, Denmark, Finland, Germany, U.K., Holland, Italy,Kuwait, Malaysia, New Zealand, Singapore, Spain, Sweden, Switzerland, Thailand,Norway.Even if the [SOUND] function is [ON], the sound will not activate in this menu.The Movie output signal from the camera can be NTSC or PAL. Your choice of output will begoverned by the type of machine (monitor or TV, etc.) to which the camera is connected.1. Press the menu button and press the RIGHT button to select[SETUP](Second) tab.2. Press the DOWN button and the cursor will be shifted to the main menu.3. Select the [FORMAT] menu by pressing the UP/DOWN button.4. Press the DOWN button on the [FORMAT] menu and the nextmenu page will be displayed.5. Select the [IMPRINT] menu by pressing the UP/DOWN button.6. Press the DOWN button on the [IMPRINT] menu and the nextmenu page will be displayed.7. Select [VIDEO] menu by pressing the UP/DOWN button.8. Press the RIGHT button and the cursor will shift to the [VIDEO]sub menu.9. Select the desired sub menu by pressing the UP/DOWN button.10. Press the OK button to confirm the setting.Press the menu button twice and the menu display will disappear.BACK:PLAY SETUP MyCAMSET:OKSOUNDLCDVIDEOQ.VIEWNTSCPALEXIT:MENUPLAY SETUP MyCAMPAGE:FILEPWR OFFLANGUAGEFORMATSERIESOFFENGLISHNO](https://usermanual.wiki/Hanwha-Techwin/DIGIMAXV3/User-Guide-306385-Page-90.png)
 tab.2. Press the DOWN and the cursor will be shifted to the main menu.3. Press the DOWN button until the [Q. VIEW] menu is selected.4. Press the RIGHT button and the cursor will shift to the [Q.VIEW]sub menu.5. Select the desired sub menu by pressing the UP/DOWN button.- [OFF] : The quick view function can’t be activated.- [1 ~ 3 SEC] : The captured image is briefly displayed during theselected time.6. Press the OK button to confirm the setting.Press the menu button twice and the menu display will bedisappeared.* Setting up the [DEL, ANSWER] functionIf you select [1~3SEC] sub menu at the step 5, press the RIGHTbutton and the [DEL. ANSWER] menu will be displayed.Select the desired [DEL. ANSWER] sub menu by pressing theUP/DOWN button.- Selecting [OFF] : A [DEL. ANSWER] message will not display.- Selecting [ON] : You can delete the captured image at once.* Using the [DEL.ANSWER] menuIf you select [ON] at the [DEL.ANSWER] menu, a message asshown alongside will be displayed after taking a picture.- Selecting [YES] : the captured image is deleted.- Selecting [NO] : the captured image is stored.INFORMATIONThe quick view function doesn’t apply to the movie clip and sound clip file.[Q.VIEW] function is not adjusted to the TIFF file type.BACK:PLAY SETUP MyCAMSET:OKSOUNDLCDVIDEOQ.VIEW1 SEC BACK:PLAY SETUP MyCAMSET:OKSOUNDLCDVIDEOQ.VIEWDEL.ANSWEROFFONEXIT:MENUPLAY SETUP MyCAMPAGE:FILEPWR OFFLANGUAGEFORMATSERIESOFFENGLISHNO](https://usermanual.wiki/Hanwha-Techwin/DIGIMAXV3/User-Guide-306385-Page-92.png)
 tab.2. Press the DOWN button and the cursor will be shifted to the main menu.3. Select the [S. IMAGE] menu by pressing the UP/DOWN button.4. Press the RIGHT button and the cursor will shift to the [S.IMAGE] sub menu.5. Select the desired sub menu by pressing the UP/DOWN button.6. Press the OK button to confirm the setting.Press the menu button twice and the menu display will disappear.NOTICEOnly a image that is save as a LOGO at the [RESIZE] sub menu can be used as the USER IMAGE.If the USER IMAGE was not saved, no image will be displayed on the LCD monitor at thetime of camera power on. Refer to p.74 for selecting the USER IMAGE.The USER IMAGE will not be deleted by the [DEL.ALL] or [FORMAT] menu.MyCAM menuYou can set up a start up image, start up sound and shutter sound.Every camera working mode has the My CAM menuStart up imageYou can select the image that is first displayed on the LCD monitor whenever the camera is turned on.MOVE:PLAY SETUP MyCAMCHANGE:S.IMAGES.SOUNDSH.SOUNDIMAGE2SOUND1SH.SOUND1BACK:PLAY SETUP MyCAMSET:OKS.IMAGES.SOUNDSH.SOUNDIMAGE 2](https://usermanual.wiki/Hanwha-Techwin/DIGIMAXV3/User-Guide-306385-Page-93.png)
 tab.2. Press the DOWN button and the cursor will be shifted to the main menu.3. Select the [S. SOUND] menu by pressing the UP/DOWN button.4. Press the RIGHT button and the cursor will shift to the [S.SOUND] sub menu.5. Select the desired sub menu by pressing the UP/DOWN button.6. Press the OK button to confirm the setting.Press the menu button twice and the menu display will disappear.1. Press the menu button and press the RIGHT button twice toselect [MyCAM](Third) tab.2. Press the DOWN button and the cursor will be shifted to the main menu.3. Select the [SH. SOUND] menu by pressing the UP/DOWN button.4. Press the RIGHT button and the cursor will shift to the [SH.SOUND] sub menu.5. Select the desired sub menu by pressing the UP/DOWN button.6. Press the OK button to confirm the setting.Press the menu button twice and the menu display will disappear.Shutter soundYou can select the shutter sound.MOVE:PLAY SETUP MyCAMCHANGE:S.IMAGES.SOUNDSH.SOUNDIMAGE2SOUND1SH.SOUND1BACK:PLAY SETUP MyCAMSET:OKS.IMAGES.SOUNDSH.SOUNDOFFSOUND1SOUND2SOUND3BACK:PLAY SETUP MyCAMSET:OKS.IMAGES.SOUNDSH.SOUNDOFFSH. SOUND1SH. SOUND2SH. SOUND3MOVE:PLAY SETUP MyCAMCHANGE:S.IMAGES.SOUNDSH.SOUNDIMAGE2SOUND1SH.SOUND1](https://usermanual.wiki/Hanwha-Techwin/DIGIMAXV3/User-Guide-306385-Page-94.png)
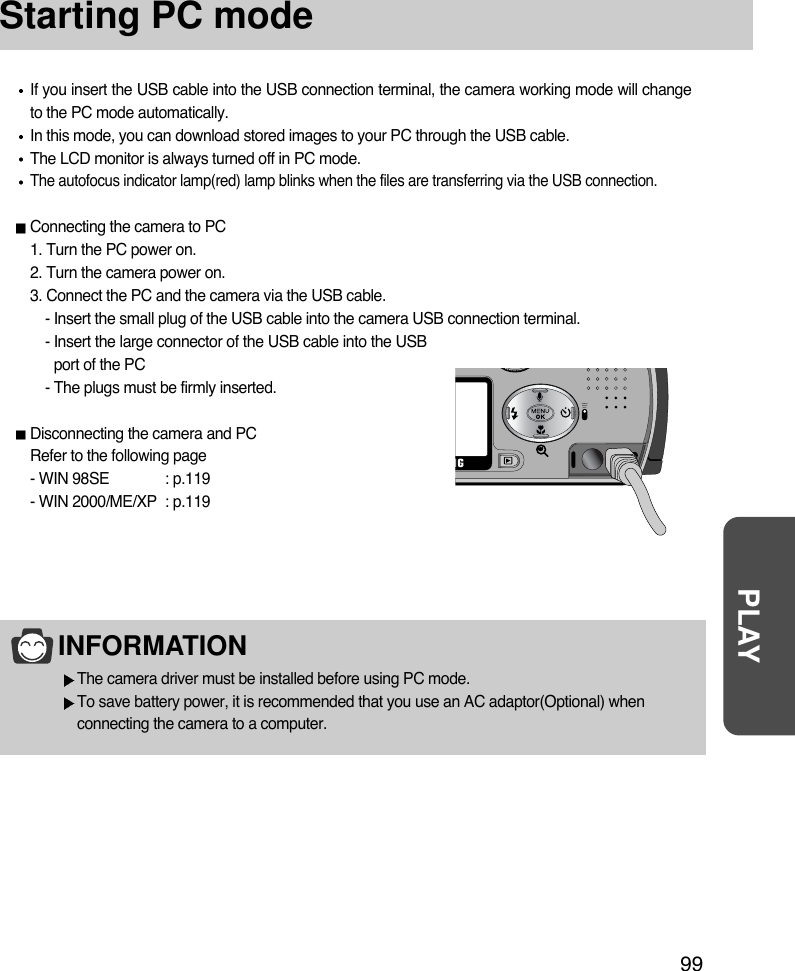
![100Downloading stored imagesOnce you have downloaded images to your PC, they can be edited and printed.Starting PC mode1. Connect the camera to your PC with the USB cable.2. On your computer’s desktop display, select [My computer] anddouble click [Removable Disk DCIM 100SSCAM]. The image files will then be displayed.3. Select an image and press the right mouse button. 4. A pop-up menu will open.Click [Cut] or [Copy] menu[Cut] : cuts a selected file.[Copy] : copies files.5. Click a folder that you want to paste the file.6. Press the right mouse button and a pop-up menu will open. Click [Paste].7. An image file is transferred from camera to your PC.- By using [Digimax Viewer], you can see the stored images in the memory directly on the PC monitorand you can copy or move the image files.](https://usermanual.wiki/Hanwha-Techwin/DIGIMAXV3/User-Guide-306385-Page-99.png)

![108Software NotesPlease ensure that you read the instruction manual carefully before use.The attached software is a camera driver and image editing software tool for Windows.Under no circumstances should all or part of either the software or the user manual be reproduced.Copyright for both software is licensed only for use with a camera.In the unlikely event of a manufacturing fault, we will repair or exchange your camera. We cannot,however, be held responsible in any way for damage caused by inappropriate use.Using a Hand-made PC or a PC that has not been guaranteed by the manufacturer is not covered bythe Samsung warranty.Before reading this manual, you should have a basic knowledge of computers and O/S (Operating Systems).Windows is a registered trademark of Microsoft.Macintosh, Mac is the registered trademark of Apple computer, USA.After inserting the CD-ROM provided with this camera into the CD-ROM drive, the following window shouldautomatically run. Before connecting the camera to the PC, you should first install the camera driver.Setting up the application programAccess to the Samsung camera web-site.Click the [Install] menu on the Autorun frame and all of application software is installed.Camera driver : This enables images to transfer between the camera and PC.This camera uses the USB Storage Driver as the camera driver. You can use the camera as a USBcard reader. After installing the driver and connecting this camera to the PC, you can find[Removable Disk] in [Windows Explorer] or [My computer]. A USB Storage Driver is provided onlyfor Windows. A USB Driver for MAC is not included with the Application CD. But you can use thecamera with Mac OS 9.0~10.2. Setting up the camera driver for WINDOWS (p.110)About the software](https://usermanual.wiki/Hanwha-Techwin/DIGIMAXV3/User-Guide-306385-Page-107.png)
![SOFTWARE109About the softwareDigimax Viewer 2.0 :This is a program for viewing stored images. You can see the stored images in the memory directlyon a PC monitor. You can also copy, move or delete the images and enlarge /downscale the imagesizes with Digimax Viewer.For windows only.Setting up Digimax Viewer (p.111) Using Digimax Viewer (p.122)MGI PhotoSuite III SE : Image editing programImage editing program for downloaded images. For Windows only.Setting up MGI PhotoSuite III SE (p.112) Using MGI PhotoSuite III SE (p.123)Internet link : You can visit the Samsung web-site through the internet.http://www.samsungcamera.com : Englishhttp://www.samsungcamera.co.kr : KoreanINFORMATIONCheck the system requirements (p.107) before setting up the driver.You should allow 5~10 seconds for running the automatic setup program according to thecapability of the computer. If the frame does not show, run the [Windows Explorer] andselect [Samsung.exe] in the CD-ROM Drive root directory.](https://usermanual.wiki/Hanwha-Techwin/DIGIMAXV3/User-Guide-306385-Page-108.png)
![110Setting up the application softwareYou can visit the Samsung web-site through the internet.http://www.samsungcamera.com : Englishhttp://www.samsungcamera.co.kr : KoreanTo use this camera with a PC, install the application software first. After this has been done, the storedimages in the camera can be moved to the PC and can be edited by an image editing program.1. Click the [Install] menu in the Autorun frame.The Digimax V camera driver is installed automatically.3. A window for which you can select application software will bedisplayed. Select the application program and click the [Install] button.Refer to page.106 for more information about the application program.2. Installation is complete. Click the [Finish] button.[Click !][Click !][Click !]NOTICEDisable other programs before installing the application software.Before installing the application software, disconnect the USB connection. INFORMATIONIf you select [Cancel] at step 3, the application program installation will be cancelled.](https://usermanual.wiki/Hanwha-Techwin/DIGIMAXV3/User-Guide-306385-Page-109.png)
![SOFTWARE111Setting up the application program4. The [Digimax Viewer 2.0] installation window will be displayed asshown below. Click the [Next] button.5. The Software License Agreement window will be displayed. If youagree to this, click [Yes], the window will then move to the nextstep. If you disagree, click [ No ] and the install program will becanceled.6. Select a destination folder and click [Next].7. Select the Program folder and click [Next].INFORMATIONIf you select [Cancel] at step 4, a window for installing MGI PhotoSuite III SE will bedisplayed.[Click !][Click !][Click !][Click !]](https://usermanual.wiki/Hanwha-Techwin/DIGIMAXV3/User-Guide-306385-Page-110.png)
![112Setting up the application program8. Installation is completed. Click the [Finish] button and a window forinstalling MGI PhotoSuite III SE will be displayed.10. A [Welcome] window will be displayed. Click the [Next] button.11. The Software License Agreement window will be displayed. If youagree to this, click [Yes], the window will then move to the nextstep. If you disagree, click [ No ] and the install program will becanceled.INFORMATION If you select [Cancel] at the step 9, a window for restarting the computer will be displayed.[Click !]9. The [MGI PhotoSuite III SE] installation window will be displayedas shown below. Click the [OK] button.[Click !][Click !][Click !]](https://usermanual.wiki/Hanwha-Techwin/DIGIMAXV3/User-Guide-306385-Page-111.png)
![SOFTWARE113Setting up the application program12. Select a setup type and click the [Next >] button.Full : the program will be installed with all the options.Custom : you can choose what you would like to install.13. If installation is completed correctly, Autoplay is registeredautomatically into the start menu program as shown alongside.Click the [Next>] button.14. The MGI Registration window will be displayed. Click the[Continue] button.15. The [Online Registration Utility] window will be displayed. Fill inthe blanks and click the [Register] button.16. Installation is complete. Click the [Finish] button.[Click !][Click !][Click !][Click !][Click !]](https://usermanual.wiki/Hanwha-Techwin/DIGIMAXV3/User-Guide-306385-Page-112.png)
![114Setting up the application programINFORMATIONA [Read me] file will open.Click the Close button to close the file.17. To use the [REMOVABLE DISK], you have to restart yourcomputer. Click [Finish] button and the computer will restart.18. After restarting the computer, connect the PC to the camera with the USB cable.19. Turn the camera power on. [Found New Hardware Wizard] willopen and the computer will recognize the camera.* If you have ever installed an image viewer program or your OS isWindows XP, an image viewer program will open. If the imageviewer program opens, the camera driver was setupsuccessfully.[Click !]20. If you can see [Removable Disk] under [My computer], thecamera driver installation is successful. Now you can transferimage files from the camera to PC via the USB cable.](https://usermanual.wiki/Hanwha-Techwin/DIGIMAXV3/User-Guide-306385-Page-113.png)
![SOFTWARE115Setting up the application programINFORMATIONIf you have installed the camera driver, [Found NewHardware Wizard] may not open.After the [Found New Hardware Wizard] window opens,a window may open to select the camera driver filelocation. In this case, select the[C:\WINDOWS\INF\OTHER] folder.If you can s find the [INF\OTHER] folder, check the[Show all files] button in [Window's Explorer View Folder option View].Before connecting the camera to the PC, You shouldfirst install the camera driver.After installing the camera driver, you have to restartyour PC.If you connect the camera to the PC before installing the camera driver, the [Found NewHardware Wizard] will open. In this case, cancel the [Found New Hardware Wizard] anddisconnect the camera. Install the camera driver and connect the camera to the PC again.Should the computer not find the camera driver after installation, please try one or more ofthe following measures.1. Delete the camera driver (p.116), and re-install the driver.2. Refer to FAQ (p.138) to check for a possible solution to the problem.3. If your PC s central processing unit is VIA chip (This is shown in the USB Host Controller),download the patch file from the Samsung Camera web page.(http://www.samsungcamera.com)](https://usermanual.wiki/Hanwha-Techwin/DIGIMAXV3/User-Guide-306385-Page-114.png)
![116Removing the USB Driver for Windows 98SETo remove the USB driver, refer to the process shown below.1. Trace [Start Settings] and click [Control Panel]2. Double-click [Add/Remove programs].](https://usermanual.wiki/Hanwha-Techwin/DIGIMAXV3/User-Guide-306385-Page-115.png)
![SOFTWARE117Removing the USB Driver for Windows 98SE[Click!]4. A window will open. Click the [OK] button and thecamera driver will be removed.5. Uninstall is complete.Click the [Finish] button and the window will disappear.3. The [Add/Remove Programs Properties] window willopen. Click [Digimax V] and click the [Add/Remove]button.](https://usermanual.wiki/Hanwha-Techwin/DIGIMAXV3/User-Guide-306385-Page-116.png)
![118Removable DiskTo use this camera as a Removable Disk, install (p.110) the USB Driver.1. Before turning the camera power on, connect the camera to the PC with the USB cable.2. Click [Removable Disk] under [My computer] or [Windows Explorer].3. Image files stored in the Removable Disk (DCIM 100SSCAM) can be transferred to the PC.NOTICEImportant information whilst using the Removable DiskThe [Removable Disk] indicator will not show when the camera power is off.We recommend that you should copy the images to the PC to view them. Opening imagesdirectly from the removable disk may be subject to unexpected disconnection.When uploading images from the PC to the camera, ensure that the uploaded file namesare not the same as those already stored on the memory. When you upload a file that is not taken by this camera toRemovable Disk, the [FILE ERROR!] message will bedisplayed on the LCD monitor in the PLAY mode, andnothing is displayed in THUMBNAIL mode.The green lamp next to the viewfinder will blink, when a file istransferred (copy or deletion) between the PC and the camera. Do not remove the USBcable until the lamp stops blinking. To remove the USB cable in Windows 2000/ME/XP, usethe [Unplug or Eject Hardware] icon on the task bar.](https://usermanual.wiki/Hanwha-Techwin/DIGIMAXV3/User-Guide-306385-Page-117.png)
![119SOFTWARERemoving the removable diskWindows 98SE1. Check whether the camera and PC are transferring a file. If the green lamp (next to viewfinder)blinks, you have to wait until the LED illuminates.2. Unplug the USB cable.Windows 2000/ME/XP (The illustrations may be different from the real display in accordance with the Windows O/S.)1. Check whether the camera and PC are transferring a file.If the green lamp (next to viewfinder) blinks, you have to wait until the LED illuminates.2. Double-click the [Unplug or Eject Hardware] icon onthe task bar.3. The [Unplug or Eject Hardware] window will open.Select the [USB Mass Storage Device] and click the[Stop] button.[Click!][Double-click]](https://usermanual.wiki/Hanwha-Techwin/DIGIMAXV3/User-Guide-306385-Page-118.png)
![120Removing the removable disk5. A [Safe to Remove Hardware] window will open.Click the [OK] button.7. Unplug the USB cable.6. A [Unplug or Eject Hardware] window will open.Click the [Close] button and the removable disk willbe removed safely.4. The [Stop a Hardware device] window will open.Select the [SAMSUNG DIGIMAX V3 USB Device]and click the [OK] button.[Click!][Click!][Click!]](https://usermanual.wiki/Hanwha-Techwin/DIGIMAXV3/User-Guide-306385-Page-119.png)
![122Digimax ViewerThis software is only compatible with Windows.1. To open Digimax Viewer, click the [ Start Programs Samsung Digimax Viewer 2.0 Digimax Viewer 2.0 ]and Digimax Viewer 2.0 will then open.3. You can easily use the Digimax viewer program as itoffers FILE menu and TOOL bar.And, you can use the pop up menu. Click an image andpress the right mouse button.2. If the [Auto Launch] option is selected, this program will be executed automatically with recognizingthe camera.Digimax Viewer functions are listed below.- Basic function : Copy, Move, Delete, Rotate, Rename, changing file type, Resize, Property.- Advanced function : Print, Slide show, Export, Sending e-mail, On-line print, Web album etc.INFORMATIONRefer to the [Help] menu in Digimax viewer 2.0 for further information.](https://usermanual.wiki/Hanwha-Techwin/DIGIMAXV3/User-Guide-306385-Page-121.png)
![123SOFTWAREMGI PhotoSuite III SEThis software is only compatible with Windows.To open MGI PhotoSuite lll SE, click the [Start Programs MGI PhotoSuite lll SE MGIPhotoSuite lll SE] and MGI PhotoSuite lll SE will then open.](https://usermanual.wiki/Hanwha-Techwin/DIGIMAXV3/User-Guide-306385-Page-122.png)

![126MGI PhotoSuite III SETo obtain images from the computer1. To acquire images, Click the large [Get] button on theWelcome screen, or the [Get] button on the Navigationbar. Click [Computer] from the list of options displayed onthe activity panel.2. The Open file selector is displayed. Now select the imagefile and click [open].3. The Welcome screen will change to the next work step,with the selected image displayed.GET](https://usermanual.wiki/Hanwha-Techwin/DIGIMAXV3/User-Guide-306385-Page-125.png)
![127SOFTWAREMGI PhotoSuite III SEWhen you obtain images from the digital camera.Before transferring an image file, check the USB connection.1. To acquire images, click the large [Get] button on theWelcome screen, or the [Get] button on the Navigationbar. Click [Computer] from the list of options displayed onthe activity panel. 2. The Open file selector is displayed. Click [Look in :] tochoose [Removable Disk( :)] and click [open] for the openfile window to be displayed.3. Select the [ DCIM 100sscam ] folder. Then select animage and click [ Open ].](https://usermanual.wiki/Hanwha-Techwin/DIGIMAXV3/User-Guide-306385-Page-126.png)
![128MGI PhotoSuite III SE4. The Welcome screen will change to the next work step, with the selected image displayed.NOTICE When you use the Digimax camera, only [Computer] and[Album] from the list of options displayed are available.You will be able to obtain images from the digital camera.[Computer and Album Only]](https://usermanual.wiki/Hanwha-Techwin/DIGIMAXV3/User-Guide-306385-Page-127.png)
![129SOFTWAREMGI PhotoSuite III SEAcquiring images from an Album.Refer to page 133 for more information about creating an Album.1. To acquire images, click the large [Get] button on theWelcome screen, or the [Get] button on the Navigationbar. Click [Album] from the list of options displayed on theactivity panel. 2. After selecting Album on the [ Choose a photo album],click an image in the album and click [Open].3. The Welcome screen will change to the next work step,with the selected image displayed.](https://usermanual.wiki/Hanwha-Techwin/DIGIMAXV3/User-Guide-306385-Page-128.png)
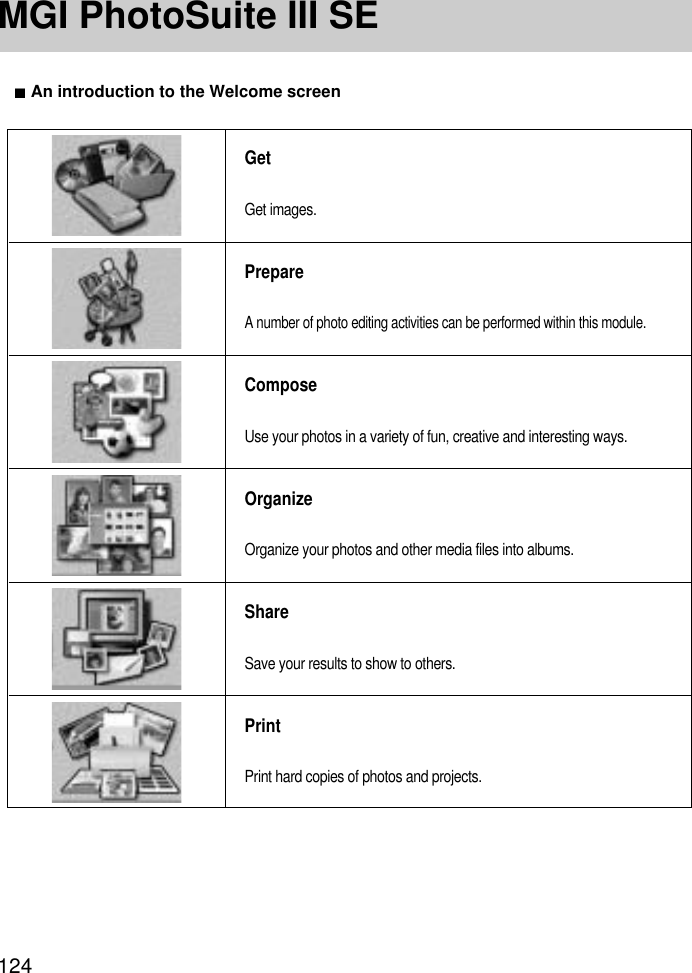
![130MGI PhotoSuite III SEPREPAREWhen the image is loaded, the step changes to Prepare automatically.Menu for [PREPARE] stepsRotate & CropYou can rotate, flip or crop images along with a host of others.TouchupRemove Red eye, Remove Scratches etc.. are available in this menu.Special EffectsA number of special effects can be applied.StitchingJoin a series of photos together to create a sweeping panoramic effect.](https://usermanual.wiki/Hanwha-Techwin/DIGIMAXV3/User-Guide-306385-Page-129.png)
![131SOFTWAREMGI PhotoSuite III SECOMPOSEAdd text, Compound Images etc. are available in this step.Menu of [COMPOSE] stepsCollages : A collage consists of several photosor sections of photos arrangedtogether on a common background.Photo Layouts : The Photo Layouts activity includesmany collage and layout options.Cards & tags : Use your photos to create items suchas Gift Tags, Greeting Cards,Invitations, Postcards, and SportsCards.Calendars : Use your photos to create a variety ofcalendars (monthly, quarterly,seasonal, yearly).Collections : Photos can also be used to create avariety of items for businesspurposes.Fun stuff : You can create magazine covers,Backgrounds etc. in this menu.Business : You can make business items suchas business cards, certificates, signs,labels, promotions, name tags,stationaryFrames & Edges : Add frames and edge effects to yourphotos according to predefinedtemplates.](https://usermanual.wiki/Hanwha-Techwin/DIGIMAXV3/User-Guide-306385-Page-130.png)
![132MGI PhotoSuite III SEORGANIZEOrganize your photos and other media files into albums.Menu of [ORGANIZE] steps [Choose a photo album to view or edit]Select Album : To create an Album, click [Organize] inthe welcome screen or navigation bar. Album.. : Open Master Album.[Select a photo, and choose an action below.]- Open : Open selected image.- Delete : Delete selected image.- Properties... : view image information.[Choose an action to manage your album.]- Add : click [Add] to add an image to an Album.- Sort : click [Sort] to Sort saved images.- Search : click [Search] to Search saved images.- Reset : click [Reset] to reset the setting.- Update : click [Update] to update images.- Create Slide Show : click [Create Slide Show] to createa Slide Show.Always start on this page : If you select this option, theprogram will start in [Organize].](https://usermanual.wiki/Hanwha-Techwin/DIGIMAXV3/User-Guide-306385-Page-131.png)
![133SOFTWAREMGI PhotoSuite III SECreating an Album1. To create an Album, click the large Organize button onthe Welcome screen, or the Organize button on theNavigation bar.2. Click [Album..] in [ Choose a photo album to view oredit.]3. The Master Album window will be displayed, then click[New..].4. Put a new Album name in the New Album window andclick [OK]. A new album will now be created.5. A [Master Album] window will open. Click the [OK] button.](https://usermanual.wiki/Hanwha-Techwin/DIGIMAXV3/User-Guide-306385-Page-132.png)
![134MGI PhotoSuite III SEAdd images to the album1. Select [ Choose an action to manage your album. Add..] to add images to the album.2. Click [Computer] in Add Photos menu.NOTICE[Digital Camera(Direct)], [Scanner(TWAIN)], [Digital Camera(TWAIN)] sources can't be used.[Click!][Click!]](https://usermanual.wiki/Hanwha-Techwin/DIGIMAXV3/User-Guide-306385-Page-133.png)
![135SOFTWAREMGI PhotoSuite III SE3. A [Add photo to Album] window will open. Select imagesthat you want to add. Click the [Add] button.4. Adding images is complete.[Click!]](https://usermanual.wiki/Hanwha-Techwin/DIGIMAXV3/User-Guide-306385-Page-134.png)
![136MGI PhotoSuite III SESaving or sharing images. Menu of [SHARE] stepsSHARESaveTo save the active file according to its current name andpath.Save AsTo assign a new name or path to the file.Send E-maile-mailing images.Slide ShowViewing images as a slide show.](https://usermanual.wiki/Hanwha-Techwin/DIGIMAXV3/User-Guide-306385-Page-135.png)
![137SOFTWAREMGI PhotoSuite III SEYou can print images.Menu for the [PRINT] stepsPRINTPrintPrinting images.Print MultiplesPrint multiple copies of a photo or project, or one copy ofeach of the photos included in an album, according to apredefined template.Choose a printer, an orientation, the print size, and thenumber of copies. You can then print the images.INFORMATIONFor more information, please refer to the Help file in [Help MGI PhotoSuite lll help].](https://usermanual.wiki/Hanwha-Techwin/DIGIMAXV3/User-Guide-306385-Page-136.png)
![138FAQPlease check the following if the USB connection malfunctions.[Case 1] The camera power is off. Turn the camera power on. We recommend using an AC power adapter in PC mode. If you use batteries, check the battery condition.[Case 2] USB Driver is not installed correctly.Install the USB Driver correctly. Refer to page 110.[Case 3] The USB cable is not connected or you are using a cable with an incorrect specification.Use a USB cable with the correct specification.[Case 4] Occasionally the computer recognizes the USB as another device.Install the camera driver correctly. Turn the camera power off and remove the USBcable.Connect the USB cable again and turn the camera power on. The computer should nowrecognize the camera.[Case 5] There is an unexpected error during file transfer.Turn the camera power off and on again. Transfer the file again.](https://usermanual.wiki/Hanwha-Techwin/DIGIMAXV3/User-Guide-306385-Page-137.png)
![139SOFTWAREFAQ[Case 6] How do I know my computer supports a USB Interface?Check the USB port in your computer or keyboard.Check OS version. USB Interface is available in Windows 98, 98SE, 2000, ME .XP.Check [Universal serial bus controller] in Device Manager. Do the following to check[Universal serial bus controller].Win 98/ME : Trace [Start Setting Controller System Device Manager Universal serial bus controller]Win 2K : Trace [Start Setting Controller System Hardware Device ManagerUniversal serial bus controller].Win XP : Trace [Start Control Panel Performance and Maintenance System Hardware Device Manager Universal Serial Bus controller].There must be USB Host Controller and USB root hub under [Universal serial buscontroller].When all the conditions mentioned above are met, the computer can support the USBinterface.[Case 7] When using the USB hub.There may be a problem in connecting the camera to the PC through the USB hub if thePC and the hub are not compatible. Wherever possible, connect the camera to the PCdirectly.[Case 8] Are other USB cables connected to the PC?The camera may malfunction when it is connected to the PC at the same time as anotherUSB cable. In this case, disconnect the other USB cable, and connect only one USBcable to the camera.](https://usermanual.wiki/Hanwha-Techwin/DIGIMAXV3/User-Guide-306385-Page-138.png)