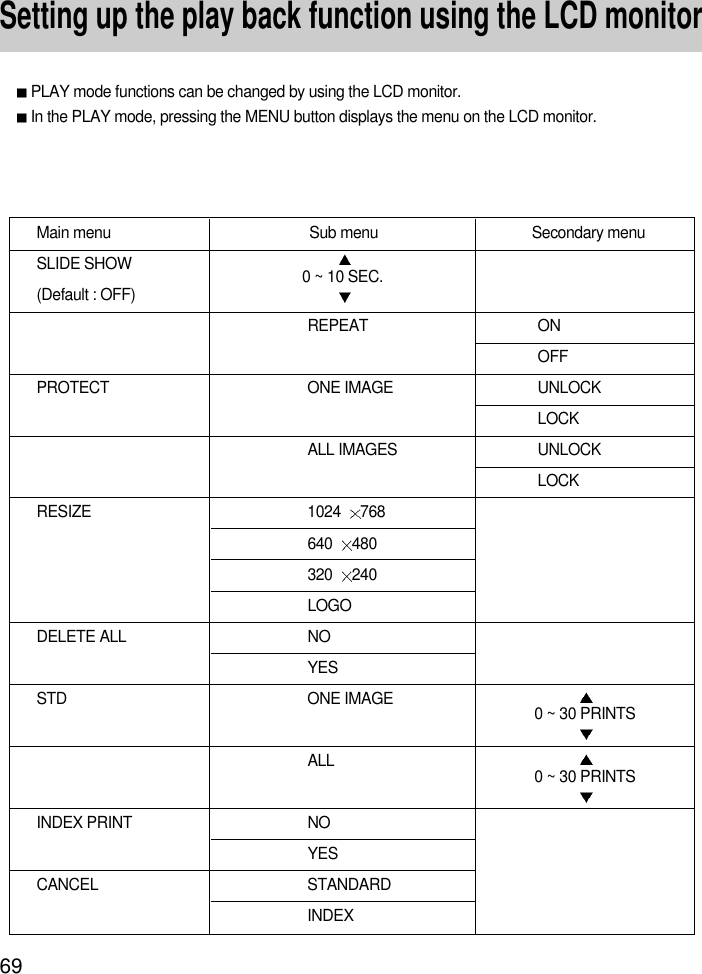
Hanwha Techwin DIGIMAXV4 Digital Camera User Manual
Samsung Techwin Co Ltd Digital Camera
UserManual.wiki
>
Hanwha Techwin
>
DIGIMAXV4 User Manual
User Manual
Navigation menu
Upload a User Manual
Namespaces
Wiki Guide
HTML
PDF
Info
Views
User Manual
Discussion / Help
Navigation
Take a pictureInsert USB cableCheck the camerapowerCheck[Removable Disk]](https://usermanual.wiki/Hanwha-Techwin/DIGIMAXV4/User-Guide-297058-Page-1.png)
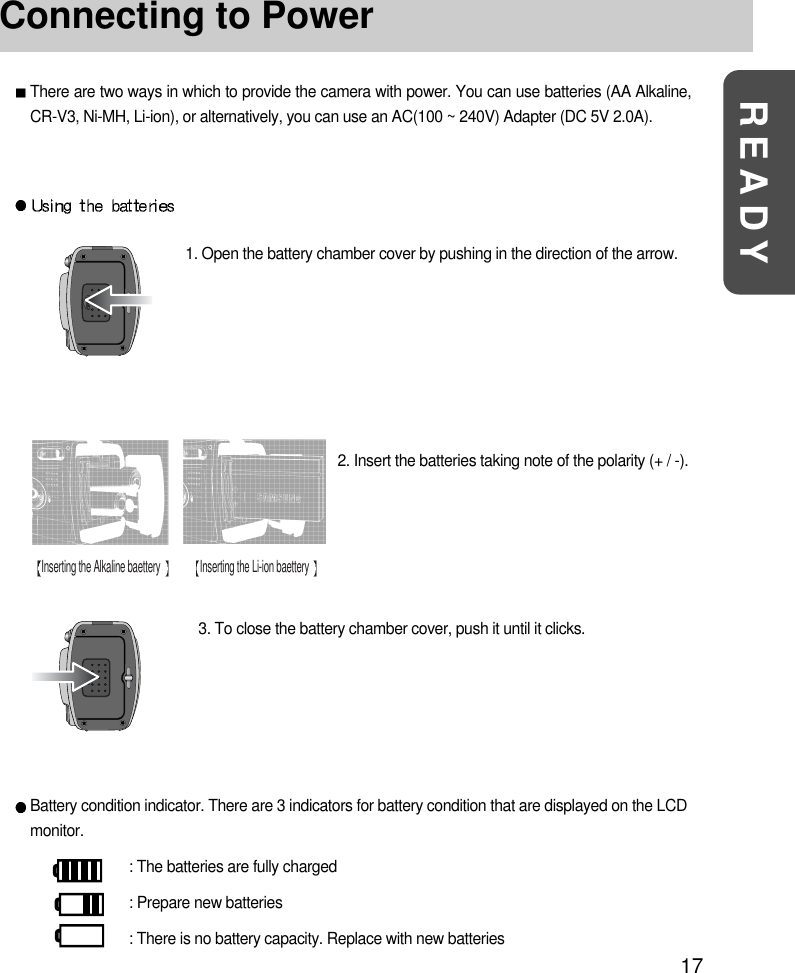
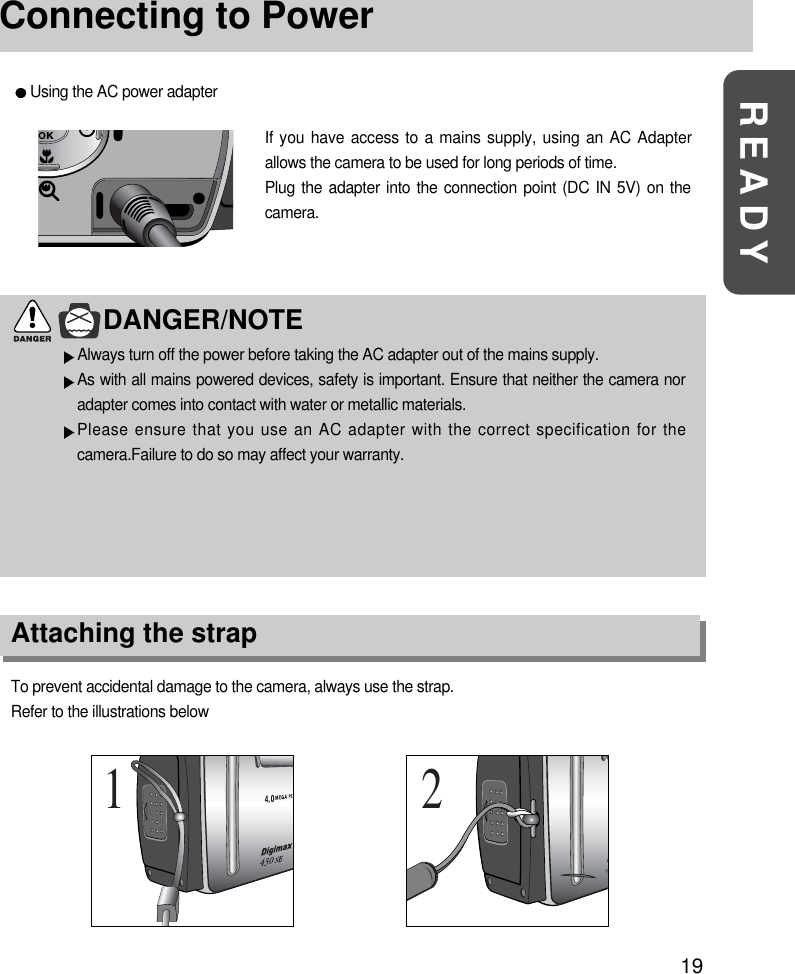
![18Connecting to PowerNOTICEImportant information about battery usage- Please remove the batteries if the camera will not be used for long periods.Batteries can lose power over time and are prone to leaking if kept inside the camera.- We recommend high capacity ALKALINE batteries as manganese batteries cannotdeliver sufficient power.- Low temperatures (below O ) can affect the performance of the batteries and you mayexperience reduced battery life.- Batteries will normally recover at normal temperatures.- Do not use old and new batteries at the same time.- During extended use of the camera, the camera body may become warm. This isperfectly normal. - If you are planning to use this camera for long periods of time, it is advisable to use an ACadapter.INFORMATIONThis camera will automatically switch off when not in use for a period of time.Refer to [POWER OFF] function(p.37).](https://usermanual.wiki/Hanwha-Techwin/DIGIMAXV4/User-Guide-297058-Page-15.png)
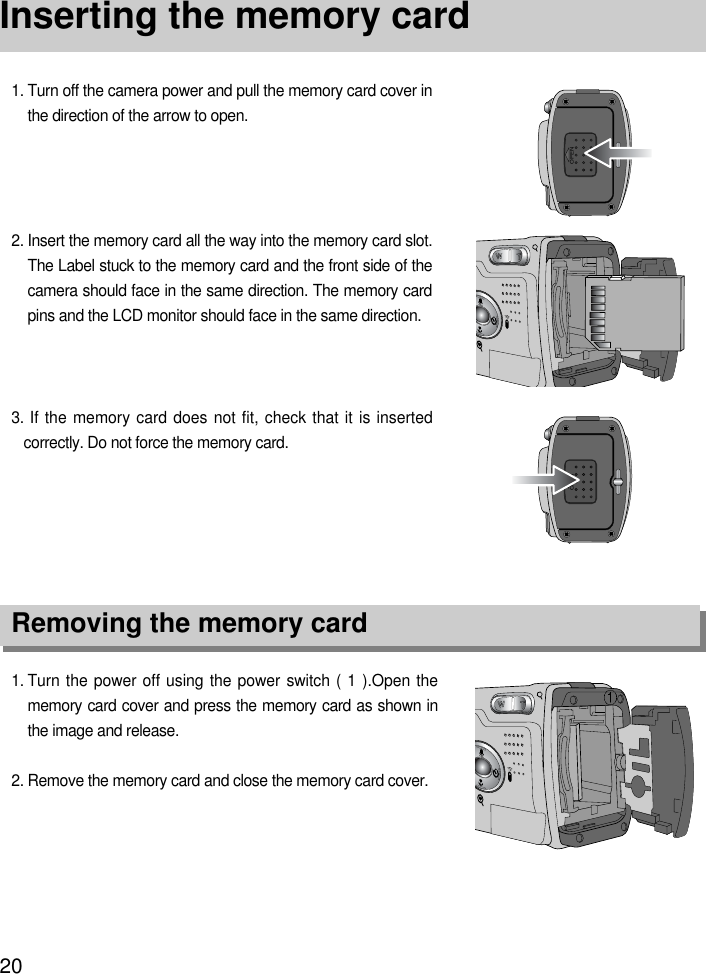
![21READYInstructions on how to use the memory cardNOTICEIf you open the memory card cover when the camera power is turned on, the power will turnoff automatically.Don t remove the memory card when the Autofocus indicator lamp(Green) is blinking as thismay cause damaged data in the memory card.You can use SD memory card and Multi Media Card(MMC).The SD memory card has a write protect switch thatprevents image files from being deleted orformatted.By sliding the switch to the bottom of theSD memory card, the data will be protected. Bysliding the switch to the top of the SD memory card,the data protection will be canceled. Check theswitch position before taking an image.When using a 32MB SD memory card, the specified shooting capacity will be as follows. (Thesefigures are intended as an indication of expected performance).These figures are approximate as image capacities can be affected by variables such as memoryperformance and subject matter.Recorded image size T I F F Super fine Fine Normal2272X1704 (Large) 3 15 31 472272X1504 (Photo) 4 17 35 531120X840 (Medium) 16 64 129 194544X408 (Small) 68 275 550 826WriteprotectswitchLabelCardpins[SD(Secure Digital) memory card]](https://usermanual.wiki/Hanwha-Techwin/DIGIMAXV4/User-Guide-297058-Page-18.png)
![22Instructions on how to use the memory cardMaintenance of the memory cardTurn off the camera power whenever the memory card is being inserted or removed.Repeated use of the memory card will eventually reduce the memory card s performance. Shouldthis be the case, you will need to purchase a new memory card.Wear and tear on the memory card is not covered by the Samsung warranty.The memory card is an electronic precision device. Do not bend, drop or subject the memory card toany heavy impact.Do not store the memory card in an environment with strong electronic or magnetic fields, e.g. nearloud speakers or TV receivers.Please do not use or store in an environment where there are extremes in temperature.Do not allow the memory card to become dirty or to come into contact with any liquid. Should thishappen, clean the memory card with a soft cloth.Please keep the memory card in its case when not in use.During and after periods of extended use, you may notice that the memory card is warm. This isperfectly normal.Preserving the memory card dataIf the memory card is subjected to any of the following, the recorded data may become corrupted :- When the memory card is used incorrectly.- If the power is switched off or the memory card is removed while recording, deleting(formatting) orreading.Samsung cannot be held responsible for lost data.It is advisable to copy important data onto other media as back-up e.g. floppy disks, hard disks, CDetc.If there is insufficient memory available:If you press the shutter button for the shot, [MEMORY FULL!]message is displayed and the camera will not operate. To optimize the amount of memory in thecamera, replace the memory card or delete unnecessary images stored on the memory.](https://usermanual.wiki/Hanwha-Techwin/DIGIMAXV4/User-Guide-297058-Page-19.png)
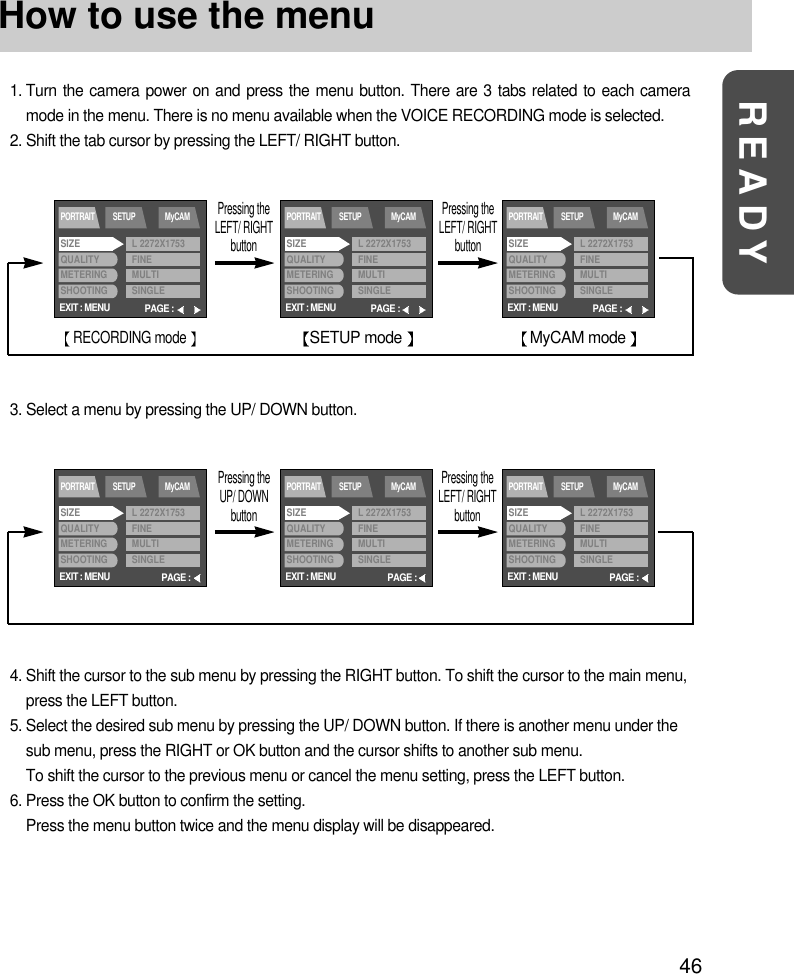
![23READYSelecting the date and timeYou can record the date and time with the image data in the memory card.2. Select [SETUP] tab by pressing the RIGHT/button. Select[FORMAT] menu by pressing the DOWN/button. Press theDOWN/again and the next menu page will be displayed.Pressthe UP/or DOWN/button and select [DATE SET].3. Shift the cursor to the [DATE SET] sub menu by pressing theRIGHT/button.1. Turn on the power and press the MENU(OK) button.The recording mode menu will be displayed in the RECORDING mode, and the play mode menu willbe displayed in the PLAY mode.(There is no associated menu in VOICE RECORDING mode.)INFORMATIONDate setting range : 2003/01/01 ~ 2050.12.31 (Leap years and months are correctedautomatically)The default is 2003/01/01.EXIT : MENUPORTRAIT SETUP MyCAMPAGE :SIZEQUALITYMETERINGSHOOTINGL 2272X1753FINEMULTISINGLEEXIT : MENUPORTRAIT SETUP MyCAMPAGE :SIZEQUALITYMETERINGSHOOTINGL 2272X1753FINEMULTISINGLE](https://usermanual.wiki/Hanwha-Techwin/DIGIMAXV4/User-Guide-297058-Page-20.png)
![24Selecting the date and time6. To select the correct time, select [TIME SETUP] at the step 2.Press the MENU(OK) button again and the menu will becancelled.5. Press the MENU(OK) button to confirm the setting.To return to the main menu or cancel the setting, press theLEFT/( ) button.4. Select the correct date by pressing the 5-function button.RIGHT/button : selects YEAR/ MONTH/ DAY item.UP/or DOWN/button : changes the value of each item.NOTICEIf the batteries are removed, the date and time settings will remain for approximately 1 hour.If the batteries are removed for a period longer than 1 hour, it may be necessary to reset thedate and time.EXIT : MENUPORTRAIT SETUP MyCAMPAGE :SIZEQUALITYMETERINGSHOOTINGL 2272X1753FINEMULTISINGLEEXIT : MENUPORTRAIT SETUP MyCAMPAGE :SIZEQUALITYMETERINGSHOOTINGL 2272X1753FINEMULTISINGLEEXIT : MENUPORTRAIT SETUP MyCAMPAGE :SIZEQUALITYMETERINGSHOOTINGL 2272X1753FINEMULTISINGLE](https://usermanual.wiki/Hanwha-Techwin/DIGIMAXV4/User-Guide-297058-Page-21.png)
![25READYLanguageThere is a choice of languages that can be displayed on the LCD monitor.INFORMATIONThe default language is KOREANYou can select 15 languages. Those are listed below.English, Korean, Chinese1, Chinese2, Japanese, Russian, Germany, Spanish, French,Italian, Portuguese, Danish, Swedish, Finnish, Dutch.Even though the camera is restarted, the language setting is maintained.1. Turn on the power and press the MENU(OK) button.The recording mode menu will be displayed in the RECORDING mode, and the play mode menu willbe displayed in the PLAY mode.(There is no associated menu in VOICE RECORDING mode.)2. Select [SETUP] tab by pressing the RIGHT button.Press the UP or DOWN utton and select [LANGUAGE].3. Shift the cursor to the [LANGUAGE] sub menu by pressing theRIGHT button and select language that you want by pressingthe UP or DOWN/button.4. Press the MENU(OK) button to confirm the setting.To return to the main menu or cancel the setting, press the LEFT/FLASH button.Press the MENU(OK) button again and the menu will be cancelled.EXIT : MENUPORTRAIT SETUP MyCAMPAGE :SIZEQUALITYMETERINGSHOOTINGL 2272X1753FINEMULTISINGLEEXIT : MENUPORTRAIT SETUP MyCAMPAGE :SIZEQUALITYMETERINGSHOOTINGL 2272X1753FINEMULTISINGLE](https://usermanual.wiki/Hanwha-Techwin/DIGIMAXV4/User-Guide-297058-Page-22.png)

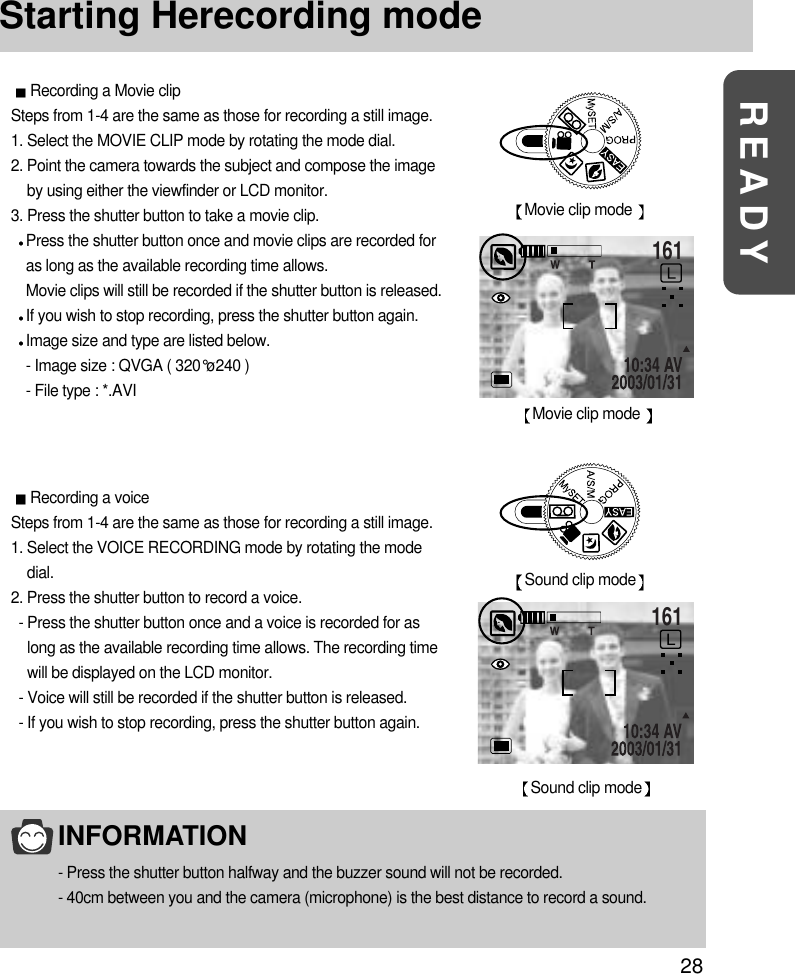
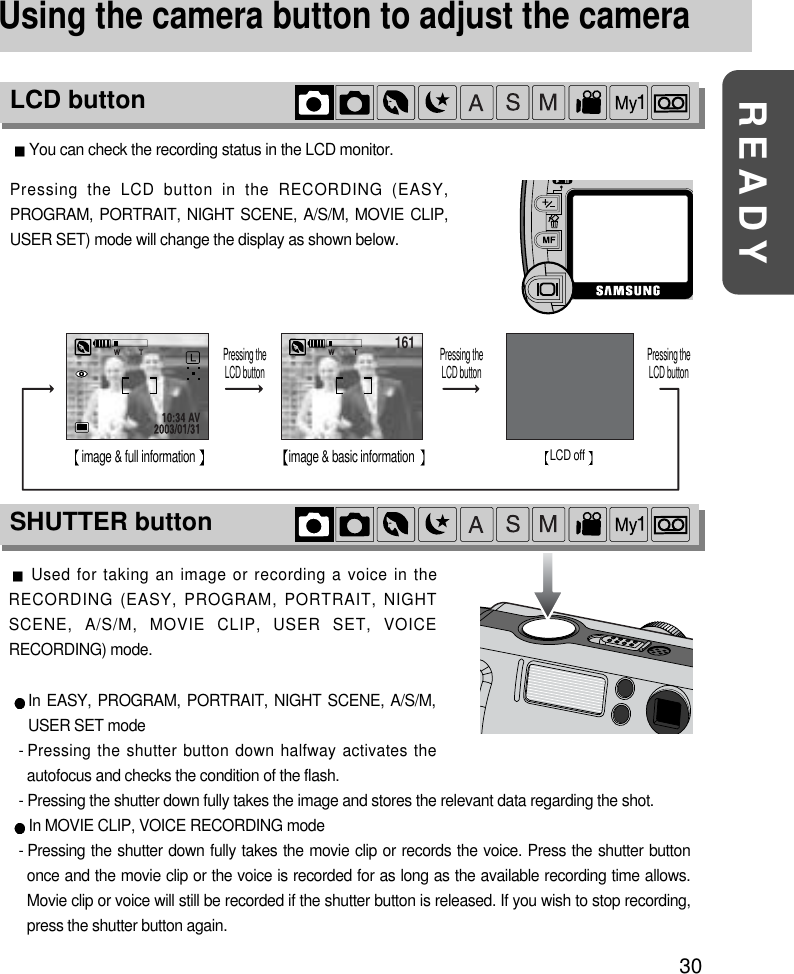
![27Starting Herecording mode1. Insert the batteries (p.26).Insert the batteries taking note of the polarity (+ / -).2. Insert the memory card (p.29).3. Close the memory card cover.4. Slide the power switch to turn on the camera.5. Select the PROGRAM mode by rotating the mode dial.6. Point the camera towards the subject and compose the image by using either the viewfinder or LCDmonitor.7. Press the shutter button to capture an image.Recording a still imageProgram mode 161[RROGRAM mode]INFORMATIONThere are two LED lamps (one green, one red) positioned next to the viewfinder.- If the camera is in focus when you press the shutter button halfway, the green LED will lightup and you can take an image. If the camera can focus on the subject, the autofocus framein the center of the LCD monitor will change from white to green.- If the red lamp lights up, the flash can fire.- If the red lamp blinks, the flash is being charged.- When an image is being stored onto the memory card, the green lamp blinks slowly.When the image data has been stored, the green LED light will go out.After the green LEDlight has gone out, you can resume taking images.NOTICEBlinking the autofocus indicator lamp means that the camera cannot focus on the subject.Should this be the case, the camera cannot make beautiful photography.](https://usermanual.wiki/Hanwha-Techwin/DIGIMAXV4/User-Guide-297058-Page-25.png)

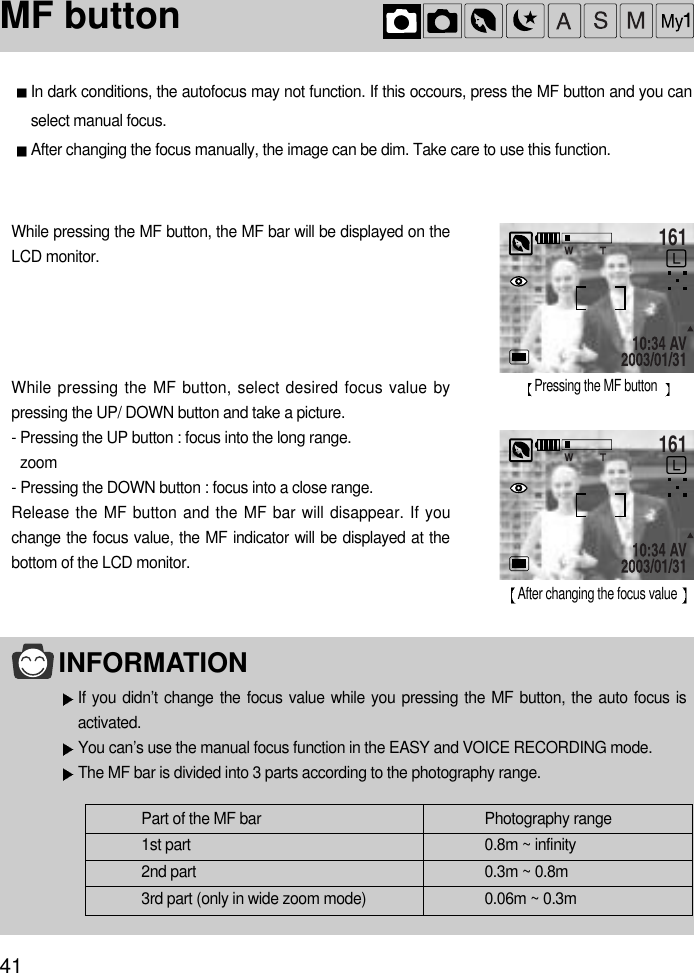
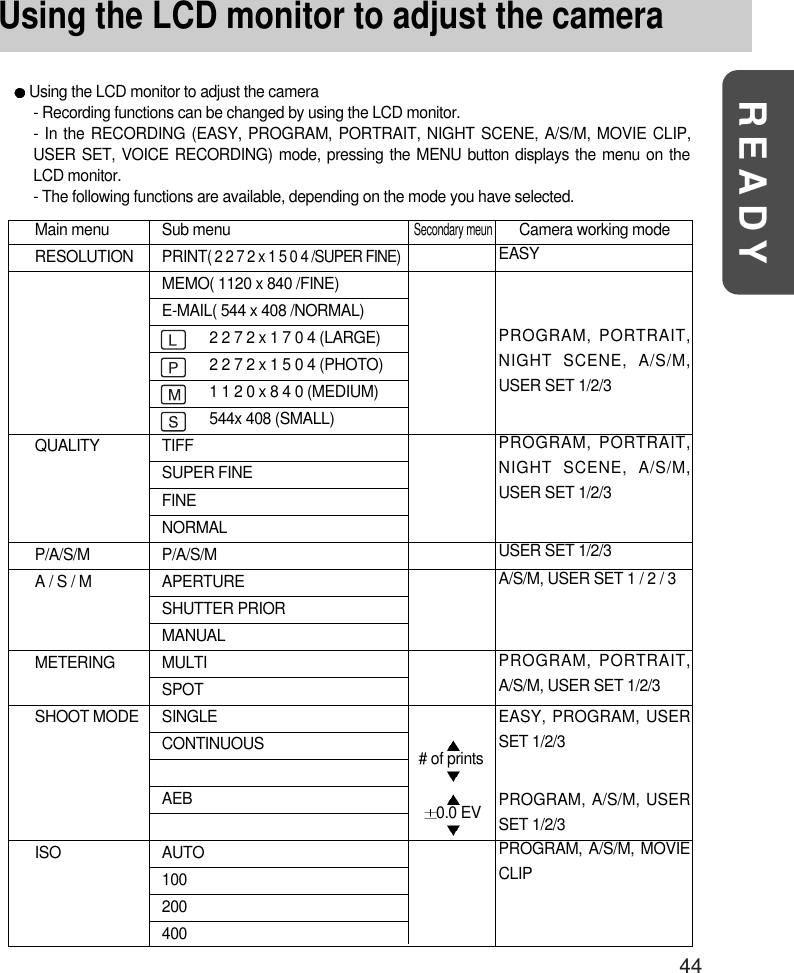
![47SizeYou can select the image size you require.1. Rotate the mode dial to the RECORDING mode and press the MENU button.2. Press the DOWN and the cursor will be shifted to the main menu.3. Select [SIZE] menu by pressing the UP/DOWN button.4. Press the RIGHT button and the cursor will shift to the [SIZE] sub menu.Press the OK button to confirm the setting.Press the menu button twice and the menu display will be disappeared. Take a picture.EASY modeSelect the desired sub menu by pressing the UP/DOWN button.- PRINT : taking a picture for printing(2272 X 1504/ Super fine)- MEMO : taking a picture for web site image(1120 X 840/ Fine)- E-MAIL : taking a picture for e-mail(544 X 408/ Normal)PROGRAM, PORTRAIT, NIGHT SCENE, A/S/M, MySET 1/ 2/3 mode. Select the desired sub menu by pressing theUP/DOWN button.- 2272x1704(LARGE) :- 2272x1504(PHOTO) :- 1120x840(MEDIUM) :- 544x408(SMALL) :INFORMATIONA large image uses more memory, so increasing the image size will reduce the total numberof shots you can store in the memory.Even though the camera is restarted, the image size setting is maintained.EXIT : MENUPORTRAIT SETUP MyCAMPAGE :SIZEQUALITYMETERINGSHOOTINGL 2272X1753FINEMULTISINGLE](https://usermanual.wiki/Hanwha-Techwin/DIGIMAXV4/User-Guide-297058-Page-45.png)
![48READYQualityIn RECORDING mode, you can select the image quality(Data compression rate).INFORMATIONThe higher the QUALITY setting, the better the final image will be. However, the high quality setting willrequire more memory and therefore reduce the number of images you can store on the memory.SUPER FINE is the highest quality and NORMAL is the lowest setting. Choose the settingappropriate for your needs.The image file is stored in *.jpg (Default).But, if you select TIFF in the quality menu, theimage file is stored in *.tif.TIFF format is an uncompressed image file format for an expert. If you take a picture with theTIFF file format, the number of available shot is decreased and the time for recording theimage file will be longer because the TIFF file size is bigger than the JPG file format.When the TIFF file is being recorded to the memory card, [Please Wait] message will bedisplayed on the LCD monitor.This file format complies with DCF(Design rule for Camera File system).Even though the camera is restarted, the quality setting is maintained.Even though the camera is restarted, the quality setting is maintained.When using the 32MB SD memory card, the specified shooting capacity will be as follows.(These figures are intended as an indication of expected performance)QUALITY IMAGE SIZEL (Large) P (Photo) M (Medium) S (Small)TIFF (1:1) 3 4 16 68Super fine (4:1) 15 17 64 275Fine (8:1) 31 35 129 550Normal (16:1) 47 53 194 826Press the OK button to confirm the setting.Press the menu button twice and the menu display will bedisappeared. Take a picture.1. Rotate the mode dial to the RECORDING mode and press the MENU button.2. Press the DOWN and the cursor will be shifted to the main menu.3. Select [QUALITY] menu by pressing the UP/DOWN button.4. Press the RIGHT button and the cursor will shift to the[QUALITY] sub menu.- TIFF : No indicator - FINE :- SUPER FINE : - NORMAL :EXIT : MENUPORTRAIT SETUP MyCAMPAGE :SIZEQUALITYMETERINGSHOOTINGL 2272X1753FINEMULTISINGLE](https://usermanual.wiki/Hanwha-Techwin/DIGIMAXV4/User-Guide-297058-Page-46.png)
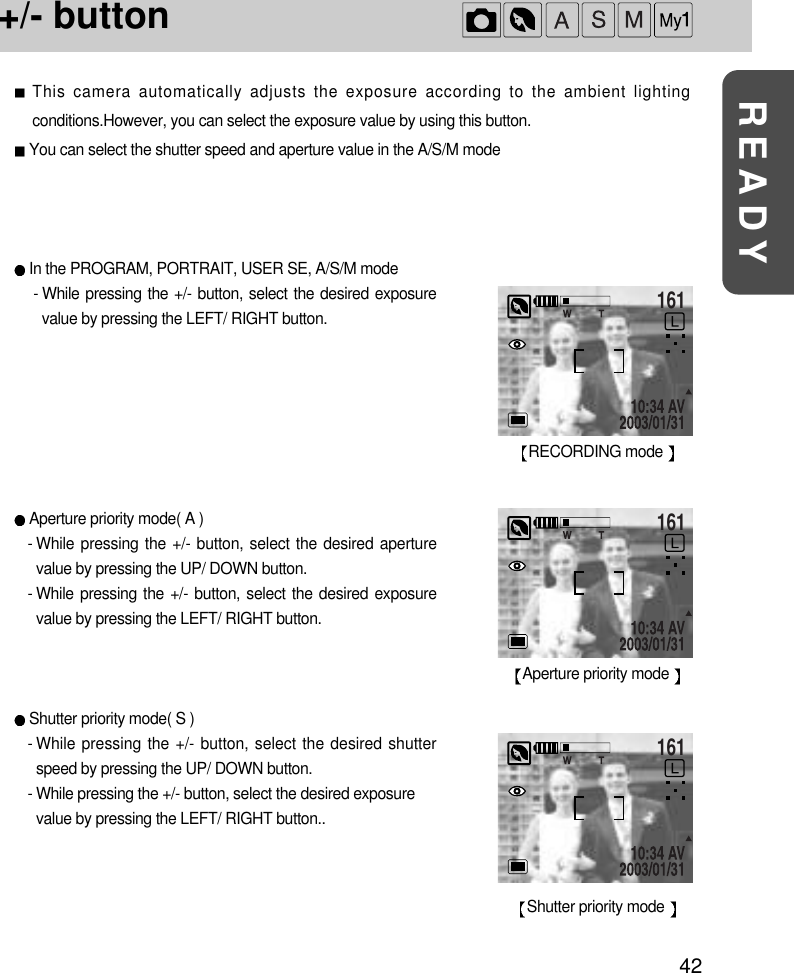
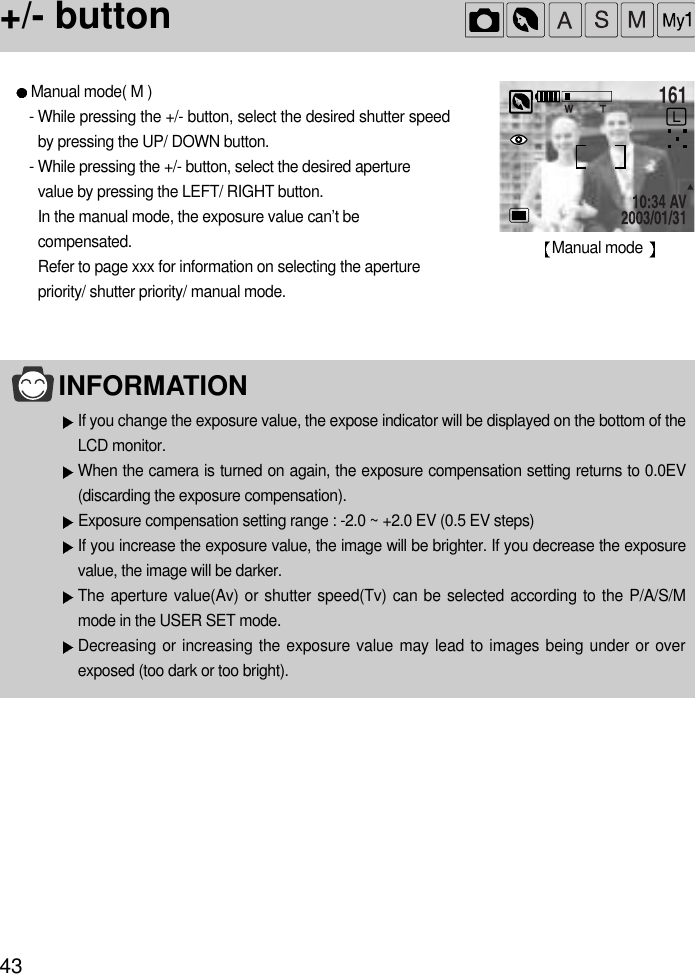
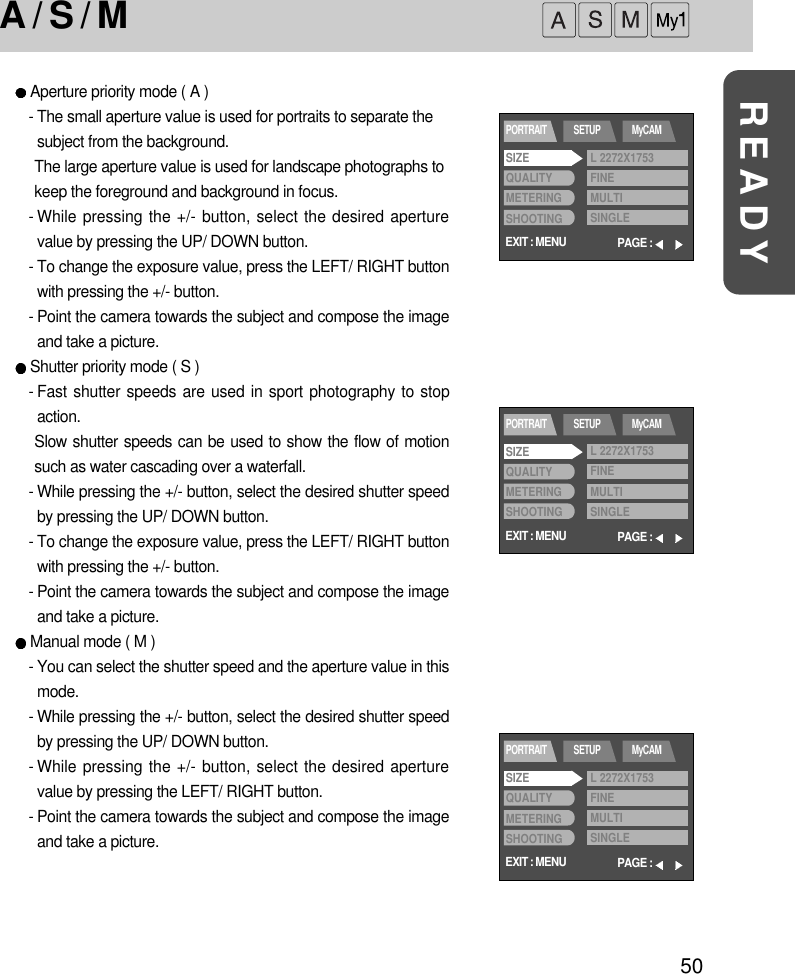
![49A / S / MIn this mode you can select the shutter speed or aperture value as your preference.1. Rotate the mode dial to the A/ S/ M mode and press the MENU button.2. Press the DOWN and the cursor will be shifted to the main menu.3. Select [A/S/M] menu by pressing the UP/DOWN button.4. Press the RIGHT button and the cursor will shift to the [A/S/M] sub menu.Press the OK button to confirm the setting.Press the menu button twice and the menu display will be disappeared. Take a picture.Select the desired sub menu by pressing the UP/DOWN button.Aperture priority ( A ) : You can select the aperture value in thismode.The camera calculates the bestshutter speed automatically to makeproper exposure value.Shutter priority ( S ) : You can select the shutter speed in thismode.The camera calculates the bestaperture value automatically to makeproper exposure value.Manual ( M ) : You can select the shutter speed and theaperture value in this mode.EXIT : MENUPORTRAIT SETUP MyCAMPAGE :SIZEQUALITYMETERINGSHOOTINGL 2272X1753FINEMULTISINGLEINFORMATIONAfter pressing the shutter button half way down, the values that were changed in the A/S/Mmode will be applied to the picture.If the aperture value or shutter speed is out of the limit of application, the value that isdisplayed on the LCD monitor is turned to red. But you can take a picture. It warns that : To be the proper exposure, the aperturevalue is smaller than F 2.8.But the minimum aperture value that you can select is F2.8.161F 2.81/1000](https://usermanual.wiki/Hanwha-Techwin/DIGIMAXV4/User-Guide-297058-Page-47.png)
![51Metering When the camera cannot calculate a proper exposure, you can change the metering method.1. Rotate the mode dial to the RECORDING mode and press the MENU button.2. Press the DOWN and the cursor will be shifted to the main menu.3. Select [METERING] menu by pressing the UP/DOWN button.Press the OK button to confirm the setting.Press the menu button twice and the menu display will be disappeared. Take a picture.4. Press the RIGHT button and the cursor will shift to the[METERING] sub menu. Select the desired sub menu bypressing the UP/DOWN button.- Multi pattern metering : Exposure will be calculated based onan average of the light available inthe image area. However, thecalculation will be biased towards thecentre of the image area. - Spot metering : Use this function when there isbacklight or when photographing asubject that has little contrast. Inbacklighting conditions adjust thelight metering to suit the subjectmatter.INFORMATIONThe default metering mode is Multi pattern metering.If the subject is not on the centre of the focus, do not use the spot metering as there may beexposure error. In this case, use the exposure compensation.Even though the camera is restarted, the metering setting is maintained.EXIT : MENUPORTRAIT SETUP MyCAMPAGE :SIZEQUALITYMETERINGSHOOTINGL 2272X1753FINEMULTISINGLE](https://usermanual.wiki/Hanwha-Techwin/DIGIMAXV4/User-Guide-297058-Page-49.png)
![52READYShootingYou can select the continuous shot or AEB shot in this menu.Shooting mode is not available in the A/S/M mode.1. Rotate the mode dial to the RECORDING mode and press the MENU button.2. Press the DOWN and the cursor will be shifted to the main menu.3. Select [SHOOTING] menu by pressing the UP/DOWN button.Press the OK button to confirm the setting.Press the menu button twice and the menu display will be disappeared. Take a picture.INFORMATIONThe flash mode is fixed to the flash off in the continuous shot and AEB shot.After completing the continuous or AEB shot, the shooting mode is changed to [SINGLE] automatically.Once a continuous sequence has begun, it will continue until the selected number of shots has beentaken. Releasing the shutter button will not interrupt this funtion.The maximum number of shots in a sequence is governed by the image settings.Using a 32MB SD memory card, the specified shooting capacity will be as follows.(These figures are intended as an indication of expected performance)Quality Size Large Photo Medium SmallTIFF (1:1) N/A N/A N/A N/ASuper fine (4:1) 3 3 14 59Fine (8:1) 6 7 28 99Normal (16:1) 10 11 42 99EXIT : MENUPORTRAIT SETUP MyCAMPAGE :SIZEQUALITYMETERINGSHOOTINGL 2272X1753FINEMULTISINGLE4. Press the RIGHT button and the cursor will shift to the[SHOOTING] sub menu.Select the desired sub menu by pressing the UP/DOWN button.- SINGLE : you can take only a picture ata time. - CONTINUOUS : In this mode, you can takemoving subjects continuously.- AEB (Auto Exposure Bracket) : In this mode, you can take a3-image bracket of a scene.There are over exposure image,normal exposure image and under exposure image in a bracket. You can select the exposure bracket and the number of continuous shots in [SHOOTING] sub menu.](https://usermanual.wiki/Hanwha-Techwin/DIGIMAXV4/User-Guide-297058-Page-50.png)
![53ShootingINFORMATIONThe continuous and AEB shot cannot be selected in the TIFF image quality.If the number of available shots remaining is under 2 pages, the continuous shot Is notactivated as the minimum number of the continuous shots are 2. In the AEB shot, thenumber of available shots remaining have to be over 3 page.It is easy to be the camera shaking in the AEB shot and it takes a lot of time to store the AEBimage.We recommend using a tripod.Even though the camera is restarted, the language setting is maintained.You can select the camera’s sensitivity to light by selecting the ISO sub menu.The speed or specific light-sensitivity of a camera is rated by ISO numbers.1. Rotate the mode dial to the RECORDING mode and press the MENU button.2. Press the DOWN and the cursor will be shifted to the main menu.3. Select [SHOOTING] menu by pressing the UP/DOWN button.4. Press the DOWN button on the [SHOOTING] menu and the next menu page will be displayed.5. Select [ISO] menu by pressing the UP/DOWN button.Press the OK button to confirm the setting.Press the menu button twice and the menu display will be disappeared. Take a picture.6. Press the RIGHT button and the cursor will shift to the [ISO] submenu. Select the desired sub menu by pressing the UP/DOWNbutton.- AUTO : The camera's sensitivity is automaticallychanged by variables such as lighting valueor subject brightness.- 100/ 200/ 400 : In the same lighting condition, the higherISO value is, the faster the shutter speed willbe. However, the images can be saturatedwith the high brightness condition.INFORMATIONThe higher the number, the more sensitive it is to light. As with film, the higher speeds usually induce moreelectronic noise so the image gets grainier.Even though the camera is restarted, the ISO setting is maintained.ISOEXIT : MENUPORTRAIT SETUP MyCAMPAGE :SIZEQUALITYMETERINGSHOOTINGL 2272X1753FINEMULTISINGLE](https://usermanual.wiki/Hanwha-Techwin/DIGIMAXV4/User-Guide-297058-Page-51.png)
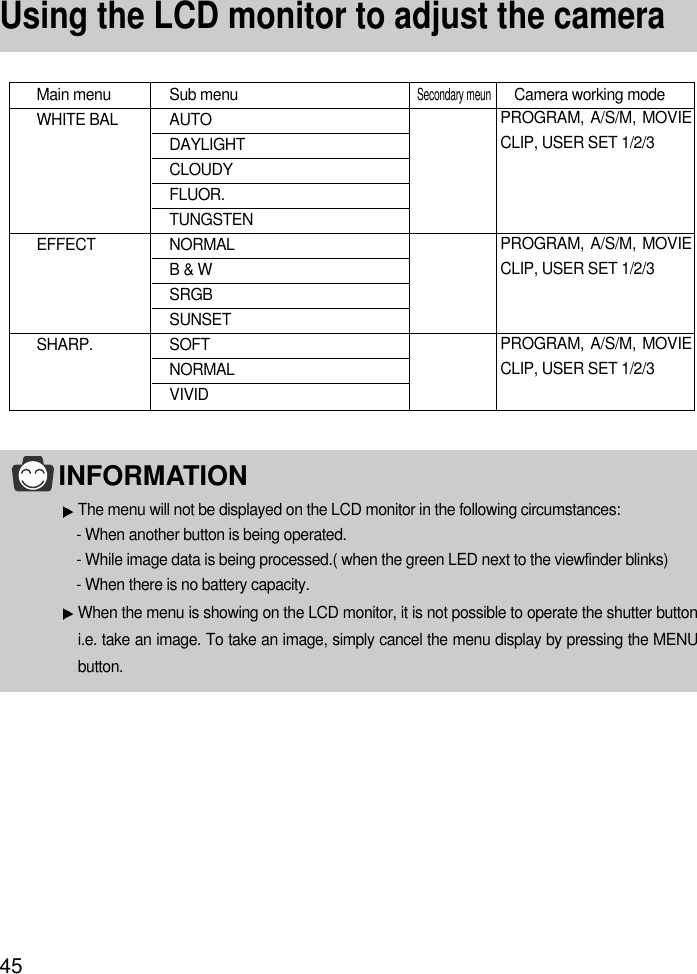
![54READYWHITE BALANCEThe white balance control allows you to adjust the colors to appear more natural looking.1. Rotate the mode dial to the RECORDING mode and press the MENU button.2. Press the DOWN and the cursor will be shifted to the main menu.3. Select [SHOOTING] menu by pressing the UP/DOWN button.4. Press the DOWN button on the [SHOOTING] menu and the next menu page will be displayed.5. Select [WHITE BALANCE] menu by pressing the UP/DOWN button.3. Select [WHITE BALANCE]menu by pressing the UP/DOWN button.6. Press the RIGHT button and the cursor will shift to the [WHITE BALANCE] sub menu.Press the OK button to confirm the setting.Press the menu button twice and the menu display will be disappeared. Take a picture.Select the desired sub menu by pressing the UP/DOWN button.AUTO : The camera automatically selects theappropriate white balance settings, dependingon the prevailing lighting conditions.DAYLIGHT : For taking images outside.CLOUDY : For taking images under a cloudy and overcastsky.TUNGSTEN : For shooting under tungsten (standard lightbulb) lighting.FLUORESCENT : For shooting under fluorescent lighting.INFORMATIONDifferent lighting conditions may cause a color cast on your images.Even though the camera is restarted, the white balance setting is maintained.EXIT : MENUPORTRAIT SETUP MyCAMPAGE :SIZEQUALITYMETERINGSHOOTINGL 2272X1753FINEMULTISINGLE](https://usermanual.wiki/Hanwha-Techwin/DIGIMAXV4/User-Guide-297058-Page-52.png)
![55EffectUsing the camera’s digital processor, it is possible to add special effects to your images.1. Rotate the mode dial to the RECORDING mode and press the MENU button.2. Press the DOWN and the cursor will be shifted to the main menu.Press the OK button to confirm the setting.Press the menu button twice and the menu display will be disappeared. Take a picture.3. Select [EFFECT] menu by pressing the UP/DOWN button.4. Press the DOWN button on the [SHOOTING] menu and thenext menu page will be displayed.5. Select [EFFECT] menu by pressing the UP/DOWN button.6. Press the RIGHT button and the cursor will shift to the[EFFECT] sub menu.7. Select the desired sub menu by pressing the UP/DOWN button.- NORMAL : No effect is added to the image.- B & W : Converts the image to black and white.- sRGB : sRGB is device independent standardcolor model. Devices supporting sRGBcan display exact image color.- SUNSET : Used for sunset images.INFORMATIONEven though the camera is restarted, the effect setting is maintained.EXIT : MENUPORTRAIT SETUP MyCAMPAGE :SIZEQUALITYMETERINGSHOOTINGL 2272X1753FINEMULTISINGLE](https://usermanual.wiki/Hanwha-Techwin/DIGIMAXV4/User-Guide-297058-Page-53.png)
![56READYSharpnessYou can select the still image sharpness.1. Rotate the mode dial to the RECORDING mode and press the MENU button.2. Press the DOWN and the cursor will be shifted to the main menu.3. Select [SHOOTING] menu by pressing the UP/DOWN button.4. Press the DOWN button on the [SHOOTING] menu and thenext menu page will be displayed.5. Select [SHARPNESS] menu by pressing the UP/DOWN button.6. Press the RIGHT button and the cursor will shift to the[SHARPNESS] sub menu.7. Select the desired sub menu by pressing the UP/DOWN button.SOFT : This gives smooth edges and the final image willhave a soft appearance.NORMAL : This setting will give a standard finish to the final image.HARD : This will give the image a crisp and clear appearance.Press the OK button to confirm the setting.Press the menu button twice and the menu display will be disappeared. Take a picture.INFORMATION Even though the camera is restarted, the sharpness setting is maintained.EXIT : MENUPORTRAIT SETUP MyCAMPAGE :SIZEQUALITYMETERINGSHOOTINGL 2272X1753FINEMULTISINGLE](https://usermanual.wiki/Hanwha-Techwin/DIGIMAXV4/User-Guide-297058-Page-54.png)
![57MySET mode menuYou can select your favorite menus that have been saved in this menu.1. Rotate the mode dial to the MySET mode and press the MENUbutton.2. Press the DOWN and the cursor will be shifted to the mainmenu.3. Select [MODE] menu by pressing the UP/DOWN button.4. Press the RIGHT button and the cursor will shift to the [MODE]sub menu.5. Select the desired sub menu by pressing the UP/DOWN button.Press the OK button to confirm the setting.Press the menu button twice and the menu display will be disappeared. Take a pictureTo apply this function to the camera, change the MySET mode menu or press the DOWN buttonand select the CHANGE menu.Refer to the CHANGE menu.You can select your favorite menus and save them in this menu.Main menu Sub menuMYSET2 MYSET3CHANGE NOYESEXIT : MENUPORTRAIT SETUP MyCAMPAGE :SIZEQUALITYMETERINGSHOOTINGL 2272X1753FINEMULTISINGLEMode](https://usermanual.wiki/Hanwha-Techwin/DIGIMAXV4/User-Guide-297058-Page-55.png)
![58READYChangeThe loaded MySET menu will be applied to the camera by this menu.1. Rotate the mode dial to the MySET mode and press the MENU button.2. Press the DOWN and the cursor will be shifted to the main menu.3. Select [CHANGE] menu by pressing the UP/DOWN button.4. Press the RIGHT button and the cursor will shift to the[CHANGE] sub menu.5. Select the desired sub menu by pressing the UP/DOWN button.6. Press the OK button to confirm the setting.Press the menu button twice and the menu display will bedisappeared. Take a picture.- Selecting [NO] : The MySET memu will not be changed.- Selecting [YES] : You can change your favorite menus.Refer to page 30 ~ 50 for information about the menus.P/A/S/M in the main menu stands for Program mode(P), Aperture priority(A), Shutterpriority(S) and Manual mode(M). You can save one of the camera mode in the MySETmode.EXIT : MENUPORTRAIT SETUP MyCAMPAGE :SIZEQUALITYMETERINGSHOOTINGL 2272X1753FINEMULTISINGLE](https://usermanual.wiki/Hanwha-Techwin/DIGIMAXV4/User-Guide-297058-Page-56.png)
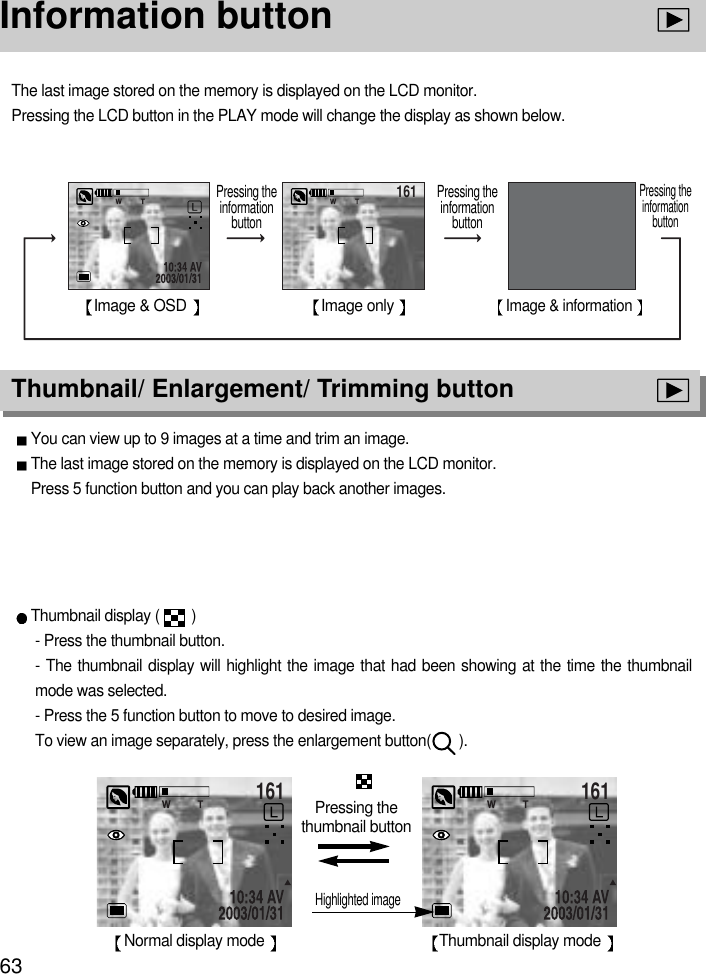
![64READYThumbnail/ Enlargement/ Trimming buttonImage enlargement- Select an image that you want to enlarge and press theenlargement button.- Different parts of the image can be viewed by pressing the 5function button.- Pressing the thumbnail button will zoom back to the originalfull sized image.- There is the location indicator in the bottom left side of theLCD monitor.Trimming : you can extract part of the image that you want andsave it separately.- select a part that you want to trim by pressing the 5 functionbutton. Press the OK button and a message will be displayedas shown alongside.- Select [YES] or [NO] by pressing the LEFT/ RIGHT buttonand press the OK button.- Selecting [YES] : a trimmed image that has the last file name will be displayed on the LCD monitor.- Selecting [NO] : an initial image will be displayed. INFORMATION The maximum enlargement rate in proportion as the image size.If an image is enlarged, enlargement indicator will be displayed in the bottom left of the LCDmonitor.Photo size image, Movie clip, TIFF, WAV files can’s be enlarged.You may notice a decrease in image quality when using image enlargement.We can’s define image size of the trimmed image as it extracts only displayed part of theimage in the LCD monitor.If there is little memory space to save the trimmed image, the image can’t be trimmed.Image size Large (Photo) Middle SmallMaximum enlargement rate161161](https://usermanual.wiki/Hanwha-Techwin/DIGIMAXV4/User-Guide-297058-Page-62.png)
![65UP/ Voice memo button1. Press the play mode button.2. Press the 5 function button to select image that you wish to addsound to. Press the voice memo button ( ) and the voice memoindicator will display. The camera is now ready to record avoice.3. Press the shutter button to start recording.The [RECORDING..] message will be displayed on the LCDmonitor (as shown) and the voice is recorded to the still imagefor 10 seconds.4. Recording can be stopped by pressing the shutter button again.INFORMATIONA voice can’s be recorded in the movie clip and voice recording file.When you press the shutter button to stop the sound recording, press the shutter buttonhalfway and the buzzer sound will not be recorded.40cm between you and the camera (microphone) is the best distance to record a sound.When the menu is displayed on the LCD monitor, pressing the UP button makes the menu cursormove up or change the sub menu value.When the menu is not displayed on the LCD monitor, the UP button operates as the voice memobutton.You can add your voice to a stored still image.161!161161](https://usermanual.wiki/Hanwha-Techwin/DIGIMAXV4/User-Guide-297058-Page-63.png)

![67DELETE buttonThis deletes an image stored on the memory card.1. Press the play mode button.2. Press the LEFT/ RIGHT button to select image that you wantto delete.NOTICEBefore deleting an image from the camera, you should download(p.80) the image to yourcomputer or protect(p.61) the image, if you want to keep it.3. a message as shown alongside will be displayed on the LCDmonitor.4. To cancel the deletion, press the LEFT button. Press the OK button and a message as shown alongside willbe displayed on the LCD monitor.Select [YES] or [NO] by pressing the LEFT/RIGHT button andpress the OK button.- Selecting [YES] : Once an image has been deleted, theprevious image in the sequence will appear on the LCDmonitor.- Selecting [NO] : The image will be displayed on the LCDmonitor.161161](https://usermanual.wiki/Hanwha-Techwin/DIGIMAXV4/User-Guide-297058-Page-65.png)

![70READYSlide showImages can be displayed continuously at pre-set intervals.INFORMATION The default is OFF and the loading time depends on the image size and quality.The slide show will start from a image that was displayed on the LCD monitor and the[POWER OFF] function can s activate. While the slide show is playing, AVI file is justdisplayed it s first frame.If the slide show is paused, [PAUSE] message will be displayed on the LCD monitor.1.Press the play mode button and press the menu button.2. Press the DOWN and the cursor will be shifted to the main menu.3. Select [SLIDE SHOW] menu by pressing the UP/DOWN button.4. Press the RIGHT button and the cursor will shift to the [SLIDESHOW] sub menu.5. Select the desired sub menu by pressing the UP/DOWN button.* If you select [1 ~ 10SEC], you can select the [REPEAT]secondary menu.Select [1 ~ 10SEC] and press the RIGHT button and the cursorshift to the secondary menu.Select the desired menu by pressing the UP/DOWN button.- [ON] : Even though a cycle(from the first image to the lastimage) is completed, the slide show doesn’t stop.- [OFF] : If a cycle is completed, the slide show stop automatically.Press the menu button twice and the slide show will start.Press the menu button twice again and the slide show will stop and the menu will be displayed.To pause the slide show, press the play & pause button. To start the slide show again, press the play & pause button again.EXIT : MENUPORTRAIT SETUP MyCAMPAGE :SIZEQUALITYMETERINGSHOOTINGL 2272X1753FINEMULTISINGLEEXIT : MENUPORTRAIT SETUP MyCAMPAGE :SIZEQUALITYMETERINGSHOOTINGL 2272X1753FINEMULTISINGLE](https://usermanual.wiki/Hanwha-Techwin/DIGIMAXV4/User-Guide-297058-Page-68.png)
![71ProtectThis is used to protect specific shots from accidental erasing (LOCK).It also releases images thathave been previously protected (UNLOCK).1. Press the play mode button and press the menu button.2. Press the DOWN and the cursor will be shifted to the main menu.3. Select [PROTECT] menu by pressing the UP/DOWN button.4. Press the RIGHT button and the cursor will shift to the[PROTECT] sub menu.INFORMATIONAn image in LOCK mode will be protected from [DELETE] or [DELETE ALL] functions, butwill NOT be protected from the [FORMAT] function.5. Select the desired sub menu by pressing the UP/DOWN button.- [ONE PIC] : Only an image that is displayed on the LCD monitoris protected or unprotected. Select [LOCK] or [UNLOCK] by pressing the UP/ DOWN buttonand press the OK button.If you need to protect the other image, press the LEFT/ RIGHTbutton. Press the shutter button and the menu will be disappeared. - [ALL PICS] : All of the stored images are protected orunprotected.Select [LOCK] or [UNLOCK] by pressing the UP/ DOWN buttonand press the OK button.Press the shutter button and the menu will be disappeared.- [UNLOCK] : Discards the protect function.- [LOCK] : Sets up the PROTECT function.If you protect an image, the protect icon( ) will be displayed on theLCD monitor.(Unprotected image has no indicator)161EXIT : MENUPORTRAIT SETUP MyCAMPAGE :SIZEQUALITYMETERINGSHOOTINGL 2272X1753FINEMULTISINGLEEXIT : MENUPORTRAIT SETUP MyCAMPAGE :SIZEQUALITYMETERINGSHOOTINGL 2272X1753FINEMULTISINGLE](https://usermanual.wiki/Hanwha-Techwin/DIGIMAXV4/User-Guide-297058-Page-69.png)
![72READYResizeThe stored image size can be changed and used as logo image. The resized image will have a newfile name.INFORMATIONLarge size images can be resized to small size, but small size images can’s be resized tolarge size.Large, Medium, Small, Memo and E-mail size images can be resized.If you try to resize the Photo or Print size image, [N/A] (Not available) sub menu will bedisplayed on the menu display. Only JPG image can be resized. TIFF, WAV files can’s be resized.The resized image will have a new file name.EXIT : MENUPORTRAIT SETUP MyCAMPAGE :SIZEQUALITYMETERINGSHOOTINGL 2272X1753FINEMULTISINGLE1. Press the play mode button and select an image that you want to resize by pressing the LEFT/RIGHT button. 2. Press the menu button.3. Press the DOWN and the cursor will be shifted to the mainmenu.4. Select [RESIZE] menu by pressing the UP/DOWN button.5. Press the RIGHT button and the cursor will shift to the [RESIZE]sub menu.6. Select the desired sub menu by pressing the UP/DOWN button.7. Press the OK button to confirm the setting.Press the menu button twice and the menu display will be disappeared.](https://usermanual.wiki/Hanwha-Techwin/DIGIMAXV4/User-Guide-297058-Page-70.png)
![73Delete allThis enables you to clear all unprotected images from the memory.NOTICERemember that this will permanently delete unprotected images. Important shots should bestored on a computer before deletion takes place.1. Press the play mode button and press the menu button.2. Press the DOWN and the cursor will be shifted to the main menu.3. Select [SIZE] menu by pressing the UP/DOWN button.4. Press the RIGHT button and the cursor will shift to the [SIZE] sub menu.5. Select the desired sub menu by pressing the UP/DOWN button.6. Press the OK button to confirm the setting.Press the menu button twice and the menu display will be disappeared.- Selecting [NO] : The display is returned to the initial menu.- Selecting [YES] : [PLEASE WAIT!] message will display and all the unprotected images aredeleted. If there aren’t protected images, all the images are deleted and [NO IMAGE!] message willdisplay.EXIT : MENUPORTRAIT SETUP MyCAMPAGE :SIZEQUALITYMETERINGSHOOTINGL 2272X1753FINEMULTISINGLE](https://usermanual.wiki/Hanwha-Techwin/DIGIMAXV4/User-Guide-297058-Page-71.png)
![74READYDPOF : StandardThis function allows you to embed print quantity information on the a stored image.1. Press the play mode button and select an image that you want to embed print quantity by pressingthe LEFT/ RIGHT button. 2. Press the menu button.3. Press the DOWN and the cursor will be shifted to the mainmenu.4. Select [DEL. ALL] menu by pressing the UP/DOWN button.5. Press the DOWN button on the [DEL. ALL] menu and the nextmenu page will be displayed.6. Select [STANDARD] menu by pressing the UP/DOWN button.7. Press the RIGHT button and the cursor will shift to the[STANDARD] sub menu.8. Select the desired sub menu by pressing the UP/DOWN button.- [ONE PIC] : Specifying the number of copies from a selectedimage.- [ALL PICS] : Specifying the number of copies from all imagesexcept for movie clips and voice recording file.9. Press the OK button and a display to select the quantity will display on the LCD monitor.10. Select the print quantity by pressing the LEFT/RIGHT button.11. Press the OK button to confirm the setting.INFORMATIONDPOF(Digital Print Order Format) allows you to embed printing information on your memorycard. Select the pictures to be printed and how many prints to make.(Print quantity : 0 ~ 30 )The DPOF indicator( ) will display on the LCD monitor when an image that has DPOFinformation plays back. Images can then be printed on DPOF printers, or at an increasingnumber of photo laboratories.This function is not available for Movie clips.EXIT : MENUPORTRAIT SETUP MyCAMPAGE :SIZEQUALITYMETERINGSHOOTINGL 2272X1753FINEMULTISINGLEEXIT : MENUPORTRAIT SETUP MyCAMPAGE :SIZEQUALITYMETERINGSHOOTINGL 2272X1753FINEMULTISINGLE](https://usermanual.wiki/Hanwha-Techwin/DIGIMAXV4/User-Guide-297058-Page-72.png)
![75DPOF : IndexINFORMATIONThe number of copy is 1.There is no indicator for the index print.If the index print was set, the [INDEX] sub menu will be displayed as [YES] on the LCDmonitor.The first printed image is the first stored image.This function will specify the number of copies (except for movie clips and sound clip) for index print.1. Press the play mode button and press the menu button.2. Press the DOWN and the cursor will be shifted to the mainmenu.3. Select [DEL. ALL] menu by pressing the UP/DOWN button.4. Press the DOWN button on the [DEL. ALL] menu and the nextmenu page will be displayed.5. Select [INDEX] menu by pressing the UP/DOWN button.6. Press the RIGHT button and the cursor will shift to the [INDEX]sub menu.7. Select the desired sub menu by pressing the UP/DOWN button.8. Press the OK button to confirm the setting.Press the menu button twice and the menu display will bedisappeared. EXIT : MENUPORTRAIT SETUP MyCAMPAGE :SIZEQUALITYMETERINGSHOOTINGL 2272X1753FINEMULTISINGLEEXIT : MENUPORTRAIT SETUP MyCAMPAGE :SIZEQUALITYMETERINGSHOOTINGL 2272X1753FINEMULTISINGLE](https://usermanual.wiki/Hanwha-Techwin/DIGIMAXV4/User-Guide-297058-Page-73.png)
![76READYDPOF : CancelThis is used for canceling STANDARD or INDEX DPOF function.EXIT : MENUPORTRAIT SETUP MyCAMPAGE :SIZEQUALITYMETERINGSHOOTINGL 2272X1753FINEMULTISINGLEEXIT : MENUPORTRAIT SETUP MyCAMPAGE :SIZEQUALITYMETERINGSHOOTINGL 2272X1753FINEMULTISINGLE1. Press the play mode button and press the menu button.2. Press the DOWN and the cursor will be shifted to the mainmenu.3. Select [DEL. ALL] menu by pressing the UP/DOWN button.4. Press the DOWN button on the [DEL. ALL] menu and the nextmenu page will be displayed.5. Select [CANCEL] menu by pressing the UP/DOWN button.6. Press the RIGHT button and the cursor will shift to the[CANCEL] sub menu.7. Select the desired sub menu by pressing the UP/DOWN button.- [STANDARD] : Pre-set print quantity is canceled.- [INDEX] : Index print is canceled.8. Press the menu button twice and the menu display will bedisappeared.](https://usermanual.wiki/Hanwha-Techwin/DIGIMAXV4/User-Guide-297058-Page-74.png)
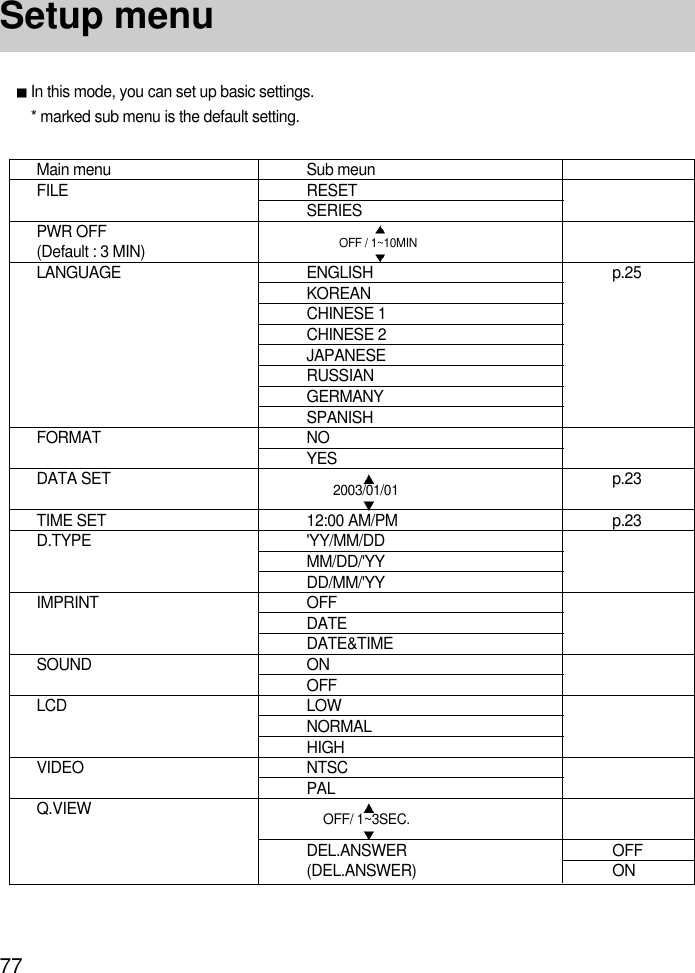
 tab.2. Press the DOWN and the cursor will be shifted to the main menu.3. Select [FILE] menu by pressing the UP/DOWN button.4. Press the RIGHT button and the cursor will shift to the [FILE]sub menu.5. Select the desired sub menu by pressing the UP/DOWN button.6. Press the OK button to confirm the setting.Press the menu button twice and the menu display will bedisappeared.- [RESET] : Using reset, the next file name will be set from 0001 even after formatting, deleting all orinserting a new memory card.- [SERIES] : Under this system, the file name will directly follow the last stored file name, regardlessof any actions such as file deletion or formatting.INFORMATIONThe first stored folder name is 100SSCAM, and first name is S400001.Whenever you store an image, the file number is increased by 1.The file number is named from S430001 to S439999 automatically, 9999 files will be storedin a folder. Using SERIES, the sequence starts at 100SSCAM and increases in increments of 1.(e.g :101SSCAM, 102SSCAM...)The files used with the memory card conform to the DCF(Design rule for Camera Filesystem) format.EXIT : MENUPORTRAIT SETUP MyCAMPAGE :SIZEQUALITYMETERINGSHOOTINGL 2272X1753FINEMULTISINGLE](https://usermanual.wiki/Hanwha-Techwin/DIGIMAXV4/User-Guide-297058-Page-76.png)
 tab.2. Press the DOWN and the cursor will be shifted to the mainmenu.3. Select [PWR OFF] menu by pressing the UP/DOWN button.4. Press the RIGHT button and the cursor will shift to the [PWROFF] sub menu.5. Select the desired sub menu by pressing the UP/DOWN button.- Selecting [NO] : The power off function will not operate.- Selecting [YES] : A menu will be displayed on the LCDmonitor as shown alongside.Select desired time by pressing the UP/DOWN button. 6. Press the OK button to confirm the setting.Press the menu button twice and the menu display will bedisappeared.INFORMATIONEven if the batteries or AC adapter are removed and inserted again, the power off setting willbe preserved.Note that the automatic power off does not operate if the camera is in slide show or PCmode.EXIT : MENUPORTRAIT SETUP MyCAMPAGE :SIZEQUALITYMETERINGSHOOTINGL 2272X1753FINEMULTISINGLEEXIT : MENUPORTRAIT SETUP MyCAMPAGE :SIZEQUALITYMETERINGSHOOTINGL 2272X1753FINEMULTISINGLE](https://usermanual.wiki/Hanwha-Techwin/DIGIMAXV4/User-Guide-297058-Page-77.png)
 tab.2. Press the DOWN and the cursor will be shifted to the main menu.3. Select [FORMAT] menu by pressing the UP/DOWN button.4. Press the RIGHT button and the cursor will shift to the [FORMAT] sub menu.5. Select the desired sub menu by pressing the UP/DOWN button.- Selecting [NO] : The image will be displayed on the LCD monitor.- Selecting [YES] : The memory card is formatted.([NO IMAGE] message will be displayed after the formatting in the play mode)6. Press the OK button to confirm the setting.Press the menu button twice and the menu display will be disappeared.INFORMATIONBefore using the memory card, it must be initialized.- New memory card, unformatted memory card.- A memory card that has a file this camera can’t recognize or taken by the other camera.NOTICEAll the files in the memory are deleted by [FORMAT] function. Before formatting thememory, it is advisable to copy important data onto other media as back-up e.g. floppydisks, hard disks, CD etc. When you format the memory card in your PC that runs on Windows 2000 or XP, pleaseselect FAT file system. If you select FAT 32, the image file may not be recognized on DPOFprinter.](https://usermanual.wiki/Hanwha-Techwin/DIGIMAXV4/User-Guide-297058-Page-78.png)
![81Format1. Select [Removable Disk] in the [Windows Explorer].2. Press the right mouse button and select [Format].3. Select [FAT] file format type and click the [Start] button.When you format the card in your PC that runs on Windows 2000 or XP, please select FAT filesystem. If you select FAT 32, the image file may not be recognized on DPOF printer.Formatting on a PC](https://usermanual.wiki/Hanwha-Techwin/DIGIMAXV4/User-Guide-297058-Page-79.png)
 tab.2. Press the DOWN and the cursor will be shifted to the main menu.3. Select [FORMAT] menu by pressing the UP/DOWN button.4. Press the DOWN button on the [FORMAT] menu and the next menu page will be displayed.5. Select [DATE SET] menu by pressing the UP/DOWN button.6. Press the RIGHT button and the cursor will shift to the [DATESET] sub menu. Select the desired sub menu by pressing theUP/DOWN button.RIGHT button : selects YEAR/ MONTH/ DAY item.UP/ DOWN button : changes the value of each item.7. Press the OK button to confirm the setting.Press the menu button twice and the menu display will bedisappeared.EXIT : MENUPORTRAIT SETUP MyCAMPAGE :SIZEQUALITYMETERINGSHOOTINGL 2272X1753FINEMULTISINGLEEXIT : MENUPORTRAIT SETUP MyCAMPAGE :SIZEQUALITYMETERINGSHOOTINGL 2272X1753FINEMULTISINGLE](https://usermanual.wiki/Hanwha-Techwin/DIGIMAXV4/User-Guide-297058-Page-80.png)
 tab.2. Press the DOWN and the cursor will be shifted to the main menu.3. Select [FORMAT] menu by pressing the UP/DOWN button.4. Press the DOWN button on the [FORMAT] menu and the next menu page will be displayed.5. Select [TIME SET] menu by pressing the UP/DOWN button.6. Press the RIGHT button and the cursor will shift to the [TIMESET] sub menu. Select the desired sub menu by pressing theUP/DOWN button.RIGHT button : selects HOUR, MINUTE, AM/PM item.UP/ DOWN button : changes the value of each item.7. Press the OK button to confirm the setting.Press the menu button twice and the menu display will bedisappeared.EXIT : MENUPORTRAIT SETUP MyCAMPAGE :SIZEQUALITYMETERINGSHOOTINGL 2272X1753FINEMULTISINGLEEXIT : MENUPORTRAIT SETUP MyCAMPAGE :SIZEQUALITYMETERINGSHOOTINGL 2272X1753FINEMULTISINGLE](https://usermanual.wiki/Hanwha-Techwin/DIGIMAXV4/User-Guide-297058-Page-81.png)
 tab.2. Press the DOWN and the cursor will be shifted to the main menu.3. Select [FORMAT] menu by pressing the UP/DOWN button.4. Press the DOWN button on the [FORMAT] menu and the nextmenu page will be displayed.5. Select [D.TYPE] menu by pressing the UP/DOWN button.6. Press the RIGHT button and the cursor will shift to the [D.TYPE]sub menu. Select the desired sub menu by pressing theUP/DOWN button.‘YY/ MM/ DD: Year/ Month/ DayMM/ DD/ ‘YY: Month/ Day/ YearDD/ MM/ ‘YY: Day/ Month/ ‘Year7. Press the OK button to confirm the setting.Press the menu button twice and the menu display will bedisappeared.EXIT : MENUPORTRAIT SETUP MyCAMPAGE :SIZEQUALITYMETERINGSHOOTINGL 2272X1753FINEMULTISINGLEEXIT : MENUPORTRAIT SETUP MyCAMPAGE :SIZEQUALITYMETERINGSHOOTINGL 2272X1753FINEMULTISINGLE](https://usermanual.wiki/Hanwha-Techwin/DIGIMAXV4/User-Guide-297058-Page-82.png)
 tab.2. Press the DOWN and the cursor will be shifted to the mainmenu.3. Select [FORMAT] menu by pressing the UP/DOWN button.4. Press the DOWN button on the [FORMAT] menu and the nextmenu page will be displayed.5. Select [IMPRINT] menu by pressing the UP/DOWN button.6. Press the RIGHT button and the cursor will shift to the[IMPRINT] sub menu.- OFF- DATE- DATE&TIME7. Press the OK button to confirm the setting.Press the menu button twice and the menu display will be disappeared.INFORMATIONDate & Time are imprinted at the bottom right side of the LCD monitor.Date will be imprinted as DATE TYPE setting.TIME is imprinted in the following way : [Hour / Minute/ Second] and hours are shown usingthe 24 hour clock.The imprint function is unaffected by the camera being switched on and off.Date & Time is imprinted as you set in the DATE SET, TIME SET menu.The imprint function is applied only to the still image. EXIT : MENUPORTRAIT SETUP MyCAMPAGE :SIZEQUALITYMETERINGSHOOTINGL 2272X1753FINEMULTISINGLEEXIT : MENUPORTRAIT SETUP MyCAMPAGE :SIZEQUALITYMETERINGSHOOTINGL 2272X1753FINEMULTISINGLE](https://usermanual.wiki/Hanwha-Techwin/DIGIMAXV4/User-Guide-297058-Page-83.png)
 tab.2. Press the DOWN and the cursor will be shifted to the mainmenu.3. Select [FORMAT] menu by pressing the UP/DOWN button.5. Press the DOWN button on the [FORMAT] menu and the nextmenu page will be displayed.6. Select [IMPRINT] menu by pressing the UP/DOWN button.5. Press the DOWN button on the [IMPRINT] menu and the nextmenu page will be displayed.6. Select [SOUND] menu by pressing the UP/DOWN button.4. Press the RIGHT button and the cursor will shift to the [SOUND]sub menu.5. Select the desired sub menu by pressing the UP/DOWN button.- [OFF] : The sound function doesn’t activate.- [ON] : The sound function activate.7. Press the OK button to confirm the setting.Press the menu button twice and the menu display will be disappeared.INFORMATIONEven though the SOUND function is set to [OFF], you can hear Movie clip, voice memo andsound clip file. EXIT : MENUPORTRAIT SETUP MyCAMPAGE :SIZEQUALITYMETERINGSHOOTINGL 2272X1753FINEMULTISINGLEEXIT : MENUPORTRAIT SETUP MyCAMPAGE :SIZEQUALITYMETERINGSHOOTINGL 2272X1753FINEMULTISINGLE](https://usermanual.wiki/Hanwha-Techwin/DIGIMAXV4/User-Guide-297058-Page-84.png)
 tab.2. Press the DOWN and the cursor will be shifted to the mainmenu.3. Select [FORMAT] menu by pressing the UP/DOWN button.4. Press the DOWN button on the [FORMAT] menu and the nextmenu page will be displayed.5. Select [IMPRINT] menu by pressing the UP/DOWN button.6. Press the DOWN button on the [IMPRINT] menu and the nextmenu page will be displayed.7. Select [LCD] menu by pressing the UP/DOWN button.8. Press the RIGHT button and the cursor will shift to the [LCD]sub menu.9. Select the desired sub menu by pressing the UP/DOWN button.There are LOW, NORMAL and HIGH sub menu in the [LCD]menu.10. Press the OK button to confirm the setting.Press the menu button twice and the menu display will be disappeared.EXIT : MENUPORTRAIT SETUP MyCAMPAGE :SIZEQUALITYMETERINGSHOOTINGL 2272X1753FINEMULTISINGLEEXIT : MENUPORTRAIT SETUP MyCAMPAGE :SIZEQUALITYMETERINGSHOOTINGL 2272X1753FINEMULTISINGLE](https://usermanual.wiki/Hanwha-Techwin/DIGIMAXV4/User-Guide-297058-Page-85.png)
 tab.2. Press the DOWN and the cursor will be shifted to the mainmenu.3. Select [FORMAT] menu by pressing the UP/DOWN button.4. Press the DOWN button on the [FORMAT] menu and the nextmenu page will be displayed.5. Select [IMPRINT] menu by pressing the UP/DOWN button.6. Press the DOWN button on the [IMPRINT] menu and the nextmenu page will be displayed.7. Select [VIDEO] menu by pressing the UP/DOWN button.8. Press the RIGHT button and the cursor will shift to the [VIDEO]sub menu.9. Select the desired sub menu by pressing the UP/DOWN button.EXIT : MENUPORTRAIT SETUP MyCAMPAGE :SIZEQUALITYMETERINGSHOOTINGL 2272X1753FINEMULTISINGLEEXIT : MENUPORTRAIT SETUP MyCAMPAGE :SIZEQUALITYMETERINGSHOOTINGL 2272X1753FINEMULTISINGLE](https://usermanual.wiki/Hanwha-Techwin/DIGIMAXV4/User-Guide-297058-Page-86.png)

 tab.2. Press the DOWN and the cursor will be shifted to the mainmenu.3. Select [FORMAT] menu by pressing the UP/DOWN button.4. Press the DOWN button on the [FORMAT] menu and the nextmenu page will be displayed.5. Select [IMPRINT] menu by pressing the UP/DOWN button.6. Press the DOWN button on the [IMPRINT] menu and the nextmenu page will be displayed.7. Select [Q.VIEW] menu by pressing the UP/DOWN button.8. Press the RIGHT button and the cursor will shift to the [Q.VIEW]sub menu.9. Select the desired sub menu by pressing the UP/DOWN button.- [OFF] : The quick view function can’t activate.- [1 ~ 3 SEC] : The captured image is briefly displayed duringthe selected time.- [DEL. ANSWER] : If you select one of the quick view time, amessage as shown alongside will displaywhenever you take a picture.- Selecting [ON] : [DEL. ANSWER] message will displaywhenever you take a picture. If you need notto store the image, press [YES] button,otherwise the image will store after pre-settime.- Selecting [NO] : [DEL. ANSWER] message will not display.10. Press the OK button to confirm the setting.Press the menu button twice and the menu display will be disappeared.INFORMATIONThe quick view function doesn’s apply to the movie clip and sound clip fileEXIT : MENUPORTRAIT SETUP MyCAMPAGE :SIZEQUALITYMETERINGSHOOTINGL 2272X1753FINEMULTISINGLEEXIT : MENUPORTRAIT SETUP MyCAMPAGE :SIZEQUALITYMETERINGSHOOTINGL 2272X1753FINEMULTISINGLE161161](https://usermanual.wiki/Hanwha-Techwin/DIGIMAXV4/User-Guide-297058-Page-88.png)
 tab.2. Press the DOWN and the cursor will be shifted to the mainmenu.3. Select [S. IMAGE] menu by pressing the UP/DOWN button.4. Press the RIGHT button and the cursor will shift to the [S.IMAGE] sub menu.5. Select the desired sub menu by pressing the UP/DOWN button.6. Press the OK button to confirm the setting.Press the menu button twice and the menu display will bedisappeared.INFORMATIONTo save you favorite image as LOGO, do [RESIZE] in the play mode menu and select[LOGO] sub menu.MySET menuYou can set up the start up image, start up sound and shutter sound.Start up imageYou can select the image that is displayed on the LCD monitor whenever the camera is turned on.](https://usermanual.wiki/Hanwha-Techwin/DIGIMAXV4/User-Guide-297058-Page-89.png)
 tab.2. Press the DOWN and the cursor will be shifted to the mainmenu.3. Select [S. SOUND] menu by pressing the UP/DOWN button.4. Press the RIGHT button and the cursor will shift to the [S.SOUND] sub menu.5. Select the desired sub menu by pressing the UP/DOWN button.6. Press the OK button to confirm the setting.Press the menu button twice and the menu display will bedisappeared.1. Press the menu button and press the RIGHT button twice to select [MyCAM](Third) tab.2. Press the DOWN and the cursor will be shifted to the main menu.3. Select [SH. SOUND] menu by pressing the UP/DOWN button.4. Press the RIGHT button and the cursor will shift to the [SH.SOUND] sub menu.5. Select the desired sub menu by pressing the UP/DOWN button.7. Press the OK button to confirm the setting.Press the menu button twice and the menu display will bedisappeared.Shutter soundYou can select the shutter sound.](https://usermanual.wiki/Hanwha-Techwin/DIGIMAXV4/User-Guide-297058-Page-90.png)