Hanwha Techwin DIGIMAXV800 Digital Camera User Manual v800en c V19
Samsung Techwin Co Ltd Digital Camera v800en c V19
UserManual.wiki
>
Hanwha Techwin
>
DIGIMAXV800 User Manual
>
Users Manual 1 of 3
Contents
1.
Users Manual 1 of 3
2.
Users Manual 2 of 3
3.
Users Manual 3 of 3
Users Manual 1 of 3
Navigation menu
Upload a User Manual
Namespaces
Wiki Guide
HTML
PDF
Info
Views
User Manual
Discussion / Help
Navigation
![2InstructionsUse this camera in the following orderInsert the USB cableSet up the camera driverBefore connecting the camera to a PC, via theUSB cable, you will need to set up the cameradriver. Install the camera driver that is contained inApplication software CD-ROM.(p.110)Take a picture (p.22)Insert the supplied USB cable into the PC’s USBport and the camera’s USB connectionterminal.(p.120)Check the camera’s power. If the power is turnedoff, press the camera button to turn it on.(p.29) Take a pictureCheck the camera’s powerCheck [Removable Disk]Open Window s EXPLORER and search for[Removable Disk].(p.121)If you use a card reader to copy the images on the memory card to your PC, the imagescould be damaged. When transferring the images taken with the camera to your PC, be sureto use the supplied USB cable to connect the camera to your PC. Please note that themanufacturer holds no responsibility for loss or damage of images on the memory card dueto the use of a card reader.](https://usermanual.wiki/Hanwha-Techwin/DIGIMAXV800.Users-Manual-1-of-3/User-Guide-572102-Page-2.png)

![16Instructions on how to use the memory cardBe sure to format the memory card (see p.91) if you are using a newly purchased memory forthe first time, if it contains data that the camera cannot recognise, or if it contains imagescaptured with a different camera.Turn off the camera power whenever the memory card is being inserted or removed.Repeated use of the memory card will eventually reduce the memory card’s performance.Should this be the case, you will need to purchase a new memory card. Wear and tear on the memory card is not covered by the Samsung warranty.The memory card is an electronic precision device. Do not bend, drop or subject the memory card to any heavy impact.Do not store the memory card in an environment with strong electronic or magnetic fields,e.g. near loud speakers or TV receivers.Please do not use or store in an environment where there are extremes in temperature.Do not allow the memory card to become dirty or to come into contact with any liquid. Should this happen, clean the memory card with a soft cloth.Please keep the memory card in its case when not in use.During and after periods of extended use, you may notice that the memory card is warm. This is perfectly normal.Do not use a memory card that is used in another digital camera.To use the memory card in this camera, format first the memory card by using this camera. Do not use a memory card formatted by another digital camera or memory card reader.Maintenance of the memory cardPreserving the memory card dataIf the memory card is subjected to any of the following, the recorded data may becomecorrupted :- When the memory card is used incorrectly.- If the power is switched off or the memory card is removed while recording, deleting(formatting) or reading.Samsung cannot be held responsible for lost data.It is advisable to copy important data onto other media as back-up e.g. floppy disks, harddisks, CD etc.If there is insufficient memory available : If you press the shutter button for the shot, a [Card Full !] message will appear and the camera will not operate. To optimise the amount ofmemory in the camera, replace the memory card or delete unnecessary images stored onthe memory.](https://usermanual.wiki/Hanwha-Techwin/DIGIMAXV800.Users-Manual-1-of-3/User-Guide-572102-Page-16.png)
![17Instructions on how to use the memory cardDon't remove the memory card when the Auto focus lamp(Green) is blinking as this maycause damage to data in the memory card.INFORMATION[ SD(Secure Digital) memory card ]WriteprotectswitchLabelCardpinsRecorded image size TIFF S. Fine Fine Normal 30 FPS 15FPS3072X2304 1 9 15 23 - -2816X2112 1 10 18 26 - -2592X1944 1 11 21 33 - -2272X1704 2 14 26 40 - -2048X1536 3 17 33 50 - -1600X1200 4 30 51 60 - -1024X768 11 60 106 129 - -640X480 22 121 165 202 - -640X480 - - - -About 2MIN About 4MIN320X240 - - - -About 4MIN About 7MIN160X128 - - - -About 8MIN About 15MINThe camera can use SD Memory Cards and MMC (Multi Media Cards).Please consult the enclosed manual for using the the MMC Cards.The SD memory card has a write protect switchthat prevents image files from being deleted orformatted.By sliding the switch to the bottom of the SDmemory card, the data will be protected. By sliding the switch to the top of the SDmemory card, the data protection will becanceled. Slide the switch to the top of the SDmemory card before taking a picture.When using a 32MB SD memory card, the specified shooting capacity will be as follows.(These figures are intended as an indication of expected performance). These figures areapproximate as image capacities can be affected by variables such as subject matter.StillimageMovieclip](https://usermanual.wiki/Hanwha-Techwin/DIGIMAXV800.Users-Manual-1-of-3/User-Guide-572102-Page-17.png)
![19When Using the Camera for the First TimeIf the camera is turned on for the first time, a menu will be displayed to set date, time andlanguage in the LCD monitor. This menu will not be displayed after setting up the date, timeand language. Set up the date, time and language before using this camera. Setting up the date, time and date type1. Select the [D & Time] menu by pressing the UP/DOWNbutton and press the RIGHT button.2. Press the UP/DOWN/LEFT/RIGHT button to select thedesired sub menu and press the OK button. RIGHT button : Selects YEAR/ MONTH/ DAY/ HOUR /MINUTE/DATE TYPELEFT button : Moves the cursor to the [D & Time]main menu if the cursor is at the firstitem of the date and time setup. In all other instances, the cursor will beshifted to the left of its current position.UP/ DOWN button : changes the value of each item.You can select 18 languages. These are listed below: English, Korean, French, German, Spanish, Italian, S. Chinese, T. Chinese, Japanese,Russian, Portuguese, Dutch, Danish,Swedish, Finnish, Thai, BAHASA(MALAY/INDONESIAN) and Arabic.Even if the camera is restarted, the language setting will be maintained.INFORMATIONSetting up the language1. Select the [Language] menu by pressing the UP/DOWNbutton and press the RIGHT button.2. Select the desired sub menu by pressing the UP/ DOWNbutton and press the OK button.Date&TimeLanguageSetupBack:◀ Set:OK▲05/05/0113:01▼yy/mm/ddDate&TimeLanguage ENGLISH한국어FRANÇAISDEUTSCHESPAÑOLSetupBack:◀ Set:OK](https://usermanual.wiki/Hanwha-Techwin/DIGIMAXV800.Users-Manual-1-of-3/User-Guide-572102-Page-19.png)
![20LCD monitor indicator[ Image & Full Status ]②③④⑤⑥⑦⑧⑨⑮⑰⑯⑲⑱⑳⑫⑪ ⑬ ⑭⑩①No. Description Icons Page1Batteryp.163Shooting typep.524Flashp.345Self-timerp.376Voice memo / MIC. Offp.327Macrop.338Meteringp.519Memory card indicatorp.4310AELp.4411Manual/ Continuous auto focusp.5312Auto focus frame13Camera shake warningp.2814Date/ Time2005/08/0101:00PM15Exposure compensationp.42■The LCD monitor displays information about the shooting functions and selections.Recording mode2p.11~12](https://usermanual.wiki/Hanwha-Techwin/DIGIMAXV800.Users-Manual-1-of-3/User-Guide-572102-Page-20.png)
![21LCD monitor indicatorStarting the recording mode1. Insert the batteries (p.16). Insert the batteries takingnote of the polarity (+ / -).2. Insert the memory card. (p.19)3. Close the battery chamber cover.4. Press the power button to turn on the camera. (If the date/time that is displayed on the LCD monitor isincorrect, reset the date/time before taking a picture.)5. Select the AUTO mode by rotating the mode dial.6. Point the camera towards the subject and compose theimage by using either the viewfinder or LCD monitor.7. Press the shutter button to capture an image.How to use the AUTO mode ( )[ AUTO mode ]If the auto focus frame turns to red when you press the shutter button down half way, it means that the camera cannot focus on the subject. Should this be the case, thecamera is unable to capture an image clearly.INFORMATION16White Balancep.4117ISOp.4118RGBRGB p.4019Sharpness20Image qualityp.5021Image sizep.49Number of available shots remaining12Remaining time (Movie clip/ Voice recording)00:01:30/01:00:0023Optical/ Digital Zoom bar/ Zoom rate22](https://usermanual.wiki/Hanwha-Techwin/DIGIMAXV800.Users-Manual-1-of-3/User-Guide-572102-Page-21.png)
![22Starting the recording modeHow to use the PROGRAM mode ( )Selecting the automatic mode will configure the camerawith optimal settings. You can still manually configure allfunctions except the aperture value and shutter speed.Steps from 1-4 are the same as those for AUTO mode.5. Select the PROGRAM mode by rotating the mode dial.6. Press the menu button to configure advanced functionssuch as image size (p.49), quality (p.50), metering (p.51),continuous shooting (p.52) , picture effects (p.53) andspecial effects (p.54). 7. Point the camera towards the subject and compose theimage by using either the viewfinder or LCD monitor.8. Press the shutter button to capture an image.10.0[ PROGRAM mode ]10.0[ Aperture priority mode ]How to use the APERTURE PRIORITY mode ( )Steps from 1-4 are the same as those for AUTO mode.5. Select the APERTURE PRIORITY mode by rotating themode dial.6. Select the desired aperture value by rotating the jog dial.7. Point the camera towards the subject and compose theimage by using either the viewfinder or LCD monitor.8. Press the shutter button to capture an image.* Smaller Aperture values make the object sharp but blurthe background. Larger Aperture values make both theobject and background sharp.](https://usermanual.wiki/Hanwha-Techwin/DIGIMAXV800.Users-Manual-1-of-3/User-Guide-572102-Page-22.png)
![23Starting the recording modeHow to use the SHUTTER PRIORITY mode ( )Steps from 1-4 are the same as those for AUTO mode.5. Select the SHUTTER PRIORITY mode by rotating themode dial.6. Select the desired shutter speed by rotating the jog dial.7. Point the camera towards the subject and compose theimage by using either the viewfinder or LCD monitor.8. Press the shutter button to capture an image.* High Shutter speeds can capture a moving object in astill image as if the object is not moving. Low Shutterspeeds can capture a moving object with an ‘active’effect.[ Shutter Priority mode ]How to use the MANUAL mode ( )Steps from 1-4 are the same as those for AUTO mode.5. Select the MANUAL mode by rotating the mode dial.6. Press the ASM button to select the shutter speed or theaperture value. Then select the desired shutter speed oraperture value by rotating the jog dial.7. Point the camera towards the subject and compose theimage by using either the viewfinder or LCD monitor.8. Press the shutter button to capture an image.10.0[ Manual mode ]](https://usermanual.wiki/Hanwha-Techwin/DIGIMAXV800.Users-Manual-1-of-3/User-Guide-572102-Page-23.png)
![24Starting the recording modeHow to use the MySET mode ( )This mode allows users to save frequently used shootingsettings for later use. Steps from 1-4 are the same as those for AUTO mode.5. Select the MySET mode by rotating the mode dial.6. Press the menu button.7. Use the Left/Right buttons to select the [Load Myset]menu tap. Use the Up/Down buttons to select desiredMySET number.8. Press the OK button to load the camera configurationsaved in the MySET number and close the menuscreen.9. Point the camera towards the subject and compose theimage by using either the viewfinder or LCD monitor.10. Press the shutter button to capture an image.Please see page 57 for details of the MySET shootingmode and menus.10.0[ MySET mode ]How to use the MOVIE CLIP mode ( )Steps from 1-4 are the same as those for AUTO mode.5. Select the MOVIE CLIP mode by rotating the mode dial.6. The MOVIE CLIP mode icon and available recordingtime will display on the LCD monitor.7. Point the camera towards the subject and compose the image by using either the viewfinder or LCD monitor.Press the shutter button and movie clips are recordedfor as long as the available recording time.Movie clips will still be recorded if the shutter button isreleased. *If you wish to stop recording, press the shutter buttonagain.*Image size and type are listed below.- Image size : 640X480, 320X240,160X128(Selectable) - File type : *.avi(MPEG-4)10.08 01:00 PM2005/08/01 [ MOVIE CLIP mode ]STANDBY](https://usermanual.wiki/Hanwha-Techwin/DIGIMAXV800.Users-Manual-1-of-3/User-Guide-572102-Page-24.png)
![25Starting the recording modePausing while recording a movie clip (Successive Recording)This camera allows you to temporarily stop during unwanted scenes, while recording a movieclip. Using this function, you can record your favourite scenes into a movie clip without havingto create multiple movie clips.Using Successive Recording Steps from 1-6 are the same as those for MOVIE CLIPmode.7. Point the camera towards the subject and compose theimage by using the viewfinder or LCD monitor. Pressthe shutter button and movie clips are recorded for aslong as the available recording time. Movie clips will stillbe recorded if the shutter button is released.8. Press the Pause button( ) to pause recording.9. Press the Pause button( ) again to resume therecording.10. If you wish to stop recording, press the shutter button again.[Successive recording of a movie clip]STOP:SHUTTER](https://usermanual.wiki/Hanwha-Techwin/DIGIMAXV800.Users-Manual-1-of-3/User-Guide-572102-Page-25.png)
![26Starting the recording modeHow to use the SCENE mode ( )Use the menu to easily configure optimal settings for a variety of shooting situations. These include NIGHT, PORTRAIT, CHILDREN, LANDSCAPE, CLOSE UP, TEXTRECOGNITION, SUNSET, DAWN, BACKLIGHT, FIREWORKS and BEACH & SNOWscenes.Steps from 1-4 are the same as those for AUTO mode.5. Select the SCENE mode by rotating the mode dial.6. Press the menu button and select the [Scene] menu bypressing the left and right button. 7. Select the desired [Scene] sub menu by pressing the UP andDOWN buttons and press the OK button. Please see page 58for detailed descriptions for each screen.8. The current scene icon is displayed at the top left of theLCD.9. Point the camera towards the subject and compose theimage by using either the viewfinder or LCD monitor.10. Press the shutter button to capture an image.[ SCENE mode ]How to use the VOICE RECORDING mode ( )1. Select the VOICE RECORDING mode by pressing theVoice recording button twice. (In Movie clip mode, pressthe Voice recording button once to select the VOICERECORDING mode)2. Press the shutter button to record a voice. - Press the shutter button once and voice is recorded foras long as the available recording time (Max : 1 hour)allows. The recording time will be displayed on theLCD monitor. Voice will still be recorded if the shutterbutton is released.- If you wish to stop recording, press the shutter buttonagain.- File type : *.wav* A distance of 40cm between you and the camera(microphone) is the best distance to record sound.[ VOICE RECORDING mode ]START:SHUTTER](https://usermanual.wiki/Hanwha-Techwin/DIGIMAXV800.Users-Manual-1-of-3/User-Guide-572102-Page-26.png)
![27Things to Watch Out for When Taking PicturesPressing the shutter button down half way. Lightly press the shutter button to confirm focus and flash battery charge. Press the shutter button all way down to take the picture.The available recording time may vary depending on shooting conditions and camerasettings.When the Flash Off or Slow synchro mode is selected in a low lighting condition, the camerashake warning indicator ( ) may appear on the LCD monitor. In this case, use a tripod,support the camera on a solid surface or change the flash mode to flash shot mode.Compensated shooting against the light : Please do not take pictures to the sunlight direction. Taking a picture against the sun maymake the picture dark. To take a picture against the sun, please use the [Backlight] in thescene shooting mode (see page 58), fill-in flash (see page 36), spot metering(see page 51), orexposure compensation (see page 42).Avoid obstructing the lens or the flash when you capture an image.As there can be some differences between what is seen through the Viewfinder and theresulting image when taken at a range closer than 1.5m, it is recommended that you use theLCD monitor to compose these shots.Using the LCD monitor extensively will drain the batteries. We recommend turning off the LCD monitor and using the optical viewfinder as often aspossible in order to extend battery life.Under certain conditions the auto focus system may not perform as expected.- When photographing a subject that has little contrast.- If the subject is highly reflective or shiny.- If the subject is moving at high speed.- When there is strong reflected light, or when the background is very bright.- When the subject matter has only horizontal lines or the subject is very narrow (such as a stick or flagpole).- When the surroundings are dark.[ Lightly press the shutter button ] [ Press the shutter button ]](https://usermanual.wiki/Hanwha-Techwin/DIGIMAXV800.Users-Manual-1-of-3/User-Guide-572102-Page-27.png)
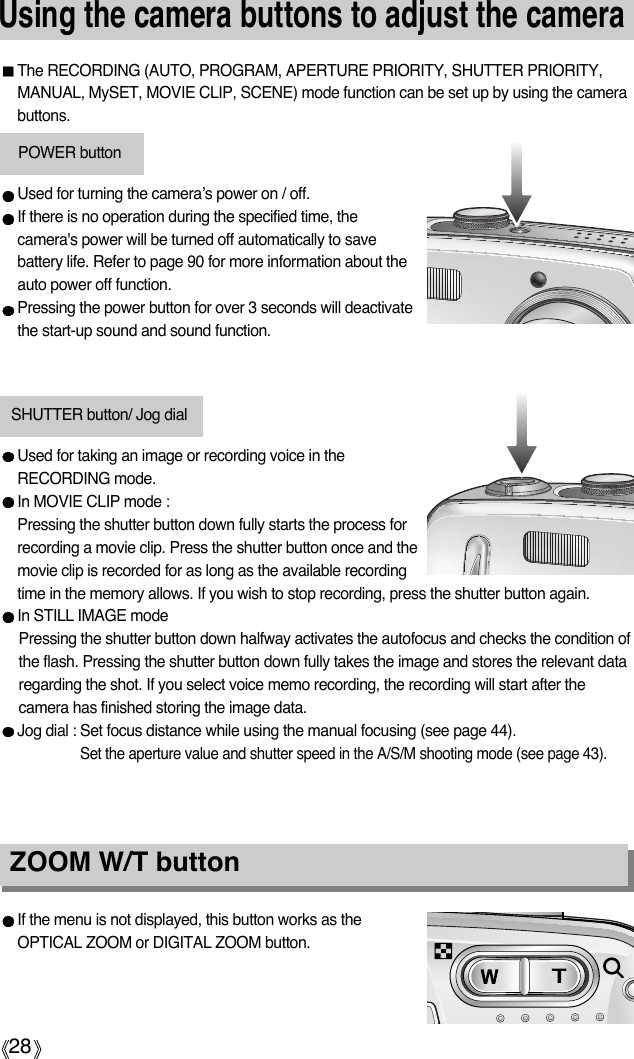
![29ZOOM W/T buttonThis camera has a 3X optical zoom and a 10X digital zoom function. Using both will offer a total zoom ratio of 30X.TELE ZoomOptical zoom TELE : Pressing the ZOOM T button. This will zoom into the subject i.e.the subject will appear nearer.Digital zoom TELE : When the maximum (3X) optical zoom is selected, pressing theZOOM T button activates the digital zoom software. ReleasingZOOM T button stops the digital zooming at the required setting.Once the maximum digital zoom (10X) is achieved, pressing theZOOM T button will have no effect.[ WIDE zoom ] [ TELE zoom ] [ Digital zoom 5.0X ]Pressing theZOOM T buttonPressing theZOOM T buttonWIDE ZoomOptical zoom WIDE : Pressing the ZOOM W button. This will zoom out from the subjecti.e. the subject will appear further away. Pressing the ZOOM Wbutton continuously will set the camera to its minimum zoomsetting i.e. the subject appears at its furthest from the camera.Digital zoom WIDE : When the digital zoom is in operation, pressing the ZOOM Wbutton will reduce the digital zooming in steps. Releasing ZOOM Wbutton stops digital zooming. Pressing the ZOOM W button willreduce the digital zoom and then it will continue to reduce theoptical zoom until the minimum setting is reached. [ TELE zoom ][ Optical zoom 2X ][ WIDE zoom ]Pressing theZOOM W buttonPressing theZOOM W button[ Digital zoom 5.0X ] [ TELE zoom ] [ WIDE zoom ]Pressing theZOOM W buttonPressing theZOOM W buttonOptical zoomDigital zoom](https://usermanual.wiki/Hanwha-Techwin/DIGIMAXV800.Users-Manual-1-of-3/User-Guide-572102-Page-29.png)
![30ZOOM W/T buttonTo use the digital zoom the LCD monitor has to be turned on.Images taken using the digital zoom may take a little longer for the camera to process.Allow time for this to take place.The digital zoom cannot be used in movie clip shots.If the movie clip is being recorded, the zoom operation cannot be activated.You may notice a decrease in image quality when using the digital zoom.To view more clear digital zoom image, press the shutter button halfway at the maximum(3X) optical zoom position and press the zoom T button again.The digital zoom can’t be activated in the [Night], [Children], [Close up], [Text] and[Fireworks] scene modes. Take care not to touch the lens to avoid taking an unclear image and possibly causingcamera malfunction. If the image is dim, turn the camera power off and on again to modifythe lens position.Take care not to press the lens as this may cause a camera malfunction.When the camera is turned on, take care not to touch the camera's moving lens parts asthis may cause the resulting image to be dim and unclear.Take care not to touch the lens during zoom operation as this may cause damage.INFORMATION](https://usermanual.wiki/Hanwha-Techwin/DIGIMAXV800.Users-Manual-1-of-3/User-Guide-572102-Page-30.png)
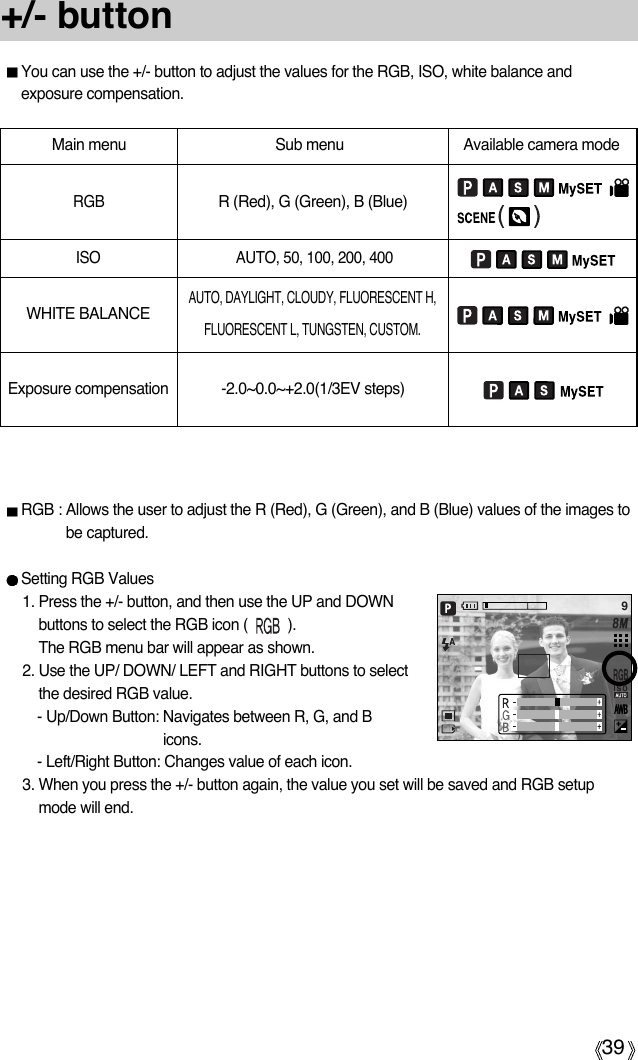
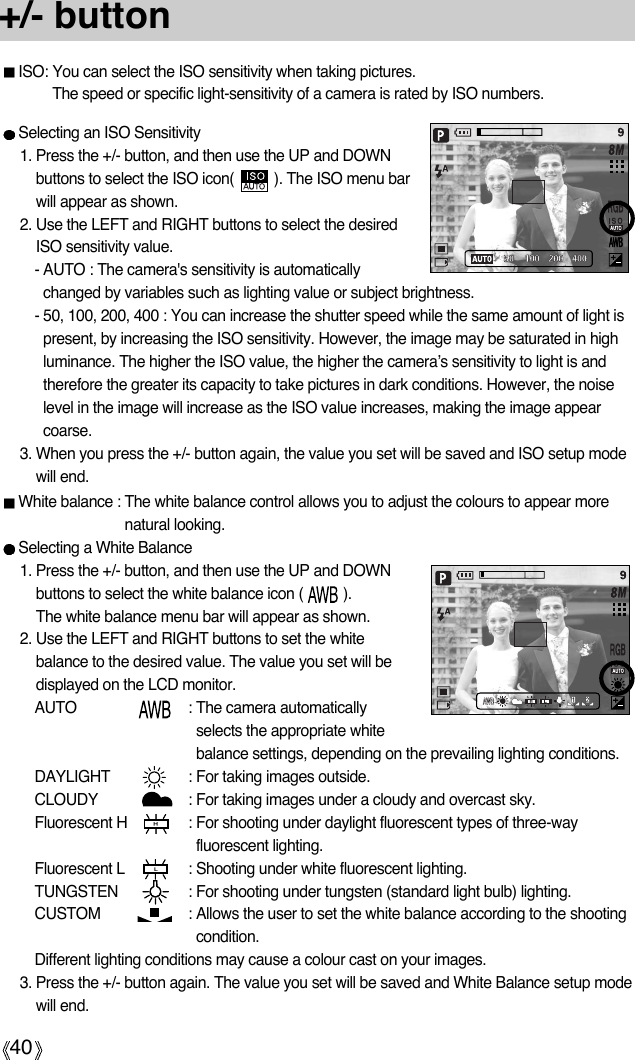
![31Voice memo( ) / UP buttonWhile the menu is showing, press the UP button to move up the submenu cursor.When the menu is not displayed on the LCD monitor, the UP button operates as the voicememo ( ) button. You can add your voice-over to a stored still image.Recording a voice memo1. Rotate the MODE DIAL to select a RECORDING mode with the exception of MOVIE CLIPmode. 2. Press the VOICE MEMO ( ) button. If the voice memo indicator is displayed on theLCD monitor, the setting is completed.3. Press the shutter button and take a picture. The picture is stored on the memory card.4. Voice memo will be recorded for ten seconds from the moment the picture is stored. In the middle of the sound recording, pressing the shutter button will stop the voice memo.[Recording Voice Memo][Preparing for Voice Memo]A distance of 40cm between you and the camera (microphone) is the best distance torecord sound.INFORMATIONSTOP:SHUTTER](https://usermanual.wiki/Hanwha-Techwin/DIGIMAXV800.Users-Manual-1-of-3/User-Guide-572102-Page-31.png)
![32Available focusing method, by recording mode(O:Selectable, X:Not selectable, :Infinity focus range)OOOOOOOOXOOOOOOXOXXXX XXXModeAutoMacroAuto macroModeAutoMacroAuto macroOO XX O OXXXOOXXXXXXXXXXXXXXXMacro( ) / Down button (Focusing)When the macro mode is selected, it is possible that camera shake will occur. If this is thecase, use a tripod to eliminate this.When you take a picture within 20cm(MACRO focus), select the FLASH OFF mode.In the AUTO mode, the Auto macro will be selected by pressing the macro button. INFORMATIONWhile the menu is showing, press the DOWN button to move from the main menu to asubmenu, or to move down the submenu cursor.When the menu is not showing, you can use the MACRO/ DOWN button to take macropictures (within the distance range of 4-80 cm).[ Macro ][ Auto focus ]Pressing the macrobuttonWIDE TELE WIDE TELE WIDE TELE80 ~ 80 ~ 4 ~ 80 25 ~ 80 4 ~ 25 ~ Unit : cmTypes of focus modes and focus rangesFocus typeFocus rangeMacro Auto macroAuto](https://usermanual.wiki/Hanwha-Techwin/DIGIMAXV800.Users-Manual-1-of-3/User-Guide-572102-Page-32.png)
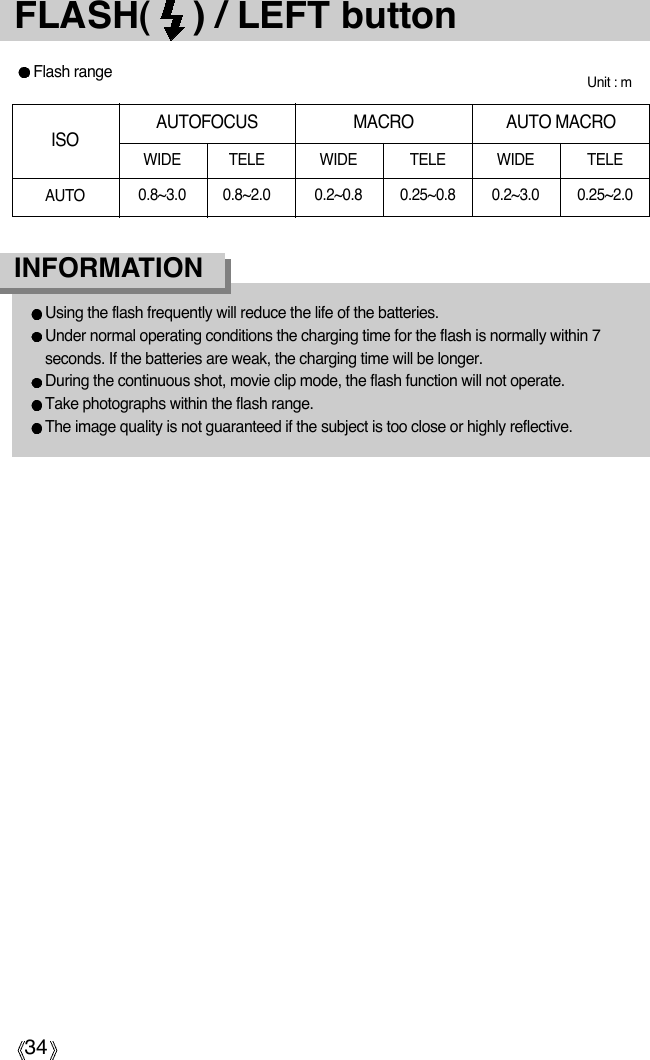
![33Focus lockTo focus on the subject positioned outside of the centre, use the focus lock function.Using the Focus Lock1. Ensure the subject in the centre of the autofocus frame.2. Press the SHUTTER button halfway. When the green auto lights up, it means the camerais focused on the subject. Be careful not to press the SHUTTER button all the way down toavoid taking an unwanted pictured.3. With the SHUTTER button still pressed down only halfway, move the camera torecompose your picture as desired, and then press the SHUTTER button completely totake the picture. If you release your finger from the SHUTTER button, the focus lockfunction will be cancelled.1. The image to becaptured 2. Press the SHUTTERbutton halfway andfocus on the subject3. Recompose thepicture and fullydepress theSHUTTER buttonFLASH( ) / LEFT button[ Selecting the Auto flash ]10.0When the menu is displayed on the LCD monitor,pressing the LEFT button makes the cursor shift to the lefttab.When the menu is not displayed on the LCD monitor, theLEFT button operates as the FLASH ( ) button.Selecting the flash mode1. Rotate the MODE DIAL to select a RECORDING modewith the exception of MOVIE CLIP and VOICERECORDING modes.2. Press the Flash button until the desired flash mode indicator displays on the LCD monitor.3. A flash mode indicator will be displayed on the LCD monitor. Use the correct flash to suitthe environment.](https://usermanual.wiki/Hanwha-Techwin/DIGIMAXV800.Users-Manual-1-of-3/User-Guide-572102-Page-33.png)
![36Self-timer( ) / Remote ( )/ Right buttonWhen the menu is displayed on the LCD monitor, pressing the Right button makes the cursorshift to the right tab. The right button can also be used to move to a sub menu to select adifferent setting.When the menu is not displayed on the LCD monitor, the RIGHT button operates as the Self-timer ( ) and Remote ( ) button. This function is used when the photographer wouldalso like to be in the image.Using the self-timer and remote control.1. Rotate the mode dial to the RECORDING mode.2. Press the SELF-TIMER button until the desired mode indicator displays on the LCDmonitor. A self-timer icon or remote control icon appears on the LCD monitor.- Selecting a self-timer : When you press the SHUTTER button, the picture will betaken after the specified time has elapsed and the self-timerfunction will be canceled.- Selecting a remote mode : Pressing the shutter button of remote control will allow aninterval of 2 seconds before the image is taken. In the remotemode, the shutter button of the camera can’t be activated. Aftertaking a picture, the remote mode will be maintained. But,pressing the power button, rotating the mode dial, pressing theplay mode button and pressing the self-timer button will cancelthe remote mode.10.0[Selecting the 2 SEC self-timer] [Selecting the remote control]Description of Self-timer/Remote modeIcon Mode Description Pressing the shutter button will allow an interval of 2 secondsbefore the image is taken.Pressing the shutter button will allow an interval of 10 secondsbefore the image is taken.A picture will be taken after about 10 seconds and 2 secondslater a second picture will be taken.You can take a picture by remote control instead of using theshutter button of the camera.DoubleRemotemode2s10s](https://usermanual.wiki/Hanwha-Techwin/DIGIMAXV800.Users-Manual-1-of-3/User-Guide-572102-Page-36.png)
![37Self-timer( ) / Remote ( )/ Right buttonSelf-timer/ remote mode settingRemote control range When you take a picture by using the remote control, referto the illustrations shown alongside about the remotecontrol range.Off 2s self-timer 10s self-timer Double self-timer RemoteOff 10s self-timer RemoteMode dialAUTOPROGRAMA/S/M, MySETSCENEMOVIE CLIP[ Shutter button on theremote control ]When taking a picture using the self-timer, the self-timer lamp works as follows: 2 second self-timer setting : The self-timer lamp blinks at 0.25 second interval for 2seconds. 10 second self-timer setting : The self-timer lamp blinks at 1 second interval for the first 8seconds. It blinks at 0.25 second interval for the remaining2 seconds.If you operate the Mode dial and Self-timer button during the self-timer operation, the self-timer function is canceled.Use a tripod to prevent the camera from shaking.In Movie Clip mode, only the 10s self-timer and remote will work.INFORMATIONSetting ( marked camera working mode is the default setting.)](https://usermanual.wiki/Hanwha-Techwin/DIGIMAXV800.Users-Manual-1-of-3/User-Guide-572102-Page-37.png)
![38Self-timer( ) / Remote ( )/ Right buttonReplacing batteries for the remote controlMENU/ OK button Make sure the + polarity is toward the top and the - polarity is toward the bottom whileinstalling batteries for the remote control. Replace batteries for the remote control in the localservice centre. Use the CR 2025 3V batteries.If the menu is displayed, use the 5-Function buttons to change the data values and for yourchanges to be acceptedIf the menu is not displayed, press the MENU/OK button to display a menu for the currentcamera mode on the LCD monitor. Press the button again to return to the previous state.- There is no menu for VOICE RECORDING mode.- The menu screen may not show on the LCD when another button is pressed or image datais being processed. (The green lamp next to the view finder blinks)[ Menu on ][ Menu off ]Pressing the MENUbutton3624X24483072X23042816X21122592X19442272X17042048X1536Size](https://usermanual.wiki/Hanwha-Techwin/DIGIMAXV800.Users-Manual-1-of-3/User-Guide-572102-Page-38.png)