Hanwha Techwin SEW3034WN Wireless LCD Monitor User Manual
Samsung Techwin Co Ltd Wireless LCD Monitor
UserManual.wiki
>
Hanwha Techwin
>
SEW3034WN User Manual
User Manual
Navigation menu
Upload a User Manual
Namespaces
Wiki Guide
HTML
PDF
Info
Views
User Manual
Discussion / Help
Navigation

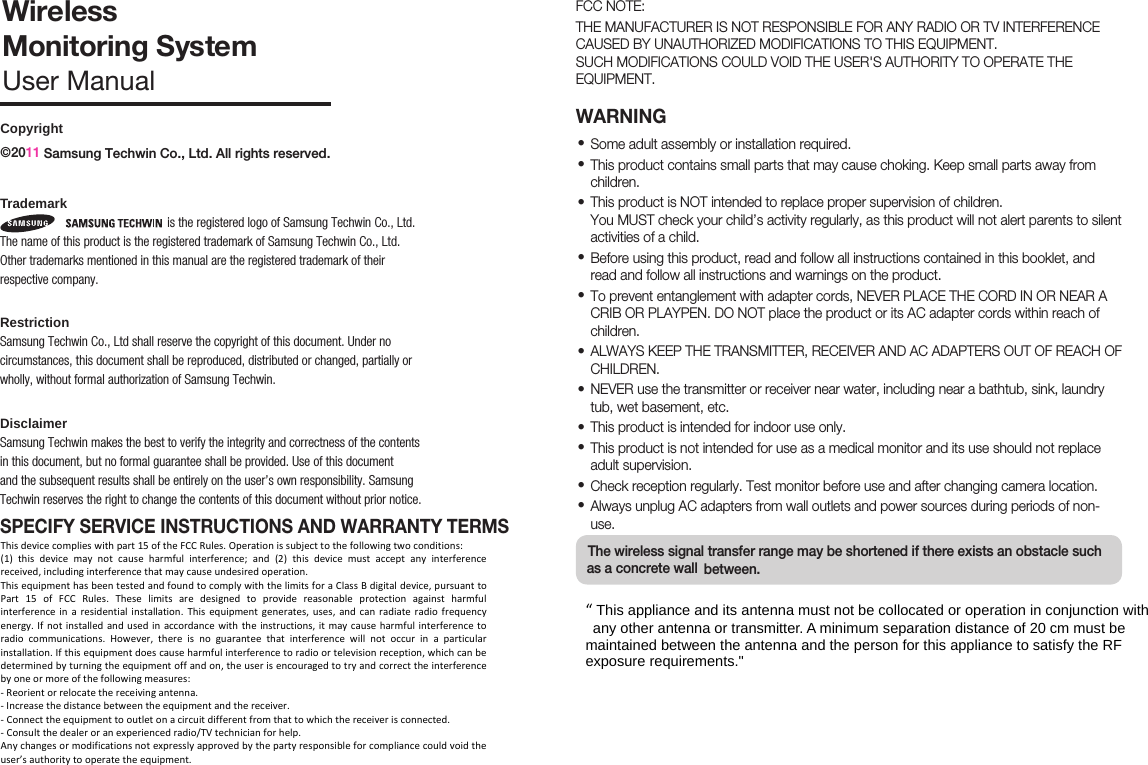

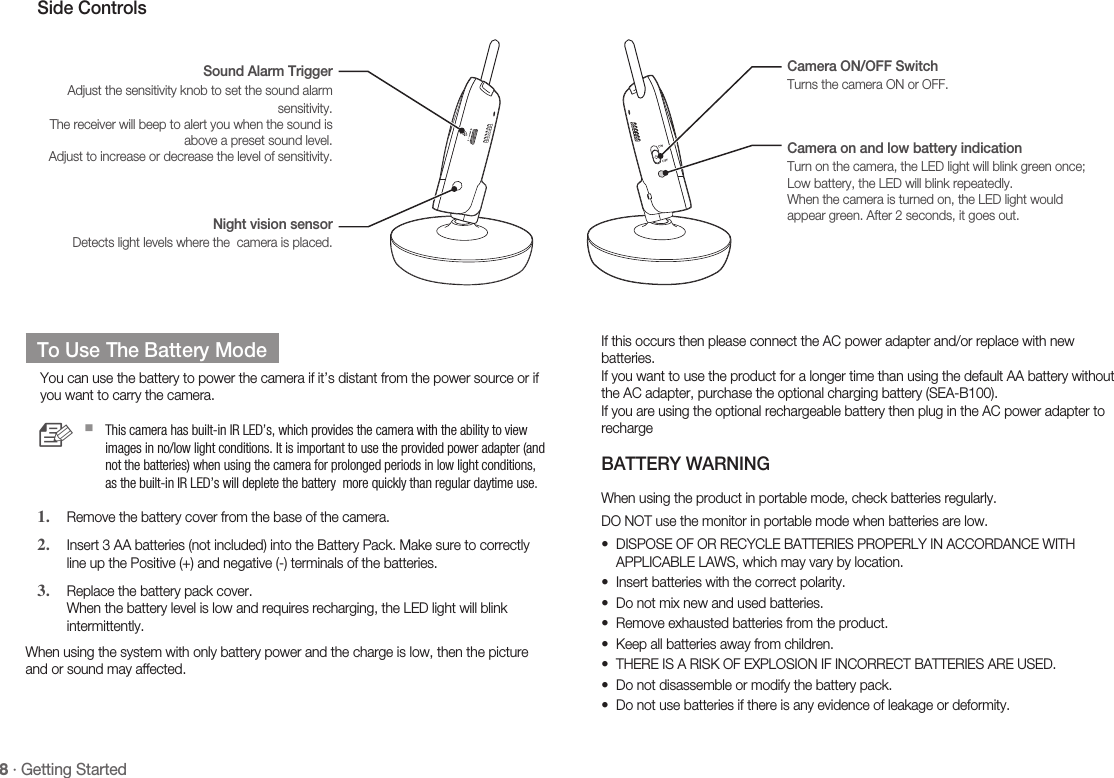
![English · 01 Getting StartedGetting to know your Monitoring systemWireless ReceiverAfter opening the box, fully charge the monitor before use. After initial charge, recharge as needed.Front ControlsNavigation Controls / ButtonViewing Mode: The following controls are used while watching live video from the camera:Press the [+] or [–] keys to increase or decrease the volume.Press the [A] key to view cameras in automatic switching mode.Press the [M] key to manually switch between cameras.Menu Mode: Use the [+/–/A/M] key arrows to navigate in Menu Mode. Press the [ ] button to confirm the menu selection.•••SEW-3034Receiver AntennaReceives and sends signals from or to the camera.3.5” LCD ScreenDisplays video from the camera.MicrophoneTransmits audio to the camera when Talk Button is pressed down and held like a walkietalkie.MENU ButtonPress to access the receiver menu. Press the button again to exit.Navigation Controls/ ButtonUse the controls to move and select while in Viewing Mode and Menu Mode.Play/StopUsed to play or stop playing the recorded data.SLEEP / ButtonUsed to activate the screen saver mode.Press the [A/M] or [SLEEP] button again to release the screen saver mode.Used to delete the recorded data on the Micro SD card in search mode.](https://usermanual.wiki/Hanwha-Techwin/SEW3034WN/User-Guide-1433336-Page-5.png)

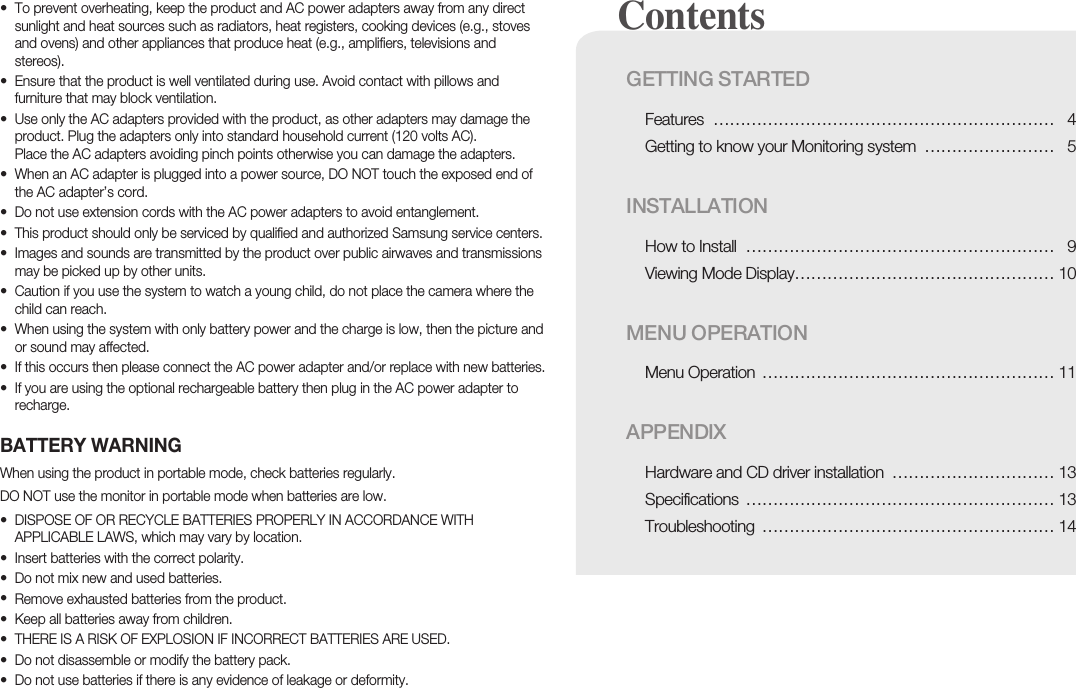
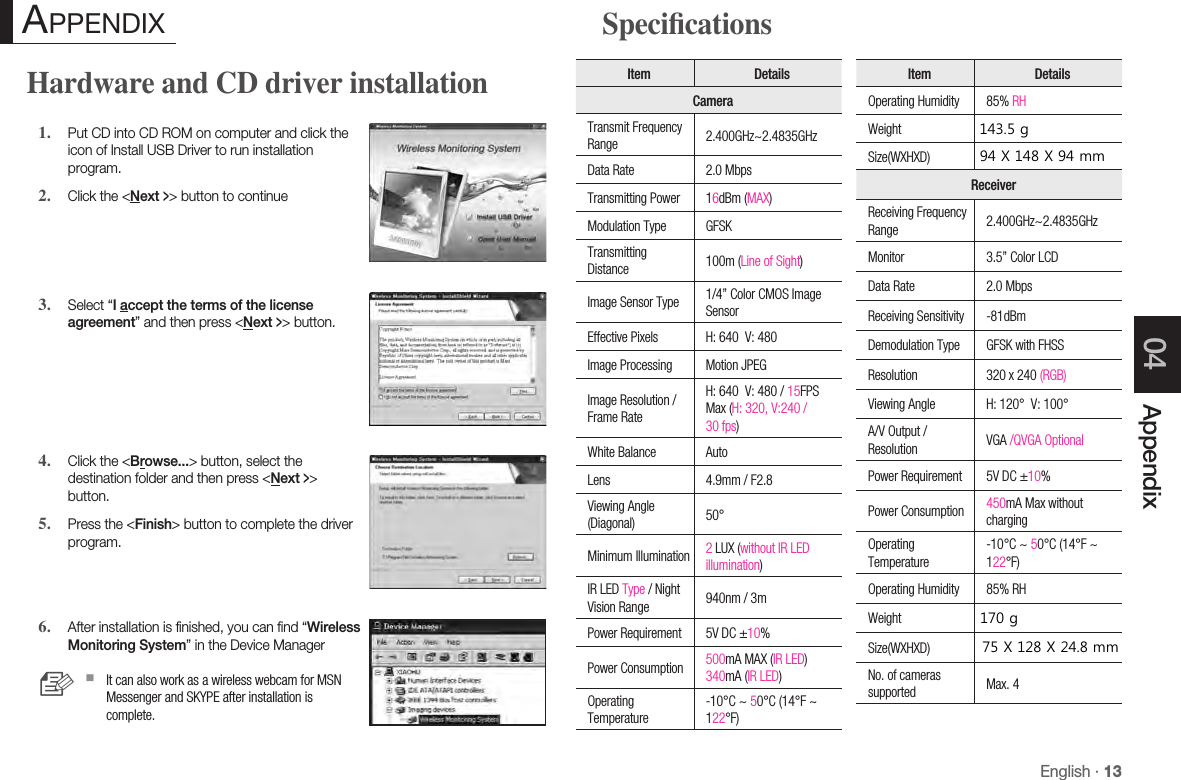
![10 · InstallationWireless ReceiverSignal Indicator The signal indicator shows the strength of the signal being received from the camera. The number of bars in the signal indicator shows the strength of the signal – One or no bars indicate the signal is poor, and 4 bars indicate a strong signal.Camera Number Indicates the number of camera that is displayed on the current screen. Press the [M] key on the receiver to switch between available cameras.To automatically switch between channels, press the [A] key (AUTO).For paring to add a camera, refer to “Pairing”. (Page 12)n``Trigger Alert Indicates the type of alert when audio is detected on the camera. The Trigger Alert volume will be adjusted with the applicable message on the screen. Press the [–] key to decrease the volume, and press the [+] key to increase the volume.Talk It displays if you press and hold [ ] in the left corner. Indicates that it is on talking mode.Night light If you press [ ] in the wireless receiver or wireless camera, the night light of the wireless camera turns on with the applicable message.SEW-3034Viewing Mode DisplayAuto Mute If you set Auto Mute to <YES>, the applicable message appears on the screen.Micro SD card status Indicates when a Micro SD card is inserted. It displays the recording type if you press record button.A/M record Press to auto record or manual record during monitoring. REC A : Auto Recording - Start recording when the alarm is detected. REC M : Manual Recording - Press to the button will be recorded. Volume adjustment The receiver volume can be adjusted by using the [+], [–] keys when viewing a camera. Press the [–] key to decrease the volume, and press the [+] key to increase the volume. When the volume is set to one bar (lowest setting), the volume will be muted and no sound will be emitted by the device.The volume adjustment icon will be displayed during volume changes, and will disappear after 10 seconds of inactivity.Alarm Indicates if the alarm set to <ON>.Time/ZOOM Displays the time that is set in the current receiver. Displays zoom size if it sets x2.No Signal WarningsYou will see the following warning message when the camera is out of range of the receiver. The "OUT OF RANGE" message means the receiver cannot access the camera. Please reposition the camera, or check the camera power.](https://usermanual.wiki/Hanwha-Techwin/SEW3034WN/User-Guide-1433336-Page-10.png)
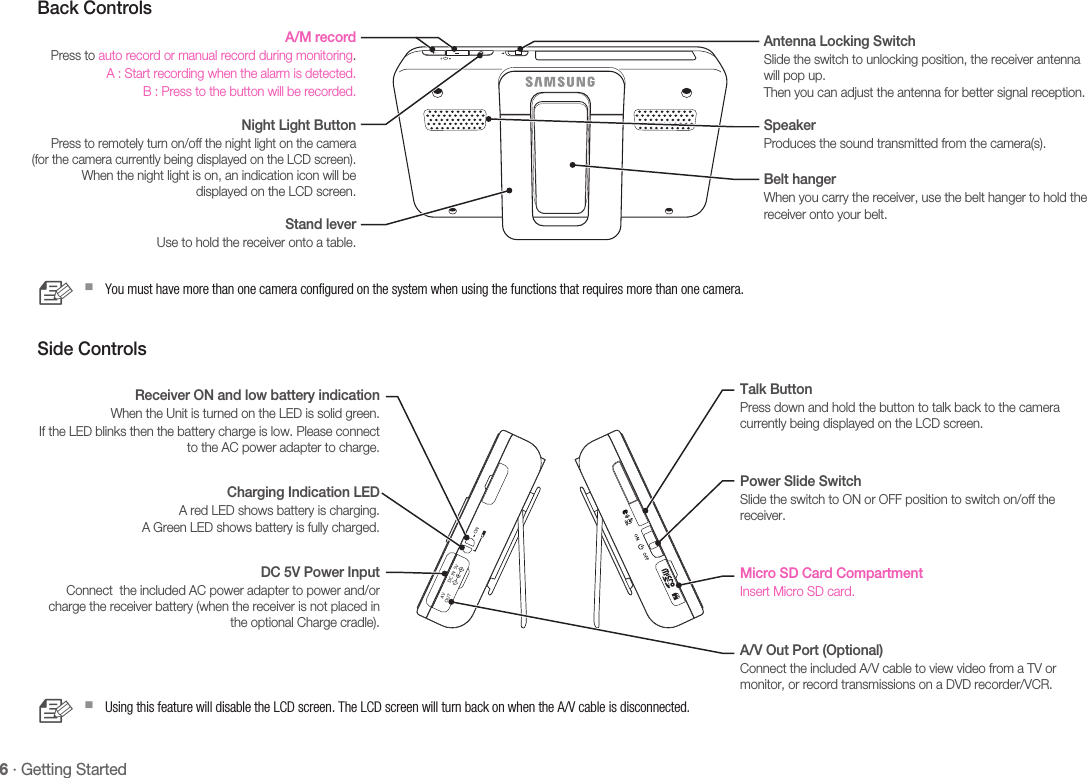
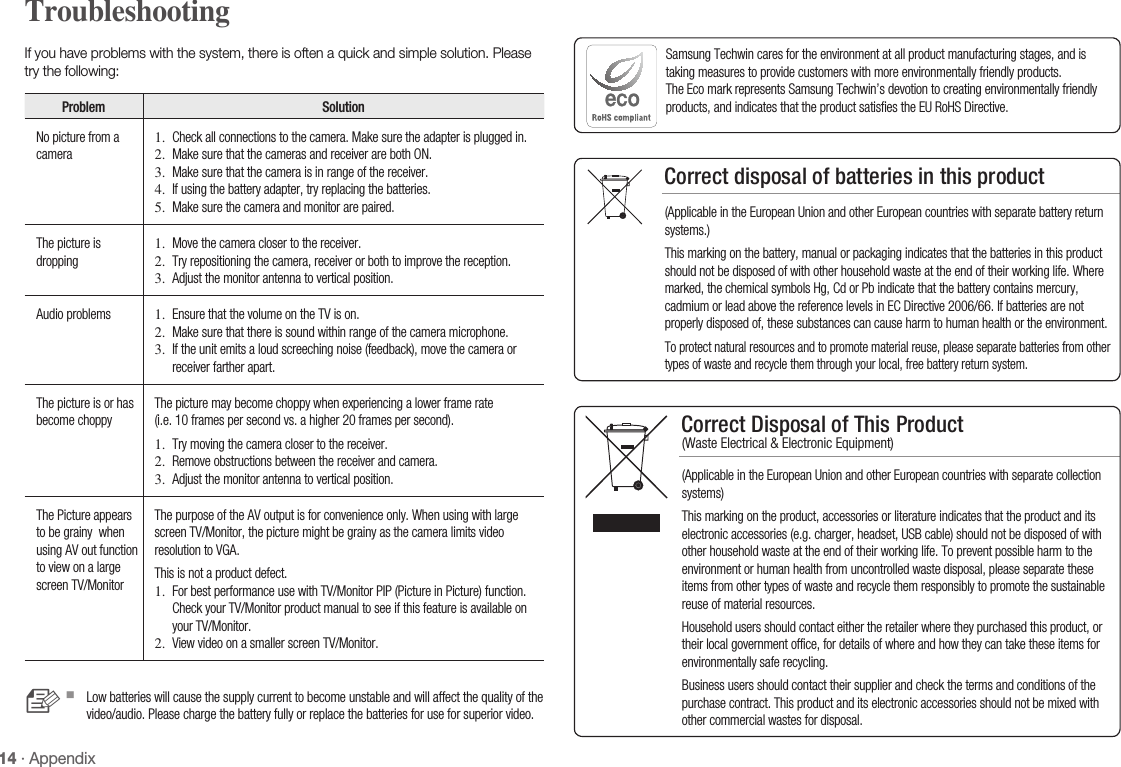
![English · 11Menu Operation03Menu OperationHow to use the buttons to setupPress [MENU] button to enter the menu setting or exit the menu setting.Move to other menu by press [A] or [M] key.Press the [ ] button for option selection mode. Adjust option level by [+] or [–] key. Press the [ ] button to complete.Buttons used in setup iconBrightness Adjusts the brightness of the image.Zoom Zoom in 1x or 2x of the video image. In double size mode, press the navigation control buttons to pan up/down and left/right while viewing live image.1.2.3.4.5. Menu operation Power Saving Enables receiver power save mode (when no activity on the camera is detected). The Power Saving Menu is used to turn off the screen at a predetermined time, to conserve battery power. After selected time, the monitor will go to a select screen saver or black screen if blank is selected as the screen saver. Power Saving mode will be deactivated by pushing any key on the front panel of monitor or by higher sound detected by cameras. If Power Saving mode is deactivated by pushing [A], [M] and [SLEEP], the monitor will go back to black screen after the time you set if there is no sound trigger during that time. If Power Saving mode is deactivated by a sound trigger, the device will go back to black screen approximately 8 seconds after the last trigger.Screen Saver After selected time, the monitor will go to a select screen saver or black screen if blank is selected as the screen saver.Auto Mute Automatically cuts off the audio when there is only slight environmental noise on the camera side. Choose <YES> to enable this function. If auto mute is enabled, the receiver will automatically mute if there is no audio detected from the camera. If the audio is detected on the camera, the receiver will automatically unmute.Alert Setting Select the type of alert when audio is detected on the camera. You may select the Vibration or Beep as the trigger alert manner while something has been detected by camera side.Alarm Setting Sets the time value with HH, MM and select the ON or OFF to decide alarm or not.Date Setting Sets the year, month, date value to show in the monitor screen.►►►►Enter menu settingMove to a menuSelect the menuAdjust level Save the change](https://usermanual.wiki/Hanwha-Techwin/SEW3034WN/User-Guide-1433336-Page-11.png)
![12 · Menu OperationDate Format Sets the date format to show in the monitor screen.Time Setiing Sets the time value with hour, minute to show in the monitor screen.A/V Out Format Choose the TV system when outputting the video/audio to TV, DVR/VCR or other viewing/recording devices.Pairing You can register a wireless camera with the receiver using the registration menu where you can view the video of the selected wireless camera. Pairing The system comes with a camera that has already been paired with the receiver unit. The pairing function assigns the camera to a channel on the wireless receiver. Up to 4 Cameras (each additional camera sold separately) may be paired, which each optional camera on its own channel. If additional cameras are paired, they must each be configured separately.It is highly recommended to pair the cameras to the receiver before permanently mounting the cameras. See the pairing section on this manual for details.n`Reset Choose <YES> to reset the receiver to factory defaults. All menu settings will be reset.Camera pairing settings will NOT be affected by a reset. The camera will remain paired with the receiver.n`Memory-format Delete recorded data Choose <YES> to delete all data.Pairing CameraPower on and turn the switch to ON. The power LED for the camera and receiver should be ON.Press the [MENU] button on the receiver.Select Pairing menu by pressing [A] or [M] key. Press the [ ] button to go into the Pairing menu.Select a channel by pressing the [+] or [–] key. The receiver will count down from 30~0 sec as showing a message you must press the pairing button on the camera during this time to successfully pair the camera.Press the [ ] button on the back of the camera. If not, the receiver will return to the view screen, and no pairing will take place. Once the camera has been paired, it will be immediately viewable on the receiver monitor.1.2.3.4.5.USA-Federal Communications Commission (FCC) This device complies with part 15 of the FCC Rules. Operation is subject to the following two conditions: (1) this device may not cause harmful interference; and (2) this device must accept any interference received, including interference that may cause undesired operation. This equipment has been tested and found to comply with the limits for a Class B digital device, pursuant to Part 15 of FCC Rules. These limits are designed to provide reasonable protection against harmful interference in a residential installation. This equipment generates, uses, and can radiate radio frequency energy. If not installed and used in accordance with the instructions, it may cause harmful interference to radio communications. However, there is no guarantee that interference will not occur in a particular installation. If this equipment does cause harmful interference to radio or television reception, which can be determined by turning the equipment off and on, the user is encouraged to try and correct the interference by one or more of the following measures: - Reorient or relocate the receiving antenna. - Increase the distance between the equipment and the receiver. - Connect the equipment to outlet on a circuit different from that to which the receiver is connected. - Consult the dealer or an experienced radio/TV technician for help. Any changes or modifications not expressly approved by the party responsible for compliance could void the user’s authority to operate the equipment.](https://usermanual.wiki/Hanwha-Techwin/SEW3034WN/User-Guide-1433336-Page-12.png)
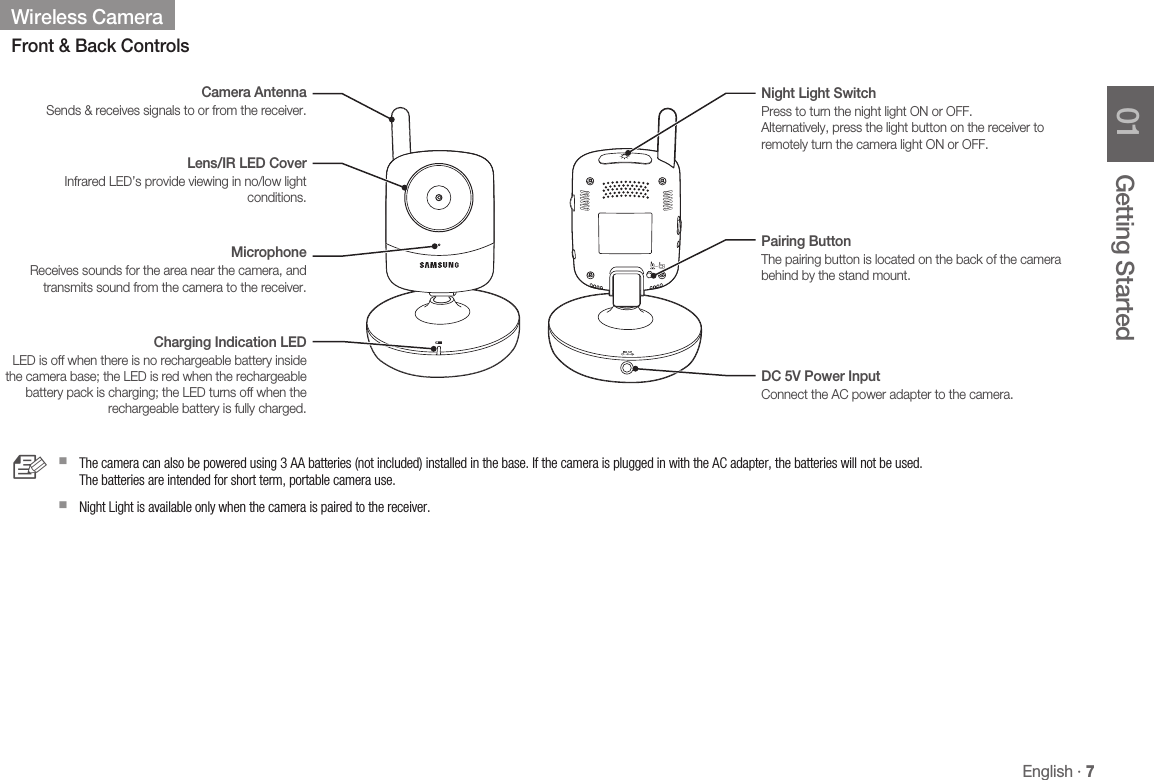
![This template is used to install the camera on the wall.TEMPLATECAMERA FRONTScrew holes for the Camera installation67mm [2.6 inch]](https://usermanual.wiki/Hanwha-Techwin/SEW3034WN/User-Guide-1433336-Page-15.png)