Hanwha Techwin SNHV6410PN SMART HOME CAMERA User Manual
Hanwha Techwin Co., Ltd. SMART HOME CAMERA
UserManual.wiki
>
Hanwha Techwin
>
SNHV6410PN User Manual
User manual
Navigation menu
Upload a User Manual
Namespaces
Wiki Guide
HTML
PDF
Info
Views
User Manual
Discussion / Help
Navigation


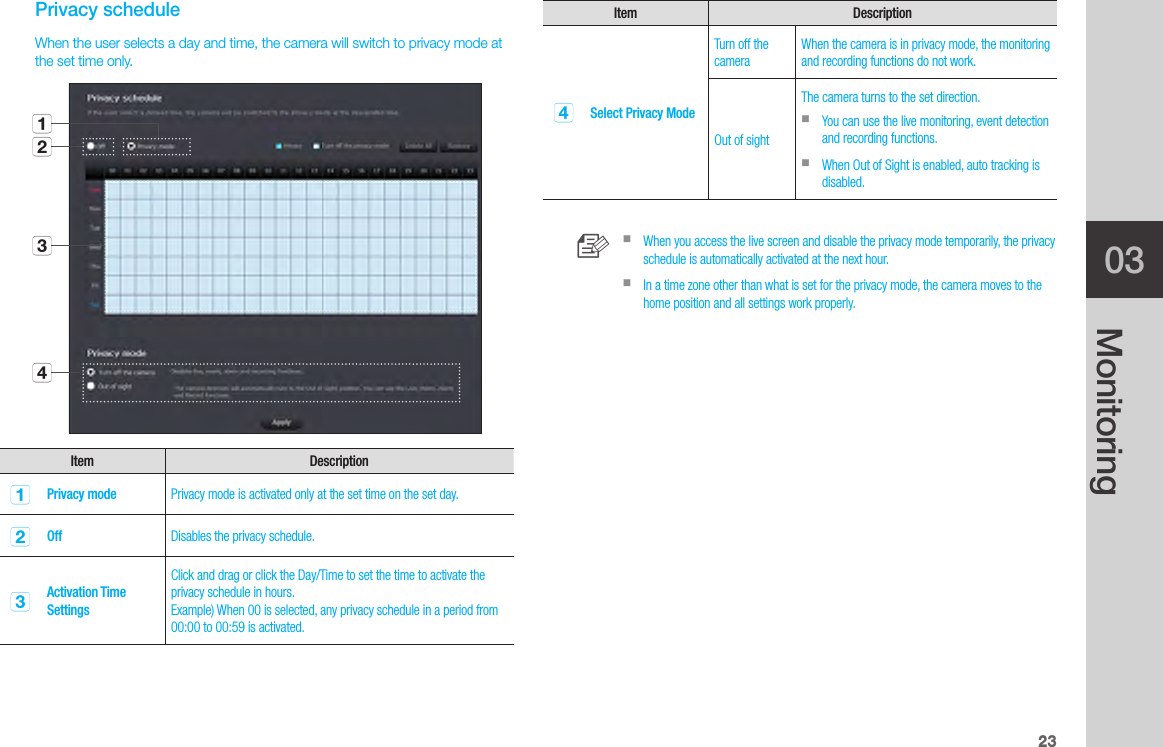
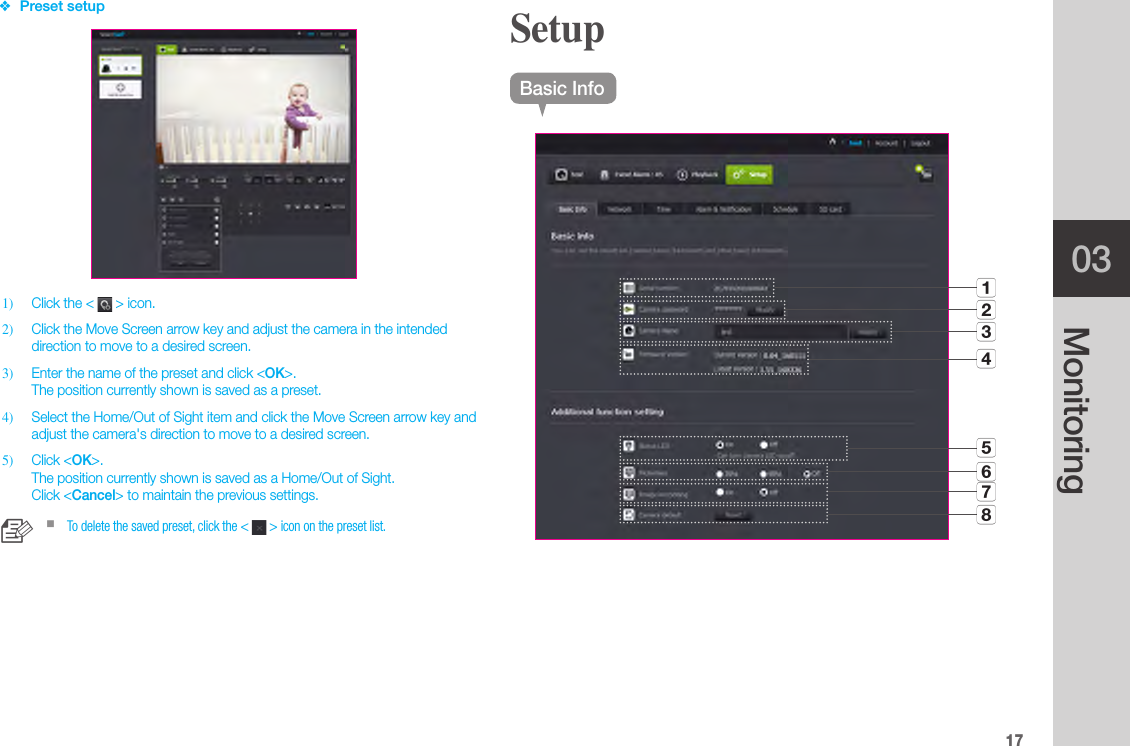
![16 · EnglishItem DescriptionoPreset setup Adds and modifies a preset, and sets the Home/Out of Sight position. `The preset name should be up to 12 alphanumeric characters with no spaces.pAuto TrackingAutomatically tracks an object moving on the screen. `When auto tracking is enabled, the audio detection is automatically disabled, and the motion detection by auto tracking is activated. `With auto tracking enabled, if no motion is detected for a certain period of time, the camera automatically moves back to the position where the auto tracking started.qOut of Sight When Out of Sight [ ] is clicked, the camera moves to the Out of Sight position set.rHome When the Home button [ ] is clicked, the camera moves to the Home position set.sBrightness You can adjust the brightness of the screen image.tHide/unhide detailed menu Click on the [ ] icon to unhide or hide detailed setting menu.AAudioAdjust the volume of the built-in microphone and speaker of the camera as appropriate. If you set the mic setting to '0', you will not hear the live audio, and it will not be recorded in your SD card. Note that the Two-way audio transfer function is available only with the smart phone application.BAdd a camera Click the [ ] icon to register an additional camera. ❖Wireless Network SpeedProfile Name Resolution Frame rate Recommended bandwidthLow Speed Network VGA 10 fps 0.7MbpsMid Speed Network HD(720P) 15 fps 1.5MbpsHigh Speed Network Full HD(1080P) 30 fps 3.5Mbps n `What is relay mode? If the network condition is unstable, the camera cannot make a normal connection (P2P), so it will set up a connection in relay mode. In this case, you will see the video for the first seven minutes only. `Relay mode is added feature where the video from the camera is transmitted to Samsung server then retransmitted to the user's computer. `If you have trouble connection to the camera, visit "http://www.samsungsmartcam.com", go to support page, and refer to “Troubleshooting” on it. `It is recommended to use one browser at one time. `The Night Vision video produces a different visibility according to the distance between camera and subject. `The number of available concurrent users for a single camera may vary depending on the speed of your Wi-Fi router. ❖Motion Zone Setting1) Click the < > icon.2) Drag it to the screen to set the detection area.3) Click on <OK>. If you want to delete the set area, click on <Delete All>. n `The <Motion Detection> function needs to be activated in order to use the motion zone function. `You can set up to 3 motion zones.](https://usermanual.wiki/Hanwha-Techwin/SNHV6410PN/User-Guide-2924555-Page-16.png)
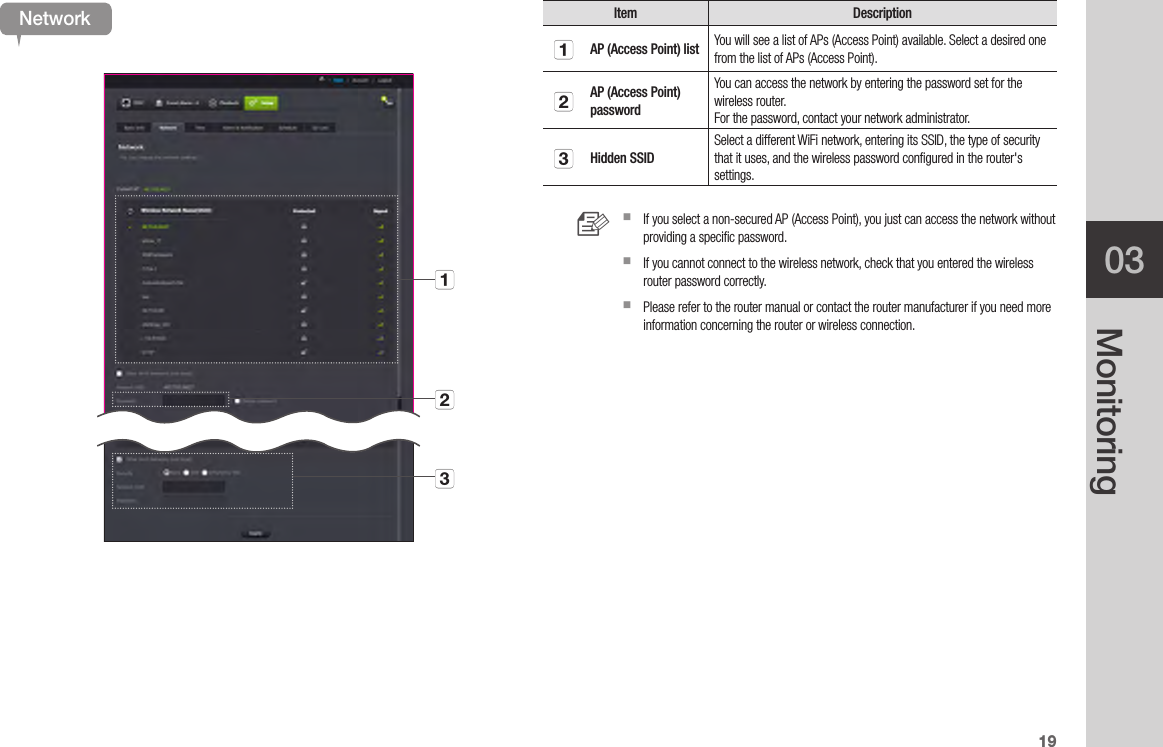
![18 · EnglishItem DescriptionaSerial number You can confirm the serial number.bCamera passwordClick the <Modify>, you can change the Camera password. Enter the current camera password, and type a new Camera password.cCamera Name Click the <Modify>, you can change the camera name.dFirmware Version You can check the current version and the latest version of your camera S/W.eStatus LED You can turn on/off the LED in your camera. `The LED will illuminate when the power supply is reconnected.fFlickerlessYou can reduce the occurrence of screen shaking due to the frequency mismatches with the neighboring lighting. `If you use the flickerless function outdoors (in a bright environment), image saturation may occur.gImage encryptingEncrypts the transmitted image. `If the Encrypt Image is activated, the image transmission performance may be affected.hCamera defaultPress the <Reset> button to initialize all camera settings other than network settings. `To reset the camera to its factory default settings, press the [RESET] button on the camera. n `If you change the camera password, you will be logged out and return to the camera password input page. `Keep the camera password in a safe place as it is used for viewing the live screen of the camera or for changing the display settings. ❖Firmware updateIf the currently used S/W is not of the latest version, update it. If you are using the latest version, then the firmware will not be activated.1) Click <Firmware>.2) Click the < > icon to update the firmware.3) When the firmware update is finished, the camera will reboot. n `The duration of the firmware update depends on the size of the firmware file and the network connection speed. `When executing the firmware update, the camera LED turns purple. J `Please do not cut off the camera power or Internet connection during a firmware update. The system may be damaged.](https://usermanual.wiki/Hanwha-Techwin/SNHV6410PN/User-Guide-2924555-Page-18.png)
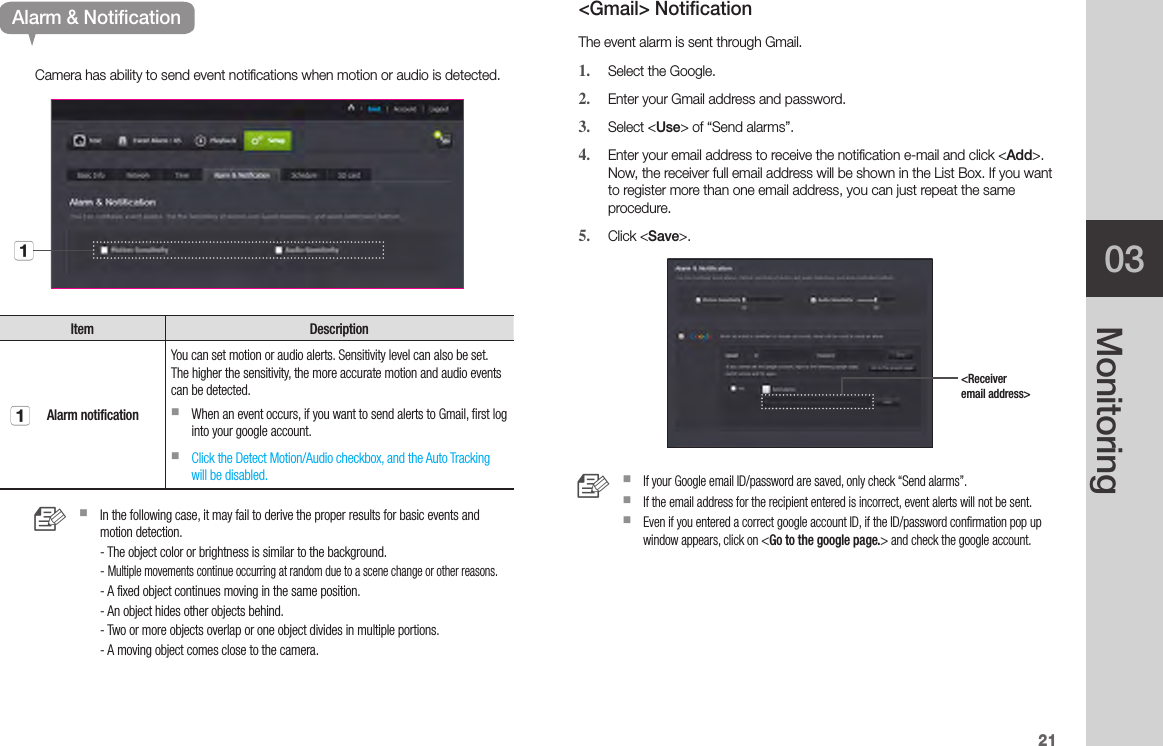
![22 · EnglishPush alarm Notification For users whose cameras are registered, a push alarm is provided via the Web app and the mobile app.•Push alert list shows the list of IDs of users who registered cameras. When an alarm occurs, the web site will send push alerts to each smart phone.•If [ ] is disabled, no push alarm is provided, even if a camera alarm is generated.•If SD Card and Alarm is enabled, an alarm generated is stored in the SD card.ScheduleAlarm ScheduleWhen the user designates a desired day and time, the alarm sends only at the designated time.)Item DescriptionaOnly Scheduled Time Alarm function will only operate for the time/day designated by the user.bAlways Alarm function always operates.cMotion time settingsClick and drag or click Day/Time to set the time to activate in hours. Example) When selecting 00, events are generated in a period from 00:00 to 00:59.<Push Notice Receiver ID>bca](https://usermanual.wiki/Hanwha-Techwin/SNHV6410PN/User-Guide-2924555-Page-22.png)