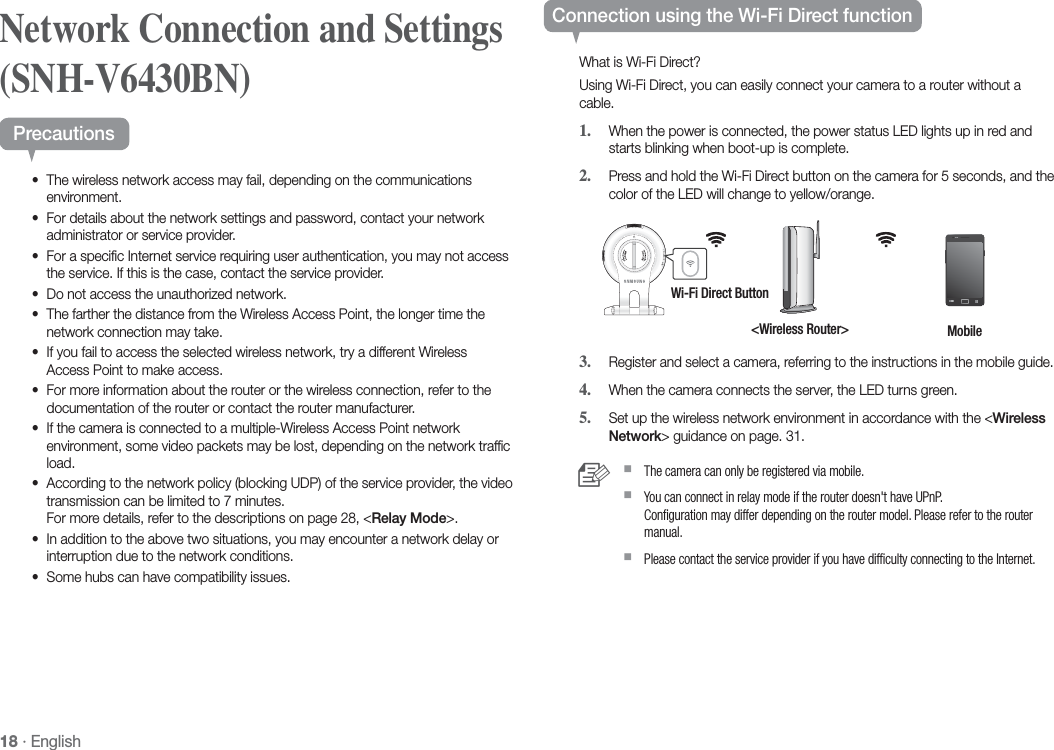
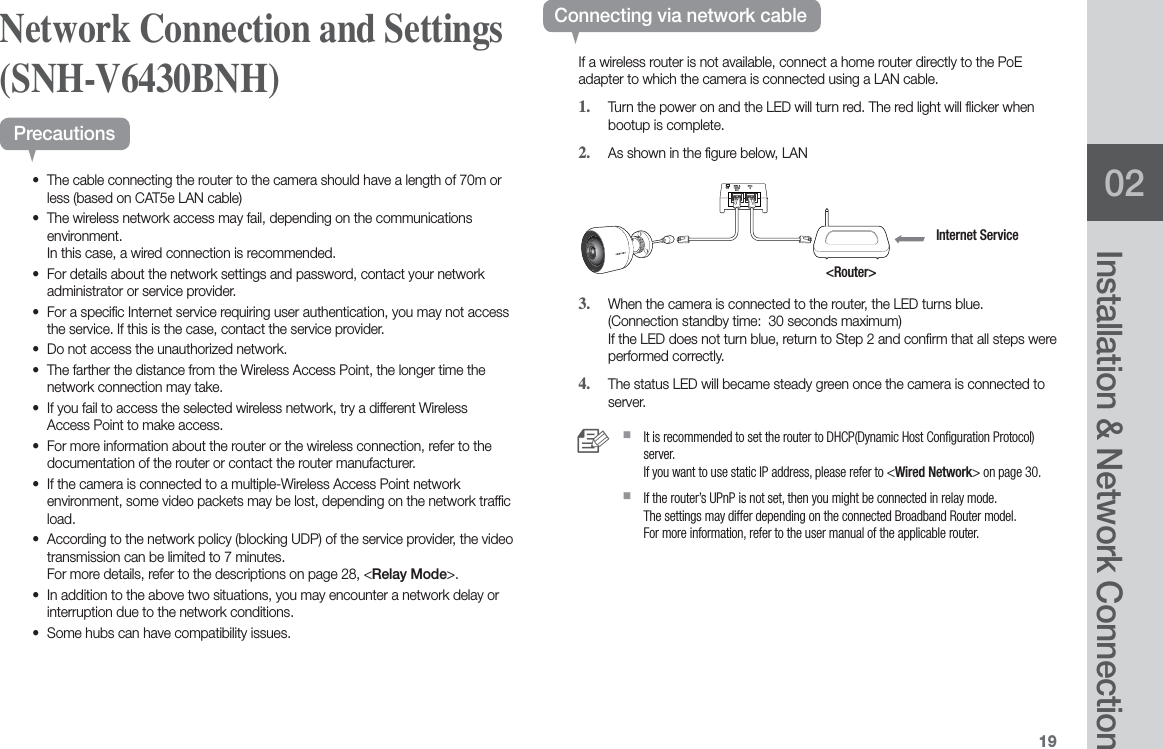
Hanwha Techwin SNHV6430BNH HOME CAMERA User Manual SNH V6430BNH ENGLISH Web 0905
Hanwha Techwin Co., Ltd. HOME CAMERA SNH V6430BNH ENGLISH Web 0905
UserManual.wiki
>
Hanwha Techwin
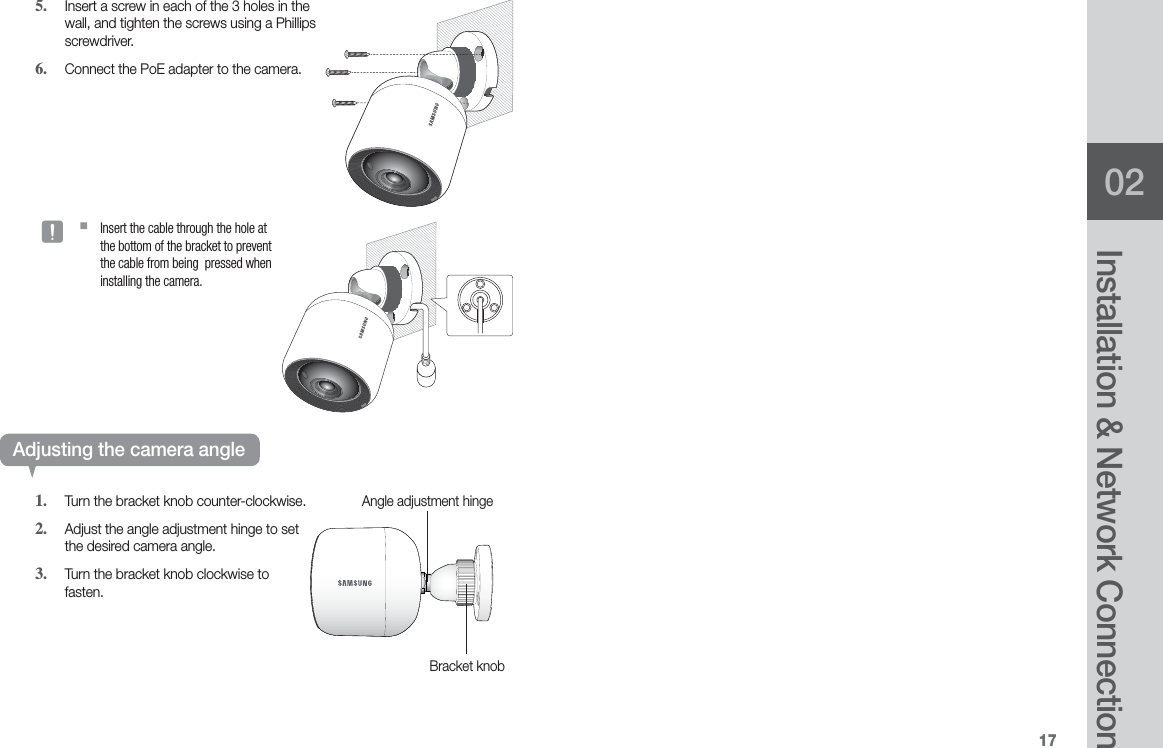
>
SNHV6430BNH User Manual
User manual
Navigation menu
Upload a User Manual
Namespaces
Wiki Guide
HTML
PDF
Info
Views
User Manual
Discussion / Help
Navigation

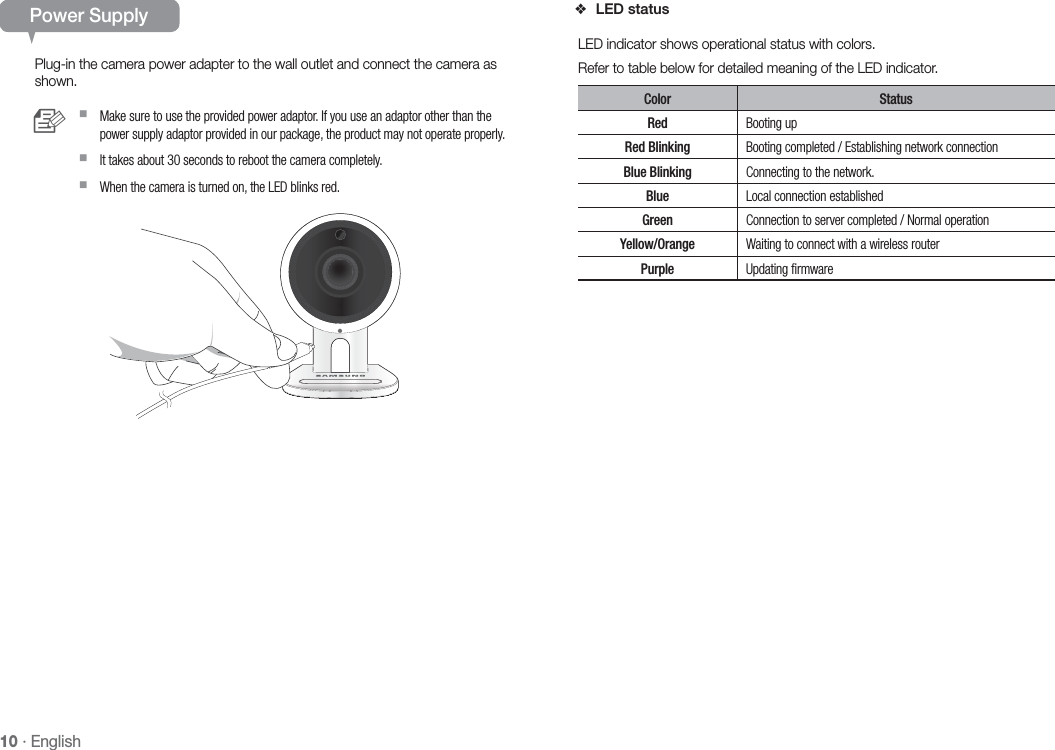
![12 · EnglishPower SupplyUsing the PoE adapter1. Push to insert the included PoE adapter in the power plug, as shown in the figure below. 2. To remove the power plug from the PoE adapter, press the [PUSH] section as shown in the figure below, and push up the power plug. 3. Connect the LAN cable from the PoE adapter [DATA & POWER OUT] socket to the PoE socket.4. Connect the LAN cable from the PoE adapter [DATA I N] socket to the LAN port of the router. n `When connecting the camera wirelessly via Wi-Fi Direct, remove the LAN cable connecting the PoE adapter and the router.5. Plug the PoE adapter into an electrical outlet. n `Use the PoE adapter and power plug that have been included with the camera. Using an incompatible adapter may cause the camera to malfunction. `It takes about 30 seconds to reboot the camera completely. `When the camera is turned on, the LED blinks red. ❖LED statusLED indicator shows operational status with colors.Refer to table below for detailed meaning of the LED indicator.Color StatusRed Booting upRed Blinking Booting completed / Establishing network connectionBlue Blinking Connecting to the network.Blue Local connection establishedGreen Connection to server completed / Normal operationYellow/Orange Waiting to connect with a wireless routerPurple Updating firmware<Router>](https://usermanual.wiki/Hanwha-Techwin/SNHV6430BNH/User-Guide-3128023-Page-12.png)
![1302Installation & Network Connection13 Indoor/Outdoor bracket switching 13 Precautions13 Separating the indoor bracket14 Installing the outdoor bracket14 Installation (SNH-V6430BN)14 Precautions14 Installing on the wall and ceiling using screws15 Adjusting the camera angle16 Installation (SNH-V6430BNH)16 Precautions16 Installing on the wall and ceiling using screws17 Adjusting the camera angle18 Network Connection and Settings (SNH-V6430BN)18 Precautions18 Connection using the Wi-Fi Direct function19 Network Connection and Settings (SNH-V6430BNH)19 Precautions19 Connecting via network cable20 Connection using the Wi-Fi Direct function02INSTALLATION & NETWORK CONNECTIONPrecautions1. Outdoor bracket is available separately.Separating the indoor bracket1. Turn the knob on the back of the camera in the [LOOSEN] direction. 2. Remove the bracket from the main body of the camera, as shown in the figure below. Indoor/Outdoor bracket switching /226(17,*+7(15(6(7Main body](https://usermanual.wiki/Hanwha-Techwin/SNHV6430BNH/User-Guide-3128023-Page-13.png)
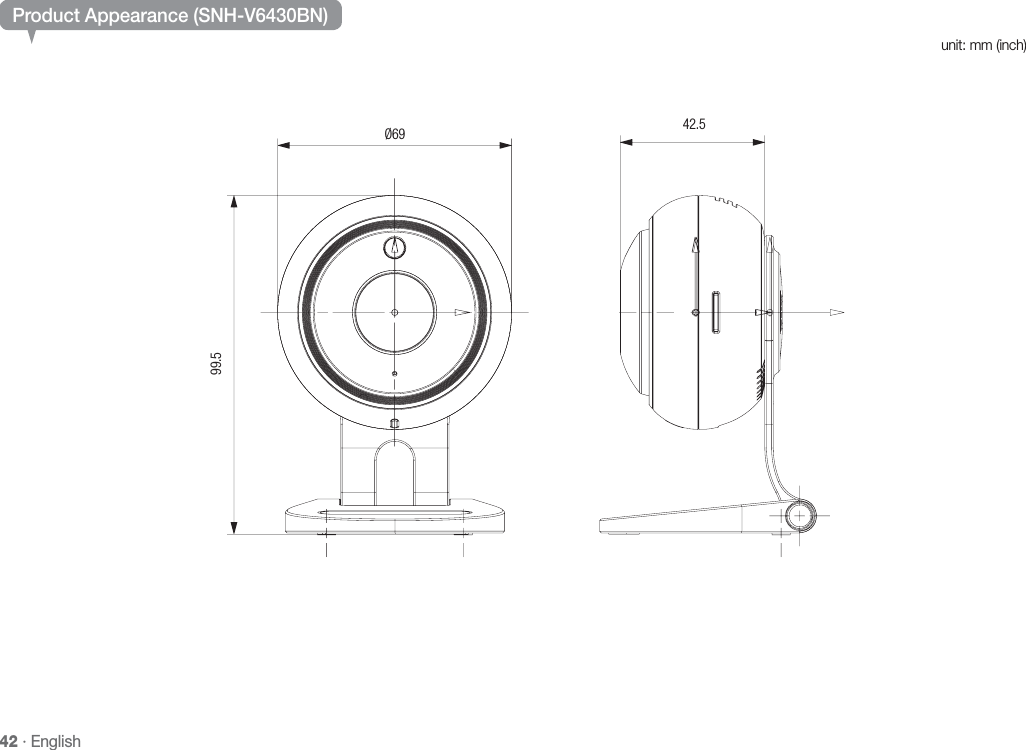
![14 · EnglishPrecautions1. Install the camera in a location with a good Wi-Fi signal and no interference.2. Keep it away from humidity such as around the humidifier.3. Keep it away from direct sunlight, strong light or dust; install it in a place with clear view.4. Do not install it in a place where there are a lot of obstacles. 5. Keep the lens clean at all times. Wipe off the dust with a soft cloth.Installing on the wall and ceiling using screws1. Remove the rubber packing attached to the camera stand.2. Take out the screws (M3xL20) and anchors (Φ5x25mm).When installing on a wooden wall3. Fix the bracket to the wall using screws, as shown in the next image. Using a Phillips screwdriver, fasten screws in 2 screw holes on the wall on which the camera is to be installed. Installation (SNH-V6430BN)Installing the outdoor bracket1. Install the outdoor bracket into the groove on the main body of the camera, as shown in the figure below.2. Turn the housing to the LOCK [ ] direction. Main body](https://usermanual.wiki/Hanwha-Techwin/SNHV6430BNH/User-Guide-3128023-Page-14.png)

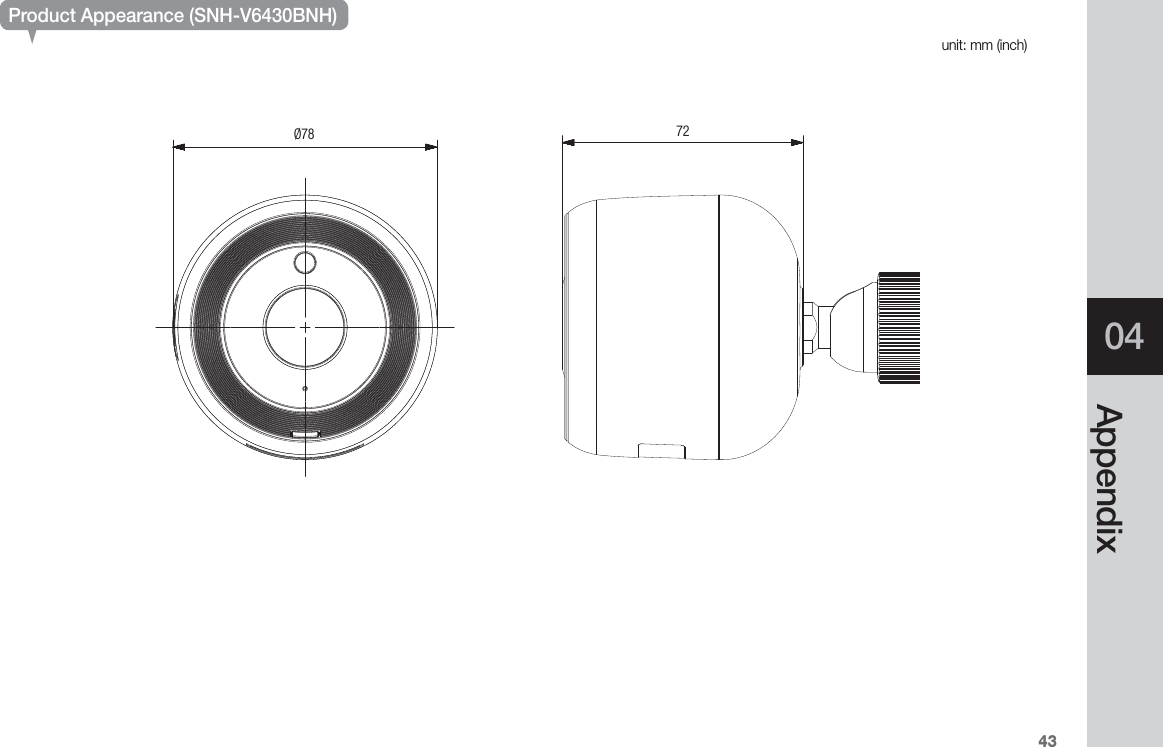
![16 · EnglishPrecautions1. To facilitate monitoring, connect between the PoE adapter [DATA IN] port and the router.2. In a location with a good Wi-Fi signal and no interference, use Wi-Fi communication.3. As the front of the lens may become dirty due to rainwater, avoid installing under the eaves or in a moist space.4. Keep it away from direct sunlight, strong light or dust; install it in a place with clear view.5. Do not install it in a place where there are a lot of obstacles. 6. Keep the lens clean at all times. Wipe off the dust with a soft cloth.Installing on the wall and ceiling using screws1. Take out the screws (M3xL20) and anchors (Φ5x25mm).When installing on a wooden wall2. Fix the bracket to the wall using screws, as shown in the next image. Using a Phillips screwdriver, fasten screws in 3 screw holes on the wall on which the camera is to be installed. Installation (SNH-V6430BNH) When installing on a concrete wall2. Fix the bracket on the wall using screws and anchors. First, mark the wall on which the camera is to be installed as shown in the figure.3. On the mark, drill a hole to a depth of about 3cm in the wall using a drill bit and drill with a 5mm diameter for concrete. Remove any debris remaining in the hole after drilling. J `Use caution when drilling to avoid injury.4. Insert an anchor in each of the 3 holes for the screws, then hit the back of the anchor with a hammer or a rubber mallet until it is completely inserted.](https://usermanual.wiki/Hanwha-Techwin/SNHV6430BNH/User-Guide-3128023-Page-16.png)
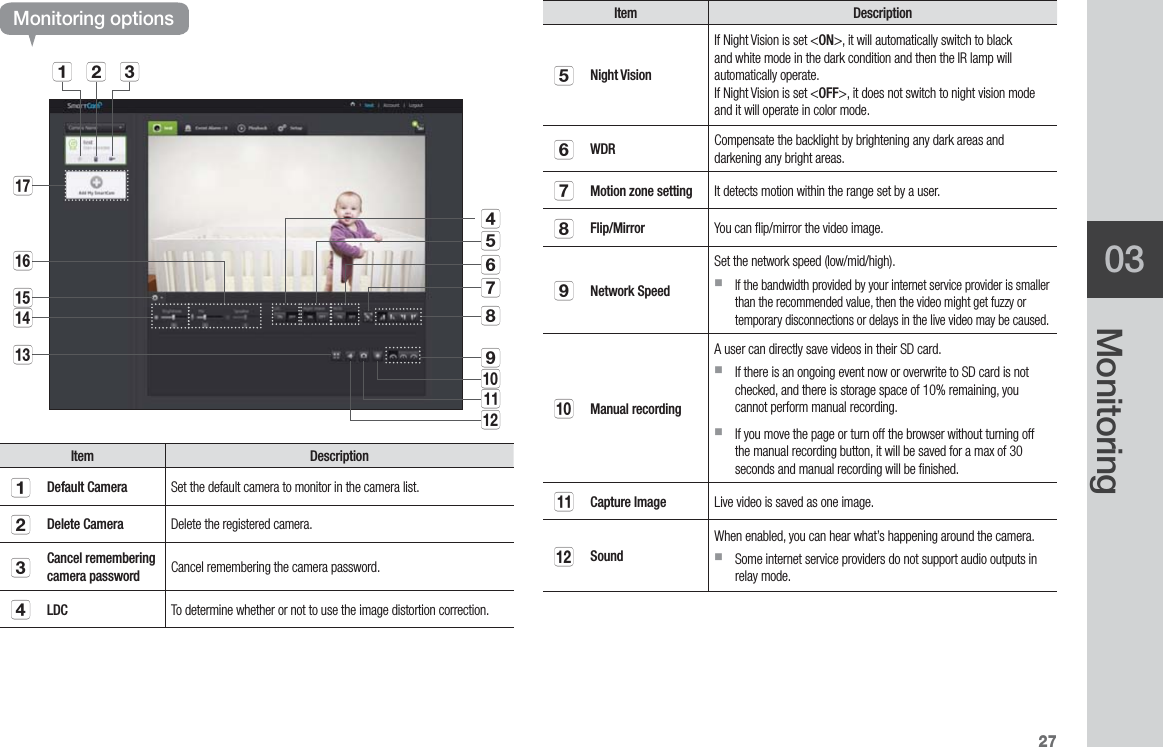
![28 · EnglishItem DescriptionmFull screenConverts the current image to full screen size. `The system supports Internet Explorer only. `If you double-click the screen, the full screen mode is terminated.nBrightness You can adjust the brightness of the screen image.oHide/unhide detailed menu Click on the [ ] icon to unhide or hide detailed setting menu.pAudioAdjust the volume of the built-in microphone and speaker of the camera as appropriate. If you set the mic setting to '0', you will not hear the live audio, and it will not be recorded in your SD card. Note that the Two-way audio transfer function is available only with the smart phone application. `The SNH-V6430BNH model does not support a speaker or the interactive audio function.qAdd a camera Click the [ ] icon to register an additional camera. ❖Wireless Network SpeedProfile Name Resolution Frame rate Recommended bandwidthLow Speed Network VGA 10 fps 0.7MbpsMid Speed Network HD(720P) 15 fps 1.5MbpsHigh Speed Network Full HD(1080P) 30 fps 3.5Mbps n `What is relay mode? If the network condition is unstable, the camera cannot make a normal connection (P2P), so it will set up a connection in relay mode. In this case, you will see the video for the first seven minutes only. `Relay mode is added feature where the video from the camera is transmitted to Samsung server then retransmitted to the user's computer. `If you have trouble connection to the camera, visit "http://www.samsungsmartcam.com", go to support page, and refer to “Troubleshooting” on it. `It is recommended to use one browser at one time. `The Night Vision video produces a different visibility according to the distance between camera and subject. `The number of available concurrent users for a single camera may vary depending on the speed of your Wi-Fi router. ❖Motion Zone Setting1) Click the < > icon.2) Drag it to the screen to set the detection area.3) Click on <OK>. If you want to delete the set area, click on <Delete All>. n `The <Motion Detection> function needs to be activated in order to use the motion zone function. `You can set up to 3 motion zones.](https://usermanual.wiki/Hanwha-Techwin/SNHV6430BNH/User-Guide-3128023-Page-28.png)
![2903MonitoringSetup Basic InfoItem DescriptionaSerial number You can confirm the serial number.bCamera passwordClick the <Modify>, you can change the Camera password. Enter the current camera password, and type a new Camera password.cCamera Name Click the <Modify>, you can change the camera name.dFirmware Version You can check the current version and the latest version of your camera S/W.eStatus LED You can turn on/off the LED in your camera. `The LED will illuminate when the power supply is reconnected.fFlickerlessYou can reduce the occurrence of screen shaking due to the frequency mismatches with the neighboring lighting. `If you use the flickerless function outdoors (in a bright environment), image saturation may occur.gImage encryptingEncrypts the transmitted image. `If Encrypt Image is activated, the image transmission performance may be affected.hCamera defaultPress the <Reset> button to initialize all camera settings other than the network settings. `To reset the camera to its factory default settings, press the [RESET] button on the camera. n `If you change the camera password, you will be logged out and return to the camera password input page. `Keep the camera password in a safe place as it is used for viewing the live screen of the camera or for changing the display settings.abcdfghe](https://usermanual.wiki/Hanwha-Techwin/SNHV6430BNH/User-Guide-3128023-Page-29.png)