Hanwha Techwin SNSR0810W Station Hub User Manual
Hanwha Techwin Co., Ltd. Station Hub
User manual

Quick Start Guide
WISENET
SMARTCAM
2
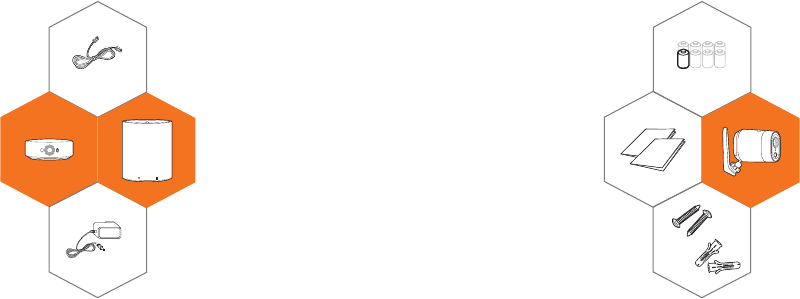
What’s in the box
Station Hub Outdoor, Battery-Powered CameraStation Camera
Warranty Card / Quick Start Guide
Power Adapter Screws / Plastic anchors
LAN Cable (3.28ft) Battery(CR123)

3
Outdoor, Battery-Powered Camera
System Requirements
※
If you are already using Wisenet SmartCam app, please check the
version in the Google Play/app store and update it to the latest version.
.
. Recommended : 3.5Mbps or higher
. iOS 8 or higher
. Android OS 5.0 or higher
Download the free Wisenet SmartCam app now
available on Google Play and the App Store.
Mobile Application
<iOS>
<Android>
Wi-Fi & 900 MHz band
4
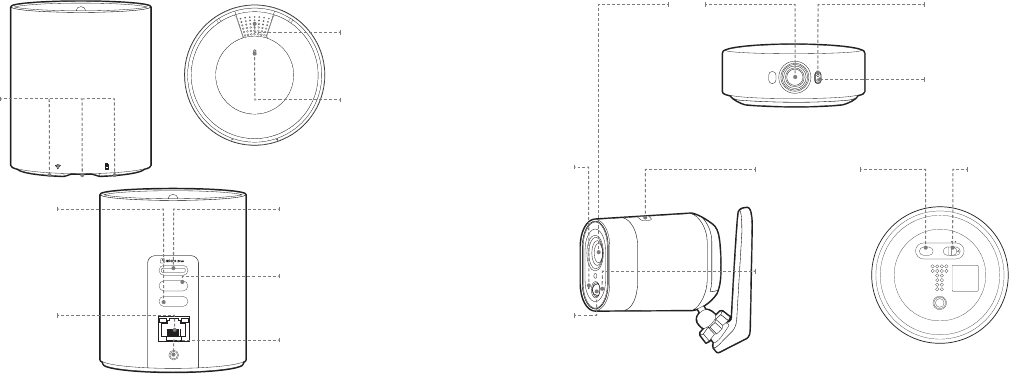
Station Hub Overview Camera Overview
Lens
Microphone
LED Status Indicator
Microphone
LED Status Indicator
POWER
NETWORK
Wi-Fi
PAIR
Power
microSD Slot
Wi-Fi Direct button
Pairing button
Ethernet Port
OFF ON
PAIR
RESET
Speaker
Reset button
LED Status Indicator
Power SwitchPairing button
Motion Sensor

5
Create account and register Station Hub Camera Power On
Station Camera Power on Outdoor Battery-Powered Camera Power on
Connect the power adapter
to the Station Hub and plug
it into the nearest wall
outlet.
1 2
3
POWER
NETWORK
Wi-Fi
PAIR
User ID : ___________________
User Password : _____________
Camera Name : ______________
Camera Password : ___________
Open the Wisenet
SmartCam app and create
an account. Follow the
on-screen instructions to
register.
Save your Account and Device information here.
OFF ON
PAIR
ON a
c
b
6
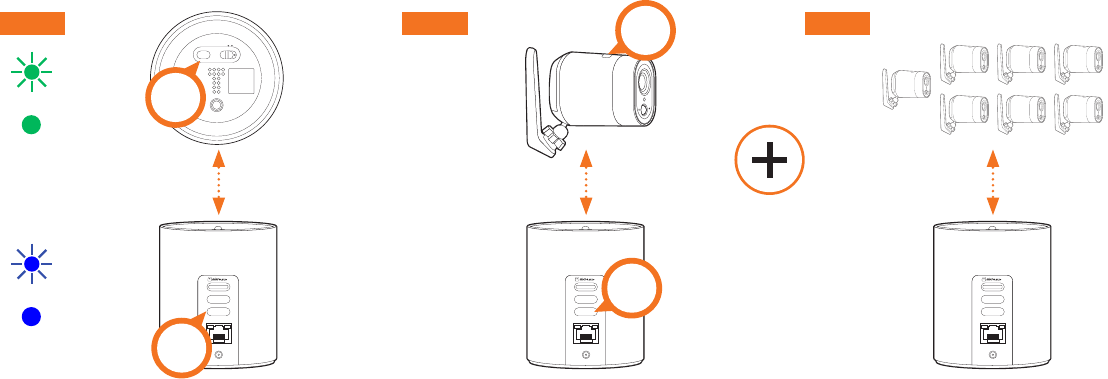
Paring the Camera with Station Hub
OFF ON
PAIR
Paired
Paired
Pairing
Pairing
POWER
NETWORK
Wi-Fi
PAIR
POWER
NETWORK
Wi-Fi
PAIR
※ For every instance the camera is added, the pairing must be done by
pressing the [PAIR] button on each side.
※ Up to 7 Outdoor, Battery-Powered Cameras can be securely paired with
the Station Hub.
PAIR
Hold 3 sec
PAIR
Hold 3 sec
POWER
NETWORK
Wi-Fi
PAIR
STEP 1 STEP 2 STEP 3
PAIR
Hold 3 sec
PAIR
Hold 3 sec

7
Mounting the Camera
Note: If you are mounting
the camera on the wall,
carefully separate the
bracket cover from the
bracket.
Use a flat-head screwdriver
or your hands and gently
pry open the bracket cover
from the bracket.
Match the bracket cover to
the holes on the wall and
fasten the screws.
1 2
34 5
6
Place the bracket cover
against the wall where the
camera will be mounted and
mark the position of the
screw holes.
Secure the camera bracket
on to the bracket cover.
Drill a hole and insert anchors. Adjust the angle of view.
(Do not use force to adjust. Unscrew the lever and adjust accordingly after checking the
position of the groove, then re-tighten the lever. )
※ Before installing the camera, determine the best location and angle for the camera, and then install it.
8
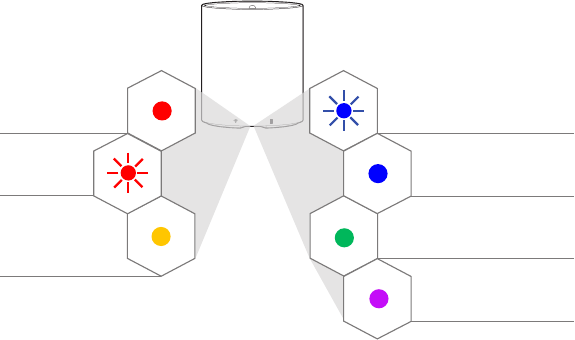
LED Status Guide Station Hub
Booting up
Booting completed
Enabling Wi-Fi Direct
Searching for available Wi-Fi network
Connecting to a Wi-Fi network
Connected to Wi-Fi Network/ Normal Operation
Updating firmware
Caution
1. Recommended micro SD card
- It is recommended to use a MLC for higher data density and reliability of recording.
2. We recommend that you use the provided batteries, or well-known brand batteries such as Panasonic, Energizer, or Duracell.
Use of counterfeit or low-quality batteries increases the risk of camera malfunction and the possibility of re.
3. We do not recommend using rechargeable batteries for the Outdoor, Battery-Powered Camera.
It increases the risk of camera malfunction and the possibility of re.
4. Station Camera is not weatherproof.
For indoor use only.
Hanwha Techwin cares for the environment at all product manufacturing stages, and is taking measures to
provide customers with more environmentally friendly products.
The Eco mark represents Hanwha Techwin’s devotion to creating environmentally friendly products, and
indicates that the product satisfies the EU RoHS Directive.
Correct Disposal of This Product (Waste Electrical & Electronic Equipment)
(Applicable in the European Union and other European countries with separate collection systems)
This marking on the product, accessories or literature indicates that the product and its electronic accessories (e.g.
charger, headset, USB cable) should not be disposed of with other household waste at the end of their working life. To
prevent possible harm to the environment or human health from uncontrolled waste disposal, please separate these
items from other types of waste and recycle them responsibly to promote the sustainable reuse of material resources.
Household users should contact either the retailer where they purchased this product, or their local government office,
for details of where and how they can take these items for environmentally safe recycling.
Business users should contact their supplier and check the terms and conditions of the purchase contract. This product
and its electronic accessories should not be mixed with other commercial wastes for disposal.
Correct disposal of batteries in this product
(Applicable in the European Union and other European countries with separate battery return systems.)
This marking on the battery, manual or packaging indicates that the batteries in this product should not be disposed of with other household waste at the
end of their working life. Where marked, the chemical symbols Hg, Cd or Pb indicate that the battery contains mercury, cadmium or lead above the
reference levels in EC Directive 2006/66. If batteries are not properly disposed of, these substances can cause harm to human health or the environment.
To protect natural resources and to promote material reuse, please separate batteries from other types of waste and recycle them through your local,
free battery return system.
Wireless Operation Mode
- Station Hub
WI-FI 802.11 b/g/n (Single-band)
2 412 ㎒ ~ 2 462 ㎒ (11b/g/n_HT20), 2 422 ㎒ ~ 2 452 ㎒ (11n_HT40)
WI-FI 802.11 a/b/g/n (Dual-band)
2.4GHz : 2 412 ㎒ ~ 2 462 ㎒ (11b/g/n_HT20), 2 422 ㎒ ~ 2 452 ㎒ (11n_HT40)
UNII-1 : 5 180 ㎒ ~ 5 240 ㎒ (11a/n_HT20, 11ac_VHT20), 5 190 ㎒ ~ 5 230 ㎒ (11n_HT40, 11ac_VHT40), 5 210 ㎒ (11ac_VHT80)
UNII-2A : 5 260 ㎒ ~ 5 320 ㎒ (11a/n_HT20, 11ac_VHT20), 5 270 ㎒ ~ 5 310 ㎒ (11n_HT40, 11ac_VHT40), 5 290 ㎒ (11ac_VHT80)
UNII-2C : 5 500 ㎒ ~ 5 720 ㎒ (11a/n_HT20, 11ac_VHT20), 5 510 ㎒ ~ 5 710 ㎒ (11n_HT40, 11ac_VHT40), 5 530 ㎒ ~ 5 690 ㎒ (11ac_VHT80)
UNII-3 : 5 745 ㎒ ~ 5 825 ㎒ (11a/n_HT20, 11ac_VHT20), 5 755 ㎒ ~ 5 795 ㎒ (11n_HT40, 11ac_VHT40), 5 775 ㎒ (11ac_VHT80)
900MHz module : 920.6 ㎒ ~ 922.0 ㎒
- Station Camera
WI-FI 802.11 b/g/n (Single-band)
2 412 ㎒ ~ 2 462 ㎒ (11b/g/n_HT20), 2 422 ㎒ ~ 2 452 ㎒ (11n_HT40)
- Outdoor, Battery- Powered Camera
WI-FI 802.11 b/g/n (Single-band)
2 412 ㎒ ~ 2 462 ㎒ (11b/g/n_HT20)
900MHz module : 920.6 ㎒ ~ 922.0 ㎒
FCC Compliance Statement
This device complies with part 15 of the FCC rules. Operation is subject to the following two conditions: (1) This device may not cause harmful
interference, and (2) this device must accept any interference received, including interference that may cause undesired operation.
FCC Interference Statement
This equipment has been tested and found to comply with the limits for a Class B digital device, pursuant to part 15 of the FCC Rules. These limits are
designed to provide reasonable protection against harmful interference in a residential installation. This equipment generates, uses and can radiate
radio frequency energy and, if not installed and used in accordance with the instructions, may cause harmful interference to radio communications.
However, there is no guarantee that interference will not occur in a particular installation. If this equipment does cause harmful interference to radio
or television reception, which can be determined by turning the equipment off and on, the user is encouraged to correct the interference by one of
the following measures:
• Reorient or relocate the receiving antenna.
• Increase the separation between the equipment and receiver.
• Connect the equipment into an outlet on a circuit different from which the receiver is connected. • Consult the dealer or an experienced radio/TV
technician for help.
FCC Caution
Any changes or modifications not expressly approved by the party responsible for compliance could void the user's authority to operate this equipment.
This transmitter must not be co-located or operating in conjunction with any other antenna or transmitter.
FCC Radiation Exposure Statement
This equipment complies with FCC radiation exposure limits set forth for an uncontrolled environment. This equipment should be installed and operated
with minimum distance 20 cm between the radiator and your body. This transmitter must not be co-located or operating in conjunction with any other
antenna or transmitter.
IEEE 802.11b or 802.11g operation of this product in the USA is firmware-limited to channels 1 through 11.
If the device is going to be operated in the 5.15 - 5.25 frequency range, then it is restricted to indoor environment only. This device meets all other
requirements specified in Part 15E, Section 15.407 of the FCC Rules.
Industry Canada Statement
This device complies with RSS-247 of the Industry Canada Rules. Operation is subject to the following two conditions: (1) This device may not cause
harmful interference, and (2) this device must accept any interference received, including interference that may cause undesired operation. Ce dispositif
est conforme à la norme CNR-247 d’Industrie Canada applicable aux appareils radio exempts de licence. Son fonctionnement est sujet aux deux
conditions suivantes: (1) le dispositif ne doit pas produire de brouillage préjudiciable, et (2) ce dispositif doit accepter tout brouillage reçu, y compris
un brouillage susceptible de provoquer un fonctionnement indésirable.
Industry Canada Caution
(i) the device for operation in the band 5150-5250 MHz is only for indoor use to reduce the potential for harmful interference to co-channel mobile
satellite systems; (ii) high-power radars are allocated as primary users (i.e. priority users) of the bands 5250- 5350 MHz and 5650-5850 MHz and that
these radars could cause interference and/or damage to LE-LAN devices.
Avertissement:
(i) les dispositifs fonctionnant dans la bande 5 150-5 250 MHz sont réservés uniquement pour une utilisation à l’intérieur a n de réduire les risques de
brouillage préjudiciable aux systèmes de satellites mobiles utilisant les mêmes canaux; (ii) De plus, les utilisateurs devraient aussi être avisés que les
utilisateurs de radars de haute puissance sont désignés utilisateurs principaux (c.-à-d., qu’ils ont la priorité) pour les bandes 5 250-5 350 MHz et 5
650-5 850 MHz et que ces radars pourraient causer du brouillage et/ou des dommages aux dispositifs LAN-EL.
Industry Canada Radiation Exposure Statement
This equipment complies with IC radiation exposure limits set forth for an uncontrolled environment. This equipment should be installed and operated
with minimum distance 20 cm between the radiator & your body.
Déclaration d’exposition aux radiations
Cet équipement est conforme aux limites d’exposition aux rayonnements IC établies pour un environnement non con trôlé. Cet équipement doit être
installé et utilisé avec un minimum de 20 cm de distance entre la source de rayonnement et votre corps.
