Hanwha Techwin TRM1610S NETWORK VIDEO RECORDER User Manual User manaul
Hanwha Techwin Co., Ltd. NETWORK VIDEO RECORDER User manaul
UserManual.wiki
>
Hanwha Techwin
>
TRM1610S User Manual
>
User manaul
Contents
1.
User manual
2.
User manaul
User manaul
Navigation menu
Upload a User Manual
Namespaces
Wiki Guide
HTML
PDF
Info
Views
User Manual
Discussion / Help
Navigation
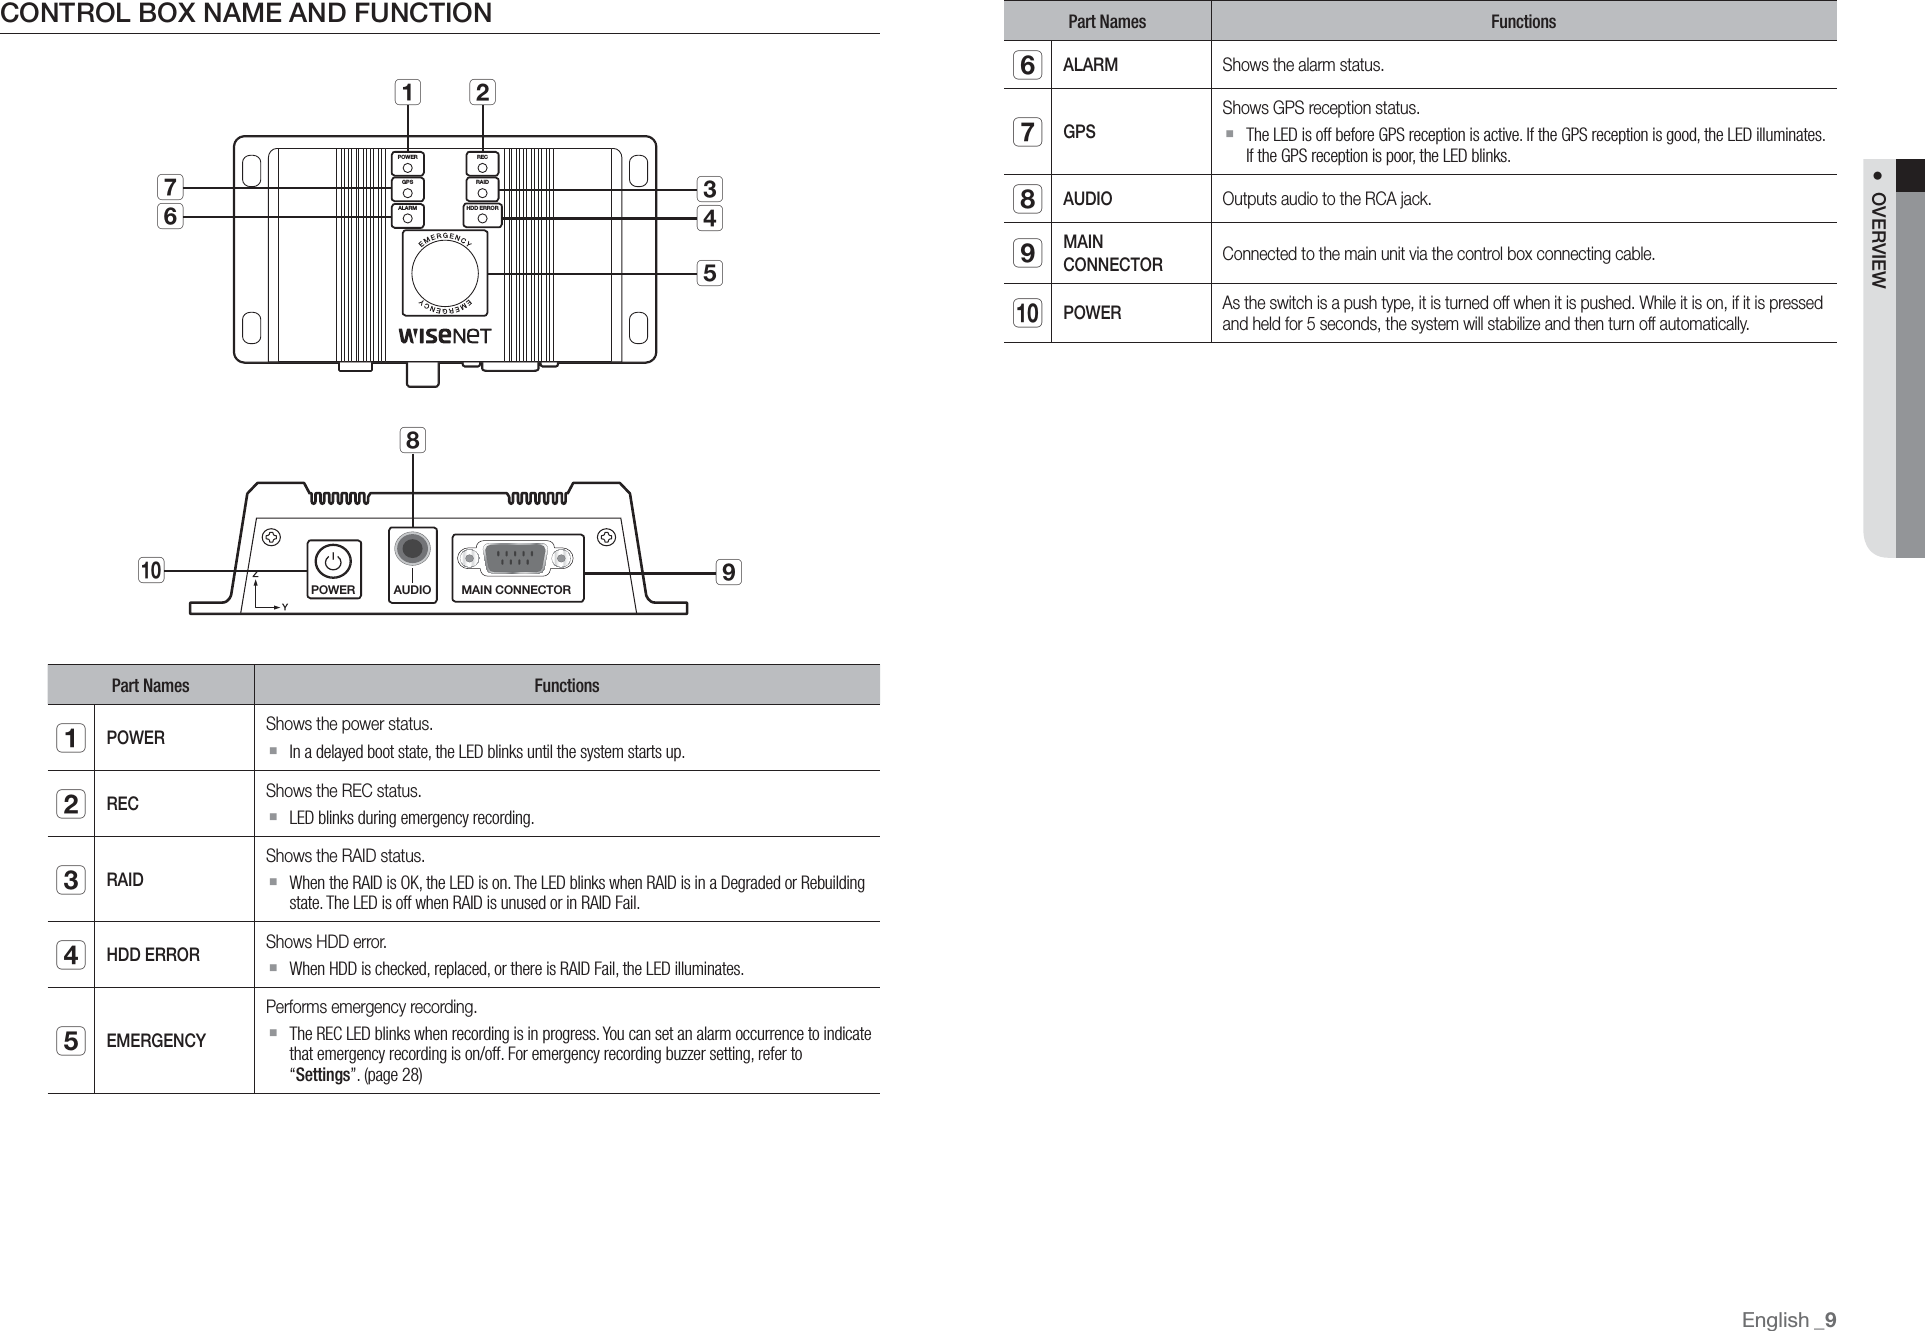
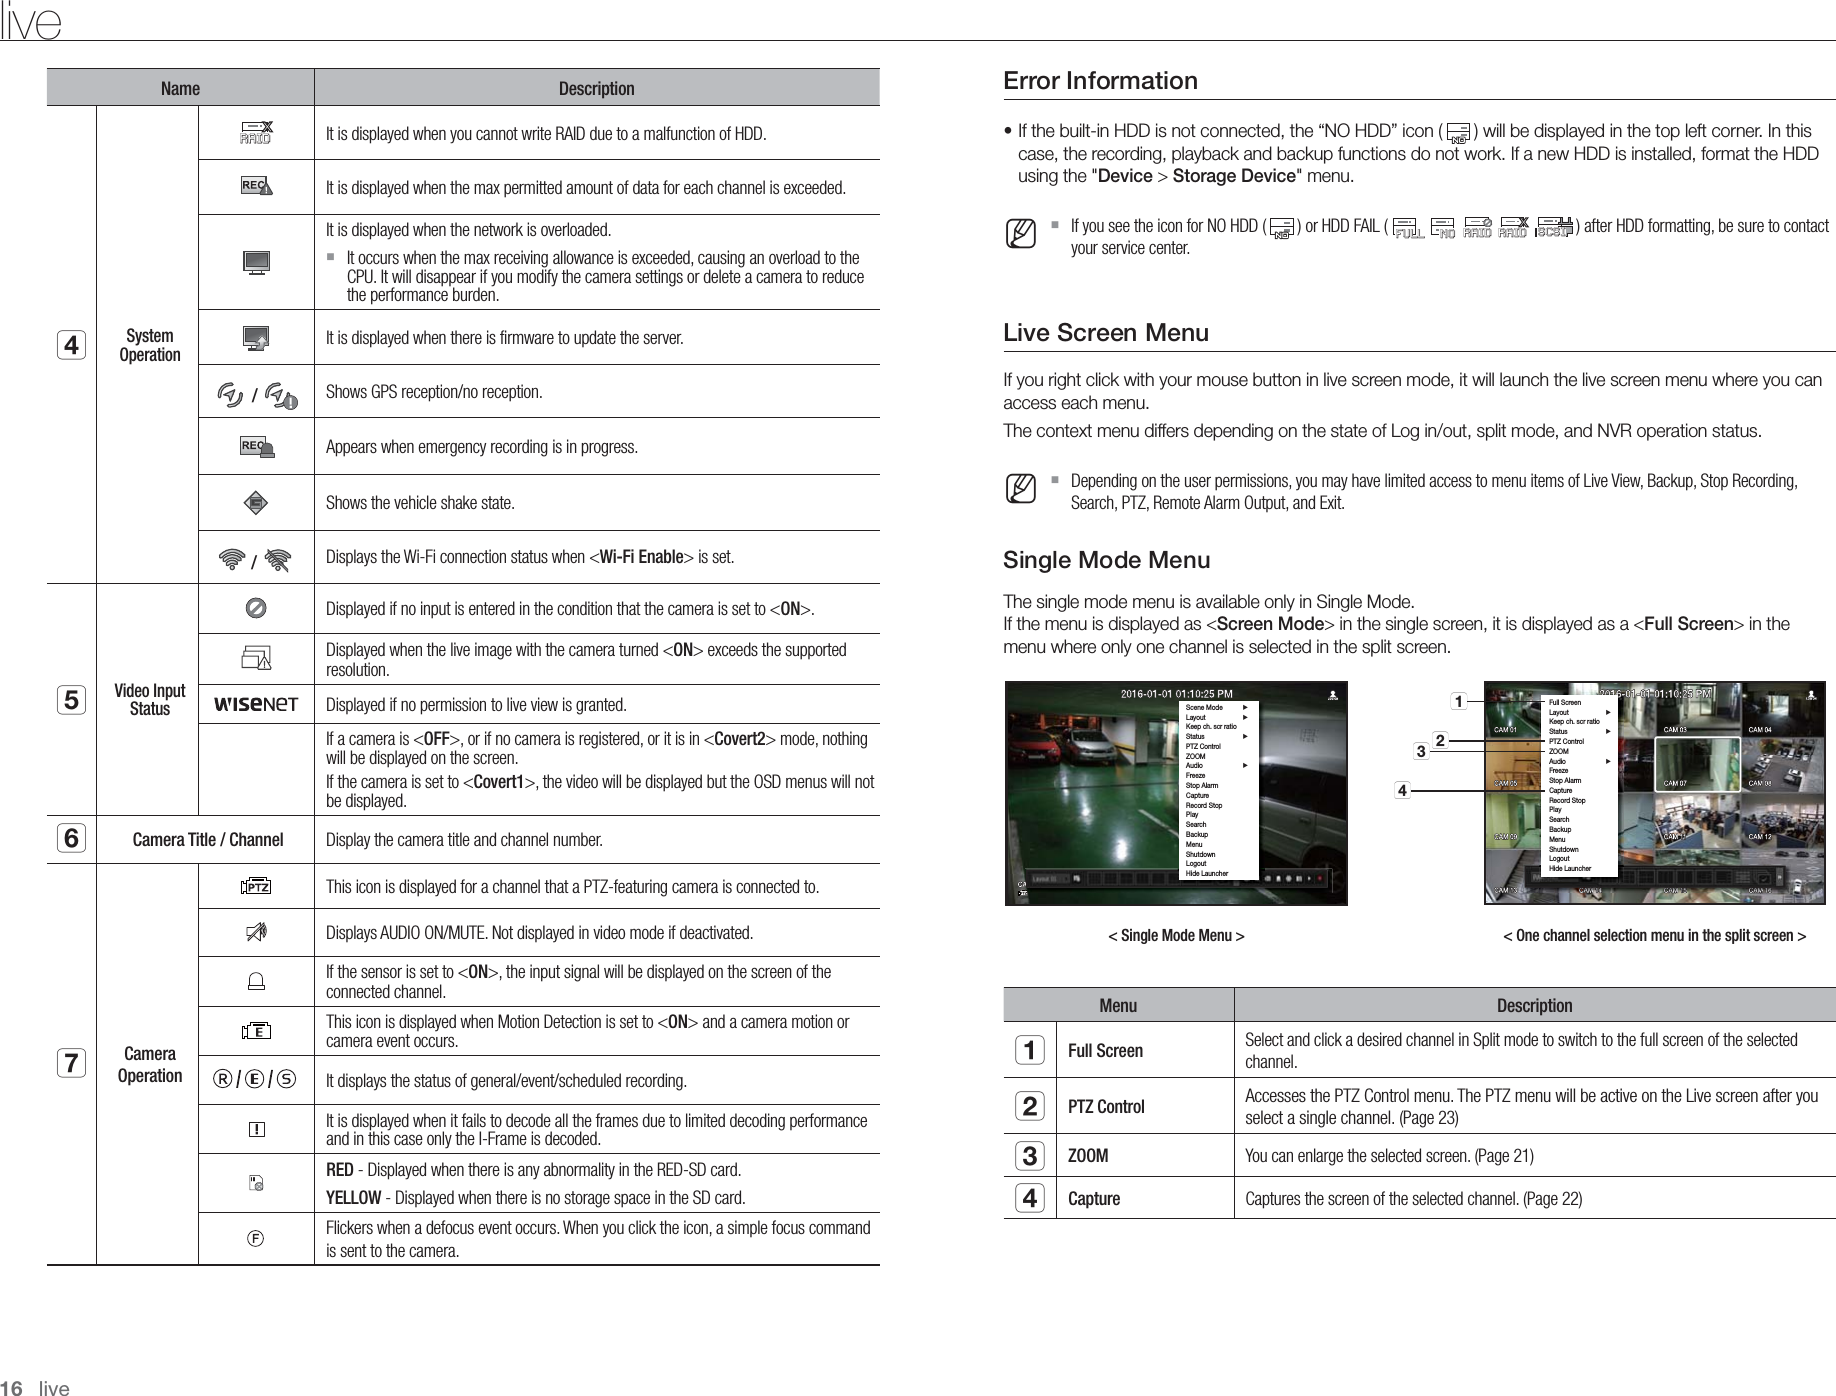
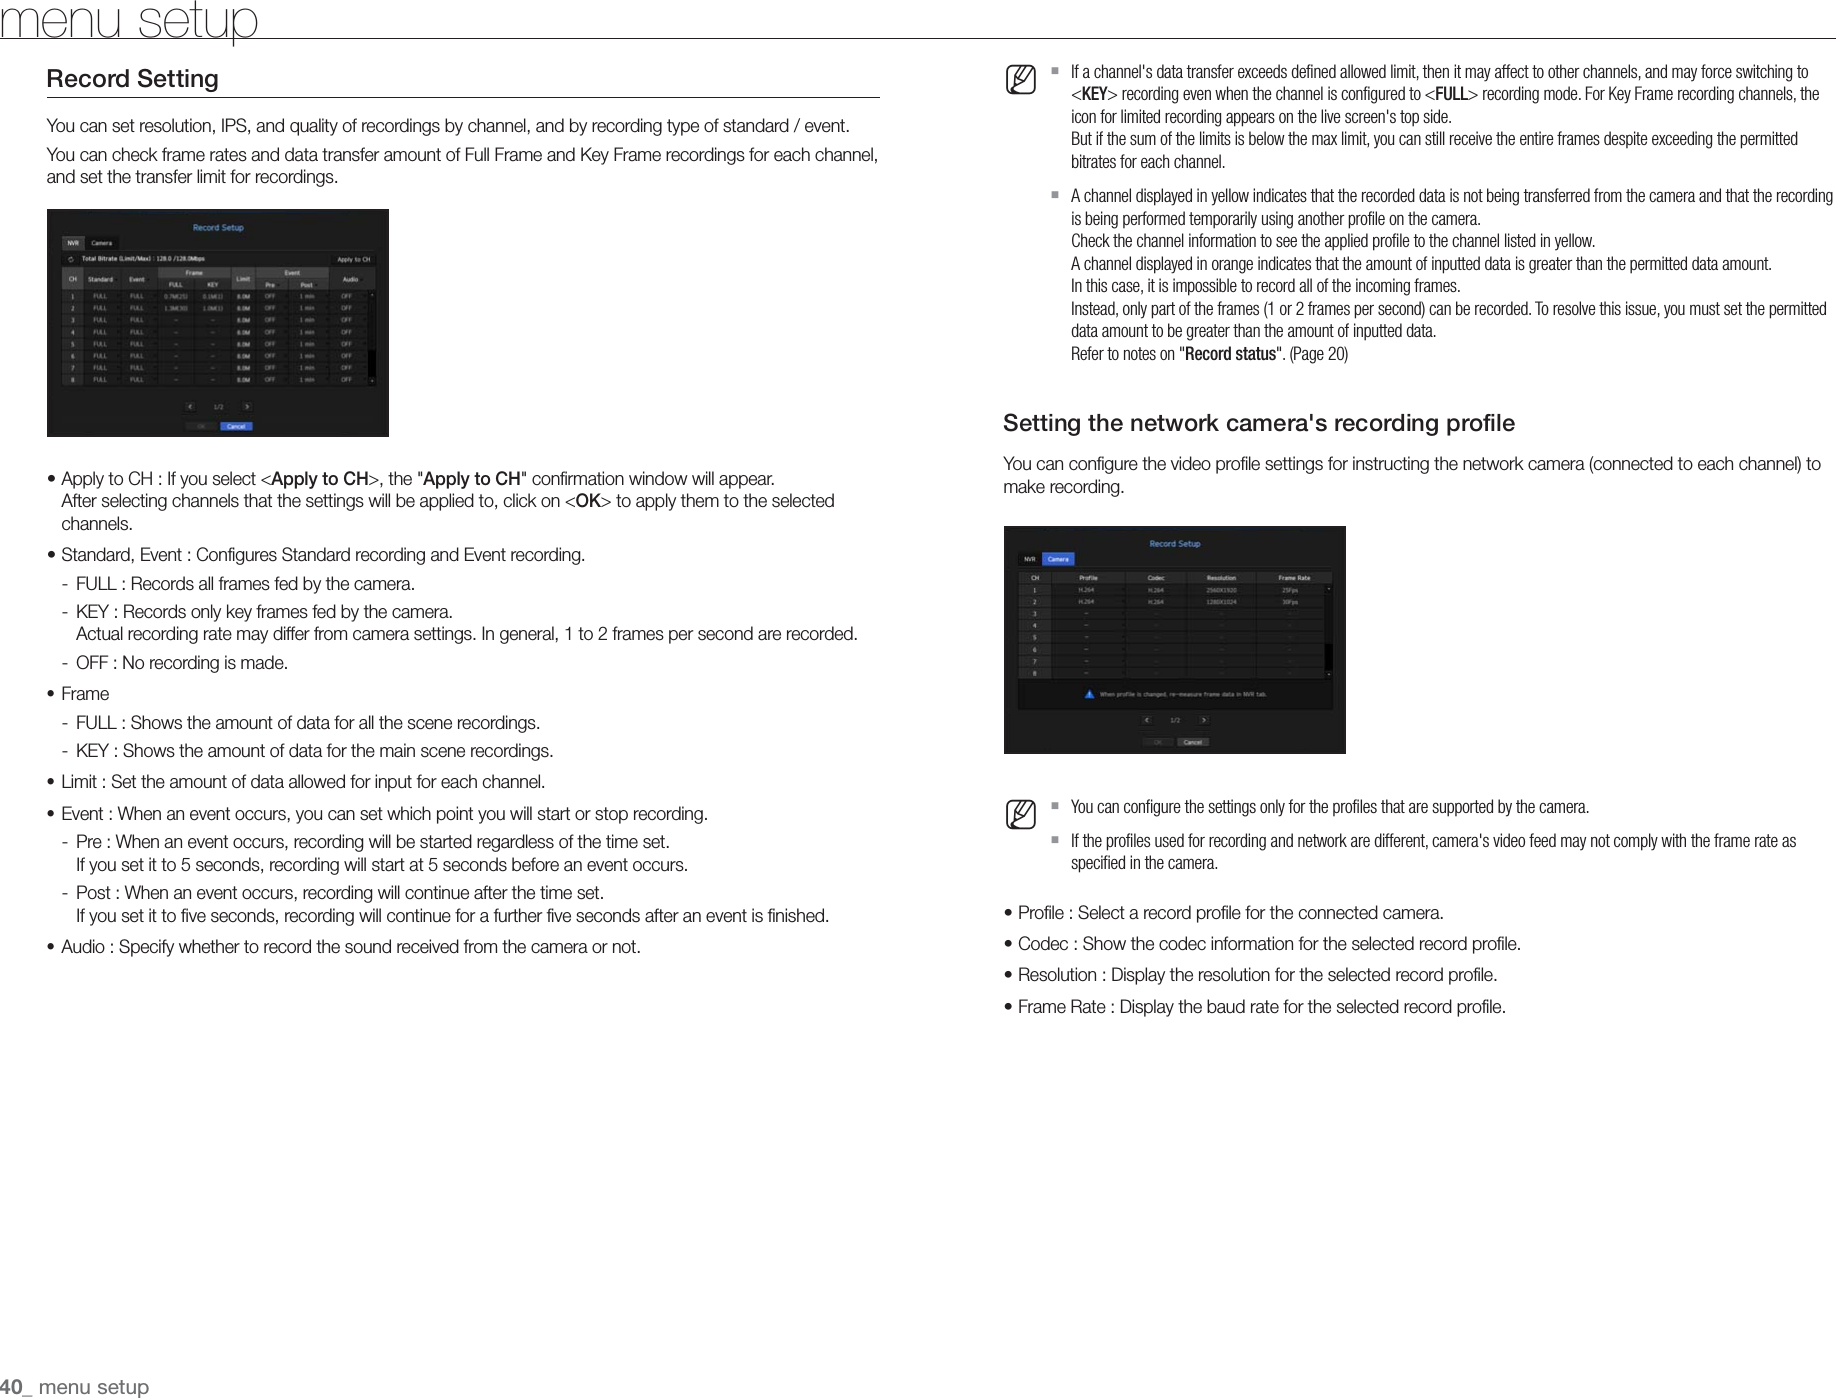
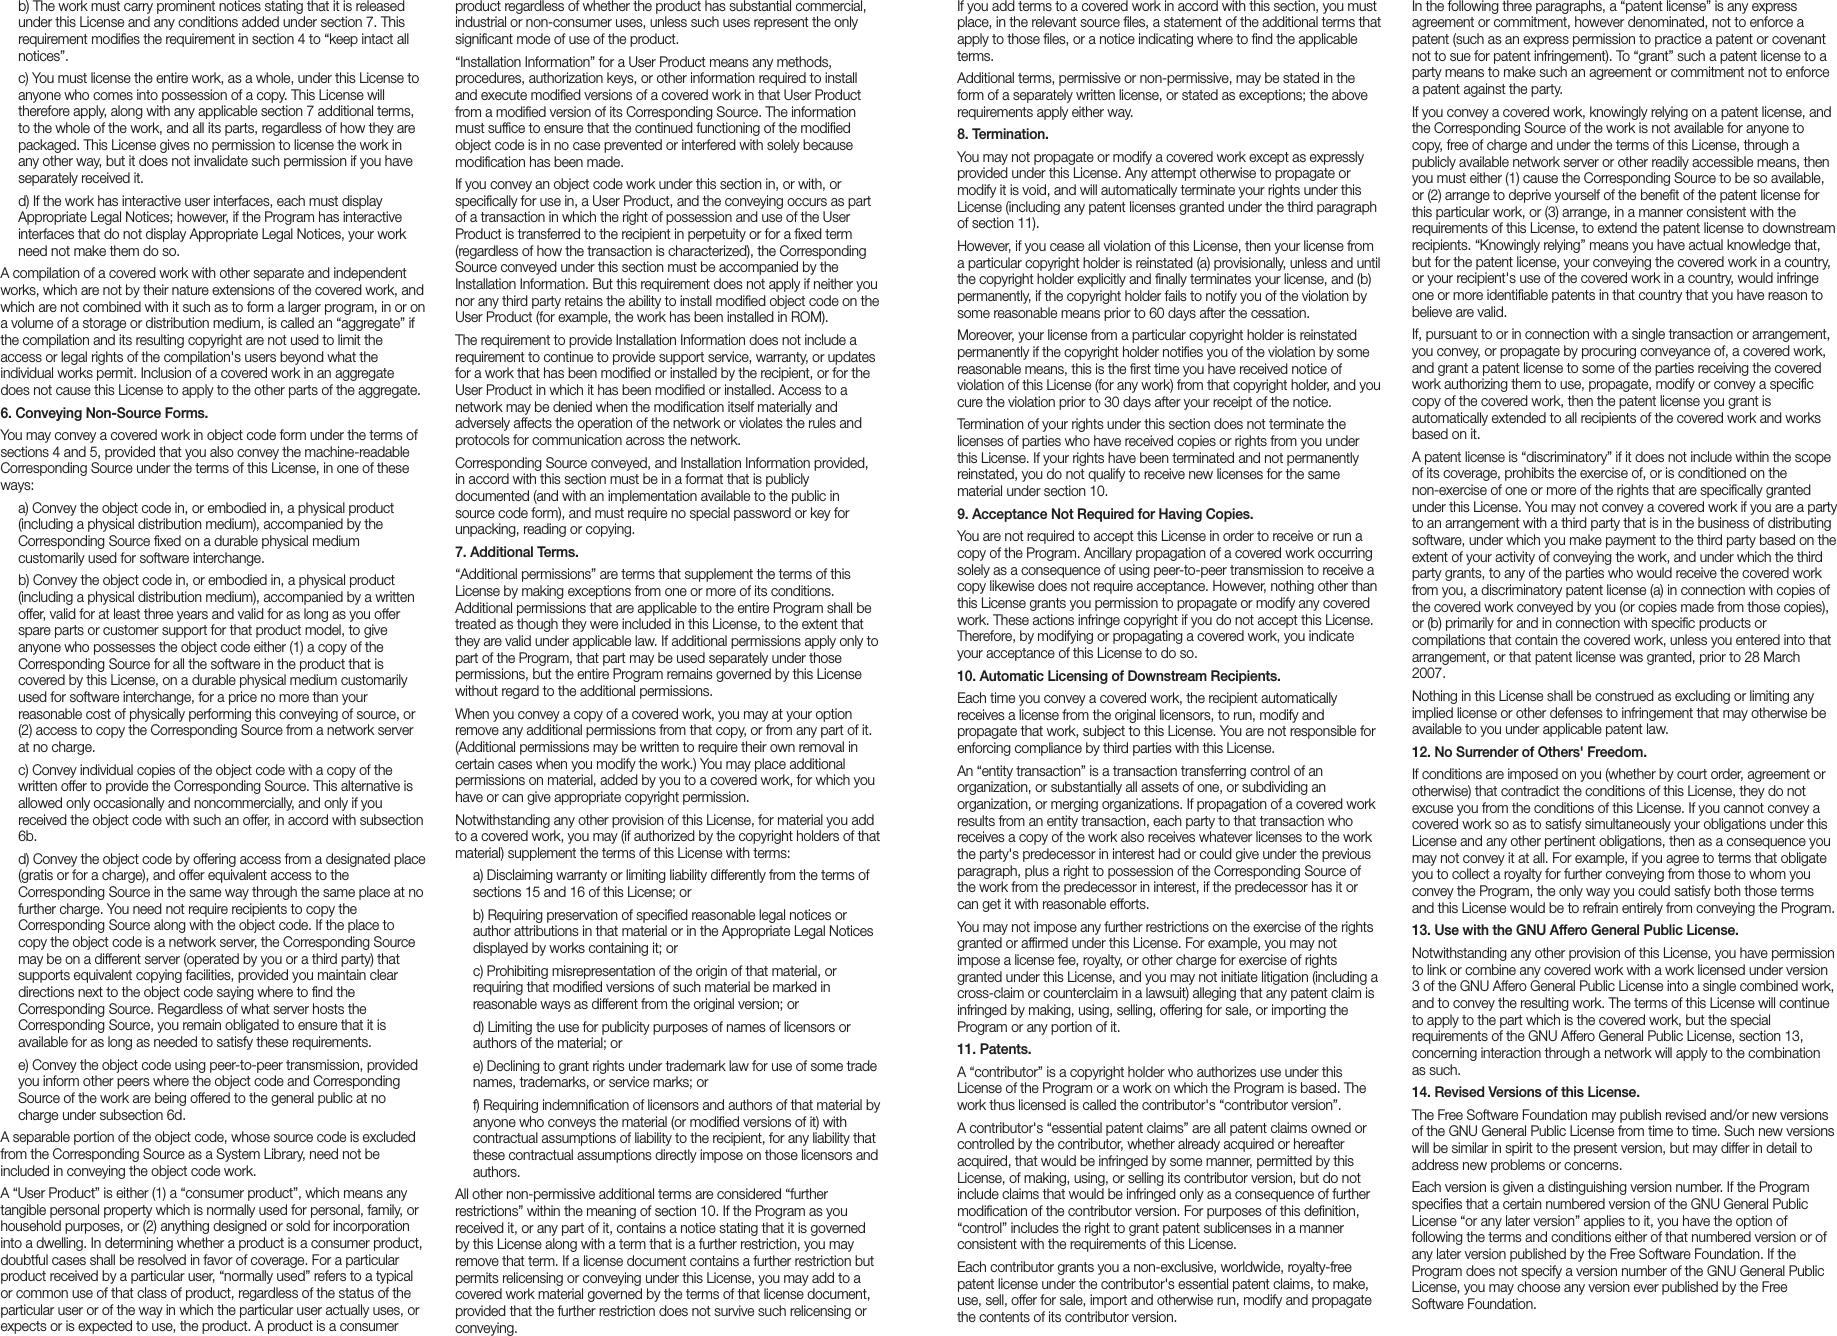
![10_ installationinstallationPlease take note of the followings before using this product. • Do not use the product outdoor. • Do not spill water or liquid in the connection part of the product. • Do not impose the system to excessive shock or force. • Do not pull out the power plug forcefully. • Do not disassemble the product on your own. • Do not exceed the rated input/output range. • Use a certified power cord only. • For the product with an input ground, use a grounded power plug. • Do not move the product using the HDD bracket handle on the front of the product as it may cause damage to the HDD.CHECKING THE INSTALLATION ENVIRONMENTThis product is a top-notch security device that is equipped with a high-capacity HDD and other key circuit boards.Note that an excessive internal temperature of the product may cause a system failure or a shortened product life (see the right figure). Keep in mind the following instructions before installing the product.HOW TO INSTALL THE BRACKET1. After removing the product from the box, disconnect the bottom bracket by removing the bracket assembly screws (10 pieces), as shown in the figure.2. Place the floor bracket on a flat surface and fasten it with the mounting screws (12 pieces) included in the product, as shown in the figure.3. Reassemble the main unit and floor bracket. `This is a shock absorber to protect the HDD from vehicle vibration.One Year: 24HR X 365 DAY =8,760 HRTemperatureUnit: ºCLife (Unit: HOURS)[Figure 1]HOW TO INSTALL THE CONTROL BOXAssemble mounting screws and install the camera on a wall/floor/ceiling as shown in the figure.HOW TO CONNECT THE CONTROL BOXConnect to the main unit via the control box connection cable.HDD ADDITIONMake sure to unplug the power cord from the wall outlet to prevent possible electric shock, injury or product damage.Please consult your provider for further information on HDD installation since improper installation or settings may damage the product. `Number of HDDs supported : Up to 2 HDDs supported `Make sure to unplug the power cord from the wall outlet before proceeding with the installation. J `Cautions for data loss (HDD care)Please pay attention so that the data inside the HDD is not damaged.Before adding a HDD, please check the compatibility with this product.HDD is vulnerable to malfunction due to its sensitive nature especially against shock when operating.Please ensure that the HDD is free from such shock.We are not liable for any damage to the HDD incurred by user's carelessness or miss use. `Cases might cause damage to HDD or recorded dataTo minimize the risk of data loss from a damaged HDD, please backup data as often as possible.If exposed to shock when disassembling or installing, data stored in the hard disk may be damaged.A sudden power failure or turning off the product while in HDD operation may damage the hard disk drive.HDD or files stored inside may be damaged if the main body is moved or impacted during the HDD operation.USB 2.0USB 3.0AUDIOPOWER REC ALARMVGAGPS ANTHDD1 HDD2HDMIUSB 2.0Screw for bracket assemblyMounting screwsMounting screwsCONTROL BOXRS-232CALARM BLOCKCONSOLEDC 9V~36VVIEWER CAMERAWIFI ANT2 WIFI ANT1PoE1 PoE2 PoE3 PoE4TROL BCONTROL BOXCONTROL BOXControl box](https://usermanual.wiki/Hanwha-Techwin/TRM1610S.User-manaul/User-Guide-3633110-Page-10.png)
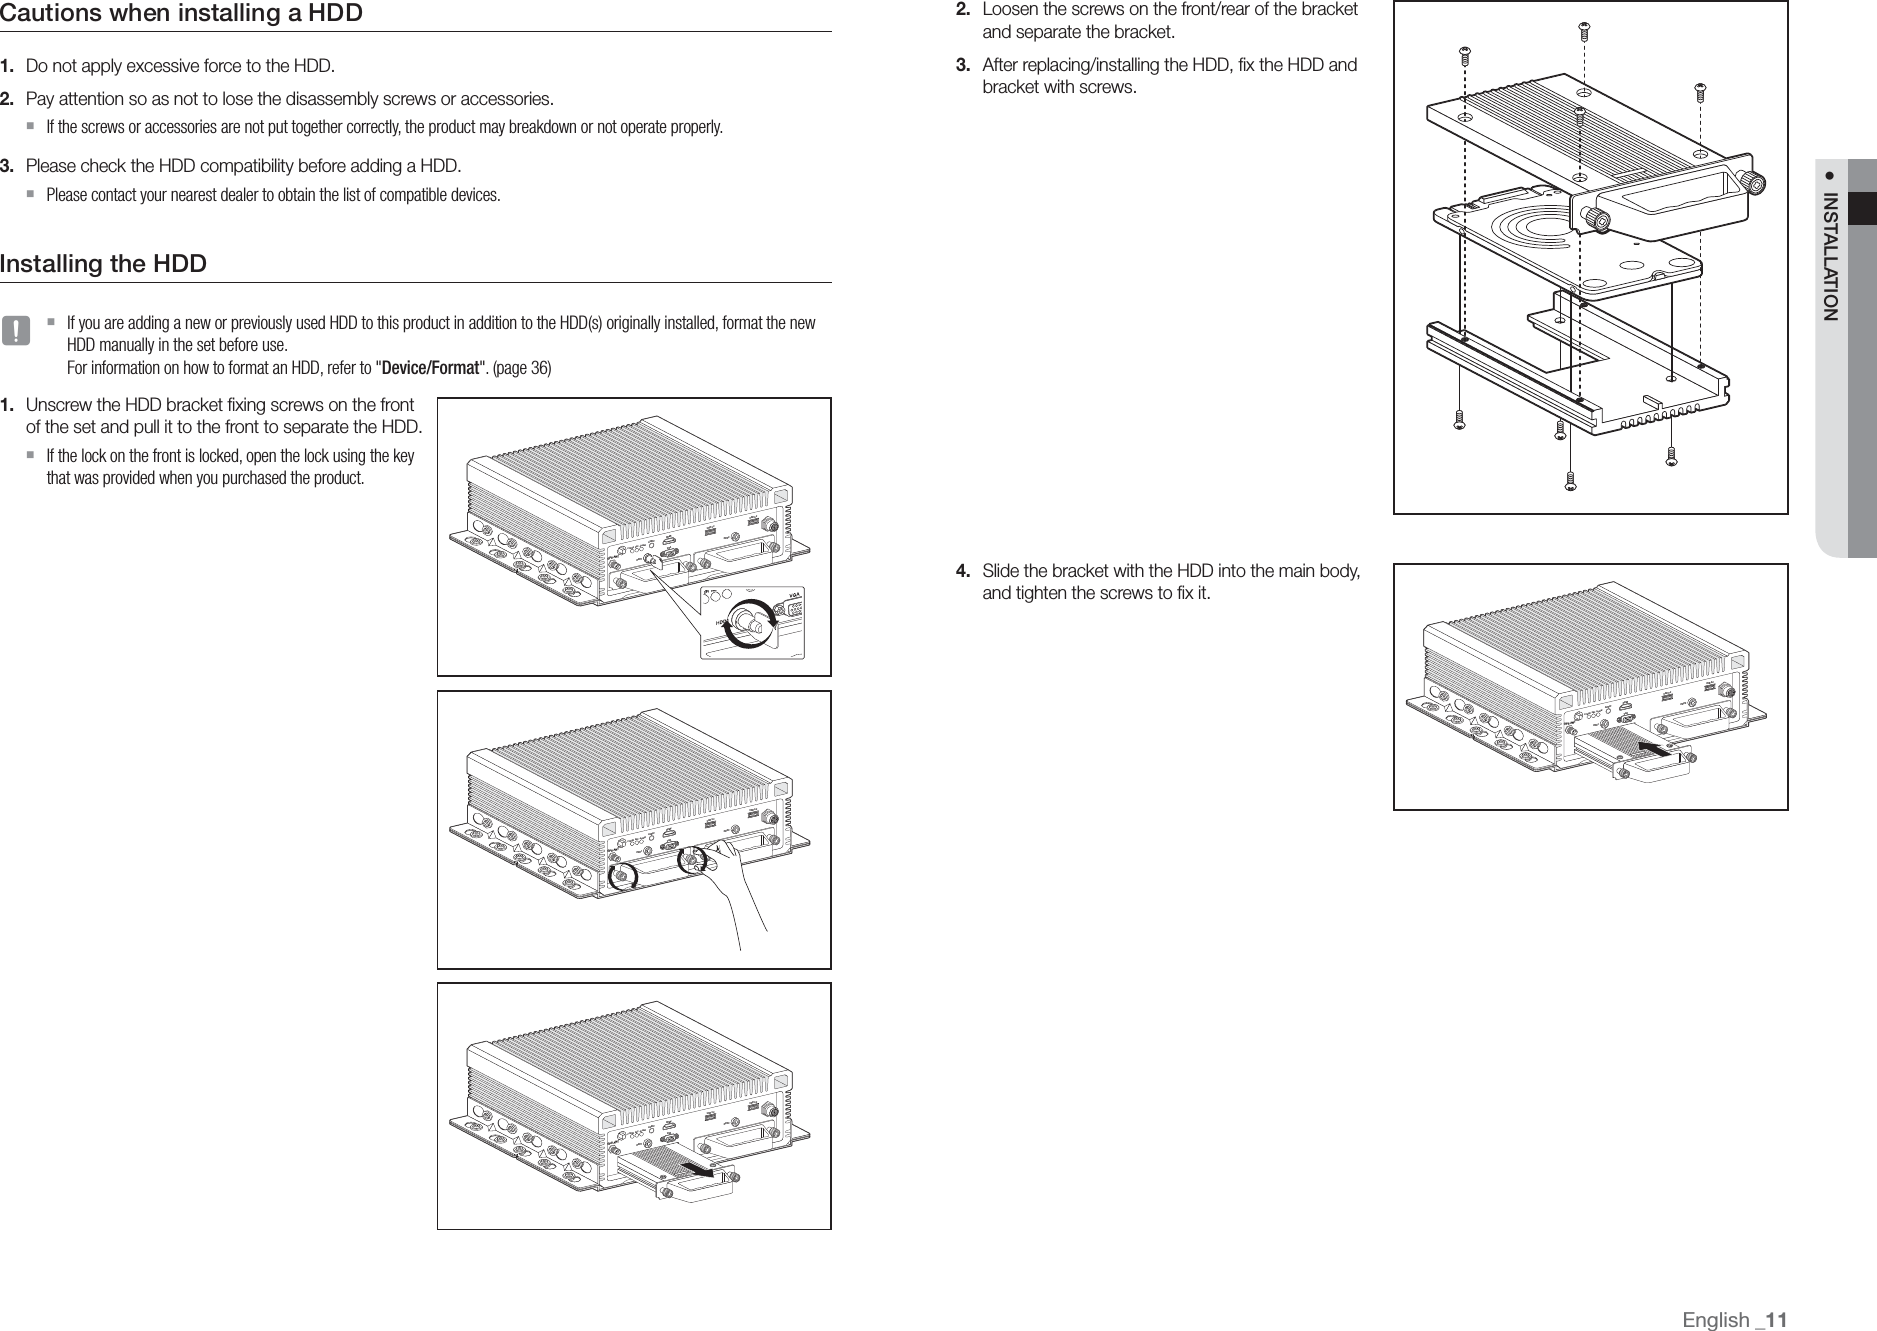


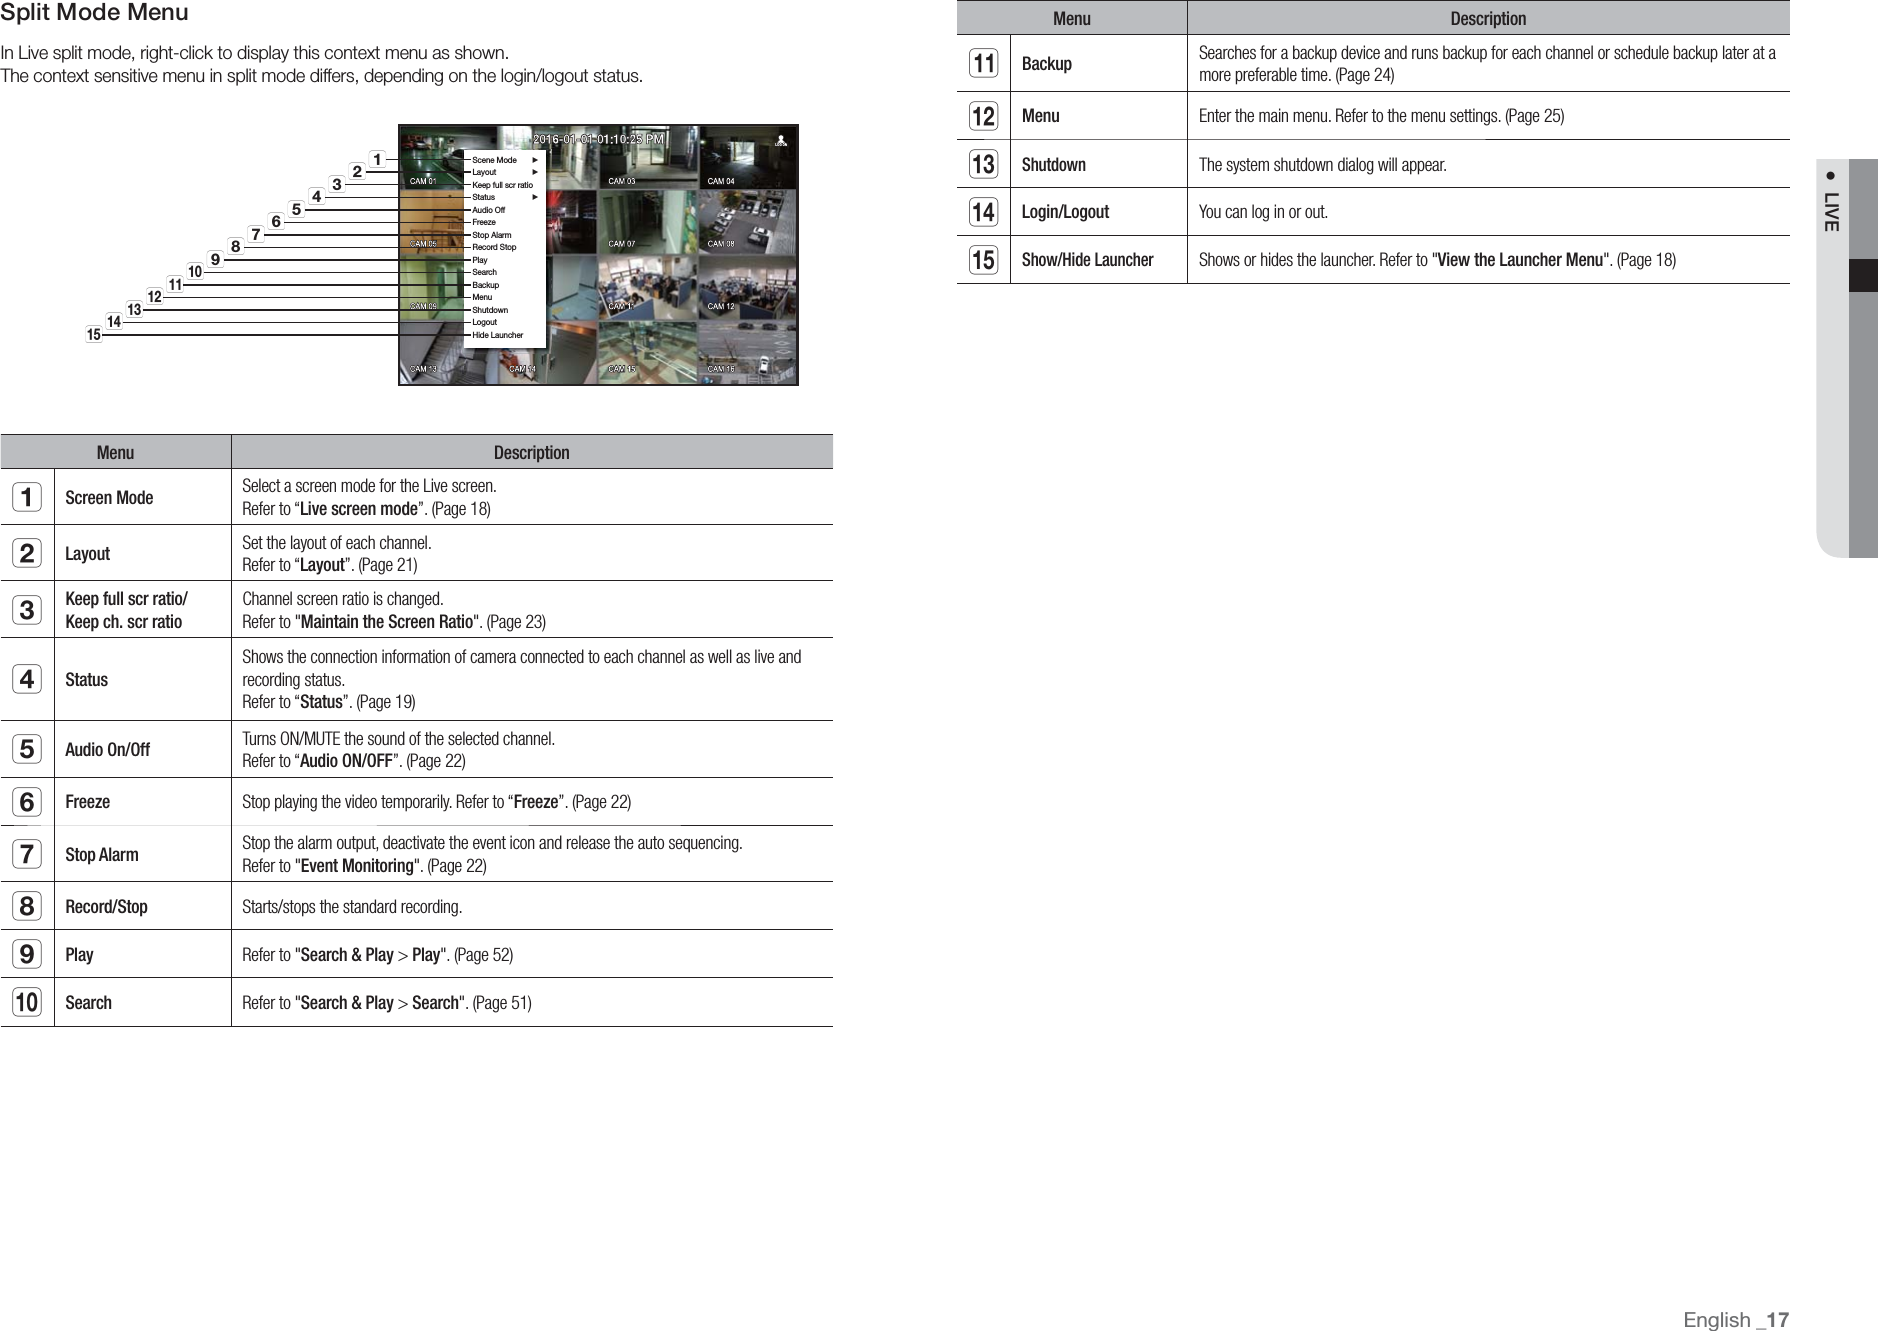
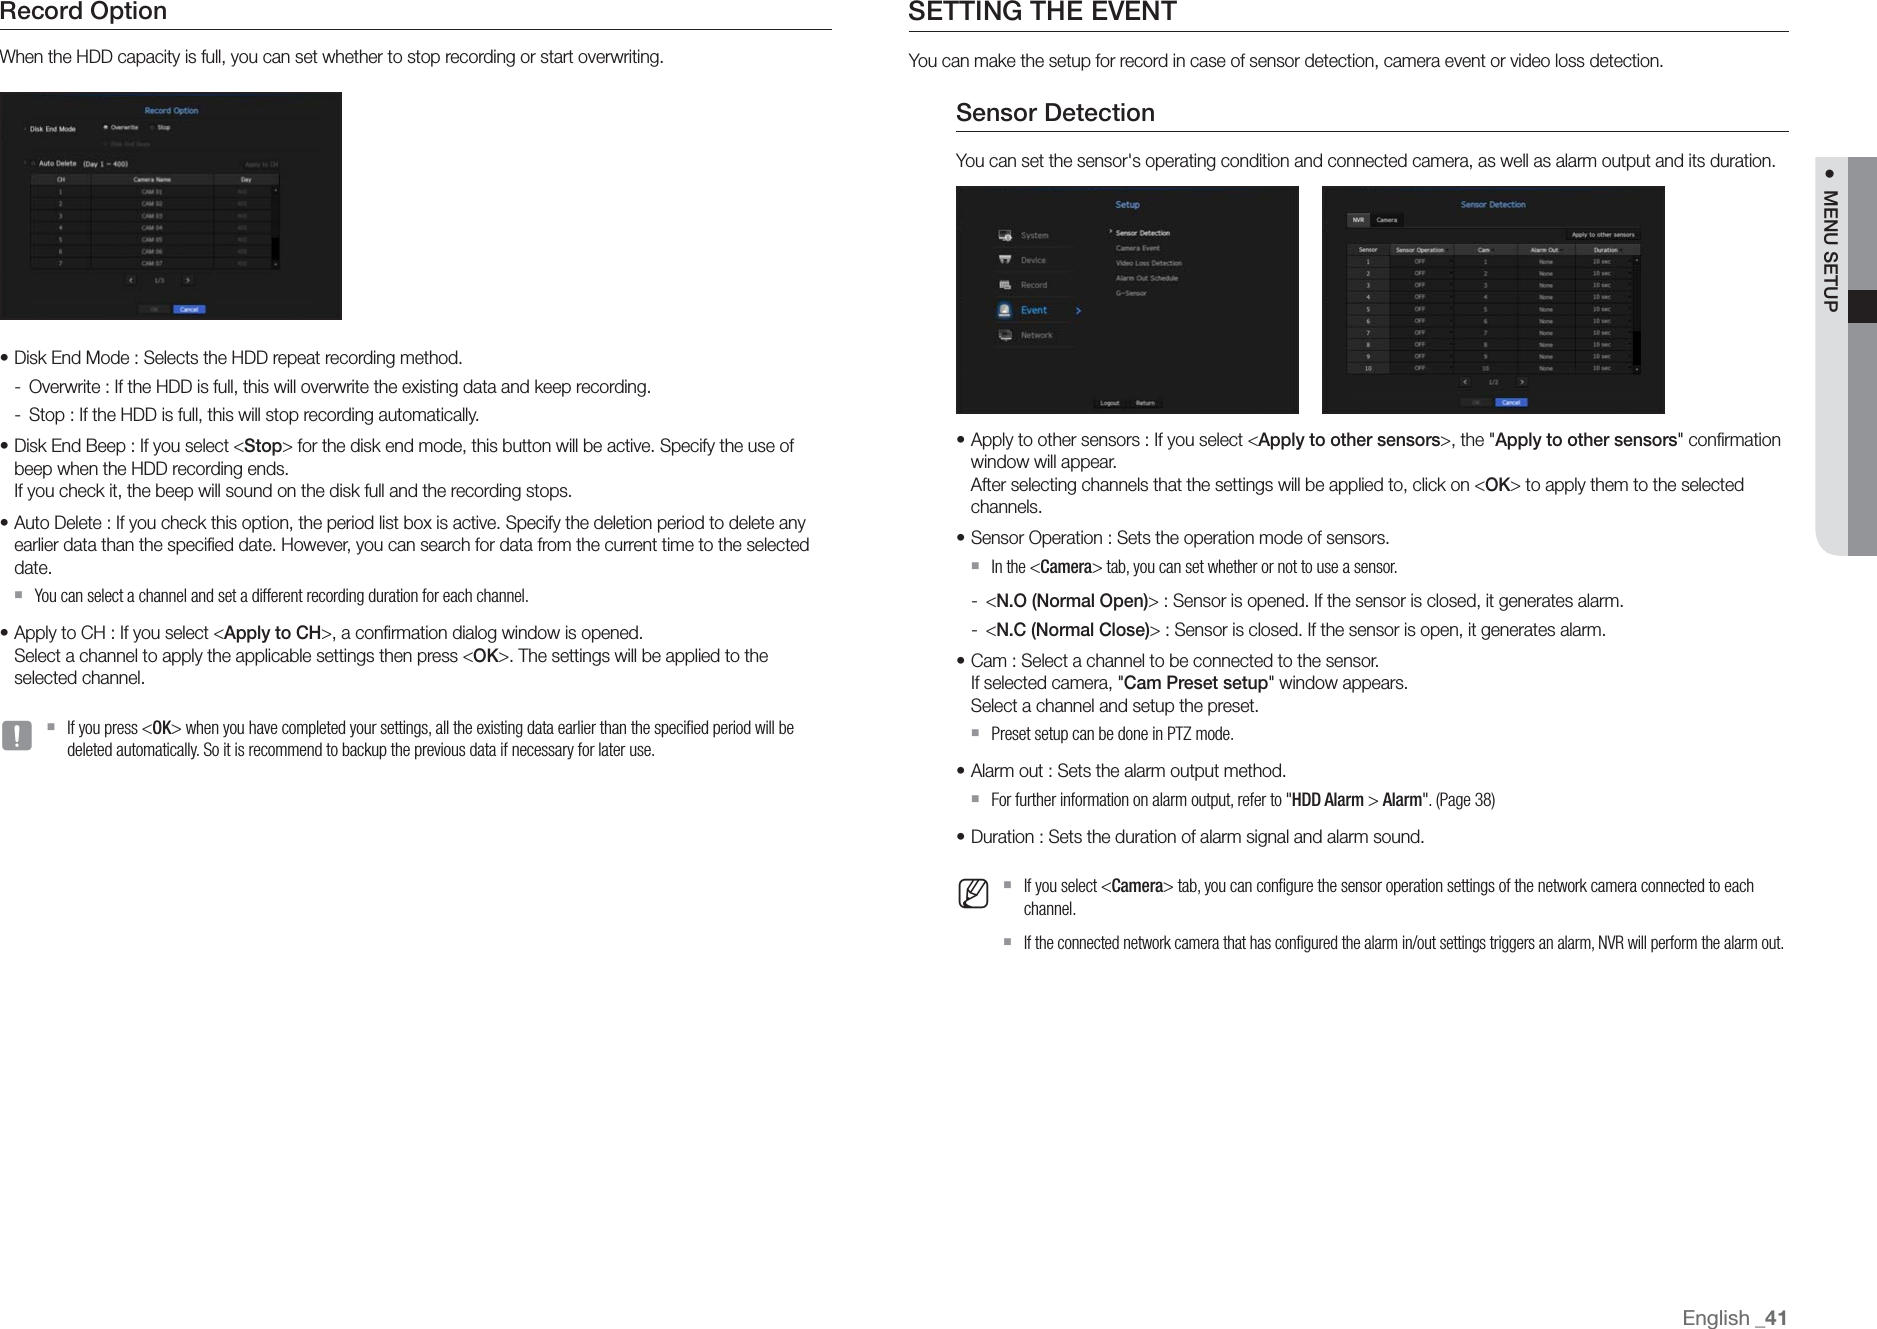
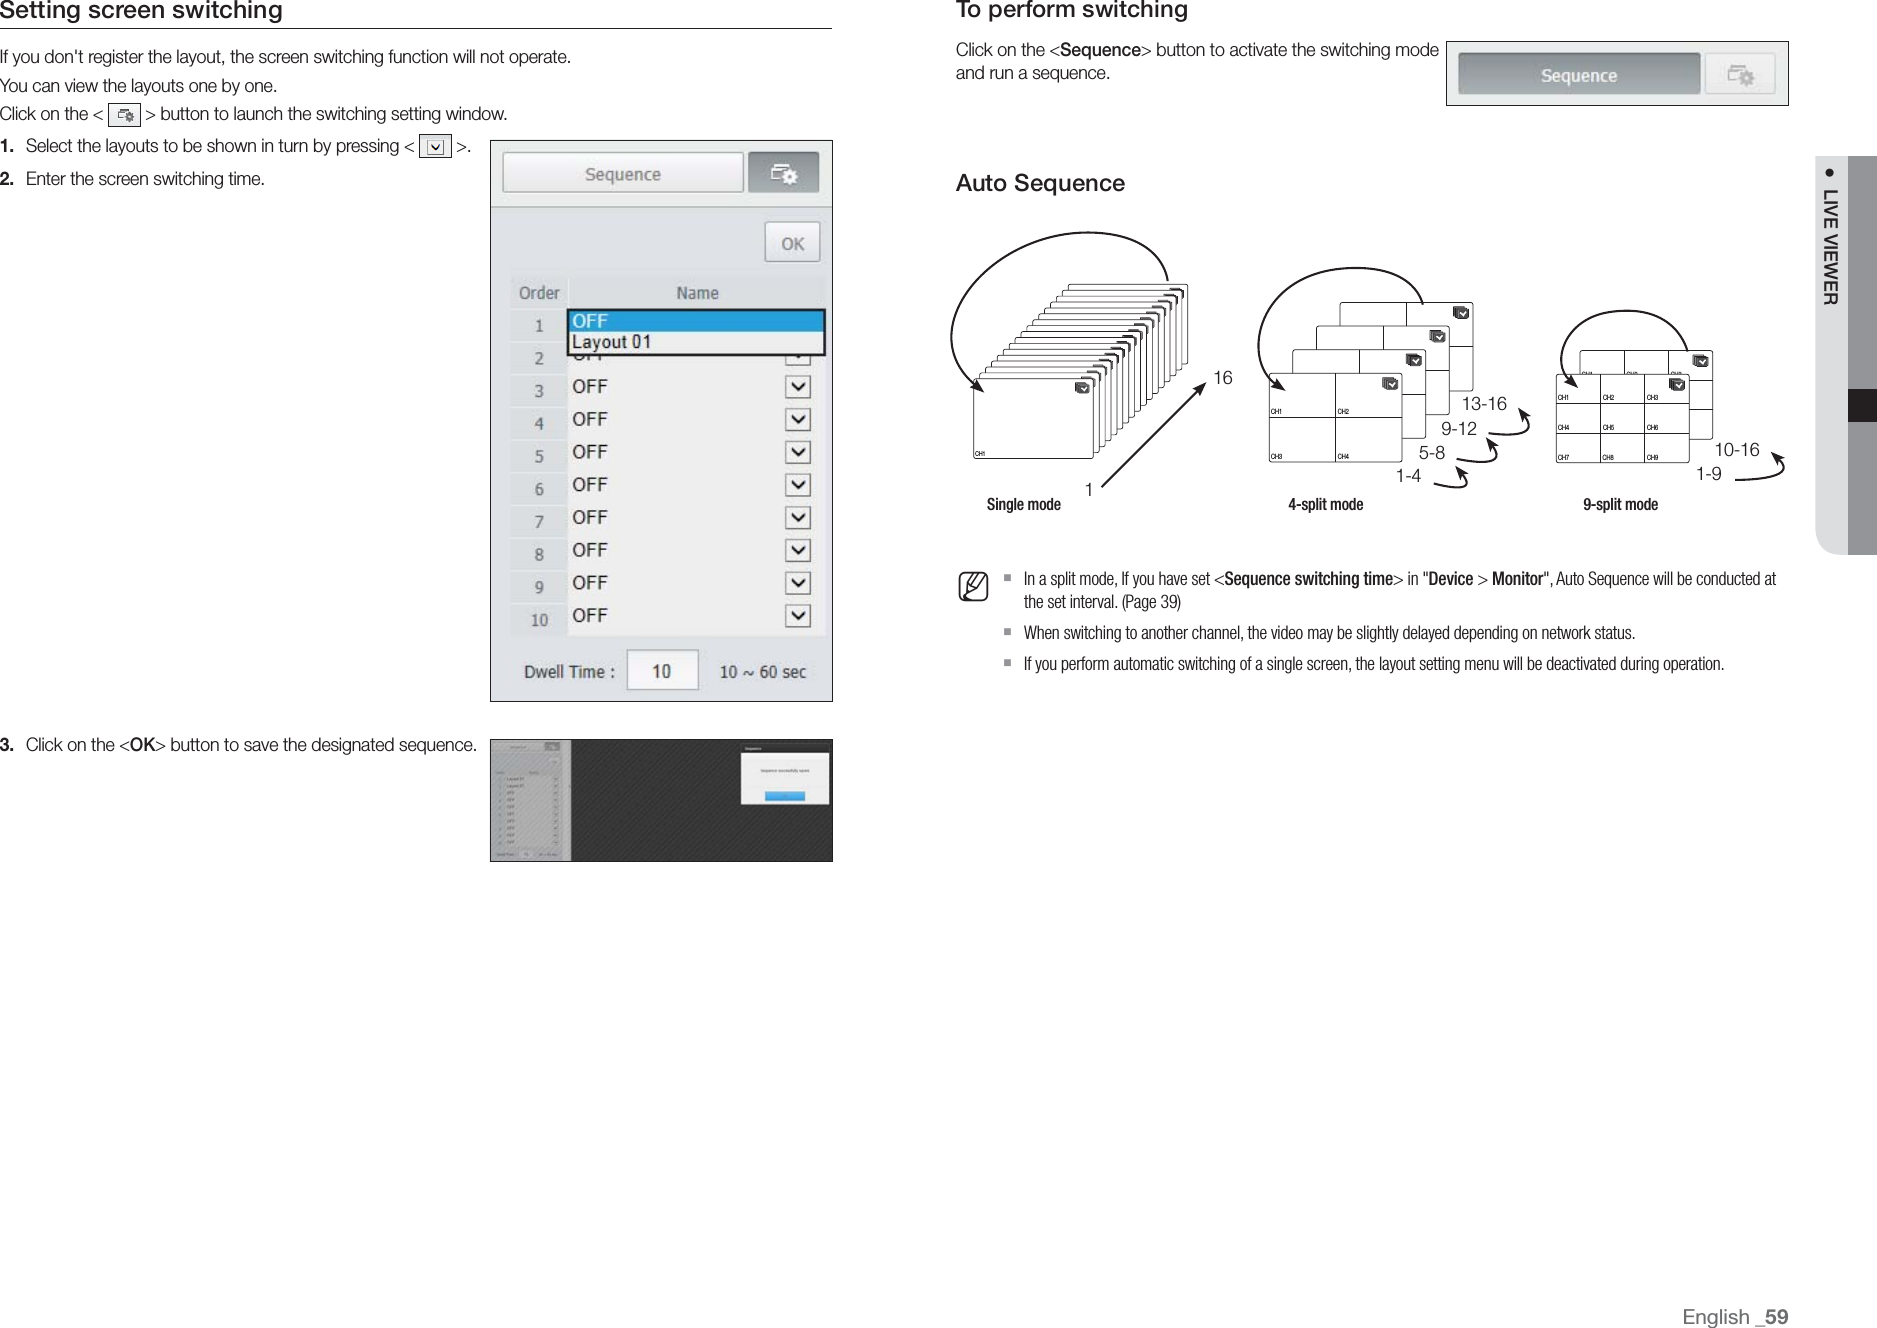
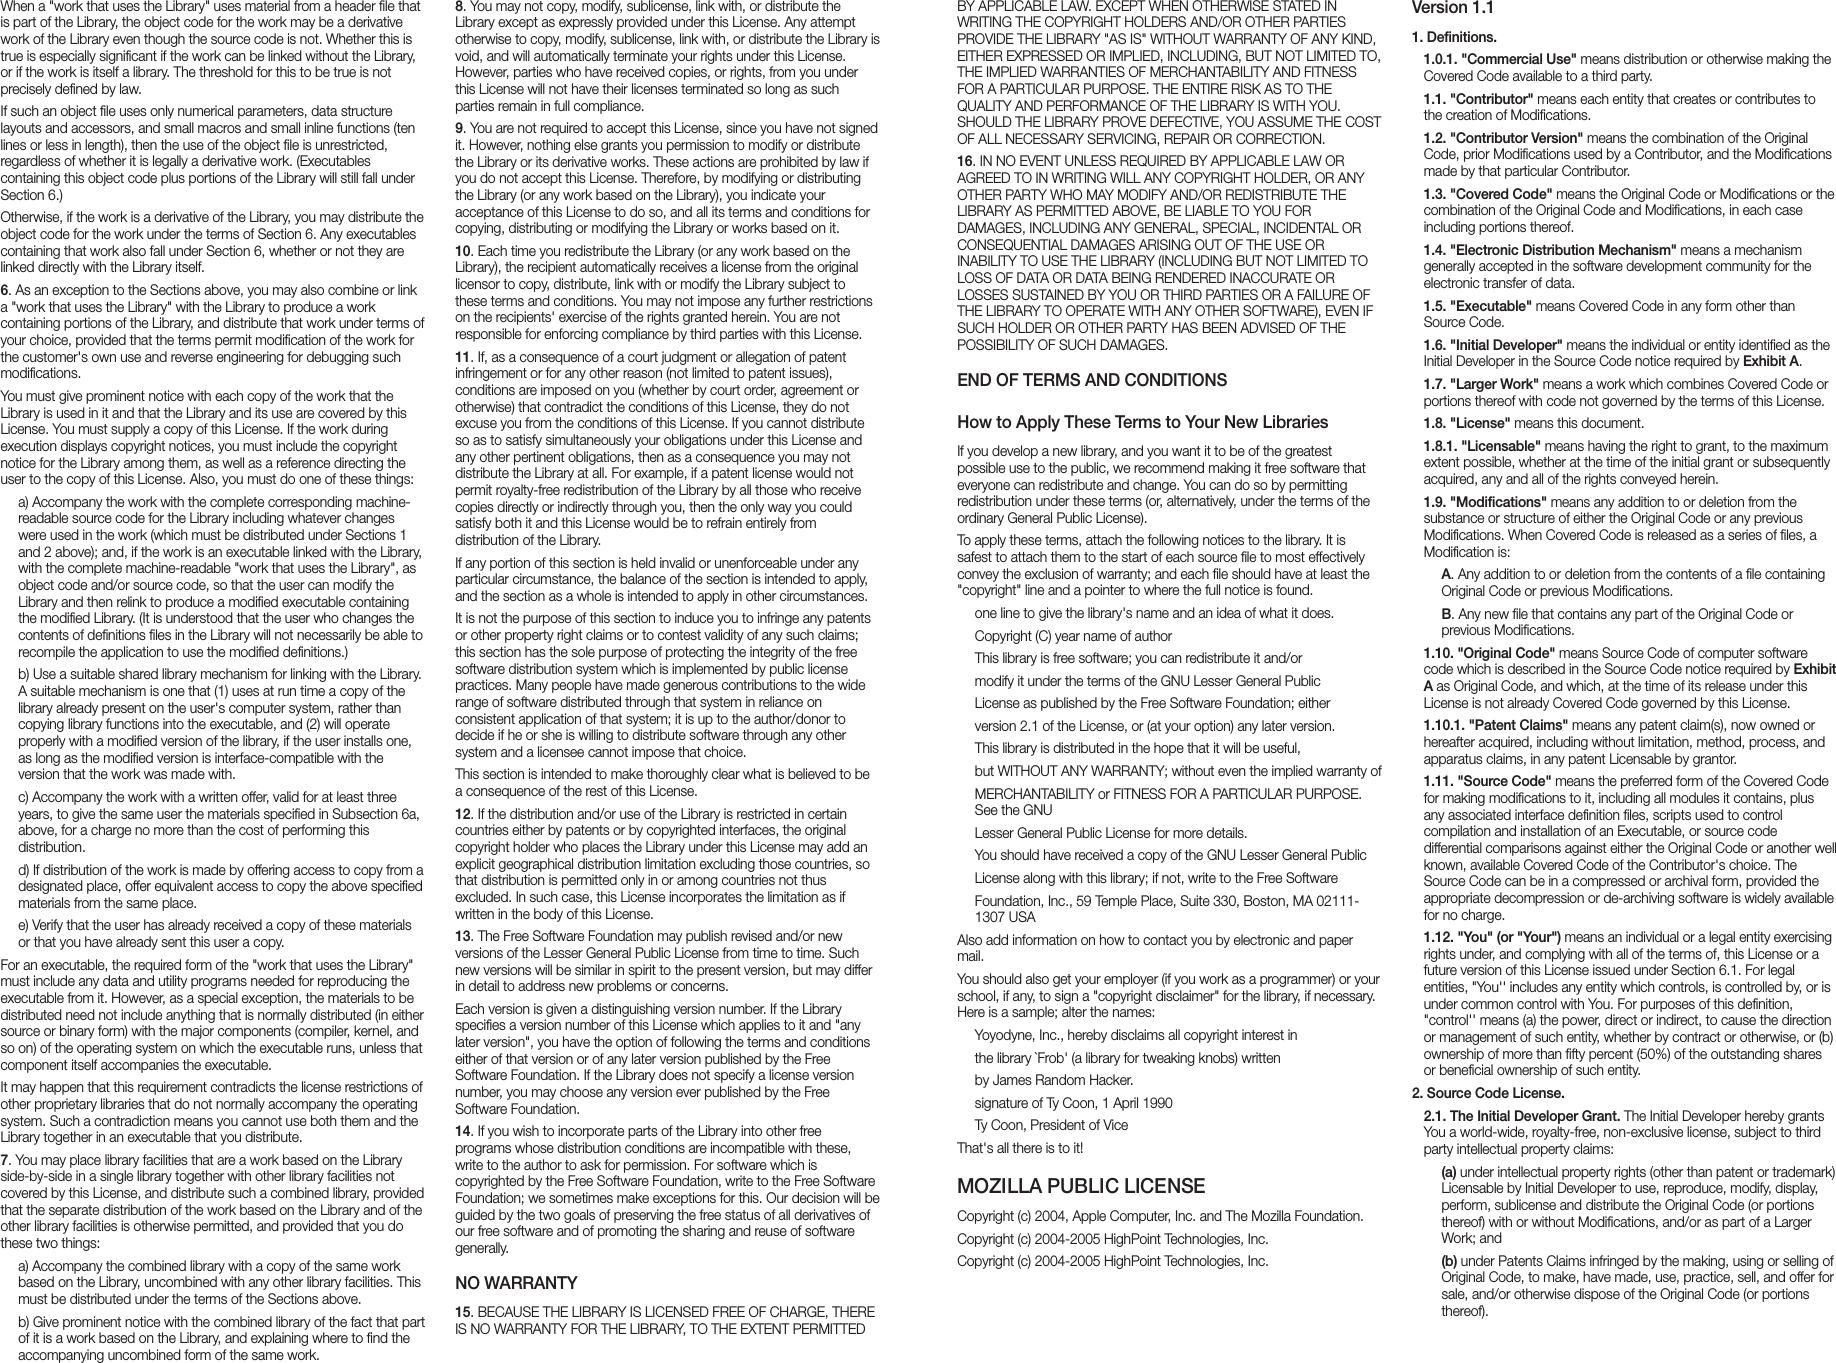
![English _19● LIVEAuto Sequence M `In a split mode, If you have set <Sequence switching time> in "Setting the Device > Monitor", Auto Sequence will be conducted at the set interval. (Page 39) `When you switch the channel, the video may be delayed depending on the network condition.Manual SwitchingClick the arrow <◄/►> key to move to the next split mode. • If pressing the right [►] button in 9-split mode :Channel (CH 1~9) Channel (CH 10~16) Auto Sequence • If pressing the right [►] button in 4-split mode :Channel (CH 1~4) Channel (CH 5~8) Channel (CH 9~12) Channel (CH 13~16) Auto SequenceStatusYou can check the connection information of the camera to be connected to each channel on the live screen.ConnectionIf you select <Connection> in the <Status> menu on the live screen, you can check the connection state of the camera connected to each channel.Live Status If you select <Live> in the <Status> menu on the live screen, you can check the transmisson information and state of the camera connected to each channel. • Model : Displays the camera model name connected to each channel. • Status : Displays the status of camera connection set to each channel. • IP Address : Displays the IP address of a camera set to each channel. • Codec : Displays the live profile codec information for a camera set to each channel. • Resolution : Displays the live profile resolution of a camera set to each channel. • Frame Rate : Displays the number of live profile frames of the camera set for each channel.16CH11Single modeCH1CH1CH1CH1CH1CH1CH1CH1CH1CH1CH1CH1CH1CH1CH1CH1CH1 CH2CH3 CH413-169-125-81-44-split modeCH1 CH2CH3 CH4CH1 CH2CH3 CH4CH1 CH2CH3 CH4CH4 CH5CH2CH6CH1 CH3CH7 CH8 CH910-161-99-split modeCH4 CH5CH2CH6CH1 CH3CH7 CH8 CH9CH4 CH5CH2CH6CH1 CH3CH7 CH8 CH9CH13 CH14CH11CH15CH10 CH12CH16CH4 CH5CH2CH6CH1 CH3CH7 CH8 CH9CH4 CH5CH2CH6CH1 CH3CH7 CH8 CH910-161-9CH1 CH2CH3 CH4CH5 CH6CH7 CH8CH9 CH10CH11 CH12CH13 CH14CH15 CH1613-169-125-81-4CH1 CH2CH3 CH4CH1 CH2CH3 CH4CH1 CH2CH3 CH4CH1 CH2CH3 CH4](https://usermanual.wiki/Hanwha-Techwin/TRM1610S.User-manaul/User-Guide-3633110-Page-19.png)
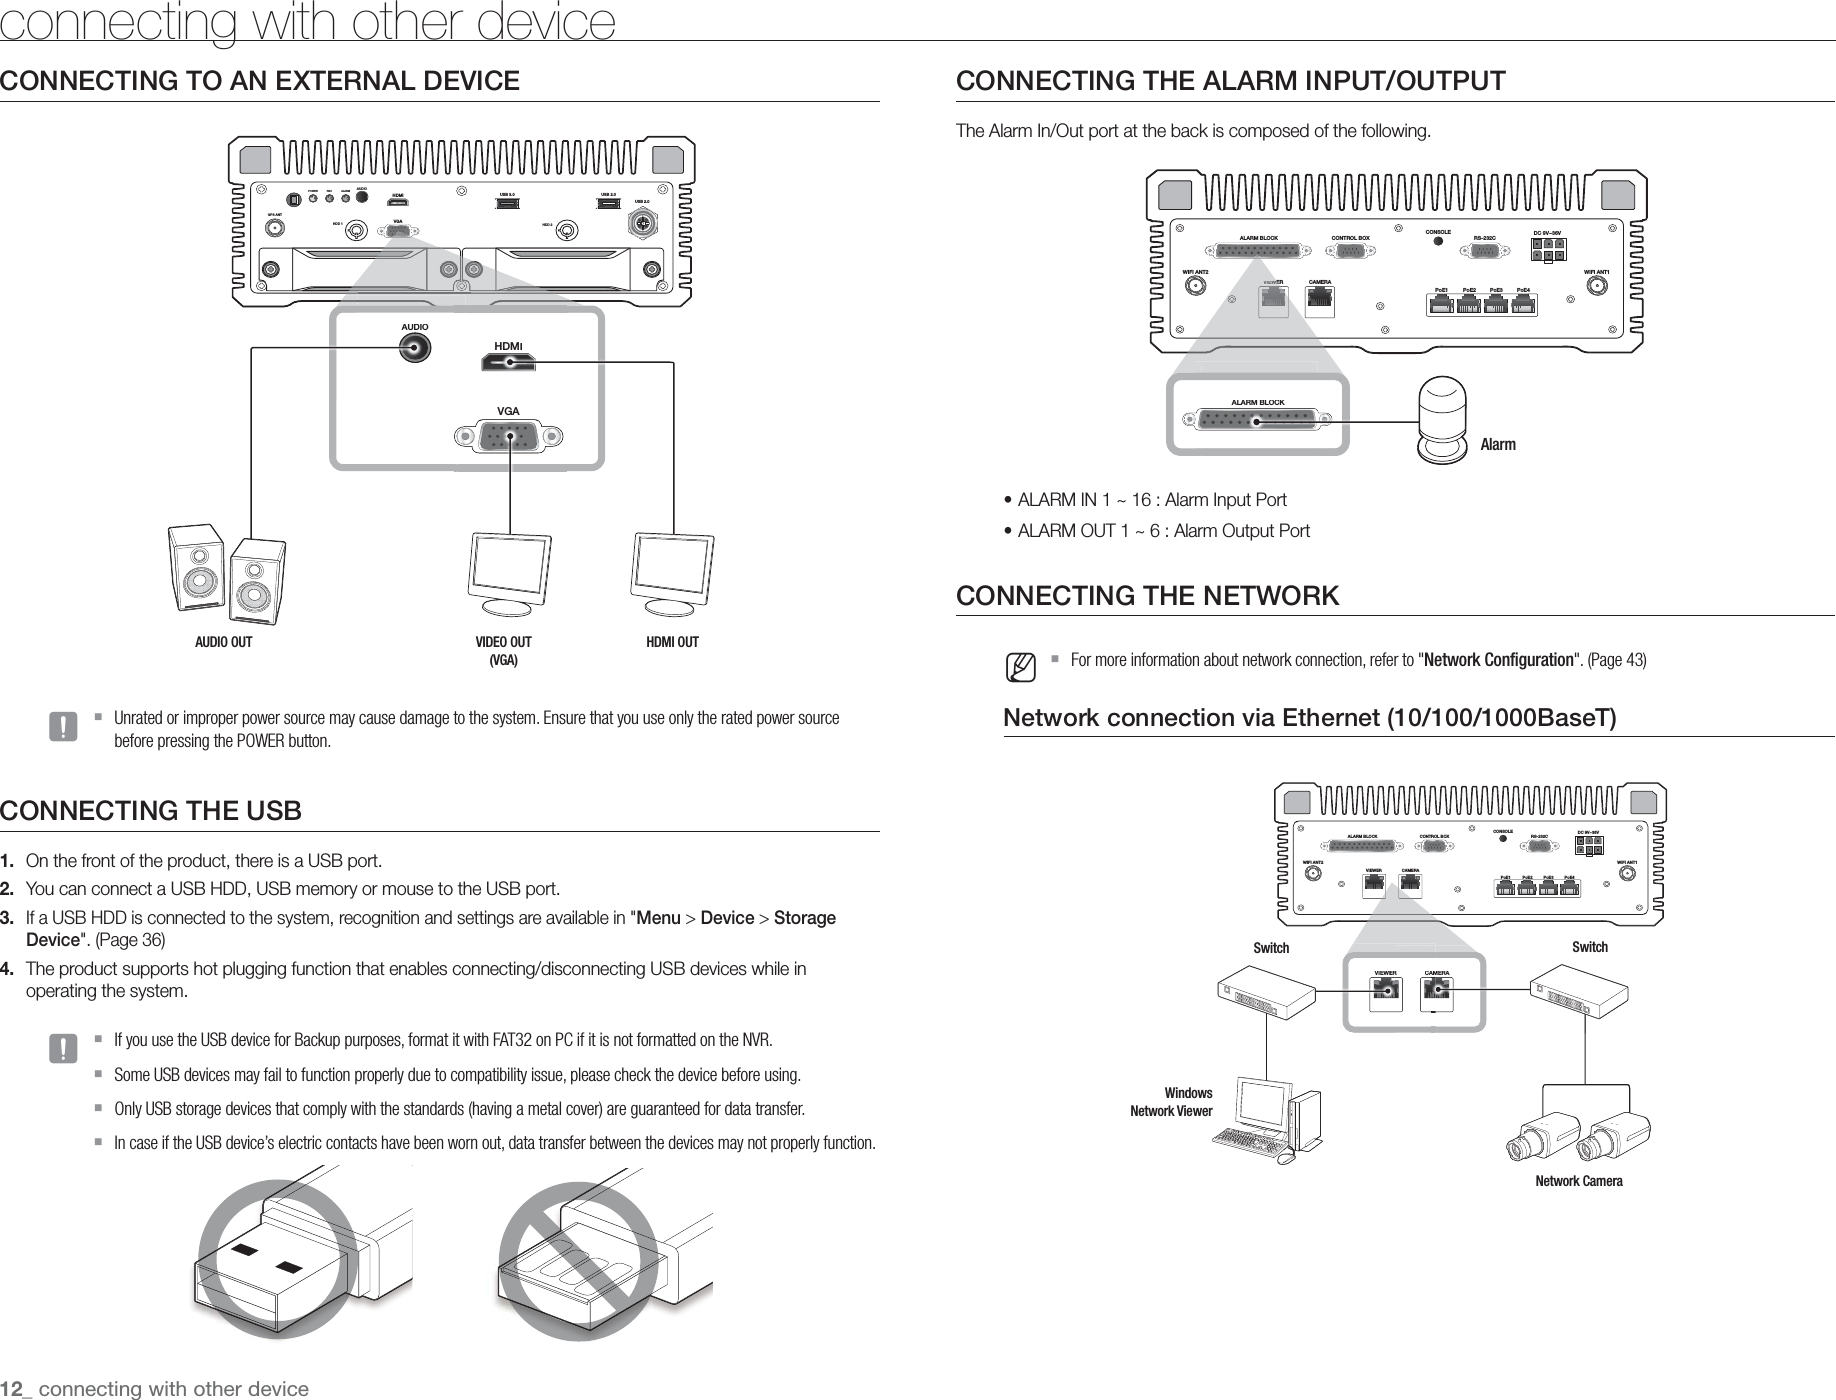
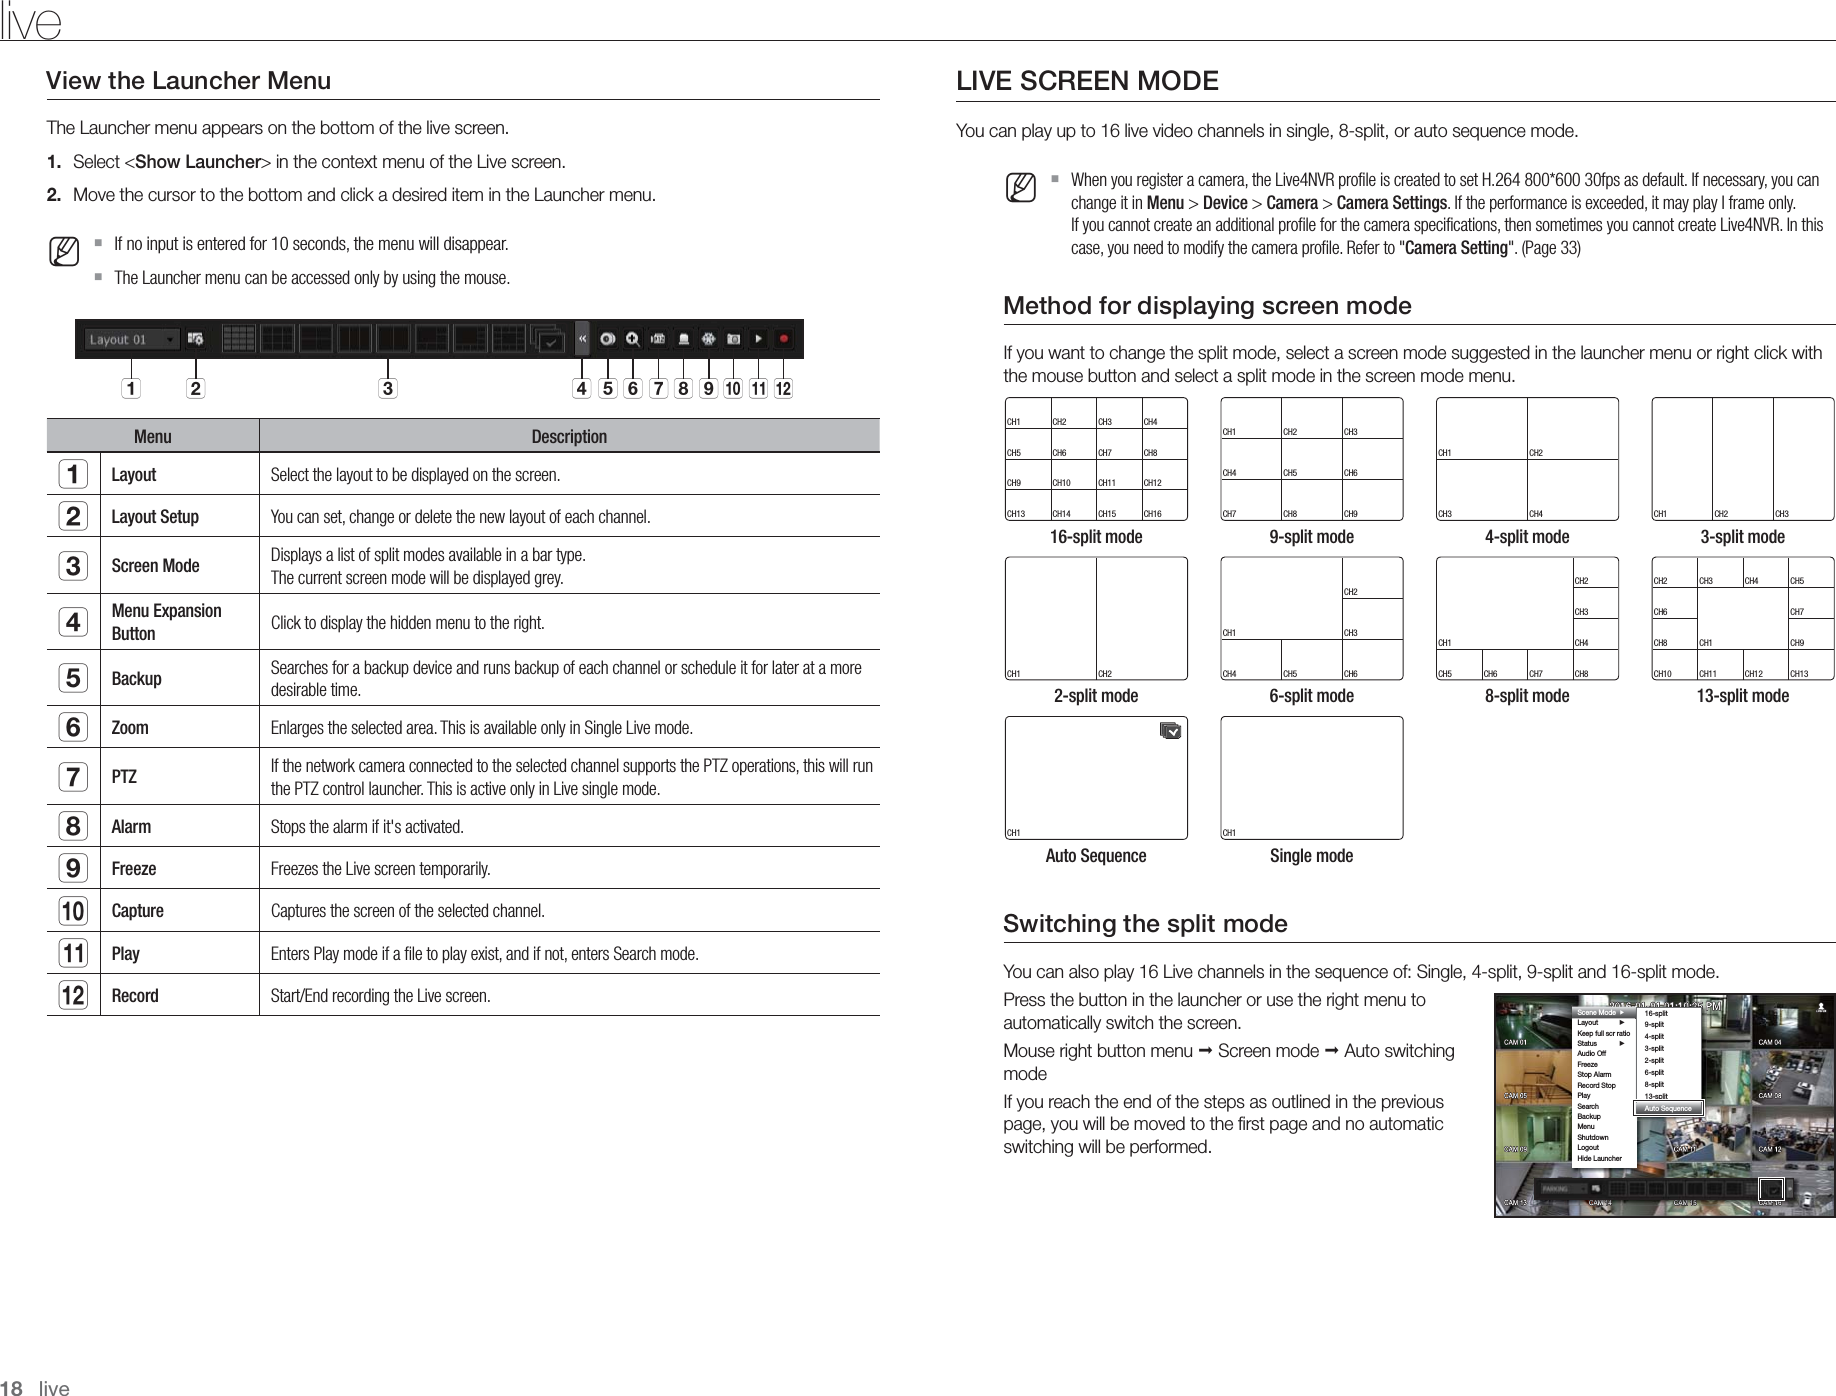
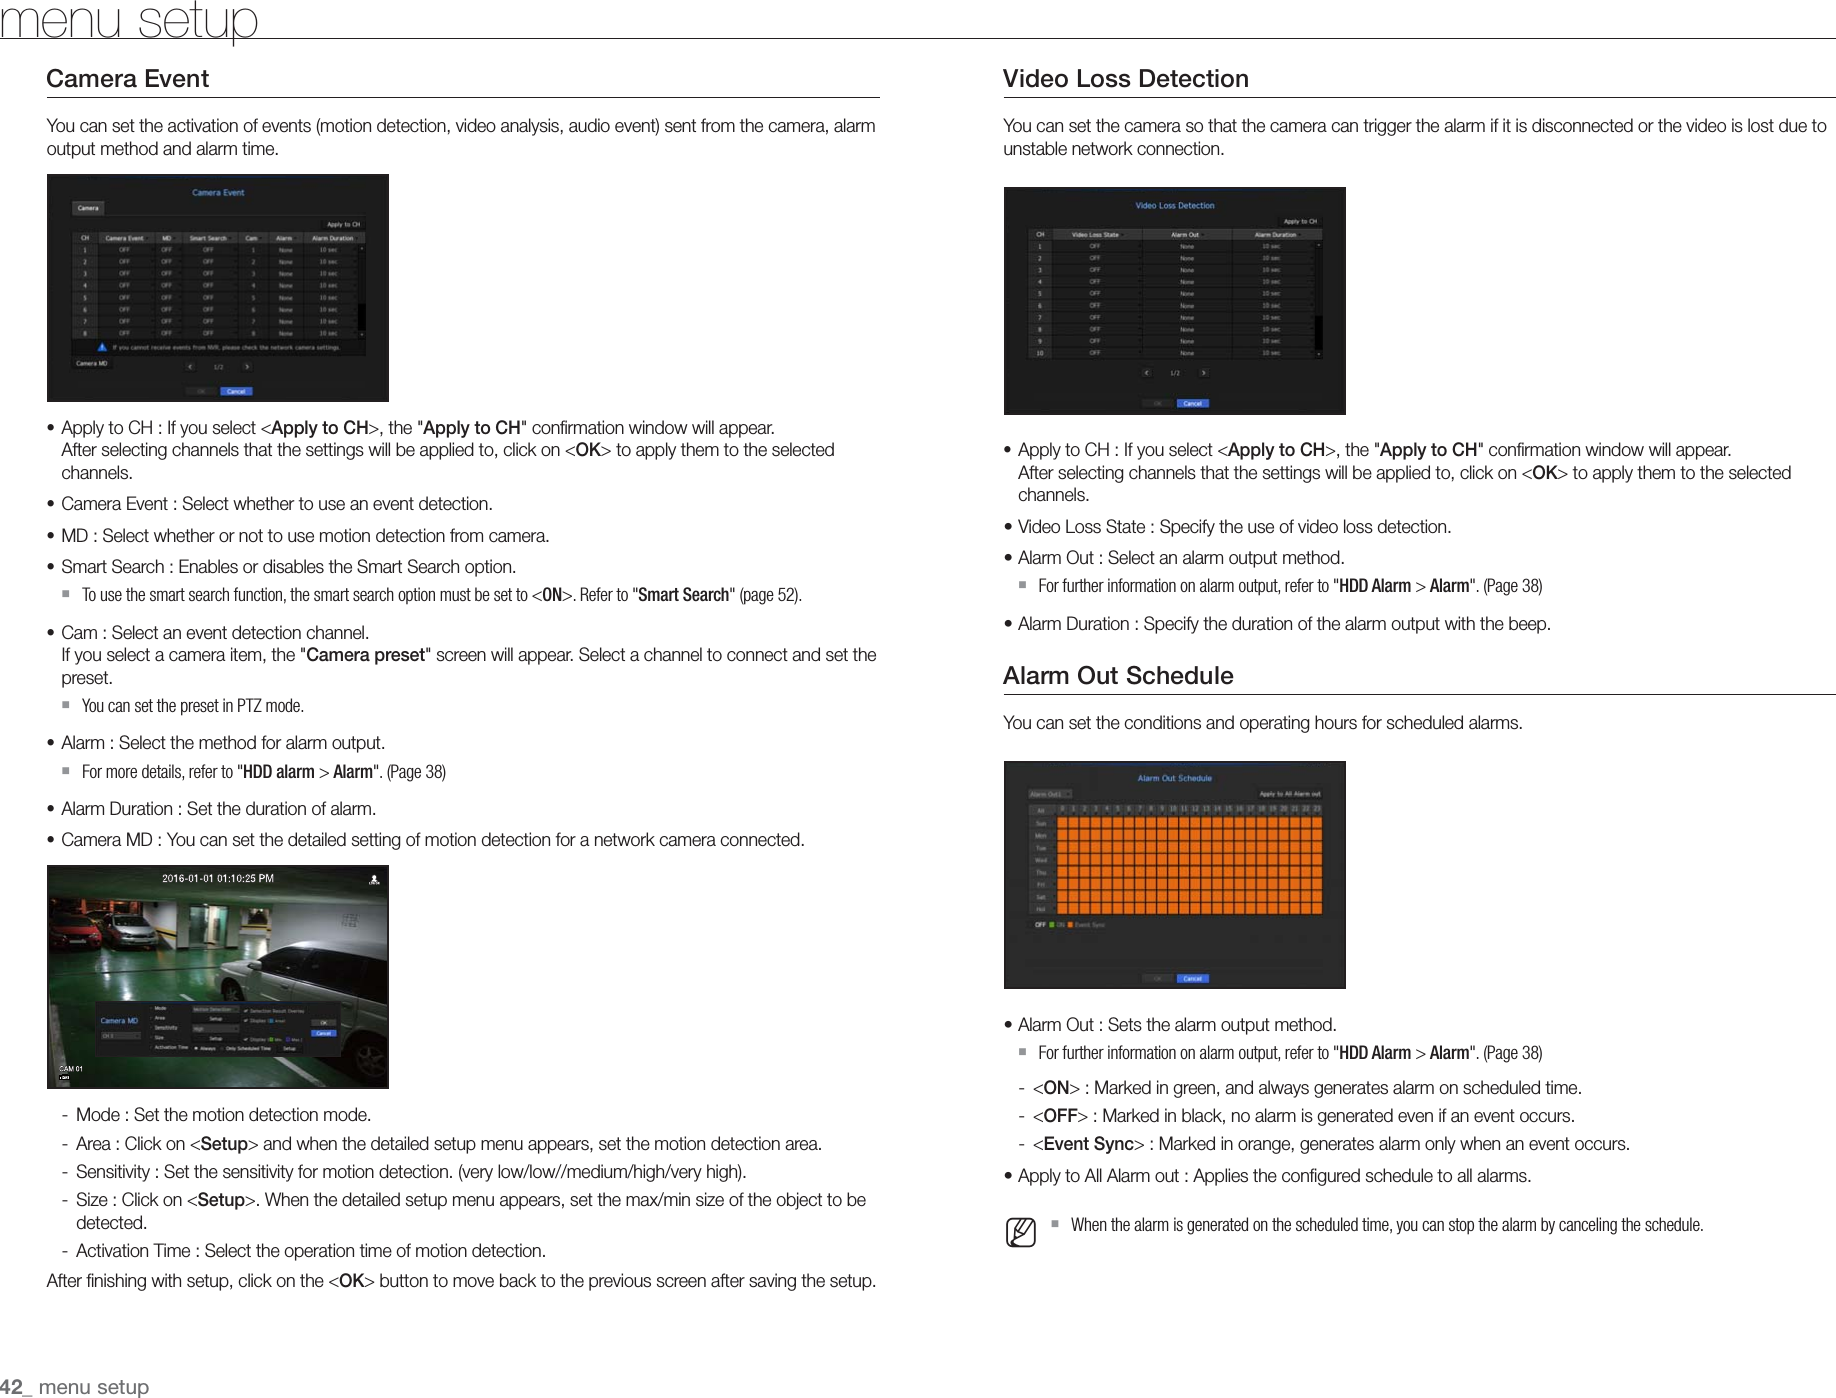
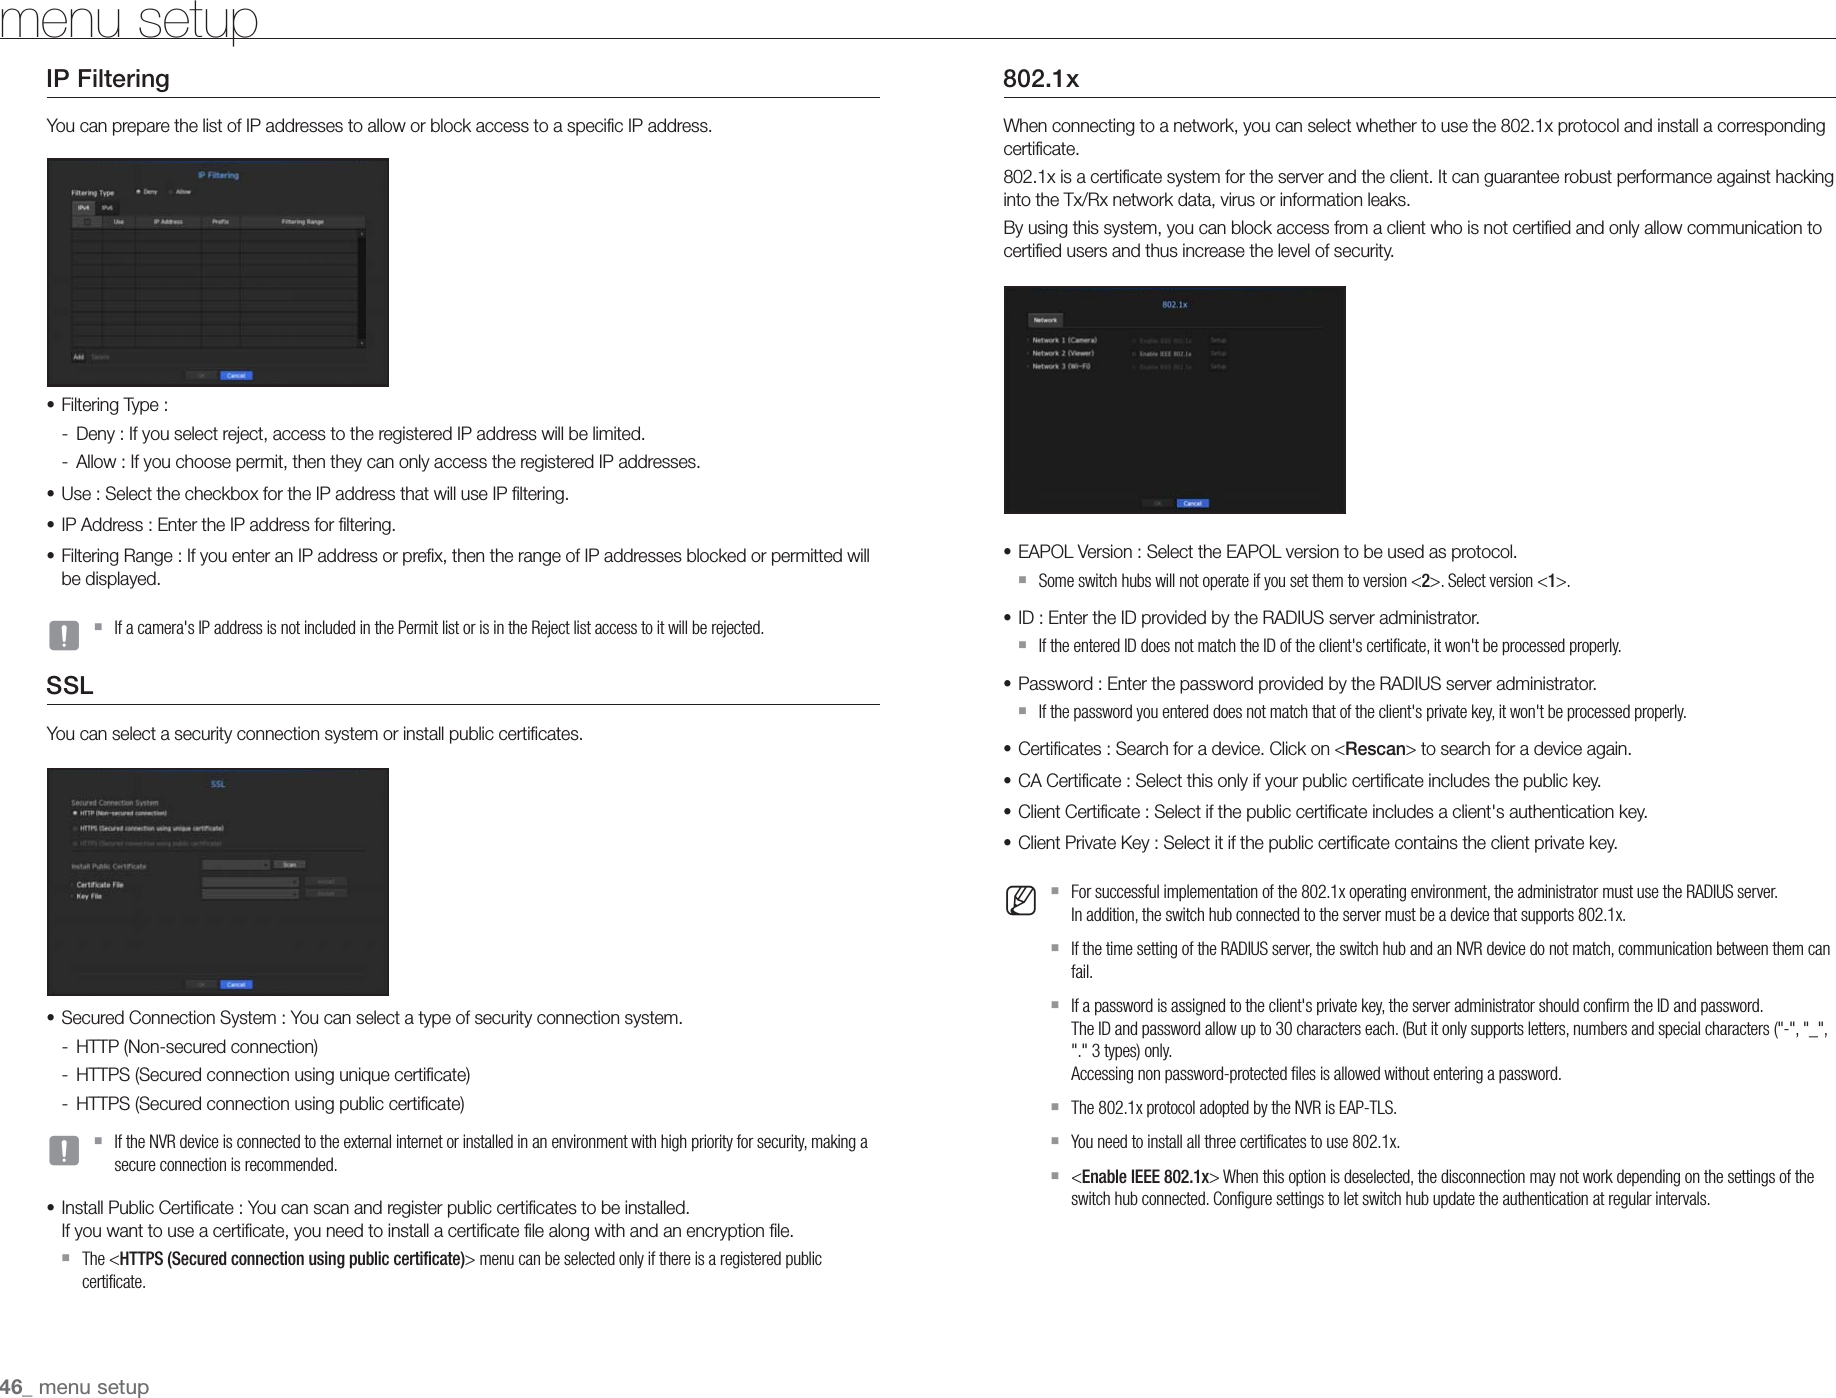
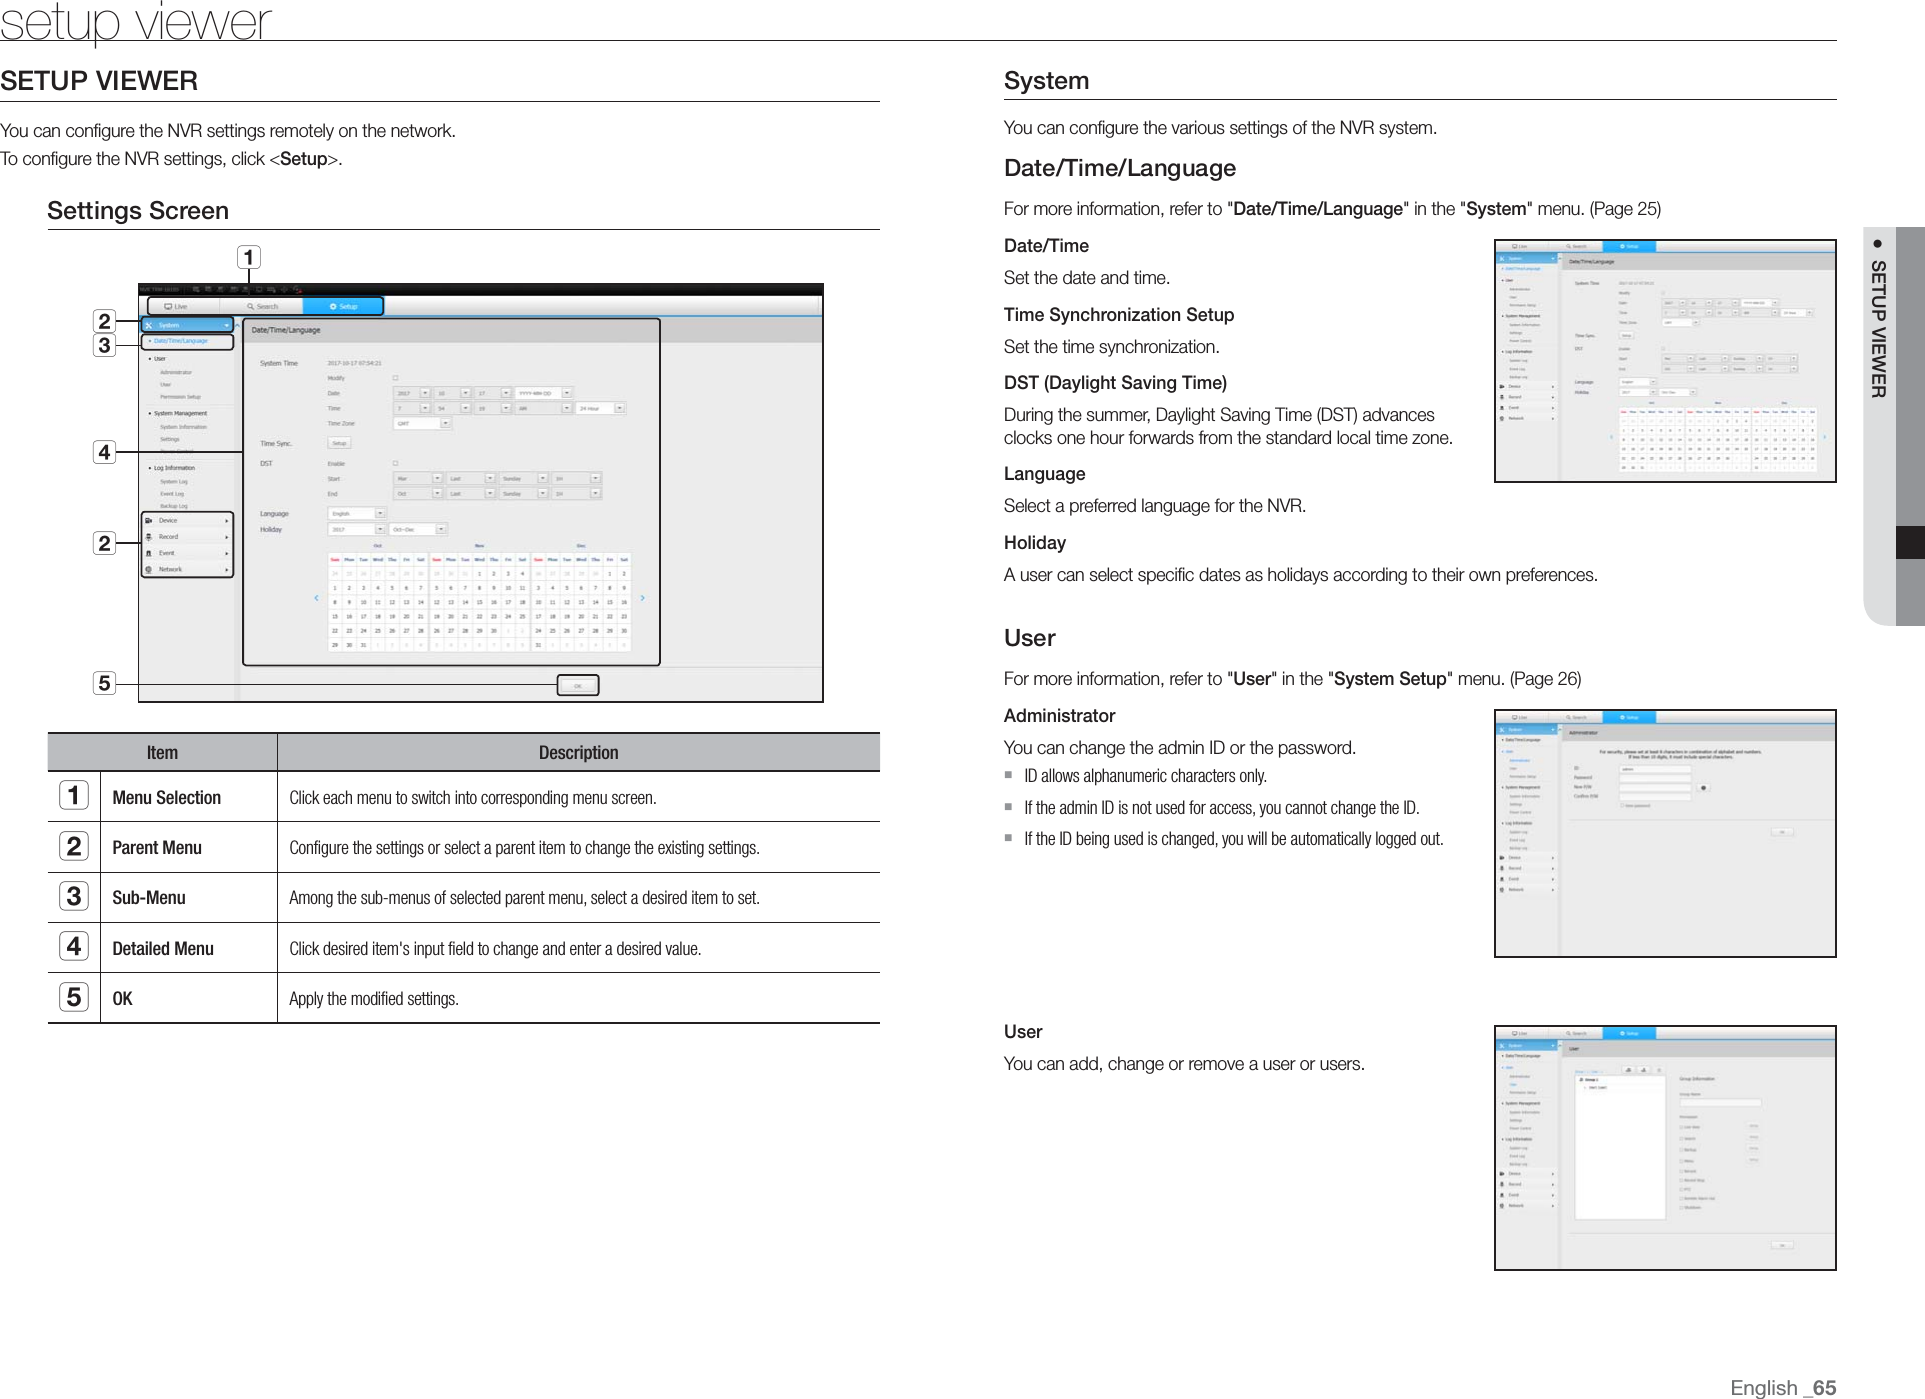
![UserYou can set permissions of each user over the NVR's specific function and settings.Setting the AdministratorYou can set and change Administrator's ID and password.The administrator can use and set all menu items and functions.• ID : Change the admin ID.• Password : Checks the current password.• New P/W : Enter new password.• Confirm P/W : Confirms the new password. `If <View password> is selected, the password will no longer be hidden on the screen when you type it. M `The initial administrator ID is set to "admin" and you will need to configure the password in the installation wizard. `Please change your password every three months to safely protect personal information and to prevent the damage of the information theft.Please, take note that it's a user's responsibility for the security and any other problems caused by mismanaging a password. `If you click < >, a basic guide for password setup is displayed.Using Virtual Keyboard1. For alphanumeric inputs, the virtual keyboard window appears.2. Using a mouse, click on the desired character tab.3. In the upper text input box of the virtual keyboard, there displays a list of candidate words containing the selected character.4. Select a word from the list, or use the keyboard to enter the whole word. `If there are many of candidate words, use < > buttons to move between them forward and backward.5. Select <OK>. Entered word is applied. `For upper case letters, use <Caps Lock> button. `For special characters, use <Shift> button. `Using the virtual keyboard is the same to a normal keyboard use in your region. `ID allows alphanumeric characters only. `The password should at a minimum be an 8-digit combination of alphabetical letters and numbers.User settingYou can create a group or set permissions for each group.You can add a user and edit the registered user information.If you want to add a group1. Click on the [ ] button to launch the Group Addition popup window.If you want to add a group, click on <OK>.2. Press the group name item to launch the virtual keyboard used to enter group names.Enter the group name to register. `You can add a maximum of 10 groups.If you want to set group permissionSet permission to access each group.Each group's users can only access items with a check mark beside them.1. Select the menu to set group permissions.The menu with access permissions will appear when a user of the group logs in.• Live View : You can set permissions to access the live screen for each channel.• Search : You can set permissions to access the search menu for each channel.• Backup : You can set permissions to access the backup menu for each channel.• Menu : You can select and set the setting menu that can be accessed. A group user can only access the menu selected. If you select the menu, the menu permission setting screen will be displayed.• Record Stop, PTZ, Remote Alarm Out, Shutdown : You can select these functions to add to a group's permissions.2. Click <OK>.Check a group user to give them the permission to access the selected item.26_ menu setupmenu setup](https://usermanual.wiki/Hanwha-Techwin/TRM1610S.User-manaul/User-Guide-3633110-Page-26.png)
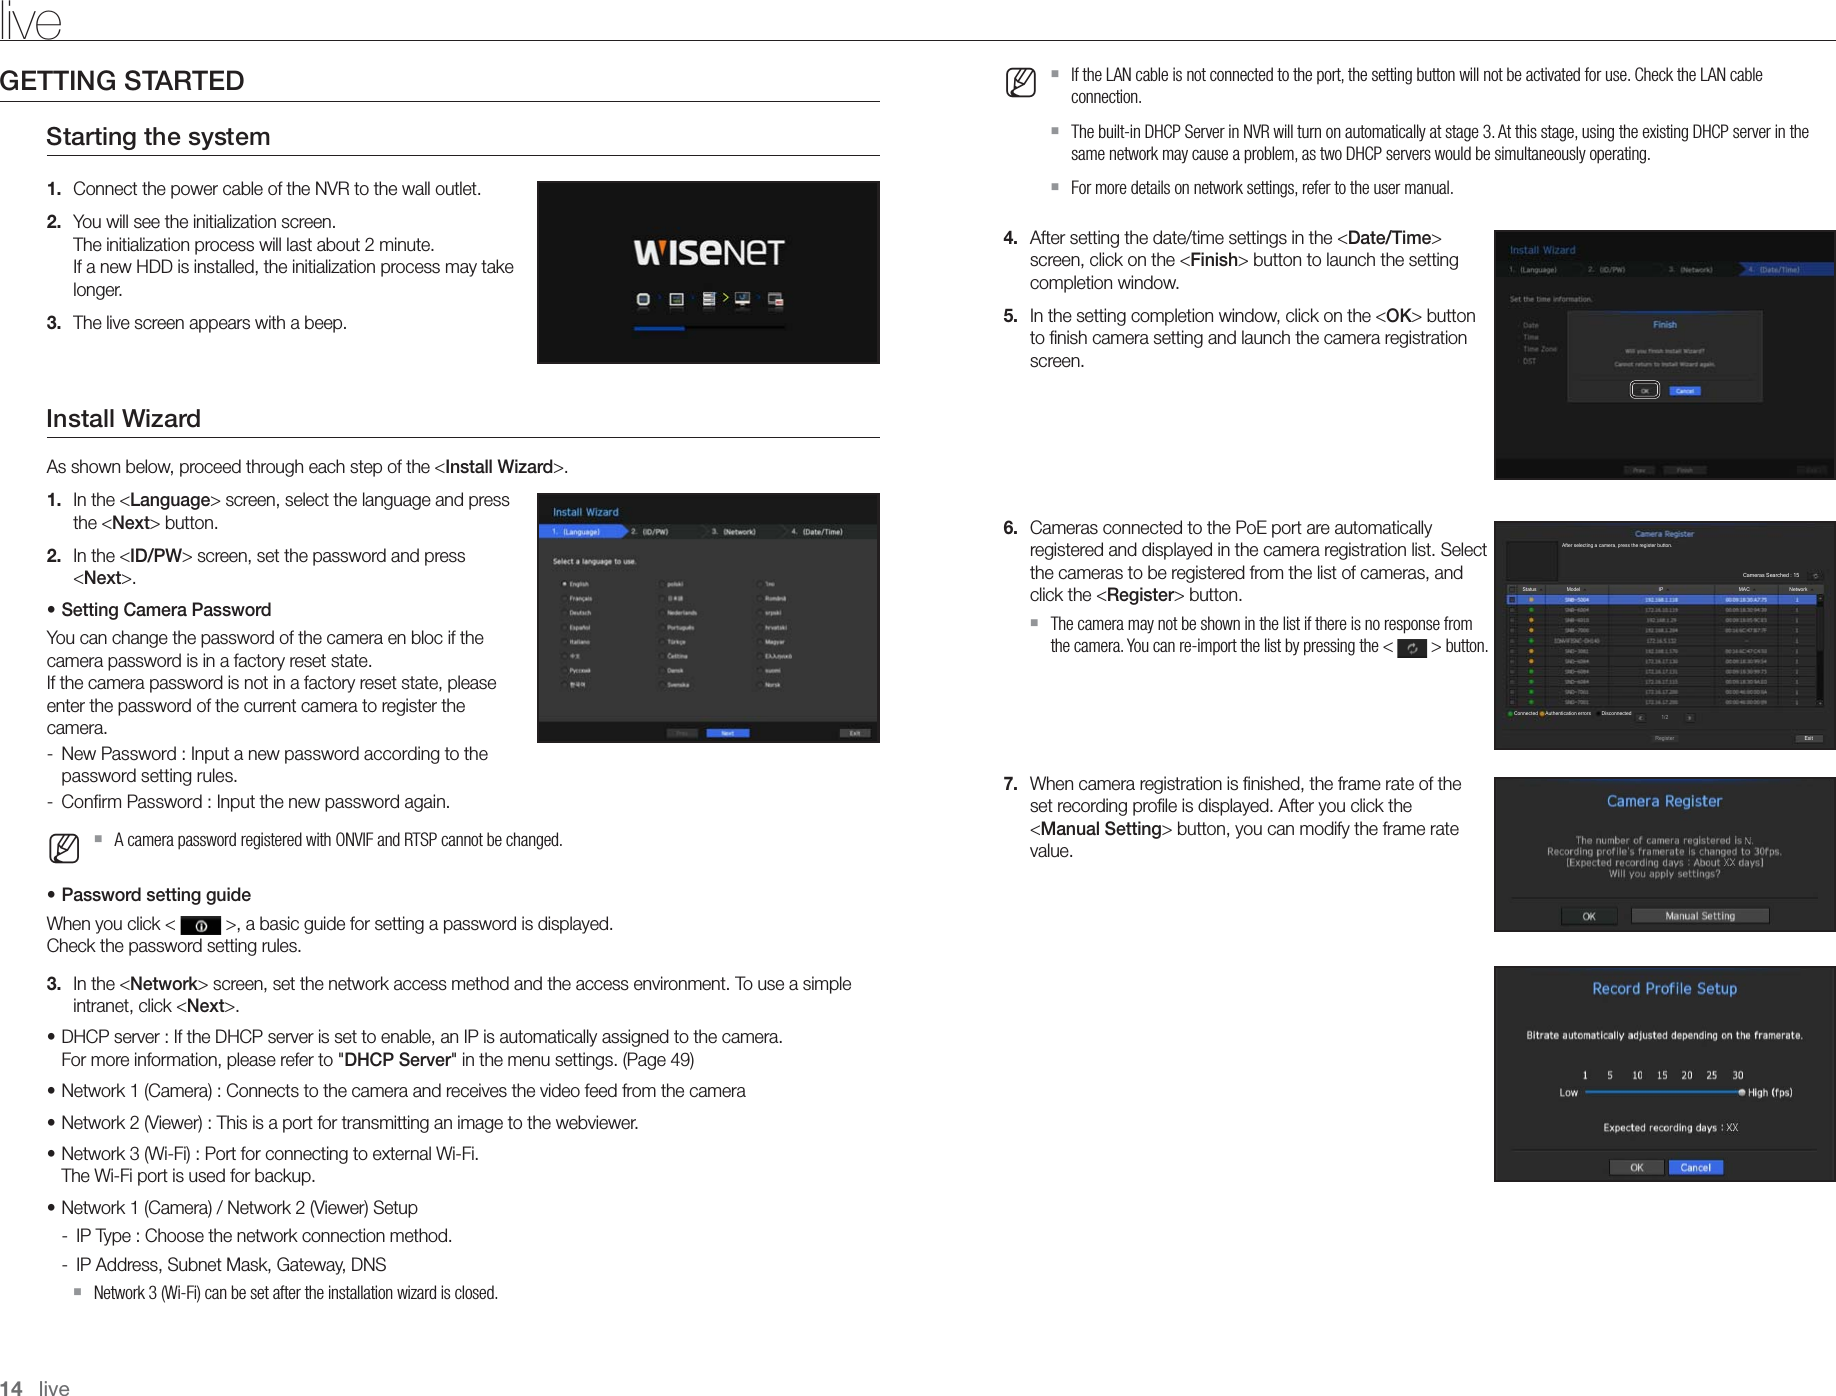
![If you want to register a user1. Click on the [ ] button to launch the user addition popup window.To add a user, click on <OK>.2. Select a group.When registering a user, the selected group will be automatically registered. `A group can be changed after inputting all required information.3. Enter name, ID, password and select whether to use the viewer.If you activate use of <Viewer>, you will have the right to use the web viewer and the network viewer.4. Click <OK>.Registered user information will be saved.When you want to delete the group and user information1. To delete, click on the [ ] button.2. The deletion confirmation window will appear and you can select an item to delete and click on <Delete>.Setting PermissionsYou can set restricted access for all general users.Items with restrictions will require logging in for use.• Restricted Access : All menu items allowed for a user can be set with restricted access. -Checked ( ) : Restricted -Not checked ( ) : Accessible `If it is not checked ( ) in <Restricted Access>, any user can access the item no matter what the <Permission> setting. `If it is checked ( ) in <Restricted Access>, a user can access the item only if the user has permission in <Permission> setting.• Restriction on Network Access : Restricts remote access from a <Restricted Access> network. -All Network : Restricts all access instances via Network Viewer and Web Viewer. -Web Viewer : Restricts access via the Web Viewer.• Auto Log out : A user will be automatically logged out if there is no operation on NVR for over set period of time.• Manual Input of ID : In the login window, select whether to enter ID.If the user has restricted accessIf a new group is restricted to access the entire menus, the users belonging to the group can access only the basic menus and can change only their respective password.If all permissions are restricted, you will see only some menu items accessible in the Live screen menu.To change the user passwordIf you log in with the user account of a group with restricted access, you just can change your own password.1. Provide the login information.2. Select <User Menu>.The Permission Management screen appears.3. Select <User>.The Password dialog shall appear.4. Provide a new password.5. Select <OK>.The old password will be changed to a new one.English _27● MENU SETUP](https://usermanual.wiki/Hanwha-Techwin/TRM1610S.User-manaul/User-Guide-3633110-Page-27.png)
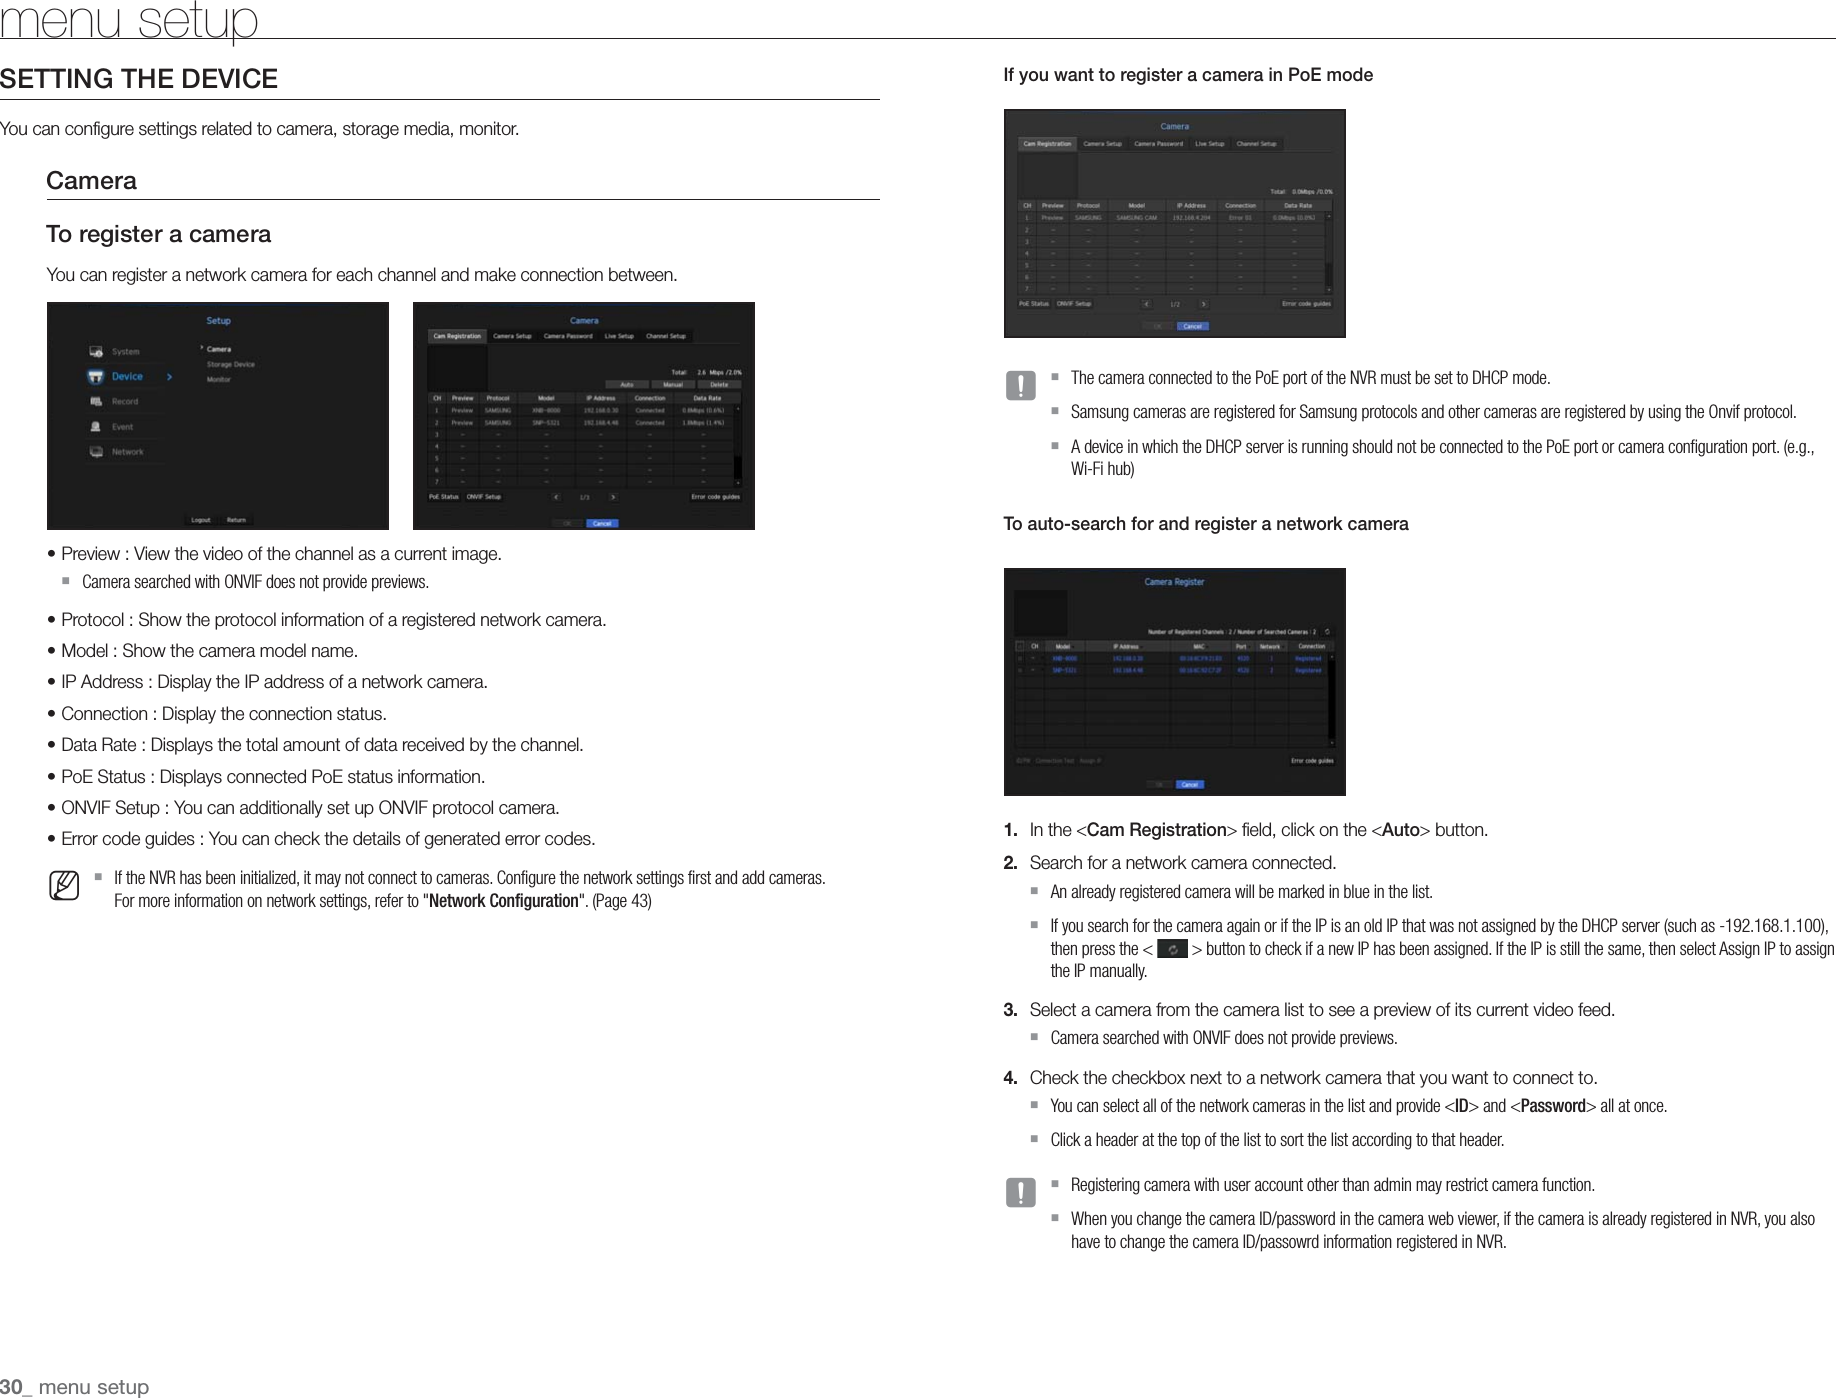
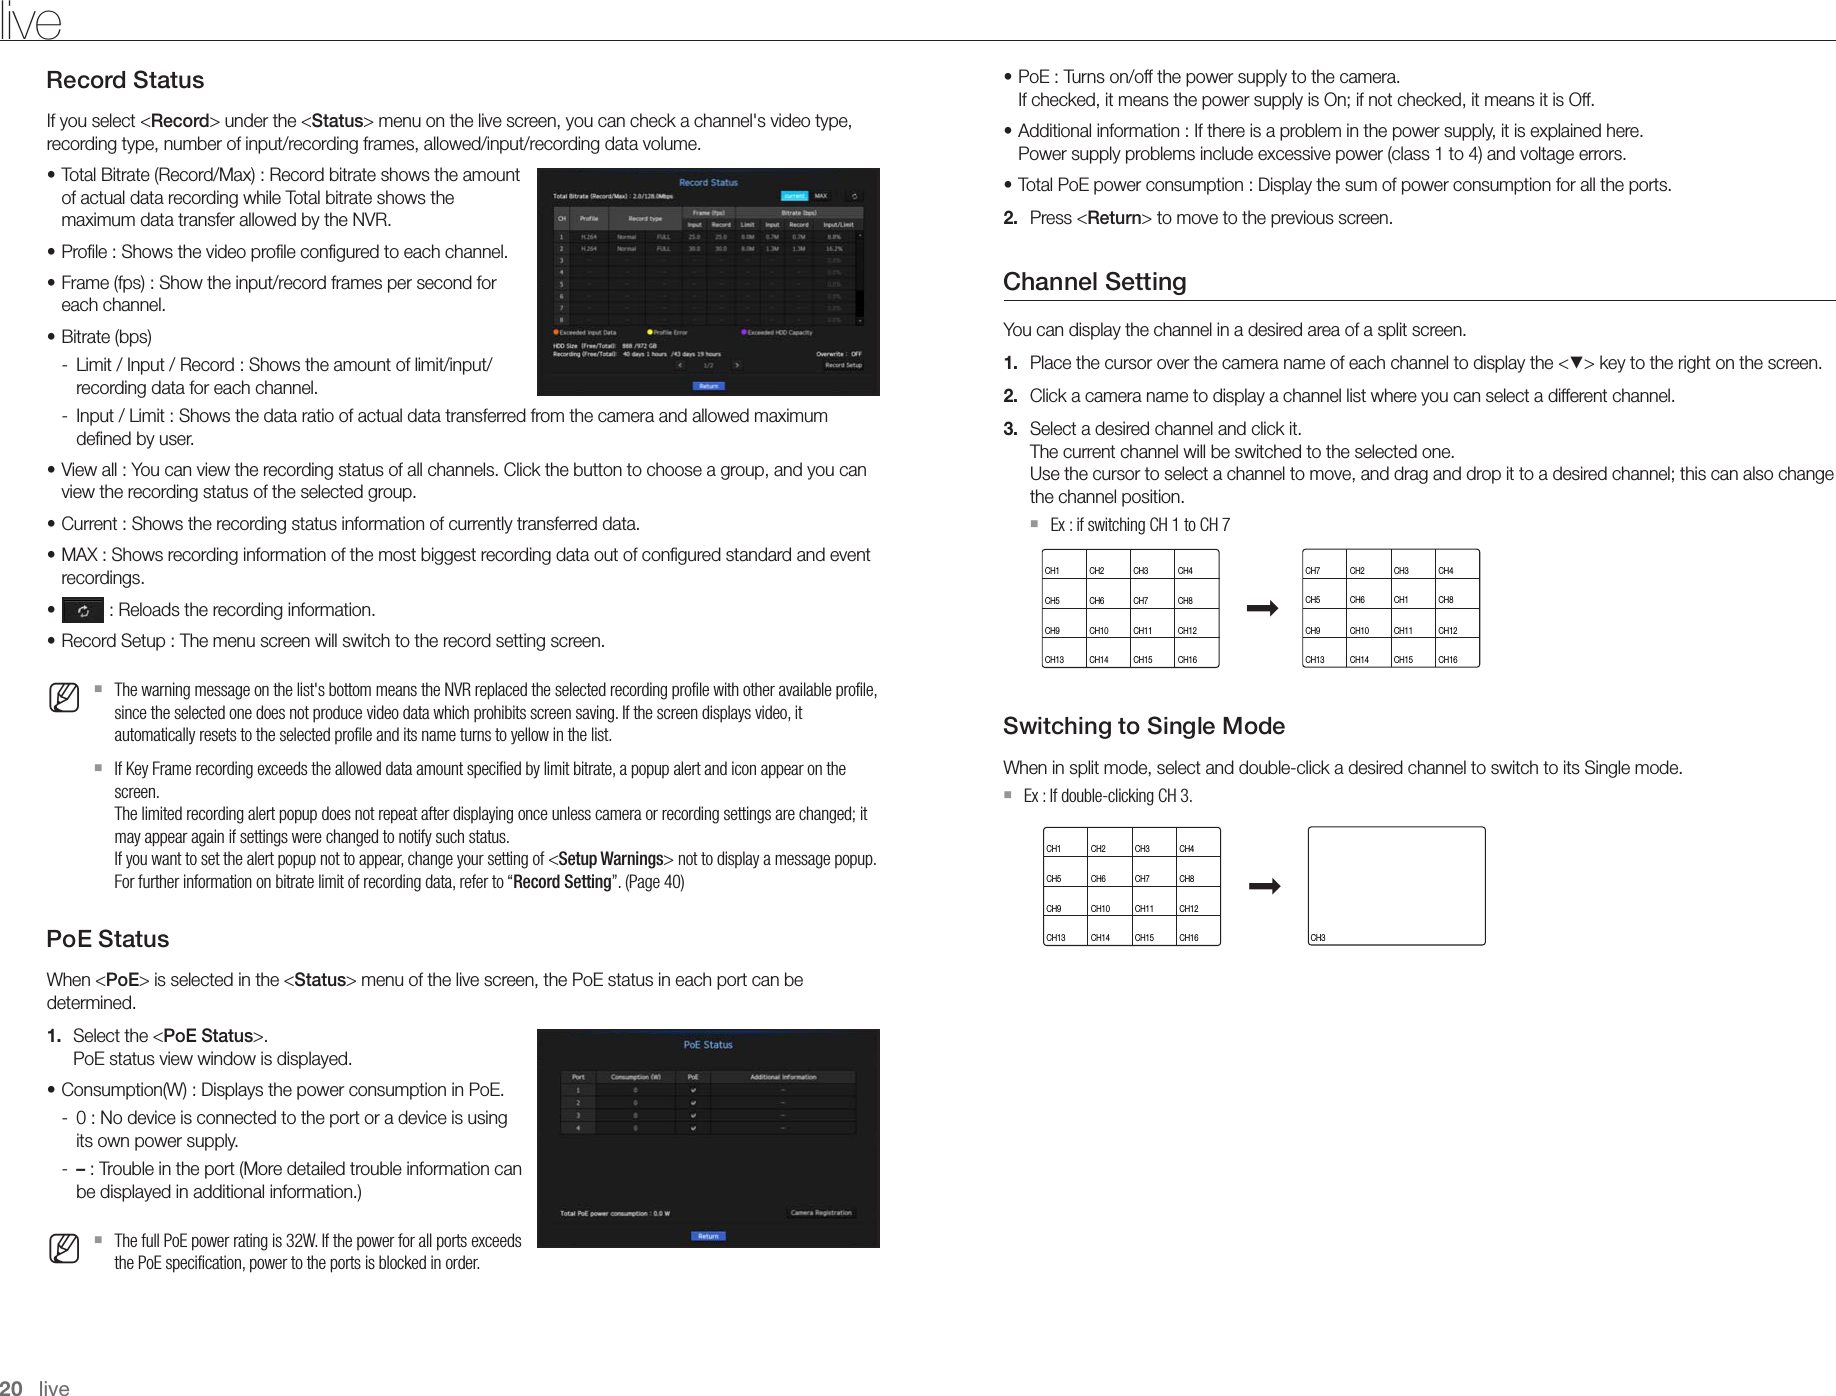
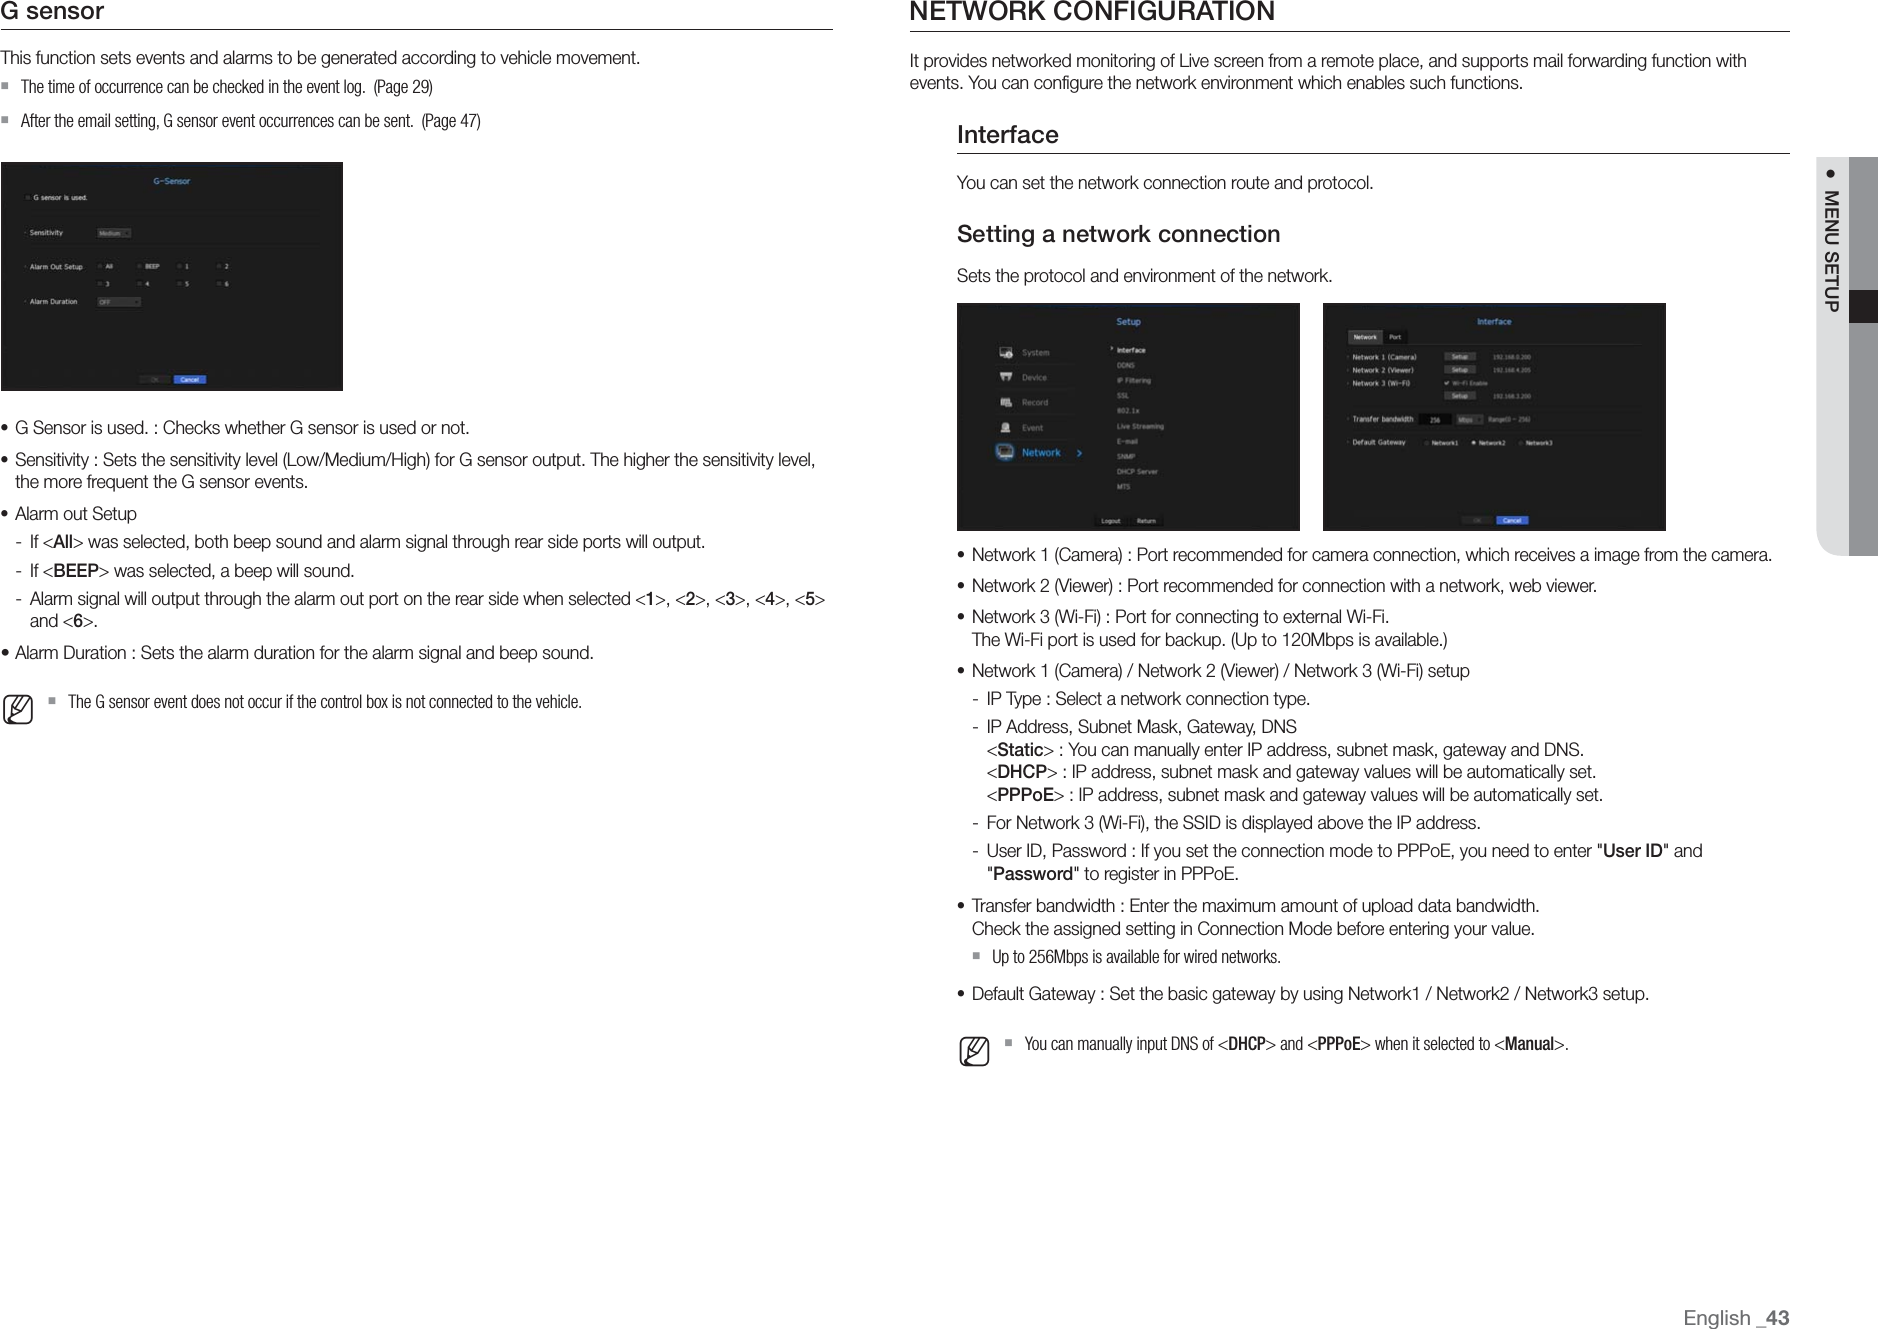
![Setting Camera PasswordYou can change the passwords of all registered cameras at once.• New P/W : Input a new password according to the password setting rules.• Confirm P/W : Input the new password again. M `If you click < >, a basic guide for password setup is displayed. `If <View password> is selected, the password is no longer hidden on the screen when you type it. `A camera password registered with ONVIF and RTSP cannot be changed.Password setting guideThe length and limitations of a password are as follows. -Uppercase letters/lowercase letters/numbers/special characters, containing at least 3 out of the 4 character types mentioned: 8 or 9 digit combination -Uppercase letters/lowercase letters/numbers/special characters, containing at least 2 out of the 4 character types mentioned: 10 to 15 digit combination -The password shall not be identical to the user ID. -To enhance security, it is not recommended to use repeated digits or letters, or keyboard patterns as a password. -Special characters accepted for a password : ~`!@#$%^*()_-+=|{}[].?/Live SettingYou can change the live transfer settings of the network camera.• Live Replacement : You can select the live profile setup mode.If you select <Manual>, the profile setup items are enabled, and you can change settings manually. -Auto : In case of split mode, the profile for live monitoring shows the Live4NVR profile(basic: H.264 800*600 30fps) created at the time of registration and it automatically selects the second profile in case of single mode. -Manual : Live monitoring is performed with the profile selected by the user from the registered camera profiles. -Record : Live monitoring is performed with the profile set for recording.• Profile : You can select the video profile of the connected camera setting.• Codec : Show the codec of the selected recording profile.• Resolution : Show the resolution of the selected profile.• Frame Rate : Show the frame rate of the selected profile.Channel SettingYou can configure the video settings for each channel.• Apply to CH : If you select <Apply to CH>, the "Apply to CH" confirmation window will appear.After selecting channels that the settings will be applied to, click on <OK> to apply them to the selected channels.• Video -<ON/OFF> : You can turn ON/OFF the selected channel's camera. -<Covert1> : Shows information other than the video of the selected channel.For privacy protection, it does not display the video while the recording continues. -<Covert2> : Shows nothing but an empty screen while the recording continues.English _35● MENU SETUP](https://usermanual.wiki/Hanwha-Techwin/TRM1610S.User-manaul/User-Guide-3633110-Page-35.png)
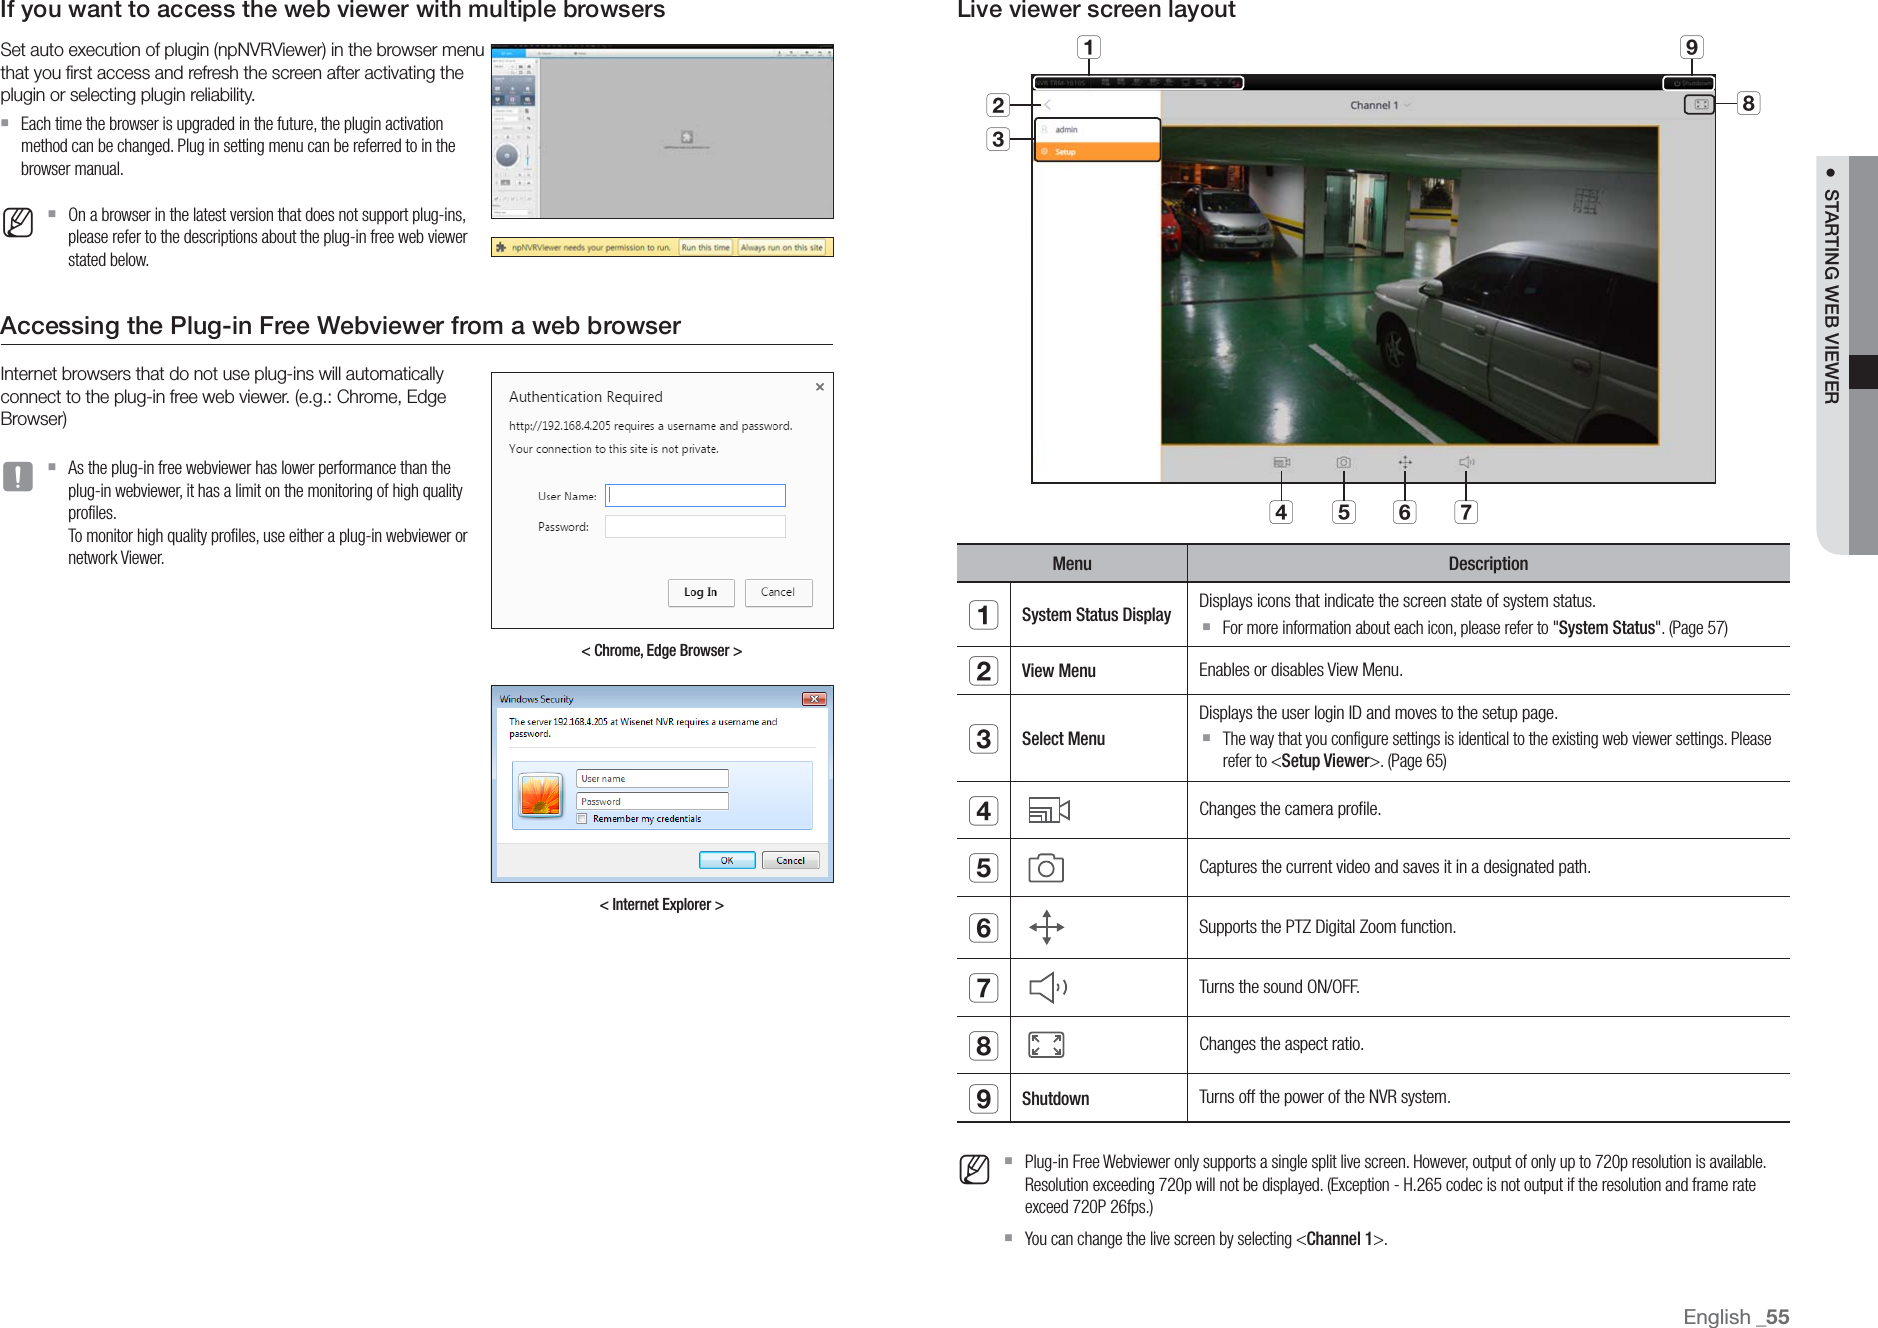
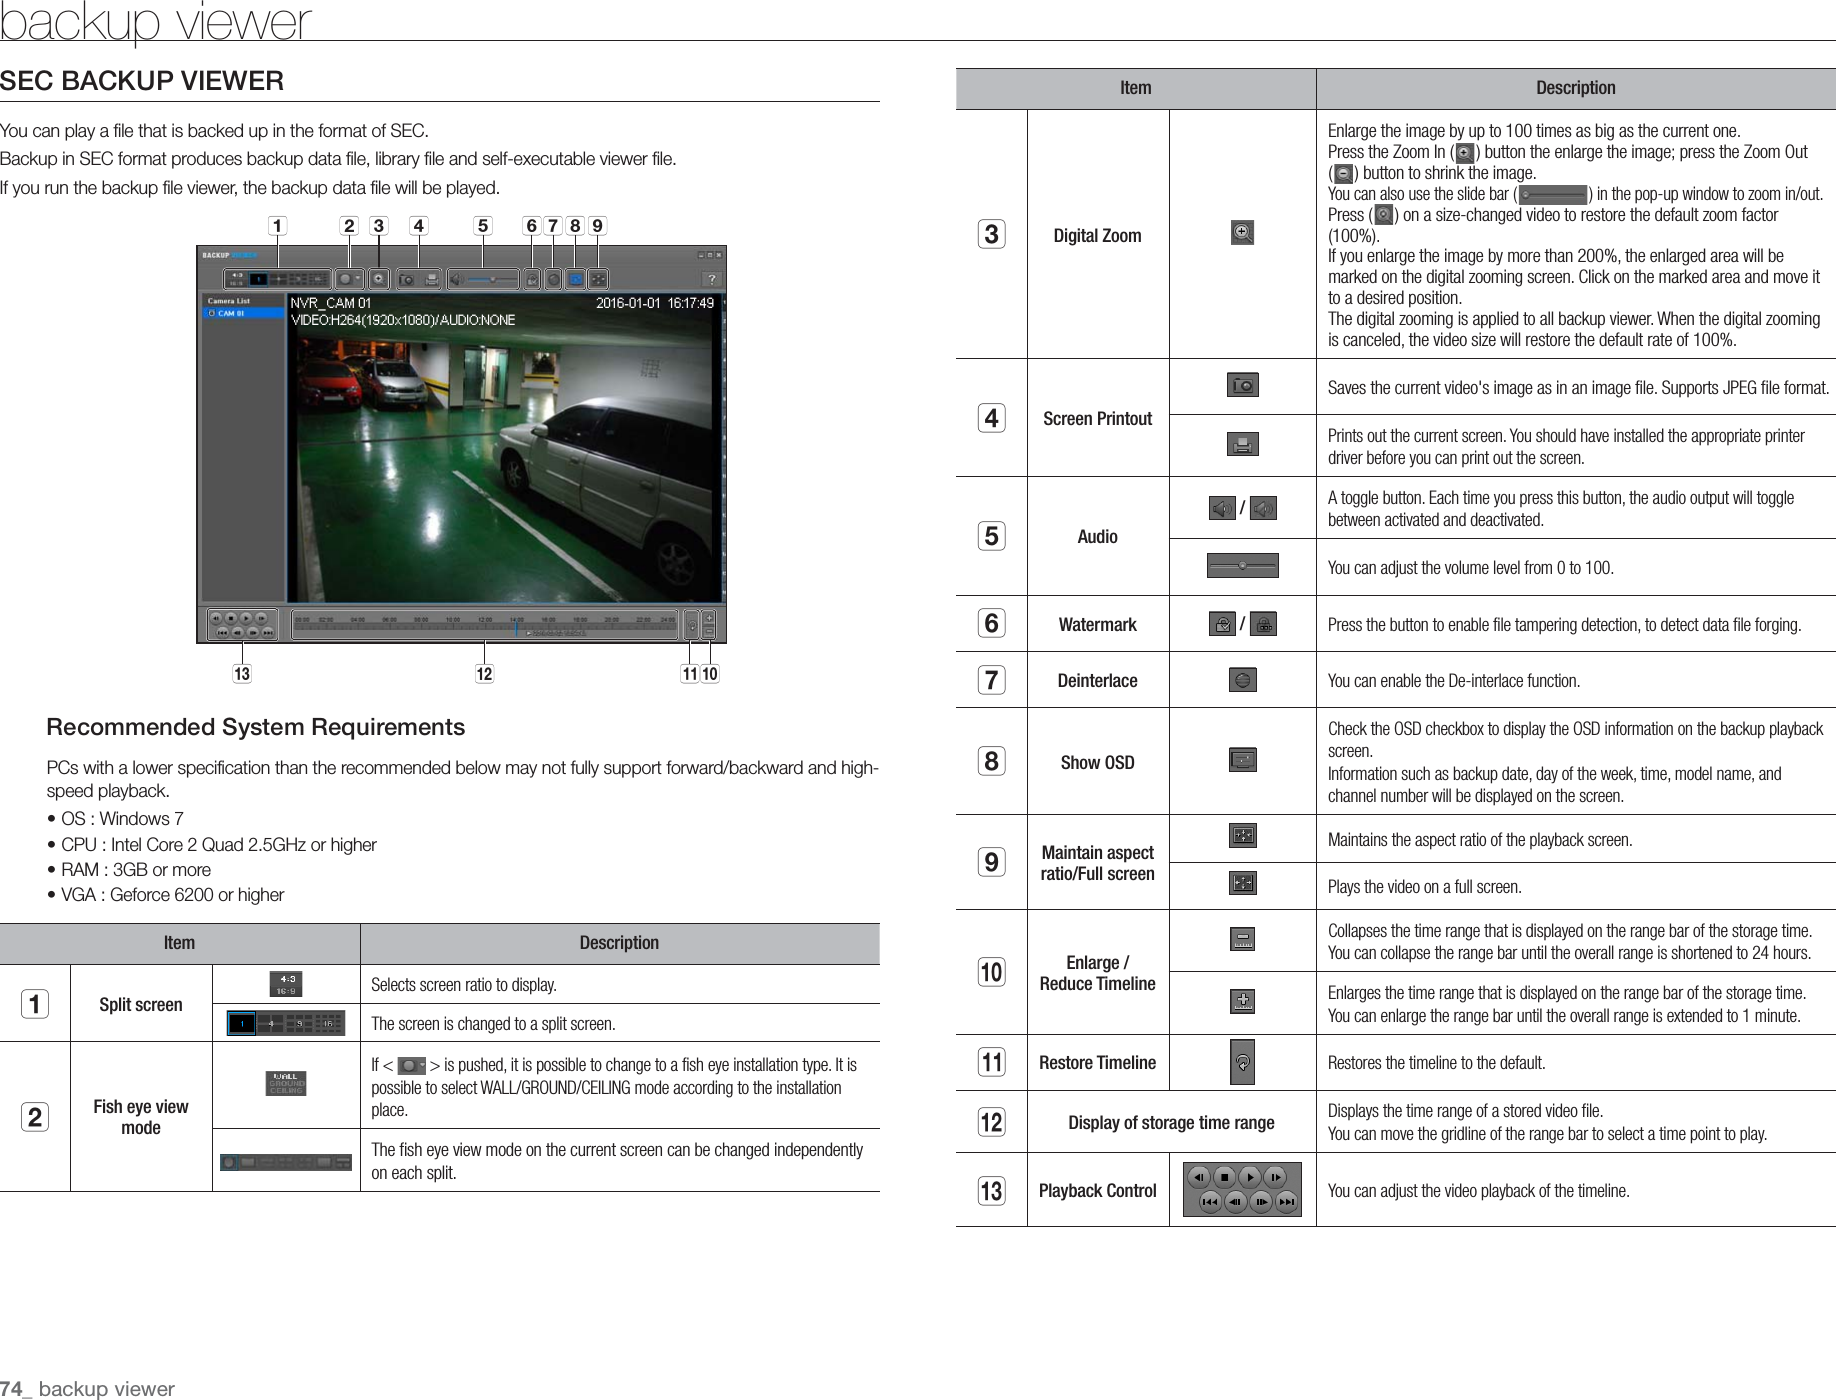
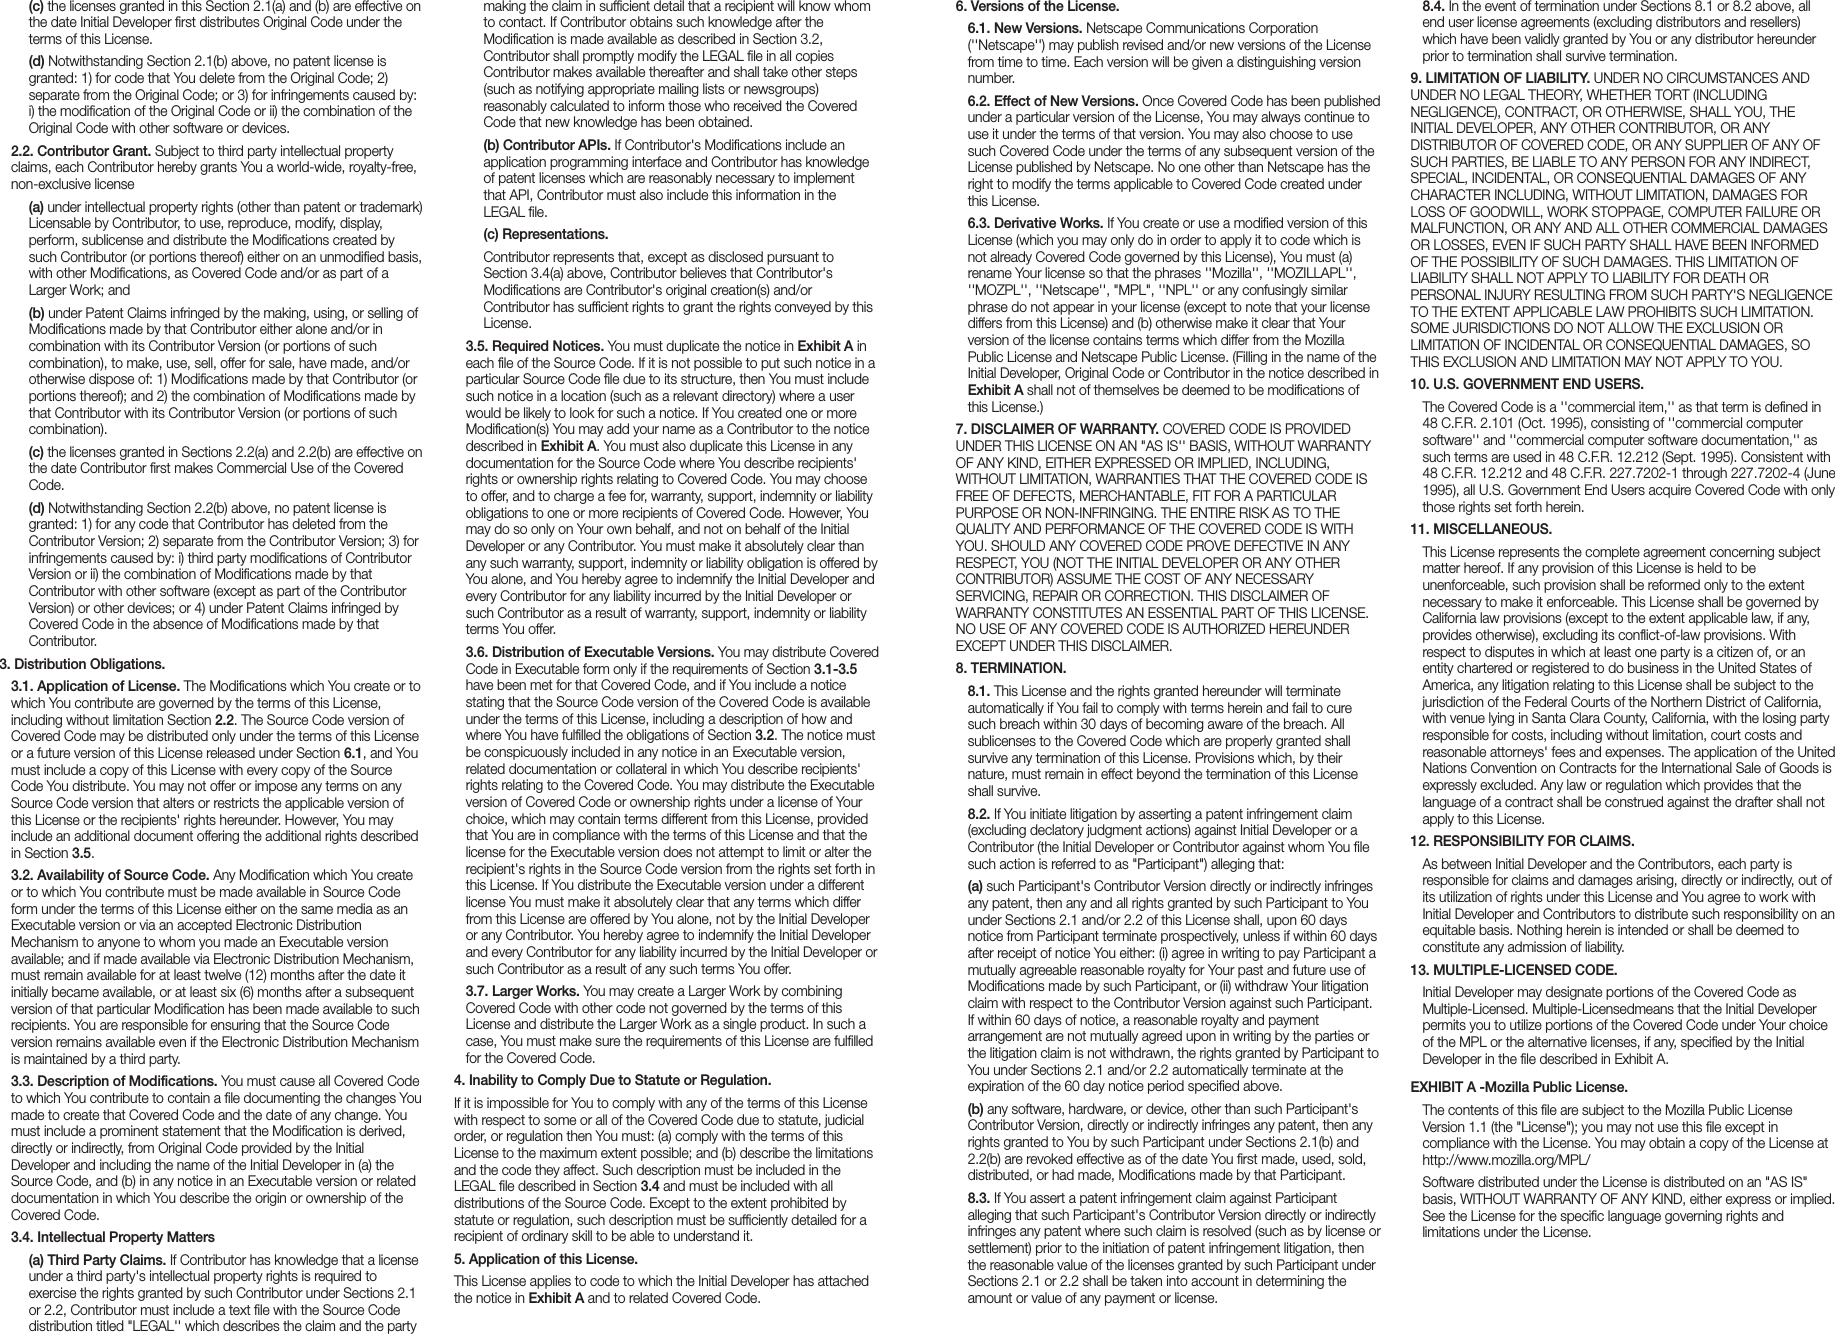
![WHAT IS WEB VIEWER?WebViewer is a software program with which the operator can access a remote NVR (Network Video Recorder) for real-time monitoring, PTZ control (if configured) or search.Product Features• Remote connection using the browser• PTZ camera control enabled• 4:3 mode : supports 1, 4, 9, 16, 1+5, 1+7, 1+12, 1+9, 1+11, and 2+8 channels (up to 16 cameras)• 16:9 mode : supports 2, 3, 6, 12, and 20 channels (up to 16 cameras)• Saving function in JPEG/BMP/PNG image format for printing and storage.• Record video in AVI format-compatible with popular media players. (The integrated codec is needed)• To play the video in Windows Media Player, you must download and install the relevant codec from www.windows7codecs.com. (version 4.0.3 or higher)System RequirementsThe following lists the minimum suggested hardware and operating system requirements needed to run the Web Viewer.Item Minimum RecommendedCPU Intel Core 2 Quad 2.5GHz or higher Intel i7 (3.5GHz) or moreRAM 3GB or more 4GB or moreHDD 200GB or more 500GB or moreVGA Memory 512MB or more 1GB or moreDisplay Resolution 1280 x 1024 or higherOS- Supported OS : Windows 7, 8.1, 10, Mac OS X 10.9, 10.10, 10.11- Plug-in free web viewerSupported web browsers : Google Chrome 47, MS Edge 38- Plug-in WebviewerSupported web browsers : MS Explorer 11, Apple Safari 9 ※ Mac OS X onlyNetwork 10/100/1000 Ethernet NIC It is recommended to install the latest version of graphic driver.CONNECTING WEB VIEWER1. Open your web browser and type the IP address or URL of NVR into the URL address box. M `Accesses the web viewer by connecting to Network 2 (recommended). `"192.168.2.200" is set to IP by default. `You must have specified the IP address in "Network > Interface". `The URL connection will be enabled only when the DDNS connection settings have been completed.For more information, refer to "Network Configuration > DDNS". (Page 45)2. A user with the admin permissions should provide the admin ID and password. A registered user should provide the user ID and password. J `All settings are applied according to the NVR settings. `To log in with a different ID, quit your Internet browser and log back in. `The initial ID and password for webviewer is "admin" and "4321".When an initial password is entered, while partially resetting to access a web viewer, a pop up window will appear that will guide the user to change the password and when doing a whole reset to access a web viewer, a pop up window will appear that will guide the user to complete the settings for the Install Wizard.Set a new password when a pop up window appears. `Please change your password every three months to safely protect personal information and to prevent the damage of the information theft.Please, take note that it's a user's responsibility for the security and any other problems caused by mismanaging a password. M `It allow s up to 10 simultaneous access including the Admin and general users. `Password of the Admin and general users can be changed in <User> menu of the NVR. `Normal users should have set <Webviewer> under <Restriction on Network Access> to Use before connecting to the Web Viewer. (Page 27) `All settings are applied by the NVR's settings.3. The plugin installation confirmation pop-up window will appear.4. When a program installation wizard window appears, press the [Install] button to install the program. `The version of the program installed may vary depending on the update version.5. When program installation is complete, click on the [Finish] button.6. After completing installation and successfully logging in, the main live viewer screen appears.USB 2.0USB 3.0AUDIOHDD 1 HDD 2GPS ANTPOWER REC ALARMPOWERVGAHDMINETWORKNETWORKNVRNetwork CameraRemote PC54_ starting web viewerstarting web viewer](https://usermanual.wiki/Hanwha-Techwin/TRM1610S.User-manaul/User-Guide-3633110-Page-54.png)
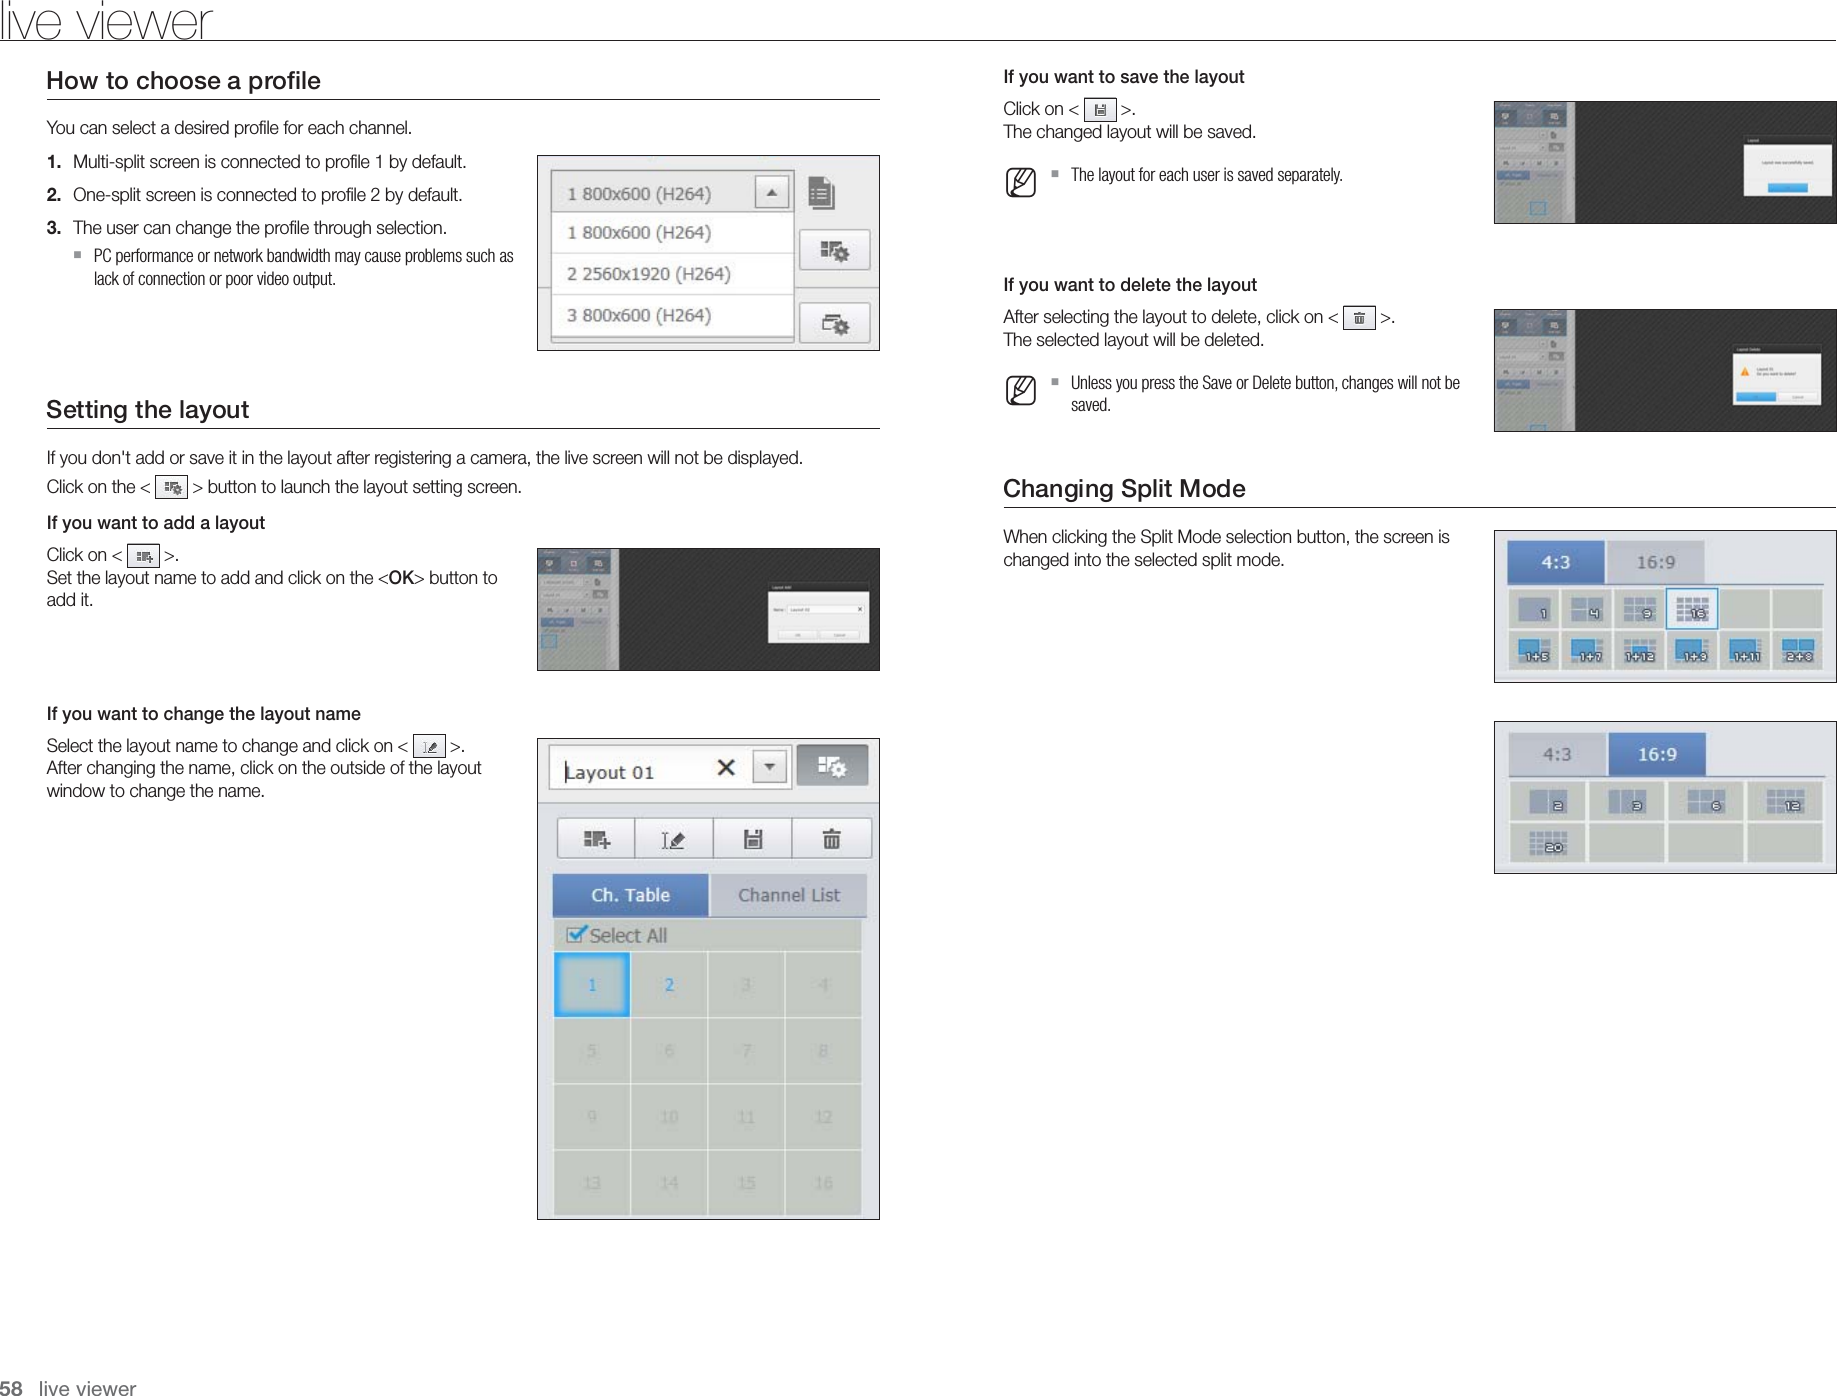
![Menu DescriptionChannel informationShows the channel information selected. `If the user's PC monitor does not support 60Hz at a specific high resolution, or the HDMI cable does not support HDMI 2.0, 60fps or higher will not be output from the channel information.PauseTemporarily stops the videos in all the channels or deactivates the Pause function in suspending status.Stop AlarmDeactivates an alarm when it occurs.OSDCheck the OSD item to display the OSD screen information in the web viewer window.PC recordingSaves the real-time video, in AVI format, from the selected channel in a designated folder on the PC.NVR recordingStart and stop NVR recording.Profile selectionSets a desired profile for each channel.Layout settingSet the layout.SwitchingSet the sequence.PTZ Controls connect PTZ camera(s).Fisheye Runs the fisheye settings for the selected channel.(Configures the mounting mode and the view mode to correct the screen distortion.)Display PaneDisplays the video of camera connected to NVR.IDDisplay the ID of user connected.Quick setupSimple camera registration and recording settings.Manual backupManually backup the video of the camera connected.StatusShows the camera live and recording status.HelpMove to the help window.mShutdownTurn off the NVR system.LIVE VIEWERYou can check the video from camera registered in the NVR connected from a remote PC. Also, you can adjust the camera and check the network transfer status. Live Viewer ScreenMenu DescriptionSystem Stauts IndicatorDisplays icons to display the screen or system status.bMenu SelectionSwitches into corresponding menu screen by clicking each menu.cDate/channelShows the access date/time and the selected channel.SoundSets the sound connected to each channel to either ON/OFF.CaptureSaves current video for the selected channel in the path designated by the user.PrintPrints current video image for the selected channel through designated printer.Rotate Video Rotates the screen of a selected channel by 90 degrees.Keep ch. scr ratio Changes screen ratio of the selected channel.Keep full scr ratioChanges screen ratio for all channels.Channel changeSwitches to the previous/next channel group.Full screenSwitch from the full screen to the split screen.Press the [ESC] key on the keyboard to exit full screen mode. `Safari for Mac does not support full screen mode.56_ live viewerlive viewerbcmF F F FF F F FF F F FF F F F](https://usermanual.wiki/Hanwha-Techwin/TRM1610S.User-manaul/User-Guide-3633110-Page-56.png)
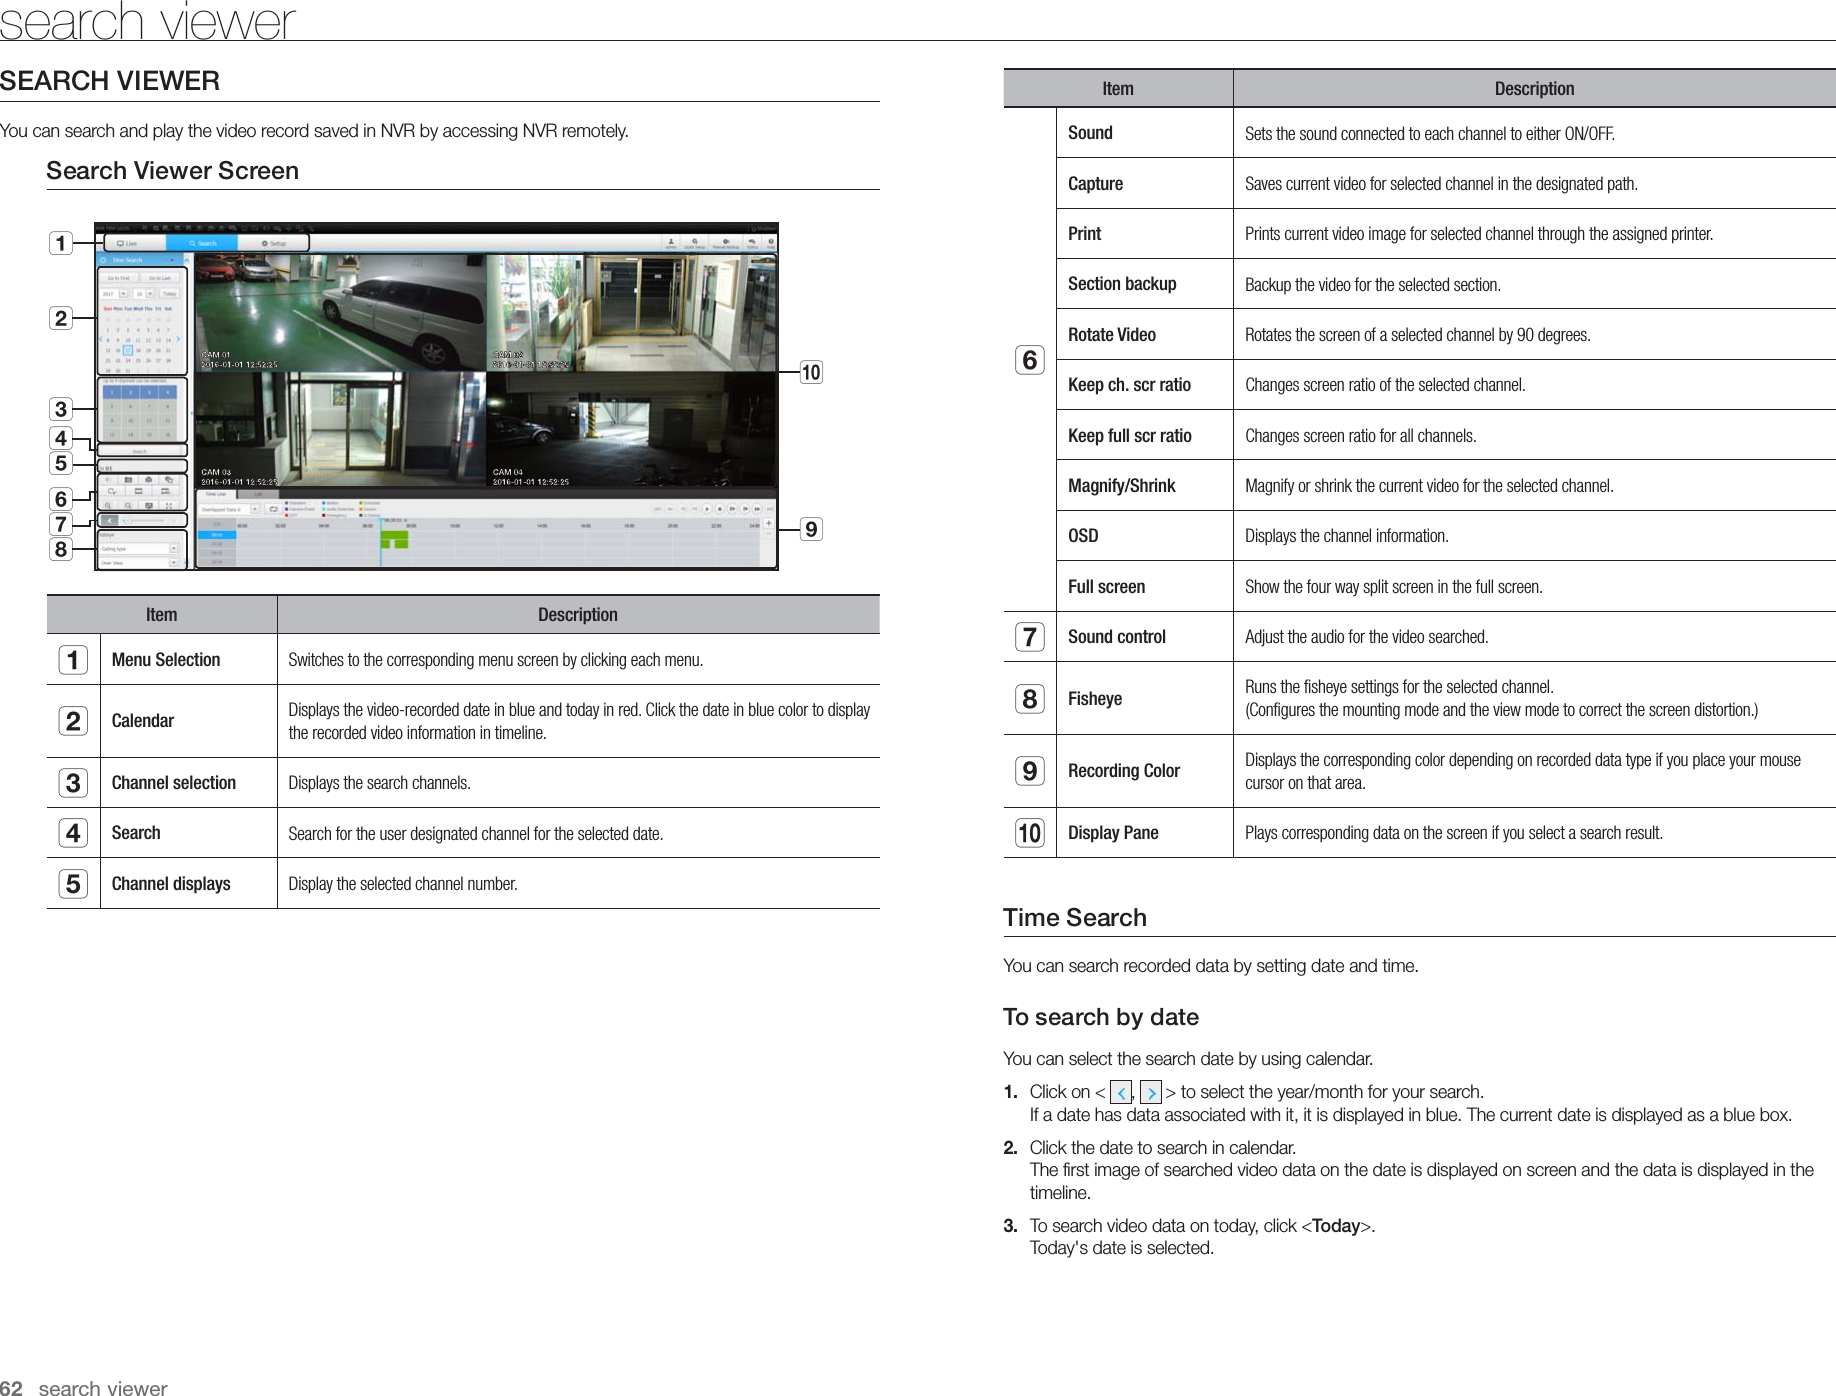
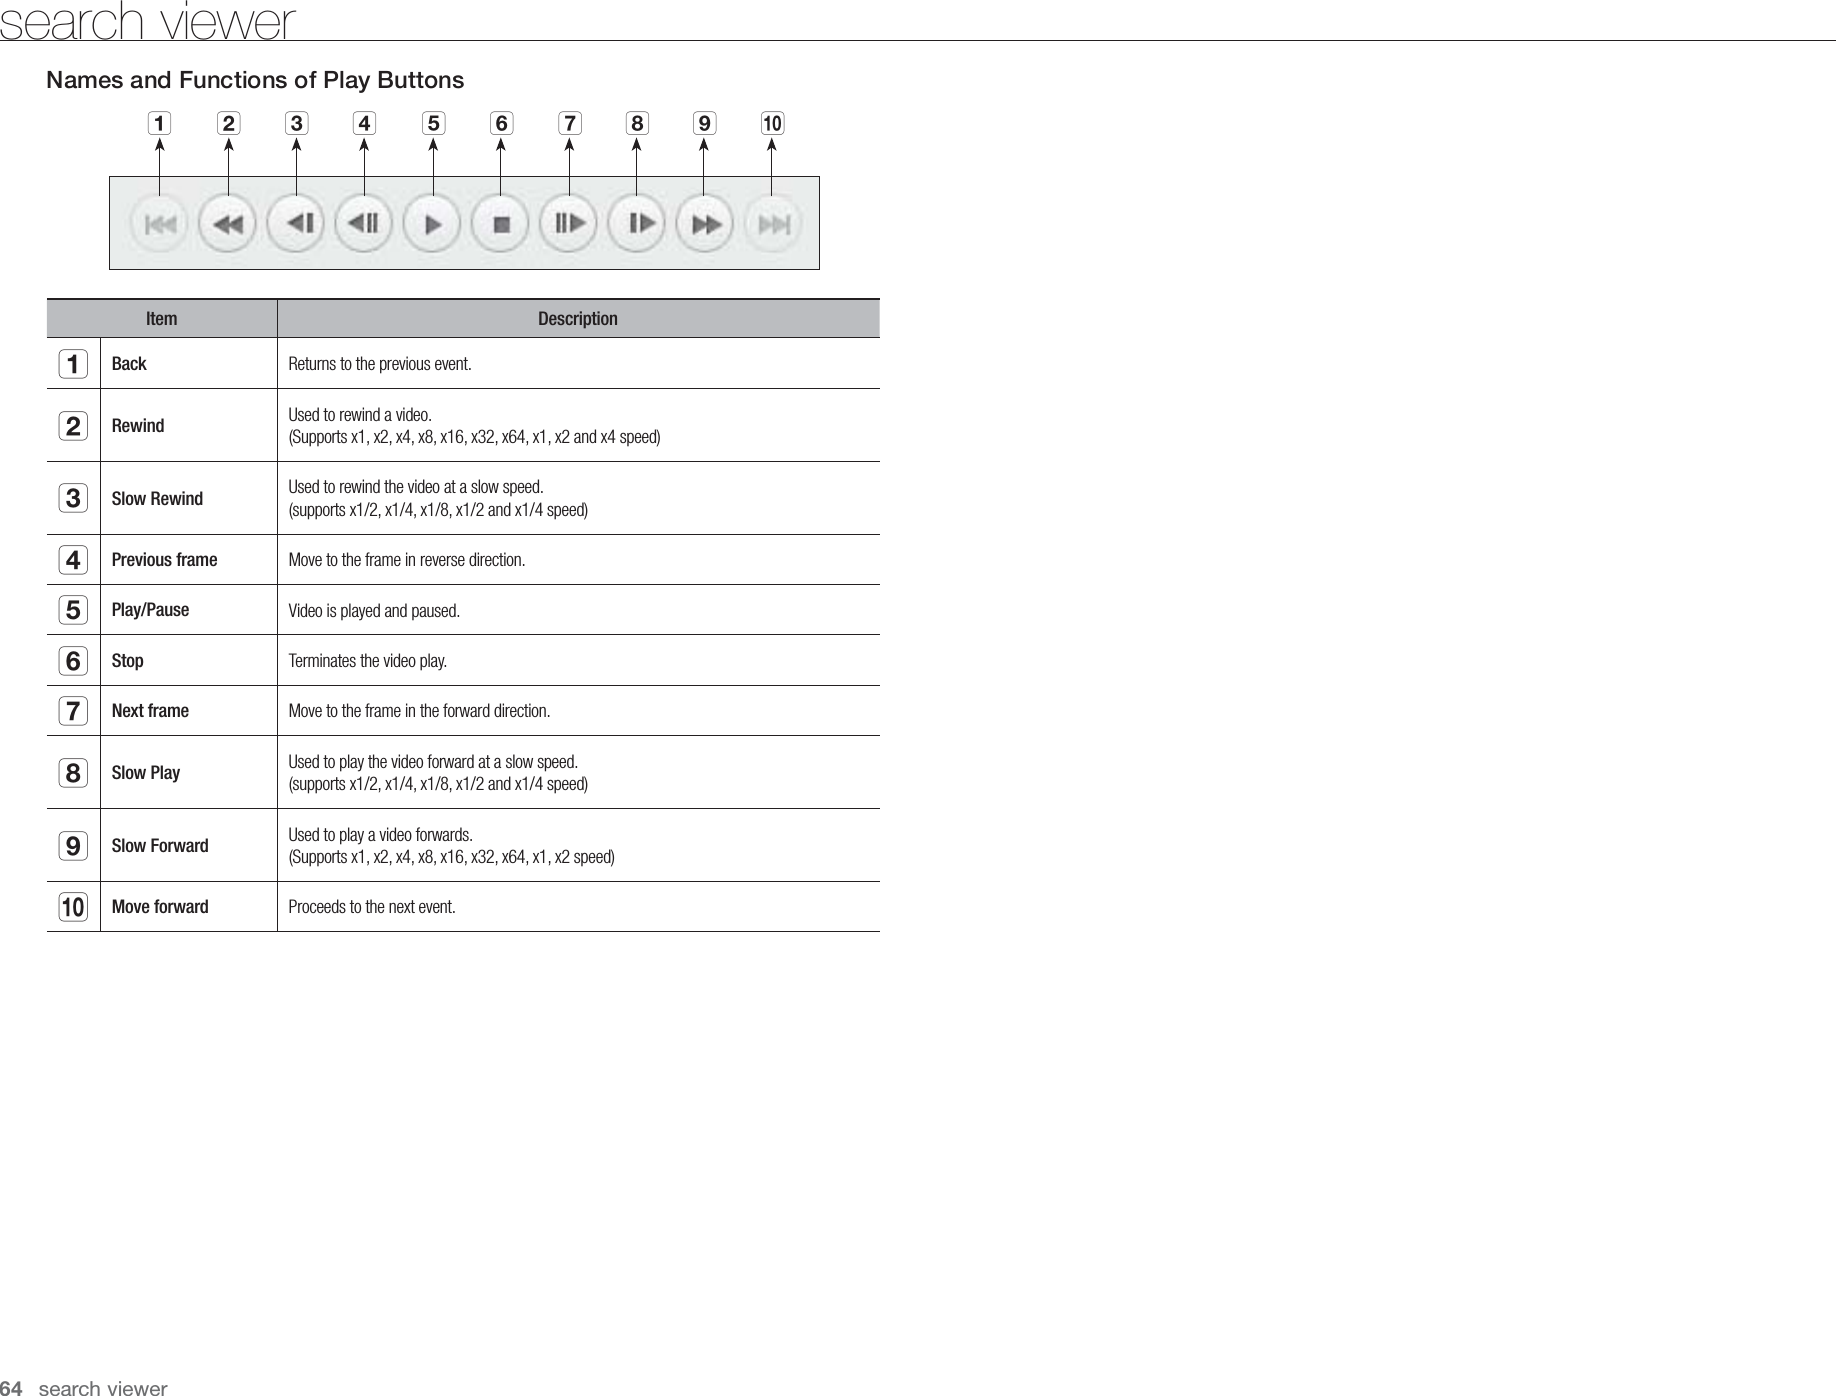
![Color indications depending on current recording statusDisplays the corresponding color according to the recorded data type. M `If 2 or more kinds of recording type are mixed for the same timeline, only the recording type with higher priority is displayed.(Priority: Emergency > G-Sensor > DST > Audio Detection > Camera Event > Sensor > Schedule > Motion > Standard)To adjust timelineIf searched data are overlapping, you can select a desired data, move its playback time point, and zoom in/out the timeline.1. Select the number of data to search if data is overlapping.It appears only when data are overlapped and assigns <0> to the most recent data.2. Click your desired time point to play on the timeline.The playback start point is moved.3. Click <+> / <-> to zoom in/out the zoom factor to display time.4. When magnified, if you want to view the pre/post timeline, click on the timeline and drag it in the direction you want to move it.If you want to check the recording listThe results for each recording section will be displayed.To back up the search resultsYou can back up the search results in the list.1. Click the [ ] button.2. From the search results, select the check box of the item you wish to back up. • Format : Select the format of the file to back up. - AVI : Codec information provided from the NVR is saved together and can be played in a separate viewer (Windows Media Player, etc.) on the PC. - SEC : Proprietary file format, which can be played on the PC immediately as it is saved with a dedicated viewer. `If you select the SEC format, you can select whether or not to “Set Password”.• Path : displays the location of the folder in which the section backup file is to be saved.3. After completing the backup settings, click the <Backup> button. `If you press the <Stop> button during the backup process, the backup will be suspended.To run the section backup functionYou can select and back up a desired section in the timeline or list of video(s) being played.1. Click the [ ] button.2. On the timeline of a video being played, select the start point and the end point of the section to back up.Section backup settings screen will open.• Channel : Displays the channel for the section backup.• Backup section : Displays the <Start time> and the <End time> of a section to back up.• Format : Selects the format of a section to back up. - AVI : Codec information provided from the NVR is saved together and can be played on a separate viewer (Windows Media Player, etc..) on the PC. - SEC : Proprietary file format, which can be played on the PC immediately as it is saved with a dedicated viewer. `If you select the SEC format, you can select whether or not to “Set Password”.• File name : Sets the name of a section backup file.• Path : displays the location of the folder in which the section backup file is to be saved.3. After completing the section backup settings, click the <Backup> button. `If you press the <Stop> button during the section backup process, the backup will be suspended.English _63● SEARCH VIEWER](https://usermanual.wiki/Hanwha-Techwin/TRM1610S.User-manaul/User-Guide-3633110-Page-63.png)
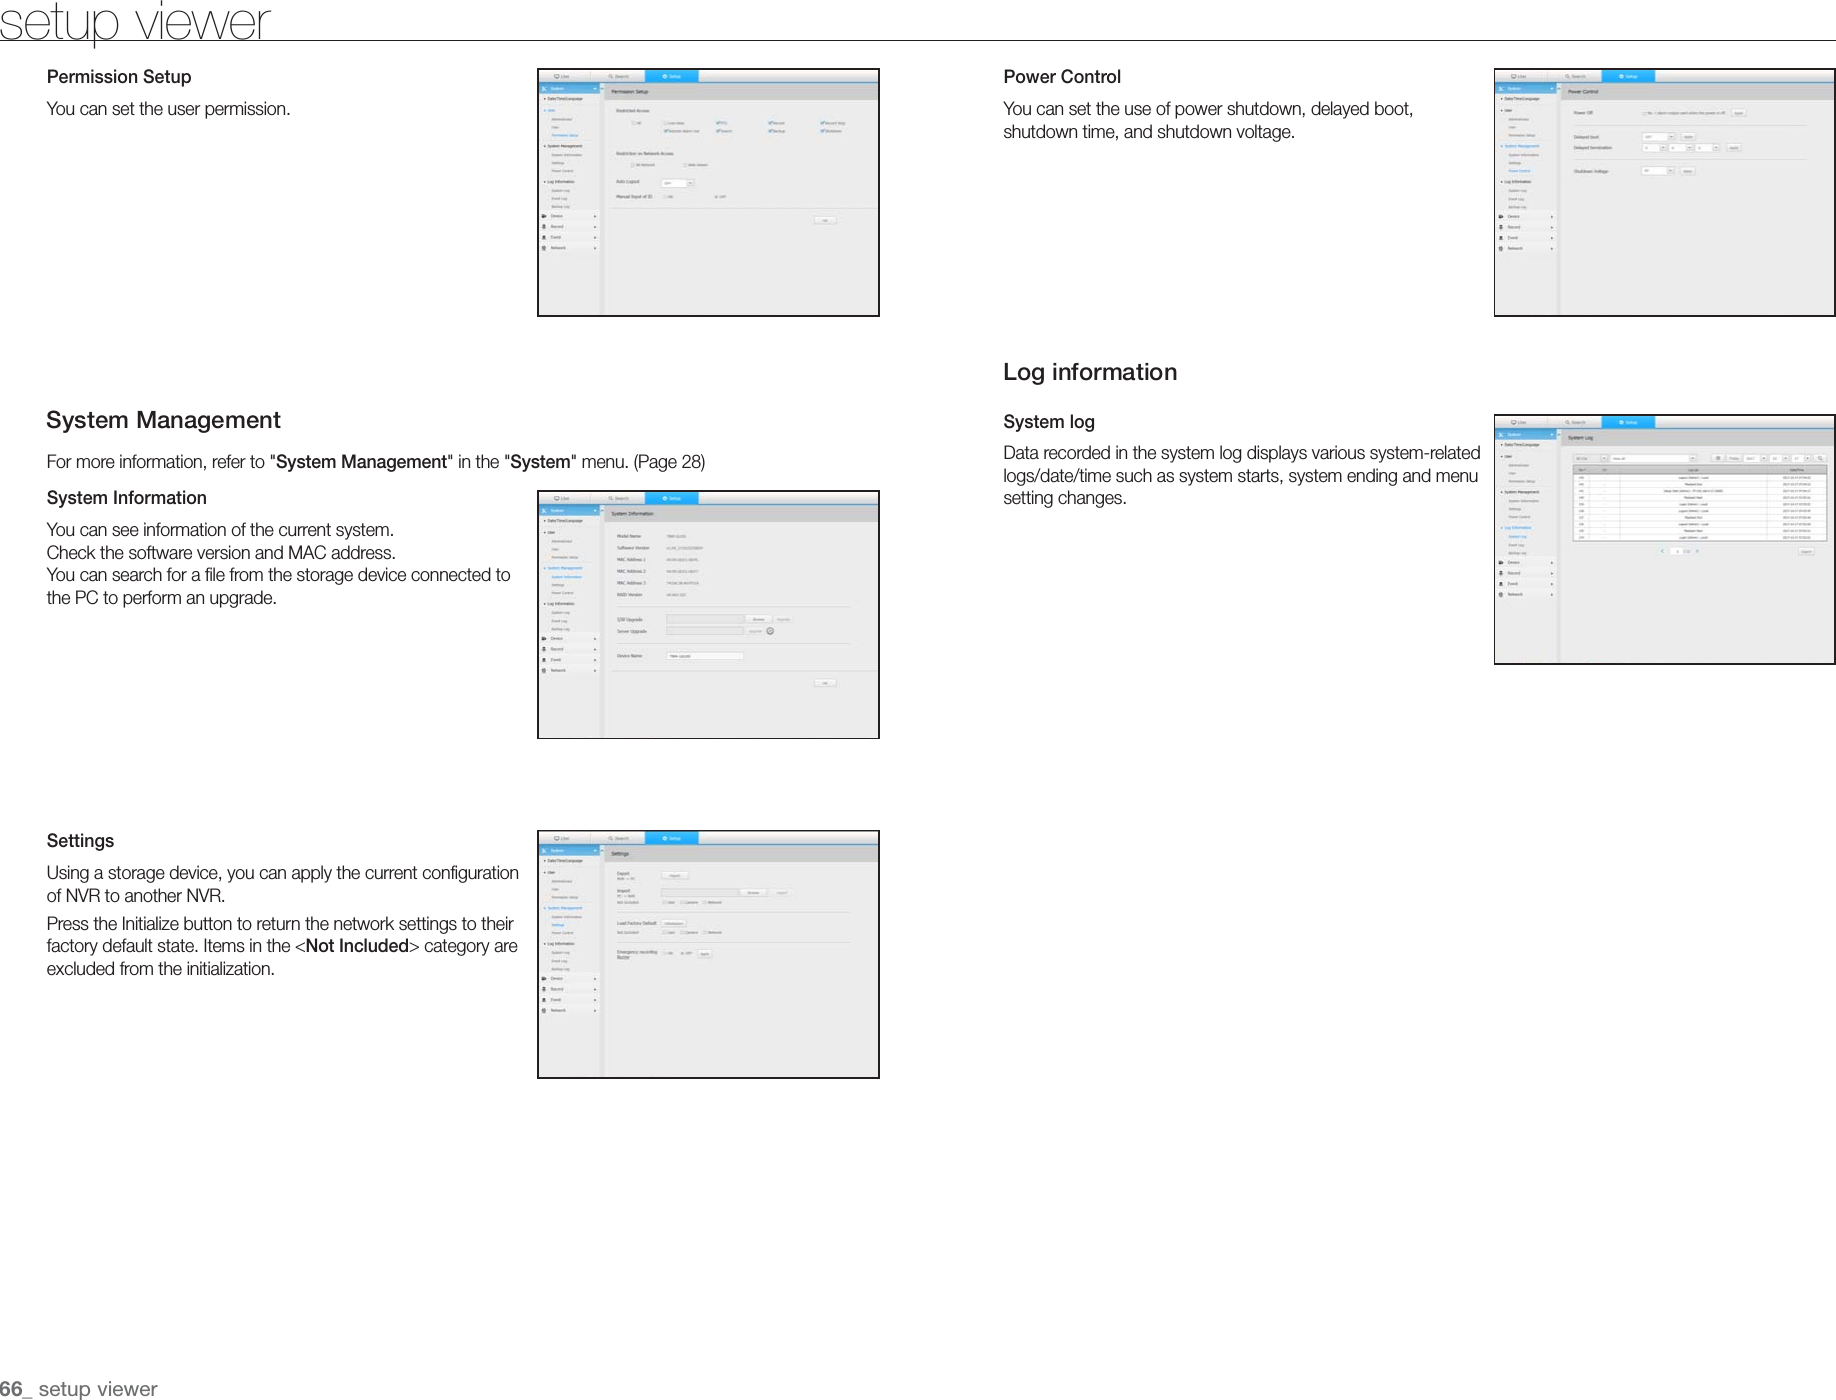
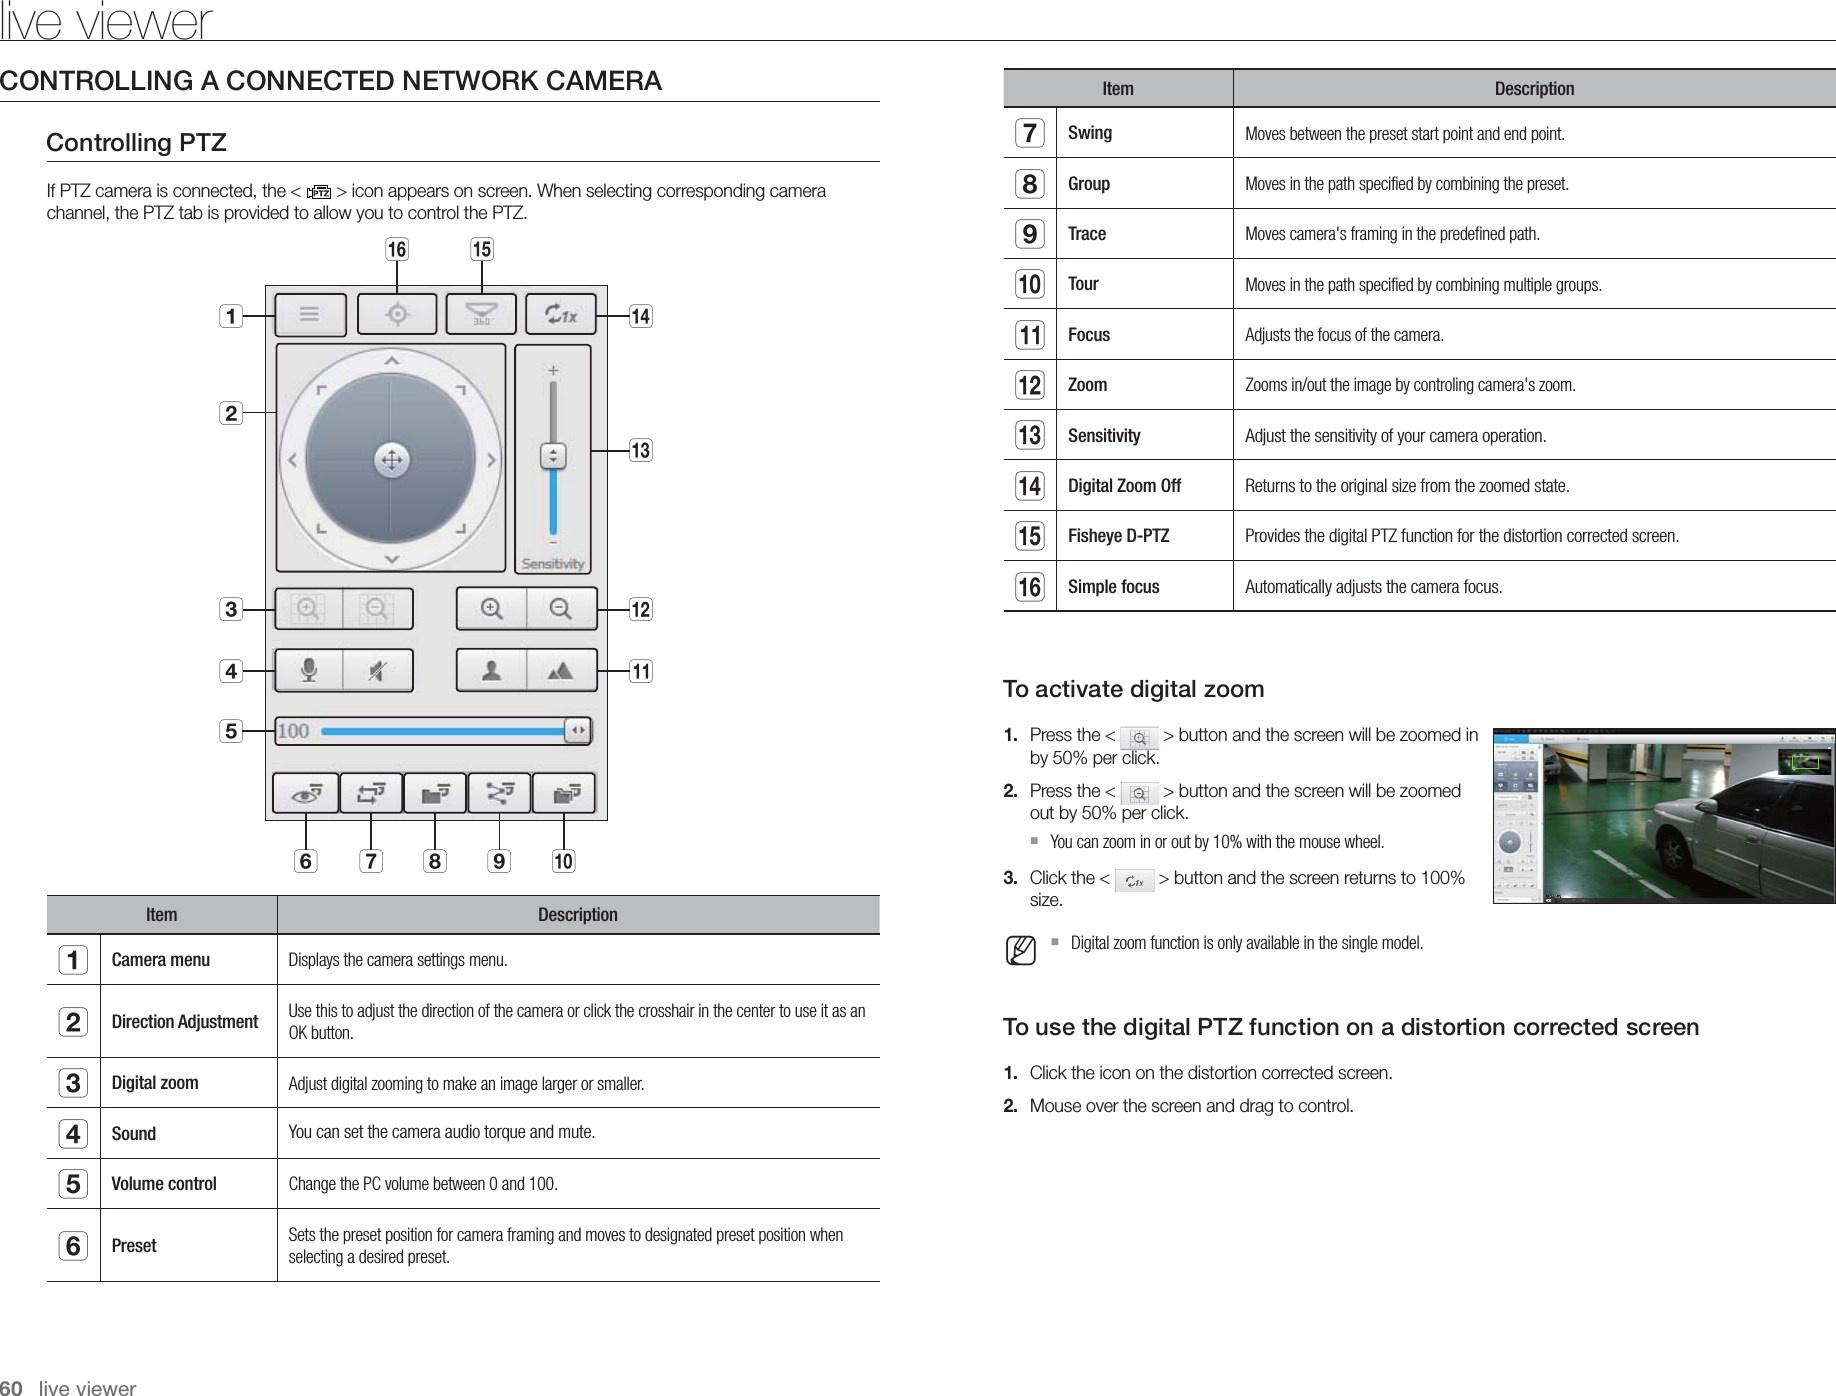
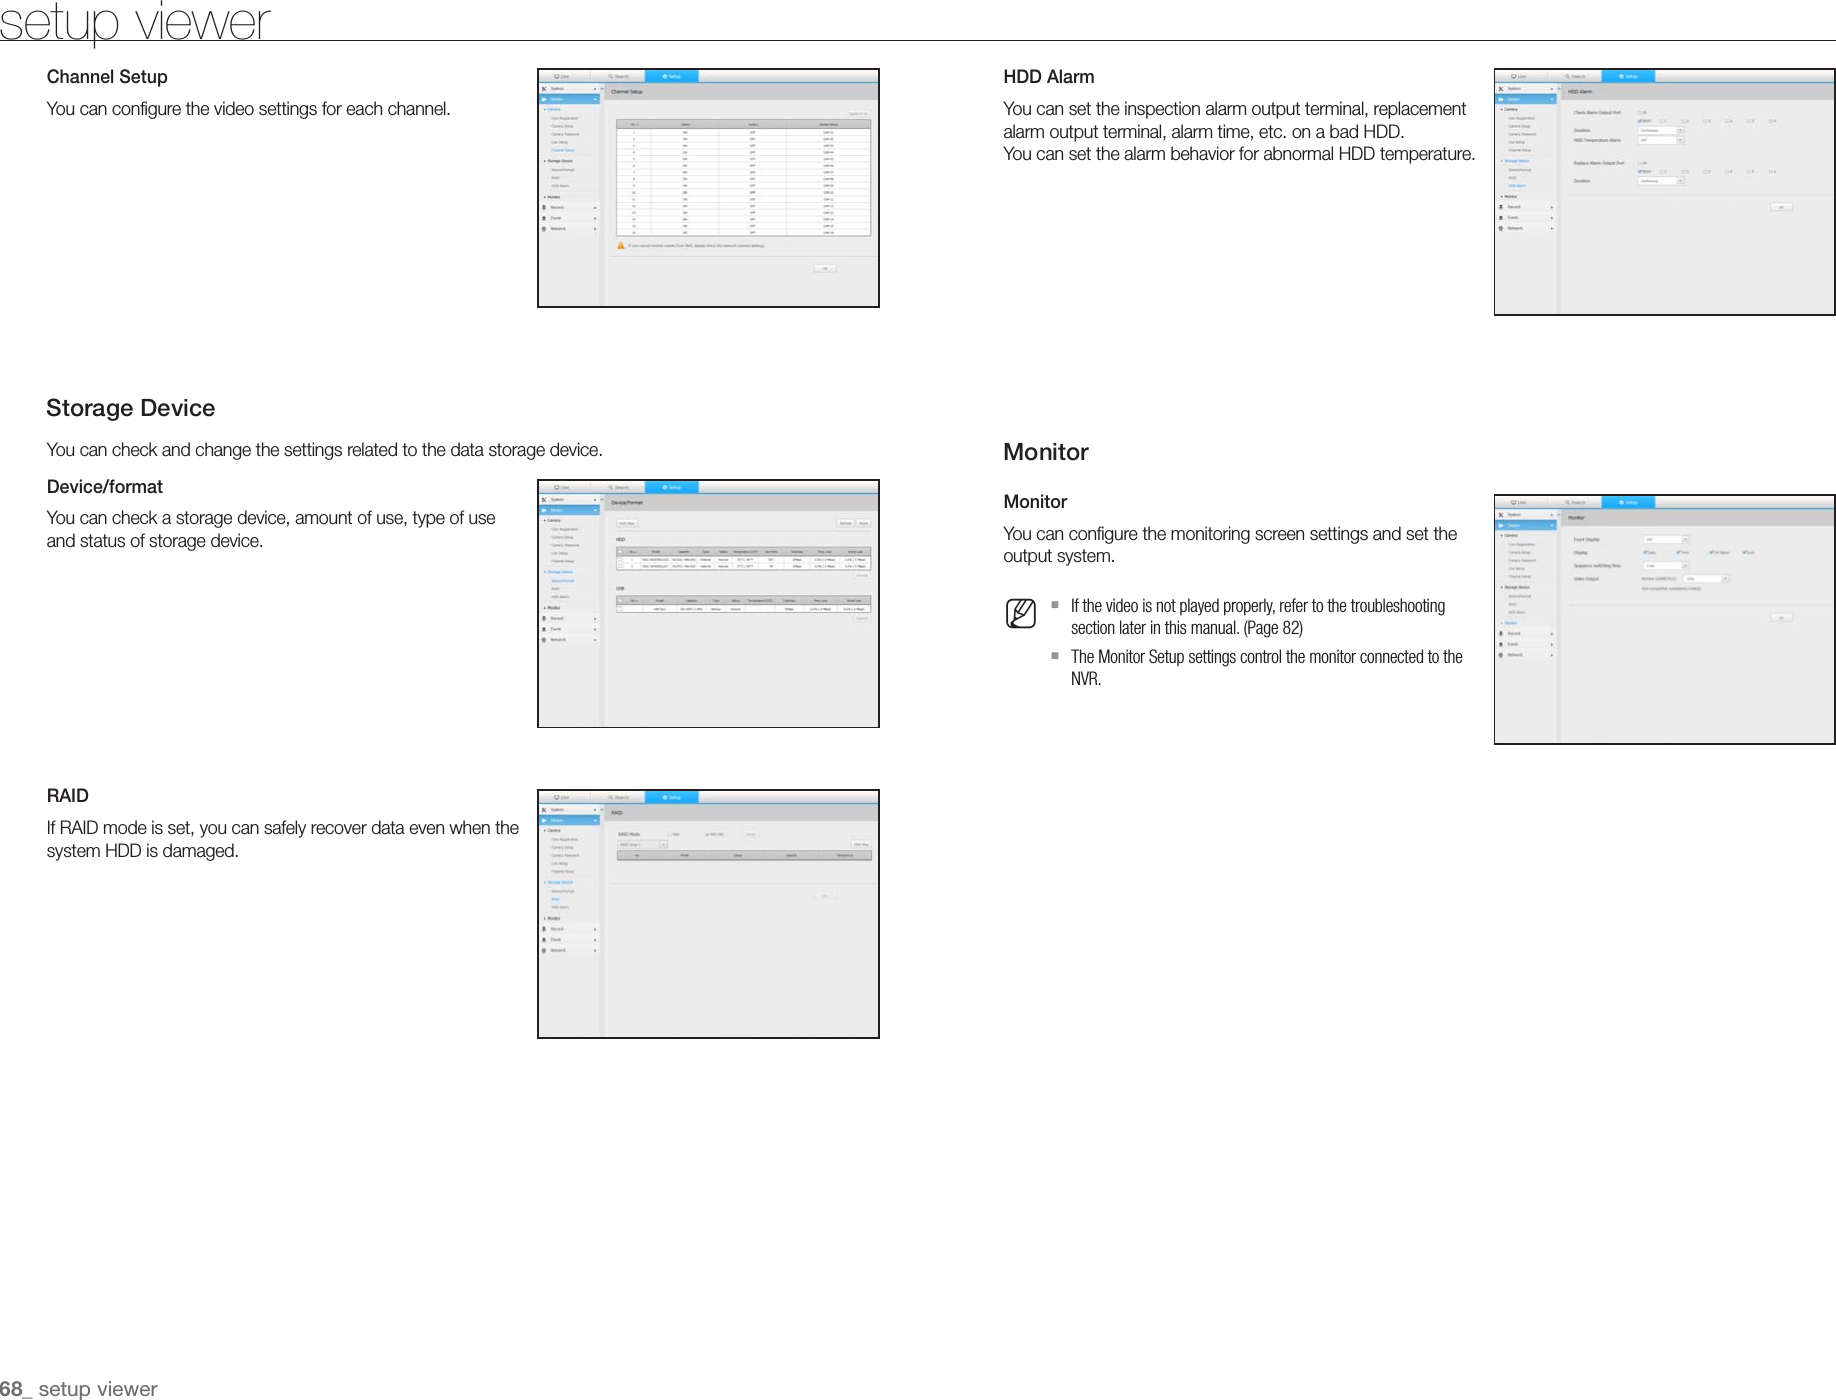
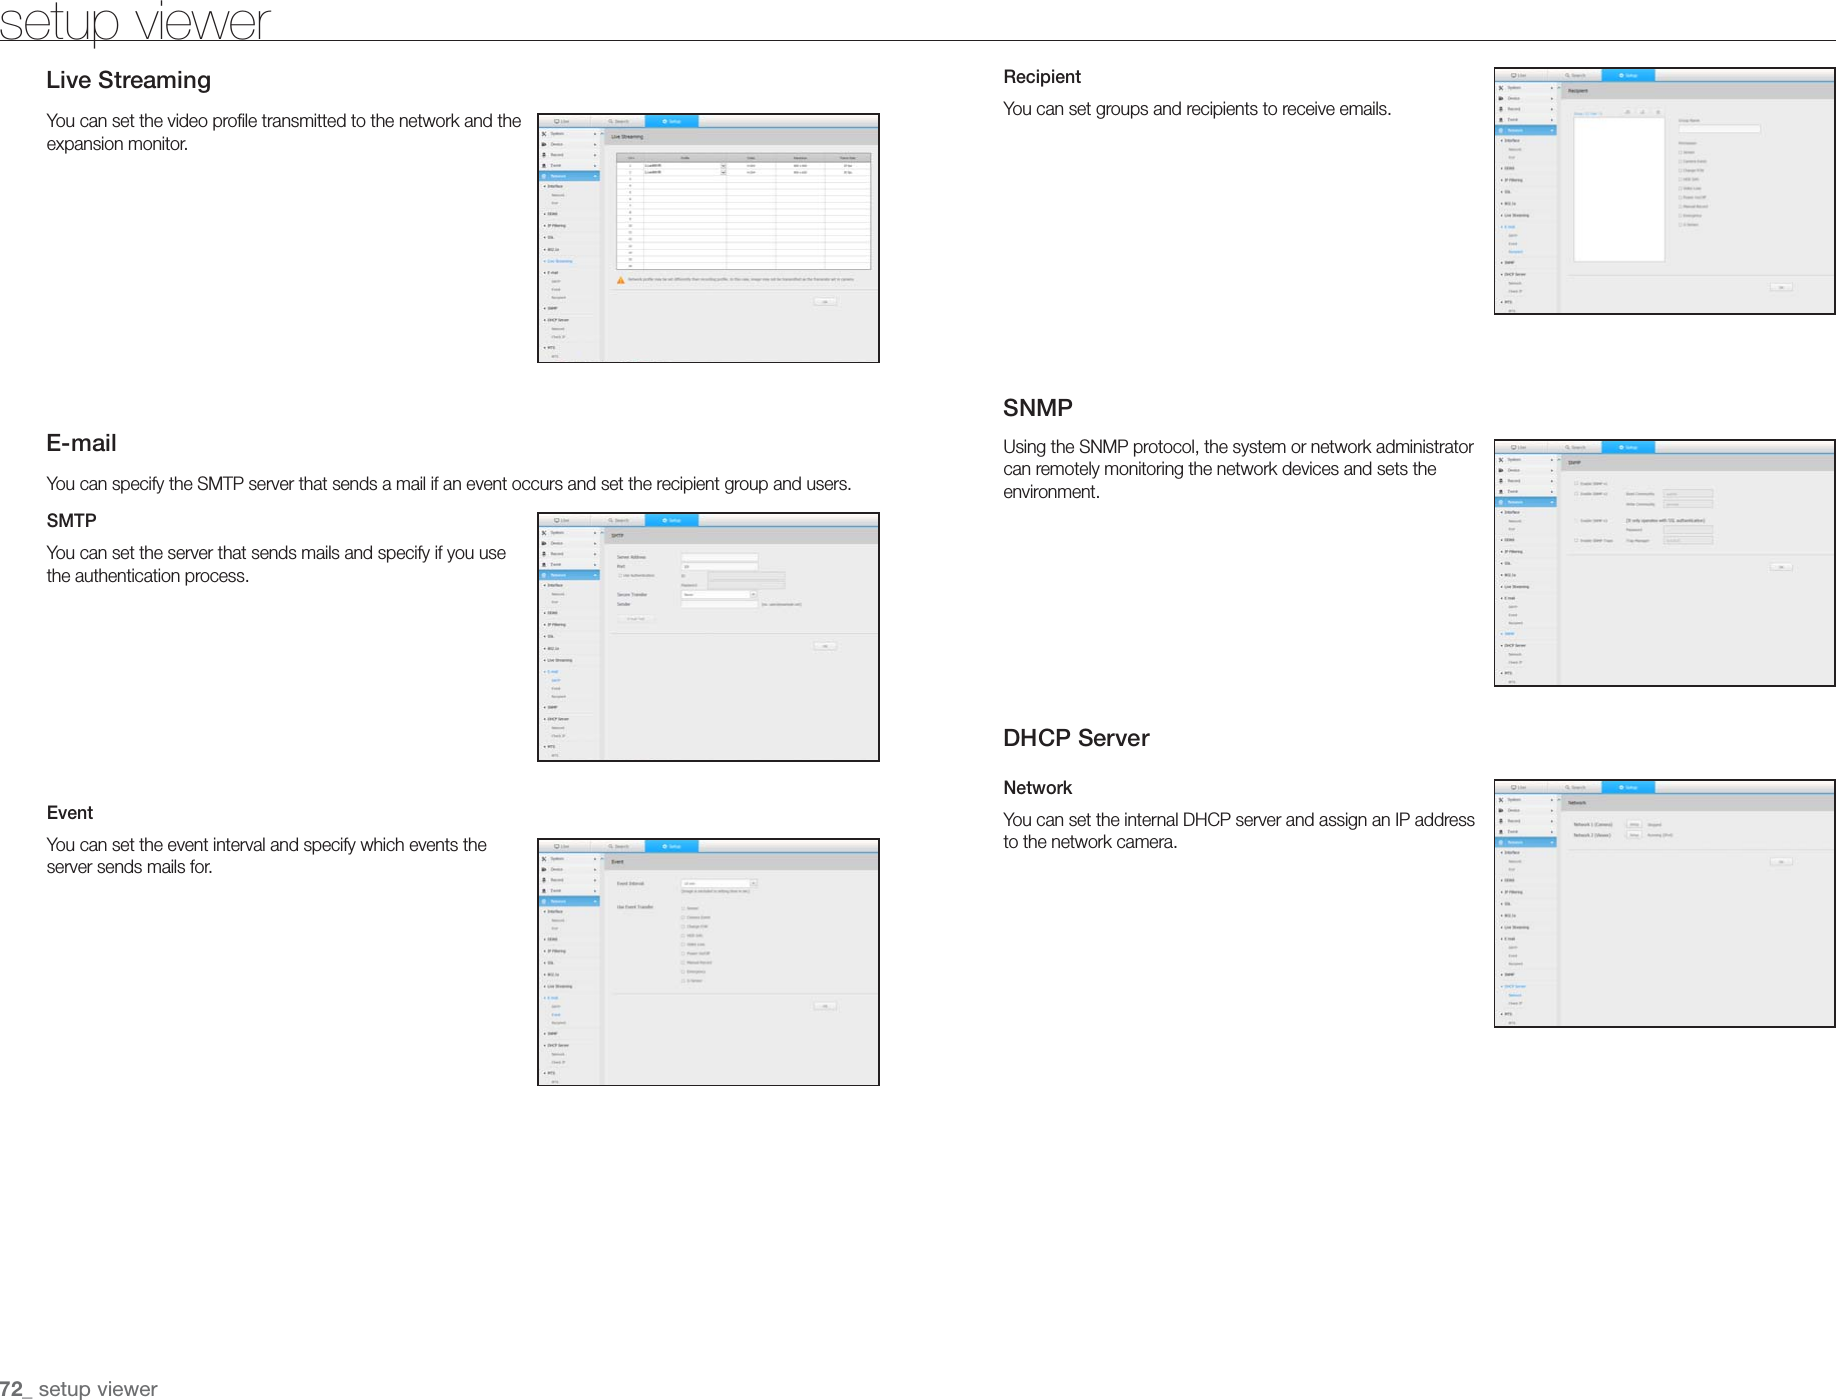
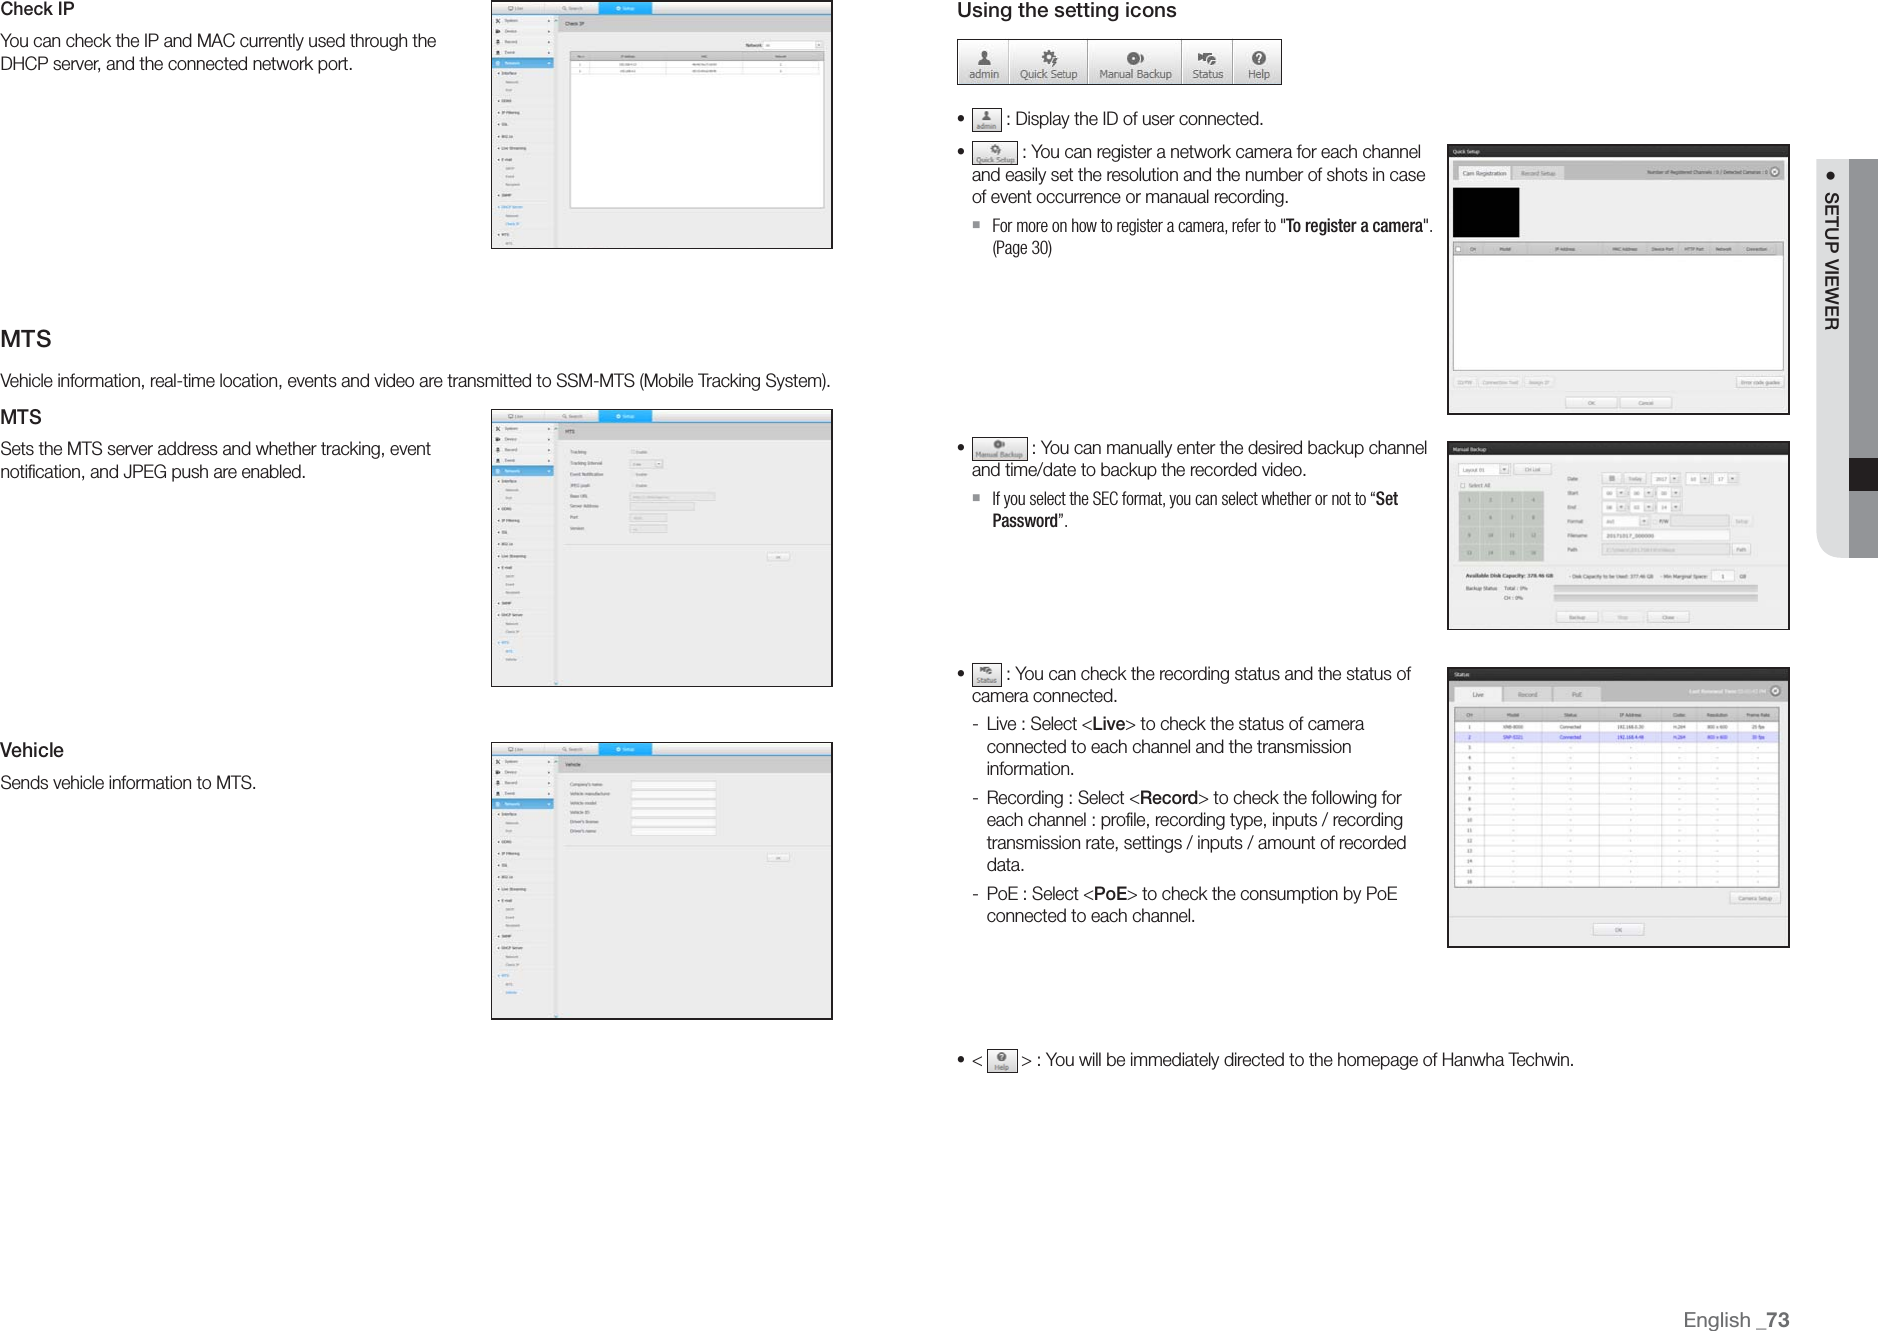
![Event logThe event log lists recorded events, such as sensor events, camera events, or image losses.Backup logYou can inquire about a user who performed a backup, execution time, details (backup time, channel, backup device, backup file type).DeviceYou can check a list of devices that are connected to the NVR and configure the necessary settings.Click <Device> in the menu screen.For more information, refer to "Setting the Device". (Page 30)CameraCam RegistrationYou can add a network camera(s).Camera SetupYou can change the settings of a connected network camera. When you click the [Camera website] button, a new camera web browser window is opened. -Not supported if the camera is connected using the RTSP protocol. -Not supported if the camera is connected using DDNS, URL, MAC Address. -It supports the version specified below or later for each Q/P/X series camera.(QND-7010R series: 1.04, QND-7080R series: 1.02, QND-6010R series: 1.02, QND-6070R series: 1.01, P series: 1.01) -It supports only when the camera is connected to IPv4 and is not set to HTTPS. -When connecting to the camera web page on a closed network, a camera that does not support the universal web cannot output an image. -When trying to connect, if the plugin does not get installed, try again after setting the compatibility view from the web page of the NVR web viewer. -It only supports Google Chrome browser.Camera PasswordYou can change the passwords of all registered cameras at once.Live SetupYou can change the life transfer settings of the network camera.English _67● SETUP VIEWER](https://usermanual.wiki/Hanwha-Techwin/TRM1610S.User-manaul/User-Guide-3633110-Page-67.png)
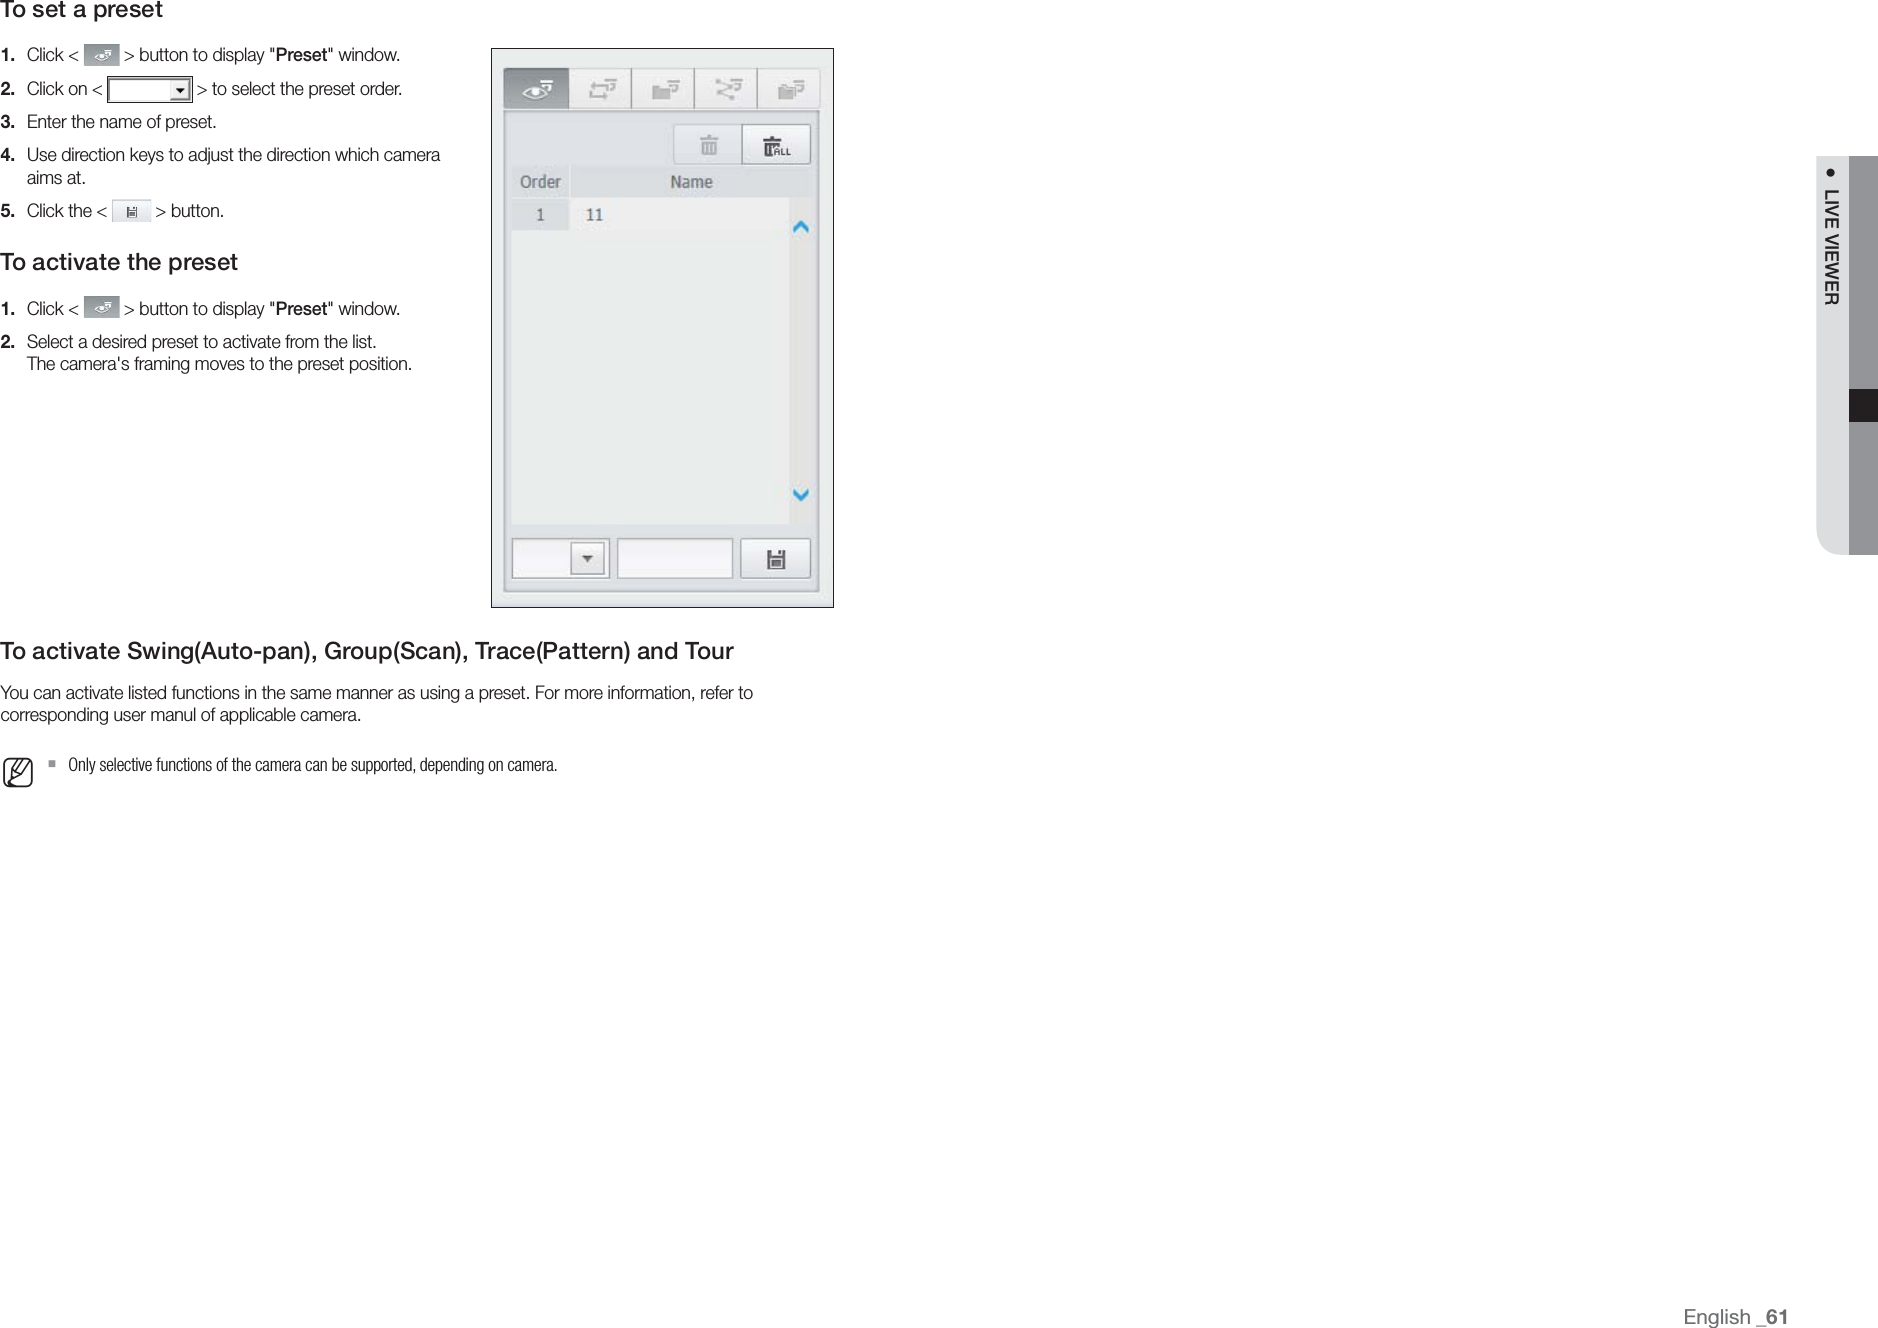
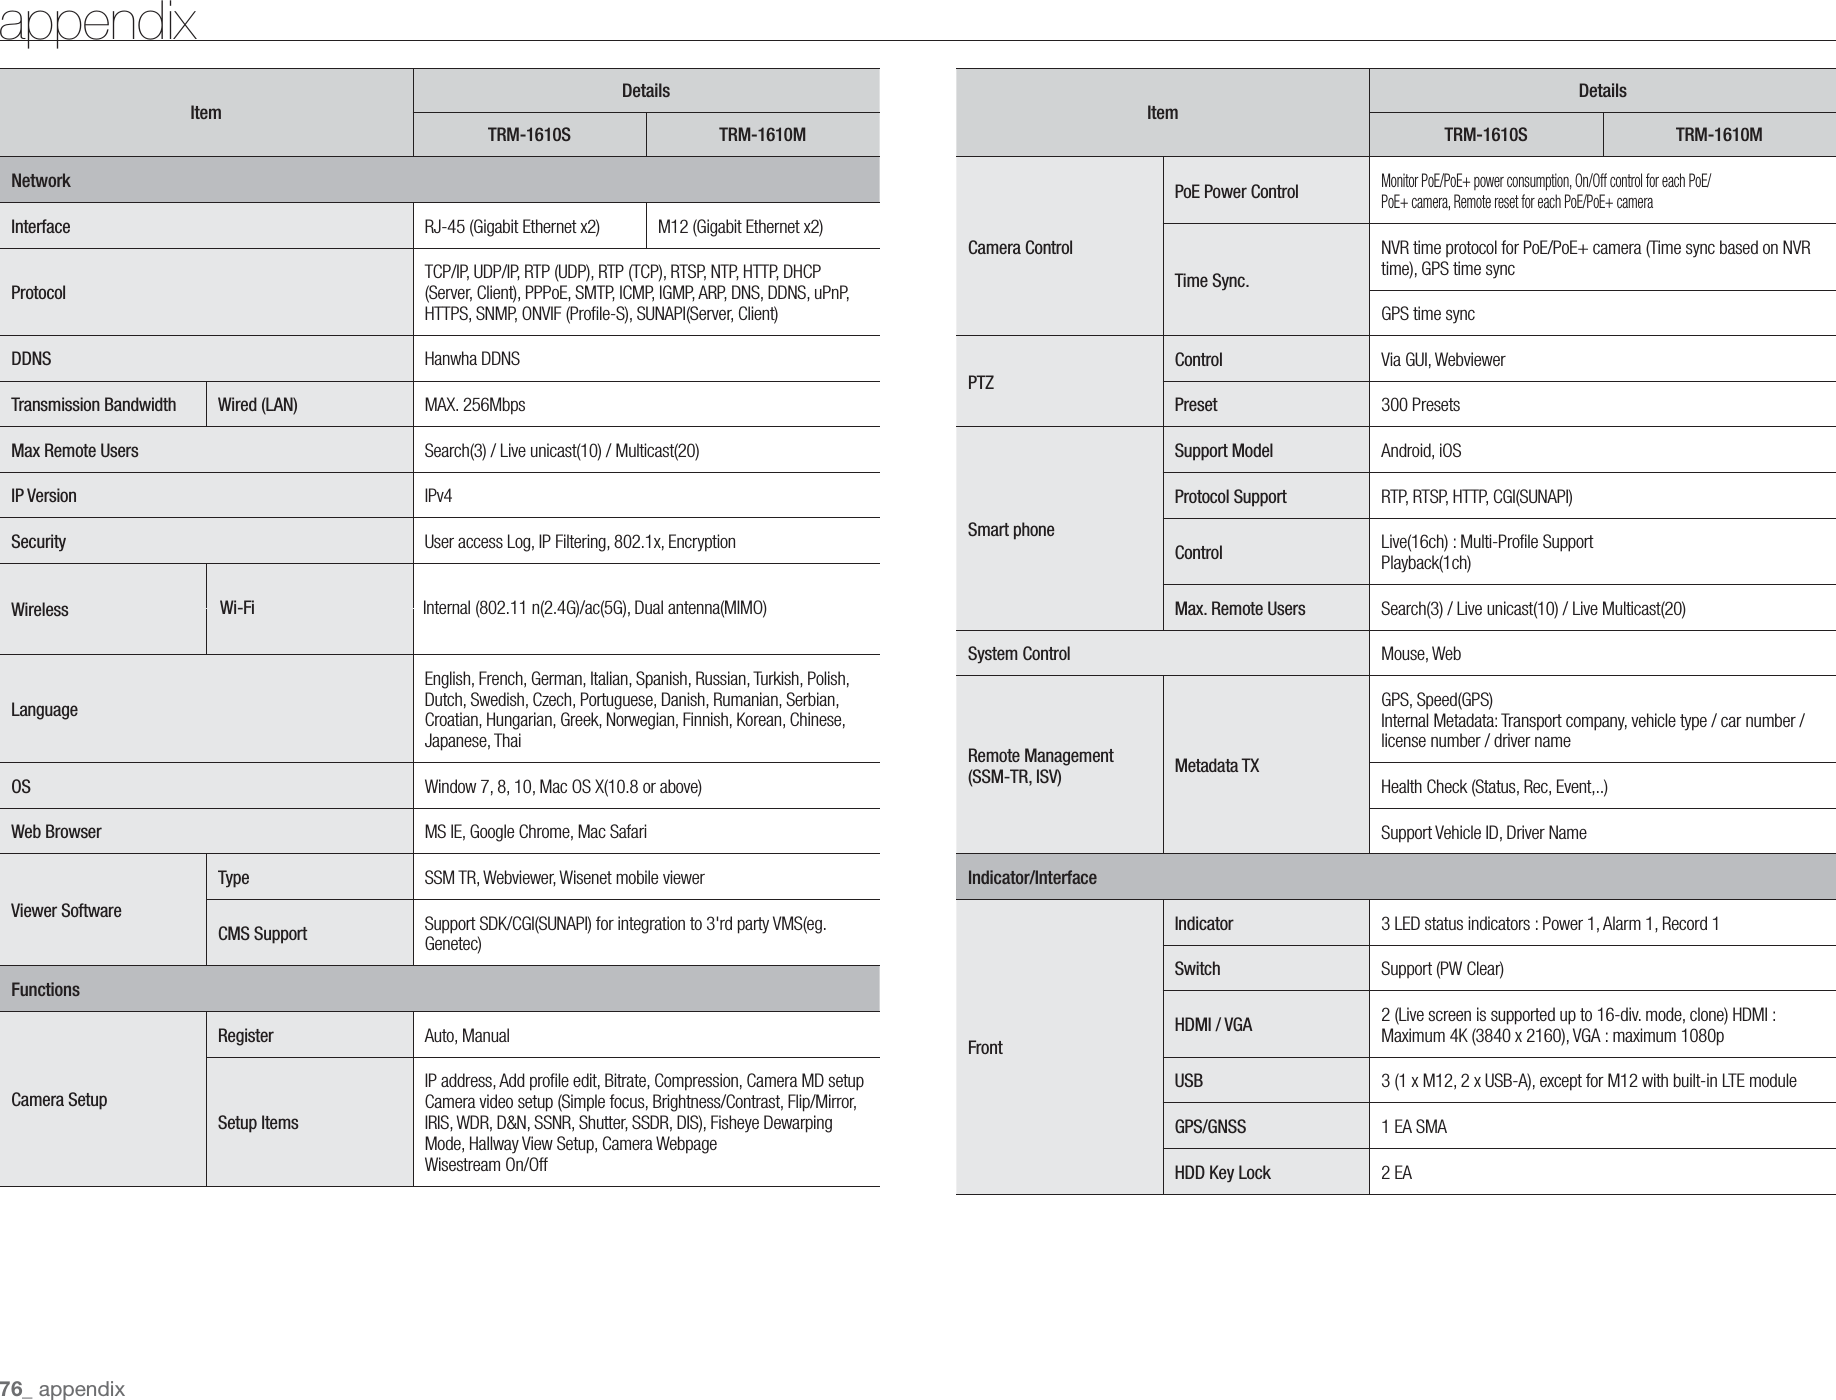
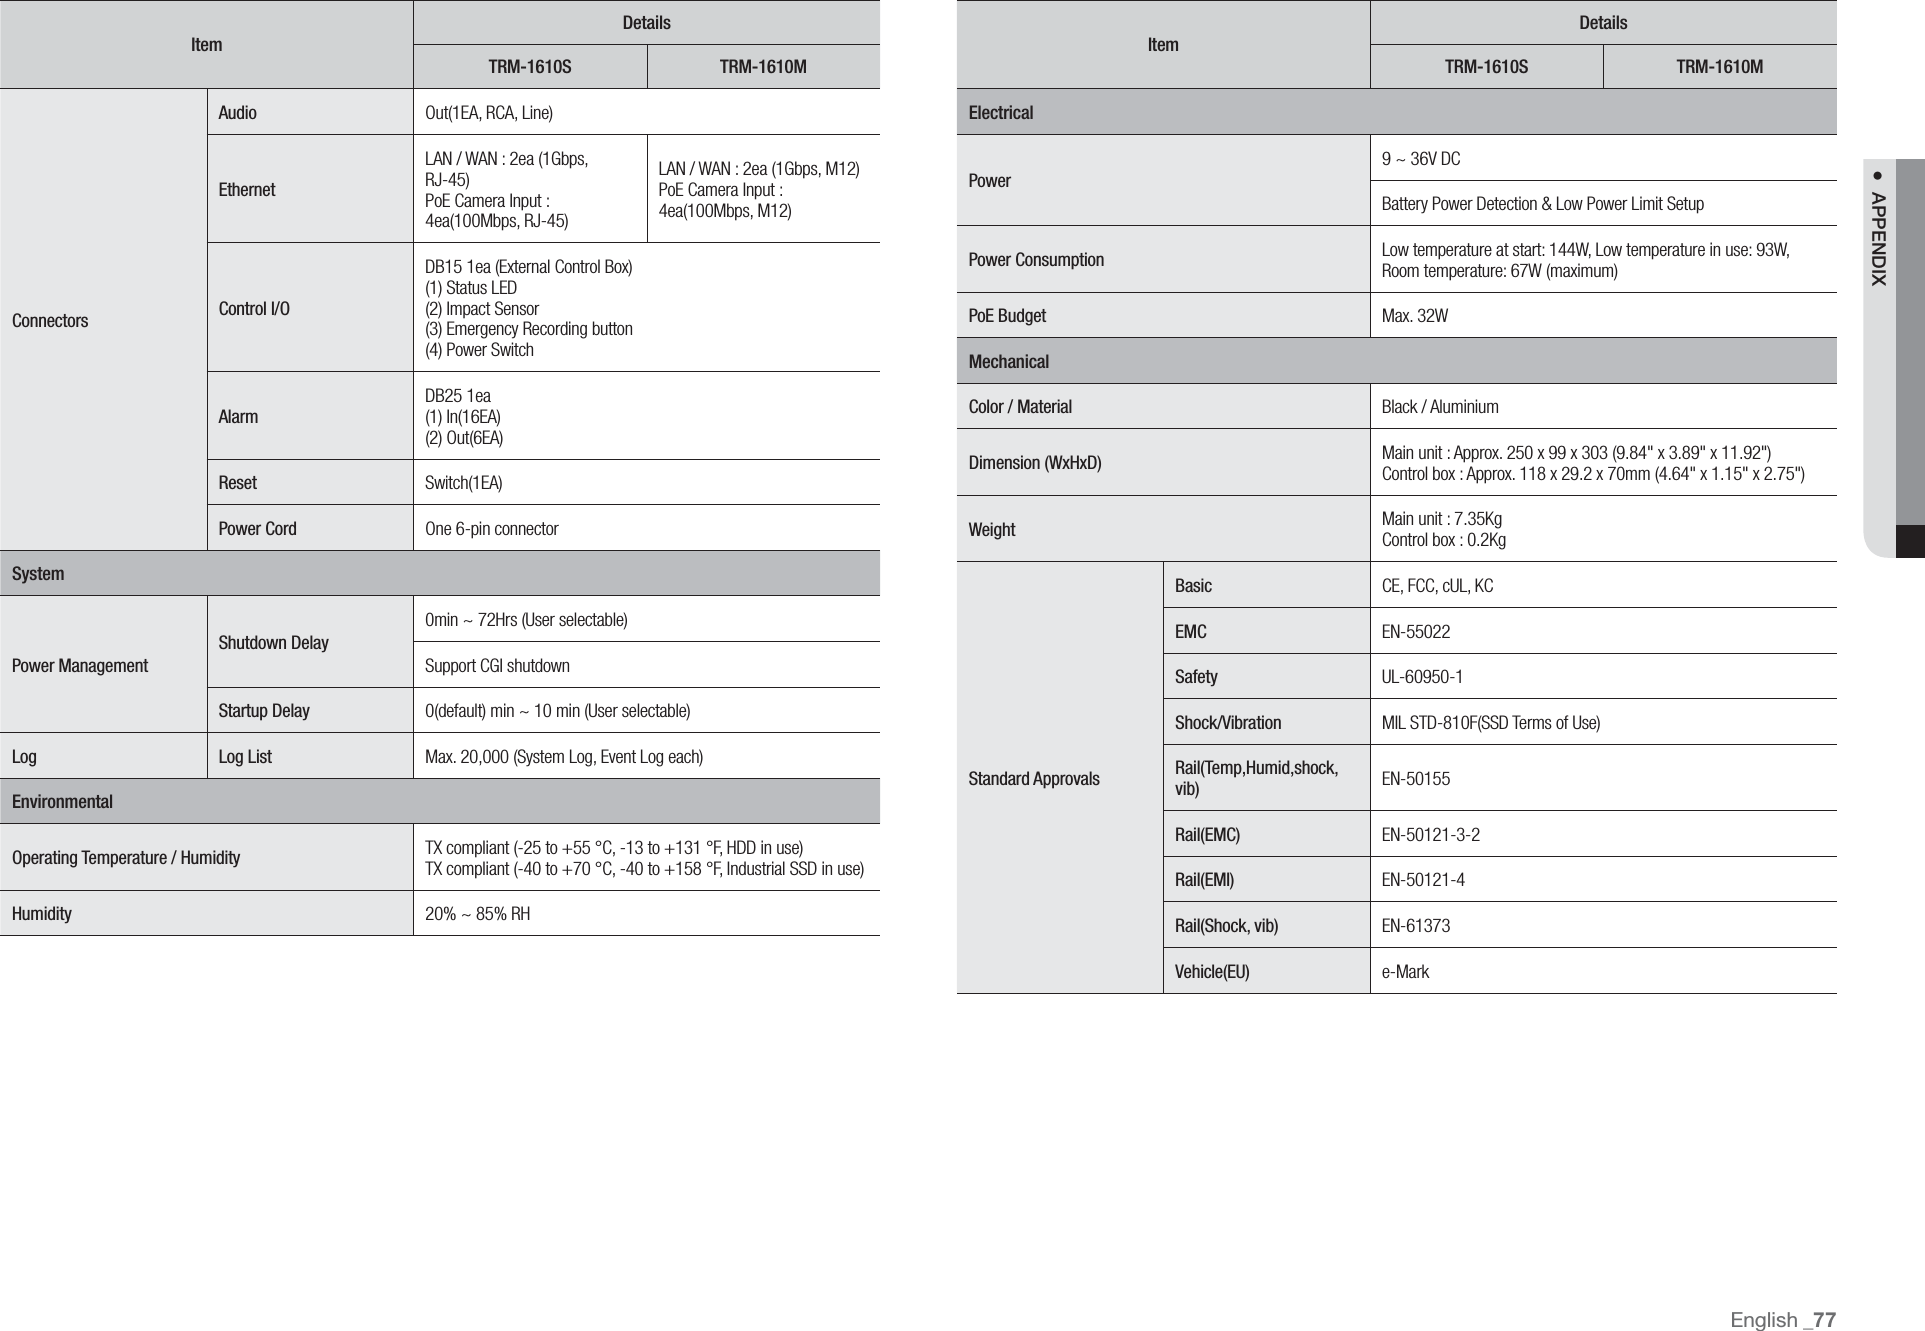
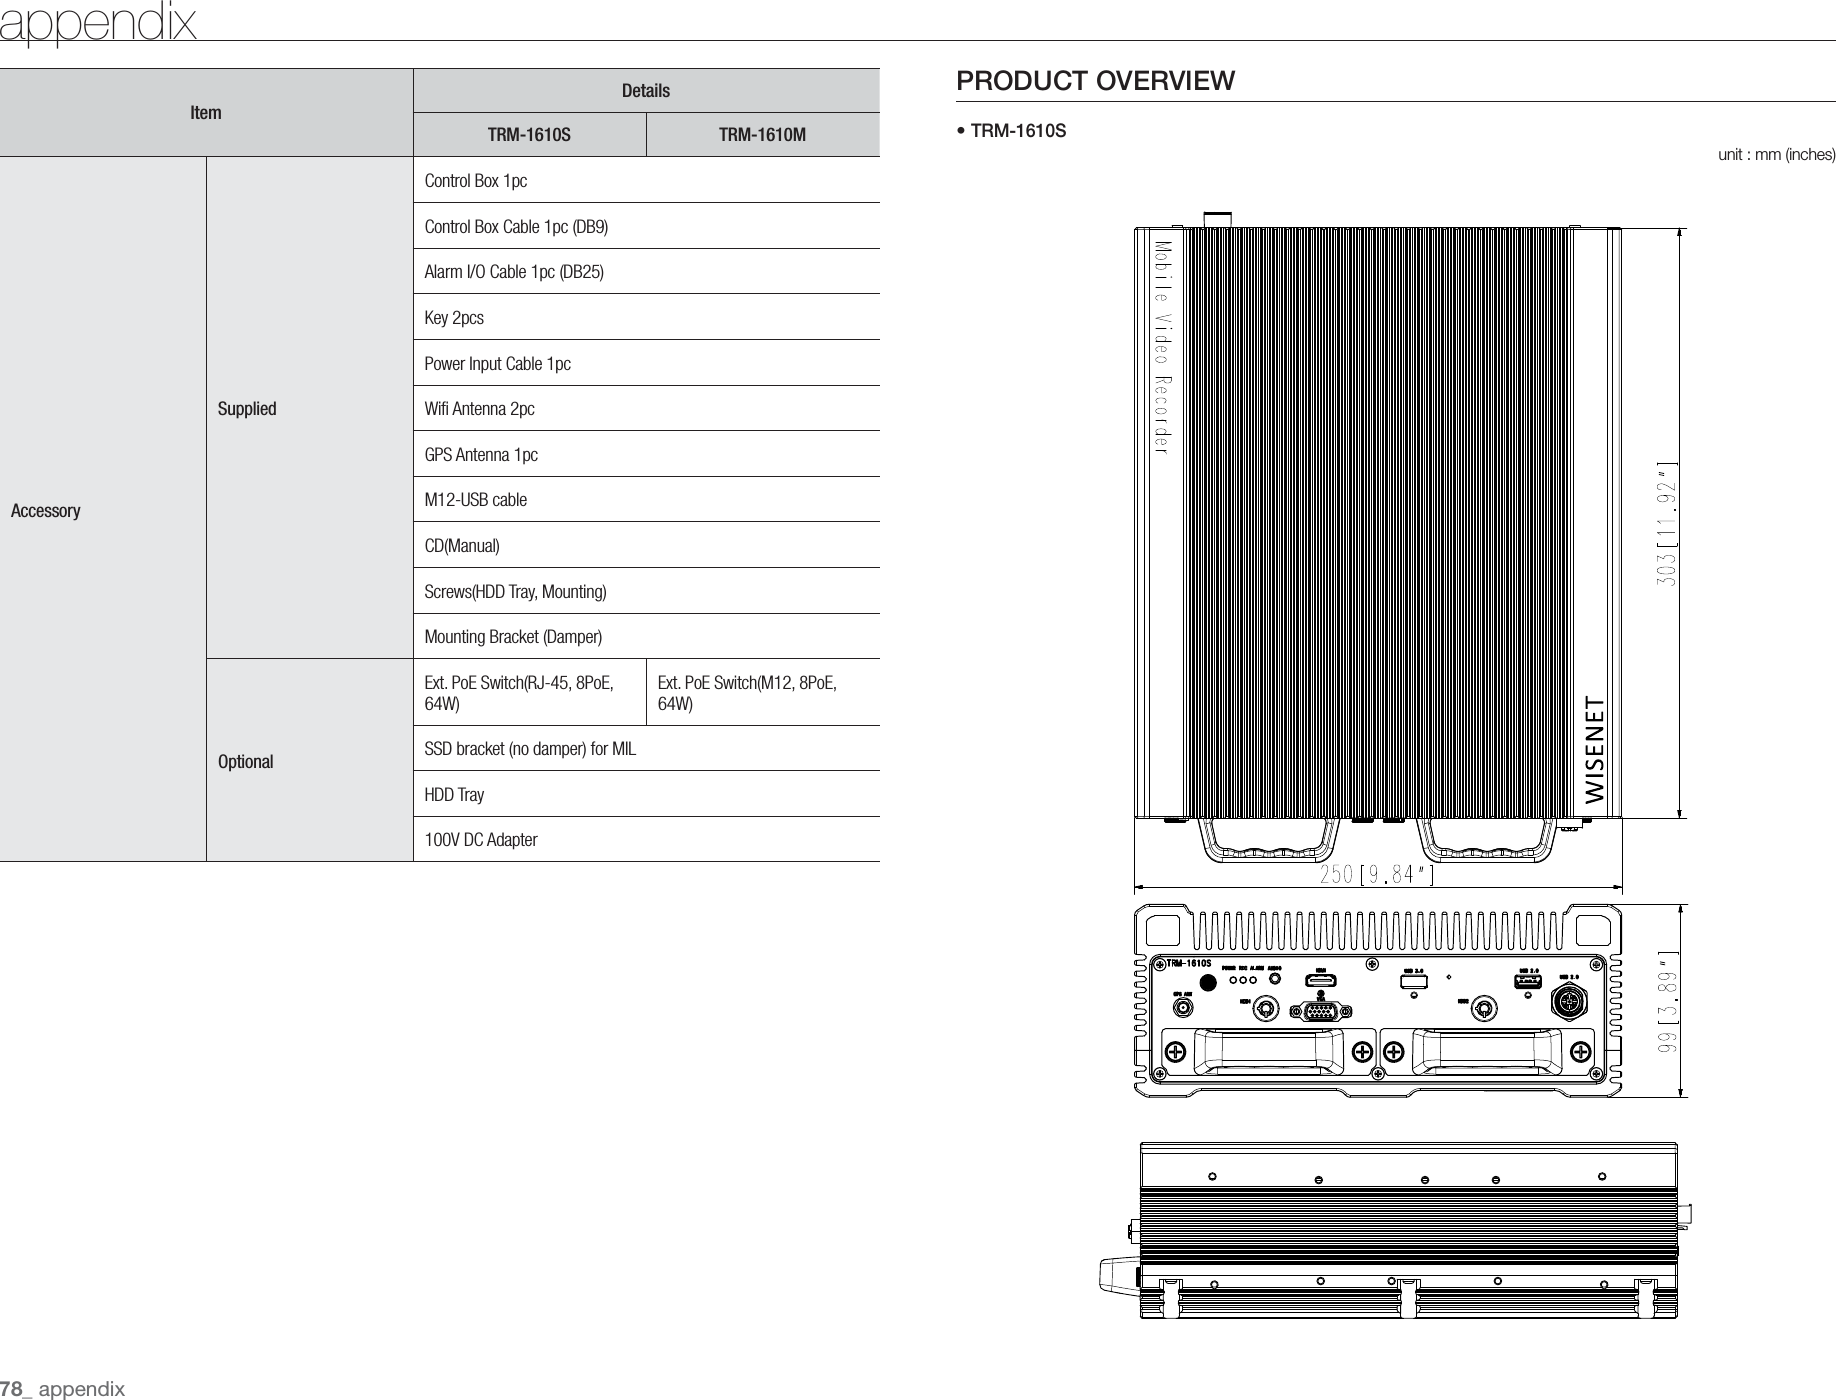
![PRODUCT SPECIFICATIONItemDetailsTRM-1610S TRM-1610MDisplayNetwork CameraInputs Max. 16CH (4 PoE,RJ-45) Max. 16CH (4 PoE, M12)Resolution CIF ~ 12MPProtocols SUNAPI, ONVIFLiveLocal Display HDMI / VGAMulti-Channel Display Local Monitor : 1 / 2V / 3V / 4 / 6 / 8 / 9 / 13 / 16 / Auto sequenceWeb : 1 / 4 / 9 / 16 / Auto sequencePerformance[Local Monitor]- 12M (30fps)- 8.3M(120fps)- 1080p(480fps)PerformanceOperating System Embedded LinuxRecordCompression H.265, H.264, MJPEG, WiseStream(H.265, H.264)Recording Bandwidth Max. 128MbpsResolution CIF ~ 12MPType Normal, Schedule(Continuous/Event), Event (Pre/Post), EmergencyRetention Retention per channel (1~400 days)Event TriggerAlarm Input (16), Video Loss, Camera Event(Sensor, MD, Video Analytics, Defocus Camera)Event Action e-Mail, Alarm Out, Buzzer, Monitor Out, VMS transmissionItemDetailsTRM-1610S TRM-1610MSearch & PlayPlayback Bandwidth 32Mbps(16ch simultaneously)User Max. 4 Users (Local 1, Remote 3)Mode Date & Time(Calendar)/Event Log list, Smart Search(Virtual Line w/direction, Enter/Exit)Simultaneous playback Max. 16 channels(Local Monitor, CMS)Search & PlayResolution CIF ~ 12MPFisheye Dewarping Web / CMSPlayback Control Fast/Slow Forward/Backward, Move one step up/downStorageBuilt-In 0TB ~ 4TB (2TB 2EA)Internal HDD2 SATA(Front-Swap)- Max. 4TB(HDD, Non-RAID Mode)- Max. 1TB(SSD, Non-RAID Mode)RAID RAID-1BackupFile backupExe(GUI), JPG/AVI(excluding GPS information)(Network)Function Multi channel(Upto 16CH) Play, Date-Time/Title/GPS displayType Auto(Wifi), Manual(HDD)Wifi Backup Performance MAX. 150Mbps (IEEE802.11ac) Sensor I/O 16/6AudioInput 16 channels (network)Compression G.711, G.726, AAC(16/48KHz)Audio Communication 2-WayEnglish _75● APPENDIXappendix](https://usermanual.wiki/Hanwha-Techwin/TRM1610S.User-manaul/User-Guide-3633110-Page-75.png)
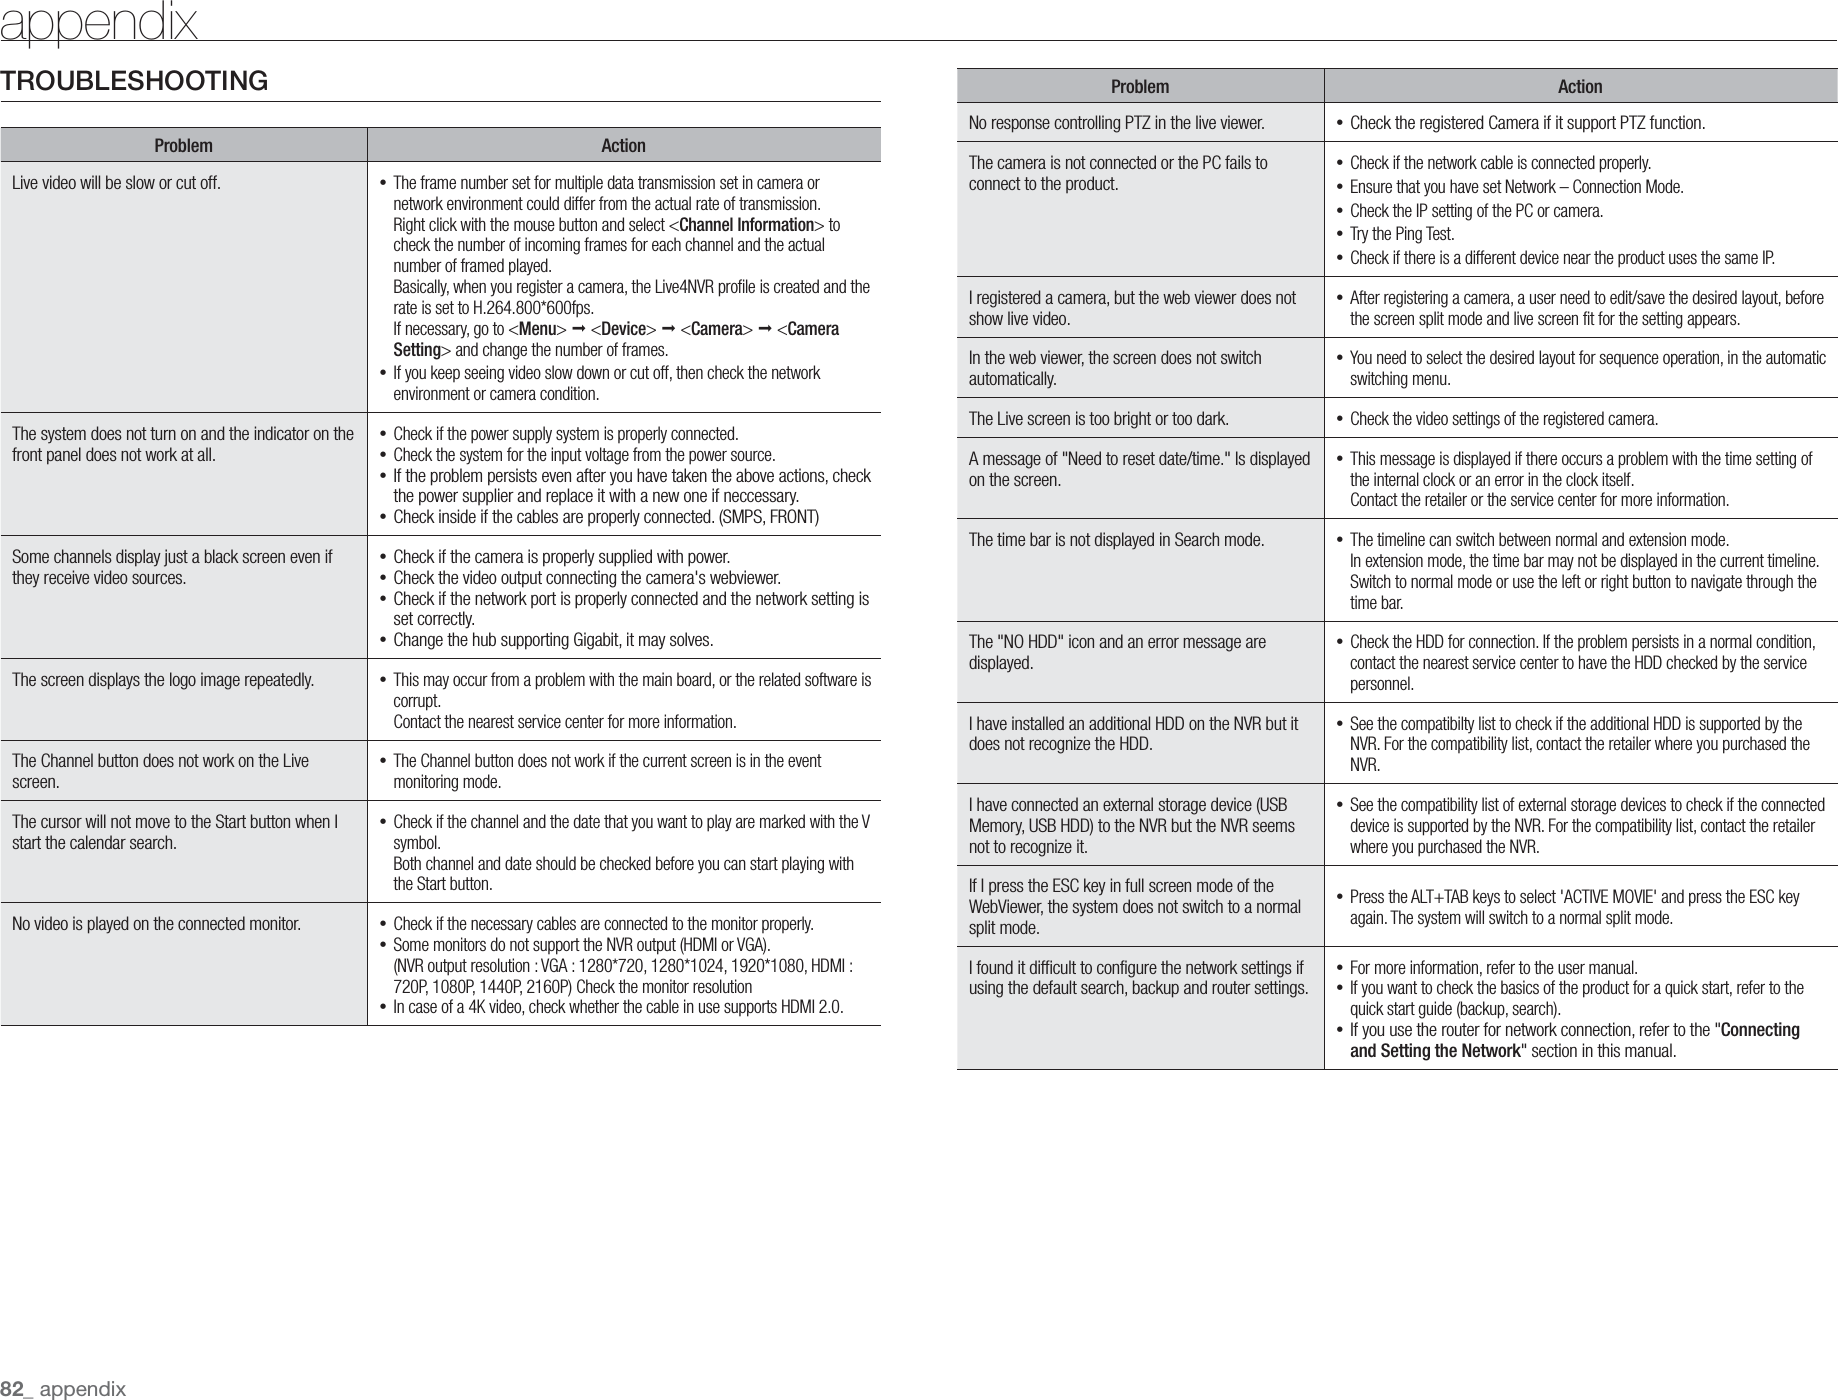
![Problem Action I forgot the password. Contact the NVR administrator for help.Recording does not work. If your player does not display a Live image at all, that indicates recording does not work so first check if you see an image on the screen. Recording does not work if the recording settings are not properly configuredScheduled Record: Specify a desired time in Menu – Record – Recording Schedule. Recording will start at the specified time. -<Continuous> Record: Recording will proceed in any conditions at the specified time. -<Event> Record: When an event occurs, recording will perform only if the event is of alarm, motion detection and video loss. If there is no event found, recording will not perform. -<Continuous / Event> Record: If there is no event found, Continuous recording will perform. Whereas, if an event occurs, Event recording will perform.The image quality of the recording data is not good. Increase the resolution and quality level in Menu – Record – Quality / Resolution.1) Resolution: Select a bigger size when specifying the recording size.The recording image in the CIF format shows a deteriorated quality as it is enlarged from a small-sized image.2) Record Quality: Specify a bigger level for the recording quality. If you increase the resolution and the recording quality, the data size increases accordingly. So the HDD will be filled faster. Overwriting will overwrite the existing data so recording will proceed at a shorter interval.Frame rate of the actual recording does not match that of configured to the camera. If multiple profiles were applied to one camera for video transmission, the actual video stream can be serviced by the camera at a lower frame rate than specified.Configure your camera to use one profile for data streaming as possible.For example, if you set the same profile for recording and network profiles, the actual recording is made at the specified frame rate.Still, live video display using split screen mode may apply yet another profile to camera in accordance with the used screen mode.Note that allowed limit bitrate for recording / recording settings should be set to be bigger values than that of camera's feed.Problem Action In the recording setting screen, the permitted level for a specific channel is displayed in orange. If the input data is greater than the permitted level for each channel, it is displayed in orange. Set the permitted data limit to higher than the amount of input data. If the sum of input data for each channel exceeds the limit, the alarm icon will be displayed. In this case, the channel exceeding the input limit does not record the entire frame, but it records the main frame only(one or two per sec).In the live screen, the [ ] icon is displayed and the message window saying " recording data load exceeds the limit. Check it in the record setting." pops up. If the sum of input data for each channel exceeds the limit, the alarm icon and the pop up window will be displayed. In this case, the channel exceeding the input limit does not record the entire frame, but it records the main frame only(one or two per sec). Set the permitted data limit to higher than the amount of input data entered in the record setting menu (page 40).Recording is not performed in accordance with the settings. If the recording status displays 'Exceeds the maximum hard disc performance', set the recording size according to the recording performance specifications for each HDD condition. (Refer to "Record Settings" in the menu settings. (Page 39))The recording screen will slow down. Check whether the recording performance specifications for each HDD condition match the actual recording settings. (Refer to "Record Settings" in the menu settings. (Page 39)) If the data volume of a video exceeds the playing performance, only the main frame is played. (Refer to "Product Specifications" in the appendix. (Page 75))If recording loss persists continuously Reset the camera recording profile to let the entire recording bps size fit the recording performance for each HDD condition. (Refer to "Record Settings" in the menu settings. (Page 39)) `Check the HDD status and determine whether inspection or replacement is necessary. (Refer to "Storage Device" in the menu settings. (Page 36))Booting log screen does not proceed further in the [ ] state. HDD may be problematic. Please visit your nearest customer center to check the HDD.English _83● APPENDIX](https://usermanual.wiki/Hanwha-Techwin/TRM1610S.User-manaul/User-Guide-3633110-Page-83.png)
![If the Program specifies that a proxy can decide which future versions of the GNU General Public License can be used, that proxy's public statement of acceptance of a version permanently authorizes you to choose that version for the Program.Later license versions may give you additional or different permissions. However, no additional obligations are imposed on any author or copyright holder as a result of your choosing to follow a later version.15. Disclaimer of Warranty.THERE IS NO WARRANTY FOR THE PROGRAM, TO THE EXTENT PERMITTED BY APPLICABLE LAW. EXCEPT WHEN OTHERWISE STATED IN WRITING THE COPYRIGHT HOLDERS AND/OR OTHER PARTIES PROVIDE THE PROGRAM “AS IS” WITHOUT WARRANTY OF ANY KIND, EITHER EXPRESSED OR IMPLIED, INCLUDING, BUT NOT LIMITED TO, THE IMPLIED WARRANTIES OF MERCHANTABILITY AND FITNESS FOR A PARTICULAR PURPOSE. THE ENTIRE RISK AS TO THE QUALITY AND PERFORMANCE OF THE PROGRAM IS WITH YOU. SHOULD THE PROGRAM PROVE DEFECTIVE, YOU ASSUME THE COST OF ALL NECESSARY SERVICING, REPAIR OR CORRECTION.16. Limitation of Liability.IN NO EVENT UNLESS REQUIRED BY APPLICABLE LAW OR AGREED TO IN WRITING WILL ANY COPYRIGHT HOLDER, OR ANY OTHER PARTY WHO MODIFIES AND/OR CONVEYS THE PROGRAM AS PERMITTED ABOVE, BE LIABLE TO YOU FOR DAMAGES, INCLUDING ANY GENERAL, SPECIAL, INCIDENTAL OR CONSEQUENTIAL DAMAGES ARISING OUT OF THE USE OR INABILITY TO USE THE PROGRAM (INCLUDING BUT NOT LIMITED TO LOSS OF DATA OR DATA BEING RENDERED INACCURATE OR LOSSES SUSTAINED BY YOU OR THIRD PARTIES OR A FAILURE OF THE PROGRAM TO OPERATE WITH ANY OTHER PROGRAMS), EVEN IF SUCH HOLDER OR OTHER PARTY HAS BEEN ADVISED OF THE POSSIBILITY OF SUCH DAMAGES.17. Interpretation of Sections 15 and 16.If the disclaimer of warranty and limitation of liability provided above cannot be given local legal effect according to their terms, reviewing courts shall apply local law that most closely approximates an absolute waiver of all civil liability in connection with the Program, unless a warranty or assumption of liability accompanies a copy of the Program in return for a fee.END OF TERMS AND CONDITIONSHow to Apply These Terms to Your New ProgramsIf you develop a new program, and you want it to be of the greatest possible use to the public, the best way to achieve this is to make it free software which everyone can redistribute and change under these terms.To do so, attach the following notices to the program. It is safest to attach them to the start of each source file to most effectively state the exclusion of warranty; and each file should have at least the “copyright” line and a pointer to where the full notice is found.<one line to give the program's name and a brief idea of what it does.>Copyright (C) <year> <name of author>This program is free software: you can redistribute it and/or modify it under the terms of the GNU General Public License as published by the Free Software Foundation, either version 3 of the License, or (at your option) any later version.This program is distributed in the hope that it will be useful, but WITHOUT ANY WARRANTY; without even the implied warranty of MERCHANTABILITY or FITNESS FOR A PARTICULAR PURPOSE. See the GNU General Public License for more details.You should have received a copy of the GNU General Public License along with this program. If not, see <http://www.gnu.org/licenses/>.Also add information on how to contact you by electronic and paper mail.If the program does terminal interaction, make it output a short notice like this when it starts in an interactive mode:<program> Copyright (C) <year> <name of author>This program comes with ABSOLUTELY NO WARRANTY; for details type `show w'.This is free software, and you are welcome to redistribute it under certain conditions; type `show c' for details.The hypothetical commands `show w' and `show c' should show the appropriate parts of the General Public License. Of course, your program's commands might be different; for a GUI interface, you would use an “about box”.You should also get your employer (if you work as a programmer) or school, if any, to sign a “copyright disclaimer” for the program, if necessary. For more information on this, and how to apply and follow the GNU GPL, see <http://www.gnu.org/licenses/>.The GNU General Public License does not permit incorporating your program into proprietary programs. If your program is a subroutine library, you may consider it more useful to permit linking proprietary applications with the library. If this is what you want to do, use the GNU Lesser General Public License instead of this License. But first, please read <http://www.gnu.org/philosophy/why-not-lgpl.html>.GNU Lesser General Public LicenseVersion 2.1, February 1999Copyright (C) 1991, 1999 Free Software Foundation, Inc.59 Temple Place, Suite 330, Boston, MA 02111-1307 USAEveryone is permitted to copy and distribute verbatim copiesof this license document, but changing it is not allowed.[This is the first released version of the Lesser GPL. It also countsas the successor of the GNU Library Public License, version 2, hencethe version number 2.1.]PreambleThe licenses for most software are designed to take away your freedom to share and change it. By contrast, the GNU General Public Licenses are intended to guarantee your freedom to share and change free software--to make sure the software is free for all its users. This license, the Lesser General Public License, applies to some specially designated software packages--typically libraries--of the Free Software Foundation and other authors who decide to use it. You can use it too, but we suggest you first think carefully about whether this license or the ordinary General Public License is the better strategy to use in any particular case, based on the explanations below. When we speak of free software, we are referring to freedom of use, not price. Our General Public Licenses are designed to make sure that you have the freedom to distribute copies of free software (and charge for this service if you wish); that you receive source code or can get it if you want it; that you can change the software and use pieces of it in new free programs; and that you are informed that you can do these things.To protect your rights, we need to make restrictions that forbid distributors to deny you these rights or to ask you to surrender these rights. These restrictions translate to certain responsibilities for you if you distribute copies of the library or if you modify it. For example, if you distribute copies of the library, whether gratis or for a fee, you must give the recipients all the rights that we gave you. You must make sure that they, too, receive or can get the source code. If you link other code with the library, you must provide complete object files to the recipients, so that they can relink them with the library after making changes to the library and recompiling it. And you must show them these terms so they know their rights. We protect your rights with a two-step method: (1) we copyright the library, and (2) we offer you this license, which gives you legal permission to copy, distribute and/or modify the library. To protect each distributor, we want to make it very clear that there is no warranty for the free library. Also, if the library is modified by someone else and passed on, the recipients should know that what they have is not the original version, so that the original author's reputation will not be affected by problems that might be introduced by others. Finally, software patents pose a constant threat to the existence of any free program. We wish to make sure that a company cannot effectively restrict the users of a free program by obtaining a restrictive license from a patent holder. Therefore, we insist that any patent license obtained for a version of the library must be consistent with the full freedom of use specified in this license. Most GNU software, including some libraries, is covered by the ordinary GNU General Public License. This license, the GNU Lesser General Public License, applies to certain designated libraries, and is quite different from the ordinary General Public License. We use this license for certain libraries in order to permit linking those libraries into non-free programs. When a program is linked with a library, whether statically or using a shared library, the combination of the two is legally speaking a combined work, a derivative of the original library. The ordinary General Public License therefore permits such linking only if the entire combination fits its criteria of freedom. The Lesser General Public License permits more lax criteria for linking other code with the library. We call this license the "Lesser" General Public License because it does Less to protect the user's freedom than the ordinary General Public License. It also provides other free software developers Less of an advantage over competing non-free programs. These disadvantages are the reason we use the ordinary General Public License for many libraries. However, the Lesser license provides advantages in certain special circumstances. For example, on rare occasions, there may be a special need to encourage the widest possible use of a certain library, so that it becomes a de-facto standard. To achieve this, non-free programs must be allowed to use the library. A more frequent case is that a free library does the same job as widely used non-free libraries. In this case, there is little to gain by limiting the free library to free software only, so we use the Lesser General Public License. In other cases, permission to use a particular library in non-free programs enables a greater number of people to use a large body of free software. For example, permission to use the GNU C Library in non-free programs enables many more people to use the whole GNU operating system, as well as its variant, the GNU/Linux operating system. Although the Lesser General Public License is Less protective of the users' freedom, it does ensure that the user of a program that is linked with the Library has the freedom and the wherewithal to run that program using a modified version of the Library. The precise terms and conditions for copying, distribution and modification follow. Pay close attention to the difference between a "work based on the library" and a "work that uses the library". The former contains code derived from the library, whereas the latter must be combined with the library in order to run. TERMS AND CONDITIONS FOR COPYING, DISTRIBUTION AND MODIFICATION0. This License Agreement applies to any software library or other program which contains a notice placed by the copyright holder or other authorized party saying it may be distributed under the terms of this Lesser General Public License (also called "this License"). Each licensee is addressed as "you".A "library" means a collection of software functions and/or data prepared so as to be conveniently linked with application programs (which use some of those functions and data) to form executables. The "Library", below, refers to any such software library or work which has been distributed under these terms. A "work based on the Library" means either the Library or any derivative work under copyright law: that is to say, a work containing the Library or a portion of it, either verbatim or with modifications and/or translated straightforwardly into another language. (Hereinafter, translation is included without limitation in the term "modification".) "Source code" for a work means the preferred form of the work for making modifications to it. For a library, complete source code means all the source code for all modules it contains, plus any associated interface definition files, plus the scripts used to control compilation and installation of the library.Activities other than copying, distribution and modification are not covered by this License; they are outside its scope. The act of running a program using the Library is not restricted, and output from such a program is covered only if its contents constitute a work based on the Library (independent of the use of the Library in a tool for writing it). Whether that is true depends on what the Library does and what the program that uses the Library does. 1. You may copy and distribute verbatim copies of the Library's complete source code as you receive it, in any medium, provided that you conspicuously and appropriately publish on each copy an appropriate copyright notice and disclaimer of warranty; keep intact all the notices that refer to this License and to the absence of any warranty; and distribute a copy of this License along with the Library. You may charge a fee for the physical act of transferring a copy, and you may at your option offer warranty protection in exchange for a fee. 2. You may modify your copy or copies of the Library or any portion of it, thus forming a work based on the Library, and copy and distribute such modifications or work under the terms of Section 1 above, provided that you also meet all of these conditions: a) The modified work must itself be a software library. b) You must cause the files modified to carry prominent notices stating that you changed the files and the date of any change.c) You must cause the whole of the work to be licensed at no charge to all third parties under the terms of this License. d) If a facility in the modified Library refers to a function or a table of data to be supplied by an application program that uses the facility, other than as an argument passed when the facility is invoked, then you must make a good faith effort to ensure that, in the event an application does not supply such function or table, the facility still operates, and performs whatever part of its purpose remains meaningful. (For example, a function in a library to compute square roots has a purpose that is entirely well-defined independent of the application. Therefore, Subsection 2d requires that any application-supplied function or table used by this function must be optional: if the application does not supply it, the square root function must still compute square roots.) These requirements apply to the modified work as a whole. If identifiable sections of that work are not derived from the Library, and can be reasonably considered independent and separate works in themselves, then this License, and its terms, do not apply to those sections when you distribute them as separate works. But when you distribute the same sections as part of a whole which is a work based on the Library, the distribution of the whole must be on the terms of this License, whose permissions for other licensees extend to the entire whole, and thus to each and every part regardless of who wrote it. Thus, it is not the intent of this section to claim rights or contest your rights to work written entirely by you; rather, the intent is to exercise the right to control the distribution of derivative or collective works based on the Library. In addition, mere aggregation of another work not based on the Library with the Library (or with a work based on the Library) on a volume of a storage or distribution medium does not bring the other work under the scope of this License. 3. You may opt to apply the terms of the ordinary GNU General Public License instead of this License to a given copy of the Library. To do this, you must alter all the notices that refer to this License, so that they refer to the ordinary GNU General Public License, version 2, instead of to this License. (If a newer version than version 2 of the ordinary GNU General Public License has appeared, then you can specify that version instead if you wish.) Do not make any other change in these notices. Once this change is made in a given copy, it is irreversible for that copy, so the ordinary GNU General Public License applies to all subsequent copies and derivative works made from that copy. This option is useful when you wish to copy part of the code of the Library into a program that is not a library. 4. You may copy and distribute the Library (or a portion or derivative of it, under Section 2) in object code or executable form under the terms of Sections 1 and 2 above provided that you accompany it with the complete corresponding machine-readable source code, which must be distributed under the terms of Sections 1 and 2 above on a medium customarily used for software interchange. If distribution of object code is made by offering access to copy from a designated place, then offering equivalent access to copy the source code from the same place satisfies the requirement to distribute the source code, even though third parties are not compelled to copy the source along with the object code.5. A program that contains no derivative of any portion of the Library, but is designed to work with the Library by being compiled or linked with it, is called a "work that uses the Library". Such a work, in isolation, is not a derivative work of the Library, and therefore falls outside the scope of this License. However, linking a "work that uses the Library" with the Library creates an executable that is a derivative of the Library (because it contains portions of the Library), rather than a "work that uses the library". The executable is therefore covered by this License. Section 6 states terms for distribution of such executables.](https://usermanual.wiki/Hanwha-Techwin/TRM1610S.User-manaul/User-Guide-3633110-Page-87.png)
![The Original Code is ______________________________________. The Initial Developer of the Original Code is ________________________. Portions created by ______________________ are Copyright (C) ______ _______________________. All Rights Reserved. Contributor(s): ______________________________________. Alternatively, the contents of this file may be used under the terms of the _____ license (the [___] License), in which case the provisions of [______] License are applicable instead of those above. If you wish to allow use of your version of this file only under the terms of the [____] License and not to allow others to use your version of this file under the MPL, indicate your decision by deleting the provisions above and replace them with the notice and other provisions required by the [___] License. If you do not delete the provisions above, a recipient may use your version of this file under either the MPL or the [___] License." [NOTE: The text of this Exhibit A may differ slightly from the text of the notices in the Source Code files of the Original Code. You should use the text of this Exhibit A rather than the text found in the Original Code Source Code for Your Modifications.] BSD Two Clause LicenseCopyright (c) 2004-2005 HighPoint Technologies, Inc.All rights reserved.Redistribution and use in source and binary forms, with or without modification, are permitted provided that the following conditions are met:1. Redistributions of source code must retain the above copyright notice, this list of conditions and the following disclaimer. 2. Redistributions in binary form must reproduce the above copyright notice, this list of conditions and the following disclaimer in the documentation and/or other materials provided with the distribution. THIS SOFTWARE IS PROVIDED BY THE AUTHOR "AS IS" AND ANY EXPRESS OR IMPLIED WARRANTIES, INCLUDING, BUT NOT LIMITED TO, THE IMPLIED WARRANTIES OF MERCHANTABILITY AND FITNESS FOR A PARTICULAR PURPOSE ARE DISCLAIMED. IN NO EVENT SHALL THE AUTHOR BE LIABLE FOR ANY DIRECT, INDIRECT, INCIDENTAL, SPECIAL, EXEMPLARY, OR CONSEQUENTIAL DAMAGES (INCLUDING, BUT NOT LIMITED TO, PROCUREMENT OF SUBSTITUTE GOODS OR SERVICES; LOSS OF USE, DATA, OR PROFITS; OR BUSINESS INTERRUPTION) HOWEVER CAUSED AND ON ANY THEORY OF LIABILITY, WHETHER IN CONTRACT, STRICT LIABILITY, OR TORT (INCLUDING NEGLIGENCE OR OTHERWISE) ARISING IN ANY WAY OUT OF THE USE OF THIS SOFTWARE, EVEN IF ADVISED OF THE POSSIBILITY OF SUCH DAMAGE. BSD 3-clause LicenseCopyright (c) 2000~2013, Marvell International Ltd.Copyright (c) 2008-2009, Alex Weber.Copyright (c) 2005, Tom Wu.Copyright (c) 2000-2009, Paul Johnston.Copyright (c) 1994-1997, Thomas G. Lane.Copyright (c) 2009, 2011, D. R. Commander.Copyright (c) 2009 Texas Instruments Incorporated - http://www.ti.com/Copyright (c) 2006 Alexander Chemeris.Copyright (c) 2003 Sun Microsystems, Inc.Copyright (c) 2010-2015, The Dojo Foundation.Copyright (c) 2005-2007 Paul Hsieh.Copyright (c) Alexandru Marasteanu.Copyright (c) 2003, 2010, Dr Brian Gladman, Worcester, UK.Copyright (c) 2002-2008, Milan Ikits <milan ikits[]ieee org>Copyright (c) 2002-2008, Marcelo E. Magallon <mmagallo[]debian org>Copyright (c) 2002, Lev Povalahev.Copyright (c) 2007 The Khronos Group Inc.All rights reserved.Redistribution and use in source and binary forms, with or without modification, are permitted provided that the following conditions are met: • Redistributions of source code must retain the above copyright notice, this list of conditions and the following disclaimer. • Redistributions in binary form must reproduce the above copyright notice, this list of conditions and the following disclaimer in the documentation and/or other materials provided with the distribution. • Neither the name of the <ORGANIZATION> nor the names of its contributors may be used to endorse or promote products derived from this software without specific prior written permission. THIS SOFTWARE IS PROVIDED BY THE COPYRIGHT HOLDERS AND CONTRIBUTORS "AS IS" AND ANY EXPRESS OR IMPLIED WARRANTIES, INCLUDING, BUT NOT LIMITED TO, THE IMPLIED WARRANTIES OF MERCHANTABILITY AND FITNESS FOR A PARTICULAR PURPOSE ARE DISCLAIMED. IN NO EVENT SHALL THE COPYRIGHT OWNER OR CONTRIBUTORS BE LIABLE FOR ANY DIRECT, INDIRECT, INCIDENTAL, SPECIAL, EXEMPLARY, OR CONSEQUENTIAL DAMAGES (INCLUDING, BUT NOT LIMITED TO, PROCUREMENT OF SUBSTITUTE GOODS OR SERVICES; LOSS OF USE, DATA, OR PROFITS; OR BUSINESS INTERRUPTION) HOWEVER CAUSED AND ON ANY THEORY OF LIABILITY, WHETHER IN CONTRACT, STRICT LIABILITY, OR TORT (INCLUDING NEGLIGENCE OR OTHERWISE) ARISING IN ANY WAY OUT OF THE USE OF THIS SOFTWARE, EVEN IF ADVISED OF THE POSSIBILITY OF SUCH DAMAGE.The MIT LicenseCopyright (c) 2008-2010 Adrian ToscaCopyright (c) 2010-2011 Ittrium LLCCopyright (c) 2009 Dave GambleCopyright (c) 2008-2011 Martin WendtCopyright (c) 2003-2005 Tom WuCopyright (c) 2008 Tony TomovCopyright (c) 2012, AUTHORS.txt (http://jqueryui.com/about)Copyright (c) 2010 “Cowboy” Ben AlmanCopyright (c) 2009-2011 Brantley HarrisCopyright (c) 2011-2012 Timo TijhofCopyright (c) 2006-2011 Sam Collett (http://www.texotela.co.uk)Copyright (c) 2009 WroclawCopyright (c) 2008-2012 Dmitry BaranovskiyCopyright (c) 2008-2012 Sencha LabsCopyright (c) 2007,2014 jQuery Foundation and other contributorsPermission is hereby granted, free of charge, to any person obtaining a copy of this software and associated documentation files (the "Software"), to deal in the Software without restriction, including without limitation the rights to use, copy, modify, merge, publish, distribute, sublicense, and/or sell copies of the Software, and to permit persons to whom the Software is furnished to do so, subject to the following conditions:The above copyright notice and this permission notice shall be included in all copies or substantial portions of the Software.THE SOFTWARE IS PROVIDED "AS IS", WITHOUT WARRANTY OF ANY KIND, EXPRESS OR IMPLIED, INCLUDING BUT NOT LIMITED TO THE WARRANTIES OF MERCHANTABILITY, FITNESS FOR A PARTICULAR PURPOSE AND NONINFRINGEMENT. IN NO EVENT SHALL THE AUTHORS OR COPYRIGHT HOLDERS BE LIABLE FOR ANY CLAIM, DAMAGES OR OTHER LIABILITY, WHETHER IN AN ACTION OF CONTRACT, TORT OR OTHERWISE, ARISING FROM, OUT OF OR IN CONNECTION WITH THE SOFTWARE OR THE USE OR OTHER DEALINGS IN THE SOFTWARE.libxml2 LicenseExcept where otherwise noted in the source code (e.g. the files hash.c, list.c and the trio files, which are covered by a similar licence but with different Copyright notices) all the files are: Copyright (C) 1998-2003 Daniel Veillard. All Rights Reserved. Permission is hereby granted, free of charge, to any person obtaining a copy of this software and associated documentation files (the "Software"), to deal in the Software without restriction, including without limitation the rights to use, copy, modify, merge, publish, distribute, sublicense, and/or sell copies of the Software, and to permit persons to whom the Software is furnished to do so, subject to the following conditions: The above copyright notice and this permission notice shall be included in all copies or substantial portions of the Software. THE SOFTWARE IS PROVIDED "AS IS", WITHOUT WARRANTY OF ANY KIND, EXPRESS OR IMPLIED, INCLUDING BUT NOT LIMITED TO THE WARRANTIES OF MERCHANTABILITY, FITNESS FOR A PARTICULAR PURPOSE AND NONINFRINGEMENT. IN NO EVENT SHALL THE DANIEL VEILLARD BE LIABLE FOR ANY CLAIM, DAMAGES OR OTHER LIABILITY, WHETHER IN AN ACTION OF CONTRACT, TORT OR OTHERWISE, ARISING FROM, OUT OF OR IN CONNECTION WITH THE SOFTWARE OR THE USE OR OTHER DEALINGS IN THE SOFTWARE. Except as contained in this notice, the name of Daniel Veillard shall not be used in advertising or otherwise to promote the sale, use or other dealings in this Software without prior written authorization from him. Apache LicenseVersion 2.0, January 2004Copyright (c) 2015 Saminda Abeyruwan (saminda@cs.miami.edu)http://www.apache.org/licenses/ TERMS AND CONDITIONS FOR USE, REPRODUCTION, AND DISTRIBUTION 1. Definitions."License" shall mean the terms and conditions for use, reproduction, and distribution as defined by Sections 1 through 9 of this document. "Licensor" shall mean the copyright owner or entity authorized by the copyright owner that is granting the License. "Legal Entity" shall mean the union of the acting entity and all other entities that control, are controlled by, or are under common control with that entity. For the purposes of this definition, "control" means (i) the power, direct or indirect, to cause the direction or management of such entity, whether by contract or otherwise, or (ii) ownership of fifty percent (50%) or more of the outstanding shares, or (iii) beneficial ownership of such entity. "You" (or "Your") shall mean an individual or Legal Entity exercising permissions granted by this License. "Source" form shall mean the preferred form for making modifications, including but not limited to software source code, documentation source, and configuration files. "Object" form shall mean any form resulting from mechanical transformation or translation of a Source form, including but not limited to compiled object code, generated documentation, and conversions to other media types. "Work" shall mean the work of authorship, whether in Source or Object form, made available under the License, as indicated by a copyright notice that is included in or attached to the work (an example is provided in the Appendix below). "Derivative Works" shall mean any work, whether in Source or Object form, that is based on (or derived from) the Work and for which the editorial revisions, annotations, elaborations, or other modifications represent, as a whole, an original work of authorship. For the purposes of this License, Derivative Works shall not include works that remain separable from, or merely link (or bind by name) to the interfaces of, the Work and Derivative Works thereof. "Contribution" shall mean any work of authorship, including the original version of the Work and any modifications or additions to that Work or Derivative Works thereof, that is intentionally submitted to Licensor for inclusion in the Work by the copyright owner or by an individual or Legal Entity authorized to submit on behalf of the copyright owner. For the purposes of this definition, "submitted" means any form of electronic, verbal, or written communication sent to the Licensor or its representatives, including but not limited to communication on electronic mailing lists, source code control systems, and issue tracking systems that are managed by, or on behalf of, the Licensor for the purpose of discussing and improving the Work, but excluding communication that is conspicuously marked or otherwise designated in writing by the copyright owner as "Not a Contribution." "Contributor" shall mean Licensor and any individual or Legal Entity on behalf of whom a Contribution has been received by Licensor and subsequently incorporated within the Work. 2. Grant of Copyright License. Subject to the terms and conditions of this License, each Contributor hereby grants to You a perpetual, worldwide, non-exclusive, no-charge, royalty-free, irrevocable copyright license to reproduce, prepare Derivative Works of, publicly display, publicly perform, sublicense, and distribute the Work and such Derivative Works in Source or Object form. 3. Grant of Patent License. Subject to the terms and conditions of this License, each Contributor hereby grants to You a perpetual, worldwide, non-exclusive, no-charge, royalty-free, irrevocable (except as stated in this section) patent license to make, have made, use, offer to sell, sell, import, and otherwise transfer the Work, where such license applies only to those patent claims licensable by such Contributor that are necessarily infringed by their Contribution(s) alone or by combination of their Contribution(s) with the Work to which such Contribution(s) was submitted. If You institute patent litigation against any entity (including a cross-claim or counterclaim in a lawsuit) alleging that the Work or a Contribution incorporated within the Work constitutes direct or contributory patent infringement, then any patent licenses granted to You under this License for that Work shall terminate as of the date such litigation is filed. 4. Redistribution. You may reproduce and distribute copies of the Work or Derivative Works thereof in any medium, with or without modifications, and in Source or Object form, provided that You meet the following conditions: a. You must give any other recipients of the Work or Derivative Works a copy of this License; and b. You must cause any modified files to carry prominent notices stating that You changed the files; and c. You must retain, in the Source form of any Derivative Works that You distribute, all copyright, patent, trademark, and attribution notices from the Source form of the Work, excluding those notices that do not pertain to any part of the Derivative Works; and d. If the Work includes a "NOTICE" text file as part of its distribution, then any Derivative Works that You distribute must include a readable copy of the attribution notices contained within such NOTICE file, excluding those notices that do not pertain to any part of the Derivative Works, in at least one of the following places: within a NOTICE text file distributed as part of the Derivative Works; within the Source form or documentation, if provided along with the Derivative Works; or, within a display generated by the Derivative Works, if and wherever such third-party notices normally appear. The contents of the NOTICE file are for informational purposes only and do not modify the License. You may add Your own attribution notices within Derivative Works that You distribute, alongside or as an addendum to the NOTICE text from the Work, provided that such additional attribution notices cannot be construed as modifying the License. You may add Your own copyright statement to Your modifications and may provide additional or different license terms and conditions for use, reproduction, or distribution of Your modifications, or for any such Derivative Works as a whole, provided Your use, reproduction, and distribution of the Work otherwise complies with the conditions stated in this License. 5. Submission of Contributions. Unless You explicitly state otherwise, any Contribution intentionally submitted for inclusion in the Work by You to the Licensor shall be under the terms and conditions of this License, without any additional terms or conditions. Notwithstanding the above, nothing herein shall supersede or modify the terms of any separate license agreement you may have executed with Licensor regarding such Contributions. 6. Trademarks. This License does not grant permission to use the trade names, trademarks, service marks, or product names of the Licensor, except as required for reasonable and customary use in describing the origin of the Work and reproducing the content of the NOTICE file. 7. Disclaimer of Warranty. Unless required by applicable law or agreed to in writing, Licensor provides the Work (and each Contributor provides its Contributions) on an "AS IS" BASIS, WITHOUT WARRANTIES OR CONDITIONS OF ANY KIND, either express or implied, including, without limitation, any warranties or conditions of TITLE, NON-INFRINGEMENT, MERCHANTABILITY, or FITNESS FOR A PARTICULAR PURPOSE. You are solely responsible for determining the appropriateness of using or redistributing the Work and assume any risks associated with Your exercise of permissions under this License. 8. Limitation of Liability. In no event and under no legal theory, whether in tort (including negligence), contract, or otherwise, unless required by applicable law (such as deliberate and grossly negligent acts) or agreed to in writing, shall any Contributor be liable to You for damages, including any direct, indirect, special, incidental, or consequential damages of any character arising as a result of this License or out of the use or inability to use the Work (including but not limited to damages for loss of goodwill, work stoppage, computer failure or malfunction, or any and all other commercial damages or losses), even if such Contributor has been advised of the possibility of such damages.](https://usermanual.wiki/Hanwha-Techwin/TRM1610S.User-manaul/User-Guide-3633110-Page-90.png)
![9. Accepting Warranty or Additional Liability. While redistributing the Work or Derivative Works thereof, You may choose to offer, and charge a fee for, acceptance of support, warranty, indemnity, or other liability obligations and/or rights consistent with this License. However, in accepting such obligations, You may act only on Your own behalf and on Your sole responsibility, not on behalf of any other Contributor, and only if You agree to indemnify, defend, and hold each Contributor harmless for any liability incurred by, or claims asserted against, such Contributor by reason of your accepting any such warranty or additional liability. END OF TERMS AND CONDITIONS APPENDIX: How to apply the Apache License to your work To apply the Apache License to your work, attach the following boilerplate notice, with the fields enclosed by brackets "[]" replaced with your own identifying information. (Don't include the brackets!) The text should be enclosed in the appropriate comment syntax for the file format. We also recommend that a file or class name and description of purpose be included on the same "printed page" as the copyright notice for easier identification within third-party archives. Copyright [yyyy] [name of copyright owner] Licensed under the Apache License, Version 2.0 (the "License"); you may not use this file except in compliance with the License. You may obtain a copy of the License at http://www.apache.org/licenses/LICENSE-2.0 Unless required by applicable law or agreed to in writing, software distributed under the License is distributed on an "AS IS" BASIS, WITHOUT WARRANTIES OR CONDITIONS OF ANY KIND, either express or implied. See the License for the specific language governing permissions and limitations under the License.The zlib/libpng LicenseCopyright (c) 2011 Lee ThomasonCopyright (c) 1995-2012 Jean-loup Gailly and Mark AdlerCopyright (c) 1998-2012 Glenn Randers-PehrsonCopyright (c) 2003-2005 Hector Mauricio Rodriguez SeguraCopyright (c) 1995-2009 Nullsoft and ContributorsCopyright (c) 2002-2008 Davide PizzolatoThis software is provided 'as-is', without any express or implied warranty. In no event will the authors be held liable for any damages arising from the use of this software.;Permission is granted to anyone to use this software for any purpose, including commercial applications, and to alter it and redistribute it freely, subject to the following restrictions:1. The origin of this software must not be misrepresented; you must not claim that you wrote the original software. If you use this software in a product, an acknowledgment in the product documentation would be appreciated but is not required.2. Altered source versions must be plainly marked as such, and must not be misrepresented as being the original software.3. This notice may not be removed or altered from any source distribution.Boost Software License - Version 1.0August 17th, 2003Permission is hereby granted, free of charge, to any person or organization obtaining a copy of the software and accompanying documentation covered by this license (the "Software") to use, reproduce, display, distribute, execute, and transmit the Software, and to prepare derivative works of the Software, and to permit third-parties to whom the Software is furnished to do so, all subject to the following:The copyright notices in the Software and this entire statement, including the above license grant, this restriction and the following disclaimer, must be included in all copies of the Software, in whole or in part, and all derivative works of the Software, unless such copies or derivative works are solely in the form of machine-executable object code generated by a source language processor.THE SOFTWARE IS PROVIDED "AS IS", WITHOUT WARRANTY OF ANY KIND, EXPRESS OR IMPLIED, INCLUDING BUT NOT LIMITED TO THE WARRANTIES OF MERCHANTABILITY, FITNESS FOR A PARTICULAR PURPOSE, TITLE AND NON-INFRINGEMENT. IN NO EVENT SHALL THE COPYRIGHT HOLDERS OR ANYONE DISTRIBUTING THE SOFTWARE BE LIABLE FOR ANY DAMAGES OR OTHER LIABILITY, WHETHER IN CONTRACT, TORT OR OTHERWISE, ARISING FROM, OUT OF OR IN CONNECTION WITH THE SOFTWARE OR THE USE OR OTHER DEALINGS IN THE SOFTWARE.Curl LicenseCopyright (c) 1996 - 2003, Daniel Stenberg, <daniel@haxx.se>.All rights reserved.Permission to use, copy, modify, and distribute this software for any purposewith or without fee is hereby granted, provided that the above copyright notice and this permission notice appear in all copies. THE SOFTWARE IS PROVIDED "AS IS", WITHOUT WARRANTY OF ANY KIND, EXPRESS OR IMPLIED, INCLUDING BUT NOT LIMITED TO THE WARRANTIES OF MERCHANTABILITY, FITNESS FOR A PARTICULAR PURPOSE AND NONINFRINGEMENT OF THIRD PARTY RIGHTS. IN NO EVENT SHALL THE AUTHORS OR COPYRIGHT HOLDERS BE LIABLE FOR ANY CLAIM, DAMAGES OR OTHER LIABILITY, WHETHER IN AN ACTION OF CONTRACT, TORT OR OTHERWISE, ARISING FROM, OUT OF OR IN CONNECTION WITH THE SOFTWARE OR THE USEOR OTHER DEALINGS IN THE SOFTWARE. Except as contained in this notice, the name of a copyright holder shall not be used in advertising or otherwise to promote the sale, use or other dealings in this Software without prior written authorization of the copyright holder. Microsoft Public License (Ms-PL)Copyright (c) 2009 Wong Shao VoonCopyright (c) 1998-2012 Glenn Randers-PehrsonThis license governs use of the accompanying software. If you use the software, you accept this license. If you do not accept the license, do not use the software.1. DefinitionsThe terms "reproduce," "reproduction," "derivative works," and "distribution" have the same meaning here as under U.S. copyright law.A "contribution" is the original software, or any additions or changes to the software.A "contributor" is any person that distributes its contribution under this license."Licensed patents" are a contributor's patent claims that read directly on its contribution.2. Grant of RightsA. Copyright Grant- Subject to the terms of this license, including the license conditions and limitations in section 3, each contributor grants you a non-exclusive, worldwide, royalty-free copyright license to reproduce its contribution, prepare derivative works of its contribution, and distribute its contribution or any derivative works that you create.B. Patent Grant- Subject to the terms of this license, including the license conditions and limitations in section 3, each contributor grants you a non-exclusive, worldwide, royalty-free license under its licensed patents to make, have made, use, sell, offer for sale, import, and/or otherwise dispose of its contribution in the software or derivative works of the contribution in the software.3. Conditions and LimitationsA. No Trademark License- This license does not grant you rights to use any contributors' name, logo, or trademarks.B. If you bring a patent claim against any contributor over patents that you claim are infringed by the software, your patent license from such contributor to the software ends automatically.C. If you distribute any portion of the software, you must retain all copyright, patent, trademark, and attribution notices that are present in the software.D. If you distribute any portion of the software in source code form, you may do so only under this license by including a complete copy of this license with your distribution. If you distribute any portion of the software in compiled or object code form, you may only do so under a license that complies with this license.E. The software is licensed "as-is." You bear the risk of using it. The contributors give no express warranties, guarantees or conditions. You may have additional consumer rights under your local laws which this license cannot change. To the extent permitted under your local laws, the contributors exclude the implied warranties of merchantability, fitness for a particular purpose and non-infringement.The Code Project Open License (CPOL) 1.02Copyright (c) 2004..2007 Rob GrovesPreambleThis License governs Your use of the Work. This License is intended to allow developers to use the Source Code and Executable Files provided as part of the Work in any application in any form. The main points subject to the terms of the License are:• Source Code and Executable Files can be used in commercial applications;• Source Code and Executable Files can be redistributed; and• Source Code can be modified to create derivative works.• No claim of suitability, guarantee, or any warranty whatsoever is provided. The software is provided "as-is".• The Article accompanying the Work may not be distributed or republished without the Author's consentThis License is entered between You, the individual or other entity reading or otherwise making use of the Work licensed pursuant to this License and the individual or other entity which offers the Work under the terms of this License ("Author").LicenseTHE WORK (AS DEFINED BELOW) IS PROVIDED UNDER THE TERMS OF THIS CODE PROJECT OPEN LICENSE ("LICENSE"). THE WORK IS PROTECTED BY COPYRIGHT AND/OR OTHER APPLICABLE LAW. ANY USE OF THE WORK OTHER THAN AS AUTHORIZED UNDER THIS LICENSE OR COPYRIGHT LAW IS PROHIBITED.BY EXERCISING ANY RIGHTS TO THE WORK PROVIDED HEREIN, YOU ACCEPT AND AGREE TO BE BOUND BY THE TERMS OF THIS LICENSE. THE AUTHOR GRANTS YOU THE RIGHTS CONTAINED HEREIN IN CONSIDERATION OF YOUR ACCEPTANCE OF SUCH TERMS AND CONDITIONS. IF YOU DO NOT AGREE TO ACCEPT AND BE BOUND BY THE TERMS OF THIS LICENSE, YOU CANNOT MAKE ANY USE OF THE WORK.1. Definitions. a. "Articles" means, collectively, all articles written by Author which describes how the Source Code and Executable Files for the Work may be used by a user.b. "Author" means the individual or entity that offers the Work under the terms of this License.c. "Derivative Work" means a work based upon the Work or upon the Work and other pre-existing works.d. "Executable Files" refer to the executables, binary files, configuration and any required data files included in the Work.e. "Publisher" means the provider of the website, magazine, CD-ROM, DVD or other medium from or by which the Work is obtained by You.f. "Source Code" refers to the collection of source code and configuration files used to create the Executable Files.g. "Standard Version" refers to such a Work if it has not been modified, or has been modified in accordance with the consent of the Author, such consent being in the full discretion of the Author. h. "Work" refers to the collection of files distributed by the Publisher, including the Source Code, Executable Files, binaries, data files, documentation, whitepapers and the Articles. i. "You" is you, an individual or entity wishing to use the Work and exercise your rights under this License. 2. Fair Use/Fair Use Rights. Nothing in this License is intended to reduce, limit, or restrict any rights arising from fair use, fair dealing, first sale or other limitations on the exclusive rights of the copyright owner under copyright law or other applicable laws. 3. License Grant. Subject to the terms and conditions of this License, the Author hereby grants You a worldwide, royalty-free, non-exclusive, perpetual (for the duration of the applicable copyright) license to exercise the rights in the Work as stated below: a. You may use the standard version of the Source Code or Executable Files in Your own applications. b. You may apply bug fixes, portability fixes and other modifications obtained from the Public Domain or from the Author. A Work modified in such a way shall still be considered the standard version and will be subject to this License.c. You may otherwise modify Your copy of this Work (excluding the Articles) in any way to create a Derivative Work, provided that You insert a prominent notice in each changed file stating how, when and where You changed that file.d. You may distribute the standard version of the Executable Files and Source Code or Derivative Work in aggregate with other (possibly commercial) programs as part of a larger (possibly commercial) software distribution. e. The Articles discussing the Work published in any form by the author may not be distributed or republished without the Author's consent. The author retains copyright to any such Articles. You may use the Executable Files and Source Code pursuant to this License but you may not repost or republish or otherwise distribute or make available the Articles, without the prior written consent of the Author.Any subroutines or modules supplied by You and linked into the Source Code or Executable Files this Work shall not be considered part of this Work and will not be subject to the terms of this License. 4. Patent License. Subject to the terms and conditions of this License, each Author hereby grants to You a perpetual, worldwide, non-exclusive, no-charge, royalty-free, irrevocable (except as stated in this section) patent license to make, have made, use, import, and otherwise transfer the Work.5. Restrictions. The license granted in Section 3 above is expressly made subject to and limited by the following restrictions: a. You agree not to remove any of the original copyright, patent, trademark, and attribution notices and associated disclaimers that may appear in the Source Code or Executable Files. b. You agree not to advertise or in any way imply that this Work is a product of Your own. c. The name of the Author may not be used to endorse or promote products derived from the Work without the prior written consent of the Author.d. You agree not to sell, lease, or rent any part of the Work. This does not restrict you from including the Work or any part of the Work inside a larger software distribution that itself is being sold. The Work by itself, though, cannot be sold, leased or rented.e. You may distribute the Executable Files and Source Code only under the terms of this License, and You must include a copy of, or the Uniform Resource Identifier for, this License with every copy of the Executable Files or Source Code You distribute and ensure that anyone receiving such Executable Files and Source Code agrees that the terms of this License apply to such Executable Files and/or Source Code. You may not offer or impose any terms on the Work that alter or restrict the terms of this License or the recipients' exercise of the rights granted hereunder. You may not sublicense the Work. You must keep intact all notices that refer to this License and to the disclaimer of warranties. You may not distribute the Executable Files or Source Code with any technological measures that control access or use of the Work in a manner inconsistent with the terms of this License. f. You agree not to use the Work for illegal, immoral or improper purposes, or on pages containing illegal, immoral or improper material. The Work is subject to applicable export laws. You agree to comply with all such laws and regulations that may apply to the Work after Your receipt of the Work. 6. Representations, Warranties and Disclaimer. THIS WORK IS PROVIDED "AS IS", "WHERE IS" AND "AS AVAILABLE", WITHOUT ANY EXPRESS OR IMPLIED WARRANTIES OR CONDITIONS OR GUARANTEES. YOU, THE USER, ASSUME ALL RISK IN ITS USE, INCLUDING COPYRIGHT INFRINGEMENT, PATENT INFRINGEMENT, SUITABILITY, ETC. AUTHOR EXPRESSLY DISCLAIMS ALL EXPRESS, IMPLIED OR STATUTORY WARRANTIES OR CONDITIONS, INCLUDING WITHOUT LIMITATION, WARRANTIES OR CONDITIONS OF MERCHANTABILITY, MERCHANTABLE QUALITY OR FITNESS FOR A PARTICULAR PURPOSE, OR ANY WARRANTY OF TITLE OR](https://usermanual.wiki/Hanwha-Techwin/TRM1610S.User-manaul/User-Guide-3633110-Page-91.png)
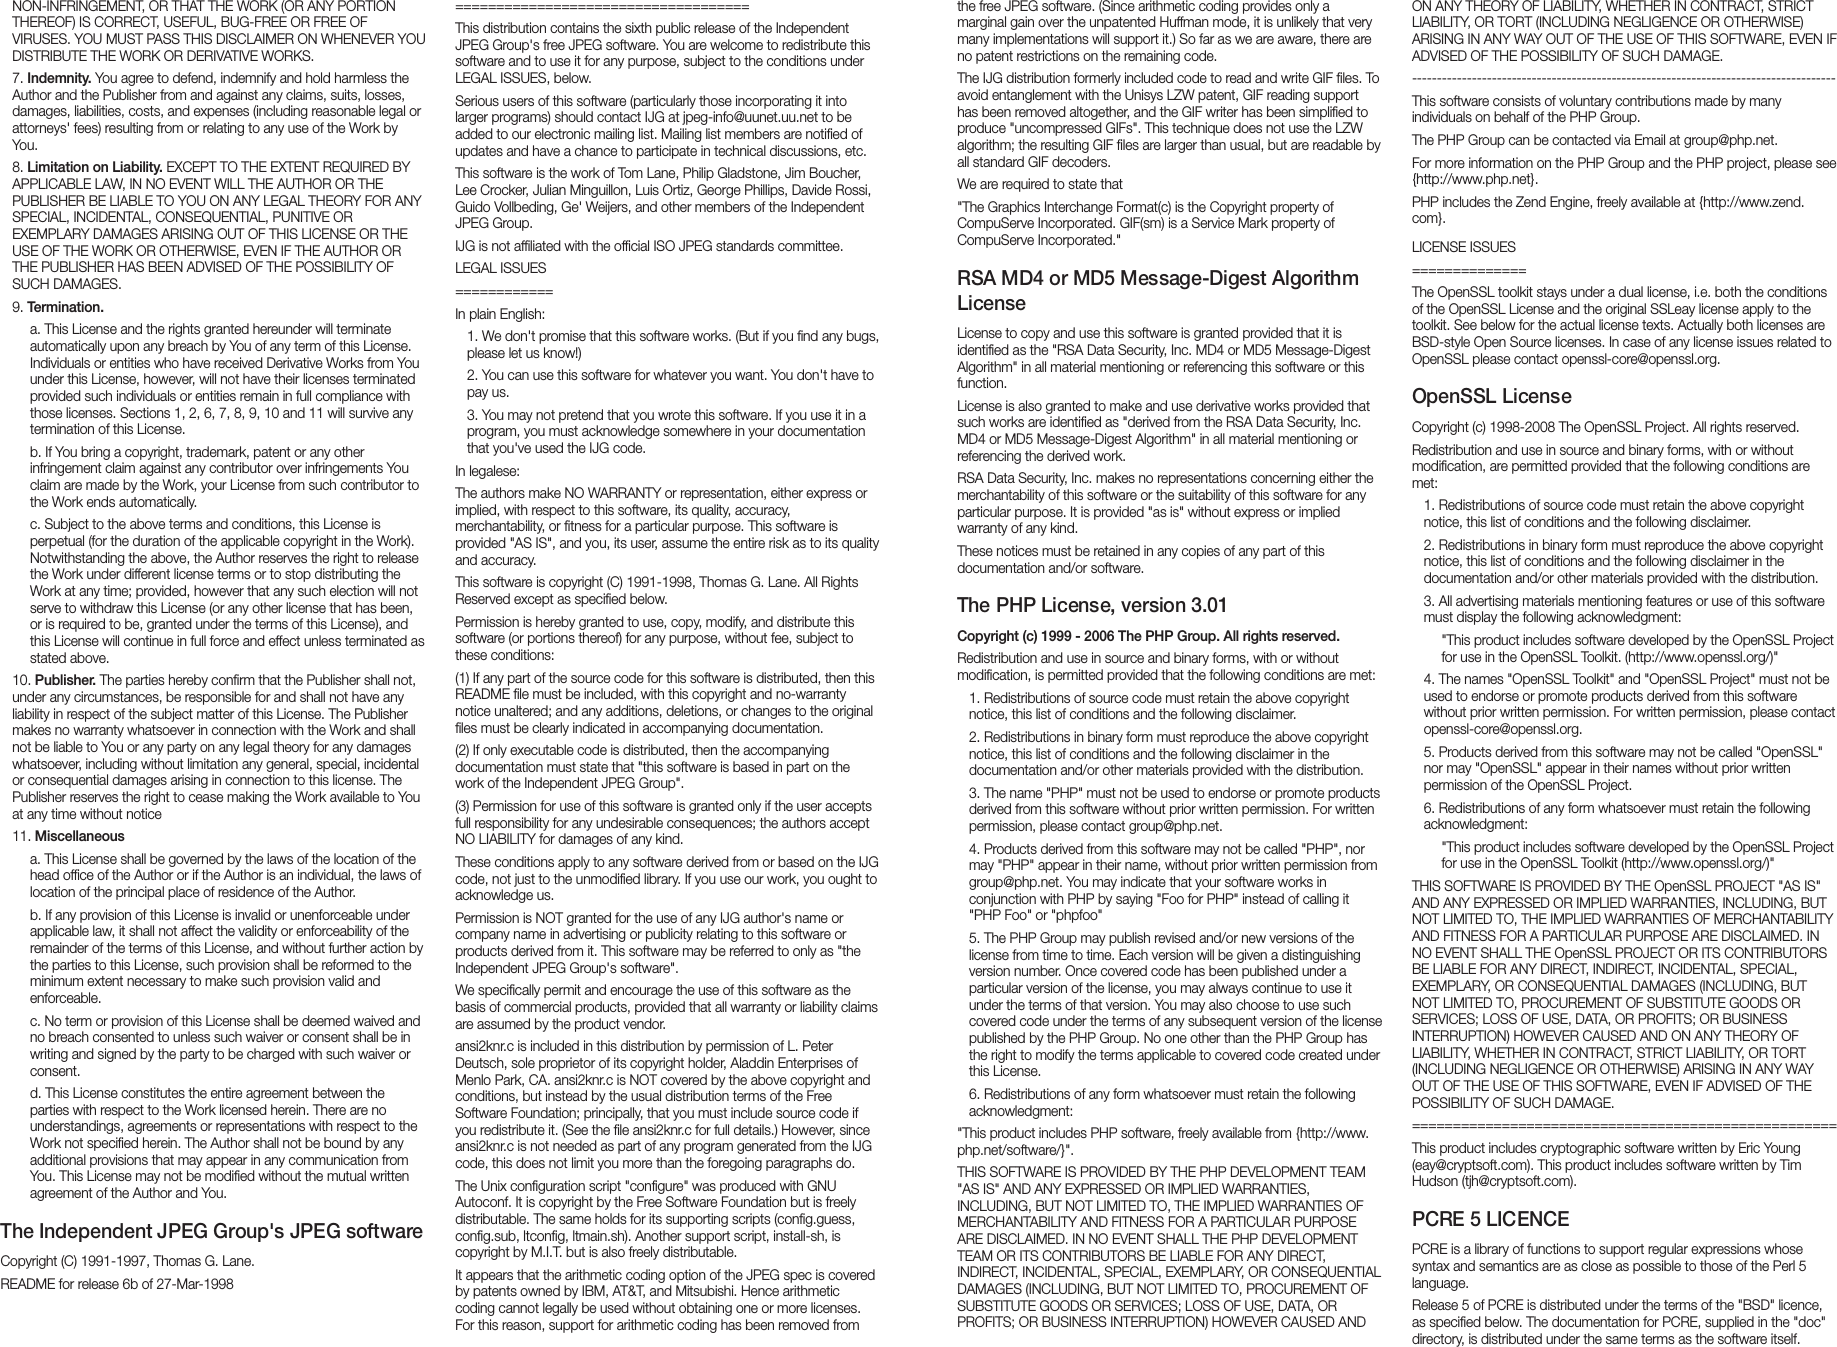
![Written by: Philip Hazel {ph10@cam.ac.uk} University of Cambridge Computing Service,Cambridge, England. Phone: +44 1223 334714. Copyright (c) 1997-2004 University of CambridgeAll rights reserved. Redistribution and use in source and binary forms, with or without modification, are permitted provided that the following conditions are met: • Redistributions of source code must retain the above copyright notice, this list of conditions and the following disclaimer. • Redistributions in binary form must reproduce the above copyright notice, this list of conditions and the following disclaimer in the documentation and/or other materials provided with the distribution. • Neither the name of the University of Cambridge nor the names of its contributors may be used to endorse or promote products derived from this software without specific prior written permission. THIS SOFTWARE IS PROVIDED BY THE COPYRIGHT HOLDERS AND CONTRIBUTORS "AS IS" AND ANY EXPRESS OR IMPLIED WARRANTIES, INCLUDING, BUT NOT LIMITED TO, THE IMPLIED WARRANTIES OF MERCHANTABILITY AND FITNESS FOR A PARTICULAR PURPOSE ARE DISCLAIMED. IN NO EVENT SHALL THE COPYRIGHT OWNER OR CONTRIBUTORS BE LIABLE FOR ANY DIRECT, INDIRECT, INCIDENTAL, SPECIAL, EXEMPLARY, OR CONSEQUENTIAL DAMAGES (INCLUDING, BUT NOT LIMITED TO, PROCUREMENT OF SUBSTITUTE GOODS OR SERVICES; LOSS OF USE, DATA, OR PROFITS; OR BUSINESS INTERRUPTION) HOWEVER CAUSED AND ON ANY THEORY OF LIABILITY, WHETHER IN CONTRACT, STRICT LIABILITY, OR TORT (INCLUDING NEGLIGENCE OR OTHERWISE) ARISING IN ANY WAY OUT OF THE USE OF THIS SOFTWARE, EVEN IF ADVISED OF THE POSSIBILITY OF SUCH DAMAGE. NTP LicenseThis file is automatically generated from html/copyright.htmCopyright Notice[sheepb.jpg] "Clone me," says Dolly sheepishly______________________________________________________________The following copyright notice applies to all files collectively called the Network Time Protocol Version 4 Distribution. Unless specifically declared otherwise in an individual file, this notice applies as if the text was explicitly included in the file. Copyright (c) David L. Mills 1992-2001Permission to use, copy, modify, and distribute this software and its documentation for any purpose and without fee is hereby granted, provided that the above copyright notice appears in all copies and that both the copyright notice and this permission notice appear in supporting documentation, and that the name University of Delaware not be used in advertising or publicity pertaining to distribution of the software without specific, written prior permission. The University of Delaware makes no representations about the suitability this software for any purpose. It is provided "as is" without express or implied warranty. The following individuals contributed in part to the Network Time Protocol Distribution Version 4 and are acknowledged as authors of this work. 1. [1]Mark Andrews <marka@syd.dms.csiro.au> Leitch atomic clock controller2. [2]Bernd Altmeier <altmeier@atlsoft.de> hopf Elektronik serial line and PCI-bus devices3. [3]Viraj Bais <vbais@mailman1.intel.com> and [4]Clayton Kirkwood <kirkwood@striderfm.intel.com> port to WindowsNT 3.54. [5]Michael Barone <michael,barone@lmco.com> GPSVME fixes5. [6]Karl Berry <karl@owl.HQ.ileaf.com> syslog to file option6. [7]Greg Brackley <greg.brackley@bigfoot.com> Major rework of WINNT port. Clean up recvbuf and iosignal code into separate modules.7. [8]Marc Brett <Marc.Brett@westgeo.com> Magnavox GPS clock driver8. [9]Piete Brooks <Piete.Brooks@cl.cam.ac.uk> MSF clock driver, Trimble PARSE support9. [10]Reg Clemens <reg@dwf.com> Oncore driver (Current maintainer)10. [11]Steve Clift <clift@ml.csiro.au> OMEGA clock driver11. [12]Casey Crellin <casey@csc.co.za> vxWorks (Tornado) port and help with target configuration12. [13]Sven Dietrich <sven_dietrich@trimble.com> Palisade reference clock driver, NT adj. residuals, integrated Greg's Winnt port.13. [14]John A. Dundas III <dundas@salt.jpl.nasa.gov> Apple A/UX port14. [15]Torsten Duwe <duwe@immd4.informatik.uni-erlangen.de> Linux port15. [16]Dennis Ferguson <dennis@mrbill.canet.ca> foundation code for NTP Version 2 as specified in RFC-111916. [17]Glenn Hollinger <glenn@herald.usask.ca> GOES clock driver17. [18]Mike Iglesias <iglesias@uci.edu> DEC Alpha port18. [19]Jim Jagielski <jim@jagubox.gsfc.nasa.gov> A/UX port19. [20]Jeff Johnson <jbj@chatham.usdesign.com> massive prototyping overhaul20. [21]Hans Lambermont <Hans.Lambermont@nl.origin-it.com> or [22]<H.Lambermont@chello.nl> ntpsweep21. [23]Poul-Henning Kamp <phk@FreeBSD.ORG> Oncore driver (Original author)22. [24]Frank Kardel [25]<Frank.Kardel@informatik.uni-erlangen.de>PARSE <GENERIC> driver (14 reference clocks), STREAMS modules for PARSE, support scripts, syslog cleanup 23. [26]William L. Jones <jones@hermes.chpc.utexas.edu> RS/6000 AIX modifications, HPUX modifications24. [27]Dave Katz <dkatz@cisco.com> RS/6000 AIX port25. [28]Craig Leres <leres@ee.lbl.gov> 4.4BSD port, ppsclock, Magnavox GPS clock driver26. [29]George Lindholm <lindholm@ucs.ubc.ca> SunOS 5.1 port27. [30]Louis A. Mamakos <louie@ni.umd.edu> MD5-based authentication28. [31]Lars H. Mathiesen <thorinn@diku.dk> adaptation of foundation code for Version 3 as specified in RFC-130529. [32]David L. Mills <mills@udel.edu> Version 4 foundation: clock discipline, authentication, precision kernel; clock drivers: Spectracom, Austron, Arbiter, Heath, ATOM, ACTS, KSI/Odetics; audio clock drivers: CHU, WWV/H, IRIG30. [33]Wolfgang Moeller <moeller@gwdgv1.dnet.gwdg.de> VMS port31. [34]Jeffrey Mogul <mogul@pa.dec.com> ntptrace utility32. [35]Tom Moore <tmoore@fievel.daytonoh.ncr.com> i386 svr4 port33. [36]Kamal A Mostafa <kamal@whence.com> SCO OpenServer port34. [37]Derek Mulcahy <derek@toybox.demon.co.uk> and [38]Damon Hart-Davis <d@hd.org> ARCRON MSF clock driver35. [39]Rainer Pruy <Rainer.Pruy@informatik.uni-erlangen.de> monitoring/trap scripts, statistics file handling36. [40]Dirce Richards <dirce@zk3.dec.com> Digital UNIX V4.0 port37. [41]Wilfredo Sánchez <wsanchez@apple.com> added support for NetInfo38. [42]Nick Sayer <mrapple@quack.kfu.com> SunOS streams modules39. [43]Jack Sasportas <jack@innovativeinternet.com> Saved a Lot of space on the stuff in the html/pic/ subdirectory40. [44]Ray Schnitzler <schnitz@unipress.com> Unixware1 port41. [45]Michael Shields <shields@tembel.org> USNO clock driver42. [46]Jeff Steinman <jss@pebbles.jpl.nasa.gov> Datum PTS clock driver43. [47]Harlan Stenn <harlan@pfcs.com> GNU automake/autoconfigure makeover, various other bits (see the ChangeLog)44. [48]Kenneth Stone <ken@sdd.hp.com> HP-UX port45. [49]Ajit Thyagarajan <ajit@ee.udel.edu>IP multicast/anycast support46. [50]Tomoaki TSURUOKA <tsuruoka@nc.fukuoka-u.ac.jp>TRAK clock driver47. [51]Paul A Vixie <vixie@vix.com> TrueTime GPS driver, generic TrueTime clock driver48. [52]Ulrich Windl <Ulrich.Windl@rz.uni-regensburg.de> corrected and validated HTML documents according to the HTML DTD[53]gif[54]David L. Mills <mills@udel.edu>References1. mailto:marka@syd.dms.csiro.au2. mailto:altmeier@atlsoft.de3. mailto:vbais@mailman1.intel.co4. mailto:kirkwood@striderfm.intel.com5. mailto:michael.barone@lmco.com6. mailto:karl@owl.HQ.ileaf.com7. mailto:greg.brackley@bigfoot.com8. mailto:Marc.Brett@westgeo.com9. mailto:Piete.Brooks@cl.cam.ac.uk10. mailto:reg@dwf.com11. mailto:clift@ml.csiro.au12. mailto:casey@csc.co.za13. mailto:Sven_Dietrich@trimble.COM14. mailto:dundas@salt.jpl.nasa.gov15. mailto:duwe@immd4.informatik.uni-erlangen.de16. mailto:dennis@mrbill.canet.ca17. mailto:glenn@herald.usask.ca18. mailto:iglesias@uci.edu19. mailto:jagubox.gsfc.nasa.gov20. mailto:jbj@chatham.usdesign.com21. mailto:Hans.Lambermont@nl.origin-it.comv22. mailto:H.Lambermont@chello.nl23. mailto:phk@FreeBSD.ORG24. http://www4.informatik.uni-erlangen.de/˜kardel25. mailto:Frank.Kardel@informatik.uni-erlangen.de26. mailto:jones@hermes.chpc.utexas.edu27. mailto:dkatz@cisco.com28. mailto:leres@ee.lbl.gov29. mailto:lindholm@ucs.ubc.ca30. mailto:louie@ni.umd.edu31. mailto:thorinn@diku.dk32. mailto:mills@udel.edu33. mailto:moeller@gwdgv1.dnet.gwdg.de34. mailto:mogul@pa.dec.com35. mailto:tmoore@fievel.daytonoh.ncr.com36. mailto:kamal@whence.com37. mailto:derek@toybox.demon.co.uk38. mailto:d@hd.org39. mailto:Rainer.Pruy@informatik.uni-erlangen.de40. mailto:dirce@zk3.dec.com41. mailto:wsanchez@apple.com42. mailto:mrapple@quack.kfu.com43. mailto:jack@innovativeinternet.com44. mailto:schnitz@unipress.com45. mailto:shields@tembel.org46. mailto:pebbles.jpl.nasa.gov47. mailto:harlan@pfcs.com48. mailto:ken@sdd.hp.com49. mailto:ajit@ee.udel.edu50. mailto:tsuruoka@nc.fukuoka-u.ac.jp51. mailto:vixie@vix.com52. mailto:Ulrich.Windl@rz.uni-regensburg.de53. file://localhost/backroom/ntp-stable/html/index.htm54. mailto:mills@udel.eduCodeIgniter License AgreementCopyright (c) 2008 - 2009, EllisLab, Inc.All rights reserved.This license is a legal agreement between you and EllisLab Inc. for the use of CodeIgniter Software (the "Software"). By obtaining the Software you agree to comply with the terms and conditions of this license.Permitted UseYou are permitted to use, copy, modify, and distribute the Software and its documentation, with or without modification, for any purpose, provided that the following conditions are met:1. A copy of this license agreement must be included with the distribution.2. Redistributions of source code must retain the above copyright notice in all source code files.3. Redistributions in binary form must reproduce the above copyright notice in the documentation and/or other materials provided with the distribution.4. Any files that have been modified must carry notices stating the nature of the change and the names of those who changed them.5. Products derived from the Software must include an acknowledgment that they are derived from CodeIgniter in their documentation and/or other materials provided with the distribution.6. Products derived from the Software may not be called "CodeIgniter", nor may "CodeIgniter" appear in their name, without prior written permission from EllisLab, Inc.IndemnityYou agree to indemnify and hold harmless the authors of the Software and any contributors for any direct, indirect, incidental, or consequential third-party claims, actions or suits, as well as any related expenses, liabilities, damages, settlements or fees arising from your use or misuse of the Software, or a violation of any terms of this license.Disclaimer of WarrantyTHE SOFTWARE IS PROVIDED "AS IS", WITHOUT WARRANTY OF ANY KIND, EXPRESSED OR IMPLIED, INCLUDING, BUT NOT LIMITED TO, WARRANTIES OF QUALITY, PERFORMANCE, NON-INFRINGEMENT, MERCHANTABILITY, OR FITNESS FOR A PARTICULAR PURPOSE.Limitations of LiabilityYOU ASSUME ALL RISK ASSOCIATED WITH THE INSTALLATION AND USE OF THE SOFTWARE. IN NO EVENT SHALL THE AUTHORS OR COPYRIGHT HOLDERS OF THE SOFTWARE BE LIABLE FOR CLAIMS, DAMAGES OR OTHER LIABILITY ARISING FROM, OUT OF, OR IN CONNECTION WITH THE SOFTWARE. LICENSE HOLDERS ARE SOLELY RESPONSIBLE FOR DETERMINING THE APPROPRIATENESS OF USE AND ASSUME ALL RISKS ASSOCIATED WITH ITS USE, INCLUDING BUT NOT LIMITED TO THE RISKS OF PROGRAM ERRORS, DAMAGE TO EQUIPMENT, LOSS OF DATA OR SOFTWARE PROGRAMS, OR UNAVAILABILITY OR INTERRUPTION OF OPERATIONS.GLUT for Win32 LicenseThe OpenGL Utility Toolkit distribution for Win32 (Windows NT & Windows 95) contains source code modified from the original source code for GLUT version 3.3 which was developed by Mark J. Kilgard. The original source code for GLUT is Copyright 1997 by Mark J. Kilgard. GLUT for Win32 is Copyright 1997 by Nate Robins and is not in the public domain, but it is freely distributable without licensing fees. It is provided without guarantee or warrantee expressed or implied. It was ported with the permission of Mark J. Kilgard by Nate Robins. THIS SOURCE CODE IS PROVIDED "AS IS" WITHOUT WARRANTY OF ANY KIND, EITHER EXPRESS OR IMPLIED, INCLUDING, BUT NOT LIMITED TO, THE IMPLIED WARRANTIES OR MERCHANTABILITY OR FITNESS FOR A PARTICULAR PURPOSE. OpenGL (R) is a registered trademark of Silicon Graphics, Inc.](https://usermanual.wiki/Hanwha-Techwin/TRM1610S.User-manaul/User-Guide-3633110-Page-93.png)