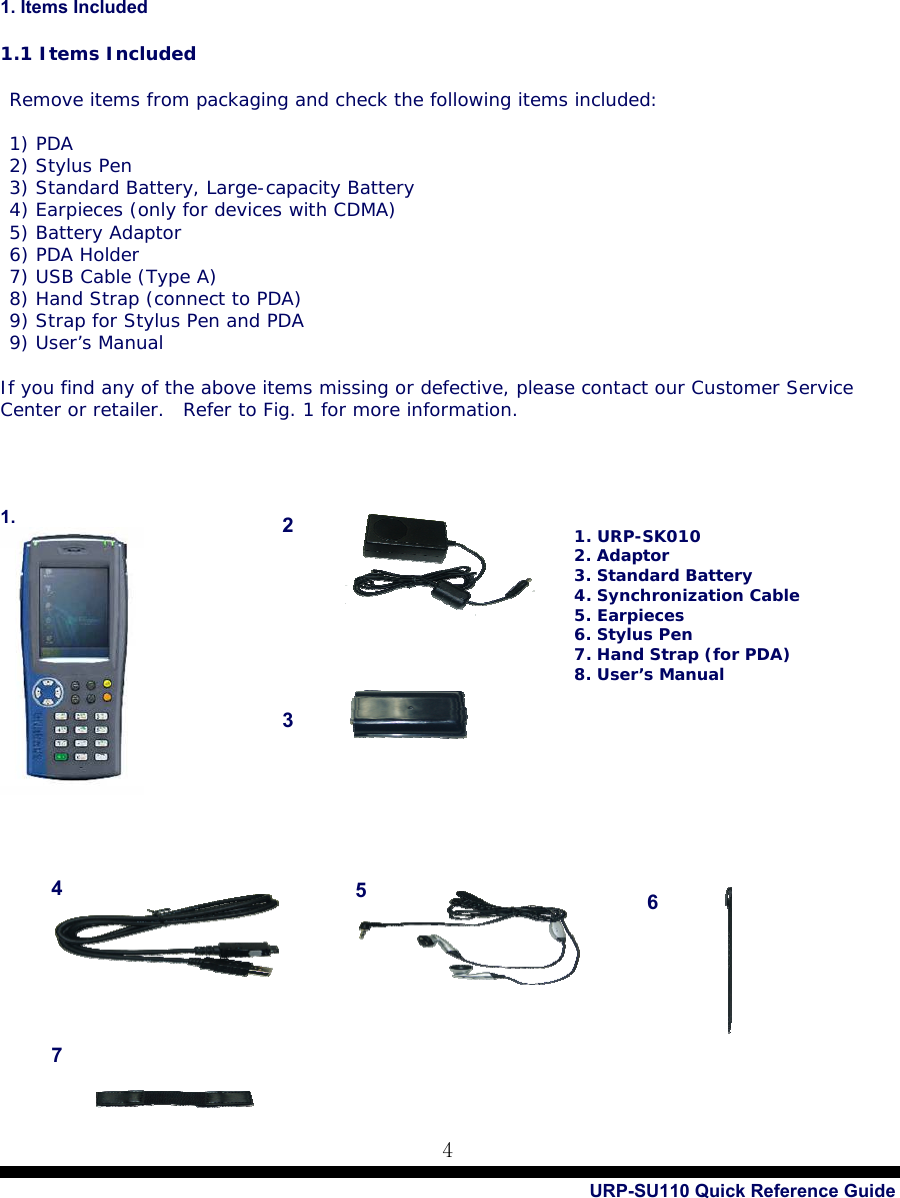
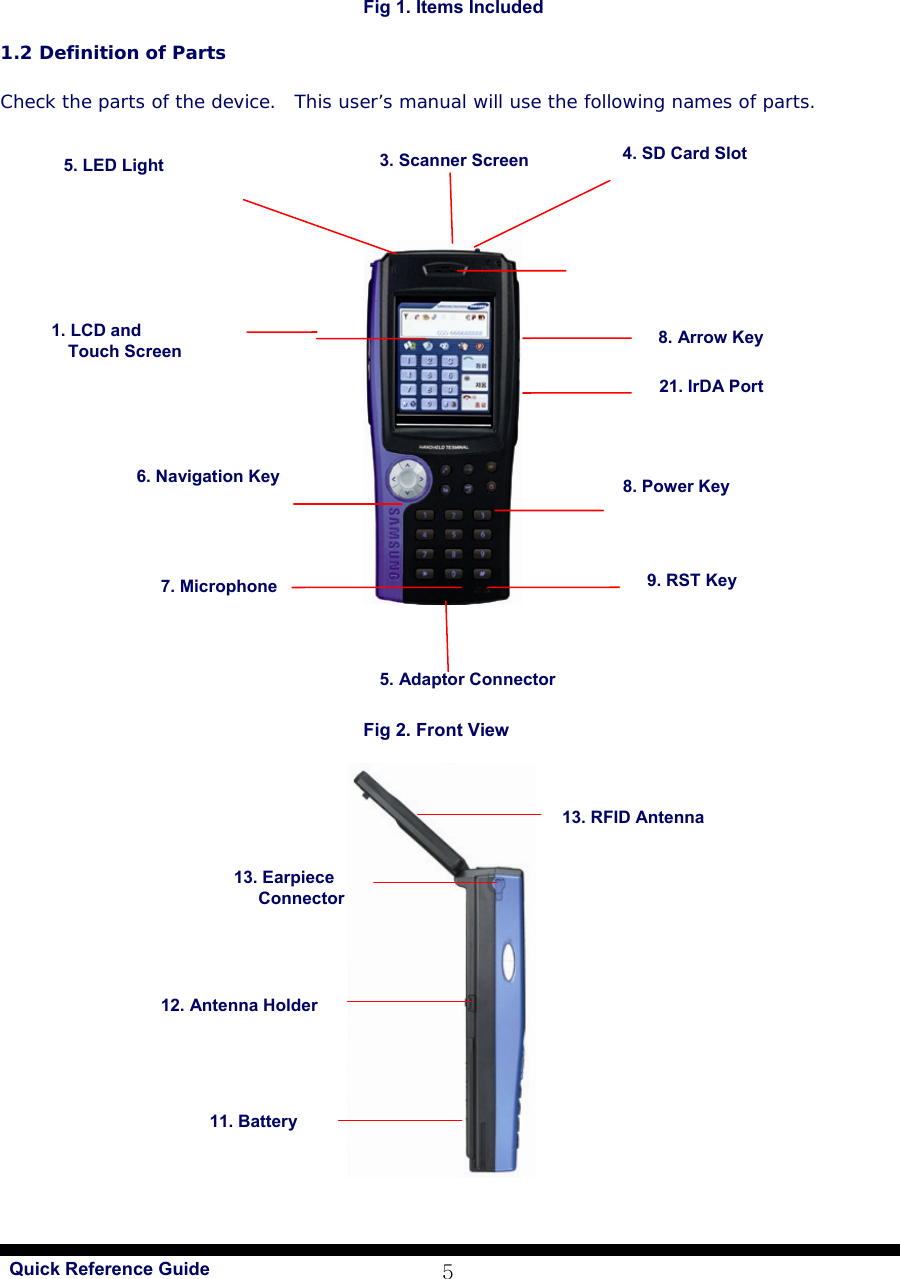
Hanwha Techwin URP-SU110 UHF RFID Handheld READER User Manual
Samsung Techwin Co Ltd UHF RFID Handheld READER
UserManual.wiki
>
Hanwha Techwin
>
URP SU110 User Manual
User manual
Navigation menu
Upload a User Manual
Namespaces
Wiki Guide
HTML
PDF
Info
Views
User Manual
Discussion / Help
Navigation


![URP-SU110 Quick Reference Guide 8 Fig 3. Standby Mode Time Setting 2.2.1 Standby Mode 1. If power is turned on by pressing the power key; 2. If the preset idle time has elapsed; 3. If battery is too low to operate the device. 2.2.2 Resuming from Standby Mode To resume from Standby Mode, press the [Power Key]. Recharge battery if battery is too low to operate the device. 2.3 Battery Standard battery uses 4.2V, 4400mAh Li-Polymer Battery. If battery life is low, the device automatically shows Low Battery message. In this case, try to recharge battery as soon as possible. 2.3.1 Checking Battery Life Run [Power] program on Control Panel and you can check the remaining battery life. 2.3.2 Battery Low If battery capacity drops under 20%, this means that battery is becoming low. It would be necessary to recharge battery as soon as possible. 2.3.3 Battery Too Low If battery capacity drops under 5%, this means that battery is becoming too low and the device will be turned on in tens of minutes. It would be necessary to recharge battery as soon as possible. 2.3.4 Placing Main Battery - Attaching Battery: Move the detach button on the back to right and slowly slide the battery into its position. - Detaching Battery: Move the detach button on the back to the left and pull out the projected handles on either end.](https://usermanual.wiki/Hanwha-Techwin/URP-SU110/User-Guide-896686-Page-8.png)
![Quick Reference Guide 92.4 How to Recharge Battery [Using Power Adaptor] 1. Connect the power adaptor to the power connection on the bottom of device. 2. If the power LED turns on (red) to the top left corner of device, it means that the battery is being charged. * The power LED turns red when the battery is being charged and becomes green when battery is fully charged. Always use the power adaptor provided with this device or designated by manufacturer. If using unauthorized adaptor causes defects, you cannot receive our free warranty services. 2.5 Secondary Battery Main battery preserves memory in emergency shutoff or while battery is replaced. Secondary battery is recharged while main battery is recharged. It is automatically charged when device needs more battery power. It takes more time to recharge secondary battery in full, but secondary battery is generally charged in full if you use the device continuously for few hours after charging main battery. Secondary battery is not used unless main battery is extremely low or detached for replacement. Discharging Battery It depends on how you use the device, but battery life is generally 6-16 hours. Battery life is shortened when you use wireless LAN or view videos on the device and lengthened when you use simple activities. Discarding Battery If battery is damaged or battery’s lifespan has elapsed, discard the battery as follows: 1. Discard battery in recycle receptacle. 2. Never discard battery with other trash. It could cause explosion. 3. Start Up This chapter contains basic information on using the device. 3.1 Settings If this is your first time with the PDA, some default values might not be suitable for you and need to be adjusted. 3.1.1 Touch Screen Adjustment The screen comes adjusted and does not need adjustment. However, adjust the screen if you feel your stylus pen is not accurate enough. This is not a defect; you just need some adjustment. [How to Adjust]](https://usermanual.wiki/Hanwha-Techwin/URP-SU110/User-Guide-896686-Page-9.png)
![URP-SU110 Quick Reference Guide 101. Start -> Settings -> Control Panel -> Stylus -> Adjustment Tab -> Readjust Note After adjusting the screen, it will count 30 seconds to resume main screen. If you touch the screen, however, it will immediately resume main screen. If adjustment fails, you need to start again. Fig 4. Selecting Stylus 1) Click Start on Task Bar and go to [Settings] -> [Control Panel]. 2) Double-click on Stylus on [Control Panel].](https://usermanual.wiki/Hanwha-Techwin/URP-SU110/User-Guide-896686-Page-10.png)
![Quick Reference Guide 11 Fig 5. Entering Adjustment Window Fig 6. Adjusting the Screen 3) Select [Adjustment Tab] under [Stylus Properties] and click [Readjust]. 4) Press the center of plus sign. Press the center of plus sign five times to proceed to Stylus Properties. Click OK on top right corner to finish settings. 3.1.2 Brightness Setting Brightness is set to about 40% by default. However, it may seem too bright or too dark according to your preference. Brightness is most closely related to power consumption. [How to Set] 1. [Start] -> [Settings] -> [Control Panel] -> [Light] Brightness Tab: Adjust the brightness of screen. Light: Adjust the duration of light on.](https://usermanual.wiki/Hanwha-Techwin/URP-SU110/User-Guide-896686-Page-11.png)
![URP-SU110 Quick Reference Guide 12 Fig 7. Adjusting Brightness 3.2 Sound Setting Adjust sound as you like. 3.2.1 Volume and Sound 1. [Start] –> [Settings] -> [Control Panel]-> [Volume and Sound] [Task Bar] -> Sound Icon Volume Tab: Adjust volume Sound Tab: Adjust various sounds. Fig 8. Adjusting Volume and Sound](https://usermanual.wiki/Hanwha-Techwin/URP-SU110/User-Guide-896686-Page-12.png)
![Quick Reference Guide 13 3.3 Date and Time Setting 1. Go to [Start] -> [Settings] -> [Control Panel] and select “Date and Time.” 2. Select Month and you will see a pull-down list of months. 3. Select Year and you will see a spin control to the side. Use arrow keys or press up/down buttons to set the year. 4. Select the day on the calendar. To set time, use arrow keys or spin control with the cursor set to hour, minute, or second. If you select the time zone the first time, you can adjust time by changing the time zone. Fig 9. Setting Date and Time 3.4 Power Setting 1. [Start] -> [Settings] -> [Control Panel] -> [Power]. 3.4.1 Battery Tab Battery Tab shows the remaining power on Main Battery and Secondary Battery or how much your battery has been charged.](https://usermanual.wiki/Hanwha-Techwin/URP-SU110/User-Guide-896686-Page-13.png)
![URP-SU110 Quick Reference Guide 14 Fig 10. Battery Status Fig 11. Power Settings 3.4.2 Power Configuration Tab If you set power configuration appropriately, you can extend battery life. If you travel a lot, use minimal functions to save battery power. 3.5 Memory Allotment and Use To allot memory, follow: [Start] -> [Settings] -> [Control Panel] and run [System]. 1. Select Memory Tab. 2. Move the memory bar to set memory allotment. 3. Press “OK” to finish settings.](https://usermanual.wiki/Hanwha-Techwin/URP-SU110/User-Guide-896686-Page-14.png)
![Quick Reference Guide 15 Fig 12. Setting Memory 3.6 Cold Reset / Warm Reset As you use the device, you might need to reset the device due to program abnormality. There are two ways to reset the device: warm reset and cold reset. Warm reset can be done anytime, but cold reset might eliminate your programs and data. - Neither warm reset nor cold reset deletes programs/files in floppy. 3.6.1 Warm Reset Warm reset is also called soft reset. It shuts down all programs and empties memories used. However, it does not affect programs and data that are installed on the device. However, some programs might lose the last used data with warm reset. [When You Need Warm Reset] If the device stops while operating a certain application program, you cannot turn the power off or run another program. In this case, you can recover the device using warm reset. If the device does not work normally due to a certain reason, run warm reset to restart memory and embedded devices. [How to Use Warm Reset] If you need warm reset, use stylus pen to press the reset switch on the front surface. The device will reset in few seconds. [Results of Warm Reset] 1. The screen will quickly come back on. 2. You will see the start screen. 3. Your registries, data, and programs will be saved. 4. It will resume network connection. 3.6.2 Cold Reset](https://usermanual.wiki/Hanwha-Techwin/URP-SU110/User-Guide-896686-Page-15.png)
![URP-SU110 Quick Reference Guide 16Cold reset is also called hard reset and is used to completely format the device. If you use hard reset, all of your programs, data, and registry values will be formatted. [When You Need Cold Reset] If your device has too many problems that warm reset cannot solve or you want to delete all programs at once, use cold reset. [How to Use Cold Reset] While pressing the power key, press the reset switch (R/S) with your stylus pen, and release both simultaneously. It might take longer for the system to reboot in cold reset and you need to set time and date again after cold reset. 4. Major Features This chapter explains various basic features of your PDA. 4.1 Reading Barcode Use scanning program to read barcodes. 1) Running Scanner Diagnostics [Start] -> [Program] -> [Scanner] -> [Samsung Scanner] Or, open the Scanner icon on the main page. 2) Reading Barcode How to Shoot Laser Beam 1. Press the scan key to the right or left or use Fn4 and KBD keys. Or, press “Start” on the screen. Then, point the laser beam at the barcode. 2. Check whether the code has been read correctly. * If it is read correctly, the data value will show on the screen. Fig 13. 1D Scanner Program Code Type Connect/Disconnect Scanner Code Number](https://usermanual.wiki/Hanwha-Techwin/URP-SU110/User-Guide-896686-Page-16.png)
![Quick Reference Guide 17 Menus on Scanner Window [How to Read Barcode] 1. Bring the scanner closer to read smaller barcodes. This device can read barcode at 40- 300mm distance. If you fail to read a barcode, adjust angle or distance. 2. The laser beam will make a bold red line when it is pointed at the barcode label. 그림18. 1D Scanner 프로그램 [Incorrect Scanning] 1. The laser beam must go across the barcode. 2. The device cannot read barcode if the laser beam only covers parts of the barcode. Fig 14. 1D Scanner Program 4.3 UHF 900Mhz (Read / Write) This program is only applied to Samsung Techwin PDA with the 902.75 ~ 927.25Mhz module. 1D 2D 1D 2D 1. Save: Saves barcode value in a file. (Directory: Flash Disk -> Scanner -> BarCode.txt) 2. Clear: Deletes barcode value, symbol type, symbol ID, number of success, and number of reading on screen. 3. EPC: Converts barcode value into EPC code. 4. Info: Shows properties of Barcode Scanner. 5. Scan: Shoots beam to read barcode every time you click Scan. (You can also use the key on the bottom right corner to scan.)](https://usermanual.wiki/Hanwha-Techwin/URP-SU110/User-Guide-896686-Page-17.png)
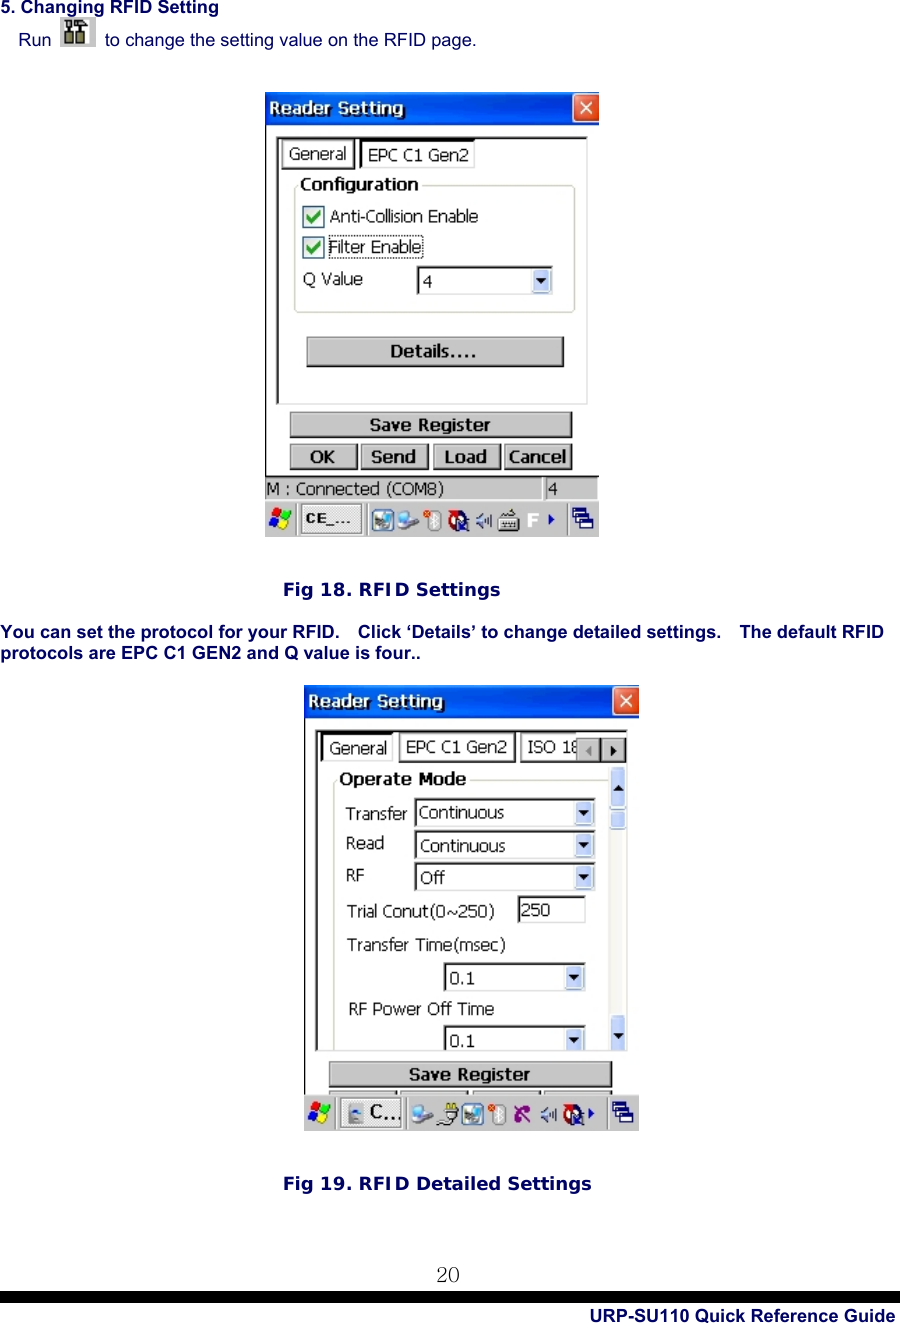
![URP-SU110 Quick Reference Guide 181. Running UHF RFID [Start] -> [Program] -> [Samsung] -> [RFID Reader Manager] Fig 15. Running UHF Program 2. Reading Tag Data Fig 16. UHF RFID Program](https://usermanual.wiki/Hanwha-Techwin/URP-SU110/User-Guide-896686-Page-18.png)
![Quick Reference Guide 19 3. Functions of Each Button 1. This PDA is written based on EPC Gen2 protocol, but it is designed to read 18000-6C protocol. 4. Tag Read: Click Read icon or press “R” key on the top right corner of PDA to read the Tag with the appropriate Read Type. If the reader has not recognized the tag while pressing the Read key [Fn4] with its Enable Leaks set to 0 (basic value=10), no results will show on the screen. If Time is set to above 1, it will attempt to read the tag as many times as indicated. After making all attempts, it will display the results. Fig 17. Information Screen : Connects serial communication between main processor and RFID module : Changes serial communication value between main processor and RFID module : Changes RFID value settings : Starts reading tag : Stops reading tag : Saves tag read : Connects serial communication between main processor and RFID module](https://usermanual.wiki/Hanwha-Techwin/URP-SU110/User-Guide-896686-Page-19.png)
![Quick Reference Guide 214.4 Wireless LAN Setting The wireless LAN is always turned OFF by default. [Connecting to Wireless LAN] 1. Open the Wireless LAN icon on Task Bar and run ‘Wireless LAN ON.’ Fig 18. Wireless LAN ON/OFF 2. Turn on Wireless LAN to go to detailed setting page. 3. Go to Wireless Info page and select AP or terminal your device can automatically detect. If no AP has been detected, enter SSID manually to start the connection.](https://usermanual.wiki/Hanwha-Techwin/URP-SU110/User-Guide-896686-Page-21.png)
![URP-SU110 Quick Reference Guide 22 Fig 19. Selecting AP 5. On the Wireless Property page, set required items and press OK button on the top right corner. 6. As you press OK, you will be automatically directed to Wireless Info page to begin connecting to Wireless LAN. [Disconnecting Wireless LAN] 1. Click Wireless LAN icon on Task Bar to open the following Wireless LAN setting page. 2. Select Wireless LAN OFF. Fig 20. Turning Wireless LAN Off](https://usermanual.wiki/Hanwha-Techwin/URP-SU110/User-Guide-896686-Page-22.png)
![Quick Reference Guide 23 4.5 Bluetooth Setting Bluetooth comes off by default. You must turn it on as follows: [Turning Bluetooth On] [Internal Devices] -> [Windows Folder] -> [Bluetooth Icon] - Select Bluetooth “ON” (automatically disappears in about 5 seconds). 1. Select the Bluetooth icon on Task Bar and run ‘BT ON.’ Fig 21. Turning Bluetooth On Note: Turn Bluetooth off when it is not being used to extend battery life. [Bluetooth Info] [Internal Devices] -> [Flash Disk] -> [Bluetooth] -> [BT Serial]](https://usermanual.wiki/Hanwha-Techwin/URP-SU110/User-Guide-896686-Page-23.png)
![URP-SU110 Quick Reference Guide 24 Fig 22. Bluetooth Info [Bluetooth Settings] Fig 23. Bluetooth Settings Fig 24. Bluetooth Settings 1. Click BT icon on Task Bar and select options to complete Bluetooth settings. 2. When you are finished, click OK to close the window.](https://usermanual.wiki/Hanwha-Techwin/URP-SU110/User-Guide-896686-Page-24.png)
![Quick Reference Guide 25[Using Phone (CDMA)] 1. Starting Phone Fig 25. Starting Phone 2. Keypad 3. Turning Phone On/Off - Turning On * If your phone is turned off, press End button for 2-3 seconds to turn it on. * The phone will be turned on with a sound. - Turning Off * If your phone is turned on, press End button for 2-3 seconds to turn it off. Press short to enter #. Press long to lock/unlock phone (default pass code: 0000). Press short to enter *. Press long to convert to vibration mode. Enter number. ~ If you are talking, this button will end your call. Press it for more than 2 seconds to turn power on or off. Used to clear numbers one by one. Enter phone number and press [Talk] key to dial. 전화기 정보 전화기 설정 문자메세지 착/발신 목록 전화번호부](https://usermanual.wiki/Hanwha-Techwin/URP-SU110/User-Guide-896686-Page-25.png)
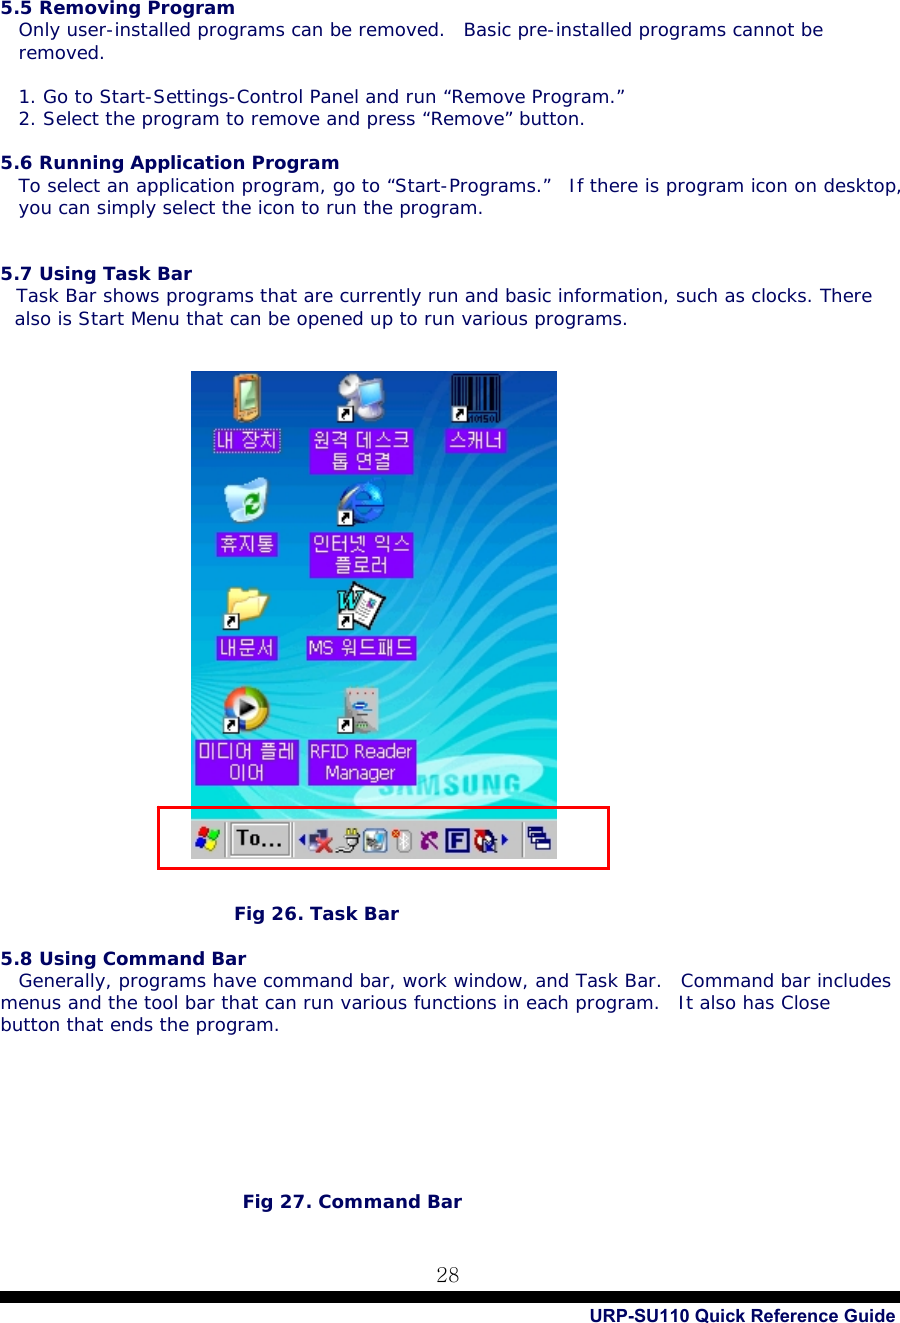
![URP-SU110 Quick Reference Guide 26 4. Dialing - Enter number and press Talk. - Press Talk once to see the latest calls and press it again to dial the select number. - If you have shortcuts saved on your phone book, press the button long to dial the shortcut number. 5. Taking Calls - Select Talk on the receiving screen. - If you select Mute on the receiving screen, the ringing will stop, but the call and vibration will not stop. 4.6 Using Keypad Keypad is a very useful entering tool. You can use keypad to enter numbers and/or alphabets. Also, press the [Fn] key to run basic functions. 4.6.1 Number Keypad Enter the number you wish to enter. Check current input status before entering the number. It is basically set to enter numbers. 4.6.2 Alphabet Characters Enter alphabet characters you wish to enter. You can use [key] to change the language. 4.6.3 Symbols You can enter symbols regardless of current language on keypad. 4.6.4 Changing Language To change language, press Key. The keypad language will change every time you press Key. In default, it will change in the following order: [Number] -> [Alphabet Lower Case] –> [Alphabet Upper Case] -> [Symbol] 4.6.5 Device Setting or Running Function Using Keypad Enter number with “Fn” to run basic functions. Fn + Key Description <Up> Arrow Turns volume up. <Down> Arrow Turns volume down. F +1~3 User-defined functions 4 Calibration.. 5 Soft Keyboard ON. 6 Soft Keyboard OFF 7 Scanner Button. 8 Camera Button 5. Application Program This chapter describes application programs that come pre-installed in the device and how to install new application programs.](https://usermanual.wiki/Hanwha-Techwin/URP-SU110/User-Guide-896686-Page-26.png)
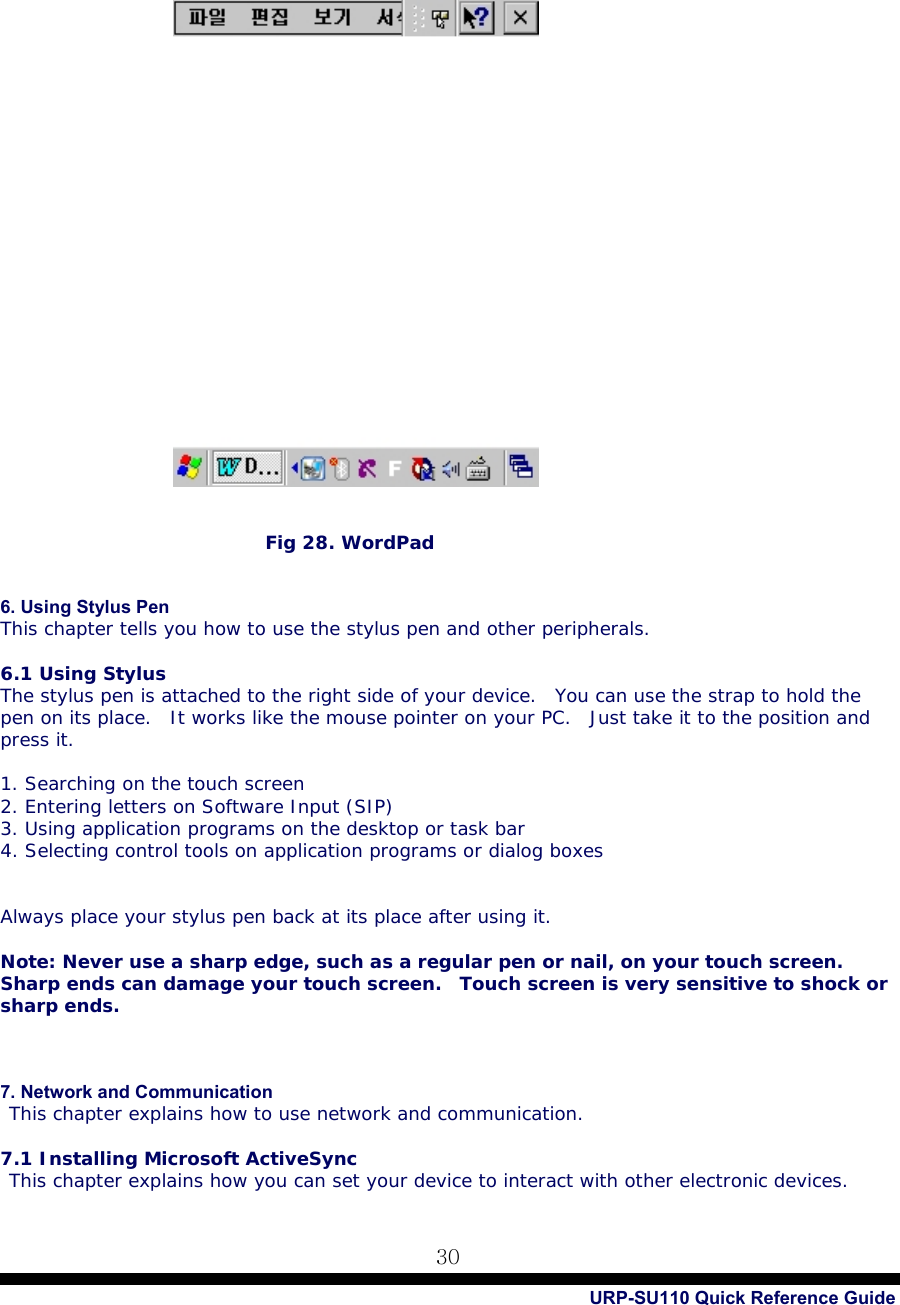
![Quick Reference Guide 29 5.9 Entering Data You can use your stylus pen to enter data on the touch screen. You can also perform the following with your stylus pen: Drag and move items on the screen. Use software input (SIP) to enter characters. Select application programs on desktop or Task Bar. Select or enter a tab or a field. [Highlighting Letters] Place the stylus at the start position and drag it to highlight select texts, as you would to edit documents on your PC. 5.10 Using Software Input (SIP) If your application program requires key input, use Software Input (SIP). Software Input displays a keyboard or letter recognizer on the screen. You may select or write letters. Fig 27. Keyboard on SIP 5.11 Internet Explorer This device comes with an Internet browser so you can go online. To use the Internet, you need wireless LAN connection. 5.12 WordPad WordPad (Pocket Word) is used to edit documents in the following formats: Text (*.txt), MS Word (*.doc), Rich Text File (*.rtf), and WordPad (*.pwd) Word Pad files automatically convert to MS Word documents when you copy them to your PC and will open on MS Word. SIP 키보드](https://usermanual.wiki/Hanwha-Techwin/URP-SU110/User-Guide-896686-Page-29.png)
![Quick Reference Guide 31 [Microsoft ActiveSync] Microsoft ActiveSync is used to transmit files between devices or to synchronize various data. Generally, all devices with Windows CE use ActiveSync to communicate. Devices with Windows CE.NET4.2 or higher must use Microsoft ActiveSync 3.7 or higher. Follow the procedures below to install Microsoft ActiveSync. Visit Microsoft WindowsCE.Net Website and download the latest version of ActiveSync. http://www.microsoft.com/mobile/pocketpc/downloads/. Install ActiveSync (v3.7 or higher) on your desktop. Once you install ActiveSync, it will automatically attempt a connection. Connect this device to your PC to make the connection. If connection fails, go to File > Connection Settings. Set Serial or USB connection and press OK. Disconnect the device and connect it again. 7.2 Using ActiveSync Use ActiveSync to transmit files between your PC and this device. [Partnership Settings] Once ActiveSync is connected, your PC automatically asks you whether you want to set up a partnership. You can transmit file without partnership, but you cannot synchronize data. As you cannot use synchronization on network, set up a partnership if you need synchronization often. [Transmitting Files] Take the following steps to transmit files from your PC to this device: 1. Connect the device to your PC through ActiveSync. 2. Double-click ActiveSync on Tray Icon. Once connected, the Explore button on the Tool Bar will be activated. If you press this button, File Finder opens and allows you to locate a file on your mobile device. Locate the file and copy it to the designated location on your PC. The file will be automatically transmitted to your PC. However, certain files are automatically converted by ActiveSync. 7.3 File Synchronization Using ActiveSync Once you have a partnership, you can automatically synchronize a certain folder every time you connect to ActiveSync. When you first connect to ActiveSync, set up a partnership to use this feature. Go to Tools > Options to set up Synchronization Options. Select the Synchronization Folder in My Folder. If you insert or delete a file in the folder, it is automatically transmitted or deleted on your PC. 8. Safety Suggestions [PDA] 1. Never cause a shock on or drop the device.](https://usermanual.wiki/Hanwha-Techwin/URP-SU110/User-Guide-896686-Page-31.png)
![URP-SU110 Quick Reference Guide 32 2. Always store the device in room temperature. 3. Do not expose the device to rain or high humidity. 4. Do not bring a magnet near the device. 5. Do not remove main battery while the device is on. It might cause damage to the OS. 6. If there is a problem, reset the device. 7. Never disassemble the device. 8. Store away from the reach of children. [Battery] 1. Always use the designated adaptor to recharge battery. 2. Do not place battery near fire or heating device. 3. Never disassemble battery or connect terminals electrically. 4. Never cause a shock on or drop the device. 5. If you store the battery in a hot or cold place for a long time, it will reduce its capacity and shorten its lifespan. Always store the battery in room temperature. 6. As battery is a consumable item, it will lose capacity if you repeat charging and discharging it. Replace the battery when its capacity drops down to about half of the initial capacity. 9. Product Warranty/Inquiry, Customer Service](https://usermanual.wiki/Hanwha-Techwin/URP-SU110/User-Guide-896686-Page-32.png)