Haojiehua Technology H100 Wireless Presenter User Manual
Shenzhen Haojiehua Technology Co., Ltd. Wireless Presenter
User Manual
eFollower
H100 PPT Presenter
User’s Guide
Thank you for your purchase of this product. This guide describes how to use your eFollower
PPT presenter H100 and run the operating software.Be sure that you have read and understood its
contents before using it.
Features:
1. It is a wireless presenter with a built-in lithium battery, display digitron and vibrating motor. plus
the somatic mouse.
2. The dongle has a built-in TF card socket.If the version you purchased includes the TF card, it
already has build-in U-disk(the computer aided software is stored in the u-disk).
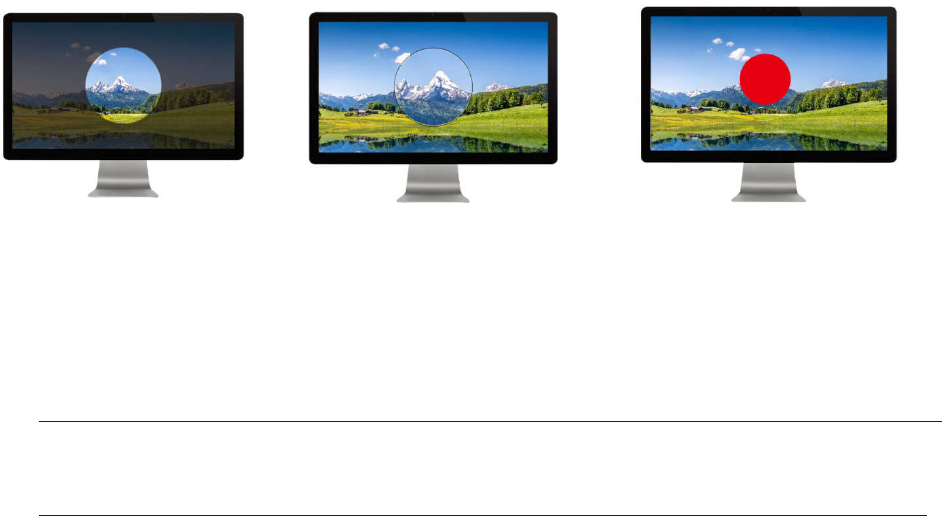
3. This product replace the laser transmitter that used to hurt user’s eyes, By using the following
three digital scene modes, it is more convenient and powerful to use.However, you need to run
the computer aided software before using these digital scene modes.
Spotlight Mode Magnifier Mode Digi-Laser Mode
4. This computer aided software doesn't need to be installed before use. You can use the following
URL for software download.(case sensitive)
Windows 7 or above:
https://spotlight.oss-cn-shenzhen.aliyuncs.com/Presenter/H100/eFollower/Windows/eFollowerPresenterH100.exe
macOS10.10 or above:
https://spotlight.oss-cn-shenzhen.aliyuncs.com/Presenter/H100/eFollower/Macos/eFollowerPresenterH100.dmg

5. You can set up the alarm timer before the meeting. When the meeting time is over, the
presenter will remind you by vibrating plus. You can check the remaining time at any given time
(digitron will display the remaining time).
6. The receiver anti-lost will remind you not to forget unplugging the usb-dongle after the
meeting.
7. By not using the traditional LED lights, the digitron and the motor are used to show various
operating modes with better clarity.
U-Disk:
To increase the memory capacity, by replacing and inserting a larger capacity TF card.
Please ensure the TF card is inserted properly according to direction marked on the receiver.
Computer Aided Software
1. Spotlight Mode: The background brightness can be adjusted by software.And whether the
mouse pointer icon is displayed or not is selectable.
Digi-Laser Mode: The color of the digital laser can be adjusted.
To ease the operation, aperture size is adjusted on the presenter. The software will save the
aperture dimensions data for different scenes.
2. Pointer Speed Setting: The speed of the mouse pointer can be adjusted.
3. Auto-boot: The software start automatically when the computer is turned on
4. Anti-lost: After the wireless is disconnected for 20 seconds(shut down), the computer will play a
sound to prompt you to take the receiver with you if the receiver is not plugged out. (This
function is turned off by default)
5. Alarm timer: Set the Timer(maximum alert time is199 minutes).Click the side key ④ to view the
remaining time.
★ The software is minimized to windows tray after running(the icon is “ ” )
Quick Start:
1. Plug the receiver into the USB port
2. Run the Computer Aided Software.
3. Turn on the presenter.
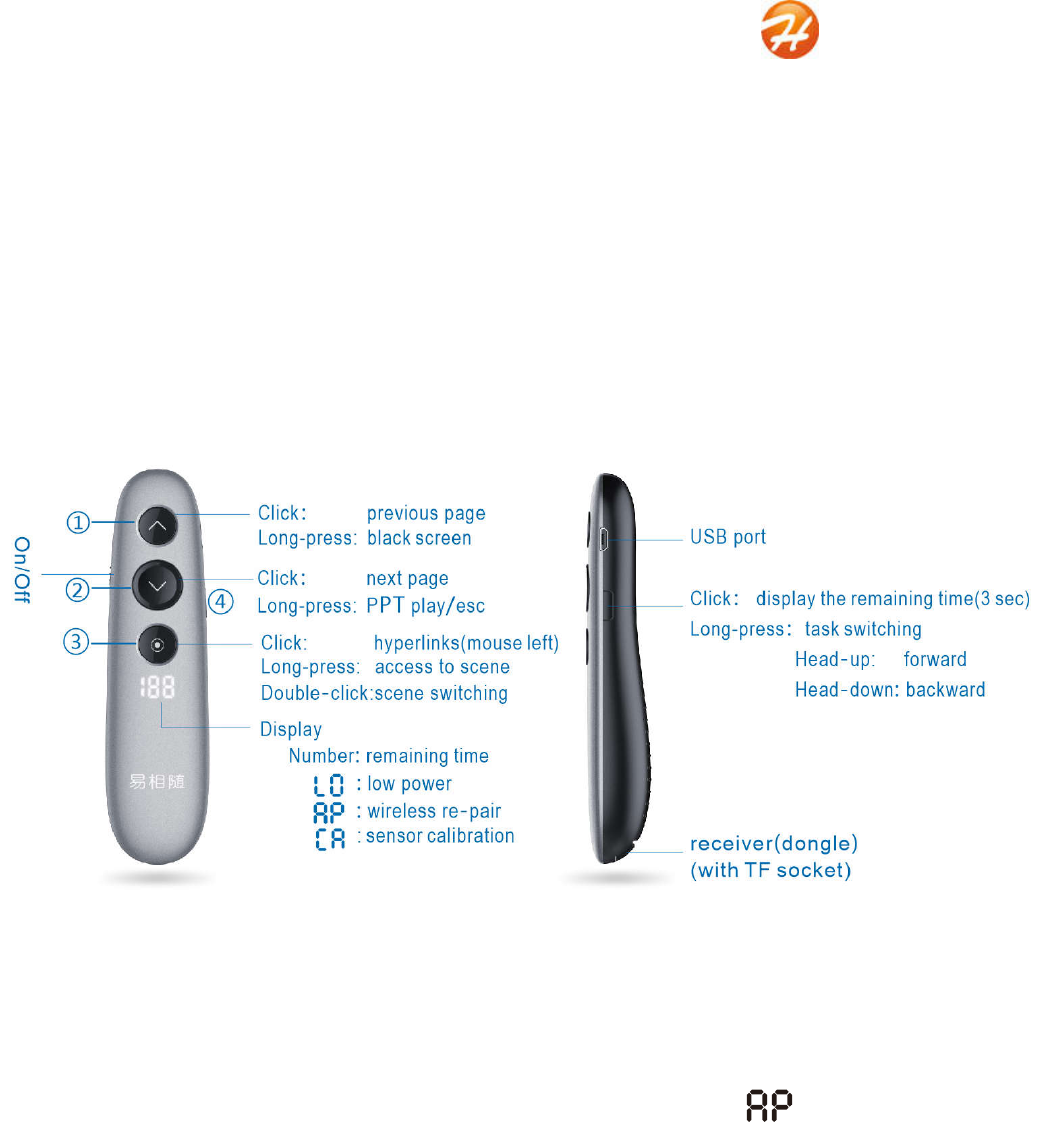
The Keys
Wireless Re-pair
If the presenter can not connect to dongle(dongle is plugged in, but the presenter doesn’t
work).You can try to re-pair the receiver as the follow steps:
1. Press and hold the key①+key②,and then turn on the presenter. “ “is displayed means the
presenter is in re-pair status.
2. Plugging in USB dongle. Then turn on the presenter, press and hold the key③ and move it
close to the receiver. The re-pair works if the scene mode can be entered.
Gyro Sensor Re-calibration
The gyro sensor can be recalibrated when the mouse movement appears to be drifting.
Operation:Press and hold key③+key④ and turn on the presenter, “ ” sign is displayed
that indicates it is in the calibration status。Then put the presenter on the desktop statically until
the “ ” sign disappears. It shows the calibration is successful.
Adjustment Of Aperture
1. Press and hold key③. After entering the scene, simultaneously press the key① to increase the
aperture.
2. Press and hold key③. After entering the scene, simultaneously press the key② to reduce the
aperture.
Others
1.A vibration of motor means wirelees is connected with receiver after turn-on. If not, please check
whether the receiver is properly plugged into the computer USB port.
2.When the battery is in the charging state, there is a red light near the USB port of pager. Full of
electricity,the light will extinguish
3.Blinking “ ” sign indicate that the battery is low and it requires charging.
4. If you do not run the computer aided software, the presenter can works except for Alarm Timer
and Scene functions.
Shenzhen Haojiehua Technology Co.,Ltd
Room B1-619,Huayuan science and technology park, Bao Yuan Road, Baoan District, Shenzhen, Guangdong, China
Support: support@haojiehua.com
Tel: 0755-29483801
This device complies with part 15 of the FCC Rules. Operation is subject to the following two
conditions: (1) this device may not cause harmful interference, and (2) this device must accept
any interference received, including interference that may cause undesired operation.
Any changes or modifications not expressly approved by the party responsible for compliance
could void the user's authority to operate the equipment.
NOTE: This equipment has been tested and found to comply with the limits for a Class B
digital device, pursuant to Part 15 of the FCC Rules. These limits are designed to provide
reasonable protection against harmful interference in a residential installation. This equipment
generates, uses and can radiate radio frequency energy and, if not installed and used in
accordance with the instructions, may cause harmful interference to radio communications.
However, there is no guarantee that interference will not occur in a particular installation.
If this equipment does cause harmful interference to radio or television reception,
which can be determined by turning the equipment off and on, the user is encouraged to try to
correct the interference by one or more of the following measures:
-- Reorient or relocate the receiving antenna.
-- Increase the separation between the equipment and receiver.
-- Connect the equipment into an outlet on a circuit different
from that to which the receiver is connected.
-- Consult the dealer or an experienced radio/TV technician for help.
The device has been evaluated to meet general RF exposure requirement. The device can be u
sed in portable exposure condition without restriction