Harbor Freight Air Spark Plug Cleaner Product Manual 32860 April 04
2015-05-27
: Harbor-Freight Harbor-Freight-Air-Spark-Plug-Cleaner-Product-Manual-723435 harbor-freight-air-spark-plug-cleaner-product-manual-723435 harbor-freight pdf
Open the PDF directly: View PDF ![]() .
.
Page Count: 10

SPARK PLUG CLEANER
ASSEMBLY and OPERATING INSTRUCTIONS
3491 Mission Oaks Blvd. / Camarillo, CA 93011
Copyright © 1997 by Harbor Freight Tools®. All rights reserved.
No portion of this manual or any artwork contained herein may be reproduced in any
shape or form without the express written consent of Harbor Freight Tools.
For technical questions and replacement parts, please call 1-800-444-3353.
®
®

SPECIFICATIONS
Inlet 1/4" NPT
Air Pressure 90 PSI
Air Hose 3/8"
Base Dimensions 8"L x 3-1/4"W x 2-1/4"H
SAVE THIS MANUAL
You will need the manual for the safety warnings and cautions, assembly instructions, operating
procedures, maintenance procedures, trouble shooting, parts list, and diagram. Keep your
invoice with this manual. Write the invoice number on the inside of the front cover. Keep both
this manual and your invoice in a safe, dry place for future reference.
SAFETY WARNING & CAUTIONS
WARNING: When using pneumatic equipment, basic safety precautions should always be
followed to reduce the risk of personal injury and hazards due to over pressurization. READ ALL
INSTRUCTIONS BEFORE USING THIS TOOL!
1. KEEP WORK AREA CLEAN. Cluttered areas invite injuries.
2. OBSERVE WORK AREA CONDITIONS. Do not use tools in damp, wet, or poorly lit locations.
Don’t expose to rain. Keep work area well lit. Do not use electrically powered air compressors
in the presence of flammable gases or liquids.
3. KEEP CHILDREN AWAY. Children must never be allowed in the work area. Do not let them
handle machines, tools, or hoses.
4. STORE IDLE EQUIPMENT. When not in use, tools must be locked up in a dry location to inhibit
rust. Always lock up tools and keep out of reach of children.
5. DO NOT FORCE THE TOOL. It will do the job better and more safely at the rate for which it
was intended. Do not use inappropriate attachments in an attempt to exceed the tool’s capacities.
6. USE THE RIGHT TOOL FOR THE JOB. Do not attempt to force a small tool or attachment to
do the work of a larger industrial tool. Do not use a tool for a purpose for which it was not
intended.
7. DRESS PROPERLY. Do not wear loose clothing or jewelry as they can be caught in moving
parts. Non-skid footwear is recommended. Wear restrictive hair covering to contain long hair.
Page #2 -- SKU: 32860 REV 04/04
8. USE EYE AND EAR PROTECTION. Always wear ANSI approved chemical splash goggles
when working with chemicals. Always wear ANSI approved impact safety goggles at other
times. Wear a full face shield if you are producing metal filings or wood chips. Wear an ANSI
approved dust mask or respirator when working around metal, wood, and chemical dusts and
mists.
9. DO NOT ABUSE THE POWER CORD. Do not yank compressor’s cord to disconnect it from
the receptacle. Do not carry tools by the cord.
10. DO NOT OVERREACH. Keep proper footing and balance at all times. Do not reach over or
across running machines.
11. MAINTAIN TOOLS WITH CARE. Keep tools sharp and clean for better and safer performance.
Follow instructions for lubricating and changing accessories. Inspect compressor’s cord
periodically and, if damaged, have them repaired by an authorized technician. Inspect all hoses
for leaks prior to use. The handles must be kept clean, dry, and free from oil and grease at all
times.
12. REMOVE ADJUSTING KEYS AND WRENCHES. Make it a habit to check that keys and adjusting
wrenches are removed from the tool or machine work surface before plugging it in.
13. AVOID UNINTENTIONAL STARTING. Do not carry any tool with your finger on the trigger, whether
it is connected to the compressor or not.
14. STAY ALERT. Watch what you are doing; use common sense. Do not operate any tool when
you are tired.
15. CHECK DAMAGED PARTS. Before using any tool, any part that appears damaged should be
carefully checked to determine that it will operate properly and perform its intended function.
Check for alignment and binding of moving parts; any broken parts or mounting fixtures; and
any other condition that may affect proper operation. Any part that is damaged should be properly
repaired or replaced by a qualified technician. Do not use the tool if any switch does not turn on
and off properly.
16. REPLACEMENT PARTS AND ACCESSORIES. When servicing, use only identical replacement
parts. Use of any other parts will void the warranty. Only use accessories intended for use with
this tool. Approved accessories are available from Harbor Freight Tools.
17. DO NOT OPERATE TOOL IF UNDER THE INFLUENCE OF ALCOHOL OR DRUGS. Read
warning labels on prescriptions to determine if your judgment or reflexes are impaired while
taking drugs. If there is any doubt, do not operate the tool.
18. DRAIN COMPRESSOR EVERY DAY. Do not allow moisture to build up inside the compressor.
Do not allow compressor to sit pressurized for longer than one hour.
19. MAKE SURE ALL EQUIPMENT IS RATED TO THE APPROPRIATE CAPACITY. Make sure
that regulator is set at least 10 PSI lower than the lowest rated piece of equipment you are
using.
Page #3 -- SKU: 32860 REV 04/04
WARNING: This product, when used for abrasive blasting and similar applications,
produces chemicals known to the State of California to cause cancer and birth defects (or
other reproductive harm). (California Health & Safety Code 25249.5, et seq.)
UNPACKING
When unpacking your Portable Sandblaster, check the items against the list below. If any parts
are missing or broken, please call Harbor Freight Tools at the number on the cover of this
manual.
Item# Description Qty
N/A Spark Plug Cleaner Assembly 1
3 Clamp 1
2 Bag 1
N/A Abrasive Material 1
ASSEMBLY
The Spark Plug Cleaner operates best when it is mounted to a wall. Follow the Steps below to
properly mount your Spark Plug Cleaner to a wall and complete Assembly.
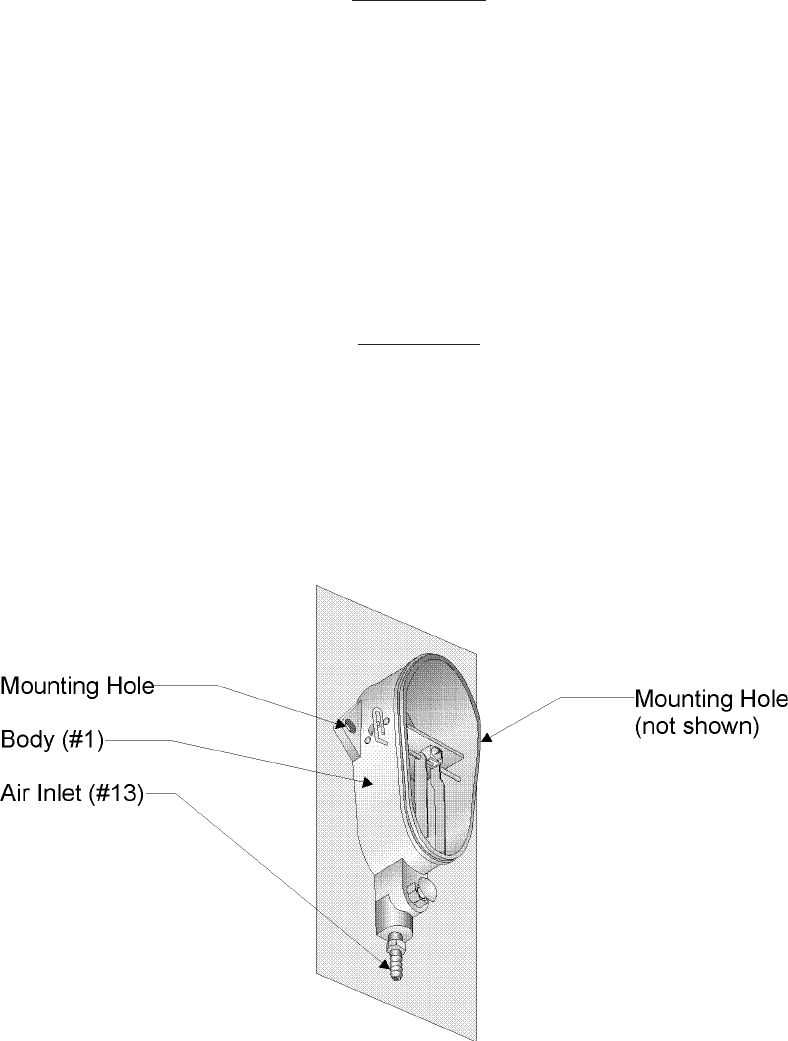
Step 1: Select a spot to mount your Spark Plug Cleaner. A wall location will ensure best results.
Step 2: Fasten your Spark Plug Cleaner to the wall with the AIR INLET (#13) pointing towards
the floor. Use the Mounting Holes in the BODY (#1) as shown in Figure 1.
Figure 1 — Mounting the Spark Plug Cleaner
Page #4 -- SKU: 32860
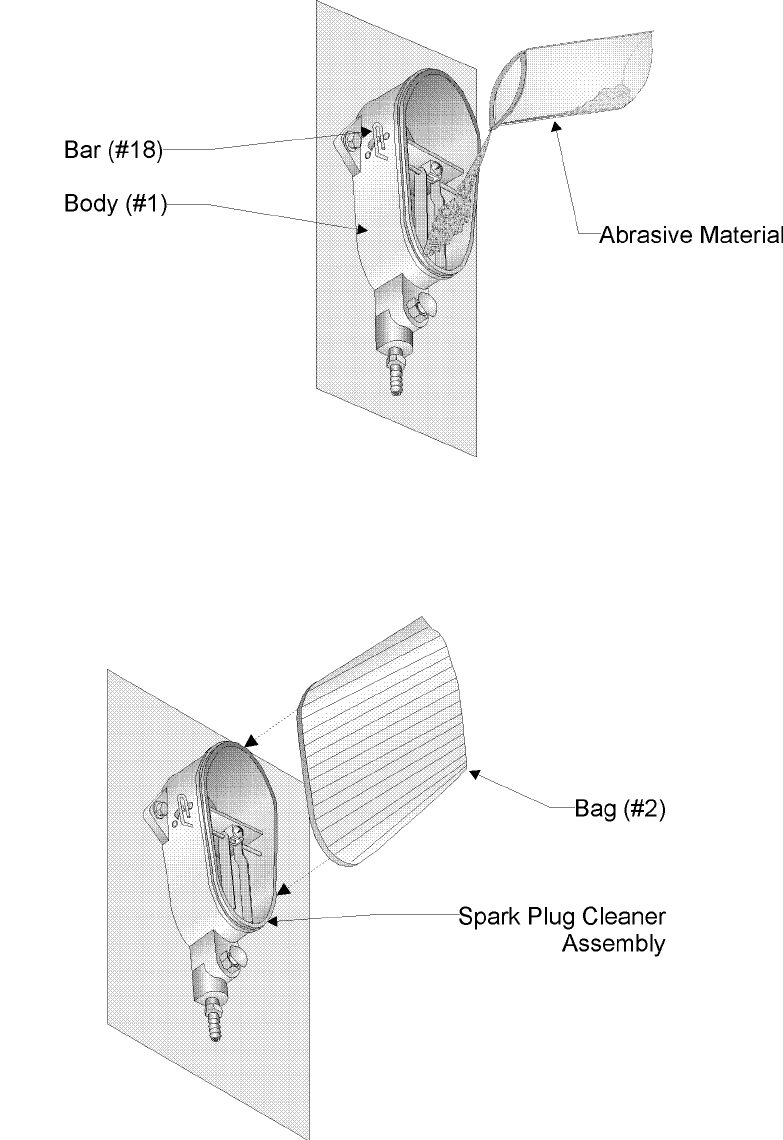
Step 3: Make sure the BAR (#18) is in the indicated position as shown in Figure 2. Place the
contents of the bag of Abrasive Material into the lower reservoir in the BODY.
Step 4: Place the BAG (#2) around the BODY as shown in Figure 3
Figure 3 — Attaching the Bag
Page #5 -- SKU: 32860
Figure 2 — Bar Position

Figure 4 — Clamp Installation
Step 6: Tighten the CLAMP SCREW to secure the BAG.
Air Connection
Step 1: For proper operation of the Spark Plug Cleaner, remove the AIR INLET (#13) from the
BODY.
Step 2: You will need a Union fitting (sold separately) before you can connect your Spark Plug
Cleaner to an air compressor.
Step 3: Attach the Union fitting to the Spark Plug Cleaner and tighten.
Step 4: Attach an Air Coupler (sold separately) to the Union fitting if desired. This is a useful
accessory as it allows quick-coupling action when using a variety of tools with the same
air compressor.
Step 5: Your Spark Plug Cleaner is ready for use.
Page #6 -- SKU: 32860
Step 5: Loosen the CLAMP SCREW (#4) and place the CLAMP (#3) over the bag with the
CLAMP SCREW towards the top of the BODY as mounted on the wall as shown in
Figure 4.

OPERATION
Figure 5 — Operation
Step 4: Press the TRIGGER (#7) to begin cleaning
Page #7 -- SKU: 32860
Step 1: Set the compressor’s pressure regulator to 90 PSI. Do not set the compressor’s outlet
regulator over 90 PSI.
Step 2: Connect the Spark Plug Cleaner to the air compressor’s hose. If leaking is detected,
disconnect the air hose and repair before use.
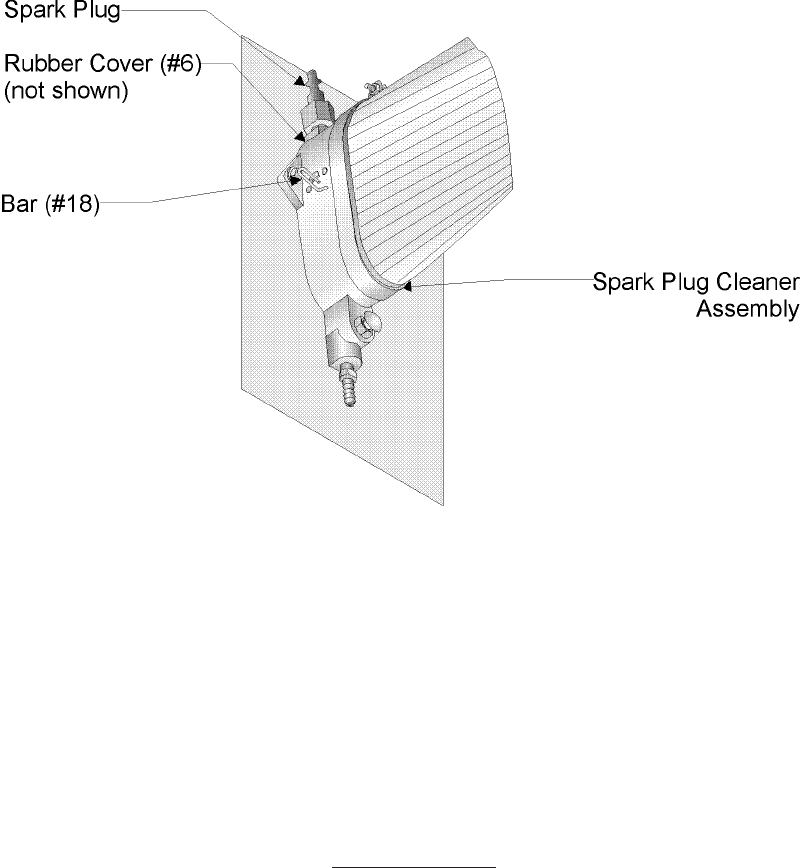
Step 3: Insert the spark plug, electrode side down, into the RUBBER COVER (#6) of the Spark
Plug Cleaner as shown in Figure 5.
Step 5: For increased cleaning of your spark plug, switch the BAR (#18) to the position shown
in Figure 6. This will swirl the air/abrasive mixture around your spark plug.
Figure 6 — Optional Bar Position
Step 6: Release the TRIGGER to stop cleaning. Remove the spark plug from the RUBBER
COVER.
Step 7: You may wish to blow air on the spark plug to remove any remaining abrasive residue
before reinstalling your spark plug into your vehicle.
MAINTENANCE
It is not recommended that you use an Airline Oiler with your Spark Plug Cleaner. The Airline Oiler
will clump your abrasive material and eventually clog your Spark Plug Cleaner.
Every year (more often with constant use), check the condition of the abrasive material. If necessary,
replace the abrasive material with approved abrasive material from Harbor Freight Tools.
Page #8 -- SKU: 32860

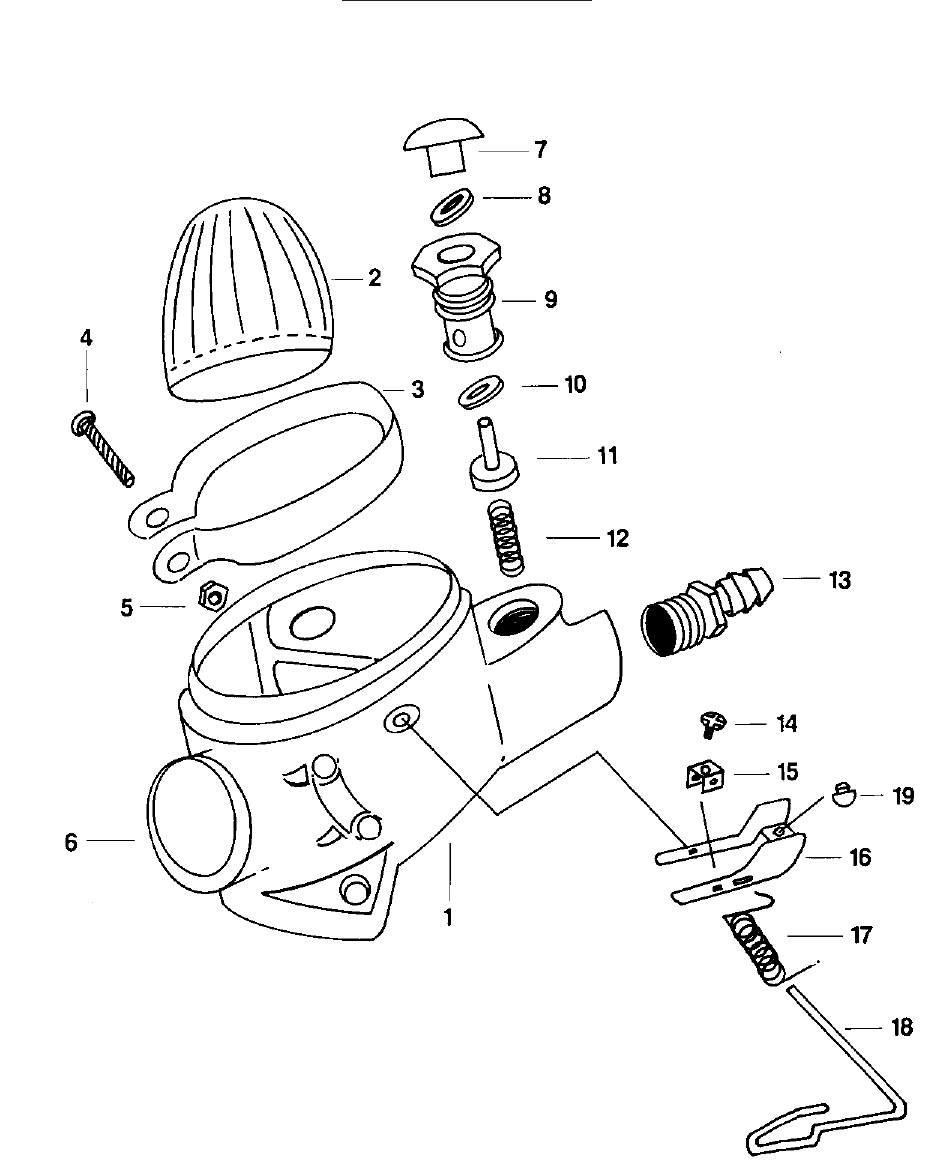
PARTS LIST
Item# Description Qty Item# Description Qty
1 Body 1 11 Valve Stem 1
2 Bag 1 12 Spring 1
3 Clamp 1 13 Air Inlet 1
4 Clamp Screw 1 14 Screw 1
5 Screw Nut 1 15 Screw Holder 1
6 Rubber Cover 1 16 Seal Body 1
7 Trigger 1 17 Spring 1
8 O-Ring 1 18 Bar 1
9 Valve Bushing 1 19 Seal 1
10 O-Ring 1
Page #9 -- SKU: 32860
Page #10 -- SKU: 32860
ASSEMBLY DIAGRAM
